

Page 1
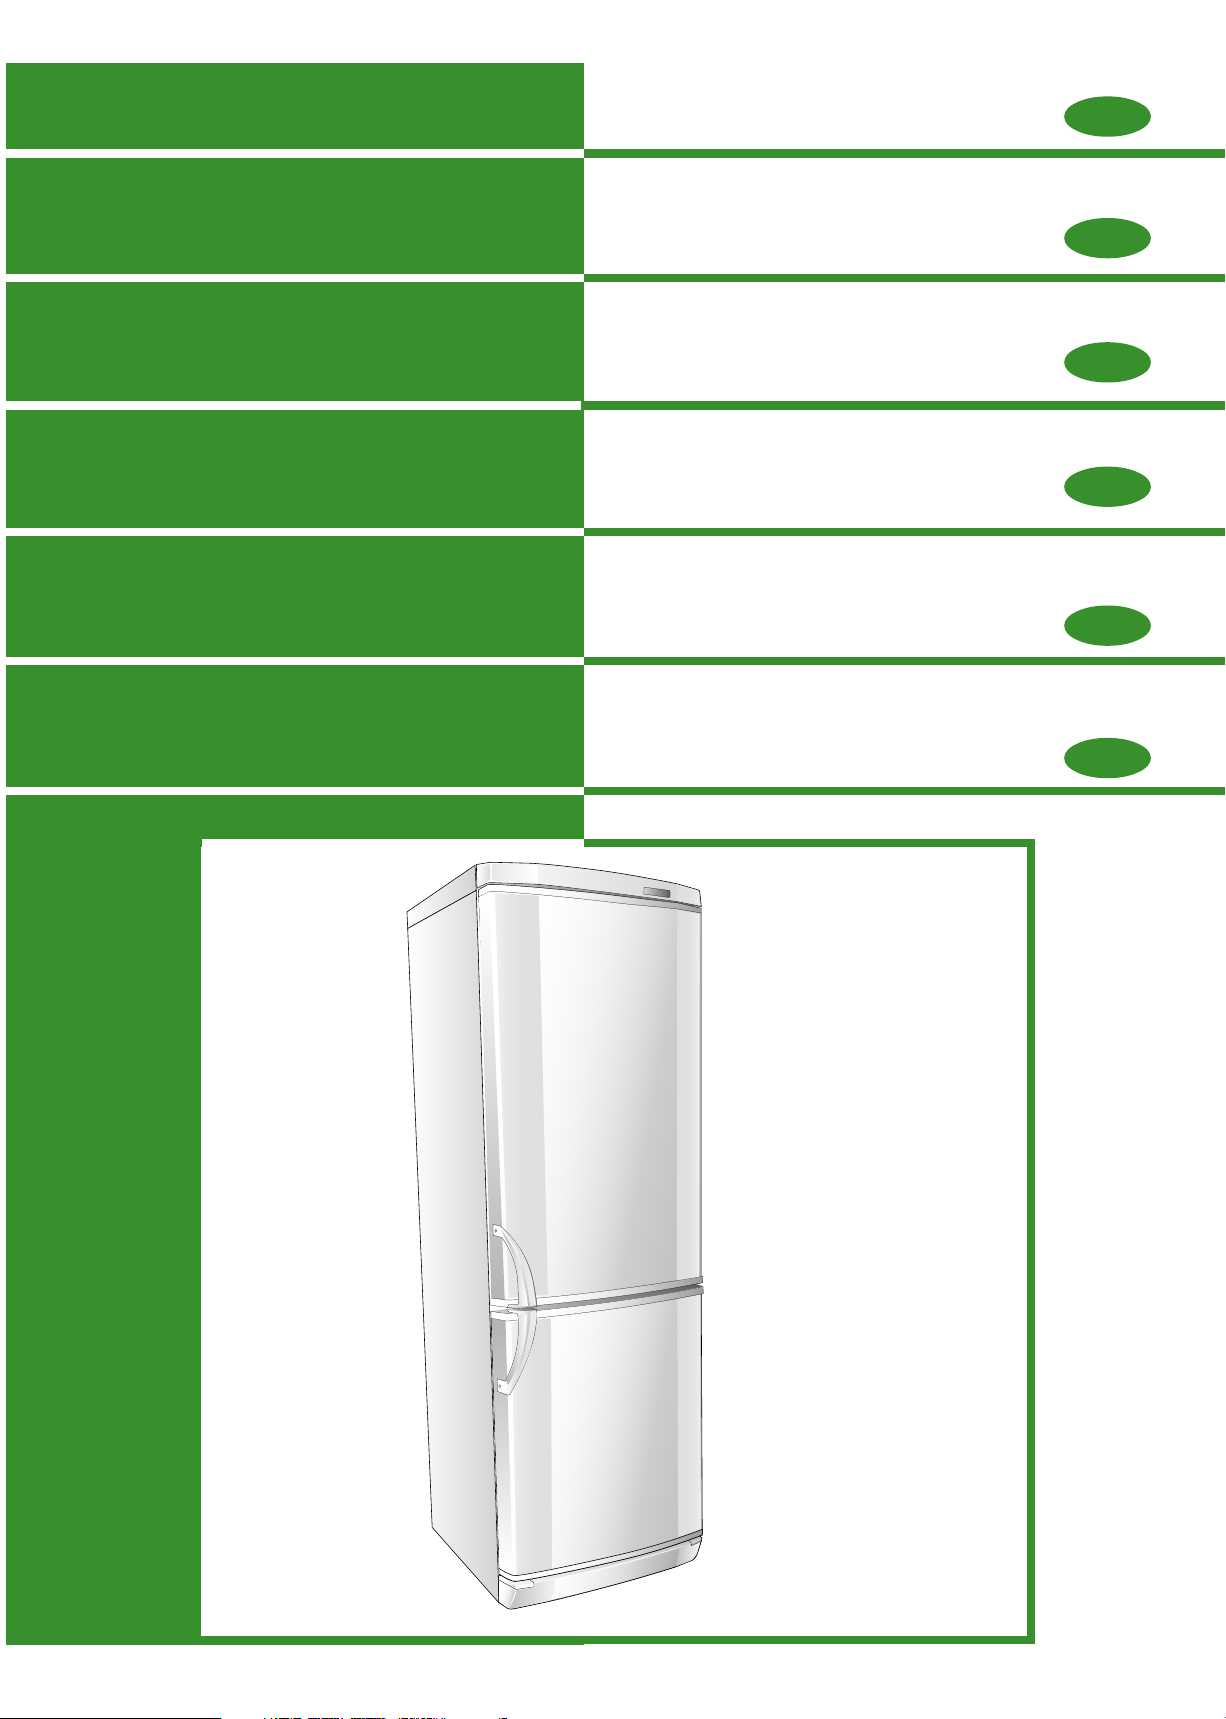
FRIGORIFERO • CONGELATORE
Istruzioni per l’installazione, l’uso, la manutenzione
I
REFRIGERATOR • FREEZER
Instructions for installation, use, maintenance
KÜHLSCHRANK • GEFRIERSCHRANK
Hinweise für Installation, Gebrauch, Wartung
RÉFRIGÉRATEUR • CONGÉLATEUR
Instructions pour l’installation, l’utilisation, l’entretien
FRIGORÍFICO • CONGELADOR
Instrucciones para la instalación, el uso y el mantenimiento
FRIGORÍFICO • CONGELADOR
Instruções para a instalação, o uso, a manutenção
GB
D
F
ES
P
Page 2

I
Questo prodotto è conforme alle vigenti normative europee di sicurezza relative alle
apparecchiature elettriche. E’ stato sottoposto a lunghe prove e meticolosi test per valutarne la sicurezza e l’affidabilità. Prima di utilizzare l’apparecchio, leggere attentamente questo manuale, in modo da sapere esattamente cosa fare e cosa non fare. Un uso
inappropriato dell’apparecchio può essere pericoloso, soprattutto per i bambini.Prima
di collegare l’apparecchio accertarsi che i dati in targa siano corrispondenti a quelli del
vostro impianto. I materiali dell’imballaggio riciclabili, non disperderli nell’ambiente,
portarli quindi ad un impianto di smaltimento, affinché possano essere riciclati. La sicurezza elettrica di questo apparecchio è assicurata soltanto quando è collegato ad un
impianto elettrico munito di un efficace presa di terra, a norma di legge. E’ obbligatorio
verificare questo fondamentale requisito di sicurezza. In caso di dubbio, richiedere un
controllo accurato dell’impianto da parte di un tecnico qualificato. (legge 46/9O) L’uso
di questa macchina, così come di un qualsiasi apparecchio elettrico, comporta l’osservanza di alcune regole fondamentali:
non toccare l’apparecchio con mani o piedi bagnati o umidi;
•
non tirare il cavo di alimentazione per staccare la spina dalla presa;
•
NORMATIVE-AVVERTENZE E CONSlGLI IMPORTANTI
non lasciare esposto l’apparecchio agli agenti atmosferici;
•
non permettere che l’apparecchio sia usato dai bambini senza sorveglianza;
•
non staccare o inserire la spina nella presa con le mani bagnate; - prima di effettuare
•
qualsiasi operazione di pulizia o di manutenzione, disinserire l’apparecchio dalla
rete di alimentazione elettrica o staccando la spina o spegnendo I ‘interruttore generale dell’impianto:
in caso di guasto o di cattivo funzionamento, spegnere l’apparecchio, e non mano-
•
metterlo.
ATTENZIONE!
Quando installate il vostro apparecchio frigorifero è importante tener
conto della classe climatica del prodotto.
Per conoscere la classe climatica del vostro apparecchio controllate la
targa dati qui riportata.
L’apparecchio funziona correttamente nel campo di temperatura ambiente indicato in tabella, secondo la classe climatica.
GB
This product is in conformity with the European safety regulations in force relative to
electrical equipment. It has undergone extensive trials and meticulous tests to evaluate
safety and reliability.
Before using the appliance, carefully read this manual in order to know exactly what to
do and what not to do.
Improper use can be dangerous, especially for children. Before connecting the appliance,
check that the data on the plate corresponds to that of your system. Do not litter the
recyclable packaging material, but take it to a waste disposal plant for recycling.
The electrical safety of this appliance is ensured only if connected to an electrical system
equipped with an efficient ground clamp in accordance with the law. It is obligatory to
check this fundamental safety requirement. In case of doubt, request an accurate control
of the system by a qualified technician (Act 46/90).
Some fundamental rules must be observed in the use of this appliance, as with any
electrical equipment:
• do not touch the appliance with moist or wet hands or feet
• do not pull on the power supply cable to pull the plug from the socket
2 504
REGULATIONS, WARNINGS AND IMPORTANT RECOMMENDATIONS
• do not expose the appliance to atmospheric agents
• do not allow children to use the appliance without supervision
• do not pull out or insert the plug with wet hands; before any cleaning or maintenance
work, disconnect the appliance from the mains by either pulling out the plug or
switching off the main system switch.
• in case of breakdown or improper functioning switch off the appliance and do not
tamper with it.
WARNING!
When you install your refrigerator, it is important to bear in mind the
climatic rating of the appliance.
In order to find out the
climatic rating of your appliance, check the data rating plate.
The appliance will function correctly within the ambient temperature
range indicated in the table, according to its climatic rating
Page 3

D
VORSCHRIFTEN, HINWEISE UND WICHTIGE RATSCHLÄGE
Dieses Produkt entspricht den geltenden EG-Sicherheitsbestimmungen in bezug auf
elektrische Apparate. Es wurde aufwendigen und genauen Tests unterzogen, bei denen
seine Sicherheit und Zuverlässigkeit geprüft wurden.
Bevor Sie diesen Apparat benützen, lesen Sie bitte dieses Handbuch aufmerksam
durch, damit Sie genau wissen, was Sie tun können und was Sie nicht tun dürfen.
Eine unsachgemäße Verwendung des Gerätes kann gefährlich sein, vor allem für
Kinder. Das Verpackungsmaterial kann recycelt werden, bitte werfen Sie es nicht
einfach im Freien weg, sondern bringen Sie es zu einer Entsorgungsstelle, wo es
recycelt werden kann. Dieser Apparat ist bezüglich seiner elektrischen Teile nur sicher,
wenn er an ein gut geerdetes Stromnetz angeschlossen wird, das allen gesetzlichen
Bestimmungen entspricht. Bitte kontrollieren Sie unbedingt, ob dies der Fall ist. Falls
Sie Zweifel haben, verlangen Sie bitte eine sorgfältige Kontrolle der Anlage durch
einen Fachmann (Gesetz Nr. 46/90). Bei der Benutzung dieses Geräts müssen genau
wie bei allen anderen elektrischen Apparaten einige wichtige Regeln beachtet werden:
• den Apparat nie mit nassen oder feuchten Händen oder Füßen berühren;
• beim Ausziehen des Steckers aus der Steckdose nie am Kabel reißen;
F
Ce produit est conforme aux normes européennes de sécurité en vigueur relatives aux
appareils électriques. Il a été soumis à de longs essais et à des tests méticuleux afin
d’en évaluer la sécurité et la fiabilité. Lire attentivement ce manuel avant d’utiliser
l’appareil afin de savoir exactement ce qu’il faut faire et ce qu’il ne faut pas faire.
Une utilisation impropre de l’appareil risque d’être dangereuse, surtout pour les enfants.
Avant de brancher l’appareil, vérifier que les données figurant sur la plaquette
correspondent à celles de votre installation. Les matériaux d’emballage sont recyclables,
ne pas les abandonner dans l’environnement, les porter dans un centre spécialisé
afin qu’ils soient recyclés. La sécurité électrique de cet appareil est assurée uniquement
lorsqu’il est relié à une installation électrique équipée d’une prise de terre en bon
état, selon la norme en vigueur. En cas de doute, faire procéder à un contrôle soigné
de l’installation par un technicien qualifié (loi 46/90).
L’utilisation de cet appareil, comme celle de tout appareil électrique, implique
l’observation de certaines règles fondamentales :
• Ne pas toucher l’appareil avec des mains ou des pieds mouillés ou humides;
• ne pas tirer sur le câble d’alimentation pour débrancher la fiche de la prise;
NORMES, AVERTISSEMENTS ET RECOMMANDATIONS IMPORTANTES
• den Apparat nie Witterungseinflüssen aussetzen;
• nicht zulassen, daß der Apparat von unbeaufsichtigtvon Kindern benutzt wird;
nie den Stecker mit nassen Händen in die Steckdose einführen oder aus dieser
•
herausziehen; vor jeder Reinigungs- und Instandhaltungsarbeit die Stromversorgung
unterbrechen, indem man den Stecker zieht oder den Hauptschalter der Anlage ausschaltet;
• bei Nichtfunktionieren oder Störungen den Apparat ausschalten und nicht selbst zu
reparieren versuchen.
ACHTUNG!
Bitte achten Sie bei der
Installation Ihres Kühlschranks auf die Kühlungsklasse des Produktes.
Die Kühlungsklasse Ihres Kühlschranks können Sie den Daten auf dem
hier aufgeführten Typenschild entnehmen.
Das Gerät funktioniert richtig bei Raumtemperatur, die in der Tabelle
nach der Kühlungsklasse angegeben ist.
• ne pas laisser l’appareil exposé aux agents atmosphériques;
• ne pas permettre que l’appareil soit utilisé par des enfants en l’absence de surveillance;
• ne pas débrancher ni brancher la fiche dans la prise de courant avec les mains mouillées;
avant d’effectuer toute opération de nettoyage ou d’entretien, débrancher l’appareil
du réseau d’alimentation électrique en débranchant la fiche ou en éteignant l’interrupteur
principal de l’installation;
• en cas de panne ou de mauvais fonctionnement, éteindre l’appareil et ne pas
l’endommager.
ATTENTION!
Quand vous installez
votre appareil frigorifique, il est important de tenir compte de la classe
climatique du produit.
Pour savoir à quelle classe climatique appartient votre réfrigérateur,
veuillez contrôler la plaque des données comme indiquée ci-après:
L’appareil frigorifique fonctionne correctement dans l’intervalle de température ambiante indiqué sur le tableau, selon la classe climatique.
ES
Este producto es conforme a las normativas europeas de seguridad vigentes relativas a
los aparatos eléctricos y ha sido sometido a largas y meticulosas pruebas para evaluar
la seguridad y la fiabilidad del mismo. Antes de utilizar el aparato leer atentamente el
presente manual, para saber exactamente cuáles son las operaciones que pueden
cumplirse y cuáles no. Un uso indebido del aparato puede ser peligroso, sobre todo
para los niños. Antes de conectar el aparato asegurarse de que los datos de la placa
correspondan a los datos de la instalación de alimentación. Los materiales reciclables
del embalaje no deben ser eliminados en el ambiente. Por consiguiente, llevarlos a un
establecimiento habilitado a tal efecto para que puedan ser reciclados.
La seguridad eléctrica de este aparato se verifica sólo cuando el mismo está conectado
a una instalación eléctrica provista de toma de tierra eficaz y normalizada. Es obligatorio
verificar este requisito fundamental de seguridad. En caso de dudas, solicitar un control
cuidadoso de la instalación por parte de un técnico calificado (Ley 46/90).
El uso de esta máquina, como así también de cualquier aparato eléctrico, comporta la
observación de algunas reglas fundamentales:
• no tocar el aparato con manos o pies mojados o húmedos;
P
Este produto está conforme as normas europeias de segurança vigentes referentes a
aparelhos eléctricos. Foi submetido a longas provas e a meticulosos testes para a
avaliação da sua segurança e fiabilidade. Antes de utilizar o aparelho, leia
atentamente este manual para saber exactamente o que fazer e o que não fazer.
Um uso inadequado do aparelho pode ser perigoso, sobretudo para as crianças.
Antes de ligar o aparelho na rede certifique-se de que os dados constantes na chapinha
correspondam aos da instalação eléctrica da sua casa. Os materiais de embalagem
recicláveis não os descarte no meio ambiente; leve-os a um centro especializado
para que possam ser reciclados. A segurança eléctrica deste aparelho é garantida
somente se este for ligado a uma instalação munida de uma eficaz tomada de ligação
à terra, nos termos da legislação em matéria. É obrigatório verificar este fundamental
requisito de segurança. Em caso de dúvidas, peça a um técnico qualificado para
efectuar um cuidadoso controlo da instalação eléctrica da sua casa. (lei 46/90)
O uso desta máquina assim como o de qualquer aparelho eléctrico, comporta o
cumprimento de algumas regras fundamentais:
• não toque no aparelho com as mãos ou os pés molhados;
NORMAS, ADVERTENCIAS Y CONSEJOS IMPORTANTES
• no tirar del cable de alimentación para desconectar el enchufe de la toma;
• no exponer el aparato a los agentes atmosféricos;
• no permitir que los niños usen el aparato sin vigilancia;
• no quitar o introducir el enchufe en la toma con las manos mojadas; antes de efectuar
cualquier operación de limpieza o mantenimiento, desconectar el aparato de la red
de alimentación eléctrica desconectando el enchufe o apagando el interruptor general
de la instalación;
• en caso de desperfecto o funcionamiento incorrecto apagar el aparato y no intervenir
en el mismo.
ATENCION!
Cuando instalen su aparato frigorífico es importante que tengan en
cuenta la clase climática del producto.
Para conocer la clase climática de su aparto, controlen la placa con los
datos que aparece aquí.
El aparato funciona correctamente en el campo de temperatura ambiente indicado en el cuadro, según la clase climática.
NORMAS, ADVERTÊNCIAS E CONSELHOS IMPORTANTES
• não puxe o cabo de alimentação eléctrica para desligar a ficha da tomada;
• não deixe o aparelho exposto aos agentes atmosféricos;
• não permita que o aparelho seja utilizado por crianças sem que estas sejam vigiadas;
• não ligue nem desligue a ficha da tomada com as mãos molhadas;
• antes de efectuar qualquer operação de limpeza ou de manutenção, desligue o
aparelho da rede de alimentação eléctrica extraindo a ficha da tomada ou
desactivando o interruptor geral da instalação eléctrica.
• em caso de avaria ou de mau funcionamento, desligue o aparelho e não o manuseie.
ATENÇÃO!
Ao instalar o seu aparelho frigorífico,
é importante observar a classe climática do produto. Para conhecer a
classe climática do seu aparelho, controlar a chapa de dados abaixo
demonstrada.
O aparelho funciona correctamente no campo de temperatura ambiente indicado na tabela, segundo a classe climática.
504
3
Page 4
3
2
1
8
5
4
6
I
Si ringrazia per la scelta della macchina.
La preghiamo di leggere attentamente queste brevi note scritte per lei e per poter
utilizzare al massimo tutte le prestazioni che può ottenere
La qualità del Frigocongelatore è garantita poiché ogni nostro prodotto è controllato
al 100% al fine produzione, con lunghe prove e con diversi tipi di TEST.
La usi e vedrà quante soddisfazioni otterrà.
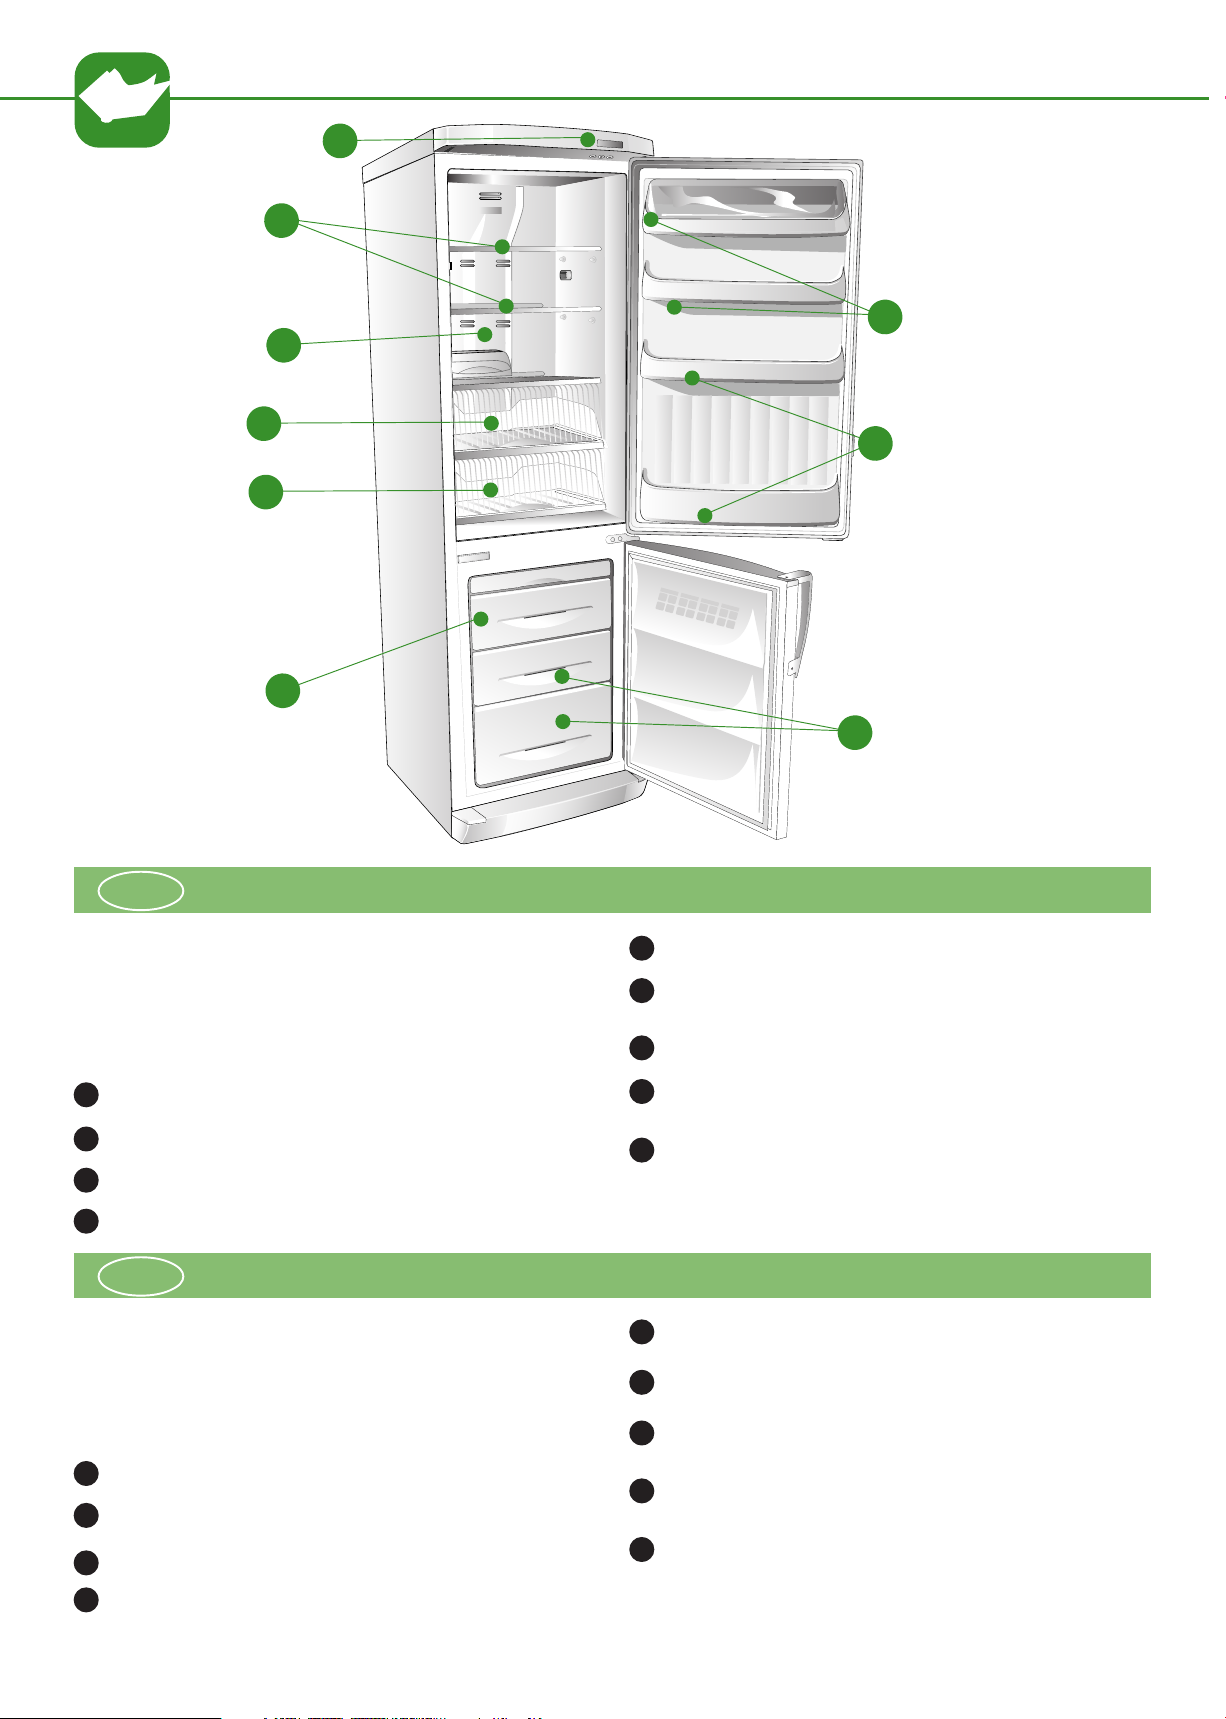
1
QUADRO COMANDI
LUCE INTERNA
2
3
GRIGLIE REGOLABILI
NOTE GENERALI ALLA CONSEGNA
SCATOLA FRUTTA EVERDURA
5
SCOMPARTO PER CONGELAZIONE CIBI FRESCHI
6
FREEZER
CASSETTI FREEZER
7
BALCONCINO
8
PORTASCATOLE
BALCONCINO
9
PORTABOTTIGLIE
9
7
4
SCOMPARTO 0-4°C
GB
Thank you for choosing this appliance.
Please carefully read these short notes so that you can use all the available functions to
a maximum. The quality of the refrigerator-freezer is guaranteed since our product is
100% tested at the end of production, with extensive trials and various types of TESTS.
Use it and you will see how much satisfaction you obtain.
CONTROL PANEL
1
INTERNAL LIGHT
2
ADJUSTABLE GRIDS
3
4
0-4°C COMPARTMENT
4 504
GENERAL NOTES ON DELIVERY
COMPARTMENT FOR FREEZING OF FRESH FOOD
5
FREEZER
6
FREEZER DRAWERS
CONTAINER
7
TRAY
EGG, BUTTER, ETC.
8
TRAY
BOTTLE
9
TRAY
Page 5

D
ALLGEMEINE BEMERKUNGEN ZUR LIEFERUNG
Wir gratulieren Ihnen zu Ihrer Wahl.
Bitte lesen Sie diese Anleitungen, die wir für Sie geschrieben haben, aufmerksam
durch, damit Sie alle Möglichkeiten dieses Geräts voll ausschöpfen können.
Für die Qualität dieses Kühl- und Gefrierschrankes garantieren wir, denn jedes unserer
Produkte wird nach erfolgter Produktion hundertprozentig kontrolliert, lange geprüft
und verschiedenen TESTS unterzogen.
Benützen Sie ihn, Sie werden zufrieden sein !
1
BEDIENFELD
2
INNENBELEUCHTUNG
VERSTELLBARE ROSTE
3
4
KÜHLZONE 0-4°C
F
Nous vous remercions de votre choix.
Nous vous prions de lire attentivement ces quelques remarques afin que vous puissiez
utiliser au maximum toutes les prestations que cet appareil offre.
La qualité du réfrigérateur-congélateur est garantie car notre produit est contrôlé à
100 % en fin de production en subissant de longs essais ainsi que différents types de
TEST.
Utilisez-le et vous verrez les nombreuses satisfactions qu’il vous procurera.
1
TABLEAU DES COMMANDES
2
ÉCLAIRAGE INTERNE
3
GRILLES REGULABLES
REMARQUES GÉNÉRALES AU MOMENT DE LA LIVRAISON
TIEFKÜHLABTEIL FÜR FRISCHE LEBENSMITTEL
5
6
TIEFKÜHLSCHUBLADEN
DOSENABLAGE
7
EIER- UND BUTTERABLAGE
8
FLASCHENABTEIL
9
COMPARTIMENT POUR LA CONGELATION DES ALIMENTS FRAIS FREEZER
5
TIROIRS FREEZER
6
PORTE-BOITES
7
8
BOITE A OEUFS, BEURRE, ETC.
9
PORTE-BOUTEILLES
4
COMPARTIMENT 0-4°C
ES
En primer lugar agradecemos la preferencia acordada eligiendo una de nuestras
máquinas.
Le solicitamos lea atentamente estas breves notas escritas para Usted, de modo que
pueda obtener las máximas prestaciones de su aparato. La calidad del frigoríficocongelador está garantizada ya que cada uno de nuestros productos es controlado al
100% al final de la producción, con largas y diferentes PRUEBAS.
Con su uso podrá comprobar sus ventajas.
TABLERO DE MANDOS
1
LUZ INTERNA
2
REJILLAS REGULABLES
3
4
COMPARTIMIENTO 0-4°C
P
Agradece-se pela escolha da máquina.
Agradecemos que leia atentamente estas breves notas que escrevemos para si, para
que a possa utilizar usufruindo, ao máximo, de todas as prestações que com ela
pode obter.
A qualidade do frigorífico-congelador é garantida dado que todos os nossos produtos
são 100% controlados no final da produção com demoradas provas e diversos tipos
de TESTES.
Use-a e verá as satisfações que terá.
1
QUADRO DE COMANDOS
2
LUZ INTERIOR
3
GRELHAS REGULÁVEIS
4
COMPARTIMENTO 0-4°C
504
NOTAS GENERALES RELATIVAS A LA ENTREGA
COMPARTIMIENTO PARA CONGELAR ALIMENTOS FRESCOS FREEZER
5
6
CAJONCILLOS FREEZER
BALCONCILLO PORTA-CAJONES
7
8
CAJÓN PARA HUEVOS, MANTEQUILLA, ETC.
9
BALCONCILLO PORTA-BOTELLAS
NOTAS GERAIS NO ACTO DE ENTREGA
COMPARTIMENTO CONGELADOR PARA CONGELAÇÃO DE ALIMENTOS FRESCOS
5
6
GAVETAS DO CONGELADOR
SUPORTE PARA AS CAIXAS
7
8
CAIXA DOS OVOS, MANTEIGA ETC.
SUPORTE PARA AS GARRAFAS
9
5
Page 6
I
DESCRlZlONE MACCHINA
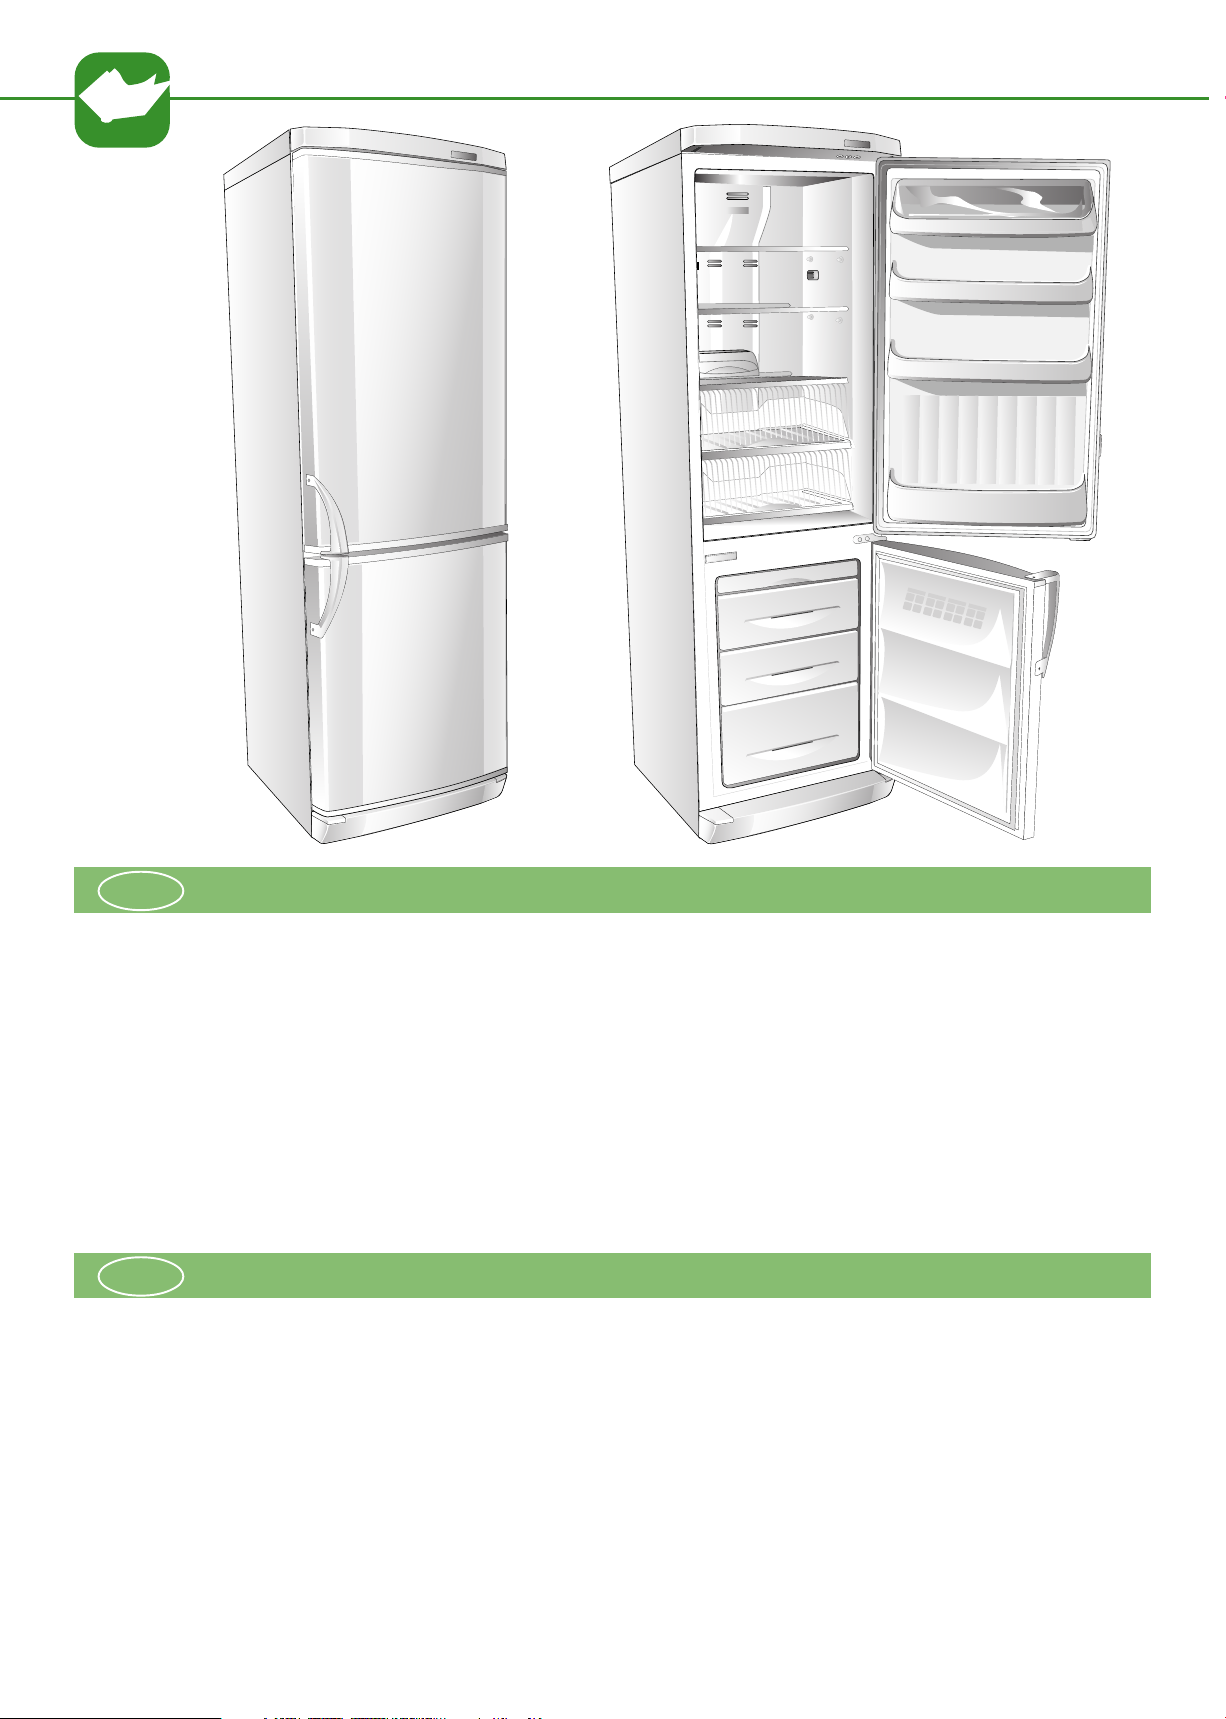
Gli apparecchi Frigocongelatori verticali della serie CO NO FROST sono elettrodomestici di grande capienza che permettono di congelare, conservare e refrigerare
qualsiasi cibo.
La STRUTTURA portante è stata realizzata in pannelli di lamiera trattati e verniciati
elettrostaticamente per resistere ai maltrattamenti e rimanere bella e lucente nel tempo.
Gli ISOLAMENTI sono stati scelti per mantenere costante la temperatura INTERNA
e avere grossi spazi interni.
GB
The upright fridge-freezers of the CO NO FROST series are large-capacity appliances
that allow any type of food to be frozen, preserved and refrigerated.
The supporting STRUCTURE is constructed in panels of treated sheet steel, electrostatically
enamelled to resist ill-treatment, and for long-lasting beauty and shine.
The INSULATION has been selected to maintain the INTERNAL temperature constant
and for large internal space.
6 504
APPLIANCE DESCRIPTION
Lo SPAZlO INTERNO è stato studiato per poter ospitare qualsiasi forma di cibo da
conservare con una facilità di spostamento dei ripiani.
ATTENZIONE: mantenere libere da ostruzioni le aperture di ventilazione nell’involucro dell’apparecchio o nella struttura da incasso.
SBRINAMENTO FRIGO AUTOMATICO
SBRINAMENTO CONGELATORE AUTOMATICO
ATTENZIONE: Non usare dispositivi meccanici o altri metodi artificiali per accelerare
il processo di sbrinamento, diversi da quelli raccomandati dal costruttore
ATTENZIONE: Non usare apparecchi elettrici all’interno dello scomparto conservatore di cibi, se questi non sono di tipo raccomandato dal costruttore.
The INTERNAL SPACE is designed to hold any form of food with easy shelf movement.
WARNING: Keep ventilation openings in the appliance enclosure or in the structure for
building in , clear of obstruction.
AUTOMATIC FRIDGE DEFROST
AUTOMATIC FREEZER DEFROST
WARNING: Do not use mechanical devices or other artificial means to
accelerate the defrosting process, other than those recommended by
the manufacturer.
WARNING: Do not use electrical appliance inside de food storage of
the appliances, unless they are of the type recommended by the manufacturer.
Page 7

D
BESCHREIBUNG DES GERÄTS
Die vertikalen Kühl-Gefrier-Automaten der Serie CO NO FROST bieten besonders
viel Platz und ermöglichen das Einfrieren, Aufbewahren und Kühlen aller Lebensmittel.
Das TRAGWERK besteht aus speziell behandelten und elektrostatisch lackierten
Blechtafeln, die auch eine unsorgfältige Behandlung ertragen und immer schön und
glänzend bleiben.
Die ISOLIERUNGEN wurden im Hinblick auf eine konstante INNENTEMPERATUR
und auf geräumige Innenflächen gewählt.
F
Les appareils Réfrigérateurs-Congélateurs verticaux de la série CO NO FROST sont
des électroménagers d’une grande capacité qui permettent de congeler, conserver et
réfrigérer tout type d’aliment.
La STRUCTURE portante est construite avec des panneaux de tôle traités et vernis
électrostatiquement afin de résister aux mauvais traitements et pour rester belle est
brillante dans le temps.
Les ISOLATIONS ont été sélectionnées afin de conserver une température INTERNE
constante et de bénéficier de larges espaces internes.
DESCRIPTION DE L’APPAREIL
Der INNENRAUM wurde so eingeteilt, daß Lebensmittel aller Art darin aufbewahrt
werden können, wobei man die Roste leicht umplazieren kann.
ACHTUNG: Die Belüftungsöffnungen des Standgerät-Gehäuses oder die der Einbaustruktur dürfen nicht verstopft werden.
ABTAU-AUTOMATIK IM KÜHLTEIL
ABTAU-AUTOMATIK IM GEFRIERTEIL
ACHTUNG: Weder mechanische Vorrichtungen noch andere künstlichen
Verfahren, die nicht den Empfehlungen des Herstellers entsprechen,
benutzen, um den Auftauprozess zu beschleunigen.
ACHTUNG: Bitte verwenden Sie keine Elektrogeräte im Kühlgut-Lagerfach, Wenn diese nicht der vom Hersteller empfohlenen Art entsprechen.
L’ESPACE INTERIEUR a été conçu pour contenir toutes les formes d’aliments à
conserver grâce à la facilité de déplacement des rayons.
ATTENTION: laisser les prises d’air libres de toute entrave au niveau du corps de
l’appareil ou du meuble à l’intérieur duquel il est encastré
DÉGIVRAGE AUTOMATIQUE DU RÉFRIGÉRATEUR
DÉGIVRAGE AUTOMATIQUE DU CONGÉLATEUR
ATTENTION:
ques ou de systèmes artifices autres que ceux préconisés par le fabricant
ATTENTION: Ne pas utiliser d’appareils électriques à l’intérieur du compartiment de conservation des aliments à moins qu’ils ne soient du
type recommandé par le fabricant.
Pour accélérer le dégivrage, ne pas utiliser de dispositifs mécani-
ES
Los aparatos refrigeradores congeladores verticales de la serie CO NO FROST son
electrodomésticos de gran capacidad que permiten congelar, conservar y refrigerar
cualquier alimento.
La ESTRUCTURA portante ha sido realizada en paneles de chapa tratados y pintados
electróstáticamente para resistir a los maltratos y permanecer bella y brillante a lo
largo del tiempo.
Los AISLAMIENTOS han sido seleccionados para mantener constante la temperatu-
ra INTERNA y a la vez obtener grandes espacios internos.
P
Os aparelhos Frigoríficos-congeladores verticais da série CO NO FROST são
electrodomésticos de grande capacidade que permitem congelar, conservar e refrigerar quaisquer alimentos.
A ESTRUTURA portante foi realizada em painéis de chapa tratada e pintada
electrostaticamente para resistir aos maus tratos e manter-se sempre bonita e brilhante
no tempo.
OS ISOLAMENTOS foram escolhidos por forma a manterem constante a temperatura INTERNA e a permitirem grandes espaços interiores.
504
DESCRIPCIÓN DE LA MÁQUINA
El ESPACIO INTERNO ha sido estudiado para contener alimentos de cualquier
forma que deban ser conservados, con gran facilidad de desplazamiento de los
planos.
ATENCION: Mantengas libre de obstrucciones los orificio de ventilación de la caja
extrema del aparato o de la estructura para empotrar.
DESCONGELACIîN REFRIGERADOR AUTOMÇTICO
DESCONGELACIîN CONGELADOR AUTOMÇTICO
ATENCION: No utilizar dispositivos mecánicos u otros métodos artificiales para acelerar el proceso de descongelamentos, a no ser los que
aconseja el fabricante.
ATENCION: No use aparato eléctricos, que no sean del tipo recomendado por el fabricante, en el interior del compartimiento para la conservación de alimentos.
DESCRIÇÃO DA MÁQUINA
O ESPAÇO INTERIOR foi estudado no sentido de poder conter qualquer tipo de
alimento em conservação com a facilidade de deslocação das prateleiras.
ATENÇÃO: Mantenha livre de obstruções as aberturas de ventilação do invólucro
do aparelho e da estrutura de encaixe.
DESCONGELAÇÃO AUTOMÇTICA DO FRIGORÊFICO
DESCONGELAÇÃO AUTOMÇTICA DO CONGELADO
ATENÇÃO: Para acelerar o processo de descongelamento, não utilize I
nunca dispositivos mecânicas nem | nenhum outro tipo de métodos
artificiais que não sejam os | recomendados pelo construtor.
ATENÇÃO: Não utilize aparelhos eléctrico no interior do compartimento para a conservação de alimentos, excepto os do tipo recomendado
pelo fabricante.
7
Page 8
5
4
2
I
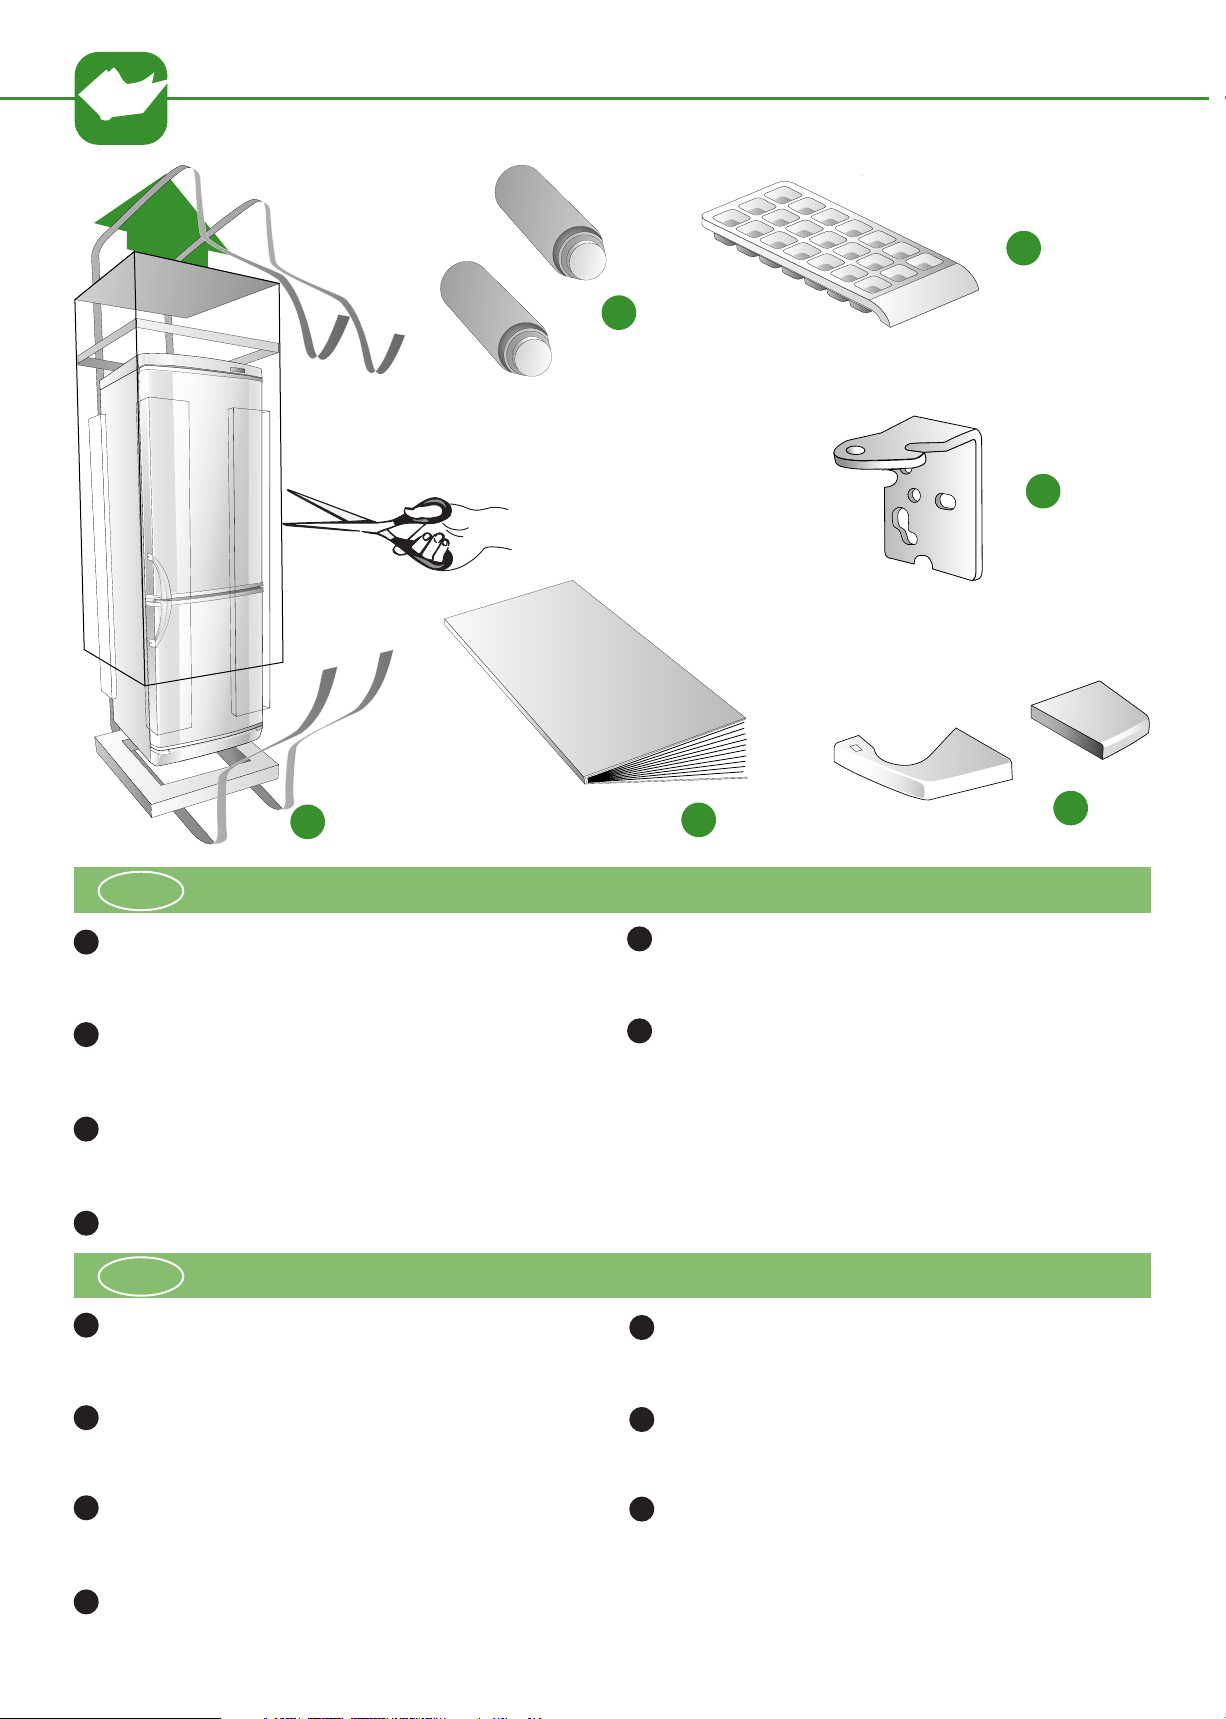
FRIGOCONGELATORE
1
CERNIERA
2
3
LIBRETTO D’ISTRUZIONE
BACINELLA GHIACCIO
4
GB
1
REFRIGERATOR-FREEZER
TRASPORTO
TRANSPROT
1
3
5
DISTANZIALI
TAPPO PER ZOCCOLO
6
ICE SPATULA
5
6
HINGE
2
3
INSTRUCTION HANDBOOK
4
ICE TRAY
8 504
6
SPACERS
7
CAP FOR PLINTH
Page 9

D
TRANSPORT
1
KÜHL- UND GEFRIERSCHRANK
SCHARNIER
2
3
GEBRAUCHSANLEITUNG
4
EISBEHÄLTER
F
1
RÉFRIGÉRATEUR-CONGÉLATEUR
CHARNIÈRE
2
3
BROCHURE D’INSTRUCTIONS
TRANSPORT
EISSPACHTEL
5
6
ABSTANDSTÜCKE
7
STÖPSEL FÜR SOCKEL
5
SPATULE GIVRE
6
ENTRETOISES
BOUCHONS POUR PLINTHE
7
4
BAC À GLACE
ES
1
FRIGORÍFICO-CONGELADOR
BISAGRA
2
3
MANUAL DE INSTRUCCIONES
CUBETA PARA HIELOS
4
P
1
FRIGORÍFICO CONGELADOR
TRANSPORTE
TRANSPORTE
ESPÁTULA HIELO
5
DISTANCIADORES
6
TAPÓN PARA ZÓCALO
7
5
ESPÁTULA PARA GELO
2
DOBRADIÇA
3
LIVRO DE INSTRUÇÕES
4
RECIPIENTES PARA O GELO
504
SEPARADOR
6
7
TAMPA PARA A BASE
9
Page 10

3
2
A
1
3
I
INVERSIONE MANIGLIA VERTICALE
Se il vostro apparecchio e dotato della maniglia verticale montata, ma decidete di
cambiare la parte di apertura bisognerà procedere all’inversione anche della maniglia verticale nel seguente modo:
Smontare la maniglia tramite le due viti di sostegno.
1
1
Estrarre tramite leggera pressione, i tappi salvaforo che troverete nel lato oppo-
2
2
sto della porta.
Rotare la maniglia di 180° e riposizionare le due viti, quindi rinfilare i tappi
3
3
salvaforo sul lato opposto
GB
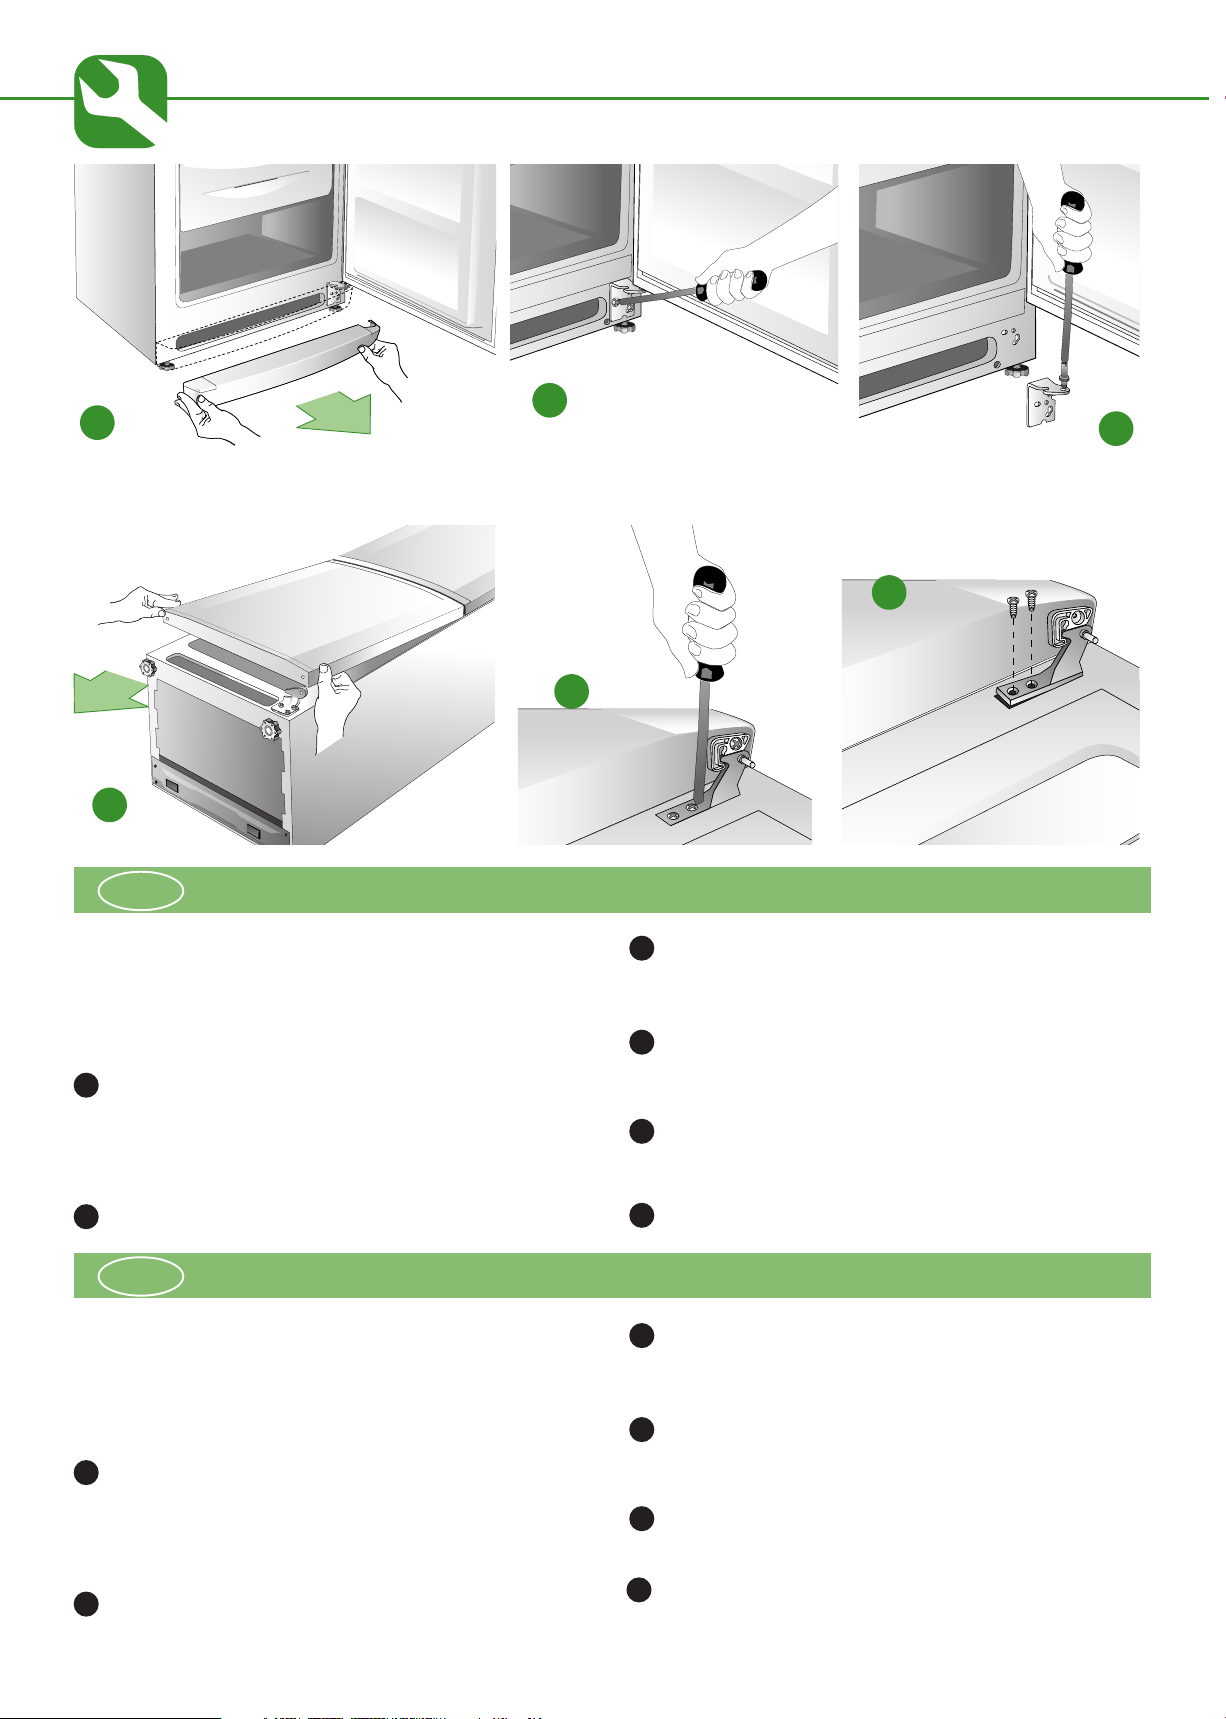
POSIZIONAMENTO E MESSA IN OPERA
RIMOZIONE DELLE PROTEZIONI PER IL TRASPORTO
POSITIONING AND INSTALLATION
4
Rimuovere la protezione dalla guarnizione della porta (fig. 6). La protezione
4
4
evita i possibili danni della guarnizione dovuti al trasporto. La protezione deve
essere rimossa per poter chiudere ermeticamente la porta. Per togliere la protezione, tirare leggermente un’estremità, ruotandola verso l’esterno.
Rimuovere i dispositivi di blocco dei ripiani in vetro. Tali elementi in plastica
5
5
evitano lo spostamento dei ripiani durante il trasporto. Per rimuovere i dispositivi di blocco, procedere come segue:
a) Afferrare gli elementi in plastica, ruotandoli fino a disimpegnarli totalmen-
te dal ripiano.
b) Estrarre gli elementi tirandoli verso l’esterno.
B
MOVING THE VERTICAL HANDLE
If your appliance is fitted with a vertical handle and you want to change the opening
direction, the position of the vertical handle must also be changed following the
procedure reported below:
Remove the handle by unscrewing the fixing screws.
1
Remove the hole plugs on the opposite side of the door by pressing lightly.
2
Rotate the handle 180° and refit it using the two screws. Insert the plugs in the
3
holes left on the opposite side
10 504
REMOVING THE TRANPORT PROTECTIONS
Remove the door seal protection (fig. 6). The protection prevents possible dam-
4
age to the seal during transport. The protection must be removed in order to be
able to close and seal the door. To remove the protection, pull one end gently
while rotating it outwards.
Remove the glass shelf locking devices. These plastic devices prevent the shelves
5
from moving during transport. To remove the devices, proceed as follows:
a) Grip the plastic element and rotate it until it is free of the shelf.
b) Extract the elements by pulling outwards.
Page 11

D
AUFSTELLUNG UND INBETRIEBSETZUNG
UMKEHRUNG DES VERTIKALEN GRIFFES
Falls Ihr Gerät über einen vertikalen Griff verfügt und Sie die Öffnungsrichtung ändern
möchten, muss auch der vertikale Griff wie nachstehend beschrieben umgekehrt
werden:
Den Griff anhand der beiden Halteschrauben demontieren.
1
2
Die Verschlussstöpsel der Bohrungen an der gegenüberliegenden Türseite durch
leichte Druckanwendung herausziehen.
3
Den Griff um 180° drehen und die beiden Schrauben erneut positionieren; dann
die Verschlussstöpsel an der Rückseite wieder anbringen.
F
INVERSION DE LA POIGNÉE VERTICALE
Si votre appareil est équipé d’une poignée verticale déjà montée et vous souhaitez
modifier le côté de l’ouverture, il faudra également effectuer l’inversion de la poignée
verticale, en agissant de la façon suivante :
Démonter la poignée, au moyen des deux vis de support.
1
2
En exerçant une légère pression, sortir les bouchons de protection qui se trouvent
sur le côté opposé de la porte.
3
Tourner la poignée de 180° et remettre en place les deux vis, puis enfiler à
nouveau les bouchons de protection sur le côté opposé.
POSITIONNEMENT ET MISE EN OEUVRE
ENTFERNEN DER SCHUTZVORRICHTUNGEN FÜR DEN TRANSPORT
Die Schutzvorrichtungen von der Türdichtung entfernen (Abb. 6). Diese
4
Schutzvorrichtung verhindert Schäden an der Dichtung, die während des
Transports entstehen können. Die Schutzvorrichtung muss entfernt werden, um
die Tür hermetisch schließen zu können. Für die Entfernung der Schutzvorrichtung
diese an einem Ende leicht nach außen hin abziehen.
Die Blockiervorrichtung der Glas-Abstellborde entfernen. Diese Plastikteile
5
verhindern die Bewegung der Abstellborde während des Transports. Zum
Entfernen der Blockiervorrichtungen folgendermaßen vorgehen:
a) Die Plastikteile ergreifen und drehen, bis sie die Abstellborde komplett
freigeben.
b) Die Teile herausziehen und entnehmen.
RETRAIT DES PROTECTIONS POUR LE TRANSPORT
Retirer la protection de la garniture de la porte (fig. 6). La protection évite tout
4
risque d’endommager la garniture pendant le transport. La protection doit être
retirée, afin de pouvoir fermer hermétiquement la porte. Pour enlever la
protection, tirer légèrement une extrémité, en la tournant vers l’extérieur.
Retirer les dispositifs de blocage des tablettes en verre. Ces éléments en plastique
5
évitent le déplacement des tablettes pendant le transport. Pour retirer les dispositifs
de blocage, effectuer les opérations suivantes :
a) Saisir les éléments en plastique, en les tournant jusqu’à ce qu’ils soient
totalement dégagés de la tablette.
b) Sortir les éléments, en les tirant vers l’extérieur.
ES
INVERSIÓN MANIJA VERTICAL
Si su aparato está dotado de manija vertical montada, pero Ud. decide cambiar la
parte de apertura debe proceder además a la inversión de la manija vertical de la
siguiente manera:
Desmontar la manija mediante los dos tornillos de soporte.
1
Extraer con una ligera presión, los tapones de protección de los orificios que
2
encontrará en el lado opuesto de la puerta.
Girar la manija en 180° y volver a montar los dos tornillos, luego colocar
3
nuevamente los tapones de protección en el lado opuesto.
P
INVERSÃO DO PUXADOR VERTICAL
Se o seu aparelho tiver montado um puxador vertical e você decidir mudar o lado de
abertura, é necessário inverter o puxador vertical do modo seguinte:
Desmonte o puxador, tirando os dois parafusos de fixação.
1
Retire as tampinhas que estão a tapar os furos do outro lado da porta, com uma
2
ligeira pressão.
Rode o puxador de 180° e fixe-o de novo com os dois parafusos. A seguir
3
encaixe as tampinhas dos furos, removidas anteriormente, nos orifícios do lado
oposto.
POSICIONAMIENTO E INSTALACIÓN
DESMONTAJE DE LAS PROTECCIONES PARA EL TRANSPORTE
COLOCAÇÃO E ACCIONAMENTO
REMOÇÃO DOS ELEMENTOS DE PROTECÇÃO UTILIZADOS NO TRANSPORTE
Quitar la protección de la guarnición de la puerta (fig. 6). La protección evita los
4
posibles daños de la guarnición debidos al transporte. La protección debe quitarse
para poder cerrar herméticamente la puerta. Para quitar la protección, tirar
ligeramente de un extremo, girándola hacia el exterior.
Quitar los dispositivos de bloqueo de las repisas de vidrio. Dichos elementos de
5
plástico evitan el desplazamiento de las repisas durante el transporte. Para
quitar los dispositivos de bloqueo, proceder de la siguiente manera:
a) Aferrar los elementos de plástico, girándolos hasta liberarlos completamente de la repisa.
b) Extraer los elementos tirándolos hacia el exterior.
Retire o protector da junta de vedação da porta (fig. 6). Este protector serve
4
para impedir que a junta de vedação se estrague durante o transporte. A
protecção tem de ser retirada para a porta poder fechar hermeticamente. Para
tirar o protector, puxe ligeiramente uma das extremidades, rodando-a para
fora.
Tire os dispositivos que estão a fixar as prateleiras de vidro. Estes elementos de
5
plástico servem para impedir o movimento das prateleiras durante o transporte.
Para tirar estes dispositivos, proceda do modo seguinte:
a) Agarre os elementos de plástico, rodando-os até os soltar completamente
da prateleira.
b) Extraia os elementos, puxando-os para fora.
504
11
Page 12
A
B
C
F
E
D
I
Questa operazione deve essere compiuta da almeno due persone.
Tutti i modelli sono predisposti per l’inversione dell’apertura della porta, per un più
coordinato allineamento con l’arredo cucina.
Per effettuare l’inversione della porta procedete nel seguente modo:
Inclinate leggermente l’apparecchio e appoggiatelo al muro per accedere alla
A
parte inferiore. Smontere lo zoccolo facendo una lieve trazione.
Svitate le viti della cerniera.
B
GB
This operation must be carried out by at least two people.
The position of the door can be inverted on all models in order to fit in better with the
kitchen furnishings.
In order to invert the door proceed as follows:
Slightly tilt the appliance and rest it against the wall in order to reach the bottom.
A
Remove the front plinth panel by pulling lightly.
INVERSIONE APERTURA PORTA
INVERSION OF DOOR OPENING
Smontare la cerniera inferiore.
C
Sfilate la porta del congelatore nel senso indicato dalla freccia.
D
Svitate le viti che tengono fissata la cerniera intermedia.
E
F
Estraete la cerniera intermedia aprendo la porta superiore.
Remove the bottom hinge.
C
Remove the lower door in the direction indicated by the arrow.
D
Remove screws which hold the middle hinge in place.
E
Open the upper door in order to remove the middle hinge in the direction of the
Unscrew the hinge screws.
B
12 504
F
arrow.
Page 13
D
UMKEHRUNG DER ÖFFNUNGSRICHTUNG DER TÜR
Diese Arbeitsschritte müssen immer von mindestens zwei Personen durchgeführt werden.
Bei allen Modellen kann die Öffnungsrichtung der Tür gedreht werden, weshalb sich
das Gerät an jede Kücheneinrichtung anpassen lässt.
Wenn Sie die Tür drehen wollen, verfahren Sie bitte wie folgt:
INeigen Sie das Gerät leicht, und stützen Sie es an der Wand ab, damit Sie an
A
den unteren Bereich gelangen können. Den Sockel durch leichtes Herausziehen
demontieren.
B
Die Schrauben des Scharniers lösen.
F
Cette opération doit être réalisée par au moins deux personnes.
Tous les modèles sont prédisposés pour l’inversion de l’ouverture de la porte,pour permettre
un alignement plus coordonné avec le reste de la décoration de la cuisine.
Pour effect ’inversion de la porte, veuillez procéder de la façon suivante:
IInclinez légèrement l’appareil et appuyez-le contre le mur pour accéder à la
A
partie inférieure. Démonter le socle en exerçant une légère traction.
INVERSION DE L’OUVERTURE DE LA PORTE
Das untere Scharnier demontieren.
C
Entfernen Sie die untere Tür in der durch den Pfeil angezeigten Richtung.
D
E
Lösen Sie die Schrauben, mit denen das mittlere Scharnier befestigt ist .
Ziehen Sie das mittlere Scharnier heraus, indem Sie die obere Tür in Pfeilrichtung
F
öffnen.
C
Démonter la charnière inférieure.
Extrayez la porte inférieure dans le sens indiqué par la flèche.
D
Dévissez les vis qui fixent la charnière intermédiaire.
E
Dévisser les vis de la charnière.
B
ES
Esta operación la tienen que realizar, por lo menos, dos personas.
Todos los modelos están preparados para que se pueda cambiar el lado hacia el que se
abre la puerta, para que se pueda coordinar mejor con la decoración de la cocina.
Para realizar el cambio de la puerta, procedan de la siguiente manera:
nclinen ligeramente el aparato y apóyenlo en la pared para poder llegar a la
A
parte inferiorl. Desmonte el zócalo ejerciendo una leve tracción.
Destornille los tornillos de la bisagra.
B
P
Esta operação deve ser realizada por pelo menos duas pessoas.
Todos os modelos são predispostos para a inversão de abertura de porta, para melhor
combinar com a decoração.
Para efectuar a inversão da porta, proceder da seguinte maneira:
CAMBIO DE LA APERTURA DE LA PUERTA
INVERSÃO DE ABERTURA DE PORTA
F
Enlevez la charnière intermédiaire en ouvrant la porte supérieure comme.
Desmonte la bisagra inferior.
C
Sacar la puerta inferior en el sentido indicado por la flecha.
D
Desenrosquen los tornillos que mantienen sujeta la bisagra intermedia.
E
F
Saquen la bisagra intermedia abriendo la puerta superior como indica la flecha.
Desmonte a dobradiça inferior.
C
Puxar a porta inferior no sentido indicado pela seta.
D
Inclinar ligeiramente o aparelho e apoiá-lo na parede para ter acesso à parte
A
inferior. Desmonte a base exercendo uma ligeira tracção.
Desaperte os parafusos da dobradiça.
B
504
Desaparafusar os parafusos que mantém fixa a dobradiça intermediária.
E
Tirar a dobradiça intermediária abrindo a porta superior como indicado pela
F
seta.
13
Page 14

G
I
H
M
N
L
I
Sfilate via la porta superiore nel senso indicato dalla freccia.
G
Estraete il piastrino dalla parte sinistra e inseritelo nella zona destra(occupata
H
precedentemente dalla cerniera intermedia).
I
Svitare il perno superiore.
GB
Remove the top door in the direction indicated by the arrow..
G
INVERSIONE APERTURA PORTA
L
M
N
INVERSION OF DOOR OPENING
L
Riavvitate il perno superiore nella parte sinistra.
Inserite la porta superiore accoppiando correttamente il perno.
Inserite la cerniera intermedia e fissatela con le proprie viti. Per facilitare il
montaggio agite contemporaneamente sulla chiusura della porta.
Screw the upper pin back into the left-hand side.
Remove plate on the left-hand side and insert it in the right-hand side (previously
H
occupied by the middle hinge).
I
Unscrew the upper pin.
14 504
Insert the upper door so that pin fits in correctly.
M
Insert the middle hinge and use its own screws to fasten it. To facilitate assembly
N
move the door lock at the same time.
Page 15

D
UMKEHRUNG DER ÖFFNUNGSRICHTUNG DER TÜR
Die obere Tür in Pfeilrichtung herausnehmen.
G
Ziehen Sie das Plättchen auf der linken Seite heraus und setzen Sie es auf der
H
rechten Seite ein, dort wo zuvor das mittlere Scharnier befestigt war.
I
Svitare il perno superiore.
F
Sortir la porte supérieure du côté indiqué par la flèche.
G
Enlevez la plaquette de la partie gauche et introduisez-la dans la partie droite
H
(occupée précédemment par la charnière intermédiaire).
INVERSION DE L’OUVERTURE DE LA PORTE
L
M
N
L
M
Schrauben Sie den oberen Stift jetzt auf der linken Seite fest.
Setzen Sie die obere Tür ein. Der Bolzen muss sich korrekt einpassen.
Setzen Sie das Zwischenscharnier I ein und befestigen Sie es mit den
Scharnierschrauben. Um die Mon-tage zu Erleichtern, wirken Sie glei- chzeitig
auf den Verschluss der Tür ein .
Revissez la cheville supérieure dans la partie gauche.
IIntroduisez la porte supérieure en assemblant correctement la cheville.
I
Dévissez la cheville supérieure.
ES
Saque la puerta superior en el sentido indicado por la flecha.
G
Quiten la plaquita colocada en la parte izquierda y pónganla en la parte
H
derecha (ocupada anteriormente por la bisagra intermedia).
I
Desenrosquen el perno superior.
P
Desmonte a porta superior extraindo-a no sentido indicado pela seta.
G
CAMBIO DE LA APERTURA DE LA PUERTA
INVERSÃO DE ABERTURA DE PORTA
IIntroduisez la charnière intermédiare et fixez-la avec ses propres vis. Pour faciliter
N
le montage intervenez en même temps sur la fermeture de la porte.
Enrosquen el perno superior en la parte izquierda.
L
Coloquen la puerta superior colocando correctamente el perno.
M
Coloquen la bisagra intermedia y sujétenla con sus propios tornillos. Para faci-
N
litar el montaje, actúen contemporáneamente en el cierre de la puerta.
Aparafusar novamente o eixo superior na parte esquerda.
L
Tirar a chapa da parte esquerda e inserí-la na parte direita (ocupada anterior-
H
mente pela dobradiça intermediária).
I
Desaparafusar o eixo superior.
504
Inserir a porta superior juntando corretamente o eixo.
M
Inserir a dobradiça intermediária e fixála com os próprios parafusos. Para
N
facilitar a montagem, operar contemporaneamente no fechamento da porta.
15
Page 16

Q
P
O
R
I
Inserite la porta inferiore accoppiando correttamente la cerniera intermedia.
O
Svitate il perno dalla cerniera (destra) e montatelo nella cerniera (sinistra) in
P
dotazione.
Sfilate il piastrino sinistro dallo zoccolo. Inserite il piastrino destro in dotazione
Q
(posizione destra).
GB
Fit the bottom door, making sure that the centre hinge is engaged properly.
O
Unscrew pin from hinge (right-hand side) and insert it into hinge (left-hand side)
P
supplied with the appliance.
INVERSIONE APERTURA PORTA
R
S
INVERSION OF DOOR OPENING
R
S
Rimonate la cerniera inferiore sul lato sinistro e fissatela con le viti.
Rimontare lo zoccolo facendo una lieve pressione.
Replace the lower hinge on the left-hand side and use the screws to fasten it into
position.
Replace the plinth panel M by pressing lightly.
Remove the left washer from base. Insert the right washer, which is being supplied
Q
(right position).
16 504
Page 17

D
UMKEHRUNG DER ÖFFNUNGSRICHTUNG DER TÜR
Die untere Tür einsetzen, indem das mittlere Scharnier korrekt verbunden wird.
O
Entfernen sie den Stift F von Scharnier (rechts) und montieren sie ihn an das
P
beigefügte Scharnier (links).
Q
Entfernen Sie das linke Plättchen von Sockel. Fügen Sie das mitgelieferte rechte
Plättchen ein (rechte Position).
F
Insérer la porte inférieure en enclenchant correctement la charnière intermédiaire.
O
Dévissez la cheville F de la charnière inférieure (droite) et montez-la dans la
P
charnière (gauche) fournie avec l’appareil.
INVERSION DE L’OUVERTURE DE LA PORTE
Bringen sie nun das untere Scharnier links an und befestigen sie es mit den
R
Schrauben.
S
Den Sockel M durch leichtes Andrücken wieder montieren.
Remontez la charnière inférieure sur le côté gauche et fixez-la avec les vis.
R
Remonter le socle M en exerçant une légère pression.
S
Extrayez la plaque gauche du socle. Insérez la plaque droite fournie avec le
Q
matériel (position droite).
ES
Introduzca la puerta inferior acoplando correctamente la bisagra intermedia.
O
Desenrosquen el perno de la bisagra inferior (derecha) y móntenla en la bisagra
P
(izquierda) que se entrega con el aparato.
Quitar la plaqueta izquierda del zócalo. Introducir la plaqueta derecha en
Q
dotación (psoción derecha).
P
Monte a porta inferior encaixando correctamente a dobradiça do meio.
O
CAMBIO DE LA APERTURA DE LA PUERTA
R
S
INVERSÃO DE ABERTURA DE PORTA
R
Monten la bisagra inferior en el lado izquierdo y sujétenla con los tornillos.
Monte nuevamente el zócalo M ejerciendo una leve presión.
Montar novamente a dobradiça inferior no lado esquerdo e fixá-la com os
parafusos.
Desaparafusar o eixo da dobradiça (direita) e montá-lo na dobradiça (esquerda)
P
que acompanha o aparelho.
Puxar a pequena chapa esquerda do suporte. Inserir a pequena chapa direita
Q
que acompanha o kit (posição direita).
504
S
Monte de novo a base M fazendo uma ligeira pressão.
17
Page 18

Green and Yellow
to Earth
Blue to
Neutral
13 amp
Fuse
Brown
to Live
Cord
Clamp
I
NON COLLOCARE L’APPARECCHIO VICINO A SORGENTI DI CALORE E
LASCIARE ALMENO 5 CM DI ARIA SULLA PARTE SUPERIORE
Accostare l’apparecchio fino a che i distanzieri tocchino il muro.
1
Pulire le parti interne usando una soluzione di soda in acqua tiepida (1 cucchiaio
2
in 2 litri di acqua).
Non usare mai abrasivi e detersivi di alcun genere.
5
Attendere circa un’ora, prima di collocare la spina alla rete di alimentazione.
3
Equilibrare l’apparecchio per mezzo dei piedini anteriori regolabili.
4
GB
DO NOT PLACE THE APPLIANCE NEAR HEAT SOURCES AND LEAVE AT
LEAST 5 CM OF SPACE ABOVE THE UPPER SECTION
1
Position the appliance so that the spacers touch the wall.
2
Clean the inside using a solution of sodium carbonate in warm water (1 tablespoon
in 2 litres of water). Never use abrasives or detergents of any kind.
5
3
Wait for approx. 1 hour before connecting to the mains.
Balance the appliance using the adjustable front feet.
4
ELECTRICAL CONNECTION
Check that the main voltage corresponds to that indicated on the rating plate in the
lower left side inside the refrigerator compartment.
If the wall socket does not have an earth terminal, or if the plug does not fit into the
socket, it is advisable to consult a qualified electrician. Do not use multiple plugs or
adapters as they could cause heating and burning.
Warning: this appliance must be earthed
18 504
ATTENZIONE:
WARNING:
COLLEGAMENTO ELETTRICO
Controllare che la tensione dell’impianto elettrico corrisponda a quella indicata sulla
targhetta caratteristiche posta sul lato sinistro in basso nella parte interna dello scomparto frigorifero.
Se la presa a muro è priva di contatto a terra, o se la spina non è adatta al vostro
impianto vi consigliamo di rivolgervi ad un elettricista specializzato.
Non impiegare adattatori o derivatori che potrebbero causare riscaldamenti e bruciature.
If this appliance is fitted with a non rewirable plug for which your socket is unsuitable, the
plug should be cut off and an appropriate plug fitted. The removed plug must be disposed
of Insertion of the plug into a 13 Amp socket is likely to cause an electrical hazard When
a nonrewirable plug ora rewirable 13 Amp (BS1363) plug is used it must be fitted with a
13 Amp ASTA approved (BS1362) fuse. If any other type of plug is used it must be
protected by a 15 Amp fuse either in the plug or at the distribution board
Important:
The wires in the main leads are coloured in accordance with the following code:
GREEN AND YELLOW - EARTH BLUE - NEUTRAL
BROWN - LIVE
As the colours of the wires in the main lead of your appliance may not correspond
with the coloured marking identifying the terminals in your plug, proceed as follows.
CONNECT GREEN & YELLOW coloured wire to plug terminal marked letter “E” or
earth symbol
CONNECT BLUE coloured wire to plug terminal marked letter “N” or coloured black.
CONNECT BROWN coloured wire to plug terminal marked letter “L“ or coloured red.
or coloured green or green & yellow.
Page 19

D
ACHTUNG:
DAS GERÄT NICHT IN DER NÄHE VON WÄRMEQUELLEN AUFSTELLEN
UND AN DER OBERSEITE WENIGSTENS 5 CM ABSTAND FÜR DIE
LUFTZIRKULATION FREILASSEN
Das Gerät an die Wand rücken, bis die beiden Abstandhalter diese berühren.
1
Die Innenwände reinigen. Hierzu eine Lösung aus Soda und lauwarmem Wasser
2
(1 Löffel Soda auf 2 Liter Wasser) .
Niemals scheuernde Substanzen und Reinigungsmittel jeglicher Art verwenden.
3
Etwa eine Stunde abwarten, bevor der Netzstecker an die Steckdose angeschlossen
wird.
4
Das Gerät mit den vorderen Verstellfüßen ausrichten.
F
NE PAS POSITIONNER L’APPAREIL A PROXIMITE DE SOURCES DE CHALEUR ET LAISSER
UN ESPACE D’AU MOINS 5 CM PAR RAPPORT A LA PARTIE SUPERIEURE
Approcher l’appareil jusqu’à ce que les entretoises touchent le mur.
1
Nettoyer les parties internes en utilisant une solution de soude et d’eau tiède (1
2
cuillère à café dans 2 litres d’eau).
Ne jamais d’utiliser de produits abrasifs ni aucun détergent, d’aucune sorte.
ATTENTION :
DAS ANSCHLIESSEN AN DAS STROMNETZ
Kontrollieren, dass die Netzspannung der unten auf der linken Seite im Tiefkühlfach
angebrachten Leistungsschild entspricht.
Hat die Steckdose keine Erdung oder passt der Stecker nicht in die Steckdose, so
benachrichtigen Sie bitte den Elektrofachmann.
Keine Adapter oder Vielfachstecker gebrauchen, weil diese eine Überhitzung oder
Verbrennung verursachen können.
BRANCHEMENT ÉLECTRIQUE
Contrôler que les valeurs de tension du réseau électrique puissent supporter celles
indiquées sur la plaquette caractéristiques placée au bas à gauche dans la partie
interne du réfrigérateur.
Si la prise de courant n’est pas équipée d’une prise de terre, ou si la fiche n’est pas
indiquée pour votre réseau, nous vous conseillons de vous adresser à un électricien
spécialisé.
Ne pas employer d’adapteurs ou de dérivateurs afin d’éviter tout échauffement et
Attendre environ une heure avant de brancher l’appareil au réseau d’alimentation.
5
3
4
Equilibrer l’appareil au moyen des pieds antérieurs réglables.
ES
NO COLOCAR EL APARATO CERCA DE FUENTES DE CALOR Y DEJAR COMO
MINIMO 5 CM DE AIRE EN LA PARTE SUPERIOR.
Acercar el aparato hasta que los separadores toquen la pared.
1
Limpiar las partes internas. Para ello utilizar una solución de soda en agua templada
2
(1 cuchara en dos litros de agua).
No usar nunca abrasivos o detergentes de ningún tipo.
5
3
Dejar pasar una hora antes de insertar el enchufe en la toma de corriente.
4
Equilibrar el aparato mediante los pies anteriores regulables.
P
NÃO COLOQUE O APARELHO AO PÉ DE FONTES DE CALOR E DEIXE
PELO MENOS 5 CM DE ESPAÇO LIVRE ACIMA DA SUA PARTE SUPERIOR
Encoste o aparelho à parede até os separadores tocarem mesma.
1
ATENCIÓN:
ATENÇÃO:
brûlure.
CONEXIÓN ELÉCTRICA
Controlar que la tensión de la instalación eléctrica concuerde con la tensión
indicada en la placa de características situada en el lado izquierdo inferior
del interior del compartimiento frigorífico.
Si la toma de pared no tuviera contacto de tierra, o si el enchufe no fuera
adecuado a su instalación, les, aconsejamos se dirijan a un electricista
especializado.
No usar adaptadores o derivadores ya que podrían ocasionar calentamientos y quemaduras.
LIGAÇÃO ELÉCTRICA
Verifique se a tensão da instalação eléctrica da sua casa corresponde à tensão
indicada na chapa de características colocada no lado esquerdo, em baixo, dentro
do frigorífico.
Limpe as partes interiores do aparelho usando uma solução de soda diluída em
2
água morna (1 colher em 2 litros de água).
Não utilize nunca abrasivos nem de detergentes.
Espere cerca de uma hora antes de ligar a ficha à rede da corrente eléctrica.
5
3
Equilibre o aparelho por meio dos seus pés anteriores reguláveis.
4
504
Se a tomada da parede não possuir ligação à terra, ou se a ficha não for adequada
para a instalação eléctrica da sua casa, aconselhamo-lo a dirigir-se a um electricista
especializado.
Não use adaptadores ou desviadores que possam causar sobreaquecimentos e queimaduras.
19
Page 20

25 4
I
1
TASTO DI CONGELAZIONE RAPIDA (CONGELATORE)
SPIA DI CONGELAZIONE RAPIDA (CONGELATORE)
2
TASTI DI REGOLAZIONE TEMPERATURA (CONGELATORE)
3
INDICAZIONE DI:
4
- temperatura effettiva interna (congelatore)
- Temperatura programmata (congelatore)
PANNELLO DI COMANDO
6
1
3
DESCRIZIONE DELL’APPARECCHIO
L’apparecchio è costituito da due celle:
- Un frigorifero (parte superiore) per la conservazione di cibi freschi e delle bevande
- Un congelatore (parte inferiore) per la conservazione a lunga durata dei prodotti
surgelati (scomparto inferiore) e la congelazione di prodotti freschi (scomparto
superiore).
INDICAZIONE DI:
5
- Temperatura effettiva interna (frigorifero)
- Temperatura programmata (frigorifero)
TASTI DI REGOLAZIONE TEMPERATURA (FRIGORIFERO)
6
GB
1
QUICK-FREEZE BUTTON (FREEZER)
2
QUICK-FREEZE INDICATOR LIGHT (FREEZER)
TEMPERATURE CONTROL BUTTONS (Freezer)
3
4
DISPLAYS:
-
actual internal temperature (freezer)
-
programmed temperature (freezer)
5
DISPLAYS:
- actual internal temperature (fridge)
- programmed temperature (fridge)
TEMPERATURE CONTROL BUTTONS (FRIDGE).
6
20 504
CONTROL PANEL
DESCRIPTION OF THE APPLIANCE
The appliance consists of two cells:
- A fridge (upper part) for storing fresh food and drinks
- A freezer (lower part) for long-term storing of frozen products (bottom compartment)
and for freezing fresh products (top compartment).
Page 21

D
BEDIENFELD
1
TASTE FÜR SCHNELLGEFRIEREN (GEFRIERTEIL)
2
KONTROLLLAMPE SCHNELLGEFRIEREN (GEFRIERTEIL)
TEMPERATUREINSTELLTASTEN (GEFRIERTEIL)
3
4
ANZEIGE FÜR:
-
Effektive Innentemperatur (Gefrierteil)
-
Programmierte Temperatur (Gefrierteil)
5
ANZEIGE FÜR:
- Effektive Innentemperatur (Kühlteil)
- Programmierte Temperatur (Kühlteil)
TEMPERATUREINSTELLTASTEN (KÜHLTEIL)
6
F
1
TOUCHE DE CONGÉLATION RAPIDE (CONGÉLATEUR)
2
VOYANT DE CONGÉLATION RAPIDE (CONGÉLATEUR)
TOUCHES DE RÉGLAGE DE LA TEMPÉRATURE (CONGÉLATEUR)
3
4
INDICATION DE :
-
la température effective interne (congélateur)
-
la température programmée (congélateur)
5
INDICATION DE :
- la température effective interne (réfrigérateur)
- la température programmée (réfrigérateur)
TABLEAU DES COMMANDES
BESCHREIBUNG DES GERÄTS
Das Gerät besteht aus zwei Abteilen:
- Ein Kühlteil (Oberteil) für die Aufbewahrung von frischen Lebensmitteln und
Getränken
- Ein Gefrierteil (Unterteil) für die langdauernde Aufbewahrung von tiefgekühlten
Produkten (unteres Abteil) und das Einfrieren von frischen Lebensmitteln (oberes
Abteil).
DESCRIPTION DE L’APPAREIL
L’appareil est constitué par deux cellules :
- Un réfrigérateur (partie supérieure), pour la conservation des aliments frais et des
boissons.
- Un congélateur (partie inférieure), pour la conservation à longue durée des produits
surgelés (compartiment inférieur) et la congélation des produits frais (compartiment
supérieur).
TOUCHES DE RÉGLAGE DE LA TEMPÉRATURE (RÉFRIGÉRATEUR)
6
ES
1
TECLA DE CONGELACIÓN RÁPIDA (CONGELADOR )
2
LUZ INDICADORA DE CONGELACIÓN RÁPIDA (CONGELADOR)
TECLAS DE REGULACIÓN DE LA temperatura (congelaDOR)
3
4
INDICACIÓN DE:
-
temperatura efectiva interna (congelador)
-
Temperatura programada (congelador)
5
INDICACIÓN DE:
- Temperatura efectiva interna (refrigerador)
- Temperatura programada (refrigerador)
TECLAS DE REGULACIÓN TEMPERATURA (REFRIGERADOR)
6
P
1
BOTÃO DE CONGELAMENTO RÁPIDO (CONGELADOR)
2
LÂMPADA PILOTO DO CONGELAMENTO RÁPIDO (CONGELADOR)
Botões de regulação da temperatura (congelador)
3
4
INDICAÇÃO DE:
- temperatura interior efectiva (congelador)
-
Temperatura programada (congelador)
TABLERO DE MANDOS
PAINEL DE COMANDO
DESCRIPCIÓN DEL APARATO
El aparato está constituido por dos celdas:
- Un refrigerador(parte superior) para la conservación de alimentos frescos y bebidas
- Un congelador (parte inferior) para la conservación de larga duración de los
productos supercongelados(compartimiento inferior) y la congelación de productos
frescos (compartimiento superior).
DESCRIÇÃO DO APARELHO
O aparelho é composto de duas câmaras:
- Uma câmara frigorífico (parte de cima) para conservar alimentos frescos e bebidas
- Uma câmara congelador (parte de baixo) para conservar a longo prazo produtos
ultracongelados (compartimento de baixo) e para congelar produtos frescos (compartimento de cima).
5
Indicação de:
- Temperatura interior efectiva (frigorífico)
- Temperatura programada (frigorífico)
BOTÕES DE REGULAÇÃO DA TEMPERATURA (FRIGORÍFICO)
6
504
21
Page 22

2
1
1C
1A 1B 1C
I
PRIMA DELLA MESSA IN FUNZIONE
Per la pulizia dei vani interni e degli accessori attenersi alle specifiche riportate nel
capitolo “ Pulizia ”.
COLLEGAMENTO DELL’APPARECCHIATURA
Verificare che la tensione dell’impianto elettrico corrisponda alla tensione indicata
sulla targhetta dell’apparecchiatura, e che la presa di corrente sia provvista di
collegamento a terra. Non utilizzare adattatori che potrebbero generare
surriscaldamenti. Qundo si collega il cavo di alimentazione alla presa di corrente,
il display si illumina e compare la grafica riportata in figura 2 lampeggiando per
6 secondi.
1A FRIGORIFERO
1B SUPER
1C CONGELATORE
ATTENZIONE! Se si spegne e si riaccende subito l’apparecchiatura,
il compressore si mette in funzione dopo circa 10 minuti. Questo
GB
BEFORE STARTING THE FRIDGE
When cleaning the internal compartments and accessories, follow the
instructions reported in chapter “ Cleaning ”.
CONNECTING THE APPLIANCE TO THE MAINS SUPPLY
Check that the mains voltage corresponds to that indicated on the appliance’s
rating plate and that the mains socket is equipped with an earth connection.
When the power supply cable is connected to the mains socket, the display
lights up and the graphics reported in figure 2 will appear and flash for 6
seconds.
1A FRIDGE
1B SUPER
1C FREEZER
WARNING! If the appliance is switched off then immediately
22 504
USO DEL REPARTO FRIGORIFERO
rientra nel normale funzionamento dell’apparecchiatura.
MESSA IN FUNZIONE E REGOLAZIONE DELLO SCOMPARTO FRI-
GORIFERO
Se all’inserimento della spina alla presa di corrente il display indica la temperatura dei due scomparti significa che il prodotto è in funzione. Nel caso appaiono i
simboli (—) scomparto frigo e (— —) scomparto congelatore significa che il prodotto è spento. Per mettere in funzione lo scomparto frigorifero, premere il tasto
“FRIGORIFERO” (fig. 2) per almeno un secondo.
ATTENZIONE! All’acensione del reparto frigorifero si accenderà automaticamente anche il reparto congelatore (vedi “Utilizzo dello scomparto congelatore”).
Per interrompere il funzionamento, tenere premuto per 4 secondi il tasto
“FRIGORIFERO”. Il display indica (—) (fig. 2). Durante il funzionamento
dell’apparecchiatura, il valore di temperatura interna del frigorifero è
visualizzato sul display (S2).
USE OF THE REFRIGERATOR COMPARTMENT
back on again, the compressor will start to operate after
approximately 10 minutes. This is normal.
STARTING AND REGULATING THE FRIDGE COMPARTMENT
If, when the plug in inserted in the mains socket, the display indicates the
temperature inside the two compartments, this means that the product is
working. If the (-) symbol appears for the fridge compartment and (- -) for the
freezer, this means that the product is not switched on. To switch on the fridge
compartment, press the “FRIDGE” button (fig. 2) for at least one second.
WARNING! When the fridge is switched on, the freezer also
switches on automatically (see “Using the freezer”).
To switch off the fridge, press the “FRIDGE” button for 4 seconds. The
display will indicate (-) (fig. 2). While the appliance is in operation, the
temperature value inside the fridge is displayed on display (S2).
Page 23

D
VOR DER INBETRIEBSETZUNG
Für die Reinigung der Innenräume und der Zubehörteile sind die im Kapitel “ Reinigung ”
gegebenen Anweisungen zu beachten.
ANSCHLUSS DES GERÄTS
Überprüfen, dass die Spannung der Elektroanlage mit der am Typenschild des Geräts
angegebenen Spannung übereinstimmt und dass die Steckdose über einen Erdanschluss verfügt. Keine Zwischenstecker verwenden, da sie zu Überhitzung führen
können. Bei Anschluss des Speisekabels an das Stromnetz leuchtet das Display auf
und die in Abbildung 2 gezeigte Graphik blinkt 6 Sekunden lang.
1A KÜHLTEIL
1B SUPER
1C GEFRIERTEIL
ACHTUNG! Bei Abschalten und sofortigem Wiedereinschalten des Geräts, setzt sich der Kompressor erst nach ca.10 Minuten in Betrieb.
Hierbei handelt es sich um einen vollkommen normalen Vorgang.
GEBRAUCH DES KÜHLTEILS
INBETRIEBSETZUNG UND TEMPERATURREGELUNG DES KÜHLTEILS
Wird der Stecker in die Steckdose gesteckt, erscheinen am Display die Temperatur
der beiden Abteile, was bedeutet, dass das Gerät funktioniert. Falls die Symbole(—)
für den Kühlteil und (— —) für den Gefrierteil angezeigt werden, ist das Gerät abgeschaltet. Für die Inbetriebsetzung des Kühlteils die Taste “KÜHLTEIL” (Abb. 2)
mindestens eine Sekunde lang drücken.
ACHTUNG! Bei Einschaltung des Kühlteils schaltet sich automatisch auch
der Gefrierteil ein (siehe “Gebrauch des Gefrierteils”).
Für die Betriebsunterbrechung 4 Sekunden lang die Taste “KÜHLTEIL” drücken. Am
Display wird (-) ausgegeben (Abb. 2).
Während des Gerätebetriebes wird die Kühlteilinnentemperatur am Display angezeigt (S2).
F
AVANT LA MISE EN FONCTION
Pour le nettoyage des logements internes et des accessoires, suivre les instructions
indiquées dans les spécifications du chapitre “ Nettoyage ”.
BRANCHEMENT DE L’APPAREIL
Vérifier que la tension de l’installation électrique corresponde à la tension indiquée
sur la plaque signalétique de l’appareil et que la prise du courant soit équipée de
connexion de mise à la terre. Il ne faut pas utiliser des adaptateurs susceptibles de
générer des surchauffes. Quand on effectue la connexion du câble d’alimentation à
la prise du courant, l’afficheur s’allume et la représentation graphique reportée dans
la figure 2 apparaît, en clignotant pendant 6 secondes.
1A RÉFRIGÉRATEUR
1B SUPER
1C CONGÉLATEUR
ATTENTION! Si on éteint puis on rallume immédiatement après l’appa-
reil, le compresseur entre en fonction après 10 minutes environ. Cela
fait partie du fonctionnement normal de l’appareil.
ES
ANTES DE LA PUESTA EN FUNCIÓN
Para la limpieza de los espacios internos y de los accesorios atenerse a las especificaciones que se indican en el capítulo “ Limpieza ”.
CONEXIÓN DEL EQUIPO
Verificar que la tensión de la instalación eléctrica corresponda a la tensión indicada
en la placa del aparato, y que la toma de corriente esté provista de conexión a
tierra. No utilizar adaptadores que podrían generar sobrecalentamientos. Cuando
se conecta el cable de alimentación a la toma de corriente, el display se ilumina y
aparece la gráfica que se indica en la figura 2 parpadeando por per 6 segundos.
1A REFRIGERADOR
1B SUPER
1C CONGELADOR
ATENCIÓN! Si el equipo se apaga y se vuelve a encender inmediatamen-
te, el compresor empieza a funcionar después de 10 minutos aproximadamente. Esto pertenece al funcionamiento normal del equipo.
EMPLOI DU COMPARTIMENT RÉFRIGÉRATEUR
MISE EN FONCTION ET RÉGLAGE DU COMPARTIMENT RÉFRIGÉRATEUR
Si, lorsqu’on insère la fiche dans la prise du courant, l’afficheur indique la température des deux compartiments, cela signifie que l’appareil est en fonction. Si les symboles (—) compartiment réfrigérateur et (— —) compartiment congélateur apparaissent, cela signifie que l’appareil est éteint. Pour effectuer la mise en fonction du
compartiment réfrigérateur, appuyer sur la touche “RÉFRIGÉRATEUR” (fig. 2) pen-
dant une seconde au moins.
ATTENTION ! Lors de la mise en marche du compartiment réfrigérateur, on aura automatiquement la mise en marche du compartiment
congélateur (voir “Emploi du compartiment congélateur”).
Pour interrompre le fonctionnement, maintenir appuyée la touche “RÉFRIGÉRATEUR”
pendant 4 secondes. L’afficheur indiquera (—) (fig. 2). Pendant le fonctionnement de
l’appareil, la valeur de la température interne du réfrigérateur sera indiquée par
l’afficheur (S2).
USO DEL SECTOR REFRIGERADOR
PUESTA EN FUNCIÓN Y REGULACIÓN DELCOMPARTIMIENTO REFRIGERADOR
Si al introducir el enchufe en la toma de corriente el display indica la temperatura de
los dos compartimientos significa que el producto está funcionando. En el caso aparezcan los símbolos (—) compartimiento refrigerador y (— —) compartimiento congelador significa que el producto está apagado. Para poner en función el compartimiento refrigerador, presionar la tecla “REFRIGERADOR” (fig. 2) por lo menos un
segundo.
ATENCIÓN! Al encender el compartimiento refrigerador se enciende
también automáticamente el compartimiento congelador (ver “Uso del
compartimiento congelador”).
Para interrumpir el funcionamiento, mantener presionado por 4 segundos la tecla “REFRIGERADOR”. El display indica (—) (fig. 2). Durante el funcionamiento del equipo, el valor
de temperatura interna del refrigerador se visualiza en el display (S2).
P
ANTES DE PÔR O APARELHO A FUNCIONAR
Para limpeza dos espaços interiores e dos acessórios, siga as indicações dadas no
capítulo “ Limpeza ”.
COMO LIGAR O APARELHO
Verifique se a tensão da instalação eléctrica de sua casa corresponde à tensão
indicada na chapa de características do aparelho e certifique-se de que a tomada
de corrente tenha ligação à terra. Não use adaptadores, porque podem gerar
sobreaquecimento. Quando se liga o cabo de alimentação à tomada de corrente
eléctrica, o display ilumina-se e aparece a gráfica representada na figura 2 que
pisca durante 6 segundos.
1A FRIGORÍFICO
1B SUPER
1C CONGELADOR
ATENÇÃO! Se o aparelho for desligado e voltado a ligar imediatamente
a seguir, o compressor começará a funcionar cerca de 10 minutos mais
504
UTILIZAÇÃO DO COMPARTIMENTO FRIGORÍFICO
tarde. Isto faz parte do funcionamento normal do aparelho.
COMO PÔR O COMPARTIMENTO FRIGORÍFICO A FUNCIONAR E COMO
REGULÁ-LO
Se, ao introduzir a ficha na tomada de corrente, o display indicar a temperatura dos
dois compartimentos, significa que o aparelho está a funcionar. Se aparecerem os
símbolos (—) no compartimento frigorífico e (— —) no compartimento congelador,
significa que o aparelho está desligado. Para pôr o compartimento frigorífico a
funcionar, prima a tecla “FRIGORÍFICO” (fig. 2) durante, pelo menos, um segundo.
ATENÇÃO! Na altura em que o compartimento frigorífico começar a
funcionar, activar-se-á também em simultâneo, automaticamente, o
compartimento congelador (ver “Utilização do compartimento
congelador”).
Para interromper o funcionamento, mantenha a tecla “FRIGORÍFICO” premida durante 4 segundos. O display indica (—) (fig. 2). Durante o funcionamento do aparelho,
o valor da temperatura interior do frigorífico aparece indicado no display (S2).
23
Page 24

3
S2 S1
1A 1B 1C
I
Il display indica i valori della temperatura interna compresi tra 0°C e +19°C. I
valori di temperatura superiori a +19°C sono contrassegnati dalla lettera “H”.
Il valore di temperatura può essere programmato da +2°C a +7°C per una
temperatura compresa tra 0°C e 4°C nello scomparto “0° - 4°”.
- Programmazione e regolazione della temperatura: premendo una volta il tasto “FRIGORIFERO”, la temperatura programmata lampeggia per
6 secondi. Premendo nuovamente il tasto, si imposta la temperatura desiderata (a ogni pressione del tasto, la temperatura diminuisce di 1 grado fino a +2°C, dopodiché il display riparte da +7°C).
- Controllo della temperatura programmata: premendo una volta il tasto
“FRIGORIFERO”, la temperatura programmata (S2) continua a lampeggiare sul display per 6 secondi.
Le funzioni programmate restano memorizzate anche in mancanza di cor-
GB
The display indicates internal temperature values between 0°C and +19°C.
Temperatures higher than +19°C are indicated by the letter “H”.
The temperature value can be programmed between +2°C and +7°C to
have a temperature between 0°C and 4°C in the “0° - 4°” compartment.
- Programming and controlling the temperature: press the
“FRIDGE” button, the programmed temperature will flash for 6 seconds. Re-press the button to set the required temperature (each time the
button is pressed, the temperature will reduce by 1 degree to +2°C,
after which the display will restart from +7°C).
- Checking the programmed temperature: press the “FRIDGE”
button once, the programmed temperature (S2) will continue to flash for
6 seconds.
USO DEL REPARTO FRIGORIFERO
rente o quando l’apparecchiatura è scollegata.
ALLARME PER PORTA APERTA: L’apertura della porta del frigorifero è
segnalata dal simbolo “ ” lampeggiante (vedere S1) e dall’accensione
della lampada interna per un tempo massimo di 5 minuti.
Dopo 60 secondi, si attiva un allarme acustico che si interrompe chiudendo
semplicemente la porta.
USE OF THE REFRIGERATOR COMPARTMENT
cut or when the appliance is disconnected from the mains supply.
DOOR OPEN ALARM: The opening of the fridge door is signalled by a
flashing “ ” symbol (see S1) and by the internal light which stays lit
for a maximum of 5 minutes.
After 60 seconds, an audible alarm is activated. The alarm is silenced
by simply closing the door.
The programmed functions will remain in the memory even during a power
24 504
Page 25

D
GEBRAUCH DES KÜHLTEILS
Am Display werden die Werte der Innentemperatur angezeigt, die zwischen 0°C und
+19°C betragen können. Temperaturwerte von über +19°C werden mit dem
Buchstaben “H” gekennzeichnet.
Die programmierbare Temperatur liegt zwischen +2°C und +7°C bei einer Temperatur
zwischen 0°C und 4°C im Abteil “0° - 4°”.
- Programmierung und Regelung der Temperatur: bei einmaligem Druck der Taste
“KÜHLTEIL” blinkt die programmierte Temperatur für 6 Sekunden. Bei erneutem
Druck der Taste kann die gewünschte Temperatur eingestellt werden (mit jedem
Tastendruck wird die Temperatur um einen Grad bis zu +2°C verringert, dann
startet die Anzeige erneut bei +7°C).
- Kontrolle der programmierten Temperatur: bei einmaligem Druck der Taste
“KÜHLTEIL” blinkt die programmierte Temperatur (S2) am Display für 6 Sekunden.
Die programmierten Funktionen bleiben auch dann gespeichert, wenn es zu einem
F
L’afficheur indique les valeurs de la température interne, comprises entre 0°C et +19°C.
Les valeurs de la température supérieures à +19°C sont indiquées par la lettre “H”.
La valeur de la température peut être programmée entre +2°C et +7°C, pour une
température comprise entre 0°C et 4°C dans le compartiment “0° - 4°”.
- Programmation et réglage de la température : en appuyant une seule fois sur la
touche “RÉFRIGÉRATEUR”, la température programmée clignote pendant 6
secondes. En appuyant à nouveau sur la même touche, on programme la
température souhaitée (chaque fois que l’on exerce une pression sur la touche, la
température diminue de 1 degré, jusqu’à +2°C, puis l’afficheur repart depuis +7°C).
- Contrôle de la température programmée: en appuyant une seule fois sur la touche
“RÉFRIGÉRATEUR”, la température programmée (S2) continue à clignoter sur
l’afficheur pendant 6 secondes.
EMPLOI DU COMPARTIMENT RÉFRIGÉRATEUR
Stromausfall kommt oder das Gerät vom Stromnetz getrennt wird.
AKUSTISCHER TÜRWARNER: die Türöffnung des Kühlteils wird vom blinkenden
Symbol “ “ (siehe S1) und vom Aufleuchten der Innenbeleuchtung für maximal 5
Minuten angezeigt.
Nach 60 Sekunden aktiviert sich ein akustischer Alarm, der durch Schließen der Tür
unterbrochen werden kann.
ou bien lorsque l’appareil n’est pas branché.
ALARME EN CAS DE PORTE OUVERTE: L’ouverture de la porte du réfrigérateur
est signalée par le symbole “ “ qui clignote (voir S1) et par l’allumage de la lampe
d’éclairage interne pendant un laps de temps maximum de 5 minutes.
Après 60 secondes, une alarme acoustique est activée; pour désactiver l’alarme, il
suffit tout simplement de fermer la porte.
Les fonctions programmées restent mémorisées même en cas de coupure du courant
ES
El display indica los valores de la temperatura interna incluidos entre 0°C y +19°C.
Los valores de temperatura superiores a +19°C están identificados con la letra “H”.
El valor de temperatura puede estar programado de +2°C a +7°C para una temperatura incluida entre 0°C y 4°C en el compartimiento “0° - 4°”.
- Programación y regulación de la temperatura: al presionar una vez la tecla
“REFRIGERADOR”, la temperatura programada parpadea por 6 segundos. Al
presionar nuevamente la tecla, se implementa la temperatura deseada (a cada
presión de la tecla, la temperatura disminuye de 1 grado hasta +2°C, luego de lo
cual el display vuelve a partir de +7°C).
- Control de la temperatura programada: al presionar una vez la tecla
“REFRIGERADOR”, la temperatura programada (S2) sigue parpadeando en el
display por 6 segundos.
Las funciones programadas quedan memorizadas incluso si falta corriente o cuando
P
O display indica os valores da temperatura interior compreendidos entre 0°C e
+19°C. Os valores de temperatura superiores a +19°C aparecem indicados genericamente com a letra “H”.
A temperatura pode ser programada com valores entre +2°C e +7°C para uma
temperatura compreendida entre 0°C e 4°C no compartimento “0° - 4°”.
- Programaç„o e regulaç„o da temperatura: carregando uma vez na tecla
“FRIGORÕFICO”, a temperatura programada pisca durante 6 segundos.
Carregando de novo na tecla, define-se a temperatura desejada (cada vez que se
prime a tecla a temperatura vai diminuindo 1 grau até chegar a +2°C, depois
volta a partir de +7°C).
- Verificaç„o da temperatura programada: carregando uma vez na tecla
“FRIGORÕFICO”, a temperatura programada (S2) continua a piscar no display,
durante 6 segundos.
USO DEL SECTOR REFRIGERADOR
el equipo está desconectado.
ALARMA POR PUERTA ABIERTA: La apertura de la puerta del refrigerador es
señalada por el símbolo “ “ intermitente (ver S1) y por el encendido de la lámpara
interna por un tiempo máximo de 5 minutos.
Después de 60 segundos, se activa una alarma acústica que se interrumpe cerrando
simplemente la puerta.
UTILIZAÇÃO DO COMPARTIMENTO FRIGORÍFICO
As funçıes programadas mantém-se armazenadas na memória quer em caso de falta
de corrente, quer se o aparelho for desligado da corrente eléctrica.
ALARME POR PORTA ABERTA: A abertura da porta do frigorífico é indicada
pelo aparecimento do símbolo “ “ a piscar (ver S1) e pela lâmpada interior que
acende durante um período de tempo máximo de 5 minutos.
Ao fim de 60 segundos, dispara um alarme acústico que, para ser interrompido,
basta fechar a porta.
504
25
Page 26

5
I
Note:
• La distanza fra i ripiani e la parete posteriore interna del frigorifero assicura la libera
circolazione dell’aria.
• Non disponete gli alimenti a diretto contatto con la parete posteriore del comparto
frigorifero.
• Non ponete gli alimenti ancora caldi nei comparti.
• Conservate i liquidi in contenitori chiusi
VANO SPECIALE PER LA CONSERVAZIONE DI CARNE E PESCE
Alcuni alimenti delicati quali carne, pesce e alimenti leggermente congelati possono
essere riposti nel cassetto speciale 5, nel quale la temperatura ha un mantenimento
costante attorno a 0° C.
GB
Note:
• The distance between the shelves and the rear internal wall of the refrigerator en-
sures that air circulates freely.
• Do not place food in direct contact with the rear wall of the refrigerator compartment.
• Do not place food that is still warm into the compartments.
• Keep all liquids in closed containers.
USO DEL REPARTO FRIGORIFERO
USE OF THE REFRIGERATOR COMPARTMENT
Il sistema NO-FROST garantisce una temperatura costante e una
capacità di raffreddamento più rapida.
La circolazione forzata di aria esente da umidità tende ad asciugare rapidamente i cibi, per questo raccomandiamo di proteggerli in contenitori sigillati.
The NO-FROST system guarantees a constant temperature and a
more rapid freezing capacity.
The humidity-free, forced air circulation tends to dry food up quickly
and for this reason we advise keeping all food in closed containers.
SPECIAL COMPARTMENT FOR THE PRESERVATION OF MEAT AND FISH
Some delicate food stuffs like meat, fish, and lightly frozen groceries can be placed in
a special box (5), in which the temperature is kept constant at 0° C.
26 504
Page 27

D
GEBRAUCH DES KÜHLTEILS
Anmerkungen:
• Der Abstand zwischen den Fächern und der inneren Rückwand des Kühlschrankes
gewährleistet das ungestörte Zirkulieren der Luft.
• Achten Sie darauf, dass die Lebensmittel nicht direkt an der Rückwand Ihres Kühl-
schrankes liegen.
• Legen Sie keine warmen Speisen in die Kühlfächer.
• Bewahren Sie Flüssigkeiten in verschlossenen Behältnissen auf.
SPEZIELLES FACH FÜR DIE AUFBEWAHRUNG VON FLEISCH UND FISCH
Einige besonders anfällige Lebensmittel wie Fleisch, Fisch und leicht angefrorene Lebensmittel können in diesem Spezialfach aufbewahrt werden (5), in dem die Temperatur konstant auf 0° C gehalten wird.
F
Note:
• La distance entre les étagères et la paroi postérieure interne du réfrigérateur permet la
libre circulation d’air.
• En rangeant les aliments, évitez qu’ils touchent la paroi postérieure du compartiment
réfrigérateur.
• Ne mettez pas les aliments encore chauds dans les compartiments.
• Conservez les liquides dans des récipients fermés.
EMPLOI DU COMPARTIMENT RÉFRIGÉRATEUR
Das No-Frost System garantiert eine konstante Temperatur und
eine größere Abkühlungskapazität. Das Luftventilationssystem
reduziert die Luftfeuchtigkeit und führt dazu, dass die Speisen
schnell austrocknen. Sie sollten deshalb in verschlossenen Behältern aufbewahrt werden.
Le système NO-FROST garantit une température constante et une
capacité de refroidissement plus rapide.
La circulation forcée d’air exempte d’humidité tend à sécher
rapidement les aliments, pour cela nous recommandons de les
conserver dans des récipients bien fermés.
BAC SPECIAL POUR LA CONSERVATION DE LA VIANDE ET DU POISSON
Quelques aliments délicats tels que la viande, le poisson et les aliments légèrement
congelés peuvent être rangés dans le tiroir spécial 5, dans lequel la température se
maintient constamment à environ 0° C.
ES
Notas:
• La distancia entre los estantes y la pared posterior interior de la nevera asegura la
libre circulación del aire.
• No pongan los alimentos en contacto directo con la pared posterior de la nevera.
• No guarden los alimentos, todavía calientes, en la nevera.
• Conserven los líquidos en contenedores cerrados.
ESPACIO ESPECIAL PARA LA CONSERVACIîN DE CARNE Y PESCADO
Algunos alimentos delicados como carne, pescado y alimentos apenas congelados
pueden ser guardados en el cajón especial 5, en el cual la temperatura tiene un
mantenimiento constante alrededor de 0° C.
P
Nota:
• A distância entre as prateleiras e a parede posterior interna da geladeira assegura a
livre circulação de ar.
• Não coloque os alimentos em contato direto com a parede posterior do comparti-
mento da geladeira.
• Não colocar os alimentos ainda quentes nos compartimentos.
• Conservar os líquidos em recipientes fechados.
USO DEL SECTOR REFRIGERADOR
El sistema NO-FROST garantiza una temperatura constante y una
capacidad de Enfriamiento más rápida.
La circulación forzada de aire sin humedad tiende a secar
rápidamente los alimentos, por esto recomendamos que los
conserven en contenedores que cierren herméticamente.
UTILIZAÇÃO DO COMPARTIMENTO FRIGORÍFICO
O sistema NO-FROST garante uma temperatura constante e uma
capacidade mais rápida de resfriamento. A circulação forçada do
ar sem umidade pode fazer com que os alimentos se tornem secos
mais rapidamente, por esta razão, recomenda-se protegêlos em
recipientes bem fechados.
COMPARTIMENTO ESPECIAL PARA A CONSERVAÇÃO DE CARNE E PEIXE
Alguns alimentos delicados, como por exemplo, carne, peixe e alimentos ainda não
totalmente congelados podem ser recolocados na gaveta especial 5, a qual possui
uma temperatura constante de cerca de 0° C.
504
27
Page 28

7
S4
S5
1A 1B 1C
S6
9
I
1) Messa in funzione e regolazione dello scomparto congelatore
Questo scomparto può funzionare anche autonomamente, per mettere in
funzione il congelatore, premere il tasto “CONGELATORE” per almeno un
secondo (fig. 8).
Per interrompere il funzionamento, premere per 4 secondi il tasto “CON-
GELATORE”. Il display indica (- -) (fig. 8).
ATTENZIONE:
Allo spegnimento del congelatore si avrà lo spegnimento di
tutta l’apparecchiatura .
Durante il funzionamento, la temperatura interna del congelatore è indicata
sul display (vedere S6, fig. 9). Il display indica i valori della temperatura
interna compresi tra +20°C e -40°C. I valori di temperatura superiori a
+20°C sono contrassegnati dalla lettera “H”.
GB
1) Starting and regulating the freezer
This compartment can also work independently. To switch on the freezer,
press the “FREEZER” button for at least one second (fig. 8)
To stop the freezer, press the “FREEZER” button for 4 seconds. The display
will indicate (- -) (fig. 8).
USO DELLO SCOMPARTO CONGELATORE
La temperatura è programmabile tra -18°C e -24°C.
- Programmazione e regolazione della temperatura: premendo una vol-
- Controllo della temperatura programmata: premendo una volta il tasto
USING THE FREEZER COMPARTMENT
- Programming and controlling the temperature: press the
8
ta il tasto “CONGELATORE”, la temperatura programmata lampeggia per
6 secondi. Premendo di nuovo, si imposta la temperatura desiderata (ad
ogni pressione, la temperatura diminuisce di 1 grado fino a -24°C,
dopodiché il display riparte da –18°C).
“CONGELATORE”, la temperatura programmata (S6) continua a lam-
peggiare sul display per 6 secondi. Le funzioni programmate restano in
memoria anche in mancanza di corrente o quando l’apparecchio è
scollegato.
“FREEZER” button. The programmed temperature will flash for 6 seconds. Re-press the button to set the required temperature (each time the
button is pressed, the temperature will reduce by 1 degree to -24°C,
after which the display will restart from -18°C).
WARNING:
When the freezer is switched off, the entire appliance is also
switched off.
While the product is in operation, the temperature value inside the freezer is
displayed on the display (see S6, fig. 9). The display indicates the internal
temperature values between +20°C and -40°C. Temperatures higher than
+20°C are indicated by the letter “H”.
The temperature can be programmed between -18°C and -24°C.
28 504
- Checking the programmed temperature: press the “FREEZER”
button once, the programmed temperature (S6) will continue to flash for
6 seconds.
The programmed functions will remain in the memory even during a
power cut or when the appliance is disconnected from the mains supply.
Page 29

D
1) Inbetriebsetzung und Temperaturregelung des Gefrierteils
Dieses Abteil kann auch unabhängig funktionieren; um den Gefrierteil in Betrieb zu
setzen, die Taste “GEFRIERTEIL” mindestens eine Sekunde lang drücken (Abb. 8).
Für die Betriebsunterbrechung 4 Sekunden lang die Taste “GEFRIERTEIL” drücken.
Am Display wird (- -) ausgegeben (Abb. 8).
ACHTUNG:
Bei Abschaltung des Gefrierteils erfolgt die Abschaltung des gesamten Geräts.
Während des Gerätebetriebes wird die Temperatur im Inneren des Gefrierteils am
Display angezeigt (siehe S6, Abb. 9). Am Display werden die Werte der Innentemperatur angezeigt, die zwischen +20°C und -40°C betragen können. Temperaturwerte
von über +20°C werden mit dem Buchstaben “H” gekennzeichnet.
Die programmierbare Temperatur liegt zwischen -18°C und -24°C.
GEBRAUCH DES GEFRIERTEILS
- Programmierung und Regelung der Temperatur: bei einmaligem Druck der Taste
- Kontrolle der programmierten Temperatur: bei einmaligem Druck der Taste
“GEFRIERTEIL” blinkt die programmierte Temperatur für 6 Sekunden. Bei erneutem
Druck der Taste kann die gewünschte Temperatur eingestellt werden (mit jedem
Tastendruck wird die Temperatur um einen Grad bis zu -24°C verringert, dann
startet die Anzeige erneut bei -18°C).
“GEFRIERTEIL” blinkt die programmierte Temperatur (S6) am Display für 6 Sekunden.
Die programmierten Funktionen bleiben auch dann gespeichert, wenn es zu einem
Stromausfall kommt oder das Gerät vom Stromnetz getrennt wird.
F
1) Mise en fonction et réglage du compartiment congélateur
Ce compartiment peut également fonctionner de façon autonome ; pour mettre le
congélateur en fonction, appuyer sur la touche “CONGÉLATEUR” pendant une seconde au moins (fig. 8).
Pour interrompre le fonctionnement, appuyer pendant 4 secondes sur la touche “CON-
GÉLATEUR”. L’afficheur indiquera (- -) (fig. 8).
ATTENTION :
Au moment où l’on éteint le congélateur, cette opération provoquera l’arrêt de tout
l’appareil.
Pendant le fonctionnement, la température interne du congélateur est indiquée par
l’afficheur (voir S6, fig. 9). L’afficheur indique les valeurs de la température interne,
comprises entre +20°C et -40°C. Les valeurs de la température supérieures à +20°C
sont caractérisées par la lettre “H”.
La température peut être programmée entre -18°C et -24°C.
ES
1) Puesta en función y regulación del compartimiento congelador
Este compartimiento puede funcionar también en forma autónoma, para poner en
función el congelador, presionar la tecla “CONGELADOR” por lo menos un segundo (fig. 8).
Para interrumpir el funcionamiento, presionar por 4 segundos la tecla “CONGELA-
DOR”. El display indica (- -) (fig. 8).
ATENCIÓN:
Al apagar el congelador se apaga todo el equipo.
Durante el funcionamiento, la temperatura interna del congelador está indicada en el
display (ver S6, fig. 9). El display indica los valores de la temperatura interna incluidos entre +20°C y -40°C. Los valores de temperatura superiores a +20°C están
identificados por la letra “H”.
La temperatura se puede programar entre -18°C y -24°C.
EMPLOI DU COMPARTIMENT CONGÉLATEUR
- Programmation et réglage de la température : en appuyant une fois sur la touche
“CONGÉLATEUR”, la valeur de la température programmée clignote pendant 6
secondes. En appuyant à nouveau sur cette touche, on programme la température
souhaitée (à chaque pression, la température diminue de 1 degré, jusqu’à -24°C,
puis l’afficheur repart depuis –18°C).
- Contrôle de la température programmée : en appuyant une fois sur la touche
“CONGÉLATEUR”, la température programmée (S6) continue à clignoter sur
l’afficheur pendant 6 secondes. Les fonctions programmées restent mémorisées
même en cas de coupure du courant ou lorsque l’appareil est débranché.
USO DEL COMPARTIMIENTO CONGELADOR
- Programación y regulación de la temperatura: al presionar una vez la tecla
“CONGELADOR”, la temperatura programada parpadea por 6 segundos. Al
presionar de nuevo, se implementa la temperatura deseada (a cada presión, la
temperatura disminuye 1 grado hasta -24°C, luego de lo cual el display vuelve a
partir de –18°C).
- Control de la temperatura programada: al presionar una vez la tecla
“CONGELADOR”, la temperatura programada (S6) sigue parpadeando en el
display por 6 segundos. Las funciones programadas permanecen en memoria
incluso si falta la corriente o cuando el aparato está desconectado.
P
1) Como pôr o compartimento congelador a funcionar e como regulá-lo
Este compartimento pode funcionar autonomamente. Para pôr o congelador a
funcionar, prima a tecla “CONGELADOR” durante, pelo menos, um segundo (fig. 8).
Para interromper o funcionamento, prima a tecla “CONGELADOR” durante 4
segundos. O display indica (- -) (fig. 8).
ATENÇÃO!
Na altura em que se desligar o congelador, todo o aparelho se desliga .
Durante o funcionamento, o valor da temperatura no interior do congelador aparece
indicado no display (ver S6, fig. 9). O display indica os valores de temperatura
interior compreendidos entre +20°C e -40°C. Os valores de temperatura superiores
a +20°C aparecem indicados genericamente pela letra “H”.
A temperatura pode ser programada entre -18°C e -24°C.
504
UTILIZAÇÃO DO COMPARTIMENTO CONGELADOR
- Programação e regulação da temperatura: premindo uma vez a tecla
“CONGELADOR”, a temperatura programada pisca durante 6 segundos. Premindo
de novo a tecla, define-se a temperatura desejada (cada vez que se preme a tecla
a temperatura vai diminuindo 1 grau até chegar a -24°C, depois volta a partir de
–18°C).
- Verificação da temperatura programada: premindo uma vez a tecla
“CONGELADOR”, a temperatura programada (S6) continua a piscar no display,
durante 6 segundos. As funções programadas mantêm-se na memória quer quando
falta a corrente, quer quando o aparelho é desligado da corrente eléctrica.
29
Page 30

7
S4 S6
S5
1A 1B 1C
10
I
2) Funzione CONGELAZIONE RAPIDA (tasto “SUPER”)
Il tasto “SUPER” serve per la congelazione rapida degli alimenti freschi, e
deve essere azionato almeno 3 ore prima di introdurre gli alimenti nel congelatore. Gli alimenti devono essere riposti nello scomparto A. Il compressore funziona continuamente per “27 ore”.
Quando si preme il tasto “SUPER”, appare il simbolo “ ” (vedere S4,
fig. 8 e 10). La funzione “SUPER” si arresta automaticamente dopo
“27ore”, ma è possibile interromperla in qualunque altro momento con
una nuova pressione sul tasto “SUPER” (fig. 10).
3) Allarme temperatura
L’allarme si attiva quando la temperatura interna dello scomparto freezer è
superiore a -12 (esempio -11). Viene segnalata sul display in modo lampeggiante.
GB
2) QUICK-FREEZE function ( “SUPER” button )
The “SUPER” button is used to quick-freeze fresh food and must be activated at least 3 hours before placing the food in the freezer. The food must
be placed in compartment A. The compressor works continuously for “27
hours”.
When the “SUPER” button is pressed, the symbol “ “ is displayed (see
S4, fig. 8 and 10). The “SUPER” function stops automatically after “27
hours”, though can be interrupted at any time by pressing the “SUPER”
button (fig. 10).
USO DELLO SCOMPARTO CONGELATORE
Possibili cause:
- E’ stata introdotta nel congelatore una quantità eccessiva di alimenti (ve-
- La porta è rimasta aperta.
- Si è interrotta la corrente elettrica.
- Vi è un guasto nell’apparecchiatura.
USING THE FREEZER COMPARTMENT
Possible causes:
- An excessive amount of food has been placed in the freezer
- The door has been left open.
- There has been a power cut.
- There is a fault in the appliance.
11
dere modalità di congelazione).
(see freezing methods).
3) Temperature alarm
The alarm is activated when the temperature inside the freezer compartment
is higher than -12 (e.g. -11). At this point the display will flash.
30 504
Page 31

D
GEBRAUCH DES GEFRIERTEILS
2) Funktion “ SCHNELLGEFRIEREN ” (Taste “SUPER“)
Die Taste “SUPER” dient zum schnellen Gefrieren von frischen Lebensmitteln und
muss mindestens 3 Stunden vor dem Einlegen des Gefrierguts in den Gefrierteil aktiviert werden. Die Lebensmittel müssen in das Abteil A gelegt werden. Der Kompres-
sor funktioniert kontinuierlich für “27 Stunden”.
Bei Drücken der Taste “SUPER”, leuchtet das Symbol “ ” auf (siehe S4, Abb.
8 und 10). Die Funktion “SUPER” wird nach “27 Stunden” automatisch unterbrochen, kann aber jederzeit durch erneutes Drücken der Taste “SUPER” deaktiviert
werden (Abb. 10).
3) Temperaturalarm
Der Alarm wird aktiviert, wenn die Innentemperatur im Gefrierteil über –12 liegt (z.B.
-11). Der Alarm wird durch Blinken am Display angezeigt.
F
2) Fonction de CONGÉLATION RAPIDE (touche “SUPER”)
La touche “SUPER” sert à effectuer la congélation rapide des aliments frais; elle doit
être activée au moins 3 heures avant d’introduire les aliments dans le congélateur. Les
aliments doivent être rangés dans le compartiment A. Le compresseur fonctionne
continuellement pendant “27 heures”.
Quand l’on appuie sur la touche “SUPER”, le symbole “ ” apparaît (voir S4, fig.
8 et 10). La fonction “SUPER” s’arrête automatiquement après “27 heures”, mais
il est possible de l’interrompre à tout moment, en appuyant une nouvelle fois sur la
touche “SUPER” (fig. 10).
EMPLOI DU COMPARTIMENT CONGÉLATEUR
Mögliche Ursachen:
- Zu viel Gefriergut wurde auf einmal in den Gefrierteil gelegt (siehe Gefriermodalität).
- Die Tür ist offen geblieben.
- Unterbrechung der Stromversorgung.
- Das Gerät ist defekt.
Causes possibles :
- Une quantité excessive d’aliments a été introduite dans le congélateur (voir modalités
de congélation).
- La porte est restée ouverte.
- Une coupure du courant électrique a eu lieu.
- L’appareil est en panne.
3) Alarme température
L’alarme est actionnée quand la température interne du compartiment freezer est
supérieure à -12 (par exemple : -11). Elle est signalée sur l’afficheur en clignotant.
ES
2) Función CONGELACIÓN RÁPIDA (tecla “SUPER”)
La tecla “SUPER” sirve para la congelación rápida de los alimentos frescos, y debe
accionarse por lo menos 3 horas antes de introducir los alimentos en el congelador.
Los alimentos deben colocarse en el compartimiento A. El compresor funciona continuamente por “27 horas”.
Cuando se presiona la tecla “SUPER”, aparece el símbolo “ ” (ver S4, fig. 8 y
10). La función super “SUPER” se detiene automáticamente después de “27 ho-
ras”, pero es posible interrumpirla en cualquier momento con una nueva presión de
la tecla “SUPER” (fig. 10).
3) Alarma temperatura
La alarma se activa cuando la temperatura interna del compartimiento freezer es
superior a -12 (ejemplo -11). Es señalada en el display de manera intermitente.
P
2) Função CONGELAMENTO RÁPIDO (tecla “SUPER”)
A tecla “SUPER” serve para fazer a congelação rápida de alimentos frescos e deve
ser accionada pelo menos, 3 horas antes de introduzir os alimentos no congelador.
Os alimentos devem ser postos no compartimento A. O compressor trabalha em
continuação, durante “27 horas”.
Quando se preme a tecla “SUPER”, aparece o símbolo “ Símbolo ” (ver S4, figs.
8 e 10). A função “SUPER” desliga-se automaticamente ao fim de “27 horas” de
funcionamento contínuo. Pode, no entanto, ser suspensa em qualquer altura desejada,
premindo de novo a tecla “SUPER” (fig. 10).
USO DEL COMPARTIMIENTO CONGELADOR
Causas posibles:
- Se ha introducido en el congelador una cantidad excesiva de alimentos (ver
modalidad de congelación).
- La puerta se ha quedado abierta.
- Se ha interrumpido la corriente eléctrica.
- Hay una avería en el equipo.
UTILIZAÇÃO DO COMPARTIMENTO CONGELADOR
Causas possíveis:
- A quantidade de alimentos introduzida no congelador é excessiva (ver como congelar os alimentos).
- A porta foi deixada aberta.
- Houve falta de corrente eléctrica.
- Há qualquer avaria no aparelho.
3) Alarme de temperatura
O alarme dispara quando a temperatura no interior do compartimento congelador
for superior a -12 (exemplo -11). Aparece indicada no display a piscar.
504
31
Page 32

S4 S6
S5
1A 1B 1C
I
NOTA
Per ottimizzare il volume dello scomparto congelatore, senza alterare il
funzionamento dell’apparecchiatura, si possono togliere i 3 cassetti superiori, e conservare unicamente il cassetto inferiore.
IMPORTANTE
- Gli alimenti che cominciano a scongelarsi non devono in nessun caso
essere ricongelati.
- Non conservare gli alimenti surgelati per periodi superiori a quelli consigliati.
- Allarme acustico per porta aperta
L’apertura della porta del congelatore è segnalata dal simbolo “ ” lam-
GB
NOTE
To optimise the use of space inside the freezer without altering any of its
operational characteristics, the 3 upper drawers can be removed, keeping
only the bottom drawer.
IMPORTANT
- Any food showing signs of thawing must not, under any
circumstances, be refrozen.
- Do not store frozen food for longer periods that that recommended.
USO DELLO SCOMPARTO CONGELATORE
peggiante (vedere S5, fig. 26). Se entro 60 secondi la porta non si chiude
completamente o in maniera corretta, si attiva un allarme acustico che si
interrompe chiudendo semplicemente la porta.
Sbrinamento Freezer
Avviene in modo automatico e non richiede alcun intervento.
USING THE FREEZER COMPARTMENT
(see S5, fig. 26). If the door is not fully closed within 60 seconds, or not
closed properly, an audible alarm is activated. The alarm is silenced by
simply closing the door.
Freezer Defrosting
The freezer defrosting function is fully automatic and does not require any user intervention.
- Audible door open alarm
The opening of the freezer door is signalled by the flashing “ ” symbol
32 504
Page 33

D
GEBRAUCH DES GEFRIERTEILS
ANMERKUNG
Um das Fassungsvermögen des Gefrierteils zu optimieren und den Gerätebetrieb in
keiner Weise zu beeinflussen, können alle 3 oberen Schubladen außer der untersten
entfernt werden.
WICHTIG
- Bereits angetaute Lebensmittel dürfen niemals erneut eingefroren werden.
- Gefriergut niemals länger als empfohlen aufbewahren.
- Akustischer Türwarner
Die Türöffnung des Gefrierteils wird vom blinkenden Symbol “ ” angezeigt (siehe
F
REMARQUE
Pour utiliser au maximum le volume du compartiment congélateur, sans altérer le
fonctionement de l’appareil, si possono togliere i 3 cassetti superiori, e conservare
unicamente il cassetto inferiore.
IMPORTANTE
- Gli alimenti che cominciano a scongelarsi non devono in nessun
caso essere ricongelati.
- Non conservare gli alimenti surgelati per periodi superiori a quelli consigliati.
EMPLOI DU COMPARTIMENT CONGÉLATEUR
S5, Abb. 26). Wird die Tür innerhalb von 60 Sekunden nicht komplett oder nicht
korrekt geschlossen, aktiviert sich ein akustischer Alarm, der durch Schließen der Tür
unterbrochen werden kann.
Abtauen des Gefrierteils
Erfolgt automatisch und erfordert keinen Eingriff.
(vedere S5, fig. 26). Se entro 60 secondi la porta non si chiude completamente o in
maniera corretta, si attiva un allarme acustico che si interrompe chiudendo
semplicemente la porta.
Dégivrage du Freezer
Cette opération a lieu de façon automatique et ne nécessite d’aucune intervention.
- Allarme acustico per porta aperta
L’apertura della porta del congelatore è segnalata dal simbolo “ ” lampeggiante
ES
NOTA
Para optimizar el volumen del compartimiento congelador, sin alterar el funcionamiento del equipo, se pueden quitar las 3 gavetas superiores, y conservare solamente la gaveta inferior.
IMPORTANTE
- Los alimentos que empiezan a descongelarse no deben en ningún caso volverse a
congelar.
- No conservar los alimentos supercongelados por períodos superiores a aquéllos
aconsejados.
- Alarma acústica por puerta abierta
La apertura de la puerta del congelador es señalada por el símbolo “ ” intermi-
P
OBSERVAÇÃO:
Para optimizar o volume do compartimento congelador sem alterar o funcionamento
do aparelho, podem tirar-se as 3 gavetas de cima e conservar unicamente a gaveta
de baixo.
USO DEL COMPARTIMIENTO CONGELADOR
tente (ver S5, fig. 26). Si dentro de 60 segundos la puerta no se cierra completamente o de manera correcta, se activa una alarma acústica que se interrumpe cerrando
simplemente la puerta.
Descongelación del Freezer
Se produce en modo automático y no requiere ninguna intervención.
UTILIZAÇÃO DO COMPARTIMENTO CONGELADOR
intermitente (ver S5, fig. 26). Se a porta não for fechada completamente ou encerrada
maneira correcta no prazo de 60 segundos, disparará um alarme acústico que se
interrompe assim que a porta for fechada.
IMPORTANTE
- Os alimentos cujo processo de descongelamento já tenha iniciado
não devem, de modo nenhum, ser recongelados.
- Não conserve os alimentos ultracongelados no congelador duran-
te períodos de tempo superiores aos aconselhados.
- Alarme acústico por porta aberta
A abertura da porta do congelador é indicada através do símbolo “ ” , que fica
504
Descongelamento do congelador
O descongelamento é automático. Não exige qualquer intervenção por parte do
utilizador.
33
Page 34

A
USO DELLO SCOMPARTO CONGELATORE
I
USO DELLO SCOMPARTO CONGELATORE
B
CONFEZIONAMENTO DEI PRODOTTI FRESCHI PER LA
CONGELAZIONE
Questa apparecchiatura comprende scomparti ben separati.
- Il cassetto “A” superiore si utilizza per la congelazione di alimenti freschi.
- I 2 cassetti inferiori servono esclusivamente per la conservazione di
alimenti surgelati o congelati.
Per ottenere una congelazione ottimale, è indispensabile attivare la
congelazione rapida (tasto SUPER) almeno 3 ore prima di introdurre gli
alimenti.
Congelare solo prodotti di prima qualità e confezionati ermeticamente per
evitare che perdano sapore o si asciughino. Su ogni confezione, applicare
un’etichetta che indichi il contenuto e la data di congelazione. La quantità
di alimenti freschi congelabili in 24 ore è indicata sulla targhetta di identificazione dell’apparecchiatura (8kg/24h).
USING THE FREEZER COMPARTMENT
GB
PACKING FRESH PRODUCTS FOR FREEZING
This freezer has two separate compartments.
- Upper drawer “A” is used for freezing fresh food.
- The two lower drawers are reserved exclusively for storing frozen prod-
ucts.
For optimum freezing, activate the quick-freeze function (SUPER button) at
least 3 hours beforehand.
Only freeze prime quality hermetically sealed products to avoid loss of taste
or drying out. Apply a label to each pack, indicating the content and date
of freezing. The quantity of fresh food that can be frozen in 24 hours is
indicated on the appliance’s rating plate (8kg/24h).
Do not place food in the freezer in contact with already frozen products.
This will prevent the food from increasing in temperature. In this respect, it is
important to transfer frozen food from compartment “A” to the lower draw-
ers.
34 504
USING THE FREEZER COMPARTMENT
Evitare di mettere gli alimenti da congelare a contatto con alimenti già
congelati, per non provocare un innalzamento di temperatura degli alimenti. E’ importante quindi estrarre i prodotti congelati dallo scomparto “A” e
collocarli nei cassetti inferiori.
FORMAZIONE DI CUBETTI DI GHIACCIO
• Riempire la vaschetta del ghiaccio con acqua, quindi rimettere la
vaschetta nell’apposito scomparto.
CONSERVAZIONE DI ALIMENTI CONGELATI
Per evitare che si deteriori la qualità degli alimenti congelati, è bene non
superare la durata di conservazione indicata che dipende dalla natura
degli alimenti. Consultare la tabella di conservazione affissa sulla controporta
dello scomparto congelatore (rif. B fig. 32). Verificare che l’imballaggio sia
integro, privo di macchie di umidità o rigonfiamenti.
ICE CUBE MAKER
• Fill the ice cube tray with water and place it in the appropriate compart-
ment.
STORING FROZEN FOOD
To prevent any deterioration in the quality of the frozen foods, do not exceed the storage times indicated for the type of product. Refer to the storage
table applied to the inside of the freezer door (ref. B fig. 32). Check that the
wrapping is complete and free of any damp marks or swelling. Otherwise,
the frozen product may have deteriorated.
Page 35

D
GEBRAUCH DES GEFRIERTEILS
VERPACKUNG DER FRISCHEN LEBENSMITTEL ZUM EINFRIEREN
Dieses Gerät ist in Abteile gegliedert.
- Die obere Schublade “A” ist zum Einfrieren von frischen Lebensmitteln bestimmt.
- Die 2 unteren Schubladen sind ausschließlich zur Aufbewahrung von tiefgekühlten
und gefrorenen Lebensmitteln bestimmt.
Für einen optimalen Gefrierprozess muss das Schnellgefrieren (Taste SUPER)
mindestens 3 Stunden vor dem Einlegen des Gefriergutes aktiviert werden.
Nur erstklassige Lebensmittel einfrieren, die hermetisch verpackt werden müssen, damit
sie ihren Geschmack nicht verlieren und nicht austrocknen. Auf jeder Verpackung
eine Etikette anbringen, die Angaben zum Inhalt und zum Einfrierdatum enthält. Die
Menge frischer Lebensmittel, die innerhalb von 24 Stunden eingefroren werden können, ist am Typenschild des Geräts angegeben.
(8kg/24h).
Der Kontakt zwischen einzufrierenden Lebensmitteln und bereits gefrorenen Lebensmitteln ist zu vermeiden, um ein Ansteigen der Lebensmitteltemperatur zu verhindern.
F
EMBALLAGE DES PRODUITS FRAIS POUR LA CONGÉLATION
Cet appareil est constitué par des compartiments bien séparés.
- Le tiroir “A” supérieur est utilisé pour la congélation des aliments frais.
- Les 2 tiroirs inférieurs doivent être utilisés exclusivement pour la conservation
des aliments surgelés ou congelés.
Pour obtenir une congélation optimale, il est indispensable d’actionner la congélation rapide (touche SUPER) au moins 3 heures avant d’introduire les aliments.
Il faut congeler uniquement des aliments de première qualité et qui soient emballés
hermétiquement, afin de ne pas altérer leur goût et d’éviter qu’ils deviennent secs. Sur
chaque emballage il faut appliquer une étiquette indiquant la nature du contenu et la
date de congélation. La quantité d’aliments frais pouvant être congelés en 24 heures
est indiquée sur la plaque signalétique de l’appareil (8kg/24h).
Il faut éviter de mettre les aliments devant être congelés en contact avec les aliments
déjà congelés, afin de ne pas provoquer une montée de la température des aliments.
EMPLOI DU COMPARTIMENT CONGÉLATEUR
Es ist wichtig, bereits gefrorene Lebensmittel aus dem Abteil “A” zu nehmen und
diese in die unteren Schubladen zu legen.
HERSTELLEN VON EISWÜRFELN
• Die Eiswürfelschale mit Wasser füllen und in das entsprechende Abteil stellen.
AUFBEWAHRUNG VON GEFRORENEN LEBENSMITTELN
Um das Verderben eingefrorener Lebensmittel zu vermeiden, sollte die empfohlene
Aufbewahrungsdauer nicht überschritten werden, die von der Art des jeweiligen
Nahrungsmittels abhängig ist. Die Aufbewahrungstabelle an der Türinnenseite des
Gefrierteils konsultieren (Bez. B, Abb. 32). Überprüfen, dass die Verpackung unversehrt ist, keine Feuchtigkeitsflecken oder
Blähungen aufweist.
Il est donc important de sortir les produits congelés du compartiment “A” et de les
ranger dans les tiroirs inférieurs.
FORMATION DE GLAÇONS
• Remplir le bac à glaçons avec de l’eau, puis remettre le bac dans le compartiment
spécialement prévu.
CONSERVATION DES ALIMENTS CONGELÉS
Afin d’éviter d’altérer la qualité des aliments congelés, il est bonne règle de ne pas
dépasser la durée de conservation indiquée, qui dépend de la nature de chaque
aliment. Consulter le tableau de conservation qui est fixé sur la contre-porte du compartiment congélateur (réf. B, fig. 32). Vérifier que l’emballage soit intact, qu’il n’y ait
aucune tache d’humidité et aucun regonflement.
ES
CONFECCIÓN DE LOS PRODUCTOS FRESCOS PARA LA CONGELACIÓN
Este equipo comprende compartimientos bien separados.
- La gaveta “A” superior se usa para la congelación de alimentos frescos.
- Las 2 gavetas inferiores sirven exclusivamente para la conservación de alimentos
supercongelados o congelados.
Para obtener una congelación ideal, es indispensable activar la congelación rápida
(tecla SUPER) por lo menos 3 horas antes de introducir los alimentos.
Congelar sólo productos de primera calidad y confeccionados herméticamente para
evitar que pierdan sabor o se sequen. En cada confección, aplicar una etiqueta que
indique el contenido y la fecha de congelación. La cantidad de alimentos frescos
congelables en 24 horas está indicada en la placa de identificación del equipo
(8kg/24h).
Evitar poner los alimentos que se van a congelar en contacto con alimentos ya congelados, para no provocar un aumento de la temperatura en los alimentos. Es importan-
P
COMO EMBALAR PRODUTOS FRESCOS PARA CONGELAMENTO
Este aparelho é constituído de compartimentos bem distintos.
- A gaveta de cima, “A”, que serve para congelar alimentos frescos.
- As 2 gavetas de baixo servem, exclusivamente, para conservação de alimentos
ultracongelados ou congelados.
Para conseguir congelar os alimentos da melhor maneira possível, é indispensável
activar a função de congelamento rápido (tecla SUPER), pelo menos, 3 horas antes
de introduzir os alimentos.
Congele apenas produtos de primeira qualidade e embalados hermeticamente para
evitar que percam o sabor ou que sequem. Em cada embalagem, aplique um rótulo
com a indicação do conteúdo e da data de congelamento. A quantidade de alimentos
frescos que se podem congelar em 24 horas está indicada na chapa de identificação
do aparelho(8kg/24h).
Evite pôr os alimentos que deseja congelar em contacto com alimentos já congelados
USO DEL COMPARTIMIENTO CONGELADOR
te por lo tanto extraer los productos congelados del compartimiento “A” y colocarlos
en las gavetas inferiores.
FORMACIÓN DE CUBITOS DE HIELO
• Llenar la cubeta del hielo con agua, luego poner nuevamente la cubeta en el
compartimiento específico.
CONSERVACIÓN DE ALIMENTOS CONGELADOS
Para evitar que se deteriore la calidad de los alimentos congelados, conviene no
superar la duración de la conservación indicada que depende de la naturaleza de
los alimentos. Consultar la tabla de conservación aplicada en la contrapuerta del
compartimiento congelador (ref. B fig. 32). Verificar que el embalaje esté íntegro, sin
manchas de humedad o hinchado.
UTILIZAÇÃO DO COMPARTIMENTO CONGELADOR
para não provocar aumento de temperatura destes últimos. Por isso, é importante
retirar os produtos do compartimento “A”, depois de congelados, e colocá-los nas
gavetas inferiores.
FORMAÇÃO DE CUBOS DE GELO
• Encha a cuvete de gelo com água e depois coloque-a de novo dentro do compartimento próprio.
CONSERVAÇÃO DOS ALIMENTOS CONGELADOS
Para evitar a deterioração da qualidade dos alimentos congelados, é conveniente
não ultrapassar o prazo de conservação indicado, que depende da natureza dos
alimentos. Consulte a tabela de conservação afixada no interior da porta do compartimento congelador (ref. B fig. 32). Verifique se a embalagem está intacta, não
tem manchas de humidade e não apresenta deformações por aumento de volume.
504
35
Page 36

V
R
I
Disinserite sempre l’apparecchio dalla presa di corrente, prima di effettuare
qualsiasi operazione di pulizia.
Nessuna protezione (griglia a filo, carter) deve essere rimossa da parte di personale non qualificato: evitate assolutamente di far funzionare l’apparecchio
senza queste protezioni.
Per la pulizia interna di tutte le parti in plastica e della guarnizione porta
Non usate abrasivi e detersivi di alcun genere.
• Usate esclusivamente una soluzione di bicarbonato di sodio in acqua tiepida 10 cucchiai
in 2 litri di acqua.
Pulizia del condensatore
• Da compiere almeno due volte l’anno.
• Utilizzate un aspirapolvere per uso domestico o una spazzola. Un condensatore sporco influisce negativamente sull’apparecchio riducendone le prestazioni.
Pulizia scarico acqua
Contemporaneamente alla pulizia del condensatore, verificate che il tubo R di scarico, sia
libero da ostruzioni.
GB
Always disconnect the appliance from the mains socket before carrying out
any cleaning operation whatsoever.
No protection device (wire grating, guard) should be removed by unqualified
personnel: never use the appliance without these protection devices.
To clean all the inner plastic parts and the door seal
Do not use any kind of abrasives or detergents.
• Use only a solution of 10 tablespoons of bicarbonate of soda dissolved in 2 litres of water.
Cleaning of the condenser
• The condenser should be cleaned at least twice a year.
• Use a household vacuum cleaner or a brush.
A dirty condenser can influence the functioning of the appliance (reduction of power).
Cleaning of water discharge
When cleaning the condenser, check that discharge tube R is not obstructed.
• Remove discharge tube R from container V and -if necessary-clean it.
Supply cable
• Regularly check the supply cable to see that it is in good condition.
36 504
PULIZIA E MANUTENZIONE
• Estraete il tubo R di scarico dalla vaschetta V e se necessario provvedete alla sua pulizia.
Cavo di alimentazione
• Ispezionate periodicamente il cavo di alimentazione al fine di controllare la sua integrità.
• Nel caso di cavo danneggiato, non utilizzate l’apparecchio e non tentate la riparazione ma
rivolgetevi a personale qualificato per la sua sostituzione.
Per assenze prolungate
• Vuotate i comparti.
• Disinserite l’apparecchio dalla rete elettrica.
• Pulite entrambi i comparti e asciugateli.
• Lasciate aperte le porte per impedite la formazione di cattivi odori o muffe.
ATTENZIONE! Non danneggiate il circuito di refrigerazione
Al termine della vita funzionale dell’apparecchio che utilizza gas refrigerante
R600a (isobutano) e gas infiammabile nella schiuma isolante, lo
stesso dovrà essere messo in sicurezza prima dell’invio in discarica. Per questa
operazione rivolgetevi al vostro negoziante o all’ente locale preposto.
CLEANING AND MAINTENANCE
• If the cable is damaged, do not use the appliance and do not try to repair it. Contact a
qualified electrician to replace it.
When the refrigerator is not going to be used for long periods
• Empty the compartments.
• Disconnect the appliance from the mains supply.
• Clean and dry both compartments.
• Leave the doors open to prevent the formation of unpleasant odours or mould.
WARNING! Do not damage the refrigerant circuit.
At the end of the functional life of the equipment which uses cooling gas R600a
(isobutane), and inflammable gas inside the insulating foam it must be placed
in safety before sending it to the waste disposal. For this operation contact
your dealer and the local authorities.
Page 37

D
REINIGUNG UND WARTUNG
Vor jeder Reinigungsarbeit muss das Gerät vom Stromnetz genommen werden.
Alle Schutzvorrichtungen (Fadenrost, Gehäuse) dürfen nur von qualifiziertem
Personal entfernt werden. Das Gerät darf niemals ohne diese
Schutzvorrichtungen in Betrieb genommen werden.
Die Reinigung aller Plastikteile und der Türdichtung
Verwenden Sie keine Scheuermittel oder andere Reinigungsmittel.
• Verwenden Sie für die Reinigung dieser Teile nur eine Natriumkarbonatlösung. Zu diesem
Zwecklösen Sie 10 Eßlöffel Natriumkarbonat in 2 l lauwarmem Wasser auf.
Reinigung des Kondensators
• Dieser muss mindestens zwei Mal jährlich gereinigt werden.
• Verwenden Sie einen Staubsauger für Haushaltsbedarf oder eine Bürste. Ein verschmutzter
Kondensator hat negative Auswirkungen auf den Betrieb des Gerätes und vermindert dessen
Leistungen.
Reinigung des Wasserabflusses
Wenn Sie den Kondensator reinigen, prüfen Sie ob Wasserabflussschlauch R sauber und frei
von Verunreinigungen ist.
• Entfernen Sie Wasserabflussschlauch R aus dem Becken V und -falls nötig- reinigen Sie ihn.
F
Débranchez toujours l’appareil avant d’effectuer chaque opération de nettoyage.
Aucune protection (grille à fil, carter) ne doit être retirée par une personne non
qualifiée: évitez absolument de faire fonctionner l’appareil sans ces protections.
Pour le nettoyage interne de toutes les parties en plastique et du join de la
porte
N’utilisez en aucun cas ni abrasifs et ni détersif.
• Utilisez exclusivement une solution à base de bicarbonate de sodium et d’eau chaude, à
raison de 10 cuillères pour 2 lt d’eau.
Nettoyage du condensateur
• A effectuer au moins deux fois par an.
• Utilisez un aspirateur de maison ou une brosse.
Un condensateur sale provoque un mauvais rendement de l’appareil et diminue les prestations.
Nettoyage évacuation eau
En même temps que le nettoyage du condensateur, vérifiez si le tuyau R de décharge, est
bouché.
• Extrayez le tuyau R de décharge du bac V et si c’est nécessaire, chargez-vous de son nettoyage.
NETTOYAGE ET ENTRETIEN
Stromkabel
• Kontrollieren Sie das Stromkabel in regelmäßigen Abständen und prüfen Sie dessen
Unversehrtheit.
• Ist das Stromkabel beschädigt, schalten Sie das Gerät aus und lassen das Kabel von autorisiertem
Personal austauschen. Versuchen Sie nicht selbst das Kabel auszutauschen.
Bei Längerer Abwesenheit
• Lehren Sie die Kühl- und Gefrierfächer.
• Nehmen Sie das Gerät vom Stromnetz
• Waschen Sie beide Fächer aus und reiben Sie sie trocken.
• Lassen Sie beide Türen offen stehen, um die schlechte Geruchsbildung oder Schimmelbildungzu
vermeiden.
ACHTUNG! Bitte nicht den Kühlkreis beschädigen. Wenn das mit Kühlgas R600a
(isobutan) und entzündbares Gas im Isolierschaum verwendet betriebene Gerät
unbrauchbar geworden ist, muß es vor dem Transport zur Wertstoffsammlung
ungefährlich gemacht werden, Fragen Sie diesbezüglich bei Ihrem Händler oder
der Entsorgungsbehörde nach.
Cordon d’alimentation
• Contrôlez périodiquement le cordon d’alimentation pour vérifier qu’il soit intègre.
• En cas de cordon endommagé, n’utilisez pas l’appareil et ne tentez pas de le réparer mais
adressez-vous à une personne qualifiée pour le remplacement.
En cas d’absence prolongée
• Videz les compartiments.
• Débranchez l’appareil de la prise de courant.
• Nettoyez tous les compartiments et essuyez-les.
• Laissez la porte ouverte pour empêcher la formation de mauvaises odeurs ou de moisissures.
ATTENTION! Ne pas endommager le circuit réfrigérant. Au terme de la vie
fonctionnelle de l’appareil utilisant le gaz réfrigérant R 600a
(isobutane) et du gaz inflammable à l’intérieur de la mousse isolante il faut
prédisposer l’appareil en état de sécurité avant sa mise au rebut. Pour des
information relativement à cette opération, s’adresser à son revendeur de
confiance ou à l’organisme local préposé.
ES
Desconecten siempre el aparato del enchufe de la corriente, antes de realizar cualquier
operación de limpieza.
Ninguna persona, salvo que forme parte del personal cualificado puede quitar
ninguna protección (cable gris, cárter, É). Eviten que el aparato funcione sin estas
protecciones.
Para la limpieza de todas las partes plásticas y las gomas de la puerta
No usen abrasivos ni detergentes de ningùn tipo.
• Usen œnica y exclusivamente una solución de bicarbonato de sodio en agua templada en proporción
de 10 cucharadas e 2 litros de agua.
Limpieza del condensador
• Tiene que realizarse por lo menos dos veces al año.
• Utilicen un aspirador doméstico o un cepillo. Un condensador sucio influye negativamente en el
aparato reduciendo sus prestaciones.
Limpieza descarga agua
Conjuntamente a la limpieza del congelador, verifique que el tubo de descarga R esté libre de
obstrucciones.
P
Desinserir sempre o aparelho da tomada de parede antes de qualquer operação
de limpeza.
Nenhuma proteção (grade com fio, carter) deve ser removida por pessoal que
não seja qualificado: evitar absolutamente o funcionamento do aparelho nestas
condições.
Para a limpeza interna de todas as partes de plástico e da guarnição da porta
Não utilizar abrasivos e detersivos de nenhum tipo
• Utilizar exclusivamente uma solução de bicarbonato de sodio em água morna: 10 colheres
em 2 litros de água.
Limpeza do condensador
• A ser realizada pelo menos duas vezes por ano.
• Utilizar um aspirador de pó de uso doméstico ou uma escova. Um condensador sujo influi
negativamente no aparelho, reduzindo as suas próprias prestações.
Limpeza descarga de água
Verificar se o tubo R, concomitantemente com a limpeza do condensador, não contém obstruções.
• Extrair o tubo R de descarga do recipiente V e se necessário providenciar a sua limpeza.
LIMPIEZA Y MANTENIMIENTO
• Extraer el tubo de descarga R de la cubeta V y, si es necesario, proveer a su limpieza.
Cable de alimentación
• Inspeccionen periódicamente el cable de alimentación con el fin de controlar su integridad.
• En caso de que el cable esté estropeado, no utilicen el aparato y no intenten hacer una
reparación del mismo sino diríjanse a personal cualificado para que lo cambien.
En el caso de ausencias prolongadas
• Vacíen el congelador.
• Desconecten el aparato de la corriente eléctrica.
• Limpien ambos aparatos y séquenlos.
• Dejen abiertas las puertas para impedir que se formen malos olores o moho.
¡ATENCION! No dañé el circuito de refrigeración.
Al término de la vida œtil del equipo que utiliza gas refrigerante R600a
(isobutano) y gas inflamable en la espuma aislante, el mismo deberá ser puesto
en estado de seguridad antes del envio al desguace. Para efectuar esta operación
diríjase a su vendedor o a la entidad local correspondiente.
LIMPEZA E MANUTENÇÃO
Cabos de alimentação
• Inspeccionar periodicamente o cabo de alimentação para observar a sua integridade.
• No caso de cabo danificado, não utilizar o aparelho e não tentar repará-lo se não for através
depessoal qualificado.
Durante as ausências prolungadas
• Desvaziar os compartimentos.
• Desinserir o aparelho da rede elétrica.
• Limpar ambos compartimentos e enxugá-los.
• Deixar abertas as portas para impedir a formação de odores desagradáveis ou de mofo.
ATENÇÃO! Não danifique os circuito de refrigeração
No final da vida funcional do aparelho que utiliza gás refrigerante R 600a
(isobutano) e gás inflamável na espuma isolante é necessário colocá-lo em
segurança até ele ser enviado ao deposito de demolição. Para esta operação
dirija-se ao seu comerciante ou a um centro Local especializado.
504
37
Page 38

I
RICERCA GUASTI
1) L’apparecchio non funziona
• C’è un’interruzione di corrente?
• La spina è ben inserita nella presa di corrente?
• Il cavo di alimentazione è danneggiato?
• L’impostazione sul display è corretta?
2) La temperatura all’interno dei comparti non è sufficientemente bassa
• Le porte chiudono correttamente?
• L’apparecchio è installato vicino ad una sorgente di calore?
• L’impostazione sul display è corretta?
• Il condensatore è pulito?
3) La temperatura all’interno del comparto frigorifero è troppo bassa
• Il termostato è sulla posizione corretta?
4) L’apparecchio è eccessivamente rumoroso
• L’apparecchio è in contatto con altri mobili, o oggetti?
• I tubi nella parte posteriore si toccano o vibrano?
• L’apparecchio è ben livellato?
GB
1) The appliance is not working
• Is there a power failure?
• Is the plug inserted correctly into the mains socket?
• Is the supply cable damaged?
• Is the setting on the display correct?.
2) The temperature inside the compartments is not low enough
• Do the doors close correctly?
• Is the appliance installed near a source of heat?
• Is the setting on the display correct?.
• Is the condenser clean?
3) The temperature in the refrigerator compartment is too low
• Is the thermostat set in the correct position?
4) The appliance is too noisy
• Is the appliance touching other pieces of furniture or objects?
• Are the tubes at the back touching each other or do they vibrate?
• Is the appliance on a level?
38 504
TROUBLESHOOTING
5) La luce interna non funziona
• Controllate prima il punto 1, poi: SOSTITUZIONE LAMPADA.
• Disinserite l’apparecchio dalla rete elettrica.
• Togliete il coperchio C della lampadina.
• Controllate la lampadina e sostituitela se necessario con una nuova (non superate
i 25 W di potenza); rimontate il coperchio C.
6) C’è acqua sul pavimento
• La vaschetta V è ben inserita a contatto della superficie del compressore?
• Il tubo di scarico R, a sua volta, è ben inserito nella vaschetta?
7) Anomalie
alcune anomalie di funzionamento sono mostrate sul display in modo lampeggiante
con le seguenti indicazioni:
E- -E E-
• In presenza di questa anomalia il funzionamento dell’apparecchio non viene inter-
rotto ma occorre rivolgersi al più presto al Centro Assistenza Tecnico Autorizzato
5) The interior light does not work
• First check point 1, then: LAMP REPLACEMENT.
• Disconnect the appliance from the mains supply.
• Remove the cover from the light bulb.
• Check the light bulb and -if necessary-replace it with a new one
(don’t use a bulb of more than 25 W). Replace lid C.
6) There is water on the floor
• Is container V nserted properly and is it in contact with the surface of the compressor?
• Is discharge tube R inserted well into the container?
7) Malfunctions
some operating faults will be indicated by a flashing display, for example:
E- -E E-
• When these faults occur, although the appliance will continue to function, the Au-
thorised Assistance Service should be called as soon as possible
Page 39

D
FUNKTIONSTÖRUNGEN
1) Das Gerät funktioniert nicht
• Ist das Stromnetz unterbrochen?
• Ist der Stecker richtig eingesteckt?
• Ist das Stromkabel beschädigt?
• Ist die Einstellung am Display korrekt?
2) Die Fächer kühlen nicht ausreichend ab
• Schlie§en die Türen perfekt?
• Wurde das Gerät in der Nähe einer Wärmequelle aufgestellt?
• Ist die Einstellung am Display korrekt?
• Ist der Kondensator sauber?
3) Die Temperatur im Innern des Kühlschrankes ist zu niedrig
• Ist die Einstellung am Display korrekt?
4) Das Gerät ist ungewöhnlich laut
• Berührt das Gerät andere Möbel oder Gegenstände?
• Berühren sich die Rohre auf der Rückseite oder vibrieren sie?
• Steht das Gerät richtig in der Waagerechten?
F
1) L’appareil ne fonctionne pas
• Est-ce qu’il y a une panne de courant?
• Est-ce que la fiche est bien branchée à la prise de courant?
• Est-ce que le cordon d’alimentation est endommagé?
• La programmation sur l’afficheur est-elle correcte ?
2) La température à l’intérieur des compartiments n’est pas assez basse
• Est-ce que les portes se ferment correctement?
• Est-ce que l’appareil est installé près d’une source de chaleur?
• La programmation sur l’afficheur est-elle correcte ?
• Est-ce que le condensateur est propre?
3) La température à l’intérieur du compartiment réfrigérateur est trop basse.
• La programmation sur l’afficheur est-elle correcte ?
4) L’appareil fait trop de bruit
• Est-ce que l’appareil touche d’autres meubles ou objets?
• Est-ce que les tubes de la partie postérieure se touchent ou vibrent?
• Est-ce que l’appareil est bien mis à niveau?
EVENTUELLES PANNES
5) Die Innenbeleuchtung funktioniert nicht
• Überprüfen Sie zunächst den Punkt 1, daraufhin: AUSTAUSCH DER GLÜHBIRNE
• Ziehen Sie den Netzstecker des Gerätes heraus.
• Nehmen sie die Schutzbedeckung von der Glühbirne ab.
• Kontrollieren Sie die Lampe und ersetzen Sie diese (falls nötig) mit einer neuen
(keine Glühbirne über 25 W verwenden). Bringen Sie den Deckel C wieder an.
6) Auf dem Fu§boden ist Wasser
• Ist das Becken V ordnungsgemäß platziert und in Kontakt mit
der Oberfläche des Kompressorsß
• Ist der Wasserabflussschlauch R fest in das Becken eingefügt?
7) Funktionsstörungen
Einige Funktionsstörungen werden am Display durch Blinklicht unter Angaben nachstehender Hinweise gegeben:
E- -E E-
• Bei dieser Funktionsstörung wird der Gerätebetrieb nicht unterbrochen, man muss
jedoch so bald wie möglich den autorisierten Kundendienst kontaktieren
5) L’éclairage interne ne fonctionne pas
• Contrôlez d’abord le point 1, et ensuite: REMPLACEZ L’AMPOULE.
• Débranchez l’appareil.
• Enlevez le couvercle de l’ampoule.
• Contrôlez l’ampoule et substituez-la, si c’est nécessaire, avec une ampoule neuve
(ne dépassez pas 25 W de puissance); remettez le couvercle C.
6) Il y a de l’eau par terre
• Le bac V est-il bien inséré au contact de la surface du compresseur?
• Le tuyau de décharge R , à son tour, est-il bien inséré dans le bac?
7) Anomalies
certaines anomalies de fonctionnement sont reportées sur l’afficheur avec les indications suivantes qui clignotent :
E- -E E-
• Si cette anomalie est présente, le fonctionnement de l’appareil n’est pas interrompu, mais
il faut s’adresser le plus rapidement possible au Service Après-Vente Technique Autorisé.
ES
1) El aparato no funciona
• Hay una interrupción de corriente eléctrica?
• El enchufe está colocado bien en el enchufe de la pared?
• El cable de alimentación está estropeado?
• La implementación del display está correcta?
2)La temperatura del interior de los departamentos no es lo
suficientemente baja
• Las puertas se cierran correctamente?
• El aparato está instalado cerca de una fuente de calor?
• La implementación del display está correcta?
• El condensador está limpio?
3) La temperatura dentro de la nevera es demasiado baja
• La implementación del display está correcta?
4) El aparato hace demasiado ruido
• El aparato está en contacto con otros muebles o con otros objetos?
• Los tubos colocados en la parte de atrás, se tocan o vibran?
• El aparato está bien nivelado?
P
1) O aparelho não funciona
• Houve uma interrupção de corrente elétrica?
• A tomada está bem inserida na parede?
• O cabo de alimentação está danificado?
• A programação indicada no display está correcta?
2) A temperatura no interior dos compartimentos não é suficientemente
baixa
• As portas fecham corretamente?
• O aparelho está instalado perto de uma fonte de calor?
• A programação indicada no display está correcta?
• O condensador está limpo?
3) A temperatura no interior dos compartimento de geladeira é muito baixa
• A programação indicada no display está correcta?
4) O aparelho apresenta rumores em excesso
• O aparelho está em contato com outros móveis ou objetos?
• Os tubos da parte posterior se encostam ou vibram?
504
BUSQUEDA DE AVERIAS
5) La luz interior no funciona
• Controlen antes el punto 1 y, después: CAMBIEN LA BOMBILLA.
• Desconecten el aparato de la corriente eléctrica.
• Quiten la tapa de la lampara.
• Controle el bombillo y sustituyalo, si es necesario, con uno nuevo (no supere los 25
W de potencia); vuelva a montar la tapa C.
6) Hay agua en el piso
• La cubeta V está bien insertada a contacto de la superficie del compresor?
• El tubo de descarga R, a su vez, está bien introducido en la cubeta?
7) Anomalías
algunas anomalías de funcionamiento se ilustran en el display de manera intermitente con las siguientes indicaciones:
• En presencia de esta anomalía el funcionamiento del aparato no se interrumpe
pero es necesario dirigirse lo más pronto posible al Centro de Asistencia Técnica
Autorizado
PROCURA DEFEITO
• O aparelho está bem nivelado?
5) A luz interna não funciona
• Desligar o aparelho das rede elétrica
• Tirar a tampa da lâmpada.
• Controlar a lâmpada e substituí-la, se necessário, com uma nova (não superar
25W de potência). A seguir, remontar a tampa C.
6) Tem água no pavimento
• O recipiente V está bem colocado em contacto com a superfície do compressor?
• O tubo de descarga R está bem inserido no recipiente?
7) Anomalias
algumas anomalias de funcionamento aparecem no display em modo intermitente,
com as indicações seguintes:
• Em caso de presença desta anomalia não haverá interrupção de funcionamento
do aparelho, mas é imperativo contactar o Centro de Assistência Técnico Autorizado
o mais rapidamente possível!
Y- -Y Y-
E- -E E-
39
Page 40

I
SERVIZIO ASSISTENZA TECNICA
Prima di contattare il Servizio Assistenza:
• Verificate se è possibile eliminare da soli i guasti (vedere “Guida Ricerca Guasti”).
• Riavviate l’apparecchio per accertarvi che l’inconveniente sia stato eliminato. Se il
risultato è negativo, disinserite nuovamente l’apparecchio e ripetete l’operazione
dopo un’ora.
Se l’apparecchio non funziona bene o addirittura non funziona affatto prima di chiedere l’intervento di un tecnico, nel vostro interesse, controllate che:
• la spina sia bene inserita nella presa di corrente;
• ci sia tensione nella linea elettrica;
• il display sia impostato correttamente;
• le chiusure delle porte siano perfette;
• la tensione di alimentazione corrisponda a quella dell’apparecchio (± 6%).
• Se il risultato è ancora negativo, contattate il Servizio Assistenza.
GB
Before contacting your Assistance Service:
• Check that it is impossible to eliminate the fault by yourself (refer to the chapter
entitled “Troubleshooting”).
• Switch the appliance back on to see if the problem has been solved. If not, disconnect
the appliance once again and repeat the operation an hour later.
If the appliance is not working well or is not working at all, before you contact a
technician it is worth checking that:
• the plug is inserted correctly into the mains socket;
• that there is on-line voltage;
• the display is set correctly
• the doors are perfectly shut;
• the supply voltage corresponds to the one marked on the appliance (± 6%);
• If the result is still negative, contact your Assistance Service.
TECHNICAL ASSISTANCE SERVICE
Comunicare:
• il tipo di guasto
• il modello
• Il numero di matricola
Advise them of:
• the type of fault;
• the model;
• the matriculation number (see data tag).
40 504
Page 41

D
TECHNISCHER KUNDENDIENST
Bevor Sie den technischen Kundendienst anrufen:
• Prüfen Sie, ob Sie an Hand der oben aufgeführten. Fragen nicht alleine in der Lage
sind den Defekt zu finden und zu beheben (Kapitel “Funktionsstörungen”).
• Schalten Sie das Gerät erneut ein, um festzustellen, ob der Defekt behoben wurde.
Ist das Ergebnis negativ, dann schalten Sie das Gerät aus und wiederholen Sie den
Vorgang noch einmal nach einer Stunde.
Wenn das Gerät nicht richtig oder gar nicht funktioniert, überprüfen Sie in Ihrem
Interesse noch einmal, bevor Sie den technischen Kundendienst rufen, ob:
• der Stecker richtig in der Steckdose sitzt;
• strom in der Leitung ist;
• das Display korrekt eingestellt ist;
• die Türen perfekt schlie§en;
• die Spannung der Stromversorgung mit der des Geräts (± 6%) übereinstimmt;
• wenn das Resultat wieder negativ ausfällt, rufen Sie bitte den Kundendienst an.
F
Avant de contacter le Service d’Assistance:
• Vérifiez s’il vous est possible d’éliminer la panne (Chapitre “EVENTUELLES PANNES”).
• Remettez en fonctionnement l’appareil pour vérifier que le problème ait été éliminé.
Dans le cas contraire, débranchez à nouveau l’appareil et répétez l’opération une
heure après.
Si l’appareil ne fonctionne pas bien ou pas du tout, avant même d’appeler un technicien
pour une intervention et dans votre intérêt, n’oubliez pas de contrôler si:
• la fiche est bien branchée à la prise de courant;
• il y a bien la tension dans la ligne;
• l’afficheur soit programmé correctement ;
• le portes se ferment correctement;
• la tension d’alimentation correspond à celle de l’appareil (± 6%);
• s’il ne fonctionne toujours pas, contactez le Service d’Assistance.
ENTRETIEN
Geben Sie an:
• Die Art der Störung
• Gerätemodell
• Die Matrikelnummer (siehe Datenschild)
N’oubliez pas de comuniquer:
• Le type de panne.
• Le modèle.
• Numéro de matricule
ES
Antes de ponerse en contacto con el Servicio Técnico:
• Comprueben si pueden eliminar ustedes solos las averías (capítulo “Guía a la
bœsqueda de averías“).
• Pongan de nuevo en marcha el aparato para asegurarse de que se eliminaron los
problemas existentes. Si el resultado es negativo, desconecten el aparato y repitan la
operación nuevamente después de que pasó una hora.
Si el aparato no funciona bien o no funciona para nada, antes de llamar a la asistencia
para que intervenga un técnico, en interés suyo comprueben que:
• el enchufe esté colocado correctamente en el enchufe de la corriente;
• que haya tensión en la línea eléctrica;
• el display esté implementado correctamente;
• que las puertas estén cerradas perfectamente;
• que la tensión de alimentación corresponda a la del aparato (+/- 6 %);
3
• si el resultado es todavía negativo, llamen al servicio de asistencia técnica.
P
Antes de contactar o Serviço de Assistência Técnica:
• Verificar se é possível eliminar os defeitos sem a ajuda de pessoal qualificado
(êtem “Guia Procura Defeitos”);
• Reativar o aparelho para certificar-se de que o inconveniente tenha sido eliminado.
Se o resultado for negativo, desinserir novamente o aparelho e repetir a operação
depois de uma hora;
Se o aparelho não funciona bem ou mesmo não funciona antes de procurar a
intervenção de um técnico, para o seu interesse, verifique se;
• a tomada está bem inserida na parede;
• há tensão na linha;
• o display esteja programado devidamente;
• o fechamento das portas é perfeito;
• a tensão de alimentação corresponde a do aparelho (± 6%);
• caso o resultado seja ainda negativo, contactar o Serviço de Assistência Técnica.
504
MANTENIMIENTO
Comuniquen:
• El tipo de avería,
• El modelo.
• El nœmero de matrícula.
MANUTENÇÃO
Comunicar:
• o tipo de defeito;
• o modelo.
• o nœmero de inscrição.
41
Page 42

Page 43

Page 44

461305743
Stampa Tipolitografia Fabrianese 504 22/07/2004
 Loading...