

Page 1

GB
D
F
E
DISHWASHER
Use and maintenance
handbook
GESCHIRRSPÜLAUTOMAT
Bedienungs- und
Wartungshandbuch
LAVE-VAISSELLE
Livret d’instructions
et d’entretien
LAVAVAJILLAS
Manual de uso y
manutención
I
LAVASTOVIGLIE
Manuale uso
e manutenzione
EL
Page 2

1234567890
1
0
1
0
1
0
1
0
1
0
1234567890
76
23456789
23456789
23456789
23456789
LV
23456789
Page 3

BEFORE USING THE APPLIANCE
1
1.1 SAFETY INSTRUCTIONS
Norms and regulations to be respected
• The dishwasher may only be used to clean household dishes. If the appliance is used for other
purposes or in a wrong manner, the manuf acturer declines all responsibilities f or possib le damages.
• For safety reasons, no modifications must be carried out on the appliance.
• Before connecting the appliance to the electric po wer supply system, check that the po wer supply at
the place of installation is compatible with the electric data indicated on the data tag.
• The installation must be carried out by qualified personnel.
Before running the appliance for the first time
• Make sure the dishwasher w as not damaged during transport. Do not hook up the appliance if there
is any damage. In case of damage, contact the vendor.
For the safety of children
• Do not allow children to play with the appliance.
• Detergents can cause permanent damage to eyes , mouth and throat.
They should therefore be kept outside the reach of children.
• The water in the dishwasher is not drinkab le. Any residues of detergent in the appliance constitute a
source of danger for children. They must therefore be kept away from the open dishwasher.
Daily use
• Do not turn on the dishwasher if the electric cable, or the water supply or water drainage pipes are
damaged, or if the control board, the work surf ace or the base are in very bad condition.
• In case of a malfunction, shut off the water supply, then tur n off the appliance and pull the electric
plug from the outlet. If there is a permanent electric connection, turn off the service switch (if present)
or remove the fuse (or fuses).
• To remove the plug from the electric outlet, hold the plug itself and pull; never pull the cable.
• All repairs of the dishwasher must be carried out b y specialised personnel. Inappropriate repairs can
create a severe danger f or the user . For repairs , you should theref ore contact our technical customer
assistance service or a specialised vendor.
• The replacement of the supply cable must be carried out only by the technical service staff.
• If the pipes and tubes are deteriorated, substitute them with new original par ts before hooking up
the appliance.
• Do not use detergent substances that could lead to an explosion.
• Do not sit or lean on the open door. The appliance might otherwise tilt over.
• Before adding special dishwasher salt, detergent and r inse aid, mak e sure that the man ufacturer of
these substances recommends their use for household dishwashers.
• Always shut off the water supply when the dishwasher is not in use for longer periods of time, e.g.,
during your vacations.
GB
1
Page 4
1234567890
1
0
1
0
1
0
1
0
1
0
1234567890
UNPACKING – DISPOSAL
2
2.1 UNPACKING
Remove the e xternal plastic packaging material, the corner re-enforcements, and the styrof oam base. Open
the door and remove the styrofoam blocks from the inside baskets.
Collect and recycle the packaging materials. This will preserve primary materials and help reduce the amount
of waste.
Take the packaging materials to specialised recycling centres .
When the appliance eventually has to be disposed of , it should be made non-functional before eliminating it.
Attention! Some packaging materials (e.g., plastic bags, styrofoam) can be
dangerous for children. Children should therefore be kept away from them.
2.2 FINAL DISPOSAL OF APPLIANCE
At the end of its life span, the appliance must be eliminated by a specialised company, respecting all
existing laws and regulations .
This will make it possible to dispose of the old appliance while at the same time recuperating and
sorting synthetic materials that are fit for recycling, thus contributing to the protection of the en vironment.
GENERAL ADVICE
3
3.1 WASHING DISHES IN AN ECONOMIC AND ECOLOGICAL WAY
• Don’t rinse your dishes under running water before placing them in the dishwasher
• Run the appliance only when it is full, because only like this the process becomes economical and
respects the environment.
• Always choose a programme that is adequate for the kind of dishes you want to wash and that
corresponds to how dirty they are
• You should avoid to use too much detergent, dishwasher salt, and rinse aid. Refer to the dosages
recommended in the usage instructions provided by the manufacturers of these substances.
• Make sure that the water softness regulator is set correctly.
3.2 DISHES NOT TO BE WASHED IN THE DISHWASHER
You must not wash in this appliance:
- Cutting boards or small containers in wood
- Plastic objects that are not heat resistant
- Lead crystal
- Objects made from tin or copper
- Dishes or cutlery with glued components
- Old cutlery with heat sensitive glue
- Steel objects that are oxidised easily
- Cutlery with handles in wood, horn, antler, porcelain, or mother of pearl.
When purchasing dishes, cutlery, or glasses, make sure that they are
dishwasher resistant.
2
23456789
23456789
23456789
23456789
GB
23456789
Page 5
DESCRIPTION OF THE APPLIANCE
4
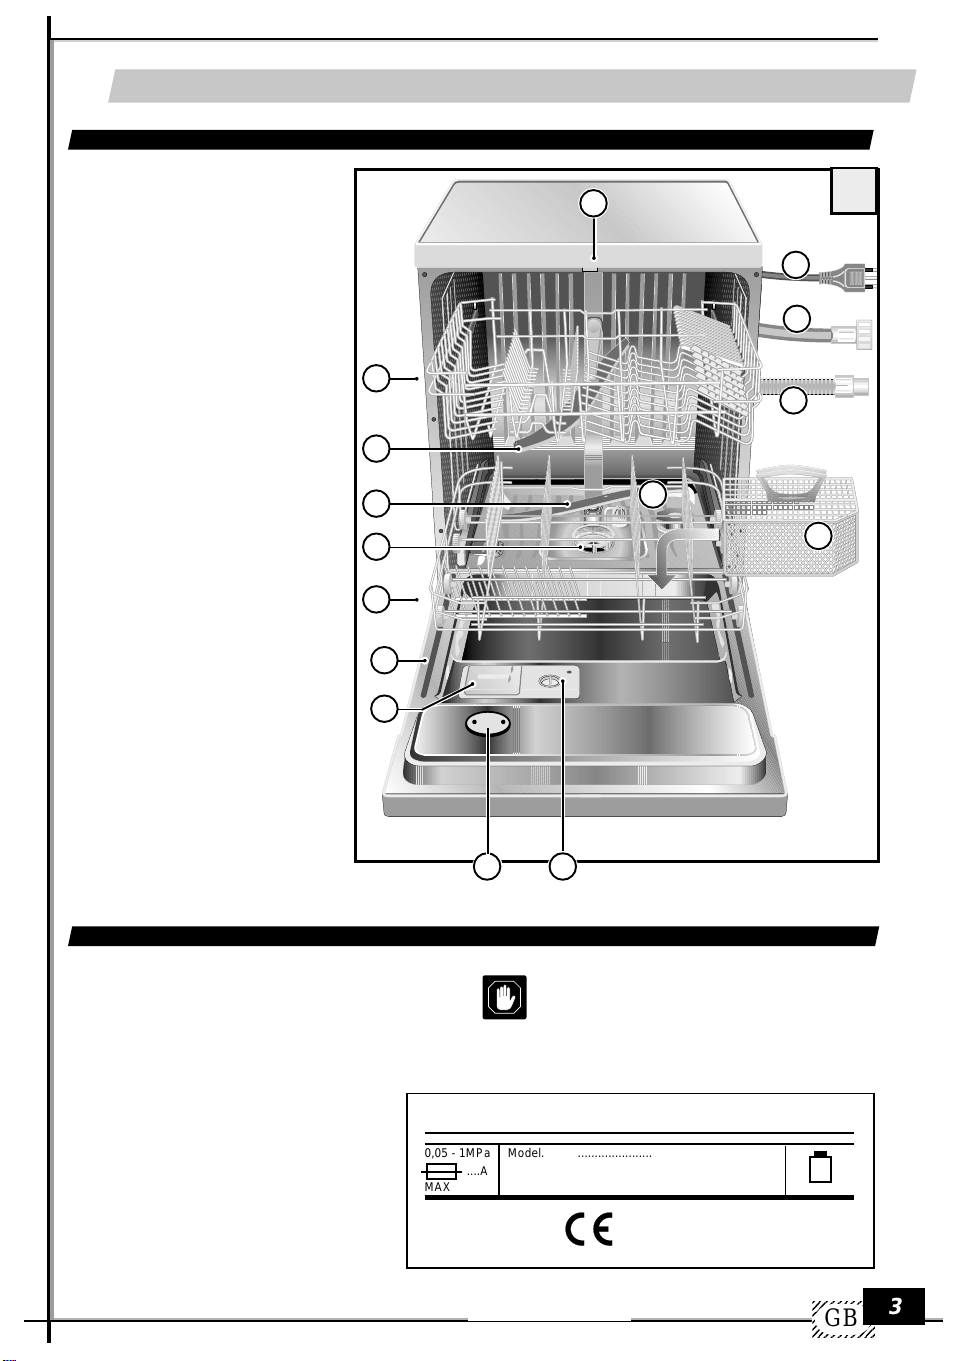
4.1 GENERAL PARTS
1) salt container
2) rinse aid container
3) drying ventilator (if included)
4) container for detergent
5) data tag
6) filters
7) lower spray-rotor
8) upper spray-rotor
9) electric cable
10) water supply tube
11) water drainage tube
12) lower basket
13) upper basket
14) cutlery container
15) hook for door closing mechanism
13
12
15
1
9
10
11
8
7
6
1
14
5
4
4.2 TECHNICAL DATA
capacity (standard settings): 12
pressure of water supply system
minimum pressure: 0.05 Mpa
maximum pressure: 1 Mpa
3 2
Attention: the necessary characteristics
of the electric supply grid are indicated
on the data tag.
0,05 - 1MPa Model. ......................
....A
MAX .......W
........V.....Hz
Made in EU
...................
12
GB
LA2505-020/1
3
Page 6
1234567890
1
0
1
0
1
0
1
0
1
0
1234567890
INSTALLATION
5
5.1 LEVELLING
2
M
2.1
P
LA2505-030
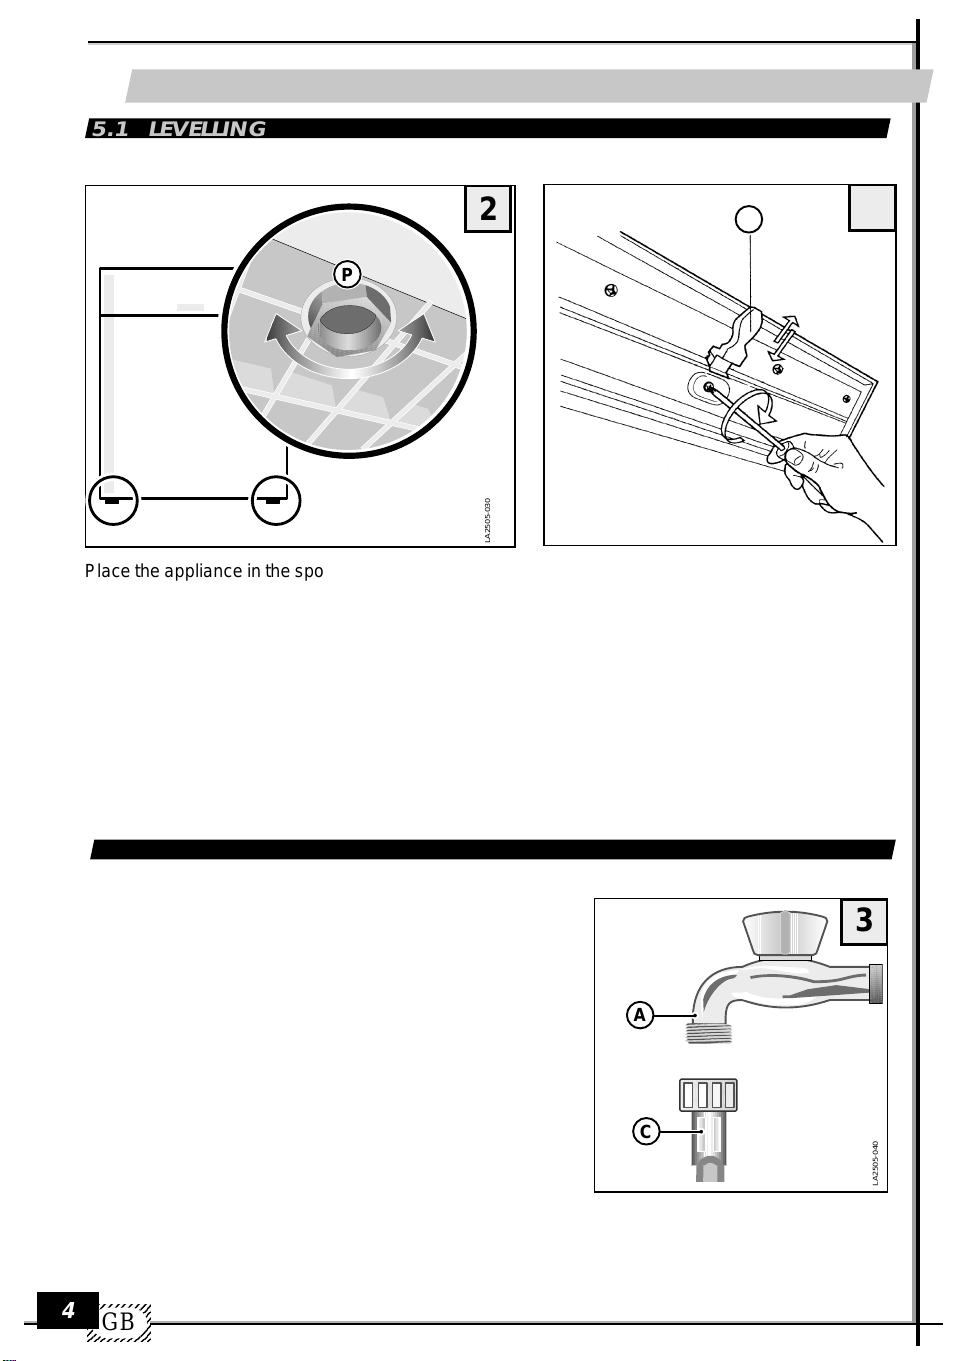
Place the appliance in the spot where you w ant to install it. Use feet P (unscrew or screw in) to regulate
(if necessary) the height of each foot to assure that the appliance is in a fully level position.
If the appliance is positioned in a level position, its correct functioning is assured.
Maximum error = 2 degrees
After levelling the appliance , regulate the hook of the door closing mechanism, to assure that the door
closes perfectly.
In order to obtain a perfect seal adjust the door loc king device b ut only after having le velled the machine
in its final installation position.
5.2 WATER CONNECTION
The water supply tube C, which accompanies the
dishwasher, makes it possible to connect the appliance to
a faucet with a 3/4” attachment.
During the installation, the following instructions must be
followed:
• Attach tube C to the cold water faucet A.
• If the tube is being attached to new pipes that have not
been used for a long time, you should let the water run
for some time bef ore attaching the tube in order to mak e
sure that dirt and rust residues are eliminated.
• Make sure that the water pressure corresponds to the
range indicated on the data tag.
The appliance may be connected to the cold water system. It must not be connected to the hot water system.
23456789
23456789
4
23456789
23456789
GB
23456789
3
A
C
LA2505-040
Page 7
5.3 CONNECTION OF DRAINAGE WATER
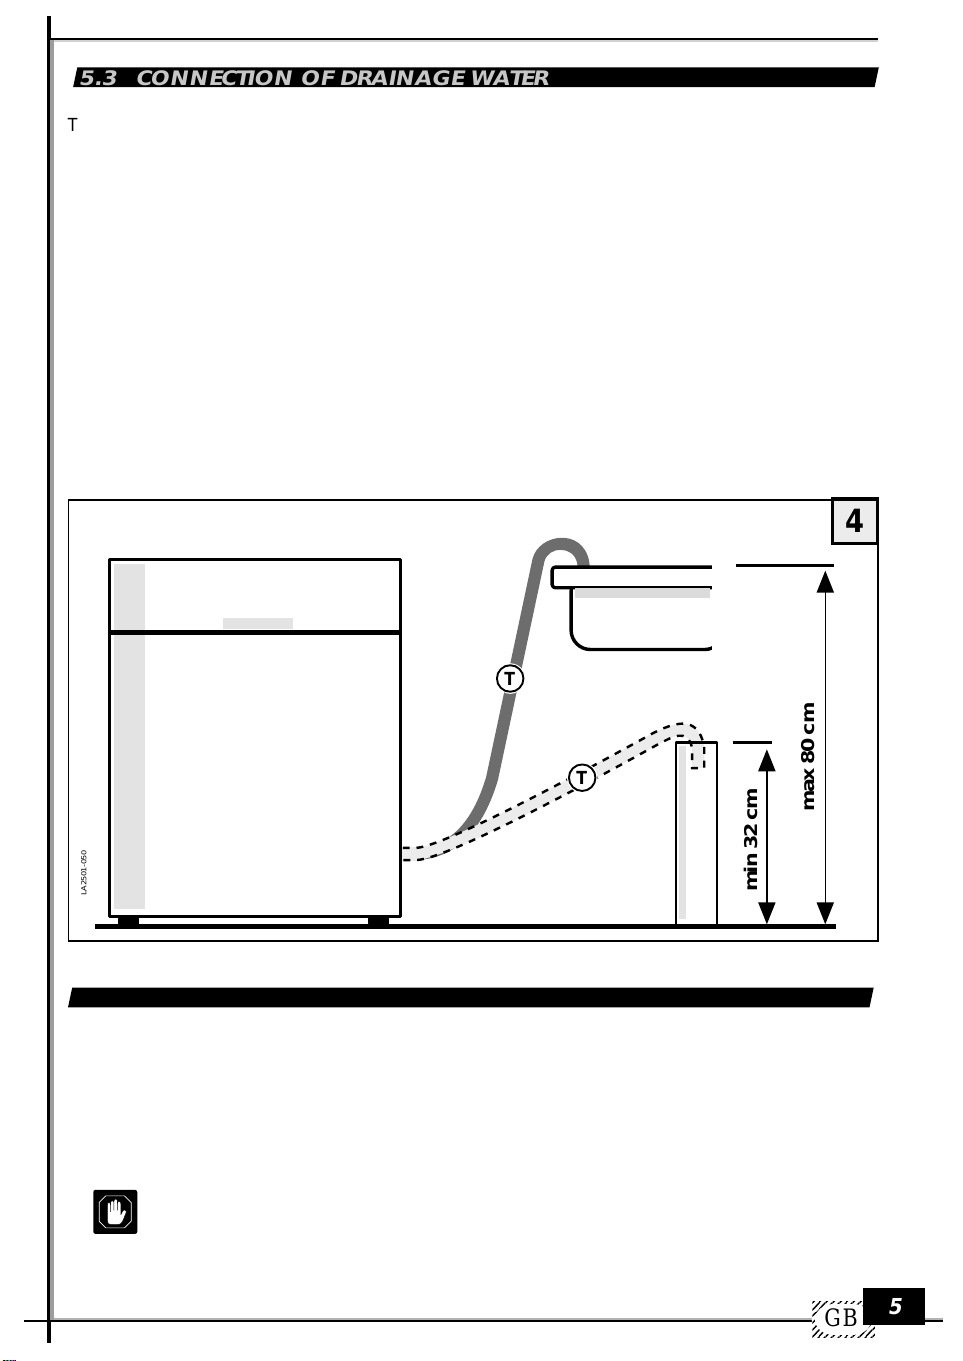
The curved end of drainage tube T, which is being supplied with your appliance, should be hooked
onto the edge of a sink or into a drainage pipe.
A special siphon should be used to prevent bad odours.
During the assembly, the following precautions should be taken:
- the drainage tube must not be bent to avoid blockages;
- the tube’s end, relative to the top surface of the dishwasher (fig. 4), must be placed at a height
between 32 and 80 cm;
- the end of the tube must never be immersed in water;
- the drainage tube must not be extended to more than a maxim um length of 1 metre . The e xtension
must have the same internal diameter. Furthermore, the maximum height at which the tube’s end
can be placed (in the case of an extended tube) must be reduced from 80 to 50 cm.
- If you use a drainage pipe, make sure its internal diameter is not inferior to 4 cm.
4
LA2501-050
5.4 ELECTRIC CONNECTIONS
The appliance may only be connected to a properly installed electric outlet with
an earth (ground) contact. The connection must be carried out in correspondence
with existing laws and regulations and supplementar y rules issued by the supplier
of electric power.
The tension shown on the data tag must correspond to the po wer tension of the electr ic
grid at the site of installation.
See data tag for the size and format of the electric outlet to be used.
T
T
max 80 cm
min 32 cm
GB
5
Page 8

1234567890
1
0
1
0
1
0
1
0
1
0
1234567890
USE
6
6.1 BEFORE USING THE APPLIANCE
Before turning on the appliance, make sure that the plug attached to the electric cable is
connected to the electric outlet, the water supply tube is connected to the faucet, the faucet
is turned on, the drainage tube has been connected according to the instructions.
Opening of the door
Pull the handle forward. The door should open without eff ort. If you pull the handle while the dishw asher
is running, a safety mechanism will turn off the appliance.
Adding special dishwasher salt
• Open the door and take out the lower basket.
• Remove the lid of the salt container b y turning it anticlock-
wise.
Only during the first time you carry out this operation:
fill about 1/2 litre of water into the salt container.
• Use funnel L to fill the special dishwasher salt into the
container (use about 1.0-1.5 kg of salt).
• Remove possible salt residues from the opening of the
container.
• Put the lid of the container back in its place by turning it
clockwise.
• If you don’t use the dishwasher immediately after filling
the salt container, run the programme
pre-wash
to rinse
away the w ater and salt particles that spilled over from the
container.
* The water softening system is equipped with an electric
instrument that indicates the salt content level.
A control light will be illuminated on the front panel (fig. 18,
) of your dishwasher to indicate when it is necessary
6
to add more dishwasher salt.
L
LA2505-060
5
Regulation of the water softener system
For the washing process it is better to use soft water (with a
low calcium content), to av oid calcium deposits on the dishes
and on the inside of the dishwasher.
T o find out the degree of hardness of y our water contact
your town administration or use a commercial testing kit.
To reach an optimal regeneration setting, keep the button
DELAY 9 (fig. 6) pressed when turning on the appliance.
Now, the current setting is being displayed (e.g., d5). To
modify the setting (within 5 seconds),press the same button
again until the desired level is reached (see table).
Wait for 6 seconds without modifying the setting. A buzzer
sound will indicate that the new setting was accepted. On
the display, the request select programme will appear.
Use only special dishwasher salt. Other types of salt
(e.g., regular household salt) often contain substances that do not dissolve completely in water and
can therefore obstruct the water softener , thus making it unusable.
23456789
23456789
6
23456789
23456789
GB
23456789
Regeneration levels
Positionof
regulation
device
d1
d2
d3
d4
d5
d6
French
degrees
<15
>15 <25
>25 <40
>40 <60
>60 <80
>80 <90
9
°fH
>22,4 <33,6
>33,6 <44,8
>44,8 <50,4
>=higher/<=lower
6
German
degrees
°dH
<8,4
>8,4 <14
>14 <22,4
Page 9

LA2505-080
Indication of salt level (if present)
7
The green mark under the cap indicates that there
is still enough salt in the container. If the green
mark is no longer visible, the salt container needs
to be refilled with special dishwasher salt.
Refilling of rinse aid
The rinse aid, which is released automatically during the final phase of the wash cycle, guarantees
that the dishes dry quickly and prevents the formation of stains and calcium sediments.
Only use rinse aids for dishwashers. Other products won’t obtain the desired
effect.
The rinse aid container S is located on the inside
of the door.
• Remove the container cap T by turning it 1/4 revo-
lution anticlockwise.
• Fill container with rinse aid up to the broken line.
Maximum quantity: about 140 ml.
• Put the cap back in its place.
• Clean off possible residues of rinse aid with a
cloth, otherwise too much foam might be produced during the rinsing process.
8
T
S
LA2505-092
9
F
Indication of rinse aid level
• Electric (fig. 18-18.1)
The appliance is equipped with a level indicator
for the rinse aid. When it lights up, more rinse
aid needs to be added.
• Mechanical (fig. 9)
More rinse aid needs to be added when the
indicator (located on the container F) is clear (
When the container is full, the indicator has a dark
coloration.
LA2505-096
).
GB
7
Page 10
1234567890
1
0
1
0
1
0
1
0
1
0
1234567890
1
2
3
4
1
2
3
4
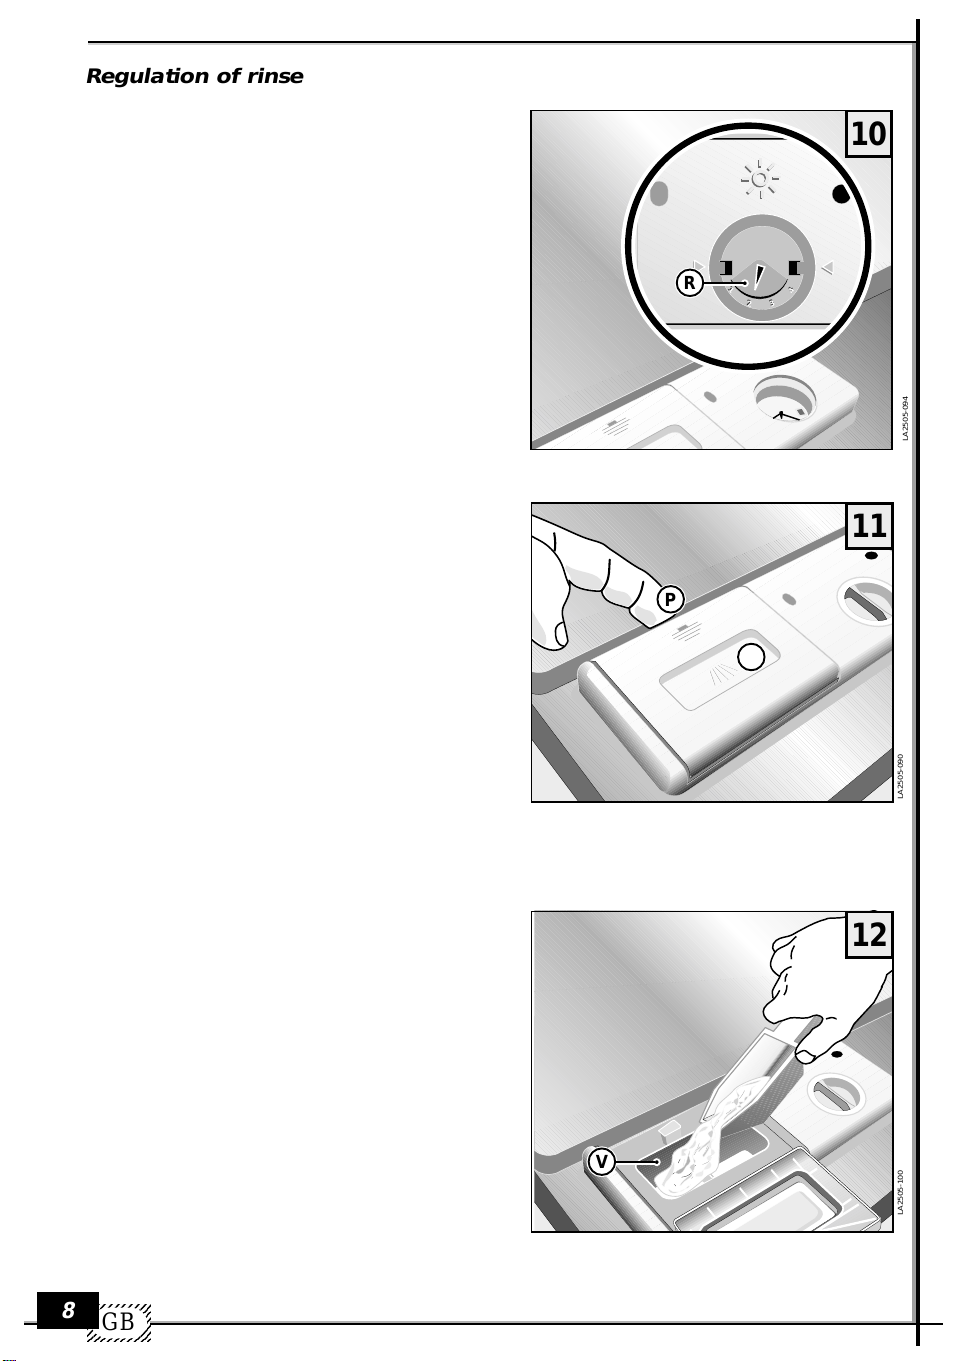
Regulation of rinse aid dosage
The regulation R of the quantity of rinse aid that is
released can be found in the refill opening of the
rinse aid container.
It can be adjusted with a screwdriver . The possible
settings range from 1 to 4,1 corresponds to a
release of one ml of rinse aid, 4 to four ml, etc. The
appliance has been set on 2 (two ml) by the
manufacturer.
A full rinse aid container is sufficient for about 50
wash cycles. The quantity of rinse aid to be released
should be adjusted when the result of the wash
process is not satisfactory.
• Always wipe off with a cloth any rinse aid that
spilled over from the container.
It is important to check the level of rinse aid in
the container periodically – if possible every
31 wash cycles.
Adding the detergent
IMPORTANT! Do not use detergents in this
dishwasher that are made for dish washing by
hand! These substances produce large quantities
of foam but they do not clean the dishes in a
dishwasher . They can e ven lead to a malfunctioning
of the appliance.
You should therefore only use detergents that are
specifically made for household dishw ashers.
Keep your detergent containers closed and in a
dry place.
Only when you use the pre-wash programme no
detergent is needed.
During a programme the detergent is automatically
taken from the detergent container.
We recommend the use of about 25 g of detergent.
Detergents vary in their strength and efficiency.
You should therefore pay attention to the dosage recommendations of each manufacturer.
The container for the detergent is located on the
inside of the door.
If the lid is closed:
• Push forward closing mechanism P. The lid will
open with a “click”.
• Fill the detergent into the container V.
• To close the lid, press until you hear a closing
“click”.
If your dishes are exceptionally dirty, you can also
fill some detergent into the indentation Q of the lid.
In this case, fill the indentation up to the edge. This
detergent will be available and active during the
pre-wash phase.
8
23456789
23456789
23456789
23456789
GB
23456789
10
R
LA2505-094
11
P
Q
LA2505-090
12
V
LA2505-100
Page 11
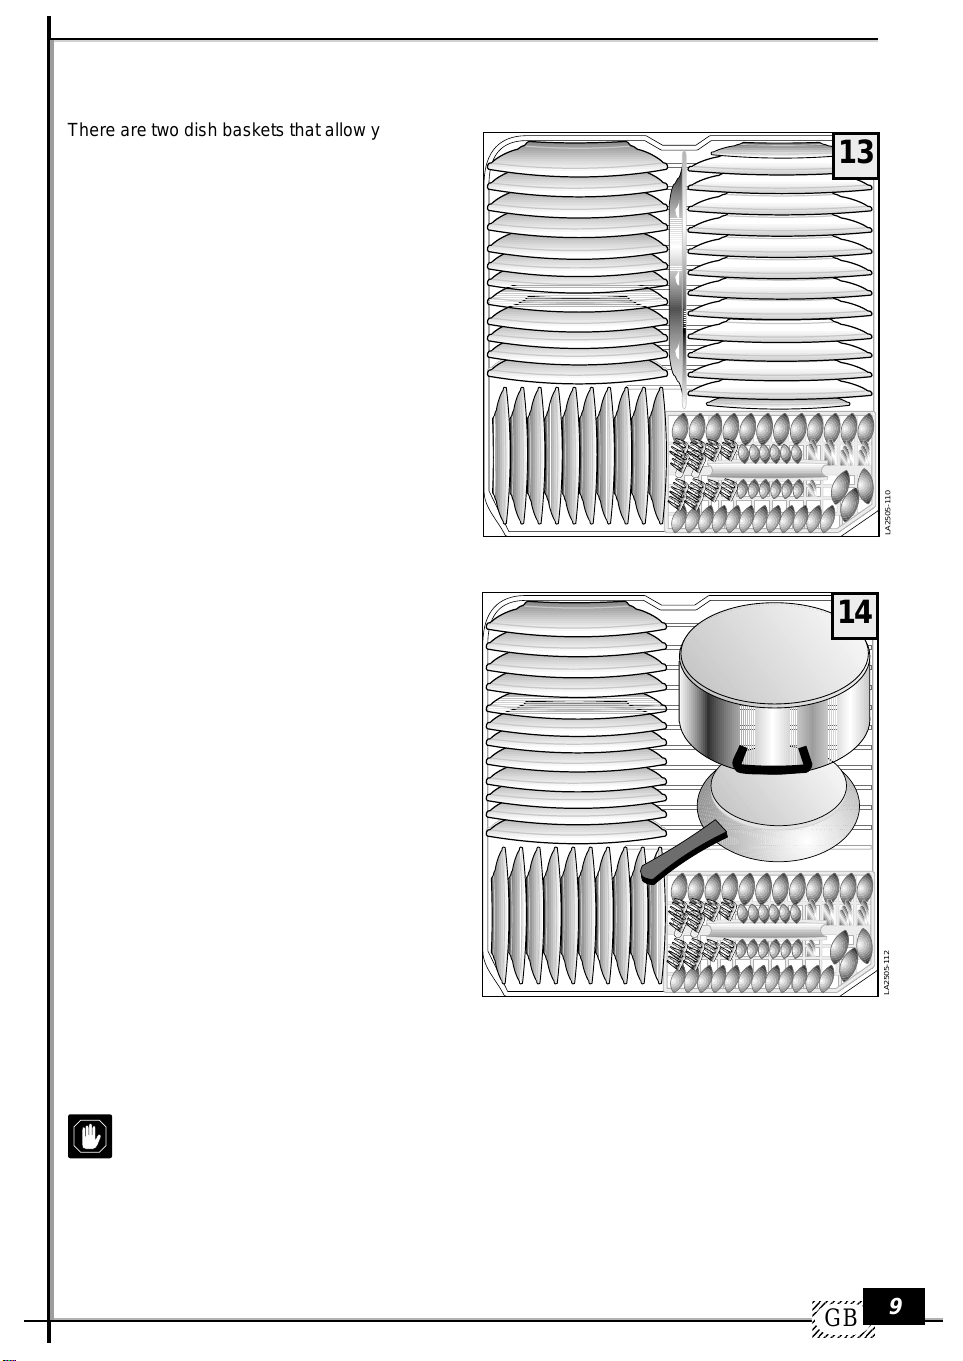
How to load and unload the dishwasher
There are two dish baskets that allow y ou to store
all different kinds of dishes.
• Remove from the dishes any larger pieces of
food to av oid an obstruction of the filter and the
development of bad odours.
• If pots and pans are particularly dirty and contain crusts of food (after frying or roasting), soak
them in a water bath before w ashing them in the
dishwasher.
Use of the lower basket
The lower basket is intended to hold dishes that
are more difficult to clean, as well as the cutlery
basket.
The lower basket holds regular plates , soup bowls,
pans, soup tureens, lids, and serving dishes. Flat
and deep plates must be placed in a way that
leaves some space between the individual plates .
13
LA2505-110
All plates must be in a vertical position so that the
water can pass freely.
Pans and pots must alw ays be placed upside down.
You can choose any kind of loading configur ation,
but you should mak e sure that the dirtiest surface
of dishes, pots and pants faces the water spray
and that the water can flow off without hindr ances.
14
Cutlery
For best cleaning results, cutlery should be inserted with its handles facing down. Spoons, forks, and
knifes must be placed in the specific areas of the cutlery basket that are designed for them.
ATTENTION:
Particularly long cutlery, specifically “long knives”, should not be positioned pointing upw ards b ut
should be placed horizontally in the top tray or washed by hand.
LA2505-112
GB
9
Page 12
1234567890
1
0
1
0
1
0
1
0
1
0
1234567890
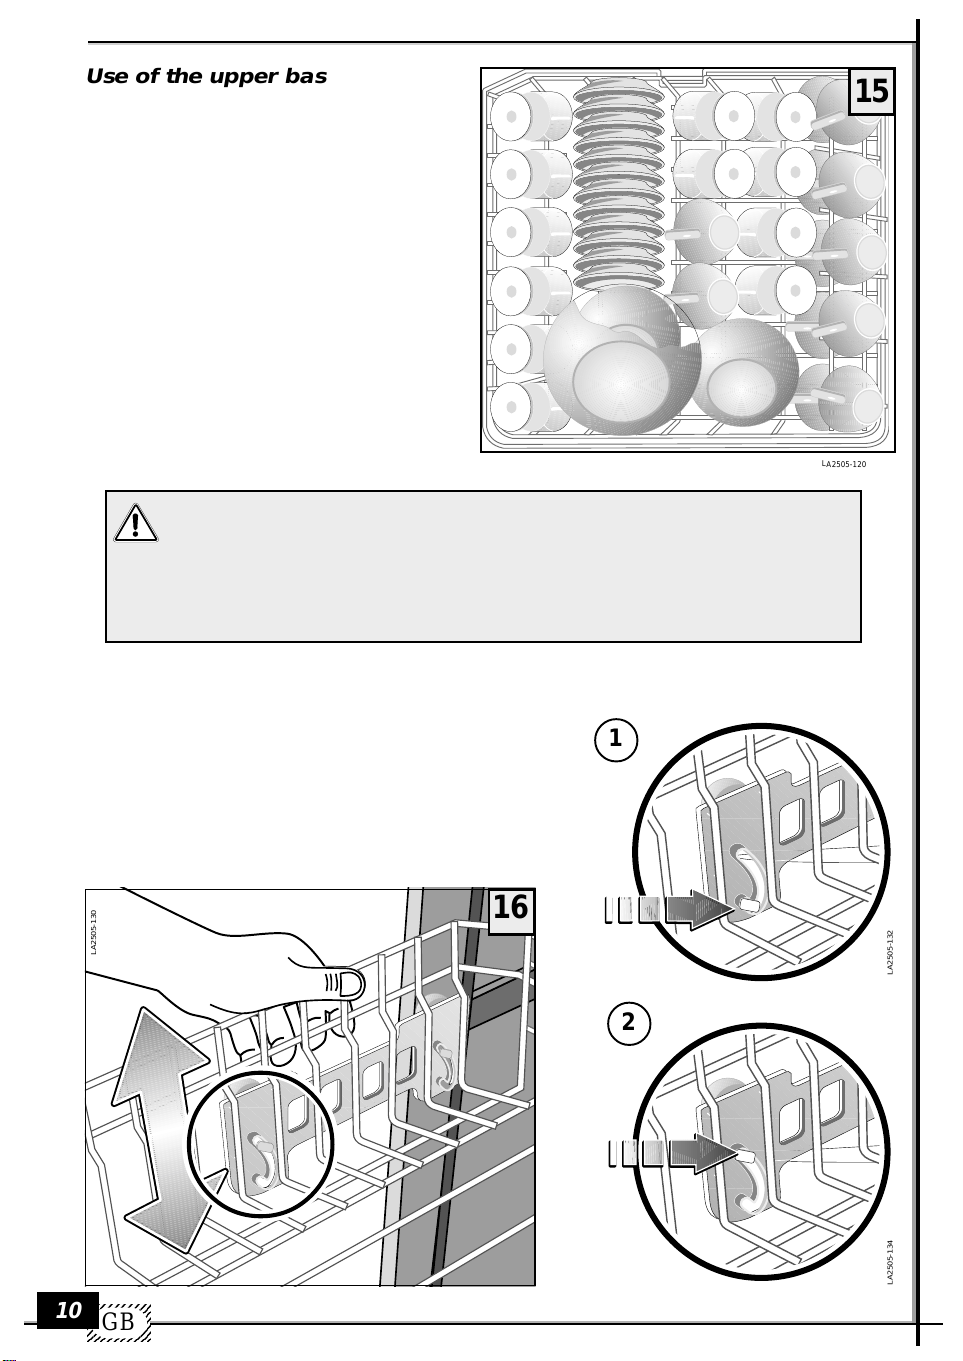
Use of the upper basket
The upper basket can be pulled out all the w ay.
It holds small and medium sized dishes such
as glasses, small plates, tea and coffee cups,
small salad bowls, and small pans and pots that
are not very dirty.
Desert plates must always be placed v ertically;
glasses, cups, pots and pants must be placed
upside down.
Light dishes should be held by a support
structure so that they don’t get thrown around
by the water jet.
An optimal arrangement of dishes inside the
dishwasher will guarantee best washing results ,
allowing the appliance will be able to develop
its full effectiveness .
Because of the elevated temperature of the water used to wash the dishes and of
potential chemical reactions with the detergent, it is recommended not to wash
copper or aluminium dishes, cutlery with wood or horn handles, delicate porcelains,
or non heat resistant glass or plastic dishes in the appliance.
If you possess decorated porcelain, you should test one single piece to make sure
that the décor is not being damaged or altered.
15
LA2505-120
Height regulation of the upper basket
Use the handle on the side (only on left) to regulate the
basket’s height and inclination.
1 regulation of horizontal position
2 regulation of inclination
16
LA2505-130
1
LA2505-132
2
10
23456789
23456789
23456789
23456789
GB
23456789
LA2505-134
Page 13
Pulling out the upper basket
The upper basket can be pulled out and removed
as shown in the figure.
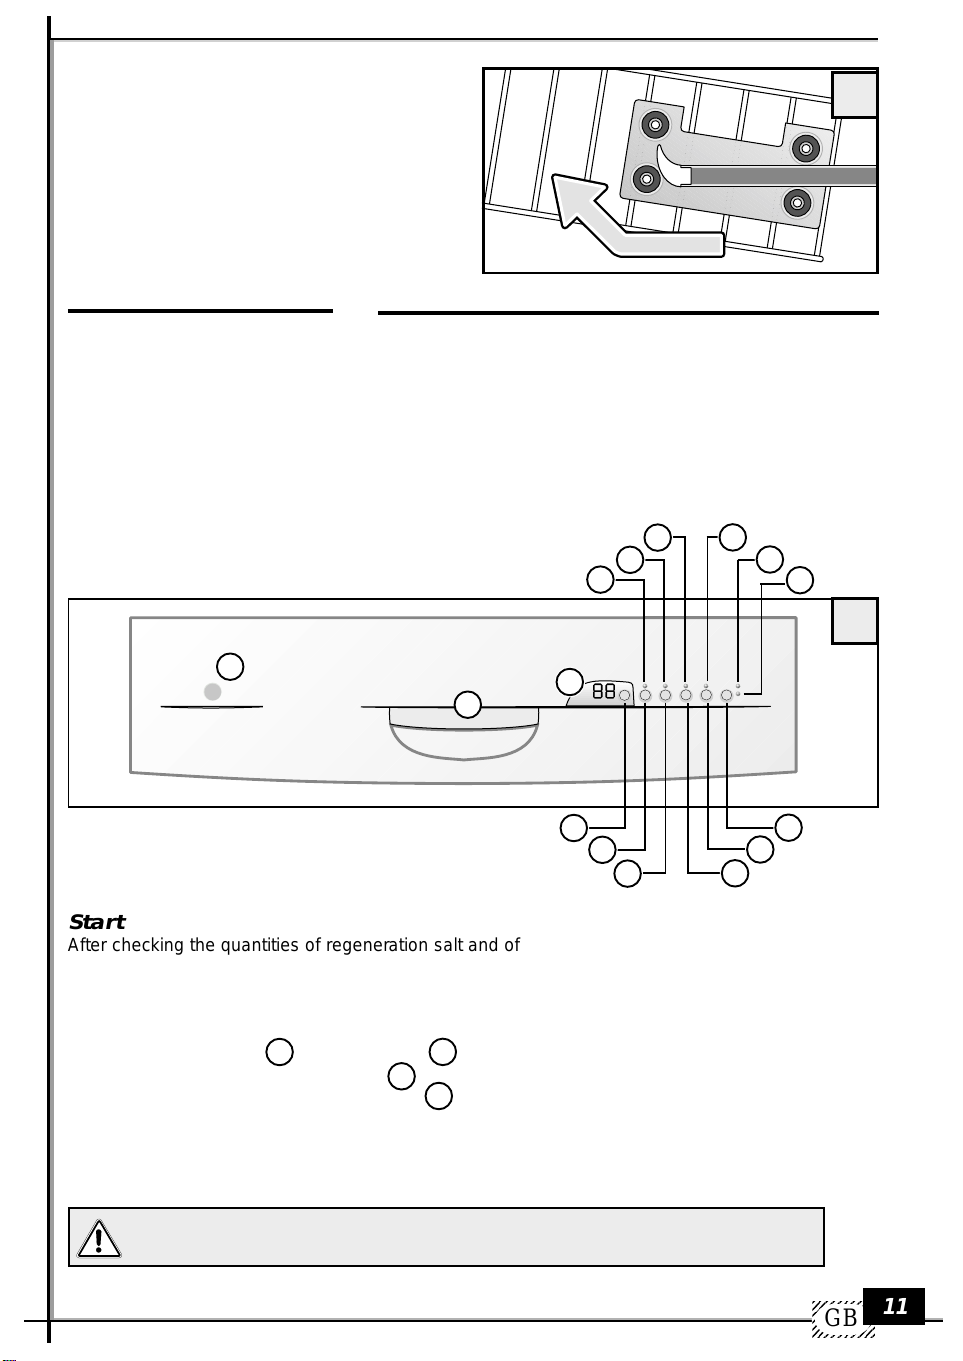
Description of control buttons and
indication lights
Led Display
Control buttons
17
LA2505-160
1) Indication of delayed start (Delay)
2) Indication of half load
3) Indication of pre-wash cancel
4) Indication of drying
5) Indication of low salt level
6) Indication of low rinse aid level
7
7) On/Off
8) Programme selection
9) Delayed start selection
(Delay)
10) Half load selection
14
15
11) Pre-wash cancel selection
12) Drying selection
13) Start/Stop/Pause programme
14) Multifunction display
15) Door opening handle
3
2
1
4
5
6
18
EL0510-010
8
9
10
13
12
11
Start
After checking the quantities of regeneration salt and of rinse aid, open the water faucet completely,
place the dishes in the baskets, fill detergent into the detergent container and add also detergent for
the pre-wash (if necessary) then close the front door.
Now proceed as follows:
• Use the On/Off button . On the display the words programme selection will appear.
7
• Use the programme selection button to select the desired programme
• Press the start/pause programme button . After a sound signal, which indicates the initiation of
14
8
13
the programme, the appliance will run the wash cycle automatically.
Note: On the display, the duration of the chosen programme will be shown.
It is advisable not to open the dishwasher during the wash.
GB
11
Page 14
1234567890
1
0
1
0
1
0
1
0
1
0
1234567890
Options
(Note: the various options must be selected before initiating the wash cycle)
• Delayed start : time delays for the initiation of the wash cycle can be set ranging from 1 to 16 hours.
9
On the display, the delay period that was selected will be shown. The LED displa y will be blinking during the
entire delay period.
The selection of this setting option is confirmed when the number of the pre -selected programme appears
on the display.
• Half load : when choosing this wash cycle option, the following indication will appear on the display:
10
(¯=wash superior basket,_=wash inferior basket). The corresponding LED indication will be illuminated.
The selection of this setting option is confirmed when the number of the pre-selected programme appears
on the display.
• Pre-wash cancel : This option is only available for programmes that include a pre-wash.
11
When pressing the button, the corresponding LED indication will be illuminated.
The selection of this setting option is confirmed when the number of the pre-selected programme appears
on the display.
• Dr ying : this programme option is carried out automatically by the programmes in whose cycle it is
included (see programme table). To modify the dryer setting, the drying button must be pressed bef ore
12
12
initiating the chosen programme. On the displa y, the following information will appear: AO = no drying; A1=
Drying 20’; A2 = Drying 35’; A3 = Drying 45’.
The corresponding LED indication will be illuminated.
The selection of this setting option is confirmed when the number of the pre -selected programme appears
on the display.
• Note: In the models without the drying ventilator, this option is to be considered as waiting time at the end
of the cycle.
• Description of Start/Stop/Pause button
• It initiates the wash programme cycle (the buzzer sound indicates that the cycle has started).
• When you tur n on the machine, using the ON/OFF button, the display indicates the number of the last
program that has been carried out. In cases where the previous program has not yet finished, the display
will flash the number of this program. In order to re-start it you must simply press the “ST AR T” button ,
the remaining time that is necessary in order to finish the cycle will appear automatically on the display.
(Situations such as this will occur each time that you open the machine when it is carrying out a program).
• If pressed during the wash f or less than 5” the machine will pause, the number of the program will be seen
flashing on the display, (in this case it is possible to add or remove dishes etc.)
In order to proceed with the washing program, close the door and press the button again.
• Programme settings by mistake (change programme)
• Reset by using the start/stop/pause button : keep the button pressed until the buzzer stops beeping (it
produces a series of beeps).
• Repeat the select programme operation.
Note: If the programme has been initiated and has run beyond the water fill phase, the display indicates
“ “, Then, the appliance will discharge all water, and (after a prolonged buzzer sound) the display will
indicate the pre-selected programme setting.
Now, the appliance is ready for a new setting.
• Note: Once you ha v e opened the door , alwa ys press the Start button in order to restart the dishwasher.
13
7
13
13
13
• Activation / Elimination of the buzzer
b0 = Buzzer DEACTIVATED
b1 = Buzzer ACTIVATED
In order to access the setting of the BUZZER, keep the PROGRAM button pressed down when you
turn on the machine. The current setting “b1” will be visualised on the Display. In order to change this
setting, press the same button until you have selected the status of the buzzer that you desire. Wait for
approximately 6 seconds, without changing your choice , following this, the sound of the B UZZER will confirm
that the setting has been memorised.
8
• End of cycle
Once the washing cycle is finished , the program number will appear lit up and still on the displa y, if it
is flashing wait for the end of the cycle.
14
• Checking the functions
During the washing phase it is possible to visualise the various functions in the following manner:
By pressing the program selection button , the number of the pre-set program will be visualised on the
display.
By pressing the half load button , the upper or lower washing area will be seen.
By pressing the drying button , the level of drying will be seen.
Stop
10
12
After the wash cycle, the dishwasher stops automatically, then unit will emit a long buzz to indicate the end of
the wahing cycle. To turn it off, press the button on/off . After each wash cycle, the water faucet must be
closed to insulate the appliance from the water supply system.
23456789
23456789
12
23456789
23456789
GB
23456789
8
7
13
Page 15

Table of wash programmes
Programmes
Turn on &
Select Prog.
number
Programme
ON
OFF
* Add Detergent
pre-wash
wash
Dishes
and
degree of dirt
Programme
descriptions
Duration*
(1)
Rinse
Intensive 70 º C
Normal 60º C
(EN 50242)
Delicate 60º C
P1
P2
P3
P4
Pans and dishes until
the next wash cycle
Very dirty dishes (except
delicate pieces)
Medium dirty dishes
(except delicate parts)
Very dirty pans and dishes
Short cold wash to prevent food residues from
drying up and forming crusts on the dishes
1 warm Pre-wash – Main wash
3 rinse (2 cold – 1 warm) Drying
1 cold pre-wash – Main wash
2 rinse (1 cold – 1 warm) Drying
Main wash
2 rinse (1 cold – 1 warm) Drying
11’
2h
2h 17’
1h 40’
Normally dirty dishes
Normal 40º C
P5
1 cold pre-wash – Main wash
2 rinse (1 cold – 1 warm)
49’
Very dirty dishes
Rapid 40º C
P6
Main wash
2 rinse (1 cold – 1 warm)
39’
Pans and dishes
Biological 60º C
Strong 70º C
P7
P8
Pans and dishes
very dirthy
Main wash
3 rinse (2 cold – 1 warm) Drying
1 warm Pre-wash – Main wash
3 rinse (2 cold – 1 warm) Drying
1h 38’
2h 11’
(1) N.B. Indicative duration of the washing times including the duration of the drying times in the programs where
drying is included.
Drying time “setting of the defaults in A2=35”.
(*) In the P1 program it is possible to have a drying setting (see options paragraph); in this way you will have a
warm rinse program with a drying feature (PLATE WARMER) with the following settings:
A1 washes at 65°C it dries for 20’ – A2 washes at 60°C and dries for 35’ – A3 washes at 50° C and dries for 45’.
MAINTENANCE
7
7.1 CLEANING OF SPAY-ROTORS
The spray-rotors can easily be remov ed for the periodic cleaning of the jets in order to prev ent possible obstructions.
Wash them thoroughly under running water and put them back in their correct position.
19
LA2505-210
To remove the upper spray-rotor:
Unscrew anticlockwise the support of the spray-rotor.
To remove the lower spray-rotor:
Pull the spray-rotor upwards and take it out.
20
GB
LA2505-220
13
Page 16
1234567890
1
0
1
0
1
0
1
0
1
0
1234567890
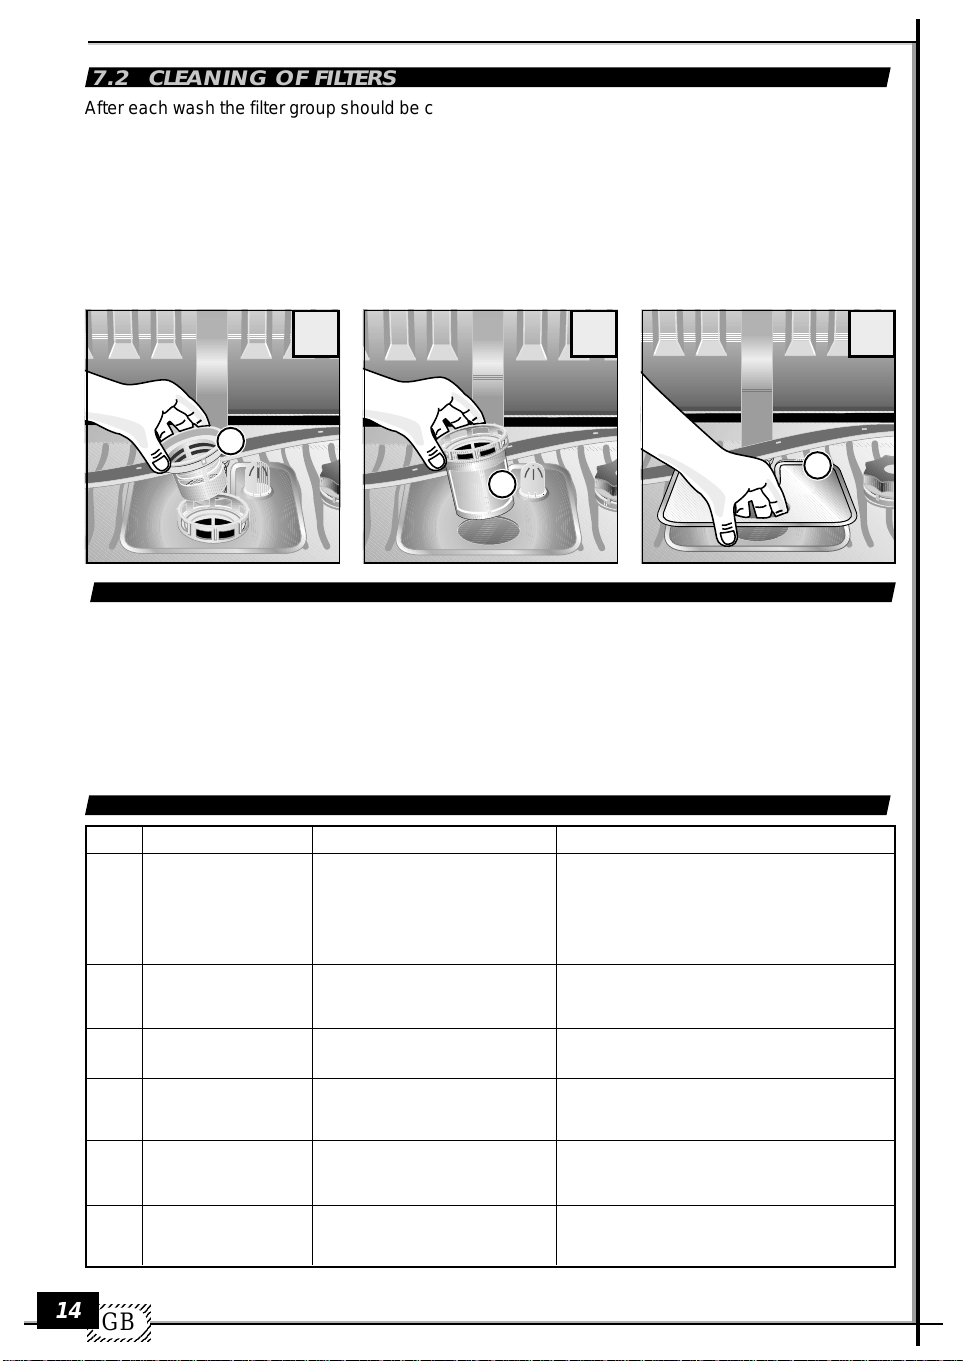
7.2 CLEANING OF FILTERS
After each wash the filter group should be chec k ed in order to remo v e possib le dirt residues. Proceed
as follows:
• take out the central filter 1.
• remove the external water filter 2.
• take out mobile grid 3.
Clean all these components under running water . It is important to clean all filters thoroughly because
the dishwasher cannot function properly with obstructed filters.
We recommend to put the cleaned filters back in their positions immediately to avoid damage to the
wash pump.
21
22
1
3
2
LA2505-180
LA2505-190
7.3 CLEANING OF THE DISHWASHER’S EXTERNAL SURFACES
The dishwasher’s surfaces (made of metal, and in the front of plastic) must be cleaned periodically.
Use a clean and soft piece of fabric. Never use acids or abrasive detergents.
If you don’t use the appliance for long periods of time
If the dishwasher is not being used for extended periods of time, you should proceed as follows:
• run the pre-wash programme twice
• remove the electric plug from the outlet
• disconnect the water supply tube
• leave the door slightly open to avoid the formation of bad odours.
7.4 TABLE OF ERROR CODES
Error
E1
E2
E4
E5
E6
E7
When this occurs
During the water cycle
(the program stops)
At the end
of the cycle
At the end
of the cycle
At the end
of the cycle
At the end
of the cycle
At the end
of the cycle
Checks to carry out
- T ap closed
- Filter of loading tube blocked
- Drainage tube flat
- Drainage tube broken
- Water supply tube bent
- Insufficient water pressure
-
Repeat the washing cycle
- Insufficient water pressure
- The litre counter valve is not working
- The drainage tube is bent
- The siphon is blocked
- The drainage pump is blocked
- The filter grills are blocked
- A pot is placed up side down
-
Repeat the washing cycle
- Reset the dishwasher
- Check
- Reset the dishwasher
- Call the authorised assistance centre
- Reset the dishwasher
- Verify the water pressure
- If the same problem reoccurs, contact the authorised
technical assistance centre immediately communicating to them the type of error that is shown.
- Verify the water pressure
- Call the authorised assistance centre
- Check
- Check
- Call the authorised assistance centre
- Clean the filter grills
- Check at the end of the cycle, position the pots
correctly during the next wash
-
If the same problem reoccurs, contact the authorised
technical assistance centre immediately communicating to them the type of error that is shown.
N.B.: Upon contacting the authorised technical assistance centre always communicate the type of error encountered.
23456789
23456789
14
23456789
23456789
GB
23456789
Action to be taken
23
LA2505-200
Page 17

WHAT TO DO IN CASE OF MALFUNCTIONS
8
You should first check whether it is possible to rectify some minor problems yourself. Follow these
instructions. If y ou are unable to identify or remo ve the prob lem, you should contact the technical client
assistance service.
• The programme does not start
- Are the internal fuses broken? Is the dishwasher connected to the electric supply system?
- Is the door closed properly? Press on the door to close it completely.
• No water enters the appliance
- Is the water faucet open?
- Is the filter between the faucet and the water supply tube obstructed? If so, clean the filter.
- Is the water supply tube obstructed? Check the tube.
• The programme indicator does not move on from its starting position
- Is the water faucet completely open?
- Is the filter between the faucet and the water supply tube obstructed? If so, clean the filter.
- Is the water pressure lower than 0.05 Mpa?
• The used water is not removed from the dishwasher
- Is the waste disposal tube obstructed? Check the tube.
- The siphon is obstructed? Check the siphon.
• The dishes are not clean after washing them
- Did you choose an appropriate programme for the type of dishes and the degree of dirt you are
dealing with?
- Are the dishes arranged in a way that allows the water-jet to reach all their surfaces?
- Are the dishwasher’s baskets overloaded?
- Are the spray-rotors blocked by a dish or some cutlery?
- Are all filters at the bottom of the dishwasher clean? Are they all in their correct position?
- Did you add the correct amount of detergent?
- Is the water discharge tube connected properly?
- Is there still any special dishwasher salt in the appropriate container? Without salt the water is not
being softened.
- Was the water softening system adjusted according to the local amount of calcium in the water?
• The dishes do not dry or they remain opaque
- Is there any rinse aid left in the appropriate container?
• Glasses and dishes show the formation of lines, spots, and stains or a shin y b lue coloration
- During the rinse process too much rinse aid is being released. Adjust the rinse aid release.
• Glasses and dishes show stains of dried water
- During the rinse process too little rinse aid is being released. Adjust the rinse aid release.
Please note:
The appliance was tested and checked by the manufacturer. As a consequence, you may find
some traces of water inside. These will disappear after the first use.
GB
15
Page 18
1234567890
1
0
1
0
1
0
1
0
1
0
1234567890
VOR DER BENUTZUNG DES GERÄTS
1
1.1 HINWEISE ZUR SICHERHEIT
Vorschriftsmäßige Benutzung
• Der Geschirrspüler darf nur zur Reinigung von Haushaltsgeschirr verwendet werden. Sollte das
Gerät für andere Zwecke oder unzweckmäßig gehandhabt werden, so kann die Herstellerfirma
keinerlei Verantwortung für eventuelle Schäden übernehmen.
• Aus Sicherheitsgründen ist es nicht erlaubt, am Geschirrspüler Umbauten oder Änderungen
vorzunehmen.
• Bevor das Gerät an das elektrische Stromnetz angeschlossen wird, prüf en, ob die auf dem Datenschild
angegebenen Spannungs- und Stromdaten mit den Werten, die am Aufstellort gegeben sind übereinstimmen.
• Die Installation hat durch qualifiziertes Personal zu erfolgen.
Handhabungen vor dem ersten Starten
• Prüfen Sie, ob der Geschirrspüler beim Transport Schäden erlitten hat. K einesf alls ein beschädigtes
Gerät anschließen. Wenden Sie sich bei Schäden an Ihren Vertragshändler.
Zur Sicherheit Ihrer Kinder
• Erlauben Sie Kindern nicht, mit dem Gerät zu spielen.
• Die Reinigungsmittel können unwiderrufliche Schäden an Augen, am Mund und im Hals v erursachen.
Reinigungsmittel deshalb außerhalb der Reichweite von Kindern aufbewahren.
• Das Wasser im Geschirrspüler ist kein Trinkwasser. Sollten sich im Gerät noch Reste des
Reinigungsmittels befinden, besteht für Kinder weiterhin eine Gefahrensituation. Kinder müssen
vom geöffneten Geschirrspüler f erngehalten w erden.
Zum täglichen Gebrauch
• Setzen Sie den Geschirrspüler niemals in Funktion, wenn das Stromkabel, der W asserzulaufschlauch
oder der Wasserabflussschlauch beschädigt sind, oder wenn die Schalterblende, die Arbeitsplatte
oder die Leiste in einem schlechten Zustand sind.
• Bei Störungen zuerst den W asserhahn abdrehen, dann das Gerät ausschalten und den Stec ker aus
der Steckdose ziehen. Bei Festinstallation, den jeweiligen Schalter ausstellen oder die Sicherung
(oder die Sicherungen) herausdrehen.
• Den Stromstecker stets am Kopf und niemals am Kabel aus der Dose herausziehen.
• Die Reparaturen des Geschirrspülers dürfen nur durch geschultes Personal durchgeführt werden.
Unsachgemäße Reparaturen können den Benutzer in große Gefahr bringen. Wenn Sie sich deshalb für eventuelle Reparaturen an unseren Kundendienst oder an Ihren eigenen V ertragshändler.
• Das Austauschen des Speisekabel muß nur vom spezialisiertem Personal ausgeführt werden.
• Im Falle, dass die Schläuche in einem schlechten Zustand sind, müssen sie, um das Gerät anzu-
schließen, mit Originalschläuchen ersetzt werden.
• Geben Sie keine Lösungsmittel in den Geschirrspüler. Sie können Explosionen auslösen.
• Setzen oder lehnen Sie sich nicht auf die geöffnete Tür: das Gerät könnte umkippen.
• Bevor Sie Spezialsalz, Reinigungsmittel oder Klarspüler einfüllen, müssen Sie sich vergewissern,
dass ihr Gebrauch vom Hersteller dieser Mittel für die Verwendung in Haushaltsgeschirrspülern
empfohlen wird.
• Drehen Sie stets den Wasserhahn zu, wenn der Geschirrspüler für längere Zeit, wie z.B . im Urlaub
nicht benutzt wird.
16
23456789
23456789
23456789
23456789
D
23456789
Page 19
AUSPACKEN - VERPACKUNGSBESEITIGUNG
2
2.1 AUSPACKEN
Entfernen Sie die äußere Verpackung aus Plastik, die Eckverstärkung sowie die Teile aus Styropor.
Tür öffnen und die Styroporblöcke der Körbe herausnehmen.
Das Sammeln und Recycling von Verpackungsmaterial trägt zum Sparen von Rohmaterial und zur
V erringerung des Müllvolumens bei.
Geben Sie die Verpackung bei den Sammelstellen für Recyclingmaterial ab.
Wenn das Gerät eines T ages endgültig entsorgt werden muss, machen Sie es v or seiner Entsorgung
gebrauchsunfähig.
WARNUNG! Einige Verpackungsmaterialien (z.B. Plastiktüten, Styropor) können für Kinder eine Gefahrenquelle darstellen. Halten Sie deshalb diese Materialien von Kindern fern.
2.2 ENTSORGUNG DES ZU VERSCHROTTENEN GERÄTS
Am Ende der Lebensdauer des Geräts muss es unter Einhaltung der gültigen Rechtsvorschriften von
spezialisierten Firmen verschrottet werden.
Auf diese Weise kann durch die Entsorgung eines alten Geräts, eine Wiederverwertung der für das
Recycling bestimmten synthetischen Materialien durchgeführt werden und somit die Umwelt geschont
werden.
ALLGEMEINE HINWEISE
3
3.1 SPARSAMES UND ÖKOLOGISCHES SPÜLEN
• Setzen Sie den Geschirrspüler nur in Betrieb, wenn er vollbeladen ist. Nur so kann sparsam und
umweltbewusst gespült werden.
• Wählen Sie stets ein Spülprogramm, das dem Typ des Geschirrs und seinem Grad der Verschmutzung entspricht.
• Überdosierung von Reinigungsmittel, Spezialsalz und Klarspüler unbedingt vermeiden. Befolgen
Sie die empfohlenen Dosierungsmengen in den Gebr auchsanweisungen und Angaben der Herstellerfirma dieser Produkte.
• Prüfen Sie, ob die Wasserenthärteranlage korrekt eingestellt ist.
3.2 UNGEEIGNETES GESCHIRR
Für die Reinigung im Geschirrspüler nicht geeignet sind:
- Holzschneidebretter oder kleine Holztabletts
- Plastikgegenstände, die nicht hitzebeständig sind
- Bleikristall
- Gegenstände aus Zinn oder Kupfer
- Geschirr oder Besteck mit zusammengeklebten Teilen
- Relativ altes Besteck, dessen Klebstoff hitzeempfindlich ist
- Gegenstände aus Stahl, die leicht rosten
- Besteck mit Griffen aus Holz, Horn, Porzellan oder Perlmutt.
Beim Kauf von Geschirr, Gläsern und Besteck darauf achten, dass sie
geschirrspülmaschinenfest sind.
D
17
Page 20

1234567890
1
0
1
0
1
0
1
0
1
0
1234567890
BESCHREIBUNG DES GERÄTS
4
4.1 ALLGEMEINE ÜBERSICHT
1) Salzfach
2) Fach für den Klarspüler
3)
Trocknungsbelüfter (falls vorgesehen)
4) Fach für das Reinigungsmittel
5) Datenschild
6) Filter
7) Unterer Sprüharm
8) Oberer Sprüharm
9) Stromkabel
10) Wasserzulaufschlauch
11) Abwasserschlauch
12) Unterkorb
13) Oberkorb
14) Besteckkorb
15) Verschlusshaken der Tür
13
12
15
1
9
10
11
8
7
6
1
14
5
4
4.2 TECHNISCHE DATEN
Fassungsvermögen
(internationales Maßgedeck ) : 12
Druck in der Hydraulikanlage
Mindestdruck: 0,05 MPa
Höchstdruck: 1 MPa
23456789
23456789
18
23456789
23456789
D
23456789
3 2
ACHTUNG: die elektrischen
Eigenschaften werden auf dem
Datenschild angegeben.
0,05 - 1MPa Model. ......................
....A
MAX .......W
........V.....Hz
Made in EU
...................
LA2505-020/1
12
Page 21
INSTALLATION
5
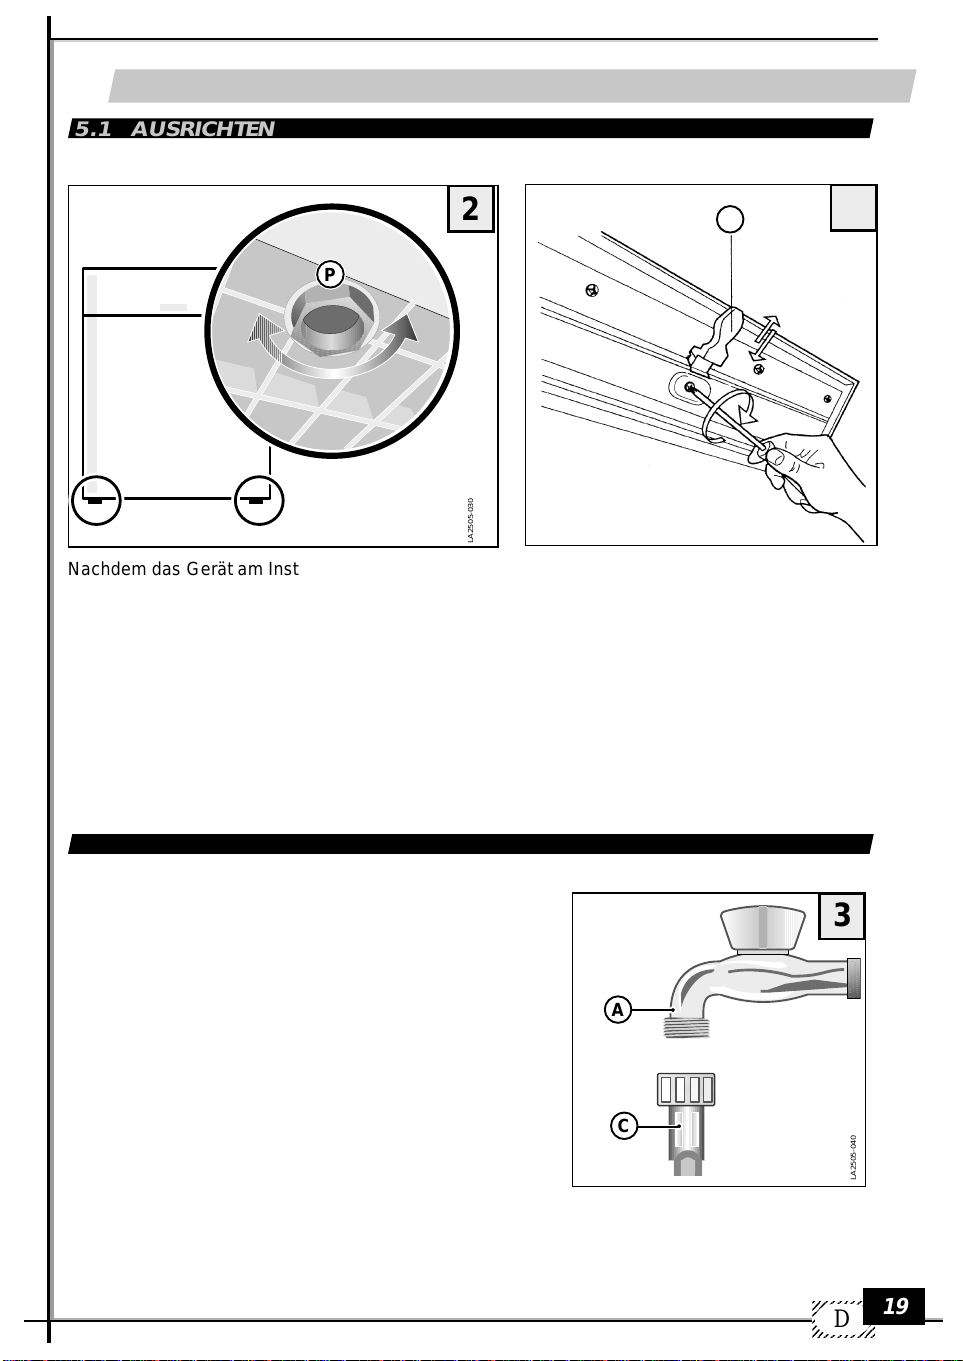
5.1 AUSRICHTEN
2
P
LA2505-030
Nachdem das Gerät am Installationsort aufgestellt wurde, falls erforderlich solange die Schraubfüße
P drehen, bis die erforderliche Höhe des Geräts erreicht ist und ausrichten.
Eine gute Ausrichtung sichert die korrekte Funktions weise des Geschirrspülers.
Max. Fehler=2 Grad
Nach dem Ausrichten des Geräts muss auch der Türverschlusshaken reguliert werden, damit sich die
Tür perfekt schließen lässt.
Sollte beim Schließen der Türe die Schließnase am Gehäuse (M) nicht in die Türaufnahme passen, so
kann diese Schließnase durch die darunterliegende Schraube entsprechend neu eingestellt werden.
M
2.1
5.2 WASSERANSCHLUSS
Der beiliegende Wasserzulaufschlauch C ermöglicht den
Anschluss an den Wasserhahn mit 3/4 Zoll.
Während der Montage müssen folgende Anw eisungen befolgt werden:
• Den Schlauch C an den Kaltwasserhahn A anschließen.
• Wenn der Anschluss an alte Rohrleitungen erfolgt, die
seit langer Zeit benutzt werden, ist es ratsam, vor dem
Anschließen des W asserzulaufschlauchs das Wasser laufen zu lassen, um Dreck- und Rostsab lagerungen zu entfernen.
• Überprüfen Sie, ob der Druck im Wassernetz innerhalb
der Werte liegt, die in den technischen Angaben genannt
werden.
Der Geschirrspüler kann an die Kaltwasserleitung, aber nicht
an die W armwasserleitung angeschlossen w erden.
3
A
C
LA2505-040
19
D
Page 22
1234567890
1
0
1
0
1
0
1
0
1
0
1234567890
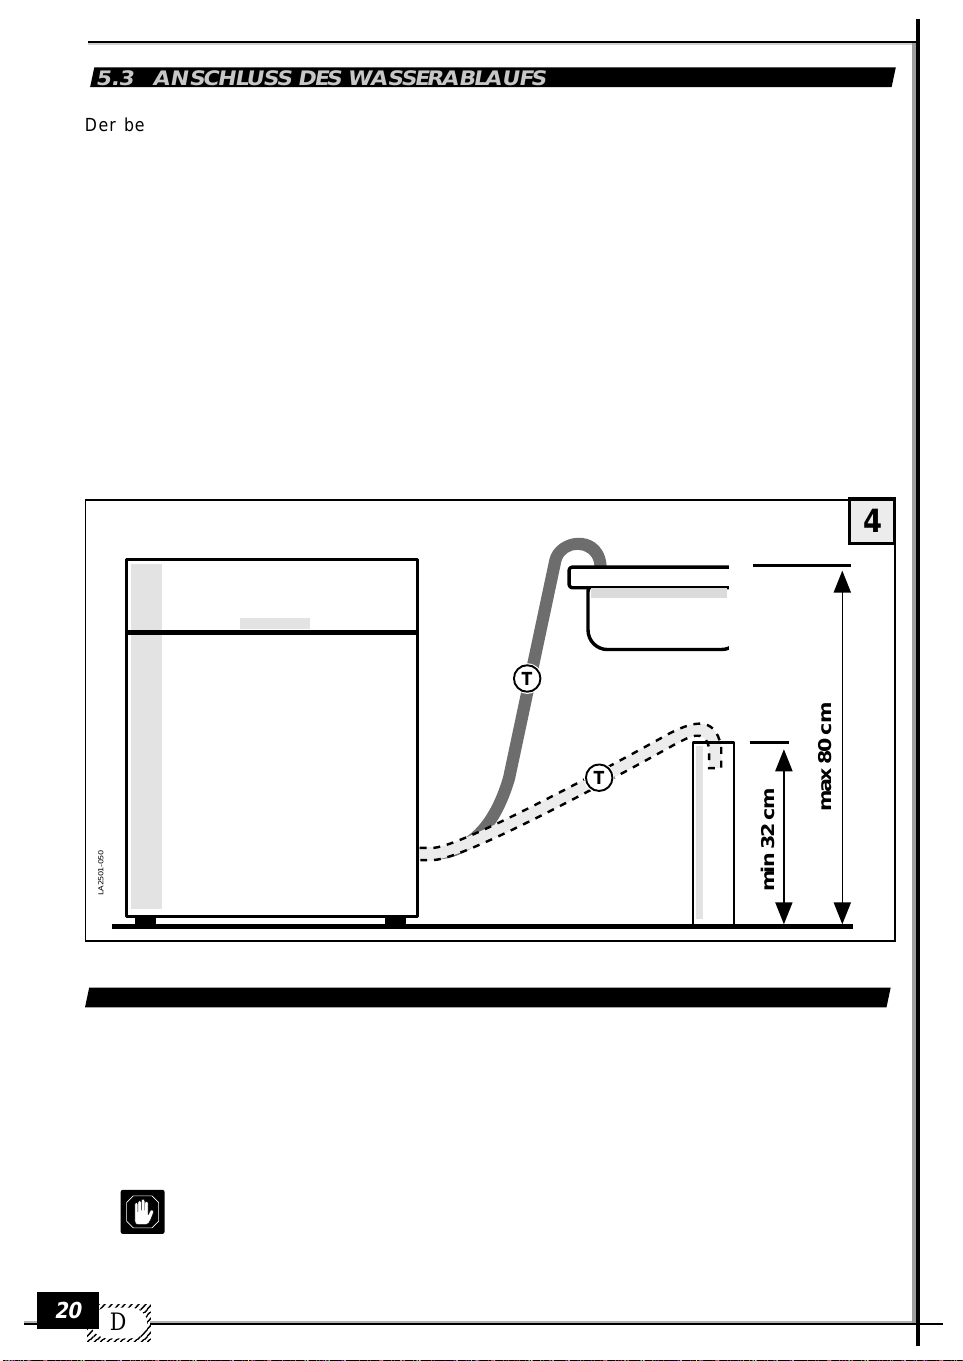
5.3 ANSCHLUSS DES WASSERABLAUFS
Der beiliegende Abwasserschlauch T wird mit dem starkgekrümmten Ende am Rand eines
Spülbeckens angebracht oder an eine Abflussleitung angeschlossen.
Der Einsatz eines Siphon (Geruchsverschluss) wird empfohlen.
Während der Montage müssen folgende Sicherheitsmassnahmen berücksichtigt werden:
- Der Abwasserschlauch darf nicht geknickt werden, damit keine Drosselstellen entstehen;
- Das äußere Ende des Schlauches muss im Verhältnis zur Abstellplatte des Geschirrspülers (Abb.
4) in einer Höhe zwischen 32 cm und 80 cm angebracht w erden.
- Das Schlauchende darf keinesfalls in Wasser getaucht werden;
- Eine eventuelle Verlängerung des Abwasserschlauchs darf eine Länge von 1 Meter nicht über-
schreiten und muss den gleichen Innendurchmesser besitzen. Des weiteren muss die maximale
Höhe in der das freie Ende angebracht werden kann, von 80 cm auf 50 cm herabgesetzt werden;
- Bei einer Abflussleitung darf der Innendurchmesser nicht weniger als 4 cm betragen.
4
LA2501-050
5.4 ELEKTRISCHER ANSCHLUSS
Der elektrische Anschluss des Geräts darf nur über eine ordnungsgemäß installierte Schutzkontaktdose erfolgen. Der Anschluss muss den gültigen gesetzlichen Richtlinien sowie den zusätzlichen Richtlinien des zuständigen Elektrizitätswerks entsprechen.
Der angegebene Spannungswert muss mit der Netzspannung am Aufstellort übereinstimmen.
Die Anschlusswerte der Steckdose können Sie dem Datenschild entnehmen.
T
T
max 80 cm
min 32 cm
20
23456789
23456789
23456789
23456789
D
23456789
Page 23
GEBRAUCH
6
6.1 HANDHABUNGEN VOR DER INBETRIEBNAHME
Vor der Inbetriebnahme des Geräts prüf en, ob der Stecker des Stromkabel an die Steckdose angeschlossen ist, ob der W asserzufuhrschlauch an den W asserhahn angeschlossen ist, ob der Wasser hahn geöffnet ist und ob der Abflussschlauch vorschriftsmäßig angeschlossen wurde.
Öffnen der Tür
Den Griff nach vorn ziehen: die Tür ist leicht zu öffnen. Wird diese Handhabung durchgeführt, während
der Geschirrspüler in Funktion ist, schaltet eine Sicherheitsvorrichtung den Geschirrspüler ab.
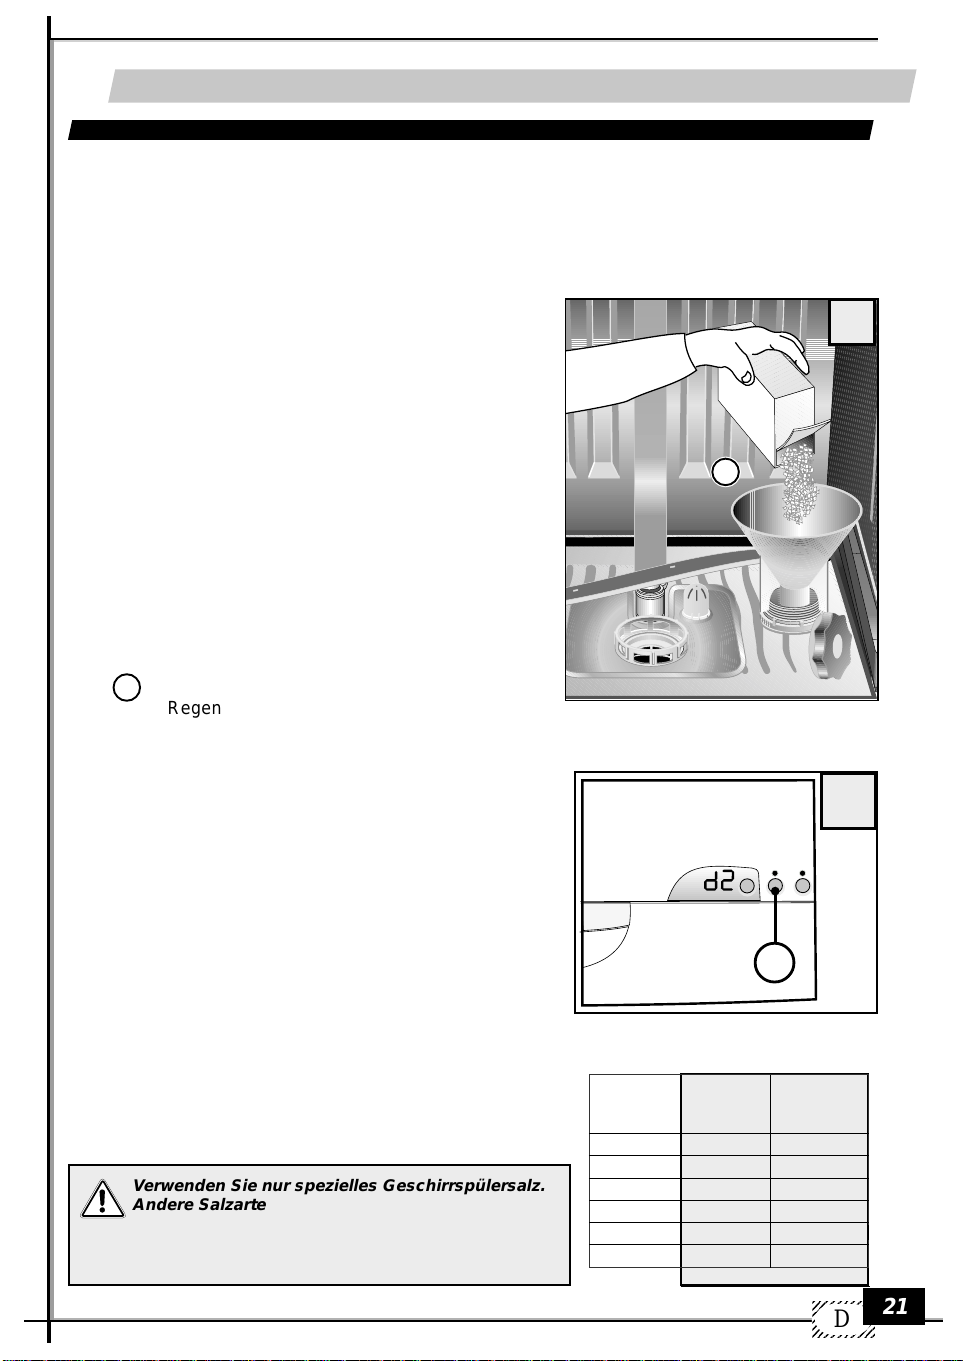
Einfüllen von Spezialsalz
• Tür öffnen und Unterkorb herausziehen.
• Deckel des Salzbehälters gegen den Uhrzeigersinn drehen, um ihn abzunehmen.
Nur für den ersten Durchlauf: circa 1/2 Liter W asser in den
Salzbehälter geben.
• Das Spezialsalz durch den Trichter L in den dafür vorgesehenen Behälter (circa 1,0 - 1,5 kg) einfüllen.
• Eventuelle Salzreste an der Behälteröffnung entfernen.
• Den Deckel wiederaufdrehen, dazu im Uhrz eigersinn drehen.
• Wenn das Geschirr nicht sofort nach dem Einfüllen des
Salzes gespült wird, das Programm EINWEICHEN einschalten, damit das W asser und das Granulat, die aus dem
Behälter entwichen sind weggespült werden.
• Die Wasserenthärteranlage beinhaltet eine elektrische
Anzeige, die angibt, wie viel Salz noch im Behälter vorhanden ist. A uf der Programmleiste Ihres Geschirrspülers (fig.
18, ) leuchtet eine Kontrolllampe auf, wenn das Nach-
6
füllen von Regeneriersalz notwendig ist.
L
LA2505-060
5
Einstellung der Wasserenthärteranlage
Empfehlenswert ist das Spülen mit weichem Wasser
(kalkarmem Wasser), damit der Entstehung von
Ablagerungen auf dem Geschirr und im Geschirrspüler
vorgebeugt wird.
Zur Ermittlung des Härtegrads des Wasserwenden Sie
sich an Ihr Kommunalamt oder benutzten Sie eines der im
Handel erhältlichen Tests.
Zur Einstellung der optimalen Regenerierung drücken Sie
die Taste DELAY 9 beim Einschalten des Geräts, dannach
wird die aktuelle Einstellung (z.B. d5) angezeigt (innerhalb
von 5 Sekunden)
Zur Änderung die gleiche Taste solange drücken, bis das
gewünschte Regenerierniveau (siehe T abelle) angezeigt wird.
Warten Sie circa 6 Sekunden, ohne die Wahl zu ändern und
das Piepen des Summers bestätigt dann die Einstellung des
neuen Niveaus, wobei auf dem Displa y die A uff orderung zur
Programmwahl erscheint.
Verwenden Sie nur spezielles Geschirr spülersalz.
Andere Salzarten (z.B. Kochsalz) enthalten
Substanzen, die sich nicht in Wasser auflösen und
den Wasserenthärter verstopfen und somit
unbrauchbar machen können.
Regenerierniveaus
Position des
Reglers
d1
d2
d3
d4
d5
d6
9
Französischer
Härtegrad
°fH
<15
>15 <25
>25 <40
>40 <60
>60 <80
>80 <90
>=höher/<=niedriger
Deutscher
Härtegrad
>8,4 <14
>14 <22,4
>22,4 <33,6
>33,6 <44,8
>44,8 <50,4
°dH
<8,4
D
6
21
Page 24
1234567890
1
0
1
0
1
0
1
0
1
0
1234567890
7
LA2505-080
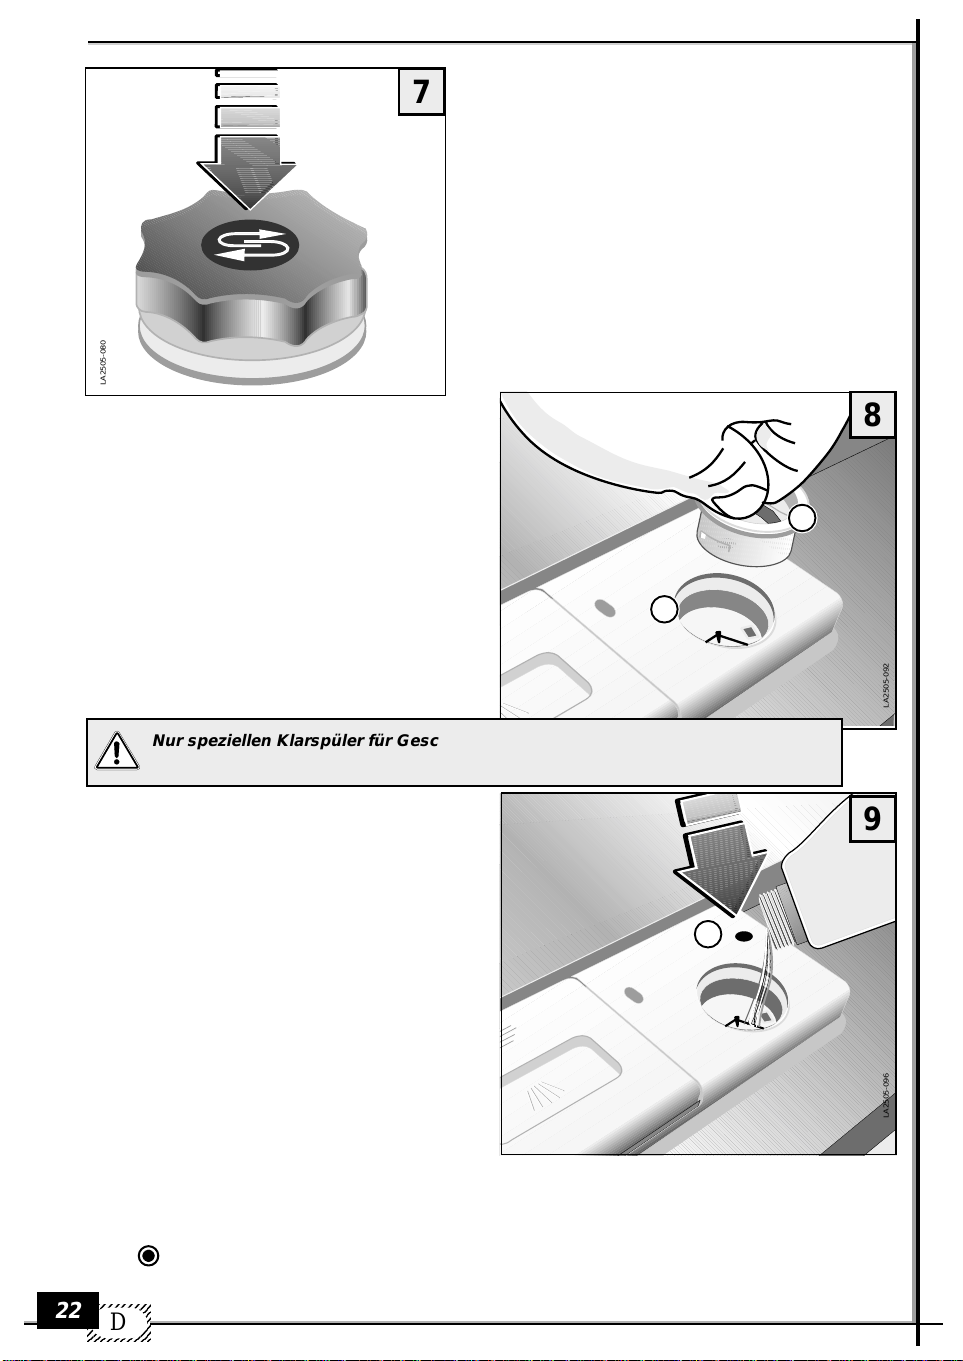
Einfüllen von Klarspüler
Der Klarspüler, der während der letzten Phase des
Spülvorgangs automatisch hinzugefügt wird, garantiert ein schnelles Trocknen des Geschirrs und
verhindert die Bildung von Fleck en und Kalkab lagerungen auf dem Geschirr.
Salzmangelanzeige zum Nachfüllen von
Regeneriersalz (falls vorhanden)
Die grüne Markierung unter der Kappe zeigt an,
dass noch ausreichend Spezialsalz im Behälter
vorhanden ist. Wenn die grüne Markierung nicht
mehr sichtbar ist, dann muss Spezialsalz nachgefüllt werden.
8
T
S
Nur speziellen Klarspüler für Geschirrspüler verwenden. Andere Produkte führen
nicht zum gewünschten Effekt.
Der Klarspülerbehälter S befindet sich auf der
Innenseite der Tür.
9
• Den Deckel T des Behälters mit einer Vierteldrehung gegen den Uhrzeigersinn drehen, um
ihn abzunehmen.
• Den Klarspüler bis zur gestrichelten Linie einfüllen.
F
Die Höchstmenge liegt bei circa 140 ml.
• Den Deckel wiederaufsetz en.
• Gegebenfalls ausgetretenen Klarspüler mit einem Tuch entfernen, da sich sonst während des
Spülvorgangs zu viel Schaum bildet.
Klarspülermangelanzeige
• Elektrisch (Abb. 18 - 6)
Das Gerät verfügt über eine Klarspülermangelanzeige, die das Niv eau des Klarspülers angibt.
Wenn die Anzeige aufleuchtet, m uss Klarspüler
nachgefüllt werden.
• Mechanisch (Abb.9)
Der Klarspüler muss eingefüllt werden, wenn die Anzeige auf dem Behälter F, eine helle Farbe aufweist ( ). Wenn der Behälter voll ist, weist die Anzeige eine dunkle Farbe auf.
LA2505-092
LA2505-096
22
23456789
23456789
23456789
23456789
D
23456789
Page 25

1
2
3
4
1
2
3
4
Einstellung der Dosierung des Klarspülers
Die Einstellung R der Dosierung befindet sich in der
Öffnung des Klarspülernachfüllbehälters.
Er kann mit einem Schraubenzieher eingestellt werden
und ist von 1 bis 4 regulierbar. Diese Zahlen
entsprechen der Klarspülerzugabe von 1 bis 4 ml. Im
Werk wurde die Zahl 2 (2 ml) eingestellt.
Der vollständig gefüllte Klarspülerbehälter reicht für ca.
50 Spülprogramme aus.
Eine Änderung der Dosiermenge ist erforderlich, wenn
das Ergebnis der Dosierung den gewünschten
Anforderungen nicht entspricht.
• Eventuell ausgetretenen Klarspüler stets mit einem
T uch entf ernen.
Es ist erforderlich, dass das Niveau des Klarspüler s
regelmäßig kontrolliert wird.
Einfüllen des Reinigungsmittels
WICHTIG! Kein Geschirrspülmittel im Geschirrspüler
verwenden, das für das Abw aschen per Hand gedacht
ist! Diese Reinigungsmittel bilden sehr viel Schaum,
reinigen das Geschirr im Geschirrspüler jedoch nicht
und können sogar zu Funktionsstörungen führen.
Verwenden Sie daher nur spezielle Reinigungsmittel
für Haushaltsgeschirrspüler.
Reinigungsmittel gut verschlossen und an einem
trockenen Ort aufbewahren.
Nur beim Einweichprogramm ist kein Reinigungsmittel erforderlich. Während des Programms wird das
Reinigungsmittel automatisch aus dem Behälter freigesetzt.
Die empfohlene Menge an Reinigungsmittel ist 25 g.
Die Wirksamkeit der verschiedenen Reinigungsmittel
kann unterschiedlich sein. Achten Sie deshalb auf die
empfohlenen Mengenangaben der je weiligen Herstellerfirma.
10
R
LA2505-094
11
P
Q
LA2505-090
Der Behälter für das Reinigungsmittel befindet sich auf
der Innenseite der Tür.
Wenn der Deck el geschlossen ist:
• Den V erschlusshebel P nach vorn drücken. Der Dekkel schnappt auf.
• Das Reinigungsmittel in den Behälter V einfüllen.
• Zum Schließen des Deckels, den Deckel hinunterdrücken, bis der Verschluss einschnappt.
Wenn das Geschirr besonders stark verschmutzt ist,
kann zusätzliches Reinigungsmittel in die Aushöhlung
Q des Deckels eingefüllt werden.
Die Aushöhlung bis zum Rand füllen, das Reinigungsmittel ist somit schon in der Einweichphase aktiv.
12
V
LA2505-100
23
D
Page 26

1234567890
1
0
1
0
1
0
1
0
1
0
1234567890
Einladen und Anordnung des
Geschirrs
Die beiden Körbe erlauben das Einladen von
verschieden Geschirrarten.
• Größere Speisereste vom Geschirr entfernen,
um einmögliches Verstopfen des Filters sowie
Geruchsbildung zu vermeiden.
• Besonders stark mit Speiseresten (vom Bra-
ten oder Frittieren) v erschmutzte Pfannen und
Töpfe in Wasser einweichen, bevor sie in den
Geschirrspüler eingeladen werden.
Gebrauch des Unterkorbs
Der Unterkorb ist für das Geschirr vorgesehen,
das schwierig zu Spülen ist, sowie für den
Besteckkorb.
In den Unterkorb werden flache Teller, tiefe Teller, Pfannen, Terrinen, Deckel und Servierteller
eingeladen.
Die flachen und tiefen Teller müssen so angeordnet werden, dass zwischen den einzelnen
Tellern ein Zwischenraum bestehen bleibt.
13
LA2505-110
Sie müssen in senkrechter Lage angeordnet werden, damit das Wasser frei zirkulieren kann.
14
Töpfe und Pfannen müssen stets umgedreht angeordnet werden.
Es gibt viele verschiedene Einräummöglichk eiten.
Wichtig ist jedoch, dass das Geschirr, die Töpfe
und die Pfannen so eingeladenwerden, dass alle
verschmutzten Oberflächen dem Wasserstrahl
ausgesetzt werden und dass das Wasser frei zirkulieren kann.
Besteck
Um ein besseres Spülergebnis zu erhalten, muss das Besteckmit dem Griff nach unten eingeräumt
werden. Löffel, Gabelnund Messer müssen in den Besteckk orb einsortiert werden.
ACHTUNG:
Besonders langes Besteck und vor allem, lange Messer, soll nicht mit dem Spitzen nach oben
eingefüllt werden, sondern horizontal in dem oberen Korb gelegt oder von Hand gewaschen
werden.
LA2505-112
24
23456789
23456789
23456789
23456789
D
23456789
Page 27

Gebrauch des Oberkorbs
Der vollständig herausziehbare Oberkorb dient
zum Einladen von Geschirr geringer und mittlerer Größe, wie Gläser, Untertassen, Kaffee- oder
T eetassen, flache Salatschüsseln, flache und nur
leicht verschmutzte Töpfe oder Pfannen. Dessertteller müssen stets senkrecht angeordnet
werden. Gläser, Tassen, Töpfe und Pfannen auf
dem Kopf stehend. Leichtes Geschirr muss so
zwischen den Halterungen angeordnet werden,
dass es nicht vom W asserstrahl fortgespült wird.
Das beste Spülergebnis wird erzielt, wenn Sie
die geeignetste Anordnung des Geschirrs in den
Körben herausgefunden haben.
Von diesem Moment an, kann der Spülvorgang
seine volle Wirkung entfalten.
Aufgrund der erhöhten T emperatur des Spül wassers sowie der chemischen Reaktion
des verwendeten Reinigungsmittels, ist es empfehlenswert Gegenstände aus Kupfer, eloxiertem Aluminium, Besteck mit Griffen aus Holz oder Horn, empfindliches
Porzellan, nicht hitzebeständiges Geschirr aus Glas und Plastik nicht im Geschirrspüler zu reinigen. Bei dekoriertem Porzellan ist es empfehlenswert, mit einem der
Teile einen Probespülgang durchzuführen, um zu prüfen, ob die Dekoration verändert oder beschädigt wird.
15
LA2505-120
Höheneinstellung des Oberkorbs.
Durch Einwirken auf den seitlichen Griff (nur auf der linken
Seite), können die Höhe und die Neigung des Korbs
reguliert werden.
1 Einstellung horizontale Position
2 Einstellung Schräglage
16
LA2505-130
1
LA2505-132
2
D
LA2505-134
25
Page 28

1234567890
1
0
1
0
1
0
1
0
1
0
1234567890
Herausnehmen des Oberkorbs
Der Oberkorb kann wie in der Abbildung dargestellt, aus den Leitschienen herausgezogen werden.
Beschreibung der Bedien- und
der Anzeigeelemente
Anzeige-Led
Kommandotasten
17
LA2505-160
1) Startverzögerungsanzeige (Delay)
2) Anzeige der halben Ladung
3) Anzeige ohne Vorspülen
4) Anzeige Trocknungsvorgang
5) Salzmangelanzeige
6) Klarspülermangelanzeige
7
7) Ein/Aus
8) Programmwahl
9) Wahl Startverzögerung
(Delay)
10) Wahl halbe Ladung
15
11) Wahl ohne Vorspülen
12) Wahl T roc knungsvorgang
13) Start/Stop/Pause Programm
14) Mulifunktionsdisplay
15) Türgriff
3
4
2
1
14
8
9
10
11
5
6
18
EL0510-010
13
12
Starten
Nach der Kontrolle der Menge des Regeneriersalzes und des Klarspülers, den Wasserhahn vollständig
aufdrehen, das Geschirr in die Körbe einräumen, das Reinigungsmittel und (falls nötig) das
Reinigungsmittel für die Vorspülung in den Reinigungsmittelbehälter geben und die Tür schließen.
Wie folgt verfahren:
• Die Taste “Ein-Aus “drücken . Das Displa y Programmwahl leuchtet auf.
7
• Das gewünschte Programm über die Taste eingeben (Programmwahl)
• Die Taste Programmstart/pause drücken. Nach dem akustischen Signal der Anzeige des
13
Programmbeginns führt das Gerät automatisch den Spülvorgang aus.
Achtung: Auf dem Display wird die Dauer des eingestellten Programms angezeigt.
Es ist ratsam, den Geschirrspüler während des Waschgangs nicht zu öffnen.
23456789
23456789
26
23456789
23456789
D
23456789
14
8
Page 29

Optionen
(Beachten Sie, dass die ver schiedenen Optionen v or Beginn des Spülvor gangs eingestellt werden müssen)
• Startverzögerung (Delay) ; die Verzögerungseinstellungen (von 1 Stunde bis zu 16 Stunden) werden auf
dem Display angezeigt, w obei das entsprechende Led beginnt, während der gesamten Dauer der eingestellten
V erzögerung aufzublink en.
Um die Bestätigung der eingestellten Option zu erhalten, muss auf dem Display die Nummer des voreingestellten Programms erscheinen.
• Halbe Ladung ; wenn die Spülbedingungen über diese Taste ausgewählt werden, erscheinen auf dem
Display die folgenden Angaben (¯ =Spülen Ober korb , _ =Spülen Unterkorb) und das entsprechende Led leuchtet
auf. Um die Bestätigung der eingestellten Option zu erhalten, muss auf dem Display die Nummer des voreingestellten Programms erscheinen.
• Ohne V orspülen ; diese Option ist n ur bei den Prog r ammen möglich, bei denen das Vorspülen vorgesehen ist. Beim Drücken der Taste leuchtet das entsprechende Led auf. Um die Bestätigung der eingestellten
Option zu erhalten, muss auf dem Display die Nummer des voreingestellten Programms erscheinen.
• Trocknungsvorgang ; diese Option wird automatisch bei den Programmen durchgeführt, bei denen sie
vorgesehen ist (siehe Programmtabelle). Um die Einstellung des Trocknungsvorgangs zu ändern, die Taste
Trocknen drücken, bevor das Programm gestartet wird. Folgende Anzeigen erscheinen auf dem Display:
A0 =ohne Trocknen - A1 =Trocknen 20' - A2 =Trocknen 35' - A3=Trocknen 45' das entsprechende Led auf der
Programmleiste leuchtet auf . Um die Bestätigung der eingestellten Option zu erhalten, muss auf dem Display
die Nummer des voreingestellten Programms erscheinen.
• Anmerkung: Bei Modellen ohne T rocknungsbelüfter m uss diese Option als A ufschub am Ende des W aschgangs
angerechnet werden;
• Beschreibung der Start/Stop/Pausen-Taste
• Der Programmstart wird durchgeführt, (der Ton des Summers bestätigt den Beginn des Programms).
• Wenn die Maschine über den Schalter Start/Stop (EIN/A US) eingeschaltet wird, z eigt das Displa y die Nummer
des letzten ausgeführten Programms an. Falls das vorhergehende Programm nicht beendet war, blinkt die
Programmnummer auf dem Display. Um das Programm wieder in Gang zu setzen, die Taste “START”
drücken, und auf dem Display erscheint automatisch die verbleibende Laufzeit.
(Dies geschieht jedesmal, wenn die Maschine während des Waschgangs geöffnet wird)
• Falls sie während des W aschgangs für w eniger als 5" gedrüc kt wird, macht die Maschine eine Pause, auf dem
Display blinkt die Nr. des gewählten Programms (in diesem Fall kann Geschirr eingefüllt oder entnommen
werden).
Um das Waschprogramm fortzusetzen, die Tür schließen und die Taste erneut drücken.
• Falsche Einstellung der Programme (Programmwechsel)
• Programm über die Start/Stop/Pausen-Taste zurücksetzen und solange drück en, bis der Summer aufhört
zu piepen.
• Die „Programmwahl” wiederholen.
Achtung: Wenn das Prog ramm begonnen hat und die Phase des Wassereinlauf ens durchgeführt wurde, erscheint
auf dem Display die Anzeige “ “, Dannach entlädt das Gerät das Wasser nach dem anhaltenen Piepen des
Summers und auf dem Display erscheint die Einstellung des voreingestellten Programms.
Jetzt ist das Gerät für eine neue Einstellung bereit.
• Anmerkung: Wenn man die Tür geöffnet hat, die Taste Start erneut drücken, um den Geschirrspüler
wieder in Gang zu setzen.
• Ein-/Ausschalten des akustischen Signals (Buzzer)
b0 = akustisches Signal AUS
b1 = akustisches Signal EIN
Um das AKUSTISCHE SIGNAL (BUZZER) einzuschalten, die Taste PROGRAMM gedrückt halten,
wenn die Maschine gestartet wird. Auf dem Displa y erscheint die Einstellung “b1”. Um diese Einstellung zu
ändern, dieselbe Taste so lange drücken, bis der gewünschte Stand des akustischen Signals erreicht ist.
Ungefähr 6 Sekunden warten, ohne die Option zu verändern, danach wird der Signalton des B UZZERS die
Speicherung bestätigen;
• Ende des Waschgangs
Wenn der Waschgang beendet ist, bleibt die Programmnummer auf dem Display fix angezeigt; falls
diese blinkt, das Ende des Waschgangs abwarten.
• Überprüfen der Funktionen
In der folgenden Weise ist es möglich während der Waschphasen die verschiedenen Funktionen sichtbar zu
machen:
Durch Drücken der T aste Prog rammwahl erscheint auf dem Displa y die Nr . des vorher gewählten Prog ramms.
Durch Drücken der Taste halbvoll wird auf dem Display die obere oder untere Waschzone angezeigt.
Durch Drücken der Taste Trocknen wird auf dem Display der Trocknungsstand angezeigt.
10
11
12
Stop
Nach dem Spüldurchlauf hält der Geschirrspüler automatisch an, ein längeres Ertönen des Summers zeigt das
Ende des Waschvorgangs an. Zum Ausschalten der Kontrolllampe die Ein/Aus - Taste
drücken. Nach jedem Spüldurchlauf unbedingt den Wasserhahn abdrehen, um den Geschirrspüler vom
Wasserversorgungsnetz zu trennen.
12
9
13
7
13
13
13
8
14
8
10
12
7
27
D
Page 30

1234567890
1
0
1
0
1
0
1
0
1
0
1234567890
Tabelle der Spülprogramme
Ein
Aus
REINIGUNGSMITTEL
Vorspülen
Geschirr und
Art der Verschmutzung
Spülen
Töpfe und Geschirr bis zum
nächsten Spüldurchlauf
Stark verschmutzte Töpfe
(mit Ausnahme von empfindlichen T eilen)
Mäßig verschmutztes
Geschirr (mit Ausnahme
von empfindlichen Teilen)
Empfindliches Geschirr stark
verschmutzt
Normal verschmutztes Geschirr
Stark verschmutztes Geschirr
Töpfe und Geschirr
Stark verschmutzte Töpfe
und Geschirr
Programmbeschreibung
Kurzes Kalt-Spülen, damit keine
Speisereste am Geschirr haften
1 Vorspülen warm – Hauptprogramm
3 Spülen (2 kalt- 1 warm) Trocknen
1 Vorspülen kalt – Hauptprogramm
2 Spülen (1 kalt - 1 warm) Trocknen
Hauptprogramm
2 Spülen (1 kalt - 1 warm) Trocknen
1 Vorspülen kalt – Hauptprogramm
2 Spülen (1 kalt - 1 warm)
Hauptprogramm
2 Spülen (1 kalt - 1 warm)
Hauptprogramm
3 Spülen (2 kalt - 1 warm) Trocknen
1 Vorspülen kalt – Hauptprogramm
3 Spülen (2 kalt - 1 warm) Trocknen
Dauer*
(1)
11’
2h
2h 17’
1h 40’
49’
39’
1h 38’
2h 11’
TASTE
e
m
ogram
r
P
Einweichen
70°C
60°C
60°C
40°C
40°C
60°C
70°C
Vor-Kurzspülen
Intensiv 70°C
Normal 60°C
(EN 50242)
Sanft 60°C
Normal 40°C
Schnell 40°C
Öko 60°C
Stark 70°C
1
2
3
4
5
6
7
8
Programmnummer
P1
P2
P3
P4
P5
P6
P7
P8
(1) N.B. Richtungs weisende Dauer der W aschzeiten einschließlich Trocknungszeit für Programme bei denen dieser Vorgang vor gesehen ist;
Trocknungszeit “Einstellung der Standards auf A2 = 35”.
(*) Bei Programm P1 ist die Einstellung “Trocknen” möglich (siehe Abschnitt Optionen); damit hat man ein Warmspül-Programm mit
Trocknen (TELLERWÄRMER) mit den folgenden Einstellungen:
A1 wäscht bei 65°C, trocknet 20' - A2 wäscht bei 60°C, trocknet 35' - A3 wäscht bei 50°C, trocknet 45'.
WARTUNG
7
7.1 REINIGUNG DER SPRÜHARME
Die Sprüharme können ganz einfach ausgebaut werden, um die regelmäßige Reinigung der Düsen
durchzuführen und somit möglichen Verstopfungen vorzubeugen.
Spülen Sie sie sorgfältig unter fließendem Wasser ab und setz en Sie sie wieder an ihren Standort ein.
19
LA2505-210
Demontage des oberen Sprüharmes:
Die Halterung des Sprüharmes gegen den
Uhrzeigersinn drehen.
23456789
23456789
28
23456789
23456789
D
23456789
Demontage des unteren Sprüharmes:
Den Sprüharm nach oben ziehen und herausziehen.
20
LA2505-220
Page 31

7.2 REINIGUNG DER FILTER
Nach jedem Spülgang ist es empfehlensw ert, die Filter zu kontrollieren und e v entuelle Reste wie folgt
zu entfernen:
• Den mittleren Filter herausnehmen 1.
• Den äusseren Filtersieb herausnehmen 2.
• Das bewegliche Sieb entfernen 3.
Die T eile müssen unter fliessendem Wasser abgespült werden. Die Filter müssen unbedingt sorgfältig
gereinigt werden, da der Geschirrspüler mit verstopften Filtern nicht funktioniert.
Vergessen Sie nicht, die sauberen Filter wieder an ihren Platz einzusetzen, damit an der Spülpumpe
keine Schäden entstehen.
21
22
23
1
3
2
LA2505-180
LA2505-190
LA2505-200
7.3 REINIGUNG DER ÄUSSEREN OBERFLÄCHEN DES GERÄTS
Die Oberflächen des Geräts, aus Metall oder Plastik der frontalen Bedien ungsleiste müssen regelmäßig
mit einem weichen und feuchten Tuch gereinigt werden. V erwenden Sie dazu aber k einesf alls Säuren
oder Kratzer verursachende Scheuermittel.
Längere Außerbetriebnahme
Wenn der Geschirrspüler längere Zeit nicht benutzt wird, wie folgt vorgehen:
• Führen Sie zwei Einweichprogramme durch.
• Ziehen Sie den elektrischen Stromstecker heraus.
• Den Wasserzufuhrschlauch abtrennen.
• Die Tür etwas offen stehen lassen, damit kein übler Geruch entsteht
7.4 FEHLER KODE-TABELLE
Fehler
E1
E2
Auftreten
Während des
Wassereinlaufs
(das Programm bleibt
stehen)
Am Ende des
- Wasserhahn zu
- Filter des Auslaufschlauchs verstopft
- Auslaufschlauch auf dem Boden
- Auslaufschlauch defekt
- Wassereinlaufschlauch geknickt
- Unzureichender Wasserdruck
- Waschzyklus wiederholen
Waschgangs
E4
E5
E6
E7
Am Ende des
Waschgangs
Am Ende des
Waschgangs
Am Ende des
Waschgangs
Am Ende des
- Unzureichender Wasserdruck
- Das Ventil des Wasserzähler
funktioniert nicht
- Auslaufschlauch geknickt
- Der Siphon ist verstopft
- Auslaufpumpe blockiert
- Filtergitter verstopft
- Umgedrehter Kochtopf
- Waschzyklus wiederholen
Waschgangs
N.B.: Geben Sie immer die Fehlerart an, wenn Sie den zuständigen Kundendienst anrufen.
Kontrollen
- Programm in Ausgangsstellung zurückbringen
- Nachprüfen
- Programm in Ausgangsstellung zurückbringen
- Zuständigen Kundendiesnst anrufen
- Programm in Ausgangsstellung zurückbringen
- Wasserdruc k prüfen
- Falls das Problem erneut auftritt, sofort den
zuständigen Kundendienst benachrichtigen und
die Art des Fehlers angeben
- Wasserdruc k prüfen
- Zuständigen Kundendiesnst anrufen
- Nachprüfen
- Nachprüfen
- Zuständigen Kundendiesnst anrufen
- Filtergitter reinigen
- Am Ende des Waschgangs nachprüfen, beim
nächsten Waschgang die Töpfe korrekt
hineinstellen
- Falls das Problem erneut auftritt, sofort den
zuständigen Kundendienst benachrichtigen und
die Art des Fehlers angeben
Abhilfe
D
29
Page 32

1234567890
1
0
1
0
1
0
1
0
1
0
1234567890
SUCHE NACH STÖRUNGSURSACHEN
8
Prüfen Sie zunächst einmal, ob Sie e ventuelle Schäden mit Hilf e der f olgenden Anleitung allein beheben können.
Sollten diese Anweisungen zur Lösung des Problems nicht hilfreich sein, wenden Sie sich bitte an den
Kundendienst.
• Das Programm startet nicht.
- Sind die Sicherungen der elektrischen Anlage beschädigt? Ist das Gerät elektrisch angeschlossen?
- Ist die Tür richtig geschlossen? Um die Tür richtig zu schliessen, Tür andrücken.
• Es läuft kein Wasser in das Gerät ein.
- Ist der Wasserhahn geöffnet?
- Ist der Filter zwischen dem W asserhahn und dem W asserzufuhrschlauch v erstopft? Gegebenenf alls den Filter
säubern.
- Weist der Wasserzufuhrschlauch Drosselstellen auf? Schlauch kontrollieren.
• Die Anzeige des Programmdruckknopfs b leibt am Anfang des Spülvorgangs stehen.
- Ist der Wasserhahn vollständig aufgedreht?
- Ist der Filter zwischen dem W asserhahn und dem W asserzufuhrschlauch v erstopft? Gegebenenf alls den Filter
säubern.
- Beträgt der Mindestdruck des Wassers mindestens 0,05 Mpa?
• Das Wasser wird nicht abgepumpt.
- Weist der Abflußschlauch Drosselstellen auf? Die Installation des Schlauchs prüfen.
- Ist der Geruchsverschluss (Siphon) verstopft? Den Geruchsverschluss überprüfen.
- Das Geschirr wird nicht sauber.
• Das Geschirr wird nicht sauber
- Ist das gewählte Programm für den Typ und den Verschmutzungsgrad des Geschirrs geeignet?
- Wurde das Geschirr so eingeräumt, dass das der Wasserstrahl die innere und äussere Oberfläche des Ge-
schirrs erreichen kann?
- Die Geschirrkörbe dürfen nicht überladen werden.
- Werden die Flügelräder vom Geschirr oder von Teilen des Bestecks behindert?
- Sind alle Filter des Innenraums sauber? Wurden die Filter korrekt wieder an ihren Platz eingesetzt?
- Ist die Dosierung des verwendeten Reinigungsmittels korrekt?
- Ist der Abflussschlauch korrekt installiert worden?
- Ist noch Spezialsalz im Salzbehälter vorhanden? Ohne das Spezialsalz wird das Wasser nicht enthärtet.
- Ist die Wasserenthärteranlage gemäß der örtlichen Wasserhärte eingestellt worden?
• Das Geschirr trocknet nicht und bleibt stumpf.
- Ist noch Klarspüler im Tank?
• Die Gläser und das Geschirr haben Streifen, Ränder, weisse Flecken ode einen blauen Schimmer.
- Beim Spülen wird eine übertriebene Menge an Klarspüler freigesetzt. Setzen Sie die Klarspülerdosis herab.
• Die Gläser und das Geschirr weisen durch getrocknete Wassertropfen Flecken auf.
Wird während des Spülens nicht genügend Klarspüler freigesetzt? Erhöhen Sie die Klarspülerdosis.
Warnung!
Dadurch, dass der Geschirrspüler im Werk sorgfältig getestet und geprüft wurde, können kleine
Wassertropfen vorhanden sein, die nach dem ersten Spülgang wieder verschwinden.
30
23456789
23456789
23456789
23456789
D
23456789
Page 33
AVANT D’UTILISER L’APPAREIL
1
1.1 INSTRUCTIONS DE SECURITE
Utilisation d’après les normes
• La machine à laver la vaisselle doit être utilisée seulement pour le lavage de la vaisselle à usage
domestique.
Si l’appareil est utilisé pour d’autres objectifs ou de façon erronée, la Maison de construction ne
s’assume aucune responsabilité pour des dommages éventuels.
• Pour des motifs de sécurité, aucune transformation ou modification au lave-vaisselle n’est admise
• Avant de brancher l’appareil au réseau électrique, assurez-vous que les données de tension et de
courant indiquées sur la plaque des données correspondent à celles qui sont indiquées à l’endroit
de l’installation.
• L’installation doit être faite par du personnel qualifié.
Opérations préliminaires lors de la première mise en marche
• Contrôlez si le lave-v aisselle a subi des dégâts éventuels durant le transport. Dans tous les cas, ne
branchez pas l’appareil endommagé. En cas de dégâts, adressez-vous à votre fournisseur.
Pour la sécurité des enfants
• Ne permettez pas aux enfants de jouer avec l’appareil.
• Les produits détersifs peuvent causer des dommages irréparables au yeux, à la bouche et à la
gorge.
Garder donc les détersifs hors de la portée des enfants.
• L’eau dans le la ve-v aisselle n’est pas potab le. Tant qu’il y a encore des restes de détergents dans la
machine, c’est un danger pour les enfants qui doivent s’éloigner du lave-vaisselle ouvert.
Pour le fonctionnement quotidien
• Ne mettez jamais en marche le lav e-vaisselle si le câble du cour ant, les tuyaux d’entrée et d’év acuation de l’eau sont endommagés ou si le tableau des commandes, le dessus de la machine ou le
socle sont très détériorés.
• En cas de panne, fermez avant tout le robinet de l’eau, éteignez l’appareil et enlevez la fiche de la
prise de courant. En cas de connexion fixe, débranchez év entuellement l’interr upteur de service ou
enlevez le fusible (ou les fusibles).
• Pour ôter la fiche de la prise de courant, saisissez la fiche par le corps et jamais par le câble.
• Les réparations de la machine à lav er la vaisselle doiv ent être effectuées seulement par des personnes spécialisées. Des répar ations non appropriées peuvent mettre l’utilisateur en grav e danger. En
cas de réparations, adressez-vous donc à notre service technique assistance clients ou à votre
revendeur spécialisé.
• Le remplacement du câble d’alimentation doit être effectué seulement par le personnel du service
assistance technique.
• En cas de détérioration des tuyaux, pour le raccordement de l’appareil, ceux-ci doivent être remplacés par des tuyaux originaux.
• N’introduisez pas de substances dissolvantes qui pourr aient pro v oquer une e xplosion dans le la v evaisselle.
• Ne vous assey ez pas et ne vous appuy ez pas sur la porte ouverte: la machine pourr ait se renv erser .
• Avant d’introduire le sel spécial, le détersif et le liquide de rinçage, assurez-vous que le producteur
de ces substances recommande leur utilisation pour les machines à laver la vaisselle à usage
domestique.
• Fermez toujours le robinet de l’eau si vous n’utilisez pas le lave-vaisselle pendant quelque temps,
par exemple durant les vacances.
31
F
Page 34

1234567890
1
0
1
0
1
0
1
0
1
0
1234567890
DEBALLAGE- TRAITEMENT DES ORDURES
2
2.1 DEBALLAGE
Enlevez l’emballage externe en plastique, les coins renforcés et les bases en polystyrène.
Ouvrez la porte et enlevez les pièces de polystyrène des paniers.
La récupération et le recyclage du matériel d’emballage contribuent à économiser les matières
premières et à diminuer le volume des ordures.
Livrez l’emballage à la décharge pour la récupération des matériaux recyclables.
Quand un jour l’appareil devra être mis définitivement hors d’usage, rendez-le inutilisable avant son
élimination.
A TTENTION! Le matériel de l’emballa ge (par e x. des sacs en plastique, polystyrène ) peut représenter une source de danger pour les enfants; pour cette
raison, il faut le mettre hors de leur portée.
2.2 TRAITEMENT DES ORDURES – APPAREIL A METTRE AU REBUT
Quand la machine ne fonctionne plus, elle doit être mise au rebut par des maisons spécialisées, en
respectant les règles en vigueur.
De cette façon, en éliminant un vieil appareil il est possib le d’eff ectuer la récupération différenciée des
matériaux synthétiques destinés au recyclage, pour respecter l’environnement.
APERÇUS GENERAUX
3
3.1 LAVER DE FAÇON ECONOMIQUE ET ECOLOGIQUE
• Ne lavez pas la vaisselle avant sous l’eau courante.
• Utilisez le lave-vaisselle toujours bien rempli, puisqu’il est possible seulement ainsi d’effectuer un
lavage économique et dans le respect pour l’environnement.
• Sélectionnez toujours un programme de lavage correspondant au type de vaisselle et à leur degré
de saleté.
• Evitez absolument des dosages trop abondants de détersif, de sel spécial et de liquide de rinçage.
Faites attention aux doses recommandées dans le mode d’emploi et dans les indications de la
Maison de production de ces substances.
• Vérifiez si le dispositif adoucisseur de l’eau est réglé correctement.
3.2 VAISSELLE NON APPROPRIEE
Ne sont pas appropriés au lavage dans le lave-vaisselle:
- les planches à hacher ou les petits plateaux en bois
- les objets en matière plastique non résistant à la chaleur
- le cristal au plomb
- les objets en étain ou en cuivre
- la vaisselle ou les services ayant des parties collées
- les services plutôt vieux, dont la colle est sensible à la chaleur
- les objets en acier qui s’oxydent facilement
- les services aux manches en bois, en corne, en porcelaine ou en nacre.
Au moment de l’achat de vaisselle , de verres et de services , assurez-vous qu’ils sont appropriés pour
le lavage dans le lave-vaisselle.
Au moment de l’achat de vaisselle, de verres et de services, assurez-vous
qu’ils sont appropriés pour le lavage dans le lave-vaisselle.
32
23456789
23456789
23456789
23456789
F
23456789
Page 35

DESCRIPTION DE LA MACHINE
4
4.1 VUE GENERALE
1) Réservoir pour le sel
2) Réservoir pour le liquide de rinçage
3) Ventilateur essuyage (si prévu)
4) Distributeur de détergent
5) Plaque des données
6) Filtres
7) Bras d’irroration tournant inférieur
8) Bras d’irroration tournant supérieur
9) Câble alimentation électrique
10) Tuyau alimentation eau
11) Tuyau d’écoulement
12) Panier inférieur
13) Panier supérieur
14) Récipient services
15) Crochet fermeture porte
13
12
15
1
9
10
11
8
7
6
1
14
5
4
4.2 DONNEES TECHNIQUES
Capacité ( selon nombre couverts standard ) : 12
Pression dans l’installation hydraulique
pression minimum: 0,05 MPa
pression maximum: 1 MPa
0,05 - 1MPa Model. ......................
MAX .......W
........V.....Hz
Made in EU
3 2
....A
...................
ATTENTION: les caractéristiques électriques sont indiquées sur la plaque des
données.
12
F
LA2505-020/1
33
Page 36

1234567890
1
0
1
0
1
0
1
0
1
0
1234567890
INSTALLATION
5
5.1 NIVELLEMENT
2
M
2.1
P
LA2505-030
Quand l’appareil est placé à son endroit d’installation, réglez les petits pieds P en les vissant ou
dévissant, si nécessaire, pour trouver la même hauteur de la machine et le même niveau.
Un bon nivellement assure le fonctionnement correct du lave-vaisselle.
Ecart max=2 degrés
Après que la machine a été nivelée, régler en outre le crochet fermeture porte de sorte que celle-ci se
ferme parfaitement.
Une fois l’appareil mis à niveau, règler la gache de fermeture de porte pour obtenir une fermeture
parfaite.
5.2 RACCORDEMENT HYDRAULIQUE
Le tube d’entrée eau C, fourni avec l’appareil permet le
raccordement à un robinet avec raccord 3/4”.
Durant le montage, vous devez respecter les instructions suivantes:
• vissez le tube C au robinet de l’eau froide A.
• si le raccordement est effectué avec une tuyauterie
qui est utilisée depuis longtemps, on conseille de laisser couler l’eau avant de raccorder le tuyau d’entrée
de l’eau afin d’éliminer les dépôts de rouille et de saleté;
• assurez-vous que la pression dans l’installation h ydrau-
lique est dans les valeurs limite indiquées dans les
données techniques.
Le lave-v aisselle peut être relié à la conduite de l’eau
froide, mais jamais à celle de l’eau chaude.
23456789
23456789
34
23456789
23456789
F
23456789
3
A
C
LA2505-040
Page 37

5.3
RACCORDEMENT POUR L’EVACUATION DU PRODUIT NETTOYANT
Le tube d’évacuation T fourni avec l’appareil doit être accroché avec la partie extrême recourbée au
bord d’un évier ou une conduite d’écoulement.
Il est opportun de placer un siphon anti-odeur.
Durant le montage, il est nécessaire d’observer les précautions suivantes:
- Le tube d’évacuation ne doit pas être plié pour ne pas causer d’étranglements;
- L’extrémité du tube par rapport au dessus du lave-vaisselle (fig. 4) doit être placée à une hauteur
comprise entre 32 cm et 80 cm.
- En aucun cas, l’extrémité du tube doit être plongée dans l’eau;
- Une rallonge éventuelle du tube d’évacuation ne doit pas dépasser la longueur d’un mètre et doit
avoir le même diamètre interne et en outre la hauteur maximale à laquelle l’extrémité libre peut être
placée doit être réduite de 80 cm. à 50 cm.;
- Dans le cas d’une conduite d’évacuation, le diamètre interne ne doit pas être inférieur à 4 cm.
4
LA2501-050
5.4 BRANCHEMENT ELECTRIQUE
ILe branchement électrique de la machine doit être effectué seulement à l’aide
d’une prise avec contact à terre installée selon les instructions. Le branchement
doit correspondre aux normes légales en vigueur et aux normes supplémentaires
de l’entreprise électrique compétente.
L’indication de la tension doit correspondre à la tension du réseau du lieu d’installation.
Pour le dimensionnement de la prise de courant, rapportez-vous à la plaque des
données.
T
T
max 80 cm
min 32 cm
35
F
Page 38

1234567890
1
0
1
0
1
0
1
0
1
0
1234567890
USAGE
6
6.1 OPERATIONS PRELIMINAIRES
Avant la mise en marche de la machine, assurez-vous que la fiche du câble d’alimentation est
enfilée dans la prise de courant, que le tuyau d’entrée de l’eau est raccordé au robinet, que le
robinet est ouvert et que le tuyau d’évacuation a été relié en suivant les instructions.
Ouverture de la porte
Tirer en avant la poignée: la porte s’ouvre facilement. Si cette opération est accomplie pendant que la
machine est en marche, un dispositif de sécurité arrête le lave-vaisselle.
Introduction du sel spécial
• Ouvrir la porte, sortir le panier inférieur.
• Dévisser le bouchon du réservoir du sel en le tournant dans
le sens contraire des aiguilles d’une montre,
Seulement pour la première mise en marche: introduire
environ 1/2 litre d’eau dans le réservoir du sel.
• Renversez le sel spécial à trav ers l’entonnoir L dans le réser-
voir fait exprès (environ 1,0 - 1,5 kg).
• Nettoyez l’ouverture du réservoir des résidus éventuels de sel.
• Revissez le bouchon du réservoir en le tournant dans le sens
des aiguilles d’une montre.
• Si tout de suite après l’introduction du sel la vaisselle ne se
lave pas , appuyez sur le prog ramme TREMPAGE, jusqu’à ce
que l’eau et les grains de sel sortis du réservoir soient dilués
et éliminés.
• L ’installation d’adoucissement comprend un indicateur élec-
trique pour signaler le contenu du sel.
Une lampe témoin s’allume sur le panneau antérieur (fig.
18, ) de votre lave-vaisselle quand il est nécessaire
6
d’ajouter du sel régénérant.
L
LA2505-060
5
Réglage du dispositif adoucisseur de l’eau
Pour le lavage, on conseille l’eau douce (pauvre en calcaire),
pouréviter que des dépôts se forment sur la v aisselle et dans le
lave-vaisselle même .
Pour savoir le degré de dureté de l’eau, adressez-vous au
bureau de votre commune ou utilisez un kit commercial de
relèvement.
Pour arriver à la position de régénération la meilleure, il faut
maintenir pressée la touche DELAY 9 (fig.6) à la mise en marche de la machine; tout de suite après, la nouvelle sélection
sera affichée (ex. d5); pour la modifier (dans les 5 secondes),
appuyer sur la même touche jusqu’à ce que vous aurez
sélectionné le niveau voulu de régénération (voir tableau).
Attendre environ 6 secondes, sans modifier le choix; le son du
buzzer confirmera la lecture du nouv eau niveau; sur le Displa y
apparaîtra la sélection du programme demandée.
Utilisez seulement du sel spécial pour lave-v aisselle; d’autres types de sel (par ex. le sel de cuisine) contiennent souvent des substances qui ne
se diluent pas avec l’eau et ils peuvent boucher
l’adoucisseur et le rendre inutilisable.
23456789
23456789
36
23456789
23456789
F
23456789
Niveaux de régénération.
Position
du
régulateur
d1
d2
d3
d4
d5
d6
Degrés
français
°fH
<15
>15 <25
>25 <40
>40 <60
>60 <80
>80 <90
>=majeur/<=mineur
6
9
Degrés
allemands
°dH
<8,4
>8,4 <14
>14 <22,4
>22,4 <33,6
>33,6 <44,8
>44,8 <50,4
Page 39

LA2505-080
7
Signalisation de contrôle pour l’introduction
du sel (si prévu)
La couleur verte sous le capuchon, indique qu’il y
a encore suffisamment de sel spécial dans le réservoir.
Se la couleur verte n’est plus visible, alors il est
nécessaire d’introduire davantage de sel spécial.
Introduction du liquide de rinçage
Le liquide de rinçage qui est ajouté automatiquement durant la dernière phase de lavage , garantit
un essuyage rapide de la vaisselle et évite la formation de taches et de résidus calcaires sur la
vaisselle.
Utiliser seulement du liquide de rinçage spécifique pour lave-vaisselle, les autres
produits ne produisent pas l’effet voulu.
Le réservoir du liquide de rinçage S se trouve à
l’intérieur de la porte .
• T ournez le bouchon T du réservoir d’un quart de
tour dans le sens contraire des aiguilles d’une
montre pour l’extraire.
• Introduisez le liquide de rinçage jusqu’à la ligne
en tirets.
Quantité maximum environ 140 ml.
• Remettez le bouchon.
• Nettoyez le liquide de rinçage qui év entuellement
est sorti, avec un chiffon, sinon il y aura trop de
mousse durant le rinçage.
8
T
S
LA2505-092
9
F
Signalisation de contrôle pour l’introduction du
liquide de rinçage
• Electrique (fig. 18 - 18.1)
L’appareil a un indicateur de niveau du liquide
de rinçage. Quand il s’allume , il f aut ajouter l’additif.
• Mécanique (fig.9)
Le liquide de rinçage doit être introduit si l’indicateur sur le réservoir F a une couleur claire (
Quand le réservoir est plein, l’indicateur a une couleur foncée.
LA2505-096
).
37
F
Page 40

1234567890
1
0
1
0
1
0
1
0
1
0
1234567890
1
2
3
4
1
2
3
4
Réglage du dosage du liquide de rinçage
Le réglage R du dosage se trouve dans l’ouverture
de remplissage du réservoir du liquide de rinçage.
En se servant d’un tourne-vis, on peut le régler de 1
à 4, chiffres qui correspondent à l’adjonction du liquide de rinçage de 1 à 4 ml. Au départ de l’usine, il
est réglé sur 2(2 ml).
Le réservoir du liquide de rinçage complètement plein
est suffisant pour environ 50 progr ammes de lav age .
Il est nécessaire d’effectuer un changement dans la
quantité du dosage si le résultat n’est pas celui qui
est désiré.
• Nettoyer toujours le liquide de rinçage qui éven-
tuellement est sorti avec un chiffon.
Il est important de contrôler périodiquement le
niveau du liquide de rinçage, possiblement tous
les 31 cycles de lavage.
Introduction du détergent
10
R
LA2505-094
IMPORTANT! Dans le lave-vaisselle, n’utilisez pas de
11
produits détersifs pour laver la vaisselle à la main!
Ceux-ci produisent beaucoup de mousse, mais dans
le lave-v aisselle, ils ne nettoient pas la v aisselle et ils
P
peuvent souvent compromettre son fonctionnement.
Utilisez donc seulement des détergents spécifiques
pour le lave-vaisselle à usage domestique.
Q
Gardez les confections des détergents bien fermées
et dans un endroit bien sec.
Seulement avec le prog ramme “trempage” le détersif
n’est pas nécessaire.
Durant le programme, le détergent est préle vé du bac
automatiquement.
La quantité de détersif conseillée est de 25 g.
L’efficacité des divers détergents peut être différente. Faites donc attention aux doses conseillées par les Maisons productrices.
Le réservoir pour le détersif se trouve à l’intérieur de
la porte.
12
Au cas où le couvercle est fermé:
• Pousser en avant le levier de fermeture P. Le cou-
vercle s’ouvre après un déclic.
• Introduisez le détersif dans le bac V.
• Pour f ermer le couv ercle , appuyer sur lui jusqu’à ce
que la fermeture se déclenche.
Quand la vaisselle est exceptionnellement sale, il est
possible de mettre dav antage de détersif dans le creux
Q du couvercle; remplissez le creux jusqu’au bord, ce
détergent est déjà actif durant la phase de trempage.
V
LA2505-090
38
23456789
23456789
23456789
23456789
F
23456789
LA2505-100
Page 41

Comment remplir et placer la vaisselle
Deux paniers permettent de remplir différents types de vaisselle.
• Enlevez de la v aisselle les déchets les plus gros
d’aliments pour éviter le risque d’obstruction du
filtre et la sortie de mauvaises odeurs.
• Si les poêles et les casseroles sont particulièrement incrustées de restes de nourriture (friture
ou rôti) plongez-les dans l’eau un moment av ant
de les introduire dans le lave-vaisselle.
Utilisation du panier inférieur
Le panier inférieur est disposé pour recevoir la
vaisselle difficilement lav able et le petit panier pour
les services.
Dans le panier inférieur, on place les assiettes plates, creuses, les poêles, les soupières, les couvercles et les plats.
Les assiettes plates et les creuses doivent être
placées en tenant compte qu’entre chaque assiette
il doit y avoir un espace intermédiaire.
13
LA2505-110
14
Leur position doit être toujours verticale de façon
que l’eau puisse passer librement.
Les poêles et les casseroles doivent être placées
toujours à l’envers. Toutes les possibilités de remplissage sont à essayer, mais en tenant compte
que la vaisselle, les casseroles et les poêles doivent être placées de sorte que toutes les surfaces
sales soient exposées au jet d’aspersion et que
l’eau puisse s’écouler librement.
Services
Pour obtenir de meilleurs résultats de lavage, les services doivent être placés a v ec les manches vers
le bas. Les cuillères, les fourchettes et les couteaux doivent être mis dans les compartiments du
panier des services.
ATTENTION:
Les couverts particulièrement longs, et dans le cas spécifique «les longs couteaux» ne
doivent pas être positionnés avec les pointes en haut; ils doivent être mis horizontalement
dans le panier supérieur ou bien lavés à main.
39
F
Page 42

1234567890
1
0
1
0
1
0
1
0
1
0
1234567890
L’utilisation du panier supérieur
Le panier supérieur complètement extractible
reçoit la petite et la moyenne vaisselle comme
les verres, les soucoupes, les tasses de thé et
de café, les petits saladiers, les casseroles et
les poêles basses pas très sales. Les assiettes
à dessert doivent être placées toujours verticalement; v erres, tasses, marmites et poêles tournés à l’envers. La vaisselle légère doit être calée entre les soutiens de façon à ne pas être
giclée directement par le jet de lavage.
Le meilleur résultat de lavage est atteint quand
on a trouvé la disposition la plus appropriée de
la vaisselle dans les paniers. A partir de ce
moment, le procédé de lavage peut montrer
toute son efficacité.
A cause de la température élevée de l’eau de lavage et de la réaction
chimique du détersif employé, il est à conseiller d’éviter les objets en cuivre, la
vaisselle en aluminium anodisé, les services aux manches en bois ou en corne, les
porcelaines délicates, la vaisselle en verre et en plastique non thermorésistant.
A la présence de vaisselle en porcelaine décorée, il est à conseiller d’effectuer un
essai de lavage sur une seule pièce pour vérifier si la décoration se modifie ou
s’endommage.
15
LA2505-120
Réglage en hauteur du panier supérieur.
En agissant sur la poignée latérale (seulement côté gauche),
il est possible de régler le panier en hauteur et son inclinaison.
1 Réglage position horizontale
2 Réglage position inclinée
LA2505-130
23456789
23456789
40
23456789
23456789
F
23456789
1
16
LA2505-132
2
LA2505-134
Page 43

Extraction du panier supérieur
l est possible de sortir le panier supérieur des glissières comme c’est représenté dans la figure.
Description du tableau de commande et indication
Del d’indication
Touches commande
17
LA2505-160
1) Indication départ en retard (Delay)
2) Indication remplissage à moitié
3) Indication exclusion prélavage
4) Indication essuyage
5) Indication manque de sel
6) Indication manque de liquide de rin-
çage
7
7) Allumé/éteint
8) Sélection programmes
9) Sélection départ en retard
(Delay)
10)Sélection remplissage à
moitié
14
15
8
11) Sélection exclusion prélav age
12) Sélection essuyage
13) Marche/arrêt/pause
programme
14) Display multifonction
15) Poignée ouverture porte
3
2
4
5
1
13
9
10
12
11
6
18
EL0510-010
Mise en marche
Après avoir contrôlé la quantité de sel de régénér ation et de liquide de rinçage , ouvrez complètement
le robinet de l’eau, placez la vaisselle dans les paniers, versez le détersif dans son bac et le détersif
pour le prélavage (si nécessaire) et fermez la porte de la machine.
Procédez de cette façon:
• Appuyez sur la touche “allumé/éteint” . Le Display s’allume
7
14
Sélection programmes
• Sélectionnez le programme désiré à l’aide de la touche (sélection programmes)
• Pressez la touche marche/pause programme , après le signal acoustique d’indication début
13
8
programme, la machine effectue automatiquement la phase de lavage.
Remarque: Sur le Display est affichée la durée du programme sélectionné.
Nous vous conseillons de ne pas ouvrir le lave-vaisselle pendant le lavage.
F
41
Page 44

1234567890
1
0
1
0
1
0
1
0
1
0
1234567890
Options
(N.B. les différentes options doivent être sélectionnées avant de mettre en marche le cycle de lavage)
• Dépar t en retard (Delay) ; les sélections de retard (de 1h à16h) sont affichées sur le Display et en
même temps la Del correspondante commence à clignoter pendant toute la durée du retard sélectionné.
Pour avoir la confirmation de l’option demandée, il faut que le n° du programme sélectionné à l’avance
apparaisse sur le Display.
• Remplissage à moitié ; en sélectionnant les modalités de lavage au moyen de cette touche, sur le
Display sont reportées les indications suivantes (¯ =lavage panier supérieur , _ =la v age panier inférieur), la
Del correspondante s’allume.
Pour avoir la confirmation de l’option demandée, il faut que le n° du programme sélectionné à l’avance
apparaisse sur le Display.
• Exclusion prélavage ; cette option existe seulement dans les progr ammes où le préla vage est prévu.
En appuyant sur la touche, la Del correspondante s’allume. P our avoir la confirmation de l’option demandée,
il faut que le n° du programme sélectionné à l’avance apparaisse sur le Display.
• Essuyage ; cette option est effectuée automatiquement dans les programmes où il est prévu, (voir
12
tableau programmes). Pour changer la sélection de l’essuyage, il faut appuyer sur la touche essuyage
avant la mise en marche du programme ; sur le Display, il sera affiché ce qui suit: A0 =n’essuie pas - A1
=Essuyage 20' - A2 =Essuyage 35' - A3=Essuyage 45' La Del qui correspond sur le tab leau de commandes
s’allume. Pour avoir la confirmation de l’option demandée, il faut que le n° du programme sélectionné à
l’avance apparaisse sur le Display .
• Note: Pour les modèles où le ventilateur d’essuyage n’est pas prévu, cette option doit être considérée
comme un temps d’attente de fin de cycle.
• Description de la touche Marche/arrêt/pause
• Elle effectue la mise en marche des programmes de lavage, (le son du buzzer confirme le début du
programme ).
7
• Lorsque vous allumez le lav e-vaisselle av ec le bouton Marche/Arrêt (ON/OFF), le display indique le numéro
du dernier programme effectué. Si le programme précédent eff ectué n’est pas terminé le display clignote le
numéro de ce programme. Pour le faire repartir il suffira d’appuyer sur la touche «START» , et le temps
qui reste pour terminer le cycle apparaîtra automatiquement sur le display.
(Cette situation se vérifie chaque fois que l’on ouvre le lave-vaisselle lorsqu’il effectue un programme)
• Si vous appuyez sur le bouton pendant le lavage pour moins de 5", la machine se mettra en pause. Le
numéro du programme qui a été introduit apparaîtra sur le Displa y (dans ce cas là, il est possib le d’ajouter
ou d’enlever de la vaisselle etc..).
Fermer la porte et appuyer de nouveau sur le bouton pour continuer le programme de lavage.
• Sélections erronées des programmes (changement de programme)
• Remise à zéro à l’aide de la touche Marche/arrêt/pause , maintenir pressé jusqu’à ce que le buzzer ne
cesse de sonner (série de bip).
• Répéter l’opération “sélection programmes”.
Remarque: Si le programme a commencé et a déjà dépassé la phase de remplissage eau, sur le Display
apparaît le sigle “ “, ensuite la machine se vide après le son prolongé du buzzer , sur le Displa y apparaît
la position du programme présélectionné. A ce point-là, la machine est prête pour une nouvelle sélection.
• Note: Lorsque la porte est ouverte, appuyer toujours sur la touche START pour faire repartir le lave-
vaisselle.
• Activation/Exclusion de l’indicateur sonore (buzzer)
b0 = Indicateur sonore DISACTIVE
b1 = Indicateur sonore ACTIVE
Pour obtenir l’introduction de l’INDICATEUR SONORE (BUZZER), appuyer sur la touche PROGRAMME
lorsque vous allumez le lave-v aisselle. “b1” apparaîtra sur le display. Pour modifier cette introduction,
8
appuyer sur cette même touche jusqu’à ce que vous aurez sélectionné l’état de l’Indicateur Sonore que
vous désirez obtenir. Attendre 6 secondes , sans modifier le choix, ensuite le son du BUZZER confirmera la
mise en mémoire.
• Fin de cycle
Lorsque la fin du cycle de lavage est terminé sur le Display , le numéro du programme reste
allumé fixe, si il clignote, attendre la fin du lavage.
• Contrôle des fonctions
Vous pouvez visualiser les différentes fonctions pendant les phases de lavage de la façon suivante:
Appuyer sur le bouton de la sélection des programmes , vous obtiendrez sur le Display le numéro du
programme pré-introduit.
Appuyer sur le bouton de demi-charge , vous obtiendrez la zone de lavage supérieure ou inférieure.
Appuyer sur le bouton de essuyage , vous obtiendrez le niveau d’essuyage.
Arret
Après le cycle de lavage, le lave-vaisselle s’arrête automatiquement le bruit prolongé de buzzer confirme la
fin du cycle de lavage. P our l’éteindre, appuyer sur le bouton allumé/éteint . Après chaque cycle de la vage,
fermer absolument le robinet de l’eau pour isoler le lave-vaisselle du réseau d’approvisionnement hydrique.
23456789
23456789
42
23456789
23456789
F
23456789
9
10
11
13
13
13
13
13
14
8
10
12
7
Page 45

Tableau des programmes de lavage
Programmes
Numéro
programme
TOUCHES
Eteint
Allumé
DÉTERGENT
Lavage
Prélavage
Vaisselle
et
type de
salissure
Description programmes
Durée*
(1)
Trempage
Intensif 70°C
Normal 60°C
(EN 50242)
Délicat 60°C
Normal 40°C
Rapide 40°C
Biologique
60°C
Energique 70C
P1
P2
P3
P4
P5
P6
P7
P8
Casseroles et vaisselle
jusqu’au prochain cycle
de lavage
Vaisselle très sales (excepté les parties délicates)
Vaisselle moyennement
sale
(excepté les parties
délicates)
Vaisselle délicate très sale
Vaisselle normalement
sale
Vaisselle très sale
Casseroles et vaisselle
Casseroles et vaisselle
très sale
Lavage court, à froid, de sorte que les restes
d’aliments ne s’attachent pas à la vaisselle
1 Prélavage chaud - Lavage principal
3 rinçages (2 froids - 1 chaud) Essuyage
1 Prélavage froid - Lavage économique
2 rinçages (1 froid - 1 chaud) Essuyage
Lavage principal
2 rinçages (1 froid - 1 chaud ) Essuyage
1 Prélavage froid - Lavage principal
2 rinçages (1 froid - 1 chaud)
Lavage principal
2 rinçages (1 froid - 1 chaud )
Lavage principal
3 rinçages (2 froids - 1 chaud ) Essuyage
1 Prélavage chaud - Lavage principal
3 rinçages (2 froids - 1 chaud) Essuyage
11’
2h
2h 17’
1h 40’
49’
39’
1h 38’
2h 11’
(1) N.B. Durée indicative des temps de lavage y compris la durée d’essuyage pour les programmes lorsque il est prévu.
Temps d’essuyage “introduction des défauts en A2=35".
(*) Durant le programme P1 il est possible d’habiliter l’introduction d’essuyage (voir paragraphe options); dans cette
façon on obtiens un programme di rinçage chaud avec essuyage (chauffe-assiettes) avec les impositions suivants:
A1 lavé à 65oC essuyé 20' - A2 lavé à 60oC essuyé 35' - A3 lavé à 50oC essuyé 45'.
ENTRETIEN
7
7.1 NETTOYAGE DES BRAS D’IRRORATION
Les bras d’irroration s’enlèv ent facilement pour permettre le netto yage périodique des gicleurs et pour
prévenir de possibles obturations.
Lavez-les soigneusement sous un jet d’eau et remontez-les dans leur emplacement.
19
LA2505-210
Pour démonter le bras d’irroration supérieur:
dévissez le support du bras dans le sens contraire
Pour démonter le bras d’irroration inférieur:
Tirez le bras d’irroration vers le haut et enlevez-le
20
des aiguilles d’une montre.
F
LA2505-220
43
Page 46

1234567890
1
0
1
0
1
0
1
0
1
0
1234567890
7.2 NETTOYAGE DES FILTRES
Après chaque lavage, il f aut contrôler le groupe filtrant et le nettoy er de tous dépôts en agissant de la façon suiv ante:
• Retirez le filtre central 1.
• Sortez le filtre externe en forme de puisard 2.
• Enlevez la grille mobile 3.
Tous les éléments doivent être nettoyés sous l’eau courante. Il est indispensable de nettoyer les filtres avec soin,
sinon le lave-vaisselle ne pourra pas fonctionner avec les filtres obstrués.
Nous vous recommandons de remettre les filtres propres à leur place afin d’éviter des dégâts à la pompe de lavage.
21
22
1
3
2
LA2505-180
LA2505-190
7.3 NETTOYAGE DES SURFACES EXTERNES DE LA MACHINE
Les surfaces de la machine, en métal et en plastique de la partie frontale, doivent être nettoyées
périodiquement à l’aide d’un chiffon doux et humide. N’employez jamais d’acides ou de détergents
abrasifs.
Mise hors service prolongée
Si le lave-v aisselle ne sera plus utilisé pendant une longue période, il f aut procéder de la f açon suivante:
• Faites tourner deux programmes de trempage.
• Débranchez la fiche du réseau électrique.
• Déconnectez le tube d’alimentation de l’eau.
• Laissez la porte frontale légèrement ouverte pour éviter la formation de mauvaises odeurs.
7.4 TABLEAU DES MESSAGES D’ERREUR
Erreur
E1
E2
Moment
Durant le chargement
d’eau
(le programme se ferme)
Fin du cyle
- Le robinet est ferme
- Filtre du tuyau bouché
- Tuyau de vidange à terre
- Tuyau de vidange percé
- Tuyau de alimentation d’eau plié
- Pression d’eau insuffisante
- -
- Répétez le cycle de lavage
- -
Contrôles à faire
- Le mètre en place
- Vérifiez
- Le mètre en place
- Appelez le service après-vente agrée
- Le mètre en place
- Vérifiez la pression
-
Si le problème se présent de nouveau appelez
le service après-venteagrée pour communiquer
legendre de message d’erreur
-
E4
E5
E6
E7
Fin du cyle
Fin du cyle
Fin du cyle
Fin du cyle
- Pression d’eau insuffisante
- La valvule compte-litres ne fonction pas
-
Tuyau de vidange plié
- Le siphon est bouché
- Pompe de vidange bloquée
- Grilles de filtre sale
- Casserole renversée
- Répétez le cycle de lavage
Vérifiez la pression
- Appelez le service après-vente agrée
- Vérifiez
- Vérifiez
- Appelez le service après-vente agrée
- Nettoyez les grilles du filtre
- Vérifier a fin du cycle, la prochaine fois mettre
correctement les casseroles
- Si le problème se présent de nouveau
appelez le service après-vente agrée pour
communiquer le gendre de message d’erreur
N.B.: Quand on appelle le service après-vente communiquer toujours le gendre de message d’erreur.
23456789
23456789
44
23456789
23456789
F
23456789
Action
23
LA2505-200
Page 47

RECHERCHE CAUSES PANNE
8
Contrôlez s’il est possible de remédier personnellement aux petits dérangements éventuels de l’appareil avec
l’aide des indications suivantes. Si ces inf ormations ne vous sont d’aucune aide pour résoudre le problème, mettezvous en contact avec le service technique assistance clients.
• Le programme ne démarre pas.
- Les fusibles de l’installation interne sont-ils défectueux? L’appareil est-il branché au réseau électrique?
- La porte est-elle fermée correctement? Appuyer sur la porte pour la fermer complètement.
• L’eau n’entre pas dans la machine.
- Le robinet de l’eau est-il ouvert?
- Le filtre placé entre le robinet et le tube d’alimentation de l’eau est-il bouché? Nettoyez éventuellement le filtre.
- La conduite d’arrivée de l’eau présente-t-elle des étranglements? Contrôler la conduite.
• L’indication des phases du programme est arrêtée au début du lavage.
- Le robinet de l’eau est-il complètement ouvert?
- Le filtre placé entre le robinet et le tube d’alimentation de l’eau est-il bouché? Nettoyez éventuellement le filtre.
- La pression minimum de l’eau est-elle au moins de 0,05 MPa?
• L’eau n’est pas évacuée.
- Le tuyau d’évacuation présente-t-il des étranglements? Contrôlez l’installation du tuyau.
- Le siphon est-il bouché? Contrôler le siphon.
• La vaisselle n’est pas propre.
- Le programme sélectionné est-il approprié au type et au niveau de saleté de la vaisselle?
- La vaisselle a-t-elle été rangée de façon que le jet de l’eau puisse atteindre sa surface interne et externe?
- Les paniers de la vaisselle ne doivent pas être surchargés.
- Les bras tournants sont-ils bloqués par des pièces de vaisselle ou par quelques services?
- T ous les filtres placés au fond de l’espace lavage sont-ils propres? Les filtres sont-ils remis à leur place correctement?
- La dose de détergent introduite est-elle correcte?
- Le tuyau d’évacuation de l’eau est-il installé correctement? Y a-t-il encore du sel spécial dans le réservoir du
sel? Sans le sel spécial, l’eau n’est pas adoucie.
- L’installation adoucisseur de l’eau est-elle réglée d’après la dureté de l’eau distribuée localement?
• La vaisselle ne sèche pas et reste opaque.
- Y a-t-il encore du liquide de rinçage dans le réservoir?
• Les verres et la vaisselle présentent des rayures, des tra”nées, des taches laiteuses ou bien une patine
bleue brillante.
- Durant le rinçage, une dose excessive de liquide de rinçage a été prélevée. Diminuez le dosage de liquide de
rinçage.
• Les verres et la vaisselle présentent des taches de gouttes d’eau désormais sèches.
- Durant le rinçage, une dose insuffisante de liquide de rinçage a-t-elle été prélevée? Augmentez le dosage de
liquide de rinçage.
Notice!
Étant donné que le lave-vaisselle a été testé et contrôlé soigneusement en fabrique , v ous pourrez tr ouver
pour cette raison des gouttelettes d’eau qui dispara”tront après le premier lavage.
45
F
Page 48

1234567890
1
0
1
0
1
0
1
0
1
0
1234567890
ANTES DE USAR EL APARATO
1
1.1 INSTRUCCIONES DE SEGURIDAD
Utilización según las normas
• El lavavajillas tiene que utilizarse solamente para lavar vajillas domésticas. Siempre que el aparato
se utilice para otros fines o de manera equivocada, la empresa constructora rechaza toda responsabilidad por eventuales daños.
• Por motivo de seguridad, no se autoriza la realización de transformaciones o modificaciones al
lavavajillas.
• Antes de conectar el aparato a la corriente eléctrica, asegúrense de que los datos de la tensión y de
la corriente indicados en la placa de los datos correspondan a los del sitio en el que se va a instalar.
• La instalación del mismo, tiene que realizarla un personal especializado.
Operaciones preliminares que hay que realizar antes de la primera
puesta en marcha del lavavajillas
• Controlen el lavavajillas para que no existan eventuales daños causados por el transporte. En nin-
gún caso instalen un aparato dañado. En caso de daños, diríjanse a la persona que les vendió el
aparato.
Para la seguridad de los niños
• No permitan que los niños jueguen con el aparato.
• Los detergentes pueden causar daños irreparables a los ojos, a la boca y a la garganta.
Por lo tanto, conserven los detergentes fuera del alcance de los niños.
• El agua del lavavajillas no es potable. Si quedan residuos de detergente en el aparato, puede
ocasionar una situación de peligro para los niños, mantener los lejos del lavavajillas cuando este
abierto.
Para el funcionamiento de todos los días
• No pongan en marcha nunca el lavavajillas si el cable de la corriente o los tubos de carga y de
descarga del agua están estropeados o si el cuadro de mandos, la superficie de trabajo o la base
del mismo están muy deteriorados.
• En caso de avería, cierren, en primer lugar, el grifo del agua, apaguen después el aparato y desco-
necten el enchufe de la corriente. En las conexiones fijas, desconecten el eventual interruptor de
servicio o quiten el fusible (o los fusibles).
• Para desconectar el enchufe de la corriente, cojan el enchufe por el cuerpo y nunca por el cable.
• Las reparaciones del lavavajillas tienen que realizarlas solamente personal especializado. Repara-
ciones inapropiadas pueden poner en grave peligro a la persona que lo usa. En caso de reparaciones, por lo tanto, diríjanse a nuestro servicio técnico de asistencia al cliente o al propio revendedor
especializado.
• La sustitución del cable de alimentación debe ser efectuada solo por el personal de la asistencia
técnica.
• En caso de deterioro de los tubos, para la conexión del aparato, éstos tienen que cambiarse con
tubos originales.
• No introduzcan en el lavavajillas sustancias solventes que puedan provocar una explosión.
• No se sienten ni se apoyen en la puerta abierta: el aparato puede volcar.
• Antes de introducir la sal especial, el detergente y el abrillantador, asegúrense de que el productor
de estas sustancias recomienda el uso de los mismos para el lavavajillas de uso doméstico.
• Cierren siempre el grifo del agua si el lavavajillas no se utiliza por bastante tiempo, por ejemplo,
durante las vacaciones.
46
23456789
23456789
23456789
23456789
ES
23456789
Page 49

DESEMBALADO - DESTRUCCION
2
2.1 DESEMBALADO
Quiten del embalaje externo de plástico las esquinas de refuerzo y las bases de polesterol.
Abran la puerta y quiten los bloques de polesterol de los contenedores.
La recuperación y el reciclaje de los materiales de embalado ayudan a ahorrar materias primas y a
que disminuya el volumen de residuos.
Entreguen el embalaje en las descargas para recuperar los materiales reciclables.
Cuando el aparato se haya estropeado y esté definitivamente roto, hagan que sea inutilizable antes
de destruirlo.
ADVERTENCIA! Algunos materiales del embalaje (por ejemplo. Las bolsas de plástico, el
polesterol &) pueden representar una fuente de peligro para los niños, por lo tanto, hay
que tener este material fuera del alcance de los mismos.
2.2 ELIMINACION DEL APARATO DESHECHADO
Al final de la vida funcional del aparato, éste tiene que ser eliminado por empresas especializadas,
respetando la normativa vigente.
De esta manera, con la eliminación de un viejo aparato se puede realizar la recuperación diferenciada
de los materiales sintéticos destinados al reciclaje, en el pleno respeto del ambiente.
INDICACIONES GENERALES
3
3.1 LAVAR DE MANERA ECONOMICA Y ECOLOGICA
• No laven la vajilla antes en agua corriente.
• Utilicen el lavavajillas siempre lleno, ya que solamente de esta forma, se puede realizar un lavado
económico y que respete el ambiente.
• Seleccionen siempre un programa de lavado que corresponda al tipo de vajillas y al grado de
suciedad.
• Eviten absolutamente utilizar más detergente, sal especial y abrillantador del que corresponda.
Tengan cuidado y pongan las dosis recomendada en las instrucciones para el uso y en las indicaciones de la casa productora de tales sustancias.
• Comprueben que la instalación del suavizador del agua esté regulado correctamente.
3.2 OBJETOS QUE NO SE PUEDEN LAVAR EN EL LAVAVAJILLAS
No se pueden lavar en el lavavajillas:
- tablas o pequeñas bandejas de madera,
- objetos de material plástico que no resista al calor,
- cristal de plomo,
- objetos de estaño o de cobre o de bronce,
- vajillas o cubiertos con partes pegadas,
- cubiertos antiguos, cuya cola sea sensible al calor,
- objetos de acero que se oxiden fácilmente,
- cubiertos con mangos de madera, cuerno, porcelana o madreperla.
En el momento de la compra de vajillas, vasos y cubiertos, asegúrense de
que se puedan lavar en el lavavajillas.
ES
47
Page 50

1234567890
1
0
1
0
1
0
1
0
1
0
1234567890
DESCRIPCIÓN DEL APARATO
4
4.1 VISTA GENERAL
1) Depósito para la sal
2) Depósito para el abrillantador
3) Ventilador de secado
(si está previsto)
4) Contenedor para el detergente
5) Placa de datos
6) Filtros
7) Hélice inferior
8) Hélice superior
9) Cable de alimentación eléctrica
10) Tubo de alimentación del agua
11) Tubo de desagüe
12) Contenedor inferior
13) Contenedor superior
14) Contenedor de los cubiertos
13
12
15
1
9
10
11
8
7
6
1
14
5
4
15) Gancho de cierre de la puerta
4.2 DATOS TECNICOS
Capacidad ( según datos stándard ) :
12 presión en la instalación hidráulica
presión mínima: 0,05 MPa
presión máxima: 1 MPa
23456789
23456789
48
23456789
23456789
ES
23456789
3 2
ATENCION: las características eléctricas
se indican en la placa de datos.
0,05 - 1MPa Model. ......................
....A
MAX .......W
........V.....Hz
Made in EU
...................
LA2505-020/1
12
Page 51

INSTALACION
5
5.1 NIVELADO
2
P
LA2505-030
Una vez colocado el aparato en el sitio en el que se va a instalar. Si es necesario muevan las patitas
P atornillándolas o desatornillándolas para regular la altura de la máquina y nivelarla.
Un buen nivelado asegura el correcto funcionamiento del lavavajillas.
Error máx=2 grados
Después de que se niveló la máquina, regulen además el gancho de cierre colocado en la puerta, de
modo que ésta se pueda cerrar perfectamente.
Para regular el cierre (Fig. 2.1 «M») procedere asì: girar el tornillo hasta regular el gatillo logrando el
perfecto cierre de la puerta.
M
2.1
5.2 CONEXION HIDRAULICA
El tubo de entrada del agua C, que se entrega con la
máquina, permite la conexión del mismo a un grifo con
una juntura de 3/4".
Durante el montaje del mismo, hay que seguir las siguientes instrucciones:
• enrosquen el tubo C al grifo del agua fría A.
• si la conexión se realiza a tubos nuevos o que no se
usan desde hace tiempo, se aconseja que dejen correr el agua antes de conectar el tubo de entrada de la
misma, de tal manera que se eliminen los depósitos
de óxido y de suciedad;
• asegúrense de que la presión de la instalación hidráulica esté dentro de los valores límites indicados en los
datos técnicos.
El lavavajillas puede conectarse a la cañería del agua
fría pero no a la del agua caliente.
3
A
C
LA2505-040
49
ES
Page 52

1234567890
1
0
1
0
1
0
1
0
1
0
1234567890
5.3 CONEXION PARA EL DESAGUE LIXIVIO
El tubo del desague T, que se entrega con la máquina, se engancha por la parte extrema curva al
borde de un fregadero o en un tubo de desagüe.
Conviene realizar un sifón antiolores.
Durante el montaje hay que observar las siguientes precauciones:
- No doblen el tubo del desagüe para no causarle roturas;
- Hay que colocar la extremidad del tubo en relación con la superficie de apoyo del lavavajillas (fig.
4) a una altura comprendida entre 32 cm. y 80 cm.
- En ningún caso la extremidad del tubo tiene que estar dentro del agua;
- Una eventual prolongación del tubo de desagüe no debe superar la longitud de 1 metro, tiene que
tener el mismo diámetro interior y, además, la altura máxima en la que se puede colocar el extremo libre tiene que reducirse de 80 cm. a 50 cm.;
- En el caso del tubo de desagüe, el diámetro interior no puede ser inferior a 4 cm.
4
LA2501-050
5.4 CONEXION ELECTRICA
La conexión eléctrica de la máquina tiene que realizarse únicamente mediante
un enchufe con toma de tierra instalada respetando la normativa y siguiendo las
instrucciones. La conexión tiene que respetar las normas legales en vigory las
normas suplementarias de la empresa eléctrica competente.
La indicación de la tensión tiene que corresponder a la tensión de la red del lugar en el
que se instala el aparato.
Para la dimensión del enchufe de corriente, hagan referencia a la placa de datos.
T
T
max 80 cm
min 32 cm
50
23456789
23456789
23456789
23456789
ES
23456789
Page 53

USO
6
6.1 OPERACIONES PRELIMINARES
Antes de la puesta en marcha de la máquina, asegúrense de que el enchufe del cable de alimentación esté
conectado al enchufe de la corriente, que el tubo de entrada del agua esté conectado al grifo, que el grifo esté
abierto y que el tubo de desagüe haya sido conectado según las instrucciones.
Apertura de la puerta
Tiren hacia adelante de la manilla: la puerta se abre fácilmente. Si tal operación se realiza mientras la
máquina está funcionando, un dispositivo de seguridad apaga el lavavajillas.
Introducción de la sal especial
• Abran la compuerta y extraigan el contenedor inferior.
• Desenrosquen la tapa del depósito de la sal dándole vueltas
en sentido antihorario.
Sólo para la primera puesta en marcha: Introduzcan,
aproximadamente,1/2 litro de agua en el depósito de la sal.
• Metan la sal especial mediante el embudo L en el correspondiente contenedor (aproximadamente 1,0 - 1,5 kg).
•
Limpien la apertura del depósito de los eventuales restos de sal.
• Enrosquen de nuevo el tapón del depósito, dándole vueltas en
sentido horario.
• Si inmediatamente después de la introducción de la sal no se
puede lavar la vajilla, pongan en marcha el programma REMOJO, para que el agua y los granitos de sal que salgan del depósito se disuelvan y desaparezcan.
• EL aparato de decalcificación incluye un indicador eléctrico
para señalar la cantidad de sal.
Cuando es necesario agregar la sal regeneradora, se enciende un indicador en el panel frontal (fig. 18, ) de
vuestra lavavajilla.
6
Regulación de la instalación del suavizador
del agua
Para lavar se aconseja usar agua dulce (es decir, pobre de
cal), para evitar que se formen depósitos en las vajillas y en el
mismo lavavajillas.
Para conocer el grado de dureza del agua, diríjanse a la
oficinas del ayuntamiento o utilicen un kit comercial de toma y
análisis de muestras de agua.
Para acceder a la planificación de regeneración optimal es necesario tener apretada la tecla DELAY 9 (fig.6) al encendido de
la máquina, en seguida viene visualizada la actual planificación (es.d5), para modificarla (dentro de 5 segundos) apretar la
misma tecla hasta seleccionar la regeneración deseada (vea
recuadro).
Espere unos 6 segundos, sin modificar la elección, el sonido
del buzzer confirmará la lectura del nuevo nivel, en el Display
aparecerá la solicitud seleccione programa.
Utilicen solamente sal especial para lavavajillas;
otros tipos de sale (por ejemplo sal de cocina)
contienen a menudo sustancias insolubles en agua
y que Pueden obstaculizar el suavizador del agua,
haciéndolo inutilizable.
LA2505-060
Niveles de regeneración
Posición del
regulador
d1
d2
d3
d4
d5
d6
Grados
franceses
>15 <25
>25 <40
>40 <60
>60 <80
>80 <90
L
9
°fH
<15
>=mayor/<=menor
alemanes
>8,4 <14
>14 <22,4
>22,4 <33,6
>33,6 <44,8
>44,8 <50,4
Grados
°dH
<8,4
6
ES
5
51
Page 54

1234567890
1
0
1
0
1
0
1
0
1
0
1234567890
LA2505-080
Introducción del abrillantador
7
Señales de control para la introducción de la
sal (si está previsto).
La señal verde situada bajo la tapa, indica que
hay todavía suficiente sal especial en el depósito.
Si la señal verde no se ve, significa que es
necesario introducir más sal especial.
8
El abrillantador que se añade automáticamente
durante la última fase del lavado, garantiza un
rápido secado de la vajilla y evita la formación de
manchas y de sedimentos de cal en las mismas.
Utilicen solamente abrillantadores específicos para lavavajillas, otros productos
no producen el efecto deseado.
El depósito del abrillantador S está colocado en la
parte interna de la puerta del lavavajillas .
• Den la vuelta al tapón T del depósito, 1/4 de vuelta en sentido antihorario para sacarlo.
• Introduzcan el abrillantador hasta llegar a la línea de puntos.
Cantidad máxima, unos 140 ml., aproximadamente.
• Coloquen nuevamente el tapón.
• Limpien el posible abrillantador que haya salido
fuera con un paño, sino, durante el aclarado, se
forma demasiada espuma.
Señales de control para la introducción del
abrillantador.
• Eléctrico (fig. 18 - 18.1)
El aparato tiene un indicador del nivel del abrillantador. Cuando se ilumina es necesario agregar el aditivo.
• Mecánico (fig.9)
T
S
LA2505-092
9
F
LA2505-096
Hay que poner el abrillantador cuando el indicador del depósito F, es de color claro (
Cuando el depósito está lleno, el indicador es de color oscuro.
23456789
23456789
52
23456789
23456789
ES
23456789
).
Page 55

1
2
3
4
1
2
3
4
Regulación de la dosificación del abrillantador
La regulación R de la dosificación está situada en
la apertura de carga del contenedor del abrillantador.
Se acciona mediante un destornillador y se regula
de 1 a 4, números que corresponden al añadido
del abrillantador de 1 a 4 ml. En la fábrica se memoriza el número 2 (2 ml).
El contenedor del abrillantador completamente lleno es suficiente para unos 50 programas de lavado, aproximadamente.
Hay que realizar un cambio en la cantidad de la
dosis si el resultado de la dosificación no es el
deseado.
• Limpien siempre el abrillantador que haya podido caer fuera del contenedor con un paño.
Es importante controlar periódicamente el nivel del abrillantador, posiblemente cada 31 ciclos de lavado.
10
R
LA2505-094
Introducción del detergente
¡IMPORTANTE! No utilicen en el lavavajillas detergente para lavar a mano los platos! Estos producen mucha espuma, además, en el lavavajillas
no lavan bien y hasta pueden poner en peligro el
funcionamiento del mismo.
Utilicen solamente detergentes específicos para
el lavavajillas de uso doméstico.
Conserven los paquetes de detergente bien cerrados y en un sitio seco.
Sólo con el programa de remojo, no es necesario
usar el detergente. Durante el programa el detergente sale automáticamente del contenedor.
La cantidad de detergente aconsejada es de 25 g.
La eficacia de los distintos detergentes puede
ser diferente. Tengan cuidado con las dosis
aconsejadas por las correspondientes casas
productoras.
El contenedor para el detergente está colocado
en el lado interno de la puerta.
En el caso de que la tapa esté cerrada:
• Pulsen hacia adelante la palanca de cierre P. La
tapa se abre inmediatamente.
• Metan el detergente en el contenedor V.
• Para cerrar la tapa, aprieten hasta que se sienta
el cierre.
11
P
LA2505-090
12
V
Cuando la vajilla está muy sucia, se puede poner
el detergente en el hueco Q de la tapa; llénenlo
hasta el borde, pues el detergente es ya activo en
la fase de enjabonado.
ES
LA2505-100
53
Page 56

1234567890
1
0
1
0
1
0
1
0
1
0
1234567890
Cómo cargar y disponer la vajilla
Dos cestas permiten cargar los distintos tipos de
vajillas.
• Quiten de la vajilla los restos más grandes de
comida para evitar una obstrucción del filtro y la
salida de malos olores.
• Si las sartenes y las tarteras contienen residos
de comida muy pegados (fritos o asados), sumérjanlas en un baño de agua antes de meterlas en el lavavajillas.
Uso del contenedor inferior
El contenedor inferior está preparado para contener la vajilla que se lava con dificultad y el contenedor para los cubiertos.
En el contenedor inferior se colocan los platos llanos, hondos, sartenes, soperas, tapas y bandejas
de servir.
Los platos llanos y hondos se deben colocar teniendo en cuenta que entre cada plato tiene que
quedar un espacio intermedio.
Su posición tiene que ser siempre vertical de manera que el agua pueda pasar libremente entre
ellos.
13
LA2505-110
14
Tarteras y sartenes se colocarán con la apertura
para abajo. Son posibles todas las combinaciones y la posibilidad de carga es infinita, pero hay
que tener en cuenta que las vajillas, las tarteras y
las sartenes se deben colocar de tal manera que
todas las superficies sucias estén expuestas al
chorro de agua y que el agua pueda pasar entre
ellas libremente.
Cubiertos
Para obener los mejores resultados de lavado, los cubiertos se colocarán con los mangos hacia
abajo. Cucharas, tenedores y cuchillos se colocarán en los espacios correspondientes de la parrilla
del contenedor de los cubiertos.
ATENCIÓN:
Cubiertos particularmente largos y en el caso específico “cuchillos largos”, no se colocan
con las puntas hacia arriba sino que van puestos en posición horizontal en el cesto
superior o se lavan a mano.
LA2505-112
54
23456789
23456789
23456789
23456789
ES
23456789
Page 57

El uso del contenedor superior
El contenedor superior, completamente
extraíble, sirve para colocar la vajilla pequeña
y mediana, como vasos, platos, tacitas de té y
de café, ensaladeras bajas, tarteras y sartenes bajas no muy sucias. Los platos para postre
se colocan siempre verticalmente; vasos, tazas,
tarteras y sartenes, con la apertura para abajo.
La vajilla ligera tiene que colocarse entre sostenes, de manera que no la golpee el chorro de
agua.
El mejor resultado del lavado se alcanza cuando se encuentra la colocación ideal para toda
la vajilla en el contenedor. A partir de este momento el proceso de lavado puede desarrollarse en toda su eficacia.
A causa de la temperatura elevada del agua de lavado y de las reacciones químicas del
detergente usado, se aconseja evitar objetos de cobre o bronce, vajillas de aluminio
anodizado, cubiertos con mango de madera o cuerno, porcelanas delicadas, vajillas de
cristal y plástico que no sean resistentes al calor.
En el caso de vajillas de porcelana decorada, se aconseja realizar una prueba de lavado
en una única pieza para comprobar que la decoración no se modifica o se daña.
15
LA2505-120
Regulación en altura del contenedor
superior
Moviendo la manilla lateral (solamente hacia el lado izquierdo)
se puede regular el contenedor en altura e inclinación.
1 Regulación de la posición horizontal,
2 Regulación de la posición inclinada.
16
LA2505-130
1
LA2505-132
2
ES
LA2505-134
55
Page 58

1234567890
1
0
1
0
1
0
1
0
1
0
1234567890
Extracción del contenedor superior
El contenedor superior puede sacarse a través de
las guías, como se representa en la figura.
Descripción de los elementos de
mando e indicaciones
Led de indicación
Teclas de mando
17
LA2505-160
1) Indicación retraso de arranque (Delay)
2) Indicación carga media
3) Indicación exclusión prelavado
4) Indicación secado
5) Indicación falta sal
6) Indicación falta abrillantador
7
7) Encendido/apagado
8) Selección programas
9) Selección retraso arranque
(Delay)
10) Selección media carga
1
14
15
8
9
11) Selección exclusión prelavado
12) Selección secado
13) Start/stop/pausa programa
14) Display multifunción
15) Manilla abertura puerta
3
2
4
5
6
18
13
12
10
11
EL0510-010
Puesta en marcha
Después de haber controlado la cantidad de sal de regeneración y de abrillantador, abran completamente el grifo del agua, coloquen la vajilla en los contenedores, echen el detergente en su contenedor y el detergente para el prelavado (si es necesario) y cierren la puerta frontal.
Sigan realizando las siguientes fases:
13
7
14
8
• Accione la tecla “encendido-apagado” . Se ilumina el display .
Selección de programa
• Seleccione el programa deseado mediante la tecla (selección programas).
• Apriete la tecla start/pausa programa , después del señal acústico que indica inicio programa;
la máquina efectúa automáticamente la fase de lavado.
Nota: En el display se visualiza la duración planificada.
Se aconseja no abrir el lavavajillas durante el ciclo de lavado.
23456789
23456789
56
23456789
23456789
ES
23456789
Page 59

Opciones
(n.b. las varias opciones deben ser seleccionadas antes de activar el ciclo de lavado)
• Retraso de arranque (Delay) ; las planificaciones de retraso (de 1h a 16h) se visualizan en el Display
y al mismo tiempo el led correspondiente inicia a parpadear por toda la duración del retraso planificado.
Para tener confirmación de la opción planificada, en el Display debe aparecer el número del programa
preseleccionado.
• Media carga : seleccionando las modalidades de lavado a través de esta tecla, el Display lleva las
siguientes indicaciones (¯ =lavado tambor superior, _ =lavado tambor inferior), el led correspondiente se
ilumina.
Para tener la confirmación de la opción planificada, en el Display debe aparecer el número programa
preseleccionado.
• Exclusión prelavado ; esta opción está habilitada sólo en los programas dotados de prelavado.
Apretando la tecla, se ilumina el led correspondiente.
Para tener la confirmación de la opción planificada, en el Display debe aparecer el número programa
preseleccionado.
• Secado ; esta opción es efectuada automáticamente en los programas donde está previsto (vea
recuadro programas). Para variar la planificación del secado, se debe apretar la tecla secado antes del
arranque del programa; en el Display se visualizará como sigue:
A0 =no seca - A1 =Secado 20' - A2 =Secado 35' - A3=Secado 45' el led correspondiente en el panel de
mandos se ilumina.
Para tener la confirmación de la opción planificada, en el Display debe aparecer el número programa
preseleccionado.
• Nota: En los modelos en los que no está previsto el ventilador de secado, tal opción debe ser considerada
como un tiempo de espera de fin de ciclo.
• Descripción tecla Start/stop/pausa
• Efectúa el arranque de programas de lavado (el sonido del buzzer confirma el arranque del programa).
• Cuando se enciende la máquina con el pulsador Marcha/Paro (ON/OFF), el display indica el número del
último programa realizado. En caso que el programa realizado precedentemente no haya terminado, el
display centelleará el número de este programa. Para reanudar el programa, es suficiente con pulsar el
pulsador “START” , automáticamente aparecerá en el display el tiempo que falta para finalizar el ciclo.
(Esta situación se verifica cada vez que se abre la máquina, cuando está realizando un programa)
• Si se presiona durante el lavado por un tiempo inferior a 5", la máquina se pondrá en pausa y en el Display
centelleará el número del programa seleccionado (en este momento, podrá colocar o extraer la vajilla).
Para reanudar el programa de lavado, cierre la puerta y vuelva a presionar el pulsador .
• Planificaciones equivocadas de los programas (cambio programa)))
• Reposicionar mediante la tecla Start/stop/pausa , tener apretado hasta que el buzzer no pare de sonar
(serie de ‘beep’).
• Repita la operación “selección programa”.
Nota: Si el programa está iniciado y ha superado la fase de carga de agua, en el Display aparece la sigla
“ “, a continuación la máquina descarga, luego del sonido prolongado del buzzer, y en el Display
aparece la planificación del programa pre-seleccionado.
Ahora la máquina está lista para una nueva planificación.
• Nota: Una vez abierta la puerta, pulse siempre el pulsador Start para volver a poner en marcha el
lavavajillas.
• Activación/Desactivación de la señal acústica (buzzer)
b0 = Señal acústica DESACTIVADA
b1 = Señal acústica ACTIVADA
Para acceder a la configuración de la SEÑAL ACÚSTICA (BUZZER), mantenga presionado el pulsador
PROGRAMA en el momento de encender la máquina. En el Display aparecerá visualizada la configuración
actual «b1». Para modificarla, presione el mismo pulsador hasta seleccionar el estado del la Señal Acústica
deseado. Espere unos 6 segundos, sin modificar la elección, a continuación el sonido del BUZZER confirmará
la memorización.
• Fin de ciclo
Una vez acabado el tiempo de lavado, en el Display el número del programa queda encendido fijo;
si centellea espere el fin del lavado.
• Verificación de las funciones
Durante las fases de lavado, se pueden visualizar las distintas funciones del siguiente modo :
Presionando el pulsador selección de programas , en el Display aparecerá visualizado el número del
programa preseleccionado;
Presionando el pulsador media carga , en el Display aparecerá visualizada la zona de lavado superior
o inferior;
Presionando el pulsador secado , en el Display aparecerá visualizado el nivel de secado.
10
11
12
13
8
9
12
13
13
13
14
8
10
12
7
13
Parada
Después del ciclo de lavado, el lavavajillas se para automáticamente el buzer produce un sonido prolongado
para confirmar que el ciclo de lavado se ha terminado. Para apagarlo, pulsen el botón encendido/apagado
. Después de cada ciclo de lavado, cierren del todo el grifo del agua para aislar el lavavajillas de la red
7
de aprovisionamiento hídrico.
ES
57
Page 60

1234567890
1
0
1
0
1
0
1
0
1
0
1234567890
Cuadro de los programas de lavado
PULSADORES
DETERGENTE
Programas
Previo
Intensivo 70°C
Normal 60°C
(EN 50242)
Delicado 60°C
Normal 40°C
Rápido 40°C
Biológico 60°C
Enérgico 70°C
Número de
P1
P2
P3
P4
P5
P6
P7
P8
programa
Apagado
Encendido
Pre-lavado
Vajillas
y tipo de sucio
Lavado
Tarteras y vajillas hasta el
próximo ciclo de lavado
Vajillas muy sucias
(con excepción de partes
delicadas)
Vajillas mediamente sucia
(con excepción de partes
delicadas)
Vajilla delicadas muy sucias
Vajilla normalmente sucia
Vajillas muy sucias
Tarteras y vajillas
Tarteras y vajillas muy
sucias
Descripción de los
programas
Lavado breve en frío de manera que no se
peguen los restos de la comida a las vajillas.
1 Prelavado caliente - Lavado principal
3 enjuagues (2 fríos - 1 caliente) - Secado.
1 Prelavado frío - Lavado principal
2 enjuagues (1 frío - 1 caliente) - Secado
Lavado principal
2 enjuagues (1 frío - 1 caliente) - Secado
1 Prelavado frío - Lavado principal
2 enjuagues (1 frío - 1 caliente)
Lavado principal
2 enjuagues (1 frío - 1 caliente)
Lavado principal
3 enjuagues (2 fríos - 1 caliente) - Secado
1 Prelavado caliente - Lavado principal
3 enjuagues (2 fríos - 1 caliente) Secado.
Duración*
(1)
11’
2h
2h 17’
1h 40’
49’
39’
1h 38’
2h 11’
(1) N.B. Duración indicativa de los tiempos de lavado incluida la duración del secado en los programas donde está
previsto.
Tiempo de secado “configuración de los default en A2=35”.
(*) En el programa P1 se puede habilitar la configuración de secado (véase párrafo opciones); de esta manera se
obtiene un programa de aclarado caliente con secado (CALIENTAPLATOS) con las siguientes configuraciones:
A1 lava a 65°C seca 20' - A2 lava a 60°C seca 35' - A3 lava a 50°C seca 45'.
MANTENIMIENTO
7
7.1 LIMPIEZA DE LOS ROCIADORES
Los rociadores se pueden sacar con facilidad para consentir la periódica limpieza de las toberas y para
prevenir posibles obstrucciones.
Lávenlos con mucha atención bajo un chorro de agua y móntenlos nuevamente en el sitio que les
corresponde.
19
LA2505-210
Para desmontar el rociador superior: Desenrosquen
el soporte del rociador en sentido antihorario
23456789
23456789
58
23456789
23456789
ES
23456789
Para desmontar el rociador inferior: Tiren del rociador hacia arriba y sáquenlo.
20
LA2505-220
Page 61

7.2 LIMPIEZA DE LOS FILTROS
Después de cada lavado conviene inspeccionar el grupo de los filtros y limpiarlo de los eventuales
depósitos actuando de la siguiente manera:
• Saquen el filtro central 1.
• Saquen el filtro externo con forma de cilindro 2.
• Quiten la rejilla móvil 3.
Todos los componentes deben limpiarse con agua corriente. Es indispensable que limpien con mucho
cuidado los filtros ya que el lavavajillas no puede funcionar con los filtros obstruidos.
Les recomendamos que vuelvan a poner en su lugar los filtros limpios para evitar causar daños a la
bomba de lavado.
21
22
23
1
3
2
LA2505-180
LA2505-190
LA2505-200
7.3 LIMPIEZA DE LAS SUPERFICIES EXTERIORES DE LA MAQUINA
Las superficies de la máquina, de metal y de plástico, de la parte frontal, tienen que limpiarse
periódicamente con un paño suave y húmedo. No usen nunca ácidos o detergentes abrasivos.
Qué hay que hacer cuando no se va a usar el lavavajillas por un amplio período de tiempo ?
Si el lavavajillas no se usa durante un período amplio de tiempo, hay que proceder de la siguiente
manera:
• Pongan en marcha dos programas de remojo.
• Quiten el enchufe de la corriente eléctrica.
• Desconecten el tubo de alimentación del agua.
• Dejen un poco abierta la puerta frontal para evitar la formación de mal olor.
7.4 TABLA MENSAJES DE ERROR
Error
N.B.: Cuando llame al servicio de asistencia técnica autorizado, comunique siempre el tipo de error.
Cuando se verifica
Durante la toma del agua
E1
(el programa se para)
E2
E4
E5
E6
E7
Fin de ciclo
Fin de ciclo
Fin de ciclo
Fin de ciclo
Fin de ciclo
Controles a efectuar
- Grifo cerrado
- Filtro tubo de desagüe obstruido
- Tubo de desagüe en el suelo
- Tubo de desagüe roto
- Tubo de alimentación de agua doblado
- Presión de agua insuficiente
- Repetir el ciclo de lavado
- Presión de agua insuficiente
- La válvula cuentalitros no funciona
- Tubo de desagüe doblado
- El sifón está obstruido
- Bomba de desagüe bloqueada
- Rejilla filtro atascada
- Olla volcada
- Repetir el ciclo de lavado
- Poner en marcha el lavavajillas
- Verificar
- Poner en marcha el lavavajillas
- Llamar al servicio de asistencia autorizado
- Poner en marcha el lavavajillas
- Verificar si hay presión
- Si se vuelve a presentar el mismo problema, llame
enseguida al servicio de asistencia técnica
autorizado y comunique el tipo de error
- Verificar si hay presión
- Llamar al servicio de asistencia autorizado
- Verificar
- Verificar
- Llamar al servicio de asistencia autorizado
- Limpiar la rejilla del filtro
- Verificar a fin de ciclo, colocar correctamente las
ollas en el próximo lavado
- Si se vuelve a presentar el mismo problema, llame
enseguida al servicio de asistencia técnica
autorizado y comunique el tipo de error
Acciones a realizar
ES
59
Page 62

1234567890
1
0
1
0
1
0
1
0
1
0
1234567890
BUSQUEDA DE LAS AVERIAS
8
Antes, si es posible, intenten eliminar personalmente los eventuales pequeños defectos del aparato con la ayuda
de las siguientes instrucciones. Si estas informaciones no les sirven de ayuda para resolver el problema, pónganse
en contacto con el servicio técnico de asistencia al cliente.
• El programa no se pone en marcha.
¿ Los fusibles de la instalación interna son defectuosos?, El aparato está conectado a la corriente eléctrica ?
¿ La puerta está cerrada correctamente?, Empujen la puerta para cerrarla completamente.
• No entra agua en el aparato.
¿ El grifo del agua está abierto?
¿ El filtro colocado entre el grifo y el tubo de alimentación del agua está atascado?, limpien eventualmente, el
filtro.
¿ El tubo de carga del agua presenta estrangulaciones?, controlen el tubo.
• El indicador de paso de los programas permanece parado al principio del lavado.
¿ El grifo del agua está completamente abierto?
¿ El filtro colocado entre el grifo y el tubo de alimentación del agua está atascado?, limpien eventualmente, el
filtro.
¿ La presión mínima del agua es de, al menos, 0.05 Mpa?
• No descarga el agua.
¿ El tubo de descarga del agua presenta estrangulaciones?, controlen la instalación del tubo.
¿ El sifón está atascado?, controlen el sifón.
• Los cacharros no parecen limpios.
¿ El programa seleccionado es el ideal para el tipo y el grado de suciedad de la vajilla?
¿ La vajilla está colocada de tal manera que el chorro de agua puede lacanzar su superficie interna y externa?
¿ Los cestos de los cubiertos no tienen que estar sobrecargados.
¿ Los brazos rotantes están bloqueados por la vajilla o por algunos cubiertos?
¿ Todos los filtros colocados en el fondo del lavavajillas están limpios?, ¿ los filtros están colocados correcta-
mente en su sitio?
¿ La dosis de detergente que echaron es la correcta?
¿ El tubo de descarga del agua está instalado correctamente?
¿ Queda todavía sal especial en el depósito de la sal?, sin la sal especial el agua no se suaviza.
¿ La instalación del suavizador del agua está regulada en base a la dureza del agua localmente suministrada?
• La vajilla no se seca y queda opaca.
¿ Hay todavía abrillantador en el depósito?
• Los vasos y la vajilla presentan estrías, rayas, manchas lechosas o una pátina azul brillante.
- Durante los enjuagues se toma una dosis excesiva de abrillantador. Disminuyan la dosis del abrillantador.
• Los vasos y la vajilla presentan manchas de gotas de agua que se secaron.
- Durante los enjuagues se toma una dosis insuficiente de abrillantador. Aumenten la dosis del abrillantador.
¡ Advertencia!
Como el lavavajillas fue probado y controlado con mucho cuidado en la fábrica, se pueden encontrar
dentro gotas de agua que desaparecen nada más que se realice el primer lavado.
23456789
23456789
60
23456789
23456789
ES
23456789
Page 63

PRIMA DI USARE L’APPARECCHIO
1
1.1 ISTRUZIONI DI SICUREZZA
Utilizzo secondo le norme
• La lavastoviglie deve essere utilizzata solo per il lavaggio di stoviglie domestiche. Qualora l’apparecchio
fosse utilizzato per altri scopi o in modo errato, la ditta costruttrice non può assumersi alcuna responsabilità
per eventuali danni.
• Per motivi di sicurezza, non sono ammesse trasformazioni o modifiche alla lavastoviglie.
• Pr ima del collegamento dell’apparecchio alla rete elettrica assicuratevi che i dati di tensione e corrente
indicati sulla targa dati corrispondano con quelli erogati sul luogo di installazione.
• L’installazione deve essere compiuta da personale qualificato.
Operazioni preliminari al primo avviamento
• Controllate la lavastoviglie per eventuali danni causati dal trasporto. In nessun caso allacciare un apparecchio danneggiato. In caso di danni rivolgersi al proprio fornitore.
Per la sicurezza dei bambini
• Non permettete ai bambini di giocare con l’apparecchio.
• I detersivi possono causare danni irreparabili agli occhi, alla bocca e alla gola.
Conservare quindi i detersivi fuori della portata dei bambini.
• L’acqua nella lavastoviglie non é potabile. Nel caso che ci siano ancora residui di detersivo nell’apparecchio, permane una situazione di pericolo per i bambini, che devono essere tenuti lontano dalla la vastoviglie
aperta.
Per il funzionamento quotidiano
• Non mettete mai in funzione la lavastoviglie se il cavo della corrente, i tubi di carico e di scarico dell’acqua
sono danneggiati oppure se il cruscotto dei comandi, il piano di lavoro o lo zoccolo sono molto deteriorati.
• In caso di guasto, chiudete prima il rubinetto dell’acqua, spegnete poi l’apparecchio e togliete la spina dalla
presa di corrente. Nel collegamento fisso disinserite l’eventuale interruttore di servizio oppure estraete il
fusibile (o i fusibili).
• Per togliere la spina dalla presa di corrente afferrare la spina dal corpo e mai dal cavo.
• Le riparazioni della lavastoviglie devono essere eseguite solo da personale specializzato. Riparazioni non
appropriate possono mettere in grave pericolo l’utente. In caso di riparazioni quindi rivolgersi al nostro
servizio tecnico assistenza clienti o al proprio rivenditore specializzato.
• La sostituzione del cavo alimentazione deve essere eseguita solo dal personale dell’assistenza
tecnica.
• In caso di deterioramento dei tubi, per l’allacciamento dell’apparecchio , questi de v ono essere sostituiti con
tubi originali.
• Non introducete nella lavastoviglie sostanze solventi che potrebbero provocare un’esplosione.
• Non sedetevi e non appoggiatevi sullo sportello aperto: l’apparecchio potrebbe ribaltarsi.
• Pr ima di introdurre il sale speciale, il detersivo e il brillantante, assicuratevi che il produttore di queste
sostanze ne raccomandi l’utilizzo per le lavastoviglie ad uso domestico.
• Chiudete sempre il r ubinetto dell’acqua se la lavastoviglie non viene utilizzata per parecchio tempo, ad
esempio durante le vacanze.
61
I
Page 64

1234567890
1
0
1
0
1
0
1
0
1
0
1234567890
DISIMBALLO- SMALTIMENTO
2
2.1 DISIMBALLO
Togliete l’imballaggio esterno in plastica gli angoli di rinforzo e le basi in polistirolo.
Aprite la porta e togliete i blocchi di polistirolo dei cestelli.
Il recupero e il riciclaggio dei materiali d’imballaggio contribuisce al risparmio delle materie prime e
alla diminuzione del volume dei rifiuti.
Consegnare l’imballaggio alle discariche per il recupero dei materiali riciclabili.
Quando un giorno l’apparecchio dovrà essere messo definitiv amente fuori uso , renderlo inutilizzabile
prima della sua eliminazione.
AVVERTIMENTO! Alcuni materiali dell’imballaggio (ad es. sacchetti di plastica, polistirolo) possono rappresentare una f onte di pericolo per i bambini pertanto occorre tenere questi materiali lontano.
2.2 SMALTIMENTO APPARECCHIO DA ROTTAMARE
Al termine della vita funzionale dell’apparecchio questo dev e essere rottamato da ditte specializzate,
nel rispetto delle normative vigenti.
In questo modo, con l’eliminazione di un vecchio apparecchio é possibile effettuare il recupero differenziato dei materiali sintetici destinati al riciclaggio, nel pieno rispetto dell’ambiente.
CENNI GENERALI
3
3.1 LAVARE IN MANIERA ECONOMICA ED ECOLOGICA
• Non lavate le stoviglie prima sotto l’acqua corrente.
• Utilizzate la lavastoviglie sempre a pieno carico, poiché solo così é possibile eseguire un lavaggio
economico e nel rispetto per l’ambiente.
• Selezionate sempre un programma di lavaggio corrispondente al tipo di stoviglie e al loro grado di
sporco.
• Evitate assolutamente sovraddosaggi di detersivo, sale speciale e brillantante. Fate attenzione alle
dosi raccomandate nelle istruzioni per l’uso e nelle indicazioni della casa produttrice di tali sostanze.
• Verificate che l’impianto addolcitore dell’acqua sia regolato correttamente.
3.2 STOVIGLIE NON ADATTE
Non sono adatti al lavaggio in lavastoviglie:
- taglieri o piccoli vassoi in legno
- oggetti in materiale plastico non resistenti al calore
- cristallo al piombo
- oggetti in stagno o in rame
- stoviglie o posate con parti incollate
- posate piuttosto vecchie, il cui collante é sensibile al calore
- oggetti in acciaio che si ossidano facilmente
- posate con manici in legno, corno, porcellana o madreperla.
Al momento dell’acquisto di stoviglie, bicchieri e posate assicurar si c he siano adatti per il lavaggio in lavastoviglie.
62
23456789
23456789
23456789
23456789
I
23456789
Page 65

DESCRIZIONE DELL’APPARECCHIO
4
4.1 VISTA GENERALE
1) Serbatoio per il sale
2) Serbatoio per il brillantante
3) Ventilatore asciugatura
(se previsto)
4) Vaschetta per il detersivo
5) Targa dati
6) Filtri
7) Girante inferiore
8) Girante superiore
9) Cavo alimentazione elettrica
10)Tubo alimentazione acqua
11)Tubo di scarico
12)Cestello inferiore
13)Cestello superiore
14)Contenitore posate
15)Gancio chiusura porta
13
12
15
1
9
10
11
8
7
6
1
14
5
4
4.2 DATI TECNICI
Capacità ( secondo coperti standard ) : 12
Pressione nell’impianto idraulico
pressione minima: 0,05 MPa
pressione massima: 1 MPa
3 2
A TTENZIONE: le caratteristiche elettriche sono indicate sulla targa dati.
0,05 - 1MPa Model. ......................
....A
MAX .......W
........V.....Hz
Made in EU
...................
LA2505-020/1
12
63
I
Page 66

1234567890
1
0
1
0
1
0
1
0
1
0
1234567890
INSTALLAZIONE
5
5.1 LIVELLAMENTO
2
M
2.1
P
LA2505-030
Una volta posizionato l’apparecchio nel luogo d’installazione, agite sui piedini P avvitandoli e svitandoli al fine di regolare, se necessario, l’altezza della macchina e livellarla.
Un buon livellamento assicurerà il corretto funzionamento della lavastoviglie .
Errore max=2 gradi
Dopo che la macchina é stata livellata, regolare inoltre il gancio chiusura porta in modo che questa si
chiuda perfettamente.
Dopo che la macchina sia stata livellata regolare inoltre il nasello chiusur a porta (Fig. 2.1 “M”) in modo
che la porta chiuda perfettamente.
5.2 COLLEGAMENTO IDRAULICO
Il tubo d’entrata acqua C, in dotazione rende possibile il
collegamento ad un rubinetto con attacco 3/4”.
Durante il montaggio dev ono essere rispettate le seguenti
istruzioni:
• avvitate il tubo C al rubinetto dell’acqua fredda A;
• se l’allacciamento viene effettuato in tubature n uove o
che sono state usate da molto tempo , é consigliabile
far scorrere acqua prima di allacciare il tubo d’entrata
acqua in modo da eliminare depositi di ruggine e di
sporcizia;
• assicuratevi che la pressione nell’impianto idr aulico sia
entro i valori limite indicati nei dati tecnici.
La lavastoviglie può essere collegata alla conduttura
dell’acqua fredda ma non a quella dell’acqua calda.
23456789
23456789
64
23456789
23456789
I
23456789
3
A
C
LA2505-040
Page 67

5.3 COLLEGAMENTO PER LO SCARICO LISCIVIA
Il tubo di scarico T in dotazione viene agganciato con la parte estrema ricurva al bordo di un lavello o
una conduttura di scarico.
E’ opportuno predisporre un sifone antiodore.
Durante il montaggio é necessario osservare le seguenti precauzioni:
- Il tubo di scarico non deve essere piegato per non causare strozzature;
- L’estremità del tubo in relazione al piano di appoggio della la v astoviglie (fig. 4) de v e essere sistemata ad un’altezza compresa fra 32 cm e 80 cm.
- In nessun caso l’estremità del tubo deve essere immersa nell’acqua;
- Un eventuale prolungamento del tubo di scarico non deve superare la lunghezza di 1 metro e deve
avere lo stesso diametro interno ed inoltre l’altezza massima in cui può essere sistemata l’estremità
libera deve essere ridotta da 80 cm. a 50 cm.;
- Nel caso di una conduttura di scarico, il diametro interno deve essere non inferiore a 4 cm.
4
LA2501-050
5.4 COLLEGAMENTO ELETTRICO
Il collegamento elettrico della macchina deve essere effettuato solo tramite una
presa con contatto a terra installata secondo le istruzioni. Il collegamento deve
corrispondere alle norme legali in vigore e alle norme supplementari dell’azienda
elettrica competente.
L’indicazione della tensione deve corrispondere alla tensione di rete del luogo d’installazione.
Per il dimensionamento della presa di corrente, riferitevi alla targa dati.
T
T
max 80 cm
min 32 cm
65
I
Page 68

1234567890
1
0
1
0
1
0
1
0
1
0
1234567890
USO
6
6.1 OPERAZIONI PRELIMINARI
Prima della messa in esercizio della macchina, assicurate vi che la spina del ca vo di alimentazione sia collegata alla presa di corrente, che il tubo d’entrata acqua sia collegato al rubinetto, che il rubinetto sia aperto e
che il tubo di scarico sia stato collegato secondo le istruzioni.
Apertura della porta
Tirare in avanti la maniglia: la porta si apre facilmente. Se tale operazione viene compiuta mentre la
macchina é in funzione, un dispositivo di sicurezza spegne la lavastoviglie.
Introduzione di sale speciale
• Aprire lo sportello, estrarre il cestello inferiore.
• Svitare il cappuccio del serbatoio del sale ruotandolo in sen-
so antiorario.
Solo per il primo avviamento: introdurre circa 1/2 litro d’acqua nel serbatoio del sale.
• Caricate il sale speciale attraverso l’imbuto L nel contenito-
re apposito (circa 1,0 - 1,5 kg).
• Pulite l’apertura del serbatoio da eventuali residui di sale.
• Riavvitate il tappo del serbatoio ruotandolo in senso orario.
• Se subito dopo l’introduzione di sale le stoviglie non vengo-
no lavate, avviate il programma AMMOLLO, affinché l’ac-
qua e i granuli di sale fuoriusciti dal serbatoio vengano sciac-
quati via.
• L’impianto di addolcimento include un indicatore elettrico
per la segnalazione del contenuto del sale.
Una spia luminosa si accende sul pannello frontale della
vostra lav asto viglie (v edi fig. 18, ) quando e’ necessa-
6
rio aggiungere sale rigeneratore.
Regolazione dell’impianto addolcitore dell’acqua
Per il lavaggio é consigliabile acqua dolce (povera di calcare),
per evitare che si formino depositi sulle stoviglie e sulla stessa
lavastoiviglie.
Per conoscere il grado di durezza dell’acqua rivolgetevi al
vostro ufficio comunale oppure utilizzate un kit commerciale di
rilevamento.
Per accedere all’impostazione di rigener azione ottimale occorre
tenere premuto il tasto DELAY 9 (fig.6) all’accensione della
macchina,di seguito viene visualizzata l’attuale impostazione
(es. d5), per modificarla (entro 5 sec.), premere lo stesso tasto
fino a selezionare il livello di rigenera voluto (vedi tabella).
Attendere circa 6 secondi, senza modificare la scelta, il suono
del buzzer confermera’ la lettura del nuovo livello, sul Display
comparira’ la richiesta selezione programma.
Utilizzate solo sale speciale per lavastoviglie;
altri tipi di sale (ad es. sale da cucina ) contengono spesso sostanze che non si sciolgono con
l’acqua e possono otturare l’addolcitore rendendolo inutilizzabile.
23456789
23456789
66
23456789
23456789
I
23456789
LA2505-060
Livelli di rigenerazione
Posizione
del
regolatore
d1
d2
d3
d4
d5
d6
L
9
Gradi
francesi
°fH
<15
>15 <25
>25 <40
>40 <60
>60 <80
>80 <90
>=maggiore/<=minore
tedeschi
>8,4 <14
>14 <22,4
>22,4 <33,6
>33,6 <44,8
>44,8 <50,4
5
6
Gradi
°dH
<8,4
Page 69

LA2505-080
7
Segnalazione di controllo per l’introduzione
del sale (se previsto)
La marcatura verde sotto il cappuccio , indica che
c’é ancora sufficiente sale speciale nel serbatoio .
Se la marcatura verde non é più visibile, allora é
necessario introdurre altro sale speciale.
Introduzione del brillantante
Il brillantante che viene aggiunto automaticamente
durante l’ultima fase di lavaggio, garantisce una
veloce asciugatura delle stoviglie e evita la
formazione di macchie e di sedimenti calcarei sulle
stoviglie.
Utilizzare solo brillantanti specifici per lavastoviglie, altri prodotti non producono
l’effetto desiderato.
Il serbatoio del brillantante S si trova sul lato interno
dello sportello .
• Ruotate il tappo T del serbatoio di 1/4 di giro in
senso antiorario per estrarlo.
• Introducete il brillantante fino alla linea tratteggiata. Quantità massima circa 140 ml.
• Rimettere il tappo.
• Pulite il brillantante eventualmente fuoriuscito
con un panno, altrimenti durante il risciacquo si
forma troppa schiuma.
8
T
S
LA2505-092
9
F
Segnalazione di controllo per l’intr oduzione del
brillantante
• Elettrico (fig. 18 - 18.1)
L’apparecchio ha un indicatore del livello del
brillantante. Quando si illumina e’ necessario
aggiungere l’additivo.
•Meccanico (fig.9)
Il brillantante deve essere inserito se l’indicatore
sul serbatoio F, è di colore chiaro (
Quando il serbatoio é pieno, l’indicatore è di colore
scuro.
).
LA2505-096
67
I
Page 70

1234567890
1
0
1
0
1
0
1
0
1
0
1234567890
Regolazione del dosaggio di brillantante
1
2
3
4
1
2
3
4
La regolazione R del dosaggio si trova nell’apertura
di carica della vaschetta del brillantante.
E’ azionabile con un cacciavite e regolabile da 1 a
4, numeri che corrispondono all’aggiunta di
brillantante da 1 a 4 ml. In f abbrica viene impostato
il numero 2(2 ml).
La vaschetta del brillantante completamente piena
é sufficente per circa 50 programmi di lavaggio.
E’ necessario effettuare un cambiamento nella
quantità del dosaggio se l’esito del dosaggio non
é quello desiderato.
• Pulire sempre il brillantante eventualmente fuo-
riuscito con un panno.
E’ importante controllare periodicamente il livello
del brillantante, possibilmente ogni 31 cicli di
lavaggio.
Introduzione del detersivo
10
R
LA2505-094
IMPORTANTE! Non utilizzate nella lavastoviglie
11
detersivo per lavare i piatti a mano! Questi
producono molta schiuma, ma nella lavastoviglie
non puliscono le stoviglie e possono addirittura
P
comprometterne il funzionamento.
Utilizzate dunque solamente detersivi specifici per
la lavasto viglie ad uso domestico.
Q
Conservate le confezioni dei detersivi ben chiuse
e in luogo ben asciutto.
Solo con il programma ammollo il detersivo non é
necessario. Durante il programma il detersiv o viene
prelevato dalla vaschetta automaticamente.
La quantità di detersivo consigliata é 25 g.
L ’efficacia dei diver si detersivi può essere differente. Fate quindi attenzione alle dosi consigliate
dalle rispettive case produttrici.
La vaschetta per il detersiv o si trova sul lato interno
dello sportello.
12
Nel caso che il coperchio sia chiuso:
• Premere in avanti la leva di chiusura P. Il coper-
chio si apre a scatto.
• Introducete il detersivo nella v aschetta V.
• Per chiudere il coperchio, premerlo finché non
scatta la chiusura.
Quando le stoviglie sono eccezionalmente sporche
é possibile mettere detersivo in più nell’incav o Q del
coperchio; riempite l’incavo fino all’orlo, questo detersivo é già attivo nella fase di ammollo.
V
LA2505-090
68
23456789
23456789
23456789
23456789
I
23456789
LA2505-100
Page 71

Come caricare e disporre le stoviglie
Due cestelli consentono di caricate i vari tipo di
stoviglie.
• Togliete dalle stoviglie i resti più grandi di cibo
per evitare il rischio di un intasamento del filtro
e l’uscita di cattivi odori.
• Se le padelle e pentole sono particolarmente incrostate con resti di cibo (fritto o arrosto) immergeteli in un bagno d’acqua prima d’introdurli nella
lavastoviglie .
Uso del cestello inferiore
Il cestello inferiore é predisposto per ricevere le
stoviglie difficilmente lavabili e il cestello per le
posate.
Nel cestello inferiore vengono messi i piatti piani,
fondi, padelle, zuppiere , coperchi e piatti di portata. I piatti piani e fondi devono essere disposti tenendo in considerazione che tra i singoli piatti de ve
rimanere uno spazio intermedio.
13
LA2505-110
La loro posizione deve essere sempre verticale in
modo che l’acqua possa passare liberamente.
Pentole e padelle devono essere disposte sempre capovolte. Sono possibili tutte le combinazioni
e possibilità di caricamento, però bisogna tenere
in considerazione che le stoviglie, le pentole e le
padelle vengono disposte in modo tale che tutte
le superfici sporche siano esposte allo spruzzo
d’acqua e che l’acqua possa defluire liberamente.
14
Posate
Per ottenere i migliori risultati di lav aggio, le posate de vono essere disposte con i manici v erso il basso .
Cucchiai, forchette e coltelli de vono essere disposti negli appositi spazi della g riglia contenitore posate.
ATTENZIONE:
Posate particolarmente lunghe, e nel caso specifico “coltelli lunghi”, non v anno posizionati con
le punte rivolte verso l’alto; ma v anno sistemati in posizione orizz ontale nel cestello superiore o
lavati a mano.
LA2505-112
69
I
Page 72

1234567890
1
0
1
0
1
0
1
0
1
0
1234567890
L’uso del cestello superiore
Il cestello superiore completamente estraibile
riceve le stoviglie piccole e medie come
bicchieri, piattini, tazzine da té e da caffé,
insalatiere basse, pentole e padelle basse non
molto sporche.I piattini da dolce de vono essere
disposti sempre verticalmente; bicchieri, tazz e,
pentole e padelle, capov olti. Le sto viglie leggere
devono essere disposte tra i sostegni in modo
da non essere colpiti dal getto di lav aggio.
Il miglior risultato di lavaggio viene raggiunto
quando si é trovata la disposizione più adatta
delle stoviglie nei cestelli. Da questo momento
in poi il processo di lavaggio può sviluppare tutta
la sua efficacia.
A causa della temperatura elevata dell”acqua di lav aggio e della reazione c himica del detersivo impiegato, è consigliabile e vitare oggetti di rame, stoviglie
in alluminio anodizzato, posate con manici in legno o corno, porcellane delicate, stoviglie in vetro e plastica non termoresistente.
In presenza di stoviglie di porcellana decorata, è consigliabile effettuare una
prova di lavaggio su un singolo pezzo per verificare che la decorazione non
venga modificata o danneggiata.
15
LA2505-120
Regolazione altezza cestello superiore.
Agendo sulla maniglia laterale (solo lato sinistro), è
possibile regolare il cestello in altezza e inclinazione.
1 Regolazione posizione orizzontale
2 Regolazione posizione inclinata
16
LA2505-130
1
LA2505-132
2
70
23456789
23456789
23456789
23456789
I
23456789
LA2505-134
Page 73

Estrazione del cestello superiore
Il cestello superiore può essere estratto dalle guide come rappresentato nella figura.
Descrizione elementi di comando
e indicazione
Led di indicazione
Tasti comando
17
LA2505-160
1) Indicazione ritardo partenza (Delay)
2) Indicazione mezzo carico
3) Indicazione esclusione prelavaggio
4) Indicazione asciugatura
5) Indicazione mancanza sale
6) Indicazione mancanza Brillantante
7) Acceso/spento
8) Selezione programmi
9) Selezione ritardo partenza
(Delay)
10) Selezione mezzo carico
11) Selezione esclusione prelavaggio
12) Selezione asciugatura
13) Start/stop/pausa programma
14) Display multifunzione
15) Maniglia apertura porta
2
1
3
4
5
6
18
7
15
Avviamento
Dopo il controllo della quantità di sale di rigenerazione e brillantante, aprite completamente il rubinetto
dell’acqua, disponete le stoviglie nei cestelli, v ersare il detersivo nel suo contenitore e il detersivo per
il prelavaggio (se necessario) e chiudete la porta frontale.
Procedete come segue:
14
8
9
10
13
12
11
EL0510-010
• Azionate il tasto “acceso-spento” . Si illumina il Display
7
14
Selezione programmi
• Selezionate il programma desiderato tramite il tasto (selezione programmi)
• Premete il tasto start/pausa programma , dopo il segnale acustico di indicazione inizio prog ram-
13
8
ma, la macchina svolge automaticamente la fase di lavaggio.
Nota: Sul Display viene visualizzata la durata del programma impostato.
E’ consigliabile non aprire la lavastoviglie durante il lavaggio.
I
71
Page 74

1234567890
1
0
1
0
1
0
1
0
1
0
1234567890
Opzioni
(n.b. le varie opzioni vanno selezionate prima di avviare il ciclo di lavaggio)
• Ritardo di partenza (Delay) ; le impostazioni di ritardo (da 1h a 16h) vengono visualizzate sul
9
Display e contemporaneamente il led corrispondente inizia a lampeggiare per tutta la durata del ritardo
impostato.
Per av ere la conferma dell’opzione impostata, sul Display deve comparire il nr. programma preselezionato .
• Mezzo carico ; selezionando le modalita’ di lavaggio tramite questo tasto, sul Display vengono
10
riportate le seguenti indicazioni (¯ =la vaggio cestello superiore, _ =lavaggio cestello inferiore), il led
corrispondente si illumina.
Per av ere la conferma dell’opzione impostata, sul Display deve comparire il nr. programma preselezionato .
• Esclusione prelavaggio ; questa opzione e’ abilitata solo in quei programmi previsti di prelav aggio.
11
Premendo il tasto si illumina il led corrispondente.
Per av ere la conferma dell’opzione impostata, sul Display deve comparire il nr. programma preselezionato .
• Asciugatura ; questa opzione viene eseguita automaticamente nei programmi dove previsto, (vedi
12
tabella programmi). Per variare l’impostazione dell’asciugatura si deve premere il tasto asciugatura
prima dell’avvio del programma, nel Display verra’ indicato come segue:
A0 =non asciuga - A1 =Asciugatura 20' - A2 =Asciugatura 35' - A3 =Asciugatura 45'
il led corrispondente sul pannello comandi si illumina.
Per av ere la conferma dell’opzione impostata sul Display deve comparire il nr. programma preselezionato .
• Nota: Nei modelli dove non è previsto il ventilatore di asciugatura tale opzione è da considerarsi come
un tempo di attesa di fine ciclo.
• Descrizione tasto Start/stop/pausa
• Esegue l’avvio dei programmi di lavaggio, (il suono del buzzer conferma l’inizio programma).
13
7
•Quando si accende la macchina con il pulsante Marcia/Arresto (ON/OFF), il display indica il numero
dell’ultimo programma eseguito. In caso che il programma precedentemente eseguito non sia terminato
il display lampeggierà il numero di questo programma, per farlo ripartire sarà sufficiente premere il tasto
“START” , automaticamente sul display comparirà il tempo residuo per finire il ciclo.
13
(Tale situazione si verifica ogni qualvolta si apre la macchina quando sta eseguendo un programma).
•
Se premuto durante il lavaggio per un tempo inferiore a 5” mette la macchina in pausa, nel Display lampeggia il nr. del programma impostato, (è possibile in questo caso aggiungere o togliere stoviglie ecc.).
Per continuare il programma di lavaggio chiudere la porta e ripremere il tasto .
• Impostazioni errate dei programmi (cambio programma)
• Resettare tramite il tasto Start/stop/pausa , tenere premuto finche’ il b uzzer non smette di suonare
13
13
(serie di beep).
• Ripetere l’operazione “selezione programmi”.
Nota:Se il programma e’ iniziato e ha superato la f ase di carico acqua, sul Displa y compare la sigla
di seguito la macchina scarica dopo il suono prolungato del buzzer, sul Display compare l’impostazione
del programma pre-impostato.
A questo punto la macchina e’ pronta per una nuova impostazione.
• Nota: Una volta aperta la porta, pigiare sempre il tasto Start per fare ripartire la lavastoviglie.
13
• Attivazione/Esclusione dell’indicatore sonoro (buzzer)
b0 = Indicatore sonoro DISATTIVATO
b1 = Indicatore sonoro ATTIVATO
Per accedere all’impostazione dell’INDICATORE SONORO (BUZZER), tenere premuto il tasto PROGRAMMA all’accensione della macchina. Viene visualizzato sul Displa y , l’attuale impostazione “b1
8
Per modificare quest’impostazione, premere lo stesso tasto fino a selezionare lo stato dell’Indicatore
Sonoro desiderato. Attendere circa 6 secondi, senza modificare la scelta, in seguito il suono del BUZZER
conferma l’avvenuta memorizzazione.
• Fine ciclo
Finito il ciclo di lavaggio sul Display il numero programma r imane acceso fisso, se lampeggia
14
attendere la fine del lavaggio.
• Verifica funzioni
E’ possibile visualizzare le varie funzioni durante le fasi di lavaggio nel seguente modo:
Premendo il tasto selezione programmi , sul Displa y viene visualizzato il nr. del programma preimpostato;
Premendo il tasto mezzo carico , sul Display viene visualizzata la zona di lavaggio superiore o
8
10
inferiore;
Premendo il tasto asciugatura , sul Display viene visualizzato il livello di asciugatura
12
.
Arresto
Dopo il ciclo di lavaggio, la la vastoviglie si ferma automaticamente, il suono prolungato del buzzer conferma
la fine del ciclo di lavaggio. Per spegnerla, premere il bottone acceso/spento . Dopo ogni ciclo di
lavaggio, chiudere assolutamente il r ubinetto dell’acqua per isolare la lavastoviglie dalla rete di
approvvigionamento idrico.
23456789
23456789
72
23456789
23456789
I
23456789
7
12
“ “,
”.
Page 75

Tabella dei programmi di lavaggio
PULSANTI DETERSIVO
Acceso
Spento
Pre-lavaggio
Lavaggio
Programmi
Numero
programma
Stoviglie
e
tipo di
sporco
Descrizione programmi
Durata*
(1)
Ammollo
Intensivo 70°C
Normale 60°C
P1
P2
P3
Pentole e stoviglie fino al prossimo ciclo di lavaggio
Stoviglie molto sporche (con eccezione di parti delicate)
Stoviglie mediamente sporche
(con eccezione di parti delicate)
Lavaggio breve a freddo in modo da non far
attaccare i resti del cibo alle stoviglie
1 Prelavaggio caldo - Lavaggio principale
3 risciacqui (2 freddi - 1 caldo) Asciugatura
1 Prelavaggio freddo - Lavaggio principale
2 risciacqui (1 freddo - 1 caldo) Asciugatura
11’
2h
2h 17’
(EN 50242)
Delicato 60°C
Normale 40°C
Rapido 40°C
Biologico 60°C
Energico 70°C
P4
P5
P6
P7
P8
Stoviglie delicate molto sporche
Stoviglie normalmente sporche
Stoviglie molto sporche
Pentole e stoviglie
Pentole e stoviglie molto sporche
Lavaggio principale
2 risciacqui (1 freddo - 1 caldo) Asciugatura
1 Prelavaggio freddo - Lavaggio principale
2 risciacqui (1 freddo - 1 caldo)
Lavaggio principale
2 risciacqui (1 freddo - 1 caldo)
Lavaggio principale
3 risciacqui (2 freddi - 1 caldo) Asciugatura
1 Prelavaggio caldo - Lavaggio principale
3 risciacqui (2 freddi - 1 caldo) Asciugatura
1h 40’
49’
39’
1h 38’
2h 11’
(1) N.B. Durata indicativa dei tempi di lavaggio inclusa la durata dell’asciugatura nei programmi dove previsto.
Tempo di asciugatura “impostazione di default in A2=35’”.
(*) Nel programma P1 è possibile abilitare l’impostazione asciugatura (vedi paragrafo opzioni); in questo modo si
ottiene un programma di risciacquo caldo con asciugatura (SCALDAPIATTI) con le seguenti impostazioni:
A1 lava a 65°C asciuga 20’ - A2 lava a 60°C asciuga 35’ - A3 lava a 50°C asciuga 45’.
MANUTENZIONE
7
7.1 PULIZIA DEGLI IRRORATORI
Gli irroratori sono facilmente asportabili per consentire la periodica pulizia degli ugelli e per pre v enire
possibili otturazioni.
Lavateli accuratamente sotto un getto d’acqua e rimontateli nelle proprie sedi.
19
LA2505-210
Per smontare l’irroratore superiore:
Svitate il supporto dell’irroratore in senso antiorario
Per smontare l’irroratore inferiore:
Tirate l’irroratore verso l’alto e sfilatelo
20
I
LA2505-220
73
Page 76

1234567890
1
0
1
0
1
0
1
0
1
0
1234567890
7.2 PULIZIA DEI FILTRI
Dopo ogni lavaggio è opportuno ispezionare il gruppo filtrante e ripulirlo da e v entuali depositi agendo
nel seguente modo:
• Estraete il filtro centrale 1.
• Sfilate il filtro esterno a pozzetto 2.
• Rimuovete la griglia mobile 3.
T utti i componenti v anno puliti in acqua corrente . È indispensabile pulire con attenzione i filtri in quanto
la lavastoviglie non potrà funzionare con i filtri ostruiti.
Vi raccomandiamo di rimettere a posto i filtri puliti per evitare danni alla pompa di lavaggio.
21
22
1
3
2
LA2505-180
LA2505-190
7.3 PULIZIA DELLE SUPERFICI ESTERNE ALLA MACCHINA
Le superfici della macchina, di metallo e di plastica del frontalino , dev ono essere pulite periodicamente
con un panno morbido ed umido. Non usate mai acidi o detergenti abrasivi.
Messa fuori servizio prolungata.
Se la lavastoviglie non viene usata per un lungo periodo, si deve procedere come segue:
• Fate girare due programmi di ammollo.
• Staccate la spina dalla rete elettrica.
• Scollegate il tubo di alimentazione dell’acqua.
• Lasciate leggermente aperta la porta frontale per evitare la formazione di cattivo odore.
7.4 TABELLA CODICI DI ERRORE
Errore
E1
E2
E4
E5
E6
E7
Quando si verifica
Durante il carico
dell’acqua
(il programma si ferma)
A fine ciclo
A fine ciclo
A fine ciclo
A fine ciclo
A fine ciclo
Controlli da effettuare
- Rubinetto chiuso
- Filtro tubo di carico ostruito
- Tubo di scarico a terra
- Tubo di scarico rotto
- Tubo di alimentazione acqua piegato
- Insufficiente pressione dell’acqua
- Ripetere il ciclo di lavaggio
- Insufficiente pressione dell’acqua
- La valvola contalitri non funziona
- Tubo di scarico piegato
- Il sifone è ostruito
- Pompa di scarico bloccata
- Griglie filtro intasate
- Pentola rovesciata
- Ripetere il ciclo di lavaggio
- Resettare la lavastoviglie
- Verificare
- Resettare la lavastoviglie
- Chiamare il centro di assistenza autorizzato
- Resettare la lavastoviglie
- Verificare se c’è pressione
- Se si ripresenta lo stesso problema contattare
subito il centro assistenza tecnica autorizzato
comunicando il tipo di errore
- Verificare se c’è pressione
- Chiamare il centro di assistenza autorizzato
- Verificare
- Verificare
- Chiamare il centro di assistenza autorizzato
- Pulire le griglie filtro
- Verificare a fine ciclo, posizionare
correttamente le pentole al prossimo lavaggio
- Se si ripresenta lo stesso problema contattare
subito il centro assistenza tecnica autorizzato
comunicando il tipo di errore
N.B.: Quando si contatta il centro assistenza tecnica autorizzato comunicare sempre il tipo di errore.
23456789
23456789
74
23456789
23456789
I
23456789
Azioni da fare
23
LA2505-200
Page 77

RICERCA GUASTI
8
Controllare prima se è possibile eliminare personalmente ev entuali piccoli dif etti dell’apparecchio con
l’ausilio delle seguenti istruzioni. Se queste inf ormazioni non sono di alcun aiuto per risolvere il prob lema,
mettersi in contatto con il servizio tecnico assistenza clienti.
• Il programma non si avvia.
- I fusibili dell’impianto interno sono difettosi? L’ apparecchio é allacciato alla rete elettrica?
- Lo sportello é chiuso correttamente? Premere sullo sportello per chiuderlo completamente.
• Non entra acqua nell’apparecchio.
- Il rubinetto dell’acqua è aperto?
- Il filtro posto fra rubinetto e tubo di alimentazione acqua è otturato? Pulite eventualmente il filtro.
- Il tubo di carico dell’acqua presenta delle strozzature? Controllate il tubo.
• L’indicazione di decorso del programma rimane ferma all’inizio del lavaggio.
- Il rubinetto dell’acqua è completamente aperto?
- Il filtro posto fra rubinetto e tubo di alimentazione acqua è otturato? Pulite eventualmente il filtro.
- La pressione minima dell’acqua è almeno di 0,05 MPa?
• L’acqua non viene scaricata.
- Il tubo di scarico presenta delle strozzature? Controllate l’installazione del tubo.
- Il sifone è otturato? Controllate il sifone.
• Le stoviglie non diventano pulite.
- Il programma selezionato è adatto al tipo e al grado di sporco delle stoviglie?
- Le stoviglie sono sistemate in modo tale che il getto dell’acqua possa r aggiungere la loro superficie
interna ed esterna?
- I cestelli delle stoviglie non devono essere sovraccarichi.
- I bracci rotanti sono bloccati dalle stoviglie o da alcune posate?
- Tutti i filtri sul fondo del vano lavaggio sono puliti? I filtri sono messi al loro posto correttamente?
- La dose di detersivo introdotta è quella corretta?
- Il tubo discarico dell’acqua è installato correttamente?
- C’è ancora sale speciale nel serbatoio del sale? Senza il sale speciale l’acqua non viene addolcita.
- L’impianto addolcitore dell’acqua è regolato in base alla durezza dell’acqua localmente erogata?
• Le stoviglie non si asciugano e rimangono opache.
- C’è ancora brillantante nel serbatoio?
• I bicchieri e le stoviglie presentano delle striature, striscie, macchie lattiginose oppure una
patina blu lucente.
- Durante il risciacquo viene prelevata una dose eccessiva di brillantante. Diminuire il dosaggio di
brillantante.
• I bicchieri e le stoviglie presentano macchie di gocce d’acqua ormai asciutte.
- Durante il risciacquo viene prelevata una dose insufficiente di br illantante? Aumentare il dosaggio di
brillantante.
Avvertenza!
Dato che la lavasto viglie è stata collaudata e controllata accuratamente in fabbrica, si potranno
trovare per questo delle goccioline di acqua che scompariranno dopo il primo lavaggio.
I
75
Page 78

1234567890
1
0
1
0
1
0
1
0
1
0
1234567890
76
23456789
23456789
23456789
23456789
LV
23456789
Page 79

1234567890
1
0
1
0
1
0
1
0
1
0
1234567890
76
23456789
23456789
23456789
23456789
LV
23456789
Page 80

461304381 04/12/03 Litograf s.r.l. Jesi
 Loading...