

Page 1

461304317
18/10/02
Litograf s.r.l. Jesi
Page 2

R R
R
GB
F
E
R R
DISHWASHER
Use and maintenance
handbook
R R
LAVE-VAISSELLE
Livret d’instructions
et d’entretien
R R
LAVAVAJILLAS
Manual de uso y
manutención
R R
I
LAVASTOVIGLIE
Manuale uso
e manutenzione
R R
R
R
R
R
R
MAQUINA DE LAVAR PRATOS
P
Manuale de uso
e manutenção
R R
R R
R R
R
R
R
Page 3
BEFORE USING THE APPLIANCE
1
1.1 SAFETY INSTRUCTIONS
Norms and regulations to be respected
• The dishwasher may only be used to clean household dishes. If the appliance is used for other
purposes or in a wrong manner, the manuf acturer declines all responsibilities f or possib le damages.
• For safety reasons, no modifications must be carried out on the appliance.
• Before connecting the appliance to the electric po wer supply system, check that the po wer supply at
the place of installation is compatible with the electric data indicated on the data tag.
• The installation must be carried out by qualified personnel.
Before running the appliance for the first time
• Make sure the dishwasher w as not damaged during transport. Do not hook up the appliance if there
is any damage. In case of damage, contact the vendor.
For the safety of children
• Do not allow children to play with the appliance.
• Detergents can cause permanent damage to eyes , mouth and throat.
They should therefore be kept outside the reach of children.
• The water in the dishwasher is not drinkab le. Any residues of detergent in the appliance constitute a
source of danger for children. They must therefore be kept away from the open dishwasher.
Daily use
• Do not turn on the dishwasher if the electric cable, or the water supply or water drainage pipes are
damaged, or if the control board, the work surf ace or the base are in very bad condition.
• In case of a malfunction, shut off the water supply, then tur n off the appliance and pull the electric
plug from the outlet. If there is a permanent electric connection, turn off the service switch (if present)
or remove the fuse (or fuses).
• To remove the plug from the electric outlet, hold the plug itself and pull; never pull the cable .
• All repairs of the dishwasher must be carried out b y specialised personnel. Inappropriate repairs can
create a severe danger f or the user . For repairs , you should theref ore contact our technical customer
assistance service or a specialised vendor.
• The replacement of the supply cable must be carried out only by the technical service staff.
• If the pipes and tubes are deteriorated, substitute them with new or iginal par ts before hooking up
the appliance.
• Do not use detergent substances that could lead to an explosion.
• Do not sit or lean on the open door. The appliance might otherwise tilt over.
• Before adding special dishwasher salt, detergent and r inse aid, mak e sure that the man ufacturer of
these substances recommends their use for household dishwashers.
• Always shut off the water supply when the dishwasher is not in use for longer periods of time, e.g.,
during your vacations.
GB
1
Page 4
1234567890
1
0
1
0
1
0
1
0
1
0
1234567890
UNPACKING – DISPOSAL
2
2.1 UNPACKING
Remove the e xternal plastic packaging material, the corner re-enforcements , and the styrofoam base .
Open the door and remove the styrofoam blocks from the inside baskets.
Collect and recycle the packaging materials. This will preserve primary materials and help reduce the
amount of waste.
Take the packaging materials to specialised recycling centres .
When the appliance ev entually has to be disposed of, it should be made non-functional bef ore eliminating
it.
Attention! Some packaging materials (e.g., plastic bags, styrofoam) can be
dangerous for children. Children should therefore be kept away from them.
2.2 FINAL DISPOSAL OF APPLIANCE
At the end of its life span, the appliance must be eliminated by a specialised company, respecting all
existing laws and regulations .
This will make it possible to dispose of the old appliance while at the same time recuperating and
sorting synthetic materials that are fit for recycling, thus contributing to the protection of the en vironment.
GENERAL ADVICE
3
3.1 WASHING DISHES IN AN ECONOMIC AND ECOLOGICAL WAY
• Don’t rinse your dishes under running water before placing them in the dishwasher
• Run the appliance only when it is full, because only like this the process becomes economical and
respects the environment.
• Always choose a programme that is adequate for the kind of dishes you want to wash and that
corresponds to how dirty they are
• You should avoid to use too much detergent, dishwasher salt, and rinse aid. Refer to the dosages
recommended in the usage instructions provided by the manufacturers of these substances.
• Make sure that the water softness regulator is set correctly.
3.2 DISHES NOT TO BE WASHED IN THE DISHWASHER
You must not wash in this appliance:
- Cutting boards or small containers in wood
- Plastic objects that are not heat resistant
- Lead crystal
- Objects made from tin or copper
- Dishes or cutlery with glued components
- Old cutlery with heat sensitive glue
- Steel objects that are oxidised easily
- Cutlery with handles in wood, horn, antler, porcelain, or mother of pearl.
When purchasing dishes, cutlery, or glasses, make sure that they are
dishwasher resistant.
2
23456789
23456789
23456789
23456789
GB
23456789
Page 5
DESCRIPTION OF THE APPLIANCE
4
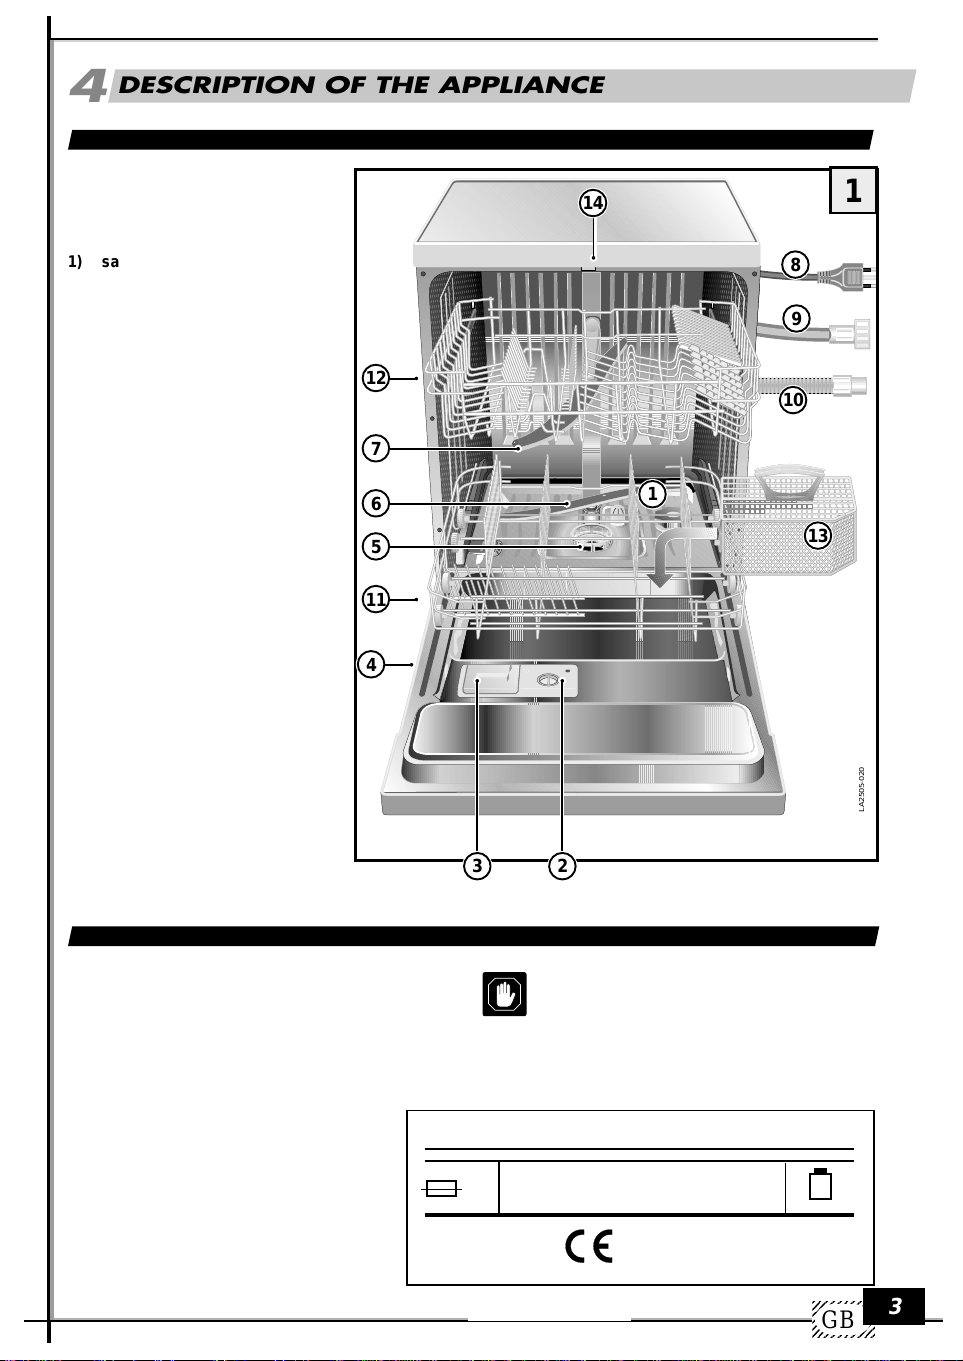
4.1 GENERAL PARTS
1) salt container
2) rinse aid container
3) container for detergent
4) data tag
5) filters
6) lower spray-rotor
7) upper spray-rotor
8) electric cable
9) water supply tube
10) water drainage tube
11) lower basket
12) upper basket
13) cutlery container
14) hook for door closing mechanism
12
11
4
14
1
8
9
10
7
6
5
1
13
4.2 TECHNICAL DATA
capacity (standard settings): 12
pressure of water supply system
minimum pressure: 0.05 Mpa
maximum pressure: 1 Mpa
3 2
Attention: the necessary characteristics
of the electric supply grid are indicated
on the data tag.
0,05 - 1MPa Model. ......................
....A
MAX .......W
........V.....Hz
Made in EU
...................
12
GB
LA2505-020
3
Page 6
1234567890
1
0
1
0
1
0
1
0
1
0
1234567890
INSTALLATION
5
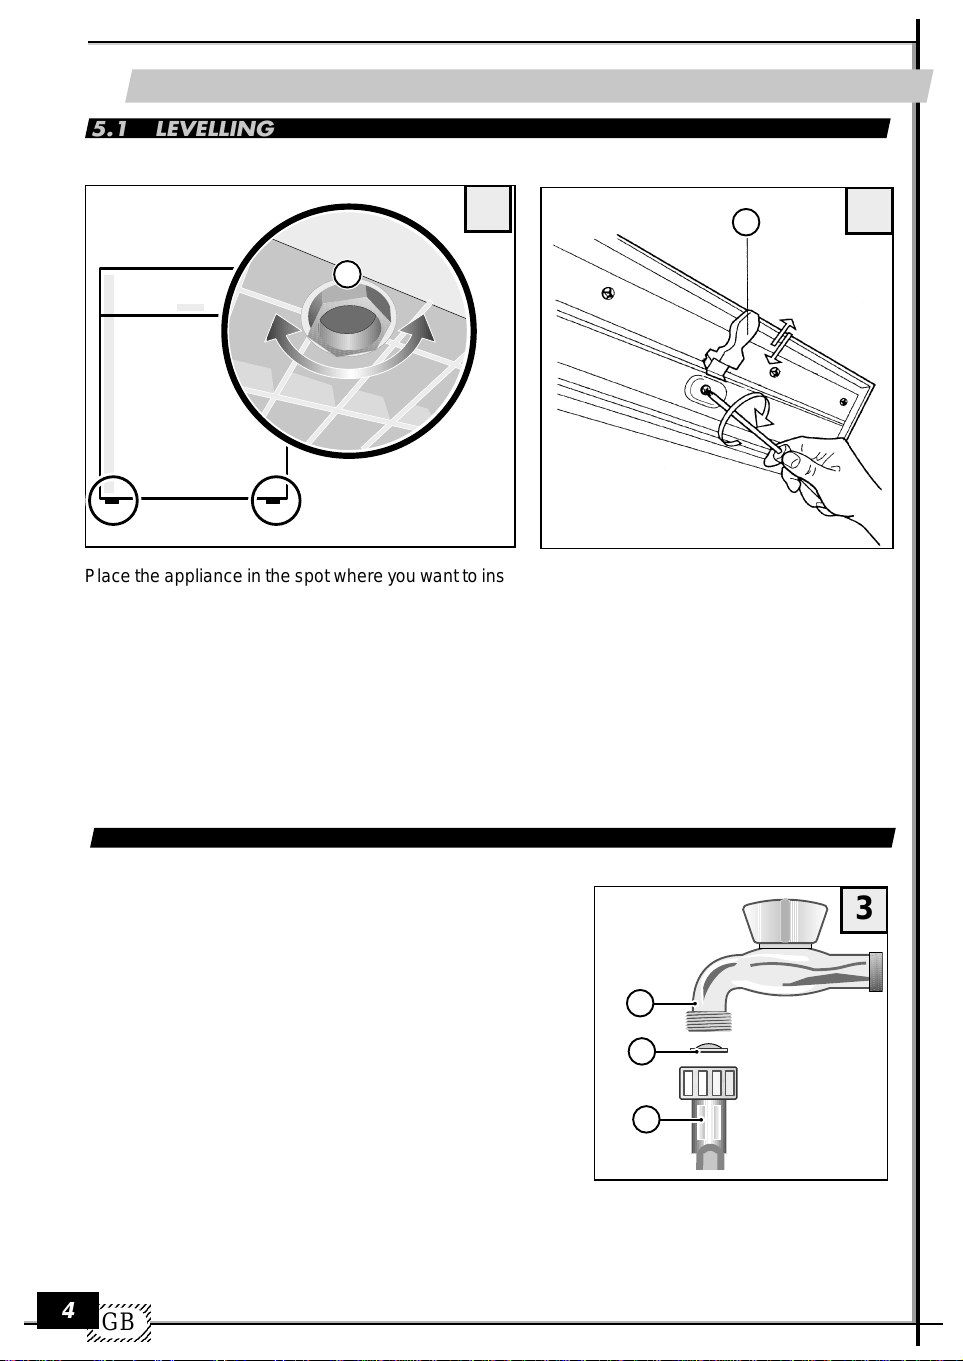
5.1 LEVELLING
2
M
2.1
P
LA2505-030
Place the appliance in the spot where you w ant to install it. Use feet P (unscrew or screw in) to regulate
(if necessary) the height of each foot to assure that the appliance is in a fully level position.
If the appliance is positioned in a level position, its correct functioning is assured.
Maximum error = 2 degrees
After levelling the appliance , regulate the hook of the door closing mechanism, to assure that the door
closes perfectly.
In order to obtain a perfect seal adjust the door loc king device b ut only after having le velled the machine
in its final installation position.
5.2 WATER CONNECTION
The water supply tube C, which accompanies the
dishwasher, makes it possible to connect the appliance
to a faucet with a _” attachment.
During the installation, the following instructions must
be followed:
• Attach tube C to the cold water f aucet A; place filter B
(supplied with the appliance) between tube and f aucet.
• If the tube is being attached to new pipes that have
not been used for a long time, y ou should let the w ater
run for some time before attaching the tube in order to
make sure that dirt and rust residues are eliminated.
• Make sure that the water pressure corresponds to the
range indicated on the data tag.
The appliance may be connected to the cold water
system. It m ust not be connected to the hot w ater system.
23456789
23456789
4
23456789
23456789
GB
23456789
3
A
B
C
LA2505-040
Page 7
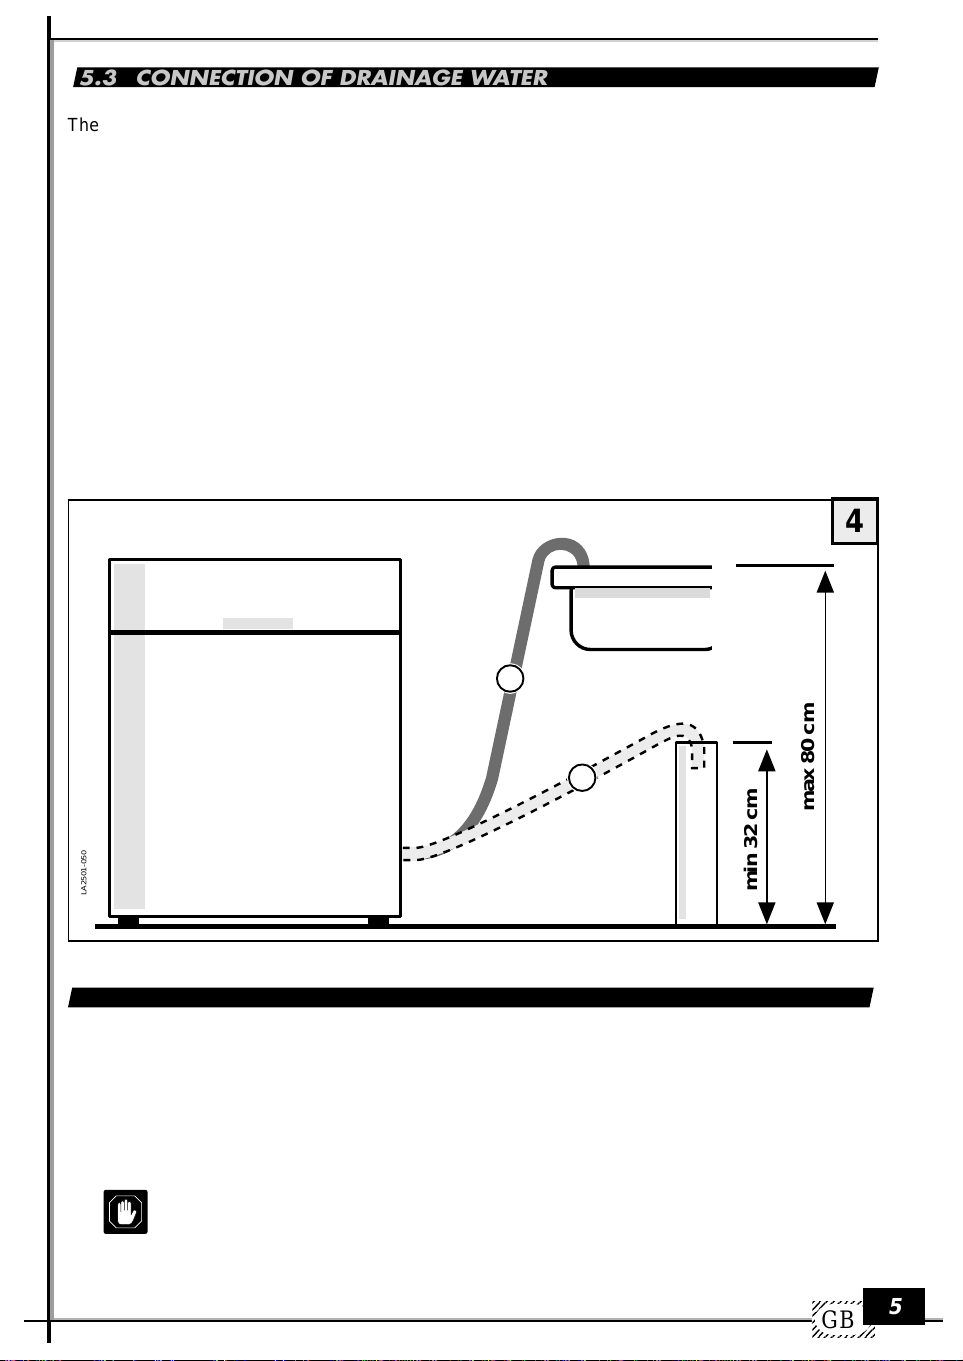
5.3 CONNECTION OF DRAINAGE WATER
The curved end of drainage tube T, which is being supplied with your appliance, should be hooked
onto the edge of a sink or into a drainage pipe.
A special siphon should be used to prevent bad odours.
During the assembly, the following precautions should be taken:
- the drainage tube must not be bent to avoid blockages;
- the tube’s end, relative to the top surface of the dishwasher (fig. 4), must be placed at a height
between 32 and 80 cm;
- the end of the tube must never be immersed in water;
- the drainage tube must not be extended to more than a maxim um length of 1 metre . The extension
must have the same internal diameter. Furthermore, the maximum height at which the tube’s end
can be placed (in the case of an extended tube) must be reduced from 80 to 50 cm.
- If you use a drainage pipe, make sure its internal diameter is not inferior to 4 cm.
4
LA2501-050
5.4 ELECTRIC CONNECTIONS
The appliance may only be connected to a properly installed electric outlet with
an earth (ground) contact. The connection must be carried out in correspondence
with existing laws and regulations and supplementar y rules issued by the supplier
of electric power.
The tension shown on the data tag must correspond to the po wer tension of the electr ic
grid at the site of installation.
See data tag for the size and format of the electric outlet to be used.
T
T
max 80 cm
min 32 cm
GB
5
Page 8
1234567890
1
0
1
0
1
0
1
0
1
0
1234567890
USE
6
6.1 BEFORE USING THE APPLIANCE
Before turning on the appliance, make sure that the plug attached to the electric cable is
connected to the electric outlet, the water supply tube is connected to the faucet, the faucet is
turned on, the drainage tube has been connected according to the instructions.
Opening of the door
Pull the handle forward. The door should open without effor t. If you pull the handle while the
dishwasher is running, a safety mechanism will turn off the appliance.
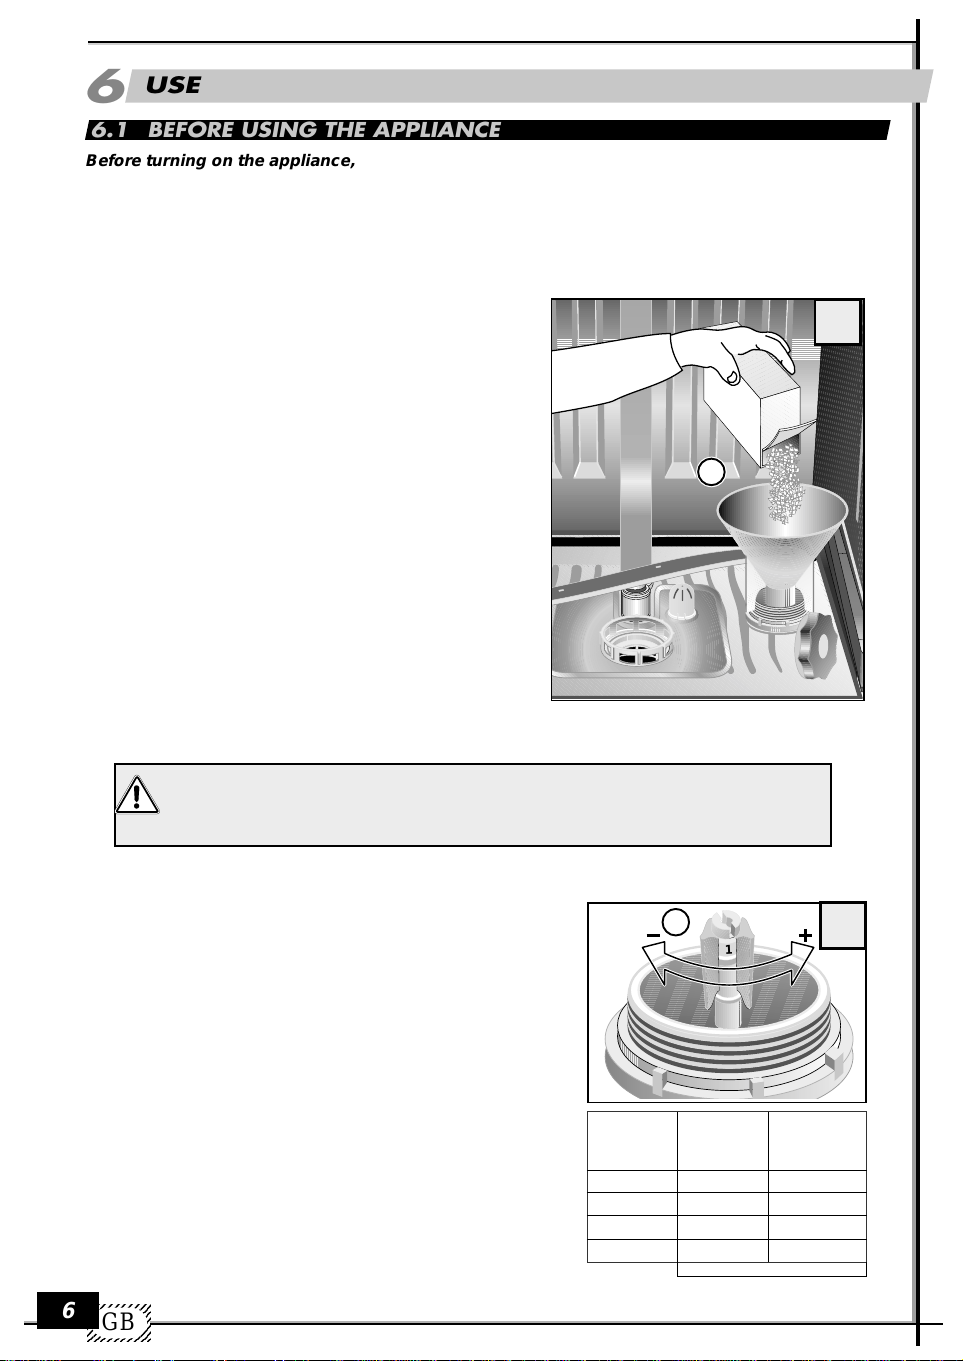
Adding special dishwasher salt
• Open the door and take out the lower basket
• Remove the lid of the salt container by turning it anti-
clockwise
Only during the first time y ou carry out this operation:
fill about 1/2 litre of water into the salt container
• Use funnel L to fill the special dishwasher salt into the
container (use about 1.0-1.5 kg of salt).
• Remove possible salt residues from the opening of the
container.
• Put the lid of the container back in its place b y turning
it clockwise.
• If you don’t use the dishwasher immediately after fill-
ing the salt container, run the prog ramme
pre-wash
to
rinse away the water and salt particles that spilled o ver
from the container.
For safety reasons we recommend to refill the
container after seven wash cycles – always at the
beginning of a cycle.
L
LA2505-060
5
Use only special dishwasher salt. Other types of salt (e.g., regular household salt)
often contain substances that do not dissolve completely in water and can
therefore obstruct the water softener , thus making it unusable.
Regulation of the water softener system
For the washing process it is better to use soft water (with a
low calcium content), to av oid calcium deposits on the dishes
and on the inside of the dishwasher. For this reason, the
appliance is equipped with a water softener (fig. 6) which is
automatically regenerated in regular intervals thanks to the
saline solution. The salt consumption for the regeneration
process depends on the hardness/softness of the local water
that is being used.
T o find out the degree of hardness of your water contact
your town administration or use a commercial testing kit.
To guarantee an optimal regeneration of the softener it is
necessary to set device D according to your local hardness
(see table) and to make sure that the salt container is alw a ys
filled with special dishwasher salt.
23456789
23456789
6
23456789
23456789
GB
23456789
Position
of
regulation device
1
2
3
4
D
1
French degrees
˚fH
<15
>15 <25
>25 <40
>60 <90
>=higher/<=lower
6
LA2505-070
German degrees
˚dH
<8,4
>8,4 <14
>14 <22,4
>33,6 <50,4
Page 9

LA2505-080
7
Indication of salt level (if present)
The green mark under the cap indicates that there
is still enough salt in the container. If the green
mark is no longer visible, the salt container needs
to be refilled with special dishwasher salt.
Refilling of rinse aid
The rinse aid, which is released automatically
during the final phase of the wash cycle,
guarantees that the dishes dry quickly and
prevents the formation of stains and calcium
sediments.
Only use rinse aids for dishwashers. Other products won’t obtain the desired
effect.
The rinse aid container S is located on the inside
of the door.
• Remove the container cap T b y turning it _ revo-
lution anticlockwise.
• Fill container with rinse aid up to the broken line.
Maximum quantity: about 140 ml.
• Put the cap back in its place.
• Clean off possible residues of rinse aid with a
cloth, otherwise too much foam might be produced during the rinsing process.
8
T
S
LA2505-092
9
F
Indication of rinse aid level
More rinse aid needs to be added when the
indicator (located on the container F) is clear (
When the container is full, the indicator has a dark
coloration.
GB
LA2505-096
7
).
Page 10
1234567890
1
0
1
0
1
0
1
0
1
0
1234567890
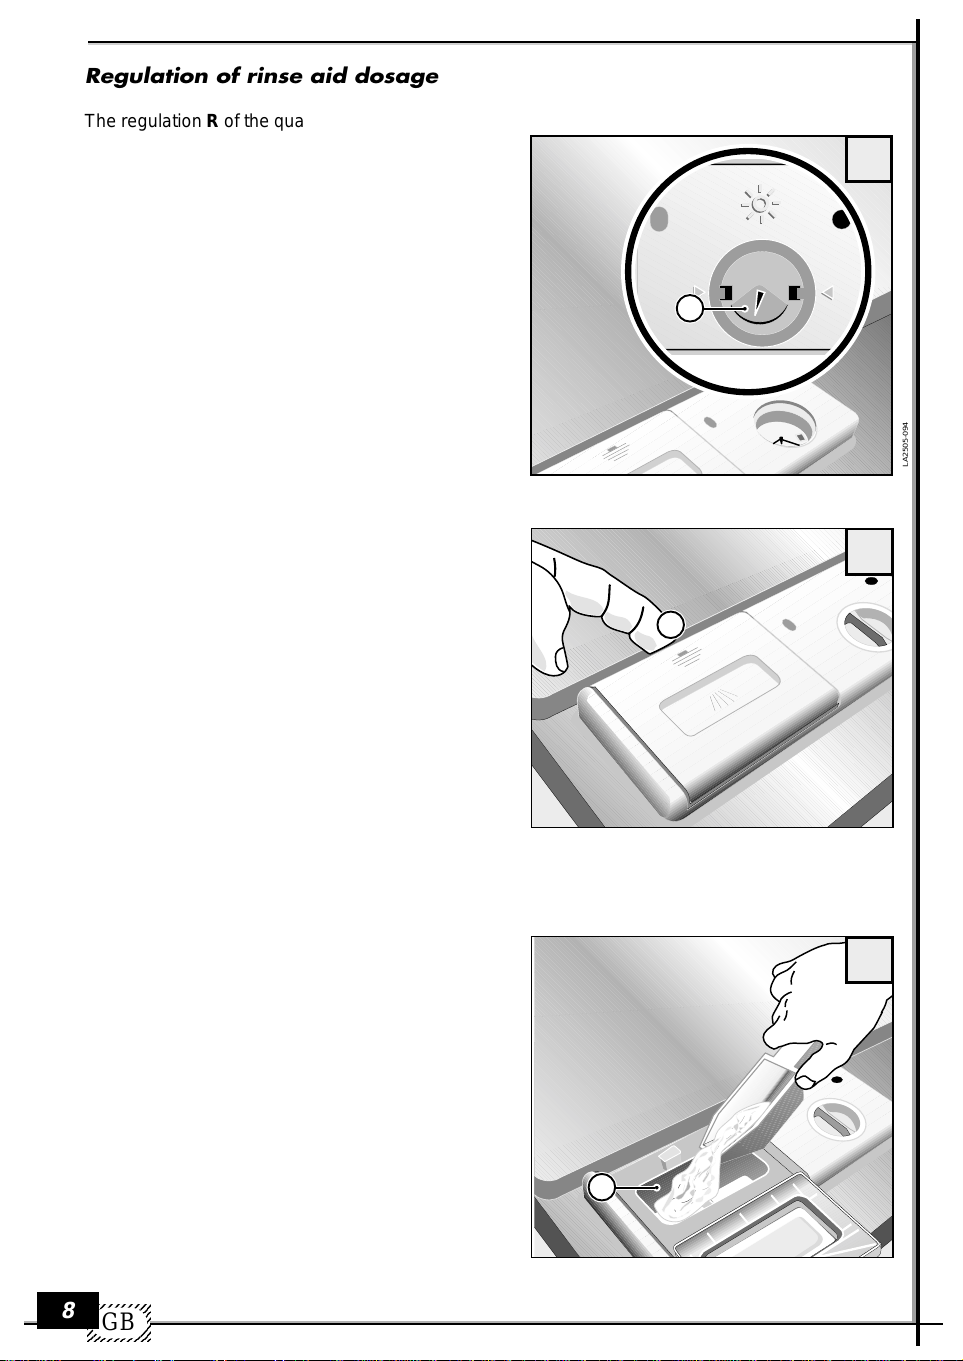
Regulation of rinse aid dosage
1
2
3
4
1
2
3
4
The regulation R of the quantity of rinse aid that is
released can be found in the refill opening of the
rinse aid container.
It can be adjusted with a screwdriver . The possible
settings range from 1 to 4. 1 corresponds to a
release of one ml of rinse aid, 4 to four ml, etc. The
appliance has been set on 2 (two ml) by the
manufacturer.
A full rinse aid container is sufficient for about 50
wash cycles. The quantity of rinse aid to be released
should be adjusted when the result of the wash
process is not satisfactory.
• Always wipe off with a cloth any rinse aid that
spilled over from the container.
10
R
It is important to check the level of rinse aid in
the container periodically – if possible every
31 wash cycles.
Adding the detergent
IMPORTANT! Do not use detergents in this
dishwasher that are made for dish washing by
hand! These substances produce large quantities
of foam but they do not clean the dishes in a
dishwasher . They can e ven lead to a malfunctioning
of the appliance.
You should therefore only use detergents that are
specifically made for household dishw ashers.
Keep your detergent containers closed and in a
dry place.
Only when you use the pre-wash programme no
detergent is needed.
During a programme the detergent is automatically
taken from the detergent container.
We recommend the use of about 25 g of detergent.
Detergents vary in their strength and efficiency.
You should therefore pay attention to the
dosage recommendations of each
manufacturer.
The container for the detergent is located on the
inside of the door.
If the lid is closed:
• Push forward closing mechanism P. The lid will
open with a “click”.
• Fill the detergent into the container V.
• To close the lid, press until you hear a closing
“click”.
If your dishes are exceptionally dirty, you can also
fill some detergent into the indentation of the lid. In
this case, fill the indentation up to the edge. This
detergent will be available and active during the
pre-wash phase.
8
23456789
23456789
23456789
23456789
GB
23456789
LA2505-094
11
P
LA2505-090
12
V
LA2505-100
Page 11
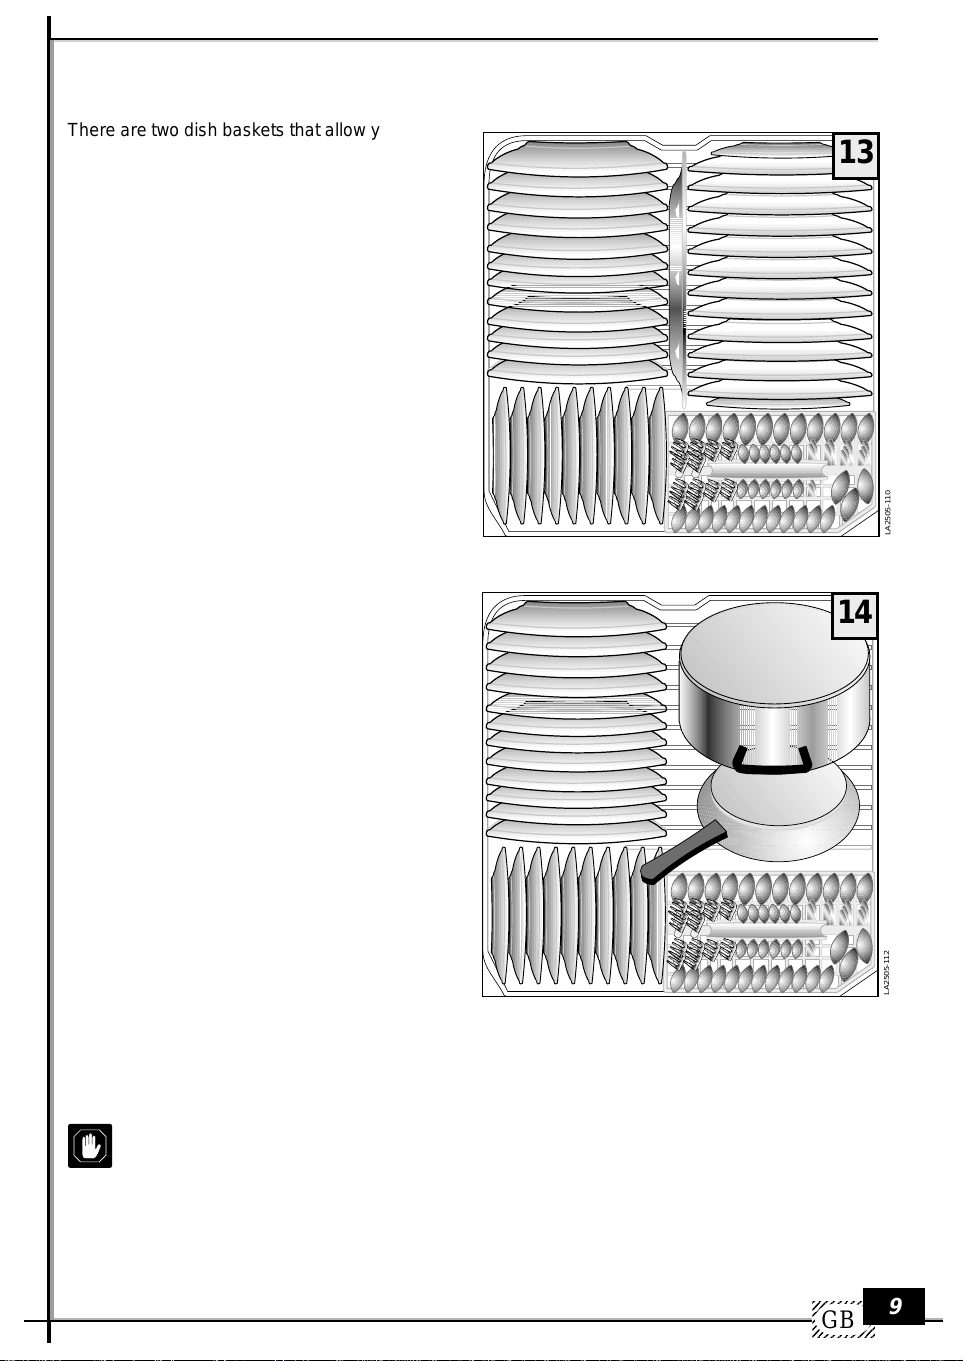
How to load and unload the dishwasher
There are two dish baskets that allow y ou to store
all different kinds of dishes.
• Remove from the dishes any larger pieces of
food to av oid an obstruction of the filter and the
development of bad odours.
• If pots and pans are particularly dirty and contain crusts of food (after frying or roasting), soak
them in a water bath before w ashing them in the
dishwasher.
Use of the lower basket
The lower basket is intended to hold dishes that
are more difficult to clean, as well as the cutlery
basket.
The lower basket holds regular plates , soup bowls,
pans, soup tureens, lids, and serving dishes. Flat
and deep plates must be placed in a way that
leaves some space between the individual plates .
13
LA2505-110
All plates must be in a vertical position so that the
water can pass freely.
Pans and pots must alw ays be placed upside down.
You can choose any kind of loading configuration,
but you should mak e sure that the dirtiest surface
of dishes, pots and pants faces the water spray
and that the water can flow off without hindr ances.
14
Cutlery
For best cleaning results, cutlery should be inserted with its handles facing down. Spoons, forks, and
knifes must be placed in the specific areas of the cutlery basket that are designed for them.
ATTENTION:
Particularly long cutlery, specifically “long knives”, should not be positioned pointing upw ards b ut
should be placed horizontally in the top tray or washed by hand.
LA2505-112
GB
9
Page 12
1234567890
1
0
1
0
1
0
1
0
1
0
1234567890
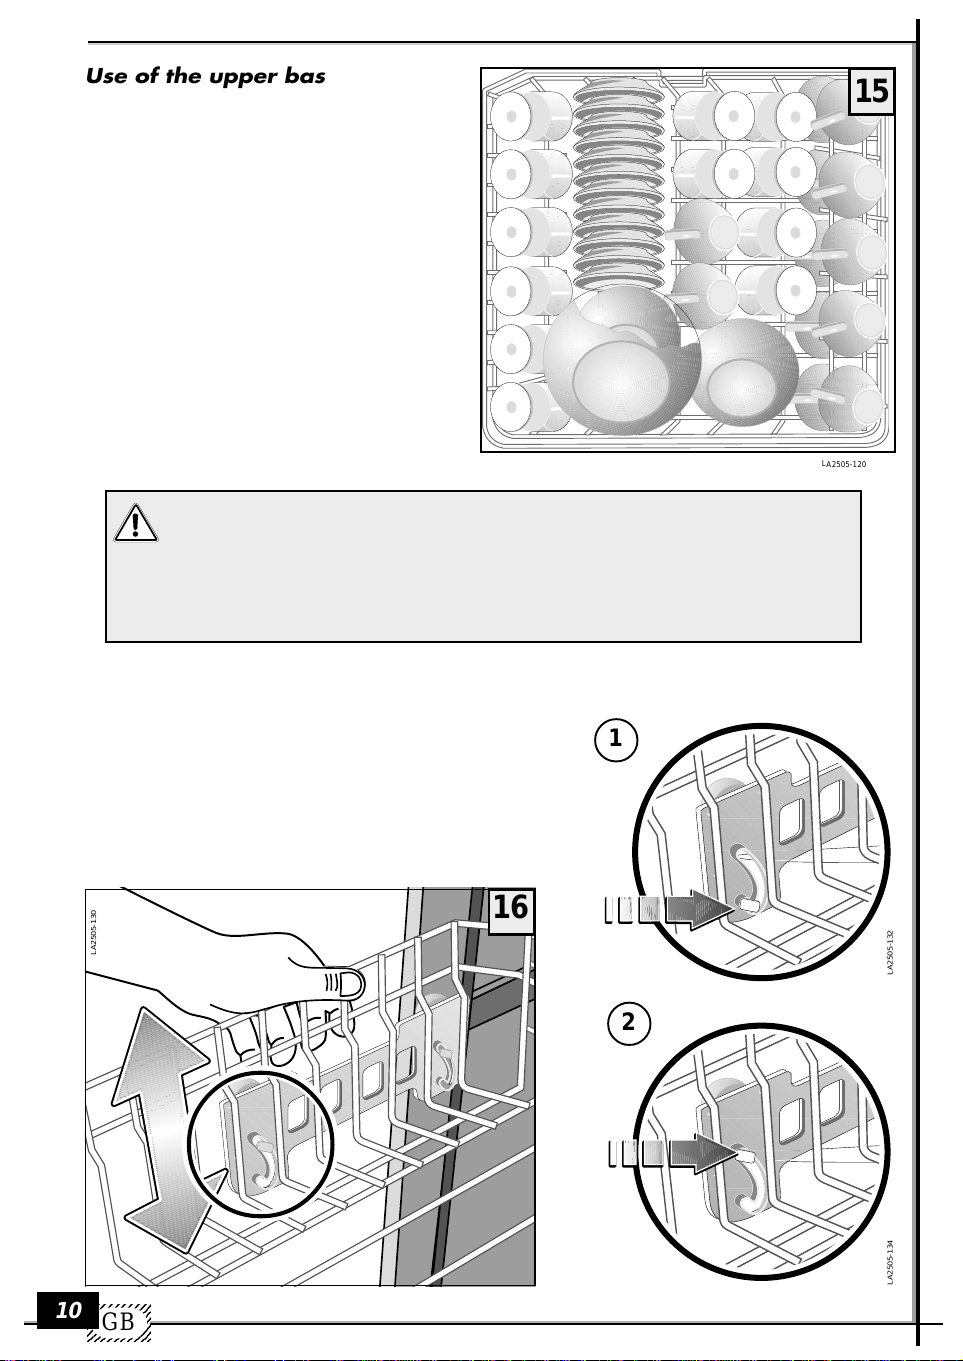
Use of the upper basket
The upper basket can be pulled out all the w ay.
It holds small and medium sized dishes such
as glasses, small plates, tea and coffee cups,
small salad bowls, and small pans and pots that
are not very dirty. Desert plates must alwa ys be
placed vertically; glasses , cups, pots and pants
must be placed upside down. Light dishes
should be held by a support structure so that
they don’t get thrown around by the water jet.
An optimal arrangement of dishes inside the
dishwasher will guarantee best washing results ,
allowing the appliance will be able to develop
its full effectiveness .
Because of the elevated temperature of the water used to wash the dishes and
of potential chemical reactions with the detergent, it is recommended not to
wash copper or aluminium dishes, cutlery with wood or horn handles, delicate
porcelains, or non heat resistant glass or plastic dishes in the appliance.
If you possess decorated porcelain, you should test one single piece to make
sure that the décor is not being damaged or altered.
15
LA2505-120
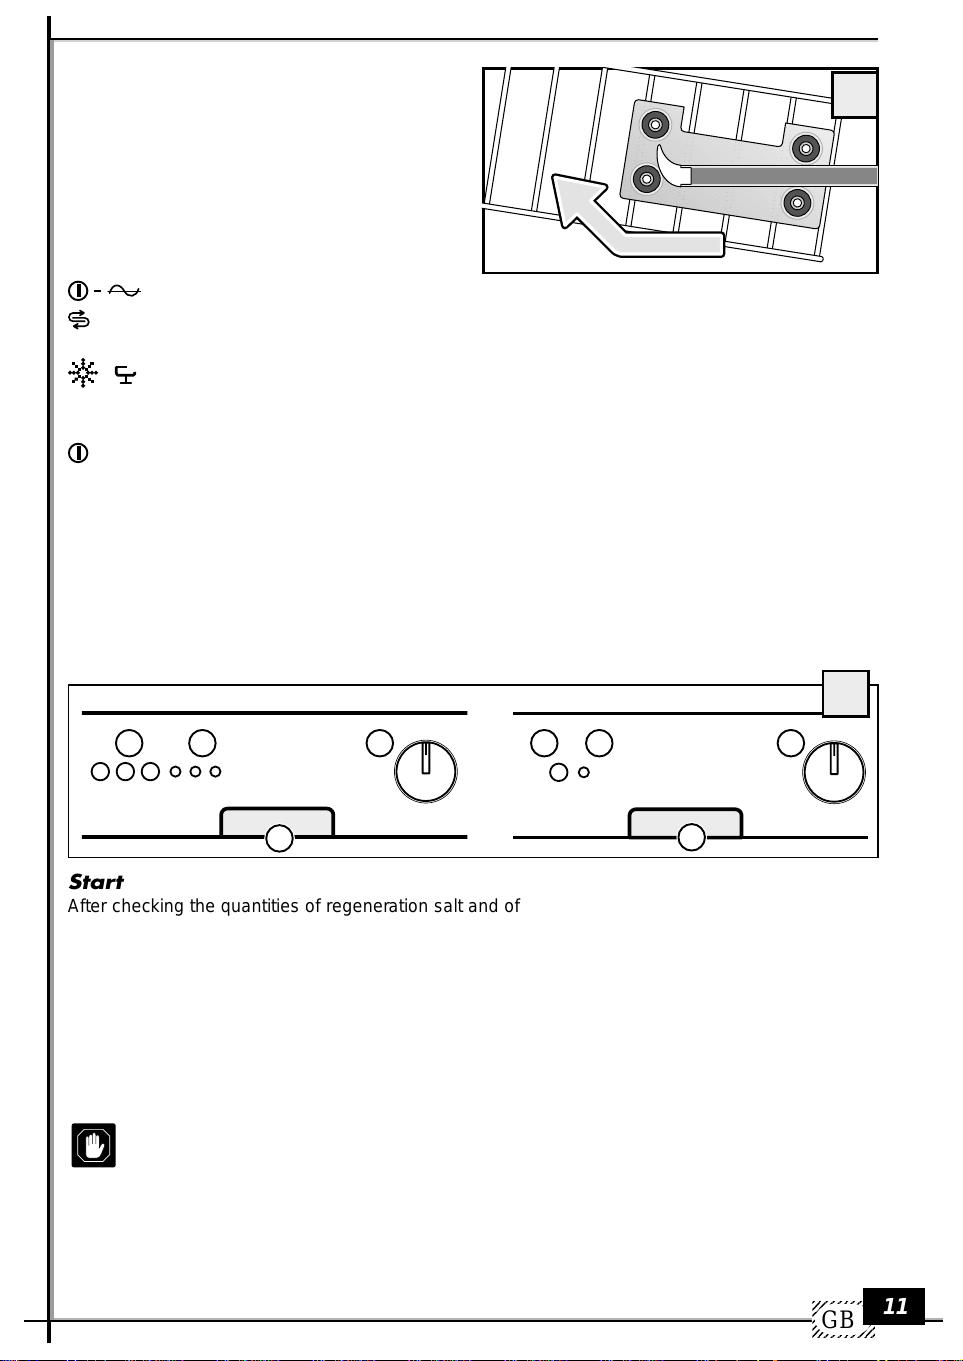
Height regulation of the upper basket
Use the handle on the side (only on left) to regulate the
basket’s height and inclination.
1 regulation of horizontal position
2 regulation of inclination
16
LA2505-130
1
LA2505-132
2
10
23456789
23456789
23456789
23456789
GB
23456789
LA2505-134
Page 13
Pulling out the upper basket
- S
The upper basket can be pulled out and removed
as shown in the figure.
Description of control buttons and
indication lights
17
-ON/OFF
45°-E
SW-SL
LA2505-170
1)Control light
It is illuminated when the appliance is turned on.
When the “add salt” light comes on (every 7 cycles), it will continue to be illuminated
✰
throughout the entire cycle, even if salt was added.
When the “add rinse aid” light comes on (every 31 cycles), it will continue to be
illuminated throughout the entire cycle, even if rinse aid was added.
2)Buttons
On/Off – Press this button to turn on the appliance.
Press the button to activate a wash at 45º.
Press the button to activate the Super Wash (special wash for pans).
3)Door handle
To open pull forward (an electric safety mechanism turns off the machine when the
door is being opened).
4)Programme selection dial
It is used to choose a wash programme (see programme table). To select the desired programme, turn the dial clockwise.
12 12 4
3
LA2505-160
18
4
3
LA2505-172
Start
After checking the quantities of regeneration salt and of rinse aid, open the water faucet completely,
place the dishes in the baskets, fill detergent into the detergent container and add also detergent for
the pre-wash (if necessary); then close the front door.
Now proceed as follows:
• Turn the programme selection dial 4 clockwise (fig. 18) until the number of the desired programme
coincides with the line on the dial.
• Press the button on/off. Now the control light should be turned on to indicate that there is a supply of
electricity. The appliance will now automatically perform all steps of the pre-chosen programme.
After the cycle is over, the dishes do not need to be dried by hand- they are being dried automatically. The dishes can now be taken out or can stay inside the dishwasher until they are needed.
Do not open the appliance after a programme has been initiated.
Stop
After the wash cycle, the dishwasher stops automatically, while the electricity control light remains
illuminated. To tur n it off, press the button on/off. After each wash cycle, the water faucet must be
closed to insulate the appliance from the water supply system.
GB
11
Page 14
1234567890
1
0
1
0
1
0
1
0
1
0
1234567890
Table of wash programmes (medium model)
Programmes:
BUTTONS
On
number
Programme
Off
SW - SL
45°- E
DETERGENT
pre-wash
Super Wash
wash
Dishes
and
degree of dirt:
Programme
descriptions:
Pre-wash
Heavy wash
pans and very
dirty dishes
Heavy wash
regularly dirty
dishes
very dirty dishes
very dirty
delicate dishes
Rinse
Fast wash with
pre-wash
Fast wash
R
S
S
S
S
1
1
2
A
A
B
pans and dishes until the next
wash cycle
Very dirty pans and dishes
(except delicate pieces)
Very dirty dishes
(except delicate pieces)
Very dirty dishes
Very dirty dishes
(except delicate pieces)
Pans and dishes
Pans and dishes
Pans and dishes
Pans and dishes
without pre-wash
B
Pans and dishes
Table of wash programmes (economy model)
BUTTONS
DETERGENT
Short cold wash to prevent food residues from
drying up and forming crusts on the dishes
1 warm Pre-wash – Main wash
2 rinse (1 cold – 1 warm) Drying
1 warm Pre-wash – economy wash
2 rinse (1 cold – 1 warm) Drying
1 cold pre-wash – Main wash
2 rinse (1 cold – 1 warm) Drying
1 cold pre-wash – economy wash
2 rinse (1 cold – 1 warm) Drying
Main wash
2 rinse (1 cold – 1 warm) Drying
Economy wash
2 rinse (1 cold – 1 warm) Drying
1 cold rinse – 1 warm – Drying
1 cold pre-wash – economy wash
2 cold rinse
1 cold pre-wash – main wash
2 cold rinse
Economy wash – 2 cold rinse
Main wash – 2 cold rinse
Pre-wash
Heavy wash
regularly dirty
dishes
very dirty dishes
Rinse
Fast wash with
pre-wash
Fast wash
without pre-wash
23456789
23456789
12
23456789
23456789
GB
23456789
Programmes:
On
number
Programme
R
1
2
3
A
B
Off
wash
pre-wash
degree of dirt:
pans and dishes until the next
wash cycle
Very dirty dishes (except
delicate pieces)
Very dirty dishes
Pans and dishes
Pans and dishes
Pans and dishes
Dishes
and
Programme
descriptions:
Short cold wash to prevent food residues from
drying up and forming crusts on the dishes
1 warm Pre-wash – Main wash
2 rinse (1 cold – 1 warm) Drying
Main wash
2 rinse (1 cold – 1 warm) Drying
1 cold rinse – 1 warm – Drying
1 cold pre-wash – economy wash
2 cold rinse
Main wash – 2 cold rinse
Page 15
MAINTENANCE
7
7.1 CLEANING OF SPAY-ROTORS
The spray-rotors can easily be remo ved f or the periodic cleaning of the jets in order to pre vent possible
obstructions.
Wash them thoroughly under running water and put them back in their correct position.
19
LA2505-210
To remove the upper spray-rotor:
Unscrew anticlockwise the support of the spray-rotor.
To remove the lower spray-rotor:
Pull the spray-rotor upwards and take it out.
20
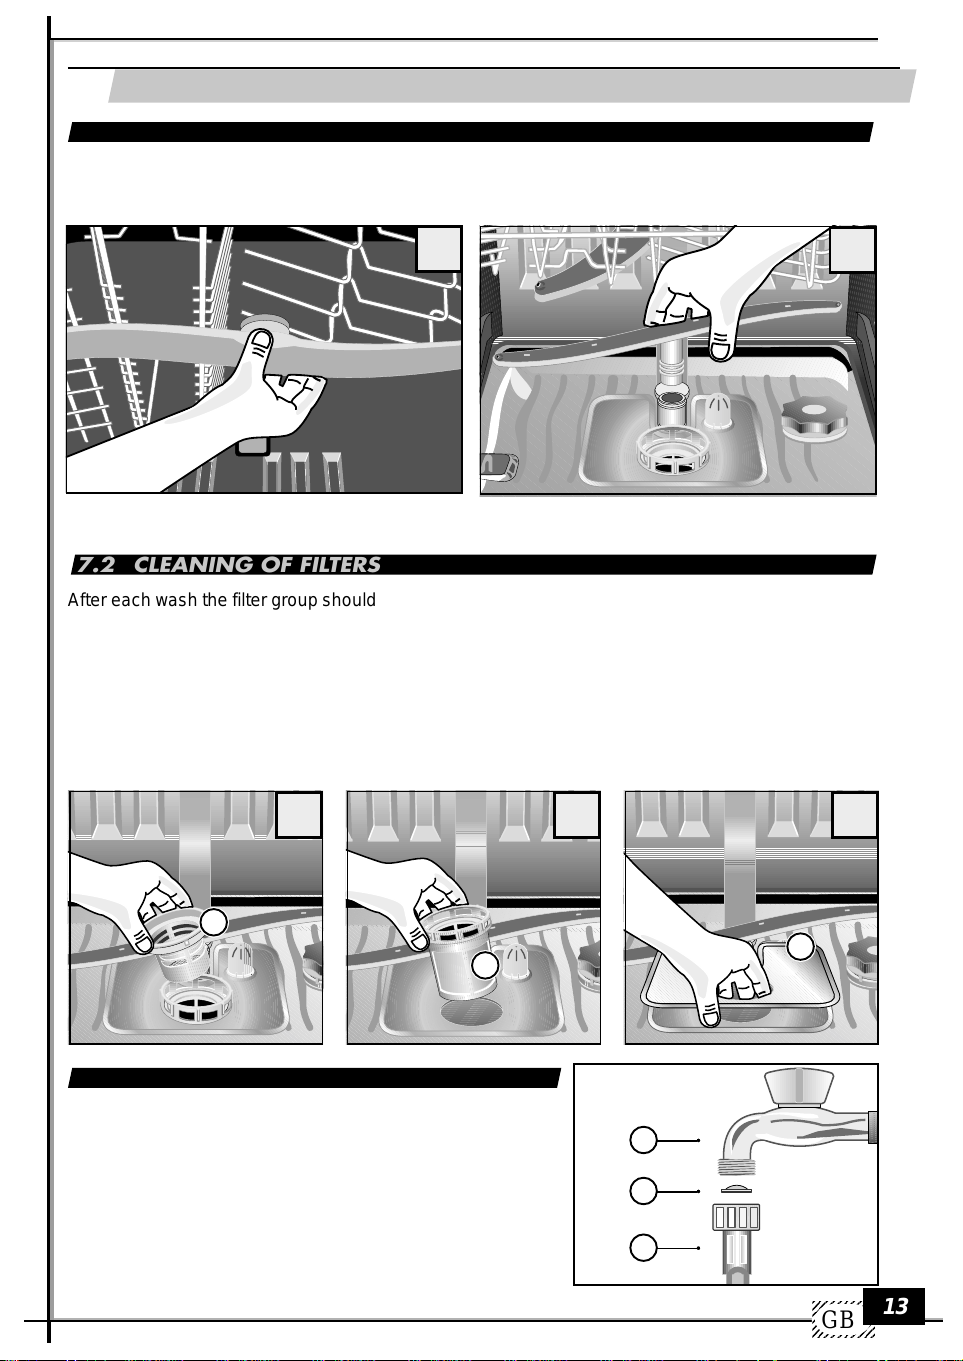
7.2 CLEANING OF FILTERS
After each wash the filter group should be chec ked in order to remo v e possib le dirt residues. Proceed
as follows:
• take out the central filter 1
• remove the external water filter 2
• take out mobile grid 3.
Clean all these components under running water . It is important to clean all filters thoroughly because
the dishwasher cannot function properly with obstructed filters.
We recommend to put the cleaned filters back in their positions immediately to avoid damage to the
wash pump.
21
22
23
LA2505-220
1
2
LA2505-180
7.3 CLEANING OF THE WATER ENTRY FILTER
You should also clean filter B periodically. It is located
between the water faucet and the water entry tube.
• Close water faucet A.
• Unscrew attachment piece C, take out filter B, and clean
it thoroughly under running water.
• Put the filter back in its place and scre w the water entry
hose on. Check that there are no water leaks.
LA2505-190
3
LA2505-200
A
B
C
LA2505-040
GB
13
Page 16
1234567890
1
0
1
0
1
0
1
0
1
0
1234567890
7.4 CLEANING OF THE DISHWASHER’S EXTERNAL SURFACES
The dishwasher’s surfaces (made of metal, and in the front of plastic) must be cleaned periodically.
Use a clean and soft piece of fabric. Never use acids or abrasiv e detergents.
If you don’t use the appliance for long periods of time
If the dishwasher is not being used for extended periods of time, you should proceed as follows:
• run the pre-wash programme twice
• remove the electric plug from the outlet
• disconnect the water supply tube
• leave the door slightly open to avoid the formation of bad odours.
WHAT TO DO IN CASE OF MALFUNCTIONS
8
You should first check whether it is possible to rectify some minor problems yourself. Follow these
instructions. If you are unable to identify or remove the problem, you should contact the technical
client assistance service.
• The programme does not start
- Are the internal fuses broken? Is the dishwasher connected to the electric supply system?
- Is the door closed properly? Press on the door to close it completely.
• No water enters the appliance
- Is the water faucet open?
- Is the filter between the faucet and the water supply tube obstructed? If so, clean the filter.
- Is the water supply tube obstructed? Check the tube.
• The programme indicator does not move on from its starting position
- Is the water faucet completely open?
- Is the filter between the faucet and the water supply tube obstructed? If so, clean the filter.
- Is the water pressure lower than 0.05 Mpa?
• The used water is not removed from the dishwasher
- Is the waste disposal tube obstructed? Check the tube.
- The siphon is obstructed? Check the siphon.
• The dishes are not clean after washing them
- Did you choose an appropriate programme for the type of dishes and the degree of dirt you are
dealing with?
- Are the dishes arranged in a way that allows the water-jet to reach all their surfaces?
- Are the dishwasher’s baskets overloaded?
- Are the spray-rotors blocked by a dish or some cutlery?
- Are all filters at the bottom of the dishwasher clean? Are they all in their correct position?
- Did you add the correct amount of detergent?
- Is the water discharge tube connected properly?
- Is there still any special dishwasher salt in the appropriate container? Without salt the water is not
being softened.
- Was the water softening system adjusted according to the local amount of calcium in the water?
• The dishes do not dry or they remain opaque
- Is there any rinse aid left in the appropriate container?
• Glasses and dishes show the formation of lines, spots, and stains or a shin y blue coloration
- During the rinse process too much rinse aid is being released. Adjust the rinse aid release.
• Glasses and dishes show stains of dried water
- During the rinse process too little rinse aid is being released. Adjust the rinse aid release.
Please note:
The appliance was tested and checked b y the man ufacturer. As a consequence, y ou ma y find
some traces of water inside. These will disappear after the first use.
23456789
23456789
14
23456789
23456789
GB
23456789
Page 17
AVANT D’UTILISER L’APPAREIL
1
1.1 INSTRUCTIONS DE SECURITE
Utilisation d’après les normes
• La machine à laver la vaisselle doit être utilisée seulement pour le lavage de la vaisselle à usage
domestique.
Si l’appareil est utilisé pour d’autres objectifs ou de façon erronée, la Maison de construction ne
s’assume aucune responsabilité pour des dommages éventuels.
• Pour des motifs de sécurité, aucune transformation ou modification au lave-vaisselle n’est admise
• Avant de br ancher l’appareil au réseau électrique, assurez-vous que les données de tension et de
courant indiquées sur la plaque des données correspondent à celles qui sont indiquées à l’endroit
de l’installation.
• L’installation doit être faite par du personnel qualifié.
Opérations préliminaires lors de la première mise en marche
• Contrôlez si le lave-v aisselle a subi des dégâts éventuels durant le transport. Dans tous les cas, ne
branchez pas l’appareil endommagé. En cas de dégâts, adressez-vous à votre fournisseur.
Pour la sécurité des enfants
• Ne permettez pas aux enfants de jouer avec l’appareil.
• Les produits détersifs peuvent causer des dommages irréparables au yeux, à la bouche et à la
gorge.
Garder donc les détersifs hors de la portée des enfants.
• L’eau dans le lave-v aisselle n’est pas potab le. Tant qu’il y a encore des restes de détergents dans la
machine, c’est un danger pour les enfants qui doivent s’éloigner du lave-vaisselle ouvert.
Pour le fonctionnement quotidien
• Ne mettez jamais en marche le lave-v aisselle si le câble du courant, les tuy aux d’entrée et d’évacuation
de l’eau sont endommagés ou si le tableau des commandes, le dessus de la machine ou le socle
sont très détériorés.
• En cas de panne, fermez avant tout le robinet de l’eau, éteignez l’appareil et enlevez la fiche de la
prise de courant. En cas de connexion fixe, débranchez éventuellement l’interr upteur de service ou
enlevez le fusible (ou les fusibles).
• Pour ôter la fiche de la prise de courant, saisissez la fiche par le corps et jamais par le câble.
• Les réparations de la machine à laver la v aisselle doivent être eff ectuées seulement par des personnes
spécialisées. Des répar ations non appropriées peuvent mettre l’utilisateur en grave danger . En cas
de réparations, adressez-vous donc à notre service technique assistance clients ou à votre revendeur spécialisé.
• Le remplacement du câble d’alimentation doit être effectué seulement par le personnel du service
assistance technique.
• En cas de détérioration des tuyaux, pour le raccordement de l’appareil, ceux-ci doiv ent être remplacés
par des tuyaux originaux.
• N’introduisez pas de substances dissolvantes qui pourr aient pro v oquer une e xplosion dans le la v evaisselle.
• Ne vous assey ez pas et ne vous appuy ez pas sur la porte ouverte: la machine pourr ait se renv erser .
• Avant d’introduire le sel spécial, le détersif et le liquide de rinçage, assurez-vous que le producteur
de ces substances recommande leur utilisation pour les machines à laver la vaisselle à usage
domestique.
• Fermez toujours le robinet de l’eau si vous n’utilisez pas le lave-vaisselle pendant quelque temps,
par exemple durant les vacances.
15
F
Page 18

1234567890
1
0
1
0
1
0
1
0
1
0
1234567890
DEBALLAGE- TRAITEMENT DES ORDURES
2
2.1 DEBALLAGE
Enlevez l’emballage externe en plastique, les coins renforcés et les bases en polystyrène.
Ouvrez la porte et enlevez les pièces de polystyrène des paniers.
La récupération et le recyclage du matériel d’emballage contribuent à économiser les matières
premières et à diminuer le volume des ordures.
Livrez l’emballage à la décharge pour la récupération des matériaux recyclables.
Quand un jour l’appareil devra être mis définitivement hors d’usage, rendez-le inutilisable avant son
élimination.
ATTENTION! Le matériel de l’emballage (par ex. des sacs en plastique,
polystyrène ) peut représenter une source de danger pour les enfants; pour
cette raison, il faut le mettre hors de leur portée.
2.2 TRAITEMENT DES ORDURES – APPAREIL A METTRE AU REBUT
Quand la machine ne fonctionne plus, elle doit être mise au rebut par des maisons spécialisées, en
respectant les règles en vigueur.
De cette façon, en éliminant un vieil appareil il est possible d’effectuer la récupération différenciée
des matériaux synthétiques destinés au recyclage, pour respecter l’environnement.
APERÇUS GENERAUX
3
3.1 LAVER DE FAÇON ECONOMIQUE ET ECOLOGIQUE
• Ne lavez pas la vaisselle avant sous l’eau courante.
• Utilisez le lave-vaisselle toujours bien rempli, puisqu’il est possible seulement ainsi d’effectuer un
lavage économique et dans le respect pour l’environnement.
• Sélectionnez toujours un programme de lavage correspondant au type de vaisselle et à leur degré
de saleté.
• Evitez absolument des dosages trop abondants de détersif, de sel spécial et de liquide de rinçage.
Faites attention aux doses recommandées dans le mode d’emploi et dans les indications de la
Maison de production de ces substances.
• Vérifiez si le dispositif adoucisseur de l’eau est réglé correctement.
3.2 VAISSELLE NON APPROPRIEE
Ne sont pas appropriés au lavage dans le lave-vaisselle:
- les planches à hacher ou les petits plateaux en bois
- les objets en matière plastique non résistant à la chaleur
- le cristal au plomb
- les objets en étain ou en cuivre
- la vaisselle ou les services ayant des parties collées
- les services plutôt vieux, dont la colle est sensible à la chaleur
- les objets en acier qui s’oxydent facilement
- les services aux manches en bois, en corne, en porcelaine ou en nacre.
Au moment de l’achat de v aisselle, de v erres et de services, assurez-vous qu’ils sont appropriés pour
le lavage dans le lave-vaisselle.
Au moment de l’achat de vaisselle, de verres et de services, assurez-vous
qu’ils sont appropriés pour le lavage dans le lave-vaisselle.
16
23456789
23456789
23456789
23456789
F
23456789
Page 19
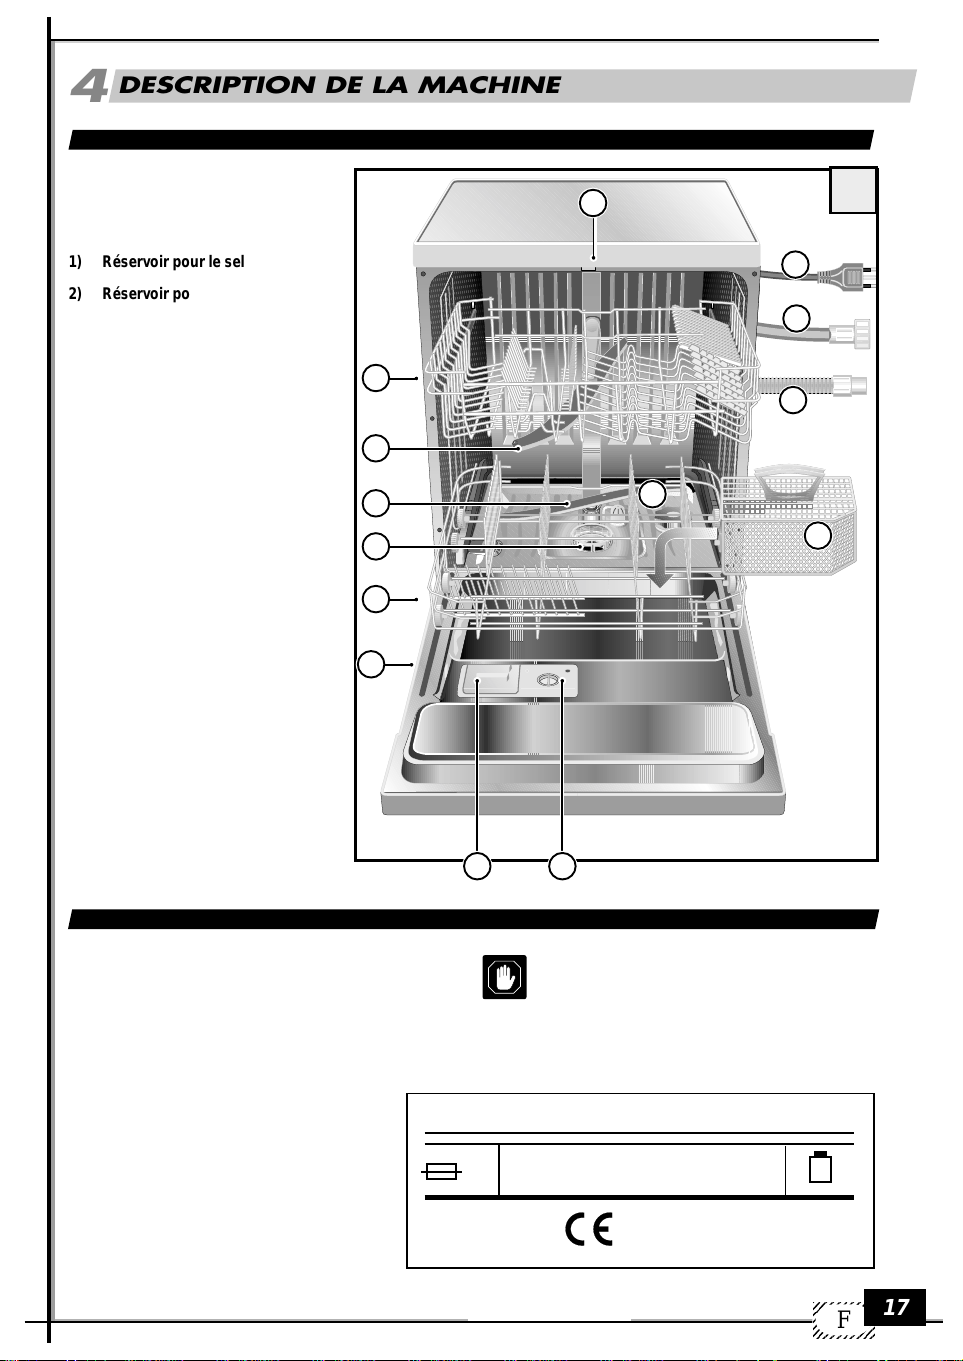
DESCRIPTION DE LA MACHINE
4
4.1 VUE GENERALE
1) Réservoir pour le sel
2) Réservoir pour le liquide de rinçage
3) Distributeur de détergent
4) Plaque des données
5) Filtres
6) Bras d’irroration tournant inférieur
7) Bras d’irroration tournant supérieur
8) Câble alimentation électrique
9) Tuyau alimentation eau
10) Tuyau d’écoulement
11) Panier inférieur
12) Panier supérieur
13) Récipient services
14) Crochet fermeture porte
12
11
4
14
1
8
9
10
7
6
5
1
13
4.2 DONNEES TECHNIQUES
Capacité ( selon nombre couverts standard ) : 12
Pression dans l’installation hydraulique
pression minimum: 0,05 MPa
pression maximum: 1 MPa
0,05 - 1MPa Model. ......................
MAX .......W
........V.....Hz
Made in EU
3 2
....A
...................
ATTENTION: les caractéristiques
électriques sont indiquées sur la plaque
des données.
12
F
LA2505-020
17
Page 20
1234567890
1
0
1
0
1
0
1
0
1
0
1234567890
INSTALLATION
5
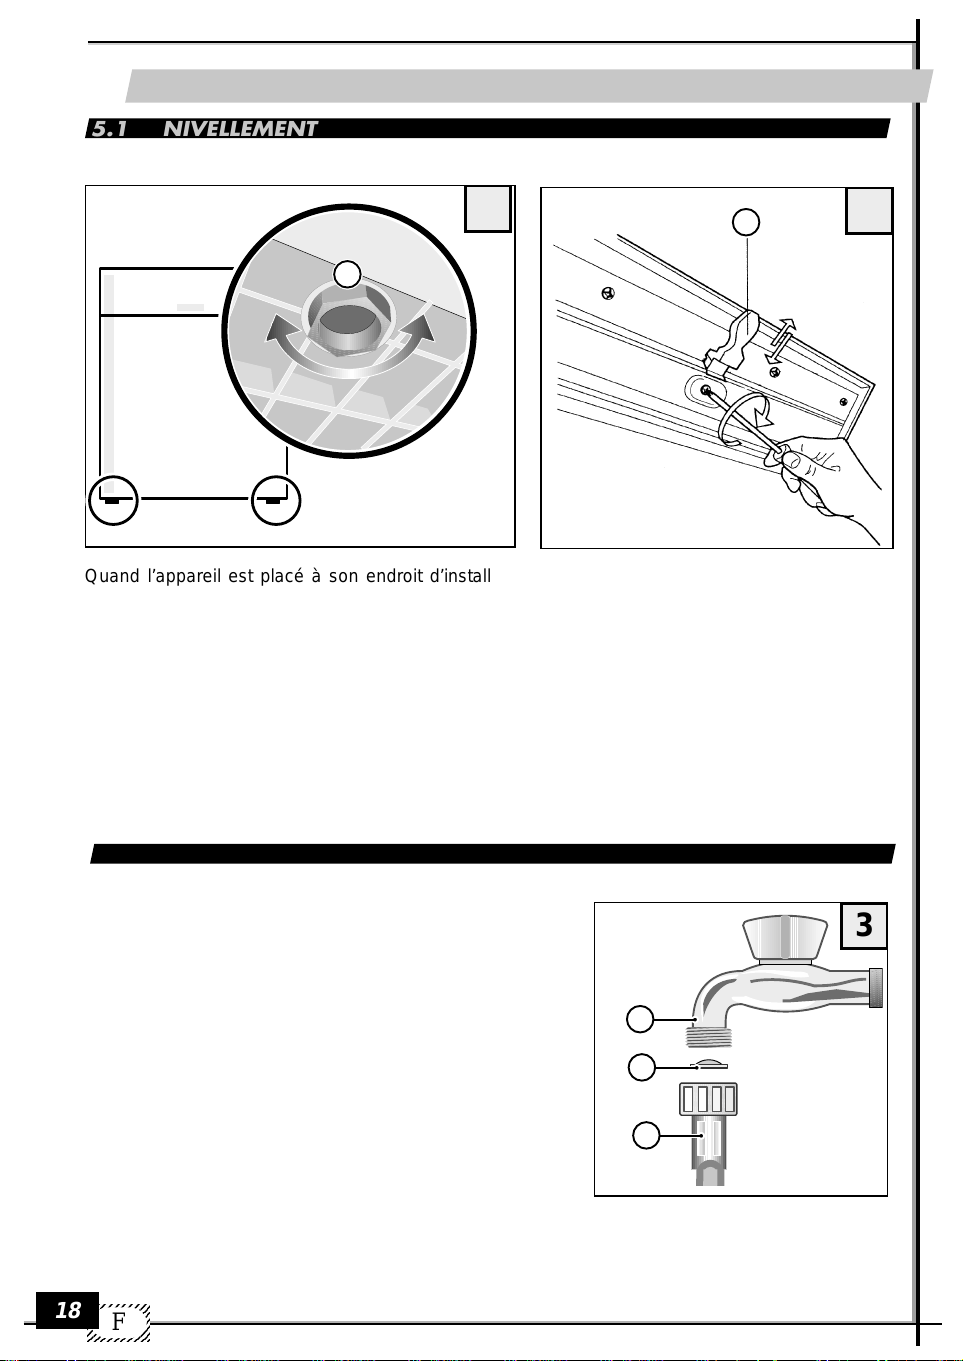
5.1 NIVELLEMENT
2
M
2.1
P
LA2505-030
Quand l’appareil est placé à son endroit d’installation, réglez les petits pieds P en les vissant ou
dévissant, si nécessaire, pour trouver la même hauteur
de la machine et le même niveau.
Un bon nivellement assure le fonctionnement correct du lave-vaisselle.
Ecart max=2 degrés
Après que la machine a été nivelée, régler en outre le crochet fermeture porte de sorte que celle-ci se
ferme parfaitement.
Une fois l’appareil mis à niveau, règler la gache de fermeture de porte pour obtenir une fermeture
parfaite.
5.2 RACCORDEMENT HYDRAULIQUE
Le tube d’entrée eau C, fourni avec l’appareil permet le
raccordement à un robinet avec raccord 3/4”.
Durant le montage, vous de vez respecter les instructions
suivantes:
• vissez le tube C au robinet de l’eau froide A en
interposant le filtre B fourni avec l’appareil.
• si le raccordement est effectué avec une tuyauterie
qui est utilisée depuis longtemps, on conseille de
laisser couler l’eau avant de r accorder le tuyau d’entrée
de l’eau afin d’éliminer les dépôts de rouille et de saleté;
• assurez-vous que la pression dans l’installation
hydraulique est dans les v aleurs limite indiquées dans
les données techniques.
Le lave-v aisselle peut être relié à la conduite de l’eau
froide, mais jamais à celle de l’eau chaude.
23456789
23456789
18
23456789
23456789
F
23456789
3
A
B
C
LA2505-040
Page 21
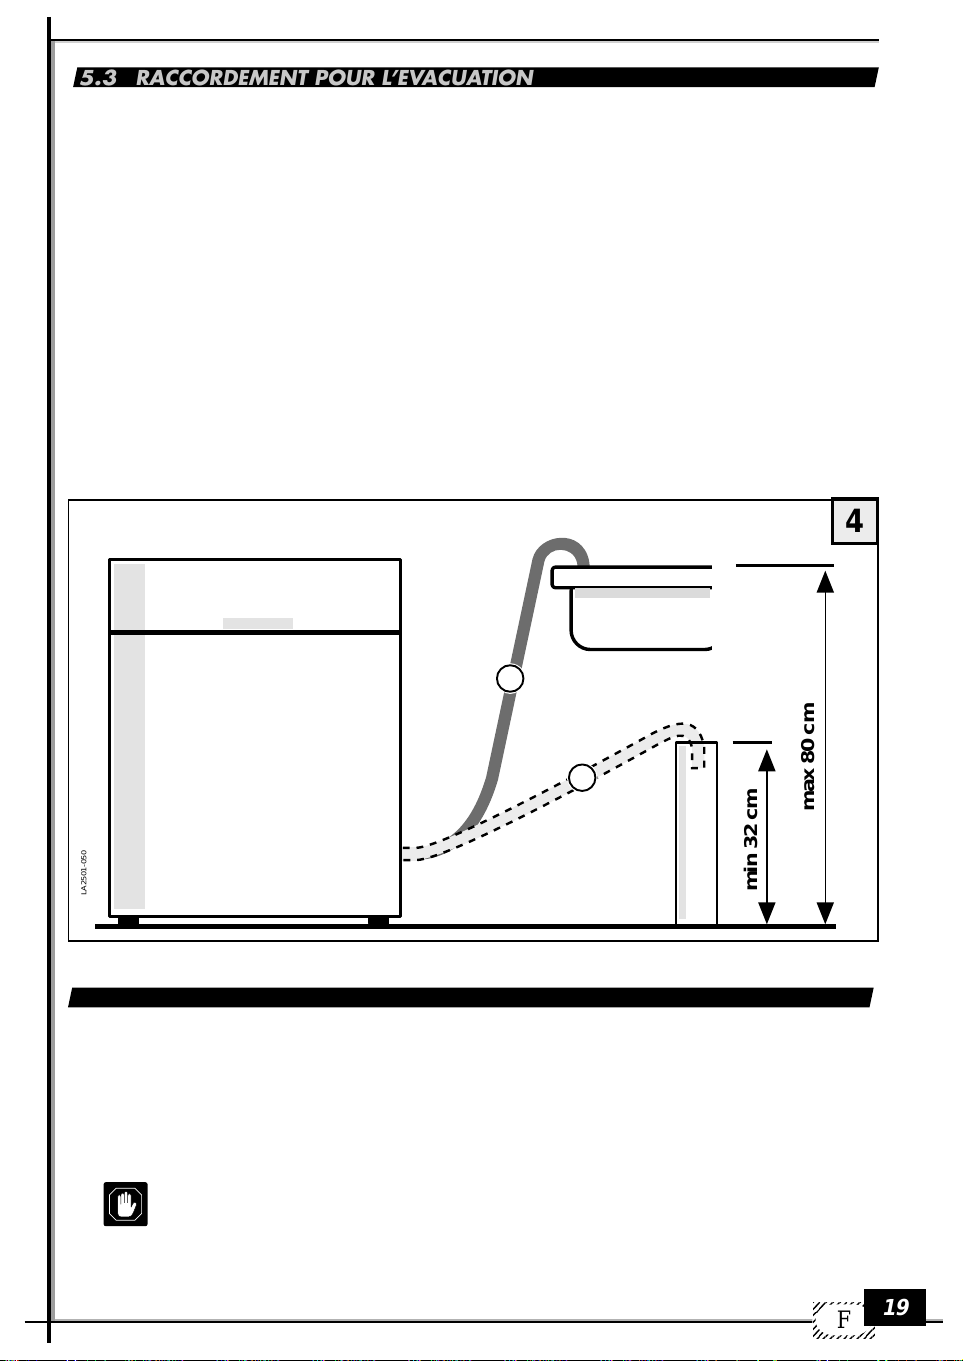
5.3
RACCORDEMENT POUR L’EVACUATION DU PRODUIT NETTOYANT
Le tube d’évacuation T fourni avec l’appareil doit être accroché avec la partie e xtrême recourbée au
bord d’un évier ou une conduite d’écoulement.
Il est opportun de placer un siphon anti-odeur.
Durant le montage, il est nécessaire d’observer les précautions suivantes:
- Le tube d’évacuation ne doit pas être plié pour ne pas causer d’étranglements;
- L’extrémité du tube par rapport au dessus du lave-vaisselle (fig. 4) doit être placée à une hauteur
comprise entre 32 cm et 80 cm.
- En aucun cas, l’extrémité du tube doit être plongée dans l’eau;
- Une rallonge éventuelle du tube d’évacuation ne doit pas dépasser la longueur d’un mètre et doit
avoir le même diamètre interne et en outre la hauteur maximale à laquelle l’e xtrémité libre peut être
placée doit être réduite de 80 cm. à 50 cm.;
- Dans le cas d’une conduite d’évacuation, le diamètre interne ne doit pas être inférieur à 4 cm.
4
LA2501-050
5.4 BRANCHEMENT ELECTRIQUE
ILe branchement électrique de la machine doit être effectué seulement à l’aide
d’une prise avec contact à terre installée selon les instructions. Le branchement
doit correspondre aux normes légales en vigueur et aux normes supplémentaires
de l’entreprise électrique compétente.
L’indication de la tension doit correspondre à la tension du réseau du lieu d’installation.
Pour le dimensionnement de la prise de courant, rapportez-vous à la plaque des
données.
T
T
max 80 cm
min 32 cm
19
F
Page 22
1234567890
1
0
1
0
1
0
1
0
1
0
1234567890
USAGE
6
6.1 OPERATIONS PRELIMINAIRES
Avant la mise en marche de la machine, assurez-vous que la fiche du câble d’alimentation
est enfilée dans la prise de courant, que le tuyau d’entrée de l’eau est raccordé au robinet,
que le robinet est ouvert et que le tuyau d’év acuation a été relié en suiv ant les instructions.
Ouverture de la porte
Tirer en avant la poignée: la porte s’ouvre facilement. Si cette opération est accomplie pendant
que la machine est en marche, un dispositif de sécurité arrête le lave-vaisselle.
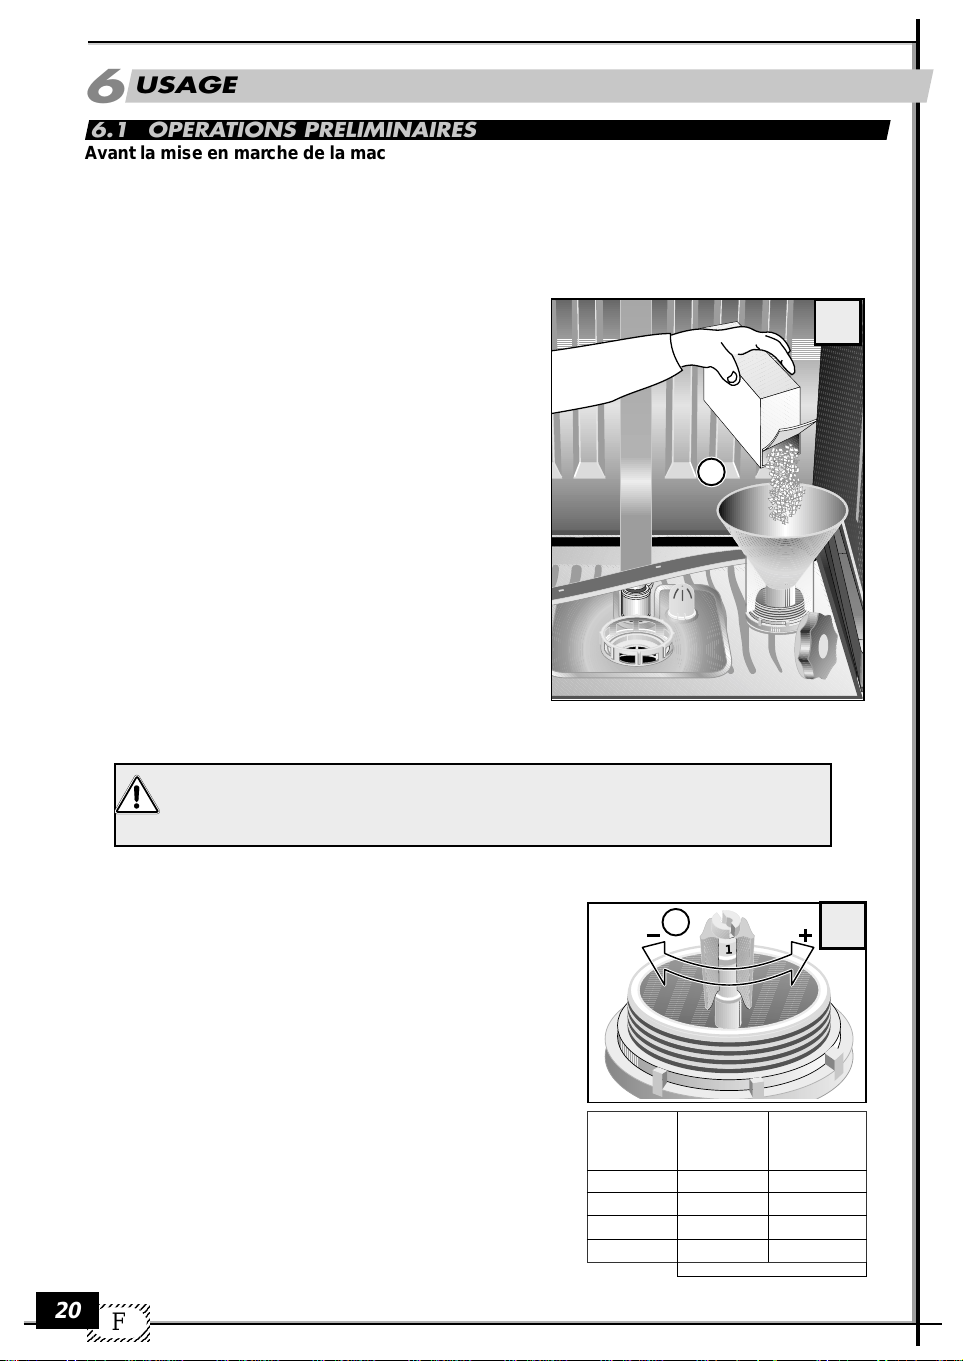
Introduction du sel spécial
• Ouvrir la porte, sortir le panier inférieur.
• Dévisser le bouchon du réservoir du sel en le tournant
dans le sens contraire des aiguilles d’une montre,
Seulement pour la première mise en marche:
introduire environ 1/2 litre d’eau dans le réservoir du
sel.
• Renversez le sel spécial à travers l’entonnoir L dans
le réservoir fait exprès (environ 1,0 - 1,5 kg).
• Nettoyez l’ouverture du réservoir des résidus év entuels
de sel.
• Revissez le bouchon du réservoir en le tournant dans
le sens des aiguilles d’une montre.
• Si tout de suite après l’introduction du sel la vaisselle
ne se lave pas, appuyez sur le programme
TREMPAGE, jusqu’à ce que l’eau et les grains de sel
sortis du réservoir soient dilués et éliminés.
L
LA2505-060
5
Pour des motifs de sécurité, nous recommandons d’effectuer le remplissage tous les 7
cycles de lavage, toujours au début du cycle.
Utilisez seulement du sel spécial pour lave-vaisselle; d’autres types de sel
(par ex. le sel de cuisine ) contiennent souvent des substances qui ne se
diluent pas avec l’eau et ils peuvent boucher l’adoucisseur et le rendre
inutilisable.
Réglage du dispositif adoucisseur de l’eau
Pour le la vage , on conseille l’eau douce (pauvre en calcaire),
pouréviter que des dépôts se forment sur la v aisselle et dans
le lave-v aisselle même. Dans ce but, le la ve-vaisselle dispose
d’unadoucisseur d’eau (fig.6) qui se régénère
automatiquement, à intervalles réguliers grâce à la solution
saline.
La consommation de sel pour la régénération dépend donc
de la dureté de l’eau distribuée dans votre commune.
Pour savoir le degré de dureté de l’eau, adressez-vous au
bureau de votre commune ou utilisez un kit commercial de
relèvement.
Pour une régénération optimale de l’adoucisseur, il est
nécessaire que le dispositif D soit réglé d’après la dureté de
l’eau débitée localement (voir tableau) et que le réservoir du
sel soit toujours plein de sel spécial.
23456789
23456789
20
23456789
23456789
F
23456789
Position
régulateur
du
D
1
Degrés
français
°fH
1
2
3
4
<15
>15 <25
>25 <40
>60 <90
>=majeur/<=mineur
6
LA2505-070
Degrés
allemands
°dH
<8,4
>8,4 <14
>14 <22,4
>33,6 <50,4
Page 23

LA2505-080
7
Signalisation de contrôle pour l’introduction
du sel (si prévu)
La couleur verte sous le capuchon, indique qu’il
y a encore suffisamment de sel spécial dans le
réservoir.
Se la couleur verte n’est plus visible, alors il est
nécessaire d’introduire dav antage de sel spécial.
Introduction du liquide de rinçage
Le liquide de rinçage qui est ajouté automatiquement durant la dernière phase de lavage , garantit
un essuyage rapide de la vaisselle et évite la
formation de taches et de résidus calcaires sur la
vaisselle.
Utiliser seulement du liquide de rinçage spécifique pour lave-vaisselle, les autres
produits ne produisent pas l’effet voulu.
Le réservoir du liquide de rinçage S se trouve à
l’intérieur de la porte .
• T ournez le bouchon T du réservoir d’un quart de
tour dans le sens contraire des aiguilles d’une
montre pour l’extraire.
• Introduisez le liquide de rinçage jusqu’à la ligne
en tirets.
Quantité maximum environ 140 ml.
• Remettez le bouchon.
• Nettoyez le liquide de rinçage qui év entuellement
est sorti, avec un chiffon, sinon il y aura trop de
mousse durant le rinçage.
8
T
S
LA2505-092
9
F
Signalisation de contrôle pour l’introduction du
liquide de rinçage
Le liquide de rinçage doit être introduit si
l’indicateur sur le réservoir F a une couleur claire
).
(
Quand le réservoir est plein, l’indicateur a une
couleur foncée.
LA2505-096
21
F
Page 24

1234567890
1
0
1
0
1
0
1
0
1
0
1234567890
Réglage du dosage du liquide de rinçage
1
2
3
4
1
2
3
4
Le réglage R du dosage se trouve dans l’ouverture
de remplissage du réservoir du liquide de rinçage.
En se servant d’un tourne-vis, on peut le régler de 1
à 4, chiffres qui correspondent à l’adjonction du
liquide de rinçage de 1 à 4 ml. A u départ de l’usine, il
est réglé sur 2(2 ml).
Le réservoir du liquide de rinçage complètement plein
est suffisant pour environ 50 progr ammes de lav age .
Il est nécessaire d’effectuer un changement dans la
quantité du dosage si le résultat n’est pas celui qui
est désiré.
• Nettoyer toujours le liquide de rinçage qui
éventuellement est sorti avec un chiffon.
Il est important de contrôler périodiquement le
niveau du liquide de rinçage, possiblement tous
les 31 cycles de lavage.
Introduction du détergent
IMPORTANT! Dans le lave-vaisselle, n’utilisez pas
de produits détersifs pour lav er la vaisselle à la main!
Ceux-ci produisent beaucoup de mousse, mais dans
le lave-v aisselle, ils ne nettoient pas la v aisselle et ils
peuvent souvent compromettre son fonctionnement.
Utilisez donc seulement des détergents spécifiques
pour le lave-vaisselle à usage domestique.
Gardez les confections des détergents bien fermées
et dans un endroit bien sec.
Seulement avec le prog ramme “ trempage” le détersif
n’est pas nécessaire.
Durant le programme, le détergent est préle vé du bac
automatiquement.
La quantité de détersif conseillée est de 25 g.
10
R
LA2505-094
11
P
LA2505-090
L’efficacité des divers détergents peut être différente. Faites donc attention aux doses conseillées
par les Maisons productrices.
Le réservoir pour le détersif se trouve à l’intérieur de
la porte.
Au cas où le couvercle est fermé:
• Pousser en avant le levier de fermeture P. Le
couvercle s’ouvre après un déclic.
• Introduisez le détersif dans le bac V.
• Pour fer mer le couvercle, appuyer sur lui jusqu’à
ce que la fermeture se déclenche.
Quand la vaisselle est e xceptionnellement sale, il est
possible de mettre dav antage de détersif dans le creux
du couvercle; remplissez le creux jusqu’au bord, ce
détergent est déjà actif durant la phase de trempage .
22
23456789
23456789
23456789
23456789
23456789
F
12
V
LA2505-100
Page 25

Comment remplir et placer la vaisselle
Deux paniers permettent de remplir différents
types de
vaisselle.
• Enlevez de la v aisselle les déchets les plus gros
d’aliments pour éviter le risque d’obstruction du
filtre et la sortie de mauvaises odeurs.
• Si les poêles et les casseroles sont particulièrement incrustées de restes de nourriture (friture
ou rôti) plongez-les dans l’eau un moment av ant
de les introduire dans le lave-vaisselle.
.
Utilisation du panier inférieur
Le panier inférieur est disposé pour recevoir la
vaisselle difficilement lav able et le petit panier pour
les services.
Dans le panier inférieur, on place les assiettes
plates, creuses, les poêles, les soupières, les
couvercles et les plats.
Les assiettes plates et les creuses doivent être
placées en tenant compte qu’entre chaque assiette
il doit y avoir un espace intermédiaire.
Leur position doit être toujours verticale de façon
que l’eau puisse passer librement.
Les poêles et les casseroles doivent être placées
toujours
à l’envers. Toutes les possibilités de remplissage
sont à essayer, mais en tenant compte que la
vaisselle, les casseroles et les
poêles doivent être placées de sorte que toutes
les surfaces sales soient exposées au jet
d’aspersion et que l’eau puisse s’écouler librement.
13
LA2505-110
14
Services
Pour obtenir de meilleurs résultats de lavage, les services doivent être placés avec les manches vers
le bas. Les cuillères, les fourchettes et les couteaux doivent être mis dans les compartiments du
panier des services.
ATTENTION:
Les couverts particulièrement longs, et dans le cas spécifique «les longs couteaux» ne doivent
pas être positionnés avec les pointes en haut; ils doivent être mis horizontalement dans le panier
supérieur ou bien lavés à main.
F
LA2505-112
23
Page 26

1234567890
1
0
1
0
1
0
1
0
1
0
1234567890
L’utilisation du panier supérieur
Le panier supérieur complètement extractible
reçoit la petite et la moyenne vaisselle comme
les verres, les soucoupes, les tasses de thé et
de café, les petits saladiers, les casseroles et
les poêles basses pas très sales. Les assiettes
à dessert doivent être placées toujours
verticalement; verres, tasses, marmites et
poêles tournés à l’envers. La vaisselle légère
doit être calée entre les soutiens de façon à ne
pas être giclée directement par le jet de lav age.
Le meilleur résultat de lavage est atteint quand
on a trouvé la disposition la plus appropriée de
la vaisselle dans les paniers. A partir de ce
moment, le procédé de lavage peut montrer
toute son efficacité.
A cause de la température élevée de l’eau de lavage et de la réaction
chimique du détersif employé, il est à conseiller d’éviter les objets en cuivre, la
vaisselle en aluminium anodisé, les services aux manches en bois ou en corne, les
porcelaines délicates, la vaisselle en verre et en plastique non thermorésistant.
A la présence de vaisselle en porcelaine décorée, il est à conseiller d’effectuer un
essai de lavage sur une seule pièce pour vérifier si la décoration se modifie ou
s’endommage.
15
LA2505-120
Réglage en hauteur du panier supérieur.
En agissant sur la poignée latérale (seulement côté gauche),
il est possible de régler le panier en hauteur et son inclinaison.
1 Réglage position horizontale
2 Réglage position inclinée
16
LA2505-130
23456789
23456789
24
23456789
23456789
F
23456789
1
LA2505-132
2
LA2505-134
Page 27

Extraction du panier supérieur
- S
l est possible de sortir le panier supérieur des
glissières comme c’est représenté dans la figure.
Description du tableau de
commande et indication
17
-ON/OFF
45°-E
SW-SL
1) Lampe témoin
Elle s’allume quand l’appareil est branché.
Quand elle s’allume, il faut ajouter du sel (tous les 7 cycles), même si l’on ajoute du sel
la lampe témoin reste allumée pendant tout le cycle.
✰
Quand elle s’allume, il f aut ajouter du liquide de rinçage (tous les 31 cycles), même si
l’on ajoute du liquide de rinçage, la lampe témoin reste allumée pendant tout le cycle.
2) T ouches
Allumé/éteint - Presser la touche pour allumer l’appareil
Presser la touche pour faire le lavage à 45
Presser la touche pour faire le Super Lavage ( lavage spécial pour marmites )
3) Poignée porte
Pour ouvrir , tirez v ers vous (une sécurité électrique est d’éteindre la machine quand la
porte doit s’ouvrir).
4) Bouton sélection programmes
Pour choisir le prog r amme de lavage (voir tableau programmes). Pour sélectionner le
programme désiré, tournez le bouton dans le sens des aiguilles d’une montre.
12 12 4
4
LA2505-160
18
LA2505-170
3
3
Mise en marche
Après avoir contrôlé la quantité de sel de régénér ation et de liquide de r inçage, ouvrez complètement
le robinet de l’eau, placez la vaisselle dans les paniers, versez le détersif dans son bac et le détersif
pour le prélavage (si nécessaire) et fermez la porte de la machine.
Procédez de cette façon:
• tournez le bouton sélection programmes 4 dans le sens des aiguilles d’une montre ( fig. 18 ) jusqu’à
ce que le numéro du programme coïncide avec la ligne sur l’interrupteur.
• Appuyez sur la touche “allumé-éteint”. La lampe témoin de contrôle pour l’indication de tension
s’allume et la machine effectue automatiquement toutes les phases du prog ramme de la vage préétabli.
A la fin du cycle, il n’est pas nécessaire d’essuyer la vaisselle parce que l’essuyage se fait
automatiquement. La v aisselle peut être enlevée ou peut rester dans la machine jusqu’au repas suivant.
N’ouvrez pas la machine si le programme a commencé.
Arrêt
Après le cycle de lavage, le lave-vaisselle s’arrête automatiquement tandis que la lampe témoin de
contrôle de la tension reste allumée. P our l’éteindre, appuyer sur le bouton allumé/éteint. Après chaque
cycle de lavage, fermer absolument le robinet de l’eau pour isoler le lave-vaisselle du réseau
d’approvisionnement hydrique.
LA2505-172
25
F
Page 28

1234567890
1
0
1
0
1
0
1
0
1
0
1234567890
Tableau des programmes de lavage (Modèle moyen)
Programmes
Trempage
Energique
casseroles et
vaisselle très
sales
Energique
vaisselle sale
normal
vaisselle très
sale
vaisselle délicate
très sale
Rinçages
Lavage
rapide avec
prélavage
Lavage
rapide sans
prélavage
Numéro
programme
R
S
S
S
S
1
1
2
A
A
B
B
TOUCHES
Eteint
Allumé
SW - SL
45°- E
DÉTERGENT
Prélavage
Super lavage
Vaisselle
et
type de
Lavage
Casseroles et vaisselle jusqu’au
prochain cycle de lavage
Casseroles et vaisselle très sales
( excepté les parties délicates)
Vaisselle très sale
(excepté les parties délicates )
Vaisselle très sale
Vaisselle très sale ( excepté les
parties délicates)
Casseroles et vaisselle
Casseroles et vaisselle
Casseroles et vaisselle
Casseroles et vaisselle
Casseroles et vaisselle
salissure
Lavage court, à froid, de sorte que les restes
d’aliments ne s’attachent pas à la vaisselle
1 Prélavage chaud - Lavage principal
3 rinçages (2 froids - 1 chaud) Essuyage
1 Prélavage chaud - Lavage
3 rinçages (2 froids - 1 chaud) Essuyage
1 Prélavage froid - Lavage principal
3 rinçages (2 froids - 1 chaud) Essuyage
1 Prélavage froid - Lavage
3 rinçages (2 froids - 1 chaud) Essuyage
Lavage principal
3 rinçages (2 froids - 1 chaud ) Essuyage
Lavage
3 rinçages (2 froids - 1 chaud) Essuyage
2 rinçages froid - 1 chaud – Essuyage
1 Prélavage froid - Lavage économique
2 rinçages froids
1 Prélavage froid - Lavage
2 rinçages froids
Lavage économique - 2 Rinçages froids
Lavage principal - 2 Rinçages froids
Description programmes
économique
économique
économique
principal
Tableau des programmes de lavage (Modèle èconomique)
DÉTERGENT
Lavage
Prélavage
Vaisselle
et
type de
salissure
Casseroles et vaisselle jusqu’au
prochain cycle de lavage
Vaisselle très sale
(excepté les parties délicates )
Vaisselle très sale
Casseroles et vaisselle
Casseroles et vaisselle
Casseroles et vaisselle
Lavage court, à froid, de sorte que les restes
d’aliments ne s’attachent pas à la vaisselle
1 Prélavage froid - Lavage principal
2 rinçages (1 froids - 1 chaud) Essuyage
Lavage principal
2 rinçages (1 froid - 1 chaud ) Essuyage
1 rinçage froid - 1 chaud – Essuyage
1 Prélavage froid - Lavage
2 rinçages froids
Lavage principal - 2 Rinçages froids
26
Programmes
Trempage
Energique
vaisselle sale
normal
vaisselle très
sale
Rinçages
Lavage
rapide avec
prélavage
Lavage
rapide sans
prélavage
23456789
23456789
23456789
23456789
F
23456789
Numéro
programme
R
1
2
3
A
B
TOUCHES
Eteint
Allumé
Description programmes
principal
Page 29

ENTRETIEN
7
7.1 NETTOYAGE DES BRAS D’IRRORATION
Les bras d’irroration s’enlèvent f acilement pour permettre le netto yage périodique des gicleurs et pour
prévenir de possibles obturations.
Lavez-les soigneusement sous un jet d’eau et remontez-les dans leur emplacement.
19
Pour démonter le bras d’irroration supérieur:
dévissez le support du bras dans le sens contraire
des aiguilles d’une montre.
LA2505-210
Pour démonter le bras d’irroration inférieur:
Tirez le bras d’irroration v ers le haut et enle vez-le
20
7.2 NETTOYAGE DES FILTRES
Après chaque lavage, il f aut contrôler le groupe filtrant et le netto yer de tous dépôts en agissant de la façon suiv ante:
• Retirez le filtre central 1.
• Sortez le filtre externe en forme de puisard 2.
• Enlevez la grille mobile 3.
Tous les éléments doivent être nettoyés sous l’eau courante. Il est indispensable de nettoyer les filtres avec soin,
sinon le lave-vaisselle ne pourra pas fonctionner avec les filtres obstrués.
Nous vous recommandons de remettre les filtres propres à leur place afin d’éviter des dégâts à la pompe de lavage.
21
22
23
LA2505-220
1
2
LA2505-180
7.3 NETTOYAGE DU FILTRE D’ARRIVÉE DE L’EAU
Nettoyez périodiquement le filtre B placé entre le robinet
et la conduite d’arrivée de l’eau.
• Fermez le robinet de l’eau A.
• Dévissez le joint C, retirez le filtre B et nettoyez-le
soigneusement sous l’eau courante.
• Remettez le filtre à sa place et vissez la conduite d’arrivée
de l’eau en s’assurant qu’il n’y a pas de pertes.
LA2505-190
3
LA2505-200
A
B
C
LA2505-040
27
F
Page 30

1234567890
1
0
1
0
1
0
1
0
1
0
1234567890
7.4 NETTOYAGE DES SURFACES EXTERNES DE LA MACHINE
Les surfaces de la machine, en métal et en plastique de la partie frontale, doivent être nettoyées
périodiquement à l’aide d’un chiffon doux et humide. N’employez jamais d’acides ou de détergents
abrasifs.
Mise hors service prolongée
Si le lave-v aisselle ne sera plus utilisé pendant une longue période, il f aut procéder de la f açon suivante:
• Faites tourner deux programmes de trempage.
• Débranchez la fiche du réseau électrique.
• Déconnectez le tube d’alimentation de l’eau.
• Laissez la porte frontale légèrement ouverte pour éviter la formation de mauvaises odeurs.
RECHERCHE CAUSES PANNE
8
Contrôlez s’il est possible de remédier personnellement aux petits dérangements éventuels de l’appareil avec
l’aide des indications suivantes. Si ces informations ne vous sont d’aucune aide pour résoudre le problème,
mettez-vous en contact avec le service technique assistance clients.
• Le programme ne démarre pas.
- Les fusibles de l’installation interne sont-ils défectueux? L’appareil est-il branché au réseau électrique?
- La porte est-elle fermée correctement? Appuyer sur la porte pour la fermer complètement.
• L’eau n’entre pas dans la machine.
- Le robinet de l’eau est-il ouvert?
- Le filtre placé entre le robinet et le tube d’alimentation de l’eau est-il bouché? Nettoyez év entuellement le filtre .
- La conduite d’arrivée de l’eau présente-t-elle des étranglements? Contrôler la conduite.
• L’indication des phases du programme est arrêtée au début du lavage.
- Le robinet de l’eau est-il complètement ouvert?
- Le filtre placé entre le robinet et le tube d’alimentation de l’eau est-il bouché? Nettoyez év entuellement le filtre .
- La pression minimum de l’eau est-elle au moins de 0,05 MPa?
• L’eau n’est pas évacuée.
- Le tuyau d’évacuation présente-t-il des étranglements? Contrôlez l’installation du tuyau.
- Le siphon est-il bouché? Contrôler le siphon.
• La vaisselle n’est pas propre.
- Le programme sélectionné est-il approprié au type et au niveau de saleté de la vaisselle?
- La vaisselle a-t-elle été rangée de façon que le jet de l’eau puisse atteindre sa surface interne et externe?
- Les paniers de la vaisselle ne doivent pas être surchargés.
- Les bras tournants sont-ils bloqués par des pièces de vaisselle ou par quelques services?
- Tous les filtres placés au fond de l’espace lavage sont-ils propres? Les filtres sont-ils remis à leur place
correctement?
- La dose de détergent introduite est-elle correcte?
- Le tuyau d’évacuation de l’eau est-il installé correctement? Y a-t-il encore du sel spécial dans le réservoir du
sel? Sans le sel spécial, l’eau n’est pas adoucie.
- L’installation adoucisseur de l’eau est-elle réglée d’après la dureté de l’eau distribuée localement?
• La vaisselle ne sèche pas et reste opaque.
- Y a-t-il encore du liquide de rinçage dans le réservoir?
• Les verres et la vaisselle présentent des rayures, des tra”nées, des taches laiteuses ou bien une patine
bleue brillante.
- Durant le rinçage, une dose excessive de liquide de rinçage a été prélevée. Diminuez le dosage de liquide de
rinçage.
• Les verres et la vaisselle présentent des taches de gouttes d’eau désormais sèches.
- Durant le rinçage, une dose insuffisante de liquide de rinçage a-t-elle été prélevée? Augmentez le dosage de
liquide de rinçage.
Notice!
Étant donné que le lave-vaisselle a été testé et contrôlé soigneusement en fabrique, vous pourrez trouver
pour cette raison des gouttelettes d’eau qui dispara”tront après le premier lavage.
23456789
23456789
28
23456789
23456789
F
23456789
Page 31

ANTES DE USAR EL APARATO
1
1.1 INSTRUCCIONES DE SEGURIDAD
Utilización según las normas
• El lavav ajillas tiene que utilizarse solamente par a la var v ajillas domésticas . Siempre que el apar ato
se utilice para otros fines o de manera equiv ocada, la empresa constr uctor a rechaza toda responsabilidad por eventuales daños.
• Por motivo de seguridad, no se autoriza la realización de transformaciones o modificaciones al
lavavajillas.
• Antes de conectar el aparato a la corriente eléctrica, asegúrense de que los datos de la tensión y
de la corriente indicados en la placa de los datos correspondan a los del sitio en el que si va a
instalar.
• La instalación del mismo, tiene que realizarla personal preparado.
Operaciones preliminares que hay que realizar antes de la primera
puesta en marcha del lavavajillas
• Controlen el lavavajillas para que no existan eventuales daños causados por el transporte. En
ningún caso instalen un aparato dañado. En caso de daños, diríjanse a la persona que les vendió
el aparato.
Para la seguridad de los niños
• No permitan que los niños jueguen con el aparato.
• Los detergentes pueden causar daños irreparables a los ojos, a la boca y a la garganta.
Por lo tanto, conserven los detergentes fuera del alcance de los niños.
• El agua del lava vajillas no es potab le. En el caso de que queden restos de detergente en el apar ato ,
se configura una situación de peligro para los niños , a los que hay que mantener lejos del la va vajillas
siempre que esté abierto.
Para el funcionamiento de todos los días
• No pongan en marcha nunca el lavavajillas si el cable de la corriente o los tubos de carga y de
descarga del agua están estropeados o si el cuadro de mandos , la superficie de trabajo o la base
del mismo están muy deteriorados.
• En caso de avería, cierren, en primer lugar, el grifo del agua, apaguen después el aparato y desconecten el enchufe de la corriente. En las conexiones fijas, desconecten el eventual interrupor de
servicio o quiten el fusible (o los fusibles).
• Para desconectar el enchufe de la corriente, cojan el enchufe por el cuerpo y nunca por el cable.
• Las reparaciones del lav avajillas tienen que realizar las solamente personal especializado . Reparaciones inapropiadas pueden poner en gra ve pelig ro a la persona que lo usa. En caso de reparaciones, por lo tanto, diríjanse a n uestro servicio técnico de asistencia al cliente o al propio revendedor
especializado.
• La sustitución del cable de alimentación debe ser efectuada solo por el personal de la asistencia
técnica.
• En caso de deterioro de los tubos, para la conexión del aparato, éstos tienen que cambiarse con
tubos originales.
• No introduzcan en el lavavajillas sustancias solventes que puedan provocar una explosión.
• No se sienten y no se apoyen en la puerta abierta: el aparato puede volcar.
• Antes de introducir la sal especial, el detergente y el abrillantador , asegúrense de que el productor
de estas sustancias recomienda el uso de los mismos para el lavavajillas de uso doméstico.
• Cierren siempre el grifo del agua si el lavavajillas no se utiliza por bastante tiempo, por ejemplo,
durante las vacaciones.
ES
29
Page 32

1234567890
1
0
1
0
1
0
1
0
1
0
1234567890
DESEMBALADO - DESTRUCCION
2
2.1 DESEMBALADO
Quiten del embalaje externo de plástico las esquinas de refuerzo y las bases de polesterol.
Abran la puerta y quiten los bloques de polesterol de los contenedores .
La recuperación y el reciclaje de los materiales de embalado ayudan a ahorrar materias primas y a
que disminuya el volumen de residuos.
Entreguen el embalaje en las descargas para recuperar los materiales reciclables.
Cuando el aparato se haya estropeado y esté definitivamente roto, hagan que sea inutilizable antes
de destruirlo.
ADVERTENCIA! Algunos materiales del embalaje (por ejemplo. Las bolsas de plástico,
el polesterol & ) pueden representar una fuente de peligro para los niños, por lo tanto,
hay que tener este material fuera del alcance de los mismos.
2.2 ELIMINACION DEL APARATO DESHECHADO
Al final de la vida funcional del aparato, éste tiene que ser eliminado por empresas especializadas,
respetando la normativa vigente.
De esta manera, con la eliminación de un viejo aparato se puede realizar la recuper ación dif erenciada
de los materiales sintéticos destinados al reciclaje, en el pleno respeto del ambiente.
INDICACIONES GENERALES
3
3.1 LAVAR DE MANERA ECONOMICA Y ECOLOGICA
• No laven la vajilla antes en agua corriente.
• Utilicen el lava vajillas siempre lleno, ya que solamente de esta f orma, se puede realizar un lavado
económico y que respete el ambiente.
• Seleccionen siempre un programa de lavado que corresponda al tipo de vajillas y al grado de
suciedad.
• Eviten absolutamente utilizar más detergente, sal especial y abrillantador del que corresponda.
T engan cuidado y pongan las dosis recomendadad en las instr ucciones par a el uso y en las indicaciones de la casa productora de tales sustancias.
• Comprueben que la instalación del suavizador del agua está regulado correctamente.
3.2 OBJETOS QUE NO SE PUEDEN LAVAR EN EL LAVAVAJILLAS
No se pueden lavar en el lavavajillas:
- tablas o pequeñas bandejas de madera,
- objetos de material plástico que no resista al calor,
- cristal de plomo,
- objetos de estaño o de cobre o de bronce,
- vajillas o cubiertos con partes pegadas,
- cubiertos antiguos, cuya cola sea sensible al calor,
- objetos de acero que se oxiden fácilmente,
- cubiertos con mangos de madera, cuerno, porcelana o madreperla.
En el momento de la compra de vajillas, vasos y cubiertos, asegúrense de
que se puedan lavar en el lavavajillas.
30
23456789
23456789
23456789
23456789
ES
23456789
Page 33

DESCRIZIONE DELL’APPARECCHIO
4
4.1 VISTA GENERALE
1) Depósito para la sal
2) Depósito para el abrillantador
3) Contenedor para el detergente
4) Placa de datos
5) Filtros
6) Hélice inferior
7) Hélice superior
8) Cable de alimentación eléctrica
9) Tubo de alimentación del agua
10) Tubo de desague
11) Contenedor inferior
12) Contenedor superior
13) Contenedor de los cubiertos
14) Gancho de cierre de la puerta
12
11
4
14
1
8
9
10
7
6
5
1
13
4.2 DATOS TECNICOS
Capacidad ( según datos stándard ) :
12 presión en la instalación hidráulica
presión mínima: 0,05 MPa
presión máxima: 1 MPa
3 2
ATENCION: las características
eléctricas se indican en la placa de
datos.
0,05 - 1MPa Model. ......................
....A
MAX .......W
........V.....Hz
Made in EU
...................
LA2505-020
12
31
ES
Page 34

1234567890
1
0
1
0
1
0
1
0
1
0
1234567890
INSTALACION
5
5.1 NIVELADO
2
M
2.1
P
LA2505-030
Una vez colocado el aparato en el sitio en el que se v a a instalar , m uev an las patitas P atornillándolas
o desatornillándolas para regular, si es necesario, la altura de la máquina y nivelarla.
Un buen nivelado asegura el correcto funcionamiento del lavavajillas.
Error máx=2 grados
Después de que se niveló la máquina, regulen además el gancho de cierre colocado en la puer ta, de
modo que ésta se pueda cerrar perfectamente.
Para regular el cierre (Fig. 2.1 “M”) procedere así: girar el tor nillo hasta regular el gatillo logrando el
perfecto cierre de la puerta.
5.2 CONEXION HIDRAULICA
El tubo de entrata del agua C, que se entrega con la
máquina, permite la conexión del mismo a un g rifo con
una conexión de 3/4".
Durante el montaje del mismo, hay que seguir las
siguientes instrucciones:
• enrosquen el tubo C al grifo del agua fría A interponendo el filtro B que se entrega con la máquina.
• si la conexión se realiza a tubos nuevos o que no se
usan desde hace tiempo, se aconseja que dejen correr el agua antes de conectar el tubo de entrada de
la misma, de tal manera que se eliminen los depósitos de óxido y de suciedad;
• asegúrense de que la presión de la instalación hidráulica esté dentro de los valores límites indicados en
los datos técnicos.
El lavav ajillas puede conectarse a la cañería del agua
fría pero no a la del agua calienta.
23456789
23456789
32
23456789
23456789
ES
23456789
3
A
B
C
LA2505-040
Page 35

5.3 CONEXION PARA EL DESAGUE LIXIVIO
El tubo del desague T, que se entrega con la máquina, se engancha por la parte extrema curva al
borde de un fregadero o de una cañería de desague.
Conviene realizar un sifón antiolores.
Durante el montaje hay que observar las siguientes precauciones:
- No doblen el tubo del desague para no causarle roturas;
- Hay que colocar la extremidad del tubo en relación con la superficie de apoyo del lavavajillas (fig.
4) a una altura comprendila entre 32 cm. y 80 cm.
- En ningún caso la extremidad del tubo tiene que estar dentro del agua;
- Una eventual prolongación del tubo de desague no debe super ar la longitud de 1 metro, tiene que
tener el mismo diámetro interior y, además, la altura máxima en la que se puede colocar el e xtremo libre tiene que reducirse de 80 cm. a 50 cm.;
- En el caso de una cañería de desague, el diámetro interior no puede ser inferior a 4 cm.
4
LA2501-050
5.4 CONEXION ELECTRICA
La conexión eléctrica de la máquina tiene que realizarse únicamente mediante
un enchufe con toma de tierra instalada respetando la normativa y siguiendo las
instrucciones. La conexión tiene que respetar las normas legales en vigor y las
normas suplementarias de la empresa eléctrica competente.
La indicación de la tensión tiene que corresponder a la tensión de la red del lugar en el
que se instala el aparato.
Para la dimensión del enchufe de corriente, hagan referencia a la placa de datos.
T
T
max 80 cm
min 32 cm
ES
33
Page 36

1234567890
1
0
1
0
1
0
1
0
1
0
1234567890
USO
6
6.1 OPERACIONES PRELIMINARES
Antes de la puesta en marcha de la máquina, asegúrense de que el enchufe del cable de alimentación
esté conectado al enchufe de la corriente, que el tubo de entrada del agua esté conectado al grifo, que el
grifo esté abierto y que el tubo de desague haya sido conectado según las instrucciones.
Apertura de la puerta
Tiren hacia adelante de la manilla: la puerta se abre fácilmente. Si tal oper ación se realiza mientras
la máquina está funcionando, un dispositivo de seguridad apaga el lavavajillas.
Introducción de la sal especial
• Abran la compuerta y extraigan el contenedor inferior.
• Desenrosquen la tapa del depósito de la sal dándole vuel-
tas en sentido antihorario.
Sólo para la primera puesta en marcha: Introduzcan,
aproximadamente, 1/2 litro de agua en el depósito de la
sal.
• Metan la sal especial mediante el embudo L en el corres-
pondiente contenedor (aproximadamente 1,0 - 1,5 kg).
• Limpien la apertura del depósito de los eventuales restos
de sal.
• Enrosquen de nuevo el tapón del depósito, dándole vuel-
tas en sentido horario.
• Si inmediatamente después de la introducción de la sal
no se puede lavar la vajilla, pongan en marcha el
programma REMOJO, para que el agua y los gr anitos de
sal que salgan del depósito se disuelvan y desaparezcan.
L
LA2505-060
5
Por motivos de seguridad, les recomendamos que realicen el llenado después de cada 7
ciclos de lavado, siempre al comienzo del ciclo.
Utilicen solamente sal especial para lavavajillas; otros tipos de sale (por ejemplo
sal de cocina ) contienen a menudo sustancias que no se disuelven con el agua
y que Pueden atascar el suavizador del agua, haciéndolo inutilizable.
Regulación de la instalación del suavizador
Posición
del
1
2
3
4
D
Grados
franceses
>15 <25
>25 <40
>60 <90
1
°fH
<15
>14 <22,4
>33,6 <50,4
>=mayor/<=menor
Grados
alemanes
<8,4
>8,4 <14
del agua
Para lavar se aconseja usar agua dulce (es decir, pobre de
cal), para evitar que se formen depósitos en las vajillas y en el
mismo lavavajillas. Con esta finalidad, el lavavajillas dispone
de un suavizador del agua (fig.5) que se regenera
automáticamente,a intervalos regulares gracias a la solución
salina. El consumo de sal para la regener ación depende , por
lo tanto, de la dureza del agua suministrada localmente.
Para conocer el grado de dureza del agua, diríjanse a la
oficinas del ayuntamiento o utilicen un kit comercial de toma y
análisis de muestras de agua.
Para una regeneración óptima del suavizador del agua se
necesita que el dispositivo D esté regulado en base a la dureza
del agua suministrada localmente (véase el cuadro) y que el
depósito de la sal eté siempre lleno de la sal especial.
23456789
23456789
34
23456789
23456789
ES
23456789
regulador
5
LA2505-070
°dH
Page 37

LA2505-080
7
Señales de control para la intr oducción de la
sal (si está previsto).
La señal verde situada bajo la tapa, indica que
hay todavía suficiente sal especial en el depósito .
Si la señal verde no se ve ya, significa que es
necesario introducir más sal especial.
Introducción del abrillantador
El abrillantador que se añade automáticamente
durante la última fase del lavado, garantiza un
rápido secado de la vajilla y e vita la formación de
manchas y de sedimentos de cal en las mismas.
Utilicen solamente abrillantadores específicos para lavavajillas, otros productos
no producen el efecto deseado.
El depósito del abrillantador S está colocado en
la parte interna de la puerta del lavavajillas .
• Den la vuelta al tapón T del depósito, 1/4 de
vuelta en sentido antihorario para sacarlo.
• Introduzcan el abrillantador hasta llegar a la línea de puntos.
Cantidad máxima, unos 140 ml., aproximadamente.
• Coloquen nuevamente el tapón.
• Limpien el posible abrillantador que hay a salido
fuera con un paño, sino , durante el aclar ado, se
forma demasiada espuma.
Señales de control para la introducción del
abrillantador.
Hay que poner el abrillantador cuando el indicador
del depósito F, es de color claro (
Cuando el depósito está lleno, el indicador es de
color oscuro.
).
8
T
S
LA2505-092
9
F
LA2505-096
ES
35
Page 38

1234567890
1
0
1
0
1
0
1
0
1
0
1234567890
1
2
3
4
1
2
3
4
Regulación de la dosificación del abrillantador
La regulación R de la dosificación está situada en
la apertura de carga del contenedor del
abrillantador.
Se acciona mediante un destornillador y se regula
de 1 a 4, números que corresponden al añadido
del abrillantador de 1 a 4 ml. En la fábrica se
memoriza el número 2 (2 ml).
El contenedor del abrillantador completamente
lleno es suficiente para unos 50 programas de
lavado, aproximadamente.
Hay que realizar un cambio en la cantidad de la
dosis si el resultado de la dosificación no es el
deseado.
• Limpien siempre el abrillantador que hay a podido caer fuera del contenedor con un paño.
Es importante controlar periódicamente el nivel
del abrillantador , posiblemente cada 31 cic los
de lavado.
10
R
LA2505-094
Introducción del detergente
¡IMPORTANTE! No utilicen en el lavavajillas
detergente para lavar a mano los platos! Estos
producen mucha espuma, además, en el
lavavajillas no lavan bien y hasta pueden poner
en peligro el funcionamiento del mismo.
Utilicen solamente detergentes específicos para
el lavavajillas de uso doméstico.
Conserven los paquetes de detergente bien
cerrados y en sitio muy seco.
Sólo con el programa de remojo, no es necesario
usar el detergente. Durante el programa el
detergente sale automáticamente del contenedor .
La cantidad de detergente aconsejada es de 25 g.
La eficacia de los distintos detergentes puede
ser diferente. Tengan cuidado con las doses
aconsejadas por las correspondientes casas
productoras.
El contenedor para el detergente está colocado
en el lado interno de la puerta.
En el caso de que la tapa esté cerrada:
• Pulsen hacia adelante la palanca de cierre P. La
tapa se abre inmediatamente.
• Metan el detergente en el contenedor V.
• Para cerrar la tapa, aprieten hasta que se sienta
el cierre.
11
P
LA2505-090
12
V
Cuando la vajilla está muy sucia, se puede poner
el detergente en el hueco de la tapa; llénenlo hasta
el borde, pues el detergente es ya activ o en la fase
de enjabonado.
36
23456789
23456789
23456789
23456789
23456789
ES
LA2505-100
Page 39

Cómo cargar y disponer la vajilla
Dos cestas permiten cargar los distintos tipos de
vajillas.
• Quiten de la vajilla los restos más grandes de
comida para evitar el peligro de que se atasque
el filtro y la salida de malos olores.
• Si las sartenes y las tarteras están muy pegadas, con restos de comida (fritos o asados), sumérjanlas en un baño de agua antes de meterlas en el lavavajillas.
Uso del contenedor inferior
El contenedor inferior está preparado para
contener la vajilla que se lava con dificultad y el
contenedor para los cubiertos.
En el contenedor inferior se colocan los platos
llanos, hondos, sartenes, soperas, tapas y
bandejas de servir.
Los platos llanos y hondos se deben colocar
teniendo en cuenta que entre cada plato tiene
que quedar un espacio intermedio.
Su posición tiene que ser siempre vertical de
manera que el agua pueda pasar libremente entre
ellos.
13
LA2505-110
14
Tarteras y sar tenes se colocarán con la aper tura
para abajo. Son posibles todas las combinaciones
y la posibilidad de carga es infinita, pero hay que
tener en cuenta que las vajillas, las tarteras y las
sartenes se deben colocar de tal manera que todas
las superficies sucias estén expuestas al chorro
de agua y que el agua pueda pasar entre ellas
libremente.
Cubiertos
Para obener los mejores resultados de lavado, los cubiertos se colocarán con los mangos hacia
abajo. Cucharas, tenedores y cuchillos se colocarán en los espacios correspondientes de la parrilla
del contenedor de los cubiertos.
ATENCIÓN:
Cubiertos particularmente largos y en el caso específico “cuchillos largos”, no se colocan
con las puntas hacia arriba sino que van puestos en posición horizontal en el cesto
superior o se lavan a mano.
LA2505-112
ES
37
Page 40

1234567890
1
0
1
0
1
0
1
0
1
0
1234567890
El uso del contenedor superior
El contenedor superior, completamente
extraíble , sirve par a colocar la vajilla pequeña
y mediana, como vasos, platos, tacitas de té y
de café, ensaladeras bajas, tarteras y sartenes
bajas no muy sucias. Los platos de dulce se
colocan siempre verticalmente; vasos, tazas,
tarteras y sartenes, con la apertura para abajo.
La vajilla ligera tiene que colocarse entre
sostenes, de manera que no la golpee el chorro
de agua.
El mejor resultado del lavado se alcanza cuando
se encuentra la colocación ideal para toda la
vajilla en el contenedor. A partir de este
momento el proceso de lavado puede
desarrollarse en toda su eficacia.
A causa de la temperatura elevada del agua de lavado y de las reacciones químicas del
detergente usado, se aconseja evitar objetos de cobre o bronce, vajillas de aluminio
anodizado, cubiertos con mango de madera o cuerno, porcelanas delicadas, vajillas de
cristal y plástico que no sean resistentes al calor.
En el caso de vajillas de porcelana decorada, se aconseja realizar una prueba de
lavado en una única pieza para comprobar que la decoración no se modifica o se daña.
15
LA2505-120
Regulación en altura del contenedor
superior
Moviendo la manilla lateral (solamente hacia el lado izquierdo)
se puede regular el contenedor en altura e inclinación.
1 Regulación de la posición horizontal,
2 Regulación de la posición inclinada.
16
LA2505-130
1
LA2505-132
2
38
23456789
23456789
23456789
23456789
ES
23456789
LA2505-134
Page 41

- S
Extracción del contenedor superior
El contenedor superior puede sacarse a través de
las guías, como se representa en la figura.
Descripción de los elementos de
mando e indicaciones
17
-ON/OFF
45°-E
SW-SL
LA2505-170
1) Pilotos.
Se enciende cuando el aparato está funcionando.
Cuando se enciende, añadan sal (cada 7 ciclos), e incluso añadiendo sal, el piloto
permanece encendido durante todo el ciclo .
✰
Cuando se enciende, añadan abrillantador (cada 31 ciclos), e incluso añadiendo
abrillantador el piloto permanece encendido durante todo el ciclo.
2) Pulsantes.
Encendido / apagado Pulsen el pulsador para encender el aparato.
Pulsen el pulsador para lavar a 45°.
Pulsen el pulsador para hacer el Super Lavado ( lavado especiale para tarteras ).
3) Manilla de la puerta.
Para abrir la puerta, tiren hacia adelante (un seguro eléctrico apaga la máquina cuando
la puerta se abre).
4) Botón de selección de los programas.
Para escoger el programa de lavado (véase el cuadro de los programas).
Para seleccionar el programa deseado, muevan el botón en sentido horario.
12
3
4
12 4
3
LA2505-160
18
LA2505-172
Puesta en marcha
Después de haber controlado la cantidad de sal de regeneración y de abrillantador, abran
completamente el grifo del agua, coloquen la vajilla en los contenedores, echen el detergente en su
contenedor y el detergente para el prelavado (si es necesario) y cierren la puerta frontal.
Sigan realizando las siguientes fases:
• den la vuelta al botón de selección de programas 4 en sentido horario ( fig. 18 ) hasta llegar al
número del programa deseado, haciendo que éste coincida con la línea del interruptor.
• Accionen el pulsador "encendido - apagado". Se enciende el piloto de control como indicador de
tensión y la máquina realiza automáticamente todas las fases del programa de lavado escogido.
Después de que termine el ciclo, no ha y que secar la v ajilla porque sale y a seca pues el secado se
realiza automáticamente. La vajilla se puede sacar de la máquina o puede permanecer en ella
hasta la próxima comida.
No abran la máquina si se está realizando un programa.
Parada
Después del ciclo de lavado , el la vav ajillas se par a automáticamente mientras permanece encendido
el piloto de control de la tensión. Para apagarlo, pulsen el botón encendido / apagado. Después de
cada ciclo de lavado, cierren del todo el grifo del agua para aislar el lavavajillas de la red de
aprovisionamiento hídrico.
ES
39
Page 42

1234567890
1
0
1
0
1
0
1
0
1
0
1234567890
Cuadro de los programas de lavado (Modelo medio)
Programas:
Remojo
Enérgico
tarteras y
vajillas muy
sucias
Enérgico
vajilla sucia
normal
vajilla muy
sucia
vajilla delicada
muy sucia
Aclarados
Lavado
rápido con
prelavado
Lavado
rápido sin
prelavado
PULSADORES
Apagado
Encendido
programa
Número de
R
S
S
S
S
1
1
2
A
A
B
B
45° - E
DETERGENTE
SW - SL
Super lavado
y tipo de sucio
Lavado
Pre- lavado
Tarteras y vajillas hasta el
próximo ciclo de lavado
T arteras y vajillas muy sucias
(con excepción de partes
delicadas)
Vajillas muy sucias
(con excepción de partes
delicadas)
Vajillas muy sucias
Vajillas muy sucias (con
excepción de partes delicadas)
Tarteras y vajillas
Tarteras y vajillas
Tarteras y vajillas
Tarteras y vajillas
Tarteras y vajillas
Vajillas
Descripción de los
programas
Lavado breve en frío de manera que no se peguen
los restos de la comida a las vajillas.
1 Prelavado caliente - Lavado principal
3 aclarados (2 fríos - 1 caliente) Secado.
1 Prelavado caliente - Lavado principal
3 aclarados (2 fríos - 1 caliente) Secado.
1 Prelavado frío - Lavado principal
3 aclarados (2 fríos - 1 caliente) Secado
1 Prelavado frío - Lavado económico.
3 aclarados (2 fríos - 1 caliente) Secado.
Lavado principal
3 aclarados (2 fríos - 1 caliente) Secado
Lavado económico.
3 aclarados (2 fríos - 1 caliente) Secado.
2 aclarados frío - 1 caliente - Secado. (Posic. 3)
1 Prelavado frío - Lavado económico.
2 Aclarados fríos.
1 Prelavado frío - Lavado principal.
2 Aclarados fríos.
Lavado económico 2 Aclarados fríos.
Lavado principal 2 Aclarados fríos
Cuadro de los programas de lavado (modelo económico)
Remojo
Enérgico
vajilla sucia
normal
vajilla muy
sucia
Aclarados
Lavado rápido
con prelavado
Lavado rápido
sin prelavado
23456789
23456789
40
23456789
23456789
23456789
Programas:
ES
PULSADORES
Apagado
Encendido
programa
Número de
R
1
2
3
A
B
DETERGENTE
Lavado
Pre- lavado
Vajillas
y tipo de sucio:
Tarteras y vajillas hasta el
próximo ciclo de lavado
Vajillas muy sucias
(con excepción de partes
delicadas)
Vajillas muy sucias
Tarteras y vajillas
Tarteras y vajillas
Tarteras y vajillas
Descripción de los
programas:
Lavado breve en frío de manera que no se peguen
los restos de la comida a las vajillas.
1 Prelavado frío - Lavado principal
2 aclarados (1 fríos - 1 caliente) Secado.
1 Prelavado frío - Lavado económico.
2 aclarados (1 fríos - 1 caliente) Secado.
1 aclarado frío - 1 caliente - Secado. (Posic. 4)
1 Prelavado frío - Lavado principal.
2 Aclarados fríos.
Lavado principal
2 Aclarados fríos
Page 43

MANTENIMIENTO
7
7.1 LIMPIEZA DE LOS ROCIADORES
Los rociadores se pueden sacar con facilidad para consentir la periódica limpieza de las toberas y para
prevenir posibles atascos.
Lávenlos con mucha atención bajo un chorro de agua y móntenlos nuevamente en el sitio que les
corresponde.
19
LA2505-210
Para desmontar el rociador superior: Desenrosquen
el soporte del rociador en sentido antihorario
Para desmontar el rociador inferior: Tiren del
rociador hacia arriba y sáquenlo.
20
7.2 LIMPIEZA DE LOS FILTROS
Después de cada lavado conviene inspeccionar el grupo de los filtros y limpiarlo de los eventuales depósitos actuando
de la siguiente manera:
• Saquen el filtro central 1.
• Saquen el filtro externo con forma de cilindro 2.
• Quiten la rejilla móvil 3.
Todos los componentes deben limpiarse con agua corr iente. Es indispensable que limpien con mucho cuidado los
filtros ya que el lavavajillas no puede funcionar con los filtros obstruidos.
Les recomendamos que vuelvan a poner en su lugar los filtros limpios para evitar causar daños a la bomba de lavado.
21
22
23
LA2505-220
1
2
LA2505-180
LA2505-190
7.3 LIMPIEZA DEL FILTRO DE ENTRADA DEL AGUA
Limpien periódicamente el filtro B, colocado entre el grifo
y el tubo de entrada del agua.
• Cierren el grifo del agua A.
• Desenrosquen la conexión C, saquen el filtro B y lím-
pienlo con mucho cuidado con agua corriente.
• Coloquen nuevamente el filtro en su lugar y enrosquen
el tubo de entrada del agua, controlando que no haya
pérdidas.
3
LA2505-200
A
B
C
LA2505-040
41
ES
Page 44

1234567890
1
0
1
0
1
0
1
0
1
0
1234567890
7.4 LIMPIEZA DE LAS SUPERFICIES EXTERIORES DE LA MAQUINA
Las superficies de la máquina, de metal y de plástico, de la par te frontal, tienen que limpiarse
periódicamente con un paño suave y húmedo. No usen nunca ácidos o detergentes abrasivos.
Qué hay que hacer cuando no se va a usar el lavavajillas por un amplio período de tiempo ?
Si el lavavajillas no se usa durante un período amplio de tiempo, hay que proceder de la siguiente
manera:
• Pongan en marcha dos programas de remojo.
• Quiten el enchufe de la corriente eléctrica.
• Desconecten el tubo de alimentación del agua.
• Dejen un poco abierta la puerta frontal para evitar la formación de mal olor.
BUSQUEDA DE LAS AVERIAS
8
Antes, si es posible, intenten eliminar personalmente los eventuales pequeños def ectos del aparato con la a yuda
de las siguientes instrucciones. Si estas informaciones no les sirven de a yuda para resolv er el problema, pónganse
en contacto con el servicio técnico de asistencia al cliente.
• El programa no se pone en marcha.
- Los fusibles de la instalación interna son defectuosos ?, ¿ el apar ato está conectado a la corriente eléctrica ?
- La puerta está cerrada correctamente ?, Empujen la puerta para cerrarla completamente.
• No entra agua en el aparato.
- El grifo del agua está abierto ?
- El filtro colocado entre el grifo y el tubo de alimentación del agua está atascado ?, limpien eventualmente, el
filtro.
- El tubo de carga del agua presenta estrangulaciones ?, controlen el tubo.
• El indicador de paso de los programas permanece parado al principio del lavado.
- El grifo del agua está completamente abierto ?
- El filtro colocado entre el grifo y el tubo de alimentación del agua está atascado ?, limpien eventualmente, el
filtro.
- La presión mínima del agua es de, al menos, 0.05 Mpa ?
• No descarga el agua.
- El tubo de descarga del agua presenta estrangulaciones ?, controlen la instalación del tubo.
- El sifón está atascado ?, controlen el sifón.
• Los cacharros no parecen limpios.
- El programa seleccionado es el ideal para el tipo y el grado de suciedad de la vajilla ?
- La vajilla está colocada de tal manera que el chorro de agua puede lacanzar su superficie inter na y externa ?
- Los cestos de los cubiertos no tienen que estar sobrecargados.
- Los brazos rotantes están bloqueados por la vajilla o por algunos cubiertos ?
- T odos los filtros colocados en el f ondo del lava vajillas están limpios ?, ¿ los filtros están colocados correctamente
en su sitio ?
- La dosis de detergente que echaron es la correcta ?
- El tubo de descarga del agua está instalado correctamente ?
- Queda todavía sal especial en el depósito de la sal ?, sin la sal especial el agua no se suaviza.
- La instalación del suavizador del agua está regulada en base a la dureza del agua localmente suministrada ?
• La vajilla no se seca y queda opaca.
- Hay todavía abrillantador en el depósito ?
• Los vasos y la vajilla presentan estrías, rayas, manchas lechosas o una pátina azul brillante.
- Durante los aclarados se toma una dosis excesiva de abrillantador. Disminuyan la dosis del abrillantador.
• Los vasos y la vajilla presentan manchas de gotas de agua que se secaron.
- Durante los aclarados se toma una dosis insuficiente de abrillantador. Aumenten la dosis del abrillantador.
¡ Advertencia!
Como el lavavajillas fue probado y controlado con mucho cuidado en la fábrica, se pueden encontrar
dentro gotas de agua que desaparecen nada más que se realice el primer lavado.
23456789
23456789
42
23456789
23456789
ES
23456789
Page 45

PRIMA DI USARE L’APPARECCHIO
1
1.1 ISTRUZIONI DI SICUREZZA
Utilizzo secondo le norme
• La lavastoviglie deve essere utilizzata solo per il lavaggio di stoviglie domestiche. Qualora l’apparecchio
fosse utilizzato per altri scopi o in modo errato, la ditta costruttrice non può assumersi alcuna responsabilità
per eventuali danni.
• Per motivi di sicurezza, non sono ammesse trasformazioni o modifiche alla lavastoviglie.
• Pr ima del collegamento dell’apparecchio alla rete elettrica assicuratevi che i dati di tensione e corrente
indicati sulla targa dati corrispondano con quelli erogati sul luogo di installazione.
• L’installazione deve essere compiuta da personale qualificato.
Operazioni preliminari al primo avviamento
• Controllate la lavastoviglie per eventuali danni causati dal trasporto. In nessun caso allacciare un apparecchio danneggiato. In caso di danni rivolgersi al proprio fornitore.
Per la sicurezza dei bambini
• Non permettete ai bambini di giocare con l’apparecchio.
• I detersivi possono causare danni irreparabili agli occhi, alla bocca e alla gola.
Conservare quindi i detersivi fuori della portata dei bambini.
• L’acqua nella lavastoviglie non é potabile. Nel caso che ci siano ancora residui di detersivo nell’apparecchio, permane una situazione di pericolo per i bambini, che devono essere tenuti lontano dalla la vastoviglie
aperta.
Per il funzionamento quotidiano
• Non mettete mai in funzione la lavastoviglie se il cavo della corrente, i tubi di carico e di scarico dell’acqua
sono danneggiati oppure se il cruscotto dei comandi, il piano di lavoro o lo zoccolo sono molto deteriorati.
• In caso di guasto, chiudete prima il rubinetto dell’acqua, spegnete poi l’apparecchio e togliete la spina dalla
presa di corrente. Nel collegamento fisso disinserite l’eventuale interruttore di ser vizio oppure estraete il
fusibile (o i fusibili).
• Per togliere la spina dalla presa di corrente afferrare la spina dal corpo e mai dal cavo.
• Le riparazioni della lavastoviglie devono essere eseguite solo da personale specializzato. Riparazioni non
appropriate possono mettere in grave pericolo l’utente. In caso di riparazioni quindi rivolgersi al nostro
servizio tecnico assistenza clienti o al proprio rivenditore specializzato.
• La sostituzione del cavo alimentazione deve essere eseguita solo dal personale dell’assistenza tecnica.
• In caso di deterioramento dei tubi, per l’allacciamento dell’apparecchio, questi de vono essere sostituiti con
tubi originali.
• Non introducete nella lavastoviglie sostanze solventi che potrebbero provocare un’esplosione.
• Non sedetevi e non appoggiatevi sullo sportello aperto: l’apparecchio potrebbe ribaltarsi.
• Pr ima di introdurre il sale speciale, il detersivo e il brillantante, assicuratevi che il produttore di queste
sostanze ne raccomandi l’utilizzo per le lavastoviglie ad uso domestico.
• Chiudete sempre il r ubinetto dell’acqua se la lavastoviglie non viene utilizzata per parecchio tempo, ad
esempio durante le vacanze.
43
I
Page 46

1234567890
1
0
1
0
1
0
1
0
1
0
1234567890
DISIMBALLO- SMALTIMENTO
2
2.1 DISIMBALLO
Togliete l’imballaggio esterno in plastica gli angoli di rinforzo e le basi in polistirolo.
Aprite la porta e togliete i blocchi di polistirolo dei cestelli.
Il recupero e il riciclaggio dei materiali d’imballaggio contribuisce al risparmio delle materie prime e
alla diminuzione del volume dei rifiuti.
Consegnare l’imballaggio alle discariche per il recupero dei materiali riciclabili.
Quando un giorno l’apparecchio dovrà essere messo definitiv amente fuori uso , renderlo inutilizzabile
prima della sua eliminazione.
AVVERTIMENTO! Alcuni materiali dell’imballaggio (ad es. sacchetti di plastica, polistirolo ) possono rappresentare una fonte di pericolo per i bambini
pertanto occorre tenere questi materiali lontano.
2.2 SMALTIMENTO APPARECCHIO DA ROTTAMARE
Al termine della vita funzionale dell’apparecchio questo dev e essere rottamato da ditte specializzate,
nel rispetto delle normative vigenti.
In questo modo, con l’eliminazione di un vecchio apparecchio é possibile effettuare il recupero differenziato dei materiali sintetici destinati al riciclaggio, nel pieno rispetto dell’ambiente.
CENNI GENERALI
3
3.1 LAVARE IN MANIERA ECONOMICA ED ECOLOGICA
• Non lavate le stoviglie prima sotto l’acqua corrente.
• Utilizzate la lavastoviglie sempre a pieno carico, poiché solo così é possibile eseguire un lavaggio
economico e nel rispetto per l’ambiente.
• Selezionate sempre un programma di lavaggio corrispondente al tipo di stoviglie e al loro grado di
sporco.
• Evitate assolutamente sovraddosaggi di detersivo, sale speciale e brillantante. Fate attenzione alle
dosi raccomandate nelle istruzioni per l’uso e nelle indicazioni della casa produttrice di tali sostanze.
• Verificate che l’impianto addolcitore dell’acqua sia regolato correttamente.
3.2 STOVIGLIE NON ADATTE
Non sono adatti al lavaggio in lavastoviglie:
- taglieri o piccoli vassoi in legno
- oggetti in materiale plastico non resistenti al calore
- cristallo al piombo
- oggetti in stagno o in rame
- stoviglie o posate con parti incollate
- posate piuttosto vecchie, il cui collante é sensibile al calore
- oggetti in acciaio che si ossidano facilmente
- posate con manici in legno, corno, porcellana o madreperla.
Al momento dell’acquisto di stoviglie, bicchieri e posate assicurar si c he siano adatti per il lavaggio in lavastoviglie.
44
23456789
23456789
23456789
23456789
I
23456789
Page 47

DESCRIZIONE DELL’APPARECCHIO
4
4.1 VISTA GENERALE
1) Serbatoio per il sale
2) Serbatoio per il brillantante
3) Vaschetta per il detersivo
4) Targa dati
5) Filtri
6) Girante inferiore
7) Girante superiore
8) Cavo alimentazione elettrica
9) Tubo alimentazione acqua
10)Tubo di scarico
11)Cestello inferiore
12)Cestello superiore
13)Contenitore posate
14)Gancio chiusura porta
12
11
4
14
1
8
9
10
7
6
5
1
13
4.2 DATI TECNICI
Capacità ( secondo coperti standard ) : 12
Pressione nell’impianto idraulico
pressione minima: 0,05 MPa
pressione massima: 1 MPa
3 2
ATTENZIONE: le caratteristiche
elettriche sono indicate sulla targa dati.
0,05 - 1MPa Model. ......................
....A
MAX .......W
........V.....Hz
Made in EU
...................
LA2505-020
12
45
I
Page 48

1234567890
1
0
1
0
1
0
1
0
1
0
1234567890
INSTALLAZIONE
5
5.1 LIVELLAMENTO
2
M
2.1
P
LA2505-030
Una volta posizionato l’apparecchio nel luogo d’installazione, agite sui piedini P avvitandoli e svitandoli al fine di regolare, se necessario, l’altezza della macchina e livellarla.
Un buon livellamento assicurerà il corretto funzionamento della lavastoviglie.
Errore max=2 gradi
Dopo che la macchina é stata livellata, regolare inoltre il gancio chiusura porta in modo che questa si
chiuda perfettamente.
Dopo che la macchina sia stata livellata regolare inoltre il nasello chiusur a porta (Fig. 2.1 “M”) in modo
che la porta chiuda perfettamente.
5.2 COLLEGAMENTO IDRAULICO
Il tubo d’entrata acqua C, in dotazione rende possibile il
collegamento ad un rubinetto con attacco 3/4”.
Durante il montaggio dev ono essere rispettate le seguenti
istruzioni:
• avvitate il tubo C al rubinetto dell’acqua fredda A interponendo il filtro B in dotazione.
• se l’allacciamento viene effettuato in tubature n uov e o
che sono state usate da molto tempo , é consigliabile
far scorrere acqua prima di allacciare il tubo d’entrata
acqua in modo da eliminare depositi di ruggine e di
sporcizia;
• assicuratevi che la pressione nell’impianto idr aulico sia
entro i valori limite indicati nei dati tecnici.
La lavastoviglie può essere collegata alla conduttura
dell’acqua fredda ma non a quella dell’acqua calda.
23456789
23456789
46
23456789
23456789
I
23456789
3
A
B
C
LA2505-040
Page 49

5.3 COLLEGAMENTO PER LO SCARICO LISCIVIA
Il tubo di scarico T in dotazione viene agganciato con la parte estrema ricurva al bordo di un lavello
o una conduttura di scarico.
E’ opportuno predisporre un sifone antiodore.
Durante il montaggio é necessario osservare le seguenti precauzioni:
- Il tubo di scarico non deve essere piegato per non causare strozzature;
- L’estremità del tubo in relazione al piano di appoggio della lavastoviglie (fig. 4) deve essere sistemata ad un’altezza compresa fra 32 cm e 80 cm.
- In nessun caso l’estremità del tubo deve essere immersa nell’acqua;
- Un eventuale prolungamento del tubo di scarico non de v e superare la lunghezza di 1 metro e de v e
avere lo stesso diametro interno ed inoltre l’altezza massima in cui può essere sistemata l’estremità libera deve essere ridotta da 80 cm. a 50 cm.;
- Nel caso di una conduttura di scarico, il diametro interno deve essere non inferiore a 4 cm.
4
LA2501-050
5.4 COLLEGAMENTO ELETTRICO
Il collegamento elettrico della macchina deve essere effettuato solo tramite una
presa con contatto a terra installata secondo le istruzioni. Il collegamento deve
corrispondere alle norme legali in vigore e alle norme supplementari dell’azienda
elettrica competente.
L’indicazione della tensione deve corrispondere alla tensione di rete del luogo d’installazione.
Per il dimensionamento della presa di corrente, riferitevi alla targa dati.
T
T
max 80 cm
min 32 cm
47
I
Page 50

1234567890
1
0
1
0
1
0
1
0
1
0
1234567890
USO
6
6.1 OPERAZIONI PRELIMINARI
Prima della messa in esercizio della macchina, assicuratevi che la spina del cavo di alimentazione sia
collegata alla presa di corrente, che il tubo d’entrata acqua sia collegato al rubinetto, che il rubinetto sia
aperto e che il tubo di scarico sia stato collegato secondo le istruzioni.
Apertura della porta
Tirare in avanti la maniglia: la porta si apre facilmente . Se tale oper azione viene compiuta mentre la
macchina é in funzione, un dispositivo di sicurezza spegne la lavastoviglie.
Introduzione di sale speciale
• Aprire lo sportello, estrarre il cestello inferiore.
• Svitare il cappuccio del serbatoio del sale ruotandolo in
senso antiorario.
Solo per il primo avviamento: introdurre circa 1/2 litro
d’acqua nel serbatoio del sale.
• Caricate il sale speciale attraverso l’imbuto L nel conte-
nitore apposito (circa 1,0 - 1,5 kg).
• Pulite l’apertura del serbatoio da ev entuali residui di sale.
• Riavvitate il tappo del serbatoio ruotandolo in senso
orario.
• Se subito dopo l’introduzione di sale le stoviglie non
vengono lavate, avviate il programma AMMOLLO, af-
finché l’acqua e i granuli di sale fuoriusciti dal serbatoio
vengano sciacquati via.
Per motivi di sicurezza raccomandiamo di
effettuare il riempimento dopo ogni 7 cicli di
lavaggio, sempre all’inizio del ciclo.
L
LA2505-060
5
Utilizzate solo sale speciale per lavastoviglie; altri tipi di sale (ad es. sale da
cucina ) contengono spesso sostanze che non si sciolgono con l’acqua e
possono otturare l’addolcitore rendendolo inutilizzabile.
Regolazione dell’impianto addolcitoredell’acqua
Per il lav aggio é consigliabile acqua dolce (po v era di calcare),
per evitare che si formino depositi sulle stoviglie e sulla stessa
lavastoiviglie. A questo scopo la lavastoviglie dispone di un
addolcitore dell’acqua (fig.6) che viene rigenerato automaticamente, ad intervalli regolari grazie alla soluzione salina. Il consumo di sale per la rigenerazione dipende perciò dalla durezza dell’acqua localmente erogata.
Per conoscere il grado di durezza dell’acqua rivolgete vi al
vostro ufficio comunale oppure utilizzate un kit commerciale
di rilevamento.
Per una rigenerazione ottimale dell’addolcitore é necessar io
che il dispositivo D sia regolato in base alla durezza dell’acqua localmente erogata (vedi tabella) e che il serbatoio del
sale sia sempre pieno di sale speciale.
23456789
23456789
48
23456789
23456789
I
23456789
Posizione
del
regolatore
1
2
3
4
D
1
Gradi
francesi
°fH
<15
>15 <25
>25 <40
>60 <90
>=maggiore/<=minore
6
LA2505-070
Gradi
tedeschi
°dH
<8,4
>8,4 <14
>14 <22,4
>33,6 <50,4
Page 51

LA2505-080
7
Segnalazione di controllo per l’introduzione
del sale (se previsto)
La marcatura verde sotto il cappuccio , indica che
c’é ancora sufficiente sale speciale nel serbatoio .
Se la marcatura verde non é più visibile, allora é
necessario introdurre altro sale speciale.
Introduzione del brillantante
Il brillantante che viene aggiunto automaticamente
durante l’ultima fase di lavaggio, garantisce una
veloce asciugatura delle stoviglie e evita la
formazione di macchie e di sedimenti calcarei sulle
stoviglie.
Utilizzare solo brillantanti specifici per lavastoviglie, altri prodotti non producono
l’effetto desiderato.
Il serbatoio del brillantante S si trova sul lato interno
dello sportello .
• Ruotate il tappo T del serbatoio di 1/4 di giro in
senso antiorario per estrarlo.
• Introducete il brillantante fino alla linea tratteggiata. Quantità massima circa 140 ml.
• Rimettere il tappo.
• Pulite il brillantante eventualmente fuoriuscito
con un panno, altrimenti durante il risciacquo si
forma troppa schiuma.
8
T
S
LA2505-092
9
F
Segnalazione di controllo per l’intr oduzione del
brillantante
Il brillantante deve essere inserito se l’indicatore
sul serbatoio F, è di colore chiaro (
Quando il serbatoio é pieno, l’indicatore è di colore
scuro.
).
LA2505-096
49
I
Page 52

1234567890
1
0
1
0
1
0
1
0
1
0
1234567890
Regolazione del dosaggio di brillantante
1
2
3
4
1
2
3
4
La regolazione R del dosaggio si trova nell’apertura
di carica della vaschetta del brillantante.
E’ azionabile con un cacciavite e regolabile da 1 a
4, numeri che corrispondono all’aggiunta di
brillantante da 1 a 4 ml. In f abbrica viene impostato
il numero 2(2 ml).
La vaschetta del brillantante completamente piena
é sufficente per circa 50 programmi di lavaggio.
E’ necessario effettuare un cambiamento nella
quantità del dosaggio se l’esito del dosaggio non
é quello desiderato.
• Pulire sempre il brillantante eventualmente fuo-
riuscito con un panno.
E’ importante controllare periodicamente il livello
del brillantante, possibilmente ogni 31 cicli di
lavaggio.
Introduzione del detersivo
10
R
LA2505-094
IMPORTANTE! Non utilizzate nella lavastoviglie
11
detersivo per lavare i piatti a mano! Questi
producono molta schiuma, ma nella lavastoviglie
non puliscono le stoviglie e possono addirittura
P
comprometterne il funzionamento.
Utilizzate dunque solamente detersivi specifici per
la lavasto viglie ad uso domestico.
Conservate le confezioni dei detersivi ben chiuse
e in luogo ben asciutto.
Solo con il programma ammollo il detersivo non é
necessario. Durante il programma il detersiv o viene
prelevato dalla vaschetta automaticamente.
La quantità di detersivo consigliata é 25 g.
L ’efficacia dei diver si detersivi può essere differente. Fate quindi attenzione alle dosi consigliate
dalle rispettive case produttrici.
La vaschetta per il detersiv o si trova sul lato interno
dello sportello.
12
Nel caso che il coperchio sia chiuso:
• Premere in avanti la leva di chiusura P. Il coper-
chio si apre a scatto.
• Introducete il detersivo nella v aschetta V.
• Per chiudere il coperchio, premerlo finché non
scatta la chiusura.
Quando le stoviglie sono eccezionalmente sporche
é possibile mettere detersivo in più nell’incavo del
coperchio; riempite l’incavo fino all’orlo, questo detersivo é già attivo nella fase di ammollo.
V
LA2505-090
50
23456789
23456789
23456789
23456789
I
23456789
LA2505-100
Page 53

Come caricare e disporre le stoviglie
Due cestelli consentono di caricate i vari tipo di
stoviglie.
• Togliete dalle stoviglie i resti più grandi di cibo
per evitare il rischio di un intasamento del filtro
e l’uscita di cattivi odori.
• Se le padelle e pentole sono particolarmente incrostate con resti di cibo (fritto o arrosto) immergeteli in un bagno d’acqua prima d’introdurli nella
lavastoviglie .
Uso del cestello inferiore
Il cestello inferiore é predisposto per ricevere le
stoviglie difficilmente lavabili e il cestello per le
posate.
Nel cestello inferiore vengono messi i piatti piani,
fondi, padelle, zuppiere , coperchi e piatti di portata.
I piatti piani e fondi de vono essere disposti tenendo
in considerazione che tra i singoli piatti deve
rimanere uno spazio intermedio.
13
LA2505-110
La loro posizione deve essere sempre verticale in
modo che l’acqua possa passare liberamente.
Pentole e padelle de vono essere disposte sempre
capovolte. Sono possibili tutte le combinazioni e
possibilità di caricamento, però bisogna tenere in
considerazione che le stoviglie, le pentole e le
padelle vengono disposte in modo tale che tutte
le superfici sporche siano esposte allo spruzzo
d’acqua e che l’acqua possa defluire liberamente.
14
Posate
Per ottenere i migliori risultati di lav aggio, le posate de vono essere disposte con i manici v erso il basso .
Cucchiai, forchette e coltelli de vono essere disposti negli appositi spazi della g riglia contenitore posate.
ATTENZIONE:
Posate particolarmente lunghe, e nel caso specifico “coltelli lunghi”, non v anno posizionati con
le punte rivolte verso l’alto; ma v anno sistemati in posizione orizz ontale nel cestello superiore o
lavati a mano.
LA2505-112
51
I
Page 54

1234567890
1
0
1
0
1
0
1
0
1
0
1234567890
L’uso del cestello superiore
Il cestello superiore completamente estraibile
riceve le stoviglie piccole e medie come
bicchieri, piattini, tazzine da té e da caffé,
insalatiere basse, pentole e padelle basse non
molto sporche.I piattini da dolce de vono essere
disposti sempre verticalmente; bicchieri, tazz e,
pentole e padelle, capov olti. Le sto viglie leggere
devono essere disposte tra i sostegni in modo
da non essere colpiti dal getto di lav aggio.
Il miglior risultato di lavaggio viene raggiunto
quando si é trovata la disposizione più adatta
delle stoviglie nei cestelli. Da questo momento
in poi il processo di lavaggio può sviluppare tutta
la sua efficacia.
A causa della temperatura elevata dell”acqua di lavaggio e della reazione
chimica del detersivo impiegato, è consigliabile evitare oggetti di rame,
stoviglie in alluminio anodizzato, posate con manici in legno o corno,
porcellane delicate, stoviglie in vetro e plastica non termoresistente.
In presenza di stoviglie di porcellana decorata, è consigliabile effettuare una
prova di lavaggio su un singolo pezzo per verificare che la decorazione non
venga modificata o danneggiata.
15
LA2505-120
Regolazione altezza cestello superiore.
Agendo sulla maniglia laterale (solo lato sinistro), è
possibile regolare il cestello in altezza e inclinazione.
1 Regolazione posizione orizzontale
2 Regolazione posizione inclinata
16
LA2505-130
1
LA2505-132
2
52
23456789
23456789
23456789
23456789
I
23456789
LA2505-134
Page 55

Estrazione del cestello superiore
- S
Il cestello superiore può essere estratto dalle guide come rappresentato nella figura.
Descrizione elementi di comando
e indicazione
17
-ON/OFF
45°-E
SW-SL
LA2505-170
1) Lampade spia
Si accende quando l’apparecchio é acceso.
Quando si accende aggiungere sale (ogni 7 cicli), anche aggiungendo sale la spia
✰
rimane accesa per tutto il ciclo.
Quando si accende aggiungere brillantante (ogni 31 cicli), anche aggiungendo
brillantante la spia rimane accesa per tutto il ciclo.
2) Pulsanti
Accesso/spento - Premere il pulsante per accendere l’apparecchio
Premere il pulsante per fare il lavaggio a 45°
Premere il pulsante per fare il Super Lavaggio ( lavaggio speciale per pentole )
3) Maniglia porta
Per aprire dov ete tirare in av anti (una sicurezza elettrica spegnere la macchina quando
la porta vive aperta).
4) Manopola selezione programmi
Per scegliere il programma di lavaggio (vedi tabella programmi). Per selezionare il
programma desiderato ruotate la manopola in senso orario.
12
3
LA2505-160
18
4
12 4
3
LA2505-172
Avviamento
Dopo il controllo della quantità di sale di rigenerazione e brillantante, aprite completamente il rubinetto
dell’acqua, disponete le stoviglie nei cestelli, v ersare il detersivo nel suo contenitore e il detersivo per
il prelavaggio (se necessario) e chiudete la porta frontale.
Procedete come segue:
• ruotate la manopola selezione programmi 4 in senso orario ( fig. 18 ) fino a quando il desiderato
numero di programma coincide con la linea sull’interruttore.
• Azionate il pulsante “acceso-spento”. Si illumina la spia di controllo per l’indicazione di tensione e la
macchina svolge automaticamente tutte le fasi del programma di lavaggio pre-inserito . Dopo la fine
del ciclo, non occorre asciugare le sto viglie perché la loro asciugatur a avviene automaticamente . Le
stoviglie possono essere tolte o rimanere in macchina fino al prossimo pasto.
Non aprite la macchina se un programma é iniziato.
Arresto
Dopo il ciclo di lavaggio, la lavastoviglie si fer ma automaticamente mentre rimane accesa la spia di
controllo della tensione. Per spegnerla, premere il bottone acceso/spento. Dopo ogni ciclo di lavaggio,
chiudere assolutamente il rubinetto dell’acqua per isolare la lavastoviglie dalla rete di approvvigionamento
idrico.
53
I
Page 56

1234567890
1
0
1
0
1
0
1
0
1
0
1234567890
Tabella dei programmi di lavaggio (modello medio)
Programmi
Ammollo
Energico
pentole e
stoviglie molto
sporche
Energico
stoviglie sporco
normale
stoviglie molto
sporche
stoviglie delicate
molto sporche
Risciacqui
PULSANTI DETERSIVO
Acceso
Spento
Numero
programma
45°- E
R
S
S
S
S
1
1
2
SW - SL
Super lavaggio
Pre-lavaggio
Lavaggio
Stoviglie
e
tipo di
sporco
Pentole e stoviglie fino al
prossimo ciclo di lavaggio
Pentole e stoviglie molto
sporche (con eccezione di
parti delicate)
Stoviglie molto sporche
(con eccezione di parti
delicate)
Stoviglie molto sporche
Stoviglie molto sporche (con
eccezione di parti delicate)
Lavaggio breve a freddo in modo da non f ar attaccare i
resti del cibo alle stoviglie
1 Prelavaggio caldo - Lavaggio principale
3 risciacqui (2 freddi - 1 caldo) Asciugatura
1 Prelavaggio caldo - Lavaggio economico
3 risciacqui (2 freddi - 1 caldo) Asciugatura
1 Prelavaggio freddo - Lavaggio principale
3 risciacqui (2 freddi - 1 caldo) Asciugatura
1 Prelavaggio freddo - Lavaggio economico
3 risciacqui (2 freddi - 1 caldo) Asciugatura
Lavaggio principale
3 risciacqui (2 freddi - 1 caldo) Asciugatura
Lavaggio economico
3 risciacqui (2 freddi - 1 caldo) Asciugatura
2 risciacqui freddi - 1 caldo - Asciugatura
Descrizione programmi
Lavaggio
rapido con
prelavaggio
Lavaggio
rapido senza
prelavaggio
A
A
B
B
Pentole e stoviglie
Pentole e stoviglie
Pentole e stoviglie
Pentole e stoviglie
1 Prelavaggio freddo - Lavaggio economico
2 Risciacqui freddi
1 Prelavaggio freddo - Lavaggio principale
2 Risciacqui freddi
Lavaggio economico - 2 Risciacqui freddi
Lavaggio principale - 2 Risciacqui freddi
Tabella dei programmi di lavaggio (modello economico)
Programmi
Ammollo
Energico
stoviglie sporco
normale
stoviglie molto
sporche
Risciacqui
PULSANTI DETERSIVO
Acceso
Spento
Numero
programma
R
1
2
3
Pre-lavaggio
Lavaggio
Stoviglie
e
tipo di
sporco
Pentole e stoviglie fino al
prossimo ciclo di lavaggio
Stoviglie molto sporche
(con eccezione di parti
delicate)
Stoviglie molto sporche
Pentole e stoviglie
Lavaggio breve a freddo in modo da non f ar attaccare i
resti del cibo alle stoviglie
1 Prelavaggio freddo - Lavaggio principale
2 risciacqui (1 freddo - 1 caldo) Asciugatura
Lavaggio principale
2 risciacqui (1 freddo - 1 caldo) Asciugatura
1 risciacquo freddo - 1 caldo - Asciugatura
Descrizione programmi
54
Lavaggio
rapido con
prelavaggio
Lavaggio
rapido senza
prelavaggio
23456789
23456789
23456789
23456789
I
23456789
A
B
Pentole e stoviglie
Pentole e stoviglie
1 Prelavaggio freddo - Lavaggio principale
2 Risciacqui freddi
Lavaggio principale - 2 Risciacqui freddi
Page 57

MANUTENZIONE
7
7.1 PULIZIA DEGLI IRRORATORI
Gli irroratori sono facilmente asportabili per consentire la periodica pulizia degli ugelli e per pre v enire
possibili otturazioni.
Lavateli accuratamente sotto un getto d’acqua e rimontateli nelle proprie sedi.
19
LA2505-210
Per smontare l’irroratore superiore:
Svitate il supporto dell’irroratore in senso antiorario
Per smontare l’irroratore inferiore:
Tirate l’irroratore verso l’alto e sfilatelo
20
7.2 PULIZIA DEI FILTRI
Dopo ogni lavaggio è opportuno ispezionare il gruppo filtrante e ripulirlo da e v entuali depositi agendo
nel seguente modo:
• Estraete il filtro centrale 1.
• Sfilate il filtro esterno a pozzetto 2.
• Rimuovete la griglia mobile 3.
T utti i componenti v anno puliti in acqua corrente . È indispensabile pulire con attenzione i filtr i in quanto
la lavastoviglie non potrà funzionare con i filtri ostruiti.
Vi raccomandiamo di rimettere a posto i filtri puliti per e vitare danni alla pompa di lavaggio.
21
22
23
LA2505-220
1
2
LA2505-180
7.3 PULIZIA DEL FILTRO D’ENTRATA ACQUA
Pulite periodicamente il filtro B posto fra il rubinetto e il
tubo d’entrata acqua.
• Chiudete il rubinetto dell’acqua A.
• Svitate l’attacco C, estraete il filtro B e pulitelo accuratamente sotto acqua corrente.
• Rimettete il filtro a posto e avvitate il tubo d’entrata acqua verificando che non vi siano perdite.
LA2505-190
3
LA2505-200
A
B
C
LA2505-040
55
I
Page 58

1234567890
1
0
1
0
1
0
1
0
1
0
1234567890
7.4 PULIZIA DELLE SUPERFICI ESTERNE ALLA MACCHINA
Le superfici della macchina, di metallo e di plastica del frontalino , dev ono essere pulite periodicamente
con un panno morbido ed umido. Non usate mai acidi o detergenti abrasivi.
Messa fuori servizio prolungata.
Se la lavastoviglie non viene usata per un lungo periodo, si deve procedere come segue:
• Fate girare due programmi di ammollo.
• Staccate la spina dalla rete elettrica.
• Scollegate il tubo di alimentazione dell’acqua.
• Lasciate leggermente aperta la porta frontale per evitare la formazione di cattivo odore.
RICERCA GUASTI
8
Controllare prima se è possibile eliminare personalmente eventuali piccoli difetti dell’apparecchio
con l’ausilio delle seguenti istruzioni. Se queste informazioni non sono di alcun aiuto per risolvere il
problema, mettersi in contatto con il servizio tecnico assistenza clienti.
• Il programma non si avvia.
- I fusibili dell’impianto interno sono difettosi? L’ apparecchio é allacciato alla rete elettrica?
- Lo sportello é chiuso correttamente? Premere sullo sportello per chiuderlo completamente.
• Non entra acqua nell’apparecchio.
- Il rubinetto dell’acqua è aperto?
- Il filtro posto fra rubinetto e tubo di alimentazione acqua è otturato? Pulite eventualmente il filtro.
- Il tubo di carico dellacqua presenta delle strozzature? Controllate il tubo.
• L’indicazione di decorso del programma rimane ferma all’inizio del lavaggio.
- Il rubinetto dell’acqua è completamente aperto?
- Il filtro posto fra rubinetto e tubo di alimentazione acqua è otturato? Pulite eventualmente il filtro.
- La pressione minima dell’acqua è almeno di 0,05 MPa?
• L’acqua non viene scaricata.
- Il tubo di scarico presenta delle strozzature? Controllate l’installazione del tubo.
- Il sifone è otturato? Controllate il sifone.
• Le stoviglie non diventano pulite.
- Il programma selezionato è adatto al tipo e al grado di sporco delle stoviglie?
- Le stoviglie sono sistemate in modo tale che il getto dell’acqua possa r aggiungere la loro superficie
interna ed esterna?
- I cestelli delle stoviglie non devono essere sovraccarichi.
- I bracci rotanti sono bloccati dalle stoviglie o da alcune posate?
- Tutti i filtri sul fondo del vano lavaggio sono puliti? I filtri sono messi al loro posto correttamente?
- La dose di detersivo introdotta è quella corretta?
- Il tubo discarico dell’acqua è installato correttamente?
- C’è ancora sale speciale nel serbatoio del sale? Senza il sale speciale l’acqua non viene addolcita.
- L’impianto addolcitore dell’acqua è regolato in base alla durezza dell’acqua localmente erogata?
• Le stoviglie non si asciugano e rimangono opache.
- C’è ancora brillantante nel serbatoio?
• I bicchieri e le stoviglie presentano delle striature, striscie, macchie lattiginose oppure una
patina blu lucente.
- Durante il risciacquo viene prelevata una dose eccessiva di brillantante. Diminuire il dosaggio di
brillantante.
• I bicchieri e le stoviglie presentano macchie di gocce d’acqua ormai asciutte.
- Durante il risciacquo viene prelevata una dose insufficiente di br illantante? Aumentare il dosaggio
di brillantante.
Avvertenza!
Dato che la lavasto viglie è stata collaudata e controllata accuratamente in fabbrica, si potranno
trovare per questo delle goccioline di acqua che scompariranno dopo il primo lavaggio.
23456789
23456789
56
23456789
23456789
I
23456789
Page 59

ANTES DE USAR O APARELHO
1
1.1 INSTRUÇÕES DE SEGURANÇA
Utilização segundo as normas
• A máquina de lavar louça deve ser só utilizada para a lavagem de louça doméstica. No momento
em que a máquina fosse utilizada para outros fins ou em modo errado, a empresa produtora não
assume alguma responsabilidade por eventuais danos.
• Por motivos de segurança não são admitidas transformações ou modificações à máquina de lavar
louça.
• Antes da ligação do aparelho à rede eléctrica dev e assegurar-se que os dados da tensão e corrente
indicadas na placa dos dados correspondam aos existentes no lugar de instalação.
• A instalação deve ser realizada por pessoal qualificado.
Operações preliminares ao primeiro funcionamento
• Controlar a máquina de lavar louça de eventuais danos causados pelo transporte. Em caso algum
ligar um aparelho danificado. Em caso de danos dirigir-se ao próprio fornecedor.
Para a segurança das crianças
• Não permitir às crianças de brincar com a máquina.
• Os detergentes podem causar danos irreparáveis aos olhos, à boca e à garganta.
Portanto conservar os detergentes fora do alcance das crianças.
• A água na máquina de lavar louça não é potáv el. Em caso que e xistam ainda resíduos de detergente na máquina persiste uma situação de perigo para as crianças, que devem ser afastados da
máquina de lavar louça enquanto aberta.
Para o funcionamento quotidiano
• Não colocar a máquina de lavar louça em funcionamento se o cabo da corrente, os tubos de entrada e saída da água estão danificados ou se o quadro dos comandos , o plano de trabalho ou o roda
pé estão muito deteriorados.
• Em caso de avaria, primeiro f echar a torneira da água, apagar a máquina e retirar a ficha da tomada. Na ligação fixa desinserir o eventual interruptor de serviço ou extrair o fusível (ou fusíveis).
• Para retirar a ficha da tomada segurar a tomada pelo corpo e nunca pelo cabo.
• As reparações da máquina de lav ar louça dev em ser realizadas por pessoal especializado . Reparações não apropriadas podem colocar em grav e perigo o utente. Em caso de reparação dev e dirigirse ao nosso serviço técnico de assistência ao cliente ou ao revendedor especializado.
• A substituição do cabo de alimentação deve ser efectuada só da pessoal de assistência técnica.
• Em caso de deterioração dos tubos, para a ligação do aparelho, estes devem ser substituídos com
tubos originais.
(Não introduzir na máquina de lavar louça substancias solventes que podem causar uma explosão.)
• Não sentar-se nem apoiar-se sobre a porta aberta: a máquina poderia voltar-se.
• Antes de introduzir o sal especial, o detergente e o abrilhantador, assegurar-se que o produtor
destas substâncias recomendam a sua utilização para as máquinas de lavar louça de uso doméstico.
• Fechar sempre a torneira da água se a máquina de la var louça não é utilizada dur ante muito tempo ,
por exemplo dur ante as férias .
57
P
Page 60

1234567890
1
0
1
0
1
0
1
0
1
0
1234567890
DESEMBALAGEM - ESMALTIMENTO
2
2.1 DESEMBALAGEM
Retirar a embalagem externa de plástico, os ângulos de reforço e as bases em esferovite.
Abrir a porta e retirar os blocos de esferovite dos cestos.
A recuperação e a reciclagem do material de embalagem contribui à poupança das matér ias primas
e à diminuição do volumes dos resíduos.
Entregar a embalagem à descarga para a recuperação dos materiais recicláveis.
Quando um dia o aparelho dev erá ser colocado definitiv amente f ora de utilização , torná-lo inutilizáv el
antes da sua eliminação.
AVISO! Alguns materiais de embala gem (por ex. sacos de plástica, esfer ovite)
podem representar uma fonte de perigo para as crianças, ocorre portanto
afastar estes materiais.
2.2 ESMALTIMENTO DA MAQUINA A ROTAMAR
No fim da vida funcional da máquina esta dev e ser rotamada por empresas especializadas no respeito
pelas normas vigentes.
Neste modo, com a eliminação de uma v elha máquina é possível ef ectuar uma recuperação dif erenciada
dos materiais sintéticos destinados à reciclagem, em pleno respeito pelo ambiente.
AVISOS GERAIS
3
3.1 LAVAR DE MODO ECONÓMICO E ECOLÓGICO
• Não lavar primeiro a louça em água corrente.
• Utilizar a máquina de lavar louça sempre em plena carga, pois só assim é possível realizar uma
lavagem económica e no respeito pelo ambiente.
• Seleccionar sempre um programa de la vagem correspondente ao tipo de louça e ao g rau de sujida-
de.
• Evitar absolutamente a sobredosagem de detergente, sal especial e abr ilhantador. Dar atenção às
doses recomendadas nas instruções para o uso e nas indicações da casa produtora de tais substâncias.
• Verificar que o sistema descalcificador da água esteja regulado de forma correcta.
3.2 LOUÇA NÃO ADAPTA
Não são adaptos à lavagem na máquina de lavar louça:
- tábuas ou pequenos tabuleiros em madeira
- objectos em material plástica não resistentes ao calor
- cristalo com chumbo
- objectos em estanho ou em cobre
- louça ou talheres com partes coladas
- talheres velhos ou cujo colante seja sensível ao calor
- objectos em aço que se oxidam facilmente
- talheres com cabos em madeira, marfim, porcelana ou madrepérola.
No momento da compra da máquina de lavar louça, assegurar-se que a
louça, copos e talheres são aptos à lavagem na máquina de lavar louça.
58
23456789
23456789
23456789
23456789
P
23456789
Page 61

DESCRIÇÃO DO APARELHO
4
4.1 VISTA GERAL
1) Reservatório para o sal
2) Reservatório para o abrilhantador
3) Recipiente para o detergente
4) Placa de dados
5) Filtros
6) Braço giratório inferior
7) Braço giratório inferior
8) Cabo de alimentação eléctrica
9) Tubo de alimentação da água
10)Tubo de descarga
11)Cesto inferior
12)Cesto superior
13)Contentor talheres
14)Gancho do fecho da porta
12
11
4
14
1
8
9
10
7
6
5
1
13
3 2
4.2 DADOS TÉCNICOS
Capacidade ( segundo coberturas standard ) : 12
Pressão na instalação hidráulica
pressão mínima: 0,05 MPa
pressão máxima: 1 MPa
0,05 - 1MPa Model. ......................
....A
MAX .......W
........V.....Hz
Made in EU
...................
ATENÇÃO: as características
eléctricas são indicadas na Placa
de dados.
12
P
LA2505-020
59
Page 62

1234567890
1
0
1
0
1
0
1
0
1
0
1234567890
INSTALAÇÃO
5
5.1 NIVELAMENTO
2
M
2.1
P
LA2505-030
Uma vez posicionada a máquina no lugar de instalação agir sobre os pé P aparafusando-os e
desaparafusando-os a fim de regular, se necessário, a altura da máquina e nivelá-la.
Um bom nivelamento assegurará o correcto
funcionamento da máquina de lavar louça.
Erro max=2 graus
Depois que a máquina foi nivelada, regular para além disso o gancho de fecho da porta de modo a
que esta se feche perfeitamente.
Depois que a máquina foi niv elada, ajustar o gancho de fêcho da porta de maneir a que a porta feche
perfeitamente.
5.2 LIGAÇÃO HIDRÁULICA
O tubo de entrada da água C, em dotação torna possível a
ligação a uma torneira com juntura 3/4".
Durante a montagem devem ser respeitadas as seguintes
instruções:
• atarraxar o tubo C à torneira da água fria A pondo no meio
o filtro B em dotação.
• se a ligação é efectuada em tubação no va que não é usa-
da há muito tempo, é aconselhável fazer escorrer a água
antes de ligar o tubo da entrada da água de modo a eliminar depósitos de ferrugem e de sujidade;
• assegurar-se que a pressão na instalação hidráulica seja
dentro dos valores limites indicados nos dados técnicos.
A máquina de lavar louça pode ser ligada à conduta da água
fria mas não à da água quente.
23456789
23456789
60
23456789
23456789
P
23456789
3
A
B
C
LA2505-040
Page 63

5.3 LIGAÇÃO PARA A DESCARGA LIXÍVIA
O tubo de descarga T em dotação é enganchado com a parte extrema recurva ao bordo de um
lavatório ou de uma conduta de descarga.
É oportuno predispor um sifão anti-cheiro.
Durante a montagem é necessário observar as seguintes precauções:
- O tubo de descarga não deve ser dobrado para não causar estrangulamentos;
- A extremidade do tubo em relação ao plano de apoio da máquina de lavar louça (fig. 4) deve ser
colocado a uma altura compreendida entre 32 cm e 80 cm.
- Em nenhum caso a extremidade do tubo deve ser imersa na água.
- Um eventual prolongamento do tubo de descarga não de v e superar o comprimento de um metro e
deve ter o mesmo diâmetro interno e par a além disso a altur a máxima nela qual pode ser colocada a extremidade livre deve ser reduzida de 80 cm a 50 cm;
- Em caso de uma conduta de descarga, o diâmetro interno não deve ser inferior a 4 cm.
4
LA2501-050
5.4 LIGAÇÃO ELÉCTRICA
A ligação eléctrica da máquina deve ser efectuada só através de uma tomada com
ligação à terra instalada segundo as instruções. A ligação deve corresponder às
normas legais em vigor e às normas suplementares da empresa eléctrica competente .
A indicação da tensão deve corresponder à tensão da rede do lugar de instalação.
Para o dimensionamento da tomada da corrente recorrer à placa de dados.
T
T
max 80 cm
min 32 cm
61
P
Page 64

1234567890
1
0
1
0
1
0
1
0
1
0
1234567890
USO
6
6.1 OPERAÇÕES PRELIMINARES
Antes de colocar a máquina em função assegurar-se que a ficha do cabo de alimentação esteja
ligada à tomada da corrente, que o tubo de entrada da água esteja ligado à torneira, que a torneira
esteja aberta e que o tubo de descarga esteja ligado segundo as instruções.
Abertura da porta
Puxar a manilha: a porta abre-se f acilmente. Se tal operação é f eita enquanto a máquina é em função ,
um dispositivo de segurança apaga a máquina de lavar louça.
Introdução de sal especial
• Abrir a porta, extrair o cesto inferior.
• Desapertar a tampa do reservatório do sal rodando-o
em sentido anti-horário.
Só para o primeiro funcionamento: introduzir cerca
de 1/2 litro de água no reservatório do sal.
• Encher com o sal especial através do funil L no recipi-
ente próprio (cerca 1,0 - 1,5 kg).
• Limpar a abertura do reservatório de eventuais resí-
duos de sal.
• Atarraxar a tampa do reservatório rodando-o em sen-
tido horário.
• Se logo após a introdução do sal a louça não é lava-
da, acender o programa de amolecimento de modo a
que a água e os grãos de sal saiam do reservatório e
sejam enxaguados e eliminados.
Por motiv os de segurança recomendamos de encher
o recipiente do sal após cada 7 ciclos de lavagem,
sempre no início do ciclo.
Utilizar só sal especial para máquinas de lavar louça; outros tipos de sal (por
ex. sal de cozinha) contêm frequentemente substâncias que não se dissolvem
com a água e podem furar o descalcificador inutilizando-o.
Regulação do sistema descalcificador da água
Para a lavagem é aconselhável água doce (pobre em
calcário), para evitar que se f ormem depósitos na louça e na
própria máquina de lavar louça. Por este motivo a máquina
de lavar louça dispõe de um descalcificador de água (fig.6)
que é regenerado automaticamente, em intervalos regulares
graças à solução salina. O consumo de sal para a regeneração dependem portanto da dureza da água localmente
fornecida.
Para conhecer o grau de dureza da água deve dirigir-se à
sua Câmara ou utilizar um kit comercial de análise da água.
Para uma regeneração optimal do descalcificador
énecessário que o dispositivo D esteja regulado com base à
dureza da água fornecida localmente (ver tabela) e que o
reservatório do sal esteja sempre cheio de sal especial.
23456789
23456789
62
23456789
23456789
P
23456789
LA2505-060
Posição
do
regulador
1
2
3
4
D
franceses
>15 <25
>25 <40
>60 <90
L
1
Graus
°fH
<15
>=maior/<=menor
5
6
LA2505-070
Graus
alemães
°dH
<8,4
>8,4 <14
>14 <22,4
>33,6 <50,4
Page 65

LA2505-080
7
Assinalação de controlo para a intr odução de
sal (se previsto)
A marcação verde debaixo da tampa, indica que
há ainda sal especial suficiente no reservatório.
Se a marcação verde já não é visível, então é
necessário introduzir mais sal especial.
Introdução do abrilhantador
O abrilhantador que é adicionado automaticamente durante a última fase de la vagem, gar ante uma
secagem veloz da louça e evita a formação de
manchas e sedimentos de calcário na louça.
Utilizar só abrilhantador específicos para máquinas de lavar louça,
outrosprodutos não produzem o efeito desejado
O reservatório do abrilhantador S encontra-se do
lado interno da porta.
• Rodar a tampa T do reservatório de 1/4 de volta
em sentido horário para o extrair.
• Introduzir o abrilhantador até à linha traçada.
Quantidade máxima cerca 140 ml.
• Recolocar a tampa.
• Limpar o abrilhantador que eventualmente tenha saído fora.
com um pano, senão durante a passagem por
água formar-se-á demasiada espuma.
8
T
S
LA2505-092
9
F
Assinalação de controlo para a introdução de
abrillantante
O abrilhantador deve ser inserido se o indicador
no reservatório F, é de cor clara(
Quando o reservatório está cheio, o indicador é
de cor escura.
).
LA2505-096
63
P
Page 66

1234567890
1
0
1
0
1
0
1
0
1
0
1234567890
Regulação da dosagem de abrilhantador
1
2
3
4
1
2
3
4
A regulação R da dosagem encontra-se na abertura para encher o recipiente de abrilhatante.
É accionável com uma chav e de parafusos de 1 a
4, números que correspondem à junção de
abrilhantador de 1 a 4 ml. Na fábrica é estabelecido o número 2 (2 ml).
O recipiente do abrilhantador completamente cheia
é suficiente para cerca 50 programas de la vagem.
É necessário efectuar uma mudança na quantidade da dosagem se o êxito da dosagem não é aquele desejado.
• Limpar sempre o abrilhantador que tenha saído
eventualmente fora com um pano.
É importante controlar periodicamente o nível
do abrilhantador, possivelmente em cada 31
ciclos de lavagem.
Introdução do detergente
IMPORTANTE! Não utilizar na máquina de lavar louça detergente para lav ar os pratos à mão! Estes produzem muita espuma, mas na máquina de la var louça não lavam a louça e podem mesmo comprometer
o seu funcionamento.
Portanto, utilizar somente detergentes específicos
para máquinas de lavar louça de uso doméstico.
Conservar as confecções dos detergentes bem fechadas e em lugar bem seco.
Só com o programa de amolecimento, o detergente
não é necessário. Durante o programa o detergente
é retirado do recipiente automaticamente.
A quantidade de detergente aconselhada é de 25 gr .
10
R
LA2505-094
11
P
LA2505-090
A eficácia dos diferentes detergente pode ser diferente. Prestar atenção às doses aconselhadas pelas respectivas casas produtoras.
O recipiente para o detergente encontra-se do lado
interno da porta.
No caso em que a tampa esteja fechada:
• Carregar na alavanca de fecho P. A tampa abre-
se de impulso.
• Introduzir o detergente no recipiente V.
• Para f echar a tampa, carregá-la até que não pro-
voque o fecho.
Quando a louça é excepcionalmente suja é possível colocar detergente a mais na ca vidade da tampa; encher a cavidade até à beira, este detergente
é já activo na fase de amolecimento.
64
23456789
23456789
23456789
23456789
23456789
P
V
12
LA2505-100
Page 67

Come carregar e dispor a louça
Os dois cestos permitem carregar os vários tipos
de louça.
• Tirar da louça os restos maiores de comida para
evitar o risco de um entupimento do filtro e a
saída de maus cheiros.
• Se as panelas estão particularmente incrustadas com restos de comida (frito ou assado)
emergê-las em água antes de as introduzir na
máquina de lavar louça.
Uso do cesto inferior
O cesto inferior é predisposto para receber a louça dificilmente lavável e o cesto par a os Talheres.
No cesto inferior vão postos os pratos r asos , fundos, panelas, terrinas, tampas e pratos de servir.
Os pratos rasos e fundos devem ser dispostos
tendo em consideração que entre cada prato de ve
permanecer um espaço intermédio.
13
LA2505-110
A sua posição deve ser sempre ver tical de modo
que a água possa passar livremente.
Panelas e frigideiras devem ser sempre colocadas giradas. São possíveis todas as combinações
de carregamento, mas é preciso ter em consideração que a louça, as panelas e as frigideiras sejam colocadas de tal modo que todas as superfícies sujas estejam expostas ao jacto de de água
e que a água possa fluir livremente.
14
Talheres
Para obter os melhores resultados na la vagem, os talheres de vem ser dispostos com os cabos vir ados
para baixo. Colheres, garfos e facas devem ser dispostos nos espaços próprios da grelha contentor
dos talheres.
LA2505-112
ATENÇÃO:
T alheres particularmente compridos e, no caso específico “facas longas”, não dev em ser colocados
com as pontas viradas para cima; devem ser sistematizados em posição horizontal, no cesto
superior ou lavados à mão.
P
65
Page 68

1234567890
1
0
1
0
1
0
1
0
1
0
1234567890
O uso do cesto superior
O cesto superior completamente extraível recebe a louça pequena e média como copos,
pires, taças de chá e de café, saladeiras baixas, panelas e frigideiras baixas não muito sujas. Os pires de doce de v em ser dispostos sempre verticalmente; copos , taças,panelas e frigideiras, virados. A louça ligeir a dev e ser disposta entre os suportes de modo a não ser atingida pelo jacto de lavagem.
O melhor resultado de lavagem é obtido quando se encontra a disposição mais adapta à louça nos cestos. A par tir desse momento o processo de lavagem pode desen volver toda a sua
eficácia.
Devido à temperatura elevada da água de lavagem e à reacção química do detergente usado, é aconselhável evitar objectos de cobre, louça em alumínio, talheres
com cabos de lenho ou marfim, porcelanas delicadas, louça em vidr o e em plástico não resistente à temperatura.
Em presença de louça de porcelana decorada, é aconselhável efectuar uma pr o va
de lavagem com uma única peça para verificar que a decoração não seja modificada ou danificada.
15
LA2505-120
Regulação da altura do cesto superior.
Agindo sobre a manilha lateral (só lado esquerdo), é
Possível regular o cesto em altura e inclinação.
1 Regulação posição horizontal
2 Regulação posição inclinada
LA2505-130
23456789
23456789
66
23456789
23456789
P
23456789
1
16
LA2505-132
2
LA2505-134
Page 69

Extracção do cesto superior
- S
O cesto superior pode ser extraído da guia como
é representado na figura.
Descrição dos elementos
decomando e indicações
1) Lâmpada de assinalação
Acende-se quando o aparelho é aceso.
Quando se acende juntar sal (cada 7 ciclos) mesmo juntando sal a luz fica acesa
✰
-ON/OFF
45°-E
SW-SL
durante todo o ciclo.
Quando se acende juntar abrilhantador (cada 31 ciclos), mesmo juntando
abrilhantador a luz permanece acesa durante todo o ciclo.
2) Botões
Acesa/apagada - Carregar no botão para acender o aparelho.
Carregar o botão para fazer a lavagem a 45°.
Carregar o botão para fazer a Super Lavagem (lavagem especial para panelas).
3) Manilha da porta
Para abrir puxar a manilha (quando a porta é aberta uma segurança eléctrica apaga a máquina).
4) Botão selecção de programas
Para escolher o programa de lavagem (ver tabela programas). Para seleccionar o
programa desejado rodar o botão em sentido horário.
17
LA2505-160
4
12 4
3
LA2505-170
12
3
Acender
Depois do controlo da quantidade de sal de regeneração e de abrilhantador, abrir completamente a
torneira da água, dispor a louça nos cestos, deitar o detergente no seu recipiente e o detergente par a
A pré-lavagem (se necessário) e fechar a porta frontal.
Proceder da seguinte maneira:
• rodar o botão selecção de programas 4 em sentido horário (fig. 18) até que o número do programa
desejado coincida com a linha do interruptor.
• Accionar o botão “acesa-apagada”. Ilumina-se a luz de controlo para a indicação de tensão e a
máquina faz automaticamente todas as fases do programa de lavagem pré-inserido . Depois do fim
do ciclo não ocorre secar a louça porque a sua secagem é f eita automaticamente . A louça pode ser
retirada ou ficar na máquina até à próxima refeição.
Não abrir a máquina se iniciou um programa
Apagar
Depois do ciclo de lavagem a máquina de lavar louça para automaticamente ficando acesa luz de
controlo da tensão. P ara a apagar , carregar no botão acesa/apagada. Depois de cada ciclo de la vagem
fechar absolutamente a torneira da água para isolar a máquina de lavar louça do fornecimento de
água.
18
P
LA2505-172
67
Page 70

1234567890
1
0
1
0
1
0
1
0
1
0
1234567890
Tabela dos programas de lavagem (modelo médio)
Programas
Amolecimento
Enérgico
Panelas e
Louça muito
suja
Enérgico
Louça sujidade
normal
Louça muito
suja
Louça delicada
Muito suja
Passagens por
água
Lavagem
Rápida com
Pré-lavagem
Lavagem
Rápida sem
Pré-lavagem
Numero
programa
R
S
S
S
S
1
1
2
A
A
B
B
BOTÕES
Acesa
Apagada
SW - SL
45°- E
DETERGENTE
Lavagem
Pre-lavagem
Super lavagem
Louça
e
tipo de
sujidade
Panelas e louça até ao
Próximo ciclo de lavagem
Panelas e louça muito sujas
(com excepção de partes
delicadas)
Louça muito suja (com excepção de partes delicadas)
Louça muito suja
Louça muito suja
(comExcepção de partes
delicadas)
Panelas e louça
Panelas e louça
Panelas e louça
Panelas e louça
Panelas e louça
Lavagem breve a frio para não f azer agarrar os restos
de comida à louça
1 Pré-lavagem quente - Lavagem principal
2 passagens por água (1 fria - 1 quente) Secagem
1 Pré-lavagem quente - Lavagem
2 passagens por água (1 fria - 1 quente) Secagem
1 Pré-lavagem a frio - Lavagem principal
2 passagens por água (1 fria - 1 quente) Secagem
1 Pré-lavagem a frio - Lavagem principal
2 passagens por água (1 fria - 1 quente) Secagem
Lavagem principal
2 passagens por água (1 fria - 1 quente) Secagem
Lavagem principal
2 passagens por água (1 fria - 1 quente) Secagem
1 passagem por água fria - 1 quente - Secagem
1 Pré-lavagem fria - Lavagem económica
2 passagens por água fria
1 Pré-lavagem fria - Lavagem principal
2 passagens por água fria
Lavagem económica - 2 passagens por água fria
Lavagem principal - 2 passagens por água fria
Descrição dos programas
económica
Tabela dos programas de lavagem (modelo econômico)
DETERGENTE
Lavagem
Pre-lavagem
Panelas e louça até ao Próximo ciclo de lavagem
Louça muito suja (com excepção de partes delicadas)
Louça muito suja
Panelas e louça
Panelas e louça
Panelas e louça
Louça
e
tipo de
sujidade
Amolecimento
Enérgico
Louça sujidade
normal
Louça muito
suja
Passagens por
água
Lavagem
Rápida com
Pré-lavagem
Lavagem
Rápida sem
Pré-lavagem
23456789
23456789
68
23456789
23456789
23456789
Programas
P
Numero
programa
R
1
2
3
A
B
BOTÕES
Acesa
Apagada
Descrição dos programas
Lavagem breve a frio para não fazer agarrar os
restos de comida à louça
1 Pré-lavagem a frio - Lavagem principal a 6_°C
2 passagens por água (1 fria - 1 quente) Secagem
Lavagem principal a 6_°C
2 passagens por água (1 fria - 1 quente) Secagem
1 passagem por água fria - 1 quente - Secagem
1 Pré-lavagem fria - Lavagem principal
2 passagens por água fria
Lavagem principal - 2 passagens por água fria
Page 71

MANUTENÇÃO
7
7.1 LIMPEZA DOS REGADORES
Os regadores são facilmente e xtraíveis par a consentir a limpeza periódica dos orifícios e para pre venir
possíveis obstruções.
Lavá-los cuidadosamente debaixo da água corrente e remontá-los nas suas bases.
19
LA2505-210
Para desmontar o regador superior:
desatarraxar o suporte do regador em sentido antihorário.
Para desmontar o regador inferior:
Puxar o regador para cima e desenfiá-lo.
20
7.2 LIMPEZA DOS FILTROS
Depois de cada lavagem é oportuno inspeccionar o g rupo filtrante e limpá-lo de eventuais depósitos
procedendo do seguinte modo:
• Extrair o filtro central 1.
• Desenfiar o filtro externo a poço 2.
• Remover a grelha móvel 3.
T odos os componentes de v em ser limpos com água corrente. É indispensáv el limpar com atenção os
filtros já que a máquina de lava louça não poderá funcionar com os filtros obstruídos.
Recomendamos de colocar no lugar os filtros para evitar danos à bomba de lavagem.
21
22
23
LA2505-220
1
2
LA2505-180
LA2505-190
7.3 LIMPEZA DO FILTRO DA ENTRADA DA ÁGUA
Limpar periodicamente o filtro B colocado entre a torneira e o
tubo da entrada da água.
• Fechar a torneira da água A.
• Desatarraxar a juntura C, e xtrair o filtro B e limpá-lo cuidadosamente debaixo de água corrente.
• Recolocar o filtro no lugar e atarraxar o tubo de entrada da
água verificando que não existam perdas.
3
LA2505-200
A
B
C
LA2505-040
69
P
Page 72

1234567890
1
0
1
0
1
0
1
0
1
0
1234567890
7.4 LIMPEZA DAS SUPERFÍCIES EXTERNAS À MÁQUINA
As superfícies da máquina de metal e de plástica da parte frontal, dev em ser limpas periodicamente
com um pano macio e húmido. Não usar nunca ácidos ou detergentes abrasivos.
Fora servico prolongado
Se a máquina de lavar louça não é usada por um longo período, deve-se proceder como abaixo
indicado:
• Girar dois programas de amolecimento.
• Desligar a tomada da rede eléctrica.
• Desligar o tubo de alimentação da água.
• Deixar ligeiramente a porta frontal aberta para evitar a formação de mau cheiro.
RECONHECIMENTO DE AVARIAS
8
Primeiro controlar se é possível eliminar pessoalmente e ventuais pequenos def eitos do aparelho com
o auxilio das seguintes instruções. Se estas informações não servirem de ajuda para resolver o problema, entrar em contacto com o serviço técnico de assistência clientes.
• O programa não parte.
- Os fusíveis da instalação externa são defeituosos? O aparelho está ligado à corrente eléctrica?
- A porta está fechada correctamente? Pressionar a porta para a fechar completamente .
• Não entra água no aparelho.
- A torneira da água está aberta?
- O filtro colocado entre a torneira e o tubo de alimentação da água é roto? Limpar e ventualmente o
filtro.
- O tubo de entrada da água apresenta estrangulamento? Controlar o tubo.
• A indicação do percurso do programa permanece fixa no inicio da lavagem.
- A torneira da água é completamente aberta?
- O filtro colocado entre a torneira e o tubo de alimentação da água é roto? Limpar e ventualmente o
filtro.
- A pressão mínima da água é pelo menos de 0, 05 MPa?
• A água não é descarregada.
- O tubo de descarga apresenta estrangulamentos? Controlar a instalação do tubo.
- O sifão é roto? Controlar o sifão.
• A louça não se apresenta limpa.
- O programa seleccionado é adapto ao tipo e ao grau de sujidade da louça?
- A louça é colocada de tal modo que o jacto da água pode atingir a sua superfície interna e e xterna?
- Os cestos da máquina de lavar louça não devem ser sobrecarregados.
- Os braços rotativos estão bloqueados pela louça ou por alguns talheres?
- T odos os filtros do fundo da máquina estão limpos? Os filtros estão colocados devidamente no seu
lugar?
- A dose de detergente introduzida é correcta?
- O tubo de descarga da água é instalado correctamente?
- Há ainda sal especial no reservatório do sal? Sem sal especial a água não vem descalcarizada.
- O sistema descalcificador da água está regulado com base à dureza da água fornecida localmen-
te?
• A louça não seca e permanece opaca.
- Há ainda abrilhantador no reservatório?
• Os copos e a louça apresentam riscos, fachas e manchas lentiginosas ou uma patina azul
brilhante.
- Durante a passagem por água é retirada uma dose excessiva de abrilhantador. Reduzir a dose de
abrilhantador.
• Os copos e a louça apresentam manchas de água já secas.
- Durante a passagem por água é retirada uma dose insuficiente de abrilhantador? A umentar a dose
de abrilhantador.
Aviso!
Dado que a máquina de lavar louça f oi experimentada e controlada cuidadosamente na fábrica,
poder-se-ão encontrar por isto gotas de água que desaparecerão depois da primeira lavagem
23456789
23456789
70
23456789
23456789
P
23456789
.
 Loading...