

Page 1
Instruction manual
Ver1.0
Technical specifications and appearance are subject to change without notice
Page 2

Contents
About This Document
Safety Instruction
1. Overview
2 . Installation
Before installation
Installation
3 . Get Started
Start X10D
Standby mode
Wake Up
4 . Operating X10D
Home screen overview
Main toolbar
Main toolbar overview
Browser
File viewer
Shortcut
Application list
Google Play
Setting
Floating toolbar
Bottom toolbar
5. System Setting
6. Specications
7. More information
01
01
04
05
05
05
06
06
06
06
07
07
07
07
08
08
10
11
11
11
12
12
14
16
17
Page 3
Welcome to the world of Newline.
Thank you for choosing Newline Android box X10D. Please use this document to get the most out
of the product.
This device complies with part 15 of the FCC Rules. Operation is subject to the following two
conditions: (1) This device may not cause harmful interference, and (2) this device must accept any
interference received, including interference that may cause undesired operation.
NOTE 1: This equipment has been tested and found to comply with the limits for a Class B digital
device, pursuant to part 15 of the FCC Rules. These limits are designed to provide reasonable
protection against harmful interference in a residential installation. This equipment generates,
uses, and can radiate radio frequency energy and, if not installed and used in accordance with
the instructions, may cause harmful interference to radio communications. However, there is no
guarantee that interference will not occur in a particular installation. If this equipment does cause
harmful interference to radio or television reception, which can be determined by turning the
equipment off and on, the user is encouraged to try to correct the interference by one or more of the
following measures:
● Reorient or relocate the receiving antenna.
● Increase the separation between the equipment and receiver.
Connect the equipment into an outlet on a circuit different from that to which the receiver is connected.
●
● Consult the dealer or an experienced radio/TV technician for help.
NOTE 2: Any changes or modifications to this unit not expressly approved by the party responsible
for compliance could void the user’s authority to operate the equipment.
FCC Radiation Exposure Statement
The device has been evaluated to meet general Radiation exposure requirement. The antennas
used for this transmitter must be installed to provide a separation distance of at least 20 cm from all
persons and must not be co-located for operating in conjunction with any other antenna or
transmitter. Shielded cables must be used with this unit to ensure compliance with the Class B FCC
limits.
The symbol of the crossed out wheeled bin indicates this product should not
be placed in municipal waste. Instead, dispose of waste equipment by taking
it to a designated collection point for electrical and electronic equipment
recycling.
Extreme Test Temperature:-10 °C to +60 °C
Page 4
About This Document
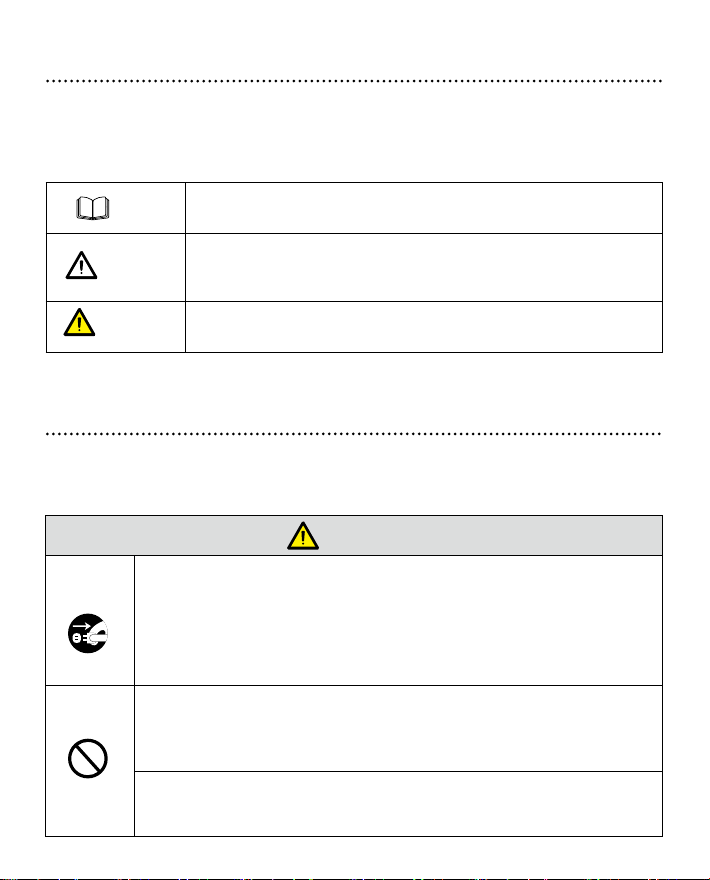
This document describes multiple functions, instructions, and notes about the product. Symbols are
used in this document to indicate operations that need particular attention. The symbols are defined
as follows:
NOTE
CAUTION
WARNING
Provides additional information to supplement operation in the main text.
Indicates a potentially hazardous situation that, if not avoided, could
result in equipment damage, data loss, performance deterioration, or
unanticipated results.
ndicates a hazard with risk that, if not avoided, could result in death or injury.
I
Safety Instruction
For your safety, please read the following instruction before you use the product. Serious injury or
property damage may be caused by improper operations. Do not try to repair the product on your own.
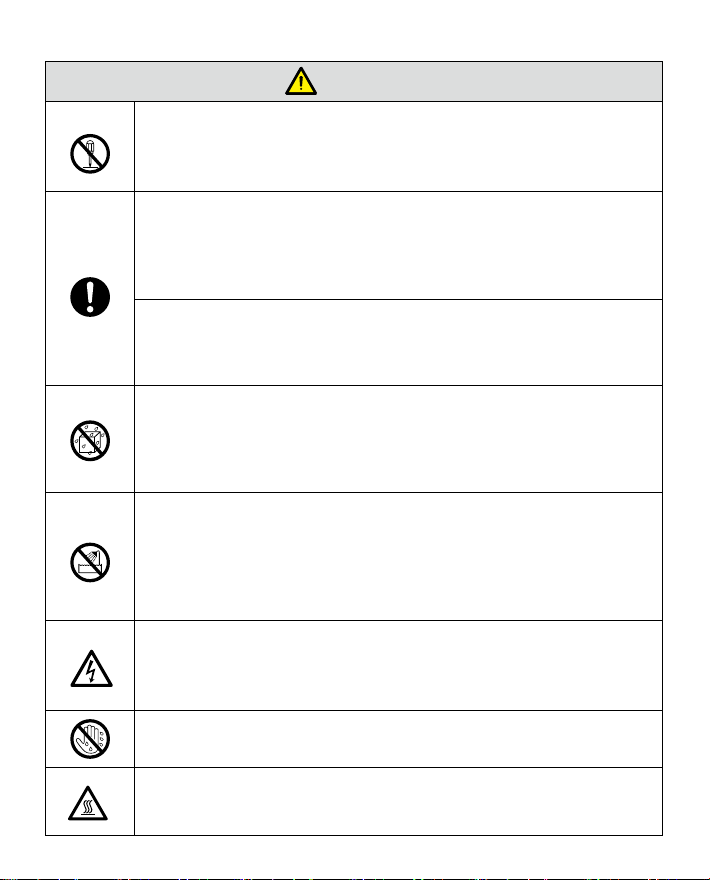
WARNING
Disconnect the product from power supply immediately if major failures occur.
Major failures include the following:
● Smoke, peculiar smell or abnormal sound is discharged from the product.
● No image or sound is displayed, or the image error occurs.
In the preceding scenarios, do not continue to use the product. Disconnect power
supply immediately and contact professional staff for troubleshooting.
Do not drop liquid, metal or anything combustible into the product.
● If any liquid or metal is dropped into the product, power off the product and
disconnect power supply, then contact professional staff for solutions.
● Pay attention to children when they are close to the product.
Put the product on a stable surface.
An unstable surface includes and does not limited to an inclined plane, a shaky
stand, desk or platform, which might cause turnover and damage.
1
Page 5
WARNING
Do not open the cover or change the product on your own.
High voltage components are installed in the product. When you open the cover, high
voltage, electric shock, or other dangerous situations may occur.
If inspection, adjustment, or maintenance is required, contact the local distributor for help.
Use the specied power supply.
To prevent the product from being damaged, do not use any cables or AC adapters
●
other than the one provided with the product.
●
Pull out the power plug or AC adapter from the socket if the product is not used for a
long period.
Clean the dust and metal on the power plug regularly.
● Fire or electric shock may be caused if the product is powered on, when you are
cleaning.
● Pull out the power plug or AC adapter before cleaning it with a dried cloth.
Do not put items on the top of the product.
● Do not put items, such as a container for liquid (a vase, flowerpot, cosmetics or
liquid medicine) on the top of the product.
● If any water or liquid is spilled on the product, a short circuit may occur and
cause fire or electric shock.
Do not install the product in an improper place.
● Do not install the product in humid places, such as the bathroom, the shower
room, near windows, or outdoor environments that experience rain, snow or other
harsh weather. Avoid installation near hot spring vapor. The preceding environments
cause faults in the product or electric shock under extreme conditions.
● Do not put exposed fire source, such as an ignited candle, on the product
Pull out the power plug during thunderstorms.
● Do not touch the product during a lighting storm to avoid electric shock.
● Install or place components that supply high enough voltage to cause personal
injury out of the reach of children.
may
Do not touch the power cable or AC adater with wet hands.
Do not install the product in high temperature environments.
● Do not install the product near a heat source, such as a radiator, a heat
reservoir,a stove or other heating products.
2
Page 6
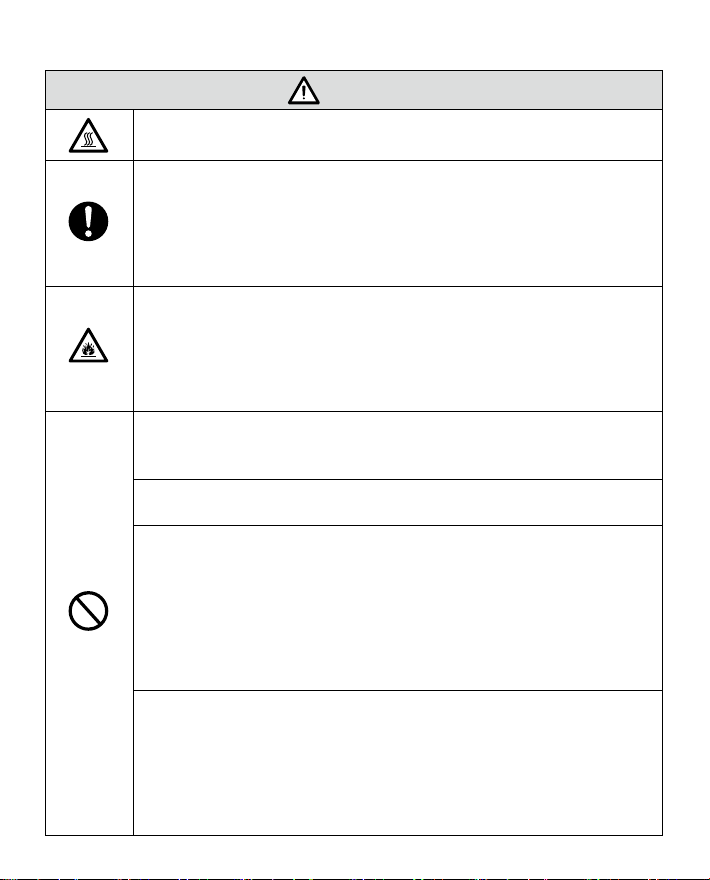
CAUTION
● Do not expose the product to direct sunlight, which may cause high temperatures
and subsequent faults in the product.
For transport.
● Pack the product for transport or maintenance by using the cartons and cushioning
material provided with the product.
Before you move the product, disconnect all external connections and separate all
●
toppling preventing products. Move the product carefully to prevent it from being
hit or squeezed.
Do not cover or block up any vents on the product.
● Any overheated components may cause fire, damage the product, and shorten
the service life.
● Do not lay the product down where the venting surface will be covered.
● Do not install the product on a carpet or cloth.
● Do not use a cloth such as table cloth to cover the product.
Use the battery correctly.
● Risk of explosion if battery is replaced by an incorrect type.
● Dispose of used batteries according to the instructions.
Use the standard conguration HDMI cable.
The device must use the HDMI cable that we provide in the accessory box.
Do not damage the power cable.
● Do not damage, change, twist, bend, or forcibly drag the power cable or AC adapter.
● Do not put weights (such as the product itself) on the power cable or AC adapter
● Do not forcibly drag the cable when you pull out the power plug or AC adapter. If
the power cable or AC adapter is damaged, please contact the local distributor to
repair or replace it.
The power cable or
use it on other products.
Keep away from the product when you use a radio.
The product complies with the international EMI standard to prevent radio
interference. However, interference may still exist and causes noise in the radio. If
noise occurs in the radio, try the following solutions.
● Adjust the direction of the radio antenna to avoid the interference from the
product.
● Keep the radio away from the product.
AC adapter in the accessory box is for this product only. Do not
3
.
Page 7
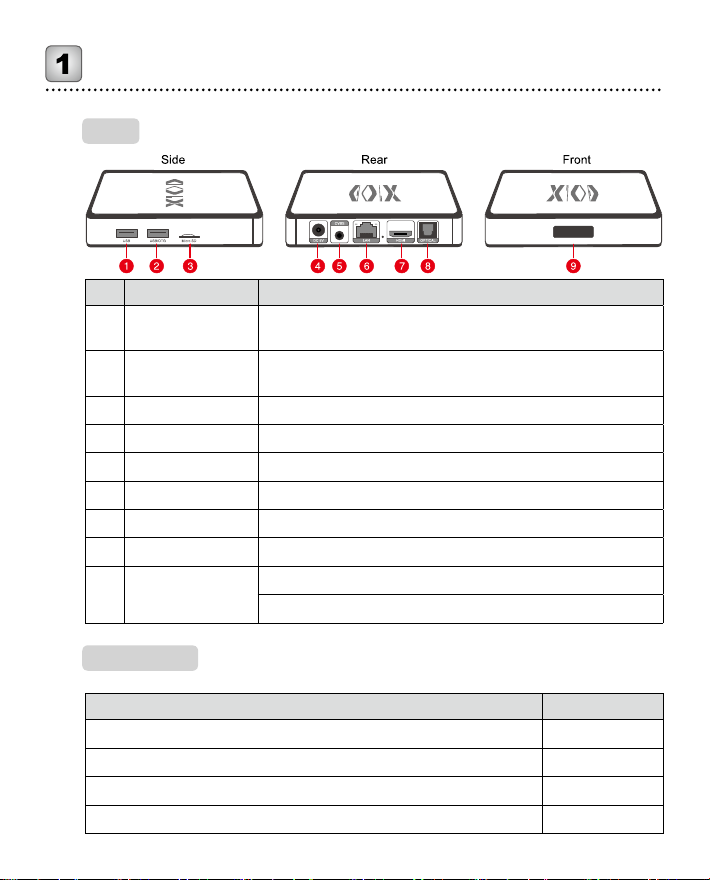
Overview
parts
No. Part Function Description
1 USB
2 USB/OTG
3 Micro SD card slot Support 1 GB/ 2 GB/ 4 GB/ 8 GB/ 16 GB/ 32 GB.
4 DC/5V For connecting AC adapter or power cable.
5 CVBS For connecting external speakers.
6 LAN For connecting local area network.
7 HDMI For connecting IFPD.
8 Optical (SPDIF) For connecting external speakers.
9 Indicator
For connecting USB devices such as mouse, keyboard and
USB flash memor . (FAT32).
For connecting USB devices such as mouse, keyboard and
USB flash memor . (FAT32).
Blue: Working state.
Red: Stand by state.
Accessories
Items Amount
X10D 1
HDMI Cable 1
Power Adapter with all-purpose interface(EU&UK&US&AU). 1
Instruction manual 1
4
Page 8
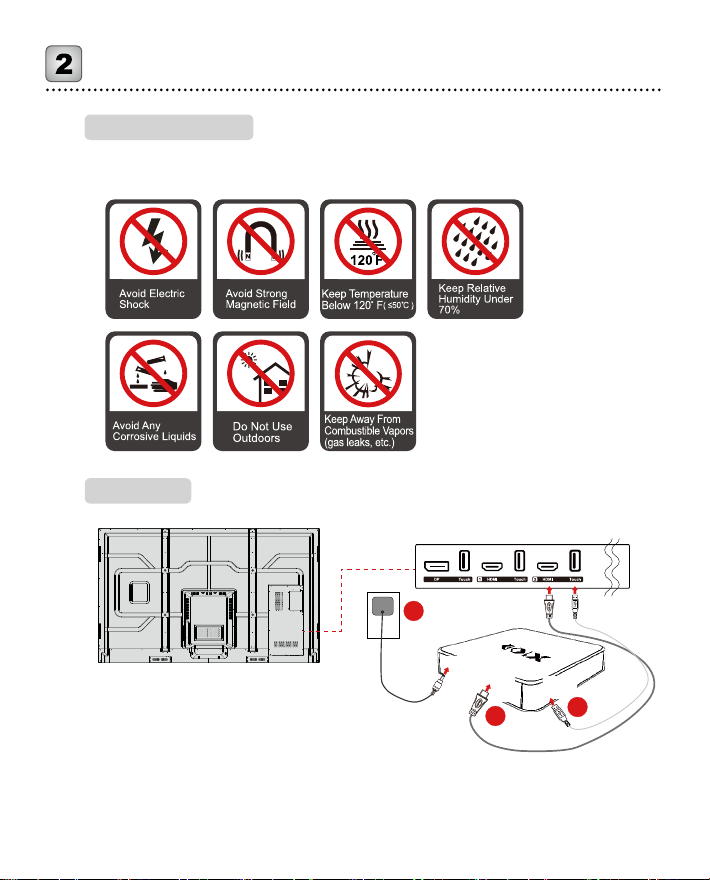
Before installation
Safety precautions
Installation
Installation
3
1
Step 1. Connect X10D to IFPD with a HDMI cable.
Step 2. Connect X10D to IFPD with a USB cable.
Step 3.
Plug the AC adapter to the 110-240 V power outlet fully and plug the connector into
X10D power input port or plug the power code to power output port on Newline IFPD
and the other end to X10D power input port.
5
2
Page 9
Get started
Start X10D
Step 1. Make sure that IFPD and X10D are connected properly.
Step 2. At the signal source selection of the devices such as IFPD, chose the signal source
X10D is connected.
Note
X10D has no power button. It is powered on upon power connection.
Standby mode
Press icon in the bottom toolbar X10D will go into the standby mode. (Please also see the
section “Bottom toolbar”.)
Or use may set the time to standby mode at Power Management in System Setting.
Wake Up
When the Android box is in standby mode, tap the IFPD screen at the signal source X10D is
connected and X10D wakes up.
When mouse is connected, move the mouse and it will wake X10D up.
●
If screen lock is active in X10D, swipe up the screen and enter the key. After entering the
correct key, it goes to the last page before getting in to the standby mode.
Standby state Enter password
For setting screen lock, go to Security in system setting, Users may set the lock method,
lock time, and power button lock.
● If screen lock is off, tap the IFPD screen and X10D directly goes to the last page shown
before going to standby mode.
6
Page 10
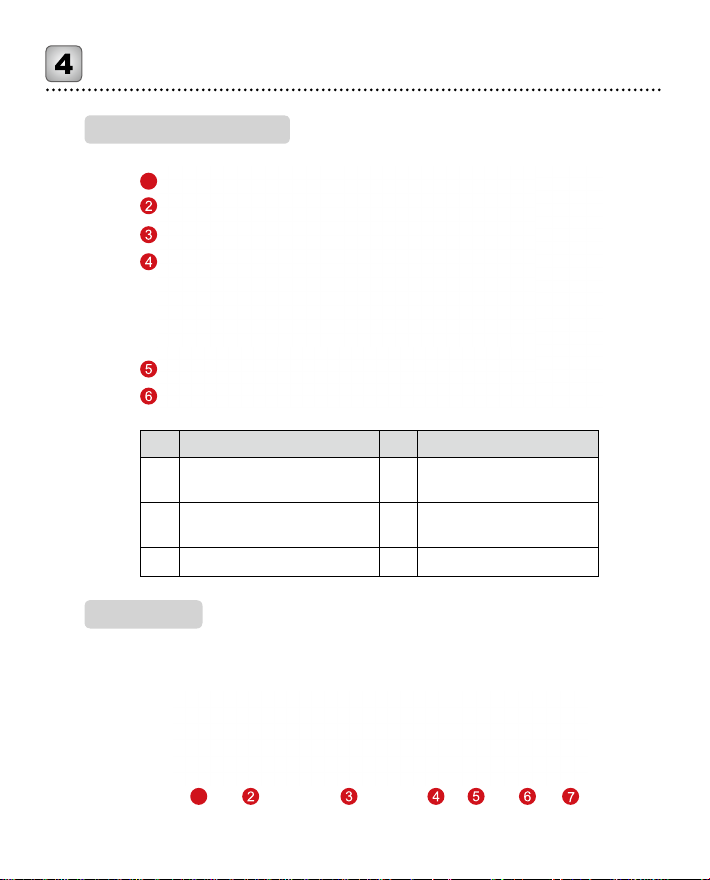
Home screen overview
1
No. Part No. Part
Logo (Shortcut to Logo &
1
Wallpaper Setting)
Date & time (Shortcut to
2
Date&time setting)
3 Indicators 6 Bottom toolbar
Main toolbar
Operating X10D
4 Floating toolbar
5 Main toolbar
◆
Main toolbar overview
1
7
Page 11
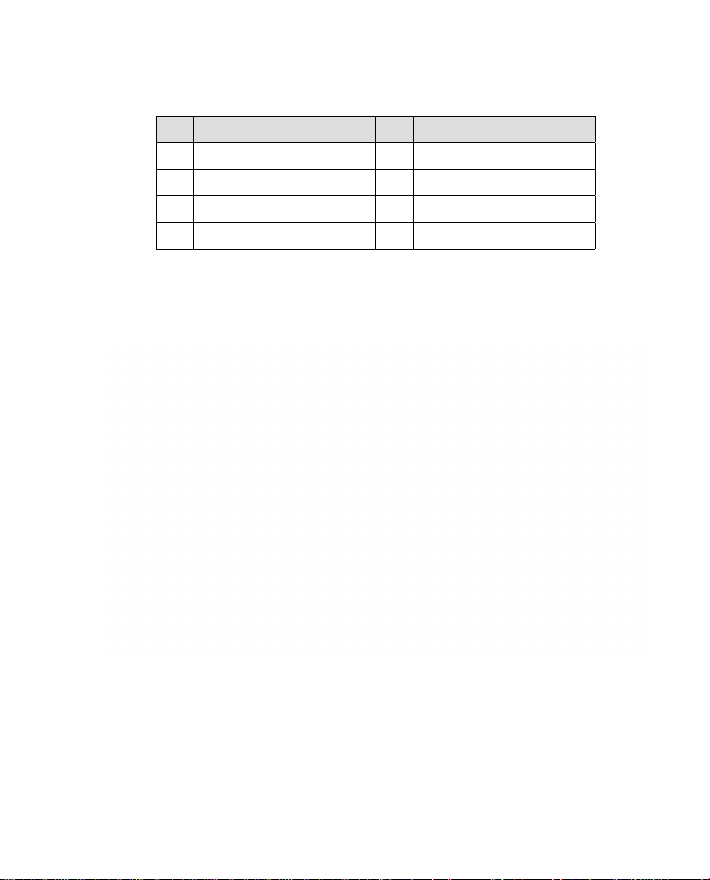
No. Part No. Part
1 Browser 5 Application list
2 File viewer 6 Google Play
3 Shortcut slot 7 Setting
4 Add shortcut
◆
Browser
Click the browser icon to access the browser and surf on the Internet.
◆
File viewer
X10D supports connection to USB flash memory and Micro SD card. Enter the File Viewer
application, you can preview all files in the internal storage nd external storage devices
connected via USB ports and select, copy, paste, delete and search for files
8
Page 12
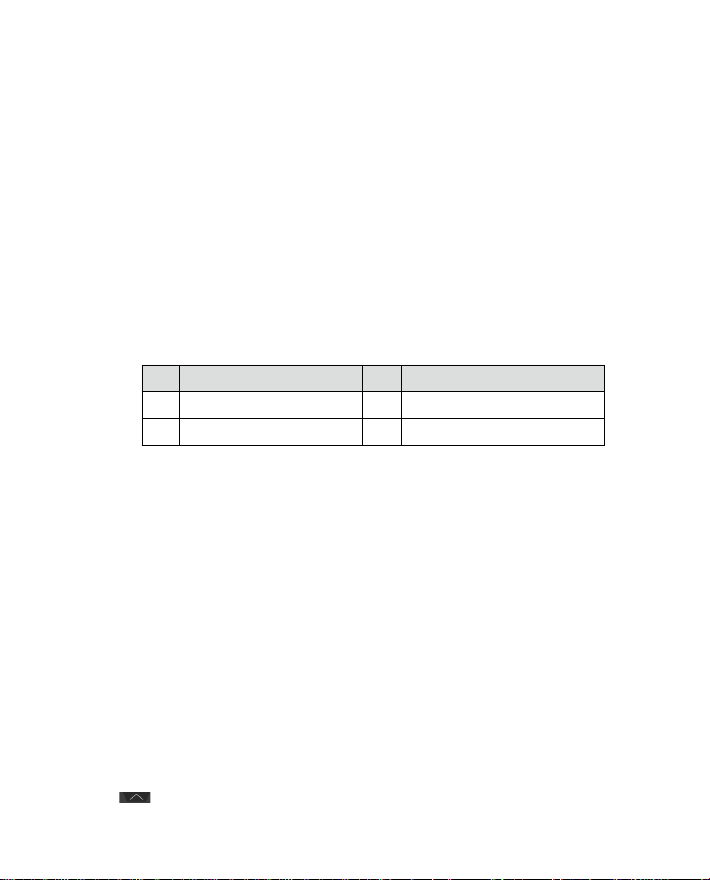
File viewer Page
No. Part No. Part
1 Device list 3 Menu bar
2 Filter bar 4 File list
Device List
Click left side of the screen and the device list will be shown as in the figure belo . The
device list includes internal storage, external storage such as USB flash memory and Micro
SD card, network SMB, and network NFS.
Filter Bar
Click and filter bar will be shown as in the figure be w. You can filter files by type
such as video, music, picture, and application files
9
Page 13

Menu Bar
Click right side of the screen and Menu bar will be shown as in the figure belo . The menu
bar contains basic functions for file operation, including mult -select, copy, paste, delete, cut,
favorite, refresh, rename, new, view, and setting.
◆
Shortcut
Users can add up to 11 shortcuts of their favorite applications to the home page by the
following steps.
Step 1. On the home page, click and open the setting page.
Step 2. Click and add check mark to favorite applications to add shortcuts.
10
Page 14

◆
Application list
Click All Apps icon and the application list will be shown. The application list contains default
apps and the apps users installed.
Click the icon to activate the app or press and hold for other menu including Uninstall, Clear
data, Info, Top and Sort.
●
Uninstall: Uninstall the application.
●
Clear data: Clear historic data of applications.
●
Info: View information related to applications.
●
Top: Place the application icons to the top of the page.
●
Sort:
Users may sort the applications by alphabetical order, installed time or usage frequency.
◆
Google Play
Click icon and access Google Play to download and install favorite apps.
Note
It requires Google account to download apps from Google Play.
◆
Setting
Click Setting and users can access to system setting. For more detail, please also see
System Setting chapter.
11
Page 15
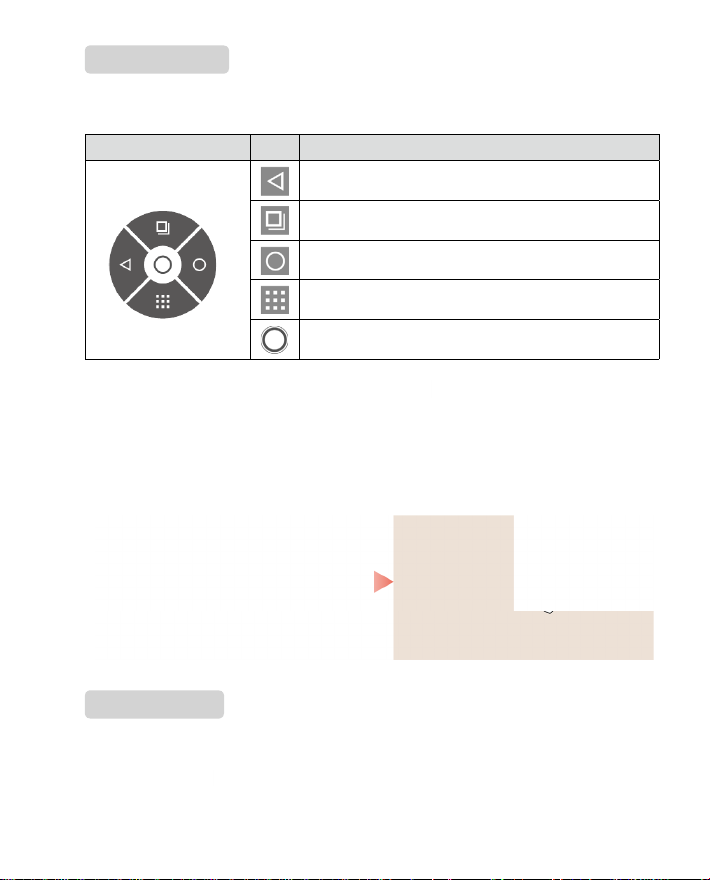
Floating toolbar
Floating toolbar provides various shortcut introduced below.
Floating toolbar Icon Function
Return to previous menu/Exit.
Manage currently running applications.
Return to the main page.
Browse all applications.
Minimize/Maximize the floating toolba .
Enabling and disabling the floating toolbar: Click the ic n on the home page to access
the Application List submenu.
●
If the floating bar is not activated, click to open Floate indows app and and then click Open.
● If users want to disable the floating toolba , click to open Floate windows app and and then
click Close.
Bottom toolbar
Bottom toolbar appears by swiping up from the bottom of the screen, as in the following figure
You may click the icon to hide it or it will be automatically hidden if there is no access for
5 seconds.
12
Page 16
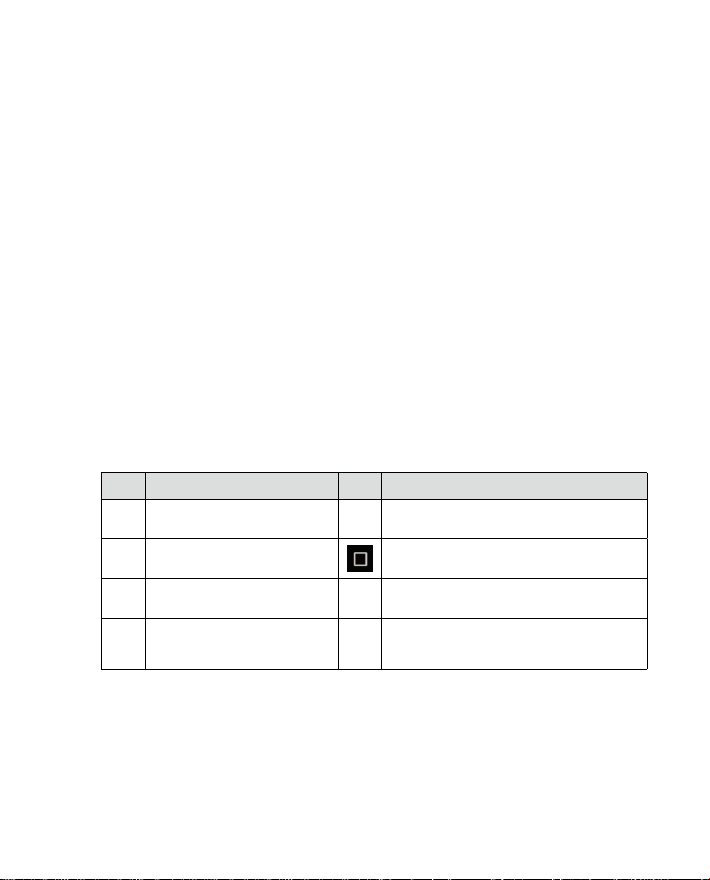
Icon Function Icon Function
Hide the toolbar. Return to the Home screen.
Decrease the sound volume. Manage currently running applications.
Increase the sound volume. Take a screenshot.
Return to the last menu/exit.
Press: Go into the standby mode.
Press and hold: Reboot the Android box.
13
Page 17
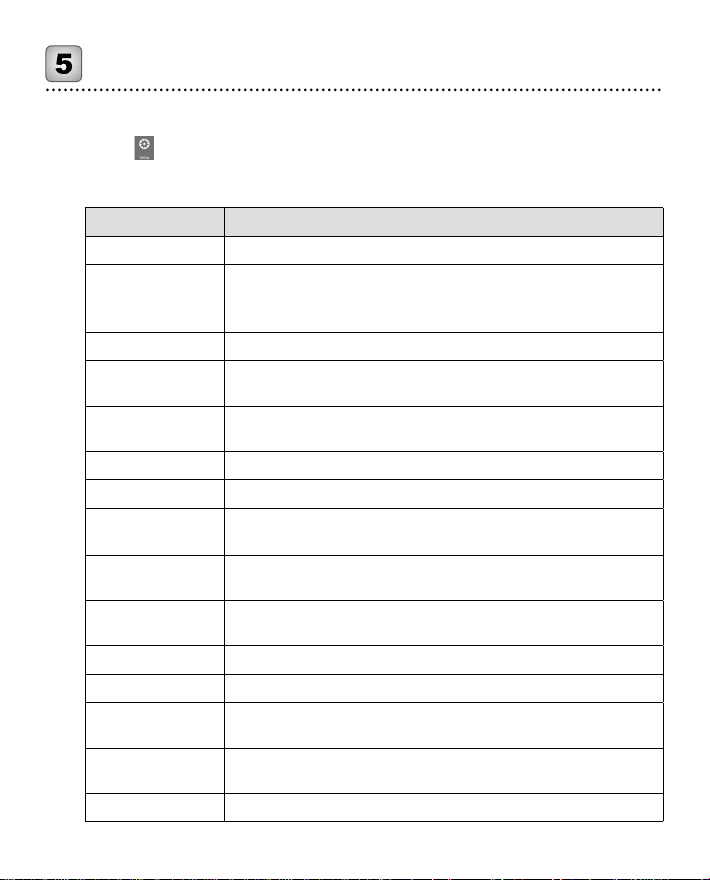
System Setting
Enter the System setting page using one of the following methods:
●
Click on the home screen.
●
Click at All apps.
Item Function
Wi-Fi Enter Wi-Fi submenu, and users can connect to Wi-Fi.
Enter Ethernet submenu, turn on Ethernet setting and X10D can
Ethernet
Display Enter Display submenu to set font size, logo, and wallpaper.
Apps
Memory
HDMI Enter HDMI submenu to set resolutions and zoom in/out screen.
Sound & notificatio Enter Sound & notication submenu to set sound and notification
Storage & USB
Users
Screenshot Setting
Location Enter Location submenu to use Wi-Fi to determine the location.
Accounts Enter Accounts submenu to add accounts such as Google account.
Language & input
Security
Google Enter Google submenu to view Google account information etc.
automatically obtain the LAN IP address or set static IP address
according to requirements.
Enter Apps submenu to view downloaded applications by type, or
disble/uninstall/force stop apps.
Enter Memory submenu to view the total memory of devices, average
memory used, and memory used by different running applications.
Enter Storage & USB submenu to view space allocation of the
internal and external storage.
Enter Users submenu to create new users or profiles. Users can
have their own apps and content.
Enter Screenshot setting submenu to set delay time to capture the
screen and location to save the screenshot.
Enter Language & Input submenu to set language and input
method.
Enter Security submenu to set screen lock method and time, device
administration etc.
14
Page 18
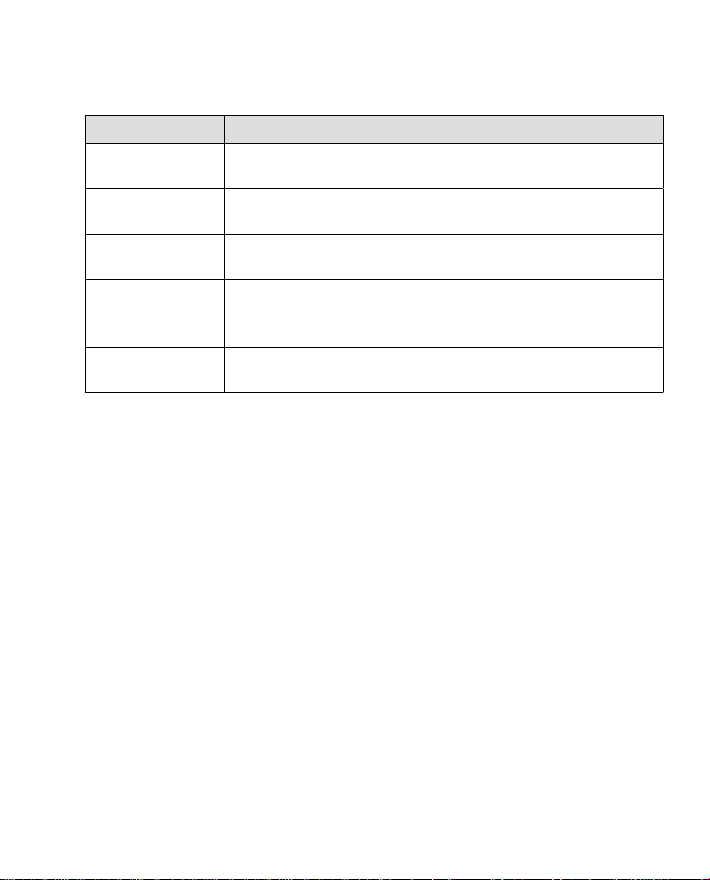
Item Function
Backup & reset
Date & time
Accessible
information
Enter Backup & reset submenu to back up user data and reset a
network to restore to factory setting.
Enter Date & time submenu to set the date and time and time
format.
Enter Accessible information submenu to set up accessibility.
Enter About X10D submenu to view various status including network
About X10D
status, firmware version and system version. Users can also update
the firmware or do factory reset
Power management
Enter Power management submenu to set the time to standby
mode.
15
Page 19
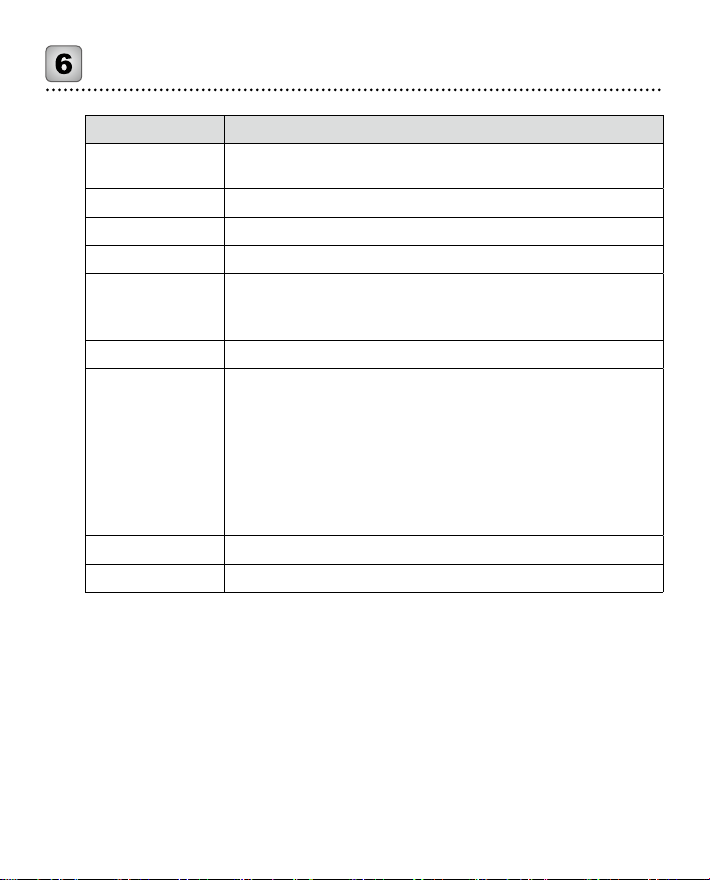
Specications
Model X10D
Processor
Memory 2 GB DDR3.
Internal Storage 16 GB eMMC.
Operating System Android 6.0.1, Built in Google Play Store, Support OTA function.
Network connectivity
Power DC 5 V/ 2 A.
I/ O ports
Weight 300 g.
Dimension 108 mm x 108 mm x 21 mm.
The device is going to be operated in 5150~5250MHz frequency
range. It is restricted indoor environment only.
CPU: Rockchip, RK3368 Octa Core up to 1.5 GHz (Cortex-A53 64 bit)
GPU: SG X 6110; support 4 K x 2 K H.265/ H.264.
IEEE 802.11 a/ b/ g/ n, 802.11 AC, 5 150 MHz to 5 250 MHz,5
●
725 MHz to 5 850 MHz (5.0 GHz
band WIFI.●RJ-45 Ethernet Jack (10/ 100/ 1000 Mbps).
●
HDMI output port: Support 4 K@60 fps/ HD Audio(7.1 CH).
Micro SD card slot x 1: Support 1 GB/ 2 GB/ 4 GB/ 8 GB/ 16 GB/
●
32 GB.
USB 2.0 port x 1.
●
USB 2.0 OTG port x 1.
●
CVBS port x 1.
●
S/SPDIF x 1: 2 CH, 5.1 CH.
●
External power needed if USB connects to over 1 TB mobile HDD.
●
ISM Band) AP6335 dual-
16
Page 20

More information
For more information
Please visit our website (www.newline-interactive.com)
Contact Us for Support
Please email us at [email protected].
Our company is devoted to product innovation and technology enhancement. Therefore, we may change product spec
and information without notice. Product pictures in the manual are for reference only, please refer to actual products.
17
 Loading...