

Page 1
TABLET 9.7" ( 24.6cm )
NVR-TAB97 S1 (4GB)
NVR-TAB97 S1 (8GB)
MANUAL DE INSTRUCCIONES
1
Page 2

Introducción Básica
* CPU: Rockchip
* LCD: TFT LCD 9.7" 1024 * 768
* Cámara: Cámara integrada de 0.3M píxeles (delantera), 2.0 M
píxeles (trasera)
* Sistema operativo: Google Android 4.1
* Conexión de Red: 802.11b/g/n inalámbrico integrado
* Formato audio: MP3, WMA, MP2, OGG, AAC, M4A, FLAC, APE, WAV
* Formato vídeo: máx. 1080p vídeo full HD (AVI,
3GP, MP4, MPG, RM, RMVB, MOV, FLV, WMV, MKV)
* Pantalla Táctil: Multitáctil Capaciti v a
* Idioma: permite varios idiomas
* Puertos: mini USB* 2 , mini HDMI * 1, Auri cul ar * 1, Ranura TF * 1, DC
IN*1
* GPU: Quad-core
* RAM: 1GB DDR3
*Bateria de Litio de 6000 mAh
* Botones: Back/Power/Reset/Vol+/Vol-
LEA ESTA GUIA RÁPIDA ANTES DE COMENZAR A USAR ESTE
DISPOSITIVO POR PRIMERA VEZ. GÚARDELA PARA FUTURAS
Uso de la pila y carga
Antes de usar este dispositivo, por favor, cárguelo completamente.
Conecte el adaptador de carga en el conector DC. El dispositivo
comenzará la carga.
CONSEJOS:
• Este dispositivo usa una batería de litio incorporada. Use solamente
el cargador específico que se incluye en este kit.
• Cuando está cargando, el icono de la pila tendrá movimiento.
• Cuando la carga termine, el icono de la pila cambiará a verde y
3066 Cortex A9 de doble núcleo hasta 1.6 Ghz Pantalla
GUIA RAPIDA
CONSULTAS.
2
Page 3

parará el movimiento.
• Si no va a usar este dispositivo durante un largo periodo de
tiempo, por favor, cárguelo /apáguelo al menos una vez al mes
para evitar que se descargue totalmente.
• Cuando el dispositivo se apague porque la batería esté muy baja,
conecte el cargador. En la pantalla, aparecerá “Batería baja” o
“Cargando, no apagar”, por favor, espere unos segundos para
operar con el dispositivo hasta que este tenga la carga mínima para
poder acceder al Menú Principal y de ahí a la opción requerida.
• La batería de litio incorporada debe cargarse regularmente. El
daño causado por una pila consumida y sin cargar a tiempo,
invalida la garantía del dispositivo.
Encender y Apagar
Encender: Mantenga pulsado el botón de encendido / apagado
(ON/OFF), situado en la parte trasera del dispositivo. El sistema
comenzará a operar entrando en el mundo ANDROID. Y aparecerá
la pantall a c onfigurada de origen.
Apagar: Mantenga pulsado el botón de encendido / apagado
(ON/OFF), situado en la parte trasera del dispositivo, aparecerá un
mensaje preguntando, si está seguro de querer apagar el dispositivo.
Pulse OK para apagar.
Conectar a un PC
El disposi tivo pu ede co nectarse a un PC a través del cable mini USB
o a través de corriente eléctrica. Los datos del USB pueden
transferirse al dispositivo y puede administrar los archivos y carpetas
del mismo a través del PC.
3
Page 4
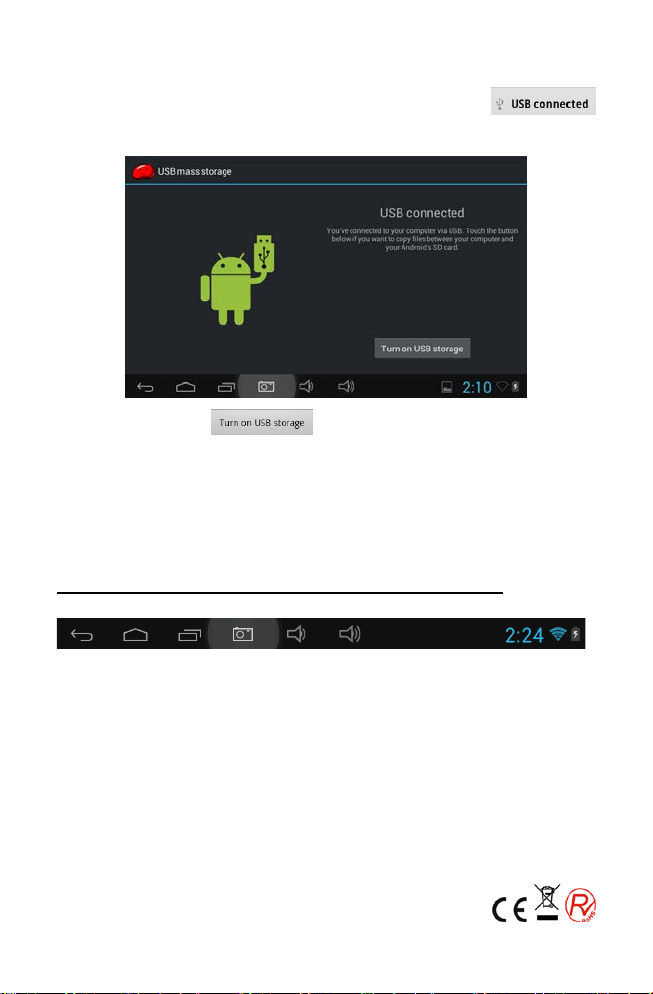
Cuando el di sposi tivo es té conecta do, apa rece rá un mensaj e en l a
parte inferior de la pantalla y aparecerá el icono
“Activar almacenamiento USB”
Púlselo y apare cerá
Pulse este icono para poder tr ansmitir los datos del pc al dispositivo o
del dispositivo al PC .
Nota: El dispositivo también soporta formato de FAT32 para
dispositivos externos, por ejemplo, disco U y tarjetas de Micro SD
para trasladar los datos.
“Desactivar almacenamiento USB”
Barra de herramientas en la pantalla principal
A. Menú: Deshacer, Menú principal, botones virtuales.
B. Icono OTG con exi ón al PC : Si el dis posi tivo e stá cone ctad o
al PC, mostrará este icono.
C. Hora: aparece la hora configur ada en e l d ispos it ivo.
D. Icono WI FI, si el WiFi está conectado y funcionando, la
señal visualizará lo s puntos de cobertura.
E. Batería: Estado de la batería y situación d e car g a.
4
Page 5
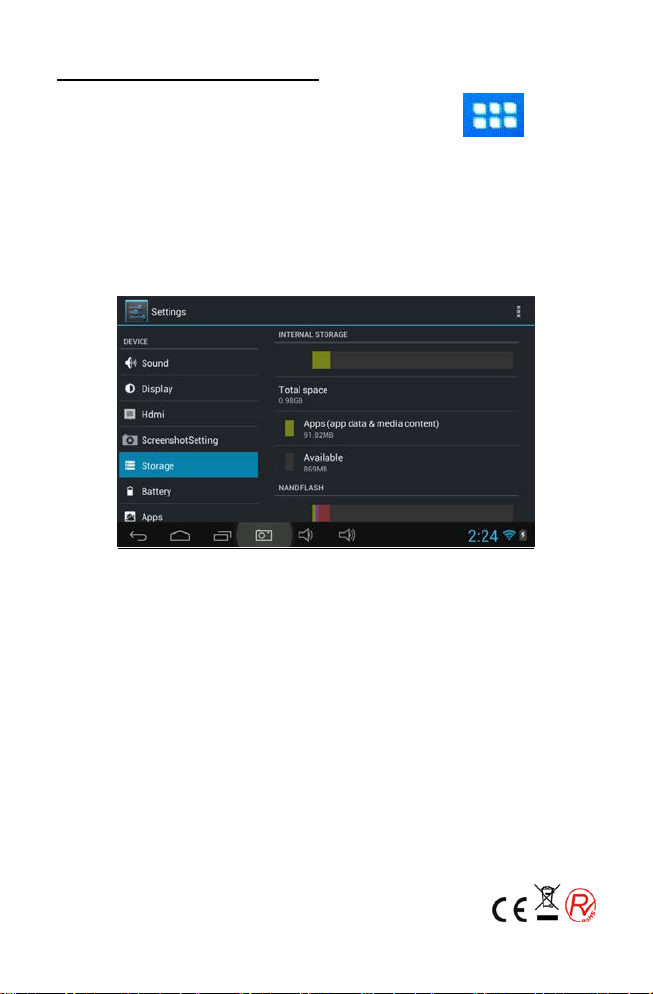
Menú en pantalla principal
Pulse el icono de Menú en la pantalla principal . . (parte
superior derecha de la pantal l a) para acceder a todos los iconos.
En esta opción, en “Almacenamiento”, podrá usted encontrar
también todas las grabaciones que realice, vídeos descargados,
música, fotos, etc.
Para configurar y personalizar el escritorio con los iconos y
aplicaciones que desee, pulse el icono correspondiente en el menú
principal, mantenga pulsado y aparecerá el escritorio. El icono y, por
tanto, la aplicación quedará fijada en el escritorio. Repita la
operación tantas veces como aplicaciones desee incluir en su
escritorio.
5
Page 6
Operaciones Básicas
Pulse el Icono de AJUSTES, en el menú principal, y
aparecerán toda s las opciones de ajustes del disposit ivo.
Seleccione la opción que quiera ajustar o cambiar, tales como
Activación de Conexiones Inalámbricas y Redes (Wifi, uso de
datos..), Ajustes del Dispositivo (sonido, iluminación de pantalla,
capacidad libre y ocupada del dispositivo, estado de batería,
aplicaciones..), Personal (cuentas y sincronización del correo
electrónico, ubicación física del usuario, seguridad del dispositivo,
idioma, c opias de seguridad ..) Sistema (fecha, hora, accesibilidad,
información de desarrollo para conexión USB, información de
software..)
Ajustes de Fecha y Hora:
En el Menú de AJUSTES, en el apartado SISTEMA, pulse Fecha y Hora
para ajustar la fech a y hor a que desee.
Podrá hac erlo de forma automática: “Fecha y hora automáticas” o
manual, desactivando la opción “Fecha y hora automáticas”.
En la opción manual:
Seleccionar + para incrementar un día/mes/ año / hora
Seleccionar- para reducir un día/ mes/ año / hora
También puede introducir directamente la fecha y hora pulsando
sobre el día, mes, año y hora y accediendo al teclado.
Ajustes de Pantalla
En el Menú de AJUSTES, en el apartado de “PANTALLA” podrá
configurar el Brillo, el fondo de pantalla, pantalla giratoria, el
autoapagado para prolongar el consumo de batería y el tamaño
de las fuentes de pantalla (tamaño de letra),
6
Page 7
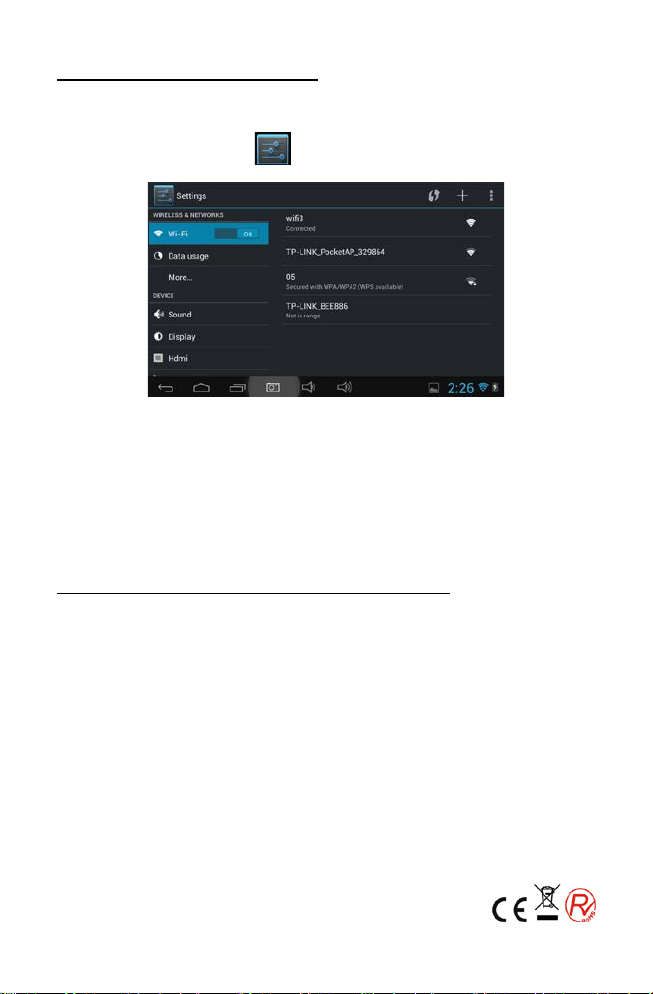
Conexión inalámbrica WIFI
Pulse el icono “Ajustes” en el Menú Pricipal.
En el apartado de “CONEXI ONES INALÁMBRICAS Y REDES”, pulse “WiFi” y éste buscará automáticamente las redes inalámbricas
disponibles. Haga clic en la que este buscando y siga los pasos que
se le indiquen a continuación para configurar la red inalámbrica.
Existen redes codificadas que necesitan una clave de acceso, si
dispone de ella int r o d ú zcala pa ra completar la conf iguración.
Instalar aplicaciones desde Google Play
Google play es la tienda on-line que está preinstalada en la tablet y
permite buscar y descargar aplicaciones; accediendo de forma
fácil y ráp id a , pulsando “Play Store”.
Usted puede descubrir y comprar aplicaciones (no todas son
gratuitas) y juegos entre más de 450.000 disponibles. También le
permite ver en HD estrenos, películas galardonadas y clásicos.
Puede reproducir las películas o descargarlas para verlas sin
conexión en cual quier m omento. Tambi én le pe rmite co mprar en l a
mayor selección de eBooks del mundo y leerlos en cualquier
dispositivo: tablet, teléfono, eReader o en la Web.
Navegando por las distintas opciones, clasificadas por categorías,
encontrará la aplicación que necesite. Se ofrece la opción de ver
los comentarios que otros usuarios han hecho sobre la app y
7
Page 8

también podemos escribir un comentario trás haberla insta la do.
Para instalar la aplicación no hay más que presionar sobre INSTALAR,
con lo que el equipo empezará a descargar el programa y a
instalarlo. Además de generarse una notificación mientras se
descarga e instala, al final aparecerá el icono de la aplicación en
una de las pantallas del escritorio. También podrá acceder a ella en
el panel de aplicaciones.
Instalar y Desinstalar Aplicaciones no descargadas
desde Google Play
Instalar Aplicaciones
1. Primero, debe seleccionar las fuentes desconocidas que permiten
la instalación de ap licacion e s que no son del Market.
2. Copie el instalador APK del programa a una Micro SD o NAND
FLASH.
3. Haga clic en el instalador APK para buscar las aplicaciones en el
directorio, a continuación seleccione las aplicaciones a instalar. Los
usuarios pueden usar el Mercado de Android (Market) para instalar
en línea (online), a través del ordenador, o en línea a través del
navegador para desc ar gar e instalar.
Desinstalar Aplicaciones
Haga clic en el apartado “Ajustes-Aplicaciones-Descargadas”, a
continuación escoja la aplicación instalada, pulse y seleccione la
opción “Desinstalar”.
Navegador
Cuando esté conectado a la red, abra el navegador Web e
introduzca el URL (dirección) o bien introduzca el URL en la barra de
búsqueda del escritorio principal y se abrirá la página Web.
Video:
Vídeo en línea: El produ cto es compatible con la reproducción de
vídeo en línea HTML5.
Reproductor de Vídeo: Presione el icono de vídeo. El reproductor
puede cargar nuevos álbumes y fotografías de forma automática,
que estarán almacenados en el disco local o en la tarjeta micro SD,
8
Page 9

a continuación seleccione la repr oducción de ví deo.
Reproduce la canción ant erior,
rápido.
Para pausa. El siguiente botón es
para volver a reproducir.
Para reproducir la siguiente canción,
del mismo tema
Muestra los detalles de la
disponibles.
Para selección aleatoria de la
música.
Para seleccionar el modo de
repetición.
Reproductor de música:
Haga clic el icono de música
para entrar en la interfaz del
reproductor de música.
Haga clic en los archivos de música que introduzca para
reproducirlos.
Pulse:
mantenga presionado p a ra ret roceso
Pulse:
Pulse:
pulsación larga para avanzar dentro
Pulse:
reproducción actua l, Pu lse pa ra
ocultarlos y ver la lista de temas
Pulse:
Pulse:
Navegador fotográfico
Pulse en “Galería” para entrar directamente en el navegador
fotográfico. Encontrará una lista de todas las carpetas de fotografías
y vídeos. Escoja un archivo de imagen y entre en la interfaz de
reproducción de imágenes, presionando el botón situado en la
parte superior derecha de la pantalla. Puede seleccionar: Editar,
Girar a la derecha/iz quierda, Recort ar, Eliminar, etc.
9
Page 10

Cámara
Pulse el ico n o d e la cámara en
el menú de aplicaciones.
Haga clic en el obturador de la cámara
para capturar fotos o vídeos
Grabadora
Pulse el icono de reproductor en el
menú de aplicaciones.
Ahora podrá encontrar las carpetas de grabación en
el carpeta del navegador donde guardó las
grabaciones.
Nota: Tanto las grabaciones, como los vídeos, fotos, música, etc,
podrá encontrarlos en:
Play Store
Pulse el icono de "Play Store".
Si no dispone de una cuenta de correo de Gmail,
debe crear una para acceder al Market.
Seleccione “Aceptar” para entrar en el mercado de
aplicaciones.
Conexión HDMI
Le sugerimos que conecte el unidad a su televisor a través del
puerto HDM I del dispositivo, para poder disfrutar de todos
tus contenidos con una resol ución de hasta 1080p.
Para la conexión HDMI se necesita un adaptador de Mini HDMI a
HDMI.
Preguntas frecuentes (FAQs)
Android
P. Cuál es la versión de Android de mi dispositivo?
R. 4.1
APK
P. Qué es APK?
R. APK es la abreviatur a de Android Package (paquete de
instalación de Android)
10
Page 11

P. Como puedo conseguir un APK?
R. Puede bajar las aplicacione s desde su ordenador o desde Google
play, si prefiere instalarlas directamente en su dispositivo.
Email
P. Puedo usar alguna de mis cuentas personales para enviar/recibir
mails?
R. Este dispositivo soporta cuentas de POP3 y SMTP. Los dispositivos
móviles no soportan algunas cuentas de mail gratuitas. Contacte
con su proveedor de email para sab er más información sobre su
cuenta.
P. Qué tipo de tarjetas soporta mi dispositivo?
R. Micro SD o TF
Músic
P. Qué formatos de música puedo reproducir con mi dispositivo?
R. MP3,WMA,MP2,OGG,AAC,M4A,FLAC,APE,WAV
Fotos
P. Qué formatos de imagen puedo reproducir en mi dispositivo?
R. JPG, JPEG, BMP , JPG and PNG
Video
P. Qué formatos de vídeo puedo reproducir en mi dispositivo?
R. AVI,3GP,MP4,MPG,RM,RMVB,MOV,FLV,WMV,MKV(max
1080p full HD video)
P. Puedo reproducir vídeos del Youtube en mi dispositivo?
R. Sí puede. Seleccione el icono d e la aplicación Youtu be para
acceder de forma rápida a sus vídeos.
Wi-fi
P. Necesito un adaptador de Wi-fi para poderme conectar a Internet?
R. No, el adaptador wi -fi, está integrado en el dispositivo. Se necesita
un adaptador para la conexión 3G.
11
Page 12

Precauciones importantes de seguridad
Siga siempre estas precauciones básicas cuando use su Tablet. Éstas
reducen el riesgo de fuego, descarga eléctrica y heridas.
- No exponga este producto a la lluvia o la humedad.
- No deje el disp ositivo direc tamente e n la lu z del s ol o otr as fuen tes
de calor.
- Proteja el cable. Coloque los cables de manera que eviten que
sean pisados o dañados por algún otro objeto. Preste especial
atención a la parte donde el cable sujeta al dispositivo.
- Use sólo el adaptador incluido con el dispositivo. Si hace uso de
otros distintos podría anularse su garantía.
- No quite la cubierta. No hay repuestos útiles para el usuario.
- Mantenga limpio su dispositivo.
- Trate la pa ntalla con cuida do. Para limpi ar las huellas o polvo
de la pantalla, recomendamos usar una tela suave, seca y no
abrasiva
PRECAUCIÓN: Por su seguridad, para reducir el riesgo de
cortocircuito eléctrico, no abra ni quite las piezas interiores del
producto. No haga ningún desmontaje del dispositivo. Entregue el
producto para su reparación al servicio técnico oficial. En el caso
que este presente algún síntoma de manipulación ajena al servicio
técnico oficial el aparato quedaría fuera de garantía.
Una vez que quiera deshacerse del disp ositivo, no l o deposi te en el
contenedor de basura. Avise al servicio de recogida de su municipio
para que sea recogido y tratado de la forma correspondiente,
siguiendo las instruccion es de prot ección al medio ambiente
Este manual es fiel reproducción en cuanto as características,
funcionamiento y cosmética del producto que usted ha adquirido
salvo error de imprenta o tipográfico.
La especificación, funcionamiento y características de este aparato
están suj eto a cambios sin previo aviso.
12
Page 13

TABLET 9.7" ( 24.6cm )
NVR-TAB97 S1 (4GB)
NVR-TAB97 S1 (8GB)
INSTRUCTION MANUAL
13
Page 14

Basic Introduction
* CPU: Rockchip 3066 Cortex A9 Dual Core up to 1.6 Ghz
* LCD Screen:9.7 " 1024 * 768 TFT LCD
* Camera: Build-in Front 0.3-megapixel, rear 2.0 megapixels camera
* Operating System: Google Android 4.1
* Network Connection: Built-in 802.11b/g/n wireless
* Audio format: MP3,WMA,MP2,OGG,AAC,M4A ,FLAC,APE, WAV
* Video format: max 1080p full HD video (AVI,3GP, MP4,
MPG, RM, RMVB, MOV,FLV, WMV,MKV)
* Touch Panel: Capacitive Multi-touch
* Language: support multiple language
* Ports: mini USB*2 , mini HDMI*1,Earphone * 1, TF card slot * 1,DC IN*1
* GPU: Quad-core
* RAM: 1GB DDR3
* 6000 mAh Litium Battery
* Buttons: Back/Power/Reset/Vol+/Vol-
Quick Start
Battery management and charging
Before using this device, please charge it fully. Put the charger adapter into the DC
jack,
the device will start to charge.
【 TIPS】 :
should be
when it is charging, the icon of battery will be rolling.
when the charging finish, the battery icon will turn green and stop rolling.
This device adopts built-in polymer battery. Only the specified charger
used.
� If you do not use this device for a long time, please
charge/release it once per month to avoid deep discharge.
� When it is power off because o f low battery, connect to t h e
charger, the device will ind ic at e “low power” or “charging”, please wait
for a second until the machine can turn to the main interface once the
power is enough.
� The built-in polymer battery should be charged regularly. The
14
Page 15

damage caused by battery over-consuming is not included in the
warranty.
Boot and Shutdown
Boot: Press and hold the power button, the system will enter the
boot
process System has been started, entering the Android
system。
The system enters the default home interface.
Shutdown: Press the power button, pop-up device options,
select
Power off, Click OK, you can safely s h u t down.
Connect with PC
By mini USB (OTG) interface of the device, you can connect with PC by mini
USB
cable attached with the device. USB Data transferring is available. You can
operate the
When your device is connected successfully, to pull up the notification area of the
status
Then click to enter the next step
files through the PC.
bar, can see the USB icon
Click , Then the device can transmission data with PC.
Note: The device also suppo rt s t h e FAT32 format for external devices,
for example U disk, Micro SD card to Transfer data.
15
Page 16

Interface Introduction Bottom bar of the Interface
A. Menu, Home, Back, virtual buttons
B. OTG connect icon: If the device connected to the PC, will
show the OTG connected icon.
C. Time display: Display the time of the current system, which
has been set.
D. WIFI signal status icon: If connected to the WIFI wireless
network, the icon will be disp layed
E. Battery status icon: Displays the current battery level
and the charging status.
The HOME Screen menu
Press the menu icon on the device . . (top right side of the
screen), it will display a home screen menu.
Basic Operation
Click the "Settings" icon in the main applications area, you
can open the system
setting interface.
Select the appropriate operation of the relevant items, such
as: wireless and network, Display, date and time settings,
about Device, etc
Date and time settings:
Click "Date & time" to enter the Date and time settings interface:
Select to set the date, select the time zone, set the time, time
format, date format and other information.
Select +: that the
increase of 1 unit, Select
- : that the reduction of 1
unit.
.
16
Page 17

Also you can choose the number, enter the input mode.
Directly entering the desired number, then click “Don e” t o s et
the Date.
Display settings
In the settings interface choose "Display" to enter the display settings
interface, select "Brightness", Pull the progress bar to adjust the brightness.
Click Sleep, adjust the inactivity time of the device. You can press power
key to activate the device. When display "Screen locked" interface, follow
the prompts to unlock it.
Wireless Connection:
Click the main menu "Settings" icon, go to "Settings" screen, click
on "Wireless and
into the "Wireless and networks settings" interface. Turn on
networks"
switch, the Wi-Fi module built-in the device will search AP lists
Wi-Fi
automatic , click the searched AP can be used, will pop up settings
dialog, please follow the prompts to complete the WIFI network links.
Some encrypted network, need to enter a valid key.
According to the above met h o d t o con nected Wi-Fi, as
shown below,
17
Page 18

Applications install and uninstall
Install applications from Google play:
Google play is the on-line shop preinstalled in this device, that
allows look for and download applications. You just need to
press the icon “Play Store”.
The user can find and buy applications (not all the applications
are free of charge) and g ames a mong the 450.000 available. I t
also allows the user to watch HD new releases, award winner
and classic films. It’s possible to watch the movies on-line or
download them to watch them when, for example there is no
wi-fi conection available. It also allow the user to find a wide
selection of eBooks.
All the applications are c lassified in different categories to make
it easier for the user to find the desired application. And also
there is the possibility to read the comments that other users
have left regarding the app lic ations, or write their own o pinion
after the application has been installed.
To install the application, you just need to press the button
“Install”, and the device will automatically start downloading
and installing the application. During the process of installing the
application, the device will show a notification message, and
once it is installed, the icon of the application will appear on the
screen of the device (p lease r emember that you can also
access to the install ed a pplicati ons on the a ppl icati ons sac reen)
18
Page 19

Install applications thag doesn’t come from Google play
1. First you should select the Unknown sources which allow installation of
non-Market
apps
2. Copy the APK installer software to Micro SD or NAND FLASH.
3. Click Apk Installer to find the app directory,then S elect
applications to install. Users can "Android market" online
installation, or download via the computer, or online
through the machine built-in browser to do wnload and
install.
Uninstall applications
Click on the i te m "Settings – Apps – Downloaded,” select the
appropriate application has been installed, click the applications
which you need to uninstall
Browser
When the network connected, open the Web browser enter the URL, you
can quickly
Browse the Web or through the main desktop search bar
enter
the URL, open the web page.
Video player:
Online video: The product support s HTML5 online video
playback.
Local video: Click the Video Icon. The Player can loading new
albums and
photos automatically which stored in local disk or micro SD card,
then select the
videos to playback
Music player:
Click the music icon you can enter the music player
interface.
19
Page 20

Click the music files you will enter the player to play music
Play the previous music, long
press to fast reverse.
Click it to suspen d, the i c on tu rn
the
normal playing again.
To play the next song, long
To display the present playing
To select the random playing
To select the repeat playing
Click:
Click:
to “
“ click and return to
Click:
Click:
Click:
Click:
Photo Browser
Click “Gallery” to get into Photo Browser directly, there will list all the
picture files and
video files
Select a picture file and ent er t h e picture playback inter face, as
shown below. Can select "Zoom", "narrow" "set" and "delete" etc
operation.
press to do function.
list.
mode.
mode.
20
Page 21

Camera
Click the Camera icon in the applications menu, as
shown below
Click the camera shutter to take photos or videos
Sound Recorder
Click the recorder icon in the applications menu.
Note: Select “Record” Button to record when it is
completed select “stop.”
button . At this point you can find the recordings folder in
the file browser,
which saved the recordings.
Market
Click the icon into the "Market" interface. If have no Gmail
account, should
create a Gmail account
HDMI connection
We sugges t you to conect unit to your TV throught the HDMI
conection. Connecting unit to your TV will allow you to
enjoy all your contents with a resolution up to 1080p.
For HDMI co nnection you need an adapter of Mini HDMI to
HDMI.
21
Page 22

Frequently Asked Questions
?
Android
Q: What Android OS version is on my Device?
A: 4.1
APK
Q: What is APK?
A: APK is Androi d Package acronym that Android installation
package.
Q: How to obtain the APK?
A: You can download via PC-side installation, you can also
"Android market" online to download and install.
Email
Q: Can I use any of my personal email addresses to send/receive
email
A: The device supports POP3 and SMTP accounts . S o me free
email accounts are not supported on mobile devices. Check
with your email provider to see if you account is supported.
Q: Which media cards are compatible with my Device?
A: micro SD cards or TF cards.
Music
Q: What type of music files can I play on my device?
A: MP3,WMA,MP2,OGG,AAC,M4A,FLA
C,APE,WAV Photos
Q: What type of photo files can I view on my device?
A: JPG, JPEG, BMP , JPG and PNG.
Video
Q: What type of video files can I play on my device?
A: AVI , 3GP , MP4 , MPG , RM , RMVB , MOV , FLV ,
WMV,MKV(max 1080p full HD video)
Q: Can I play YouTube videos on my device?
A: Yes, you can. Tap the YouTube application icon to quick
access videos.
22
Page 23

Wi-Fi
Q: Do I need a Wi-Fi adapter to connect to the Internet?
A: No. The Wi-Fi adapter is built-in to the device.
Important Safety Precautions
Always follow these basic safety precautions when using your
Tablet. This reduces the risk of fire, electric shock, and injury.
� Do not expose this product to rain or moisture.
� Keep the device out of direct sunlight and heat sources.
� Protect the power cord. Rou t e power cords so that th ey
are not likely to be walked on o r pinched by items placed on o r
against them. Pay particular attention to the point where the
cord attaches to the device.
� Only use the AC adapter included with the device. Using
any other power adapter voids your warranty.
� Do not remove the cover. There are no user-serviceable
parts inside.
� Clean your Device
Treat the screen gently. To clean fingerprints or dust from the
screen, we recommend us ing a s oft , non-abrasive cloth
such as a camera lens cloth.
! As a switching equipment, power adaptor should be
convenient for operat ing.
the device should be far aw ay fr o m water dropping and
splashing, as well as vase full of liquid.
23
Page 24

DECLARACIÓN DE CONFORMIDAD
NEVIR, S.A. declara bajo su responsabilidad que el aparato
indicado cumple los requisitos de las siguientes directivas:
EMC DIRECTIVE 2004/108/EC
LOW VOLTAGE DIRECTIVE 2006/95/EC
EN55013:2001+A1:2003+A2:2006
EN60065:2002+A1:2006+A11:2008
EN 61000-3-2: 2006
EN 61000-3-3:1995+A1:2001+A2:2005
EN 55020:2007
Descripción del aparato:
NVR-TAB97 S1 TABLET 9.7" ( 24.6c m )
Import: NEVIR S.A.
Dirección de importador:
Nevir S.A.
C/ Canteros, 14
Parque Empresarial Puerta de Madrid
28830 San Fernando de Henares - Madrid
24
 Loading...