

Page 1
1
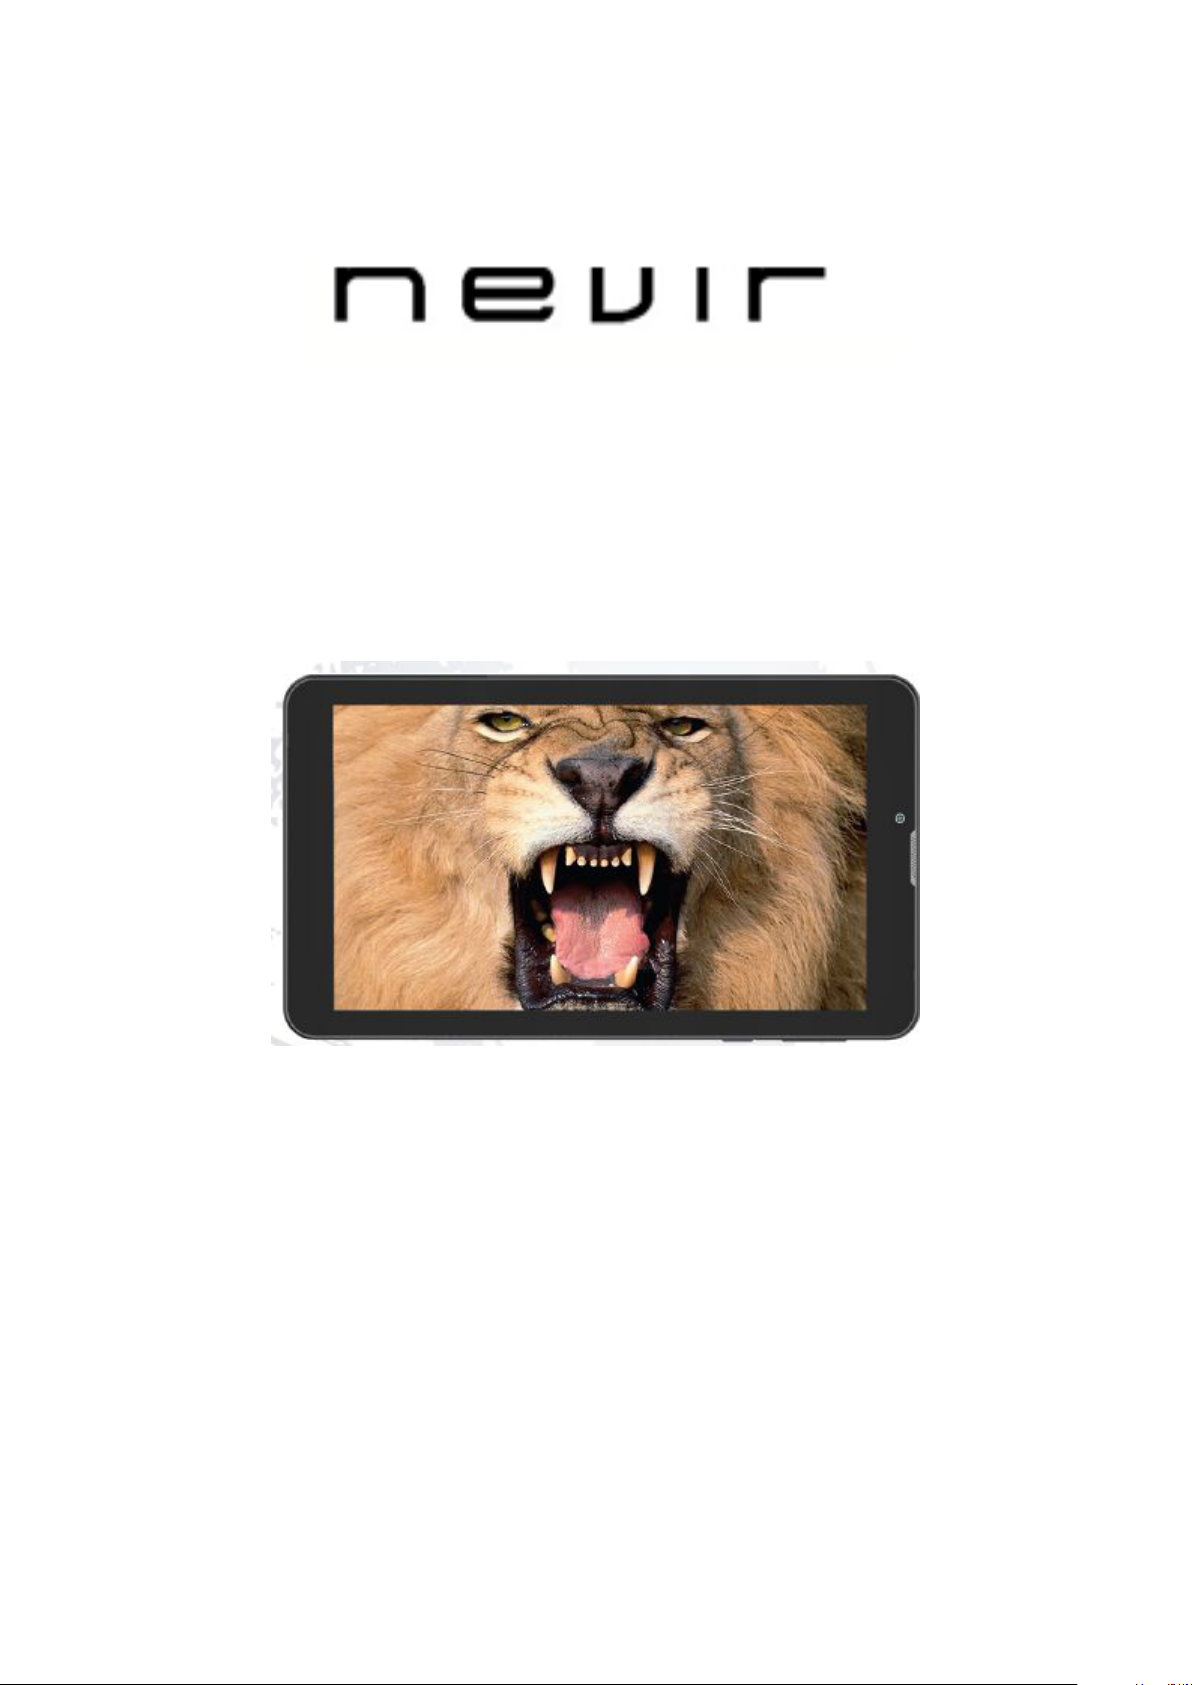
NVR-TAB7 S53G (8GB)
PHONE TABLET ANDROID 7” (17,78cm)
Manual de Instrucciones
Page 2
2
Sobre este manual
Se recomienda familiarizarse con las funciones y operaciones leyendo
completamente el manual antes de usar el producto. Es especialmente importante
que lea y observe la “Precaución” en esta página y en otras secciones.
Maneje su tableta con cuidado:
No la deje caer, la doble, inserte objetos extraños, o coloque objetos pesados en
la tableta. Los componentes sensibles en el interior podrían resultar dañados.
La pantalla de su tableta está hecha de vidrio. El vidrio puede romperse si la tableta
cae sobre una superficie dura, si recibe un impacto fuerte, o es aplastada por un
objeto pesado. Si el vidrio se rompe, no lo toque ni intente extraerlo desde la tableta.
Deje de utilizarla imediatamente y comunique con soporto técnico de Nevir para la
reparación, la sustitución o la eliminación sobre su eliminación.
No desmonte ni modifique su tableta:
La tableta es una unidad sellada. No contiene en el interior partes que puedan ser
reparadas o reemplazadas por el usuario. Cualquier reparación interna debe ser
realizada por un centro de reparación o un técnico autorizado por NEVIR. El intento
de abrir o modificar su tableta anulará la garantía.
No intente reemplazar la batería interna:
El reemplazo de la batería recargable interna debe ser realizada por un centro de
reparación o un técnico autorizado por NEVIR.
Evite mojar su tableta o el cargador:
•No sumerja su tableta en el agua ni la deje en un lugar donde pueda resultar mojada
bien con agua o cualquier otro líquido.
•No utilice el cargador de CA de Tablet NEVIR al aire libre.
Evite lesiones auditivas:
PRECAUCIÓN:
La tableta tiene un conector para los auriculares.
El volumen excesivo saliendo de los auriculares puede provocar
pérdida de capacidad auditiva.
El ajuste del ecualizador al máximo aumenta el voltaje de salida de los
auriculares y el nivel de presión sonora. Por lo tanto, para proteger sus oídos,
ajuste el ecualizador a un nivel apropiado.
Mantenga su tableta y accesorios alejados de los niños pequeños:
Su tableta contiene piezas pequeñas que pueden ser un peligro de asfixia para los
niños pequeños. Además, la pantalla de vidrio puede romperse o agrietarse si se cae
o choca contra una superficie dura.
Page 3

3
Arranque seguro
En lugares como por ejemplo avione u hospitales donde están prohibidos los
dispositivos inalámbricos, por favor, cumpla con todas las advertencias publicadas y
las indicaciones del oficial autorizado. Si debe utilizar el dispositivo en algunos de
estos lugares, usted puede configurar este dispositivo en modo avión. Mantenga
pulsado el botón [ON/OFF] y, a continuación, seleccione el modo avión.
SEGURIDAD VIAL
NO UTILICE LA TABLETA PARA HACER LLAMADAS AL CONDUCIR, A FIN DE NO
PERTURBAR LA CONDUCCI N SEGURA.
Precaución
Al utilizar este dispositivo, respete las siguientes medidas de seguridad para evitar
incendios, descargas eléctricas y lesiones.
• Guarde este manual a mano como referencia para los procedimientos de
operación y precauciones.
• Mantenga el dispositivo alejado de la lluvia y la humedad.
• Mantenga el dispositivo alejado de la luz solar directa y las fuentes de calor.
• Proteja el cable de alimentación. Cuando lo conecte, evite pisarlo o colocar
ningún objeto sobre él.
• Utilice el adaptador original para la carga. Un cargador distinto podría causar
daños al dispositivo.
• Proteja la pantalla en todo momento. Evite presionar la pantalla con fuerza.
Para borrar las huellas dactilares o polvos en la pantalla, utilice un suave paño
preparado especialmente para la pantalla.
• Cuando este producto no funcione correctamente, no intente desmontarlo o
repararlo. Póngase en contacto con su distribuidor o el más cercano Centro de
Servicio autorizado por NEVIR.
Page 4
4
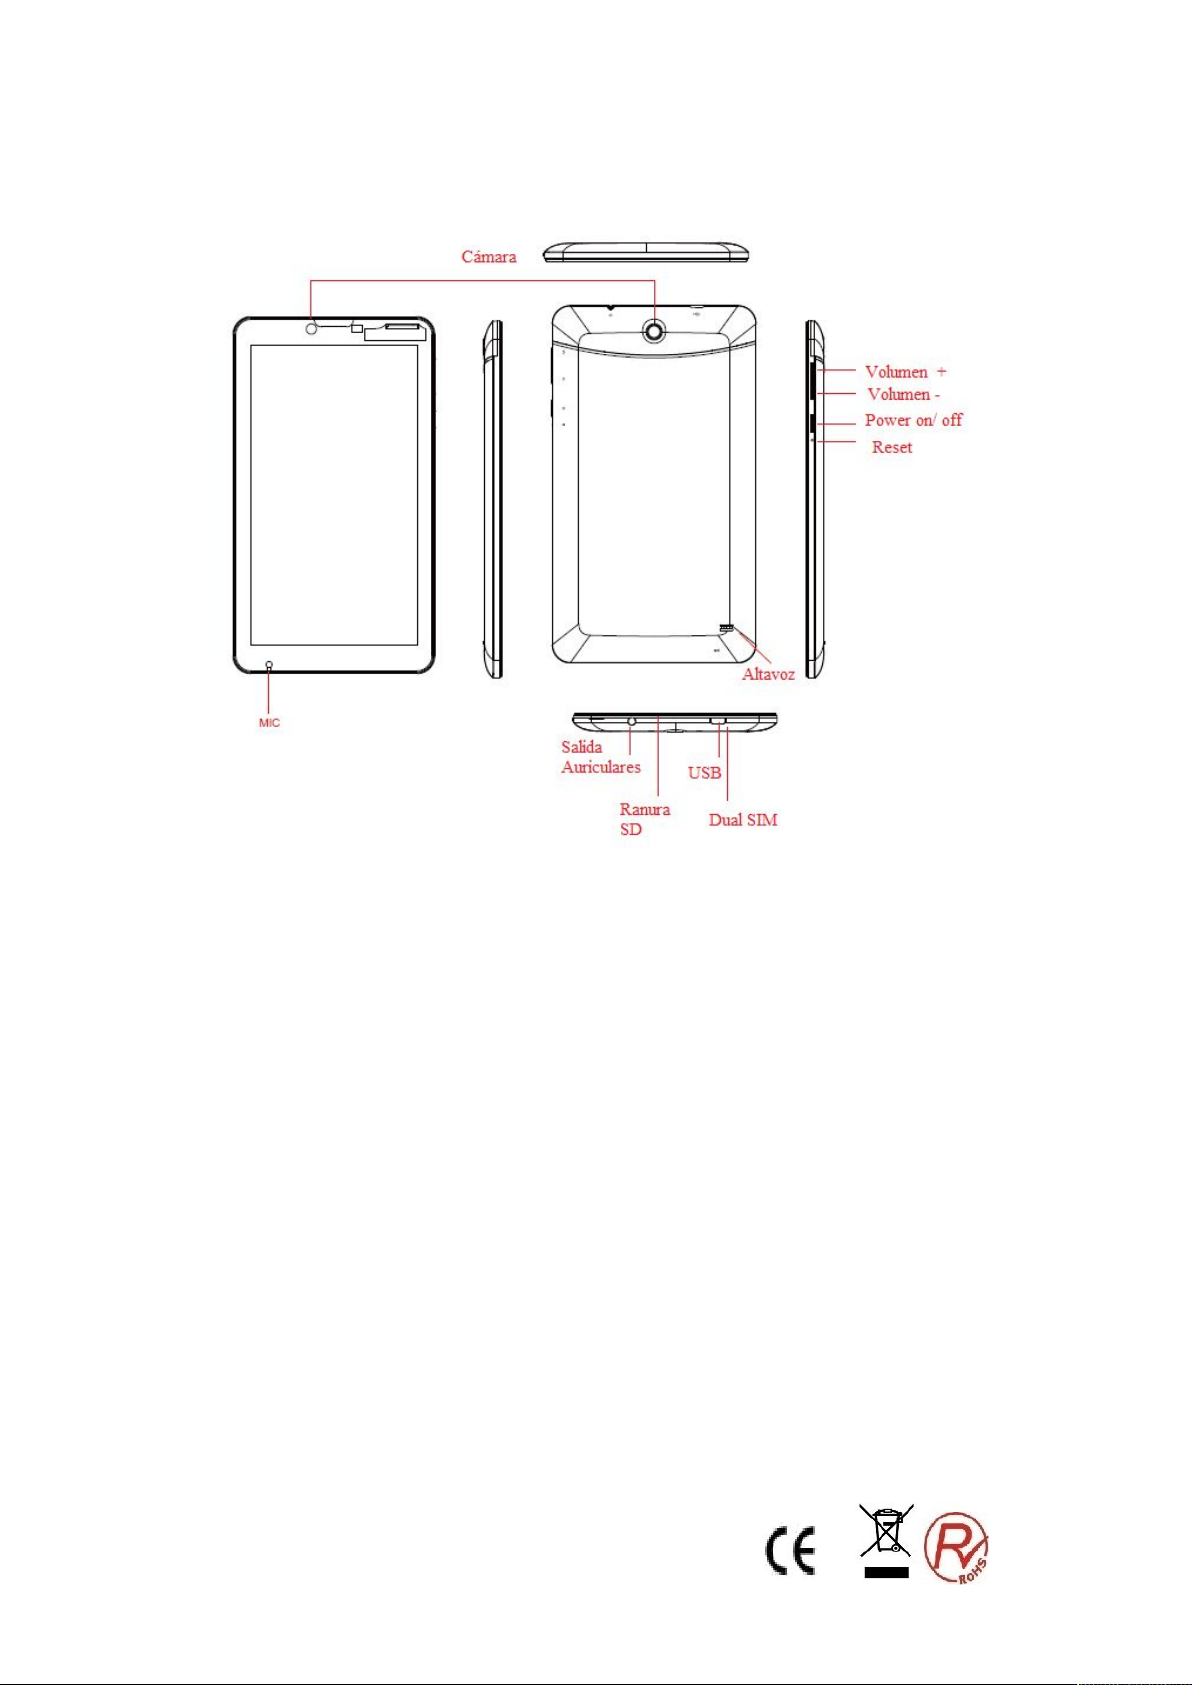
DIAGRAMA
Operaciónes Básica
Botón de encendido
Mantenga pulsado el botón de encendido (Power) por unos segundos para encender
la tableta. Para apagarla, mantenga pulsado este botón por unos segundos y, a
continuación, pulse OK en el menú de apagado.
Cuando la tableta está encendida, pulse el botón de encendido una vez para
bloquear o desbloquearla pantalla.
Cámara frontal
Su tableta tiene una cámara frontal de 0,3 megapíxeles,que se puede utilizar para
tomar fotos, crear vídeos o realizar llamadas de vídeo en colaboración con las
aplicaciones Web.
Cámara trasera
Su tableta tiene una cámara trasera de 2 megapíxeles orientada que se puede utilizar
para tomar fotos y crear vídeos.
Conector para auriculares o micrófono
Conecte los auriculares al conector para escuchar el sonido estéreo de la tableta.
Conector Micro USB
Utilice el cable USB suministrado para conectar un ordenador personal al conector de
micro USB para la transferencia de datos.
Page 5

5
Entrada TARJETA SD
Hasta 32gb
Dual SIM:
Para la insercion de su tarjeta SIM
Instalar la tarjeta SIM
Al solicitar el servicio de telefonía móvil, usted recibirá una tarjeta SIM, la que
contiene informaciones detalladas de su solicitud, tal como un número de
identificación personal (PIN) y los servicios opcionales.
Si la Tableta está encendida, por favor, mantega pulsado el botón [ON/OFF] y
seleccione "Shut Down" para apagarla.
Retire la cubierta posterior con cuidado
Inserte la tarjeta SIM
Si no se inserta la tarjeta SIM o USIM, usted puede utilizar los servicios inalámbricos.
Por favor, no inserte la tarjeta de memoria en la ranura de la tarjeta SIM.
Vuelva a colocar la cubierta posterior.
Cargar Batería
Antes de usar la Tableta por primera vez, usted debe cargar la batería. Para cargarla,
se puede usar el proporcionado cargador de viaje o a través del cable de datos del
ordenador con fin de conectar la Tableta al ordenador.
Sólo se permite utilizar el cargador y el cable USB suministrados por nuestra
empresa.
Cuando la batería está descargada, la Tableta emitirá un tono de advertencia y
mostrará la información. Si está agotada, la Tableta se apagará automáticamente. Es
necesario recargar la batería para seguir utilizando.
Cargar con el cargador de viaje
El usar la Tableta durante la carga va a extender el tiempo de carga;
Durante la carga, la Tableta se calienta. El fenómeno es normal y no afectará a la vida
o el rendimiento de la Tableta;
Si la Tableta no se carga correctamente, por favor llévela junto con el cargador al un
servicio de reparación autorizado para su revisión.
Cuando la batería está completamente cargada (el icono de la batería deja de
desplazarse), desconecte el cargador de viaje de la Tableta, y a continuación,
desenchufe el cargador del conector de alimentación.
Antes de cargar, asegúrese de que la Tableta está encendida.
1 .Enchufe un extremo (micro-USB) del cable USB en la toma multifuncional.
2. Según el tipo de cable USB, conecte el otro extremo al puerto USB del ordenador,
es posible tener que esperar un momento para iniciar la carga.
3. Cuando la batería está completamente cargada (el icono de la batería deja de
desplazarse), desconecte el cable USB de la Tableta, a continuación, desenchufe el
cargador del ordenador.
Insertar la tarjeta de memoria (No incluida)
Si usted desea almacenar otros archivos multimedia, puede utilizar una tarjeta SD.
La Tableta sólo admite la estructura de archivos FAT. Si usted inserta la tarjeta de
memoria con otra estructura, la Tableta le pedirá que vuelva a formatearla.
Usar el cable USB para cargar
Page 6

6
Escribir y borrar los datos con frecuencia acortará la vida de la tarjeta de memoria.
Al insertar la tarjeta de memoria en la tableta, el catálogo de archivos de la tarjeta de
memoria aparecerá en la carpeta de la gestión de archivos.
1. Retire la cubierta posterior.
2. Inserte la tarjeta de memoria
3. Empuje la tarjeta de memoria en la ranura de la tarjeta hasta que encaje en su
lugar.
4. Vuelva a colocar la cubierta posterior.
Sacar la tarjeta de memoria
1. RETIRE LA CUBIERTA POSTERIOR .
2. SAQUE LA TARJETA DE MEMORIA DE LA RANURA DE LA TARJETA.
3. QUITE LA TARJETA DE MEMORIA.
4. VUELVA A COLOCAR LA CUBIERTA POSTERIOR.
Por favor, no quite la tarjeta de memoria al transferir o acceder a información en la
Usar la pantalla táctil
Para evitar rayar la pantalla táctil, no use herramientas afiladas.
Se prohibe que la pantalla táctil alcance a otros equipos electrónicos. Una
descarga electrostática puede dañar la pantalla táctil.
Se prohibe que la pantalla táctil tenga contacto con el agua. En ambientes
húmedos o cerca del agua, la pantalla táctil no funciona correctamente.
A fin de lograr los mejores resultados, retire la película protectora antes de utilizar
la pantalla táctil.
Para controlar la pantalla táctil siga las siguientes instrucciones:
Tableta. De lo contrario, podría provocarse la pérdida de datos o daños de la Tableta
y de la tarjeta de memoria.
Formatear la tarjeta SD
1. Formatear la tarjeta de memoria en el ordernador puede causar que la tarjeta de
memoria deje de ser compatible con la Tableta. Por favor, formatee la tarjeta de
memoria solamente en la Tableta.
2. seleccione AJUSTES→ ALMACENAMIENTO → BORRAR TARJETA SD
Antes de formatear, recuerde hacer copias de todos los datos importantes
almacenados en la Tableta. Los servicios de garantía del fabricante no incluye la
pérdida de datos debido a operación incorrecta.
El uso de la pantalla táctil puede ser más fácil para seleccionar elementos o realizar
funciones.
Aprenda la operación básica de la pantalla táctil:
Page 7

7
Click: Haga clic una vez para seleccionar o iniciar opciones del menú o
aplicaciones con los dedos.
Clic y pulsar: haga clic y pulse por más de 2 segundos, cuando la lista de
opciones se desplega.
Desplazamiento: haga clic, arrastre el dedo hacia arriba, abajo, la izquierda o
derecha para mover el elemento de la lista.
Arrastrar: con su dedo haga clic y pulse un elemento y, a continuación, arrastre
el dedo suyo para moverlo.
Doble clic: al ver fotos o páginas web, haga clic dos veces rápidamente con su
dedo para ampliar y reducirlas.
Si usted no usa la Tableta durante un determinado período de tiempo, la pantalla
táctil se apagará. Si quiere encenderla otra vez, pulse Power.
Bloquear o desbloquear la pantalla táctil y los botones
Bloquear o desbloquear la pantalla táctil y los botones.
Usted puede bloquear la pantalla táctil y los botones, para evitar cualquier operación
accidental.
Para bloquear pulse [ON/OFF]. Para desbloquear, pulse [ON/OFF] y luego
desbloquee manualmente de acuerdo a las indicaciones que aparecen en la pantalla.
Mover elementos en la pantalla de inicio
Haga clic y pulse el elemento que desea mover. Después de la vibración, arrástrelo a
la ubicación deseada.
Eliminar elementos desde la pantalla de inicio
Haga clic y pulse el elemento que desea eliminar. Después de la vibración, en el área
de aplicación se mostrará el icono de Papelera de reciclaje, lo que indica que el área
de aplicación de la parte inferior de la pantalla ha cambiado para ser la papelera de
reciclaje.
Arrastre el elemento a la papelera de reciclaje.
Cuando el elemento está en rojo, libérelo.
Usar el panel de acceso directo
En la pantalla de inicio toque el área de indicadores de iconos en la parte superior de
la pantalla y, a continuación, arrastre su dedo hacia abajo para abrir el panel de
accesos directos. Usted puede iniciar o cancelar la conectividad inalámbrica y otras
características como por ejemplo.Tiempo de espera de la pantalla o alguna de las
siguientes:
Rotación automática de la pantalla: iniciar o terminar la rotación automática de la
pantalla.
GPS: activar o desactivar GPS.
WLAN: activar o desactivar la función de conexión WLAN. Mantenga pulsado el
icono para acceder a la interfaz de configuración de WLAN.
Bluetooth: activar o desactivar la función de conexión inalámbrica bluetooth.
Modo Avión: activar o desactivar el modo Avión.
Ajustes generales .
Idioma
En ajustes, utiliza la configuración de Idioma para establecer sus preferencias.
Idioma – Selecciona tu idioma preferido
Page 8

8
Teclado y Método de entrada –Cambiar Teclado y configuración del teclado
Si usted necesita otros idiomas en el teclado, presione el teclado correspondiente
e introduzca los ajustes de teclado elegido, seleccione Teclados, pulse el
idioma que necesita.
Fecha y hora
En ajustes, utilice la configuración de Fecha y hora para establecer sus preferencias
de cómo mostrar las fechas. También puede utilizar estos ajustes para configurar su
propia hora y la zona horaria, en lugar de obtener la hora actual de la red.
Activar o desactivar el sonido táctil
En la pantalla de inicio, abra la lista de aplicaciones y, a continuación, seleccione
ajustes → Perfiles de audio → General → Systema y selecciones la configuración
deseada
Ajustar el volumen del tono de llamada
Pulse [+/-] para ajustar el volumen del tono de llamada.
Cambiar el tono de llamada
En la pantalla de inicio, abra la lista de aplicaciones y, a continuación, seleccione
ajustes → Perfiles de audio → General → llamadas entrantes
Seleccione un tono de llamada desde la lista y luego seleccione OK.
Seleccionar Fondos de Pantalla
En la pantalla de inicio, mantenga pulsada la pantalla y los diferentes Fondos de
pantalla que puede seleccionar
Ajustar el brillo de la pantalla
Entre al menú de Ajustes y seleccione Pantalla para ajustar el brillo de la misma:
El nivel de brillo de la pantalla puede influir la velocidad del consumo de la batería.
Establecer patrón de desbloqueo
Establezca el patrón de desbloqueo para evitar el uso no autorizado.
1. En la pantalla de inicio, vaya al Menú de aplicaciones, y, a continuación,
seleccione Ajustes → Seguridad → Bloqueo de la pantalla → Patrón.
2. Lea atentamente las instrucciones
3. Arrastre su dedo para conectar al menos cuatro puntos para dibujar un patrón.
4. Elija [Continue].
5. Re-dibuje para confirmar.
6. Seleccione OK.
Después de establecer el patrón de desbloqueo, la Tableta le pedirá entrarlo cada
vez que se enciende. Si usted no desea que se lo pida, seleccione de nuevo
Ajustes→ Seguridad→ Bloqueo de la pantalla → dibujar patrón de bloqueo→No.
Nota: Si usted selecciona "No", no se bloqueará la pantalla.
Aplicaciones
Una aplicación es un programa de software que le permite realizar una tarea
específica.
Nota: Las aplicaciones pre-instaladas varían según ubicaciones geográficas y están
sujetas a cambios.
Page 9
9
Descarga de juegos y aplicaciones
Para extender la funcionalidad de su tableta, descargue e instale aplicaciones
adicionales desde los diferentes mercados de aplicaciones disponibles en la web.
Configuración de la aplicación
Entre en Ajustes y vaya a Aplicaciones para ver los detalles sobre las
aplicaciones instaladas en su tableta, gestionar sus datos, obligarles a parar si no
funcionan correctamente, y decidir si usted desea permitir la instalación de las
aplicaciones que usted ha obtenido desde los sitios web y el correo electrónico.
Para realizar una configuración, pulse el elemento de configuración para seleccionar
la casilla de verificación. Cuando se realiza una configuración, aparece en la casilla
de verificación una marca verde. Para desactivar una configuración, toque el
elemento de configuración para borrar la casilla de verificación. Si se requiere otra
acción, siga las instrucciones de la pantalla.
Tarjeta SIM
Usted debe introducir el Código PIN para bloquear la Tableta.
1. En la pantalla de inicio, vaya al Menú de aplicaciones, y, a continuación,
seleccione Ajustes → Seguridad →Bloqueo de la tarjeta SIM→ Bloquear la tarjeta
SIM.
2. Introduzca el código PIN y pulse "yes".
Al establecer el código PIN para bloquear, es necesario introducirlo cada vez que se
enciende.
Si introduce el código PIN incorrectamente tres veces seguidas, la tarjeta SIM se
bloqueará. En este caso, usted debería entrar PUK para desbloquear la tarjeta SIM.
Si la tarjeta SIM estaba bloqueada debido al mal PUK, por favor, lléve la tarjeta a su
proveedor de servicios telefónicos.
COMUNICACION
GU IESE POR EL SIGUIENTE DIAGRAMA
Page 10
10
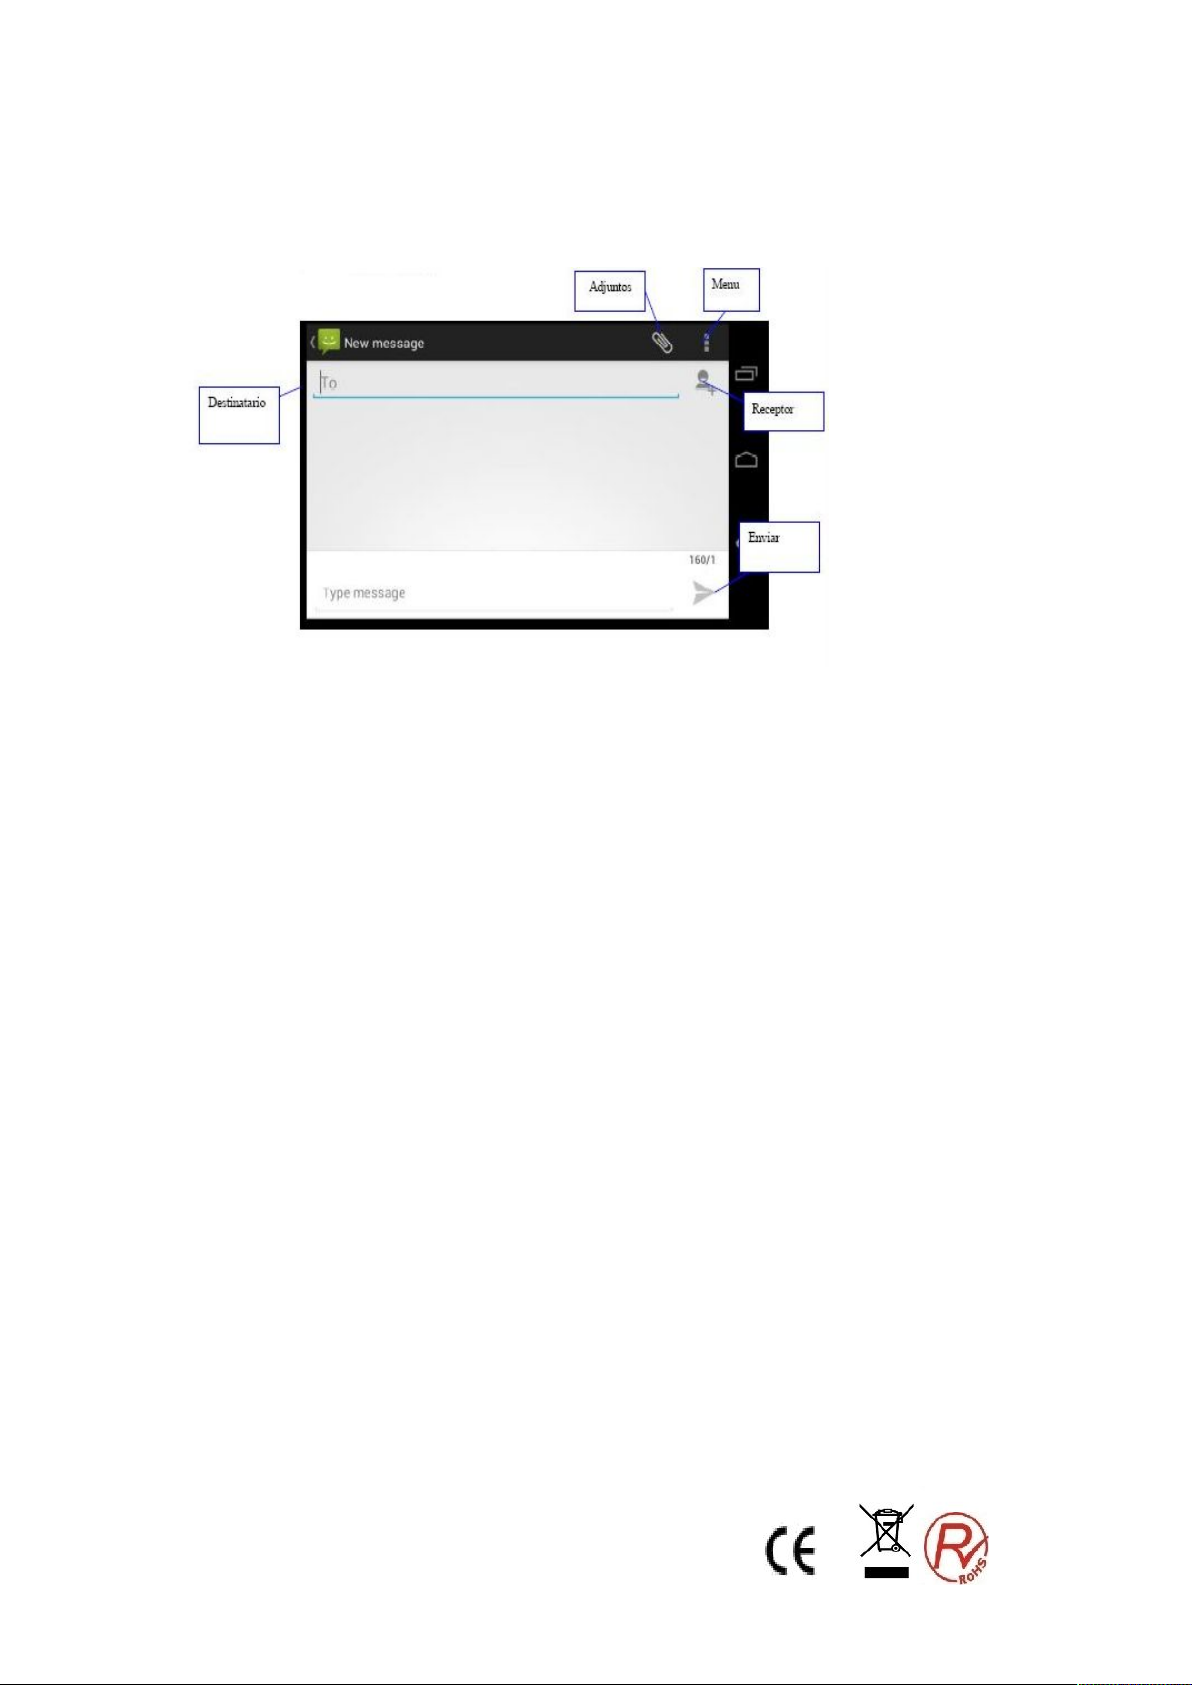
Mensajes
Puede crear y enviar mensaje SMS o MMS, revisar y gestionar los mensajes
enviados o recibidos. Para más detalles, por favor consulte con su proveedor de
servicios telefónicos.
Correo electrónico
Configurar el correo electrónico
1 En la pantalla de inicio vaya el Menú de aplicaciones y seleccione "correo".
2 Seleccione el tipo de cuenta, introduzca su dirección y contraseña de su correo
electrónico.
3 Siga las instrucciones. Después de completar la configuración, éste se cargará
en su tableta.
Calendario
Para comprobar la fecha, configurar la agenda o eventos.
Conexión a redes y dispositivos inalámbricos
Su tableta se puede conectar a una variedad de dispositivos y redes, incluidas las
redes móviles (2G o 3G), redes de datos Wi-Fi.
Wi-Fi es una tecnología de red inalámbrica que proporciona acceso a la red a
distancias de hasta 100 metros (328 pies), dependiendo del router Wi-Fi y sus
alrededores.
Una conexión Wi-Fi requiere acceso a un punto de acceso inalámbrico (WAP) que
funcione, también llamado un punto de acceso. Algunos puntos de acceso están
abiertos al público, pero algunos otros implementan medidas de seguridad para
limitar el acceso de grupos o individuos específicos.
Nota: El alcance y la calidad de la señal Wi-Fi se influyen por el número de
dispositivos conectados, la infraestructura, y los objetos a través de los cuales se
transmite la señal.
Page 11
11
Conexión a una red Wi-Fi
Para establecer una conexión a la red Wi-Fi, haga lo siguiente:
1. Desde la pantalla de inicio principal, toque el icono Ajustes
, o pulse el
icono de aplicaciones
de la barra de acciones y seleccione Ajustes. Se
abrirá la pantalla de configuración de Android.
2. En el apartado Conexiones Inalámbricas y Redes. Pulse Wi-Fi para
encenderlo.
3. Aparecerá una lista de redes disponibles. Pulse una red Wi-Fi para
conectarse a ella.
4. Si la red está abierta, se le aconsejará confirmarsi usted desea conectarse a
esa red .
5. Si la red está protegida, se le pedirá que introduzca una contraseña u otras
credenciales.
6. Cuando está conectado a una red Wi-Fi, puede obtener detalles sobre su
velocidad, seguridad, dirección..etc-
Añadir una red Wi-Fi
Para añadir una conexión a la red Wi-Fi, haga lo siguiente:
1. Desde la pantalla de inicio principal, pulse el icono Ajustes
, o toque el
icono de aplicaciones
de la barra de acciones y seleccione Ajustes. Se
abrirá la pantalla de configuración de Android.
2. Presione Conexiones Inalámbricas y pulse Wi-Fi para encenderlo.
3. Seleccione la red a la que desea conectarse.
4. Introduzca la información necesaria para la red.
5. Presione guardar. Se guarda la información sobre la red. La conexión Wi-Fi
se establecerá automáticamente la próxima vez que se encuentre dentro del
alcance de esta red.
Desactivación de una conexión automática de Wi-Fi
Si usted no desea que la tableta se conecte automáticamente a una red específica
Wi-Fi que ha configurado previamente, haga lo siguiente:
1. Desde la pantalla de inicio principal, pulse el icono Ajustes
, o el icono
de aplicaciones
de la barra de acciones y luego seleccione Ajustes. Se
abrirá la pantalla de Ajustes.
2. Presione Conexiones Inalámbricas y pulse Wi-Fi.
3. Si la función Wi-Fi está desactivada, pulse Wi-Fi para encenderlo.
4. Seleccione el nombre de la red Wi-Fi deseada
5. Pulse Borrar. Los detalles de dicha red Wi-Fi se borrarán.
Navegación por el Internet
Lea este tema para obtener más información sobre la navegación por Internet.
Uso del navegador
Para abrir el explorador, realice uno de los siguientes:
• Pulse el botón Navegador en el lado derecho de su tableta.
• Pulse el icono de aplicaciones
en la barra de acciones y luego Pulse
Page 12
12
Navegador
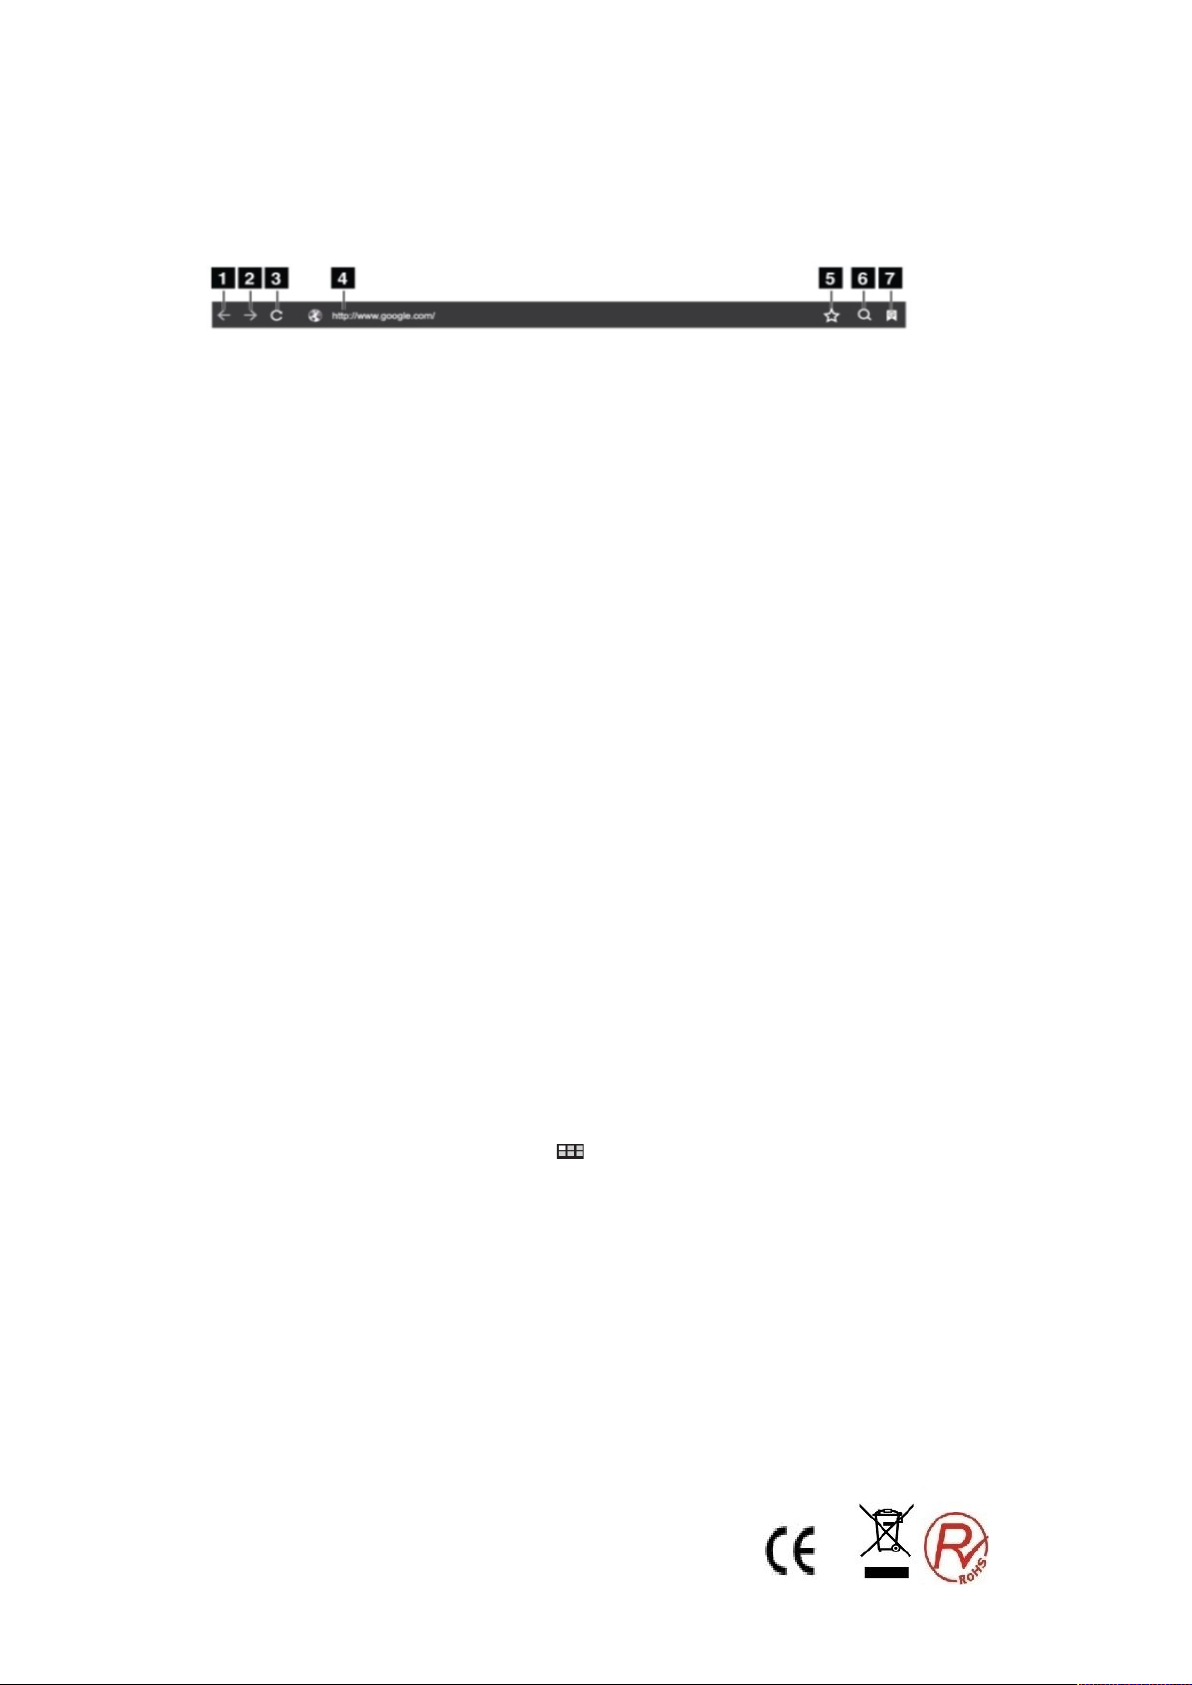
Navegación por la Web
• Uso de la barra de control del explorador
1. Retrocede a la anterior página web.
2. Avanza hacia una página web recién visitada.
3. Actualizar la página web actual.
4. Dirección Web: Seleccione este campo para introducir la dirección de la página
web que quiere visitar.
5. Marcar la página web actual.
6. Buscar información.
7. Bookmarks: Ver todos los favoritos y la historia de navegación.
• Uso del menú del navegador
Cuando usted está navegando por una página web, Seleccione el icono Menu en la
esquina superior derecha para acceder a diferentes opciones, entre ellas:
- Nueva Pestaña: Abrir una nueva pestaña para una nueva página web.
- Nueva Pestaña de incógnito: Si usted toca esta opción para abrir una nueva
página web, la página web no se registra en la historia de navegación.
- Buscar en la Página: Buscar el texto o el contenido de la página web actual.
- Compartir Página: Compartir la página web con un amigo o compañero de trabajo
a través de Bluetooth, correo electrónico, mensaje, o de otras maneras.
- Guardar Página: Guardar la página actual.
- Información de Página: Ver los detalles de la página web actual.
- Ajustes: Configura ajustes de su navegador, como configurar una página de inicio,
borrar la memoria caché, establecer el tamaño del texto, etc.
• Páginas web
Para ver una página web específica, haga lo siguiente:
1. Pulse el icono de aplicaciones
en la barra de acciones y luego pulse
Navegador.
2. Pulse el campo de dirección de la página web e introduzca la dirección de la
página web que quiere visitar. Al introducir la dirección, las direcciones de las páginas
web se muestran en una lista.
3. Lleve a cabo uno de las siguientes acciones:
- Pulse una dirección de las que aparece en la pantalla para visitarla directamente.
- Termine de introducir la dirección de la página web deseada. A continuación, pulse
la tecla Enter del teclado de Android (o pulse Go si está utilizando el teclado
FlexT9).
4. Deslice el dedo horizontal o verticalmente por la pantalla para desplazarse y ver las
áreas deseadas de una página web. Para reducir una página web, seleccione un
área deseada reuniendo dos dedos cerca en la pantalla. Para ampliar una página
web, seleccione un área deseada de una página web separando dos dedos en la
Page 13

13
pantalla.
Para seleccionar un elemento en una página web, haga lo siguiente:
- Texto: mantenga pulsada una palabra para que aparezcan las pestañas de selector
de texto y el menú de edición. El selector de texto es un par de pestañas de selección.
Arrastre cualquiera de las pestañas de selección para resaltar el texto que usted
desea seleccionar. A continuación, utilice el menú de edición que se muestra en la
parte superior de la pantalla para copiar el texto.
- En cuanto a las direcciones de hipervínculos o páginas web, toque las
deseadaspara visitar la página dirigida.
Gestión de archivos
Abrir imágenes, vídeos, música, archivos u otros documentos en su tableta o en la
tarjeta SD.
Nota:
1. No mueva o elimine los archivos de sistemas,
2. Si usted desea cambiar la tarjeta, por favor, copie los materiales a la otra tarjeta
que desea cambiar. De lo contrario puede que algunos archivos de entretenimiento
no funcionen.
Uso de su tableta para su entretenimiento
Lea este tema para conocer más sobre el uso de auriculares, el uso de cámaras, la
visualización de imágenes, la reproducción de vídeos y de música, y la trasferencia
de archivos multimedia entre dispositivos externos y su tableta.
Uso de auriculares
La tableta tiene un conector para auriculares que usted puede utilizar para una
variedad de dispositivos de escucha, como auriculares y audífonos. El escuchar con
el volumen demasiado alto durante largo tiempo puede conducir a la pérdida de la
audición. Los síntomas de lesiones en el oído podrían ser progresivos y no se notan
al principio.
Tome las siguientes precauciones:
1. Limite el tiempo de utilizar auriculares, audífonos u otros dispositivos que
proporcionan directamente el sonido a sus oídos.
2. Evite el uso de alto volumen para bloquear el ruido ambiental.
3. Reduzca el volumen si usted no puede oír a las personas que hablan a su
alrededor.
Uso de cámaras
Su tableta tiene dos cámaras, una frontal y otra trasera hacia atrás. Cada una tiene la
función de enfoque automático que le permite capturar imágenes y videos de alta
calidad.
Para utilizar una cámara, toque el icono de aplicaciones
en la barra de acciones
y luego pulse Cámara para activarla.
Hacer Fotos
Para hacer una foto, haga lo siguiente:
1. Pulse el icono de aplicaciones
en la barra de acciones y luego Pulse e
Cámara para encenderla.
2. Asegúrese de que el modo de cámara está configurado para capturar imágenes.
3. Seleccione para usar la cámara frontal o la cámara trasera.
4. Use los controles de configurar la cámara para ajustar la configuración y, a
continuación, Pulse el botón para realizar una foto. La imagen se guarda en la galería
de imágenes de forma automática y se muestra en la esquina inferior izquierda de la
Page 14

14
pantalla.
Grabar videos
Para grabar un vídeo, haga lo siguiente:
1. Toque el icono de aplicaciones
en la barra de acciones y luego toque Cámara
para encender la cámara.
2. Deslice el interruptor de modo de la cámara al modo de videocámara.
3. Seleccione para usar la cámara frontal o la cámara trasera,
4. Use los controles de configuración de la cámara para ajustar la configuración y, a
continuación, Pulse el botón de grabación (Record). Durante la grabación, el botón
Record se convierte en Stop.
5. Pulse el botón Stop para detener la grabación. El vídeo se guarda en la galería de
vídeos de forma automática.
Visualización de imágenes
Usted puede ver y administrar imágenes almacenadas en la tableta, realizar tareas
básicas de editar imágenes, y establecer una imagen como el fondo de su pantalla o
como la imagen de contacto. También puede compartir sus fotos con amigos a través
del correo electrónico o una aplicación de mensajería
Para ver las imágenes almacenadas en la tableta, haga lo siguiente:
• Pulse el icono de aplicaciones
en la barra de acciones y luego pulse Galería.
• Pulse un álbum y después una foto para verla.
Al ver una imagen, toque la pantalla para que aparezcan las siguientes opciones:
•
: Visualizar imágenes en un modo de presentación de diapositivas.
•
: Compartir la foto seleccionada a través del correo electrónico, o una aplicación
de mensajería.
•
: Eliminar la imagen seleccionada.
• Toque el icono de menú para ver los detalles de la imagen, rotar la imagen, recortar
la imagen, o establecer la imagen como el fondo de pantalla o como la foto de
contacto.
• Pulse el icono de menú para ver los detalles de la imagen, rotar la imagen, recortar
la imagen, o establecer la imagen como el fondo de pantalla o como la foto de
contacto.
Ver vídeos
Usted puede ver directamente películas en línea con su tableta usando una de las
aplicaciones de vídeo preinstaladas, reproducir videos que ha tomado con las
cámaras. También puede compartir sus vídeos con amigos a través del correo
electrónico o una aplicación de mensajería.
Para reproducir un vídeo desde su galería, haga lo siguiente:
1. Toque el icono de aplicaciones
en la barra de acción.
2. Pulse Galleria.
3. Pulse un video para reproducirlo.
5. Utilice los controles en pantalla para controlar la reproducción.
Para compartir un vídeo con sus amigos, toque sin soltar el vídeo desde la galería de
vídeos, pulse el icono de Compartir
y luego toque un método de transferencia
de datos.
Page 15

15
Escuchar música
Para escuchar la música conservada en su tableta, haga lo siguiente:
1. Pulse el icono de aplicaciones
en la barra de acción para abrir la galería de
aplicación.
2. Toque Música. El reproductor de música Android está activo.
3. Pulse un álbum y después pulse en una canción para escucharla.
Nota: La aplicación de Android Música puede encontrar sus archivos de música en
cualquier ubicación de la tableta.
Usted puede volver a la pantalla de reproducción desde cualquier otra aplicación
abriendo el panel de notificaciones y tocando la notificación de la música actual. Para
abrir el panel de notificaciones, toque el área de hora en la barra de sistema; las
notificaciones se enumeran bajo Estado detallado.
Trabajar con dispositivos USB
Su tableta tiene un conector micro USB para conectar dispositivos USB compatibles.
Lea este tema para saber cómo utilizar cada conector para conectar diferentes
dispositivos.
Usar el conector micro USB
Utilice el conector micro USB y el cable USB suministrado para conectar la tableta al
ordenador a fin de cargar la batería de la tableta, transferir archivos o compartir su
conexión de datos móviles.
Configuración de USB
Utilice las configuraciones de USB para decidir cómo desea utilizar su tableta,
cuando está conectado a un ordenador a través del conector micro USB. Usted
puede optar por utilizar la tableta como dispositivo de almacenamiento masivo o para
cargar su tableta solamente.
Reloj
Utilice la aplicación de Reloj para visualizar la fecha y la hora en grandes caracteres
en la pantalla y para configurar alarmas para que suene una vez o en una
programación de repetición.
Configurar fecha y hora
Por defecto, su tableta sincroniza automáticamente la fecha y la hora con Internet. Si
desea ajustar la fecha y la hora manualmente, haga lo siguiente:
1. Desde la pantalla de inicio principal, pulse el icono Ajustes
, o pulse el icono
de la barra de acciones y luego Ajustes. Se abrirá la pantalla
de configuración de Android.
2. Seleccione Fecha y Hora.
3. Pulse Día & Hora Automática para desactivar la función de auto-
4. Pulse Establecer Fecha, Establecer Hora, Establecer Zona Horaria, y otros
de aplicaciones
sincronización.
elementos para establecer fecha y hora.
Page 16

16
Establecer una alarma
Para establecer una alarma, haga lo siguiente:
1. Active la aplicación de Reloj.
2. Se abre un cuadro de diálogo con detalles acerca de la alarma. Podrá configurar
la hora, los días y el tono de Alarma.
GUÍA DE SOLUCIÓN DE PROBLEMAS
Con el fin de ahorrar su tiempo y costes innecesarios, por favor póngase en contacto con
el personal de servicios profesionales cuando necesita los servicios, y haga los siguientes
exámenes:
Incapaz de iniciar la tablet
Compruebe que usted ha pulsado [ON/OFF] más de 1 segundo.
Compruebe si la batería está agotada, por favor, recárguela.
Al iniciar la tableta, aparece mensaje de aviso
Entre la contraseña de bloqueo de la tableta, seleccione la función de bloqueo automático,
antes de usarla.
Contraseña de teléfono
Entre el código PIN, seleccione la función de entrar el código PIN al encenderse.
Entrar el código PUK: si ha entrado el código PIN errónemente tres veces seguidas, la
tarjeta SIM quedará bloqueada, usted debería introducir el código PUK suministrado por
el operador.
Error de la tarjeta SIM
Si la superficie metálica de la tarjeta SIM está sucia, límpiela con un paño limpio.
Si la tarjeta SIM no está instalada, instálela correctamente .
Si la tarjeta SIM está dañada, póngase en contacto con su proveedor de servicio de red.
Incapaz de conectar a la red
Si la señal es débil, por favor, muévase a otro lugar y vuelva a intentarlo.
Si está fuera de la zona de cobertura de red.
Si la tarjeta SIM no es válida, por favor póngase en contacto con su proveedor de red.
Incapaz de hacer llamada
Por favor, confirme si se ha presionado la tecla de marcación.
Por favor confirme si su compañía le ha restringido las llamadas salientes.
Por favor confirme si la tarjeta SIM esta en bun estado.
Por favor confirme si se ha ajustado la función de restricción de llamadas.
Por favor, confirme si se ha ajustado la función de marcador fijo.
Pobre calidad de llamada
Por favor confirme si el ajuste del volumen es adecuado.
Al utilizar una tableta para conversar en zonas de poca cobertura, por ejemplo alrededor
de los edificios altos o en una sala subterránea, la onda de radio no puede transmitirse
con eficacia.
Incapaz de recibir llamadas
Por favor, confirme si la tableta está encendida y conectada a la red.
Por favor confirme si su compañía le ha restringido las llamadas entrantes.
Por favor confirme si la tarjeta SIM está en buen estado
Por favor confirme si se ha ajustado la función de restricción de llamadas.
Contacto
Page 17

17
Por favor, mantenga el micrófono cerca de la boca.
El tiempo en espera se reduce la duración de la batería
El tiempo en espera está relacionado con la configuración del sistema de la red. Si se
encuentra en una zona de poca cobuertura, la tableta seguirá iniciándose a fin de
encontrar la estación de base, cuando no se puede recibir la señal, una gran cantidad de
energía de la batería se consumirá, y el tiempo de espera se acorta. Por favor, utilícela en
una zona de cobertura fuerte o apáguela temporalmente.
No hay energía
Compruebe si el enchufe está conectado.
Si la suciedad está acumulada, limpie la tableta y el puerto de conexión de la batería con
un paño limpio y suave.
Por favor, cambie el entorno de carga cuando esté por debajo de 0 ℃ o por encima de 45
℃.
La batería o el cargador debe cambiarse cuando estén dañados.
Si la información de guía no puede ayudarle a resolver los problemas, por favor, anote el
modelo de su Tableta y el número de serie y póngase en contacto con el servicio al cliente
local.
Page 18

Especificaciones
18
Modelo
Sistema operativo
CPU
Memoria
Almacenamiento
Pantalla
Resolución
Panel táctil
WiFi
USB
Tarjeta TF
Cámara
Adaptador de
alimentación
NVR-TAB7 S53G (8GB)
Android 4.2
MTK8312 Dual-Core cortex A7@ 1.2GHz
1GB
8GB
7”
1024*600
G+P
802.11b/g/n
1XUSB 2.0
Hasta 32GB
Frontal 0.3 Mega Pixeles, Trasera 2.0 Mega Pixeles
DC 5V 2A
Audio
Video
Batería
Altavoz
Compatible con diferentes formatos de audio
Compatible con diferentes formatos de video
3.7V 2500mah
1W8Ω
Nota: La lista de imágenes en el manual son sólo para referencia! El diseño y
las especificaciones del equipo están sujetos a cambios sin previo aviso
Este símbolo sobre el producto o en las instrucciones quiere decir que su
equipamiento eléctrico y electrónico debería ser depositado al final de su
vida útil por separado de la basura domestica. Hay sistemas de recogida
para el reciclaje en toda la UE. Para más información, consulte con las
autoridades locales o con la tienda donde adquirió el reproductor
Page 19

19
NVR-TAB7 S53G (8GB)
7” (17,78cm) ANDROID TABLET
USER GUIDE
Page 20

20
About this manual
This product features a number of sophisticated functions ensuring superior reception
and operation. All are designed for the easiest possible use, but many are not
self-explanatory. This operation manual is intended to help you benefit fully from their
potential and to maximize your browsing and surfing enjoyment.
We recommend that you familiarize yourself with the functions and their operation by
reading through the manual before you begin using this product. It is especially
important that you read and observe the “Precaution” on this page and in other
sections.
Handle your tablet with care:
Do not drop, bend, puncture, insert foreign objects, or place heavy obje
cts on your
tablet. Sensitive components inside might become damaged.
Your tablet screen is made of glass. The glass might break if the tablet is dropped on
a hard surface, is the subject of a high impact, or is crushed by a heavy object. If the
glass chips or cracks, do not touch the broken glass or attempt to remove it from the
tablet. Stop using t he tablet immediately and contact Nevir Technical support for repair,
replacement, or disposal information.
Do not disassemble or modify your tablet:
Your tablet is a sealed unit. There are no end-user serviceable parts
inside. All internal
repairs must be done by a Nevir-authorized repair facility or a Nevir-authorized
technician. Attempting to open or modify your t ablet will void the warranty.
Do not attempt to replace the internal battery:
Replacement of the internal rechargeable battery must be done by a Nevir-authorized
repair facility or a Nevir-authorized technician.
Prevent your tablet and charger from getting wet:
• Do not immerse your tablet in water or leave it in a location where it can get
saturated with water or other liquids.
• Do not use the Tablet AC Charger outdoors.
vent hearing damage:
Pre
Your tablet has a headphone connector. Always use the headphone connector for
headphones (also called a headset) or earphones.
CAUTION:
Excessive sound pressure from earphones and headphones can cause hearing
loss. Adjustment of the equalizer to maximum increases the earphone and
headphone output voltage and the sound pressure level. Therefore, to protect
your hearing, adjust the equalizer to an appropriate level.
Keep your tablet and accessories away from small children:
Your tablet contains small parts that can be a choking hazard to small children.
Additionally, the glass screen can break or crack if dropped on or thrown again
st a
hard surface.
Precaution
When you use this device, please follow the safety notice below to prevent fire,
electric shock and injury.
Keep this manual handy as a reference for operating procedure and
Page 21

21
precautions.
Keep the device away from rain and moisture.
Keep the device away from direct sunlight and heat source.
Protect the power cord. When the power cord is connected, avoid stepping on
Please use the original power adaptor for charging. Non-conforming chargers
Protect the screen at all time. Avoid pressing hard on the screen. To clear the
Should this product fail to operate properly, do not attempt to disassemble it or
Diagram
it or place any object on it, which may cause power interruption and program
or data corruption.
may cause harm to the device.
fingerprints or dust on the screen, use soft cloth specially made for screen or
lens.
repair it. Contact your dealer or nearest authorized Nevir Service Outlet.
In order to use your tablet PC safely and effectively, please read the following
information carefully before use.
Page 22

22
Safe Boot
In the area(such as airplanes, hospitals) which wireless devices are forbidden, please
comply with all posted warnings and authorized officer’s indication.
If need to use the non-network services of the device, you can switch to flight mode.
Hold the【ON/OFF】button, and then select the flight mode.
Waterproof
Keep the Tablet PC dry, rain、humidity and all types of liquids may contain minerals
that will corrode electronic circuits.
Interference
Mobile communication may be subject to the radio interference, which could affect
performance.
Traffic Safety
Do not use the tablet PC to call when driving, so as not to disturb the safe driving.
In the restricted area please shut down
Please comply with restrictions or regulations. On the plane or nearby the
inflammable substances, chemicals or medical equipment, Tablet PC should be shut
down.
Tablet PC placement
Place the Tablet PC and its accessories out of children's reach.
Accessory and Battery
Please use the specified battery and charger.
Do not attempt to disassemble the Tablet PC and accessories, if need service, contact
an authorized agency or professionals.
Install SIM or USIM card
When ordering mobile phone service, you will receive a Subscriber Identity Module
(SIM) card, which contains detailed information of your order, such as a personal
identification number (PIN) and optional services.
Page 23

23
If the Tablet PC is switched on, please hold the 【ON/OFF】 button and select “Shut
Travel charger charging
Insert the small end plug of the travel charger into the multifunction socket. If the
1. Insert the big end plug of the travel charger into power jack.
Using the Tablet PC when charging, this will extend the charging time;
When charging, the Tablet PC will be fever. The phenomenon is normal, and will
If the Tablet PC is not charging properly, please take the Tablet PC and charger to
Down” to turn it off.
Remove the back cover. When you remove the back cover, please be careful not to
hurt your nails.
Insert the SIM card.
To make the gold touch spot of the SIM card face down, and insert it into the Tablet
PC.
If do not insert the SIM card, you can use wireless services.
Please do not insert the memory card into the SIM card slot.
Replace the back cover.
Battery charge
Before using the Tablet PC for the first time, you must charge the battery. You can use
the provided travel charger or through the computer data cable to connect the Tablet
PC and the computer to charge for the Table PC.
Only use the charger and the USB cable provided by our company is allowed.
Unauthorized will cause the battery exploded or damage your Tablet PC.
When battery is low, the Tablet PC will issue a warning tone and show the information.
If it’s too low, the Table PC will shut down automatically. You need to recharge the
battery to continue to use.
travel charger is connected incorrectly, you may cause serious damage to the
Tablet PC. Any damage due to misuse will not warranty
not affect the life or performance of the Table PC;
Page 24

24
our company’s customer service center to have a check.
2. When the battery is fully charged (the battery icon is no longer scroll), disconnect
1.Plug one end (micro USB) of the USB cable into the multifunction socket.
2.According to the type of USB cable, connect the other end to the computer’s USB
3.When the battery is fully charged (the battery icon is no longer scroll), disconnect
The Table PC supports only the FAT file structure. If you insert the memory card
Frequent writing and deleting the data will shorten the life of the memory card.
When you insert the memory card to the Table PC, The file catalog in the memory
1. Remove the back cover.
2. Insert memory card and ensure the golden touch spot face down.
3. Push the memory card into the card slot until it locks into place.
4. Replace the back cover.
Take out the memory card
1.Remove the back cover.
2.Pull out memory card from the card slot.
3.Remove the memory card.
the travel charger and the Tablet PC connection, then pull out it from the power jack.
Use USB cable to charge
Before charging, please make sure that the Tablet PC has been turned on.
port , you may need to wait for a moment to begin charging.
USB cable with the Tablet PC, then pull out it from the computer.
Insert memory card (optional)
If you want to store other multimedia files, you can use the SD card or insert the
memory card. The Tablet PC can use micro SD™ .
Micro memory card capacity up to 32GB.
with other structure, the Tablet PC will be asked to re-format the memory card.
card will appear in the folder of the file management.
Page 25

25
4.Replace the back cover.
Please do not remove the memory card when transferring or accessing information in
Format SD card
1.Formatting the memory card on the computer may result in the memory card is not
2.In standby mode, select Applications → Settings → Storage → Format SD card.
the Tablet PC, Otherwise it may cause data loss or damage the Table PC and memory
card.
compatible with the Tablet PC, please formatting the memory card on the Tablet PC
only.
Before formatting, remember to backup all the important data stored in the Tablet PC.
The manufacturer warranty services is not included the data loss due to wrong
operation.
Startup and Shutdown
If you want to turn on the Tablet PC, long press 【ON/OFF】.
If your want to turn off the Tablet PC, long press 【ON/OFF】,choose 【shut down】.
In the area(such as airplanes, hospitals) which wireless devices are forbidden, please
comply with all posted warnings and authorized officer’s indication.
If need to use the non-network services of the devices, you can switch to flight mode.
Long press 【ON/OFF】button, then select the “flight mode”.
Connect external USB storage setting
Use an external adapter cable which could be connected to the U disk and card
readers and other external storage devices. Please insure the Tablet PC is turned on.
1 Plug one end (mini USB) of the adapter cable into the multifunction socket.
2 Plug the other end of the adapter cable into the USB port of U disk, card readers
and other external storage devices.
3 After a successful connection into the file manager, will show “external USB
memory”. You can access the files in the memory: view pictures, play music, video.
Page 26

26
4 Uninstall an external USB memory: settings, storage, external USB memory,
select "uninstall USB storage device", select "OK" to properly uninstall the USB
storage.
Using touch screen
Using touch screen can be more easily to select items or per form functions.
Learn basic operation of the touch screen:
To avoid scratching the touch screen, do not use sharp tools.
Do not allow the touch screen to reach out to other electronic equipment.
Electrostatic discharge may cause the touch screen failure.
Do not allow the touch screen to touch the water. In humid environments or
reach
close to water, touch screen may malfunction.
In order to achieve the best results, remove protective film before use the touch
screen.
To control the touch screen as below:
Click: Click once to select or start menu options or applications with your fingers.
Click and press: click and press for more than 2 seconds, options list wil pop-up.
scroll: Click , drag your finger up、down、left or right to move the item in the list.
Drop: with your finger to click and the press an item, and then drag your finger
to move the item.
Double-click: when view photos or web pages, click twice quickly with your
finger to zoom in or out.
If you do not use the Tablet PC for a specified length of time, the touch screen
will be turned off. If want re-open, press 【switch key】.
You also could adjust the backlight time. In standby mode, open the application
list, and then select Settings → Display → Sleep.
Page 27

27
Lock or unlock the touch screen and buttons
Lock or unlock touch screen and buttons
You can lock touch screen and buttons, to prevent any accidental operation.
For lock, pr ess 【ON/OFF】, unlock, press【ON/OFF】, and then according to the
prompts on the screen to manually unlock.
Move items on the standby screen
Click and press item you want to move.
After vibration, drag it to the desired location.
Remove items from the standby screen
Click and press item you want to remove, after vibration and the application area
will show the Recycle Bin Icon, this shows that the application area on the
bottom of the screen has changed to be Recycle Bin.
Drag the item to the Recycle Bin.
When the item be red, release it.
Use shortcuts panel
In standby mode or when using the application, touch the indicator icons area on
the top of the screen, then drag your finger down to open the shortcuts panel. You
can start or cancel wireless connectivity and other features, access to the
notification list, such as information, call activities, or processing status. For hidden
list, please drag up the bottom border.
Sliding shortcut icon left or right in the panel, you can use the following options:
Ambient light sensor: turn on or off ambient light sensor.
Standby: adjust delay time of screen automatically turns off.
Automatic rotate screen: turn on or off auto rotate screen function.
GPS: turn on or off GPS.
WLAN: turn on or off WLAN connection feature. Long press the icon to enter
the WLAN settings interface.
Bluetooth: turn on or off bluetooth wireless connection feature.
Page 28

28
Flight mode: turn on or off the flight mode.
Settings: enter the setting interface.
Access to application
If you want to access application
In standby mode, select start program to enter applications list.
Sliding shortcut icon left or right to other application screen, you also can
choose the bottom point and move to the main menu screen directly.
Select Start program:
Click and press application icon, add a shortcut of the application from list,
Click【Back】to return to the previous screen.
Tablet PC has a built-in motion sensor that can detect the direction of the
Panel, and then choose to automatically turn the screen. Or select Settings
Widget
Set the current time and date
In standby mode, open application list, then select Settings → Date and
Set time and date and change other options.
Turn on or off the touch sound
click. You can move the icon to the desired position in the standby screen.
Tablet PC. Use certain features rotating Tablet PC, Tablet PC interface will
automatically switch to a horizontal screen mode. To set the interface does not
change with the rotation of the Tablet PC, at the top of the screen to open the
shortcut
→ Display → Auto-rotate screen.
Click application from standby interface, choose widget, select one and long press,
drag to the interface
Customize more features based on personal preferences.
time.
In standby mode, open application list, then select Settings →Audio Profiles →
Page 29

29
General → System → Select the touch sound。
Adjust ringtone volume
Change ringtone
Select a ringtone from the list, then select OK.
Select wallpaper
Wallpaper: set background image.
Live wallpaper: You can set live wallpaper.
video Wallpaper: set the background video.
Album: You can select the pictures from album to be wallpaper.
Adjust display brightness
Set unlock pattern
Press 【+/-】 to adjust the ringtone volume.
In standby mode, open application list, then select Settings – Audio Profiles - General
- voice call ringtone or message ringtone.
1.In the standby mode, long press standby interface → Wallpaper → Select wallpaper
sources.
2.Select the image.
3. Set it as wallpaper.
Choose wallpaper from:
In the setup menu to adjust screen brightness:
In standby mode, open the pull-up bar, then select Settings → Display →
Brightness.
1. Clear check box before auto-adjust brightness.
2. Drag the slider to adjust brightness level.
3. Select OK.
Brightness level of the display will affect the speed of the battery power to use up.
Set unlock pattern to prevent unauthorized use.
1. In standby mode, open application list, then select Settings → Security → Screen
Page 30

30
lock → Pattern.
2. Carefully watch the instructions and patterns, select 【Next】 (if necessary).
3. Drag your finger to connect at least four points to draw a pattern.
4. Choose 【Continue】.
5. Re-drawn to confirm.
6. Select OK.
After setting unlock pattern, every time start tablet PC will be asked to enter the
unlock pattern. If you want no longer be required, select Settings → Security →
Screen lock → draw the pattern lock →No.
Note: If you select "No", screen will not be locked.
Applications
An application is a software program that enables you to perform a specific task.
Note: Preinstalled applications vary by geographic locations and are subject to
change.
Downloading games and applications
To extend the functionality of your tablet, download and install additional applications
from any of th
e different markets on the web.
Application Settings
Use the Applications settings to view details about the applications installed on your
tablet, to manage their data, to force them to stop if they do not function correctly, and
to set whether you want to permit the installation of applications that you obtain from
Web sites and e-mail.
To enable a setting, touch the setting item to select the check box. When a setting is
enabled, a green check is displayed in the check box. To disable a setting, touch the
setting item to clear the check box. If other actions are requir
ed, follow the instruction
on the screen.
Target SIM card
You can start PIN Code to lock Tablet PC.
1.In standby mode, open applicaons list, then select Sengs →Security→ SIM Card lock
→ Lock SIM card.
2.Input PIN code and press “yes”
If set PIN Code to lock, input PIN Code when turn on will be necessary every me.
If input wrong PIN Code three mes connuously, SIM or USIM card will be locked. In this
case, you must input PUK to unlock the SIM card
If the SIM card was locked due to wrong PUK, please take the card to service provider for
help.
Page 31

31
To know how to make a call, such as dial out or receive a call when you are in a call,
or other functions.
Records
To check call history classily selected
1 Under standby mode, click”dial”to call history.
2 In the interface of call history, to classify it in mobile or in source.
3 Select the record you want to know for details
Contacts
To know how to create and manage the contacts of personal or company stored in
memory of tablet or in SIM card
Group
Setting Groups
Collect
Collect those contacts who are special or you contacted with them frequently, to make
you manage them easily.
Note: This collect function is only for those contacts in tablet.
Contacts
Including all the contacts in tablet and SIM card.
Message.
To know how to create and send a SMS, look over and manage those messages sent
Page 32

32
Communication
Dialing
out or received. It make cause extra cost when sending or receiving messages out of
service area, for details, please consult with provider.
Emails
To send or receive emails by setting your personal or company email account.
Email setting
1 Under standby mode, open the applications, and select “email”
2 Select the account type, input your email address and password.
Select next(for common accounts) or hand set(for other company account)
3 Follow the instruction, after completing the setting, it will be loaded on your tablet.
Calendar
To check the date, setting agenda or events
Clock
clock
Set
Note: Shut down alarm is not supported.
Browser
Visit web and add it into bookmark.
Browse web
Under standby mode, open applications, select browser to open the web you like.
If visit certain web, select URL, input the web address, then press enter and search
the icon.
Files managing.
Open the images, videos, music, files or other documents in your tablet or SD card.
Note:
1 Don’t move or delete systems files except MP3, MP4, images in the SD card.
We suggest to install APK attached in SD card, if any stuck or restart happen to your
tablet due to installing APK by your side.
2 If you want to c
hange the card, please copy the materials to the other card you want
change, otherwise it will cause that some entertainment in the tablet won’t w ork.
Using cameras
Your tablet has two cameras, a front-facing camera and a rear-facing camera, each
with an auto-focus feature that enables you to capture high-quality pictures and
videos.
To use a camera, touch the applicat ions icon
from the action bar, and then touch
Camera to turn on the camera.
Taking a picture
To take a picture, do the following:
1. Touch the applications icon from the action bar and then touch Camera to turn on
the camera.
2. Make sure that the camera mode is set for capturing pictures.
3. Select to use the front-facing camera or the rear-facing camera.
4. Use camera settings controls to adjust the settings, and t hen touch the Shutter
button. The picture is saved to the picture gallery automatically and displayed at the
bottom left corner of the
screen.
Page 33

33
Recording a video
To record a video, do the following:
1. Touch the applications icon
from the action bar and then touch Camera to turn
on the camera.
2. Slide the camera mode switch to the camcorder mode.
3. Select to use the front-facing camera or the rear-facing camera.
4. Use the camera settings controls to adjust the settings, and then touch the Record
button. While recording, the Record button changes to Stop.
5. Touch the Stop button to stop recording. The video is saved into the video gallery
automatically.
Viewing pictures
You can view and manage pictures stored on your tablet, perform basic editing tasks
on pictures, and set a picture as your wallpaper or as a contact picture. You also can
share your pictures with friends through e-mail or a messaging application, or by
uploading them to the YouTube Web site.
To view pictures stored on your tablet, do the following:
• Touch the applications icon
from the action bar, and then touch Gallery.
• Touch Images and videos - Images only to display all pictures.
• Touch an album and then touch a picture to view it.
While you are viewing a picture, touch the screen to bring up the following options:
•
: View pictures in a slide-show mode.
•
: Share the selected picture through Bluetooth, e-mail, or a messaging
application.
•
: Delete the selected picture.
• Touch the menu icon to view the picture details, rotate the picture, crop the picture,
or set the picture as the wallpaper or as a contact photo.
• Touch the menu icon to view the picture details, rotate the picture, crop the picture,
or set the picture as the wallpaper or as a contact photo.
Watching videos
You can watch movies online directly from your tablet using one of the preinstalled
video applications, play videos that you have taken with cameras. You also can share
your videos with friends through e-mail, or a messaging application, or by uploading
them to the YouTube Web site.
To play a video from your video gallery, do the following:
1. Touch the applications icon
from the action bar.
2. Touch Gallery.
3. Touch Images and videos - Videos only to display all the videos you have taken
with cameras.
4. Touch a video to play it.
5. Use the controls on the screen to control playback.
To share a video with your friends, touch and hold the video from the video gallery.
Touch the Share icon
, and then touch a data transfer method.
Listening to music
To listen to music stored on your tablet, do the following:
Page 34

34
1. Touch the applications icon from the action bar to open the application library.
2. Touch Music. The Android music player is launched.
3. Touch an album and touch a song to play it.
4. Use controls on the screen to control playback.
Note: The Android Music application finds your music files anywhere you put them on
your tablet.
You can return to the playback screen from any other application by opening the
notifications panel and touching the ongoing music notification. To open the
notification panel, touch the time area from the system bar; the notifications are listed
under Details Status.
If you want
to create a playlist of your favorite songs or sort songs by type, do the
following:
1. Touch the triangular menu button to the right of an album, an artist, a song, or a
genre, and touch Add to playlist.
2. On the Add to playlist screen, touch New.
3. Type the name for your new playlist in the text field and then touch Save.
To remove a song from a playlist, touch and hold the song, and then touch Delete
from the pop-up menu.
Settings
SIM Card managing
To close or open the SIM card, select the SIM card to make video call, select if open
data connect or international roaming. Check the SI
M card application.
WLAN
Set the status of WLAN, internet notice, add network, etc.
Bluetooth
Set Bluetooth status, search Bluetooth and modify the name of Bluetooth.
Flux status
Check the flux status of SIM card
More settings
To set airplane mode, vpn, network share and portable hotspot, mobile network,
GPRS priority.
Scene
Set rings and its volume of incoming calls, messages, meanwhile, set self-defined
scene.
Display
Set functions related to the display of tablet, such as scene change, screen lock style,
brightness adjust, auto-rotate screen, screen timeout, etc.
ore message
St
Check the status of the memory of the SD card and tablet , it is able to format the
memory.
Battery
Show the status of charging and its percentage, life used of the battery, etc.
Apps
Modify the settings of installed apps.
Accounts and Sync
Change or manage the account which need sync function.
Location
Check the location in Apps with wireless network
Security
Setting varies password to protect the tablet from stealing.
Notice: Generally the initial PIN code is 1234
Page 35

35
Language and keyboard
Select language, set keyboard, select input
Reset
Factory data reset will clear all data in the tablet, please operate with attention.
Date and time
Set date and time displayed in the tablet
Shut down or turn on timely
According to the user’s habit to start this function.
Auxiliary function
Turn on t he function of power button, then press the button could end a call.
Developers options
For developers to use.
About Tablet PC
Query information about tablet, check its state.
Calculator
Learn how to perfor
m mathematical calculation, as normal hand-held or desktop
calculator, horizontal screen when switching for scientific calculator.
FM
You can recording when listening to a radio program.
Radio
Help you quickly to preserve voice recording, you can set sound and record mode,
and choose storage location arbitrarily.
Compass
Compass is a simple instrument used to determine position, whose predecessor is
one of the Chinese Four Great Inventions. It's an essential tool when you go out and
an identify the direction accurately.
who c
Search
Search local applications and some specific information on internet.
Download
Manage contents download by browser.
Video player
Learn how to view the video files stored in memory card when press a long time can
be operated as follows: share, delete, rename and view details.
This application can identify all video files the machine suppor t in the memory card,
user can free to watch video.
Film studio
You can use pictures and music to edit your favorite
video.
Bluetooth Distance Sensor
Two devices both have bluetooth distance sensor function could connect each other, if
distance is far or signal is weak, there's an alarm.
Wireless input device
You can connect to wireless keyboard.
Page 36

36
TROUBLESHOOTING
In order to save your time and unnecessary costs, please cont act professional
services staff when you need services, and make the following examinations:
Unable to start tablet PC
Check you've pressed【ON/OFF】more than 1 second.
Check the battery if is depleted, please recharge.
Start tablet, and message will alert
Input tablet lock password, choose automatic lock function, before using you must
input Telephone password.
Input PIN Code, choose every time input PIN Code function when start up.
Input PUK Code: if continuously input PIN Code three times for error, SIM Card will be
locked, you should input the PUK Code provided by operator.
SIM Card error
If SIM Car
d metal surface is dirty, please wipe with a clean cloth.
If SIM Card is not installed, install the SIM Card correctly according to the manual.
If SIM Card is damaged, contact your network service provider.
Unable to connect to network
If signal is weak, please move to a strong place and retry.
If it's beyond the network coverage area.
If SIM card is invalid, please contact your network provider.
Unable to call out
Please confirm whether press dial key.
Please confirm whether due to debt and was forbidden to call.
Please confirm whether SIM Card is effective.
Please confirm whet
her setting call restriction function.
Please confirm whether setting fixed dialing function.
Poor call quality
Please confirm whether volume adjustment is unsuited.
If using a tablet to make a conversation in the poor reception area, such as around tall
Page 37

37
buildings or in the underground room, the radio wave can’t be effectively convey.
If using tablet to make a conversation during the busy time, such as commuter time,
may cause can't call out.
Unable to call in
Please confirm tablet has turned on, and connected to network.
Please confirm whether due to debt and be barred.
Please confirm whether SIM Card is effective.
Please confirm whether setting call restriction function.
Contact
Please keep microphone close your mouth.
Standby time become short
Standby time is related with network system setting, if you stay in poor reception area
tablet will continue to launch in order to find the base station when can't receive signal,
a lot of battery power will consume, and standby time would be short. Please using in
strong signal area or temporarily turn off it.
No power
Check if plug is connected.
If dirt is accumulation, wiping tablet and battery connection port with a soft clean cloth.
Please change the charging environment when below 0℃ or above 45 ℃.
Battery or charger need to be changed when damaged.
If the guide information couldn't help you to solve the problems, please record your
Tablet PC's model and seria
l number, license or insurance policy information, and a
clear description of the problem, then contact the local customer service.
,
Page 38

38
SPECIFICATIONS
Product features, specifications and appearances are subject to change
without notice
Model
OS
CPU
Memory
Internal Memory
Display
Resolution
Panel
WiFi
USB
Sd card
Cámara
Ac adapter
NVR-TAB7 S53G (8GB)
Android 4.2
MTK8312 Dual-Core cortex A7@ 1.2GHz
1GB
8GB
7”
1024*600
G+P
802.11b/g/n
1XUSB 2.0
Be extendable from 512MB to 32GB
Front 0.3 Mega Pixel, back 2.0 Mega Pixel
DC 5V 2A
Audio
Support
Video
Batery
Support
3.7V 2500mah
Speaker
1W8Ω
Declaration of CE Conformity
This symbol on the product or on the container indicates that this
product cannot be eliminated with the general waste. The user is responsible for
eliminating this kind of waste by throwing them away at a “recycling point” specifically
for electrical and electronic waste. Selective collection and electrical equipment
recycling contribute to preserve natural resources and warrant waste recycling to
protect environment and health. In order to receive further information about electrical
and electronic waste collecting and recycling, c
ontact your Local Council, the service
of household waste or the establishment where the product was acquired.
At full volume, prolonged listening to the portable audio device may
damage the user’s hearing.
For warranty information and technical support, please visit www.nevir.es
`
Page 39

39
DECLARACIÓN DE CONFORMIDAD
NEVIR, S.A. declara bajo su responsabilidad que el aparato indicado cumple
los requisitos de las siguientes directivas:
DIRECTIVA EMC LOW VOLTAGE DIRECTIVA EEC
ETSI EN300440-1 V 1.6.1(2010-08)
ETSI EN300440-2 V 1.4.1(2010-08)
ETSI EN301489-1 V1.9.2(2011-09)
ETSI EN301489-17 V 2.2.1(2012-09)
ETSI EN301489-3 V1.4.1(2002-08)
ETSI EN301489-7 V 1.3.1(2005-11)
ETSI EN301489-24 V 1.5.1(2010-10)
RF STANDARD
ETSI EN300328 V 1.7.1(2006-10)
ETSI EN301511 V 9.0.2(2003-03)
ETSI EN301908-1 V 5.2.1(2011-05)
ETSI EN301908-2 V 5.2.1(2011-07)
EN62479:2010
EN60950-1:2006+A11:2009+A1:2 010+A12:2011
Descripción del aparato:
TABLET 7” (17,78cm) con 8GB
Modelo NEVIR: NVR-TAB7 S53G (8GB)
Importador: NEVIR, S.A.
Dirección del importador: NEVIR, S.A.
C/ Canteros, 14
Parque Empresarial Puerta de Madrid
28830 San Fernando de Henares, Madrid
 Loading...