

Page 1
TABLET 7” ( 17,78cm) 3G y 8GBs
NVR-TAB7 S13G (8GB)
MANUAL DE INSTRUCCIONES
Page 2

Contenido
1. Instrucciones de seguridad .................................................................................................... 2
2. Guía de inicio rápido ............................................................................................................... 3
2.1 Inicio y cierre/apagado ................................................................................................ 3
2.2 Interfaz principal .............................................................................................................. 3
2.3 Conexión USB ................................................................................................................... 4
3. Ajustes básicos ........................................................................................................................... 5
3.1 Gestión de la SIM ............................................................................................................ 5
3.2 Red Inalámbrica e internet .......................................................................................... 5
3.3 Bluetooth ........................................................................................................................... 6
3.4 Fecha y hora .................................................................................................................... 6
3.5 Encendido y apagado programado ........................................................................ 7
4. Multi-Media ................................................................................................................................. 7
4.1 Música ................................................................................................................................ 7
4.2 Video .................................................................................................................................. 8
4.3 Galería de fotos ............................................................................................................... 8
4.4 Cámara.............................................................................................................................. 9
4.5 Radio FM ............................................................................................................................ 9
5. Comunicación ......................................................................................................................... 10
5.1 Teléfono ........................................................................................................................... 10
5.2 SMS/Mensajes de texto ............................................................................................... 11
5.3 Lista de contactos ........................................................................................................ 11
6. Instalación de aplicaciones ................................................................................................. 12
6.1 Instalación ....................................................................................................................... 12
6.2 Desinstalar ....................................................................................................................... 12
7. Resolución de problemas ..................................................................................................... 13
1
Page 3

1. Instrucciones de seguridad
Antes de empezar a manejar la tablet, por favor, lea este capítulo y enseñe a los
posibles usuarios esta información. Para más detalles, consulte las instrucciones
de seguridad y advertencias.
Nunca utilice la tablet mientras conduce.
En zonas delimitadas y con advertencias sobre uso de dispositivos
electrónicos, apague el dispositivo cuando sea requerido( transportes,
lugares medicalizados etc).
No abra o manipule internamente el dispositivo. Esta tarea está
limitada a agentes autorizados por NEVIR.
Mantenga la tablet alejada de equipos magnéticos, radiación, ya
que podría dañar el dispositivo o borrar datos.
No use el dispositivo cerca de fuentes de ignición o combustibles.
Proteja la tablet y accesorios del alcance de niños. Si desea que la
usen, que sea bajo supervisión de los padres/adultos.
Por favor, cumpla con las normas y reglamentos relacionados con el
respeto y la privacidad de los demás y sus derechos civiles durante el uso
de la tablet.
Por favor, cíñase estrictamente a las instrucciones relacionadas en el
manual cuando se utiliza cable USB para garantizar la seguridad de la
tablet y el PC..
2
Page 4
prinncipal
Encabezamient
o
2. Guía de inicio rápido
2.1 Inicio y cierre/apagado
Inicio
Presione el botón encendido durante 3 segundos, y comenzará la pantalla
de encendido. Si la pantalla pasado el tiempo, entra en modo bloqueo,
desbloquéela para su uso.
Apagado
1. Presione la tecla de encendido/apagado hasta que salga la ventana
con opciones..
2. La ventana de opciones tiene para elegir modo sin sonido/muteado ,
modo avión reiniciar y apagar..
Búsqueda
3. Seleccione la opción apagar y confirme.
2.2 Interfaz principal
La pantalla principal, es como se describe en la foto , Presione durante breve
espacio de tiempo en cualquier lugar de la pantalla para poder accede al menú
de accesos rápidos, widgets, cambio del fondo de pantalla etc…
hora Batería
Pantallas
usadas
recientemente
Pantalla
Retroceso
3
Page 5
2.3 Conexión USB
Configuración de almacenamiento
1. Conecte la tablet a un PC por medio de un cable USB y aparecerá un
menú desplegable con opciones.
2. Pulse “USB Conectado”, como en la foto , y a “configuración de
almacenamiento por USB”.
3. Ahora puede transferir información.
Copiar un archivo a una tarjeta de memoria
1. Conecte el dispositivo a un PC por medio de un cable USB
2. Siga las instrucciones detalladas en el paso anterior
3. Busque “disco extraible” en su PC.
4. Copie el archive a la carpeta “disco extraible”
5. Cuando acabe, cierre en su PC la conexión USB y finalice. Ya puede
desconectar el dispositivo.
Aviso: Cuando el MID se conecta con cable USB, y se abre la configuración
de almacenamiento USB, no podrá ver la tarjeta de memoria a través del MID.
Sólo después de desconectar el cable USB, puede ver la tarjeta de memoria en el
MID.
4
Page 6

3. Ajustes básicos
3.1 Gestión de la SIM
3.1-1 Llamada de voz
En el menú de ajustes seleccione administracion de tarjeta como
Pulse llamada de voz y seleccione la SIM que prefiera
3.1-2 Video llamada
Siga los pasos anteriores. Pulse video llamada, después de seleccionar la SIM
deseada
3.1-3 Mensajes
Siga los pasos descritos en punto 3.1 y seleccione la SIM. Puede seleccionar envió
de mensaje
3.1-4 Conexión de datos
Siga los pasos del punto 3.1 y seleccione conexión de datos
3.2 Red Inalámbrica e internet
1. Conectar Wi-Fi
1) Vaya a ajustes
2) Pulse WI-FI seleccione On y aparecerá un listado de redes disponibles
3) Seleccione la red a la que desea conectarse. Si está protegida por
contraseña, introdúzcala y acepte.
2. Añadir red
1) Pulse
2) Introduzca el SSID, el nombre de la red y guarde..
3) Para conectarse, introduzca el nombre de la red y acepte.
3. Aviso de red disponible
Se abre este aviso, cuando la señal de WI-FI capte una señal de red
disponible.
4. Mantener la WI-FI mientras está inoperativo o en suspensión
1) Pulse , y seleccione ajustes avanzados
2) Pulse “USAR WI-FI” EN SUSPENSIÓN.
5
Page 7

3.3 Bluetooth
1. En ajustes seleccione Bluetooth
2. Pulse hasta que aparezca SI.
3. El dispositivo buscará cualquier dispositivo que tenga activado el
bluetooth.
4. Cuando seleccione el dispositivo deseado y tras introducir la
contraseña, podrá conectarse e intercambiar archivos.
5. Para desconectar seleccione NO en el menú de ajustes
3.4 Fecha y hora
De acuerdo con el valor preestablecido, el sistema se aplicará voluntariamente
la fecha, la zona y el tiempo proporcionado por internet.
1. Fecha fijada Manual, hora y zona
2. Click en ajustes.
3. Baje por la pantalla y pulse fecha y hora
4. Apague ajuste automático de fecha y hora
5. Deshabilite zona horaria automática..
6. Haga clic Zona, a continuación, elija las listas de zona. Deslícese por la
lista para ver más zonas.
7. Haga clic configuración de fecha y, a continuación, haga click arriba o
hacia abajo para ajustar la fecha, el mes y el año, haga clic en
configuración cuando termine la selección.
8. Haga click en Ajuste de hora y haga click en el botón superior o hacia
abajo para ajustar la hora y los minutos, haga clic en AM o PM para
cambiar mañana o por la tarde (no existe tal selección en formato de 24
horas). Haga clic en Configuración para terminar.
9. Haga clic en el formato de 24 horas. Si cambia entre el formato de 12
horas o de 24 horas, el formato de hora que seleccione se aplicará a la
alarma también.
10. Haga click en configuración del formato de fecha y seleccione el
formato de hora que desee mostrar en la tableta.
Nota: Si usted selecciona la hora y fecha proporcionada por internet, no será
capaz de establecer la fecha, hora y zona horaria salvo que lo deshabilite.
6
Page 8
3.5 Encendido y apagado programado
1. Ajustes
2. Pulse Encendido y apagado programado.
4. Multi-Media
4.1 Música
Acceder al reproductor de música: en el menú o a través del escritorio haga
clic en para acceder al reproductor multimedia
Album
Canción
Artista
Album
Aleatorio
Pausa/play
Siguiente Anterior
7
Page 9
Barra de
estado de
reproducción
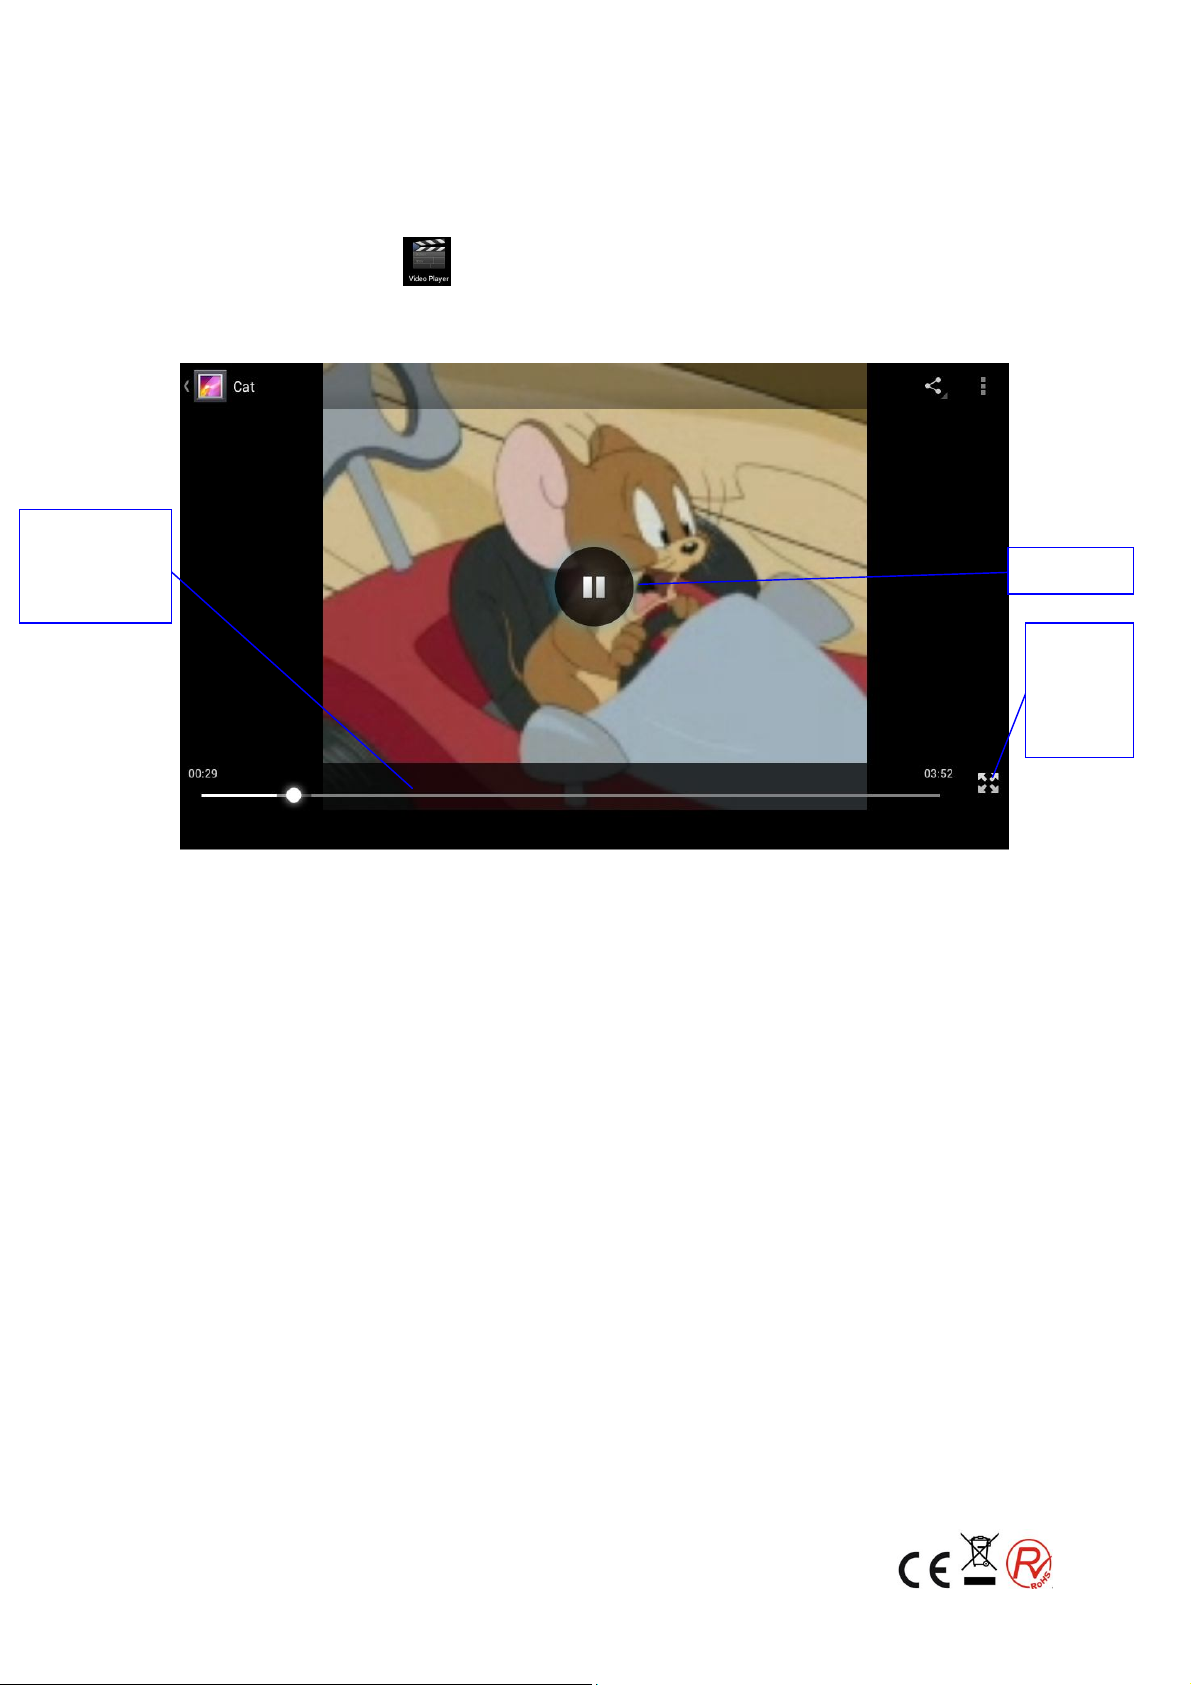
4.2 Video
Seleccione en el menú principal y elija el video que quiere
reproducir.
Los controles están detallados en la foto
Play/pausa
Tamaño
de
Pantalla
4.3 Galería de fotos
La Aplicación galería fotográfica puede buscar fotos y archivos de
vídeo en la tarjeta SD, y la galería de fotos clasificará estas fotos y
videos en la carpeta. Puede aplicar galería de fotos para ver y editar
fotos, configurar las fotos como fondo de pantalla y ver videos.
Ver fotos
1. Seleccione galería
2. Elija el archivo que quiere ver
3. Pulse sobre la foto que desea abrir.
4. Las imágenes se pueden acercar y alejar con el zoom; coloque
dos dedos en la pantalla, la separe los dedos (al juntar los dedos,
la imagen se hará mas pequeña) o doble clic en la pantalla.
Nota: al navegar por las fotos, deslizar hacia la izquierda o hacia la derecha
para ver más fotos.
Editar fotos
Para ver las imágenes en modo de pantalla completa, haga click en la
8
Page 10

tecla de menú para mostrar la selección del menú, y puede elegir la
opción que usted necesite para editar y ajustar las imágenes.
Diapositivas
1. Seleccione una foto y abra el menu.
Pulse diapositivas/slide show, o seleccione
4.4 Cámara
Seleccione en la pantalla principal ,
Aparecerá lo que se muestras en la foto
4.5 Radio FM
Visor de fotos
videos
Cambio entre
camara delantera y
trasera
TOMAR
FOTO
Sub menu
Pantalla
completa
Modo video/foto
Pulse en la pantalla principal.
Nota: Es necesario insertar los auriculares como antena durante el uso
de la radio FM, si no, la tableta no puede buscar las banda de
frecuencias.
9
Page 11

5. Comunicación
5.1 Teléfono
1 Pulse Teléfono
1 Fijese en la foto
Historial de
llamadas
contactos
Dato del
teléfono del
contacto
Ocultar teclado
Llamar
Menu
10
Page 12

5.2 SMS/Mensajes de texto
1 Seleccione
2 Editar “Nuevo mensaje”
Adjuntos
Menu
Destinatario
Receptor
Enviar
5.3 Lista de contactos
Pulse para que salgan sus contactos y fijese
Para buscar un contacto: click y entrará en modo buscar
Añadir contacto: click para añadir un Nuevo c ontacto.
11
Page 13

6. Instalación de aplicaciones
6.1 Instalación
Aplicaciones de terceros
1. Pulse el gestor de aplicaciones y a continuación la aplicación
que se haya descargado. Confirme la instalación.
2. Al finalizar la instalación, pulse abrir si desea ver el resultado.
Nota: Las aplicaciones en la red, se encuentran bajo el sufijo .apk.
6.2 Desinstalar
Cómo desinstalar
1. Pulse sobre el icono en la pantalla principal el icono de
opciones.
2. Pulse sobre el gestor de aplicaciones para que abra el
submenú de opciones
3. Pulse sobre la aplicación que desea desinstalar
4. Pulse la confirmación para eliminar la aplicación..
12
Page 14

7. Resolución de problemas
1. Al iniciar la tablet, va lenta
A veces tras la descarga de una nueva aplicación o tras una
actualización del sistema, la tablet necesita un poco más de
tiempo del habitual para reinstalar el software. Apague las
aplicaciones que no usa y reinicie.
2. No puedo conectar el Wi-Fi
Compruebe que el router está operativo y la WIFI de la MID
también.
Compruebe que la distancia entre el router y la tablet no es
superior al alcance del router y que no haya obstáculos que
interrumpan la señal.
Asegúrese que la contraseña haya sido introducida
correctamente.
3. LA tablet se calienta
Cuando el cable de corriente esta enchufado, o al operar con
muchas aplicaciones al mismo tiempo, la tablet puede sufrir un
aumento de temperatura en el procesador.
4. No puedo finalizar el registro de correo electrónico
Asegúrese de estar conectado a internet
Asegúrese que la dirección de correo y pasword son los
correctos
Compruebe que la fecha y hora son correctas
5. La tablet se bloquea y no funciona
Cuando se instala una aplicación de otro fabricante, puede
causar un comportamiento anormal,.Apague la tablet para
reiniciar el sistema
6. No puedo abrir una página web
Compruebe que haya cobertura wifi y que este tanto router
como wifi de la tablet conectadas
Reinicie el navegador y vuelva a intentarlo.
Este símbolo sobre el producto o en las instrucciones quiere
decir que su equipamiento eléctrico y electrónico debería
ser depositado al final de su vida útil por separado de la
basura domestica. Hay sistemas de recogida para el
reciclaje en toda la UE. Para más información, consulte con
las autoridades locales o con la tienda donde adquirió el
reproductor.
13
Page 15

7” ( 17,78cm) 3G MID with 8GBs
NVR-TAB7 S13G (8GB)
USER MANUAL
Page 16

Content
Content .......................................................................................................................................... 1
1. Safety Instruction ..................................................................................................................... 2
2. Quick Start Guide .................................................................................................................... 3
2.1 Startup and Shutdown ................................................................................................. 3
2.1 Home Page ..................................................................................................................... 3
2.3 USB Connection ............................................................................................................. 4
3. Basic Setting .............................................................................................................................. 5
3.1 SIM Management ......................................................................................................... 5
3.2 Wireless and Internet .................................................................................................... 5
3.3 Bluetooth ......................................................................................................................... 6
3.4 Date and Time ............................................................................................................... 6
3.5 Fixed-time Startup and Shutdown ............................................................................ 7
4. Multi-Media ............................................................................................................................... 7
4.1 Music ................................................................................................................................. 7
4.2 Video ................................................................................................................................ 8
4.3 Photo Gallery .................................................................................................................. 8
4.4 Camera .......................................................................................................................... 10
4.5 FM Radio ........................................................................................................................ 10
5. Communication Function ................................................................................................... 11
5.1 Phone ............................................................................................................................. 11
5.2 Text Message ................................................................................................................ 12
5.3 Contact List ................................................................................................................... 12
6. Installation of Procedures .................................................................................................... 13
6.1 Installation ..................................................................................................................... 13
6.2 Uninstall .......................................................................................................................... 13
7. Troubles Shooting................................................................................................................... 14
1
Page 17

1. Safety Instruction
Before the operation of the MID, please read this chapter and teach your kids
about these information. For further details, please refer to the safety instructions
and announcement.
Never use the MID when driving car, in order to ensure safe driving.
In the medical area, please abide by related rules and regulations.
Please shut down the MID when it is near to the medical area.
To avoid the wireless signal to interrupt the plane- controlled signal,
please shut down the MID or using airplane mode when you are
boarding a flight,
To avoid electronic equipment failure, please shut down the MID in
the vicinage of high-accuracy electronic equipments.
Please don’t disassemble the MID and accessories. Only authorized
agent has access to service the MID.
Please keep the MID far away from magnetic equipments, the
radiation of MID may erase the data stored in the magnetic
equipments.
Never use the MID in the vicinage of high temperature, inflammable
gas ( gas station).
Protect the MID and accessories from kids reach scope, and avoid
the kids to use the MID without parents’ supervision.
Please comply with related rules and regulations, and respect others’
privacy and legal rights while using the MID.
Please strictly adhere to related instructions in the manual when
using USB cable to ensure the safety of the MID or PC.
Never use the MID in bathroom or other humid environment, and
please protect the MID from liquid wash or wet.
2
Page 18

used
2. Quick Start Guide
2.1 Startup and Shutdown
Startup
Long press POWER key for three seconds, you can enter into startup picture.
The system enters into screen lock status, please unlock it.
Shutdown
1. Long press POWER, it will popoup shutdown window.
2. Shutdowm window contains mute mode, airplane mode,reboot mode
and shutdown four options.
3. Click Shutdown is the last step.
2.1 Home Page
Main interface as below picture , long press the blank and it will popup windows
to set wallpaper, folder, widgets, and shortcut.
search
time Battery
Menus . &
display
recently
Home
return
3
Page 19

2.3 USB Connection
MID storage configuration
Before transmitting documents, you have to conduct storage configuration for
your MID:
1. Connect the MID and computer by USB cable, the reminder column will
show the remind information.
2. Open the reminder board; please view the MID status and reminder to
learn how to open the board.
3. In the reminder board, click the “USB Connected”, it will as below Picture ,
then click “open USB storage configuration”.
4. Now the USB is connected successfully.
Copy the document into memory card
1. Connect the MID to computer with USB cable.
2. As MID storage configuration, it is connected with computer successfully.
3. Open the “My computer” in your computer, check the items in
“removable disc”.
4. Copy the documents you need into “removable disc”.
5. After copying finishes, click “shutdown the USB storage configuration” to
uninstall.
Notice: When the MID is connected with USB cable, and you open the USB
storage configuration, you can’t view the memory card through the MID. Only
after you detach the USB cable, you can view the memory card in the MID.
4
Page 20

3. Basic Setting
3.1 SIM Management
3.1-1 Voice call
Click settings in main menu, choose SIM Management
Click voice call, choose defaulted SIM card
3.1-2 Video Call
Click settings in main menu, choose SIM Management, and click video call,
choose defaulted SIM card when makes video call
3.1-3 Message
Click settings in main menu, choose SIM Management, click message, choose the
defaulted SIM card when sends message
3.1-4 Data Connection
Click setting application in main menu, choose SIM management, click data
connection, choose the defaulted SIM card
3.2 Wireless and Internet
1. Connect Wi-Fi
1) In the main menu or interface, choose setting application procedure.
2) Click WLAN, open wifi, MID will automatically search the available
Wifi wireless internet.
3) Choose the Wi-Fi internet you want to connect, if it has password, it will
popup the password window, enter password, click connect.
2. Add Network
1) Click icon in right top
2) Input network SSID, the wireless network name, click save.
3) Click user name already saved, click connect to use network,
3. Network Notice
If you open Network Notice, when WIFI signal appears, the right
bottom will remind you available WLAN network,
4. Keep WI-FI on during sleep..
a) Click icon in right top, select advanced.
b) Click Keep WI-FI on during sleep,
5
Page 21

3.3 Bluetooth
. Bluetooth function operation
1. Click setting application in main menu interface
2. Click bluetooth and open it.
3. If somebody open bluetooth in your surroudings, click search device in
right above, then MID will automatically search the bluetooth device
nearby.
4. Click the available Bluetooth device, it will popup request window, enter
into related password, and match the device to connect.
5. After match successfully, choose the operation you want to, click
3.4 Date and Time
According to the preset, system will voluntorily apply the date, zone, and time
provided by internet.
Manual set date, time and zone
1. Click Setting application procedure.
2. Slide down the screen, then click date and time.
3. Turn off “auto setting of date and time”.
4. Turn off “auto setting zone’.
5. Click Zone Selecting, then choose the zone lists. Slide down the list to view
more zones.
6. Click Date setting, then click upper or down buton to adjust date, month,
and year, click setting when you finish selection.
7. Click Time setting, then click upper or down button to adjust hour and
minute, click AM or PM to change morning or afternoon ( there is no such
selection when you se 24-hour format). Click Setting to finish.
8. Click 24-hour format, switch between 12-hour or 24-hour formay, the time
format you choose will be used on the alarm clock.
9. Click date format setting, then choose the time format you want to show
on MID.
Note: If you use the time internet provided, you will not able to set the date, time
and time zone.
6
Page 22

3.5 Fixed-time Startup and Shutdown
1. Click Setting application procedure
2. Click fixed-tine startup and shutdown.
4. Multi-Media
4.1 Music
Enter into music player: in menu or desktop click music icon to enter into
music player, click the music you want to play
Album
Random play
Song name
Artist
Album
Drag the progress bar to adjust play progress.
Operation of music player button
Pause/play
Next song Previous song
7
Page 23

mode
Adjust
play
progress
4.2 Video
Enter video player: choose application in main menu, choose the
video you want to play.
Operation of video player button as below picture
Play/pause
Choose
the
screen
4.3 Photo Gallery
Photo gallery application can auto search photos and video files in SD
card, and photo gallery will classify these photos and videos in folder. You
can apply photo gallery to view and edit photos, set the photos as
wallpaper and watch the video.
View pictures
4. Click gallery application in main interface.
5. Enter into gallery, click the folder you want to view.
6. Click the picture you want to view, the system will play it in full
screen mode automatically.
7. The pictures can be zoom in and zoom out, put two fingers on
the screen, the separete the fingers(gather up the fingers, the
picture will be zoom in) or double click the screen.
Note: when you browse the pictures, slide left or right to view more
pictures.
8
Page 24

Edit and set pictures
When check the pictures in full screen mode, click menu key to display
menu selection, you can choose the selection you need to edit and
setting pictures.
Slide Show
1. Open a picture, use virtual key to click menu key, display
menu selection.
2. Click slide show, it will auto loop play(or choose button
in picture folder)
Crop
1. Click menu key to display menu selection.
2. Then click crop, click and drag related area to adjust the
cropper.
3. Click cropper and drag it inside and outside to adjust the image.
4. After adjust the size you want, click crop.
5. If you wish to give up to crop, click cancel to return to picture
browse.
Edit
1. Click menu key, display the menu selection.
2. Click edit.
3. Adjust teh brightness, style, color, antialias setting in selection.
4. Click save.
5. If you want to give up edit, click return key, click not to return
to picture browse.
9
Page 25

4.4 Camera
In the main interface or desktop, click camera application procedure , enter
into camera
Operation of camera ,Switch camera: choose Menu key, click switch
front/back camera, as below picture
Switch front/back
camera
View the
pictures and
videos
Click it to take
pictures
camera shooting
mode
4.5 FM Radio
Click in the main interface or desktop to enter into FM radio
interface:
Click search to search FM band,
RDS setting: click Menu key in interface, click the munu button, and
choose RDS settings, enter into RDS setting, and choose the selection
you want to add
Save channels: Click button in the main interface to save
Sub menu
Camera mode
Full screen play
the channel, and the channel will be saved in channels list.
Note: You need to insert earphone as antenna when using FM
radio, If no antenna, your MID can’t search any frequency band.
10
Page 26

5. Communication Function
5.1 Phone
1 Click Phone application procedure
2 Operate as below picture
Call history contact
Display
phone
numbers
Hide keypad
The area of
dial phone
Dial phone
numbers
Function
key
11
Page 27

some files
5.2 Text Message
Directly input
phone number
1 Enter into main menu, choose application procedure.
2 Click “Edit new message”
Attach
Menu(discard,insert
text and settings)
Add receiver
Send
message
5.3 Contact List
Click Contact list in the main interface, enter into the contact list
Search contact: click button, enter into search function
Add contact: click button, enter into add contact interface.
12
Page 28

6. Installation of Procedures
6.1 Installation
Install the third party application procedure
1. Click “file manager” application procedure; choose the
application procedure you need to install.
2. Hold the application procedure you need to install.
3. It popup install, click install apk.
4. Finish the installation as guide, it will operate.
Note: The third party procedure searched from internet to use on the system are
all suffixed with .apk.
6.2 Uninstall
Uninstall application procedure
1. Click setting icon in main interface.
2. Click manage application procedure, list all the application
procedures insralled in the system.
3. Click the APK you want to uninstall, click uninstall.
4. Click confirm to finish uninstallation.
Skill: The procedure manager installed by system has many convinent
methods to uninstal after opening procedure manager, click uninstall, it will list
all the application procedures installed by system.
13
Page 29

7. Troubles Shooting
5. The first startup of MID is slow
After the MID system upgraded, the first startup need to install the
pre-installed application softwares, the lead time is around 2-3
minutes, the startup afterwards will be much quicker.
6. MID can’t connect Wi-Fi
Make sure the wireless router of internet service can work in
normal.
Ensure the MID and wireless router in certain distance, and no
wall or other barrier between them.
Ensure the user name and password both correct.
7. MID feels hot
When many application procedures are used in meanwhile, or the
brightness of screen open to the lightest or under charging, MID may
feel fever. It is normal.
8. Email can’t be set or Registeration of application procedure.
Ensure your internet is well connected.
Make sure your email setting way is correct.
Keep your system time and local time consitent.
5. The system is abnormal and can’t work.
When you install some third party application procedure, it may
cause abnormal work, you can press Reset key(next to power port) to
reset the system.
6. The webpage can’t be opened
Please keep the distance between from route to MID in
effective range.
Please restart WIFI and try again.
7. MID works terribly slow sometimes
It is normal phenomenon. Please turn off some application you don’t need in
advanced task management, or uninstall some third party application to release
more system resource.
14
Page 30

DECLARACIÓN DE CONFORMIDAD
NEVIR, S.A. declara bajo su responsabilidad que el aparato indicado cumple los
requisitos de las siguientes directivas:
EMC DIRECTIVE 2004/108/EC
LOW VOLTAGE DIRECTIVE 2006/95/EC
EN55013:2001+A1:2003+A2:2006 EN60065:2002+A1:2006+A11:2008
EN 61000-3-2: 2006
EN 61000-3-3:1995+A1:2001+A2:2005
EN 55020:2007
Descripción del aparato:
NVR-TAB7 S13G (8GB) TABLET 7” ( 17,78cm) 3G y 8GBs
Import: NEVIR S.A.
Dirección de importador:
Nevir S.A.
C/ Canteros, 14
Parque Empresarial Puerta de Madrid
28830 San Fernando de Henares - Madrid
15
 Loading...