

Page 1
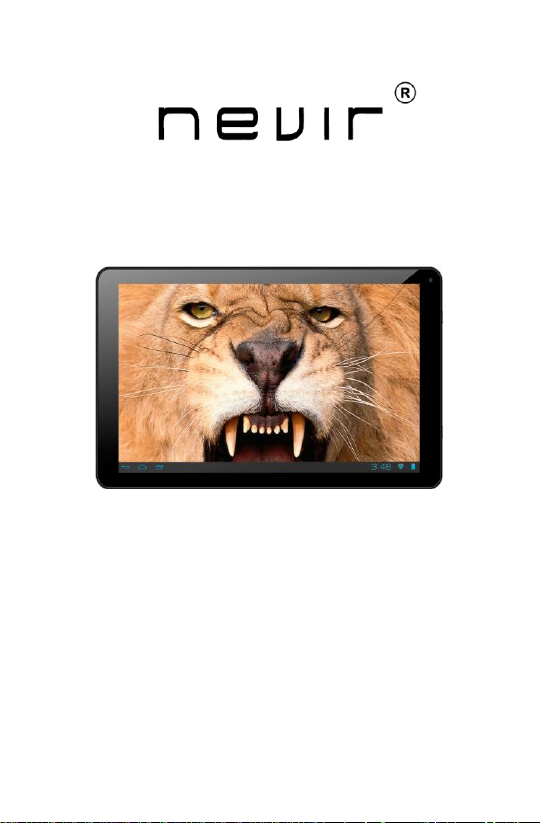
NVR-TAB101QHD S2 (8GB)
TABLET ANDROID 10.1” (25, 65 cm)
MANUAL DE USUARIO
Page 2

Español
Gracias por la compra de este dispositivo tablet. Deseamos que la disfrute.
Por favor, lea atentamente estas instrucciones antes de manipular la tablet
y guárdelas para futuras consultas. No asumimos ninguna responsabilidad
que surja de la operación incorrecta o accidental Para ofrecer un mejor
servicio, nos reservamos el derecho a modificar éste manual.
Si la configuración actual y el uso de la unidad son diferentes de este
manual, por favor visite el sitio web www.nevir.es para preguntar sobre la
información más reciente.
No deje que el agua o cualquier otro objeto extraño, entre en la
unidad.
I. ADVERTENCIA:
1. Evite que la unidad caiga al suelo.. evite agitar la pantalla de
manera brusca, o puede que el aparato se dañe.
2. No use elementos metálicos para tocar la pantalla a fin de evitar
cortocircuitos.
3. Haga volcados de seguridad de sus datos de manera preventiva
para evitar perdida de los mismos, especialmente si va a realizar
una actualización del FIRMWARE. Nevir no se hace responsable
de manera directa ni indirecta por la pérdida de los mismos.
4. No desmantele el aparato. No limpie la unidad con alcohol,
benceno o disolvente.
5. No apague/desconecte la unidad durante el proceso de volcado,
actualización o puede generar errores.
6. NEVIR no se hace responsable de los daños causados por
actualizaciones, roturas accidentales, reparaciones no autorizadas
u otras razones. Por favor, utilice la tablet estrictamente de
2
Page 3
acuerdo con el manual de usuario.
7. No use la tablet en lugares extremadamente fríos, calientes o
húmedos.
8. Las especificaciones están sujetas a cambios sin aviso.
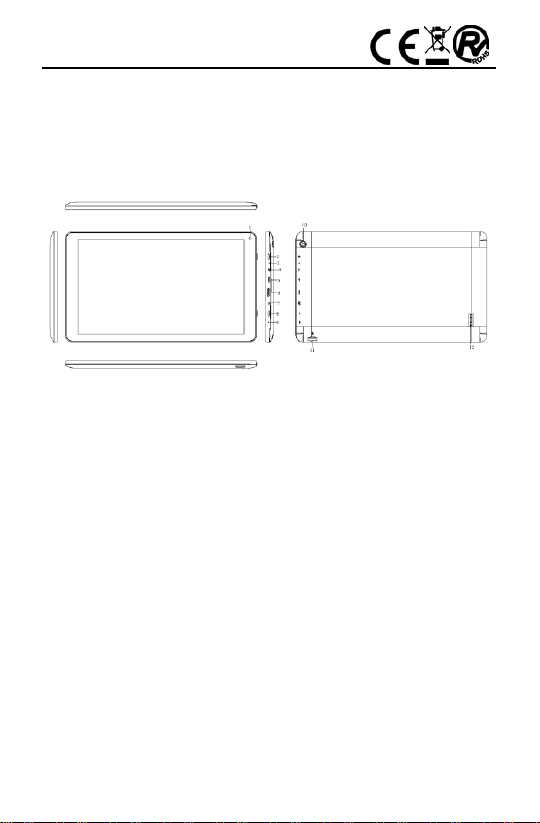
II. ELEMENTOS DE LA UNIDAD
1. Cámara frontal
2. Encendido / apagado
3. Reajustar
4. Toma de auriculares
5. Interfaz Micro USB
6. Interfaz HDMI
7. Interfaz del cargador DC
8. Menú principal
9. MIC
10. Cámara trasera
11. Interfaz TF CARD
12. Altoparlante
III. Instrucción de la operación
1. Funcionamiento básico
1.1. Encendido / Apagado
Encendido
Mantenga pulsado el botón de encendido durante 5 segundos, la
3
Page 4

unidad muestra el logotipo de la puesta en marcha y entra en el
modo de trabajo.
Apague
Mantenga pulsado el botón de encendido durante 5 segundos para
apagar la unidad.
Estado “dormido”
Mientras el dispositivo está en estado de funcionamiento, pulse el
botón de encendido, entra en el modo de dormir, y la pantalla se
apagará entonces. Pulse el botón de encendido de nuevo, cambia al
modo normal. Usted puede utilizar esta función cuando no 'utiliza el
dispositivo temporal para ahorrar energía.
1.2. Carga
Cuando el dispositivo advierte de batería baja, conecte el
cargador.
Nota: Para mejorar la vida útil de la batería añada 15 minutos de
carga después de que reciba el mensaje de batería cargada.
1.3. Menu Principal
De click en el ícono de interfase principal. Esto incluye la
configuración del sistema, la reproducción de música, reproducción
de vídeo, navegador web y otras aplicaciones que se instalan en el
menú principal.
2. Configuración
Haga clic en "Configuración" en el menú principal para entrar en la
interfaz de configuración. Haga clic en los elementos de ajuste
correspondientes para operar.
2.1.Fecha y Hora
Haga clic en "Fecha y hora" en la interfaz de configuración para
ajustar la fecha y la hora. Usted puede configurar la fecha, la zona
horaria, la hora, el formato de hora y formato de fecha, etc en el
menú.
2.2. Brillo
Seleccione "Ver" en la interfaz de configuración. Haga clic en "Brillo"
para entrar, y deslice la barra para ajustar el brillo.
4
Page 5

2.3. Tiempo de espera de la pantalla
Ajuste el retraso antes de que la pantalla se apague
automáticamente.
Seleccione "Ver" en la interfaz de configuración. Haga clic en "Sleep"
para entrar, y haga clic en el momento que desee.
Nota: El ajuste del tiempo de espera de la pantalla no está disponible
durante la reproducción de video.
3. Conexión Wi-Fi
Haz clic en "Configuración" en la principal interface.Click W i-Fi para
activar el Wi-Fi, enumera la red abierta que buscaba. Haga clic en el
nombre de la red, sino que aparece la ventana de configuración. Es
posible conectarlo a WIFI acuerdo con las instrucciones. Tendrá que
introducir el nombre de usuario y contraseña si las redes están
cifradas.
4. Instalar, desinstalar y ejecutar aplicaciones
4.1 Instalar
Hay muchas formas de instalar aplicaciones bajo Android a través de
los diferentes mercados de aplicaciones existentes.
Seleccione el archivo APK que desee e introduzca la interfaz de
instalación de la aplicación. Haga clic en "Instalar" para instalar la
aplicación automáticamente. Después de la instalación, se le pedirá
"Abrir" y "Finalizar". Haga clic en "Abrir" para abrir la aplicación.
Haga clic en "Finalizar" para salir.
4.2 Desinstalar
Usted puede utilizar la herramienta correspondiente de terceros
software de gestión o el software de gestión de aplicaciones
instaladas del dispositivo para instalar aplicaciones.
Seleccione "Setting / apps" para seleccionar las aplicaciones
instaladas y verificar el atributo de la misma o desinstalarlo.
5. Conexión a internet
5.1. Después de conectar con WIFI, abra el navegador y escriba la
dirección web, puede navegar por la web, entonces.
5
Page 6

5.2. Haga clic en el icono para entrar en el marcador para ver el
historial de exploración. Haga clic en la página web que desea abrir.
6. Reproducción de audio y vídeo
6.1. Reproducción de audio
Haga clic en la "música" en el menú principal para entrar en la
interfaz de reproducción de audio. En ella se enumeran los archivos
de audio en el dispositivo, y usted puede hacer clic en el nombre del
archivo para reproducirlo. en la interfaz de reproducción de audio,
haga clic en los iconos para reproducir / pausa / aumento de
volumen / disminución de volumen / FF / REW ....
6.2. Reproducción de vídeo
Haga clic en la "Galería" en el menú principal para entrar en la
interfaz de reproducción de vídeo. En ella se enumeran los archivos
de vídeo en el dispositivo, y usted puede hacer clic en el nombre del
archivo para reproducirlo. en la interfaz de reproducción de vídeo,
toque la pantalla para desplegar los iconos de funcionamiento y haga
clic en los iconos para reproducir / pausa / aumento de volumen de
volumen / disminución / saltar al archivo siguiente / saltar al archivo
anterior ....
7. Visualización de imágenes.
Haga clic en "Galería" en el menú principal para entrar en la lista de
una carpeta de imágenes. Seleccione y haga clic en la carpeta que
desea introducir, se muestra el archivo. haga clic en la miniatura de
la imagen para poder verla.
Toque la pantalla para desplegar los iconos de operación mientras se
visualiza la imagen, puede hacer zoom in / zoom out / saltar a la
imagen siguiente / saltar a la imagen anterior / girar / eliminarla.
8. Cámara
Haga clic en "Cámara" en la interfaz principal.
8.1 Camera
Si el cursor se encuentra en esta parte la tablet está en
6
Page 7

modo cámara.
Dé click aquí para tomar una foto.
Dé click aqui para configurar el tamaño, calidad y efecto de
color de la imagen.
De click aqui para configurar el balance de color.
8.2 Modo DV o filmación
Si el cursor está en está es esta posición la tablet está
en modo filmación.
Dé click aquí para empezar a filmar.
Dé click aquí para configurar los colores o restaurar los
colores de fábrica.
9. Conéctate con dispositivo externo
9.1. Conéctate con PC
Conecte el dispositivo con el PC a través del cable USB. El PC aparece
dos nuevos símbolos de disco después de conectarse con éxito. Uno
de ellos es la tarjeta del TF, y el otro es el flash integrado.
9.2. Aplicaciones
Para un uso conveniente, instalamos algún software de terceros en
el MID. Para los métodos de funcionamiento detallados, consulte por
favor la instrucción correspondiente. Algunos de los software puede
ser capaz de ser utilizado en algunas áreas debido al servicio de red.
IV. Solución de problemas
1. ¿Qué pasa si el dispositivo es anormal durante la operación?
Respuesta: 1) Reinicie el dispositivo para ver si funciona bien.
2) Cargue el dispositivo por el cargador para activar la batería.
Asegúrese de que tiene el poder antes de ponerlo en
funcionamiento.
3) Se recomienda actualizar el sistema operativo del dispositivo por
7
Page 8

el profesional.
TABLET
NVR-TAB9QHD S2 (8GB)
Cámara
0.3M+2M
Pantalla
9” (22.86 cm) TFT panel táctil
OS sist operativo
Android 4.4.2
Metodo de entrada
Teclado por pulso en pantalla.
Capacidad
8 GB
Capacidad Externa
Hasta 32GB
Audio
MP3,WAV ,AMR,AAC,M4A,OGG,M4RMP3,WMA,F
LAC,APP,OGG
Video
3GP,MKV,FLV,MPG,WMV,MP4,MOV
E-book
Compatible
Wi-Fi
Compatible WIFI
Idiomas
Multi-idioma
USB
USB2.0 alta velocidad
OTG
Compatible
Temperatura
-20℃ a 60℃
Corriente
AC 100~240V 50/60Hz; DC 5V/2A
Bateria
5000mAh poly-lithium battery
2. ¿Por qué el tiempo de espera es tan corta a veces?
Respuesta: el tiempo de uso de la batería es todo depende de la
temperatura y la instancia de uso. Si la temperatura es demasiado
alta o demasiado baja, el tiempo de uso de la batería podría ser
efectuada. Se sugiere utilizar el dispositivo en la temperatura normal.
El tiempo usando también se ve afectada por el aumento de
volumen y frecuencia operación.
VI. Specifications
8
Page 9

Nota: La lista de imágenes en el manual son sólo para referencia! El diseño
y las especificaciones del equipo están sujetos a cambios sin previo aviso
Este símbolo sobre el producto o en las
instrucciones quiere decir que su equipamiento
eléctrico y electrónico debería ser depositado
al final de su vida útil por separado de la basura domestica. Hay
sistemas de recogida para el reciclaje en toda la UE. Para más
información, consulte con las autoridades locales o con la tienda
donde adquirió el reproductor.
“Para dar cumplimiento a la Norma UNE EN-60335, indicamos que si
el cable flexible se daña, únicamente puede ser sustituido por un
taller de reparación reconocido por el fabricante NEVIR, S.A., ya que
se necesitan herramientas especiales”
9
Page 10

NVR-TAB101QHD S2 (8GB)
10.1” ANDROID TABLET (25, 65 cm)
User Manual
10
Page 11

English
Preface
Thank you for buying this MID. Please read and retain all the
operating instructions before operating the unit.
I. Note
1. Avoid the unit being dropped. Avoid the display been shake
seriously, or the display will be damaged or unusual.
2. Do not use metal object to touch the device to prevent it from
short circuit.
3. Please backup your data in case your important data is lost,
especially before you upgrade the firmware.
4. Do not disassemble. Do not wipe the surface of the unit by
alcohol, thinner or benzene.
5. Do not disconnect the unit while it is formatting or
uploading/downloading, or the procedures may lead to errors.
6. Avoid water or foreign objects enter the unit.
7. Do not use the unit in places that are extremely hot, cold, dusty,
or humid.
8. Specifications are subject to change and improvement without
notice.
II. Introduction of cover0
1. Front Camera
2. Power on/off
3. Reset
11
Page 12

4. Earphone Jack
5. Micro USB interface
6. HDMI interface
7. DC charger interface
8. Home
9. Mic
10. Back Camera
11. TF-CARD interface
12. Loudspeaker
II. Operation Instruction
1. Basic Operation
1.1. Power on/Power off
Power on
Press and hold the power switch for 5 seconds; the unit displays the
start-up logo and enters the working mode.
Power off
Press and hold the power switch for 5 seconds to turn the unit off.
Sleep
While the device is at working status, press the power switch, it
enters the sleeping mode, and the screen will be off then. Press the
power switch again, it shift to the normal mode. You may use this
function when you don’t’ use the device temporary to save power.
1.2. Charging
When the device prompts low battery, please charge it by provided
charger.
Note: To improve the longevity of the battery, you may charge for
another 15 minutes after it prompts the battery is full.
1.3. Main menu
Click the icon in the main interface, the main menu is
appeared. It including the system setting, music playback, video
playback, web browser and other applications you installed in the
main menu.
12
Page 13

2. Settings
Click “Settings” in the main interface to enter the setting interface.
Click the corresponding setting items to operate.
2.1.Date and Time Setting
Click “Date & time” in the setting interface to set the date and time.
You may set the date, time zone, time, time format and date format
etc. in the menu.
2.2. Brightness
Select “Display” in the setting interface. Click “Brightness” to enter,
and slide the bar to adjust the brightness.
2.3. Screen Timeout
Adjust the delay before the screen automatically turns off.
Select “Display” in the setting interface. Click “Sleep” to enter, and
click the time you want.
Note: The setting of screen timeout is unavailable while playing
video.
3. Wi-Fi connection
Click “Settings” in the main interface. Click Wi-Fi to turn on the
WIFI, it lists the open network it searched. Click the name of the
network; it pops up the setting window. You may connect it to WIFI
according to the prompts. You need to input the user name and
password if networks are encrypted.
3.1 Bluetooth
Turn on the Bluetooth,Click Bluetooth setting to set and
manage Bluetooth Devices access. Click “SEARCH FOR
DEVICES”, it lists the open devices. Click the name of the devices; it
pops up the setting window. Choose the device, pairing it, then you
can transfer pictures,movies,music etc with it.
4. Install, Uninstall and Run applications
4.1 Install
There are many ways to install applications under Android. We
13
Page 14

introduce installation by Market here.
Select the APK file you want and enter the application installation
interface. Click “Install” to install the application automatically. After
installation, it prompts “Open” and “Finish”. Click “Open” to open
the application. Click “Finish” to exit.
4.2 Uninstall
You may use the corresponding third party software management tool
or the installed application management software of the device to
install applications.
Select “Setting/Apps” to select the installed applications and check
the attribute of it or uninstall it
5. Connect to internet
5.1. After connecting with WIFI, open the browser and input the
web address, you can browse the web then.
5.2. Click the icon to enter the bookmark to view the browse
history. Click the web page you want to open it.
6. Audio and video playback
6.1. Audio playback
Click the “MUSIC” in the main menu to enter the audio playback
interface. It lists the audio files in the device, and you may click the
file name to play it. in the audio playing interface, click the icons to
play/pause/ increase volume/ decrease volume/ FF/ REW….
6.2. Video Playback
Click the “Gallery” in the main menu to enter the video playback
interface. It lists the video files in the device, and you may click the
file name to play it. in the video playing interface, touch the screen to
pop-up the operation icons and click the icons to play/pause/ increase
volume/ decrease volume/ skip to next file/skip to previous file….
7. Picture viewing
Click “Gallery” in the main menu to enter the picture folder list;
Select and click the folder you want to enter, it displays the picture.
Click the thumbnail of the picture to view it.
Touch the screen to pop-up the operation icons while viewing the
14
Page 15

picture, you may zoom in/zoom out/ skip to next picture/skip to
previous picture/ rotate/ delete the picture…
8. Camera
Click “Camera” in the main interface.
8.1 Camera
If the cursor is at position, the device is at Camera mode.
Click to take picture.
Click to set the scene mode, Picture size, Picture quality, and
colour effect.
Click to set white balance.
8.2 DV
If the cursor is at position, the device is at DV mode.
Click to take picture.
Click to set the colour effect or restore to default settings.
9. Connect with external device
9.1. Connect with PC
Connect the device with the PC via the USB cable. The PC appears
two new disk symbols after connected successfully. One is the TF
card, and the other is the built-in flash.
9.2. Applications
For convenient usage, we installed some third party software in the
MID. For detailed operation methods, please check the corresponding
instruction. Some of the software may be able to be used in some area
because of network service.
15
Page 16

IV. Troubleshooting
Item
NVR-TAB101QHD S2 (8GB)
Display
1024X600
Touch panel
Capacitive touch screen
OS
Android 4.4.2
Input method
Soft keypad
Capacity
8GB
External Capacity
TF-CARD, up to 32GB
Audio
MP3,WAV ,AMR,AAC,M4A,OGG,M4RMP3,WM
A,FLAC,APP,OGG
Video
3GP,MKV,FLV,MPG,WMV,MP4,MOV
E-book
Support
Wireless network
Support WIFI
Language
Multi-language
OTG
Support
Temperature
-20°C to 60°C
Power supply
AC 100~240V 50/60 Hz; DC 5V/1.5A
Battery
5000mah poly-lithium battery
1. What if the device is abnormal during operation?
Answer: 1) Reboot the device to see if it works OK.
2) Charge the device by the charger to activate the battery. Make sure
it has power before you operate it.
3) It is suggested to upgrade the OS of the device by professional.
2. Why the standby time is so short sometimes?
Answer: the use time of the battery is all depend on the temperature
and use instance. If the temperature is too high or too low, the use
time of the battery might be effected. It is suggest using the device in
normal temperature. The using time is also affected by increased
volume and frequently operation.
VI. Specifications
16
Page 17

Note: The pictures list in the manual are for reference only!
The design and the specification of the unit are subject to change without
notice.
This symbol indicates that when the end-user wishes to
discard this product, it must be sent to separate collection
facilities for recovery and recycling. By separating this
product from other household-type waste, the volume of
waste sent to incinerators or land fields is reduced and
natural resources will thus be conserved.
“In order to fulfill ruling UNE EN-60065, we indicate that if the flexible wire is
damaged, it can only be substituted by a technical service recognized by
NEVIR, S.A., as per special tooling is required”
17
Page 18

DECLARACIÓN DE CONFORMIDAD
NEVIR, S.A. declara bajo su responsabilidad que el aparato indicado cumple
los requisitos de las siguientes directivas:
DIRECTIVA1999/5/EC
Descripción del aparato: TABLET 10.1” (25, 65cm)
Modelo NEVIR: NVR-TAB101QHD S2 (8GB)
Importador: NEVIR, S.A.
Dirección del importador:
NEVIR, S.A.
C/ Canteros, 14
Parque Empresarial Puerta de Madrid
28830 San Fernando de Henares,
Madrid, ESPAÑA
18
 Loading...