

Page 1

WIRELESS
INVENTORY HANDHELD
USER’S Manual
Page 2

CHAPTER I BRIEFING ............................................................................................................. 1
1.1 Package List ....................................................................................................................... 1
1.2 Safety Cautions .................................................................................................................. 1
1.3 Battery Charging ............................................................................................................... 1
1.4 Battery Installation ........................................................................................................... 2
1.5 Accessories ......................................................................................................................... 3
CHAPER II FUNCTIONS & OPERATIONS........................................................................... 4
2.1 Overview ............................................................................................................................ 4
2.2 Basic Operation ................................................................................................................. 4
2.2.1 Bootup ..................................................................................................................... 4
2.2.2 Shutdown ................................................................................................................ 4
2.2.3 Menu Desciption ..................................................................................................... 4
2.3 Main Functions .................................................................................................................. 5
2.3.1 Receiving/Shipping ................................................................................................. 5
2.3.2 Cycle Count ............................................................................................................ 5
2.3.3 Wireless Scan .......................................................................................................... 7
2.3.4 Search ...................................................................................................................... 8
2.3.5 Download ................................................................................................................ 8
2.3.6 Settings .................................................................................................................... 8
2.3.7 Com-set ................................................................................................................... 8
2.3.8 Advance ................................................................................................................... 9
CHAPER III PC APPLICATION ............................................................................................ 10
3.1 Installation ....................................................................................................................... 10
3.2 Operation Description .................................................................................................... 11
3.2.1 Update Program ................................................................................................... 11
3.2.2 Download Item File .............................................................................................. 12
3.2.3 Data Upload .......................................................................................................... 19
3.2.4 Data Query ............................................................................................................ 20
3.2.5 Export File ............................................................................................................ 20
3.2.6 Delete Data ............................................................................................................ 24
WARRANTY ................................................................................................................................. 25
CONTENTS
Page 3

User’s Manual for Handheld Page 1 of 27
1
CHAPTER I BRIEFING
1.1 Package List
1.Handheld 1 ;
2.USB mini-receiver 1;
3.Mini-USB cable 1;
4.Charger 1.
1.2 Safety Cautions
Please read the following concise rules. Violation of these rules may cause danger or
infringement of the law.
Boot in safety: Don’t switch on the handheld when wireless device is forbidden or
is to cause interference and danger.
Interference: all wireless devices may be subject to radio interference which may
affect their performance.
Fare use: the handheld can be only used in the purpose described in this manual.
Maintenance: only technically qualified person can disassemble the handheld.
Accessories and battery: use only approved accessories and battery. Don’t connect
to inconsistent products.
Water-proof: the handheld is not water-proof, please keep it dry.
Data backup: please make a backup for the data saved in the handheld.
Connection: If in need of connecting to other devices, please obtain necessary
safety instructions from their manual or manufacturer. Never connect to an
inconsistent device.
1.3 Battery Charging
1.3.1 battery icon:a battery icon displays on top right of the screen to show the
battery power. When the battery voltage is lower than 3.6V, the Handheld shuts
down automatically.
1.3.2 battery charging:simply plug one end of the charger into the power outlet
(AC110-240V) and the other end into the Handheld. In power-off condition, a battery
icon will blink on the screen. If the battery icon is at rest, it indicates that the battery
is full or the battery is not installed.
CAUTIONS:
(1) The Handheld accepts only authorized battery and charger;
(2) Battery may self-discharge. Please charge up the battery before use if the battery
stands idle for a long period;
(3) If a fully charged battery’s life goes short greatly, please replace the battery with a
Page 4
User’s Manual for Handheld Page 2 of 27
2
new one;
(4) Do not impact,shock or throw the battery violently, or it may cause leakage, damage
or even explosion.
1.4 Battery Installation
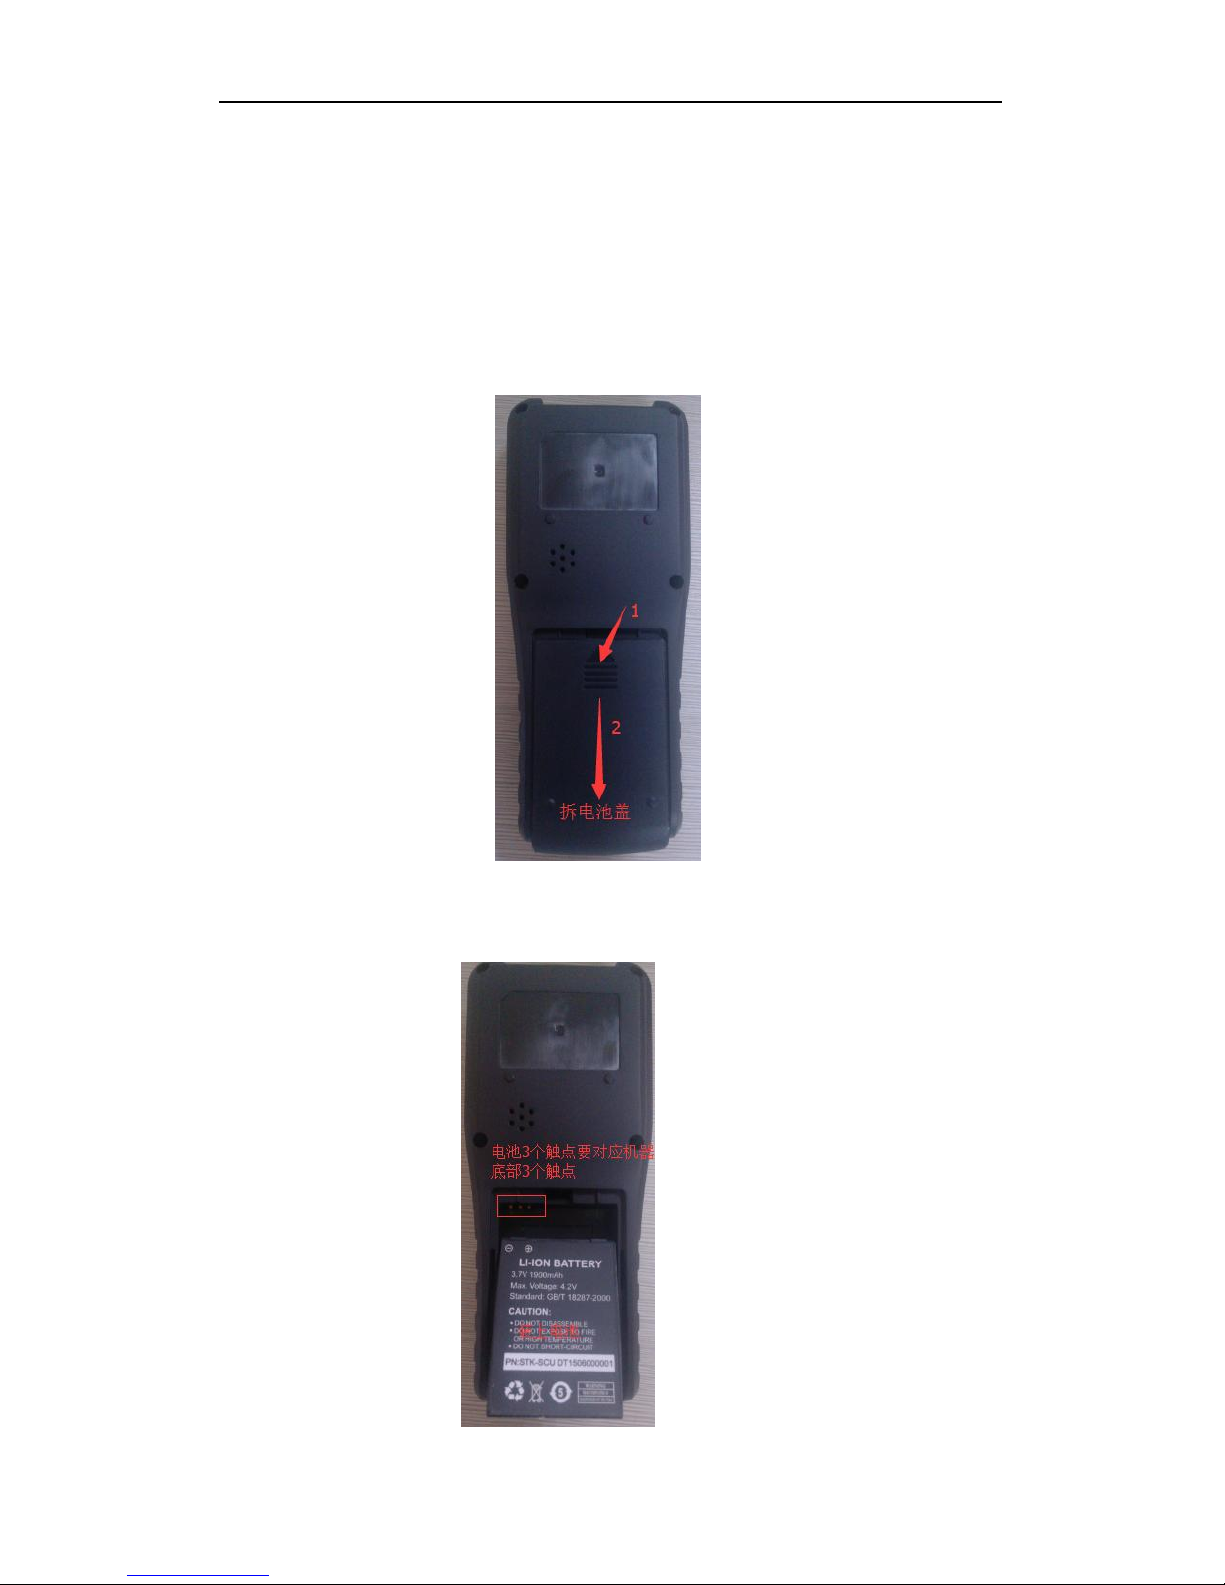
1.4.1 Remove battery cover. Turn the Handheld to its back, put some stress on the
battery cover, then push it downward as following picture shows:
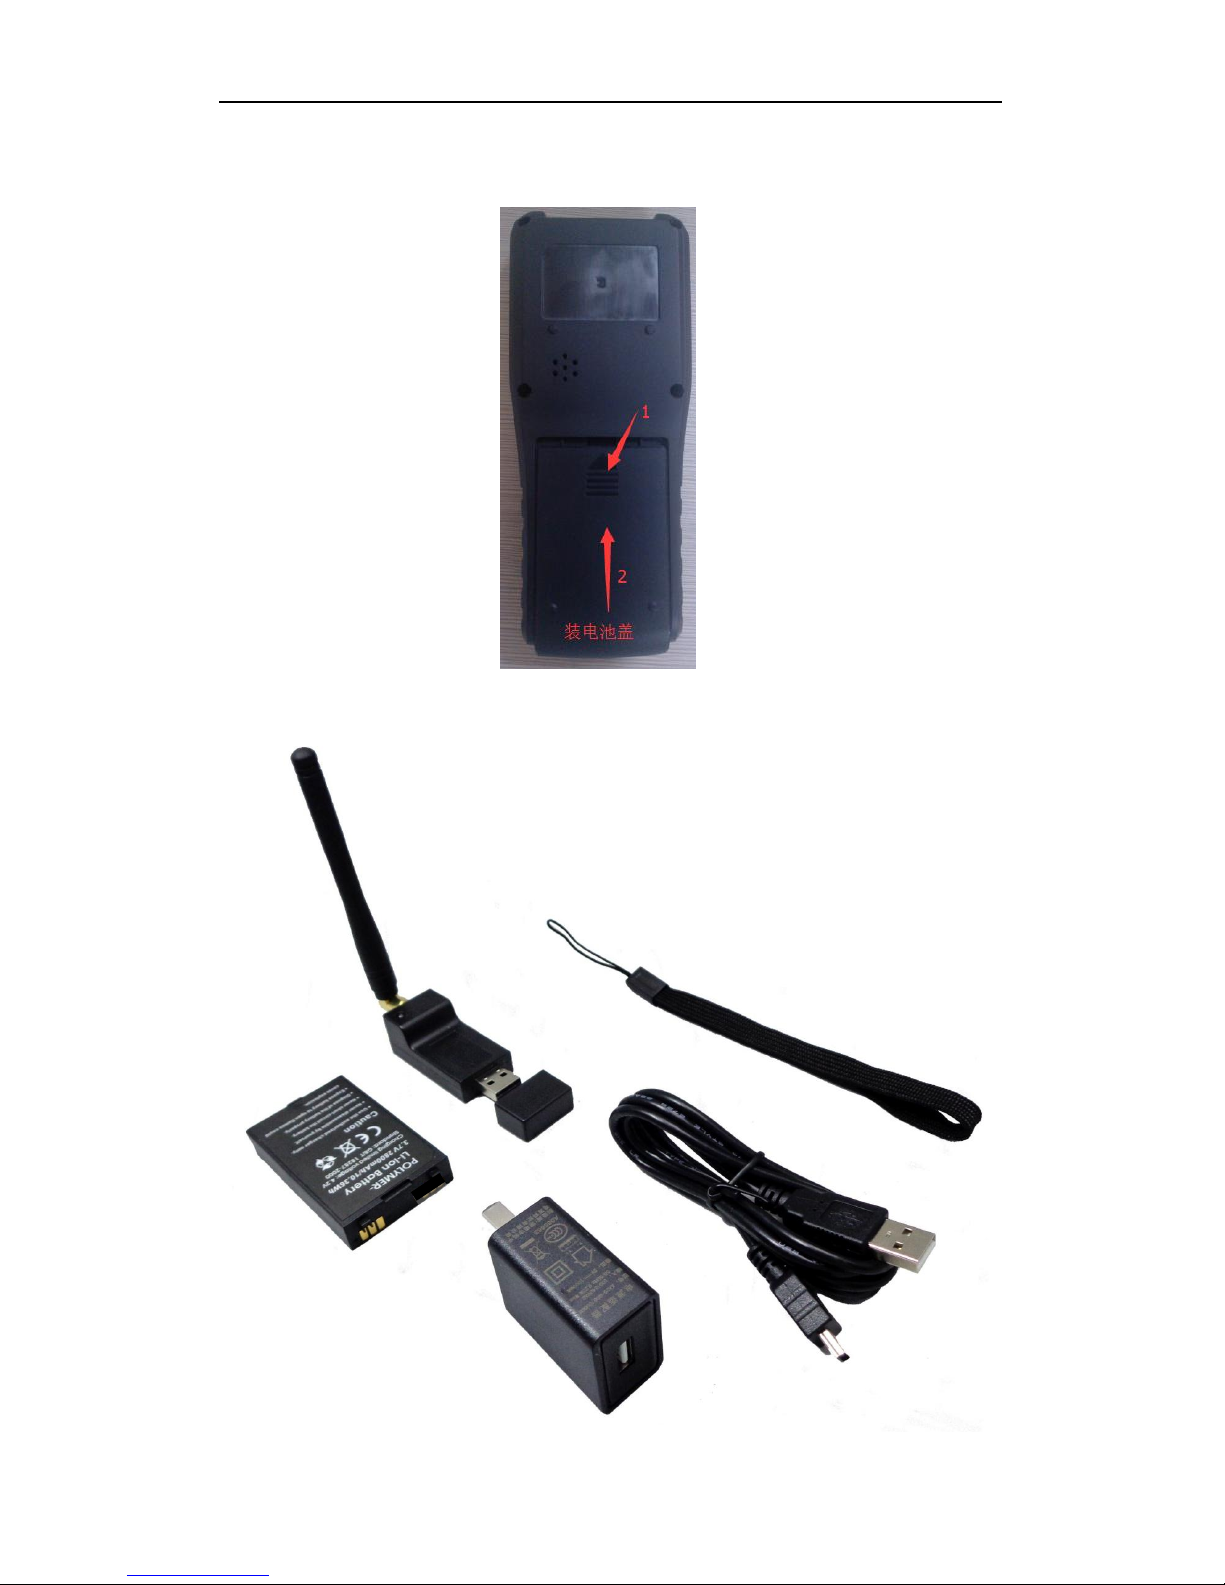
1.4.2 Load battery. Make sure the metal contacts on the battery and the Handheld are in
the same position as the following picture shows:
Page 5
User’s Manual for Handheld Page 3 of 27
3
1.4.3 Refit battery cover. Put some stress on the cover to fit it back to its place, then
push upward as the following picture shows:
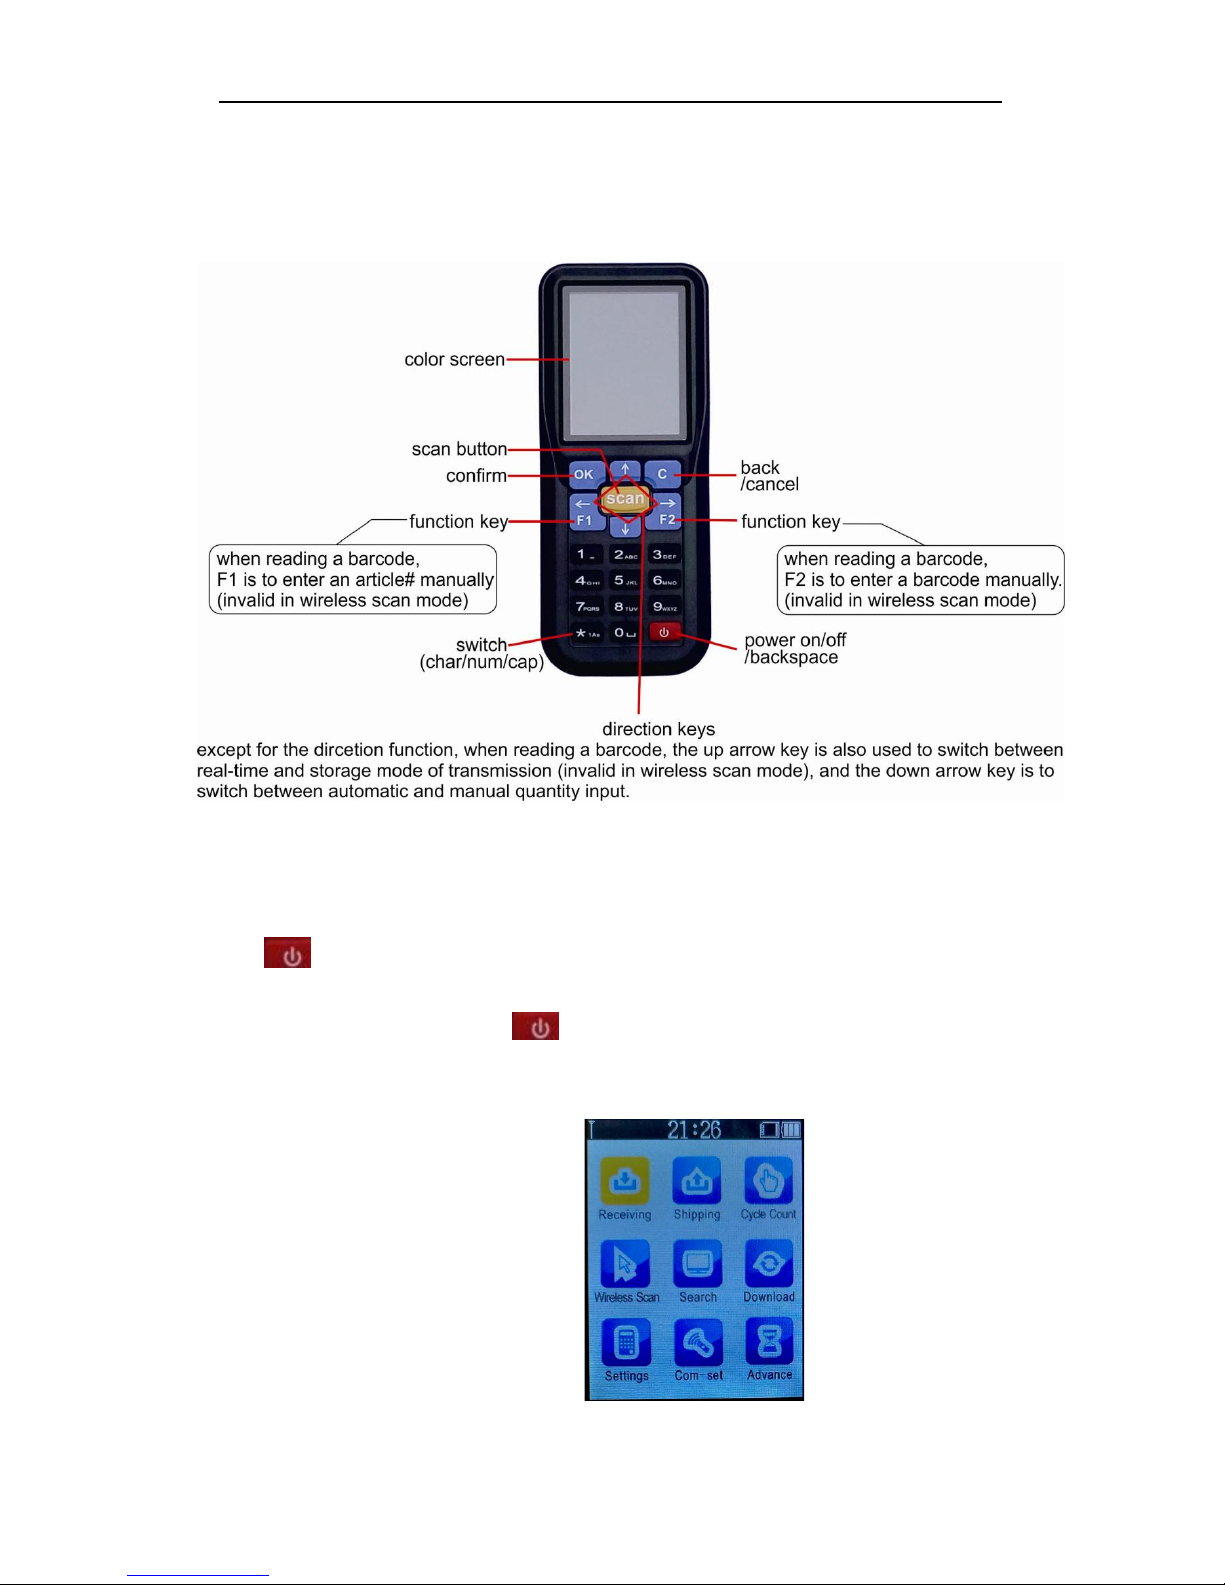
1.5 Accessories
receiver
battery
charger
cable
Wrist strap
Page 6
User’s Manual for Handheld Page 4 of 27
4
CHAPER II FUNCTIONS & OPERATIONS
2.1 Overview
2.2 Basic Operation
2.2.1 Bootup
Make sure the battery is properly loaded and fully charged. Long press the power button
until the screen lights up.
2.2.2 Shutdown
Hold down the power button till the screen turns off.
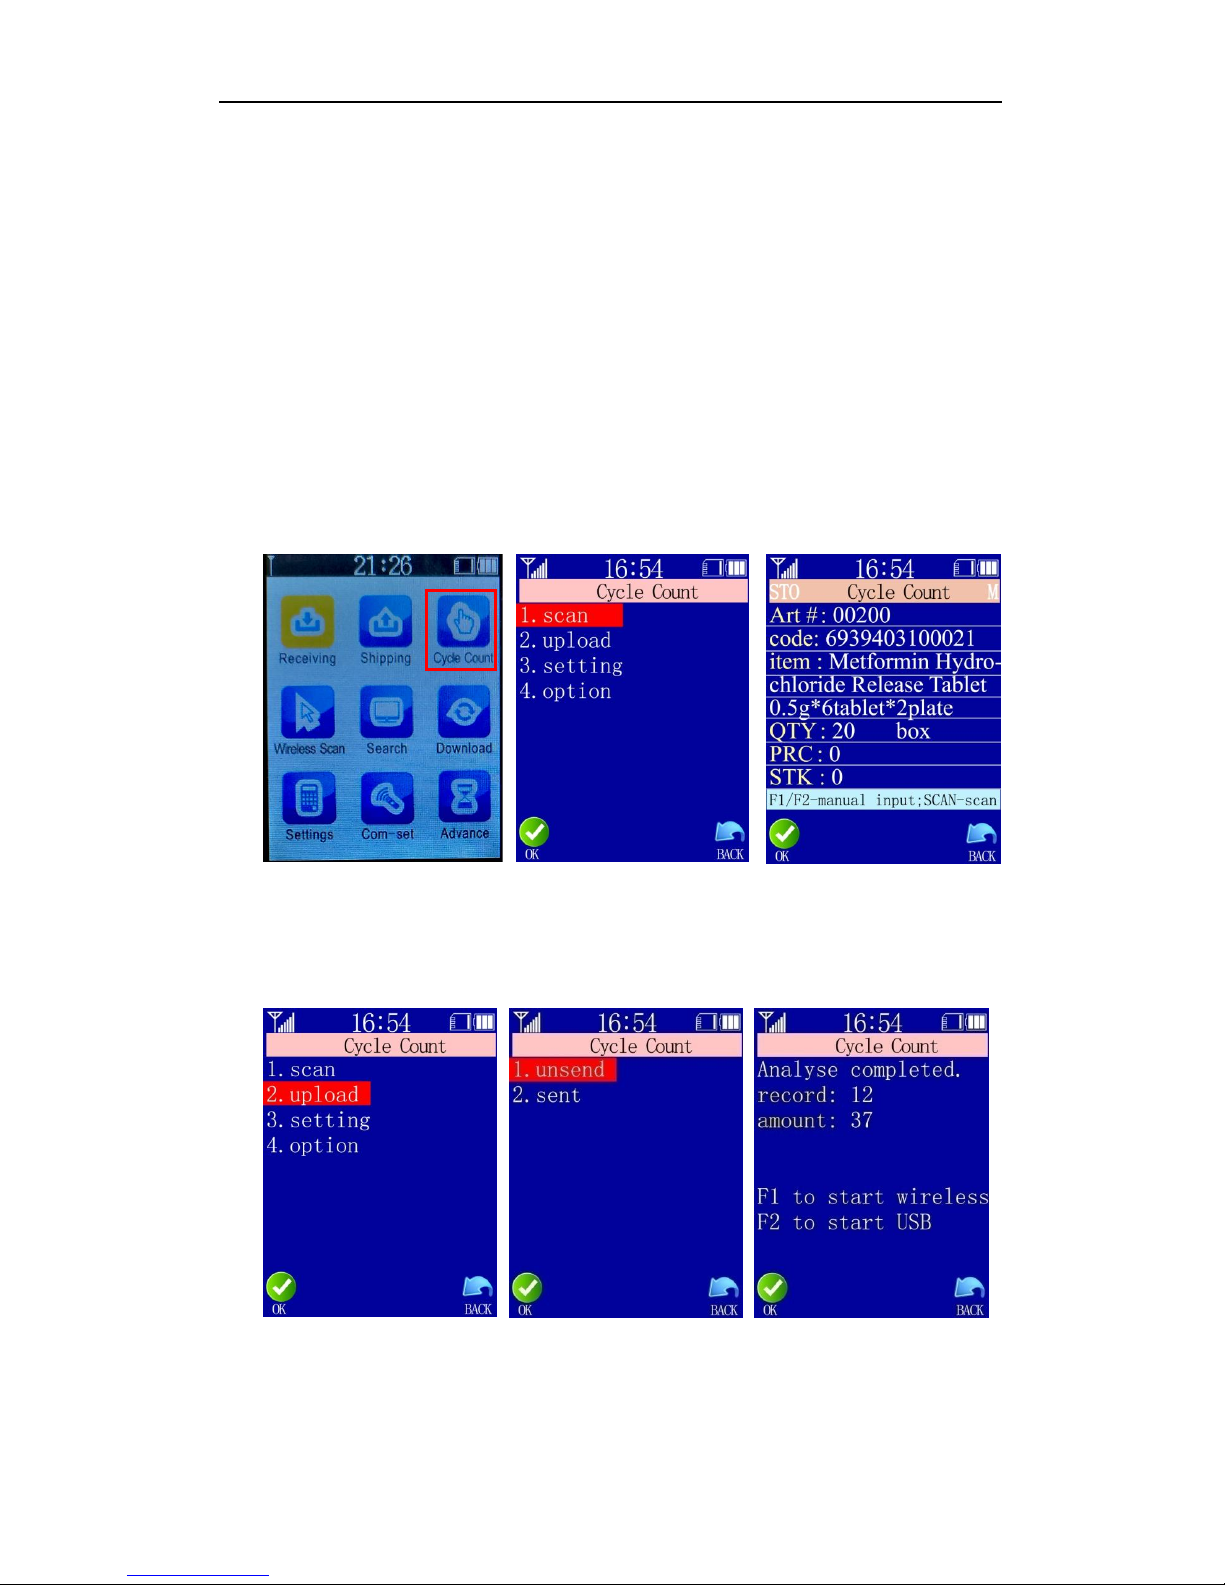
2.2.3 Menu Desciption
1 2 3 4
Note: It is a shortcut pressing the keypad number to enter the corresponding menu item.
1.Signal strength
2.Time
3.Memory used
4.Battery level
Page 7
User’s Manual for Handheld Page 5 of 27
5
2.3 Main Functions
2.3.1 Receiving/Shipping
Please refer to the following “Cycle Count” instruction. Operations are the same.
2.3.2 Cycle Count
a. In the main menu, select “Cycle Count” or press the number key 3 to enter the
operation page;
b. In the Scan page, press the SCAN button to start reading barcode or press F1 to input
Article# and F2 to input barcode manually;
c. If an item file has been imported, the corresponding item information will be
displayed as soon as the barcode is read;
d. Input quantity and press OK to save.
Data Upload: upload scanned data (sent or unsent) to computer text file, excel file or
the PC application. “unsent” refers to data that has never been sent to the
computer. “sent” refers to data that has been sent to the computer but can be sent
again. Press F1 to start a wireless transmission or F2 for a USB transmission.
Note: Data is received by the computer in two ways. One is going to where the cursor
locates (in an open text or word or excel file), the other is going to the PC
application. Please refer to chapter “3.2.3 Data Upload” for operation of sending
data to the PC application.
Page 8
User’s Manual for Handheld Page 6 of 27
6
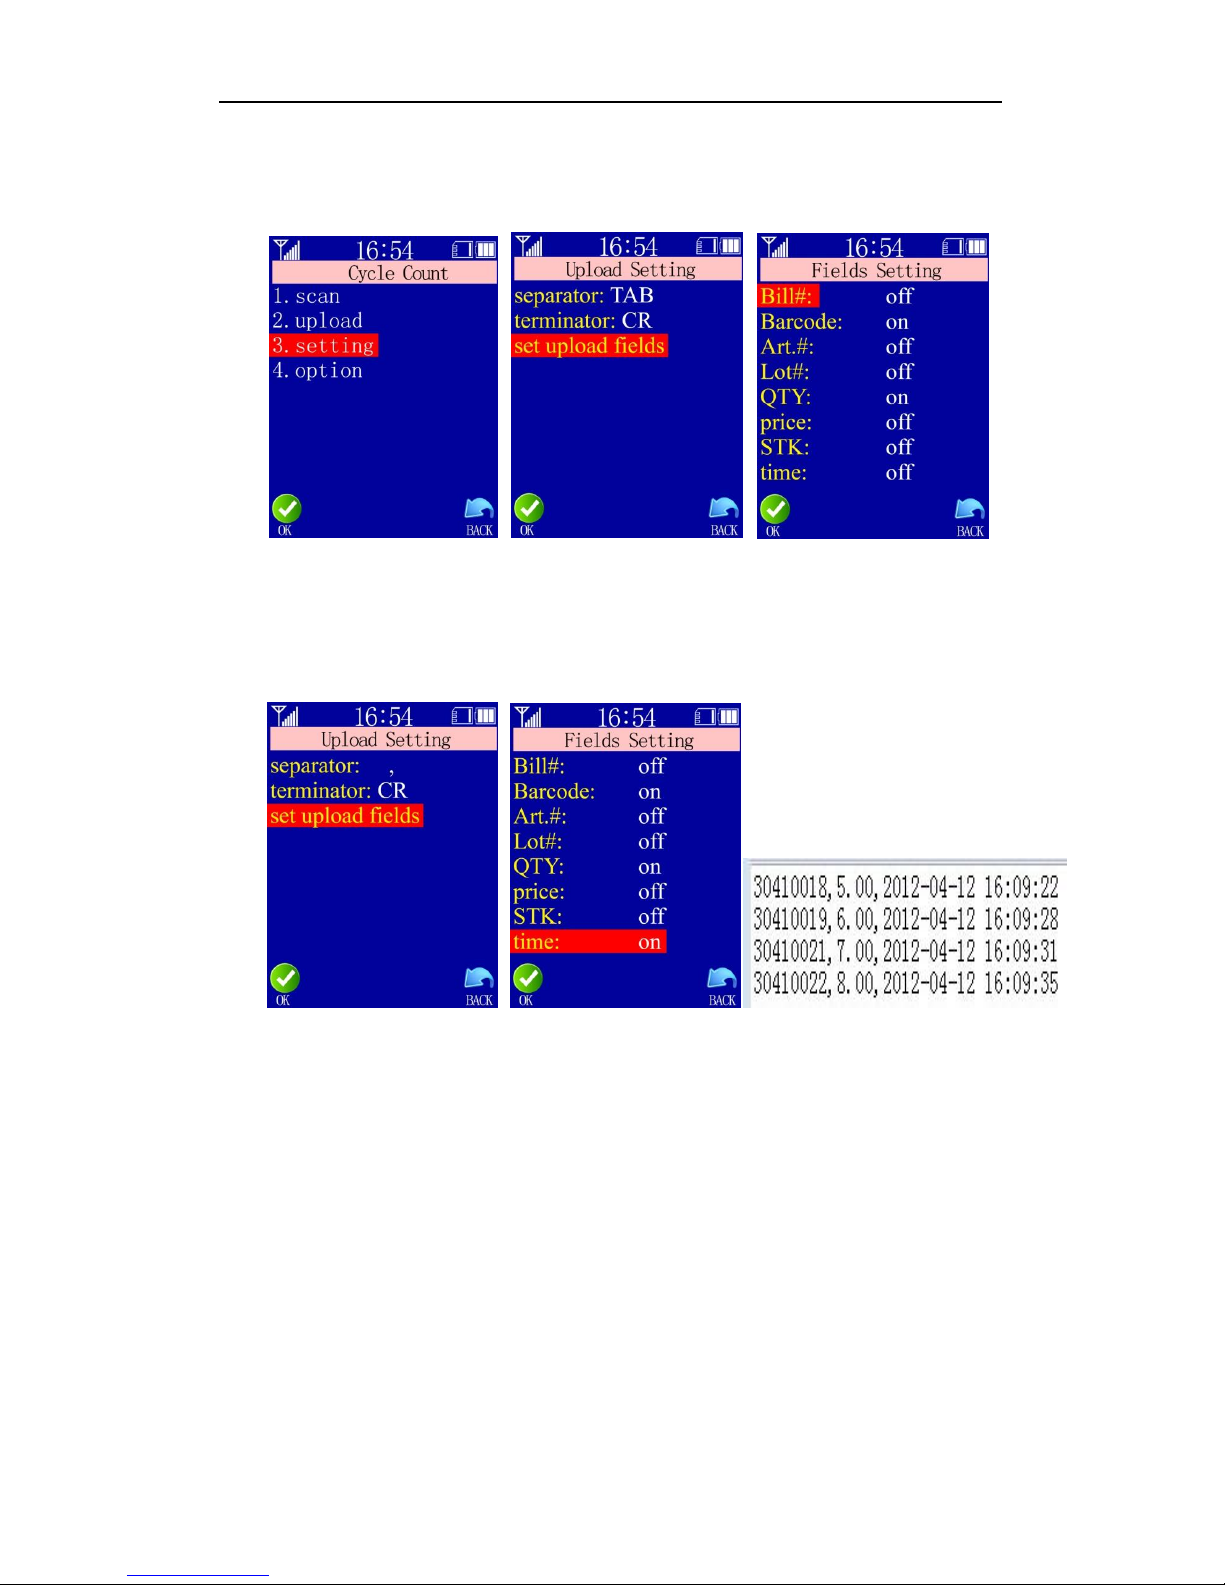
Transmission Setting: define the separator and/or terminator of the transmission data
(none, space, tab, CR, LF, comma and semicolon available) and specify
fields to be uploaded.
Note: use up or down arrow key to move among options and OK to confirm selection.
Then use left or right arrow keys to change status and OK to confirm.
eg. The separator is set to be comma and the terminator “CR”, and fields to be
uploaded are barcode, quantity and time, then it should look like this in a txt file:
Note: upload setting and fields setting are valid only in wireless transmission to
computer txt or excel file.
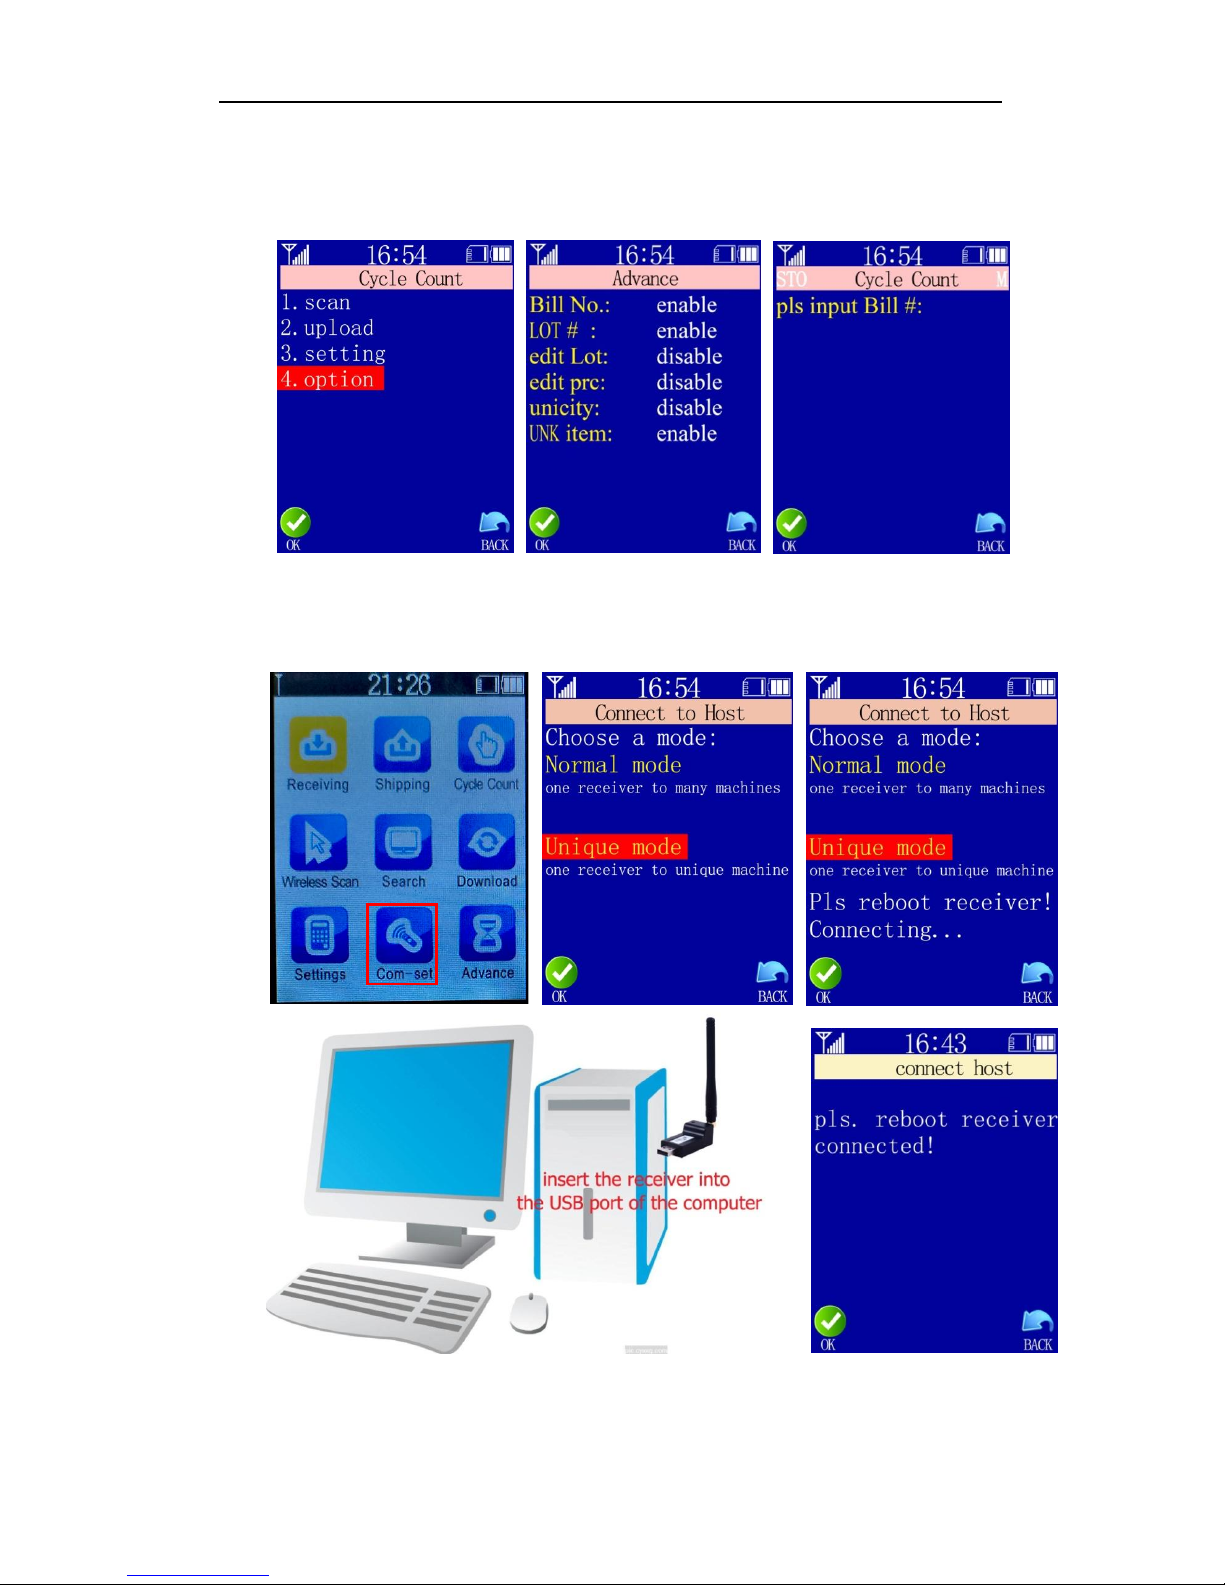
Advanced Functions:
1) Bill No.: when it is enabled, multiple bills, warehouse, shops management is
supported;
2) LOT #: when it is enabled, multiple lot number management is supported. It is very
useful in the pharmaceutical industry. When the barcode is read, press the left or
right arrow key to select the corresponding lot number:
3) Edit Lot: when it is enabled, the user may change the error lot number manually;
4) Edit price: when it is enabled, the user can change manually the default price to the
actual price at the time of sale;
5) Unicity: it is usually applied to manage serial number. When it is enabled, a
notification will come ask the user if it is allowed to process repeat barcode;
Page 9
User’s Manual for Handheld Page 7 of 27
7
6) UNK item: when it is enabled, the user can decide whether to process the unknown
items or not (new item or item missing in the item file). Otherwise, unknown item is
forbidden.
2.3.3 Wireless Scan
a. Establish communication between the Handheld and the Receiver.
b. create/open a text file on the computer and place the cursor in the blanks;
c. In the handheld main menu, select “Wireless scan” “1.scan”, then press the SCAN
Page 10
User’s Manual for Handheld Page 8 of 27
8
button to start reading barcodes. When the signal is good, the scanned data will be
uploaded right away to the computer and show up at where the cursor locates. With
no signal or weak signal, the data will be automatically saved in the handheld and
uploaded to the computer when the signal restores.
Note: only barcode will be displayed when using the Wireless Scanner function.
Data upload: upload data sent or unsent to the computer PC Software or text/excel file.
Unsent data refers to those that has never been sent to the computer and sent data are
those that has been sent to the computer but can be sent again. Press F1 to start
wireless transmission or F2 for a cable transmission to the PC Software.
Header & Trailer: This option allows you to append a header and/or a trailer to the
barcode. Header or trailer characters include space, tab, carriage return, linefeed,
comma and semicolon. Default is none. Use the left / right arrow key to switch among
characters and OK to confirm.
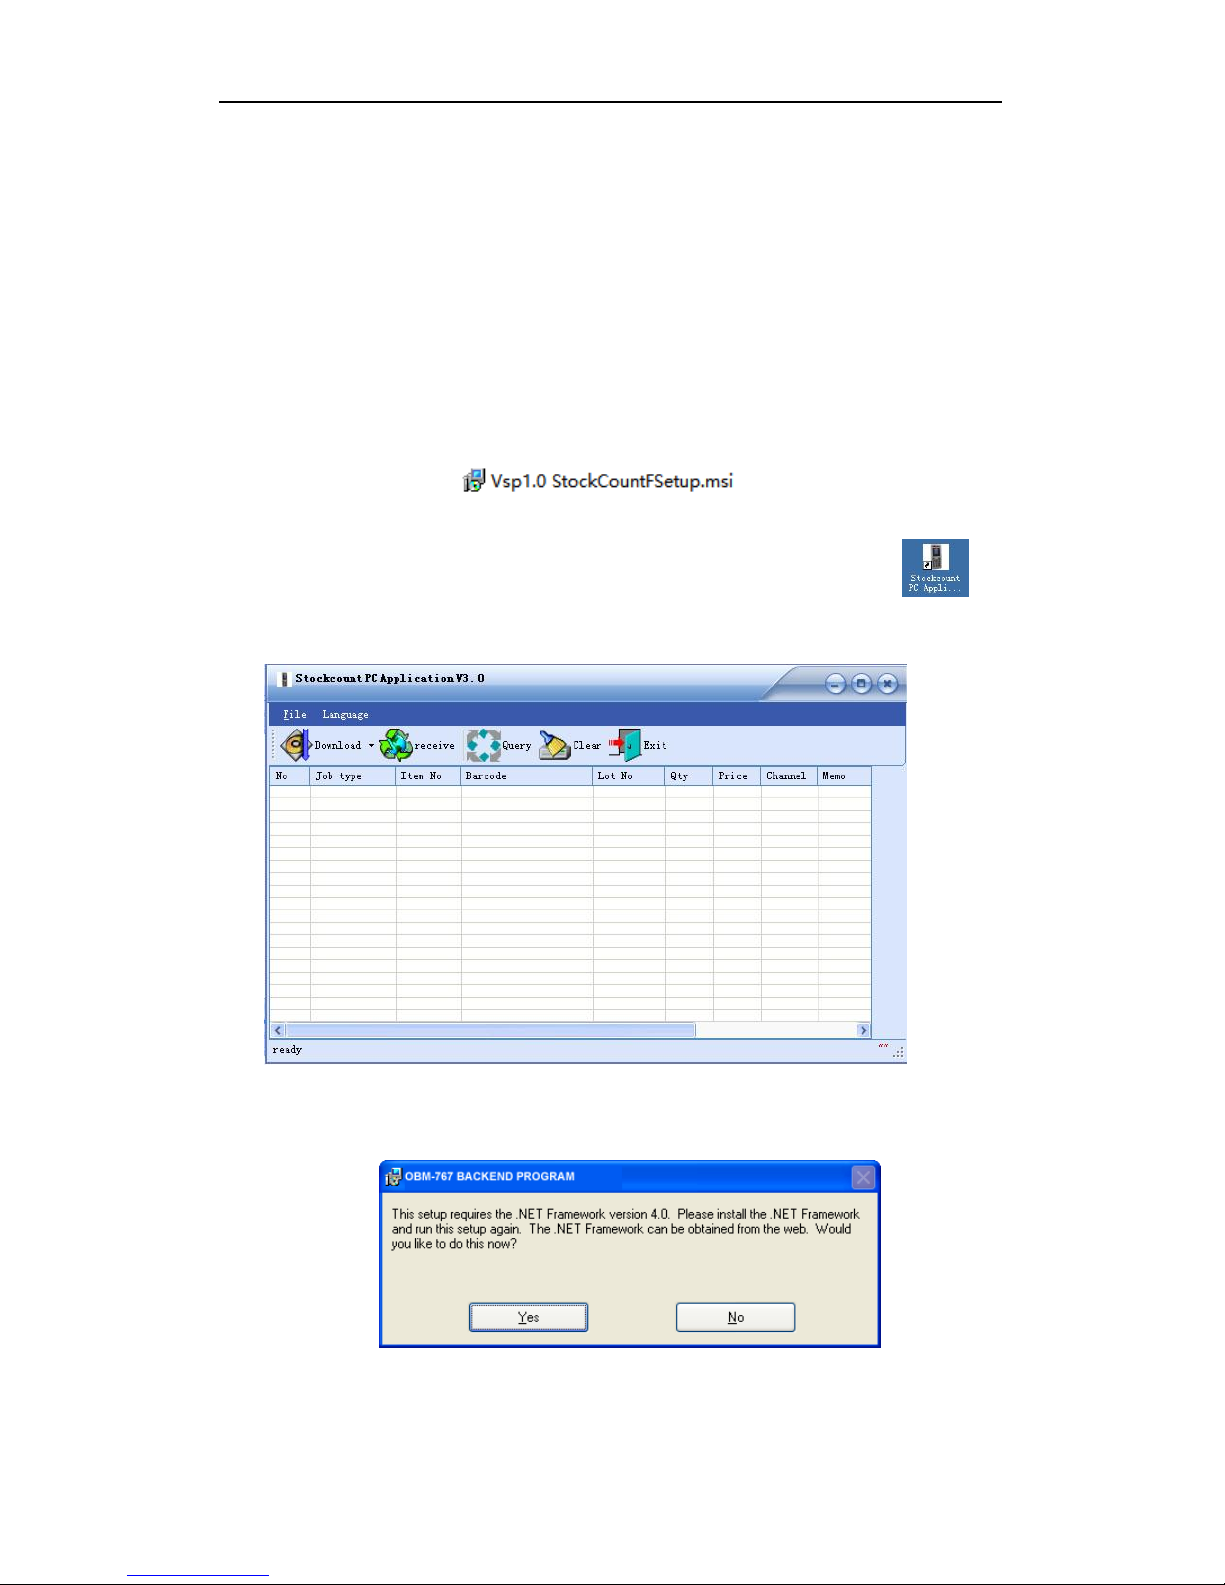
2.3.4 Search
Input or scan Art# or barcode to look up item information, then press F3 to look up Lot#.
Use up or down arrow keys to view if there are more than one Lot#. If the screen says
“Item not found, try again!”, it means the item is missing in the item file.
2.3.5 Download
Item file download must work together with the PC application. Please refer to chapter
“3.2.2 Download Item File” for details.
2.3.6 Settings
basic settings:set date, time, auto power off time and standby time.
Use up or down arrow keys to move among options and OK to confirm.
Then input characters with the button and OK to save.
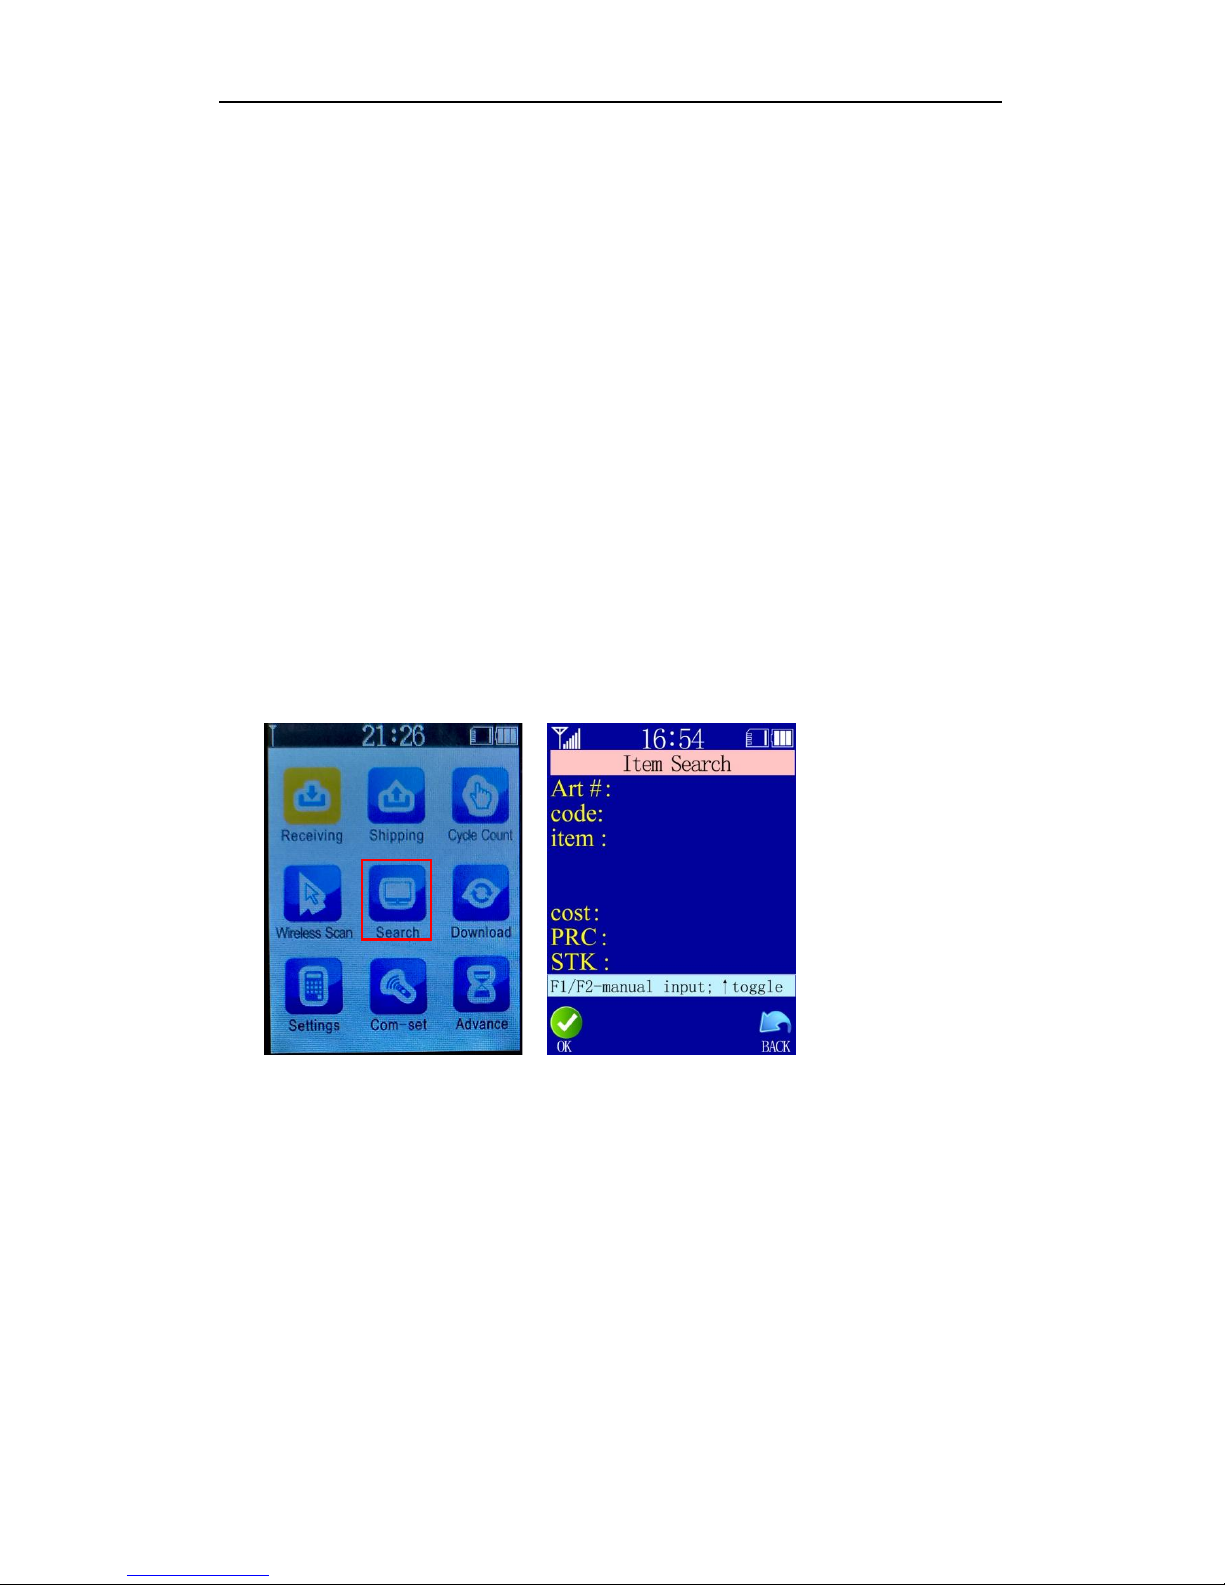
2.3.7 Com-set
normal mode: one receiver to multiple handheld
Page 11

User’s Manual for Handheld Page 9 of 27
9
unique mode: one receiver to a sole handheld
connection:select one mode and press OK to start pairing, then plug the receiver into
the usb port of the computer. If pairing failed, try again.
2.3.8 Advance
clear memory:1. remove all scanned records;
2. remove item information;
3. restore to factory default.
update: please refer to chapter “3.2.1 Update Program” for details.
Page 12
User’s Manual for Handheld Page 10 of 27
10
CHAPER III PC APPLICATION
The major function of the PC application lies in two:
1. To download a program to refresh the handheld in case of a new version or a breakdown;
2. To download item information to the handheld so that the user can check the relative
commodity details right on the handheld.
Both can only be accomplished with the cable attached.
3.1 Installation
Double click on the application installer:
Figure 3-1
Follow the instructions of the wizard until completion and the application icon will
be created on the desktop.
Double click on the icon,the application dialog should pop up as below:
Figure 3-2
Note:during installation if an error message pops up as below:
Figure 3-3
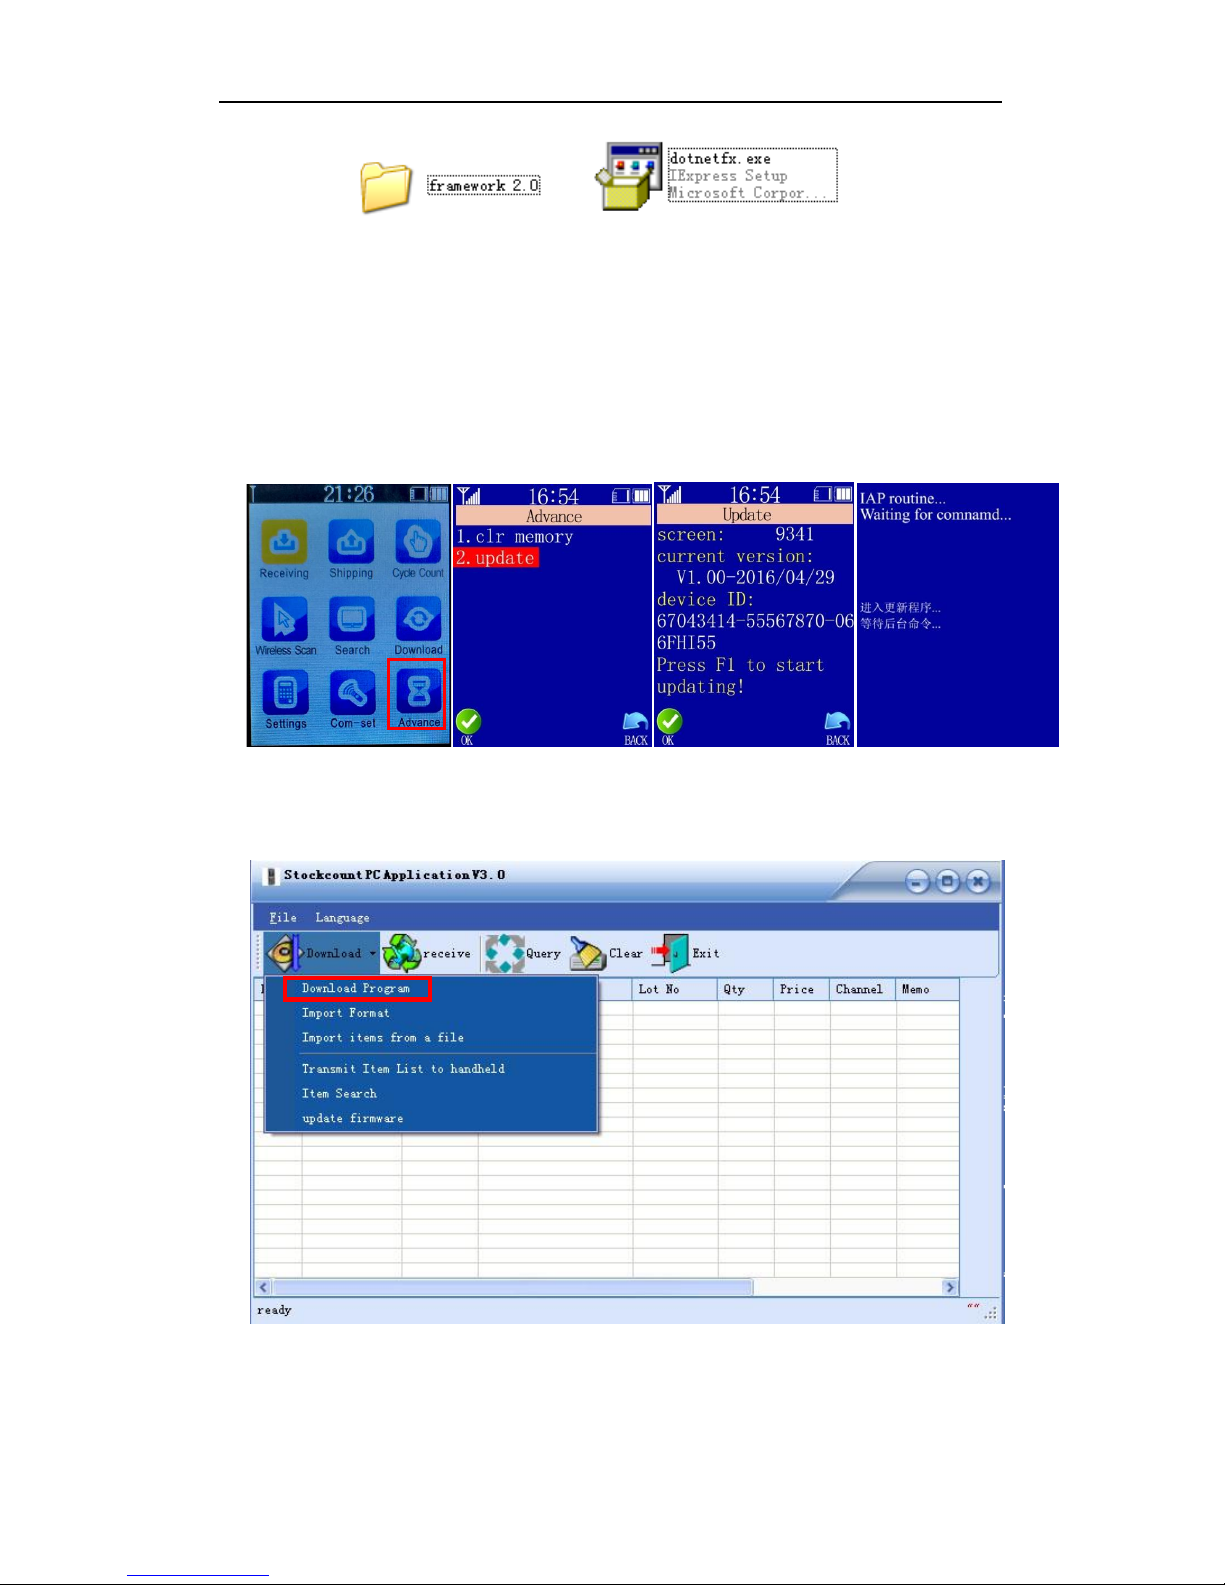
Click No and then find the folder of framework 2.0 and install the .net program:
Page 13
User’s Manual for Handheld Page 11 of 27
11
Figure 3-4
This may take a few minutes. After completion, go back to install the application again
as shown in figure 3-1 & 3-2
3.2 Operation Description
3.2.1 Update Program
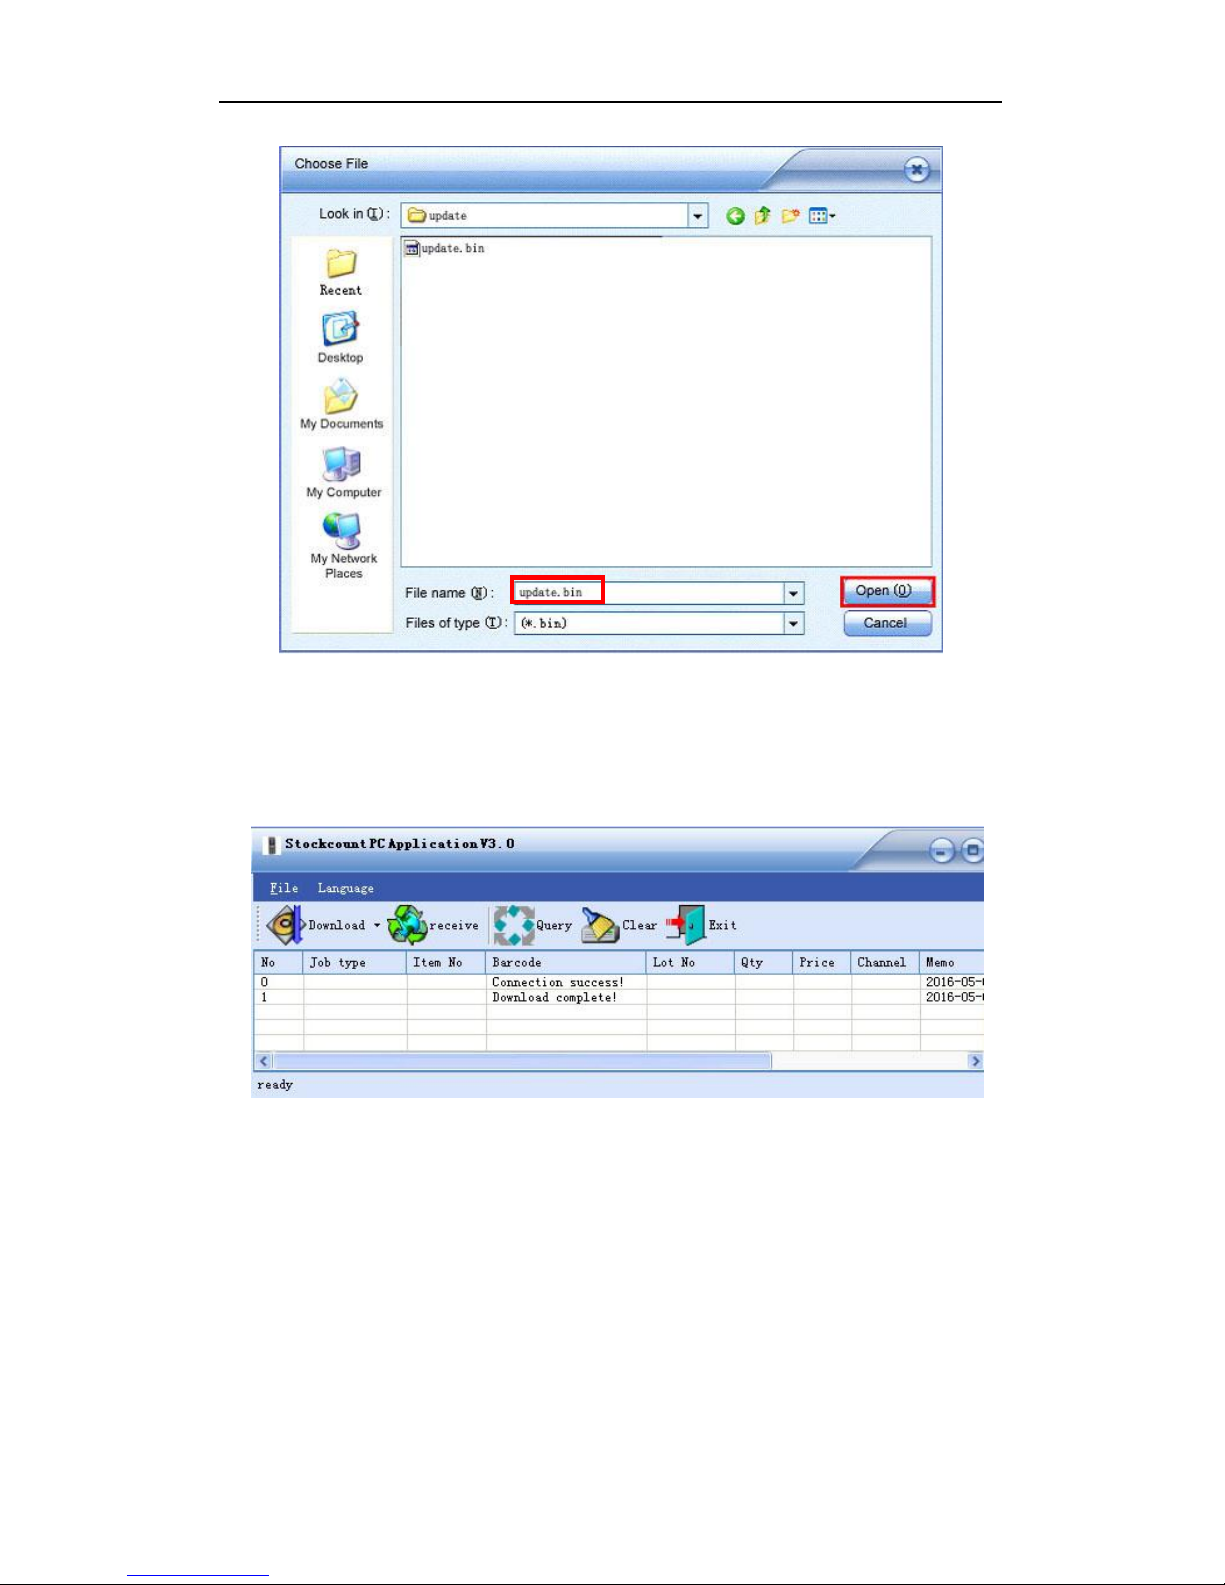
In the Handheld, select “Advance” “update” and press OK into the updating page:
Figure 3-5
Open the PC application, expand the DOWNLOAD drop-down menu and select “Download
Program”:
Figure 3-6
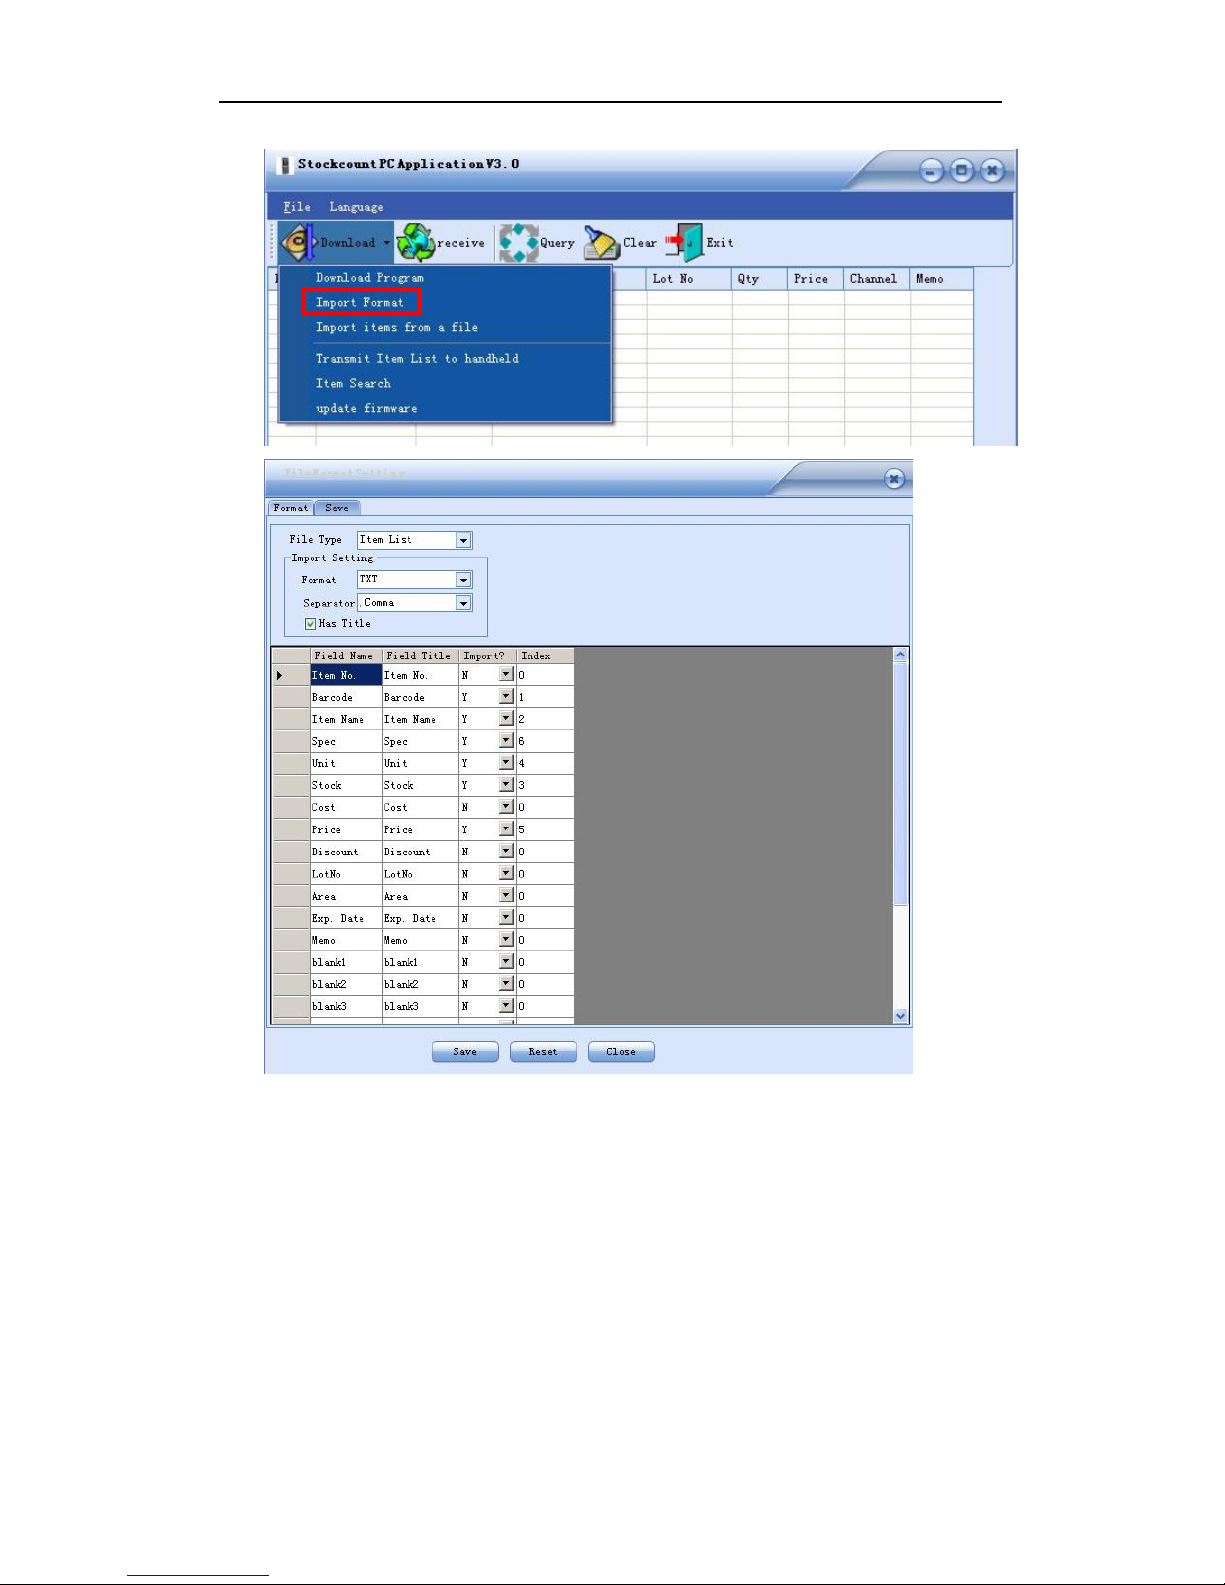
A dialog box pops up. Specify the path of the file to be updated to the Handheld then click
OPEN:
Page 14
User’s Manual for Handheld Page 12 of 27
12
Figure 3-7
Now a hint of “downloading” is shown on the Handheld. When the download completes, the
handheld will reboot automatically. A new program is updated. Meanwhile the PC
application also gives a notification of completion.
Figure 3-8
3.2.2 Download Item File
Simply speaking, it is a process to import the item file into the PC application and then
export it to the handheld.
To import the item file into the PC application, the first and most important thing is to match
its format with the pc application.
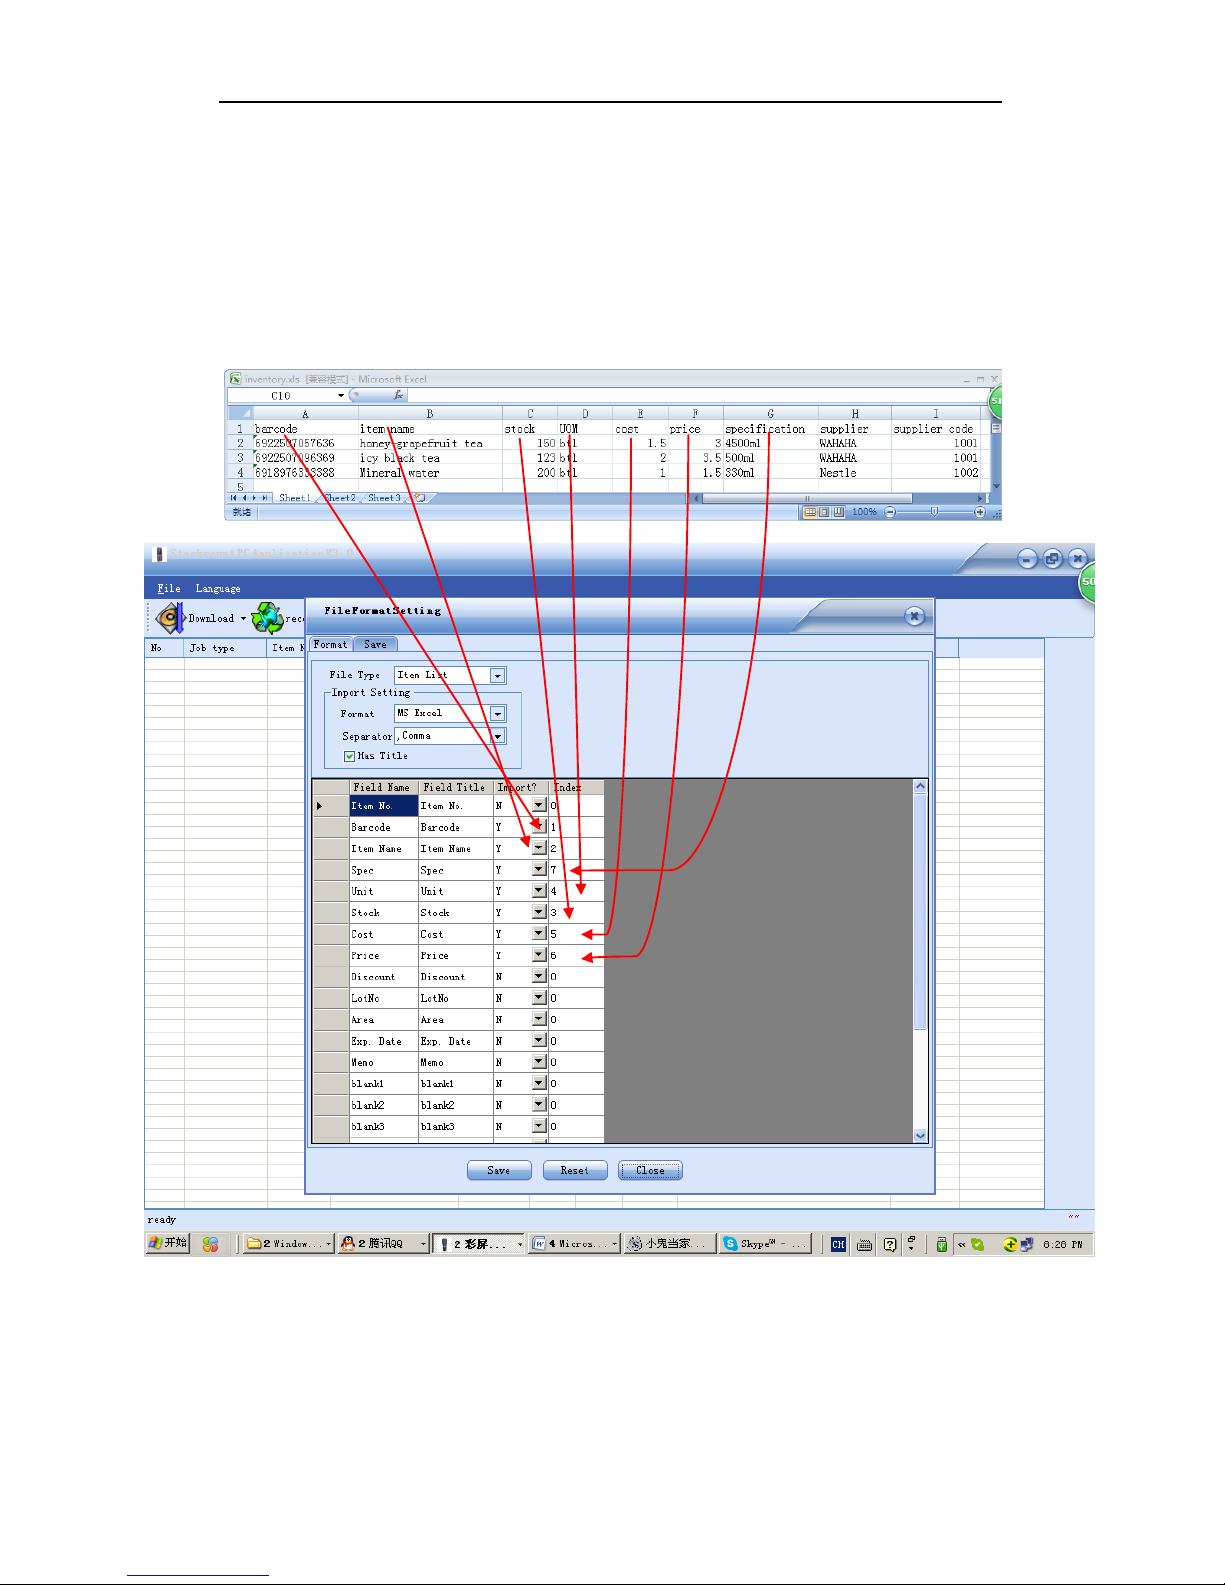
Open the PC application, expand the DOWNLOAD drop-down menu and select “Import
Format”:
Page 15
User’s Manual for Handheld Page 13 of 27
13
Figure 3-9
Configuration Instruction:
1. File Type: Item List
2. file Format: MS Excel, CSV and TXT format available. Select one according to your item file.
3. Separator: choose one from comma, semicolon, TAB and fix-length or input one according
to your item file, but leave it as it is for an Excel format file.
4. Has Title: check to import a file with field headings.
5. Field Name: default fields to be displayed on the handheld. It can not be changed.
6. Field Title: field name of your item file. You may change it to be the same as your item file.
7. Import: Y for yes to import the field; N for not to import the field
8. Index: corresponding column number of the item file
9. Length: for fix-length file only
Page 16
User’s Manual for Handheld Page 14 of 27
14
EXAMPLE:
Import an EXCEL file
Step 1: import format configuration
Suppose you have an item file named inventory.xls. There are 9 columns in it, but we need only 7
fields as barcode, item name, unit, stock, cost, price and specification. The import format is set as
below:
Figure 3-10
Step 2: import item file into the PC application
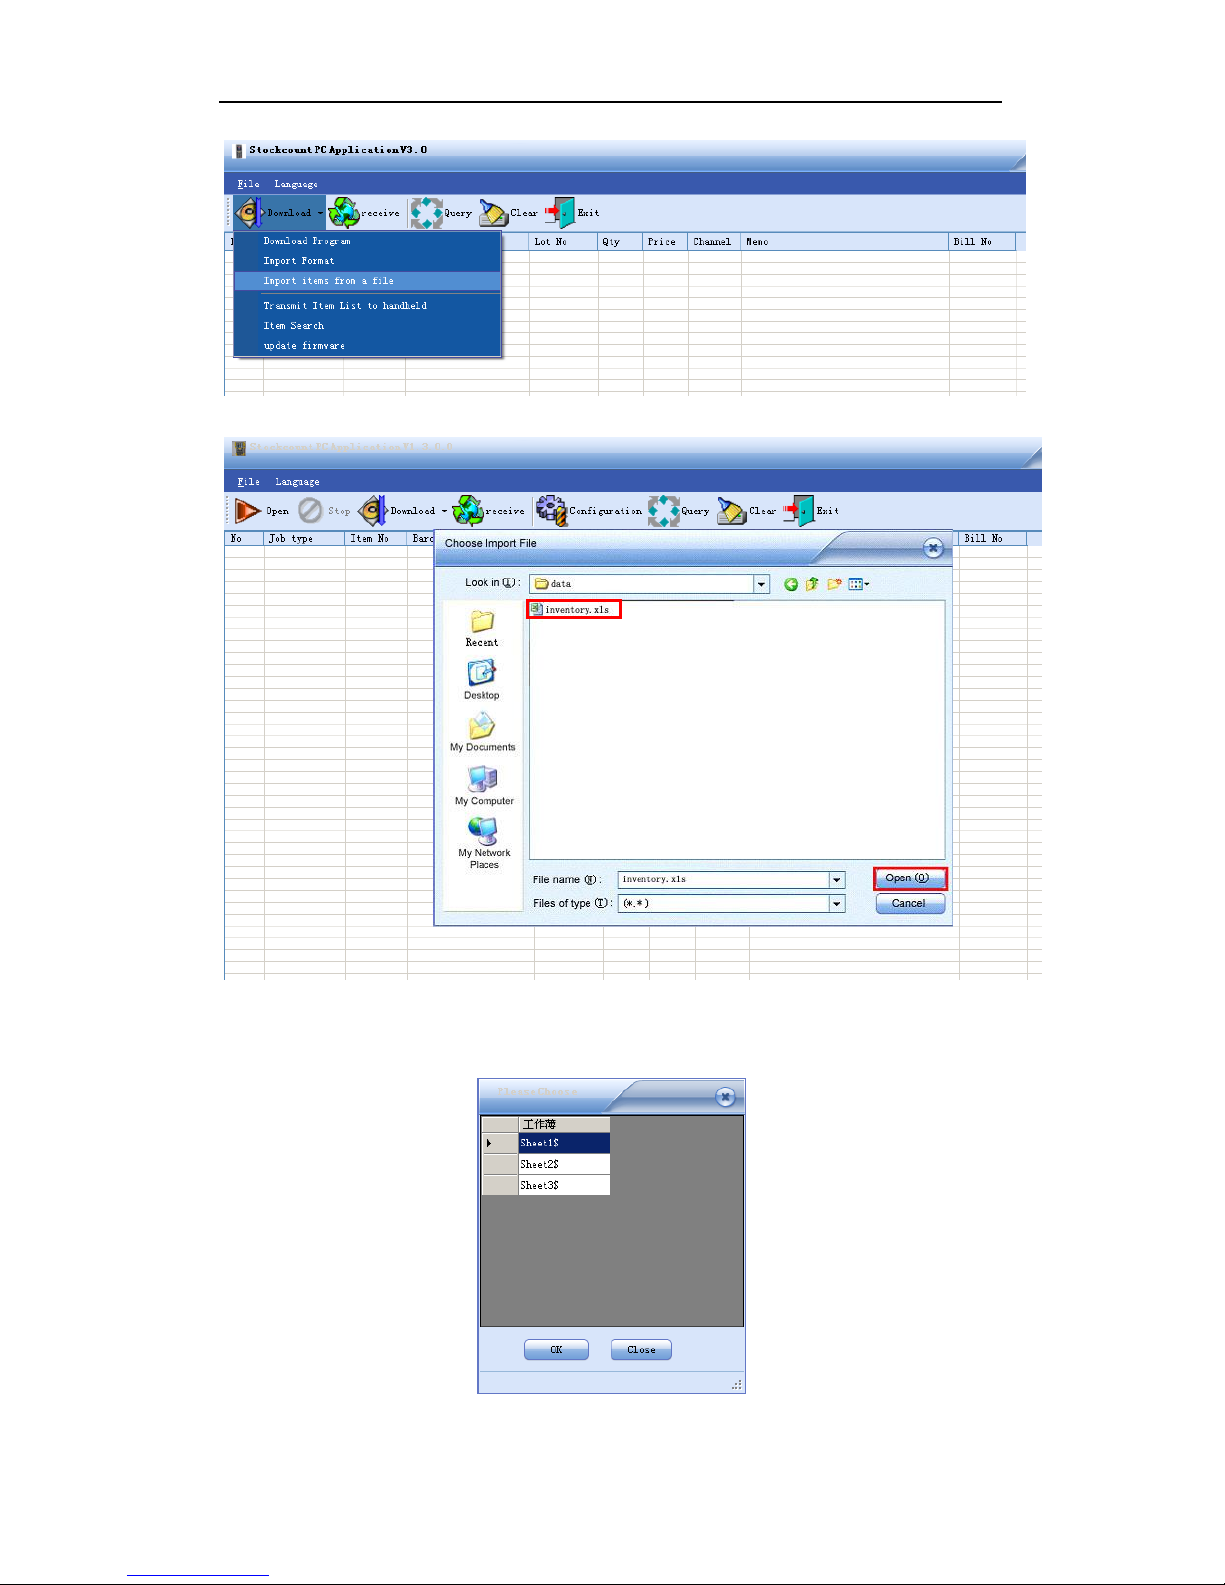
Click SAVE and CLOSE when format is configured. Then on the menu bar, click “import items
from a file” and specify the directory of the inventory.xls:
Column 1 2 3 4 5 6 7
Page 17
User’s Manual for Handheld Page 15 of 27
15
Figure 3-11
Select a work sheet:
Figure 3-12
Page 18
User’s Manual for Handheld Page 16 of 27
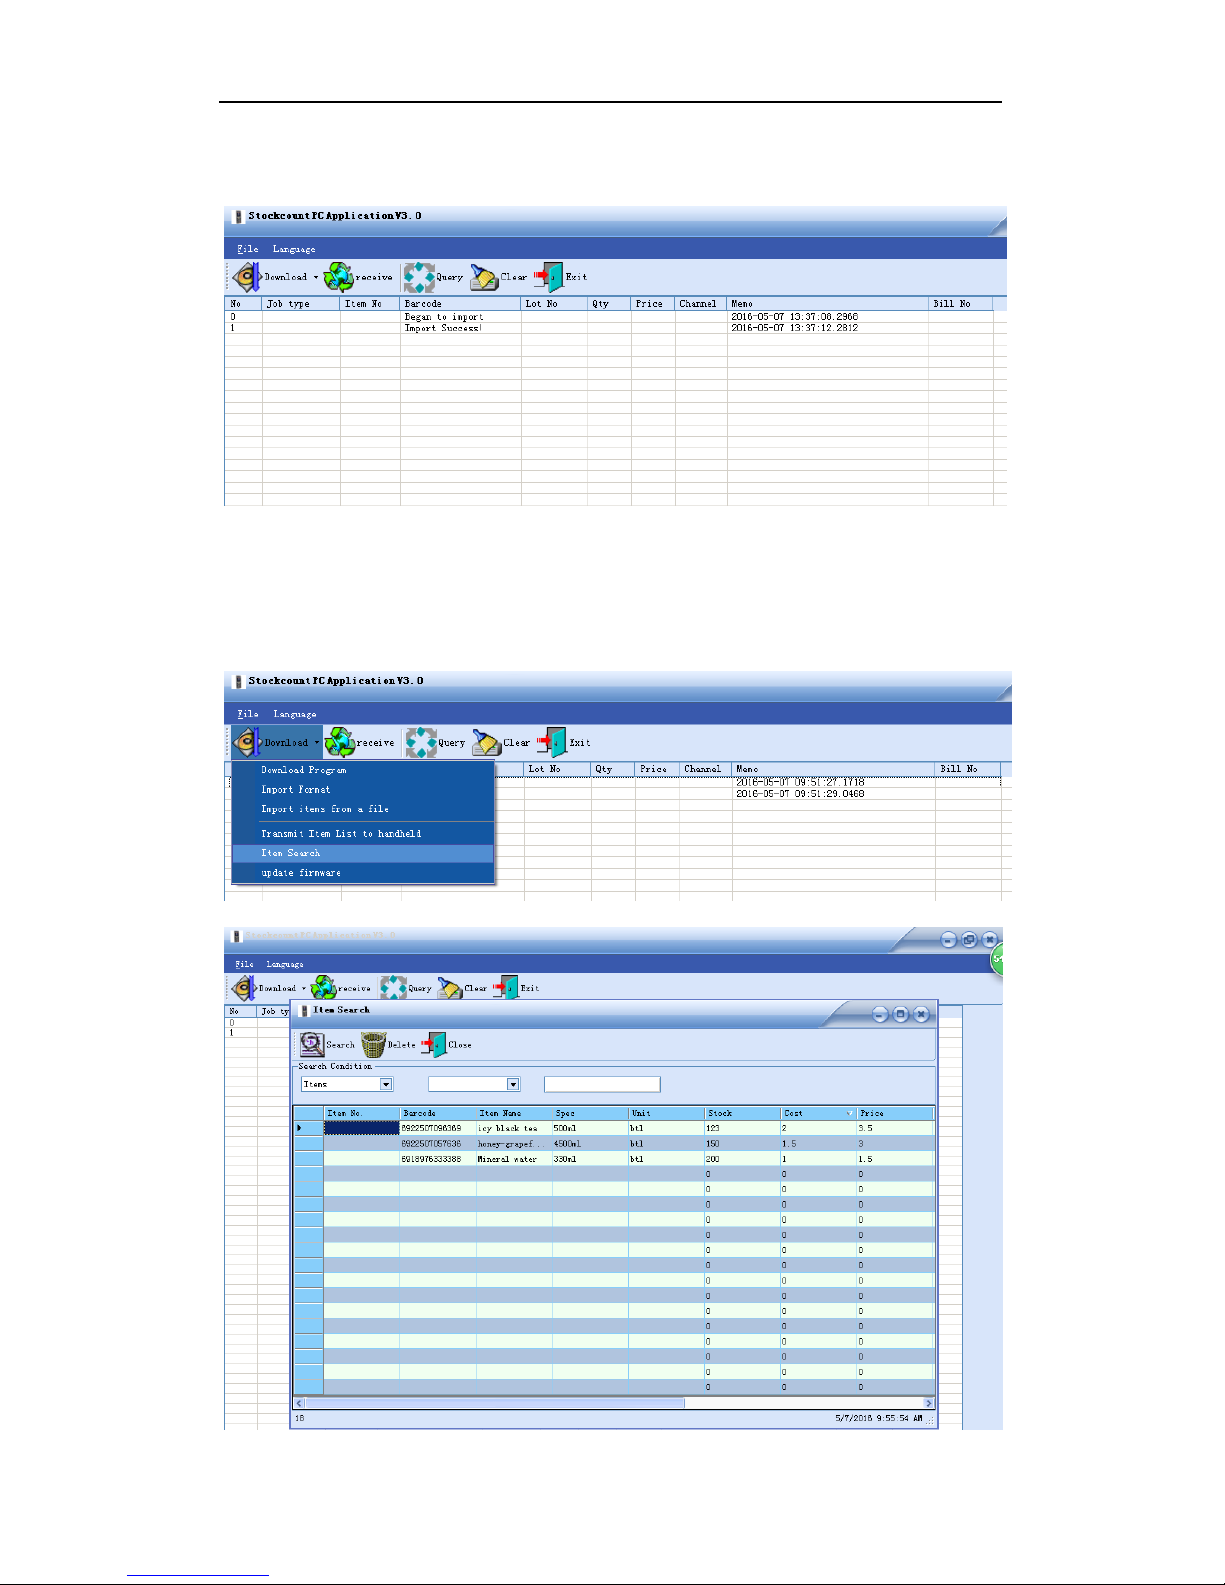
16
Confirm to start the import. When “import success!” appears, the item file has been imported into
the database of the PC application.
Figure 3-13
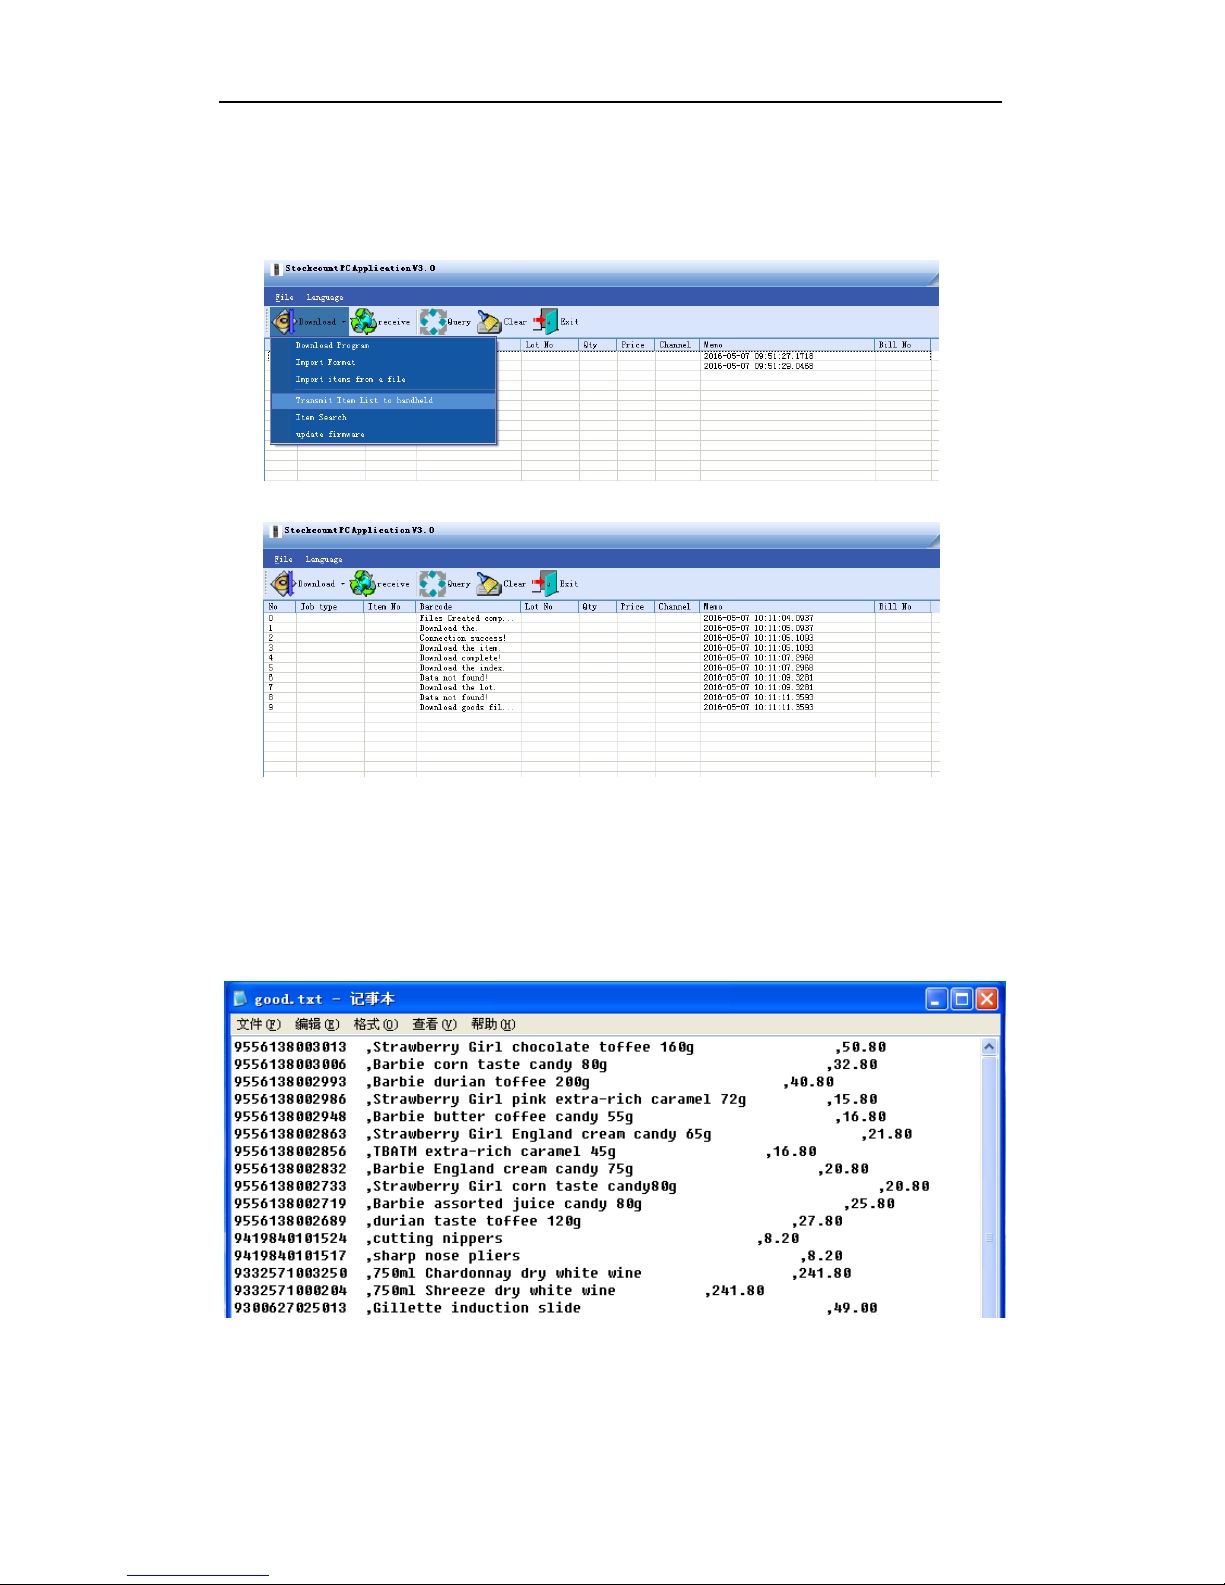
Step 3: item search
Click DOWNLOAD and select “Item Search” to confirm and view commodity details imported in
the PC application:
Page 19
User’s Manual for Handheld Page 17 of 27
17
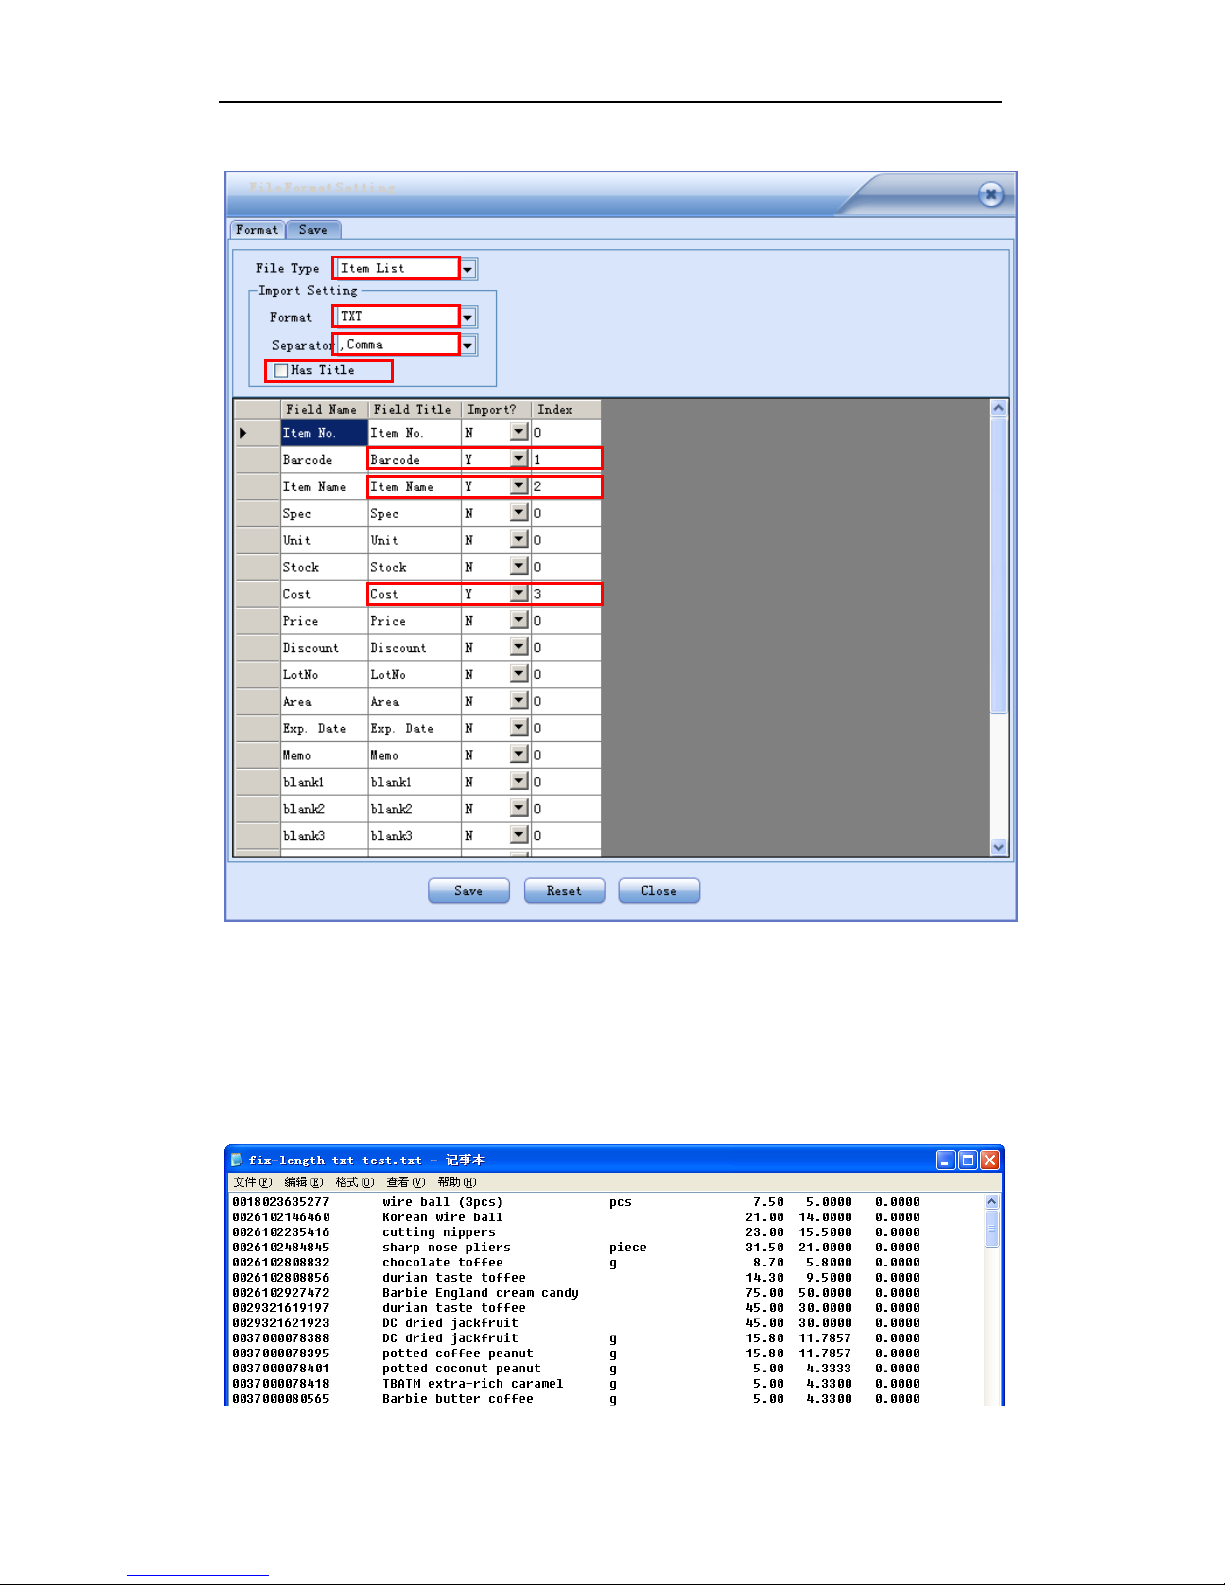
Step 4: download item file to the handheld
To start the download operation, select “Transmit Item List to handheld” from the drop-down
menu of DOWNLOAD. If download has been successfully proceeding, the PC application gives a
notification of success and the handheld screen refreshes automatically.
Figure 3-15
Import a TXT file:
1. The item file is a text file with a comma as the separator. The first column is barcode, the
second item name, the third cost. There is no field name for each column:
Page 20
User’s Manual for Handheld Page 18 of 27
18
2. format is set as below:
The rest steps please refer to the first example “import an excel file”.
Import a fix-length TXT file:
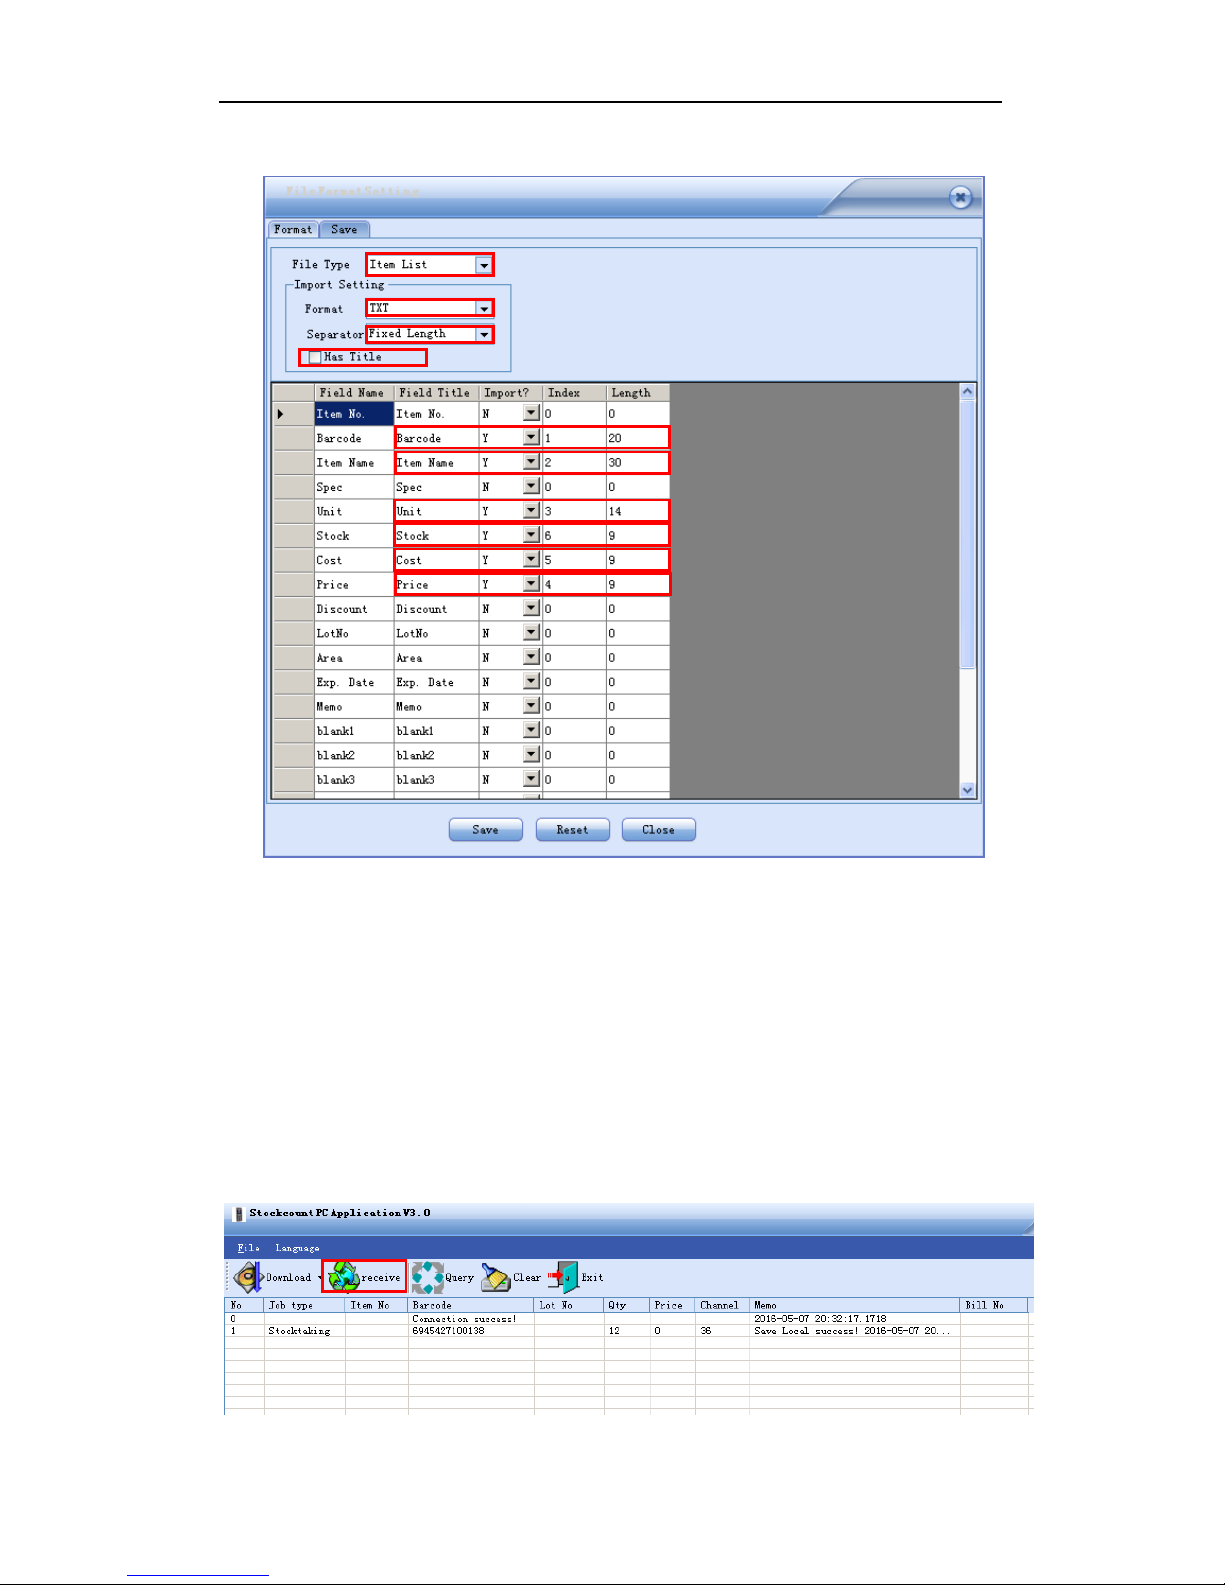
1. The first column is barcode, the second item name, the third UOM, the fourth price, the fifth
cost and the sixth stock. There is no field name for each column:
Page 21
User’s Manual for Handheld Page 19 of 27
19
2. format is set as below:
The rest steps please refer to the first example “import an excel file”.
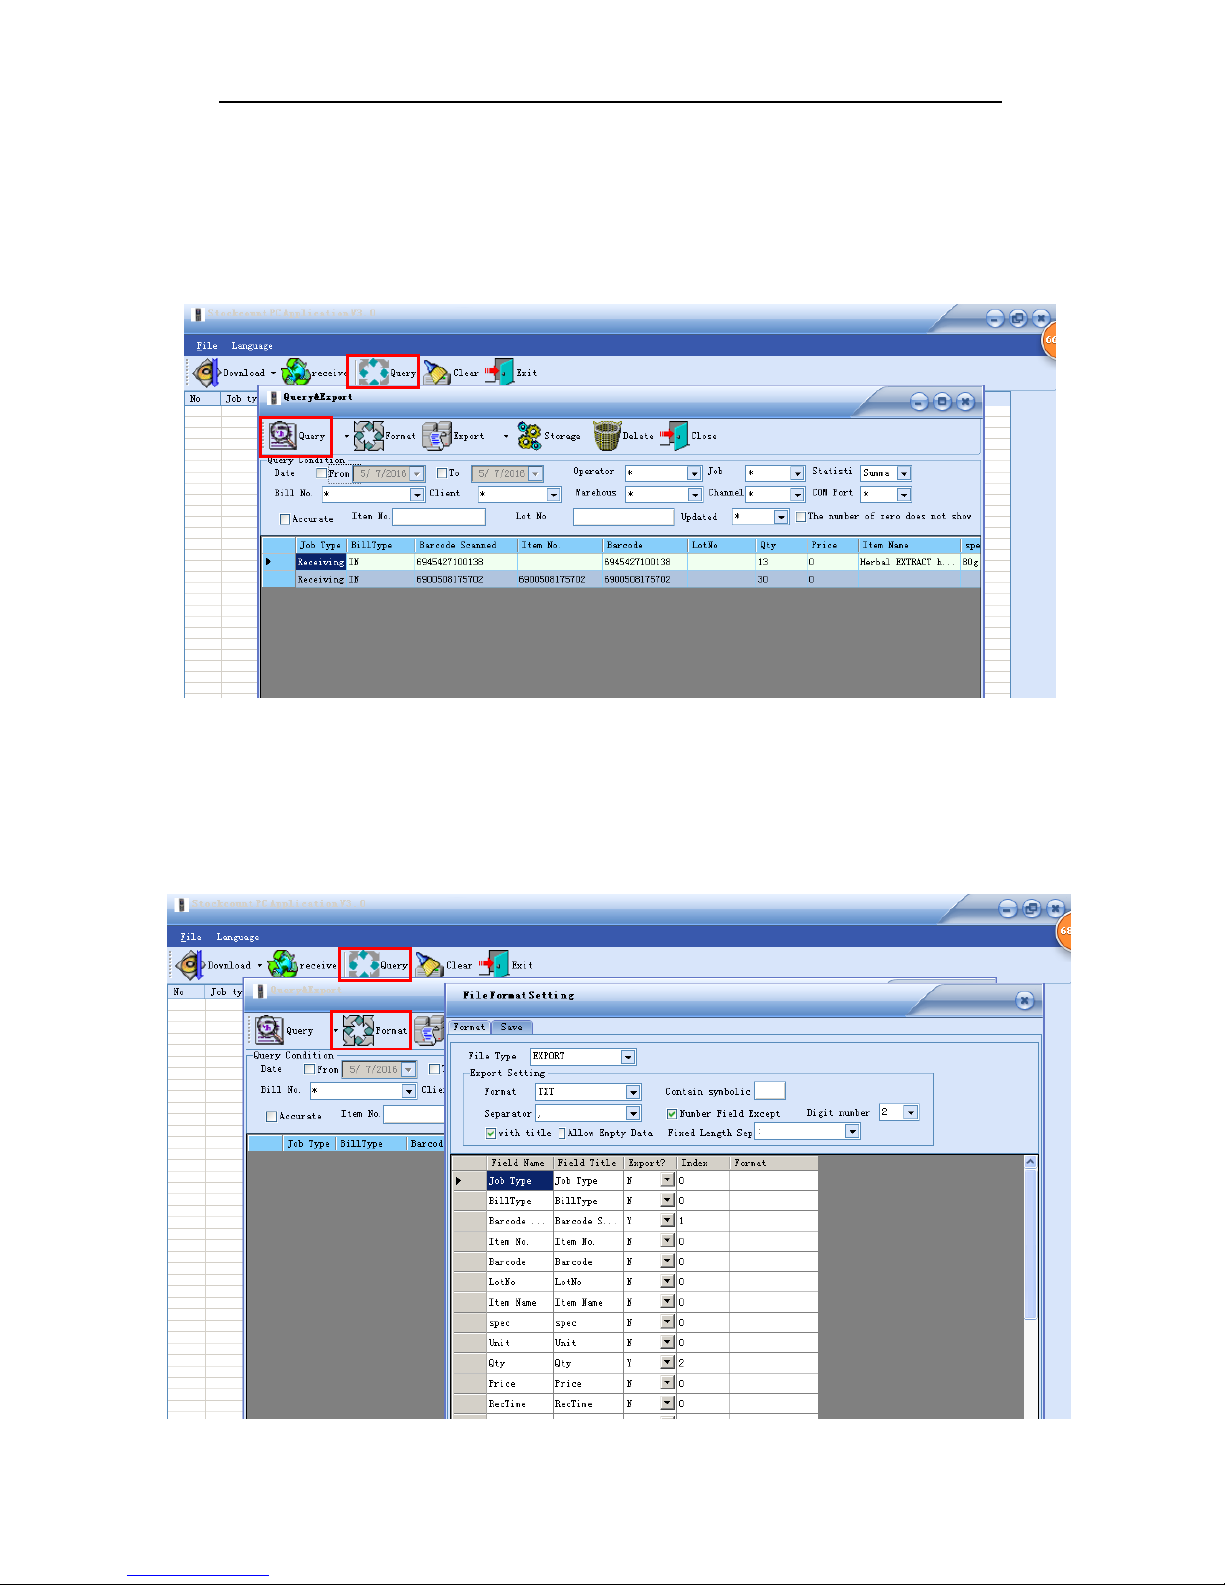
3.2.3 Data Upload
Step 1: connect the handheld and the computer with the USB cable;
Step 2: in the main menu of the handheld, enter any of the options you are going to process
(wireless scanner / receiving / shipping / Cycle Count). In the sub-menu, select “2.
Upload” “unsent” or “sent”, then press F2 to start transmission and the screen says
“linking”;
Step 3: in the PC application, click the RECEIVE button.
Page 22
User’s Manual for Handheld Page 20 of 27
20
3.2.4 Data Query
When all data is collected and uploaded to the PC application, you may carry out an enquiry,
export and cleanup of data according to different conditions.
As the query condition set,click the QUERY button to view the result:
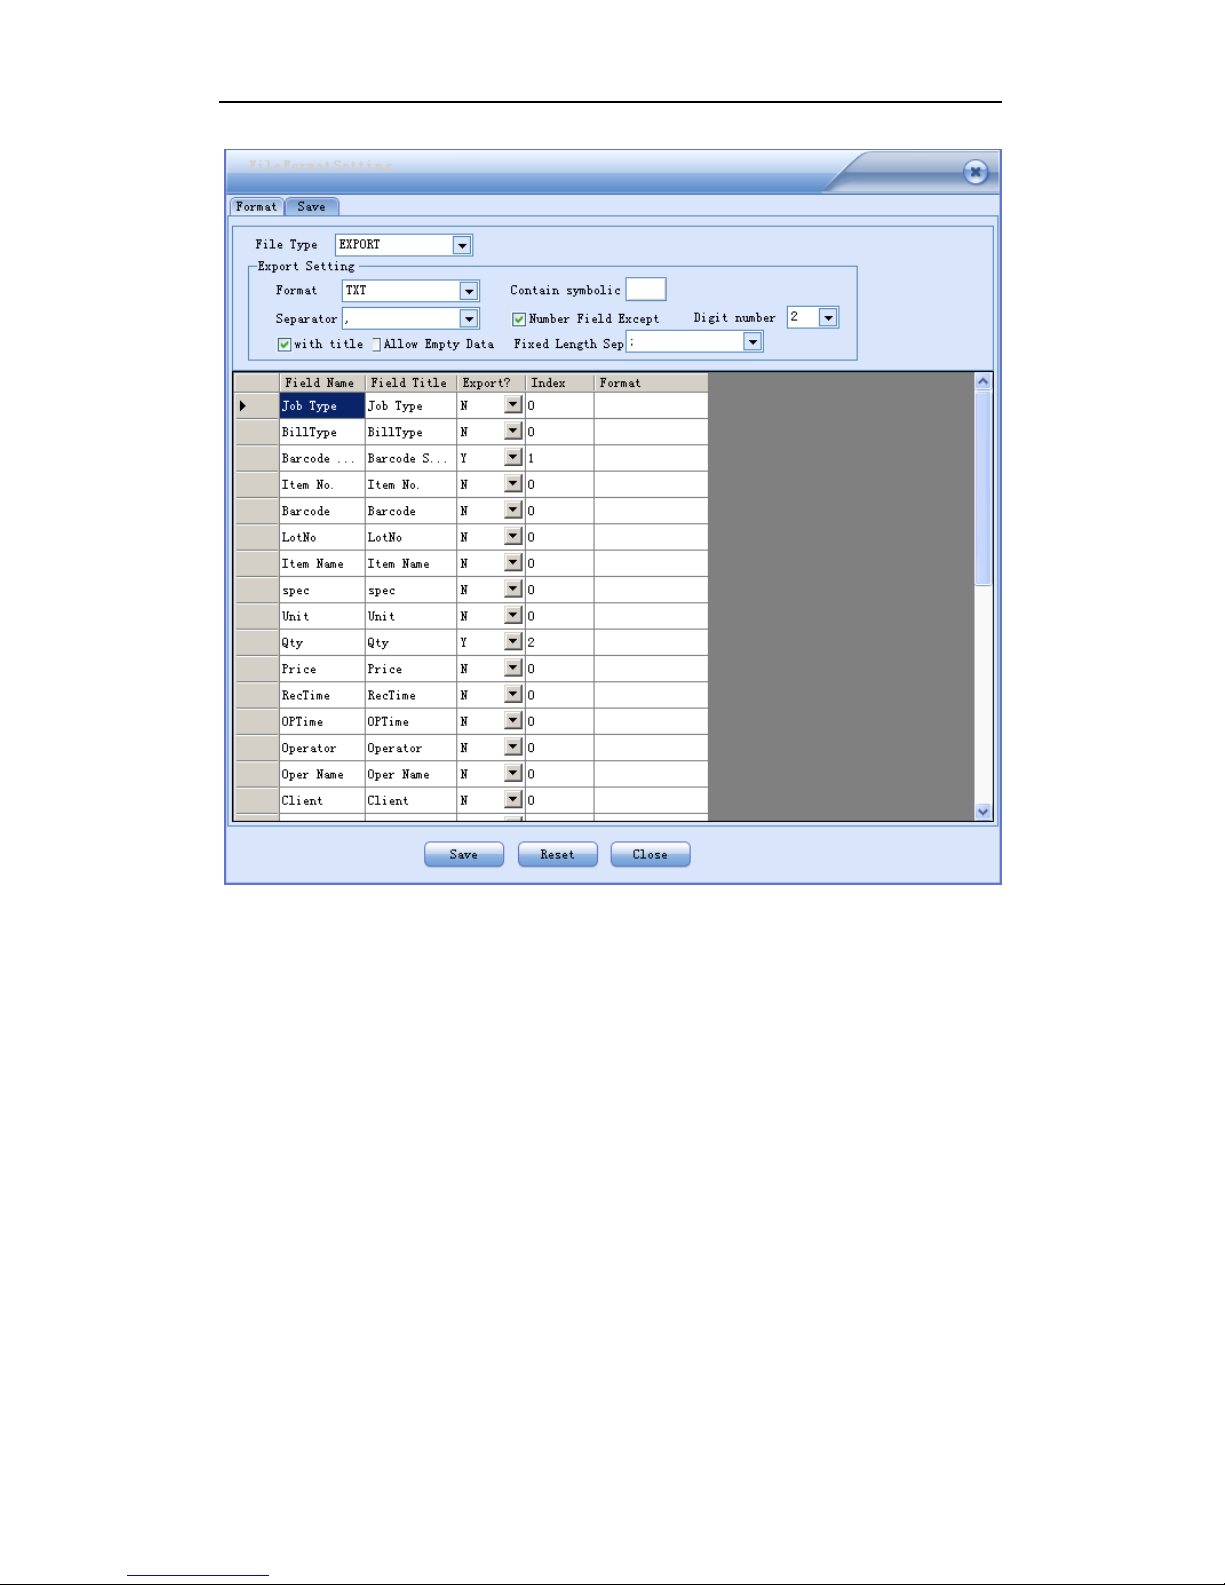
3.2.5 Export File
You could export and save query results in various file formats (eg. xls, txt, clipboard).
Click QUERY and open the QUERY & EXPORT dialog.
Click FORMAT to open the following dialog box:
Page 23
User’s Manual for Handheld Page 21 of 27
21
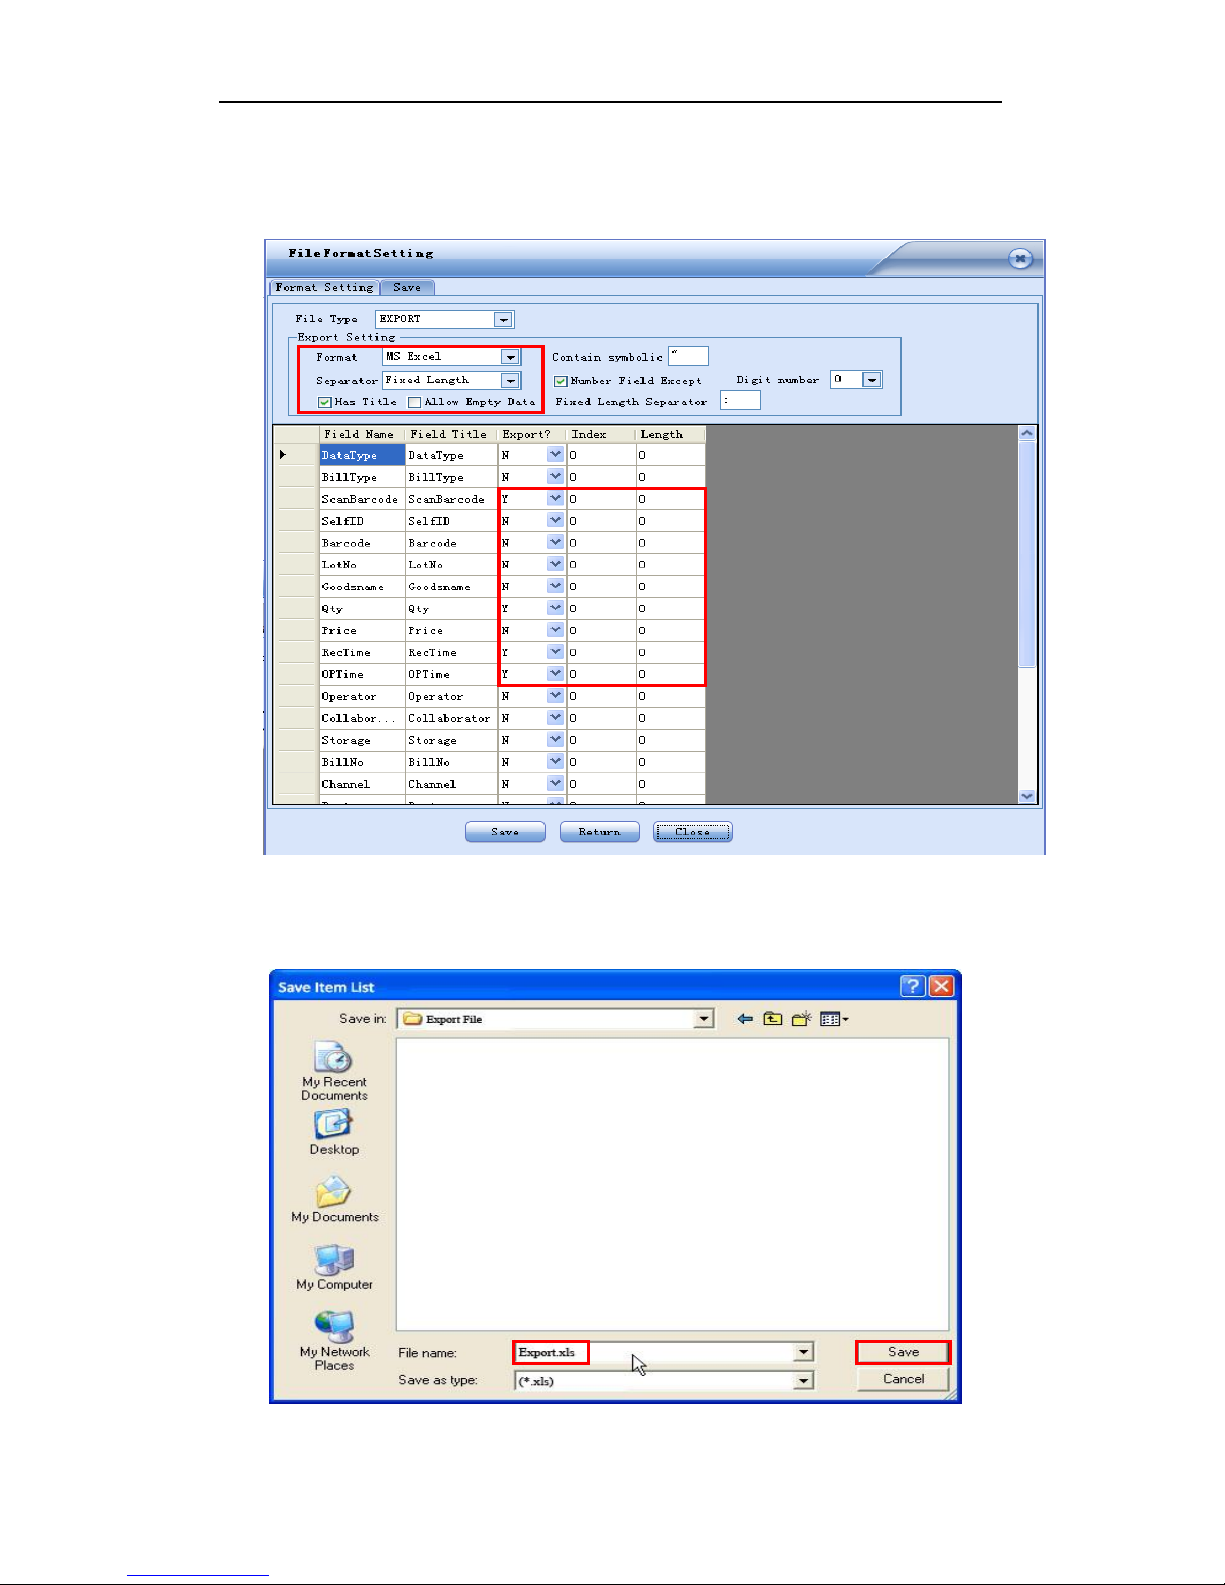
Configuration instruction:
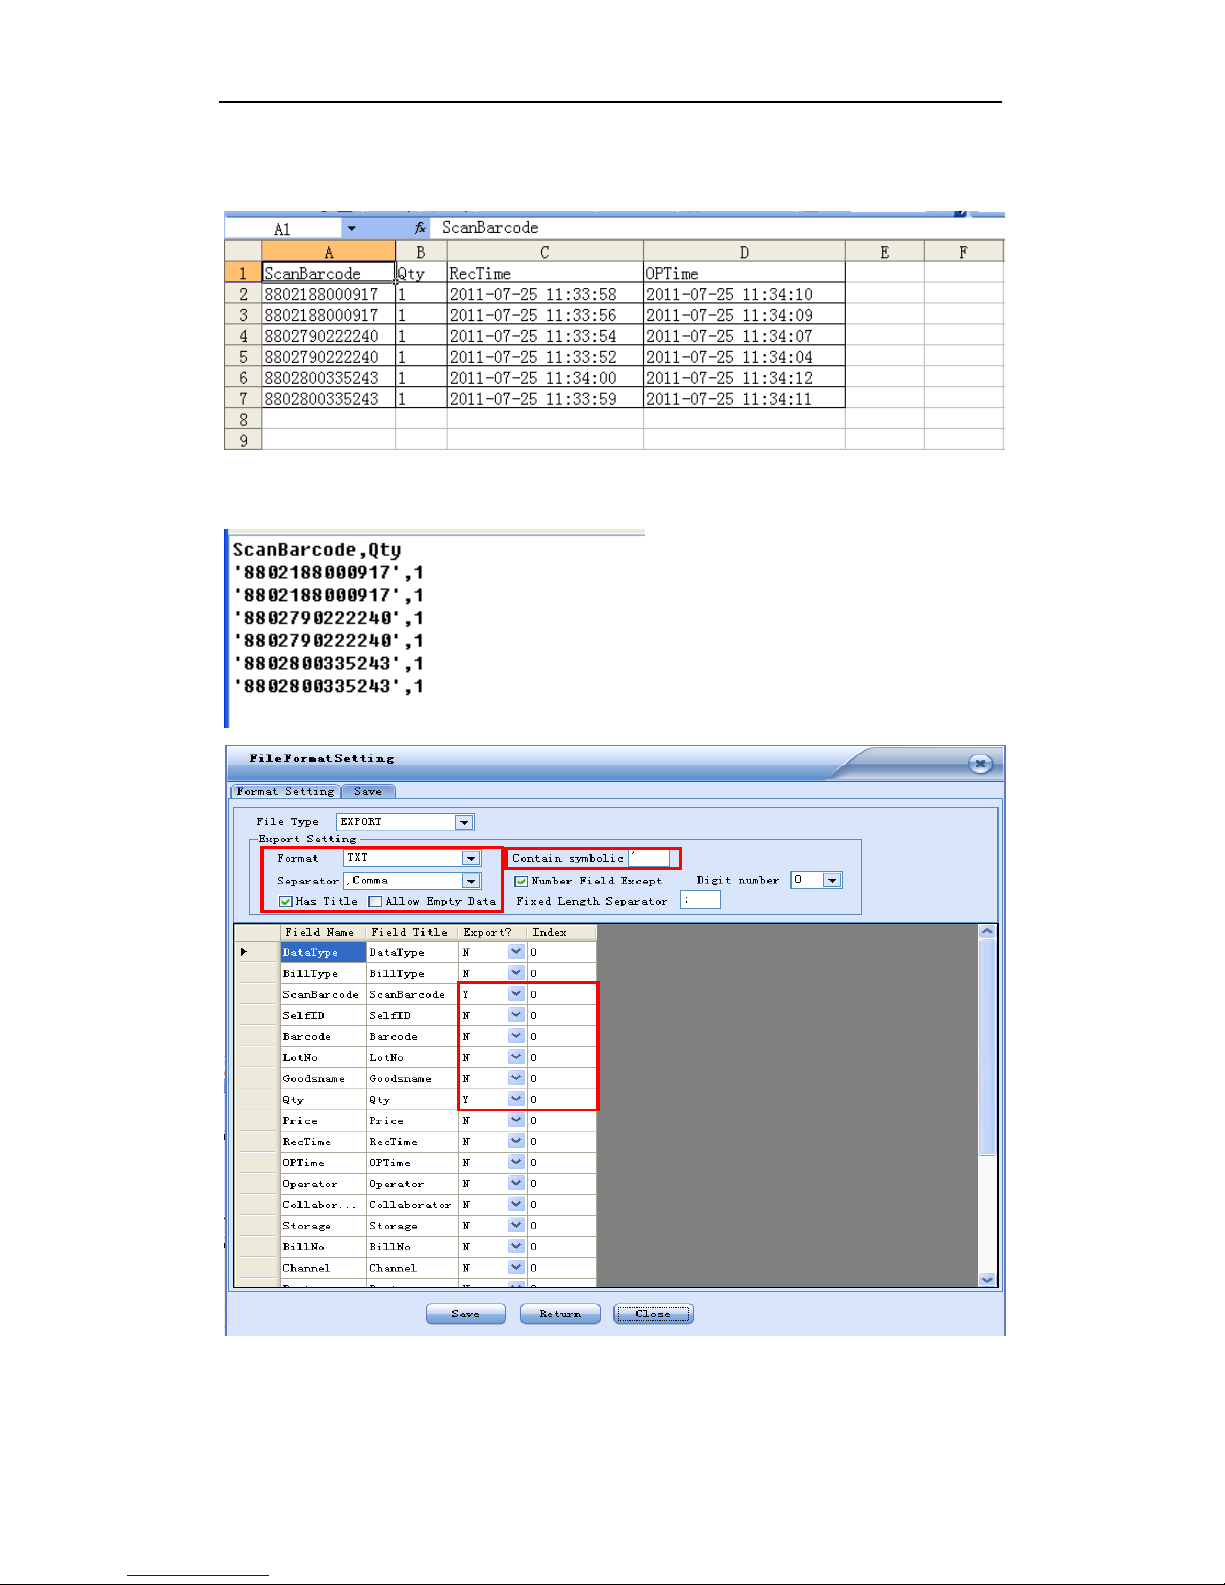
1.file type:export data;
2.fiel format:Excel,TXT,CSV,XML, clipboard, cursor, DRUGXML, WPS, ET, DBF
available;
3.contain symbolic:add a quotation mark to each field(valid only for TXT file);
4.number field except:no quotation mark to numbers even though the MARK option is
selected;
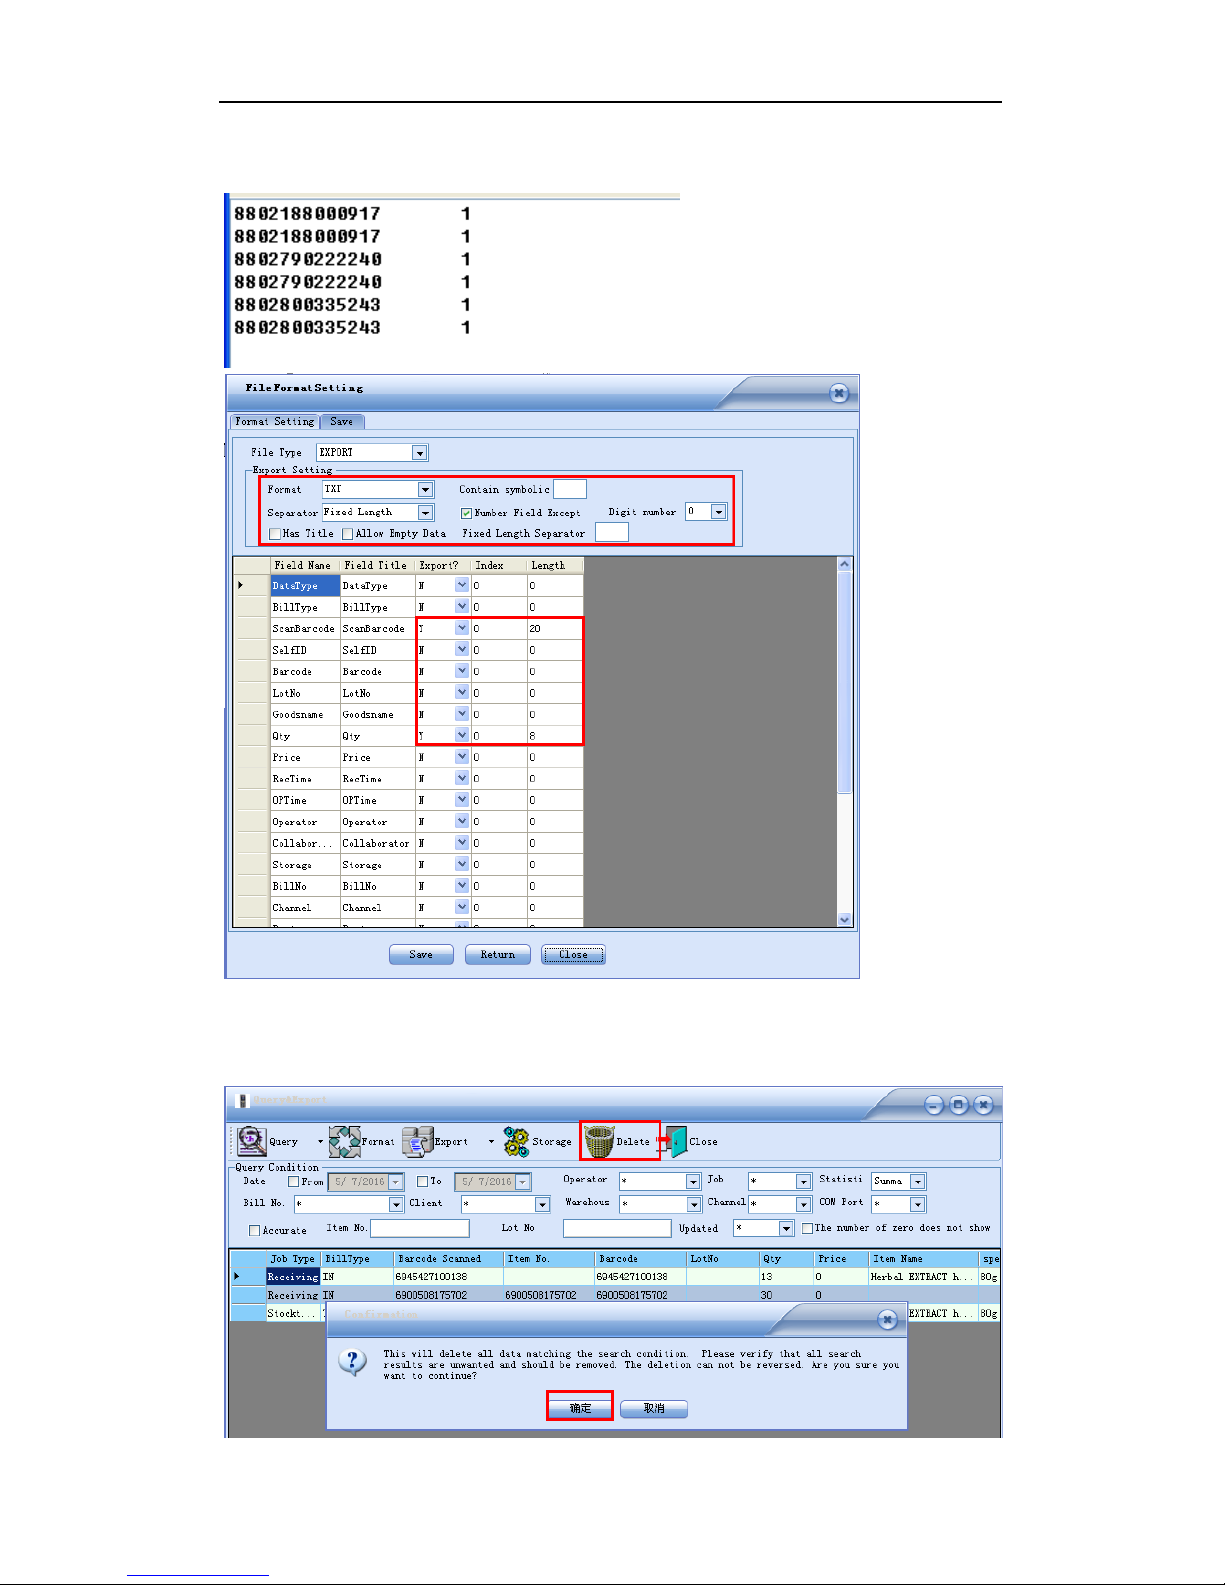
5. separator:choose one from comma, semicolon, TAB and fix-length (column width as in
excel) or input one instead;
6. with title:export a file with field headers;
7. allow empty data: allow to export blank data source.
8. fix-length separator: export a fix-length file with a separator.
9. digit number:-1(remove decimal); 0(rounded to integer); 1(one decimal);
10. Export?: Y for yes to export the field, N for not to export the field.
11. index: sequence the fields to be exported starting from 1;
12. format: define a specific format for quantity and/or date.
Page 24
User’s Manual for Handheld Page 22 of 27
22
EXAMPLE:
Step 1:configure the format of the file to be exported
Click SAVE and CLOSE to shut the dialog box then click EXPORT again
Step 2: specify a path for saving the exported file:
Enter a file name (eg. Export.xls) and click SAVE.
Page 25
User’s Manual for Handheld Page 23 of 27
23
Step 3:Open the exported file:
To get an exported TXT file like this, the format should be configured as below:
Page 26
User’s Manual for Handheld Page 24 of 27
24
To get an exported fix-length TXT file like this, the format should be configured as below:
3.2.6 Delete Data
In the "QUERY&EXPORT" interface, click "Delete" and choose YES in the pop up dialog box.
Page 27

User’s Manual for Handheld Page 25 of 27
25
WARRANTY
The Wireless Handheld is warranted for a period of twelve (12) months from the date of
purchase.
Terms & Conditions:
A. Warranty service is only available for products purchased from original manufacturer or
its authorized dealers
B. Product may be serviced provided it remains unmodified and is operated under normal
and proper conditions, while the buyer must present the original purchase invoice or receipt for
verification when warranty service is rendered. No charge will be made to Buyer for replacement
parts for warranty repairs.
C. The above warranty provisions shall not apply to the following cases, but repair service
may be rendered at the Buyer’s expense:
1. Warranty service is expired.
2. The Buyer is incapable of presenting a warranty card or the information in the warranty
card is not complete or is altered.
3. Defects or damage cause by accident or artificial factors like unusual physical or electrical
stress, water or other liquids, etc.
4. Defects or damage results from failure to perform operator handling and scheduled
maintenance instructions stating in the user’s manual.
5. Other defects or damage do not cause by workmanship or material.
D. No repair service shall apply to the following products:
1. Products not made by original manufacture.
2. Products that has been repaired, tampered with, altered or modified, without authorization
from original manufacturer.
E. Warranty service is valid in Mainland China only.
-----------------------------------------------------------------
Notes:
The product specification and information mentioned in this manual is subject to changes without
prior notice. For the latest news and information, please consult a distributor nearby.
 Loading...