

Page 1

NETUM
Barcode Scanner
Manual
· Bluetooth Connection
· 2.4GHz Connetion
. USB Wired Connection
Package Included:
1 X Scanner; 1 X 2.4G Receiver; 1 X USB Cable; 1 X Quick Setup Guide
Page 2
Quick Setup Guide.
How to Start ?
There are three kinds of connections modes:
USB Wired
2.4GHz Wireless Connection
Bluetooth Connection
Follow one of the following connection modes to get started.
Working via USB Cable
①.Connect scanner with your device via USB cable.
②USB HID-KWB mode is set by default, if you want to work under virtual serial port please
refer to" USB COM (Virtual Serial Port)". (Page)
③. Set Keyboard language→See page () . US keyboard was set by default.
④. Locate the cursor on the place where you want the scanner to output the codes then you
can start to scan.
Working via 2.4GHz USB Receiver (By default)
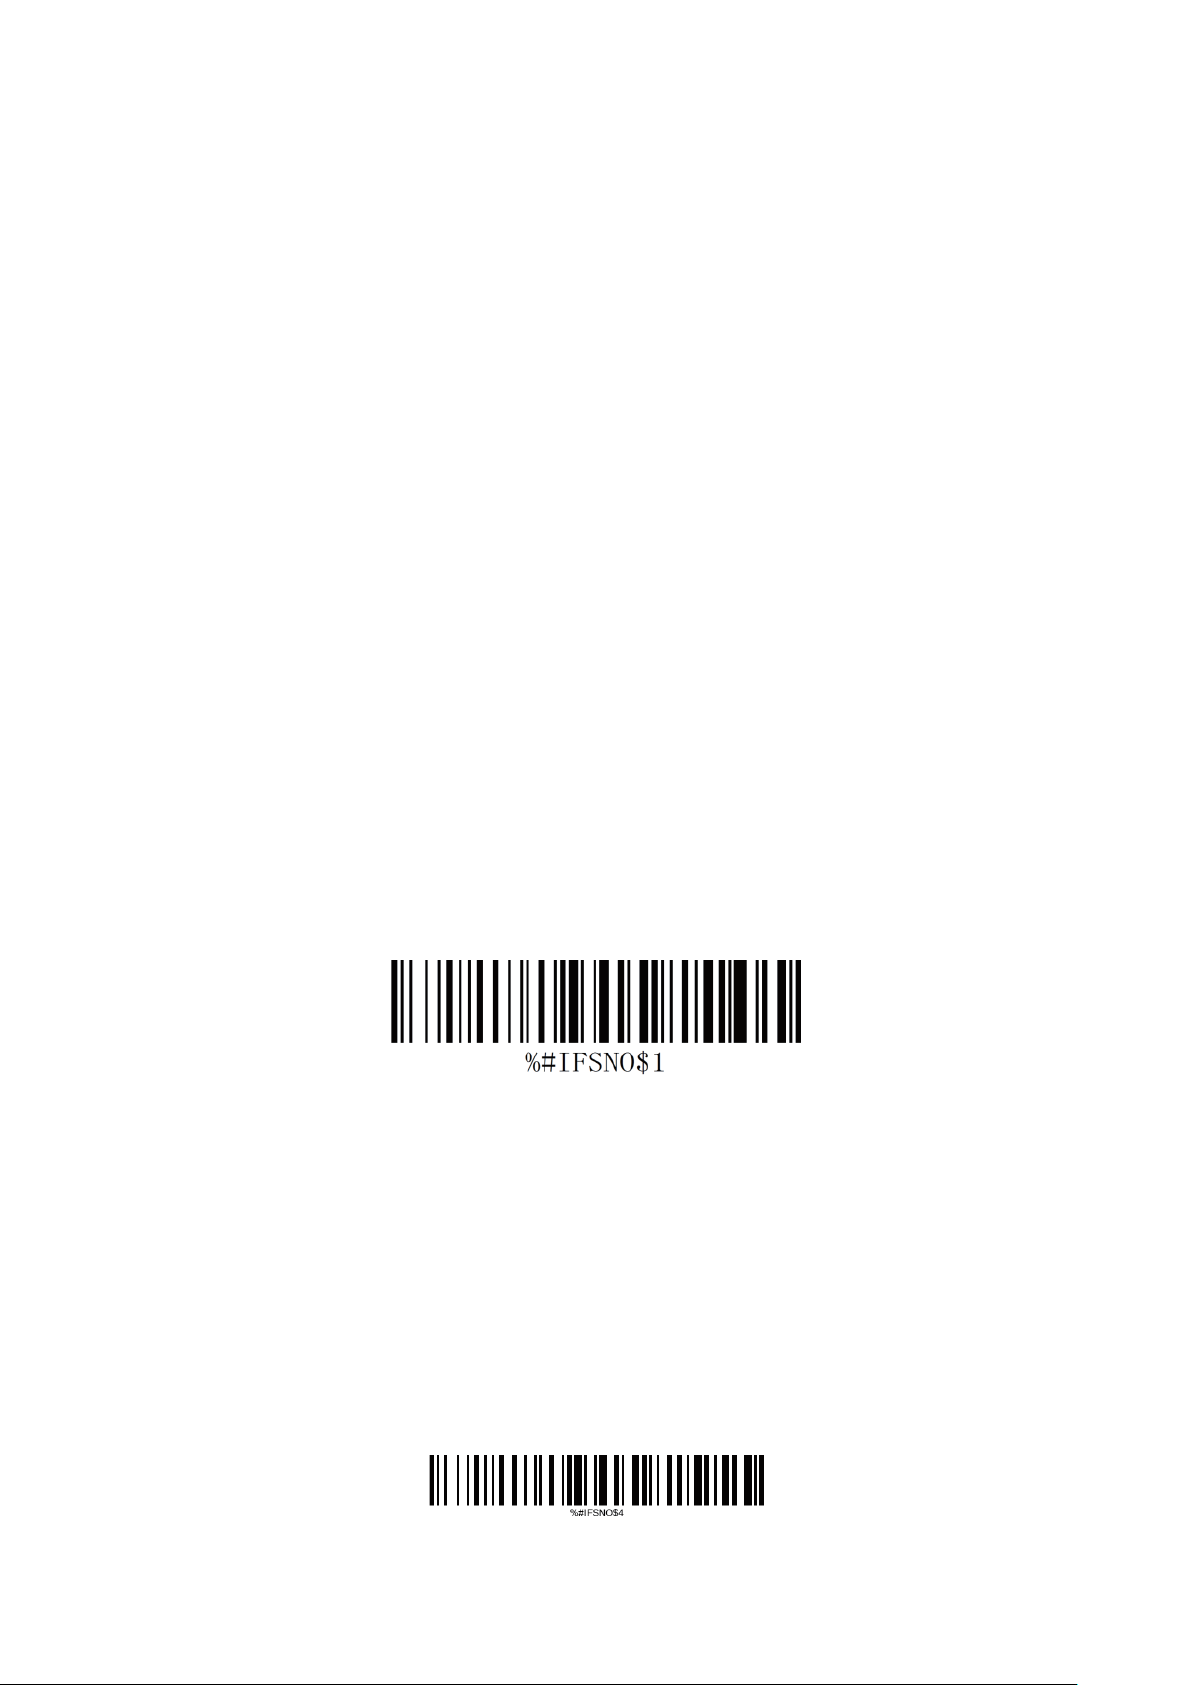
①.Scan " RF 2.4GHz Transmission". This mode was set by default , for first use please ignore
it.
②.Plug the USB receiver on your device.
③. Set Keyboard language→See page () . US keyboard was set by default.
④. Locate the cursor on the place where you want the scanner to output the codes then you
can start to scan.
*RF 2.4GHz Transmission
Working via Bluetooth
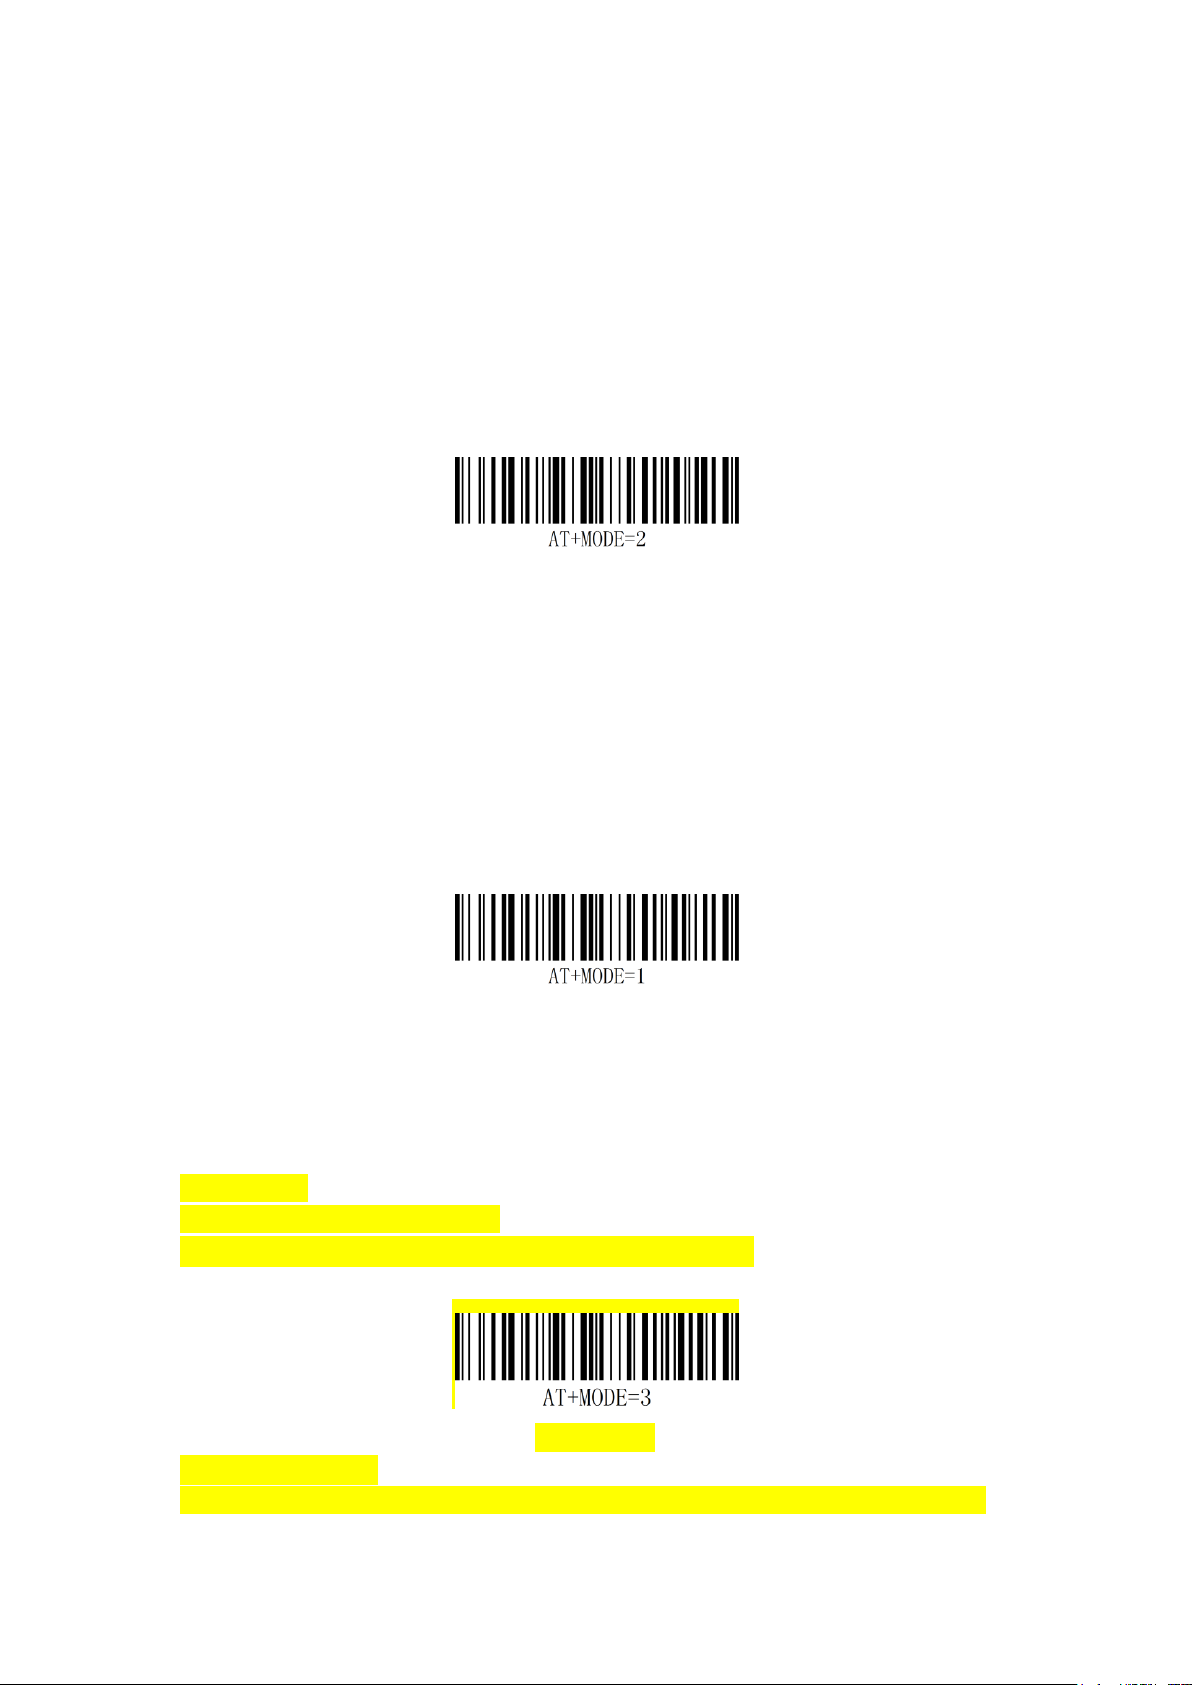
①. Scan "Bluetooth Transmission".
②. Press scanner's button to power on the scanner.
③. Pair the bluetooth. →See page()
Bluetooth HID mode is set by default, if you want to work under SPP or BLE mode please
scan related command barcode from "Bluetooth Connection Modes" accordingly. (Page)
④. Set Keyboard language→See page () . US keyboard was set by default.
⑤. Open a file or software and locate cursor on the place where you want the scanner to
output the codes then you can start to scan.
Page 3
%#IFSNO$4
Bluetooth Transmission
Bluetooth Connection Modes
There are three kinds of bluetooth connections modes:
① Basic Mode (HID) (Default)*
Human Interface Device Profile
By scanning below barcode scanner will enter "Basic Mode".
For the details on how to pair bluetooth on Basic Mode see page ()
Basic Mode
Basic Mode Features:
NO software installation required
Connects to most devices
Scanner interacts with host device like a keyboard
②SPP Mode*
Serial Port Profile- For Android or Windows OS devices
By scanning below barcode scanner will enter "SPP Mode".
Bluetooth SPP
SPP Mode Features:
More efficient and reliable data communications for barcodes containing lots of data
If you have an application that supports our scanner, this is the recommended mode
③BLE Mode*
Serial Port Profile- For iOS Devices
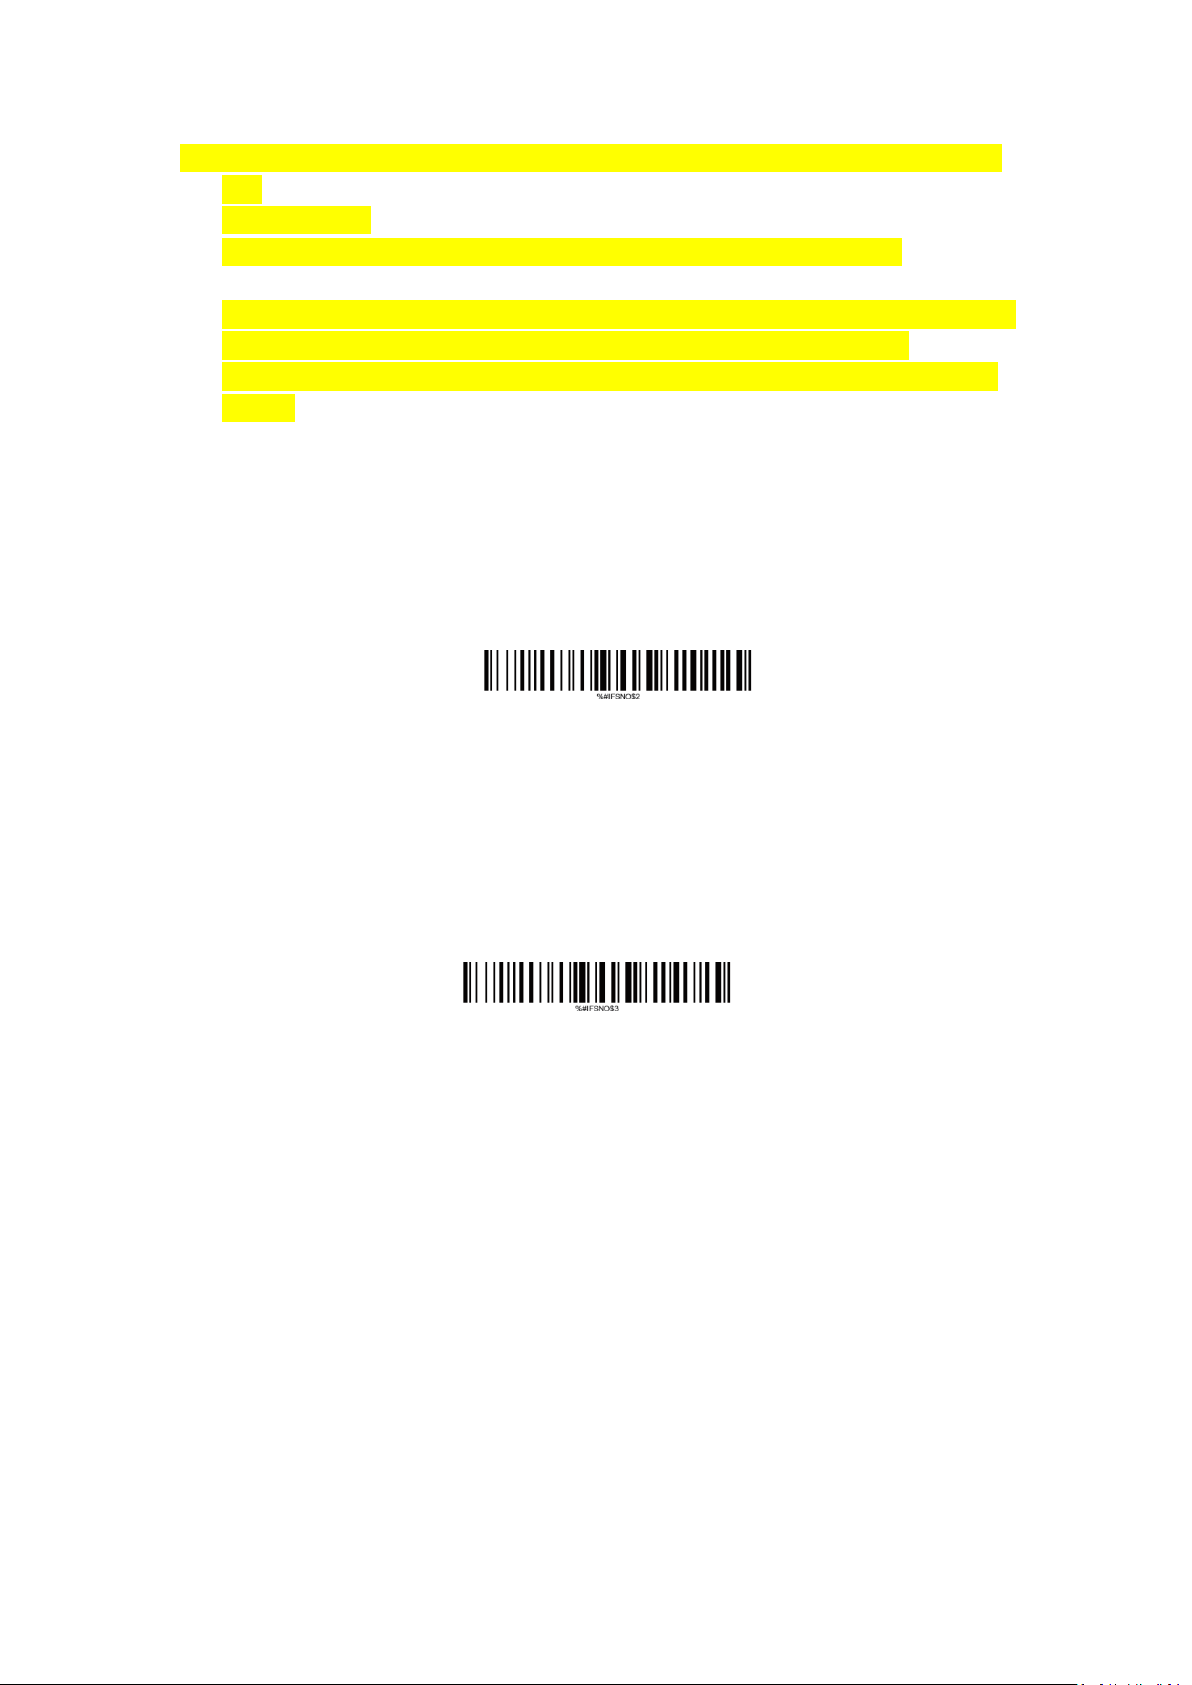
By scanning below barcode scanner will enter "BLE Mode".
Bluetooth BLE
BLE Mode Features:
More efficient and reliable data communications for barcodes containing lots of data
Page 4
If you have an iOS application that supports our scanners this is the mode you want to
use
Important Note:
1. Scanner will power off automatically if device is not connected within 1min.
2. If you want to shift from HID to SPP or BLE just scan the Corresponding command barcode.
If you want to shift from SPP or BLE to HID mode, first ignore (or delete) "Netum
Bluetooth"→ turn off bluetooth→ scan command barcode of HID→ Open the bluetooth →
repair it.
USB Wired Connection Mode
USB HID-KBW
By default, the scanner is in HID mode as a Keyboard device. It works on a Plug and Play
basis and no driver is required.
* USB HID-KBW
USB COM (Virtual Serial Port)
If you connect the scanner to the Host via a USB connection, the USB COM Port Emulation
feature allows the host to receive data in the way as a serial port does. A driver might
required for this feature.
USB COM (Virtual Serial Port)
How to pair bluetooth under Basic Mode (HID) ?
Android: Connect Android Device in Basic Mode (HID)
1. Power on the scanner. The LED light will be flashing.
2. Touch Home | Menu | Settings | Wireless & Networks | Bluetooth settings
3. Make sure the device has Bluetooth “On”.
4. In the list of found devices, select “Netum Bluetooth”. Tap Pair.
5. The scanner will make one long beep after bluetooth paired and LED light will turn to solid blue (no blinking).
Page 5
Apple: Connect Apple iOS Device (HID)
1.Power on the scanner. Blue LED light will start to flash.
2. Start a Bluetooth device search.
IOS: Tap Settings | General| Bluetooth. Turn on. A Bluetooth device search will begin.
3. In the device list, tap on “Netum Bluetooth”. Tap Pair.
4. The scanner will make one beep once it’s connected and LED light will turn to solid blue and is ready to scan.
Windows: Connect Windows PC(HID)
1.Power on the scanner. Make sure the scanner is discoverable (unpaired).
2. Use your computer’s Bluetooth Settings to connect to the scanner.
3. Open Devices and Printers and select “Add a device”.
4. In the device list, select “Netum Bluetooth”. Click Next.
5. Follow the remaining screens to complete the wizard.
Barcode Programming
Netum barcode scanners are factory programmed for the most common terminal and
communications settings. If you need to change these settings, programming is
accomplished by scanning the bar codes in this guide. An asterisk (*) next to an
option indicates the default setting.
*Important Notes: Many of the command barcodes only work with a scanner in a particular
Bluetooth or 2.4GHz mode as indicated by the header row of each table.
Factory Restore
Factory Reset will restore the scanner to Factory Default settings (configured as shipped).
Keyboard Language
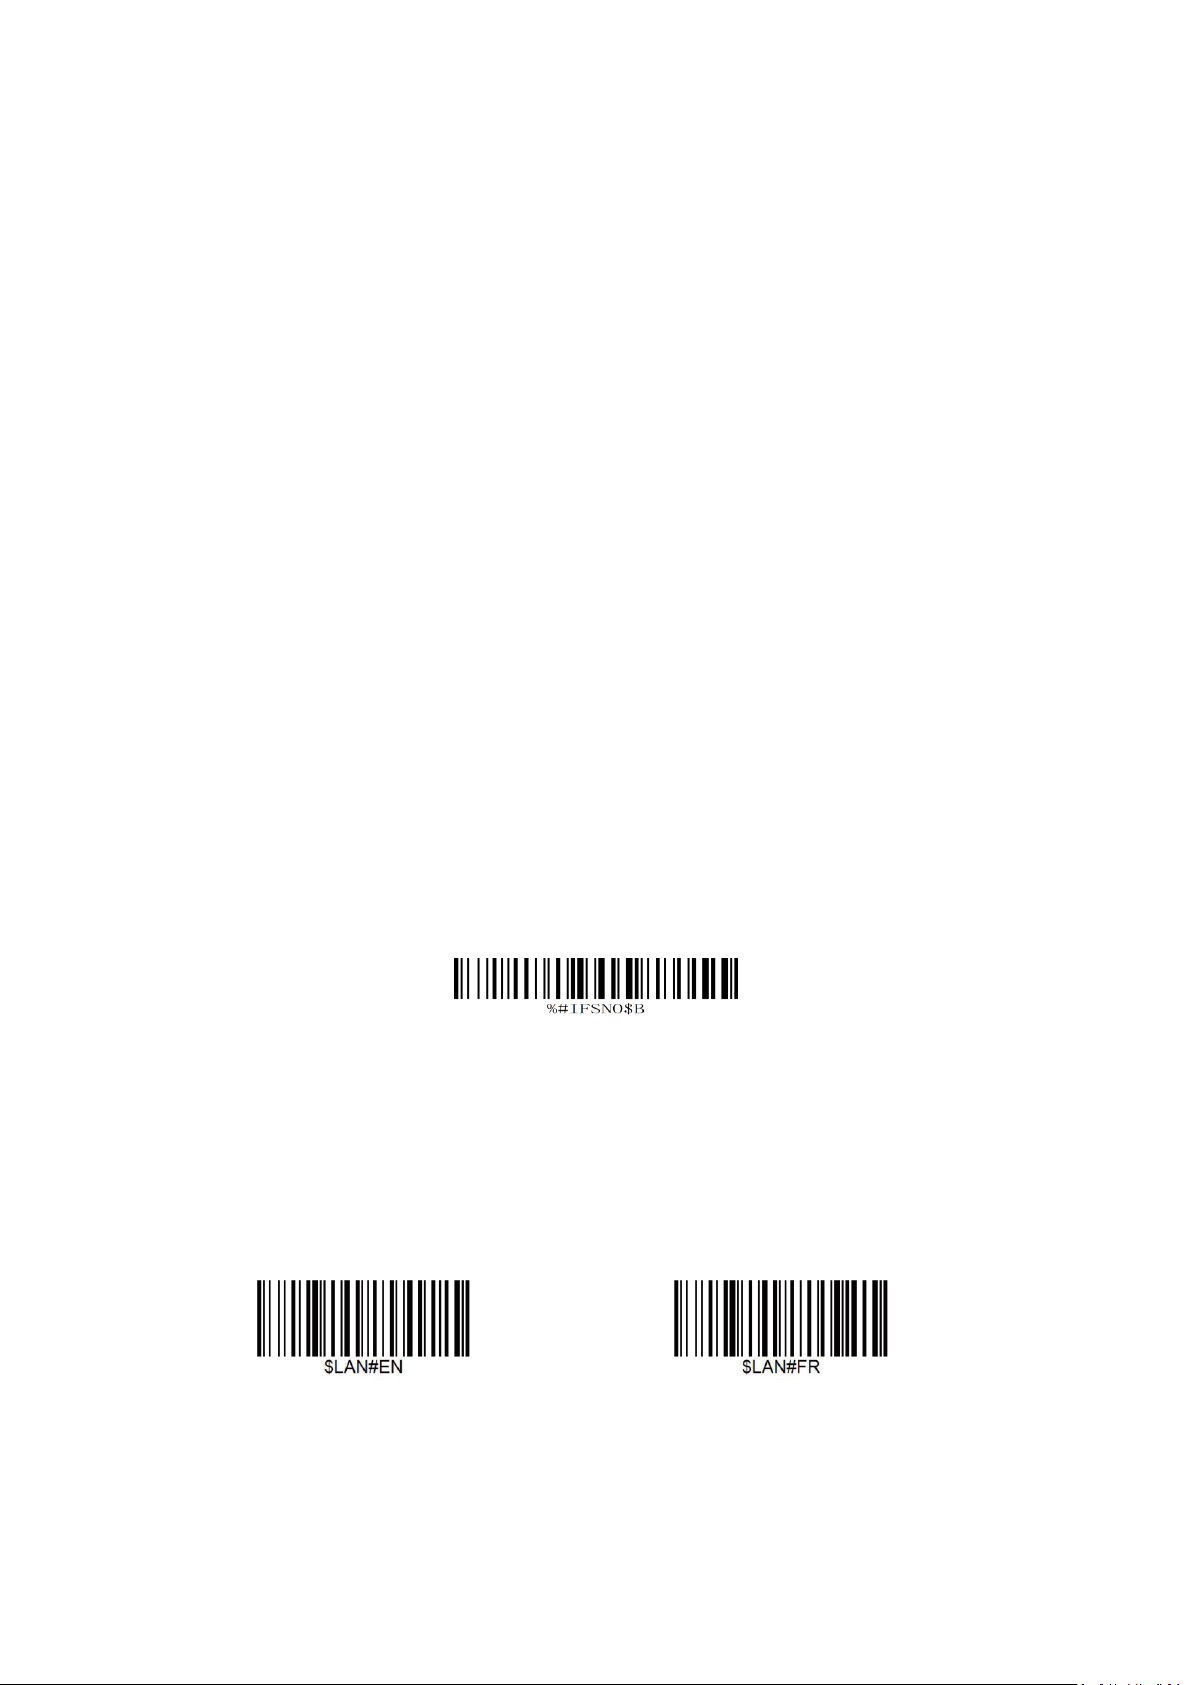
If you use French Keyboard, scan barcode of “ French Keyboard”. Locate the cursor
on the place where you want to output the data then you can start to scan. American
Keyboard is set by default, if you use a US keyboard you can just ignore it.
* America EN keyboard French keyboard
Page 6
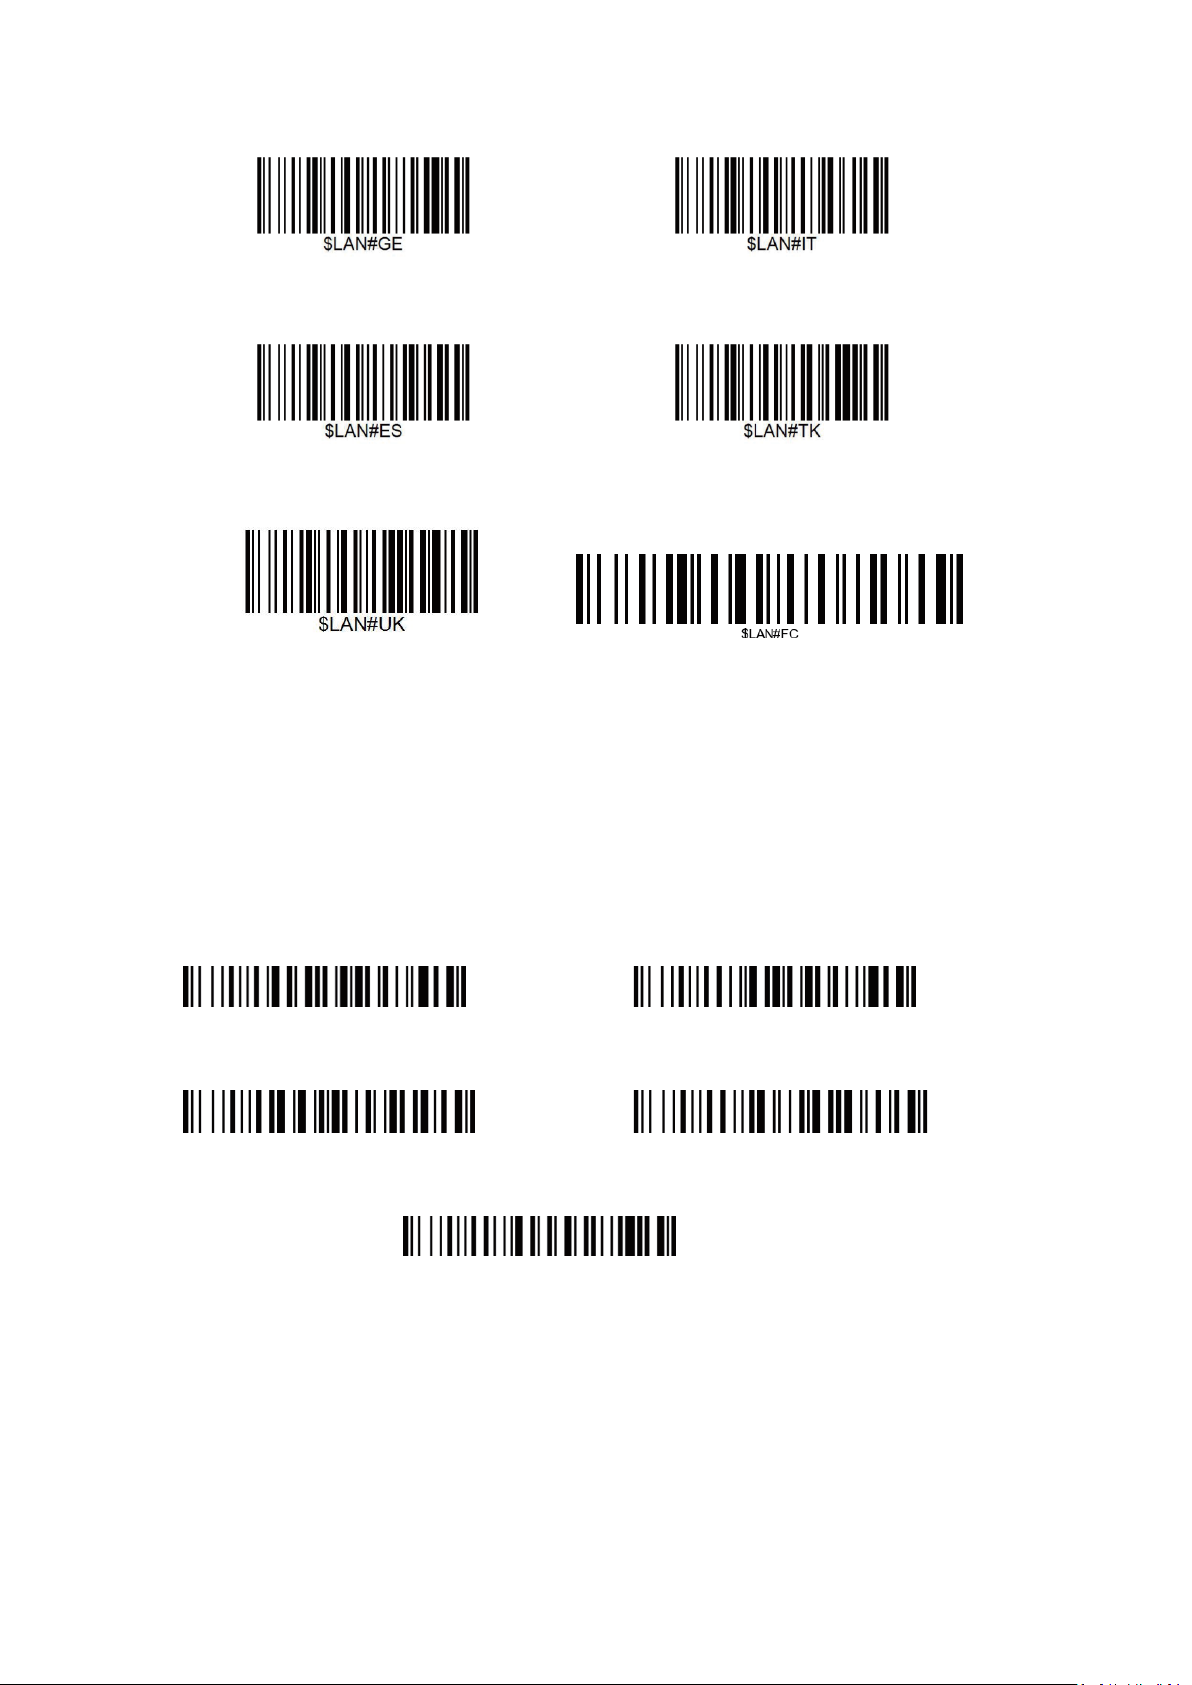
Germany keyboard Italy keyboard
Spain keyboard Turkey Q keyboard
UK keyboard Canadian FR keyboard
Working Mode (Apply for 2.4GHz and Bluetooth Connection)
If you are heading for a working area which lies outside the Bluetooth signal range, you may
activate scanner’s store mode, following steps described below. Under this mode, all
scanned data will be stored directly into the buffer memory of the device. Furthermore, the
data entries will be permanently saved in the buffer memory prior to the manual upload into
the working station, so that you may upload them when you are near your working device.
*Normal Mode Store Mode
Output Stored Data Output Total Entry
Clear Memory
Beep Settings
Beep Off: Disable scanner from beeping to indicate successful scans.
Page 7
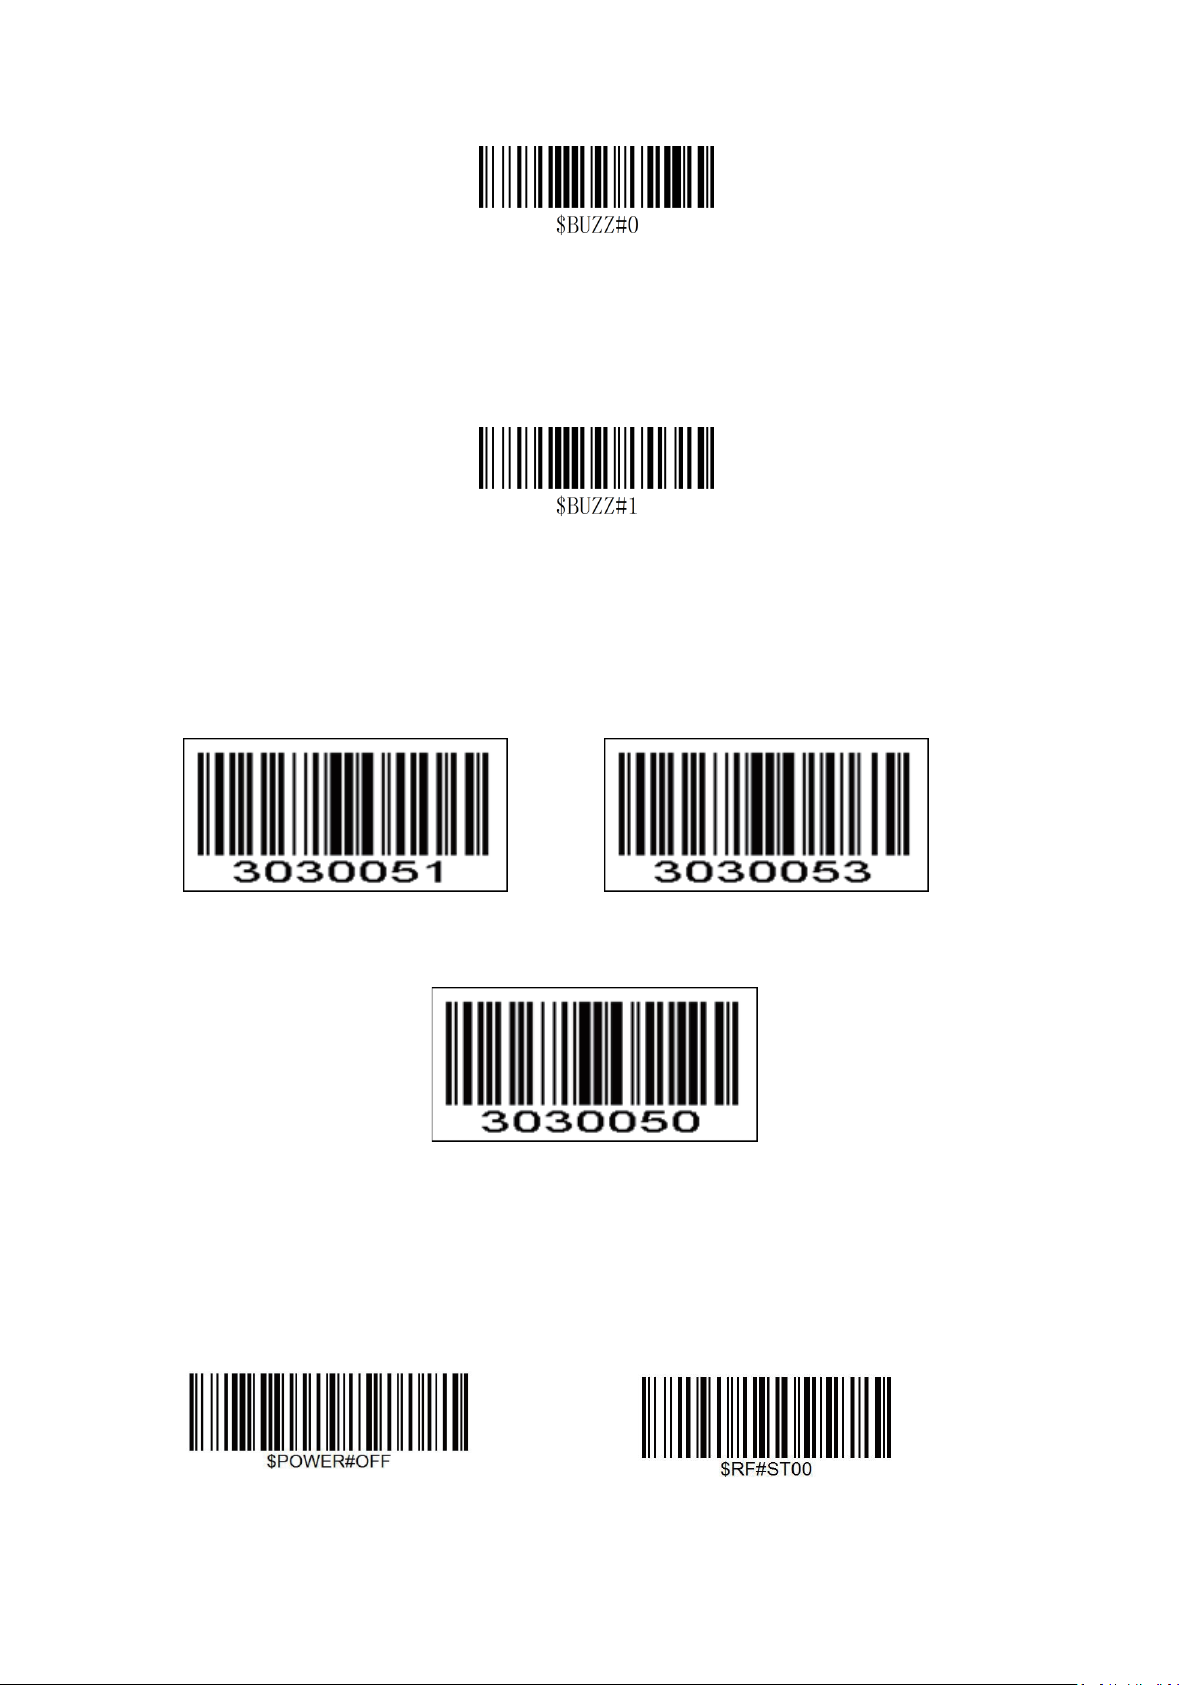
Beep OFF
Beep On: Enable scanner to beep to indicate successful scans.
*Beep On
Terminator
The scanner provides a shortcut for setting the terminating character suffix to CR or CRLF
and enabling it by scanning the appropriate barcode below.
CR+LF TAB
No terminator
Idle Time
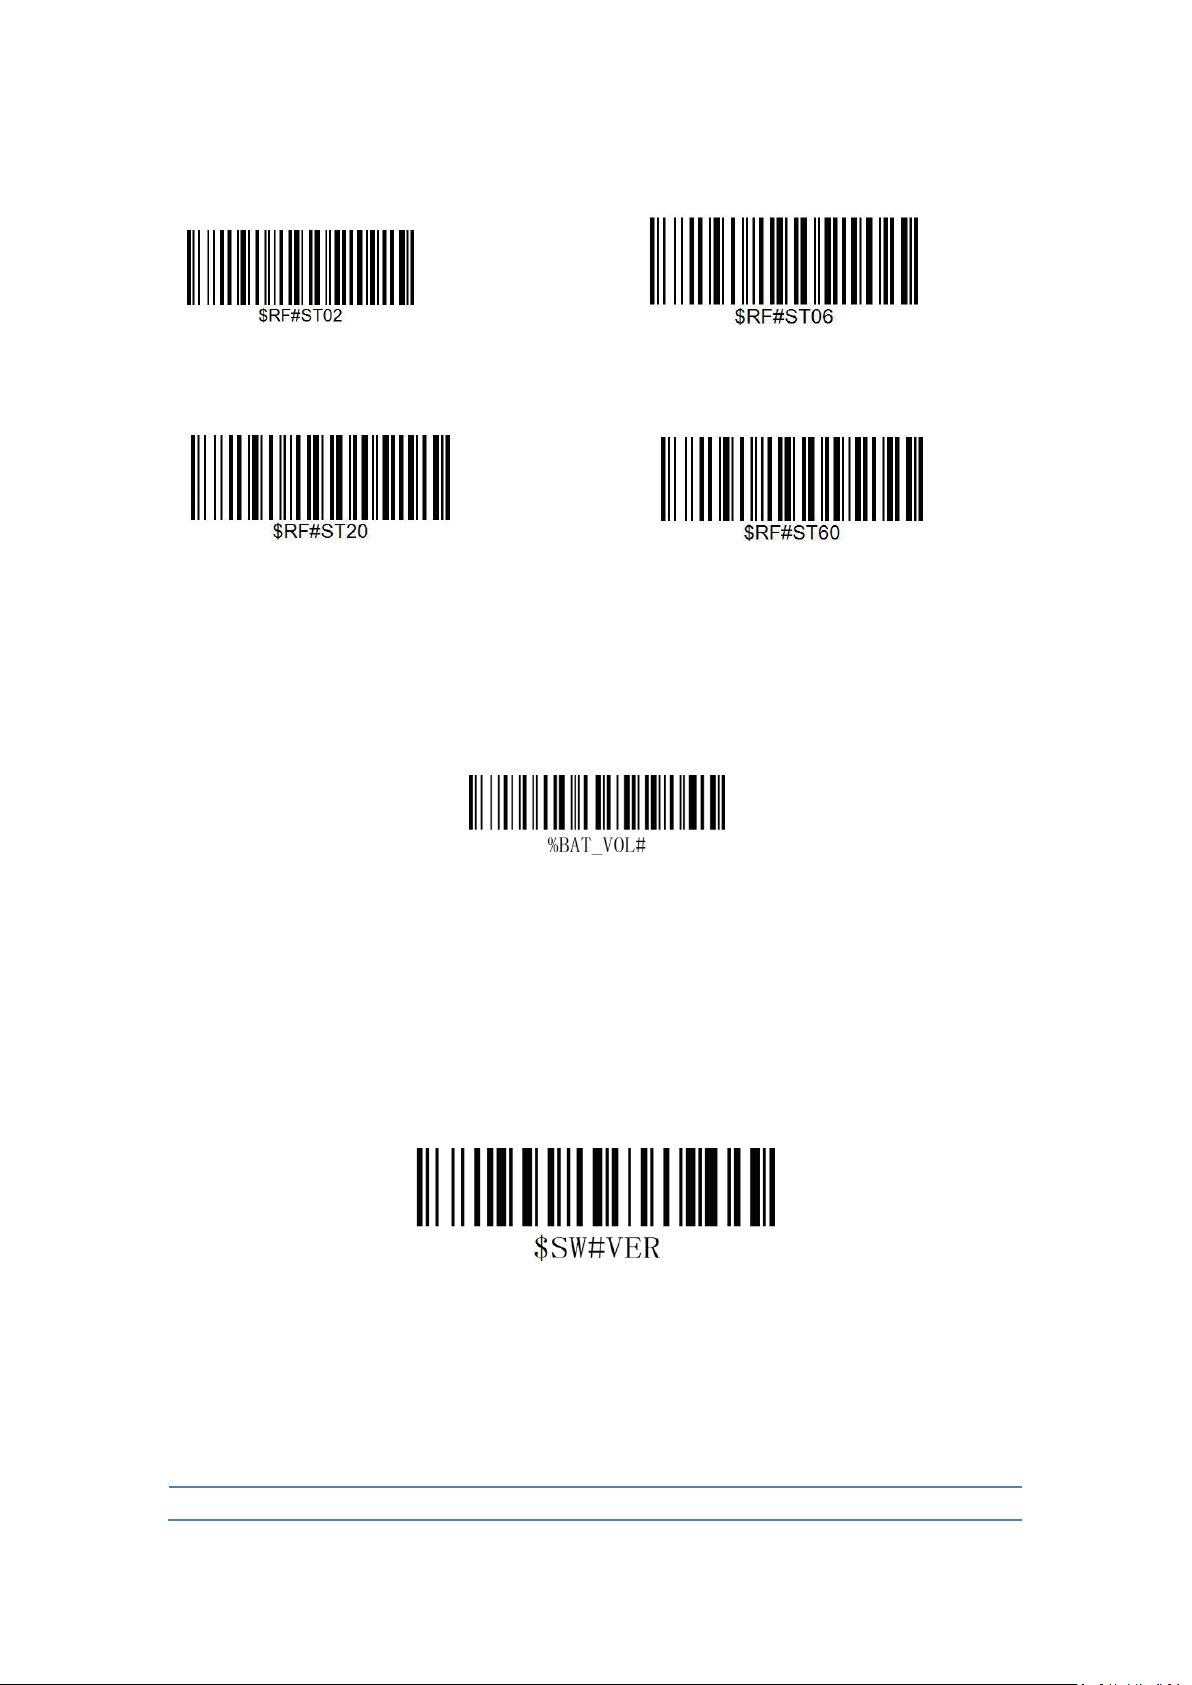
Scanner connected to a device will power off within 1 min if idle/inactive.
By scanning below command barcode will change the idle time.
POWER OFF Disabled Idle
Page 8
Red Light = Charging
Green Light= Fully charged
Beep Type
Beep Sound
Indication
*1 Min 3Mins
10Mins 30Mins
Charge the battery
When scanner make 2 beeps or battery volume under 20% please plug the cable into
scanner and connect the other side with your device to charge power for it.
By scanning below barcode you can get the remaining battery volume.
Get Battery Rough Volume
Firmware Version:
Read below command barcode to check scanner’s firmware version.
Below programming barcodes are applied for version not lower than
B009NT_RFBTWCDE9220_W
Note: Please always provide scanner’s firmware version for reference when you
turn to service team for help.
Page 9

Prompt Tone
2 beeps
①Successful scan on
command barcode;
②Power On
③USB cable connected
1 long beep
1 short beep
①Bluetooth connected,
①successful scan on normal
barcode;
②Power Off
Warning Tone
2 beeps
①Low battery volume
3 beeps
①Data transmit failed;
②Memory is full
Continuous beeps
①RF pairing
LED
Indication
RED
RED ON= Charging
GREEN
GREEN ON= Fully Charged
BLUE ON THEN OFF
BLUE LIGHT KEEPS BLINKING
SOLID BLUE,NO BLINKING
Successful scan
Bluetooth Pairing/RF Pairing
Bluetooth Connected
FCC Warning
This device complies with Part 15 of the FCC Rules. Operation is subject to the following two
conditions:
(1) This device may not cause harmful interference, and (2) this device must accept any
interference received, including interference that may cause undesired operation.
NOTE 1: This equipment has been tested and found to comply with the limits for a Class B
digital device, pursuant to part 15 of the FCC Rules. These limits are designed to provide
reasonable protection against harmful interference in a residential installation. This
equipment generates uses and can radiate radio frequency energy and, if not installed and
used in accordance with the instructions, may cause harmful interference to radio
communications. However, there is no guarantee that interference will not occur in a
particular installation. If this equipment does cause harmful interference to radio or
television reception, which can be determined by turning the equipment off and on, the user
is encouraged to try to correct the interference by one or more of the following measures:
- Reorient or relocate the receiving antenna.
- Increase the separation between the equipment and receiver.
-Connect the equipment into an outlet on a circuit different from that to which the receiver
is connected.
-Consult the dealer or an experienced radio/TV technician for help.
NOTE 2: Any changes or modifications to this unit not expressly approved by the party
responsible for compliance could void the user's authority to operate the equipment.
---------------------------------------------------------------------------------------------------------------------------------------------------------------
 Loading...