

Page 1
NT-1202G V18.5.21
Quick Setup Guide
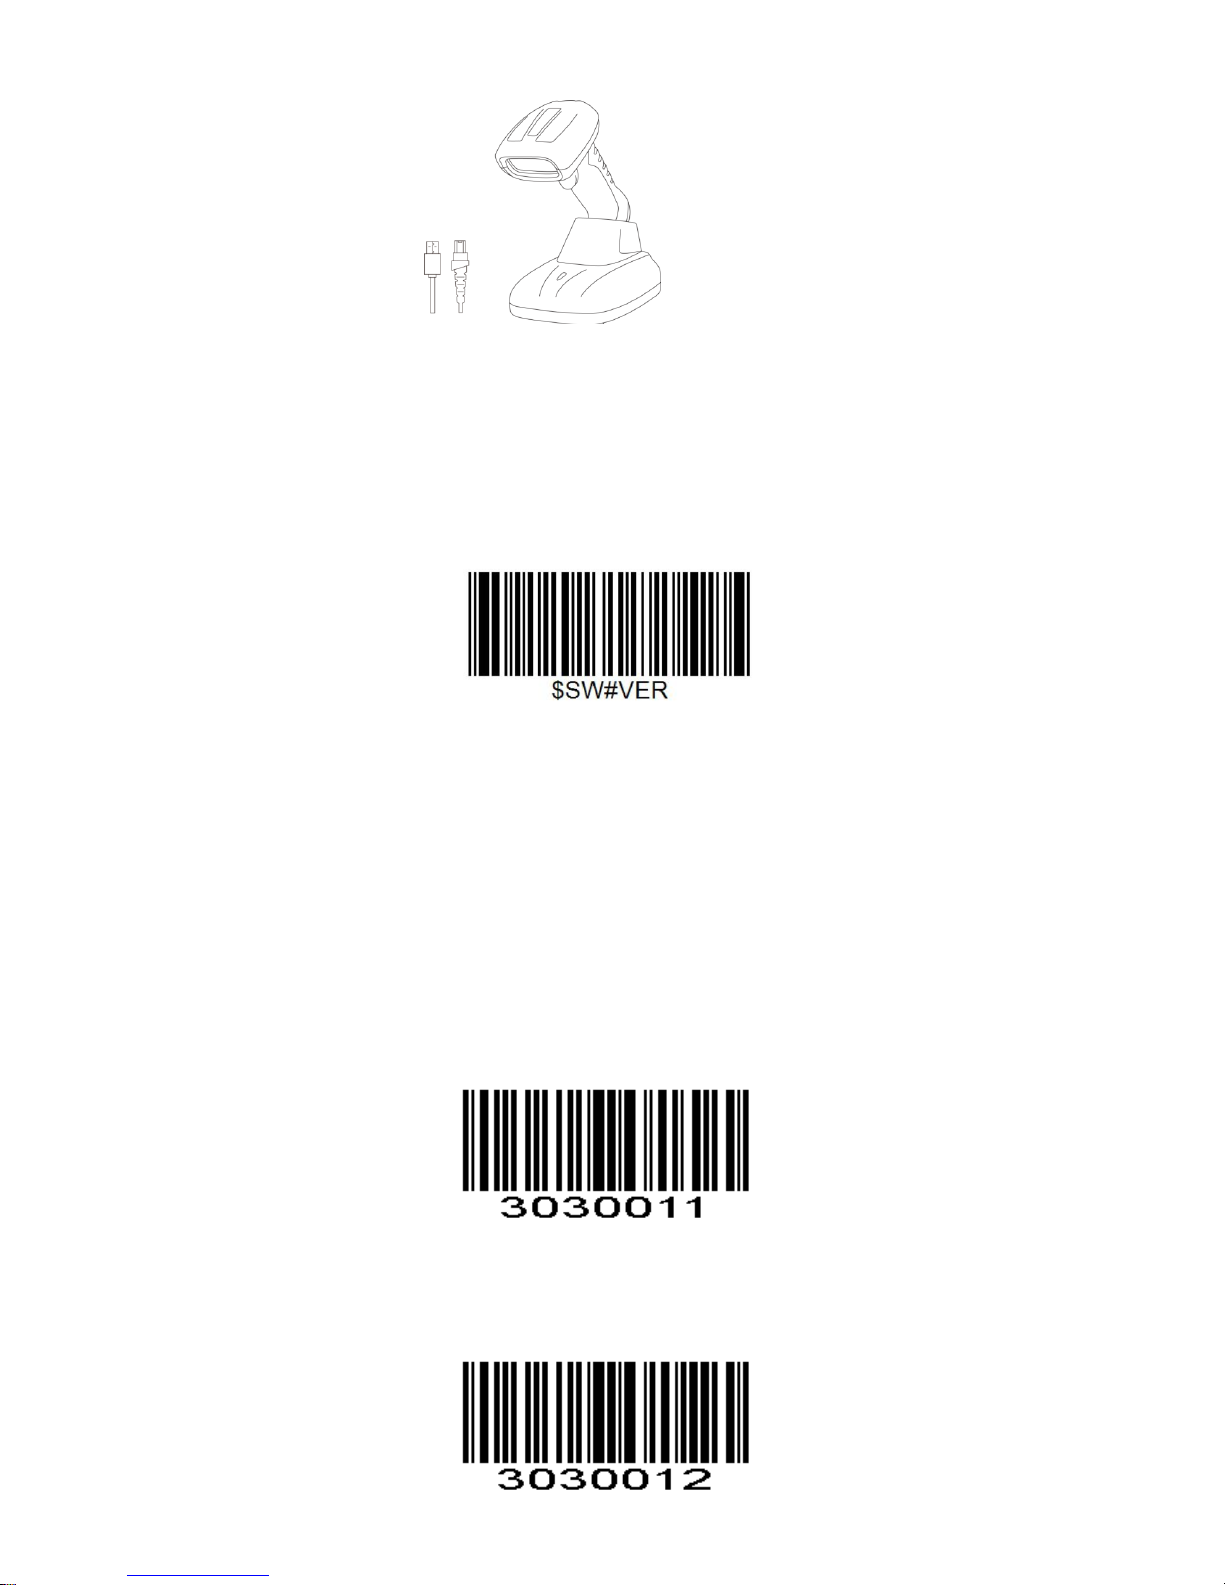
Get Started: Connect your PC and stand via the USB Cable .After plug it on your USB port, you can start to use it.
(US keyboard by default) If you use other type of keyboard , please refer to below "keyboard language type" to set the
keyboard language before use it.
If you want to do other configurations please refer to below programming barcodes.
Firmware Version:
Read below command barcode to check scanner firmware version.
2.4GWISX_20180514
Below programming barcodes are applied for version - 2.4GWISX_20180514
Barcode Programming
Netum barcode scanners are factory programmed for the most common terminal and communications settings. If you
need to change these settings, programming is accomplished by scanning the bar codes in this guide. An asterisk (*) next
to an option indicates the default setting.
Interface (Optional)
USB Interface USB -KBW
When you connect the scanner to the Host via a USB connection, you can enable the USB HID-KBW feature by scanning
the barcode below. It works on a Plug and Play basis and no driver is required.
USB Serial Port
If you connect scanner to the Host via a USB connection, the USB COM Port Emulation feature allows the Host to receive
data in the way as a serial port does.
Page 2
Keyboard Language
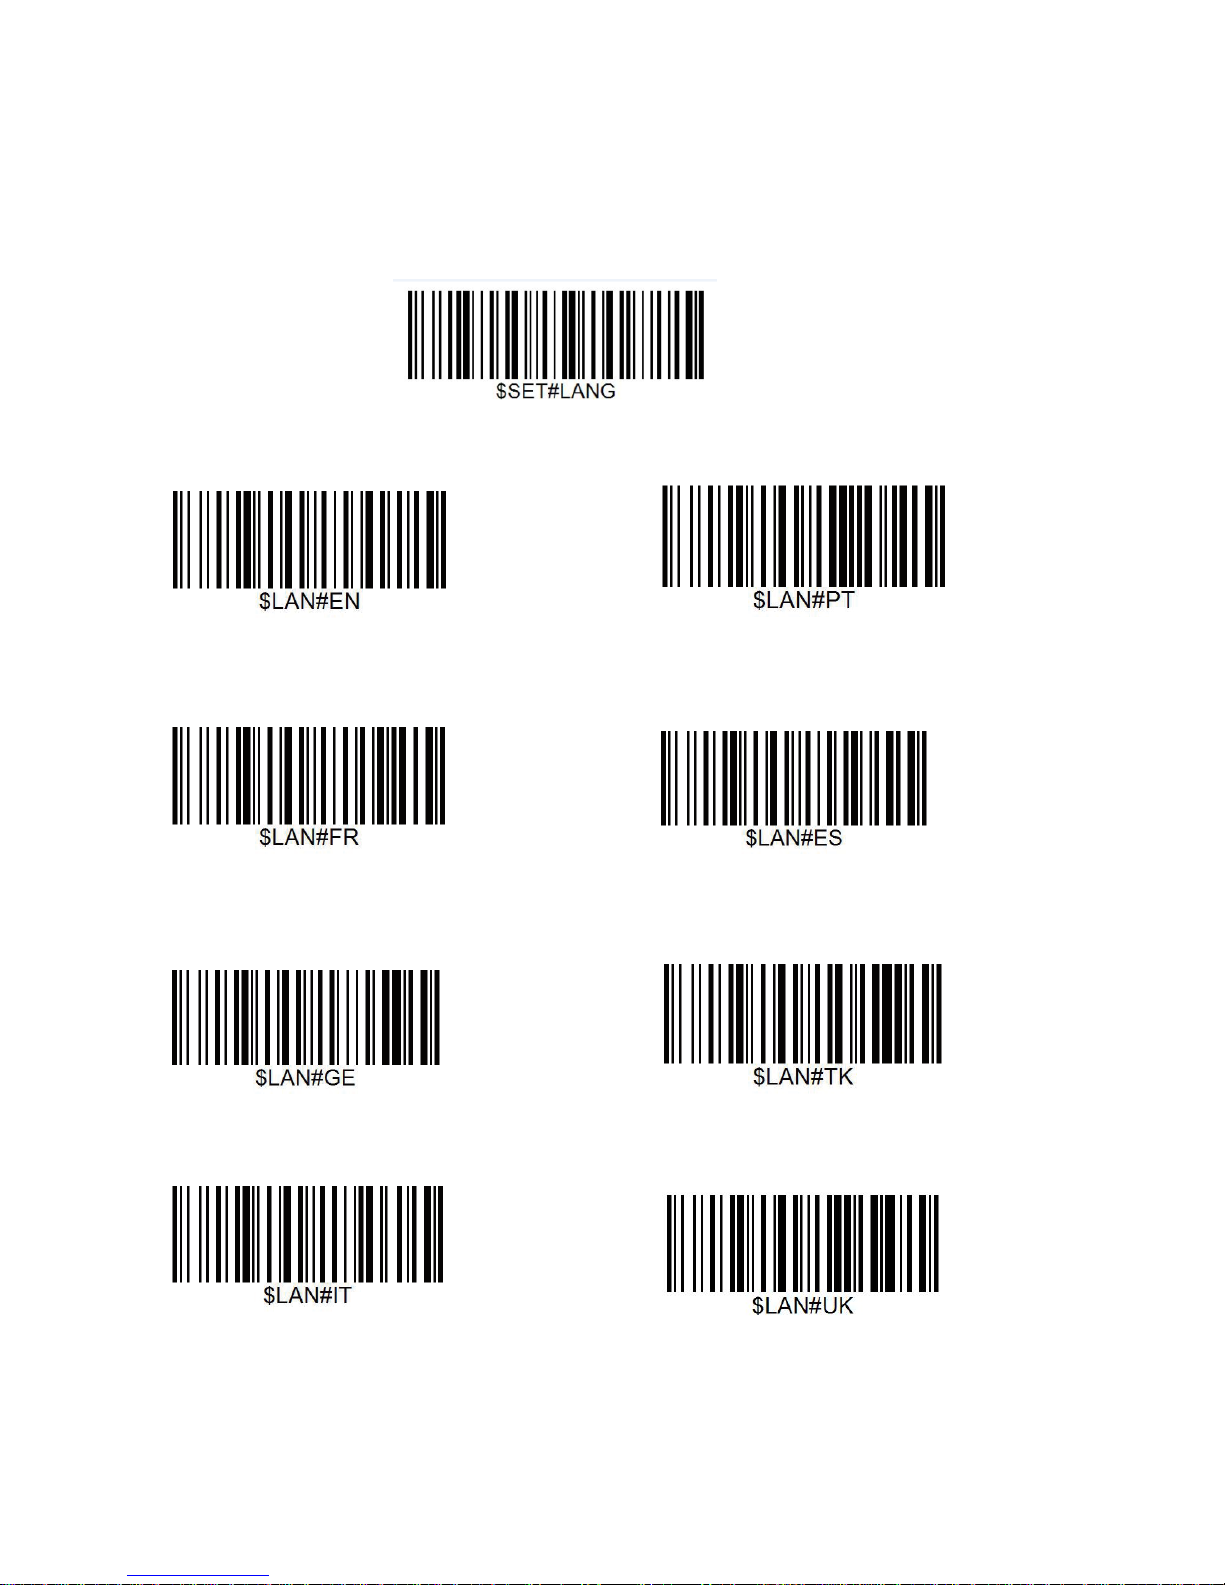
In order to let scanner upload the codes in a correct way, you have to set the keyboard language before you use it.
For example
If you use French Keyboard, first scan below barcode of “ Set Keyboard Language” then scan barcode of "French
Keyboard", after that scanner will upload barcodes according to French keyboard layout.
American Keyboard is set by default, if you use a US keyboard you can just skip this part.
Set Keyboard Language
American Keyboard * Portugal Keyboard
French Keyboard Spanish Keyboard
Germany Keyboard Turkey Q Keyboard
Italy Keyboard UK Keyboard
Page 3
Scan Mode
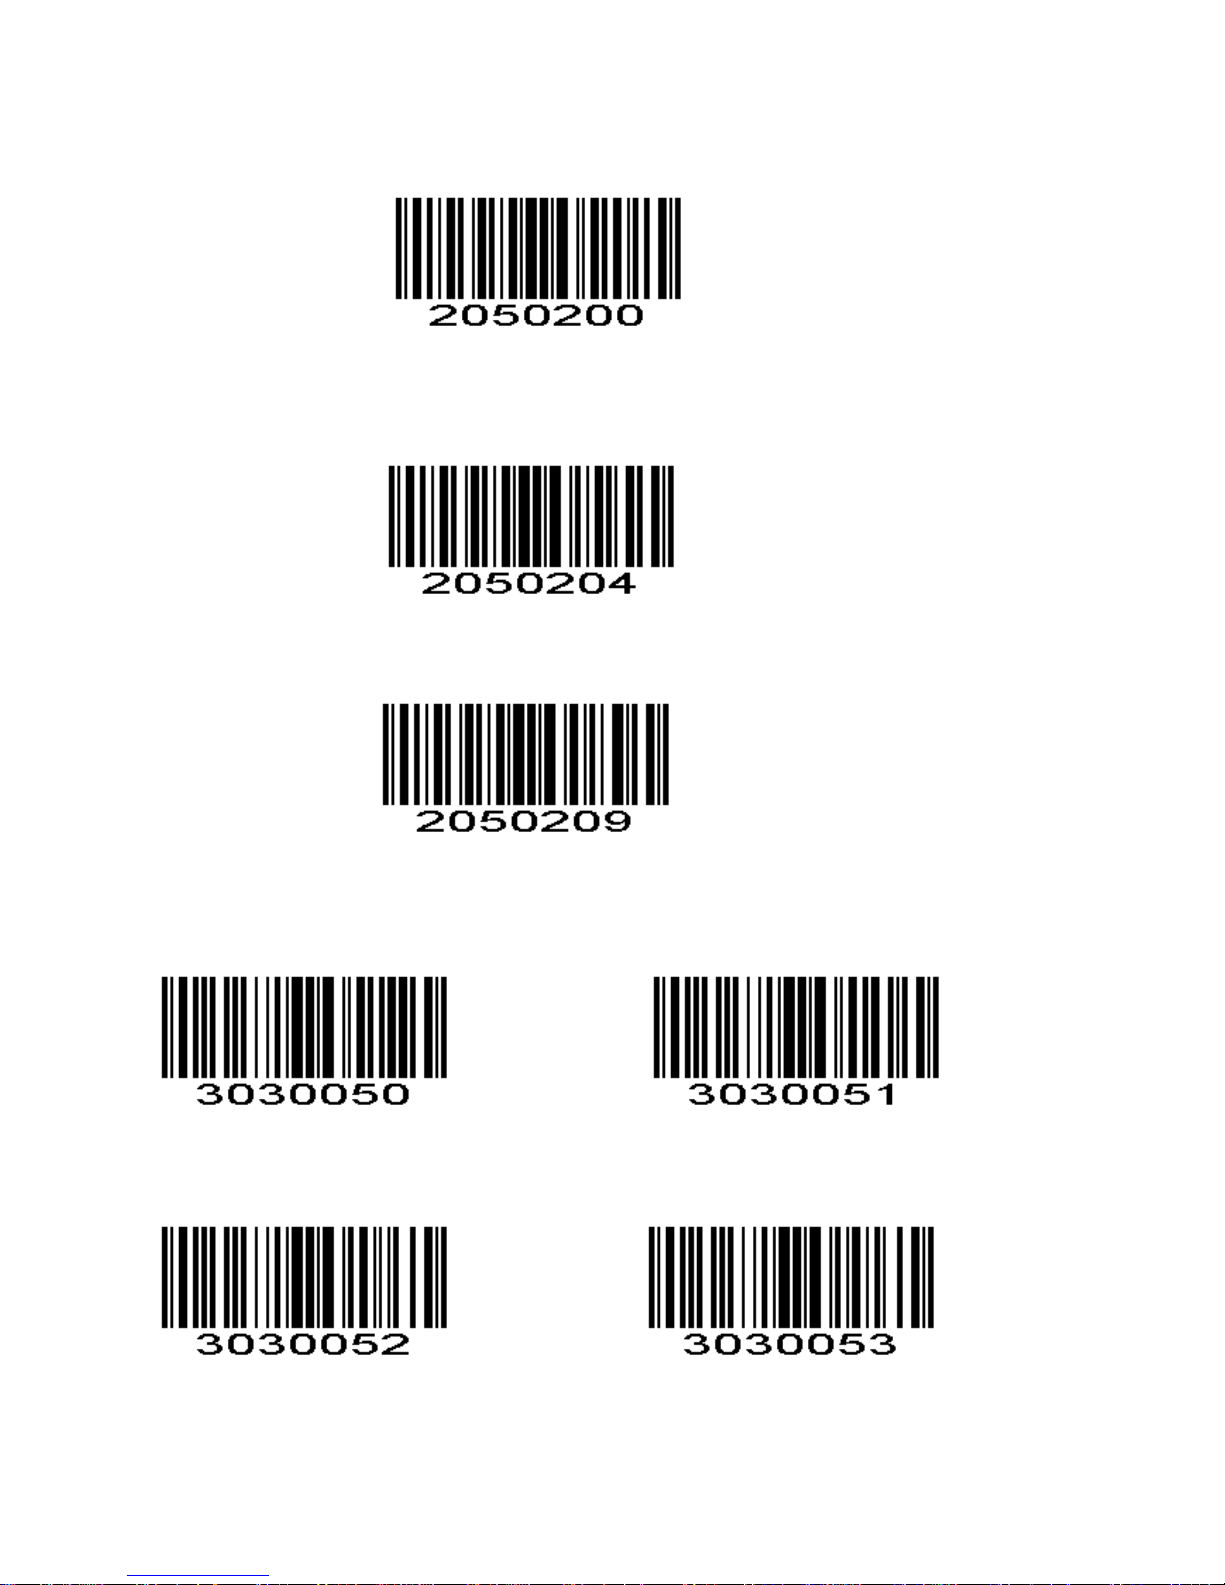
Trigger Mode (Default)
Scanning this bar code will enable the scanner to enter manual trigger mode.
Continuous Mode
This mode enables the engine to scan/capture, decode and transmit over and over again.
Auto Sense Mode
Scanning this bar code will enable the scanner to enter auto sense mode.
Terminator
The scanner provides a shortcut for setting the terminating character suffix to CR or CRLF and enabling it by scanning the
appropriate barcode below.
3030050 3030051
None CR&LF *
3030052 3030053
CR TAB
Page 4
Working Mode
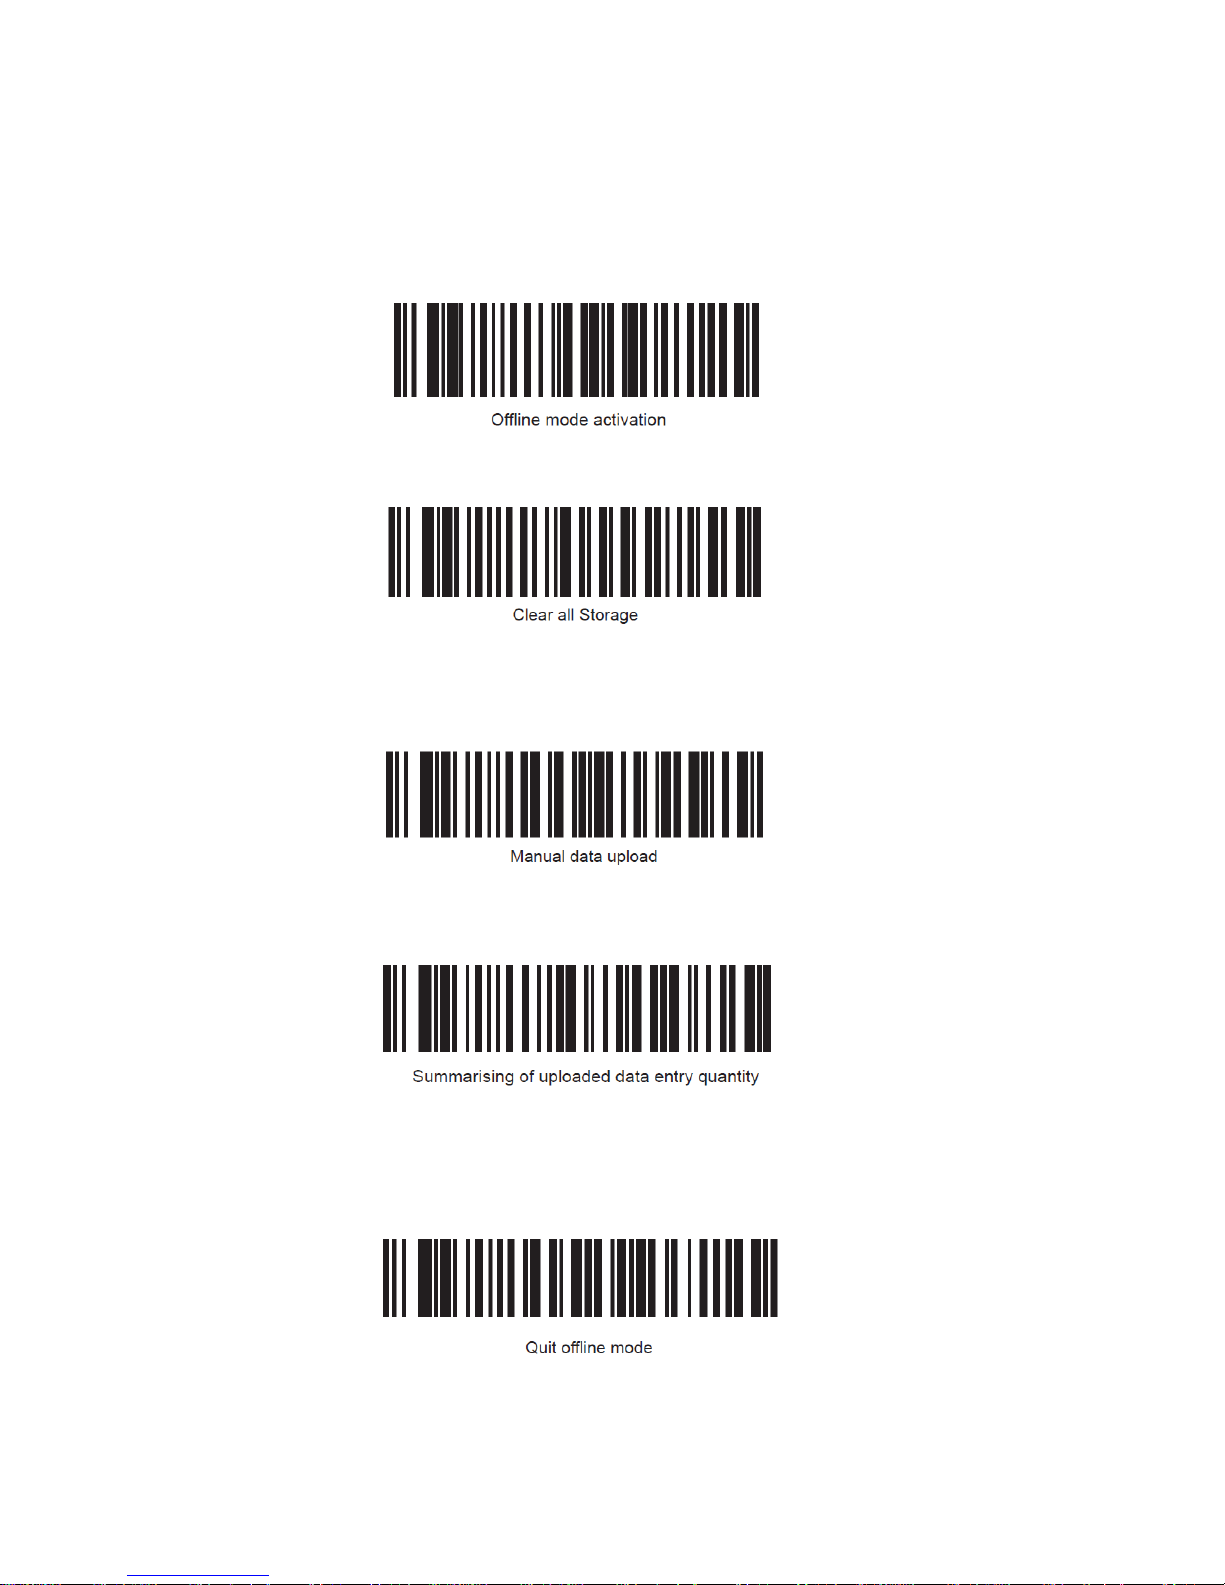
If you are heading for a working area which lies outside the signal range, you may activate the offline mode of the
scanner, following the steps described below. Under this enhanced offline mode, all scanned data will be stored directly
into the buffer memory of the device. Furthermore, the data entries will be permanently saved in the buffer memory
prior to the manual upload into the working station, so that you may upload them time and again to your liking.
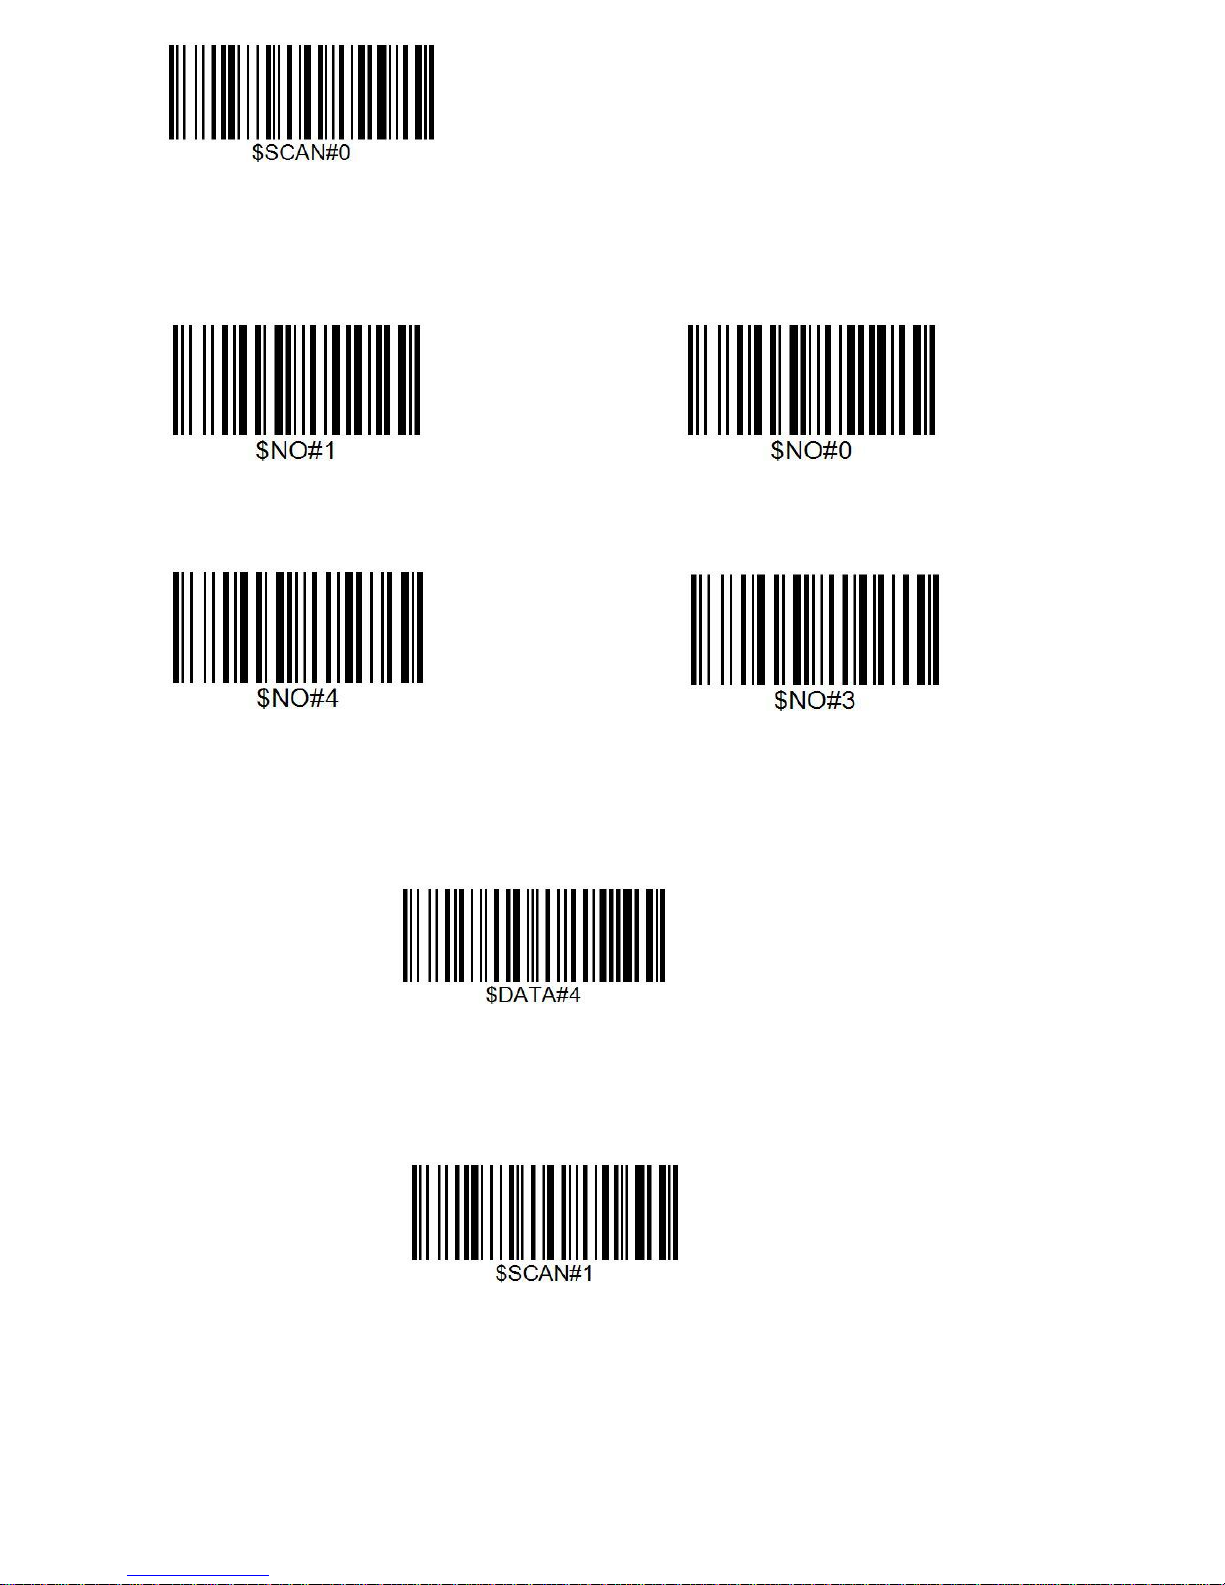
1). By scanning the following barcode, the offline mode will be activated
2). By scanning the following barcode, all data in the buffer memory will be deleted
3).By scanning the following barcode, all data entries in the buffer memory can be manually uploaded after reconnecting
to the working station (only in offline mode).
4). By scanning the following barcode, the gross quantity of the uploaded data entries will be summarised (only in offline
mode).
5). By scanning the following barcode, the device leaves the offline mode, normal mode will be
reinitialised. (By default)
Page 5
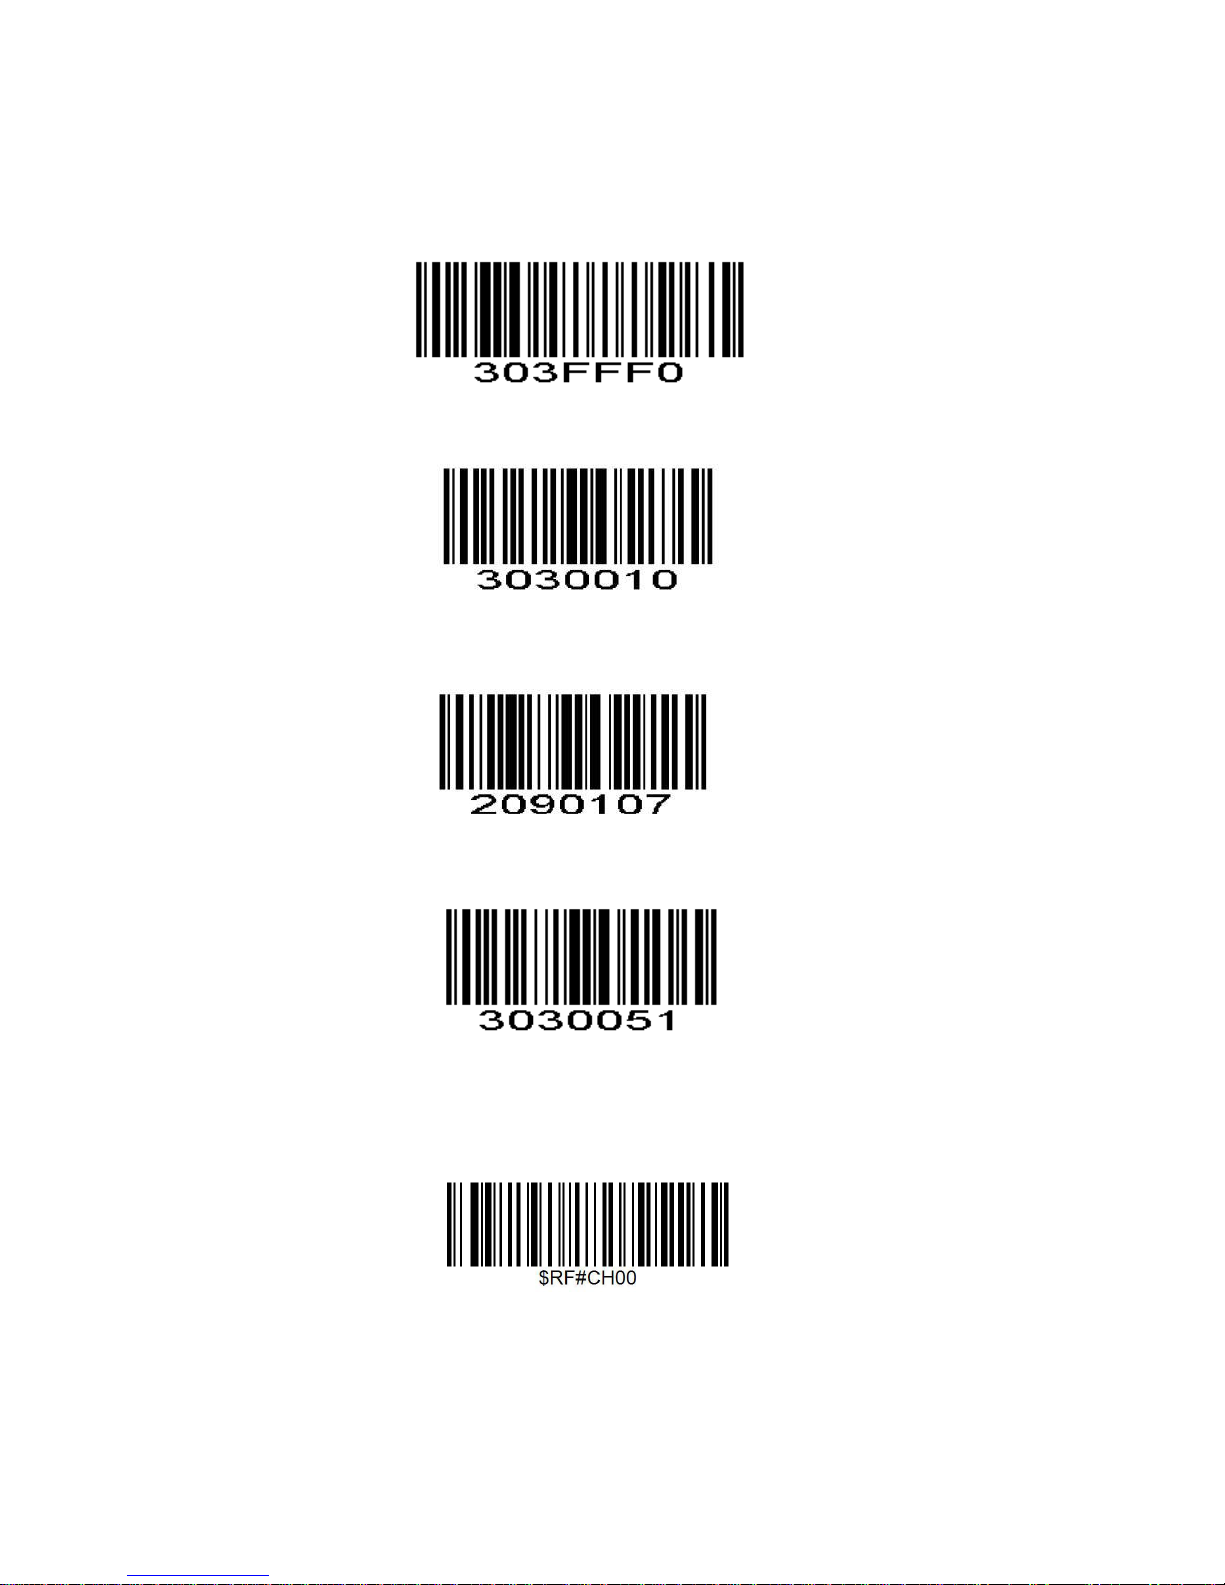
Restore factory default
Scanning the following barcodes one by one to restore the scanner to factory defaults. (Five steps included)
1. Factory Restore
2. Serial Port
3. Baud Rate 19200
4. Enter+LF
5. Setting Channel
Scan channel 0, the scanner will have di di di di… sound.
Take out the receiver and plug it again, later the di di sound will be stopped then you can start to scan the barcodes
Channel 0
Page 6
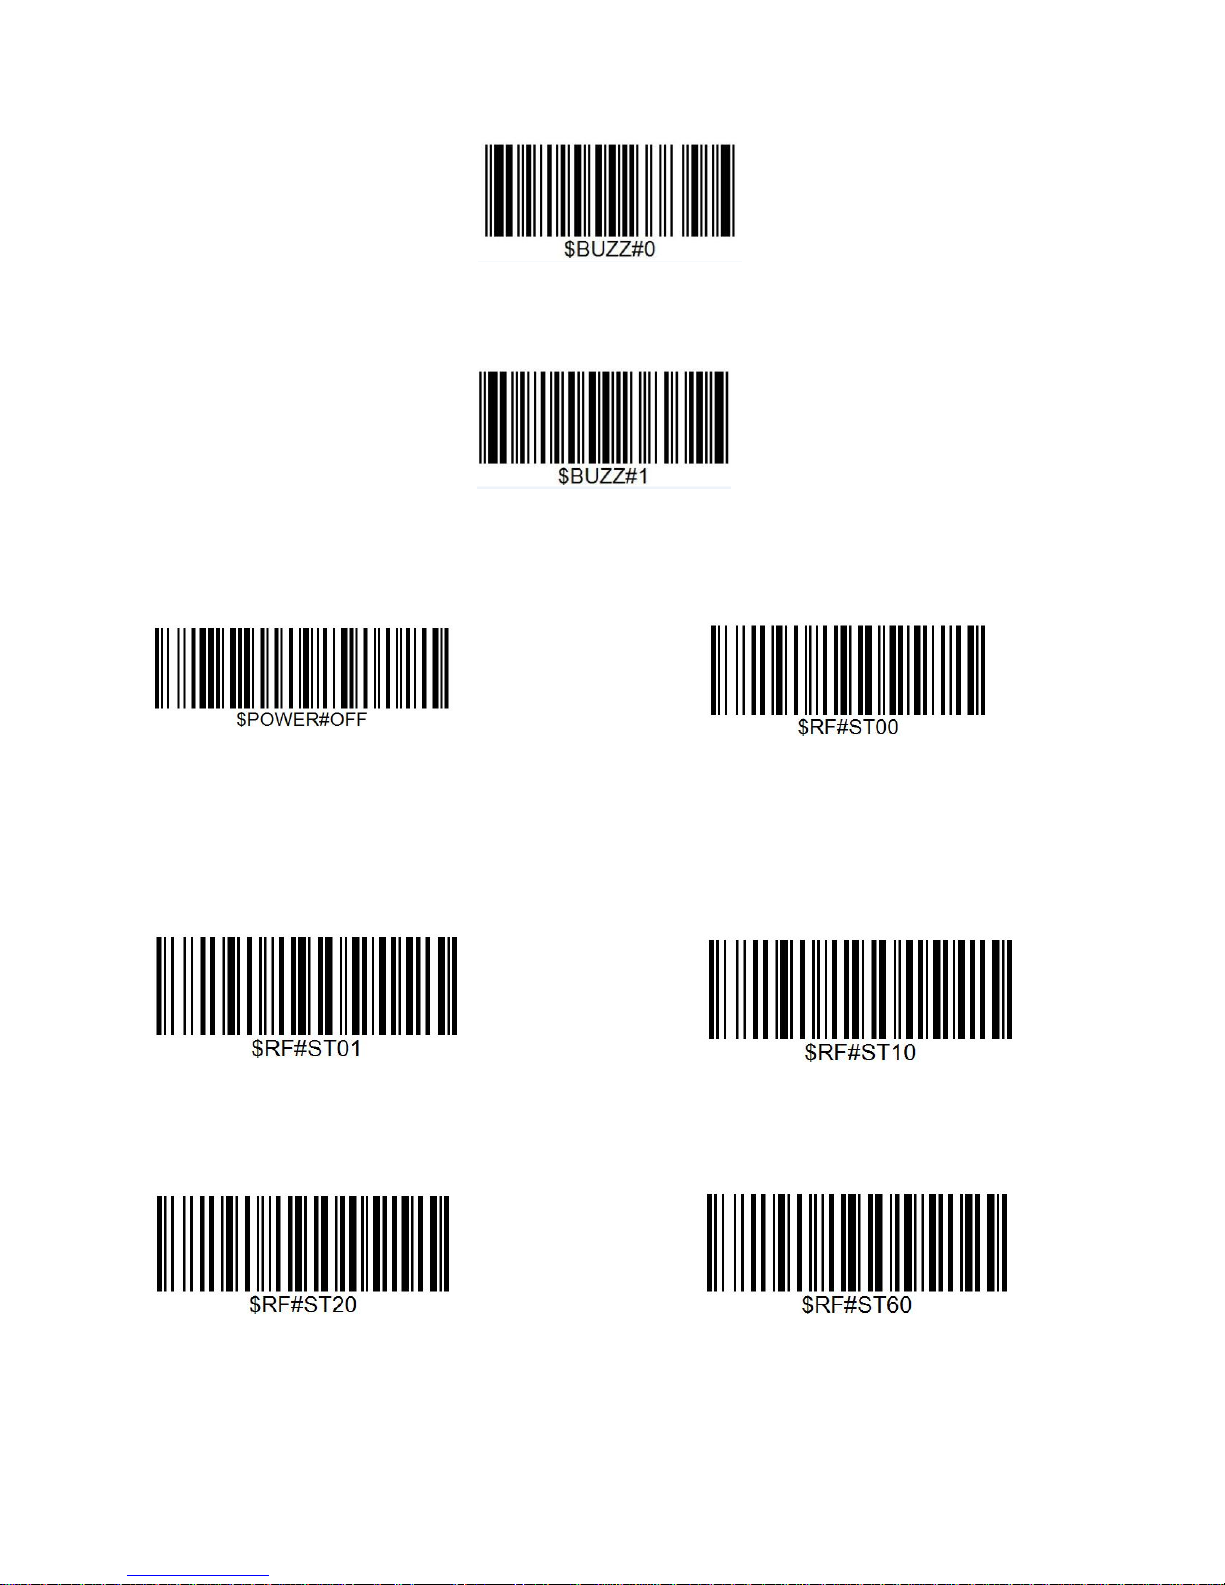
Beep for Non-programming code
Disables Scanner from beeping to indicate successful scans
Enables to beep to indicate successful scan *
Sleep Mode
Enable Sleeping Immediately Prohibit Sleeping
Idle Time
Scanner will stay awake during the idle time that you set for it and turn to sleep if you haven't used it during the whole
idle time.
30 s 5 Mins
10 Mins 30 Mins
Page 7
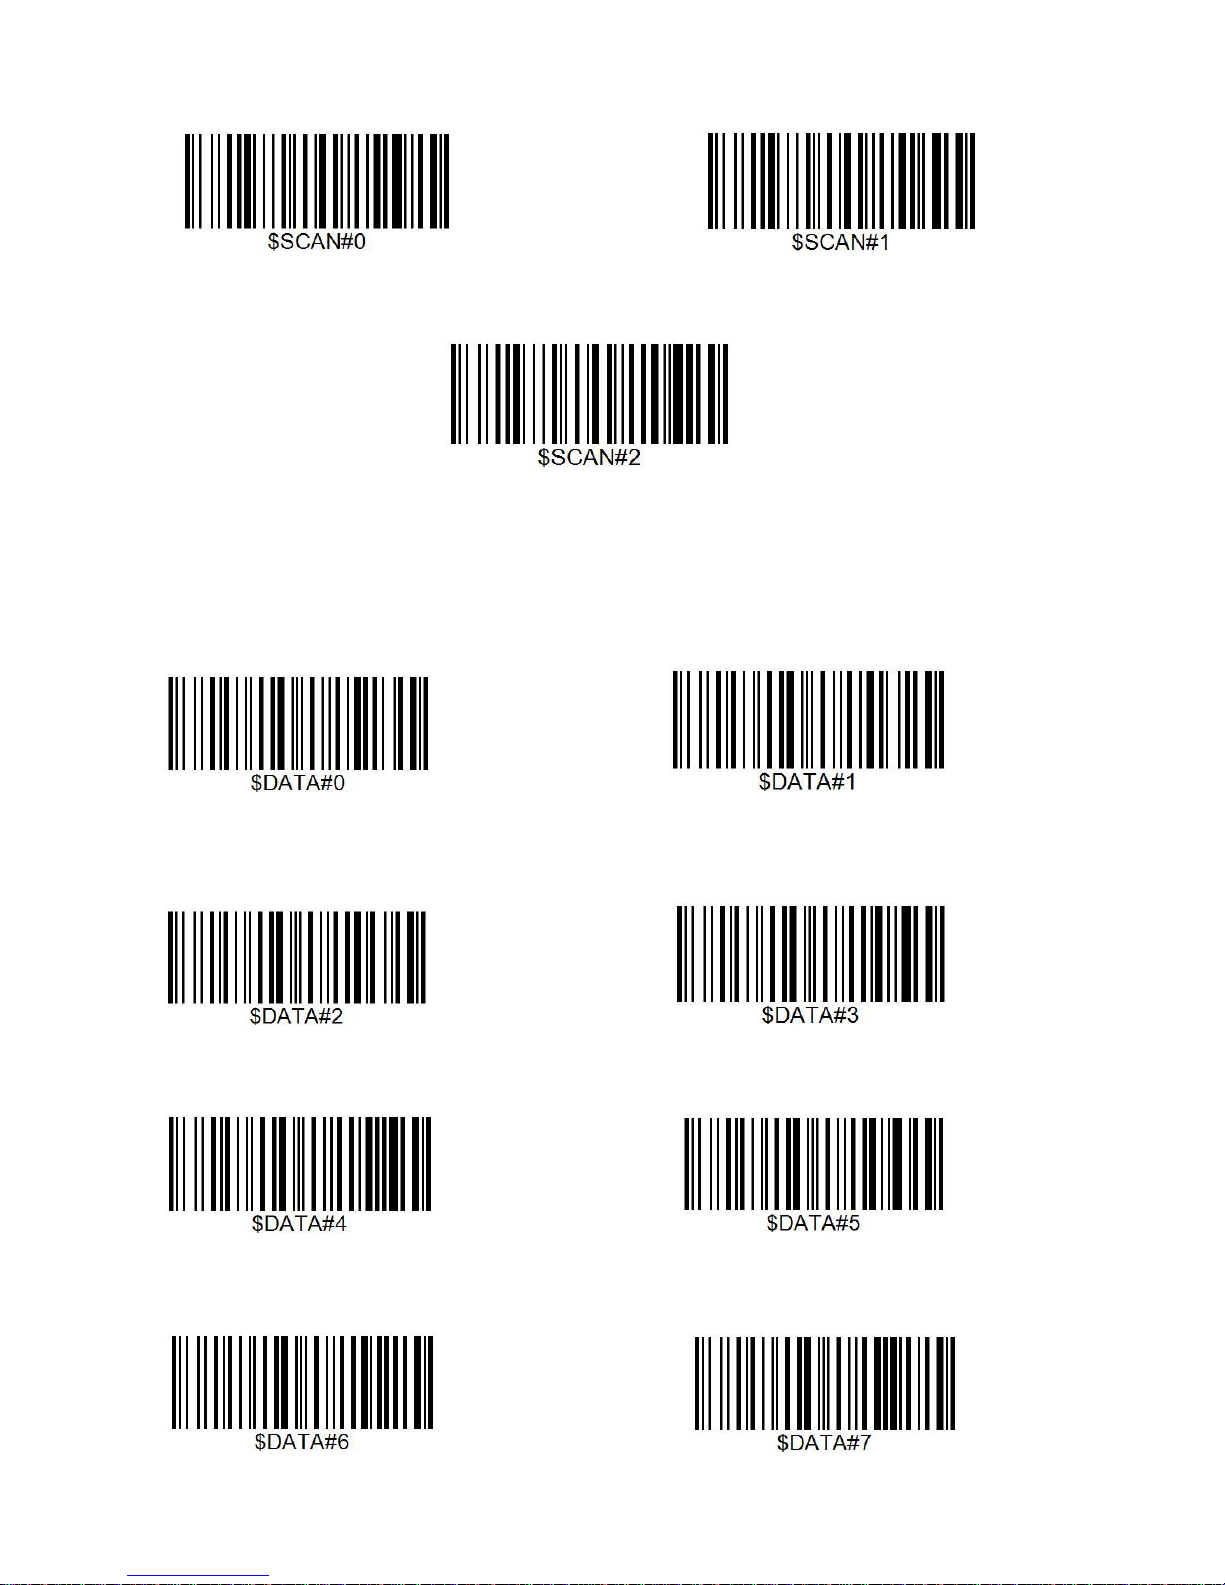
Custom prefix and suffix
Custom Prefix Custom Suffix 1
Custom Suffix 2
Please note previous prefix or suffix will be cleared once you start to add new prefix or suffix.
Scan Data Transmission Format
To change the Scan Data Transmission Format, scan one of the eight bar codes corresponding to the desired format.
*Data As Is <DATA><SUFFIX 1>
<DATA><SUFFIX2> <DATA> <SUFFIX 1><SUFFIX 2>
<PREFIX> <DATA > <PREFIX> <DATA> <SUFFIX 1>
<PREFIX> <DATA> <SUFFIX 2> <PREFIX> <DATA> <SUFFIX 1> <SUFFIX 2>
Page 8
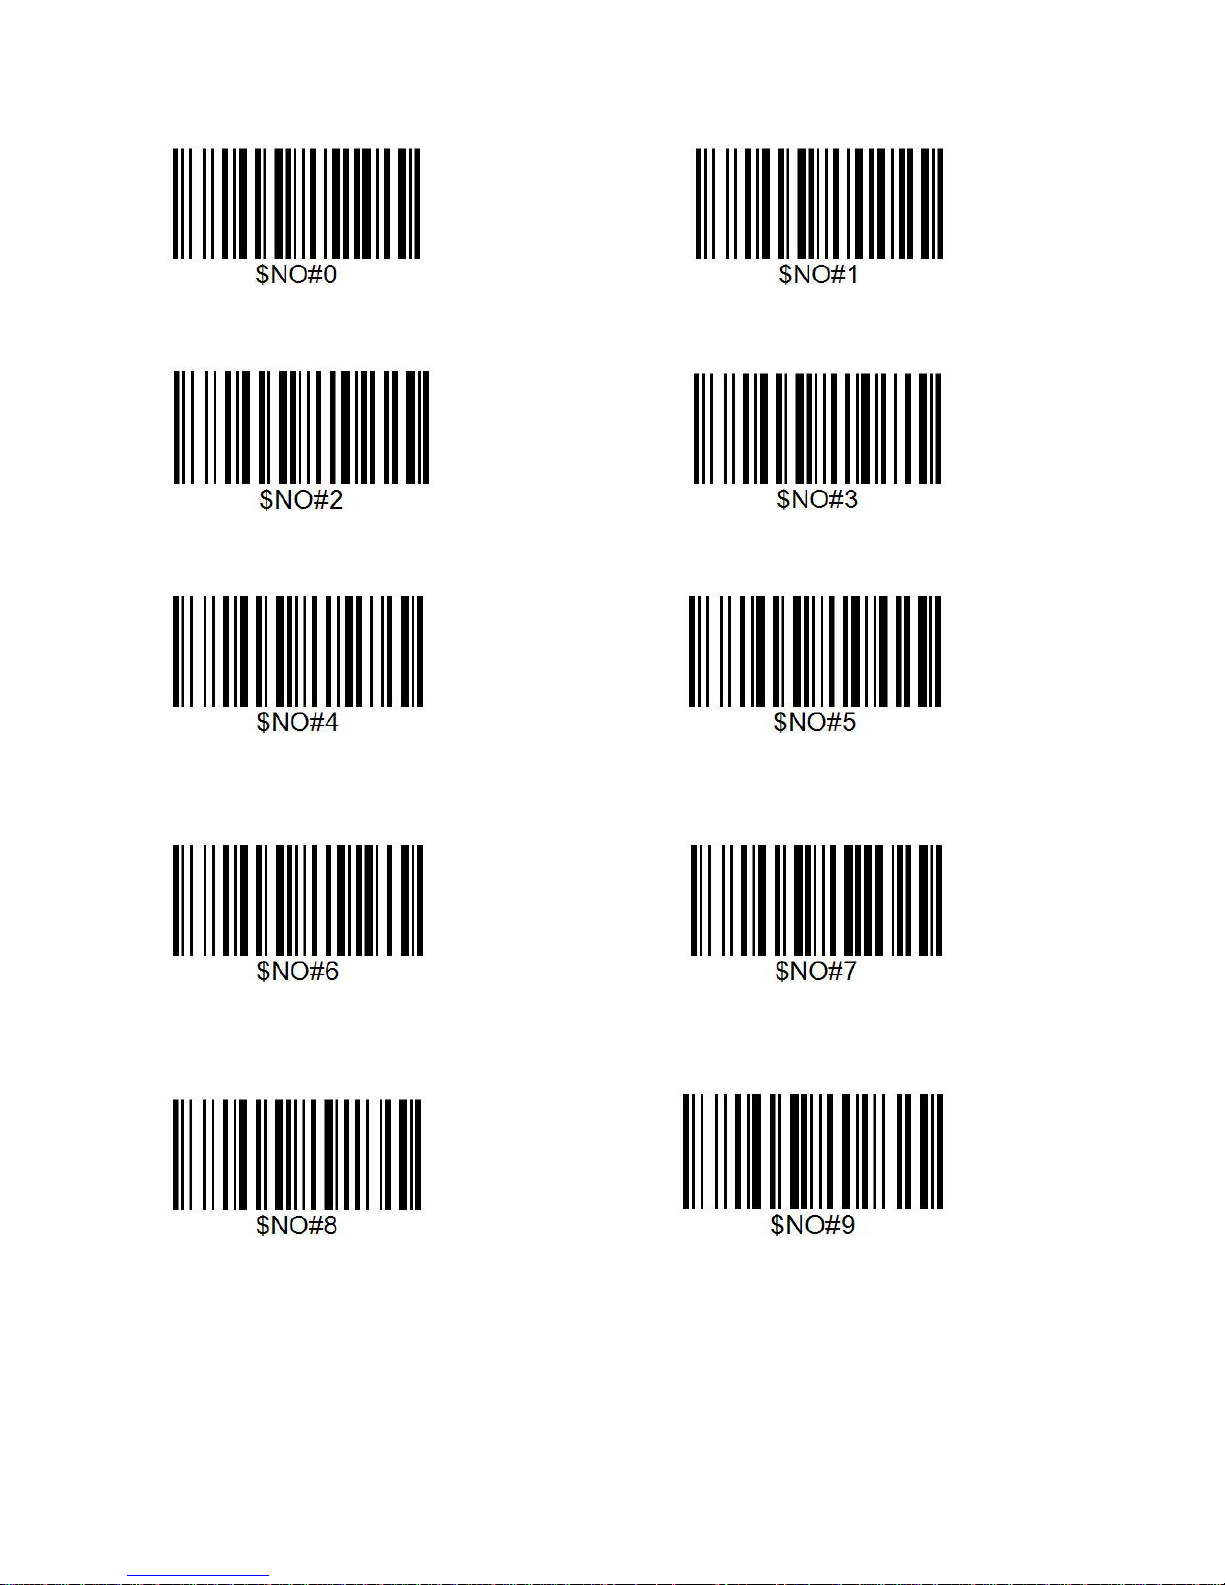
Appendix 1
Numeric Bar Codes For parameters requiring specific numeric values, scan the appropriately numbered bar code(s).
For Example
Custom @ as prefix
Step 1: scan “custom prefix”
Page 9
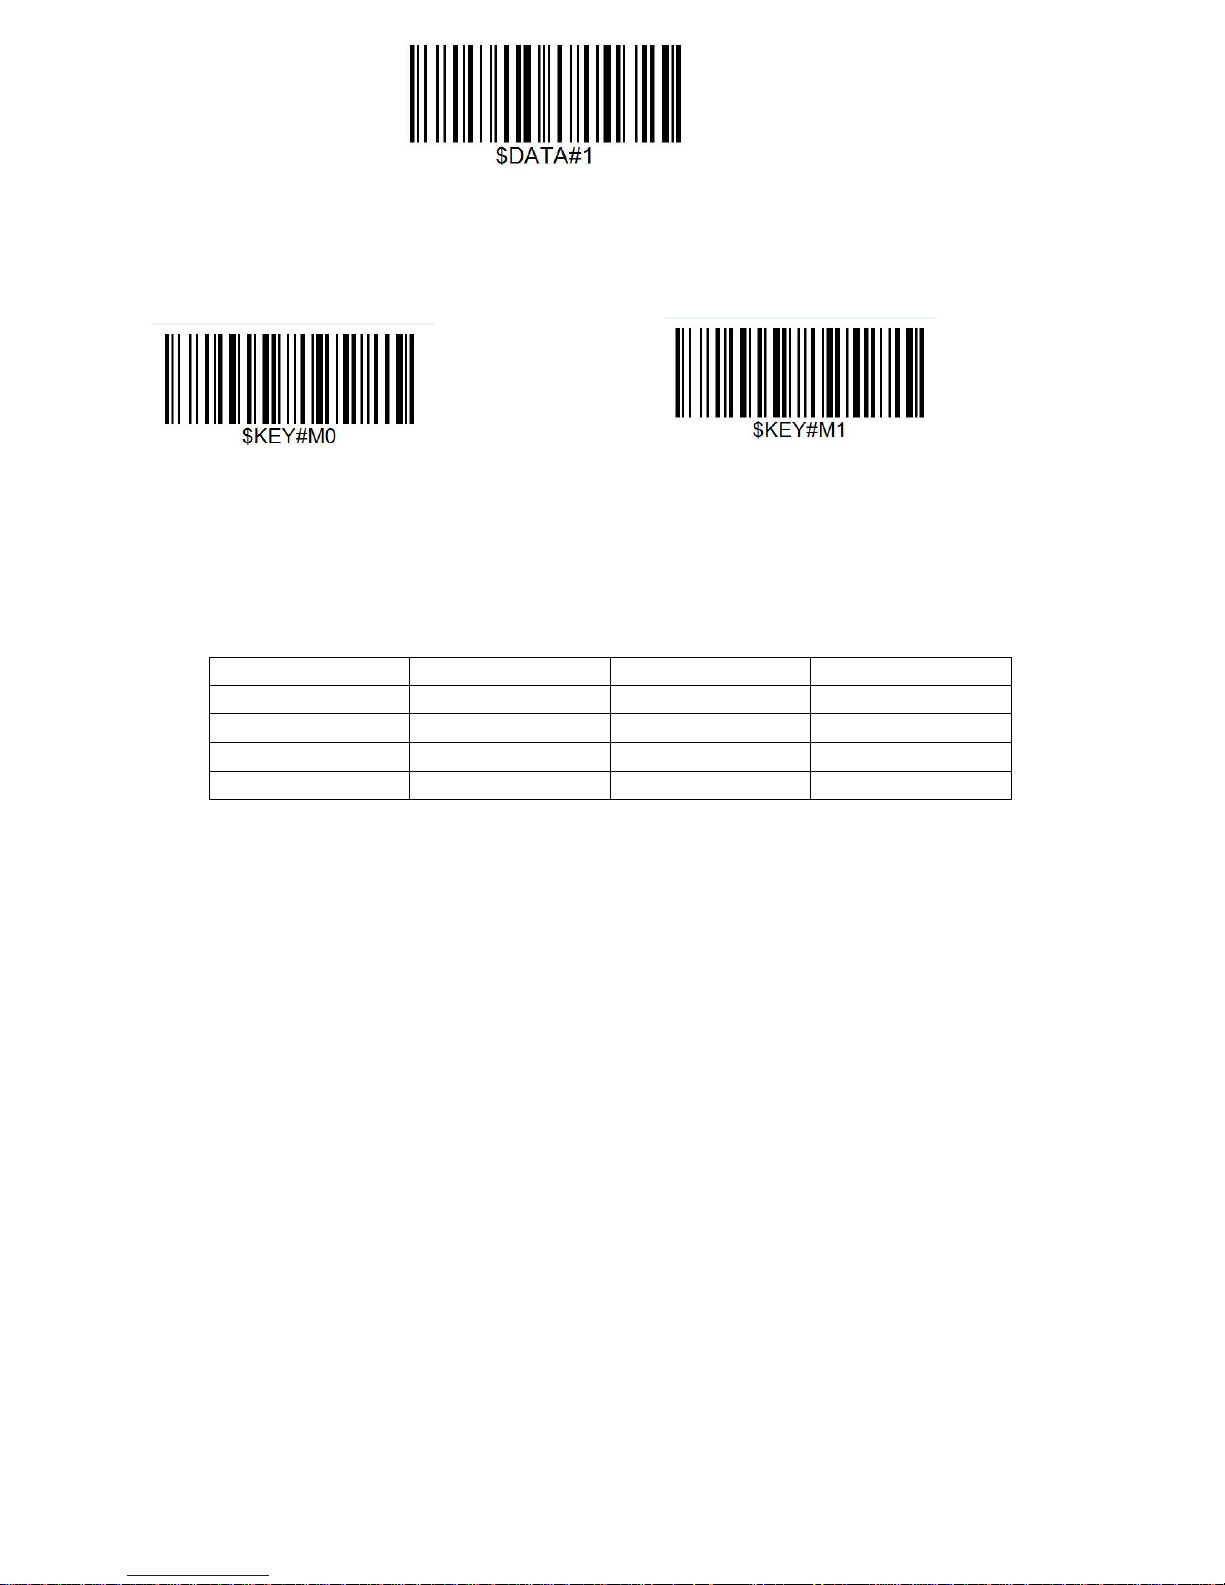
Custom Prefix
Step 2: To set these values, scan a four-digit number (i.e. four bar codes) that corresponds to ASCII values. See Numeric
Bar Codes in appendix 1. Scan 1043(@) one by one.
Step 4: Set Data Transmission Format
<PREFIX> <DATA >
Custom Suffix
Step 1: scan “custom suffix”
Scan Suffix 1
Step 2 and Step 3 same procedures like custom prefix
Step 4: Set Data Transmission Format
Page 10
<DATA><SUFFIX 1>
Enable Keystroke*/ Functional Key Set
Enable Keystroke* Enable functional Key Set
For example if you scan value 1004, Keystroke will be “Up Down”.
But if you scan Enable Functional Key Set after you scan the value ” 1004”, you will get functional key set Ctrl +D. For
more details please refer to Appendix 1.
Scan Value
Hex Value
Keystroke
Functional Key Set
1007
07
Enter
Ctrl+G
1008
08
Left Arrow
Ctrl+H
1003
03
Right Arrow
Ctrl+C
1004
04
Up Down
Ctrl+D
Page 11

Appendix 1
Scan Value
Hex Vaule
Keystorkes
Functional Key Set
1007
07
Enter
Ctrl+G
1008
08
Left Arrow
Ctrl+H
1003
03
Right Arrow
Ctrl C
1004
04
Up Down
Ctrl D
1010
0A
Down Arrow
Ctrl+J
1009
09
Horizontal Tab
Ctrl+I
1011
0B
Veritical Tab
Ctrl+K
1012
0C
Backspace
Ctrl+L
1014
0E
Insert
Ctrl+N
1015
0F
ESC
Ctrl+O
1017
11
Home
Ctrl+Q
1018
12
Print Screen
Ctrl+R
1019
13
Delete
Ctrl+S
1022
16
F1
Ctrl+V
1023
17
F2
Ctrl+W
1024
18
F3
Ctrl+X
1025
19
F4
Ctrl+Y
1026
1A
F5
Ctrl+Z
1027
1B
F6
Ctrl+[
1028
1C
F7
Ctrl+\
1029
1D
F8
Ctrl+]
1030
1E
F9
Ctrl+6
1031
1F
F10
Ctrl++-
1016
10
F11
Ctrl+P
1021
15
F12
Ctrl+U
Page 12
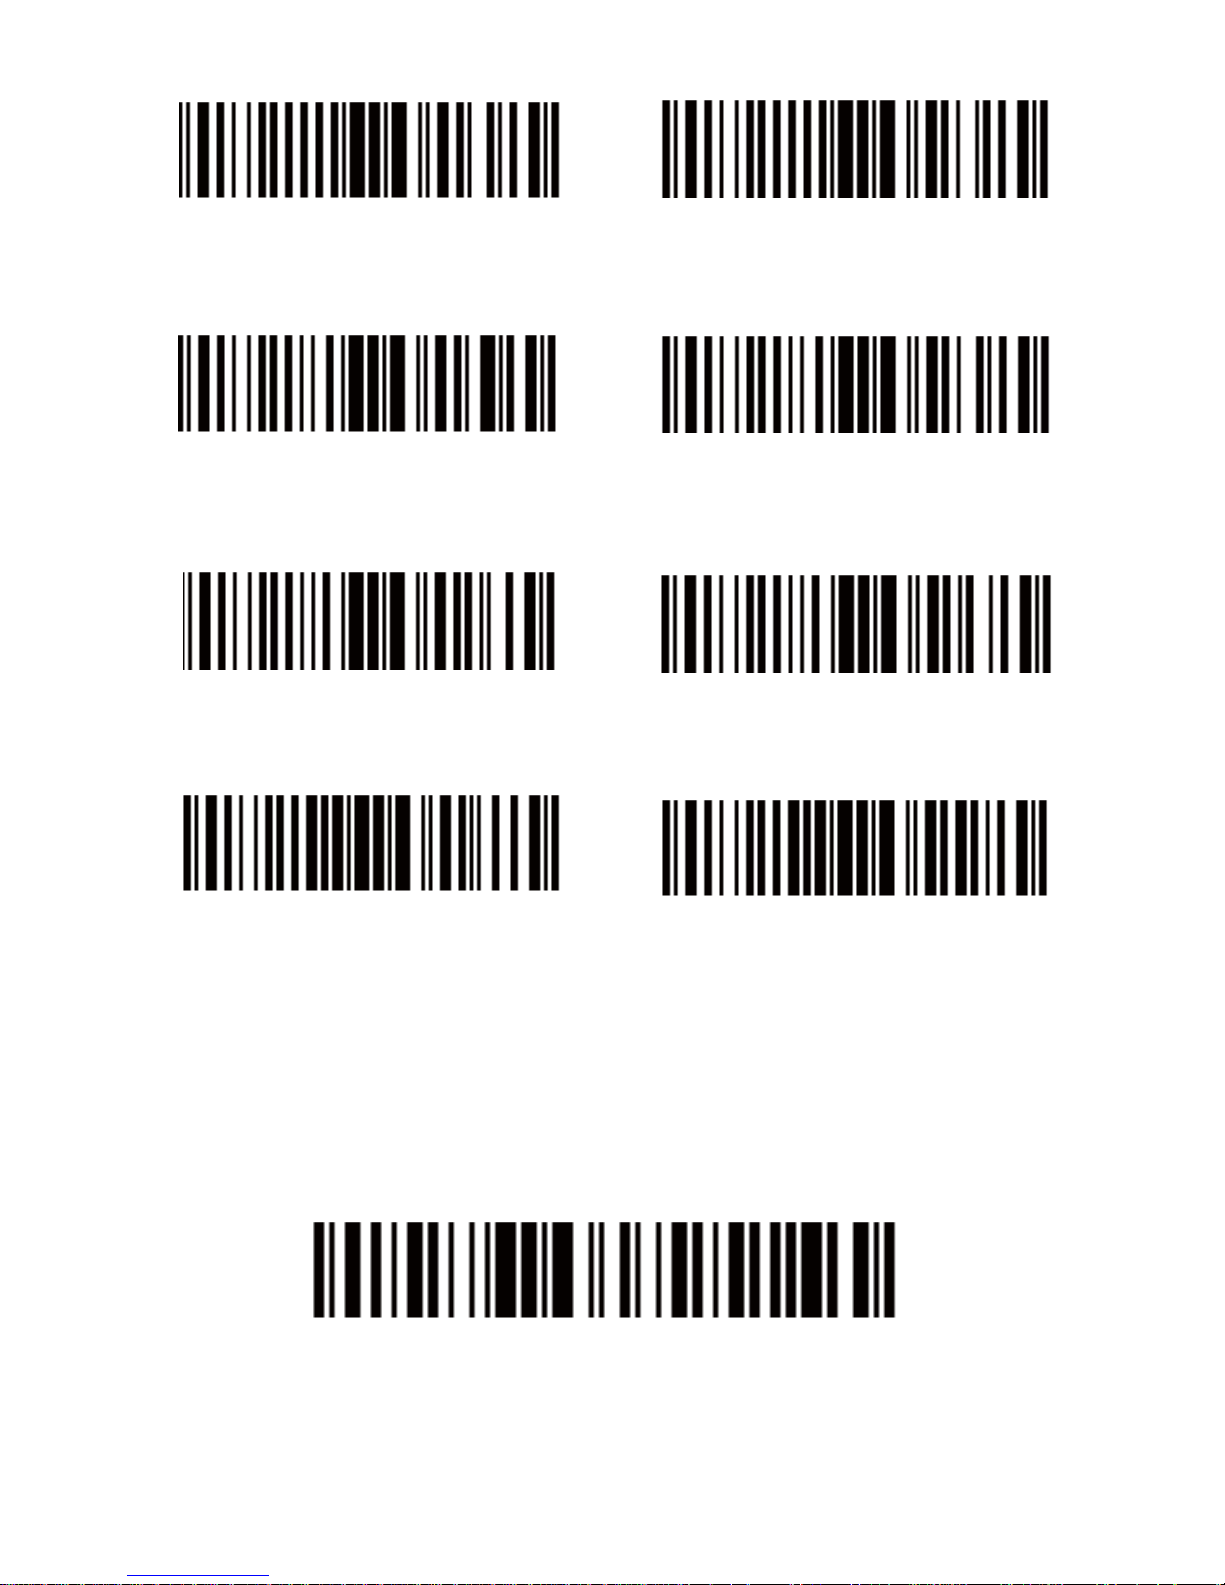
Common function Barcodes Enable/Disable UPC-E
1000021
*Enable UPC-E
Enable/Disable EAN-8
1000041
*Enable EAN-8
Enable/Disable EAN-13
1000031
*Enable EAN-13
Enable/Disable Bookland EAN(ISBN)
1000231
Enable Bookland EAN
1000020
Disable UPC-E
1000040
Disable EAN-8
1000030
Disable EAN-13
1000230
*Disable Bookland EAN
Decode UPC/EAN Supplementals UPC/EAN
Supplementals are bar codes appended according to specific format conventions (e.g.UPC
A+2, UPC E+2, EAN 13+2, EAN 13+5). The following options are available:
• Do not read supplementals – The scan engine can only read the barcode no matter
the
barcode with supplementals or not.
2010E00
*Ignore UPC/EAN with Supplementals
Page 13
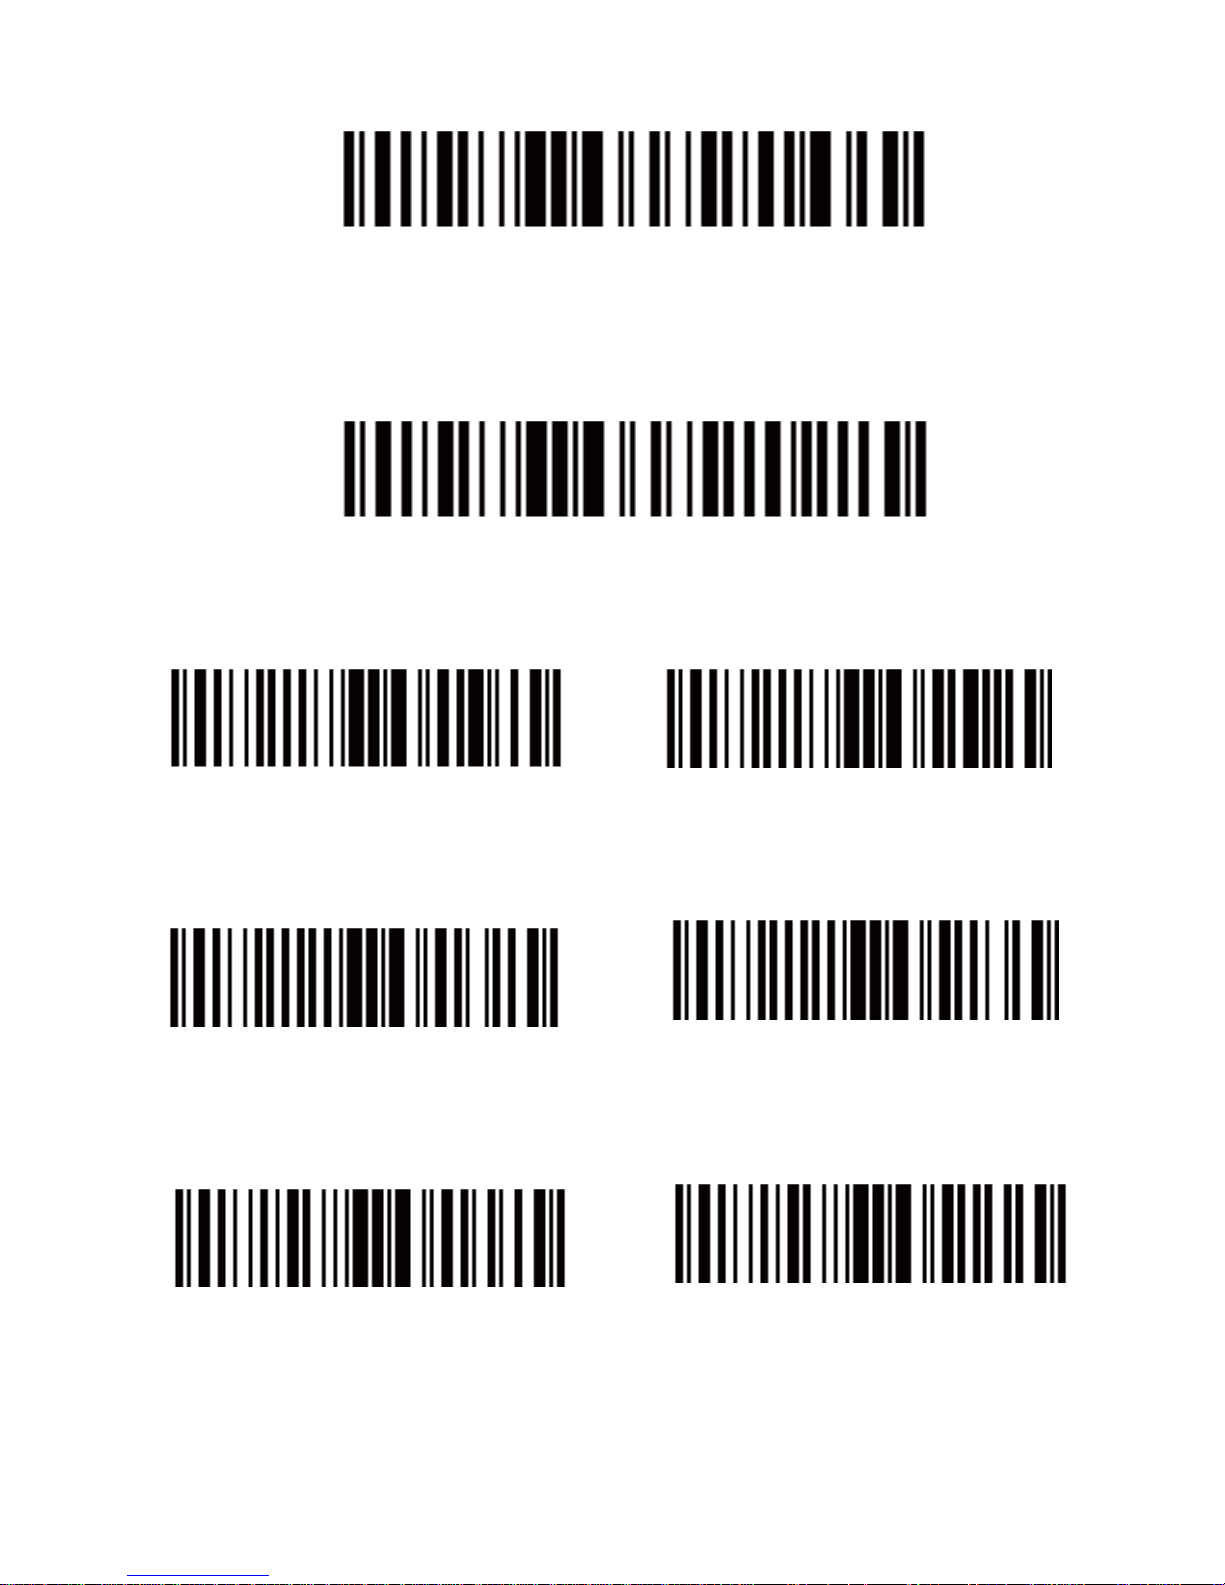
• Only read the barcode with supplementals- The scan engine can only read the
barcode with supplementals.
2010E01
Decode UPC/EAN with Supplementals
• Auto read supplementals- The scan engine can not only read the barcode with
supplementals,but also read the barcode without supplementals.
2010E02
Auto discriminate UPC/EAN Supplementals
Eable/Disable Code 128
1000101
*Enable Code 128
1000100
Disable Code 128
Enable/Disable Code 39
1000001
*Enable Code 39
Enable/Disable Code 39 Full ASCII
1020111
Enable Code 39 Full ASCII
1000000
Disable Code 39
1020110
*Disable Code 39 Full ASCII
NOTE Trioptic Code 39 and Code 39 Full ASCII cannot be enabled simultaneously. If you get an
error beep when enabling Code 39 Full ASCII, disable Trioptic Code 39 and try again.
Page 14
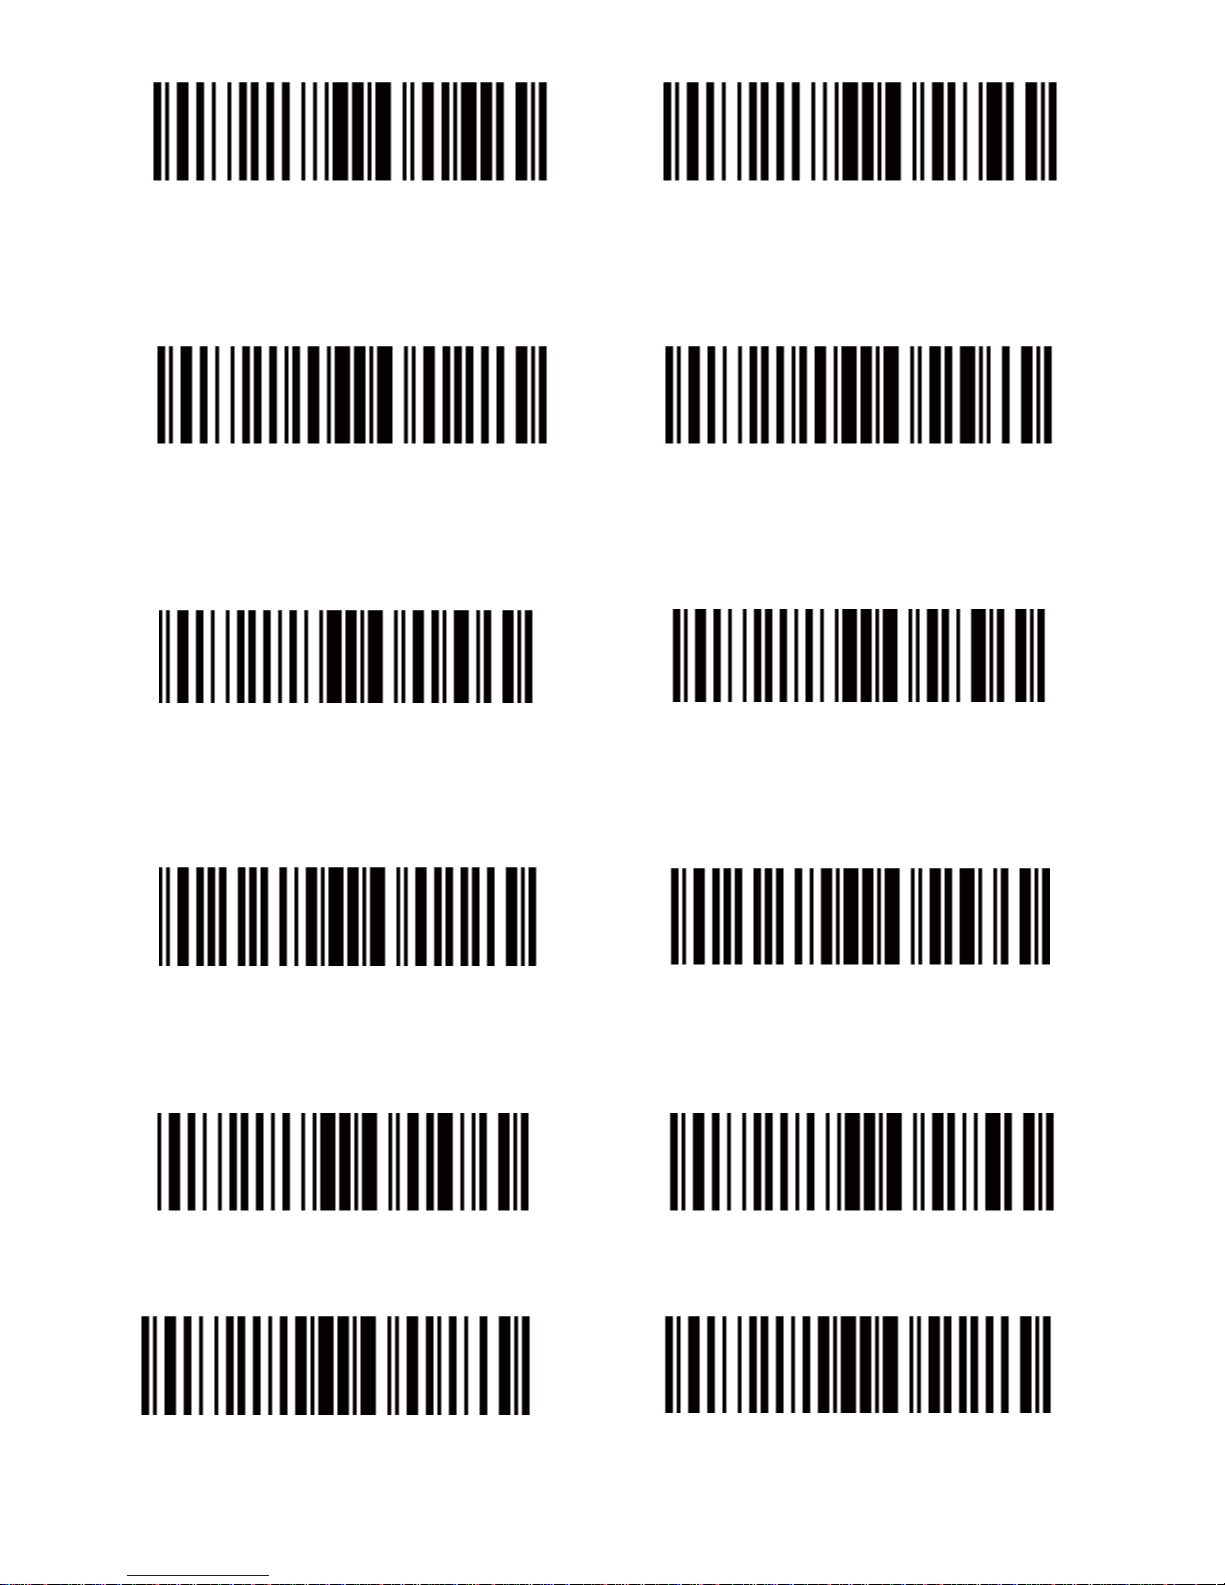
Enable/Disable Code 93
1000111
Enable Code 93
1000110
*Disable Code 93
Enable/Disable Code 11
1000121
Enable Code 11
1000120
* Disable Code 11
Enable/Disable Interleaved 2 of 5
1000061
*Enable Interleaved 2 of 5
1000060
Disable Interleaved 2 of 5
Enable/Disable Matrix 25
3030201
Enable Matrix 25
3030200
*Disable Matrix 25
Enable/Disable Codabar
1000071
Enable Codabar
1000141
Enable MSI
1000070
Disable Codabar *
1000140
*Disable MSI
Page 15
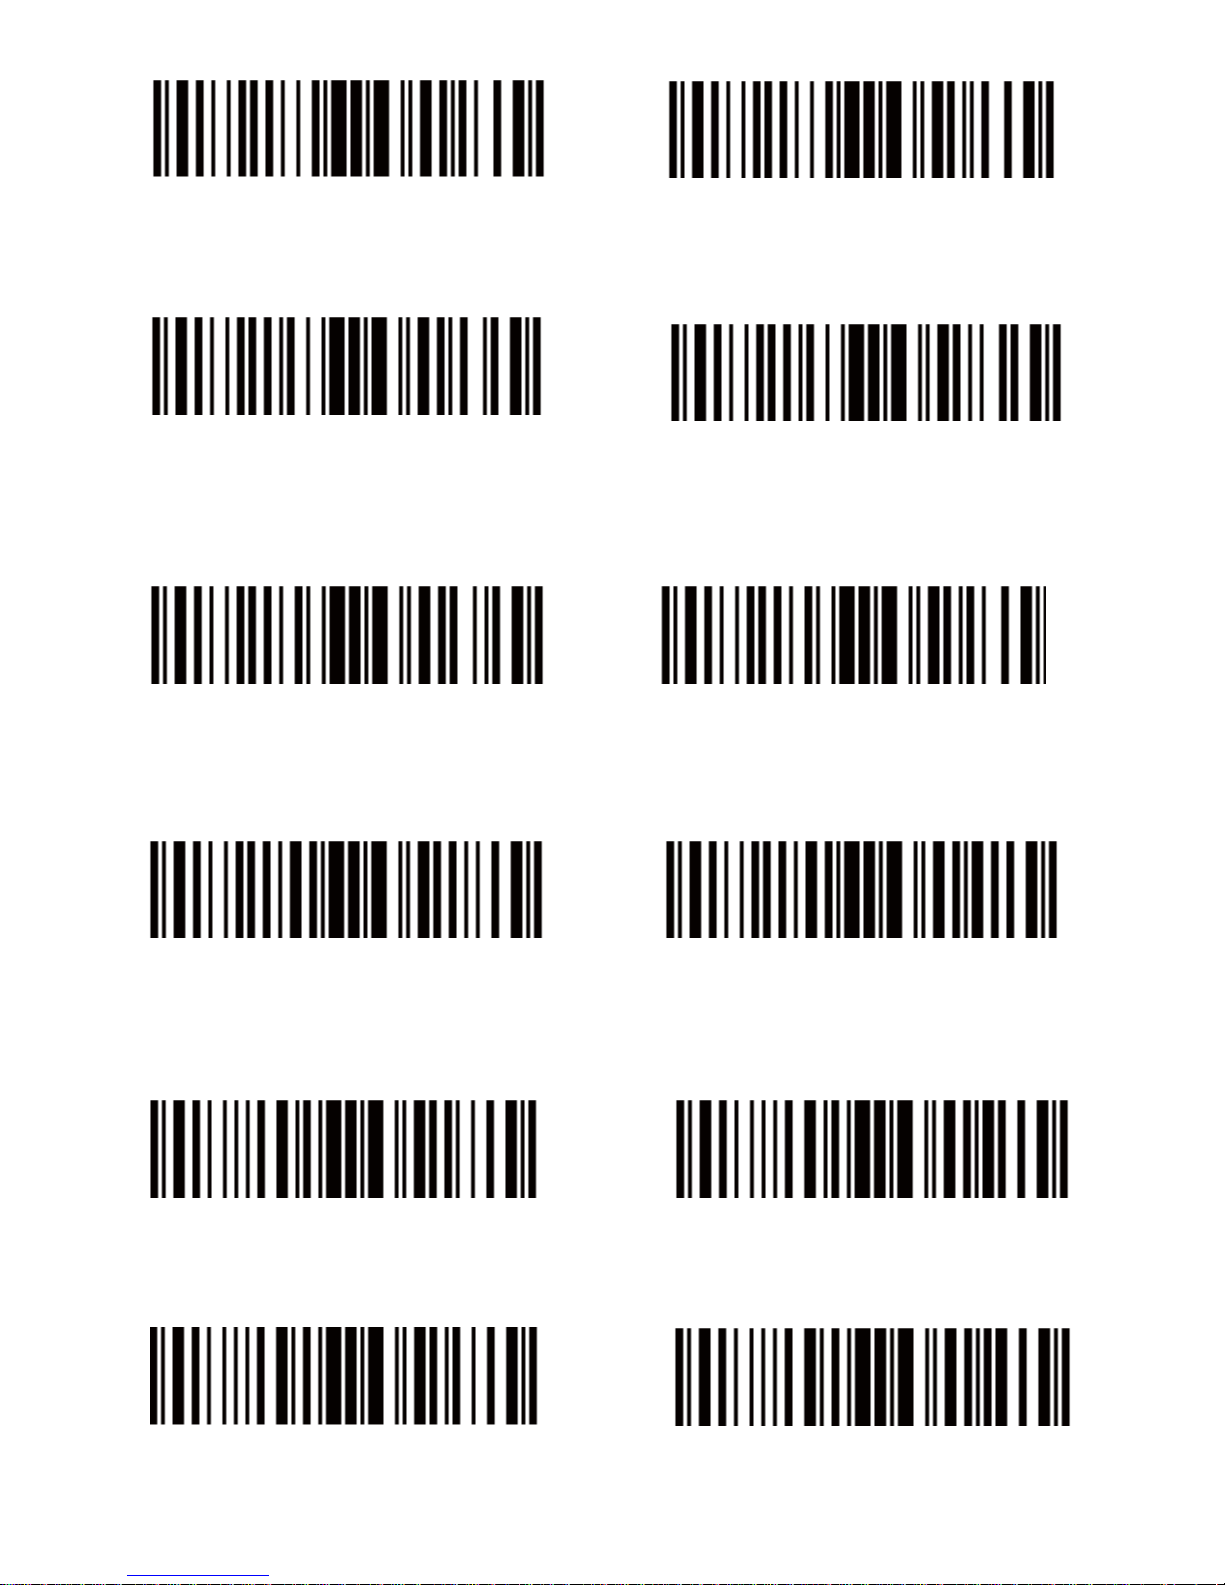
1000360
*Disable GS1 DataBar Limited
Enable/Disable GS1 DataBar-14
1000351
Enable GS1 DataBar-14
Enable/Disable GS1 DataBar Limited
1000361
Enable GS1 DataBar Limited
1000350
*Disable GS1 DataBar-14
1000360
*Disable GS1 DataBar Limited
Enable/Disable GS1 DataBar Expanded
1000371
Enable GS1 DataBar Expanded
1000370
*Disable GS1 DataBar Expanded
Enable/Disable PDF417
1000170
Disable PDF417
1000171
*Enable PDF417
Enable/Disable QR
1003250
Disable QRCode
1003251
*Enable QRCode
Enable/Disable Data Matrix(DM)
1003240
Disable DataMatrix
1003241
*Enable DataMatrix
Page 16

Appendix 2
Scan Value
Hex Value
Full ASCLL Code
39 Encode Char
Keystroke
1000
00h
%U
CTRL 2
1001
01h
$A
CTRL A
1002
02h
$B
CTRL B
1003
03h
$C
CTRL C
1004
04h
$D
CTRL D
1005
05h
$E
CTRL E
1006
06h
$F
CTRL F
1007
07h
$G
CTRL G
1008
08h
$H
CTRL H
1009
09h
$I
CTRL I
1010
0Ah
$J
CTRL J
1011
0Bh
$K
CTRL K
1012
0Ch
$L
CTRL L
1013
0Dh
$M
CTRL M
1014
0Eh
$N
CTRL N
1015
0Fh
$O
CTRL O
1016
10h
$P
CTRL P
1017
11h
$Q
CTRL Q
1018
12h
$R
CTRL R
1019
13h
$S
CTRL S
1020
14h
$T
CTRL T
1021
15h
$U
CTRL U
1022
16h
$V
CTRL V
1023
17h
$W
CTRL W
1024
18h
$X
CTRL X
Page 17

Scan Value
Hex Value
Full ASCLL Code
39 Encode Char
Keystroke
1025
19h
$Y
CTRL Y
1026
1Ah
$Z
CTRL Z
1027
1Bh
%A
CTRL [
1028
1Ch
%B
CTRL \
1029
1Dh
%C
CTRL ]
1030
1Eh
%D
CTRL 6
1031
1Fh
%E
CTRL -
1032
20h
Space
Space
1033
21h
/A ! 1034
22h
/B
‘
1035
23h
/C
#
1036
24h
/D
$
1037
25h
/E
%
1038
26h
/F
&
1039
27h
/G
‘
1040
28h
/H
(
1041
29h
/I
)
1042
2Ah
/J
*
1043
2Bh
/K + 1044
2Ch
/L
,
1045
2Dh
-
-
1046
2Eh
. . 1047
2Fh
/
/
1048
30h
0
0
1049
31h
1
1
1050
32h
2
2
1051
33h
3
3
1052
34h
4 4 1053
35h
5
5
1054
36h
6 6 1055
37h
7
7
Page 18

Scan Value
Hex Value
Full ASCLL Code
39 Encode Char
Keystroke
1056
38h
8 8 1057
39h
9
9
1058
3Ah
/Z
:
1059
3Bh
%F
;
1060
3Ch
%G
<
1061
3Dh
%H
-
1062
3Eh
%I
>
1063
3Fh
%J
?
1064
40h
%V
@
1065
41h
A
A
1066
42h
B
B
1067
43h
C
C
1068
44h
D
D
1069
45h
E
E
1070
46h
F
F
1071
47h
G
G
1072
48h
H
H
1073
49h
I
I
1074
4Ah
J J 1075
4Bh
K
K
1076
4Ch
L
L
1077
4Dh
M
M
1078
4Eh
N
N
1079
4Fh
O
O
1080
50h
P
P
1081
51h
Q
Q
1082
52h
R
R
1083
53h
S
S
1084
54h
T
T
1085
55h
U
U
1086
56h
V
V
Page 19

Scan Value
Hex Value
Full ASCLL Code
39 Encode Char
Keystroke
1087
57h
W
W
1088
58h
X X 1089
59h
Y
Y
1090
5Ah
Z Z 1091
5Bh
%K
[
1092
5Ch
%I \ 1093
5Dh
%M
]
1094
5Eh
%N
^
1095
5Fh
%O
_
1096
60h
%W
‘
1097
61h
+A
a
1098
62h
+B
b
1099
63h
+C
c
1100
64h
+D
d
1101
65h
+E
e
1102
66h
+F
f
1103
67h
+G
g
1104
68h
+H
h
1105
69h
+I
i
1106
6Ah
+J j 1107
6Bh
+K
k
1108
6Ch
+L l 1109
6Dh
+M
m
1110
6Eh
+N
n
1111
6Fh
+O
o
1112
70h
+P
p
1113
71h
+Q
q
1114
72h
+R
r
1115
73h
+S
s
1116
74h
+T
t
1117
75h
+U
u
Page 20
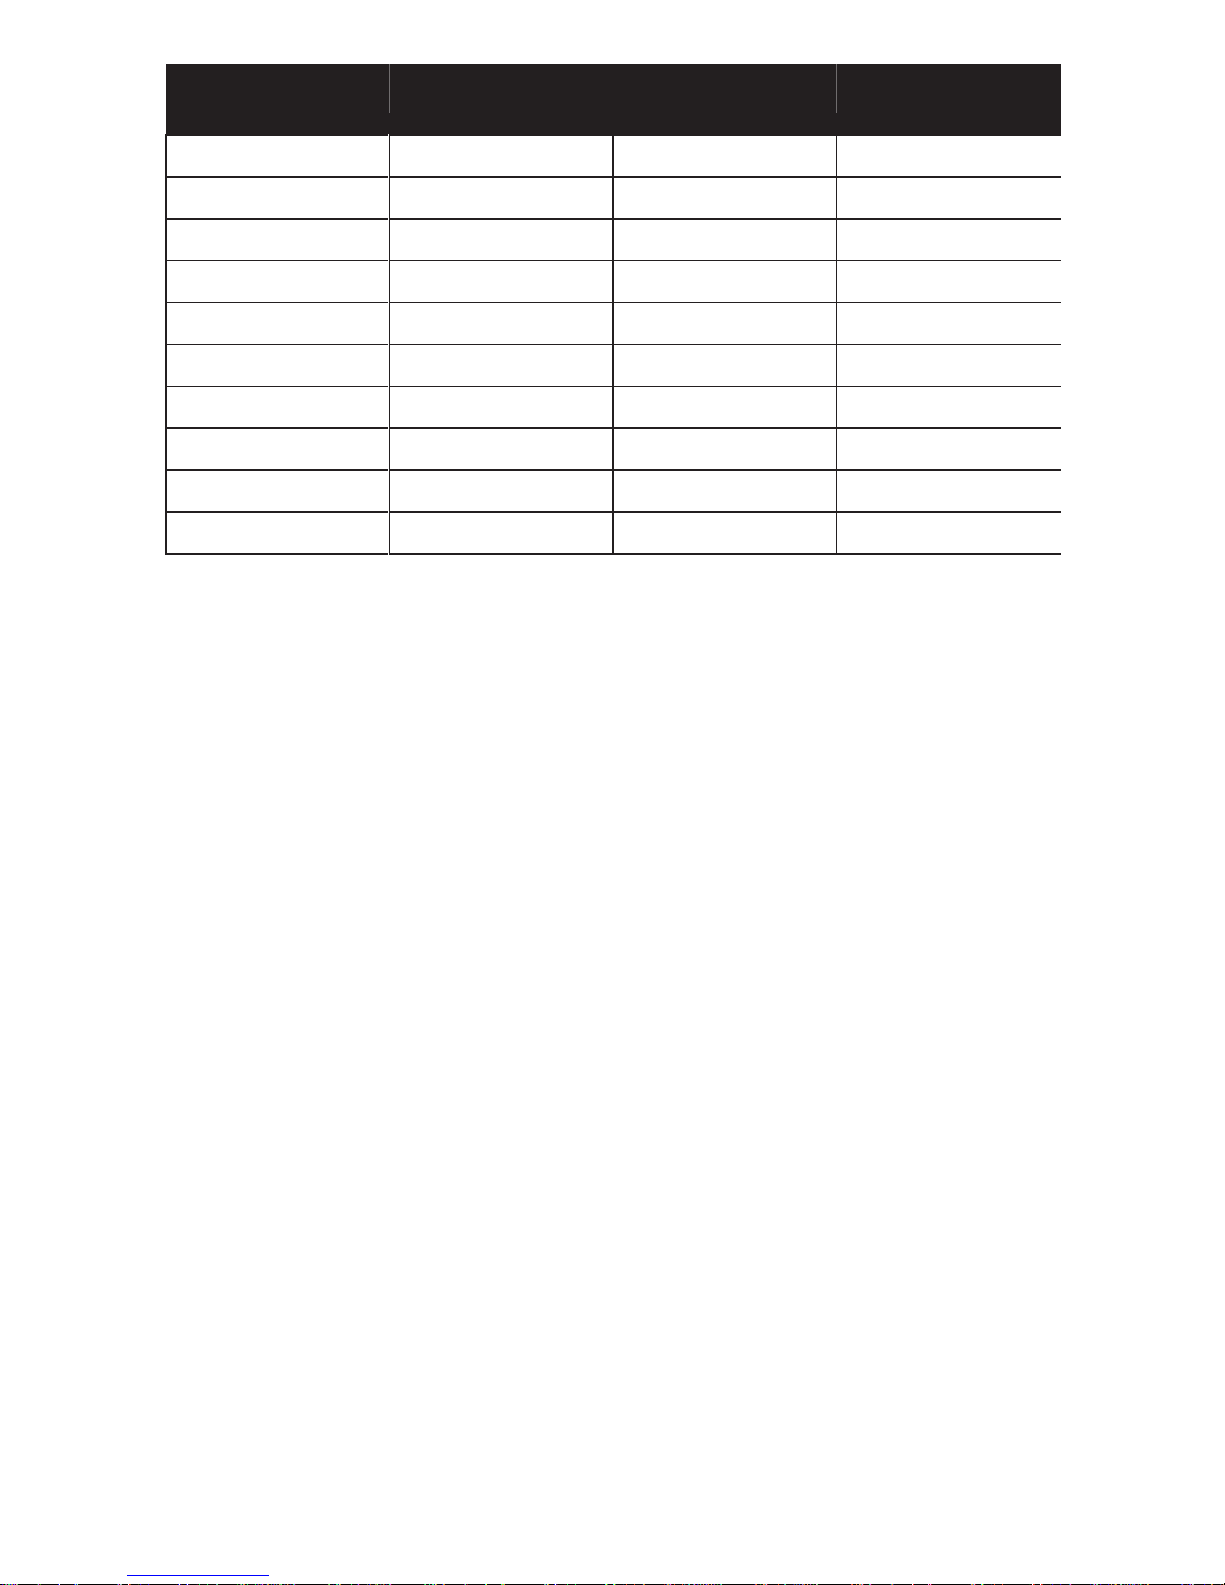
Scan Value
Hex Value
Full ASCLL Code
39 Encode Char
Keystroke
1118
76h
+V
v
1119
77h
+W
w
1120
78h
+X
x
1121
79h
+Y
y
1122
7Ah
+Z
z
1123
7Bh
%P
{
1124
7Ch
%Q
|
1125
7Dh
%R
}
1126
7Eh
%S
~
1127
7Fh
Undefined
Support
For any inquiries concerning our products, please send an email to
[email protected], and we will respond to you as soon as possible.
Contact Information
Tel.:+0086 20-6626-0708
Email:[email protected]
Addr.:Unit 137, The Pacific Industry Park, Xintang Town,Zengcheng District, Guangzhou,China/511340
Made in China
 Loading...