

Page 1

NETSCOUT 802.11ac
Network USB Adapter
D1080-Z1 User Guide
Version: 1.0
(May, 2017)
I
Page 2

Copyright ©2017 NETSCOUT SYSTEMS. INC. (NETSCOUT) All rights reserved.
No part of this publication may be reproduced, transmitted, transcribed, stored in a
retrieval system, or translated into any language or computer language, in any form or
by any means, electronic, mechanical, magnetic, optical, chemical, manual or
otherwise, without the prior written permission of NETSCOUT.
NETSCOUT makes no representations or warranties, either expressed or implied,
with respect to the contents hereof and specifically disclaims any warranties,
merchantability or fitness for any particular purpose. Any software described in this
manual is sold or licensed "as is". Should the programs prove defective following
their purchase, the buyer (and not NETSCOUT, its distributor, or its dealer) assumes
the entire cost of all necessary servicing, repair, and any incidental or consequential
damages resulting from any defect in the software. Further, NETSCOUT reserves the
right to revise this publication and to make changes from time to time in the contents
thereof without obligation to notify any person of such revision or changes.
II
Page 3

Federal Communication Commission
Interference Statement
FCC Part 15
This equipment has been tested and found to comply with the limits for a Class B
digital device, pursuant to part 15 of the FCC Rules. These limits are designed to
provide reasonable protection against harmful interference in a residential installation.
This equipment generates, uses and can radiate radio frequency energy and, if not
installed and used in accordance with the instructions, may cause harmful interference
to radio communications. However, there is no guarantee that interference will not
occur in a particular installation. If this equipment does cause harmful interference to
radio or television reception, which can be determined by turning the equipment off
and on, the user is encouraged to try to correct the interference by one or more of the
following measures:
• Reorient or relocate the receiving antenna.
• Increase the separation between the equipment and receiver.
• Connect the equipment into an outlet on a circuit different from that to
which the receiver is connected.
• Consult the dealer or an experienced Radio/ TV technician for help.
This device complies with part 15 of the FCC Rules. Operation is subject to the
following two conditions:
1) This device may not cause harmful interference.
2) This device must accept any interference received, including interference that
may cause undesired operation.
Any changes or modifications not expressly approved by the party responsible for
compliance could void the user’s authority to operate the equipment.
Note: The manufacturer is not responsible for any Radio or TV interference caused by
unauthorized modifications to this equipment. Such modifications could void the
user’s authority to operate the equipment.
III
Page 4

Federal Communication Commission (FCC) Radiation Expos ure
Statement
This equipment complies with FCC radiation exposure limits set forth for an
uncontrolled environment. End users must follow the specific operating instructions
for satisfying RF exposure compliance. This transmitter must not be co-located or
operating in conjunction with any other antenna or transmitter. This equipment has
been SAR-evaluated for use in hand. SAR measurements are based on a 50mm spacing
from the body and that compliance is achieved at that distance.
RED Compliance Statement
Safety
This equipment is designed with the utmost care for the safety of those who install
and use it. However, special attention must be paid to the dangers of electric shock
and static electricity when working with electrical equipment. All guidelines of this
and of the computer manufacture must therefore be allowed at all times to ensure the
safe use of the equipment.
EU Countries Intended for Use
The ETSI version of this device is intended for home and office use in Austria,
Belgium, Denmark, Finland, France, Germany, Greece, Ireland, Italy, Luxembourg,
the Netherlands, Portugal, Spain, Sweden, and the United Kingdom.
The ETSI version of this device is also authorized for use in EFTA member states:
Iceland, Liechtenstein, Norway, and Switzerland.
EU Countries Not intended for use
None.
IV
Page 5

RF Exposure Information (SAR)
This device meets the government’s requirements for exposure to radio waves. This
device is designed and manufactured not to exceed the emission limits for exposure to
radio frequency (RF) energy set by the Federal Communications Commission of the
U.S. Government.
The exposure standard for wireless device employs a unit of measurement known as
the Specific Absorption Rate, or SAR. The SAR limit set by the FCC is 1.6W/kg.
*Tests for SAR are conducted using standard operating positions accepted by the FCC
with the device transmitting at its highest certified power level in all tested frequency
bands. Although the SAR is determined at the highest certified power level, the actual
SAR level of the device while operating can be well below the maximum value. This
is because the device is designed to operate at multiple power levels so as to use only
the poser required to reach the network. In general, the closer you are to a wireless
base station antenna, the lower the power output.
SAR compliance has been established in the host product(s) (laptop computers),
tested at 50mm separation distance to the human body, and tested with USB slot
configurations including Horizontal-UP, Horizontal-Down, Vertical-Front,
Vertical-Back, Tip. This device can be used in host product(s) with substantially similar
physical dimensions, construction, and electrical and RF characteristics.
The highest SAR value, tested per FCC RF exposure guidelines for USB dongle, as
described in this user guide, is 1.19 W/kg. The FCC has granted an Equipment
Authorization for this device with all reported SAR levels evaluated as in compliance
with the FCC RF exposure guidelines. SAR information on this device is on file with
the FCC and can be found under the Display Grant section of
www.fcc.gov/oet/ea/fccid after searching on FCC ID: NDD9578221212.
This USB dongle transmitter is approved for use in typical laptop computers. To
comply with FCC RF exposure requirements, this USB dongle should not be used in
other devices or certain laptop and tablet computer configurations where the USB
connectors on the host computer are unable to provide or ensure the necessary
operating configurations intended for the device and its users or bystanders to satisfy
RF exposure compliance requirements. This USB dongle should be installed and
operated with minimum distance 50mm between the radiator & your body.
V
Page 6

Canadian Compliance Statement
This device complies with Industry Canada license-exempt RSSs. Operation is subject
to the following two conditions:
(1) This device may not cause interference, and
(2) This device must accept any interference, including interference that may cause
undesired operation of the device.
Le present appareil est conforme aux CNR d’Industrie Canada applicables aux
appareils radio exempts de licence. L’exploitation est autorisee aux deux conditions
suivantes :
(1) l’appareil ne doit pas produire de brouillage;
(2) l’utilisateur de l’appareil doit accepter tout brouillage radioelectrique subi, meme
si le brouillage est susceptible d’en compromettre le fonctionnement.
Caution:
(i) The device for operation in the band 5150-5250 MHz is only for indoor use to
reduce the potential for harmful interference to co-channel mobile satellite systems;
(ii) For devices with detachable antenna(s), the maximum antenna gain permitted for
devices in the bands 5250-5350 MHz and 5470-5725 MHz shall be such that the
equipment still complies with the e.i.r.p. limit;
(iii) For devices with detachable antenna(s), the maximum antenna gain permitted for
devices in the band 5725-5850 MHz shall be such that the equipment still complies
with the e.i.r.p. limits specified for point-to-point and non-point-to-point operation as
appropriate; and
The high-power radars are allocated as primary users (i.e. priority users) of the bands
5250-5350 MHz and 5650-5850 MHz and that these radars could cause interference
and/or damage to LE-LAN devices.
DFS (Dynamic Frequency Selection) products that operate in the bands 5250- 5350
MHz, 5470-5600MHz, and 5650-5725MHz.
Avertissement:
(i) Le dispositif fonctionnant dans la bande 5150-5250 MHz est reserve uniquement
pour une utilisation a l’interieur afin de reduire les risques de brouillage prejudiciable
aux systemes de satellites mobiles utilisant les memes canaux;
(ii) Le gain maximal d’antenne permis pour les dispositifs avec antenne(s) amovible(s)
utilisant les bandes 5250-5350 MHz et 5470-5725 MHz doit se conformer a la
VI
Page 7

imitation P.I.R.E.;
(iii) Le gain maximal d’antenne permis pour les dispositifs avec antenne(s)
amovible(s) utilisant la bande 5725-5850 MHz doit se conformer a la limitation
P.I.R.E specifiee pour l’exploitation point a point et non point a point, selon le cas.
This EUT is compliance with SAR for general population/uncontrolled exposure
limits in IC RSS-102 and had been tested in accordance with the measurement
methods and procedures specified in IEEE 1528 and IEC 62209.
This equipment should be installed and operated with minimum distance 5cm
between the radiator and your body. This device and its antenna(s) must not be
co-located or operating in conjunction with any other antenna or transmitter.
Cet appareil est conforme aux limites d'exposition DAS incontrolee pour la
population generale de la norme CNR-102 d'Industrie Canada et a ete teste en
conformite avec les methodes de mesure et procedures specifiees dans IEEE 1528 et
IEC 62209.
Cet appareil doit etre installe et utilise avec une distance minimale de 5cm entre
l’emetteuret votre corps. Cet appareil et sa ou ses antennes ne doivent pas etre
co-localises ou fonctionner en conjonction avec tout autre antenne ou transmetteur.
Body SAR: 1.19 W/kg
VII
Page 8

Table of Contents
Chapter I: Product Information 1
1-1 Introduction and Safety information ................................................................ 1
1-2 Safety Information ........................................................................................... 2
1-3 System Requirements ...................................................................................... 3
1-4 Package Contents ............................................................................................. 4
1-5 Familiar with your new wireless network adapter ........................................... 5
CHAPTER II: Driver Installation and Configuration 6
2-1 Network Adapter Installation ...................................................................................... 6
2-2 Connect to Wireless Access Point ........................................................................... 10
2-2-1 Using Realtek Utility .......................................................................... 10
2-2-2 Using Windows Zero Configuration .................................................. 16
2-3 Connection Profile Management ............................................................................. 21
2-3-1 Add a new profile ............................................................................... 22
2-3-2 Remove an existing profile ................................................................ 25
2-3-3 Edit an Existing Profile ...................................................................... 26
2-3-4 Make a Copy of an Existing Profile ................................................... 27
2-3-5 Set as a Default Profile ....................................................................... 28
2-4 View Network Statistics, General Information, and Status ............................. 29
2-4-1 General Information ........................................................................... 29
2-4-2 Status .................................................................................................. 30
2-4-3 V ie w Network Statistics ..................................................................... 31
2-5 Miscellaneous Settings ................................................................................................ 32
2-6 Establish a Secure Connection with AP by WPS ................................................ 34
2-6-1 PIN Code ............................................................................................ 36
2-6-2 Push Button ........................................................................................ 38
CHAPTER III: Soft-AP Function 40
3-1 Switch to AP Mode and Station Mode ..................................................................... 40
3-1-1 Configure SSID and Channel ............................................................. 43
3-1-2 Setup Soft-AP Security ...................................................................... 45
3-2 Advanced Settings ......................................................................................................... 47
3-3 Wireless Statistics .......................................................................................................... 48
3-4 Internet Connection Sharing (ICS) ......................................................................... 49
CHAPTER IV: Appendix 50
4-1 Hardware Specification .............................................................................................. 50
4-2 Troubleshooting............................................................................................................. 51
4-3 Glossary ............................................................................................................................ 53
VIII
Page 9

Chapter I: Pr o d uct Inf ormation
1-1 Introduction and Safety Information
Thank you fo r purchasing the NETSCOUT 802.11ac Network USB
Adapter, an extreme high-speed 802.11a/b/g /n /ac dual band w ir eless
network adapter! Excepting c ommon wireless standards 802.11a/b/g/n,
this wireless network adapt er is also 802.11ac compatible - data transfer
rate is 867Mbps, and that’s sixteen times faster than 802.11g wire less
network! 802.11ac also provides wider wireless coverage, so you don’t
have to worry if your compute r is far from your wireles s a ccess point.
With easy-to-install Super Speed USB 3.0 interface - a very com mon
expansion p ort of computers - plug this wireless networ k adapter into any
empty USB 3.0 port of your computer, just that simple!
Other features of this router include:
IEEE 802.11a/b/g/n/ac compatible.
Extreme High transfer data rate – 11ac up to 867Mbps, 11n up to
300Mbps
Support WMM wireless QoS feature.
Support 64/128-bit WEP, WPA, WPA2 with IEEE 802.1x
functions for high level of security.
Support the most popular operating system : Windows
XP/Vista/7/8, Linux, MAC OS
Support WPS (Wi-Fi Protected Setup) hardware butto n for easy
connection.
Support USB 3.0/2.0 interface. (11ac mode use USB 3.0 is
required )
Portable don gle ty pe desi gn.
1
Page 10

1-2 Safety Information
In order to keep the safety of users and your properties, use the
following safety instructions:
1. This USB wireless netw or k adapter is designed for ind oor use only.
DO NOT expose this network adapter to direct sun li ght, rain, or snow.
2. DO NOT put this network adapter at or near hot or humid places, like
kitchen or bathroom. Also, do not left this wireless netwo rk adapter in the
car in summer.
3. This network adapter is small enough to put i n a child’s mouth, and it
could cause serious injury or could be fatal. If they throw the network
adapter, the adapter will be damaged. PLEASE KEEP THIS NETWORK
ADAPTER OUT THE REACH OF CHILDREN!
4. This network adapter will become hot when being used for long time
(This is normal and is not a malfunction). DO NOT put the network
adapter on a paper, cloth, or other flammable objects after the network
adapter has bee n used for a long time.
5. There’s n o user-serviceable part inside the network adapter. If you
found that t he network adapter is not working properly, please contact
your dealer of purchase a nd ask for help. DO NOT disassemble the
network adapter by yourself , warranty will be void.
6. If the network adapter falls into water, DO NOT USE IT AGAIN
BEFORE YOU SEND THE ADAPTER TO THE DEALER OF
PURCHASE FOR INSPECTION.
7. If you sm e ll something strange or even see some sm oke coming out
from the network adapter, switch the computer off immediately, and call
dealer of purchase for help.
2
Page 11

1-3 System Requirements
An empty USB 3.0/2.0 port (11ac mode use Super Speed USB 3.0 is
required ) (May not be able work with USB 1.1 port, and
performa nce will be greatly reduced)
Windows XP, Vista, Windows 7, Window s 8 operat ing system
CD-ROM drive
At least 100MB of ava ila b le di sk spa ce
3
Page 12
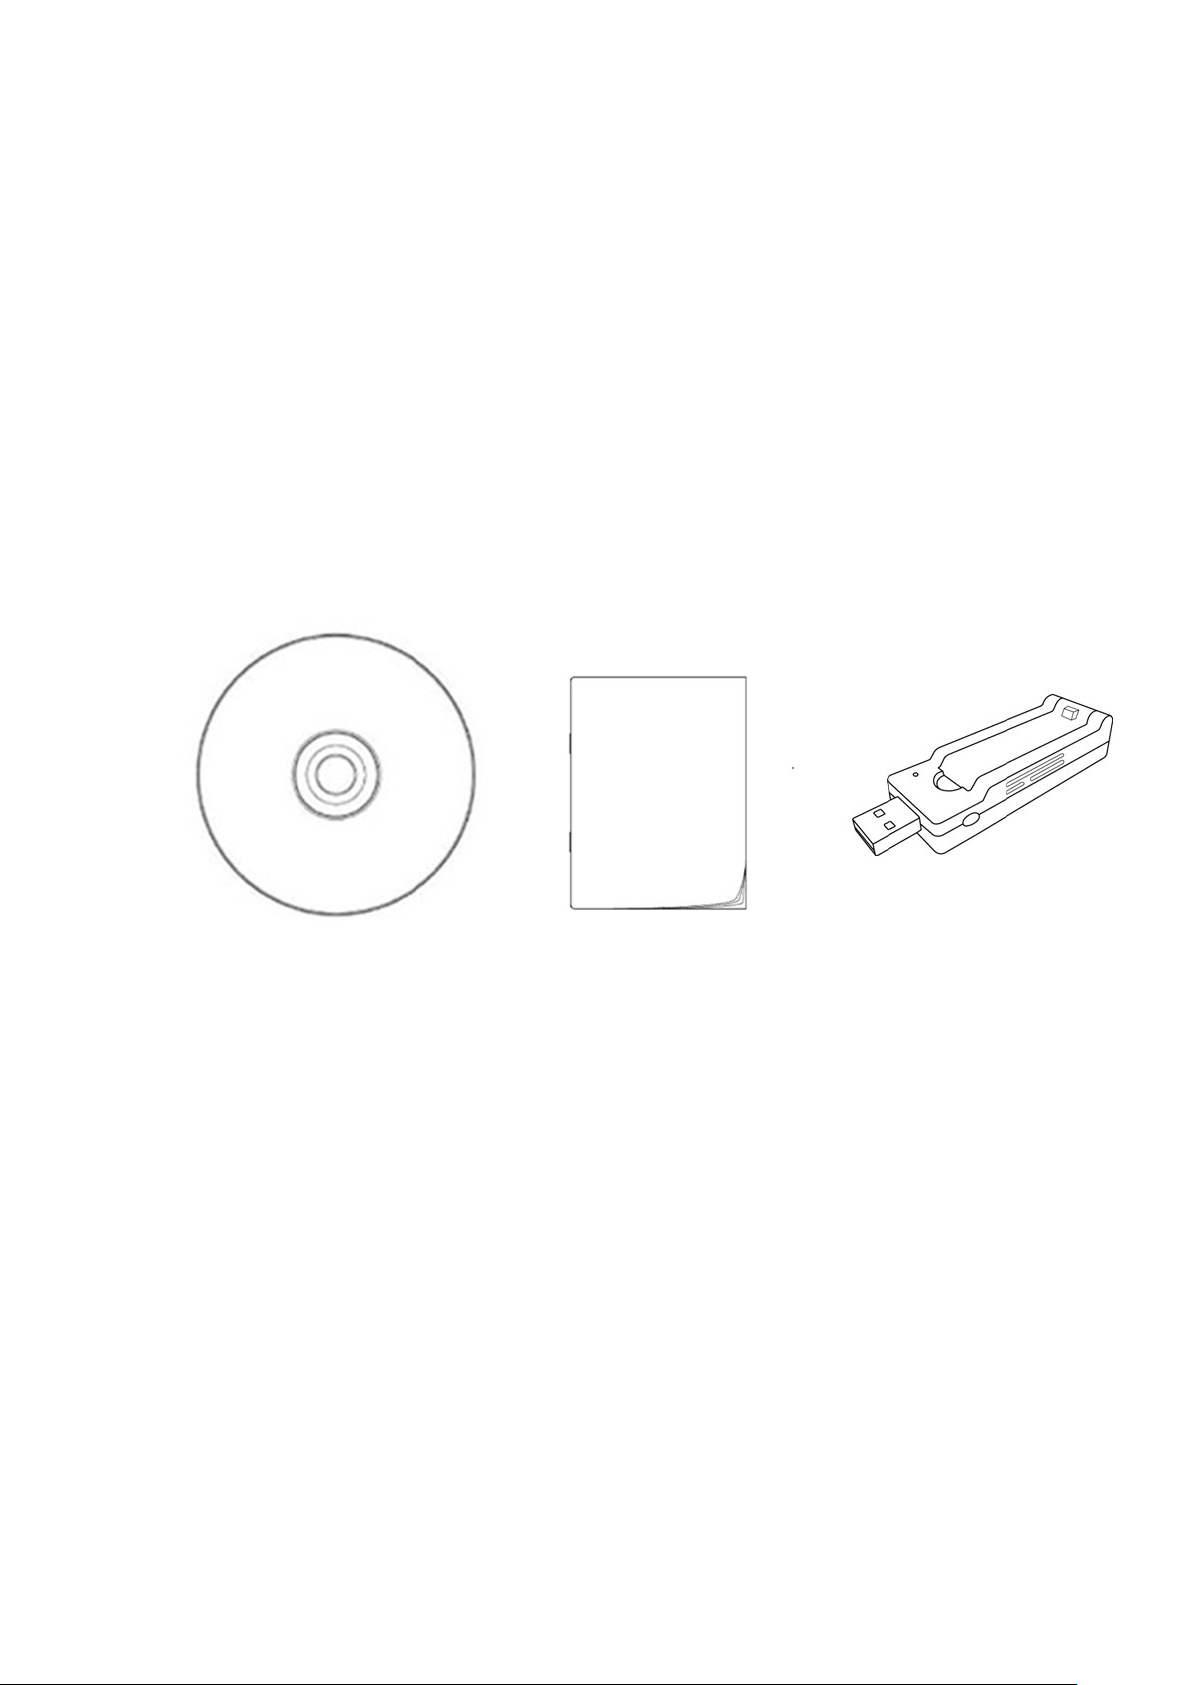
1-4 Package Contents
Before you starting to use this wireless network adapte r, please check if
there is any of the item s missing in the package, and con tact your dea ler
of purchase to claim for missing items:
• USB Wireless Network Adapter (1 pcs) ……...………………… 1
• Quick Installation Guide (1 pcs )….………….…………………. 2
• Driver/Utility/Quick Guide/User Manual CD-ROM (1 pcs) …… 3
3 2 1
4
Page 13
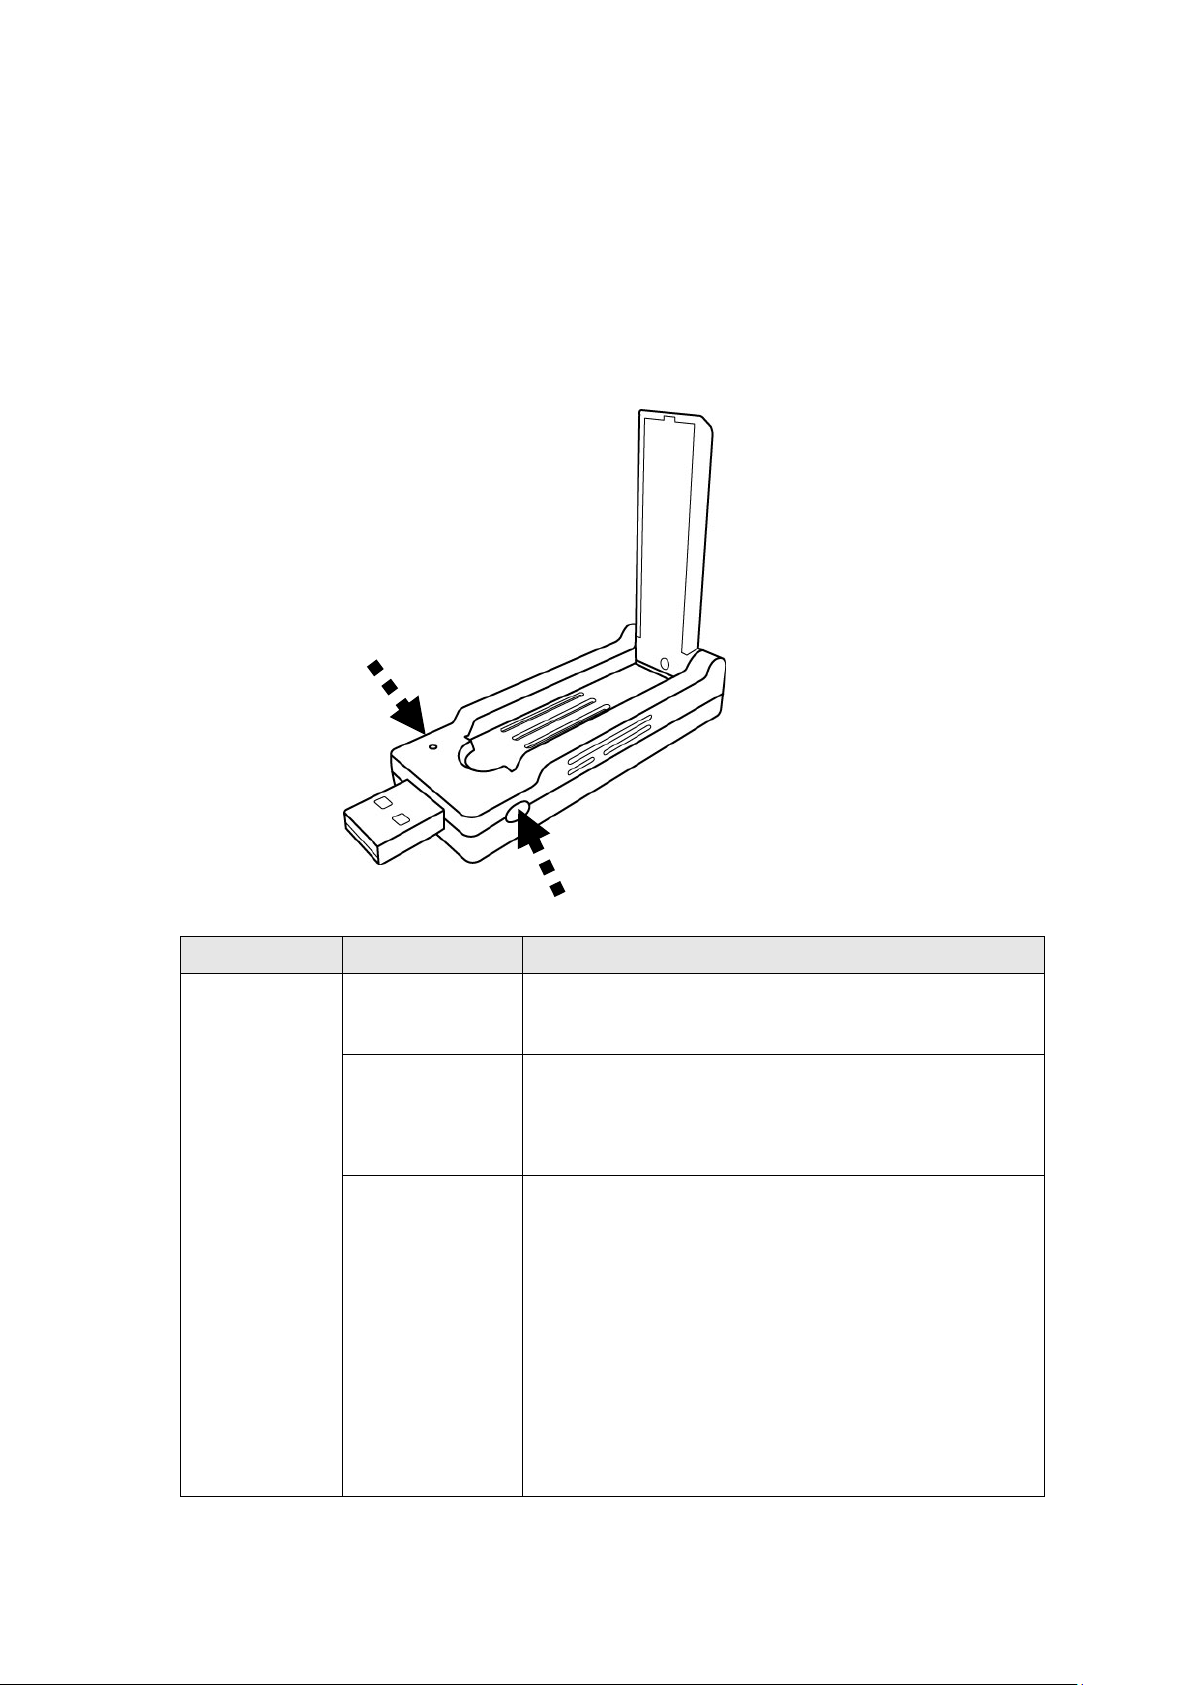
1-5 Familiar with your new wireless network adapter
LED Name
Light Status
Description
2.Radio off mode.
2.Radio on mode.
established successfully.
1
2
3
4
1. USB Connector
2. External Wirele ss Antenna
3. Power/Activity/WPS LED
4. WPS Button (Pres s 2 se c on ds to activate WPS pairing mode)
Power/
Activity/
WPS
Off
1.No wireless ne tw or k adapter is installed
On 1.Wireless network adapter is normally
installed
Blinking 1.Transferring or receiving data.
2.Slow Blinking one time per seconds
means WPS is activated. The network
adapter will wai t for 2 minutes to
establish W PS conne ctio n.
3. Fast Blinking 30 seconds, then Solid light
15 seconds, m eans W PS connec tion is
5
Page 14
CHAPTER II: Driver Install at ion an d C onf igu r at ion
2-1 Network Adap t er Installation
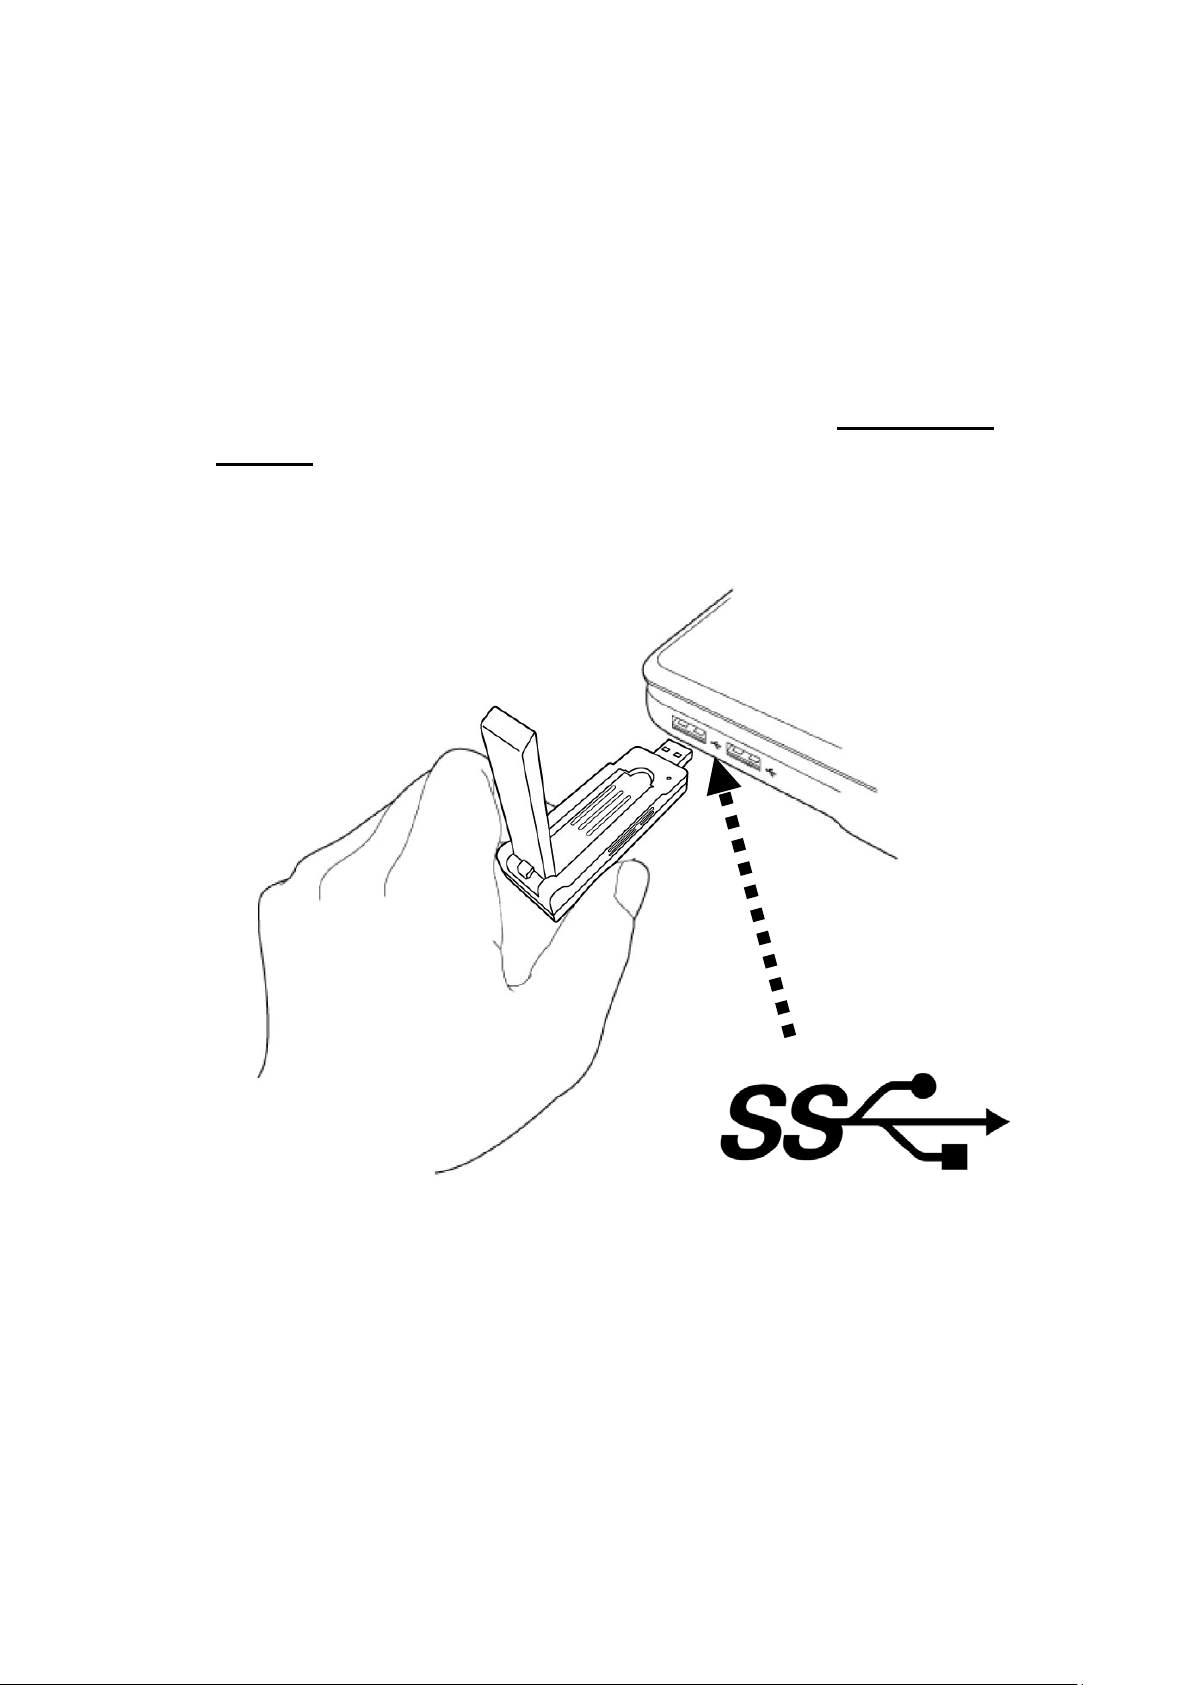
Follow the fo llowing instructions to install your new wireless net work
adapter:
1. Insert the USB wireless network adapter into an empty Super Speed
USB 3.0 port of your computer when computer is switched on. Never
use force to insert the adapter, if you feel it’s stuck, flip th e adapter
over and try again.
Super Speed USB 3.0
6
Page 15
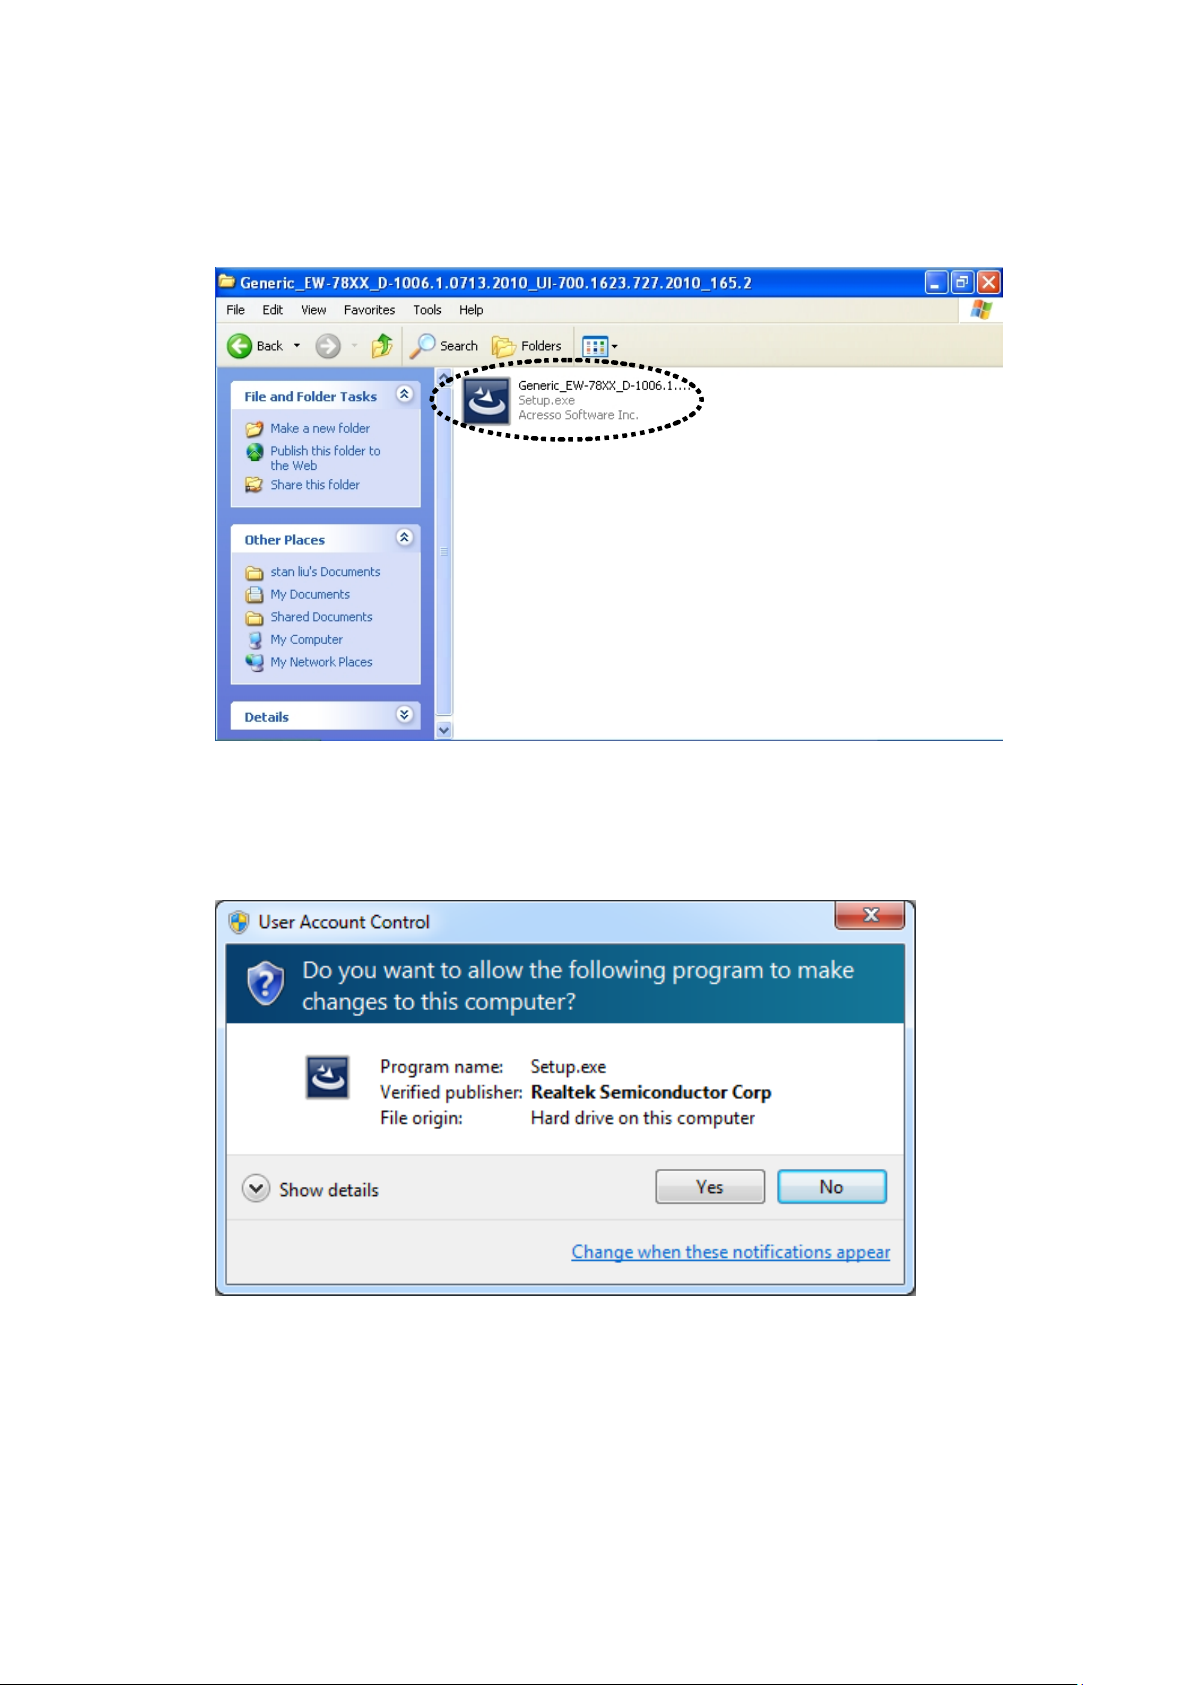
2. Insert device driver CDROM in to the CD/DVD ROM drive of your
computer, and execute ‘Setup.exe’ program in ‘Driver’ folder.
For Windows Vista / Windows 7 OS, you’ll be prompted to confirm
installation. Click ‘Yes’ to continue.
7
Page 16
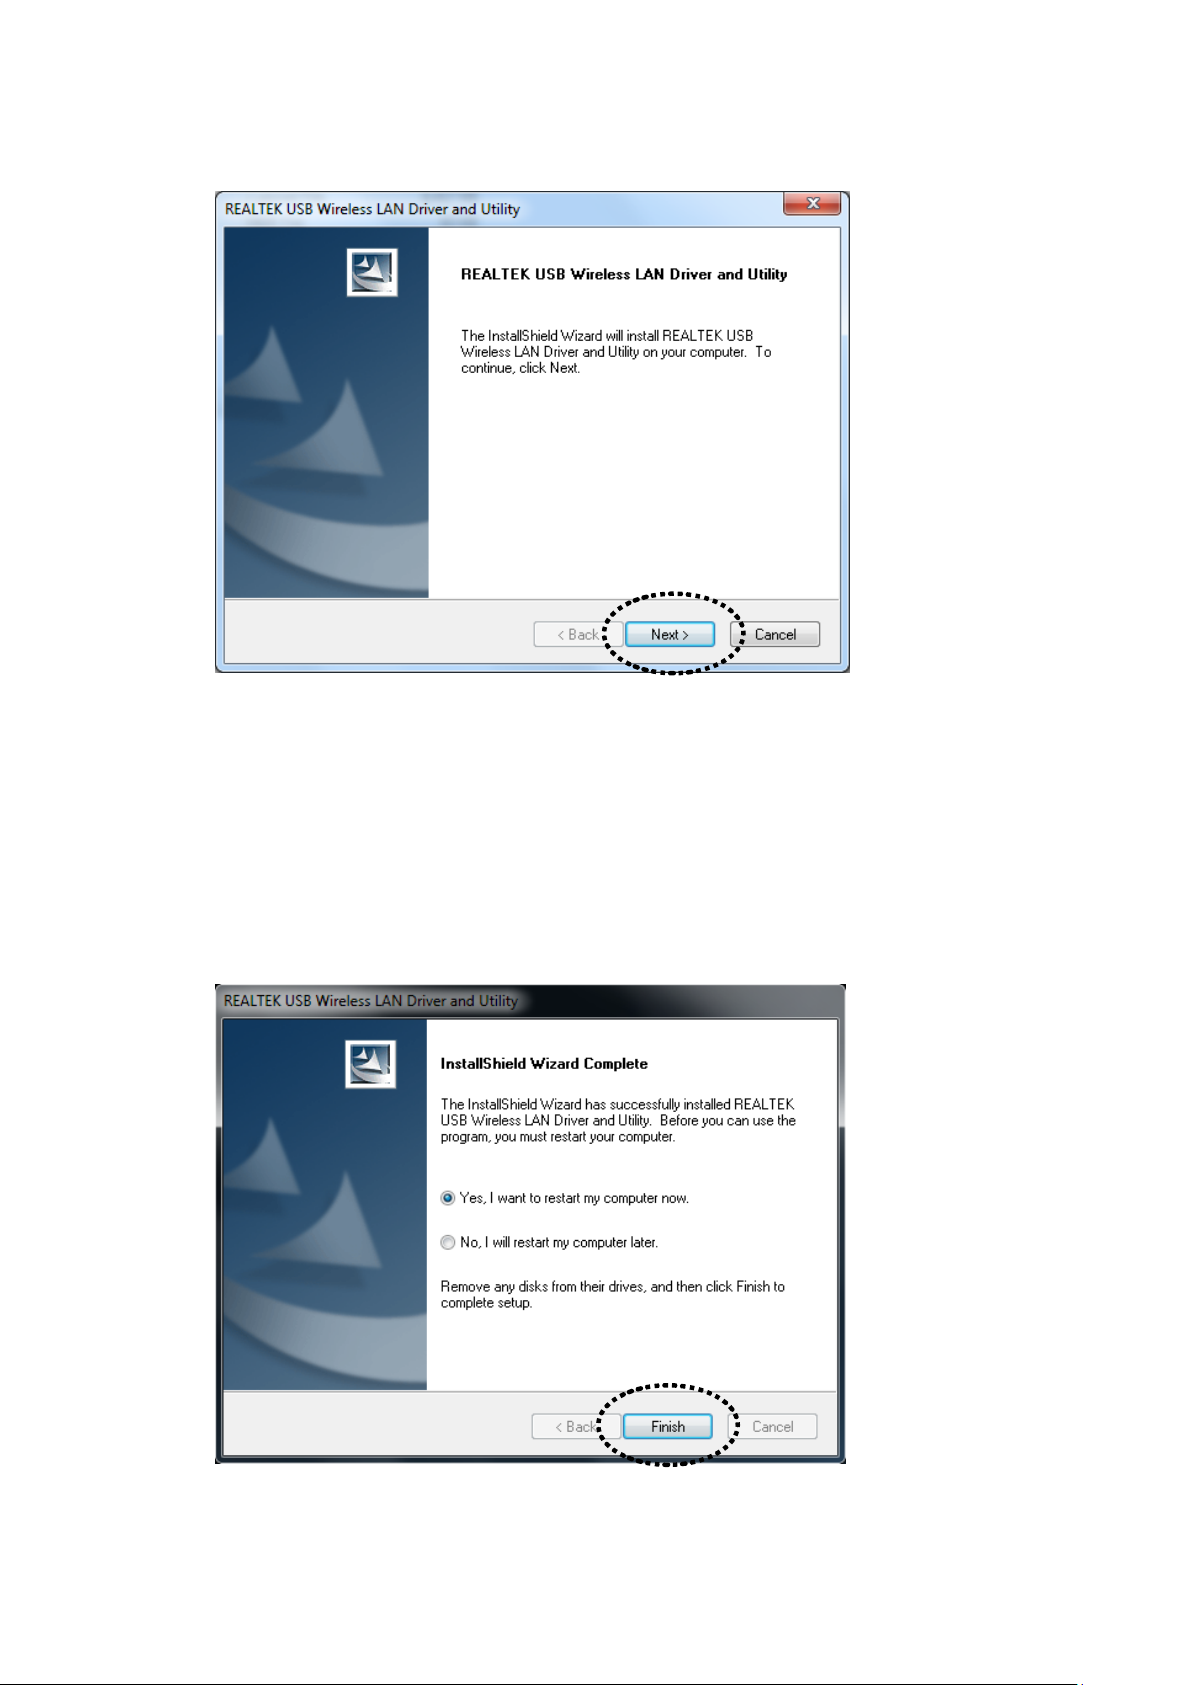
3. Click ‘Next’ to continue.
Click ‘Next’ to start installation. Ins tal la ti on pr oce d ure ne e ds few
minutes to complete, please be patient.
4. Click ‘Finish’ to restart your computer to complete installation
procedure. If you don’t want to restart compute r now, select ‘No, I
will restart my computer later’ option and click ‘Finish’. Please note
you have to restart your computer before you can use y our new USB
wireless ne twork adapter.
8
Page 17
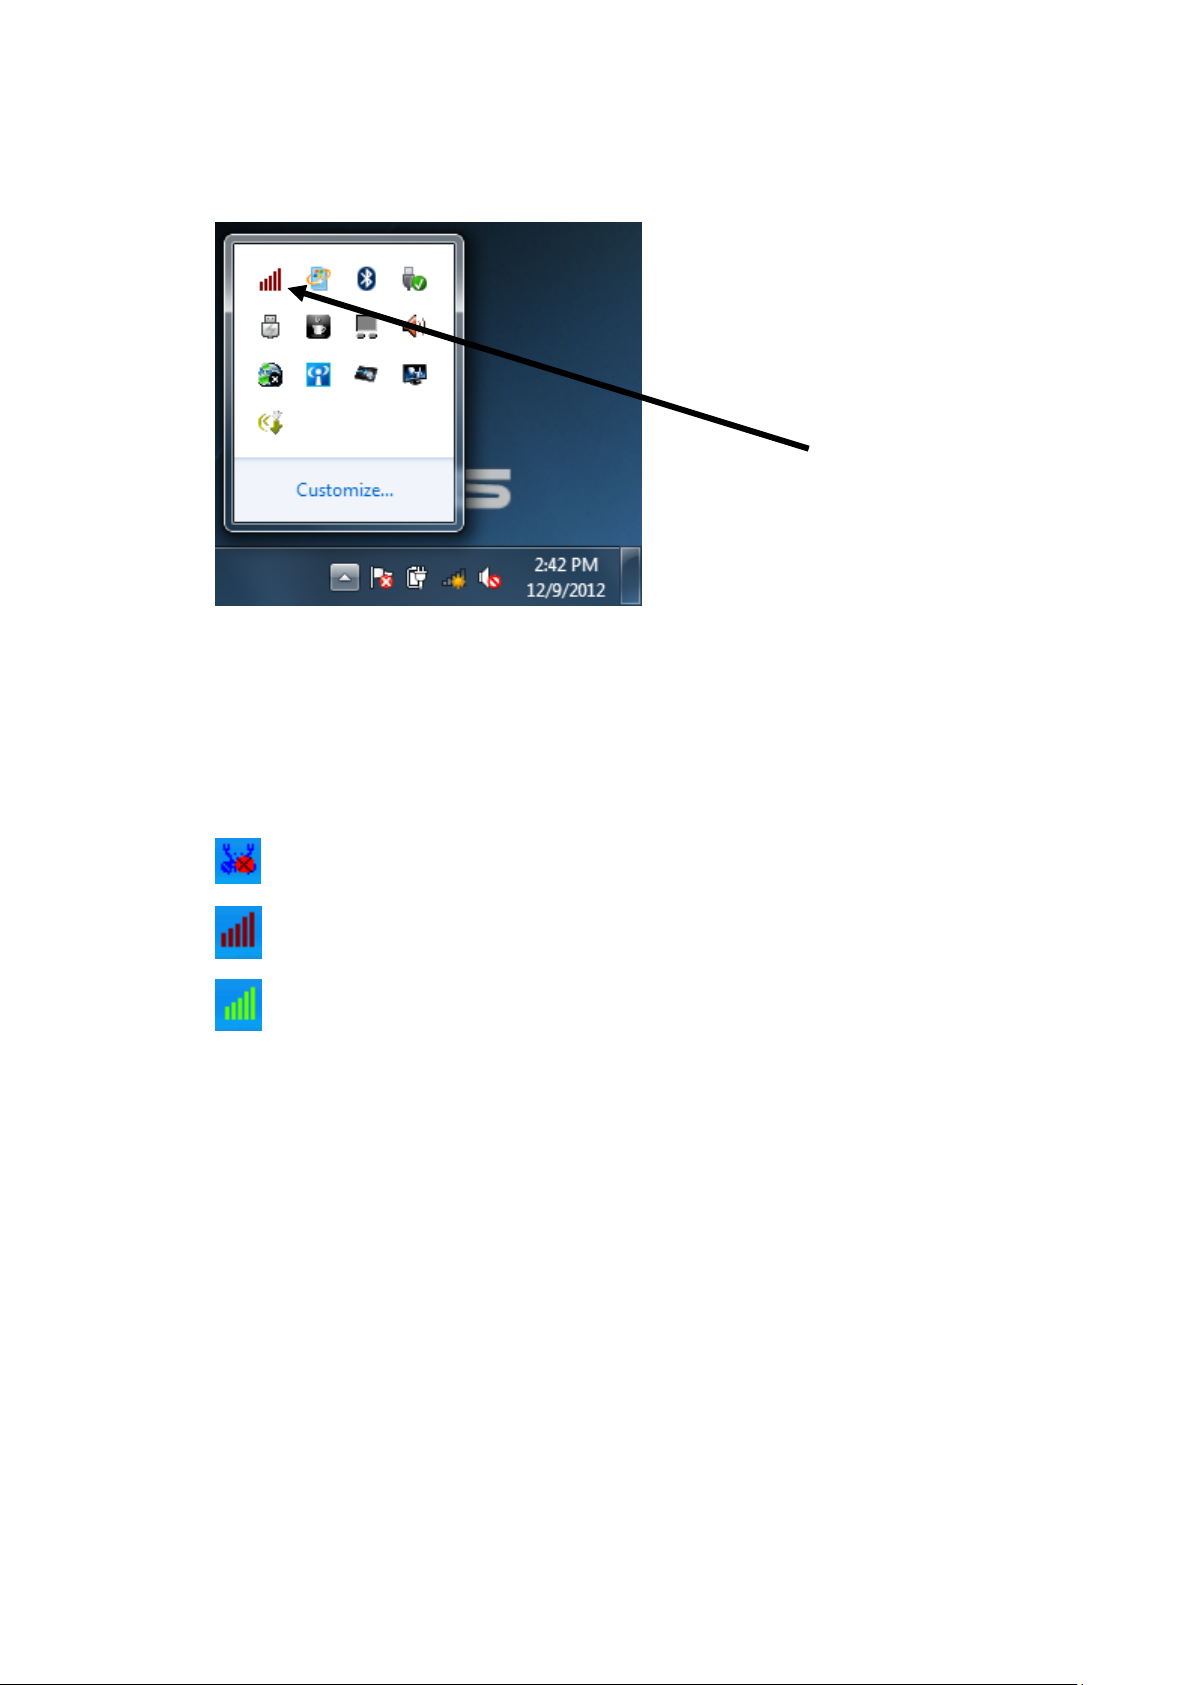
5. A new icon will appear near the clock of system tray:
HERE!
Left-click the icon w ill launch wireless networ k configuration utility,
and you can r ight-click the i con to show the quick menu of
configura tion u ti li ty. This icon also uses di fferent color to sh ow the
status of wireless connection:
Wirele ss netw ork adapter not detected
No connection with access point is established (bla ck).
Connection with access point has been establ ished (green)
For detailed instructions of wireless network conf iguration utility,
please see next chapter.
9
Page 18
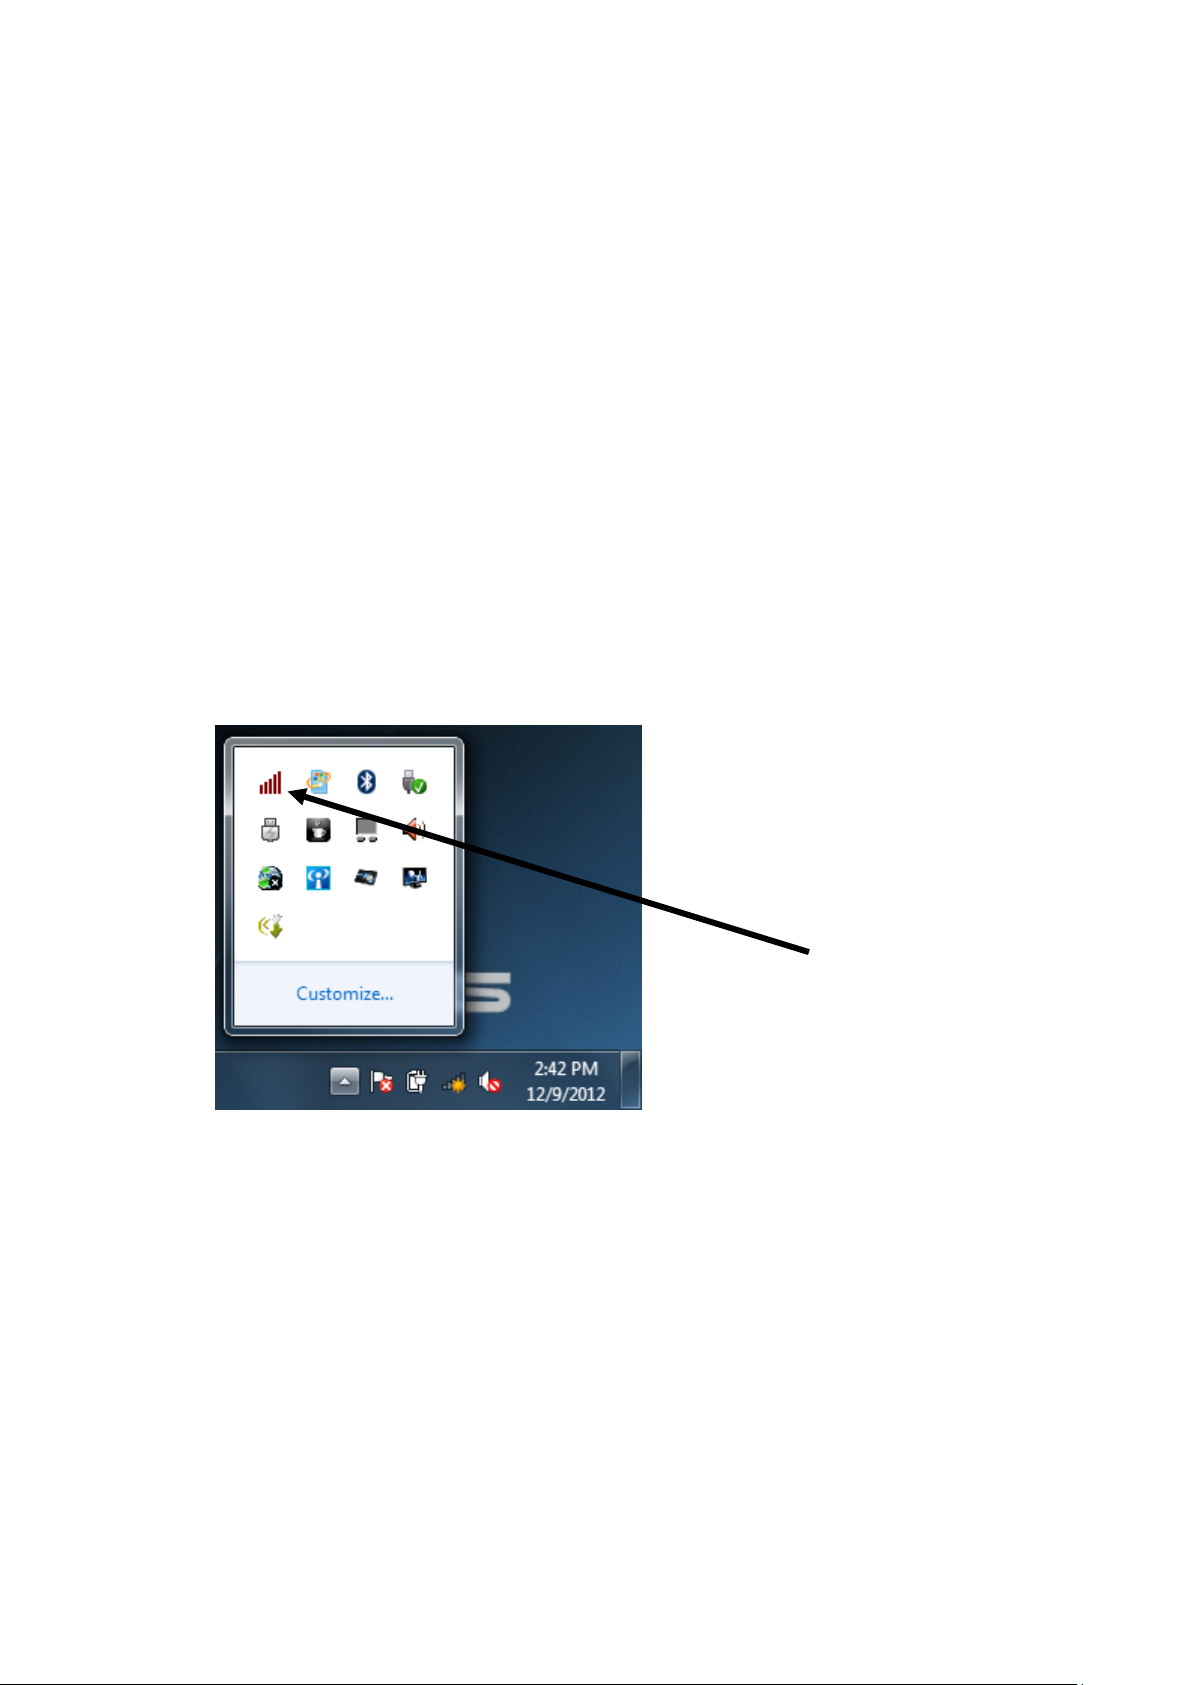
2-2 Connect to Wireless Access Point
HERE!
To use wireless network, you have to connect to a wireless access point
first. You can either use Realtek utility (comes with network adapter
driver), or Windows Zero Config utility (comes with Windows operating
system).
2-2-1 Using Realtek Utility
Please follow the fo ll owi ng in s tru ct io ns to use Realtek configuration
utility to connect to wireless access point.
1. Left-click the Realtek confi gur at i on uti li ty icon located at lower -right
corner of computer desktop, and configuration menu wi ll appear:
10
Page 19
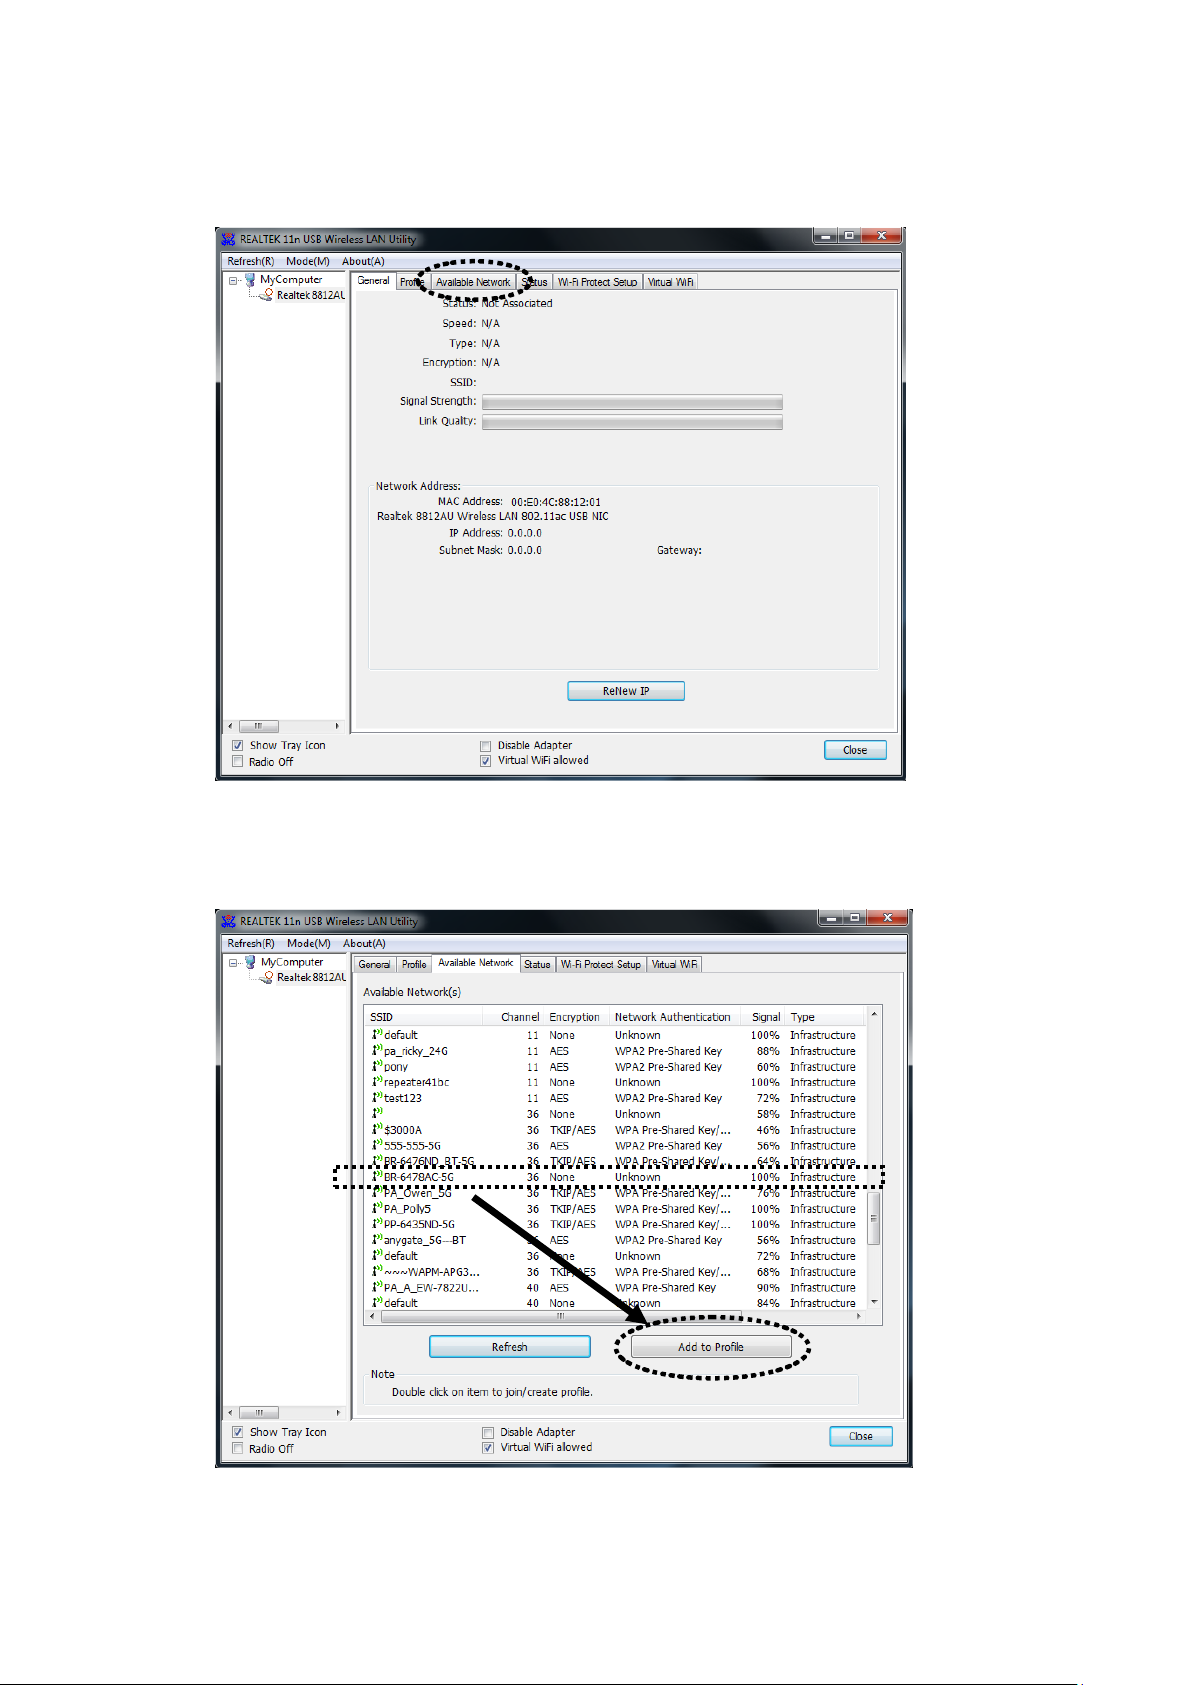
2. Wirele ss utility will appear. Click ‘Available Network’ menu to search
for wireless acce ss po in ts nea r by.
3. Please wait for a w hile, and all wireless acce ss points which can be
reached by this wire l e ss ne twor k adapter will be displaye d her e.
11
Page 20
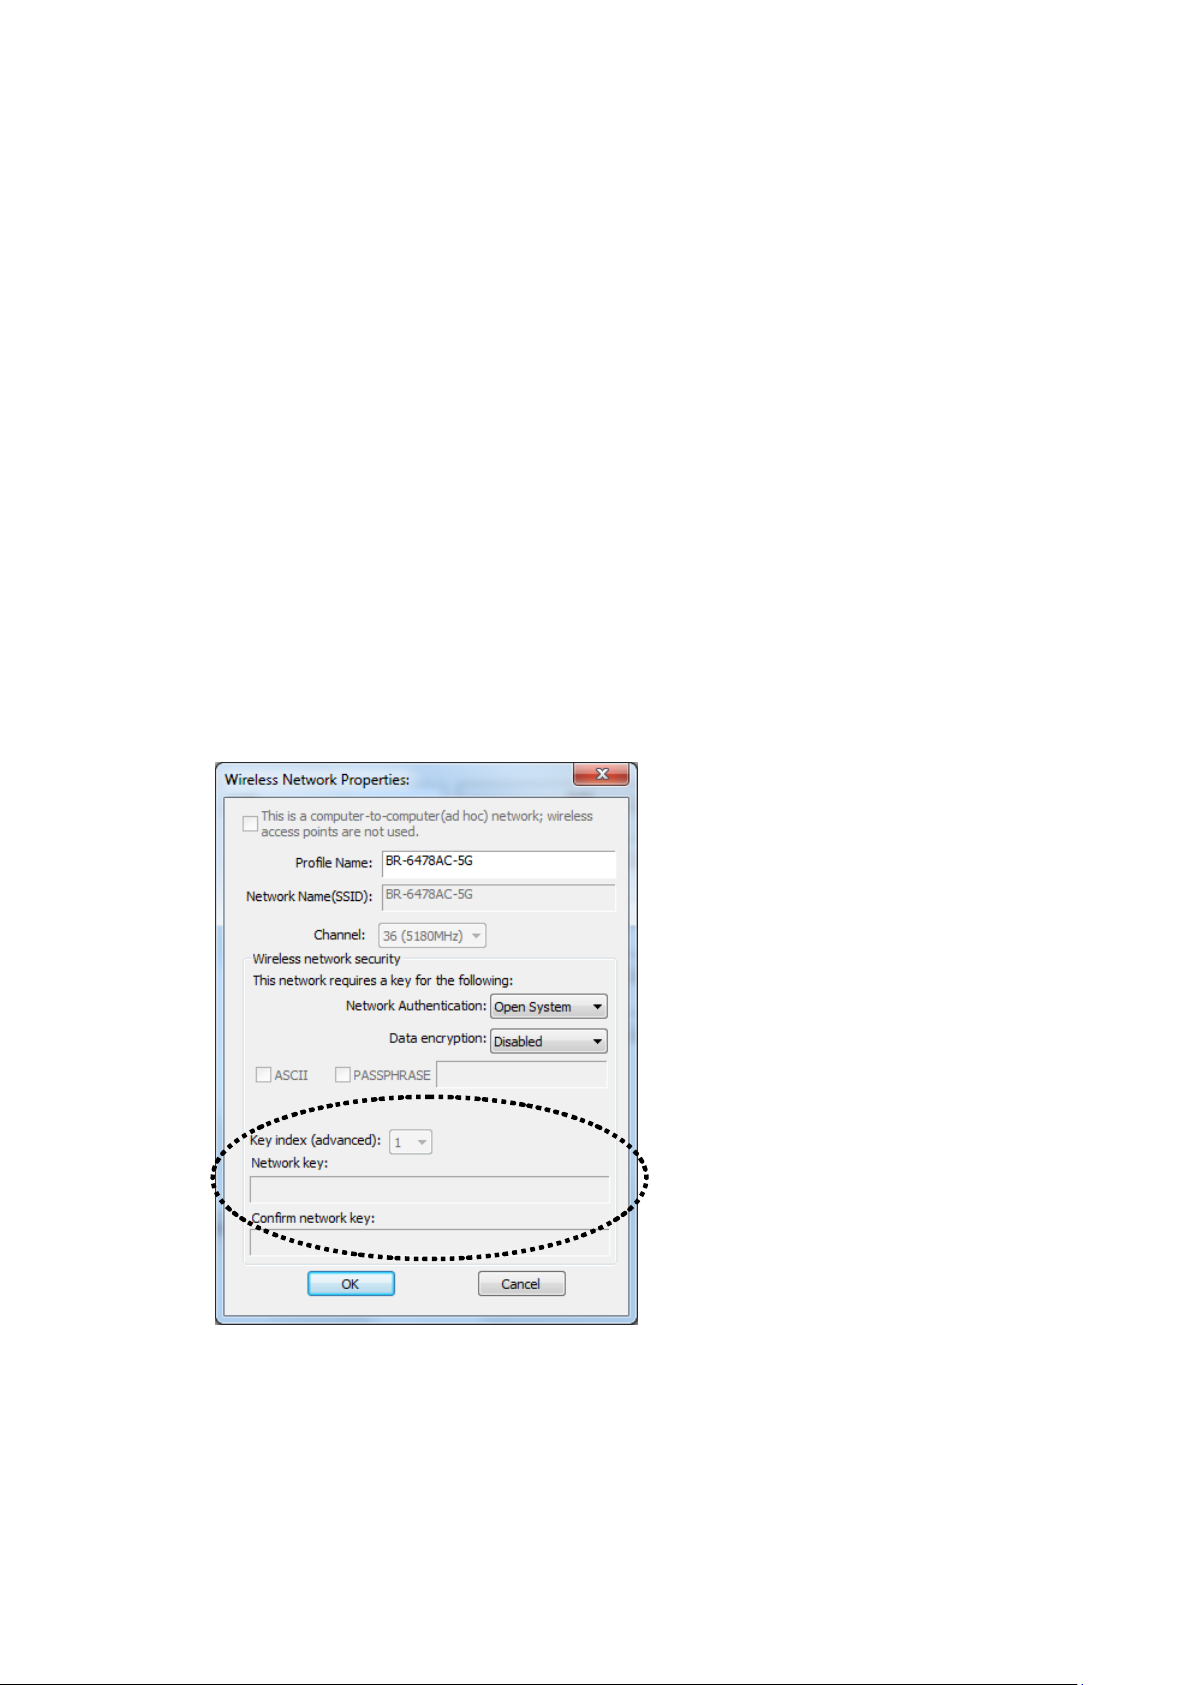
If the wireless access point you wish to c onnect does not appear here,
you can clic k ‘Refresh’ button to scan for wireless access points again;
if the wireless access point you’re looki ng for still not appear, try to
move the computer closer.
When the access point you’re looking for is on the list, left-click it and
then double clic k it or click ‘A dd to Prof il e’.
4. If a password (Network Key) is required to acc e ss the wireless access
point, please in put it i n ‘N etw ork key’ (and in put it again in ‘Confirm
network key ’ for confirma tion). Click ‘OK’ when password is properly
inputted.
NOTE: Netw ork security type (‘Network A uthe ntic at ion’ and ‘Data
encryption’) will be selec ted automatically based on wireless access
point’s security setting. It’s not required to ch an ge the se se t tin gs by
yourself.
All options in this page will be filled au tomatically a ccording to the
access poin t you wish to add to profile. However, you can still modify
any of them to meet your requirement.
12
Page 21

Profile nam e
You can give a name to th i s prof ile , so y ou
phrase to he lp you remember.
Network Name
The SSID (Service Set ID entities, i.e. access
have to inpu t correct SSID you yourself.
This is a
Check this box if you wish to connect to
access poin t, you have to check this box.
Channel
Select wireless channel f or ad hoc conne ction.
ad hoc conne ction.
Network
Select the network authentication type from
point you with to connect.
Data encryption
Select the data encryption type from
point you with to connect.
ASCII /
When the encryption type is ‘WEP’, it’s
connect.
Key index (advanced)
Select WEP key index. For most of access
the setting of the acc e ss po int.
can remember its purpose easily. It can be any
(SSID)
computer-to-computer
(ad hoc) network
Authentication
point’s name). T his field will be filled as the
access poin t you selected when SSID is not
hidden and grayed out. If SS ID is hidden, you
another computer / network device by a d hoc
method. When not acce ssing to wireless
This option only appears w hen you’re using
drop-down menu. This setting must be
identical with the setting of wireless access
PASSPHRASE
drop-down menu. This setting must be
identical with the setting of wireless access
required to inp ut a set of ‘passphrase’ to
connect to wireless access point. Check
‘ASCII’ or ‘PASSPHRASE’ depends on the
security se tting of access point, and inp ut it in
the box; if you select ‘PASSPHRASE’ you
also need to select the length of the key.
The passphrase must be identical with the
setting of wireless access point you with to
points you ca n select ‘1’, but please refer to
13
Page 22

Network key /
Confirm networ k ke y
When the encryption type is ‘WPA’ or
boxes for confirmation.
EAP TYPE / Tunnel /
When authentication type is any of 802.1X,
authentication server.
Username / Identity /
Domain / Password
Please inpu t 802.1x related authentication
informatio n here .
Certificate
If certification is requir ed to authenticate with
local certificate from dropdown list.
PAC
Check this box and PAC (Privilege Access
Certificat e ) will be automatically selected.
‘WPA2-PSK’, it’s required to in p ut a set of
‘passphrase’ to connect to wireless access
point. Please input the same passphras e in two
Provision Mode
you have to select EAP type, tunnel, and
provision mode from dropdown menu. This
setting must be identica l with your 802.1x
802.1x authentication server, please select a
Please clic k ‘OK’ when rea dy.
14
Page 23
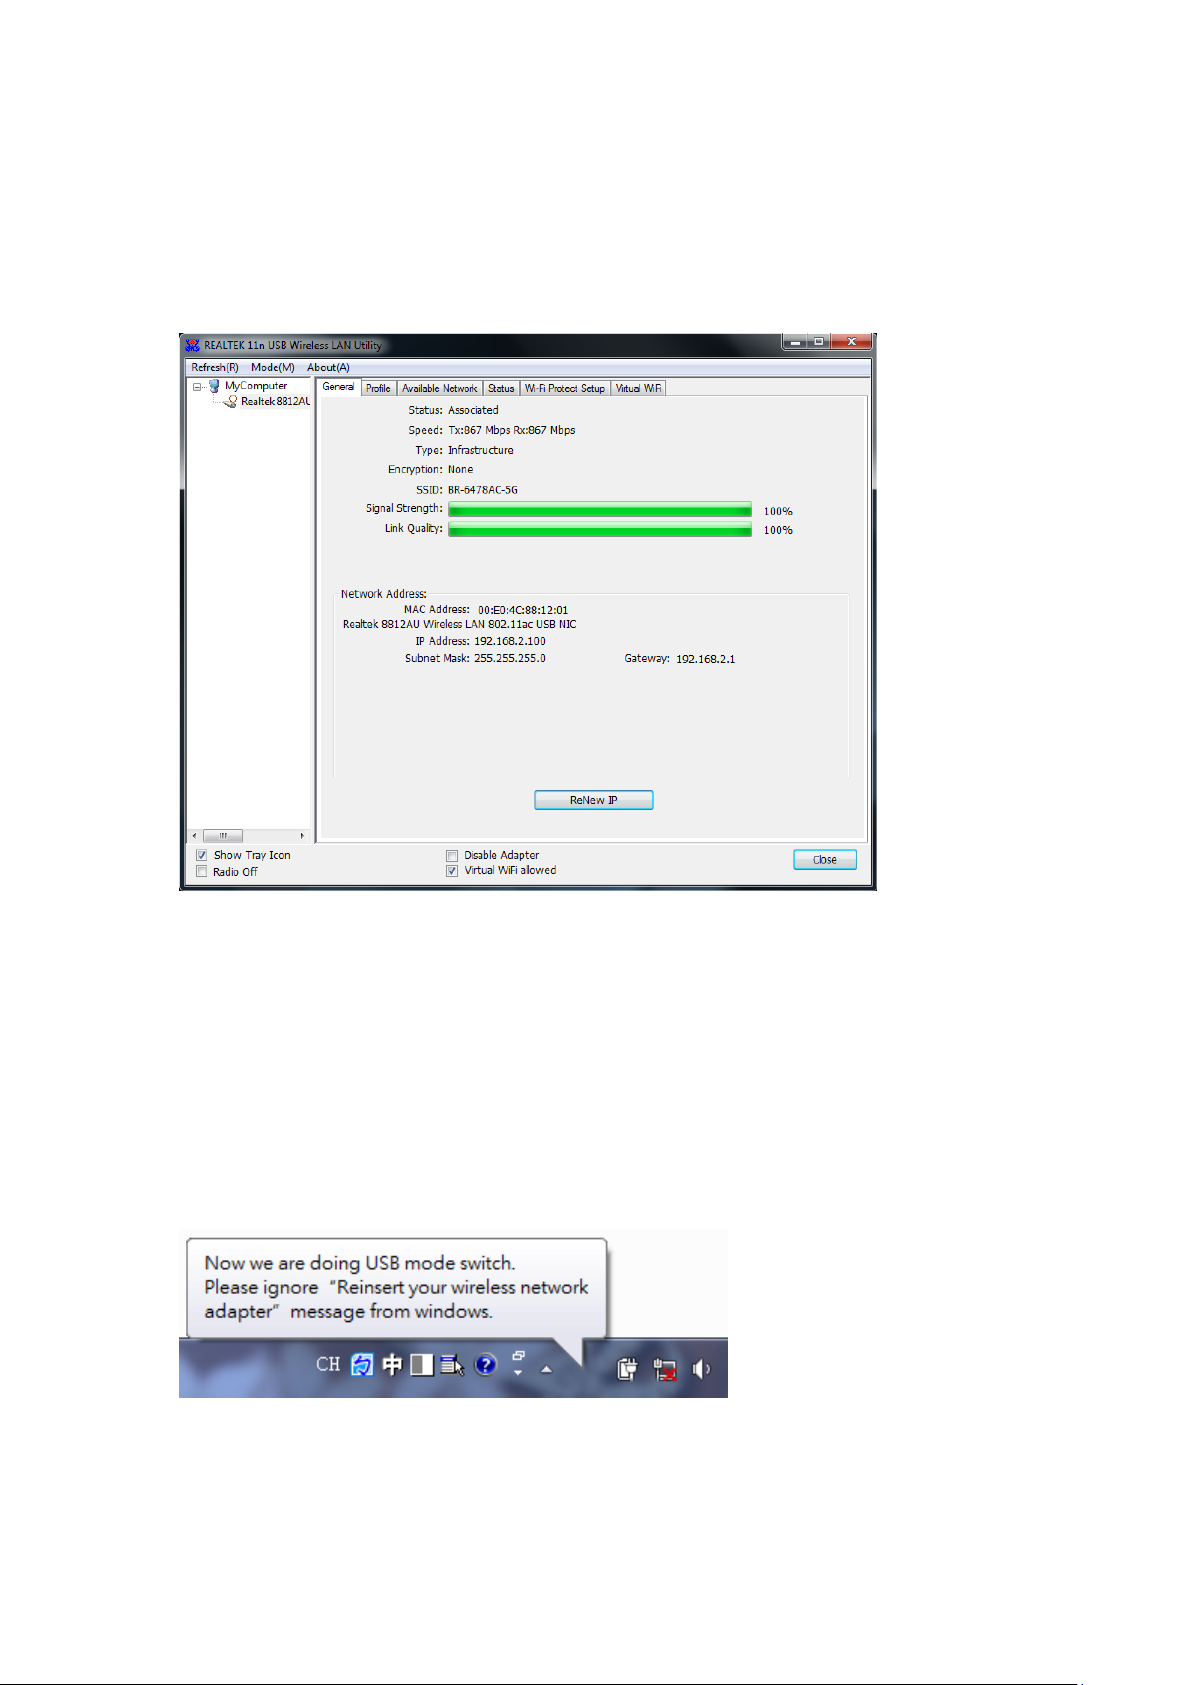
5. Network adapter will attempt to conne c t to acc es s poin t now, this
may require f ew seconds to minutes, please be patient. When the ‘Status’
become ‘Associated’, your computer is connected to acce ss point you
selected. Click ‘Close’ to close configuration menu.
NOTE: If you connecte d to an access point but the connection has been
dropped soon, please check sec urity settings and re-check password
spelling.
NOTE: If you insert the USB wireless network adapter into an USB 3.0
port and connect to an 11ac AP, device driver will doing auto USB mode
switch and shown the message as below p hoto, or you will heard sounds
of USB insert or unpl ug, this is th e normal states.
15
Page 24
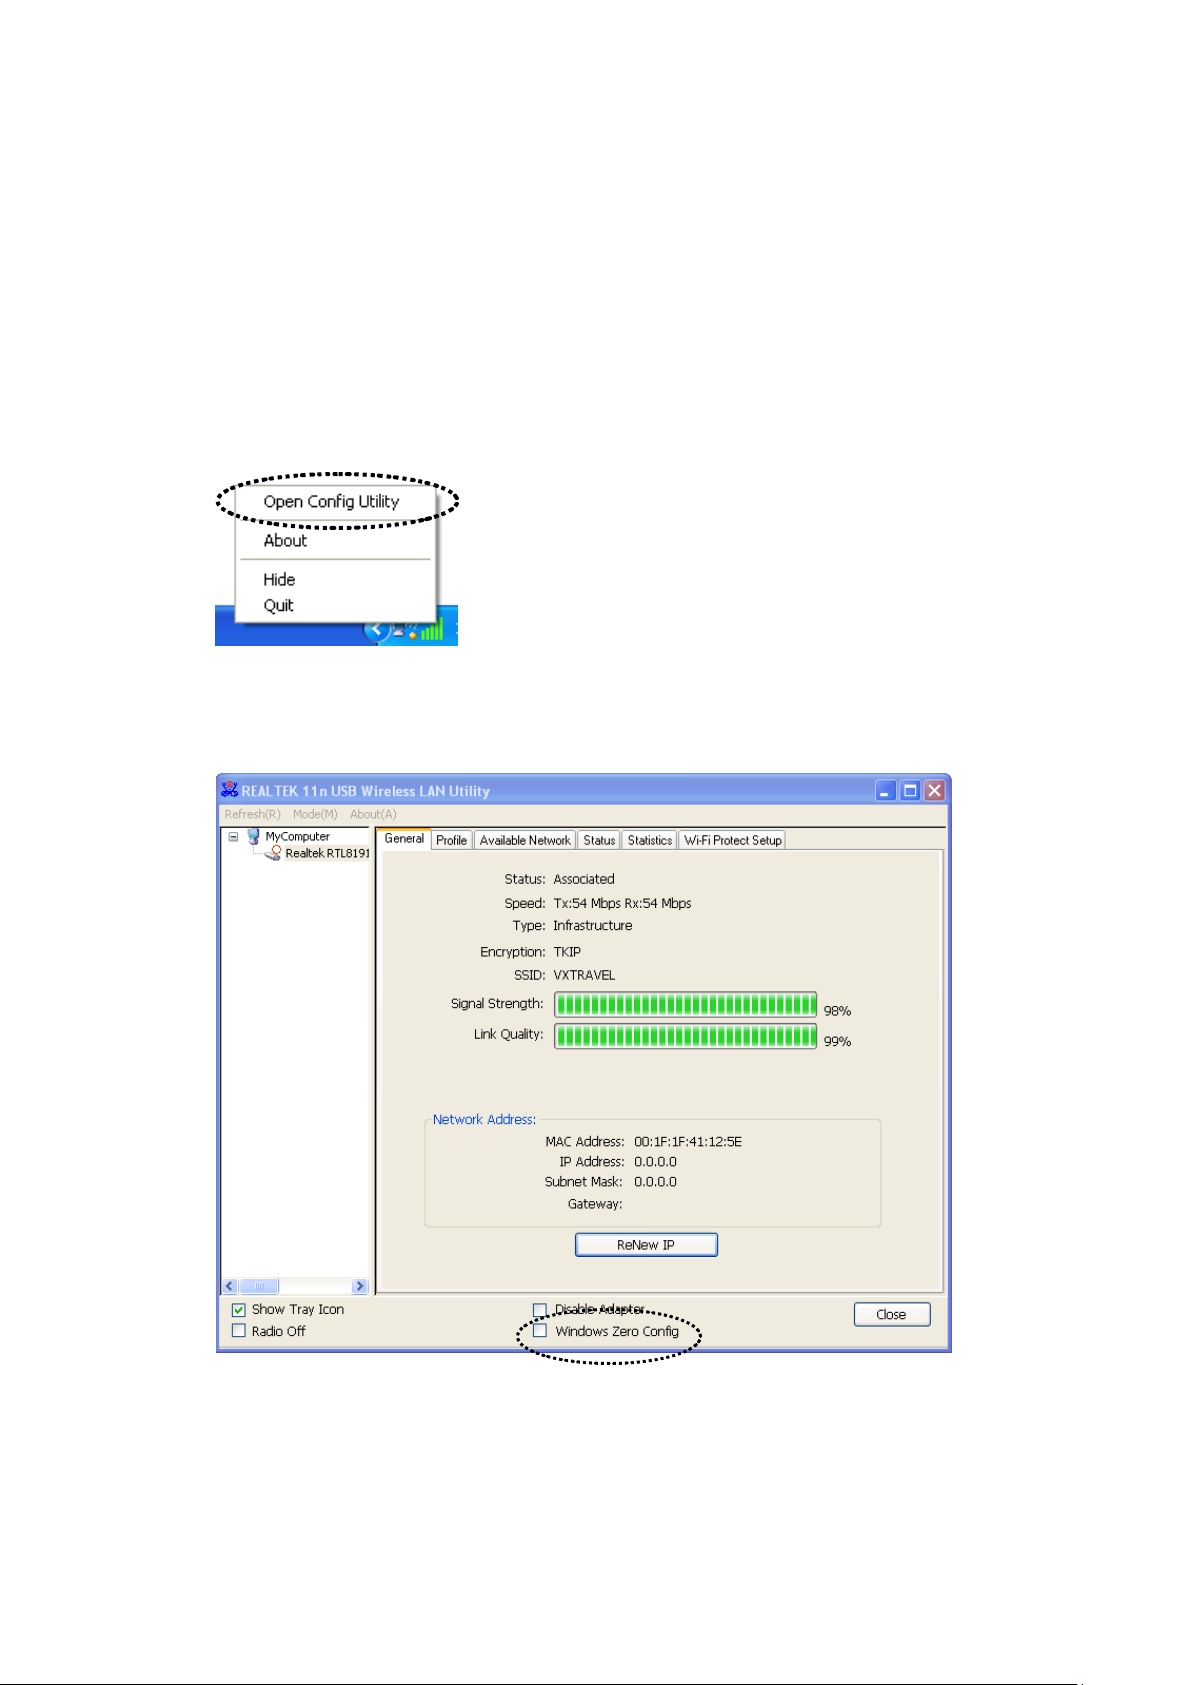
2-2-2 Using Windows Zero Configur ation
Windows XP and Vista has a built-in wireless network configuration
utility, called as ‘Windows Zero Configuration’ (WZC). You can also use
WZC to configure your wireless network parameter:
1. Right-click Realtek configuration utility icon, and click ‘Open Config
Utility’.
2. Check ‘Windows Zero Config’ box.
3. A message indicating that you’ve been sw i tch ed to Windows Zero
Configurat ion mode will appear. Click ‘OK’ to continue.
16
Page 25
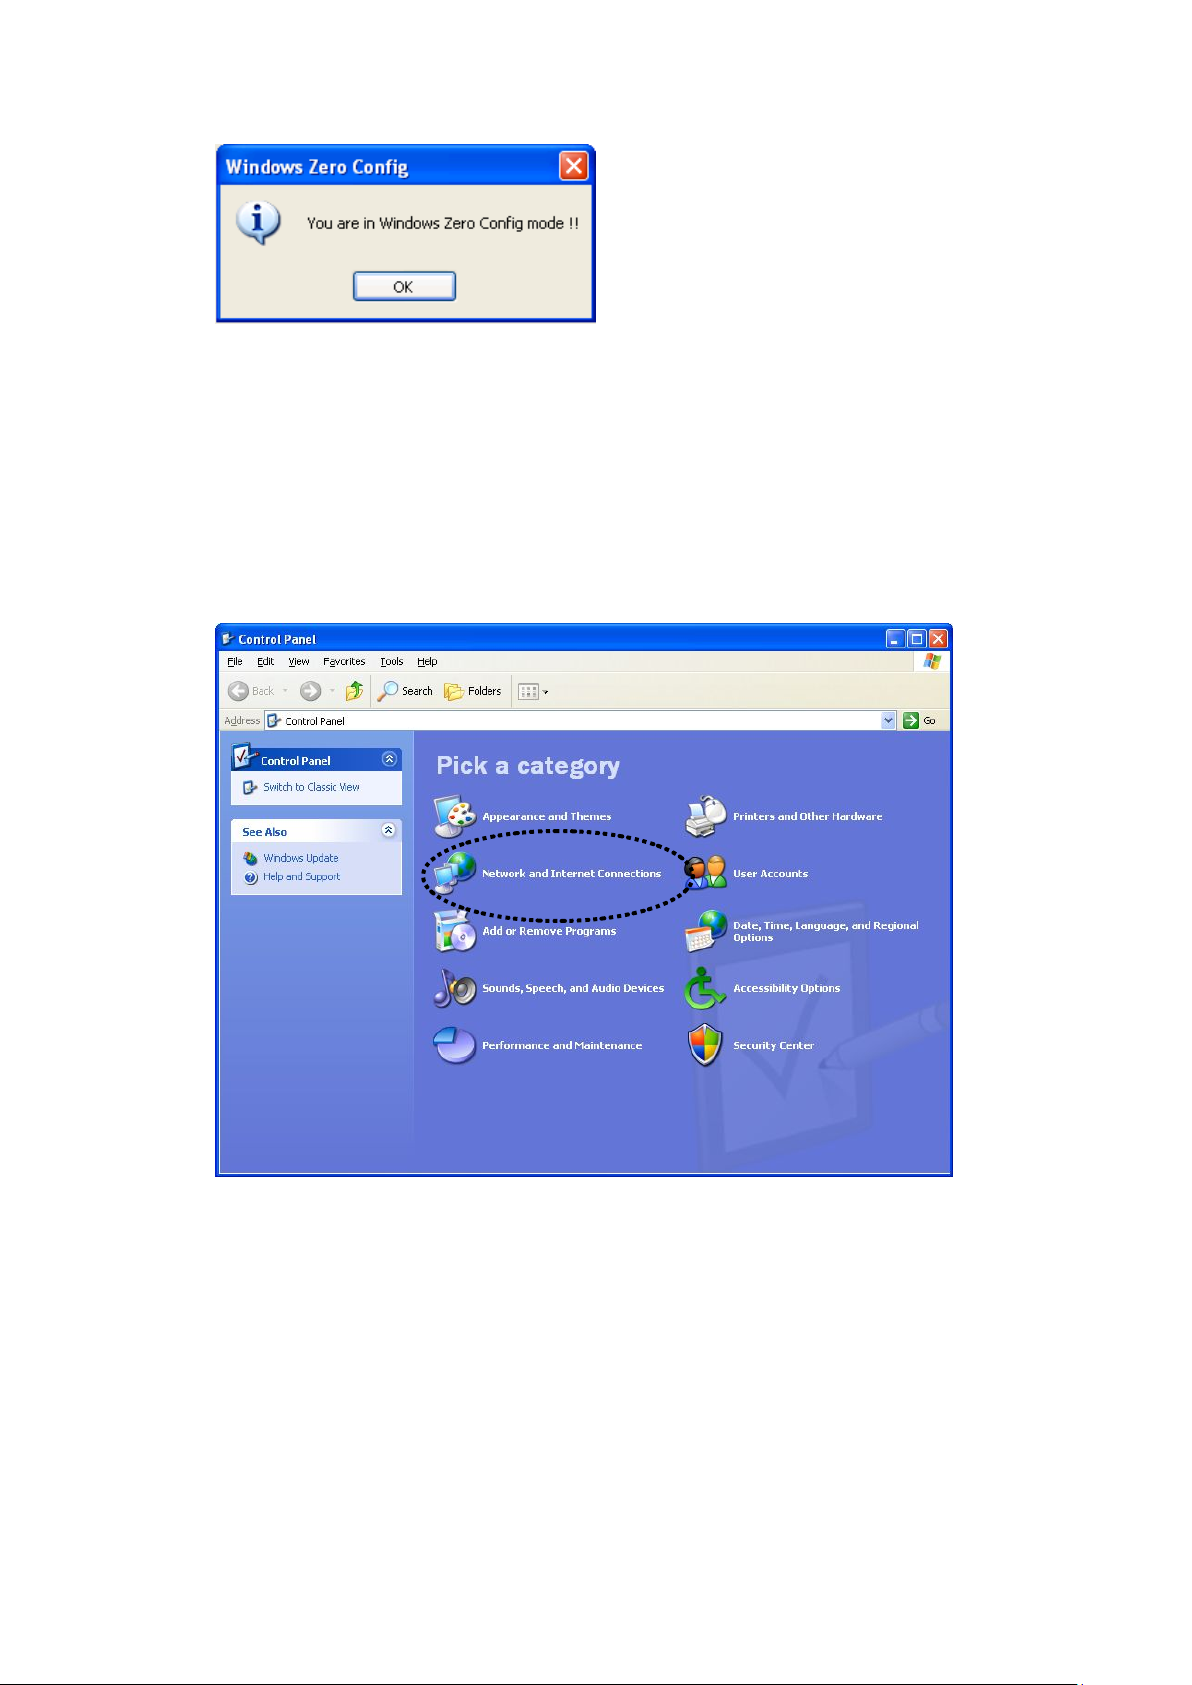
NOTE: To return to use Realtek utility, uncheck ‘Windows Zero
Config’ box.
4. Click the ‘Start’ button (should be loc ate d at the bott om-left corner of
windows desktop), click ‘Control Panel’, then click ‘Network and
Internet Connections’ in Control Panel.
17
Page 26
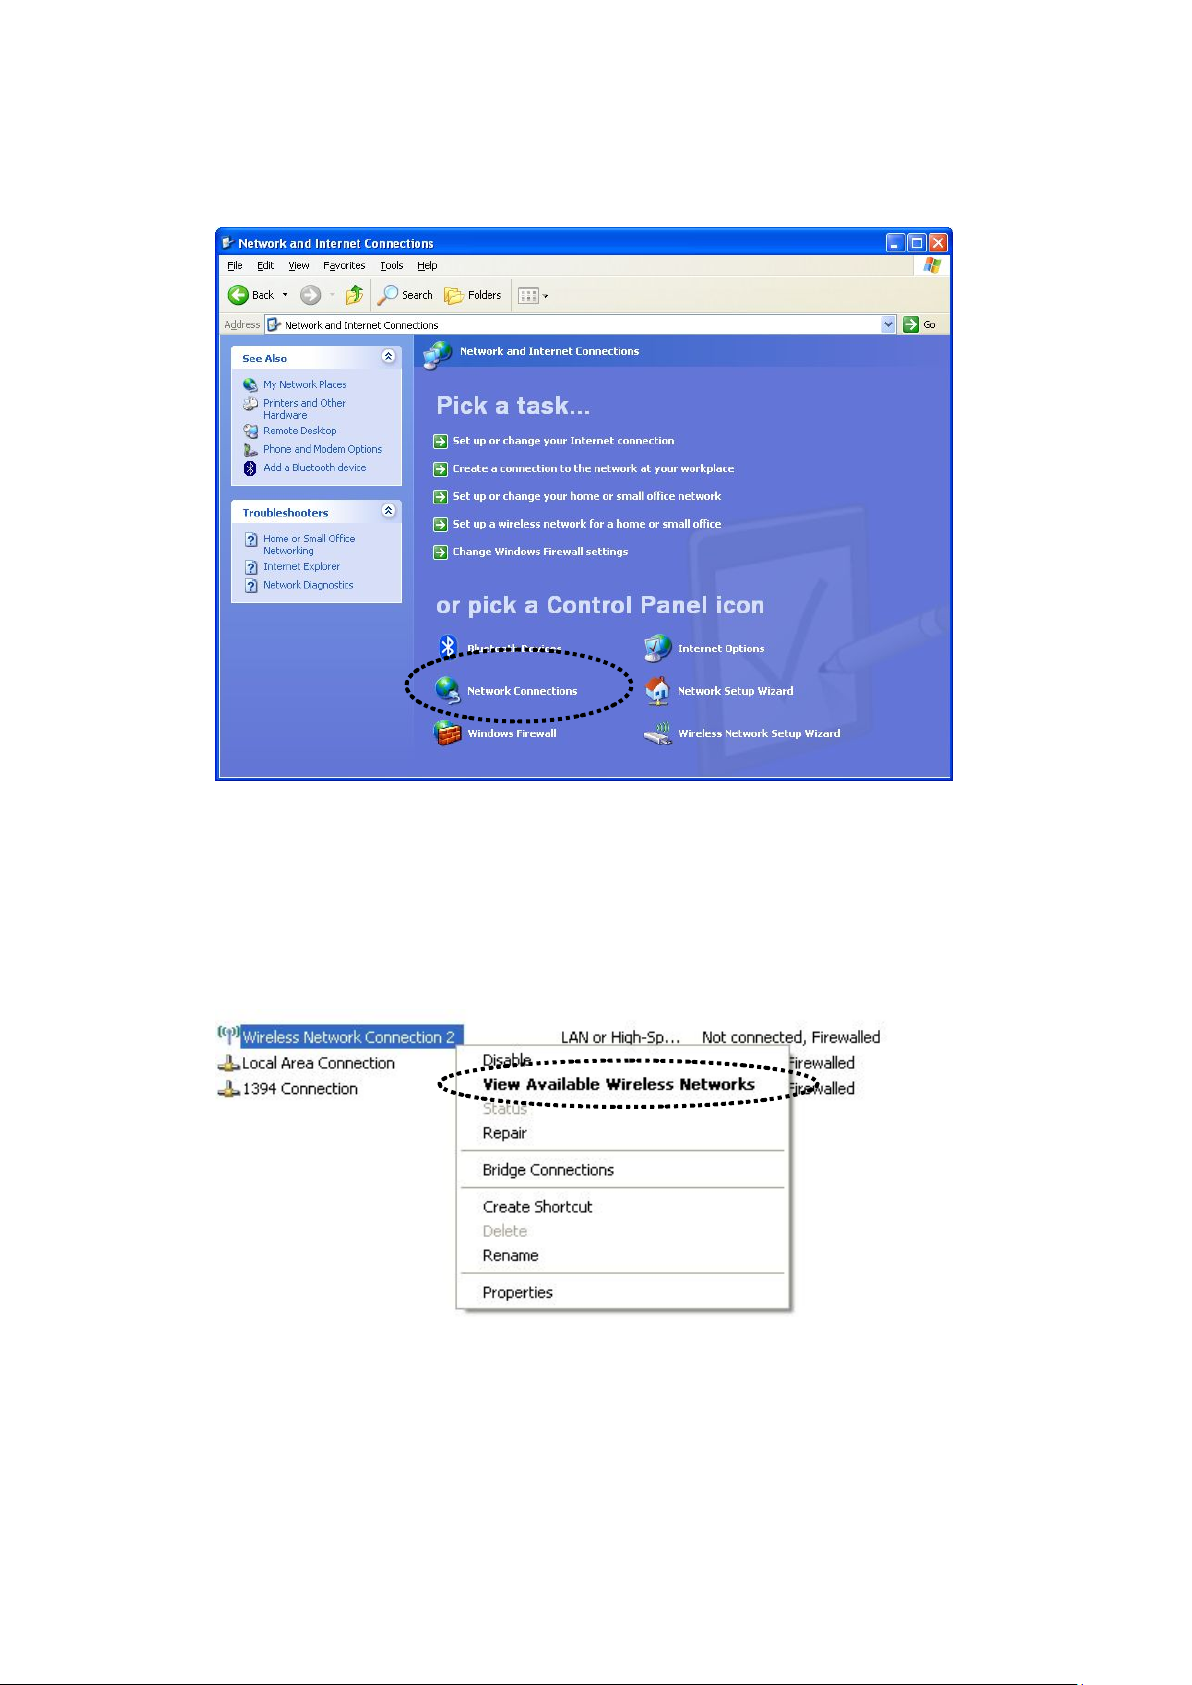
5. Double click ‘Network Connections’.
6. Right-click ‘Wireless Network Connection ’ (it may have a number as
suffix if you have m ore than one wireless network adapter, please
make sure you right-click the ‘Realtek 8812AU Wireless LAN
802.11ac USB NIC), then select ‘V iew A vaila ble Wirele ss Networks’.
18
Page 27
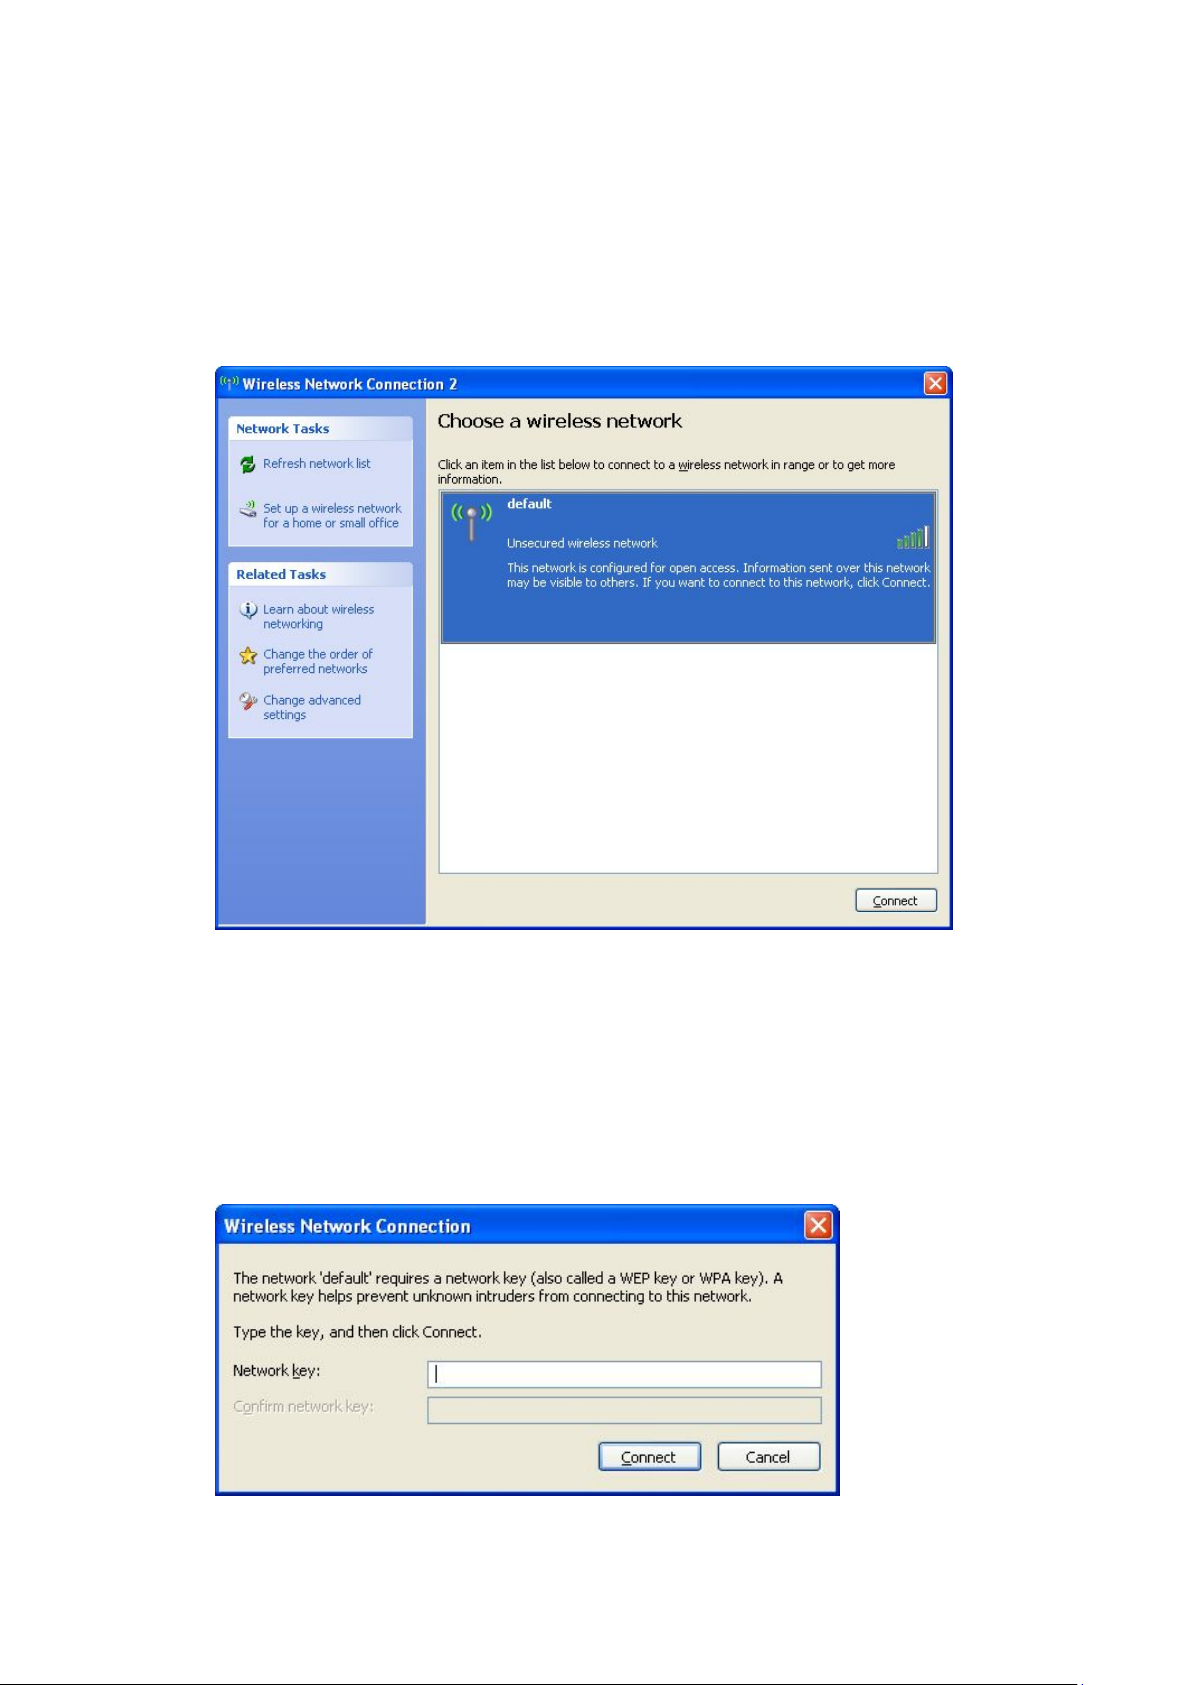
7. All wireless access points in proximity will be displayed here. If the
access poin t you want to use is not displayed here, please try to m ove
your compute r or notebook closer to the access point, or you can click
‘Refresh network list’ to rescan access p oints. Click the access poi nt
you want to use if it’s shown, then click ‘C onnect’.
8. If the access point is protected by encrypti on, you have to input its
security key or passphrase here. It must match the encryption setting
on the access point.
If the access point you selected does not use encryption, you’ll not be
prompted fo r security key or passphrase.
19
Page 28
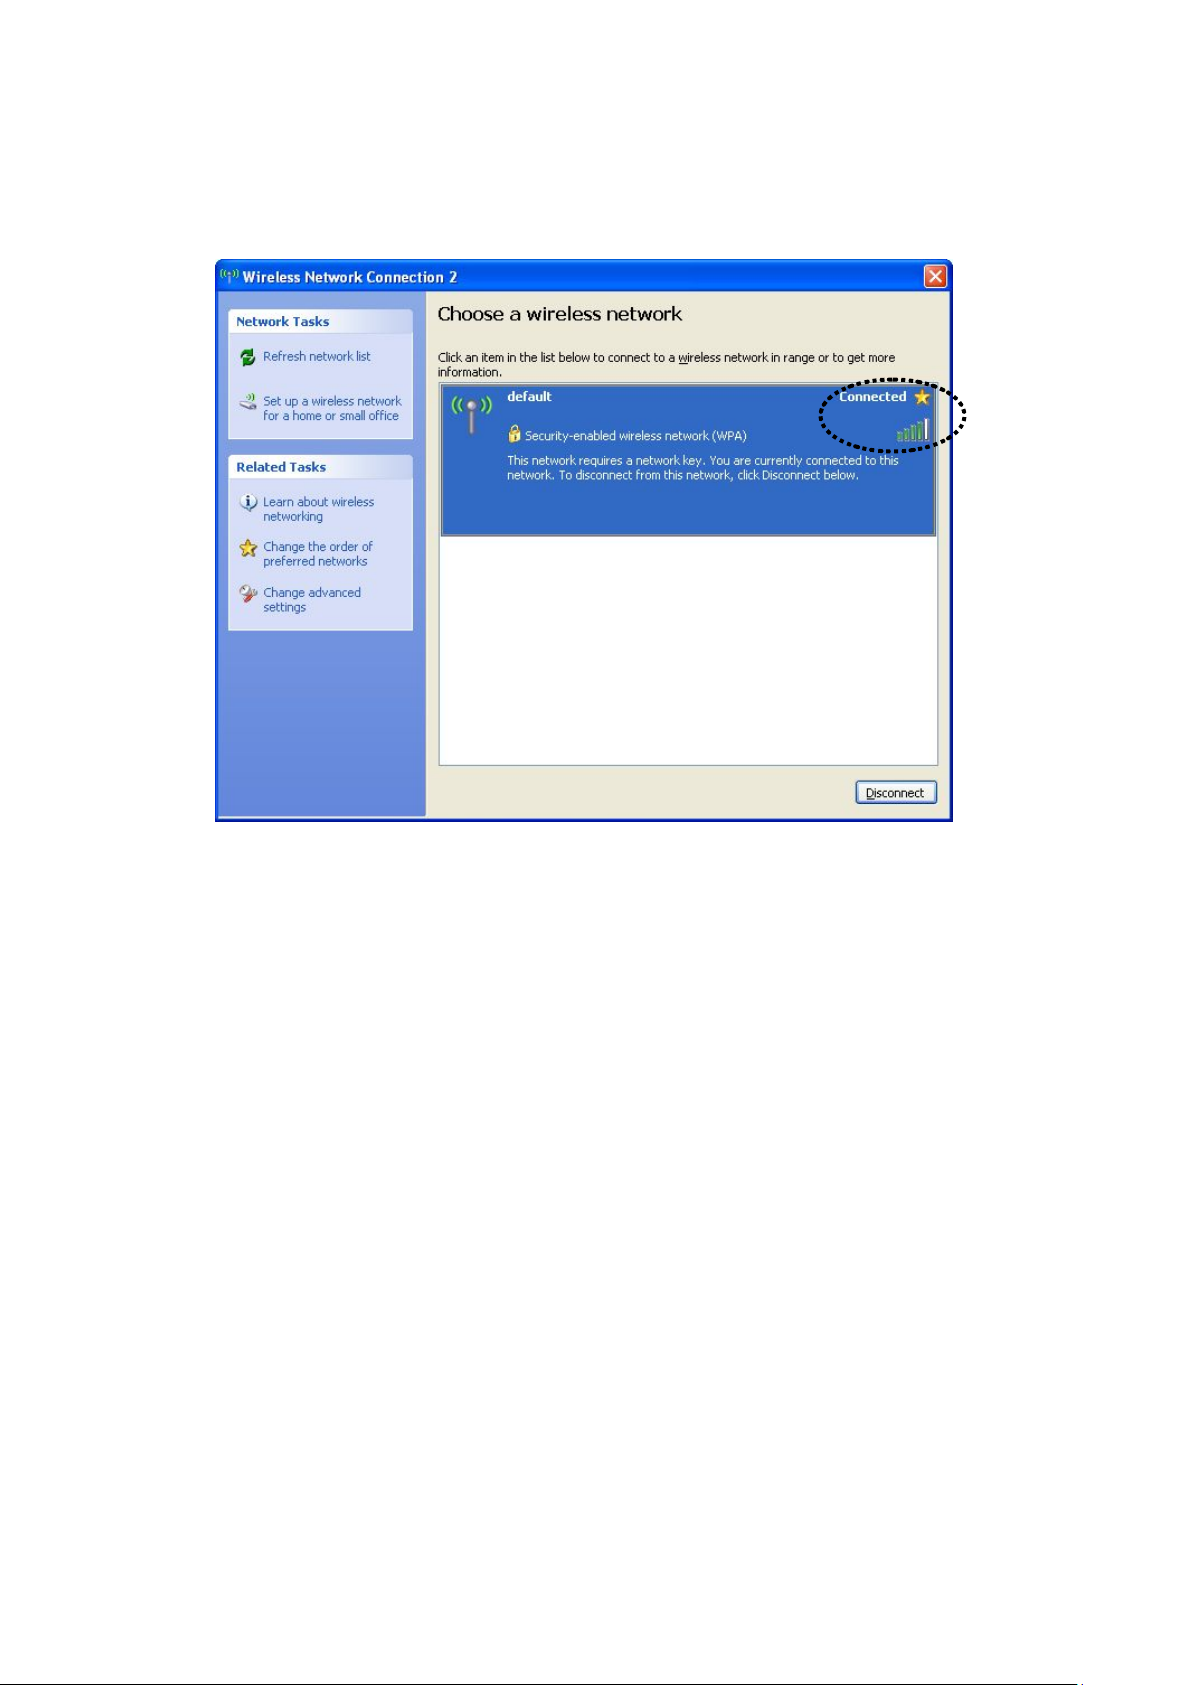
9. If you can see ‘Connected’ message, the connection between your
computer and wireless acc e ss p oi nt is s ucc ess f ully established.
20
Page 29
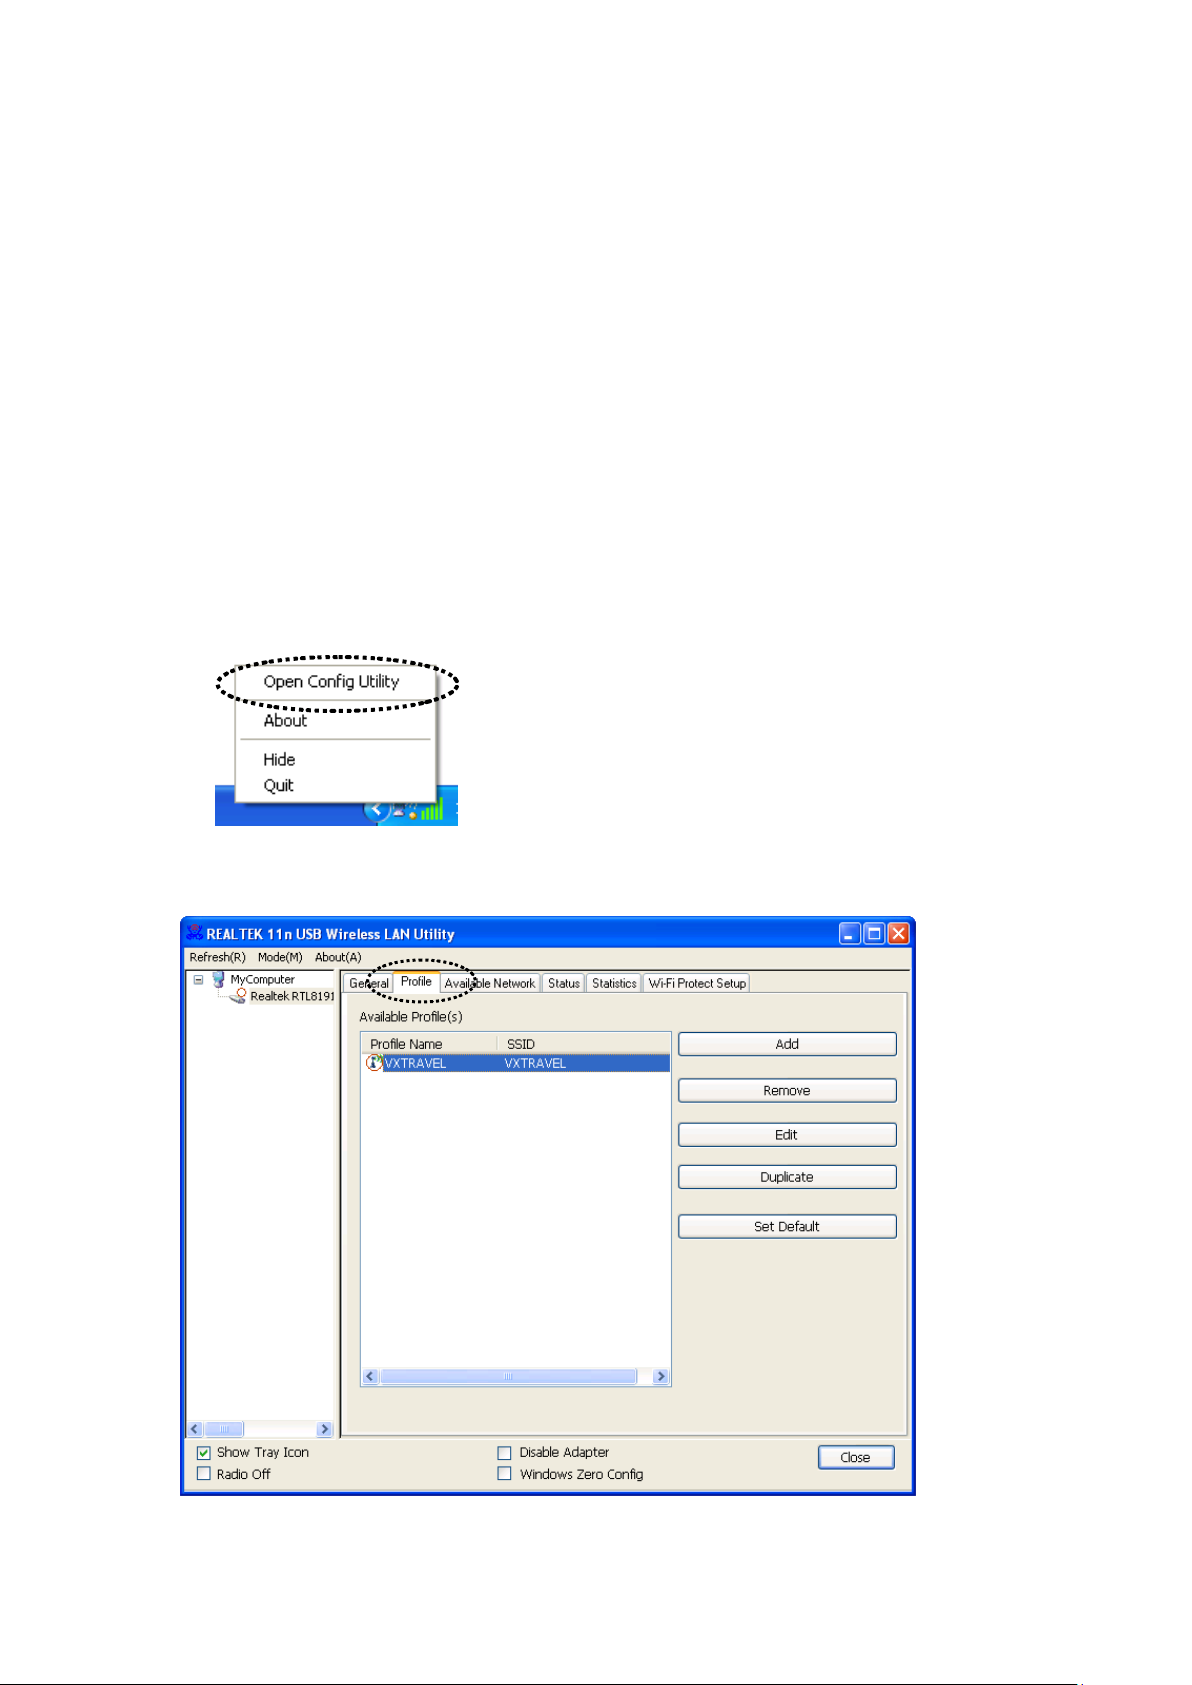
2-3 Connection Profile Management
If you need t o connect to different wireless access points at different time,
like of access point of your home, of fice, cyberca fe, or public wireless
service, you can store the connection pa rameters (encryption, passphrase,
security, and so on.) as a profile for every access point, so you don’t ha ve
to input these parameter s every time when you want to connect to a
specific wi reless access point.
To manage profiles, right-click the Realtek configuration utility icon
located at l ower-righ t corner of computer desktop, then click ‘Open
Config Utility’.
Click the ‘Profile’ menu.
21
Page 30
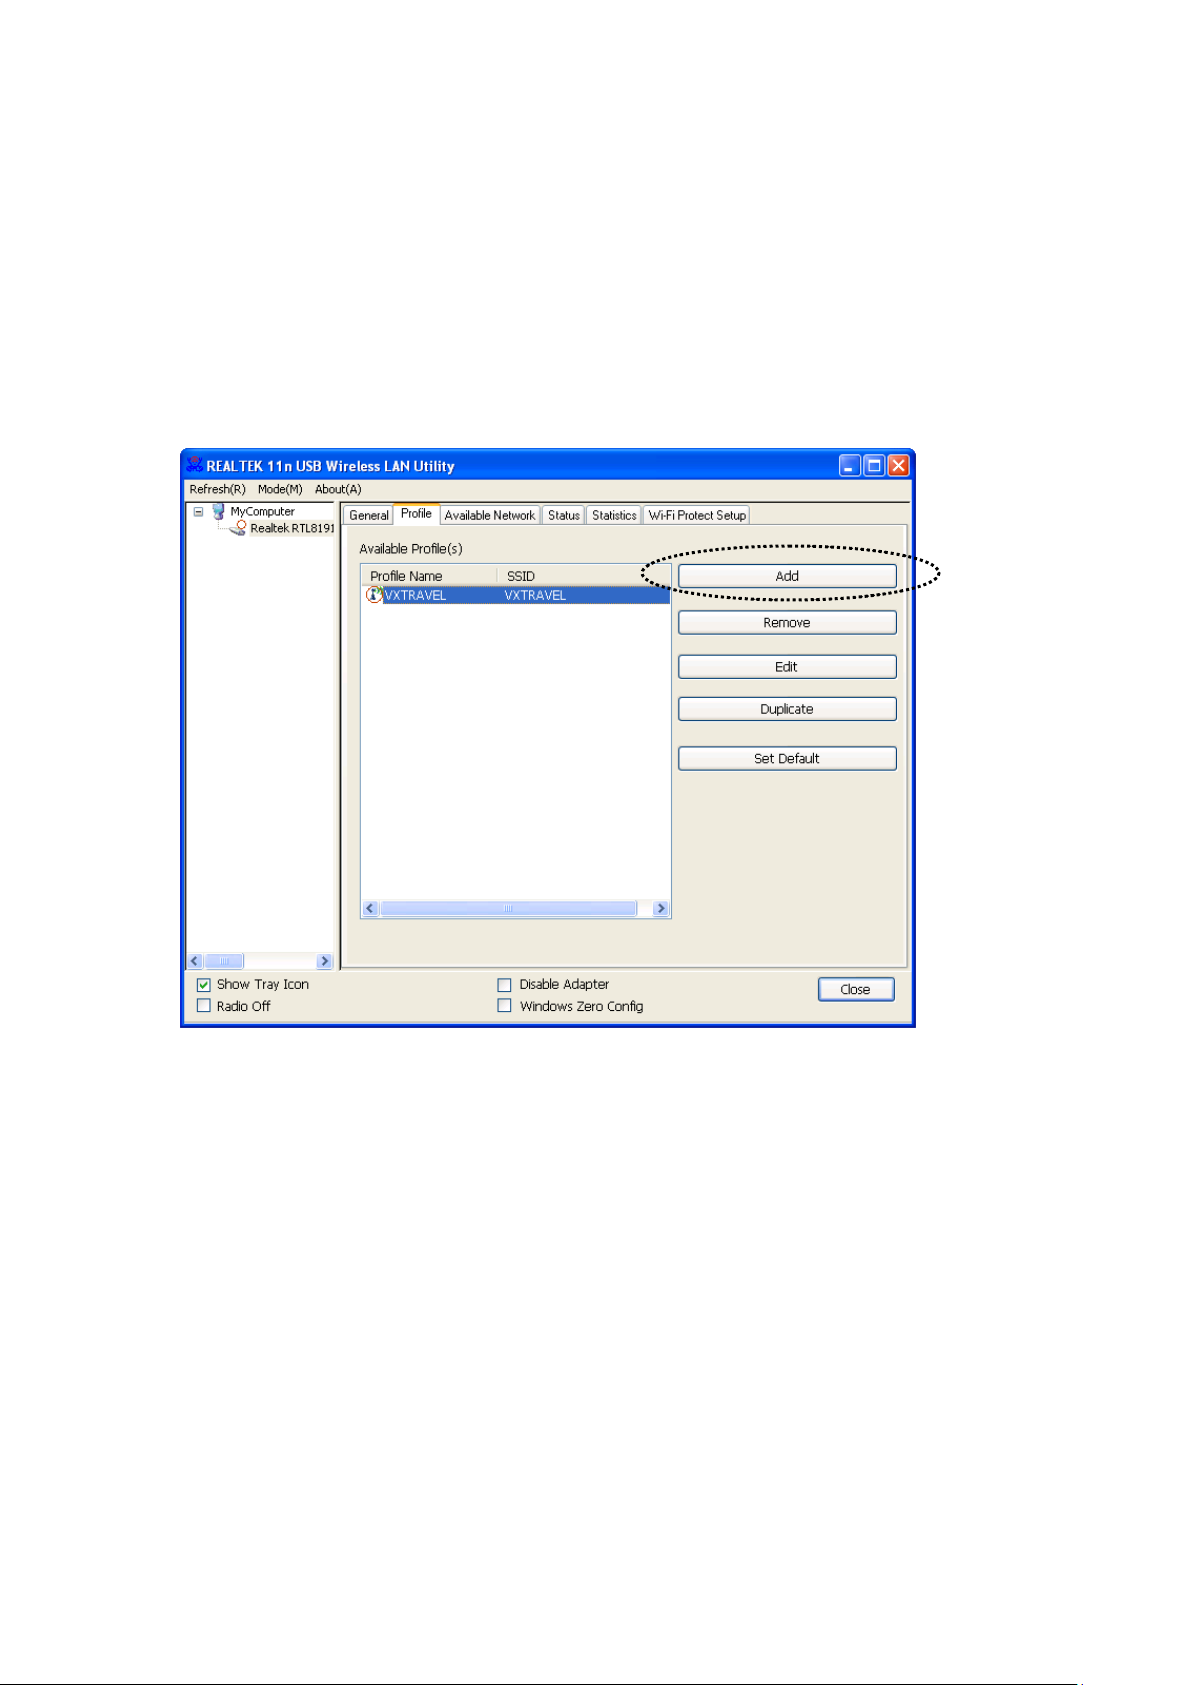
2-3-1 Add a New Profile
By this function you can se tup the connection parameters for a specific
wireless access point in advance, without contactin g it first.
If you want to c reate a new profile, click ‘Profile’ menu, then click ‘Add’
button.
22
Page 31
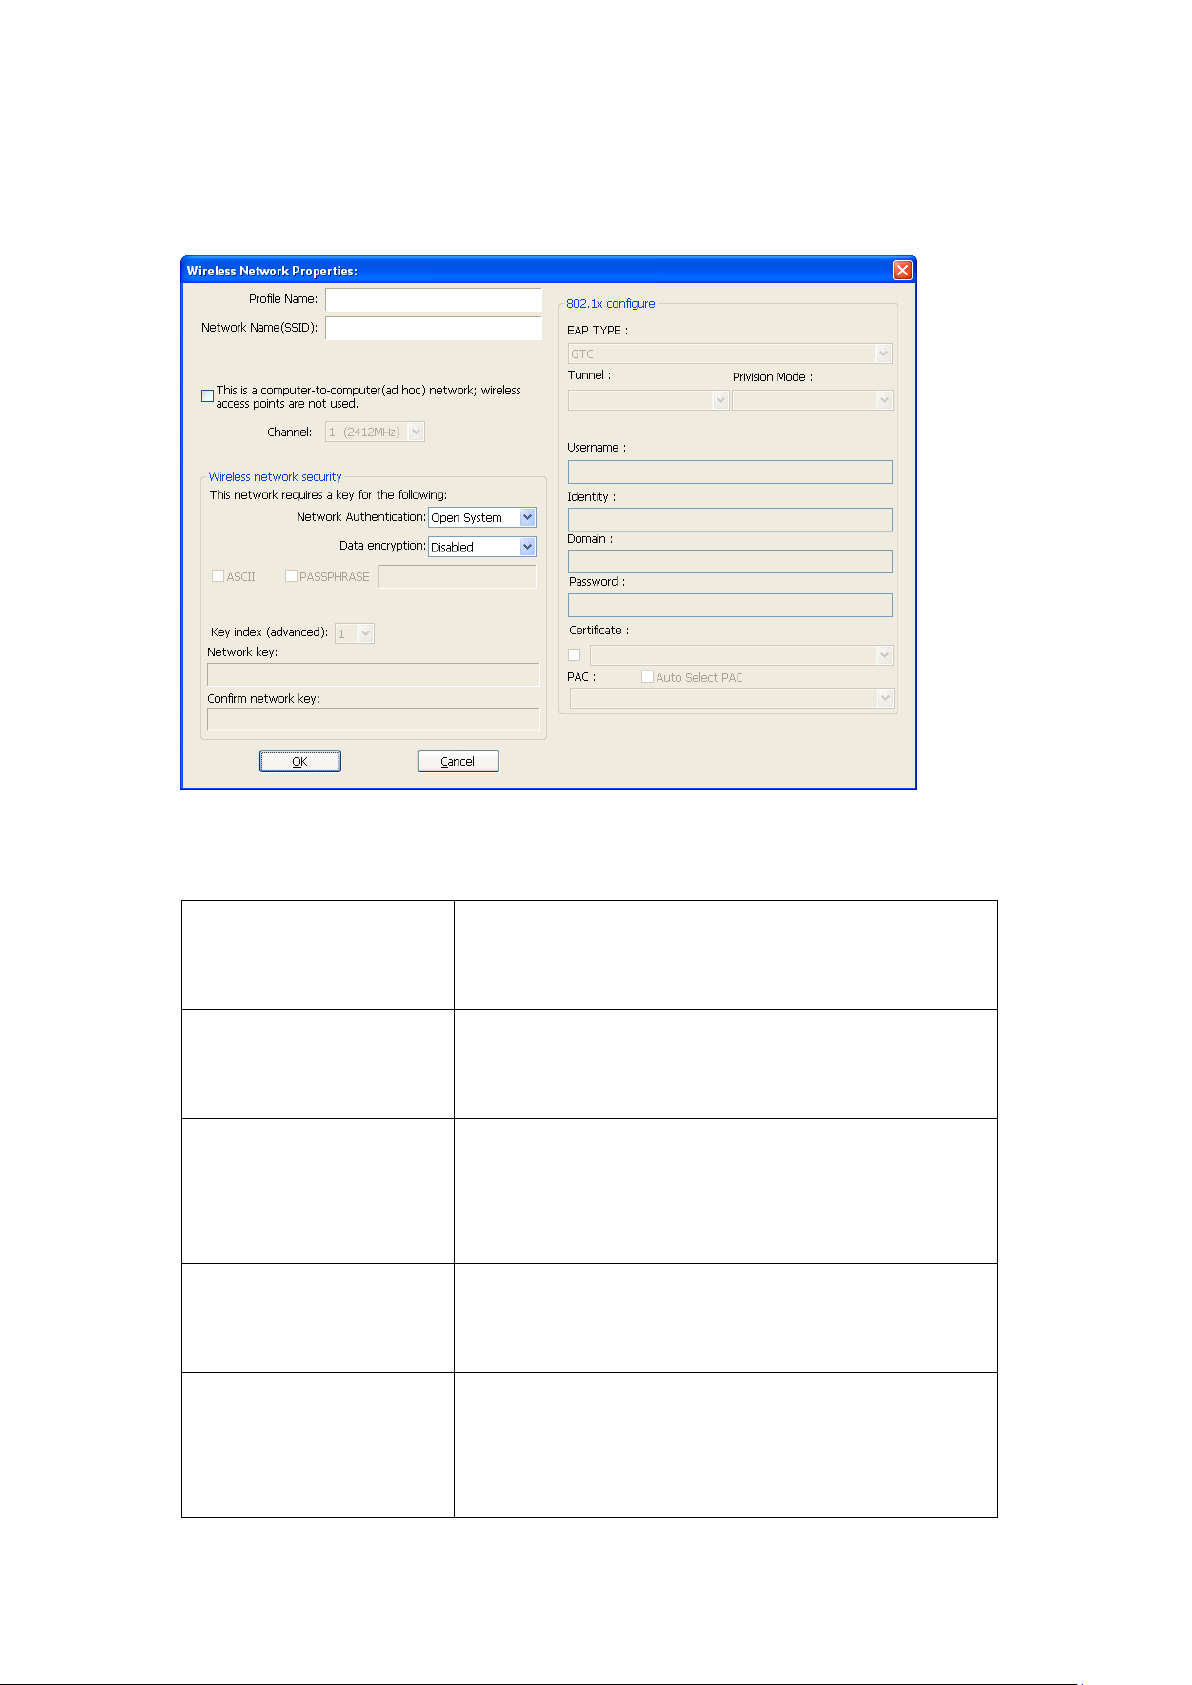
You’ll be prompted to input connection parameters for the wireless access
Profile nam e
You can give a name to this profile, so you
phrase to he lp you remember.
Network Name
The SSID (Service Set Identi fier, i.e. access
SSID of the access point you wish to connect.
This is a
Check this box if you wish to connect to
access point, you have to che ck this box.
Channel
Select wireless channel f or ad hoc conne ction.
ad hoc conne ction.
Network
Select the network authentication type from
point you with to connect.
point you wi sh to c o nne c t:
Required parameters are:
(SSID)
computer-to-computer
(ad hoc) network
can remember its purpose easily. It can be any
point’s name). This must be identical with the
another computer / network device by a d hoc
method. When not acce ssing to wireless
This option only appears w hen you’re using
Authentication
drop-down menu. This setting must be
identical with the setting of wireless access
23
Page 32

Data encryption
Select the data encryption type from
drop-down menu. This setting must be
point you with to connect.
ASCII /
When the encryption type is ‘WEP’, it’s
connect.
Key index
Select WEP key index. For most of access
the setting of the access po int.
Network key /
When the encryption type is ‘WPA’ or
boxes for co nfirmation.
EAP TYPE /
When authentication type is any of 802.1X,
authentication server.
Usernam e / Identity /
Domain / Password
Please inpu t 802.1x related authentication
informatio n here .
Certificate
If certification is requir ed to authenticate with
local certificate from dropdown list.
PAC
Check this box and PAC (Privilege Access
Certificate) will be automatically selected.
identical with the setting of wireless access
PASSPHRASE
Confirm networ k ke y
required to inp ut a set of ‘passphrase’ to
connect to wireless access point. Check
‘ASCII’ or ‘PASSPHRASE’ depends on the
security se tting of access point, and inp ut it in
the box; if you select ‘PASSPHRASE’ you
also need to select the length of the key.
The passphrase must be identical with the
setting of wireless access point you with to
points you ca n select ‘1’, but please refer to
‘WPA2-PSK’, it’s required to in p ut a set of
‘passphrase’ to connect to wireless access
point. Please input the same passphras e in two
Tunnel /
Provision Mode
you have to select EAP type, tunnel, and
provision mode from dropdown menu. This
setting must be identica l with your 802.1x
802.1x authentication server, please select a
When all req uired parameters are set, click ‘OK’ to create and save a new
profile.
24
Page 33
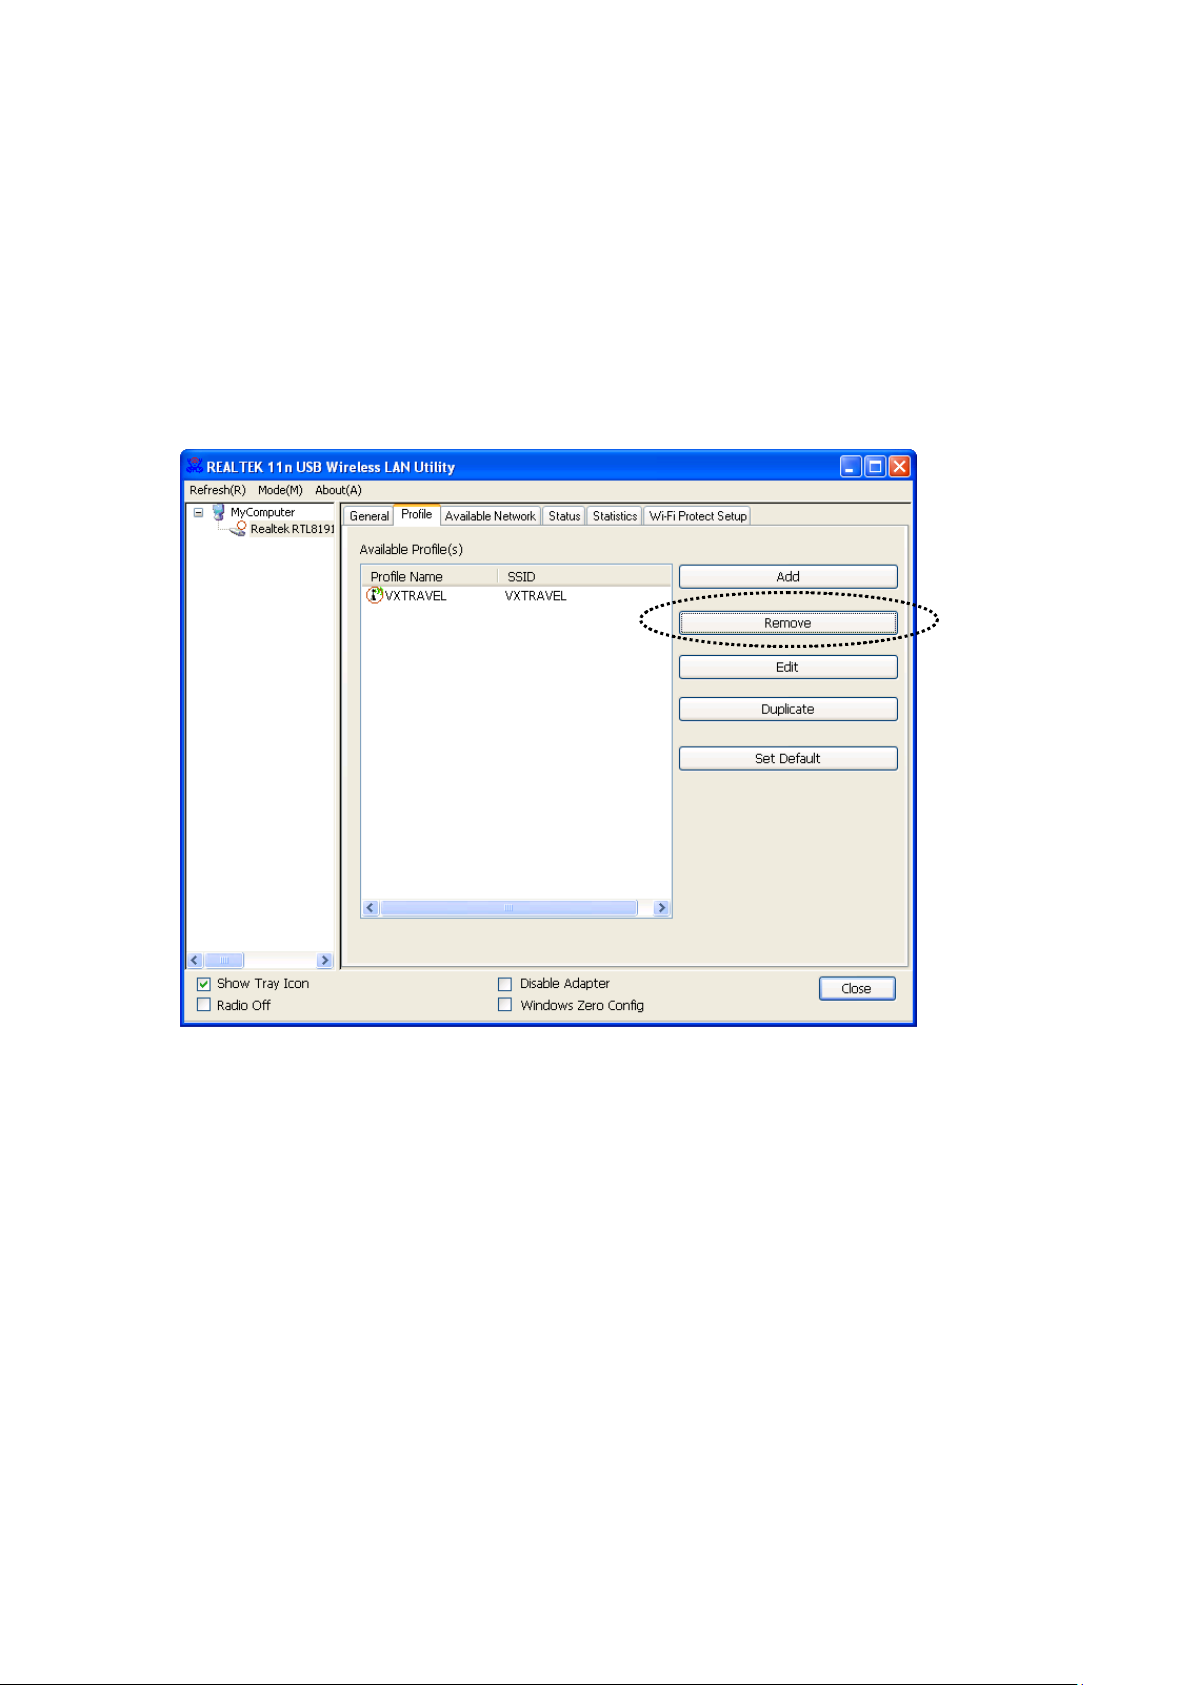
2-3-2 Remove an Existing Profile
When you no longer need an e xisting profile, you can remove it.
If you want to r emove a profile, click ‘Profile’ menu, then select an
existing pr ofile which you wish to remove, and then click ‘Remove’
button.
25
Page 34
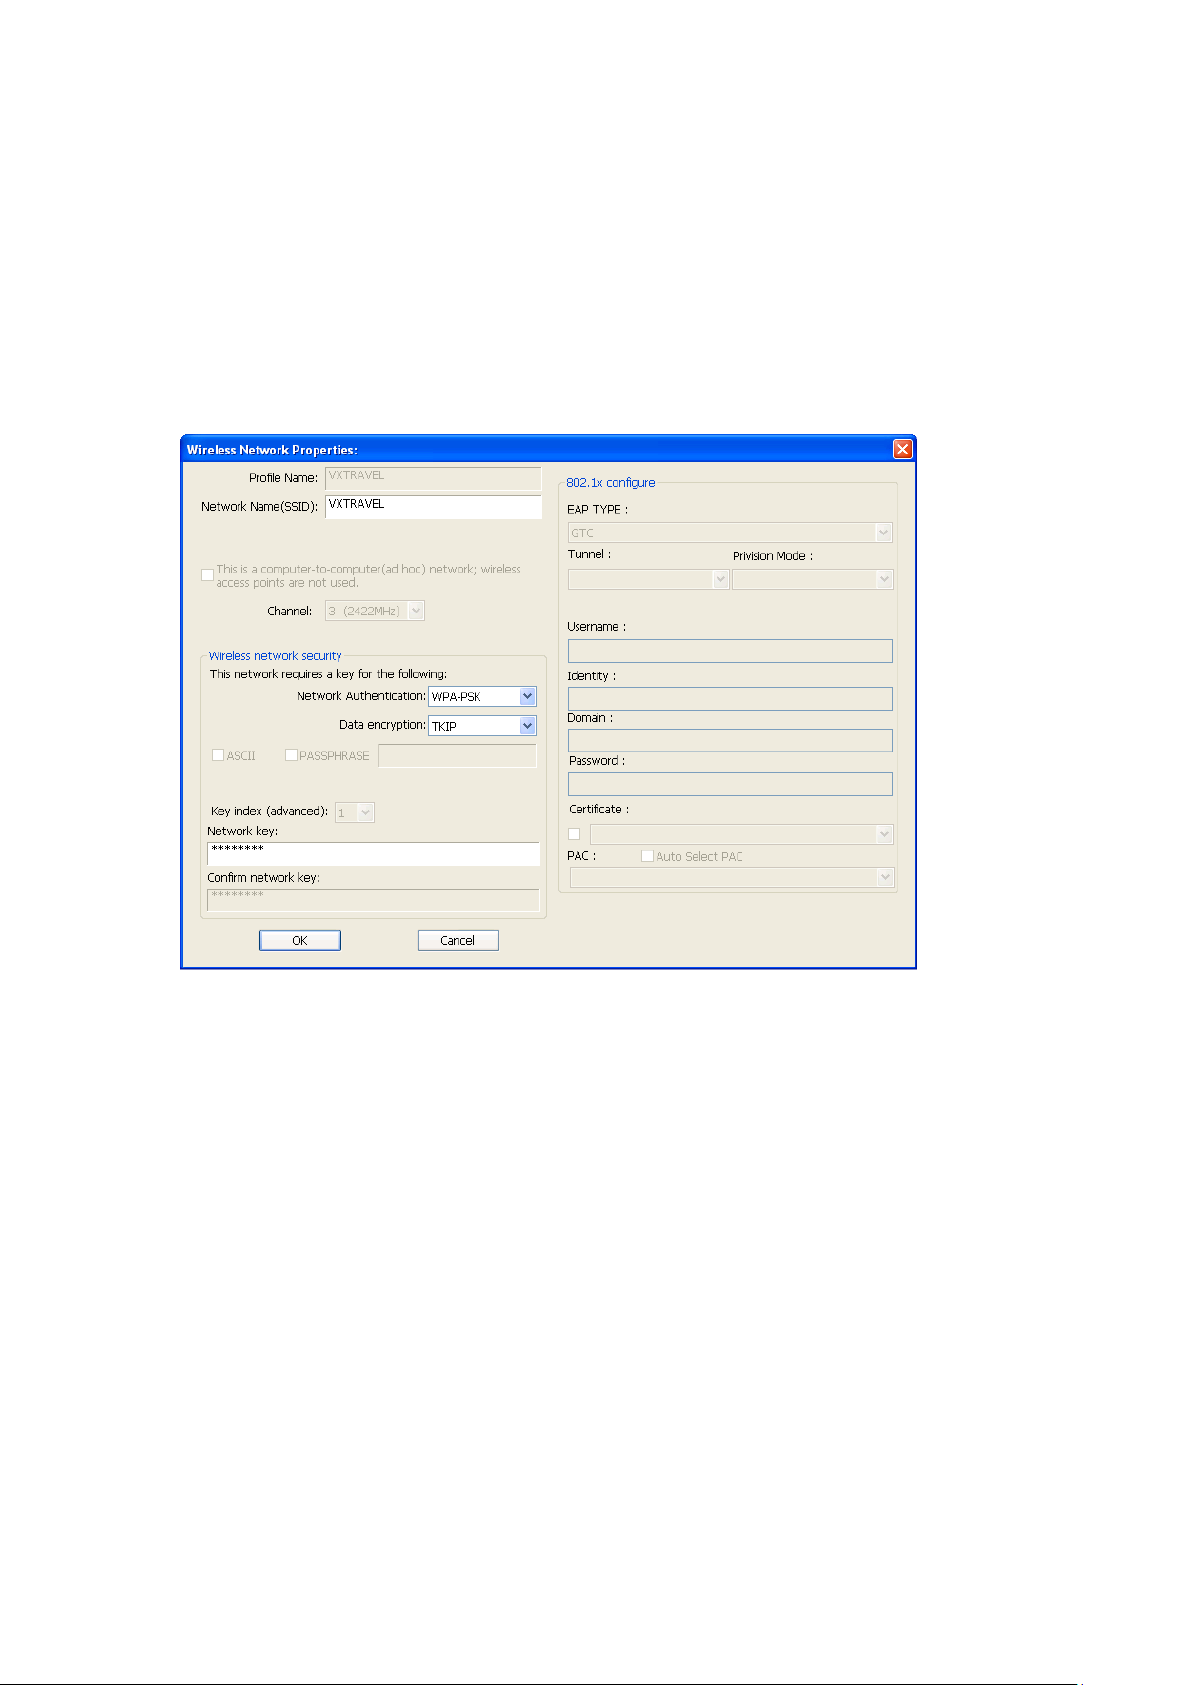
2-3-3 Edit an Existing Profile
If you have added a profile be fore, and you wish to change the content of
the profile, you can use this function. Please select a profile from the list
first, then click ‘Edit’ button. You’ll be provided with the c ont en ts of
selected profile, and you can edit them. Click ‘OK’ to save changes, or
click ‘Cancel’ to disadapter changes.
26
Page 35
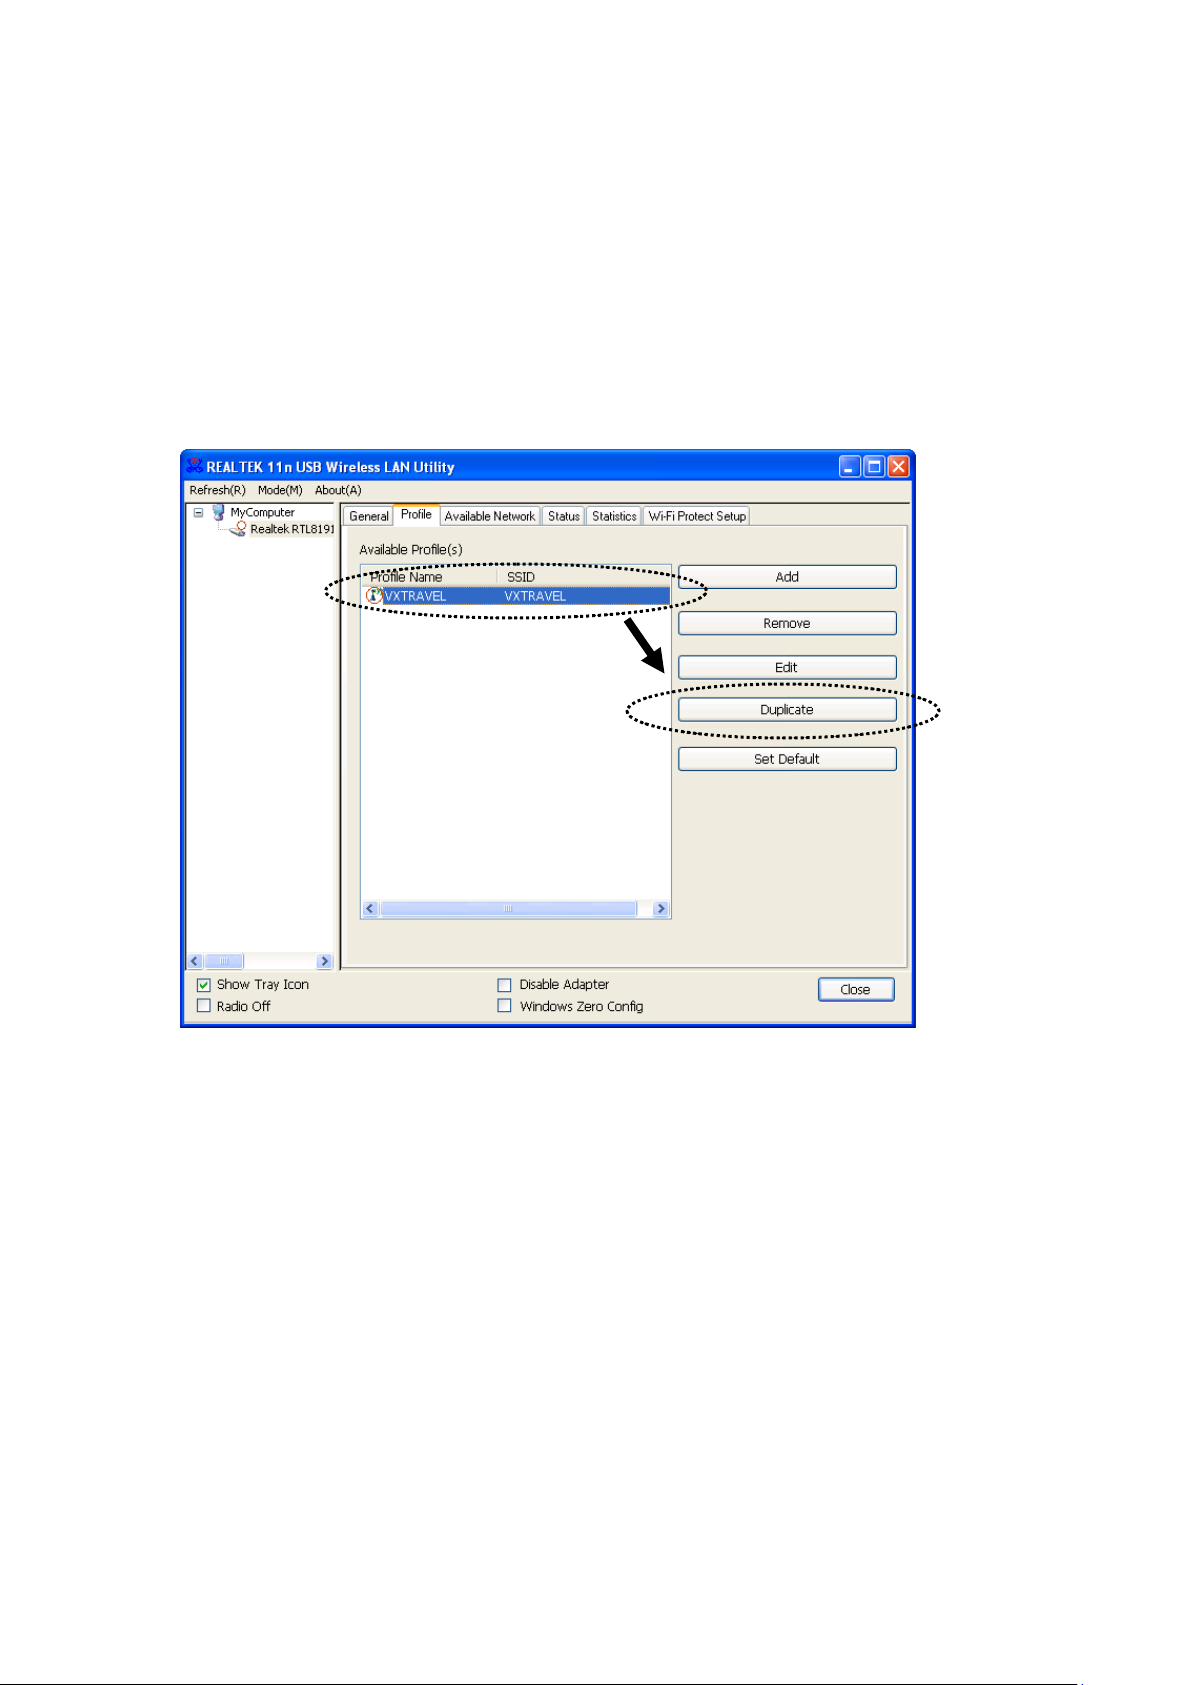
2-3-4 Make a Copy of an E xisting Profile
If you need to make a copy of a specific profile, you can use this function.
This functi on is very convenient when you need to build a new profile
which parameters are similar to any existing profile.
To do this, select an existing profile, then click ‘Duplicate’ button.
You’ll be prompted to input a profile name, please use an identical name
that does not exist in pro f ile list.
27
Page 36
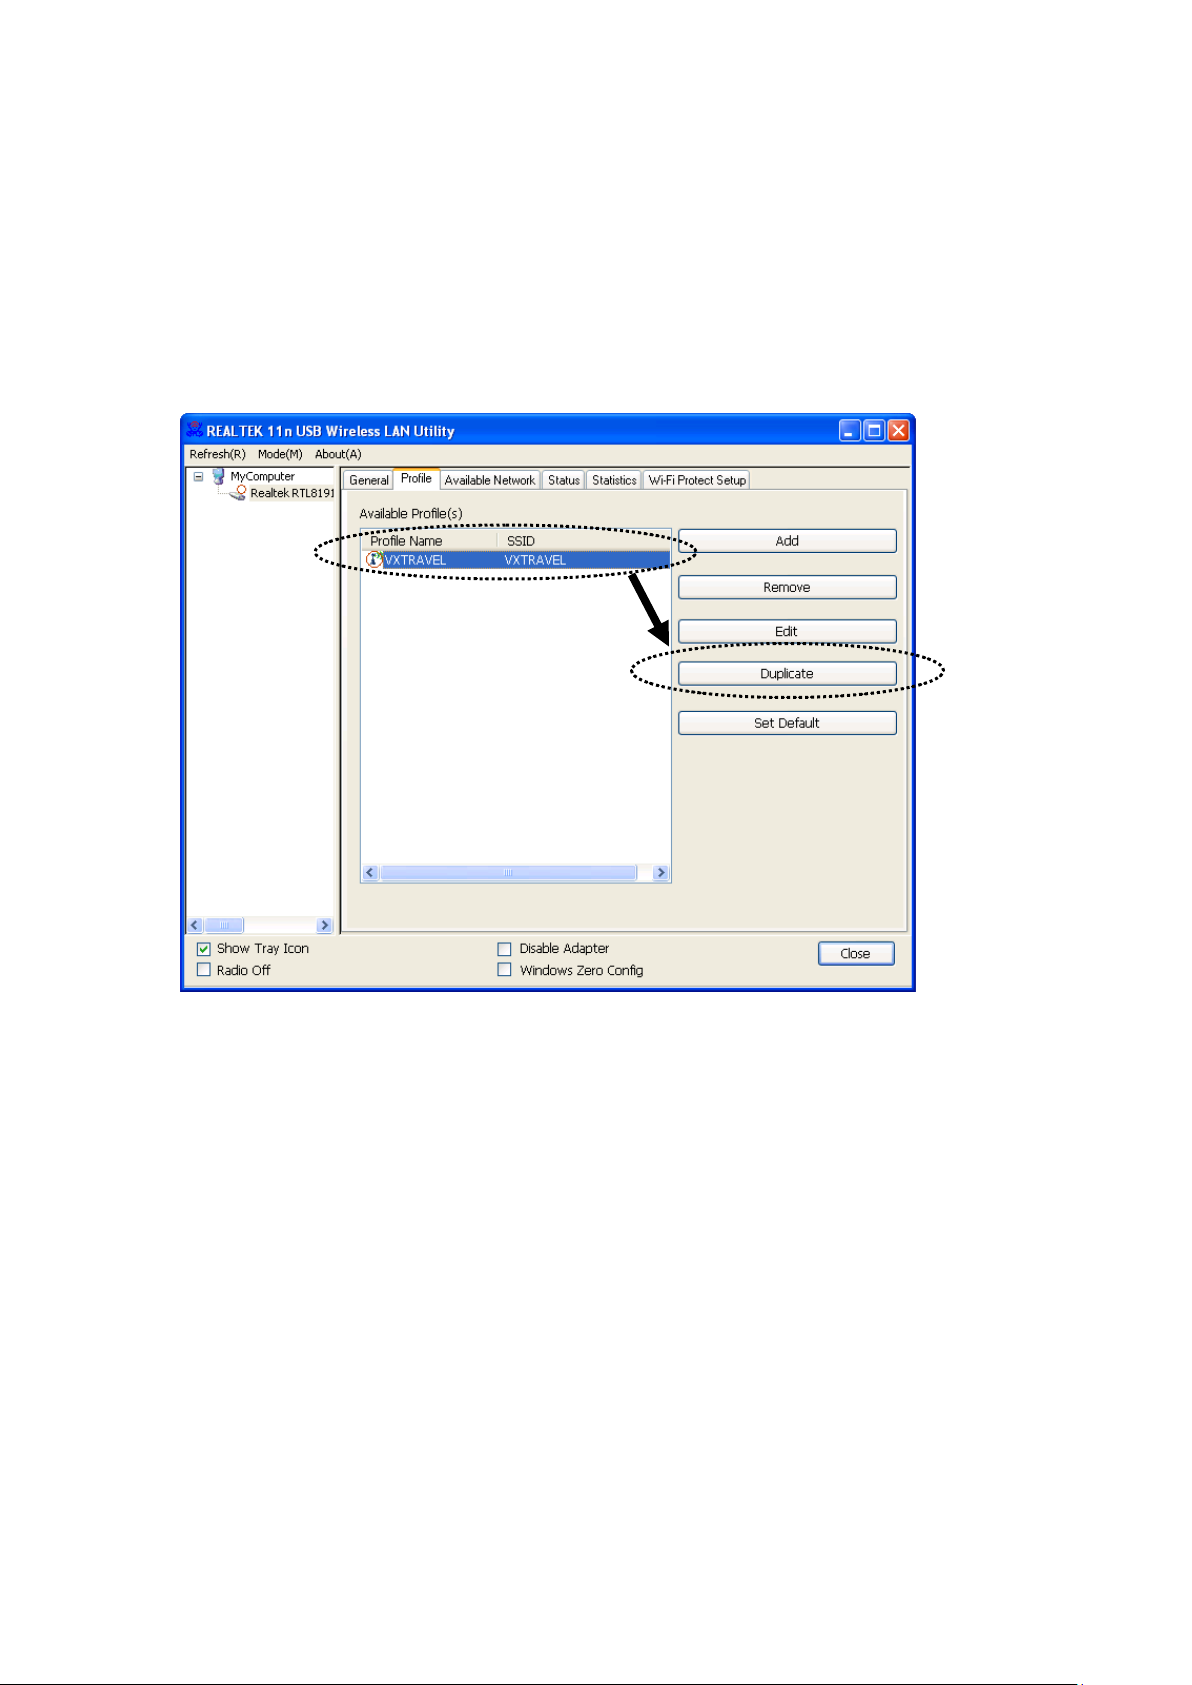
2-3-5 Set as a Default Profile
If you wish t o use a specific profile as default connecti on, you can sele ct
a profile in the list, and cl ick ‘Set Default’. Selected profile w ill become
default sel ection and Realtek configuration utility will attempt to connect
to selected acce ss po i nt.
28
Page 37
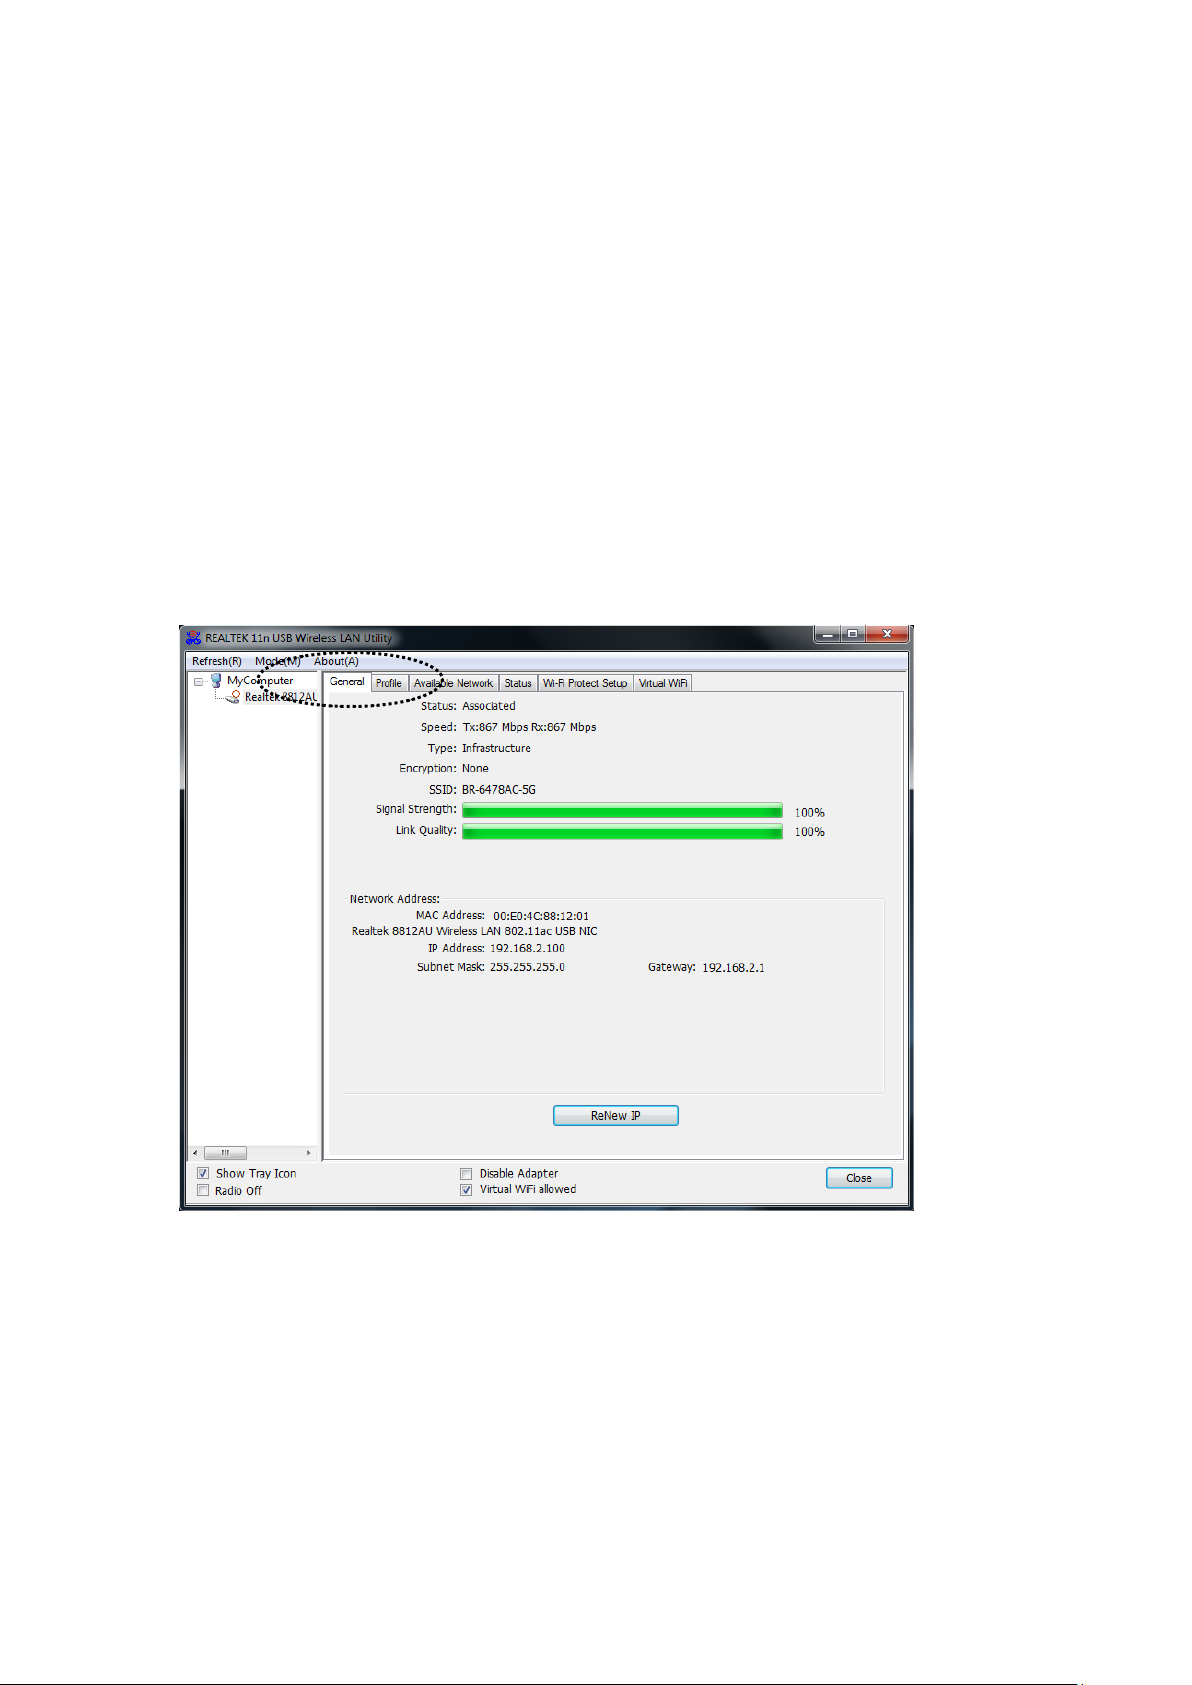
2-4 View Network Statistics, General Information, and Status
The configuration utility provides information about network sta tistics
and link sta tus. If you want to know how your wireless ne tw ork a da pt er
works, you can use these f unctions to get detailed information about the
wireless connection you’re using.
2-4-1 General I nformation
If you want to know the gene ra l inf ormation of the access p oi nt y ou’re
connecting to, clic k ‘General’ menu:
All general information like sig nal str e ng t h and li nk q ual ity wil l be
displayed h ere. These information a re very useful when you encounter
some problem on connecti ng to access point.
If you wish t o get a new IP address from DHCP server, you can click
‘ReNew IP’ button.
29
Page 38
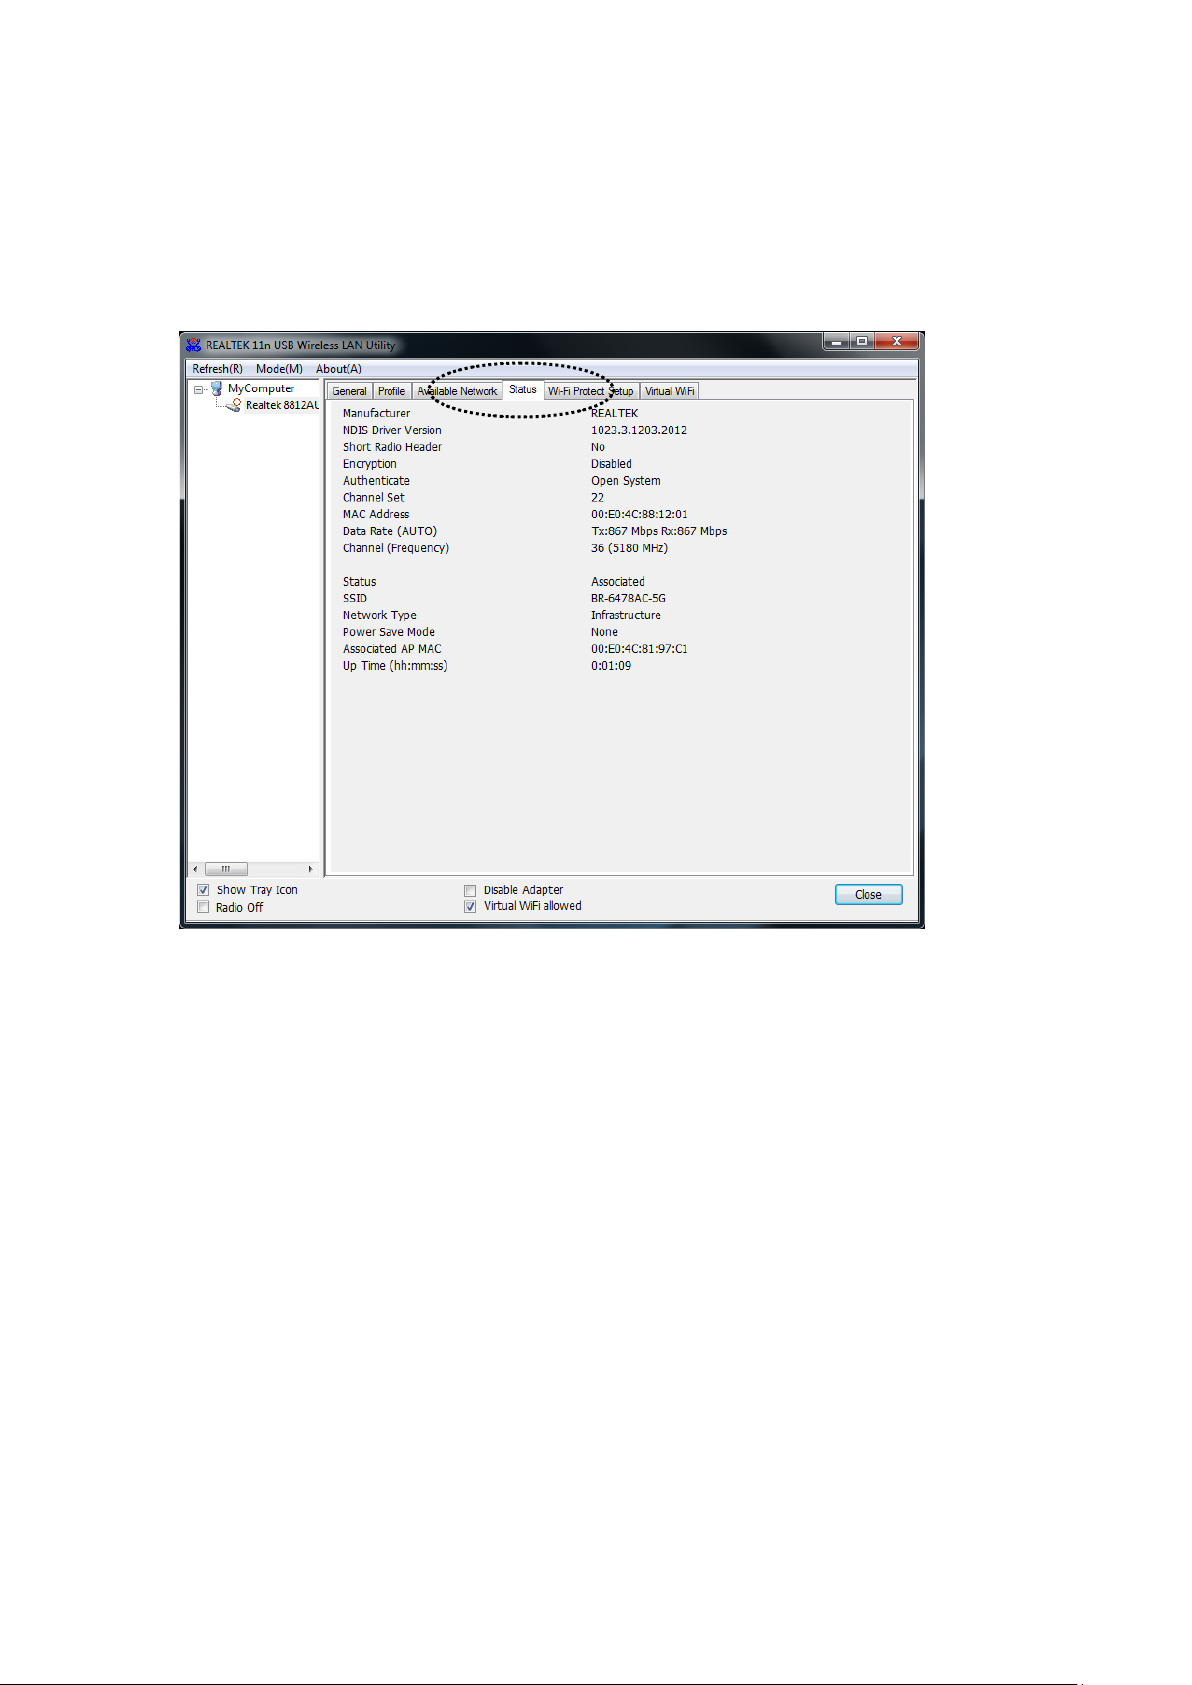
2-4-2 Status
If you want to know the status of your wireless network ada p ter, click
‘Status’ menu:
30
Page 39
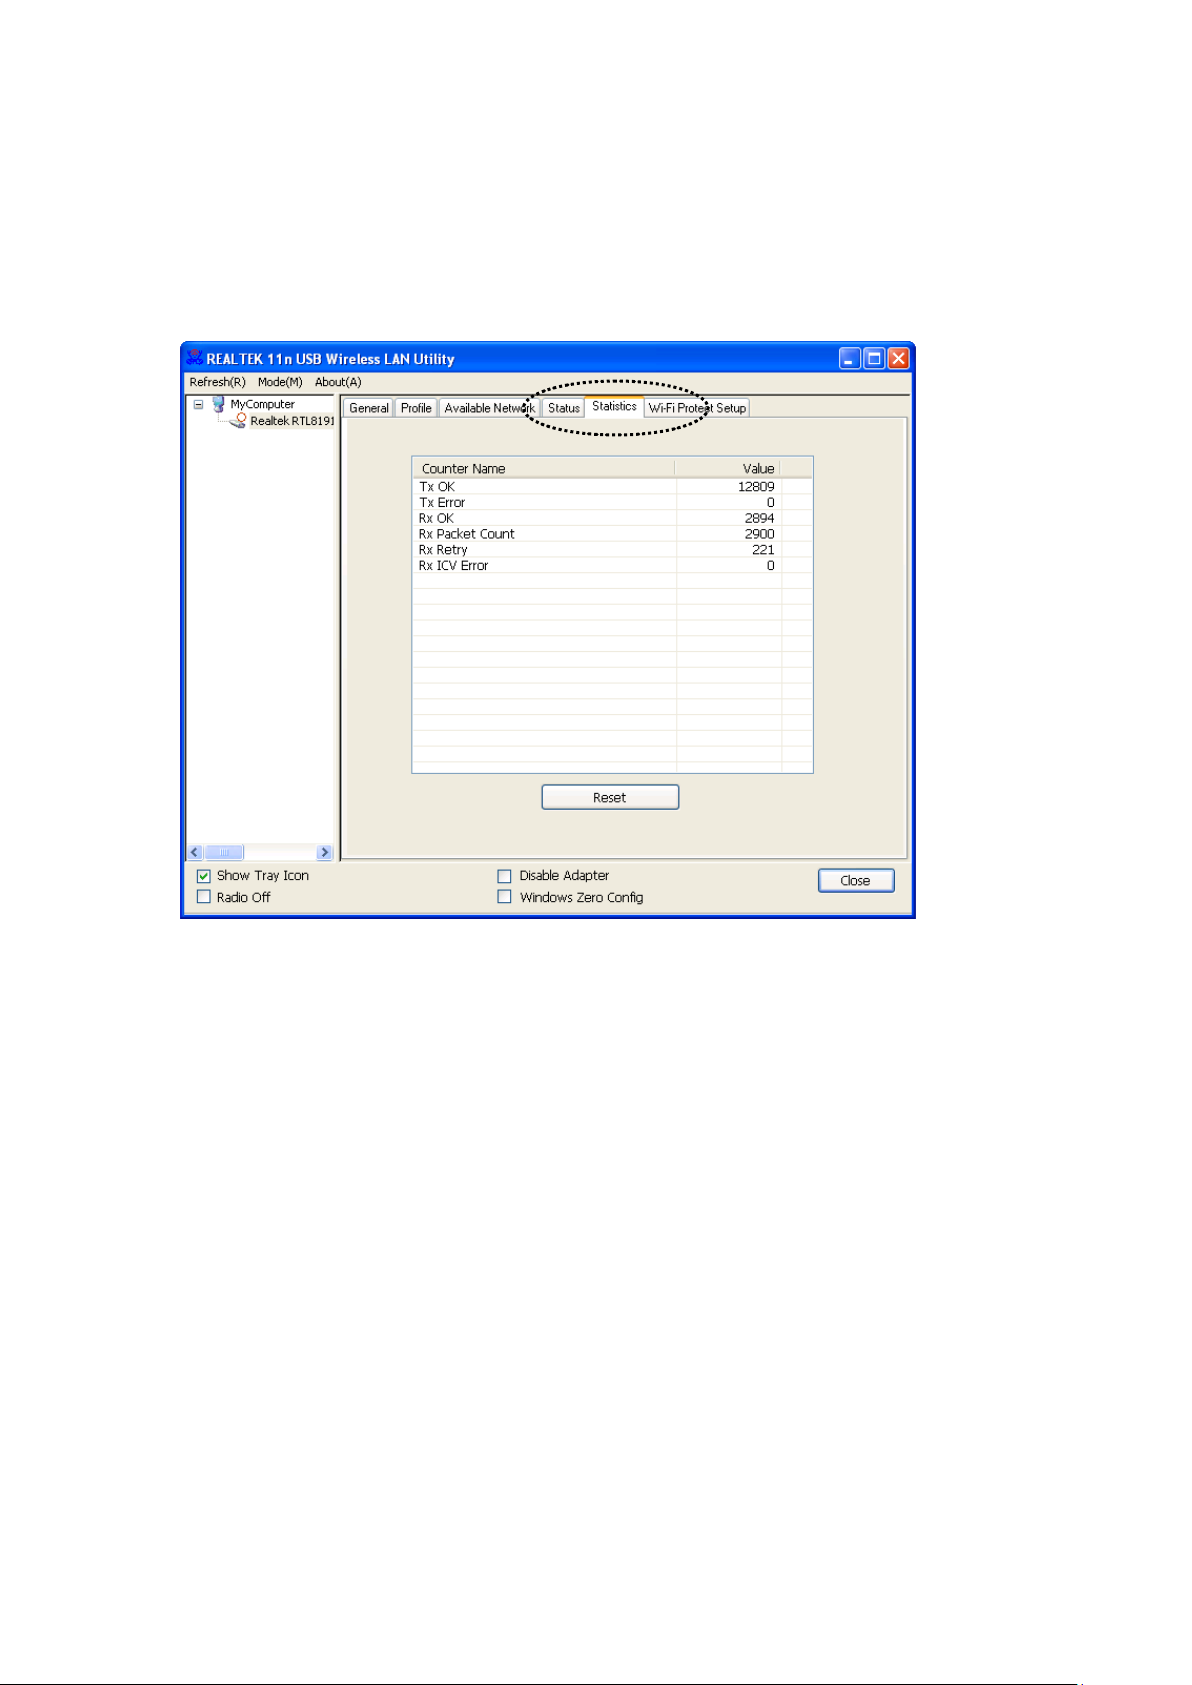
2-4-3 View Network Statistic s
To view the statistical data of wireless network ada p te r, click ‘Statistics’
menu, and the statistics of wireless connection will be displaye d:
All connection-related statistics is displayed her e. You can click ‘Reset’
button, to reset the statistics of all i tems back to 0.
31
Page 40
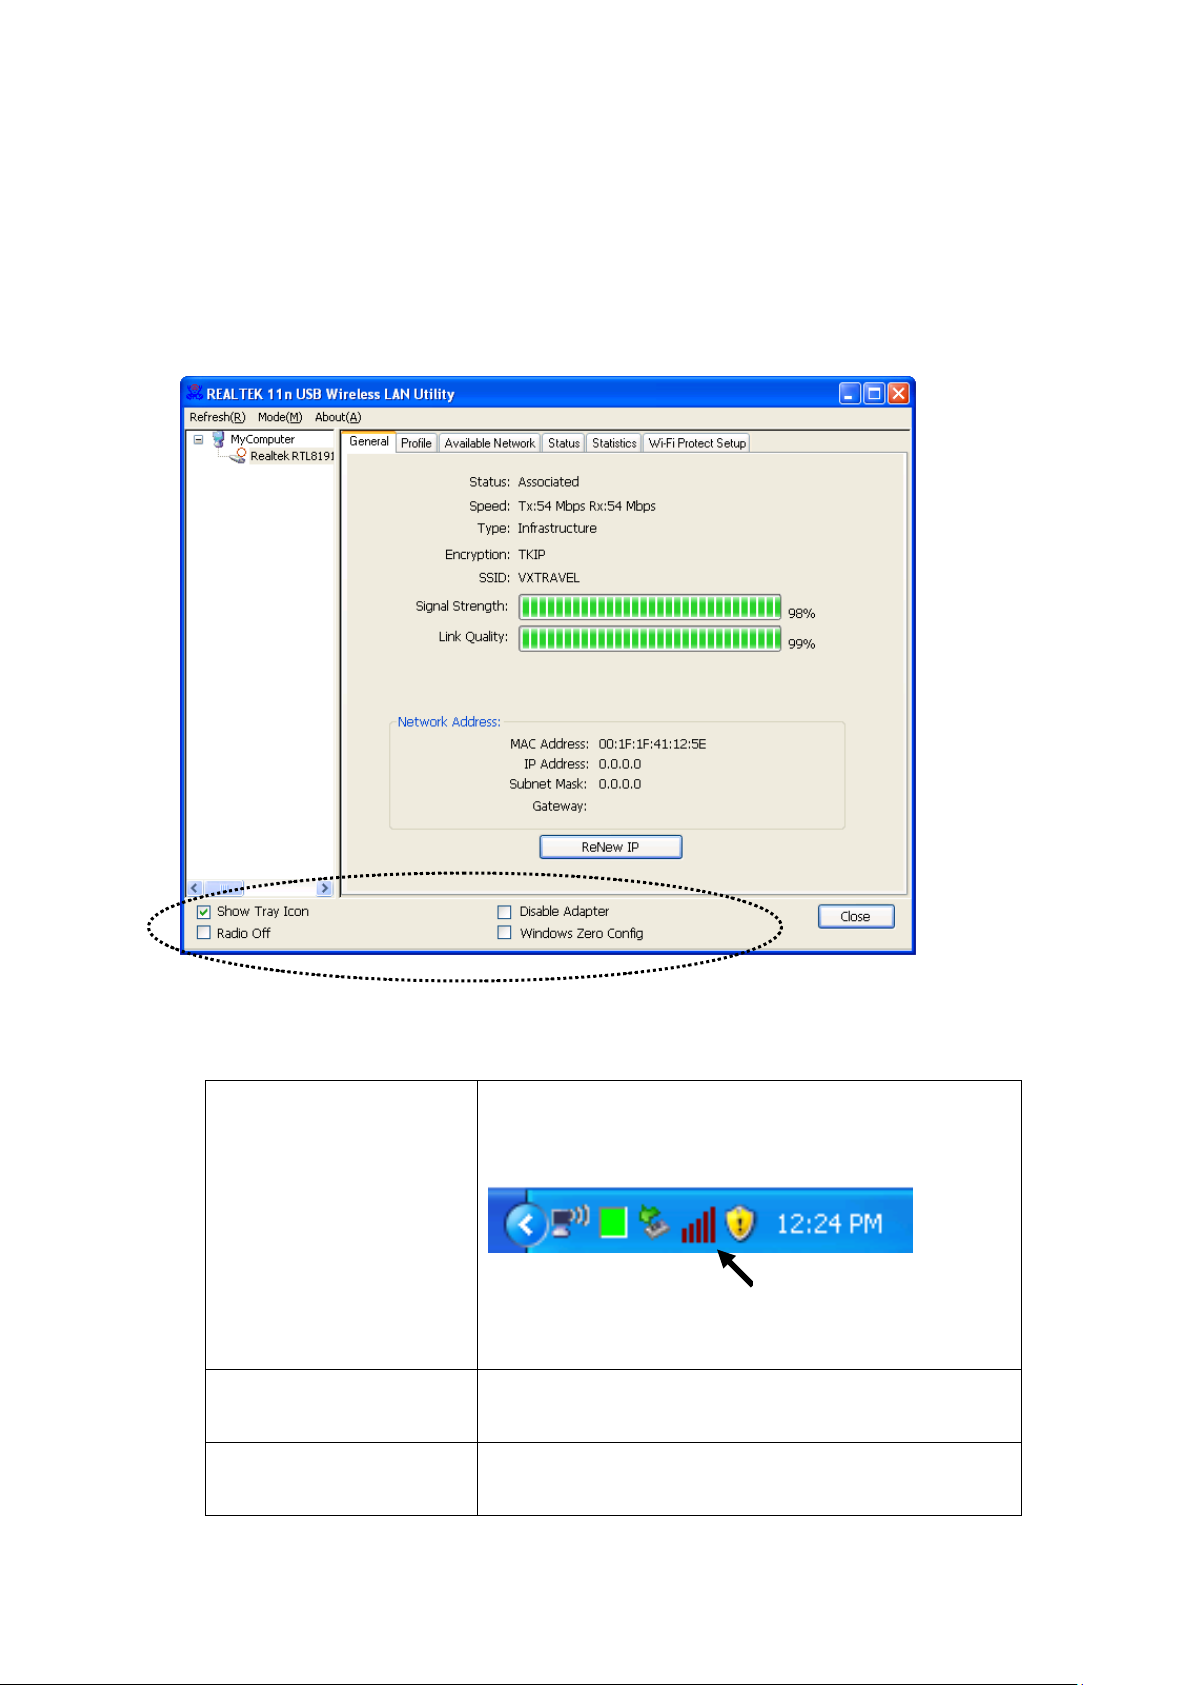
2-5 Miscellaneous Settings
Show T ray Icon
Check this box to show an icon on system
Uncheck this box t o hide it.
Radio Off
Switch wire less radio off. Wireless network
functionalities are disabled.
Disable Ada pter
Disable wireless network adapter. All
functionalities of con figration me nu will
HERE!
There are few functions provided by R ealtek configuration utility, you
can access these functions from the bottom of configuration m e nu:
The descriptions of these function are listed as follow:
tray.
32
Page 41

disappear. To resume, unckeck ‘Disable
Adapter’.
Windows Zero Config
Use Windows Zero Configuration to manage
wireless co nnections. See section 2-2-2.
33
Page 42

2-6 Establish a Secure Connection with AP by WPS
Wi-Fi Protected Setup (WPS) is the latest wire less network technology
which make s wireless network setup be come very simple. If you have
WPS-enabled wireless access point, a nd you want to establish a secure
connection to it, you do n’t have to configure the wireless access point and
setup data e ncryption by yourself. All you have to do is t o go to the WPS
setup page of this wireless adapter, click a button, a nd then press a
specific bu tton or enter a set of 8-digit code on the wireless access point
you wish to establ ish a secur e con ne ct io n - just three simple steps!
For older wireless acces s points, it’s possible to perform a firmware
upgrade to become a WPS-enabled access point. Since they may not have
a hardware button to press for WPS setup, you can u se an alternati ve
WPS setup method - input the pin co de. Every WPS-compatible wireless
network ada pter support pin code conf iguration method; you can jus t
input the co de to wireless a ccess point, a nd the wireless access point a nd
wireless network adapte r will do the rest for you.
This wireless network adapter is compatible with WPS. To use this
function, the wireless a ccess point y ou wish to connect to must support
WPS functio n too. Now, please follow the following instructions to
establish secure connection between WPS-enabled wireless access point
and your wireless network adapter.
This wireless network adapter supports 2 kinds of WPS: PIN code and
Push-Button.
Follow the following instructions to setup WPS:
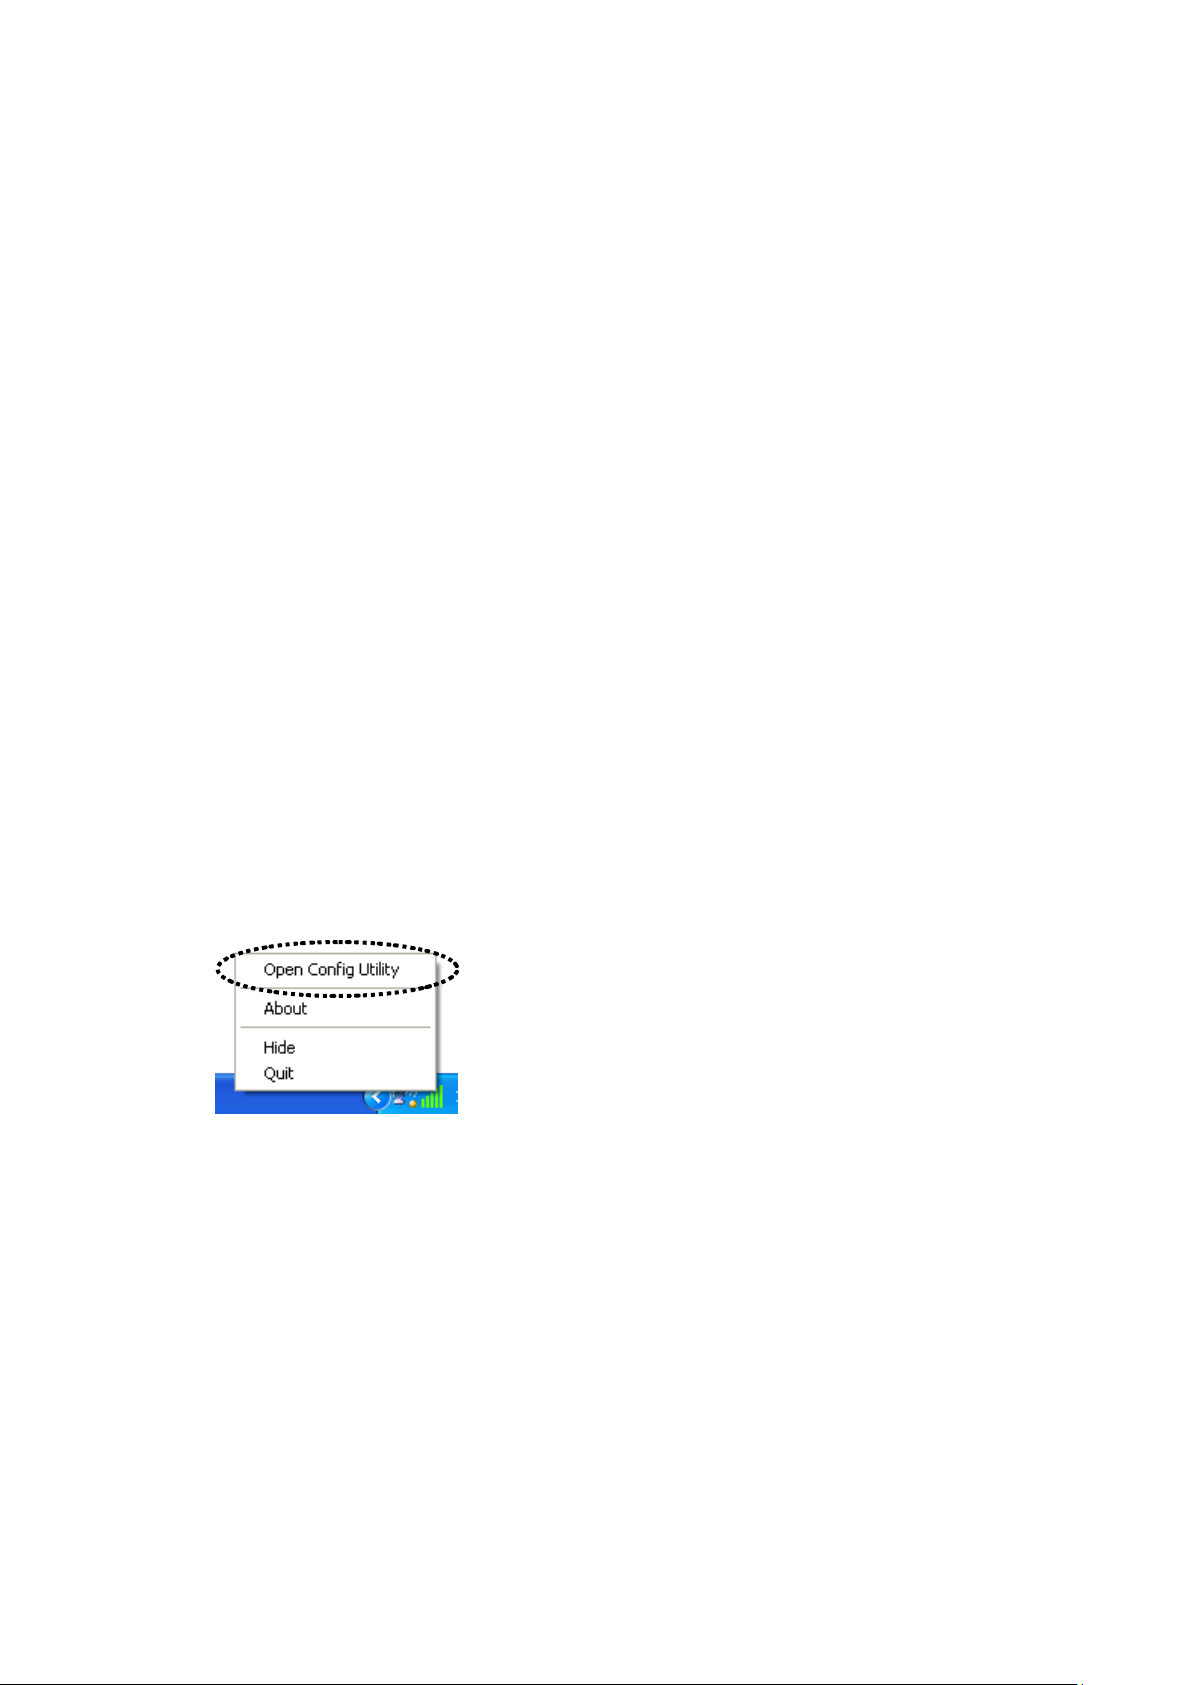
1. Right-click Realtek conf iguration utility icon, a nd click ‘Open Config
Utility’.
34
Page 43
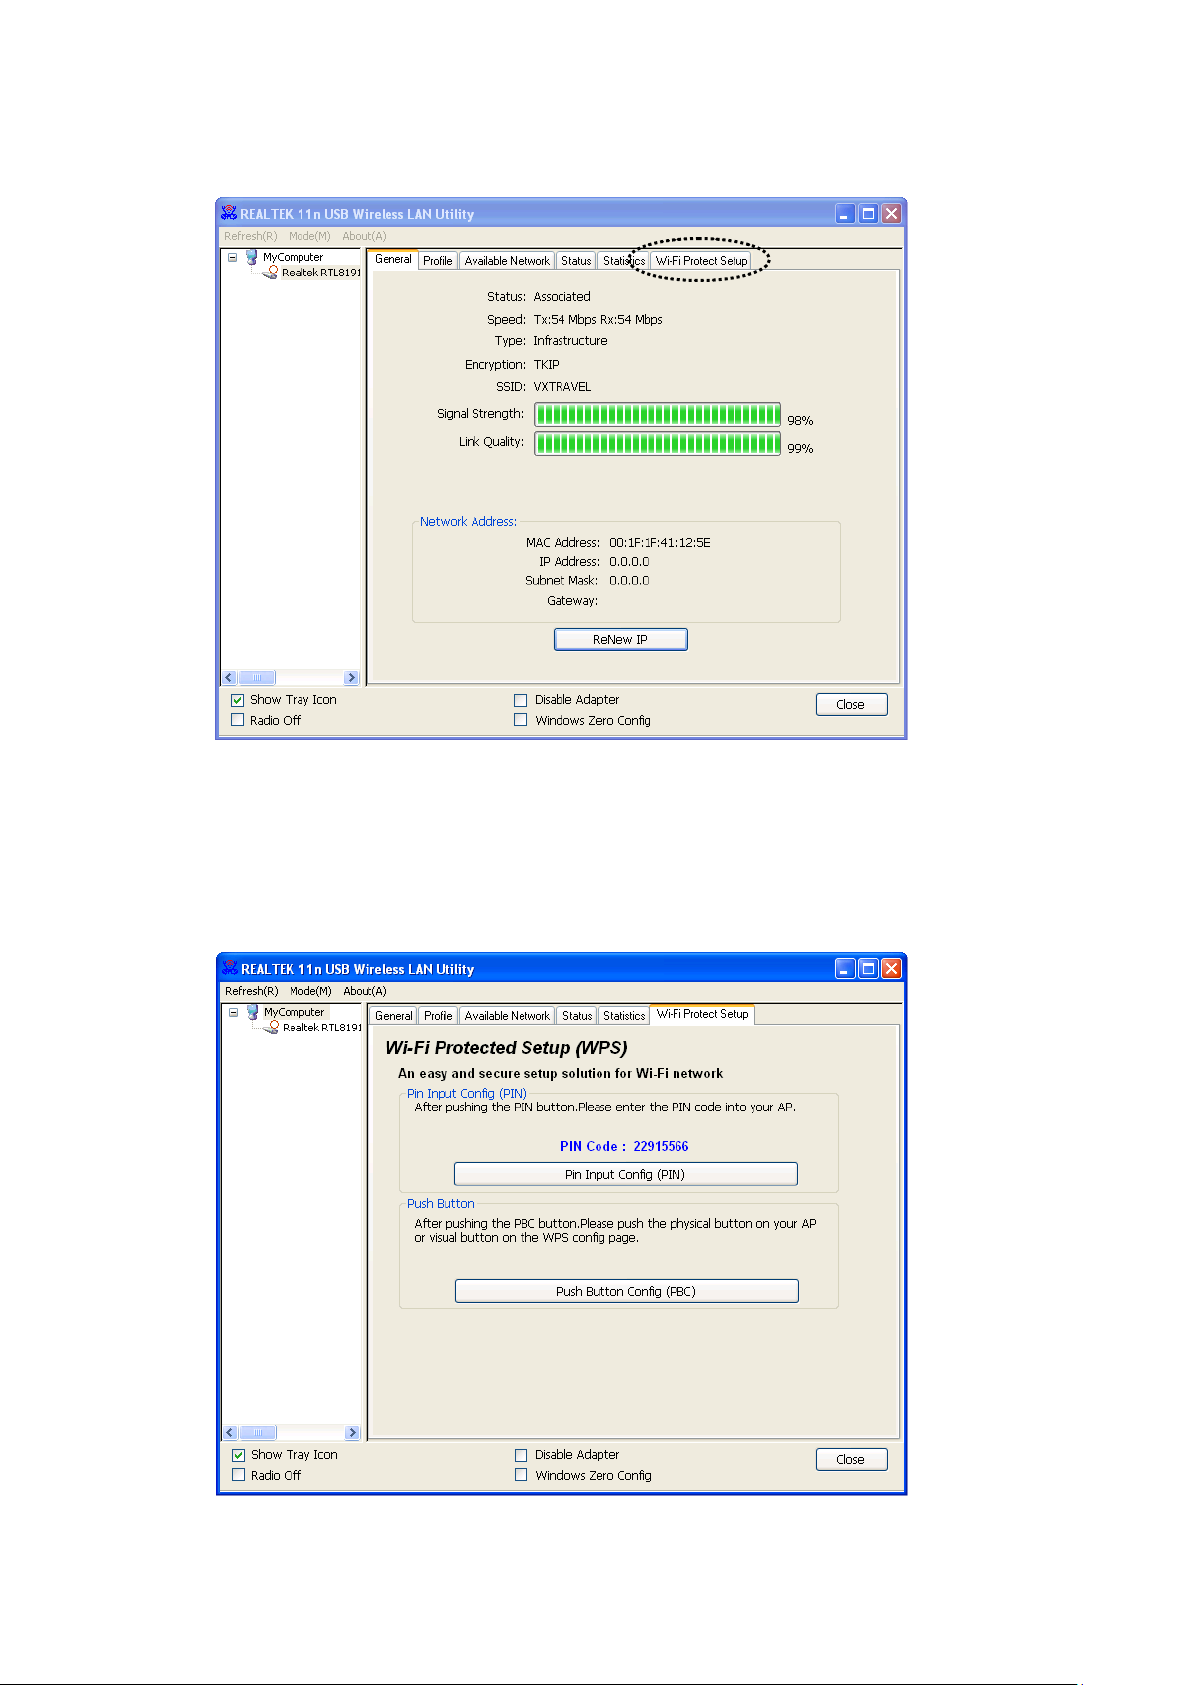
2. Click ‘Wi-Fi Protect Setup’ menu.
3. You can use PIN code or Push-Button configuration, and
WPS-compatible wireless access point must use the same type of WPS.
For instructi ons on setup each type of WPS, see next 2 chapters for
detailed instructions.
35
Page 44
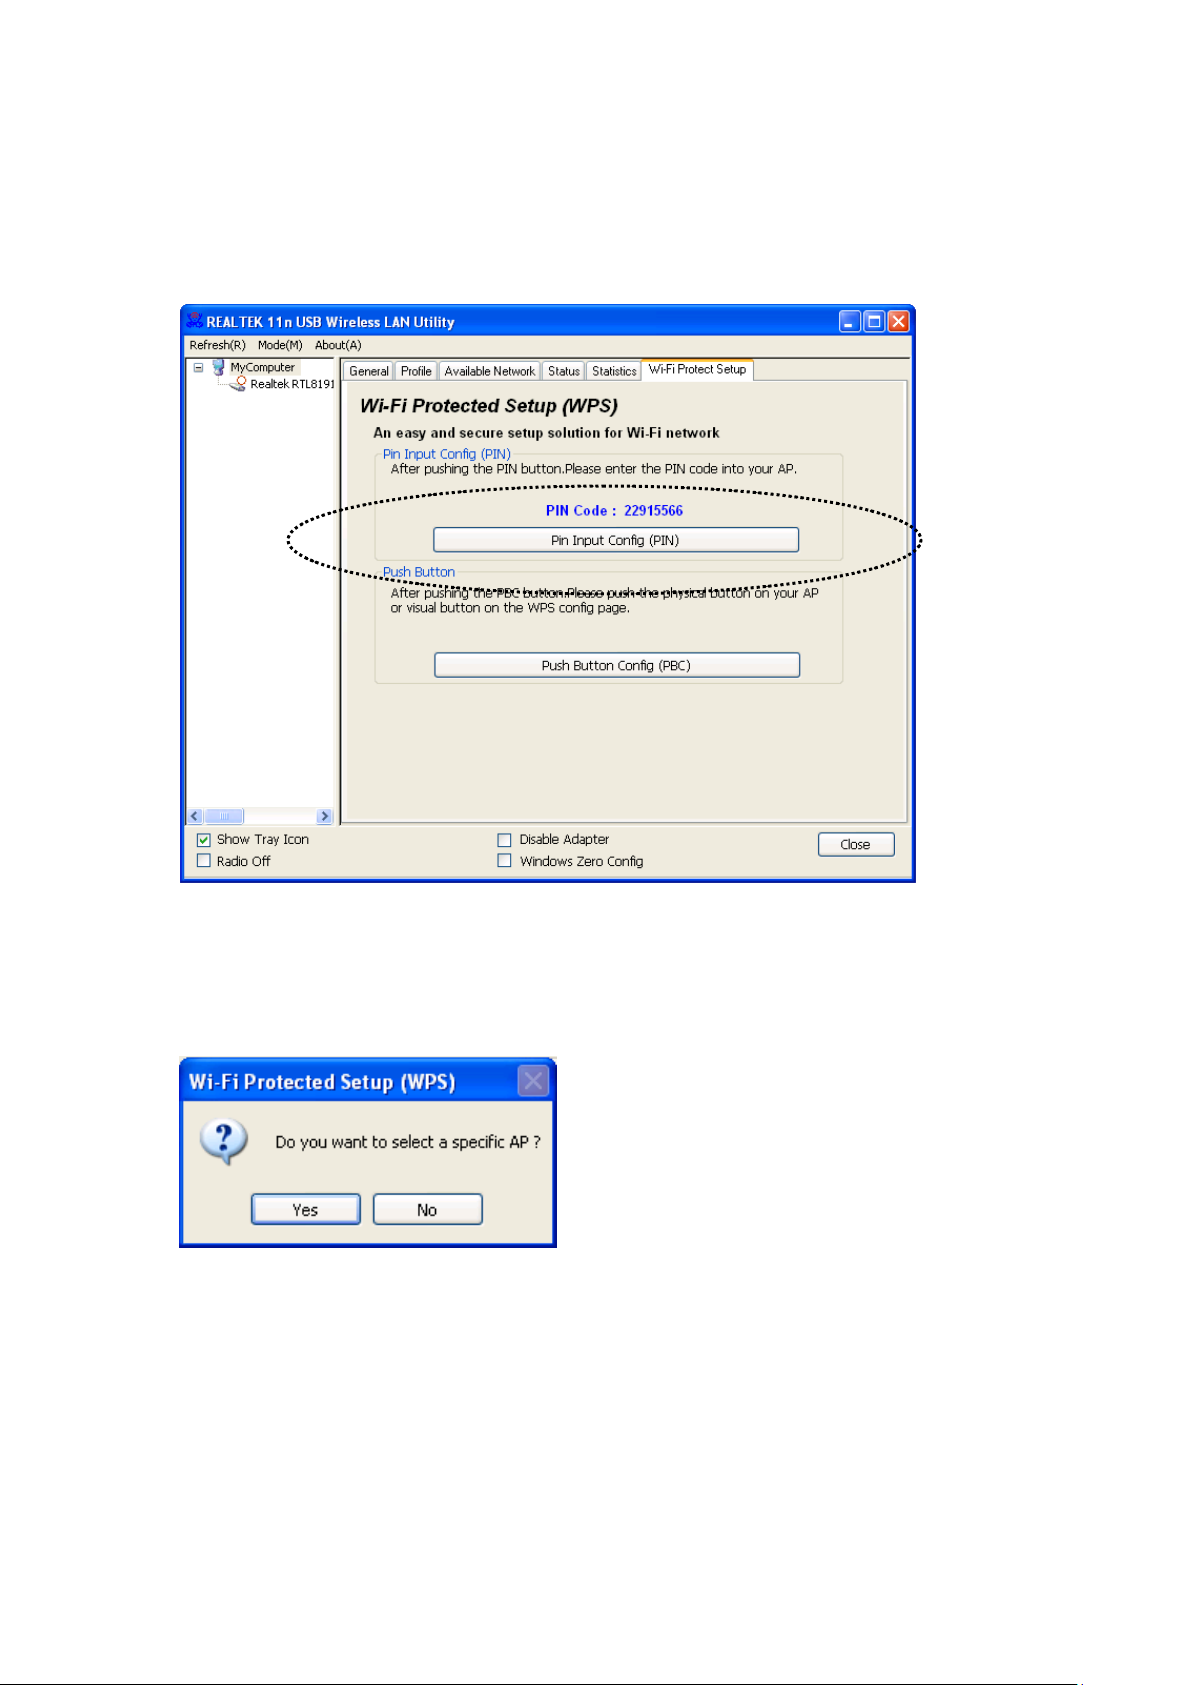
2-6-1 PIN Code
To use PIN Code, please click ‘Pin Input Config (PIN)’ button:
You’ll be prompted to select an access point you w ish to connect. If you
know its SSID, click ‘Yes’, otherwise click ‘No’.
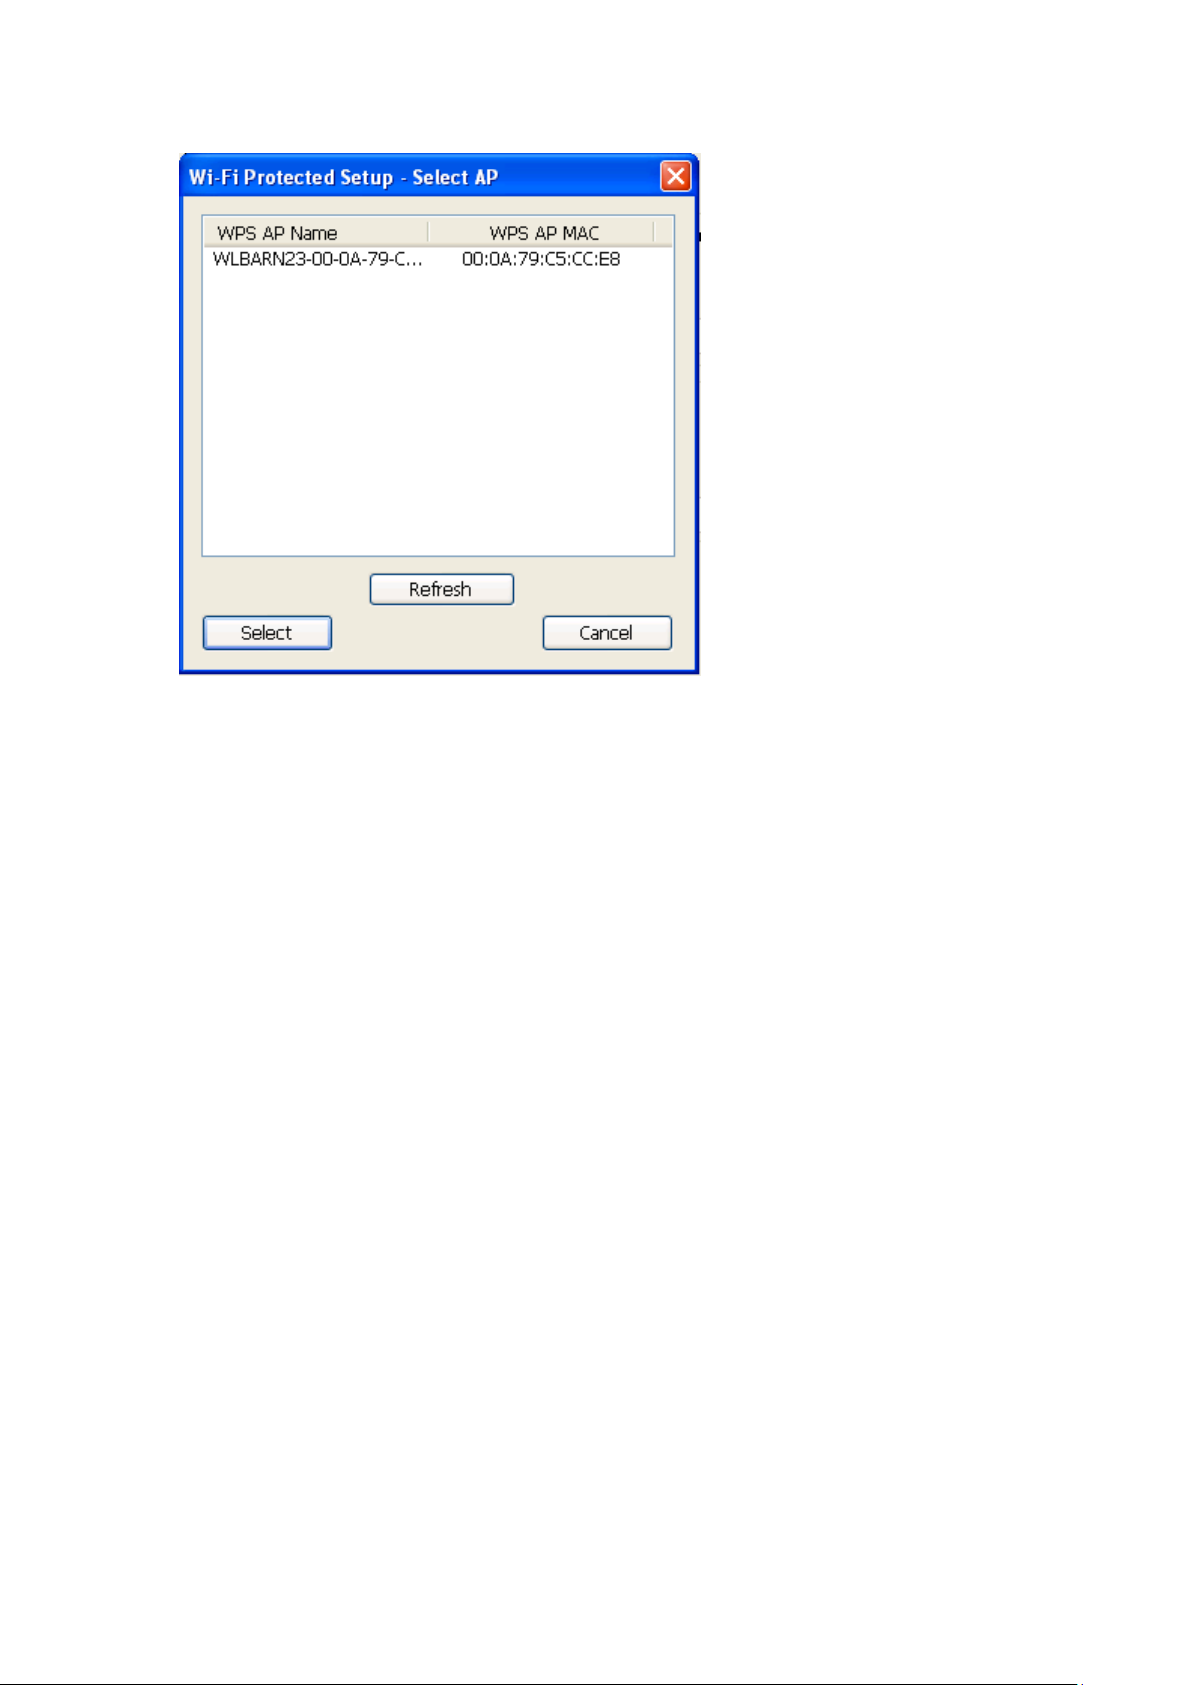
If you select ‘Yes’, a list of all WPS-compatible AP nearby will be
displayed; you can click ‘Refresh’ to rescan, then select an AP and click
‘Select’ button.
36
Page 45
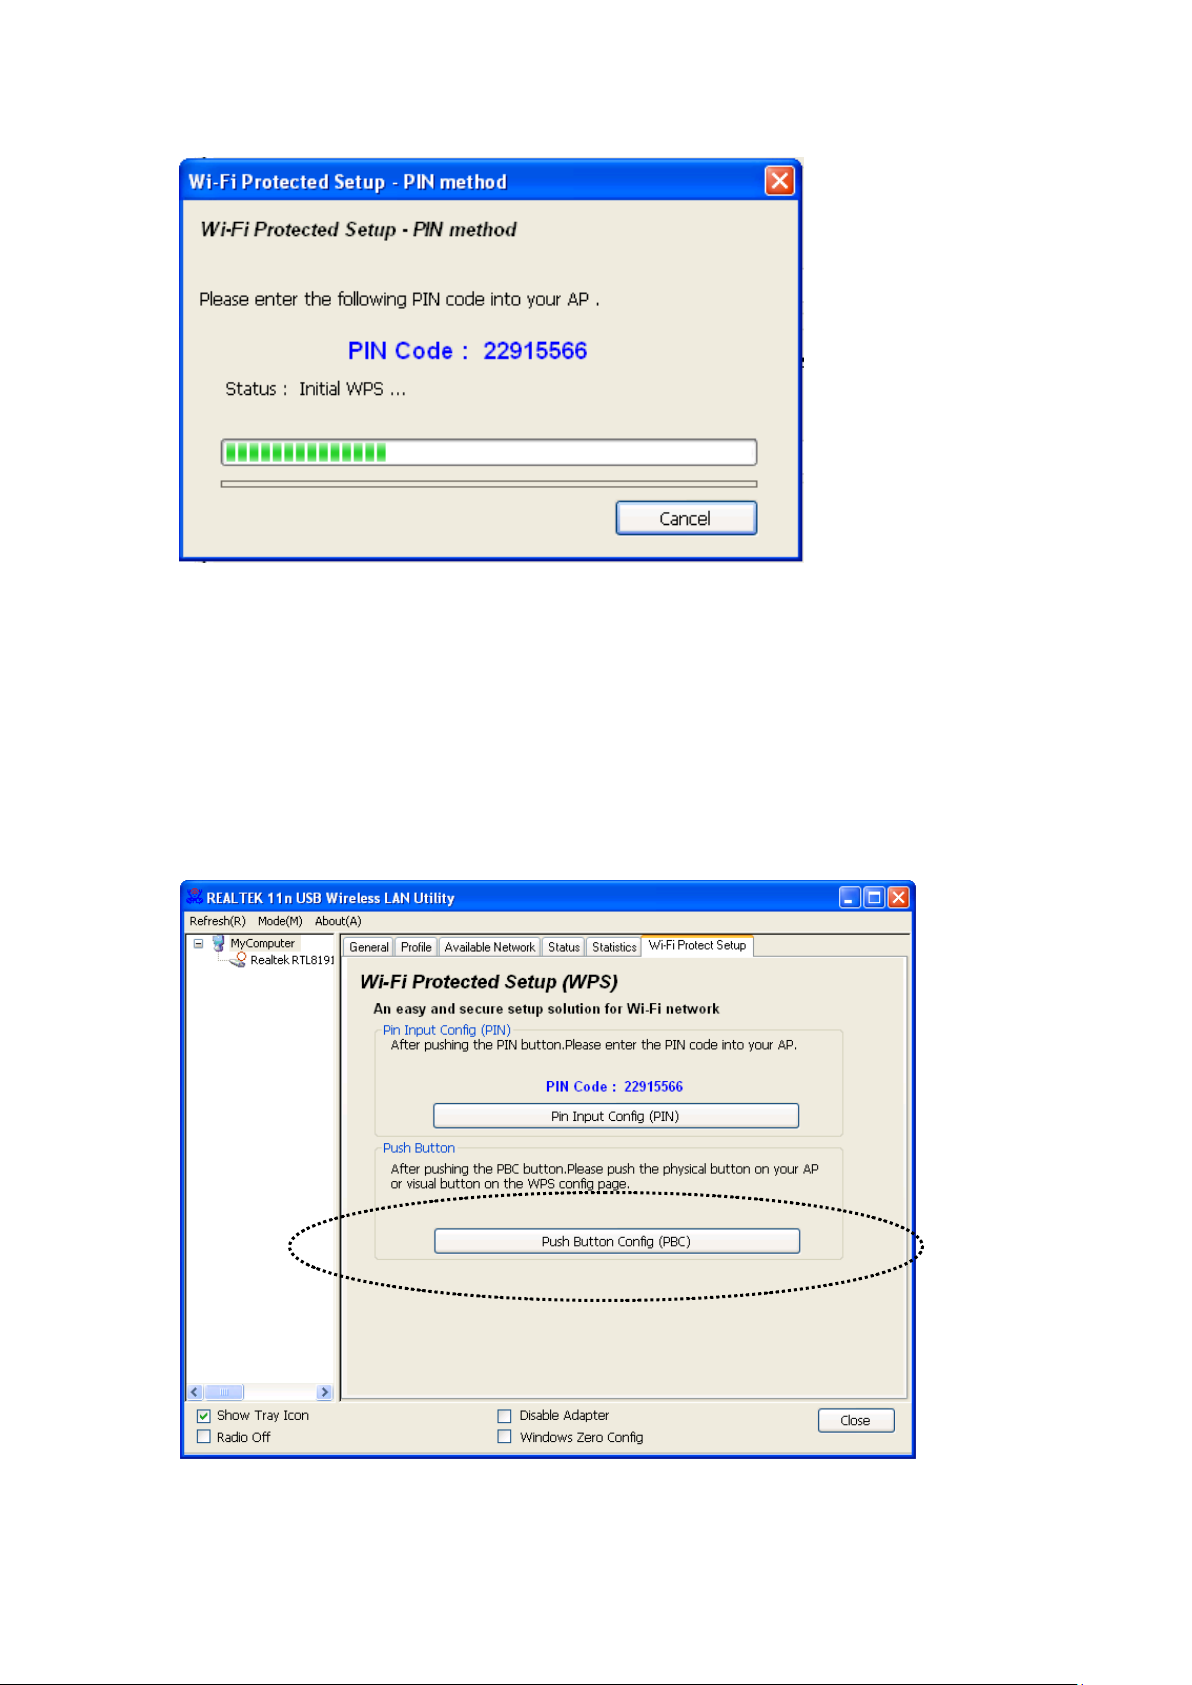
If you select ‘No’, wireless network adapter will prompt you to enter
8-digit PIN code into your AP, without selecting an AP in advanc e.
After you se le ct ‘Yes’ or ‘No’ in previous step, network adapter will
attempt to c onnect to WPS-compatible AP , and an 8-digit number will
appear. Please in p ut t his number to AP’s configuration menu within 2
minutes, and network ada pter will establish secure connection with AP
automatically.
To stop this procedure be fore connection is established, click ‘Cancel’.
37
Page 46
2-6-2 Push Button
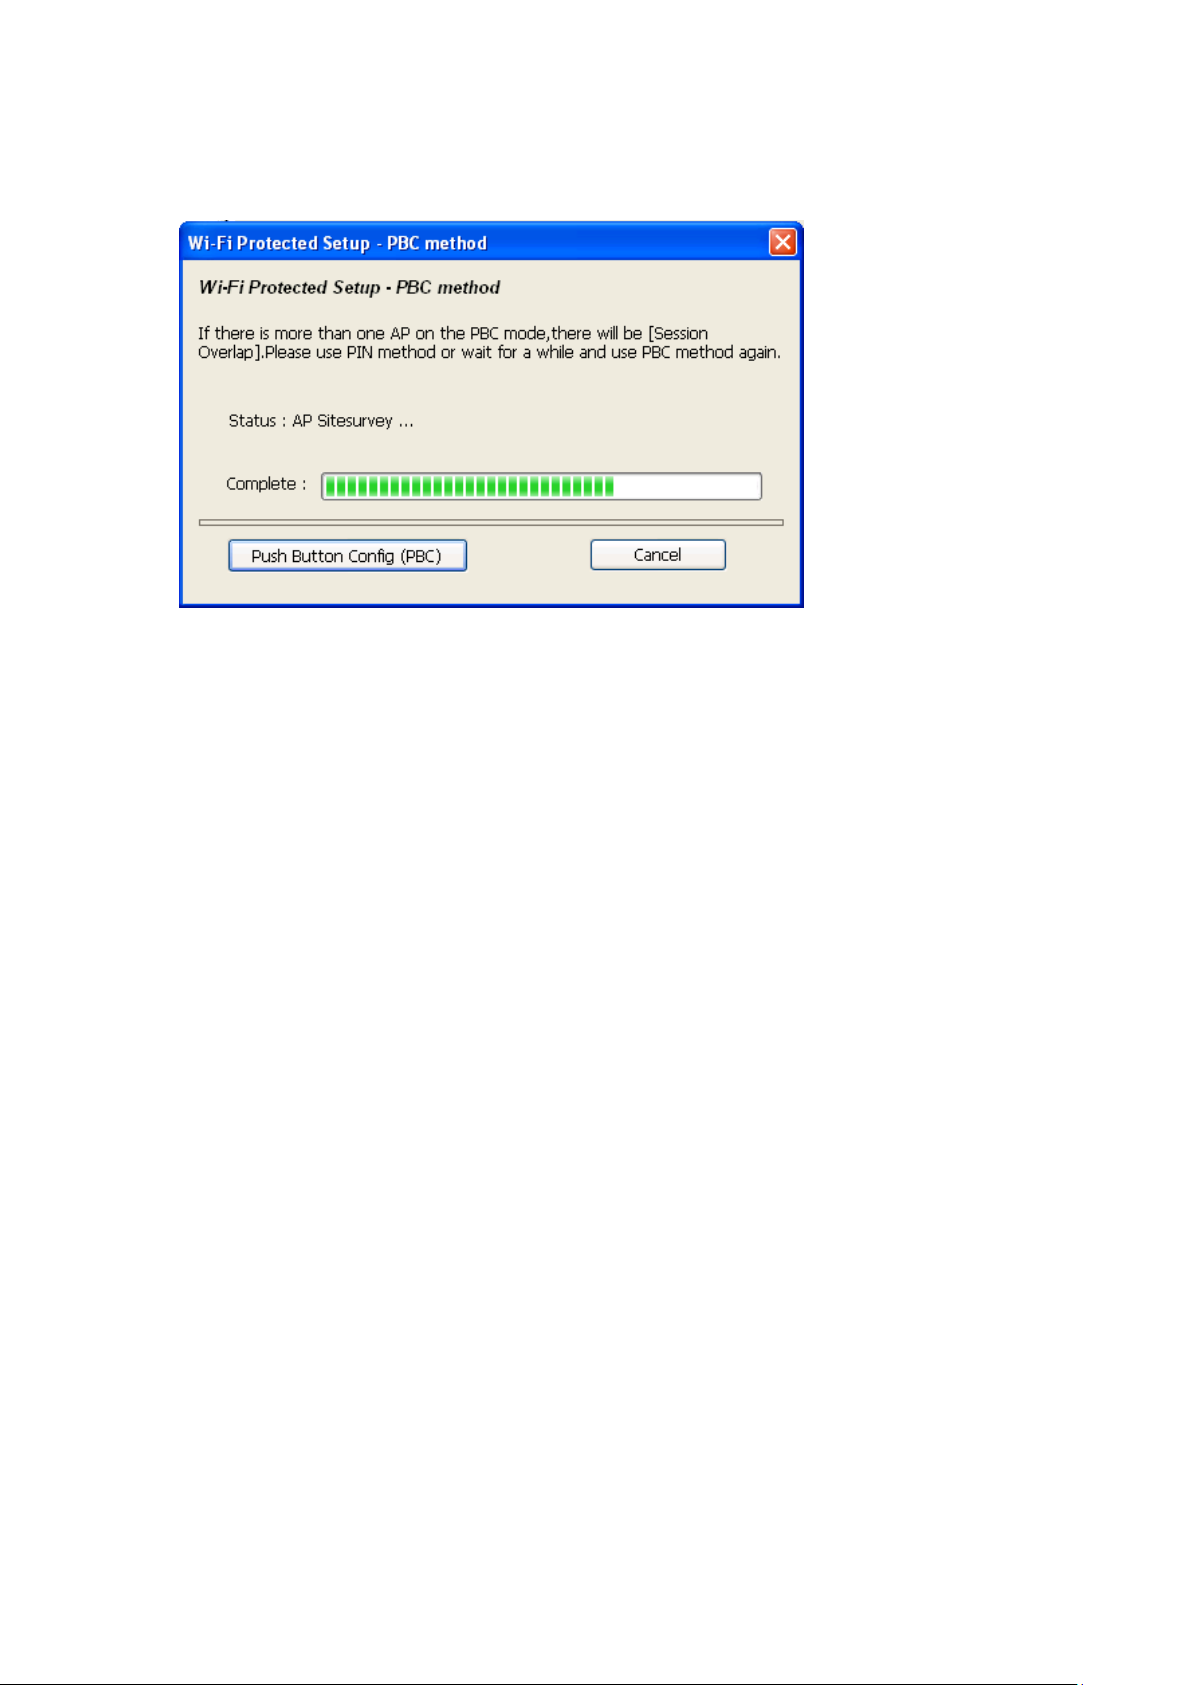
To use Push-Button WPS configurati on, ple a se click ‘Push Button Config
(PBC)’ button. This is the easiest way to establish secure connection by
WPS, but if there’re more tha n one WP S -c ompatible A P using
Push-Button config, please use PIN Code instead.
38
Page 47
After you cl ick Push Button Config, a m essage box will appear:
Please acti vate Push-Button function on wireless access point now, and
wireless network adapte r will establi sh secure connection with access
point within one minute.
39
Page 48
CHAPTER III: Soft-AP Function
Excepting become a wireless client of other wireless access points, this
wireless adapter can act as a wireless service provider also! You can
switch this wire le ss adapter’s operating mode to ‘AP’ mode to simulate
the function of a real wireless access point by software, and all other
computers and wireless devices can connect to your computer wir elessly,
even share the internet connection you have!
Please follow the i ns t ruc ti o ns in fol l owi ng cha pt e rs to us e the AP functi on
of your wire less adapter.
3-1 Switch to AP Mode and Station Mode
The operat ing mode of the wireless adapter is ‘Station Mode’ (becoming
a client of other wireless access point s) by default.
Please follow the f o llow i ng in str uc tio n s to sw itc h to AP mode:
1. Right-click Realtek conf iguration utility icon, and click ‘Open Co nfi g
Utility’.
40
Page 49
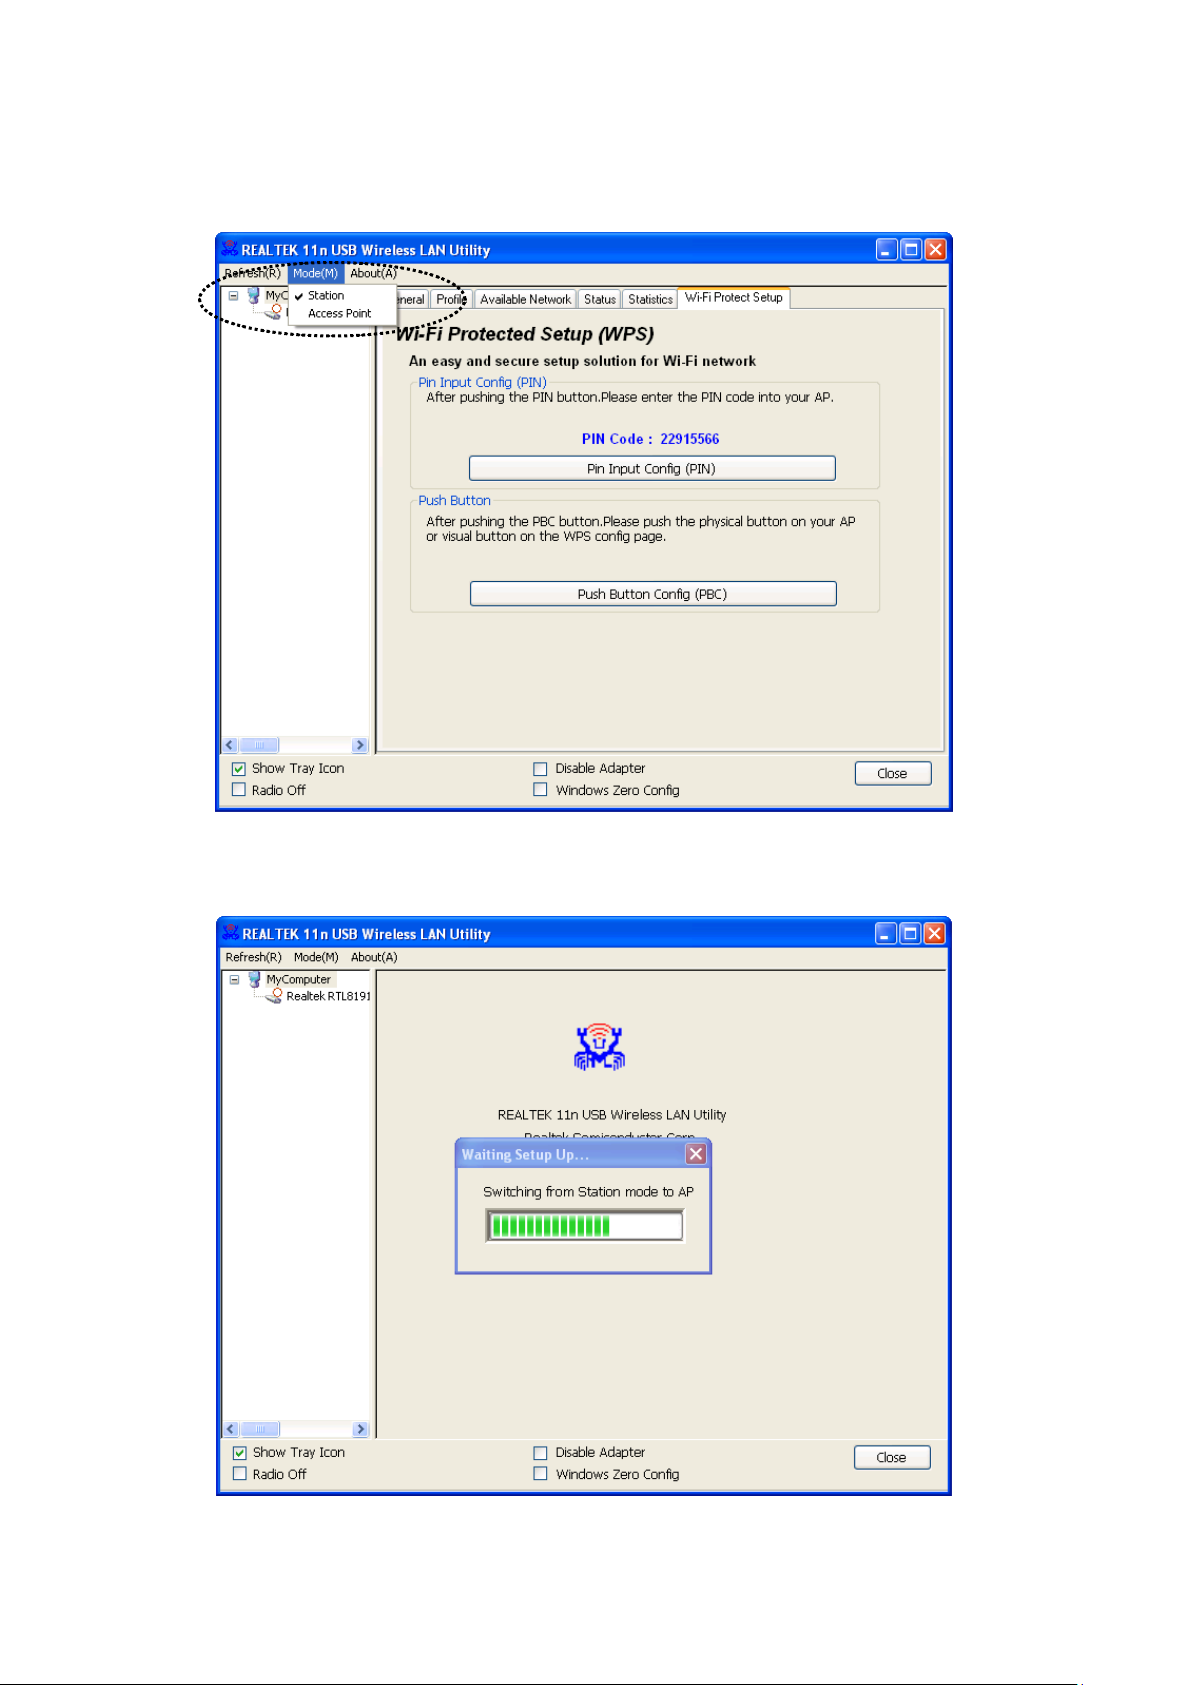
2. Select ‘Mode’, and then select ‘Access Point’.
It requires few seconds to switch to AP mode, please be patie nt.
41
Page 50
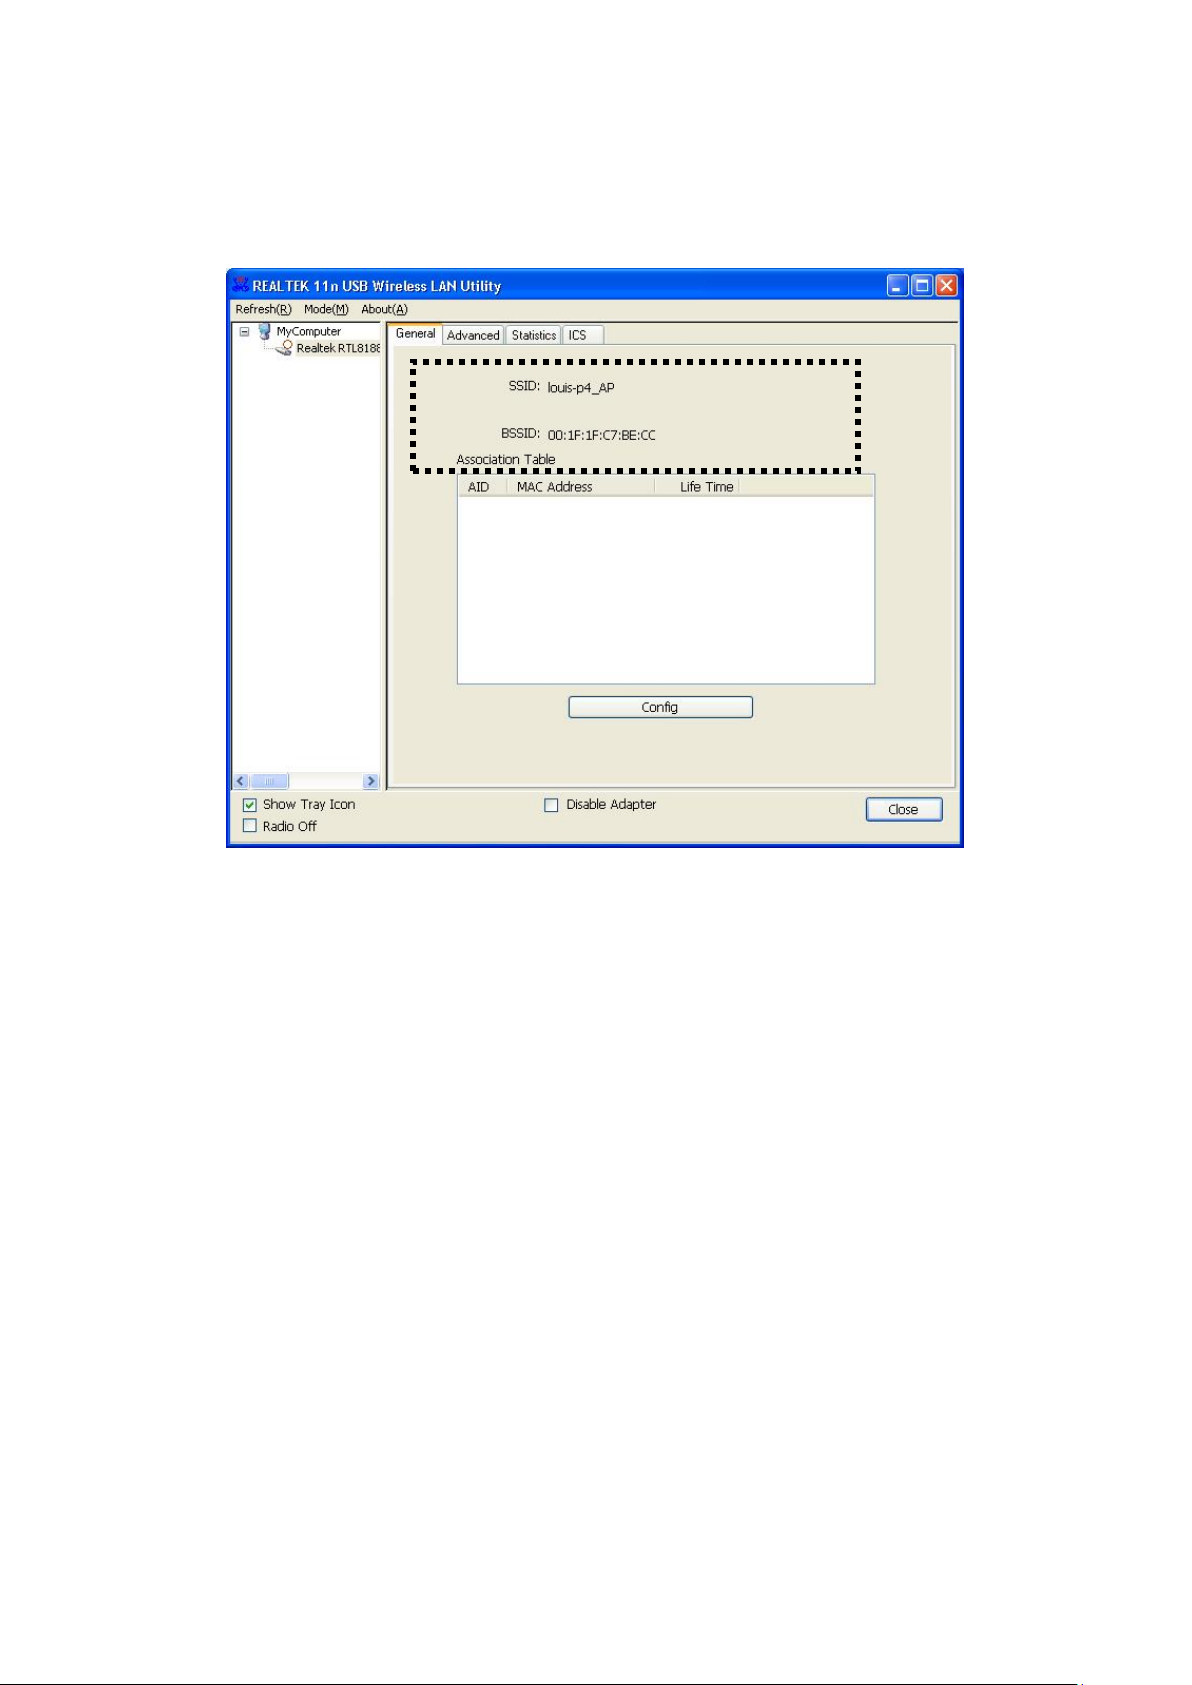
After mode switch is com ple te, you’ll see general information of software
AP, which shows AP’s SSID and con nected wireless clients.
42
Page 51
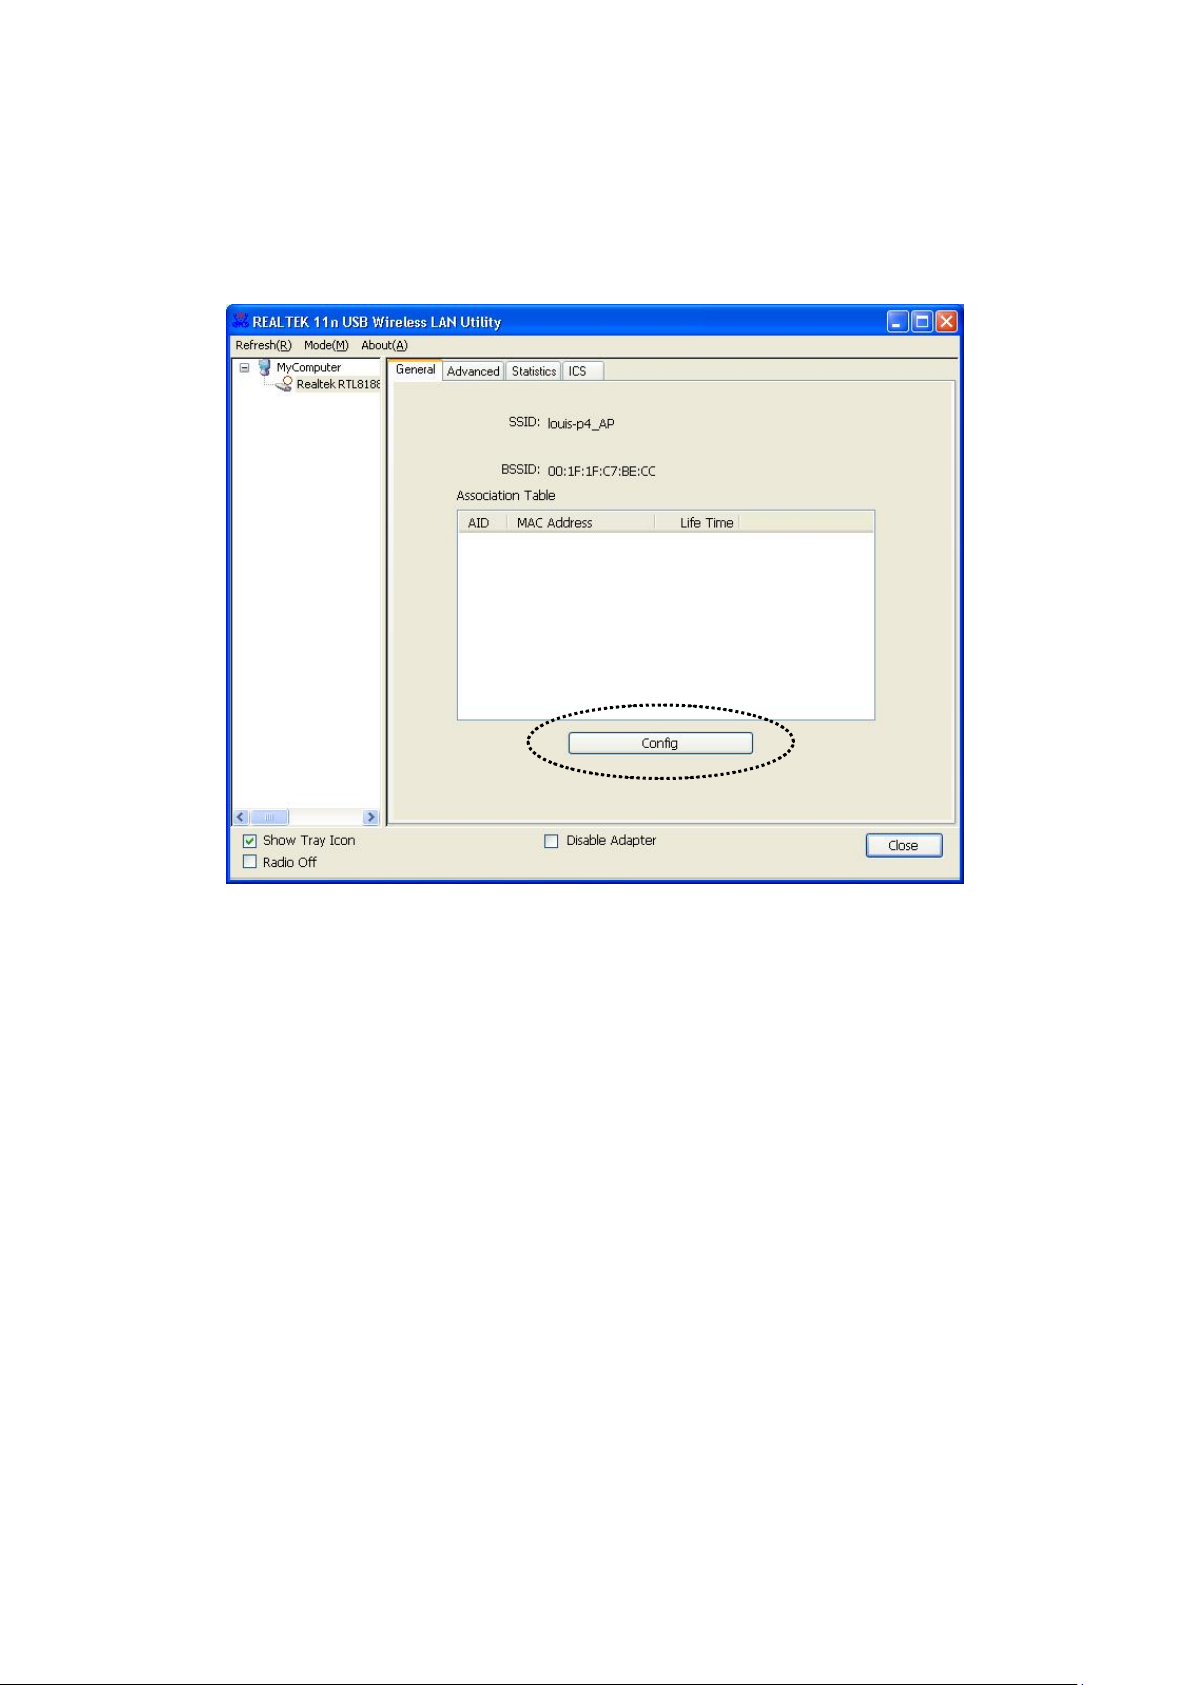
3-1-1 Configure SSID and Channel
To configure software AP, clic k ‘Config’ button:
43
Page 52
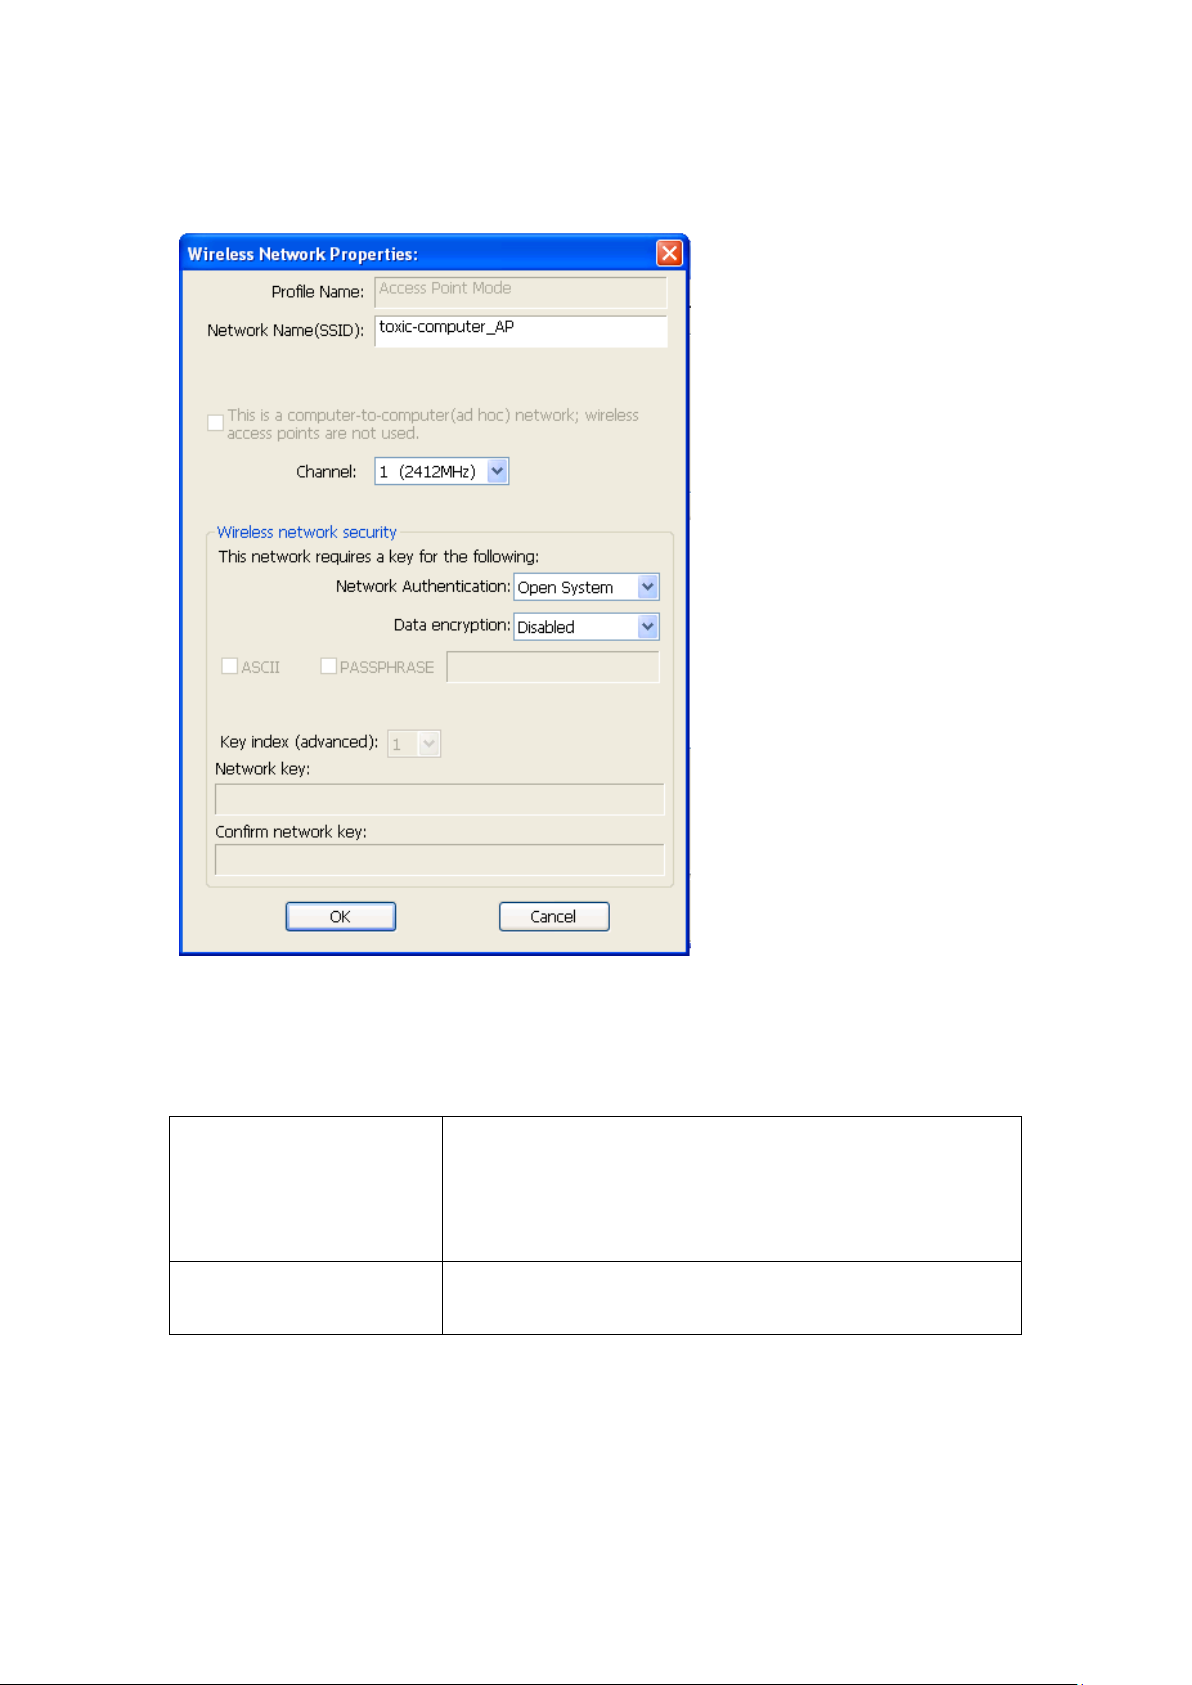
The ‘W ireless Networ k Properties’ is displayed.
Network Name
Please inpu t the SSID (the na me used to identify
excepting space.
Channel
Please select the wireless channel you wish to
use, from 1 to 13.
Note that Ad-Hoc mode is not available when network adapter i s in AP
mode. The description of major setup items are listed below:
(SSID)
this wireless access point) here. Up to 32
numerical characters can be accepted here,
To save changes, click ‘OK’; otherwise cli ck ‘Cancel’ to leave this menu
and keep settings u nt ou che d.
44
Page 53
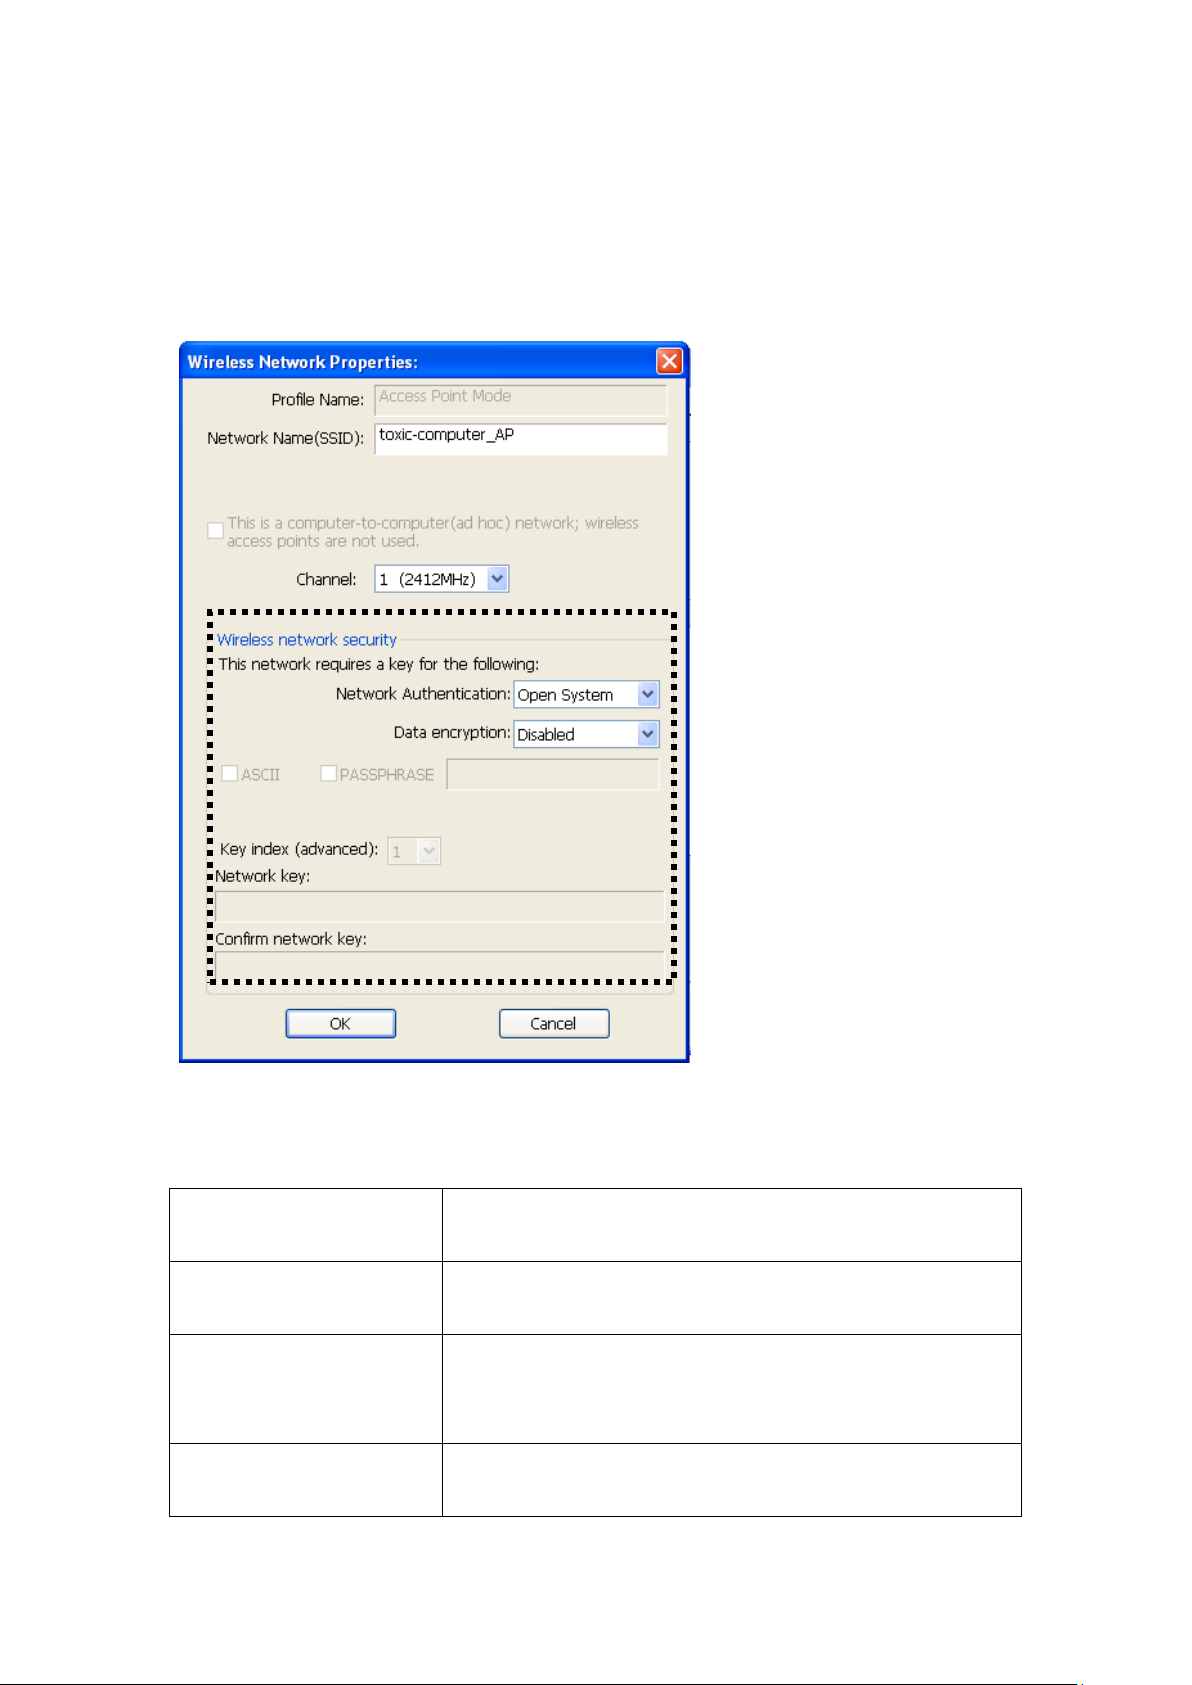
3-1-2 Setup Soft-AP Security
Network
Authentication
Select network authentication mode from
dropdown menu.
Data Encryption
Select data encryption method from dropdown
menu.
ASCII /
If the encryption method is WEP, check either
the box as WEP passphrase.
Key Index
Select WEP key index (1-4). If you don’t know
which one y ou should use, select 1.
To setup security options for Soft-AP, configure ‘Wireless N etwork
Security’ section as follow:
The descri ption of setup items about wireless security are listed be low:
PASSPHRASE
‘ASCII’ or ‘PASSPHRASE’ box and input it in
45
Page 54

Network key /
Confirm network key
IF network authentication mode is WPA, please
input WPA passphrase in both box.
To save changes, click ‘OK’; otherwise cli ck ‘Cancel’ to leave this menu
and keep settings u nt ou che d.
46
Page 55
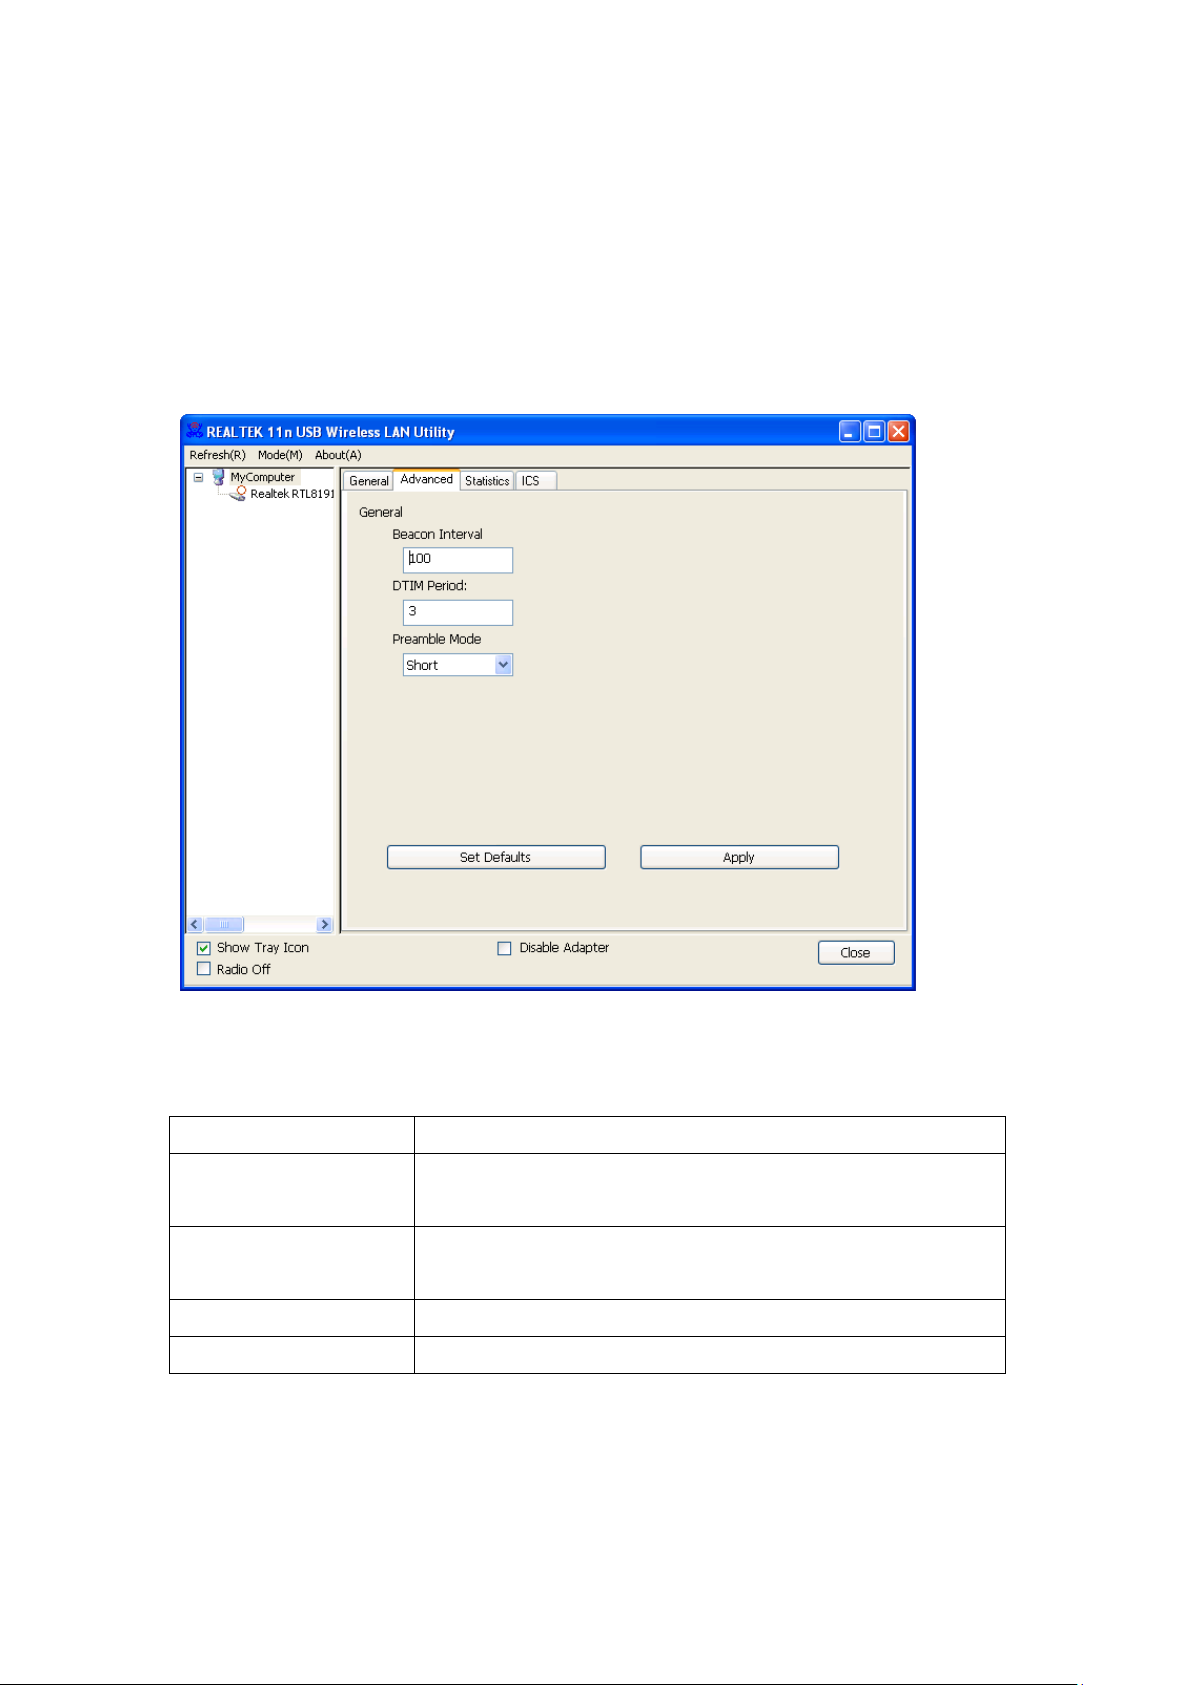
3-2 Advanced Settings
Beacon Interval
Please inpu t wireless beacon time interval here.
DTIM Period
Please inpu t DTIM (Delive ry Traffic Indication
Message) here.
Preamble Mode
Select wireless frame preamble mode (long or
short) from dropdown menu.
Set Defaults
Reset all settings back to f a ctory defau lt value.
Apply
Save change s.
If you want to setup advanced settings of software access point, select
‘Advanced’ menu. If you don’t know the meaning a nd affect s of these
settings, keep them untouched.
The descri ption of all set up items are listed below:
If you chang ed any setting here and cause problem on communicating
with wireless clients, click ‘Set Defaults’ to reset all settings back to
default setting.
47
Page 56
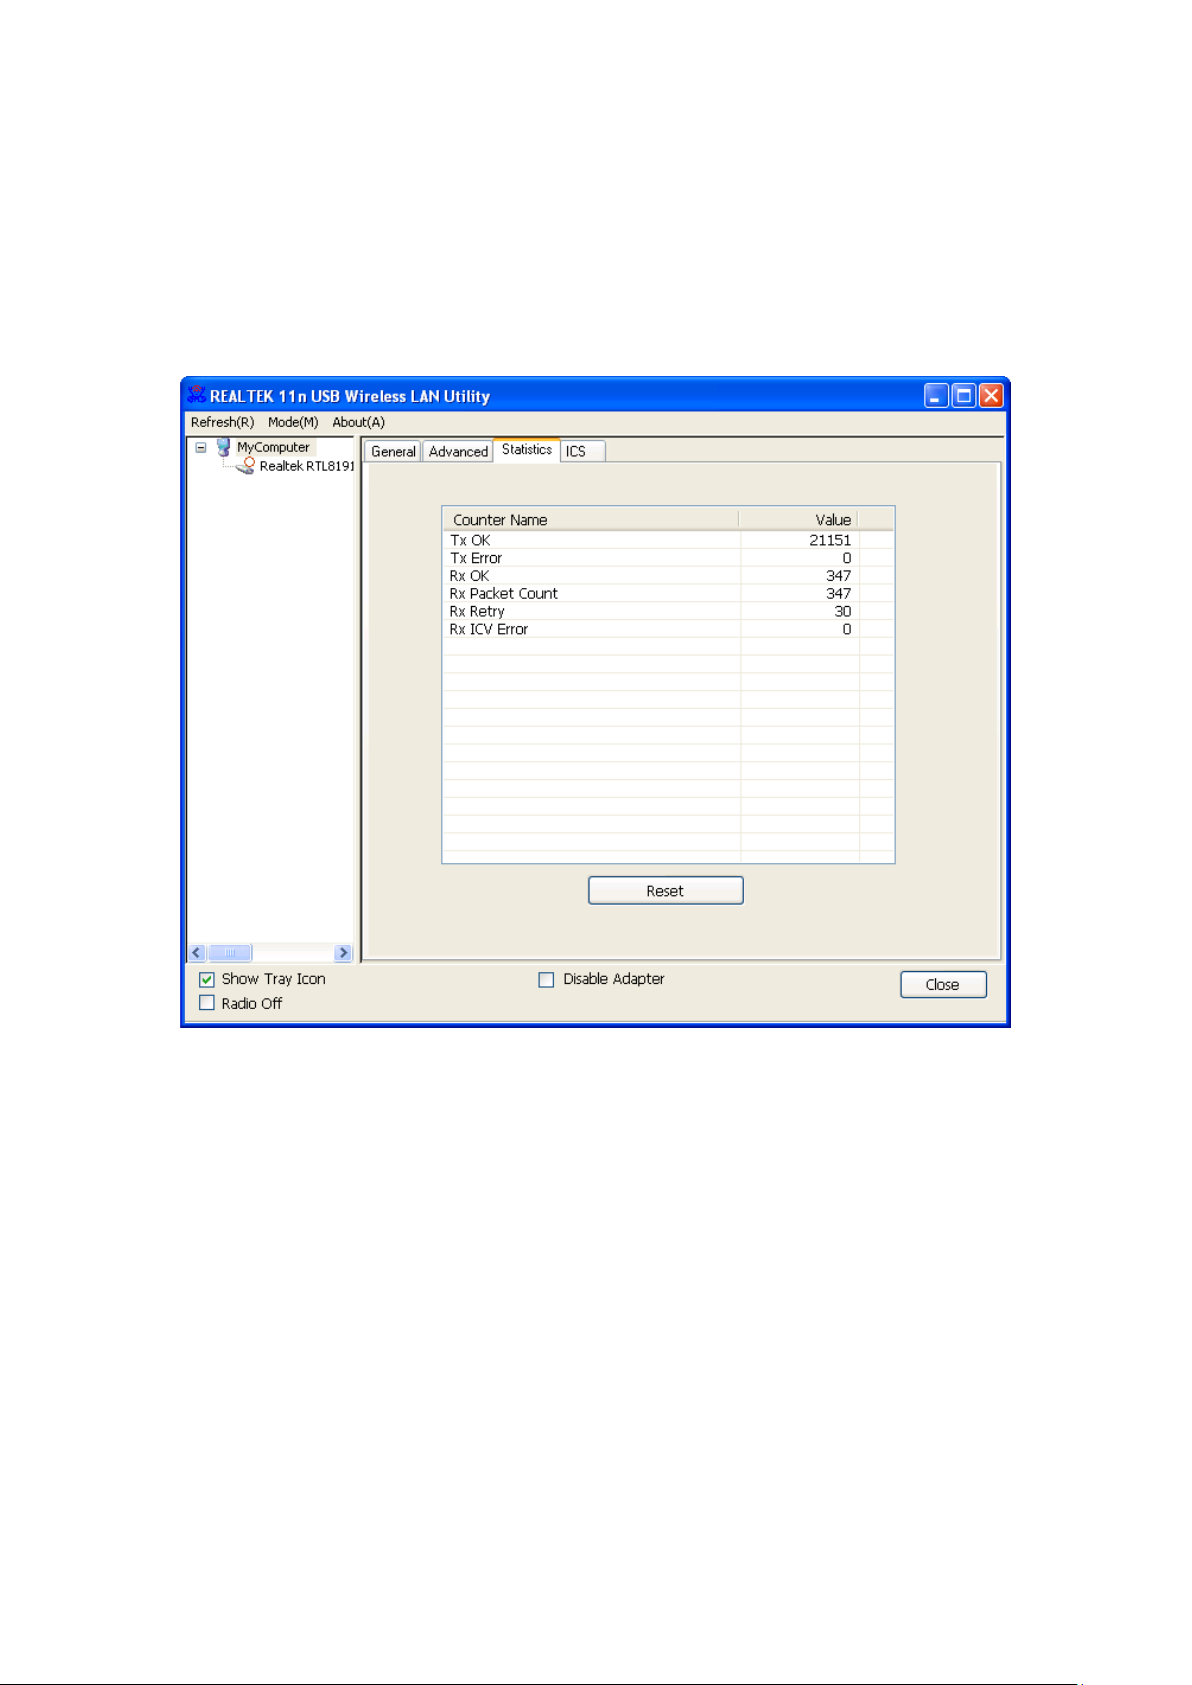
3-3 Wireless Statistics
Select ‘Statistics’ menu and the data statistics about software access point
will be display ed.
Click ‘Reset’ to reset the value of every item back to ‘0’.
48
Page 57
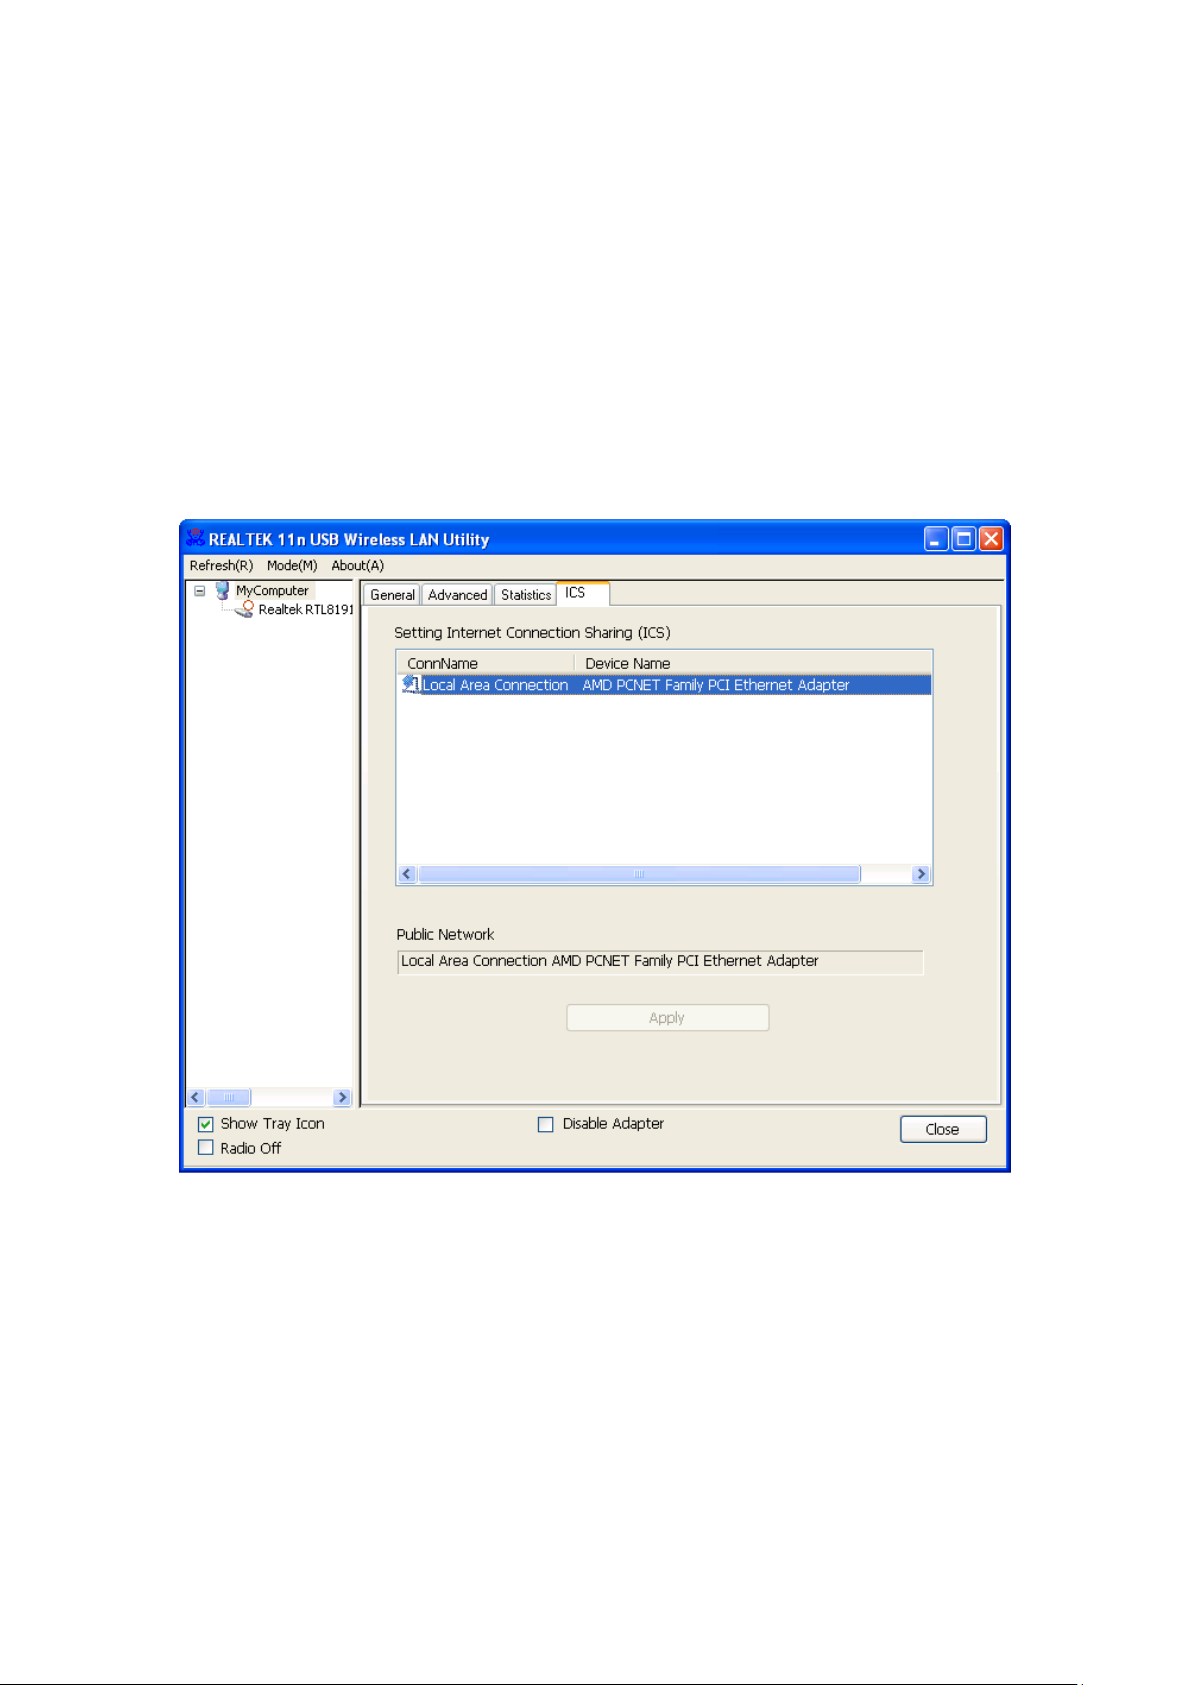
3-4 Internet Connection Sharing (ICS)
In this page, you can assign a network adapter on your computer as the
path for all w ireless clie nts to get connected to Internet.
If you have o nly one networ k adapter (exc ept t his sof tw a re acc e ss po i nt),
you don’t have to select network adapter here; if you have more than one
network ada pter, select the one you wish to be used as Internet gateway.
Click ‘Apply’ to save changes (‘Apply’ is grayed out when no changes
are made in t his page).
49
Page 58

CHAPTER IV: Appendix
4-1 Hardware Specification
Standards: IEEE 802.11a/b/g/n/ac
Interface: USB 3.0 (USB 2.0 Compatible)
Frequency Band: 2.4000~2.4835GHz (subject to local regulations)
5.150~5.825GHz (subject to local regulations)
Data Rate:
11a: 6/9/12/24/36/48/54Mbps;
11b: 1/2/5.5/11Mbps; 11g: 6/9/12/24/36/48/54Mbps
11n (20MHz): MCS0-15, up to 144Mbps
11n (40MHz): MCS0-15, up to 300Mbps
11ac (80MHz): VHTMCS0-9, up to 867Mbps
Securities: WEP 64/128, WPA, WPA2 and IEEE 802.1x
Antenna: 2 internal PIFA antennas (2.4G/5G 2dBi)
Drivers: Windows XP / Vista / 7 / 8, Linux, MAC OS
LED: Link/Act/WPS
TX Power: 2.4GHz: 11b(11M): 16±1.5 dBm , 11g(54M): 14±1.5 dBm
11n(20MHz, MCS7): 14±1.5 dBm,
11n(40MHz, MCS7): 12±1.5 dBm
5GHz: 11a(54M): 12±1.5 dBm,
11n(20MHz, MCS7): 10±1.5 dBm,
11n(40MHz, MCS7): 10±1.5 dBm
11ac(80MHz, VHTMCS9): 10±1.0 dBm
RX Sensitivity: 2.4GHz: 11b(11M): -79±2 dBm, 11g(54M): -65±2dBm
11n(20MHz, MCS7): -64±2dBm,
11n(40MHz, MCS7): -61±2dBm
5GHz: 11a(54M): -70±2dBm,
11n(20MHz, MCS7): -67±2dBm,
11n(40MHz, MCS7): -64±2dBm,
11ac(80MHz, VHTMCS9): -51±2dBm
Dimension: 87.1 (L) x 27.2 (W) x 17.2 (H) mm
Temperature: 32~104°F (0 ~ 40°C), Humidity: 10-95% (Non-Condensing)
Certification: FCC, CE
50
Page 59

4-2 Troubleshooting
Scenario
Solution
I can’t find a ny wireless
1. Click ‘Rescan’ for few more times and
is located.
Nothing happens when I
1. Please make sure the wireless network
5. Contact the dealer of pur ch ase f or hel p.
I cannot establish
wireless access point
1. Click ‘Add to Profile’ for few more
2. If the SSID of access point you wish to
If you encou nter any proble m when you’re using this wireless network
adapter, don’t panic! Bef ore you call your dealer of purchase for help,
please check this troubleshooting table, the solut ion of your problem
could be very simple, and you can solve the problem by yourself!
access poin t / wireless
device in ‘Site Survey’
function.
see if you can find any wireless access
point or wireless device.
2. Please move closer to any known
wireless access point.
3. ‘Ad hoc’ function must be enab led for
the wireles s device you wi sh to establish
a direct wireless link.
4. Please adjust the posi ti on of network
adapter (you may have to move your
computer if you’re using a note book
computer) a nd click ‘Rescan’ button for
few more times. If you can find the
wireless access point or wir eless device
you want to connect by doing this, tr y to
move closer to the place where the
wireless access point or wir eless device
click ‘Open Config
Utility’
connection with a certain
adapter is inserted into your c omputer’s
USB port.
2. Reboot the com pute r and try agai n.
3. Remove the adapter and insert it into
another USB port.
4. Remove the driver and re-install.
times.
51
Page 60

Scenario
Solution
connect is hidde n (n oth in g di spla y e d in
‘SSID’ field in ‘Site Survey’ function),
adapter to his / her access point’s list.
The network is slow /
1. Move closer to the place where access
above.
you have to i nput correct SSID of the
access poin t you wish to connect. Please
contact the owne r of acc ess point to ask
for correct SSID.
3. You have to input c or rec t pas s phr as e /
security ke y to connect an a ccess point
with encryption. Please contact the
owner of access point to ask for correct
passphrase / security key.
4. The access point you wish to connect
only allows ne tw o rk a da pte rs with
specific MAC address to establish
connection. Please go to ‘Status’ menu
and write the value of ‘MAC Address’
down, then prese nt th is val ue to th e
owner of access point so he / she can add
having problem when
transferring large files
the MAC address of your network
point is located.
2. There could be too much people using
the same ra dio channel. Ask the owner
of the access point to change the c hannel
number.
Please try one or more solutions listed
52
Page 61

4-3 Glossary
1. What is the IEEE 8 02.11g standard?
802.11g is the new IEEE standard for high-spee d wireless LA N
communications that provides for up to 54 Mbps data rate in the 2.4
GHz band. 802.11g is quickly becoming the next mainstream
wireless LAN technology for the hom e, office and public networks.
802.11g defines the use of the same OFDM modulation technique
specified i n IEEE 802.11a for the 5 GHz freque ncy band and applies
it in the same 2.4 GHz frequency band as IEEE 802.11b. The
802.1 1 g sta n dar d re q uir es ba c kwa r d com pa tib il ity with 8 02. 11b.
The standar d specifically calls for:
A. A new physical layer for the 802.11 Medium Access Control
(MAC) in the 2.4 GHz frequency band, known as the extended
rate PHY (ERP). The ERP adds OFDM as a mandatory new
coding scheme for 6, 12 and 24 Mbps (manda tory speeds), and 18,
36, 48 and 54 Mbps (optional speeds). The ERP includes the
modulation schemes found in 802.11b incl uding CCK for 1 1 and
5.5 Mbps an d Barker code modulation for 2 and 1 Mbps.
B. A protection mechanism called RTS/CTS that governs how
802.1 1 g de vic e s and 80 2. 11b devic es in ter op er at e.
2. What is the IEEE 8 02.11b standard?
The IEEE 802.11b Wireless LAN standard subcommittee , which
formulates the standard f or the industr y. The objective is to enable
wireless LAN hardware from different manufactures to
communicate.
3. What does IEEE 802.11 feature support?
The product supports the f ollowing IEE E 802.11 functions:
CSMA/CA plus Acknowledge Protocol
Multi-Channel Roaming
Automatic R ate Selection
RTS/CTS Feature
Fragmentation
Power Mana gement
4. What is Ad-hoc?
An Ad-hoc integrated wireless LAN is a group of computers, each
has a Wireless LAN adapter, Connecte d as an independent wireless
LAN. Ad hoc wireless LAN is a pplicable at a departmental scale for
53
Page 62

a branch or SOHO operation.
5. What is Infrastructu re?
An integrated wireless and wireless and wired LAN is called an
Infrastructure configuration. Infra structure is a pplicable to enterprise
scale for wireless access to central database, or wireless application
for mobile w orkers.
6. What is BSS ID?
A specific Ad hoc LAN is called a Basic Service Set (BSS).
Computers in a BSS must be configured w ith the same BSS ID.
7. What is WEP?
WEP is Wired Equivalent Privacy, a data privacy mechanism based
on a 40 bit shared key algorithm, as described in the IEEE 802 .11
standard.
8. What is TKIP?
TKIP is a quick-fix method to quic kly overcome the inherent
weaknesses in WEP security, especially the reuse of encryption keys.
TKIP is involved in the IEEE 802.11i WLAN security standard, and
the specific a tion might be officially released by early 2003.
9. What is AES?
AES (Advanced Encryption St andard), a chip-based security, has
been devel oped to ensure the highest degr ee of security and
authenticity for digita l information, wherever an d however
communicated or stored, while making more effi cient use of
hardware and/or software than previous encryption standards. It is
also included in IEEE 802.11i standard. Compare with AES, TKIP is
a temporary protocol for repl aci ng W EP security until manufacturers
implement AES at the hardware level.
10. Can Wireless products support printer sharing?
Wireless products perform the same function as LAN products.
Therefore, W ireless products ca n work with Netware, Windows
2000, or other LAN operating systems to support printer or file
sharing.
11. Would the info rmation be int ercepted while transmitting on air?
WLAN features two-fold pr otection in security. On the hardware
side, as with Direct Sequence Spread Spectrum technology, it has
the inheren t security feature of scrambling. On the software side,
WLAN series offer the encryption function (WEP) to enhance
security a nd Access Control. Users can set i t up depending upon
their needs.
54
Page 63

12. What is DSSS? What is FHSS? And what are their differences?
Frequency-hoppi ng spr ea d-spectrum (FHSS) uses a narrowband
carrier that changes fre quency in a pattern that is k nown to both
transmitte r and receive r. Properly synchronized, the ne t effect is to
maintain a s ingle logical channel. To an unintended receiver, FHSS
appears to be short-duration impulse noise. Direct-sequence
spread-spectrum (DSSS) gener ates a redun dant bit pattern for each
bit to be transmitted. This bit pattern is called a chip (or chipping
code). The longer the chip is, the greater the probability that the
original data can be recove red. Even if one or more bits in the chip
are damaged during transmission, statistical techniques embedded in
the radio can recover the original data without-the need for
retransmission. To an unintended r eceiver, DSSS app e ars as low
power wideband noise and is rejected (ignored) by most narrowband
receivers.
13. What is Spread Spectrum?
Spread Spectrum technology is a wideband radio frequency
technique developed by the military for use in reliable, secure,
mission-critical communication syst ems. It is designed to trade off
bandwidth e fficiency for reliability, integrity, and security. In other
words, m or e bandwidth is consumed than in the case of narrowband
transmission, but the trade off produces a signal that is, in effect,
louder and thus easier to detect, provided that the rece iver knows the
parameters of the spread-spectrum signal being broadcast. If a
receiver is not tuned to the right freque ncy, a spread –spectrum
signal looks like bac k gro u nd noi se. T he re a re two m a in alter na ti ve s,
Direct Sequence Spread Spectrum (DS SS) and Frequenc y Hopping
Spread Spectrum (FHSS) .
14. What is WPS?
WPS stands f or Wi-Fi Protec ted Setup. It provides a simple way to
establish unencrypted or encrypted connections between wireless
clients and a c cess point automatically. User can press a software or
hardware button to activate WPS function, and WPS-compatible
wireless cl ients and access point will establish connection by
themselve s. There are two types of WPS: PBC (Push-Button
Configuration) and PIN code.
55
 Loading...