


 Loading...
NETGEAR XCM8948, XCM89P, XCM8944, XCM8924X, XCM8944F User Manual
...
Installation 
NETGEARProSAFEM6100ChassisSwitch
XCM8944, XCM8948, XCM8944F, XCM8924X, XCM89P, XCM89UP
Contents |
|
M6100 Series Front Panels...................................................................................... |
3 |
Before Installing the Switch Blade........................................................................... |
4 |
Install the Chassis......................................................................................................... |
5 |
Install the Fan Tray....................................................................................................... |
6 |
Install the Switch Blade.............................................................................................. |
7 |
Install the Power Supply............................................................................................. |
9 |
Install Optional PoE (XCM89P) or UPoE (XCM89UP) Board......................... |
10 |
Configure the Switch Blade..................................................................................... |
11 |
2
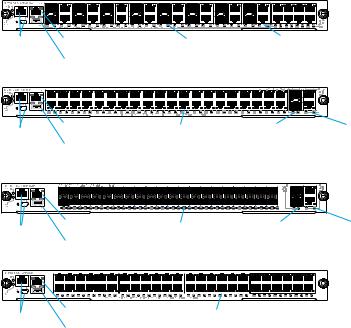
M6100 Series Front Panels
XCM8924X
Console |
OoB port |
10G SFP+ ports 10G RJ-45 ports |
||
ports |
USB port |
|
|
|
|
|
|
|
|
XCM8944 |
|
|
|
|
Console |
OoB port |
1G RJ-45 ports |
10G SFP+ ports |
10G RJ-45 ports |
ports |
USB port |
|
|
|
|
|
|
|
|
XCM8944F |
|
|
|
|
Console |
OoB port |
1G SFP ports |
10G SFP+ ports |
10G RJ-45 ports |
ports |
USB port |
|
|
|
|
|
|
|
|
XCM8948 |
|
|
|
|
Console |
OoB port |
1G RJ-45 ports |
|
|
ports |
USB port |
|
|
|
|
|
|
|
|
3
Before Installing the Switch Blade
The M6100 series switch blades are designed to be installed in the XCM8903 rack-mount switch chassis. NETGEAR recommends installing the XCM8903 rack-mount chassis into a rack before installing any switch blades. For more information about how to
install the XCM8903 rack-mount switch chassis, see the XCM8903 Hardware Installation Guide.
4
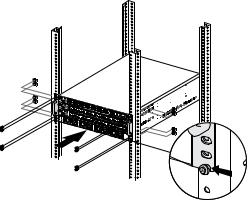
Install the Chassis
You can either bracket-mount the chassis into a rack or install the chassis using the included rails. For more information about installing the chassis using rails, see the XCM8903 Hardware Installation Guide.
¾¾ To bracket-mount the chassis:
1.Partially screw two of the included screws into the rack where you want the bottom of the chassis to rest.
2.Rest the bottom of the chassis’s brackets on the two screws.
5

3. Screw the rest of the bracket to the rack.
Install the Fan Tray
¾¾ To install the fan tray:
1.Carefully slide the fan tray all the way into the fan tray bay at the rear of the chassis.
The fan tray is connected to power when it has been inserted completely into the fan tray bay.
6
Loading...