

Page 1

Powerline Music Extender (XAU2511)
Installation Guide
Page 2

Technical Support
Thank you for selecting NETGEAR products.
After installing your device, locate the serial number on the label of your product
and use it to register your product at
https://mynetgear.com. You must register your product before you can use
NETGEAR telephone support. NETGEAR recommends registering your product
through the NETGEAR web site.
Phone (US & Canada only): 1-888-NETGEAR
Phone (Other Countries):
See http://support.netgear.com/app/answers/detail/a_id/984.
Trademarks
NETGEAR, the NETGEAR logo, and Connect with Innovation are trademarks
and/or registered trademarks of NETGEAR, Inc. and/or its subsidiaries in the
United States and/or other countries. Information is subject to change without
notice. Other brand and product names are registered trademarks or trademarks
of their respective holders. © 2012 NETGEAR, Inc. All rights reserved.
Statement of Conditions
In the interest of improving internal design, operational function, and/or reliability,
NETGEAR reserves the right to make changes to the products described in this
document without notice. NETGEAR does not assume any liability that may occur
due to the use or application of the product(s) or circuit layout(s) described herein.
Page 3

Contents
Package Contents . . . . . . . . . . . . . . . . . . . . . . . . . . . . . . . . . . . 2
Hardware Features . . . . . . . . . . . . . . . . . . . . . . . . . . . . . . . . . . . 3
Powerline Adapter Setup . . . . . . . . . . . . . . . . . . . . . . . . . . . . . . 4
Powerline Music Extender Features . . . . . . . . . . . . . . . . . . . . . . 6
Play Music Anywhere Features . . . . . . . . . . . . . . . . . . . . . . 7
Networking Features . . . . . . . . . . . . . . . . . . . . . . . . . . . . . . 8
Extend Internet and Home Network to Any Outlet . . . . . . . . 9
Set Up ReadySHARE USB Storage . . . . . . . . . . . . . . . . . . . . . 20
Advanced Setup . . . . . . . . . . . . . . . . . . . . . . . . . . . . . . . . 22
LED Descriptions . . . . . . . . . . . . . . . . . . . . . . . . . . . . . . . . 23
Button Descriptions . . . . . . . . . . . . . . . . . . . . . . . . . . . . . . 24
1
Page 4

Package Contents
USB to Audio
cable
Ethernet cable
XAU2511
Powerline
Adapter
Products sold in some
locations have a
Resource CD.
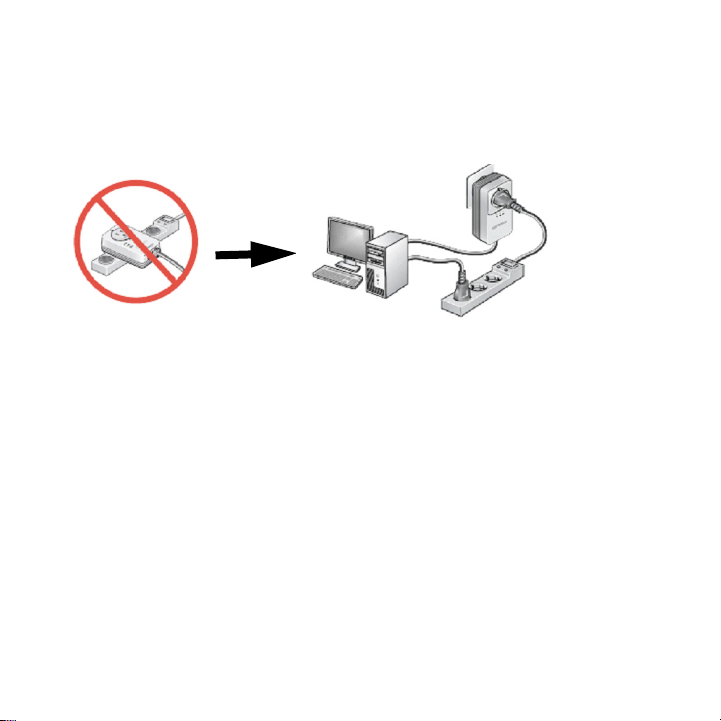
Note: NETGEAR recommends that you do not plug a Powerline
adapter directly into a power strip. See Advanced Setup on
page 22 for instructions.
2
Page 5
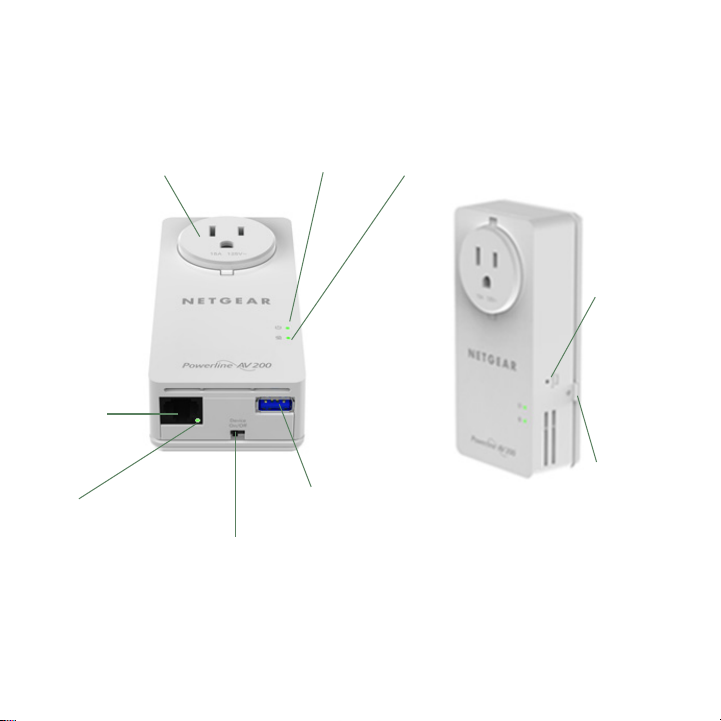
Hardware Features
Filtered
AC Socket
Ethernet
port
Ethernet LED
On/Off
switch
Power
LED
USB port
Powerline
LED
Factory
Reset
button
Security
button
3
Page 6

Powerline Adapter Setup
Make sure that the new XAU2511 adapter and your existing adapters
are on the same security key so they can work together:
1. Plug the XAU2511 into a power outlet.
2. When the Power LED lights, press the Security button for 2
seconds until the Power LED starts to blink.
3. On one of your existing Powerline adapters, press the Security
button for 2 seconds until the Power LED starts to blink.
When the Power LED stops blinking, the two devices are
connected and paired on the same network key.
4
Page 7
Troubleshooting
If the Powerline LED is not green, plug the Powerline adapter into the
wall power outlet. If there is a power strip, plug the power strip into the
Powerline adapter socket.
After you finish plugging in the adapter and if the Powerline LED is off
or red, place the Powerline adapter into another AC wall outlet.
Note: See LED Descriptions on page 23 for a description of the LEDs
5
Page 8
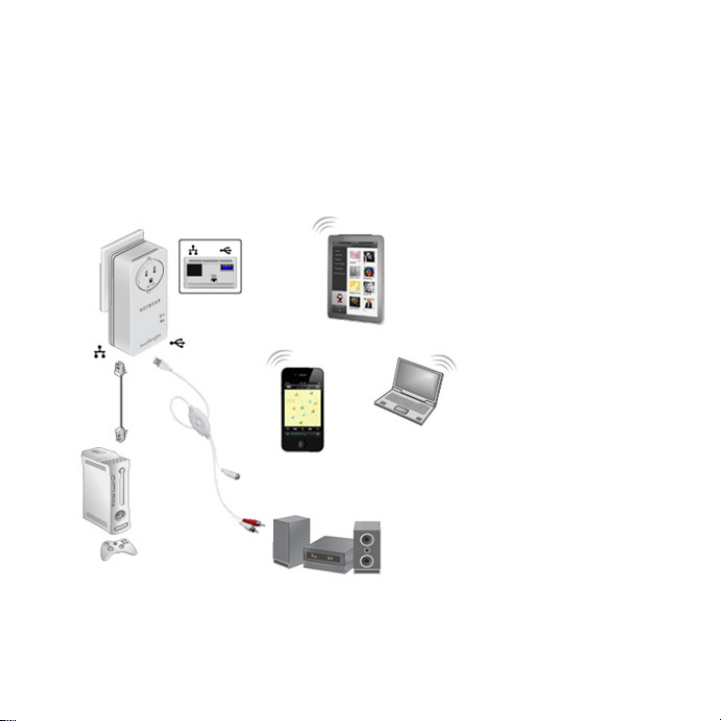
Powerline Music Extender Features
The Powerline Music Extender provides music and networking
features. The Play Music Anywhere features let you play music
wirelessly. The networking features let you connect USB storage
devices and USB printer/scanners to your home network.
6
Page 9
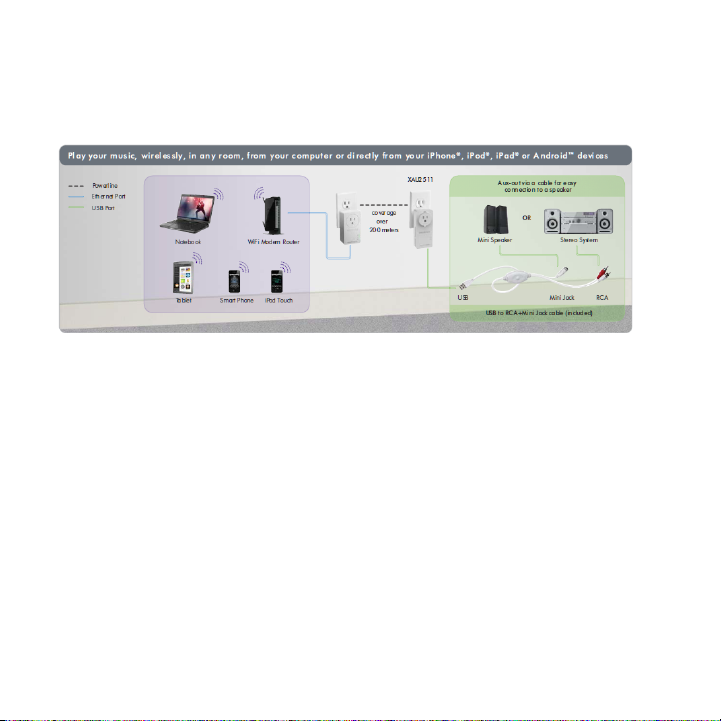
Play Music Anywhere Features
The Play Music Anywhere features are ReadySHARE AirMusic and
ReadySHARE Music.
ReadySHARE AirMusic
ReadySHARE AirMusic lets you play music wirelessly from your
iPhone, iPad, iPod touch, or Android devices. The music is played on
audio speakers, such as USB speakers or a Hi-Fi stereo system.
NETGEAR supports all types of stereo speaker because it has a USB
to RCA + 3.5 mm Mini jack cable (included).
ReadySHARE Music
ReadySHARE Music lets you play music from your computer on a
remote audio speaker, such as USB speakers or a Hi-Fi system.
7
Page 10

Networking Features
The networking features let you connect any USB printer and USB
hard drive to your home network so they can be accessed through
WiFi. The XAU2511 adapter shares the USB devices for remote
access with other users or computers anywhere in the home. The
networking features are ReadySHARE Printer and ReadySHARE
USB Storage access.
ReadySHARE Printer
ReadySHARE Printer lets you place your USB printer anywhere in
your house. When you connect the USB printer to the XAU2511 USB
port, the printer is shared among all computers on the home network.
ReadySHARE USB Storage
ReadySHARE USB Storage lets you share the content on a hard disk
or memory stick across your home network. All you do is connect the
hard disk or memory stick to the XAU2511 USB port.
8
Page 11

Extend Internet and Home Network to Any Outlet
The Powerline Music Extender uses an Ethernet port to convert a
standard electrical wall outlet into a high-speed network connection.
The high-speed network connection brings Internet connectivity to
any device with an Ethernet port, such as a game console, Blu-ray™
player, smart TV, HD set-top box, network DVR, or computer. All
devices on your home network that are plugged into a Powerline
adapter are interoperable.
9
Page 12

Set up ReadySHARE AirMusic
ReadySHARE AirMusic is for smart phones and tablets. This setup
procedure only works if you have a WiFi network at home that comes
from a WiFi router, gateway, or extender.
Step 2
Steps 4 & 5
Step 1
Router/Gateway
Step 3
1. Plug the Powerline Music Extender into any electrical outlet in
your home.
2. Connect the XAU2511 to your stereo system with the mini jack
connector or the RCA connectors.
3. Select the WiFi router/gateway network SSID on your smart
phone or tablet.
4. Select music on your smart phone or tablet and beam it to the
speaker by way of the Airplay feature.
10
Page 13

Note: Make sure that the smart phone or tablet is connected to the
WiFi network of the Router/Gateway that is connected to the XAV1601
Powerline adapter.
For iOS devices (such as an iPhone, iPad, or iPod):
1. Launch the music application (for example, iPod).
2. Click the arrow on the right side of the screen.
3. Select XAU2511-XX in the devices list.
You should hear the XAU2511 play music on the remote speaker.
For Android devices (such as a smart phone or tablet):
You can also play music on the NETGEAR Powerline Music Extender
through specific Airplay-compatible applications running on an
Android OS.
1. Launch the Google Play app (previously Android Market).
11
Page 14

2. Download a free Airplay application and launch it.Twonky Mobile
is recommended.
3. Select the music source.
4. Choose a song and play it.
5. Once the music plays, press the Beam button and select
XAU2511.
Music plays on your remote speaker through the XAU2511.
Use the USB to Audio Cable
Depending on the speaker you want to use, you can connect a USB
speaker directly into the XAU2511 or use the USB to Audio cable.
12
Page 15

Use the two RCA connectors to
connect a Hi-Fi audio system
with RCA aux-in connectors.
Or, use the 3.5 mm mini jack to
connect a speaker with the
mini jack connector.
13
Page 16
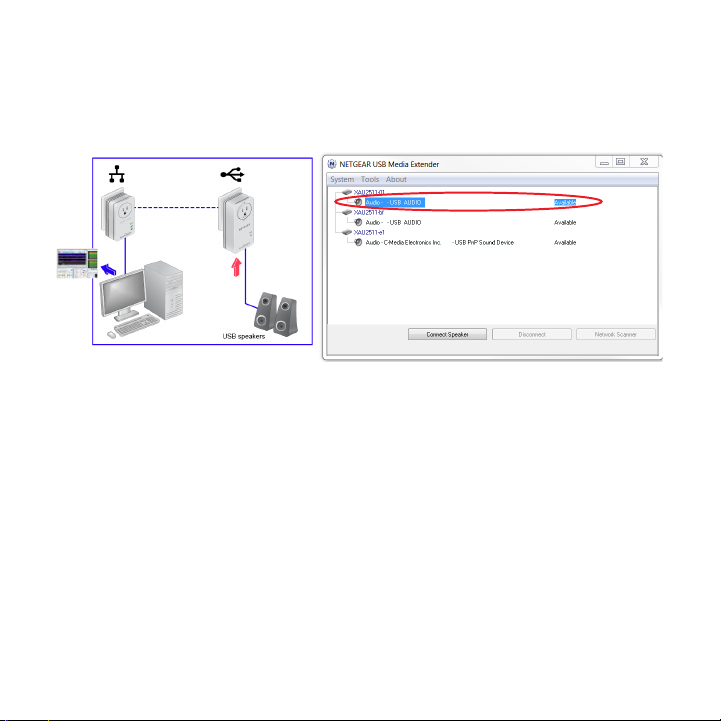
Set up ReadySHARE Music on Computers
First Installation
1. Plug the speaker into the XAU2511.
2. Insert the CD-ROM into your computer.
3. Install the NETGEAR USB Media Extender utility that is available
on the CD-ROM.
4. Launch the utility. After 30 seconds, it finds and displays the
remote XAU2511 devices on your home network.
5. Select the XAU2511 device to which you want to stream the
music by selecting the line below the corresponding XAU2511XX device. See figure in Step 1.
You can identify the device by its AirMusic name, which is shown
on the product label on the back of the XAU2511 adapter.
14
Page 17

6. Click the Connect button. The music played on the computer is
played on the remote audio system.
7. To stop playing the music on the XAU2511 device, select the
Disconnect button as shown in the figure.
After the First Installation
The NETGEAR USB Media Extender utility is always running in the
background. To display the utility on the screen, click the icon on the
Windows tray. To play music remotely, select the XAU2511-XX and
connect to it.
15
Page 18

Troubleshooting
• It takes between 30 seconds to 1 minute to detect the remote
XAU2511 the first time.
• If after pressing the Connect button the music is not played
remotely, press the Disconnect button and press the Connect
button again.
• No other device (for example, a smart phone or tablet) can use
the XAU2511 in AirMusic mode unless you press the Disconnect
button in the utility on the computer.
• All of the music and Windows sounds that come from the
computer are redirected and played remotely on the XAU2511.
To play only the music without the Windows sounds, launch an
Airplay application such as iTunes on your computer.
16
Page 19

Set up ReadySHARE Printer
You can have multiple printers or scanners working simultaneously if
each USB printer/scanner is connected to an XAU2511 adapter.
1. Connect the USB printer or scanner/fax to the USB port on the
XAU2511.
2. Install the NETGEAR USB Media Extender utility and launch the
application.
The utility is available on the CD-ROM.
17
Page 20

3. After a few seconds, the USB Media Extender utility shows that
the XAU2511-XX detected the printer/scanner/fax and is waiting
for the connection.
18
Page 21

4. Click the printer/scanner device listing and press the Connect
for Scan/Fax function button.
Your remote printer/scanner/fax is now connected as if it was
connected locally through the USB cable. To print or scan, open
the application (such as, Word or Excel), select the Print function
and select the printer.
Troubleshooting
If the remote printer/scanner is not detected, make sure that you have
already installed the printer/scanner software on the computer where
you want to print. The printer/scanner driver must be installed on the
computer first.
19
Page 22

Set Up ReadySHARE USB Storage
1. Connect any storage device to the USB port of the XAU2511.
For example, you could connect a USB hard drive or a USB
memory stick.
2. Install the NETGEAR USB Media Extender utility and launch the
application.
The utility is available on the CD-ROM.
20
Page 23

3. After a few seconds, the USB Media Extender utility shows that
the storage device is connected to the XAU2511-XX.
4. Select the storage device and press the Browse Share button.
A window displays that lets you browse the remote storage
device directories.
Troubleshooting
If you use a USB Hub to connect different USB hard drives
simultaneously, the power on the USB port of XAU2511 might not be
sufficient to power on all of the USB devices. You might need to
power on some hard disks with an external power supply.
21
Page 24

Advanced Setup
Use Advanced Setup to secure the Powerline network.
1. Plug the Powerline adapters into AC wall outlets.
2. Make sure that the Powerline LEDs on each adapter are lit.
When the LEDs are lit, it means that the adapters are associated
with each other and connected to the network.
3. On each adapter, press the Security button for 2 seconds and
then release.
After a few seconds, the Power LED stops blinking and turns
back on. The two devices are now connected and paired on a
secure random key.
22
Page 25

LED Descriptions
The LEDs indicate the status of your Powerline adapters.
• When you plug in the adapter, the Power LED lights up and
turns green.
• The Powerline LED lights up when the adapter detects at least
one other compatible Powerline device.
• The Pick A Plug feature lets you pick the electrical outlet with the
strongest link rate.
- Green: Link rate > 80 Mbps (Best)
- Amber: Link rate > 50 and < 80 Mbps (Better)
- Red: Link rate < 50 Mbps (Good)
23
Page 26

Button Descriptions
The buttons on your Powerline adapters let you do the following:
• Security button: Use the Security button to secure the Powerline
network between adapters. Press the Security button for 2
seconds on each adapter to pair adapters and to set a new
random security key.
For more information about Security settings, see Advanced
Setup on page 22.
• Power On/Off: Use the Power On/Off button to turn the device on
and off. When this button is in the Off position, the pass-through
socket still has power.
• Factory Reset: Use the Factory Reset button to return your
Powerline adapter to its default factory settings. Press the
Factory Reset button for 2 seconds with the device plugged into
the electrical socket, and then release it.
24
Page 27

Page 28

Page 29

Page 30

User Manual
You can get the user manual online at
http://downloadcenter.netgear.com.
Compliance
For the complete EU Declaration of Conformity, visit:
http://support.netgear.com/app/answers/detail/a_id/11621/.
This symbol is placed in accordance with the European Union Directive 2002/96
on the Waste Electrical and Electronic Equipment (the WEEE Directive). If
disposed of within the European Union, this product should be treated and
recycled in accordance with the laws of your jurisdiction implementing the
WEEE Directive.
For indoor use only in all EU countries and in Switzerland.
NETGEAR, Inc.
350 East Plumeria Drive
San Jose, CA 95134 USA
August 2012
 Loading...