

Page 1
NETGEAR ProSafe SSL VPN Concentrator 25 SSL312 Reference Manual
NETGEAR, Inc.
350 East Plumeria Drive
San Jose, California 95134 USA
202-10208-05
November 2008
v2.1
Page 2

© 2008 by NETGEAR, Inc. All rights reserved.
Technical Support
Please register to obtain technical support. Please retain your proof of purchase and warranty information.
To register your product, get product support or obtain product information and product documentation, go to
http://www.NETGEAR.com
out the registration card and mailing it to NETGEAR customer service.
You will find technical support information at: http://www.NETGEAR.com/
want to contact technical support by telephone, see the support information card for the correct telephone number for
your country.
. If you do not have access to the World Wide Web, you may register your product by filling
through the customer service area. If you
Trademarks
NETGEAR, the NETGEAR logo, ProSafe and Auto Uplink are trademarks or registered trademarks of NETGEAR, Inc.
Microsoft, Windows, and Wi ndow s NT are registered trademar ks of Microsoft Corporation.
Other brand and product names are registered trademarks or trademarks of their respective holders.
Statement of Conditions
In the interest of improving internal design, operational function, and/or reliability, NETGEAR reserves the right to
make changes to the products described in this document without notice.
NETGEAR does not assume any liability that may occur due to the use or application of the product(s) or circuit
layout(s) described herein.
FCC Statement
This device complies with part 15 of the FCC Rules. Operation is subject to the following two conditions:
• This device may not cause harmful interference.
• This device must accept any interference received, including interference that may cause undesired operation.
FCC Requirements for Operation in the United States
Radio Frequency Interference Warnings & Instructions This equipment has been tested and found to comply
with the limits for a Class B digital device, pursuant to part 15 of the FCC Rules. These limits are designed to provide
reasonable protection against harmful interference in a residential installation. This equipm ent generates, uses, and can
radiate radio frequency energy and, if not installed and used in accordance with the instructions, may cause harmful
interference to radio communications. However, there is no guarantee that interference will not occur in a particular
installation. If this equipment does cause harmful interference to radio or television reception, which can be determined
by turning the equipment off and on, the user is encouraged to try to correct the interference by one or more of the
following measures:
• Reorient or relocate the receiving antenna
• Increase the separation between the equipment and receiver
• Connect the equipment into an outlet on a circuit different from that to which the receiver is connected
• Consult the dealer or an experienced radio/TV technician for help.
ii
v2.1, November 2008
Page 3

EU Regulatory Compliance Statement
ProSafe SSL VPN Concentrator 25 is compliant with the following EU Council Directives: 89/336/EEC and
LVD 73/23/EEC. Compliance is verified by testing to the following standards: EN55022 Class B, EN55024 and
EN60950.
Certificate of the Manufacturer/Importer
It is hereby certified that the ProSafe SSL VPN Concentrator 25 has been suppressed in accordance with the conditions
set out in the BMPT-AmtsblVfg 243/1991 and Vfg 46/1992. The operation of some equipment (for example, test
transmitters) in accordance with the regulations may, however, be subject to certain restrictions. Please refer to the notes
in the operating instructions.
The Federal Office for Telecommunications Approvals has been notified of the placing of this equipment on the market
and has been granted the right to test the series for compliance with the regul ations.
Bestätigung des Herstellers/Importeurs
Es wird hiermit bestätigt, daß dasProSafe SSL VPN Concentrator 25 gemäß der im BMPT-AmtsblVfg 243/1991 und
Vfg 46/1992 aufgeführten Bestimmungen entstört ist. Das vorschriftsmäßige Betreiben einiger Geräte (z.B. T e stsender)
kann jedoch gewissen Beschränkungen unterliegen. Lesen Sie dazu bitte die Anmerkungen in der Betriebsanleitung.
Das Bundesamt für Zulassungen in der Telekommunikation wurde davon unterrichtet, daß dieses Gerät auf den Markt
gebracht wurde und es ist berechtigt, die Serie auf die Erfüllung der Vorschriften hin zu überprüfen.
Export
This software product and related technology is subject to U.S. export control and may be subject to export or import
regulations in other countries. Purchaser must strictly comply with all such laws and regulations. A license to export or
reexport may be required by the U.S. Department of Commerce.
Licensing
This product includes software developed by the OpenSSL Project for use in the OpenSSL Toolkit
(http://www.openssl.org/).
This product includes software developed by the Apache Sof tware Foundation (http://www.apache.org/).
This product includes SSLeay cryptographic software written by Tim Hudson (tjh@cryptsoft.com) and Eric Young
(eay@cryptsoft.com).
v2.1, November 2008
iii
Page 4

Product and Publication Details
Model Number: SSL312
Publication Date: November 2008
Product Family: Concentrator
Product Name: ProSafe SSL VPN Concentrator 25
Home or Business Product: Business
Language: English
Publication Part Number: 202-10208-05
Publication Version Number: 2.1
iv
v2.1, November 2008
Page 5

Contents
About This Manual
Conventions, Formats and Scope .................................................................................... ix
Using This Manual .............................................................................................................x
Printing this Manual ...........................................................................................................x
Revision History ..................... ... ... .... ... ... ... .......................................... ..............................xii
Chapter 1
Introduction
About the ProSafe SSL VPN Concentrator 25 ...............................................................1-1
Key Features ..................................................................................................................1-1
Web Browser Requirements ...........................................................................................1-2
What’s in the Box ............................................................................................................1-3
Hardware Description .....................................................................................................1-3
Front Panel ...............................................................................................................1-4
Back Panel ...............................................................................................................1-5
Steps for Deploying the SSL312 .....................................................................................1-5
Chapter 2
Installing the SSL312
Choosing a Network Topology ........................................................................................2-1
Single Arm ................................................................................................................2-1
Routing .................................. ................................. ................................... ............... 2-2
Initial Connection to the SSL VPN Concentrator ............................................................2-3
Accessing the Management Interface ............................................................................2-4
Configuring Basic Network Settings ...............................................................................2-6
Installing the SSL VPN Concentrator .............................................................................2-8
Managing Certificates ................................................................ .....................................2-8
Obtaining a Certificate from a Certificate Authority .................................................. 2-9
Generating a Self-Signed Certificate ......................................................................2-11
Uploading and Enabling the New Certificate ..........................................................2-12
Viewing and Deleting Certificates ..........................................................................2-14
v2.1, November 2008
v
Page 6

Steps for Further Configuration ....................................................................................2-15
Chapter 3
Authenticating Users
Authentication Domains ............................ .... ..................................................................3-1
Local User Database Authentication ..............................................................................3-2
RADIUS and NT Domain Authentication ........................................................................ 3-3
Configuring for RADIUS Domain Authentication ....................... ............................... 3-4
Configuring for NT Domain Authentication ................... ....... ...... ....... ...... ...... ....... .....3-5
LDAP Authentication ......................................................................................................3-7
Sample LDAP Attributes ..........................................................................................3-7
LDAP Attribute Rules ...............................................................................................3-8
Sample LDAP Users and Attributes Settings ............................................... .... ... ... ..3-8
Querying an LDAP Server ........................................................................................3-9
Configuring for LDAP Authentication .......................................................................3-9
Kerberos Authentication (Active Directory) ...................................................................3-11
Troubleshooting Active Directory Authentication ...................................................3-12
Deleting a Domain ........................................................................................................3-12
Chapter 4
Setting Up User and Group Access Policies
Determine Your Requirements .......................................................................................4-1
Users, Groups and Global Policies ..................... ... ... .... ... ... ... .... .....................................4-2
Global Policies .......................... ... .... ... ... ... .... ... ... ... ... .......................................... ............4-3
Editing Global Policy Settings ..................................................................................4-4
Adding and Editing Global Policies ..........................................................................4-6
Defining and Editing Global Bookmarks ...................................................................4-7
Groups Configuration .....................................................................................................4-8
Adding a New Group ....... ... ... .... ... ... ... .... .......................................... ... ... ... ... .... ........4-8
Editing Group Settings .............................................................................................4-9
Defining and Editing Group Policies .......................................................................4-11
Defining and Editing Group Bookmarks .................................................................4-12
Deleting a Group ....................................................................................................4-13
Users Configuration ......................................................................................................4-14
Adding a New User ...................................... ... ... .... ... ... ... .... ...................................4-15
Editing a User .........................................................................................................4-17
Defining and Editing User Policies .........................................................................4-20
vi
v2.1, November 2008
Page 7

Defining and Editing a User Bookmarks ................................................................4-21
Deleting a User ......................................................................................................4-22
Using Network Resource Objects to Simplify Policies ..................................................4-22
Chapter 5
Configuring the Remote Access Web Portal
Creating the Portal ....................... .... ... .......................................... ..................................5-1
Portal Options ..........................................................................................................5-2
Adding Portal Layouts ............... ... ... .......................................... ... .... ... ... ... ... .... ... ... ..5-3
Adding Terminal Services Applications to the Portal .... ... .... ... ... ... ............................5-6
Customizing the Banner ...........................................................................................5-7
Duplicating and Editing Portal Layouts ...........................................................................5-8
Preparing the Client for Using Portal Services ...................... .... ... ... ... .... ... ... ... ... .... ... ... ..5-9
Terminal Services Client Compatibility .....................................................................5-9
Creating a User Guide for Portal Services ............................................. ................5-10
Chapter 6
Configuring the SSL VPN Tunnel Client and Port Forwarding
Two Approaches for VPN ...................................................... .... ... ... ...............................6-1
SSL VPN Client Configuration ........................................................................................6-2
Adding IP Address Ranges ............. ... .... ... ... ... ... .... ... ... ... .... ... ... ... .... ... .....................6-3
Adding Routes for VPN Tunnel Clients ........ ... ... .... ... ... .......................................... ..6-4
Configuring Applications for Port Forwarding .................................................. ... .... ... ... ..6-6
Configuring Host Name Resolution ..........................................................................6-8
Chapter 7
Additional System Configuration
Configuring Network Settings .........................................................................................7-1
Sample SSL VPN Concentrator Configuration .........................................................7-1
Network Interface and Default Gateway Configuration ... .... .....................................7-2
Static Route Configuration .......................................................................................7-4
Network Host Table Settings ....................................................................................7-6
Configuring DNS Settings ........................................................................................7-7
Setting Date and Time .................................. ... ... ... ... .... ... ... .......................................... ..7-9
System Configuration Utilities .......................................................................................7-10
Encrypting the Configuration File ...........................................................................7-11
Exporting and Saving a Backup Configuration File ................................................7-11
Importing a Configuration File ................................ ................................................ 7-12
v2.1, November 2008
vii
Page 8

Erasing the Configuration and Restoring the Default Settings ......................... ...... 7-13
Upgrading the SSL VPN Concentrator Firmware ..................................................7-13
Additional Notes on the Management Interface ...........................................................7-14
Chapter 8
Monitoring and Logging
SSL VPN Concentrator Status ........................................................................................8-1
Active Users ............................. ... .... ... ... ... ....................................... ... .... ... ... ... ... .... ........8-3
Event Log .......................................................................................................................8-4
Log Settings ....................................................................................................................8-5
Diagnostics .....................................................................................................................8-9
Appendix A
Default Settings and Technical Specifications
Factory Default Settings ................................................................................................ A-1
Technical Specifications ................................................................................................. A-2
Appendix B
Related Documents
Index
viii
v2.1, November 2008
Page 9
About This Manual
The NETGEAR® Prosafe™ SSL VPN Concentrator 25 SSL312 Reference Manual describes how
to install and configure the SSL312. The information in this manual is intended for administrators
who will configure the SSL312. You should have intermediate computer and Internet skills.
Conventions, Formats and Scope
The conventions, formats, and scope of this manual are described in the following paragraphs:
• Typographical Conventions. This manual uses the following typographical conventions:
Italics Emphasis, books, CDs, file and server names, extensions
Bold User input, IP addresses, GUI screen text
Fixed Command prompt, CLI text, code
italic URL links
• Formats. This manual uses the following formats to highlight special messages:
Note: This format is used to highlight information of importance or special interest.
Tip: This format is used to highlight a procedure that will save time or resources.
Warning: Ignoring this type of note could result in a malfunction or damage to the
equipment.
v2.1, November 2008
-ix
Page 10
NETGEAR ProSafe SSL VPN Concentrator 25 SSL312 Reference Manual
Danger: This is a safety warning. Failure to take heed of this notice could result in
personal injury or death.
• Scope. This manual is written for the SSL VPN Concentrator according to these
specifications:
Product Version ProSafe SSL VPN Concentrator 25 SSL312
Manual Publication Date November 2008
For more information about network, Internet, firewall, and VPN technologies, see the links to the
NETGEAR website in Appendix B, “Related Documents”.
Note: Product updates are available on the NETGEAR, Inc. website at
http://kbserver.netgear.com/products/SSL312.asp.
Using This Manual
The HTML version of this manual includes the following:
• Buttons, and , for browsing forwards or backwards through the manual one page
at a time
• A button that displays the table of contents and an button. Double-click on a
link in the table of contents or index to navigate directly to where the topic is described in the
manual.
• A button to access the full NETGEAR, Inc. online knowledge base for the product
model.
• Links to PDF versions of the full manual and individual chapters.
Printing this Manual
To print this manual you can choose one of the following several options, according to your needs.
• Printing a Page in the HTML View.
-x
v2.1, November 2008
Page 11
NETGEAR ProSafe SSL VPN Concentrator 25 SSL312 Reference Manual
Each page in the HTML version of the manual is dedicated to a major topic. Use the Print
button on the browser toolbar to print the page contents.
• Printing a Chapter.
Use the PDF of This Chapter link at the top left of any page.
– Click the PDF of This Chapter link at the top right of any page in the chapter you want to
print. The PDF version of the chapter you were viewing opens in a browser window.
– Your computer must have the free Adobe Acrobat reader installed in order to view and
print PDF files. The Acrobat reader is available on the Adobe Web site at
http://www.adobe.com.
– Click the print icon in the upper left of the window.
Tip: If your printer supports printing two pages on a single sheet of paper, you can
save paper and printer ink by selecting this feature.
• Printing the Full Manual.
Use the Complete PDF Manua l link at the top left of any page.
– Click the Complete PDF Manual link at the top left of any page in the manual. The PDF
version of the complete manual opens in a browser window.
– Click the print icon in the upper left of the window.
Tip: If your printer supports printing two pages on a single sheet of paper, you can
save paper and printer ink by selecting this feature.
-xi
v2.1, November 2008
Page 12
NETGEAR ProSafe SSL VPN Concentrator 25 SSL312 Reference Manual
Revision History
Version Date Description of Changes
-01, v1.1 November 2006 • Restructured the contents so that common setup and configuration tasks
are easier to find
• Added new topics
• Added a link to a Microsoft Word template for creating an end-user guide
-02, v1.0 December 2006 • Refined Portal layout behavior
• Added Full Tunnel Support for VPN Tunnels
-02,v1.1 April 2007 • Removed references to SNMP – not supported
• Bug fixes
• v1.5 firmware
-04,v2.0 May 2007 • Expanded feature set.
• v2.0 firmware
-05, v2.1 November 2008 • Added two-factor authentication (WiKID)
• Minor menu changes
• v2.1 firmware
-xii
v2.1, November 2008
Page 13

Chapter 1
Introduction
This chapter describes some of the key features of the NETGEAR® ProSafe™ SSL VPN
Concentrator 25 SSL312. It also includes the minimum prerequisites for installation (“Web
Browser Requirements” on page 1-2.), package contents (“What’s in the Box” on page 1-3), and a
description of the front and back panels of the SSL312 (“Hardware Description” on page 1-3).
About the ProSafe SSL VPN Concentrator 25
The ProSafe SSL VPN Concentrator 25 is a hardware-based SSL VPN solution designed
specifically to provide remote access for mobile users to their corporate resources without
requiring a pre-installed VPN client on their laptops. Using the familiar Secure Sockets Layer
(SSL) protocol, commonly used for e-commerce transactions, the SSL VPN Concentrator can
authenticate itself to an SSL-enabled client, such as a standard web browser. Once the
authentication and negotiation of encryption information is completed, the server and client can
establish an encrypted connection. With support fo r 25 concurrent sessions, users can easily access
the remote network for a customizable, secure, user portal experience from virtually any available
platform.
Key Features
The ProSafe SSL VPN Concentrator 25 is easy to use and to administer, through a customizable
and intuitive interface. Other key features:
• Uses Secure Sockets Layer (SSL) protocol to transfer data. SSL is a protocol that is
extensively used in the world of electronic commerce and has gone through years of public
scrutiny.
• Browser based, platform-independent, remote access through a number of popular browsers,
such as Microsoft Internet Explorer, Mozilla Firefox, or Apple Safari.
• Supports 25 concurrent sessions.
• Provides granular access to corporate resources based upon user type or group membership.
• Supports multiple user authentications, including local database, Kerberos, Microsoft Active
Directory (using Kerberos), LDAP, NT Domain, and RADIUS.
1-1
v2.1, November 2008
Page 14

NETGEAR ProSafe SSL VPN Concentrator 25 SSL312 Reference Manual
• Provides client-less access with customizable user portals and support for a wide variety of
user repositories. Access includes support for:
– Full network access
– HTTP and HTTPS proxy and reverse proxy
– Remote desktop and application access including file sharing
Web Browser Requirements
The following web browsers are supported for the SSL VPN Concentrator web management
interface and the SSL VPN portal. Note that Java is only required for the SSL VPN portal, not the
web management interface.
• Microsoft Windows:
– Browsers: Microsoft Internet Explorer 5.1.or higher
Mozilla Firefox 1.x – supports VPN tunnel, VNC, Network Places and Utilities (Microsoft
Internet Explorer is required for Port Forwarding, Applications, and Terminal Services)
– Java: Sun JRE 1.1 or higher
Microsoft JVM 5 or higher
• Apple MacOS X:
– Browser: Safari 1.2 or higher
– Java: Sun JRE 1.1 or higher
• Unix, Linux, or BSD:
– Browsers: Mozilla Firefox 1.x – supports VPN tunnel, VNC, Network Places and Utilities
(Microsoft Internet Explorer is required for Port Forwarding, Applications, and Terminal
Services)
Safari 1.2 or higher
– Java: Sun JRE 1.1 or higher
To configure the NETGEAR ProSafe SSL VPN Concentrator 25, an administrator must use an
Internet Explorer 5.1 or higher, Apple Safari 1.2 or higher , or Mozilla Firefox l.x web browser with
JavaScript, cookies, and SSL enabled.
End Users can use Microsoft Internet Explorer 5.1 or higher , Apple Safari 1.2 or higher or Mozilla
Firefox 1.x (for VPN tunnel, VNC, Network Places and Utilities). The browsers should also
1-2 Introduction
v2.1, November 2008
Page 15
NETGEAR ProSafe SSL VPN Concentrator 25 SSL312 Reference Manual
support JavaScript, Java, cookies, SSL and ActiveX to take advantage of the full suite of
applications.
Note: For 64-bit support with signed CABs, you must use a 64-bit version of Microsoft
Internet Explorer. The default browser in Microsoft Windows Vista 64-bit Edition
is 32-bit Internet Explorer.
What’s in the Box
The product package should contain the following items:
• ProSafe SSL VPN Concentrator 25 SSL312
• A power cord specific to your region.
• Straight through Category 5 Ethernet cable.
• A serial cable (included for Engineering and debugging purposes only)
• Resource CD
• ProSafe™ SSL VPN Concentrator 25 SSL312 Installation Guide
• Warranty and Support Registration Card
Hardware Description
This section describes the front and rear hardware functions of the SSL312.
Introduction 1-3
v2.1, November 2008
Page 16
NETGEAR ProSafe SSL VPN Concentrator 25 SSL312 Reference Manual
1
2
3
4
5
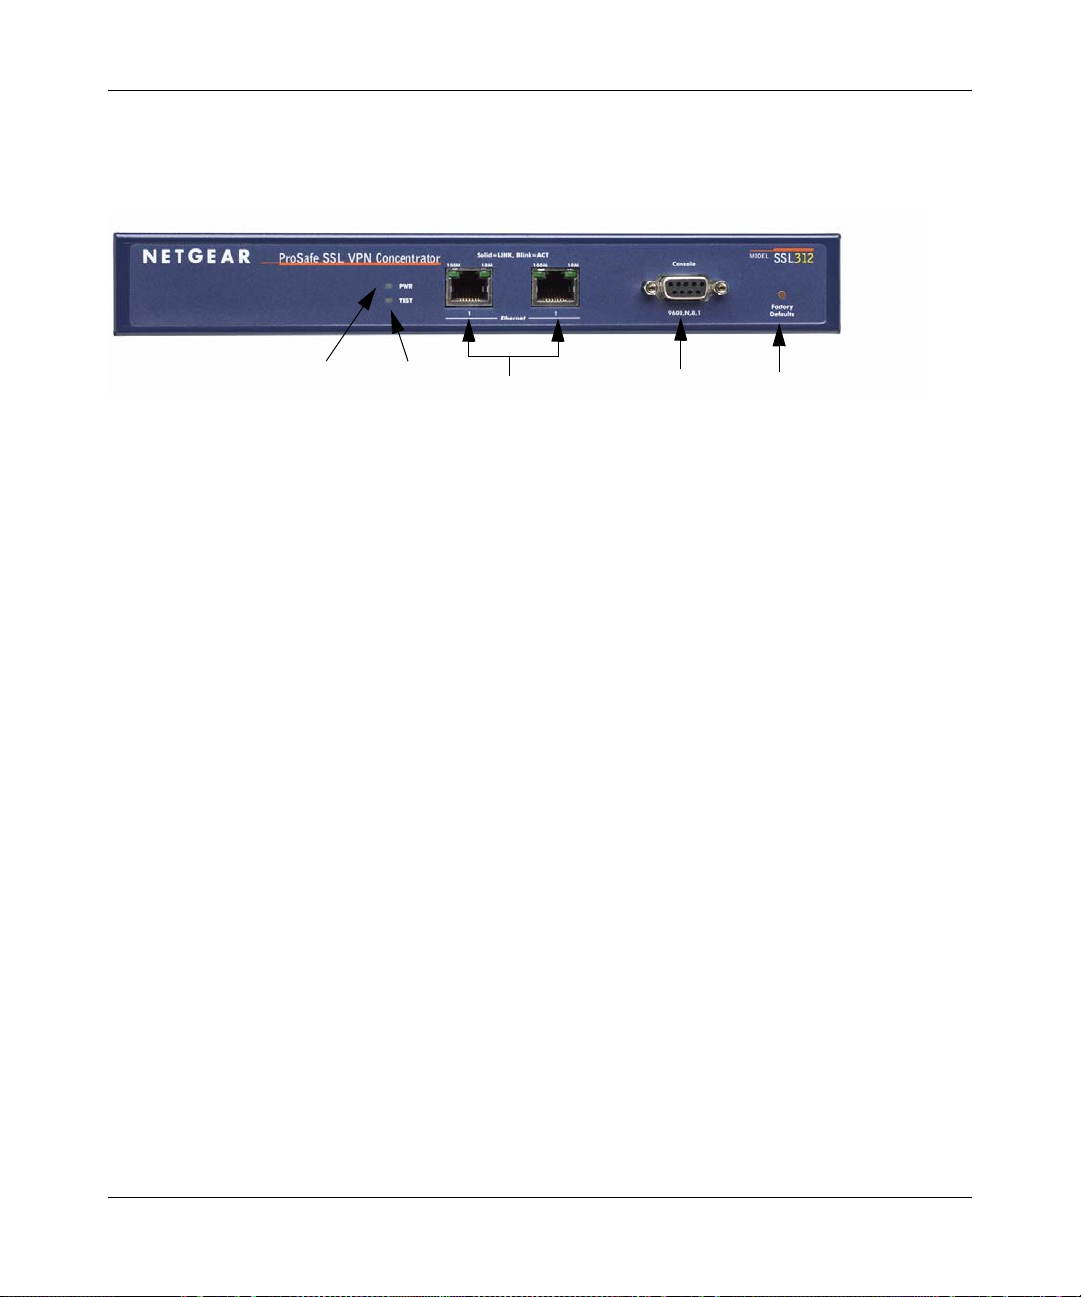
Front Panel
The SSL VPN Concentrator front panel hardware is shown below:
Figure 1-1
The SSL VPN Concentrator front panel hardware functions are described below:
1. LED power indicator:
• Off – No power
• On – Power is on.
2. LED self test indicator.
• Self test – on while initializing. (~2 minutes)
• Loading software – blinking while uploading software
• System fault – on (prolonged)
This LED will blink for 1-2 minutes before going off.
3. Two 10/100M Ethernet ports:
• A solid green LED indicates a connectivity link has been established on either the 10M or
100M interface.
• A blinking green LED indicates activity on either the 10M or 100M interface.
4. Serial console port (for engineering and debugging only)
Male
DB-9 serial port for serial DTE connections.
5. Restore to Factory Defaults button
1-4 Introduction
v2.1, November 2008
Page 17
NETGEAR ProSafe SSL VPN Concentrator 25 SSL312 Reference Manual
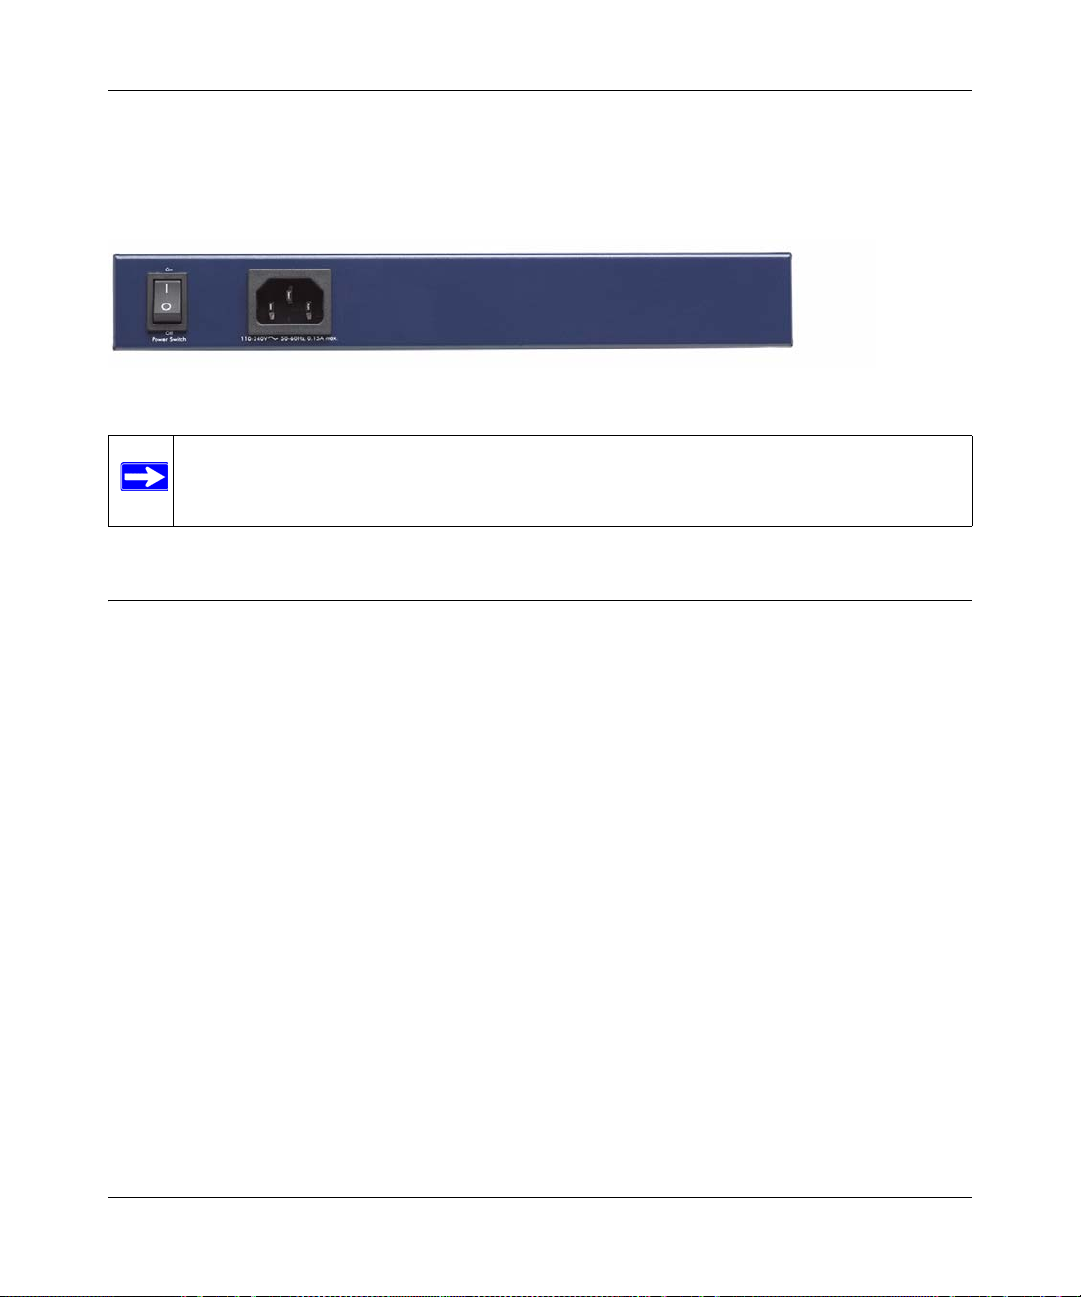
Back Panel
The SSL VPN Concentrator back panel hardware is shown below and consists of the power On/
Off switch and the 110-240V power cord connection.
Figure 1-2
Note: Never substitute a power cord. Only use the power cord provided with the SSL
VPN Concentrator.
Steps for Deploying the SSL312
Three basic steps are involved in deploying the ProSafe SSL VPN Concentrator 25 in your
network:
• Installing the SSL312: choosing a network topology, configuring its IP addressing scheme,
connecting the SSL312, and provisioning the SSL certificate. Refer to Chapter 2, “Installing
the SSL312”.
• Setting up SSL312 user accounts: creating individual user accounts, grouping users by
common access privileges, and defining those privileges. Refer to Chapter 3, “Authenticating
Users” and Chapter 4, “Setting Up User and Group Access Policies”.
• Configuring remote access to corporate network resources through the SSL312: designing the
presentation Web portal that will display the available corporate resources to remotely
connected users. Refer to Chapter 5, “Configuring the Remote Access Web Portal”.
Introduction 1-5
v2.1, November 2008
Page 18

NETGEAR ProSafe SSL VPN Concentrator 25 SSL312 Reference Manual
1-6 Introduction
v2.1, November 2008
Page 19

Chapter 2
Installing the SSL312
This chapter describes how to install the ProSafe SSL VPN Concentrator 25 SSL312. The
installation includes choosing a network topology, configuring the IP addressing scheme,
connecting the SSL312, and provisioning the SSL certificate.
This chapter includes these topics:
• Choosing a Network Topology
• Initial Connection to the SSL VPN Concentrator
• Accessing the Management Interface
• Configuring Basic Network Settings
• Installing the SSL VPN Concentrator
• Managing Certificates
• Steps for Further Configuration
Choosing a Network Topology
The physical connection of the SSL VPN Concentrator to your network is determined by the
network topology you choose. There are two common network topologies for installing the SSL
VPN Concentrator: single arm or routing. Variations of these topologies are possible, particularly
if your firewall supports a DMZ connection.
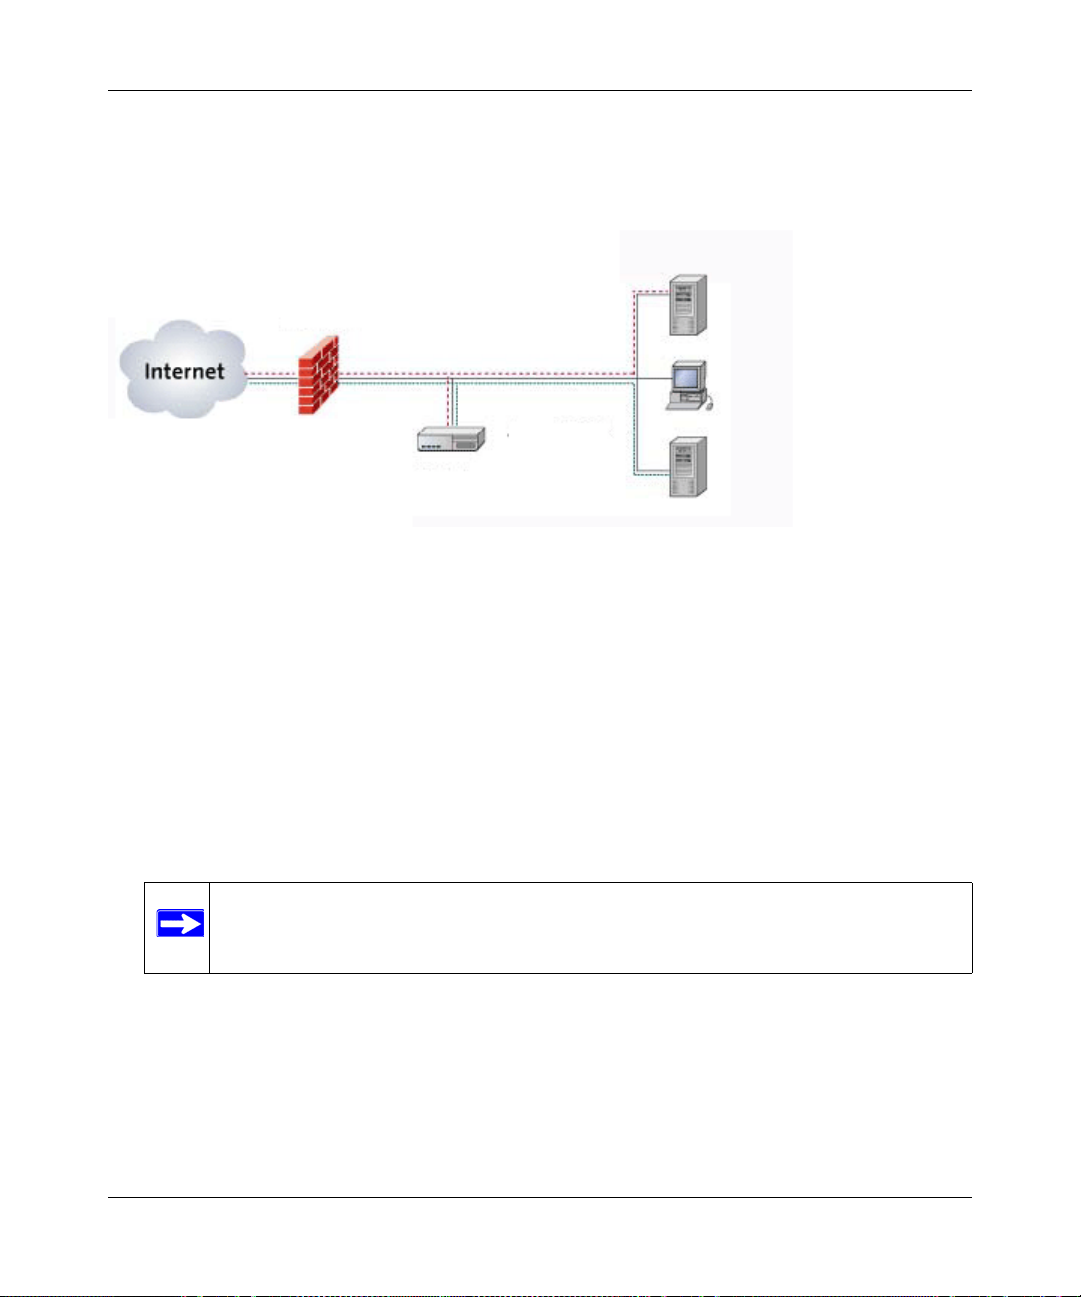
Single Arm
In the single arm, or one port, topology , the SSL VPN Concentrator’s Ethernet Port 1 is connected
to your corporate Ethernet network behind your existing firewall, while Ethernet Port 2 is not used.
The single active Ethernet port hosts both the encrypted connection to the Internet and the
decrypted connection to the corporate network’s resources.
As shown in the following figure, encrypted SSL traffic from a remote user passes through the
firewall and terminates at the SSL VPN Concentrator, which authenticates the user and displays
the portal and resources authorized for that user. The user’s subsequent requests for network
2-1
v2.1, November 2008
Page 20
NETGEAR ProSafe SSL VPN Concentrator 25 SSL312 Reference Manual
Corporate Server
IP Address 192.168.1.3
SSL312 IP Address
192.168.1.1
Firewall/Router
IP Address
192.168.1.254
LAN Subnet
192.168.1.0/24
services are decrypted by the SSL VPN Concentrator and relayed to the appropriate corporate
network servers.
.
Figure 2-1
Single arm mode has the advantage of being protected by your firewall.
In later steps, you will use the following settings when configuring for single arm operation.
• Assign Ethernet Port 1 an IP address on your local network.
• Disable Ethernet Port 2.
• Disable Routing Mode.
• Define a default route to the firewall.
• If your firewall performs NAT, you must configure the firewall to forward incoming HTTPS
traffic to the IP address of Ethernet Port 1.
Note: NETGEAR recommends single arm operation for most networks.
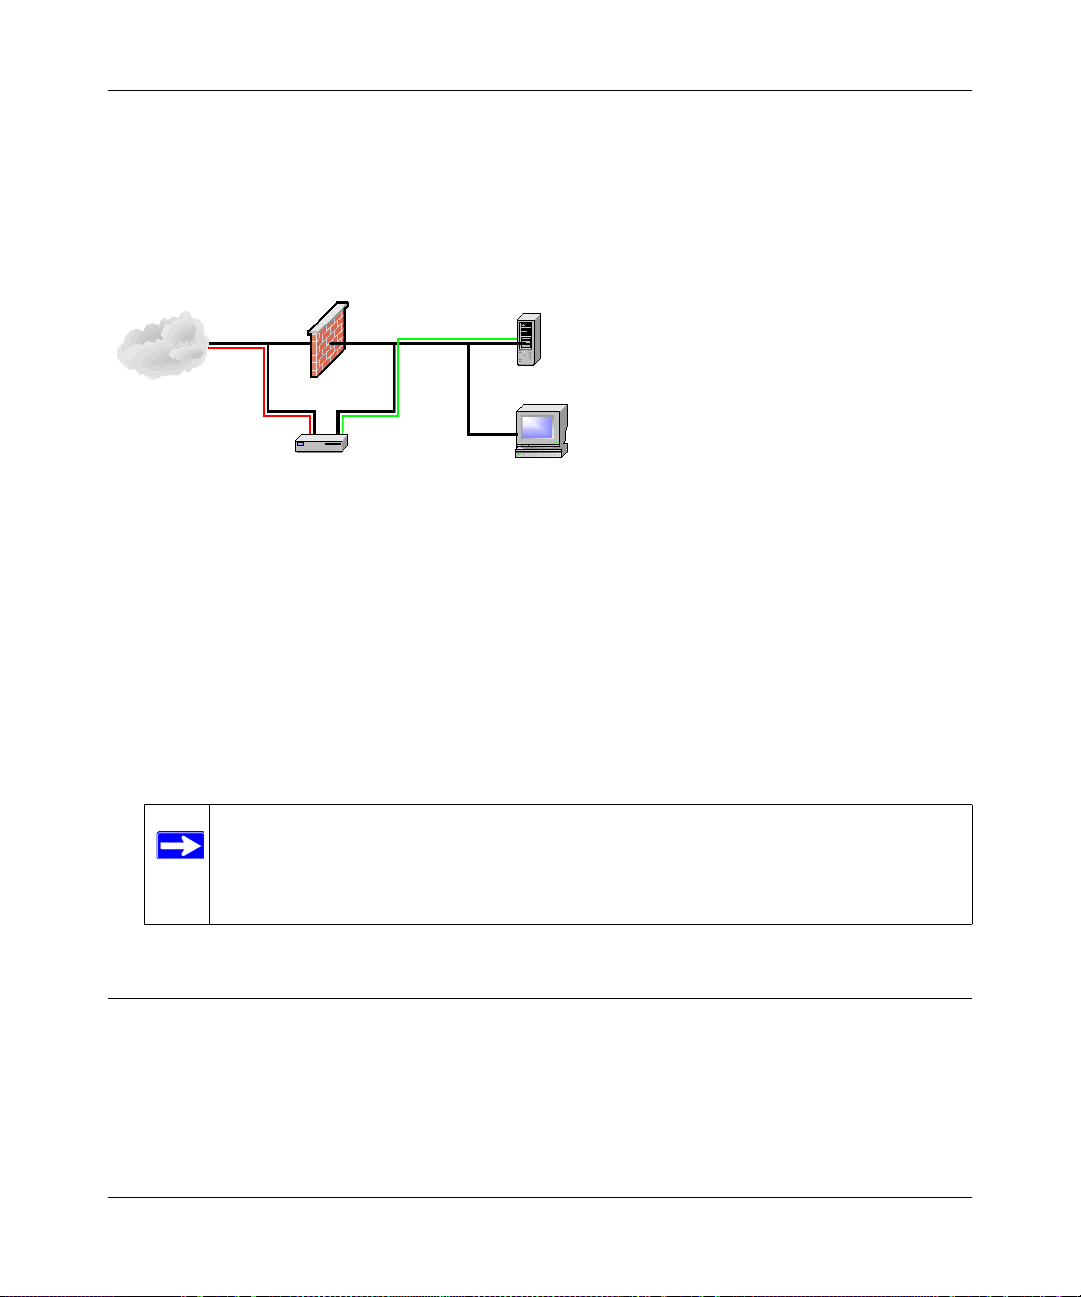
Routing
In the routing, or two port, topology , the SSL VPN Concentrator is connected in parallel with your
existing firewall. Ethernet Port 1 is connected to the untrusted side of your firewall, while Ethernet
Port 2 connects to your corporate network.
2-2 Installing the SSL312
v2.1, November 2008
Page 21
NETGEAR ProSafe SSL VPN Concentrator 25 SSL312 Reference Manual
SSL312
10.0.0.254
10.0.0.10
10.0.0.20
10.0.0.1
66.123.4.80
Red = Public (untrusted)
Green = Local (trusted)
As shown in the following figure, encrypted SSL traffic from a remote user is sent directly to the
SSL VPN Concentrator, which authenticates the user and displays the portal and resources
authorized for that user. The user’s subsequent requests for network services are decrypted by the
SSL VPN Concentrator and relayed to the appropriate network servers on the corporate network.
Figure 2-1
Routing mode has the advantage of unloading SSL traffic from your firewall. However, your
network may not be as well protected since the firewall can not inspect this traffic.
In later steps, you will use the following settings when configuring for routing operation.
• Assign Ethernet Port 1 a public IP address.
• Assign Ethernet Port 2 an IP address on your local network.
• Enable Routing Mode.
Initial Connection to the SSL VPN Concentrator
In its factory default state, the SSL VPN Concentrator Ethernet Port 1 IP address is 192.168.1.1
and the Ethernet Port 2 IP address is 10.0.0.1. Unless these default IP addresses are compatible
with your network, you must configure and connect a computer directly to Ethernet Port 1 for
initial configuration including reassignment of the Ethernet Port IP addresses. This procedure is
described in the following steps:
Installing the SSL312 2-3
Note: The SSL VPN Concentrator does not perform Network Address Translation
(NAT). Also, the SSL VPN Concentrator only enforces access policies on SSL
VPN traffic, not on other TCP/IP protocols. Therefore, the SSL VPN
Concentrator should always be used in conjunction with a network firewall.
v2.1, November 2008
Page 22
NETGEAR ProSafe SSL VPN Concentrator 25 SSL312 Reference Manual
https://
192.168.1.1
1. Prepare a PC with an Ethernet adapter. If this PC is already part of your network, record its
TCP/IP configuration settings so that you can restore them later.
2. Configure your PC with a static IP address of 192.168.1.10 and 255.255.255.0 as the subnet
mask.
3. Connect an Ethernet cable from your computer to Ethernet Port 1 on the front of the SSL VPN
Concentrator.
4. Connect the power cord to the SSL312, turn on the concentrator and verify the following:
• The PWR (power) light goes on immediately.
• The TEST light goes off after about one minute, indicating that the system has initialized.
• One of the Ethernet lights is lit: either the 10 Mbps or the 100 Mbps LED should light
showing that a connectivity link as been established
Accessing the Management Interface
Using the PC with the static IP address configured, you can log into the SSL VPN Concentrator
web management interface. The initial administrative setup of the concentrator must be performed
using a supported browser listed in “Web Browser Requirements” on page 1-2. The machine used
for management is referred to as the “Management Station”.
Note: You must have administrative access to the SSL VPN Concentrator to configure the
Management Interface settings.
To log into the management interface:
1. Connect to the SSL312 by opening your browser and entering https://192.168.1.1 (for the
Ethernet Port 1 IP) in the address field. Be sure to type https, not http..
Figure 2-2
If you are connected to Ethernet Port 2 IP, the default address is https://10.0.0.1.
2-4 Installing the SSL312
v2.1, November 2008
Page 23
NETGEAR ProSafe SSL VPN Concentrator 25 SSL312 Reference Manual
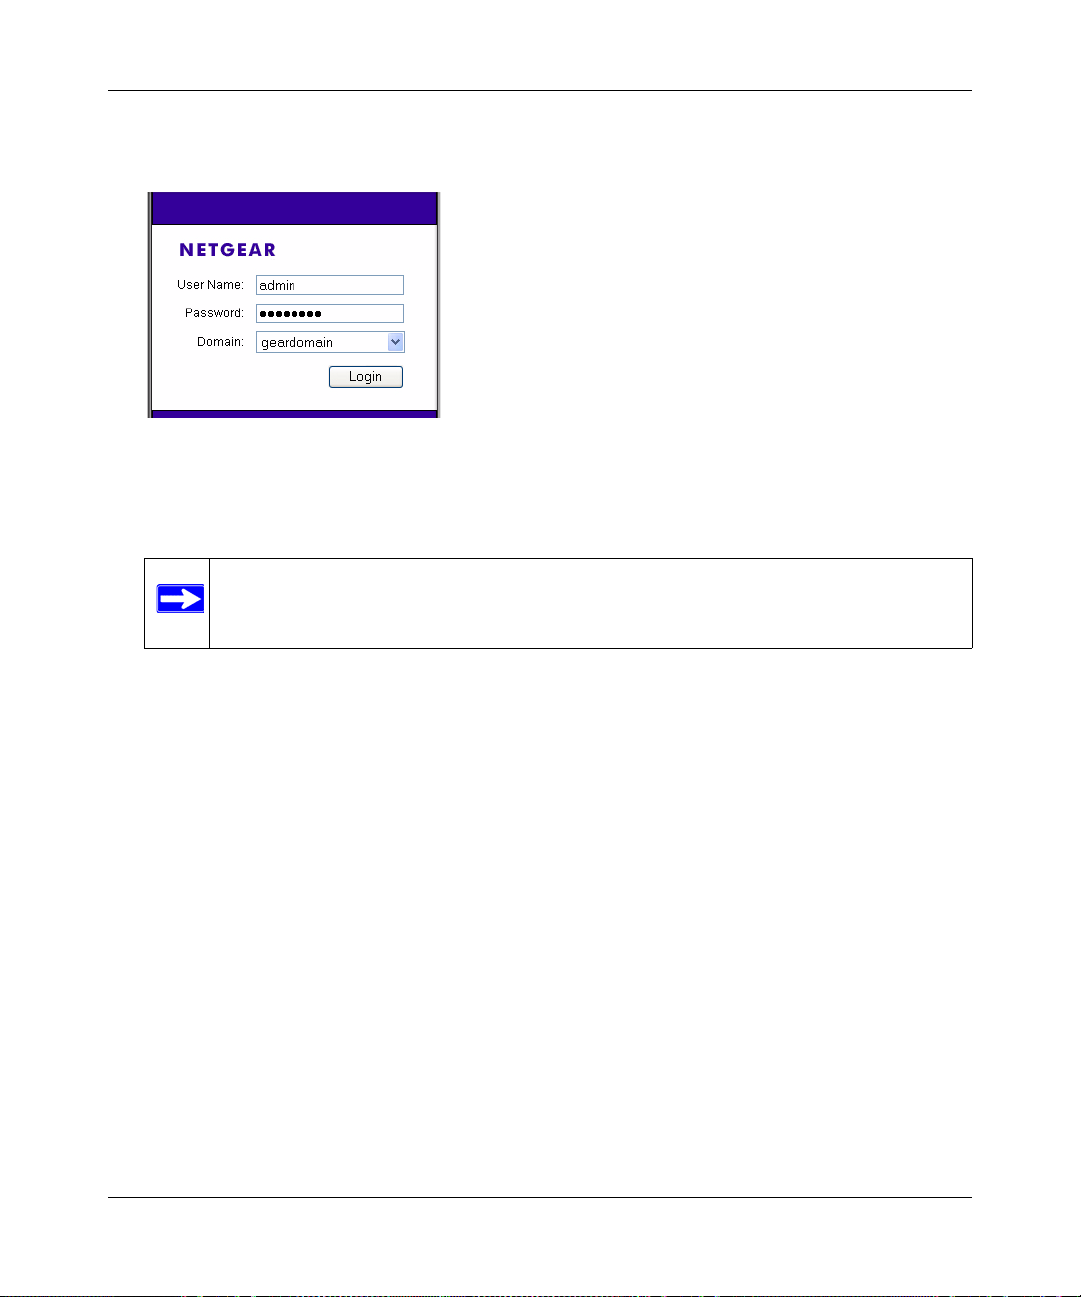
2. A certificate security warning may appear. Click Yes or OK to continue. A login screen with
User Name and Password dialog boxes displays.
Figure 2-3
3. When prompted, enter admin for the User Name and password for the Password, both in
lower case letters.
Note: Both the user name and password are case-sensitive.
4. From the Domain drop-down menu, select geardomain.
5. Click Login to log in to the SSL VPN Concentrator Management Interface.
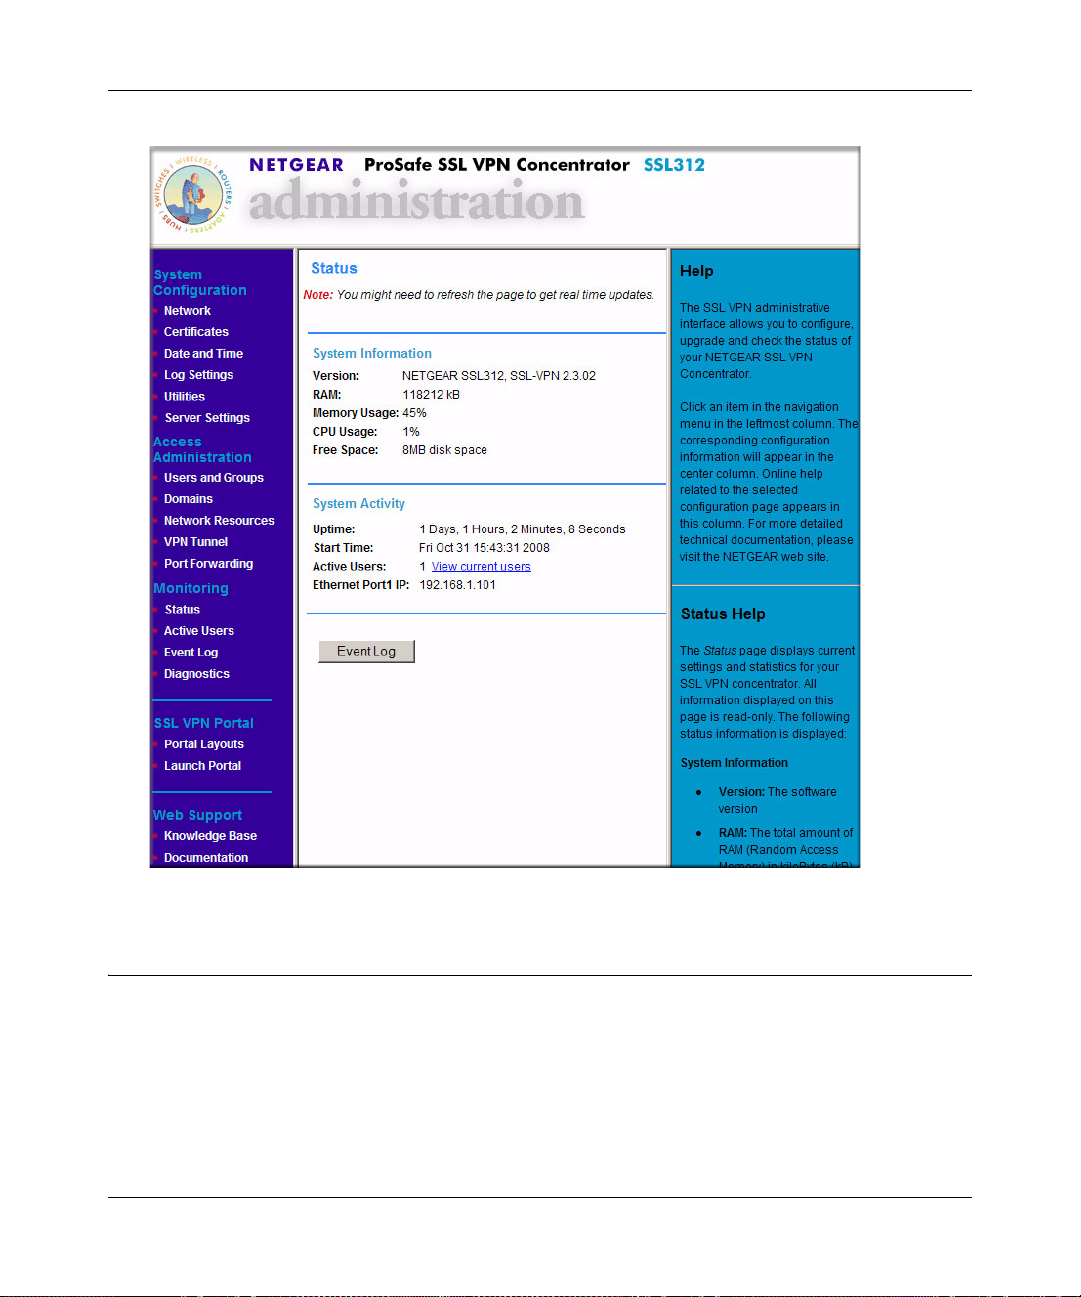
Once you have logged in, the following Status screen will display. The navigation links under
System Configuration, Access Administration, Monitoring, SSL VPN Portal and Web Support
headings on the left side of the browser window allow you to access and configure
administrative settings. When one of the navigation options is clicked, the corresponding
management configuration screen will display.
Installing the SSL312 2-5
v2.1, November 2008
Page 24
NETGEAR ProSafe SSL VPN Concentrator 25 SSL312 Reference Manual
Figure 2-4
Configuring Basic Network Settings
Before deploying the SSL VPN Concentrator into your existing network, you should configure the
following basic settings:
• Change the administrator password
• Configure DNS server IP address
• Configure a default route
2-6 Installing the SSL312
v2.1, November 2008
Page 25

NETGEAR ProSafe SSL VPN Concentrator 25 SSL312 Reference Manual
• Configure Ethernet interface IP addresses
To prepare for installation:
1. Change the administrator account password.
a. On the left side of the browser window, select the Users and Groups link.
b. In the Users table, click on admin.
c. Type your new Password and re-type to Confirm Password.
d. Click Apply.
2. Configure the DNS server IP address.
a. On the left side of the browser window, select the Network link.
b. In the Network menu, click the DNS Settings radio button.
c. Enter at least one DNS server IP address.
d. Click Apply.
3. Configure a default route for Internet access.
a. On the left side of the browser window, select the Network link.
b. In the Network menu, click the Static Routes radio button.
c. Specify the Default Gateway Address.
• If you plan a single arm topology, the Default Gateway is your corporate firewall.
Specify that IP address for the ethernet-1 interface.
• If you plan a routing topology , the Default Gateway for the ethernet-1 interface is your
Internet Service Provider’s gateway . The Default Gateway for the ethernet-2 interface
is your corporate firewall.
d. Click Apply.
4. Change the Ethernet port IP Addresses.
a. Select the Network link.
b. In the Network menu, click the Interfaces radio button.
c. Enter your chosen Ethernet Port 1 IP Address and Subnet Mask.
d. If you plan a single arm topology, clear the Enable Routing Mode checkbox. If you plan a
routing topology, check the Enable Routing Mode checkbox and enter your chosen
Ethernet Port 2 IP Address and Subnet Mask.
Installing the SSL312 2-7
v2.1, November 2008
Page 26

NETGEAR ProSafe SSL VPN Concentrator 25 SSL312 Reference Manual
e. Click Apply. If you changed the IP address for the Ethernet Port to which you are
connected, you will now lose your connection to the SSL VPN Concentrator.
Installing the SSL VPN Concentrator
You are now ready to physically install your SSL VPN Concentrator using the following steps:
1. Turn off the power to the SSL VPN Concentrator and connect it to your network in your
chosen topology.
• For a single arm topology, connect Ethernet Port 1 to your corporate network and leave
Ethernet Port 2 disconnected.
• For a routing topology , connect Ethernet Port 1 to your pu blic network and Ethernet Port 2
to your corporate network.
2. Turn on the power to the SSL VPN Concentrator.
3. From a PC on your corporate network, open a suitable browser and access the SSL VPN
Concentrator web management interface by typing https://<IP_address>, where IP_address
is the address that you assigned to the SSL312 Ethernet Port that is connected to the corporate
network.
Note: If the default portal (SSL-VPN) is changed to another user-defined portal, the
administration portal, SSL-VPN, can be reached by typing
https://<IP_address>/portal/SSL-VPN.
4. Log in as admin using the new password that you assigned. You can now continue the
configuration of your SSL VPN Concentrator.
Managing Certificates
Establishing an SSL connection requires that the SSL server , such as your SSL VPN Concentrator,
provide a digital SSL certificate to the user’s browser. A certificate is a file that contains:
• A public encryption key to be used for encrypting your messages to the server.
• Information identifying the operator of the server.
• A digital signature confirming the identity of the operator of the server.
2-8 Installing the SSL312
v2.1, November 2008
Page 27
NETGEAR ProSafe SSL VPN Concentrator 25 SSL312 Reference Manual
You can obtain a certificate from a well-known commercial Certificate Authority (CA) such as
Verisign or Thawte, or you can generate and sign your own certificate. Because a commercial CA
takes steps to verify the identity of an applicant, a certificate from a commercial CA provides a
strong assurance of the server’s identity. A self-signed certificate will trigger a warning from most
browsers as it provides no protection against identity theft of the server.
Note: If you obtain a certificate from a CA, you must use a Root CA, not an Intermediate
CA. Root certificates are signed by the Root CA itself, while Intermediate
certificates depend on a verification hierarchy leading back to a Root CA.
Your SSL VPN Concentrator contains a self-signed certificate from NETGEAR. NETGEAR
recommends that you replace this certificate prior to deploying the SSL VPN Concentrator in your
network.
From the Certificates menu, you can view the currently loaded certificates, upload a new
certificate and generate a Certificate Signing Request (CSR).
Obtaining a Certificate from a Certificate Authority
T o obtain a certificate from a CA, you must generate a Certificate Signing Request (CSR) for your
SSL VPN Concentrator. The CSR is a file containing information about your company and about
the device that will hold the certificate. Refer to the CA for guidelines on the information you
include in your CSR.
To generate a new Certificate Signing Request (CSR) file:
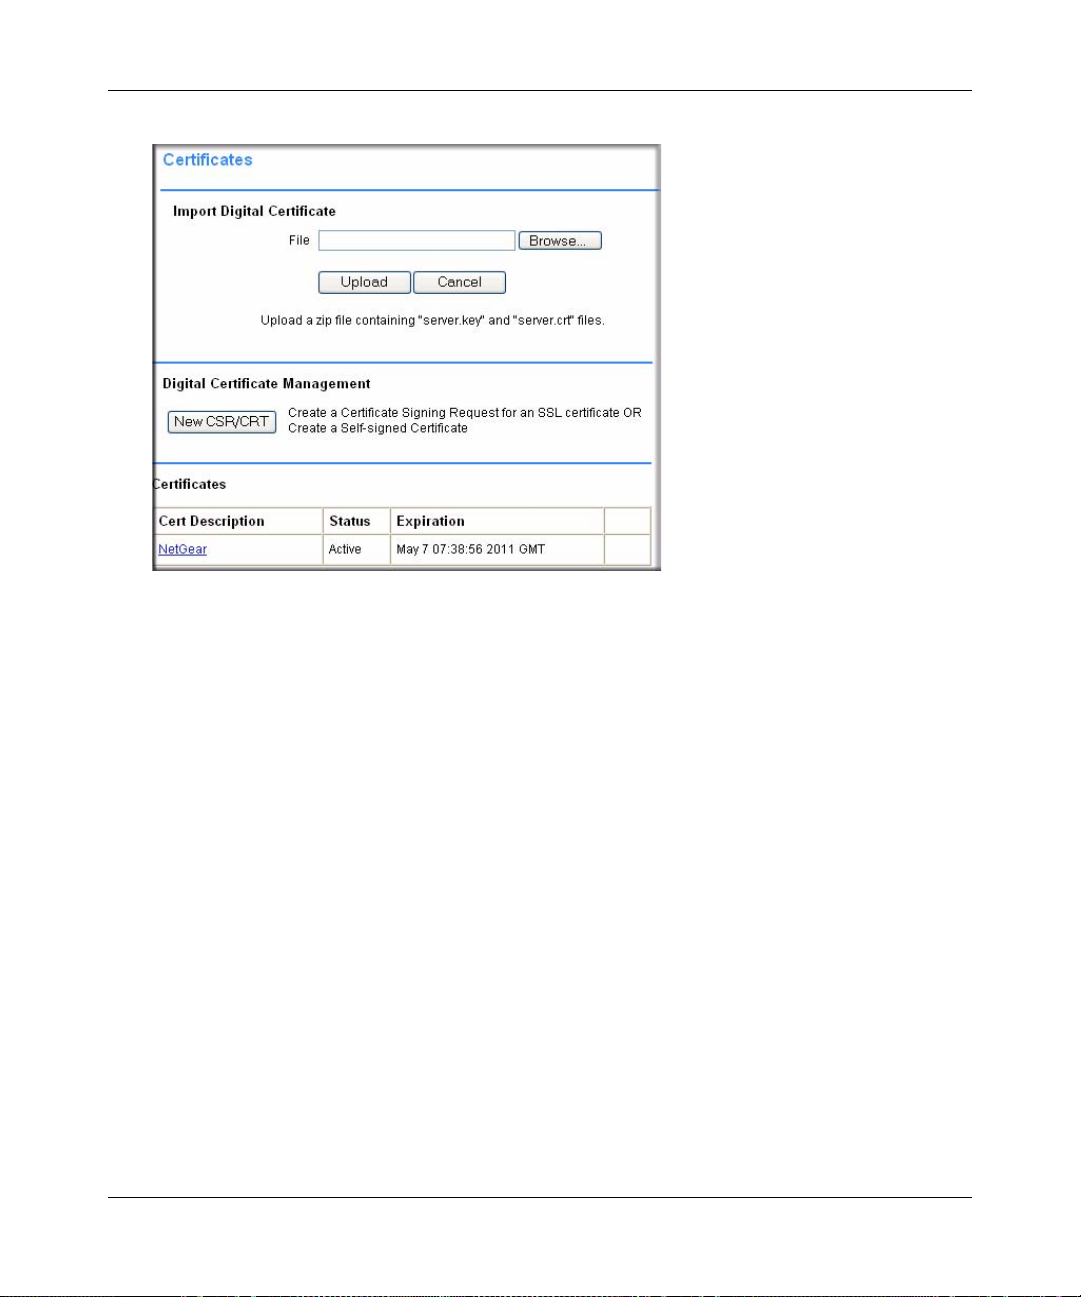
1. Under the System Configuration menu in the left navigation pane, select Certificates. The
Certificates screen displays.
Installing the SSL312 2-9
v2.1, November 2008
Page 28
NETGEAR ProSafe SSL VPN Concentrator 25 SSL312 Reference Manual
Figure 2-5
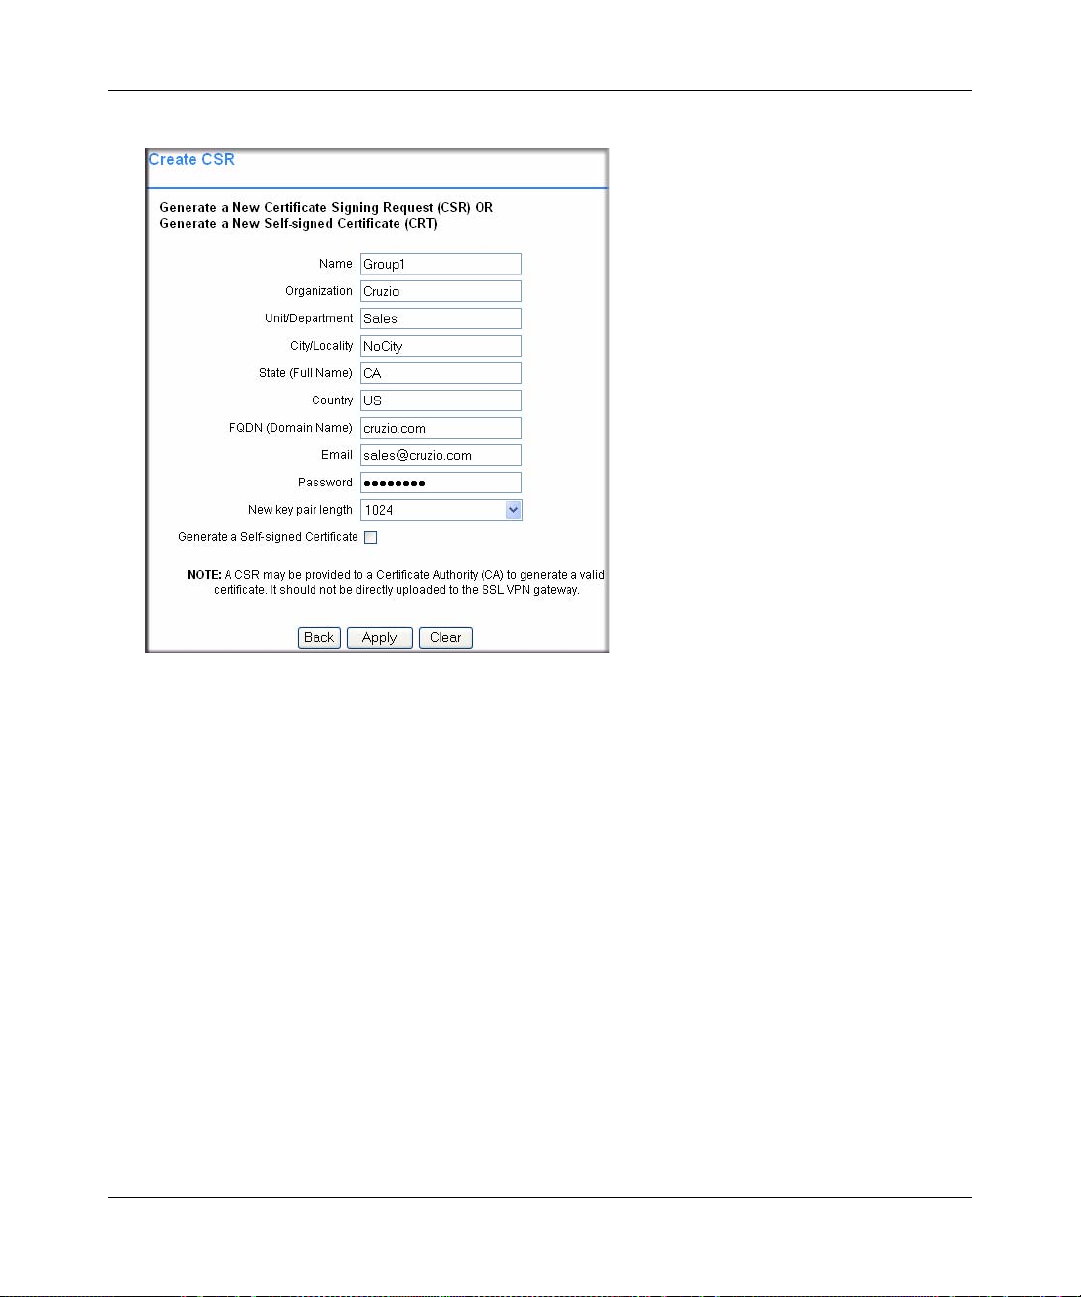
2. In the Digital Certificate Management section, click New CSR/CRT. The Create CSR screen
displays.
3. Fill out all of the fields with the appropriate information. This information will appear in your
certificate and will be visible to users.
2-10 Installing the SSL312
v2.1, November 2008
Page 29
NETGEAR ProSafe SSL VPN Concentrator 25 SSL312 Reference Manual
Figure 2-6
4. Click Apply. A file download screen will display. Click Save to save the CSR.ZIP file to a disk
location. You will need to provide this file to the Certificate Authority.
5. Contact the CA to purchase your certificate using the CSR file you generated.
6. When you receive your certificate from the CA, store the certificate file on your PC.
7. Upload and enable the certificate according to the instructions later in this chapter.
Generating a Self-Signed Certificate
As an alternative to obtaining a certificate from a CA, you can generate a self-signed certificate for
your SSL VPN Concentrator.
To generate a self-signed certificate file:
1. Under the System Configuration menu in the left navigation pane, select Certificates. The
Certificates menu will display as shown in the previous section.
2. In the Digital Certificate Management section, click New CSR/CRT. The Create CSR screen
will display.
Installing the SSL312 2-11
v2.1, November 2008
Page 30

NETGEAR ProSafe SSL VPN Concentrator 25 SSL312 Reference Manual
3. Fill out all of the fields with the appropriate information. This information will appear in your
certificate and will be visible to users.
4. Check the Generate a Self-signed Certificate checkbox to generate a new CRT.
5. Click Apply. If all information is entered correctly , a file download screen displays. Click Save
to save the crt.zip file to a disk location. This file includes a server.crt and a server.key key file.
6. Upload and enable the certificate according to the instructions later in this chapter.
Uploading and Enabling the New Certificate
For uploading to the SSL VPN Concentrator, the certificate information must be in a zipped file
containing a certificate file named server.crt and a certificate key file named server.key. If the
zipped file does not contain these two files, the zipped file will not be uploaded. Any file name
will be accepted, but it must have the .zip extension.
Note: Do not upload the CSR file to the SSL VPN Concentrator.
To upload and enable the new certificate:
1. Under the System Configuration menu in the left navigation pane, select Certificates. The
Certificates menu will display as shown in the previous section.
2. In the Import Digital Certificate table, select Browse to locate the zipped digital certificate file
on your disk or network drive.
3. Click Upload to save the file to the Cert Description table. Once the certificate has been
uploaded, the certificate is displayed in the Current Certificates table.
Note: Valid certificates generated by an authorized Certificate Authority (CA), or a
non-authorized CA, require a password. Before you enable the certificate and
restart the software, be sure to enter the correct certificate password in the
Enable Certificate window. The password for the NETGEAR default
certificate is password.
2-12 Installing the SSL312
v2.1, November 2008
Page 31

Figure 2-7
NETGEAR ProSafe SSL VPN Concentrator 25 SSL312 Reference Manual
4. Click the Enable link adjacent to the new certificate. The Enable Certificate screen displays
Figure 2-8
Installing the SSL312 2-13
v2.1, November 2008
Page 32

NETGEAR ProSafe SSL VPN Concentrator 25 SSL312 Reference Manual
5. Enter the Certificate Password and click Enable. The SSL VPN Concentrator software will
restart using the new certificate.
Note: The file server.key contains your SSL VPN Concentrator’s private encryption
key, which is used to decrypt messages. It is extremely important that you
safeguard this file.
Viewing and Deleting Certificates
The Current Certificates table lists the valid SSL certificates. (The Certificate being used by the
SSL VPN Concentrator will not show an Enable link.)
To view details of currently available certificates:
In the Certificate table, click the name of the certificate. The View Certificate window is displayed
for that certificate. From the View Certificate window, you can view the issuer and certificate
subject information.
Figure 2-9
You can also delete an expired or incorrect certificate. Click Delete do delete the certificate.
Note: The Delete button will not be displayed if the SSL certificate is active. To
delete a certificate, upload and activate another SSL certificate. Then you can
delete the inactive certificate from the View Certificate window.
2-14 Installing the SSL312
v2.1, November 2008
Page 33

NETGEAR ProSafe SSL VPN Concentrator 25 SSL312 Reference Manual
Steps for Further Configuration
The next steps in configuring the SSL VPN Concentrator are:
• Create authentication domains (Chapter 3, “Authenticating Users”).
• Define user and group settings (Chapter 4, “Setting Up User and Group Access Policies”).
Installing the SSL312 2-15
v2.1, November 2008
Page 34

NETGEAR ProSafe SSL VPN Concentrator 25 SSL312 Reference Manual
2-16 Installing the SSL312
v2.1, November 2008
Page 35

Chapter 3
Authenticating Users
Remote users connecting to the SSL VPN Concentrator must be authenticated before being
allowed to access the network. The login window presented to the user requires three items: a User
Name, a Password, and a Domain selection. The Domain determines the authentication method to
be used and the portal layout that will be presented. This chapter explains how to define
authentication domains.
This chapter describes:
• Authentication Domains
• Local User Database Authentication
• RADIUS and NT Domain Authentication
• Configuring for NT Domain Authentication
• LDAP Authentication
• Kerberos Authentication (Active Directory)
• Deleting a Domain
If your implementation consists of a small number of users, a single portal layout, and no central
authentication server, you can skip this chapter and simply use the default domain “geardomain.”
Authentication Domains
To view the SSL VPN Concentrator Domains window from the Administrative User Interface,
click the Domains option under the Access Administration menu in the left navigation pane.
3-1
v2.1, November 2008
Page 36
NETGEAR ProSafe SSL VPN Concentrator 25 SSL312 Reference Manual
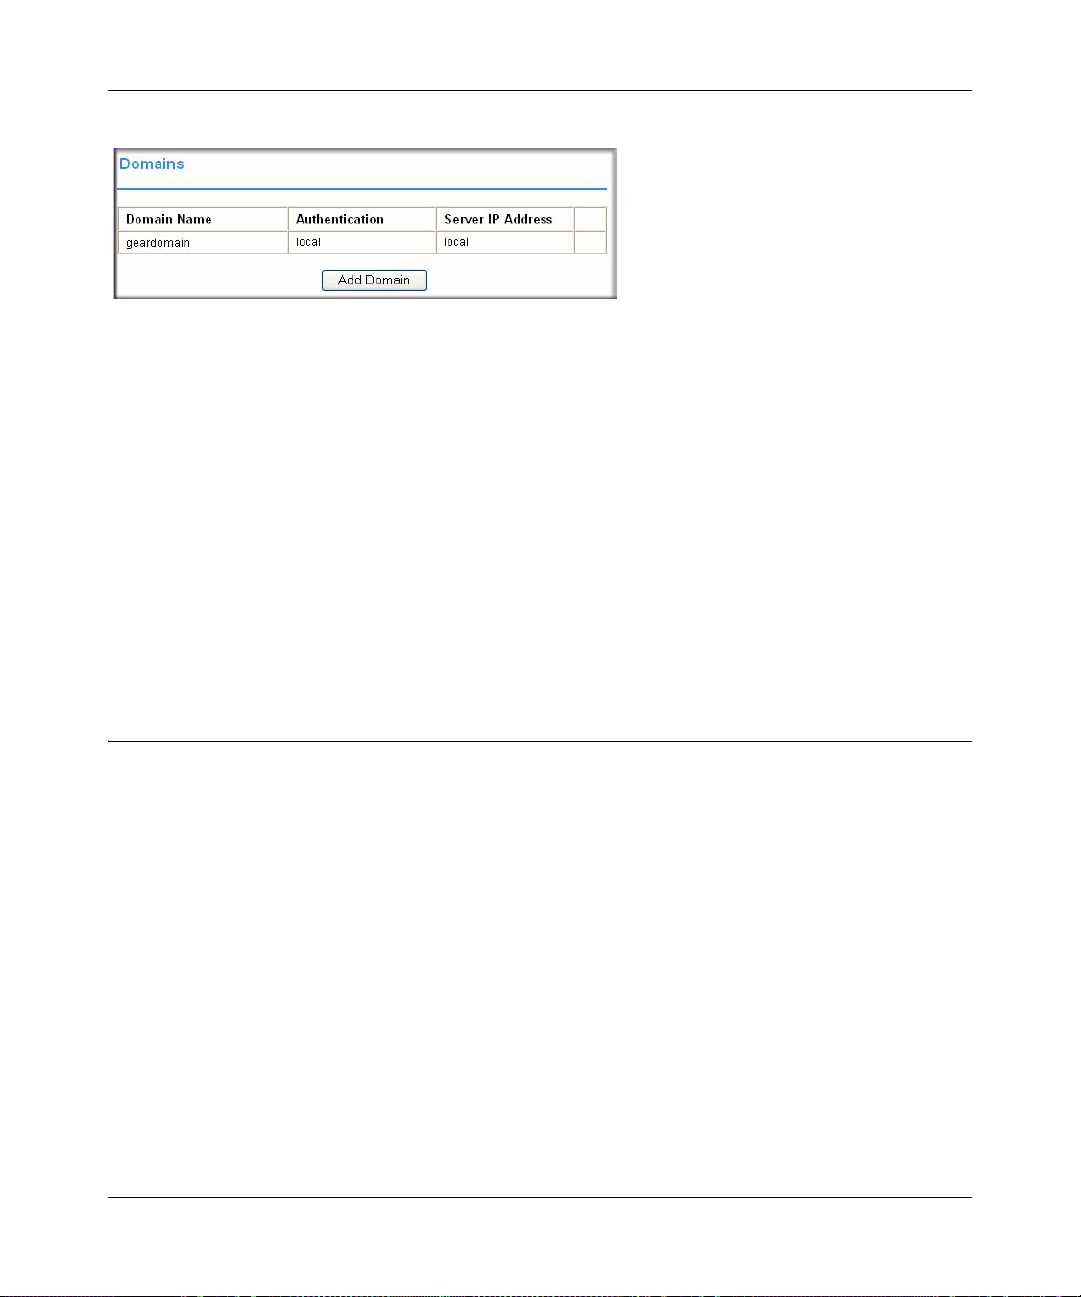
Figure 3-1
All of the configured domains will be listed in the table in the Domains window. The domains are
listed in the order in which they were created. By default, the geardomain authentication domain is
already defined, using the SSL VPN Concentrator’s local internal user database for user
authentication.
Additional domains may be created that use the internal user database authentication or require
authentication to remote authentication servers. The SSL VPN Concentrator supports RADIUS
(PAP, CHAP, MSCHAP, MSCHAPV2, and WiKID), LDAP, NT Domain, and Kerberos
authentication in addition to internal user database authentication.
Because a portal layout (such as portal pages, themes, banners, etc.) must be associated with a
domain, multiple domains are necessary if you wish to display different portal layouts to different
users.
Local User Database Authentication
You can create multiple domains that authenticate users with user names and passwords stored in a
local user database on the SSL VPN Concentrator.
To add a new authentication domain using the local user database:
3-2 Authenticating Users
v2.1, November 2008
Page 37

NETGEAR ProSafe SSL VPN Concentrator 25 SSL312 Reference Manual
1. From the Access Administration menu, select Domains. The Domains window will display.
Click Add Domain.
Figure 3-2
2. From the Authentication Ty pe pull-down menu, select Local User Database.
3. In the Domain Name field, enter a descriptive name for the authentication domain. This is the
domain name users will select in order to log into the SSL VPN portal.
4. In the Portal Layout Name pull-down menu, select the name of the layout. The default layout
is SSL-VPN. You can define additional layouts in the Portal Layouts screen.
5. Click Apply to update the configuration. Once the domain has been added, the domain is
displayed in the table on the Domains screen
RADIUS and NT Domain Authentication
For authentication to RADIUS or Microsoft NT domains (using Kerberos), you can individually
define authentication, authorization, and accounting (AAA) users and groups. This is not required,
but it allows you to create separate policies or bookmarks for individual AAA users.
When a user logs in, the SSL VPN Concentrator will validate with the appropriate RADIUS or NT
server that the user is authorized to log in. If the user is authorized, the SSL VPN Concentrator will
check to see if a user exists in the SSL VPN Concentrator Users and Groups database. If the user is
defined, then the policies and bookmarks defined for the user will apply.
Authenticating Users 3-3
v2.1, November 2008
Page 38

NETGEAR ProSafe SSL VPN Concentrator 25 SSL312 Reference Manual
For example, if you create a RADIUS domain in the SSL VPN Concentrator called “Miami
RADIUS server”, you can add users to groups that are members of the “Miami RADIUS server”
domain. These user names must match the names configured in the RADIUS server. Then, when
users log in to the portal, policies, bookmarks and other user settings will apply to the users. If the
AAA user does not exist in the SSL VPN Concentrator, then only the global settings, policies and
bookmarks will apply to the user.
When specifying RADIUS domain authentication, you are presented with several authentication
protocol choices, as summarized in the following table:
Table 3-1.
Authentication
Protocol
PAP Password Authentication Protocol (PAP) is a simple protocol in which the client sends a
CHAP Challenge Handshake Authentication Protocol (CHAP) executes a three-way handshake
MSCHAP Microsoft CHAP (MSCHAP) is a Microsoft variation of CHAP.
MSCHAPv2 MSCHAPv2 is an improved version providing mutual authentication between peers.
WiKID WiKID is a key-based two-factor authentication method using public key cryptography.
Description
password in clear text.
in which the client and server trade challenge messages, each responding with a hash of
the other’s challenge message that is calculated using a shared secret valu e.
The client sends an encrypted PIN to the WiKID server and receives a one-time passcode
with a short expiration period. The client logs in with the passcode.
The chosen authentication protocol must be configured on the RADIUS server and on the
authenticating client devices.
Configuring for RADIUS Domain Authentication
To create a domain with RADIUS authentication:
1. From the Access Administration menu, select Domains. The Domains window will display.
Click Add Domain.
2. From the Authentication Ty pe pull-down menu, select a RADIUS domain that specifies the
authentication method to be used. The Add Domain window displays the fields for a domain
for RADIUS authentication.
3-4 Authenticating Users
v2.1, November 2008
Page 39

NETGEAR ProSafe SSL VPN Concentrator 25 SSL312 Reference Manual
Figure 3-3
3. In the Domain Name field, enter a descriptive name for the authentication domain. This is the
domain name users will select in order to log into the SSL VPN portal.
4. In the Radius Server Address field, enter the IP address or domain name of the Radius server.
5. If an authentication secret is required by the Radius server, enter it in the Secret Password
field.
6. From the Portal Layout Name drop-down menu, select the name of the layout. The default
layout is SSL-VPN. You can define additional layouts in the Portal Layouts page.
7. Click Apply to update the configuration. Once the domain has been added, the domain
displays in the table on the Domains screen.
Configuring for NT Domain Authentication
To configure NT Domain authentication:
1. From the Access Administration menu, select Domains. The Domains window will display.
Click Add Domain.
Authenticating Users 3-5
v2.1, November 2008
Page 40

NETGEAR ProSafe SSL VPN Concentrator 25 SSL312 Reference Manual
Home Directory Base Path required when
“Require CIFS Bookmark” is enabled
2. From the Authentication Ty pe menu, select NT Domain. The Add Domain window displays
the fields for a domain with NT authentication:
Figure 3-4
3. In the Domain Name field, enter a descriptive name for the authentication domain. This is the
domain name selected by users when they authenticate to the SSL VPN portal. It may be the
same value as the NT Domain Name.
4. In the NT Server Address field, enter the IP address or host and domain name of the server.
5. In the NT Domain Name field, enter the NT authentication domain. This is the domain name
configured on the Windows authentication server for network authentication.
3-6 Authenticating Users
v2.1, November 2008
Page 41

NETGEAR ProSafe SSL VPN Concentrator 25 SSL312 Reference Manual
6. From the Portal Layout Name pull-down menu, select the name of the layout. The default
layout is SSL-VPN. You can define additional layouts in the Portal Layouts page.
7. Check the Require CIFS bookmark to home directory check box to automatically allow access
to users of this domain and add the home directory path in the field provided.
8. Click Apply to update the configuration. Once the domain has been added, the domain
displays in the table in the Domains screen.
LDAP Authentication
LDAP (Lightweight Directory Access Protocol) is a standard for querying and updating a
directory . Since LDAP supports a multilevel hierarchy (for example, groups or organizational
units), the SSL VPN Concentrator can query this information and provide specific group policies
or bookmarks based on LDAP attributes. By configuring LDAP attributes, the SSL VPN
Concentrator administrator can leverage the groups that have already been configured in an LDAP
or Active Directory database, rather than manually recreating the same groups in the SSL VPN
Concentrator.
Once an LDAP authentication domain is created, a default LDAP group will be created with the
same name as the LDAP domain name. Although you can add additional groups to or delete
groups from this domain, you cannot delete the default LDAP group.
For an LDAP group, you can define LDAP attributes. For example, you can specify that users in
an LDAP group must be members of a certain group or organizational unit defined on the LDAP
server. Or you can specify a unique LDAP distinguished name.
Note: The Microsoft Active Directory database uses an LDAP organization schema. The
Active Directory database can be queried using Kerberos authentication (the
standard authentication type), NTLM authentication (labeled “NT Domain”
authentication in the SSL VPN Concentrator), or using LDAP database queries. As
a result, an LDAP domain configured in the SSL VPN Concentrator can
authenticate to an Active Directory server.
T o add an LDAP authenticat ion domain, see “Configu ring for LDAP Authen tication” o n page 3-9.
Sample LDAP Attributes
You can enter up to 4 LDAP attributes per group. The following are some example LDAP
attributes of Active Directory LDAP users:
Authenticating Users 3-7
v2.1, November 2008
Page 42

NETGEAR ProSafe SSL VPN Concentrator 25 SSL312 Reference Manual
name=Administrator
memberOf=CN=TerminalServerComputers,CN=Users,DC=netgear,
DC=net
objectClass=user
msNPAllowDialin=FALSE
LDAP Attribute Rules
• If multiple attributes are defined for a group, all attributes must be met by LDAP users.
• If no attributes are defined, then any user authorized by the LDAP server can be a member of
the group.
• If multiple groups are defined and a user meets all the LDAP attributes for two groups, then
the user will be considered part of the group with the most LDAP attributes defined. If the
matching LDAP groups have an equal number of attributes, then the user will be considered a
member of the group based on the alphabetical order of the groups.
• If an LDAP user fails to meet the LDAP attributes for all LDAP groups configured on the SSL
VPN Concentrator, then the user will not be able to log into the portal. So the LDAP attributes
feature not only allows the administrator to create individual rules based on the LDAP group
or organization, it also allows the administrator to only allow certain LDAP users to log into
the portal.
Sample LDAP Users and Attributes Settings
If you manually add a user to an LDAP group, then the user setting will take precedence over
LDAP attributes.
For example:
An LDAP attribute objectClass=Person is defined for group Group1 and an LDAP attribute
memberOf=CN=WINSUsers,DC=netgear,DC=net is defined for Group2.
• If user Jane is defined by an LDAP server as a member of the Person object class, but is not a
member of the WINS Users group, Jane will be a member of the SSL VPN Concentrator
Group1.
• But if the administrator manually adds the user Jane to the SSL VPN Concentrator Group2,
then the LDAP attributes will be ignored and Jane will be a member of Group2.
3-8 Authenticating Users
v2.1, November 2008
Page 43

NETGEAR ProSafe SSL VPN Concentrator 25 SSL312 Reference Manual
Querying an LDAP Server
T o query your LDAP or Active Directory server to find out the LDAP attributes of your users, you
can use several different methods. From a machine with LDAPsearch tools (for example a Linux
machine with OpenLDAP installed), run the following command:
ldapsearch -h 10.0.0.5 -x -D
cn=demo,cn=users,dc=netgear,dc=net -w demo123 -b
dc=netgear,dc=net > /tmp/file
where
• 10.0.0.5 is the IP address of the LDAP or Active Directory server
• cn=demo,cn=users,dc=netgear,dc=net is the distinguished name of an LDAP
user
• demo123 is the password for the user demo
• dc=netgear,dc=net is the base domain that you are querying
• > /tmp/file is optional and defines the file where the LDAP query results will be
saved.
For further information on querying an LDAP server from a Window server, please see:
http://www.microsoft.com/technet/prodtechnol/windowsserver2003/library/TechRef/8196d68e776a-4bbc-99a6-d8c19f36ded4.mspx
Configuring for LDAP Authentication
To configure LDAP authentication, click Add Domain. An Add Domain window displays. In the
Add Domain window:
1. From the Access Administration menu, select Domains. The Domains window will display.
Click Add Domain.
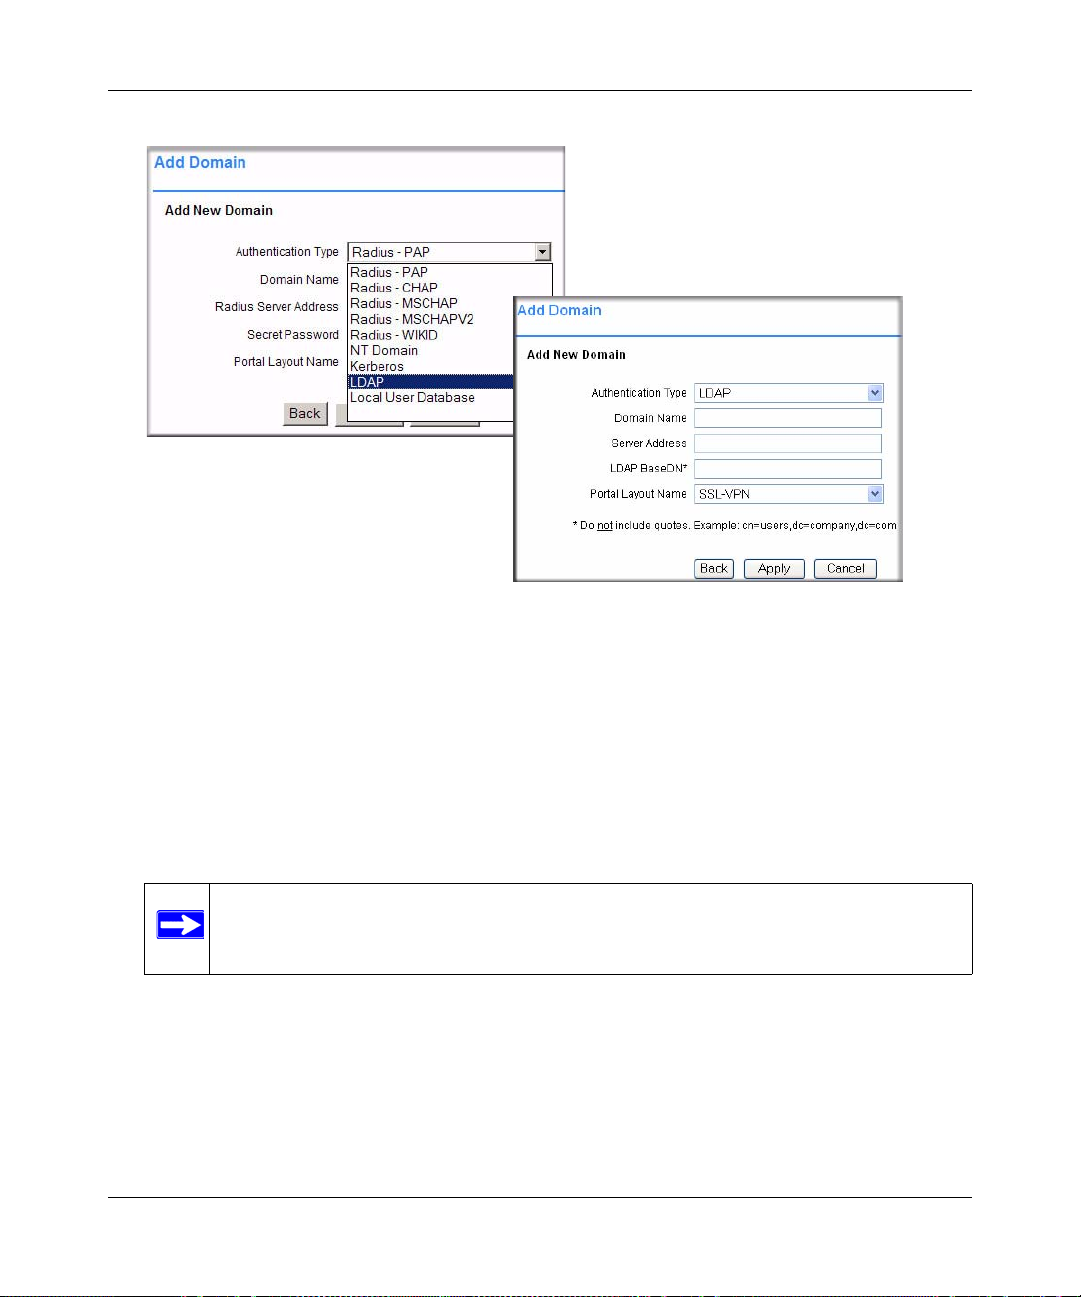
2. From the Authentication Ty pe menu, select LDAP. The Add Domain Window displays the
fields for a domain with LDAP authentication:
Authenticating Users 3-9
v2.1, November 2008
Page 44
NETGEAR ProSafe SSL VPN Concentrator 25 SSL312 Reference Manual
:
Figure 3-5
3. In the Domain Name field, enter a descriptive name for the authentication domain. This is the
domain name users will select in order to log into the SSL VPN portal. It can be the same
value as the Server Address field.
4. In the Server Address field, enter the IP address or domain name of the server.
5. In the LDAP BaseDN field, enter the search base for LDAP queries. An example of a search
base string is:
CN=Users,DC=yourdomain,DC=com
Note: Do not include quotes (“ ”) in the LDAP BaseDN field.
6. From the Portal Layout Name drop-down menu, select the name of the layout. The default
layout is SSL-VPN. You can define additional layouts in the Portal Layouts page.
7. Click Apply to update the configuration. Once the domain has been added, the domain
displays in the table on the Domains screen.
3-10 Authenticating Users
v2.1, November 2008
Page 45

NETGEAR ProSafe SSL VPN Concentrator 25 SSL312 Reference Manual
Kerberos Authentication (Active Directory)
Kerberos authentication is performed by either a Kerberos authentication server or a Windows
Server 2000 or later running Active Directory.
Users who have been defined in the Kerberos database can log into the SSL-VPN portal by
entering their Kerberos user name and password and selecting the new Kerberos authentication
domain from the Domain menu on the SSL VPN login page.
To configure Kerberos or Active Directory authentication:
1. From the Access Administration menu, select Domains. The Domains window will display.
Click Add Domain.
2. From the Authentication Ty pe menu, select Kerberos. The Kerberos configuration fields will
display:
Figure 3-6
3. Enter a descriptive name for the authentication domain in the Domain Name field. Users will
select this domain when they log into the SSL VPN portal. It can be the same value as the
Server Address field or the Kerberos Domain field depending on your network configuration.
4. Enter the IP address or fully qualified domain name of the Kerberos or Active Directory server
in the Server Address field.
Authenticating Users 3-11
v2.1, November 2008
Page 46

NETGEAR ProSafe SSL VPN Concentrator 25 SSL312 Reference Manual
5. Enter the Kerberos or Active Directory domain name in the Kerberos Domain field.
6. Enter the name of the layout in the Portal Layout Name field. The d efau lt layout is S SL-VPN.
(Additional layouts may be defined from the SSL VPN Portal > Portal Layouts screen.)
Note: If you selected a portal layout other than SSL-VPN, then the domain will not
be displayed on the default login page. Users will need to log in at
https://<IP/Domain Name>/portal/<Portal Name>.
7. Click Apply. Once the domain has been added, the domain will be added to the Domains
table.
Troubleshooting Active Directory Authentication
If your users are unable to connect via Active Directory, verify the following:
1. The time settings between the Active Directory server and the SSL VPN Concentrator must be
synchronized. Kerberos authentication, used by Active Directory to authenticate clients,
permits a maximum of a 15-minute time difference between the Windows server and the client
(the SSL VPN Concentrator). The easiest way to solve this issue is to configure Network Time
Protocol on the Date and Time screen and check that the server’s time settings are also
correct.
2. Confirm that your Windows server is configured for Active Directory authentication using
Kerberos. If you are using a Window NT 4.0 server, then your server only supports NT
Domain authentication. T ypically, Windows 2000 and 2003 servers are also configured for NT
Domain authentication to support legacy Windows clients.
Deleting a Domain
T o delete a domain, click the Delete link in the Domains table for the domain you wish to remove.
Once the SSL VPN Concentrator has been updated, the deleted domain will no longer appear in
the table in the Domains table.
Note: The SSL VPN Concentrator “geardomain” domain cannot be deleted.
3-12 Authenticating Users
v2.1, November 2008
Page 47

Chapter 4
Setting Up User and Group Access Policies
This chapter describes how to define users and groups and how to configure SSL VPN
Concentrator access policies and bookmarks for the users and groups. This chapter includes the
following topics:
• Determine Your Requirements
• Users, Groups and Global Policies
• Global Policies
• Groups Configuration
• Users Configuration
• Using Network Resource Objects to Simplify Policies
Determine Your Requirements
The ProSafe SSL VPN Concentrator 25 provides an extremely flexible and granular architecture
for managing users and groups. Depending on your requirements, you can implement a simple or
complex policy structure. Some general guidelines are:
• If you have a small number of users, all with the same privileges, and no central authentication
server, you can just add your users to the SSL VPN Concentrator’s local user database, using
the default group and domain.
• If you use a RADIUS, LDAP, NT or Kerberos authentication server, you do not need to add
individual users into the SSL VPN Concentrator unless you wish to define specific policies or
bookmarks per user. Configure groups using the same group names as defined in your
authentication server.
Note: When adding Group/Global policies, if the user is authenticated using an
external repository such as Microsoft NT or RADIUS, then the user name must
be added to the local database. If the user is authenticate by the LDAP
repository, then the user is added to the policy automatically.
4-1
v2.1, November 2008
Page 48

NETGEAR ProSafe SSL VPN Concentrator 25 SSL312 Reference Manual
• T o create complex policies involving groups of host names, IP addresses or IP address ranges,
you can define these groups as network objects using Network Resources as described in
“Using Network Resource Objects to Simplify Policies” on page 4-22.
• To present different portal content to different users (for example, external suppliers), create
the new portal layout, then add a new domain, selecting the new portal layout.
Users, Groups and Global Policies
An administrator can define and apply user, group and global policies to predefined network
resource objects, IP addresses, address ranges, or all IP addresses and to different SSL VPN
services. A specific hierarchy is invoked over which policies take precedence. The SSL VPN
Concentrator policy hierarchy is defined as:
1. User Policies take precedence over all Group Policies.
2. Group Policies take precedence over all Global Policies.
3. If two or more user, group or global policies are configured, the most specific policy takes
precedence.
For example, a policy configured for a single IP address takes precedence over a policy configured
for a range of addresses. And a policy that applies to a range of IP addresses takes precedence over
a policy applied to all IP addresses. If two or more IP address ranges are configured, then the
smallest address range takes precedence. Hostnames are treated the same as individual IP
addresses.
Network Resources are prioritized just like other address ranges. However, the prioritization is
based on the individual address or address range, not the entire Network Resource.
For example, let’s assume the following global policy configuration:
• Policy 1: A Deny rule has been configured to block all services to the IP address range
10.0.0.0 – 10.0.0.255.
• Policy 2: A Deny rule has been configured to block FTP access to 10.0.1.2 – 10.0.1.10.
• Policy 3: A Permit rule has been configured to allow FTP access to the predefined network
resource, FTP Servers. The FTP Servers network resource includes the following addresses:
10.0.0.5 – 10.0.0.20 and ftp.company.com, which resolves to 10.0.1.3.
Assuming that no conflicting user or group policies have been configured, if a user attempted to
access:
• An FTP server at 10.0.0.1, the user would be blocked by Policy 1.
4-2 Setting Up User and Group Access Policies
v2.1, November 2008
Page 49
NETGEAR ProSafe SSL VPN Concentrator 25 SSL312 Reference Manual
• An FTP server at 10.0.1.5, the user would be blocked by Policy 2.
• An FTP server at 10.0.0.10, the user would be granted access by Policy 3. The IP address
range 10.0.0.5 - 10.0.0.20 is more specific than the IP address range defined in Policy 1.
• An FTP server at ftp.company.com, the user would be granted access by Policy 3. A single
host name is more specific than the IP address range configured in Policy 2.
Note: The user would not be able to access ftp.company.com using its IP address
10.0.1.3. The SSL VPN Concentrator policy engine does not perform reverse
DNS lookups.
Global Policies
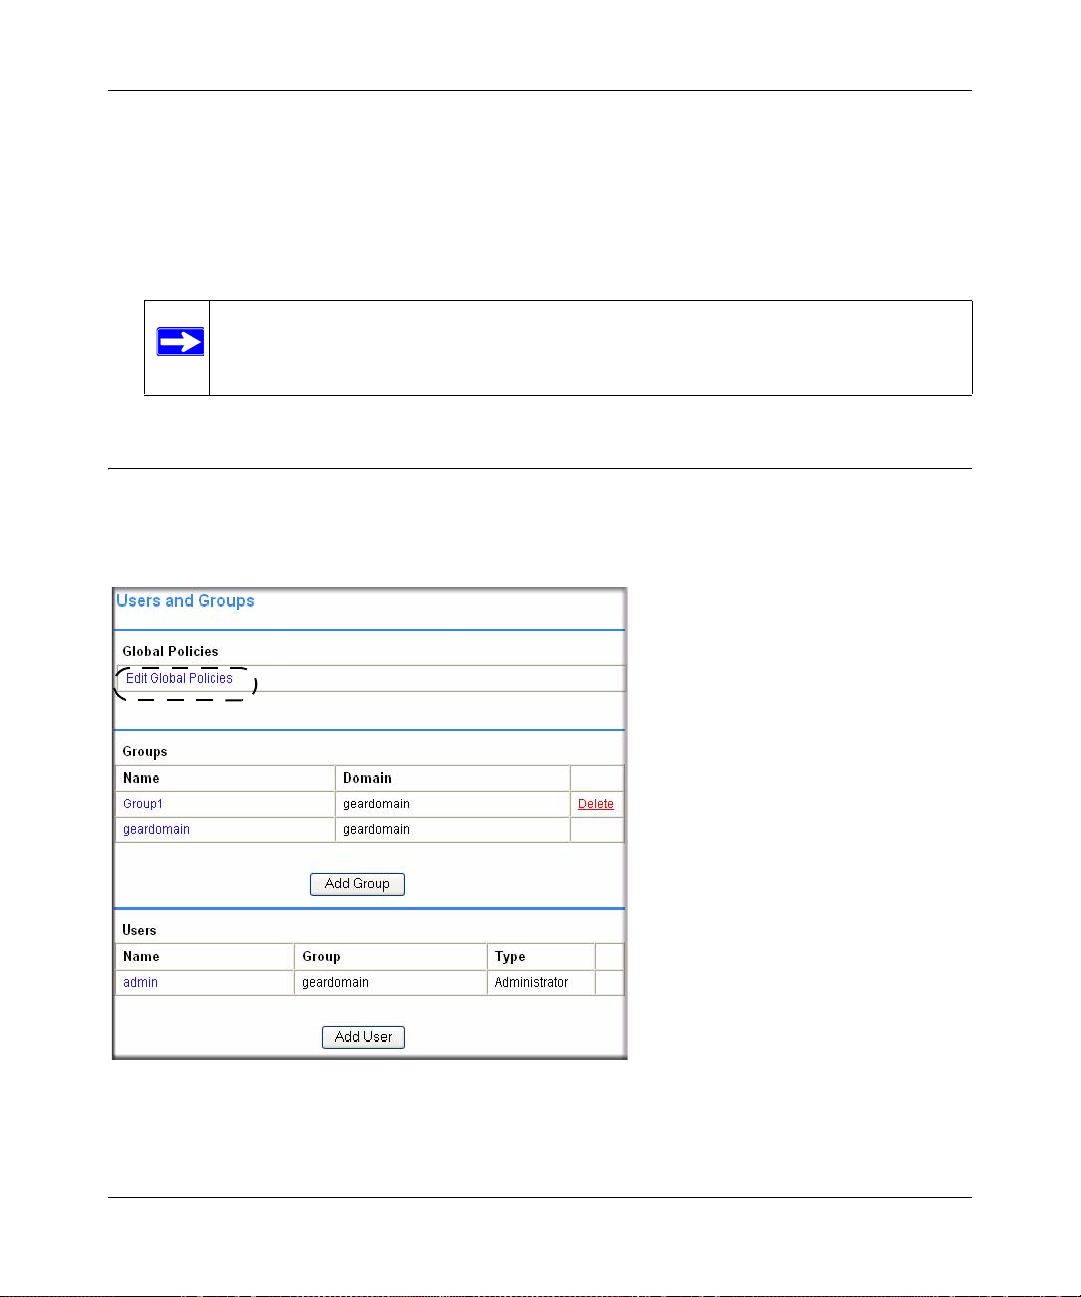
You can view and configure the SSL VPN Concentrator Global Policies, Groups and Users by
selecting Users and Groups under the Access Administration menu in the left navigation pane.
Figure 4-1
Setting Up User and Group Access Policies 4-3
v2.1, November 2008
Page 50

NETGEAR ProSafe SSL VPN Concentrator 25 SSL312 Reference Manual
Editing Global Policy Settings
To edit global settings:
1. In the Global Policies table, click the Edit Global Policies link. The Global Settings screen
displays.
Figure 4-2
2. In the Inactivity Timeout field, enter the number of minutes of inactivity to allow.
You can set the inactivity timeout at the user, group and global level. If one or more timeouts
are configured for an individual user, the user timeout setting will take precedence over the
group timeout and the group timeout will take precedence over the global timeout.
Setting the global settings timeout to 0 disables the inactivity timeout for users who do not
have a group or user timeout configured.
3. From the Terminal Services SSO pull-down menu, sele ct Enable or Disable.
4-4 Setting Up User and Group Access Policies
v2.1, November 2008
Page 51

NETGEAR ProSafe SSL VPN Concentrator 25 SSL312 Reference Manual
When Terminal Services Single Sign-On (SSO) is enabled, a user with a domain account will
log in only once, and can then access remote servers without being asked again for his
credentials. SSO can be enabled or disabled at the user, group and global level. If different
settings are configured at different levels, the user level option will take precedence over the
group level option and the group level option will take precedence over the global level option.
4. Click Apply to save the configuration changes.
Setting Up User and Group Access Policies 4-5
v2.1, November 2008
Page 52

NETGEAR ProSafe SSL VPN Concentrator 25 SSL312 Reference Manual
Adding and Editing Global Policies
To define global access policies:
1. In the Global Policies section, click Add Policy. An Add Policy window displays.
Note: User and group access policies will take precedence over global policies.
Figure 4-3
2. From the Apply Policy To pull-down menu, select whether the policy will be applied to a
predefined network resource, an individual host, a network, or all addresses.
3. In the Policy Name field, enter a name for the policy.
Note: SSL VPN Concentrator policies apply to the destination address(es) of the SSL
VPN connection, not the source address. You cannot permit or block a specific
IP address on the Internet from authenticating to the SSL VPN Concentrator
through the policy engine.
• If your policy applies to a predefined network resource, select the name of the resource
from the Defined Resource menu. For information about creating network resources, refer
to “Using Network Resource Objects to Simplify Policies” on page 4-22.
• If your policy applies to a specific host, enter the IP address of the local host machine in
the IP Address field.
• If your policy applies to a network, enter the network address in the Network Address
field and the subnet mask in the Subnet Mask field.
4-6 Setting Up User and Group Access Policies
v2.1, November 2008
Page 53
NETGEAR ProSafe SSL VPN Concentrator 25 SSL312 Reference Manual
4. From the Service pull-down menu, select the service type. If you are applying a policy to a
network resource, the service type is defined in the network resource.
5. From the Status pull-down menu, select PERMIT or DENY to either permit or deny SSL VPN
connections for the specified service and host machine.
6. Click Apply to update the configuration. Once the configuration has been updated, the new
policy appears in the Global Policies table on the Global Settings screen.
The Global Policies will be displayed in the order of priority, from the highest priority policy
to the lowest priority policy.
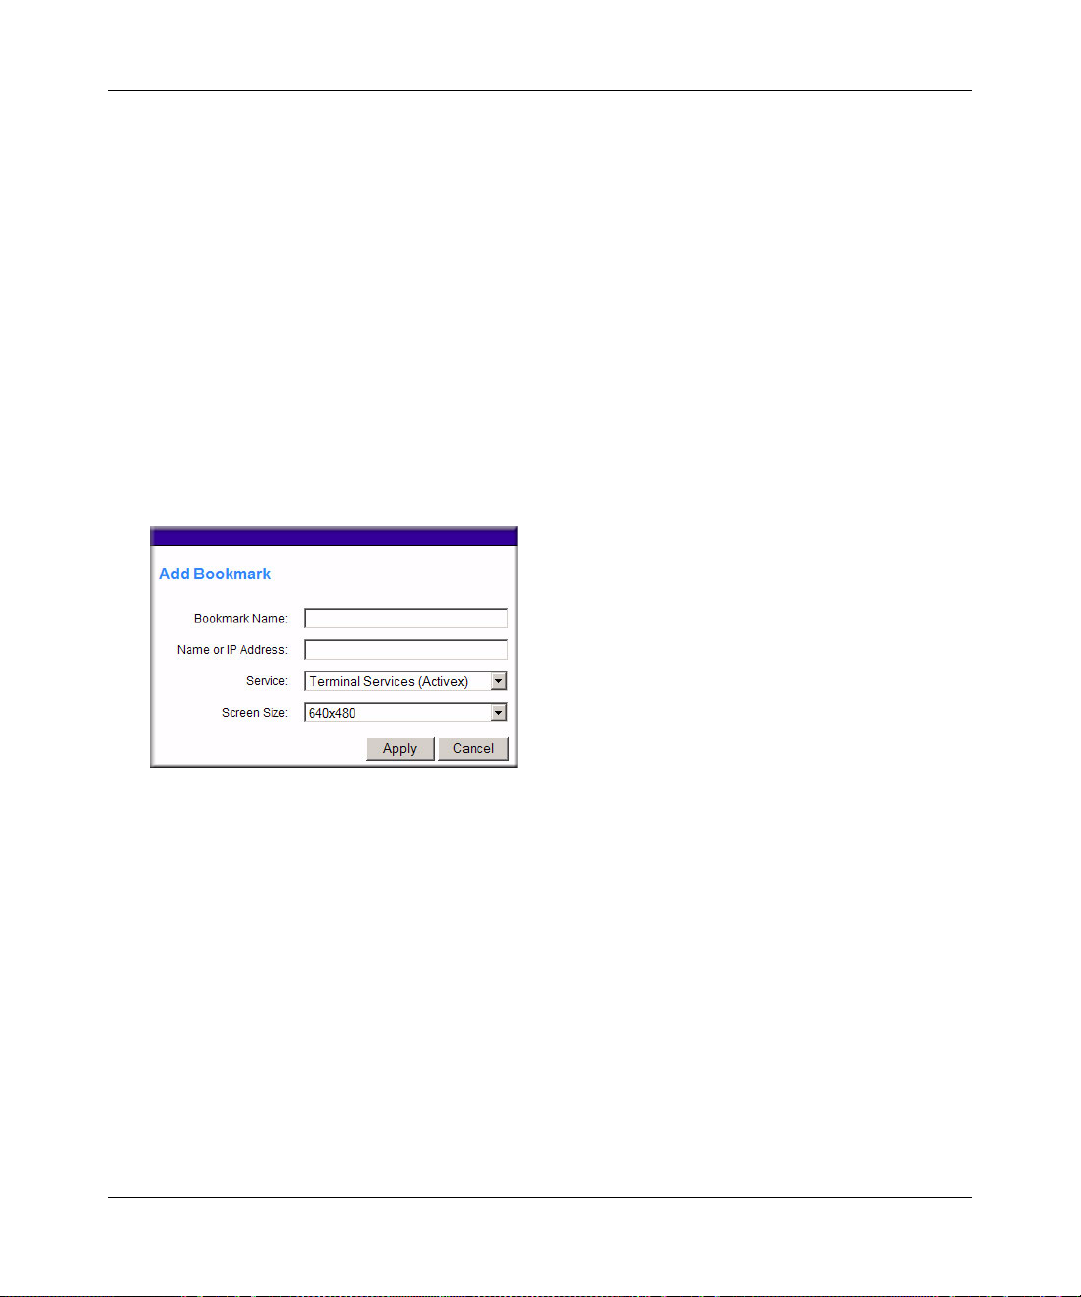
Defining and Editing Global Bookmarks
To define global bookmarks:
1. In the Global Bookmarks section, click Add Bookmark. An Add Bookmark window displays.
Figure 4-4
When global bookmarks are defined, all members will see the defined bookmarks from the
SSL VPN portal. Individual users will not be able to delete or modify global bookmarks.
2. In the Bookmark Name field, enter a descriptive name.
3. In the Name or IP Address field, enter the domain name or the IP address of a host machine on
the LAN.
4. From the Service pull-down menu, select the service type.
5. If Terminal Services (RDP) is selected, select the screen size that the bookmark will use from
the Screen Size drop-down menu.)
6. Click Apply to update the configuration. Once the configuration has been updated, the new
global bookmark appears in the Global Bookmarks table on the Global Settings screen.
Setting Up User and Group Access Policies 4-7
v2.1, November 2008
Page 54

NETGEAR ProSafe SSL VPN Concentrator 25 SSL312 Reference Manual
Groups Configuration
When configuring Groups, remember that user policies take precedence over all group policies
and group policies take precedence over all global policies, regardless of the policy definition. (A
user policy that allows access to all IP addresses will take precedence over a group policy that
denies access to a single IP address).
SSL VPN Concentrator Groups are also defined from the Users and Groups menu. Under the
Access and Administration menu in the left navigation pane, select the Users and Groups option.
The Users and Groups menu displays
Figure 4-5
Adding a New Group
To create a new group:
1. In the Users and Groups menu, click Add Group. The Add Group menu displays.
4-8 Setting Up User and Group Access Policies
v2.1, November 2008
Page 55

NETGEAR ProSafe SSL VPN Concentrator 25 SSL312 Reference Manual
.
Figure 4-6
2. In the Group Name field., enter a descriptive name for the group.
3. In the Domain menu, select the appropriate domain. The domain will determine the
authentication method for the group.
4. Click Apply to update the configuration. Once the group has been added, the new group
appears in the Groups table on the User and Groups menu.
All of the configured groups are displayed in the table in the Users and Groups menu. The
Groups are listed in alphabetical order.
Editing Group Settings
To edit group settings:
1. In the Groups table, click the name of the group. The Edit Group Settings menu displays. The
general group information, including the Group Name, Domain Name, T erminal Service SSO,
and Inactivity Timeout are displayed. The Group Name and Domain Name are not
configurable.
Setting Up User and Group Access Policies 4-9
v2.1, November 2008
Page 56

NETGEAR ProSafe SSL VPN Concentrator 25 SSL312 Reference Manual
Figure 4-7
2. From the Terminal Services SSO pull-down menu, select Use Global, Enable, or Disable.
When Terminal Services Single Sign-On (SSO) is enabled, a user with a domain account will
log in only once, and can then access remote servers without being asked again for his
credentials. SSO can be enabled or disabled at the user, group and global level. If different
settings are configured at different levels, the user level option will take precedence over the
group level option and the group level option will take precedence over the global level option.
To force the group to use the global level option, select Use Global.
3. In the Inactivity Timeout field, enter the number of minutes of inactivity to allow for users in
the group.
You can set the inactivity timeout at the user, group an d global level. Set the timeout as 0 in the
user and group configuration to use the global timeout setting. If multiple timeout settings are
configured, the user timeout setting will take precedence over the group timeout and the group
timeout will take precedence over the global timeout.
4-10 Setting Up User and Group Access Policies
v2.1, November 2008
Page 57

NETGEAR ProSafe SSL VPN Concentrator 25 SSL312 Reference Manual
The maximum timeout setting is 232 or over 100,000 minutes, although setting the timeout to 0
on the Global Settings page disables the inactivity timeout (if 0 is also configured as the
inactivity timeout for the user and group).
4. Click Apply to save the configuration changes.
Defining and Editing Group Policies
With group access policies, all traffic is allowed by default. You can create additional allow and
deny policies by destination address or address range and by service type.
The most specific policy will take precedence over less specific policies. For example, a policy
that applies to only one IP address will have priority over a policy that applies to a range of IP
addresses. If two policies apply to a single IP address, then a policy for a specific service (for
example RDP) will take precedence over a policy that applies to all services.
Note: User policies take precedence over all group policies and group policies take
precedence over all global policies, regardless of the policy definition (A user
policy that allows access to all IP addresses will take precedence over a group
policy that denies access to a single IP address).
To define group access policies:
1. In the Group Policies section of the Group Settings menu, click Add Policy. An Add Policy
menu displays.
Figure 4-8
2. From the Apply Policy To pull-down menu, select whether the policy will be applied to a
predefined network resource, an individual host, a range of addresses or all addresses.
Setting Up User and Group Access Policies 4-11
v2.1, November 2008
Page 58

NETGEAR ProSafe SSL VPN Concentrator 25 SSL312 Reference Manual
3. In the Policy Name field, define a name for the policy.
Note: SSL VPN Concentrator policies apply to the destination address(es) of the SSL
VPN connection, not the source address. You cannot permit or block a specific
IP address on the Internet from authenticating to the SSL VPN Concentrator
through the policy engine. That type of policy would need to be defined by a
firewall rule.
4. Select the appropriate policy:
• If your policy applies to a predefined network resource, select the name of the resource
from the Defined Resource pull-down menu. For information about creating network
resources, refer to “Using Network Resource Objects to Simplify Policies” on page 4-22.
• If your policy applies to a specific host, enter the IP address of the local host machine in
the IP Address field.
• If your policy applies to a network, enter the network address and subnet bit mask (0-32)
in the Network and Subnet Mask fields.
5. In the Service pull-down menu, select the service type. If you are applying a policy to a
network resource, the service type is defined in the Defined Resource field. .
Note: Network Resources are configured in Network Resources under the Access
Administration menu on the left navigation pane.
6. From the Status pull-down menu, select PERMIT or DENY to either permit or deny SSL VPN
connections for the specified service and host machine.
7. Click Apply to update the configuration. Once the configuration has been updated, the new
group policy appears in the table in the Edit Group Settings menu.
The group policies in the Group Policies table are ranked by the order of priority, from the
highest priority policy to the lowest priority policy.
Defining and Editing Group Bookmarks
SSL VPN Concentrator bookmarks provide a convenient way for SSL VPN users to access
computers on the local area network that they will connect to frequently. Group bookmarks will
apply to all members of the specific group. When group bookmarks are defined, all group
members will see the defined bookmarks from the SSL VPN portal. Individual users will not be
able to delete or modify group bookmarks.
4-12 Setting Up User and Group Access Policies
v2.1, November 2008
Page 59

NETGEAR ProSafe SSL VPN Concentrator 25 SSL312 Reference Manual
To define group bookmarks:
1. In the Group Bookmarks section of the Group Settings menu, click Add Bookmark. An Add
Bookmark menu displays.
When group bookmarks are defined, all group members will see the defined bookmarks from
the SSL VPN Portal. Individual group members will not be able to delete or modify group
bookmarks.
.
Figure 4-9
2. In the Bookmark Name field, enter a descriptive name.
3. In the Name or IP Address field, enter the domain name or the IP address of a host machine on
the LAN.
4. From the Service pull-down menu, select the service type.
5. If Terminal Services is selected, select the screen size that the bookmark will use from the
Screen Size drop-down menu.
6. Click Apply to update the configuration. Once the configuration has been updated, the new
group bookmark will be displayed in the Group Bookmarks table in the Group Settings
window.
Deleting a Group
To delete a group that is the default group for an authentication domain, delete the corresponding
domain (you cannot delete the group in the Group Settings menu).
If a group is not the default group for an authentication domain, first delete all users in the group.
Then you can delete the group on the Group Settings page using the following steps.
To delete a group:
Setting Up User and Group Access Policies 4-13
v2.1, November 2008
Page 60

NETGEAR ProSafe SSL VPN Concentrator 25 SSL312 Reference Manual
1. Click the name of the group that you wish to remove from the Groups table. The Group
Settings menu displays.
2. In the Group Settings window, click Delete Group. The Users and Groups menu displays and
the deleted group no longer appears in the list of defined groups.
Note: A group cannot be deleted if users have been added to the group or if the group
is the default group created for an authentication domain.
You can also delete a group by clicking its Delete link.
Note: The default group “geardomain” cannot be deleted.
Users Configuration
SSL VPN Concentrator users are defined from the Users and Groups menu. Under the Access and
Administration menu in the left navigation pane, select the Users and Groups option. The Users
and Groups menu displays.
4-14 Setting Up User and Group Access Policies
v2.1, November 2008
Page 61

Figure 4-10
NETGEAR ProSafe SSL VPN Concentrator 25 SSL312 Reference Manual
Adding a New User
To create a new user:
1. In the Users and Groups menu, click Add User. An Add User menu displays.
Figure 4-11
2. In the User Name field, enter the user name for the user. This is the name the user will enter in
order to log into the SSL VPN portal.
3. From the Group pull-down menu, select the name of the group to which the user belongs.
Setting Up User and Group Access Policies 4-15
v2.1, November 2008
Page 62

NETGEAR ProSafe SSL VPN Concentrator 25 SSL312 Reference Manual
4. Click Apply.
If the selected group is in a domain that uses external authentication, such as Kerberos,
RADIUS, NT Domain, or LDAP, then the Add User menu will close and the new user will be
added to the Users and Groups table.
Note: Groups configured to use Radius, LDAP, NT Domain, or Kerberos
authentication do not require passwords because the external authentication
server will validate user names and passwords.
It is only necessary to enter RADIUS, LDAP, NT and Kerberos user names if you wish to
define specific policies or bookmarks per user. If users are not defined in the SSL VPN
Concentrator, then global policies and bookmarks will apply to users authenticating to an
external authentication server.
If the selected group is in a domain that uses internal database authentication, such as the
default “geardomain” domain, then the following window displays:
Figure 4-12
5. In the Password field, enter the user’s password.
6. In the Confirm Password field, re-enter the password.
Note: Both the user name and password are case-sensitive.
7. From the User Type pull-down menu, select the user type (either User or Administrator).
8. Click Apply to update the configuration. Once the user has been added, the new user appears
in the table in the Users and Groups menu.
4-16 Setting Up User and Group Access Policies
v2.1, November 2008
Page 63

Figure 4-13
NETGEAR ProSafe SSL VPN Concentrator 25 SSL312 Reference Manual
Editing a User
To edit a user:
1. In the Users table in the Users and Groups menu, click the name of the user . The User Settings
menu displays as shown in Figure 4-14.
• The Edit User Settings section shows the User Name, Group Name, and Domain Name.
These fields are not configurable. To modify information supplied in these fields, remove
the user by clicking Delete User and then recreate the user with the correct information.
• If the user authenticates to an external authentication server, then the User Type and
Password fields are not shown. The password fields are not configurable because the
authentication server will validate the password. The user type is not configurable because
the SSL VPN Concentrator only allows users who authenticate to the internal user
database to have administrative privileges.
Setting Up User and Group Access Policies 4-17
v2.1, November 2008
Page 64

NETGEAR ProSafe SSL VPN Concentrator 25 SSL312 Reference Manual
.
Figure 4-14
2. To modify the user password, enter the new user password in the Password field.
3. In the Confirm Password field, enter the new password again.
4. From the Terminal Services SSO pull-down menu, select Use Group, Enable, or Disable.
When Terminal Services Single Sign-On (SSO) is enabled, a user with a domain account will
log in only once, and can then access remote servers without being asked again for his
credentials. SSO can be enabled or disabled at the user, group and global level. If different
settings are configured at different levels, the user level option will take precedence over the
group level option and the group level option will take precedence over the global level option.
To force the group to use the group level option, select Use Group.
4-18 Setting Up User and Group Access Policies
v2.1, November 2008
Page 65

NETGEAR ProSafe SSL VPN Concentrator 25 SSL312 Reference Manual
5. In the Inactivity Timeout field, enter the number of minutes of inactivity to allow for users in
the group.
You can set the inactivity timeout at the user, group an d global level. Set the timeout as 0 in the
user and group configuration to use the global timeout setting. If multiple timeout settings are
configured, the user timeout setting will take precedence over the group timeout and the group
timeout will take precedence over the global timeout.
The maximum timeout setting is 2
32
or over 100,000 minutes, although setting the timeout to 0
on the Global Settings page disables the inactivity timeout (if 0 is also configured as the
inactivity timeout for the user and group).
6. Click Apply to save the configuration changes.
Setting Up User and Group Access Policies 4-19
v2.1, November 2008
Page 66

NETGEAR ProSafe SSL VPN Concentrator 25 SSL312 Reference Manual
Defining and Editing User Policies
To define user access policies:
1. On the Edit User Settings screen, click Add Policy. An Add Policy menu displays.
Figure 4-15
2. In the Apply Policy To pull-down menu, select whether the policy will be applied to a
predefined network resource, an individual host, a network or all addresses.
3. In the Policy Name field, enter a name for the policy.
Note: SSL VPN Concentrator policies apply to the destination address(es) of the SSL
VPN connection, not the source address. You cannot permit or block a specific
IP address on the Internet from authenticating to the SSL VPN Concentrator
through the policy engine.
• If your policy applies to a predefined network resource, select the name of the resource
from the Defined Resource menu. For information about creating network resources, refer
to “Using Network Resource Objects to Simplify Policies” on page 4-22.
• If your policy applies to a specific host, enter the IP address of the local host machine in
the IP Address field.
• If your policy applies to a network, enter the network address in the Network Address
field and the subnet mask in the Subnet Mask field.
4. From the Service pull-down menu, select the service type. If you are applying a policy to a
network resource, the service type is defined in the network resource.
5. From the Status pull-down menu, select PERMIT or DENY to either permit or deny SSL VPN
connections for the specified service and host machine.
4-20 Setting Up User and Group Access Policies
v2.1, November 2008
Page 67
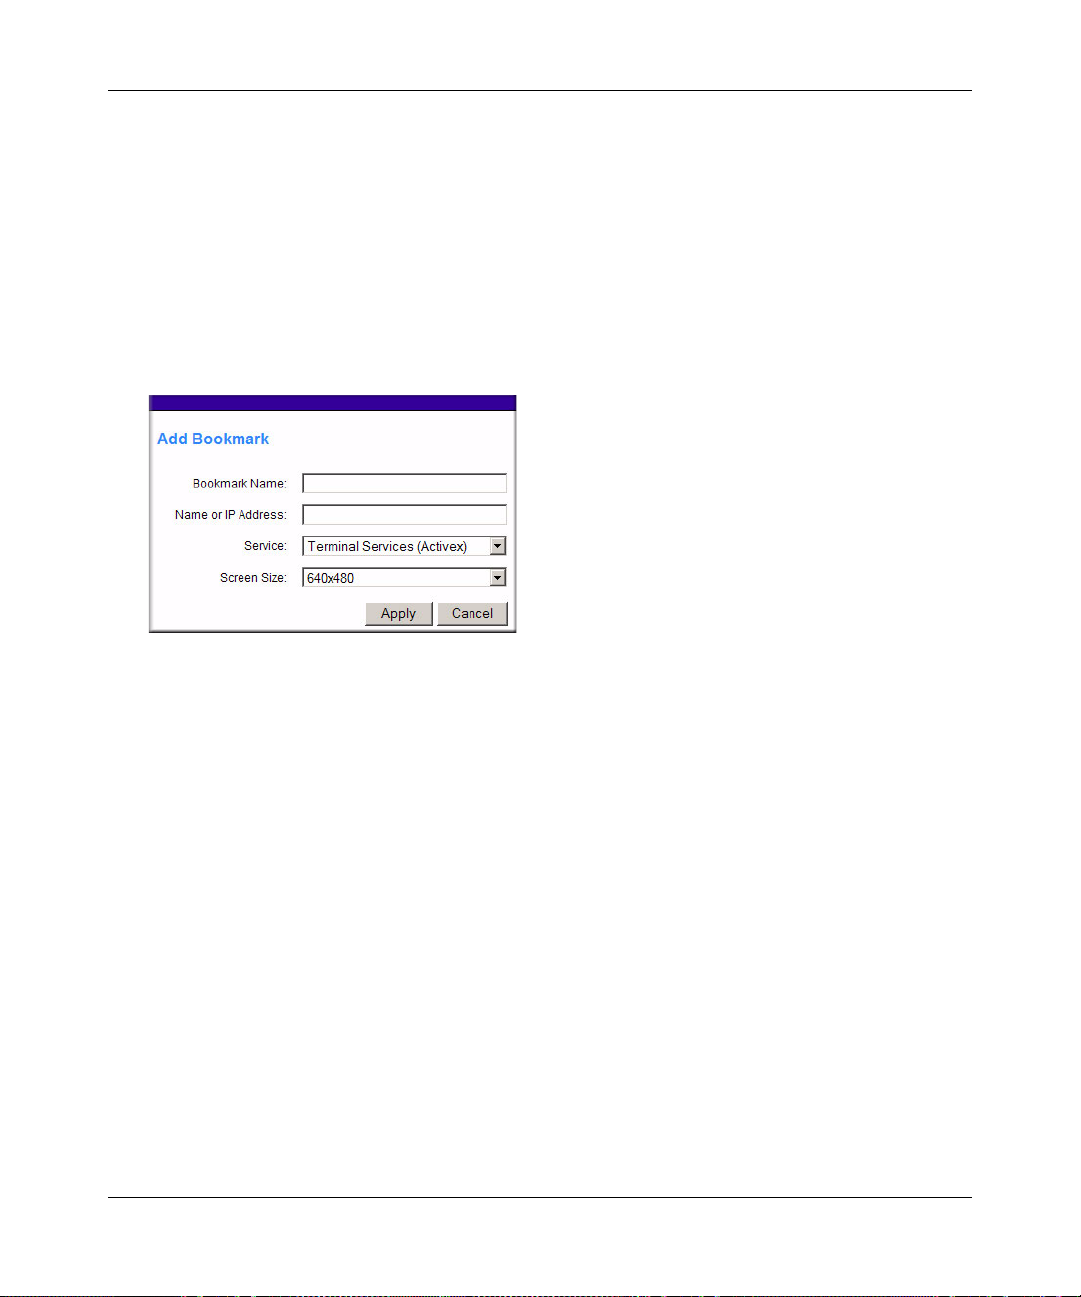
NETGEAR ProSafe SSL VPN Concentrator 25 SSL312 Reference Manual
6. Click Apply to update the configuration. Once the configuration has been updated, the new
policy appears in the Edit User Settings menu.
The user policies will be displayed in the Edit Users Settings screen in the User Policies table
in the order of priority, from the highest priority policy to the lowest priority policy.
Defining and Editing a User Bookmarks
To define user bookmarks:
1. In the Edit User Settings menu, click Add Bookmark. An Add Bookmark menu displays.
Figure 4-16
When user bookmarks are defined, the user will see the defined bookmarks from the SSL VPN
portal. Individual user members will not be able to delete or modify bookmarks created by the
administrator.
2. In the Bookmark Name field, enter a descriptive name.
3. In the Name or IP Address field, enter the domain name or the IP address of a host machine on
the LAN.
4. From the Service pull-down menu, select the service type.
5. If Terminal Services (RDP) is selected, select the screen size that the bookmark will use from
the Screen Size drop-down menu.)
6. Click Apply to update the configuration. Once the configuration has been updated, the new
user bookmark appears in the User Bookmarks table in the Edit User Settings menu.
Setting Up User and Group Access Policies 4-21
v2.1, November 2008
Page 68

NETGEAR ProSafe SSL VPN Concentrator 25 SSL312 Reference Manual
Deleting a User
To delete a user:
1. Click the Delete link adjacent to the users name in the Users table. The user is removed from
the table in the Users and Groups menu, or
2. Click the user name that you wish to remove. The Edit User Settings window will display.
3. In the Edit User Settings window, click Delete User. Once deleted, the user no longer appears
in the table in the Users and Groups menu.
Note: A user cannot be deleted if the user is the only user defined with administrative
privileges.
Using Network Resource Objects to Simplify Policies
Network Resources are groups of host names, IP addresses and IP address ranges. By defining
resource objects, you can more quickly create and configure network policies. This is because you
will not need to redefine the same set of IP addresses or address ranges when configuring the same
access policies for multiple users.
Defining Network Resources is optional; smaller organizations can choose to create access
policies using individual IP addresses or IP networks rather than predefined Network Resources.
But for most organizations, it is recommended that you use Network Resources. If your server or
network configuration changes, by using Network Resources you can perform an update quickly
instead of individually updating all of the user and group policies.
To define a network resource:
1. Under the Access Administration menu on the left navigation pane, select Network Resources.
The Network Resources screen displays.
Figure 4-17
4-22 Setting Up User and Group Access Policies
v2.1, November 2008
Page 69

NETGEAR ProSafe SSL VPN Concentrator 25 SSL312 Reference Manual
2. Click Add Resource. An Add Network Resource menu similar to the following displays.
Figure 4-18
3. In the Resource Name field, enter a name for the Network Resource.
4. From the Services pull-down menu, select the type of service to which the Network Resource
will apply.
5. Click Apply. The new Network Resource appears in the table on the Network Resources
menu.
Figure 4-19
To edit the Network Resource.
1. In the table on the Network Resources menu, click the name of the resource in the Resource
Name column. The Edit Network Resource screen displays.
Setting Up User and Group Access Policies 4-23
v2.1, November 2008
Page 70

NETGEAR ProSafe SSL VPN Concentrator 25 SSL312 Reference Manual
.
Figure 4-20
2. From the Object Ty pe pull-down menu under Add Resource Addresse s, select either IP
Address or IP Network:
• If you selected IP Address, enter an IP address or fully qualified domain name in the IP
Address/Name field.
• If you selected IP Network, enter the IP network address in the Network Address field.
Enter the mask length in the Mask Length (0-31) field.
• Enter the Port Range or Port Number for the IP Address or IP Network you selected.
Note: Only default ports are allowed for Terminal Services, FTP and CIFS. An
Administrator cannot configure user desired ports for these services.
3. Click Add Resource to add the IP address or IP network to the Network Resource. The new
configuration appears in the Defined Resource Addresses table, as shown in the example
below.
4-24 Setting Up User and Group Access Policies
v2.1, November 2008
Page 71

NETGEAR ProSafe SSL VPN Concentrator 25 SSL312 Reference Manual
Figure 4-21
.
Note: You may define up to 128 addresses or address ranges per Network Resource
To delete a defined resource, click Delete in the Defined Resource Addresses table adjacent to the
resource you wish to delete.
Setting Up User and Group Access Policies 4-25
v2.1, November 2008
Page 72

NETGEAR ProSafe SSL VPN Concentrator 25 SSL312 Reference Manual
4-26 Setting Up User and Group Access Policies
v2.1, November 2008
Page 73

Chapter 5
Configuring the Remote Access Web Portal
This chapter explains how to create multiple Web portals for different users and how to customize
the appearance of a portal. It describes:
• Creating the Portal
• Portal Options
• Adding Portal Layouts
• Adding Terminal Services Applications to the Portal
• Customizing the Banner
• Duplicating and Editing Portal Layouts
• Preparing the Client for Using Portal Services
If your implementation consists of only a single portal layout, you can simply modify the default
layout “SSL-VPN.”
Creating the Portal
The SSL VPN Portal Layouts screen allows you to create a custom page that remote users will
see when they log into the portal. Because the page is completely customizable, it provides the
ideal way to communicate remote access instructions, support information, technical contact info
or VPN-related news updates to remote users. The page is also well-suited as a starting page for
restricted users; if mobile users or business partners are only permitted to access a few files or web
URLs, the page you create will only show those links relevant to these users.
Portal Layouts are applied by selecting from available layouts in the configuration of a Domain.
When you have completed your Portal Layout, you can apply the Portal Layout to one or more
authentication domains (see “Authentication Domains” on page 3-1 to apply a Portal Layout to a
Domain). You can also make the new portal the default portal for the SSL VPN gateway by
selecting the default radio button adjacent to the portal layout name.
5-1
v2.1, November 2008
Page 74

NETGEAR ProSafe SSL VPN Concentrator 25 SSL312 Reference Manual
Note: The default portal address is https://<IP_Address>. If the default portal is changed
from the default (SSL-VPN), you can use the URL address
https://<IP_Address>/portal/SSL-VPN to access the administration domain
geardomain. The administration domain, geardomain, is attached to the SSL-
VPN portal layer.
To view the Portal Layout screen:
Click Portal Layouts under the SSL VPN Portal menu on the left navigation pane. A window
similar to the following will display.
.
Figure 5-1
Portal Options
The SSL VPN Concentrator portal can present the remote user with all of the features listed in the
table below, or a subset, depending on the configuration by the administrator.
Table 5-1. Portal Option Features for Remote Users
Feature Description
VPN Tunnel An ActiveX-based SSL VPN client for Windows that provides full network connectivity. A
client program is downloaded to the remote PC from the SSL312.
Applications Network-enabled applications running on a Windows Server on the corporate network.
Remote Access Two common remote desktop clients are impl e me nt ed on the S SL VPN Conce n tra to r.
• RDP allows connection to a Windows Server desktop.
• VNC allows connection to the desktop of various platforms.
Network Places Network Neighborhood display of the corporate network.
Port Forwarding A thin web-based client that provides a secure tunnel for specified TCP ports. A client
program is downloaded to the remote PC from the SSL312.
Utilities Telnet, SSH, and FTP clients are implemented on the SSL VPN Concentrator.
5-2 Configuring the Remote Access Web Portal
v2.1, November 2008
Page 75

NETGEAR ProSafe SSL VPN Concentrator 25 SSL312 Reference Manual
The configuration of the VPN Tunnel and Port Forwarding features are described in Chapter 6,
“Configuring the SSL VPN Tunnel Client and Port Forwarding”.
Adding Portal Layouts
The SSL VPN Concentrator administrator may define individual layouts for the SSL VPN portal.
The layout configuration includes the theme, menu layout, portal pages to display, portal
application icons to display, and web cache control options.
The default portal layout is the SSL-VPN portal. You can add additional portal layouts. You can
also make the any new portal the default portal for the SSL VPN gateway by selecting the default
radio button adjacent to the portal layout name.
Note: To apply a portal layout to a domain, add a new domain and select the portal layout
from the Portal Layout Name menu on the domain configuration page. The
selected portal layout will be applied to all users in the new domain.
To add a new portal layout:
1. Under the SSL VPN Portal menu on the left navigation pane, click Portal Layouts and click
Add Layout. The Portal Layout page displays.
Figure 5-2
Configuring the Remote Access Web Portal 5-3
v2.1, November 2008
Page 76

NETGEAR ProSafe SSL VPN Concentrator 25 SSL312 Reference Manual
2. In the Portal Layout and Theme Name section:
a. Enter a descriptive name for the portal layout in the Portal Layout Name field. This name
will be part of the path of the SSL VPN portal URL.
Note: Custom portals are accessed at a different URL than the default portal. For
example, if your SSL VPN portal is hosted at
https://vpn.company.com, and you created a portal layout named “sales”,
then users will be able to access the sub-site at
https://vpn.company.com/portal/sales.
Only alphanumeric characters, hyphen (-), and underscore (_) are accepted for the Portal
Layout Name. If you enter other types of characters or spaces, the layout name will be
truncated before the first non-alphanumeric character. Please note that unlike most other
URLs, this name is case sensitive.
:
b. In the Portal Site Title field, enter the title for the web browser window.
c. To display a banner message to users before th ey log in to the portal, enter the banner title
text in the Banner Title field. Also enter the banner message text in the Banner Message
text area. Enter a plain text message or include HTML and JavaScript tags. The maximum
length of the login page message is 4096 characters. Then check the Display banner
message on login page checkbox to show the banner title and banner message text on the
Login screen as shown below
Figure 5-3
d. Check the Enable HTTP meta tags for cache control checkbox to apply HTTP meta tag
cache control directives to this Portal Layout. Cache control directives include:
5-4 Configuring the Remote Access Web Portal
v2.1, November 2008
Page 77

NETGEAR ProSafe SSL VPN Concentrator 25 SSL312 Reference Manual
<meta http-equiv=”pragma” content=”no-cache”>
<meta http-equiv=”cache-control” content=”no-cache”>
<meta http-equiv=”cache-control” content=”mustrevalidate”>
These directives help prevent clients browsers from caching SSL VPN portal pages and
other web content.
Note: NETGEAR strongly recommends enabling HTTP meta tags for security
reasons and to prevent out-of-date web pages, themes and data being
stored in a user’s web browser cache.
e. Check the ActiveX web cache cleaner checkbox to load an ActiveX cache control when
users log in to the SSL VPN portal.
The web cache cleaner will prompt the user to delete all temporary Internet files, cookies
and browser history when the user logs out or closes the web browser window. The
ActiveX web cache control will be ignored by web browsers that don't support ActiveX.
3. In the SSL VPN Portal Pages to Display section, select the portal pages you wish users to
access. Any pages that are not selected will not be visible from the portal navigation menu.
Note: If you hide portal pages or applications, you should also create SSL VPN
access policies that deny access to the corresponding applications. The portal
layout only affects the look and feel of the portal, but it does not prevent users
from accessing hidden sites.
4. In the Utilities Page–Available Services section, select the services that users should be able to
access. Only the corresponding service icons will be visible on the Services page.
5. In the Remote Access Page–Available Remote Desktop Clients section, select the desktop
clients that users should be able to access. Only the corresponding service icons will be visible
on the My Desktop page.
6. Click Apply to confirm your settings.
Note: An administrator can customize the portal layout by uploading a .gif file for the
banner image. However, the custom banner can be uploaded only after adding
the portal.
Configuring the Remote Access Web Portal 5-5
v2.1, November 2008
Page 78

NETGEAR ProSafe SSL VPN Concentrator 25 SSL312 Reference Manual
Adding Terminal Services Applications to the Portal
If you selected the option Applications page (in the SSL VPN Portal Pages to Display section),
then the Portal Layout screen will expand to include an Applications Page–Available Terminal
Services Applications section. You can now add Terminal Services application icons to display in
the Applications page.
Figure 5-4
To add a Terminal Services application:
1. In the Application Description field, enter a description of the application. This name appears
beneath the application icon on the SSL VPN Portal Applications page.
2. In the Application and Path field, enter the path and application name of the Terminal Services
application.
Note: To launch a Terminal Services application individually, the Terminal Server
must be run in Application mode. In addition, the application must be installed
through the Control Panel Add/Remove Programs and must be licensed for
multiple users. For more information, see the NETGEAR Support Site.
3. In the Working Directory field, enter the current working directory path for the Terminal
Services application.
5-6 Configuring the Remote Access Web Portal
v2.1, November 2008
Page 79

NETGEAR ProSafe SSL VPN Concentrator 25 SSL312 Reference Manual
4. From the Icon Image menu, select an image to appear on the Applications page.
5. Click Add Application to add the new application to the SSL VPN Portal Applications page.
Apply the portal layout to one or more SSL VPN Concentrator authentication domains.
Customizing the Banner
An administrator can further customize the portal by uploading a a customized image for the
banner.
To upload a banner image:
1. On the Portal Layout screen (see Figure 5-2 on page 5-3), click Upload Banner. The Custom
Banner screen displays.
Figure 5-5
2. Click Browse to locate and upload a .gif file. If the upload is successful, two new buttons
appear on the Portal Layout screen: View Banner and Delete Banner.
• Click View Banner to view the uploaded banner.
• Click Delete Banner to delete an uploaded banner.
Configuring the Remote Access Web Portal 5-7
v2.1, November 2008
Page 80

NETGEAR ProSafe SSL VPN Concentrator 25 SSL312 Reference Manual
Duplicating and Editing Portal Layouts
You can edit the features of an existing portal; for example, create a banner or banner message that
displays at the top of the page; or show or hide all applicable bookmarks (user, group, and global)
for each user. You can, optionally, upload an HTML file. You can also create another portal with
all of the features of the existing portal by changing the existing portal layout name.
Tip: To create another portal with all of the features of an existing portal, open the
existing portal and change the layout name field. This will not rename the
existing portal. Instead, it will create a new portal with the new name.
To add a new Portal by editing an existing Portal layout:
1. Under the SSL VPN Portal menu on the left navigation pane, click Portal Layouts. The Port al
Layouts screen displays.
2. In the Portal Layouts table, click the Portal Layout name you wish to duplicate. The Portal
Layout screen of the selected Portal displays.
3. In the Portal Layout Name field, enter the new name. The new title is displayed at the top of
the page. (You can also modify any features of the new Portal.)
4. Click Apply. A new portal is created with the same features as the existing portal and is
displayed in the Portal Layouts table.
Figure 5-6
.
Note: The Available Terminal Services Applications displayed in the original Portal
Layout page will apply to the new page if the Application and Path are the
same. If the path is not the same, when the new page is created the
Applications Services will no longer be available.
5-8 Configuring the Remote Access Web Portal
v2.1, November 2008
Page 81

NETGEAR ProSafe SSL VPN Concentrator 25 SSL312 Reference Manual
To modify the features of an existing portal:
1. Under the SSL VPN Portal menu on the left navigation pane, click Portal Layouts. The Port al
Layouts screen displays.
2. In the Layout Name column, click the portal you want to edit. The Portal Layouts screen
displays.
3. Enter a new Banner Title and Banner message, and check the Display banner message on login
page checkbox to display a custom message at the top of the new page.
4. Modify any of the services in the SSL VPN Portal Pages to Display, Services Page – Available
Services, or Desktop Page – Available Remote Desktop Clients sections of the Portal Layouts
screen. For example:
• Leave the Desktop Page/Add Bookmark button checkbox checked to display all
applicable user, group and global bookmarks in a single table on the desktop page.
• Leave the Display banner message on login page checkbox checked, and enter a custom
message to be displayed at the top of the portal login page in the Banner message field.
Enter a text message.
5. Click Apply to update the home page content.
Preparing the Client for Using Portal Services
In addition to the basic browser requirements described in “Web Browser Requirements” on
page 1-2, your client computers may require additional configuration or software. This section
provides information to help the remote user prepare the client computer to access the portal
services.
Terminal Services Client Compatibility
T o access portal applications made available through T erminal Services, the remote computer must
have a compatible Terminal Services client.
Microsoft Windows Terminal Services (Remote Desktop Connection)
Windows XP, Windows Server 2003, and later Windows versions include a Terminal Services
client called Remote Desktop Connection. Computers running earlier Windows versions can
install Remote Desktop Connection by networking to a Windows Server 2003 or later (refer to
Microsoft support for instructions). NETGEAR recommends that you run at least Windows XP
with Service Pack 2.
Configuring the Remote Access Web Portal 5-9
v2.1, November 2008
Page 82

NETGEAR ProSafe SSL VPN Concentrator 25 SSL312 Reference Manual
The Remote Desktop Connection client is launched from the Start button by choosing Start/
Programs/Accessories/Remote Desktop Connection.
If your computer uses ActiveX Terminal Services 5.0 with Windows XP Professional SP2, you
may see an error stating that you cannot establish a connection to the server. In this case, you will
need to download and install an update for Service Pack 2 that provides support for alternative
loopback addresses (such as 127.0.02). The update is available at:
http://www.microsoft.com/downloads/details.aspx?FamilyID=17d997d2-5034-4bbb-b74dad8430a1f7c8&DisplayLang=en
Microsoft Remote Desktop Services Client for the Macintosh
To access the functions of the portal using a Macintosh, you will need to install the Microsoft
Remote Desktop Services client for the Mac. To download the client, go to:
http://www.microsoft.com/mac/otherproducts/otherproducts.aspx?pid=remotedesktopclient
Note that the Macintosh will be unable to run Windows applications available on the Windows
terminal server.
Remote Desktop Services Client for Linux
To access the functions of the portal using a Linux computer, you can install RDesktop, an open
source client for Windows Terminal Services. To download the client, go to:
http://www.rdesktop.org
Note that the Linux computer will be unable to run Windows applications available on the
Windows terminal server.
Creating a User Guide for Portal Services
For SSL VPN installations serving many users, it may be helpful to prepare a user guide for
accessing the portal and its applications. NETGEAR makes available an application note, created
in Microsoft Word, that serves as a template document that can be customized according to the
way that your portal is configured. To download the application note, go to:
http://documentation.netgear.com/ssl312/enu/202-10208-04/appnote.doc
5-10 Configuring the Remote Access Web Portal
v2.1, November 2008
Page 83

Chapter 6
Configuring the SSL VPN Tunnel Client and Port
Forwarding
This chapter describes the configuration for the SSL VPN Tunnel Client and for Port Forwarding.
When a remote user accesses the SSL VPN Concentrator from a PC that allows ActiveX content,
these two powerful features can be activated. For each of these features, the SSL312 installs a
small client program on the user’s PC that enables a more direct level of network access than is
possible from the browser alone.
This chapter includes:
• Two Approaches for VPN
• SSL VPN Client Configuration
• Configuring Applications for Port Forwarding
Two Approaches for VPN
Two portal features allow direct VPN access to the corporate network. The SSL VPN Tunnel
Client allows full network access similar to an IPSec VPN connection. Port Forwarding allows
direct network access for selected client-server applications.
When a remote user accesses the SSL VPN Portal, one of the listed options is to Establish an SSL
VPN Tunnel. When this feature is selected, the SSL VPN Concentrator will install a small VPN
Tunnel Client program on the user’s PC that will allow the remote user to virtually join the
corporate network. The VPN Tunnel Client provides a PPP (point-to-point) connection between
the client and the SSL VPN Concentrator, and a virtual network interface is created on the user’s
PC. The SSL VPN Concentrator will assign the PC an IP address and DNS server IP addresses,
allowing the remote PC to access network resources in the same manner as if it were connected
directly to the corporate network.
Port Forwarding, like VPN Tunnel, is a web-based client that installs transparently and then
creates a virtual, encrypted tunnel to the remote network. However, Port Forwarding differs from
VPN Tunnel in several ways. For example, Port Forwarding:
• Only supports TCP connections, not UDP or other IP protocols.
6-1
v2.1, November 2008
Page 84

NETGEAR ProSafe SSL VPN Concentrator 25 SSL312 Reference Manual
• Detects and reroutes individual data streams to the Port Forwarding connection rather than
opening up a full tunnel to the corporate network.
• Offers more fine grained management than VPN Tunnel. Administrators define individual
applications and resources that will be available to remote users. With VPN Tunnel,
administrators must create access policies to block undesirable traffic at the SSL VPN
Concentrator rather than at the client level.
SSL VPN Client Configuration
The IP addresses to be assigned to remote VPN Tunnel Clients are configured in the VPN Tunnel
menu. Because the connection is a point-to-point connection, you can assign IP addresses from the
corporate subnet to the remote VPN Tunnel Clients. The DNS settings assigned to the VPN Tunnel
Client are configured in the Network menu.
Some additional considerations:
• So that the virtual (PPP) interface address of the VPN Tunnel Client does not conflict with
addresses on the corporate network, configure an IP address range that does not directly
overlap with addresses on your local network. For example, if 192.168.0.1 through
192.168.0.100 are currently assigned to devices on your local network, then start the client
address range at 192.168.0.101 or choose an entirely different subnet altogether.
• The VPN Tunnel Client cannot contact a server on the corporate network if the VPN Tunnel
Client’s Ethernet interface shares the same IP address as the server or the SSL VPN
Concentrator (for example, if your laptop has a network interface IP address of 10.0.0.45, then
you won't be able to contact a server on the remote network that also has the IP address
10.0.0.45).
• If you assign an entirely different subnet to the VPN Tunnel Clients than the subnet used by
the corporate network, you must
– Add a client route to configure the VPN Tunnel client to connect to the corporate network
using the VPN tunnel.
– Create a static route on the corporate network’s firewall to forward local traffic intended
for the VPN Clients to the SSL VPN Concentrator.
• Select whether you want to enable full tunnel or split tunnel support based on yo ur bandwidth:
– Full tunnel – Sends all of the traffic across the VPN tunnel.
6-2 Configuring the SSL VPN Tunnel Client and Port Forwarding
v2.1, November 2008
Page 85

NETGEAR ProSafe SSL VPN Concentrator 25 SSL312 Reference Manual
– Split tunnel – Sends only traffic destined for the internal network based on the specified
client routes. All other traffic is sent to the internet. Split tunnel allows you to manage
your company bandwidth by reserving the VPN tunnel for corporate traffic only.
Beyond what is defined in “Web Browser Requirements” on page 1-2, the VPN Tunnel Client has
some specific operating requirements. For
• Mac OS. VPN Tunnel supports Version 1.4 (Tiger).
• Browsers. The Firefox browser supports only VPN tunnel, VNC, Network places and Utilities
(IE is required for Port Forwarding, Applications, and Terminal Services).
Adding IP Address Ranges
Determine the address range you will assign to VPN Tunnel Clients, then define the address range
in the SSL VPN Concentrator administrative interface.
To configure the SSL VPN Tunnel client address range:
1. Under Access Administration in the left navigation pane, select VPN Tunnel. The VPN Tunnel
Client screen displays.
Figure 6-1
Configuring the SSL VPN Tunnel Client and Port Forwarding 6-3
v2.1, November 2008
Page 86

NETGEAR ProSafe SSL VPN Concentrator 25 SSL312 Reference Manual
In the Client IP Address Range section of the screen, you can define the IP address range to
assign to incoming VPN T unnel clients. The defau lt range begins with 192.168.251.1 and ends
with 192.168.251.254.
2. In the Client Address Range Begin field, enter the first IP address of the IP address range.
3. In the Client Address Range End field, enter the last IP address of the IP address range.
4. Select one of the following:
• Enter the Network Subnet to enable Split Tunnel Mode (point-to-point). If you choose a
different subnet for the VPN Tunnel client range than the subnet used by the corporate
network, then you must:
a. Add a client route to configure the VPN Tunnel client to connect to the corporate
network using the VPN tunnel.
b. Create a static route on the corporate network firewall to forward traffic intended for
the VPN clients to the SSL VPN gateway.
• Select the Enable Full Tunnel Support check box to enable Full Tunnel mode. The VPN
client will install an 0.0.0.0 route on the client machines that will forward all traffic to the
SSL Concentrator.
5. Click Apply to update the configuration.
6. Restart the SSL VPN Concentrator software if any VPN Tunnel Clients are actively
connected. Restarting will force the clients to obtain a new virtual IP address.
VPN Tunnel Clients are now able to connect to the SSL VPN Concentrator and receive a
dynamic IP address in the client address range.
Note: Be sure to configure DNS addresses in the Network menu.
.
Adding Routes for VPN Tunnel Clients
The VPN Tunnel Clients assume that the following networks are located across the VPN over SSL
tunnel:
• The subnet containing the client IP address (PPP interface), as determined by the class of the
address (Class A, B, or C).
• Subnets specified in the Configured Client Routes table.
6-4 Configuring the SSL VPN Tunnel Client and Port Forwarding
v2.1, November 2008
Page 87

NETGEAR ProSafe SSL VPN Concentrator 25 SSL312 Reference Manual
If the assigned client IP address range is in a different subnet than the corporate network or if the
corporate network has multiple subnets, you must define Client Routes.
To add an SSL VPN Tunnel client route:
1. Select the VPN Tunnel menu on the left navigation pane.
2. In the Destination Network field under Add Routes for VPN Tunnel Clients section, enter the
network address of a local area network or subnet. For example, enter 192.168.0.0.
3. Enter the subnet mask of the local area network Subnet Mask field.
4. Click Add Route. The client route appears in the Configured Client Routes table, as shown in
the figure below.
Note: You must also add a static route on your corporate firewall or router that directs
local traffic destined for the VPN Tunnel Client address range to the SSL VPN
Concentrator.
Figure 6-2
Configuring the SSL VPN Tunnel Client and Port Forwarding 6-5
v2.1, November 2008
Page 88

NETGEAR ProSafe SSL VPN Concentrator 25 SSL312 Reference Manual
5. Restart the SSL VPN Concentrator software if VPN Tunnel Clients are currently connected to
the SSL VPN Concentrator. Restarting forces clients to reconnect and receive new addresses
and routes.
Now users are able to connect to the SSL VPN Concentrator and receive a virtual IP address
from the client address range.
.
To delete a VPN Tunnel Client Route:
1. In the Configured Client Routes table, click the Delete link adjacent to the client route.
2. Restart the SSL VPN Concentrator software if VPN Tunnel Clients are currently connected to
the SSL VPN Concentrator. Restarting forces clients to reconnect and receive new addresses
and routes.
Configuring Applications for Port Forwarding
The Port Forwarding screen allows you to specify the internal addresses and TCP applications
(port numbers) that will be intercepted by the Port Forwarding client on the user’s PC. The client
will reroute this traffic to the SSL VPN Concentrator. To configure Port Forwarding, you must
define the internal host machines and TCP applications available to remote users.
6-6 Configuring the SSL VPN Tunnel Client and Port Forwarding
v2.1, November 2008
Page 89

NETGEAR ProSafe SSL VPN Concentrator 25 SSL312 Reference Manual
To configure applications for Port Forwarding:
1. From the Access Administration menu in the left navigation pane, select the Port Forwarding
option. The Port Forwarding configuration screen displays.
Figure 6-3
2. In the Configured Applications for Port Forwarding section, enter the IP address of an internal
server or host computer in the IP Address field.
3. In the TCP Port field, enter the TCP port number of the application to be tunneled. The table
below lists many commonly used TCP applications and port numbers (see
http://www.iana.org for a more complete list of registered port numbers).
4. Click Apply . Th e IP address and port number submitted appear in the Config ured Applications
for Port Forwarding table.
Table 6-1. Port Forwarding Applications/TCP Port Numbers
TCP Application Port Number
FTP Data (usually not needed) 20
FTP Control Protocol 21
Configuring the SSL VPN Tunnel Client and Port Forwarding 6-7
v2.1, November 2008
Page 90

NETGEAR ProSafe SSL VPN Concentrator 25 SSL312 Reference Manual
Table 6-1. Port Forwarding Applications/TCP Port Numbers (continued)
TCP Application Port Number
SSH 22
Telnet 23
SMTP (send mail) 25
HTTP (web) 80
POP3 (receive mail) 110
NTP (network time protocol) 123
Citrix 1494
Terminal Services 3389
VNC (virtual network computing) 5900 or 5800
a. Users can specify the port number together with the host
name or IP address.
a
a
Configuring Host Name Resolution
Once the server and port information has been configured, remote users will be able to access
private network servers using Port Forwarding. As a convenience for users, the SSL VPN
Concentrator administrator can also specify host name to IP address resolution for network
servers. Host Name Resolution allows users to access TCP applications at familiar addresses such
as mail.mycompany.com or ftp.mycompany.com rather than by IP addresses.
To add a host name for client name resolution:
1. In the Configured Host Names for Port Forwarding section, enter an IP address in the Local
Server IP Address field. The address should already be defined in the Configured Applications
for Port Forwarding table.
2. In the Fully Qualified Domain Name field, enter a domain name of the internal server.
3. Click Apply to submit the host-to-name mapping. The IP address and domain name should
appear in the Configured Host Names for Port Forwarding table.
Now , remote users will be able to securely access network applications once they have logged
into the SSL VPN portal and launched Port Forwarding.
6-8 Configuring the SSL VPN Tunnel Client and Port Forwarding
v2.1, November 2008
Page 91

Chapter 7
Additional System Configuration
This chapter describes additional network and configuration management functions provided by
the Web Management Interface. The additional functions include:
• Configuring Network Settings
• Setting Date and Time
• System Configuration Utilities
• Additional Notes on the Management Interface
Configuring Network Settings
The IP settings and interface settings of the SSL VPN Concentrator appliance are configured
through the Network screen under the System Configuration menu on the left navigation panel.
From the Network window, an SSL VPN Concentrator administrator can
• Set the Ethernet Port 1 and Ethernet Port 2 addresses.
• Define the default network route and add additional static IP routes.
• Map host names or fully qualified domain names to IP addresses.
• Manage SSL Certificates (as described in “Managing Certificates” in Chapter 2).
Warning: These advanced network settings should only be conf igured by a network
administrator.
Sample SSL VPN Concentrator Configuration
In the following network configuration example, the SSL VPN Concentrator appliance is deployed
as a standalone SSL VPN device. A separate access router or firewall performs perimeter security .
• Interface Ethernet Port 1 IP address: 192.168.1.1
• Interface Ethernet Port 1 subnet mask: 255.255.255.0 (subnet: 192.168.1.0/24)
7-1
v2.1, November 2008
Page 92

NETGEAR ProSafe SSL VPN Concentrator 25 SSL312 Reference Manual
Corporate Server
IP Address 192.168.1.3
SSL312 IP Address
192.168.1.1
Firewall/Router
IP Address
192.168.1.254
LAN Subnet
192.168.1.0/24
• Default gateway address (Firewall/Router address): 192 .1 68. 1.254
In the configuration shown in the diagram, the IP addresses of devices in the local network are
configured in the 192.168.1.0/24 subnet and the default gateway for these devices is the internal IP
address of the local firewall or router, 192.168.1.254.
Figure 7-1
All connections initiated from the Internet can be blocked by the firewall except HTTPS traffic
(TCP port 443). HTTPS traffic should be forwarded to the SSL VPN Concentrator appliance
address, 192.168.1.1.
Network Interface and Default Gateway Configuration
Configure the SSL VPN Concentrator network Interface settings by selecting Network under the
System Configuration menu in the left navigation pane and then clicking the Interface radio
button.
To configure the Ethernet Port 1 and Ethernet Port 2 Interfaces:
1. Enter the Ethernet Port 1 (SSL) IP address of your SSL VPN Concentrator. This address
should be a unique address in the same subnet as the rest of your local network. The factory
default is 192.168.1.1.
7-2 Additional System Configuration
v2.1, November 2008
Page 93

NETGEAR ProSafe SSL VPN Concentrator 25 SSL312 Reference Manual
Figure 7-2
2. Enter the Ethernet Port 1 subnet mask that has been configured for your network. The subnet
mask value should be the same value as the subnet mask configured on your network
computers. The factory default is 255.255.255.0 (The subnet mask specifies the network
number portion of an IP address.).
3. Only if you plan to use two port mode, enable routing mode by checking this checkbox. The
second Ethernet port will be enabled.
Note: NETGEAR recommends one port operation for most networks.
4. Enter a local or internal IP address of your ProSafe SSL VPN Concentrator 25. This address
should be in a different subnet than the Ethernet Port 1 IP address. The default Ethernet Port 2
IP Address is 10.0.0.1.
Additional System Configuration 7-3
v2.1, November 2008
Page 94

NETGEAR ProSafe SSL VPN Concentrator 25 SSL312 Reference Manual
5. Enter the subnet mask. The subnet mask specifies the network number portion of an IP
address. The factory default is 255.255.255.0.
6. Click Apply to save your settings.
From the Network screen, you can define the default network route. The default route is required
for Internet access.
1. In the Default Gateway section, enter the IP address of the router or default gateway of the
network in the Default Gateway Address field.
The default gateway address is the same gateway address used by local area network
computers to connect to the Internet and it may be the address of a network firewall.
2. From the Interface pull-down menu, select the Ethernet interface (ethernet-1 or ethernet-2)
that should be used to connect to the default gateway address.
3. Click Apply to save your settings.
Note: The SSL VPN Concentrator does not perform Network Address Translation
(NAT). And the SSL VPN Concentrator only enforces access policies on SSL
VPN traffic, not on other TCP/IP protocols. Therefore, the SSL VPN
Concentrator should be used in conjunction with a network firewall.
If the interface is configured to terminate SSL VPN c onne ctions, then restart the SSL VPN
Concentrator software for the change to take effect.
Note: The SSL VPN Concentrator administrative session will end when the software
is restarted. To log in to the SSL VPN Concentrator management interface,
enter the new IP address of the SSL VPN Concentrator device in the Address
or Location field of your web browser. Be sure that the management station is
in the same subnet as the new SSL VPN Concentrator IP address.
To complete the IP settings configuration, also configure SSL VPN Concentrator DNS settings
and network routes.
Static Route Configuration
If your corporate network contains other subnets whose resources will be made available through
remote SSL connections, you must configure static routes to those subnets.
7-4 Additional System Configuration
v2.1, November 2008
Page 95

NETGEAR ProSafe SSL VPN Concentrator 25 SSL312 Reference Manual
To configure a static route:
1. In the Add Static Routes section, enter the destination network address of the static route in the
Destination Network field. The destination network address is an IP address in the remote
network subnet.
Note: The destination network address may be a valid IP address or it may be a
subnet address that ends in .0, such as 192.168.0.0.
2. In the Subnet Mask field, enter the subnet mask of the remote network segment.
3. In the Gateway Address field, enter the IP address of your router. The gateway address should
be in the same subnet as the ethernet-1 or ethernet-2 interface.
For example, if the ethernet-1 interface address is 10.0.0.100 and the subnet mask is
255.255.255.0, then a router connected through the ethernet-1 interface should be 10.0.0.X.
4. From the Interface menu (ethernet-1 or ethernet-2), select the Ethernet interface that should be
used to connect to the gateway address.
5. Click Apply. The new static route is added to the Routes table.
Note: To add additional local subnets that can directly connect to the ProSafe SSL
VPN Concentrator 25 device, define the Destination Network address, the
Subnet Mask, and the Interface, but leave the Gateway Address field blank.
Additional System Configuration 7-5
v2.1, November 2008
Page 96
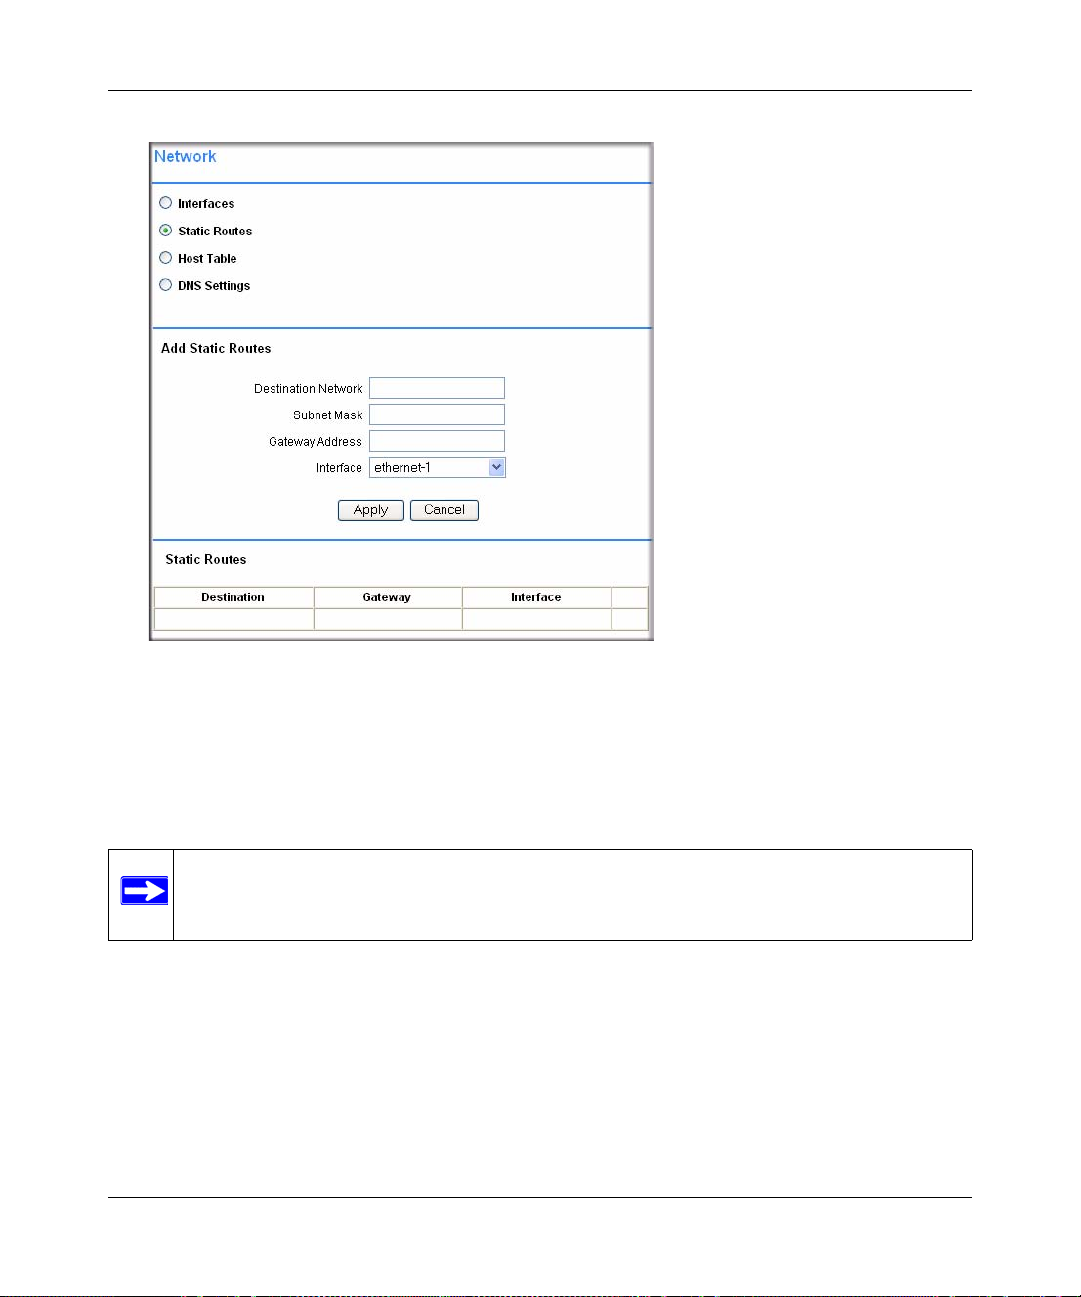
NETGEAR ProSafe SSL VPN Concentrator 25 SSL312 Reference Manual
Figure 7-3
Network Host Table Settings
For the convenience of users, you can configure the SSL VPN Concentrator to translate host
names or fully qualified domain names (FQDNs) to IP addresses. This function is configured in
the Host Table menu.
Note: The SSL VPN Concentrator can act as a NetBIOS client to learn local network host
names and their corresponding IP addresses.
To configure host resolution:
1. In the Network menu, check the Host Table radio but ton. The Network menu displays the Add
Host fields and the Host Table.
2. In the IP Address field, enter the IP Address of the machine that will be mapped to a host
name.
7-6 Additional System Configuration
v2.1, November 2008
Page 97

NETGEAR ProSafe SSL VPN Concentrator 25 SSL312 Reference Manual
3. In the Host Name field, enter the host name or Fully Qualified Domain Name of the machine.
For example, enter mycomputer or www.netgear.com. Do not enter names with spaces or
other non-alphanumeric characters such as apostrophes or commas.
4. In the optional Alias field, enter the host alias. For example, if you entered the FQDN
www.netgear.com in the Host Name field, then you can enter a shorter name, such as www or
web in the Alias field.
5. Click Apply.
The new Host appears in the Host Table. The Host Table displays a list of the configured host
names and the corresponding IP addresses.
Figure 7-4
Configuring DNS Settings
The DNS Settings menu allows the administrator to configure the hostname and DNS server
addresses. The DNS server configuration is required.
To configure the hostname and DNS settings:
Additional System Configuration 7-7
v2.1, November 2008
Page 98

NETGEAR ProSafe SSL VPN Concentrator 25 SSL312 Reference Manual
1. In the Network menu, check the DNS Settings radio button. The Network menu displays the
fields for entering the DNS Settings.
Figure 7-5
2. Enter the Hostname for the SSL VPN Concentrator. The hostname identifies the SSL VPN
Concentrator on the network. Use only letters and numbers for the hostname; do not en ter nonalphanumeric characters such as spaces or apostrophes.
3. In the Primary DNS Server field, enter the IP address of your DNS server.
4. In the Secondary DNS Server field, enter the IP address of a backup DNS server for
redundancy.
5. In the DNS Domain field, enter the domain name of your network. This field is optional and is
not required for most network environments.
6. Click Apply to update the configuration.
Note: If you update the SSL VPN gearhost hostname, you must restart the SSL VPN
Concentrator for the change to take effect. DNS settings changes take effect
immediately.
7-8 Additional System Configuration
v2.1, November 2008
Page 99
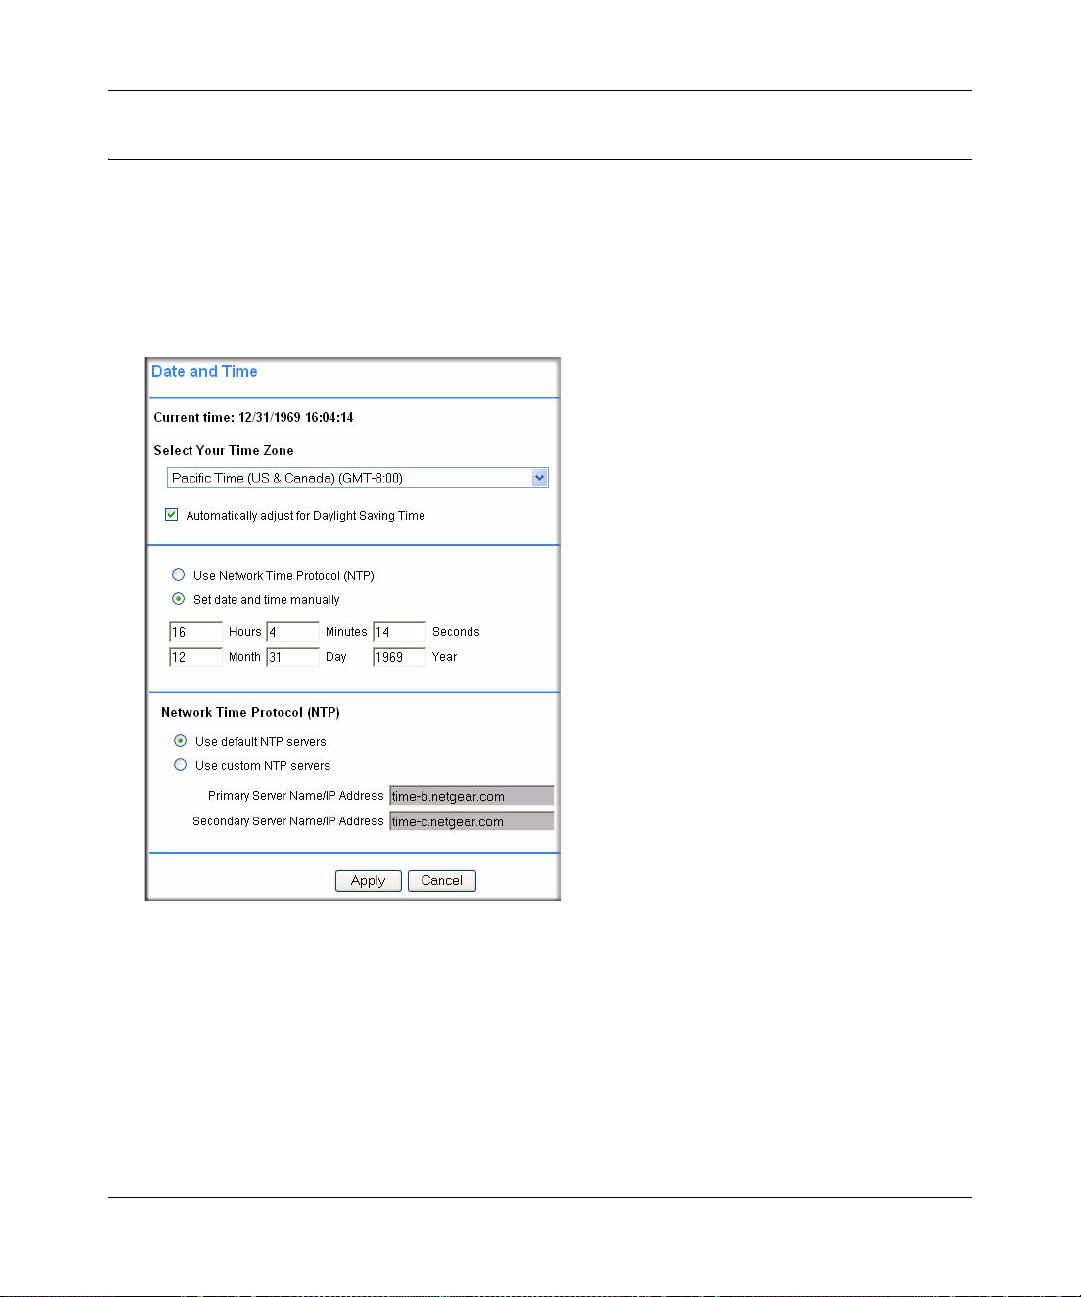
NETGEAR ProSafe SSL VPN Concentrator 25 SSL312 Reference Manual
Setting Date and Time
To configure the SSL VPN Concentrator date and time settings:
1. Under the System Configuration menu in the left navigation pane, click Date and Time.
The SSL VPN Concentrator uses the date and time settings to timestamp log events, verify
certificate validity, and for other internal purposes.
Figure 7-1
2. From the Select Your Time Zone drop-down menu, select your time zone.
3. Automatically adjust for Daylight Saving Time is enabled by default. Uncheck the radio box
to disable this feature.
4. Select either the Use Network Time Protocol (NTP) radio bo x or the Set date and time
manually radio box. If you select the manual option, enter the desired time (in 24-hour time
format) in the Hours, Minutes, Seconds, Month, Day and Year fields and proceed to step 6.
5. Select the Network Time Protocol (NTP) servers to be used.
Additional System Configuration 7-9
v2.1, November 2008
Page 100

NETGEAR ProSafe SSL VPN Concentrator 25 SSL312 Reference Manual
• If you selected Use default NTP servers, NETGEAR’s primary and secondary NTP
servers for your time zone will appear.
• If you selected Use custom NTP servers, enter an NTP server IP address or fully-qualified
domain name (FQDN) in the address fields. (For redundancy, enter a backup custom
server address in the Secondary Server Name and IP Address fields.)
Note: If you select the default NTP servers or if you enter a custom server FQDN, the
SSL VPN Concentrator must determine the IP address of the NTP server by a
DNS lookup. You must configure a DNS server address in the Network menu
before the SSL VPN Concentrator can perform this lookup.
6. Click Apply to update the configuration.
If you enabled NTP, then the NTP time settings will override the manually configured time
settings. The NTP time settings will be determined by the NTP server and the time zone that is
selected in the Select Your Time Zone menu.
System Configuration Utilities
The Utilities menu allows you to
• export the configuration file
• import a saved configuration file
• upgrade the SSL VPN Concentrator software
• restore the settings to factory defaults
• restart the SSL VPN Concentrator
In addition, the menu allows users to encrypt the configuration files.
To access the SSL VPN Concentrator software and system settings, click Utilities under the
System Configuration menu in the left navigation pane. The Utilities menu will display.
7-10 Additional System Configuration
v2.1, November 2008
 Loading...