

Page 1
)NSTALLATION'UIDE
ProSafe SSL VPN Concentrator 25 SSL312
Start Here
Follow these instructions to set up your SSL VPN Concentrator. You can also
consult the documentation links on the Resource CD or the NETGEAR
Knowledgebase link at http://kbserver.netgear.com.
The ProSafe SSL VPN Concentrator 25 is a browser-based VPN portal that is
compatible with Microsoft Internet Explorer 6.5.1 or above, or Apple Safari.1.2 or
above. However, for the initial administrative setup of the SSL312, you can also
use Mozilla 1.x. (End Users will need IE or Safari browsers that support
JavaScript, Java, cookies, SSL and ActiveX to take advantage of the full suite of
applications.)
First, Set up the SSL VPN Concentrator
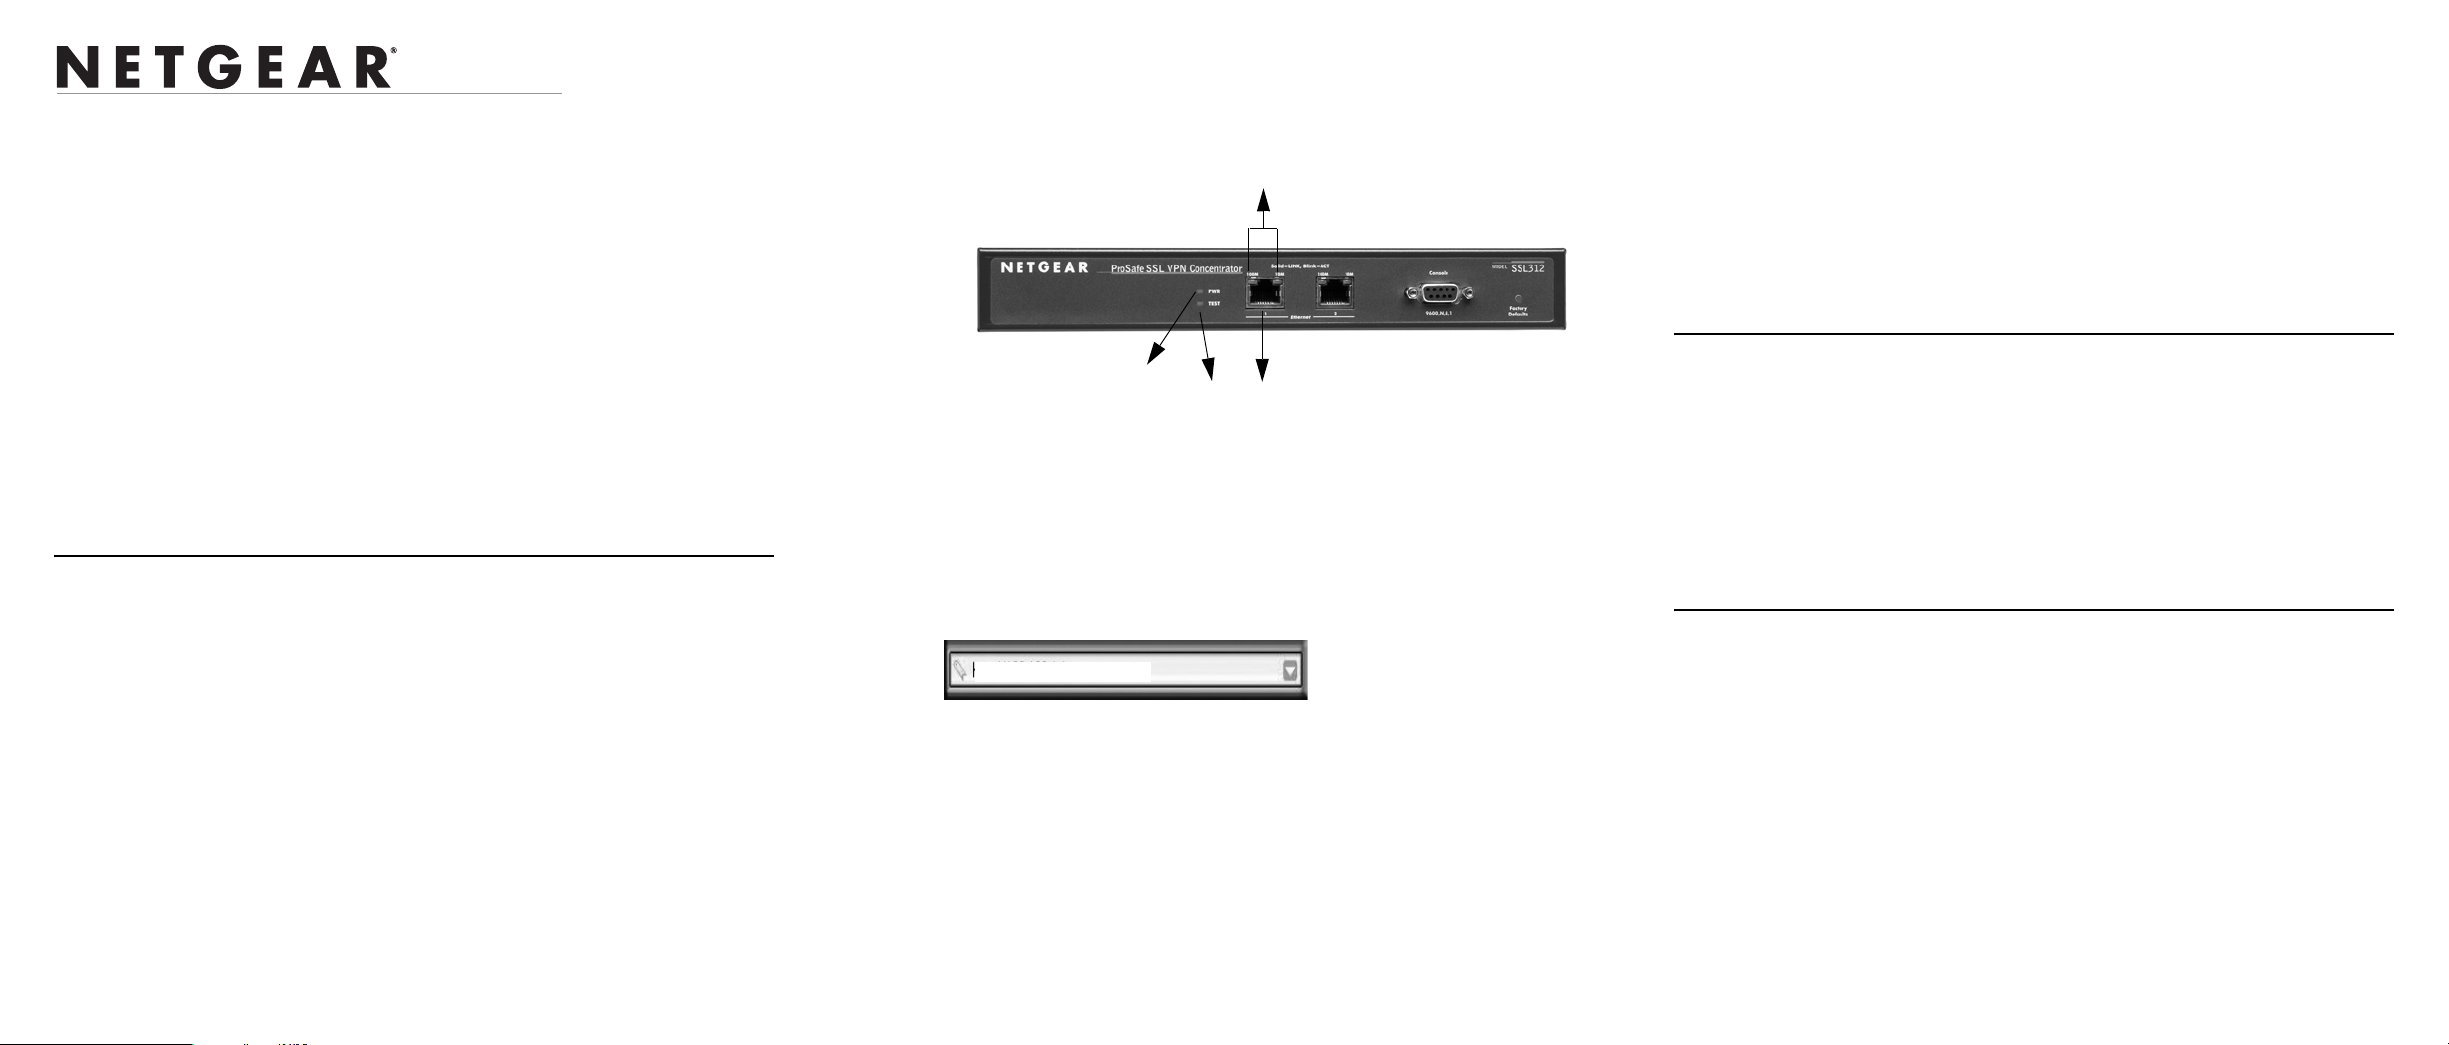
1. CONNECT THE SSL VPN CONCENTRATOR TO YOUR COMPUTER
a. Unpack the box and verify the contents.
b. Prepare a PC with an Ethernet adapter. If this PC is already part of your
network, record its TCP/IP configuration settings. Configure the PC with
a static IP address of 192.168.1.10 and 255.255.255.0 as the subnet mask.
c. Securely connect the Ethernet cable to Ethernet Port 1 (1) on the front of
the SSL VPN Concentrator; securely insert the other end of the cable into
the Ethernet port on your computer.
d. Connect the power cord to the SSL312 and turn on your computer.
e. Turn the SSL312 power switch to On, and verify the following:
• Power. The power light should be lit (2). If the power light is not lit,
check the connections and check to see if the power outlet is
controlled by a wall switch that is turned off.
• Test. The test light should blink when the SSL312 is first turned on
(3). When the system has initialized, the light will turn off.
• LAN. Either the 10 Mbps or the 100 Mbps LED should light to show
that a connectivity link as been established (4). If not, make sure the
Ethernet cable is securely attached at both ends.
4
2
3
1
2. CONFIGURE THE MANAGEMENT INTERFACE OF THE SSL VPN
CONCENTRATOR
Note:You must have administrative access to your network’s gateway device
to configure the Management Interface settings.
a. Connect to the SSL312 by opening your browser and entering
https://192.168.1.1 in the address field. A security warning may appear.
Click Yes or OK to continue.
https://
b. When prompted, enter admin for the user name and password for the
password, both in lower case letters. Select geardomain from the Domain
drop-down menu and click Login.
c. Configure the network settings to deploy the SSL VPN Concentrator in
your network. Typical scenarios for deployment would be
• As a standalone SLL VPN device connected to a separate access
router or firewall performing perimeter security.
• Connecting the SSL VPN Concentrator to an existing LAN behind a
firewall.
192.168.1.1
• Connecting the SSL VPN Concentrator to a DMZ interface.
• Deployed online with two network interfaces enabled; or as a bridge
to a special network.
See the online help or the Reference Manual for full instructions on selecting
the appropriate settings for the deployment option for your network.
After you have finished the setup steps, you are ready to deploy the SSL312 in
your network. If needed, you can now reconfigure the PC you used in step 1
back to its original TCP/IP settings.
Deploy the SSL312
1. Disconnect the SSL312 and position it where you will deploy it in your
network based on the configuration scenario you selected above.
2. Connect an Ethernet cable from your SSL312 to an Ethernet port on your
firewall, router, switch, or hub.
3. Connect the power cord to the SSL VPN Concentrator and to a power outlet.
The PWR, TEST, and 10M/100M lights should light up.
Now, Test your Configuration
1. From a PC on your network, open a browser window using Internet Explorer
6.5.1 or higher or Apple Safari 1.2 or higher.
2. Enter the default IP address of the SSL312 (https://192.168.1.1) or, if you
changed the default address, enter your new SSL312 address.
3. When prompted, enter admin for the user name and password for the
password or, if you changed the password, enter your new password. Select
geardomain from the Domain drop-down menu and click Login.
You should now be logged in to the SSL VPN Concentrator.
Page 2
Troubleshooting Tips
I cannot access the SSL VPN Concentrator remotely.
There is a configuration problem. Check these items:
Here are some tips for correcting simple problems you may have.
No lights are lit on the SSL VPN Concentrator.
The SSL VPN Concentrator has no power.
• Make sure the power cord is connected to the concentrator and plugged in to a
working power outlet or power strip.
• Make sure that the power outlet is turned on (if controlled by an On/Off switch).
The Ethernet light is not lit.
There is a hardware connection problem.
• Make sure the cable connectors are securely plugged in at the concentrator
and the network device (hub, switch, or router).
• Make sure the connected device is turned on.
I cannot configure the concentrator from a browser.
Check these items:
• The SSL312 is properly installed: the Ethernet cable is plugged into the
Ethernet Port 1 on the SSL VPN Concentrator and to your Ethernet port on
your computer and it is powered on. Check that the 10 /10 0 port LED is green
to verify that the Ethernet connection is OK.
• Make sure you using Microsoft Internet Explorer Browser 6.5.1 or above to
configure your management interface.
• Make sure that your PC’s Static IP address is set to 192.168.1.10 and the
default Subnet Mask to 255.255.255.0. Your domain should be set to
geardomain on the login screen.
• Check the network settings for the configuration scenario you selected (see
the Reference Manual).
• Make sure that you do not have an IP addressing conflict on your network; for
example, no other device has the same Ethernet Port 1 IP address or Static IP
address as the SSL VPN Concentrator. For full instructions on changing the
SSL VPN Concentrator default values, see the Reference Manual on the
Resource CD.
Technical Support
Thank you for selecting NETGEAR products.
To register your product, go to: http://www.netgear.com/register
Go to http://www.netgear.com/support for support information.
This symbol was placed in accordance with the European Union
Directive 2002/96 on the W aste Electrical and Electronic Equipment (the
WEEE Directive). If disposed of within the European Union, this
product should be treated and recycled in accordance with the laws of
your jurisdiction implementing the WEEE Directive.
June 2006
© 2006 by NETGEAR, Inc. All rights reserved. NETGEAR is a registered trademark of NETGEAR, Inc. in the
United States and/or other countries. Other brand and product names are trademarks or registered trademarks of
 Loading...