

Netgear SRK60 Installation Manual

User Manual
Orbi Pro Tri-Band Mesh WiFi System
Models
Orbi Pro Router Model SRR60
Orbi Pro Satellite Model SRS60
NETGEAR, Inc.
350 E. Plumeria DriveMay 2021
San Jose, CA 95134, USA202-11824-08

Orbi Pro Router Model SRR60 and Orbi Pro Satellite Model SRS60
Support and Community
Visit netgear.com/support to get your questions answered and access the latest
downloads.
You can also check out our NETGEAR Community for helpful advice at
community.netgear.com.
Regulatory and Legal
Si ce produit est vendu au Canada, vous pouvez accéder à ce document en français
canadien à https://www.netgear.com/support/download/.
(If this product is sold in Canada, you can access this document in Canadian French at
https://www.netgear.com/support/download/.)
For regulatory compliance information including the EU Declaration of Conformity, visit
https://www.netgear.com/about/regulatory/.
See the regulatory compliance document before connecting the power supply.
For NETGEAR’s Privacy Policy, visit https://www.netgear.com/about/privacy-policy.
By using this device, you are agreeing to NETGEAR’s Terms and Conditions at
https://www.netgear.com/about/terms-and-conditions. If you do not agree, return the
device to your place of purchase within your return period.
Trademarks
© NETGEAR, Inc., NETGEAR, and the NETGEAR Logo are trademarks of NETGEAR, Inc.
Any non-NETGEAR trademarks are used for reference purposes only.
2

Orbi Pro Router Model SRR60 and Orbi Pro Satellite Model SRS60
Revision History
Number
CommentsPublish DatePublication Part
May 2021202-11824-08
March 2020202-11824-07
We added the following sections:
Resolve a browser security warning on page 27
Enable or disable SSID broadcast for a radio on page 103
Enable or disable 20/40 MHz coexistence for the 2.4 GHz radio on page 103
Enable or disable Wi-Fi multimedia for a radio on page 104
Change the CTS/RTS threshold and preamble mode for a radio on page 105
Change the transmission output power for a radio on page 107
Enable or disable daisy-chain topology on page 107
Enable or disable fast roaming on page 110
Change the NTP server on page 135
Set your time zone manually on page 135
We made major changes to the following sections:
Overview on page 9
Add satellites to your network using the router web interface on page 20
Manage and monitor your Orbi network with NETGEAR Insight on page 21
Use the interactive Internet setup process on page 25
Log in to the Orbi router web interface on page 26
Manage an IPv6 Internet connection on page 34 and all subsections
View or change WAN settings on page 69
View the satellite status in the satellite web interface on page 130
Technical specifications for Orbi Pro router model SRR60 on page 176
Technical specifications for Orbi Pro satellite model SRS60 on page 177
We made minor changes and adjustments to many other sections.
We added the following sections:
Enable the network access control list and specify the access rule on page 57
and subsections
Manage the IoT WiFi network settings on page 91 and subsections
Set up a guest WiFi network and captive portal on page 95 and Set up a guest
WiFi network with open access or password authentication on page 95
Enable or disable Protected Management Frames on page 111
Manage the automatic backup options on page 137
We made major changes to the following sections:
Manage MAC access control lists for WiFi networks and the LAN on page 51
and subsections
Change the admin WiFi password or security level on page 86
Change the employee WiFi password or security level on page 89
Manage the download bandwidth per SSID on page 100
View satellites, WiFi devices, and wired devices connected to the Orbi network
on page 129
View and manage logs of router activity on page 131
Set up a syslog server on page 132
We made minor changes and adjustments to other sections.
November 2019202-11824-06
We added the following new sections:
Manage MAC access control lists for WiFi networks and the LAN on page 51
Manage the download bandwidth per SSID on page 100
Set up a syslog server on page 132
3

Contents
Chapter 1 Overview
Supported Orbi Pro models..............................................................10
Orbi Pro router and satellite hardware overviews..........................10
Orbi Pro router model SRR60 hardware overview....................10
Orbi Pro satellite model SRS60 hardware overview..................11
LED behavior.......................................................................................11
Orbi Pro WiFi system LEDs...........................................................12
Add-on Orbi Pro satellite LEDs....................................................12
Wall mount or ceiling mount your Orbi Pro router........................13
Wall-mount your Orbi Pro.............................................................13
Ceiling-mount your Orbi Pro........................................................14
Orbi Pro router label and Orbi Pro satellite label..........................16
Connect your Orbi Pro router...........................................................17
Place your satellite..............................................................................18
Sync your Orbi Pro satellite...............................................................18
Sync a satellite from an Orbi Pro WiFi system............................18
Sync an add-on Orbi Pro satellite................................................19
Add satellites to your network using the router web interface.20
Manage and monitor your Orbi network with NETGEAR Insight..21
Chapter 2 Connect to the Orbi Pro Network and Access the Router
Connect to the network for initial configuration.............................23
Wired connection..........................................................................23
WiFi connection.............................................................................23
WiFi connection using WPS..........................................................24
Types of logins....................................................................................24
Use a web browser to access the router..........................................24
Use the interactive Internet setup process.................................25
Log in to the Orbi router web interface......................................26
Change the language........................................................................27
Resolve a browser security warning.................................................27
Chapter 3 Specify Your Internet Settings
Use the Internet Setup Wizard..........................................................30
Manually set up the Internet connection.........................................30
Specify an Internet connection without a login..........................30
4

Orbi Pro Router Model SRR60 and Orbi Pro Satellite Model SRS60
Specify an Internet connection that uses a login.......................32
Manage an IPv6 Internet connection...............................................34
Requirements for entering IPv6 addresses.................................34
Specify IPv6 Internet connections................................................34
Use auto detection for an IPv6 Internet connection..................35
Use auto configuration for an IPv6 Internet connection...........36
Set up an IPv6 6to4 tunnel Internet connection.........................38
Set up an IPv6 6rd tunnel Internet connection...........................40
Set up an IPv6 pass-through Internet connection......................42
Set up an IPv6 fixed Internet connection....................................42
Set up an IPv6 DHCP Internet connection..................................44
Set up an IPv6 PPPoE Internet connection..................................46
Change the MTU size.........................................................................48
Chapter 4 Control Access to the Internet
Manage MAC access control lists for WiFi networks and the LAN.51
Enable a MAC ACL for a specific network..................................52
Add automatically detected devices to a MAC ACL.................53
Manually add, remove, or change the information for a device
on a MAC ACL................................................................................54
Disable a MAC ACL for a specific network.................................55
Manage the Orbi network access control list..................................56
Enable the network access control list and specify the access
rule...................................................................................................57
Manage the allowed devices on the network access control
list.....................................................................................................58
Manage the blocked devices on the network access control
list.....................................................................................................60
Use keywords to block Internet sites...............................................61
Delete keywords that are used to block Internet sites...................62
Prevent blocking on a trusted computer.........................................63
Block services from the Internet.......................................................64
Schedule when to block Internet sites and services......................65
Set up security event email notifications.........................................66
Chapter 5 Manage the LAN, WAN, and WiFi Settings
View or change WAN settings..........................................................69
Manage Dynamic DNS.......................................................................70
Set up a new Dynamic DNS account...........................................71
Specify a DNS account that you already created.......................72
Change the Dynamic DNS settings.............................................73
Set up a default DMZ server..............................................................73
Change the router’s device name....................................................74
Change the LAN TCP/IP settings......................................................75
5

Orbi Pro Router Model SRR60 and Orbi Pro Satellite Model SRS60
Use the router as a DHCP server......................................................77
Disable the DHCP server feature in the router...............................78
Manage reserved LAN IP addresses................................................79
Reserve an IP address....................................................................79
Edit a reserved IP address............................................................80
Delete a reserved IP address entry..............................................80
Manage custom static routes............................................................81
Set up a static route.......................................................................82
Edit a static route...........................................................................83
Delete a static route.......................................................................83
Change the admin WiFi network settings.......................................84
Change the admin WiFi network name and channel................84
Change the admin WiFi password or security level..................86
Manage the employee WiFi network settings................................87
Enable the employee WiFi network and change the settings..88
Change the employee WiFi password or security level............89
Manage the IoT WiFi network settings............................................91
Enable the IoT WiFi network and change the settings..............91
Change the IoT WiFi password or security level........................93
Set up a guest WiFi network and captive portal.............................95
Set up a guest WiFi network with open access or password
authentication.................................................................................95
Set up a guest network with a captive portal.............................96
Set up Facebook Wi-Fi..................................................................98
Manage the download bandwidth per SSID................................100
Manage the advanced WiFi settings..............................................102
Change the region of operation................................................102
Enable or disable SSID broadcast for a radio..........................103
Enable or disable 20/40 MHz coexistence for the 2.4 GHz
radio..............................................................................................103
Enable or disable Wi-Fi multimedia for a radio.......................104
Change the CTS/RTS threshold and preamble mode for a
radio..............................................................................................105
Change the transmission output power for a radio................107
Enable or disable daisy-chain topology...................................107
Generate a new backhaul password.........................................108
Enable or disable implicit beamforming..................................109
Enable or disable fast roaming..................................................110
Enable or disable MU-MIMO......................................................110
Enable or disable Protected Management Frames.................111
Use the router as a WiFi access point............................................112
Set up router mode..........................................................................114
Check your Internet bandwidth......................................................114
Set up a bridge for a port group or VLAN profile........................115
Set up a bridge for a port group...............................................115
6

Orbi Pro Router Model SRR60 and Orbi Pro Satellite Model SRS60
Set up a bridge for a VLAN profile............................................116
Improve network connections with Universal Plug and Play......118
Chapter 6 Manage and Monitor Your Orbi Pro System
Update the router and satellite firmware......................................121
Enable the automatic firmware update feature.......................121
Check for firmware updates.......................................................121
Manually update firmware..........................................................122
Manually update satellite firmware...........................................123
Manually update router firmware..............................................124
Change the admin password..........................................................124
Enable admin password reset........................................................125
Reset the admin password..............................................................126
View router status and usage information....................................127
Display Internet port statistics.........................................................127
Check the Internet connection status............................................128
View satellites, WiFi devices, and wired devices connected to the
Orbi network.....................................................................................129
View the satellite status in the satellite web interface..................130
View and manage logs of router activity.......................................131
Set up a syslog server......................................................................132
Monitor Internet traffic.....................................................................133
Change the NTP server....................................................................135
Set your time zone manually...........................................................135
Manage the router configuration file.............................................136
Back up settings...........................................................................136
Manage the automatic backup options....................................137
Erase the current configuration settings...................................137
Restore configuration settings...................................................138
Set up remote management...........................................................139
Use remote access...........................................................................140
Chapter 7 Customize Internet Traffic Rules for Ports
Manage port forwarding to a local server.....................................142
Set up port forwarding to a local server...................................142
Add a custom port forwarding service.....................................143
Edit a port forwarding service....................................................144
Delete a port forwarding entry..................................................145
Application example: Make a local web server public...........145
How the router implements the port forwarding rule.............146
Manage port triggering...................................................................146
Add a port triggering service.....................................................147
Enable port triggering................................................................148
Application example: Port triggering for Internet Relay Chat.149
7

Orbi Pro Router Model SRR60 and Orbi Pro Satellite Model SRS60
Chapter 8 Use VPN to Access Your Network
Set up a VPN connection.................................................................151
Specify VPN service in the router...................................................151
Install OpenVPN software...............................................................152
Install OpenVPN software on your Windows-based computer.152
Install OpenVPN software on your Mac computer..................155
Install OpenVPN software on an iOS device............................156
Install OpenVPN software on an Android device....................157
Use a VPN tunnel on your Windows-based computer................158
Use VPN to access your Internet service at your business..........159
Set up VPN client Internet access in the router........................159
Block VPN client Internet access in the router.........................160
Use a VPN tunnel to access your Internet service at your
business........................................................................................161
Chapter 9 Troubleshooting
Quick tips...........................................................................................163
Sequence to restart your network.............................................163
WiFi settings.................................................................................163
Network settings..........................................................................163
The router and satellite do not sync..............................................163
You cannot log in to the router.......................................................165
You cannot access the Internet.......................................................165
Troubleshoot Internet browsing.....................................................166
Troubleshoot PPPoE........................................................................167
Troubleshoot WiFi connectivity......................................................168
Troubleshoot your network using the ping utility........................168
Test the LAN path to your router...............................................169
Test the path from your computer to a remote device...........169
Appendix A Supplemental Information
Factory settings.................................................................................172
Factory settings for Orbi Pro router model SRR60..................172
Factory settings for Orbi Pro satellite model SRS60...............174
Technical specifications...................................................................176
Technical specifications for Orbi Pro router model SRR60....176
Technical specifications for Orbi Pro satellite model SRS60..177
8

1
Overview
The Orbi Pro Tri-Band Mesh WiFi System creates dedicated high-speed WiFi connections
to your Internet service. The Orbi Pro router connects to your modem or gateway. The
Orbi Pro satellite extends the WiFi signal throughout your business, office, or home.
This chapter contains the following sections:
• Supported Orbi Pro models
• Orbi Pro router and satellite hardware overviews
• LED behavior
• Wall mount or ceiling mount your Orbi Pro router
• Orbi Pro router label and Orbi Pro satellite label
• Connect your Orbi Pro router
• Place your satellite
• Sync your Orbi Pro satellite
• Manage and monitor your Orbi network with NETGEAR Insight
For more information about the topics covered in this manual, visit the support website
at support.netgear.com.
Note: This manual refers to the Orb Pro router as the router and refers to the Orbi Pro
satellite as the satellite.
Note: The Orbi Pro router does not support and does not pair with Orbi home satellites,
except for the Orbi Outdoor Satellite RBS50Y. The Orbi Pro satellite does not pair with
an Orbi home router.
9

Orbi Pro Router Model SRR60 and Orbi Pro Satellite Model SRS60
Supported Orbi Pro models
This user manual describes the following Orbi Pro models:
Orbi Pro Router (Model SRR60)
•
Orbi Pro Satellite (Model SRS60)
•
This user manual does not describe the following Orbi Pro satellites:
Orbi Outdoor Satellite (Model RBS50Y)
•
Orbi Pro Ceiling Satellite (Model SRC60)
•
For more information about these Orbi Pro satellites, see their user manuals, which are
available at https://www.netgear.com/support/.
Note: To manage your Orbi Pro router and any Orbi Pro satellites that are connected
to your Orbi Pro network, you must manage them from your Orbi Pro router web
interface.
Orbi Pro router and satellite hardware overviews
The following sections display the hardware features available for the Orbi Pro router
(model SRR60) and Orbi Pro satellite (model SRS60).
Orbi Pro router model SRR60 hardware overview
Figure 1. Orbi Pro router model SRR60, front and back views
User Manual10Overview

Orbi Pro Router Model SRR60 and Orbi Pro Satellite Model SRS60
1. Ring LED (not shown in image)
2. Sync button (also used for WPS connection)
3. Internet port
4. Ethernet ports
5. Power On/Off button and Power LED
6. DC Power connector
7. Reset button
Orbi Pro satellite model SRS60 hardware overview
Figure 2. Orbi Pro satellite model SRS60, front and back views
1. Ring LED (not shown in image)
2. Sync button (also used for WPS connection)
3. Ethernet ports
4. Power On/Off button and Power LED
5. DC Power connector
6. Reset button
LED behavior
When you sync an Orbi Pro satellite to the Orbi Pro router, the LED behavior for a satellite
that comes in an Orbi Pro WiFi system is different from the LED behavior for add-on
Orbi Pro satellites.
User Manual11Overview

Orbi Pro Router Model SRR60 and Orbi Pro Satellite Model SRS60
Orbi Pro WiFi system LEDs
The following table describes the LED behavior for an Orbi Pro router (model SRR60)
and Orbi Pro satellite (model SRS60) that are purchased together and come in the same
package.
Table 1. Orbi ProWiFi System router and satellite LED descriptions
LED BehaviorLED
Power LED
Router ring LED
Satellite ring
LED
The Power LED is located above the Power On/Off button on the rear panel.
Solid green. Power is on.
•
Solid amber. The router or satellite is booting.
•
Blinking amber. The router or satellite is resetting to factory default settings.
•
Blinking red. The firmware is corrupted.
•
Off. Power is not supplied.
•
The ring LED is located on the top.
Pulsing white. The router is booting or someone pressed the Sync button.
•
Off. The router finished booting and is working normally.
•
Solid white. The router is resetting to factory default settings.
•
Solid magenta. The router cannot connect to the Internet. See You cannot access the
•
Internet on page 165.
This satellite is included when you buy an Orbi router. The ring LED is located on the
top.
Pulsing white. The satellite is booting.
•
Blue for three minutes. The connection between the satellite and the router is good.
•
Amber for three minutes. The connection between the satellite and the router is fair.
•
Magenta. The satellite failed to sync to the router. See The router and satellite do not
•
sync on page 163.
Off. The satellite synced to the router and is working normally.
•
Add-on Orbi Pro satellite LEDs
The following table describes the LED behavior for an add-on Orbi Pro satellite (model
SRS60) that was purchased separately from the Orbi Pro kit.
User Manual12Overview

Orbi Pro Router Model SRR60 and Orbi Pro Satellite Model SRS60
Table 2. Orbi Pro add-on satellite (model SRS60) LED description
LED BehaviorLED
Power LED
Add-on satellite
ring LED
The Power LED is located above the Power On/Off button on the rear panel.
Solid green. Power is on.
•
Solid amber. The satellite is rebooting.
•
Blinking amber. The satellite is resetting to factory default settings.
•
Blinking red. The firmware is corrupted.
•
Off. Power is not supplied.
•
Optional add-on satellites are sold separately and can be added to your Orbi network. The
ring LED is located on the top.
Pulsing white. The satellite is booting.
•
Solid white. The satellite is ready to sync to the router (press the Sync button).
•
Blue for three minutes. The connection between the satellite and the router is good.
•
Amber for three minutes. The connection between the satellite and the router is fair.
•
Magenta. The satellite is not connected to the router or is not getting an IP address.
•
Off. The satellite synced to the router and is working normally.
•
Wall mount or ceiling mount your Orbi Pro router
Your package contains wall-mounting and ceiling-mounting items. Before you can wall
mount or ceiling mount your Orbi Pro router (model SRR60) or Orbi Pro satellite (model
SRS60), you must attach the mount base and cover to your router or satellite.
Wall-mount your Orbi Pro
After you attach the mount base and cover to your router or satellite, you can mount
your router or satellite to the wall.
User Manual13Overview

Orbi Pro Router Model SRR60 and Orbi Pro Satellite Model SRS60
To wall mount your router or satellite:
1. Place your Orbi router or satellite on the mount base and attach the router or satellite
to the base with the provided screws.
2. Attach the mount cover to the mount base.
3. Use the wall anchors with screws to attach the wall bracket to the wall.
4. Slide the mount base onto the wall bracket.
Ceiling-mount your Orbi Pro
The following instructions require a drop ceiling.
User Manual14Overview

Orbi Pro Router Model SRR60 and Orbi Pro Satellite Model SRS60
To ceiling mount your router or satellite:
1. Place your Orbi router or satellite on the mount base and attach the router or satellite
to the base with the provided screws.
2. Attach the mount cover to the mount base.
3. Attach the T-bracket to the ceiling bracket with the T-bracket screws.
4. Loosen the screw so that the locking plate can slide.
5. Secure the T-bracket to the T-bar and tighten the screw.
User Manual15Overview
Orbi Pro Router Model SRR60 and Orbi Pro Satellite Model SRS60
6. Slide the mount base into the ceiling bracket.
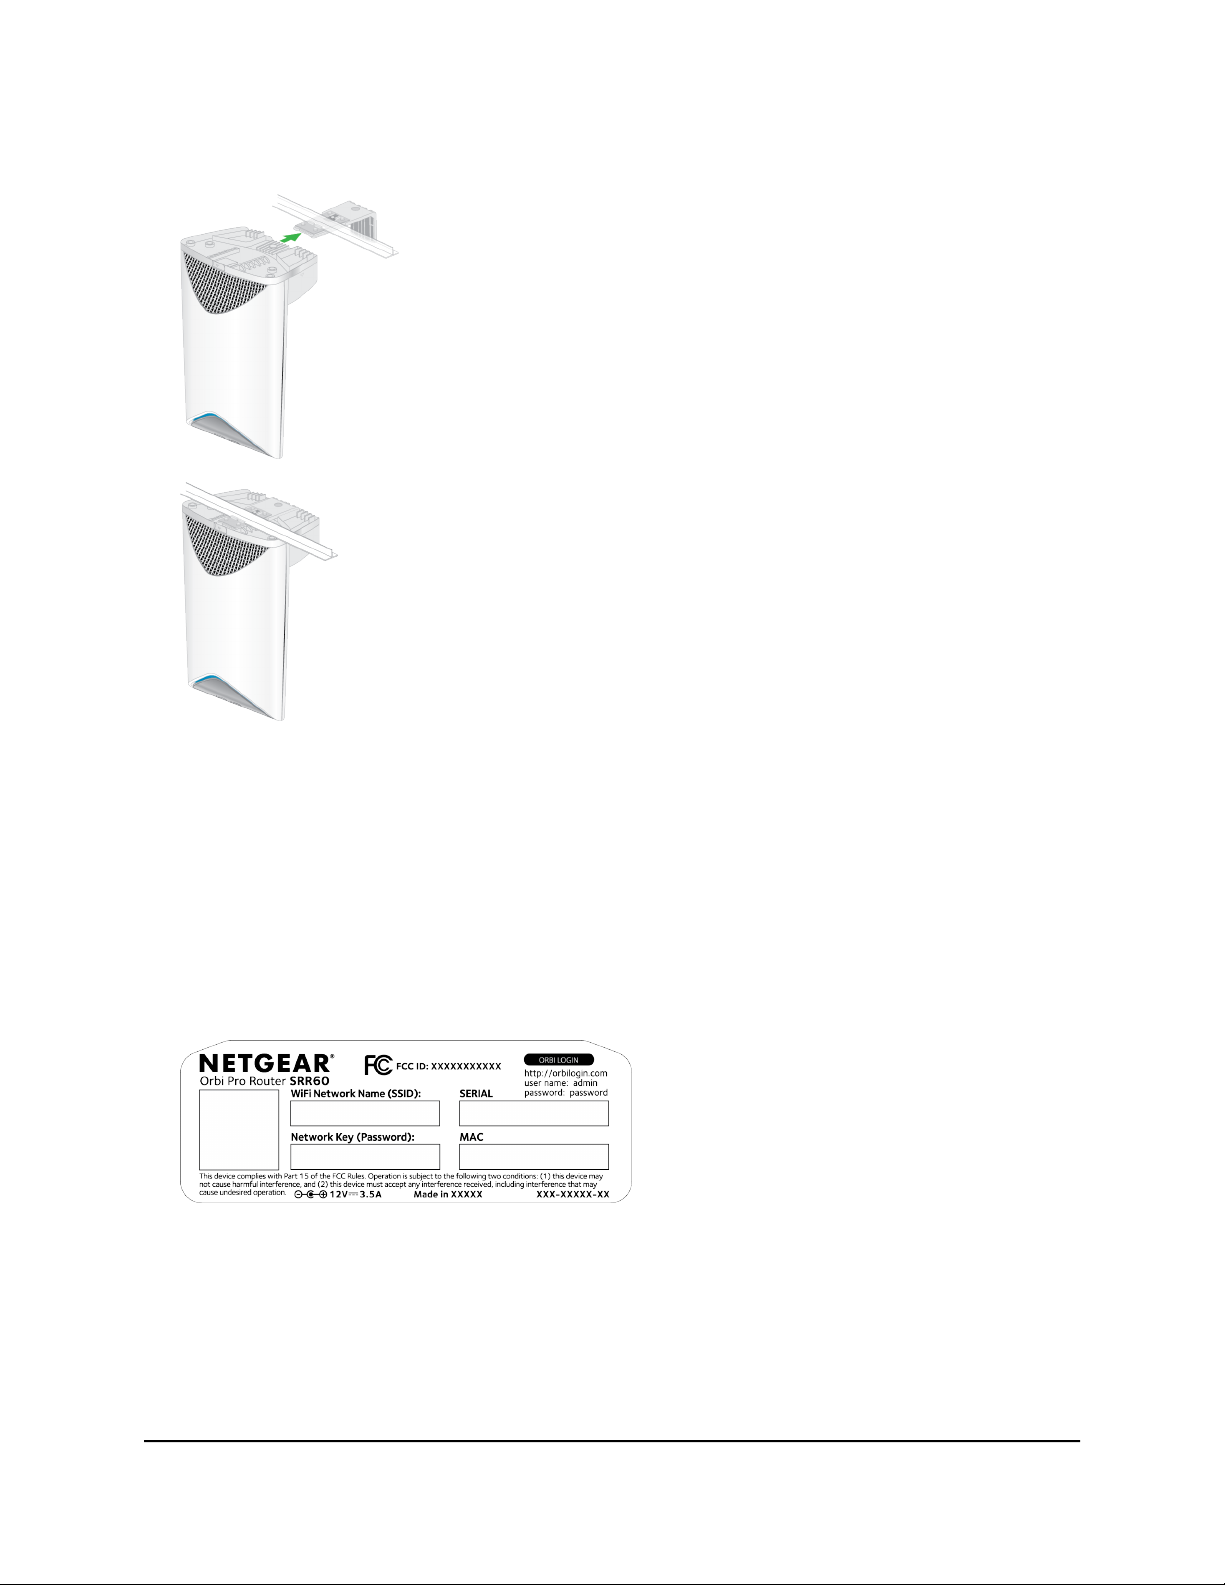
Orbi Pro router label and Orbi Pro satellite label
The Orbi Pro router label shows the login information, the WiFi network name and
password, the router’s MAC address, and the router’s serial number. The following is
an example of what the router label might look like:
Figure 3. Orbi Pro router label
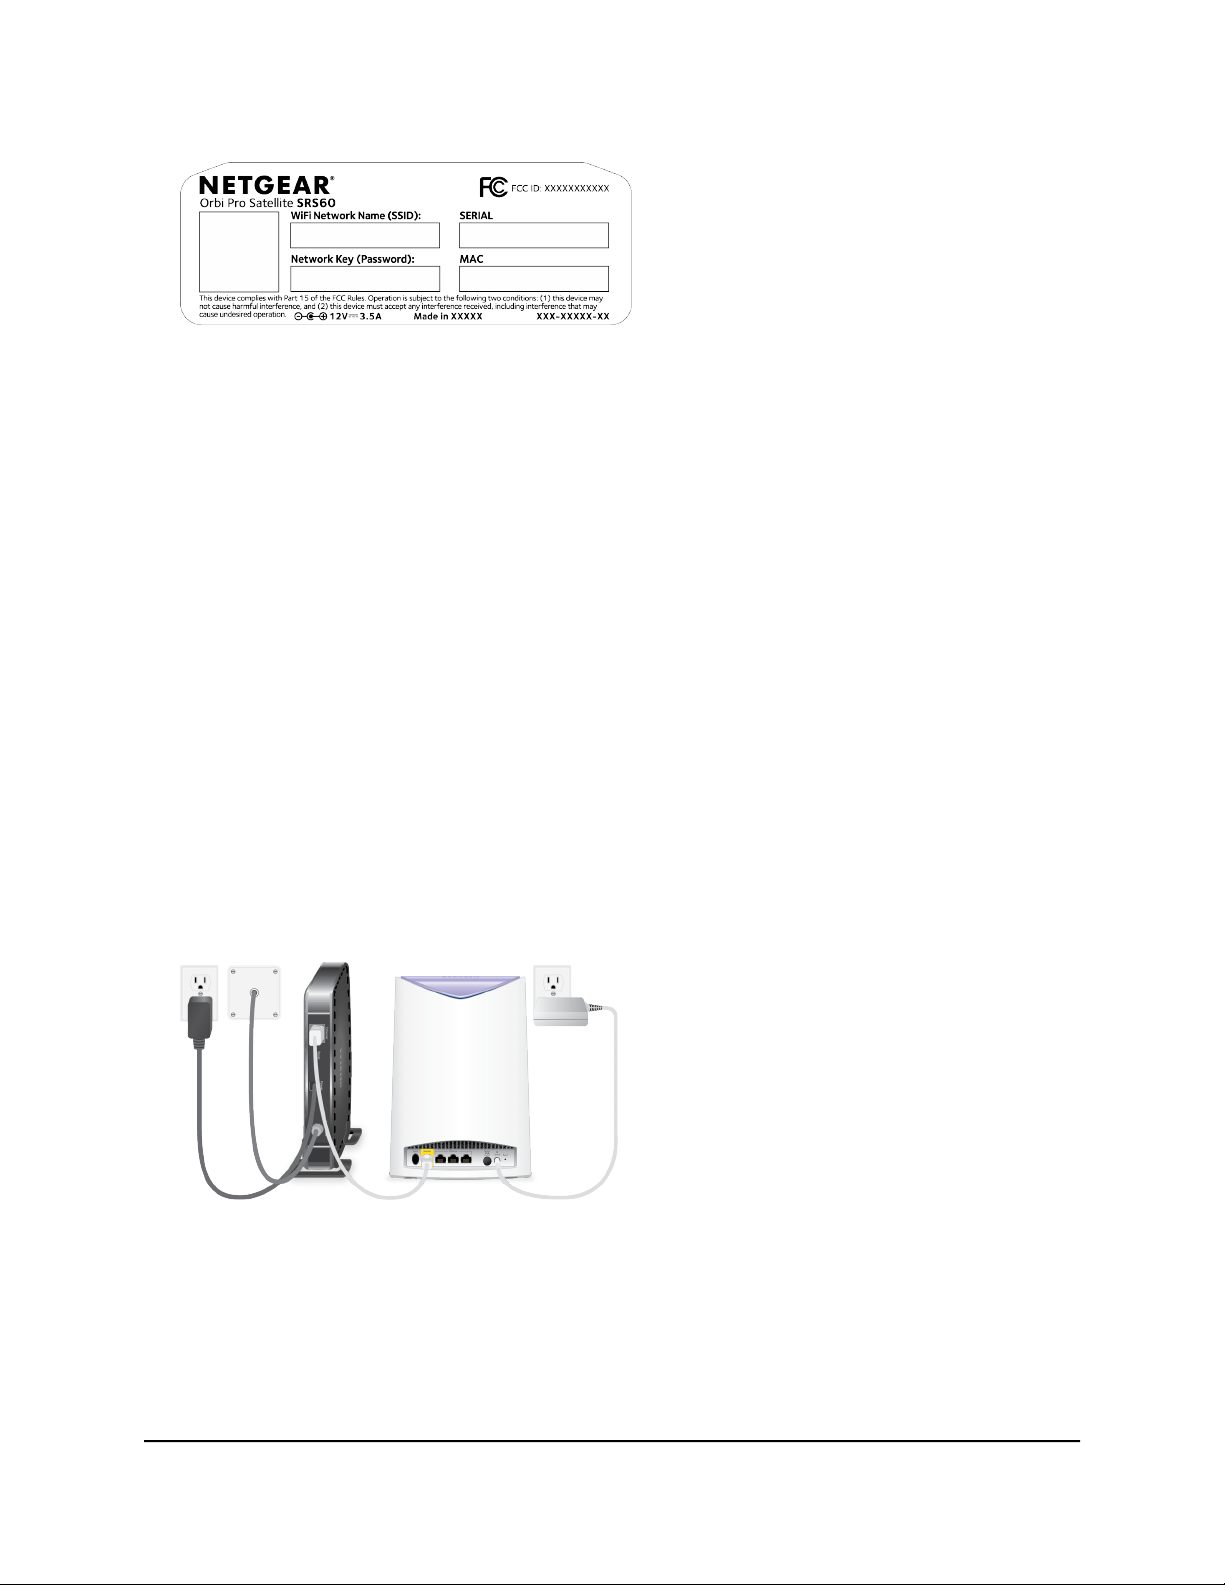
The Orbi Pro satellite label shows the WiFi network name and password, the satellite’s
MAC address, and the satellite’s serial number. The following is an example of what the
satellite label might look like:
User Manual16Overview
Orbi Pro Router Model SRR60 and Orbi Pro Satellite Model SRS60
Figure 4. Orbi Pro satellite label
Connect your Orbi Pro router
If you want to connect your Orbi Pro router to an existing gateway, we recommend that
you turn off your existing gateway’s WiFi.
To cable your router:
1.
Unplug your modem’s power, leaving the modem connected to the wall jack for
your Internet service.
If your modem uses a battery backup, remove the battery, and then put the battery
back in.
2. Plug in and turn on your modem.
3.
Connect your modem to the Internet port of your router with the Ethernet cable that
came with your router.
4. Connect the power adapter to your router and plug the power adapter into an
outlet.
5.
If the Power LED does not light, press the Power On/Off button on the rear panel
of the router.
User Manual17Overview

Orbi Pro Router Model SRR60 and Orbi Pro Satellite Model SRS60
Place your satellite
Your satellites must be within range of your router’s WiFi signal in order for it to sync
with the router. Use the satellite’s ring LED to help you determine where to place your
satellite.
Sync your Orbi Pro satellite
The sync process for your Orbi Pro satellite depends on whether your satellite came
with your Orbi Pro WiFi system, or if your satellite is an add-on satellite.
Sync a satellite from an Orbi Pro WiFi system
The Orbi Pro WiFi System includes an Orbi Pro router and a Orbi Pro satellite. The Orbi
pro satellite in the WiFi system is preset to automatically find and sync to the WiFi signal
from the Orbi Pro router in the same WiFi system.
To sync your Orbi Pro satellite:
1. Place your satellite.
For more information, see Place your satellite on page 18.
2. Connect the satellite to a power source.
3.
If the Power LED on the back of the satellite does not light, press the Power On/Off
button.
The satellite ring LED pulses white. The satellite automatically finds the Orbi router’s
WiFi signal and attempts to sync to the Orbi router.
The satellite ring LED lights one of the following colors for about three minutes and
then turns off:
Blue. The Orbi router and satellite successfully synced, and the connection
•
between the router and satellite is good.
Amber. The Orbi router and satellite successfully synced, and the connection
•
between the router and satellite is fair. Consider moving the Orbi satellite closer
to the Orbi router.
Magenta. The Orbi router and satellite failed to sync.
•
User Manual18Overview

Orbi Pro Router Model SRR60 and Orbi Pro Satellite Model SRS60
4.
If the satellite ring LED is magenta, move the satellite closer to the router and then
sync the satellite to the router:
a.
Press the Sync button on the back of the router.
b.
Within two minutes, press the Sync button on the back of the satellite.
The satellite attempts to sync to the Orbi router. The satellite ring LED lights blue,
amber, or magenta as described in Step 3 of this procedure and then turns off.
Sync an add-on Orbi Pro satellite
If you already set up an Orbi Pro router and satellite and you are adding an optional
add-on Orbi Pro satellite (sold separately), follow these steps.
Note: When you purchase an Orbi Pro satellite separately from the Orbi Pro router,
the satellite has a different WiFi network name and password. However, after syncing
the add-on satellite with the router, the satellite uses the same WiFi network name and
password as the router.
To sync your add-on Orbi Pro satellite:
1. Place your satellite.
For more information, see Place your satellite on page 18.
2. Connect the satellite to a power source.
3.
If the Power LED on the back of the satellite does not light, press the Power On/Off
button.
4.
Wait about two minutes for the satellite ring LED to light solid white.
5.
Press the Sync button on the back of the satellite and within two minutes, press the
Sync button on the back of your Orbi router.
The satellite ring LED pulses white, then lights one of the following colors for about
three minutes, and then turns off:
Blue. The Orbi router and satellite successfully synced, and the connection
•
between the router and satellite is good.
Amber. The Orbi router and satellite successfully synced, and the connection
•
between the router and satellite is fair. Consider moving the Orbi satellite closer
to the Orbi router.
Magenta. The Orbi router and satellite failed to sync. Move the satellite closer
•
to the router and try again.
User Manual19Overview

Orbi Pro Router Model SRR60 and Orbi Pro Satellite Model SRS60
Add satellites to your network using the router web interface
You can use the router web interface to add a satellite to your Orbi network.
To add a satellite to your Orbi network using the router web interface:
1.
Launch a web browser from a computer or mobile device that is connected to your
Orbi network.
2. Enter orbilogin.com.
A login window displays.
If your browser does not display a login window but displays a security warning and
does not let you proceed, see Resolve a browser security warning on page 27.
3. Enter the admin user name and password.
The user name is admin. The password is the one that you specified the first time
that you logged in. The user name and password are case-sensitive.
The BASIC Home page displays.
4. Select Add Orbi Pro Satellite.
The Place Your Satellite page displays.
5. Follow the instructions about where to place your satellite at your location.
6. Connect the satellite to a power source.
7.
If the Power LED on the back of the satellite does not light, press the Power On/Off
button.
8. Click the NEXT button.
9.
Wait about two minutes for the satellite’s ring LED to light solid white.
10. Press the Sync button on the satellite.
The satellite’s ring LED pulses white.
11.
Click the SYNC button in the router web interface.
The router attempts to sync with the satellite.
User Manual20Overview
Orbi Pro Router Model SRR60 and Orbi Pro Satellite Model SRS60
The satellite’s ring LED lights one of the following colors for about three minutes
and then turns off:
Blue. The Orbi router and satellite successfully synced, and the connection
•
between the router and satellite is good.
Amber. The Orbi router and satellite successfully synced, and the connection
•
between the router and satellite is fair. Consider moving the Orbi satellite closer
to the Orbi router.
Magenta. The Orbi router and satellite failed to sync. Move the satellite closer
•
to the router and try again.
Note: The first time that you sync the satellite and the router, the sync process can
take up to five minutes because the router might automatically update the satellite’s
firmware.
Manage and monitor your Orbi network with NETGEAR Insight
If you are a NETGEAR Insight Premium or Pro subscriber, after you use the router web
interface to set up your Orbi system, you can use NETGEAR Insight to manage and
monitor your Orbi network remotely.
For more information about NETGEAR Insight, visit https://www.netgear.com/insight/.
User Manual21Overview

2
Connect to the Orbi Pro Network and Access the Router
To manage your Orbi Pro router and any Orbi Pro satellites that are connected to your
Orbi Pro network, you must manage them from your Orbi Pro router web interface.
This chapter contains the following sections:
• Connect to the network for initial configuration
• Types of logins
• Use a web browser to access the router
• Change the language
• Resolve a browser security warning
22

Orbi Pro Router Model SRR60 and Orbi Pro Satellite Model SRS60
Connect to the network for initial configuration
You can connect to the Orbi network through a wired or WiFi connection.
Note: If you set up your computer to use a static IP address, change the settings so
that it uses Dynamic Host Configuration Protocol (DHCP).
Wired connection
You can connect your computer to the router using an Ethernet cable and join the
router’s local area network (LAN).
To connect your computer to the router with an Ethernet cable:
1. Make sure that the router is receiving power (its Power LED is lit).
2. Connect an Ethernet cable to an Ethernet port on your computer.
3.
Connect the other end of the Ethernet cable to one of the router’s Ethernet ports.
Your computer connects to the LAN.
WiFi connection
When you install your Orbi router for the first time, you can connect to the router’s WiFi
network by scanning the QR code on your router with the camera app on your mobile
device. To scan the QR code with your camera app, your mobile device must have iOS
version 11 or later, or Android version 10 or later.
You can also manually find and select the Orbi router’s WiFi network from your
WiFi-enabled computer or mobile device.
To find and select the WiFi network:
1. Make sure that the router is receiving power (its Power LED is lit).
2.
On your WiFi-enabled computer or mobile device, find and select the WiFi network.
The WiFi network name is on the router label.
3. Join the WiFi network and enter the WiFi password.
The password is on the router or satellite label.
Your WiFi-enabled computer or mobile device connects to the WiFi network.
and Access the Router
User Manual23Connect to the Orbi Pro Network

Orbi Pro Router Model SRR60 and Orbi Pro Satellite Model SRS60
WiFi connection using WPS
You can connect to the router’s WiFi network with Wi-Fi Protected Setup (WPS) or you
can find and select the WiFi network.
To use WPS to connect to the WiFi network:
1. Make sure that the router is receiving power (its Power LED is lit).
2.
Check the WPS instructions for your computer or WiFi device.
3. Press the Sync button on the router.
4. Within two minutes, on your WiFi-enabled computer or mobile device, press its WPS
button or follow its instructions for WPS connections.
Your computer or mobile device connects to the WiFi network.
Types of logins
You must use different logins for different types of tasks:
Internet service login: The login information that your Internet service provider
•
(ISP) gave you lets your router connect to your Internet service. Your service provider
gave you this login information in a letter or some other way. If you cannot find this
login information, contact your ISP.
WiFi network login: Your router uses a preset WiFi network name (SSID) and
•
password for WiFi access. This information is on the router label. During setup, you
can change the WiFi network name (SSID) and password for increased security.
Orbi Pro router login: The password that logs you in to the router interface from a
•
web browser as the admin. The default password for initial login is password. During
setup or at initial login, you must specify a new password for increased security.
Use a web browser to access the router
When you connect to the network (either through WiFi or through an Ethernet cable),
you can use a web browser to access the router to view or change the settings for the
router and the satellites that you synced with the router.
The first time you log in to the router web interface, use the interactive Internet setup
process to connect your router to your Internet service. You can also set up your router
manually.
User Manual24Connect to the Orbi Pro Network
and Access the Router

Orbi Pro Router Model SRR60 and Orbi Pro Satellite Model SRS60
Use the interactive Internet setup process
Before you start the interactive Internet setup process, get your ISP information and
make sure that the computers and devices in the network use the settings described
here.
When your Internet service starts, your Internet service provider (ISP) typically gives you
all the information needed to connect to the Internet.
For DSL service, you might need the following information to set up your router:
The ISP configuration information for your DSL account
•
ISP login name and password
•
Fixed or static IP address settings (special deployment by ISP; this setting is rare)
•
If you cannot locate this information, ask your ISP to provide it.
The interactive Internet setup process takes about 10 minutes to complete.
To use the interactive Internet setup process:
1. Power on your router.
2. Make sure that your WiFi-enabled computer or mobile device is connected to the
router with an Ethernet cable (wired) or wirelessly with the preset security settings
listed on the label.
Note: If you want to change the router’s WiFi settings, use a wired connection so
the WiFi device that you are using for setup is not disconnected when the new WiFi
settings take effect.
3. Launch a web browser.
If your browser displays a security message, see Resolve a browser security warning
on page 27.
The page that displays depends on whether you accessed the router before:
The first time that you set up the Internet connection for your router, the browser
•
goes to orbilogin.com, and the Orbi login page displays.
If you already set up the Internet connection, enter orbilogin.com in the address
•
field for your browser to start the installation process.
4. Follow the onscreen instructions.
The router connects to the Internet.
If your browser does not display the web page or your router does not connect to
the Internet, see the following troubleshooting suggestions.
User Manual25Connect to the Orbi Pro Network
and Access the Router
Orbi Pro Router Model SRR60 and Orbi Pro Satellite Model SRS60
through one of the LAN Ethernet ports, or is connected
through WiFi.
Your router does not connect to the InternetYour browser does not display the web page
Review your settings.Make sure that the computer is connected to the router
Make sure that the router is receiving power, and that
its Power LED is lit
Close and reopen your browser or clear the browser
cache.
If your computer is set to a static or fixed IP address
(this setting is uncommon), change its settings to obtain
an IP address automatically from the router.
Make sure that you selected the correct options and
typed everything correctly.
Contact your ISP to verify that you are using the correct
configuration information.
Read the information in Troubleshooting on page 162.Browse to orbilogin.com.
If problems persist, register your NETGEAR product
and contact NETGEAR technical support.
Log in to the Orbi router web interface
When you log in to the Orbi, the browser displays the router web interface. You can
use the router web interface to change the router or satellite settings.
To log in to your Orbi:
1.
Launch a web browser from a computer or mobile device that is connected to your
Orbi network.
2. Enter orbilogin.com.
A login window displays.
If your browser does not display a login window but displays a security warning and
does not let you proceed, see Resolve a browser security warning on page 27.
3. Enter the admin user name and password.
The user name is admin. The password is the one that you specified the first time
that you logged in. The user name and password are case-sensitive.
The BASIC Home page displays.
User Manual26Connect to the Orbi Pro Network
and Access the Router

Orbi Pro Router Model SRR60 and Orbi Pro Satellite Model SRS60
Change the language
By default, the language is set as Auto.
To change the language:
1.
Launch a web browser from a computer or mobile device that is connected to your
Orbi network.
2. Enter orbilogin.com.
A login window displays.
If your browser does not display a login window but displays a security warning and
does not let you proceed, see Resolve a browser security warning on page 27.
3. Enter the admin user name and password.
The user name is admin. The password is the one that you specified the first time
that you logged in. The user name and password are case-sensitive.
The BASIC Home page displays.
4.
In the upper right corner, select a language from the menu.
5.
When prompted, click the OK button to confirm this change.
The page refreshes with the language that you selected.
Resolve a browser security warning
Access to the router web interface is encrypted through the Hyper Text Transfer Protocol
Secure (HTTPS) protocol, instead of the Hyper Text Transfer Protocol (HTTP). The extra
security of HTTPS requires your browser to verify that orbilogin.com (which is the same
as 192.168.1.1) is safe. As a result, a security warning can display in your browser when
you try to access that domain.
If such as security warning displays, you cannot proceed but must take one of the
following actions, depending on the browser that you are using:
Google Chrome: If Google Chrome displays a Your connection is not private warning,
•
click the ADVANCED link. Then, click the Proceed to x.x.x.x (unsafe) link, in which
x.x.x.x represents the domain or IP address of the Orbi.
Apple Safari: If Apple Safari displays a This connection is not private warning, click
•
the Show Details button. Then, click the visit this website link. If a warning pop-up
window displays, click the Visit Website button. If another pop-up window displays
to let you confirm changes to your certificate trust settings, enter your Mac user name
and password and click the Update Setting button.
User Manual27Connect to the Orbi Pro Network
and Access the Router

Orbi Pro Router Model SRR60 and Orbi Pro Satellite Model SRS60
Mozilla Firefox: If Mozilla Firefox displays a Your connection is not secure warning,
•
click the ADVANCED button. Then, click the Add Exception button. In the pop-up
window that displays, click the Confirm Security Exception button.
Microsoft Edge: If Microsoft Edge displays a There is a problem with this website’s
•
security certificate warning or a similar warning, select Details > Go on to the
webpage.
Microsoft Internet Explorer: If Microsoft Internet Explorer displays a There is a
•
problem with this website’s security certificate warning, click the Continue to this
website (not recommended) link.
and Access the Router
User Manual28Connect to the Orbi Pro Network

3
Specify Your Internet Settings
Usually, the quickest way to set up the router to use your Internet connection is to allow
Orbi to detect the Internet connection when you first access the router with a web
browser. You can also customize or specify your Internet settings.
This chapter contains the following sections:
• Use the Internet Setup Wizard
• Manually set up the Internet connection
• Manage an IPv6 Internet connection
• Change the MTU size
29

Orbi Pro Router Model SRR60 and Orbi Pro Satellite Model SRS60
Use the Internet Setup Wizard
You can use the Setup Wizard to detect your Internet settings and automatically set up
your router.
To use the Setup Wizard:
1.
Launch a web browser from a computer or mobile device that is connected to your
Orbi network.
2. Enter orbilogin.com.
A login window displays.
If your browser does not display a login window but displays a security warning and
does not let you proceed, see Resolve a browser security warning on page 27.
3. Enter the admin user name and password.
The user name is admin. The password is the one that you specified the first time
that you logged in. The user name and password are case-sensitive.
The BASIC Home page displays.
4. Select ADVANCED > Setup Wizard.
The Setup Wizard page displays.
5. Select the Yes radio button.
If you select No, you are taken to the Internet Setup page (see Manually set up the
Internet connection on page 30).
6. Click the Next button.
The Setup Wizard searches your Internet connection for servers and protocols to
determine your ISP configuration and checks your operation mode.
Manually set up the Internet connection
You can view or change the router’s Internet connection settings.
Specify an Internet connection without a login
To specify the Internet connection settings:
1.
Launch a web browser from a computer or mobile device that is connected to your
Orbi network.
2. Enter orbilogin.com.
User Manual30Specify Your Internet Settings
 Loading...