

Page 1
Page 2

Start Here
The NETGEAR™ Model ND508 Network Disk Drive and Model ND520
Network Disk Drive pro vide an ef fecti v e, scalable solution for network ed PCs to
share stored files. The Model ND508/ND520 Network Disk Drive will be up
and running on your network in minutes.
This guide provides installation instructions for:
®
• Users of Microsoft
Windo ws® 95, Windows 98, or Windows NT
• Users who have a compatible network card installed in their computers
®
All others should refer to the
Resource
CD for hardware and software installation instructions.
Model ND508/ND520 Network Disk Drive
This guide provides information for the Model ND508 Network Disk Drive and
the Model ND520 Network Disk Drive. The Model ND508 drive has 8
gigabytes (GB) of disk capacity, and the Model ND520 drive has 20 GB of disk
capacity. Illustrations may show either model; however, all information applies
to both models unless otherwise specified.
If you have not yet installed network cards in your computer, you can use the
NETGEAR Model FA310 network card. If you are setting up a network, you
can also use a NETGEAR Network Starter Kit, available at your local computer
retail store.
Model ND508/ND520 Network Disk Drive Installation Guide
Page 3
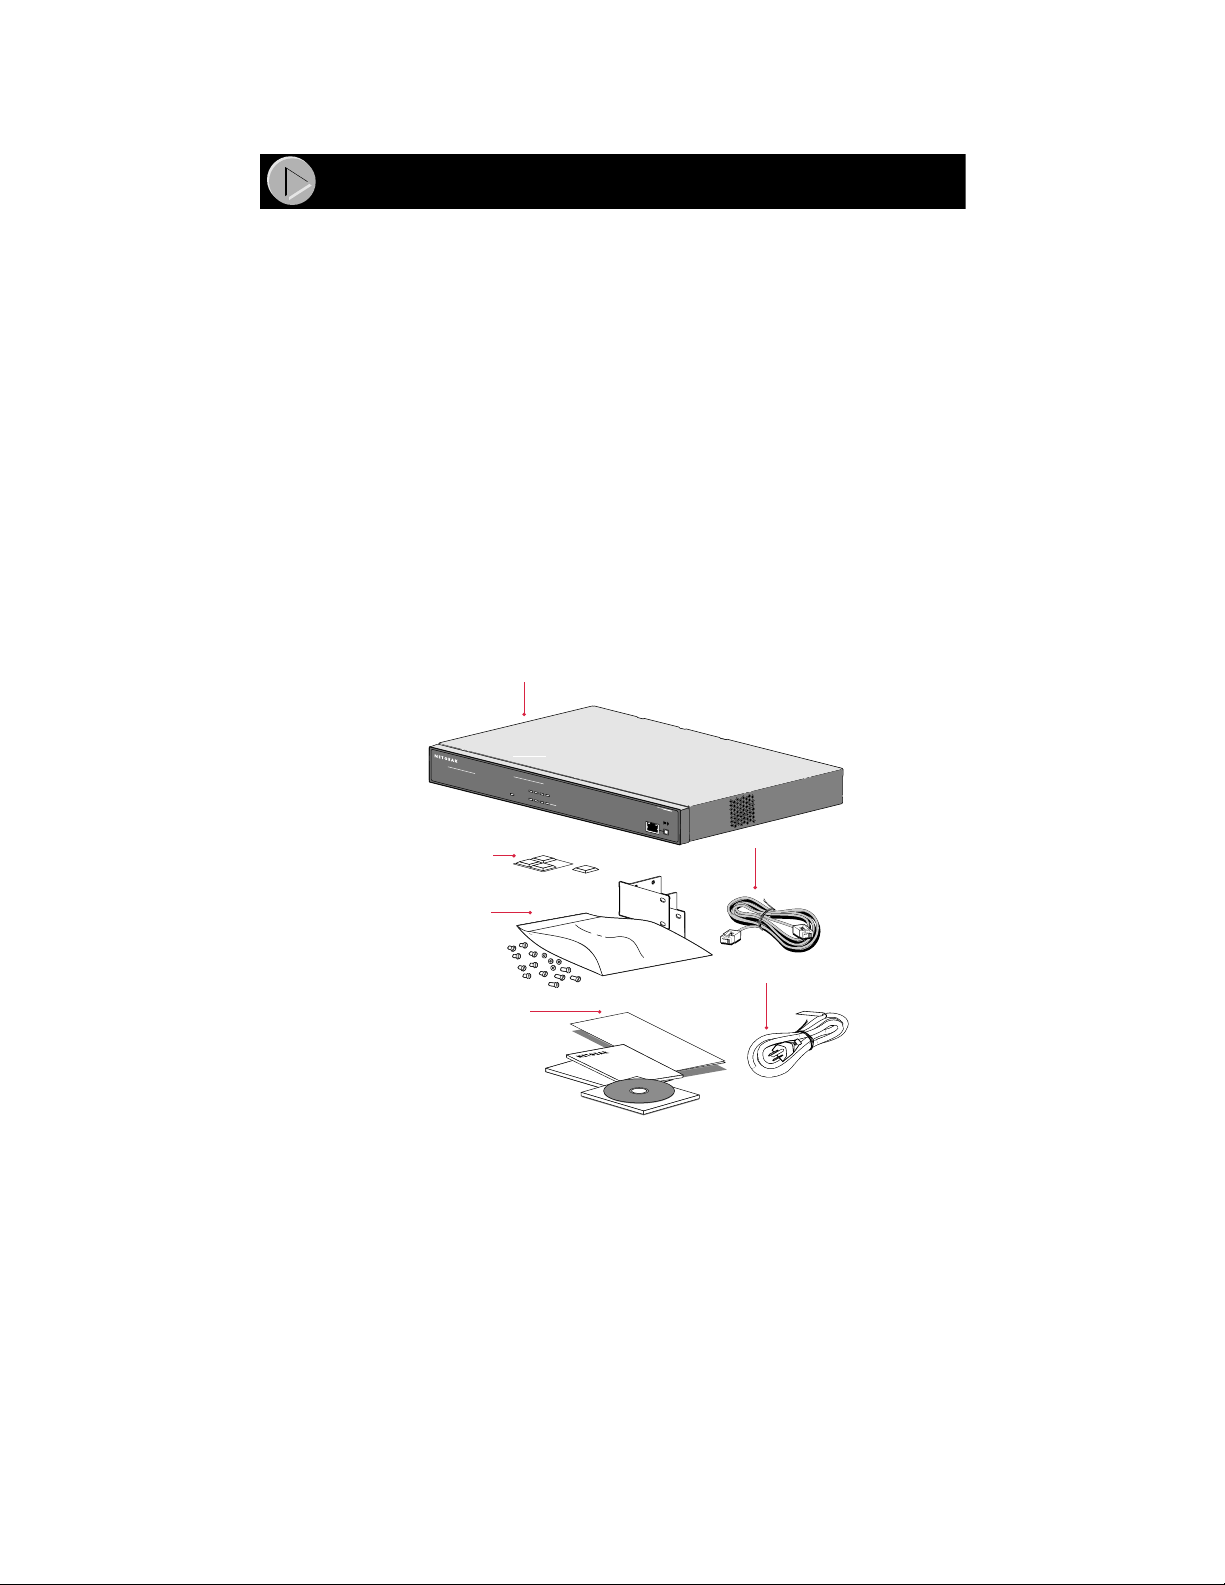
Package Contents
Verify that the package contains the following items, as shown in the
illustration:
• Model ND508/ND520 Network Disk Drive
• Power cord
• Rack mount kit
• Rubber footpads
• Category 5 10/100 Mbps UTP cable
• This installation guide
• Model ND508/ND520 Network Disk Drive Resource CD
• Please Read: MAC Address Labels
• Warranty & Owner Registration Card
• Support Information Card
Model ND508/ND520 Network Disk Drive
Auto 10/100 Mbps
1
0
G
B
y
te
Network Disk Drive
Rubber
footpads
Rack mount kit
DUAL SPEED
A
u
to
1
0
/1
0
0
M
b
p
s
DUAL SPEED
T
e
s
t
H
D
P
L
in
o
w
k
e
r
T
x
/R
x
2
0
%
4
0
%
6
0
%
6
0
%
D
is
k
U
t
iliz
a
t
io
n
M
o
d
e
l
S
S
5
1
0
L
in
k
R
X
N
o
rm
a
l/U
p
lin
k
Category 5
10/100 Mbps
UTP cable
Power
Resource CD,
cord
Installation Guide,
Warranty & Owner
Registration Card,
Support Information Card,
MAC Address Labels
9280FB
Model ND508/ND520 Network Disk Drive Installation Guide
Page 4

Product Illustration
The front panel of the Model ND508/ND520 Network Disk Drive has the
following features:
• Power LED
• Diagnostic LEDs:
— 1 Ready LED
— 1 HD LED
— 1 100M LED
— 1 FDX LED
— 4 Disk Utilization LEDs
• Vista RJ-45 Network Port with built-in Link and Tx/Rx LEDs
• Normal/Uplink button
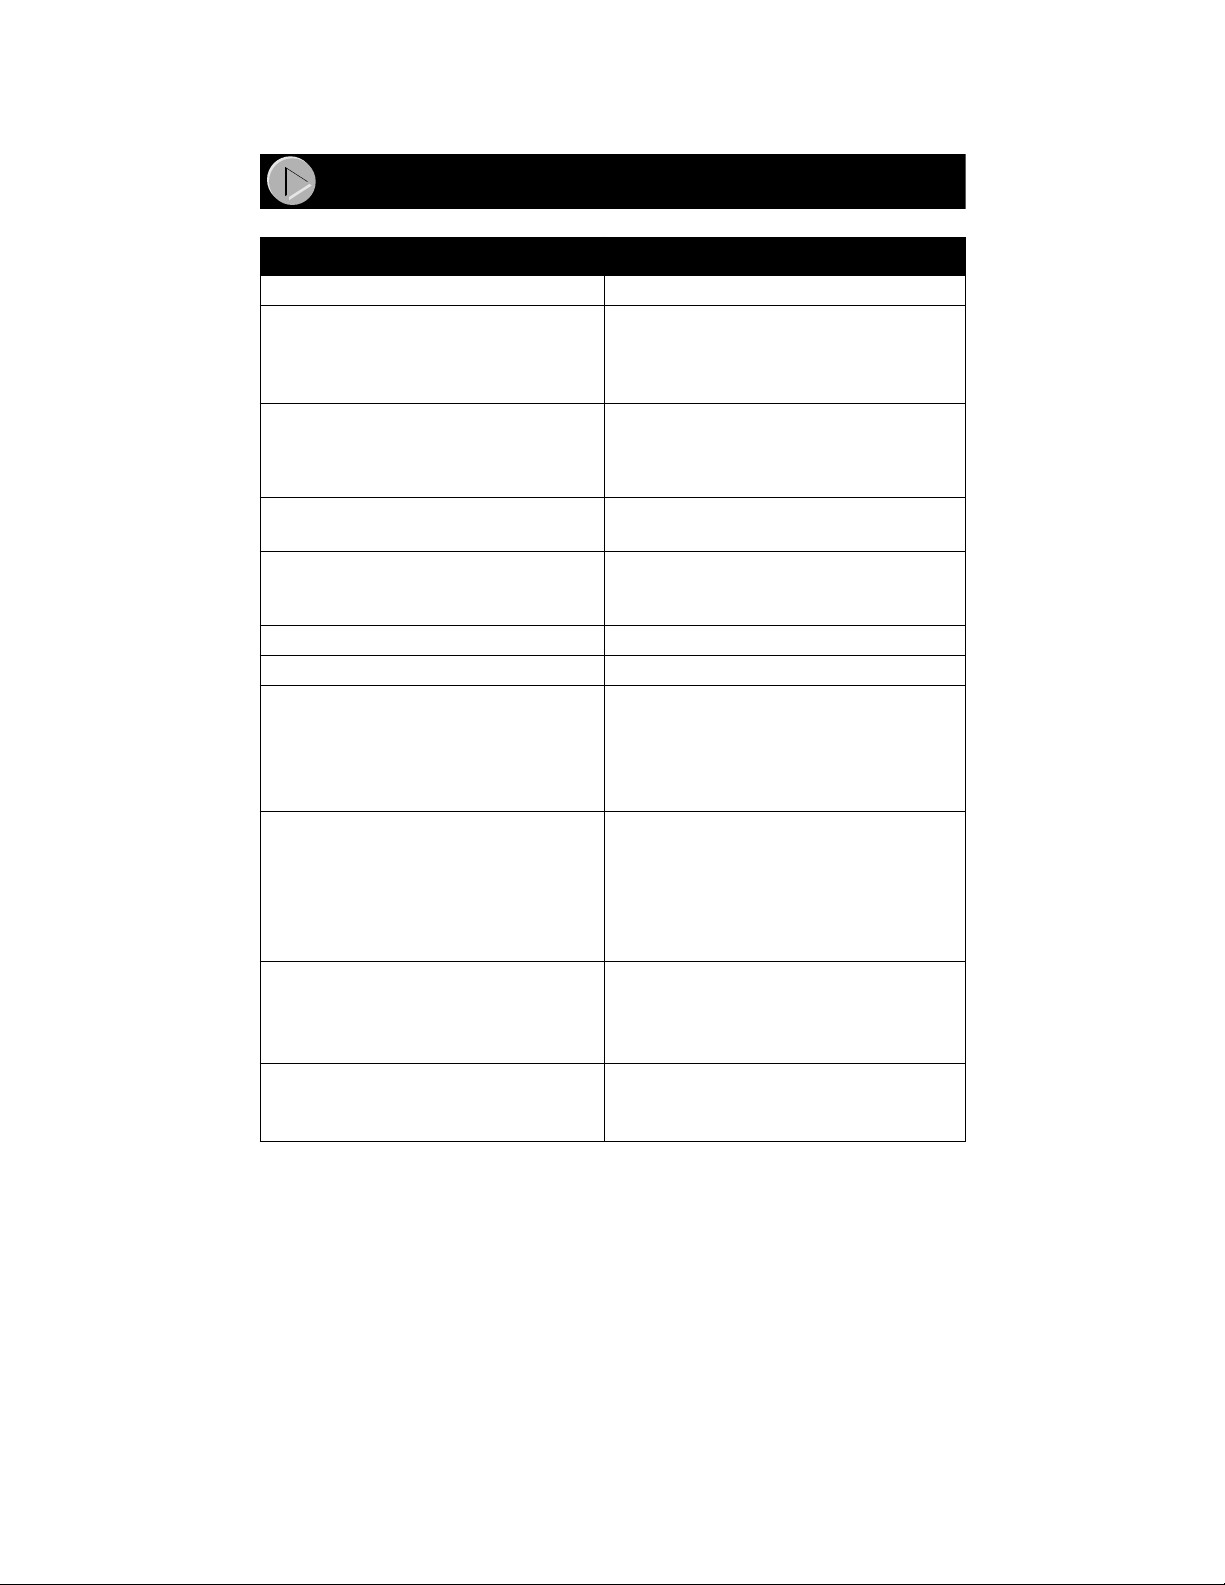
LED Description
The Model ND508/ND520 Network Disk Drive provides front-panel LEDs for
monitoring activity. The following table describes the LED indications.
Label
Power
Ready Green Blinking The system is starting up or powering down.
HD Green Blinking The network disk drive is reading from or writing to its
100M Green On The 100 Mbps Ethernet link is active.
FDX Green On Transmission is in full-duplex mode.
20% Green Off The network disk drive is less than 20% full.
40% Green On The network disk drive has reached 40% capacity.
60% Green On The network disk drive has reached 60% capacity.
80% Green On The network disk drive has reached 80% capacity.
All four Green Blinking The network disk drive has reached 95% capacity.
Link Green On The Ethernet link is established.
Tx/Rx Green Blinking The network disk drive is transmitting or receiving
Color Activity Description
Green On The network disk drive is on.
On The system started up successfully and is ready for
use.
internal hard drive.
Off The 10 Mbps Ethernet link is active.
Off A link is not established, or the operation is in half-
duplex mode.
On The network disk drive has reached 20% capacity.
data.
Model ND508/ND520 Network Disk Drive Installation Guide
Page 5
Vista RJ-45 Network Port with Built-in LEDs
The front panel of the Model ND508/ND520 Network Disk Drive provides one
vista RJ-45 network port. This standard connector accepts two-pair Category 5
unshielded twisted pair (UTP) copper wiring. The connector contains two
LEDs. The left LED is the Link LED, and the right LED is the Tx/Rx LED.
Typcial Application
The following illustration provides an example of your Model ND508/ND520
Network Disk Drive in simple network.
Caution:
100 Mbps operation requires the use of Category 5 UTP
wiring with 100 Mbps certified connectors. NETGEAR highly
recommends using Category 5 cable so your network can operate at
either 10 or 100 Mbps.
Model DS108
Key
10 Mbps
100 Mbps
hub
Model ND508/ND520 Network
10 Gbyte
Network Disk Drive
DUAL SPEED HUB
Col
Pow
Disk Drive
MODEL
PCs
ND508
9281FA
Auto 10/100 Mbps
DUAL SPEED
Auto 10/100 Mbps
DS108
DUAL SPEED
Model ND508/ND520 Network Disk Drive Installation Guide
Page 6
Auto 10/100 Mbps
DUAL SPEED
DUAL SPEED HUB
DS108
Network Disk Drive
SS510
MODEL
yte
Auto 10/100 Mbps
DUAL SPEED
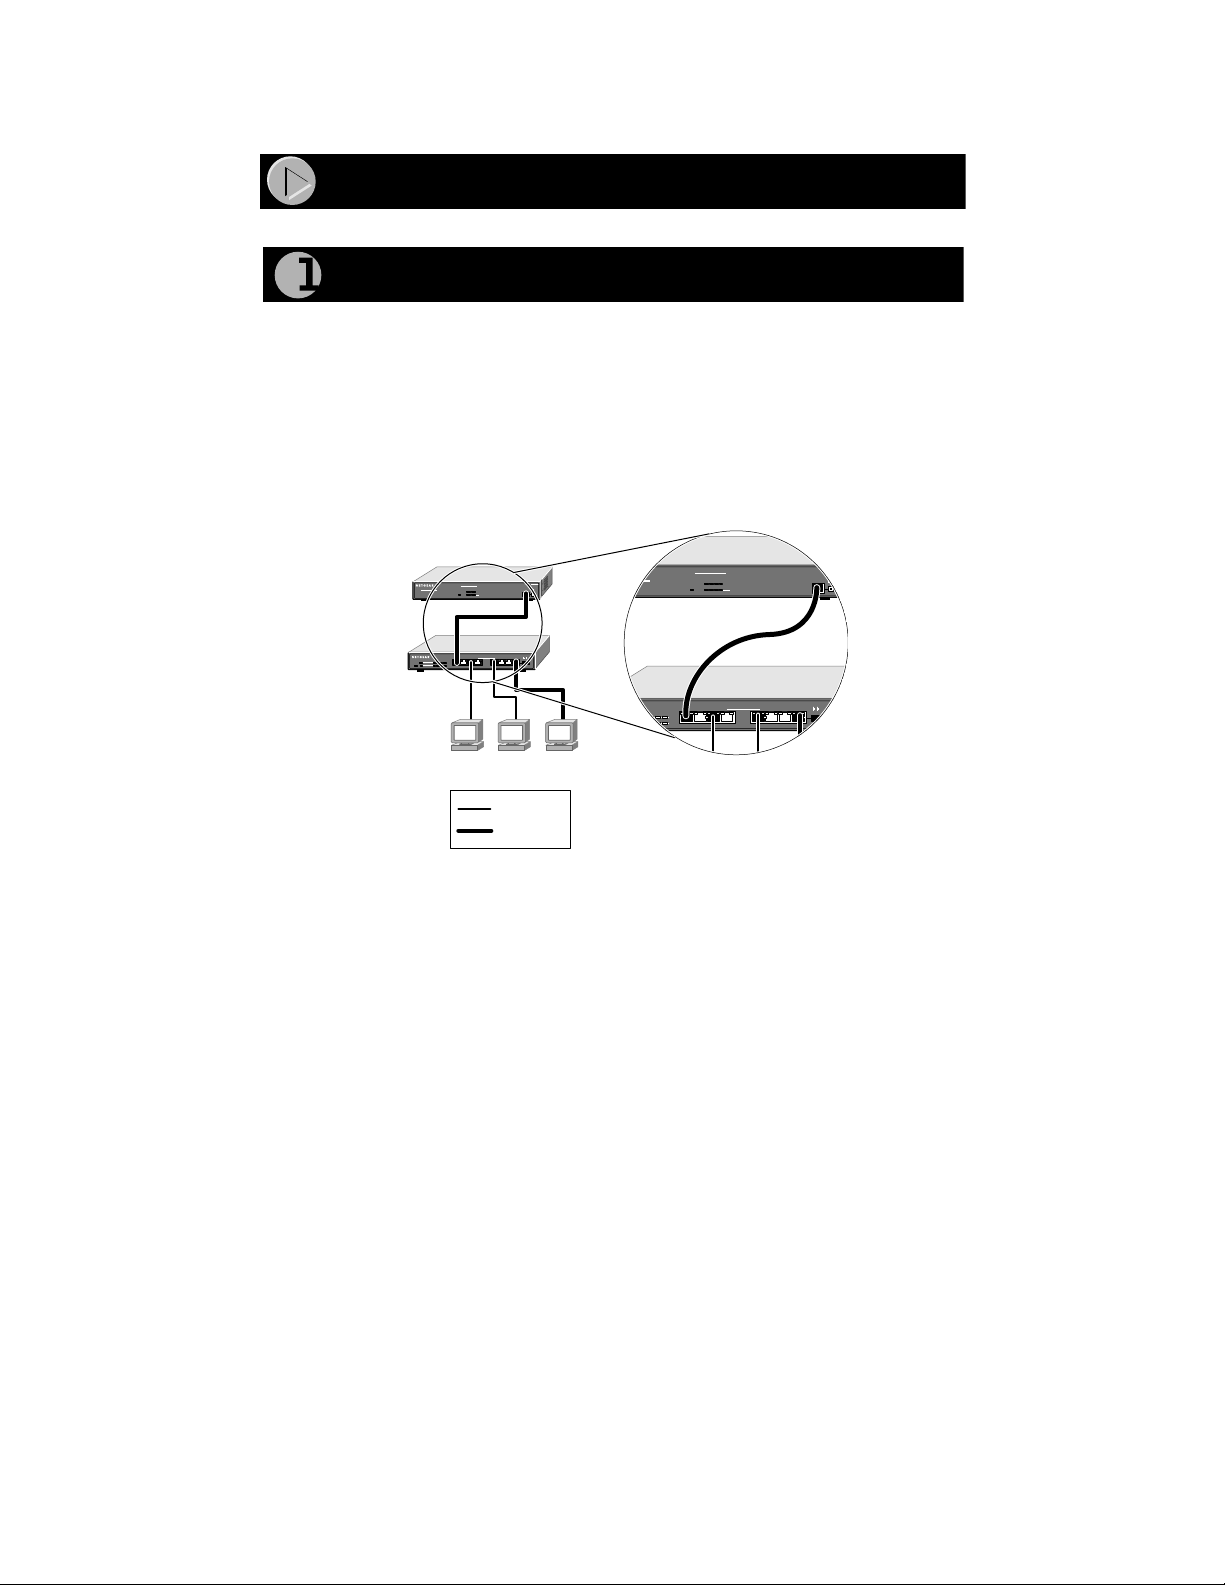
Installation Procedures
Connect to the Network
To connect your Model ND508/ND520 Network Disk Drive to the network:
1. Connect one end of a Category 5 10/100 UTP Ethernet cable to the RJ45 connector on the front panel of the Model ND508/ND520 Network
Disk Drive.
2. Connect the other end of the Ethernet cable to a network hub port, as
shown in the example below.
Model ND508/ND520
Network Disk Drive
10 Gbyte
Network Disk Drive
DUAL SPEED HUB
DS108
Col
Pow
Model DS108
hub
Key
Auto 10/100 Mbps
DUAL SPEED
Auto 10/100 Mbps
DUAL SPEED
PCs
10 Mbps
100 Mbps
MODEL
SS510
9219FA
Model ND508/ND520 Network Disk Drive Installation Guide
Page 7

Connect the Power Cord
To connect the power cord to the Model ND508/ND520 Network Disk Drive:
1. Connect one end of the power cord to the power receptacle on the rear
panel of the Model ND508/ND520 Network Disk Drive, as shown below.
2. Connect the other end of the power cord to a standard power outlet.
Rear Panel of the Model ND508/ND520
Network Disk Drive
Power receptacle
Caution:
Fan Power
Use the appropriate power cord as required by your national
button
9282FA
electrical codes and ordinances.
3. Power on the network disk drive by pressing the power button on the
rear panel.
4. Verify that the LEDs on the front panel display the following:
• The Power LED is green, indicating that power to the network disk
drive is on.
• The Link and Ready LEDs are green, indicating that the network disk
drive is connected to the network and ready for use.
5. Verify that the Link LED is on. If this LED is not on, depress the
Normal/Uplink button on the front panel of the drive.
Model ND508/ND520 Network Disk Drive Installation Guide
Page 8

Map to the Network Disk Drive
NETGEAR provides an automapping program to simplify setting up drive
mappings for your network disk drives. (Mapping is a Windows term that means
“assigning.”) This program automatically maps (or assigns) a drive letter to the
public folder of each network disk drive on your network. The NETGEAR
Network Disk Drive Automap Utility is located on the
Network Disk Drive Resource
folders through Network Neighborhood, refer to
Drives
,” later in this section.
Note:
When you power on your PC, be sure to enter your network
CD. For instructions for manually mapping to
“Manually Mapping to Network Disk
password at the logon prompt. If you select Cancel to bypass the
network logon, you will be unable to access network disk drives or
any other drives on your network.
Model ND508/ND520
Installing the Network Disk Drive Automap Utility
To install the utility:
1. Insert the Resource CD in the CD drive of your computer.
The Network Disk Drive Resource CD window opens.
2. Click on Map to NETGEAR Network Disk Drives.
If the Automap Utility was not previously installed on your computer, you
will be asked if you want to install it now.
3. Click on Yes to proceed with the installation.
The Welcome window opens.
4. Read the Welcome window, and click on Next.
The Choose Destination Location window opens.
5. Click on Next to install into the default location.
The Select Program Folder window opens.
6. Click on Next to install into the default location.
The Start Copying Files window opens.
7. Verify that the information in the Start Copying Files window is
correct, or go back to change information as necessary.
8. Click on Next to install the Automap Utility.
The Setup Complete window opens when installation is complete.
9. Click on Finish.
Some versions of Windows may require you to reboot. If you are prompted
to reboot, you should do so at this time.
Model ND508/ND520 Network Disk Drive Installation Guide
Page 9

Automatically Mapping to Network Disk Drives
To automatically map to network disk drives:
1. Click on the FirstGear for Network Drives icon on your Windows
desktop.
The Automap Utility searches the netw ork for network disk dri ves. The ne xt
available drive letter will automatically be assigned to the Public folder of
any new NETGEAR network disk drives that have been added to your
network.
Manually Mapping to Network Disk Drives
For some network configurations, it is necessary to manually map the network
disk drive. If the Automap Utility did not locate your network disk drive, you
must map to it manually.
To manually map to network disk drives:
1. From the Start button, select Find > Computer, type the name of your
network disk drive at the prompt, and click on Find Now.
The default name of the network disk drive is NETGEARxxxxxx. The
xxxxxx of the default name is the last six digits of the 12-digit MAC address
of the network disk drive. The MAC address can be found on the bottom of
your drive or on the Please Read: MAC Address Labels card included in
your shipment.
2. Double-click on the network disk drive that you want to connect to.
3. Right-click on the Public folder of the network disk drive.
A menu opens.
4. From the menu, choose Map Network Drive.
5. In the Drive field, enter or select the drive letter y ou want to use f or this
network disk drive.
6. Click on OK.
The network disk drive is ready for use.
If you cannot locate the network disk drive on your network, or if you prefer
to manually configure the IP address of your network disk drive, refer to
Reference Guide for the Model ND508/ND520 Network Disk Drive on your
Resource CD.
Model ND508/ND520 Network Disk Drive Installation Guide
Page 10

Use the Network Disk Drive
You can start using the network disk drive as you would any other drive on your
network. For example:
• Browse to the drive in Windows Explorer or Network Neighborhood.
• Create and save shared files in the drive’s Public folder.
• Copy files to the drive for storage.
• Create shortcuts to folders that you use often.
In its default configuration, the network disk drive permits e v eryone on your
network to access files saved on the drive. The administrator can use the
Web-based administration tools to change access, if necessary.
Model ND508/ND520 Network Disk Drive Installation Guide
Page 11

Web-Based Administration Tools
The Web-based administration tools support Netscape Navigator and Microsoft
Internet Explorer browsers, versions 4.0 and greater. The administrator can use
these tools to protect folders with a password and change settings for the network
disk drive. The administrator should set an administrator’s password when logging
on a network disk drive for the first time.
Note:
When accessing the administration tools for the first time,
NETGEAR recommends that the administrator set a password.
NETGEAR ships the network disk drive without a preset
administrator’s password.
Accessing Administration Tools from the Windows Desktop
To access the Model ND508/ND520 administration tools from the Windows
desktop:
1. From the Start button, select Find > Computer, type the name of your
network disk drive, and click on Find Now.
2. Double-click on the network disk drive icon to view the contents of the
drive.
3. Double-click on the Setup folder.
4. Double-click on the setup.html file.
The Web browser displays the Log On window.
Setting or Changing the Administrator’s Password
To set or change the administrator’s password:
1. Log on to the Network Disk Drive (as described in the previous section) to
display the Main Menu, as shown below.
2.
Select Change Administrator’s Password to display the Change
Administrator’s Password window, as shown below.
Model ND508/ND520 Network Disk Drive Installation Guide
Page 12

3.
Choose a secure password that you will remember easily.
The password can include any combination of up to 15 alphanumeric
characters, except spaces or slashes.
4. Enter the password in the Enter Password and Confirm Password
fields.
5. Click on OK.
Note:
If you forget this password, you must call NETGEAR customer
support for assistance.
Changing Network Disk Drive Settings
To change settings in the Model ND508/ND520 Network Disk Drive:
1. From the Main Menu, select Change Network Disk Drive Settings.
2. Enter the new settings.
3. Click on OK.
You will not see changes to the network disk drive’s name or workgroup
until the drive is shut down and restarted.
Logging Off a Network Disk Drive
To log off a network disk drive and select another drive:
1. From the Main Menu, select Log Off this Network Disk Drive.
2. Click on Log On Another Network Disk Drive in the confirmation
window.
3. From the displayed list of drives, click on the drive you want to use.
4. Click on OK.
5. Log off the network disk drives when finished with your administration
tasks.
Model ND508/ND520 Network Disk Drive Installation Guide
Page 13

Managing Shared Folders
This section describes how to work with public and private folders. You must first
log on to the main menu, as described in
Password
You can name folders using up to 15 characters. If you are accessing folders from
Windows for Workgroups or DOS, limit your folder name to eight alphanumeric
characters or less. Do not use any symbols.
.”
“Setting or Changing the Administrator’s
Changing a Public Folder to a Private Folder
To change a public folder to a private folder:
1. From the Main Menu, choose Make/Change Private Folders.
The Make/Change Private Folders window opens, as shown below.
2.
Click on the public folder you want to make private.
3. Enter a new password for the private folder.
The password can include any combination of 15 alphanumeric characters. Do
not use spaces, slashes, or symbols.
4. Click on OK.
The folder is now protected by a password. A shortcut to the folder appears in
the Public folder.
Windo ws networking may take up to 15 minutes to detect a pri vate folder . Until
then, you may receive a message indicating that the resource is not available
when you double-click on the new shortcut icon.
Changing a Password on a Private Folder
To change a password on a private folder:
1. From the Main Menu, select Make/Change Private Folders.
2. Click on the folder with a password you want to change.
3. Enter a new password for the folder.
4. Click on OK.
Model ND508/ND520 Network Disk Drive Installation Guide
Page 14

Changing a Private Folder to a Public Folder
To change a private folder to a public folder:
1. From the Main Menu, select Make/Change Private Folders.
2. Click on the private folder you want to change to a public folder.
3. Click on Make Folder Public.
4. Click on OK.
Troubleshooting
This section provides suggestions for troubleshooting the network disk drive.
Installation
To troubleshoot the installation:
1. Verify that all network components have been properly installed.
2. Be sure all cable connectors are securely positioned in the proper ports.
3. Be sure all devices are still connected to the network.
Equipment may have been accidentally disconnected.
LEDs
If the Power LED is not lit:
1. Check the power connections to make sure the ends are securely
plugged into the network disk drive and into the wall outlet.
2. Be sure you are using the appropriate power cord as required by your
national electrical codes and ordinances.
3. Be sure that your power outlet is functioning properly.
If the Link LED is not lit:
1. Press the Normal/Uplink button on the front panel of the network disk
drive.
2. Make sure your Ethernet cable is plugged into an active hub port.
Network Interface Card
Make sure that you have a network interface card (NIC) installed in your PC.
Make sure the card is in working condition.
Configuration/Connections
If a problem occurs after you have altered your network connections:
1. Restore the original connections.
2. Repeat your changes one at a time, to determine which change is
causing problems.
Model ND508/ND520 Network Disk Drive Installation Guide
Page 15

Logging On to Your Network
When you power on your computer, be sure to enter your network password at
the logon prompt. If you click on Cancel to bypass the logon, you will be unable
to access your network disk drives.
Private Folders
If you receive a message that indicates a resource is not available when you
double-click on the shortcut to a private folder:
1. Click on the shortcut again in a few minutes. The new private folder
may not be detected within the system yet.
2. Be sure the shortcut is up to date. Update your shortcuts if the folder
has moved or if the name or workgroup f or y our network disk drive has
changed.
Mobile Computing
If you cannot locate a network disk drive after moving your laptop from one
network to another, run the Windows IP Configuration program. This program
updates the address information that your PC receives from the network.
To update address information using Windows 95 or Windows 98:
1. From the Start button, select Run, type winipcfg, and click on OK.
The IP Configuration window opens.
2. Select the Ethernet adapter for your computer from the drop-down
menu.
3. Click on Release All.
4. Click on Renew All.
5. Click on OK.
To update address information using Windows NT, you must have NT
Administrator privileges:
1. Log on to your NT workstation as Administrator.
2. From the Start button, go to Programs > MS DOS Prompt.
3. At the prompt, type ipconfig /release, and press [Enter].
Your PC releases its old address information.
4. At the DOS prompt, type ipconfig /renew, and press [Enter].
Your PC obtains the new address information.
5. At the prompt, type exit to exit DOS.
You can now connect to your network disk drive.
Model ND508/ND520 Network Disk Drive Installation Guide
Page 16
Technical Specifications
General Specifications
Network Protocol and Standards
Compatibility
Data Rate
Disk Capacity
Interface
Power Consumption
Input V oltage
Physical Specifications
Dimensions:
Weight:
Environmental Specifications
Operating temperature:
Operating humidity:
Model ND508/ND520 Network Disk Drive
ISO/IEC 802-3 (ANSI/IEEE 802.3u)
100BASE-TX Fast Ethernet
IEEE 802.3i 10BASE-T CSMA/CD and
TCP/IP protocols
100BASE-T: 100 Mbps with4B/5B encoding
and MLT-3 physical interface
10BASE-T: 10 Mbps diff erential Manchester
encoding
Model ND508: 8 GB
Model ND520: 20 GB
RJ-45 connector for 10BASE-T or
100BASE-TX Ethernet interface
IDE interface
35 W , maximum
Autosensing, 100 to 240 V AC, 50 to 60 Hz
13.0 x 1.7 x 10.5 in.
33.0 x 5.4 x 20.7 cm
8.8 lb; 4.0 kg
5° to 55° C (41° to 131° F)
90% maximum relative humidity (RH)
Storage temperature:
Storage humidity:
Electromagnetic Emissions
Safety Agency Approvals
Model ND508/ND520 Network Disk Drive Installation Guide
-20° to 70° C
10 to 95% RH
CE mark, commercial
FCC Part 15 Class B
VCCI Class B ITE
C-Tick
CE mark, commercial
FCC Part 15 Class B
CUL
Page 17

© 2000 by NETGEAR, Inc. All rights reserved.
Trademarks
NETGEAR™ is a trademark of NETGEAR, Inc. Windows® is a registered trademark of Microsoft
Corporation. Other brand and product names are trademarks or registered trademarks of their respective
holders. Information is subject to change without notice.
Statement of Conditions
In the interest of improving internal design, operational function, and/or reliability, NETGEAR reserves the
right to make changes to the products described in this document without notice.
NETGEAR does not assume any liability that may occur due to the use or application of the product(s) or
circuit layout(s) described herein.
Certificate of the Manufacturer/Importer
It is hereby certified that the Model ND508 Network Disk Drive and Model ND520 Network Disk Drive have
been suppressed in accordance with the conditions set out in the BMPT-AmtsblVfg 243/1991 and Vfg 46/
1992. The operation of some equipment (for example, test transmitters) in accordance with the regulations
may, however, be subject to certain restrictions. Please refer to the notes in the operating instructions.
Federal Office for Telecommunications Approvals has been notified of the placing of this equipment on the
market and has been granted the right to test the series for compliance with the regulations.
Voluntary Control Council for Interference (VCCI) Statement
This equipment is in the first category (information equipment to be used in commercial and/or industrial
areas) and conforms to the standards set by the Voluntary Control Council for Interference by Data Processing
Equipment and Electronic Office Machines that are aimed at preventing radio interference in commercial and/
or industrial areas.
Consequently, when this equipment is used in a residential area or in an adjacent area thereto, radio
interference may be caused to equipment such as radios and TV receivers.
Federal Communications Commission (FCC) Compliance Notice: Radio Frequency
Notice
Note: This equipment has been tested and found to comply with the limits for a Class A digital device,
pursuant to Part 15 of the FCC rules. These limits are designed to provide reasonable protection against
harmful interference when the equipment is operated in a commercial environment. This equipment generates,
uses, and can radiate radio frequency energy. If it is not installed and used in accordance with the instruction
manual, it may cause harmful interference to radio communications. Operation of this equipment in a
residential area is likely to cause harmful interference, in which case users will be required to take whatever
measures may be necessary to correct the interference at their own expense.
EN 55 022 Statement
This is to certify that the Model ND508 Network Disk Drive and Model ND520 Network Disk Drive are
shielded against the generation of radio interference in accordance with the application of Council Directive
89/336/EEC, Article 4a. Conformity is declared by the application of EN 55 022 Class A (CISPR 22).
Warning: This is a Class A product. In a domestic environment, this product may cause radio
interference, in which case the user may be required to take appropriate measures.
Canadian Department of Communications Radio Interference Regulations
This digital apparatus (Model ND508 Network Disk Drive and Model ND520 Network Disk Drive) does not
exceed the Class A limits for radio-noise emissions from digital apparatus as set out in the Radio Interference
Regulations of the Canadian Department of Communications.
Règlement sur le brouillage radioélectrique du ministère des Communications
Cet appareil numérique (Model ND508 Network Disk Drive et Model ND520 Network Disk Drive) respecte
les limites de bruits radioélectriques visant les appareils numériques de classe A prescrites dans le Règlement
sur le brouillage radioélectrique du ministère des Communications du Canada.
Model ND508/ND520 Network Disk Drive Installation Guide
Page 18

NETGEAR, Inc.
4500 Great America Parkway
Santa Clara, CA 95054
USA
Phone: 1-888-NETGEAR
E-mail: support@NETGEAR.com
http://www.NETGEAR.com
*M1-ND500NA-2*
 Loading...