

Page 1

NETGEAR® LTE Gateway 6100D
User Guide
[UG template version 13a]
Page 2

Table of Contents
Get Started ................................................................................................................................ 1
Package Contents .............................................................................................................. 1
Your Gateway ..................................................................................................................... 1
Care and Maintenance ........................................................................................................ 2
System Requirements ......................................................................................................... 2
Set Up Your Gateway ......................................................................................................... 3
Attach the Antennas .................................................................................................... 3
Place Your Gateway .................................................................................................... 3
Start Your Gateway for the First Time .......................................................................... 4
Connect to Your Gateway’s Network .................................................................................. 5
Get Help ............................................................................................................................. 6
Visiting the Sprint Website ........................................................................................... 6
Contacting Sprint Customer Service ............................................................................ 6
Gateway Basics ......................................................................................................................... 7
Components of Your Gateway ............................................................................................ 7
3G and LTE Networks ......................................................................................................... 8
Power Button ...................................................................................................................... 9
LEDs ................................................................................................................................... 9
Micro-SIM ..........................................................................................................................10
Launch Your Mobile Network Connection ..........................................................................10
Web Browser Interface ..............................................................................................................12
Log In to Your Gateway .....................................................................................................12
Home Page ........................................................................................................................12
Alerts ..........................................................................................................................14
Activate Your Account from the Home Page ...............................................................14
Data Usage.................................................................................................................15
My Account Summary .................................................................................................15
Connection Details ......................................................................................................16
Support ..............................................................................................................................17
About .................................................................................................................................18
TOC i
Page 3

WAN Status .......................................................................................................................19
Feedback ...........................................................................................................................20
Your Network Connections .......................................................................................................22
Launch Your Mobile Network Connection ..........................................................................22
Set Up a Guest Wi-Fi Network ...........................................................................................22
Turn the Guest Wi-Fi Network On and Off ..................................................................22
Share Your Wi-Fi Network .................................................................................................23
Manually Enter the Wi-Fi Information ..........................................................................23
Connect Through WPS ...............................................................................................23
Devices Page.....................................................................................................................24
Wi-Fi Connect Tab .............................................................................................................25
Wi-Fi Options Tab ..............................................................................................................26
MAC Filter ..................................................................................................................29
Wi-Fi Security ....................................................................................................................30
Change Wi-Fi Network Names and Passwords ..........................................................32
Enable or Disable the Black List .................................................................................33
Display and Block Currently Connected Devices (Block List) ......................................33
View and Unblock Devices on the Black List ...............................................................34
Allow or Deny Computers Access to the Network (MAC Filter) ...................................34
Wi-Fi Channel ....................................................................................................................36
Set the Maximum Number of Wi-Fi Devices .......................................................................37
Security .....................................................................................................................................39
Dynamic DNS ....................................................................................................................39
Remote Management ........................................................................................................40
TR069 Client ......................................................................................................................41
SNMP ................................................................................................................................42
Firewall Rules ....................................................................................................................43
Block Internet Access ........................................................................................................45
Use Keywords to Block Internet Sites ................................................................................46
Block Services from the Internet ........................................................................................48
Schedule When to Block Internet Sites and Services .........................................................50
Avoid Keyword Blocking on a Trusted Computer ...............................................................51
ALG Services .....................................................................................................................51
TOC ii
Page 4

IP Passthrough ..................................................................................................................52
IPPT Functionality with Dual WAN ..............................................................................53
USB File Sharing ......................................................................................................................55
Gateway Settings ......................................................................................................................57
General Settings ................................................................................................................57
LED Settings ...............................................................................................................58
Login Settings .............................................................................................................58
Change the Gateway URL ..........................................................................................58
Change the Admin Password .....................................................................................59
Software and Reset ....................................................................................................59
System Logs ...............................................................................................................61
Date & Time Settings ..................................................................................................62
Network Setup ...................................................................................................................63
Network Access Point Names .....................................................................................65
Configure Access Point Names..........................................................................................66
View SIM Security.......................................................................................................67
Status Details .............................................................................................................67
Ethernet Setup ...................................................................................................................70
MTU Size ....................................................................................................................71
Router Settings ..................................................................................................................73
Router Basic Settings .................................................................................................73
UPnP (Universal Plug and Play) .................................................................................75
DHCP .........................................................................................................................75
DNS Mode ..................................................................................................................76
Port Forwarding ..........................................................................................................77
Enable Port Forwarding ..............................................................................................78
Enable Port Forwarding for an Application ..................................................................79
Disable Port Forwarding for an Application .................................................................79
Port Filtering ...............................................................................................................80
Enable Port Filtering ...................................................................................................81
Enable Port Filtering for an Application .......................................................................81
Disable Port Filtering for an Application ......................................................................82
Address Reservation ..................................................................................................83
TOC iii
Page 5

MAC Address Cloning ................................................................................................84
DMZ – General ...........................................................................................................84
Enable DMZ ................................................................................................................85
Configure DMZ ...........................................................................................................85
Share a USB Printer .................................................................................................................87
Install the Printer Driver and Cable the Printer ...................................................................87
Download the ReadySHARE Printer Utility ........................................................................87
Install the ReadySHARE Printer Utility ...............................................................................88
Use the Shared Printer ......................................................................................................89
View or Change the Status of a Printer ..............................................................................89
Use the Scan Feature of a Multifunction USB Printer .........................................................91
Change NETGEAR USB Control Center Settings ..............................................................91
Mobile Network Settings ...........................................................................................................93
View Network Activation Information ..................................................................................93
View Data Usage ...............................................................................................................93
Network Settings ................................................................................................................94
Set the Roaming Mode ...............................................................................................94
Enable or Disable the Roaming Guard Warning Message ..........................................95
Set the Network Mode ................................................................................................95
Ethernet WAN Settings .............................................................................................................97
Connect the Ethernet WAN Port ........................................................................................97
Internet Connection Mode ..................................................................................................98
Dual WAN Configuration .............................................................................................98
Set Up a Dual WAN Configuration ..............................................................................99
Set Up a Fixed Ethernet WAN Internet Connection ................................................... 100
IPv6 Internet Connections ................................................................................................ 100
Requirements for Entering IPv6 Addresses .............................................................. 101
Use Auto Config to Detect the IPv6 Internet Connection ........................................... 101
Specify a DHCP IPv6 Internet Connection ................................................................ 102
IPv6 6to4Tunnel ....................................................................................................... 104
Ethernet WAN Security Settings ...................................................................................... 106
Software and Reset ................................................................................................................ 108
Export and Import Settings............................................................................................... 108
TOC iv
Page 6

Export Settings ......................................................................................................... 108
Import Settings ......................................................................................................... 108
Update the Software and Firmware .................................................................................. 109
Download Software Updates .................................................................................... 109
Upgrade Firmware from a File .................................................................................. 110
Reset Your Gateway ........................................................................................................ 111
Clear Account Details Only ....................................................................................... 111
Reset Device Settings Only ...................................................................................... 111
Reset the Gateway to Factory Default Settings ......................................................... 112
Set Up a Virtual Private Network (VPN) .................................................................................. 114
VPN Overview ................................................................................................................. 114
IPsec Parameters ............................................................................................................ 115
Set Up a Remote Client-to-Gateway VPN ........................................................................ 115
Configure Remote Clients in the Gateway ................................................................ 115
Enable the Client-to-Gateway VPN ........................................................................... 117
Configure a Windows Computer as a Remote Client ................................................ 117
ShrewSoft Client Configuration ................................................................................. 120
Set Up a Site-to-Site VPN ................................................................................................ 124
Add an IKE Policy ..................................................................................................... 124
Edit an IKE Policy ..................................................................................................... 127
Delete an IKE Policy ................................................................................................. 127
Specify the Site-to-Site VPN Connection .................................................................. 128
Configure the Global VPN Settings for Site-to-Site VPNs ......................................... 131
Enable the Site-to-Site VPN ...................................................................................... 131
View the VPN Status ........................................................................................................ 132
Manage Certificates for Site-to-Site VPN ......................................................................... 133
Authentication Mode ................................................................................................. 135
Frequently Asked Questions ................................................................................................... 137
How Can I Tell I’m Connected to 3G or LTE? .................................................................. 137
How Do I Connect to Wi-Fi? ............................................................................................. 137
Is Roaming on LTE Supported? ....................................................................................... 137
What Do I Do If I Forget the Main or Guest Wi-Fi Password? .......................................... 138
What Do I Do If I Forget the Administrator (admin) Password? ........................................ 138
TOC v
Page 7

If the Connection Is “Always On,” Am I Always Being Billed? ........................................... 138
Questions About WPS ..................................................................................................... 138
What Is WPS? .......................................................................................................... 138
How Do I Use WPS? ................................................................................................ 139
If a Wireless Device Has a WPS Button or a WPS Software Option, Must I Use It to
Connect Via Wi-Fi? ................................................................................................... 139
What Should I Do If the Antenna Is Loose? ..................................................................... 139
How Do I Access My Corporate Network Through a VPN? .............................................. 139
Are Terminal Sessions Supported? .................................................................................. 139
Tips ......................................................................................................................................... 140
Gateway Location ............................................................................................................ 140
Improving Signal Strength ................................................................................................ 140
Improving 3G Network Service ........................................................................................ 141
Improving Wi-Fi Performance .......................................................................................... 141
Security Tips .................................................................................................................... 142
Finding the MAC Address ................................................................................................ 142
Finding the IP Address ..................................................................................................... 143
Troubleshooting ...................................................................................................................... 145
General Tips .................................................................................................................... 145
Insufficient Signal Strength .............................................................................................. 145
Cannot Connect to Wi-Fi .................................................................................................. 145
Cannot Display the Home Page ....................................................................................... 146
Cannot Connect to the Mobile Broadband Network ......................................................... 147
Technical Specifications .......................................................................................................... 149
Radio Frequency and Electrical Specifications ................................................................. 149
Software Specifications .................................................................................................... 149
Environmental Specifications ........................................................................................... 150
Mechanical Specifications ................................................................................................ 151
Wall Mounting .................................................................................................................. 151
Regulatory Notices .................................................................................................................. 153
Legal ....................................................................................................................................... 155
Patents ............................................................................................................................ 155
Licenses .......................................................................................................................... 155
TOC vi
Page 8

GNU General Public License (Version 2) .................................................................. 155
GNU General Public License (Version 3) .................................................................. 161
GNU Lesser General Public License (Version 2.1) ................................................... 173
GNU Lesser General Public License (Version 3) ...................................................... 181
License ..................................................................................................................... 184
libxml2 License ......................................................................................................... 185
locapi License ........................................................................................................... 186
pimd License ............................................................................................................ 187
shadow License ........................................................................................................ 188
ISC License .............................................................................................................. 188
OpenSSL License ..................................................................................................... 189
Original SSLeay License........................................................................................... 190
Trademarks ..................................................................................................................... 191
Copyright ......................................................................................................................... 191
Limitation of Liabilit y ......................................................................................................... 192
Additional Information and Updates ................................................................................. 192
Index ....................................................................................................................................... 193
TOC vii
Page 9
Get Started
The following topics give you all the information you need to set up your gateway and Sprint
service the first time.
Package Contents
Your package includes several items.
● NETGEAR LTE Gateway 6100D
● Power adapter
● Micro-SIM (preinstalled)
● Ethernet cable
● Get Started poster
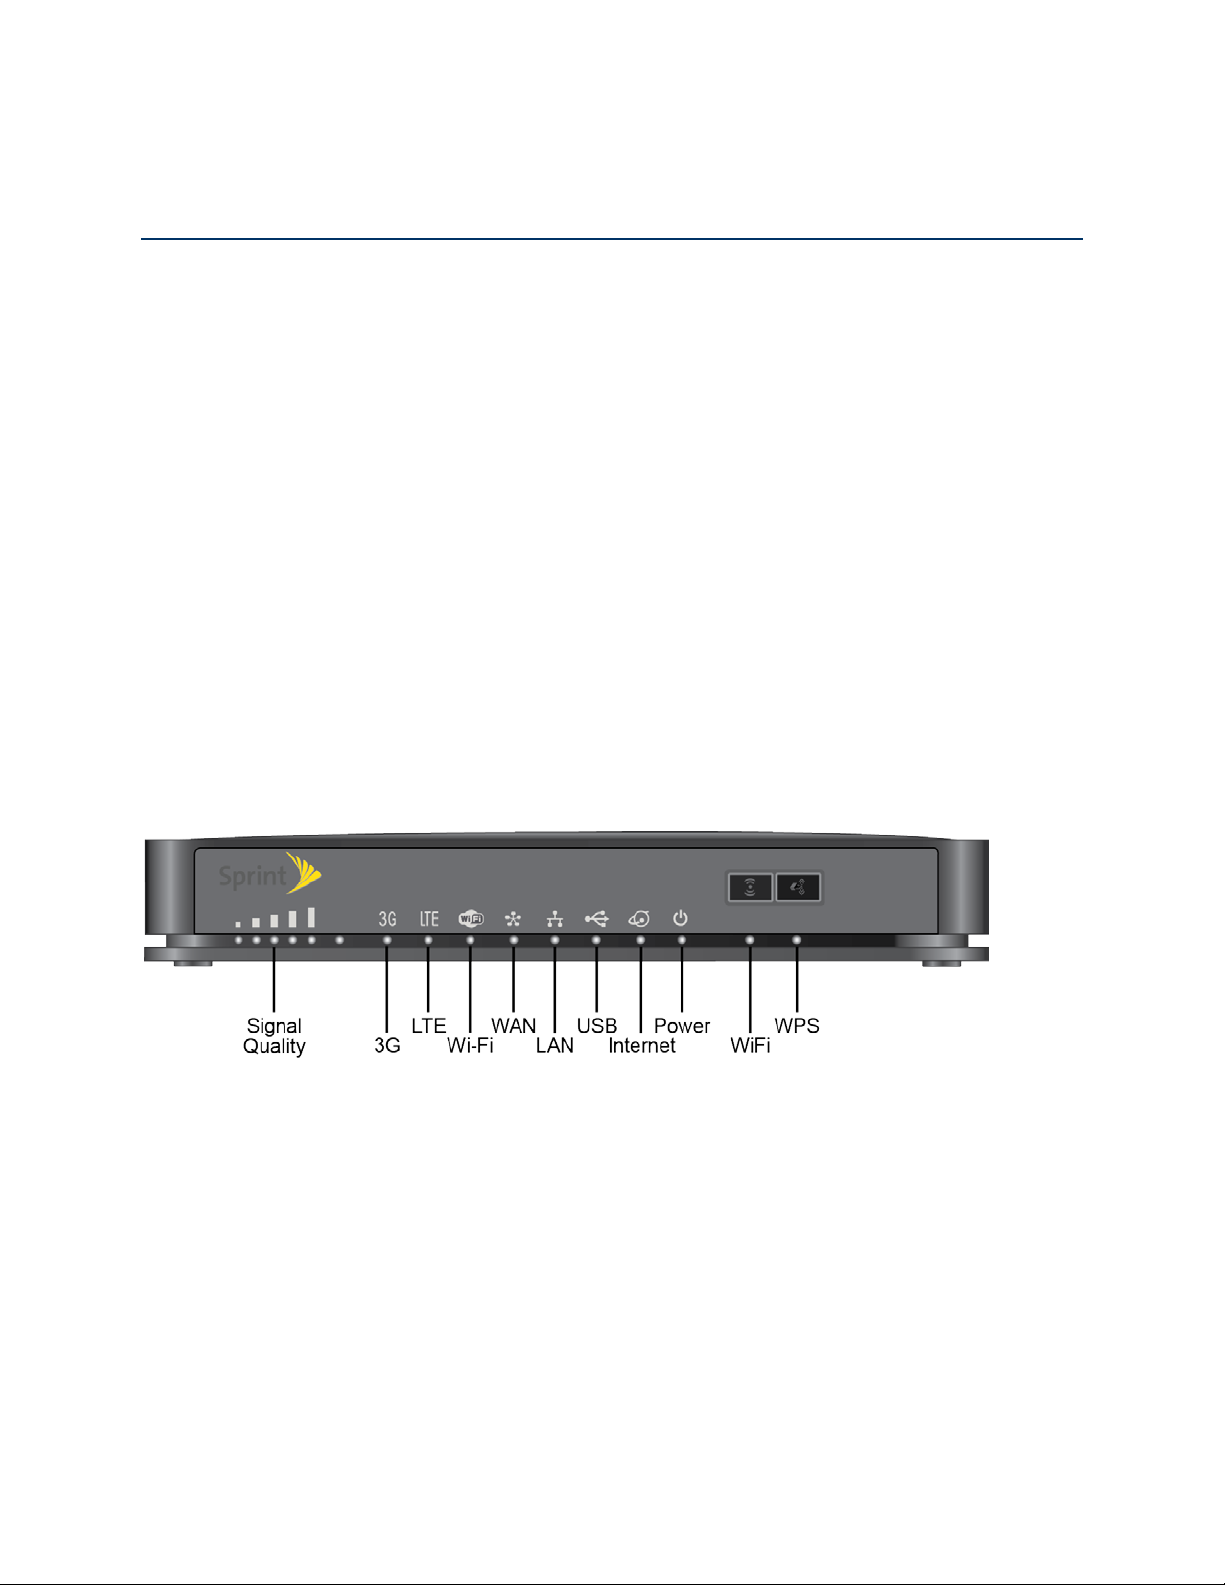
Your Gateway
The following illustrations show your gateway’s LEDs, buttons, and connectors.
Front View
Get Started 1
Page 10
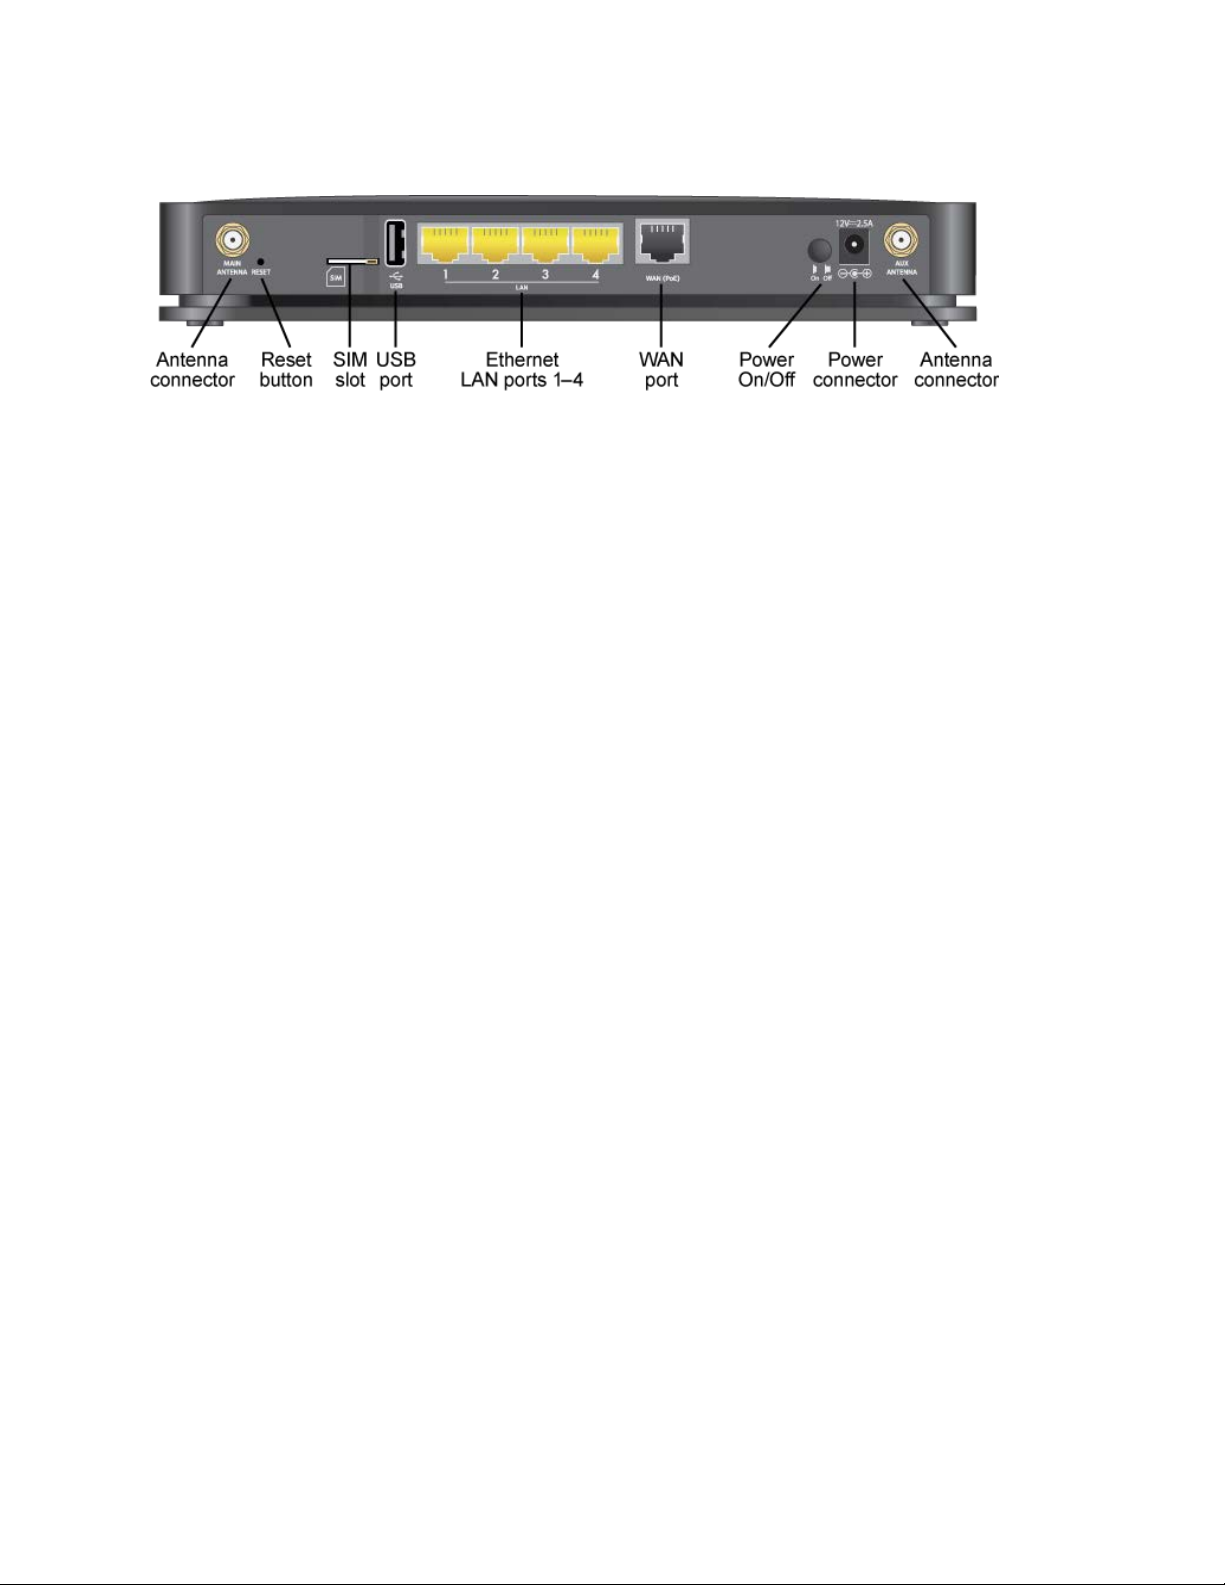
Back View
Care and Maintenance
As with any electronic device, you should handle the gateway with care to ensure reliable
operation. Follow these guidelines in using and storing your device.
● Protect your device from liquids, dust, and excessive heat.
● Do not apply adhesive labels to your device. They may cause your device to overheat
and may alter the antenna’s performance.
System Requirement s
The following items are required to use your NETGEAR LTE Gateway 6100D.
● One or more computers that support Wi-Fi (802.11b/g/n or 11ac).
● Web browser (required if you’ll be using the browser interface to view status and to
configure settings). Chrome browser is recommended for the best user experience when
you log in to the gateway .The following browsers are supported:
Chrome (version 30 and above)
Internet Explorer (version 9 and above)
Safari (version 5.1.7 and above)
If you’ll be connecting to your gateway through Ethernet:
Computer with an available Ethernet port
Get Started 2
Page 11
Set Up Your Gateway
The following topics describe how to set up and start using your gateway.
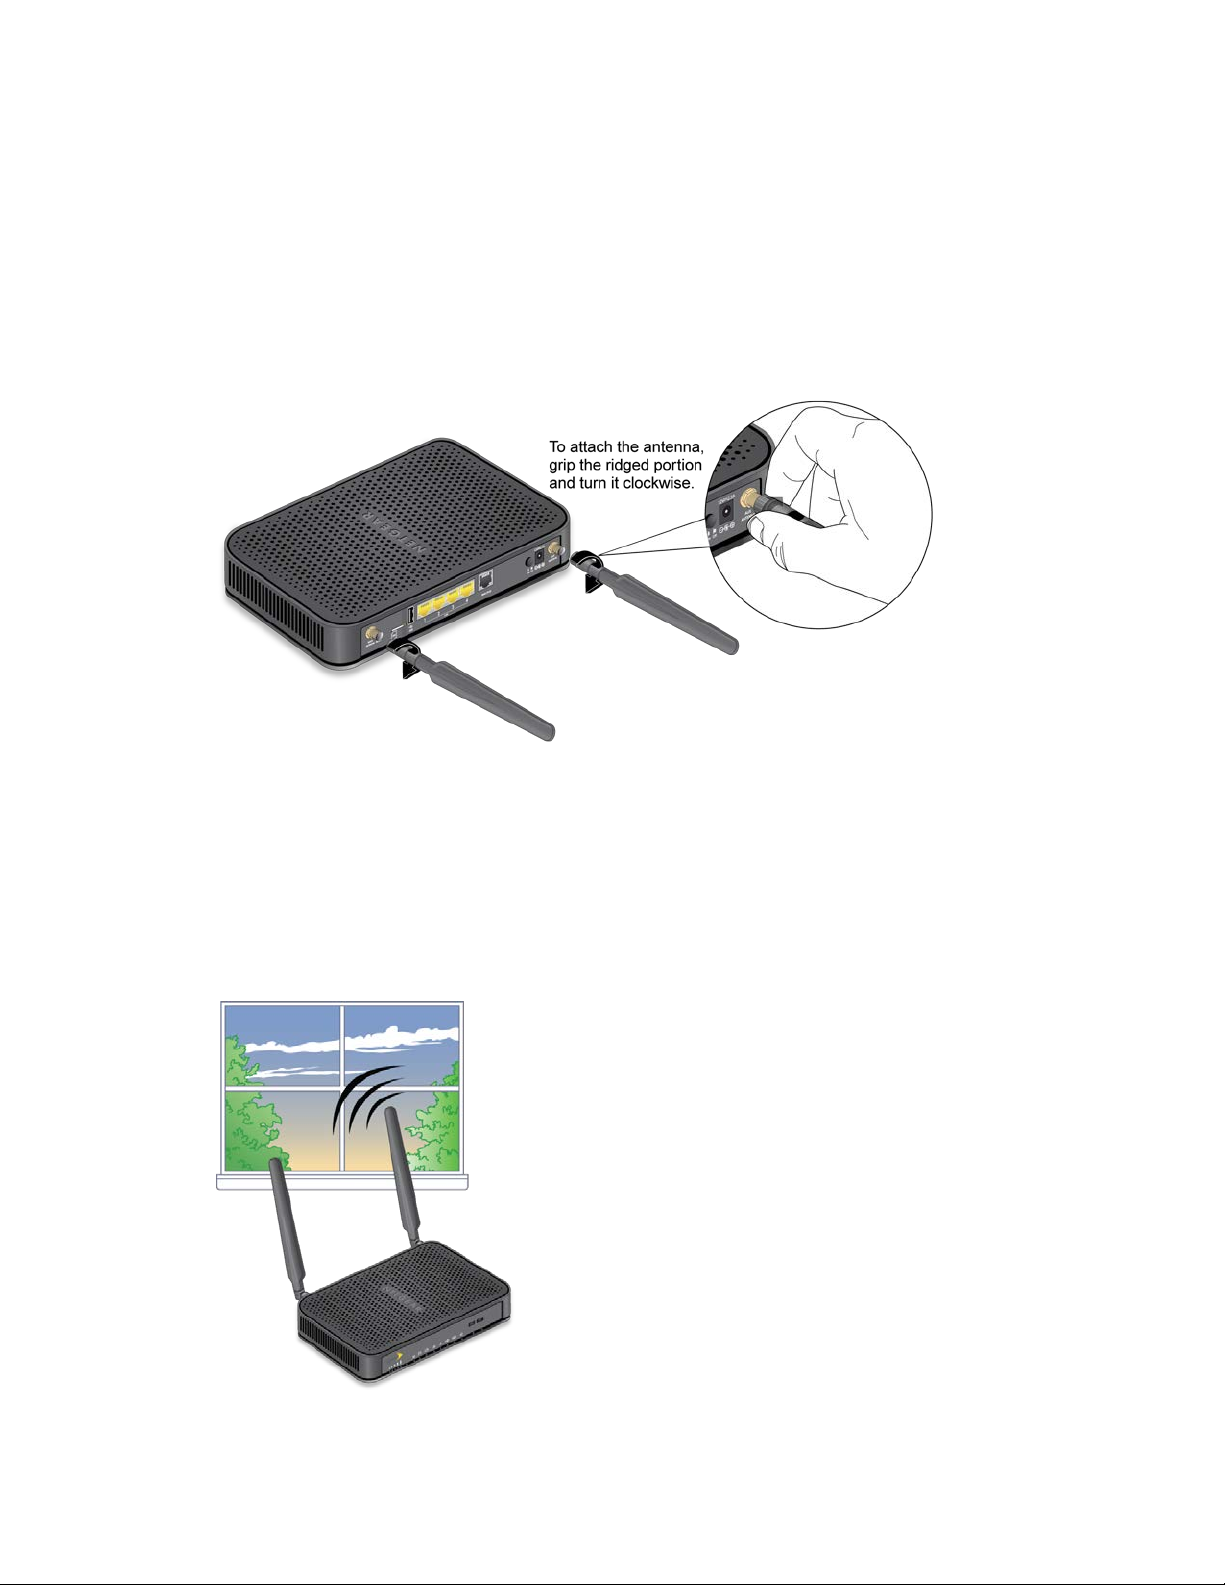
Attach the Antennas
The gateway comes with two external antennas that are interchangeable.
1. Attach the antennas to the gateway.
2. Adjust the angle of the antennas so that they are vertical.
Place Your Gateway
Place your gateway in a location with a good 3G or LTE signal.
1. Place your gateway in a location with good 3G or 4G coverage, such as near a window.
Get Started 3
Page 12

Note: When the gateway is powered on, you can use the Signal Quality LED to
position the gateway in the location with the best signal strength.
2. Also, for best results, place your gateway:
Near the center of the area where your computers and other devices operate, and
preferably within line of sight to your Wi-Fi devices.
So it is accessible to an AC power outlet and near Ethernet cables for wired
computers.
In an elevated location such as a high shelf, keeping the number of walls and
ceilings between the gateway and your other devices to a minimum.
Away from electrical devices that are potential sources of interference. Equipment
that might cause interference includes ceiling fans, home security systems,
microwaves, computers, the base of a cordless phone, or a 2.4 GHz cordless phone.
Away from any large metal surfaces, such as a solid metal door or aluminum studs.
Large expanses of other materials such as glass, insulated walls, fish tanks, mirrors,
brick, and concrete can also affect your wireless signal.
Start Your Gateway for the First Time
Learn how to start your gateway for the first time.
The gateway is designed to activate automatically the first time that it is turned on using hands-
free activation. Typically, the activation process will be seamless, not requiring any action on
your part.
To start your gateway:
1. Connect the power adapter to the gateway and plug the power adapter into an electrical
outlet.
2. Make sure that the Power On/Off button on the rear panel of the gateway is pressed in.
The Power and Wi-Fi LEDs light.
The gateway automatically connects to a 3G or LTE network, and the 3G LED or the
LTE LED lights .
The Internet LED lights to show that you have Internet access.
If your account did not activate for some reason, connect to the gateway network and use a
Web browser to log in to the gateway. Alerts on the home page allow you to try the activation
again. You must activate your account before you can use Sprint data services.
Get Started 4
Page 13

Connect to Your Gateway’s Network
You can connect with Wi-Fi or you can use an Ethernet cable for a wired connection to an
Ethernet LAN port.
Tip: The Wi-Fi network name and password are on the label of the gateway.
Tip: Alternatively, you can use WPS to connect your computer or device to the gateway, if your
computer or device supports WPS. (See Connect Through WPS.)
To find and select a Wi-Fi network, then connect with Wi-Fi:
3. Do one of the following, depending on your operating system:
Windows 7: Click the Wi-Fi icon in the system tray.
Windows Vista: Click Control Panel > Network and Internet > Network and
Sharing Center > Connect to a network.
Windows XP: Click Control Panel > Network Connections > Wireless Network
Connections > View available wireless networks.
Mac: Click the AirPort icon (in the upper right corner of your screen).
Linux: Please see the user documentation of the Linux distribution.
Other operating systems: Please see the user documentation for your operating
system or computer.
4. Select the Wi-Fi network for the gateway and connect to it. (If prompted for a network
key/security key/password, enter the Wi-Fi password on the gateway label.)
To use WPS to connect with Wi-Fi:
1. Check the WPS instructions that came with your computer or wireless device.
2. Press the WPS button on the gateway.
For 2 minutes, the gateway tries to detect a computer or wireless device that is using
WPS to connect to its Wi-Fi network.
3. On your computer or wireless device, press its WPS button or follow its WPS
instructions.
Your computer or wireless device connects to the Wi-Fi network.
To connect with Ethernet:
A yellow Ethernet cable comes in the package with your gateway.
Get Started 5
Page 14
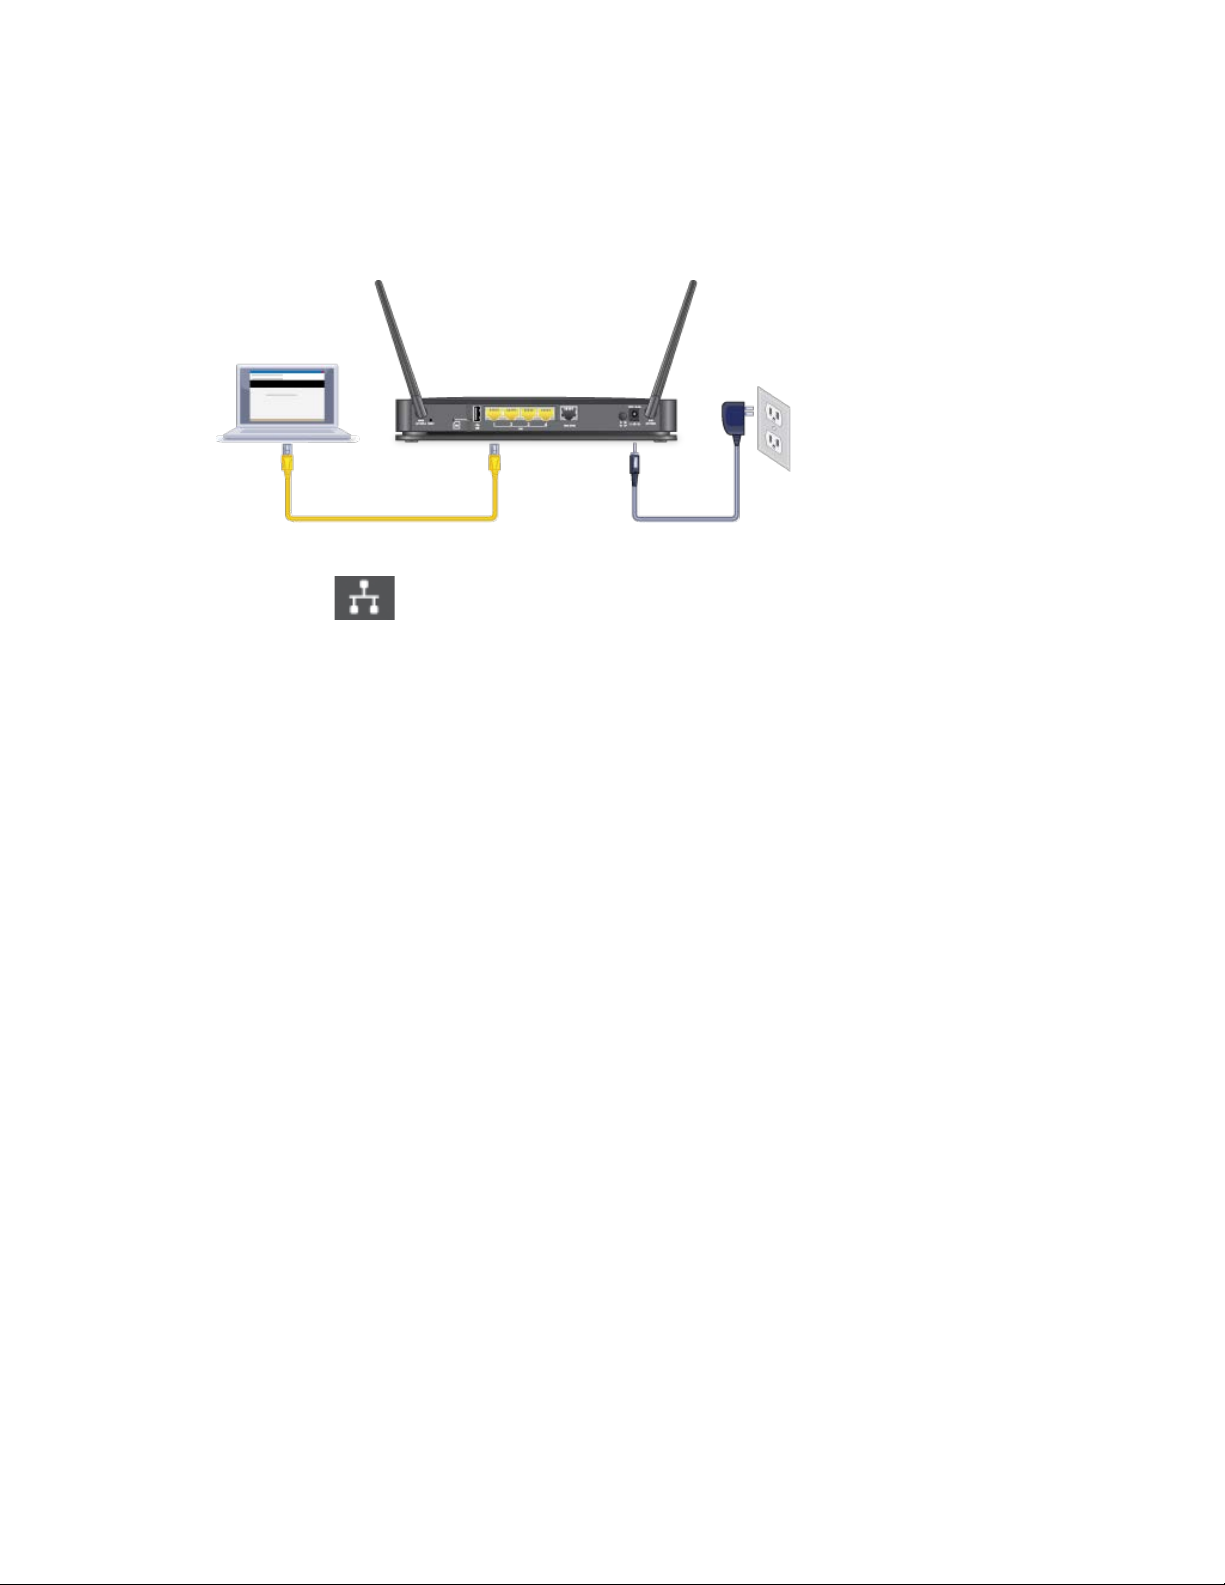
1. Connect an Ethernet cable (included in the package) to one of the yellow Ethernet LAN
ports on the rear panel of the gateway.
2. Connect the other end of the Ethernet cable to an Ethernet port on your computer.
The Ethernet LAN LED on the gateway lights.
Your computer connects to the gateway’s local area network (LAN). A message might display
on your computer screen to notify you that an Ethernet cable is connected.
Get Help
Learn where you can get more information or assistance.
Visiting the Sprint Website
Sign on to sprint.com/mysprint to get up-to-date information on Sprint services and options.
● Review coverage maps.
● Access your account information.
● Add additional options to your service plan.
● Purchase accessories.
● Check out frequently asked questions.
● And more.
Contacting Sprint Customer Service
You can reach Sprint Customer Service online or by calling toll-free.
● Log in to your account at sprint.com/mysprint.
● Call us toll-free at 1-888-788-4727 (business use) or 1-888-211-4727 (personal use).
Get Started 6
Page 15
Gateway Basics
Learn about the buttons, connectors, and other components of your gateway.
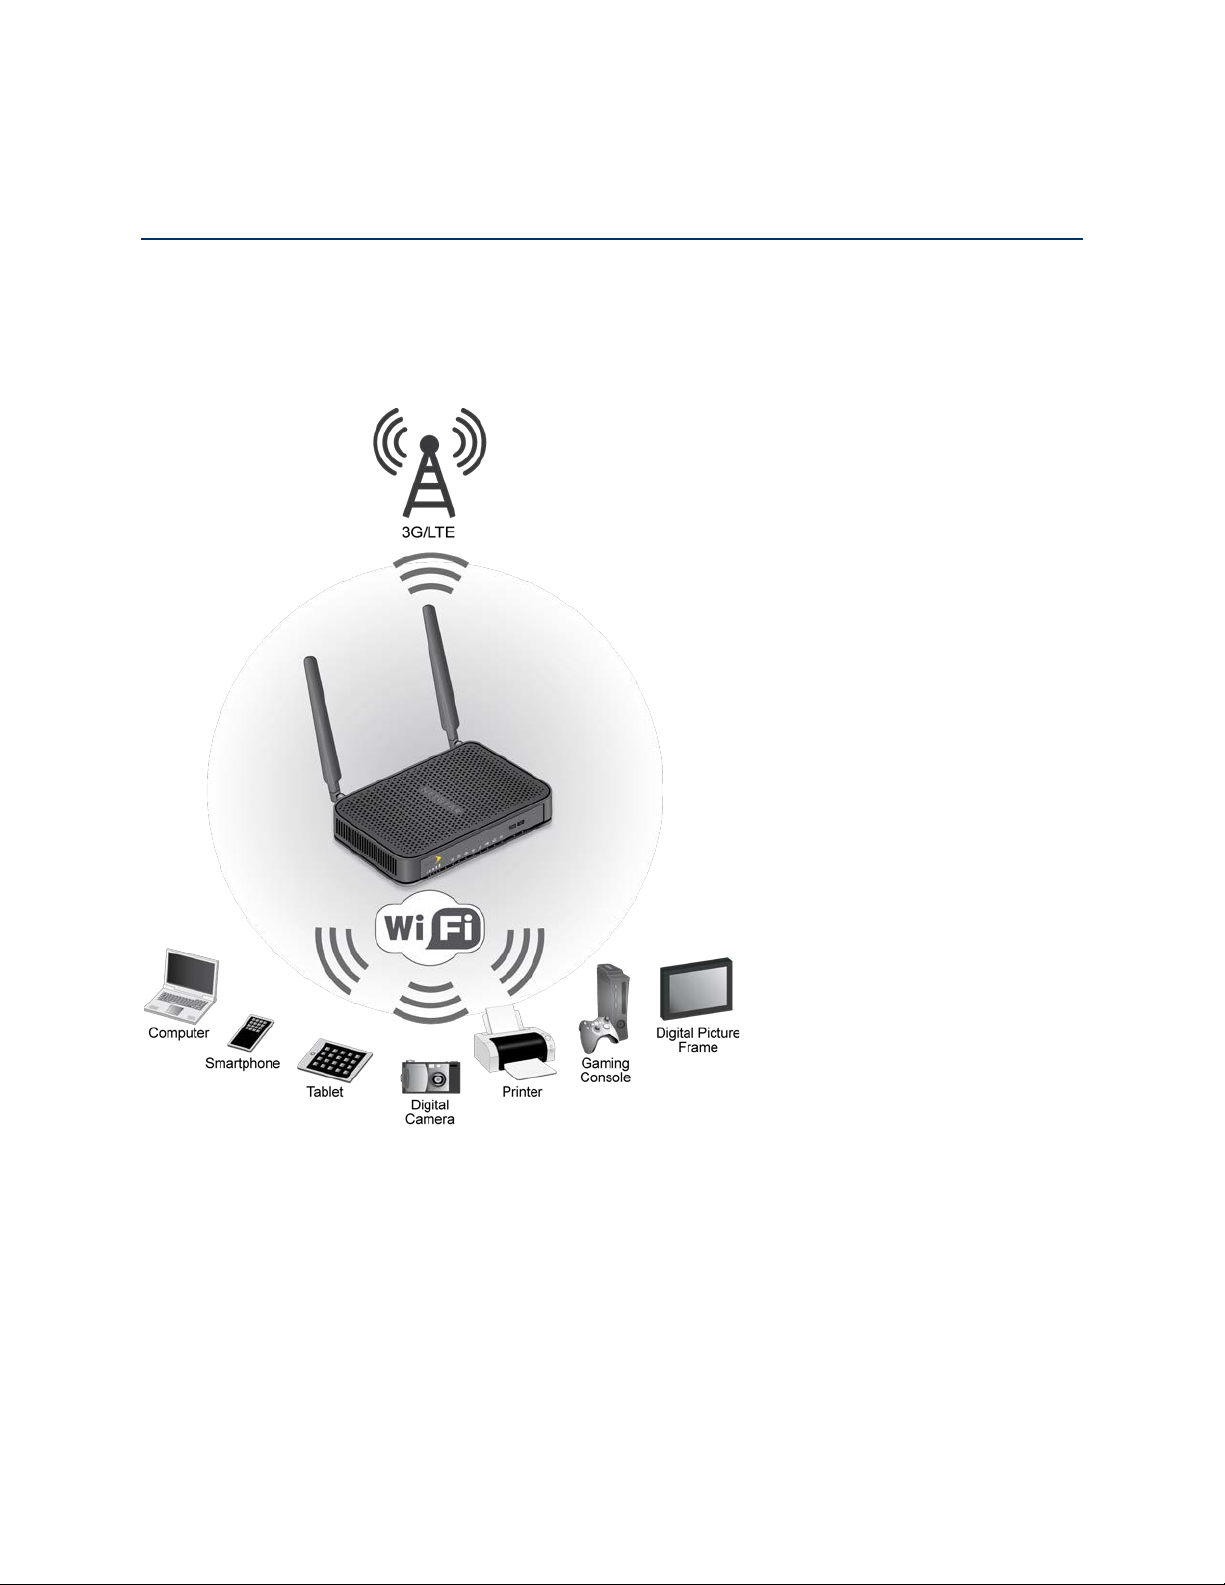
Your gateway provides a simple way to use your Internet connection (3G or LTE) with any
Wi-Fi-enabled device, and to share your Internet connection with friends and family.
Components of Your Gat eway
Your gateway consists of several main components.
● Main and Guest Wi-Fi networ ks: The Wi-Fi networks (access points) connect your
computers and other Wi-Fi-enabled devices to the gateway.
Gateway Basics 7
Page 16

● Main Wi-Fi dual -band: The gateway has two Main Wi-Fi networks, so you can connect
with 2.4 GHz or 5 GHz Wi-Fi. To connect with 5 GHz, your computer or Wi-Fi-enabled
device must support 5 GHz.
● Modem: The modem connects your gateway to the Internet via the best available
network (customizable):
LTE: Newer technology, faster speeds compared with 3G
3G: CDMA technology, more widely available compared with LTE
● Routing hardware: The routing hardware handles traffic between the modem, the Wi-Fi
access point, and the Wi-Fi network.
● USB port: You can connect a USB drive and share it.
● Power over Ethernet: The gateway has one fast (10/100) Ethernet WAN port that
supports Power over Ethernet (PoE), standard IEEE 803.3at-2009. The PoE port allows
an Ethernet cable to provide both data connection and electrical power to the gateway.
PoE can serve as main power or backup power.
Note: You can choose to connect only PoE, or to connect both PoE and the gateway AC
power adapter. When both are connected, the gateway automatically selects PoE
power. If you remove PoE, the gateway continues to work and automatically switches to
AC power. If both are connected and you remove AC power, the gateway continues to
work and automatically switches to PoE power.
3G and LTE Networks
These wireless networks connect you to the Internet.
Depending on your coverage area, you may have:
● Only LTE coverage
● Only 3G coverage
● A combination of these networks
The gateway automatically connects to the fastest network that is available to you. If you have
both 3G and LTE coverage and your connection happens to get disrupted, your gateway can
automatically switch to the other network. (For more information, see Mobile Network Settings.)
Your gateway is designed to always connect to an available network if possible. If your gateway
is not connected (dropped signal, roaming not supported, etc.), the Signal
Strength LED is off. The connection status can also be seen on your gateway’s
Status Details page.
Gateway Basics 8
Page 17
Your gateway can be set to connect automatically to the best available network, or to connect to
LED
Description
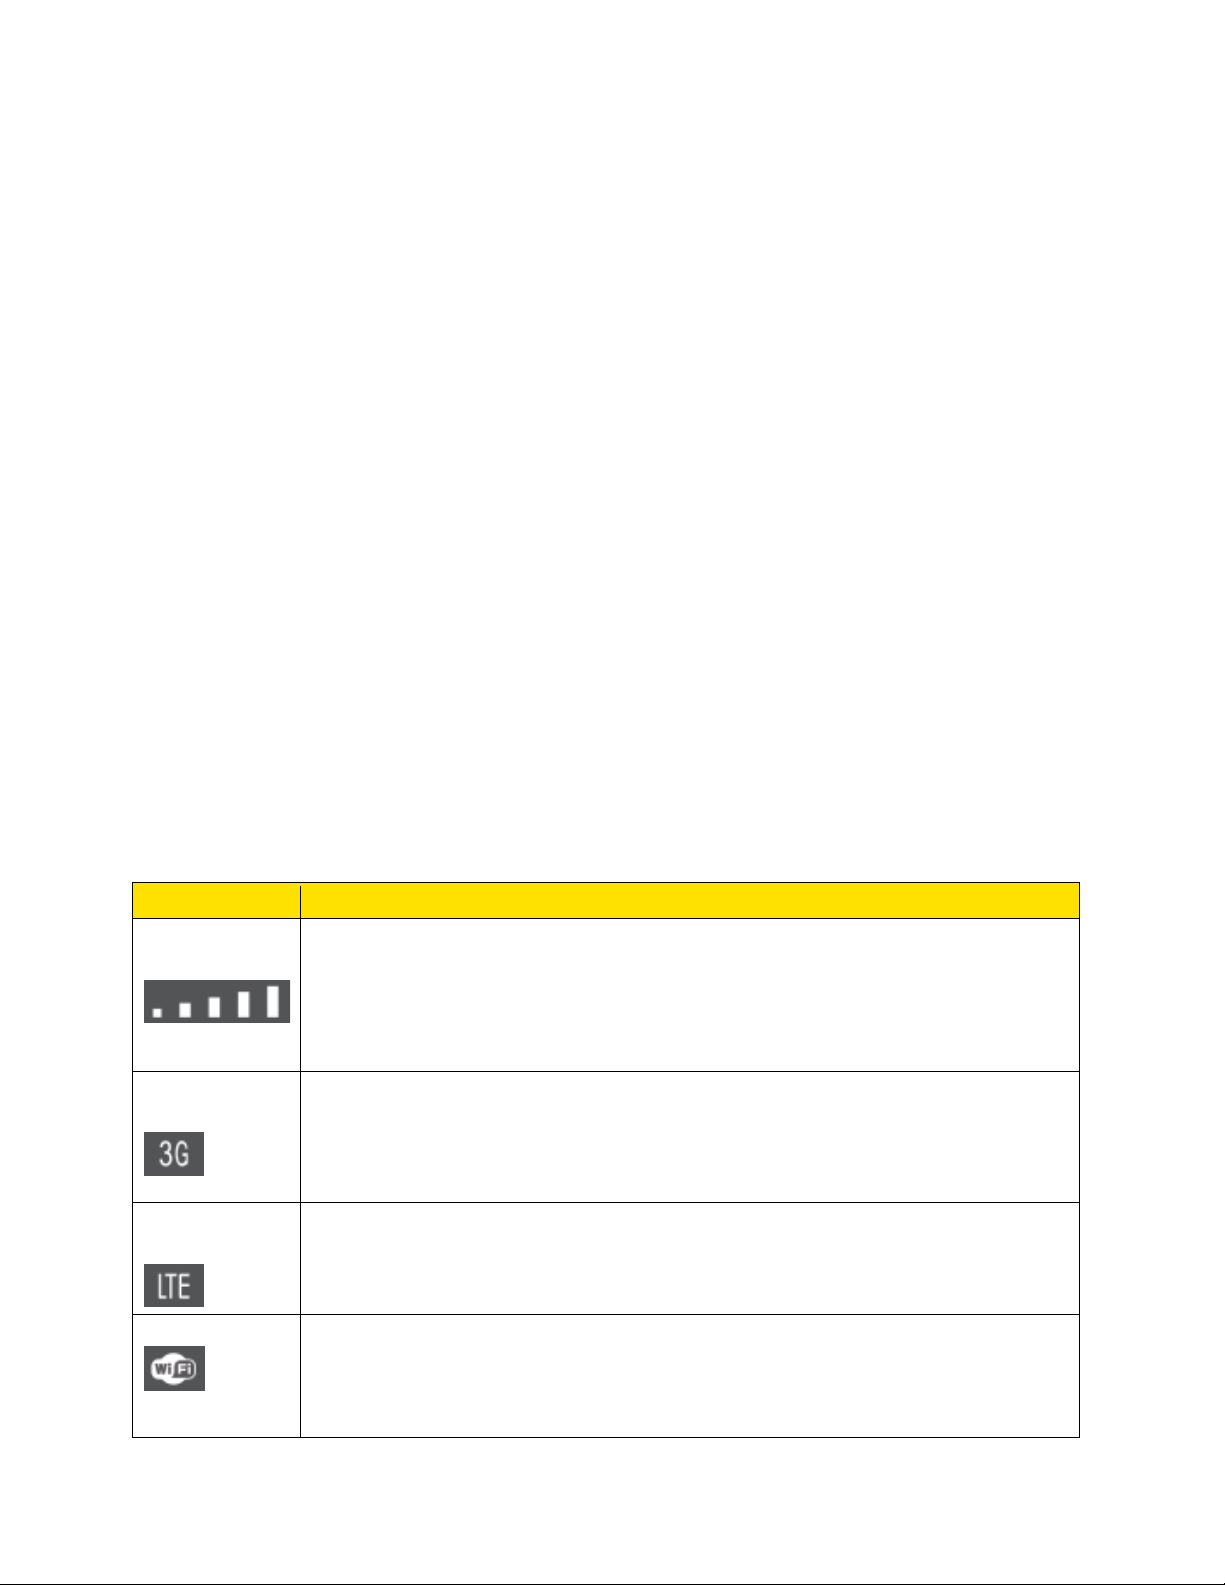
Signal
5 bars: Excellent coverage.
Off
3G
Solid blue: The gateway has a connection with the 3G network.
LTE
Solid blue: The gateway has a connection with the 4G LTE network.
Wi-Fi
Solid green: The 2.4 GHz wireless radio is on.
LTE or 3G networks only. See Setting the Allowed Network Mode.
Your gateway can also be set to allow roaming on Sprint networks, domestically, and
internationally. See Setting the Roaming Mode.
Power Button
Use the Power button to turn your gateway on and off.
To turn your gateway on:
1. Make sure that power adapter for your gateway is plugged in to an electrical outlet.
2. Press the Power On/Off button so that it is in the on position.
Note: The LEDs on the gateway light unless you logged in to the gateway and turned off the
LEDs from the Device page.
To turn your gateway off:
■ Press the Power On/Off button so that it is in the off position.
Note: The LEDs on the gateway turn off.
LEDs
The LED status indicators show the gateway’s Internet and network connections.
Quality
Connection
Connection
4 bars: Strong coverage.
3 bars: Moderate coverage.
1 bar: Poor coverage.
: No coverage.
Off: The gateway does not have a 3G connection.
Off: The gateway does not have a 4G connection.
Solid purple: The 5 GHz wireless radio is on.
Gateway Basics 9
Solid blue: Both the 2.5 GHz and the 5 GHz wireless radios are on.
Off: The wireless radios are off.
Page 18
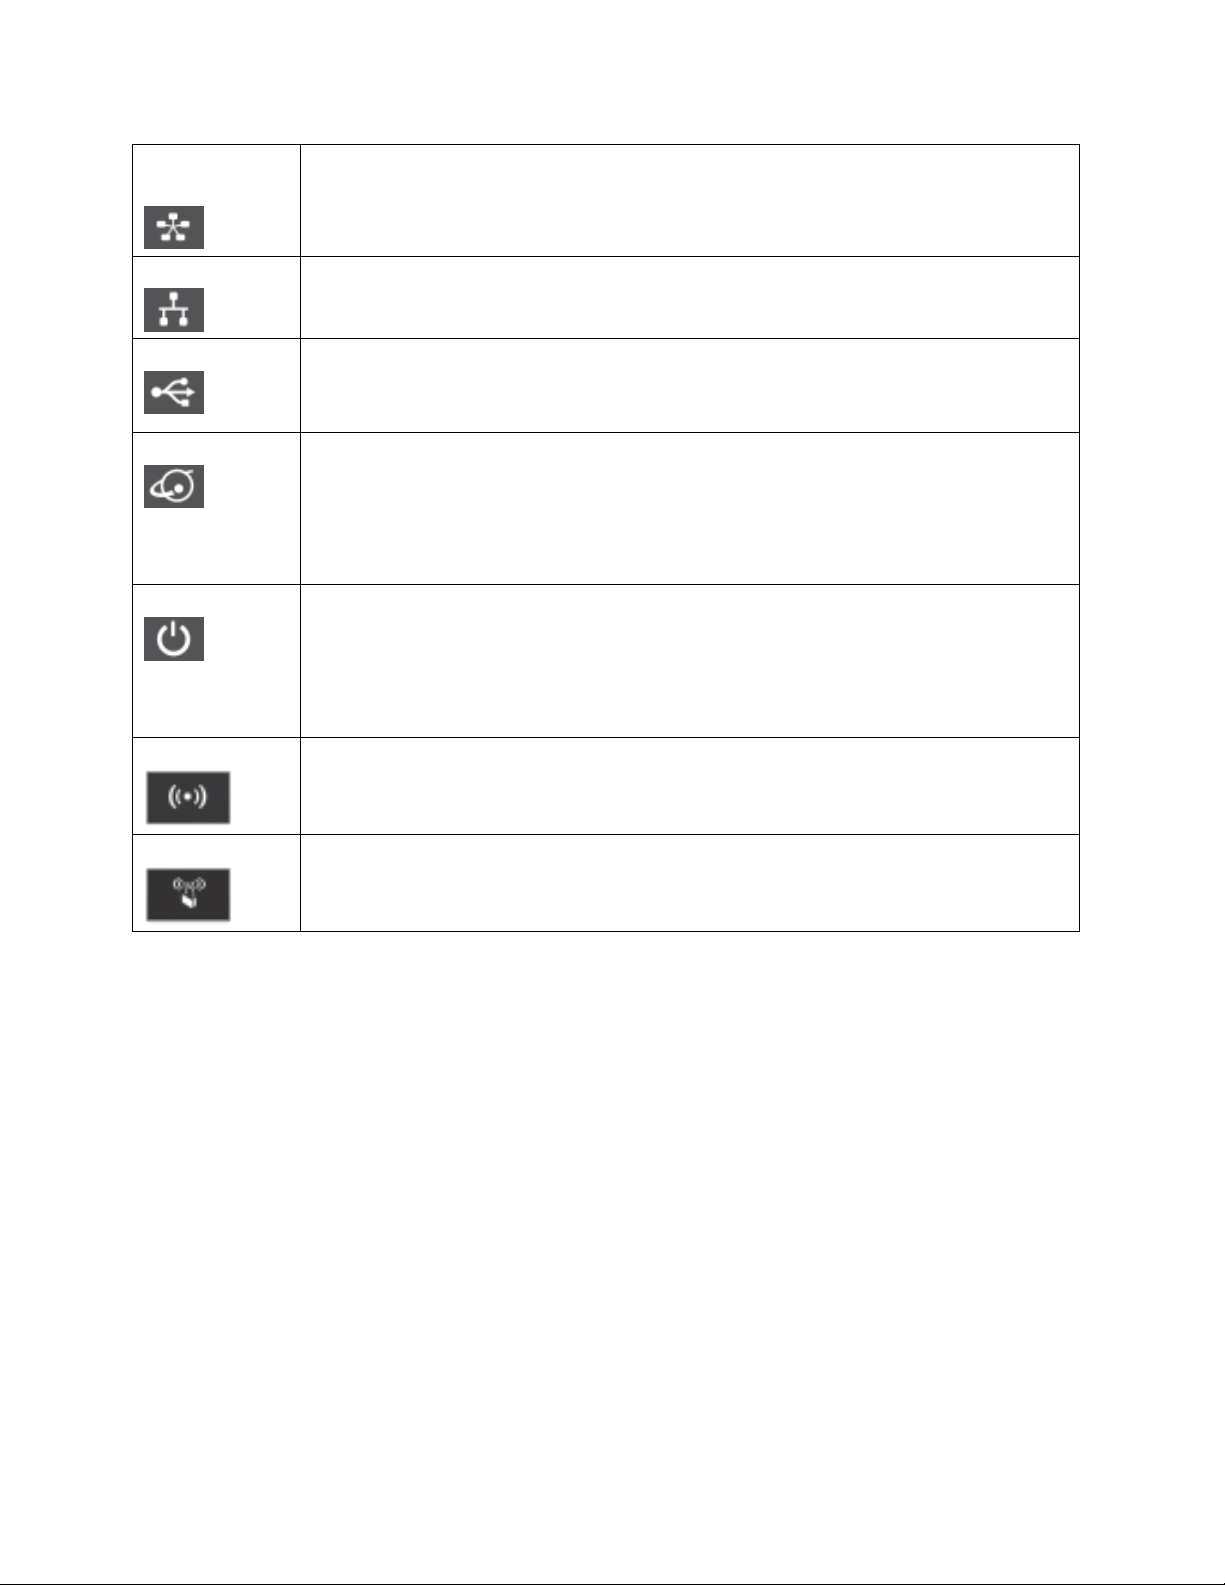
Ethernet
WAN
Solid blue: The Ethernet WAN port is connected to a device and is ready.
Ethernet LAN
Solid blue: One or more local Ethernet ports 1 – 4 have detected wired links.
USB
Solid blue: The gateway has accepted the USB device and the USB device
Off
Internet
Solid blue: The Internet connection is ready.
Off
Power
Solid green: The gateway is ready.
Off
Wi-Fi On/Off
Solid blue: The wireless radios are on.
WPS
Solid blue: WPS security is enabled.
Off: The gateway does not detect a link on this port.
Off: The gateway does not detect links on these ports.
is ready.
: No USB device is connected.
Solid amber: Network error.
Slow blinking amber: The gateway failed to cut over from an Internet WAN
connection to a mobile broadband connection.
: No Internet connection.
Slow blinking green: The gateway is powering up.
Solid red: System failure.
Slow blinking red: Thermal cutoff alarm.
: No power is supplied to the gateway.
Off: The wireless radios are off.
Blinking blue: Someone is using WPS to join the gateway’s Wi-Fi network.
Off: WPS is not in use.
Micro-SIM
Your gateway comes with a preinstalled micro-SIM card that gives you access to the Sprint
network.
NOTE: Do not remove the SIM card. Hot swapping is not supported.
Launch Your Mobile Network C onnection
After your gateway powers on and boots up, a connection to the best available network (3G or
LTE) is launched automatically.
Your gateway remains connected at all times, unless:
● You are out of signal range or the signal is blocked.
● You are in a roaming area and you have chosen not to allow roaming.
Gateway Basics 10
Page 19

Note: Even though your gateway is connected, you are billed only when data is sent or
received. See If the Connection is “Always On,” Am I Always Being Billed?
Gateway Basics 11
Page 20

Web Browser Interface
When you connect to the gateway network (either with Wi-Fi or with an Ethernet cable), you can
use a Web browser to log in to your gateway to view or change its settings.
Log In to Your Gateway
Tip: If you want to change your gateway’s Wi-Fi settings, use a wired Ethernet connection to
avoid being disconnected when the new Wi-Fi setti ngs take effect.
To log in to your gateway:
1. On a computer or wireless device that is connected to your gateway’s network, launch a
Web bro wser.
2. In the address or URL field of your browser, type http://myrouter.
3. When prompted to log in, enter admin for the user name and type the password. (The
default password is password.)
Note: If you’re using the Google Chrome Web browser, after typing in the address bar, press
the Down Arrow key and then press the Enter key. (If you don’t press the Down Arrow first, a
Google search starts and you are not prompted to log in to your gateway.)
Note: After 10 minutes of inactivity, the gateway automatically logs you out.
4. If your Web browser displays an error message, see Cannot Display the Home Page.
Home Page
The home page is the entry page when you log in to the gateway.
You can:
● Activate your account if it did not automatically activate.
● View your data usage and status information for your data connection.
● Manage your mobile broadband network connection and Wi-Fi connections.
● View alert messages.
Web Browser Interface 12
Page 21
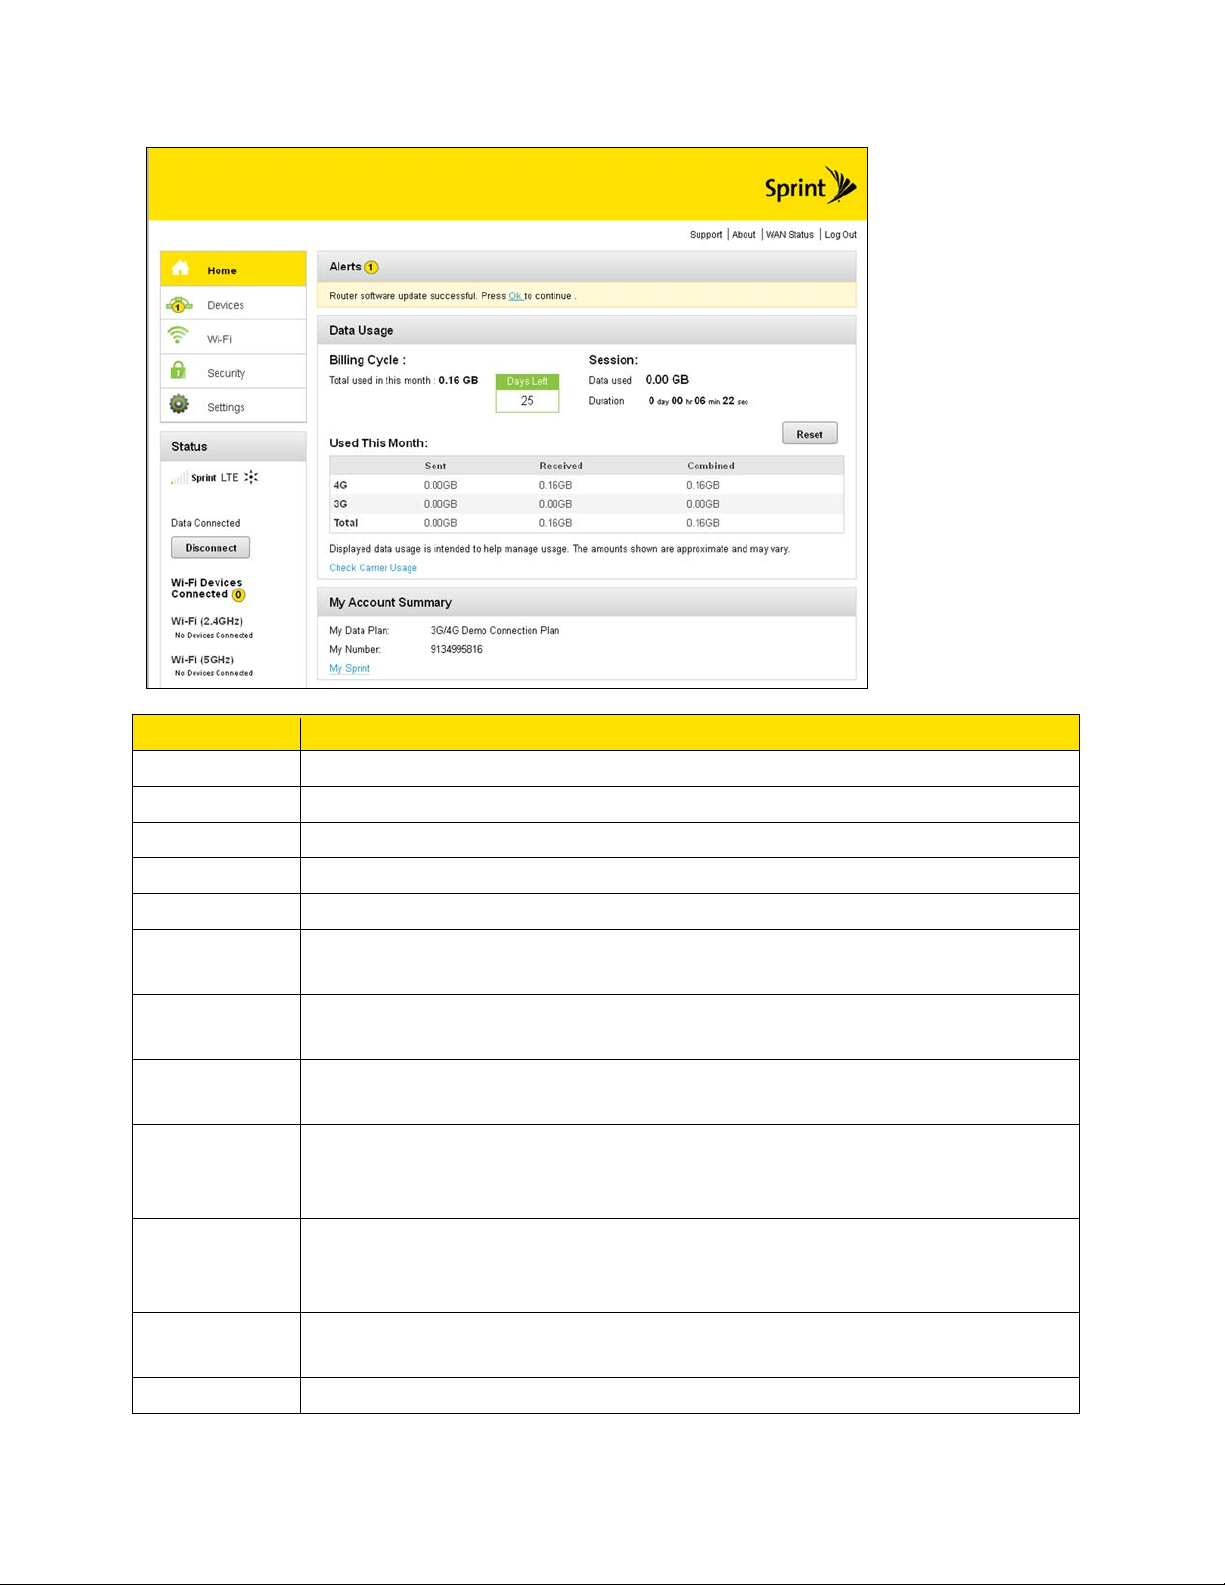
Item
Description
Home
Click to view the Home Page.
Devices
Click to view the Devices Page.
Wi-Fi
Click to view the Wi-Fi Connect Tab.
Security
Click to view the Security Settings.
Settings
Click to view the General Settings.
Connection
Details
Mobile broadband connection information – see Mobile Network Settings.
Devices
Connected
List of devices connected to the gateway’s Main or Guest Wi-Fi networks.
My Account
Summary
Basic information about your Sprint data plan. For more details, click My
Sprint
Feedback
Click to access the Sprint Twitter® feed and Facebook® page or to send your
International
Click to view Sprint’s International Coverage Areas search feature in a new
Important
Click to read importa nt safet y information about the gateway.
Alerts
Alerts remain until issue is resolved.
to connect to your account at sprint.com/mysprint.
comments on your gateway. See Feedback. (Your device must be connected
to the network for this option to work.)
Information
browser window or tab. (Your device must be connected to the network for
this option to work.)
Information
Web Browser Interface 13
Page 22
Data Usage
Session
Estimated data usage for current session.
Data Usage
of This Month
Estimated data usage for current billing period.
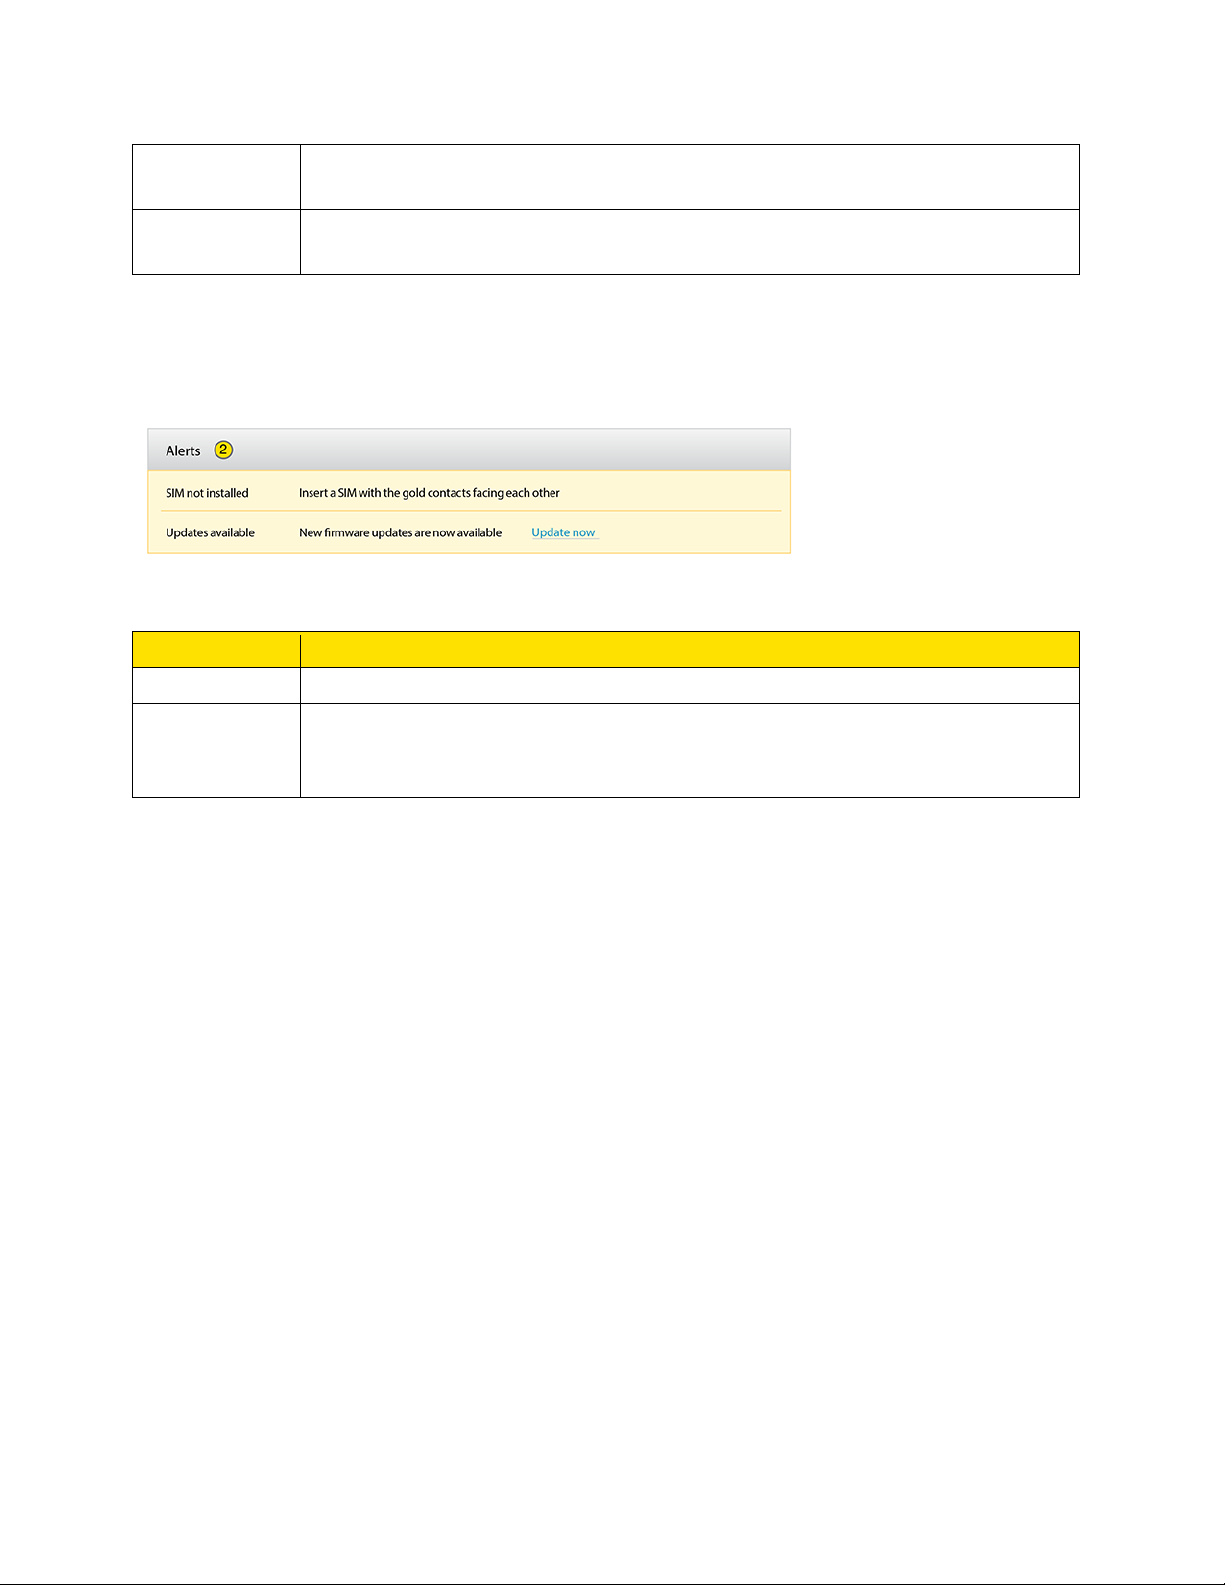
Item
Description
Alert title
A short description of the issue to be addressed.
Description
The alert message and, if appropriate, links or buttons to take action on the
would take you to the Software Update screen.)
Alerts
Alerts notify you about situations that require your attention and suggest the actions you need to
take to resolve them.
The following information is displayed for each alert.
alert. (For example, the Update now link in the second alert shown above
The alerts disappear only when the issues they describe are resolved. Some of the alerts you
may encounter include:
● Software Update Available
● Max Wi-Fi devices reached
● Mobile Broadband disconnected
● Wi-Fi is off
● Gateway is not activated
● SIM errors
● Roam Guard
Activate Your Account from the Home Page
Until your account is activated, you cannot use Sprint data services.
Web Browser Interface 14
Page 23

If you have already signed up for an account, the gateway automatically attempts activation
Item
Description
Current billing cycle
Usage of This
The amount of data sent and received during the billing period for each
Reset button
Click to set the displayed monthly usage values to 0MB.
Session
Used
Data amount used since your device connected to the network.
Elapsed time
Length of time that your device has been connected to the network.
when first powered up. In this case, you won’t see a Retry Activation message. You will just be
connected to the Sprint network
To activate your account:
1. On the home screen, go through the alerts until you see the Ho tspot not activated
alert.
2. Click Retry Activation.
3. Follow any instructions that may appear.
Note: If you already signed up for an account, the gateway automatically attempts activation
when first powered up. If this happens, you will not see a Retry Activation message. You will just
be connected to the Sprint network.
Data Usage
Data usage estimates are shown in the Data Usage section of t he home page.
Note: Data usage amounts are approximate and should not be used for billing purposes. For
accurate data usage amounts, check with Sprint or click the My Sprint link in the My Account
Summary section to view your account details.
The Data Usage section displays monthly billing period statistics and current session statistics.
Month
network type.
Important: This does not reset the actual data usage for the billing cycle.
My Account Summary
The My Account Summary section shows basic information about your plan and includes a link
to see more detailed information.
Web Br owser Interface 15
Page 24
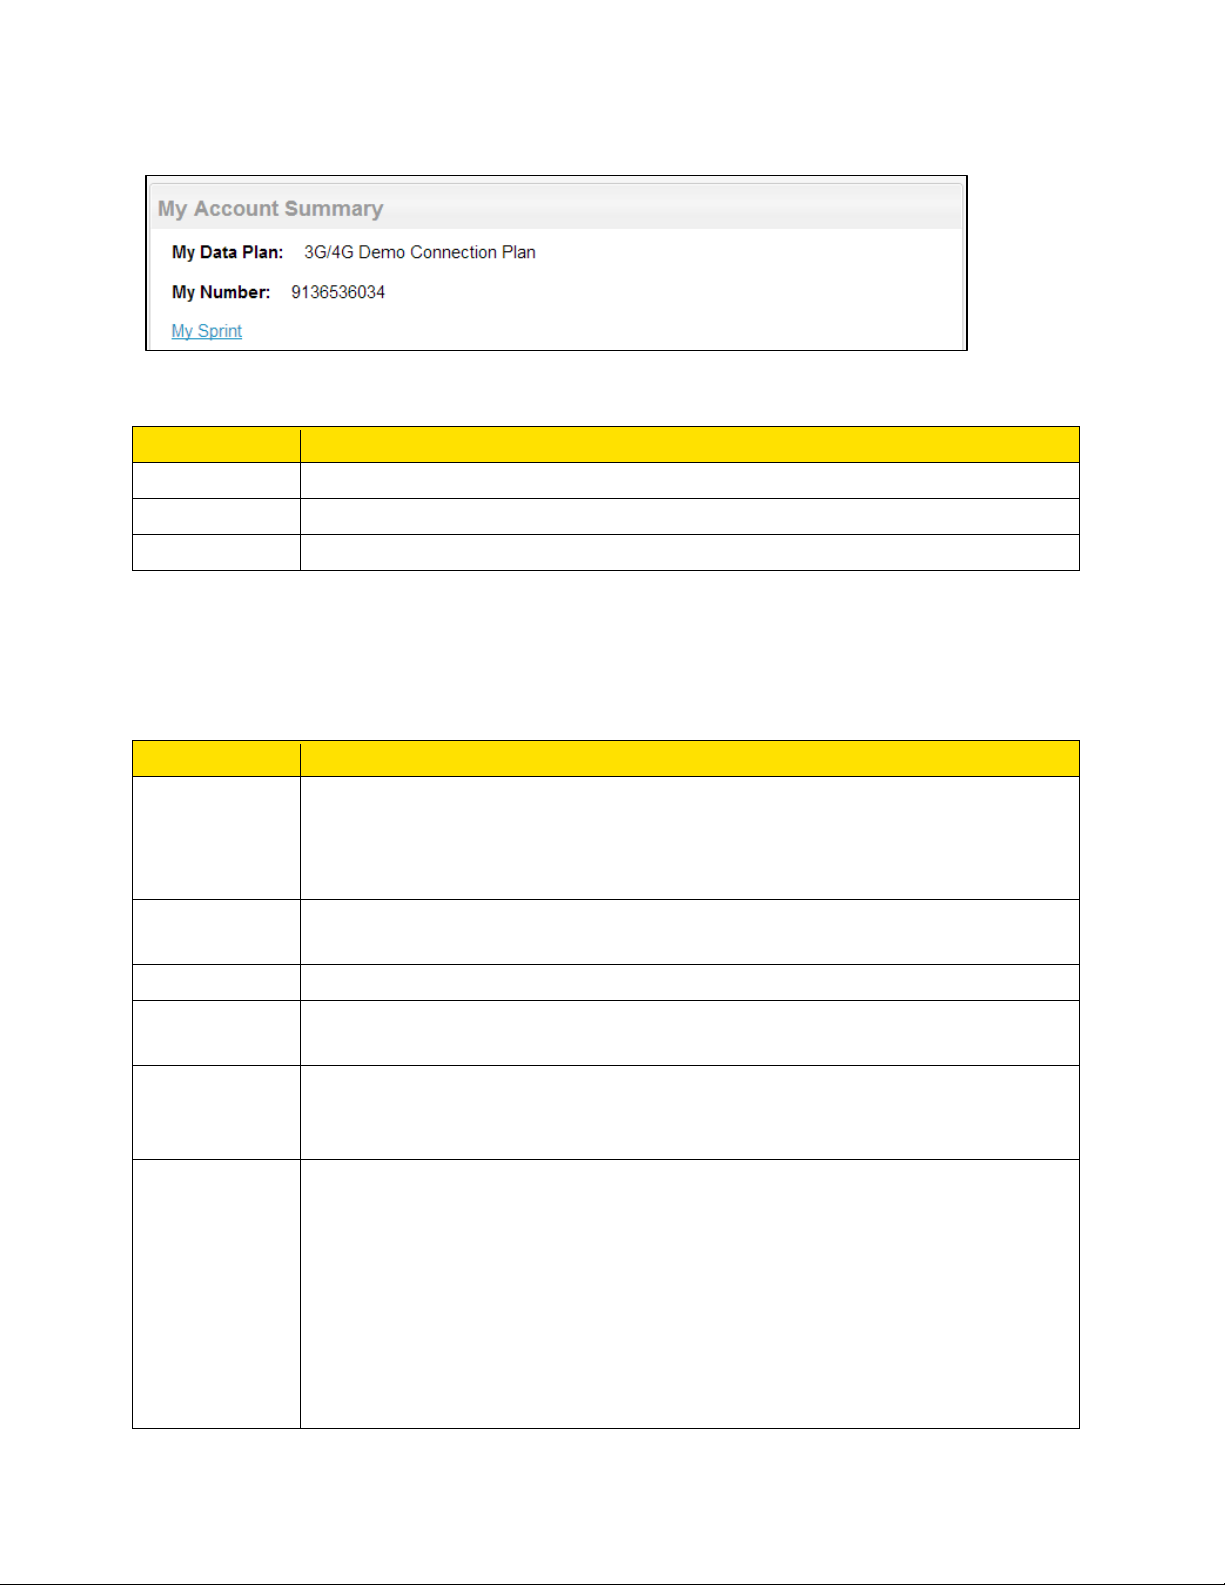
Item
Description
My Data Plan
The type of Sprint data plan used on your gateway.
My Number
The telephone number linked to your data plan.
My Sprint
Click to connect to your account at mysprint.sprint.com/mysprint.
Item
Description
Signal
The more bars, the stronger the signal. A triangle in the icon means your
Network
carrier name
Name of the available network. For example, Sprint.
Network type
LTE or 3G
Roaming
Indicates whether your device is roaming on a Sprint network, domestically,
Connect /
Click this button to connect or disconnect your device from the mobile
Devices
Wi-Fi 2.4 GHz: A list of devices currently connected to the Main Wi-Fi 2.4
The following information is displayed.
Connection Details
The Connection Details section shows details about your mobile broadband service and
connection state, and lists the devices that are connected to the Main and Guest Wi-Fi
networks. The following information is displayed.
strength and
roaming
status
message
Disconnect
button
Connected
device is roaming.
or internationally.
network.
GHz network.
Wi-Fi 5 GHz: A list of devices currently connected to the Main Wi-Fi 5 GHz
network
Guest Wi-Fi: A list of devices currently connected to the Guest Wi-Fi
network.
You can click any of the device names to view their details, or to block them
from using your network. See Display and Block Currently Connected
Devices (Block List).
Web Br owser Interface 16
Page 25
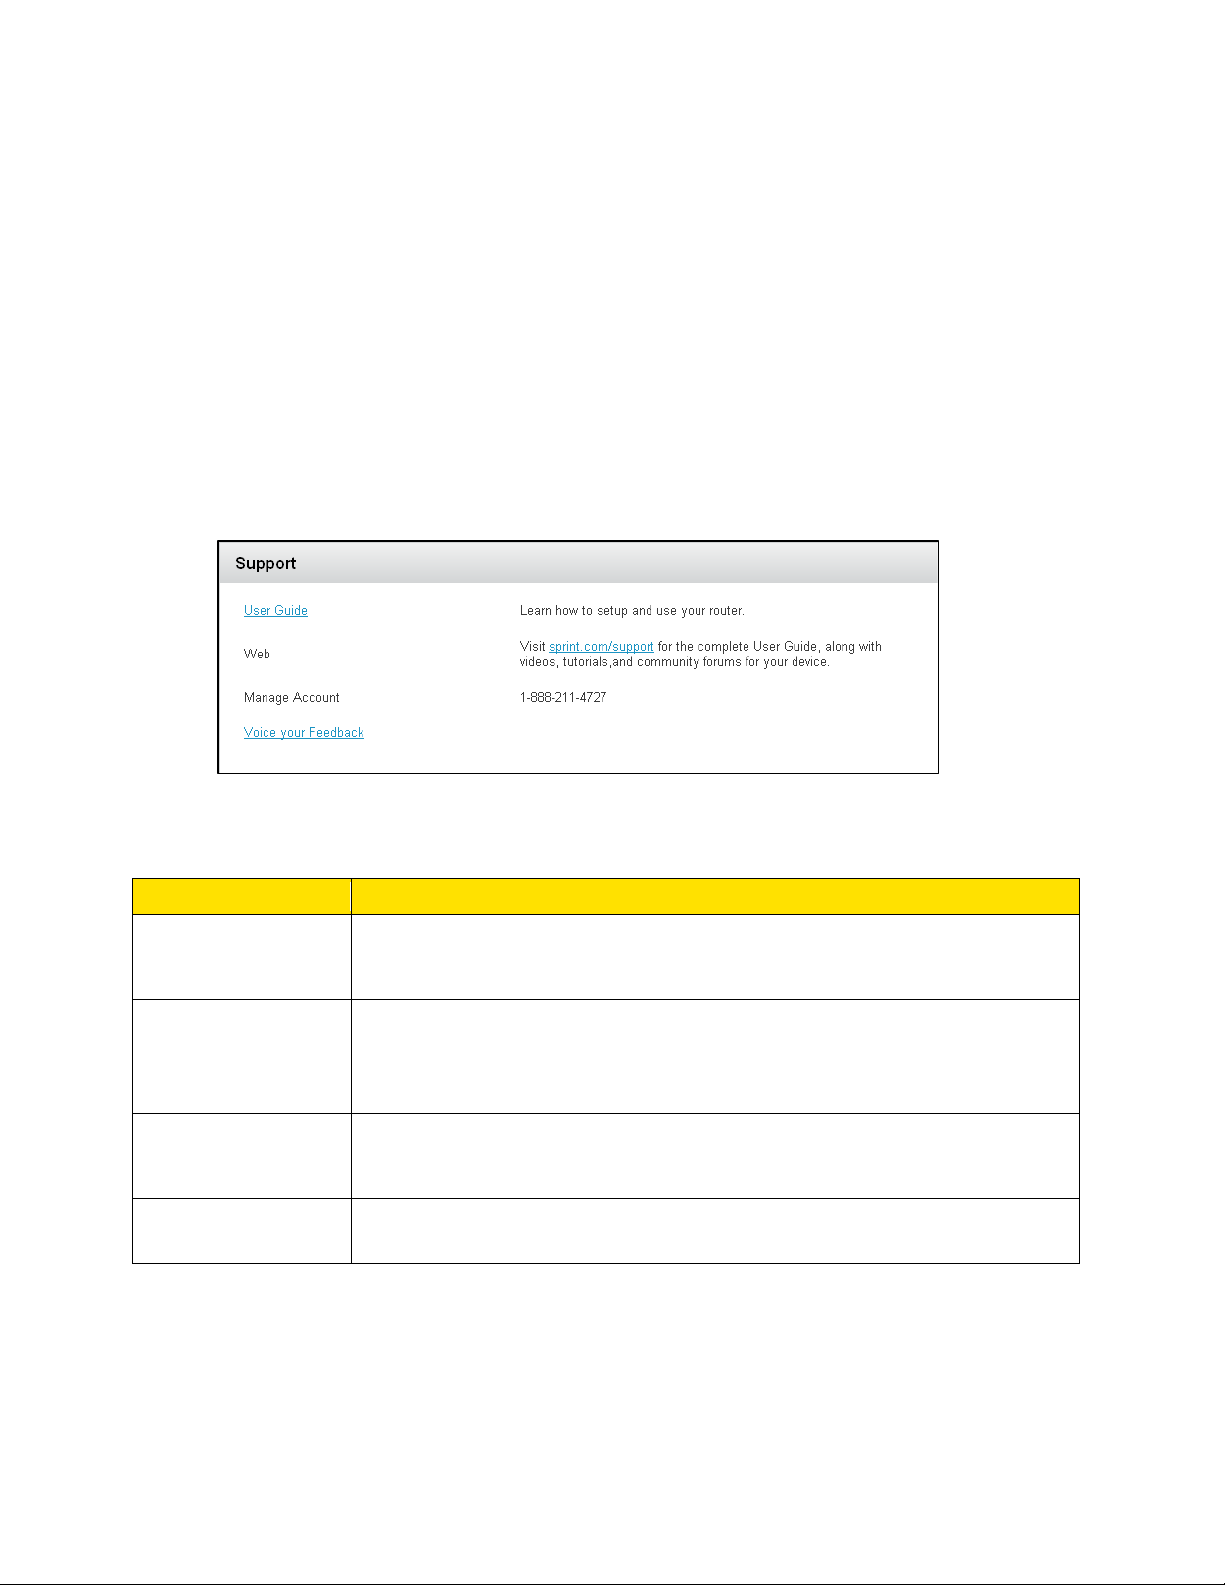
Support
Item
Description
User Guide
Open an online copy of this guide in a new Web browser window or tab.
Web
Click the link to open the online support website in a new Web browser
Manage Account
Contact Sprint Customer Service by telephone (for business use or
Voice Your
Feedback
Send NETGEAR your comments on your device. See Feedback Page.
This page provides links to resources that can help you use your device and manage your
Sprint account.
1. On a computer or wireless device that is connected to your gateway, launch a Web
browser.
2. In the address or URL field of your browser, type http://myrouter.
3. When prompted to log in, enter admin for the user name and type the password. (The
default password is password.)
4. Click the Support link in the top right corner.
The following information is displayed.
(You must be connected to the Internet to use this link.)
window or tab where you can find a variety of resources to help you with
your gateway. (You must be connected to the Internet to use this link.)
personal use).
Web Br owser Interface 17
Page 26
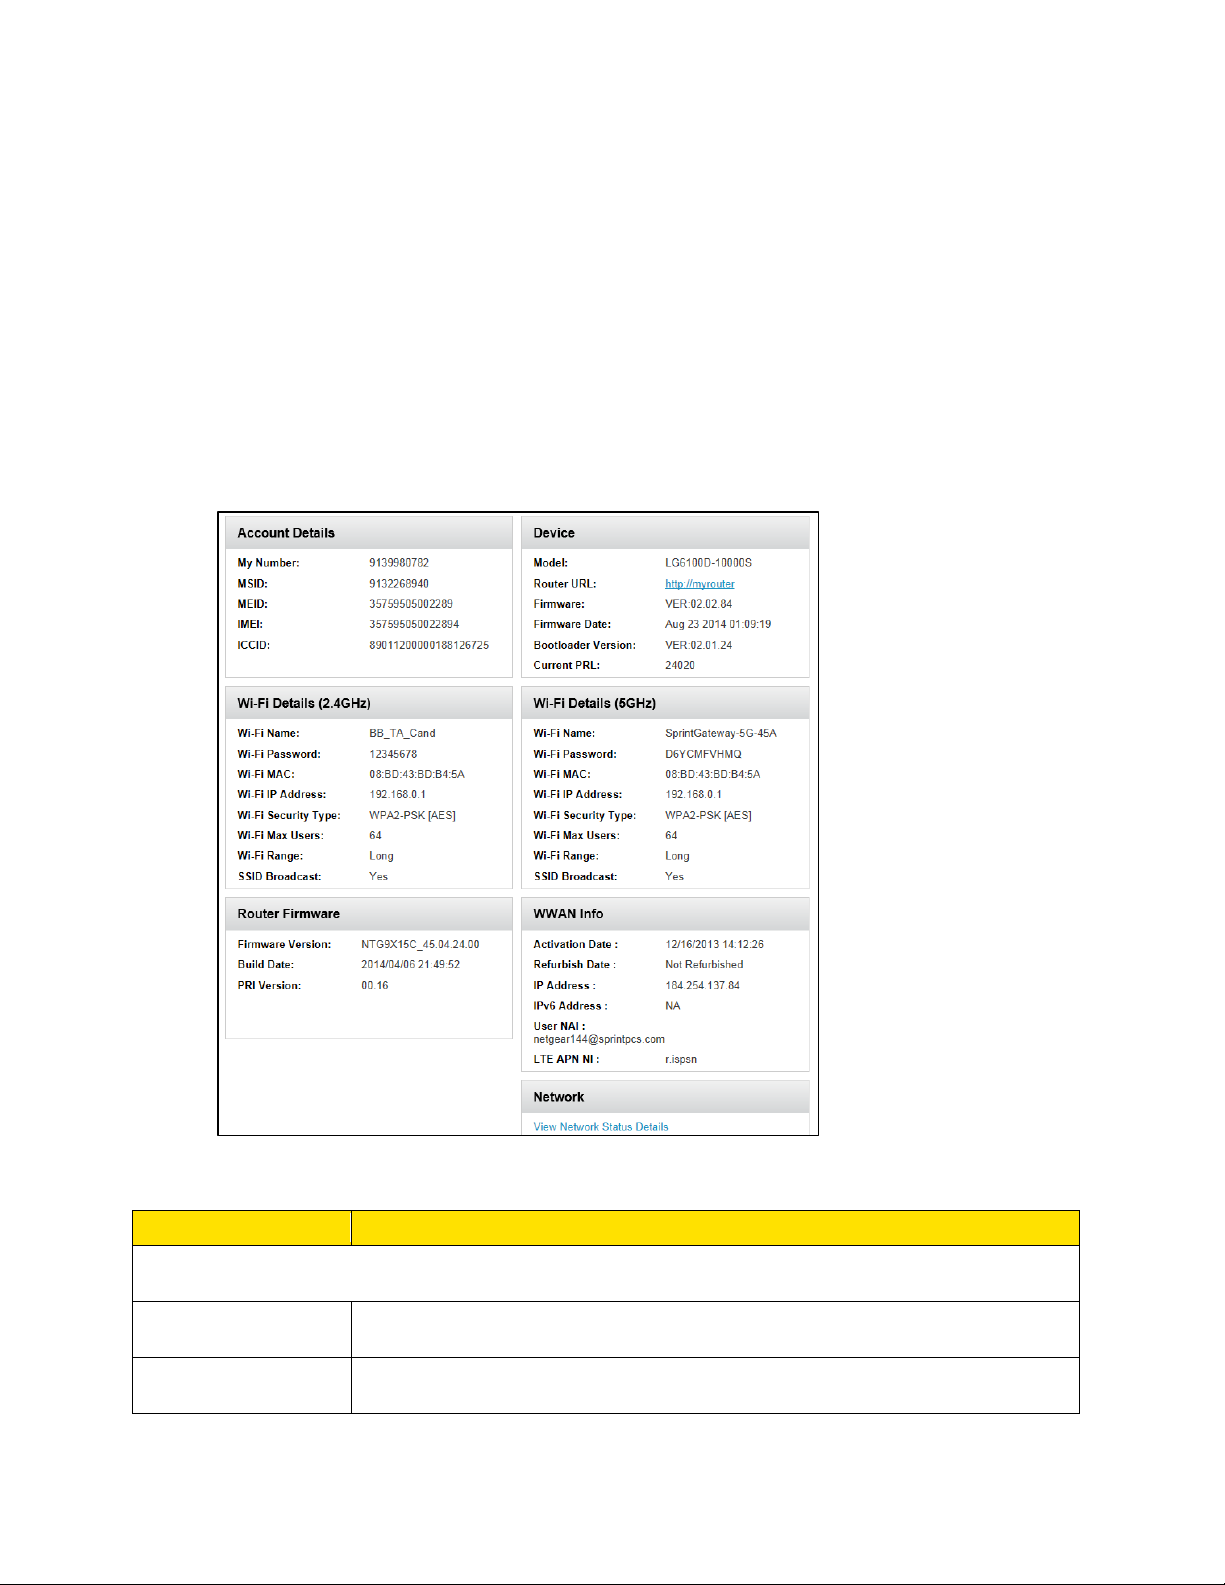
About
Item
Description
Account Details
My number
The gateway’s telephone number.
IMEI
International Mobile Equipment Identify number.
View information about your gateway and account.
1. On a computer or wireless device that is connected to your gateway, launch a Web
browser.
2. In the address or URL field of your browser, type http://myrouter.
3. When prompted to log in, enter admin for the user name and type the password. (The
default password is password.)
4. Click the About link in the top right corner.
The following information is displayed.
Web Br owser Interface 18
Page 27

ICCID
The serial number of the SIM.
Wi-Fi Details
Wi-Fi Name
The Main Wi-Fi network name.
Wi-Fi MAC
Address
The MAC address of the LTE module. Each wireless device has a
Wi-Fi Security
Type
The security standard used for the Wi-Fi network. (See Wi-Fi Security.)
Wi-Fi Range
Select the range for the Wi-Fi signal.
SSID Broadcast
Indicates whether the SSID (Wi-Fi network name) is being broadcast.
Firmware
Firmware Version
The LTE modem firmware version.
Build Date
The date the firmware version was created.
PRI Version
The PRI version.
Network Status
View D etails
Click the link to jump to the Status Details Page.
unique MAC address (assigned by its manufacturer).
(See Wi-Fi Options Tab.) You could choose to not broadcast and give
the Wi-Fi name directly to users.
WAN Status
You can view the status of the WAN connection.
1. On a computer or wireless device that is connected to your gateway, launch a Web
browser.
2. In the address or URL field of your browser, type http://myrouter.
3. When prompted to log in, enter admin for the user name and type the password. (The
default password is password.)
4. Click the WAN Status link in the top right corner.
Web Br owser Interface 19
Page 28
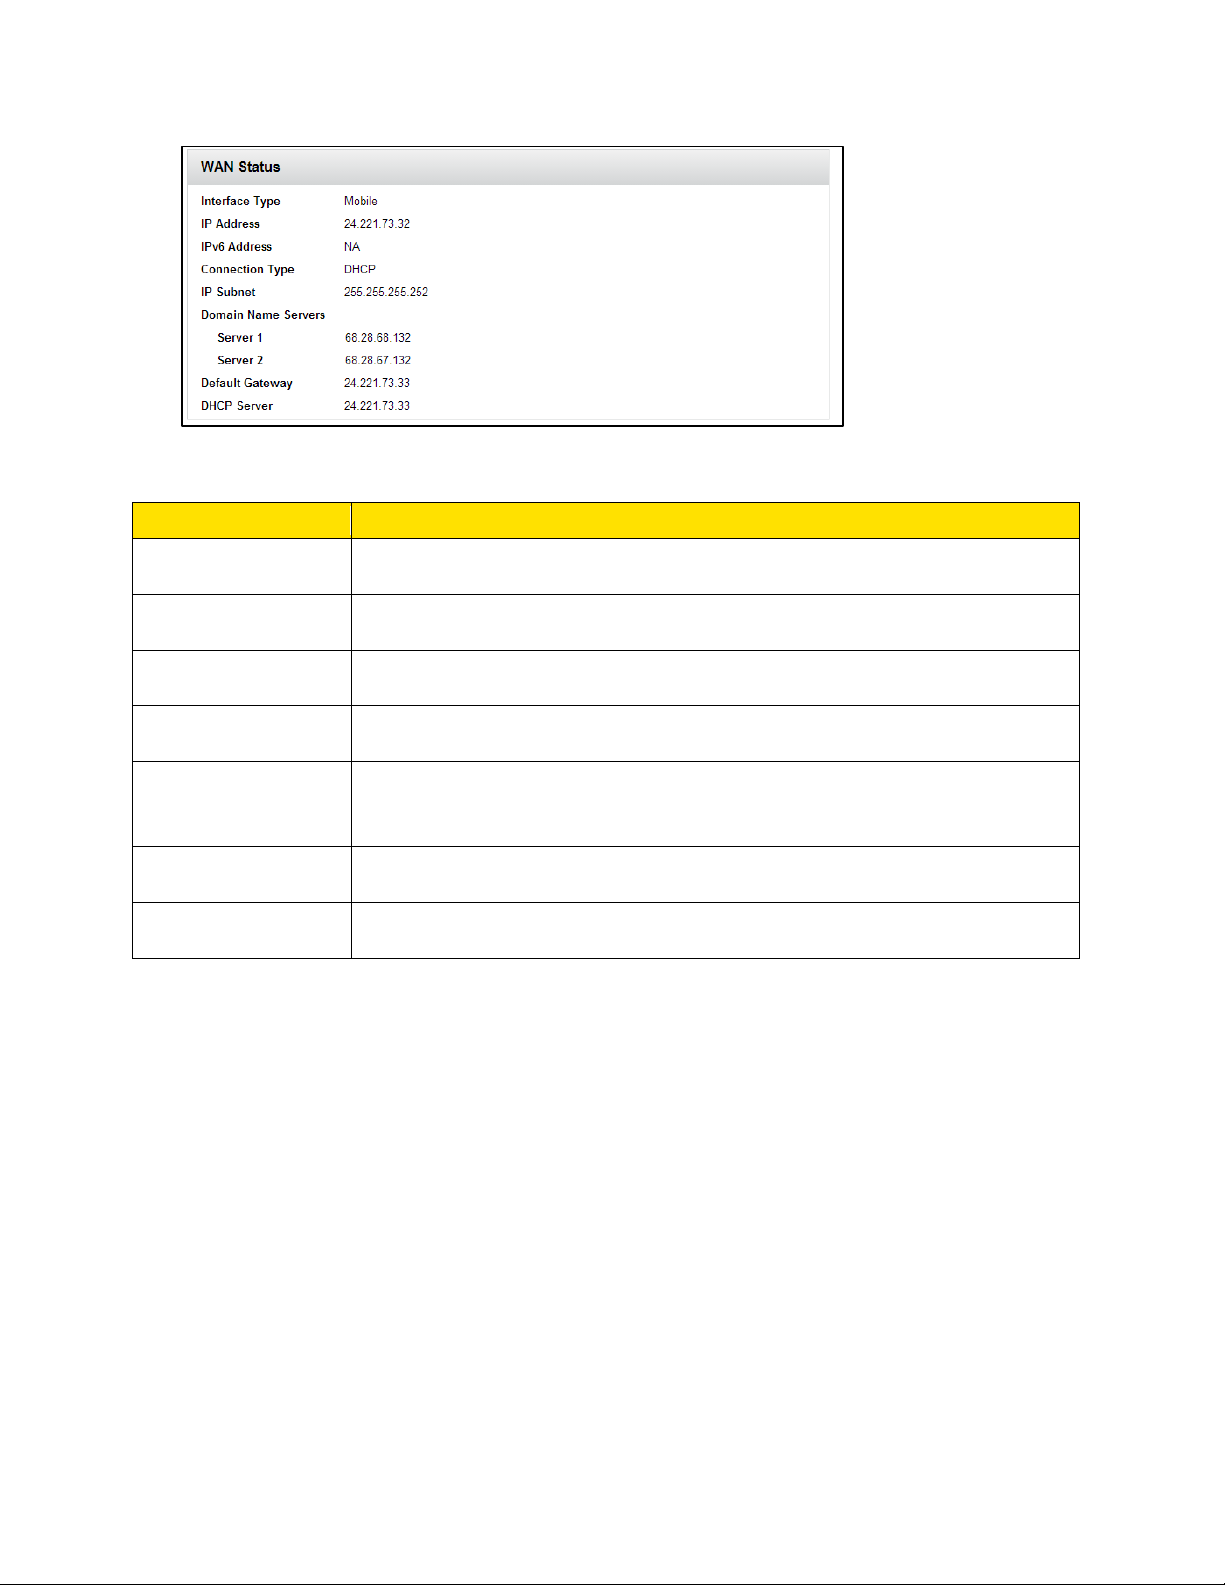
The following information is displayed.
Item
Description
Interface Type
Displays which WAN interface is being used, mobile or Ethernet.
IP Address
WAN IP address.
Connection Type
Displays whether the connection is static or dynamic (DHCP).
IP Subnet
IP subnet mask.
Domain Name
The primary and secondary domain name servers for the WAN
Default Gateway
IP address of the default gateway.
DHCP Server
IP address of the DHCP server.
Servers
interface.
Feedback
Use the links on this page to access the Sprint Twitter® feed and Facebook® page and to se nd
your comments on your device, look up support information, and participate in a customer
survey.
1. On a computer or wireless device that is connected to your gateway, launch a Web
browser.
2. In the address or URL field of your browser, type http://myrouter.
3. When prompted to log in, enter admin for the user name and type the password. (The
default password is password.)
4. Click the Feedback link in the bottom left corner of any page.
Web Br owser Interface 20
Page 29

The following information is displayed.
Item
Description
Connect with us
Facebook
Click to view the AirCard Facebook page in a new browser window or
Twitter
Click to view the AirCard Twitter feed in a new browser window or tab.
Product Support
User Guide
Open an online version of this user guide in a new window or tab.
FAQs
Read frequently asked questions and answers.
Survey
Customer
Feedback Survey
Participate in a NETGEAR customer survey.
tab. (Your device must be connected to the network for this option to
work.)
(Your device must be connected to the network for this option to work.)
Web Br owser Interface 21
Page 30

Your Network Connections
Find out how to launch, share, and end your Internet network connection.
Launch Your Mobile Network C onnection
After your gateway powers on and boots up, a connection to the best available network is
launched automatically.
Your gateway remains connected at all times, unless:
● You are out of signal range or the signal is blocked.
● You are in a roaming area and you have chosen not to allow roaming.
Note: Even though your gateway is connected, you are billed only when data is sent or
received. See If the Connection is “Always On,” Am I Always Being Billed?
Set Up a Guest Wi-Fi Network
You can create a separate Guest Wi-Fi network that you can share with temporary users.
Computers and wireless devices on the Guest Wi-Fi network:
● Cannot access devices that are on the Main Wi-Fi network (such as printers or other
computers)
● Cannot log in to the gateway to change its settings
Turn the Guest Wi-Fi Network On and Off
You can turn the Guest Wi-Fi network on and off from the gateway’s Wi-Fi page.
To turn the guest Wi-Fi network on and off:
1. On a computer or wireless device that is connected to your gateway, launch a Web
browser.
2. In the address or URL field of your browser, type http://myrouter.
3. When prompted to log in, enter admin for the user name and type the password. (The
default password is password.)
4. Click Wi-Fi.
5. In the Guest Wi-Fi area, click Turn On or click Turn Off.
Your Network Connections 22
Page 31

Share Your Wi-Fi Network
Your gateway provides two ways of sharing your network connection with other users.
● Users find and select the Main or Guest Wi-Fi network information.
● User connects to the Main or Guest Wi-Fi network using WPS.
Manually Enter the Wi-Fi Information
Users can connect to the network by manually entering the Wi-Fi information.
Share your network connection with others:
1. Provide the Main or Guest Wi-Fi network name and password to them.
2. Users must open their device’s Wi-Fi network manager and connect to the Main or
Guest Wi-Fi network using the password you provided. (See
How Do I Connect to Wi-Fi?)
Connect Through WPS
Wi-Fi Protected Setup (WPS) provides a fast, simple, and secure way to connect WPS-enabled
devices to your Wi-Fi network.
With WPS, you don’t have to give the name (SSID) and Wi-Fi password of your Main or Guest
network to other users. The WPS feature is available on certain cameras, printers,
smartphones, and laptops. These devices have either a hardware button or a WPS-related
option in the software. Please consult the user documentation of your device.
WPS is always available for the Main and Guest Wi-Fi networks as long as the Wi-Fi radio is on.
WPS is not available in the following situations:
● The Wi-Fi radio is off because someone pressed the Wi-Fi On/Off button on the
gateway.
● The Wi-Fi security option is WPA Personal, WEP, or WEP-related (for example, WEP 64
Bit Open). WPS is available if the Wi-Fi security option is WPA/WPA2 Personal. (See
Wi-Fi Options Tab.)
● Broadcast network name is not enabled. (See Wi-Fi Options Tab.)
● MAC Filter Mode is White list (Allow only those in list), but no computers have been
added to the list. (See Allow or Deny Computers Access to the Network (MAC Filter).)
If the maximum number of connected devices on the chosen network (Main or Guest) has
already been met, an error message indicating that the maximum number of devices has been
reached is displayed when you attempt WPS. Disconnect one of the connected devices and
then retry.
Your Network Connections 23
Page 32

You can use the WPS button on the gateway or you can log in to the gateway and use the
Item
Description
Main Wi-Fi
(2.4 GHz)
A list of devices currently connected to the Main Wi-Fi network in the 2.4 GHz
band.
Main Wi-Fi
(5 GHz)
A list of devices currently connected to the Main Wi-Fi network in the 5 GHz
Guest Wi-Fi
A list of devices currently connected to the Guest Wi-Fi network.
Ethernet
A list of devices currently connected to the device through an Ethernet
connection to an Ethernet LAN port.
Wi-Fi > Connect page.
Devices Page
The Devices page lets you see lists of devices that are connected to your Main and Guest Wi-Fi
networks.
Note: These lists are also in the Devices Connected section on the left side of the page.
1. On a computer or wireless device that is connected to your gateway, launch a Web
browser.
2. In the address or URL field of your browser, type http://myrouter.
3. When pr ompted to log in, enter admin for the user name and type the password. (The
default password is password.)
4. Click Devices.
The following information is displayed.
band.
Your Network Connections 24
Page 33

You can click any of the device names to view detailed information, and to block them from
using your network. See Enable or Disable the Block List.
Wi-Fi Connect Tab
From the Wi-Fi tab, you can configure the Wi-Fi network, including Wi-Fi security.
1. On a computer or wireless device that is connected to your gateway, launch a Web
browser.
2. In the address or URL field of your browser, type http://myrouter.
3. When prompted to log in, enter admin for the user name and type the password. (The
default password is password.)
4. Click Wi-Fi and the Connect tab displays.
You can configure access to your Main and Guest Wi-Fi networks.
You can:
● Edit the Main or Guest Wi-Fi names and passwords. See Change Wi-Fi Network Names
and Passwords.
● Turn the Guest Wi-Fi network on or off. See Setting up a Guest Wi-Fi Network.
● Connect devices using WPS. See Connecting Through WPS.
Your Network Connections 25
Page 34

The following information is displayed.
Item
Description
Main Wi-Fi (2.4 GHz)
Name
This is the name that identifies your Main Wi-Fi network and is visible to other
WPS
Connect a device to the Main Wi-Fi network using WPS. See
Connecting Through WPS.
Main Wi-Fi (5 GHz)
Name
This is the name that identifies your Main Wi-Fi network and is visible to other
WPS
Connect a device to the Main Wi-Fi network using WPS. See
Connecting Through WPS.
Guest Wi-Fi (2.4 GHz)
Turn Off /
Click this button to turn the Guest Wi-Fi network on or off.
Name
This is the name that identifies your Guest Wi-Fi network and is visible to
Passwords.
Wi-Fi-enabled devices. See Change Wi-Fi Network Names and Passwords.
Wi-Fi-enabled devices.
Turn On
Note: The rest of the Guest W i-Fi f ields / buttons appear only when the Guest
Wi-Fi network is on.
other Wi-Fi-enabled devices. See Change Wi-Fi Network Names and
Wi-Fi Options Tab
From the Wi-Fi Options tab, you can configure your Wi-Fi network’s connection settings and
security and additional Wi-Fi options.
1. On a computer or wireless device that is connected to your gateway, launch a Web
browser.
2. In the address or URL field of your browser, type http://myrouter.
3. When prompted to log in, enter admin for the user name and type the password. (The
default password is password.)
Your Network Connections 26
Page 35

4. Click Wi-Fi > Options.
You can:
● Edit the Main or Guest Wi-Fi names and passwords. See
Change Wi-Fi Network Names and Passwords.
● Configure your Wi-Fi network’s connection parameters and security and additional Wi-Fi
options.
● Specify the maximum number of devices that can connect to the Wi-Fi network.
Your Network Connections 27
Page 36

Note: For some of these Wi-Fi settings, if you change them, all connected devices will be
Item
Description
Main Wi-Fi
Network Name
This is the name that identifies your Main Wi-Fi network and is visible to
Guest Wi-Fi
Network Name
This is the name that identifies your Guest Wi-Fi network and is visible to
Wi-Fi Options
Wi-Fi Range
Short
Connection
20/40 MHz
The gateway can run in either 40 MHz mode or 20 MHz mode when the
Connection
This setting determines the type of Wi-Fi devices that can connect to your
Wi-Fi Channel
This is the active channel of the Wi-Fi access point. If your network is
RTS Threshold
This setting specifies the smallest packet size, in bytes, for which RTS/CTS
data flow. Make only minor changes to this value.
Fragmentation
This setting specifies the largest allowable size, in bytes, for a packet. If the
disconnected and have to reconnect after the settings are saved.
The following information is displayed.
other Wi-Fi-enabled devices. (See Change Wi-Fi Network Names and
Passwords).
other Wi-Fi-enabled devices. (See Change Wi-Fi Network Names and
Passwords).
Medium
Long
Coexistence
Rate
wireless mode is set to Up to 300 Mbps. The gateway uses 40 MHz mode
unless a nearby Wi-Fi network is using 40 MHz mode. If that happens, the
gateway uses 20 MHz mode to coexist with that network.
network.
For the Main and Guest 2.4 GHz networks, the default connection is Up t o
300 Mbps. The other choices are Up to 130 Mbps and Up to 54 Mbps.
For the 5 GHz network, the default connection rate is Up to 300 Mbps. The
other choices are Up to 400 Mbps and Up to 800 Mbps.
having performance issues (possibly caused by other Wi-Fi networks in the
vicinity using the same channel), try a different Wi-Fi channel.
(Request to Send/Clear to Send) handshaking is used. The recommended
value is 2347. Change this value only if you’re experiencing inconsistent
Threshold
packet is larger than this, it is fragmented into multiple packets before it is
transmitted. To prevent poor network performance, it’s recommended to
keep this value as large as possible (up to 2346).
Your Network Connections 28
Page 37

Security
Broadcast
Network Name
If broadcast is enabled (Yes), the wireless network is displayed in the list of
Encryption
The type of security used by the Main Wi-Fi network. See Wi-Fi Security.
Guest
The type of security used by the Guest Wi-Fi network. See Wi-Fi Security.
Max Wi-Fi
Clients
The maximum number of Wi-Fi clients that can connect to the gateway Main
Encryption
Wi-Fi networks available in the local area. For increased security, set this
field to No. You will need to give the Wi-Fi network name (Main or Guest) to
the people who will be accessing your network, and WPS will not be
available.
Wi-Fi network and Guest Wi-Fi network.
MAC Filter
MAC (Media Access Control) filtering can prevent unauthorized wireless devices from
connecting to your network.
The MAC filter is used to grant (white list) or block (black list) wireless devices access to the
Wi-Fi and mobile broadband (3G or LTE) networks. Access is based on the MAC address of
each wireless device.
MAC filtering increases security of your network. You can give access to your network, based
on the MAC address of the wireless devices. This makes it harder for a hacker to use a MAC
address to access your network.
To set up MAC filtering or turn it off:
1. On a computer or wireless device that is connected to your gateway, launch a Web
browser.
2. In the address or URL field of your browser, type http://myrouter.
3. When prompted to log in, enter admin for the user name and type the password. (The
default password is password.)
4. Click Wi-Fi and then click the MAC Filter tab.
Your Network Connections 29
Page 38

You can:
Item
Description
MAC Filter
None: Any device can connect to the Wi-Fi networks.
Black List or White List
Name
A description of the device (the owner’s name, the device’s purpose, etc.)
MAC Address
The device’s MAC address.
● Turn MAC filtering off (None) or on (Black List or W hite List).
● Add or remove a device from the list.
The following information is displayed.
Mode
Black List: The listed devices will not be able to connect to the Wi-Fi
networks.
White List: Only the listed devices will be allowed to connect to the Wi-Fi
networks.
Wi-Fi Security
Learn about the Wi-Fi security options available to you.
By default Wi-Fi security is enabled for your device and its Wi-Fi networks.
Note: All devices used with the gateway must support the selected security type.
Note: WPS is available only if you select either a WPA2 Personal option (including WPA/WPA2
Personal) or no security (not recommended). (See Connect Through WPS.)
Note: WEP is available only for the Guest network.
You can change the security used for Wi-Fi:
1. On a computer or wireless device that is connected to your gateway, launch a Web
browser.
2. In the address or URL field of your browser, type http://myrouter.
3. When prompted to log in, enter admin for the user name and type the password. (The
default password is password.)
4. Click Wi-Fi > Options.
Your Network Connections 30
Page 39

5. In the list beside Encryption (for Main Wi-Fi) or Guest Encryption (for Guest Wi-Fi)
select one of the following options. Note that not all options may be available, depending
on the Connection Rate.
None: No security is used (no password is required to access the Wi-Fi network);
this setting is not recommended. Anyone may access your device and use your
Internet connection. (You are responsible for payment for data usage fees.)
WEP 64 Bit – Open: This option provides security, but it’s relatively weak. This
option works with older and newer Wi-Fi devices and is recommended only if any of
your devices don’t support WPA or WPA2.
Open WEP uses the key for encryption, but not for authentication.
WEP 64 Bit – Shared: This option provides security, but it’s relatively weak. This
option works with older and newer Wi-Fi devices and is recommended only if any of
your devices don’t support WPA or WPA2.
Shared WEP uses the same key for encryption and authentication; some consider
shared WEP to be less secure than open WEP.
WEP 128 Bit – Open: This option provides security, but it’s relatively weak (but
stronger than WEP 64 Bit – Open). This option works with older and newer Wi-Fi
devices and is recommended only if any of your devices don’t support WPA or
WPA2.
Open WEP uses the key for encryption, but not for authentication.
WEP 128 Bit – Shared: This option provides security, but it’s relatively weak (but
stronger than WEP 64 Bit – Shared). This option works with older and newer Wi-Fi
devices and is recommended only if any of your devices don’t support WPA or
WPA2.
Shared WEP uses the same key for encryption and authentication; some consider
shared WEP to be less secure than open WEP.
WPA PSK TKIP: This is a strong security standard that is supported by most Wi-Fi
devices.
WP A2 PSK AES: This is a stronger, newer security standard that is limited to newer
Wi-Fi devices.
WP A2 PSK TKIP: This is a stronger, newer security standard that is limited to newer
Wi-Fi devices.
6. Click Submit.
Your Network Connections 31
Page 40

The option you select determines the Wi-Fi security used and also the maximum length of the
Wi-Fi password.
Change Wi-Fi Network Names and Passwords
The Main and Guest Wi-Fi network names identify your Wi-Fi networks and are visible to other
Wi-Fi-enabled devices.
You can change the names and passwords for your Main and Guest Wi-Fi networks on the
gateway’s Wi-Fi > Options page.
For optimal security, you should make your Wi-Fi network names and passwords unique, and
change them on a regular basis.
Note: If you change either of the Wi-Fi network names or passwords, all connected devices will
be disconnected and will have to reconnect using the new values.
Note: For security reasons, it’s recommended you disable SSID Broadcast. (See Wi-Fi Options
Tab.)
To mak e your Wi-Fi passwords more secure:
● Use numbers and both uppercase and lowercase letters.
● Use special characters (for example, ‘@’, ‘#’, etc.).
Also, the password length depends on the Wi-Fi encryption type that you’ve selected.
● None: No password is required.
● WEP 64 bit – Open: The password must be 5 ASCII characters.
● WEP 64 bit – Shared: The password must be 5 ASCII characters.
● WEP 128 bit – Open: The password must be 13 ASCII characters.
● WEP 128 bit – Shared: The password must be 13 ASCII characters.
● WPA-Personal TKIP: The password must be 8 to 63 ASCII characters.
● WPA-Personal TKIP/AES: The password must be 8 to 63 ASCII characters.
● WPA2-Pers onal TKIP/AES: The password must be 8 to 63 ASCII characters.
● WPA/WPA2 Personal: The password must be 8 to 63 ASCII characters.
To change the Wi-Fi network name and password:
1. On a computer or wireless device that is connected to your gateway, launch a Web
browser.
Your Network Connections 32
Page 41

2. In the address or URL field of your browser, type http://myrouter.
3. When prompted to log in, enter admin for the user name and type the password. (The
default password is password.)
4. Click Wi-Fi > Options.
5. In the Main Wi-Fi and Guest Wi-Fi sections, change the Network Name and Password
fields as desired. (The required lengths appear beneath the fields.)
6. Click Submit.
7. When pr ompted , click Submit again. (All devices that were connected will have to
reconnect with the new settings.)
Enable or Disable the Black List
You can enable your gateway’s black list on the gateway’s Wi-Fi MAC Filter page. This lets you
identify devices that should not be allowed to access your Wi-Fi networks.
To enable or disable the Wi-Fi black list (MAC filtering):
1. On a computer or wireless device that is connected to your gateway, launch a Web
browser.
2. In the address or URL field of your browser, type http://myrouter.
3. When prompted to log in, enter admin for the user name and type the password. (The
default password is password.)
4. Click Wi-Fi and then click the MAC Filter tab.
5. Beside MAC Filter Mode, select Black List to block devices, or select White List to
prevent devices from being blocked.
6. Click Submit.
Display and Block Currently Connected Devices (Block List)
To detect a potential intruder, you may want to display a list of the Wi-Fi-enabled devices that
are currently connected to your gateway. You can view this list the gateway’s home page.
To stop a device from connecting to your network, you can add it to your gateway’s block list.
The blocked device will not be able to connect again until you choose to unblock it.
Note: You have to enable the block list before you can block devices from using your Wi-Fi
networks. (See Enable or Disable the Block List.)
Your Network Connections 33
Page 42

To manage the block list:
1. On a computer or wireless device that is connected to your gateway, launch a Web
browser.
2. In the address or URL field of your browser, type http://myrouter.
3. When prompted to log in, enter admin for the user name and type the password. (The
default password is password.) The Devices Connected section of the home page
shows a list of the devices connected to your Main and Guest Wi-Fi networks.
4. To block a listed device, click its device name. The device’s IP address and MAC
address display.
5. Click Block Device.
6. Click Block Device again.
View and Unblock Devices on the Black List
You can view a list of devices that you have blocked from connecting to your gateway on your
gateway’s Wi-Fi MAC Filter page.
To allow any of these devices to connect to the network again, you can remove them from your
device’s block list.
To view and unblock devices on the block list:
1. On a computer or wireless device that is connected to your gateway, launch a Web
browser.
2. In the address or URL field of your browser, type http://myrouter.
3. When prompted to log in, enter admin for the user name and type the password. (The
default password is password.)
4. Click Wi-Fi > MAC Filter.
5. Select the Black List (Block all in list) radio button.
A list of the devices blocked from using your Wi-Fi networks appears.
6. Click the beside the device you want to unblock. The device is removed from the list
immediately.
Allow or Deny Computers Access to the Network (MAC Filter)
MAC (Media Access Control) filtering can prevent unauthorized wireless devices from
connecting to your network.
Your Network Connections 34
Page 43

The MAC filter is used to grant (white list) or block (black list) wireless devices access to the
Main and Guest Wi-Fi networks. Access is based on the MAC address of each wireless device.
In the MAC Filter page (Wi-Fi > Mac Filter), you can choose one of three modes:
● None: All computers are allowed to access the network.
● Black list: All computers are allowed to access the network, unless they’re in this list.
● White list: Only computers that are in this list are allowed to access the network.
Regardless of the mode, a user must provide the correct Wi-Fi password to access the network.
To specify computers that can access the network:
1. On a computer or wireless device that is connected to your gateway, launch a Web
browser.
2. In the address or URL field of your browser, type http://myrouter.
3. When prompted to log in, enter admin for the user name and type the password. (The
default password is password.)
4. Click Wi-Fi and then click the MAC Filter tab.
5. Beside MAC Filter Mode, select White list.
6. In the empty Name field, enter a name for the device. For example, Amy’s PC.
7. In the empty MAC Address field, enter the MAC address of the device you’re adding to
the list. (If you don’t know this address, see Finding the MAC Address.)
8. Click the beside the row. Repeat steps 6 through 8 for each computer for which you
want to allow access.
IMPORTANT: Make sure you add the computer you are using, or else you will not be able to
access the network after your device resets.
9. Click Submit.
To specify computers that are not allowed to access the network:
1. On a computer or wireless device that is connected to your gateway, launch a Web
browser.
2. In the address or URL field of your browser, type http://myrouter.
3. When prompted to log in, enter admin for the user name and type the password. (The
default password is password.)
Your Network Connections 35
Page 44

4. Click Wi-Fi and then click the MAC Filter tab.
5. Select the Black list radio button.
6. Determine and block an unwanted user of your network:
In the Devices Connected section, if you see a device you don’t recognize, you can
click its name and compare its MAC address to the MAC address of each of the
devices on your network.
Tip: To determine the MAC address of each device you have, see
Finding the MAC Address. If none of your devices have this MAC address, that
device might be an intruder.
In the Name field, enter a name for the device. For example, Amy’s PC.
In the MAC Address field, enter the MAC address of the device you’re adding.
Click the beside the row.
7. For each device you want to block, repeat steps 4 through 6.
Tip: You can also block the device from the device list. See Display and Block Currently
Connected Devices (Block List).
To remove a device from the Allowed or Disallowed list:
1. On a computer or wireless device that is connected to your gateway, launch a Web
browser.
2. In the address or URL field of your browser, type http://myrouter.
3. When prompted to log in, enter admin for the user name and type the password. (The
default password is password.)
4. Click Wi-Fi and then click the MAC Filter tab.
5. In the list of allowed/disallowed devices, click the beside the row.
6. Click Submit.
Wi-Fi Channel
The Wi-Fi channel is the active channel of the Wi-Fi access point. If your network is having
performance issues (possibly caused by other Wi-Fi networks in the vicinity using the same
channel), try a different Wi-Fi channel.
You can change the channel from your gateway’s Wi-Fi Options tab.
Your Network Connections 36
Page 45

Note: All connected devices will be disconnected and have to reconnect if the channel is
changed.
To change the Wi-Fi channel:
1. On a computer or wireless device that is connected to your gateway, launch a Web
browser.
2. In the address or URL field of your browser, type http://myrouter.
3. When prompted to log in, enter admin for the user name and type the password. (The
default password is password.)
4. Click Wi-Fi > Options.
5. Select a different channel number in the Wi-Fi Channel list, or, to have your device
automatically determine the channel to use, select Auto.
Note: If you choose Auto, your device could reselect the same channel. If this happens,
try again.
6. Click Submit.
Set the Maximum Number of Wi-Fi Devices
You can enter the maximum number of Wi-Fi devices that are allowed to connect to the
gateway at the same time.
If your network is having performance issues, you might want to allow fewer Wi-Fi devices to
connect to your gateway at the same time, or change the maximum number of devices that can
connect to either the Main Wi-Fi or Guest Wi-Fi networks at the same time. (When Guest Wi-Fi
is turned on, the maximum number of Wi-Fi devices is shared between Main Wi-Fi and Guest
Wi-Fi.)
Note: Your gateway is factory preset to allow a maximum of 80 Wi-Fi devices.
Note: If you change the Max Wi-Fi Devices value, the Main Wi-Fi and Guest Wi-Fi values
automatically adjust to match the new total.
To set the maximum number of Wi-Fi devices:
1. On a computer or wireless device that is connected to your gateway, launch a Web
browser.
2. In the address or URL field of your browser, type http://myrouter.
3. When prompted to log in, enter admin for the user name and type the password. (The
default password is password.)
Your Network Connections 37
Page 46

4. Click Wi-Fi > Options.
5. Scroll down to view the Max Wi-Fi section.
6. Beside Max Wi-Fi, select the total number of Wi-Fi devices that can connect to your
device at the same time.
Note: The Main Wi-Fi limit cannot be set to 0.
7. Click Submit.
Your Network Connections 38
Page 47

Security
Learn about how to use security features to control access to the gateway through the Internet.
Dynamic DNS
Learn about Dynamic DNS (DDNS), a service that lets you access your gateway by using a host
name or domain.
A Dynamic DNS (DDNS) service provides a central public database where information (such as
email addresses, host names, and IP addresses) can be stored and retrieved. The Dynamic
DNS server also stores password-protected information and accepts queries based on email
addresses.
If you want to use a DDNS service, you must register for it. The Dynamic DNS client service
provider will give you a password or key.
Note: The gateway supports only basic DDNS, and the login and password might not be
secure. If you have a private WAN IP address, do not use DDNS service as it can lead to
problems.
To set up DDNS:
1. On a computer or wireless device that is connected to your gateway, launch a Web
browser.
2. In the address or URL field of your browser, type http://myrouter.
3. When prompted to log in, enter admin for the user name and type the password. (The
default password is password.)
4. Click Security > Dynamic DNS.
5. If you have registered with a DDNS service provider, select the Use a Dynamic DNS
Service check box.
6. Select the name of your Dynamic DNS service provider.
Security 39
Page 48

7. Type the host name that your Dynamic DNS service provider gave you. (The DDNS
service provider might call this the domain name.)
8. Type the user name for your DDNS account.
9. Type the password (or key) for your DDNS account.
10. Click Submit.
Remote Management
The remote management feature lets you access your gateway over the Internet to view or
change its settings.
You need to know the gateway’s WAN IP address to use this feature.
Tip: Be sure to change the password for admin to a secure password. The ideal password
contains no dictionary words from any language and contains uppercase and lowercase letters,
numbers, and symbols. It can be up to 30 characters. See Change the Admin Password.
To set up remote management:
1. On a computer or wireless device that is connected to your gateway, launch a Web
browser.
2. In the address or URL field of your browser, type http://myrouter.
3. When pr ompted to log in, enter admin for the user name and type the password. (The
default password is password.)
4. Click Security > Remote Management.
Security 40
Page 49

5. Select the Turn Remote Management On check box.
6. In the Allow Remote Access By section, specify the external IP addresses to be allowed
to access the gateway’s remote management.
7. For enhanced security, restrict access to as few external IP addresses as practical.
8. Select one of the following:
To allow access from a single IP address on the Internet, select the Only This
Computer radio button. Enter the IP address to be allowed access.
To allow access from a range of IP addresses on the Internet, select the IP Address
Range radio button. Enter a beginning and ending IP address to define the allowed
range.
To allow access from any IP address on the Internet, select the Everyone radio
button.
9. Specify the port number for accessing the web browser interface.
Normal web browser access uses the standard HTTP service port 80. For greater
security, enter a custom port number for the remote web management interface.
Choose a number from 1024 to 65535, but do not use the number of any common
service port. The default is 8080, which is a common alternate for HTTP.
10. To enable remote logging, select the Enable Remote Log Config check box and
specify the remote IP address.
11. Click Submit.
To use remote access:
1. Launch a Web browser on a computer that is not on your home network.
2. Type your gateway’s WAN IP address into your browser’s address or location field
followed by a colon (:) and the custom port number.
For example, if your external address is 134.177.0.123 and you use port number 8080, enter
https://134.177.0.123:8080 in your browser.
TR069 Client
You can set up the gateway to let you use TR069 client to manage the gateway remotely.
TR069 client is configured by the Sprint network.
Security 41
Page 50

To set up TR069 client in the gateway:
1. On a computer or wireless device that is connected to your gateway, launch a Web
browser.
2. In the address or URL field of your browser, type http://myrouter.
3. When prompted to log in, enter admin for the user name and type the password. (The
default password is password.)
4. Click Security > Remote Management > TR069 Client.
5. Select the Turn WAN Management Protocol On check box.
6. Enter the settings for the connection.
7. Click Submit.
SNMP
You can enable SNMP in the gateway and use SNMP to manage the gateway remotely.
Using SNMP v3 support provides the best results and the best security when you are using
SNMP. SNMP v2C and v3 are supported, but not v1. SNMP version 3 adds both encryption and
authentication, which can be used together or separately.
To enable SNMP in the gateway:
1. On a computer or wireless device that is connected to your gateway, launch a Web
browser.
2. In the address or URL field of your browser, type http://myrouter.
3. When prompted to log in, enter admin for the user name and type the password. (The
default password is password.)
Security 42
Page 51

4. Click Security > Remote Management > SNMP.
5. Select the SNMP agent Enable radio button.
6. Enter the settings for the connection.
NOTE: The user name and password are required only for SNMP v3. SNMPv2c
performs authentication using these community strings: public for read-only and
netgear for read-write. The trap community string is fixed to netgear.
7. Click Submit.
Firewall Rules
The Firewall Rules page sets the level of security on your local network.
To specify the firewall security level:
All security levels, except None, protect against known Internet attacks and attempts at remote
access to your modem.
1. On a computer or wireless device that is connected to your gateway, launch a Web
browser.
2. In the address or URL field of your browser, type http://myrouter.
3. When prompted to log in, enter admin for the user name and type the password. (The
default password is password.)
Security 43
Page 52

4. Click Security > Firewall.
Item
Description
High
The High security setting allows only basic Internet functionality. The
Medium
The Medium security setting allows only basic Internet functionality by
Low
The Low security setting will allow all traffic except for known attacks.
Custom
Custom is an advanced configuration option that allows you to edit the
5. Select the radio button for the security level that you want.
6. Click the OK button to confirm th e change.
The following settings are available.
High security setting guarantees to pass only Mail, News, Web, FTP,
IPSEC and Telnet. All other traffic is not allowed. High security restricts
modification by NAT configuration options.
default, just like High level security. Medium security, however, allows
customization through NAT configuration so certain traffic can pass.
With low security, your modem is visible by other computers on the
Internet.
firewall configuration directly. Only expert users should attempt this
Known attacks that will be blocked include the following:
● LAN to modem protocol UDP, destination ports 135,136,137,138,389,3268
Security 44
Page 53

● LAN to modem protocol TCP, destination ports 53, 135, 136, 137, 138, 389, 3268
● LAN to WAN protocol UDP, destination ports 135, 136, 137, 138, 139, 161, 389, 445,
3268
● LAN to WAN protocol TCP, destination ports 53, 135, 136, 137, 138, 139, 161, 389, 445,
3268
Block Inte rn e t Access
You can create a custom firewall rule to block all Internet access based on a schedule that you
set.
To do this, you specify a custom firewall and set up a blocked services rule.
To block all Internet acces s during a specific time:
1. On a computer or wireless device that is connected to your gateway, launch a Web
browser.
2. In the address or URL field of your browser, type http://myrouter.
3. When pr ompted to log in, enter admin for the user name and type the password. (The
default password is password.)
4. Click Security > Firewall > Fi rewall Rules.
5. Select the Custom radio button and click OK.
6. Click Security > Firewall > Block Services.
7. In the Services Blocking section, select the Per Schedule radio button and click Submit.
Security 45
Page 54

8. In the Block Services List, click the Add button.
The Add Block Service pop-up screen displays.
9. From the Service Type list, select Any.
The screen populates with these sett ings:
The Protocol list is automatically set to TCP/UDP.
The Starting and Ending Ports are automatically set to 1 through 65534. These cover
all possible ports.
In the Filter Services For section, All IP Services is selected.
10. Click Submit.
For information about how to set up a blocking schedule, see Schedule When to Block
Internet Sites and Services.
Use Keywords to Block Internet Sites
You can use keywords to block certain Internet sites from your network. You can use blocking
all the time or based on a schedule.
Security 46
Page 55

To block Internet sites:
11. On a computer or wireless device that is connected to your gateway, launch a Web
browser.
12. In the address or URL field of your browser, type http://myrouter.
13. When prompted to log in, enter admin for the user name and type the password. (The
default password is password.)
14. Click Security > Firewall > Block Sites.
15. Select one of the keyword blocking options:
Per Schedule: Turn on keyword blocking according to the Schedule screen settings.
(See Schedule When to Block Internet Sites and Services.)
Always: Turn on keyword blocking all the time, independent of the Schedule screen.
16. In the Add Keyword field, enter a keyword or domain that you want to block.
For example:
Specify XXX to block http://www.badstuff.com/xxx.html.
Specify .com if you want to allow only sites with domain suffixes such as .edu or
.gov.
Security 47
Page 56

Enter a period (.) to block all Internet browsing access.
17. Click the Add Keyword button.
The keyword is added to the keyword list. The keyword list supports up to 32 entries.
18. Click the Submit button.
Your settings are saved. Users on the LAN cannot access the blocked sites.
Note: Site blocking works by interrupting DNS queries. So if the client has already resolved the
domain name, then it is not blocked until the next query. This may take few minutes.
To delete keywords from the list:
■ Select the word and click the Delete Keyword button. The keyword is removed from the
list.
Block Servi ces from the Internet
You can block Internet services on your network based on the type of service. You can block
the services all the time or based on a schedule.
NOTE: The Firewall Rule should be set to Custom for blocked services t o take effect.
NOTE: To disable Block Services, the Firewall Rule must be set to other than Custom.
To block services:
1. On a computer or wireless device that is connected to your gateway, launch a Web
browser.
2. In the address or URL field of your browser, type http://myrouter.
3. When prompted to log in, enter admin for the user name and type the password. (The
default password is password.)
Security 48
Page 57

4. Click Security > Firewall > Block Services.
Tip: For information about how to specify the schedule, see Schedule When to Block
Internet Sites and Services.
5. To add a service that is in the Service Type list, select the application or service.
The settings for this service automatically display in the fields.
6. To add a service or application that is not the list, click the Add button.
The Services screen displays.
7. In the Service Name field, type the name of the service.
8. If you know that the application uses either TCP or UDP, select the appropriate protocol;
otherwise, select TCP/UDP (both).
9. Enter the starting port and ending port numbers. If the service uses a single port
number, enter that number in both fields.
Tip: To find out which port numbers the service or application uses, you can contact the
publisher of the application, ask user groups or newsgroups, or search on the Internet.
Security 49
Page 58

Schedule When to Block Internet Sites and Services
When you schedule blocking, the same schedule is used to block sites and to block services.
For information about how to specify what you want the router to block, see Use Keywords to
Block Internet Sites and Block Services from the Internet.
To schedule blocking:
1. On a computer or wireless device that is connected to your gateway, launch a Web
browser.
2. In the address or URL field of your browser, type http://myrouter.
3. When prompted to log in, enter admin for the user name and type the password. (The
default password is password.)
4. Click Security > Firewall > Schedule.
5. Specify when to block keywords and services:
Days to Block. Select the check box for each day that you want to block the
keywords or select the Ev ery Day check box, which automatically selects the check
boxes for all days.
Time of Day to Block. Select a start and end time in 24-hour format, or select All
Day for 24-hour blocking.
6. Select your time zone from the list.
Security 50
Page 59

7. If you use daylight saving time, select the Automatically adjust for daylight savings
time check box.
8. Click the Submit button.
NOTE: For the schedule to take effect, Per Schedule must be selected for Block Services or
Block Sites.
Avoid Keyword Blocking on a Trusted Computer
You can exempt one trusted computer from blocking.
The computer you exempt must have a fixed IP address. You can use the reserved IP address
feature to specify the IP address. See Address Reservation.
To specify a trusted computer:
1. On a computer or wireless device that is connected to your gateway, launch a Web
browser.
2. In the address or URL field of your browser, type http://myrouter.
3. When prompted to log in, enter admin for the user name and type the password. (The
default password is password.)
4. Click Security > Firewall > Block Sites.
5. Scroll down and select the Allow trusted IP address to visit blocked sites check box.
6. In the Trusted IP Address field, enter the IP address of the trusted computer.
7. Click the Submit button.
ALG Services
Application level gateway (ALG) allows customized NAT traversal filters to be plugged into the
gateway to support address and port translation for certain application layers such as FTP,
PPTP, and IPSec.
Note: When the firewall level is set to High, some services may not be configurable.
1. On a computer or wireless device that is connected to your gateway, launch a Web
browser.
2. In the address or URL field of your browser, type http://myrouter.
3. When prompted to log in, enter admin for the user name and type the password. (The
default password is password.)
Security 51
Page 60

4. Click Security > ALG.
5. Select the check boxes for the ALG services that you want.
IP Passthrough
You can designate a computer behind the gateway to receive unsolicited traffic from the public
network.
IP passthrough allows your wireless network carrier to assign an address directly on the Internet
to external devices that are configured as the IP passthrough clients. This feature might be used
for specific enterprise network or enterprise VPN configurations, or to allow direct remote
access into the IP passthrough address.
You can continue to use other LAN or Wi-Fi clients to access the Internet through the gateway.
Note: The public WAN IP will be assigned to this computer and the firewall settings will be
disabled only for this port. Before setting up IP passthrough, make sure that you understand the
effects of making this change and confirm that your IP passthrough device has its own
firewalling or security settings.
To set up IP passthrough:
1. Use an Ethernet cable to connect the computer to a LAN Ethernet port on the gateway.
2. On this computer, launch a Web browser.
3. In the address or URL field of your browser, type http://myrouter.
4. When prompted to log in, enter admin for the user name and type the password. (The
default password is password.)
Security 52
Page 61

5. Click Settings > Network > IP Passthrough.
6. Select the IP Passthrough Enable check box.
7. To specify the device, do one of the following:
Leave the MAC Address radio button selected and type the MAC address of the
device. MAC addresses are in the form of xx:xx:xx:xx:xx:xx, where xx represents
hexadecimal numbers.
Select the Connected Devices radio button and select the device from the list. If
you do not see the device in the list, make sure that it is connected to one of the
gateway’s Ethernet LAN ports.
Select the Port Number radio button and select a port number. The connected
device may be assigned a LAN IP address. When the lease period expires
(approximately 3 – 5 minutes), the computer should have a WAN IP address. To
check the lease time of the IP address on Windows machine, run ipconfig /all in
console.
8. Click Submit.
Note: When enabling IP passthrough, you must clear any existing DHCP lease to get the
correct IP address assigned from the router. On Windows client, you can use the command
ipconfig /release, followed by ipconfig /renew. On Linux client, you can use ifconfig eth1 down,
followed by ifconfig eth1 up. The Ethernet interface ID may differ on different machines and may
not be eth1.
Note: If the IPPT device is connected before IPPT is configured and enabled, the IPPT device
will have a LAN IP with a lease time of 24 hours. You must release and renew the IP address to
obtain a WAN IP.
Note: For detailed IP passthrough usage scenarios, consult Sprint.
IPPT Functionality with Dual WAN
IP passthrough can co-function with the dual WAN feature. In dual WAN, the Internet access is
through Ethernet WAN as long as it is available. If the gateway detects that the Ethernet WAN is
Security 53
Page 62

not working, the gateway initiates a mobile data call to be used for Internet access. When
Ethernet WAN is available again, the gateway falls back to the Ethernet WAN connection. See
Ethernet WAN Settings for more details.
The IPPT client IP address changes depending on which WAN interface is active. When WAN
Ethernet is active, the IPPT client has a WAN Ethernet IP address and when mobile is active,
the IPPT client has a mobile WAN IP address. When the gateway is in the process of switching
the Internet connection, the IPPT client may have an old WAN IP address or LAN IP address
from 5 seconds to 5 minutes. During this time, the IPPT client loses Internet connectivity.
Note: If you reboot your gateway, you must have the WAN Ethernet cable connected and active
if you intend to use this feature. The feature will not work if the Ethernet cable is unplugged
when the gateway boots up.
Security 54
Page 63

USB File Sharing
You can connect a USB drive to the gateway’s USB port and share it with others on your
network.
You can specify how you want file sharing to be managed for files on a USB device attached to
the gateway USB port.
To set up file sharing for a USB driv e:
1. Connect a USB drive to the USB port on your gateway.
2. On a computer or wireless device that is connected to your gateway, launch a Web
browser.
3. In the address or URL field of your browser, type http://myrouter.
4. When prompted to log in, enter admin for the user name and type the password. (The
default password is password.)
5. Click Settings > Router > File Sharing.
USB File Sharing 55
Page 64

6. To allow file sharing, select Enable in the File Server field.
When this feature is enabled, all of the files on the USB drive are avail able as Windows
Shared Files to other devices on the local area network (LAN). Shared files are not
available to clients on the Internet outside of the local network.
7. In the Domain Name field, specify the network name.
This feature allows a computer on the LAN to access the shared files with a name rather
than the IP address. The host name displays in the Windows Network on local network
computers. Files can be accessed with the router’s IP address (for example,
\\192.168.15.1), the host name (for example, \\dslrouter), or the link in the network
neighborhood.
8. In the File Sharing Users section, specify user names and passwords for access to
network file shares.
With this feature, anyone who tries to access the files on the USB device must enter a
user name and password. Each user can be set to read only or have write access to the
files on the USB drive. Existing passwords cannot be viewed. You must change them if
they are forgotten.
9. To add a user, click the Add button and type the user name and password.
10. To edit a user’s credentials or password, click the user name.
USB File Sharing 56
Page 65

Gateway Settings
Item
Description
Router LED
Router LED
Indicates whether the LEDs are used (On) or not (Off). See
Manage the gateway settings. From the Settings page, you can configure your device, network,
and router settings.
General Settings
From the General tab, you can configure your device’s LED status indicators, the gateway’s
(web browser) URL and administrator password.
1. On a computer or wireless device that is connected to your gateway, launch a Web
browser.
2. In the address or URL field of your browser, type http://myrouter.
3. When prompted to log in, enter admin for the user name and type the password. (The
default password is password.)
4. Click Settings and the General tab displays.
The following information is displayed.
Turning the LED On or Off.
Gateway Settings 57
Page 66

Homepage
(Web UI name)
URL
The URL used to show the home page. See
Changing the Gateway’s URL.
Set Password
The password used to show the home page. See
Changing the Password.
LED Settings
By default, the LEDs are on because they are status indicators. You can log in to the gateway
and turn the LEDs off and on.
To turn the LEDs off and on:
1. On a computer or wireless device that is connected to your gateway, launch a Web
browser.
2. In the address or URL field of your browser, type http://myrouter.
3. When prompted to log in, enter admin for the user name and type the password. (The
default password is password.)
4. Click Settings > General > Device.
5. Beside LED, select On or Off as desired.)
6. Click Submit.
Login Settings
You can customize the URL that you use to log in to the gateway and you can change the
administrator password.
Change the Gateway URL
You may want to change the URL for the gateway to something more memorable.
To change the URL:
1. On a computer or wireless device that is connected to your gateway, launch a Web
browser.
2. In the address or URL field of your browser, type http://myrouter.
3. When prompted to log in, enter admin for the user name and type the password. (The
default password is password.)
4. Click Settings > General > Device.
5. In the URL field (in the Homepage section), type the new value (maximum 31 letters
and numbers).
Gateway Settings 58
Page 67

6. Click Submit.
Change the Admin Password
For security reasons, you should change the gateway’s admin password on a regular basis.
It is strongly recommended that you enable password recovery, so that if you forget the
password you can recover it.
Note: If you forget the admin password, you’ll need to reset your device to its default settings
and go through the device setup. (See What Do I Do if I Forget the Administrator Password?.)
To change the administrator password:
1. On a computer or wireless device that is connected to your gateway, launch a Web
browser.
2. In the address or URL field of your browser, type http://myrouter.
3. When prompted to log in, enter admin for the user name and type the password. (The
default password is password.)
4. Click Settings > General > Device.
5. In the Old Password field, type the old password.
6. In the New Password field, type the new password (1–31 letters, numbers, and
symbols).
7. In the Confirm New Password field, type the new password again.
8. Click Submit.
Software and Reset
From this page, you can save your current device settings and restore them later, update your
software, reset your device to default settings, and set your device startup options.
1. On a computer or wireless device that is connected to your gateway, launch a Web
browser.
2. In the address or URL field of your browser, type http://myrouter.
3. When pr ompted to log in, enter admin for the user name and type the password. (The
default password is password.)
Gateway Settings 59
Page 68

4. Click Settings > General > Software and Reset.
You can:
● Back up and restore your gateway’s configuration, if needed. See
Export Settings and Import Settings.
● Update your gateway’s software. See Update the Software and Firmware.
● Reset some or all of your gateway’s settings. See Reset Device Settings Only, Reset the
Gateway to Factory Default Settings, and Clear Account Details Only.
● Reboot the gateway.
Gateway Settings 60
Page 69

The following information is displayed.
Item
Description
Downl oad /
Click Save to make a copy (export) of the gateway’s current
Restore Settings
Click Choose file to use a previously saved copy of your device
Software Update
Click Check for update to see if a new version of software has been
Firmware Update
Click Upload to see if a new version of your device’s firmware has been
Factory Reset
Click to reset your device to factory default settings and clear your
Reset
Settings Reset. Click to reset your device to factory default settings, but
Backup
configuration, so that you can restore it later if needed. See Exporting
Settings.
configurat ion. See Importing Setting s.
released and if there is, download and install it. The last time you
checked is shown on the screen (Last checked at). See
Update the Software and Firmware.
Note: Software downloads count against your plan’s data limit.
released, and if there is, download and install it.
account details. See Reset the Gateway to Factory Default Settings.
(You can do this only with assistance from Sprint.)
leave your Sprint account details unchanged. See
Reset Device Settings Only.
Clear Programming. Click to clear your account details. See
Clear Account Details Only.
System Logs
Technical support staff may need you to configure system logging in this page for the purpose
of err or diagn osis.
Note: You should adjust settings on this page only under the direction of technical support staff.
1. On a computer or wireless device that is connected to your gateway, launch a Web
browser.
2. In the address or URL field of your browser, type http://myrouter.
3. When prompted to log in, enter admin for the user name and type the password. (The
default password is password.)
Gateway Settings 61
Page 70

4. Click Settings > General > System Logs.
You can:
● Stop capturing logs
● Save as a file
● Clear logs
Date & Time Settings
Configure the date and time settings.
To specify the date and time settings:
1. On a computer or wireless device that is connected to your gateway, launch a Web
browser.
2. In the address or URL field of your browser, type http://myrouter.
3. When prompted to log in, enter admin for the user name and type the password. (The
default password is password.)
Gateway Settings 62
Page 71

4. Click Security > Date & Time.
Note: The Local Time field displays the local time.
5. In the Time Zone list, select the time zone.
6. If your location uses daylight saving, select the Daylight Saving Time check box.
Selecting this check box enables daylight saving time. If the current time falls within
the daylight saving period, then daylight saving time takes effect. The Start and End
fields display.
7. If needed, change the settings in the Start and End fields.
8. Select or clear the Automatic Time Update check box.
This check box enables or disables the NTP server. You can edit the first NTP server
entry and you can add, remove, or edit a second NTP server.
9. Click Submit.
Your changes are saved.
Network Setup
From the Network Setup page, you can specify how the gateway selects mobile networks and
roaming, and receive network configuration updates from Sprint.
Gateway Settings 63
Page 72

1. On a computer or wireless device that is connected to your gateway, launch a Web
Item
Description
Network Mode
The type of network that your device can connect to. See
Roaming Mode
The areas in which your device can roam. See
browser.
2. In the address or URL field of your browser, type http://myrouter.
3. When prompted to log in, enter admin for the user name and type the password. (The
default password is password.)
4. Click Settings > Network.
You can:
● Configure network selection and roaming options.
● Check the network for a new Preferred Roaming List.
The following information is displayed.
Setting the Allowed Network Mode.
Setting the Roaming Mode.
Gateway Settings 64
Page 73

Roaming Guard
If selected, the roaming areas where a warning will appear when you
enter them. See
Update PRL
Click to check if a new PRL (Preferred Roaming List) is available on the
Update Network
Settings
Click to re-run HFA (Hands Free Activation).
Manual
Use only when instructed by Sprint.
Advanced
Settings
Use only when instructed by Sprint.
Enabling / Disabling the Roaming Guard Warning Message.
network, and use it to update your device.
Configuration
Network Access Point Names
In this page, you can add, modify, or remove access point names (APNs) for the networks you
want to connect to.
To connect to a carrier’s network when roaming, your device must be configured with an access
point name (APN) for that carrier. The APN is checked by the carrier to determine the type of
network connection to establish.
Note: Your gateway comes with the APN for Sprint preconfigured.
To view or change the access point names:
1. On a computer or wireless device that is connected to your gateway, launch a Web
browser.
2. In the address or URL field of your browser, type http://myrouter.
3. When prompted to log in, enter admin for the user name and type the password. (The
default password is password.)
4. Click Settings > Network > Access Point Names.
Gateway Settings 65
Page 74

Configure Access Point Names
Your gateway comes preconfigured with the access point name (APN) fo r Sprint.
To add an APN for another network:
1. On a computer or wireless device that is connected to your gateway, launch a Web
browser.
2. In the address or URL field of your browser, type http://myrouter.
3. When prompted to log in, enter admin for the user name and type the password. (The
default password is password.)
4. Click Settings > Network > Access Point Names.
5. In the blank line, enter the APN details:
Active: If the new APN is going to be used now, select this button.
Name: Enter a short description (for example, the carrier name).
APN: Ent er t he APN you obtained from the carrier.
Username: Enter the user name you obtained from the carrier (if required).
Password: Enter the password you obtained from the carrier (if required).
6. Click Submit.
7. Click the beside the new APN entry.
To select the APN to be used:
● Select the Active button at the beginning of the entry.
To remove an APN from the list:
● Click the beside the APN entry.
Gateway Settings 66
Page 75

The list of all APNs that have been set up includes the following information.
Item
Description
Active
The access point currently in use. Only one access point can be marked
Name
Network carrier name (for example, Sprint).
APN
The operator’s access point name (obtained from the operator).
Username
If required, the user name (obtained from the operator) used to connect
Password
If required, the password (obtained from the operator) used to connect
as active.
to the APN.
to the APN.
View SIM Security
If you are using a SIM that has security enabled, you can display the SIM security status.
To display SIM security status:
1. On a computer or wireless device that is connected to your gateway, launch a Web
browser.
2. In the address or URL field of your browser, type http://myrouter.
3. When prompted to log in, enter admin for the user name and type the password. (The
default password is password.)
4. Click Settings > Network > SIM Security.
If the SIM has security enabled, SIM Security is shown as Active.
Status Details
This page shows you details about the current mobile broadband connection (3G or LTE).
1. On a computer or wireless device that is connected to your gateway, launch a Web
browser.
2. In the address or URL field of your browser, type http://myrouter.
Gateway Settings 67
Page 76

3. When prompted to log in, enter admin for the user name and type the password. (The
Item
Description
Connected Status
Indicates whether you are connected to an LTE network.
Service type
Indicates the LTE service type.
RSRP
The signal strength of the LTE network (reference signal received
RSRQ
The siqnal quality of the LTE network (Reference Signal Received
RS-SINR
Signal to Interference Noise Ratio based on Reference Signals
PLMN ID
Public land mobile network ID (operator network ID).
Serving Cell
The 3G/4G cell that is currently serving the gateway (router).
TX Power
The transmitter power. A higher number is better.
IP Address
The IP address of the 4G LTE connection.
Channel UL
The channel that is used to upload to the 4G LTE network.
Channel DL
The channel that is used to download from the 4G LTE network.
IMSI
The International Mobile Station Identity is an identifier of a device on
Band
The LTE band being used for the connection.
Last Error Code
Technical support staff may request this value from you.
ICCID
The Integrated Circuit Card ID.
default password is password.)
4. Click Settings > Network > Status Details.
The information that is displayed depends on your current connection.
4G/LTE Details
power).
Quality). RSRQ is the ratio between the RSRP and the Received Signal
Strength Indicator (RSSI).
(narrowband and wideband).
the network.
Gateway Settings 68
Page 77

3G Details
Item
Description
Status
Indicates whether you are connected to a 3G network.
PS service type
Indicates the 3G service type (for example, CDMA, HRPD,
IP Address
The IP address of the 3G connection.
IPv6
IPv6 is the next generation Internet Protocol (IP) address standard that
Coverage Type
The type of 3G network available.
RSSI
Signal strength of the network.
Ec/Io
Dimensionless ratio of the average power of a channel, typically the pilot
MDN
Mobile Directory Number. This is your 10-digit telephone number.
MSID
Mobile Station Identifier.
DRC Cover
Digital Rate Control Cover.
DRC Value
Digital Rate Control Value.
Channel
DRC Channel number.
Roaming
Indicates if you are roaming on Sprint, domestically, or internationally.
PRL Version
Preferred Roaming List version. To update the PRL, see Network Page.
1xRTT PN
Technical support staff may request this value from you.
EVDO PN
Technical support staff may request this value from you.
PRev
Technical support staff may request this value from you.
Rx Power
Technical support staff may request this value from you.
Serving SID
The Serving System ID identifies your home network area and is used to
CDMA_HRPD).
will supplement and eventually replace IPv4.
channel, to the total signal power.
determine if you are home or roaming.
Gateway Settings 69
Page 78

NID
Technical support staff may request this value from you.
Packet Zone ID
Technical support staff may request this value from you.
Frame Error Rate
Used to determine the quality of a signal connection. Technical support
staff may request this value from you.
Subnet Color
Code
Technical support staff may request this value from you.
AN-AAA
Technical support staff may request this value from you.
Packet Error Rate
Technical support staff may request this value from you.
MIP Error Code
The Mobile IP Error Code. Technical support staff may request this
value from you.
Ethernet Setup
You do not need to change the settings on the Ethernet Setup screen unless instructed to do so
by your service provider.
To view or change the Ethernet setup:
1. On a computer or wireless device that is connected to your gateway, launch a Web
browser.
2. In the address or URL field of your browser, type http://myrouter.
3. When prompted to log in, enter admin for the user name and type the password. (The
default password is password.)
Gateway Settings 70
Page 79

4. Click Settings > Network > Ethernet Setup.
5. To change the IP address setting, select one of the following radio buttons and click
Submit.
Get Dynamically from ISP: This is the default setting, which works with most
Internet connections. The ISP assigns IP addresses as needed.
Use Static IP Address: If your ISP has assigned you a static IP address, select this
radio button and type the IP address, subnet mask, and gateway IP address into the
fields.
6. To change the Domain Name Server (DNS) Address setting, select one of the
following radio buttons and click Submit.
Get Automatically from ISP. This is the default setting. The ISP automatically
assigns DNS servers.
Use These DNS Servers. To use specific DNS servers, select this radio button and
type the appropriate IP addresses in the Primary DNS and Secondary DNS fields.
7. To change the MTU size, type a value in the MTU Size field and click Submit.
Note: The maximum transmission unit (MTU) is the largest data packet a network device
transmits. For more information about this setting, see MTU Size.
MTU Size
Learn about maximum transmission unit (MTU) size and how to change this setting.
Gateway Settings 71
Page 80

The maximum transmission unit (MTU) is the largest data packet a network device transmits.
MTU Siz e
Application
1500
The largest Ethernet packet size. This setting is typical for connections that
1492
Used in PPPoE environments.
1472
Maximum size to use for pinging. (Larger packets are fragmented.)
1468
Used in some DHCP environments.
When one network device communicates across the Internet with another, the data packets
travel through many devices along the way. If a device in the data path has a lower MTU setting
than the other devices, the data packets must be split or “fragmented” to accommodate the
device with the smallest MTU.
The best MTU setting for your gateway is often the default value. In some situations, changing
the value fixes one problem but causes another. Leave the MTU unchanged unless one of
these situations occurs.
You have problems connecting to your ISP or other Internet service, and the technical support
of either the ISP recommends changing the MTU setting. These Web-based applications might
require an MTU change:
● A secure website that does not open, or only part of a Web page displays.
● Yahoo! Mail.
● MSN portal.
● America Online’s DSL service.
● You use VPN and have severe performance problems.
● You used a program to optimize MTU for performance reasons, and now you have
connectivity or performance problems.
● An incorrect MTU setting can cause Internet communication problems. For example, you
might not be able to access certain Websites, frames within Websites, secure l ogin
pages, or FTP or POP servers.
If you suspect an MTU problem, a common solution is to change the MTU to 1400. If you are
willing to experiment, you can gradually reduce the MTU from the maximum value of 1500 until
the problem goes away. The following table describes common MTU sizes and applications.
The following table lists common MTU sizes.
do not use PPPoE or VPN, and is the default value for NETGEAR gateways,
adapters, and switches.
Gateway Settings 72
Page 81

1460
Usable by AOL if you do not have large email attachments, for example.
1436
Used in PPTP environments or with VPN.
1400
Maximum size for AOL DSL.
576
Typical value to connect to dial-up ISPs.
Router Settings
Adjust your gateway’s router settings through the Basic, Port Forwarding, and Port Filtering
pages.
Router Basic Settings
From this page you can configure the router’s UPnP feature, LAN settings, and DMZ settings.
1. On a computer or wireless device that is connected to your gateway, launch a Web
browser.
2. In the address or URL field of your browser, type http://myrouter.
3. When prompted to log in, enter admin for the user name and type the password. (The
default password is password.)
4. Click Settings > Router.
Gateway Settings 73
Page 82

5. You can make changes to any of these fields. When you finish, click Submit.
Item
Description
UPnP
UPnP
Current state of the Universal Plug and Play feature (On or Off). (See
LAN
IP Address
The routing hardware’s IP address on the LAN.
Netmask
The routing hardware’s internal LAN subnet mask.
DHCP Server
This field enables (On) or disables (Off) DHCP. See DHCP.
DHCP IP Range
This specifies the starting and ending address of the range of IP
DHCP Lease Time
This is the amount of time, in minutes, a computer can use its assigned
DNS Mode
This specifies how the DNS servers (that the DHCP clients are to
DMZ
DMZ On/Off
Enable / disable demilitarized zone.
The following information is displayed.
UPnP (Universal Plug and Play).)
addresses available for your device to dynamically (that is, not
permanently) assign to computers connected to it. See
DHCP.
IP address before it is required to renew the lease. After this time is up,
the computer is automatically assigned a new dynamic IP address. See
DHCP.
Enter a number between 2 and 10080.
communicate with) are obtained.
Manual: The routing hardware assigns DHCP clients the DNS servers
specified in the DNS 1 and DNS 2 fields.
Use this option to access a DNS server that provides customized
addressing or if you have a local DNS server on your network.
Note: The DNS 1 and DNS 2 fields appear only if DNS Mode is Manual.
Auto: T he DNS server specified by Sprint is used.
Gateway Settings 74
Page 83

DMZ Address
If DMZ is enabled, this is the IP address of a single computer used to
receive all unsolicited incoming connections.
Submit
UPnP (Universal Plug and Play)
UPnP provides simple and robust connectivity among consumer electronics, intelligent
appliances, and mobile devices from many different vendors. (For more information, see
upnp.org.)
Note: If UPnP is enabled, there are potential security risks.
To enable UPnP:
Before you can use UPnP, you must enable it.
1. On a computer or wireless device that is connected to your gateway, launch a Web
browser.
2. In the address or URL field of your browser, type http://myrouter.
3. When prompted to log in, enter admin for the user name and type the password. (The
default password is password.)
4. Click Settings > Router.
5. Next to UPnP, select On.
6. Click Submit.
DHCP
DHCP (Dynamic Host Control Protocol) automatically assigns an IP address to each device on
the network and manages other network configuration information for devices connected to your
network. You do not need to manually configure the IP address on each device that’s on your
network.
The assigned IP addresses are not permanent (as opposed to when using static IP addresses).
Most ISPs (Internet Service Providers) use DHCP.
Normally, you should enable DHCP, in which case you must configure each device on the
network with one of the following:
● TCP/IP settings set to Obtain an IP address automatically.
● TCP/IP bound to the Ethernet connection with DHCP.
Gateway Settings 75
Page 84

If DHCP is disabled, you must configure each device on the network with:
● Fixed (permanent/static) IP address.
● DNS server addresses (provided by Sprint).
To enable DHCP:
1. On a computer or wireless device that is connected to your gateway, launch a Web
browser.
2. In the address or URL field of your browser, type http://myrouter.
3. When prompted to log in, enter admin for the user name and type the password. (The
default password is password.)
4. Click Settings > Router.
5. Next to DHCP Server, select Enabled.
6. You can set the following DHCP settings:
DHCP IP Range: This is the starting and ending address of the range of IP
addresses available for your device to dynamically (that is, not permanently) assign
to computers connected to it.
Note: The start address must be 192.168.0.10 or above and the ending address
must be 192.168.0.50 or below.
DHCP Lease Time: This is the amount of time, in minutes, a computer can use its
assigned IP address before it is required to renew the lease. After this time is up, the
computer is automatically assigned a new dynamic IP address.
Note: Enter a number between 2 and 10080.
DNS Mode: This specifies how the DNS servers (that the DHCP clients are to
communicate with) are obtained. (See DNS Mode.)
7. Click Submit.
DNS Mode
The DNS Mode setting specif ies how the DNS servers (that the DHCP clients are to
communicate with) are obtained.
1. On a computer or wireless device that is connected to your gateway, launch a Web
browser.
2. In the address or URL field of your browser, type http://myrouter.
Gateway Settings 76
Page 85

3. When prompted to log in, enter admin for the user name and type the password. (The
default password is password.)
4. Click Settings > Router.
5. Set DNS Mode to one of the following:
Auto: The DNS server specified by Sprint is used.
Manual: The routing hardware assigns DHCP clients the DNS servers specified in
the DNS 1 and DNS 2 fields. (These fields appear when Manual is selected.)
Use this option to access a DNS server that provides customized addressing or if
you have a local DNS server on your network.
6. Click Submit.
Port Forwarding
Port forwarding lets you forward incoming traffic to specific ports and devices (per their local IP
address) on your network. (Normally, incoming traffic is blocked.)
1. On a computer or wireless device that is connected to your gateway, launch a Web
browser.
2. In the address or URL field of your browser, type http://myrouter.
3. When prompted to log in, enter admin for the user name and type the password. (The
default password is password.)
4. Click Settings > Router > Port Forwarding.
You can:
● Enable or disable port forwarding. See Enable Port Forwarding.
Note: You must enable port forwarding before you can view and update the port forwarding list.
● Enter port forwarding details for an application. (See
Enable Port Forwarding for an Application.)
For example, you can configure port forwarding so that:
Gateway Settings 77
Page 86

You can access your Remote Desktop from the Internet (by specifying the WAN
Item
Description
Port Forwarding
Indicates whether port forwarding is on (Enable) or off (Disable).
List of forwarded ports: This list appears only if port forwarding is on. Each port displays:
Name
A name describing the application using the port.
IP Address
The IP address of the server being accessed.
Port
The port that is forwarded. If the application uses more than one port,
Protocol
The protocol (TCP, UDP, etc.) being used for this application.
Actions
[public] IP address that your device is using).
Internet users can access a Web, FTP, or email server, or gaming or Internet
application hosted by your computer.
● Remove an application from the port forwarding list. (See
Port Forward Panel: Disable Port Forwarding for an Application.)
Note: Port forwarding creates a security risk. When not required, port forwarding should be
disabled.
Note: Port forwarding does not apply to normal browsing, file downloading, running most online
games or other applications hosted on the Internet. (Some online games require port
forwarding.)
The following information is displayed.
each port must be forwarded separately.
Enable Port Forwarding
Before you can use or configure port forwarding, you must enable it.
1. On a computer or wireless device that is connected to your gateway, launch a Web
browser.
2. In the address or URL field of your browser, type http://myrouter.
3. When prompted to log in, enter admin for the user name and type the password. (The
default password is password.)
Gateway Settings 78
Page 87

4. Click Settings > Router > Port Forwarding.
5. Next to Port Forwardi ng, select Enable.
6. Click Submit.
Enable Port Forwarding for an Application
You can enable port forwarding for certain application types.
Note: Port forwarding must currently be enabled. (See Enabling Port Forwarding.)
1. On a computer or wireless device that is connected to your gateway, launch a Web
browser.
2. In the address or URL field of your browser, type http://myrouter.
3. When prompted to log in, enter admin for the user name and type the password. (The
default password is password.)
4. Click Settings > Router > Port Forwarding.
5. In the blank row of the list, enter a name that describes the application (for example,
RandomEmailApp).
6. In the IP field, enter the IP address of the server to be accessed.
7. In the Port field, enter the port used by the application. (If the application uses more than
one port, each port must be forwarded separately.)
8. In the Protocol list, click the protocol(s) used for this application (TCP, UDP).
9. Click the to add this row to the list.
10. Click Submit.
Disable Port Forwarding for an Application
If you want to stop forwarding any ports, you can remove them from the forwarding list.
Note: Port forwarding must currently be enabled. (See
Enabling Port Forwarding for an Application.)
Gateway Settings 79
Page 88

1. On a computer or wireless device that is connected to your gateway, launch a Web
browser.
2. In the address or URL field of your browser, type http://myrouter.
3. When prompted to log in, enter admin for the user name and type the password. (The
default password is password.)
4. Click Settings > Router > Port Forwarding.
5. Click the beside the row that you want to remove.
6. Click Submit.
Port Filtering
Port filtering lets you either allow (white list) or prevent (black list) which applications (for
example, HTTP, FTP, email servers) can access the Internet.
1. On a computer or wireless device that is connected to your gateway, launch a Web
browser.
2. In the address or URL field of your browser, type http://myrouter.
3. When prompted to log in, enter admin for the user name and type the password. (The
default password is password.)
4. Click Settings > Router > Port Filtering.
You can:
● Enable port filtering. (See Por t Filtering Panel: Enable Port F iltering.)
● Add an application to a port filtering list. (See
Port Filtering Panel: Enable Port Filtering for an Application.)
● Remove an application from the port filtering list. (See
Port Filtering Panel: Disable Port Filtering for an Application.)
Gateway Settings 80
Page 89

The following information is displayed.
Item
Description
Port Filtering
Indicates which type of filtering is being used.
List of filtered ports: This list appears only if port filtering is on. Each port displays:
Name
A name describing the application using the port.
Port
The port that the application uses to access the Internet.
Protocol
The protocol (TCP, UDP, etc.) being used by the application.
Actions
● No Filtering: All applications are allowed to access the Internet.
● Black List: Applications in the list are not allowed to access the
Internet.
Enable Port Filtering
Before you can use or configure port filtering, you must enable it.
1. On a computer or wireless device that is connected to your gateway, launch a Web
browser.
2. In the address or URL field of your browser, type http://myrouter.
3. When prompted to log in, enter admin for the user name and type the password. (The
default password is password.)
4. Click Settings > Router > Port Filtering.
5. In the Port Filtering list, select Black List to prevent specific applications from using the
Internet.
6. Click Submit.
Enable Port Filtering for an Application
You can enable port filtering for certain application types.
Gateway Settings 81
Page 90

Note: Port filtering must currently be enabled. (See Port Filtering Panel: Enabling Port
Filtering.)
1. On a computer or wireless device that is connected to your gateway, launch a Web
browser.
2. In the address or URL field of your browser, type http://myrouter.
3. When prompted to log in, enter admin for the user name and type the password. (The
default password is password.)
4. Click Settings > Router > Port Filtering.
5. In the Name field, enter a name that describes the application being filtered (for
example, RandomEmailApp).
6. In the Port field, enter the port used by the application.
7. In the Protocol list, select the protocol(s) used for this application (TCP, UDP, or both).
8. Click the to add this filter to the list.
9. Click Submit.
Disable Port Filtering for an Application
If you currently have port filtering enabled and some ports already in the list (Black List or White
List), you can remove any of those rows.
Note: Port filtering must currently be enabled. (See Port Filtering Panel: Enable Port Filtering.)
1. On a computer or wireless device that is connected to your gateway, launch a Web
browser.
2. In the address or URL field of your browser, type http://myrouter.
3. When prompted to log in, enter admin for the user name and type the password. (The
default password is password.)
4. Click Settings > Router > Port Filtering.
5. Select Black List.
6. To remove an application from the list click the beside the row that you want to
remove.
7. Click Submit.
Gateway Settings 82
Page 91

Address Reservation
Address reservation lets you specify a specific IP address that the gateway assigns to a
computer or device when it connects to the gateway’s local area network (LAN).
When you specify a reserved IP address for a computer on the gateway’s local area network
(LAN), that computer always receives the same IP address each time it accesses the DHCP
server. Reserved IP addresses should be assigned to servers that require permanent IP
settings.
To reserve an IP address:
1. On a computer or wireless device that is connected to your gateway, launch a Web
browser.
2. In the address or URL field of your browser, type http://myrouter.
3. When prompted to log in, enter admin for the user name and type the password. (The
default password is password.)
4. Click Settings > Router > Address Reservation.
5. Click the Add button.
6. Enter the device name, IP address, and MAC address of the computer that you want to
add.
7. Click Submit.
To edit a reserved IP address:
1. Select the radio button next to the reserved address.
2. Click the Edit button.
3. Edit the IP address, MAC address, or device name.
4. Click the Accept button when finished.
Gateway Settings 83
Page 92

To delete a reserved IP address:
1. Select the radio button next to the reserved address.
2. Click the Delete button.
MAC Address Cloning
Your computer's local address is its unique address on your network. This is also referred to as
the computer's MAC (Media Access Control) address. The format for the MAC address is
XX:XX:XX:XX:XX:XX.
To set up MAC address cloning:
1. On a computer or wireless device that is connected to your gateway, launch a Web
browser.
2. In the address or URL field of your browser, type http://myrouter.
3. When prompted to log in, enter admin for the user name and type the password. (The
default password is password.)
4. Click Settings > Router > MAC Address Cloning.
5. If your ISP does not require MAC authentication, select Use Default MAC Address.
6. If your ISP requires MAC authentication, select one of the following:
Use Computer MAC address: Disguise the router's MAC address with the MAC
address of the computer that you are currently using to configure the gateway.
Use This MAC Address and manually type the MAC address: Disguise the
router's MAC address with the MAC address of another computer (not the one that
you are currently using).
7. Click Submit.
DMZ – General
You can select one computer to receive all unsolicited incoming connections.
Gateway Settings 84
Page 93

The IP address of the DMZ (demilitarized zone) is the default recipient of incoming packets
(from the Internet) that are not handled by port forwarding rules or NAT’d connections:
● If port forwarding is enabled, incoming traffic is routed according to the port forwarding
rules or NAT’d connections.
● If incoming traffic was not routed as a result of the above:
If DMZ is enabled, then incoming traffic is routed to the computer that uses the IP
address specified by the DMZ settings.
If DMZ is not enabled, the incoming traffic is blocked.
Note: Putting a computer in the DMZ opens all the ports of that computer, and exposes that
computer to various security risks. Use this option only as a last resort — if possible, use other
options instead (for example, port forwarding).
Enable DMZ
Before you can use or configure DMZ, you must enable it.
To enable DMZ:
1. On a computer or wireless device that is connected to your gateway, launch a Web
browser.
2. In the address or URL field of your browser, type http://myrouter.
3. When pr ompted t o log in, enter admin for the user name and type the password. (The
default password is password.)
4. Click Settings > Router.
5. Next to DMZ Enabled, select ON.
6. Click Submit.
Configure DMZ
Specify which computer is to receive all unsolicited incoming connections.
To configure DMZ:
Note: DMZ must currently be enabled. (See Enable DMZ.)
1. On a computer or wireless device that is connected to your gateway, launch a Web
browser.
2. In the address or URL field of your browser, type http://myrouter.
Gateway Settings 85
Page 94

3. When prompted to log in, enter admin for the user name and type the password. (The
default password is password.)
4. Click Settings > Router.
5. In the DMZ Address field, enter the IP address of the computer that you want exposed
to the Internet. (If you don’t know how to find the IP address, see Finding the IP
Address.)
Gateway Settings 86
Page 95

Share a USB Printer
The Netgear ReadySHARE Printer utility lets you share a USB printer that is connected to the
USB port on your router. You can share this USB printer among the Windows and Mac
computers on your network.
Install the Printer Driver and Cable the Printer
Some USB printer manufacturers (for example, HP and Lexmark) request that you do not
connect the USB cable until the installation software prompts you to do so.
To install the driver and cable the printer:
1. On each computer on your network that shares the USB printer, install the driver
software for the USB printer.
If you do not have the printer driver, contact the printer manufacturer.
2. Use a USB printer cable to connect the USB printer to the router USB port.
Download the ReadySHARE Printer Utility
The ReadySHARE Printer utility works on Windows and Mac computers.
To download the utility:
1. Visit netgear.com/readyshare.
2. In the ReadySHARE Printer pane, click the PC Utility or Mac Utility link.
3. Follow the onscreen instructions to download the file.
Share a USB Printer 87
Page 96

Install the ReadySHARE Printer Utility
You must install the ReadySHARE Printer utility on each computer that will share the printer.
After you install it, the utility displays as NETGEAR USB Control Center on your computer.
To install the utility:
1. Double-click the ReadySHARE Printer utility setup file that you downloaded.
The InstallShield wizard displays.
2. Follow the wizard instructions to install NETGEAR USB Control Center.
After the InstallShield Wizard completes the installation, the NETGEAR USB Control
Center prompts you to select a language.
3. Select a language from the list and click the OK button.
The NETGEAR USB Control Center displays.
Some firewall software, such as Comodo, blocks the Netgear USB Control Center from
accessing the USB printer. If you do not see the USB printer displayed in the screen,
you can disable the firewall temporarily to allow the utility to work.
4. Select the printer and click the Connect button.
The printer status changes to Manually connected by Mycomputer. Now, only your
computer can use the printer.
5. Click the Disconnect button.
The status changes to Available. Now all computers on the network can use the printer.
6. To exit the utility, selec t System > Exit.
Share a USB Printer 88
Page 97

Use the Shared Printer
For each computer, after you click the Connect and Disconnect buttons once, the utility
automatically manages the printing queue and handling. By default, the utility starts
automatically whenever you log on to Windows and runs in the background.
To manually connect and print:
1. Click the NETGEAR USB Contro l Cent er ic on .
The NETGEAR USB Cont r o l Ce nte r displays.
2. Click the Connect button.
The printer status changes to Manually connected by Mycomputer. Now, only the
computer you are using can use this printer.
3. Use the print feature in your application to print your document.
4. To release the printer so that all computers on the network can use it, click the
Disconnect button.
To print and release the printer to any computer on the network:
1. To print your document, use the print feature in your application.
The NETGEAR USB Control Center automatically connects your computer to the USB
printer and prints the document. If another computer is already connected to the printer,
your print job goes into a queue to wait to be printed.
2. If your document does not print, use the NETGEAR USB Control Center to check the
status. See View or Change the Status of a Printer.
View or Change the Status of a Printer
You can check to find out which computer is using a printer and change this setting.
Share a USB Printer 89
Page 98

To view or change the status:
1. Click the NETGEAR USB Contro l Cent er ic on .
The NETGEAR USB Cont r o l Ce nte r displays.
The Status column shows the status for each device:
Available. No print jobs are in process. You can use the USB printer from any
computer in the network.
Connected. Your computer is connected to the printer and will be released when
your print job is done.
Manually Connected by. Only the connected computer can use the printer.
Waiting to Connect. Your computer is not connected to the shared printer yet.
2. To print from your computer when the status shows Manually connected by another
computer, click the Disconnect button.
The printer is released from the connection and the status changes to Available.
3. To print from your computer when the status shows Waiting to Connect:
Click the Connect button.
The printer status changes to Manually connected by Mycomputer. Now, only your
computer can use the printer.
To allow the printer to be shared, click the Disconnect button.
The printer is released from the connection and the status changes to Available.
Share a USB Printer 90
Page 99

Use the Scan Feature of a M ul tifunction USB Printer
If your USB printer supports scanning, you can also use the USB printer for scanning. For
example, the USB printer displayed in the Windows Printers and Faxes window is ready for print
jobs.
To use the scan feature of a multifunction USB printer:
1. Click the NETGEAR USB Contro l Cent er ic on .
The NETGEAR USB Cont r o l Ce nte r displays.
2. Make sure that the printer status shows as Available.
3. Click the Network Scanner button.
The scanner screen displays so that you can use the USB printer for scanning.
Change NETGEAR USB Contr ol Center Settings
You can stop the NETGEAR USB Control Center from starting automatically when you log in to
Windows. You can also change the language and specify the time-out to release the printer
connection.
To turn off automatic NETGEAR USB Control Center startup:
1. Click the NETGEAR USB Contro l Cent er ic on .
The main screen displays.
2. Click Tools > Configuration.
Share a USB Printer 91
Page 100

3. Clear the Automatically execute when logging on Windows check box.
4. Click the OK button.
Your change is saved.
To change the language:
1. Click Tools > Configuration.
2. In the Language list, select a language.
3. Click the OK button.
The next time NETGEAR USB Control Center starts, the language changes.
To specify the time-out:
1. Click Tools > Configuration.
2. In the Timeout field, type the number of minutes.
The time-out is the number of minutes that a computer holds its connection to the printer
when the connection isn’t being used.
3. Click the OK button.
Your settings are saved.
Share a USB Printer 92
 Loading...