

Page 1

NetCommWireless
Wireless
AC750 WiFi Extender
QUICK START GUIDE
NetComm
NP127
Page 2

Wireless
WELCOME
NetCommWireless
NetCommWireless
NetCommWireless
NetCommWireless
NetCommWireless
Thank you for choosing a NetComm Wireless NP127 AC750 WiFi Extender.
This guide will help you set up, connect and congure your device quickly and easily.
PACKAGE CONTENTS
The NP127 package includes:
1 x NetComm Wireless NP127 Dual AC750 WiFi Extender
1 x Quick start guide
1 x 1.5m RJ-45 Ethernet cable
1 x WiFi security card
1 x Warranty card
NetComm
NP127 Dual AC750
WiFi Extender
1.5m RJ-45
Ethernet cable
2.4GHz - 2.4GHz -
5GHz - 5GHz -
WiFi security card
Page 3
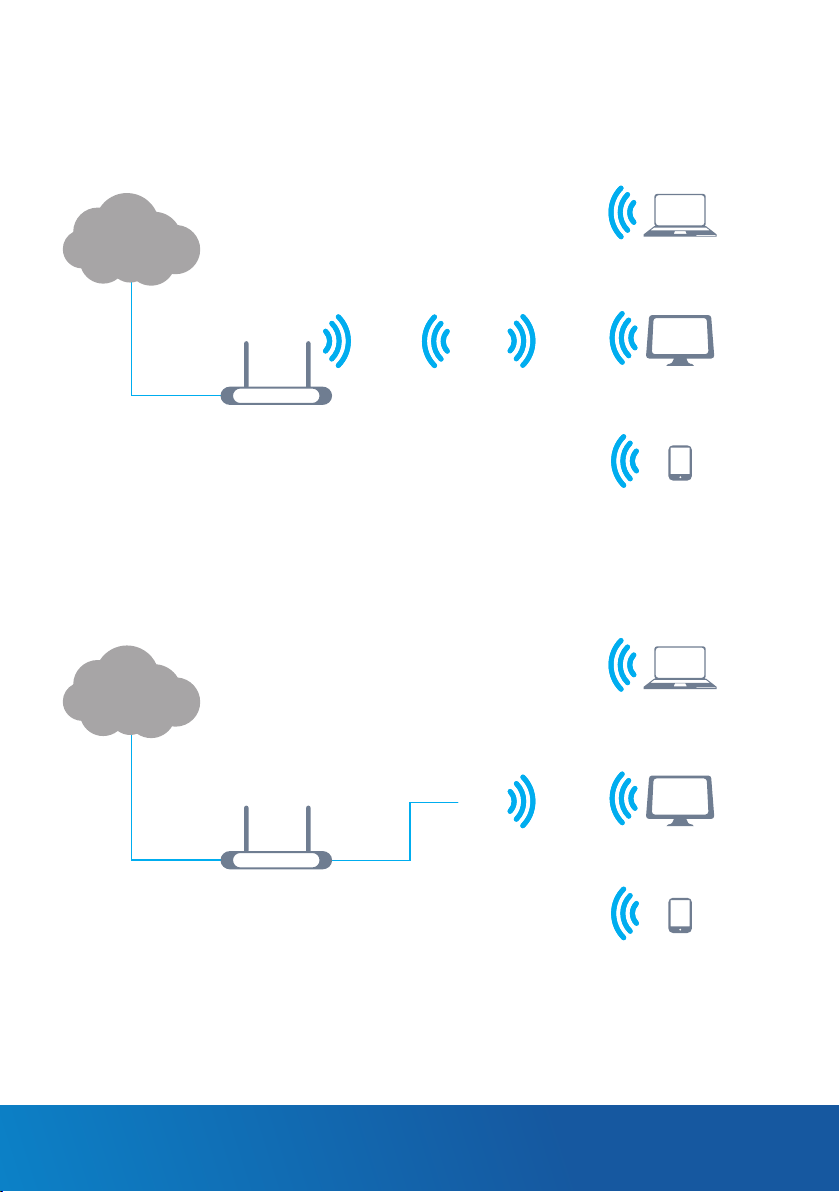
HOW IT WORKS
The NP127 has two modes of operation:
1. Repeater mode (default) – the NP127 repeats the wireless signal of your existing network
to provide coverage to a greater area of your premises
Laptop
Internet
2.4/5GHz2.4/5GHz
NP127
Router
PC
Smartphone
2. Access Point mode – the NP127 connects to an existing router via Ethernet and provides
a wireless signal for wireless devices. This is useful in situations where there is no existing
wireless access point or where you wish to provide a wireless signal to a remote area (up
to 100 metres) from where the router is located.
Laptop
Internet
Ethernet cable
Router
up to 100m
2.4/5GHz
NP127
PC
Smartphone
AC750 WiFi Extender - NP127
Page 4

Wireless
DEVICE OVERVIEW
Front panel
The NP127 features 7 LEDs on the front panel and a WPS button. The top 5 LEDs give an
indication of the distance and strength of the signal between the NP127 and the connected
router. The signal strength LEDs only functions when the device is in repeater mode. The
images below describe the meaning of each indicator and button.
The NP127 is located too far from the router to provide a
reliable signal.
The NP127 is located just out of the optimal range of the
connected router.
Optimal signal and distance from the connected router to
provide the widest coverage area for your network.
The NP127 has a good signal to the router but is too close
to maximize the coverage area.
The NP127 has a strong signal to the router but is too close
to maximize the coverage area.
When illuminated, indicates that the NP127 is correctly
powered and is switched on.
When illuminated, indicates that the NP127 is connected to
an active Ethernet connection.
WPS button/LED – Press and hold the WPS button for
between 1 and 2 seconds then release to trigger the WPS
connection when you are connecting a client device to the
NP127. Press and hold the button for between 4 and 9
seconds then release to trigger the WPS connection when
you are connecting the NP127 to a router. The WPS LED
blinks when the WPS process is triggered.
AC
Power
Ethernet
WPS
Bottom panel
Reset
Off/On
NetComm
Reset button – press and hold this button for more than 3
second to restore the factory default settings of the NP127.
Ethernet port – Connect the supplied RJ45 Ethernet cable
here to set up the WiFi Extender.
Power switch – Turns the NP127 on or off.
Page 5

CONNECTING THE WIFI EXTENDER
1. Ensure that the NP127 power switch is in the ‘off’ position and then plug the NP127 into a
power outlet which is close to your device (e.g. computer or smartphone).
2. Turn the power switch of the NP127 to the ‘on’ position. The NP127 starts up and the
Power LED illuminates. You may now access the NP127 using either WiFi or Ethernet.
Connecting over WiFi
1. Ensure WiFi is enabled on your wireless device (e.g. computer or smartphone) that will
connect to the router.
2. Scan for wireless networks in your area. If your device supports both 2.4GHz and 5GHz
networks then you will see both networks appear on the scanned list. Connect to the
network name that matches one of the Wireless network name found on the Wireless
Security Card (included in the box).
2.4GHz - 2.4GHz -
5GHz - 5GHz -
Note: For security purposes, each NetComm Wireless NP127 has a unique SSID (such as NetComm 7559) and
Wireless Security Key. The above image is for illustration only.
3. When prompted for your wireless security settings, enter the Wireless security key listed
on your Wireless Security Card.
4. Wait approximately 30 seconds for the connection to establish.
Connecting using Ethernet Cable
Connect one end of the supplied RJ45 Ethernet cable to the Ethernet port on the bottom
panel of the NP127 and the other end to the Ethernet port of your computer. Wait for 30
seconds as your computer is assigned a local address by the WiFi Extender.
AC750 WiFi Extender - NP127
Page 6

Wireless
LOGGING IN TO THE WEB INTERFACE
1. Open a web browser (such as Internet Explorer, Google Chrome or Firefox), type
http://my.extender or http://192.168.40.1 into the address bar and press Enter.
The login page is displayed
2. At the login screen, type admin into the Password eld. If you would like to store the
password in the browser, select the Remember my password option. Click the Login
button. The Connection Wizard is displayed.
CONNECTING THE NP127 TO YOUR ROUTER
Repeater Mode
Upon logging in to the NP127 web interface, you are presented with the Connection
Wizard screen.
Click the Start button at the bottom of the screen to begin connecting the WiFi Extender to
your broadband hub/router. The NP127 scans the available wireless networks in its range and
presents them in a list.
Step 1 of 2
Select the network you wish to connect to by selecting the radio button in the Select column
for the corresponding network and click the Next button. You are prompted for the Wireless
key to connect.
NetComm
Page 7

Step 2 of 2
Enter the wireless key and click the Finish button.
The NP127 connects to the router and after a moment, the NP127 displays that the
connection was successful.
Click the OK button. The connection wizard is complete. To access the NP127 user interface
in the future, connect an Ethernet cable to the Ethernet port on the NP127, then enter
http://my.extender into the address bar.
Access Point Mode
To use the NP127 in Access Point mode:
1. From the left side of the screen select the Set-up menu then select the
Mode Settings link.
2. Select AP mode then select Apply.
AC750 WiFi Extender - NP127
Page 8

Wireless
610000005339
The NP127 reboots. Wait approximately 1 minute before attempting to connect any wireless
clients to the NP127.
CHOOSING A LOCATION FOR YOUR
WIFI EXTENDER
Now that your WiFi Extender is connected to your router, you can move it to a different
location to provide greater range for your network.
1. Slide the power switch to the ‘off’ position and remove the NP127 from the wall socket.
2. Plug the NP127 into a wall socket in the centre of the area that you would like to cover
which is also within range of the router. Turn the power switch to the ‘on’ position. Wait
approximately 30 seconds for the NP127 to power up and connect to the router.
3. Examine the signal strength LEDs on the front panel of the NP127. If one of the top two
LEDs is illuminated, the NP127 is further than ideal from the router or may have other
environmental factors causing the signal to be weak. In this case, try moving the NP127 to
a wall socket closer to the router. If one of the bottom two LEDs are illuminated then you
have a strong signal to the router but you may not have the greatest coverage possible. In
this case you might like to plug the NP127 into a wall socket further away from the router
to achieve greater coverage for your wireless network. When the middle signal strength
LED is illuminated, you have the ideal location for performance and coverage of your
wireless network. Try different locations in the premises until you nd the one that provides
you with the optimal coverage for the desired area.
CONNECTING YOUR WIRELESS DEVICE TO
THE NP127
To connect additional wireless client devices to the NP127, follow the steps in the
Connecting over WiFi section of this quick start guide.
NetComm
QSG-00070 NP127 rev 3
 Loading...