

Page 1

Page 2

Legal & Regulatory Information Copyright Information
This manual is copyright. Apart from any fair dealing for the purposes of private study, research, criticism or
review, as permitted under the Copyright Act, no part may be reproduced, stored in a retrieval system or
transmitted in any form, by any means, be it electronic, mechanical, recording or otherwise, without the prior
written permission of NetComm Limited. NetComm Limited accepts no liability or responsibility, for
consequences arising from the use of this product.
NetComm Limited reserves the right to change the specifications and operating details of this product without
notice.
NetComm is a registered trademark of NetComm Limited.
All other trademarks are acknowledged the property of their respective owners.
Customer Information
ACA (Australian Communications Authority) requires you to be aware of the following information and
warnings:
(1) This unit shall be connected to the Telecommunication Network through a line cord which neets the
requirements of the ACA TS008 Standard.
(2) This equipment has been tested and found to comply with the Standards for C-Tick and or A-Tick as set
by the ACA . These standards are designed to provide reasonable protection against harmful interference
in a residential installation. This equipment generates, uses, and can radiate radio noise and, if not
installed and used in accordance with the instructions detailed within this manual, may cause interference
to radio communications. However, there is no guarantee that interference will not occur with the
installation of this product in your home or office. If this equipment does cause some degree of
interference to radio or television reception, which can be determined by turning the equipment off and on,
we encourage the user to try to correct the interference by one or more of the following measures:
• Change the dirtection or relocate the receiving antenna.
• Increase the separation between this equipment and the receiver.
• Connect the equipment to an alternate power outlet on a different power circuit from that to which the
receiver/TV is connected.
• Consult an experienced radio/TV technician for help.
(3) The power supply that is provided with this unit is only intented for use with this product. Do not use this
power supply with any other product or do not use any other power supply that is not approved for use
with this product by NetComm. Failure to do so may cause damage to this product, fire or result in
personal injury.
Note: It is recommend that you enable wireless encryption before joining the
NB1300Plus4Wireless to your network or the Internet. You are responsible for the
security of your computers and network.
www.netcomm.com.au Rev. 1- YML709
Page 2 NB1300Plus4 ADSL Modem
Page 3

Contents
Overview...........................................................................................................................................5
Package Contents ..............................................................................................................5
Connecting your NB1300Plus4Wireless ...........................................................................6
Do I need a Micro filter? .....................................................................................................8
LED Indicators ....................................................................................................................9
Using Easy Config........................................................................................................... 10
Factory Defaults ............................................................................................................. 12
Resetting to factory defaults .......................................................................................... 12
Configuration Types ....................................................................................................................... 13
ADSL Modem - Ethernet Configuration (Not recommended for Wireless use) ............. 14
ADSL Modem - USB Configuration (Not recommended for Wireless use) ................... 19
ADSL Gateway Router - Ethernet Configuration ........................................................... 24
ADSL Gateway Router - USB Configuration ................................................................. 30
Macintosh OS X USB Configuration ............................................................................... 35
Setting up your Wireless LAN........................................................................................................ 38
Introduction to Setting up your WLAN ............................................................................ 38
WLAN Basic Information................................................................................................. 38
Planning a Wireless Network.......................................................................................... 40
Configuring Client Adapters............................................................................................ 44
Configuring the Firewall ................................................................................................................. 46
Service Filtering .............................................................................................................. 46
Configuring Groups ......................................................................................................... 47
Firewall Databases ......................................................................................................... 47
Configuring Policies......................................................................................................... 48
Advanced Configuration for your NB1300Plus4 Wireless............................................................ 49
How to make changes .................................................................................................... 49
Multiple Virtual Circuits .................................................................................................... 49
USB or Ethernet? ............................................................................................................ 49
Main Menu - (Simple) ...................................................................................................... 50
Basic Menu ..................................................................................................................... 51
Status .............................................................................................................................. 52
Router.............................................................................................................................. 53
ADSL ............................................................................................................................... 54
PPP .................................................................................................................................. 55
Main Menu - (Advanced) ................................................................................................ 56
Advanced........................................................................................................................ 56
One Page Setup .............................................................................................................. 56
Hide Advanced settings .................................................................................................. 56
Administration ................................................................................................................. 57
WAN ................................................................................................................................ 57
LAN/DHCP ....................................................................................................................... 60
DNS ............................................................................................................................ ..... 61
NAT.................................................................................................................................. 62
Port Forwarding .............................................................................................................. 64
Rev. 1 - YML709 www.netcomm.com.au
NB1300Plus4 Wireless ADSL Modem Page 3
Page 4

Wireless .......................................................................................................................... 65
ADSL Configuration ........................................................................................................ 66
RIP Configuration............................................................................................................. 67
Diagnostic Test................................................................................................................ 68
Route T able .....................................................................................................................69
MAC Filtering ...................................................................................................................70
Security ........................................................................................................................... 71
Admin Password ............................................................................................................ 71
User Password ............................................................................................................... 72
Misc Configuration .......................................................................................................... 73
System Log ..................................................................................................................... 75
Code Update ................................................................................................................... 77
Status .............................................................................................................................. 78
Router.............................................................................................................................. 78
ADSL ............................................................................................................................... 79
LAN ................................................................................................................................. 80
WAN ................................................................................................................................ 81
ATM ............................................................................................................................ ..... 82
TCP Connections............................................................................................................. 83
Learned MAC Table......................................................................................................... 84
PP P .................................................................................................................................. 85
Save Settings and Reboot .............................................................................................. 86
Appendix A - Connection Instructions ........................................................................................... 87
Connect your NB1300Plus4 Wireless ADSL Modem via Ethernet ................................. 87
Connect your NB1300Plus4 Wireless ADSL Modem via USB ....................................... 88
Macintosh OS X USB Configuration ............................................................................... 89
Appendix B - Trouble Shooting ...................................................................................................... 92
General Modem Operation .............................................................................................. 92
Web Based Interface ...................................................................................................... 93
Internet / ISP Connection................................................................................................. 94
T esting your TCP/IP Network Using a Ping Utility............................................................ 96
Appendix C - Glossary................................................................................................................... 98
Appendix D - Frequently Asked Questions ................................................................................. 101
What is DHCP? .............................................................................................................. 101
What is NAT? ................................................................................................................ 101
What is Port Forwarding?............................................................................................. 102
How do you set up Firewalling correctly on a router?................................................ 103
What is QoS and why should I use it? ......................................................................... 104
Appendix E - Cable Connections ................................................................................................. 105
Appendix F - Registering your NetComm Product ....................................................................... 108
Contact Information ....................................................................................................... 108
Legal & Regulatory Information Copyright Information................................................. 109
Product Warranty ........................................................................................................... 110
Limitations of Warranty.................................................................................................. 111
www.netcomm.com.au Rev. 1- YML709
Page 4 NB1300Plus4 ADSL Modem
Page 5

Overview
Package Contents
The following items should be contained in your
NB1300Plus4Wireless ADSL Modem Router
Package:
❒ One ADSL ModemPlus4 Port Switch Wireless
(NB1300+4W)
❒ Package Contents Note and a User Guide
❒ Power Adaptor (9VAC/800mA)
❒ Telephone Line Cable (RJ11) and 605 to RJ11
Adaptor
❒ Ethernet Network Cable (RJ45)
Overview
❒ USB Cable
❒ Microfilter
❒ NetComm Communications CD-ROM
Check the contents of your package and, if any parts are missing or damaged, please contact
your Dealer.
Rev. 1 - YML709 www.netcomm.com.au
NB1300Plus4 Wireless ADSL Modem Page 5
Page 6

Connecting your NB1300Plus4Wireless
The NB1300Plus4Wireless can be connected via a USB cable or an Ethernet cable or both. The
reason for this is that the USB connection is simply an ethernet simulation, as far as your
computer is concerned the USB connection is an Ethernet connection, hence DHCP and other
protocols will work the same as for Ethernet.
Connecting your NB1300Plus4Wireless ADSL Modem via Ethernet
Overview
1. Connect your NB1300Plus4Wireless to either a computer directly or a network hub or
switch using cat5 ethernet cables. You need to ensure you are using the correct type of
ethernet cable - i.e. straight through or crossover.
2. Connect the power pack to the NB1300Plus4Wireless ADSL Modem and switch on the
power switch.
3. Ensure that the connected port has a LAN led light on the NB1300Plus4Wireless.
4. Ensure that the computer you intend to use has an IP address in the same subnet as the
NB1300Plus4Wireless ADSL Modem. (e.g. the NB1300Plus4Wireless’s default IP is
192.168.1.1 - your computer should be on 192.168.1.100 or similar.) If you have DHCP
enabled on your computer, the NB1300Plus4Wireless will assign your computer a suitable
IP address.
5. Ensure that your computer has a LAN link light.
6. Connect one end of the ADSL phone line to the NB1300Plus4Wireless ADSL Modem and
the other end to the wall socket.
7. Additional network devices or computers can be connected to the remaining LAN ports.
www.netcomm.com.au Rev. 1- YML709
Page 6 NB1300Plus4 ADSL Modem
Page 7

Connecting your NB1300Plus4Wireless ADSL Modem via USB
1. Connect the power pack to the NB1300Plus4Wireless ADSL Modem and switch on the
power switch.
2. Install the USB driver (Windows 98/Me/2000/XP only - for Macintosh refer to the
Macintosh Configuration section.)
When you install the USB driver on your computer it creates a Virtual Ethernet Adapter,
which can be configured in the same way as a Network Interface card with DHCP or static
IP address. To install the USB driver please follow the steps below;
a. Boot your machine into Windows 98/Me/2000/XP.
b. Insert your NetComm NB1300Plus4Wireless CD-ROM into your CD-ROM drive.
c. Select “Install drivers” from the screen which will automatically appear. If the screen
does not appear, browse the CD-ROM and double-click on the “autorun.exe” file.
d. Plug power up to your NB1300Plus4Wireless and switch ON.
e. Plug a USB cable from the back of the unit into a spare USB socket on your computer.
f. The Windows “Add New Hardware Wizard” should appear. Click Next to continue.
g. Ensure the option “Search for the best driver….” is chosen and click Next.
h. When prompted where you would like to look for the drivers choose “Specify location”
and untick any other boxes. Then click the browse button to select the CD-ROM drive
which you inserted you NetComm CD-ROM into. Then choose the ‘USBdriver’ folder.
3. Connect one end of the ADSL phone line to the NB1300Plus4Wireless ADSL Modem and
the other end to the wall socket.
4. In addition to using the USB connection, you my connect up to 4 additional network devices
or computers.
Overview
Rev. 1 - YML709 www.netcomm.com.au
NB1300Plus4 Wireless ADSL Modem Page 7
Page 8

Do I need a Micro filter?
Micro filters are used to prevent common telephone equipment, such as phones, answering
machines and fax machines, from interfering with your ADSL service. If your ADSL enabled
phone line is being used with any other equipment other than your ADSL Modem then you will
need to use one Micro filter for each phone device.
Splitters may be installed when your ADSL line is installed or when your current phone line is
upgraded to ADSL. If your telephone line is already split you will not need to use a Microfilter
Overview
- check with your ADSL service provider if you are unsure.
Each micro filter is connected in-line with your telephone or fax machine so that all signals pass
through it. T elephones and/or facsimiles in other rooms that are using the same extension will
also require Microfilters. The following diagram gives an example of connecting your ADSL
Modem/Router using a Microfilter.
A suitable Microfilter can be purchased from NetComm or your Service Provider, if required.
www.netcomm.com.au Rev. 1- YML709
Page 8 NB1300Plus4 ADSL Modem
Page 9

LED Indicators
The LED Indicators are located on the front of the unit, they are green in colour. The meanings
are as follows:
Label Meaning Status Indicates:
PWR Power On Power is on
O f f Power is off
Flashing Unit is powered up correctly when pulsing steadily.
ON or OFF during reboot or when unit switched
OFF. If ON or OFF permanently then there is an
error. Try powering unit OFF then ON after a
minute.
LNK WAN Link Flashing Link being attempted by router and when receiving
or sending data on the WAN port (ADSL line)
On Link established
O f f No link
WLAN Wireless LAN Flashing Check Wireless device.
LAN 1/2/3/4 LAN Port 1/2/3/4 Flashing Flashes when data is being sent or received on the
LAN connection
On Indicates a link to your LAN or Network card is
active
O f f Indicates no link to LAN
Overview
Rev. 1 - YML709 www.netcomm.com.au
NB1300Plus4 Wireless ADSL Modem Page 9
Page 10

Using Easy Config
Loading an ISP profile into your NB1300Plus4Wireless
NetComm’s Easy Config software is supplied to help you to configure your
NB1300Plus4Wireless for a quick connection to the Internet. You can use one of the default
profiles provided or you can use a profile that is provided by your Internet Service Provider
(e.g. via Email, floppy disk or CD-ROM).
Overview
A number of examples are supplied in the next section to assist you in selecting the appropriate
connection configuration to connect your NB1300Plus4Wireless to your Network or Computer.
Note: Before continuing you must connect your ADSL Modem. Refer to the sections on
Connecting your ADSL Modem via Ethernet or via USB for instructions.
1. Switch your router ON and wait for the ‘RDY’ light to start pulsing.
2. Reset your router to factory defaults by using a pen to depress the reset button on the back
of the unit. Ensure you depress the button for 5 seconds.
Note: Refer to the section on resetting your NB1300Plus4Wireless for more
information.
3. Start your Windows PC and connect your router to your computer as per the Quick Start
Guide. This can be done either via Ethernet or USB Refer to the sections on connecting your
ADSL Modem via Ethernet or via USB for instructions.
4. Launch NetComm’s Easy Config software (Double click EzCfg.exe or launch.bat) from the
CD-ROM or from your downloaded copy. Note: The ISP profile you wish to load into your
NB1300Plus4Wireless should be in the same directory as the EzCfg.exe file)
5. Choose your ISP Profile from the drop down box.
6. Type in your ISP User Name in full as given by your ISP.
7. Type in your ISP Password as supplied by your ISP.
www.netcomm.com.au Rev. 1- YML709
Page 10 NB1300Plus4 ADSL Modem
Page 11

Note: Your password characters will be represented by stars.
8. Click the Configure My Router button and follow the on-screen prompts. The software will
ask you to ensure your router is powered on, click OK to continue.
9. When prompted you should power off your router and then power it back on again. You can
close Easy Config at this point by clicking the Exit button.
Note: It may also be beneficial to reboot your computer but this is usually not
required.
10. Once your NB1300Plus4Wireless has booted (RDY light pulses) wait one minute and you
should now be able to connect to the Internet. You can run Easy Config again just to check
your connection status.
Overview
Rev. 1 - YML709 www.netcomm.com.au
NB1300Plus4 Wireless ADSL Modem Page 11
Page 12

Factory Defaults
The following table lists the Factory Defaults of your NB1300Plus4Wireless ADSL Modem:
Field Setting Details
LAN IP address: 192.168.1.1
LAN Subnet Mask: 255.255.255.0
Overview
DHCP Server: Enabled
User Name: admin
Password: password
Main Function: Router (Bridge Disabled)
WAN connection type: PPPoE LLC
VPI: 8
VCI: 35
SSID: Wireless
Channel Number: 9
Note: These defaults may change with firmware updates and factory changes, please
consult the NetComm website to check for the latest defaults.
Resetting to factory defaults
If you forget your passwords, lock out HTTP or FTP access or simply can’t remember what IP
address you have set the NB1300Plus4Wireless on you will probably need to perform a factory
defaults reset.
To perform a factory defaults reset you must have physical access to the unit then follow these
steps;
1. Make sure the NB1300Plus4Wireless is powered on and the RDY light is flashing.
2. Locate the Reset button hole on the back of the unit.
3. Gently press in and hold the button for 5 seconds with a suitably thin appliance (E.g.
straightened paper clip) seconds after release the RDY light will turn off.
4. Watch the RDY light and wait for it to stabilise and start pulsing again (in approximately 1
minute.
Note: Do not switch off or press reset again until the NB1300Plus4Wireless has
completed its reset and the RDY light is flashing.
5. Your router should now be set to factory defaults (192.168.1.1, ‘admin’ & ‘password’)
www.netcomm.com.au Rev. 1- YML709
Page 12 NB1300Plus4 ADSL Modem
Page 13

Configuration Types
This section is supplied to help you connect your NB1300Plus4 ADSL Modem quickly to your
network or Windows computer. The following are the most common configurations for using
your NB1300Plus4 Wireless ADSL Modem.
■ ADSL Modem - Ethernet (Not recommended for Wireless use)
This is when you plug the modem directly into the Ethernet port of a computer and then
run Internet connection software (often supplied by your ISP) on the computer to establish
a connection to the Internet. This method means that the computer connected to the
Ethernet port of the NB1300Plus4 Wireless is exposed to the Internet and is given a public
IP address.
■ ADSL Modem - USB (Not recommended for Wireless use)
This is when you plug the modem directly into the USB port of just one computer. You
then must run Internet connection software (often supplied by your ISP) on the computer to
establish a connection to the Internet. This method means that the computer connected to
the USB port of the NB1300Plus4 Wireless is exposed to the Internet and is given a public
IP address.
Note: Using a Modem (bridge) configuration will render the Wireless Access Point
function of your NB1300plus4Wireless virtually useless
■ ADSL Gateway Router - Ethernet
This is when the NB1300Plus4 Wireless is connected to your network switch or hub and
shares the Internet connection to all computers on the network. The NB1300Plus4 Wireless
will log on to your ISP on behalf of your computers and it will shield your computers from
direct Internet attack by using Network address Translation (NAT).
■ ADSL Gateway Router - USB
If you do not have an Ethernet port on your computer you can use your USB port like an
Ethernet port to connect to the NB1300Plus4 Wireless. This "simulated" Ethernet port is
only for connecting to the NB1300Plus4 Wireless and is only available for Windows 98SE,
Windows 2000, Windows XP and machintosh OSX.. The NB1300Plus4 Wireless will log on
to your ISP on behalf of your computer and it will shield your computer from Internet
attack by using NAT.
Refer to the instructions in one of the following sections for the configuration you wish to use.
If you wish to configure the NB1300Plus4 Wireless in a different way to the examples shown,
please consult a Network Specialist and the Advanced Configuration section for more
information.
Note: If the NB1300Plus4 Wireless has already been used, we strongly recommend you
reset and flush all settings of the unit by pressing and holding the RESET button on
the rear of the modem for 10 seconds. Wait for the RDY light to begin pulsing
before continuing.
We also recommend you change your router's password and enable wireless
encryption (WEP) from the factory default before connecting it to a network or the
Internet. Refer to the “Admin Password” section in the “Security” Menu.
Rev. 1 - YML709 www.netcomm.com.au
NB1300Plus4 Wireless ADSL Modem Page 13
Configuration Types
Page 14

ADSL Modem - Ethernet Configuration (Not recommended for Wireless use)
Note: Using a Modem (bridge) configuration will render the Wireless Access Point
function of your NB1300plus4Wireless virtually useless. This configuration is NOT
recommended for wireless use
Use this configuration if you:
■ Have been told to use the “ADSL Modem” Easy Config Profile, or
■ Want to connect this device to another router, or
■ Want to use your ISP’s software to log on to the Internet directly (not sharing) and your
computer will use a Public IP address, and
■ DO NOT need the NB1300Plus4 Wireless to share your Internet service ( You can still use
windows ICS to share your Internet Service), and
■ Do not require your computer to be protected (via NAT) from the Internet, e.g. you may be
running Personal firewall software or a Secondary router.
ADSL Modem - Ethernet
ADSL modem (Transparent Bridge) - This is when you plug the modem directly into the
Ethernet port of a computer and then run Internet connection software (often supplied by your
ISP) on the computer to establish a connection to the Internet. This method means that the
computer connected to the Ethernet port of the NB1300Plus4 Wireless is exposed to the
Internet and is given a public IP address.
www.netcomm.com.au Rev. 1- YML709
Page 14 NB1300Plus4 ADSL Modem
Page 15

Before continuing, ensure you have the following items and information ready:
■ A computer with a Network Interface Card installed or a router (such as the NetComm
NB3100 Compact).
■ An Ethernet network cable.
■ A telephone line with ADSL service enabled.
■ User Name, Password, VPI, VCI, encapsulation and DNS server settings for your ADSL
account (ask your ISP if unsure). These are not needed for the NB1300Plus4 Wireless, but
are required for the computer or router that it will be connected to.
Note: The following procedure presumes your NB1300Plus4 Wireless is set to a factory
default IP address 192.168.1.1.
Step 1: Connecting your computer to the NB1300Plus4 Wireless
Note: This unit should only be connected to the Telecommunications Network through a
line cord which meets the requirements of ACA TS008.
a. Using an ethernet network cable, connect an Ethernet port of the NB1300Plus4 Wireless
into the Ethernet port of the computer you wish to use to configure the unit.
b. Connect the power and switch the NB1300Plus4 Wireless on.
c. Ensure the LAN link on the NB1300Plus4 Wireless is active.
d. Configure your Computer to use any IP address in the range of 192.168.1.2 to
192.168.1.254.
e. Additional network devices may be connected to the remaining ethernet ports.
ADSL Modem - Ethernet
Note: When the NB1300Plus4 Wireless is used in Bridge mode it is a fairly passive
device and most Internet configuration required (such as User Name, Password,
etc.) is done on the computer or another router.
Rev. 1 - YML709 www.netcomm.com.au
NB1300Plus4 Wireless ADSL Modem Page 15
Page 16

Step 2: Configuring the NB1300Plus4 Wireless
After connecting all the ADSL Router cables you can either configure your NB1300Plus4
Wireless using the Easy Config software provided or complete the following manual
configuration instructions:
a. Power on the ADSL Router and launch a web browser, such as Internet Explorer or
Netscape Navigator, browse to the address http://192.168.1.1.
b. Enter the correct user name and password to access the Configuration tool. The default user
name and password are as below.
User Name : admin
Password : password
Note: You must click the Submit button on every page that you make changes on and
when you have made all your changes click the Save Setting and Reboot button
from the bottom of the menu.
c. Click on the One Page Setup link under the Basic menu.
ADSL Modem - Ethernet
You will need to Change your WAN and VC settings as provided by your ISP. The following
lists an example of the most common ISP settings used in Australia. The fields that require
changing from the default settings are highlighted.
www.netcomm.com.au Rev. 1- YML709
Page 16 NB1300Plus4 ADSL Modem
Page 17

Field Setting Details
Service name: Blank ❖
User Name: Blank ❖
Password: Blank ❖
Disconnect timeout: 0 ❖
Mode/Wan Connection Type: 1483 Bridged IP LLC
VPI: 8 ❖
VCI: 35 ❖
Static IP Addr ess: 192.168.241.101 ❖
Subnet Mask: 255.255.255.0 ❖
Default Gateway: 0.0.0.0 ❖
Bridge mode: Enabled
❖
Default Setting. Although in most cases you will not be required to alter these
default settings for your NB1300Plus4 Wireless, your ISP may identify specific
settings to enable connection to their service. Please refer to your ISP or Network
Administrator for further information.
4. Click Submit and then click the Save Setting and Reboot button from the bottom of the
menu. W ait for the configuration to complete.
Step 3: Configuring your Computer/Router to use the NB1300Plus4 Wireless
ISP Software Method
Install software on your computer (usually provided by your ISP) and enter a User Name and
Password. This software usually adds a PPP service to your computer.
Please refer to your ISP for more information on how to configure your software to work with
the NB1300Plus4 Wireless ADSL Modem when used as a bridge.
Second Router Method
If you are using a second router in conjunction with the NB1300Plus4 Wireless as a Bridge, you
should unplug the NB1300Plus4 Wireless from the computer and plug the NB1300Plus4
Wireless into WAN port of the secondary router. Consult the second router’s documentation for
information on how to configure your user name and password.
ADSL Modem - Ethernet
Note: Depending on the second router, you may need to use a “straight through” UTP
cable instead of a “crossover” UTP cable to join the NB1300Plus4 Wireless to the
WAN port of the other router.
Rev. 1 - YML709 www.netcomm.com.au
NB1300Plus4 Wireless ADSL Modem Page 17
Page 18

Operational Diagram for ADSL Modem Configuration
ADSL Modem - Ethernet
www.netcomm.com.au Rev. 1- YML709
Page 18 NB1300Plus4 ADSL Modem
Page 19

ADSL Modem - USB Configuration (Not recommended for Wireless use)
Note: Using a Modem (bridge) configuration will render the Wireless Access Point
function of your NB1300plus4Wireless virtually useless. This configuration is NOT
recommended for wireless use
Use this configuration if you:
■ Have been told to use the “ADSL Modem” Easy Config Profile, or
■ Want to connect this device to another router, or
■ Want to use your ISP’s software to log on to the Internet directly (not sharing) and your
computer will use a Public IP address, and
■ DO NOT need the NB1300Plus4 Wireless to share your Internet service ( You can still use
windows ICS to share your Internet Service), and
■ Do not require your computer to be protected (via NAT) from the Internet, e.g you may be
running Personal firewall software or a Secondary router.
ADSL Modem - USB
ADSL modem (Transparent Bridge) to be connected to a router - This is when you plug the
modem directly into the USB port of just one computer. You then must run Internet connection
software (often supplied by your ISP) on the computer to establish a connection to the Internet.
This method means that the computer connected to the USB port of the NB1300Plus4 Wireless
is exposed to the Internet and is given a public IP address.
Note: In this configuration you should not use the 4 port switch.
Before continuing, ensure you have the following items and information ready:
■ A computer with a free USB port.
■ A USB cable.
■ A telephone line with ADSL service enabled.
Rev. 1 - YML709 www.netcomm.com.au
NB1300Plus4 Wireless ADSL Modem Page 19
Page 20

■ User Name, Password, VPI, VCI, encapsulation and DNS server settings for your ADSL
account (ask your ISP if unsure). These are not needed for the NB1300Plus4 Wireless, but
are required for the computer or router that it will be connected to.
Note: The following procedure presumes your NB1300Plus4 Wireless is set to a factory
default IP address 192.168.1.1.
Step 1: Connecting your computer to the NB1300Plus4 Wireless
Note: This unit should only be connected to the Telecommunications Network through a
line cord which meets the requirements of ACA TS008.
ADSL Modem - USB
a. Place the CD-ROM provided into your CD-ROM drive.
b. Connect the USB cable from the NB1300Plus4 Wireless into a spare USB port on your
computer. If you are using Macintosh OSX, please refer to the Macintosh USB
Configuration section.
c. Windows will detect the new hardware and launch a New hardware Wizard. When prompted
to search for drivers choose “Specify location”.
d. Browse the drive letter of your CD-ROM drive and locate the “USB driver” folder. E.g.
D:\USB driver\ where D: is the drive letter of your CD-ROM.
e. Continue with the driver search by clicking OK and the Found Hardware Wizard will locate
the USB driver and prompt you to install it.
f. Once the driver is installed, it is configurable as a regular Ethernet adapter and will be set to
automatically accept an IP address from the NB1300Plus4 Wireless. You can manually set
its IP address to any free address in the range of 192.168.1.2 –254 as required.
Note: When the NB1300Plus4 Wireless is used in Bridge mode it is a fairly passive
device and most Internet configuration required (such as User Name, Password,
etc.) is done on the computer or another router.
www.netcomm.com.au Rev. 1- YML709
Page 20 NB1300Plus4 ADSL Modem
Page 21

Step 2: Configuring the NB1300Plus4 Wireless
After connecting all the ADSL Router cables you can either configure your NB1300Plus4
Wireless using the Easy Config software provided or complete the following manual
configuration instructions:
a. Power on the ADSL Router and launch a web browser, such as Internet Explorer or
Netscape Navigator, browse to the address http://192.168.1.1.
b. Enter the correct user name and password to access the Configuration tool. The default user
name and password are as below.
User Name : admin
Password : password
Note: You must click the Submit button on every page that you make changes on and
when you have made all your changes click the Save Setting and Reboot button
from the bottom of the menu.
c. Click on the One Page Setup link under the Basic menu.
ADSL Modem - USB
You will need to Change your WAN and VC settings as provided by your ISP. The following
lists an example of the most common ISP settings used in Australia. The fields that require
changing from the default settings are highlighted.
Rev. 1 - YML709 www.netcomm.com.au
NB1300Plus4 Wireless ADSL Modem Page 21
Page 22

Field Setting Details
Service name: Blank ❖
User Name: Blank ❖
Password: Blank ❖
Disconnect timeout: 0 ❖
Mode/Wan Connection Type: 1483 Bridged IP LLC
VPI: 8 ❖
VCI: 35 ❖
Static IP Addr ess: 192.168.241.101 ❖
Subnet Mask: 255.255.255.0 ❖
Default Gateway: 0.0.0.0 ❖
Bridge mode: Enabled
❖
Default Setting. Although in most cases you will not be required to alter these
default settings for your NB1300Plus4 Wireless, your ISP may identify specific
settings to enable connection to their service. Please refer to your ISP or Network
ADSL Modem - USB
Administrator for further information.
4. Click Submit and then click the Save Setting and Reboot button from the bottom of the
menu. W ait for the configuration to complete.
Step 3: Configuring your Computer/Router to use the NB1300Plus4 Wireless
Install software on your computer (usually provided by your ISP) and enter a User Name and
Password. This software usually adds a PPP service to your computer.
Please refer to your ISP for more information on how to configure your software to work with
the NB1300Plus4 Wireless ADSL Modem when used as a bridge.
www.netcomm.com.au Rev. 1- YML709
Page 22 NB1300Plus4 ADSL Modem
Page 23

Operational Diagram for ADSL Modem Configuration
ADSL Modem - USB
Rev. 1 - YML709 www.netcomm.com.au
NB1300Plus4 Wireless ADSL Modem Page 23
Page 24

ADSL Gateway Router - Ethernet Configuration
Use this configuration if you:
■ Have been told to use Easy Config “ISP Profile 1, 2, 3, 5 or 6 ”, or
■ Were told by your ISP to use this Configuration with another Easy Config profile, or
■ Have at least one computer with an Ethernet Networking socket, and / or
■ Want to share your Internet Service with more than one computer.
■ Want your computers to be protected by the NB1300Plus4 Wireless (via NAT and
Firewall).
■ You want your computers to use Private IP addresses.
ADSL Gateway
Router - Ethernet
Ethernet Gateway (performing Network Address Port Translation) - This is when the
NB1300Plus4 Wireless is connected to your network switch or hub and shares the Internet
connection to all computers on the network. The NB1300Plus4 Wireless will log on to your ISP
on behalf of your computers and it will shield your computers from direct Internet attack by
using Network Address Translation (NAT).
www.netcomm.com.au Rev. 1- YML709
Page 24 NB1300Plus4 ADSL Modem
Page 25

Before continuing, ensure you have the following items and information ready:
■ A Windows 98, ME, NT, 2000 or XP client machine with a Network Interface Card
installed.
■ An Ethernet cable.
■ A telephone line with ADSL service enabled.
■ User Name, Password, VPI, VCI, encapsulation and DNS server settings for your ADSL
account (ask your ISP if unsure) .
Note: The following procedure presumes your NB1300Plus4 Wireless is set to a factory
default IP address 192.168.1.1.
Step 1: Connecting your computer to the NB1300Plus4 Wireless
Note: This unit should only be connected to the Telecommunications Network through a
line cord which meets the requirements of ACA TS008.
Router - Ethernet
ADSL Gateway
a. Connect your NB1300Plus4 Wireless to either a computer directly or a network hub or
switch using cat5 ethernet cables. You need to ensure you are using the correct type of
ethernet cable - i.e. straight through or crossover.
b. Connect one end of the ADSL phone line to the NB1300Plus4 Wireless ADSL Modem and
the other end to the wall socket.
c. Connect the power pack to the NB1300Plus4 Wireless ADSL Modem and switch on the
power switch.
d. Ensure that there is a LAN link light on the NB1300Plus4 Wireless.
e. Ensure that the computer you intend to use has an IP address in the same subnet as the
NB1300Plus4 Wireless ADSL Modem. (e.g. the NB1300Plus4 Wireless’s default IP is
192.168.1.1 - your computer should be on 192.168.1.100 or similar.) If you have DHCP
enabled on your computer, the NB1300Plus4 Wireless will assign your computer a suitable
IP address.
f. Ensure that your computer has a LAN link light.
Rev. 1 - YML709 www.netcomm.com.au
NB1300Plus4 Wireless ADSL Modem Page 25
Page 26

Step 2: Configuring the NB1300Plus4 Wireless
After connecting all the ADSL Router cables you can either configure your NB1300Plus4
Wireless using the Easy Config software provided or complete the following manual
configuration instructions:
a. After connecting all the ADSL Router cables, powering on the ADSL Router, and launching a
web browser, such as Internet Explorer or Netscape Navigator, browse to the address http://
192.168.1.1.
b. Enter the correct user name and password to access the Configuration tool. The default user
name and password are as below.
User Name : admin
Password : password
Note: You must click the Submit button on every page that you make changes on and
when you have made all your changes click the Save Setting and Reboot button
from the bottom of the menu.
c. Click on the One Page Setup link under the Basic menu. You do not need to change the
LAN settings unless you need the NB1300Plus4 Wireless to work with an existing network
on a subnet other than 192.168.1.x.
ADSL Gateway
Router - Ethernet
You will need to Change your WAN and VC settings as provided by your ISP. The following
lists an example of the most common ISP settings used in Australia. The only fields that
require changing from the default settings are highlighted.
www.netcomm.com.au Rev. 1- YML709
Page 26 NB1300Plus4 ADSL Modem
Page 27

Field Setting Details
Service name: Any name to describe your ISP
User Name: Your ISP will provide a case sensitive User Name in a
format similar to your email address. Contact your ISP
for details
Password: Enter your Password as supplied by your Service
Provider (characters are usually all lower case)
Disconnect timeout: 0 ❖
Mode/Wan Connection Type: PPPoE LLC or PPPoA (Your ISP should advise which
WAN Type)
VPI: 8 ❖
VCI: 35 ❖
Static IP Addr ess: 192.168.241.101 ❖
Subnet Mask: 255.255.255.0 ❖
Default Gateway: 0.0.0.0 ❖
Bridge mode: Disabled ❖
❖
Default Setting. Although in most cases you will not be required to alter these
default settings for your NB1300Plus4 Wireless, your ISP may identify specific
settings to enable connection to their service. Please refer to your ISP or Network
Administrator for further information.
d. Click Submit and then click the Save Setting and Reboot button from the bottom of the
menu. W ait for the configuration to complete.
Standard configuration of your NetComm NB1300Plus4 Wireless ADSL Modem is now
complete. You should be able to access the Internet through the unit, when it is set to be
your gateway on your computer/s. Refer to Step 3 for more information.
Step 3: Configuring your Computer to use the NB1300Plus4 Wireless
To use the NB1300Plus4 Wireless ADSL Modem to access the Internet, your computer must
have an IP Address that is in the same LAN subnet as the NB1300Plus4 Wireless ADSL Router
and use the NB1300Plus4 Wireless ADSL Router’s IP address as its gateway. The easiest way
to do this is to ensure that your computer is set to use DHCP, and all of the required
configuration will be performed by the NB1300Plus4 Wireless.
Most applications call for the Primary and Secondary DNS server entries to be made on each
computer. These can be automatically assigned by another DHCP server or by enabling the
DHCP server on the NB1300Plus4 Wireless ADSL Modem, and entering the DNS values in the
DNS section of the NB1300Plus4 Wireless.
The following example shows how a computer could be set up when the NB1300Plus4 Wireless
ADSL Modem is configured with no DHCP service for this example. The NB1300Plus4
Wireless ADSL Modem would be set to a LAN IP Address (Gateway) of 192.168.1.1 with a
Subnet Mask of 255.255.255.0
Rev. 1 - YML709 www.netcomm.com.au
NB1300Plus4 Wireless ADSL Modem Page 27
Router - Ethernet
ADSL Gateway
Page 28

Open the Control Panel and double click on the Network icon. Scroll down to select
TCP/IP-> Ethernet Card and click on the Properties button.
Note: When using Internet Explorer as a web
ADSL Gateway
Router - Ethernet
browser, click on the “Tools” menu and
select “Internet Options”. Select the
“Connections” tab and click on the “LAN
Settings” button. Tick the “Automatically
detect settings” checkbox and make sure
the “Use a Proxy server” checkbox is
unchecked.
Your DNS numbers are
specific to your ISP and
should be notified along
with your User Name and
Password.
www.netcomm.com.au Rev. 1- YML709
Page 28 NB1300Plus4 ADSL Modem
Page 29

Operational Diagram for Ethernet Gateway Configuration
Router - Ethernet
ADSL Gateway
Rev. 1 - YML709 www.netcomm.com.au
NB1300Plus4 Wireless ADSL Modem Page 29
Page 30

ADSL Gateway Router - USB Configuration
Use this configuration if you:
■ Have been told to use Easy Config “ISP Profile 1, 2, 3, 5 or 6 ”, or
■ Were told by your ISP to use this Configuration with another Easy Config profile.
■ Wish to use the NB1300Plus4 Wireless with a computer that does not have an Ethernet
socket. This computer will use a Private IP address and will be protected from the Internet
by the NB1300Plus4 Wireless (via NAT).
■ Already use the NB1300Plus4 Wireless with an Ethernet network but wish to connect a
Computer that does not have an Ethernet socket. (You do not need to reconfigure the
NB1300Plus4 Wireless please refer to the “Connecting your NB1300Plus4 Wireless via
USB cable” section in this guide)
Router - USB
ADSL Gateway
USB Gateway Configuration (Multiple public IPs to Multiple internal IPs) - If you do not
have an Ethernet port on your computer you can use your USB port like an Ethernet port to
connect to the NB1300Plus4 Wireless. This "simulated" Ethernet port is only for connecting to
the NB1300Plus4 Wireless and is only available for Windows 98SE, Windows 2000, Windows
XP and machintosh OSX.. The NB1300Plus4 Wireless will log on to your ISP on behalf of your
computer and it will shield your computer from Internet attack by using NAT.
www.netcomm.com.au Rev. 1- YML709
Page 30 NB1300Plus4 ADSL Modem
Page 31

Before continuing, ensure you have the following items and information ready:
■ A Windows 98SE, ME, 2000 or XP client machine with a free USB port.
■ A USB cable.
■ A telephone line with ADSL service enabled.
■ User Name, Password, VPI, VCI, encapsulation and DNS server settings for your ADSL
account (ask your ISP if unsure).
Note: Please be aware that connection via USB is only supported in Windows 98SE,
Windows Me, Windows 2000 and Windows XP. For Windows 95, NT, Linux and
Macintosh you should use the Ethernet port of your NB1300Plus4 Wireless.
Step 1: Connecting your computer to the NB1300Plus4 Wireless
Note: This unit should only be connected to the Telecommunications Network through a
line cord which meets the requirements of ACA TS008.
a. Place the CD-ROM provided into your CD-ROM drive.
b. Connect the USB cable from the NB1300Plus4 Wireless into a spare USB port on your
computer. If you are using Macintosh OSX, please refer to the Macintosh Installation
section.
c. Windows will detect the new hardware and launch a New hardware Wizard. When prompted
to search for drivers choose “Specify location”.
d. Browse the drive letter of your CD-ROM drive and locate the “USB driver” folder. E.g.
D:\USB driver\ where D: is the drive letter of your CD-ROM.
e. Continue with the driver search by clicking OK and the Found Hardware Wizard will locate
the USB driver and prompt you to install it.
f. Once the driver is installed, it is configurable as a regular Ethernet adapter and will be set to
automatically accept an IP address from the NB1300Plus4 Wireless. You can manually set
its IP address to any free address in the range of 192.168.1.2 –254 as required.
Note: You may be asked if you wish to continue without a digital signature if so choose
YES to continue. This request may occur up to four (4) times depending on your
operating system.
Rev. 1 - YML709 www.netcomm.com.au
NB1300Plus4 Wireless ADSL Modem Page 31
ADSL Gateway
Router - USB
Page 32

Step 2: Configuring the NB1300Plus4 Wireless
After connecting all the ADSL Router cables you can either configure your NB1300Plus4
Wireless using the Easy Config software provided or complete the following manual
configuration instructions:
a. Power on the ADSL Router and launch a web browser, such as Internet Explorer or
Netscape Navigator, browse to the address http://192.168.1.1.
b. Enter the correct user name and password to access the Configuration tool. The default user
name and password are as below.
User Name : admin
Password : password
Note: You must click the Submit button on every page that you make changes on and
when you have made all your changes click the Save Setting and Reboot button
from the bottom of the menu.
c. Click on the One Page Setup link under the Basic menu. You do not need to change the
LAN settings unless you need the NB1300Plus4 Wireless to work with an existing network
on a subnet other than 192.168.1.x.
Router - USB
ADSL Gateway
You will need to Change your WAN and VC settings as provided by your ISP. The following
lists an example of the most common ISP settings used in Australia. The fields that require
changing from the default settings are highlighted.
www.netcomm.com.au Rev. 1- YML709
Page 32 NB1300Plus4 ADSL Modem
Page 33

Field Setting Details
Service name: Any name to describe your ISP.
User Name: Your ISP will provide a case sensitive User Name in a
format similar to your email address. Contact your ISP
for details.
Password: Enter your Password as supplied by your Service
Provider (characters are usually all lower case).
Disconnect timeout: 0 ❖
Mode/Wan Connection Type: PPPoE LLC or PPPoA
VPI: 8 ❖
VCI: 35 ❖
Static IP Addr ess: 192.168.241.101❖
Subnet Mask: 255.255.255.0❖
Default Gateway: 0.0.0.0 ❖
Bridge mode: Disabled ❖
❖
Default Setting. Although in most cases you will not be required to alter these
default settings for your NB1300Plus4 Wireless, your ISP may identify specific
settings to enable connection to their service. Please refer to your ISP or Network
Administrator for further information.
d. Click Submit and then click the Save Setting and Reboot button from the bottom of the
menu. W ait for the configuration to complete.
Step 3: Configuring your Computer to use the NB1300Plus4 Wireless
Most applications call for the Primary and Secondary DNS server entries to be made on each
computer. These can be automatically assigned by another DHCP server or by enabling the
DHCP server on the NB1300Plus4 Wireless ADSL Modem, and entering the DNS values in the
DNS section of the NB1300Plus4 Wireless.
ADSL Gateway
Router - USB
Rev. 1 - YML709 www.netcomm.com.au
NB1300Plus4 Wireless ADSL Modem Page 33
Page 34

Operational Diagram for USB Gateway Configuration
Router - USB
ADSL Gateway
www.netcomm.com.au Rev. 1- YML709
Page 34 NB1300Plus4 ADSL Modem
Page 35

Macintosh OS X USB Configuration
1. Close any running applications.
2. Execute the Install_USB_ADSL.pkg
program.
3. OS X will then request you enter the
passphrase for a user that has
administration access to the computer.
Enter the details and click on OK.
4. Click on Continue.
Macintosh USB
5. Select the drive that contains OS X and
then click on Continue.
Rev. 1 - YML709 www.netcomm.com.au
NB1300Plus4 Wireless ADSL Modem Page 35
Page 36

6. Click on Upgrade or Install to continue.
7. Installation of this software requires that
you restart your computer when
installation is complete. Click on Continue
Installation to continue.
Macintosh USB
8. Click on Restart.
9. Connect the USB cable from the NB1300
into a spare SUB port on your computer.
10. Open System Preferences from the Dock.
11. Click on Network to display this window.
Click on OK.
www.netcomm.com.au Rev. 1- YML709
Page 36 NB1300Plus4 ADSL Modem
Page 37

12. Select the Ethernet Adaptor (en1) from the Show box. Select the TCP/IP tab and select Using
DHCP.
13. Click on Apply Now. Close the Network window and System Preferences.
Macintosh USB
Rev. 1 - YML709 www.netcomm.com.au
NB1300Plus4 Wireless ADSL Modem Page 37
Page 38

Setting up your Wireless LAN
Introduction to Setting up your WLAN
The IEEE 802.11b standard is the most widely used standard for wireless LANs today. A
wireless LAN (WLAN) is a wireless computer network that transmits data using radio signals
instead of cables. WLAN technology is commonly used in home, small office and large corporate
networks. WLAN devices have a high degree of mobility and flexibility that allow networks to
be quickly set up or dismantled and allow them to roam freely throughout the network.
Wireless LAN users can use the same network applications used on an Ethernet LAN. 802.11b
adapter cards used on laptop and desktop computers support the same protocols as Ethernet
adapter cards. For most users, there is no functional difference between computers attached to a
wired Ethernet LAN or a mobile 802.11b workstation except that hardware is not physically
attached to the network. For most networks however, it may be desirable for mobile network
devices to be able to link to the wired Ethernet LAN to use shared resources such as servers,
printers or an Internet connection. This product unites Ethernet and 802.11b/g wireless private
networks with an Internet connection. The Wireless USB 2.0 Network Adapter supports data
rates of up to 54 Mbps for wireless operation when used in conjunction with other IEEE 802.11
b/g compatible devices.
WLAN technology provides users with many convenient and cost saving features:
Mobility: WLAN provide LAN users with access to real-time
information anywhere in their organization, without
being limited to the wired connection.
Easy Installation: Installing this device is easy for novice and expert
users alike, eliminating the need for network cables in
walls and ceilings.
Wireless
Scalab ili ty : WLAN can be configured in a variety of topologies
to adapt to specific applications and installations.
Configurations are easily changed and range from
peer-to-peer networks suitable for a small number of
users, to full infrastructure networks of thousands of
users roaming over an extensive area.
WLAN Basic Information
Some basic understanding of 802.11b/g wireless technology and terminology is useful when you
are setting up the router or any wireless access point. If you are not familiar with wireless
networks please take a few minutes to learn the basics.
www.netcomm.com.au Rev. 1- YML709
Page 38 NB1300Plus4 ADSL Modem
Page 39

Transmitting Radio Signals
WLAN devices use electromagnetic waves within a broad, unlicensed range of the radio
spectrum to transmit and receive radio signals. When a wireless access point is present, it
becomes a base for other WLAN devices in its broadcast range. WLAN nodes transmit digital
data using FM (frequency modulation) radio signals. WLAN devices generate a carrier wave and
modulate this signal using various techniques. In this way, digital data can then be superimposed
onto the carrier signal. This radio signal carries data to WLAN devices within range of the
transmitting device. The antennae of WLAN devices listen for and receive the signal, which in
turn is then altered and the transmitted data extracted and sent to your computer.
Range
Range should not be a problem in most homes or small offices. If you experience low or no
signal strength in some areas, consider positioning the device in a location between the WLAN
devices maintaining a roughly equal straight-line distance to all devices that need to access the
Router through the wireless interface. Adding more 802.11b/g W ireless Network Adapters to
rooms where the signal is weak can improve signal strength.
Wireless LAN Modes
Wireless LANs can be configured in one of two ways:
Ad-hoc Networking Also known as a peer-to-peer network, an ad-hoc
network is one that allows all workstations and
computers in the network to act as servers to all
other users on the network. Users on the network
can share files, print to a shared printer, and access
the Internet with a shared modem. However, with adhoc networking, users can only communicate with
other wireless LAN computers that are in the
wireless LAN workgroup, and are within range.
Wireless
Infrastructure Networking Infrastructure networking differs from ad-hoc
networking in that it includes an access point. Unlike
the ad-hoc structure where users on the LAN
contend the shared bandwidth, on an infrastructure
network the access point can manage the bandwidth
to maximize bandwidth utilization.
Additionally, the access point enables users on a wireless LAN to access an existing wired
network, allowing wireless users to take advantage of the wired networks resources, such as
Internet, email, file transfer, and printer sharing.
Infrastructure networking has the following advantages over ad-hoc networking:
■ Extended range: each wireless LAN computer within the range of the access point can
communicate with other wireless LAN computers within range of the access point.
Rev. 1 - YML709 www.netcomm.com.au
NB1300Plus4 Wireless ADSL Modem Page 39
Page 40

■ Roaming: the access point enables a wireless LAN computer to move through a building and
still be connected to the LAN.
■ Wired to wireless LAN connectivity: the access point bridges the gap between wireless
LANs and their wired counterparts.
Planning a Wireless Network
Infrastructure or Adhoc mode
Use Adhoc mode if you wish to join several wireless clients to each other in a small area and you
do not need these devices to access your Internet connection or other “wired services”.
Remember if you include a Wireless Access Point (AP) in your network you must use
Infrastructure mode to work with it.
When connecting to an Adhoc network you must know the following parameters in order to
configure your Client Adapter correctly to join the Adhoc network;
■ Network Name (SSID)
■ Network Channel
■ Encryption type (none, 64bit WEP, 128bit WEP, WPA)
■ Encryption keys (only if encryption is enabled)
Example of Adhoc Networking
Client Adapter 1
Mode = Adhoc
SSID = “Hyperion”
Channel = 5
Client Adapter 2
Mode = Adhoc
SSID = “Hyperion”
Channel = 5
Wireless
Client Adapter 3
Mode = Adhoc
SSID = “Hyperion”
Channel = 5
Use Infrastructure mode if you wish to join several wireless clients together over a wider area as
well as offer them access to “wired services” (such as a LAN with Network printers or Servers).
An Infrastructure requires the use of one or more Access Points (AP’s) to be installed.
NetComm Wireless Routers operate as Access Points and are a great way of sharing your
Internet connection wirelessly.
Note: Access Points can only operate in Infrastructure mode. Adhoc networks are often
temporarily setup between two or more Wireless clients to share files at a
conference etc.
www.netcomm.com.au Rev. 1- YML709
Page 40 NB1300Plus4 ADSL Modem
Page 41

When connecting to an Infrastructure network you must know the following parameters in order
to configure your Client Adapter correctly to join the Infrastructure network;
■ Network Name (SSID)
■ Encryption type (none, 64bit WEP, 128bit WEP, WPA)
■ Encryption keys (only if encryption is enabled)
Example of Infrastructure Networking
Access Point 1
SSID = “Kelewan”
Channel = 1
Client Adapter 4
Mode = Infrastructure
SSID = “Kelewan”
Client Adapter 5
Mode = Infrastructure
SSID = “Kelewan”
Client Adapter 5
Mode = Infrastructure
SSID = “Kelewan”
Access Point 2
SSID = “Kelewan”
Channel = 12
Client Adapter 6
Mode = Infrastructure
SSID = “Kelewan”
Client Adapter 7
Mode = Infrastructure
SSID = “Kelewan”
Client Adapter 8
Mode = Infrastructure
SSID = “Kelewan”
Positioning of AP & Client Adapters
Generally Adhoc networks work across shorter ranges than Infrastructure networks because
there is no Access point (which naturally acts as a repeater station – extending range). Both
types of Wireless LANs (WLAN’s) work best when the signal is unobstructed by metal or other
thick structures containing metal. When positioning Wireless devices remember the following
guide lines;
Wireless
■ Access Points should be located in the center of their intended coverage area
■ An AP with an Omni antenna transmits in a 3 dimensional sphere out from the antenna
■ Where possible the AP should be placed in the ceiling, this gives best overall range because it
reduces obstructions.
■ A wall that is 30cm thick becomes 42cm thick on a 45 degree diagonal. Therefore the signal
will be depleted even more when the direct line of sight between two Wireless devices passes
diagonally through an interfering wall.
■ Avoid placing AP or Client Adapters near strong interference created by other devices such
as cordless phones, microwaves etc.
■ Perform a full site survey at the four corners on the fringe of your network to determine if
there are any other wireless networks present and what channels they are using.
■ Avoid using Channels that are adjacent to one another (e.g. Use Channels 1, 6 & 13 when
using three AP’s in the same area)
Rev. 1 - YML709 www.netcomm.com.au
NB1300Plus4 Wireless ADSL Modem Page 41
Page 42

■ For maximum range keep AP’s and Client Adapters away from metal structures or
conductive materials (such as people, cubicle framing, window frames, computers, lights,
phones, speakers)
Channels, SSID & Roaming
In an Adhoc Network each device must be told what channel to use in addition to the Network
name (SSID). Infrastructure mode works differently because the access point tells the Client
Adapter what channel to use, all the Client adapter needs to know to find the network is the
SSID.
When you first setup your Wireless network you should perform a site survey using the
NetComm Wireless utility that comes with your Client Adapter. When you know what channels
are currently being used make a list of the Channels that are not being used and choose a channel
that is the most numerically distant from the all of the ‘used’ channels.
Then choose a Network name (SSID) that is suitable to identify your wireless network.
Note: For security it is best not to use an SSID that describes; You, Your Wireless
Product, Your Company, Your location or the services available.
Roaming is a way of running an Infrastructure Wireless Network in an area that needs more than
one AP to obtain complete coverage. Roaming works by using the same SSID for each access
point but by placing them on different channels and with their fringe radio coverage slightly
overlapping. When a Client adapter comes into range of an AP with the correct SSID it will
associate with the AP and join the network, if the Client Adapter moves out of range of the first
AP and into range of another AP (with the same SSID) then the Client Adapter will change
channel to suit the new AP and maintain connection to the same Wireless network.
Wireless Encryption & Security
Adhoc networks and Infrastructure networks can both use Wireless encryption to keep their
data secure and prevent unauthorised associations. Infrastructure networks also have a few extra
Wireless
security measures that allow you to make your wireless network more secure than an Adhoc
network The most common Wireless Network Security features are;
■ Effective range / Radio partitioning
■ SSID
■ Broadcast Beacon Disabling
■ MAC address filtering
■ Encryption (WEP, WPA-Psk)
■ Third party Authentication (WPA-Radius / 802.11i / 802.11x EAP TLS Certificates etc)
www.netcomm.com.au Rev. 1- YML709
Page 42 NB1300Plus4 ADSL Modem
Page 43

Effective Range
When planning your wireless network it is best to position your Access Points and Client
Adapters away from the perimeter of your property where possible. Obviously the first goal is
to ensure reception to all areas but remember that the more your wireless emissions leak outside
the property the more likely unauthorised access can be obtained without entering the property.
SSID
The SSID is in a way a simplified security, although it may be easily found by a site survey but
whoever finds it may not know who it belongs to. Best practice is to keep it secret where
possible and ensure it does not describe You, Your Wireless Product, Your Company, Your
location or the services available.
Broadcast Beacon Disabling
Some Access Points allow you to disable the Broadcast Beacon to make the Wireless Network
harder to find. However this does hide the network more from the ‘casual browser’ it is not a
way of protecting your data as it travels in the air or a way of preventing unauthorised access.
MAC Address Filtering
In most Access Points it is possible to only allow Wireless Clients with known MAC addresses
to associate with the Access Point. Your Access Point will maintain an “Authorised MAC
Address table” where you must enter the MAC address of each Wireless Client Adapter you
want to allow to access the AP.
MAC address filtering does not prevent unauthorised interception of your data as it travels
through the air. MAC addresses can also be intercepted and cloned (or spoofed) so that an
unauthorised Wireless Client Adapter could be made to pretend to be an authorised Client
Adapter and gain access to the network. MAC filtering has the advantage of not adding any
overheads to the packet and therefore maintains maximum throughput.
Wireless
Encryption
Wired Equivalent Privacy (WEP) is available in 64 bit and 128 bit standards and is configured
using a key of Hexadecimal characters to encrypt your data before it is transmitted. This
maintains the integrity and privacy of your data, however your WEP key can be determined if
enough data is ‘sniffed’ as it passes between Access Point and Client adapters. Because the WEP
key is common to every Client adapter on the network it is also necessary to change the keys in
every client adapter in order to recover from a stolen key situation.
WiFi Protected Access (WPA) builds upon the WEP method but has two alternate methods
these are;
■ WPA – PSK
■ WPA – RADIUS
Rev. 1 - YML709 www.netcomm.com.au
NB1300Plus4 Wireless ADSL Modem Page 43
Page 44

WPA – PSK uses a Pre-Shared Key similar to WEP but it has an improved system that prevents
the keys from being determined by ‘sniffing’. WPA – PSK offers the small scale simplicity of
WEP but with increased security that prevents ‘Key cracking’
WPA – RADIUS uses a RADIUS server to provide centralised and a per client key management
system. Because RADIUS servers are already used in large scale networks it provides a scalable
and manageable solution to large companies.
Both forms of WPA will prevent your data being readable if it is intercepted by ‘sniffing’ and it
will prevent unauthorised associations on your wireless network.
Third party Authentication 802.11x / 802.11i
These are standards and draft standards often used similar to WPA that incorporate alternative
methods of authentication including Certificates and Biotechnologies (such as thumb printing
etc).
Configuring Client Adapters
Mode (Adhoc or Infrastructure)
When configuring your Wireless Client adapter you must first determine if you are connecting to
an Adhoc Network or an Infrastructure network. Choose the appropriate mode for your
network and apply the changes.
SSID
In Adhoc mode or Infrastructure mode set this to be the same for every Client Adapter (and
matching the AP if in Infrastructure mode).
Note: Most Client adapters allow you to set the SSID as “ANY”, which tells the Client
Adapter to associate with the first wireless network it finds, regardless of the SSID.
Channel
Wireless
The Channel does not need to be specified when using Infrastructure mode as it will change to
suit the access point. In Adhoc mode you must ensure that all Client Adapters you want to join
the network are configured to use the same channel.
Encryption
When using WEP the Keys should be common to all Client adapters and Access Points, you
must also specify which key (1, 2, 3 or 4) is currently being used.
If using other Encryption such as WPA – PSK you should ensure that encryption is setup
correctly between your AP and Client Adapters.
WPA – RADIUS this encryption is too complicated to explain here but if compulsory to join
the network it must be configured correctly before you can associate with the network.
www.netcomm.com.au Rev. 1- YML709
Page 44 NB1300Plus4 ADSL Modem
Page 45

Note: If a Wireless Network has encryption enabled you will not be assigned an IP
address or be able to associate with the Network until you have encryption
configured correctly.
IP Addresses
It is important to note that Wireless Networks operate similar to Wired Networks. Usually
Broadcast protocols such as DHCP will work across them seamlessly; therefore if you have a
DHCP server available on your network it should be able to dynamically assign an IP address to
any clients. Your IP address setting should be considered closely if you are running an Adhoc
network because you are less likely to be running a DHCP server.
Windows defaults for DHCP clients usually fall back to the Automatic Private IP Address
(APIPA) scheme when no DHCP server is available, this means that your Adhoc devices will
end up with an IP address in the range 169.xxx.xxx.xxx. This is fine for setting up a temporary
network but for something more permanent you may wish to assign static IP addresses to each
client device.
File Sharing over Wireless
Once you have your Wireless device connected you may wish to access to files on a server or
another Client. This can be done in several ways depending on your Network operating system
and architecture. The simplest example for Windows users is to use ‘mapped network drives’
remember to do this you must either map the drive via an IP address (e.g. \\10.0.2.10\sharename)
or use full UNC path names to your network drives.
Network Printing, Email and Web browsing over Wireless
All these services should work automatically over your wireless network the same as if you
were connected to the wired network. If these services are not working you should check that
you can ping via your wireless network and that the IP Address, Subnet mask and Gateway are
correct for your wireless network (generally the same as for the wired network).
Wireless
Rev. 1 - YML709 www.netcomm.com.au
NB1300Plus4 Wireless ADSL Modem Page 45
Page 46

Configuring the Firewall
The NB1300Plus4W has an inbuilt firewall. A firewall is a device which prevents unauthorized
users from gaining access to your computer network. This tutorial will show you how to
configure the advanced options of this firewall. Configuration of these options is only
recommended for advanced users. The NB1300plus4W defaults include a moderate level of
security and usually the firewall will only require further configuration if a higher or lower
security level is required.
Note: You can click on the Firewall link at the top of the page to return to the main firewall
configuration screen at any time.
Protection Policy - allows you to enable the firewall to check for different types of unauthorized
access - when you've finished with this page, click on Submit.
Hacker Log - allows you to manage logging preferences for the firewall.
Syslog event - section allows you to determine which events are logged.
Syslog Operation - section allows you to determine the properties of the log, and where you
want to send the logs to. You can send them via email, or you can send
them to a computer on your LAN. Note that if you choose to send the
logs to a computer on your LAN, that computer must be running a
suitable Syslog application.
When you've finished configuring these options, click on "submit".
Service Filtering
The service filtering setting allows you to filter incoming connections from your external
network. Checking the box will block incoming traffic for that protocol. When you've finished,
click on Submit to save the settings.
Remember if you've changed any settings, you must save them to flash by clicking on Save
Firewall Configuration at the bottom of the Firewall Configuration screen. Then you'll need to
press Save Settings and Reboot on the side menu, then clicking "Save & Reboot" in the next page
displayed.
Security
www.netcomm.com.au Rev. 1- YML709
Page 46 NB1300Plus4 ADSL Modem
Page 47

Configuring Groups
The NB1300Plus4W's inbuilt firewall works by using groups and policies. Groups are used to
define certain settings. These settings are used when creating firewall rules, or policies.
Firewall Databases
The IP Group section allows you to add IP address information to the group database. You can
add a single IP , an IP range and a Subnet range. In this example, we are adding an IP entry named
"mailserver" with an IP address of 192.168.1.137. Note that if you are adding single IPs, it must
be entered in both the IP address 1 and 2 fields. Click on Add/Modify to add the entry to the
database.
Once you've finished adding or modifying entries to this section, click on the firewall link at the
top of the screen to return to the main firewall configuration screen.
The Service Group is used to set port information to the group database. As you can see, the
most common ports have already been entered into the database. To add new entries, simply
enter their relevant details into the input fields near the bottom of the screen. In this example, we
are adding a "PPTP" port, which uses the TCP protcol and port number 1723. You'll need to
click on the Add/Modify button to add it to the database.
The Time Window Group allows you to create periods of time which can be used in a firewall
policy. To add a new entry, simply give it a name and then specify the time period using the
drop down box. In this example, we are creating an entry called "Monday9to5" which is the time
period of 9am to 5pm on Monday.
The FTP Group is a pre-defined group used to filter certain FTP commands. The example
shown is an entry called DenyMKD, where the MKD command is selected, and the action is set
to deny. Also, make sure you click on the "Add modify entry" button to save the entry to the
group database.
The SMTP Group pre-defined group used to filter certain SMTP commands. In this example,
we are creating an entry called "allow all" which has all the commands selected and the action is
set to allow. You'll need to click on "Add modify entry" button to save the entry.
The HTTP group allows you to block either URLs, keywords in a URL or certain special
applications in that URL. In this example, we are creating a "DenyYahoo" entry, which will
block access to the www.yahoo.com.au website.
Remember if you've added or changed any entries, you must save them to flash by clicking on
Save Firewall Configuration at the bottom of the Firewall Configuration screen. Then you'll need
to press Save Settings and Reboot on the side menu, then clicking "Save & Reboot".
Rev. 1 - YML709 www.netcomm.com.au
NB1300Plus4 Wireless ADSL Modem Page 47
Security
Page 48

Configuring Policies
Once you've created entries in the NB1300Plus4W's group databases, it is time to create a
policy. A policy is a firewall rule which governs data passing through the firewall. You can create
an inbound policy - a policy for data coming in from the internet or an outbound policy which is
a policy for data going out to the internet.
To create an inbound policy, click on the inbound policy link under the "Inbound /Outbound
policies" heading. You will now be presented with an Adding New Policy screen.
Firstly, you can specify whether the rule applies to a certain IP, IP range or any IP. You can also
specify a range created in the IP Group if you've done so by using the "DB" drop down box.
This must be done for both the Source IP and the Destination IP,
Secondly you can specify which ports this rule applies to. You can either specify the ports
manually, or use a group database rule if you've created one previously.
Now, select the Transport Protocol, which can be TCP, UDP or both. You can also enable
reverse NAT if you wish. Also select whether this rule applies an Allow or Deny action.
The next sections (Time window, ftp content, SMTP content, http content) refer directly to
group databases. If you haven't created any rules under the relevant group database, you will not
be able to use these sections. Select the relevant rules using the drop down box.
Once you've finished click on "Add Modify inbound policy" to add the rule to the database. You
should now see it listed under the Inbound Policy screen. To create more rules, you will need to
click on the "Add" button.
The Outbound Policy screen is essentially the same, other than it deals with outgoing
connections rather than incoming connections. You can modify policies in either screen by
clicking on "edit" for the rule you wish to modify.
Remember if you've added changed any entries, you must save them to flash by clicking on Save
Firewall Configuration at the bottom of the Firewall Configuration screen. Then you'll need to
press Save Settings and Reboot on the side menu, then clicking "Save & Reboot".
Security
www.netcomm.com.au Rev. 1- YML709
Page 48 NB1300Plus4 ADSL Modem
Page 49

Advanced Configuration for your NB1300Plus4 Wireless
How to make changes
The NB1300Plus4 Wireless utilises a Web based interface for configuration, this means that you
do not need to load drivers (unless using USB) and configuration is always performed via a W eb
browser (such as Internet Explorer or Netscape Navigator).
For each configuration page there is a Submit button to store the changes for that page before
you move on to the next page. Once you have made and submitted all your required changes you
must click the Save Settings and Reboot button.
Clicking this button will permanently store all your changes and implement them by performing
a reboot. Please wait up to 30 seconds for your router to reboot and resynchronize the ADSL
link (Showtime). The Reboot process is complete when the RDY light starts pulsing steadily
again.
Note: DO NOT power the unit off or press the reset button again during the reboot process
Multiple Virtual Circuits
The NB1300Plus4 Wireless is capable of being configured to maintain multiple virtual circuits –
that is multiple routed connections or PPP sessions down the same ADSL copper cable. Most
ADSL connections will only support one PPP session please confirm your line’s / accounts
capabilities with your ISP. All configurations made in the one-page setup are made to Virtual
Circuit Zero (VC0). You can configure the other VCs individually by opening the Advanced
WAN page and selecting which VC you want to edit at the bottom of the page then pressing the
Submit button. All fields on that page will be presented in terms of the Virtual Circuit number
just chosen.
USB or Ethernet?
The NB1300Plus4 Wireless can be connected via a USB cable or an Ethernet cable or both. The
reason for this is that the USB connection is simply an ethernet simulation, as far as your
computer is concerned the USB connection is an
Ethernet connection, hence DHCP and other protocols
will work the same as for Ethernet.
1. After connecting all the ADSL Router cables,
powering on the ADSL Router , and launching a web
browser, such as Internet Explorer or Netscape
Navigator, browse to the address http://192.168.1.1.
2. Enter the correct user name and password to access
the Configuration tool. The default user name and
password are as below.
User Name : admin
Password : password
Rev. 1 - YML709 www.netcomm.com.au
NB1300Plus4 Wireless ADSL Modem Page 49
Advanced
Page 50

Note: You must click the Submit button on every page that you make changes on and
when you have made all your changes click the Save Setting and Reboot button
The configuration page is split into two sections, Simple mode (default) and Advanced mode.
When you log into the router it will be in simple mode. This provides enough configuration for
the majority of connections.
Main Menu - (Simple)
The following is displayed in the left hand panel when you first log into the NB1300Plus4
Wireless:
Advanced
www.netcomm.com.au Rev. 1- YML709
Page 50 NB1300Plus4 ADSL Modem
Page 51

Basic Menu
One Page Setup
The One Page setup page is designed to make the most commonly required configuration fields
available all in one place. For most installations you will only need to use the one-page setup to
configure the unit. One-Page setup fields all apply to Virtual Circuit zero only (see section on
Multiple V irtual Circuits in this manual for more information).
LAN:
This the Local Area Network IP address of the NB1300Plus4 Wireless, by default this is set to
192.168.1.1 this can be changed to reflect your network requirements, i.e. 172.16.1.1 or 10.0.0.1
For simple networks it is suggested that the default addresses be used.
WAN:
This is the field that you configure your ISP details, enter the details provided by your ISP into
these fields:
Service name - This is the name you wish to call the connection, it is recommended that
you use your ISP's name to avoid confusion at a later date. For example if you use Ozemail
as your ISP then enter 'OzEmail' in the service field. Your ISP does NOT set this field.
Username - This is the Username provided by your ISP. Please check with your ISP as to
the format to use, some ISPs use your full Username (i.e. user@ISP.com.au) and some just
use the username only.
Rev. 1 - YML709 www.netcomm.com.au
NB1300Plus4 Wireless ADSL Modem Page 51
Advanced
Page 52

Password - This is the password provided by your ISP for your Internet connection. It is
usually only required for connection types that use PPP.
Disconnect timeout - If no activity is recorded on the network the NB1300Plus4 Wireless
will disconnect the line after this many seconds, the maximum is 32767 seconds (about 10
hours).
WAN Type: This is the connection type set by your ISP, you can select from the following
options:
o PPPoA VC-Mux
o PPPoA LLC
o 1483 Bridged IP LLC or VC-Mux (For Transparent bridge also enable Bridge mode)
o 1483 Routed IP LLC or VC-Mux
o Classical IP over ATM
o PPPoE - VC-Mux, LLC, None
If your connection is not working with the suggested configuration try using one of the other
settings.
VC Settings:
These are the settings for the line itself, these are supplied by your ISP.
❏ VPI - usually 8 unless specified otherwise by your ISP
❏ VCI - usually 35 unless specified otherwise by your ISP
❏ Static IP Address - 0.0.0.0 or 192.168.241.101 unless specified by your ISP
❏ Subnet mask - 255.255.255.0 unless specified by your ISP.
❏ Default Gateway - 0.0.0.0 unless specified by your ISP.
Bridge:
Enabling bridge mode will place the unit into Transparent bridge mode (like a Ethernet ADSL
modem). To use this mode you should select “enable” for Bridge mode at the bottom of the
OnePage setup. Also, set your WAN type to a Bridging option (e.g RFC 1482 Bridge using
LLC).
Show Advanced Settings
Select this option to display the advanced settings of the NB1300Plus4 Wireless (See further for
details of Advanced settings)
Advanced configurations should only be used if you are familiar with the operation of your
network and ISP settings or if you are directed to do so by NetComm support or your ISP.
Status
The status pages show what the status is of current connections and settings, this section
describes what fields are displayed. See 'Main Menu - advanced' for details on how to change
these settings.
Advanced
www.netcomm.com.au Rev. 1- YML709
Page 52 NB1300Plus4 ADSL Modem
Page 53

Router
The Router page shows the firmware versions and WAN and LAN interface status.
Firmware Version: This field displays the NetComm firmware version number on the
router.
Customer Software Version: This field displays the software interface version on the
router. Firmware updates can be downloaded from the NetComm website when available.
WAN:
These fields display the current IP address, Subnet Mask and MAC address for the WAN
(ADSL) interface. This address is supplied by your ISP either automatically or using a static
assigned address.
LAN:
These fields display the IP address, Subnet Mask and MAC address for the LAN interface.
Number of Ethernet Devices Connected to the DHCP Server: This field displays the
number of DHCP clients connected to the NB1300Plus4 Wireless. It also shows the IP
address and MAC address of the attached DHCP clients.
Advanced
Rev. 1 - YML709 www.netcomm.com.au
NB1300Plus4 Wireless ADSL Modem Page 53
Page 54

ADSL
The ADSL Status page shows the ADSL physical layer status.
ADSL Line Status: This field displays the ADSL connection process and status.
ADSL Modulation: This field displays the ADSL modulation status for G.dmt or T1.413.
ADSL Annex Mode: This field displays the ADSL annex modes for Annex A or Annex B.
ADSL Startup Attempts: This field displays the ADSL connection attempts after
loss of showtime.
Elapsed Time: This field displays the time of the modem has been in operation.
SNR Margin: Amount of increased noise that can be tolerated while maintaining the
designed BER (bit error rate). The SNR Margin is set by Central Office DSLAM. If the SNR
Margin is increased, bit error rate performance will improve, but the data rate will decrease.
Conversely, if the SNR Mar gin is decreased, bit error rate performance will decrease, but the
data rate will increase.
Line Attenuation: Attenuation is the decrease in magnitude of the ADSL line signal
between the transmitter (Central Office DSLAM) and the receiver (Client ADSL Modem),
measured in dB. It is measured by calculating the difference in dB between the signal power
level received at the Client ADSL modem and the reference signal power level transmitted
from the Central Office DSLAM.
Errored Seconds: The error during Showtime (ADSL link), whenever, a given sec contains
CRC error, that second will be declared error second.
Loss of Signal: This field displays the count of event of ADSL signal loss.
Loss of Frame: This field displays the count of event of ADSL frame loss.
Advanced
CRC Errors: This field displays the number of transmit data frames containing CRC errors.
Data Rate: This field displays the ADSL data rate.
Latency: This field displays the latency modes for fast or interleave.
www.netcomm.com.au Rev. 1- YML709
Page 54 NB1300Plus4 ADSL Modem
Page 55

PPP
The PPP Status page shows the status of PPP for each PPP interface. See PPP:
These fields display the following information on each PPP interface:
■ Connection Name (user defined)
■ Interface (PVC)
■ Mode (PPPoE or PPPoA)
■ Status (Connected or Not Connected)
■ Packets Sent
■ Packets Received
■ Bytes Sent
■ Byte Received.
Connect and Disconnect: Each PPP session can be individually controlled, simply enter
the desired connection number into the 'Connection #' field and select either connect or
disconnect from the drop down menu and click on the 'Execute' button.
Advanced
Rev. 1 - YML709 www.netcomm.com.au
NB1300Plus4 Wireless ADSL Modem Page 55
Page 56

Main Menu - (Advanced)
Advanced
One Page Setup
See 'Main menu - Simple' for full details of the One Page Setup.
Hide Advanced settings
Select this option to hide the advanced settings of the NB1300Plus4 Wireless. Pressing this will
display the Simple settings.
Advanced
www.netcomm.com.au Rev. 1- YML709
Page 56 NB1300Plus4 ADSL Modem
Page 57

Administration
The links under the Administration column are associated to the pages that represent the
configurations of system and interfaces.
Note: When the configurations are changed, please go to the Save Settings page to save
the new setting and reboot the board.
WAN
The WAN configuration page allows the user to set the configuration for the WAN/ADSL ports.
Per VC Settings/Change Adapter: Under Per VC Setting, it provides the configurations
for VPI/VCI, Static IP Address Subnet Mask, and Gateway. The Static IP Address, Subnet
Mask and Gateway are used for Static IP configuration. Current NetComm firmware
supports eight PVCs. To switch between the PVCs, please choose one of the virtual circuit
numbers and click on the Submit button to switch over.
Note: For newer firmware you click on the Change Adapter button and select the VC you
wish to View/Edit.
MAC Spoofing: MAC Spoofing is developed to solve the scenario when the ISP only
recognizes one MAC address. Copy the ISP-recognized MAC address here.
Rev. 1 - YML709 www.netcomm.com.au
NB1300Plus4 Wireless ADSL Modem Page 57
Advanced
Page 58

A TM:
Service Category: UBR and CBR are supported from the ATM.
Bandwidth: Bandwidth setting takes effect only when the CBR is selected. The maximum
available bandwidth is from the upstream data rate of ADSL status page.
Encapsulation: Bridge IGMP
IGMP relay/proxy specification and environment: Support IGMP proxy/relay function
for ADSL modem, based on the following requirement and case:
■ On CO side, there must be at least one IGMP querier (router) present. IGMP querier
will send IGMP query packet. The ADSL modem is responsible to relay these IGMP
query to Ethernet.
■ End-user multicast application device send IGMP report while receiving IGMP query or
being activated by user, the ADSL modem should be responsible to proxy (that is,
change source IP to ADSL modem's WAN IP) the IGMP report to ADSL WAN side,
include all PVCs. The same case is for IGMP leave packet.
■ Not necessary to relay multicast routing between two ADSL PVCs or two interfaces in
LAN side.
■ Special purpose multicast packet (such as RIP 2 packet) should run without
interference.
Note: Before the IGMP mode is enabled; please go to the Miscellaneous Configuration
page to enable the IGMP proxy. Otherwise, the IGMP selection will not be valid.
Q: Where can I download the free software to test IGMP.
A: Please go to this link http://manimac.itd.nrl.navy.mil/MGEN/.
PPP: The current release supports multiple PPP sessions per PVC. The PPP configuration
in the WAN configuration page is for the first PPP session for each PVC. The predefined
PPP Account Name (Account ID) is "Simple PPP Account 0" for PVC0 and predefined PPP
Connection Name is "Simple PPP Session 0" for PVC0. For the other PVC X, the predefined
account name and connection name will be Simple PPP Account X and Simple PPP Session
X. X is the PVC number from 1 to 7.
It can support up to total of 16 PPP sessions, and each PVC can support up to 8 PPP
sessions. The multiple PPP sessions may be configured with any combination over 8 PVCs.
For the multiple PPP sessions, please go to PPP Configuration page (Section 6.3).
Service Name: The service name of PPP is required by some ISPs. If the ISP does not
provide the Service Name, please leave it blank.
Disconnect Timeout: The Disconnect Timeout allows the user to set the specific period of
time to disconnect from the ISP. The default is 0, which means never disconnect from the
ISP.
DHCP Client: Use Table 6-1 to configure a valid setting for each PVC.
MRU: Maximum Receive Unit indicates the peer of PPP connection the maximum size of
the PPP information field this device can be received. The default value is 1492 and is used in
the beginning of the PPP negotiation. In the normal negotiation, the peer will accept this
Advanced
MRU and will not send packet with information field larger than this value.
www.netcomm.com.au Rev. 1- YML709
Page 58 NB1300Plus4 ADSL Modem
Page 59

MTU: Maximum Transmission Unit indicates the network stack of any packet is larger than
this value will be fragmented before the transmission. During the PPP negotiation, the peer
of the PPP connection will indicates its MRU and will be accepted. The actual MTU of the
PPP connection will be set to the smaller one of MTU and the peer's MRU. The default is
value 1492.
MSS: Maximum Segment Size is the largest size of data that TCP will send in a single IP
packet. When a connection is established between a LAN client and a host in the WAN side,
the LAN client and the WAN host will indicate their MSS during the TCP connection
handshake. The default value is 1432.
Automatic Reconnect: When it is checked, it will maintain the PPP connection all the time.
If the ISP shut down the PPP connection, it will automatically reconnect PPP session.
Authentication: When AUTO option is chosen, the PAP mode will run first then CHAP.
If you are having connection problems with PPPoA or PPPoE connections it is
recommended that you try forcing either PAP or CHAP modes.
Host name: Required by some ISPs. If the ISP does not provide the Host name, please
leave it blank.
Q1: If the PPP is disconnected after the Disconnect Timeout and how can I
reconnect it?
A: You have to go to the PPP Status under Admin Privileged column, choose the correct
PVC and Connect option, and then click Execute to restart a new PPP secession.
Alternatively you can click the CONNECT button at the bottom of the OnePage setup.
When should I change my MTU settings?
MTU settings should be changed to suit your ISPs recommendations if you are experiencing the
following symptoms;
■ General emails send but emails with attachments fail
■ Can achieve a connection but some web pages wont load or can't download files.
■ Windows Update starts but fails to complete.
■ Y our ISP recommends you change the setting.
What should I change my MTU settings to?
MTU settings should be set to 1492 to start with, if you still have problems try lowering them
to 1456, 1400 or even as low as 750 to see if the problem improves. Your ISP is the best person
to contact to find out what MTU setting to use.
Note: MTU above 1492 is likely to cause problems and is not likely to improve data
throughput.
Advanced
Rev. 1 - YML709 www.netcomm.com.au
NB1300Plus4 Wireless ADSL Modem Page 59
Page 60

LAN/DHCP
The LAN configuration page allows you to set the configuration for the LAN port.
LAN IP Address & Subnet Mask: The default is 192.168.1.1 and 255.255.255.0 you can
change it to another private IP address, such as 172.168.0.1, and 255.255.255.0. - For most
configurations it is recommended to leave it as default.
DHCP Server: System Allocated: The DHCP address pool is based on LAN port IP
address plus 12 IP addresses. For example, the LAN IP address is 192.168.1.1; the DHCP
address pool is at the range of 192.168.1.2 to 192.168.1.14.
User Defined: The DHCP address pool is at the range of User Defined Start Address and
User Defined End Address. The maximum pool size can be 253 IP addresses: 255 total IP
addresses - 1 broadcast address - 1 LAN port IP address.
DHCP Gateway Selection: The default setting for the DHCP Gateway Selection is
"Automatic". The user can select the "User Defined" to specify "User Defined Gateway
Address". The DHCP server will issue the "User Defined Gateway Address" to the LAN
DHCP clients.
Lease time: The Lease time is the amount of time of a network user will be allowed to
connect with DHCP server. If all fields are 0, the allocated IP addresses will be effective
forever.
User mode: Under the Single User mode, the DHCP server only allocates one IP address to
local PC. Under the Multiple User mode, the DHCP server allocates the IP addresses
specified bye the DHCP address pool.
Advanced
Ethernet Mode Setting: The Ethernet Mode configuration page allows the user to set the
LAN port into Auto Sense, 100 Mbps Full Duplex, 100 Mbps Half Duplex, 10 Mbps Full
Duplex or 10 Mbps Half Duplex.
www.netcomm.com.au Rev. 1- YML709
Page 60 NB1300Plus4 ADSL Modem
Page 61

DNS
The DNS Configuration page allows you to set the configuration of DNS proxy.
The NetComm firmware supports DNS proxy. For the DHCP requests from local PCs, the
DHCP server will set the LAN port IP as the default DNS server. Thus, all DNS query
messages will come into LAN port first. The DNS proxy on the ADSL modem recorded the
available DNS servers, and forward DNS query messages to one of DNS server.
Disable DNS Proxy: The LAN port does not process the DNS query message. For the
DHCP requests from local PCs, the DHCP server will set the user-configured preferred DNS
sever or alternate DNS server whichever is available as the DNS server. Then all DNS query
messages will be directly sent to the DNS servers.
Use Auto Discovered DNS Servers Only: The DNS proxy will store the DNS server IP
addresses obtained from DHCP client or PPP into the table. And all DNS query messages
will be sent to one of the dynamically obtained DNS servers.
Use User Configured DNS Servers Only: The DNS proxy will use the user-configured
preferred DNS server and alternate DNS server. And all DNS query message will be sent to
one of DNS servers. Enter the DNS IP in the Preferred DNS Server and Alternate DNS
Server fields.
Auto Discovery + User Configured: The DNS proxy's table has all the IP addresses of
dynamically obtained and user configured DNS servers.
User Configuration: Place your primary and secondary DNS addresses here.
Rev. 1 - YML709 www.netcomm.com.au
NB1300Plus4 Wireless ADSL Modem Page 61
Advanced
Page 62

NA T
The NAT Configuration page allows the user to set the configuration for the Network Address
Translation. The default setting is Dynamic NAPT. It provides dynamic
Network Address Translation capability between LAN and multiple WAN connections, the
LAN traffic is routed to appropriate WAN connections based on the destination IP addresses
and Route Table. This eliminates the need for the static NAT session configuration between
multiple LAN clients and multiple WAN connections.
When the Dynamic NAPT is chosen, there is no need to configure the NAT Session and NAT
Session Name Configuration.
The NAT option only maps single WAN IP address to the local PC IP address. It is peer to-peer
mapping. (1x1) For each WAN interface, only one local PC IP address can be associated with
each WAN interface. Click the link Session Name Configuration to add the session name for
WAN interface.
The NAPT option maps the single WAN IP addresses to many local PCs IP addresses. (1xN). It
is the multiple-mapping mechanism. For each WAN Interface, more than one local PC can be
associated with one WAN Interface. Click the link Session Name Configuration to add the
session name for WAN interface.
Session Name: This field allows the user to enter his/her own session Name to distinguish
different NAT session for different interfaces among different PPP sessions and different
Advanced
PVCs.
Interface: This field allows the user to choose specific WAN Interface (PVC or PPP
Session) for NAT Session.
www.netcomm.com.au Rev. 1- YML709
Page 62 NB1300Plus4 ADSL Modem
Page 63

NAT Session Name Status: This table displays at the bottom of this page to show all the
NAT Session Names with its WAN Interface.
Number of NAT Configurations: This filed displays the total number of NAT Sessions
Name is entered.
Click the link Go back to NAT Configuration to return to the NAT configuration page. Select
the NAT option. Select the Session Name and assign the PC IP address, and choose the Add
action. Click the Submit button and go to the Save Settings to save this configuration.
NAT allows only one entry (User IP) per session.
NAPT allows many entries (User IPs) per session.
Session Name: This field allows the user to select the session from the configured NAT
Session Name Configuration.
User's IP: This filed allows the user to assign the IP address to map the corresponding
NAT/NAPT sessions.
Session Name Status will be displayed at the middle of this page to show the corresponding
Session Name with its IP address.
Number of NAT Configurations: This filed displays the total number of NAT Sessions is
entered.
Available Sessions Status will be displayed at the end of this page to show all the Session
Names with its WAN Interface.
Number of Session: This filed displays the total number of NAT Sessions Name is
entered.
Rev. 1 - YML709 www.netcomm.com.au
NB1300Plus4 Wireless ADSL Modem Page 63
Advanced
Page 64

Port Forwarding
The Port Forwarding Configuration page allows the user to set the configuration for Port
Forwarding. By default all UDP/TCP ports are protected from intrusion. If any specific local
PCs need to be mapped to the UDP/TCP port on WAN side, please input the mappings here.
Public Port: This field allows the user to enter the port number of the Public Network.
Private Port: This field allows the user to enter the port number of the Private Network.
Note: In most cases, the private port number is same as public port number.
Host IP Address: This field allows the user to enter the private network IP address for the
particular server.
Well Known Ports:
Port Protocol
21 FTP
23 Telnet
25 SMTP
43 Whois
53 DNS
69 TFTP
7 0 Gopher
79 Finger
80 HTTP
110 POP3
Advanced
www.netcomm.com.au Rev. 1- YML709
Page 64 NB1300Plus4 ADSL Modem
115 SFTP
161 SNMP
16 2 SNMP traps
Page 65

Wireless
The NB1300Plus4Wireless can support wireless connections to your Network. Any PC
equipped with an IEEE802.11b wireless network adaptor can be configured to connect to your
network.
SSID: This is the name of the Wireless LAN. All devices in the same Wireless LAN should
have the same SSID.
Channel: The channel used by the Wireless LAN. All devices in the same Wireless LAN
should use the same channel.
Security: Enable or Disable Wireless encryption.
Key Length: You can select the key length for the encryption key; either 64bit or 128bit.
Key 1 to Key 4: The key used to encypt data transmitted in the wireless network.
Note: If you make any changes, click the Submit button to save them.
Rev. 1 - YML709 www.netcomm.com.au
NB1300Plus4 Wireless ADSL Modem Page 65
Advanced
Page 66

ADSL Configuration
The ADSL Configuration page allows the user to set the configuration for ADSL protocols.
Trellis: This field allows the user to enable or disable the Trellis Code. By default, it is
always enabled.
Handshake Protocol: This field allows the user to select the ADSL handshake protocol.
Wiring Selection: This field allows the user to enter the wiring selection for the RJ-11.
Tip/Rip is the default for the board without the inner/outer pair relay
Bit Swapping: This field allows the user to enable or disable the upstream bit swapping.
Advanced
www.netcomm.com.au Rev. 1- YML709
Page 66 NB1300Plus4 ADSL Modem
Page 67

RIP Configuration
The RIP Per Interface Configuration page allows the user to set the configuration for each
Interface (PVCs, PPP Sessions, USB and LAN).
Interface: This field allows the user to choose the Interface (PVCs, PPP Sessions, USB and
LAN), for the RIP to be configured.
Enable: This field allows the user to Enable (Yes) or Disable (No) the specified interface for
RIP.
Supplier: This field allows the user to select the Supplier Mode (RIP Transmit).
❏ Disabled: The supplier transmit is disabled.
❏ V1 BC: The supplier transmits in RIPv1 Broadcast.
❏ V2 BC: The supplier transmits in RIPv2 Broadcast.
❏ V2 MC: The supplier transmits in RIPv2 Multicast.
Listener: This field allows the user to select the Listener Mode (RIP Receive)
❏ V1: The listener receives the RIPv1 only .
❏ V2: The listener receives the RIPv2 only .
❏ V1+V2: This listener receives the both RIPv1 and RIPv2.
Supplier and Listener are based on section 4.1 "Compatibility Switch" in RFC 1723.
Current RIP Settings: This field displays the each interface's RIP status.
Advanced
Rev. 1 - YML709 www.netcomm.com.au
NB1300Plus4 Wireless ADSL Modem Page 67
Page 68

Diagnostic T est
The Diagnostic Test page shows the test results for the connectivity of the physical layer and
protocol layer for both LAN and WAN sides.
Testing Ethernet LAN Connection: This test checks the Ethernet LAN interface
connection.
Testing ADSL Synchronization: This test checks the ADSL showtime. If this test returns
FAIL, all other tests will be skipped.
Test ATM OAM Segment Loop Back: This test sends ATM OAM F5 Segment loop-back
request cells to the CO. This test will pass if response cell is received. Some service
providers might not support this test. If this test fails consistently and the ADSL modem
does not seem to be working, make sure the VPI and VCI are configured correctly .
Test ATM OAM End-to-End Loop Back: This test sends ATM OAM F5 End to End
loop-back request cells to the CO. This test will pass if response cell is received. Some
service providers might not support this test. If this test return FAIL consistently and the
ADSL modem does not seem to be working, make sure the VPI and VCI are configured
correctly.
Test Ethernet Connect to ATM: This test checks the ATM AAL5 module is loaded
correctly.
Test PPPoE Connection: This test checks the PPPOE connection.
Test PPP Layer Connection: This test checks the PPP authentication.
Test IP Connect to PPP: This test checks a valid IP address assigned from the service
provider. Please note that on some ADSL services this test may fail despite the fact that
you have connected correctly.
Ping Primary DNS: This test checks the primary DNS can be reached through ping
Advanced
request. For example, Query DNS for www.netcomm.com.au
This performs a quick connectivity test to the NetComm website.
Note: on some ADSL services this test may fail despite you have connected correctly.
www.netcomm.com.au Rev. 1- YML709
Page 68 NB1300Plus4 ADSL Modem
Page 69

Route Table
The Route Table page displays routing table and allows the user to manually enter the routing
entry. The routing table will display the routing status of Destination, Netmask, Gateway, and
Interface. The interface br0 means the USB interface; lo0 means the loopback interface; and
ppp1 means the PPP interface. The Gateway is the learned Gateway
Rev. 1 - YML709 www.netcomm.com.au
NB1300Plus4 Wireless ADSL Modem Page 69
Advanced
Page 70

MAC Filtering
The MAC Filtering configuration page allows the user to set the configuration of IP filtering.
Enable and disable MAC filtering by selecting the 'Yes' or 'No' radio buttons.
Source MAC: When the bridge filtering is enabled, enter the Source MAC address, select
Block and click Add. Then all incoming WAN and LAN Ethernet packets matched with this
source MAC address will be filtered out. If the Forward is selected, then the packets will be
forwarded to the destination PC.
Destination MAC: When the bridge filtering is enabled, enter the Destination MAC
address, select Block and click Add. Then all incoming WAN and LAN Ethernet packets
matched with this destination MAC address will be filtered out. If the Forward is selected,
then the packets will be forwarded to the destination PC.
Type: Enter the hexadecimal number for the Ethernet type field in Ethernet_II packets.
For example, 0800 is for IP protocol.
0800 - IP Protocol
A5FF - Ethernet
Advanced
www.netcomm.com.au Rev. 1- YML709
Page 70 NB1300Plus4 ADSL Modem
Page 71

Security
Admin Password
The Admin Password Configuration page allows the user to set the password for administrator.
The Admin password is the same as the FTP password and must be at least 8-characters long
for the FTP function to work.
User Name: admin
Password (default): password
Rev. 1 - YML709 www.netcomm.com.au
NB1300Plus4 Wireless ADSL Modem Page 71
Advanced
Page 72

User Password
The User Password Configuration page allows the Admin user to set the password for the
general user. When logged in as a general user you can view the basic status of the NB1300Plus4
Wireless but you can not make critical changes to the unit.
User Name: admin
Password (default): password
Advanced
www.netcomm.com.au Rev. 1- YML709
Page 72 NB1300Plus4 ADSL Modem
Page 73

Misc Configuration
The Miscellaneous Configuration allows the user to set all the miscellaneous configurations.
HTTP Server Access: This field allows the user to configure the Web pages can be
accessed from.
All: When this field is checked, it allows both WAN and LAN access to the Web pages.
Restricted LAN: This field allows the Web pages access from LAN side.
Restricted WAN Specified IP & Subnet Mask: This field allows the Web access from WAN
side with a specify IP and subnet mask.
HTTP Server Port: This field allows the user to specify the port of the Web access.
For example, when it is changed to 1001, the HTTP server address for the LAN/WAN
access is http://192.168.1.1:1001.
FTP server: This field allows the user to enable or disable the FTP connection. If you want
FTP access from the WAN side you must ensure there are no port forwards for port 21.
TFTP server: This field allows the user to enable or disable the TFTP connection.
DMZ: A DMZ (De-Militarized Zone) is added between a protected network and an external
network, in order to provide an additional layer of security. When there is a suspected
packet coming from WAN, the firewall will forward this packet to the DMZ host.
DMZ Host IP: The IP address of the DMZ host at LAN side.
DHCP Relay: If it is enabled, the DHCP requests from local PCs will forward to the
DHCP server runs on the WAN side of a network. To have this function working properly,
please disable the NAT to run on router mode only, disable the DHCP server on the LAN
port, and make sure the routing table has the correct routing entry.
Advanced
Rev. 1 - YML709 www.netcomm.com.au
NB1300Plus4 Wireless ADSL Modem Page 73
Page 74

DHCP Target IP: The DHCP server runs on WAN side.
IGMP Pr oxy: Here is the global setting for IGMP Proxy . If it is enabled, then the enabled
IGMP Proxy on WAN PVCs will be working. Otherwise, no WAN PVC can have IGMP
Proxy working on it.
PPP connect on WAN access: If it is enabled, the PPP session will be automatically
established when there is a packet wants to go out the WAN.
PPP Half Bridge: When the PPP Half Bridge is enabled, only one PC is able to access the
Internet, and the DHCP server will duplicate the WAN IP address from the ISP to the local
client PC. Only the PC with the WAN IP address can access the Internet. This function
should only be used if one computer will be allowed to connect to the internet (E.G a
Software firewall computer or Proxy server)
Q: What is the difference between PPP connect on WAN access and the
Automatic Reconnect?
A: Some ISPs terminated the PPP session due to the inactivity. For the PPP connect on WAN
access, the PPP will be automatically reconnected when an URL is entered in the browser
(packet interested in going out the WAN). For the Automatic Reconnect, it will reconnect the
PPP session whenever it is terminated by ISP.
Advanced
www.netcomm.com.au Rev. 1- YML709
Page 74 NB1300Plus4 ADSL Modem
Page 75

System Log
The System Log page shows the events triggered by the system.
To clear the System Log simply click on the 'Clear Log' button.
To save the System Log, right click in the Log field and select "Select All" then right click again
and select "Copy" then paste it to your text editor (Notepad is good).
The System Log records:
■ DSL Layer
■ DSL Link detected
■ DSL Link connected
■ DSL Link disconnected
■ ATM Layer
■ ATM detected
■ ATM connected
■ ATM disconnected
■ ATM setting up VPI/VCI
■ PPP Layer
■ PPP authenticated
■ PPP invalid user name or password
■ PPP unable to connect with PPP server
Advanced
Rev. 1 - YML709 www.netcomm.com.au
NB1300Plus4 Wireless ADSL Modem Page 75
Page 76

■ IP Layer
■ IP protocol up
■ PPP IP address
■ PPP Gateway IP address PPP DNS Primary IP address
■ PPP DSN Secondary IP address
Advanced
www.netcomm.com.au Rev. 1- YML709
Page 76 NB1300Plus4 ADSL Modem
Page 77

Code Update
The Code Update page allows the user to upload new firmware to the NB1300Plus4 Wireless.
To upload new firmware:
1. Download the latest firmware image from the NetComm website
2. Save the file to your Desktop or other location
3. Select the Browse button and locate the file saved in step 2
4. Click on the Update button to start the process
5. Once the upgrade has been completed the router will need to reboot.
Rev. 1 - YML709 www.netcomm.com.au
NB1300Plus4 Wireless ADSL Modem Page 77
Advanced
Page 78

Status
Router
The Router page shows the firmware versions and WAN and LAN interface status.
Firmware Version: This field displays the NetComm firmware version number.
Showtime Firmware Version: This field displays the NetComm firmware version number.
Graphical Interface Version: This field displays the Graphical User Interface version.
WAN: These fields display the IP address, Subnet Mask and MAC address for the WAN
(ADSL) interface.
LAN: These fields display the IP address, Subnet Mask and MAC address for the LAN
interface.
Number of Ethernet Devices Connected to the DHCP Server: This field displays the
number of DHCP clients connected to the NB1300Plus4 Wireless.
Advanced
www.netcomm.com.au Rev. 1- YML709
Page 78 NB1300Plus4 ADSL Modem
Page 79
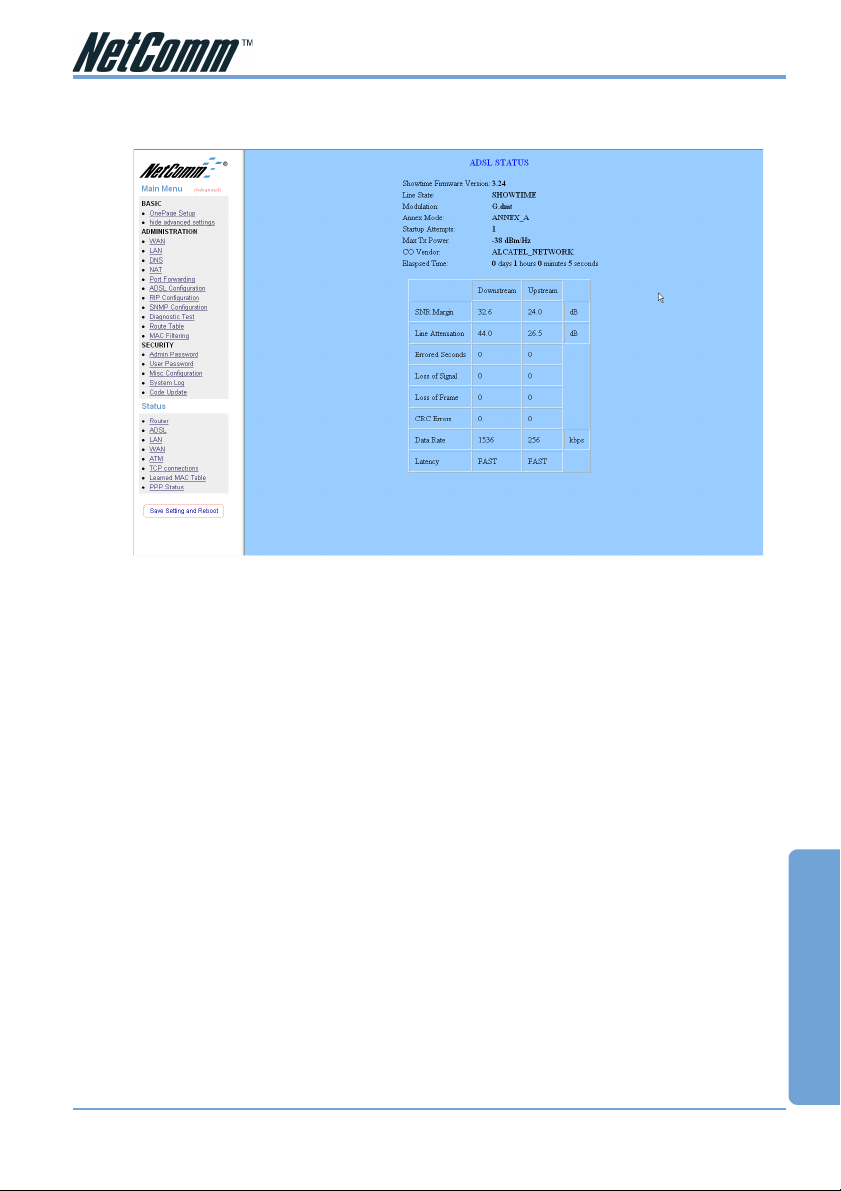
ADSL
The ADSL Status page shows the ADSL physical layer status.
ADSL Line Status: This field displays the ADSL connection process and status.
ADSL Modulation: This field displays the ADSL modulation status for G.dmt or T1.413.
ADSL Annex Mode: This field displays the ADSL annex modes for Annex A or Annex B.
ADSL Startup Attempts: This field displays the ADSL connection attempts after loss of
showtime.
Elapsed Time: This field displays the time of the modem has been in operation.
SNR Margin: Amount of increased noise that can be tolerated while maintaining the
designed BER (bit error rate). The SNR Margin is set by Central Office DSLAM. If the SNR
Margin is increased, bit error rate performance will improve, but the data rate will decrease.
Conversely, if the SNR Mar gin is decreased, bit error rate performance will decrease, but the
data rate will increase.
Line Attenuation: Attenuation is the decrease in magnitude of the ADSL line signal
between the transmitter (Central Office DSLAM) and the receiver (Client ADSL Modem),
measured in dB. It is measured by calculating the difference in dB between the signal power
level received at the Client ADSL modem and the reference signal power level transmitted
from the Central Office DSLAM.
Errored Seconds: The error during Showtime (ADSL link), whenever, a given sec contains
CRC error, that second will be declared error second.
Loss of Signal: This field displays the count of event of ADSL signal loss.
Loss of Frame: This field displays the count of event of ADSL frame loss.
CRC Errors: This field displays the number of transmit data frames containing CRC errors.
Data Rate: This field displays the ADSL data rate.
Latency: This field displays the latency modes for fast or interleave.
Advanced
Rev. 1 - YML709 www.netcomm.com.au
NB1300Plus4 Wireless ADSL Modem Page 79
Page 80

LAN
The LAN page shows the information and status of LAN port, DHCP client table, Ethernet link
and USB link.
LAN: These fields display the IP address, Subnet Mask and MAC address for the LAN
interface.
Number of Ethernet Devices Connected to the DHCP Server:These fields display the
number of connections to the DHCP server as well as the DHCP client table with the
assigned IP addresses and MAC addresses.
Ethernet Link Status: This field displays the link up or down for the Ethernet.
USB Link Status: This field displays the link up or down for the USB.
Advanced
www.netcomm.com.au Rev. 1- YML709
Page 80 NB1300Plus4 ADSL Modem
Page 81

WAN
The WAN Status page shows the information and status of WAN PVCs.
WAN: These fields display the IP address, Subnet Mask and MAC address for the WAN
(ADSL) interface. Use the V irtual Circuit selection to selection different PVC for status
display.
DHCP Release & Renew: This field allows the user to release and renew the WAN IP
address in the WAN DHCP Client Enabled (dynamic) mode.
Rev. 1 - YML709 www.netcomm.com.au
NB1300Plus4 Wireless ADSL Modem Page 81
Advanced
Page 82

ATM
The ATM Status page shows all the statistics information of ATM cells.
Advanced
www.netcomm.com.au Rev. 1- YML709
Page 82 NB1300Plus4 ADSL Modem
Page 83

TCP Connections
TCP Status: The TCP Status page shows the statistics for all TCP connections.
Rev. 1 - YML709 www.netcomm.com.au
NB1300Plus4 Wireless ADSL Modem Page 83
Advanced
Page 84

Learned MAC Table
The Learned MAC Table page shows the current learned Bridge MAC table.
Aging Timeout: This field allows the user to enter the update period for the MAC table.
Advanced
www.netcomm.com.au Rev. 1- YML709
Page 84 NB1300Plus4 ADSL Modem
Page 85

PPP
The PPP Status page shows the status of PPP for each PPP interface.
PPP: These fields display the following information on each PPP interface:
■ Connection Name (user defined)
■ Interface (PVC)
■ Mode (PPPoE or PPPoA)
■ Status (Connected or Not Connected)
■ Packets Sent
■ Packets Received
■ Bytes Sent
■ Byte Received.
Connect and Disconnect: This field allows the user to manually connect/disconnect the
PPP connection for each PPP interface. In another word, each PPP session can be connected
and disconnected individually.
Advanced
Rev. 1 - YML709 www.netcomm.com.au
NB1300Plus4 Wireless ADSL Modem Page 85
Page 86

Save Settings and Reboot
The Save Settings and Reboot button allows the user to save the new configuration to the flash
and reboot the system.
After making changes on any of the configuration pages, click the “Submit” button at the bottom
of the page to save the changes.
When you have finished making all the changes required in all pages, the new settings need to be
saved into the flash, so it is necessary to go to the Save Settings page to save and reboot the
system for the changes to be taken effect. After the Save and Reboot, you will be returned to
the onepage setup.
Note: DO NOT power the unit off or press the reset button again during the reboot process.
Advanced
www.netcomm.com.au Rev. 1- YML709
Page 86 NB1300Plus4 ADSL Modem
Page 87

Appendix A - Connection Instructions
Connect your NB1300Plus4 Wireless ADSL Modem via Ethernet
1. Connect your NB1300Plus4 Wireless to either a computer directly or a network hub or
switch using cat5 ethernet cables. You need to ensure you are using the correct type of
ethernet cable - i.e. straight through or crossover.
2. Connect the power pack to the NB1300Plus4 Wireless ADSL Modem and switch on the
power switch.
3. Ensure that the connected port has a LAN led light on the NB1300Plus4 Wireless.
4. Ensure that the computer you intend to use has an IP address in the same subnet as the
NB1300Plus4 Wireless ADSL Modem. (e.g. the NB1300Plus4 Wireless’s default IP is
192.168.1.1 - your computer should be on 192.168.1.100 or similar.) If you have DHCP
enabled on your computer, the NB1300Plus4 Wireless will assign your computer a suitable
IP address.
5. Ensure that your computer has a LAN link light.
6. Connect one end of the ADSL phone line to the NB1300Plus4 Wireless ADSL Modem and
the other end to the wall socket.
7. Additional network devices or computers can be connected to the remaining LAN ports.
Rev. 1 - YML709 www.netcomm.com.au
NB1300Plus4 Wireless ADSL Modem Page 87
Page 88

Connect your NB1300Plus4 Wireless ADSL Modem via USB
1. Connect the power pack to the NB1300Plus4 Wireless ADSL Modem and switch on the
power switch.
2. Install the USB driver (Windows 98/Me/2000/XP only, for Macintosh installation see
appendix.)
When you install the USB driver on your computer it creates a Virtual Ethernet Adapter,
which can be configured in the same way as a Network Interface card with DHCP or static
IP address. To install the USB driver please follow the steps below;
a. Boot your machine into Windows 98/Me/2000/XP.
b. Insert your NetComm NB1300Plus4Wireless CD-ROM into your CD-ROM drive.
c. Select “Install drivers” from the screen which will automatically appear. If the screen
does not appear, browse the CD-ROM and double-click on the “autorun.exe” file.
d. Plug power up to your NB1300Plus4Wireless and switch ON.
e. Plug a USB cable from the back of the unit into a spare USB socket on your computer.
f. The Windows “Add New Hardware Wizard” should appear. Click Next to continue.
g . Ensure the option “Search for the best driver….” is chosen and click Next.
h. When prompted where you would like to look for the drivers choose “Specify location”
and untick any other boxes. Then click the browse button to select the CD-ROM drive
which you inserted you NetComm CD-ROM into. Then choose the ‘USBdriver’ folder.
3. Connect one end of the ADSL phone line to the NB1300Plus4 Wireless ADSL Modem and
the other end to the wall socket.
4. In addition to using the USB connection, you my connect up to 4 additional network devices
or computers.
www.netcomm.com.au Rev. 1- YML709
Page 88 NB1300Plus4 ADSL Modem
Page 89

Macintosh OS X USB Configuration
1. Close any running applications.
2. Execute the Install_USB_ADSL.pkg
program.
3. OS X will then request you enter the
passphrase for a user that has
administration access to the computer.
Enter the details and click on OK.
4. Click on Continue.
5. Select the drive that contains OS X and
then click on Continue.
Rev. 1 - YML709 www.netcomm.com.au
NB1300Plus4 Wireless ADSL Modem Page 89
Page 90

6. Click on Upgrade or Install to continue.
7. Installation of this software requires that
you restart your computer when
installation is complete. Click on Continue
Installation to continue.
8. Click on Restart.
9. Connect the USB cable from the NB1300
into a spare SUB port on your computer.
10. Open System Preferences from the Dock.
11. Click on Network to display this window.
Click on OK.
www.netcomm.com.au Rev. 1- YML709
Page 90 NB1300Plus4 ADSL Modem
Page 91

12. Select the Ethernet Adaptor (en1) from the Show box. Select the TCP/IP tab and select Using
DHCP.
13. Click on Apply Now. Close the Network window and System Preferences.
Rev. 1 - YML709 www.netcomm.com.au
NB1300Plus4 Wireless ADSL Modem Page 91
Page 92

Appendix B - T rouble Shooting
The following section gives details about troubleshooting issues for your NB1300Plus4 Wireless
ADSL Modem. Problems are divided into different areas to assist you in finding the
appropriate solution.
General Modem Operation
Before continuing, refer to the correct power up sequence to verify that your NB1300Plus4
Wireless ADSL Modem is operating.
Correct power up sequence
After you turn on your NB1300Plus4 Wireless ADSL Modem, the following sequence should
occur:
1. When power is first applied, verify that both the Power LED and Ready LED are on.
2. The RDY LED will turn off after 5 seconds.
3. After approximately 10 seconds, verify that:
■ The RDY LED will flash which indicates that the modem is ready for use.
■ The LAN LED will only light when a ethernet cable is connected and a successful LAN
connection is made.
If any of these conditions does not occur, refer to the appropriate section below.
PWR LED Not On
If the PWR and other LEDs are off when your ADSL modem is turned on:
■ Make sure that the power cord is properly connected to your ADSL Modem and that the
power supply adapter is also properly connected to a functioning power outlet.
■ Check that you are using the 12 V AC power adapter supplied by NetComm for this
product.
If the error persists, you have a hardware problem and should contact NetComm technical
support.
Resetting the NB1300Plus4 Wireless ADSL Modem
To restore the factory default configuration settings without knowing the administration
password or IP address, you must use the Default Reset button on the rear panel of the ADSL
Modem.
1. Press and hold the Default Reset button for about 10 seconds.
2. Release the Default Reset button and wait for the Modem to reboot (which will take
approximately one minute).
3. Once the RDY and WAN LEDs are flashing, the unit has finished rebooting and the factory
defaults have been restored. Do not power off the modem or press reset again until these
LEDs are flashing.
www.netcomm.com.au Rev. 1- YML709
Page 92 NB1300Plus4 ADSL Modem
Page 93

Web Based Interface
If you are unable to access the NB1300Plus4 Wireless ADSL Modem’s Web Based Interface
from a computer on your local network, check the following:
■ Check the Ethernet connection between your computer and your NetComm ADSL Modem.
■ Make sure your computer’s IP address is on the same subnet as your ADSL Modem. If you
are using the recommended addressing scheme, your computer’s address should be in the
range of 192.168.1.1 to 192.168.1.254.
Note: If your computer’s IP address is shown as 169.254.x.x: Recent versions of
Windows and MacOS will generate and assign an IP address if the computer
cannot reach a DHCP server. These auto-generated addresses are in the range of
169.254.x.x. If your IP address is in this range, check the connection from the
computer to your ADSL Modem and reboot your computer.
■ If your ADSL Modem’s IP address has been changed and you don’t know the current IP
address, reset your ADSL Modem’s configuration to factory defaults. This will set the
ADSL Modem’s IP address to 192.168.1.1.
■ Make sure your browser has Java, JavaScript, or ActiveX enabled. If you are using Internet
Explorer, click Refresh to be sure the Java applet is loaded.
■ Try quitting the browser and launching it again.
■ Make sure you are using the correct login information. The factory default login name is
admin and the password is password. Make sure that Caps Lock is off when entering this
information.
If your ADSL Modem does not save changes you have made in the Web Based Interface, check
the following:
■ When entering configuration settings, be sure to click the Submit button before moving to
another menu or tab, or else your changes will be lost.
■ Once all of the changes are made, click the save settings button to save your settings. The
unit will then automatically reboot itself. Once completed, your modem is ready for use.
Click the Refresh or Reload button in your Web browser. The changes may have occurred, but
the W eb browser may be caching the old configuration settings. In this case clear your web
browser cache and refresh again.
Rev. 1 - YML709 www.netcomm.com.au
NB1300Plus4 Wireless ADSL Modem Page 93
Page 94

Internet / ISP Connection
ADSL link
If your ADSL Modem is unable to access the Internet, you should first determine whether you
have an ADSL link with the service provider. The state of this connection is indicated with the
WAN LED.
WAN LED is Yellow
If your WAN LED is yellow, then you have a good ADSL connection. You can be confident that
the service provider has connected you line correctly and that your wiring is correct.
WAN LED is Blinking
If your WAN LED is blinking then your ADSL Modem is attempting to make an ADSL
connection with the service provider. The LED should stop blinking and stay on within two
minutes.
If the WAN LED does not stay on, disconnect all telephones on the line. If this solves the
problem, reconnect the telephones one at a time, being careful to use a microfilter on each
telephone. If the microfilters are connected correctly, you should be able to connect all your
telephones.
If disconnecting telephones does not return the WAN LED to yellow, there may be a problem
with your wiring. If the telephone company has tested the ADSL signal at your Network
Interface Device (NID), then you may have poor quality wiring in your house.
Obtaining a W AN IP Address
If your ADSL Modem is unable to access the internet, and your WAN LED is yellow or
blinking, you should determine whether your ADSL Modem is able to obtain a WAN IP address
from the ISP.
Unless you have been assigned a static IP address, your ADSL Modem must request an IP
address from the ISP. You can determine whether the request was successful using the browser
interface.
To check the WAN IP address from the browser interface:
1. Launch your browser and select an external site such as www.netcomm.com.au
2. Access the Main Menu of the ADSL Modem’s configuration at http://192.168.1.1
3. Under the Router menu, check that an IP address is shown for the WAN Port. I If
nothing is shown, your ADSL Modem has not obtained an IP address from your ISP.
If your ADSL Modem is unable to obtain an IP address from the ISP, the problem may be
one of the following:
■ Y our ISP may require a login program.
■ Ask your ISP whether they require PPP over Ethernet (PPPoE) or PPP over ATM
(PPPoA) login.
■ If you have selected a login program, you may have incorrectly set the Service Name,
User Name and Password. See “PPPoE or PPPoA”, below.
www.netcomm.com.au Rev. 1- YML709
Page 94 NB1300Plus4 ADSL Modem
Page 95

■ Your ISP may check for your computer's host name. Assign the computer Host Name of
your ISP account to your ADSL Modem in the browser-based Setup Wizard.
■ Your ISP only allows one MAC address to connect to Internet, and may check for your
computer’s MAC address. In this case, inform your ISP that you have bought a new
network device, and ask them to use your ADSL Modem’s MAC address.
PPPoE or PPPoA
The PPPoE or PPPoA connection can be debugged as follows:
1. Access the Main Menu of the ADSL Modem’s configuration at http://192.168.1.1.
2. Under the PPP menu you can view the PPP configuration settings depending on your
connection type.
3. If the PPP menu shows the PPP connection type as connected, the connection is up and
working.
4. If there is no PPP connection listed in the menu, check your connection settings in the
main menu.
If you cannot connect after several minutes, you may be using an incorrect Service Name, User
Name or Password. There also may be a provisioning problem with your ISP.
Internet Browsing
If your ADSL Modem can obtain an IP address but your computer is unable to load any web
pages from the Internet:
■ Your computer may not recognize any DNS server addresses.
A DNS server is a host on the Internet that translates Internet names (such as www
addresses) to numeric IP addresses. Typically your ISP will provide the addresses of one or
two DNS servers for your use. If you entered a DNS address during the modem’s
configuration, reboot your computer and verify the DNS address. Alternatively, you may
configure your computer manually with DNS addresses, as explained in your operating
system documentation.
■ Your computer may not have the ADSL Modem configured as its TCP/IP gateway.
If your computer obtains its information from the Modem by DHCP, reboot your computer
and verify the modem’s address.
Rev. 1 - YML709 www.netcomm.com.au
NB1300Plus4 Wireless ADSL Modem Page 95
Page 96

T esting your TCP/IP Network Using a Ping Utility
Most TCP/IP terminal devices and ADSL Modems contain a ping utility that sends an echo
request packet to a designated device. The device then responds with an echo reply.
Troubleshooting a TCP/IP network is made very easy by using the ping utility in your
computer.
T esting the LAN Path to Y our ADSL Modem
You can ping the ADSL Modem from your computer to verify that the LAN path to your
modem is working.
T o ping the modem from a computer running Windows 95 or later:
1. From the Windows toolbar, click the Start button and select Run.
2. In the field provided, type Ping followed by the IP address of the ADSL Modem, as in this
example:
ping 192.168.1.1
3. Click OK.
Y ou should see a message like this one:
Pinging <IP address> with 32 bytes of data
If the path is working, you see this message:
Reply from < IP address >: bytes=32 time=xx ms
TTL=xxx
If the path is not working, you see this message:
Request timed out
If the path is not functioning correctly, you could have one of the following problems:
■ Wrong physical connections
■ Make sure the LAN LED is on.
■ Check that the corresponding Link LEDs are on for your network interface card and for
any hub ports that are connected to your computer and ADSL Modem.
■ Wrong network configuration
■ Verify that the Ethernet card driver software and TCP/IP software are both installed and
configured on your computer or workstation.
■ Verify that the IP address for your ADSL Modem and your computer are correct and
that the addresses are on the same subnet.
www.netcomm.com.au Rev. 1- YML709
Page 96 NB1300Plus4 ADSL Modem
Page 97

Testing the Path from Y our Computer to a Remote Device
After verifying that the LAN path works correctly, test the path from your computer to a
remote device.
From the Windows run menu, type:
PING -n 10 <IP address>
where <IP address> is the IP address of a remote device such as your ISP’s DNS server.
If the path is functioning correctly, replies as in the previous section are displayed. If you do not
receive replies:
■ Check that your computer has the IP address of your ADSL Modem listed as the default
gateway. If the IP configuration of your computer is assigned by DHCP, this information
will not be visible in your computer’s Network Control Panel. Go to the Run… window and
run winipcfg. Verify that the IP address of your ADSL Modem is listed as the default
gateway.
■ Check to see that the network address of your computer (the portion of the IP address
specified by the netmask) is different from the network address of the remote device.
Rev. 1 - YML709 www.netcomm.com.au
NB1300Plus4 Wireless ADSL Modem Page 97
Page 98

Appendix C - Glossary
ADSL: Asymmetric Digital Subscriber Line (ADSL), as its name indicates, is an
asymmetrical data transmission technology with higher traffic rate
downstream and lower traffic rate upstream. ADSL technology satisfies
the bandwidth requirements of applications which demand asymmetric
traffic, such as web surfing, file downloads, and telecommuting.
Bandwidth: The amount of data that can be transmitted in a fixed amount of time.
DHCP: Dynamic Host Configuration Protocol (DHCP) is a protocol for
assigning dynamic IP Addresses to devices on a network. Dynamic
Addressing means that a device can have a different IP Address each time
it connects to the network.
DNS: Domain Name Server (DNS), translates domain names into IP Addresses.
T o help us recognize and remember domain names they are alphabetic in
form, however, the Internet actually runs on numbered IP Addresses.
DNS servers translate domain names into their respective IP Addresses.
Ethernet: One of the most common Local Area Network (LAN) standards.
Ethernet uses a bus topology which supports a data transfer rate of 10
or 100 Mbps.
DMZ: In computer networks, a DMZ (demilitarized zone) is a computer host
or small network inserted as a "neutral zone" between a company's
private network and the outside public network. It prevents outside
users from getting direct access to a server that has company data. A
DMZ is an optional and more secure approach to a firewall and
effectively acts as a proxy server as well.
Domain Name: A name that identifies one or more IP Addresses. For example, the
domain name microsoft.com represents about a dozen IP Addresses.
Domain names are used in URLs to identify particular Web pages. For
example, in the URL http://www.pcwebopedia.com/index.html, the
domain name is pcwebopedia.com.
Firewall: A security system used to enforce an access control policy between an
organisation’s networks and the Internet.
Gateway: A gateway is a network point that acts as an entrance to another
network.
IPSec: Internet Protocol Security is a security standard for network
transmission, which is often used for VPN connections. It provides
authentication and packet encryption over the Internet.
www.netcomm.com.au Rev. 1- YML709
Page 98 NB1300Plus4 ADSL Modem
Page 99

LAN: Local Area Network (LAN) is a computer network that spans a
relatively small area. A system of LANs connected is called a wide area
network (WAN).
MAC Address: Media Access Control Address (MAC) is a hardware address that
uniquely identifies each node of a network.
NAT: Network Address Translation (NAT) is a routing protocol that allows
global IP Addresses to be translated into multiple private IP Addresses
for use on internal LAN networks. The explosion in the use of the
Internet has created a critical problem for the Internet Assigned Numbers
Authority (IANA) which is in charge of assigning IP Addresses to
Internet users, ISPs etc. NAT is a technology that has been introduced to
help maximize the utilization of assigned IANA and global IP Addresses.
P AP/CHAP: Password Authentication Protocol and Challenge Handshake
Authentication Protocol (PAP/CHAP). Most ISPs use either one for
user identification. If your ISP doesn’t support these two protocols,
contact them for an authentication script.
PCI: Peripheral Component Interconnect (PCI) is a specification introduced
by Intel Corporation that defines a local bus system that allows up to 10
PCI-compliant expansion cards to be installed in the computer.
PPP: Short for Point-to-Point Protocol, a communications protocol for
transmitting information over standard telephone lines between devices
from different manufacturers.
PPPoE: Short for PPP over Ethernet, relying on two widely accepted standards,
Ethernet and the Point-to-Point Protocol. PPPoE is a communications
protocol for transmitting information over the Ethernet between devices
from different manufacturers.
Router: An Internet device that routes requests for information to other routers
until the information’s location is found and the data can be transmitted
back to the origin of the request.
TCP/IP: Short for Transmission Control Protocol and Internet Protocol, the suite
of communications protocols that enable hosts on the Internet to connect
and exchange streams of data.
MRU: Maximum Receive Unit indicates the peer of PPP connection the
maximum size of the PPP information field this device can be received.
The default value is 1492 and is used in the beginning of the PPP
negotiation. In the normal negotiation, the peer will accept this MRU
and will not send packet with information field larger than this value.
Rev. 1 - YML709 www.netcomm.com.au
NB1300Plus4 Wireless ADSL Modem Page 99
Page 100

MTU: Maximum Transmission Unit indicates the network stack of any packet
is larger than this value will be fragmented before the transmission.
During the PPP negotiation, the peer of the PPP connection will
indicates its MRU and will be accepted. The actual MTU of the PPP
connection will be set to the smaller one of MTU and the peer’s MRU.
The default is value 1492.
MSS: Maximum Segment Size is the largest size of data that TCP will send in a
single IP packet. When a connection is established between a LAN client
and a host in the WAN side, the LAN client and the WAN host will
indicate their MSS during the TCP connection handshake. The default
value is 1432.
UBR: Short for Unspecified bit rate.
WAN: Wide Area Network. A System of LANs connected by telephone lines
and/or radio waves.
www.netcomm.com.au Rev. 1- YML709
Page 100 NB1300Plus4 ADSL Modem
 Loading...