

Page 1
Electric Vacuum Sealer model VS-12
Care/Use Guide
Guide d’entretien et d’utilisation
Emballeuse sous vide électrique modèle VS-12
Guía del cuidado/del uso
Electricidad Sellador al Vacío modelo VS-12
Page 2

English Français Espanól
Table of Contents
Important Safeguards ...................................................................................1
Parts, Operation ............................................................................................2
Cooking Guide ..............................................................................................3
Instructions for Care and Cleaning .................................................................4
One Year Limited Warranty ............................................................................5
Table des Matières
Mesures de Précaution Importantes ..............................................................6
Pièces, Mode d’emploi ...................................................................................7
Guide de Cuisson ..........................................................................................8
Accessoires, Conseils d’entretien et de Nettoyage ............................................9
Garantie Limitée d’un an ..............................................................................10
Tabla de Contenido
Salvaguardas Importantes ...........................................................................11
Partes, Instrucciones de uso ........................................................................12
Guía de Cocina ...........................................................................................13
Accesorios,
Instrucciones de Cuidado y Limpieza ........................................... 14
Garantía limitada de un Año .........................................................................15
Technical Specications
Specication / Caractéristiques / Especicaciones:
Model: VS-12, 130 W., 120 VAC, 60Hz
For accessories and additional products, go to
www.nesco.com
Page 3

1
English
- This product is designed for household use only -
When using electrical appliances, basic safety precautions should always be
followed, including the following:
IMPORTANT SAFEGUARDS
1. READ ALL INSTRUCTIONS BEFORE USING THIS APPLIANCE.
2. The appliance is designed for household use only. It is not intended for
commercial use.
3. To protect against electric shock, do not immerse the appliance,
including cord and plug, in water or other liquid.
4. Close supervision is necessary when appliance is used near children.
This appliance is not recommended for use by children.
5. Unplug appliance from power outlet when not in use, before assembly
or disassembly of parts, and before cleaning.
6. Do not operate any appliance with damaged cord or plug or after
appliance malfunctions, or has been damaged in any manner. Return
the appliance to NESCO® Factory Service Department for examination,
repair or adjustment.
7. Do not place appliance on or near a hot gas or electric burner, or heated
oven.
8. Only use accessory attachments recommended by the manufacturer.
9. Do not use appliance outdoors or for other than intended use.
10. Do not let the cord hang over the edge of a table or touch hot surfaces.
11. WARNING: Appliance is not designed for continuous use. Approved for
one operating cycle every two minutes.
12. Operate appliance only when all parts are fully engaged and tightened.
13. To reduce risk of injury and damage to appliance keep hands, hair,
clothing and utensils away from parts during operation.
14. Place appliance on at and steady support surface when ready for use.
SAVE THESE INSTRUCTIONS
Polarized Plug: This appliance has a polarized plug (one blade is wider than
the other). To reduce risk of electric shock, plug is intended to t into polarized
outlet only one way. If the plug does not t fully into the outlet, reverse the
plug. If it still does not t, contact a qualied electrician. Do not try to modify
the plug in any way.
Short Cord Instructions: A short power supply cord is provided to reduce
the risk resulting from becoming entangled in or tripping over a longer cord.
Extension cords may be used if care is exercised in their use. If an extension
cord is used, the marked electrical rating of the cord should be at least as
great as the electrical rating of the appliance. The longer cord should be
arranged so that it will not drape over the tabletop where it can be pulled on
by children or tripped over unintentionally.
Page 4
2
English
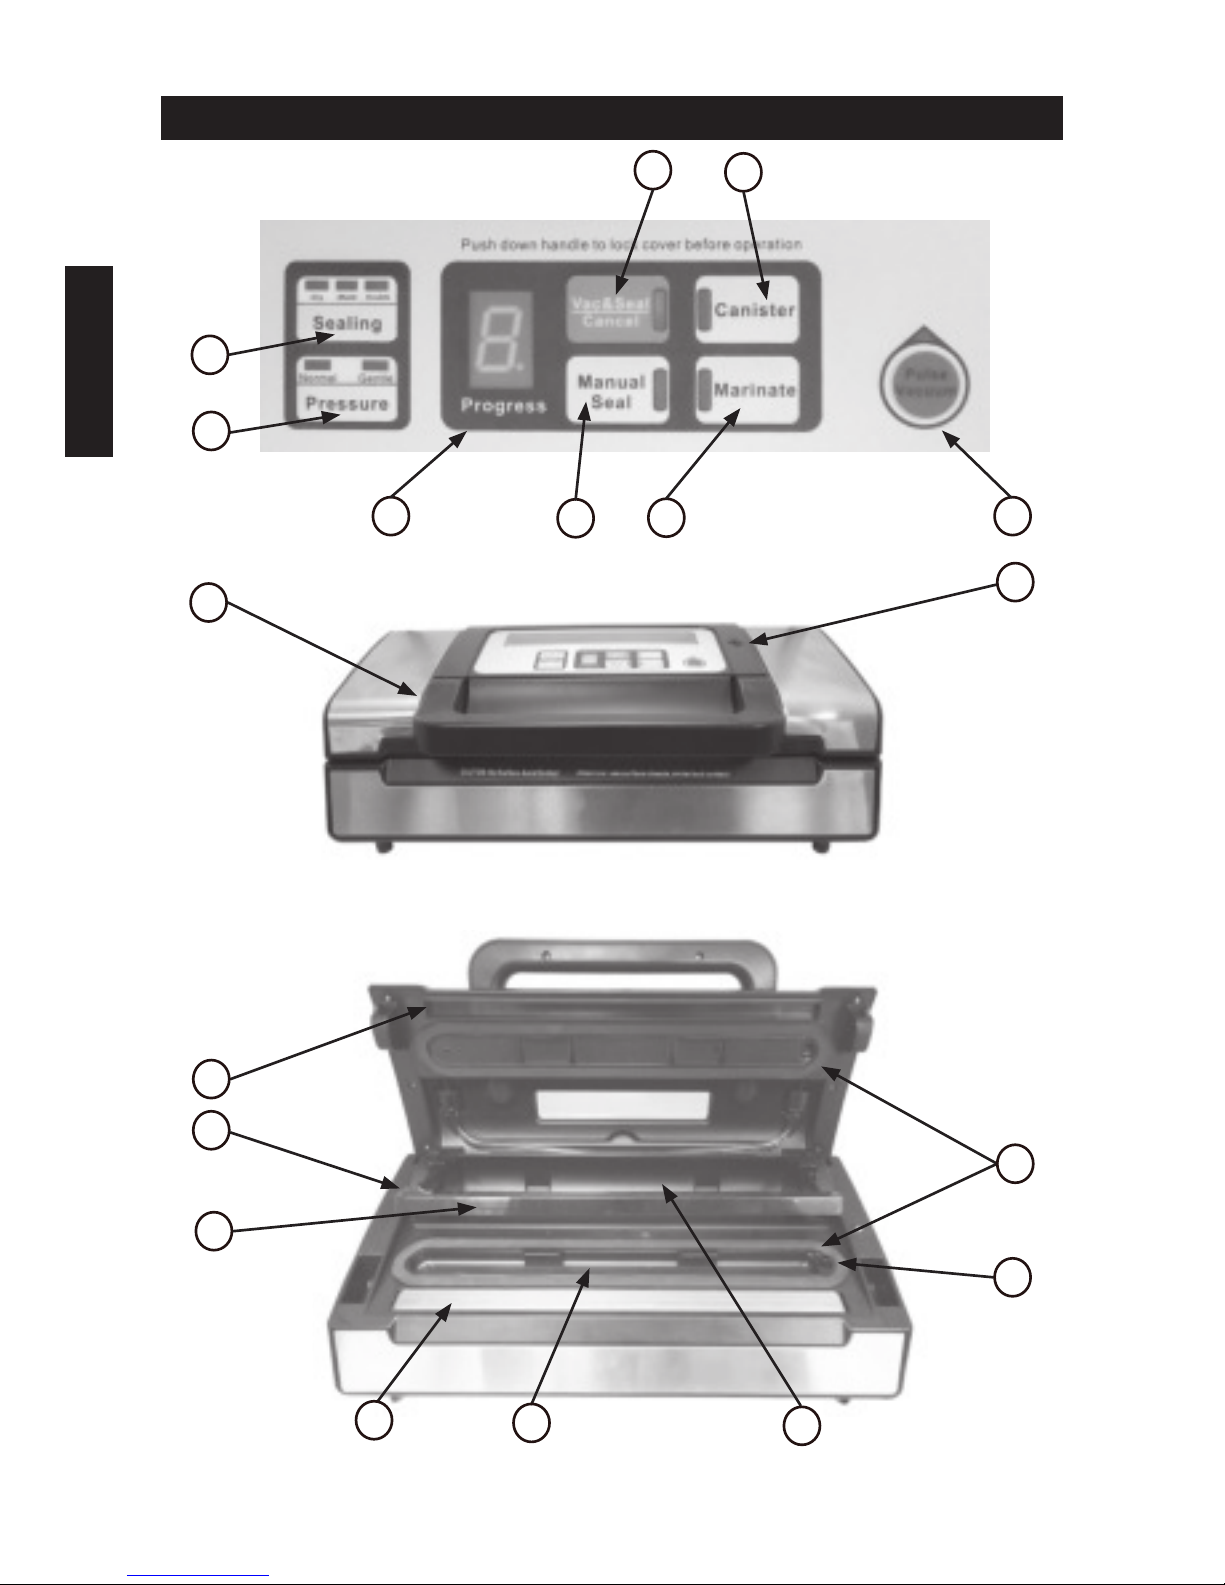
Parts
8
10
4
3
5
6
7
1
9
2
16
12
13
11
17
14
15
18
Page 5

3
English
Functions
1. Vac&Seal / Cancel - Button will start the automatic vacuuming and sealing or
press to cancel the maching at anytime during operation.
2. Canister - To start vacuuming for canisters, jar lids, wine stoppers or other
accessories through a hose. Canister and hose accessories sold separately.
3. Sealing time - Three setting for choosing the best bag sealing time;
• Dry setting: for single sealing dry bags and items without moisture, with a
shorter heat sealing time.
• Moist setting: for single sealing wet bags or foods with a little moisture has a
longer heat sealing time.
• Double setting: for double sealing wet bags or foods with very high moisture.
• Default setting: Normal setting for single sealing dry bags and shorter seal time.
4. Pressure - Two settings for choice of different vacuum pressures:
• Normal setting: for regular items storage in normal vacuum pressure.
• Gentle setting: for soft or delicate items where less vacuum pressure is desired.
• Default setting is normal and high vacuum pressure.
5. Progress - A numeric display and provides two functions;
• Shows the progress of vacuuming
• Shows that the device is on and the lid is closed. When the LED blinks, please
wait until it stays lit, before starting next operation.
6. Manual Seal - This button provides two functions:
• To seal the open end of a bag without vacuum.
• When the automatic “Vac&Seal” function is in operation, press the button to
stop the vacuum and immediately start to seal the bag so that vacuum pressure
inside the bag can be controlled to avoid crushing delicate items.
7. Marinate - This function is to use the canister and tube and it will vacuum
in stages and slowly infuse the juices into the items being marinated. When
the progress reaches zero the items will be ready to cook or will remain under
vacuum pressure until the air in the canister is released.
8. Pulse vacuum - Press this button to vacuum manually, release button to
stop. Repeat this process until desired vacuum pressure is reached. Then press
“manual seal” to complete vacuum seal.
9. Front handle - Press down to lock the cover. And lift to unlock and open cover.
10. Hose port - Insert the hose for canister and wine stopper before “marinate” or
“canister” operations.
Canister and hose accessories sold separately.
11. Sealing strip - Place the bag to be sealed over this strip. Clean with a
damp cloth and dry. Replace it when distorted or broken. See Warranty for
replacement information.
12. Bag cutter- Press and slide in any direction to cut bags to desired size.
13. Cutter rack - Supports the cutting blade to slide along. Lift and slide bag
material under rack. Close and slide cutter from one end to the other.
14. Foam Gaskets - Keep air out by pressing with upper gasket in the vacuum
chamber. Clean and dry or replace it when it is distorted or broken. See
Warranty for replacement information.
15. Air intake - Air intake connects with vacuum chamber and pump. DO NOT
cover intake when placing bag for vacuum sealing.
16. Sealing element - Teon-coated heater that seals the bag ends.
17. Vacuum chamber - Position the open end of the bag across the chamber,
draws air out of bag and catches any liquid overow from the bag.
18. Bag storage - will store up to one, 11 inch wide roll of bag material.
Page 6
4
English
Operating Instructions
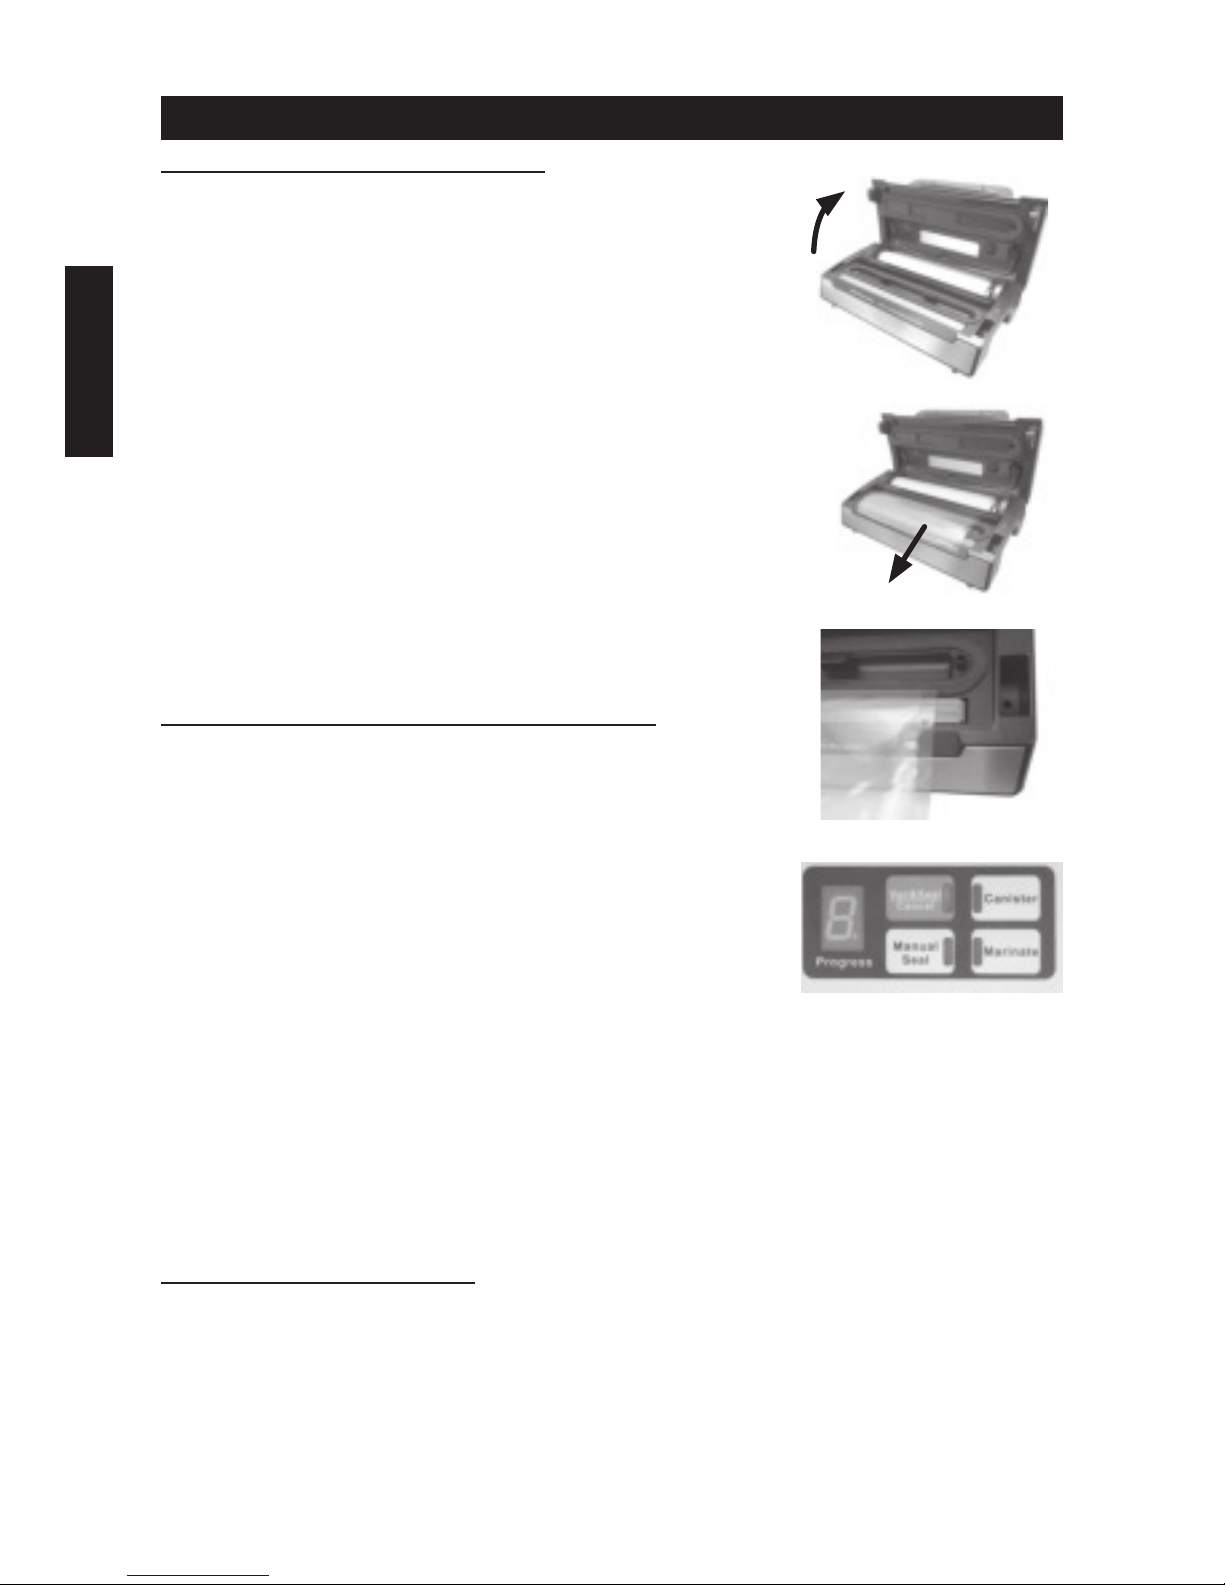
MAKING A BAG WITH THE ROLL
1. Place sealer on a at and stable surface and insert
plug into electrical outlet.
2. Lift handle and open the lid. Place bag roll into roll
storage compartment. FIG. 1.
3. Move cutter blade to end of rack then lift cutter rack
and pull the bag material from the roll (Pull enough
of the roll to hold items to be vacuum packed plus an
additional 3 inches) then close the cutter rack. Press
lightly on cutter rack while sliding blade along rack to
cut the bag material. FIG. 2
4. Place open end of bag material on the sealing strip and
close the top cover. Press down on the handle until it is
fully closed. FIG. 3
5. Press the “Manual Seal” button to start sealing. FIG. 4
6. When the progress display reaches 0 the unit will
automatically turn off and sealing will be completed.
7. Lift handle, open the top cover and remove the bag.
VACUUM PACKAGING YOUR FILLED BAG:
1. Put the items inside the bag.
2. Open the lid, clean and straighten the open end of the
bag, make sure there are no wrinkles or ripples.
3. Place the open end of the bag across the vacuum
chamber area. Make sure the air intake is not covered
by the bag.
4. Put the top cover down and press front handle to lock
the top cover.
5. Check the LED lights of “Pressure” and “Sealing” to
conrm settings depending on the moisture of food
items (Double/Moist/Dry) and desired vacuum pressure
(Normal/Gentle) according to the type of food.
6. Press the “Vacuum/Seal” button. The unit will automatically vacuum and seal the
bag. NOTE: This product has high pressure during vacuum packaging, in order to
avoid crushing delicate items, observe the status of the items inside the bag and
press the “MANUAL SEAL” button immediately when the desired vacuum pressure
is reached. The pump will stop and change to heat-seal the bag.
7. Lift handle and top cover to remove the sealed bag.
FOR BEST SEALING NOTE;
• To avoid overheating of sealing element, let the appliance cool down for 1 minute
after each use and do not seal more than one or two bags continuously.
• Clean and remove any excess liquid or food residue in the vacuum chamber with
a paper towel after each use.
• The “Manual Seal” button will not work if pressed within 15 seconds of the last
activation.
FIG 2
FIG 3
FIG 4
FIG 1
Page 7

5
English
VACUUM PACKAGE USING A CANISTER (SOLD SEPARATELY)
1. Clean and dry canister cover and base.
2. Put the items into the canister. Ensure cover valve is
truned to seal.
3. Insert one end of the hose into the hose port of vacuum
sealer and other end into the center hole of the canister
cover. Push rmly to seat hose connections.
4. Check the LED lights of “Pressure” and make sure it is at “Normal” setting.
5. Press the “Canister” button to start vacuuming. To ensure seal between the cover
and the canister, use your hand to push down the cover at the beginning of the
cycle. The machine will stop automatically when desired vacuum pressure is
reached.
6. Remove the hose from the canister cover and the hose port immediately after
sealing.
Note: When moist foods are under vacuuming, moisture will form in the hose.
Remember to clean and dry the hose after vacuuming.
Cleaning and Maintenance
Vacuum Sealer:
1. Unplug the unit before cleaning.
2. Clean the vacuum sealer with a damp sponge. Do not immerse in water.
3. Do not use abrasive cleaners as they will scratch the surface.
4. Dry thoroughly before storing. When storing do not lock cover to prevent
deformation of the gaskets.
Bags:
1. The bag material can be washed in warm water with dish washing soap. Rinse
the bags well and allow to dry thoroughly before re-using.
2. Bags can be washed on the top rack in your dishwasher by turning the bags
inside out. Stand the bag up so the water can get inside the bag. Dry thoroughly
before next use.
Note: Bags used to store greasy foods should not be re-used.
Storing Your Vacuum Sealer:
1. Keep the unit in a at and safe place, out of the reach of children.
2. When not in use, keep handle in unlocked position to prevent the foam
gaskets from deforming.
Vacuum Sealing Tips
• Do not overll the bags; leave enough space at the open end of the bag so that the
bag can be placed on the vacuum chamber more positively, about 3 inches (76mm).
• Do not wet the open end of the bag. Wet bags may be difcult to seal.
• Clean and straighten the open end of the bag before sealing. Ensure no wrinkle
or creases appear on the bag material, creased bags may be difcult to seal.
• Do not vacuum package objects with sharp points like sh bones and hard shells.
Sharp points can penetrate and tear the bag.
• Freeze fruits and blanch vegetables before vacuum packing for best results.
• Hot liquids need to be cooled before vacuum packing. Hot liquids will bubble up
and over the top of the bag when vacuum packed.
Page 8

6
English
• Partially freeze meats before sealing.
• During vacuum sealing, small amounts of liquids, crumbs or food particles can be
pulled into vacuum chamber clogging the pump and damaging your appliance.
To avoid this: Always clean chamber and freeze wet foods rst before sealing or
place a folded paper towel near the inside top of the bag.
• Store perishable foods in the freezer or refrigerator. Vacuum packing extends the
shelf life of foods, but does not preserve them.
• Pantry items such as our, rice, mixes for cakes and pancakes, all stay fresher
longer when vacuum packed.
• Keep camping supplies such as matches, rst aid kits and clothing, clean and dry.
• Keep silver and collectibles untarnished.
• Fill a bag about 2/3 full with water, seal the end (don’t vacuum). Freeze the bag
and use for ice in the cooler or ice packs for rst aid.
Troubleshooting
VACUUM SEALER HAS NO POWER
• Check to see that the unit is plugged in. To test an electrical outlet, plug in
another appliance, such as a lamp.
• Vacuum sealer will shut off automatically if overheated. Allow to cool down for 15
minutes and try again.
• Check power cord and plug for damage. If damaged, do not use the vacuum
sealer.
VACUUM SEALER DOES NOT PERFORM FIRST SEAL
• Make sure the bag end is properly positioned over sealing element and there are
no creases or debris in bag material.
VACUUM SEALER DOES NOT PULL A COMPLETE VACUUM
• To seal properly, open end of bag must be entirely inside vacuum chamber area.
• Check upper sealing strip and gaskets for obstructions. Wipe clean and ensure
they are fully seated.
• Check the cover and handle are down all the way.
• Bag material may have a leak. To test, seal the bag with some air in it, submerge
in water, and apply pressure. Bubbles indicate a leak. Reseal or use another bag.
VACUUM SEALER NOT SEALING BAG PROPERLY
• Should sealing element overheat and melt the bag, it may be necessary to lift the
top cover and allow the sealing element to cool for several minutes.
BAG LOSES VACUUM AFTER BEING SEALED
• Leaks along the seal can be caused by wrinkles, crumbs, grease or liquids. Wipe
the top inside of the bag and smooth it out along the sealing element before
sealing.
• Check the bag for a puncture or hole which may have released the vacuum.
Cushion sharp edges in the contents of the bag with paper towels.
Page 9

7
English
ONE YEAR LIMITED WARRANTY
This appliance is warranted for one year from date of original purchase against
defects in material and workmanship. This warranty does not cover transportation
damage, misuse, accident or similar incident. This warranty gives you specic legal
rights and you may have other rights, which vary from state to state. This product is
intended for household use only, not for commercial use. Warranty does not cover
commercial use.
Your new NESCO
®
/AH® appliance comes equipped with numerous safety features.
Any attempt to interfere with the operation of these safety features makes this
warranty null and void. In the event we receive an appliance for service that has
been tampered with, we reserve the right to restore it to its original state and
charge for the repair.
For service in warranty - Defective products may be returned, postage prepaid, with
a description of the defect to: The Metal Ware Corporation, 1700 Monroe Street,
Two Rivers, Wisconsin 54241, for no-charge repair or replacement at our option.
Must include proof of purchase or copy of original bill of sale when
returning product for warranty service.
Please call Customer Satisfaction at 1-800-288-4545 to obtain a Return Authorization
before shipping.
• For service in warranty, follow instructions set forth in warranty. When ordering
new parts, make sure that you always mention the model number of the
product.
• Call us on our toll free number, 1-800-288-4545 and tell us about your problem.
• If we instruct you to send all or part of your appliance to us for repair or
replacement, our Customer Satisfaction representative will provide a Return
Authorization number (this number noties our receiving department to expedite
your repair). Pack your unit carefully in a sturdy carton with sufcient padding to
prevent damage because any damage caused in shipping is not covered by the
warranty.
• Print your name, address and Return Authorization number on the carton.
• Write a letter explaining the problem. Include the following: your name, address
and telephone number and a copy of the original bill of sale.
• Attach the sealed envelope containing the letter inside the carton. Insure the
package for the value of the NESCO
®
/AH® appliance and ship prepaid to:
Attn: Factory Service Dept.
The Metal Ware Corporation
1700 Monroe Street
Two Rivers, WI 54241
Page 10

8
Français
MESURES DE PROTECTION IMPORTANTES
- Ce produit est conçu pour usage domestique seulement -
Lors de l’utilisation d’appareils électriques, on doit observer des mesures de sécurité
de base en tout temps, dont les suivantes :
1. LIRE TOUTES LES DIRECTIVES AVANT D’UTILISER L’APPAREIL.
2. L’appareil est conçu pour usage domestique seulement. Il n’est pas destiné à des
ns commerciales.
3. Aux ns de protection contre les chocs électriques, ne pas plonger l’appareil, y
compris le cordon et la che, dans l’eau ou tout autre liquide.
4. Une surveillance étroite est nécessaire lorsque l’on utilise l’appareil près des
enfants. L’utilisation de cet appareil par des enfants n’est pas recommandée.
5. Débrancher l’appareil de la prise de courant lorsqu’il n’est pas utilisé, avant de
monter ou de démonter les pièces ainsi qu’avant le nettoyage.
6. Ne pas faire fonctionner d’appareil dont la che ou le cordon est endommagé,
qui a subi une défaillance ou qui a été endommagé de quelque façon que ce soit.
Retourner l’appareil à la division des services de l’usine OPEN COUNTRY® aux
ns d’examen, de réparation ou d’ajustement.
7. Ne pas placer l’appareil dans un four chauffé, sur un brûleur à gaz ou électrique
chaud, ni dans les environs.
8. N’utiliser que les accessoires recommandés par le fabricant.
9. Ne pas utiliser l’appareil à l’extérieur ou pour un usage autre que celui prévu.
10. Ne pas laisser le cordon suspendu sur le bord d’une table ou en contact avec des
surfaces chaudes.
11. AVERTISSEMENT: Cet appareil n’est pas conçu pour une utilisation continue.
Approuvé pour un cycle d’utilisation toutes les deux minutes.
12. Utilisez l’appareil uniquement lorsque toutes les pièces sont bien enclenchées et
serrées.
13. Pour réduire le risque de blessure et d’endommagement de l’appareil, tenez les
mains, les cheveux, les vêtements et les ustensiles éloignés des pièces mobiles
pendant l’opération.
14. Placez l’appareil sur une surface plane et robuste avant utilisation.
CONSERVER CES DIRECTIVES
Fiche polarisée : Cet appareil possède une che polarisée (une branche est plus
large que l’autre). Pour réduire le risque de choc électrique, la che est conçue pour
entrer dans la prise polarisée d’une seule façon. Si la che n’entre pas correctement
dans la prise, retourner la che. Si elle n’entre toujours pas correctement,
communiquer avec un électricien qualié. Ne pas tenter de modier la che.
Directives relatives au cordon court: Un cordon d’alimentation court est fourni
dans le but de réduire le risque de s’y empêtrer ou de trébucher. Des rallonges
peuvent convenir si elles sont utilisées avec prudence. En cas d’utilisation d’une
rallonge, les caractéristiques électriques indiquées sur le cordon doivent être au
moins celles inscrites sur l’appareil. Le cordon long ne doit pas s’étendre d’un côté à
l’autre du dessus de la table où les enfants pourraient le tirer ou quelqu’un pourrait
trébucher involontairement..
Page 11

9
Français
Caractéristiques
8
10
4
3
5
6
7
1
9
2
16
12
13
11
17
14
15
18
Fonctions
1. Vac&Seal / Cancel - Ce bouton a deux fonctions selon l’état de l’appareil:
• À l’état de veille, il démarre l’opération automatique de mise sous vide du sac et
le scelle ensuite automatiquement lorsque le vide est complet.
• En état de marche (opération de mise sous vide ou de soudure), il arrête l’appareil.
2. Canister - Pour démarrer la mise sous vide des boîtes et récipients avec couvercles,
bouchons de vin ou autres accessoires avec un tuyau. Boîte vendue séparément.
Page 12

10
Français
3. Sealing time - Trois réglages pour choisir le temps de soudure le plus adapté;
• <Dry> pour le scellement simple de sacs secs et d’aliments sans humidité, avec
un temps de soudure plus court.
• <Moist> pour le scellement simple de sacs mouillés ou d’aliments contenant un
peu d’humidité, avec un temps de soudure plus long.
• <Double> pour le scellement double de sacs mouillés ou d’aliments contenant
un taux d’humidité élevé.
• <Default> réglage normal pour le scellement unique de sacs secs et un temps
de soudure plus court.
4. Pressure - Deux réglages pour choisir entre différentes pressions de mise sous vide:
• <Normal> Réglage ordinaire pour le stockage d’aliments avec pression de mise
sous vide ordinaire.
• <Gentle> Réglage délicat pour les aliments moelleux ou délicats nécessitant une
faible pression.
• La position par défaut est ordinaire <Normal> et la pression de mise sous vide
est élevée.
5. Progress - Afchage numérique offrant deux fonctions;
• Indique l’état d’avancement de la mise sous vide
• Indique que l’appareil est en marche et que le couvercle est fermé. Lorsque la LED
clignote, attendez que la lumière soit continue avant de commencer l’opération suivante.
6. Manual Seal - Ce bouton a deux fonctions:
• Sceller l’ouverture d’un sac sans le mettre sous vide, utilisé pour faire un sac à
partir d’un rouleau.
• Lorsque la fonction automatique « Vac&Seal » est en opération, ce bouton
stoppe la pompe et démarre immédiatement le scellement du sac de façon à
permettre à l’opérateur de contrôler la pression sous vide à l’intérieur du sac et
de ne pas écraser les aliments délicats
.
7. Marinate - Cette fonction est d’utiliser le tube de la cartouche et le vide et
il sera par étapes et laisser infuser lentement le jus dans les articles étant
marinés. Lorsque la progression atteint zéro les éléments seront prêts à cuire ou
sous vide pression restera jusqu’à l’air dans la cartouche est libérée
8. Pulse vacuum -
Appuyez sur ce bouton pour effectuer une mise sous vide manuelle,
relâchez-le pour la stopper. Renouvelez l’opération jusqu’à ce que la pression de mise
sous vide souhaitée soit atteinte. Puis appuyez sur pour terminer l’opération
.
9. Front handle - Appuyez vers le bas pour verrouiller le couvercle. Soulevez pour
déverrouiller et ouvrir le couvercle.
10. Hose port - Insérez le tuyau pour la boîte et le bouchon de vin avant les
opérations <marinate> ou <canister>. Tuyau vendu séparément.
11. Sealing strip - Placez le sac à sceller au-dessus de cette bande. Lavez-la et
séchez-la ou remplacez-la lorsqu’elle est déformée ou usée.
12. Bag cutter- Appuyez et faites glisser dans n’importe quel sens pour couper les
sacs à la taille souhaitée.
13. Cutter rack - Guide la lame coupante.
14. Foam Gaskets - Empêchent l’air d’entrer en appuyant sur le joint supérieur
dans la chambre à vide. Nettoyez-les et séchez-les ou remplacez-les lorsqu’ils
sont déformés ou usés.
15. Air intake - L’entrée d’air se connecte à la chambre à vide et à la pompe. Ne la
couvrez pas lorsque vous placez le sac pour la mise sous vide.
16. Sealing element - Élément chauffant enduit de téon qui scelle les extrémités du sac.
17. Vacuum chamber - Placez l’extrémité ouverte du sac à l’intérieur de la
chambre, elle aspire l’air et recueille tout liquide débordant du sac.
18. Bag storage - Permet de ranger un rouleau de 12 po (30 cm) de large.
Page 13

11
Français
Operating Instructions
FABRICATION D’UN SAC À PARTIR DU ROULEAU:
1. Placez l’emballeuse sous vide sur une surface plane et
stable puis branchez-la.
2. Soulevez la poignée et ouvrez le couvercle. Placez le
rouleau dans le compartiment de rangement. FIG. 1.
3. Placez la lame coupante à l’extrémité du guide,
soulevez celui-ci et tirez le matériau du rouleau
(comptez 3 pouces (8 cm) de plus que ce qui est
nécessaire à l’emballage des aliments). Fermez le
guide. Appuyez doucement dessus tout en faisant
coulisser la lame pour couper le matériau du sac. FIG. 2
4. Placez l’extrémité ouverte sur la bande de soudure et
fermez le couvercle. Appuyez sur la poignée jusqu’à ce
qu’il soit entièrement fermé. FIG. 3
5. Appuyez sur le bouton de soudure manuelle « Manual
Seal » pour commencer à sceller. FIG. 4
6. Lorsque l’afchage de suivi atteint 0, l’unité s’arrête
automatiquement et scellement est terminé.
7. Soulevez la poignée, ouvrez le couvercle et ôtez le sac.
MISE SOUS VIDE DE VOTRE SAC PLEIN:
1. Placez les aliments dans le sac.
2. Ouvrez le couvercle, nettoyez et lissez l’ouverture du
sac en veillant à bien ôter tous les plis.
3. Placez l’extrémité ouverte du sac dans la zone de la
chambre à vide. Veillez à ne pas couvrir l’entrée d’air
avec le sac.
4. Abaissez le couvercle et appuyez sur la poignée avant
pour le verrouiller.
5. Vériez la LED indiquant l’état de la pression <Pressure>
et de la soudure <Sealing> pour conrmer les réglages
selon l’humidité des aliments emballés (Double/Moist/
Dry) et la pression souhaitée (Normal/Gentle) selon le
type d’aliment
.
6. Appuyez sur le bouton <Vacuum/Seal> L’unité mettra sous vide et scellera
automatiquement le sac. REMARQUE: Ce produit exerce une forte pression au
cours de la mise sous vide. Pour éviter de briser les aliments délicats, observez
l’état des aliments dans le sac et appuyez immédiatement sur le bouton de
scellement manuel <MANUAL SEAL> lorsque la pression de mise sous vide
souhaitée est atteinte. La pompe s’arrêtera et passera au mode scellement du sac
.
7. Soulevez la poignée et le couvercle pour ôter le sac scellé.
POUR DES RÉSULTATS OPTIMAUX;
• Laissez l’appareil refroidir pendant 1 minute avant de poursuivre son utilisation
et ne scellez pas plus d’un ou deux sacs à la fois pour éviter de faire surchauffer
l’élément de soudure.
• Nettoyez et ôtez tout excès de liquide ou résidu alimentaire de la chambre à
vide après chaque utilisation.
• Le bouton <Seal> ne fonctionnera pas si l’on appuie dessus dans les 15 secondes
suivant sa dernière activation
.
FIG 2
FIG 3
FIG 4
FIG 1
Page 14

12
Français
CONSERVATION SOUS VIDE DANS UNE BOÎTE:
1. Nettoyez et séchez le couvercle et la base de la boîte.
2. Placez les aliments dans la boîte. Assurez-vous que la
valve du couvercle est réglée sur <Seal>.
3. Insérez fermement une extrémité du tuyau dans l’entrée
d’air de l’emballeuse sous vide et l’autre extrémité
dans le trou central du couvercle de la boîte pour que
l’ensemble soit bien connecté.
4. Vériez l’état de la LED de pression <Pressure> et assurez-vous qu’il est sur le
réglage <Normal>.
5. Appuyez sur le bouton <Canister> pour démarrer la mise sous vide. Pour
assurer une bonne étanchéité entre le couvercle et la boîte à vide, appuyez
sur le couvercle à l’aide de la main au début du cycle. La machine s’arrêtera
automatiquement lorsque la pression de mise sous vide sera atteinte.
6. Ôtez le tuyau de la boîte à vide et du bol immédiatement après avoir terminé la
mise sous vide.
Remarque: Lors de la mise sous vide d’aliments moelleux, de l’humidité se formera
dans le tuyau. Veillez à nettoyer le tuyau avant de commencer la mise sous vide.
Cleaning and Maintenance
Emballeuse sous vide:
1. Débranchez l’unité avant de procéder à son nettoyage.
2. Nettoyez l’emballeuse sous vide à l’aide d’une éponge humide. Ne la plongez pas
dans l’eau.
3. Utilisez un produit à vaisselle doux. N’utilisez pas de détergents abrasifs qui
rayeront la surface.
4. Séchez l’unité soigneusement avant de l’utiliser. Pour la ranger, ne verrouillez pas
le couvercle pour ne pas déformer les joints.
Sacs:
1. Le matériau des sacs est lavable à l’eau tiède à l’aide d’un produit à vaisselle
doux. Rincez soigneusement les sacs et laissez-les sécher complètement avant de
la réutiliser.
2. Les sacs peuvent être lavés dans la partie supérieure du lave-vaisselle en mettant
les sacs sur l’envers. Placez les sacs en position verticale de façon à ce que l’eau
puisse pénétrer dedans. Séchez-les soigneusement avant l’utilisation suivante.
Remarque: Il est déconseillé de réutiliser les sacs ayant contenu des aliments gras.
Rangement de votre emballeuse sous vide
1. Rangez l’unité dans un endroit plane et sécuritaire, hors de portée des enfants.
2. Assurez-vous que le couvercle de l’appareil n’est pas verrouillé lorsque ce dernier
n’est pas utilisé et pendant son stockage pour ne pas déformer les joints.
Vacuum Sealing Tips
• Ne dépassez pas la capacité des sacs; laissez sufsamment de place près de
l’extrémité ouverte (environ 3 pouces (8 cm)) pour que le sac puisse être placé dans
la chambre à vide facilement.
• Ne mouillez pas l’extrémité ouverte du sac. Les sacs mouillés peuvent être difciles à sceller.
• Nettoyez et lissez l’extrémité ouverte du sac avant de le sceller. Assurez-vous qu’aucun
pli ne se forme sur le matériau du sac car cela peut rendre le scellement difcile.
• Ne mettez pas sous vide d’objets présentant des pointes comme des arêtes de
poissons ou des coquilles dures. Celles-ci peuvent transpercer le sac et le déchirer.
Page 15

13
Français
• Pendant la mise sous vide, de petites quantités de liquides, miettes ou particules
alimentaires peuvent être avalés dans la chambre à vide et boucher la pompe et
endommager votre appareil. Pour éviter que cela ne se produise, nettoyez toujours
la chambre et congelez les aliments humides au préalable avant de les mettre sous
vide ou placez un essuie-tout plié près du bord supérieur du sac.
• Congelez les fruits et faites blanchir les légumes avant de les emballer sous vide pour
des résultats optimaux.
• Faites refroidir les liquides chauds avant de les mettre sous vide. Ceux-ci feront des
bulles et déborderont du sac pendant la mise sous vide.
• Conservez les articles périssables dans le congélateur ou le réfrigérateur. L’emballage sous
vide augmente la durée de conservation des aliments mais ne les met pas en conserve.
• Les aliments secs comme la farine, le riz, les préparations pour gâteaux et gaufres
conservent leur fraîcheur plus longtemps lorsqu’ils sont emballés sous vide.
• Conserve les fournitures de camping comme les allumettes, les trousses de premiers
secours et les vêtements propres et au sec.
• Prévient le ternissement de l’argent et des objets de collection.
• Remplissez un sac au 2/3 d’eau, scellez l’extrémité (ne le mettez pas sous vide).
Congelez le sac et utilisez-le pour la glacière ou comme poche de glace pour les
premiers soins
.
DÉPANNAGE
L’EMBALLEUSE SOUS VIDE N’EST PAS ALIMENTÉE EN COURANT
ÉLECTRIQUE
• Vériez que l’unité est branchée. Pour tester une prise électrique, branchez un
autre appareil comme une lampe.
• L’emballeuse électrique s’arrêtera automatiquement en cas de surchauffe.
Laissez-la refroidir 15 minutes avant d’essayer de l’utiliser à nouveau.
• Vériez que le cordon d’alimentation et la che ne sont pas endommagés. En cas
d’endommagement, n’utilisez pas l’emballeuse sous vide.
L’EMBALLEUSE SOUS VIDE NE SCELLE PAS LE SAC
• • Assurez-vous que l’extrémité du sac est correctement positionnée sur l’élément
de soudure et qu’il n’y a aucun pli ou débris dans le matériau du sac.
L’EMBALLEUSE SOUS VIDE N’ÔTE PAS TOUT L’AIR DES SACS
• Pour un bon scellement, l’extrémité ouverte du sac doit se trouver complètement
à l’intérieur de la chambre à vide.
• Vériez que la bande de soudure supérieure et les joints sont exempts
d’obstruction. Essuyez-les et assurez-vous qu’ils sont bien en place.
• Le matériau du sac peut comporter une fuite. Pour le tester, scellez le sac avec
de l’air à l’intérieur, plongez-le dans l’eau et exercez une pression dessus. Des
bulles indiquent la présence d’une fuite. Scellez à nouveau le sac ou utilisez-en
un autre.
L’EMBALLEUSE SOUS VIDE NE SCELLE PAS LE SAC CORRECTEMENT
• Si l’élément de soudure surchauffe et fait fondre le sac, il peut être nécessaire
de soulever le couvercle et de laisser l’élément de soudure refroidir pendant
quelques minutes.
L’EMBALLEUSE SOUS VIDE NE MAINTIENT PAS LE VIDE APRÈS AVOIR
SCELLÉ LE SAC
• Il se peut que des fuites le long de la soudure soient dues à des plis, des miettes,
de la graisse ou des liquides. Essuyez le haut du sac à l’intérieur et aplanissez-le
le long de l’élément de soudure avant de le sceller.
• Vériez qu’aucun trou n’empêche le vide. Atténuez les bords tranchants du
contenu du sac à l’aide d’essuie-tout.
Page 16

14
Français
GARANTIE LIMITÉE D’UN (1) AN
Le présent appareil est garanti pendant un an suivant la date de l’achat initial
contre les défauts de matériau ou de fabrication. La présente garantie ne couvre
pas les dommages causés par le transport, l’usage abusif, les accidents ou incidents
semblables. La présente garantie vous confère des droits juridiques précis et vous
pouvez disposer d’autres droits, qui peuvent varier selon l’État ou la province. Ce
produit est conçu pour usage domestique seulement et n’est pas destiné à des ns
commerciales. La garantie ne couvre pas l’usage commercial.
Votre nouvel appareil NESCO®/AH® est équipé de nombreuses caractéristiques de
sécurité. Toute tentative d’entrave au fonctionnement de ces dispositifs de sécurité
rend la présente garantie nulle et sans effet. En cas de réception d’un appareil aux
ns de réparation ayant été traqué, nous réservons le droit de le remettre dans
son état d’origine et de facturer la réparation au client.
Pour une réparation en vertu de la garantie - Veuillez retourner les produits
défectueux, par courrier affranchi, avec une description du défaut à l’adresse
suivante : The Metal Ware Corporation, 1700 Monroe Street, Two Rivers, Wisconsin
54241, pour une réparation ou un remplacement sans frais à notre choix.
Veuillez inclure une preuve d’achat ou une copie de la facture originale
lors du retour d’un produit aux ns de réparation en vertu de la garantie.
Appelez le service de satisfaction du client au 1-800-288-4545 pour obtenir une
autorisation de retour avant d’expédier le produit.
• Pour une réparation en vertu de la garantie, suivez les directives indiquées dans
la garantie. Lors de la commande de nouvelles pièces, assurez-vous de toujours
mentionner le numéro de modèle du produit.
• Appelez-nous au numéro sans frais 1-800-288-4545 pour nous faire part du
problème.
• Si nous vous indiquons de nous envoyer votre appareil en tout ou en partie aux
ns de réparation ou de remplacement, notre représentant de la satisfaction du
client vous fournira un numéro d’autorisation de retour (ce numéro avise notre
service de la réception d’accélérer votre réparation). Emballez votre appareil
avec soin dans une boîte robuste avec une quantité sufsante de rembourrage,
étant donné que les dommages causés lors de l’expédition ne sont pas couverts
par la garantie.
• Inscrivez vos nom, adresse et numéro d’autorisation de retour en caractères
d’imprimerie sur la boîte.
• Rédigez une lettre expliquant le problème. Veuillez inclure les éléments suivants:
vos nom, adresse et numéro de téléphone, ainsi qu’une copie de la facture
originale.
• Mettez l’enveloppe scellée à l’intérieur de la boîte. Assurez le colis pour la valeur
de l’appareil NESCO®/AH® et envoyez-le port payé à l’adresse suivante:
Attn: Factory Service Dept.
The Metal Ware Corporation
1700 Monroe Street
Two Rivers, WI 54241
Page 17

15
Espanól
SALVAGUARDAS IMPORTANTES
- Este producto está diseñado sólo para uso doméstico Cuando use aparatos eléctricos, las precauciones básicas de seguridad deben
seguirse, incluyendo las siguientes:
1. LEA TODAS LAS INSTRUCCIONES.
2. El aparato está diseñado para uso doméstico solamente. No está destinado para
uso comercial.
3. Para protegerse contra un choque eléctrico y lesiones físicas, no sumerja este
electrodoméstico, incluyendo su cable y enchufe, en agua u otro líquido.
4. Supervisar de cerca cuando se usa un electrodoméstico en presencia de niños.
5. Desenchufe el aparato de toma de corriente cuando no esté en uso, antes del
montaje o desmontaje de las piezas, y antes de limpiarlo.
6. No use los electrodomésticos cuyo cable o enchufe está dañado o si el aparato
funciona mal o si se dañó de alguna manera. Para evitar peligros, devuelva el
electrodoméstico al Departamento de servicio de fábrica de NESCO® para su
revisión, reparación o ajuste.
7. No colocar el aparato sobre o cerca de un quemador caliente, eléctrico o a gas,
o dentro de un horno caliente
8. El uso de los accesorios no recomendados por el fabricante puede dar lugar a
fuego, a descarga eléctrica o a lesión a las personas.
9. No usar en el exterior.
10. No permitir que el cable cuelgue de la mesa o encimera, ni que esté en contacto
con supercies calientes.
11. ADVERTENCIA: Este artefacto no está diseñado para uso continuo. Aprobado
para un ciclo de funcionamiento cada dos minutos.
12. Opere el artefacto únicamente cuando todas las piezas se encuentren
perfectmente en posición.
13. Para minimizar el riesgo de lesiones y daños al artefacto, mantenga las manos,
cabello, ropa y otros utensilios lejos del mismo la operación.
14. Coloque el artefacto en una supercie de apoyo plana y rme cuando esté listo
para su uso.
GUARDE ESTAS INSTRUCCIONES
Enchufe polarizado: Este electrodoméstico tiene un enchufe polarizado (una pata
es más ancha que la otra). Para reducir el riesgo de choque eléctrico, el enchufe está
diseñado para encajar en un tomacorriente polarizado solamente de un lado. Si el
enchufe no encaja bien en el tomacorriente, délo vuelta. Si aún no encaja, contacte
a un electricista calicado. No intente modicar el enchufe de ninguna manera.
Instrucciones para el cable corto: Este aparato tiene un cable de suministro de
energía corto para reducir el riesgo de que se enrosque o de que alguien se tropiece
con él. Se pueden usar cables de extensión en tanto se tomen precauciones al
usarlos. Si usa un cable de extensión, el régimen del cable debe ser al menos igual
al régimen de potencia del aparato. El cable más largo debe disponerse de manera
tal que no caiga por la encimera y evitar así que los niños tiren de él o que alguien
se tropiece.
Page 18

16
Espanól
Funciones
8
10
4
3
5
6
7
1
9
2
16
12
13
11
17
14
15
18
Funciones
1. Vac&Seal / Cancel - Este botón cumple dos funciones dependiendo de la
condición en la que se encuentre el artefacto:
• En la condición de reposo (“stand-by”), se inicia la operación de vacío en la
bolsa y nalmente la sella automáticamente.
• En la condición de operación (durante las operaciones de vacío o de sellado), se
detiene la máquina.
Page 19

17
Espanól
2. Canister -
Se inicia la operación de vacío para latas, tapas de frascos, tapones de
vino u otros accesorios a través de una manguera. Las latas se venden por separado.
3. Sealing time -
Tres posiciones para seleccionar el mejor tiempo de sellado de las bolsas
;
• Conguración seca: para un sellado simple en bolsas secas conteniendo artículos
sin humedad, con un tiempo menor de sellado.
• Conguración húmeda: para un sellado simple en bolsas húmedas o alimentos
con bajo contenido de humedad, con un tiempo mayor de sellado.
• Conguración doble: para un sellado doble en bolsas húmedas o alimentos con
alto contenido de humedad.
• Conguración predeterminada: conguración normal para un sellado simple en
bolsas secas, con un tiempo menor desecado.
4. Pressure - Dos posiciones para elegir diferentes presiones de vacío:
• Conguración normal: para almacenamiento de artículos regulares bajo una
presión normal de vacío.
• Conguración suave: para artículos suaves y delicados para los que se desea
una menor presión de vacío.
• Conguración predeterminada: conguración normal con una alta presión de vacío.
5. Progress - Una pantalla numérica que cumple dos funciones;
• Indica el progreso del vacío.
• Indica que el artefacto está encendido y que la tapa se encuentra cerrada.
Cuando parpadee el LED, espere hasta que la luz sea continua antes de iniciar la
siguiente operación.
6. Manual Seal - este botón cumple dos funciones:
• Sellar el extremo abierto de la bolsa sin vacío; se usa para hacer la bolsa a partir de rollo.
• Cuando la función “Vac&Seal” se encuentra en operación, este botón detiene la bomba e
inmediatamente inicia el sellado de la bolsa, de manera que la presión de vacío dentro de
la bolsa pueda ser controlada por el operador a n de evitar aplastar artículos dedicados.
7. Marinate - Esta función es utilizar el tubo vacío y el recipiente y lo hará en
etapas e infunde lentamente los jugos en los artículos que son marinados.
Cuando el progreso llegue a cero los artículos estarán listos para cocinar o se
mantendrá bajo presión de vacío hasta el aire en el recipiente se libera.
8. Pulse vacuum -
Presione este botón para iniciar el vacío manualmente; suéltelo
para detenerlo. Repita el proceso hasta haber alcanzado la presión de vacío deseada.
Finalmente, presione el botón de sellado manual para nalizar el sellado al vacío.
9. Front handle - Presiónela hacia abajo para jar la tapa, y levántela para
liberarla y abrirla.
10. Hose port - Introduzca la manguera para latas y tapones de vino antes de
realizar operaciones de “marinar” o de lata.
11. Sealing strip - Coloque la bolsa a sellar sobre esta banda. Manténgala limpia y
seca, o reemplácela cuando esté deformada o rota.
12. Bag cutter- Presiónela y deslícela en cualquier dirección para cortar las bolsas al
tamaño deseado.
13. Cutter rack - Sirve de soporte para el deslizamiento de la cuchilla.
14. Foam Gaskets - Mantenga hermética la conexión presionando con el sello
superior en la cámara de vacío. Manténgalo limpio y seco o reemplácelo cuando
esté distorsionado o roto.
15. Air Intake - La entrada de aire se conecta con la cámara de vacío y la bomba.
No bloquee esta entrada cuando coloque la bolsa a ser sellada al vacío
16. Sealing element -
Calentador cubierto de teón que sella los extremos de las bolsas.
17. Vacuum chamber -
Al colocar el extremo abierto de la bolsa dentro de la cámara
de vacío, extrae el aire de la bolsa y atrapa cualquier líquido que escape de la bolsa
.
18. Bag storage - Puede almacenar hasta un rollo de material de bolsa de 30 cm (12 pulgadas).
Page 20

18
Espanól
Instrucciones de Operación
CÓMO HACER BOLSAS A PARTIR DE UN ROLLO
1. Coloque el sellador en una supercie plana y estable y
enchufe el artefacto en un tomacorriente.
2. Levante la manilla y abra la tapa. Coloque el rollo
de material de bolsa en el compartimiento de
almacenamiento. FIG. 1.
3. Mueva la cuchilla de corte hasta el nal de su base,
luego levante la base y hale del material de bolsa del
rollo (hale suciente material del rollo para contener
los artículos que se envasarán al vacío más 7.5 cm (3
pulgadas) adicionales) y, nalmente, cierre la base de
la cuchilla. Aplique una ligera presión sobre esta base
mientras desliza la cuchilla sobre la misma para cortar el
material de bolsa. FIG. 2
4. Coloque el extremo abierto del material de bolsa sobre
la banda de sellado y cierre la tapa superior. Aplique
presión sobre la manilla hasta que se encuentre
completamente cerrada. FIG. 3
5. Presione el botón de “sellado manual” (“Manual Seal”)
para iniciar el sellado. FIG. 4
6. Cuando la pantalla de progreso llegue a 0, el artefacto se
apagará automáticamente y se habrá completado el sellado
.
7. Levante la manilla, abra la cubierta superior y retire la bolsa.
ENVASADO AL VACÍO DE LA BOLSA UNA VEZ LLENA
:
1. Coloque los artículos dentro de la bolsa.
2. Abra la tapa, limpie y enderece el extremo abierto de la
bolsa, asegurándose de que no haya arrugas u ondulaciones.
3. Coloque el extremo abierto de la bolsa dentro del área
de la cámara de vacío. Asegúrese de que la entrada de
aire no esté obstruida por la bolsa.
4. Baje la tapa superior y presione la manilla frontal para
jar la tapa.
5. Revise la condición de los LEDs de “Presión” y
“Sellado” para conrmar las conguraciones dependiendo del
grado de humedad de los artículos envasados (Doble/Húmedo/Seco) y la presión
de vacío deseada (Normal/Suave) según el tipo de comida.
6. Presione el botón de “Vacío/Sellado”. La unidad generará el vacío automáticamente y sellará
la bolsa. NOTA: Este producto aplica alta presión durante el envasado al vacío; a n de evitar
aplastar artículos dedicados, observe la condición de los artículos dentro de la bolsa y presione
inmediatamente el botón de “sellado manual” (“MANUAL SEAL”) una vez que haya alcanzado la
presión de vacío deseada. La bomba se apagará y la unidad sellará la bolsa con calor.
7. Levante la manilla y cubierta superior y retire la bolsa sellada.
PARA MEJORES RESULTADOS:
• Deje enfriar la unidad durante un minuto antes de utilizarla nuevamente y no
selle más de una o dos bolsas consecutivamente para evitar el recalentamiento
del elemento de sellado.
• Limpie y retire cualquier líquido excedente o residuos de comida de la cámara de
vacío después de cada uso.
• El botón de sellado (“Seal”) no funcionará si se presiona dentro de los 15
segundos posteriores a la última activación.
FIG 2
FIG 3
FIG 4
FIG 1
Page 21

19
Espanól
ENVASADO AL VACÍO EN UNA LATA
1. Limpie y seque la tapa de la lata y su base.
2. Coloque los artículos dentro de la lata. Asegúrese de que
la válvula se encuentre en la posición de sellado (“Seal”).
3. Introduzca uno de los extremos de la manguera en la
entrada de aire de la selladora al vacío, y el otro en el
oricio central de la tapa de la lata. Presione rmemente
para asentar las conexiones de la manguera.
4. Revise la condición de los LED de presión (“Pressure”) y asegúrese de que se
encuentren en la posición “Normal”.
5. Presione el botón para envasado de latas (“Canister”) para iniciar el ciclo de vacío.
Para asegurar un buen sello entre la tapa y la lata, utilice su mano para presionar
la tapa hacia abajo al principio del ciclo de vacío. La máquina se detendrá
automáticamente una vez que se haya alcanzado la presión de vacío deseada.
6. Retire la manguera de la lata y de la unidad inmediatamente después de nalizar
el sellado.
Nota: Cuando se someten comidas húmedas al vacío, se formará humedad dentro de
la manguera. Recuerde limpiarla antes de comenzar el ciclo de vacío.
Limpieza y Mantenimiento
Selladora al vacío:
1. Desenchufe la unidad antes de limpiarla.
2. Limpie la selladora al vacío con una esponja húmeda. No la sumerja en agua.
3. Utilice un detergente lavavajillas suave. No utilice limpiadores abrasivos ya que
rayarán la supercie.
4. Seque completamente la unidad, antes de usarla. Cuando la vaya a almacenar, no
asegure la tapa superior para evitar que se deformen los sellos.
Bolsas:
1. El material de bolsa se puede lavar con agua tibia y detergente lavavajillas. Aclare
bien las bolsas y permita que se sequen antes de reutilizarlas.
2. Las bolsas se pueden lavar en el peldaño superior de su lavavajillas automático
colocándolas con el lado interno hacia fuera. Coloque las bolsas paradas de modo
que el agua pueda penetrar dentro de las mismas. Séquelas completamente
antes de su próximo uso.
Nota: Las bolsas que hayan sido utilizas para almacenar comidas grasosas no deben
ser reutilizadas.
Almacenamiento de su selladora al vacío:
1. Guarde la unidad en un lugar plano y seguro, alejada del alcance de los niños.
2. Asegúrese de que la tapa superior de la unidad no se encuentre
asegurada cuando no se encuentre en uso y durante su almacenamiento
para evitar la deformación de los sellos
.
Consejos de Sellado al Vacío
• No llene demasiado las bolsas; deje suciente espacio en el extremo abierto de
la bolsa como para poder sostener más rmemente la misma sobre la cámara de
vacío, aproximadamente 7,5 cm (3 pulgadas).
• No moje el extremo abierto de la bolsa. Una bolsa mojada puede ser difícil de sellar.
• Limpie y enderece el extremo abierto de la bolsa antes de sellarla. Asegúrese de
que no aparezcan arrugas u ondulaciones en el material de bolsa ya que una bolsa
con pliegues puede ser difícil llegar.
Page 22

20
Espanól
• No envase al vacío objetos que contengan puntas aladas, tales como espinas de
pescado o conchas duras. Las puntas aladas pueden atravesar o romper la bolsa.
• Durante el sellado al vacío, pequeñas cantidades de líquido, migas o partículas
de comida podrían ingresar a la cámara de vacío obstruyendo la bomba y
posteriormente dañando su artefacto. Para evitar esto: siempre limpie la cámara y
congele los alimentos húmedos antes de sellarlos o coloque una servilleta de papel
cerca de la parte superior interna de la bolsa.
• Para mejores resultados, congele las frutas y dele un breve hervor a los vegetales.
• Deberá enfriar cualquier líquido caliente antes de envasarlo al vacío. Los líquidos
calientes generarán burbujas y rebosarán por la parte superior de la bolsa al ser
sometidos al vacío.
• Almacene los alimentos perecederos en el congelador o en la nevera. El envasado al
vacío prolonga la vida útil de los alimentos pero no los conserva.
• Los artículos de despensa, tales como la harina, arroz, mezclas para tortas y
panquecas permanecerán frescos durante más tiempo si los envasa al vacío.
• Mantenga limpios y secos sus artículos de acampar, tales como fósforos, equipos de
primeros auxilios y vestimenta.
• El sellado al vacío evita que se oscurezca la plata y otros artículos de colección.
• Llene una bolsa con agua hasta 2/3 de su capacidad, selle el extremo (sin aplicarle
vacío), congele la bolsa y utilícela para hielo potable o para compresas de hielo de
primeros auxilios.
.
Solución de problemas
LA SELLADORA AL VACÍO NO ENCIENDE
• Asegúrese de que la unidad esté enchufada. Para probar un tomacorriente,
enchufe otro artefacto, como una lámpara.
• La selladora al vacío se apagará automáticamente si se recalienta. Permita que se
enfríe durante 15 minutos y luego inténtelo nuevamente.
• Revise el cable eléctrico y enchufe para asegurarse que no presenten daños. Si se
encuentran dañados, no utilice la selladora al vacío.
LA SELLADORA AL VACÍO NO REALIZA EL PRIMER SELLO EN LA BOLSA
• Asegúrese de que el extremo de la bolsa se encuentre correctamente colocado
sobre el elemento de sellado y que no contenga pliegues o restos de comida en
el material de bolsa.
LA SELLADORA AL VACÍO NO APLICA SUFICIENTE VACÍO A LAS BOLSAS
• Para sellar correctamente, el extremo abierto de la bolsa debe estar
completamente introducido dentro del área de la cámara de vacío.
• Revise la banda superior de sellado y los sellos para asegurarse de que no se encuentran
obstruidos. Límpielos bien y asegúrese de que se encuentren bien asentados.
• El material de bolsa podría tener una fuga. Para probarla, selle la bolsa con algo
de aire en su interior, sumérjala en agua, y aplique presión. La salida de burbujas
indicará una fuga. Séllela nuevamente o utilice una nueva bolsa.
LA SELLADORA AL VACÍO NO SELLA CORRECTAMENTE LA BOLSA
• En caso de que el elemento de sellado se recaliente y derrita la bolsa, puede ser
necesario levantar la cubierta superior y permitir que el elemento de sellado se
enfríe durante unos minutos.
LA BOLSA PIERDE VACÍO LUEGO DE HABER SIDO SELLADA
• Las fugas a lo largo de la línea de sellado pueden ser causadas por pliegues,
migas, grasa o líquidos. Limpie el interior de la parte superior de la bolsa y
colóquela plana sobre el elemento de sellado antes de sellarla.
• Asegúrese de que la bolsa no tenga algún pinchazo que pudiera haber liberado el vacío.
Cubra con una servilleta de papel cualquier borde alado en el contenido de la bolsa
.
Page 23

21
Espanól
Garantí Limitada d 1 Ańo
Este electrodoméstico está cubierto por una garantía de un año a partir de
la fecha de compra original contra defectos en los materiales y en la mano
de obra. Esta garantía no cubre los daños por transporte, el uso inadecuado,
accidentes u otros incidentes similares. La garantía le conere derechos legales
especícos y es posible que tenga otros derechos que varían de estado en
estado. Este producto está concebido para un uso doméstico solamente, no
para usos comerciales. Esta garantía no cubre el uso comercial.
Su nuevo electrodoméstico NESCO
®
/AH® está equipado con numerosas
funciones de seguridad. Todo intento de interferir con el funcionamiento
de estas características de seguridad anulará la garantía. En el caso de que
recibamos un electrodoméstico para servicio técnico que haya sido forzado,
nos reservamos el derecho de repararlo a su estado original y cobrar por la
reparación.
Para servicio técnico bajo la garantía – Los productos defectuosos pueden
restituirse, con franqueo postal prepago, con una descripción del defecto a: The
Metal Ware Corporation, 1700 Monroe Street, Two Rivers, Wisconsin 54241,
para su reparación o reemplazo libre de cargo, a nuestra discreción.
Se debe incluir el comprobante de compra o una copia del contrato de
compra cuando devuelva el producto para el servicio bajo la garantía.
Llame al servicio de Satisfacción del Cliente al 1-800-288-4545 para obtener
una Autorización de Devolución antes de enviar el producto.
• Para servicio técnico bajo la garantía, siga las instrucciones consignadas en
la garantía. Cuando pida nuevas piezas, asegúrese de mencionar siempre el
número de modelo del producto.
• Llámenos a nuestro número gratuito, 1-800-288-4545 e infórmenos de su
problema.
• Si le indicamos que nos envíe todo su electrodoméstico o parte de él, nuestro
representante de Satisfacción al Cliente la dará un número de Autorización
de Devolución (este número le notica nuestro departamento receptor que
acelere su reparación). Empaque su unidad cuidadosamente en una caja de
cartón fuerte con suciente material de protección para prevenir daños dado
que los daños causados por el envío no están cubiertos por la garantía.
• Escriba su nombre, dirección y número de Autorización de Devolución en la caja.
• Escriba una carta explicando el problema. Incluya lo siguiente: su nombre,
dirección y teléfono y una copia del contrato de compra original.
• Incluya el sobre cerrado con la carta dentro de la caja. Asegure el paquete por
el valor del electrodoméstico NESCO®/AH® y envíelo con franqueo pago a:
Atención: Repare el departamento
The Metal Ware Corporation
1700 Monroe Street
Two Rivers, WI 54241, USA
Page 24

The Metal Ware Corporation
1700 Monroe St., P.O. Box 237
Two Rivers, WI 54241-0237
Phone: 1 (800) 288-4545
Part No. 67841 ©2016 The Metal Ware Corporation
All Rights reserved, including the right of reproduction in whole or part
For Accessories please call our
Customer Satisfaction helpline or
visit us online at www.nesco.com
 Loading...