

Page 1
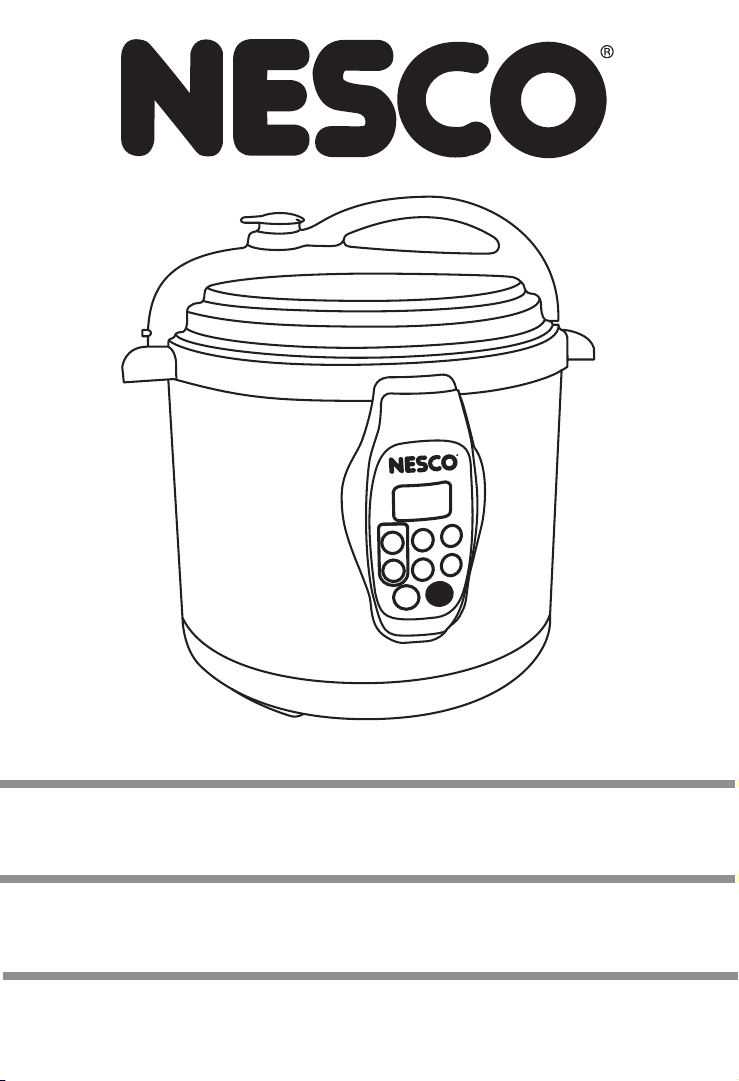
Digital Pressure Cooker (model PC-6-25)
Care/Use Guide
Autocuiseur Numérique (modèle PC-6-25)
Guide d’entretien et d’utilisation
Cocina de Presión Digital (modelo PC-6-25)
Guía del cuidado/del uso
Page 2

Digital Cooker model PC- 6 - 25
“NESCO®” is a registered trademark of The Metal Ware Corporation.
The Metal Ware Corporation
1700 Monroe St., P.O. Box 237
Two Rivers, WI 54241-0237
Phone: 1 (800) 288-4545
Care-Use manual p/n: 67064
printed in China
Page 3

Table of Contents
IMPORTANT SAFEGUARDS 4
Parts and Features 5-6
Operating Instructions 7-9
Clenaing Instructions 9
Hints and Tips 10
Cooking charts 11-12
Recipes 13-18
ONE YEAR LIMITED WARRANTY 19
Table des Matières
IMPORTANTES MESURES DE 20
Partys et fonctionnalités 21-22
Mode d’emploi 23-25
Instructions pour le nettoyage 25
Trucs et Astuces 26
Tableaux de cuisson 27-28
Recettes 29-34
GARANTIE LIMITÉE D’UN AN 35
English
FrançaisEspanól
Tabla de Contenidos
SALVAGUARDAS IMPORTANTES 36
Piezas y características 37-39
Manual de instrucciones 40-41
Instrucciones de limpieza 42
Consejos y sugerencias 43
Cocinas y grácos 44-45
Recetas 46-50
UN AÑO DE GARANTÍA LIMITADA 51
Page 4

IMPORTANT SAFEGUARDS
When using electrical appliances, basic safety precautions should always be followed,
including the following:
1. READ ALL INSTRUCTIONS BEFORE USING THIS PRODUCT.
English
2. The appliance is designed for household use only. It is not intended for commercial use.
3. To protect against electric shock, do not immerse the appliance, including cord and
plug, in water or other liquid.
4. Close supervision is necessary when appliance is used near children. This appliance is
English
not recommended for use by children.
5. Unplug appliance when not in use, before putting on, removing parts or before cleaning.
6. Do not operate any appliance with damaged cord or plug or after appliance
malfunctions, or has been damaged in any manner. Return the appliance to NESCO
Factory Service Department for examination, repair or adjustment.
7. Do not place appliance on or near a hot gas, electric burner or oven.
8. Use of accessory attachments not recommended by the manufacturer may cause re,
electrical shock or injury to persons.
9. Do not use outdoors or for other than intended use.
10. Do not let the cord hang over the edge of a table or touch hot surfaces.
11. Operate appliance only when all parts are fully engaged and secured.
12. To reduce the risk of electrical shock, cook only in the removable cooking pot.
13. Do not touch hot surfaces. Use handles or knobs.
14. Always attach plug to appliance rst, then plug cord into the wall outlet. To disconnect,
turn any control to “off” then remove plug from wall outlet.
15. Extreme caution must be used when moving an appliance containing hot oil or other hot liquids.
16. WARNING: Never deep fry or pressure fry in this appliance. It is dangerous and may
cause damage or serious injury.
17. Keep hands and face away from pressure regulator valve when releasing pressure.
18. Do not cover appliance or use near ammable material, such as draperies or walls.
19. Do not ll pot over 4/5 full. When cooking foods that expand during cooking such as
rice or dried vegetables, do not ll the unit over 3/5 full. Failure to follow this procedure
can result in injury to person(s) and/or damage to the unit.
20. Be aware that certain foods, such as applesauce, cranberries, pearl barley, oatmeal or
other cereals, split peas, noodles, macaroni, rhubarb, or spaghetti can foam, froth, and
sputter, and clog the pressure release device (steam vent). These foods should not be
cooked in a pressure cooker.
SAVE THESE INSTRUCTIONS
Polarized Plug: This appliance has a polarized plug (one blade is wider than the other). To
reduce risk of electric shock, plug is intended to t into polarized outlet only one way. If the
plug does not t fully into the outlet, reverse the plug. If it still does not t, contact a qualied
electrician. Do not try to modify the plug in any way.
Short Cord Instructions: A short power supply cord is provided to reduce the risk resulting
from becoming entangled in or tripping over a longer cord. Extension cords may be used if
care is exercised in their use. If an extension cord is used, the marked electrical rating of
the cord should be at least as great as the electrical rating of the appliance. The longer cord
should be arranged so that it will not drape over the tabletop where it can be pulled on by
children or tripped over unintentionally.
4
Page 5
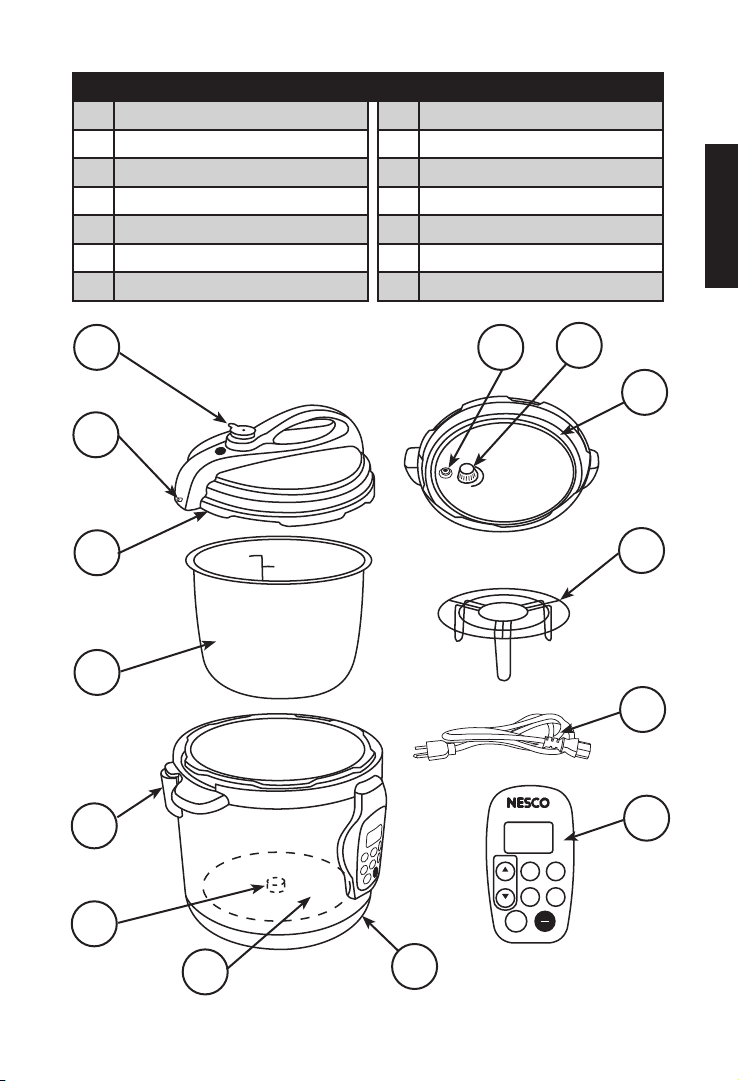
DIGITAL COOKER PARTS AND FEATURES
1 Cooker Base
2
Heating Plate
3 Temperature Sensor
4 Condensation Reservoir
5 Removable Cooking Pot
6 Locking Lid
7 Locking Pin
8 Pressure Regulator Knob
9
Floating Valve
10 Filter
11 Gasket Seal
12 Cooking Rack
13 Power Cord
14 Control Panel
English
8 9
7
6
5
4
3
DELAY TIME
Time/Pressure
10
11
12
13
14
WARM STEAM
HIGH
SLOW
BROWN
COOK
LOW
START
DELAY
TIME
STOP
2
1
5
Page 6

PARTS AND FEATURES (continued)
Pressure Regulator Knob Position to “seal” for pressurized cooking and position to “vent”
Floating Valve Safety valve engages when pressure is built in the cooker and
English
Locking Lid A mechanical safety feature that locks the lid until pressure in the
Removable Cooking Pot Features 6 liters capacity, removable with non-stick coating for
Condensation Reservoir Collects excess condensation during cooking process.
Rubber Gasket Creates air tight seal necessary for pressure cooking.
Filter Protects pressure regulator and removable for easy cleaning.
Control Panel functions
WARM Reheats food or keeps food warm for serving.
BROWN Allows you brown/sauté meat before pressure cooking for better results.
STEAM Quickly boils water to steam foods like vegetables or rice.
SLOW COOK Cooks recipes slowly (9-1/2 hour timer) and at a low heat (180°F) to
DELAY TIME Allows you to delay the cooking process by up to 8 hours.
CAUTION: Perishable foods should not be left at room temperature for
to release pressure or cooking without pressure.
will not allow lid to be removed. It will release when pressure is
reduced, lid can safely be removed.
cooker is reduced to safe levels.
easy cleanup and durable Aluminum alloy for even heating.
retain the natural avors and tenderness.
more than 2 hours (1 hour if above 90°F).
BEFORE FIRST USE
Unpack your appliance, removing all paper and plastic bags from inside the appliance.
Wash all removable parts in warm, soapy water. Rinse a dry all parts thoroughly. Wipe Base
with damp cloth. NEVER immerse Base in water or any other liquid. Do not place parts in
dishwasher.
Be sure Gasket seal is installed properly inside lid. To install, t gasket to ring inside the lid
and lock lid. Fill the removable cooking pot 3/5 full of water and set control for “HIGH”
pressure for 15 minutes (see image below for gasket assembly).
Release pressure by turning pressure regulator knob to “VENT” and wait for oating valve
to drop as all pressure is released. When cool, empty removable cooking pot and clean. Do
not use abrasive cleaners or harsh chemicals.
PUSH
PULL UP
DOWN
6
Page 7

OPERATING YOUR DIGITAL COOKER
1. To open the lid, hold the handle and turn clockwise until it stops, lift lid to remove.
2. Remove the cooking pot and place desired food and liquids into cooking pot. The
amount of food and liquid should not exceed 4/5 of the height of the cooking pot. For
food that will expand the level should not exceed 3/5 the height of cooking pot. The
minimum level for cooking is 1/5 height of cooking pot.
3. Check inside the base, where the heating plate and sensor are located, to be sure it is
clean before inserting cooking pot.
4. Place lid onto base, be sure the gasket seal is installed correctly and turn counterclockwise until it locks into position. CAUTION: Gasket must not be damaged. If
damaged, do not use the pressure cooker and contact NESCO customer service (1-800288-4545) to have it replaced.
5. Plug cord into the base and then into wall outlet.
6. Press START/STOP button to clear any previous program before choosing a setting.
NOTE: Cooker will switch to WARM function after all cook settings time out, except
BROWN function. If you forget to program desired cooking functions or do not push
START/STOP button, the display will show “0.0” after 30 seconds and the settings will
be lost. Repeat programming steps and push START/STOP.
PRESSURE COOKING SETTING:
Before using your appliance, always check the lid to make sure the gasket seal, pressure
regulator knob and lter are clean and positioned correctly.
1. Place removable cooking pot into base. Plug power cord into base, then electrical outlet.
2. Place food to be cooked into removable cooking pot. NOTE: When cooked under
pressure, most foods should have a minimum of 1 cup (8 oz.) of liquid added.
3. Place self locking lid on base and turn counter-clockwise until it locks and the locking
pin ‘clicks’ into place.
4. Turn the pressure regulator knob to ‘SEAL’.
5. Choose the desired cooking function by pressing either the ‘HIGH’ or ’LOW’ pressure
button on control panel. Check recipe for suggested settings. The indicator light will
ash and the digital display will show cooking times in minutes.
6. Set the desired cooking time by pressing the button, once for each additional minute or
hold down continuously. The maximum cooking time is 99 minutes.
7. Press the ‘START/STOP’ button to begin cooking. The indicator light will stop ashing.
8. The cooker will begin to count down (in minutes). The oating valve will rise after the
appropriate pressure has been reached, safely preventing the lid from being removed.
When cooking time reaches zero, the appliance will beep three times and switch to
WARM function automatically.
9. When nished cooking, allow pressure to release by using the ‘natural method’ or
‘quick release method’ (see below).
Natural Method: After cooking, press the ‘START/STOP’ button to make sure unit is off.
Let appliance stand and allow pressure to drop naturally which takes from 10 to 20
minutes. After 20 minutes, turn the pressure regulator knob towards ‘VENT’ to make
sure all pressure has been released.
Quick Release Method: After cooking, press the ‘START/STOP’ button to make sure unit
is completely off. Turn the pressure regulator knob to ‘VENT’ and allow the pressure to
release. CAUTION! KEEP HANDS AND FACE AWAY FROM ESCAPING STEAM
AS IT IS EXTREMELY HOT AND CAN CAUSE INJURY.
7
English
Page 8

WARM SETTING:
1. Place removable cooking pot in in base and add food to be heated.
2. Place lid on cooker and lock into place. Plug power cord into base, then electrical outlet.
3. Turn pressure regulator knob to “VENT”.
4. Press “WARM” button on the control panel. The indicator light will start ashing and
English
the display will show “0.0”.
5. Press ‘START/STOP’ button to begin heating. The indicator light will stop ashing.
NOTE: The WARM function does not use timed settings.
BROWN SETTING:
1. Place removable cooking pot in base.
2. Add amount of oil as directed in recipe. Plug power cord into base, then electrical outlet.
3. Press ‘BROWN’ button on the control panel. The light will start ashing and the display
will show “0.0”. Keep lid off while browning.
4. Press ‘START/STOP’ button to begin heating. The indicator light will stop ashing.
5. Allow to preheat for 1 minute. Then add meat or poultry and begin browning food.
6. In this setting, the control panel will beep 3 times every 10 minutes to alert you it is
cooking at a high temperature setting. NOTE: For safety, do not leave the appliance
unattended while browning foods.
STEAM SETTING:
1. Place removable cooking pot in base. Plug power cord into base, then electrical outlet
2. Place a small, heat-resistant basket, wire rack (included) in bottom of cooking pot.
3. Add at minimum 8 oz. water and make sure bottom of rack is above the liquid.
4. Place food on rack. Do not ll pot more than 4/5 full with food. NOTE: If steaming rice,
put rice in an 8-inch or smaller bowl and place on rack.
5. Place lid on cooker and lock into place. Turn pressure regulator knob to “VENT”.
6. Press ‘STEAM’ button on the control panel. The indicator light will start ashing and
the display will show “01” (equals 1 minute cooking time).
7. Set the desire cooking time by pressing the ‘HIGH’ button once for each additional
minute or press continuously. Press ‘LOW’ button to decrease cooking time.
8. Press ‘START/STOP’ button to begin cooking. The indicator light will stop ashing.
CAUTION! Never put your face or hands directly over the cooker when removing lid,
escaping steam can cause serious burn injury.
SLOW COOK SETTING:
1. Place removable cooking pot in base. Plug power cord into base, then electrical outlet
2. Place the food inside cooking pot according to the recipe.
3. Place lid on cooker and lock into place.
4. Turn pressure regulator knob to “VENT”.
5. Press ‘SLOW COOK’ button on the Control Panel. The light will start ashing and the
display will show “0.5” (this means 30 minutes cooking time).
6. Set the desired slow cook time by pressing the ‘SLOW COOK’ button once for each
additional 30 minutes. The longest slow cook time is 9.5 hours at 180°F. NOTE: Use
slow cooker recipes as a guide only.
7. Press ‘START/STOP’ button to begin cooking. The indicator light will stop ashing.
8. The cooker will begin to count down in half hour (30 minute) 0.5 increments after the
temperature reaches 180°F. The appliance will then switch to WARM mode.
8
Page 9

DELAY TIME SETTING:
1. Press “DELAY TIME” button. The display will show “0.5” (equals 30 minutes) and the
indicator light will be lit. Repeat pressing ‘DELAY TIME’ until desired amount of delay
time is displayed. Total delay time is 8 hours.
2. Select the desired cooking mode (HIGH, LOW, STEAM, etc.) and time by pressing the
appropriate button(s).
3. Press the ‘START/STOP’ button and the delay time indicator light will turn on. Your
appliance will begin desired cooking after the delay time has elapsed. The time delay
indicator light will turn off.
CLEANING YOUR DIGITAL COOKER
1. Unplug cord from the wall outlet, then the appliance and let the unit cool before
cleaning.
2. DO NOT wash any parts of your appliance in a dishwasher. Use warm soapy water,
rinse and dry. Always clean after each use or if it has not been used for an extended
period of time.
3. Wipe base with a clean damp cloth. NEVER submerge the base in water or other liquid.
Wipe the inside of base as necessary to remove any food product.
4. If the condensation reservoir contains visible moisture, remove by pulling down. Wash
in warm soapy water. Rinse and dry. Attach to base by pushing up to lock into place.
5. Turn the lid upside down, grasp the rubber gasket on either side and pull up. Wash
gasket in warm soapy water. Rinse and dry thoroughly. Insert the rubber gasket by
pushing it down inside the edge of the lid, making sure the ‘v’ groove of the gasket is
centered around the wire ring on the lid. NOTE: If the rubber gasket is not positioned
properly the appliance will not function normally.
6. In order to maintain good performance of your appliance, the bottom of the removable
cooking pot should be cleaned after each use. Wipe with a soft damp cloth and dry
before using.
7. Never use abrasive cleaners or scouring pads to clean any parts of this appliance, as they
will make ne scratches in the surface, especially on the polished surfaces.
8. Store your appliance with the lid resting upside down on the removable cooking pot.
This will protect the valves, knobs and pressure regulator on the top of the lid. If the
appliance is stored with the lid sealed, stale odors may form on the inside.
Cleaning the Pressure Regulator Knob
Check to make sure the pressure regulator knob and oating valve are in good working
order before each use. To clean, please follow the instructions below:
1. After the unit has cooled, remove the lid.
2. Press down and turn the pressure regulator knob clockwise past the SEAL setting and
carefully lift and remove.
3. Turn the lid upside down and set on a tabletop. Pull out the lter by rmly grasping
with a soft cloth lifting upwards. Using a small brush, check and remove any food
particles that may be lodged inside the lter and the oating valve. Push lter back in
place.
4. Replace the pressure regulator knob by lining the notches up to the inside wall of the
pressure regulator chamber in the lid, then press down and turn clockwise to latch.
English
9
Page 10

HINTS AND TIPS ABOUT YOUR DIGITAL COOKER
• To ensure the best cooking performance when pressure cooking, always make sure the
recipe calls for at least 1 cup of water or other liquid so enough steam can be generated to
English
create pressure.
• After a period of time the rubber gasket may shrink, harden, or otherwise become
distorted under normal use. When this happens or other damage occurs, do not use the
appliance. The rubber gasket should be replaced. Contact the Customer Satisfaction
Department (800-288-4545).
• When using the HIGH or LOW pressure settings, the timer will not start counting ‘down’
until sufcient steam pressure is generated.
• When pressure cooking, if you are not sure how much cooking time is necessary, it is
better to ‘under’ cook. Then use the “quick release” method, remove Lid and check for
doneness.
• Never ll the removable cooking pot more than half full with food or 4/5 full with liquid.
• Make sure this appliance is plugged into a separate 120 volt electrical outlet. A circuit
overload may occur if used with another appliance at the same time.
• Tougher, less expensive cuts of meats are better suited for your digital pressure cooker
because the steam pressure helps break down the tough bers in the meat making them
more tender and avorful.
• Fresh fruit should be cooked under low pressure.
• When pressure cooking beans, add a teaspoon of oil to the water to reduce the amount of
foaming.
• Any liquid such as oils, oil-based marinades and dressings should not be used pressure
cooking.
• Liquids that contain water can be used when pressure cooking. These include wine,
beer, stocks, tomato and other vegetable and fruit juices. Wine must be mixed with an
equivalent amount of water because it evaporates quickly during cooking.
• Frozen foods can be cooked if meat is one-inch or less in thickness, do not alter the
cooking times, appliance will begin the timer after set internal temperature is reached.
• During the pressure building process, you may notice steam escaping from the pressure
regulating valve. Carefully adjust the valve by moving it gently or turning it side to side
gently using tongs or similar utensil until it seals properly.
• If steam is escaping around the lid, it means that the rubber gasket may not be sealed.
Cancel the cooking process, release pressure manually or naturally, remove the lid and
check the rubber gasket for damage or incorrectly installed. Re-install after examination
and start cooking process.
• NOTE: The boiling point of water decreases as the altitude increases, and this changes
your appliance performance. When pressure cooking at higher altitudes, the following
will apply: Add 5% to the cooking time for every 1,000 feet above the rst 2,000 feet.
Example: At 3,000 feet add 5%; 4,000 feet add 10%; 5,000 feet add 15%; etc..
10
Page 11
Vegetables:
• When pressure cooking vegetables use HIGH pressure setting and QUICK RELEASE
for pressure release.
• Before pressure cooking fresh vegetables, add 1 cup water and place a steam rack into
removable cooking pot. Place a layer of vegetables on rack. Cover and lock lid in place.
Turn regulator knob to ‘SEAL’. Cook for time indicated below.
• Remove vegetables, add desired seasonings and serve. NOTE: Cooking times that
exceed 7 minutes, add an extra 1/2 C water for each additional 5 minutes cooking time
so appliance does not boil dry.
Vegetables Time
(minutes)
Artichoke 9 to 11 Onions 4 to 5
Asparagus 1-1/2 to 2 Parsnips 2 to 4
Beans, green 2 to 3 Peas, in pods 2 to 3
Beets, small 11 to 13 Potatoes, sliced 5 to 7
Broccoli, owerets 2 to 3 Potatoes, small 5 to 8
Broccoli, stalks 3 to 4 Potatoes, medium 11 to 15
Brussel Sprouts 3 to 5 Rutabagas, 1/2” thick 5 to 6
Cabbage, shredded 1-1/2 Spinach 2 to 3
Cabbage, quartered 3 to 4 Squash, acorn halved 6 to 8
Carrots, baby 4 to 5 Squash, sliced 1 to 3
Carrots, sliced 1 to 2 Tomatoes, quartered 2 to 3
Cauliower 2 to 3 Tomatoes, whole 5 to 6
Corn on the Cob 3 to 5 Turnips, sliced 1 to 2
Egg Plant, sliced 2 to 3 Yams, whole 6 to 8
Okra 2 to 3 Zucchini, sliced 2 to 3
Vegetables Time
(minutes)
English
Fruits:
When pressure cooking fruits, follow the same guidelines as described above, except select
LOW pressure setting.
Fruits Time
(minutes)
Apples, fresh 3 to 4 Peach 4 to 5
Apples, quartered 2 Pears 2 to 4
Apricots 2 to 4 Prunes 5 to 6
Figs, dried 5 to 6 Raisins 4 to 5
Fruits Time
(minutes)
11
Page 12
Meat/Poultry:
• When pressure cooking beans or legumes use HIGH pressure setting and QUICK
RELEASE for pressure release.
• Always cook meat or poultry with at least 1-3 cups of liquid.. Preserved or salted meats
English
should be immersed in water.
• Unless indicated, the cooking times given below are for 3 pounds of meat or poultry unless noted
otherwise. All times are recommended and vary depending on quality and cut of meat.
Type of Meat Time
Beef, Pork, Lamb, cubed 15 to 20 Turkey Breast, whole 30 to 40
Beef / Veal:
Roast, brisket (3 - 4 lbs)
Shank, 1-1/2 in. thick
Pork:
Loin roast (3 - 4 lbs)
Smoked butt
Ham shank
(minutes)
50 to 60
25 to 30
40 to 50
20 to 25
30 to 40
Type of Meat Time
Fish:
Steaks, llets, 3/4 in. thick
1-1/2 in. thick
Chicken:
Boneless breast, thigh
Pieces (2 - 3 lbs)
Whole (3 - 4 lbs)
Dried Beans and Other Legumes:
• When pressure cooking beans or legumes use HIGH pressure setting and NATURAL
RELEASE for pressure release.
• Place beans or legumes in pressure cooker, add 3 cups of water for each cup of food.
• Add 1 tablespoon of vegetable oil for each cup of water to cut down on foaming. Do not
add salt until after cooking.
Type of Legume Time
(minutes)
Azuki 6 to 8 Kidney Beans, Red 4 to 5
Black Beans 2 to 3 Pinto 2 to 3
Black Eyed Peas 11 to 13 Red 5 to 7
Chick Peas (garbanzo) 3 to 5 Soybeans 5 to 6
Great Northern 3 to 4 Tepary 6 to 8
Type of Legume Time
(minutes)
3 to 4
6 to 7
8 - 10
11 - 14
15 - 20
(minutes)
Grains:
Before cooking, soak certain grains, such as wheat berries in four times their volume of
lukewarm water for at least four (4) hours or overnight if required.
• Do not soak rice.
Type of Grain Time
(minutes)
Rice, basmati – 1 1/2 C 7 to 8 Rice, brown – 1 1/2 C 7 to 8
Rice, converted – 1 1/2 C. 7 to 8 Rice, wild – 3 C 24 to 27
Rice, long grain – 1 1/2 C 7 to 8 Wheat, berries – 3 C 2 to 3
Type of Grain Time
(minutes)
12
Page 13

RECIPES
Please note that all of the information given below is for your reference only and can be
adjusted to the user’s preference and taste.
Applesauce
1 C Apple juice
1 C Water
6 Apples, peeled and cored / cut in half
Cinnamon to taste
Add all of the ingredients to the cooker and cook on high pressure for 6 minutes. Stir and
serve. Increase or decrease time for consistency.
BBQ Ribs
1 Rack of Ribs
1 bottle of Barbeque sauce
2 C Ginger ale
Pour ginger ale in cooking pot. Cut the rack of ribs, to place on the rack in the cooker. You
do not want the ribs in the liquid. Add your favorite rub or just salt and pepper and cook on
high pressure for 12 minutes. At 12 minutes the ribs will still be firm. If you want them very
tender and falling off the bone cook 35 minutes. Release pressure and pour out the ginger
ale and remove the stainless rack. Add the ribs and the barbeque sauce and cook another 10
minutes or until tender.
Beef in Pepper Sauce
Pepper Sauce
1 Red or Green Bell Pepper
1/2 C Baby Carrot
1 (8 ounce) can Tomato sauce (1 tbsp to be use later)
2 Garlic cloves
2 tsp Ground Ginger
1 tsp Turmeric
1 tsp Salt
1/2 tsp Black Pepper
1/2 to 1 tsp Cayenne Pepper (depends on how spicy you like it)
1/2 tsp Ground Cardamom
Remaining Ingredients
2 Tbsp Olive Oil
2 lbs. boneless Sirloin steaks, cut into strips
Salt & Pepper, to taste
1 C Water
1/2 tsp Paprika
1/2 tsp Cumin
1/2-1 onions, sliced
1 green bell pepper, sliced
English
13
Page 14

(Beef in Pepper sauce continued)
Remove 1 tablespoon of tomato sauce from the can to be used later. Then blend the
ingredients for the pepper sauce (green pepper through cardamom) in a food processor until
there are no chunks left. Set aside.
Pour the oil into the pressure cooker, sprinkle the beef with salt & pepper then brown over heat.
English
Once brown, add the water, reserved tomato sauce, paprika and cumin. Close the lid and
press the HIGH pressure button for 15 to 20 minutes.
When meat is done, use the natural method for releasing the pressure.
Add the pepper mixture, sliced onions & green peppers to the meat and sauce, cover with lid
and press the HIGH pressure button for additional 3 to 5 minutes.When cooking is complete,
follow instructions to reduce pressure.Vegetables should be tender. Serve immediately.
Beef Pot Roast
3 lb. Beef pot roast
2 Tbsp Vegetable oil
1 medium Onion, chopped
3 C Beef broth
1 C Water
Salt and Pepper to taste
1 Bay leaf
Heat oil in cooker, using the BROWN setting to brown roast on both sides. Place meat on
wire rack and add remaining ingredients. Cover and lock lid in place. Set regulator knob on
SEAL. Program for HIGH pressure and cook for 45 minutes. Release pressure by using the
natural release method. Cooker will beep and switch automatically to the warm setting when
cooking time is completed.
Breakfast Burritos
1/4 C Margarine
2 tsp. Garlic, minced
1 cup Chorizo (Mexican cured sausage)
1 small Green Pepper, seeded, diced
1 small Yellow Pepper, seeded, diced
2 Roma Tomatoes, chopped into large pieces
1 tsp Cayenne Pepper
8 Eggs
1 package Tortillas
Melt margarine, using the BROWN setting. Add garlic, brown lightly. Add chorizo, continue
to brown and separate meat. Stir frequently. Remove meat mixture, drain fat and set aside.
Add peppers in cooker, brown lightly. Add tomatoes, cayenne pepper, brown lightly.
Remove vegetables from cooker, set aside.
Crack eggs into a bowl. Pour eggs into cooker, lightly scramble, add meat and vegetable
mixture. Cover and lock lid in place. Turn regulator knob to SEAL. Program for high
pressure and cook for 5 minutes. Release pressure by using the quick release method.
Unlock and remove lid. Pour mixture on tortilla, and serve.
14
Page 15

Brown Sugar Apples
1 C Apple juice
1 C Water
4 Apples / Leave the peel on and core the apple at the stem and make a small bowl for your
ingredients. You do not want to core all the way through.
2 Tbsp Brown sugar
1/4 C Raisins
1 Tbsp Butter
Add your liquids to the cooker and then add your stainless rack. Place your apples on the
rack and add a bit of brown sugar, raisins and a pat of butter. Cook for 4 minutes and serve
warm with vanilla ice cream.
Chicken Cacciatore
4 medium Chicken breasts / if defrosted reduce cooking time by three minutes.
1 (8 oz.) jar of Spaghetti sauce
1 C Red Wine
1/2 Green Pepper, large slices
1 medium Onion, large slices
1 pint of fresh Mushrooms, whole
1 (6 oz.) can of sliced Black or Green Olives
Parmesan cheese
Add all of the ingredients to the cooker except the olives and parmesan cheese. Turn
regulator knob to SEAL. Program for high pressure and cook for 12 minutes. When finished
serve over rice or pasta and sprinkle with olives and parmesan cheese.
Chicken and Yellow Rice
1 (4 lbs.) Whole Chicken
2 C Water
Salt and Pepper, to taste
2 C. Yellow Rice
Take a whole chicken, wash and pat dry. Place in the pressure cooker with water. Add salt
and pepper to the bird. Program high pressure and cook for 35 minutes. Once cooked,
remove it and place in a large bowl. Drain the broth remaining in the cooker and retain this
liquid to cook the rice. Add your rice to the chicken broth and turn regulator knob to SEAL.
Program for high pressure and cook for 15 minutes. Reduce to 12 minutes if you are using
one cup of rice.
While the rice is cooking shred or separate the chicken pieces to add to the yellow rice.
After the rice is cooked, release pressure, open the lid and add the chicken. The chicken
pieces will still be warm.
Quick Appetizer Meatballs
1 bag of frozen Meatballs, cooked
2 jars of Thai Chili Sauce
1/2 Green Pepper diced
1 can (14 oz.) diced Pineapples, drained
Add all of the ingredients to the cooker and cook for 6 minutes. Serve!
15
English
Page 16

Chocolate Cheesecake
1 C Chocolate Wafer Cookie crumbs
2 Tbsp Butter, melted
Mix 1 Cup cookie crumbs & butter together. Press in bottom of 7” spring form pan. Set
English
aside.
1 C Water
2 Eggs
2 (8-oz) packages Cream Cheese, softened
6 oz. semi-sweet Chocolate Chips, melted
2/3 C Sugar
3/4 C Chocolate Wafer cookie crumbs
(Variation: Add 1 tsp. instant coffee to melted chocolate chips for a mocha cheesecake.)
Blend cream cheese in bowl with mixer until smooth. Gradually add sugar. Mix
thoroughly. Adding one egg at a time, mix until cheese is smooth. Fold in melted
chocolate until thoroughly blended. Add remaining 3/4 cup of cookie crumbs into
mixture. Pour into spring form pan over crust. Add water to cooker. Tear off a 6” piece of
aluminum foil and fold in half, lengthwise. This helps to remove pan after cooking cycle
is complete. Place spring form pan on foil and lower into cooker. Cover and lock lid in
place. Turn regulator knob to SEAL. Program for high pressure and cook for 20 minutes.
Release pressure by using the quick release method. Unlock and remove lid. Remove
cheesecake from cooker by lifting up the ends of foil swing. Let cool to room temperature
before refrigerating. For best results, refrigerate overnight.
Cilantro Chicken Vegetable Soup
2 lbs. boneless, skinless, Chicken breast, cubed 1/2 tsp Cayenne Pepper
1 (10 oz.) package frozen Corn kernels 2 qts Chicken broth
3/4 C Green Onions, thinly sliced 3 stalks Celery, chopped
1/2 C Cilantro, finely chopped 2 cloves Garlic, minced
2 C cooked White Rice
1 small Onion, chopped
1 (14 oz.) can peeled and diced tomatoes with juice
1 yellow bell pepper, seeded, chopped
1/2 tsp. cumin
Garnish with cheese or tortilla chips
Place broth, chicken, onion, celery, and garlic in cooker. Cover and bring to a boil using
the BROWN setting. Reduce heat using the WARM setting until chicken is tender. Add
un-drained tomatoes, bell pepper, cumin, cayenne pepper. Stir mixture. Add corn, green
onion, cilantro and rice. Mix well. Cover and lock lid in place. Turn regulator knob to
SEAL. Program for high pressure and cook for 10 minutes. Release pressure by using the
quick release method. Unlock and remove lid. Garnish with cheese and tortilla chips and
serve.
16
Page 17

Fiesta Meat Loaf
1 C salted Crackers, crushed
1 pkg Taco Seasoning
1/2 C Ketchup
1/2 C Green Peppers, seeded, diced
1 can (2-1/4 oz.) pitted, sliced Black Olives, drained
1 small Onion, chopped
2 Eggs, beaten
2 Tbsp Worcestershire sauce
2 lbs. Ground Beef
Optional items: salsa, shredded cheese, sour cream and tortilla chips
In a bowl, combine the first eight ingredients. Add meat; mix well. Place in 7” round or
spring form pan. Tear off a 6” piece of aluminum foil and fold in half, lengthwise. This helps
to remove pan after cooking cycle is complete. Place spring form pan on foil and lower into
cooker.
Cover and lock lid in place. Turn pressure regulator knob to SEAL. program for SLOW
COOK for 2 - 3 hrs. Cooker will beep and switch automatically to the warm setting when
cooking time is completed. Unlock and remove lid. Lift and remove pan from cooker.
Garnish with salsa, shredded cheese, sliced black olives, sour cream or tortilla chips.
Leek & Asparagus Risotto
1-1/2 Tbsp Olive Oil 1-1/2 Tbsp Butter
1-1/2 Tbsp water 2 Garlic cloves, minced
1-1/2 C Leeks, sliced 1-1/2 C Arborio rice
4 C Vegetable broth 1/4 lb Asparagus, chopped
1-1/4 C parmesan cheese, shredded
In the pressure cooker, heat the olive oil and butter (use browning mode). Add the garlic
and leeks, sauté until soft. Add the rice, stir thoroughly and then add broth. Close lid turn
pressure regulator knob to SEAL. program for high pressure for 8 minutes.
While risotto cooks, steam asparagus in water. Then sauté in olive oil. Season with salt and
pepper. When risotto is done cooking, reduce pressure, then add the sautéed asparagus and
parmesan cheese.
Orange-Flavored Candied Yams
1 C Orange Juice 2 large Sweet Potatoes (yams)
Salt, to taste 1/2 C Brown sugar
1 tsp grated Orange Zest 2 Tbsp Butter
Pour the orange juice into the pressure cooker. Peel the sweet potatoes and cut them in half
lengthwise. Arrange in a pressure cooker steamer basket (if available) and sprinkle with salt,
brown sugar and orange zest. Dot with butter. Lower the steamer basket into the pressure
cooker. Lock the lid in place and turn regulator knob to SEAL. Program for high pressure
and cook for 8 to 10 minutes.
When cooking is complete, use the Quick or Natural release method and remove the lid. Lift
out the sweet potatoes Boil down the sauce until thickened and pour over the sweet potatoes.
English
17
Page 18

Jambalaya
1/2 lb boneless skinless Chicken breasts, cubed
1/2 lb cooked Andouille or Italian sausage, sliced
1/2 lb uncooked Shrimp, peeled and deveined
2 teaspoons Creole seasoning 1 tsp dried Thyme leaves
English
1/8 teaspoon cayenne pepper 1 Onion, chopped
3 Garlic cloves, minced 1 Green Bell Pepper, chopped
3 stalks Celery, sliced 1 C Long Grain Rice
16 oz chopped Tomatoes, un-drained 1 C Chicken stock
1 Tbsp Vegetable oil 3 Tbsp Parsley, minced
Heat oil in the removable cooking pot (use browning mode). Add chicken, sausage and
shrimp. Sprinkle meats with half of the creole seasoning, half the thyme and half the
cayenne. Cook for 3-5 minutes uncovered, stirring frequently, until chicken and shrimp
are thoroughly cooked. Remove chicken, sausage and shrimp with a slotted spoon and set
aside. Add onion, bell pepper, celery and remaining creole seasoning, thyme and cayenne to
cooking pot Cook for 4-5 minutes, stirring frequently. Add chicken, sauce, shrimp and rice,
tomatoes with their juice and stock. Lock the lid in place and turn regulator knob to SEAL.
Program for high pressure and cook for 10 minutes.
Pears Stewed in Red Wine
A most elegant dessert when served with raspberry sauce. A fine ending to a special dinner.
2 C Water
1/2 C Sugar
2 Lemon slices
2 Cinnamon sticks
1/4 tsp Mace
4 firm Pears, peeled but not cored, stems on
3/4 C Red Wine
1 C frozen Raspberries
4 Tbsp heavy Cream
In the removable cooking pot, combine the water, sugar, lemon, cinnamon sticks and mace.
Simmer until the sugar is dissolved (use browning mode).Place the pears into the pressure
cooker, trimming bottoms if necessary so they stand upright. Lock the lid in place and
program to cook for 10 minutes.
Add the red wine. Lock the lid in place again and program to cook for 10 more minutes.
Carefully remove only the pears and transfer to a deep container.
Boil down the remaining sauce until it is syrupy by pressing START. Cool, then pour
over the pears and keep at room temperature overnight. To serve, defrost and purée the
raspberries in a processor until smooth.
Spoon 4 tablespoons of the purée on four dessert dishes or shallow bowls. Place a pear
upright in the center or each dish. Spoon some syrup over the pears. Dribble 1 tablespoon of
cream in a circle over the sauce. With the aid of a knife, swirl the cream into the sauce in an
attractive design.
18
Page 19

ONE YEAR LIMITED WARRANTY
This appliance is warranted for one year from date of original purchase against
defects in material and workmanship. This warranty does not cover transportation
damage, misuse, accident or similar incident. This warranty gives you specic
legal rights and you may have other rights, which vary from state to state. This
product is intended for household use only, not for commercial use. Warranty
does not cover commercial use.
Your new NESCO® appliance comes equipped with numerous safety features.
Any attempt to interfere with the operation of these safety features makes this
warranty null and void. In the event we receive an appliance for service that has
been tampered with, we reserve the right to restore it to its original state and
charge for the repair.
For service in warranty - Defective products may be returned, postage prepaid,
with a description of the defect to: The Metal Ware Corporation, 1700 Monroe
Street, Two Rivers, Wisconsin 54241, for no-charge repair or replacement at our
option. Must include proof of purchase or copy of original bill of sale when
returning product for warranty service.
Please call Customer Satisfaction at 1-800-288-4545 to obtain a Return
Authorization before shipping.
• For service in warranty, follow instructions set forth in warranty. When
ordering new parts, make sure that you always mention the model number of
the product.
• Call us on our toll free number, 1-800-288-4545 and tell us about your
problem.
• If we instruct you to send all or part of your appliance to us for repair or
replacement, our Customer Satisfaction representative will provide a Return
Authorization number (this number noties our receiving department to
expedite your repair). Pack your unit carefully in a sturdy carton with
sufcient padding to prevent damage because any damage caused in shipping
is not covered by the warranty.
• Print your name, address and Return Authorization number on the carton.
• Write a letter explaining the problem. Include the following: your name,
address and telephone number and a copy of the original bill of sale.
• Attach the sealed envelope containing the letter inside the carton. Insure the
package for the value of the NESCO appliance and ship prepaid to:
Attn: Factory Service Dept.
The Metal Ware Corporation
1700 Monroe Street
Two Rivers, WI 54241
English
19
Page 20

MESURES DE PROTECTION IMPORTANTES
Lors de l’utilisation d’appareils électriques, on doit observer des mesures de sécurité de base en tout temps, dont les suivantes :
1. LIRE TOUTES LES DIRECTIVES AVANT D’UTILISER L’APPAREIL.
2. L’appareil est conçu pour usage domestique seulement. Il n’est pas destiné à des ns commerciales.
3. Aux ns de protection contre les chocs électriques, ne pas plonger l’appareil, y compris le cordon et
la che, dans l’eau ou tout autre liquide.
4. Une surveillance étroite est nécessaire lorsque l’on utilise l’appareil près des enfants. L’utilisation
de cet appareil par des enfants n’est pas recommandée.
5. Débrancher l’appareil de la prise de courant lorsqu’il n’est pas utilisé, avant de monter ou de
démonter les pièces ainsi qu’avant le nettoyage.
6. Ne pas faire fonctionner d’appareil dont la che ou le cordon est endommagé, qui a subi une
Français
défaillance ou qui a été endommagé de quelque façon que ce soit. Retourner l’appareil à la division
des services de l’usine NESCO aux ns d’examen, de réparation ou d’ajustement.
7. Ne pas placer l’appareil dans un four chauffé, sur un brûleur à gaz ou électrique chaud, ni dans les environs.
8. N’utiliser que les accessoires recommandés par le fabricant.
9. Ne pas utiliser l’appareil à l’extérieur ou pour un usage autre que celui prévu.
10. Ne pas laisser le cordon suspendu sur le bord d’une table ou en contact avec des surfaces chaudes.
11. Operar aparato sólo cuando todas las partes participen plenamente y se aprieta.
12. Pour réduire le risque de décharge électrique, ne cuisinez que dans la marmite amovible.
13. Ne touchez pas les surfaces chaudes. Utilisez les poignées ou les boutons.
14. Branchez toujours la che dans l’appareil d’abord, ensuite branchez le cordon dans la
prise de courant. Pour débrancher, placez n’importe quel bouton de contrôle sur Off et
enlevez ensuite la che de la prise de courant.
15. Exercez la plus grande prudence lorsque vous déplacez un appareil qui contient de
l’huile chaude ou un autre liquide chaud.
16. MISE EN GARDE: ne faites jamais frire et n’utilisez jamais la pression pour frire des aliments dans
cet appareil. Cela est dangereux et pourrait causer des dommages ou des blessures graves.
17. Lorsque vous relâchez la pression, éloignez vos mains et votre visage de la soupape de régulation de pression.
18. Ne couvrez pas l’appareil et ne l’utilisez pas près de matériaux inammables, par
exemple les rideaux ou les murs.
19. Ne remplissez pas la marmite au-delà des 4/5. Lorsque vous cuisinez des aliments qui augmentent de
volume durant la cuisson, par exemple le riz ou les légumes séchés, ne remplissez pas l’unité au-delà de la
moitié. Si vous ne le faites pas, vous pourriez causer des blessures aux personnes et endommager l’appareil.
20. N’oubliez pas que certains aliments comme la purée de pomme, les canneberges, l’orge perlée, le
gruau, les pois cassés, les nouilles, les macaronis, la rhubarbe ou les spaghettis peuvent mousser,
former de l’écume et se répandre en obstruant le mécanisme de relâchement de la pression (volet
d’aération). Il ne faut pas cuisiner ces aliments dans une marmite à pression.
CONSERVER CES DIRECTIVES
Fiche polarisée : Cet appareil possède une che polarisée (une branche est plus large que l’autre). Pour
réduire le risque de choc électrique, la che est conçue pour entrer dans la prise polarisée d’une seule
façon. Si la che n’entre pas correctement dans la prise, retourner la che. Si elle n’entre toujours pas
correctement, communiquer avec un électricien qualié. Ne pas tenter de modier la che.
Directives relatives au cordon court : Un cordon d’alimentation court est fourni dans le but de
réduire le risque de s’y empêtrer ou de trébucher. Des rallonges peuvent convenir si elles sont utilisées
avec prudence. En cas d’utilisation d’une rallonge, les caractéristiques électriques indiquées sur le
cordon doivent être au moins celles inscrites sur l’appareil. Le cordon long ne doit pas s’étendre d’un
côté à l’autre du dessus de la table où les enfants pourraient le tirer ou quelqu’un pourrait trébucher
involontairement.
20
Page 21

PIÈCES DE CUISSON NUMÉRIQUE ET PRÉSENTE
1 Cuisinière Base
2
Plaque chauffante
3 Capteur de température
4 Réservoir à condensation
5 Marmite amovible
6 Couvercle autobloquant
7 Goupille de verrouillage
8 Régulatationde la pression
9
Flottant Soupape
10 Filtre
11 Rondelle d’étanchéité
12 Grille de cuisson
13 Puissance Corde
14 Panneau de commande
8 9
7
6
5
4
3
DELAY TIME
Time/Pressure
10
11
Français
12
13
14
WARM STEAM
HIGH
SLOW
BROWN
COOK
LOW
START
DELAY
TIME
STOP
2
1
21
Page 22

PIÈCES ET CARACTÉRISTIQUES (suite)
Poignée de régulationdela pression
Soupape ottante
Couvercle autobloquant
Marmite amovible Capacité de 6 litres, amovible, ni antiadhésif pour un
Français
Réservoir à condensation Recueille l’excès de condensation durant la cuisine.
Rondelle d’étanchéité
Filtre Protège la soupape de régulation de pression et la partie
Fonctions du panneau de commande
WARM :
BROWN:
STEAM: Fait rapidement bouillir l’eau pour cuire à la vapeur des aliments comme
SLOW COOK: Pour recettes à cuisson lente (minuterie de 9-1/2) et à faible température
DELAY TIME: Permet de différer le début la cuisson jusqu’à 8 heures.
Placez en position SEAL pour cuisiner sous pression et en
position VENT pour dégager la pression ou pour cuisiner sans pression.
La soupape de surpression se déclenche lorsque la pression
s’accumule dans la marmite, elle retient alors le couvercle et il n’est
plus possible de l’ouvrir. Lorsqu’on réduit la pression, elle s’échappe
et on peut alors enlever le couvercle de façon sécuritaire.
Une caractéristique mécanique de sécurité bloque le couvercle jusqu’à
ce que le niveau de pression dans la marmite diminue et soit sécuritaire.
nettoyage facile et alliage d’aluminium durable.
Crée un espace d’étanchéité à l’air nécessaire à la cuisson à pression.
amovible pour un nettoyage facile
Réchauffe les aliments ou les garde au chaud avant le service.
Pour de meilleurs résultats, vous permet de faire revenir ou sauter la viande
avant la cuisson sous pression
les légumes ou le riz.
(180°F) an de retenir les saveurs naturelles et la tendreté.
MISE EN GARDE : Les aliments périssables ne doivent pas être laissés
à température ambiante durant plus de deux heures
AVANT LA PREMIÉRE UTILISATION
Déballez votre appareil, enlevez tous les papiers et sacs en plastique qui se trouvent à l’intérieur.
Lavez toutes les parties amovibles dans de l’eau tiède et savonneuse. Rincez et séchez bien
toutes les pièces. Essuyez la base avec un chiffon humide. N’immergez JAMAIS la base dans
l’eau ou dans un autre liquide. Ne mettez aucune pièce dans le lave-vaisselle.
Le joint d’étanchéité doit être bien installé à l’intérieur du couvercle. Pour l’installer, placez le
joint sur la bague à l’intérieur du couvercle et verrouillez le couvercle. Remplissez la marmite
amovible d’eau jusqu’au 3/5 et placez le bouton de contrôle sur pression élevée ( HIGH ) pour
15 minutes (voir illustration ci-dessous pour l’installation du joint d’étanchéité).
Relâchez la pression en tournant la poignée de régulation de la pression jusqu’à la position
VENT et attendez que la soupape ottante s’abaisse lorsque toute la pression sera libérée.
Lorsqu’elle aura refroidi, videz et nettoyez la marmite amovible. N’utilisez pas de
nettoyants abrasifs ou de produits chimiques durs.
22
ENFONCEPULL UP
Page 23

FONCTIONNEMENT DE VOTRE CUISINIERE DIGITAL
1. Pour ouvrir le couvercle, tenez la poignée et tournez-la dans le sens des aiguilles d’une
montre jusqu’au bout puis soulevez le couvercle pour l’enlever.
2. Retirez la marmite et placez-y les aliments et liquides. La quantité d’aliments et de
liquides ne doit pas dépasser les 4/5 de la hauteur de la marmite. Pour les aliments qui
augmentent de volume, le niveau ne doit pas dépasser les 3/5 de la hauteur de la marmite.
Le niveau minimum pour que les aliments cuisent est de 1/5 de la hauteur de la marmite.
3. Vériez l’intérieur de la base, là où sont situés le plat chauffant et le capteur an de vous
assurer qu’il est propre avant d’y insérer la marmite.
4. Placez le couvercle sur la base, voyez à ce que le joint d’étanchéité soit bien installé et
tournez dans le sens contraire des aiguilles d’une montre jusqu’à ce qu’il se verrouille.
MISE EN GARDE : le joint d’étanchéité ne doit pas être endommagé. S’il est
endommagé, n’utilisez pas la marmite à pression et contactez le département de service à
la clientèle de NESCO (1-800-288-4545) pour demander un remplacement.
5. Branchez le cordon dans la base, puis dans la prise murale.
6. Poussez le bouton START/STOP an de supprimer toutes les informations déjà
programmées avant de reprogrammer selon de nouvelles informations. NOTE : la
marmite passera à la fonction WARM à la n du temps de cuisson, sauf si vous avez
programmé la fonction BROWN. Si vous avez oublié de programmer les fonctions de
cuisson ou si vous avez oublié de presser le bouton START/STOP, l’afchage indiquera
0.0 au bout de 30 secondes et les fonctions que vous avez programmées seront perdues.
Si nécessaire, recommencez les étapes du programme et pressez sur START/STOP.
FONCTIONS DE LA MARMITE PRESSION:
Avant d’utiliser votre appareil, vériez toujours le couvercle pour vous assurer que le joint
d’étanchéité, la poignée de régulation de la pression et le ltre sont propres et bien installés.
1. Placez la marmite amovible sur la base. Branchez le cordon d’alimentation électrique dans la
base, et ensuite dans la prise de courant.
2. Placez les aliments que vous voulez cuire dans la marmite amovible. NOTE : pour la plupart des
aliments cuits sous pression, il faut ajouter un minimum d’une tasse (8 oz) de liquide.
3. Installez le couvercle auto verrouillant sur sa base et tournez dans le sens contraire des aiguilles d’une
montre jusqu’à ce qu’il se verrouille et que vous entendiez le clic de la goupille de verrouillage.
4. Tournez la poignée de régulation de la pression jusqu’à SEAL.
5. Choisissez la fonction de cuisson HIGH ou LOW en pressant sur le bouton situé sur le panneau
de contrôle. Les paramètres de programmation recommandés sont indiqués dans la section des
recettes. L’indicateur lumineux clignotera et l’afchage numérique indiquera le nombre de
minutes de cuisson.
6. Sélectionnez le temps de cuisson en pressant le bouton, une fois pour chaque minute
supplémentaire, ou bien pressez-le sans le relâcher. La durée maximale de temps de cuisson
programmable est de 99 minutes.
7. Pressez le bouton START/STOP pour commencer la cuisson. L’indicateur lumineux arrêtera de clignoter.
8. La minuterie commencera ensuite le compte à rebours (en minutes). La soupape ottante s’élèvera
lorsque la pression nécessaire sera atteinte, ce qui empêchera le couvercle de s’ouvrir. Lorsque le temps
de cuisson atteindra zéro, l’appareil émettra 3 “bips” et passera automatiquement à la fonction WARM.
9. Lorsque la cuisson est terminée, relâchez la pression en utilisant la méthode “naturelle” ou la
“méthode dite de relâchement rapide” (détails ci-dessous).
Méthode naturelle: Une fois la cuisson terminée, pressez sur le bouton « START/STOP » pour vous
assurer que l’unité est bien arrêtée. Laissez la pression de se libérer
reposer la marmite, cela prendra 10 à 20 minutes. Au bout de 20 minutes, tournez le régulateur de
pression jusqu’à la position VENT pour vous assurer que toute la pression a été libérée.
Méthode de relâchement rapide: Après la cuisson, pressez sur le bouton « START/STOP » pour
vous assurer que l’unité est complètement arrêtée. Tournez la poignée de régulation de pression
jusqu’à VENT et relâchez la pression. MISE EN GARDE! ÉLOIGNEZ VOS MAINS ET
VOTRE VISAGE DE LA SOUPAPE DE RÉGULATION DE PRESSION, CAR LA VAPEUR
BRULANTE QUI S’ÉCHAPPE POURRAIT CAUSER DES BLESSURES.
naturellement en laissant
23
Français
Page 24

FONCTION WARM :
1. Installez la marmite sur sa base et ajoutez les aliments que vous voulez chauffer.
2. Fixez le couvercle sur la marmite et verrouillez-le. Branchez le cordon d’alimentation
dans la base et ensuite dans la prise de courant.
3. Tournez la poignée de régulation de la pression jusqu’à VENT.
4. Pressez sur le bouton WARM qui est situé sur le panneau de contrôle. L’indicateur
lumineux clignotera et l’afchage indiquera 0.0.
5. Pressez sur le bouton START/STOP pour commencer à chauffer les aliments.
L’indicateur lumineux arrêtera de clignoter. NOTE : la fonction WARM ne peut pas être
utilisée en même temps que la fonction de durée de cuisson.
FONCTION BROWN:
1. Installez la marmite amovible sur sa base.
2. Ajoutez l’huile, selon les mesures indiquées dans la recette. Branchez le cordon
Français
d’alimentation sur la base et ensuite dans la prise de courant.
3. Pressez sur le bouton BROWN qui est situé sur le panneau de commande. La lumière
commencera à clignoter et l’afchage indiquera 0.0. Il ne faut pas mettre le couvercle
pendant que les aliments dorent dans la marmite.
4. Pressez sur le bouton START/STOP pour commencer à chauffer. L’indicateur lumineux arrêtera de clignoter.
5. Laissez la marmite chauffer durant une minute, puis ajoutez la viande ou la volaille et
commencez à dorer les aliments.
6. Lorsque cette fonction est mise en marche, le panneau de commande émet 3 bips toutes les 10
minutes pour vous aviser que la cuisson se fait à température élevée. NOTE : par mesure de
sécurité, ne laissez pas l’appareil sans surveillance pendant que vous dorez des aliments.
FONCTION STEAM:
1. Installez la marmite amovible sur la base. Branchez le cordon d’alimentation dans la base et ensuite
branchez-le ensuite dans la prise de courant.
2. Installez le petit panier de treillis résistant à la chaleur (inclus) au fond de la marmite.
3. Ajoutez au moins 8 onces d’eau et assurez-vous que le fond du panier se trouve au-dessus du liquide.
4. Mettez les aliments sur la grille. Ne remplissez pas la marmite d’aliments au-delà des 4/5. NOTE : si
vous cuisez du riz à la vapeur, mettez le riz dans un bol de 8 pouces et placez-le sur la grille.
5. Placez le couvercle sur la marmite et verrouillez-le. Tournez la poignée de régulation de la pression
jusqu’à la position VENT.
6. Pressez sur le bouton STEAM qui est situé sur le panneau de commande. L’indicateur lumineux
commencera à clignoter et l’afchage indiquera 01 (égal à une minute de temps de cuisson).
7. Fixez le temps de cuisson en pressant sur le bouton HIGH une fois pour chaque minute que vous
ajoutez ou pressez sans relâcher. Pressez sur le bouton LOW pour diminuer le temps de cuisson.
8. Pressez sur le bouton START/STOP pour commencer la cuisson. L’indicateur lumineux cessera de clignoter.
MISE EN GARDE! Ne placez jamais directement votre visage ou vos mains au dessus de la marmite
lorsque vous enlevez le couvercle, car la vapeur qui s’en échappe pourrait causer de graves brulures.
FONCTION CUISSON LENTE (SLOW COOK):
1. Installez la marmite amovible sur sa base. Branchez le cordon d’alimentation sur sa base. Branchez le
cordon d’alimentation sur sa base, et ensuite dans la prise de courant
2. Placez les aliments à l’intérieur de la marmite, selon la recette.
3. Installez le couvercle sur la marmite et verrouillez-le.
4. Tournez la poignée de régulation de la pression jusqu’à la position VENT.
5. Pressez sur le bouton SLOW COOK qui est situé sur le panneau de commande. L’indicateur lumineux
commencera à clignoter et l’afchage indiquera 0.5 (cela signie 30 minutes de temps de cuisson).
6. Choisissez le temps de cuisson lente en pressant le bouton SLOW COOK une fois pour chaque tranche de
30 minutes. La durée la plus longue de cuisson est de neuf heures et trente minutes à une température de
82C (180°F). NOTE : les recettes à cuisson lente ont pour objectif de vous donner idées et orientation.
7. Pressez sur le bouton START/STOP pour commencer la cuisson. L’indicateur lumineux arrêtera de
clignoter.
8. Lorsque la température atteint 82C, la marmite commencera le compte à rebours par sections de 30
minutes. L’appareil sera alors passer en mode CHAUD.
24
Page 25

FONCTION DELAY TIME SETTING:
1. Appuyez sur “DELAY TIME”. L’écran afche “0,5” (est égal à 30 minutes) et le voyant
lumineux s’allume. Appuyez à nouveau sur montant jusqu’à obtenir DELAY TIME ‘de
temps de retard est afché. temps de retard total est de 8 heures
2. Sélectionnez le mode de cuisson désiré (haut, bas, vapeur, etc) et l’heure en appuyant
sur le bouton approprié (s).
3. Appuyez sur la touche START / STOP et le voyant de temporisation se met en marche.
Votre appareil commencera la cuisson désirée après le délai s’est écoulé. Le voyant de
temps de retard s’éteint.
NETTOYAGE DE LA CUISINEÉRE DIGITAL
1. Débrancher le cordon de la prise murale, puis l’appareil et laisser refroidir l’unité avant
le nettoyage.
2. Ne lavez aucune des pièces de votre appareil dans un lave-vaisselle. Utiliser de l’eau
chaude savonneuse, rincez et séchez. Toujours nettoyer après chaque utilisation ou si
elle n’a pas été utilisée pendant une longue période de temps.
3. Essuyer la base avec un chiffon propre et humide. Ne jamais plonger la base dans l’eau
ou autre liquide. Essuyez l’intérieur de la base si nécessaire pour enlever tout produit
alimentaire.
4. Si le réservoir contient de l’humidité de condensation visible, enlevez-le en tirant vers le
bas. Laver à l’eau tiède savonneuse. Rincer et sécher. Fixer à la base en appuyant sur le
haut pour verrouiller en place.
5. Tournez le couvercle à l’envers, tirez sur le joint en caoutchouc de chaque côté et tirez
vers le haut. joint Laver à l’eau tiède savonneuse. Rincer et sécher soigneusement.
rainure Insérez le joint en caoutchouc en le poussant vers le bas à l’intérieur du bord
du couvercle, en s’assurant que le ‘v’ du joint est centré autour de l’anneau métallique
sur le couvercle. NOTE: Si le joint en caoutchouc n’est pas positionné correctement
l’appareil ne fonctionne pas normalement.
6. An de maintenir une bonne performance de votre appareil, le fond de la casserole de
cuisson amovible doit être nettoyé après chaque utilisation. Essuyer avec un chiffon
doux et humide et sec avant de l’utiliser.
7. Ne jamais utiliser de nettoyants abrasifs ou de tampons à récurer pour nettoyer les
pièces de cet appareil, car ils apporteront nes rayures à la surface, en particulier sur les
surfaces polies.
8. Rangez votre appareil avec le couvercle reposant à l’envers sur la pot.This cuisson
amovible protéger les robinets, les poignées et régulateur de pression sur le dessus du
couvercle. Si l’appareil est stocké avec le couvercle fermé, mauvaises odeurs peuvent se
former à l’intérieur.
Nettoyage du régulateur de pression
Assurez-vous que le bouton du régulateur de pression et la soupape ottante sont en bon
état de fonctionnement avant chaque utilisation. Pour nettoyer, s’il vous plaît suivez les
instructions ci-dessous:
1. Après l’appareil a refroidi, retirez le couvercle.
2. Enfoncer et tourner la molette de régulateur de pression après la mise en SEAL,
soulevez doucement et à enlever.
3. Tournez le couvercle et mettre la tête en bas sur une table. Retirez le ltre en tenant
fermement avec un chiffon doux soulevant vers le haut. Utiliser une petite brosse,
vérier et éliminer toutes les particules alimentaires qui peuvent être déposées à
l’intérieur du ltre et la soupape ottante. Pousser le ltre en place.
4. Remplacer le bouton de régulateur de pression en alignant les encoches vers le mur
intérieur de la chambre du régulateur de pression dans le couvercle, puis appuyez sur le
bas et tournez dans le sens horaire pour verrouiller.
25
Français
Page 26

TRUCS ET CONSEILS AU SUJET DE VOTRE CUISINIERE DIGITAL
• Pour garantir les meilleures performances de cuisson lors de la cuisson sous pression,
vériez toujours la recette pour au moins 1 tasse d’eau ou autre liquide vapeur an assez
peuvent être générés pour créer une pression.
• Après une période de temps le joint en caoutchouc peut se contracter, se durcir, ou
se déforment conditions normales d’utilisation. Lorsque cela se produit ou tout autre
dommage se produit, ne pas utiliser l’appareil. Le joint en caoutchouc doit être remplacé.
Communiquez avec le Service Satisfaction de la clientèle (800-288-4545).
• Lorsque vous utilisez le HIGH ou LOW réglages de pression, le compteur ne sera pas
commencer à compter le «bas» jusqu’à ce que la pression de vapeur sufsante est généré.
• Lors de la cuisson sous pression, si vous n’êtes pas sûr de temps de cuisson combien est
Français
nécessaire, il est préférable de “sous” la cuisine. Ensuite, utilisez la “libération rapide”
méthode, retirez le couvercle et vérier la cuisson.
• Ne jamais remplir le récipient de cuisson amovible plus qu’à moitié plein avec de la
nourriture ou 4 / 5 plein de liquide.
• Assurez-vous que cet appareil est branché dans une prise de 120 volts séparée électrique.
Une surcharge électrique peut se produire si utilisé avec un autre appareil en même temps.
• Plus sévères, des coupes moins chères de viandes sont mieux adaptés à votre autocuiseur
numérique, car la pression de vapeur permet de briser les bres dures dans la fabrication
de viande les plus tendres et plus savoureux.
• Les fruits frais doivent être cuits à basse pression.
• Quand les haricots de cuisson sous pression, ajouter une cuillère à café d’huile à l’eau
pour réduire la quantité de mousse.
• Tout liquide tels que les huiles, les marinades à base d’huile et les pansements ne doivent
pas être utilisés de cuisson sous pression.
• Les liquides qui contiennent de l’eau de cuisson peut être utilisé sous pression. Il s’agit
notamment de vin, de bière, les stocks, les tomates et autres légumes et jus de fruits. Le
vin doit être mélangé avec une quantité équivalente d’eau, car il s’évapore rapidement
pendant la cuisson.
• Les aliments congelés peuvent être cuits si la viande est d’un pouce d’épaisseur ou moins,
ne modient pas les temps de cuisson, appareil commencera la minuterie après réglage de
la température interne recommandée est atteinte.
• Pendant le processus de construction de pression, vous remarquerez peut-être de la vapeur
s’échappant de la soupape régulatrice de pression. Réglez soigneusement le robinet en le
déplaçant doucement ou en le tournant doucement côté à l’autre en utilisant des pinces ou
un outil similaire jusqu’à ce que les joints correctement.
• Si la vapeur s’échappe autour du couvercle, cela signie que le joint en caoutchouc
ne peuvent pas être scellés. Annuler la pression de sortie du processus de cuisson,
manuellement ou naturellement, enlever le couvercle et vérier le joint en caoutchouc
pour les dommages ou mal installé. Re-installer après l’examen et le processus de cuisson
de départ.
• NOTE: Le point d’ébullition de l’eau diminue avec l’altitude, ce qui modie les
performances de votre appareil. Lors de la cuisson sous pression à des altitudes plus
élevées, les dispositions suivantes s’appliquent: Ajouter 5% pour le temps de cuisson pour
1.000 pieds au-dessus des 2.000 premiers pieds. Exemple: à 3.000 pieds ajouter 5%, 4.000
pieds ajouter 10%, 5.000 pieds ajouter 15%, etc.
26
Page 27

Legumes:
• Lorsque la cuisson des légumes utiliser le réglage de pression à haute pression et
RAPIDE COMMUNIQUÉ pour relâcher la pression.
• Avant la pression de cuisson des légumes frais, ajoutez 1 tasse d’eau et de vapeur rack
place dans le pot de cuisson amovible. Placez une couche de légumes sur la grille.
Couvrir et verrouiller le couvercle en place. Tourner le bouton de «sceau». Cuire
pendant le temps indiqué ci-dessous.
• Retirer les légumes, ajouter les assaisonnements désirés et servir. NOTE: Les temps de
cuisson qui dépassent 7 minutes, ajouter un surplus d’eau 1/2 C pour chaque 5 minutes
de plus le temps de cuisson si l ‘appareil ne s’évapore pas complètement.
Légumes Temps
(Minutes)
Artichaut 9 to 11 Oignons 4 to 5
Asperges 1-1/2 to 2 Panais 2 to 4
Haricots, verts 2 to 3 Pois, dans les gousses 2 to 3
Les betteraves, petits 11 to 13
Brocoli, eurons 2 to 3 Pommes de terre, petits 5 to 8
Brocoli, des tiges 3 to 4 Pommes de terre, à moyen 11 to 15
Choux de Bruxelles 3 to 5
Chou, râpé 1-1/2 Épinards 2 to 3
Chou, en quartiers 3 to 4
Carottes, bébé 4 to 5 Squash, tranchés 1 to 3
Carottes, tranchées 1 to 2 Les tomates, les quartiers 2 to 3
Cauliower 2 to 3 Tomates, entières 5 to 6
Épis de maïs 3 to 5 Navets, tranchés 1 to 2
Egg Plant, tranchés 2 to 3 Ignames, toute 6 to 8
Gombo 2 to 3 Courgette, en tranches 2 to 3
Légumes Temps
Pommes de terre, en tranches
Rutabagas, 12mm d’épaisseur
Squash, gland réduit de moitié
(Minutes)
5 to 7
5 to 6
6 to 8
Fruits
Lorsque la cuisson des fruits de pression, suivre les mêmes lignes directrices que décrit cidessus, sauf réglage de la pression sélectionnez FAIBLE.
Fruits Temps
(Minutes)
Pommes, fraîches 3 to 4 Pêches 4 to 5
Pommes en quartiers 2 Poires 2 to 4
Abricots 2 to 4 Pruneaux 5 to 6
Figues, séchées 5 to 6 Raisins secs 4 to 5
Fruits Temps
(Minutes)
Français
27
Page 28

Viande / Volaille:
• Quand les haricots de cuisson sous pression ou des légumineuses utiliser le réglage
haute pression et QUICK RELEASE pour relâcher la pression.
• Toujours faire cuire la viande ou de volaille avec au moins 1-3 tasses de liquide ..
Conserve ou salés viandes doivent être immergées dans l’eau.
• Sauf mention contraire, le temps de cuisson donnés ci-dessous sont pour les 3 livres de
viande ou de volaille, sauf indication contraire. Toutes les heures sont recommandées et
varient en fonction de la qualité et la coupe de viande.
Type de Viande Temps
Français
Boeuf, porc, agneau,
coupée en cubes
Bœuf / Veau:
Rôti, poitrine
Shank, 33 mm d’épaisseur
Viande de porc:
Rôti de Longe (1,3 - 1,8 kgs)
Viande Fumée
Jambonneau
(1.,3 - 1,8 kgs)
(Minutes)
15 to 20 Poitrine de dinde, entières 30 to 40
50 to 60
25 to 30
40 to 50
20 to 25
30 to 40
Type de Viande Temps
Poisson:
Darnes, en lets, 20 mm. épais
44 mm.épais
Poulet:
Poitrine, cuisses
Pieces (2 - 3 lbs)
Entier (1,3 - 1,8 kgs)
Haricots secs et autres Légumineuses:
• Quand les haricots de cuisson sous pression ou des légumineuses utiliser le réglage
haute pression et NATURELLES DE PRESSE pour relâcher la pression.
• Place haricots ou des légumineuses cocotte, ajouter 3 tasses d’eau pour chaque tasse de nourriture.
• Ajouter 1 cuillère à soupe d’huile végétale pour chaque tasse d’eau pour réduire le
moussage. Ne pas ajouter de sel jusqu’à ce que après la cuisson.
Type de Legume Temps
Azuki 6 to 8 Haricots, rouge 4 to 5
Haricots noirs 2 to 3 Pinto 2 to 3
Black Eyed Peas 11 to 13 Rouge 5 to 7
Pois chiches (pois chiches)
Great Northern 3 to 4 Tepary 6 to 8
(Minutes)
3 to 5 Soya 5 to 6
Type de Legume Temps
Grains:
Avant la cuisson, faire tremper les grains de certains, tels que grains de blé dans quatre fois
leur volume d’eau tiède pendant au moins quatre (4) heures ou toute la nuit si nécessaire.
• Ne pas faire tremper le riz.
Type de Grain Temps
Riz, riz Basmati - 1-1/2 C 7 to 8 Riz, brun – 1-1/2 C 7 to 8
Riz, convertis – 1-1/2 C. 7 to 8 Riz, sauvages – 3 C 24 to 27
Grain de riz, à long – 1-1/2 C
(Minutes)
7 to 8 Le blé, les baies – 3 C 2 to 3
Type de Grain Temps
28
(Minutes)
3 to 4
6 to 7
8 - 10
11 - 14
15 - 20
(Minutes)
(Minutes)
Page 29

RECETTES
Veuillez noter que toutes les informations que nous vous présentons dans les recettes
ci-dessous ne sont offertes qu’à titre de référence et qu’elles peuvent être adaptées aux
préférences et au goût des utilisateurs.
Purée de pommes
1 tasse de jus de pomme
1 tasse d’eau
6 pommes, épluchées, cœur retiré / coupées en moitiés
Cannelle au goût
Ajoutez tous les ingrédients à la marmite et faites cuire à pression élevée durant 6 minutes.
Mélangez et servez. Augmentez ou diminuez la durée selon la consistance désirée.
Côtes levées BBQ Ribs
1 palette de côtes levées
Une bouteille de sauce BBQ
2 tasses de soda gingembre
Versez du soda gingembre dans la marmite. Coupez la palette de côtes levées et placez les
morceaux sur le panier dans la marmite. Ne laissez pas les côtes se noyer dans le liquide.
Ajoutez votre badigeonnage favori ou seulement du poivre et du sel et faites cuire à pression
élevée durant 12 minutes. Au bout de 12 minutes, les côtes seront encore fermes. Si vous
voulez qu’elles soient très tendres et qu’elles se détachent de l’os, faites-les cuire 10 minutes
de plus, ou jusqu’à ce qu’elles soient tendres.
Bœuf sauce au poivre
Sauce au poivre
1 poivron doux rouge ou vert
½ tasse de mini-carottes
1 boite (8 onces) de sauce tomate (1 c. à soupe)
2 gousses d’ail
2 c. à soupe de gingembre moulu
1 c à soupe de curcuma
1 c. à soupe de sel
½ c. à soupe de poivre noir
½ c. à soupe de poivre de Cayenne (selon que vous l’aimez plus ou moins épicé)
½ c. à soupe de cardamome
Ingrédients restants
2 c. à soupe d’huile d’olive
2 lb de bifteck de surlonge désossé
Sel et poivre au goût
1 tasse d’eau
½ c. à soupe de paprika
½ c. à soupe de cumin
1/2-1 oignon en morceaux
1 poivron doux vert découpé en morceaux
Français
29
Page 30

Recette (suite : bœuf en sauce au poivre)
Enlevez de la boite 1 cuillère à soupe de sauce tomate et réservez-la pour plus tard.
Versez l’huile dans la marmite à pression, salez et poivrez le bœuf et faites-le revenir pour
le dorer.
Une fois le steak doré, ajoutez l’eau, la sauce tomate que vous avez réservée, le paprika et le
cumin. Fermez le couvercle, pressez sur le bouton HIGH et programmez 15 ou 20 minutes.
Ajoutez le mélange de poivre, oignons tranchés et poivrons verts à la viande et la sauce,
couvrez et pressez sur le bouton de pression HIGH et programmez 3 à 5 minutes de plus.
À la fin de la cuisson, suivez les instructions de réduction de la pression. Les légumes
devraient être tendres. Servez immédiatement.
Casserole de rôti de porc
Français
3 lb de rôti de porc
2 c. à soupe d’huile végétale
1 oignon moyen, tranché
3 tasses de bouillon de bœuf
1 tasse d’eau
Sel et poivre au goût
1 feuille de laurier
Chauffez l’huile dans la marmite en utilisant la fonction BROWN pour rôtir et dorer
des deux côtés. Placez la viande sur le panier et ajoutez les autres ingrédients. Couvrez
et verrouillez le couvercle. Mettez la poignée de régulation de la pression sur SEAL.
Programmez 45 minutes sur HIGH. Relâchez la pression en utilisant la méthode de
relâchement naturelle de la pression.
Burritos de petit déjeuner
1/4 tasse de margarine
2 cuillers à soupe d’ail émincé
1 tasse de chorizo (saucisses mexicaines)
1 petit poivron vert sans graines (les enlever) et coupés en dés
1 petit poivron jaune sans graines (les enlever) et coupé en dés
2 tomates Roma, sectionnées en gros morceaux
1 cuillère à soupe de poivre de Cayenne
8 œufs
1 paquet de tortillas
Faites fondre la margarine en utilisant la fonction BROWN. Ajoutez de l’ail, dorez
légèrement. Ajoutez les chorizos, continuez à faire dorer puis séparez la viande. Mélangez
fréquemment. Enlevez le mélange, videz le gras et réservez. Mettez des poivrons dans
la marmite et dorez légèrement. Ajoutez des tomates, du poivre de Cayenne, et dorez
légèrement. Enlevez les légumes de la marmite et réservez-les.
Cassez les œufs dans un bol. Mettez les œufs dans la marmite, brouillez-les légèrement,
ajoutez de la viande et un mélange de légumes. Couvrez et verrouillez le couvercle.
Tournez la poignée de régulation de la pression jusqu’à la position SEAL. Programmez la
pression élevée et cuisez pendant 5 minutes. Relâchez la pression en utilisant la méthode
de relâchement rapide. Déverrouillez et enlevez le couvercle. Versez le mélange sur les
croustilles au maïs et servez.
30
Page 31

Pommes au sucre brun
1 tasse de jus de pomme
1 tasse d’eau
4 pommes non épluchées, mais dont vous avez enlevé le cœur pour former un petit espace
bol dans lequel vous mettrez vos ingrédients. Il ne faut donc pas retirer le cœur jusqu’au fond
2 cuillères à soupe de sucre brun
1/4 tasse de raisins
1 cuillère à soupe de beurre
Ajoutez vos liquides à la marmite et ensuite votre panier en acier inoxydable. Placez les
pommes sur le panier et ajoutez un peu de sucre brun, les raisins, et un peu de beurre. Cuisez
durant 4 minutes et servez chaud avec de la crème glacée à la vanille.
Poulet Cacciatore
4 poitrines de poulet moyennes / si elles sont décongelées, diminuez de trois minutes le
temps de caisson.
1 (8 onces) bocal de sauce à spaghetti
1 tasse de vin rouge
1/2 poivron vert en grosses tranches
1 oignon moyen en grosses tranches
1 PINT de champignons frais entiers
1 boite (6 onces) d’olives noires ou vertes tranchées
Fromage Parmesan
Mettez tous les ingrédients dans la marmite sauf les olives et le fromage parmesan. Tournez
la poignée de régulation de la pression jusqu’à la position SEAL. Programmez la pression
élevée et cuisez durant 12 minutes. Lorsque c’est terminé, servez sur du riz ou des pâtes et
ajoutez des olives et du parmesan.
Poulet et riz jaune
1 (4 lb.) poulet entier
2 tasses d’eau
Sel et poivre au goût
2 tasses de riz jaune
Prenez un poulet entier, lavez-le et séchez-le en le tapotant avec une serviette. Placez le
poulet dans la marmite avec de l’eau. Ajoutez du sel et du poivre. Programmez la pression
élevée et cuisez pendant 35 minutes. Une fois le poulet cuit, enlevez-le et placez-le dans
un grand bol. Enlevez tout le bouillon qui reste dans la marmite et réservez –le pour
cuire le riz. Ajoutez le riz au bouillon de poulet et tournez la poignée de régulation de la
pression jusqu’à SEAL. Programmez la pression élevée et laissez cuire pendant 15 minutes.
Diminuez à 12 minutes si vous utilisez une seule tasse de riz.
Pendant que le riz cuit, effilochez le poulet ou découpez-le en morceaux. Lorsque le riz est
cuit, relâchez la pression, enlevez le couvercle et ajoutez le poulet. Les pièces de poulet
seront encore tièdes.
Amuse-gueule rapide de boulettes de viande
1 sac de boulettes de viande cuites et congelées
2 bocaux de sauce thaïe au chili
1/2 poivron vert coupé en dés
1 boite (14 onces) d’ananas coupés en dés et égouttés
Mettez tous les ingrédients dans la marmite et faites cuire pendant 6 minutes et servez!
31
Français
Page 32

Gâteau chocolaté au fromage
1 tasse de miettes de biscuits au chocolat
2 cuillères à soupe de beurre fondu
Mélangez le beurre et la tasse de miettes de biscuits. Étalez sur le fond d’un moule à
charnière de 7”. Réservez.
1 tasse d’eau
2 œufs
2 paquets (8-onces) de fromage en crème ramolli
6 onces de brisures de chocolat mi-amer fondu
2/3 tasse de sucre
3/4 tasse de miettes de gaufrettes au chocolat
(Variation : pour faire un gâteau au fromage et au moka, joutez une cuillère à soupe de café
Français
instantané aux éclats de chocolat fondu.)
Dans un bol, mélangez au mélangeur le fromage à la crème jusqu’à ce qu’il devienne
crémeux et lisse. Ajouter graduellement le sucre. Mélangez bien. En ajoutant un œuf à
la fois, mélangez jusqu’à ce que le fromage ramollisse. Ajoutez à ce fromage le chocolat
fondu et mélangez bien. Incorporez la tasse de miettes au mélange. Versez sur la croute
dans un moule à charnière rond. Versez de l’eau dans la marmite. Découpez un morceau de
papier aluminium et pliez-le en deux sur la longueur. Cela permet de retirer la poêle lorsque
le cycle de cuisson est terminé. Placez un moule sur du papier aluminium et abaissez-le
dans la marmite. Couvrez et verrouillez le couvercle. Tournez la poignée de régulation de
la pression jusqu’à la position SEAL. Programmez la pression élevée et cuisez pendant 20
minutes. Relâchez la pression en utilisant la méthode de relâchement rapide de la pression.
Déverrouillez le couvercle et enlevez-le. Retirez le gâteau au fromage de la marmite en
soulevant les coins de la feuille d’aluminium. Laissez refroidir à température de la pièce
avant de réfrigérer. Pour de meilleurs résultats, réfrigérez pendant la nuit.
Soupe au poulet, légumes et coriandre
2 livres de poitrines de poulet désossées, sans peau, coupées en cubes
½ cuillère à soupe de poivre de Cayenne
1 paquet (10 onces) de maïs en grain 2 portions de bouillon de poulet
3/4 tasse d’oignons verts tranchés fins 3 branches de céleri haché
1/2 tasse de coriandre finement haché 2 gousses d’ail émincé
2 tasses de riz blanc cuit
1 petit oignon haché
1 (14 onces) de tomates pelées et coupées en dés avec le jus
1 poivron doux jaune, nettoyé et haché
1/2 cuillère à soupe de cumin
Garnissez de fromage ou de croustille au maïs
Mettez le bouillon, le poulet, l’oignon, le céleri et l’ail dans la marmite. Couvrez et
portez à ébullition en utilisant la fonction BROWN. Réduisez la chaleur en utilisant
la fonction WARM jusqu’à ce que le poulet soit tendre. Ajoutez les tomates sans les
égoutter, le poivron doux, le cumin et le poivre de Cayenne. Mélangez. Ajoutez ensuite
le maïs, l’oignon vert, la coriandre et le riz. Mélangez bien. Couvrez et verrouillez
le couvercle. Tournez la poignée jusqu’à SEAL. Programmez la pression élevée et la
cuisson à 10 minutes. Relâchez la pression en utilisant la méthode de relâchement rapide.
Déverrouillez et enlevez le couvercle. Garnissez avec du fromage, des croustilles de maïs
et servez.
32
Page 33

Pain de viande Fiesta
1 tasse de biscuits soda salés écrasés
1 paquet d’assaisonnement pour Tacos
1/2 tasse de ketchup
1/2 tasse de poivrons verts nettoyés et coupés en dés
1 boite (2-1/4 onces) d’olives noires dénoyautées, égouttées et coupées en tranches
1 petit oignon haché
2 œufs battus
2 cuillères à soupe de sauce Worcestershire
2 lb de bœuf haché
Ingrédients optionnels : sauce, fromage en filaments, crème sure et croustilles maïs.
Mélangez les premiers huit ingrédients dans un bol. Ajoutez la viande, mélangez bien.
Placez dans un moule à charnière rond de 7”. Coupez un morceau de 6” pouces dans une
feuille d’aluminium et pliez-la en deux sur la longueur. Cela vous permettra d’enlever le
moule lorsque le cycle de cuisson se terminera. Mettez le moule à charnière sur la feuille
d’aluminium et baissez-le dans la marmite. Couvrez et verrouillez le couvercle. Tournez la
poignée de régulation de la pression jusqu’à SEAL. Programmez la cuisson lente pour 2-3
heures. La marmite émettra un signal sonore (bip) et passera automatiquement à la fonction
WARM lorsque la cuisson sera terminée. Déverrouillez et enlevez le couvercle. Soulevez et
retirez le moule de la marmite. Garnissez de sauce, de fromage en filaments, crème sure ou
croustilles de maïs.
Risotto aux poireaux et asperges
1-1/2 cuillère à soupe d’huile d’olive 1-1/2 cuillère à soupe de beurre.
1-1/2 cuillère à soupe d’eau 2 gousses d’ail émincé
1-1/2 tasse de poireaux tranchés 1-1/2 tasse de riz Arborio
4 tasses de bouillon de légumes 1/4 lb asperges hachées
1-1/4 tasse de fromage parmesan râpé en filaments
Dans la marmite à pression, chauffez l’huile d’olive et le beurre (avec la fonction BROWN).
Ajoutez l’ail et les poireaux et faites-les revenir jusqu’à ce qu’ils ramollissent. Ajoutez le riz,
mélangez bien et ajoutez le bouillon. Fermez le couvercle, tournez la poignée de régulation
de la pression jusqu’à SEAL. Programmez la pression élevée pour 8 minutes.
Pendant que le risotto cuit, blanchissez les asperges à l’eau. Faites-les ensuite revenir dans
l’huile d’olive. Salez et poivrez. Lorsque le risotto est prêt, diminuez la pression et ajoutez
ensuite les asperges dorées et le fromage parmesan.
Patates douces caramélisées à saveur d’orange
1 tasse de jus d’orange 2 grandes patates douces
Salez au goût 1/2 tasse de cassonade
1 cuillère à soupe de zeste d’orange 2 cuillères à soupe de beurre
Versez le jus d’orange dans la marmite à pression. Épluchez les patates douces et coupez-les
en deux sur la longueur. Disposez-les dans une marguerite (si vous en avez une) et ajoutez
du sel, saupoudrez de cassonade et de zeste d’orange. Ajouter quelques noix de beurre.
Abaissez le cuiseur à vapeur dans la marmite à pression. Verrouillez le couvercle et tournez
la poignée de régulation de la pression jusqu’à SEAL. Programmez la pression élevée
pour 12 minutes. Lorsque la cuisson est terminée, utilisez la méthode rapide ou la méthode
naturelle et enlevez le couvercle. Sortez les patates douces et laissez réduire la sauce jusqu’à
ce qu’elle épaississe et versez ensuite sur les patates douces.
33
Français
Page 34

Jambalaya
1/2 lb de poitrines de poulet désossées et coupées en cube
1/2 lb d’andouilles cuites ou de saucisses italiennes découpées en rondelles
1/2 lb crevettes non cuites, déveinées et sans écorce
2 cuillères à café d’assaisonnement créole 1 cuillère à soupe de feuilles de thym sèches
1/8 de cuillère à café de poivre de Cayenne 1 oignon haché
3 gousses d’ail émincé 1 poivron vert doux haché
3 branches de céleri en rondelles 1 tasse de riz à grains longs
16 oz de tomates en boite non égouttées 1 tasse de bouillon de poulet
1 cuillère à soupe d’huile végétale 3 cuillères à soupe de persil haché fin
Chauffez l’huile dans la marmite amovible (avec la fonction BROWN). Ajoutez le poulet, les
saucisses et les crevettes. Arrosez les viandes avec la moitié de l’assaisonnement créole, la
Français
moitié du thym et la moitié du poivre de cayenne Cuisez pendant 3 à 5 minutes sans couvrir
en remuant fréquemment, jusqu’à ce que le poulet et les crevettes soient complètement
cuits. Enlevez le poulet, les saucisses et les crevettes avec une cuillère à rainures et réservez.
Ajoutez l’oignon, le poivron doux, le céleri et le reste de l’assaisonnement créole, le thym et
le poivre de Cayenne dans la marmite pour 4 ou 5 minutes en remuant fréquemment. Ajoutez
le poulet, la sauce, les crevettes et le riz, les tomates dans leur jus et le bouillon. Verrouillez
le couvercle et tournez la poignée de régulation de la pression jusqu’à SEAL. Programmez la
pression élevée et cuisez pendant 10 minutes.
Poires à ľétuvée au vin rouge
Un dessert des plus raffinés lorsqu’il est servi avec une sauce aux framboises.
2 tasses d’eau
1/2 tasses de sucre
2 tranches de citron
2 bâtons de cannelle
1/4 cuillère à café de muscade
4 poires fermes, pelées, mais avec cœur et tige
3/4 tasses de vin rouge
1 tasse de framboises congelées
4 cuillères à soupe de crème (riche)
Dans la marmite amovible, mélangez l’eau, le sucre, le citron, les bâtons de cannelle et la
muscade. Laissez mijoter jusqu’à ce que le sucre se liquéfie (avec la fonction BROWN).
Mettez les poires dans la marmite à pression et si nécessaire coupez les bases des poires pour
qu’elles tiennent debout. Verrouillez le couvercle et programmez une cuisson de 10 minutes.
Ajoutez le vin rouge. Verrouillez le couvercle et programmez la cuisson pour 10 minutes
supplémentaires. Enlevez soigneusement les poires seulement et transférez-les dans un
contenant profond.
Pressez sur START et continuez à réduire la sauce jusqu’à ce qu’elle se transforme en sirop.
Laissez refroidir, versez sur les poires et laissez à température de la pièce pour la nuit. Pour
servir, décongelez les framboises et battez-les en purée veloutée avec un robot culinaire.
Mettez 4 cuillères à soupe de purée sur 4 assiettes de dessert ou dans des bols creux. Mettez
une poire debout au centre de chaque assiette. Avec une cuillère, ajoutez un peu de sirop sur
les poires. Ajoutez 1 cuillère à soupe de crème en formant un cercle au-dessus de la sauce.
Avec un couteau, formez une petite spirale de crème dans la sauce et faites un joli dessin.
34
Page 35

GARANTIE LIMITÉE D’UN (1) AN
Le présent appareil est garanti pendant un an suivant la date de l’achat initial contre les
défauts de matériau ou de fabrication. La présente garantie ne couvre pas les dommages
causés par le transport, l’usage abusif, les accidents ou incidents semblables. La présente
garantie vous confère des droits juridiques précis et vous pouvez disposer d’autres droits,
qui peuvent varier selon l’État ou la province. Ce produit est conçu pour usage domestique
seulement et n’est pas destiné à des ns commerciales. La garantie ne couvre pas l’usage
commercial.
Votre nouvel appareil NESCO / AH est équipé de nombreuses caractéristiques de sécurité.
Toute tentative d’entrave au fonctionnement de ces dispositifs de sécurité rend la présente
garantie nulle et sans effet. En cas de réception d’un appareil aux ns de réparation ayant
été traqué, nous nous réservons le droit de le remettre dans son état d’origine et de
facturer la réparation au client.
Pour une réparation en vertu de la garantie - Veuillez retourner les produits défectueux, par
courrier affranchi, avec une description du défaut à l’adresse suivante : The Metal Ware
Corporation, 1700 Monroe Street, Two Rivers, Wisconsin 54241, pour une réparation ou
un remplacement sans frais à notre choix. Veuillez inclure une preuve d’achat ou une
copie de la facture originale lors du retour d’un produit aux ns de réparation en
vertu de la garantie.
Appelez le service de satisfaction du client au 1-800-288-4545 pour obtenir une
autorisation de retour avant d’expédier le produit.
• Pour une réparation en vertu de la garantie, suivez les directives indiquées dans
la garantie. Lors de la commande de nouvelles pièces, assurez-vous de toujours
mentionner le numéro de modèle du produit.
• Appelez-nous au numéro sans frais 1-800-288-4545 pour nous faire part du problème.
• Si nous vous indiquons de nous envoyer votre appareil en tout ou en partie aux ns
de réparation ou de remplacement, notre représentant de la satisfaction du client
vous fournira un numéro d’autorisation de retour (ce numéro avise notre service de
la réception d’accélérer votre réparation). Emballez votre appareil avec soin dans
une boîte robuste avec une quantité sufsante de rembourrage, étant donné que les
dommages causés lors de l’expédition ne sont pas couverts par la garantie.
• Inscrivez vos nom, adresse et numéro d’autorisation de retour en caractères
d’imprimerie sur la boîte.
• Rédigez une lettre expliquant le problème. Veuillez inclure les éléments suivants : vos
nom, adresse et numéro de téléphone, ainsi qu’une copie de la facture originale.
• Mettez l’enveloppe scellée à l’intérieur de la boîte. Assurez le colis pour la valeur de
l’appareil NESCO
®
et envoyez-le port payé à l’adresse suivante:
Attn: Factory Service Dept.
The Metal Ware Corporation
1700 Monroe Street
Two Rivers, WI 54241
Français
35
Page 36

SALVAGUARDAS IMPORTANTES
Cuando use aparatos eléctricos, las precauciones básicas de seguridad deben seguirse, incluyendo las siguientes:
1. LEA TODAS LAS INSTRUCCIONES.
2. El aparato está diseñado para uso doméstico solamente. No está destinado para uso comercial.
3. Para protegerse contra un choque eléctrico y lesiones físicas, no sumerja este
electrodoméstico, incluyendo su cable y enchufe, en agua u otro líquido.
4. Supervisar de cerca cuando se usa un electrodoméstico en presencia de niños.
5. Desenchufe el aparato de toma de corriente cuando no esté en uso, antes del montaje o
desmontaje de las piezas, y antes de limpiarlo.
6. No use los electrodomésticos cuyo cable o enchufe está dañado o si el aparato funciona
mal o si se dañó de alguna manera. Para evitar peligros, devuelva el electrodoméstico al
Departamento de servicio de fábrica de NESCO para su revisión, reparación o ajuste.
7. No colocar el aparato sobre o cerca de un quemador caliente, eléctrico o a gas, o dentro
de un horno caliente
8. El uso de los accesorios accesorios no recomendados por el fabricante puede dar lugar a
fuego, a descarga eléctrica o a lesión a las personas.
9. No usar en el exterior.
10. No permitir que el cable cuelgue de la mesa o encimera, ni que esté en contacto con supercies calientes.
11. Aparato en funcionamiento sólo cuando todas las piezas estén completamente montada y asegurada.
12. Para reducir el riesgo de una descarga eléctrica, cocine solamente en la olla extraíble.
Espanól
13. No toque las supercies calientes. Utilice los mangos o las perillas.
14. Siempre conecte el enchufe primero al aparato, luego conecte el cable al tomacorriente.
Para desconectarla, coloque cualquier control en la posición de “off” (apagado) y luego
retire el enchufe del tomacorriente.
15. Se deben tomar extremas precauciones al mover un aparato que contenga aceite caliente
u otros líquidos calientes.
16. ADVERTENCIA: Nunca utilice este aparato para freír en aceite muy abundante ni para
freír a presión. Es peligroso y podrá ocasionar daños o lesiones graves.
17. Al liberar la presión, mantenga las manos y la cara alejadas de la válvula reguladora de presión.
18. No cubra el aparato y no lo utilice cerca de materiales inamables, como cortinas o paredes.
19. No llene la olla más de 4/5 de su capacidad. Al cocinar alimentos que se expanden
durante la cocción, como arroz o las verduras secas, no llene la unidad más de la 3/5
de su capacidad. El incumplimiento con este procedimiento puede ocasionar lesiones
personales y/o daños a la unidad.
20. Tenga en cuenta que algunos alimentos, como el puré de manzana, los arándanos, la cebada
perlada, la avena y otros cereales, los chícharos, los deos, los macarrones, el ruibarbo o
el espagueti puede producir espuma y burbujas, y obstruir el dispositivo de liberación de
presión (escape de vapor). No se deben cocinar estos alimentos en una olla a presión.
GUARDE ESTAS INSTRUCCIONES
Enchufe polarizado: Este electrodoméstico tiene un enchufe polarizado (una pata es más
ancha que la otra). Para reducir el riesgo de choque eléctrico, el enchufe está diseñado para
encajar en un tomacorriente polarizado solamente de un lado. Si el enchufe no encaja bien
en el tomacorriente, délo vuelta. Si aún no encaja, contacte a un electricista calicado. No
intente modicar el enchufe de ninguna manera.
Instrucciones para el cable corto: Este aparato tiene un cable de suministro de energía
corto para reducir el riesgo de que se enrosque o de que alguien se tropiece con él. Se
pueden usar cables de extensión en tanto se tomen precauciones al usarlos. Si usa un cable
de extensión, el régimen del cable debe ser al menos igual al régimen de potencia del
aparato. El cable más largo debe disponerse de manera tal que no caiga por la encimera y
evitar así que los niños tiren de él o que alguien se tropiece.
36
Page 37

DIGITAL DE PIEZAS Y CARACTERÍSTICAS DE COCINA
1 Cocina de Base
2
Placa calefactora
3 Sensor de Temperatura
4 Embalse de Condensación
5 Cazo extraíble
6 Tapa
7 Pasador de Cierre
8 Perilla del Regulador de Presión
9
Válvula otante
10 Filtro
11 Sello de juntas
12 Cocina Rack
13 Cable de Alimentación
14 Panel de Control
8 9
7
6
5
4
3
DELAY TIME
Time/Pressure
10
11
12
Espanól
13
14
WARM STEAM
HIGH
SLOW
BROWN
COOK
LOW
START
DELAY
TIME
STOP
2
1
37
Page 38

PIEZAS Y CARACTERÍSTICAS (continuación)
Perilla reguladora de presión Coloque en la posición de “seal” (sellar) para cocinar a
Válvula otante La válvula de seguridad se activa cuando se haya acumulado
Tapa de seguridad Una función mecánica de seguridad que mantiene cerrada
Olla extraíble Cuenta con 6 litros de capacidad, extraíble con capa
Recipiente de condensación Recoge el exceso de condensación durante el proceso de
Empaque de hule Crea el sello hermético necesario para la cocción a presión.
Filtro
Funciones del tablero de control
Espanól
CALENTAR Recalienta los alimentos o los mantiene calientes y listos para servir.
DORAR Permite dorar/saltear la carne antes de su cocción a presión para
AL VAPOR Hierve el agua rápidamente para cocinar al vapor alimentos como
COCCIÓN LENTA Cocina las recetas lentamente (temporizador de 9-1/2 horas) y a fuego
TEMPORIZADOR DE RETARDO Permite retrasar el proceso de cocción hasta 8 horas.
PRECAUCIÓN: Los alimentos perecederos no se deben dejar a temperatura ambiente por
más de 2 horas (1 hora si la temperatura está por encima de 90°F).
obtener mejores resultados.
verduras o arroz.
lento (180°F) para mantener los sabores naturales y la suavidad.
presión y de “vent” (liberar) para liberar la presión o para
cocinar sin presión.
presión en la olla y no permite quitar la tapa. Se desactivará
cuando se reduzca la presión, la tapa se puede quitar sin
peligro.
la tapa hasta que se reduzca la presión dentro de la olla a un
nivel seguro.
antiadherente para facilitar la limpieza y de aleación de
aluminio duradera para asegurar un calentamiento uniforme.
cocción.
Protege el regulador de presión y es extraíble para facilitar la limpieza.
ANTES DEL PRIMER USO
Desempaque su aparato, retirando todo el papel y las bolsas de plástico del interior del mismo.
Lave todas las piezas extraíbles en agua tibia jabonosa. Enjuague a fondo todas las piezas
secas. Limpie la Base con un trapo húmedo. NUNCA sumerja la Base en agua ni en ningún
otro líquido. No coloque las piezas en el lavaplatos.
Asegúrese de que el sello del Empaque esté instalado correctamente dentro de la tapa. Para
instalar el empaque, encájelo en el anillo dentro de la tapa y cierre la tapa. Llene la olla
extraíble con agua a 3/5 de su capacidad y mantenga el control en la posición de “HIGH”
(presión alta) durante 15 minutos (véase la imagen abajo para ver cómo colocar el empaque).
Libere la presión girando la perilla reguladora de presión hacia “VENT” (liberar) y espere hasta
que se caiga la válvula otante cuando toda la presión se haya liberado. Cuando se haya enfriado,
vacíe la olla extraíble y límpiela. No use limpiadores abrasivos o productos químicos fuertes.
DETENERSE
38
EMPUJE
HACIA
ABAJO
Page 39

FUNCIONAMIENTO DE SU COCINA DIGITAL
1. Para abrir la tapa, tome el mango y gírelo en sentido de las manecillas del reloj hasta
que se detenga, luego levante la tapa para quitarla.
2. Retire la olla y coloque los alimentos y líquidos que desee en la olla. La cantidad de
alimentos y líquidos no debe exceder 4/5 de la altura de la olla. En el caso de alimentos
que se expandan, el nivel no debe exceder 3/5 de la altura de la olla. El nivel mínimo de
cocción es 1/5 de la altura de la olla.
3. Revise dentro de la base, donde se encuentran la placa y el sensor de calentamiento, para
asegurar que esté limpia antes de insertar la olla.
4. Coloque la tapa sobre la base, asegúrese de que el sello del empaque esté instalado correctamente
y gire la tapa en sentido opuesto a las manecillas del reloj hasta encajar en su posición.
PRECAUCIÓN: El empaque no debe estar dañado. Si está dañado, no utilice la olla a presión y
llame al servicio de atención al cliente de NESCO (1-800-288-4545) para pedir un repuesto.
5. Enchufe el cable a la base y luego conéctelo al tomacorriente.
6. Presione el botón START/STOP (encender/apagar) para borrar cualquier programación
anterior antes de seleccionar las funciones deseadas. NOTA: La olla cambiará a la función
de CALENTAR al agotar el tiempo límite, excepto cuando se use la función de DORAR.
Si se le olvida congurar las funciones de cocción deseadas o si no presiona el botón de
START/STOP, en la pantalla se mostrará “0.0” después de 30 segundos y se borrarán
todas las conguraciones. Repita los pasos de programación y presione START/STOP.
FUNCIÓN DE COCCIÓN A PRESIÓN
Antes de utilizar el aparato, siempre revise la tapa para asegurarse de que el sello del empaque, la
perilla reguladora de presión y el ltro estén limpios y que se encuentren en las posiciones correctas.
1. Inserte la olla extraíble en la base. Enchufe el cable de alimentación en la base, luego conéctelo al
tomacorriente.
2. Coloque los alimentos a cocinar en la olla extraíble. NOTA: Cuando se cocinen a presión, a la
mayoría de los alimentos se les debe agregar por lo menos 1 taza más de líquido.
3. Coloque la tapa de cierre automático sobre la base y gírela en sentido opuesto a las manecillas del
reloj hasta que se cierre y el pasador de sujeción se asiente en su lugar con un “clic”.
4. Gire la perilla reguladora de presión a la posición de ‘SEAL’.
5. Seleccione la función de cocción deseada presionando el botón ‘HIGH’ (alta) o ’LOW’ (baja) en
el tablero de control. Consulte la receta para obtener las conguraciones recomendadas. La luz
indicadora parpadeará y en la pantalla digital se mostrará el tiempo de cocción en minutos.
6. Seleccione el tiempo de cocción deseado presionando el botón una vez por cada minuto adicional o
sujételo de manera continua. El tiempo máximo de cocción es de 99 minutos.
7. Presione el botón de ‘START/STOP’ para iniciar la cocción. La luz indicadora dejará de parpadear.
8. La olla iniciará una cuenta regresiva (en minutos). La válvula otante subirá cuando se haya llegado
a la presión adecuada, asegurando la tapa para que no se pueda quitar. Cuando el tiempo de cocción
llegue a cero, el aparato sonará tres veces y cambiará automáticamente a la función de CALENTAR.
9. Al terminar la cocción, permite que se libere la presión mediante el ‘método natural’ o el ‘método
de liberación rápida’ (véase abajo).
Método natural: Después de cocinar, presione el botón ‘START/STOP’ para asegurar
que la unidad esté apagada. Deje reposar el aparato y permita que baje la presión de
forma natural, lo cual tarda entre 10 y 20 minutos. Después de 20 minutos, gire la perilla
reguladora de presión hacia ´VENT´ para asegurar que toda la presión se haya liberado.
Método de liberación rápida: Después de cocinar, presione el botón ‘START/STOP’ para
asegurar que la unidad esté completamente apagada. Gire la perilla reguladora de presión
hacia ‘VENT’ (liberar) y permita que se libere la presión. ¡PRECAUCIÓN! MANTENGA
LAS MANOS Y LA CARA ALEJADAS DEL VAPOR QUE SE ESCAPA YA QUE ESTÁ
EXTREMADAMENTE CALIENTE Y PUEDE OCASIONAR LESIONES.
39
Espanól
Page 40

FUNCIÓN DE CALENTAR
1. Coloque la olla extraíble en la base y agregue los alimentos a calentar.
2. Coloque la tapa sobre la olla y encájela en su lugar. Enchufe el cable de alimentación en
la base, luego conéctelo al tomacorriente.
3. Gire la perilla reguladora de presión a la posición de “VENT” (liberar).
4. Presione el botón de “WARM” (calentar) en el tablero de control. La luz indicadora
empezará a parpadear y en la pantalla se mostrará “0.0”.
5. Presione el botón de ‘START/STOP’ para iniciar el calentamiento. La luz indicadora
dejará de parpadear. NOTA: La función de CALENTAR no utiliza tiempos límites.
FUNCIÓN DE DORAR
1. Inserte la olla extraíble en la base.
2. Agregue la cantidad de aceite que se indique en la receta. Enchufe el cable de
alimentación en la base, luego conéctelo al tomacorriente.
3. Presione el botón de ´BROWN´ (dorar) en el tablero de control. La luz empezará a
parpadear y en la pantalla se mostrará “0.0”. No utilice la tapa para la función de dorar.
4. Presione el botón de ‘START/STOP’ para iniciar el calentamiento. La luz indicadora
dejará de parpadear.
5. Permita precalentar 1 minuto. Luego, agregue la carne o el pollo y empiece a dorar los alimentos.
6. En esta función, el tablero de control sonará 3 veces cada 10 minutos para alertarle
que está cocinando a alta temperatura. NOTA: Para su seguridad, no deje el aparato
desatendido mientras está dorando los alimentos.
FUNCIÓN DE COCINAR AL VAPOR
Espanól
1. Inserte la olla extraíble en la base. Enchufe el cable de alimentación en la base, luego conéctelo
al tomacorriente.
2. Coloque una canastilla resistente al calor, una rejilla de alambre (incluida) en el fondo de la olla.
3. Agregue un mínimo de 8 onzas de agua y asegúrese de que el fondo de la rejilla esté por arriba del
líquido.
4. Coloque los alimentos sobre la rejilla. No llene la olla con alimentos a más de 4/5 de su
capacidad. NOTA: Cuando cocine arroz al vapor, ponga el arroz en un tazón de 8 pulgadas o
menos y coloque el tazón sobre la rejilla.
5. Coloque la tapa sobre la olla y encájela en su lugar. Gire la perilla reguladora de presión a la
posición de “VENT” (liberar).
6. Presione el botón de ´STEAM´ (cocinar al vapor) en el tablero de control. La luz indicadora
empezará a parpadear y en la pantalla se mostrará “01” (equivale 1 minuto de cocción).
7. Seleccione el tiempo de cocción deseado presionando el botón ´HIGH´ (alta) una vez por cada minuto
adicional o sujételo de manera continua. Presione ´LOW´ (baja) para reducir el tiempo de cocción.
8. Presione el botón de ‘START/STOP’ para iniciar la cocción. La luz indicadora dejará de
parpadear. ¡PRECAUCIÓN! Nunca coloque la cara o las manos directamente por encima de la
olla mientras quite la tapa, ya que el vapor que se escapa puede ocasionar quemaduras graves.
FUNCIÓN DE COCCIÓN LENTA
1. Inserte la olla extraíble en la base. Enchufe el cable de alimentación en la base, luego
conéctelo al tomacorriente.
2. Coloque los alimentos dentro de la olla de acuerdo con la receta.
3. Coloque la tapa sobre la olla y encájela en su lugar.
4. Gire la perilla reguladora de presión a la posición de “VENT” (liberar).
5. Presione el botón de ´SLOW COOK´ (cocción lenta) en el Tablero de control. La luz empezará
a parpadear y en la pantalla se mostrará “0.5” (esto signica 30 minutos de cocción).
6. Seleccione el tiempo de cocción lenta deseado presionando el botón ´SLOW COOK´
(cocción lenta) una vez por cada 30 minutos adicionales. El tiempo más largo de cocción
lenta es de 9-1/2 horas a 180°F. NOTA: Use las recetas de cocción lenta como una guía.
7. Presione el botón de ‘START/STOP’ para iniciar la cocción. La luz indicadora dejará de parpadear.
8. La olla iniciará la cuenta regresiva en incrementos de media hora (30 minutos) cuando
la temperatura haya llegado a 180°F. El aparato pasará al modo de WARM.
40
Page 41

RETRASO Tiempo de fraguado
1. Presione “tiempo de retraso” botón. La pantalla mostrará “0.5” (igual a 30 minutos) y el
indicador luminoso se enciende. Repita la pulsación de “cantidad deseada hasta DELAY
TIME ‘del tiempo de retardo en la pantalla. tiempo de demora total es de 8 horas.
2. Seleccione el programa de cocción deseado (alto, bajo, vapor, etc) y el tiempo pulsando
el botón correspondiente (s).
3. Pulse el botón “START / STOP ‘y la luz indicador de tiempo de retardo se enciende. El
aparato empezará después de la cocción deseado tiempo de retardo ha transcurrido. El
tiempo de retardo luz indicadora se apagará.
LIMPIEZA DE SU COCINA DIGITAL
1. Desconecte el cable de la toma de la pared, entonces el aparato y deje que la unidad se
enfríe antes de limpiarlo.
2. NO lave ninguna parte de su aparato en el lavavajillas. Use agua tibia jabonosa,
enjuague y seque. Siempre limpie después de cada uso o si no se ha utilizado durante un
largo periodo de tiempo.
3. Limpie la base con un paño limpio y húmedo. NUNCA sumerja la base en agua u otro
líquido. Limpie el interior de la base si es necesario para eliminar cualquier producto
alimenticio.
4. Si el depósito contiene la condensación de humedad visible, extráigalo tirando hacia
abajo. Lavar con agua tibia y jabón. Enjuague y seque. Adjuntar a la base, empujando
hacia arriba para bloquear en su lugar.
5. Gire la tapa hacia abajo, tome la junta de goma en ambos lados y tire hacia arriba. Lave
junta con agua jabonosa caliente. Enjuague y seque bien. Inserte la ranura de la junta de
goma presionando hacia abajo dentro del borde de la tapa, asegurándose de que la “v”
de la junta se centra en el anillo de alambre en la tapa. NOTA: Si la junta de goma no se
coloca correctamente el aparato no funcionará con normalidad.
6. A n de mantener un buen rendimiento de su aparato, el fondo de la olla de cocción
removible se debe limpiar después de cada uso. Limpie con un paño suave y húmedo y
seco antes de usar.
7. Nunca use limpiadores abrasivos o estropajos para limpiar las partes de este aparato, ya
que van a hacer rayas nas en la supercie, especialmente en las supercies pulidas.
8. Almacene su aparato con la tapa descansando boca abajo sobre la pot.This cocción
removible protegerá a las válvulas, tiradores y regulador de presión en la parte superior
de la tapa. Si el aparato se almacena con la tapa sellada, malos olores se pueden formar
en el interior.
Limpieza del botón regulador de presión
Asegúrese de que la perilla del regulador de presión y válvula de otador se encuentran
en buen estado de funcionamiento antes de cada uso. Para la limpieza, por favor, siga las
siguientes instrucciones:
1. Cuando la unidad se haya enfriado, retire la tapa.
2. Presione y gire el regulador de presión en sentido horario la perilla que sobrepase el
ajuste SEAL y levante con cuidado y quitar.
3. Gire la tapa hacia abajo y sobre una mesa. Saque el ltro sujetando rmemente con un
paño suave elevación hacia arriba. El uso de un cepillo pequeño, el control y eliminar
todas las partículas de alimentos que se podrán presentar, dentro del ltro y la válvula
otante. Empuje el ltro nuevo en su lugar.
4. Vuelva a colocar el mando regulador de presión, alineando las muescas hasta la pared
interior de la cámara del regulador de presión en la tapa, a continuación, presione hacia
abajo y gire hacia la derecha para enganchar.
41
Espanól
Page 42

CONSEJOS Y SUGERENCIAS ACERCA DE SU COCINA DIGITAL
• Para asegurar el mejor rendimiento de cocina al cocinar a presión, siempre asegúrese de
que la receta requiere al menos 1 taza de agua u otro líquido suciente vapor para que se
pueden generar para crear presión.
• Después de un período de tiempo que la junta de goma pueden reducir el tamaño, se
endurecen, se deforman o no en condiciones de uso normal. Cuando esto ocurre se
produce u otros daños, no utilice el aparato. La junta de goma debe ser reemplazado.
Póngase en contacto con el Departamento de satisfacción del cliente (800-288-4545).
• Cuando se utiliza el HIGH o LOW parámetros de presión, el temporizador no empezará a
contar “abajo” hasta que la presión de vapor suciente se genera.
• Cuando la cocción a presión, si no está seguro de cuánto tiempo de cocción es necesario,
es mejor ‘en’ cocinar. A continuación, utilice la “liberación rápida” método, quitar la tapa
y compruebe si está listo.
• Nunca llene la olla de cocción removible más de la mitad con alimentos o con 4 / 5 llenos
de liquido.
• Asegúrese de que este aparato está conectado a un tomacorriente de 120 voltios por
separado eléctrica. Una sobrecarga eléctrica puede ocurrir si se utiliza con otro aparato al
mismo tiempo.
• Más duras, los cortes de carne más baratos son más adecuados para su olla de presión
Espanól
digital, dado que la presión del vapor ayuda a romper las bras duras en la toma de la
carne que más tierna y sabrosa.
• La fruta fresca se debe cocinar a baja presión.
• Cuando los granos de la presión de cocción, añadir una cucharadita de aceite al agua para
reducir la cantidad de espuma.
• Cualquier líquido, como los aceites, a base de aceite adobos y aliños no debe ser utilizado
para cocinar a presión.
• Los líquidos que contienen agua se puede utilizar al cocinar a presión. Estos incluyen el
vino, la cerveza, las existencias, el tomate y otros vegetales y zumos de frutas. El vino
debe ser mezclado con una cantidad equivalente de agua porque se evapora rápidamente
durante la cocción.
• Los alimentos congelados pueden cocinarse si la carne es de una pulgada o menos de
grosor, no alteran los tiempos de cocción, aparato comenzará el temporizador después de
ajustar la temperatura interna que se llegó.
• Durante el proceso de construcción de la presión, puede observar vapor que escapa de
la válvula reguladora de presión. Ajuste con cuidado la válvula moviendo suavemente
o girar de lado a lado suavemente con pinzas o herramienta similar hasta que se selle
adecuadamente.
• Si el vapor sale por la tapa, signica que la junta de goma no pueden ser sellados.
Cancelar el proceso de cocción, deje de ejercer presión manual o natural, retire la tapa y
comprobar la junta de goma de los daños o instalado incorrectamente. Vuelva a instalar
después del examen y el proceso de comienzo de la cocción.
• NOTA: El punto de ebullición del agua disminuye a medida que aumenta la altitud, y
esto cambia el rendimiento de su aparato. Al cocinar la presión en altitudes más altas,
se aplicará lo siguiente: Añadir el 5% y el tiempo de cocción por cada 1.000 pies sobre
los primeros 2.000 metros. Ejemplo: A 3.000 pies añadir 5%, de 4.000 pies añadir 10%,
5.000 pies de agregar el 15%, etc
42
Page 43

Hortalizas:
• Cuando la presión para cocinar verduras entorno de uso de alta presión y de liberación
rápida para liberar la presión.
• Antes de presión para cocinar las verduras frescas, añadir 1 taza de agua y la rejilla de
vapor en lugar cazo extraíble. Coloque una capa de verduras en la parrilla. Cubierta
y tapa encaje en su sitio. Gire la perilla del regulador a “SELLO”. Cocine durante el
tiempo indicado a continuación.
• Hortalizas quitar, agregar los condimentos deseados y servir. NOTA: Los tiempos de
cocción que más de 7 minutos, añadir un exceso de agua 1/2 C por cada 5 minutos más
el tiempo de cocción para aparato no hierva en seco.
Hortalizas Tiempo
Alcachofa 9 to 11 Cebollas 4 to 5
Espárragos 1-1/2 to 2 Chirivías 2 to 4
Los frijoles, verde 2 to 3 Guisantes, en las vainas 2 to 3
Las remolachas, las pequeñas
El brócoli, ores de 2 to 3 Las papas, los pequeños 5 to 8
El brócoli, tallos 3 to 4 Patatas, medio 11 to 15
Coles de Bruselas 3 to 5
La col, rallado 1-1/2 Espinacas 2 to 3
La col, en cuartos 3 to 4 Squash, reducido a la
Zanahorias, bebé 4 to 5 Squash, en rodajas 1 to 3
Zanahorias, en rodajas 1 to 2
Colior 2 to 3 Tomates enteros 5 to 6
El Maíz en la Mazorca 3 to 5 Nabos, en rodajas 1 to 2
Berenjena en rodajas 2 to 3 Ñames, toda 6 to 8
Okra 2 to 3 Calabacín en rodajas 2 to 3
(Minutos)
11 to 13 Las papas en rodajas 5 to 7
Hortalizas Tiempo
Colinabos, 1 / 2 “de espesor
mitad de bellota
Tomates, cortados en cuartos
(Minutos)
5 to 6
6 to 8
2 to 3
Frutas:
Cuando las frutas de presión para cocinar, siga las mismas pautas que la anterior excepto en
ajuste de selección de baja presión.
Frutas Tiempo
(Minutos)
Manzanas frescas 3 to 4 Duraznos 4 to 5
Manzanas, en cuartos 2 Peras 2 to 4
Albaricoques 2 to 4 Ciruelas pasas 5 to 6
Higos secos 5 to 6 Pasas 4 to 5
Frutas Tiempo
(Minutos)
43
Espanól
Page 44

Carne/Pollo:
• Cuando los granos de presión para cocinar o legumbres utilizar la conguración de alta
presión y de liberación rápida para liberar la presión.
• Siempre cocine la carne o las aves de corral, con al menos 1-3 tazas de líquido ..
Conserva o salados carnes se deben sumergir en agua.
• Salvo que se indique, los tiempos de cocción se indican a continuación son para 3
libras de carne o de ave, a menos que se indique lo contrario. Todas las horas son
recomendados y varían dependiendo de la calidad y el corte de carne
Tipo de Carne Tiempo
Carne de res, Cerdo,
Cordero, Cortada en cubitos
Carne / Carne de ternera:
Asado, pecho (3 - 4 lbs)
Caña, 1-1/2 in. thick
Carne de cerdo:
Lomo asado (3 - 4 lbs)
Espanól
Ahumado trasero
Jamón vástago
(Minutos)
15 to 20 Pechuga de pavo, enteros 30 to 40
50 to 60
25 to 30
40 to 50
20 to 25
30 to 40
Tipo de Carne Tiempo
Pescado:
Carnes, letes, 3/4 in. thick
1-1/2 in. thick
Pollo:
Sin hueso del pecho, el muslo
Piezas (2 - 3 lbs)
Todo (3 - 4 lbs)
Frijoles y oras Legumbres:
• Cuando los granos de presión para cocinar o legumbres utilizar la conguración de alta
presión y liberación natural de la liberación de presión.
• Coloque los frijoles o legumbres en olla a presión, añadir 3 tazas de agua por cada taza de alimento.
• Añada 1 cucharada de aceite vegetal por cada taza de agua para reducir la formación de
espuma. No agregue sal hasta después de la cocción.
Tipo de Leguminosas Tiempo
(Minutos)
Azuki 6 to 8 Frijoles rojos 4 to 5
Fríjol Negro 2 to 3 Pinto 2 to 3
Black Eyed Peas 11 to 13 Rojo 5 to 7
Garbanzos 3 to 5 Soja 5 to 6
Great Northern 3 to 4 Tepary 6 to 8
Tipo de Leguminosas Tiempo
Grains:
Avant la cuisson, faire tremper les grains de certains, tels que grains de blé dans quatre fois
leur volume d’eau tiède pendant au moins quatre (4) heures ou toute la nuit si nécessaire.
• Ne pas faire tremper le riz.
Tipo de Grano Tiempo
Arroz, basmati – 1 1/2 C 7 to 8 Arroz, café – 1 1/2 C 7 to 8
Arroz, convertido – 1 1/2 C.
Arroz, de grano largo – 1 1/2 C
(Minutos)
7 to 8 Arroz, salvaje – 3 C 24 to 27
7 to 8 El trigo, las bayas – 3 C 2 to 3
Tipo de Grano Tiempo
44
(Minutos)
3 to 4
6 to 7
8 - 10
11 - 14
15 - 20
(Minutos)
(Minutos)
Page 45

RECETAS
Por favor, tenga en cuenta que toda la información proporcionada a continuación se facilita
únicamente para su referencia y puede ser modicada según las preferencias y los gustos del usuario.
Puré de manzana Applesauce
1 taza de jugo de manzana
1 taza de agua
6 manzanas, peladas y sin el corazón / cortadas en mitades
Canela al gusto
Agregar todos los ingredientes a la olla y cocinar a presión alta durante 6 minutos. Revolver
y servir. Aumentar o reducir el tiempo para obtener la consistencia deseada
Costillas asadas BBQ Ribs
1 Costillar de cerdo
1 botella de salsa barbecue
2 tazas de Ginger ale
Echar el Ginger ale en la olla. Cortar el costillar para colocarlo sobre la rejilla en la olla.
Las costillas no deben meterse en el líquido. Agregar su mezcla de hierbas preferida o nada
más sal y pimienta y cocinar a alta presión durante 12 minutos. A 12 minutos las costillas
aún estarán firmes. Si desea que estén tiernas y despegadas del hueso, cocinar 35 minutos.
Liberar la presión y vaciar el Ginger ale y retirar la rejilla de acero inoxidable. Agregar las
costillas y la salsa barbecue y cocinar otros 10 minutos o hasta que estén tiernas.
Carne de res en salsa de pimiento
Salsa de pimiento
1 pimiento rojo o verde
1-2 taza de zanahorias pequeñas (tamaño “baby”)
1 lata (de 8 onzas) de salsa de tomate (1 cucharada grande para usar más tarde)
2 dientes de ajo
2 cucharaditas de jengibre molido
1 cucharadita de cúrcuma
1 cucharadita de sal
1/2 cucharadita de pimienta negra
1/2 a 1 cucharadita de pimienta cayena (según su gusto por el picante)
1/2 cucharadita de cardamomo molido
Ingredientes restantes
2 cucharadas grandes de aceite de oliva
2 libras de chuletas deshuesadas de sirloin cortadas en tiras
Sal y pimienta al gusto
1 taza de agua
1/2 cucharadita de pimentón dulce
1/2 cucharadita de comino
1/2-1 cebollas, en rebanadas
1 pimiento verde, en rebanadas
Espanól
45
Page 46

Instrucciones (Carne de res en salsa de pimiento, continuación)
Retirar 1 cucharada grande de salsa de tomate de la lata para usarla más tarde. Luego,
mezclar los ingredientes de la salsa de pimiento (pimiento verde hasta cardamomo) en un
procesador de alimentos hasta que no queden pedazos sólidos. Reservar.
Echar el aceite en la olla a presión, espolvorear la carne con sal y pimienta y luego dorarla
sobre el fuego.
Una vez que esté dorada, agregar el agua, las salsa tomate reservada, pimentón dulce y
comino. Cerrar la tapa y presionar el botón HIGH (alta presión) por 15 a 20 minutos.
Cuando se haya cocido la carne, utilizar el método natural para liberar la presión.
Agregar la mezcla de pimientos, las rebanadas de cebolla y pimiento verde a la carne
y salsa, cubrir con la tapa y presionar el botón HIGH (alta presión) por 3 a 5 minutos
adicionales. Cuando se haya terminado la cocción, seguir las instrucciones para reducir la
presión. Las verduras deben estar tiernas. Servir inmediatamente.
Estofado de res
3 libras de estofado de res
2 cucharadas grandes de aceite vegetal
1 cebolla de tamaño mediano, picada
3 tazas de caldo de res
1 taza de agua
Sal y pimienta al gusto
Espanól
1 hoja de laurel
Calentar el aceite en la olla, usando la función de BROWN (dorar) para dorar ambos
lados del estofado. Coloque la carne sobre la rejilla de alambre y agregar los ingredientes
restantes. Cubrir y encajar la tapa en su lugar. Girar la perilla reguladora a la posición de
SEAL (sellar). Seleccionar la presión ALTA y cocinar por 45 minutos. Liberar la presión
utilizando el método de liberación natural. La olla sonará y cambiará automáticamente a la
función de calentar cuando se haya terminado el tiempo de cocción.
Burritos de desayuno
1/4 taza de margarina
2 cucharaditas de ajo, molido
1 taza de chorizo
1 pequeño pimiento verde, cortado en dados y sin semillas
1 pequeño pimiento amarillo, cortado en dados y sin semillas
2 tomates saladet (Roma), cortados en piezas grandes
1 cucharadita de pimienta cayena
8 huevos
1 paquete de tortillas
Derretir la margarina usando la función de BROWN (dorar). Agregar el ajo, dorarlo
ligeramente. Agregar el chorizo, seguir dorando y separar la carne. Revolver con frecuencia.
Retirar la mezcla de carne, drenar la grasa y dejarla a un lado. Agregar los pimientos a la
olla, dorarlos ligeramente. Agregar los tomates y la pimienta cayena, dorarlos ligeramente.
Retirar las verduras de la olla, dejarlas a un lado.
Cascar los huevos en un tazón. Echar los huevos en la olla, mezclarlos ligeramente,
agregar las mezclas de carne y verduras. Cubrir y encajar la tapa en su lugar. Gire la perilla
reguladora a la posición de “SEAL” (sellar). Seleccionar la presión alta y cocinar por 5
minutos. Liberar la presión utilizando el método de liberación rápida. Abrir y quitar la tapa.
Echar la mezcla sobre la tortilla y servir.
46
Page 47

Manzanas con azúcar moreno
1 taza de jugo de manzana
1 taza de agua
4 manzanas / Dejar la cáscara en las manzanas, quitarles el pedúnculo y meter los
ingredientes en un tazón pequeño No debe quitarles todo el corazón.
2 cucharadas grandes de azúcar moreno
1/4 taza de pasas
1 cucharada grande de mantequilla
Agregar los líquidos a la olla y luego meter la rejilla de acero inoxidable. Colocar las
manzanas en la rejilla y agregar un poco de azúcar moreno, pasas y una porción de
mantequilla. Cocinar por 4 minutos y servir caliente con helado de vainilla.
Pollo a la cazadora
4 pechugas medianas de pollo / si están descongeladas, reducir el tiempo de cocción 3 minutos.
1 tarro (de 8 onzas) de salsa de espagueti
1 taza de vino tinto
1/2 pimiento verde, en rebanadas grandes
1 cebolla de tamaño mediano, en rebanadas grandes
1 pinta de hongos frescos, enteros
1 lata (de 6 onzas) de aceitunas negras o verdes
Queso parmesano
Agregar todos los ingredientes a la olla excepto las aceitunas y el queso parmesano. Gire
la perilla reguladora a la posición de “SEAL” (sellar). Seleccionar la presión alta y cocinar
por 12 minutos. Al terminar, servir sobre arroz o pasta y espolvorear con aceitunas y queso
parmesano.
Pollo y arroz amarillo
1 pollo entero (de 4 libras)
2 tazas de agua
Sal y pimienta, al gusto
2 tazas de arroz amarillo
Tomar un pollo entero, lavarlo y secarlo suavemente. Colocar en la olla con agua. Agregar
sal y pimienta al ave. Seleccionar la presión alta y cocinar por 35 minutos. Al terminar
la cocción, retirarlo y meterlo en un tazón grande. Drenar el caldo que queda en la olla y
guardar este líquido para cocinar el arroz. Agregar el arroz al caldo de pollo y girar el botón
a la posición de SEAL (sellar). Seleccionar la presión alta y cocinar por 15 minutos. Reducir
a 12 minutos si está usando una taza de arroz.
Mientras se cocina el arroz, cortar las piezas de pollo en tiras o separarlas y agregarlas al
arroz amarillo. Cuando se haya cocido el arroz, liberar la presión, abrir la tapa y agregar el
pollo. Las piezas de pollo aún estarán calientes.
Albóndigas rápidas (aperitivo)
1 bolsa de albóndigas congeladas, cocidas
2 tarros de salsa de chile tailandés
1/2 pimiento verde en dados
1 lata (de 14 onzas) de piña en dados, drenada
Agregar todos los ingredientes a la olla y cocinar por 6 minutos. ¡Servir
47
Espanól
Page 48

Pastel de queso y chocolate
1 taza de migajas de galletas de barquillo de chocolate
2 cucharadas grandes de mantequilla derretida
Mezclar 1 taza de migajas de galleta con la mantequilla. Presionar en el fondo de un
molde desmontable de 7 pulgadas. Dejar reposar.
1 taza de agua
2 huevos
2 paquetes (8 onzas) de queso crema, ablandado
6 onzas de chispas de chocolate semiamargo, derretidas
2/3 taza de azúcar
3/4 taza de migajas de galletas de barquillo de chocolate
(Variación: Agregar 1 cucharadita de café instantáneo a las chispas de chocolate derretidas
para hacer un pastel de queso moca.)
Mezclar el queso crema en un tazón con una batidora hasta que quede sin grumos.
Agregar poco a poco el azúcar. Mezclar a fondo. Mezclar agregando un huevo a la vez
hasta que el queso quede sin grumos. Agregar el chocolate derretido y mezclar a fondo.
Agregar las 3/4 taza de migajas de galleta a la mezcla. Echar en el molde desmontable
sobre la corteza. Agregar el agua a la olla. Cortar una pieza de 6 pulgadas de papel
Espanól
aluminio y doblarla por la mitad y a lo largo. Esto ayuda a quitar el molde al terminar
el ciclo de cocción. Colocar el molde desmontable sobre el papel aluminio y meterlos
en la olla. Cubrir y encajar la tapa en su lugar. Gire la perilla reguladora a la posición de
“SEAL” (sellar). Seleccionar la presión alta y cocinar por 20 minutos. Liberar la presión
utilizando el método de liberación rápida. Abrir y quitar la tapa. Retirar el pastel de la olla
levantando los extremos del soporte de papel aluminio. Dejar enfriar hasta temperatura
ambiente antes de refrigerar. Refrigerar toda la noche para obtener los mejores resultados.
Sopa de verduras y pollo al cilantro
2 libras de pechuga de pollo sin hueso, sin piel, cortada en cubos
1 paquete (10 onzas) de granos de elote congelados Medio galón de caldo de pollo
3/4 tazas de láminas finas de cebolla verde 3 tallos de apio, picados
1/2 taza de cilantro, finamente picado 2 dientes de ajo, molidos
2 tazas de arroz blanco 1/2 cucharadita de pimienta cayena
1 cebolla pequeña, cortada en trozos pequeños
1 lata (14 onzas) de tomates pelados y cortados en dados con jugo
1 pimiento amarillo, picados y sin semillas
1/2 cucharadita de comino
Adornar con queso o totopos
Colocar el caldo, el pollo, la cebolla, el apio y el ajo en la olla. Cubrir y llevar a ebullición
usando la función de BROWN (dorar). Reducir el calor usando la función de WARM
(calentar). Agregar los tomates sin escurrir, el pimiento, comino, y la pimienta cayena.
Revolver la mezcla. Agregar el elote, la cebolla verde, el cilantro y el arroz. Mezclar bien.
Cubrir y encajar la tapa en su lugar. Gire la perilla reguladora a la posición de “SEAL”
(sellar). Seleccionar la presión alta y cocinar por 10 minutos. Liberar la presión utilizando
el método de liberación rápida. Abrir y quitar la tapa. Adornar con queso y totopos y
48
servir.
Page 49

Pastel de carne festejo
1 taza de galletas saladas, machacadas
1 paquete de sazón para tacos (“Taco Seasoning”)
1/2 taza de salsa de tomate
1/2 taza de pimiento verde, cortado en dados y con las semillas quitadas
1 lata (2-1/4 onzas) de aceitunas negras deshuesadas, escurridas y cortadas en rebanadas
1 cebolla de tamaño pequeña, picada
2 huevos, batidos
2 cucharadas grandes de salsa inglesa
2 libras de carne molida
Ingredientes opcionales: salsa, queso rallado, crema agria y totopos
En un tazón, combinar los primeros ocho ingredientes. Agregar la carne; mezclar bien.
Colocar en un molde redondo o desmontable de 7 pulgadas. Cortar una pieza de 6 pulgadas de
papel aluminio y doblarla por la mitad y a lo largo. Esto ayuda a quitar el molde al terminar el
ciclo de cocción. Colocar el molde desmontable sobre el papel aluminio y meterlos en la olla.
Cubrir y encajar la tapa en su lugar. Girar la perilla reguladora de presión a la posición de
SEAL (sellar), seleccionar SLOW COOK (cocción lenta) por 2 - 3 horas. La olla sonará y
cambiará automáticamente a la función de calentar al terminar el tiempo de cocción. Abrir
y quitar la tapa. Levantar y retirar el molde de la olla. Aderezar con salsa, queso rallado,
rebanadas de aceitunas negras, crema agria o totopos.
Risotto de poro y espárrago
1-1/2 cucharadas grandes de aceite de oliva 1-1/2 cucharadas grandes de mantequilla
1-1/2 cucharadas grandes de agua 2 dientes de ajo, molidos
1-1/2 tazas de poro, cortado en rebanadas 1-1/2 tazas de arroz arborio
4 tazas de caldo de verduras 1/4 libra de espárrago, cortado en trozos
1-1/4 taza de queso parmesano, rallado
En la olla a presión, calentar el aceite de oliva y mantequilla (usar la modalidad de dorar).
Agregar el ajo y los poros, saltear hasta que se ablanden. Agregar el arroz, revolver a fondo
y luego agregar el caldo. Cerrar la tapa y girar la perilla reguladora de presión al programa
de SEAL (sellar) para cocinar a alta presión por 8 minutos.
Mientras se cocina el risotto, cocinar el espárrago al vapor. Luego, saltear en aceite de oliva.
Aderezar con sal y pimienta. Cuando se haya cocido el risotto, reducir la presión, luego
agregar el espárrago salteado y queso parmesano.
Camote caramelizado sabor naranja
1 taza de jugo de naranja 2 camotes grandes (ñames)
Echar sal, al gusto 1/2 taza de azúcar moreno
1 cucharadita de cáscara de naranja rallada 2 cucharadas grandes de mantequilla
Echar el jugo de naranja en la olla a presión. Pelar los camotes y cortarlos por la mitad y a
lo largo. Meterlos en una canastilla vaporizadora (si tiene una) y espolvorear con sal, azúcar
moreno y cáscara de naranja. Salpicar con mantequilla. Meter la canastilla vaporizadora
en la olla a presión. Encajar la tapa en su lugar y girar la perilla reguladora a la posición de
SEAL (sellar). Seleccionar la presión alta y cocinar por 12 minutos.
Al terminar la cocción, usar el método de liberación rápida o natural y quitar la tapa. Sacar
los camotes. Hervir la salsa hasta que se espese y echarla sobre los camotes.
Espanól
49
Page 50

Jambalaya
1/2 libra de pechuga de pollo deshuesado y sin piel, cortada en cubos
1/2 libra de salchicha “andouille” (de cerdo) o italiana, cortada en rebanadas
1/2 libra camarones crudos, pelados y desvenados
2 cucharaditas de sazón criollo 1 cucharadita de hojas secas de tomillo
1/8 cucharadita de pimienta cayena 1 cebolla, cortada en trozos
3 dientes de ajo, molidos 1 pimiento verde, cortado en trozos
3 tallos de apio, cortados en rebanadas 1 taza de arroz de grano largo
16 onzas tomates cortados en trozos, sin escurrir 1 taza de cubitos de caldo de pollo
1 cucharada grande de aceite vegetal 3 cucharadas de perejil, molido
Calentar el aceite en la olla extraíble (usar la modalidad de dorar). Agregar el pollo, las
salchichas y los camarones. Espolvorear la carne con la mitad de la sazón criollo, la mitad
del tomillo y la mitad de la cayena. Cocinar por 3-5 minutos sin la tapa, revolviendo con
frecuencia, hasta que el pollo y los camarones estén bien cocidos. Retirar el pollo, la
salchicha y los camarones con una cuchara ranurada y dejar a un lado. Agregar la cebolla,
el pimiento, apio y el resto de la sazón criollo, tomillo y la cayena a la olla. Cocinar por 4-5
minutos, revolviendo con frecuencia. Agregar el pollo, la salsa, los camarones, el arroz, y
los tomates con su jugo y caldo. Encajar la tapa en su lugar y girar la perilla reguladora a la
posición de SEAL (sellar). Seleccionar la presión alta y cocinar por 10 minutos.
Espanól
Peras cocoidas en vino tinto
Un postre muy elegante cuando se sirve con salsa de frambuesa. Un final magnífico para
una cena especial.
2 taza de agua
1/2 taza de azúcar
2 rebanadas de limón
2 rajas de canela
1/4 cucharadita de macis
4 peras firmes, peladas pero con el corazón y pedúnculo
3/4 taza de vino tinto
1 taza de frambuesas congeladas
4 cucharadas grandes de crema espesa
En la olla extraíble, combinar el agua, azúcar, limón, las rajas de canela y la macis. Hervir a
fuego lento hasta que se disuelva el azúcar (usar la modalidad de dorar). Meter las peras en
la olla, recortar sus fondos si es necesario para mantenerlas verticales. Encajar la tapa en su
lugar y programar la olla para cocinar por 10 minutos.
Agregar el vino tinto. Encajar la tapa en su lugar de nuevo y programar la olla para cocinar por
10 minutos más. Retirar con cuidado las peras solamente y trasladarlas a un recipiente profundo
Hervir la salsa restante presionando START (encender) hasta que tenga la consistencia de
jarabe. Enfriarla, luego echarla sobre las peras y mantenerlas a temperatura ambiente toda
la noche. Para servir, descongelar y licuar las frambuesas en una procesadora hasta que
queden sin grumos.
Echar 4 cucharadas grandes del puré en cuatro platos de postre o tazones poco profundos.
Colocar una pera en posición vertical en el centro de cada plato. Echar jarabe sobre las peras
con una cuchara. Aplicar lentamente 1 cucharada grande de crema en un círculo sobre la
salsa. Usar un cuchillo para revolver la crema en la salsa en un diseño atractivo.
50
.
Page 51

GARANTI LIMITADA D 1 AÑO
Este electrodoméstico está cubierto por una garantía de un año a partir de la fecha de
compra original contra defectos en los materiales y en la mano de obra. Esta garantía no
cubre los daños por transporte, el uso inadecuado, accidentes u otros incidentes similares.
La garantía le conere derechos legales especícos y es posible que tenga otros derechos
que varían de estado en estado. Este producto está concebido para un uso doméstico
solamente, no para usos comerciales. Esta garantía no cubre el uso comercial.
Su nuevo electrodoméstico NESCO está equipado con numerosas funciones de seguridad.
Todo intento de interferir con el funcionamiento de estas características de seguridad
anulará la garantía. En el caso de que recibamos un electrodoméstico para servicio técnico
que haya sido forzado, nos reservamos el derecho de repararlo a su estado original y
cobrar por la reparación.
Para servicio técnico bajo la garantía – Los productos defectuosos pueden restituirse, con
franqueo postal prepago, con una descripción del defecto a: The Metal Ware Corporation,
1700 Monroe Street, Two Rivers, Wisconsin 54241, para su reparación o reemplazo libre
de cargo, a nuestra discreción.
Se debe incluir el comprobante de compra o una copia del contrato de compra
cuando devuelva el producto para el servicio bajo la garantía.
Llame al servicio de Satisfacción del Cliente al 1-800-288-4545 para obtener una
Autorización de Devolución antes de enviar el producto.
• Para servicio técnico bajo la garantía, siga las instrucciones consignadas en la garantía.
Cuando pida nuevas piezas, asegúrese de mencionar siempre el número de modelo del
producto.
• Llámenos a nuestro número gratuito, 1-800-288-4545 e infórmenos de su problema.
• Si le indicamos que nos envíe todo su electrodoméstico o parte de él, nuestro
representante de Satisfacción al Cliente la dará un número de Autorización de
Devolución (este número le notica nuestro departamento receptor que acelere su
reparación). Empaque su unidad cuidadosamente en una caja de cartón fuerte con
suciente material de protección para prevenir daños dado que los daños causados por
el envío no están cubiertos por la garantía.
• Escriba su nombre, dirección y número de Autorización de Devolución en la caja.
• Escriba una carta explicando el problema. Incluya lo siguiente: su nombre, dirección y
teléfono y una copia del contrato de compra original.
• Incluya el sobre cerrado con la carta dentro de la caja. Asegure el paquete por el valor
del electrodoméstico NESCO y envíelo con franqueo pago a:
Attn: Factory Service Dept.
The Metal Ware Corporation
1700 Monroe Street
Two Rivers, WI 54241, USA
51
Espanól
Page 52

Part No. 67064 ©2010 The Metal Ware Corporation
For accessories and additional products, go to
www.nesco.com
All Rights reserved, including the right of reproduction in whole or part
 Loading...