

Page 1

Manual
Nero DiscSpeed
Page 2

Copyright and Trademark Information
Copyright and trademark information
This document, like the software described therein, is provided as a license and may only be used or reproduced in accordance with
the licensing agreement. The contents of this document, as well as the associated software, is subject to change without prior notice.
Nero AG rejects any responsibility for the correctness of the contents of this document and rejects any claims that transcend the
clauses of the guarantee agreement.
This document and all of its contents are protected by copyright and are the property of Nero AG. All rights reserved. In addition, this
document contains material that is protected by internationally valid copyright. This document may not be reproduced, transmitted, or
transcribed in whole or in part without the express written permission of Nero AG.
Please keep in mind that existing graphics, pictures, videos, music titles, and other materials that you may wish to insert or transcribe into projects may be protected by copyright. The unauthorized use of this type of material in your projects may violate the
rights of the owner of the copyright. Make sure that you obtain all necessary authorizations from the owner of the copyright.
Unless you own the copyright, have permission from the copyright owner, or your actions fall under the "fair use" provisions of copyright law, you may be violating national or international copyright laws. The transcribing, duplication, modification or publication of
copyright-protected material may lead to claims for damages and the enforcement of other legal measures against you. If you are
unsure of your rights, you should contact your legal advisor.
Some of the applications of the Nero Suite require technology developed by third-party manufacturers and may be included in Nero
Suite as demo versions. These applications can be activated online free of charge or by sending an activation fax to enable unlimited
use of the version. Nero will only transmit the data necessary for activation of the technology licensed from third parties. For unlimited use of Nero Suite, it is therefore necessary to have an Internet connection or a fax machine.
Copyright © 2006 - 2008 Nero AG and its licensors. All rights reserved.
Adobe, Acrobat, Acrobat Reader and Premiere are brands or protected trade names of Adobe Systems, Incorporated.
AMD Athlon™, AMD Opteron™, AMD Sempron™, AMD Turion™, ATI Catalyst™ and ATI Radeon™ are brands or protected trademarks of Advanced Micro Devices, Inc.
ASTC is a trademark of Advanced Television Committee.
ICQ is a registered trademark of AOL, LLC.
Apple, iPhone™, iPod, iTunes, FireWire, and Mac are brands or registered trade names of Apple, Inc.
ARM is a registered trademark of ARM, Ltd.
AudibleReady is a registered trademark of Audible, Inc.
BenQ is a trademark of the BenQ Corporation.
Blu-ray Disc is a brand of Blu-ray Disc Association.
CyberLink is a registered trademark of CyberLink Corp.
DLNA is a registered trademark of Digital Living Network Alliance.
DivX and DivX Certified are registered trademarks of DivX, Inc.
Dolby, Pro Logic and the double-D symbol are brands or registered trademarks of Dolby Laboratories, Inc.
DTS and DTS Digital Surround are registered trademarks of DTS, Inc.
DVB is a registered trademark of the DVB Project.
Freescale is a brand of Freescale Semiconductor, Inc.
Google and YouTube are trademarks of Google, Inc.
WinTV is a registered trademark of Hauppauge Computer Works, Inc.
Intel, Intel XScale, Pentium and Intel Core™2 Duo are brands or registered trademarks of the Intel Corporation.
Linux is a registered trademark of Linus Torvalds.
Memorex is a registered trademark of Memorex Products, Inc.
ActiveX, ActiveSync, DirectX, DirectShow, Internet Explorer, Microsoft, HDI, MSN, Outlook, Windows, Windows Mobile, Windows
NT, Windows Server, Windows Vista, Windows Media, Xbox, Xbox 360, the Start button of Microsoft Windows Vista and the Windows logos are brands or registered trademarks of Microsoft Corporation.
MySpace™ is a brand of MySpace, Inc.
NVIDIA, GeForce and ForceWare are brands or registered trademarks of NVIDIA Corporation.
Nokia is a registered trademark of Nokia Corporation.
CompactFlash is a registered trademark of SanDisk Corporation.
Sony, Memory Stick, PlayStation, PLAYSTATION and PSP are brands or registered trademarks of Sony Corporation.
HDV is a brand of Sony Corporation and Victor Company of Japan, Limited (JVC).
UPnP is a registered trademark of the UPnP Implementers Corporation.
Labelflash is a registered trademark of Yamaha Corporation.
All brands are for information purposes only. All trade names and trademarks are the property of their respective owners.
Nero AG, Im Stoeckmaedle 13-15, D-76307 Karlsbad, Germany
Nero DiscSpeed
Page 3

Table of contents
1 Start Successfully 5
1.1 About the manual 5
1.2 About Nero DiscSpeed 5
2 Launching the Program 6
3 Main Screen 7
4 Nero DiscSpeed Options Window 11
4.1 User Interface Navigation Entry 11
4.2 Standard Tests Navigation Entry 13
4.3 Transfer Rate Navigation Entry 15
4.4 Access/Seek Times Navigation Entry 18
4.5 Save Navigation Entry 19
4.6 Autorun Navigation Entry 20
4.7 Disc Quality Entry 21
4.8 Capture Navigation Entry 24
5 Benchmark Tab - Standard Tests 25
5.1 Transfer rate 26
5.2 DAE quality 28
5.3 Access/Seek Times 28
5.4 CPU usage 28
5.5 Burst Rate 29
5.6 Spin Up/Down 29
5.7 Load/Eject 29
5.8 Create Data Disc (Classic Version) 30
5.9 Running an individual Standard Test 30
5.10 Running a Standard Test Series 32
Table of contents
6 Create Disc Tab 33
6.1 Creating a Data Disc (Advanced Version) 33
6.2 Running the Create Data Disc Test 36
7 Disc Info Tab 37
8 Disc Quality tab 39
8.1 Quality Test 39
8.2 Running the Disc Quality Test 43
9 ScanDisc tab 44
9.1 Scan Disc 44
9.2 Running the ScanDisc Test 46
10 Advanced DAE Quality Test 48
10.1 Nero DiscSpeed Window - DAE Test Disc 48
Nero DiscSpeed III
Page 4

Table of contents
10.2 Creating a Test Disc 50
10.3 Nero DiscSpeed window - Advanced DAE Quality Test 50
10.4 Running the Advanced DAE Quality Test 52
10.5 Error test 53
10.5.1 Advanced DAE Error Correction Test Window 53
10.5.2 Create Image 55
10.5.3 Running the Test with an A-BEX Test Disc 55
10.5.4 Running the Test with a DAE Test Disc 56
11 Overburning test 57
11.1 Nero DiscSpeed - Overburning Test window 58
11.2 Running the Overburning Test 60
12 Saving Test Data 61
13 Loading Test Data 62
14 Erasing a Disc 64
15 Bit Setting 65
15.1 Nero DiscSpeed - Bit Setting Window 65
15.2 Changing the Bit Setting 66
16 Technical Information 67
16.1 System requirements 67
17 Glossary 68
18 Index 72
19 Contact 74
Nero DiscSpeed IV
Page 5
1 Start Successfully
1.1 About the manual
This manual is intended for all users who want to learn how to use Nero DiscSpeed. It is
process-based and explains how to achieve a specific objective on a step-by-step basis.
To make best use of this documentation, please note the following conventions:
Indicates warnings, preconditions or instructions that have to be precisely followed.
Indicates additional information or advice.
Start Successfully
1. Start …
OK
(see…)
[…]
The number at the beginning of a line indicates a prompt for action.
Carry out these actions in the order specified.
Indicates an intermediate result.
Indicates a result.
Indicates text passages or buttons that appear in the program interface. They are shown in boldface.
Indicates references to other chapters. They are executed as links
and are shown in red and underlined.
Indicates keyboard shortcuts for entering commands.
1.2 About Nero DiscSpeed
Nero DiscSpeed tells you the speed of the available CD/DVD drives. Results can be viewed
either as a graph or as a test log. Nero DiscSpeed also creates special test media for data
and audio.
Nero DiscSpeed 5
Page 6
2 Launching the Program
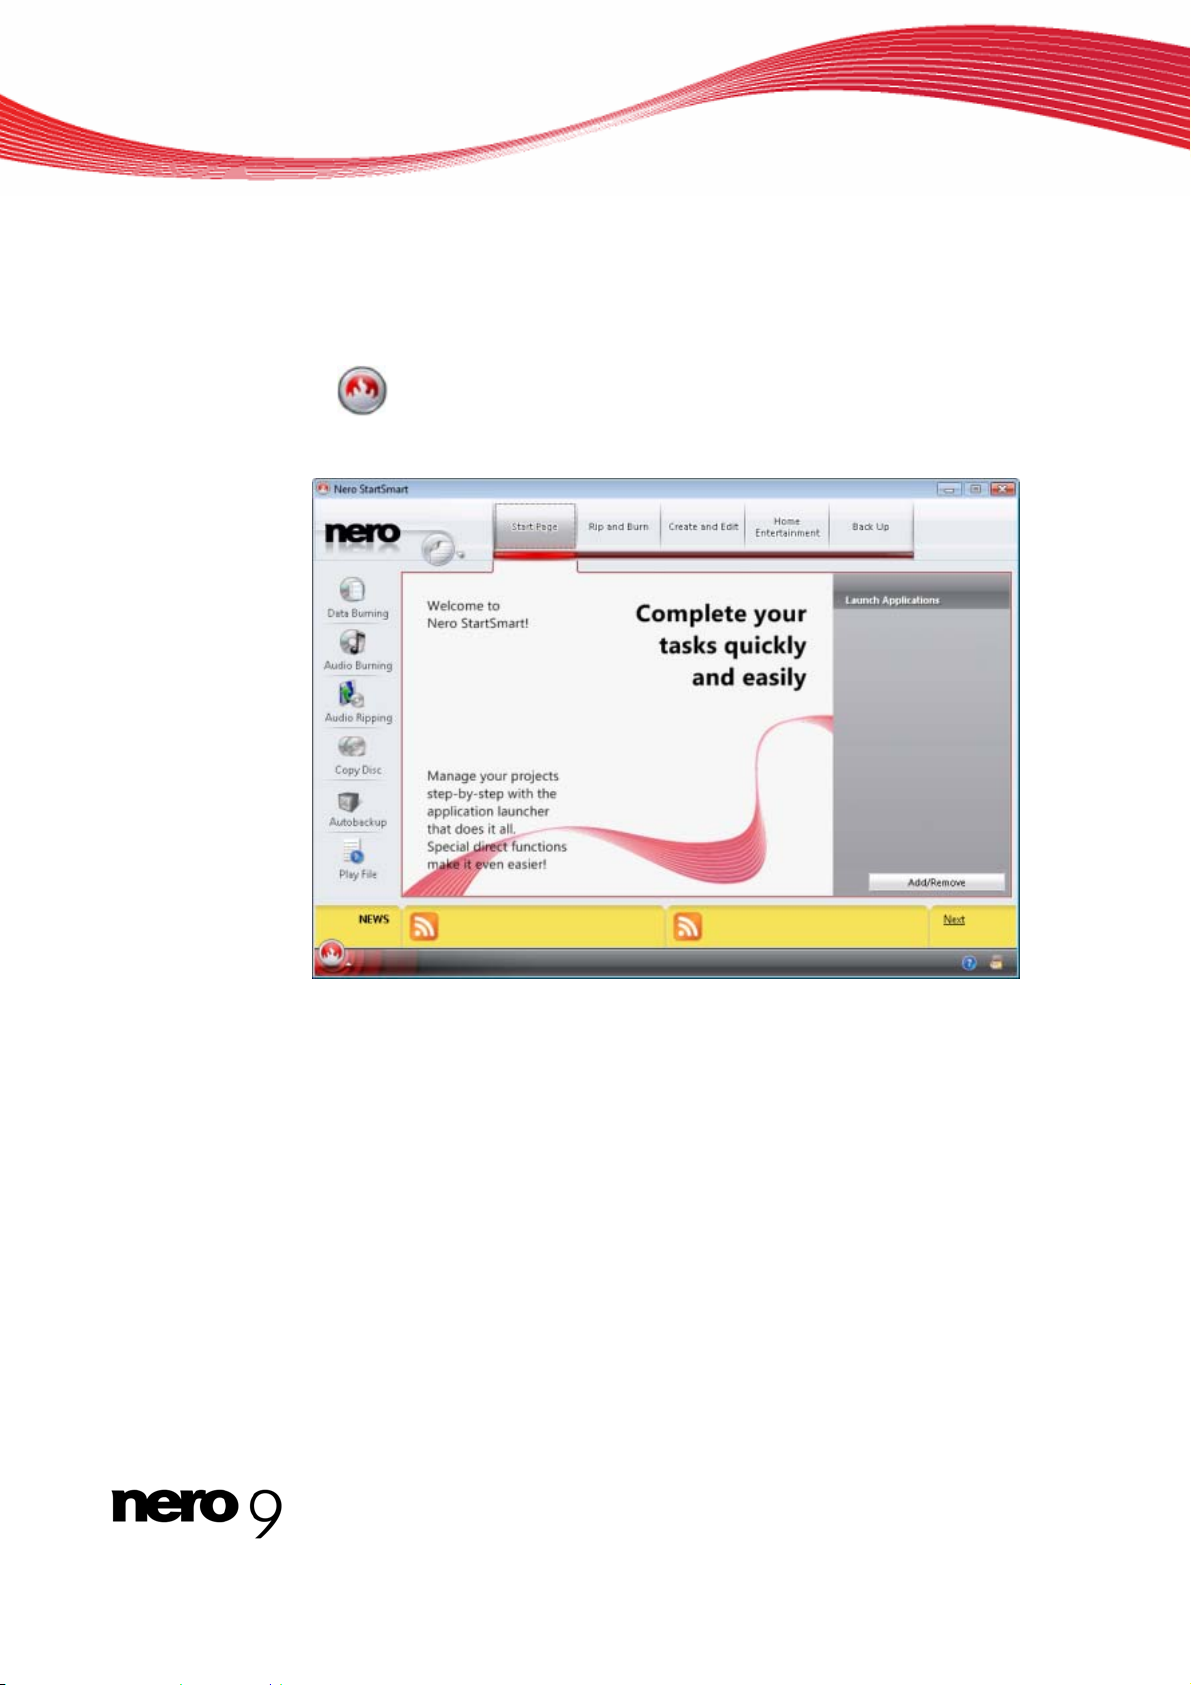
To start Nero DiscSpeed via Nero StartSmart, proceed as follows:
1. Click the Nero StartSmart icon.
The Nero StartSmart window opens.
2. Click the button.
The list of Nero applications is displayed.
Launching the Program
3. Select the Toolbox > Nero DiscSpeed entry in this selection list.
4. The Nero DiscSpeed window opens.
You have launched Nero DiscSpeed via Nero StartSmart.
Nero DiscSpeed 6
Nero StartSmart window
Page 7
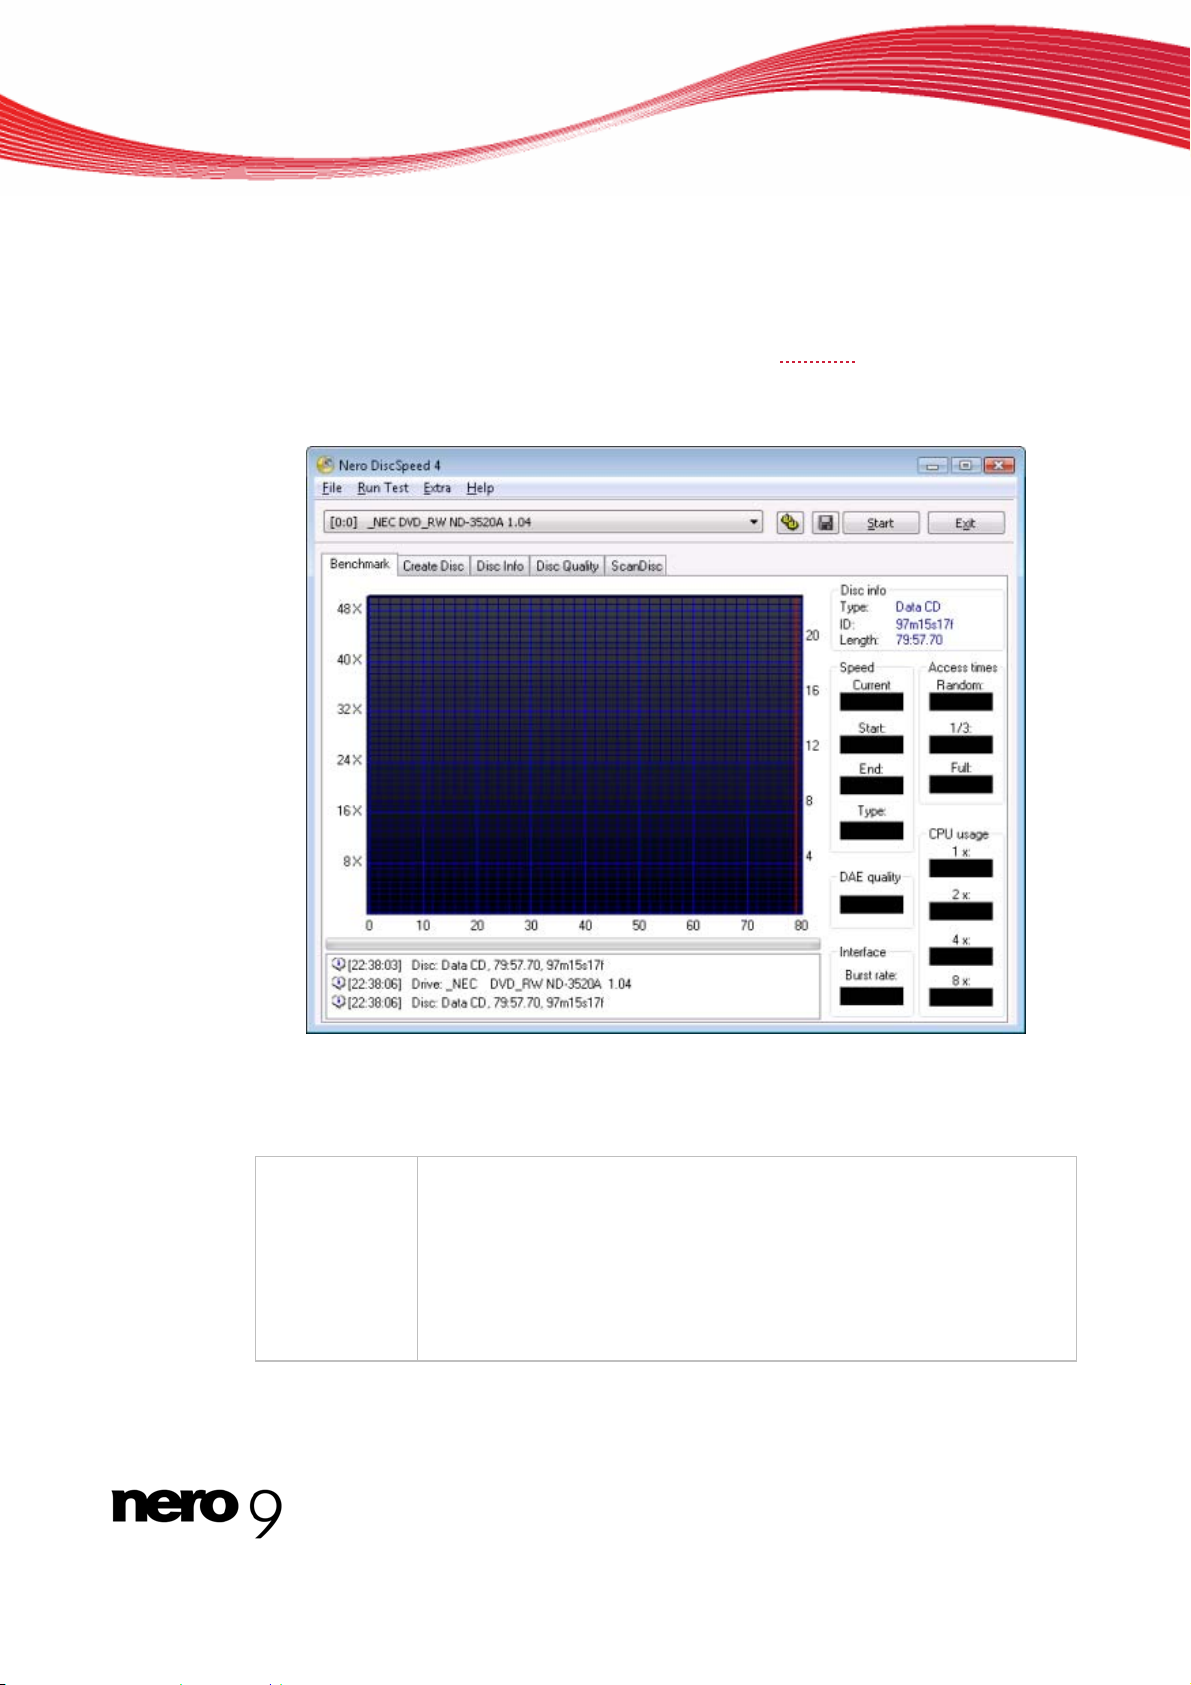
3 Main Screen
The Nero DiscSpeed main screen is the starting point for all actions that you perform using
Nero DiscSpeed.
The drop-down menu lists the optical drives available on the computer using their exact model designations. It also displays the version number of the firmware
You can switch between five tabs within the main screen. These tabs are used to carry out
the different tests and to display information regarding them.
Main Screen
installed on the drive.
The menu bar in the main screen has four menus.
The following entries are available in the File menu:
Load Results
Contains the following two sub-entries: Load Single File and Database.
Load Single File: Loads a saved test file.
Database: Loads several files at the same time. This way, you can
compare test results and/or the efficiency of optical drives.
Only test files saved as binary files with the extension *.dat can be loa-
ded again.
Nero DiscSpeed 7
Main Screen
Page 8

Main Screen
Save Results
Options
Exit
The following entries are available in the Run Test menu:
Selected
Contains the following three sub-entries: Binary (.dat), Text (.csv), and
HTML.
Binary (.dat): Saves the test results as a binary file. Only test files sa-
ved as binary files with the extension *.dat can be loaded again. Use
this format if you want to open the test results in Nero DiscSpeed or in
the Nero DiscSpeed database and compare them.
Text (.csv): Saves the test results as a text file that you can open with
any text editor.
HTML: Saves the test results in a diagram that you can open with any
Web browser. In the Options window, under the Save navigation entry,
you can define how much data will be saved in the file. If the Include
status check box is enabled, the diagram and all other test results are
saved; if it is cleared, only the graph is saved.
Opens the Nero DiscSpeed - Options window, where you can define
settings for the user interface, for the save function, and for various
tests.
Exits Nero DiscSpeed.
Starts a standard test series. All standard tests that you selected in the
Nero DiscSpeed - Options window, under the Standard Tests naviga-
tion entry, are run.
All
Transfer rate
DAE quality
Access/Seek
Times
CPU usage
Burst Rate
Spin Up/Down
Load/Eject
Create data
disc
Starts the standard test series. All the standard tests that are listed in
the Nero DiscSpeed - Options window, under the Standard Tests na-
vigation entry, are run.
Starts the transfer rate test.
Starts the DAE quality test.
Starts the access/seek times test.
Starts the CPU usage test.
Starts the burst rate test.
Starts the spin up/down test.
Starts the load/eject test.
Starts the create data disc test.
Nero DiscSpeed 8
Page 9
The following entries are available in the Extra menu:
Main Screen
Advanced DAE
Quality Test
Overburning test
Erasing a Disc
Bit Setting
Contains the following three sub-entries: Create Test CD, Run
Test, and Error Test.
Create Test CD: Opens the Nero DiscSpeed - DAE Test Disc
window, where you can burn a special test disc in order to run the
advanced DAE quality test.
Run Test: Opens the Advanced DAE Quality Test window, where
you can run the advanced DAE quality test with the help of a previously created test disc.
Error Test: Contains the Create Image and Run Test sub-entries.
Create Image: Opens the Nero DiscSpeed - Create Advanced
DAE Image window, where you can create an image file of the test
disc. You need a test disc type A-BEX (TCD-714R, TCD-721R, or
TCD-726)
Run Test: Opens the Nero DiscSpeed - Advanced DAE Error
Correction Test window, where you can read the data from an A-
BEX disc and compare it with the data of the created image file.
Opens the Nero DiscSpeed - Overburning Test window, where
you can simulate the overburning test.
Opens the Nero DiscSpeed - Erase window, where you can erase
data from rewritable discs.
Opens the Nero DiscSpeed - Bitsetting window, where you can
change the bit settings for a DVD recorder.
Capture to clipboard
Capture to file
The following entries are available in the Help menu:
Manual
About
Copies a snapshot of Nero DiscSpeed to the clipboard. The results
in all further displays are lost.
You must save the snapshot before removing the disc you are testing from the optical drive. Otherwise the image will be deleted from
the clipboard.
The Save as dialog appears. Opens the Save As window, where
you can save the snapshot on your hard drive.
Opens the Help Information window, where you can download the
manual for Nero DiscSpeed from the Nero website.
Opens the About Nero DiscSpeed window, where you can find the
exact version number of Nero DiscSpeed.
Nero DiscSpeed 9
Page 10

The following buttons are available:
Main Screen
Start
Stop
Exit
The following tabs are available:
Benchmark
Create Disc
Disc Info
Disc Quality
Scan Disc
Opens the Nero DiscSpeed - Options window, where you can de-
fine settings for the user interface, for the save function, and for various tests.
Starts the test.
The test that is started depends on the selected tab.
Stops the test in progress.
Closes Nero DiscSpeed.
Displays the Benchmark tab. Here you can run the standard tests
offered by the program. This is also where the results are displayed.
Displays the Create Disc tab. Here you can run an advanced test
for writing to disc.
Displays the Disc Info tab, where you can find detailed information
on the disc currently in the optical drive.
Displays the Disc Quality tab. Here you can run a scan to test the
quality of burned discs.
Displays the ScanDisc tab. Here you can run a further quality test.
See also:
Transfer rate 26
DAE quality 28
Access/Seek Times 28
CPU usage 28
Burst Rate 29
Spin Up/Down 29
Load/Eject 29
Create Data Disc (Classic Version) 30
Advanced DAE Quality Test 48
Overburning test 57
Erasing a Disc 64
Bit Setting 65
Benchmark Tab - Standard Tests 25
Disc Info Tab 37
Nero DiscSpeed Options Window 11
Saving Test Data 61
Loading Test Data 62
Nero DiscSpeed 10
Page 11
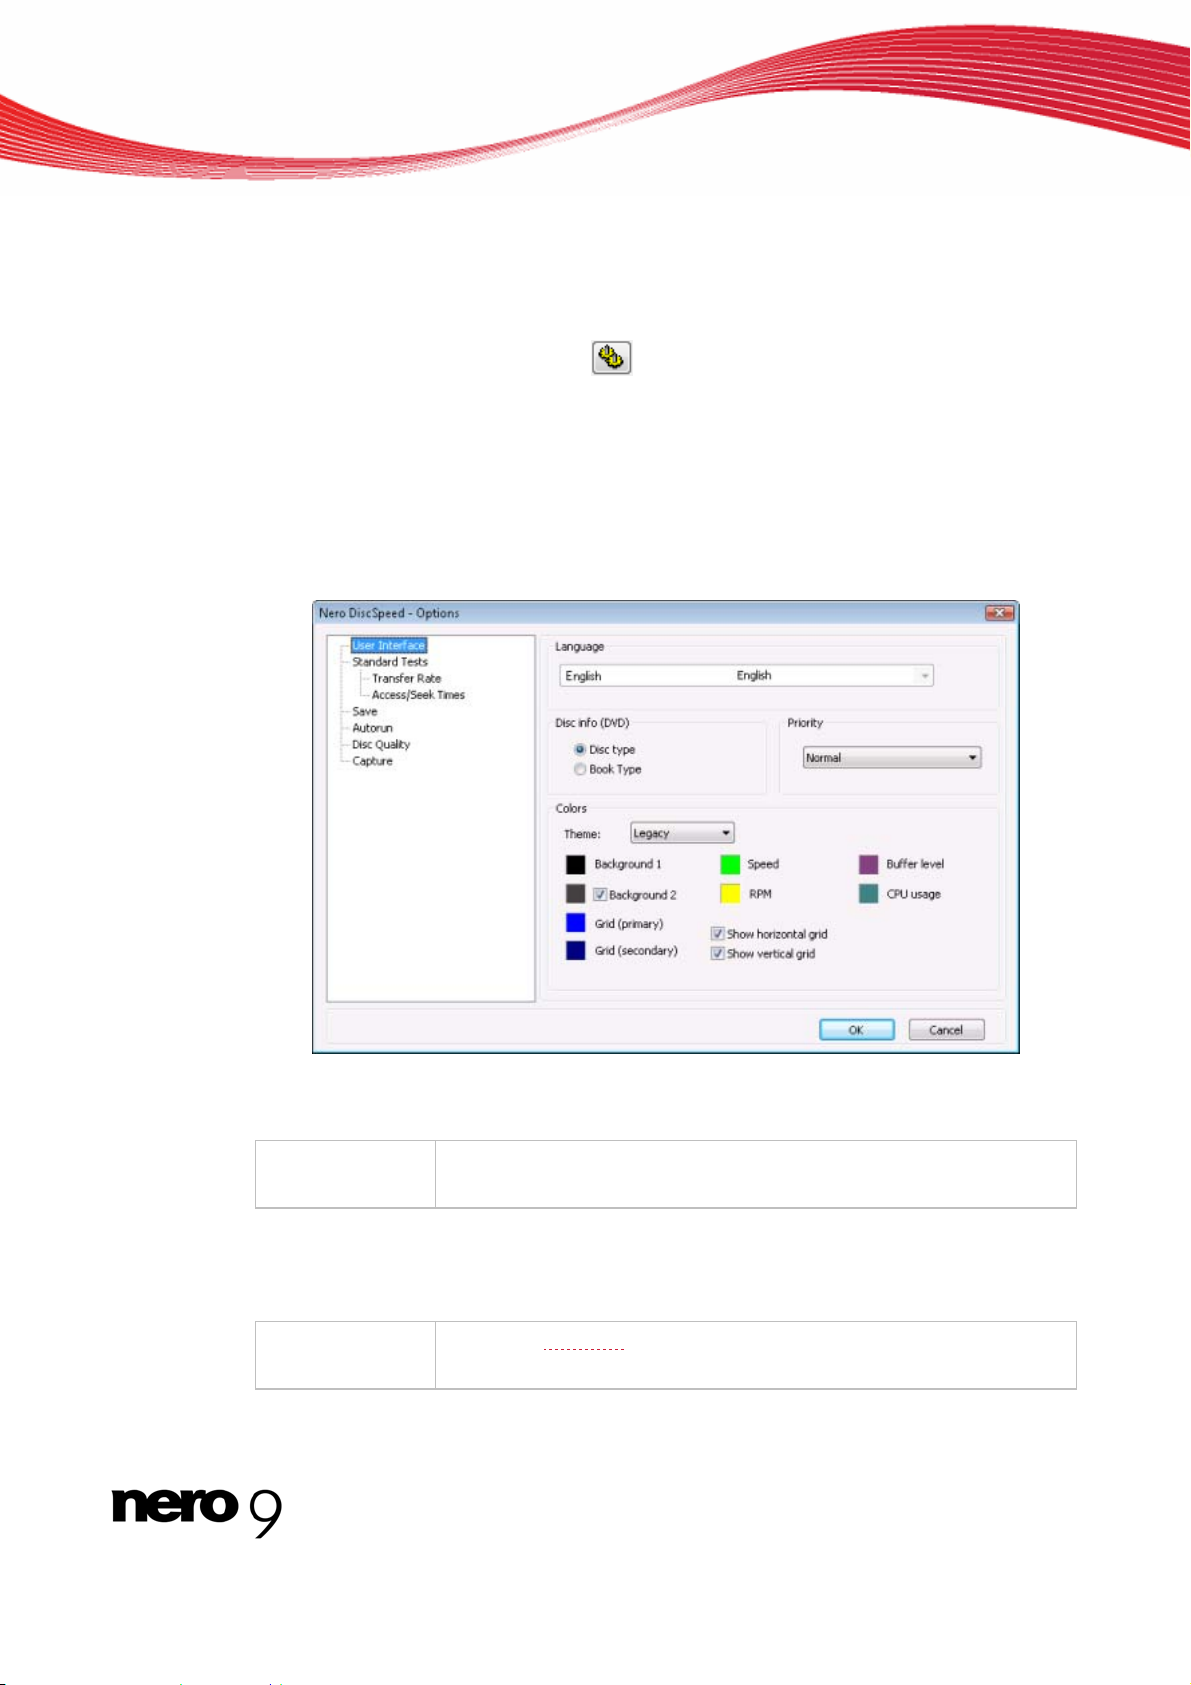
4 Nero DiscSpeed Options Window
The Nero DiscSpeed - Options window provides various options for customizing the ap-
pearance of the Nero DiscSpeed interface and for configuring settings according to your requirements.
The window can be opened using the
setting options. Different input areas will be displayed depending on the entry selected in the
navigation tree.
4.1 User Interface Navigation Entry
The User Interface navigation entry offers setting options in the Language, Disc info
(DVD), Priority, and Colors areas.
button. It comprises a navigation tree and various
Nero DiscSpeed Options Window
Nero DiscSpeed - Options - User Interface navigation entry
The following setting options are available in the Language area:
Menu
Language
In the Disc info (DVD) area, you can select which information is displayed on the Benchmark tab on the main screen. This setting will only be available if there is a DVD in the opti-
cal drive. The following setting options are available:
Option button
Disc type
Specifies the language to be used in the program interface.
Shows the Disc type
Nero DiscSpeed 11
of the DVD.
Page 12

Nero DiscSpeed Options Window
Option button
Book type
The following setting options are available in the Priority area:
Menu
Priority
In the Colors area, you can define the colors for theBenchmark tab in the main screen. The
following setting options are available:
Menu
Topic
Button
Background 1
Shows the book type
Selects the priority of Nero DiscSpeed. Each process in Windows is
run with a defined priority. This priority defines how efficiently Nero
DiscSpeed can access the computer's resources, e.g. memory.
The following priority levels are available for selection: Low, Normal,
High, and Realtime.
Set the priority to High to prevent your tests from being interfered with
by other processes running concurrently on the computer.
Selects the desired theme. In addition to predefined themes, you can
also set colors with the User-defined entry. To manually edit a color,
click the colored tile and select the color you want in the dialog box
that appears.
Changes the basic color in the background of the graph area.
of the DVD.
Button
Background 2
Button
Grid (primary)
Button
Grid (secondary)
Button
Speed
Button
RPM
Button
Buffer level
Button
CPU usage
Changes the basic color for shading in the background of the graph
area.
Only works when the Background 2 check box is enabled. Other-
wise, the background of the graph area is displayed in one single
color.
Changes the colors for the coarse grid in the graph area.
Only works when at least one of the following check boxes is enabled:
Show horizontal grid and/or Show vertical grid.
Changes the color for the fine grid in the graph area.
Only works when at least one of the following check boxes is enabled:
Show horizontal grid and/or Show vertical grid.
Changes the color for the graph curve that represents speed (write or
read
speed, depending on the test).
Changes the color for the graph curve that represents the rotational
speed of the disc.
Changes the color for the Buffer level
Changes the color for the CPU usage
curve.
curve.
Nero DiscSpeed 12
Page 13
Nero DiscSpeed Options Window
Check box
Show horizontal
grid
Check box
Show vertical
grid
Shows the horizontal grid lines in the graph area or hides them. This
box is checked by default.
Shows the vertical grid lines in the graph area or hides them. This box
is checked by default.
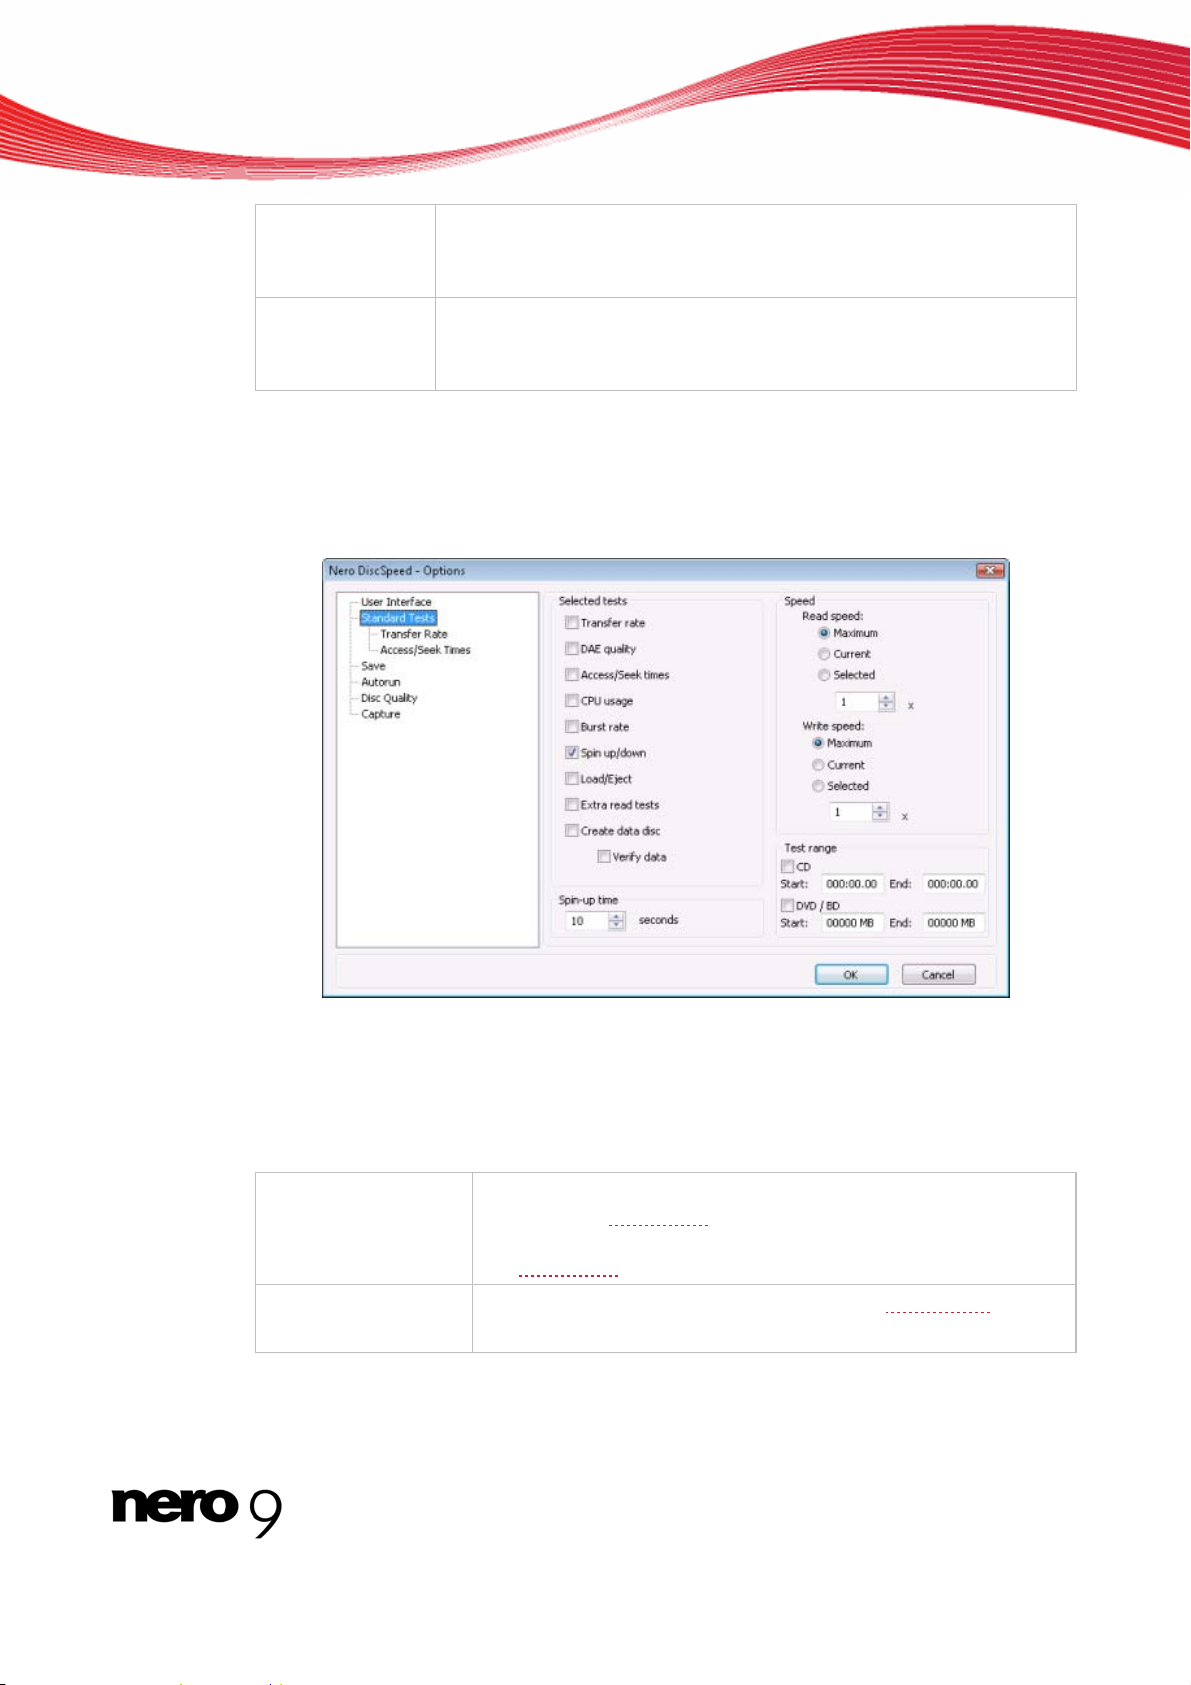
4.2 Standard Tests Navigation Entry
The Standard Tests navigation entry offers setting options in the Selected tests, Speed,
and Spin-up time areas.
Nero DiscSpeed - Options - Standard Tests navigation entry
In the Selected tests area, you can define the standard tests that are run automatically if
you click the Start button on the main screen or the menu item Run Test > Selected. These
tests are run on the Benchmark tab. All tests are activated by default.
The following setting options are available:
Check box
Transfer rate
Check box
DAE quality
Adds the test to the standard test series. The Transfer rate test
measures the read speed
read from a disc. If the disc inserted is blank, the test measures
the write speed
Adds the test to the standard test series. The DAE quality test
comprises two partial measurements.
Nero DiscSpeed 13
.
of data, i.e. the speed at which data is
Page 14

Nero DiscSpeed Options Window
Check box
Access/Seek Times
Check box
CPU usage
Check box
Burst Rate
Check box
Spin Up/Down
Check box
Load/Eject
Check box
Extra Read Tests
Check box
Create data disc
Adds the test to the standard test series. The Access/seek times
test measures the access
inserted in the drive in three partial measurements.
Adds the test to the standard test series. The CPU usage test
measures the percentage utilization of the CPU (central process-
ing unit) at various speeds (1x, 2x, 4x, and 8x).
Adds the test to the standard test series. The Burst rate test
measures the maximum possible transmission rate from the optical drive to the computer.
Adds the test to the standard test series. The Spin down test
measures how long it takes an optical drive to stop, while the
Spin up test measures how long it takes before the optical drive
can read data again after stopping.
Adds the test to the standard test series. The Load/eject test
measures the time that an optical drive needs to load, detect, and
eject a disc.
Adds the test to the standard test series. The Extra read tests
test series consists of three tests. One or more sectors
disc are read with defined test samples.
Adds the test to the standard test series. The Create data disc
test is available in its classic version on the Benchmark tab and
as an advanced version on the Create Disc tab. You can use the
classic test to analyze the write speed and the rotational speed
You can use the advanced test to also measure the buffer
and the CPU usage
or seek times of optical drives for discs
on the
.
level
caused by the optical drive.
Check box
Verify data
In the Speed area, you can define the read speed for the Transfer rate test and the write
speed for the Create data disc
recommended for testing the optical drive and/or the discs under worst-case conditions. The
following setting options are available:
Option button
Maximum
Option button
Current
Option button
Selected
Checks the data that was written on the disc during the Create
data disc test.
test. Maximum speed is enabled by default; this speed is also
Selects the maximum speed that an optical drive can achieve.
Selects the current speed of the optical drive. This speed is not
influenced, and can be affected by other system settings, e.g. other software or the firmware
Selects the speed manually. Enter the desired value in the input
field.
Nero DiscSpeed 14
settings.
Page 15
Nero DiscSpeed Options Window
The following setting option is available in the Spin-up time area:
Spin-up time
See also:
Transfer rate 26
DAE quality 28
Access/Seek Times 28
CPU usage 28
Burst Rate 29
Spin Up/Down 29
Load/Eject 29
Defines the spin-up time.
In order to stabilize the disc and the optical drive, Nero DiscSpeed starts spinning the disc before the actual test starts. The
default setting here is 10 seconds.
4.3 Transfer Rate Navigation Entry
The Transfer Rate navigation entry offers setting options in the Graph and Write options
areas specifically for the Transfer rate test.
Nero DiscSpeed - Options - Transfer Rate navigation entry
Nero DiscSpeed 15
Page 16

Nero DiscSpeed Options Window
You can define the settings for the graph in the Graph area. The following setting options
are available:
Slider
Test length
Check box
Show RPM
Menu
Maximum speedCD/DVD
Maximum speedCD/DVD
Check box
Show minimum/maximum
Check box
Read test
Defines the accuracy of the transfer rate test.
The higher the accuracy, the more detailed the graph is.
However, higher accuracy results in a longer test duration.
Shows the rotational speed
Defines the maximum value shown on the vertical scale
of the graph on the Create Disc tab if a CD/DVD is in-
serted into the optical drive.
To prevent parts of the curve from extending past the
edge of the graph area, we recommend that you choose
a value slightly above the maximum read speed of the
optical drive.
Shows the minimum and maximum speed values recorded during the transfer rate test.
In a normal curve, the lowest speed is the start speed
while the highest speed is the end speed. In an uneven
curve, the lowest recorded speed is displayed as the minimum value while the highest recorded speed is displayed as the maximum value.
Shows the read test curve in either high or low resolution.
in the graph.
Check box
Write test
The following setting options are available in the Write options area:
Area
Write mode
Area
Disc type
Check box
Buffer underrun protection
Shows the write test curve in either high or low resolution.
Selects the SAO (Session-At-Once) or TAO (Track-At-
Once)write mode for discs.
You can also enable the Overburn CD and Overburn DVD
check boxes in Session-At Once mode. Enter the exact data quantity in the corresponding input fields.
Enables burning simulation for either data or audio discs.
Enables protection against optical drive buffer underrun
Buffer underrun protection is enabled by default. We recommend that you leave this box checked.
Nero DiscSpeed 16
.
Page 17

Nero DiscSpeed Options Window
Check box
Streaming
Check box
Direct overwrite
Check box
Burning an image file
Check box
Include test data
Streaming can more than double the write speed. However,
it can have a negative effect on the quality of the disc, since the disc is not checked during the burn process and defective sectors are not re-written.
This box is cleared by default, in other words verification is
enabled. If this check box is enabled, verification will be disabled for DVD-RAM
If this box is checked, rewritable discs will be directly overwritten without having to delete old data first.
If this box is not checked, a dialog box will notify you when
a disc containing data is inserted for writing.
If this check box is enabled, Nero DiscSpeed will run
through the Create data disc test by creating an image file
(ISO or NRG).
If this check box is not enabled, Nero DiscSpeed will run
through the same test by burning binary data until the maximum capacity of the disc is reached.
If this check box is enabled, additional information about
the test (information on the optical drive, the installed firmware, and the burn process graph) will be burned to the
disc.
and Blu-ray discs.
See also:
Transfer rate 26
Nero DiscSpeed 17
Page 18
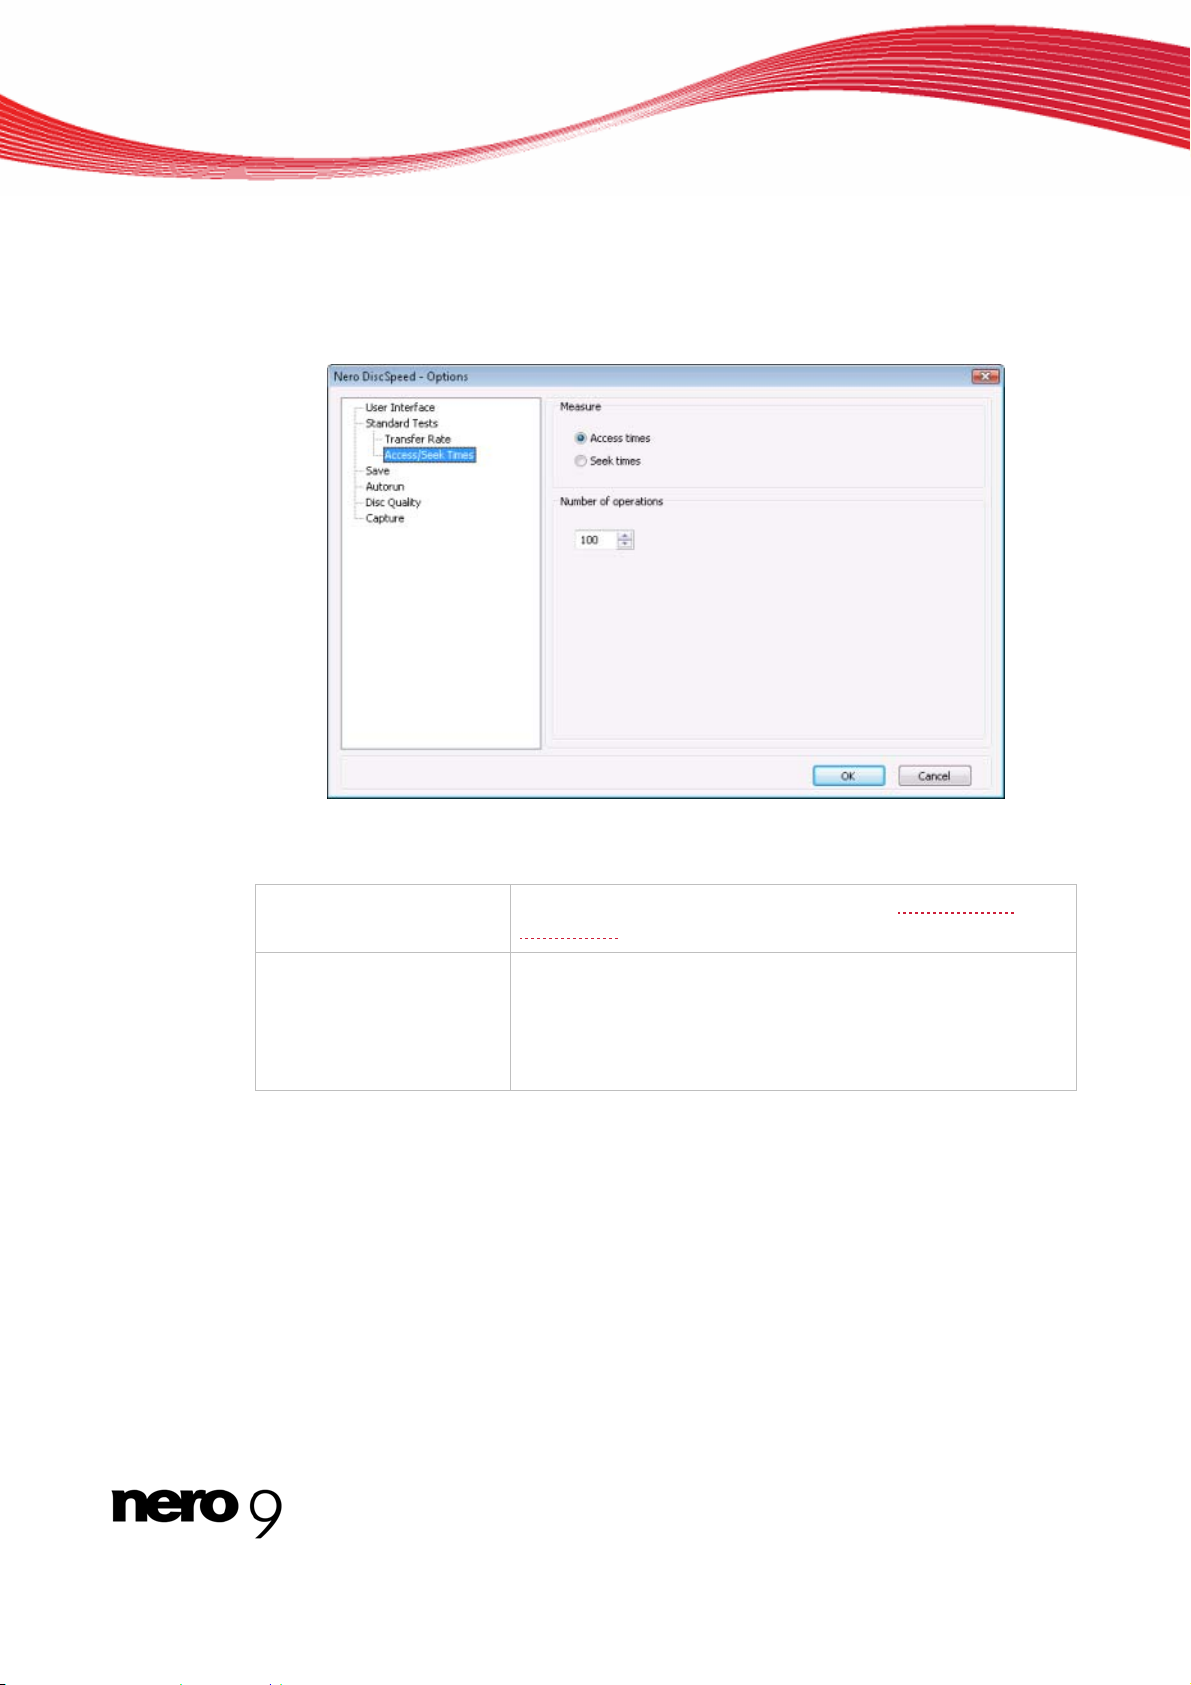
4.4 Access/Seek Times Navigation Entry
The Access/Seek Times navigation entry offers setting options in the Measure and Number of operations areas specifically for the Access/seek times test.
Nero DiscSpeed Options Window
The following setting options are available:
Area
Measure
Input field
Number of operations
See also:
Access/Seek Times 28
Defines which of the two tests will be run - Access times
Seek times
Defines how many times the selected test is run. The higher
the value that you enter, the more accurate the measurement
result is. However, the duration of the test becomes longer if
the test is repeated often. The test is run 100 times by default.
.
Nero DiscSpeed - Options - AccessSeek Times navigation entry
or
Nero DiscSpeed 18
Page 19
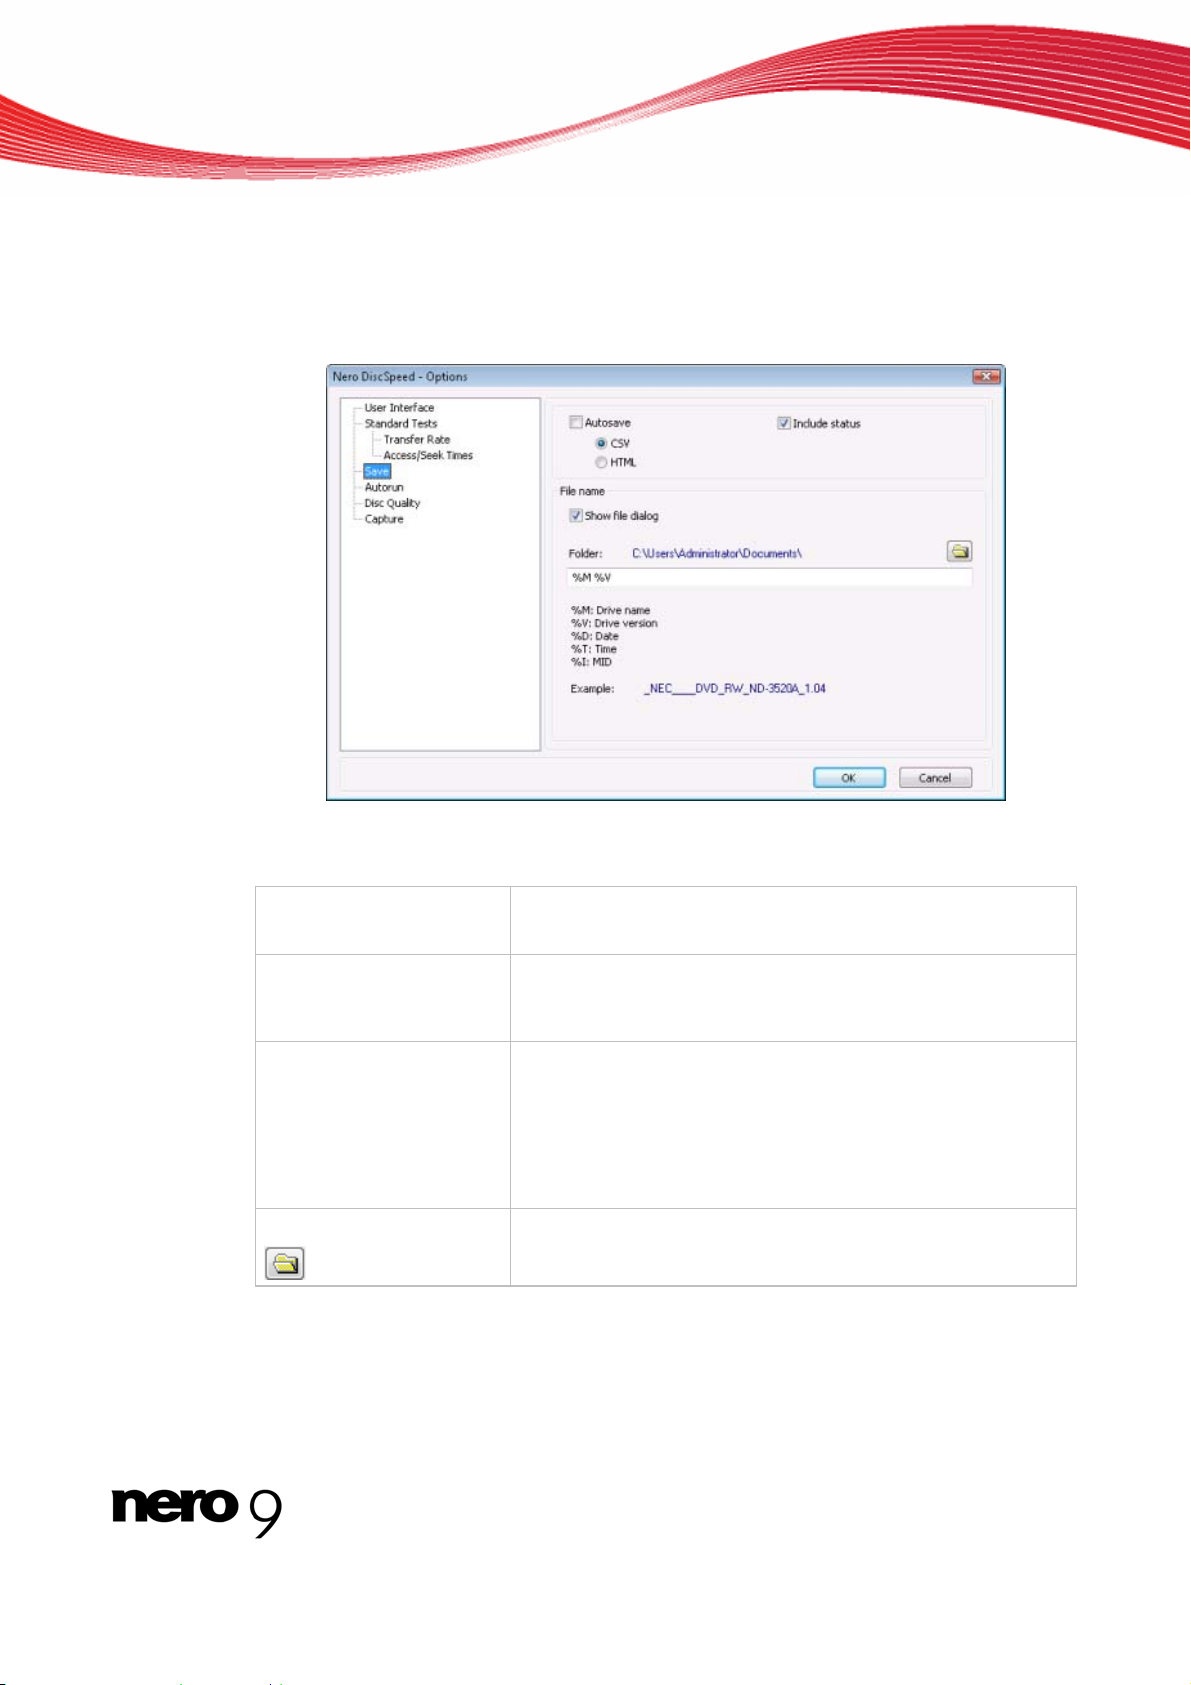
4.5 Save Navigation Entry
Under the Save navigation entry you can specify a storage location and file name that are
automatically selected if you have enabled the Autosave feature.
Nero DiscSpeed Options Window
The following setting options are available:
Check box
Autosave
Check box
Include status
Check box
Show file dialog
Button
If this check box is enabled, Nero DiscSpeed will automatically save all test results, either in CSV or in HTML format.
If this check box is enabled, Nero DiscSpeed will not only save the graph, but also all additional information appearing in
the display area.
If this box is checked, an appropriate dialog box will open before the file is saved. Here you can choose a file name and
specify where the file is to be saved.
If this box is not checked, then all files will be automatically
saved in the specified folder. The file name is automatically
created.
Opens the Find Folder window. Here, you can specify the
folder in which the file should be saved.
Nero DiscSpeed - Options - Save navigation entry
Nero DiscSpeed 19
Page 20
Nero DiscSpeed Options Window
Input field
See also:
Saving Test Data 61
Creates file names based on the following user-defined pa-
rameters: drive name, drive version, date, time, and MID
(Media Identification Code).
You can compile the parameters in any order. Arrange all the
parameters you want in the input field.
If all parameters are cleared from the input field, the file name
cannot be automatically generated.
Only works if the Show file dialog check box is enabled.
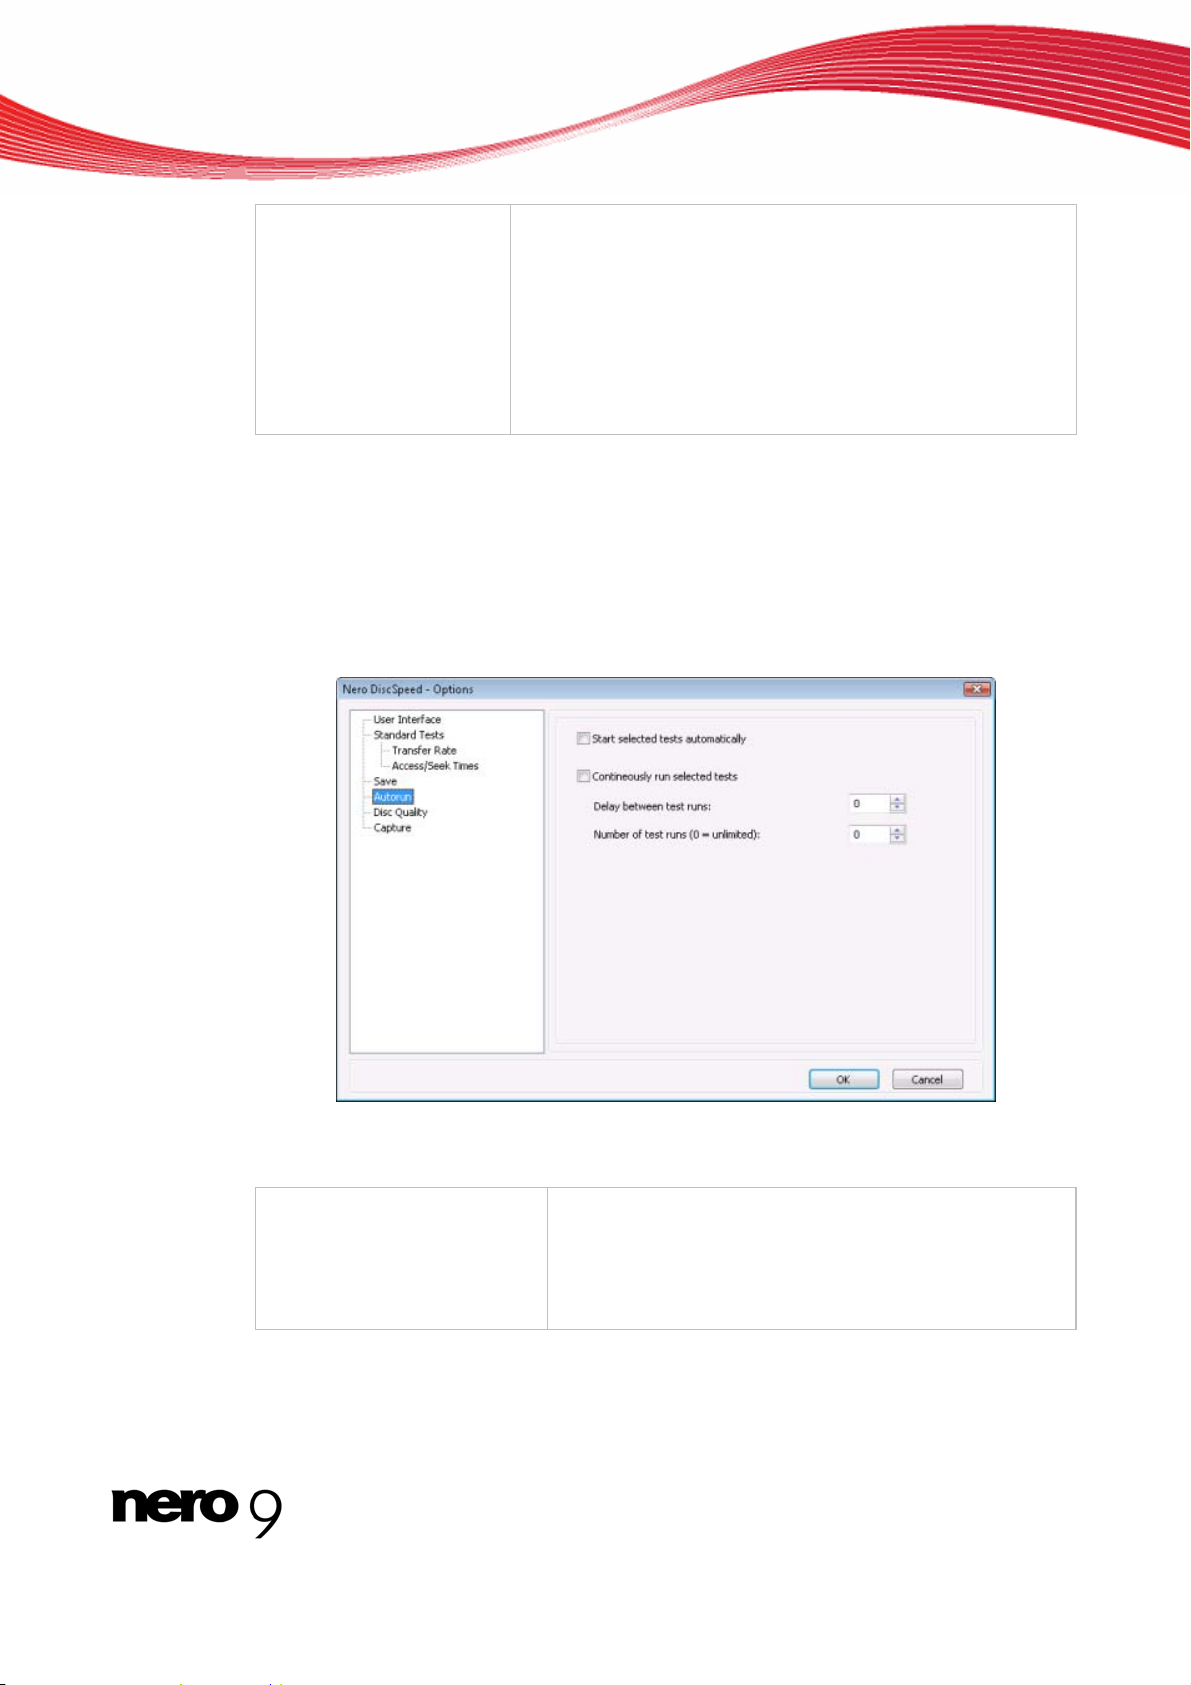
4.6 Autorun Navigation Entry
You can configure detailed settings for the autorun feature under the Autorun navigation en-
try.
The following check boxes are available:
Start selected tests automatically
Automatically starts the series of tests selected under the
Standard Tests navigation entry as soon as a disc is in-
serted in the optical drive.
If this box is not checked, the test series must be manu-
ally started.
Nero DiscSpeed 20
Nero DiscSpeed - Options - Autorun navigation entry
Page 21
Nero DiscSpeed Options Window
Continuously run selected
tests
See also:
Standard Tests Navigation Entry 13
4.7 Disc Quality Entry
The Disc Quality navigation entry offers setting options for the quality test in the General,
QuickScan, Diagram Margins and Colors.
Defines how many times the tests selected under the
Standard Tests navigation entry will be run.
The following options are available if this box is checked:
Delay between test runs - Defines the length of the de-
lay between two test runs.
Number of test runs - Defines how many times the tests
will be repeated. If the value selected is 0, the tests will
be repeated until you manually stop them.
Nero DiscSpeed - Options - Disc quality navigation entry
The following check boxes are available in the General area:
Determing the speed
The speed the Disc Quality is tested, can change with the
choosed optical drive. The speed is connected to the recorder
model and the installed firmware. If the check box is active, Nero DiscSpeed automatically detects the speed, as soon as the
Disc quality tab in the main screen is selected. If this box is not
checked, the speed must be manually detected.
Nero DiscSpeed 21
Page 22

Nero DiscSpeed Options Window
Show error limits
Show statistics
Show disc label
In the QuickScan area you can define the options for the quick scan. The Disc Quality
could be executed as complete scan. You can choose between the quick and the full scan
on the Disc Quality tab. The quick scan only checks defined points on the disc. All other ar-
eas are ignored. As a result, it requires less time than a complete scan but is less accurate.
Measure points
Sample Length
In the Diagram Margins area you can define the maximum scale limits for the graphical rep-
resentation of the error curves. The following setting options are available:
Option button
Automatic
Shows the intervals in the diagram of the graphical representation in colored graduations.
Depending on the optical drive model and the intervals at which
they occur, detected errors can be classed at a glance as permissible, tolerable, or unacceptable.
Shows a statistical overview of the results at the end of the test.
Shows the disc label on the Disc Quality tab.
Defines how many points on a disc will be checked during the
quick scan.
Defines the size of each scan point in MB.
Automatically adapts the graduated scale values to the number
of errors measured. A value of 10 is defined as the initial value
for both C1 Errors/PI Errors and for C2 Errors/PI Failures.
If more errors are found, Nero DiscSpeed automatically adapts
the scales to the higher value.
Option button
Fix
Selection area
Maximum CD speed
In the Colors area you can define the colors on the Disc Quality tab in the main screen.
The following setting options are available:
Menu
Topic
Button
Background 1
Defines the maximum values on the scales as locked. Enter
the values you want in the C1 Errors/PI Errors and C2 Er-
rors/PI Failures text boxes.
Defines the maximum value that will be displayed in the C1 Er-
rors/PI Errors curve for write and read speeds.
This value is separately defined for CDs and DVDs.
Selects the desired theme. In addition to predefined themes,
you can also set colors with the User-defined entry. To manu-
ally edit a color, click the colored tile and select the color you
want in the dialog box that appears.
Changes the basic color in the background of the graph area.
Nero DiscSpeed 22
Page 23
Nero DiscSpeed Options Window
Button
Background 2
Button
Grid (primary)
Button
Grid (secondary)
C1/PIE
C2/PIF
Jitter
Read speed
Write speed
Check box
Show horizontal grid
Changes the basic color for shading in the background of the
graph area.
Only works when the Background 2 check box is enabled.
Otherwise, the background of the graph area is displayed in
one single color.
Changes the colors for the coarse grid in the graph area.
Only works when at least one of the following check boxes is
enabled: Show horizontal grid and/or Show vertical grid.
Changes the color for the fine grid in the graph area.
Only works when at least one of the following check boxes is
enabled: Show horizontal grid and/or Show vertical grid.
Line signifying the C1 errors
Line signifying the C2 errors
Representation of Jitter
Line signifying the Read speed
Line signifying the write speed
This curve will only be displayed if the Include test data box
has been checked under the Transfer Rate navigation entry.
Shows the horizontal grid lines in the graph area or hides them.
This box is checked by default.
/PI errors in the graph.
PI errors in the graph.
in the graph.
in the graph.
in the graph.
Check box
Show vertical grid
Shows the vertical grid lines in the graph area or hides them.
This box is checked by default.
Nero DiscSpeed 23
Page 24

4.8 Capture Navigation Entry
The Capture navigation entry offers setting options for saving test results with the help of the
snapshot feature.
Nero DiscSpeed Options Window
The following setting options are available:
Check box
Show file dialog
Menu
Image format
Button
Input field
If this box is checked, an appropriate dialog box will open before the file is saved. Here you can choose a file name and
specify where the file is to be saved.
If this box is not checked, then all files will be automatically
saved in the specified folder. The file name is automatically
created.
Defines the file format in which snapshots are saved. Formats BMP, PNG, JPG, PNG, and TIFF are available.
Opens the Find Folder window. Here, you can specify the
folder in which the file should be saved.
Creates file names based on the following user-defined pa-
rameters: drive name, drive version, date, time, and MID
(Media Identification Code).
You can compile the parameters in any order. Arrange all the
parameters you want in the input field.
If all parameters are cleared from the input field, the file
name cannot be automatically generated.
Only works if the Show file dialog check box is enabled.
Nero DiscSpeed - Options - Capture navigation entry
Nero DiscSpeed 24
Page 25

5 Benchmark Tab - Standard Tests
All standard tests are run in the main screen on the Benchmark tab. You can run tests indi-
vidually or combined into a test series.
The following standard tests are available:
Transfer rate
DAE quality
Access/Seek T
CPU usage
Burst Rate
Spin Up/Down
Load/Eje
Crea
te Data Disc (Classic Version)
imes
ct
Benchmark Tab - Standard Tests
Standard Tests - Benchmark tab
Y find d in the drive in the Disc Type a-
ou will general information on the disc that is inserte
rea, to the rig
Type
Length
ht of the graph. The following display panels are available:
Shows the disc type
For some tests, the results achieved are conditional upon the disc type.
Shows the storage capacity of the disc in the drive. In MB for CD's, in GB for
DVD's.
of the disc in the drive.
Nero DiscSpeed 25
Page 26

5.1 Transfer rate
The Transfer rate test measures the read speed of data, i.e. the speed at which data is read
from a disc. If the disc inserted is blank, the test measures the write speed
This test is suitable for testing an optical drive and for verifying the readability of burned
discs (CDs or DVDs).
The results are displayed in the form of two curves in the graph. By default, the read speed
is shown as a green line, and the rotational speed or angular velocity
a yellow line.
The horizontal scale shows the storage capacity values (in MB for CD's and in GB for
DVD's). The vertical scales show the read speed on the left and the rotational speed on the
right in RPM
With a dual layer disc
pacity of the disc and a pink one that divides the representation into two sections. Each section shows the measurement for one layer.
In addition, the test results are displayed in the Speed area, to the right of the graph.
The following display panels are available in the Speed area:
x 1000.
If your main interest is testing optical drives, it is a good idea to use discs that
are slightly damaged.
Benchmark Tab - Standard Tests
.
of the disc is shown as
, the graph shows two additional vertical lines: a red one for the full ca-
Current/Average
Start
End
Shows the varying speed over the course of the test. The average speed is displayed here when the test is finished.
Shows the lowest speed determined over the course of the test.
In a normal curve, the lowest speed is also the start speed. In
an uneven curve, the lowest recorded speed is displayed here
as the minimum value.
Shows the highest speed determined over the course of the
test. In a normal curve, the highest speed is reached at the end.
In an uneven curve, the highest recorded speed is displayed
here as the maximum value.
Nero DiscSpeed 26
Page 27

Benchmark Tab - Standard Tests
Type
Shows the type of rotational speed.
A disc can be read with the following types of rotational speed:
CAV (constant angular velocity): With constant angular velocity, the disc rotates at a constant speed, which means the inner
tracks travel at the slowest linear velocity. The linear velocity
increases as you move away from the center towards the outer
edge. The data rate remains constant while the data density
decreases away from the center of the disc.
CLV (constant linear velocity): With constant linear velocity,
the rotational speed of the disc decreases as the laser moves
away from the center of the disc. As a result, both the read
speed and the data density and rate remain constant in all areas of the disc.
ZCLV (zone CLV): If a disc is divided into several CLV zones,
each one of them can be read and above all burned as separate logical areas by using CLV. 16x speed is a characteristic
value for the innermost zone of a CD, after which the speed can
be increased in stages.
PCAV (partial CAV): In a combination of CAV and CLV, CAV
technology is used in the inner area of the disc. When a certain
linear velocity is reached, CLV technology is switched to towards the outer edge of the disc. In other words, the rotational
speed remains constant until the read speed has reached a
maximum value; the read speed then remains at a constant level while the rotational speed decreases.
See also:
Transfer Rate Navigation Entry 15
Disc Quality Entry 21
Nero DiscSpeed 27
Page 28

5.2 DAE quality
The DAE quality test comprises two partial measurements. The DAE quality test results are
displayed in the DAE Quality area.
First, audio areas from three different points on the disc are read and stored on the hard
drive. The same areas are read again and compared with the buffered data. The DAE quality
is awarded a value between 0 and 10 (perfect quality, no differences) depending on the
number of differences counted. The determined value is shown on the display panel.
Next, Nero DiscSpeed checks if the optical drive supports accurate streaming. If the Accu-
rate stream check box is enabled, desired audio files can be precisely located on a disc
whenever necessary.
If your optical drive performs poorly in the test, we recommend that you also
enable a verification feature when ripping
5.3 Access/Seek Times
The Access/seek times test measures the access or seek times of optical drives for discs
inserted in the drive in three partial measurements. The results of all three partial measure-
ments are displayed in the Access times area, to the right of the graph.
Before starting the test, you can use the options to define whether you want to test the access time or the seek time, as well as how many times you want to run the test.
Benchmark Tab - Standard Tests
CD's.
The following partial measurements are performed for seek or access times:
Random
1/3
Full
See also:
Access/Seek Times Navigation Entry 18
5.4 CPU usage
The CPU usage test measures the percentage utilization of the CPU (central processing u-
nit) at various read
CPU usage area, to the right of the graph.
Moves the read head to a random position on the disc.
Moves the read head from the start of the disc over the first third.
Moves the read head from the start of the disc to its logical end, i.e. to the outermost position where data is saved on the disc.
and write speeds (1x, 2x, 4x, and 8x). The results are displayed in the
Nero DiscSpeed 28
Page 29

5.5 Burst Rate
The Burst rate test measures the maximum possible transmission rate from the optical drive
to the computer.
Since optical drives are usually connected to the IDE channel of a motherboard with the corresponding cable, the test result in this case shows the transmission speed of the IDE channel.
If the optical drive is connected in a different manner, the test is useful nevertheless. You
can use the result to check whether the connection is fast enough for a high burning speed.
The result of the measurement is shown in the Interface area, to the right of the graph. The
value in the Burst rate display panel should always be greater than the maximum speed of
the optical drive (e.g. greater than 21 MB/s for a DVD burner with 16x write speed
The test results are only meaningful if data from the disc inserted in the drive is
cached. Since many optical drives do not cache audio data on the hard drive,
we recommend using data CD's for this test.
5.6 Spin Up/Down
The Spin down test measures how long it takes an optical drive to stop, while the Spin up
test measures how long it takes before the optical drive can read data again after stopping.
The shorter the two times, the better the result. Faster optical drives have faster spin up/spin
down times.
The results of both measurements are shown at the bottom of the screen, in the display area.
Benchmark Tab - Standard Tests
).
5.7 Load/Eject
The Load/eject test measures the time that an optical drive needs to load, detect, and eject
a disc.
The time an optical drive needs to load and/or eject a disc should always be roughly the same, regardless of the disc type
ses the tray and opens it again.
The time an optical drive needs to detect a disc that is inserted in the drive depends on the
disc type. It takes longer to detect a multisession disc
sion.
The results of the measurements are displayed at the bottom of the screen, in the display
area.
. The duration depends on how quickly the optical drive clo-
than a disc containing a single ses-
Nero DiscSpeed 29
Page 30

5.8 Create Data Disc (Classic Version)
The Create data disc test is available in its classic version on the Benchmark tab and as an
advanced version on the Create Disc tab. You can use the classic test to analyze the write
speed and the rotational speed
level and the CPU usage
The classic test is run on the Benchmark tab, where the result is also displayed. The graph
shows the curve for the write speed
quest.
The classic test is run in accordance with the settings you defined in the options under the
Transfer Rate navigation entry (see ).
. You can use the advanced test to also measure the buffer
caused by the optical drive.
in this case, and the rotational speed of the disc on re-
Benchmark Tab - Standard Tests
If you do not want to show the rotational speed
RPM check box in the options under the Transfer Rate navigation entry.
Previously selected binary data is written to a blank disc until the maximum disc capacity is
reached. The number of files written differs according to the disc type
significantly more data than a CD.
If you want to check your data and display the results in the display panel under
the graph, enable the Verify data check box in the options under the Standard
Tests navigation entry.
See also:
Transfer Rate Navigation Entry 15
5.9 Running an individual Standard Test
The following requirement must be fulfilled:
The Benchmark tab is selected in the main screen.
To start an individual test, proceed as follows:
1. If there are several optical drives available, select the one you want in the drop-down menu.
2. Insert an appropriate disc into the optical drive.
in the graph, disable the Show
, since a DVD holds
3. Click the Run Test menu.
The Run Test menu opens.
Nero DiscSpeed 30
Page 31

Benchmark Tab - Standard Tests
Standard Test - Selection
4. Select the desired test.
The test is run. You can follow the individual steps of the test process in the display area
under the graph.
You can cancel a running test at any time by clicking the Stop button.
You can now see the result of the test in the graph and the relevant displays and save it.
See also:
Saving Test Data 61
Nero DiscSpeed 31
Page 32

5.10 Running a Standard Test Series
The following requirement must be fulfilled:
The Benchmark tab is selected in the main screen.
To start more than one test in succession, proceed as follows:
1. If there are several optical drives available, select the one you want in the drop-down menu.
2. Click the button.
The Nero DiscSpeed - Options window opens.
3. Click the Standard Tests navigation entry.
4. Enable the check boxes for the tests that you want to run and clear the check boxes for all
tests that you do not want to start.
5. Configure further settings for the enabled tests as desired (under the relevant navigation
entrie
nd click the OK button.
s) a
Benchmark Tab - Standard Tests
6. Insert an appropriate di
sc into the optical drive.
7. Click the Start button.
The test is run. Yo
under the graph.
You can cancel a test in progress at any time by clicking the Stop button.
u can follow the individual steps of the test pro
You can now see the result of the test in the graph and the relevant displays and save it.
See also:
Saving Test Data 61
Nero DiscSpeed Options Window 11
cess in the display area
Nero DiscSpeed 32
Page 33

6 Create Disc Tab
6.1 Creating a Data Disc (Advanced Version)
The Create data disc test is available as an advanced version on the Create Disc tab and
as a classic version on the Benchmark tab.
You can use the classic test to analyze the read speed and the rotational speed
use the advanced test to also measure the buffer level and the CPU usage caused by the
optical drive.
The advanced test is run on the Create Disc tab, and the result is also displayed here.
The results are displayed on the graph in the form of the following four curves:
Writing Speed
Rotation
Buffer level
CPU usage
The horizontal scale shows the values for disc capacity (in MB for CD's and in GB for
DVD's). The vertical scales show the write speed on the left and the rotational speed on the
right (in RPM
A progress bar between the diagram and the display area shows the burning progress.
x 1000).
Create Disc Tab
. You can
You will find general information on the disc that is inserted in the drive in the
t ght e available:
o the ri of the graph. The following display panels ar
Nero DiscSpeed 33
Create Disc tab
Disc info area,
Page 34

Create Disc Tab
e Typ
ID
Length
Shows the disc type
Shows the media code of the disc.
Shows th
e recording capacity of the disc in the drive (in MB for CD's and GB for
of the disc in the drive.
DVD's).
As a basic principle, all settings defined in the options apply to the standard
test on the Benchmark tab. All settings a
figured directly on the Create Disc tab.
ffecting the advanced test are con-
The colors in the graph are an exception to this. If you want to change these
colors, you can do so in the options under the User Interface navigation entry.
You can define necessary preferences for the test in the
g he follo
raph. T wing setting options are available:
Defines the speed at which the test is run. The availaMenu
Speed
Check box
Burn image
down menu vary depending on the disc in the drive.
If this check box is enabled, Nero DiscSpeed writes an image file that you
have selected
to the recordable disc instead of writing previously defined
Settings area to the right of the
ble entries in the drop-
binary data.
Check box o cre-
Simulate
If this check box is enabled, Nero DiscSpeed simulates the process t
ate all the test results instead of writing data on the recordable disc.
The test results are also displayed in the Speed, Buffer, CPU Usage, and Progress areas
t t of th
o the righ e graph. The following areas are available:
Speed
Shows the partial results of the speed test.
Current/Average shows the varying speed over the course
of the test. The
average speed is displayed here when the test is finished.
Start - Shows the lowest speed detected over the course of the test. In a
normal curve, the lowest speed is also the start speed. In an uneven curve,
the lowest recorded speed is displayed here
as the minimum value.
Type - Shows the type of rotational speed.
End - Shows the highest speed determined over the course of the test. In a
normal curve, the highest speed is reached at the end. In an uneven c
urve,
the highest recorded speed is displayed here as the maximum value.
Nero DiscSpeed 34
Page 35

Create Disc Tab
Buffer
CPU usage
Progress
Shows the percentage usage of the buffer
graphically in the bar and numerically beside it. The values for the minimum
buffer level, the maximum buffer level, and the average buffer level are
listed below from left to right. These values are continuously refreshed over
the course of the test.
If the Show graph check box is enabled, a representation of the buffer leve
is plotted on the graph. The small colored square to the left shows the color
of the line. You can change this color according to your re
options under the User Interface navigation entry.
Shows the CPU usage
merically beside it. The values for the minimum CPU usage, the maximum
CPU usage, and
These values are continuously refreshed over the course of the test.
If the Show graph check box is enabled, a representation of the CPU us-
age is plotted on the graph. T
color of the line. You can chang
in the options under the User Interface navigation entry.
Position continuously indicates the current position of the read head on the
disc during the write process.
Elapsed specifies in minutes and seconds the time elapsed since the write
process started.
during the write test graphically in the bar and nu-
the average CPU usage are listed below from left to right.
he small colored square to the left shows the
e this color according to your requirements
during the write test, both
quirements in the
l
See also:
Create Data Disc (Classic Version) 30
Nero DiscSpeed 35
Page 36

6.2 Running the Create Data Disc Test
The following requirement must be fulfilled:
The Create Disc tab is selected in the main screen.
To start the Create data disc test, proceed as follows:
1. If there are several optical drives available, select the one you want in the drop-down menu.
2. Configure the settings you want in the Settings area to the right of the graph.
3. Insert a blank disc in the optical drive if you are not running a simulation.
4.
Click the Start button.
The test or burn process is run. Yo
the display area under the graph.
You can cancel a running test at any time by clicking the Stop button.
u can follow the individual steps of the test process in
Create Disc Tab
Always start the test using the button.
As long as you are runni
grayed out. If you click Run Test > Selected, the test is automatically run
the Benchmark tab and the results of the classic version are displayed.
You ca
them.
See also:
Saving Test Data 61
n now see the results of the test in the grap
Start
ng this test, the entries in the Run Test menu will be
on
h and the releva
nt displays and save
Nero DiscSpeed 36
Page 37

7 Disc Info Tab
The Disc Info tab provides detailed information on the disc inserted in the drive. The information is displayed on the tab in an area divided into: Basic Information, Extended Infor-
mation, and Raw Data.
Disc Info Tab
Disc Info Tab
You can customize the display to meet your requirements by using the check boxes under
the display area. The following check boxes are available:
Basic information
Extended Information
Raw data
Additionally, the following buttons are available under the display area:
Copy Text
Copy HTML
Copies all of the information to the clipboard in text format.
Copies all of the information to the clipboard in HTML format.
If this check box is enabled, the general information in
the Basic Information area is displayed.
If this box is not checked, this information will be hidden.
If this box is checked, the information in the Extended
Information area will be displayed.
If this box is not checked, this information will be hidden.
If this box is checked, the Raw data will be displayed.
If this box is not checked, this information will be hidden.
Nero DiscSpeed 37
Page 38

Disc Info Tab
You will find general information on the disc in the drive in the Basic Information area. The
following display panels are available:
Disc type
Book type
Manufacturer
MID
Write Speeds
Capacity
You will find further information on the disc in the drive in the Extended Information area.
The following display panels are available:
Layers
Write strategies
Shows the disc type
Shows the book type
Shows the manufacturer's name.
Show the media identification code (MID). The MID identifies the
disc.
Shows all possible burning speeds for the disc in the drive.
This information depends on the firmware
drive, i.e. different recorders can show different options for the
same disc.
Shows the disc capacity both in MSF (minutes/seconds/frames)
and in MB.
Additional capacity achieved through overburning is not incorporated into the calculation.
Shows the number of available layers on the disc.
Checks the intended use of a disc. Some discs have a designated purpose, for example audio CDs, data CD.
of the disc in the drive.
of the disc in the drive.
of the chosen optical
Copyright protection
Disc status
You will find information on binary data that was previously burned to the disc in the Raw
Data area.
Shows whether or not the disc in the drive is copy-protected.
Shows the status of the disc, i.e. whether the disc is still totally
blank, already finalized or can accept more data.
Nero DiscSpeed 38
Page 39

8 Disc Quality tab
8.1 Quality Test
The Disc Quality test is often referred to as Scan, and can be run on the Disc Quality tab.
You can choose between a quick scan and a complete scan. The quick scan only checks
defined points on the disc. All other areas are ignored. As a result, it requires less time than
a complete scan but is less accurate. This test is particularly useful for burned discs. It can
only be run reliably with a recorder; a simple reader is not sufficient.
The results are displayed in two graphs: the top one shows the results for C1 errors
(for CD's and DVD's respectively), while the bottom one shows the results for C2 errors
failures (for CD's and DVD's respectively). In the top graph, the vertical scales on the left
show the number of C1 errors/PI errors and the vertical scales on the right show the
/read speed. In the bottom graph, the vertical scales on the left show the number of C2
write
errors/PI failures and the vertical scales on the right show the jitter
le in both graphs shows the disc capacity, in MB for CD's and in GB for DVD's.
If you want to omit a protected area from the bottom graph, enable the Use
background to show error limits check box in the options under the Disc
Quality navigation entry.
Disc Quality tab
/PI errors
/PI
value. The horizontal sca-
In addition, both test results and data on the test in progress are shown in the Disc info area
and in a number of other display panels to the right of the graph. In the PI errors, PI Fail-
ures, and Jitter areas under the graph, information on the disc quality is displayed in realtime while the test is run. The number of PO failures is also shown here.
Nero DiscSpeed 39
Page 40

Disc Quality tab
If the Include test data check box has been enabled in the options under the
Transfer Rate navigation entry, an additional display panel showing information
on the recorder and the firmware
used to burn the disc in the drive is shown
above the graph.
Disc Quality tab
You can define preferences for the test in the Settings area to the right of the graph. In addition, the necessary basic settings in the options under the Disc Quality navigation entry
must be met.
The following setting options are available on the tab:
Menu
Speed
Button
Defines the speed at which the test is run. The available entries in the
drop-down menu vary depending on the disc in the drive.
Refreshes the entries in the drop-down menu of available speeds.
If there are several drives connected to your computer, we recommend that you refresh the data once you have chosen the optical
drive for the test.
Input field
Start
Defines the start value from which the test should run. This value can
be manually entered.
Select the value 0000MB to start the test from the beginning of the
disc.
Nero DiscSpeed 40
Page 41

Disc Quality tab
Input field
End
Check box
Quick Scan
Check box
Show C1/PIE
Check box
Show C2/PIF
Check box
Show Jitter
Check box
Show read
speed
Defines the end value up to which the test should run. This value can
be manually entered.
Nero DiscSpeed suggests a value for the disc in the drive. For a
burned disc, this value may deviate from the maximum capacity, since
the data may either not fill up or exceed the maximum capacity.
If this box is checked, the quick scan will be run as per the settings
you defined in the options under the Disc Quality navigation entry.
If this box is not checked, the entire disc will be scanned.
If this box is checked, the C1 errors/PI errors will be shown.
If this box is not checked, this information will be hidden.
If this box is checked, the C2 errors/PI failures will be shown.
If this box is not checked, this information will be hidden.
If this box is checked, the jitter will be shown. If this box is not
checked, this information will be hidden.
Not all recorders can measure jitter values. Even if this box is
checked, the jitter will not be shown if the recorder in question cannot
measure the values.
If this check box is enabled, the read speed is displayed in the top
graph.
The curve is displayed in red by default. You can change this color
according to your requirements in the options under the Disc quality
navigation entry.
Check box
Show write
speed
Button
Advanced
The Disc info area shows general information on the disc in the drive. The following display
panels are available:
Type
ID
If this check box is enabled, the write speed is displayed in the top
graph.
The curve is displayed in white by default. You can change this color
according to your requirements in the options under the Disc quality
navigation entry.
If the Include test data check box has been enabled in the options
under the Transfer Rate navigation entry, the write speed will have
been recorded on the disc during the burn process and will be available for further tests on the disc. If this box was not checked during
burning, the write speed cannot be displayed as the information will
not have been saved on the disc.
Opens the Disc Quality Test: Advanced Options dialog box.
Shows the disc type
Shows the media code of the disc.
of the disc in the drive.
Nero DiscSpeed 41
Page 42

Disc Quality tab
Date
Label
There is more information available in the following display panels:
Quality score
Progress
Position
Speed
The C1 Errors or PI Errors area shows information onC1 or PI errors found. If a CD has
been inserted in the optical drive, C1 errors are shown in this area. If a DVD has been inserted in the optical drive, PI errors are displayed in this area.
The following display panels are available:
Shows the date when the disc was created/burned. If an image file
was burned to the disc, this display panel shows the date on which
the image file was created.
Shows the disc label of the disc in the drive.
If you do not want to show the disc label, disable the Show disc label
box in the options under the Disc Quality navigation entry.
A percentage is calculated based on the results of the test. A quality
index of 100% is perfect, i.e. there were no errors.
Shows the progress of the test, i.e. the percentage of the disc already
scanned.
Continuously indicates the current position of the read head on the
disc.
Shows the scanning speed.
Average
Maximum
Total
The C2 Errors or PI Failures area shows information on C2 errors or PI failures found. If a
CD has been inserted in the optical drive, C2 errors are shown in this area. If a DVD has
been inserted in the optical drive, PI failures are shown in this area.
The following display panels are available:
Average
Maximum
Total
The Jitter area shows information on the jitter. Not all recorders can measure jitter values.
The display panels remain blank if the recorder in question cannot measure the values. The
following display panels are available:
Average
Maximum
Shows the average number of C1 or PI errors found.
Shows the maximum number of C1 or PI errors.
Shows the total number of C1 or PI errors found.
Shows the average number of C2 errors or PI failures found.
Shows the maximum number of C2 errors or PI failures.
Shows the total number of C2 errors or PI failures found.
Shows the average jitter value.
Shows the maximum jitter value.
Nero DiscSpeed 42
Page 43

Disc Quality tab
The number of PO failures is shown in the PO Failures
errors that can be found on a DVD. PO failures are normally an indication of there being unreadable data on the disc.
See also:
Disc Quality Entry 21
Transfer Rate Navigation Entry 15
8.2 Running the Disc Quality Test
The following requirement must be fulfilled:
The Disc Quality tab is selected in the main screen.
To start the Disc Quality test, proceed as follows:
1. If there are several optical drives available, select the one you want in the drop-down menu.
2. Insert a disc into the optical drive.
If you want to run the detailed test, i.e. test the entire disc, make sure that the
Quick scan check box is disabled.
3. Configure the settings you want in the Settings area, to the right of the graph.
4. Click the Start button.
The test is run. You can follow the test processes in the areas under the graphs. You can
cancel the ru
You ca
them.
nning test at any time by clicking the Stop button.
n now see the results of the test in the graphs and the rel
display panel. These are the gravest
evant displays and save
See also:
Saving Test Data 61
Nero DiscSpeed 43
Page 44

9 ScanDisc tab
9.1 Scan Disc
The Scan Disc test is available on the Scan Disc tab, where the result is also displayed. It
can be run in two versions: as a read test and as a C1/C2 – PI/PO test.
You can use the Read test to test optical drives and/or burned discs. The test checks
whether burning was successful and whether all areas can be read.
If you want to test burned discs, we recommend that you set the test speed to
maximum. You will then be testing the disc under worst-case conditions.
The C1/C2 - PI/PO test lets you check the quality of the disc with respect to completeness of
the sectors. It must be noted that this test is different from the disc quality test, even if the
latter is similar to the C1/C2 - PI/PO test. The results from the C1/C2 - PI/PO test are dis-
played differently in the graph. Instead of the number of errors, the status of the sectors is
shown.
The test results of both versions are displayed both in a graph and in detail in the display panel below the graph. In addition, both the test results and data on the test in progress are
shown in the Disc info, Surface scan, and Position areas to the right of the graph.
ScanDisc tab
ScanDisc tab
You can define preferences for the test in the Settings area to the right of the graph. The
following setting options are available:
Nero DiscSpeed 44
Page 45

ScanDisc tab
Menu
Speed
Option button
Defines the speed at which the test is run. The available entries in
the drop-down menu vary depending on the disc in the drive.
Enables the Read test.
Read test
Option button
Enables the C1/C2 – PI/PO test.
C1/C2 - PI/PO Test
The graph shows all sectors on the disc in one chart, with each sector being plotted with a
small square. Each square, i.e. each sector, is displayed in a different color depending on its
status. The Surface scan area shows the respective percentage of sectors in the following
three categories: Good, Damaged, and Bad in real time while the test is running. The follo-
wing colors, i.e. status indicators, are available:
Green
Yellow
Readable sectors with no errors.
Damaged sectors that can still be read using the recorder's internal error correction feature.
Red
Damaged sectors that cannot be corrected and are consequently unreadable.
The Disc info area shows general information on the disc in the drive. The following display
panels are available:
Type
ID
Date
Shows the disc type
Shows the media code of the disc.
Shows the date when the disc was created/burned. If an image file was bur-
of the disc in the drive.
ned to the disc, this display panel shows the date on which the image file was
created.
Label
Shows the disc label of the disc in the drive.
If you do not want to show the disc label, disable the Show disc label box in
the options under the Disc Quality navigation entry.
If the Include test data check box has been enabled in the options under the
Transfer Rate navigation entry, an additional display panel showing information
on the recorder and the firmware
used to burn the disc in the drive is shown
above the graph.
The following display panels are available in the Position area while the test is running:
Progress
Shows the progress of the test, i.e. the percentage of the disc already
scanned.
Position
Continuously indicates the current position of the read head on the
disc.
Speed
Shows the scanning speed.
Nero DiscSpeed 45
Page 46

The following information is available in the columns in the display panel:
ScanDisc tab
File
Position
Length
Quality
PIE
PIF
POE
POF
Jitter
See also:
Transfer Rate Navigation Entry 15
Lists the names of the files on the disc in the drive.
Shows the respective position of the file on the disc.
Shows the length of the individual files.
Specifies the quality of the files. This score is calculated from the number of
errors found.
Specifies the number of PI errors
Only available for the C1/C2 – P1/PO test.
Specifies the number of PI failures found.
Only available for the C1/C2 – P1/PO test.
Specifies the number of PO errors
Only available for the C1/C2 – P1/PO test.
Specifies the number of PO failures
Only available for the C1/C2 – P1/PO test.
Specifies the jitter values
Only available for the C1/C2 – P1/PO test. Not all recorders can measure jitter
values. This column is omitted if the recorder in question cannot measure the
values.
.
found.
found.
found.
9.2 Running the ScanDisc Test
The ScanDisc test can be run in two versions: as a read test and as a C1/C2 – PI/PO test.
The following requirement must be fulfilled:
The ScanDisc tab is selected in the main screen.
To start the ScanDisc test, proceed as follows:
1. If there are several optical drives available, select the one you want in the drop-down menu.
2. Insert a disc into the optical drive.
3. Select the speed with which you want to run the test from the Speed drop-down menu.
4. If you want to run the test as a read test, select the Read test option button.
If you want to run the test as a C1/C2 - PI/PO test, select the C1/C2 - PI/PO test option but-
ton.
Nero DiscSpeed 46
Page 47

ScanDisc tab
5. Click the Start button.
The test is run. You can follow the test processes in the areas under and next to the
graph. You can cancel the running test at any time by clicking the Stop button.
You can now see the results of the test in the graphs and the relevant displays and save
them.
See also:
Saving Test Data 61
Nero DiscSpeed 47
Page 48

10 Advanced DAE Quality Test
The Advanced DAE Quality Test is different from the standard DAE Quality test. With a
special test disc, the advanced test identifies problems that your optical drive may have
when reading an audio CD.
You can run the test in two steps, depending on whether you first want to create a test CD
and then test it or you already have a suitable test disc with which you can start the test directly.
In addition, the Error test lets you determine the capabilities of an optical drive to prevent errors when creating a copy.
See also:
Creating a Test Disc 50
Running the Advanced DAE Quality Test 52
10.1 Nero DiscSpeed Window - DAE Test Disc
You can create a test disc in the Nero DiscSpeed - DAE Test Disc window.
You can define preferences for the burn process in the top area of the window. Information
on the write process in progress and on the disc in the drive is displayed in the Write posi-
tion and Disc information areas as well as in the display area at the bottom of the window.
Advanced DAE Quality Test
Nero DiscSpeed Window - DAE Test Disc
Nero DiscSpeed 48
Page 49

The following setting options are available:
Advanced DAE Quality Test
Menu
Write speed
Input field
Test capacity
Check box
Simulate
Check box
RAW mode
The following information on the write process in progress is displayed in the Write position
area:
Position
Relative
The following information on the disc in the drive is displayed in the Disc information area
and in the display area:
Defines the speed at which the disc is burned. We recommend that
you choose a speed of 16x or less when burning an audio CD.
Shows the disc capacity in MSF (minutes/seconds/frames).
If this check box is enabled, Nero DiscSpeed simulates the burn
process rather than writing data to the recordable disc. This box is
checked by default and cannot be cleared.
If this box is checked, the disc will be burned in RAW mode.
Continuously indicates the current position of the read head on the
disc.
Always indicates the percentage of the disc that has already been
written.
Indicates the burn progress.
Capacity
Manufacturer
Dye type
Disc type
Shows the disc capacity both in MSF (minutes/seconds/frames) and in
MB.
Maximum specifies the maximum volume of data that can be written to
the disc with the help of additional capacity achieved through overburning.
Extra - Shows the difference between normal capacity and maximum
capacity.
Shows the manufacturer's name.
Shows the dye type
Shows the disc type
used.
of the disc in the drive.
Nero DiscSpeed 49
Page 50

Advanced DAE Quality Test
10.2 Creating a Test Disc
To create a test disc, proceed as follows:
1. Insert an empty CD into the recorder.
2. Click Extra > Advanced DAE Quality Test > Create Test CD.
The Nero DiscSpeed DAE Test Disc window opens.
3. want in the top part of the window. Make the settings you
4. Click the Start button.
The burn process starts. You can monitor the progress of the burn process in the Write
position and Disc information areas, as well as in the display area underneath.
You have created a test disc and can now use it to run the advanced DAE quality test.
See also:
Running the Advanced DAE Quality Test 52
10.3 Nero DiscSpeed window - Advanced DAE Quality Test
In the Nero DiscSpeed - Advanced DAE Quality Te
DAE quality test, and the result is also shown there.
The results are displayed in the Test results and On-the-fly copying areas, as well as in
detail in the display area. A
the test while it is running.
In the On-the-fly copying area, the test determines whether an audio CD can be copied
without causing errors at various speeds between 1x and 16x, i.e. indicates if the optical
drive is suitable for use on-the-fly
The results of two tests are displayed in the Test results area: the Sequential read test and
the Random read test. The sequential read test simulates the digital extraction of audio files
) under ideal conditions and then runs a harmonic read test. This test helps you to iden-
(DAE
tify errors on the disc. There are two different types of error.
A search for data errors returns audio samples that were not read correctly, based on a
comparison of the read bytes with the known data from the test disc. Minor data errors can
be corrected using the drive's error correction feature. The most common cause of data errors is poor-q
drive speed.
Synchronization errors occur when, instead of reading the required audio sectors, an optical
drive reads the adjacent sectors. Nero DiscSpeed uses special data on the test disc to check
if the correct sectors are being read. Synch
or repeated. These errors can be audible.
uality discs. Avoid data errors by using high-quality discs and/or reducing the
progress bar at the bottom of the window indicates the status of
in combination with a recorder for backing up audio discs.
ronization errors can result in samples being lost
st wind
ow, you can run the advanced
Nero DiscSpeed 50
Page 51

Advanced DAE Quality Test
Nero DiscSpeed window - Advanced DAE Quality Test
You can define preferences for the optical drive test in the Advanced features area. Optical
drives start from different positions when reading audio sectors. There is also no standardized start position for the write process of recorders - there is usually a gap of a few hundred
samples. The following check boxes are available:
Read Leadin
If this check box is enabled, the capability of the optical drive of reading the leadin
is tested. To create perfect copies, an optical drive
should begin reading data before the actual start position.
Read Leadout
If this check box is enabled, the capability of the optical drive of reading the leadout
is tested. To create perfect copies, an optical drive
should read data from the leadout.
Read CD Text
Read Subchannel Data
If this check box is enabled, the capability of the drive of reproducing
CD Text
If this check box is enabled, the subchannel data
is tested.
is read during the
test.
Subchannel data contains information such as index markers. An optical drive must be able to reproduce this data if it is to create perfect
audio copies.
The following information is available in the Test results area:
Nero DiscSpeed 51
Page 52

Advanced DAE Quality Test
Average Speed
Data Errors
Sync Errors
Quality score
Calculates and shows the average speed of the completed test.
Lists the data errors found.
Shows the number of synchronization errors found.
Synchronization errors occur when data is correct but has been moved by one or more sectors.
A percentage is calculated based on the results of the test. A quality
index of 100% is perfect, i.e. there were no errors.
10.4 Running the Advanced DAE Quality Test
The following requirement must be fulfilled:
You have already created a test disc.
To run the test, proceed as follows:
1. If there are several optical drives available, select the one you want in the drop-down menu.
2. Insert the special test disc that you previously created into the optical drive.
3. Click Extra > Advanced DAE Quality Test > Run Test on the menu bar.
The Nero DiscSpeed - Advanced DAE Quality Test window opens.
4. Make the settings you want in the Advanced features area.
5. Click the Start button.
The test is run. You can cancel a running test at any time by clicking the Stop button.
You can now see the results of the test in the Test results and On-the-fly co
eas, a
s well as their detailed information in the display area, and save them.
See also:
Saving Test Data 61
Creating a Test Disc 50
pying ar-
Nero DiscSpeed 52
Page 53

10.5 Error test
The Error test determines the capability of a optical drive to prevent errors when creating a
copy. The test is run in two steps: The Create Image feature first creates an image file of
your test disc and saves it on the hard drive. After this, the Run Test feature reads the data
on your test disc in order to compare it with the image file.
To run this test you need a standard test disc of the type A-BEX (TCD-714R, TCD-721R, or
TCD-726). All A-BEX discs
various A-BEX discs contains a series of intentional defects of varying severity.
Instead of using an A-BEX disc, you can also run a limited version of the test by using a DAE
test disc that you have previously created. It is not necessary to create an image file in this
case, since Nero DiscSpeed is familiar with the contents of the comparison disc.
See also:
Creating a Test Disc 50
Create Image 55
10.5.1 Advanced DAE Error Correction Test Window
The Error test is run in the Nero DiscSpeed - Advanced DAE Error Correction Test win-
dow.
The results are displayed in the C2 errors and Compare errors graphs, as well as in the
display areas underneath, while the test is still in progress. The top graph shows C2 errors
found on the disc. The bottom graph compares the errors found when Nero DiscSpeed compares the data on the disc with the data from the image file.
Advanced DAE Quality Test
contain the same data (audio data). The reading surface of the
Nero DiscSpeed 53
Page 54

Advanced DAE Quality Test
Nero DiscSpeed window- Advanced DAE Error Correction Test
The following fields are available in the areas below the graphs:
Position
Continuously indicates the current position of the read head on the
disc over the course of the write process.
Elapsed
Specifies in minutes and seconds the time elapsed since the write
process started.
C2 accuracy
The C2 accuracy of the optical drive is determined based on the results of the test.
Quality score
A percentage is calculated based on the results of the test. A quality
index of 100% is perfect, i.e. there were no errors.
C2 errors
C2 missed
Compare errors
Shows the number of C2 errors found.
Shows the number of C2 errors missed.
Shows the number of compare errors found.
Compare errors occur when the audio data read out does not match
the compare data from the image file.
Sync Errors
Shows the number of synchronization errors found.
Synchronization errors occur when data is correct but has been moved by one or more sectors.
Nero DiscSpeed 54
Page 55

Advanced DAE Quality Test
10.5.2 Create Image
The Create Image feature lets you extract data from an A-BEX disc in order to create an er-
ror-free image file on the hard drive - provided the optical drive can create the file from the
data provided.
To create an image file of the test disc, proceed as follows:
1. If there are several optical drives available, select the one you want in the drop-down menu.
2. Insert an A-BEX disc in the optical drive.
3. Click > > > . Extra Advanced DAE-Quality Test Error Tests Create Image
The Nero DiscSpeed - Advanced DAE - Create Image window opens.
4. Click the Start button.
The image file of the test disc is created. You can follow the progress of the write proc-
ess with e
button.
the prog
A dialog box opens that informs you whether the image file has been successfully cre-
ated. You have created an image file of the test disc and can no
the second part of the error test, Run Test.
See also:
Running the Test with an A-BEX Test Disc 55
ress bar, and can cancel the process at any time by clicking th Stop
w use it to pro
ceed with
10.5.3 Running the Test with an A-BEX Test Disc
The Run Test feature reads the data on an A-BEX disc and compares it to an image file of
the s
ame disc
The following requirement must be fulfilled:
The image file of the test disc must be saved on the hard drive.
To compare the test disc to the associated image file on the hard drive, proceed as follows:
. This test ensures that the cop
y created is perfect.
1. If there are several optical drives available, select the one you want in the drop-down menu.
2. Insert an A-BEX disc whose image file is already on the hard drive into
the optical drive.
3. Click Extra > Advanced DAE Quality Test > Error Test > Run Test.
The Nero DiscSpeed - Advanced DAE Error Correction Test window opens.
C2 er
4. Some optical drives sho in reverse order. If you want to correct this, enable the
Rev
erse C2
check box
w
.
rors
5. Click the Start button.
The test is run. The graphs and the areas underneath indicate the progress. You can
cancel a running test at any time by clicking the Stop button.
You can now see the results of the test in the graphs and the relevant displays and save
them.
Nero DiscSpeed 55
Page 56

See also:
Saving Test Data 61
Create Image 55
Advanced DAE Quality Test
10.5.4 Test Disc
Running the Test with a DAE
Instead of using an A-BEX disc, you can also run a limited version of the Error test by using
test disc that you have previous
a DAE
image file, since Nero DiscSpeed alrea
To run the te
st, proc
eed as follows:
ly created. In this case it is not necessary to create an
dy knows the content of the comparison disc.
1. If there are several optical drives available, select the one you want in the drop-down menu.
2. Insert a DAE disc in the o
ptical drive.
3. Click Extra > Advanced DAE Quality Test > Run Test.
The Nero DiscSpeed - Advanced DAE Error Correction Test window opens.
w C2 errors
4. Some optical drives in reverse order. If you want to correct this, enable the
Reverse C2
5. Click the St
The test is run. You can
You can now see the resu
them.
See also:
Saving Test Data 61
Creating a Test Disc 50
check box.
art button.
sho
cancel a running test at any time by clickin
lts of the test in the graphs and the rel
evant displays and save
g the Stop button.
Nero DiscSpeed 56
Page 57

11 Overburning test
Not all recorders support overburning.
Note that overburning can damage an optical drive. To prevent damage to the
optical drive, you should only use this feature with suitable discs.
Overburning test
Note that a disc whose leadout
has been written to no longer conforms to the
standard specification for CDs, and therefore may not be detected by some readers.
Overburning is the process of writing data past the official capacity of the disc in the CD's
leadout area
. The actual purpose of the leadout area is to define where the disc ends. By filling part of the leadout with data instead of zeros it is possible to increase the disc's capacity.
Usually it is possible to overwrite the 90 seconds of the leadout without any difficulty. Nonetheless there is a high probability that the data will become unreadable since the area was
originally intended for storing only zeros and is at the outer edge of the disc. This part of the
disc is more likely to become damaged or soiled.
Overburning is also possible, although not advisable, with DVD's. The outer edge of DVD's is
more susceptible to errors. Furthermore only a small number of DVD recorders support this
feature.
The Overburning Test feature lets you run a simulation of the overburn process and test
whether or not the recorder is suitable for this process. Nero DiscSpeed also checks how
much data can be written to the disc being used.
If you want to test the overburn capability of a disc and your recorder in a real
burn process, enable the Overburn CD or Overburn DVD (depending on the
disc type) check box under the Transfer Rate navigation entry, in the Nero
DiscSpeed – Options window.
After this, start the Create data disc standard test.
See also:
Transfer Rate Navigation Entry 15
Create Data Disc (Classic Version) 30
Nero DiscSpeed 57
Page 58

11.1 Nero DiscSpeed - Overburning Test window
The overburn process simulation is run in the Nero DiscSpeed - Overburning Test window.
The results are displayed in the same window, in the Write position and Disc information
areas, as well as in the display area at the bottom of the window.
Overburning test
Nero DiscSpeed - Overburning Test window
You can define preferences for the test in the top section of the window. The following setting options are available:
Menu
Write speed
Input field
Test capacity
Check box
Simulate
Check box
RAW mode
Defines the speed at which burning of the disc is simulated.
We recommend that you choose a speed of 16x or less
when burning an audio CD.
Shows the disc capacity in MSF (minutes/seconds/frames).
If this check box is enabled, Nero DiscSpeed simulates
the burn process rather than writing data to the recordable disc. This box is checked by default and cannot be
cleared.
If this box is checked, the burn process will be simulated
in RAW mode.
Nero DiscSpeed 58
Page 59

Overburning test
The following information on the burn process simulation in progress is displayed in the Wri-
te position area:
Position
Relative
The following information on the disc that is inserted in the drive is displayed in the Disc information area and in the display area
Capacity
Shows the disc capacity both in MSF (minutes/seconds/frames) and in
MB.
Maximum specifies the maximum volume of data that can be written to
the disc with the help of additional capacity achieved through overburning.
Extra - Shows the difference between normal capacity and maximum
capacity.
Continuously indicates the current position
of the read head on the disc.
Always indicates the percentage of the disc
that has already been written.
Shows the progress of the simulated burn
process:
Green – Data written within the disc's nor-
mal capacity.
Yellow – Data written past the disc's normal
capacity.
Dark green – Buffer status.
Blue – Standard, official disc capacity.
Red – Current position of the read head on
the disc.
Manufacturer
Dye type
Disc type
Shows the manufacturer's name.
Shows the dye type
Shows the disc type
Nero DiscSpeed 59
used.
of the disc in the drive.
Page 60

11.2 Running the Overburning Test
To run the overburning test as a simulation, proceed as follows:
1. If there are several optical drives available, select the one you want in the drop-down menu.
2. Insert a blank disc in the optical drive.
3. Click Extra > Overburning Test.
The Nero DiscSpeed - Overburning Test window opens.
Overburning test
4. If you want to simulate the burn process in RAW mode, enable the RAW mode check box
5. Choose the volume of data
mine the official capacit
y.
that you want
to write to the disc or let Nero DiscSpee
d deter-
6. Click the Start button.
The simulation is started. You can follow the progress of the burn process in the Write
a unde
position and Disc information areas, as well as in the display are
can cancel a running test at any time by clicking the Stop button
A dialog box specifying the maximum detected capacity opens.
verbu
7. If you w
button.
ant to add the detected value to the internal o
rning database, click the Yes
If a disc of the same type is inserted again, Nero DiscSpeed will detect i
the results stored in the database can be displayed in the d
8. If you want to discard the detected value
, click the No button.
isplay ar
You have run the overburning test.
.
rneath. You
t in this way, and
ea.
.
Nero DiscSpeed 60
Page 61

12 Saving Test Data
The Save Results menu item lets you save the full set of results from a test on the hard
drive.
Nero DiscSpeed offers different storage formats:
Only test data saved as binary files with the *.dat extension can be loaded a-
gain. Use this format if you want to open the test data in Nero DiscSpeed
and/or open and compare the test data in the Nero DiscSpeed database.
An *.html file that you can open with any Web browser saves the results as a
graph. In the Options window, under the Save navigation entry, you can define
how much data will be saved in the file. If the Include status check box is en-
abled, the diagram and all other test results are saved; if it is cleared, only the
graph is saved.
A *.csv file saves the test results in a pure text file that you can open with any
text editor.
The following requirements have to be fulfilled:
The test you want has already been run.
The results are displayed on the corresponding tab in the main screen.
Saving Test Data
To save the test results, proceed as follows:
1. Click File > Save Results and choose your preferred storage format.
The Save As window appears.
2. Enter a file name in the File name input field if necessary.
3. Save button. Click the
You have saved the test file.
See also:
Save Navigation Entry 19
Loading Test Data 62
Nero DiscSpeed 61
Page 62

13 Loading Test Data
The Load Single File menu item lets you load saved test data, while the Database menu
item lets you load several files at once in order to compare test results and/or the efficiency
of optical drives.
Only test data saved as binary files with the *.dat extension can be loaded again.
To load test results, proceed as follows:
1. If you want to open a single saved test file:
1. Click File > Load Results > Load Single File.
2. Select the file you want and click the Open button.
In order to make effective use of the database, i.e. to get comparable results,
you should use the same disc for the different tests in all optical drives.
The Open window appears.
The chosen file is opened in the main screen on the Benchmark tab and the test da-
ta is displayed.
Loading Test Data
2. If you want to load several files at once for comparison:
1. Click File > Load Results > Database in the menu bar.
The Nero DiscSpeed - Database window opens.
2. Click the Add Results button.
The Insert Files dialog box opens.
3. Select the files you want and click the Open button.
The test files are imported and displayed in the Nero DiscSpeed – Database win-
dow.
4. Check the boxes beside the files you want to compare.
5. In the lower part of the window, select the option button for the test type for which you
want to compare data.
The results of the chosen test are displayed for the chosen test files.
Nero DiscSpeed 62
Page 63

Loading Test Data
6. Click the Graph
The Nero DiscSpeed Test Results window is opened and shows a graph of the se-
lected test results. The results for each test file are displayed in a different color (the
Legend area shows which graph corresponds to which test).
button.
You have loaded your chosen test results.
Nero DiscSpeed - Test Results window
Nero DiscSpeed 63
Page 64

14 Erasing a Disc
The Erase Disc feature lets you erase data from rewritable discs. This operation is run in the
Nero DiscSpeed - Erase window. As a general rule, there are two erase methods available:
Quick erasing does not remove the data physically from the disc, but instead only makes it
inaccessible by erasing the references to existing content. The data can be restored!
Full erasing removes the data from the disc by overwriting it with zeroes. The contents cannot be restored with conventional methods. Repeated full erasing increases the probability
that third parties will not be able to reconstruct the contents.
To erase a rewritable disc, proceed as follows:
1. If there are several optical drives available, select the one you want in the drop-down menu.
2. Insert the disc that you want to erase into the optical drive.
3. Click Extra > Erase Disc.
The Nero DiscSpeed - Erase window opens.
Erasing a Disc
Nero DiscSpeed - Erase window
4. Select the option button for the erase method you want.
5. Click the Erase button.
The erase procedure starts. You can cancel the erase process in progress at any time by
clicking the Exit button.
You can track the progress of the erase process with the progress bar.
Nero DiscSpeed 64
Page 65

15 Bit Setting
The Bitsetting feature lets you change the bit settings or Book type of a selected DVD recorder in the Nero DiscSpeed - Bit Setting window(provided the recorder in question sup-
ports this feature).
The book type
changing the book type, you can fool the player into believing that the inserted DVD is a
pressed disc and not a burned disc.
Not all DVD recorders can modify the book type. What's more, the book type can only be
changed for "plus" media (e.g. +R). With other media types, the book type is already on the
disc before the burn process.
15.1 Nero DiscSpeed - Bit Setting Window
Bit settings and book type modifications are carried out in the Nero DiscSpeed - Bit Setting
window.
information is what an optical drive uses to detect the inserted disc type. By
Bit Setting
Nero DiscSpeed - Bit Setting window
The Drive settings area shows the defined book type, as well as all the changes that can be
made. The following information is displayed:
Nero DiscSpeed 65
Page 66

Bit Setting
Disc type
Book type
The following setting options are available:
Menu
New setting
Button
Set
Check box
Set as default
The Disc settings area shows the disc type currently selected and the selected book type.
Shows which new settings can be selected for the book type.
Media types not supported by the chosen optical drive are grayed
out.
Accepts the changes made.
If this check box is enabled, the chosen changes will be retained
as the default settings for the optical drive even after the computer is restarted.
This check box will be grayed out if the optical drive does not
support this feature.
15.2 Changing the Bit Setting
To edit the bit settings for a DVD recorder, proceed as follows:
Shows the disc type
Shows the book type
of the disc in the drive.
of the disc in the drive.
1. If there are several optical drives available, select the one you want in the drop-down menu.
2. Click Extra > Bitsetting.
The Nero DiscSpeed - Bit Setting window opens. The Drive settings area shows the
disc types
, as well as the respective book types.
3. Change a book type in the corresponding New setting drop-down menu and click the Set
button.
4. If you want to retain the modified book type setting as the default setting for the optical drive,
enable the Set as de
fault che
ck box.
5. Click the Refresh button.
The display in the window will be refreshed. The Drive settings are
pes and the modified
book types as a selection under Book Type.
a show
s the disc ty-
6. Click the Close button.
You have changed the bit settings for a DVD recorder.
Nero DiscSpeed 66
Page 67

16 Technical Information
16.1 System requirements
Nero DiscSpeed is installed along with the Nero Suite. Its system requirements are the same. You can find more detailed information on the system requirements under
www.nero.com
.
Technical Information
Nero DiscSpeed 67
Page 68

17 Glossary
A-BEX-Disc
Eine A-BEX-Disk ist eine Test-DVD, die eingesetzt wird, um die Fehlerkorrektur eines optischen Laufwerkes zu testen. Hierbei ist die Test-DVD bereits ab Werk mit Fehlern, wie Kratzern oder Fingerabdrücken versehen, um eine Testreferenz darzustellen.
Access Time
The access time is the time a drive needs to move the read head to a specific position on the
disc that is inserted in the drive and to additionally read an area of the disc. In other words,
the access time encompasses the seek time and in addition the period of time for reading a
specific area.
Blu-ray
Blu-ray technology refers to burning on special data carriers. In comparison to DVD's, which
use a red laser in order to read and write data, Blu-ray discs are written with a blue laser.
The shorter wavelength (405 nm) of this blue laser makes it possible to position the laser
with greater accuracy. Data can be written in a more compact manner and takes up less
space on the disc. A Blu-ray disc can store up to 25 GB on a single layer disc and up to 50
GB on a dual layer disc.
Glossary
Book Type
The book type defines the specification (e.g. DVD-, DVD+, DVD-ROM) of a DVD. In order to
ensure correct playback, the DVD specifications are defined in books so that all media can
be read correctly. The specifications are defined in the so-called Rainbow Books, which are
distinguished by means of their color (e.g. Yellow Book).
Buffer
A buffer refers to temporary memory that records and delivers data that cannot be processed
immediately as required. The buffer also allows for continuous data flow.
C2 errors
A C2 error describes the error rate on the lower layers of a burned CD that are automatically
corrected during reading. Every recordable disc features these errors; the fewer they are, the
better the quality. High C2 error rates indicate burn problems or quality flaws.
CD Text
CD Text consists of additional information on a CD that can store e.g. music track titles and
artists. CD Text is stored in the so-called lead-in area of the CD before the audio data starts.
The display on the CD player shows the additional data. You must have a CD burner which
supports CD Text to enable the CD Text to be written to a CD. In particular, CD Text can only be written in disc-at-once mode.
CPU usage
The central processing unit processes a computer's processes. The higher the computing
performance, the higher the load of the CPU and its performance.
Nero DiscSpeed 68
Page 69

Glossary
DAE quality
DAE (Digital Audio Extraction) refers to the process of reading audio files with a drive. DAE
quality indicates how well a drive reads data on a CD.
Disc type
Disc type refers to different optical storage media with different specifications. The best
known are CD's and DVD's that can be written to once or multiple times, and which are manufactured with different storage capacities.
Dual Layer Disc
A dual layer disc refers to a DVD that uses two layers on one side, which increases its storage capacity.
DVD-RAM
Digital Versatile Disc Random Access Memory is the first rewritable data carrier format developed. It is characterized by a distribution of sectors that makes it possible to achieve increased data integrity, quicker formatting, and improved error management in comparison to
DVD+/-RW.
Dye type
There are different materials of different colors that are used to produce storage media. The
laser-sensitive and data-carrying dye layer can e.g. be made of phthalocyanine or formazan.
Firmware
Firmware is software that has been installed on hardware during production (e.g. recorder,
USB device, etc.). It is used for communication between the respective hardware and other
software, e.g. when a USB device is connected to a PC.
Jitter
Jitter refers to an abrupt and undesired change in the signal characteristics. Small gaps occur in the data stream as a result. Audio correction synchronizes the data by overlapping the
sectors. This way, the gaps are not audible.
Lead-in
The leadin is the starting area (innermost area) of user data on a data carrier. This is where
the table of contents and additional information concerning the disc is stored.
Lead-out
The leadout is the ending area of user data on a data carrier that is used to close a session.
If the disc has not been completed yet, the reference for the next session is stored here.
Multisession Disc
A multisession disc can contain several sessions that are not fixed. This way, more data can
be added in new sessions at a later point in time, and the disc is not closed until it is full.
Nero DiscSpeed 69
Page 70

Glossary
On-the-fly
The name on-the-fly describes a burn process for discs. In this process, data is written to the
disc directly from an image.
PI Errors
Parity of inner code is part of the structure of a DVD's data block, and is used for error correction purposes. If a PI in a DVD cannot be read, one speaks of a PI error.
PO Errors
The parity of outer code is part of the structure of the data block of a DVD and is used for error correction purposes. If a PO on a DVD cannot be read, one speaks of a PO error.
Read Speed
The read speed of a drive is a factor of the speed that the laser needs in order to read the
data on an optical storage medium, e.g. 8x or 16x speed.
Ripping
Ripping refers to the process of extracting audio or video data from an optical storage medium onto a computer's hard drive in order to process it.
Rotational speed
Discs can be read and/or burned in different ways. As a general rule, the reading process in
optical drives starts at the radius of the disc and moves from the center outwards. The two
standards used to define the types of rotational speed are linear velocity and angular velocity. With constant angular velocity, the tracks at the center of the disc always travel at the
slowest linear velocity. The linear velocity increases as you move away from the center towards the outer edge. Angular velocity (also called rotational speed) describes the change in
the rotation angle over time independently of the radius of the disc, i.e. the velocity at which
an object loops a sector.
RPM
Revolutions per minute (RPM) is an English unit that is used in mechanics to represent rotational speed. It indicates the number of complete revolutions per minute.
Search Time
The seek time is the time the drive needs to move the read head to a specific position on the
disc that is inserted in the drive. In other words, the seek time encompasses the period of
time between the arrival of a write or read command and commencement of the actual write
or read process.
Sector
A sector is the smallest addressable information unit on a CD-ROM. A sector is composed of
2,352 bytes, of which - depending on the type of CD used - different amounts are available
as user data. A sector generally consists of a header, synchronization bits and user data. It
may also have error recognition and correction data.
Nero DiscSpeed 70
Page 71

Glossary
Streaming
Streaming refers to the continuous transmission of data that can already be played during
the transmission procedure. This means that it is not necessary to wait until a media file has
been transmitted completely before it can be played back. A TV channel can be received
and displayed at the same time without it first having to be saved to the hard drive.
Subchannel data
Subchannel data on a disc contains additional information, such as CD Text or information
on positions.
Write Speed
The write speed indicates the speed at which a drive can write data to the optical storage
medium, e.g. 8x or 16x speed.
Nero DiscSpeed 71
Page 72

18 Index
Index
A
Access/Seek Times ........................ 18, 28
Access/Seek Times Test ................ 18, 28
Additional tests. 48, 50, 52, 53, 55, 56, 57,
58, 60
Advanced DAE Quality Test .... 48, 50, 52,
55, 56
Angular velocity..................................... 26
Autorun.................................................. 20
Autosave ............................................... 19
B
Benchmark tab .......................... 10, 25, 30
Bit Settings ...................................... 65, 66
Book type ........................................ 65, 66
Burst rate test........................................ 29
C
C1/C2 - PI/PO Test ............................... 44
Capture ................................................. 24
Changing Bit Settings ........................... 66
Colors.................................................... 21
Conventions, manual .............................. 5
CPU usage............................................ 28
CPU usage test..................................... 28
Create data disc........................ 30, 33, 36
Create data disc test ....................... 30, 33
Create Disc tab ......................... 10, 33, 36
Create Image .................................. 53, 55
Creating a DAE Test Disc ............... 48, 50
D
DAE quality ........................................... 48
Database......................................... 61, 62
Disc Info Tab ......................................... 10
Disc Quality ........................................... 21
Disc Quality tab ......................... 10, 39, 43
E
Erasing a Disc ....................................... 64
Error test ............................. 48, 53, 55, 56
L
Language .............................................. 11
Launching the Program........................... 6
Linear velocity ....................................... 26
Load/Eject ............................................. 29
Load/eject test....................................... 29
Loading Test Data................................. 62
M
Main Screen ............................................ 7
Manual, conventions ............................... 5
N
Nero DiscSpeed - Bit Setting window ... 66
Nero DiscSpeed - Bit Setting Window .. 65
Nero DiscSpeed - Database window .... 62
Nero DiscSpeed - Erase window .......... 64
Nero DiscSpeed - Overburning Test
window ............................................ 58, 60
Nero DiscSpeed Options Window......... 11
Nero DiscSpeed window - Advanced DAE
Error Correction Test ............................ 53
Nero DiscSpeed window - Advanced DAE
Quality Test ..................................... 50, 52
Nero DiscSpeed Window - DAE Test Disc
........................................................ 48, 50
Nero DiscSpeed window- Advanced DAE
Error Correction Test ...................... 55, 56
O
Options........ 11, 13, 15, 18, 19, 20, 21, 24
Overburning test........................ 57, 58, 60
Q
Quality Test ........................................... 39
R
Read speed.....................................
Read test
Rotational speed ............................. 26, 33
Running a test series ............................ 32
Running the Advanced DAE Quality Test
............................................... 44
13, 26
Nero DiscSpeed 72
Page 73

Index
.............................................................. 52
Running the quality test ........................ 43
Running the ScanDisc Test .................. 46
Running the test.................................... 30
S
Save .................................... 10, 19, 24, 61
Saving Test Data............................. 10, 61
ScanDisc ............................................... 44
ScanDisc tab ............................. 10, 44, 46
ScanDisc test ........................................ 44
Snapshot feature................................... 24
Spin down ............................................. 29
Spin up ............................................ 13, 29
Spin up/down test ................................. 29
Standard Tests.. 13, 25, 26, 28, 29, 30, 32
Storage formats............................... 61, 62
System requirements ............................ 67
T
Test DAE quality ................................... 21
Test series............................................. 25
Transfer rate.............................. 15, 26, 29
Transfer Rate Test .......................... 15, 26
U
User Interface........................................ 11
W
Write speed ..................................... 13, 33
Nero DiscSpeed 73
Page 74

19 Contact
Nero DiscSpeed is a Nero AG product.
Contact
Nero AG
Im Stoeckmaedle 13-15
76307 Karlsbad
Germany
Nero Inc.
330 N Brand Blvd Suite 800
Glendale, CA 91203-2335
USA
Nero KK
Rover Center-kita 8F-B, 1-2-2
Nakagawa-chuou Tsuzuki-ku
Yokohama, Kanagawa
Japan 224-0003
Internet:
Help:
Fax:
Internet:
Help:
Fax:
E-mail:
Internet:
Help:
www.nero.com
http://support.nero.com
+49 724 892 8499
www.nero.com
http://support.nero.com
(818) 956 7094
US-CustomerSupport@nero.com
www.nero.com
http://support.nero.com
Copyright © 2008 Nero AG and its licensors. All rights reserved.
Nero DiscSpeed 74
 Loading...