

Nero BURNING ROM 7 user Manual
User Guide
Nero Burning ROM 7
Nero AG

Information on copyright and trade marks
The Nero Burning ROM 7 user manual and all its contents are protected by
copyright and are the property of Nero AG. All rights reserved. This user manual
contains material that is protected by internationally valid copyright. This manual
may not - in whole or in part - be copied, transmitted or otherwise reproduced
without the express written permission of Nero AG.
All trade names and trademarks are the property of the respective owners.
Nero AG rejects any claims that transcend the legal guarantee rights. Nero AG
does not undertake any liability for the correctness of the content of the Nero
Burning ROM 7 user manual. The contents of the software supplied, as well as
of the Nero Burning ROM 7 user manual, may be changed without prior
warning.
The trademarks mentioned here are only listed for information purposes.
REV 7.0
Unless you own the copyright or have the permission of the copyright
holder, the unauthorized copying of discs can represent a violation of
national or international laws and may result in serious penalties.
Copyright © 1995 - 2006 by Nero AG

Contents
1 For users in a hurry............................................................................................6
1.1 Five easy steps to a finished CD/DVD ............................................................ 6
Copying a disc in four easy steps................................................................. 12
1.2
2 General information about Nero Burning ROM 7...........................................15
2.1 Media supported by Nero............................................................................... 15
2.2 Nero Express 7................................................................................................ 15
2.2.1 Differences to Nero Burning ROM 7................................................................. 15
3 Creating a CD....................................................................................................17
3.1 Data CD............................................................................................................17
3.1.1 Creating a CD-ROM (ISO)................................................................................17
3.1.2 Background information for advanced users....................................................18
3.2 Audio CD .........................................................................................................23
3.2.1 Creating an audio CD.......................................................................................23
3.2.2 Extracting audio files from a CD and then burning them..................................25
3.2.3 Background information for advanced users....................................................26
3.3 Mixed Mode CD............................................................................................... 40
3.3.1 Creating a Mixed Mode CD ..............................................................................40
3.4 CD EXTRA .......................................................................................................41
3.4.1 Creating a CD EXTRA...................................................................................... 41
3.5 Bootable CD and DVD .................................................................................... 43
3.5.1 Conditions.........................................................................................................43
3.5.2 Background.......................................................................................................44
3.5.3 Template for making a bootable CD................................................................. 44
3.5.4 Making bootable CDs .......................................................................................45
3.6 Video CD/Super Video CD.............................................................................. 46
3.6.1 Creating a Video CD.........................................................................................46
3.6.2 Creating a Super Video CD..............................................................................48
3.7 miniDVD...........................................................................................................50
3.7.1 miniDVD erstellen............................................................................................. 50
3.8 Hybrid CDs......................................................................................................51
3.8.1 Creating a Hybrid CD........................................................................................ 51
3.9 CD-ROM (UDF) ................................................................................................ 52
3.9.1 Creating a CD-ROM (UDF)............................................................................... 52
3.10 CD-ROM (UDF/ISO)......................................................................................... 54
3.10.1 Creating a CD-ROM (UDF/ISO) .......................................................................54
4 Copying a CD ....................................................................................................56
4.1 Direct copy or copy of an image file?...........................................................56
4.2 Copying using an image file.......................................................................... 56
4.3 Copying using a fast copy (on the fly).......................................................... 58
Nero Burning ROM 7 Contents • 3

5 DVD erstellen ....................................................................................................61
5.1 DVD-Video erstellen .......................................................................................61
5.2 Creating a DVD-ROM (ISO) ............................................................................62
5.3 Creating a bootable DVD-ROM...................................................................... 62
5.4 Creating a DVD-ROM (UDF) ........................................................................... 62
5.5 Creating a DVD-ROM (UDF/ISO).................................................................... 62
5.6 Copying a DVD................................................................................................62
6 About burning...................................................................................................63
6.1 Choose Recorder............................................................................................63
6.2 Burning a disc.................................................................................................64
6.2.1 Viewing a log file...............................................................................................66
6.3 Additional information for advanced users ................................................. 67
6.3.1 The Burn tab..................................................................................................... 67
6.3.2 Book Type bestimmen...................................................................................... 69
6.4 Use Multiple Recorders..................................................................................71
7 Image file...........................................................................................................72
7.1 What is an image file?.................................................................................... 72
7.2 Creating an image file ....................................................................................72
7.3 Burning an image file ..................................................................................... 73
7.4 Nero ImageDrive ............................................................................................. 74
7.4.1 Installation of Nero ImageDrive ........................................................................74
7.4.2 Activating drives using Nero ImageDrive..........................................................74
8 Setting options for Nero Burning ROM 7........................................................76
8.1 Tabs .................................................................................................................76
8.1.1 Compilation.......................................................................................................77
8.1.2 Cache ...............................................................................................................77
8.1.3 Language..........................................................................................................77
8.1.4 Sounds..............................................................................................................77
8.1.5 Audio.................................................................................................................77
8.1.6 Expert Features................................................................................................77
8.1.7 Database ..........................................................................................................77
8.1.8 Ultrabuffer......................................................................................................... 78
8.1.9 File Browser......................................................................................................78
8.1.10 Mics ..................................................................................................................78
8.1.11 LightScribe........................................................................................................78
9 Saving tracks using Nero Burning ROM 7......................................................79
9.1 Saving audio tracks........................................................................................79
9.2 Saving data tracks.......................................................................................... 79
10 LightScribe........................................................................................................ 81
10.1 LightScribe System requirements ................................................................81
10.2 Printing LightScribe labels ............................................................................ 81
Nero Burning ROM 7 Contents • 4

10.3 Creating a compilation, and burning and printing LightScribe labels.......82
10.4 LightScribe FAQs ...........................................................................................92
11 Miscellaneous ...................................................................................................95
11.1 Virus Checker.................................................................................................. 95
11.1.1 Updating the database......................................................................................95
11.2 Nero Burning ROM 7 level indicator ............................................................. 95
11.3 Overburning .................................................................................................... 96
11.3.1 What is overburning?........................................................................................96
11.3.2 Overburning a CD.............................................................................................97
11.4 Automatic system shutdown at the end of the burning process............... 98
11.4.1 Activating automatic system shutdown.............................................................98
11.5 Verifying compilations with Nero Burning ROM 7....................................... 99
11.5.1 Writing data to a CD or DVD involves more risks than writing data to a hard
disk. .................................................................................................................. 99
11.5.2 Using the Verify option...................................................................................... 99
11.5.3 How the Verify option works.............................................................................99
11.6 Erasing data from rewritable discs............................................................... 99
12 FAQs................................................................................................................101
12.1 General questions about Nero Burning ROM 7 ......................................... 101
12.1.1 Can Nero Burning ROM 7 burn and copy CDs on the fly? ............................. 101
12.1.2 How do I create a CD image file?................................................................... 101
12.1.3 I have entered my serial number, but I cannot open Nero Burning ROM 7. Why
is this?.............................................................................................................101
12.1.4 How can I avoid 'Buffer underrun' errors? ......................................................101
12.1.5 I can't select any language other than English. .............................................. 102
12.1.6 Since I installed Nero Burning ROM 7, my computer is behaving unpredictably.
What is the cause of this?...............................................................................102
12.1.7 I can read the CD/DVD that I have burnt in my recorder, but not in all CD/DVD-
ROM drives. Why is this? ...............................................................................102
12.1.8 How do I remove the irritating 2-second pause between audio tracks?.........103
12.1.9 The audio CDs which I have burnt have sound interference such as crackling,
humming or rustling. Why is this?...................................................................103
12.1.10 One of the following error messages appears during the burning process. Why
is this?.............................................................................................................103
12.2 Context-sensitive help .................................................................................104
12.3 Contact ..........................................................................................................105
13 Glossary ..........................................................................................................107
Nero Burning ROM 7 Contents • 5

1 For users in a hurry
1.1 Five easy steps to a finished CD/DVD
With Nero Burning ROM 7 you can quickly and easily create your own discs and
copy (non-copy-protected) discs.
With Nero Burning ROM 7, you have a powerful burning software which enables
you to easily burn data, music and videos onto discs. Nero Burning ROM 7 is
the ideal software for power users - making it possible to work individually to a
large extent. You have full control over the projects you want to burn and you can
specify the file system, the length of the file names and the required font. You
want to change the name of the disc? No problem, Nero Burning ROM 7 will
assist you and provide you with several options. Even if you want to burn projects
with unusual formats, Nero Burning ROM 7 assists you and enables you to
create discs which can be read by both Apple and Windows computers. UDF
format discs are also no problem. You can customize the tool bar and change the
shortcuts of Nero Burning ROM 7 - in other words, you have a program which is
as individual as you are. Despite the scope and the vast ability of Nero Burning
ROM 7, it remains an easy-to-use burning program which creates your own discs
in just a few easy steps. First select the disc type (a type supported by your
device) to be burned (CD / DVD / Blu-ray / HD DVD), then select the type of
project before adding the required data, and then you are ready to start burning quickly and reliably, in proven Nero quality.
Nero Burning ROM 7 For users in a hurry • 6
Step 1: Launching the program
Start Nero Burning R OM 7 using the command sequence 'Start' >'All programs'
> 'Nero 7 Premium' > 'Audio' / 'Data' > 'Nero Burning ROM'.
The program starts with the window in which you select the media type and
specify the compilation type.
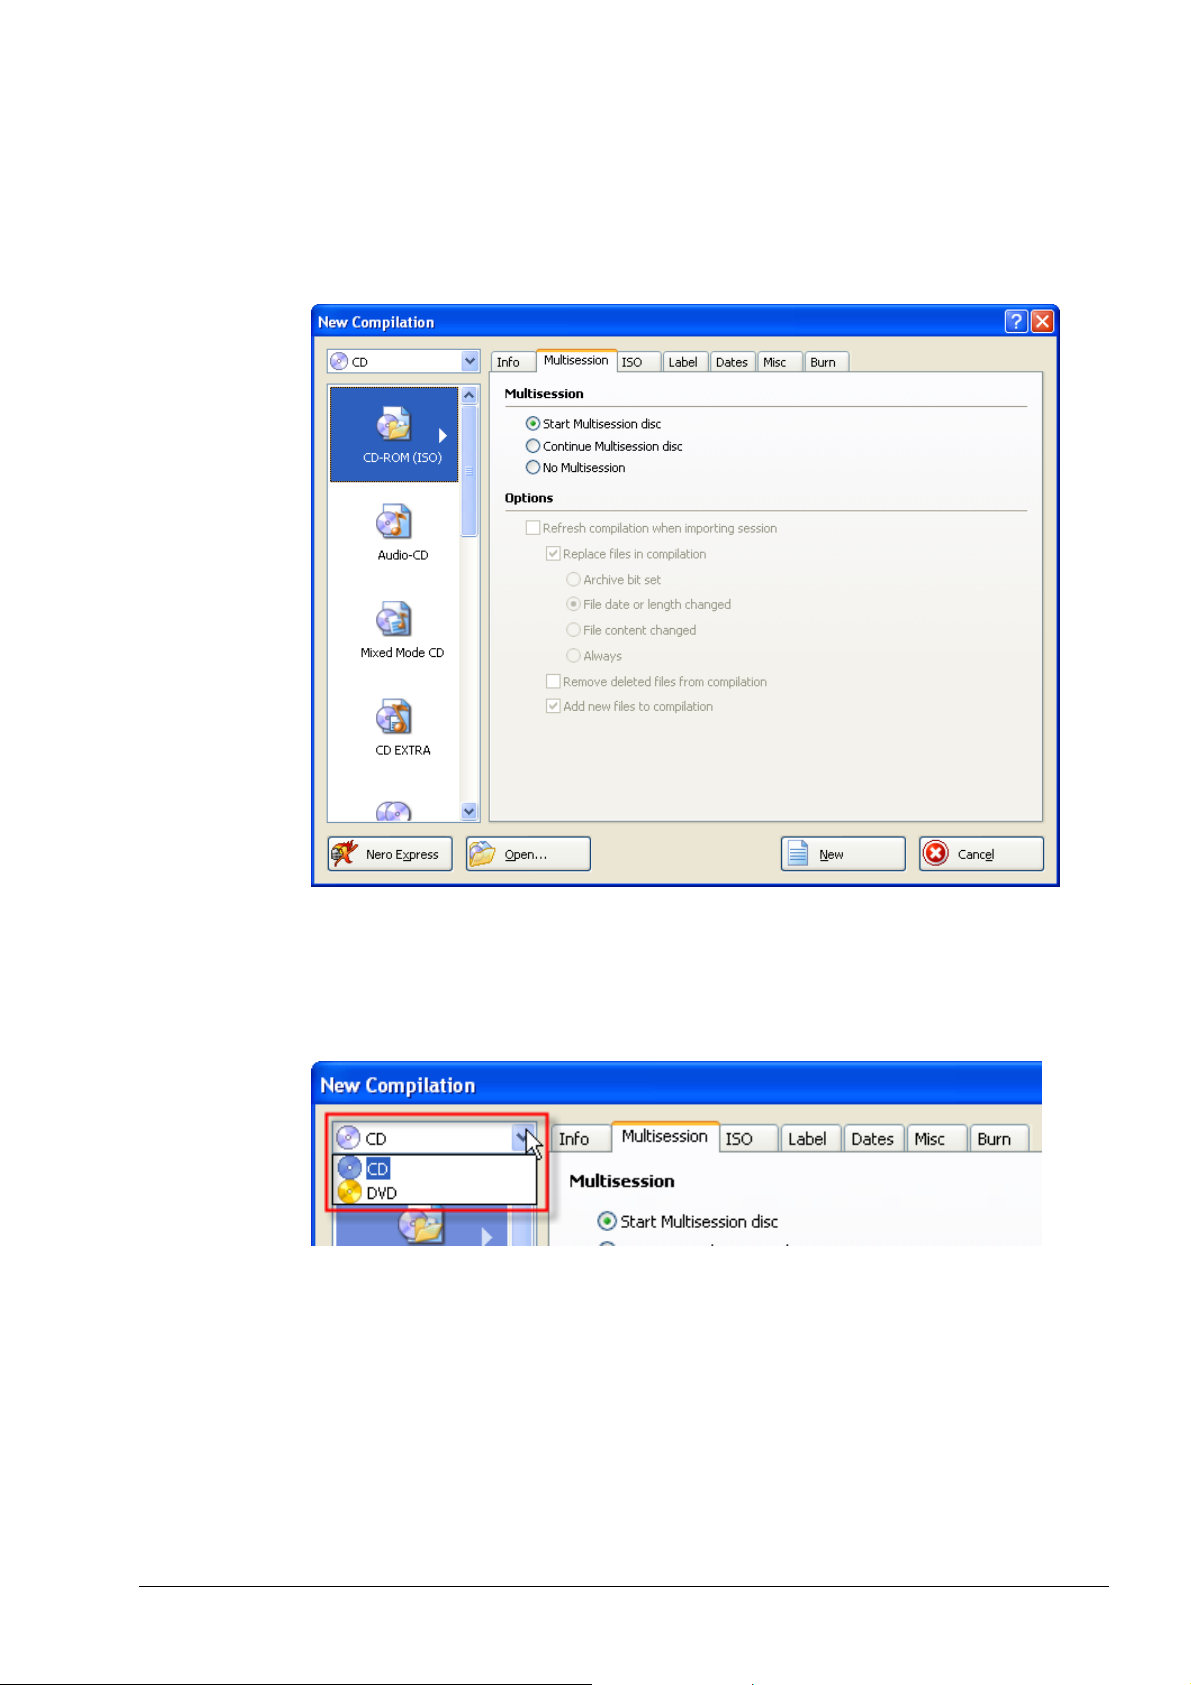
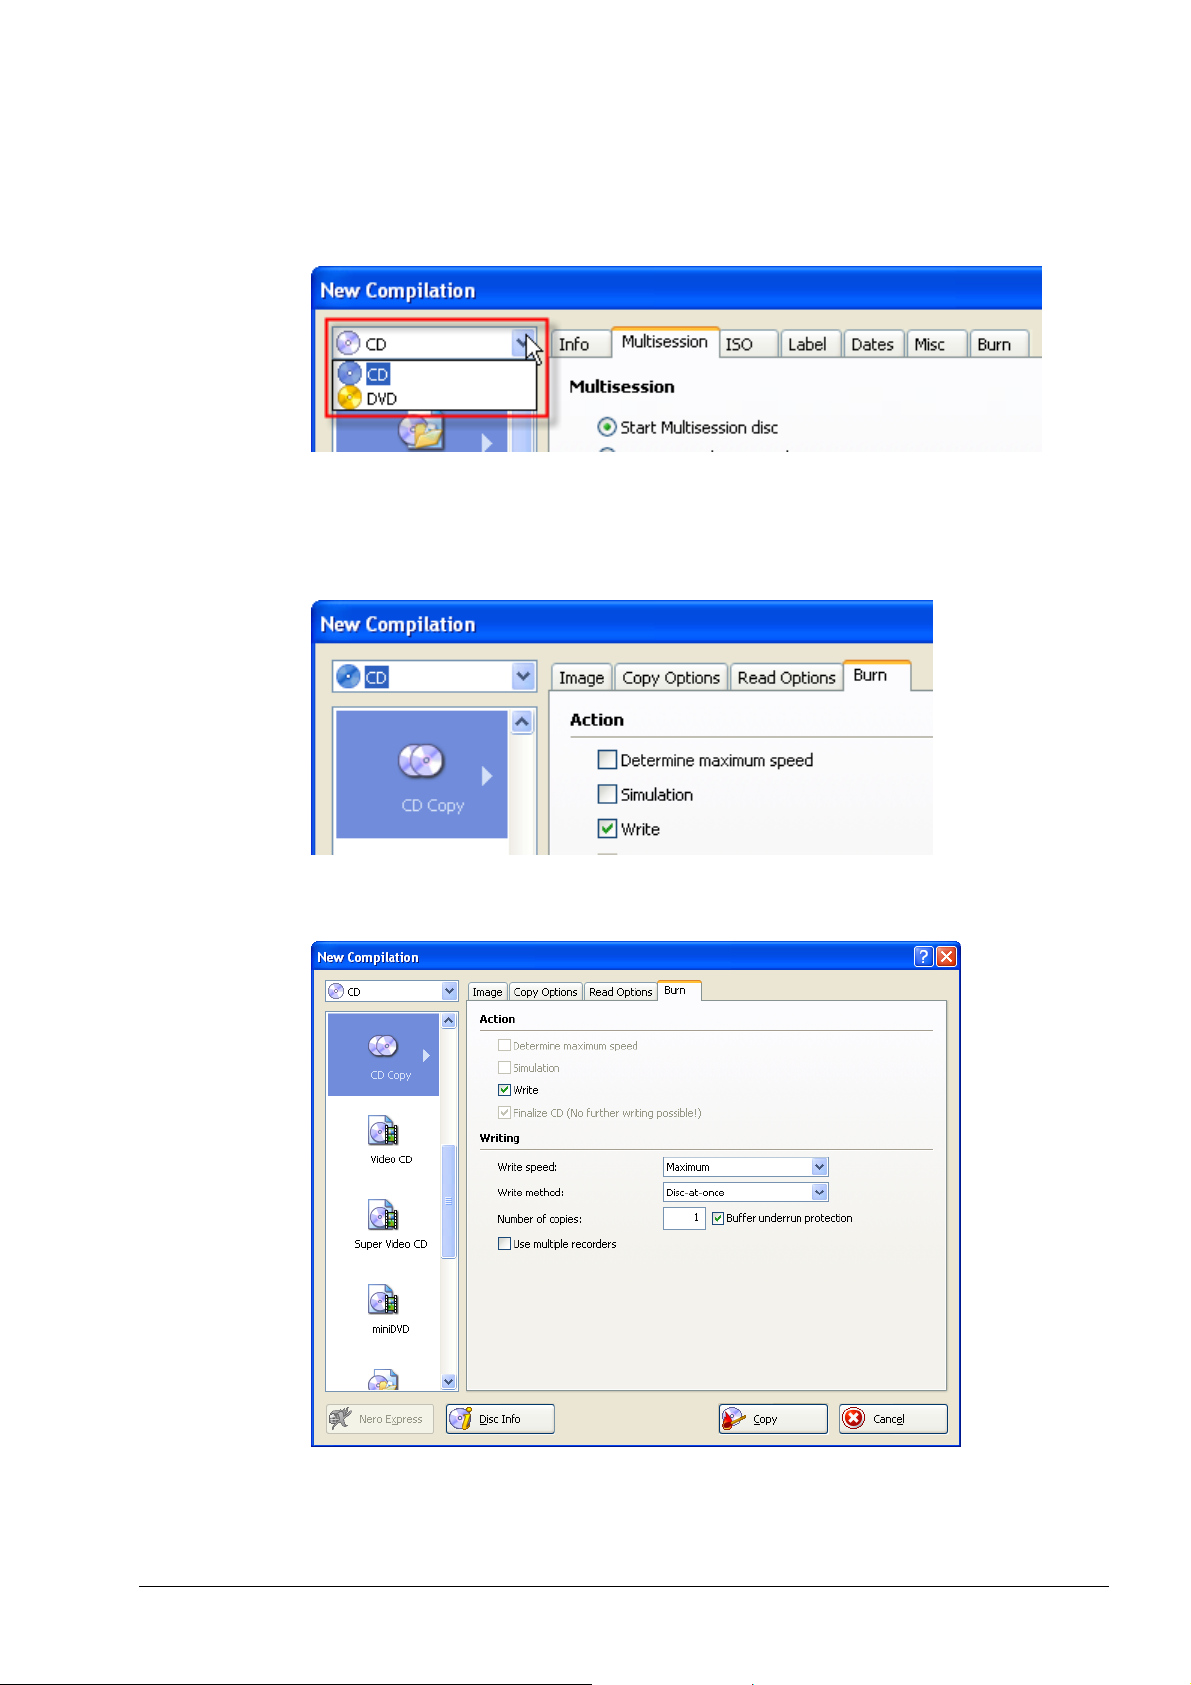
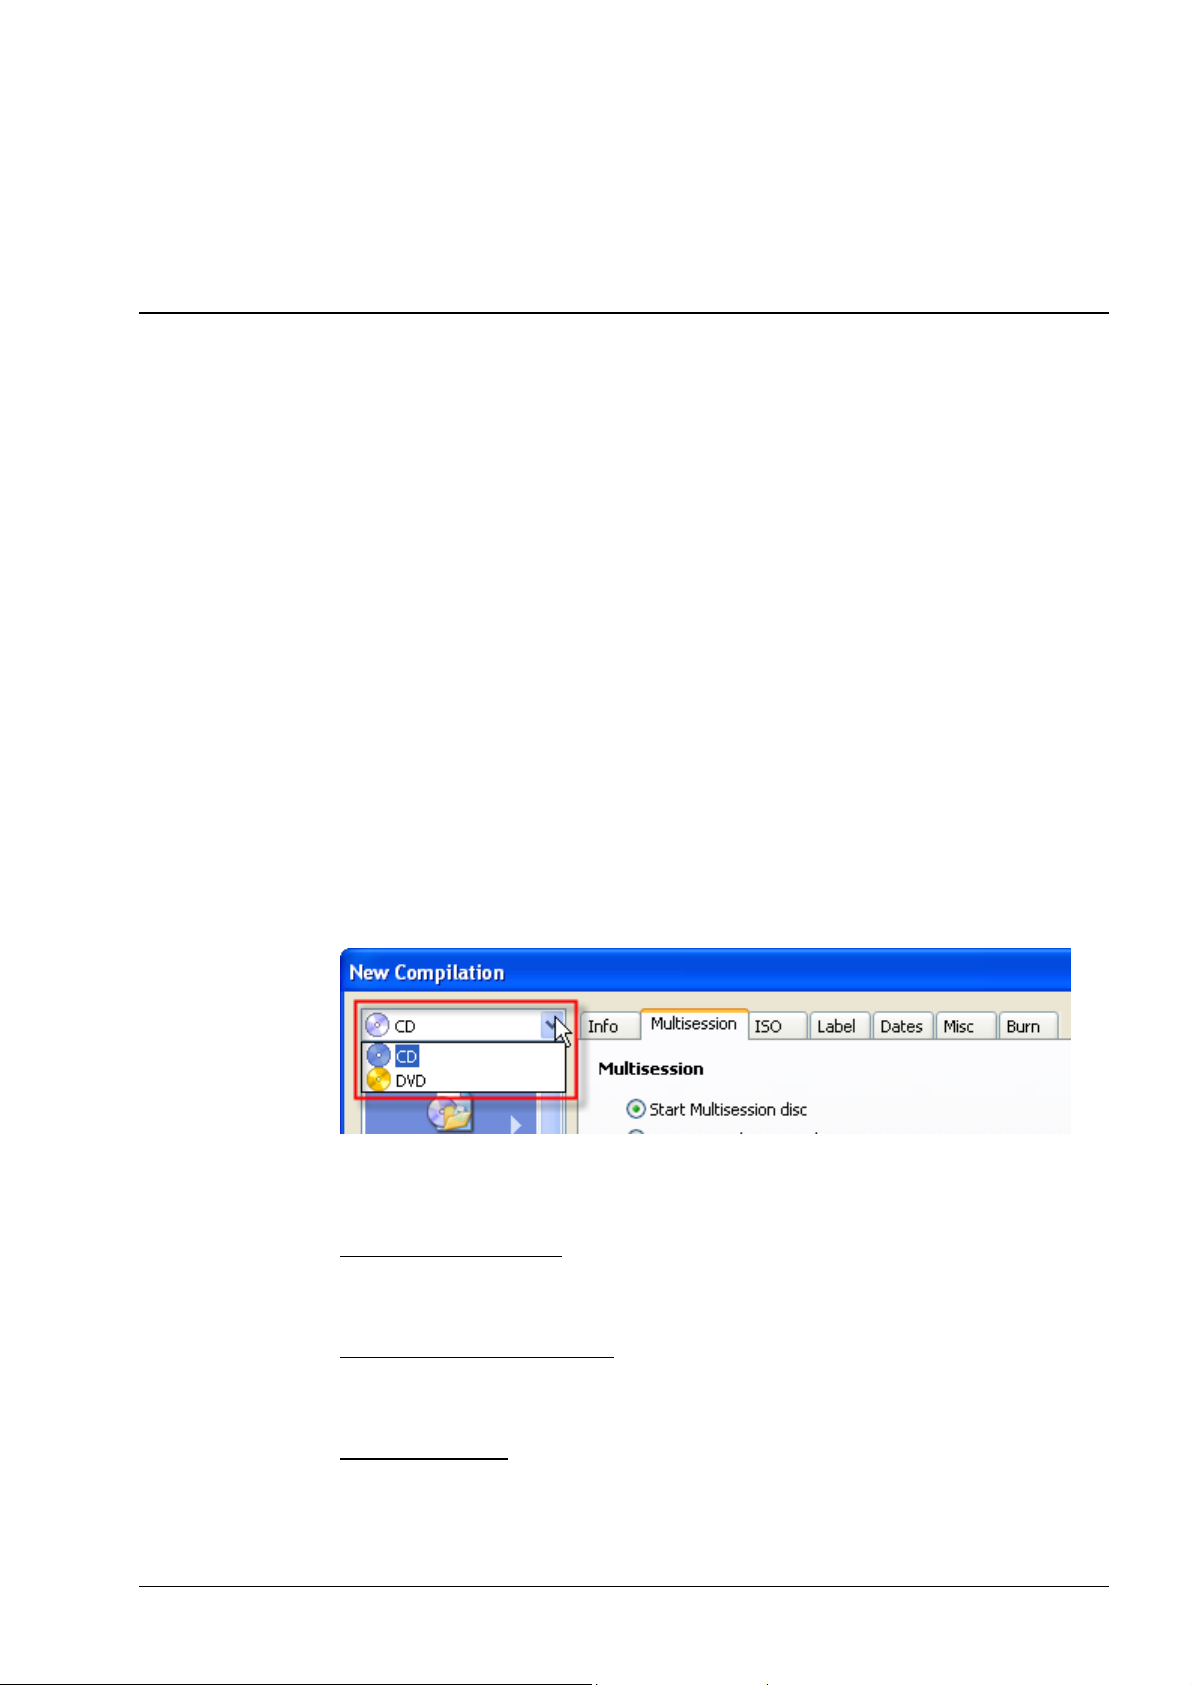
Step 2: Selecting the media type
If you have installed a recorder that can burn a number of media types (e.g. CDs,
DVDs), then click on the drop-down list box and select the media type to be
burned.
Nero Burning ROM 7 For users in a hurry • 7
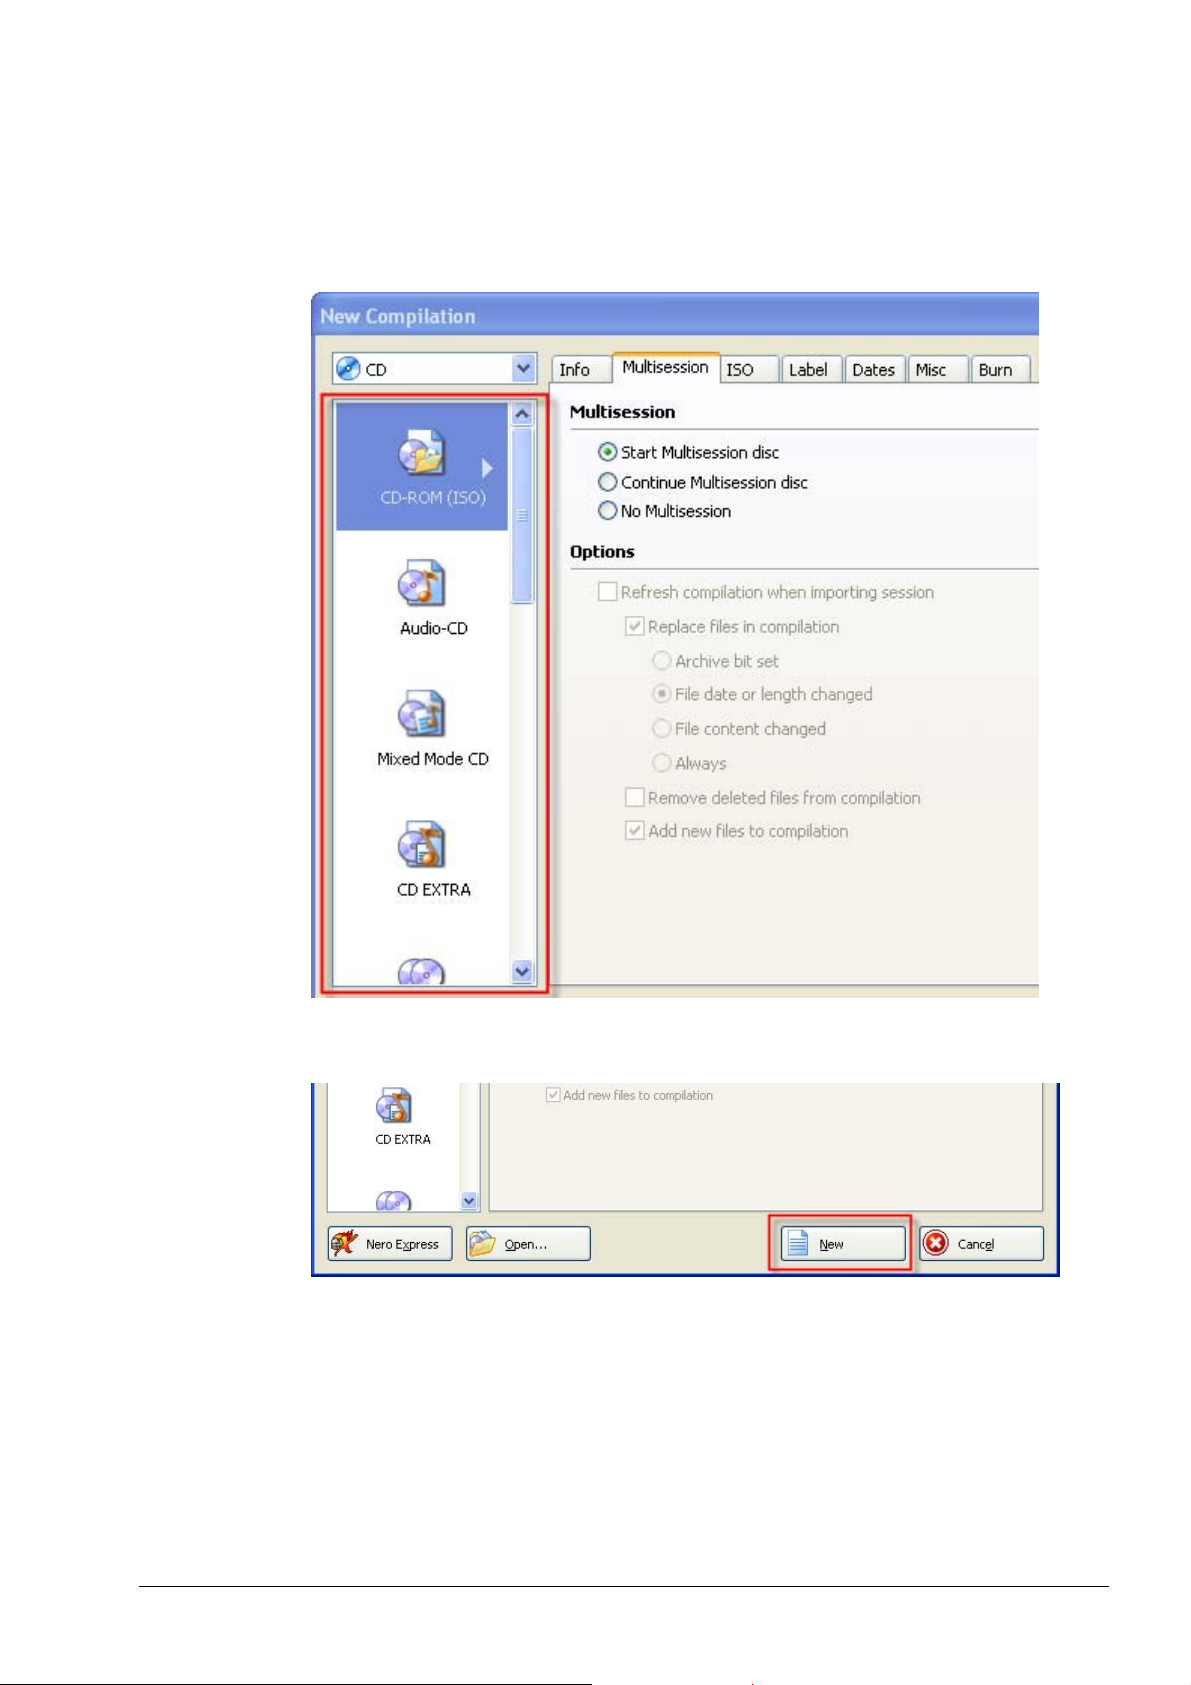
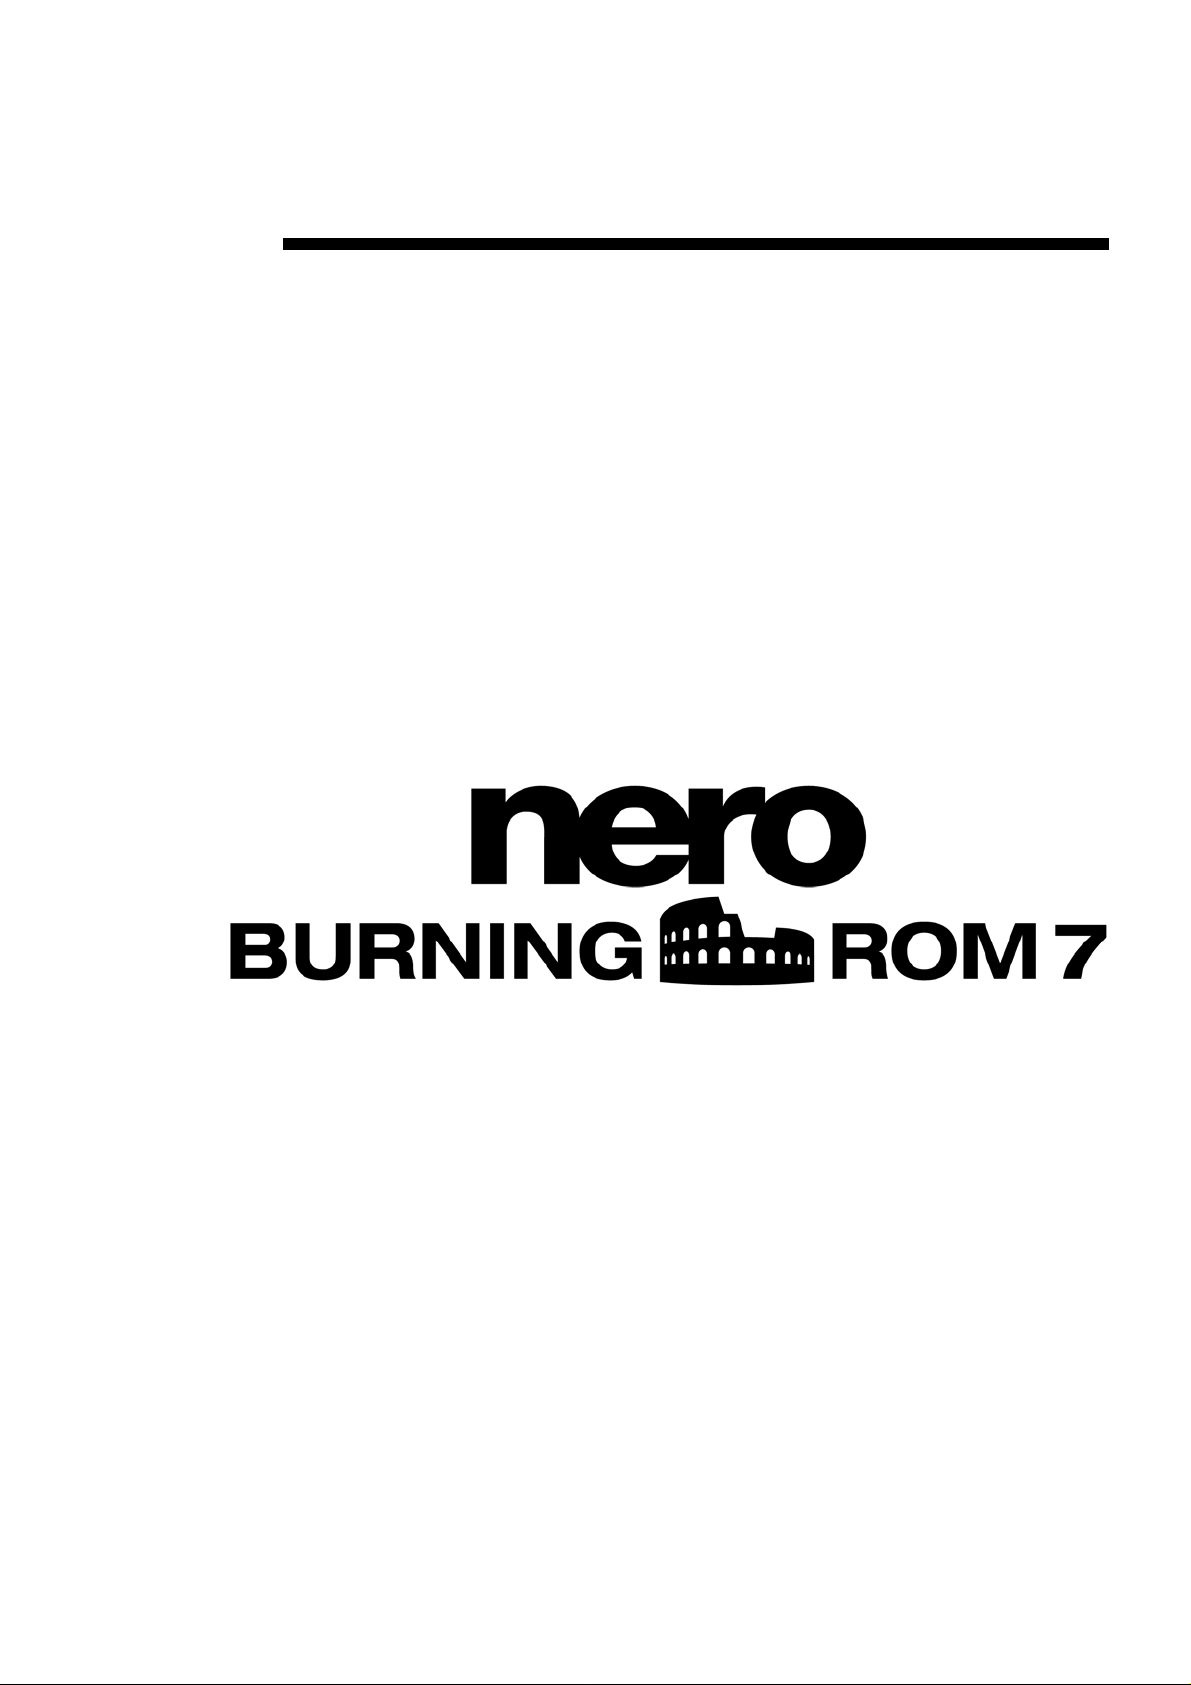
Step 3: Specifying the compilation type
Select the desired compilation type. The window in the compilation area will
display the possible compilations for the media type selected. For example, to
burn an Audio CD you must use the media type 'CD' and to burn a DVD-Video
you must use the media type 'DVD'.
Click on the 'New' button to finish selection of the compilation.
The Nero Burning ROM 7 file browser opens in which you select the files to be
burned.
Nero Burning ROM 7 For users in a hurry • 8
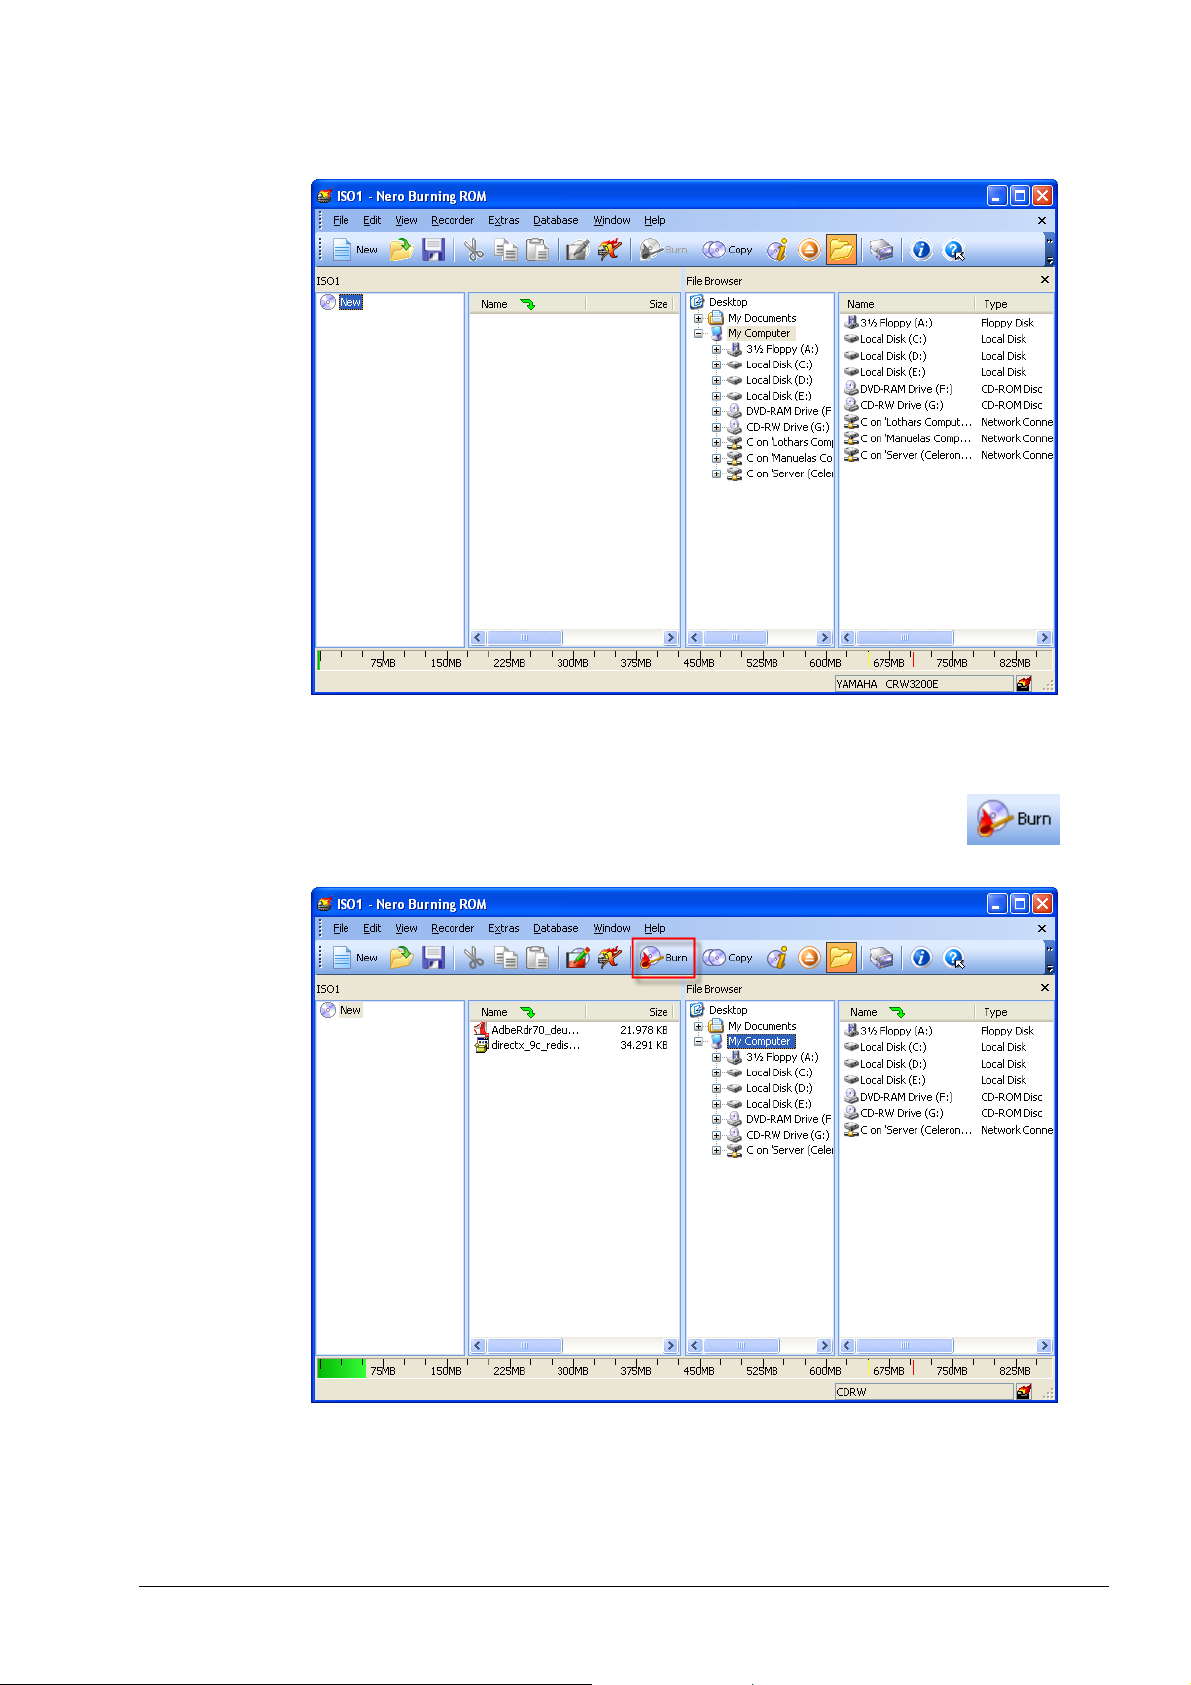
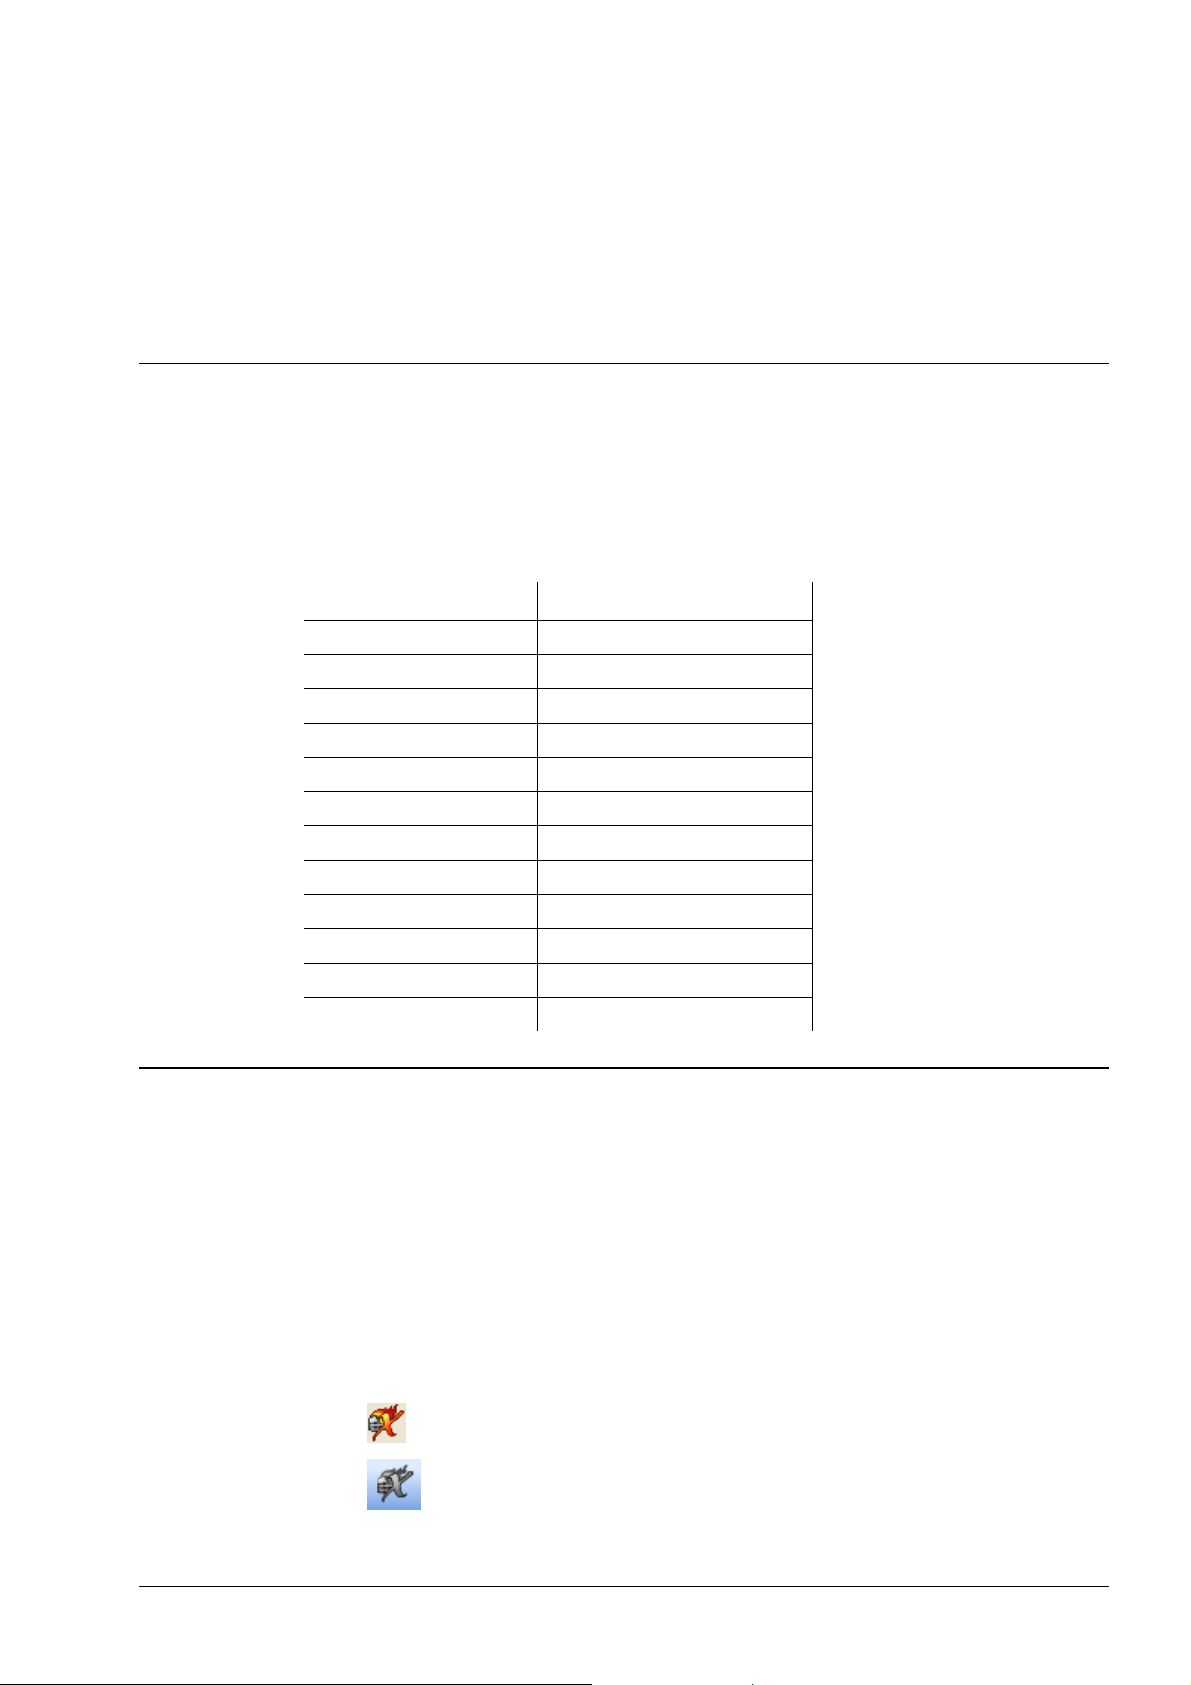
Step 4: Running a compilation
Compiling the files is child's play: Select the desired files on the right-hand side of
the file browser and drag them to the left-hand side. Repeat this step until all of
the files are in the compilation area of the file browser. Click on the
icon
to switch to the burning area.
The Nero Burning ROM 7 file browser is configured as standard to show the file
structure of your PC on the right-hand side and the files to be burned on the lefthand side.
Nero Burning ROM 7 For users in a hurry • 9
If there is no file browser open yet, you can repeat this step by clicking on the
icon.
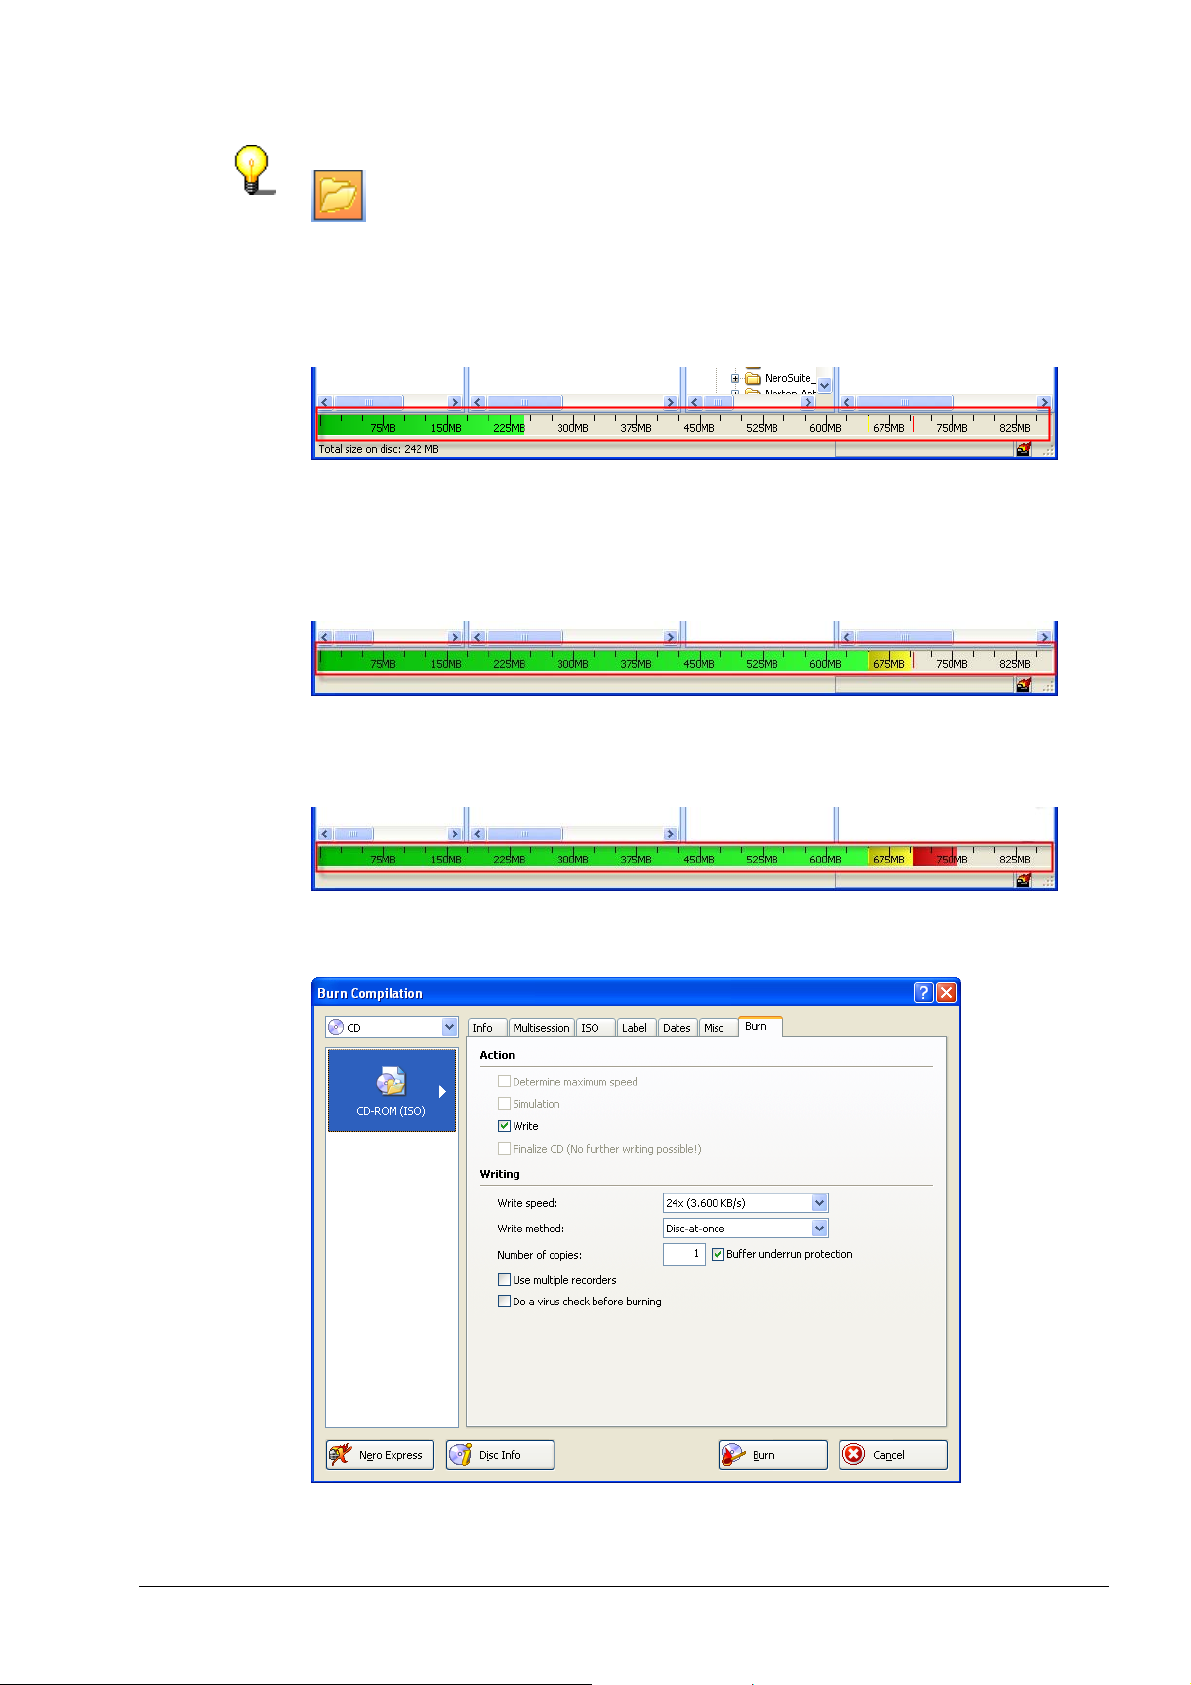
You can tell whether the data will fit on the disc or the disc will be too small by the
color of the full-o-meter. If the color of the full-o-meter is green, the data will fit on
the disc.
If the color is yellow, the data might fit on the disc. This depends on the disc
inserted. Commercially available CDs, for example, are available with a capacity
of 650 MB and 700 MB, i.e. in the example shown the data would fit on a CD with
700 MB, but not on a CD with 650 MB.
If the color is red, the data will not fit on the disc unless you have inserted a
special size of disc, for example a CD with 800 MB.
Step 5: Starting the burn process
Nero Burning ROM 7 For users in a hurry • 10
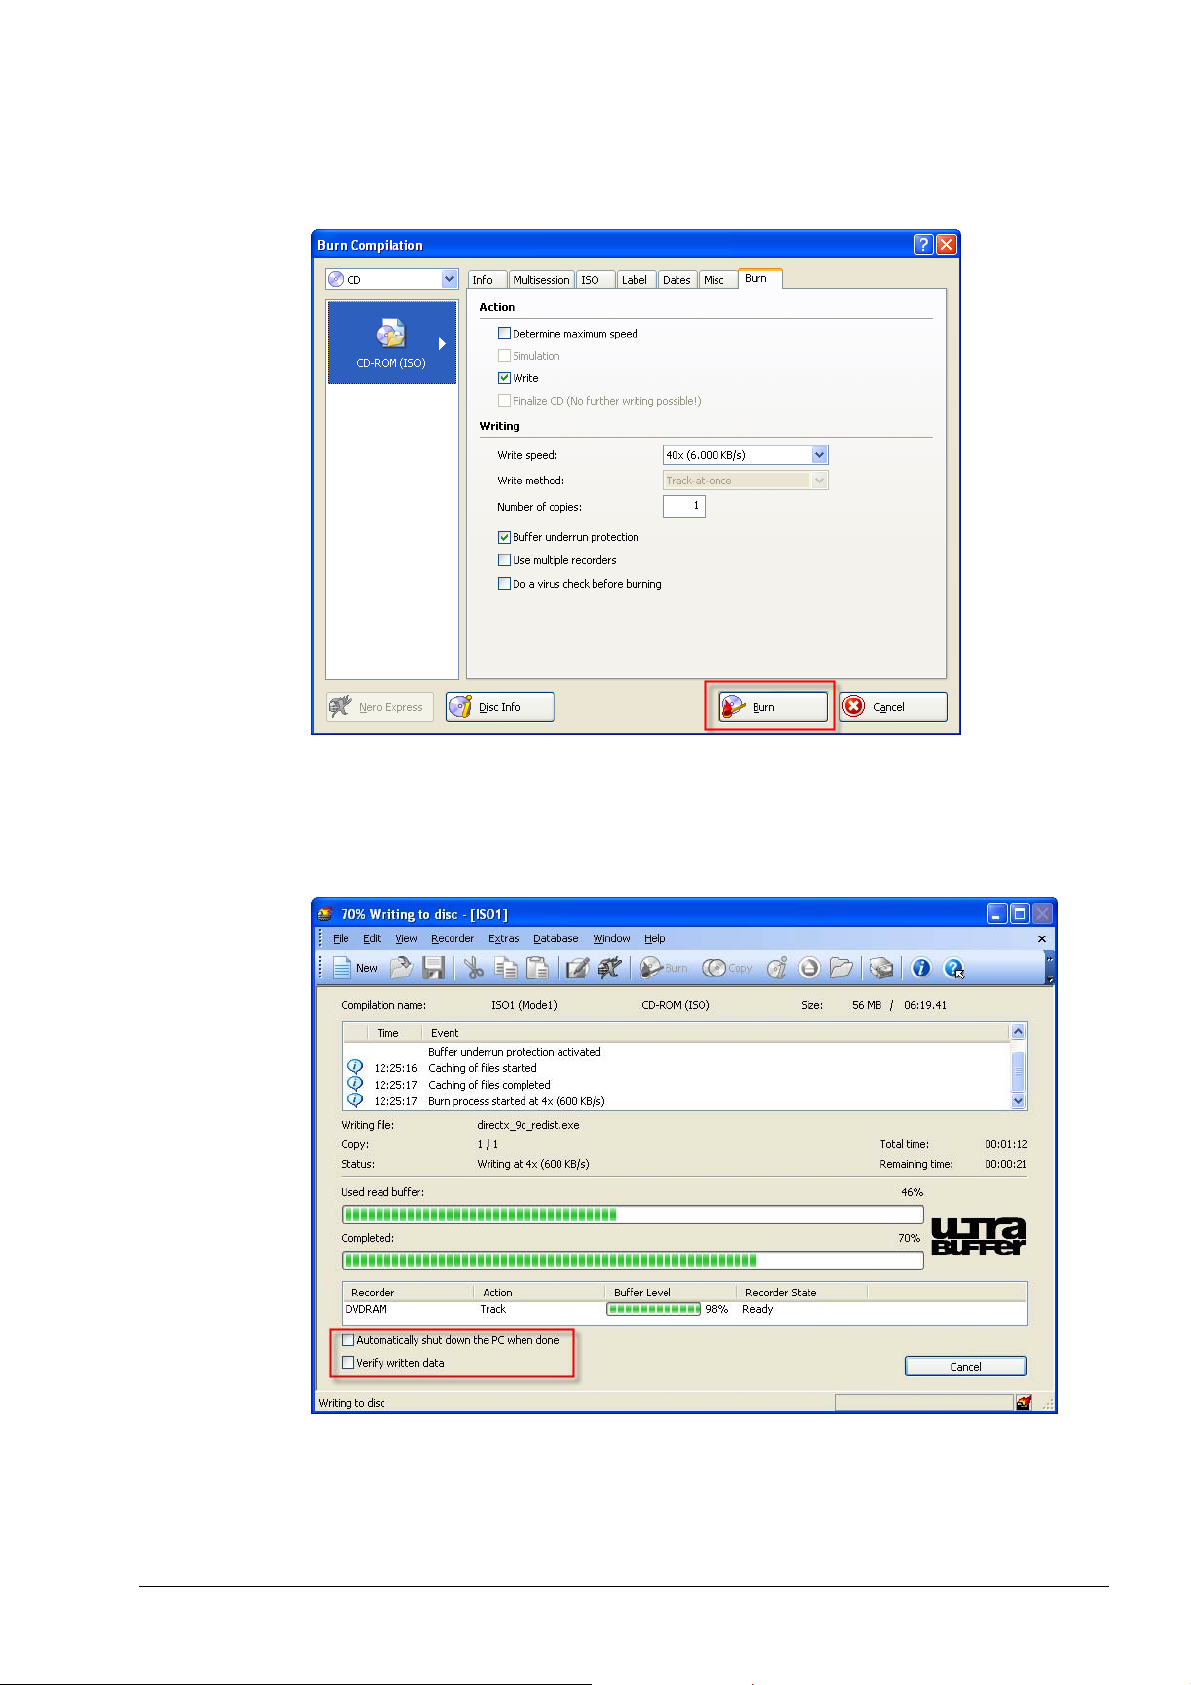
On the 'Burn' tab you can make the final settings before the burn process. Note,
however, that all of the settings are preset as standard to the most suitable value.
Insert the disc and click on the 'Burn' button.
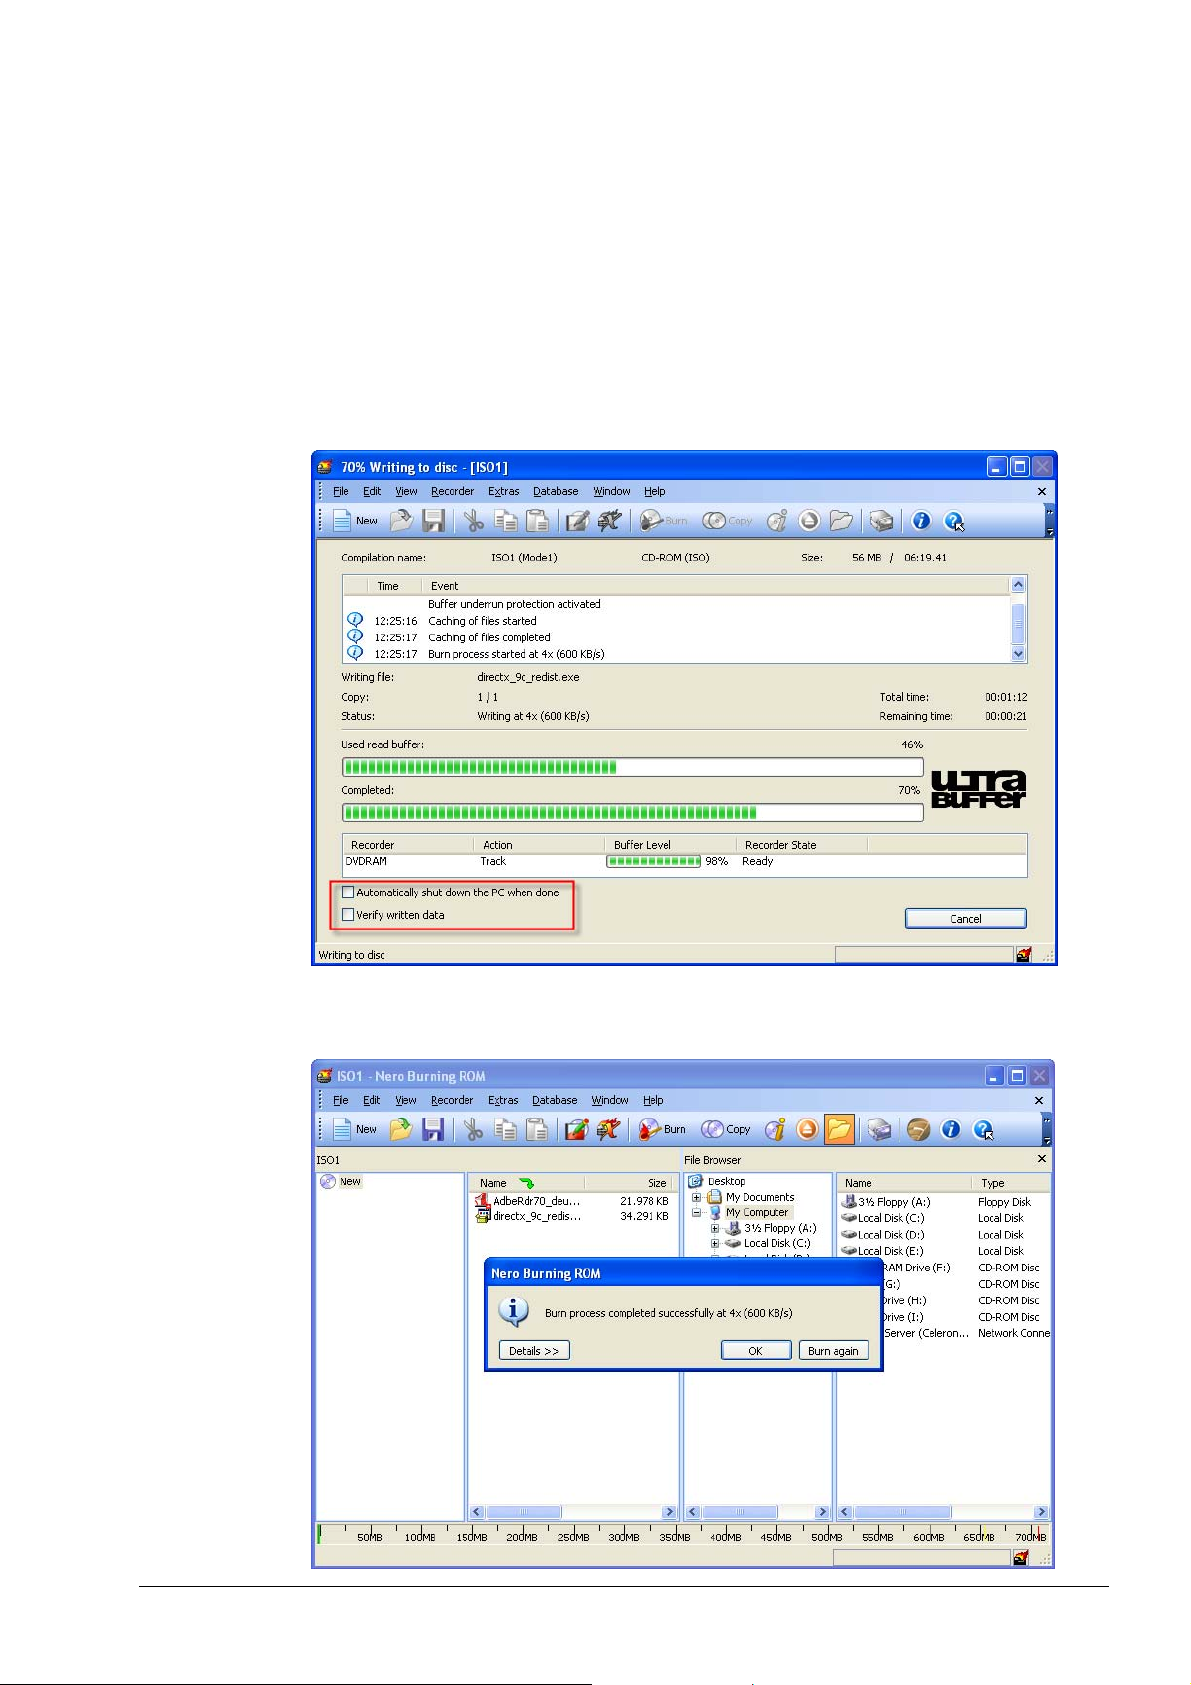
The burn process is started; while it is running you can specify whether the files
burned onto the disc should be verified and/or the PC shut down after the burn
process (provided this is technically possible and you have the administrator
rights required for this).
Nero Burning ROM 7 For users in a hurry • 11
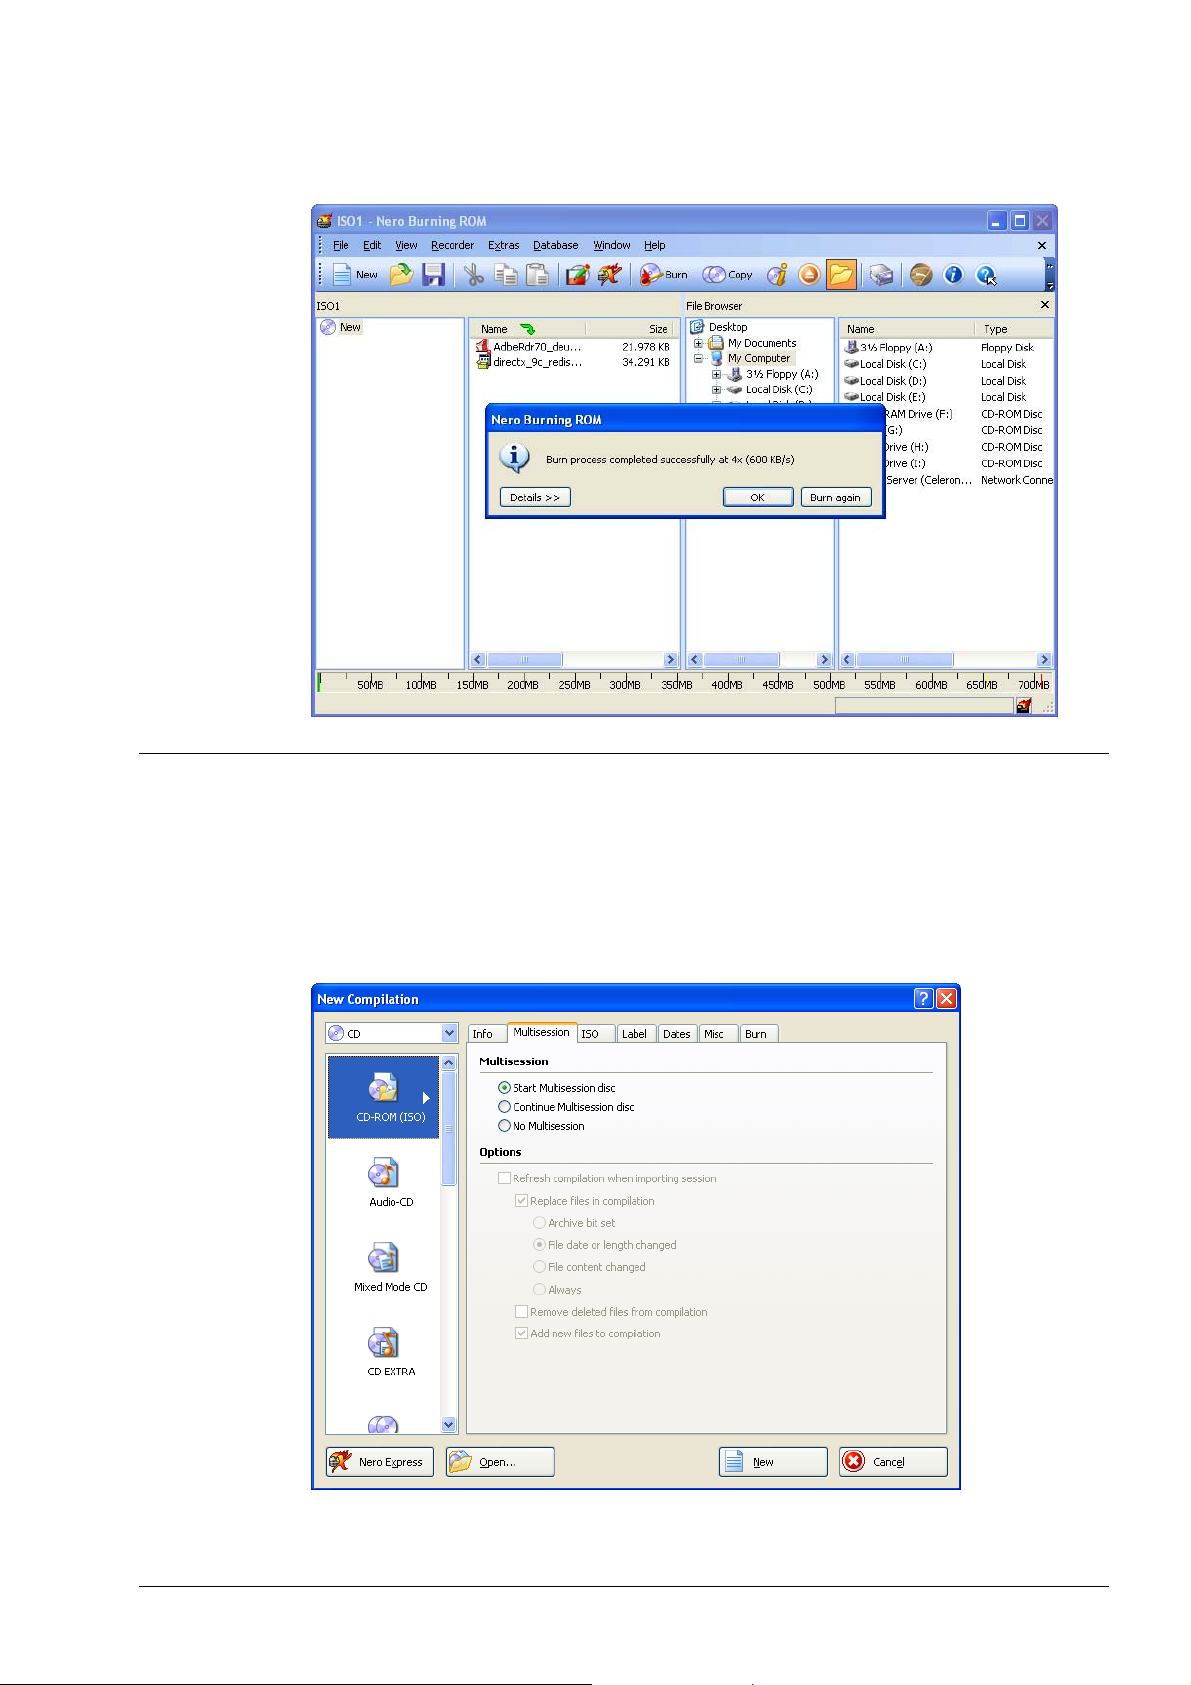
The outcome of the burn process is displayed once it is finished. Click on 'OK' to
finish or on 'Burn again' if the compilation should be burned again.
1.2 Copying a disc in four easy steps
Step 1: Launching the program
Start Nero Burning R OM 7 using the command sequence 'Start' >'All programs'
> 'Nero 7 Premium' > 'Audio' 'Data' > 'Nero Burning ROM'.
The program starts with the window in which you select the media type and
specify the compilation type.
Nero Burning ROM 7 For users in a hurry • 12
Step 2: Selecting the media type
If you have installed a recorder that can burn a number of media types (e.g. CDs,
DVDs), then click on the drop-down list box and select the media type to be
copied.
Step 3: Specifying the compilation type
Select the compilation type 'CD Copy' or 'DVD Copy' according to the media type
selected.
Step 4: Starting the burn process
Nero Burning ROM 7 For users in a hurry • 13
A: Direct copy (only for systems with two drives)
Insert the disc to be copied in the source drive and the empty disc in the target
drive and close both trays. Click on the 'Burn' button to start the copy process.
B: Copy via image file (for systems with one drive)
Insert the disc to be copied in the drive and close the tray. Click on the 'Burn'
button to start the copy process.
The burn process is started; while it is running you can specify whether the files
burned onto the disc should be verified and/or the PC shut down after the burn
process (provided this is technically possible and you have the administrator
rights required for this).
The outcome of the burn process is displayed once it is finished. Click on 'OK' to
finish or on 'Burn again' if the compilation should be burned again.
Nero Burning ROM 7 For users in a hurry • 14
2 General information about Nero Burning
ROM 7
2.1 Media supported by Nero
Nero Burning ROM 7 is able to burn different types of media. Both DVDs and
CDs can be burned with a DVD recorder. Only CDs can be burned with a CD
recorder.
The following table shows the possible compilations for the various media types.
CD DVD
CD-ROM (ISO) DVD-ROM (IS0)
Audio CD DVD Copy
Mixed Mode CD DVD-Video
CD EXTRA DVD-ROM (Boot)
CD Copy DVD-ROM (UDF)
Video CD DVD-ROM (UDF/ISO)
Super Video CD
miniDVD
CD-ROM (Boot)
CD-ROM (Hybrid)
CD-ROM (UDF)
CD-ROM (UDF/ISO)
2.2 Nero Express 7
2.2.1 Differences to Nero Burning ROM 7
Nero Express 7 is an assistant-driven application based on Nero Burning ROM
7.
You can switch from Nero Burning ROM 7 to Nero Express 7 at any time during
compilation of a project if the compilation in question is also to be burned using
Nero Express 7.
If the
If the
Nero Burning ROM 7 General information about Nero Burning ROM 7 • 15
icon is activated, you can switch to Nero Express 7.
icon is deactivated, you cannot switch to Nero Express 7.
Even though Nero Burning ROM 7 can burn a greater number of compilations
than Nero Express 7, there are also compilation templates that are found
exclusively in Nero Express 7:
! MP3 CD and MP3 DVD
! WMA CD and WMA DVD
! Nero Digital Audio CD and Nero Digital Audio DVD
You can still burn these compilations using Nero Burning ROM 7. To do so,
simply select Data CD or Data DVD as the compilation and add MP3, WMA or
Nero digital audio files.
With Nero Express 7 you can burn all of the compilations marked with an X in
the following table.
CD DVD
Data disk X X
Audio CD X
MP3 disk X X
WMA disk X X
Nero Digital Audio X X
Video CD X
Super Video CD X
DVD-Video X
Copying a disc X X
Image file X X
Saved compilation X X
You will find further information about using Nero Express 7 in the manual
written especially for Nero Express 7.
Nero Burning ROM 7 General information about Nero Burning ROM 7 • 16
3 Creating a CD
3.1 Data CD
You can save all kinds of data on a data CD, i.e. these compilations can be used
for all file types and every kind of original file can be burned.
You can burn a data CD using the following compilations:
! CD-ROM (ISO)
! CD-ROM (UDF)
! CD-ROM (UDF/ISO)
A special feature of data CDs is the option of creating a multisession CD. This
means that the CD does not have to be written in one session (as with audio CDs
and DVD videos, for example), instead it can be written in a number of sessions
until it is full.
3.1.1 Creating a CD-ROM (ISO)
1. Start Nero Burning ROM 7.
2. If you have installed a recorder that can burn a number of media types (e.g.
CDs, DVDs), then click on the drop-down list box and select the media type to
be copied.
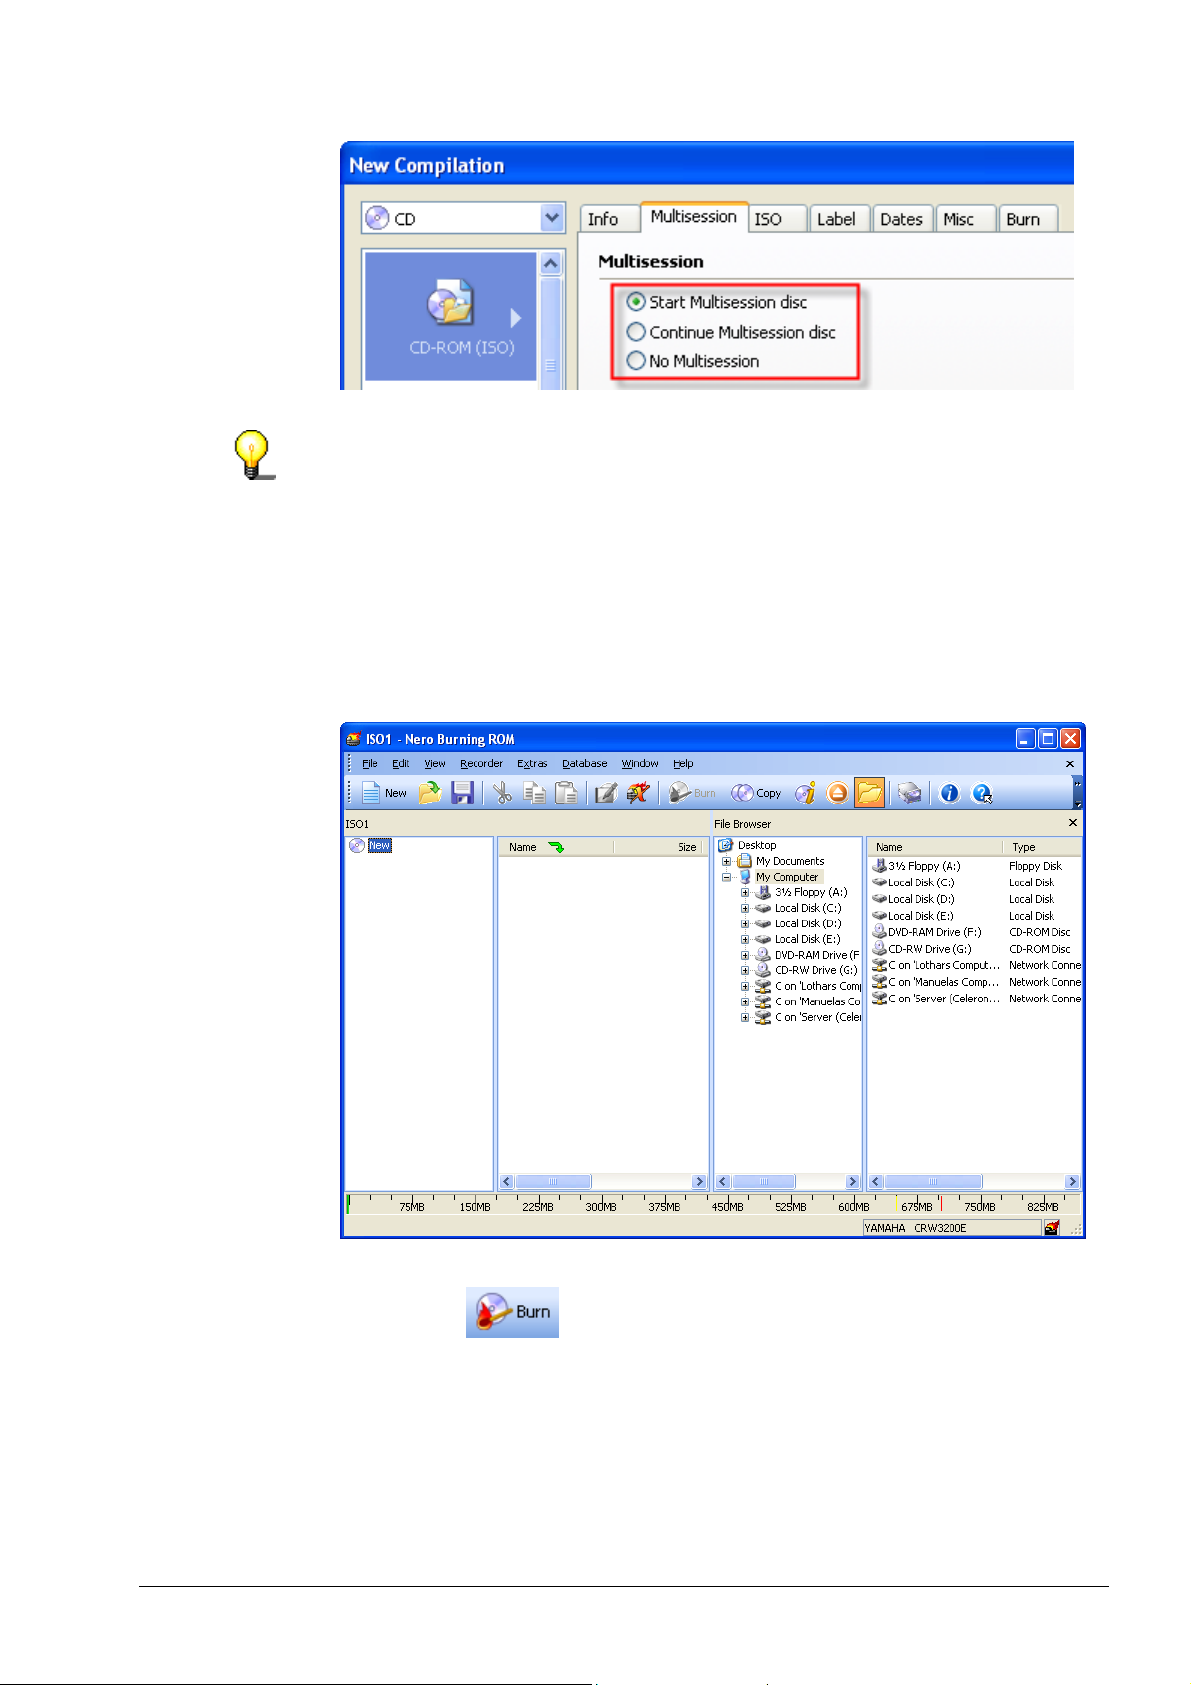
3. Select the 'CD-ROM (ISO)' compilation, thereby bringing the 'Multisession' tab
to the foreground. Select the desired multisession option.
Start Multisession disc
first session and can burn further sessions later once the first session has
been burned. All of the burned sessions are visible later in the drive and you
can access all of the data.
Continue Multisession disc
already burned with at least one session. All of the burned sessions are visible
later in the drive and you can access all of the data. If you select this option,
there must be a multisession disc in the recorder.
No Multisession:
enables the disc to be written until it is full. Note, however, that only the last
session will be visible then and you will only have access to the data from this
last session.
A multisession disc will not be created. This option still
: A multisession disc will be started, i.e. you create the
: A further session will be burned onto a disc
Nero Burning ROM 7 Creating a CD • 17
A
dditional information on the multisession options and the other tabs can be
found in the chapter '
4. Click on the 'New' button to finish selection of the compilation. The Nero
Burning ROM 7 file browser opens in which you select the files to be burned.
5. Select the desired files on the right-hand side of the file browser and drag
them to the left-hand side. Repeat this step until all of the files are in the
compilation area of the file browser.
Background information for advanced users'.
6. Click on the
to burn the CD. For information on how to do this, please read the chapter
'
Burning a disc'.
icon to switch to the burning area. You are then ready
3.1.2 Background information for advanced users
This chapter describes the tabs not explained in the previous chapter (see the
relevant subsections) as well as providing additional information on multisession
CDs and describing the ISO and UDF file systems:
Nero Burning ROM 7 Creating a CD • 18

3.1.2.1 Additional tabs for data CDs
On the 'ISO' tab you can toggle between Mode 1 and Mode 2/XA format as
required. You should not need to verify the format – in the past there were
problems with CD drives that could not read Mode 1 CDs, but very few of these
drives will still be in use today. If these options are grayed it means that selection
is not logically meaningful at present. Mixing Mode 1 and Mode 2/XA tracks on a
CD would result in an unreliable and potentially unreadable CD format. In the
'File/Directorynames length‘ section you can specify the ISO level for the length
of the names. Up to 31 characters are permitted for Windows 95 and higher.
Names cannot be more than 11 characters long for Windows 3.1 (8 for the name
and 3 for the extension). ISO Level 2 will be best in most cases – if you know that
the CD must also be readable on a Windows 3.1 system then you should select
Level 1.
On the 'Label' tab you can give your CD a name and overtype the default name
'New'. You can use letters A-Z, digits 0-9 and the underscore character (_) –
diacritics (accents) and spaces are not supported.
On the 'Dates' tab you can specify the date of the compilation and of its files. The
current date and time are entered for the compilation as default, also the creation
date of the files.
Use the 'Misc' tab to specify which files will be buffered in the cache. Files that
are on slow media (floppy disks and network drives) and are very small are
moved to the cache by default. You specify the location of the cache on the
Cache tab in the File menu (Preferences option).
3.1.2.2 How are Multisession CDs structured?
This chapter explains the background to Multisession CDs and is pretty technical
– it is intended mainly for users who already have some experience of CD
burning and want to know a little more. The 'normal' user who just wants to create
a Multisession CD with Nero Burning ROM 7 can skip this chapter.
The ISO file system has a very useful feature that helps us to create Multisession
CDs: The way files are stored in ISO tables of contents is that the absolute
block of each file and the file’s length in blocks is given. Absolute means that all
blocks in all CD tracks are numbered sequentially.
So what happens when a file’s start block belongs to a different track than the
one where the TOC you want to create is located? No problem! CD-ROM drivers
and recorders will simply read the file from another track.
CDs are written session by session and track by track, so of course only tracks
that have already been written can be addressed. This is why a reference track
must be specified first when creating Multisession ISO CDs with Nero Burning
ROM 7. Nero Burning ROM 7 reads this track in and remembers the positions of
the files that are on it. At the next write session these positions are then re-written
for unchanged files.
Additional Multisession information on the CD
start
When a new Multisession CD is started, Nero Burning ROM 7 saves not just the
files and folders but also their source location on the hard disk. When a
Multisession compilation is updated, this additional information is used to
automatically replace, add or delete modified files.
Nero Burning ROM 7 Creating a CD • 19

Multisession CDs can still be created even if there is no additional Nero Burning
ROM 7 information on the reference track. The disadvantage of this however is
that the references to the hard disk which we mentioned above will not be known
to Nero Burning ROM 7 and so there can be no automatic update.
3.1.2.3 Creating a data CD (not multisession)
The procedure for creating a data CD without multisession is identical to the
procedure described in the chapter '
to check the option 'No Multisession' on the 'Multisession' tab.
Please note that when a CD is burned without a multisession, a table of contents
(TOC) for the CD is created at the end of the burn. If the 'Finalize CD‘ option is
selected the CD is write protected and no further burning is possible. If this option
is not selected then further sessions can be burned but only the last session is
visible, so the CD looks like there’s nothing else on it – not so! We suggest that
you use the '
CD with several sessions.
Creating a data CD (with multisession)' option when creating a data
Creating a CD-ROM (ISO)'. You simply have
3.1.2.4 Creating a data CD (with multisession)
The procedure for creating the first session of a data CD with multisession is
identical to the procedure described in the chapter '
You simply have to check the option 'Start Multisession disk' on the 'Multisession'
tab.
Creating a CD-ROM (ISO)'.
The procedure for creating the second and each subsequent session of a data
CD with multisession is identical to the procedure described in the chapter
'
Creating a CD-ROM (ISO)'. You simply have to check the option 'Continue
Multisession disk' on the 'Multisession' tab and insert the CD containing the
existing sessions in the recorder.
If you want to create a data CD that consists of several sessions, we advise that
you create a Multisession CD. Every complete write process with Nero Burning
ROM 7 on a CD, from inserting the CD you want to write to the CD being ejected,
generates a session on the CD. A session in turn contains one or more tracks. All
CDs with several sessions are 'Multisession CDs'.
There are basically two types of Multisession CD:
! Multisession CD for linked files, e.g. for backups
! Multisession CD for independent files
Multisession CD for linked files
Multisession CDs are advisable, say, when making a weekly Backup of a number
of folders on a CD.
When an ISO compilation is created the required folder is written to the CD in
every new session. Since only a few files may have changed, writing the entire
folder again would have the following disadvantages:
! Burning would take an unnecessarily long time because redundant data are
being written each time.
Nero Burning ROM 7 Creating a CD • 20

! Valuable CD space would be wasted as the same data is copied a number of
times.
With a CD-R, data can only be written to a CD but cannot be deleted or changed,
so the following procedure is used with Multisession CDs:
Instead of writing the unchanged data again with every session (i.e. every backup
procedure), Nero Burning ROM 7 only writes cross-references to a previous CD
track which contains the unchanged file. Only the changed files are completely
re-written.
By activating the two checkboxes 'Replace files in compilation' and 'Add new files
to compilation' in the 'Options' section you will ensure that this actually happens.
Of course when individual sessions are linked to one another there must be some
way of ensuring that the tracks (which have a definite connection to an existing
CD) are not written to another CD by mistake. This would make all files with
references outside the tracks unreadable later on! For this reason Nero Burning
ROM 7 checks that the correct CD has been loaded for burning. If it hasn‘t, then
the CD that has been loaded in error is ejected.
Multisession CD for nonlinked files
If the files in the file session you wish to burn are so small that further files can be
added, and if you want to use all of the space on the CD, you can create a
Multisession CD.
By clearing the two checkboxes 'Replace files in compilation' and 'Add new files
to compilation' in the 'Options' section you will ensure that Nero will not search
for links to existing files on the CD.
3.1.2.5 The ISO file system
Nero Burning ROM 7 normally writes ISO data in the CD sector format Mode 1.
However Nero Burning ROM 7 also supports the so-called 'XA-Format' for ISO
data. The XA format is an extension of ISO structures and can only be burned
onto the CD in 'Mode 2' (another CD sector format). 'Normal' ISO Mode 1 tracks
behave just like Mode2/XA tracks when read under DOS/Windows and using
modern CD-ROM drives.
The latest CD-ROM drives can easily read Mode 1 and Mode2/XA-CDs. However
there are still some CD-ROM drives around that cannot read the Mode 1 CDs
correctly. Owners of these older drives are advised to write data in the
Mode2/XA-format.
ISO9660
ISO9660 is a file system that was designed with the aim of creating a file system
that is as system-independent and so as compatible as possible. Discs with
ISO9660 as the file system can be read on all operating systems.
ISO9660 supports filenames in 8.3 format in Level 1 (8 characters for the
filename and 3 for the extension) and directory names 8 characters long. Only
characters A-Z, 0-9 and the underscore (_) are allowed. The maximum interleaf
depth is restricted to 8 levels (including root directory).
A total of 31 characters are allowed in Level 2 and can be read by Windows 95
and higher, whereas DOS and Windows 3.1 usually have trouble handling the
long filenames.
Nero Burning ROM 7 Creating a CD • 21

ISO9660:1999
ISO9660 is a file system that was designed with the aim of creating a file system
that is as system-independent and so as compatible as possible. The advantages
of this file system lie in the length of possible file names (the ISO9660:1999 file
system supports file names with a length of up to 207 characters) and the fact
that restrictions on directory depth have been lifted.
3.1.2.6 The UDF file system
The UDF file system was developed when it became increasingly obvious that
the ISO9660 file system used on CDs was no longer meeting the needs of
rewritable media and DVDs. It was optimized mainly to accommodate large data
volumes and to make it easy to modify an existing file system.
Nero Burning ROM 7 can burn UDF and so-called 'UDF Bridge CDs', which
contain both a UDF and an ISO9660 file system. The UDF file system can be
read by, say, Windows 98 and Windows 2000 with no special drivers. In case of
doubt, Windows 2000 and Windows 98 also read the UDF file system if both an
ISO9660 and a UDF file system are detected on the medium. Writing in UDF
format is particularly important when burning DVDs because UDF is the preferred
operating system for these media.
3.1.2.7 The UDF/ISO file system
The big advantage of a UDF/ISO Bridge CD is that the data comply with both the
UDF standard and the ISO standard. The data are only added to the compilation
once and Nero Burning ROM 7 automatically creates a UDF and an ISO table of
contents. These two tables of contents allow the CD to be used as a Bridge CD.
Nero Burning ROM 7 Creating a CD • 22
3.2 Audio CD
3.2.1 Creating an audio CD
An Audio CD is a CD that contains music files and that can be played with any
regular CD player which you can buy in a store – the songs on the CD must
either be in CDA format or be converted to this format.
1. Start Nero Burning ROM 7.
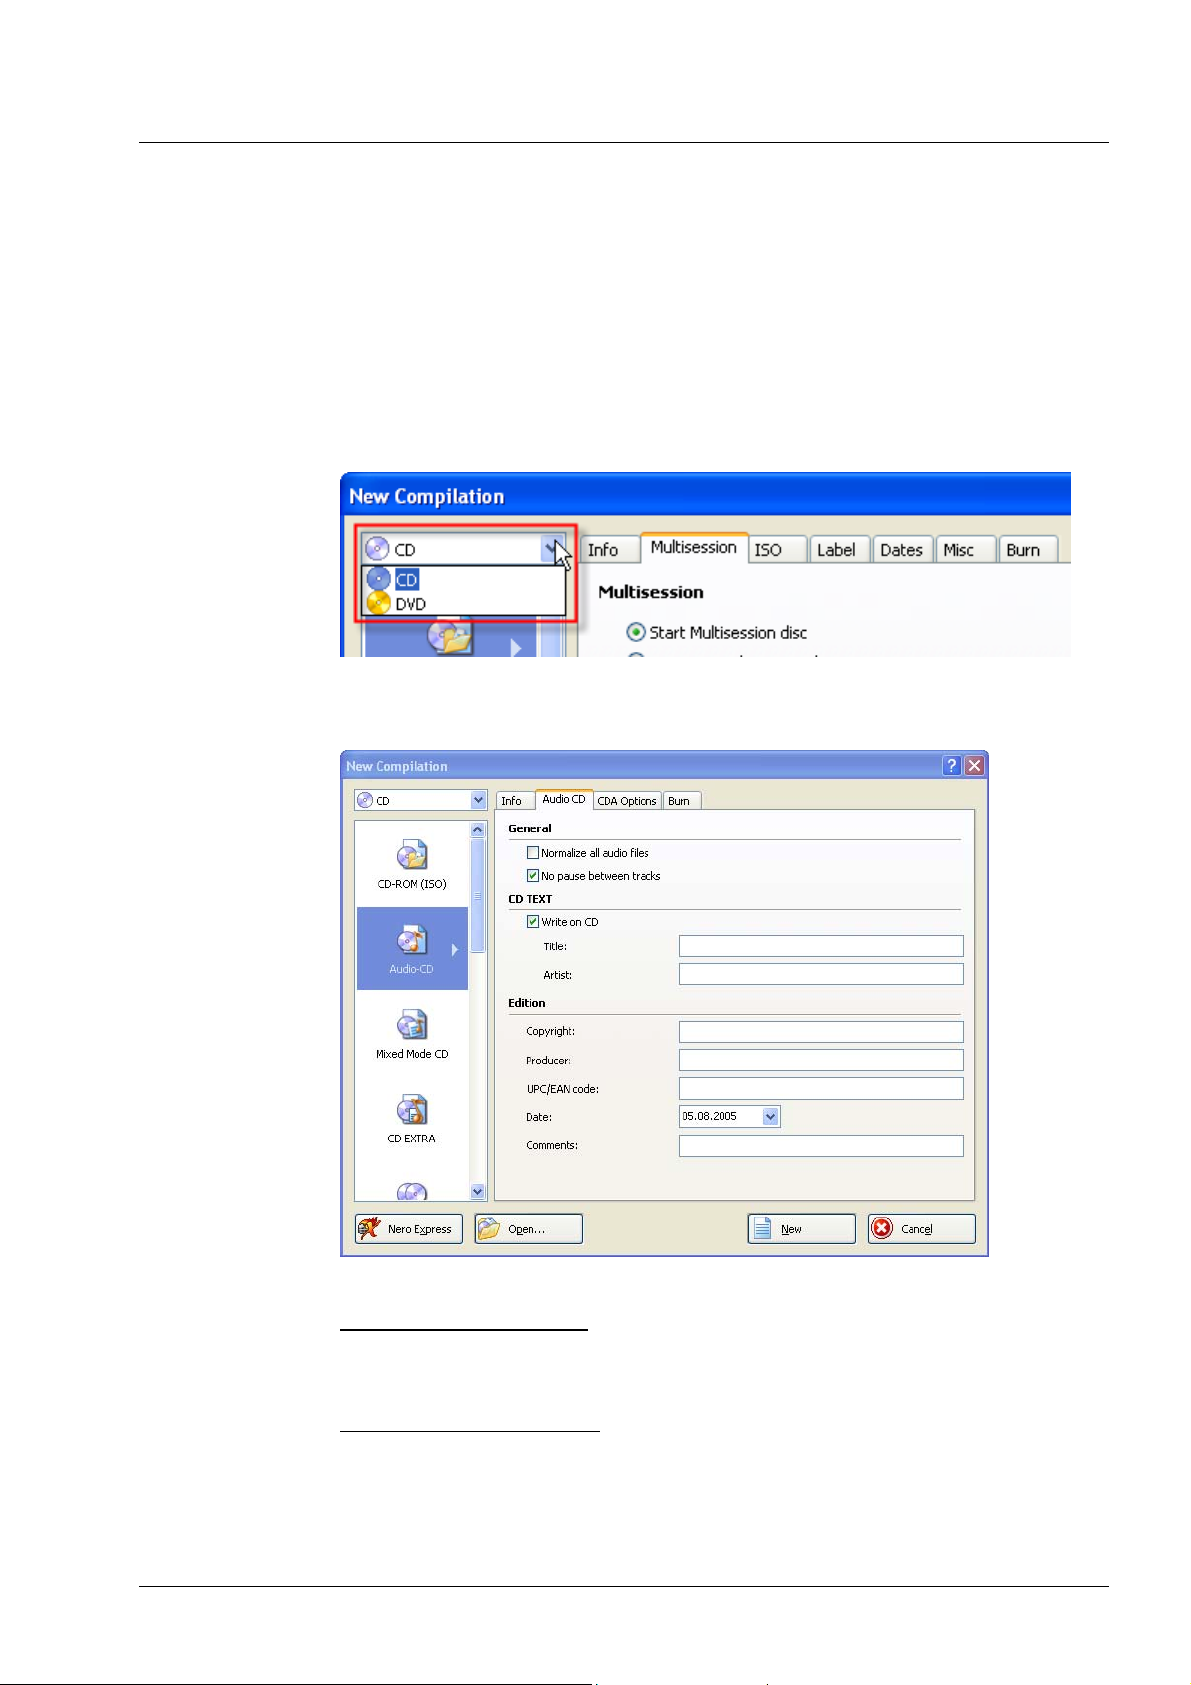
2. Click on the drop-down list box and select the media type 'CD'.
3. Select the 'Audio CD' compilation, thereby bringing the 'Audio CD' tab to the
foreground. On this tab you can make certain settings.
General' area
Normalize all audio files:
volume of the audio tracks to be burned. This is particularly recommended if
the audio tracks to be burned are from different sources, as the differences in
volume may then be significant.
No pause between tracks:
pause of 2 seconds between the tracks on the audio CD or whether the tracks
should transition from one to the next without pause as is the case with live
recordings.
Nero Burning ROM 7 Creating a CD • 23
This check box activates a filter that equalizes the
This check box defines whether there should be a
CD Text' area
Write on CD:
This check box activates the option for writing CD text. CD text is
additional information on an audio CD that displays the name of the CD, the
individual songs and the artist on CD players that support this function.
Title: The name of the CD is entered here.
Artist: The name of the artist is entered here.
Edition' area
Here you can enter additional information.
4. Click on the 'New' button to finish selection of the compilation. The Nero
Burning ROM 7 file browser opens in which you select the audio tracks to be
burned.
5. You have a number of options for adding the audio files.
Option 1
: You can insert audio files that are on a (non-copy-protected) audio
CD.
Option 2
: You can insert audio files in the various formats (e.g. MP3, WAV,
WMA) found on your PC.
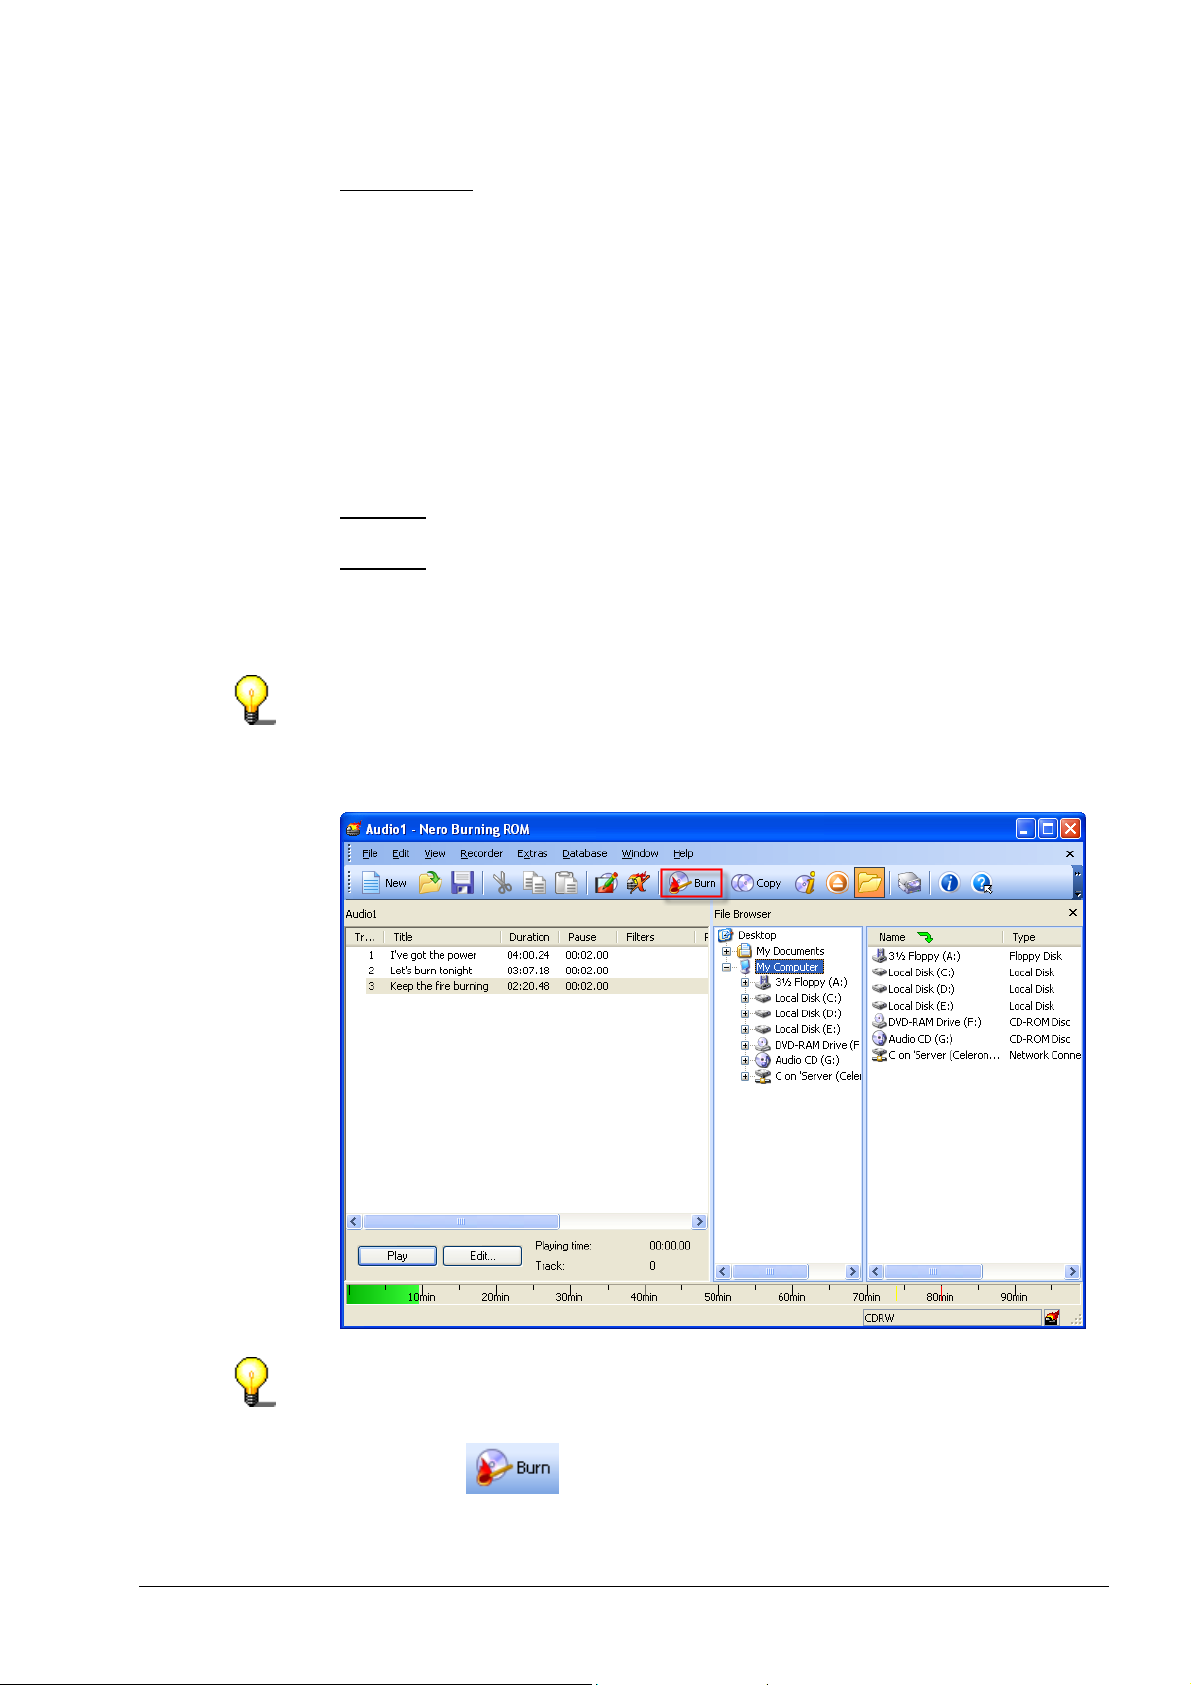
Select the desired audio files on the right-hand side of the file browser and
drag them to the left-hand side. Repeat this step for all of the audio files.
If you have added audio files, you can listen to the individual tracks. To do so,
click on the 'Play' button. If you have added audio files that are on the hard drive,
you can edit these tracks. To do so, click on the 'Edit' button to open the Nero
Wave Editor 3.
Additional filters and other options are available to you if you double-click an
audio track. For further information, see the chapter '
Special audio filters'.
6. Click on the
icon to switch to the burning area. You are then ready
to burn the CD. For information on how to do this, please read the chapter
'
Burning a disc'.
Nero Burning ROM 7 Creating a CD • 24
3.2.2 Extracting audio files from a CD and then burning them
If you have (non-copy-protected) audio CDs and wish to extract individual tracks
from them to burn as a new audio CD, you can do so using Nero Burning ROM
7.
1. Start Nero Burning ROM 7.
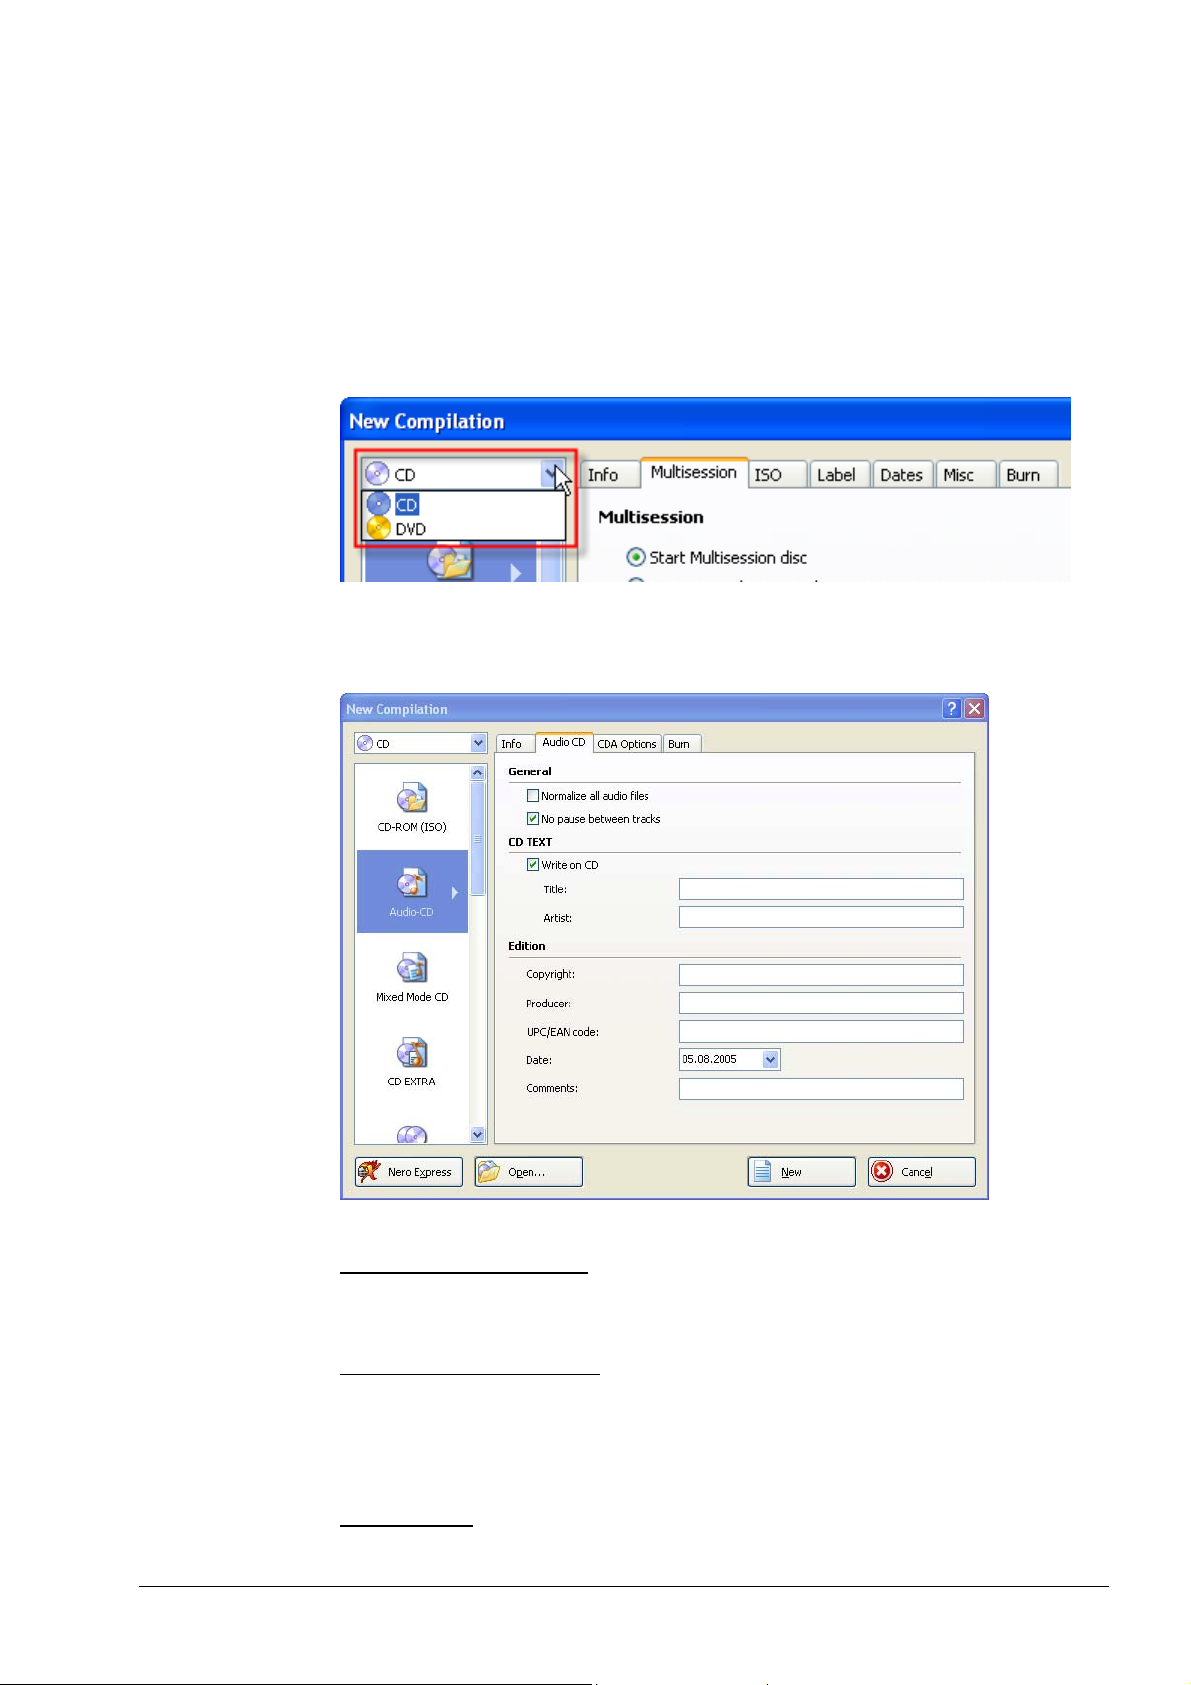
2. Click on the drop-down list box and select the media type 'CD'.
3. Select the 'Audio CD' compilation, thereby bringing the 'Audio CD' tab to the
foreground. On this tab you can make certain settings.
General' area
Normalize all audio files:
volume of the audio tracks to be burned. This is particularly recommended if
the audio tracks to be burned are from different sources, as the differences in
volume may then be significant.
No pause between tracks:
pause of 2 seconds between the tracks on the audio CD or whether the tracks
should transition from one to the next without pause as is the case with live
recordings.
CD Text' area
Write on CD:
additional information on an audio CD that displays the name of the CD, the
Nero Burning ROM 7 Creating a CD • 25
This check box activates the option for writing CD text. CD text is
This check box activates a filter that equalizes the
This check box defines whether there should be a

individual songs and the artist on CD players that support this function.
Title: The name of the CD is entered here.
Artist: The name of the artist is entered here.
Edition' area
Here you can enter additional information.
4. On the 'CDA Options' tab you can define the strategy which Nero should use
to handle the CDA files on an audio CD. This setting is for advanced users, for
more information read the chapter '
5. Click on the 'New' button to finish selection of the compilation. The Nero
Burning ROM 7 file browser opens in which you select the files to be burned.
6. Insert the first original CD from which you wish to extract audio tracks into your
CD-ROM drive and open this drive with the File Browser.
7. Compile the CDA files for the first audio CD using 'Drag&Drop' editing by
simply clicking on the required files in the File Browser and dragging them into
the compilation window.
Nero Burning ROM 7 now analyzes the source CD and the required CDA files
and shows them in the File Browser. You will also see a small window in which
you can enter a name for the source CD. This is for your own convenience so
that when you select the reference strategy for writing Nero Burning ROM 7
can prompt you to insert the named CD that it needs for writing.
Dragging & dropping audio track'.
8. Now insert the second CD (the one with the audio files you want to burn) into
your CD-ROM drive, select the File Browser and update the screen contents
by pressing 'F5' (or select the 'Refresh' option from the 'View' menu).
9. Open the drive with the File Browser and compile the CDA files for the second
Audio CD with 'Drag&Drop' as described above in Point 7.
10. Repeat the last three steps for each additional CD you wish to use.
11. You are then ready to burn the CD. For more information on how to do this,
please read the chapter '
If your burned Audio CDs crackle, hum or hiss, you probably have problems with
the so-called 'Audio Jitter Effect'. This is due to basic problems which the
hardware has when reading audio data and has nothing to do with Nero Burning
ROM 7.
Burning a disc'.
3.2.3 Background information for advanced users
Almost all CD players can only read CD-Rs, i.e. using rewritable CDs (CD-RW) is
not recommended. Nero Burning ROM 7 writes the audio data to the CD-RW
correctly but many CD players will not be able to play back the tracks.
If possible, audio CDs should always be burned in the 'Disc-at-once' mode. This
will make the most out of the features that Nero Burning ROM 7 offers and will
avoid unwanted 'hiss and crackle‘ between individual tracks.
A CD that contains music files in a variety of different formats (say MP3 or WMA)
is strictly speaking an audio CD as well, but since a CD player cannot read these
formats and play them back, these CDs are not referred to as Audio CDs.
Nero Burning ROM 7 does not mind what audio format the files are in because
compressed files (e.g. MP3, mp3PRO, WAV, WMA or AIF) are automatically
Nero Burning ROM 7 Creating a CD • 26
converted prior to burning so that they can be burned in CDA format. However
r
decoding these files takes a certain amount of time and so the burning speed
may have to be matched to the PC’s power and computing processes.
Although writing Audio CDs with Nero Burning ROM 7 is really simple, it is worth
spending a few moments thinking about your source medium. There are basically
two ways of creating Audio CDs. With one method the audio tracks come from an
Audio CD and with the other the audio files are on a hard disk.
! To copy an existing Audio CD, you will find all the information you need in the
chapter '
Copying a CD'.
! If you wish to use tracks from an existing Audio CD and/or tracks from a
number of Audio CDs, then there are several strategies with which Nero
Burning ROM 7 can handle the audio files. You will find further information
about these strategies in the chapter '
information you require about burning will be found in the chapter '
disc
'.
Source medium is CD/DVD drive'. The
Burning a
! If you want to use audio files that are on your hard drive, then the chapter
entitled '
Source medium is hard disk' will explain the advantages of this option.
The information you require about burning will be found in the chapter '
a disc
'.
Music CDs with a special copy protection have been around on the market fo
some time now. These CDs cannot be played or copied with a normal PC. If you
experience problems with copying, please make sure that you are not using CDs
of this type. You can identify this from a note on the cover of the original CD.
Burning
3.2.3.1 Source medium is CD/DVD drive
Dragging & dropping audio tracks
When dragging & dropping audio files that are on a CD (CDA) the user has a
basic choice of four different strategies with which Nero Burning ROM 7 can
handle the CDA files. The strategy is selected on the 'CDA Options' tab. You will
see this tab in the 'New Compilation' dialog box which opens when you create a
new compilation. If a compilation is already open, select your required strategy or
check the selected strategy in the 'File' menu with the 'Compilation Properties'
option.
The 'General Settings' section offers you a choice of four different strategies:
! Diskspace strategy (the default)
With this strategy the CDA files are buffered in Nero Burning ROM 7's cache
directory if sufficient space is available. If no space is available then a track
reference is created.
! Tempfile strategy
With this strategy the CDA files are buffered in Nero Burning ROM 7's cache
directory if sufficient space is available. If no space is available, an error
message is displayed.
! Reference strategy
The CDA files are handled as track reference. The source medium can only be
a CD/DVD drive, not a recorder.
! Device dependant strategy
CDA files are handled as track reference where possible, otherwise the
tempfile strategy is used.
Nero Burning ROM 7 Creating a CD • 27

The diskspace and tempfile strategies can be used to burn in 'Disc-at-once'
mode. We advise that you use one of these two strategies.
The reference strategy can only be used for 'Track-at-once' burning and can only
be read by CD/DVD drives, not by recorders. The reason why 'Track-at-once'
must be used with this strategy (it is preset) is that when you use files that are on
an interchangeable medium you may need to switch the source CD if the audio
files come from different source CDs or if a track has to be approached at a
remote read position on the source CD. This can mean a long wait between
tracks however. In the 'Track-at-once' mode the wait between tracks can be any
length of time without ruining the target CD.
The burning mode that can be used with the device dependant strategy depends
on the source medium, i.e. if the tracks are from a CD/DVD player, then only a
reference is created and only 'Track-at-once' can be used.
The chapter '
how to burn compilations created with drag&drop editing.
Copying audio tracks
Copying CDA files to a hard disk offers the user more ways of using audio files.
Unlike drag&drop, tracks can be converted to other formats.
You will find full details about copying CDA files in the chapter '
tracks
'.
Extracting audio files from a CD and then burning them' explains
3.2.3.2 Source medium is hard disk
The advantage of burning audio files that are on a hard disk is that the CD can
be written using 'Disc-at-once'. This means that you can get more out of the
functionality of many recorders. For example, you can write CD text, specify the
pause length or set additional index positions - these capabilities are only
available with 'Disc-at-once'.
The disadvantage is that the audio files need storage space on the hard disk.
Depending on the audio format, around 10 MB per minute is required (in WAV
format). If the files are compressed, e.g. in MP3 format, then the space
requirement is cut by 90%. You can test the advantages of MP3 compression
with Nero B urning ROM 7: You can convert up to 30 audio files to MP3 format.
The chapter '
Saving audio tracks' tells you how to do this.
Saving audio
3.2.3.3 Audio track properties
Double click one (or more) audio files to open the 'Audio Information' dialog box.
The tab offers you a wide variety of options. The main ones are:
'Audio Track Properties' tab
If your recorder supports the writing of CD Text, you can insert information for CD
Text on this tab.
You will find further information about CD Text in the chapter '
You can also specify the length of the pause between tracks – the default pause
between two tracks is 2 seconds.
Nero Burning ROM 7 Creating a CD • 28
CD-Text'.
r
You may feel that a pause between tracks is irritating, especially with live
recordings. In this case set a pause length of 0 seconds. You can create a cross
fade between two audio tracks, so the new number starts to play quietly while the
current number is still playing. The current track will meld into the new track
without a break. In this case activate the checkbox and specify the seconds fo
the fade.
'Indexes, Limits, Split' tab
The top part of the tab shows the progress of the audio track as a graph.
The 'New Index' button sets a new index position at the selected position. For a
CD player this is the position from which a new number starts and the player can
also jump to it directly.
Not all CD players support this function.
The 'Split' button splits the audio track at the selected position, i.e. the track is
physically split and becomes two (or more) tracks. These split tracks behave just
like two independent tracks, so they can be named and the pause between them
can be specified.
The 'Play button plays the track from the selected position. While the track is
playing the button switches to a 'Stop' button.
The 'Delete' button deletes a selected new index position or the position for a split
track.
'Filter' tab
You will see a number of filters on the left. The settings on the right change
depending on the selected filter.
To select a filter, activate its checkbox. The 'Test Selected Filters' button plays
the audio track - this lets you check that you are happy with the result before you
confirm the changes.
3.2.3.4 CD-Text
CD-Text is an extra item of information on Audio CDs which allows newer style
CD players to display the CD title and the names of the tracks and artists. Your
CDs will be played correctly even if your CD player does not support CD-Text.
This is possible because the additional CD-Text information is stored in the CD’s
so-called 'lead-in' area before the start of the audio data.
Creating CDs with CD-Text is only possible when two conditions are met: Your
recorder must support this function and the CD must be burned in the 'Disc-at-
once' mode.
Creating an Audio CD with CD-Text
CD-Text cannot be written to a CD unless this function is supported by the CD
recorder you are using and the disc is written in the 'Disc-at-once' mode. A CD
Nero Burning ROM 7 Creating a CD • 29

can always be written in 'Disc-at-once' mode is the audio files are on a hard drive.
The use of 'Disc-at-once' for compilations of Audio CDs depends on the selected
strategy. You will find full details about this topic in the chapter '
dropping audio track
'.
Dragging &
You can see whether your recorder can write CD-Text by selecting the 'Choose
Recorder' option from the 'Recorder' menu. Now highlight the required recorder
and read the information.
In the same way you can also check whether your recorder supports 'Overburn',
'Buffer Underrun Protection' and 'Disc-at-once'.
Create an Audio CD as described in the chapter '
and then burning them
! First, create a new audio compilation and drag the audio tracks you want into
the compilation.
! From the 'File' menu, select 'Compilation Properties' and on the 'Audio CD' tab
check the 'Write CD-Text to the CD' checkbox.
! Enter the title of the CD and its artist. These entries should not be longer than
64 characters each.
! In the compilation window click an audio track and enter the track’s title and
artist on the tab.
! Before writing, make sure that the 'Disc-at-once' mode is active.
! Now click the 'Burn' button to write the Audio CD with CD-Text.
Viewing CD-Text information
You can view CD-Text on Audio CDs provided the selected read drive supports
the reading of CD-Text. Recorders that can write CD-Text can do this.
! Insert an Audio CD into the recorder.
! Select the Save Tracks option from the 'Recorder' menu and choose the drive
you require.
Extracting audio files from a CD
'. Please note the following points:
! Now view the information you want in the ‘Title’ and ‘Artist’ columns.
Copying CDs with CD-Text information
Burning ROM 7 automatically copies the existing CD-Text if the reading drive
and the selected recorder both support CD-Text. This applies to both image
copies and on the fly copies.
3.2.3.5 Special audio filters
If you are unhappy with the quality of your audio tracks, Nero Burning ROM 7
offers a range of filters can enhance the quality of the music tracks or change the
tracks. The tracks are edited 'non-destructively' which means that the actual
recording is not affected and only selections are set. The big advantage of the
non-destructive method is that editing steps can be undone at any time and no
additional audio data are created as you work. The audio files are not actually
changed until they are written.
Nero Burning ROM 7 Creating a CD • 30
 Loading...