

Page 1

Manual
Nero BackItUp
Page 2

Copyright and Trademark Information
Copyright and Trademark Information
This document, like the software described therein, is provided as a license and may only be used or reproduced in accordance with
the licensing agreement. The contents of this document, as well as the associated software, is subject to change without prior notice.
Nero AG rejects any responsibility for the correctness of the contents of this document and rejects any claims that transcend the
clauses of the guarantee agreement.
This document and all of its contents are protected by copyright and are the property of Nero AG. All rights reserved. In addition , thi s
document contains material that is protected by internationally valid copyright. This document may not be reproduced, transmitted, or
transcribed in whole or in part without the express written permission of Nero AG.
Please keep in mind that existing graphics, pictures, videos, music titles or other materials that you may wish to insert or transcribe
into projects may be protected by copyright. The unauthorized use of this type of material in your projects may violate the rights of
the owner of the copyright. Make sure that you obtain all necessary authorizations from the owner of the copyright.
Unless you own the copyright, have permission from the copyright owner or your actions fall under the "fair use" provisions of copyright law, you may be violating national or international copyright laws. The transcribing, duplication, modification or publication of
copyright-protected material may lead to claims for damages and the enforcement of other legal measures against you. If you are
unsure of your rights, you should contact your legal advisor.
Nero BackItUp requires technologies developed by third party manufacturers, some of which are contained in Nero BackItUp as
demo versions. These applications can be activated online free of charge or by sending an activation fax to have unlimited use of the
version. Nero will only transmit the data necessary for activation of the technology licensed from third parties. For unlimited use of
Nero BackItUp, it is therefore necessary to have an Internet connection or a fax machine.
Copyright © 2006 - 2009 Nero AG and its licensors. All rights reserved.
Nero, Nero Digital, Nero BackItUp, Nero Essentials, Nero Express, Nero ImageDrive, Nero LiquidTV, Nero MediaHome, Nero Recode, Nero RescueAgent, Nero ShowTime, Nero Simply Enjoy, Nero StartSmart, Nero Vision, InCD, Move it, PhotoSnap, the SecurDisc logo, Burn-At-Once, DNC Dynamic Noise Control, LayerMagic, Nero DMA Manager, SmartDetect, SmoothPlay, Superresolution, Nero Surround, Nero LiquidMedia, Nero MediaStreaming and UltraBuffer are trademarks or registered trademarks of Nero
AG.
Adobe, Acrobat, Acrobat Reader and Premiere are trademarks or registered trademarks of Adobe Systems, Incorporated. AMD Athlon, AMD Opteron, AMD Sempron, AMD Turion, ATI Catalyst and ATI Radeon are trademarks or registered trademarks of Advanced
Micro Devices, Inc. ATSC is a trademark of the Advanced Television Committee. ICQ is a registered trademark of AOL, LLC. Apple,
iPhoto, iPod, iTunes, iPhone, FireWire, and Mac are trademarks or registered trademarks of Apple, Inc. ARM is a registered trademark of ARM, Ltd. AudibleReady is a registered trademark of Audible, Inc. BenQ is a trademark of the BenQ Corporation. Blu-ray
Disc is a trademark of Blu-ray Disc Association. CyberLink is a registered trademark of CyberLink Corp. DLNA is a registered trademark of Digital Living Network Alliance. DivX and DivX Certified are registered trademarks of DivX, Inc. Dolby, Pro Logic and the
double-D symbol are trademarks or registered trademarks of Dolby Laboratories, Inc. DTS and DTS Digital Surround are registered
trademarks of DTS, Inc. DVB is a registered trademark of the DVB Project. Freescale is a trademark of Freescale Semiconductor,
Inc. Google and YouTube are trademarks of Google, Inc. WinTV is a registered trademark of Hauppauge Computer Works, Inc.
Intel, Intel XScale, Pentium and Core are trademarks or registered trademarks of Intel Corporation. Linux is a registered trademark
of Linus Torvalds. Memorex is a registered trademark of Memorex Products, Inc. ActiveX, ActiveSync, DirectX, DirectShow, Internet
Explorer, Microsoft, HDI, MSN, Outlook, Windows, Windows Mobile, Windows NT, Windows Server, Windows Vista, Windows Media, Xbox, Xbox 360, the Windows Vista start button and the Windows logo are trademarks or registered trademarks of Microsoft
Corporation. My Space is a trademark of MySpace, Inc. NVIDIA, GeForce and ForceWare are trademarks or registered trademarks
of NVIDIA Corporation. Nokia is a registered trademark of Nokia Corp
Corporation. Sony, Memory Stick, PlayStation, PLAYSTATION and PSP are trademarks or registered trademarks of Sony Corporation. HDV is a trademark of Sony Corporation and Victor Company of Japan, Limited (JVC). UPnP is a registered trademark of the
UPnP Implementers Corporation. Labelflash is a registered trademark of Yamaha Corporation.
The trademarks mentioned here are named for information purposes only. All trade names and trademarks are the property of their
respective owners.
Nero AG, Im Stoeckmaedle 13-15, D-76307 Karlsbad, Germany
oration. CompactFlash is a registered trademark of SanDisk
Nero BackItUp
Page 3

Table of contents
1 Start Successfully 5
1.1 About the Manual 5
1.2 About Nero BackItUp 5
1.3 Versions of Nero BackItUp 6
1.4 Working with Nero BackItUp 7
2 Installing Nero BackItUp 8
3 User interface 10
4 File Backup 14
4.1 Selecting Files For Backup 14
4.2 Backup Summary 16
4.3 Updating a File Backup 17
4.3.1 About Backup Types 18
5 Drive Backup 22
5.1 Selecting a Drive For Backup 22
Table of contents
6 Specifying The Backup Target And Starting The Backup Process 24
6.1 Backup Settings Screen 24
6.1.1 Use Password Window 26
6.2 CompletingThe Backup Wizard Screen 27
6.3 Backup Process Screen 29
6.4 Burning a Backup to Disc 30
6.5 Saving a Backup to a Hard Drive 33
6.6 Saving a Backup on an FTP Server 35
7 Scheduling a Backup - Jobs 38
7.1 Setting Up Jobs 38
7.1.1 Job Information Screen 39
7.2 Executing jobs 41
7.3 Editing Jobs 42
8 Verifying a Backup 44
9 Autobackup 46
9.1 Configuring Autobackup 46
10 Restoring Files And Drives 48
10.1 Restore Screen 48
10.2 Restoring a File Backup 50
10.3 Restoring a Drive Backup 53
10.4 Starting The Restore Process 54
Nero BackItUp
11 Backup And Restore Tools 57
III
Page 4

Table of contents
11.1 Filters 57
11.1.1 Creating Filters 57
11.1.2 Selecting And Combining Filters 59
11.2 Find Files 60
12 Nero BackItUp ImageTool 62
12.1 Creating a Bootable Disc 62
12.2 Starting Nero BackItUp ImageTool 63
12.3 User Interface 64
12.3.1 Options Window 66
12.3.2 Open File/Folder Window 66
12.4 Drive Backup 68
12.4.1 Burning a Backup to Disc 68
12.4.2 Saving the Backup to a Hard Drive or FTP Server 70
12.5 Verifying a Drive Backup 71
12.6 Restoring a Drive Backup 72
12.7 Exiting Nero BackItUp ImageTool 73
13 Other Operations 74
13.1 Updating the Virus Scanner 74
13.2 Erasing a Rewritable Disc 74
14 Options Window 76
14.1 General Tab 77
14.2 Backup Tab 78
14.3 Job Tab 80
14.4 Restore Tab 80
14.5 E-mail Notification Tab 81
14.5.1 Events And E-mail Notifications 81
14.6 Remote FTP 82
14.7 Expert Features Tab 83
15 Technical Information 86
15.1 Formats Supported 86
15.1.1 Disc Types 86
15.1.2 Supported File Formats 86
15.1.3 Source Media Supported 87
16 Glossary 89
17 Index 92
18 Contact 96
Nero BackItUp
IV
Page 5
1 Start Successfully
1.1 About the Manual
This manual is intended for all users who want to learn how to use Nero BackItUp. It is process-based and explains how to achieve a specific objective on a step-by-ste p basis.
To make best use of this documentation, please note the following conventions:
Indicates warnings, preconditions or instructions that have to be precisely followed.
Indicates additional information or advice.
Start Successfully
1. Start …
OK
(see…)
[…]
The number at the beginning of a line indicates a prompt for action.
Carry out these actions in the order specified.
Indicates an intermediate result.
Indicates a result.
Indicates text passages or buttons that appear in the program inter-
face. They are shown in boldface.
Indicates references to other chapters. They are executed as links
and are shown in red and underlined.
Indicates keyboard shortcuts for entering commands.
1.2 About Nero BackItUp
Nero BackItUp is a program for backing up and restoring data. Nero BackItUp saves files (file backup), as well as programs and operating systems (drive backup).
Open files can be backed up with the shadow copy
the file. You can burn the backup to a disc or save it to a hard drive or FTP server. An image
file can also be saved. With Nero BackItUp you can verify at any time that the backed up data is complete and correct.
Use Nero BackItUp to set up jobs for regular data backup that are executed automatically.
Nero BackItUp can create bootable discs and, if necessary, can restore a previously backedup system.
You can also use Nero BackItUp to set up the Autobackup feature, which automatically
backs up monitored folders.
feature, while you continue to work on
Nero BackItUp
5
Page 6

1.3 Versions of Nero BackItUp
Nero BackItUp is available in two different versions:
Nero BackItUp and Nero BackItUp Essentials.
Nero BackItUp offers the full range of features as described in this manual.
Nero BackItUp Essentials offers a limited feature set. The user interface is supported by wiz-
ards and offers a simple introduction to the various tasks.
You can execute the following tasks with Nero BackItUp Essentials:
Create and update a file backup
Create a drive backup
Restore a file or drive backup
Create a job and manage jobs
Autobackup
Compared with the full version, Nero BackItUp Essentials does not offer the following features:
File backup
Start Successfully
Backup from Windows Explorer via the shell context menu
File selection by clicking and dragging
Shadow copy
Automatic PC shutdown after the backup
Backup of access rights (from NTFS-formatted data media)
File search
Selected file view
NTFS stream support
e backup
Driv
NTFS stream support
Restore
Restoration of backed up access rights (to NTFS-formatted data media)
Adaptation of drive size
File display in tree structure
Jobs
Backup when logging onto the system
Warning if there is insufficient storage space on the disc
General features
Nero BackItUp
Verification of backups
6
Page 7

Calendar
Other filters
Use of the most recent filter setting
Addition of new files to an incremental backup
Saving of profiles
Script support
Encryption
Setting of compression levels
Ignoring of time differences when comparing files
E-mail notification
Virus scanner
Sounds to indicate various events
Resetting of archive bits after a backup
1.4 Working with Nero BackItUp
Nero BackItUp is a powerful tool for backing up and restoring data. You have to decide between saving files and saving entire drives:
If you choose a file backup, the individual files and folders that you select are backed up. If
you want to back up the same files again later, a backup update makes it easier and saves
resources and other things.
If you choose Drive Backup, entire drives
cluding the programs and the operating system.
Set up Nero BackItUp jobs, if you want to regularly perform backups.
Nero BackItUp offers you useful features to restore data in case of failure.
With the Nero BackItUp, Nero BackItUp ImageTool offers you another tool for backing up fi-
les and drives. The Nero BackItUp ImageTool is included on the bootable disc that you can
create with Nero BackItUp. With the Nero BackItUp ImageTool, you can back up and restore
drives. This particularly lends itself to backing up on otherwise active drives, since such
drives are inactive when booting the Nero BackItUp ImageTool.
Start Successfully
(hard drives and/or partitions) are backed up, in-
Nero BackItUp
See also:
File Backup 14
Updating a File Backup 17
Drive Backup 22
Scheduling a Backup - Jobs 38
Restoring Files And Drives 48
Nero BackItUp ImageTool 62
Autobackup 46
7
Page 8

2 Installing Nero BackItUp
The installation wizard will walk you through the quick and uncomplicated installation process. To install Nero BackItUp, proceed as follows:
1. Close all Microsoft Windows programs and exit any anti-virus software that may be running.
2. Start the installation process by double-clicking the downloaded installation file.
The required files are automatically unzipped and stored on drive C in a temporary folder
from which they are automatically deleted once they have been used.
The installation is prepared and the installation wizard is displayed.
If you purchased Nero BackItUp bundled with Nero Suite, insert the disc into
your computer's drive and start the installation process by clicking the Nero BackItUp button.
If the program does not start automatically, select the drive with the disc in
Windows Explorer. You can start the installation wizard manually by doubleclicking the setup.exe file.
3. Select a language for the installation.
4. Click the Next button.
The Installation of Nero Ask Toolbar screen is displayed.
Installing Nero BackItUp
5. If you want to use the Ask Toolbar, please read the licensing agreement carefully and choo-
se the first option button.
6. Click the Next button.
The License Conditions (EULA) screen is displayed.
7. Please read the license agreement carefully and select the appropriate check box if you
agree to the terms of the agreement. If you agree to the terms of the license agreement, click
"I accept all terms of the preceding License Agreement."
8. Click the Next button.
The Personalize Nero BackItUp screen is displayed.
9. Enter your name and serial number in the input fields. Corporate customers should also in -
clude their company's name.
The serial number can be found on the back of the disc jacket. If you are using
the download version you will have received the serial number per e-mail.
10. Click the Next button.
The Select Installation Type screen is displayed. Here it is possible to choose betwee n
Default, meaning standard installation, or User Defined installation. In the user-defined
installation, you can determine the languages and choose the installation path.
11. Choose the required installation type and click the Next button.
If you choose a default installation, the Optional Settings screen is displayed. If you
choose custom installation, the User-de f ined Installation scree n is displayed.
Nero BackItUp
8
Page 9

Installing Nero BackItUp
12. If you have chosen the user-defined installation:
1. Select the required folder and click the OK button.
2. Click the Next button.
The Select Application Language screen is displayed.
3. Select the check boxes for the languages you wish to install and click the Next button.
The Optional Settings screen is displayed.
13. if you want to adapt optional settings, select or clear the required check boxes.
14. Click the Next button.
The Ready to Start Installation Process screen is displayed.
15. Click on the Next button to start the installation.
The installation process is started. Nero BackItUp is installed in the selected folder, and
a progress bar informs you of the progress of the installation process.
16. Click the Next button.
The Help Us to Improve Our Software screen is displayed. In order to offer a better
service, Nero is collecting anonymous data to determine which features are used and
what problems, if any, occur.
17. If you want to take part in the anonymous collection of data, select the check box and click
the Next button.
The final screen of the installation wizard is displayed.
18. Click the Exit button.
The installation wizard is closed.
You have now installed Nero BackItUp. The Nero BackItUp link is now available on the
computer's desktop.
Nero ControlCenter
The Nero BackItUp application is installed with Nero ControlCenter.
With Nero ControlCenter, you can determine whether new updates are avail-
able for your Nero products and can download them if required. In addition, you
can select an installed language and enter or remove serial numbers. You can
find further information in the Nero ControlCenter manual.
Nero BackItUp
9
Page 10
3 User interface
The Nero BackItUp user interface is the starting point for backups, restores, and any other
actions that you can carry out with Nero BackItUp.
The user interface consists of a menu bar, a top toolbar and a left toolbar, and a screen with
changing content (depending on which menu icon is selected on the left bar).
User interface
Nero BackItUp
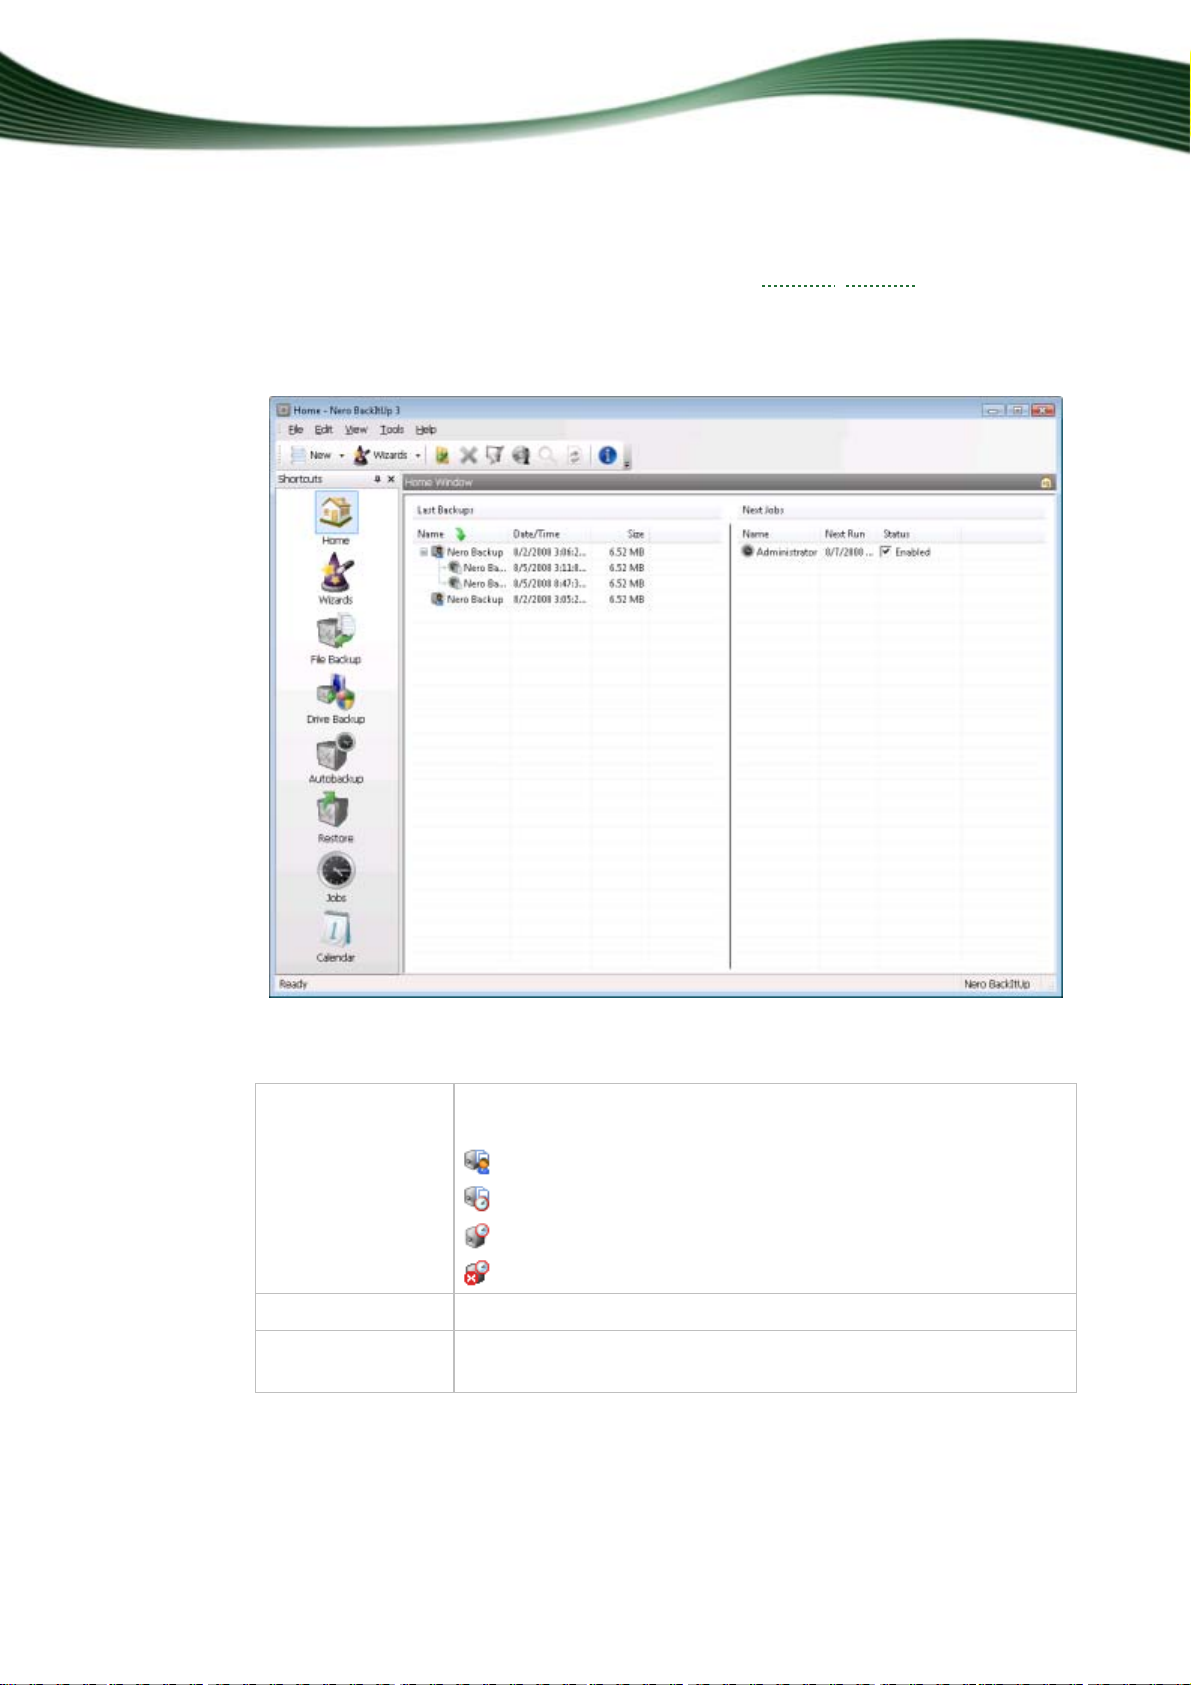
The following menu icons are available in the left selection list:
Home
Displays the Home screen, which offers an overview of the last
backups and next jobs. The following icons are used:
- Backup carried out
- Job carried out
- Scheduled job
- Disabled job
Wizards
File backup
Displays the Wizards screen, where you can launch the wizards.
Displays the File Backup screen, where you can select files for
backup and start the file backup.
Nero BackItUp - User interface
10
Page 11

User interface
Drive backup
Restore
Jobs
Calendar
Autobackup
Displays the Drive Backup screen, where you can select drives for
backup and start the drive backup.
Displays the Restore screen, where you can select a backup to restore and start the restore.
Displays the Jobs screen, which indicates upcoming jobs and permits jobs to be added. Jobs are scheduled backups that are automatically executed by Nero BackItUp at a defined time.
Displays the Calendar screen, which offers a calendar overview of
planned and executed jobs and restores. You can also add jobs and
start the restore.
The job names are shown in different colors, which represent the
following:
Green - Job carried out successfully
Red - Job failed
Blue - Scheduled job
Gray - Disabled job
Displays the Autobackup screen, where you can set up Autobackup, start a restore process, and erase files from the Autobackup backup.
The following menus are available in the menu bar:
File
Opens the File menu, which provides file-related functions such as
open, print, and close. You can also set, import, and export the options as well as launch Nero CoverDesigner.
The Open and Print options are only available on the Restore
screen.
Edit
Opens the Edit menu containing file editing functions such as Select, Unselect, Delete, and Show Properties. You can also search
for specific files.
View
Opens the View menu where you can display toolbars and switch
between the screens.
Tools
Opens the Tools menu where you can start wizards. You can also
display information about the inserted disc, erase a rewritable disc,
and create a bootable disc.
Help
Opens the Help menu containing help options. You can also update
the anti-virus scanner and enter a new serial number if necessary.
Nero BackItUp
11
Page 12
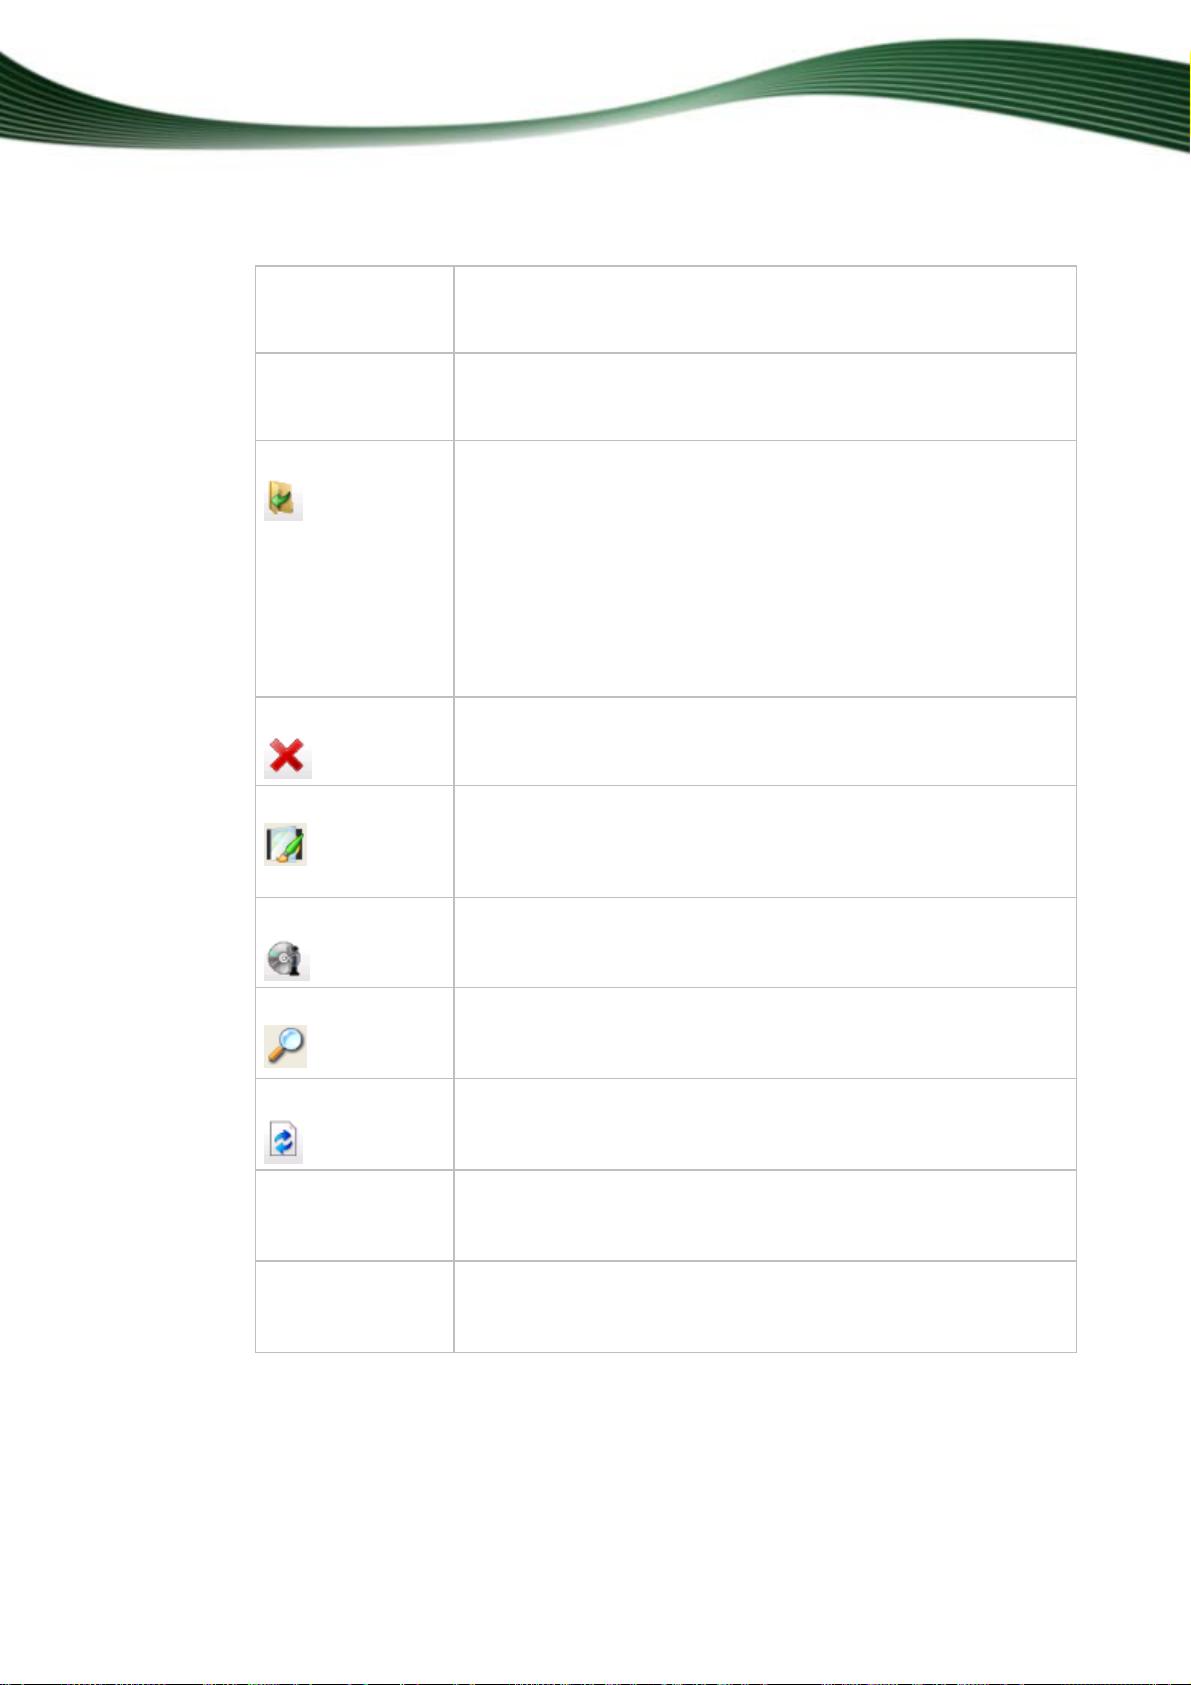
The following setting options are available in the Standard toolbar:
User interface
Menu
New
Menu
Wizards
Button
Button
Button
Opens a selection list with the menu icons that are also available in
the user interface. When you click one of these icons, a new window opens with the respective screen.
Opens a selection list containing the File Backup, Drive Backup,
Restore, Jobs, and Verify menu icons. When you click one of these symbols, the corresponding wizard opens.
Chooses an existing backup.
In the Home and Wizards screens, the selected backup can be re-
stored and verified, a job can be created from it, and data backups
can be updated.
The Backup Summary window is opened in the File Backup
screen. The backup summary shows if any files have been modified
or deleted on the PC since the last backup.
The selected backup is transferred to the screen in the Drive
Backup and Restore screens.
Deletes the selected backup or job from the backup or job list.
This button is available in the Home, Restore, and Job screens.
Launches Nero CoverDesigner, which you can use to create labels
and covers. Information about a current backup, such as the number and names of files, is incorporated into the document data of
the Nero CoverDesigner file.
Button
Button
Button
View selection
menu
Profile selection
menu
Displays information on the inserted disc such as sessions, contents (if any), and capacity.
Opens the Find File window, where you can search for specific files
on your computer.
This button is available in the File Backup and Restore screens.
Updates the information on drives and connected devices.
This button is available in the Drive Backup screen.
Selects a view for the files that will be displayed.
This selection list is available in the File Backup and Restore
screens.
Selects a profile and with it, the filters and settings assigned to that
profile.
This selection list is available in the File Backup screen.
Nero BackItUp
12
Page 13

User interface
Button
Opens the About Nero BackItUp window to display information
such as the version number.
The following drop-down menu is available on the Address toolbar
Address
Selects a start folder for displaying the folders and files.
This toolbar is available in the File Backup screen.
See also:
Selecting Files For Backup 14
Selecting a Drive For Backup 22
Autobackup 46
Restore Screen 48
Setting Up Jobs 38
Nero BackItUp
13
Page 14

4 File Backup
You can back up files with Nero BackItUp. You can burn the backup to a disc or hard drive
(internal, external, USB or FireWire), network drives or removable medium. It is also possible
to save on an FTP server or to save as an image file
A file backup is useful to protect against data loss that can occur due to hardware damage or
force majeure (fire, etc.). As a result, we recommend frequent backups so that you can restore data that is as current as possible in case of loss.
If you always want to back up the same folders and files (e.g. the My Documents folder),
you can simply update the backup, starting with the second backup. On one hand, this saves
disk space; on the other, you don't have to configure the same settings every single time.
When updating the backup, you can choose between an incremental
differential
See also:
Specifying The Backup Target And Starting The Ba
Backup Tab 78
Autobackup 46
backup.
File Backup
.
backup and a
ckup Process 24
4.1 Selecting Files For Backup
The first step is selecting files and folders to back up. "File backup" means that individual files can be backed up and then restored at a later point in time. In contrast to drive backups,
it is not possible to restore operating systems or programs with this option.
You can select files and folders from your hard drive, from drives, removable data media,
from the network, or from an FTP server
see ).
Windows Vista
Search folders
®
operating system. This means that you can back up search queries,
Vista
paths, and the original documents. Restore is possible to the original path, a selected path, or in a search folder (virtual folder).
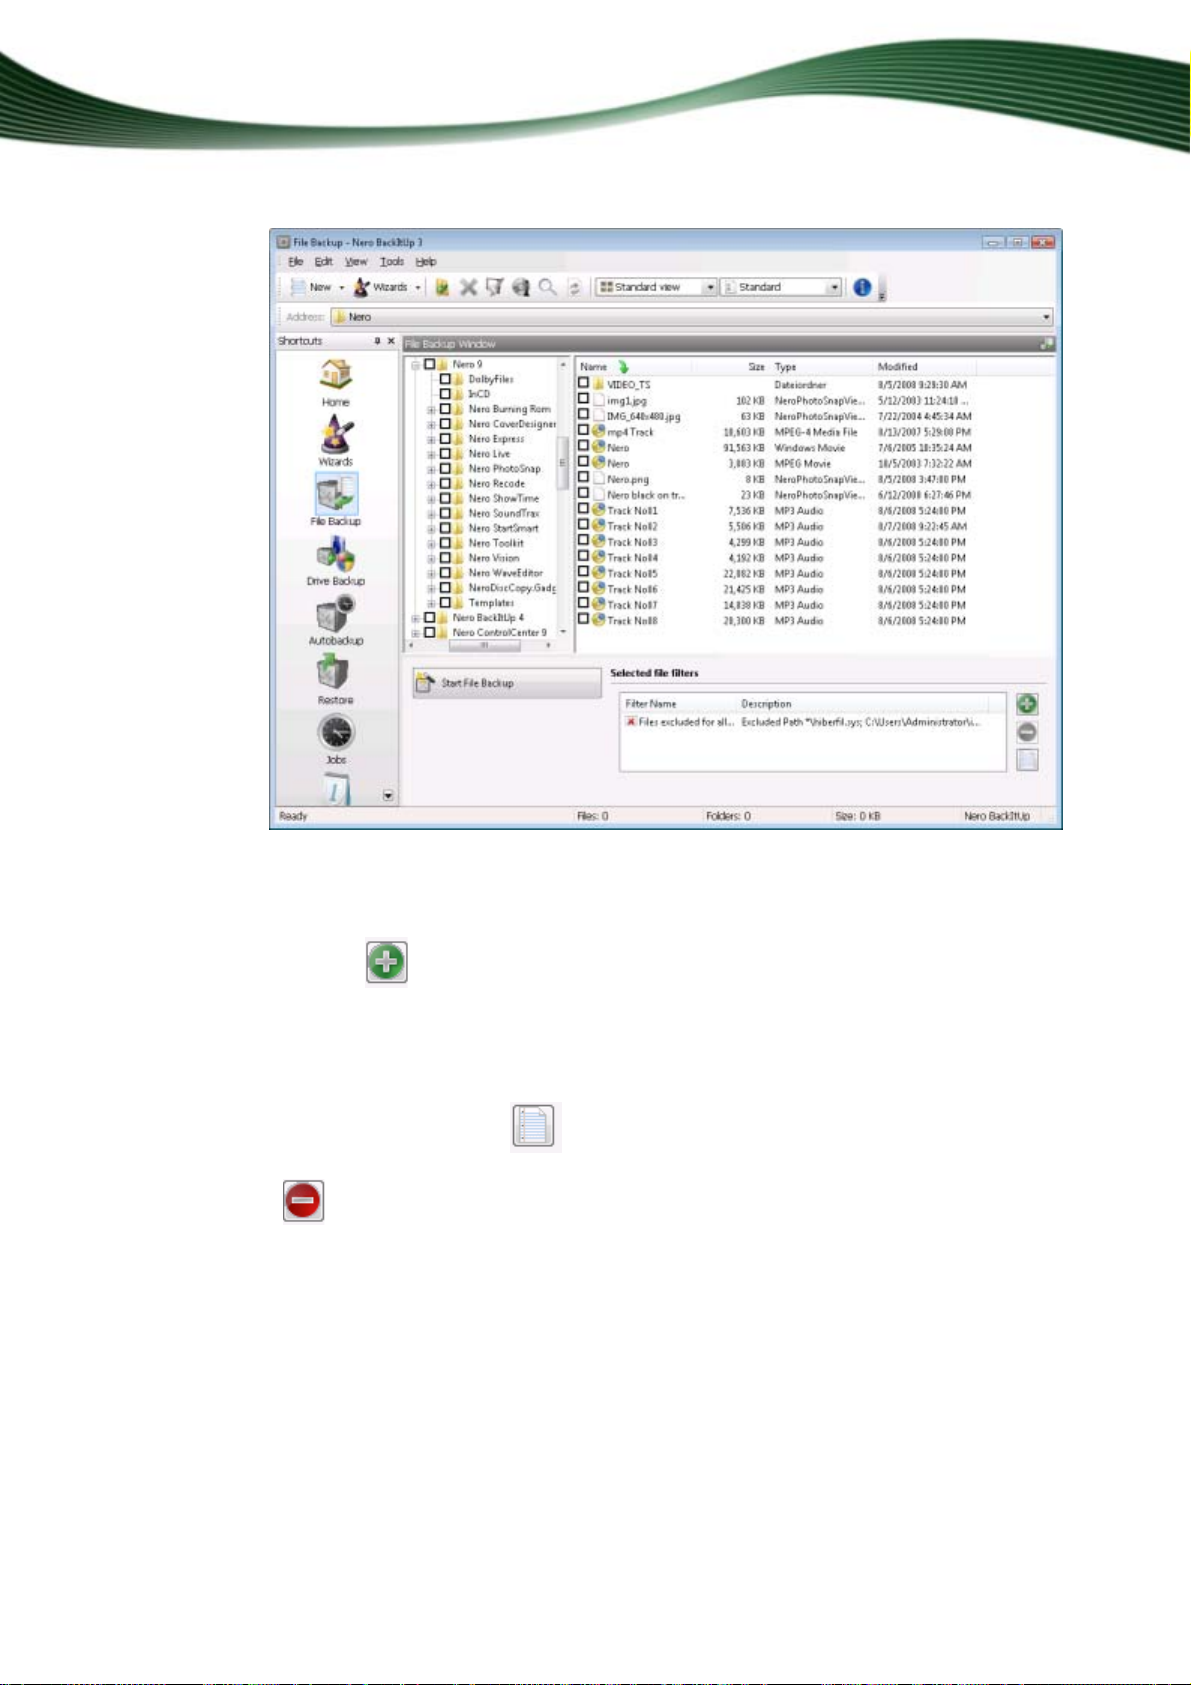
To select files, proceed as follows:
1. Click the File Backup menu icon.
The File Backup screen appears.
are supported both for backup and restore under the Windows
(if you have entered an FTP server in the options,
Nero BackItUp
14
Page 15
File Backup
File Backup screen
2. If you want to use filters to exclude certain file types from the backup or to allow only certain
file types:
1. Click the
Files that do not meet the filter criteria are excluded from the backup, and the corre-
sponding check box is grayed out automatically.
2. To use a profile with a predefined combination of filters , select the respective profile from
the drop-down menu on the upper right.
To create filters, click the
4. To remove filters, select a filter in the Selected File Filters selection list and click the
button.
button to select filters.
button. 3.
3. Check the box preceding the folder or folders that you want to add to the backup.
The selected files are added to the backup.
4. If you want to see the selected files in a list, select the Selected files view entry from the
View drop-down menu.
Nero BackItUp
15
Page 16

5. If you want to search for specific files in order to add them to the backup or exclude them
from the backup, then execute a file search.
Advantage of the file search option
The advantage of the file search option, in addition to specific searches, is the
fact that files that have been excluded through filters can still be added to the
backup.
You have selected files to back up. Now proceed with the file backup by clicking the
Start File Backup button and specifying the backup target.
See also:
Burning a Backup to Disc 30
Saving a Backup to a Hard Drive 33
Saving a Backup on an FTP Server 35
Filters 57
Find Files 60
4.2 Backup Summary
File Backup
The backup summary is useful when you intend to update a file backup and want to know
first if there have been any changes (as well as what their extent is) since the last backup.
When you select an existing backup, the backup summary tells you whether or not there are
any changes, how many folders and files have been removed, and how many files have
been changed.
In order to show a backup summary, follow the procedure below:
1. Click the File Backup menu icon.
The File Backup screen appears.
2. Click the button.
The Open Backup window opens.
In the Open Backup window all backups are displayed. However you can only
select file backups.
3. Select the desired file backup and click the Open button.
The Backup Summary window opens.
Nero BackItUp
16
Page 17

File Backup
Backup Summary window
4. Click the OK button.
The Backup Summary dialog box closes. The selected existing backup is transferred to
the File Backup screen. Now you can update this backup.
See also:
Updating a File Backup 17
4.3 Updating a File Backup
You can update a file backup with Nero BackItUp. Your starting point will be an existing
backup. A backup with multiple updates is referred to as a backup set
The selected backup does not have to be available during the update.
To update a backup, proceed as follows:
1. Click the Wizards > File Backup button.
The Backup Wizard window with the welcome screen opens.
2. Click the Next button.
The Backup Source screen appears.
3. Select the Use Existing Backup option button.
Select an existing file backup from the list or using the
5.
Click the Next button.
The Select Fi
6.
transferred.
Add additional files and folders to the backup as desired.
7.
les and Folders screen appears. The file selection of the chosen backup is
.
button. 4.
Nero BackItUp
17
Page 18

File Backup
8. Click the Next button.
The Backup Settings screen appears.
9. Select the desired type of backup in the Backup Type drop-down menu.
Backup types
Depending on the selected backup type, either all files are backed up again
(Full Backup) or only files that have been modified are backed up. With anIn-
cremental Backup, the files that have been modified since the last backup in
this backup set are backed up. With a Differential Backup, the files that have
been modified since the first complete backup are backed up.
If you selected the Incremental or Differential Backup types, and want newlyadded files in a backed-up folder to be backed up, make sure that the Add new
files in incremental or differential backup check box is enabled in the corresponding options.
You have selected a file backup to update. Proceed with the update by clicking the Next
button and specifying the target of the backup.
See also:
Burning a Backup to Disc 30
Saving a Backup to a Hard Drive 33
Backup Summary 16
Find Files 60
Backup Tab 78
4.3.1 About Backup Types
There are four backup types in Nero BackItUp:
Full Backup
Differential Backup
Incremental Backup
Update Backup
With the Full backu
first backup is always a full backup.
With the Incremental backup type, all files that have changed in comparison to the last
backup will be saved.
With the Differential backup type, all files that have changed in comparison to the first
backup will be saved.
With the Update backup type, the actual procedure depends on the media on which the
backup is made:
Nero BackItUp
p type, all files and folders that you have selected will be backed up. A
18
Page 19
File Backup
If you are backing up to a hard drive with the Update backup type, then the data of the
previous backup will be overwritten with the changed data. This means that older versions will be erased; access to older backup states will no longer be possible.
If you are backing up to the disc on which the last backup was burned with the Update
backup type, then the procedure is the same as described for the Incremental backup.
In this case a folder will be generated in a new session.
With the three Full, Incremental and Differential backup types, it does not matter which
medium you save the backup to. You can, for example, use the disc that you used for the old
backup (Nero BackItUp automatically started a multisession disc) as long as there is still
space on the disc. You can also back up to a new medium.
Incremental Backup (Above) and Differential Backup (Below)
An example is provided below to illustrate the difference between incremental and differential
backups:
Let's assume that you have 100 photos and are backing them up. The first (full) backup contains the 100 photos. Then you change 25 of the photos and want to back up again. You select an incremental or differential backup (it does not matter which you select for the second
backup). The 25 changed photos are backed up. Then you change another 10 photos and
want to back up again:
If you select the Incremental backup, 10 photos are backed up, specifically those that have
changed since the last backup. (Nero BackItUp compares the current status with the last
backup.)
If you select the Differential backup, 35 photos are backed up, specifically those that have
changed since the first backup. (Nero BackItUp compares the current status with the first
backup.)
This means that incremental backups require less storage space, however usually more
backup versions will have been created. The result is that the restore takes longer since many small versions must be restored (and made ready) one after the other.
The opposite is true of the differential backup: It requires more storage space, however only
two backup versions (the first and the last) are needed. Consequently, for the restore only
two versions are restored (and made ready) because the last version contains all chan ges
made since the first backup.
Nero BackItUp
19
Page 20
File Backup
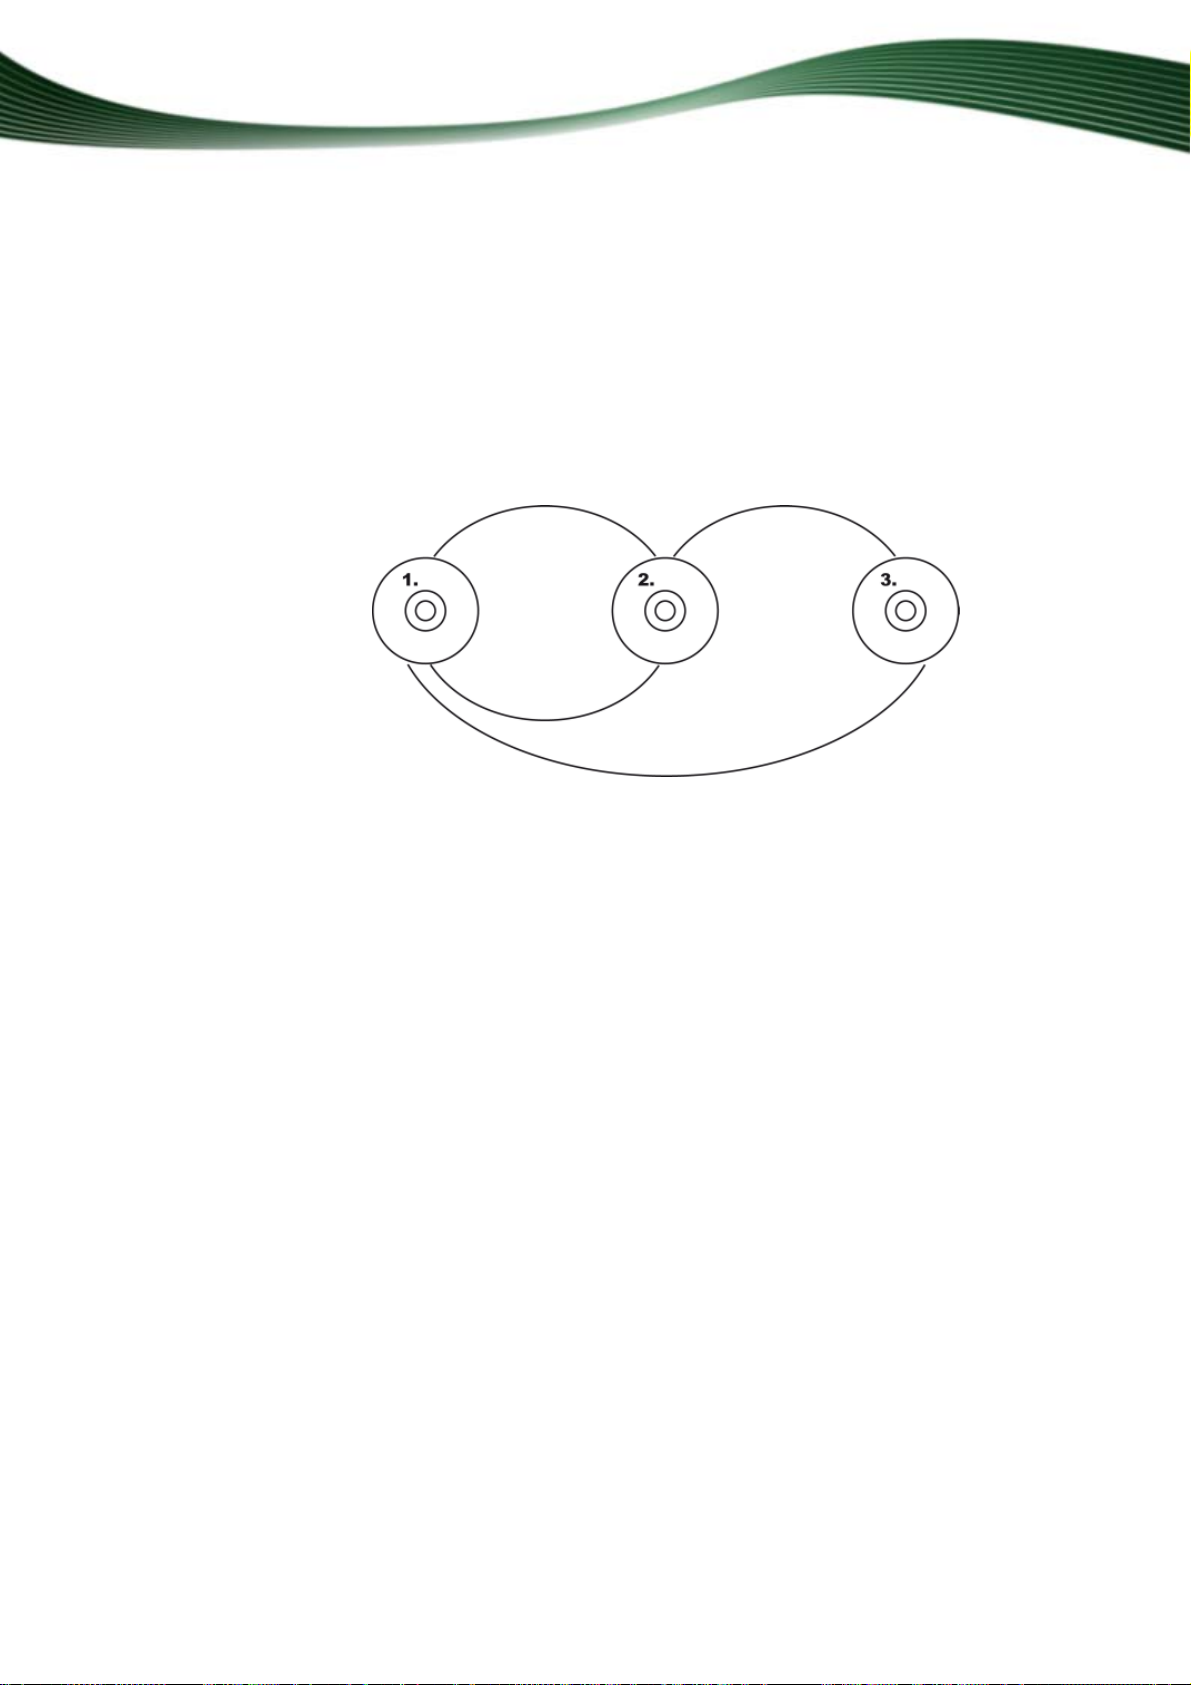
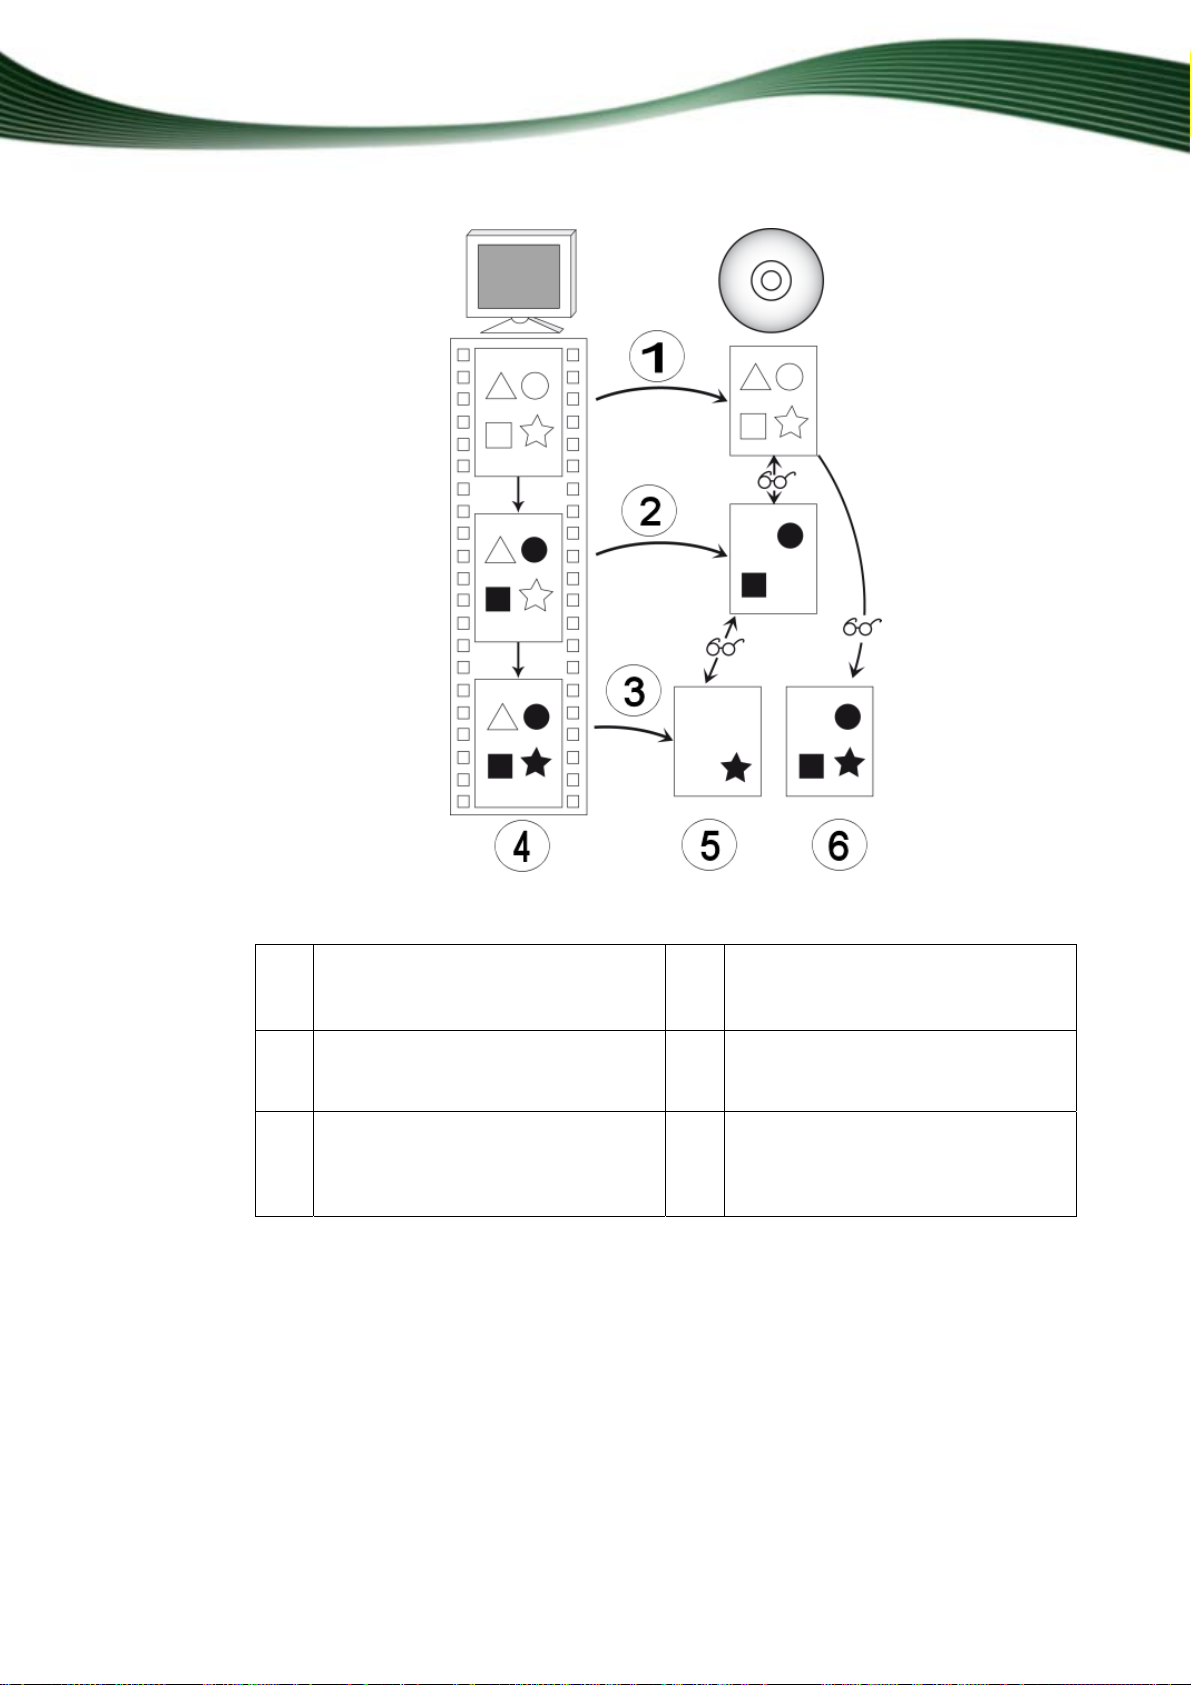
Data backup distinction between differential and incremental backup
1 1st backup 4 Data on the computer
White: Original data
Black: Altered data
2 2nd backup 5 Incremental backup
Data that has been modified since
the first backup is backed up
3 3rd backup 6 Differential backup
Data that has been modified since
the last previous backup are backed
up
Nero BackItUp
20
Page 21

File Backup
The following table provides information to help you determine the correct update type for
your application:
Backup type
Storage space re-
quirement for the
backup set
Full backup Extremely high
Differential backup Mid
Incremental backup Low
Backup update to
Extremely low
hard drive
(old versions will be
erased)
Effort involved in
restoring
Extremely low (only
the current version
is required)
Low (current and
first version must be
kept)
High (all versions
must be kept)
Extremely low (only
the current version
is required)
Can older versions
be accessed?
Yes
Yes
Yes
No
Nero BackItUp
21
Page 22
5 Drive Backup
You can back up entire drives with Nero BackItUp. In contrast to file backups, drive backups
restore programs and operating systems when restoring.
You can burn the backup to a disc or save it to a hard drive. It is also possible to save on an
FTP server or to save as an image file.
When you back up a drive, the backup file is usually quite large. If you burn the backup to
disc, you will usually require multiple discs. The first backup disc is always a bootable disc. If
you do not burn the backup to disc, it is still quite useful to create a bootable disc so that you
can start the computer (and the drive restore) from CD/DVD in the event of an emergency.
It is not possible to update a drive backup.
Administrator rights
You must have administrator rights in order to back up and restore hard drives
and partitions.
See also:
Specifying The Backup Target And Starting The Ba
Backup Tab 78
Drive Backup
ckup Process 24
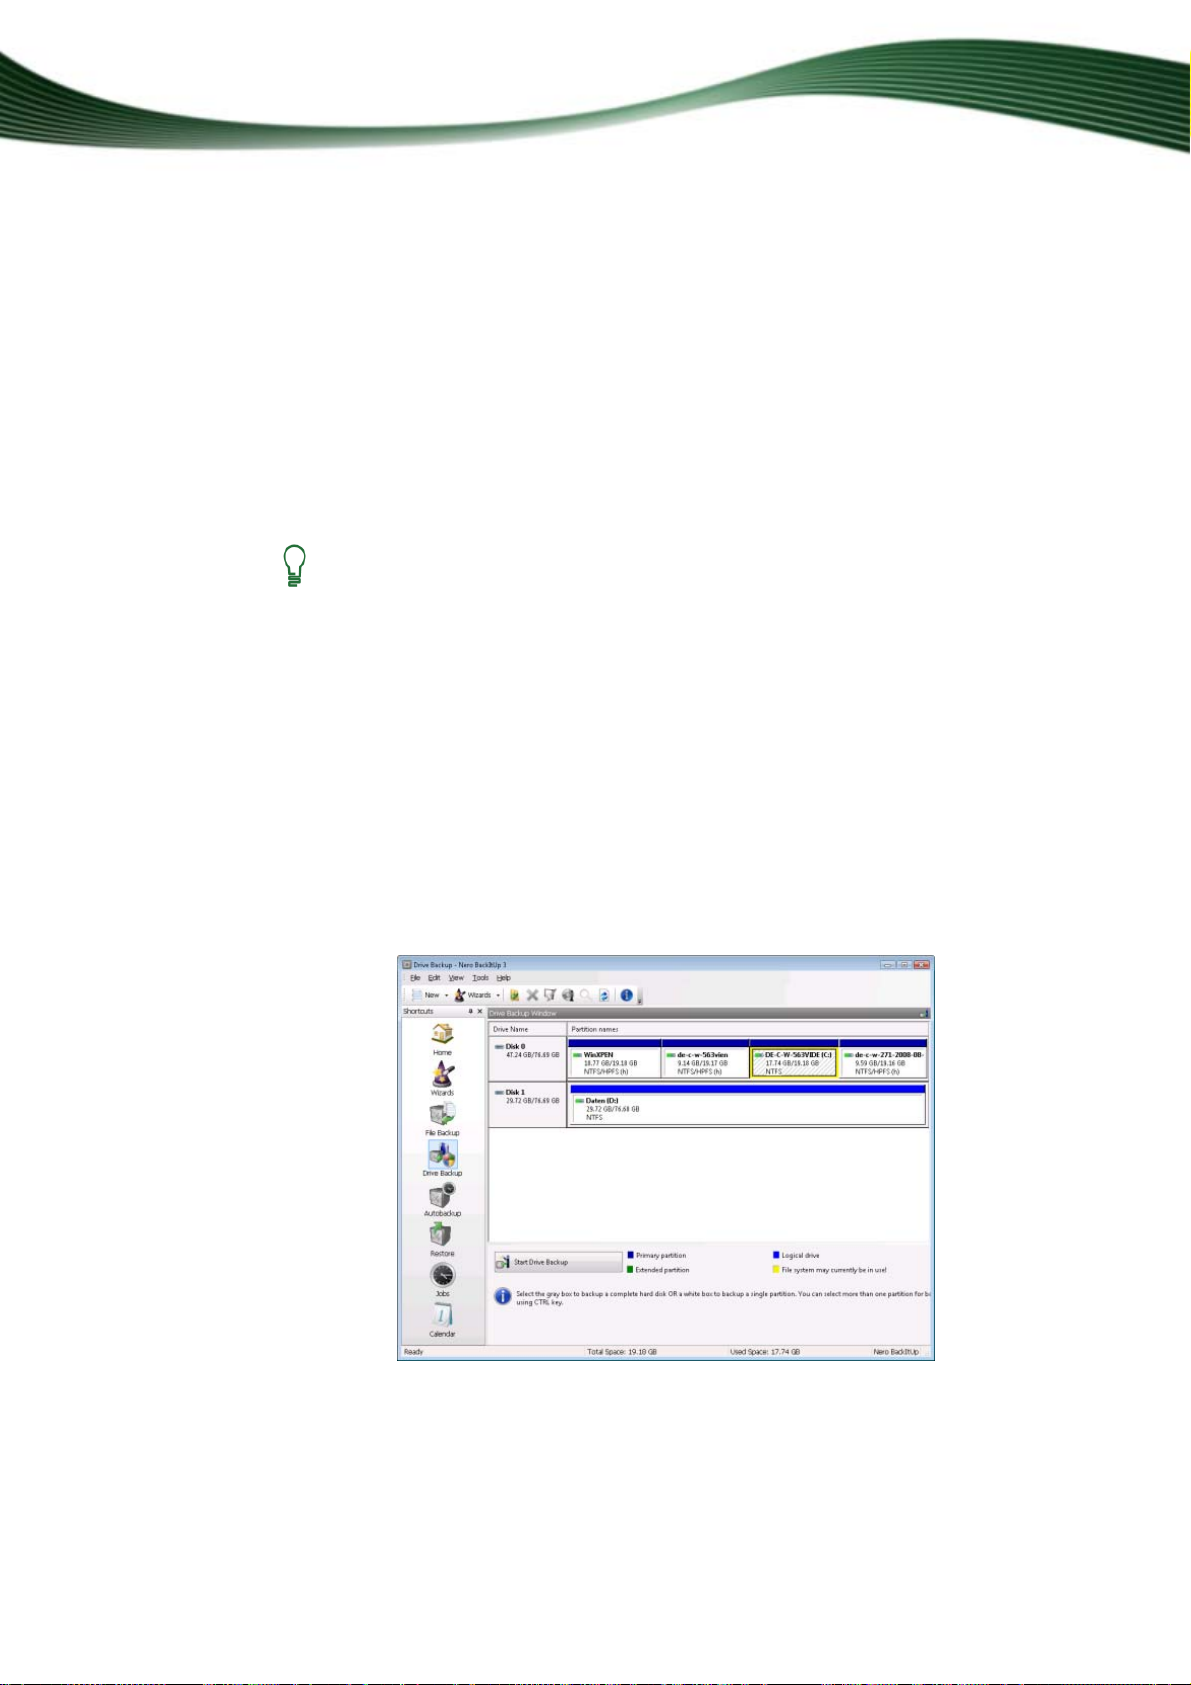
5.1 Selecting a Drive For Backup
To select a drive to back up, proceed as follows:
1. Click the Drive Backup menu icon.
The Drive Backup screen appears.
Drive Backup Screen
Nero BackItUp
22
Page 23

Drive Backup
2. If you want to back up a hard drive, click the appropriate button under the Drive Name list
heading.
The hard drive and all its partitions are selected and marked.
3. If you want to back up a Partition, click the appropriate partition under the Partition names
list heading.
The partition is selected and marked.
4. If you want to back up another hard drive partition, repeat the previous step.
You have selected a hard drive or partition to back up. Continue with the drive backup by
clicking the Start Drive Backup button in order to specify the backup target.
See also:
Burning a Backup to Disc 30
Saving a Backup to a Hard Drive 33
Saving a Backup on an FTP Server 35
Nero BackItUp
23
Page 24
Specifying The Backup Target And Starting The Backup Process
6 Specifying The Backup Target And Starting The Backup
Process
After selecting the files or the drive to back up, specify the target for the backup in the Backup Settings window. After specifying the target, configure the final settings in the Completing the Backup Wizard window and start the backup process.
See also:
Selecting Files For Backup 14
Selecting a Drive For Backup 22
Source Media Supported 87
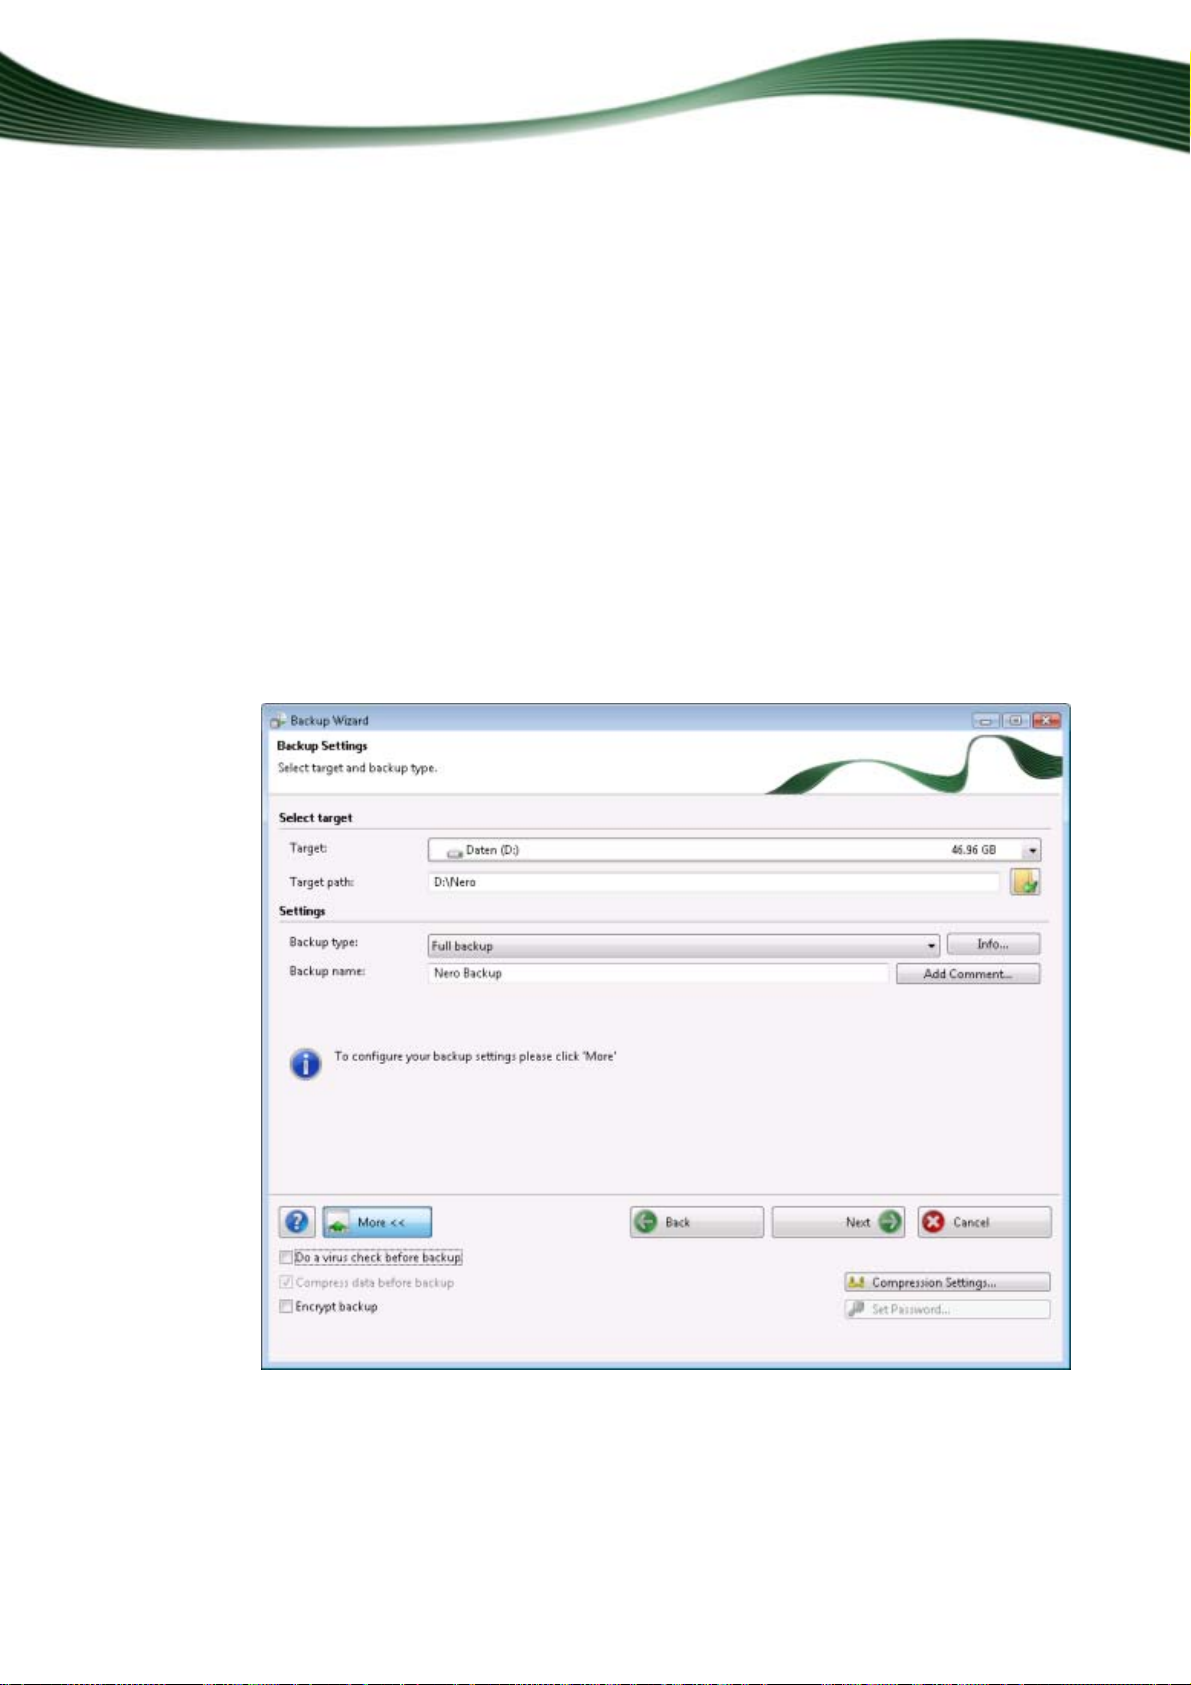
6.1 Backup Settings Screen
In the Backup Settings screen you specify the backup settings. Here you select the target
and thus determine the course of the backup. In addition you can select the backup type if
necessary. The screen consists of the main screen and the extended area.
Nero BackItUp
Backup Wizard Window, Backup Settings Screen
24
Page 25

Specifying The Backup Target And Starting The Backup Process
The following setting options are available on the main screen:
Drop-down menu
Target
Input field
Target Path
Drop-down menu
Disc type
Display panel
Path
Drop-down menu
Backup type
Specifies the backup destination. You can select a burner or hard
drive, as well as network drives and removable media. If you have
enabled the appropriate settings in the Options, you are also given
the FTP and Image Recorder options. You can use the Choose
multiple recorders entry to select multiple burners as the target, if
necessary.
The following input field changes depending on the target selected.
Specifies the save path.
The input field is available if a hard drive, a network drive, or removable media was selected as a target.
Specifies the disc type (e.g. CD or DVD) of the image file.
The drop-down menu is available if the Image Recorder was se-
lected as a target.
Specifies the folder.
The display panel is available if an FTP server was selected as a
target.
Specifies the type of backup. Four types are available: Full backup,
Backup update, Incremental backup and Differential backup.
These entries are only available if you are updating a file backup
(i.e. carrying out the same backup at a later point in time). The first
file backup and the drive backup are always a complete backup.
Input field
Backup Name
Button
Add Comment
Button
?
Button
More
Button
Back
Button
Next
Button
Cancel
Specifies the name of the backup.
Adds a comment to the backup.
Opens a selection list with help tasks.
Opens the extended area.
Displays the previous screen.
Shows the next screen, i.e. the Completing the Backup Wizard
screen.
Cancels the procedure.
Nero BackItUp
25
Page 26

Specifying The Backup Target And Starting The Backup Process
Check box
Checks the data for viruses prior to backup.
Do a virus check
before backup
Check box
Compress data
before backup
Button
Compresses the data before backup.
If you clear the check box, the data is not compressed and the
backup is created in the old Nero BackItUp format.
Specifies the level of compression.
Compression Settings
Check box
Encrypt backup
Button
Set Password
Activates the encryption function so that you can encrypt the backup with a password by using the Set Password button.
Opens the Use Password window in which you can specify the
password for the encryption and select an encryption algorithm.
Keep the following in mind before encrypting a backup:
If you protect the backup with a password, you will only be able to restore the
data after entering the password. Restoring an encrypted backup without the
correct password is impossible!
See also:
Burning a Backup to Disc 30
Saving a Backup to a Hard Drive 33
Saving a Backup on an FTP Server 35
Remote FTP 82
General Tab 77
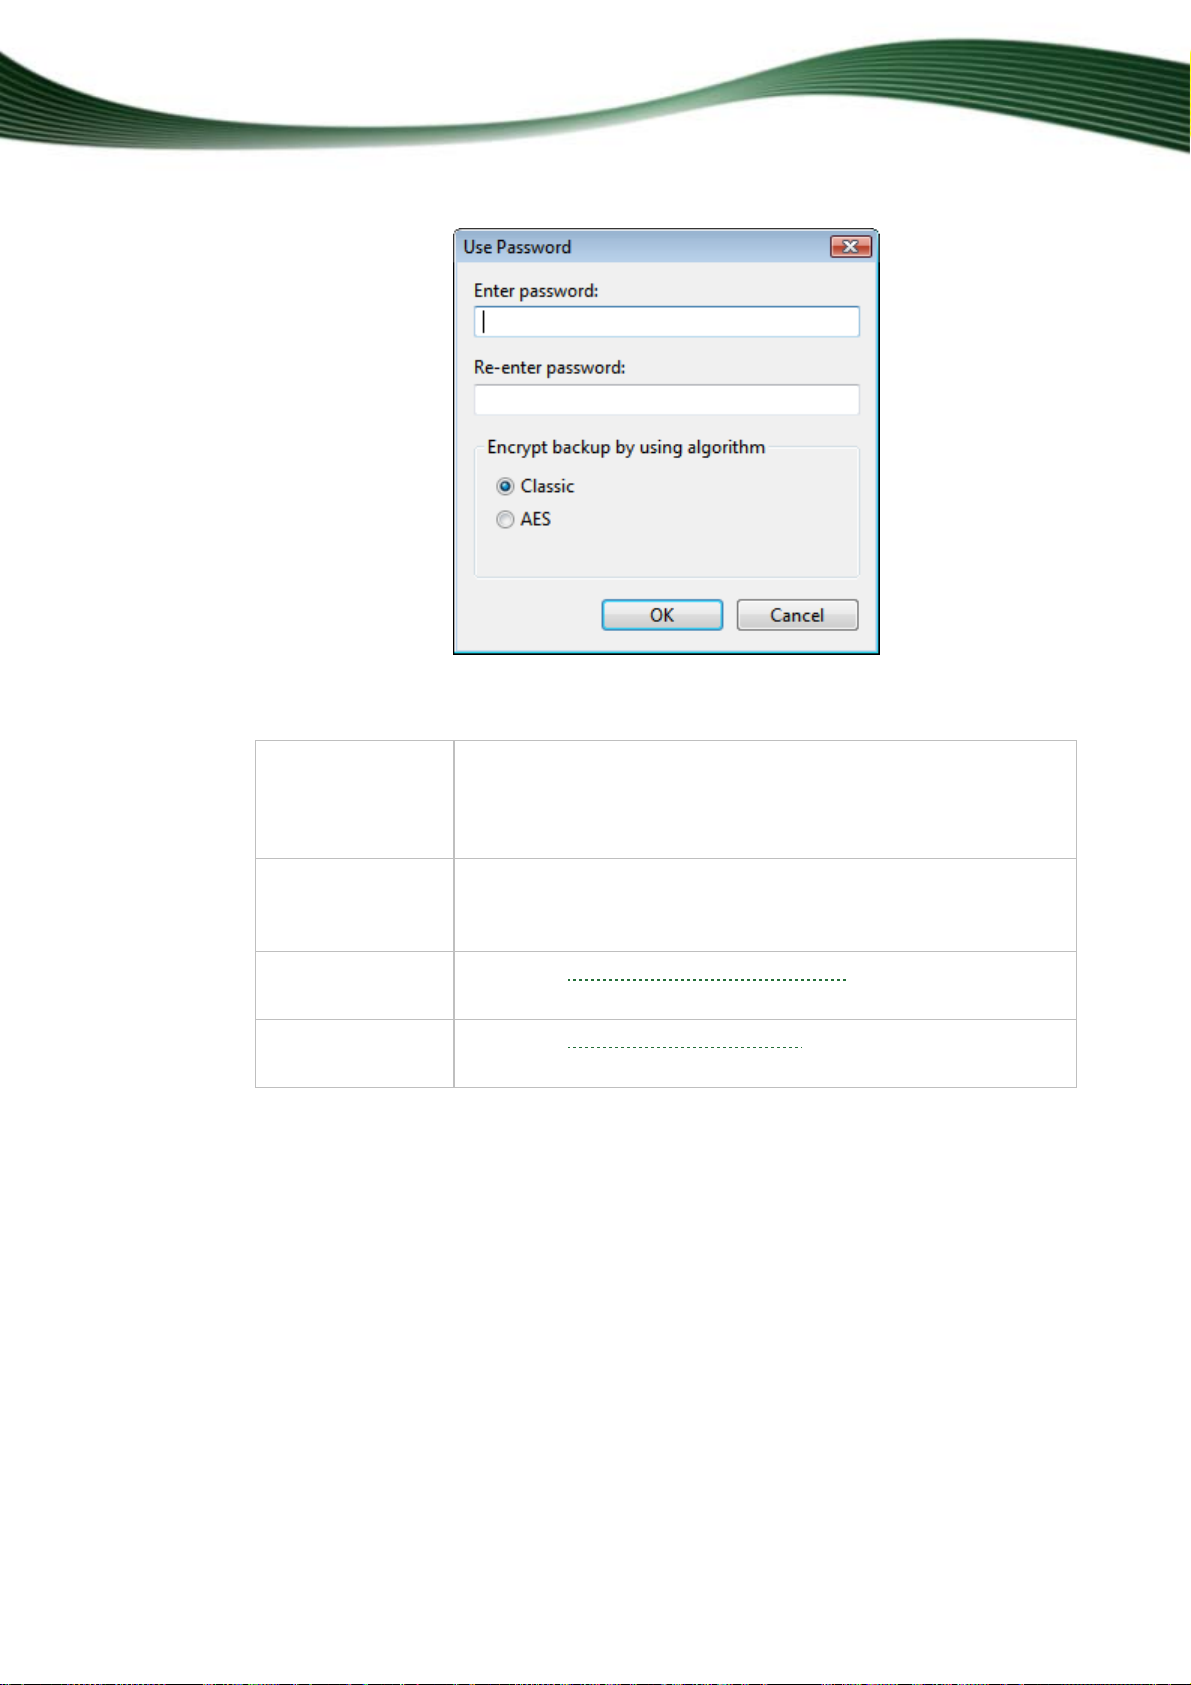
6.1.1 Use Password Window
In the Use Password window, enter a password for the encryption and select an encryption
algorithm. You can open the window with the Set Password button found in the extended
area of the Backup Settings screen.
Nero BackItUp
26
Page 27
Specifying The Backup Target And Starting The Backup Process
The following setting options are available:
Use Password window
Input fields
Specifies the encryption password.
Enter password /
Re-enter password
Area
Selects an encryption algorithm.
Encrypt backup by
using algorithm
Option button
Selects the traditional encryption procedure
Classic
Option button
AES
Selects the AES encryption procedure (AES = Advanced Encryption
Standard), a popular encryption standard.
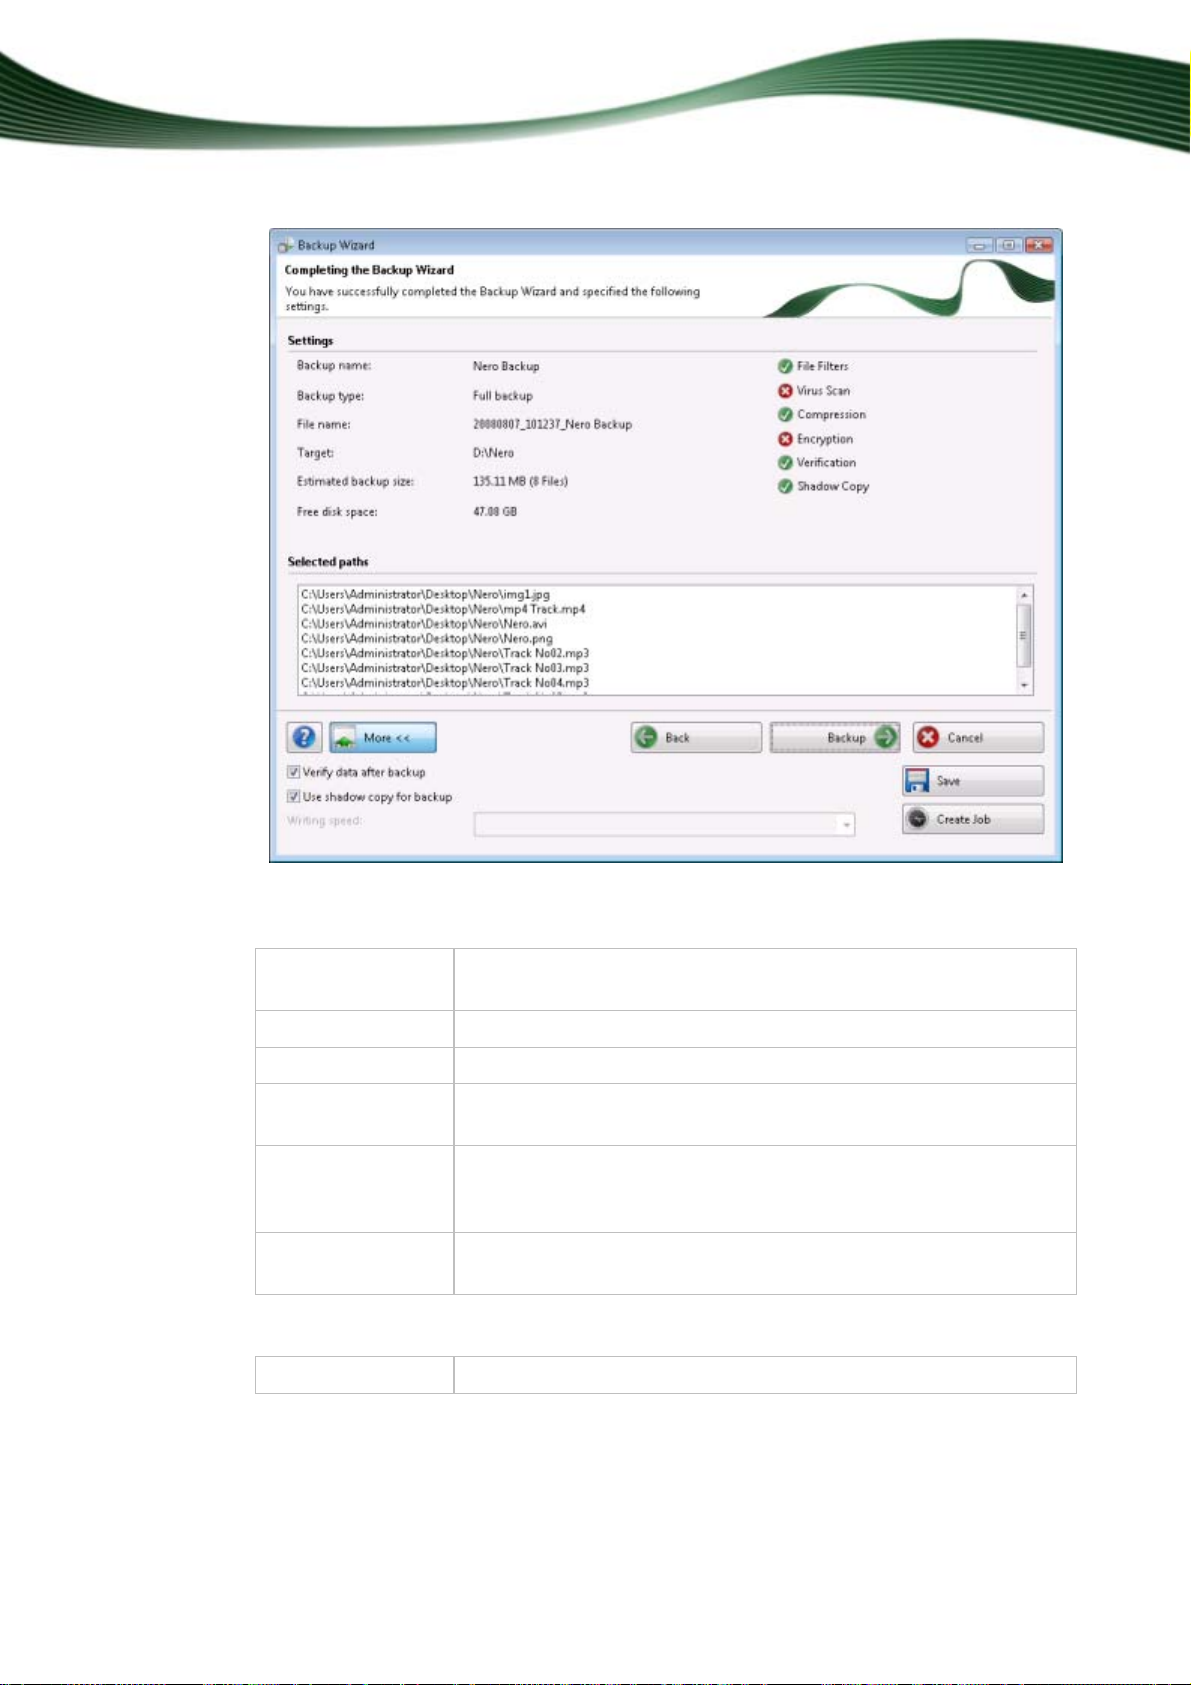
6.2 CompletingThe Backup Wizard Screen
The Completing the Backup Wizard screen is the last screen before the backup process
starts. It shows all the settings that you have made so far and offers further configuration options in its extended area.
.
Nero BackItUp
27
Page 28
Specifying The Backup Target And Starting The Backup Process
Backup Wizard window, Completing the Backup Wizard screen
In the Settings area, the settings that you have selected are indicated with a green dot.
File Filters
Applies one or more file filters during the backup process. Only files
that meet the selected file filter criteria are stored.
Virus Scan
Compression
Encryption
Scans the files for viruses before backup.
Compresses the files before backup.
Encrypts the backup with the selected password. (This password is
required when the backup is restored at a later point in time!)
Verification
Compares the backed up files with the original files after the backup
process in order to make sure that all the files were copied, among
other things. This check is also called verification.
Shadow Copy
Creates shadow copies of the files before backup. Thus files can
also be backed up that are currently being worked on.
The following buttons are available:
?
Opens a selection list with help tasks.
Nero BackItUp
28
Page 29

Specifying The Backup Target And Starting The Backup Process
More
Back
Backup
Opens the extended area.
Shows the previous screen, i.e. the Backup Settings screen.
Starts the backup process. Depending on the target that you se-
lected previously, the backup is written onto a disc, saved on a hard
drive, uploaded onto a server, or created as an image.
Cancel
Cancels the procedure.
The following setting options are available in the extended area:
Check box
Verifies that the data is complete and correct after backup
Verify data after
backup
Check box
Use shadow copy
Uses a shadow copy for the backup. The shadow copy feature is
used to back up files that are open at the time and that you are still
working on.
This feature is available in the Backup Wizard window.
Selection field
Selects the speed at which the disc is written.
Write speed
Button
Saves information on the backup such as selection and settings.
Save
Button
Create Job
Creates a job from the backup. This means that this backup will be
carried out regularly at a defined time. The Job Information
screen, in which you can indicate the cycle for the job, among other
things, is shown.
6.3 Backup Process Screen
The Backup Process screen is displayed during the backup process. It consists of a main
screen and an extended area. You can track the backup process with the progress bar and
the messages in the main screen. You can open the extended area with the More button
and configure further actions.
Nero BackItUp
29
Page 30

Specifying The Backup Target And Starting The Backup Process
During the backup process, the following setting options are available in the extended area:
Check box
Automatically shut
Automatically shuts down the PC after the backup process has
ended.
do wn the PC when
done
Button
Print Disc Cover
Opens Nero CoverDesigner. The backup data (e.g. which files
are included in the backup) is transferred to Nero CoverDesigner - you can find this data in the document data and
paste it on the cover with the folder list tool.
6.4 Burning a Backup to Disc
You can write the backup to a disc with Nero BackItUp. Depending on the backup size, the
backup could require several discs. As far as technically possible, the first disc for a drive
backup is always a bootable disc
disc. The discs that are written are started or continued as multisession discs
that you can save other backups on this disc if there is enough storage space.
Backup Wizard window, Backup Process screen
, i.e. you can start the restore process for the disc with this
. This means
Nero BackItUp
30
Page 31

Specifying The Backup Target And Starting The Backup Process
The following assumes that several discs are written.
To start the backup and burn to a disc, proceed as follows:
1. Select a burner in the Target drop-down menu.
2. Place a recordable disc inside the recorder.
3. Make additional settings as necessary.
4. Click the Next button.
The Completing the Backup Wizardscreen appears.
5. Check the settings in the Completing the Backup Wizard screen.
6. If necessary specify other settings in the extended area.
7. Click the Backup button.
The Backup process screen appears and backup begins. You can track the backup
process with the progress bar.
Nero BackItUp
Backup Wizard window, Backup Process screen
31
Page 32

Specifying The Backup Target And Starting The Backup Process
8. During the backup process, configure other setting options in the extended area as desired.
If the disc's storage capacity runs out, the Waiting for Disc window opens and the drive
is ejected.
9. Remove the recorded disc and insert a new blank disc.
The backup process resumes and the newly inserted blank disc is burned.
10. Repeat the previous step until the backup has been written completely.
The Select source drive for data verification window opens and the drive is ejected.
If the backup was written to one single disc, the verification process is started
automatically.
11. Insert the first disc of the backup in order to have it verified.
12. In the Select source drive for data verification window, select the appropriate drive and
click the OK button.
13. The verification process is started and the first disc verified. After verification the disc is ejec-
ted and the Select source drive for data verification window appears again.
14. Repeat the two previous steps for each disc of the backup in chronological order.
Once the backup process is complete, the disc is ejected and a message window opens.
15. Click the OK button.
Nero BackItUp
"Backup process completed successfully"
You have burned the backup. Now you can save the log or click the Next button in orde r
to start other actions, e.g. creating a new backup or closing the wizards.
See also:
Selecting Files For Backup 14
Updating a File Backup 17
Selecting a Drive For Backup 22
Backup Settings Screen 24
CompletingThe Backup Wizard Screen 27
Backup Process Screen 29
32
Page 33

Specifying The Backup Target And Starting The Backup Process
6.5 Saving a Backup to a Hard Drive
With Nero BackItUp, you can save the backup to a hard drive, network drives, or removable
media. When doing this, the backup is saved to the hard drive, network drive, or removable
media in a defined backup format.
To start the backup and to save it to the hard drive, proceed as follows:
1. In the Target drop-down menu, select a hard drive, a network drive, or a removable drive.
2. In the Target Path input field, specify the path of the folder to which the backup is to be sa-
ved.
3. Configure other settings as desired.
4. Click the Next button.
The Completing the Backup Wizard screen appears.
5. Check the settings in the Completing the Backup Wizard screen.
6. If necessary specify other settings in the extended area.
7. Click the Backup button.
The Backup process screen appears and backup begins. You can track the backup
process with the progress bar.
If the selected hard drive is active, it cannot be locked, and a window with the message
"Nero BackItUp cannot lock the selected partition/hard drive" opens.
Locking a hard drive
An active hard drive cannot be locked, since it is in use. The operating system
is running on it, for example, or other programs are accessing it.
If the hard drive is not locked, system files can be modified during the backup
process. This can result in an error during data verification at the end of the
backup process. An information window with a corresponding message then
appears.
The changes made to files during the backup are usually not relevant for restoration of the system.
However, if you are interested in a drive backup without verification errors, you
can back up the drive with the Nero BackItUp ImageTool. Nero BackItUp ImageTool boots from a disc, which means that the drive in this case is not in operation and thus system files cannot change during the backup.
8. If you want to continue the process without locking, click the Ignore button.
The backup process resumes.
Nero BackItUp
33
Page 34

Specifying The Backup Target And Starting The Backup Process
Backup Wizard window, Backup Process screen
9. Configure further setting options as desired in the extended area during the backup process.
Once the backup process has ended, a message window opens.
"Backup process completed successfully"
10. Click the OK button.
You have saved the backup to a hard drive. Now you can save the log or click the Next
button in order to start other actions, e.g. creating a new backup or closing the wizards.
See also:
Selecting a Drive For Backup 22
Nero BackItUp
34
Page 35

Specifying The Backup Target And Starting The Backup Process
Selecting Files For Backup 14
Updating a File Backup 17
Backup Settings Screen 24
CompletingThe Backup Wizard Screen 27
Backup Process Screen 29
6.6 Saving a Backup on an FTP Server
Nero BackItUp can be used to upload and save the backup to an FTP server.
The following requirement has to be fulfilled:
You have entered an FTP server on the FTP tab under Options.
To start the backup and upload it to an FTP server, proceed as follows:
1. Select the desired FTP server in the Target drop-down menu.
2. If you want to specify a folder on the server:
1. Click the
The Open Folder window opens.
2. Click the New Folder button and enter a name.
A new folder is created and displayed in the Folder Name selection list.
3. Double-click a folder in the Folder Name selection list.
The folder is transferred into the Path display panel.
4. Click the Select button.
The Open Folder window closes and the selected folder is transferred.
button.
3. If necessary make additional settings in the Backup Settings screen.
Click the Next button.
4. The Completing the Backup Wizard screen appears.
Check the settings in the Completing the Backup Wizard screen.
5. If necessary specify other settings in the extended area.
6. Click the Backup button.
The Backup process screen appears and backup begins. You can track the backup
process with the progress bar.
Nero BackItUp
35
Page 36

Specifying The Backup Target And Starting The Backup Process
Backup Wizard window, Backup Process screen
7. Configure further setting options as desired in the extended area during the backup process.
Once the backup process has ended, a message window opens.
"Backup process completed successfully"
8. Click the OK button.
You have uploaded the backup to an FTP server. Now you can save the log or click the
Next button to start other actions, e.g. creating a new backup or closing the wizards.
See also:
Selecting a Drive For Backup 22
Nero BackItUp
36
Page 37

Specifying The Backup Target And Starting The Backup Process
Selecting Files For Backup 14
Updating a File Backup 17
Backup Settings Screen 24
Backup Process Screen 29
Remote FTP 82
Nero BackItUp
37
Page 38

7 Scheduling a Backup - Jobs
Jobs in Nero BackItUp are scheduled backups that are automatically executed by Nero BackItUp at a defined time.
You can see scheduled jobs and jobs that have been carried out in the Jobs and Calendar
screens. You can also set up jobs here. In order for a job to be able to start, i.e. for a scheduled backup to be carried out, the computer must be switched on and an op erating system
must be running. Nero BackItUp does not necessarily have to be running, since it can work
in the background.
See also:
Job Tab 80
7.1 Setting Up Jobs
Setting up jobs is particularly useful when you want to carry out regular backups for the same files. The advantages are, e.g. that all the settings for the backup have already been configured and that there is no risk of forgetting a backup date or of not carrying out a backup as
scheduled (as long as the computer is on).
To configure a job, proceed as follows:
Scheduling a Backup - Jobs
1. Click the Jobs menu icon.
The Job screen opens.
2. Click the Add Job button.
The Job Wizard window with the start screen opens.
3. Click the Next button.
The Job Source screen appears.
4. If you want to configure the job for a file backup, choose the Select Files or Folders option
button.
5. If you want to configure the job for a drive backup, choose the Select a Drive or a Partition
option button.
Administrator rights
You must have administrator rights in order to back up and restore hard drives
and partitions.
6. If you want to use an existing backup as a template for the job:
1. Select the Use Existing Backup option button.
The selection list is activated.
2. Select an existing backup from the selection list.
7. Click the Next button.
If you selected a file backup, the Select Files or Folders screen will appear.
Nero BackItUp
38
Page 39

Scheduling a Backup - Jobs
If you selected a drive backup, the Select Partition or Hard Disc screen will appear.
8. Choose files/folders or a drive/partition as desired or edit the selection for the existing back-
up.
9. Click the Next button.
The Backup Settings screen appears.
10. Specify the settings in the Backup Settings screen.
11. Click the Next button.
The Job Information screen appears.
12. Specify the settings for execution as desired.
13. Click the Next button.
The Completing the Job Scheduling Wizard screen appears.
14. Verify the settings in this screen.
15. If necessary specify other settings in the extended area.
16. Click the Finish button.
If you previously cleared the Run only if user logged on check box, the Set Account
Information window opens.
17. Enter your user name and password in the appropriate boxes and then click the OK button.
The information is saved (Nero BackItUp needs your user information in order to be able
to carry out the job even if a different user is logged on). The Set Account Information
window closes, and a window with the message "Add Job Successfully" opens.
18. Click the OK button.
The Job Wizard closes. The job that you have configured will appear in the Job, Calen-
dar, and Home screens. If you select the job and display the context menu with the left
mouse button, then various possibilities are available such as deactivating/activating
the job, deleting the job, or calling up the properties.
See also:
Selecting Files For Backup 14
Selecting a Drive For Backup 22
Editing Jobs 42
Executing jobs 41
7.1.1 Job Information Screen
You specify settings for job execution in the Job Information screen.
Nero BackItUp
39
Page 40

Scheduling a Backup - Jobs
The following setting options are available:
Input field
Specifies the name of the job.
Job Name
Drop-down menu
Job Type
Specifies when / with what frequency backups are made. The following entries are available:
Once: Makes exactly one backup
Daily: Makes daily backups
Weekly: Makes weekly backups on one or more defined days (e.g.
every Tuesday and Thursday)
Monthly: Makes monthly backups
On system start: Starts the backup when the operating system is
started.
On logon: Starts the backup when you log into the system
On idle: Starts the backup when the computer is inactive, i.e. no
applications are active and there is no user input
Drop-down menu
Start on:
Defines the start date and time for the (first) backup.
The input fields will be activated if the job type Once, Daily,
Weekly, or Monthly is selected.
Job Wizard window, Job Information screen
Nero BackItUp
40
Page 41

Scheduling a Backup - Jobs
Check box
Monday, Tuesday,
Wednesday,
Thursday, Friday,
Saturday, Sunday
Input field
When the computer has been
idle for
Check box
Run only if user
logged on
7.2 Executing jobs
If you have set up a job, the backup process will be carried out automatically at the defined
time. The system time is used for this purpose.
The computer must be switched on and an operating system must be running fo r this to
happen. Nero BackItUp does not have to be running in order to carry out the scheduled
backup, since it can work in the background.
Depending on which setting you have selected, the job can either be executed without the
user being logged on or a user must be logged on.
Defines the day or days in which the backup is made every week,
e.g. you can let the job run on weekdays.
These check boxes will be activated if the job type Weekly is selected.
Defines how many minutes the computer must be idle before the
scheduled backup is started.
This input field is activated if the job type When Idle is selected.
Starts the backup only if the user who set up the job is logged onto
the system.
If this check box is cleared, the backup is not made if the user is not
logged on. In this case, Nero BackItUp asks for your user information when setting up the job.
In order for the backup to be carried out as scheduled, provide the chosen target media:
If the backup is to be burned to disc, ensure that an appropriate blank disc is inserted in
the burner.
If you are backing up to an FTP server, ensure that the computer is connected to the In-
ternet.
If you are backing up to a removable medium or to an external hard drive, ensure that the
appropriate device is connected or installed.
After the job has been successfully completed, a dialog box with the message "Backup job
finished successfully" appears. If you set e-mail notifications in the options, you will be sent
an e-mail (if a network or Internet connection exists).
See also:
Setting Up Jobs 38
Nero BackItUp
41
Page 42

7.3 Editing Jobs
You can edit jobs that have been created at a later time if desired.
To edit a job, proceed as follows:
1. Click the Jobs menu icon or the Calendar menu icon.
The Jobs screen or the Calendar screen appears.
Job views in the Job and Calendar screens
The Job screen shows a tabular listing of the created jobs.
The Calendar screen shows a calendar view of the created jobs.
Select the screen with the view that best suits your needs.
2. Select a job.
3. Right-click to open the context menu.
4. Select the Properties entry.
The Job Properties window, containing the Schedule, Backup, and Source tabs,
opens.
Scheduling a Backup - Jobs
Nero BackItUp
Job Properties
42
Page 43

Scheduling a Backup - Jobs
5. Change the settings on the Schedule tab as desired.
If you want the backups not to be carried out for some time, choose the Disabled option
6.
button.
If you want carry out di
Change the settings on the Backu
7.
If necessary, use the Sour
8.
Click the OK button.
9.
The Job Properties window closes. The changed job properties are applied and saved.
sabled backups once again, choose the Enabled option button.
p tab as desired.
ce tab to check which files or which drive the backup contains.
Nero BackItUp
43
Page 44

8 Verifying a Backup
Nero BackItUp can be used to verify an existing backup. Nero BackItUp verifies whether or
not the backup
rity is checked, and the backed up data is compared to the source data. If you carry out the
verification right after the backup and have not modified any data in the meantime, you can
use the feature to verify whether or not all data was backed up successfully (data verification).
To verify the backup, proceed as follows:
1. Click the Wizards menu icon.
The Wizards screen appears.
2. Click the Verify Backup button.
The Verify Wizard window opens and the welcome screen appears.
3. Click the Next button.
4. The Verify Settings screen appears.
5. Click the button.
The Open Backup window opens.
can be used for a successful restore process. During this process, data integ -
Verifying a Backup
6. Select a backup from the selection list or select a different backup using the option buttons
and the
button.
7. Click the OK button.
The Open Backup window closes. The selected backup is transferred and the name of
the backup is shown in the Select Backup display panel. The Select any option to verify the backup area is available.
8. If you selected a file backup, specify the type of check that should be used for the file back-
up:
1. If you want to compare the CRC
of the original files, select the Verify by CRC option button.
2.
If you want to verify whether files have been changed after the backup, select the Modified option button.
3.
If you want to verify whether all files have been backed up, select the Verify by contents
option button.
checksum of the backed up files with the CRC checksum
9. If you selected a drive backup, specify the type of check that should be used for the drive
backup:
1. If you want to compare the CRC checksum of the backed up drive with the CRC check-
sum of the original drive, select the Verify by CRC option button.
2. If you want to compare the original drive with the backup sector-by-sector, select the Sec-
tor by Sector option button.
3. Select the appropriate hard drive or partition from the lower area.
Nero BackItUp
44
Page 45

Verifying a Backup
Calculation of the CRC
however it usually supplies more precise results.
checksum takes longer than the sector comparison,
10. Click the Verify button.
The Verify Process screen appears. You can track the progress of the verification via
the progress bar and the messages.
11. After a successful verification, a window that notifies you of the verification's result appears.
The message "The data verification process has been completed successfully"
means that the verified backup is error-free and is suitable for restoring.
If the message "Data verification has failed" appears, there is no guarantee that
the verified backup is suitable for a restore process. There can be several reasons, e.g. the backup file can have errors or there is no data on the computer
for a comparison.
12. Click the OK button.
The message window closes. The result of the data verification is visible in the message
area, marked with the
the
symbol.)
See also:
General Tab 77
symbol. (System and verification messages are marked with
Nero BackItUp
45
Page 46

9 Autobackup
You can use Nero BackItUp to set up and configure the automatic Autobackup. Once it has
been set up, Autobackup is available on your computer's system tray and backs up the folders that you specify in the background. During this process, the existing backup is replaced
by the current one.
In addition to a hard drive, you can use the Nero Online Backup Internet service as a backup
target. Autobackup can then restore the saved files from there.
9.1 Configuring Autobackup
In order for Autobackup to be able to carry out the automatic backup process according to
your preferences, configure which file types should be automatically backed up in which folders and define the backup target.
Autobackup
This update backup method is used for automatic backups made through Autobackup. In this process, the data from the previous backup is overwritten with
the modified data. This means that there are no backup versions, i.e. accessing
older backup versions is not possible.
Autobackup
Files that are deleted from a monitored folder are kept in the backup. If you
want to delete these files from the backup as well, then use the delete feature,
which can be selected in the Autobackup screen.
In order to set up Autobackup or change the settings, proceed as follows:
1. Click the Autobackup menu icon.
The Autobackup screen appears.
2. Click the Backup entry.
The screen for configuring Autobackup backups is displayed.
3. Specify which file types you want to back up in the Backup Source area.
4. If you want to edit the file extension, click one of the file types.
5. Specify which files you want to monitor with Autobackup in the Backup Source area:
1. Click Add to add folders to the monitoring list.
2. Click Remove Folder to remove folders from the monitoring list.
6. Specify the destination where Autobackup should back up the files in the Backup Target
area.
7. If you want to save the backup to a hard drive:
1. Choose the Local Storage entry from the Backup Target drop-down menu.
The corresponding area is displayed.
2. Define the other settings.
Nero BackItUp
46
Page 47

Autobackup
8. If you want to save the backup online and use the Nero Online Backup Internet service:
1. Choose the Online Storage entry from the Backup Target drop-down menu.
The corresponding area is displayed.
2. If you already have an account, enter your user name and password in the corresponding
fields.
3. Click the Log on button.
4. If you do not have an account, click theSet up account button.
A window that will guide you through the registration process opens.
9. Click the Backup button.
The first full backup for the folders that you have specified is carried out.
Autobackup has been set up and is now monitoring the specified fol ders. If there are
modifications or new files, Autobackup carries out a backup update automatically.
Nero BackItUp
47
Page 48

10 Restoring Files And Drives
You can use Nero BackItUp to restore the data in a backup (files or a complete drive). Data
can be restored to its original path, to a new one, or to an FTP server. Individual files can be
excluded from the restore process as desired, and it is also possible to only restore individual files.
Windows Vista
Search folders
®
operating system. This means that you can back up search queries,
Vista
paths, and the original documents. Restore is possible to the original path, a selected path, or in a search folder (virtual folder).
Administrator rights
You must have administrator rights in order to back up and restore hard drives
and partitions.
See also:
Restore Tab 80
are supported both for backup and restore under the Windows
Restoring Files And Drives
10.1 Restore Screen
Choose a backup to restore in the Restore screen. The screen is divided into three large areas:
A list of all backups
An area that shows the files belonging to the backup
A filter area
The Start Restore button, which begins the restore process, is also available.
Nero BackItUp
48
Page 49

Restoring Files And Drives
Restore screen
The Drive View tab is available for drive backups, and shows details regarding t he backedup drive/partition. The files and folders included in the backup are displayed on the File View
tab. This tab includes three types of views that you can choose with the drop-down menu in
the toolbar:
Standard view
Shows the backup folders in a navigation view on the left, and the
corresponding content on the right.
Selected file view
Explorer view
Shows all files of the backup in a list.
Shows the computer folders on the left and the corresponding con-
tent on the right. Backup folders and files that have been added or
modified are shown with green lettering. Folders that are not a part
of the backup are marked with a grayed-out check box.
The following buttons are available in the filter area:
Opens the Select File Filters window, where you can select filters
that will be applied to the files to be restored.
Deletes the selected filter from the Selected filters selection list,
i.e. it is not applied in this restore process.
Nero BackItUp
49
Page 50

Opens the Filter Settings window where you can create a new filter.
See also:
Filters 57
10.2 Restoring a File Backup
Nero BackItUp can be used to restore a backup. The contents of the file backup are restored
during this process. You can exclude individual files from the restore process or select specific individual files. In contrast to a drive backup restore process, no programs or operating
systems can be restored.
Windows Vista
Search folders
®
operating system. This means that you can back up search queries,
Vista
paths, and the original documents. Restore is possible to the original path, a selected path, or in a search folder (virtual folder).
In order to restore a file backup, proceed as follows:
are supported both for backup and restore under the Windows
Restoring Files And Drives
1. Click the Restore menu icon.
The Restore screen appears.
2. Select the desired backup.
The files and folders of the backup are displayed in the view area.
If you want to restore a full backup set (full first backup, plus one or more backup updates) then select the last backup of the backup set.
3. Make the backup available:
1. If the backup is located on a disc, insert the disc in a drive.
2. If the backup has been saved to hard drive, network drive, or removable medium, ensure
that your computer has access to the respective drive.
3. If the backup has been saved as an image file, load the image file, e.g. with Nero Im-
ageDrive.
4. If you want to exclude specific files or folders from the restore, clear the appropriate boxes.
5. Apply filters to the files or remove them as desired.
Files and folders that do not meet the filter criteria are excluded and shown with
a grayed-out check box. The check box cannot be selected. However, individual files can be re-added with the file search feature.
6. If you want to search for specific files in order to exclude them from or add them to the back-
up, run a file search.
Nero BackItUp
50
Page 51

Restoring Files And Drives
7. Click the Start Restore button.
The Restore Wizard window with the Restore Settings screen opens. Th e selected
backup is transferred into the Backup name display panel.
8.
9.
Nero BackItUp
Restore Wizard, Restore Settings screen
If you want to restore the backup to the original path, select the Restore to original path
option button.
If you want to specify the path on which
the backup will be restored yourself:
1. Select the Restore on selected hard disk path option button.
2. Select the desired entry in the selection list.
The Restore path display panel and the button are activated.
3. Click the
button.
The Select folder window opens.
4. Select the desired restore path and click the Select button.
The Select folder window is closed and the selected path is transferred.
51
Page 52

Restoring Files And Drives
In order to be able to use the FTP server
ver under Options.
, you must have entered an FTP ser-
10. If you want to restore the backup on an FTP server:
1. Select the Restore on selected FTP path option button.
2. Select an FTP server in the Host name drop-down menu.
The Remote Status window opens and a connection to the FTP server is estab -
lished.
3. Click the OK button.
The Remote Status window closes.
4. Click the
The Open Folder window opens.
5. Click the New Folder button and enter a name.
A new folder is created and displayed in the Folder Name selection list.
6. Double-click a folder in the Folder Name selection list.
7. The folder is transferred into the Path display panel.
8. Click the Select button.
9. The Open Folder window closes and the selected folder is transferred.
button to specify a folder for the restore.
11. If you want to specify further options for the restore:
1. Click the More button.
The extended area opens.
2. Use the option buttons to choose the action to take when a file to be restored is already
(or is still) on the computer.
12. Click the Next button.
The Restore Wizard Completed screen appears.
13. Check the information.
14. Configure further options in the extended area as desired:
1.
If you want Nero BackItUp to verify the files after restoring them, select the Verify data
after restore check box.
2.
If you have also saved access rights for files and folders in the backup and want to retain
these, check the Restore access rights of files and folders check box.
15. Click the Restore button.
The Restore Wizard Completed screen appears. You ca n now start the restore.
See also:
Starting The Restore Process 54
Restore Screen 48
Filters 57
Find Files 60
Remote FTP 82
Nero BackItUp
52
Page 53

10.3 Restoring a Drive Backup
Nero BackItUp can be used to restore a drive backup. During this process, the drive backup
content is restored. Programs and operating systems are restored. Problems can occur if
you want to restore an active hard drive or partition, e.g. it's usually not possible to lock the
active hard drive or partition for the restore process. In this case, we recommend carrying
out the restore process with Nero BackItUp ImageTool. Nero BackItUp ImageTool is always
included in the first drive backup disc and can be run from it.
Administrator rights
You must have administrator rights in order to back up and restore hard drives
and partitions.
To restore a hard drive or partition, proceed as follows:
1. Click the Restore menu icon.
The Restore screen appears.
2. Select a backup.
The details of the backup are displayed in the view area on the Drive View and File
View tabs.
3. If you want to view the selected files and verify them manually:
1. Click the File View tab.
The Creating list of files window opens and creates a list of the files in the backup.
You can track the process via the progress bar and the messages.
After the list has been created, a dialog box will open with an appropriate message.
2. Click the OK button.
The dialog box closes.
3. Click the Close button.
The Creating list of files window closes. The files of the selected folder or folders
are displayed on the File View tab.
4. If you want to exclude a file from the backup, clear the appropriate box preceding the file.
Restoring Files And Drives
4. If you want to search for specific files in order to exclude them from the restore or add them
5. If you have backed up multiple partitions, select the partition that you want to restore.
6. Make the backup available:
Nero BackItUp
Files and folders that do not meet the filter criteria are excluded and shown with
a grayed-out check box. The check box cannot be selected. However, individual files can be re-added with the file search feature.
to the restore, execute a file search.
For technical reasons, only one partition
dure.
can be restored in one restore proce-
1. If the backup is located on a disc, insert the disc in a drive.
53
Page 54

Restoring Files And Drives
2. If the backup has been saved to hard drive, network drive, or removable medium, ensure
that your computer has access to the respective drive.
3. If the backup has been saved as an image file, load the image file, e.g. with Nero Im-
ageDrive.
7. Click the Start Restore button.
The Restore Wizard window, with the Restore Settings screen, opens.
8. In the Select Target Location drop-down menu, select where the backup is to be restored:
1. If you have selected an entire hard drive (with partitions) to restore, select a hard drive as
the target location (e.g. Disc 1).
2. If you have selected a partition to restore, select a partition as the target location (e.g. Da-
ta (D)).
If you have selected a complete hard drive (e.g. Disc 1) as the target location, the Re-
stored partition size area will be available.
9. In the Restored partition size area, specify whether the restore should be fitted to the tar-
get or source size.
Should I fit to the target or to the source size?
Fit to target size: The size of the target partition remains intact. The storage
space not needed for the restore becomes empty space but remains part of the
partition.
Fit to source size: The size of the target partition is reduced to the size of the
backed up partition. Partition storage space that is not needed anymore is no
longer part of the partition. You can repartition this unused storage space as
needed.
10. If the hard drive or partition to be restored contains an operating system and you want the
operating system to be booted when the computer starts, enable the Restore MBR check
box in order to restore the MBR
.
11. Click the Next button.
The Restore Wizard Completed screen appears. You ca n now start the restore.
See also:
Starting The Restore Process 54
Restore Screen 48
Filters 57
10.4 Starting The Restore Process
If you selected a file backup or drive backup for restoring, you can start the actual restore
process. You will be in the Restore Wizard Complete screen.
In order to start the restore process, proceed as follows:
Nero BackItUp
54
Page 55

Restoring Files And Drives
1. Verify the settings. (If you want to change the settings, you can display the previous screen
with the Back button.)
2. If you want Nero BackItUp to verify the files after the restore, select the Verify data after
restore check box in the extended area.
3. If you have also saved access rights for files and folders in the backup and want to retain
these, check the Restore access rights of files and folders box in the extended area.
4. Click the Restore button.
The Restore Process screen appears and the restore process begins. You can track
the restore process with the progress bar.
If you want to restore a drive or a partition, the corresponding hard drive to which the re-
store data is written is locked. If locking is not possible, an error message will ap pear.
5. Specify further configuration options as desired in the extended area during the backup pro-
6. Provide the requested backup and click the OK button.
Nero BackItUp
Restore Wizard, Restore Process Screen
cess.
If you want to restore a complete backup set and need a backup that is in a different lo-
cation (e.g. on a different disc), a window requesting you to provide the required backup
will open.
55
Page 56

Restoring Files And Drives
The restore process resumes.
Once the restore process has ended, a window with a corresponding message is opened. If the restore process took place on a disc, the disc is ejected.
Restore process completed successfully.
7. Click the OK button.
You have restored a backup. You can now save the log or click the Next button and start
other actions, e.g. carrying out a different restore process.
If you have restored a drive backup, it may be necessary to restart your computer so that
the system can be updated.
See also:
Restoring a Drive Backup 53
Restoring a File Backup 50
Nero BackItUp
56
Page 57

11 Backup And Restore Tools
11.1 Filters
You can define filters in Nero BackItUp, which you can then use for backing up or restoring
files or drives. Depending on the definition, the filter includes or excludes certain files. The
filters can also be combined.
Nero BackItUp includes pre-defined standard filters that have proven useful:
Files excluded for all backups - Excludes system files
See also:
Backup Tab 78
11.1.1 Creating Filters
You can create filters to filter certain files for backup or restore. You can either create filters
for a particular backup or restore, or create them for all backups and restores.
To create a filter, proceed as follows:
Backup And Restore Tools
1. If you want to create filters that will subsequently be available for every backup and every
restore:
1. Click File > Options.
The Options window opens.
2. Click the File Filters tab.
3. Click the Create button.
2. If you want to create filters for a special backup/restore, click the Create button in the
File Backup/Restore screen or in the corresponding wizards, in the expanded area.
The Filter Settings window opens.
Nero BackItUp
Filter Settings window
57
Page 58

Backup And Restore Tools
3. Enter a name for the filter in the Filter name input field.
4. Select a filter type in the Filter files by drop-down menu.
A definition area appropriate to the selected filter type will be displayed below the drop-
down menu.
5.
If you selected the File Extension filter type:
1. Select the Exclude files o
2. Select the Include files option button to include files with a certain file extension.
3. Click the Edit File Types button.
The Add Included/Excluded File Types window opens.
4. Select an entry on the left and click the >> button to add file extensions.
5. Select an entry on the right and click the << button to remove file extensions.
6. Enter user-defined file extensions in the input field if necessary.
7. Click the OK button.
The window closes. The selected file extensions are added to the list.
ption button to exclude files with a certain file extension.
6.
If you selected the Dat
1. In the Find all files drop-down menu, select whether the desired files are to be gener-
ated, changed or called up for the last time on a certain date.
2. Use the option buttons to select a date or a time frame.
7.
If you selected the Siz
1. In the Size drop-down menu, specify whether the desired files must have a certain mini-
mum or maximum size.
2. Specify the size in MB.
8.
If you selected the Attribute filter type:
1. Select the ch
cifications.
2. In the drop-down menu specify whether files with the respective attribute are to be se-
lected or excluded from the selection.
9.
If you selected the Exclud
1. Click the Add button.
The Select Folder window opens.
2. Select a folder and click the OK button.
The path to the selected folder is added to the Exclude the following paths list. The
folder and all of its subfolders are excluded in the filtering process.
3. Add additional paths as desired.
4. If you want to select a path again, click the Remove button.
e filter type:
e filter type:
eck boxes of those attributes for which you want to make more precise spe-
ed Path filter type:
10. If you opened the Filter Settings window via the File Backup or Restore screen but want
11. Click the OK button.
Nero BackItUp
the filter to be available in the future for each backup or restore, check the Save in file filter
options box.
The window is closed and the created filter is applied and saved.
58
Page 59

See also:
Selecting And Combining Filters 59
11.1.2 Selecting And Combining Filters
You can select and combine filters created in Nero BackItUp.
Filters of the same filter type (e.g. the file extension filter type) are linked with an OR relationship. This means that files to which one or both conditions apply will be filtered.
Filters of different types are linked with an AND relationship. This means that files to which
both conditions apply will be filtered.
You can combine filters universally and save the combination as a profile that you can use
for backups/restores. You can also combine filters only for a special backup/restore.
To select and combine filters, proceed as follows:
1. If you want to combine filters universally and save them as a profile:
1. Click File > Options menu
The Options window opens.
2. Click the Backup tab.
3. Click the Add/Remove button.
Backup And Restore Tools
2. If you want to combine filters for a special backup/restore, click the Add button in the File
Backup/Restore screens or in the corresponding wizards.
The Select File Filters window opens.
Select File Filters Window
Nero BackItUp
59
Page 60

3. If you want to select filters:
1. Select the desired filter in the Known filters selection list.
2. Click the >> button.
The filter is added to the Selected filters list.
4. If you do not want to apply a filter:
1. Select the filter in the Selected filter list.
2. Click the << button.
The filter is removed from the Selected filters list.
5. Click the OK button.
The window closes and the selected filter combination is applied.
If you have combined the filters in the Options window, you can now save the changed
profile under a different name.
See also:
Creating Filters 57
11.2 Find Files
Backup And Restore Tools
You can use the Find File feature to search for specific files on your computer for file backups and restores of file and drive backups. You can add the files to the backup or restore, or
you can exclude them from the backup or restore. By using this feature you can even add
files that do not meet the filter criteria. The Find File feature is only available in the appropriate screens; it is not available in the wizards.
To search for specific files, proceed as follows:
1. Click the button.
The Find File dialog box opens.
Nero BackItUp
Find File Window
60
Page 61

Backup And Restore Tools
2. In the Look in drop-down menu, specify where the search will be executed.
3. If you also want to execute the search in the subfolders, check the Include subfolders box.
4. If you want to search for files by name, enter a text in the Name input field.
5. If you want to search for files of a certain date or time frame, click the Date tab and specify
the search criteria using the option buttons.
6. If you want to search for files of a certain type or file size, click the Advanced tab.
7. Specify the desired file extension in the Type drop-down menu.
8. In the Size drop-down menu you can specify whether the file should have a certain mini-
mum or maximum size, and enter the desired size in KB. If you do not want to specify any
restrictions, leave the appropriate box empty or set to the default setting.
9. Click Search Now.
The search is executed. The results of the search are displayed in the lower list.
10. If you want to include a file in the backup/restore, select the appropriate check box preceding
the file.
11. If you want to exclude a file from the backup/restore, clear the appropriate box preceding the
file.
12. Click the Apply button.
13. Click the OK button.
The Find File window closes. The selected files are transferred.
Nero BackItUp
61
Page 62

12 Nero BackItUp ImageTool
Nero BackItUp ImageTool is a backup and restore program that is similar to Nero BackItUp,
and which is run from a bootable CD or DVD without Windows being active.
The bootable CD or DVD is created with Nero BackItUp.
Nero BackItUp ImageTool is intended for backing up and restoring drives. Since Nero BackItUp ImageTool is booted from a CD or DVD, the computer's hard drives are not active. This
makes it possible to back up or restore a drive without verification errors.
See also:
Remote FTP 82
12.1 Creating a Bootable Disc
Nero BackItUp can be used to create a bootable CD or DVD that Nero BackItUp ImageTool
boots
. The FTP servers that you entered in the Nero BackItUp options are applied.
To create a bootable CD/DVD, proceed as follows:
1. Insert a writable CD/DVD in the burner.
Nero BackItUp ImageTool
2. On the Nero BackItUp toolbar, click the menu Tools > Create bootable disk.
3. The Create Bootable Disc window opens.
Nero BackItUp
Creating a bootable disc window
62
Page 63

4. Select the appropriate burner in the upper drop-down menu.
5. Select the type of the inserted disc (CD or DVD) in the Disc Type drop-down menu.
6. Click the Create button.
The creation process begins; you can track the process via the progress bar and the
messages. After the creation process is completed, the disc is ejected and a window with
the message "Copy image process has finished successfully" opens.
7. Click the OK button.
The dialog box closes.
8. Click the Close button.
The Create Bootable Disc window closes.
You have created a bootable disc that can be used to start Nero BackItUp ImageTool.
See also:
Remote FTP 82
12.2 Starting Nero BackItUp ImageTool
Nero BackItUp ImageTool is started from the bootable CD/DVD that you created with Nero
BackItUp. If booting from the CD/DVD, the computer is started without having to access the
hard drive. Since the hard drive is disabled, backup or restore without verification errors is
possible.
The following prerequisites must be fulfilled for the computer to be able to boot from the disc:
The start sequence must be set in the BIOS of the computer in su ch a way that the drive
is addressed first as the boot drive (start sequence CD-ROM, C, A for instance).
In the case of an SCSI CD-ROM drive, this drive must be connected to an SCSI adapter
with a separate BIOS in which settings can be modified accordingly. (This will only work if
there are no IDE hard drives present, as these come before the SCSI adapter in the boot
sequence.)
The bootable CD/DVD that you created with Nero BackItUp is placed in the drive.
Nero BackItUp ImageTool
1.
Nero BackItUp
To boot the compute
lows:
Start the computer.
r from the disc and to start Nero BackItUp ImageTool, proceed as fol-
The computer starts and boots from the CD/DVD.
Nero BackItUp ImageTool is loaded. You can track the process with the messages on
the screen.
The Nero BackItUp ImageTool start screen is displayed. A language selection list is displayed.
63
Page 64

Nero BackItUp ImageTool
Booting from the CD/DVD
It is important for the CD/DVD to already be in the drive when the computer is
started, since this is the only way that the CD/DVD will be booted and Nero BackItUp ImageTool run.
Because it is not possible to insert a CD/DVD when the computer is switched
off, first start the computer as usual, insert the CD/DVD, and then shut down
the computer.
2. Select the language for Nero BackItUp ImageTool from the Please choose your language
selection list.
3. Click the OK button.
The Nero BackItUp ImageTool window is opened.
A window with a license agreement is opened.
4. Please read the license agreement carefully and select the appropriate check box if you
agree to the terms of the agreement. Using Nero BackItUp ImageTool is not possible without
your consent to this agreement.
5. Click the Next button.
The window with the license agreement is closed. The Options window is opened with
the Network tab on front. You can now configure the network or close the window.
You have booted Nero BackItUp ImageTool from the disc.
The CD/DVD is no longer needed after Nero BackItUp ImageTool has started.
You can remove the CD/DVD if you need the drive for a backup or restore disc.
See also:
Exiting Nero BackItUp ImageTool 73
Expert Features Tab 83
12.3 User Interface
The Nero BackItUp ImageTool user interface is the starting point for:
Drive backups
Restoring drives
Verifying drive backups
The user interface is similar to that of Nero BackItUp.
Nero BackItUp
64
Page 65

Nero BackItUp ImageTool
The following menus are available:
File
Includes program tasks such as Open and Exit. Also, you can configure, import, and export options, save the log file, and restart or
shut down Nero BackItUp ImageTool.
View
Tools
Selects which toolbars are shown.
Allows wizards to be started. You can also display information about
the inserted disc, erase a rewritable disc, and update device information.
Help
Shows information about Nero BackItUp ImageTool.
The following buttons are available in the toolbar:
Open
Rescan Devices
Opens a drive backup to restore.
Updates the information about the hard drives, drives, and con-
nected devices.
About
Displays information about Nero BackItUp ImageTool, such as the
version number.
Nero BackItUp Image Tool
Nero BackItUp
65
Page 66

The following buttons are available in the selection list:
Nero BackItUp ImageTool
e backup
Driv
Restore
Verification
12.3.1 Options Window
The Options window offers setting options for network and FTP. Use the Options entry in
the extended area to open the window. The functionality is similar to the one in Nero BackItUp.
The following tabs are available:
FTP
Network
Starts a drive backup.
Starts the recovery.
Starts verification of a drive backup.
Configures an FTP server.
Displays FTP servers that were entered in Nero BackItUp at the
time when the bootable CD/DVD was created.
You can also enable proxy settings here and set the maximum ar-
chive size.
FTP servers can only be displayed or configured if the network has
been configured.
Offers configuration options for the network:
None: No network is configured.
DHCP: Dynamically references the IP address.
Static IP: Uses the static IP address that you enter in the input
fields.
The network must be configured for Nero BackItUp ImageTool to
connect with an FTP server.
Cache
12.3.2 Open File/Folder Window
The Open File or Open Folder window opens when you select a file or a folder, for example
a drive backup to restore. The window is similar to the search windows in Windows
Nero BackItUp
Specifies where data is stored in the cache.
®
.
66
Page 67

Nero BackItUp ImageTool
The following setting options are available:
Drop-down menu
Look in:
Button
Shows the path information. Use the buttons to create a new folder
or to move one folder up.
Shows the content of hard drives in the display area.
Hard drives
Button
Ejects all drives and shows them in the display area.
CD/DVD
Button
Shows the network in the display area.
Network
Button
FTP
Shows the entered FTP servers in the display area.
This button is only available if you entered one or more FTP servers
under Options.
Open File/Folder Window
Nero BackItUp
67
Page 68

Nero BackItUp ImageTool
Display area
Display/Input field
Location:
Button
Filter:
Button
OK
Button
Cancel
Message area
12.4 Drive Backup
With Nero BackItUp ImageTool you can back up a hard drive or partition. The advantage in
comparison to drive backups made with Nero BackItUp is that the drive is not active, since
Nero BackItUp ImageTool is booted from the disc. This way, no verification errors occur during the backup process - active hard drives can be backed up.
To back up a drive with Nero BackItUp ImageTool, you must first select the backup source.
You can then write the backup to a disc or save it to a hard drive. It is also possible to save it
to an FTP server.
If you connect a device, you may need to click the Rescan Devices button in the extended
area so that Nero BackItUp ImageTool recognizes the devices.
Shows the selected content. You can open a folder or an entry by
double-clicking it.
Specifies the current path or specifies a file name.
This button is currently not assigned.
Closes the window and transfers the selected folder or the selected
file.
Cancels the action and closes the window.
Shows messages when drives are read.
12.4.1 Burning a Backup to Disc
With Nero BackItUp ImageTool you can make a drive backup and write it to a disc.
The following assumes that the backup is written to several discs.
In order to write a drive backup to a disc, proceed as follows:
1. Click the Backup > Drive Backup button.
The Manual drive backup screen is displayed.
2. Select the appropriate check box to select the desired hard drive or partition.
The hard drive or partition is selected.
You can select several partitions in a hard drive for a backup. However, only
one hard drive can be selected per pass.
3. Click the Next button.
The Select target and options screen is displayed.
4. Select a burner in the Target drop-down menu.
Nero BackItUp
68
Page 69

Nero BackItUp ImageTool
5. Make additional settings as desired.
6. Click the Next button.
The Finalize screen is displayed.
7. Verify the settings in this screen.
8. Click the Backup button.
The Backup Process screen is displayed and the backup process starts. You can track
the process with the progress bar.
The Waiting for Disc window is opened, and the selected drive is ejected.
9. Insert a suitable recordable disc.
The Waiting for Disc window is closed and the backup process continues. (Nero BackI-
tUp ImageTool starts a multisession disc automatically or continues with it.)
If the disc's storage capacity is exhausted, the Waiting for Disc window is open ed again
and the disc is ejected.
10. Remove the recorded disc and insert a new blank disc.
The backup process resumes and the newly inserted blank disc is burned.
11. Repeat the previous step until the backup has been completely burned to disc.
Once the backup is complete, the disc is ejected and the Backup Process window is
opened.
After the backup has been written completely, Nero BackItUp ImageTool will want to verify the data by default. For this purpose, it will require the discs in the sequence that they
were written.
If the backup was written to one single disc, the verification process is started
automatically.
12. Remove the disc.
13. Click on the Disc drives button in the Backup Process window.
14. Insert the first disc of the backup in order to have it verified.
15. Double-click the drive containing the disc.
The verification process is started and the first disc verified. The disc is then ejected and
the Backup Process window is opened again.
16. Repeat the two previous steps for each disc of the backup in chronological order.
When the backup is completed, a window with an appropriate message is opened.
17. Click the OK button.
You have written the drive backup to a disc. Now you can save the log or click the Next
button to start other actions.
See also:
Backup Settings Screen 24
CompletingThe Backup Wizard Screen 27
Nero BackItUp
69
Page 70

Nero BackItUp ImageTool
Exiting Nero BackItUp ImageTool 73
12.4.2 Saving the Backup to a Hard Drive or FTP Server
With Nero BackItUp ImageTool you can save a drive backup to a hard drive or to an FTP
server. Hard drives, network drives, and removable media are generally suppo rte d as storage media.
In order to be able to use the FTP server, you must have entered an FTP server under Options.
To save a drive backup to a hard drive or FTP server, proceed as follows:
1. Click the Backup > Drive Backup button.
The Manual drive backup screen is displayed.
2. Select the appropriate check box to select the desired hard drive or partition.
The hard drive or partition is selected.
3. Click the Next button.
The Select target and options screen is displayed.
4. Select a hard drive, a network drive, removable media, or the desired FTP server in the Tar-
get drop-down menu.
5. If you selected a hard drive as a target, specify the folder in which the backup should be
saved in the Target path input field.
6. If you selected an FTP server as a target, choose a folder if applicable.
7. Make additional settings as desired.
8. Click the Next button.
The Finalize screen is displayed.
9. Verify the settings in this screen.
10. Click the Backup button.
The Backup Process screen is displayed and the backup process starts. You can track
the process with the progress bar.
When the backup is completed, a window with an appropriate message appears.
11. Click the OK button.
You have saved the drive backup. Now you can save the log, click the Next button to
start other actions.
See also:
Backup Settings Screen 24
CompletingThe Backup Wizard Screen 27
Exiting Nero BackItUp ImageTool 73
Remote FTP 82
Nero BackItUp
70
Page 71

12.5 Verifying a Drive Backup
Nero BackItUp ImageTool can be used to verify an existing drive backup. Nero BackItUp ImageTool verifies whether the backup can be used to restore successfully. The data integrity
is checked. The backup is also checked against the source data. If you perform the verification immediately after the backup and no data has changed in the meantime, you can use
the function for data verification.
To verify a backup, proceed as follows:
1. Click the Verify button.
The Verify Wizard window opens and the welcome screen appears.
2. Click the Next button.
The Verify Settings screen appears.
3. Click the button.
4. The File window opens.
5. Select a drive backup and click the OK button.
The File window closes. The selected backup is transferred and the name of the backup
is shown in the Select Backup display panel.
Nero BackItUp ImageTool
6. If you want to compare the CRC checksum of the backed up drive with the CRC checksum
of the original drive, select the Verify by CRC option button.
7. If you want to compare the original drive with the backup sector-by-sector, select the Sector
by Sector option button.
Calculation of the CRC
however it usually supplies more precise results.
checksum takes longer than the sector comparison,
8. Select the appropriate hard drive or partition from the lower area.
9. Click the Verify button.
The Verify Process screen appears. You can track the progress of the verification via
the progress bar and the messages.
10. After successful verification a dialog box opens, showing the result of the verification.
The message "The data verification process has been completed successfully"
means that the verified backup is error-free and is suitable for restoring.
If the message "Data verification has failed" appears, there is no guarantee that
the verified backup is suitable for a restore process. There can be several reasons, e.g. the backup file can have errors or there is no data on the computer
for a comparison.
11. Click the OK button.
You have verified a drive backup.
Nero BackItUp
71
Page 72

See also:
Exiting Nero BackItUp ImageTool 73
12.6 Restoring a Drive Backup
Nero BackItUp ImageTool can be used to restore a drive backup. The hard drive is not active
during the restore since Nero BackItUp ImageTool is booted from CD/DVD. This provides
greater security as opposed to restoring with Nero BackItUp under Windows
ro Nero BackItUp ImageTool cannot be used to select individual files in the drive backup the drive is restored completely.
To restore a drive, proceed as follows:
1. Click the Restore button.
The Restore Wizard window with the welcome screen opens.
2. Click the Next button.
The Restore Settings screen appears.
3. Click the button.
The File window opens.
Nero BackItUp ImageTool
®
. However, Ne-
4. Select a drive backup and click the OK button.
The File window closes.
The backed up hard drive with all partitions or the backed up partition of the hard drive is
displayed in the Restore Settings screen. Partitions that are not backed up are grayed
out.
5. Select the hard drive or partition that you want to restore.
For technical reasons, only one partition
dure.
can be restored in one restore proce-
6. Click the Next button.
The Drive Restore Settings screen appears.
7. In the Select Target Location drop-down menu, select where the backup is to be restored:
1. If you have selected an entire hard drive to restore, select a hard drive as the target loca-
tion (e.g. Disc 1).
The Restored partition size area is displayed.
2. If you have selected a partition to restore, select a partition as the target location (e.g. Da-
ta (D)).
8. In the Restored partition size area, specify whether the restore should be fitted to the tar-
get or source size.
Nero BackItUp
72
Page 73

Nero BackItUp ImageTool
Should I fit to the target or to the source size?
Fit to target size: The size of the target partition remains intact. The storage
space not needed for the restore becomes empty space but remains part of the
partition.
Fit to source size: The size of the target partition is reduced to the size of the
backed up partition. Partition storage space that is not needed anymore is no
longer part of the partition. You can repartition this unused storage space as
needed.
9. If the hard drive or partition to be restored contains an operating system and you want the
operating system to be booted when the computer starts, select the Restore MBR check
box to restore the MBR
.
10. Click the Next button.
The Restore Wizard Completed screen appears. The previously set options are dis-
played.
11. If you want to verify the data after the restore, select the appropriate check box.
12. Click the Restore button.
The Restore Process screen appears and the restore process begins. You can track
the process via the progress bar and the messages.
When the restore is concluded, a window with an appropriate message will appear.
13. Click the OK button.
You have restored a drive backup. Now you can save the log or click the Next button
and start other actions such as executing the same restore again, creating a new restore, or closing the wizard.
See also:
Exiting Nero BackItUp ImageTool 73
12.7 Exiting Nero BackItUp ImageTool
To exit Nero BackItUp ImageTool, proceed as follows:
1. Remove the bootable CD/DVD from the drive.
2. If the drive is locked, click Open> CD/DVD to eject all drives and to be able to remove the
CD or DVD.
3. Click the File menu followed by Shutdown System.
Nero BackItUp ImageTool is exited and the computer shut down.
Nero BackItUp
73
Page 74

13 Other Operations
13.1 Updating the Virus Scanner
A virus scanner that checks the data to be burned is integrated in Nero BackItUp. This ensures that infected data will not be burned. We recommend that you update the virus scanner database regularly. The database is updated via an Internet connection.
The following requirement must be satisfied to update the virus scanner:
An active Internet connection must exist .
To update the virus scanner, proceed as follows:
1. Click the Help menu followed by Update Antivirus Scanner.
The Remote status window opens.
Nero BackItUp is connected to the FTP server av.nero.com and the antivirus files are
downloaded. Progress of the update is displayed in the window.
Once the database has been updated, the OK button is enabled.
2. Click the OK button.
You have updated the virus scanner database.
Other Operations
See also:
Backup Tab 78
13.2 Erasing a Rewritable Disc
Nero BackItUp can be used to erase rewritable discs, i.e. discs with the RW specification, as
long as your recorder supports this feature. The following disc types are supported when
erasing a rewritable disc: CD-RW, DVD+RW, DVD-RW, and DVD-RAM.
The following erase methods are available:
Quick erasing does not remove the data physically from the disc, but instead only makes it
inaccessible by erasing the references to existing content. The data can be restored!
Full erasing removes the data from the disc by overwriting it with zeroes. The contents cannot be restored with conventional methods. Repeated full erasing increases the probability
that third parties will not be able to reconstruct the contents.
To erase a rewritable disc, proceed as follows:
1. Insert a rewritable disc whose content you want to erase.
2. Click the Tools menu followed by Erase Rewritable Disc.
The Erase Rewritable Disk window opens.
Nero BackItUp
74
Page 75

Other Operations
Erase Rewritable Disc window
3. If you have installed multiple burners, select a recorder in the Choose recorder drop-down
menu.
4. Select an erase method from the Select the erase method to be used drop-down menu.
Two erase methods are available:
Quick erasing does not remove the data physically from the disc, but instead
only makes it inaccessible by erasing the references to existing content. Please
note that the data can be restored.
Full erasing removes the data from the disc by overwriting it with zeroes. The
contents cannot be restored with conventional methods. Repeated full erasing
increases the probability that third parties will not be able to reconstruct the
contents.
5. Click the Delete button.
The erase procedure starts. A progress bar in a window informs you about the progress
being made by the erase process. When all data has been fully erased, the window is
closed and the disc ejected.
6. Remove the disc.
You have successfully erased a rewritable disc and can now write to the disc again.
Nero BackItUp
75
Page 76

14 Options Window
You can define options for working with Nero BackItUp in the Options window. To open the
window, select File > Options from the menu.
Options Window
Nero BackItUp
The following tabs are available:
General
Backup
Job
Restore
Offers general options for working with Nero BackItUp.
Offers options for profile and filter selection for the backups.
Offers options for executing jobs.
Offers options for restoring files. You can specify how to proceed
when restoring a file that already exists on the computer.
Options Window
76
Page 77

Options Window
Log File
File Filters
E-mail Notification
FTP Server
Cache
Expert Features
Sounds
14.1 General Tab
The General tab offers general configuration options for working with Nero BackItUp.
Offers options for the log file. Here you can specify the information
that the log file will contain and where it will be saved.
Allows you to create, change, or remove filters.
Allows you to set up e-mail notifications for various events.
Configures an FTP server.
Contains options for the cache. Here you can specify where the files
are to be cached.
Additionally, you can enable the backup database and indicate a
path for it. The backup database saves the backup name, date of
creation, and size, as well as the name and path for all included files. The backup database is used for file searches during restore
processes, among other things.
Offers expert features for working with Nero BackItUp.
We recommend that you only change the default settings if you ha-
ve extensive knowledge in the areas of file backup and burning.
Allows you to assign sounds to different events.
The following setting options are available:
Check box
Show tooltips
Enables the display of tooltips. Tooltips contain brief explanations about screen elements and are displayed in a
"bubble" when you pause over a screen element with your
mouse.
Check box
Enable Nero BackItUp in
shell context menu
Allows Nero BackItUp to be started from the shell context
menu. The shell context menu offers various pertinent information and is opened by clicking a file or folder with the
right mouse button in the Windows
Check box
Burns the disc at the maximum possible speed.
Use maximum available
speed when burning a disc
Check box
Ignore time difference
when comparing files
Ignores a time difference in the file properties when verifying files after the backup. (Such a time difference can occur, for example, if the file is very large and the backup
took some time.)
Enter in the input field the allowable time difference in seconds during which the file is recognized as identical.
®
Explorer.
Nero BackItUp
77
Page 78

Options Window
Check box
Enable Push-for-Backup
device button
System shutdown selection list
Check box
Show all message boxes
Slider
Thread priority
Comments
14.2 Backup Tab
The Backup tab offers setting options for backups.
Enables the "Push for Backup" service. This service can
be started only from an appropriately equipped external
hard drive and the corresponding software with the help of
the hard drive's "Push for Backup" button, and carries out
a previously defined backup automatically with Nero
BackItUp.
Information about this feature is normally available in the
Help of the respective hard drive or application.
Specifies whether the system will be switched off and if so,
when.
Shows all messages that you have disabled.
Specifies the priority of Nero BackItUp processes in the
system. If the Idle value is selected, Nero BackItUp processes are only started when the system is running no
other or only standard processes.
Allows you to enter a standard comment.
The following setting options are available in the Backup Profile Selection area:
Drop-down menu
Standard profile
Button
Save
Selects a profile as the default profile for backups.
A profile consists of defined filters and settings on this tab.
Saves an edited profile under a new name.
This button is only enabled if you have changed settings -
and therefore the profile - on this tab.
Button
Remove
Removes the selected profile.
The standard profile cannot be deleted.
The following setting options are available in the Options area:
Check box
Do a virus check before
Checks the files and performs a virus check before
backup.
backup
Check box
Encrypts the backup; you must set a password.
Encrypt backup
Check box
Verify data after backup
Verifies whether the data is complete and readable after
backup.
Nero BackItUp
78
Page 79

Options Window
Check box
Compresses the data before backup.
Compress data before
backup
Button
Determines the degree of compression.
Compression Settings
The following setting options are available in the Advanced Options area:
Drop-down menu
File backup format
Offers options for the format in which the file backup is
saved. The following entries are available:
Back up each file individually: Backs up each file individually. Choose this option if it is important for you to have
access to the backup contents from any computer or system. Please note: If you want to compress the backup contents, this means that every single file will be compressed
when this backup type is chosen.
Save multiple files in one archive: Creates a backup in
Nero BackItUp format with the file extension *.nba. Structure information about the file is saved in the backup file.
Select this option if full backup functionality and minimal
memory are important to you.
Back up several files with NTFS streams in one archive: Generates the backup in the MTF (Microsoft Tape
File) format. Backup content includes any existing data
streams (NTFS streams from NTFS version 5.0) in addition to individual files. Choose this option if it is important
for you to back up the NTFS stream.
Nero BackItUp
Button
Add/Remove
Selection list
File Filter
Check box
Use 8.3 file names for
backup
Check box
Do not backup empty folders
Check box
Add new files in incremental or differential
backup
Opens the Select File Filters window, where you can add
or remove filters to/from the profile.
Shows the filters of the profile you have selected in the De-
fault Profile drop-down menu.
Saves the backup in a DOS-compatible format.
Excludes empty folders from the backup.
Adds newly added files belonging to the backup if you
choose the incremental or differential backup type for a
backup update.
79
Page 80

See also:
Filters 57
Updating the Virus Scanner 74
14.3 Job Tab
The following check boxes are available:
Options Window
Display Nero BackItUp
Scheduler icon in system
tray
Display a warning before
writing to a disc
Always use updated settings from preferences
Display a warning when
less than the following
space is available on target
drive
Keep last versions of the
same full backup on hard
drive
14.4 Restore Tab
On the Restore tab, you can define which actions to take when, during a restore process, a
backed up file is already (or still) on the computer.
Displays an icon for the Nero BackItUp Scheduler in the
operating system's system tray.
Before executing the job, the system will display a dialog
box with an appropriate message and will only burn the
disc after the message is confirmed.
Uses the latest settings that you specified in the Options
when executing a job.
If this check box is disabled, the settings are used that
were enabled when the job was created.
Displays a warning if there is insufficient free space on the
backup target. In the input field, specify the minimum storage space that must be available.
Specifies the number of full backups that are saved on the
hard drive.
Nero BackItUp
The following setting options are available:
Option button
Do not replace the file on
my computer
Option button
Replace local file with one
available in backup, only
local is older
Does not restore the backup file; the file on the computer
remains intact.
Replaces the file on the computer with the backed-up file
only if the latter is newer.
We recommend selecting this option.
80
Page 81

Options Window
Option button
Always replace the file on
my computer
Option button
Delete destination folder
before restore
Option button
Ask for each file
Check box
Create backups before
overwriting files
14.5 E-mail Notification Tab
The E-mail Notification tab allows you to set up e-mail notifications for various events.
The following setting options are available:
Check box
Enable e-mail notifications
Restores the backup file; the file on the computer is overwritten.
Deletes the target folder before the restore operation and
then restores the backup files.
Opens a dialog box for each questionable file. You can
choose whether or not the file should be replaced with the
backup copy.
Creates a backup copy of the file on the computer before it
is overwritten.
Enables sending of e-mail notifications.
Area
E-mail settings
Button
Add
Button
Edit
Button
Delete
Specifies settings for sending e-mails, such as server
name and sender.
Specifies when and to whom an e-mail will be sent. You
can specify the events that will trigger an e-mail notification.
Edits the selected entry.
Deletes the selected entry.
14.5.1 Events And E-mail Notifications
You can use Nero BackItUp to set up automatic e-mail notifications for certain events. You
can add these events under the E-mail Notification tab in the Options window (File > Op-
tions).
The following events are available for selection:
Backup process completed successfully.
Backup process completed. Some files could not be backed up.
Backup process completed succes sf ully but verification process has failed.
Nero BackItUp
81
Page 82

The backup was completed successfully, however several files were changed between
backup and verification. This can occur if the selected partition/hard drive wa s not locked
before the backup.
Backup process failed.
Restore process completed successfully.
The restore process has been completed successfully. The changes in the restored vol-
umes may be updated after system restart.
The restore process has failed.
The restore process has been aborted by the user.
The data verification process has been completed successfully.
The verification process has been completed, but some files could not be verified.
The data verification process has failed.
The restore process has been completed successfully. The changes in the restored vol-
umes may be updated after system restart.
14.6 Remote FTP
You can set up remote targets in the Remote destinations screen: On the FTP tab you can
add, change, or delete FTP servers. On the Shares tab you can organize network connections.
Options Window
The following setting options are available:
Check box
Enable FTP servers
Remote connection list
Button
New
Button
Change
Button
Set as Default
Button
Remove
Activates the entered FTP server connections as a target
and a source for backups and restores.
Only available on the FTP tab.
Shows the FTP servers/the network connections that have
been configured.
Opens the Remote Host Settings window where you can
enter a remote target.
????? You can only accept the FTP server if a connection
could be established with the Test button.
Edits the selected remote target.
Chooses the selected remote target as default connection.
Deletes the selected remote target server.
Nero BackItUp
82
Page 83

Options Window
Area
Proxy settings
Input field
Maximum archive size
The created FTP servers are saved when creating a bootable CD/DVD and applied to the respective Nero BackItUp ImageTool options. (To enable them in
Nero BackItUp ImageTool, the network must be configured in the Nero BackItUp ImageTool options.)
14.7 Expert Features Tab
The Expert Features tab offers further configuration options for working with Nero BackItUp.
The following check boxes are available:
Do not use temporary
storage for compression
Back up access rights of
files and folders
Specifies the proxy settings. If you are using a local proxy,
you can configure it.
Specifies the maximum size for backups on FTP servers.
The program will not store temporary data in the cache.
The program will also back up the access rights of files and
folders if such rights have been configured.
This function can only be executed if the data medium uses
the NTFS
file system.
Use CRC checksum for
file comparison
Clear archive bit of files
and folders after file
backup
Enable scripting
Settings
Do not eject the disc after
the backup
Erase rewritable disc
automatically when required
Verifies the CRC
checksum when restoring and replacing
files and by so doing increases the certainty that the same
file will be replaced.
If this box is not checked, only the file name will be compared.
After the backup, sets the archive bit
for the files and folders
to 0. This value of 0 indicates that the file/folder was archived and has not been modified since then.
Enables scripting and the Settings button.
Opens the Scripting Settings window. You can select
autowrite action scripts and specify whether they are executed before or after a certain procedure.
Does not eject the disc after the backup.
Erases a rewritable disc if there is no longer sufficient space
for the backup. Prior to erasing, a dialog box will be displayed that offers the option of not erasing the rewritable
disc.
Nero BackItUp
83
Page 84

Options Window
Wait time
Enable intelligent
compression
Settings
Use shadow copy for file
backup
Scan files accessibility
before file backup
Split files having size
greater than
Create bootable disc with
Nero BackItUp ImageTool
Specifies how long the dialog box waits for input before
Nero BackItUp erases the rewritable disc.
Enables intelligent compression and the Settings button.
Opens the Intelligent Compression Filter window. You
can specify what file types are not compressed when backing up to save backup time.
Creates a shadow copy for the file backup, i.e. open files
that are being worked on can be saved.
Verifies prior to backup whether the files can be accessed.
Specifies the size at which a file is split into smaller files if a
disc limit is reached when backing up.
Files that are smaller than the specification made here will
be written to the new disc rather than split when a disc limit
is reached.
Creates the first disc of a drive backup as bootable disc. It
enables the computer to boot with Nero BackItUp ImageTool.
Print selected items in
tree structure
Enable change of language in Nero BackItUp
ImageTool
Enable drive backup CRC
If a rewritable disc is automatically erased as needed, you cannot select the
erase method. The Quick-erase method is used. If you want to use the Full-
erase method, you have to manually erase the rewritable disc.
Prints the files of the backup in a tree structure.
If this box is not checked, the files will be printed out in a
list.
Enables the language selection dialog when Nero BackItUp
ImageTool is booted.
If the check box is disabled, Nero BackItUp ImageTool is
started with the language that was enabled in Nero BackItUp at the time of the creation.
Calculates the CRC
checksum during the drive backup
process. This provides additional security but requires more
time.
Nero BackItUp
84
Page 85

The backup copy in *.nba format created during backup is a ZIP archive. Normally the files in the ZIP archive are compressed. With Intelligent compres-
sion you can specify the files within the archive that are not to be compressed.
This is useful for file types that are already compressed, such as JPG, ZIP, or
MP3. In this case the backup will take less time, but the backup file may be somewhat larger.
See also:
Erasing a Rewritable Disc 74
Nero BackItUp ImageTool 62
Options Window
Nero BackItUp
85
Page 86

15 Technical Information
15.1 Formats Supported
15.1.1 Disc Types
CD
DVD
Blu-ray - burning only
You can find more information on Blu-ray support at
www.nero.com/link.php?topic_id=416
The actual entries that are available, and the actual disc types (e.g. DVD) that
can be written to depend on the recorder used.
15.1.2 Supported File Formats
Nero BackItUp supports the following file systems:
Technical Information
.
The following file systems are supported for file backup and restore processes:
FAT16
FAT32
NTFS
The followi
FAT16
FAT32
NTFS
ext2/3
ReiserFS
The followi
file backup and restore processes under an NTFS file system:
Standard Data Stream
Security Stream
Encrypted Stream
Object Identifier Stream
Alternate Data Stream
Reparse Stream, e.g. Junction Points (for backups that fit on one disc only)
Extended Attribute Stream
ng file systems are supported for drive backup and restore processes:
ng NTFS streams (starting with NTFS Version 5.0) are generally supported for
Nero BackItUp
86
Page 87

Technical Information
Sparse Stream
Hard Link
NTFS streams
NTSF streams are hidden file fragments that belong to a main file. Particularly
relevant are NTSF streams under the Windows 2000 and Windows XP operating systems. For drive backups, NTFS streams are automatically backed up,
since entire sectors are backed up.
Nero BackItUp supports the following file systems when saving drive backups and image files on a hard drive:
FAT16
FAT32
NTFS
Nero BackItUp ImageTool supports the following file systems when saving drive backups
and image files on a hard drive:
FAT16
FAT32
ext2/3
ReiserFS
NTFS
See also:
Backup Tab 78
15.1.3 Source Media Supported
Nero BackItUp generally supports the following source media for backups:
Disc
Internal hard drive
External hard drive
USB hard drive
FireWire hard drive
Network drive (LAN)
Removable media
FTP Server
Image file
In order to be able to use the FTP server, you must have entered an FTP server under Options.
Nero BackItUp
87
Page 88

See also:
Remote FTP 82
General Tab 77
Technical Information
Nero BackItUp
88
Page 89

16 Glossary
AES Encryption
The Advanced Encryption Standard uses symmetrical encryption with key lengths of 128,
192, and 256 bits. With it, sensitive data is protected from unauthorized access.
Archive Bit
Archive bits are used to identify files that have been edited. A file is only resaved during the
next backup process if it was edited (and an archive bit is thus reset).
Backup
Copying data from the computer to an alternative storage medium. Backups are created in a
special format with the help of a backup program.
Backup Set
A backup set consists of individual backups that belong together - a complete backup and a
differential backup extension, or a complete backup and one or more incremental backup
extensions.
Bootable CD
Booting refers to loading the operating system when a computer is started. This is normally
done from the hard drive. However, if you do not want to boot or cannot boot your computer
from your hard drive for whatever reason, you can load an operating environment from the
drive with a boot CD.
Glossary
Classic Encryption
Classic encryption is the predecessor of AES encryption. It uses a symmetrical encryption
algorithm as well. The key length is 56 bits.
CRC
Cyclic Redundance Check refers to an error-detection procedure used during the transmission or copying of data. A checksum is calculated with a defined amount of data at the beginning, and provided with the data block. After the operation has ended, the checksum is
calculated again and compared to the first value. Deviations indicate the presence of errors.
Differential Backup
Differential backup refers to a type of backup update / backup extension. Only data that has
been modified or added since the first full backup is backed up.
Drive
General term for a storage device with read, and possibly write, capabilities that is located
outside RAM. Drives are e.g. physical drives (hard drives), logical drives (partitions), or optical drives (CD/DVD drives).
Nero BackItUp
89
Page 90

Glossary
FTP Server
An FTP server is a data storage unit that can be accessed through the Internet. Access is
usually anonymous. FTP servers are frequently used as storage locations for backups.
Hard Drive
A hard drive is a physical drive that writes binary data on a rotating magnetic disk. The hard
drive can be installed in the computer or be connected to the computer as a so-called external hard drive.
Image
An image refers to a single file on the hard drive that contains the image for a complete disc.
A disk image can be used to create exact copies on media at a later point in time if problems
occur during the write process or if no recorder is connected to your PC. The image requi res
as much free space on the hard drive as the contents of the original disc.
Incremental Backup
Incremental backup refers to a type of backup update / backup extension. Only data that has
been modified or added since the last backup - the first full backup or an earlier incremental
backup - is backed up. The reason why this type of backup extension is called incremental
backup is that several incremental backups are usually added to a full backup.
Master Boot Record MBR
The Master Boot Record (MBR) is located in the hard drive's first sector. It contains a boot
file that starts the operating system. It also defines the drive's partitioning.
Multisession Disc
A multisession disc can contain several sessions that are not fixed. This way, more data can
be added in new sessions at a later point in time, and the disc is not closed until it is full.
NTFS
New Technology File System is a Windows® file system. Its advantages include differentiated access and rights management, as well as defragmented data storage, which allows
the processing speed to remain high.
Partition
A partition is a section of the hard drive. A hard drive can be divided into several partitions
that can work independently of each other, as if they were separate drives. Because of this,
partitions are also called "logical" drives.
Restore
Restore stands for restoring data to a previous condition or to copying data by using a backup copy that was created previously and a backup program, e.g. Nero BackItUp.
Shadow Copy
A shadow copy is a snapshot of a file at a certain point in time. The advantage is that you
can keep working with this file while the backup program, e.g. Nero BackItUp, backs up the
Nero BackItUp
90
Page 91

Glossary
file in the background. This feature is particularly relevant when you want to save system files, which are modified continuously by the system.
Nero BackItUp
91
Page 92

17 Index
A
Access rights
Backing up....................................................... 83
Restoring......................................................... 52
Action script
Assigning......................................................... 83
Active hard drive ................................... 33
Antivirus scanner .................................. 74
Archive bit after backup
Resetting ......................................................... 83
Autobackup........................................... 46
Configure......................................................... 46
AutoBackup
Configure......................................................... 46
B
Backup
Checking.......................................................... 44
Encrypting........................................................ 78
FTP Server...................................................... 35
Nero Online Backup ........................................ 46
Restoring......................................................... 48
Saving as DOS-compatible ............................. 79
Saving on an FTP server.................................35
Saving to the hard drive................................... 33
Scheduling....................................................... 38
Storing online................................................... 46
Update............................................................. 17
Verifying........................................................... 44
Writing onto a disc........................................... 30
Backup configuration
Defining ........................................................... 78
Backup database
Activate............................................................ 77
Buffer............................................................... 77
Cache.............................................................. 77
Backup media ....................................... 14
Backup options
Adjust............................................................... 76
Backup Process.................................... 29
Backup Set............................................ 17
Restoring......................................................... 50
Backup type
Choose a backup type.....................................21
Differential backup........................................... 18
Full backup...................................................... 18
Incremental backup......................................... 18
Overview.......................................................... 18
Index
Update backup.................................................18
Backups
Job...................................................................38
Scheduling.......................................................38
Bootable disc......................................... 63
Bootable Disc
Create..............................................................62
Breaking up files
Defining............................................................84
Buffer
Not using..........................................................83
C
CD
burn..................................................................30
Changes
Backup Summary.............................................12
Display.............................................................12
Compression
Activate............................................................79
Compression level
Defining............................................................79
Computer
Shutting down after backup .............................30
Conventions, manual.............................. 5
CRC checksum
Calculating.................................................45, 71
CRC checksum comparison
Activate............................................................83
D
Data
Restoring..........................................................48
Verifying after a restore process......................52
Data compression
Activate............................................................79
Data integrity
Checking..........................................................44
Data verification .................................... 71
Activate............................................................78
Checking..........................................................44
Disc
burn..................................................................30
Delete...............................................................75
Disc Info
Nero BackItUp
92
Page 93

Index
Display.............................................................12
Disk ejection
deactivate........................................................ 83
DOS-compatible
Backing up....................................................... 79
Drive
Backing up....................................................... 22
Backing up with Nero BackItUp ImageTool..... 68
Select............................................................... 22
Drive backup......................................... 22
Supported file systems.................................... 86
Verifying........................................................... 71
Without verification errors................................63
Drive backup with Image Tool
Restoring......................................................... 72
Drive information
Update............................................................. 12
DVD
burn .................................................................30
E
E-mail Notification................................. 81
Activate............................................................ 81
Empty folders
Not backing up................................................. 79
Existing file
Replace: .......................................................... 80
Expert Features..................................... 83
ext2/3 .................................................... 86
F
FAT16 ................................................... 86
FAT32 ................................................... 86
File
Backing up....................................................... 15
Search................................................. 11, 12, 60
Selecting for backup........................................ 15
File accessibility
Checking.......................................................... 84
File backup............................................ 14
Restoring......................................................... 50
Showing changes............................................ 16
Supported file systems.................................... 86
File backup format
Defining ........................................................... 79
File backup modifications
Backup Summary............................................16
Display.............................................................16
File Filters.............................................. 77
File search............................................. 16
File systems
Supported ........................................................86
File types:
Excluding from file backup...............................15
Filters:..............................................................15
Files View
Select...............................................................12
Filter combination
Creating an AND relationship ..........................59
Creating an OR relationship............................. 59
Filter Settings
Defining............................................................57
Filter Type
Attribute............................................................58
Date .................................................................58
Excluded Path..................................................58
File extension...................................................58
Size..................................................................58
Filters
Combining........................................................59
Create..............................................................77
Delete...............................................................77
Modifying..........................................................77
Select...............................................................59
Filters: ................................................... 57
Create..............................................................57
Folders
Monitoring........................................................46
FTP server
Transferring to Nero BackItUp ImageTool.......83
FTP Server
Add...................................................................82
Managing.........................................................82
H
Hard Drive
Not locking.......................................................33
Saving a backup ..............................................33
Home
Icons ................................................................10
I
Image Tool
&Exit.................................................................73
Create..............................................................62
Creating with language selection.....................84
Ejecting drives..................................................67
User Interface ..................................................64
Nero BackItUp
93
Page 94

Index
Installation............................................... 8
J
Job
Carrying out..................................................... 41
Configure......................................................... 38
deactivate........................................................ 43
Not carrying out for some time ........................ 43
Job cycle
Indicating......................................................... 40
Job options
Adjust............................................................... 76
Junction Points...................................... 86
L
Log File ................................................. 77
Low storage space warning
Activate............................................................ 80
M
Main Screen.......................................... 10
Manual, conventions............................... 5
Master Boot Record.............................. 54
MBR
Restoring................................................... 54, 73
Menu
Edit .................................................................. 11
File...................................................................11
Help................................................................. 11
Tools................................................................11
View.................................................................11
N
Nero BackItUp
Installing ............................................................ 8
Starting with Windows® Explorer....................77
Nero BackItUp ImageTool
Backing up to FTP server................................ 70
Backing up to hard drive.................................. 70
Drive backup.................................................... 68
Explanation......................................................62
FTP server.......................................................66
Network ...........................................................66
Starting............................................................ 63
Nero ControlCenter................................. 9
Network Drive........................................ 33
New files
Back up at the same time................................ 79
NTFS..................................................... 86
NTFS stream
Backing up.......................................................79
Supported ........................................................86
O
Operating system
Starting after a restore.....................................73
Options
Exporting..........................................................11
Importing..........................................................11
Print..................................................................11
P
Partition
Backing up.......................................................23
Select...............................................................23
PC
Shutting down after backup .............................30
Profile.................................................... 78
Modifying..........................................................78
Select...............................................................12
Proxy settings
Defining............................................................83
Push-for-Backup device button
Activate............................................................78
R
ReiserFS............................................... 86
Removable media................................. 33
Restore.................................................. 48
Fitting to the source size............................54, 73
Fitting to the target size..............................54, 73
Own path..........................................................51
To FTP server..................................................52
To original path................................................51
Restore options
Adjust...............................................................76
Restore process
Starting.............................................................54
Rewritable disc
Delete...................................................74, 75, 84
Deleting automatically......................................83
RW disc
Delete...............................................................84
Deleting automatically......................................83
S
Saving to a hard drive
Supported file systems.....................................87
Nero BackItUp
94
Page 95

Index
Scheduler
Display.............................................................80
Scheduler in system tray
Display.............................................................80
Scripting
Activate............................................................ 83
Serial number
Enter................................................................ 11
Setting
Cache.............................................................. 77
Making............................................................. 76
Options............................................................ 76
Shadow Copy
Activate............................................................ 84
Shell context menu ............................... 77
Smart compression............................... 85
Activate............................................................ 84
Source media
Supported........................................................ 87
Standard profile
Select...............................................................78
T
Time difference
Ignoring............................................................77
Toolbars
Display.............................................................11
U
User interface........................................ 10
V
Verification
failed ..........................................................45, 71
Successful..................................................45, 71
Version number
Display.............................................................13
Virus check
Activate............................................................78
Virus scanner
Update .............................................................74
Nero BackItUp
95
Page 96

18 Contact
Nero BackItUp is a Nero AG product.
Nero AG
Contact
Im Stoeckmaedle 13-15
76307 Karlsbad
Germany
Nero Inc.
330 N Brand Blvd Suite 800
Glendale, CA 91203-2335
USA
Nero KK
Rover Center-kita 8F-B, 1-2-2
Nakagawa-chuou Tsuzuki-ku
Yokohama, Kanagawa
Japan 224-0003
Copyright © 2009 Nero AG and its licensors. All rights reserved.
Internet:
Help:
Fax:
Internet:
Help:
Fax:
E-mail:
Internet:
Help:
www.nero.com
http://support.nero.com
+49 724 892 8499
www.nero.com
http://support.nero.com
(818) 956 7094
US-CustomerSupport@nero.com
www.nero.com
http://support.nero.com
Nero BackItUp
96
 Loading...