

Page 1
Back to Start Page
May 01 09:15
4.8 Speech
ISDN
ALPHA
Saturn F
Nera F77
Nera F77
User Manual
Page 2

Page 3
USER MANUAL
CONTENTS
INTRODUCTION.......................................5
General ............................................................. 5
Above Deck Equipment - ADE........................... 5
Below Deck Equipment - BDE ........................... 5
Communication services ................................... 6
OPERATION FROM HANDSET................ 9
SIM card .......................................................... 10
Switching ON....................................................11
Nera ISDN Handset..........................................1 1
Nera F77 starts up........................................... 12
Making a call ................................................... 12
Redialing ......................................................... 13
Dialing from phone book.................................. 13
Incoming calls.................................................. 14
Call hold and transfer ...................................... 14
Internal communication ................................... 15
Various call procedures ................................... 15
To call Nera F77 .............................................. 15
Phone book entry ............................................ 16
Phone book editing.......................................... 17
HANDSET FUNCTIONS ........................18
Overview ......................................................... 18
Satellite search................................................ 20
Satellite Coverage Map ................................... 21
Phone setup: ................................................... 22
- keyclick ......................................................... 22
- ringer............................................................. 23
- answer beep.................................................. 23
- backlight On/Off ............................................ 24
- protocol ......................................................... 24
- software version ............................................ 25
Selecting default Net service provider ............. 25
Priority calls ..................................................... 26
Distress Alarm ................................................. 26
Setting serial ports........................................... 27
Information available ....................................... 28
OPERATION FROM PC..........................29
Installing the PC program ................................ 29
Starting up ....................................................... 31
Phone book ..................................................... 33
- capacity......................................................... 33
- abbreviated dialing ........................................ 33
- adding or editing entries ................................ 33
- saving entries to/from PC .............................. 34
T raffic Log........................................................ 35
T raffic log settings............................................ 37
T raffic log printout viewer - normal calls (Cct).. 39
T raffic log printout viewer -
Mobile Packet Data Service calls (MPDS) ....... 40
CONFIGURATION FROM PC.................41
Menu functions ................................................ 41
Function reference list ..................................... 42
Access level .................................................... 43
- changing the PIN code .................................. 43
- functions requiring owner level ...................... 44
- shifting to owner level.................................... 44
- changing owner level password .................... 44
Selecting default Net service provider ............. 45
Phone setup .................................................... 46
- setting call duration limit ................................ 46
Nera F77
Continuing the Saturn tradition
Rev Date: February 2003
Publication No.: 101444 (Rev. 1.1)
3
Page 4
CONTENTS
0434/00
USER MANUAL
- setting date and time ..................................... 46
- message indication........................................ 47
Advanced functions ......................................... 48
Access control ................................................. 49
- restricted dialing ............................................ 49
- checking the dialing setup ............................. 49
- restricted dialing setup .................................. 50
- access code .................................................. 51
- restricted SIM usage ..................................... 52
- setting SIM restrictions .................................. 52
Satellite setup .................................................. 53
Configuration menu ......................................... 54
- ISDN protocol configuration........................... 54
- net service providers ..................................... 55
- set diagnostics .............................................. 56
Information available ....................................... 57
- miscellaneous version Id information............. 57
- network status information............................. 57
Customize menu.............................................. 58
- paid functions ................................................ 58
- phone name setup......................................... 58
All specifications are subject to change without notice.
© Nera Satcom AS, 2003
Routing of incoming calls................................. 59
- routing of incoming calls (examples) ............. 60
MSN configuration ........................................... 61
- Nera ISDN Handset w/Distress Alarm........... 62
- ISDN port ...................................................... 64
- RS-232 port................................................... 65
- USB port........................................................ 66
- analogue port ................................................ 67
Saving and reloading configurations................ 68
Print handling setup......................................... 70
Mobile Packet Data Service............................. 71
MAINTENANCE ......................................72
General ........................................................... 72
TROUBLESHOOTING ............................73
LIST OF TERMS .....................................77
SYSTEM DESCRIPTION........................78
Appendix - Terminal Identities .................87
A MEMBER OF CIRM
The Nera F77 terminal fully complies with the R&TTE directive.
4
Nera F77
Continuing the Saturn tradition
Page 5
USER MANUAL
INTRODUCTION
General
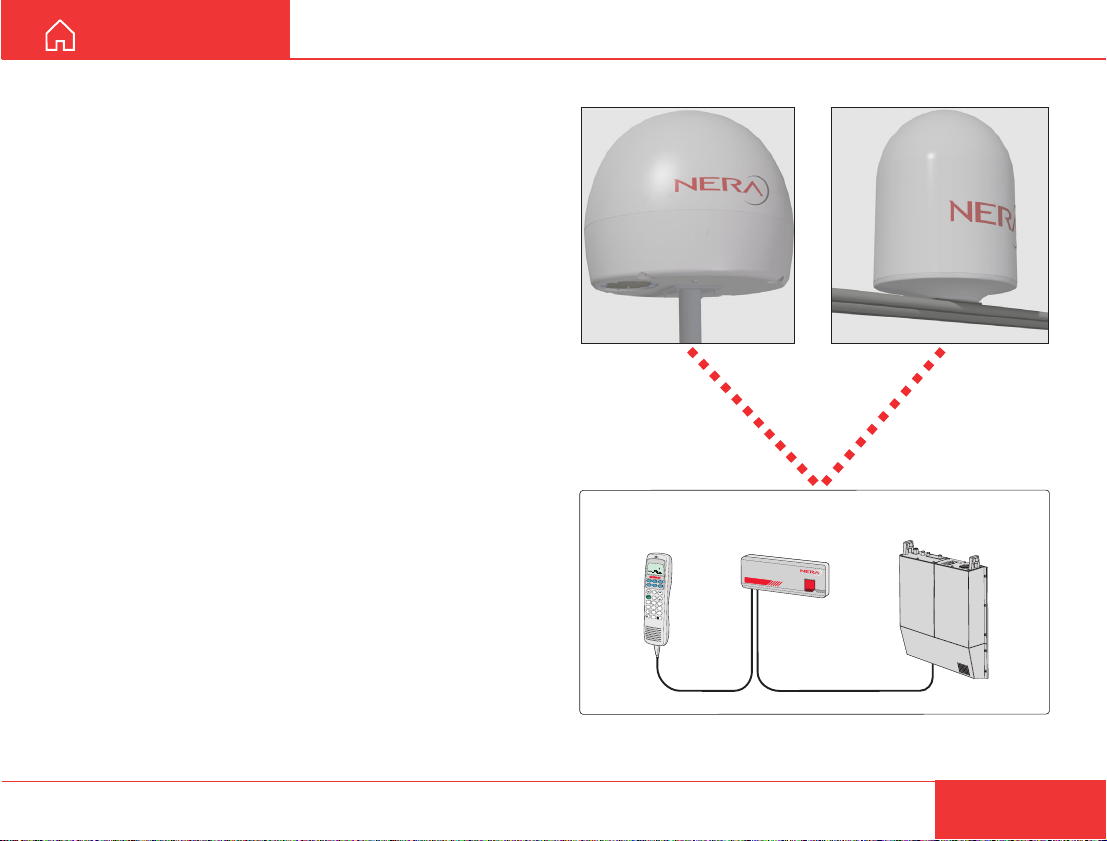
The Nera F77 satellite terminal provides 64 kbps
voice and data, and 4.8 kbps low cost voice for
transmission via the Inmarsat satellite system.
Nera F77 offers full ISDN functionality.
Above Deck Equipment - ADE
The Nera F77 Above Deck Equipment consists of:
• Servo stabilized antenna dish with RF-Transceiver
• Mast mounted radome, or
• Deck mounted radome
Below Deck Equipment - BDE
The Nera F77 Main Communication Unit (MCU) which constitutes the major electronic part - is designed for wall or desktop installation.
The MCU mains input is 100 - 240 VAC ±10%. The
power requirement is approx. 40 W in receive/idle
mode, and approx. 150 W in transmit mode.
The MCU supplies 48 VDC power to the ADE
through the coaxial cable.
Nera ISDN Handset
The ISDN Handset keypad and built-in display allows
dialing and control of the MCU and antenna.
Nera ISDN Handset
DIAL 00+INTL
TEL.NO.+
S
H
I
F
T
O
N
DEL
1
2
3
4
5
6
7
8
9
0
Distress Alarm
Nera F77
DISTRESS
Deck mounted antennaMast mounted antenna
Main Communication Unit
MCU
Distress Alarm
The Distress Alarm Unit provides remote activation of
an alert transmission and indication of incoming
distress calls.
Nera F77
Continuing the Saturn tradition
Figure 1 Nera F77 satellite terminal.
5
Page 6
INTRODUCTION CONT’D
USER MANUAL
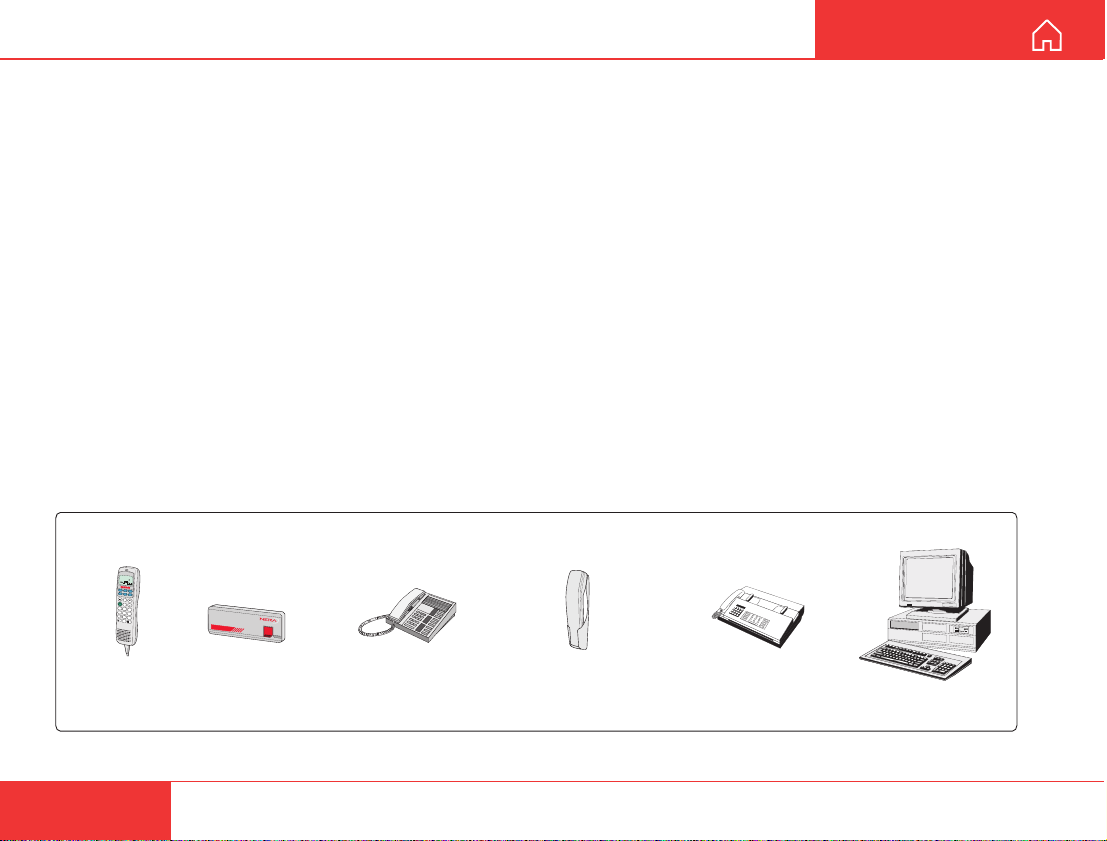
Communication services
Nera F77 provides the following services:
• ISDN: - 64 kbps Mobile Data Service (UDI)
- 56 kbps Mobile Data Service
- 4.8 kbps speech
- 64 kbps speech
- 3.1 kHz audio (64 kbps)
• RS-232: - 64 kbps Mobile Data Service (UDI)
- Mobile Packet Data Service (MPDS
• RS-422: - 64 kbps Mobile Data Service (UDI)
- Mobile Packet Data Service (MPDS
• USB - 64 kbps Mobile Data Service (UDI)
- Mobile Packet Data Service (MPDS)
• ANALOGUE - 4.8 speech / 64 speech
- 3.1 kHz (e.g. telefax Gr.3)
DIAL 00+INTL
TEL.NO.+
S
H
I
F
T
O
N
DEL
1
2
3
4
5
6
7
8
9
0
Additional
ISDN Handsets
Nera F77
DISTRESS
Additional
Distress Alarm
ISDN telephones
Internal communication
Equipment connected to the various interfaces may
communicate with each other via an internal MSN
(Mobile Subscriber Number) assigned to each unit.
Control interface
The RS-232/RS-422 or USB port allows connection
of a PC for configuration of the Nera F77 MCU.
A PC program (vtLite Marine) that provides the
software to operate and configure the MCU is supplied on the enclosed CD (requires at least Windows
95).
Analogue telephones
(wall or desk)
Telefax
(Group 3 or 4)
PC
Figure 2 Additional equipment.
6
Nera F77
Continuing the Saturn tradition
Page 7
USER MANUAL
CD
The CD ROM supplied with Nera F77
contains:
• program for control from PC
(vtLite Marine)
• manuals
• application notes
• modem drivers
• and other useful information.
INTRODUCTION CONT’D
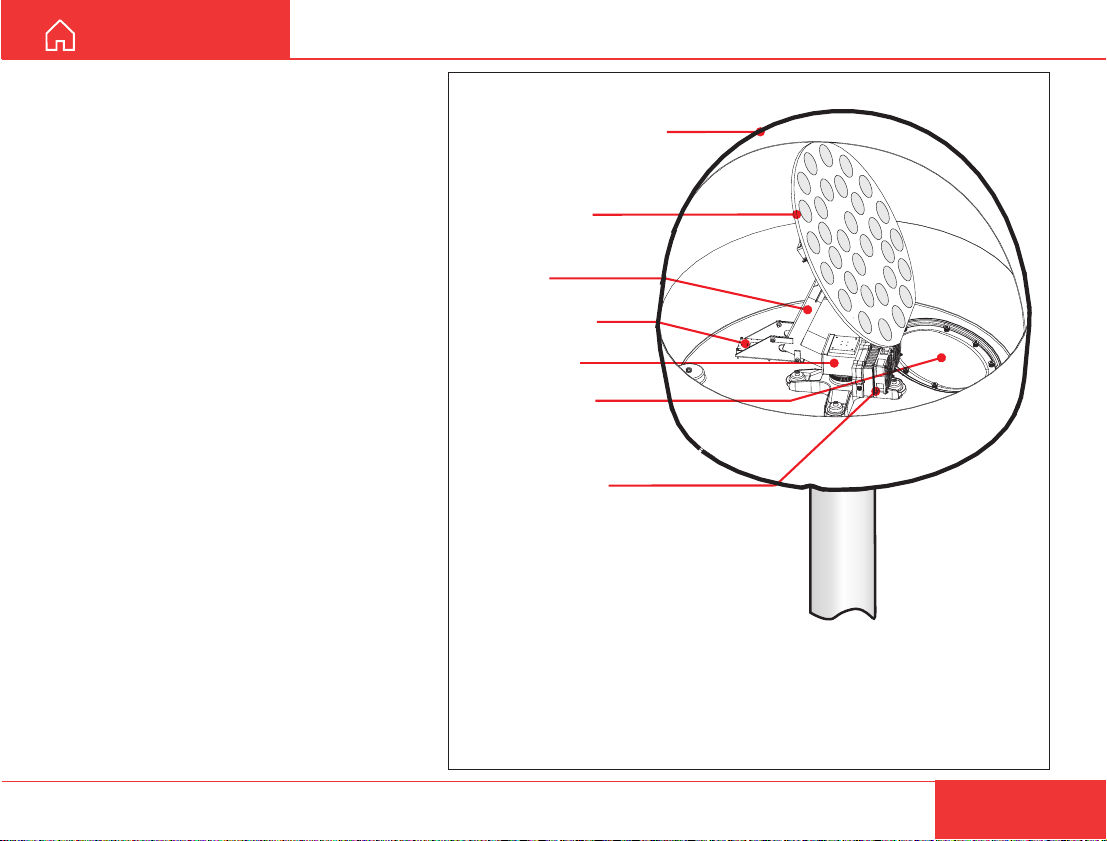
Mast mounted radome
(cutaway view)
Antenna Dish
Servo Stabilized
Pedestal
GPS Receiver
Additional equipment
• Additional Nera ISDN Handsets
• Additional Distress Alarm Unit (DA)
• ISDN telephones
• Analogue DTMF telephones
• Group 3 and Group 4 telefax
•PC
Nera F77
Continuing the Saturn tradition
Rotary Joint
Access Hatch
(Mast mounted
antenna only)
RF-Transceiver
Figure 3 Antenna parts - mast mounted version.
The deck mounted version houses the same parts.
7
Page 8

INTRODUCTION CONT’D
Figure 4 Examples of preprogrammed
T erminal Ids and MSN numbers.
Allows direct connection without
prior configuration.
See also Routing of incoming calls
and MSN configuration.
USER MANUAL
Nera ISDN Handset
connected to ISDN
port/bus:
4.8kbps speech
Term Id 05, MSN 21
Term Id 92, MSN 31
Nera ISDN Handset/
Distress Alarm unit
connected to ISDN
port/bus:
4.8kbps speech
Term Id 01, MSN 20
64kbps speech
Term Id 91, MSN 30
Digital fax (G4)
connected
to ISDN port/bus:
64kbps data
Term Id 51, MSN 60
8
DIAL 00+INTL
TEL.NO.+
S
H
I
F
T
B
A
T
A
L
P
H
A
O
N
F
U
N
C
A
L
P
H
A
E
N
T
E
R
MO
S
H
RE/
IF
T
L
E
S
HEL
P
P
T
T
O
N
/
O
F
F
L
IS
T
L
I
S
T
D
E
S
E
C
L
PL
AY
1
A
BC
2
D
EF
3
G
H
I
4
J
K
L
5
M
N
O
6
P
Q
R
TA
X
7
L
S
I
G
T
H
U
T
8
V
W
X
9
Y
Z
Æ
D
A
T
A
ØÅ.
0
Ä
Ö
Ü
SP
C
Analogue telephone
connected to port
TEL1 - TEL3:
4.8kbps speech
TEL1: Term Id 03, MSN 01
MCU
DIAL 00+INTL
TEL.NO.+
S
H
I
F
T
B
A
T
A
L
P
H
A
O
N
Nera F77
F
U
N
C
A
L
P
H
A
E
N
T
E
R
M
S
OR
H
I
F
E/
T
L
E
S
HELP
P
T
T
O
N
/
O
F
F
L
I
S
T
L
I
S
T
D
E
S
E
C
L
PLAY
1
ABC
2
D
EF
3
G
H
I
4
J
K
L
5
M
N
O
6
P
Q
R
T
A
X
7
L
ST
I
G
H
U
T
8
V
W
X
9
Y
Z
Æ
D
A
T
A
ØÅ
.
0
Ä
Ö
Ü
S
PC
Nera F77
TEL2: Term Id 04, MSN 02
TEL3: Term Id 01, MSN 03
Analogue fax (G3)
connected to TEL4 port:
3.1 kHz audio
Term Id 61, MSN 04
PC connected to
USB port:
64kbps data
MPDS supported
Term Id 53, MSN 62
PC connected to
RS232A port:
64kbps data
MPDS supported
vt-Lite Marine supported
Term Id 52, MSN 61
PC connected to
RS232B port:
64kbps data
MPDS supported
Term Id 54, MSN 63
Nera F77
Continuing the Saturn tradition
Page 9

USER MANUAL
Handsfree microphone
Display indicators:
appears at hook OFF
flashes when receiving a call
Net provider&Ocean Region
appears when loudspeaker
is ON
appears when selecting
ALPHA
letters on the keypad, e.g. for
Phone Book entries
signal strength indicator
alarm indicator
Function keys:
allows adjusting the earpiece
volume during conversation
opens/closes Phone Book
reverts to previous postion
used to transfer a call
selects function menu
handsfree microphone/
loudspeaker ON/OFF (hook
ON/OFF when in cradle)
hook ON/OFF
. . . . . number keys.
The keys include letters for
Phone Book entries.
enters selected choice
deletes last character or
complete entry
LIST
scrolls up/down through
function menu/choices
Handsfree loudspeaker
Figure 5 Display and keys.
ISDN
ALPHA
Telenor IOR
Ready for call
OPERA TION FROM HANDSET
Hook ON magnet
click!
Figure 6 Holder/cradle wallmounted.
Nera F77
Continuing the Saturn tradition
9
Page 10

OPERATION FROM HANDSET CONT’D
USER MANUAL
SIM card
The SIM card carries subscription information from
your Net service provider on an integrated circuit.
The Nera F77 used with the SIM card assumes the
identity of the SIM card.
The SIM card has its own set of Inmarsat Mobile
Numbers (IMN) on which the user can be contacted
irrespective of the Nera F77 used.
All outgoing calls will be billed to the owner of the
SIM card.
The SIM card is protected by a SIM PIN (Personal
Identification Number). Contact your Net service
provider if you do not have the PIN code.
If the PIN code entered does not match the PIN code
on the SIM card, operation with that particular SIM
card will lock-up after three failed attempts. You must
then use the SIM un-block code (PUK code) provided by your Net service provider to un-lock the
card. Contact your Net service provider if you do not
have the PUK code.
Note!
When the PUK is used, the SIM PIN is set to 1 2 3 4.
To change or disable the PIN code, see "Access
level" later in this manual.
The SIM card can store various information, e.g.:
• PIN code (Personal Identification Number)
• Phone book
• Allowed and preferred Net service providers
Note! Nera F77 can be used with or without SIM
card. The Net service provider, however, sometimes
requires the use of SIM card.
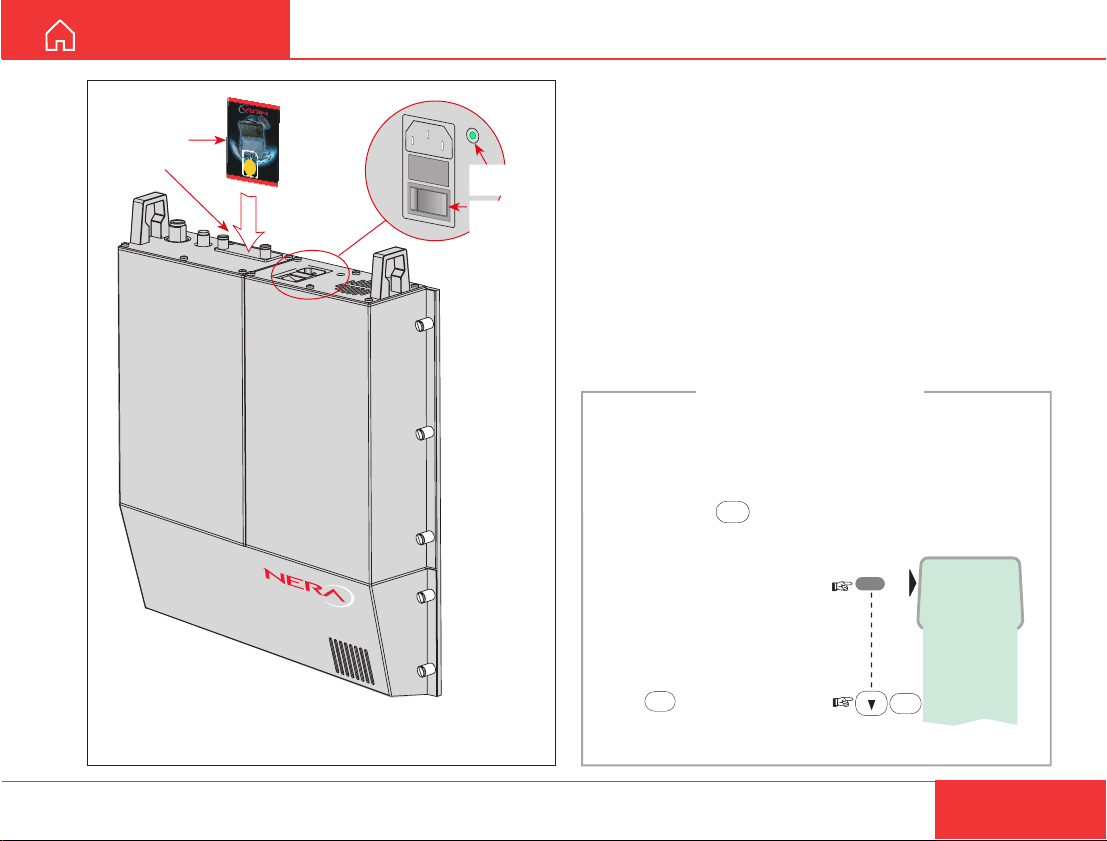
The SIM card is located on the upper end of the
Main Communication Unit, see figure 6. The cover
must be removed to access the the card slot. The
cover is atttached by two serrated screws. No tools
are required to loosen the screws.
10
Nera F77
Continuing the Saturn tradition
Page 11
USER MANUAL
SIM card
Cover
Nera F77
Main Communication Unit, MCU
Figure 7 Location of SIM card and ON/OFF switch.
O I
Power
indicator
Power
ON/OFF
switch
OPERATION FROM HANDSET CONT’D
Switching ON
The ON/OFF switch located on the upper end of the
Main Communication Unit switches all basic units of
the Nera F77 terminal on/off:
• the Nera ISDN Handset
• the Main Communication Unit (MCU), and
• the Antenna Unit.
See figure 7 for location of the power ON/OFF switch
and indicator.
Nera ISDN Handset
When connected, the handset is automatically set to Nera
Fleet mode, providing an idle display as shown on the next
page.
To switch to normal Nera ISDN Handset mode, press
and hold down
Switching back to Nera Fleet mode
is then achieved as follows:
Open the MENU
and scroll down to
Set to Fleet
Press
OK
For normal ISDN mode, see
Nera ISDN Handset - User Guide on CD.
DEL
when turning ON power.
MENU
.
> Active MSN
Keyclick
Ringer
Answer beep
Backlight
Language
MSN
Protocol
OK
Set to Fleet
Nera F77
Continuing the Saturn tradition
11
Page 12
OPERATION FROM HANDSET CONT’D
USER MANUAL
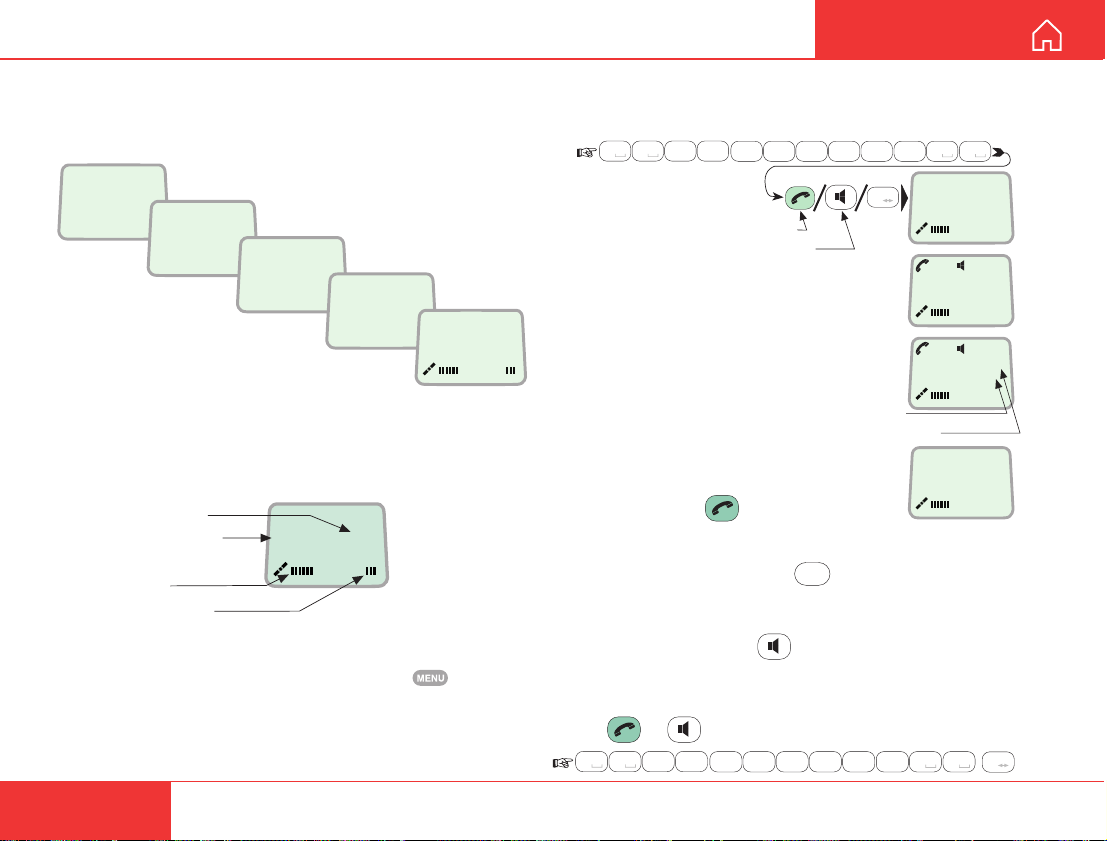
Nera F77 starts up
Nera F77 automatically initializes the system and
searches for the satellite:
Nera Fleet
Euro- ISDN
Enumerating
Telenor IOR
Initializing
See Satellite search
later in this manual to
restart a search manually.
If required, see "Selecting
default Net service provider".
Idle
When idle, the Nera ISDN Handset displays:
Ocean Region
Service provider
Signal strength
indicator
Telenor IOR
Ready for call
Alarm indicator
The alarm indicator flashes when an alarm condition
occurs. The indicator stops once the alarm has been
read in the Display Handset by pressing > Infor-
mation > Alarms & messages".
The indicator continues to be displayed if the alarm
condition persists.
Telenor IOR
Searching
Telenor IOR
Ready for call
Making a call
• Dial 00, country code and subscriber number, e.g.:
0 4
0
abc
7
6
pqrs
For normal call
For handsfree call
• When entered, the display reads:
• When the remote end answers,
the display reads:
The timer starts.
• End the call by pressing
hook ON/OFF , or
replacing the handset in the cradle.
Use DEL to modify entries:
erases one digit. Holding the key more than 0.5
second erases the whole number.
Use the handsfree key to toggle the loudspeaker
ON/OFF.
Alternative dialing:
Press or for dialing tone, then dial the number:
0 4
0
abc
7
6
pqrs
mno
mno
2
abc
7
pqrs
Dash separates
additional dialing
Timer, minutes:seconds
DEL
2
abc
7
pqrs
abc
7
pqrs
A a
Dial (4.8)
004767244700
Calling...
004767244700
Connected 09:46
004767244700-
Disconnected
0 0
4
4
abc
#
Pressing DEL once,
4
4
abc
0 0
abc
7
pqrs
A a
#
12
Nera F77
Continuing the Saturn tradition
Page 13
USER MANUAL
OPERATION FROM HANDSET CONT’D
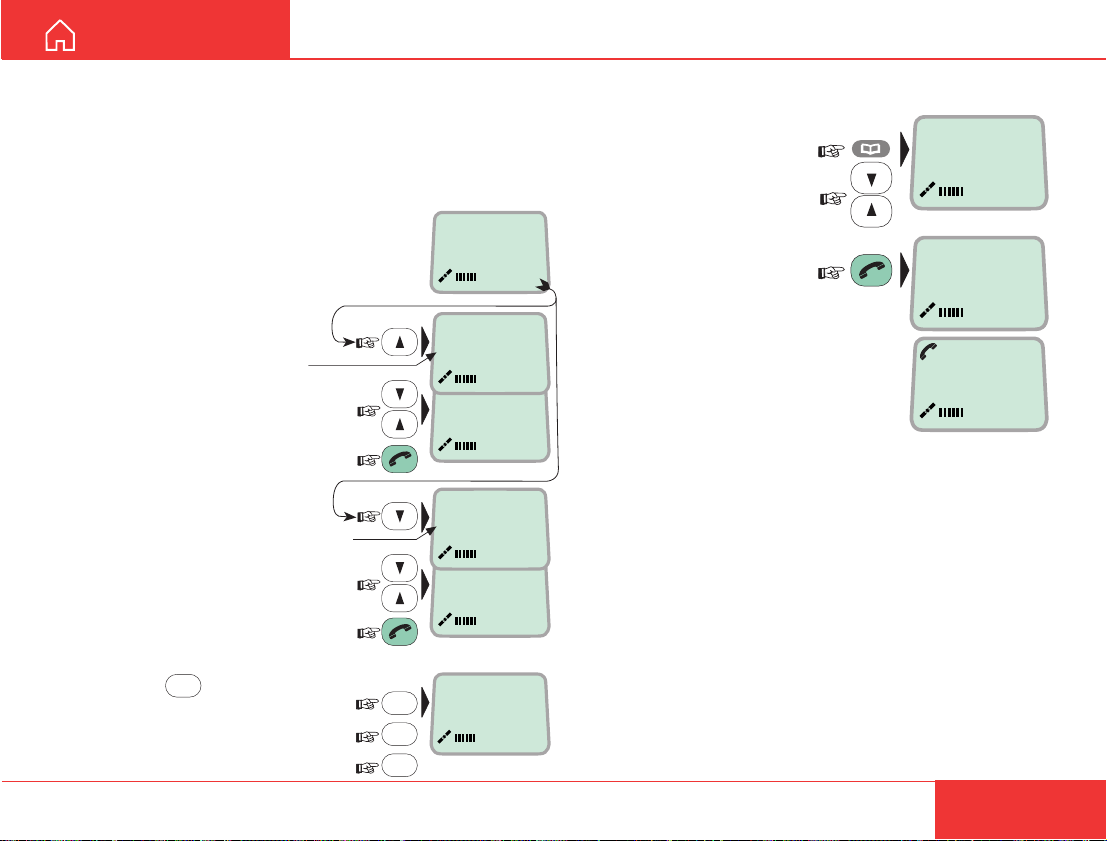
Redialing
The Redial Memory stores the last 30 called and
received numbers (since incoming IMN numbers are
not conveyed from "ashore", the received numbers
are listed by local MSN numbers).
The data are erased when disconnecting
the handset or Nera F77 is switched off.
To redial calls made:
Telenor IOR
Ready for call
1 Press the arrow up key
to recall the last number
dialed:
2 Use the
arrow keys to
Redial list
if no number is stored
scroll through the list:
3 Pressing hook ON/OFF
sends the chosen number:
To view calls received:
4 Press the
arrow down
key to recall
the last number received.
Scroll through list.
To delete a listed number:
5 Press
chosen number from list:
Press OK to delete:
Revert to idle:
Received call list
if no number is stored
DEL
to clear the
OUT:JAN17 15:09
004767244700 01
OUT:JAN25 12:10
004722763110 02
IN:JAN20 13:09
20 01
IN:FEB10 16:11
21 02
DEL
Clear?
21
OK
OK
Dialing from phone book
Press the phone
1
book key:
and scroll through the
phone book:
LIST
2 Press the hook key to
call the selected number:
»
BT
Nera Satcom
BT
Calling...
ALPHA
ALPHA
Nera F77
Continuing the Saturn tradition
13
Page 14
OPERATION FROM HANDSET CONT’D
USER MANUAL
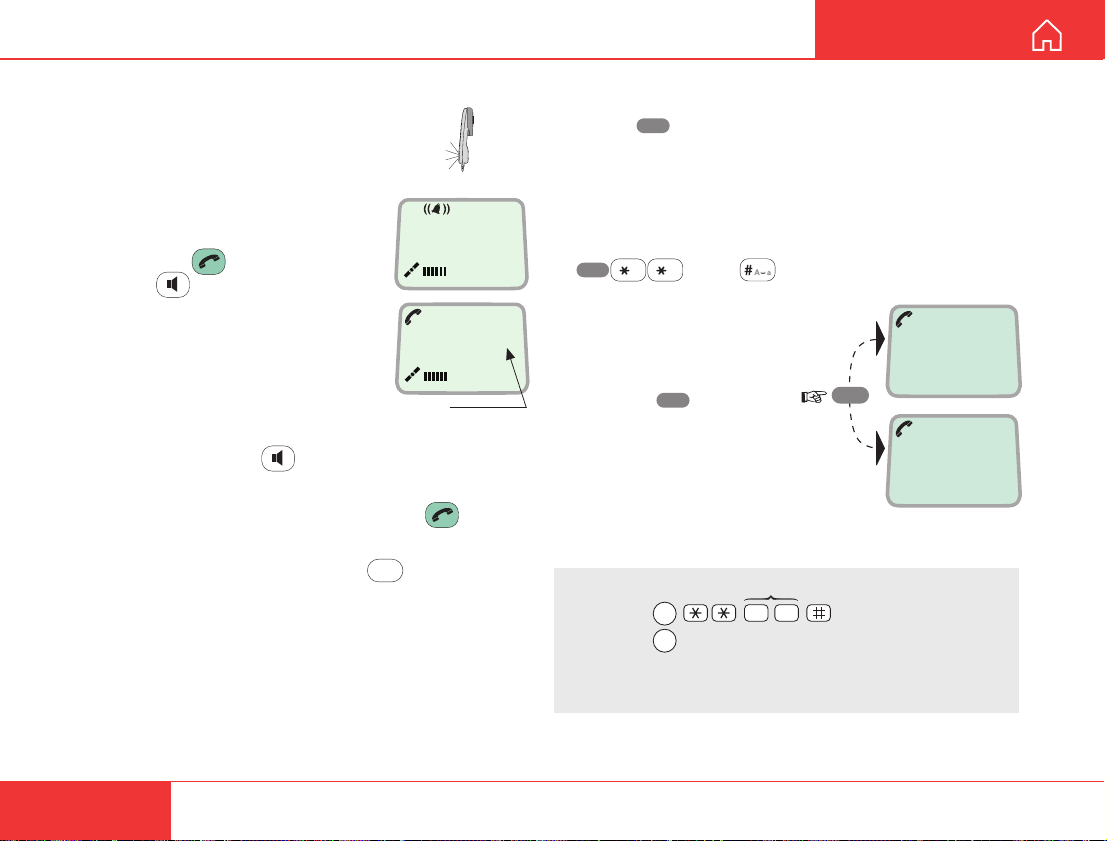
Incoming calls
The handset rings when receiving a call.
The ringing symbol flashes until the call
is answered.
• Answer the call by pressing
hook ON/OFF: or
handsfree:
With the ISDN Handset in the
cradle, the loudspeaker and
microphone are ON for handsfree
operation.
If lifting the handset, the loudspeaker turns OFF.
Use the handsfree key to toggle the loudspeaker
ON/OFF.
• End the call by pressing hook ON/OFF , or
replacing the handset in the cradle.
• Reject the call by pressing DEL:
4.8 Speech
00:00
Timer,
minutes:seconds
DEL
Call hold and transfer
Pressing R during a conversation will put the
current call on hold. Another internal call may now be
made.
Switching between the two calls:
• The 2nd call is established by keying:
R
• The original call is put on hold,
and 2nd connected.
• T oggling between the
two calls is achieved by
pressing R repeatedly:
Call transfer (connection via satellite):
Exception!
Transfer from analogue to ISDN is not possible.
[MSN]
MSN/Handset Id
R
toggles between subscribers
R
2 0
1 on hold
**20#
R
2 on hold
Hang up
14
Nera F77
Continuing the Saturn tradition
Page 15
USER MANUAL
OPERATION FROM HANDSET CONT’D
Internal communication
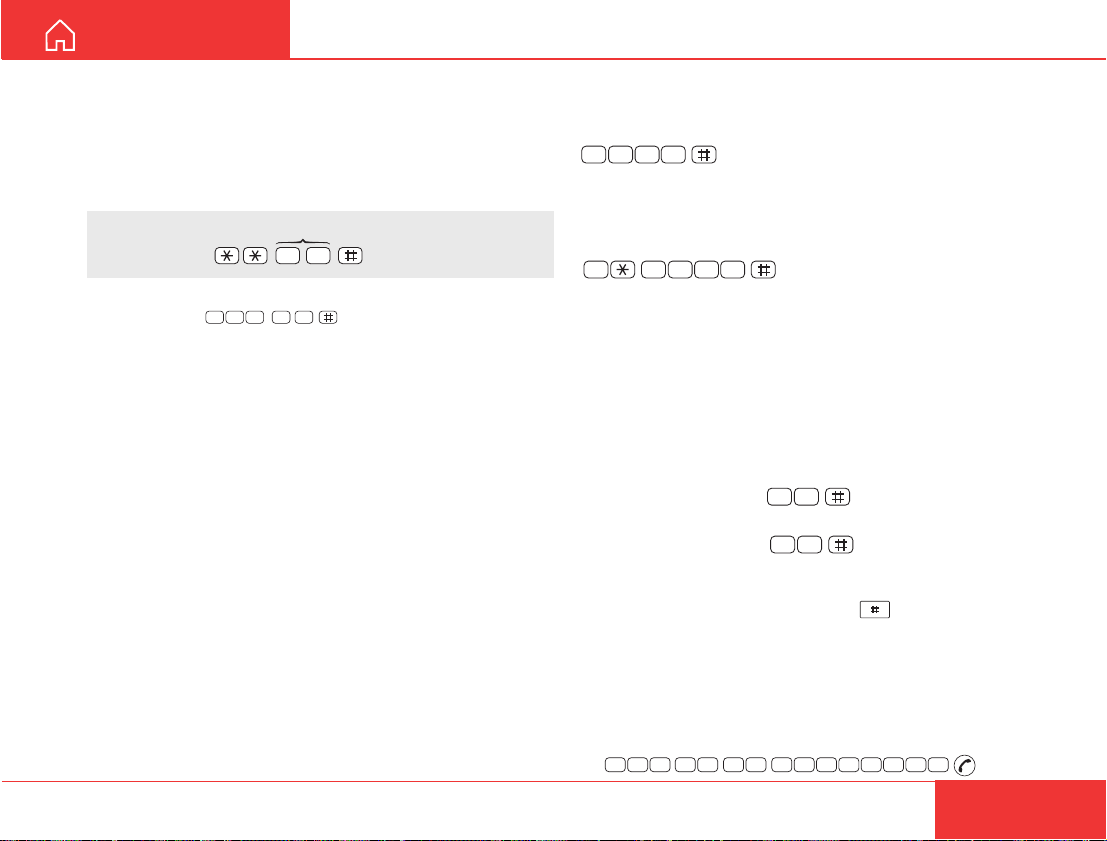
Nera F77 allows calls to be made internally between
the connected ISDN and analogue telephones.
Internal calls:
MSN (example)
2
0
Note! If the telephone lacks the *-key, 103 may be dialed
instead, e.g.:
1
When receiving a call, the caller`s MSN number will
appear in the display (if programmed).
When Nera F77 is busy with a satellite link call, it is
possible to make internal calls.
2
0
0
3
Various call procedures
Short number dialing from Phone Book (prefix 23)
2 3
number stored in the Phone Book under short number 15.
Short number dialing (prefix 23) through selected
Net service provider
telephone number stored under short number 15 via
the selected Net service provider (Telenor=no. 4).
Service calls
Special information services are accessible with
2-digit service address code.
Note! Not all Net service providers offer every service.
Examples:
Obtaining assistance from the International
Operator:
Calling the technical staff of the Land
Earth Station (LES):
T elefax/ Videophone
On a telefax with keypad, enter
before starting transmission.
Note! Some types of equipment do not have # implemented in software even if the #-key is on the keypad.
Then in front of the telephone number use:
903 if dialing the number digit by digit, or
902 if for the number to be sent as a block. e.g.:
9 0
5
1
2 3 54 1
0
2
fetches and sends the telephone
fetches and sends the
1
1
3
3
as the last digit
0
4
7
6
7
2
4
4
7
0
0
Nera F77
Continuing the Saturn tradition
15
Page 16
OPERATION FROM HANDSET CONT’D
OK
ALPHA
Add name:
N_
ALPHA
Add name:
Ne_
ALPHA
Add name:
Ner_
ALPHA
Add name:
Nera_
ALPHA
Add name:
Nera _
ALPHA
Add name:
Nera_A
ALPHA
Add name:
Nera_AS
#
A a
#
A a
2
abc
7
pqrs
0
2
abc
7
pqrs
3
def
ALPHA
Add name:
Nera_ASA
2
abc
6
mno
»
Add entry
Edit number
USER MANUAL
To call Nera F77
Dial the international prefix (normally 00) followed by
870 and the IMN number, e.g. 00 870 762420510.
The common Ocean Region access no. 870 connects the call to the dialed Nera F77 terminal regardless of the Ocean Region the user currently communicates through.
If the Net service provider does not support access
no. 870, call the Ocean Region directly:
871 – AOR-E (Atlantic Ocean Region East)
872 – POR (Pacific Ocean Region)
873 – IOR (Indian Ocean Region)
874 – AOR-W (Atlantic Ocean Region West)
16
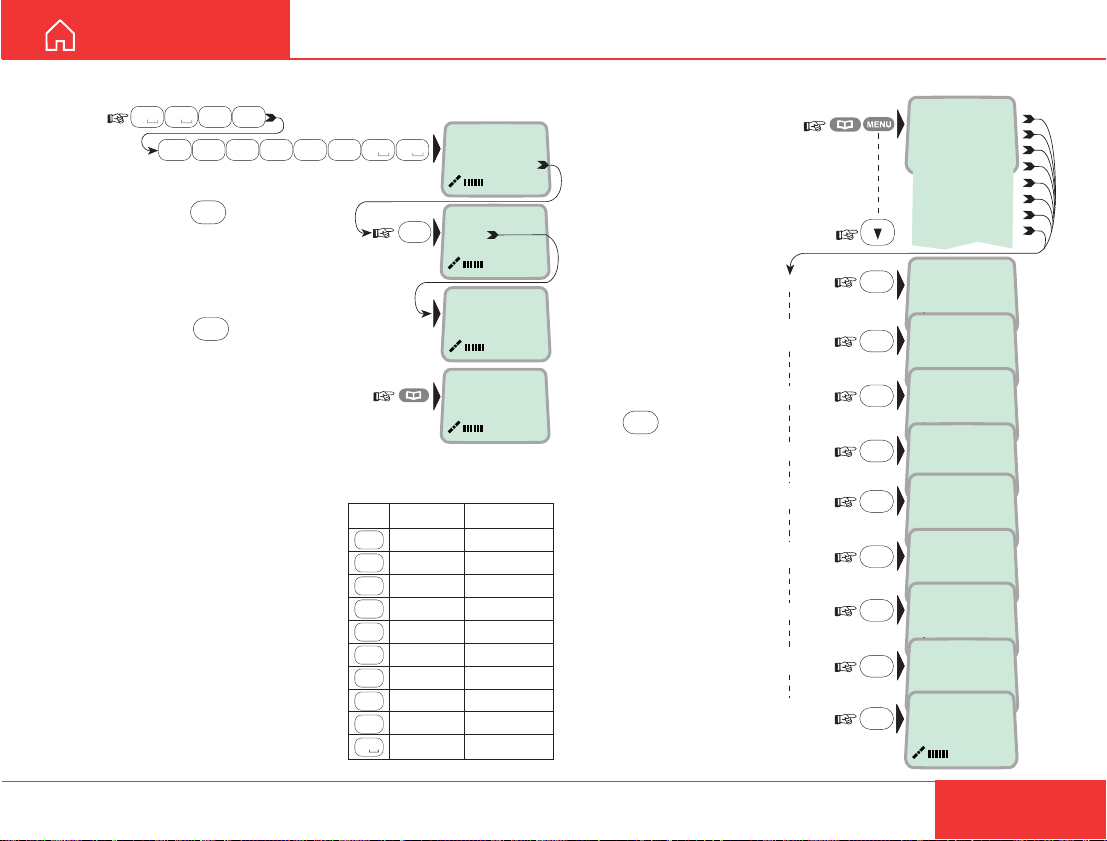
Phone book entry
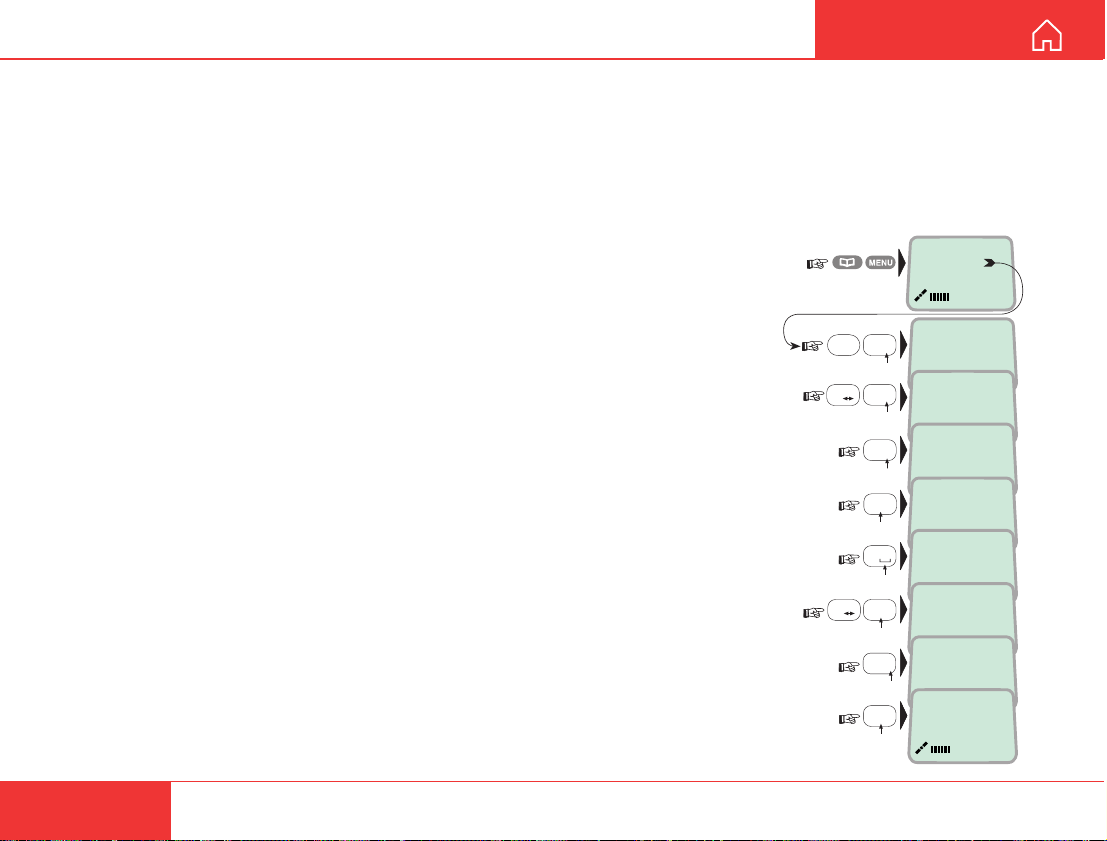
The entries in the Nera F77 phone book may consist
of maximum 15 characters and 19 digits. Typical 6character/8-digit entries yield a total of 85 phone
numbers. The number/name list is stored in the Main
Communication Unit.
Programming:
1 Open the phone book
> menu:
Open the Add entry
function by pressing Ok
before starting to key in
characters.
2 Enter the name, e.g.
Nera ASA.
Note that the additional
characters accessible with
the key appear momentarily .
See the character table on
next page.
For modifying an entry ,
see Phone book editing
on next page.
Enter the phone number,
continue on next page . . . .
Nera F77
Continuing the Saturn tradition
Page 17
USER MANUAL
»
Add Entry
Edit number
Edit name
Delete
Search book
See number
Copy
Sort by ShrtNo
ALPHA
Add name:
Nera Satcom_
OK
Number:
004767244700
OK
ALPHA
Edit name:
Nera Satcom
OK
Deleting
OK
ALPHA
Name search:
_
OK
ALPHA
[1] 0047672447
00
OK
ALPHA
Short Number:
2_
OK
ALPHA
[1] 0047672447
00
OK
ALPHA
Nera Satcom
OK
Add Entry
Edit
number
Edit name
Del
Search
book
See
number
Copy
Sort by
ShrtNo
Sort by
name
OPERATION FROM HANDSET CONT’D
3 Enter the telephone number e.g.:
0 4
0
abc
7
pqrs
mno
7
pqrs
OK
DEL
2
stores
6
4 Pressing
the entry in the phone book:
An entry can be erased
by pressing
Revert to idle:
The character table shows all
the characters accessible:
Notes:
• The #-key toggles between
• The * -key ends the 1-sec
• Names written with none
Nera F77
Continuing the Saturn tradition
uppe r-c a se and lower-case
characters.
delay after every key entry.
Anglo-American characters
such as Æ, Ø, Å etc., can only
contain 6 different special
characters (however, 2 equal
characters count as 1).
4
4
abc
abc
0 0
abc
7
pqrs
Key Uppercase Lowercase
1
2
abc
3
def
4
abc
5
jkl
6
mno
7
pqrs
8
tuv
9
wxyz
0
Number:
004767244700
OK
Saving
»
Nera ASA
Neratek
Telenor IOR
Ready for call
. , ? ! - : ; / 1 . , ? ! - : ; / 1
ABCÆÅÄ2 abcæåä2
DEF3 def3
GHI4 ghi4
JKL5 jkl5
MNOØÖ6 mnoøö6
PQRS7 pqrs7
TUVÜ8 tuvü8
WXYZ9 wxyz9
_0 _0
ALPHA
Phone book editing
Open phone book menu
and
scroll down to the required
function.
If "Sort by ShrtNo" is selected,
the function switches to
"Sort by Name".
ALPHA appears
when letters are to
be entered.
DEL
Use
modify entries.
to
17
Page 18

HANDSET FUNCTIONS
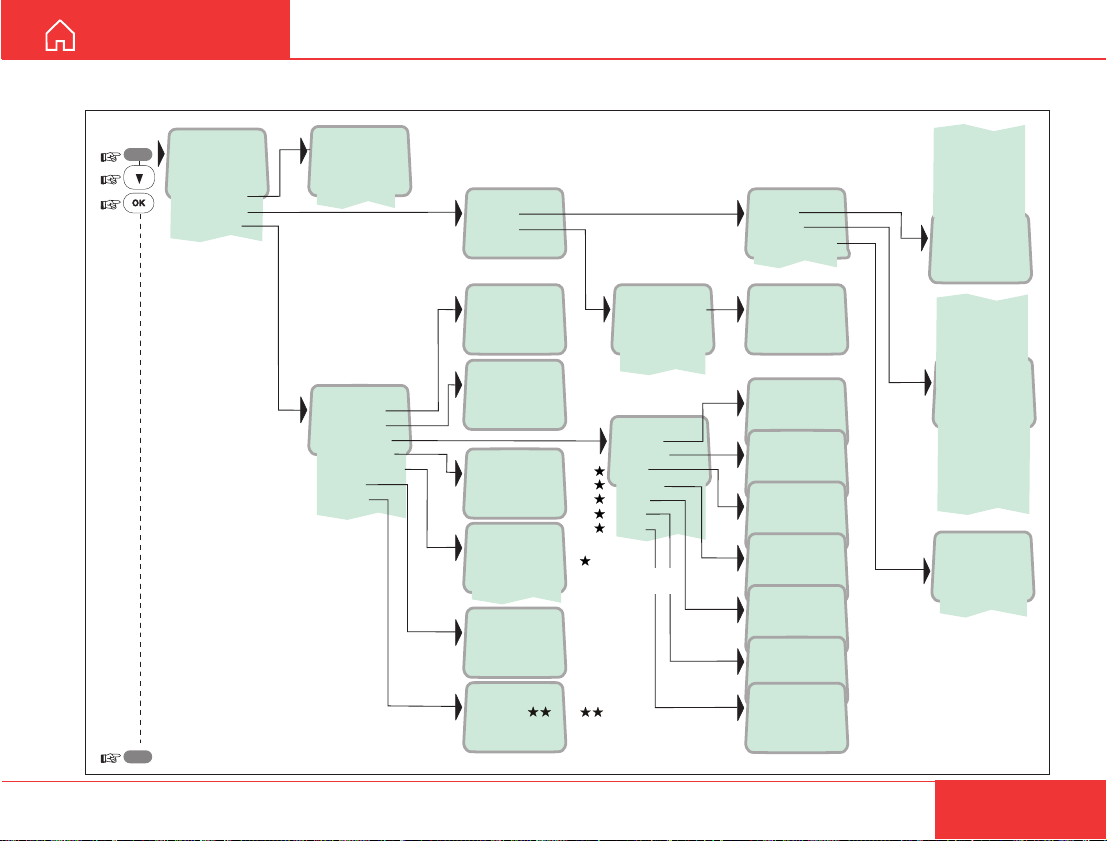
Overview
»
Sat. Search
MENU
Phone setup
Set Network
Priority Call
Serial Ports
Information
ESC
reverts to idle
Opening Search
»
Active MSN
Keyclick
Ringer
Answer beep
Backlight
Protocol
SW version
1.3.00 270103
»
Euro-ISDN
NI-1
»001/Telenor
002/Stratos
004/Telenor
005/OTE
»Find Any
AOR-W
AOR-E
POR
IOR
Region 4
Region 5
Region 6
Region 7
Not in use
Searching... IOR
Elevation 0
Elevation: 0...90
»
#1: 4.8 Speech
#2: 64K Speech
»
On
Off
»
Tone
Volume
»
On
Off
»
On
Off
30 second
Dimmer
Tuning to IOR
Elevation 17
º
USER MANUAL
Telenor IOR
Logging On
»Tone#1
Tone#2
Tone#3
Tone#4
Tone#5
Tone#6
Tone#7
Tone#8
Tone#9
»
Low
Medium
High
Increasing
Dimmer [100%]
90%
10%
Telenor IOR
Ready for call
See next page
18
Nera F77
Continuing the Saturn tradition
Page 19
USER MANUAL
Overview cont'd
»
Sat. Search
MENU
Phone setup
Set Network
Priority Call
Serial Ports
Information
»
Safety Call
Urgency Call
Distress Test
Test Buzzer
»Port A
Port B
To defaults
HANDSET FUNCTIONS CONT’D
1200bps
2400bps
4800bps
9600bps
19200bps
»Speed
Format
Flow control
38400bps
57600bps
»115200bps
ESC
reverts to idle
Nera F77
Continuing the Saturn tradition
»
Diagnostics
Forward Id
Version Info
Network Info
Alarms & Msgs
Position
Heading
»On
Off
»
HW (fwd):A98853
IOR Spot: 5
Ready for call
»
Clear Causes
Alarms List
Info Log
»
010d29m02s E
059d52m11s N
»
0.0
000
»Driver switch
Speed
Format
Flow control
»
System
Ctrl SW
DSP
Monitor
KDB
RFB
ATB
Only appears with
Diagnostics On
Requires NMEA
input to MCU
»
RS-232
RS-422
Nera F77
11 June 2002
101476 Ver: 1.0
05 June 2002
1.1
01.05
1.20
0.140
Type: 160.110
d=7,p=none,s=1
d=7,p=e,s=1
d=7,p=0,s=1
d=7,p=m,s=1
d=7,p=s,s=2
» d=8,p=none,s=1
d=8,p=e,s=1
d=8,p=0,s=1
d=8,p=m,s=1
d=8,p=s,s=1
d=8,p=none,s=2
d=8,p=e,s=2
d=8,p=0,s=2
d=8,p=m,s=2
none
»
rts/cts
<E>xon/xoff tr
<E>xon/xoff st
19
Page 20
HANDSET FUNCTIONS CONT’D
USER MANUAL
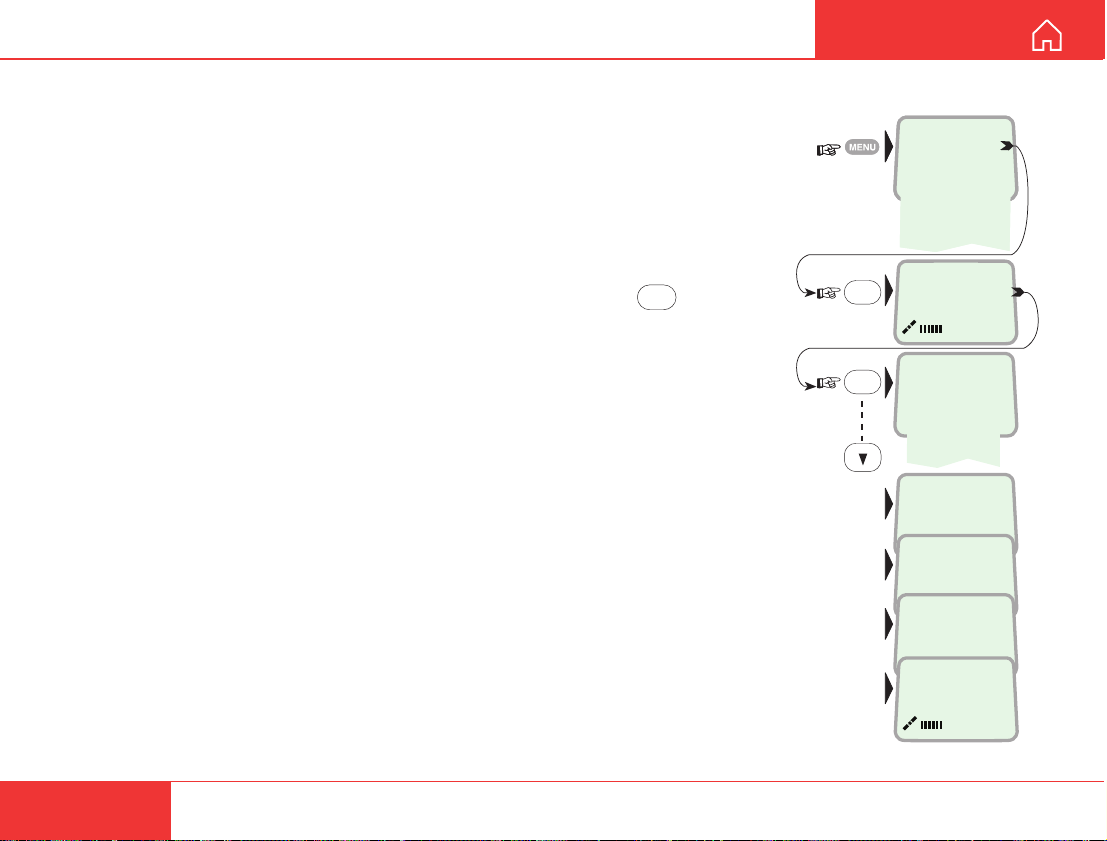
Satellite search
Some geographic locations allow contact with more
than one Ocean Region satellite. It is recommended
to choose an Ocean Region providing good signal
quality and cost-effective communication.
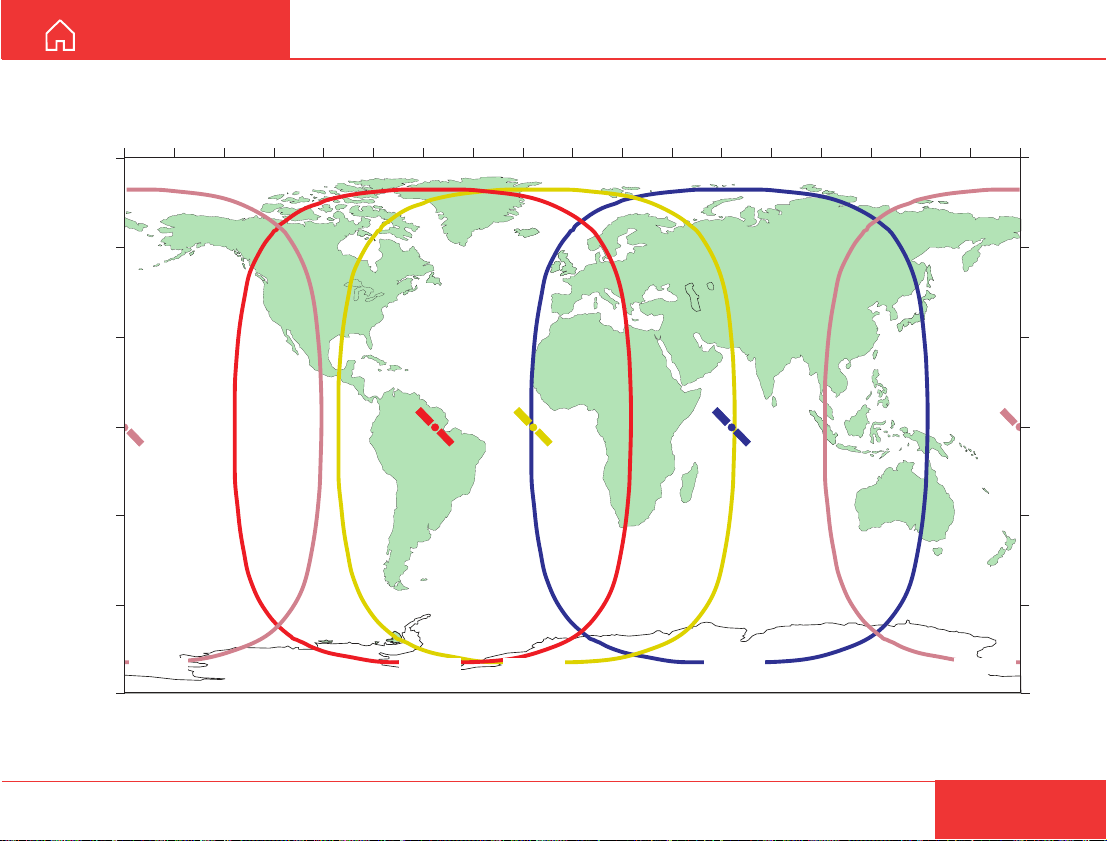
Use the Satellite Coverage Map on next page or on
the CD to select the Ocean Region at your location:
Atlantic Ocean Region West: AOR-W
Atlantic Ocean Region East: AOR-E
Pacific Ocean Region: POR
Indian Ocean Region: IOR
Regions 4 - 7 are not in use.
See the Satellite Coverage Map on the next page.
To select another Ocean Region:
1 Open the MENU and
press Sat. Search:
Pressing
OK
opens the
list of searching alternatives:
2 Select as required:
When selecting Find Any,
the antenna searches one
Ocean Region after the other
until a satellite signal is found.
The antenna performs an
hemispheric search at antenna
elevation angles varying within
0º through 90º.
»
Sat. Search
Sat. Search
Phone setup
»
Phone setup
Set Network
Set Network
Priority Call
Priority Call
Serial Ports
Serial Ports
Information
Information
OK
Opening Search
OK
»Find Any
Searching.. . IOR
Elevation 0
Tuning to IOR
Elevation 17
Telenor IOR
Logging On
AOR-W
AOR-E
POR
IOR
20
Telenor IOR
Ready for call
Nera F77
Continuing the Saturn tradition
Page 21
USER MANUAL
Satellite Coverage Map
140 W 120 W160 W 40 E 60 E
LONGITUDE
20 W 0 20 E80 W 60 W 40 W100 W180 W
HANDSET FUNCTIONS CONT’D
100 E 120 E 140 E 160 E
80 E
180E
60 N
30 N
LATITUDE
0
POR
178 E
30 S
60 S
5° Elevation
TEL: 870 or 872
Pacific Ocean Region
POR
Nera F77
Continuing the Saturn tradition
AOR-W
54 W
TEL: 870 or 874
Atlantic Ocean West Region
AORW
AOR-E
15.5 E
TEL: 870 or 871
Atlantic Ocean East Region
AORE
IOR
64.5 E
5° Elevation 5° Elevation 5° Elevation 5° Elevation
TEL: 870 or 873
Indian Ocean Region
IOR
POR
178 E
TEL: 870 or 872
Pacific Ocean Region
POR
21
60 N
30 N
LATITUDE
0
30 S
60 S
Page 22
HANDSET FUNCTIONS CONT’D
OK
»
On
Off
Active MSN
»
Keyclick
OK
Sat. Search
»
Phone setup
Set Network
Priority Call
Serial Ports
Information
USER MANUAL
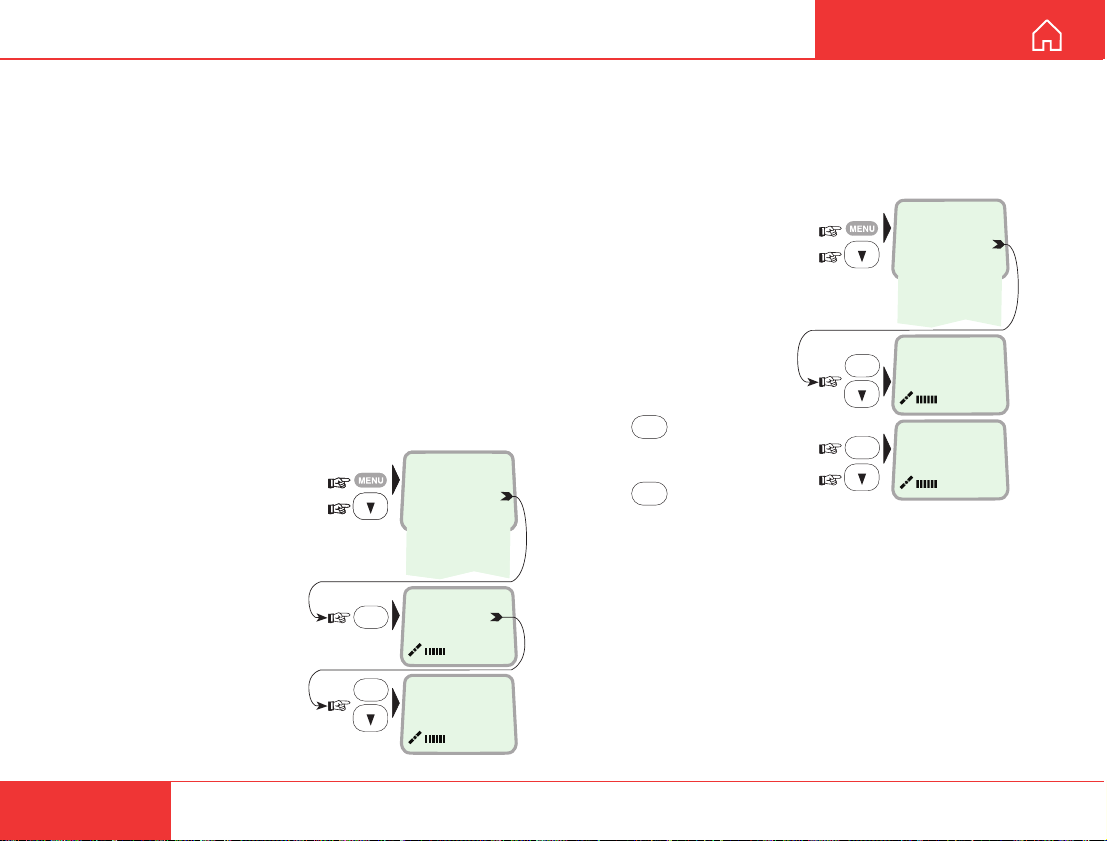
Phone setup
Active MSN (Multiple Subscriber Number)
When making a call, the device connected to Nera
F77 identifies itself locally by its MSN number .
Although specific MSN numbers may be programmed in the Nera ISDN Handset for both the 4.8
Speech and 64K S peech services, only one can be
active at one time for outgoing calls.
The first Nera ISDN Handset connected has the
following MSN numbers:
Identity MSN number Name/speech quality
#1: 20 4.8 Speech
#2: 30 64K Speech
T o change active MSN:
Sat. Search
OK
Sat. Search
»
Phone setup
»
Phone setup
Set Network
Set Network
Priority Call
Priority Call
Serial Ports
Serial Ports
Information
Information
»
Active MSN
Keyclick
1 Open the MENU:
scroll down to Phone setup,
and
select the Active MSN
function:
2 Select required identity/
speech quality:
Note! T o change MSN
number, see ISDN MSN
configuration later in this manual.
22
OK
» #1: 4.8 Speech
#2: 64K Speech
Keyclick
When activated, a click is heard when pressing a key.
The keyclick can be turned on/off as follows:
1 Open the MENU and scroll
down to Phone setup:
2 Select the Keyclick
function:
3 Press
On or Off, as required:
4 Press
setting.
OK
and scroll to
OK
to store the
Nera F77
Continuing the Saturn tradition
Page 23
USER MANUAL
HANDSET FUNCTIONS CONT’D
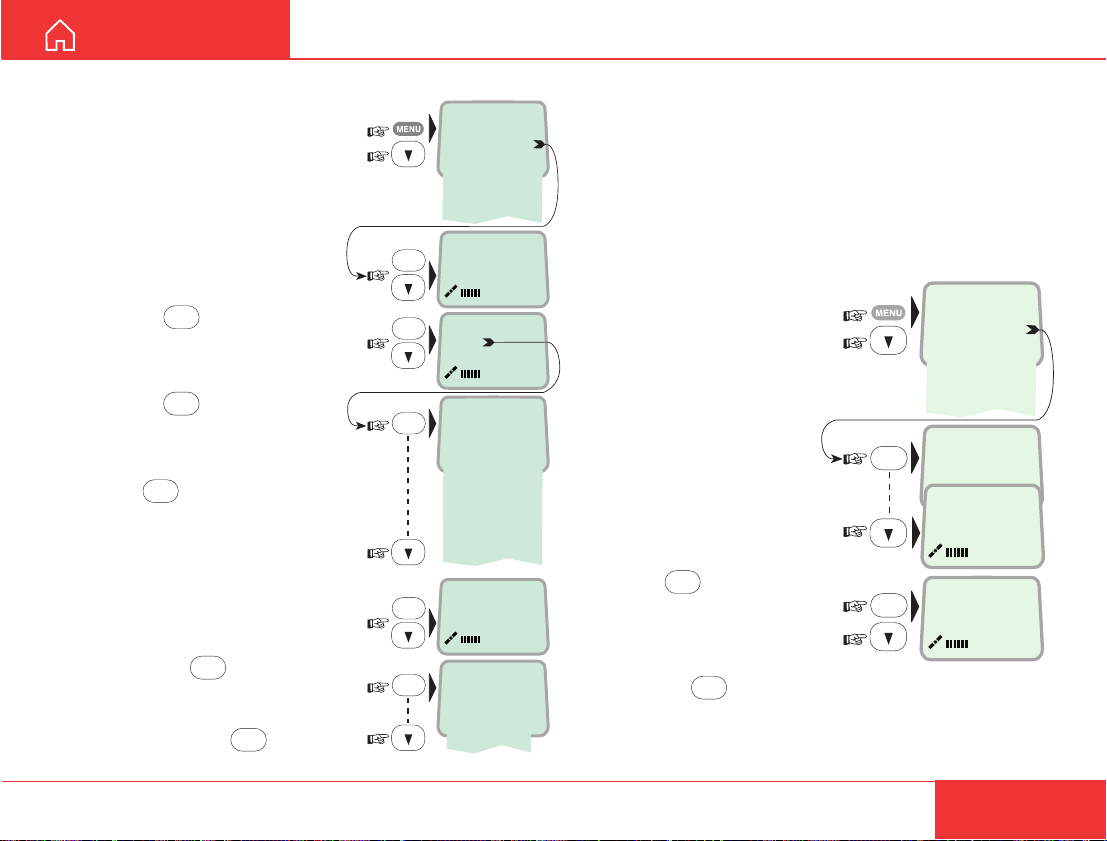
Ringer
The tone sound and level
heard when the phone
rings may be selected as
follows:
1 Open the MENU and
select
Phone setup > Ringer:
2 Press
OK
to select the
Tone function:
3 Press
OK
again and
scroll down to required tone:
Press OK to store the
selected one.
4 Select the Ringer function
again and scroll down to the
Volume function:
5 Pressing
choices:
Scroll down to required sound
level, and press OK to store it:
OK
lists the
OK
OK
OK
OK
OK
Sat. Search
»
Phone setup
Set Network
Priority Call
Serial Ports
Information
Keyclick
»
Ringer
»
Tone
Volume
»Tone#1
Tone#2
Tone#3
Tone#4
Tone#5
Tone#6
Tone#7
Tone#8
Tone#9
Tone
» Volume
»
Low
Medium
High
Increasing
Answer beep
Nera F77 may be set to emit a signal in the handset
when an outgoing call is answered. The signal will
also sound when a call is transferred at the remote
end.
The signal is not active during handsfree calls.
The answer beep can be turned on/off as follows:
OK
OK
Sat. Search
»
Phone setup
Set Network
Priority Call
Serial Ports
Information
»
Active MSN
Keyclick
Ringer
»
Answer beep
»
On
Off
1 Open the MENU:
scroll down to Phone setup,
and
select the Active MSN
function:
2 Scroll down to the Answer
beep function:
3 Press
On or Off, as required:
4 Pressing
OK
and scroll to
OK
stores the
chosen mode.
Nera F77
Continuing the Saturn tradition
23
Page 24
HANDSET FUNCTIONS CONT’D
USER MANUAL
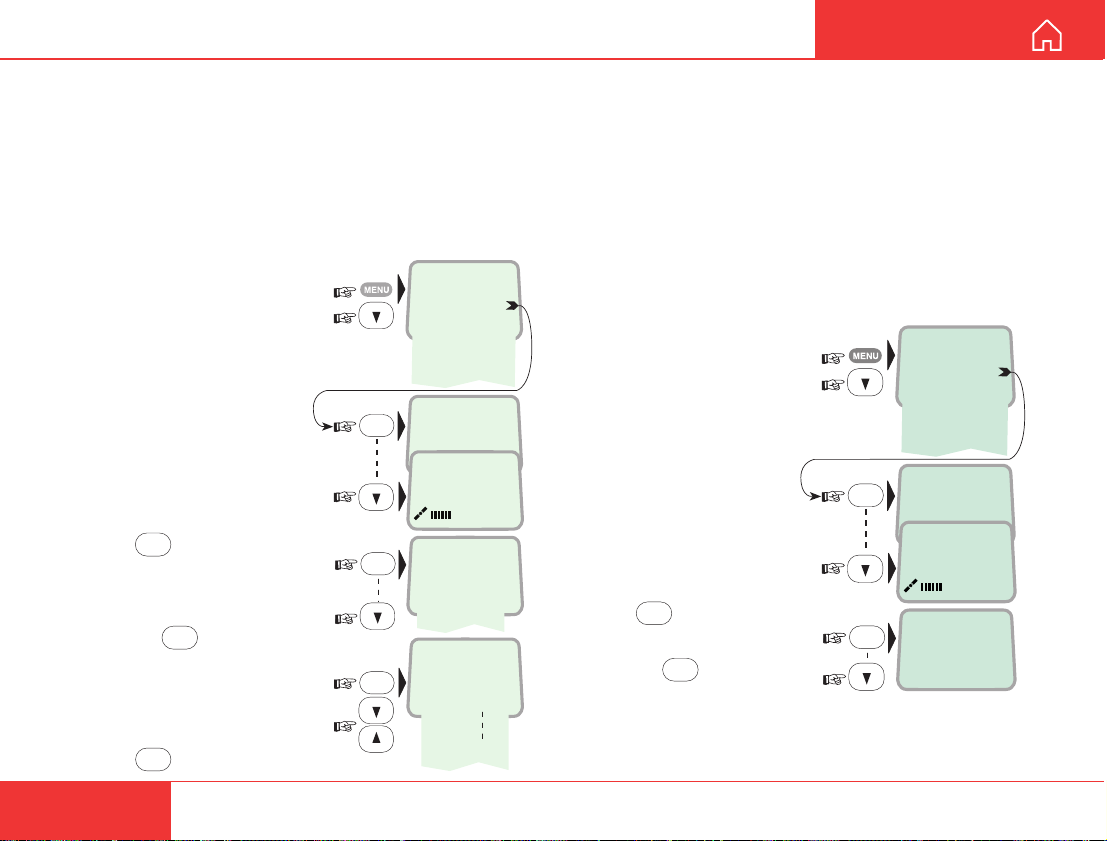
Backlight On/Off
The display and keypad backlight can be set to:
• On, permanently ON
• Off, permanently OFF
• 30 seconds ON when pressing a key or receiving
a call, and stays ON 30 secs after last event.
• Dimmer, intensity adjustable in 10 steps.
Changing the setting:
1 Open the MENU:
scroll down to Phone setup,
and
scroll down to the
Backlight function:
3 Press
to required setting:
4 Pressing
opens the backlight adjustment window:
Adjust with up/down arrows:
5 Press
OK
and scroll down
OK
at Dimmer
OK
to store.
OK
OK
OK
LIST
Sat. Search
»
Phone setup
Set Network
Priority Call
Serial Ports
Information
»
Active MSN
Keyclick
Answer beep
»
Backlight
»
On
Off
30 second
Dimmer
Dimmer [100%]
90%
10%
Protocol
Nera F77 allows selection between the following
ISDN protocols:
• Euro ISDN for connection to equipment conform-
ing to the European ISDN standard (default)
• NI-1 protocol for equipment conforming to the NI-1
standard (National ISDN-1).
• All ISDN devices and MCU must use the same
protocol.
The check for current protocol:
OK
OK
Sat. Search
»
Phone setup
Set Network
Priority Call
Serial Ports
Information
»
Active MSN
Keyclick
Backlight
»
Protocol
»
Euro-ISDN
NI-1
1 Open the MENU:
scroll down to Phone setup,
and
select the Protocol function:
2 Press
required protocol:
3 Pressing
chosen ISDN protocol.
T o change the default setting in the MCU, see ISDN
protocol configuration later in this manual.
OK
and scroll
OK
stores the
24
Nera F77
Continuing the Saturn tradition
Page 25
USER MANUAL
HANDSET FUNCTIONS CONT’D
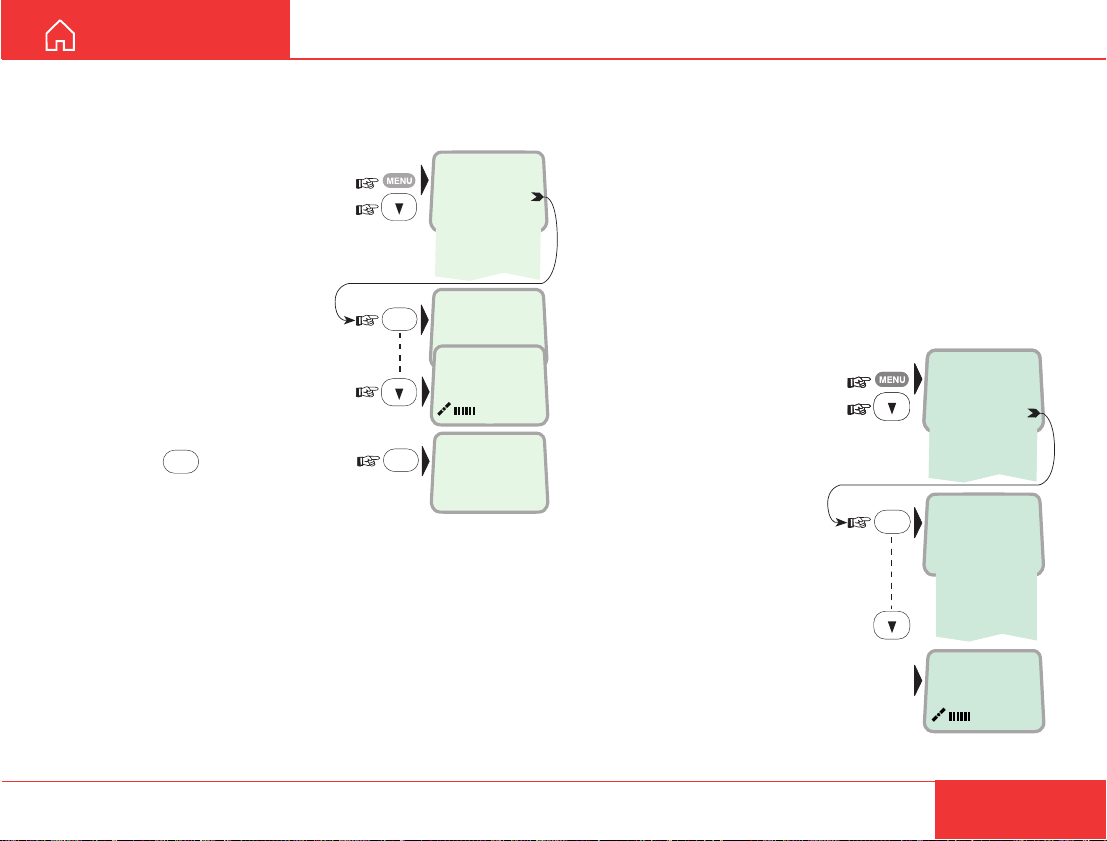
Software version
This function displays the Nera ISDN Handset
software version:
OK
OK
Sat. Search
»
Phone setup
Set Network
Priority Call
Serial Ports
Information
»
Active MSN
Keyclick
Protocol
»
SW version
1.3.00 270103
1 Open the MENU:
scroll down to Phone setup,
and
select the SW version
function:
3 Press
OK
to read:
Selecting default Net service provider
The default Net service provider for a satellite (Ocean
Region) is automatically used if the user does not
select another one.
When using SIM card, selection of a Net provider is
restricted to one of the allowed Net service providers!
When the Restricted Net function is enabled, and
with some SIM cards, selection of default Net service
provider is not possible.
Changing default Net service provider:
»
Sat. Search
OK
Sat. Search
Phone setup
»
Phone setup
Set Network
Set Network
Priority Call
Priority Call
Serial Ports
Serial Ports
Information
Information
»001/Telenor
002/Stratos
004/Telenor
005/OTE
007/Indosat
011/
France Tel
012/Xantic
Saving data ....
1 Open the MENU:
Scroll down to Set Network:
2 Scroll down to the
required Net service
provider:
3 Store the new Net service
provider for the current Ocean
Region:
Nera F77
Continuing the Saturn tradition
T o preprogramme Net provider for
all Ocean Regions, vt-Lite Marine
must be used, see Satellite Setup.
25
Page 26
HANDSET FUNCTIONS CONT’D
USER MANUAL
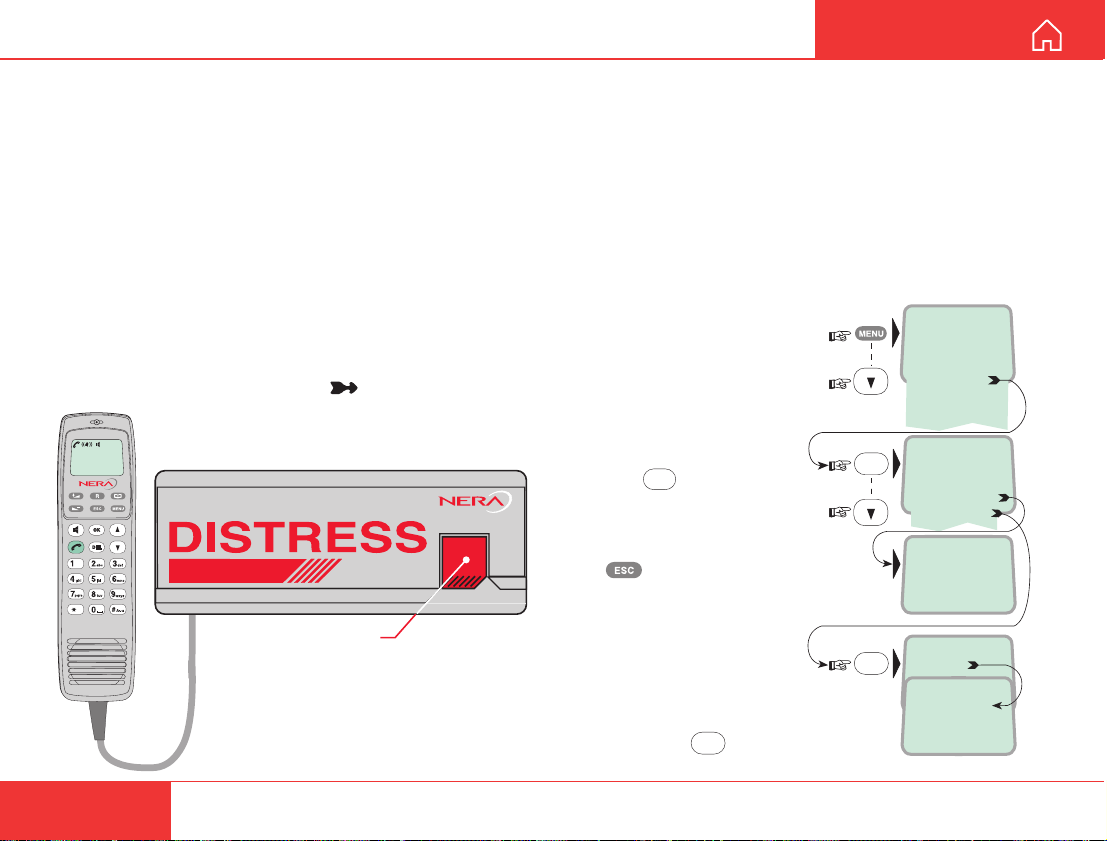
Priority calls
The Priority Call functions only appear in the Nera
ISDN Handset connected to the Distress Alarm Unit.
The following call priority levels are recognized by the
Inmarsat system:
Safety Call
Urgency Call
Distress T est
Test Buzzer
For Safety Call or Urgency Call, specific telephone
numbers are prompted for that must be provided by
the Net service provider.
See menu to select function:
Nera ISDN Handset
ISDN
ALPHA
May 01 09:15
4.8 Speech
Distress Alarm Unit
Nera F77
DISTRESS BUTTON
Accessible when lifting the flap.
Must be pressed and held down for at
least 6 seconds to activate an alarm.
(Allows checking the alert function
when set in distress test mode)
Distress Alarm
The Distress Alarm Unit allows activation of an alert
transmission. Messages concerning the alarm
transmission and reception are displayed on the
connected Nera ISDN Handset.
T esting the Distress Alarm Unit
Call service no. 33 to arrange an alarm test transmission with the Land Earth Station (LES).
Procedure:
1 Open the MENU:
Scroll down to Priority Call:
Sat. Search
»
Phone setup
Set Network
Priority Call
Serial Ports
Information
2 Scroll down to
Distress T est.
Pressing
OK
enables
the Distress Test function,
allowing a test alarm
transm
press to exit.
Press the DISTRESS BUTTON
within 30 secs, otherwise a real
distress will be transmitted.
ission. If required,
3 Press Priority Call again
(step 1) and scroll down to
T est Buzzer.
When pressing OK, the Distress
Alarm buzzer sounds for a short period.
OK
OK
»
Safety Call
Urgency Call
Distress Test
Test Buzzer
Distress Test
Mode Enabled
Self Test
BUZZER_ON
26
Nera F77
Continuing the Saturn tradition
Page 27
USER MANUAL
OK
»
Sat. Search
Phone setup
Set Network
Priority Call
Serial Ports
Information
»Driver switch
Speed
Format
Flow control
OK
OK
Port A
»
Port B
RS-232
»
RS-422
HANDSET FUNCTIONS CONT’D
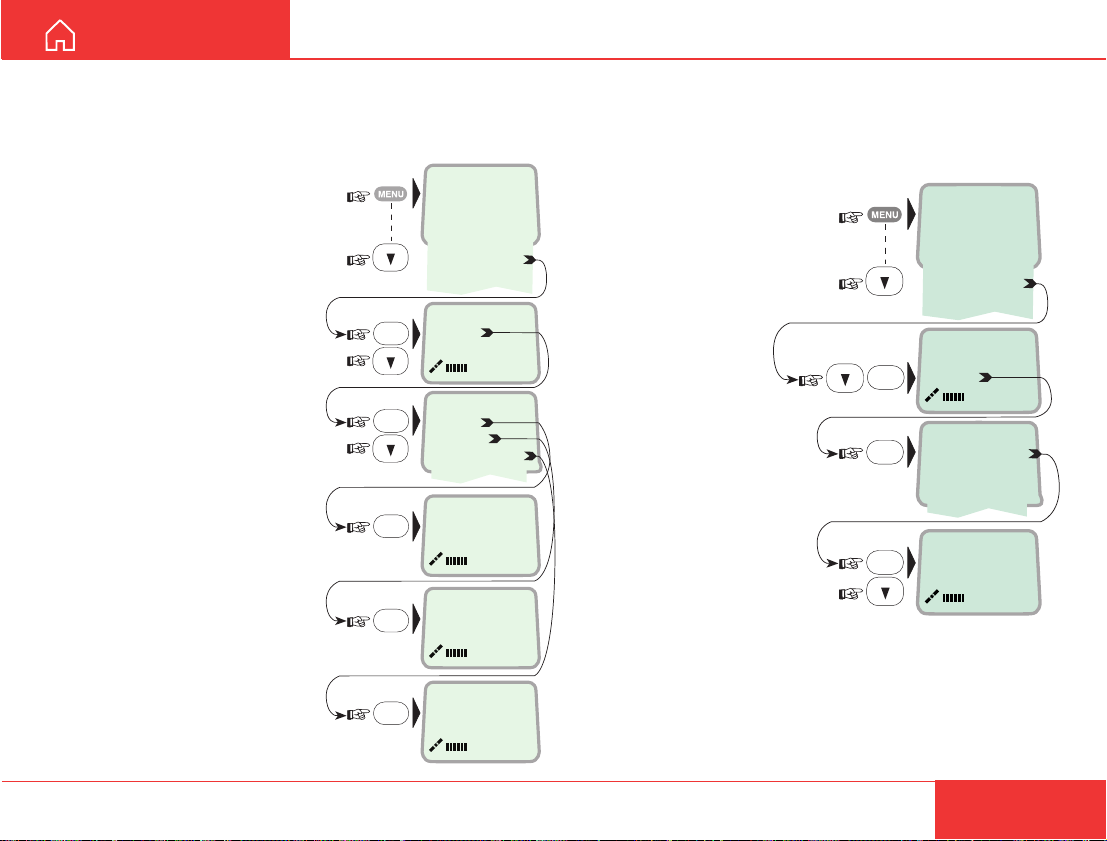
Setting serial ports
The data speed, format and flow control for the
RS-232A and B ports are set up as follows:
1 Open the MENU and
scroll down to Serial
Ports:
Sat. Search
»
Phone setup
Set Network
Priority Call
Serial Ports
Information
See Overview for
available choices.
OK
»
Port A
Port B
2 Select the parameter
OK
to be set for Port A:
3 Select the listed data
Speed 1 15200bps
(default):
4 Select listed format:
8 data bits, no parity and
1 stop bit (default)
5 Set flow control to
none (default):
»Speed
Format
Flow control
OK
»
115200bps
» d=8,p=none,s=1
OK
d=8,p=e,s=1
none
OK
»
rts/cts
RS-232 B / RS-422 driver switch
Select data speed, format and flow control as described above.
Switching the driver from
RS-232B to RS-422:
6 Select Serial Ports:
and
scroll down to Port B:
7 Open the Driver
switch function:
and
scroll down to RS-422:
The RS-422 is now activated for
connection of e.g. PC using cables of up to 100 m.
The RS-232 B port is disconnected.
Nera F77
Continuing the Saturn tradition
27
Page 28
HANDSET FUNCTIONS CONT’D
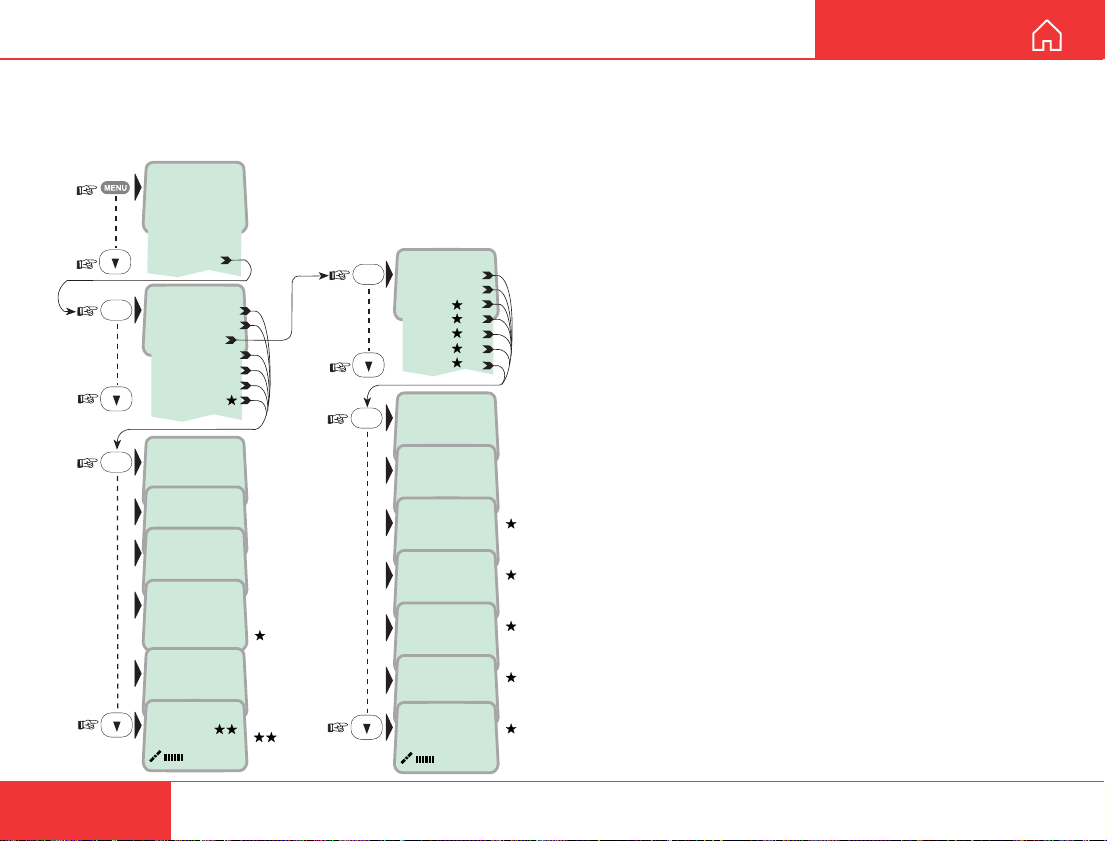
Information available
Open the menu and scroll down to read various
information, as indicated (examples):
»
Sat. Search
Phone setup
Set Network
Priority Call
Serial Ports
Information
OK
»
Diagnostics
Forward Id
Version Info
Network Info
Alarms & Msgs
Position
Heading
OK
On
Off
HW (fwd):A98853
IOR Spot: 5
Ready for call
»
Clear Causes
Alarms List
Info Log
010d29m02s E
059d52m11s N
Only appears with
Diagnostics ON
OK
OK
»
System
Ctrl SW
DSP
Monitor
KDB
RFB
ATB
Rel. 1.2
30 Aug 2002
101476 Ver: 1.2
27 July 2002
1.1
1.05
1.20
0.140
USER MANUAL
28
0.0
000
Requires NMEA
input to MCU
Type: 160.110
Nera F77
Continuing the Saturn tradition
Page 29
USER MANUAL
OPERA TION FROM PC
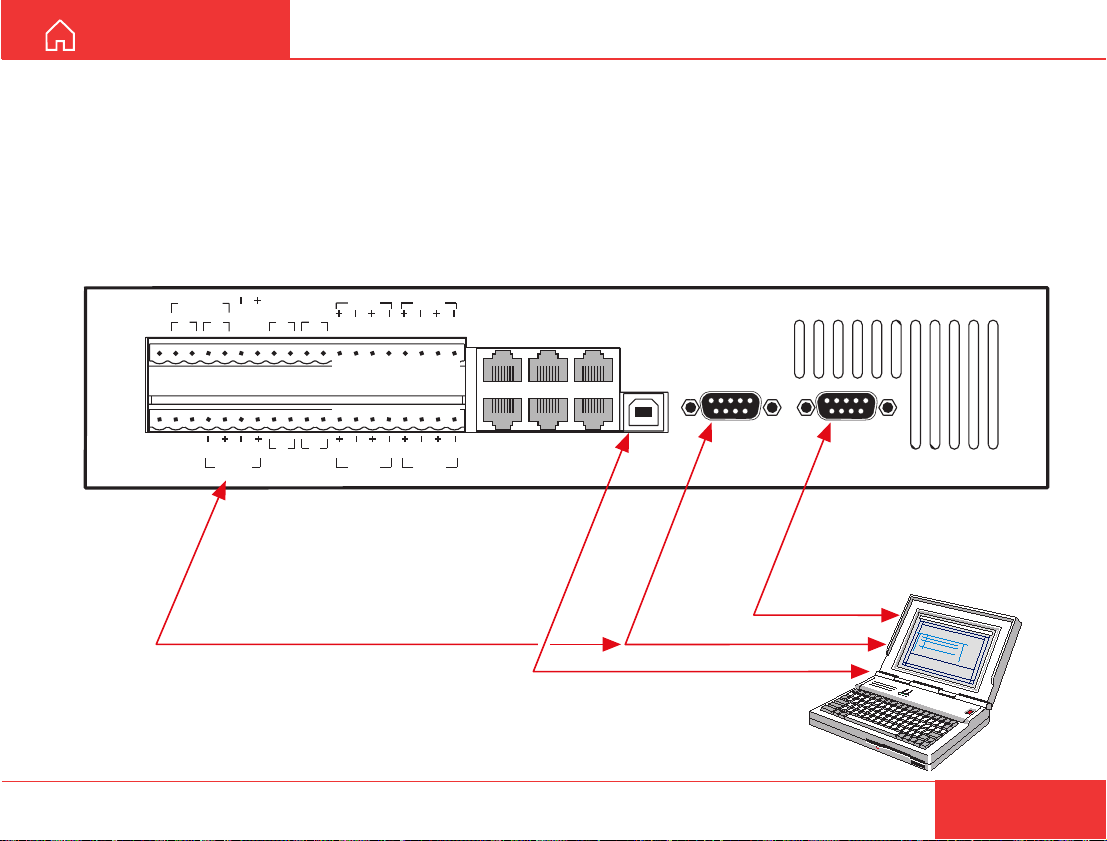
Installing the PC program
The vtLite Marine program allows Nera F77 to be
operated or configured from a PC, including functions such as:
• Phone book
• Traffic log
• Configuration of ports
(ISDN/analogue/RS-232/USB/RS422)
SILENCE
SW
IND
NMEA
TX
TX
RX
RS-422
Max 100 metres
NMEA
RX
TX
TEL 1
TEL 3
4 5 3 6 4 5 3 6
4 5 3 6 4 5 3 6
TX
TEL 4
TEL 2
TEL 4
ISDN
ISDN
ISDN
TX
TX
TX
TX
RX
RX
RX
RX
RX
RX
ISDN
8 1
1 8
TX
TX
ISDN
ISDN
RX
RX
For an explanation of the functions, see later in this
manual.
The vtLite Marine program is available on the
enclosed CD and must be installed on the PC
harddisk.
Close any Acrobat Reader program open on the PC
before proceeding.
See next page.
TEL 4
ISDN
8 1
1 8
ISDN
8 1
1 8
TEL 3
USB
5 4 3 2 1
9 8 7 6
RS-232
B
USB port
5 4 3 2 1
PC serial port
PC serial port
9 8 7 6
RS-232
A
Nera F77
Continuing the Saturn tradition
DTE
29
Page 30
OPERATION FROM PC CONT’D
USER MANUAL
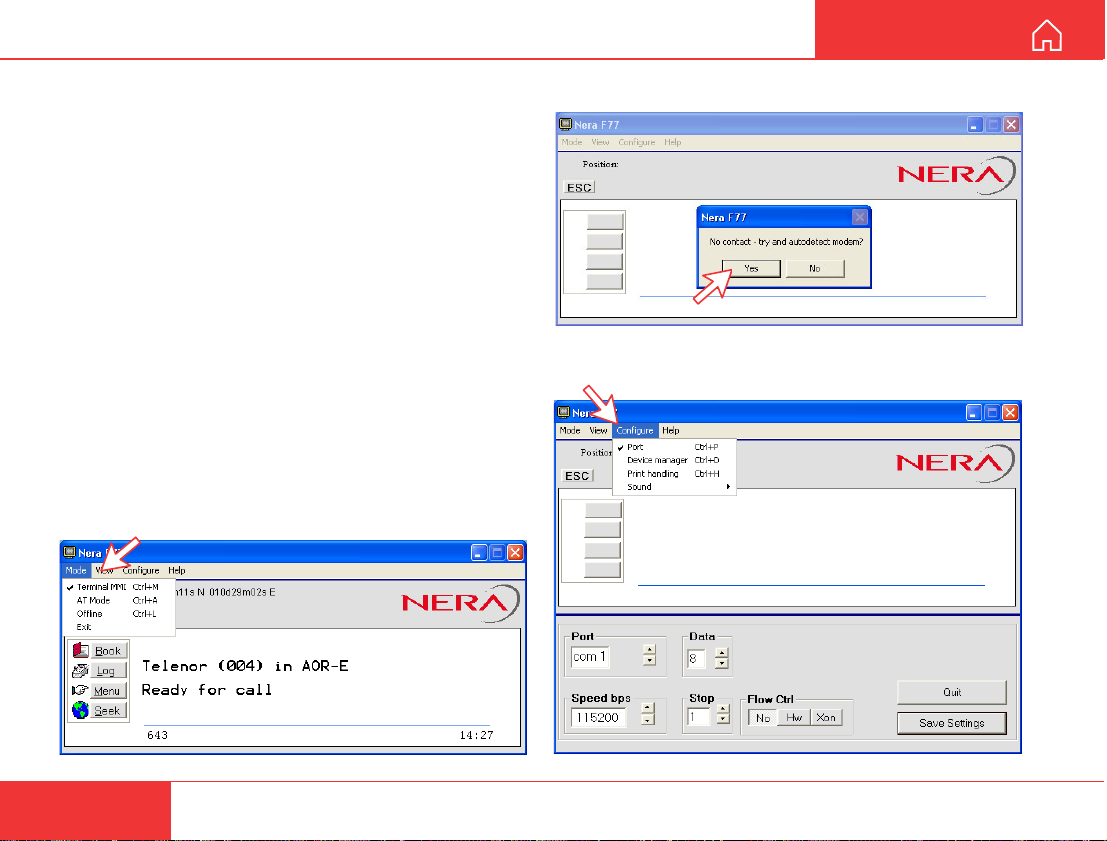
Procedure:
1 Insert the CD :
The Start Page opens automatically in a few seconds.
(Alternatively, open the Acrobat file “Nera F77_StartPage”
on the CD. If necessary, install Acrobat Reader by clicking
“Ar505enu.exe” in the “SW Installation” folder.)
2 Click “Software Installation” and then “vtLite
Marine”. Allow files to load on to the PC hard drive.
The installation of the program starts automatically
when files have been loaded.
3 Connect the serial cable between the PC serial
port and the RS-232 port on the Nera F77 Main
Communication Unit. See previous page.
4 St art the vtLite Marine program by clicking
Start>Programs>vtLite Marine.
5 Switch ON the Main Communication Unit.
If no contact, click Mode>Terminal MMI.
6 If no contact, try Autodect.
7 Click Configure > Port to check the port settings.
30
Nera F77
Continuing the Saturn tradition
Page 31
USER MANUAL
OPERATION FROM PC CONT’D
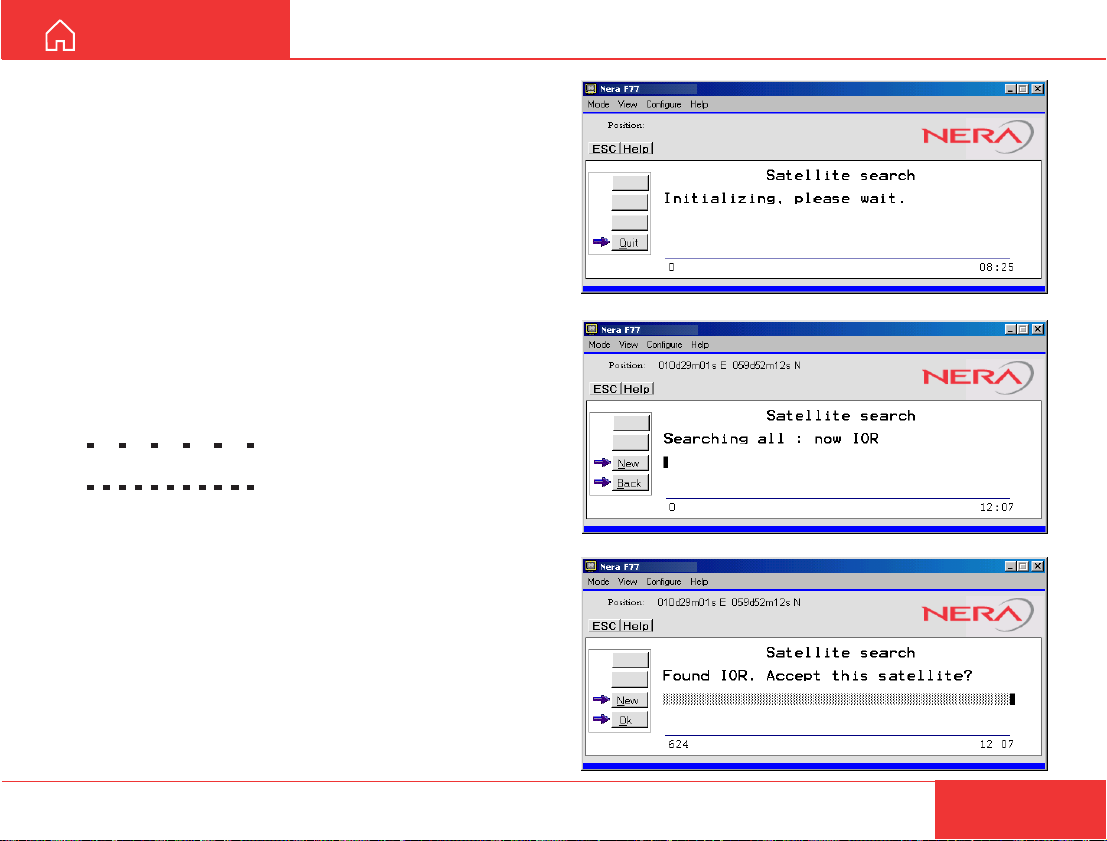
Starting up
• Switch ON Nera F77,
see figure 4 for location of the ON/OFF switch.
• Turn ON the PC and click
Start>Programs>vtLite Marine.
1 The satellite search program is initialized.
See also "Satellite search" .
2 Nera F77 starts searching for last known satel-
lite (Ocean Region) as default.
On a PC with sound ability , beep tones will be heard
when clicking Tone (text changes to Mute).
slow intermittent tones when searching
for any satellite.
rapid intermittent tones when closing in
on a specific satellite (faster when
searching for a single satellite).
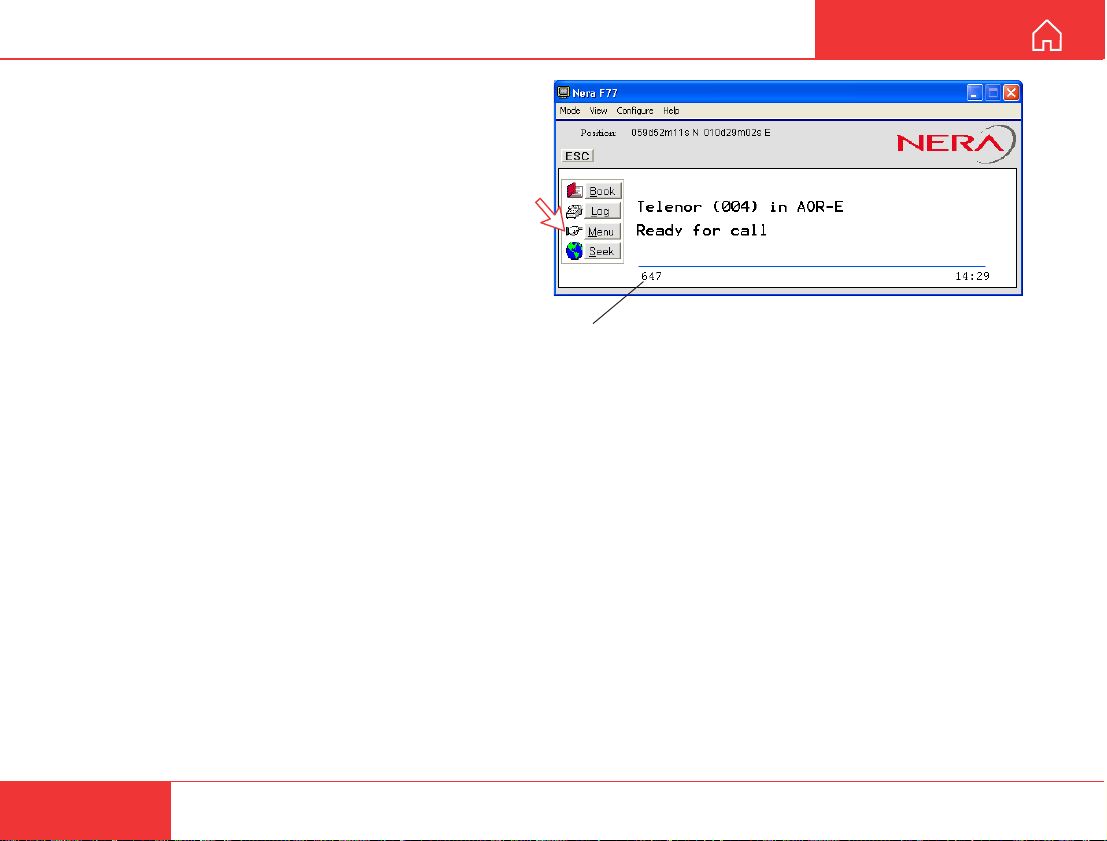
3 When receiving a satellite signal, a signal strength
bar will appear in the search window.
The longer the signal bar or higher the signal
strength indicator value, the better the signal quality .
The maximum marker indicates the highest signal
strength achieved during the current search.
Note! It is recommended that the signal strength
reading (S/N=Signal/Noise ratio) should be at least
1
2
3
Nera F77
Continuing the Saturn tradition
31
Page 32
OPERATION FROM PC CONT’D
USER MANUAL
550, typically 660. The antenna will automatically
fine-tune to the best signal and accept it.
Clicking Seek starts the search again.
If required, select a specific satellite by clicking New.
See also "Selecting default Net provider".
4 The equipment is ready for use when the
Main window appears.
To make a connection, see "Making a call"
4
S/N=Signal/Noise ratio
32
Nera F77
Continuing the Saturn tradition
Page 33
USER MANUAL
OPERATION FROM PC CONT’D
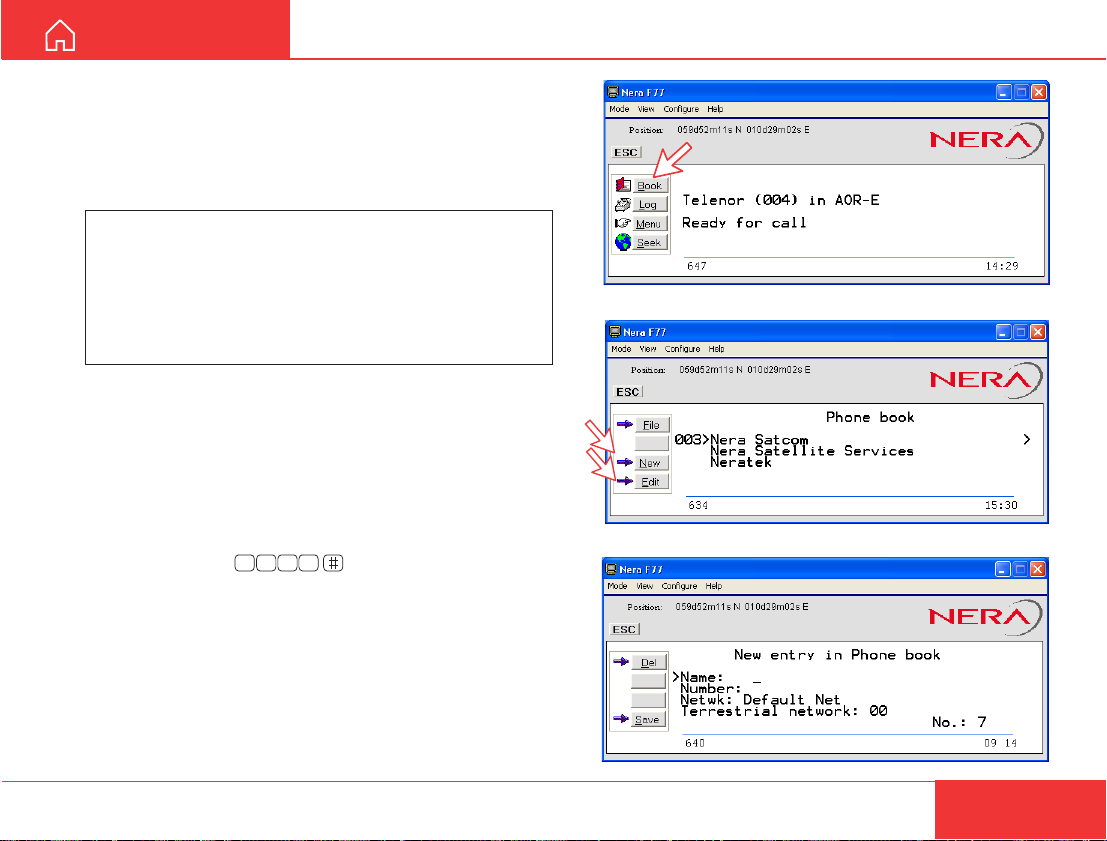
Phone book
Adding and editing entries can also be done from the
handset, see OPERATION FROM HANDSET.
Phone book capacity
MCU SIM card
Phone numbers: 100 entries 100 entries
Number length: 19 digits 19 digits
Name length: 29 characters 12 characters
Entry numbers: 0 - 99 100 and up
The SIM card entries and "MCU" entries merge when
the card is inserted. The list is sorted by name.
Abbreviated dialing (prefix 23)
(Data vary with card type)
1 Clicking Book opens the Phone book.
2 Scroll through list }/ to wanted entry .
Example: dialing
phone or ISDN keypad fetches and sends the telephone number stored under short number entry 10.
Adding or editing entries
2 3 51
on the analogue tele-
3 Clicking New (window 2) opens the window used
to add an entry to the book.
Use Del to modify. Save stores the new entry.
1
2
3
Nera F77
Continuing the Saturn tradition
33
Page 34
OPERATION FROM PC CONT’D
USER MANUAL
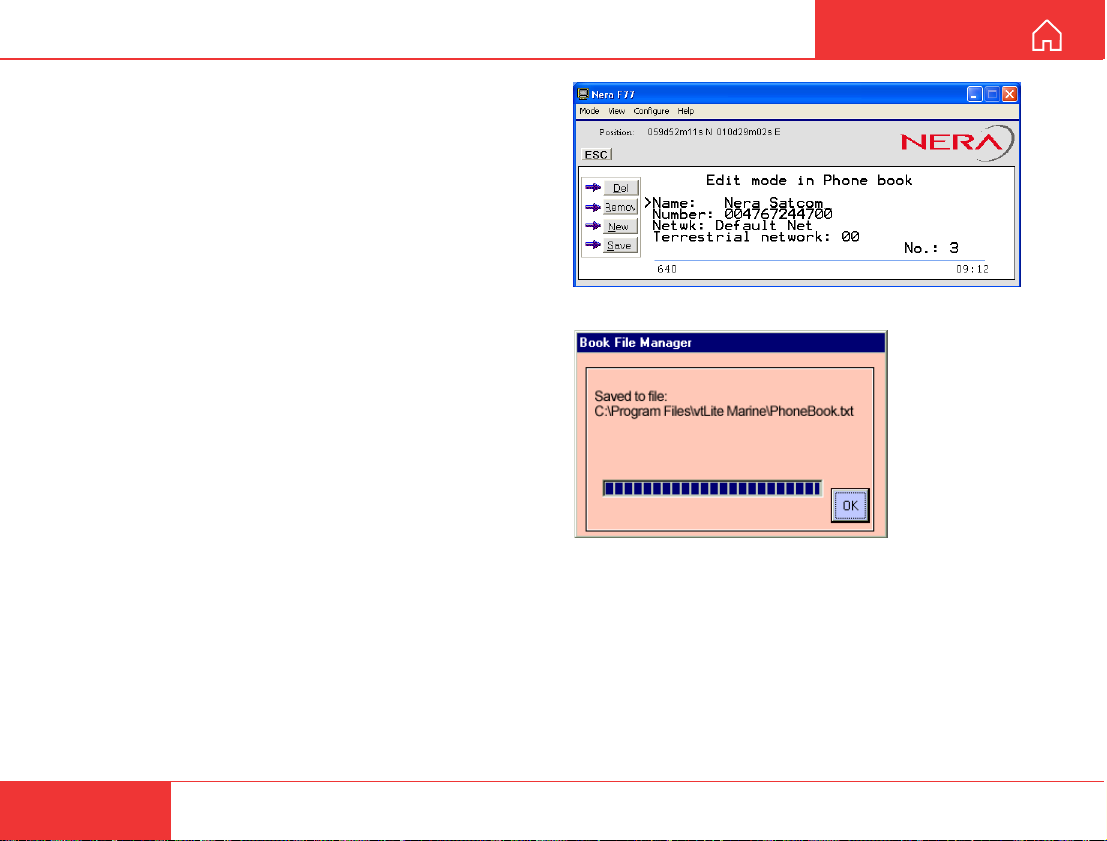
4 Clicking Edit (window 2 on previous page) opens
the window allowing changes to be made in the
Phone book.
Use Del to modify. Remov erases the entry.
Note! The book is also used with the restriction “Dial
from book only”, see "Restricted dialing setup".
Terrestrial network is normally "not in use" in the
Inmarsat system.
Saving entries to/from PC
5 Click File to save, load or replace the phone book.
4
5
34
Nera F77
Continuing the Saturn tradition
Page 35
USER MANUAL
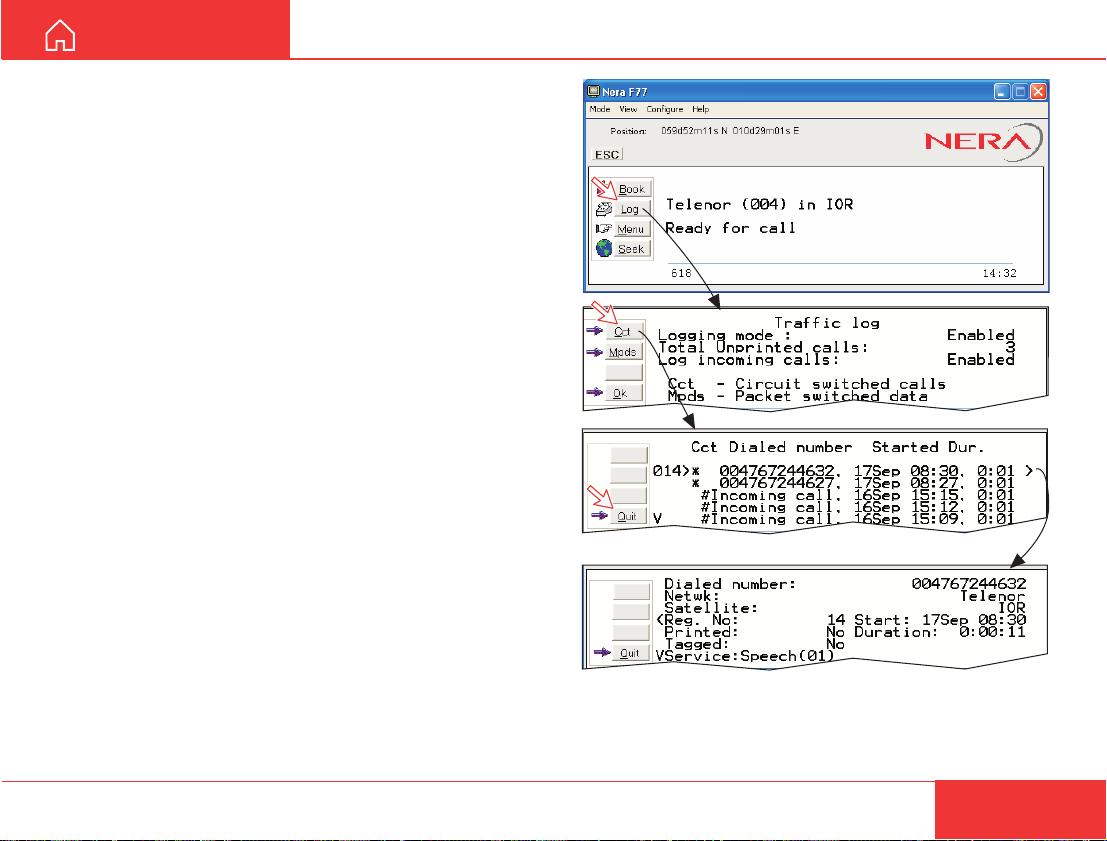
#
Tagged for printout
*
Calls not yet printed
OPERATION FROM PC CONT’D
Traffic Log
This function logs all outgoing and incoming calls
both with and without SIM card inserted. Incoming
calls may be logged as well.
Up to 100 calls can be logged:
Circuit switched calls (Cct) including:
• Voice calls
• Mobile Data Service calls
Packet switched data calls (Mpds) including:
• Mobile Packet Data Service calls
The Nera F77 owner may set the log output mode as
follows, (see "Traf fic log settings"):
• paused
• cleared (stops logging and clears the log)
• enabled
Traffic log readout
1 Clicking Log opens the T raf fic log window.
2 The T raf fic log window shows whether the logging
is enabled, whether incoming calls are logged, and
the total number of unprinted calls (MPDS and Cct
calls).
Circuit switched calls:
Clicking Cct displays the list of calls.
3 Scroll }/ to wanted call record and press to
display details of the selected call.
1
2
3
4
4 The call details include data such as dialed
number, start of the call, duration, service and
terminal Id.
Quit reverts to main window .
Nera F77
Continuing the Saturn tradition
35
Page 36
OPERATION FROM PC CONT’D
USER MANUAL
Mobile Packet Data Service calls:
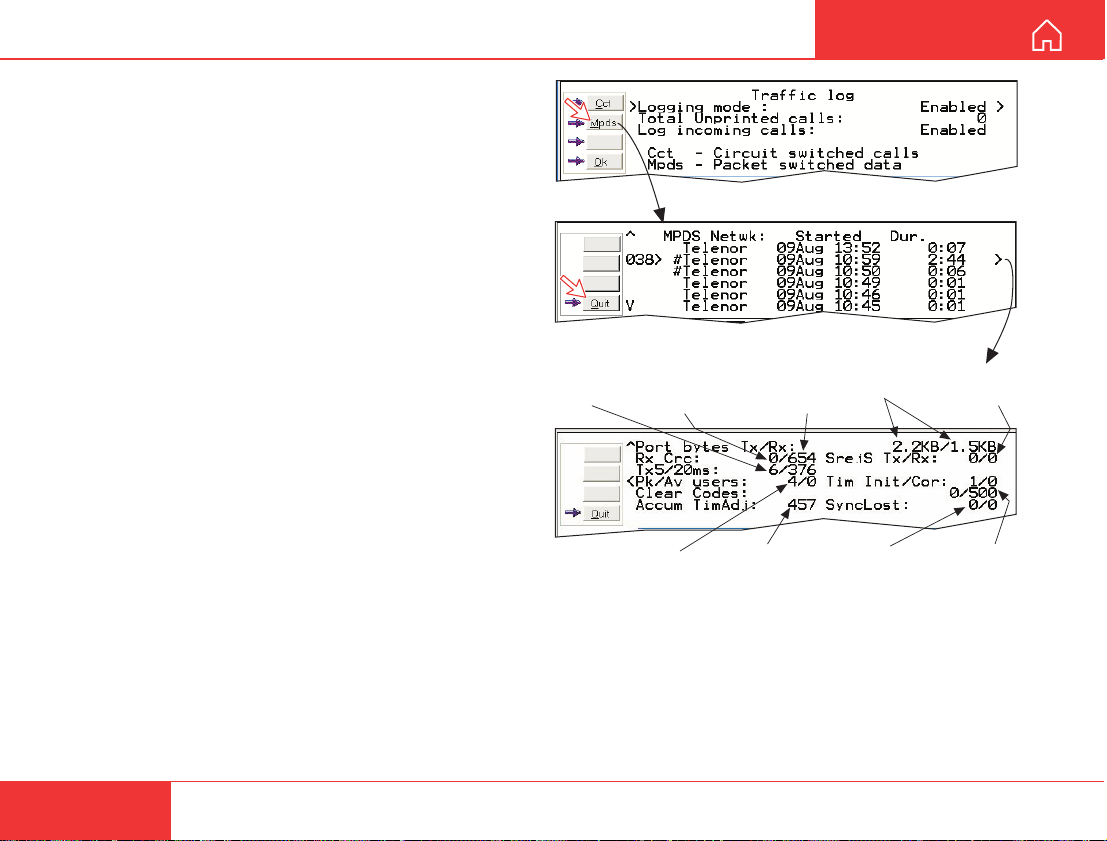
5 Clicking Mpds displays the list of Mobile Packet
Data Service calls.
6 The call list include data such as Net provider , st art
of the call and duration.
Scroll }/ to wanted call record and press to
display details of the selected call.
7 The call details include data such as forward errors
in the MPDS system, forward frames received, etc.
Quit reverts to main window .
5
6
No. of 5 and
20ms slots
used
7
Peak and average
number of users on the
same channel.
Example: 4 active users.
#
Tagged for printout
Forward errors
in the MPDS
system
Time adjustment
of slot due to
location on earth
Forward
frames
received
Tx/Rx in
Bytes
Lost synchronisation
Retransmitted
frames Tx/Rx
direction
Clear cause
level1/level2
(0/500=
normal clear)
36
Nera F77
Continuing the Saturn tradition
Page 37
USER MANUAL
#
Tagged for printout
*
Calls not yet printed
Hours:minutes:secondsService Terminal Id
OPERATION FROM PC CONT’D
Traffic log settings
(owner level only , see "Shifting to owner level")
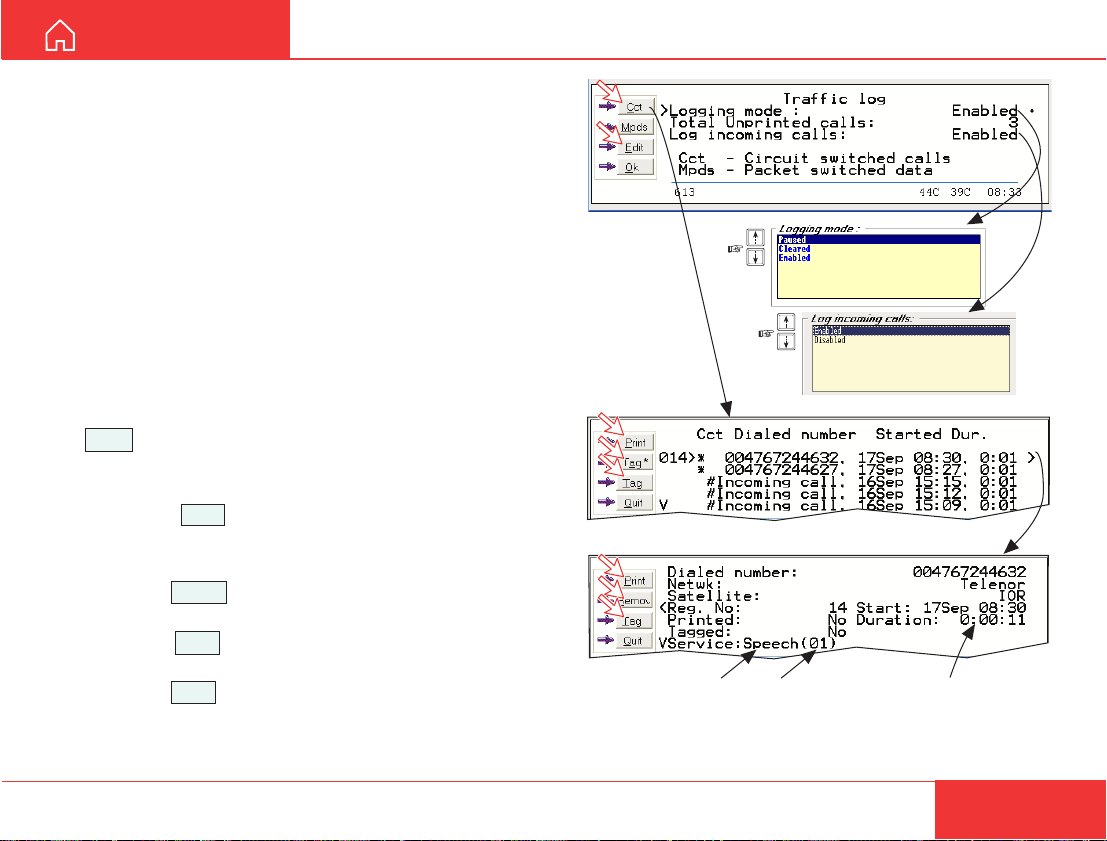
1 In the Main window , clicking Log opens the Traffic
log window, which displays the current log mode,
number of unprinted calls, and whether logging of
incoming calls is enabled/disabled.
• Point to Logging mode, click Edit or to choose
mode of operation:
• Paused: any logging is off.
• Cleared:
• Enabled: outgoing logging is on.
Scroll }/ to wanted mode, and click to select.
• Scroll down to Log incoming calls and click
Edit or to enable or disable logging of incoming calls.
Circuit switched calls:
2 Clicking Cct in the Traffic log window (1) opens
the list of all call records except MPDS calls.
Print outputs all unprinted calls (marked with a star):
•Clicking Tag* marks all calls with a hash, which
adds the records to the printout file.
•Clicking Tag marks the selected call with a hash,
which adds the record to the printout file.
•Clicking Tag again untags a selected record.
all log entries are deleted (incoming and outgoing).
1
2
3
3 Pressing at a record when in window (2)
displays detailed call data.
Nera F77
Continuing the Saturn tradition
37
Page 38
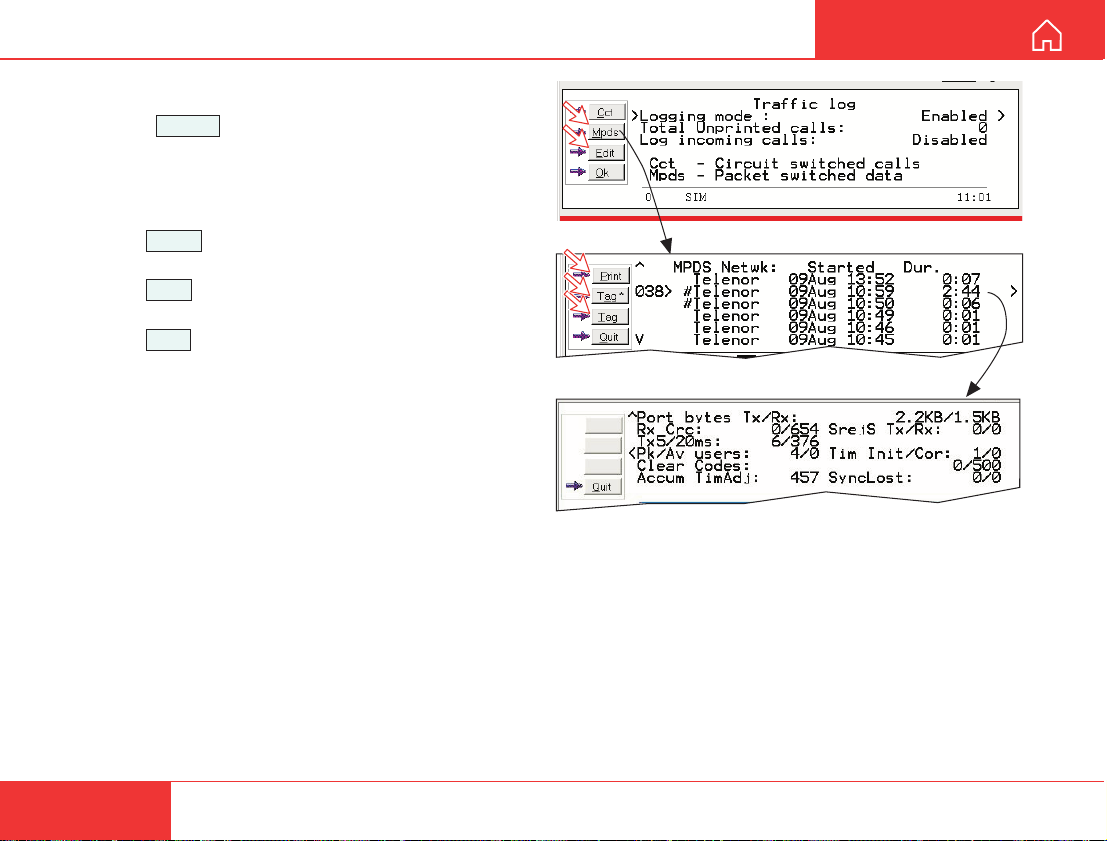
OPERATION FROM PC CONT’D
USER MANUAL
Mobile Packet Data Service calls:
4 Clicking Mpds in the Traffic log window (1) opens
the list of Mobile Packet Data Service call records.
5 Print outputs all unprinted calls (tagged with a
hash):
•Clicking Tag* marks all calls with a hash, which
adds the records to the printout file.
•Clicking Tag marks the selected call with a hash,
which adds the record to the printout file.
•Clicking Tag again untags a selected record.
6 Pressing Q at a record when in window (2)
displays detailed call data.
4
5
#
Tagged for printout
6
38
Nera F77
Continuing the Saturn tradition
Page 39
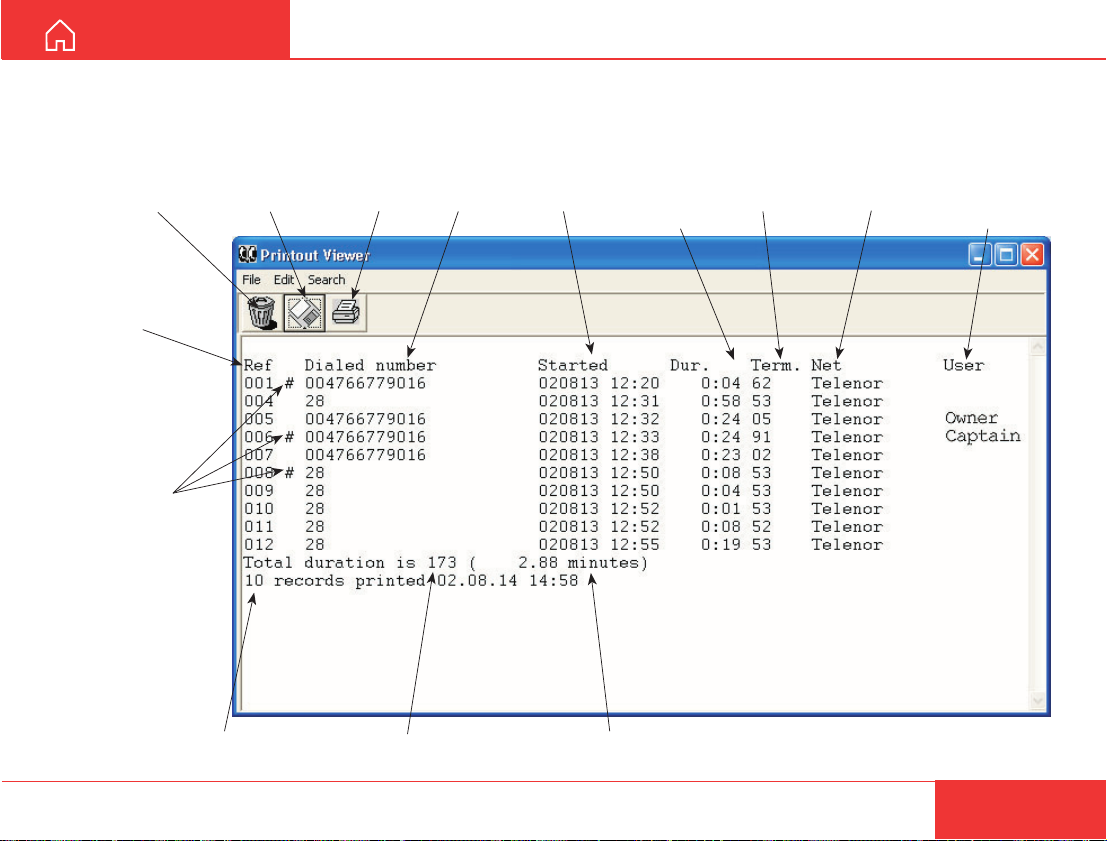
USER MANUAL
OPERATION FROM PC CONT’D
Traffic log printout viewer - normal calls (Cct)
The viewer lists tagged call records.
Records that have been printed out previously are
Click to delete
record file
Ref. no.
#: record printed
previously.
"No hash" when
printed first time.
Click to save
record file
Click for
printout
Subscriber
number
Start date
and time
marked with a hash.
The record file can be printed out or saved to disk.
For default setup, see "PRINT HANDLING".
Call duration
in minutes
and seconds
TerminalIdNet service
provider
User name if
access code
is activated
Number of
records
Nera F77
Continuing the Saturn tradition
Duration in
seconds
Accumulated time in minutes
and 1/100 of a minute
39
Page 40
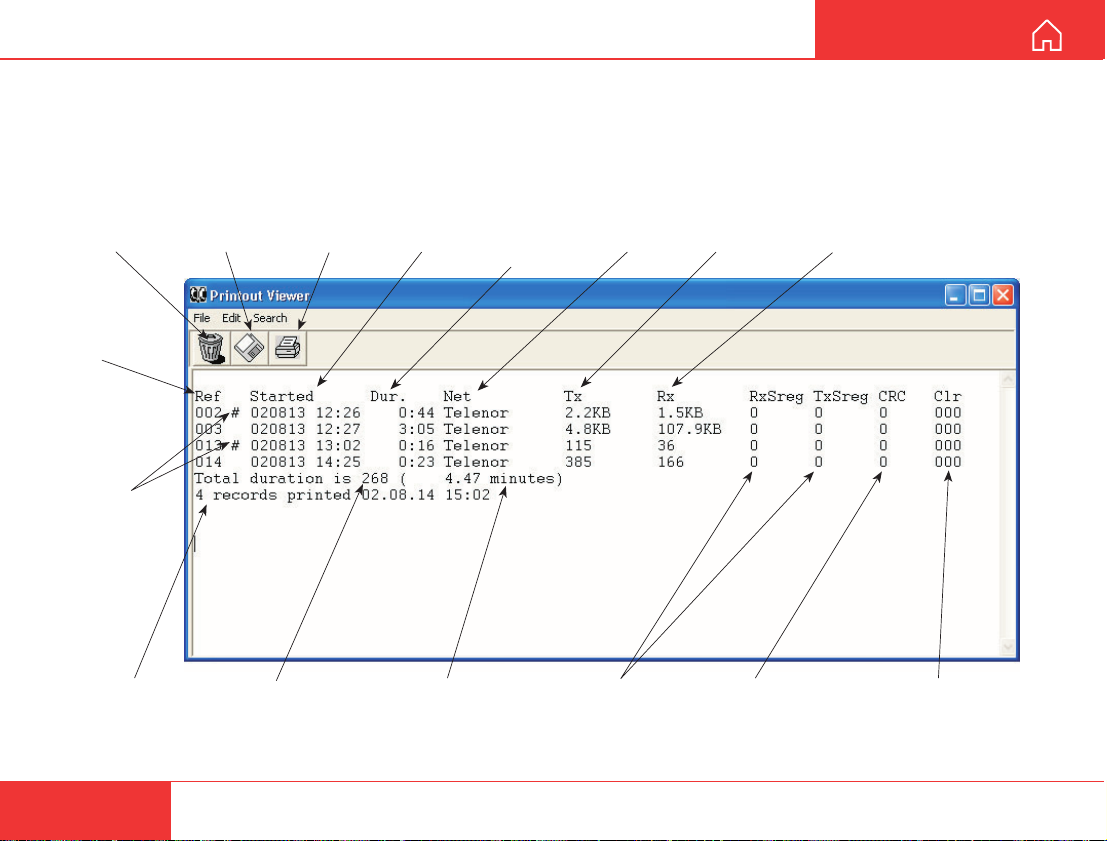
OPERATION FROM PC CONT’D
USER MANUAL
Traffic log printout viewer Mobile Packet Data Service calls (MPDS)
The viewer lists tagged call records.
Records that have been printed out previously are
Click to delete
record file
Ref. no.
#: record printed
previously.
"No hash" when
printed first time.
Click to save
record file
Click for
printout
Start date
and time
Call duration
in minutes
and seconds
marked with a hash.
The record file can be printed out or saved to disk.
For default setup, see "PRINT HANDLING".
Net service
provider
Transmitted
data in Bytes
Received
data in Bytes
Number of
records
40
Duration in
seconds
Accumulated time in
minutes and 1/100
of a minute
Retransmitted
frames
Forward errors in
the MPDS system
Clear cause codes.
000=normal clearing
of connection
Nera F77
Continuing the Saturn tradition
Page 41
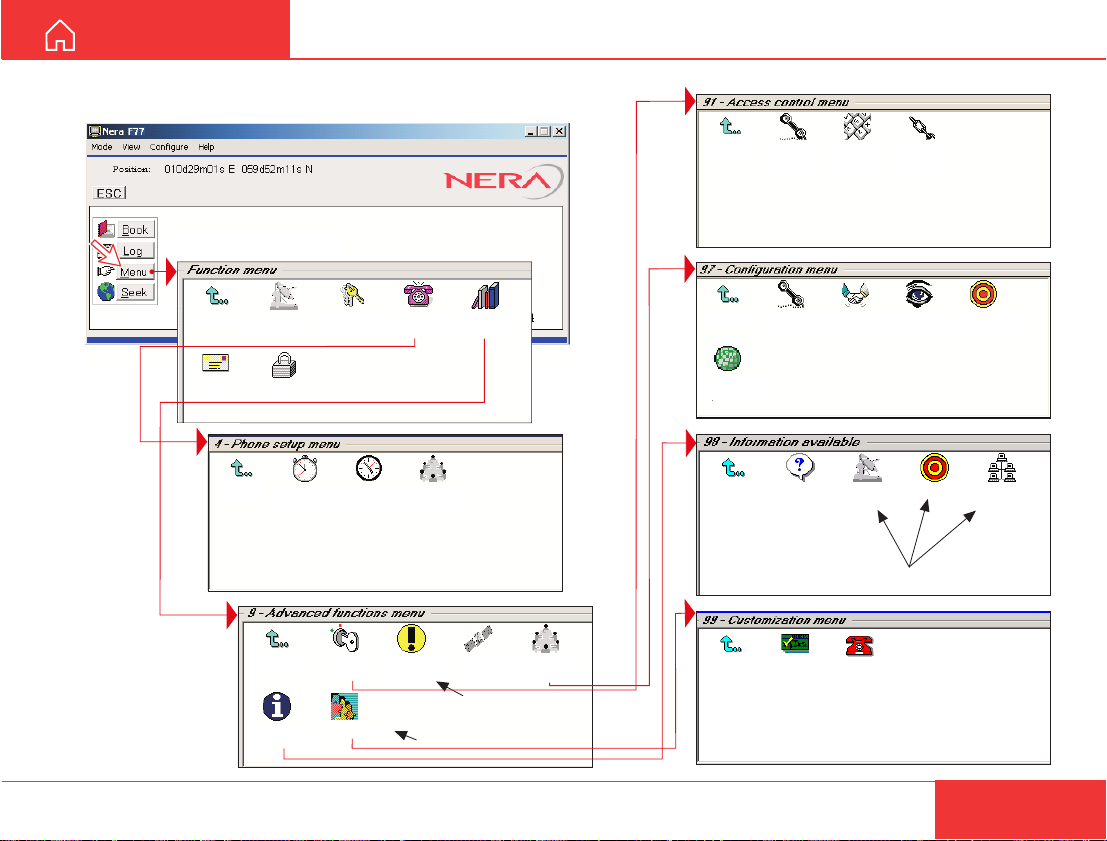
USER MANUAL
Menu functions
Point at icons and double-click the mouse to open menus and functions.
CONFIGURA TION FROM PC
Exit Menu
Mail
Exit Menu
1. Set default
Net provider
Lock
2. Call duration
guard
Exit Menu
8. Information
available
2. Set access
level
4. Set system
clock
1. Access
control
9. Customize
9. Advanced
4. Phone
setup menu
4. Alarms and
messages
functions
7. Message
indication
6. Satellite
setup
Only appears when
Diagnostics is ON
Only appears in OWNER level.
7.
Configuration
1. Restrict
Exit Menu
Exit Menu
configuration
9. Spot Beam
Report Method
Exit Menu
Exit Menu
dial
1. ISDN
2. Misc.
version I...
1. Paid
functions
2. Access
2. Net service
providers
3. Transceiver
2. Phone
name setup
3. Restrict
SIM usage
code
4. Set
7. Rx L-band
diagnostics
Setup
4. EIRP table
Status
Only appears in OWNER level.
9. Network
status information
Nera F77
Continuing the Saturn tradition
41
Page 42
CONFIGURATION FROM PC CONT’D
USER MANUAL
Function reference list
Reference number for direct selection. Click menu in main window and then key in the number.
Ref. Function Features
1 Set default Net provider Allows changing Net service provider (and terrestrial network).
See "Selecting default Net service provider".
2 Set access level Allows shifting between user level and owner level, changing PIN code
4 Phone setup menu
42 Call duration guard Sets maximum call duration for 64 kbps calls.
44 Set system clock Sets MCU time and date.
47 Message indication Switches indication of received call on/off.
9 Advanced functions menu
91 Access control menu See "Advanced functions".
911 Restrict dial
912 Access code
913 Restrict SIM usage Only allows calls with specific card, no card or any card.
96 Satellite Setup Allows preprogramming of Net service providers etc.
97 Configuration menu
971 ISDN configuration Chooses between ISDN protocols.
972 Net service providers Changing Net service provider data.
974 Set diagnostics Allows additional system information to be displayed
977 Rx L-Band setup See Installation Manual,,
979
98 Information available See "Advanced functions ".
982
983 Transceiver status Displays max/min voltages and temperatures in RF uint
984 EIRP table Carrier status (not in use)
989
99 Customization menu See "Advanced functions".
991 Paid functions Installs additional functions, if any.
992 Phone name setup Allows altering the factory and phone name.
Spot beam report method
Misc.version Id information
Network status information
and owner password. See "Access level".
Only allows calls from Phone Book. List of barred numbers may be established.
Sets personal codes for using Nera F77.
Sending spot ID or position
Displays a series of version information windows.
Displays various network status information.
42
Nera F77
Continuing the Saturn tradition
Page 43
USER MANUAL
4. Phone
setup menu
9. Advanced
functions
Lock
1. Set default
Net provider
Mail
2. Set access
level
Exit Menu
CONFIGURATION FROM PC CONT’D
Access level
The Nera F77 user program (vtLite Marine) is accessible from two levels:
• USER LEVEL
• OWNER LEVEL
Warning! To prevent misuse, passwords other than
default must be entered before putting the Nera F77
in operation.
Activating/changing user PIN code
– accessed by owner level password.
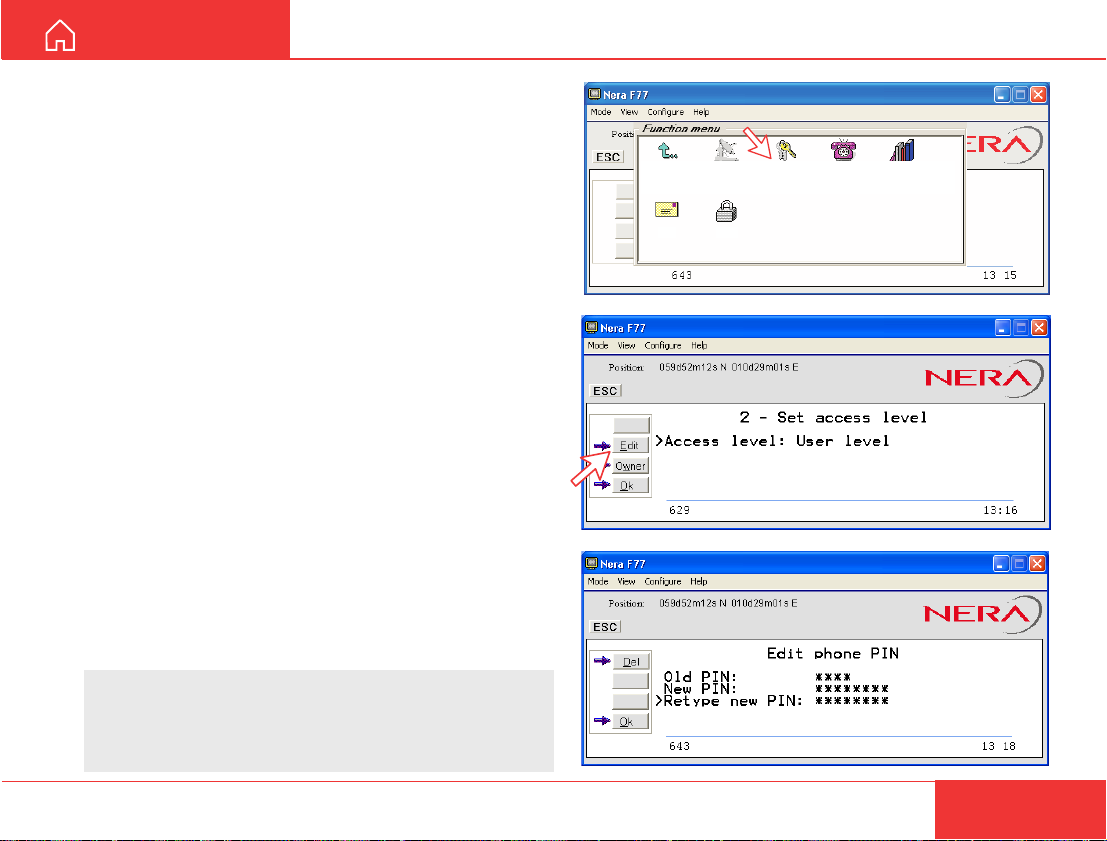
1 Double-click the Set access level icon on the
Function menu.
2 Click Edit to enter/modify the PIN code.
3 Key in:
• Old PIN code (default: 1234)
• New PIN code (4 - 10 digits possible)
• Retype to confirm
Click Ok for each entry and to store the new code.
Note! Clicking Ok without entering any numbers for
New PIN and Retype new PIN disables the PIN code.
NB! The Old PIN code must be entered to reactivate
the previous PIN code.
1
2
3
If the PIN is accidentally lost, it is possible to reset the
user’s password to default (1234) by logging in as owner:
" + owner’s password"
(Resetting is not possible on the SIM card.)
Nera F77
Continuing the Saturn tradition
43
Page 44
CONFIGURATION FROM PC CONT’D
USER MANUAL
Functions requiring owner level
Programming of the functions below requires that the
user access is set to OWNER LEVEL:
• Traffic log settings/printouts
• Modifying password
• Net Service provider names
• Restricted dial
• Restricted SIM usage
• ISDN configuration (except data/time element)
• Access code
• Paid functions
• Phone name setup
• Spot beam report method
Shifting to owner level
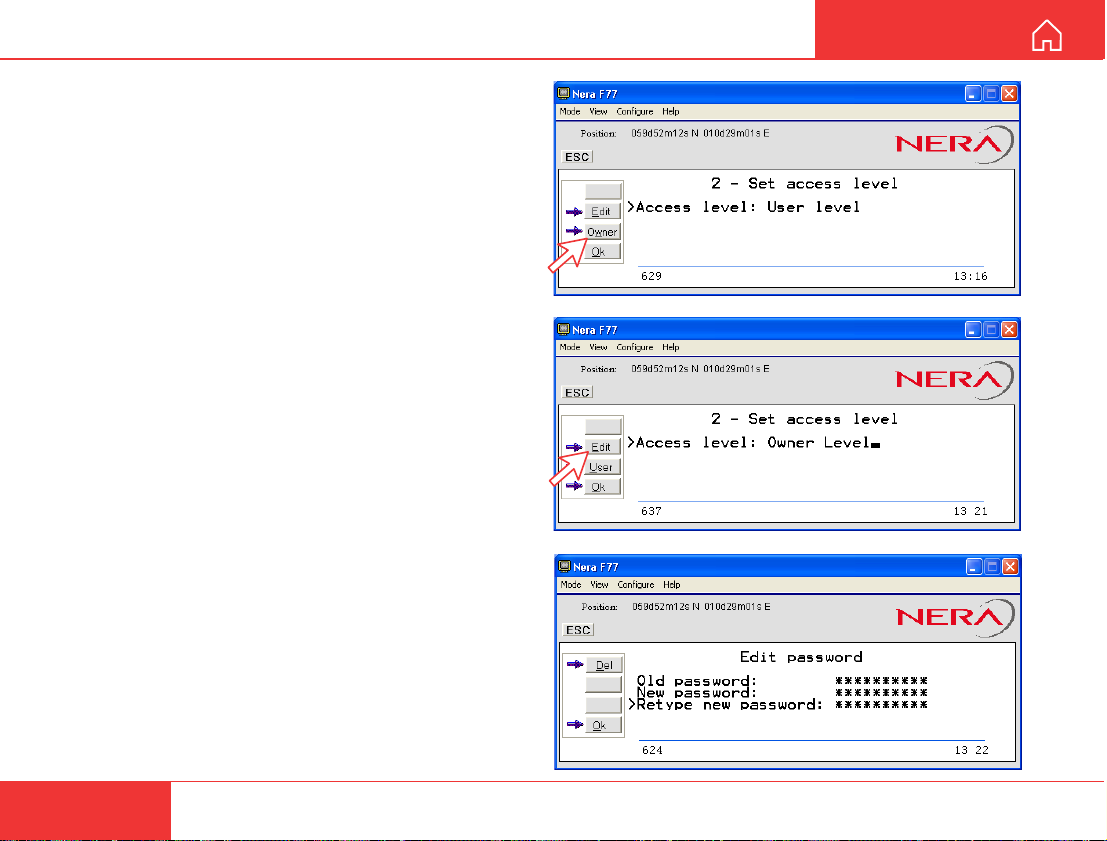
1 Click Owner in Set access level window.
2 Key in the password.
Note! The default password is: 1 2 3 4 5 6 7 8 9 0
Clicking Ok activates the Owner level.
Changing owner level password
3 Open the Set access level window again, and
click Edit to modify the owner password. Key in:
• Current password
• New password (10 – 12 digits)
• Retype to confirm
Click Ok for each entry and to store new password.
To revert to User level, open the "Set access level"
window and click User.
1
2
3
44
Nera F77
Continuing the Saturn tradition
Page 45
USER MANUAL
CONFIGURATION FROM PC CONT’D
Selecting default Net service provider
The default Inmarsat Net service provider for a
satellite (Ocean Region) is automatically used if
the user does not select another one when making
a call.
Make sure that you choose the Net service provider who commissioned the equipment. You will
othervise be barred or charged additional rate.
In this menu default Net service provider can be
preprogrammed for the current Ocean Region.
When using SIM card, selection is automatically
restricted to one of the allowed Net service providers and does not need to be programmed!
Procedure:
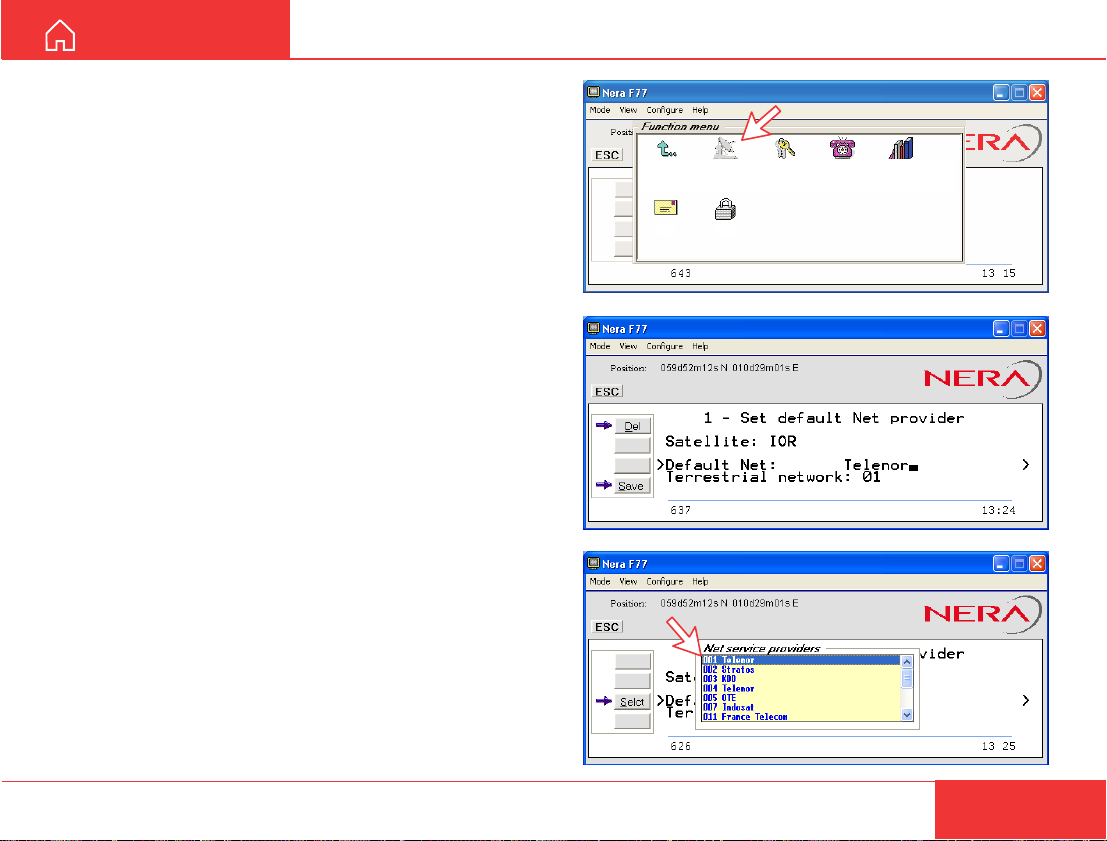
1 On the Function menu, double-click the Set
default Net provider icon to display the current
selections.
2 Pressing displays the list of available Net
service providers.
3 Scroll to required Net provider:
press
Save stores the selected Net provider for this
satellite (Ocean Region).
to enter chosen Net as default.
a
}/
, and
1
1. Set default
Exit Menu
Mail
Net provider
Lock
2. Set access
level
4. Phone
setup menu
9. Advanced
functions
2
3
Nera F77
Continuing the Saturn tradition
45
Page 46
CONFIGURATION FROM PC CONT’D
4. Phone
setup menu
9. Advanced
functions
Lock
1. Set default
Net provider
Mail
2. Set access
level
Exit Menu
USER MANUAL
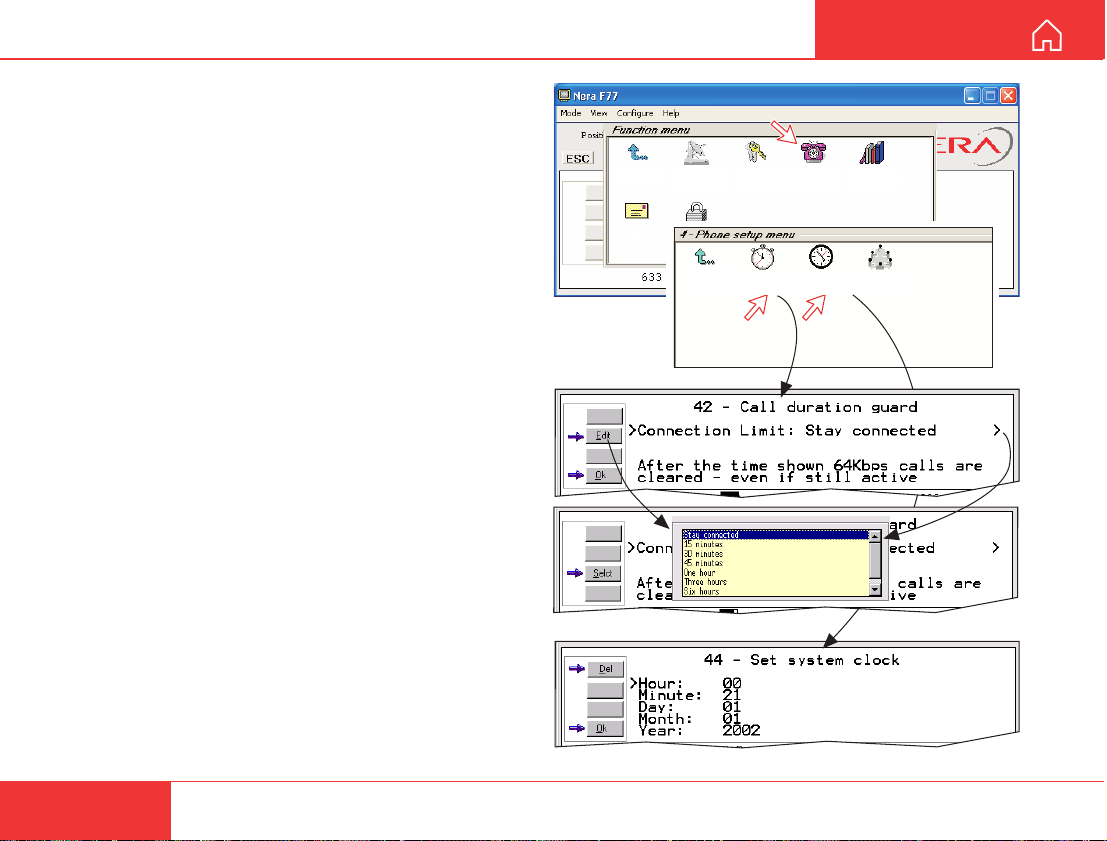
Phone setup
This phone setup menu includes the functions:
• Limitation of call duration.
• Setting date and time.
• Indication of received calls, see next page.
Double-click the Phone setup menu icon in the
Function menu to access the above functions:
Call duration limit
The call duration guard prevents accidental transmission of prolonged 64 kbps calls.
The timer sets the point at which the call is automatically cleared:
1 Double-click the Call duration guard icon
2 Click Edit to set the timer.
3 Scroll }/ to select the required limit (either
“Stay connected” or in step s between 15 minutes and
12 hours), and click Selct to store the setting.
Date and time
The function sets the time displayed in the window:
1 Double-click the Set system clock icon.
4 Scroll down through entries and key in new
data. Use Del to modify.
Clicking Ok stores the selected settings.
1
Exit Menu
2. Call
duration guard
clock
7. Message
Indication
4. Set system
2
3
4
Note! Nera F77 is now restarted.
46
Nera F77
Continuing the Saturn tradition
Page 47
USER MANUAL
4. Set system
clock
2. Call
duration guard
7. Message
Indication
Exit Menu
CONFIGURATION FROM PC CONT’D
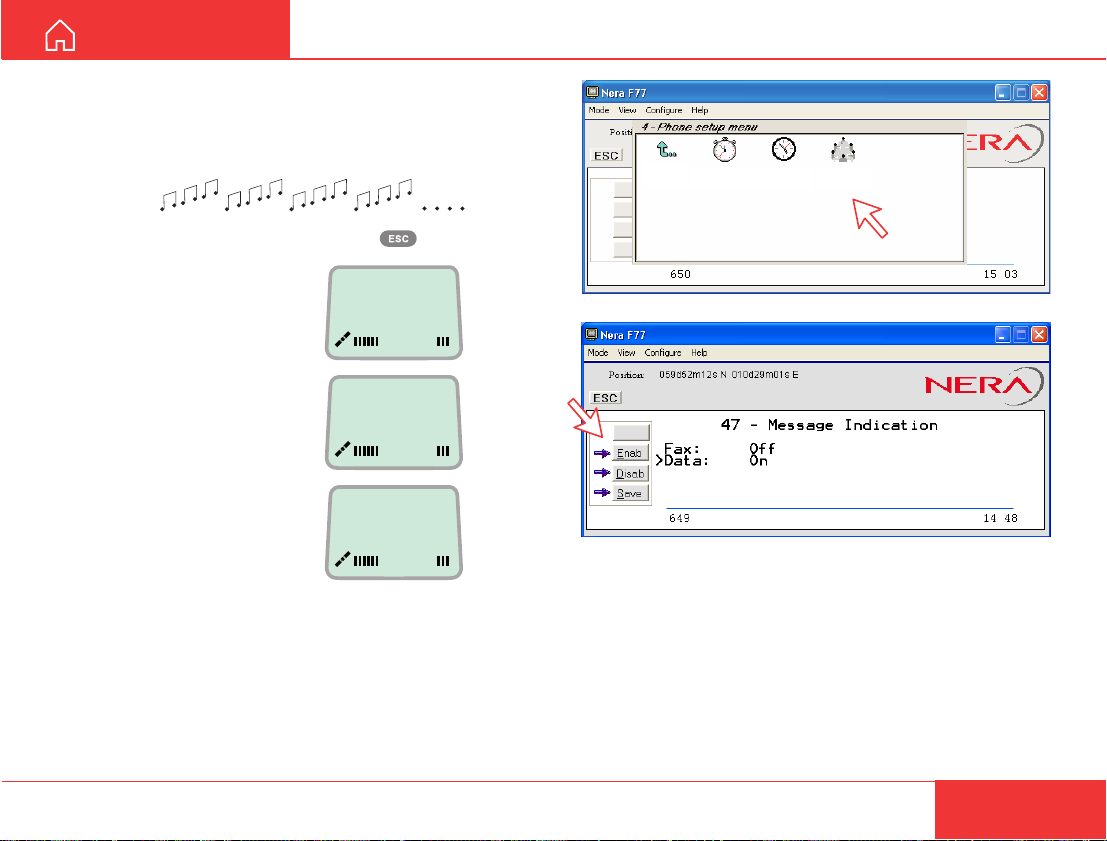
Message indication
When the Message Indication function is set On, a
received data and/or fax call is signalled in all Nera
Display Handsets:
The ringing stops when pressing , or when the
call is finished.
Data call:
F2M data call
Press ESC. . . . . .
F2M = Fixed-to-Mobile
Fax call:
F2M fax call
Press ESC. . . . . .
When the call is
finished, the display
reverts to idle.
Telenor IOR
Ready for call
Setup:
1 Double-click the Message Indication icon in the
Phone setup menu.
2 Select Fax or Data and Enable or Disable
indication of received messages, as required.
Press Save to store the settings.
1
2
(Default G3 fax connection is configured on TEL4)
Nera F77
Continuing the Saturn tradition
47
Page 48
CONFIGURATION FROM PC CONT’D
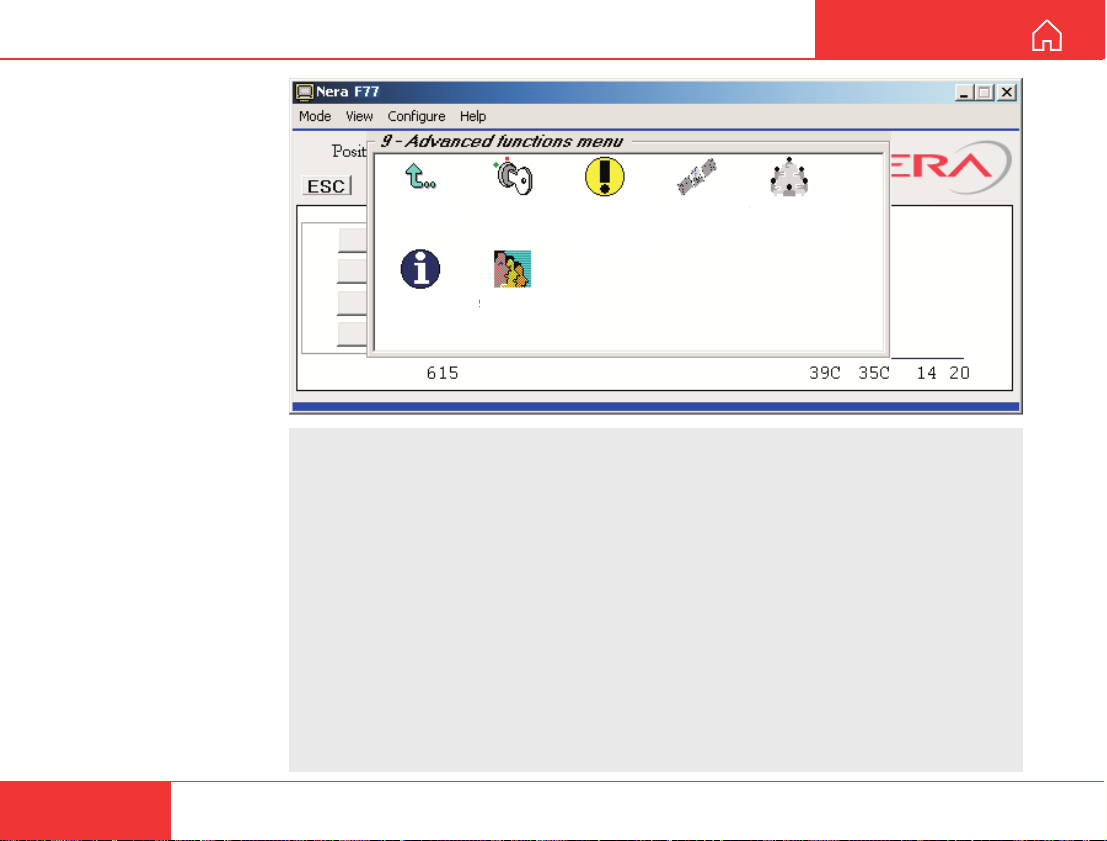
Advanced functions
Some Advanced
*
functions are accessible
from OWNER LEVEL
only .
The OWNER LEVEL is
protected by password.
For shifting to owner
level and assignment of
password,
see "Access level".
Other Advanced
**
functions are accessible
when Diagnostics is
turned ON.
The Advanced functions include the following menus:
Exit Menu
8. Information
available
• Access control: Restrict dial
• Satellite setup: Preprogramming of Net providers
• Configuration: ISDN configuration
• Information available: Misc. version Id information
• Customize: Paid functions
1. Access
control
4. Alarms and
*
9. Customize
USER MANUAL
**
messages
6. Satellite
setup
Access code
Restrict SIM usage
Net service provider names
Set diagnostics
Rx L-Band Setup
Spot Beam Report Method
Network status information
(when diagnostics is ON, see "Set diagnostics")
Phone name setup (owner level)
7.
Configuration
48
Nera F77
Continuing the Saturn tradition
Page 49
6. Satellite
setup
8. Information
available
1. Access
control
7.
Configuration
9. Customize
4. Alarms and
messages
Exit Menu
1. Restricted
dial
2. Access
code
3. Restrict SIM
usage
Exit Menu
USER MANUAL
Access control
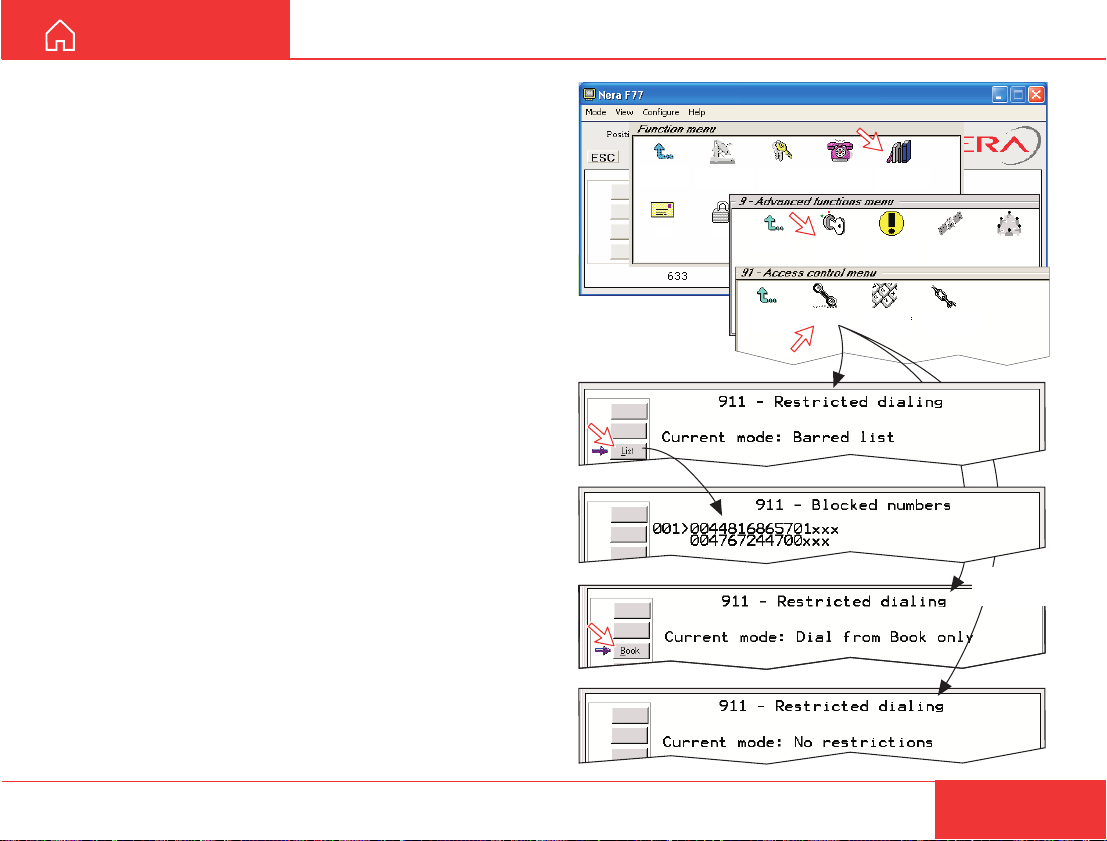
Restricted dialing
The restricted dialing function allows the owner to
establish a Barred list of subscriber numbers that
cannot be called; or set Nera F77 for dialing from
Phone Book only . The restricted dialing modes
prevent misuse of Nera F77:
• Barred list, which may contain up to 10 phone
numbers or part of numbers that can not be
called. E.g. the entry "0087" in the barred list
prevents all mobile-to-mobile calls.
• Dial from Book only, which restricts calls to the
numbers in Nera F77 Phone Book. It is still possible
to append: an entry with number field "0047" means
that it is possible to dial all Norwegian numbers.
When a SIM card is inserted, the SIM entries will
not be merged with the "phone" entries.
The function is active for non-SIM operation and for
one specific SIM card, see "Restricted SIM usage".
• No restrictions (default).
Only one mode can be active at one time, as selected by the owner, see next page.
Checking the dialing setup
Via the Function menu > Advanced functions
menu, double-clicking the Restrict dial icon on the
Access control menu shows the active mode:
• Barred list
Nera F77
Continuing the Saturn tradition
• Dial from Book only
• No restrictions
CONFIGURATION FROM PC CONT’D
1. Set default
Exit Menu
Mail
Net provider
Lock
2. Set access
level
4. Phone
setup menu
9. Advanced
functions
Alternative
modes
49
Page 50
CONFIGURATION FROM PC CONT’D
1. Restricted
dial
2. Access
code
3. Restrict SIM
usage
Exit Menu
USER MANUAL
Restricted dialing setup
(owner level only)
"Barred list" and phone book are established as
follows:
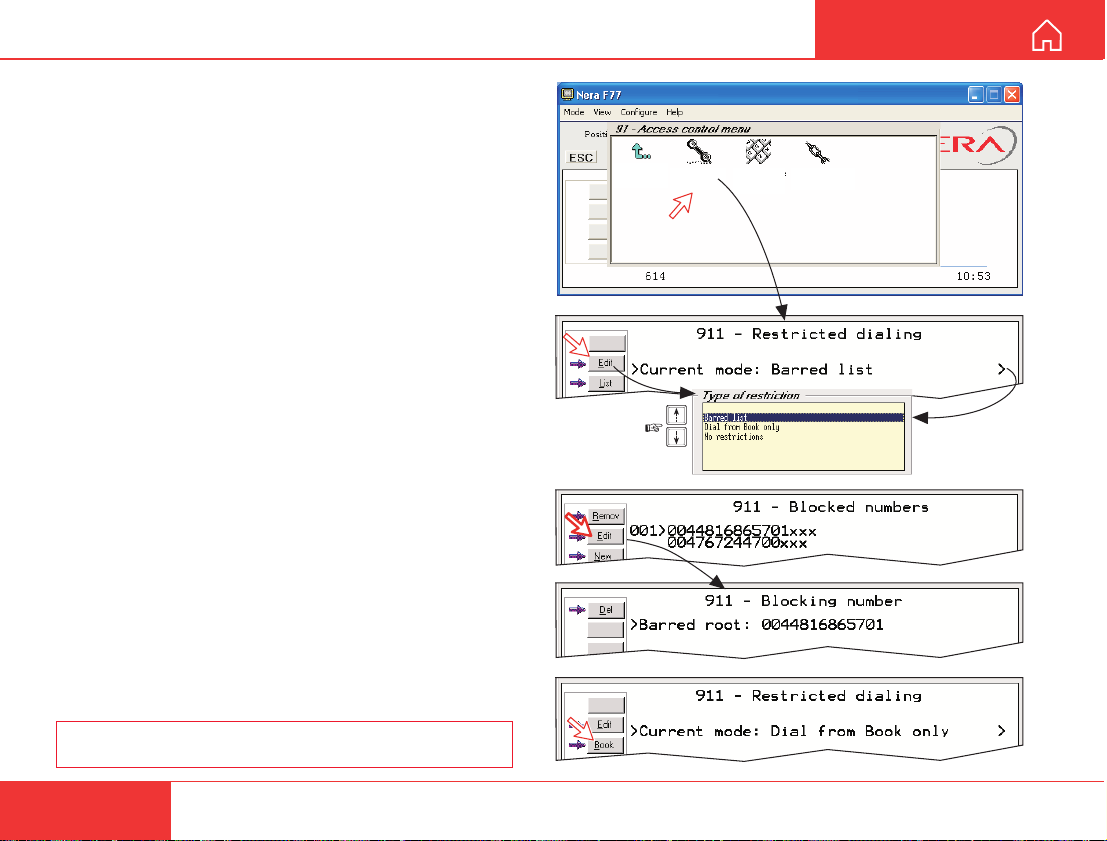
1 Open the Restricted dial window as shown on the
previous page.
2 The Restricted dialing window shows which list is
currently active.
Edit allows selection of restriction mode.
Scroll up/down to select:
(Selct enters the chosen mode)
3 Clicking List displays the blocked phone numbers.
The List key only appears when Current mode is
Barred list.
4 Clicking Edit allows the barred number to be
modified:
The field is empty when clicking New to add a
phone number to the list.
Remove deletes number .
Save stores the changes.
1
2
3
4
5 When the restriction mode "Dial from Book only" is
active, clicking Book allows data to be entered.
Warning! Remember to revert to user level
50
5
Nera F77
Continuing the Saturn tradition
Page 51
USER MANUAL
1. Restricted
dial
2. Access
code
3. Restrict SIM
usage
Exit Menu
CONFIGURATION FROM PC CONT’D
Access code (owner level only)
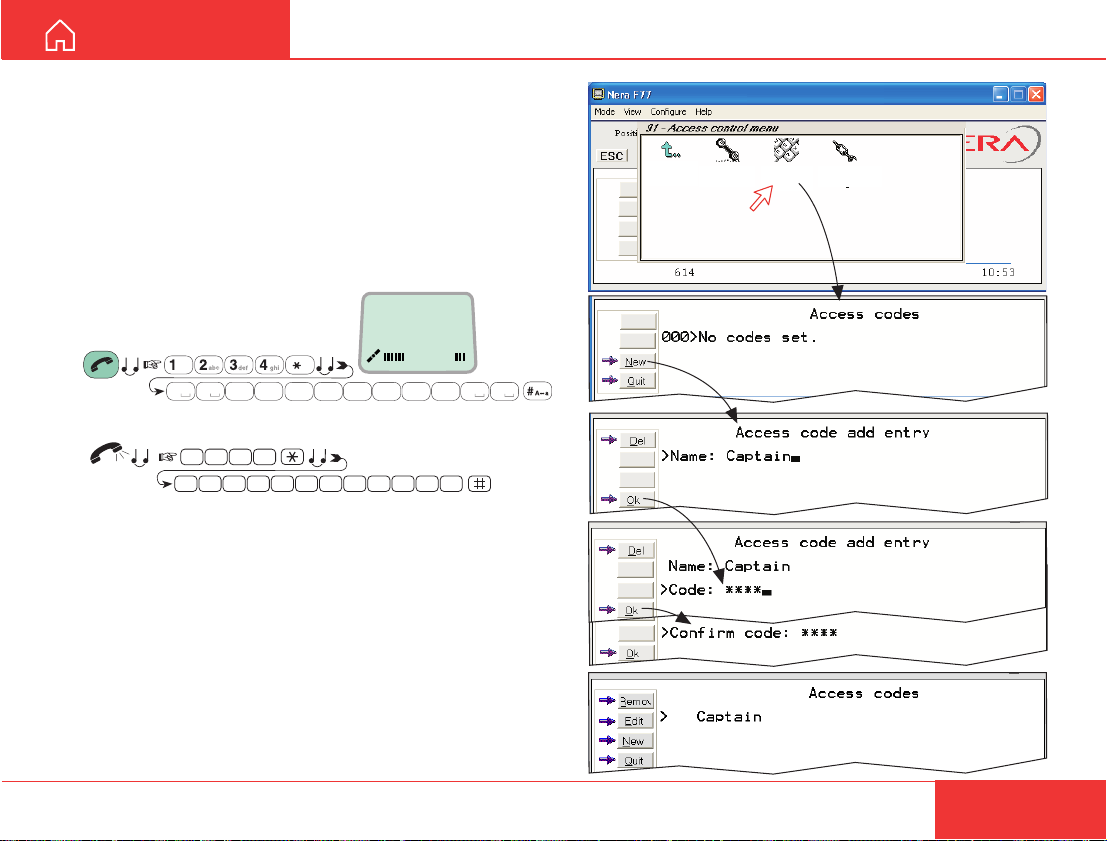
Access code can be activated for 4.8 speech and 64
speech only .
When the access code function has been activated,
the user is always prompted for a 1 - 8 digit personal
code when making a call.
All telephones are activated.T o release a telephone for
use without access code, see MSN configuration.
Entering the personal code allows the subscriber
number to be dialed, e.g.:
2
abc
7
pqrs
Telenor IOR
Code
Dial #
*
4
4
abc
abc
7
pqrs
0 0
Nera ISDN Handset:
0 4
0
Analogue telephone:
0 0 4 7 6 7 4 42 7 0 0
abc
7
6
pqrs
mno
42 31
Setup:
1 Double-click the Access code icon in the Access
control menu.
2 Pressing New opens the Access code entry
window, allowing a name associated with the
particular code to be entered.
3 Pressing Ok allows entering the personal code.
Pressing Ok again prompts you to confirm the entry.
4 When pressing the Access code icon the next
time (1), the window displays a list of the names
associated with the programmed access codes.
1
2
3
4
Nera F77
Continuing the Saturn tradition
51
Page 52
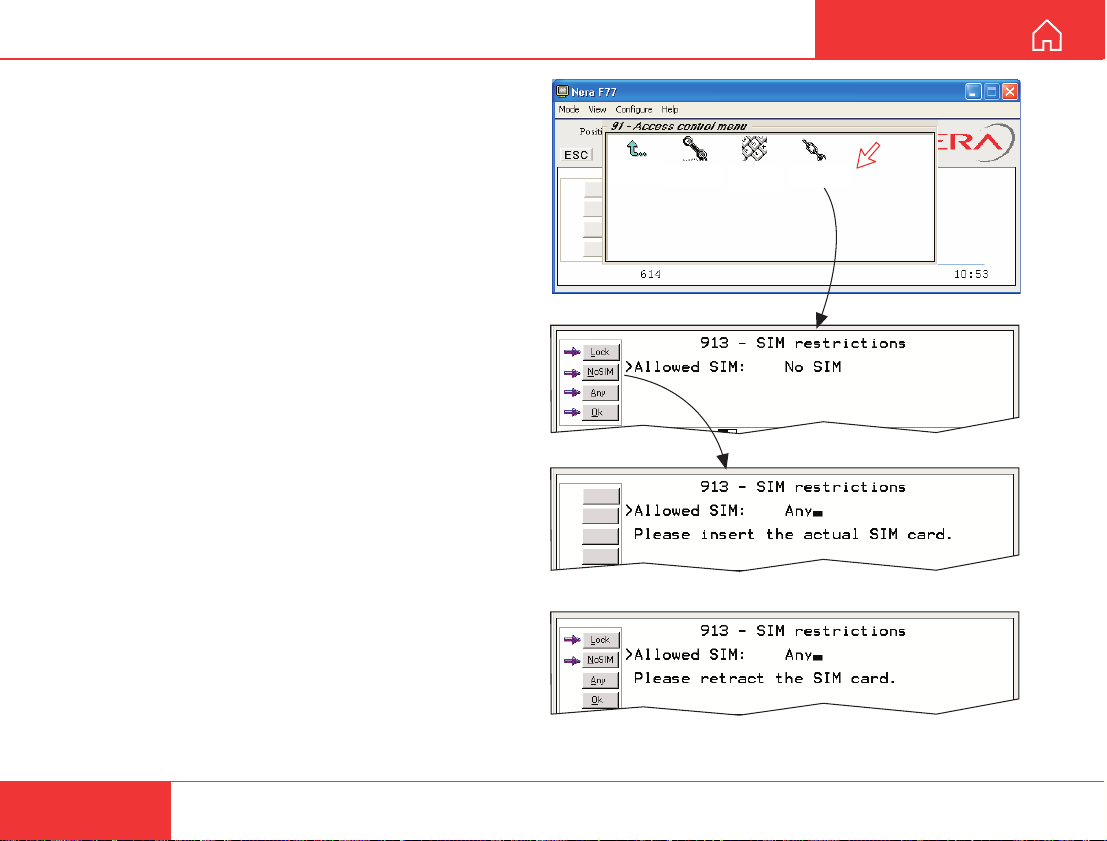
CONFIGURATION FROM PC CONT’D
1. Restricted
dial
2. Access
code
3. Restrict SIM
usage
Exit Menu
USER MANUAL
Restricted SIM usage
Allowed SIM
Nera F77 can be set to operate from:
• Lock SIM, locked to one specific SIM card.
Any other SIM user will be rejected.
• No SIM card. All SIM users will be rejected.
• Any SIM card.
Setting SIM restrictions
(owner level only)
1 Double-click the Restrict SIM usage icon.
2 The SIM restrictions window shows an example
with the setting Allowed SIM: No SIM.
Click Any (default) to set Nera F77 for operation
from a specific card only .
Lock SIM:
3 Click Lock and insert the actual SIM card.
Nera F77 can now be operated with that specific
card only .
4 When retracting the card, the Id of the SIM pro-
vider is displayed.
Ok stores the settings.
1
2
3
4
52
Nera F77
Continuing the Saturn tradition
Page 53
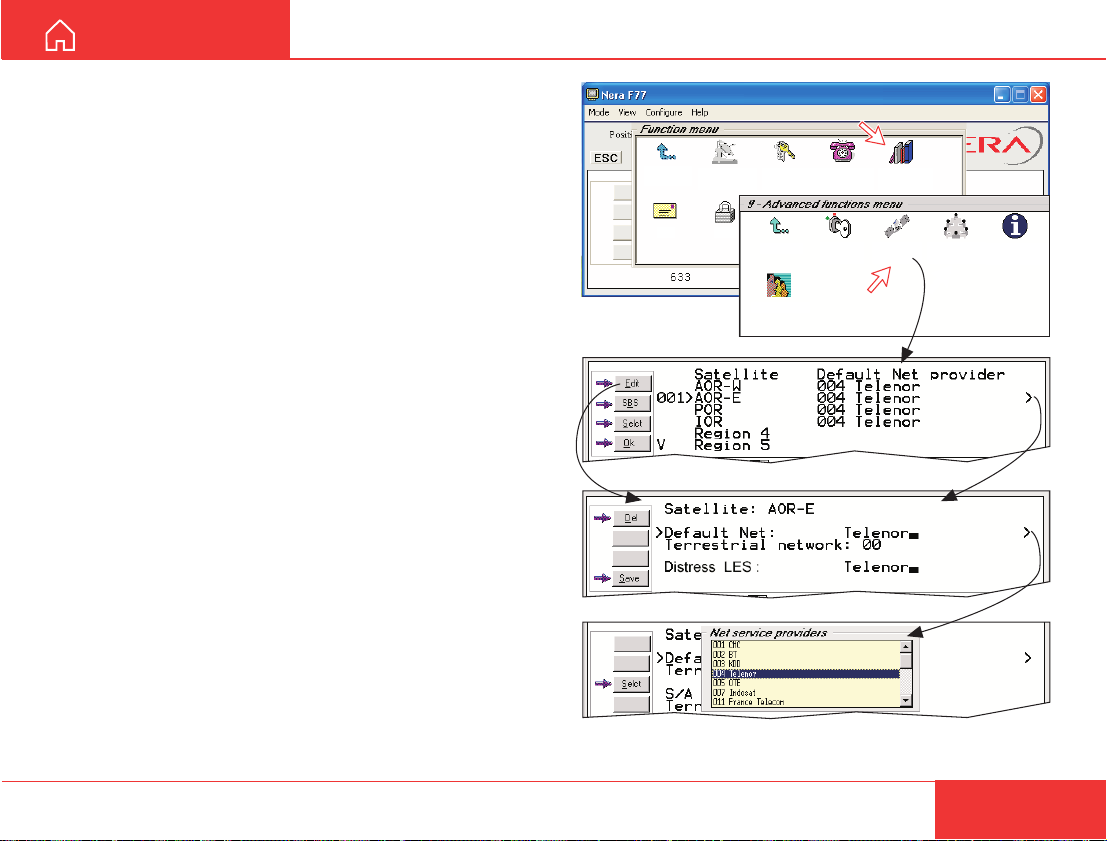
USER MANUAL
4. Phone
setup menu
9. Advanced
functions
Lock
1. Set default
Net provider
Mail
2. Set access
level
Exit Menu
6. Satellite
setup
8. Information
available
1. Access
control
7.
Configuration
9. Customize
Exit Menu
CONFIGURATION FROM PC CONT’D
Satellite setup
The satellite setup function allows preprogramming
of default Net service provider and terrestrial
network for each satellite region (Ocean Region).
When using a SIM card, the above data are already
preprogrammed.
Procedure:
1 Via the Function menu, double-clicking the
Satellite setup icon in the Advanced functions
menu opens the list of Satellites and prepro-
grammed Default Net providers.
2 Scroll }/ to required region. Clicking Edit
opens the window for default settings (3). The
example shows that Telenor has been selected as
default provider for the AOR-E region.
3 Press to change Net provider and networks for
the individual satellite. Pressing displays the list of
available providers. Scroll
provider and click Selct to store the chosen network
as default.
If required, scroll down for entering of Terrestrial
network. Normally not necessary .
Distress Net service provider is automatically selected, typically the same as the default Net.
It can not be selected manually .
Nera F77
Continuing the Saturn tradition
to the required Net
}/
1
2
3
53
Page 54
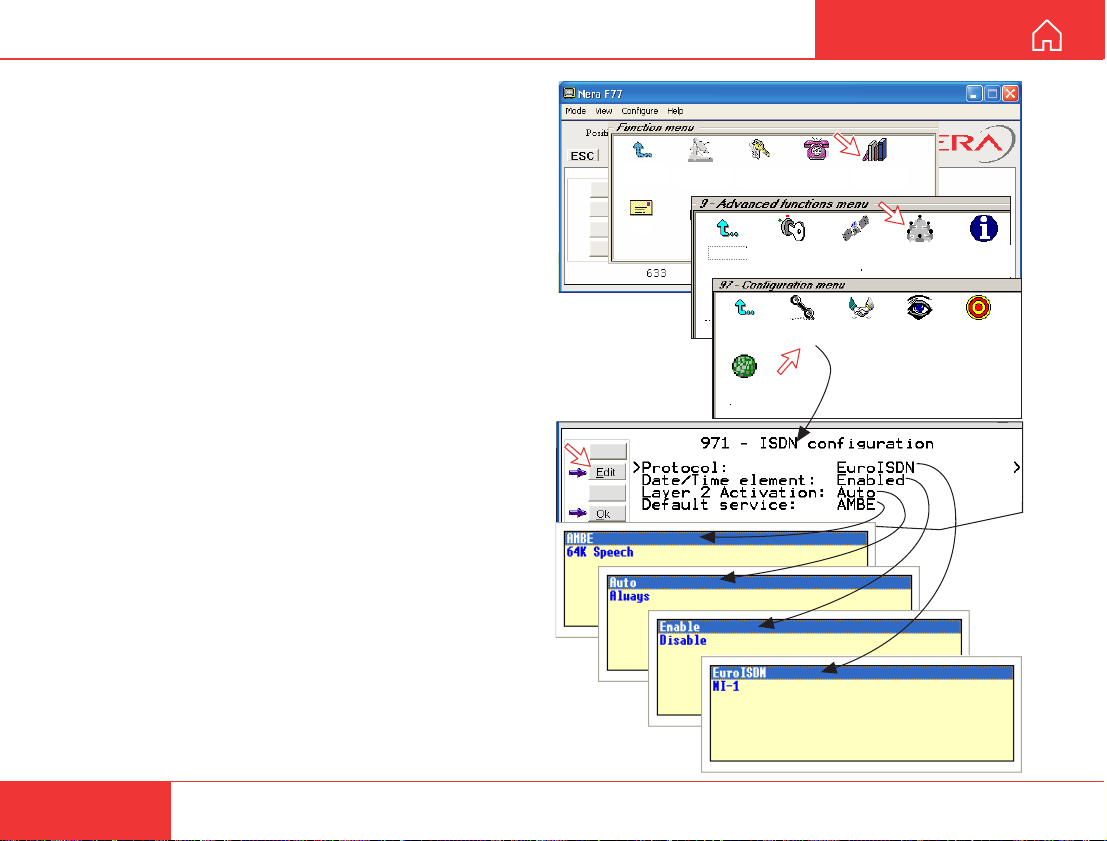
CONFIGURATION FROM PC CONT’D
4. Phone
setup menu
9. Advanced
functions
Lock
1. Set default
Net provider
Mail
2. Set access
level
Exit Menu
USER MANUAL
Configuration menu
ISDN protocol configuration
1 Open the Configuration menu via the Function
menu > Advanced functions menu.
2 Double-clicking the ISDN configuration displays
the ISDN configurations implemented in Nera F77.
Switch to owner level to edit the entries:
• Protocol
Select Euro ISDN for connection of equipment
conforming to the European ISDN standard.
Select NI-1 protocol for equipment conforming to
the NI-1 standard (National ISDN-1).
• Date/time element
When enabled, date and time is sent to the connected
Terminal Equipment during call establishment. Some
ISDN devices do not survive this message. The date
and time transmission may then be disabled.
• Layer 2 Activation
The layer 2 connection is deactivated after some
idle time as default. Some ISDN devices interpret
this as an alarm situation. Layer 2 dectivation can
then be disabled. When the ISDN protocol is set to
NI-1, this option is on as default.
• Default service
Some ISDN devices can not signal their own MSN
number. Such a phone will be able to use the
64 kbps service since all "unknown" speech devices
are required to use the 4.8 speech service. The
user can set Nera F77 to map all "unknown" de-
vices to 64 kbps speech service.
NB! Remember to revert to user level.
54
1
7.
Exit Menu
9. Customize
Exit Menu
9. Spot Beam
Report Method
1. Access
control
1. ISDN
configuration
6. Satellite
setup
2. Net service
providers
Configuration
4. Set
diagnostics
8. Information
available
7. Rx L-Band
Setup
2
Nera F77
Continuing the Saturn tradition
Page 55
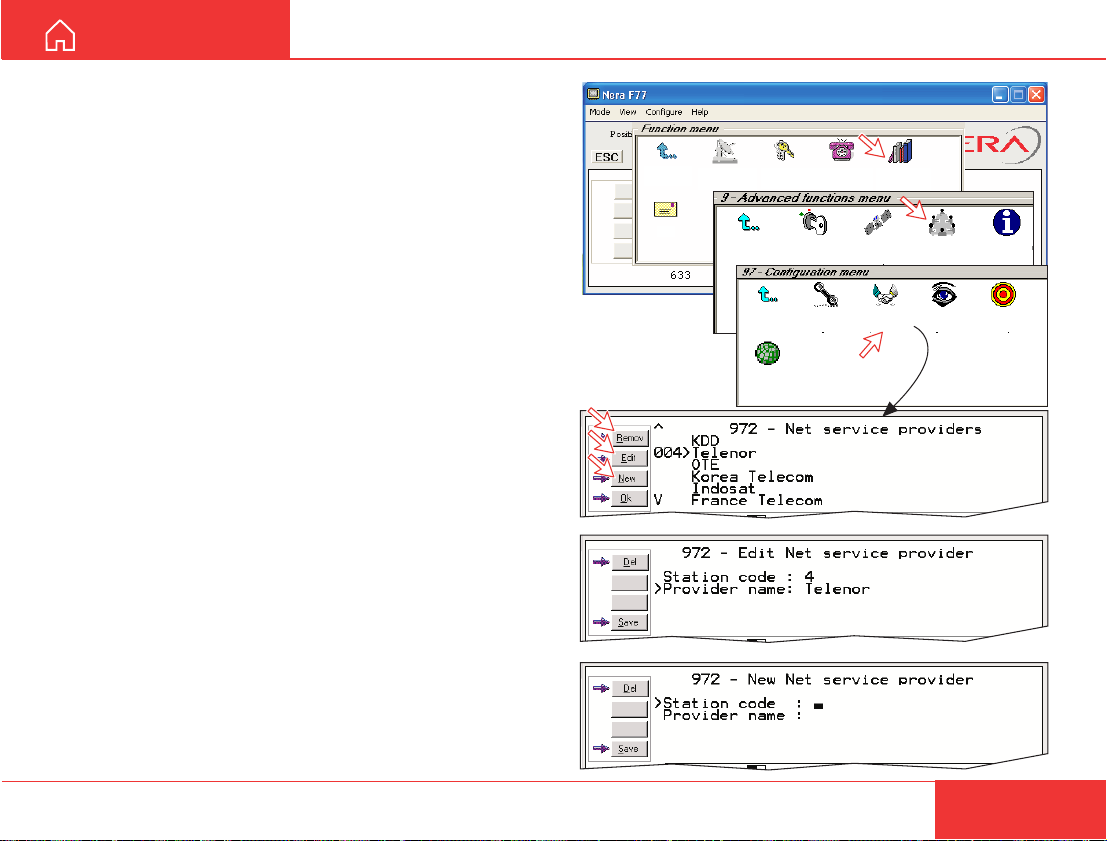
USER MANUAL
4. Phone
setup menu
9. Advanced
functions
Lock
1. Set default
Net provider
Mail
2. Set access
level
Exit Menu
6. Satellite
setup
8. Information
available
1. Access
control
7.
Configuration
Exit Menu
9. Customize
4. Set
diagnostics
2. Net service
providers
9. Spot Beam
Report Method
Exit Menu
1. ISDN
configuration
7. Rx L-Band
Setup
CONFIGURATION FROM PC CONT’D
Net service providers (owner level only)
Adding, editing, or removing entries in the list of Net
service providers:
1 Via the Function menu > Advanced functions
menu, double-clicking the Net service providers
icon in the Configuration menu displays the list of
Net service providers including their station codes.
2 Scroll to required Net service provider, }/.
Clicking Ok returns you to the Configuration window.
Remov deletes entry. Clicking Edit opens the
window allowing the station code and provider name
to be modified (window 3).
4 Clicking New (window 2) opens the window allowing
station code and provider name to be added.
Use Del to modify. Save stores the changes.
NB! Remember to revert to user level.
1
2
3
Nera F77
Continuing the Saturn tradition
4
55
Page 56
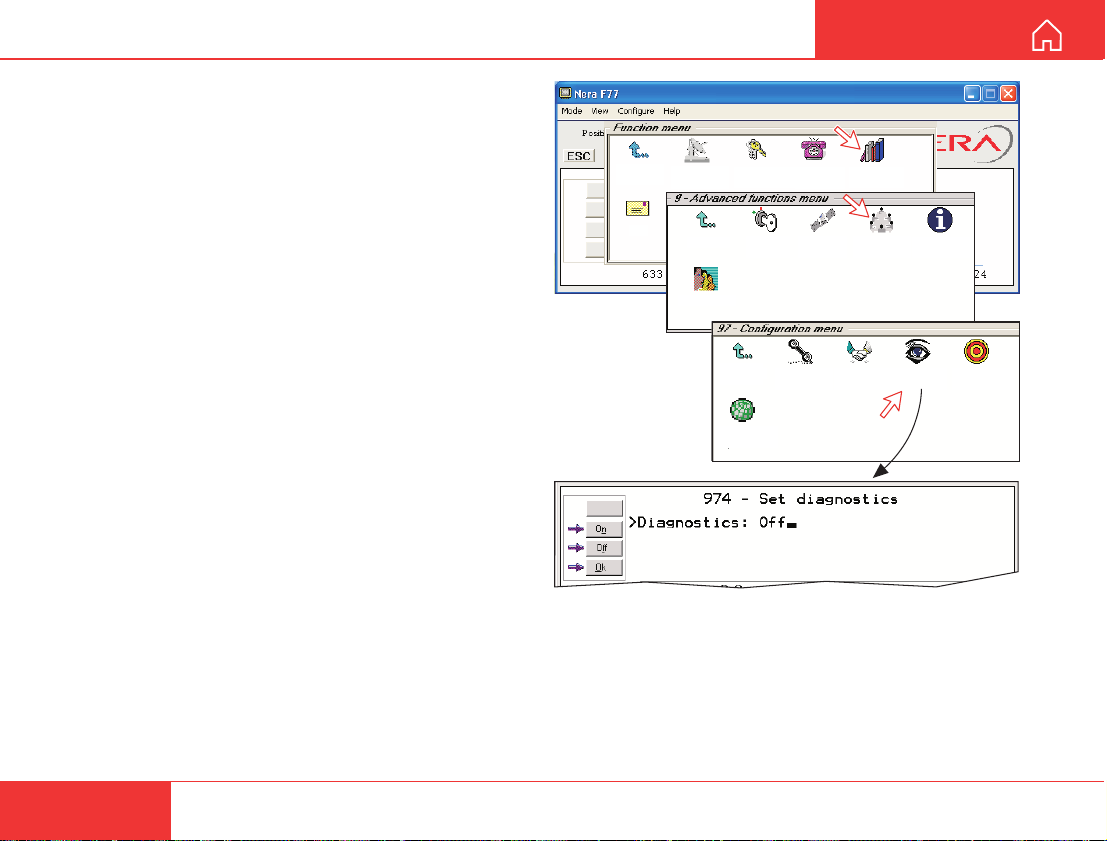
CONFIGURATION FROM PC CONT’D
4. Phone
setup menu
9. Advanced
functions
Lock
1. Set default
Net provider
Mail
2. Set access
level
Exit Menu
USER MANUAL
Set diagnostics
Additional system information is displayed when
diagnostics is turned On.
See also MENU FUNCTIONS.
1 Double-click the Set diagnostics icon via the
Function menu > Advanced functions menu >
Configuration menu.
2 Click On or Off as required.
1
Exit Menu
9. Customize
Exit Menu
9. Spot Beam
Report Method
1. Access
6. Satellite
control
setup
Exit Menu 1. ISDN
1. ISDN
configuration
configuration
7.
Configuration
2. Net service
2. Net service
providers
providers
8. Information
available
3. Power
4. Set
conservation
diagnostics
4. Set
7. Rx L-Band
diagnostics
Setup
2
56
Nera F77
Continuing the Saturn tradition
Page 57
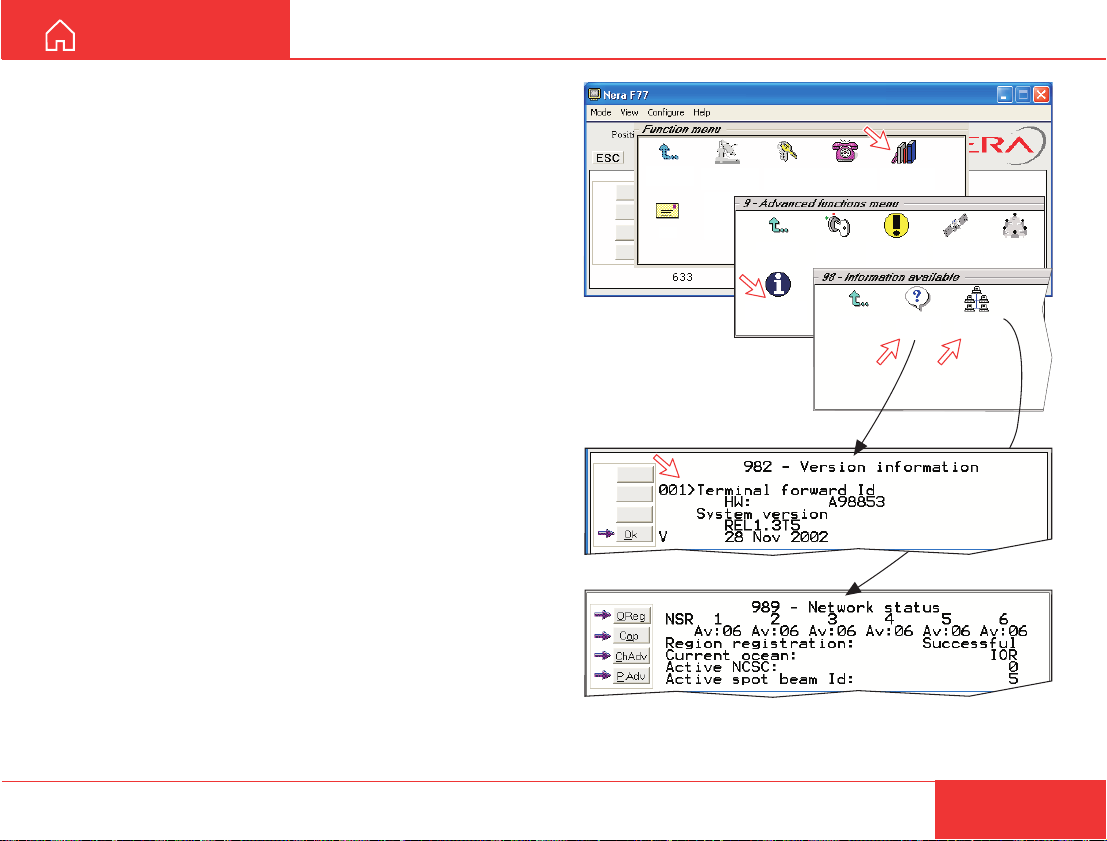
USER MANUAL
4. Phone
setup menu
9. Advanced
functions
Lock
1. Set default
Net provider
Mail
2. Set access
level
Exit Menu
2. Misc.
version I...
9. Network
status inf...
Exit Menu
CONFIGURATION FROM PC CONT’D
Information available
Miscellaneous version Id information
The Information available function displays the
terminal forward Id and system versions.
1 Via the Function menu > Advanced functions
menu, double-clicking the Miscellanous version Id
information icon in the Information available
menu displays the available data (window 2).
2 With Diagnostics On, pressing P opens a series
of version information windows.
Network status information
(owner level only)
This function displays various network status
information.
1
1. Access
Exit Menu
8. Information
available
control
9. Customize
4. Alarms and
messages
6. Satellite
setup
7.
Configuration
2
3
3 Double-click the Network status information icon
in the Information available menu for readout.
NB! Remember to revert to user level.
Nera F77
Continuing the Saturn tradition
57
Page 58
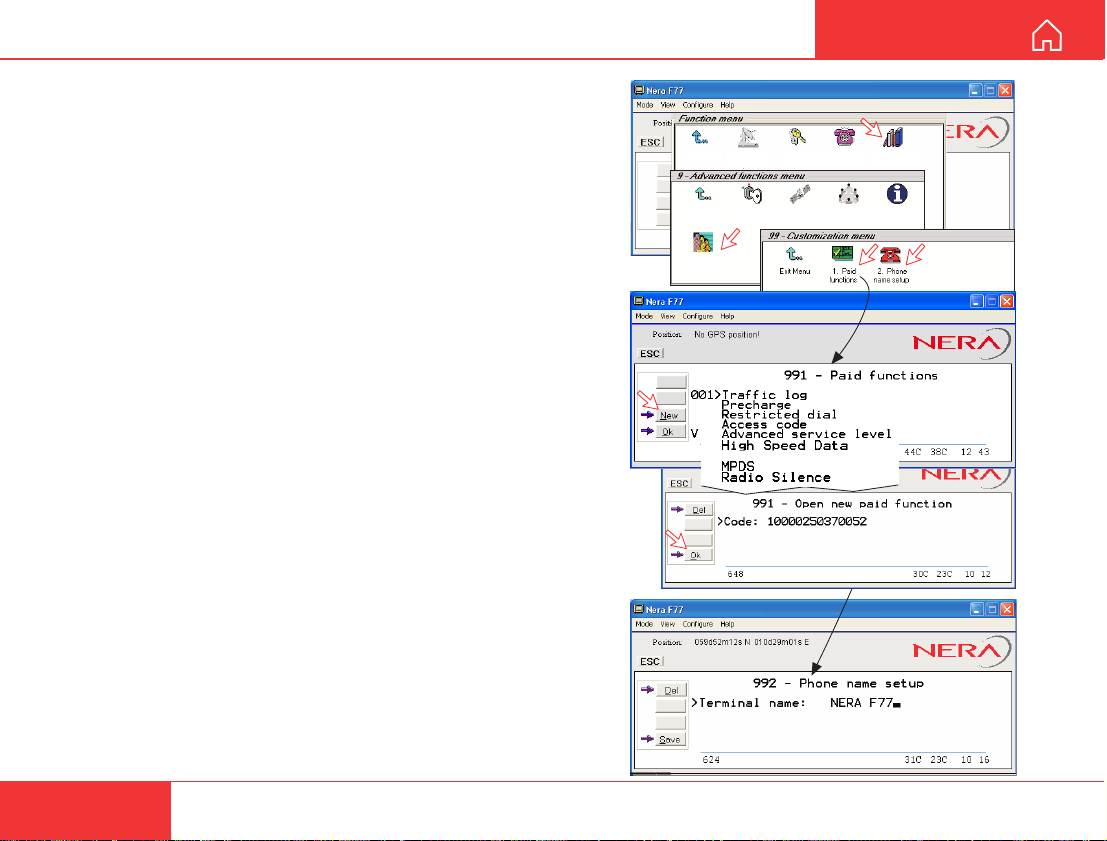
CONFIGURATION FROM PC CONT’D
4. Phone
setup menu
9. Advanced
functions
Lock
1. Set default
Net provider
Mail
2. Set access
level
Exit Menu
6. Satellite
setup
8. Information
available
1. Access
control
7.
Configuration
9. Customize
Exit Menu
USER MANUAL
Customize menu
(owner level only)
1 Open the Customization menu via the Function
menu > Advanced functions menu.
Paid functions
2 A paid function is activated by entering an
"Opening key" provided when purchasing the
function.
Double-clicking the Paid functions icon in the
Customization menu displays the list of available
functions.
Clicking New opens the Open new paid functions
menu. Enter the "Opening key" and click Ok.
Phone name setup
3 Double-clicking the Phone name setup icon in the
Customization menu displays the Phone name, i.e.
Nera F77. To change, key in uppercase/lowercase
letters as required.
Use Del to modify.
Save stores the changes
1
2
3
NB! Remember to revert to user level.
58
Nera F77
Continuing the Saturn tradition
Page 59
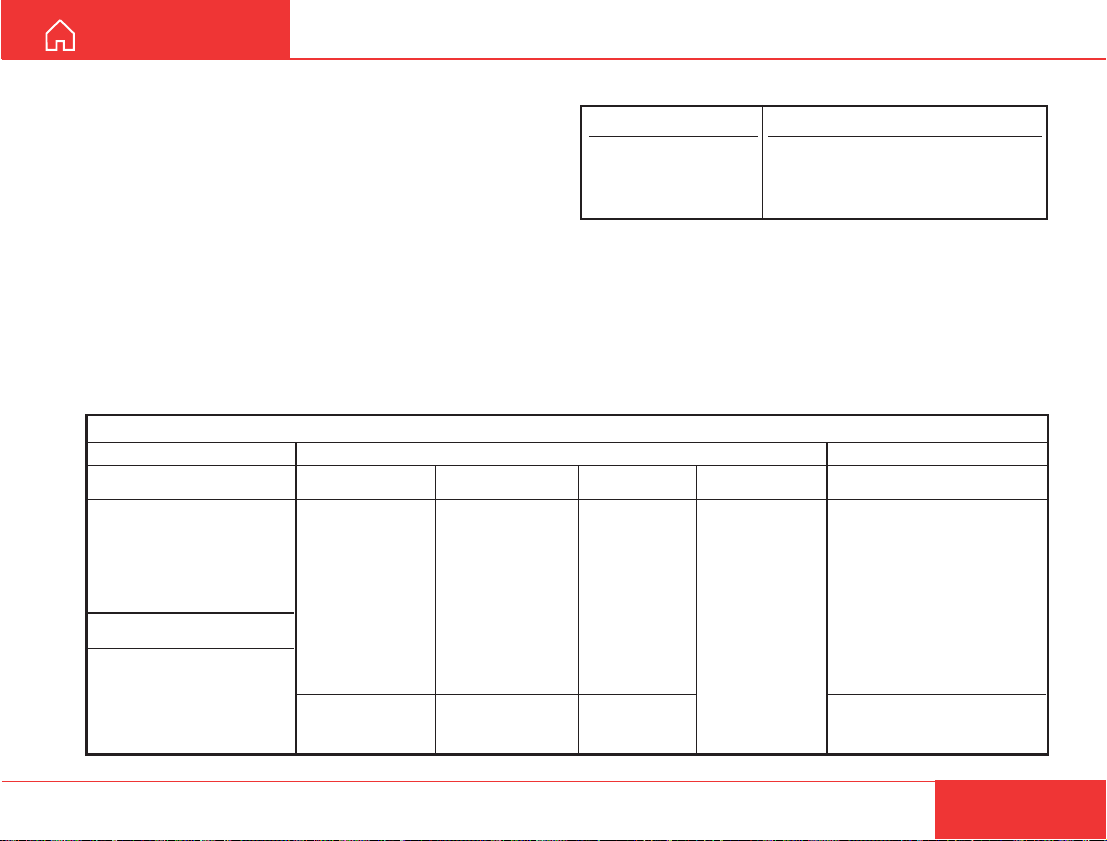
USER MANUAL
CONFIGURATION FROM PC CONT’D
Routing of incoming calls
When applying for IMN numbers, a Terminal Id
(OID/DID) is received from the Net service provider.
All devices connected to Nera F77 can make outgoing calls. For incoming calls it must be assured that
the Terminal Ids and MSN numbers configured are
as commissioned.
To make an incoming call reach a particular device,
an MSN number and the Terminal Id “connected” to
the IMN number must be programmed into the Main
Communication Unit (MCU). See later in this manual.
The table below lists valid MSN numbers for the
available services.
LIST OF VALID TERMINAL IDs AND MSN NUMBERS
ANALOGUE PORTS
4.8 speech
Port Term.Id MSN
TEL 1 03* 01*
TEL 2 04* 02*
TEL 3 02* 03*
3.1kHz audio
Port Term.Id MSN
TEL 4 61* 04*
* Preprogrammed
4.8kbps speech
Term.Id MSN
01* 20*
0X 21
0X 22
0X 23
0X 24
0X 25
0X 26
0X 27
0X 28
01/20 Distress
Handset. First HS
connected via
Distress Alam Unit.
64 kbps speech
Term.Id MSN
ISDN PORTS
91* 30*
92 31
93 32
94 33
95 34
96 35
97 36
98 37
99 38
91/30 Distress
Handset. First HS
connected via
Distress Alam Unit.
Numbers to be programmed into ISDN devices:
In ISDN device:
MSN number
In Main Communication Unit:
MSN number
and Terminal Id
(the Terminal Id is paired
with a specific IMN number)
For an easy start, some Terminal Ids and MSN
numbers have been preprogrammed into the MCU
(marked with a star in the table).
In the 4.8 kbps speech and 3.1 kHz audio columns
of the ISDN PORTS table the Term.Id is represented
by an X, allowing an ISDN Term.Id to be used for
analogue ports.
Note! A Term.Id already entered is not accepted.
ISDN/RS-232/USB PORTS
3.1kHz audio
Term.Id MSN
62* 41*
6X 42
6X 43
6X 44
6X 45
6X 46
6X 47
6X 48
6X 49
3.1kHz/
64kbps
audio service
56kbps data
Term.Id MSN
71* 50*
72 51
73 52
74 53
75 54
76 55
77 56
78 57
79 58
64kbps data
Term.Id MSN
51* 60*
52* 61*
53* 62*
54* 63*
55 64
56 65
57 66
58 67
51/60, preset for ISDN port
52/61, preset for RS-232A port
53/62, preset for USB port
54/63, preset for RS-232B port
59 68
Nera F77
Continuing the Saturn tradition
59
Page 60
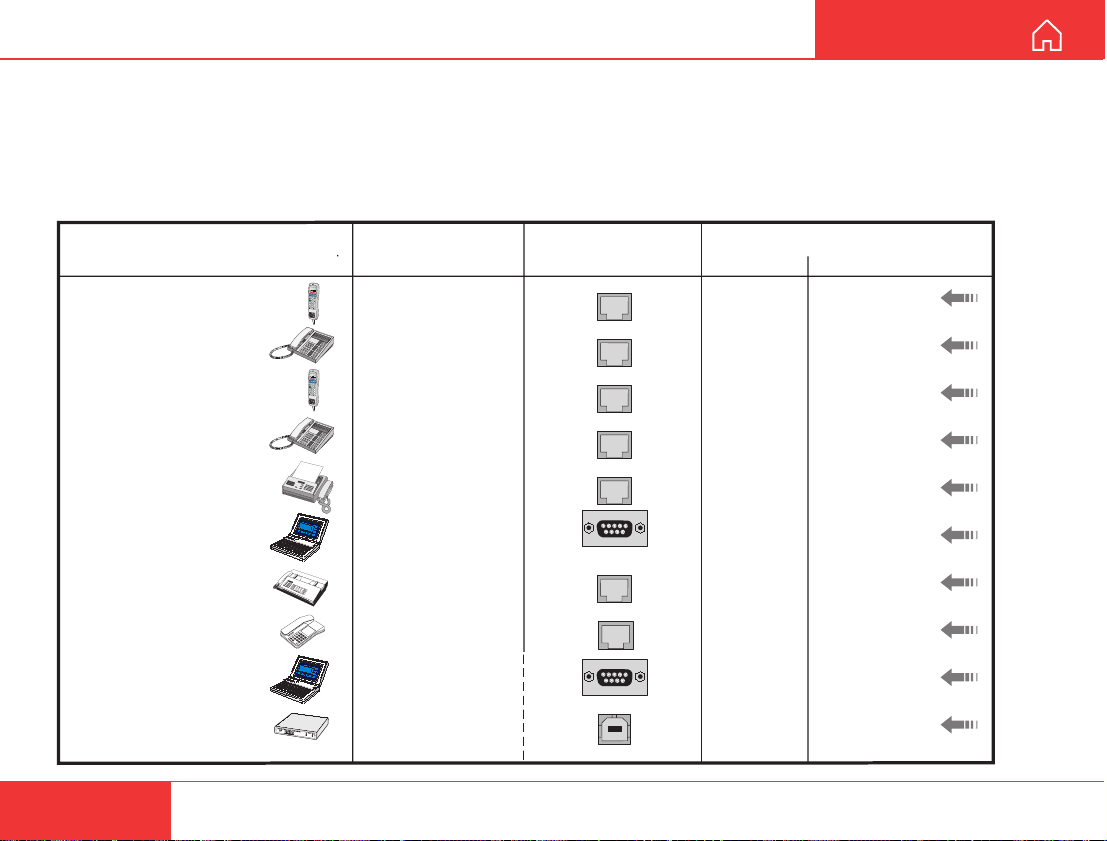
CONFIGURATION FROM PC CONT’D
USER MANUAL
Routing of incoming calls (examples)
The table below illustrates the use of appropriate
Terminal Ids for the various services combined with
examples incoming IMN numbers.
* Preprogrammed, see table on previous page.
Name Service MCU ports
Bridge MSN 20* 4.8kbps speech 01* 762420510
D
IA
L
0
0
+
I
N
T
L
T
E
L
.
N
O
.+
S
H
I
F
T
B
A
T
A
L
P
H
A
O
N
F
U
N
C
A
L
P
H
A
E
N
T
E
R
S
H
MO
I
F
T
RE
/
L
E
S
HEL
P
P
T
T
O
N
/
O
F
F
L
I
S
T
DE
E
L
S
I
S
C
T
L
P
L
A
Y
1
A
B
C
2
D
E
F
3
G
H
I
4
J
K
L
5
M
N
O
6
P
Q
R
T
A
X
7
S
T
U
L
IG
HT
8
V
W
X
9
Y
Z
Æ
D
A
T
A
Ø
Å
.
0
Ä
Ö
Ü
S
P
C
Note! If the Net service provider does not specify
which T erminal Id should be used with the various
IMN numbers, select T erm. Id no.1 for the first
4.8 kbps telephone, then no. 2 for the second phone.
Use the same principle for the other type services. It
is advisable to note down the selections.
Provided by ISP:
Term.Id IMN
ISDN
ISDN
Radio room
Bridge MSN 30* 64kbps speech 91* 600020520
MSN 21 4.8kbps speech 05 762420512
D
I
A
L
0
0
+
IN
T
L
T
E
L
.N
O
.
+
S
H
I
F
T
B
A
T
A
L
P
H
A
O
N
F
U
N
C
A
L
P
H
A
E
N
T
E
R
S
H
MO
I
F
T
RE
/
L
E
S
HE
LP
P
T
T
O
N
/
O
F
F
L
I
S
T
D
E
L
EL
S
IS
C
T
P
L
A
Y
1
A
B
C
2
D
EF
3
G
H
I
4
J
K
L
5
M
N
O
6
P
Q
R
T
A
X
7
S
T
U
L
IG
H
T
8
VWX
9
Y
Z
Æ
D
A
T
A
Ø
Å
.
0
Ä
Ö
Ü
S
P
C
ISDN
ISDN
Captain MSN31 64kbps speech 92 600020521
ISDN
FaxGr.4 MSN60* 64kbps data 51* 600020522
Data MSN 63* 64kbps data 54* 600020525
RS-232 B
TEL 4
FaxGr.3 MSN04* 3.1/64 audio 61* 600020527
R
e
P
7
4
8
1
5
Saloon MSN 03* 4.8speech 02* 762420511
9
S
2
6
0
3
#
R
TEL3
Data MSN61 * 64kbps data 52 * 600020523
RS-232 A
Router MSN62 * 64kbps data 53 * 600020524
USB
60
Nera F77
Continuing the Saturn tradition
Page 61
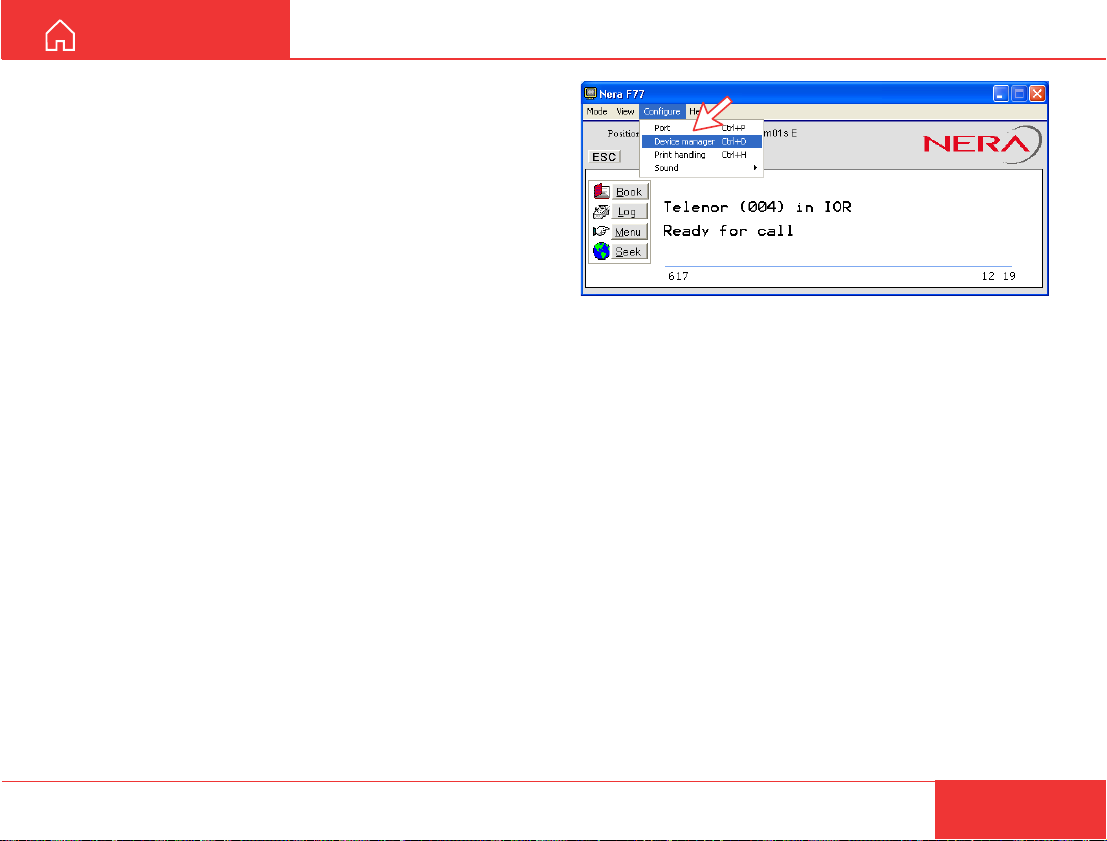
USER MANUAL
MSN configuration
You are prompted to enter the owner level password
(default: 1234567890). For security , the password
should be changed before or after configuration of a
device. See ACCESS LEVEL > Changing owner
level password.
CONFIGURATION FROM PC CONT’D
Click to open Device Manager for configuration
of ISDN/analogue/RS-232/RS-422/USB > > > > > >
Nera F77
Continuing the Saturn tradition
61
Page 62
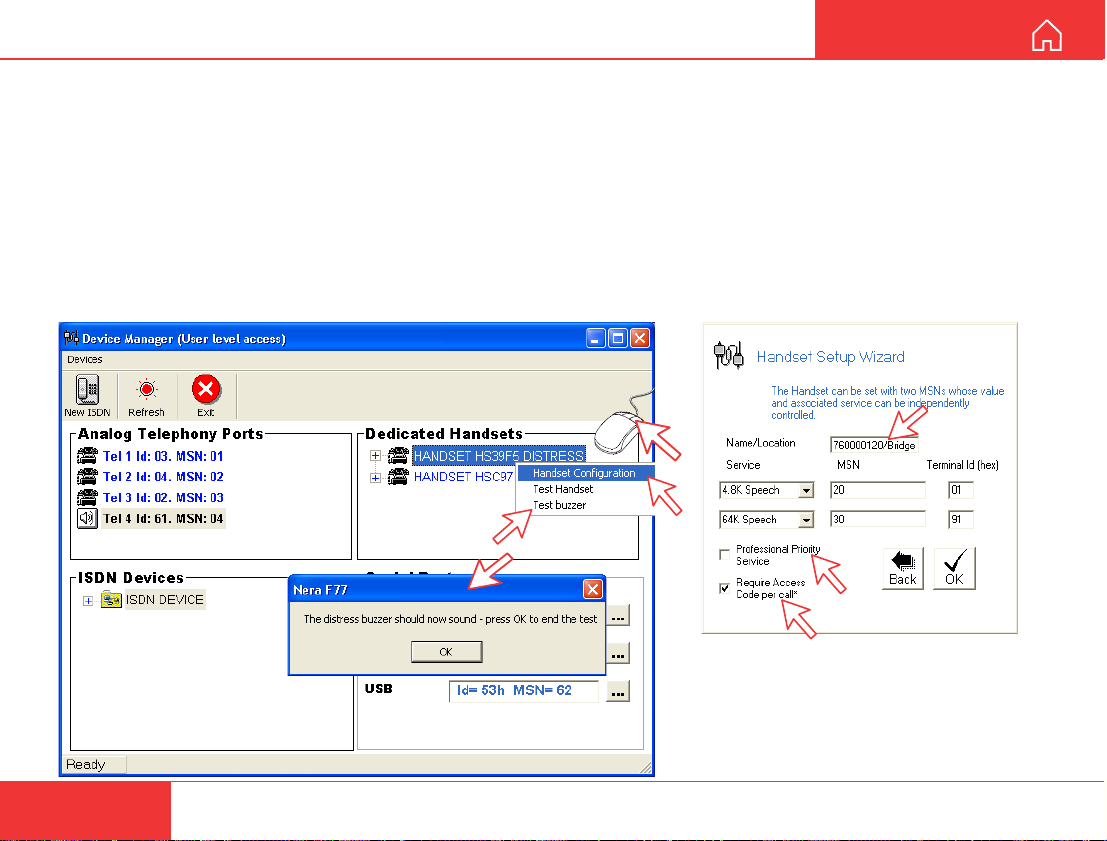
CONFIGURATION FROM PC CONT’D
USER MANUAL
Nera ISDN Handset w/Distress Alarm
•
Nera ISDN Handsets will automatically be configured
with Handset MSNs in the Device Manager.
• The first Nera ISDN Handset connected to the
Distress Alarm unit will be given MSN20 and MSN30.
A new handset will thus respond to both these MSNs.
• The next Nera ISDN Handset will be the next
available MSNs.
• All Nera ISDN Handset are given two MSN num-
bers, one for 4.8 speech and one for 64 speech.
• A Nera ISDN Handset connected to a Distress Alarm
will automatically constitute a distress handset.
• The MSN numbers will follow the handset.
• The MSNs can be controlled independently, e.g. if
two handsets are given the same MSN, they will
both respond to an incoming call to that MSN.
•
To verify selected MSNs of a handset, check in the
Device Manager or press the "R"-button on the Handset.
Open the device manager, see previous page.
Right-clicking a Dedicated Handset and then clicking
Handset Configuration starts the Handset Setup Wizard.
Enter Name/Location of the installed Handset, as required.
Require Access Code must be
unchecked to allow this Handset to be
used without entering a code.
Professional Priority Service is
checked on special agreement with the
Net Provider, e.g. for higher priority in
the Inmarsat system.
62
Nera F77
Continuing the Saturn tradition
Page 63
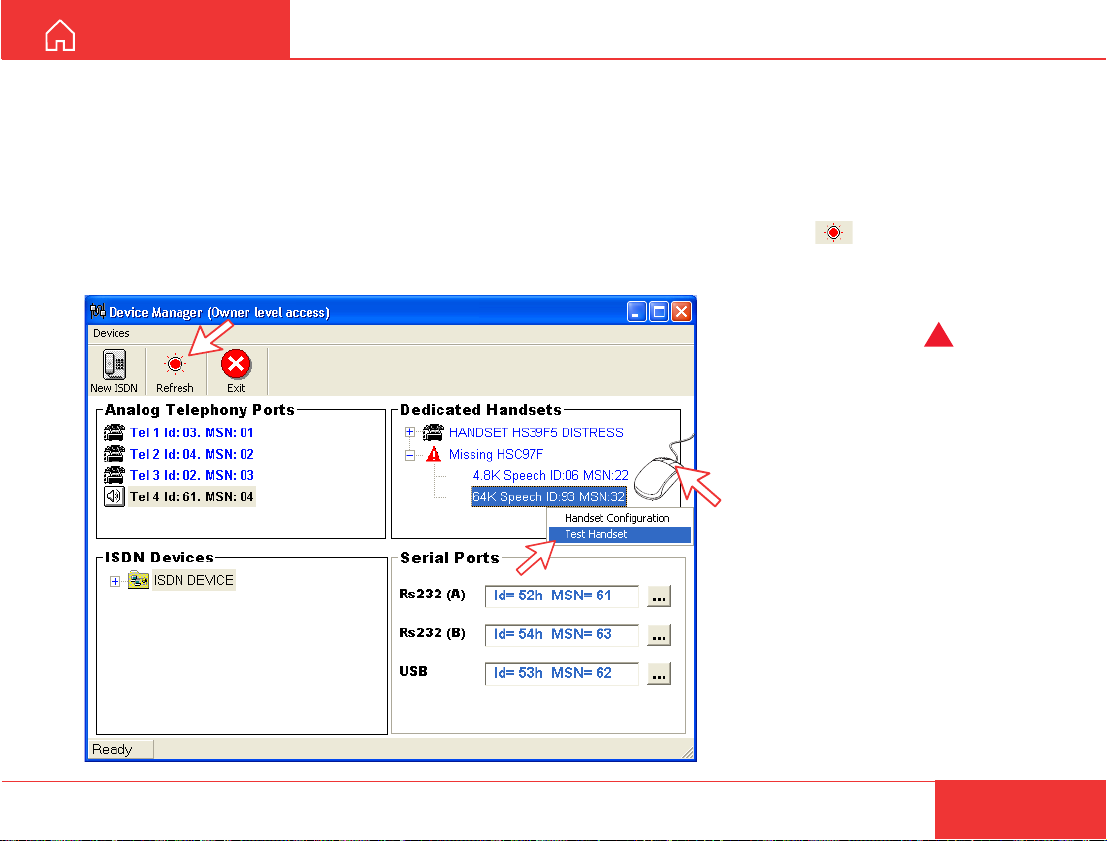
USER MANUAL
CONFIGURATION FROM PC CONT’D
T esting the Distress Alarm
See window on previous page.
Rightclicking a Dedicated Handset as indicated
allows activating the buzzer in the Distress Alarm
unit. Clicking OK in the window appearing stops the
alarm buzzer.
See also Distress Alarm earlier in this manual.
Deleting an ISDN Handset
Unplug the Nera ISDN Handset to be deleted and
rightclick the same in the Dedicated Handset list.
Clicking Test Handset removes its data, leaving the
Terminal Id and MSN number vacant for another
Display Handset.
If necessary , click refresh: and repeat clicking
T est Handset. The Main Communication Unit will
remember the handset connection data. All handset s
are given a unique name.
Note! A triangle symbol ! in the
Device Manager appears when a
Display Handset is missing.
Nera F77
Continuing the Saturn tradition
63
Page 64
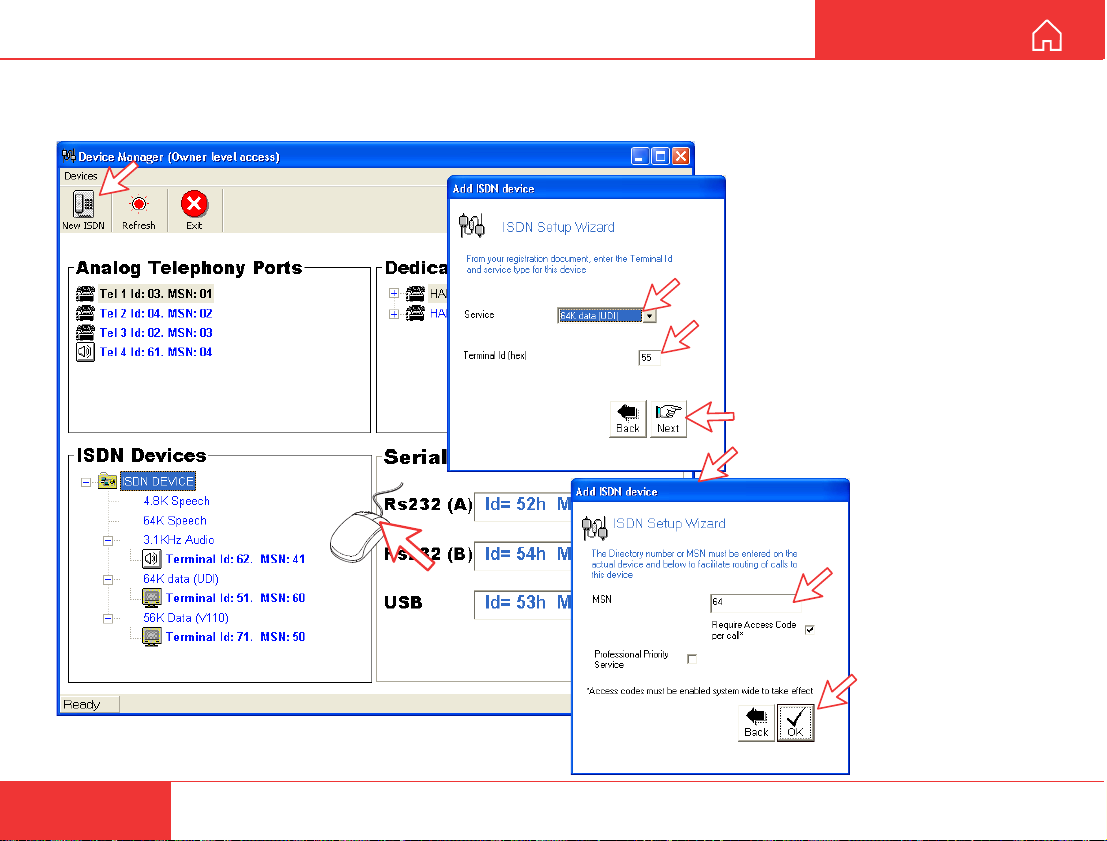
CONFIGURATION FROM PC CONT’D
ISDN port
Open device manager and right-click to open ISDN Setup Wizard.
USER MANUAL
Select the required service:
• 4.8 kbps standard speech service
• 64 kbps speech service
• 3.1 kHz Audio
• 56 kbps data service (V1 10)
• 64 kbps data service (UDI)
Click to continue.
The system selects the Next
available Terminal Id. Check with
T erminal Id received
from Net provider.
Key in MSN number
if not using the
recommended one.
Access Code is not
used for ISDN data.
Click to enter
number.
64
Nera F77
Continuing the Saturn tradition
Page 65
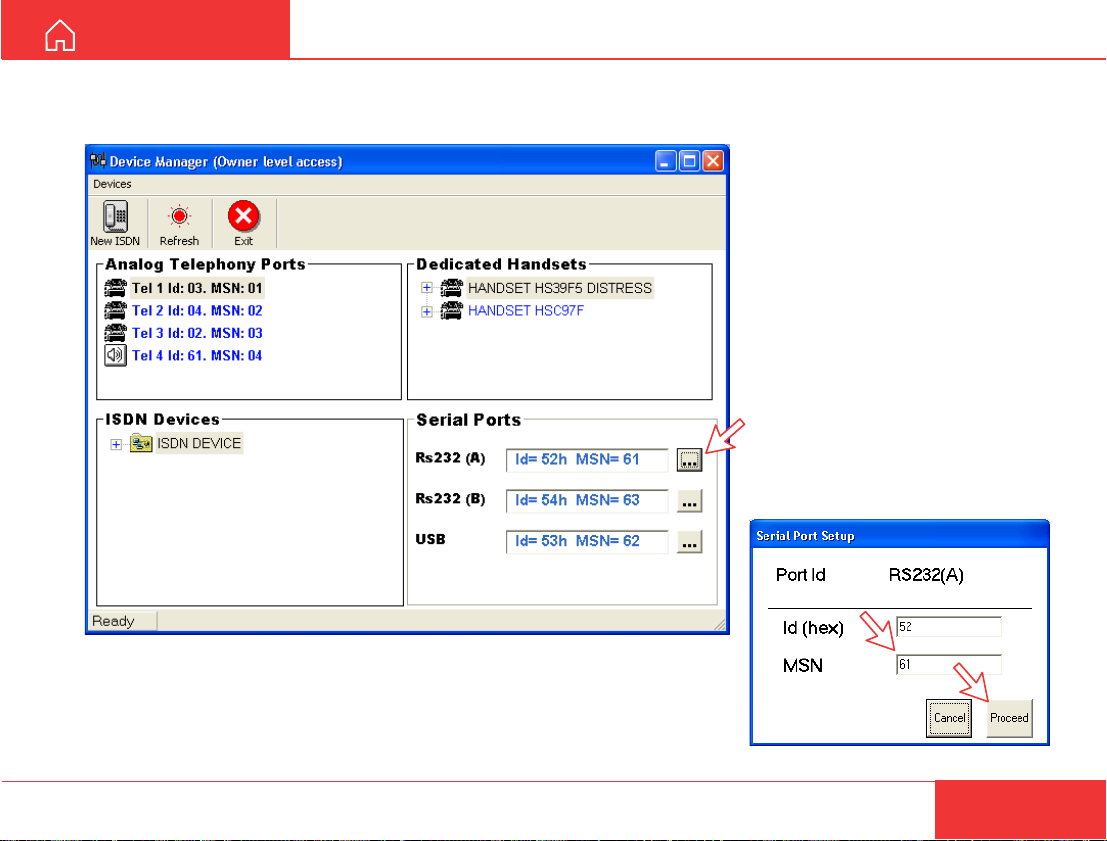
USER MANUAL
RS-232 port
Open device manager and right-click to open setup editor.
CONFIGURATION FROM PC CONT’D
Click to open Serial Port Setup.
Key in MSN number if not using
the recommended one.
Click Proceed to enter number.
Nera F77
Continuing the Saturn tradition
65
Page 66
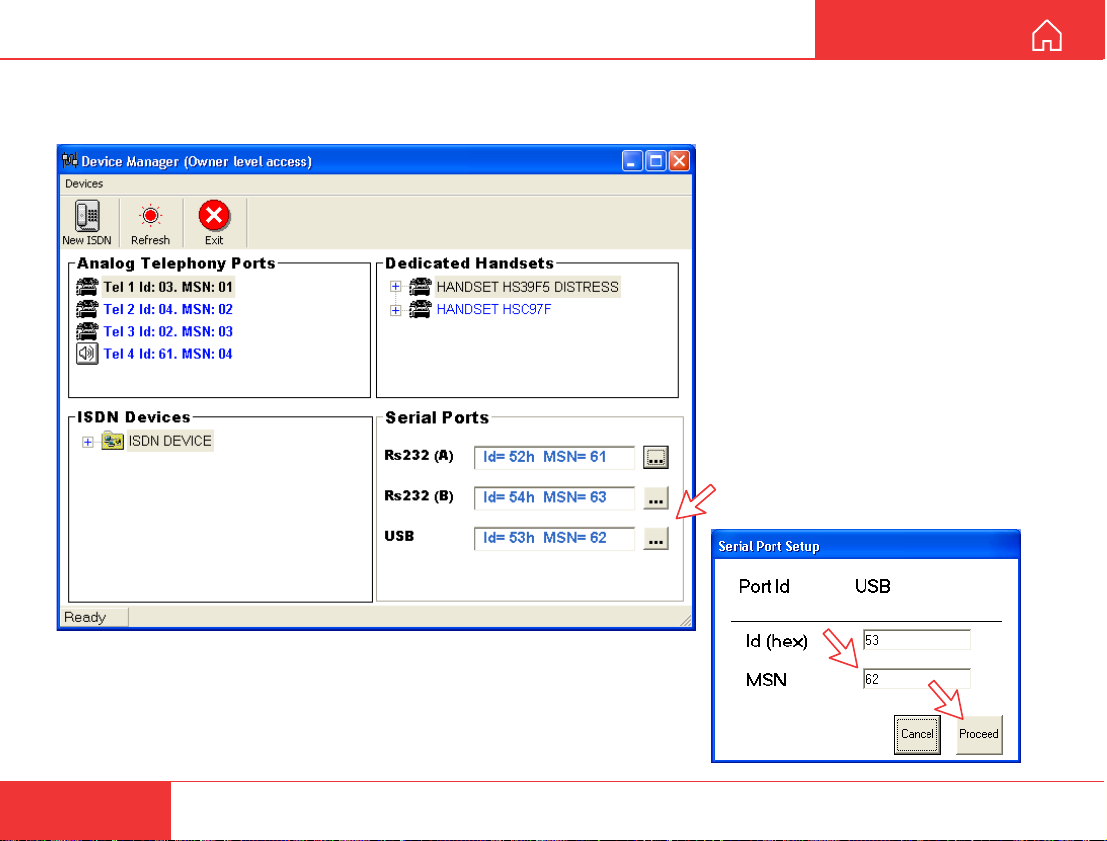
CONFIGURATION FROM PC CONT’D
USB port
Open device manager and right-click to open setup editor.
USER MANUAL
66
Click to open
Serial Port
Setup.
Key in MSN number
if not using the
recommended one.
Click Proceed to
enter number.
Nera F77
Continuing the Saturn tradition
Page 67
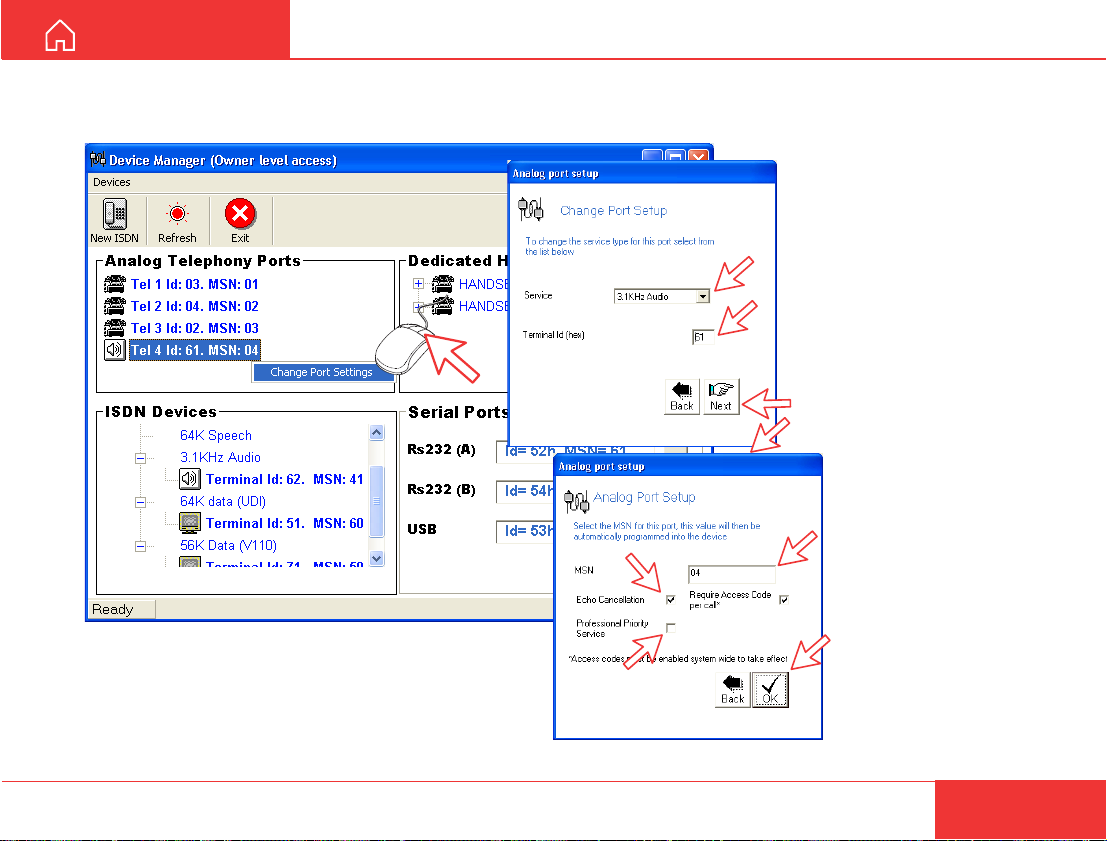
USER MANUAL
Analogue port
Open device manager and right-click to open analogue port setup window.
CONFIGURATION FROM PC CONT’D
Select the required service:
• 4.8 kbps standard speech
service
• 64 kbps speech service
• 3.1 kHz Audio
Enter terminal Id (OID/DID)
received from the Net provider.
Click Next to continue.
Key in MSN number if not
using the recommended one.
Echo Cancellation is performed automatically for all
voice calls. Uncheck if problems with echo cancellation.
Require Access Code is not used for 3.1 kHz Audio
service.
Professional Priority Service is checked on special
agreement with the Net Provider, e.g. for higher priority
in the Inmarsat system.
Nera F77
Continuing the Saturn tradition
Click OK to enter number.
The MSNs can be control-
led independently, e.g. if
two telephones are given
the same MSN, they will
both respond to an incoming call to that MSN.
67
Page 68
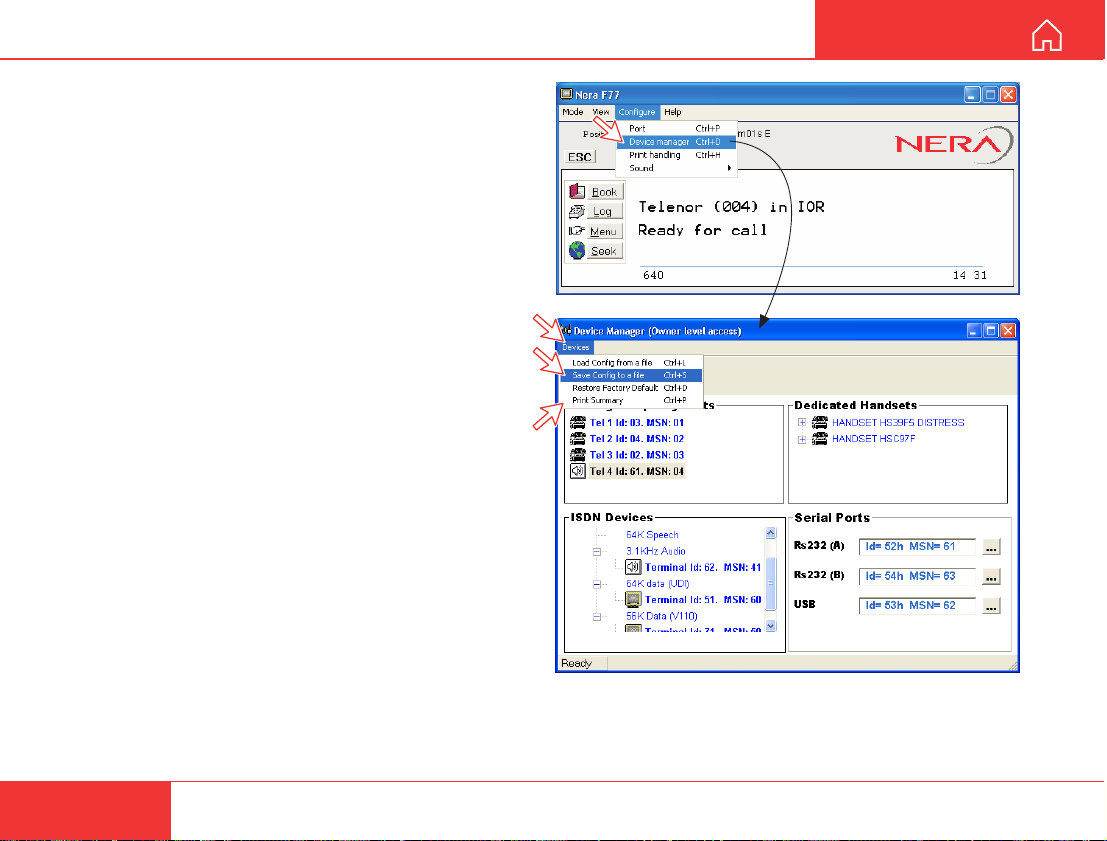
CONFIGURATION FROM PC CONT’D
Saving and reloading configurations
The Nera F77 configuration settings may be stored
on the PC harddisk, e.g. prior to replacing software.
Procedure:
1 Open the Device Manager window as indicated
2 Clicking Devices >Save config to a file
automatically stores the data in a "Config.cgf" file in
the vtLite directory c:/program files/vtLite Marine.
3 After installing the software, the settings may be
transferred back to Nera F77 by pressing Load.
4 Clicking Restore Factory Default s loads default
Nera F77 configurations.
Printout/storing a configuration summary:
5 Clicking Print Summary opens the Printout
Viewer (see next page) which lists the settings of the
end user equipment, and allows filing and/or printout.
Note!
Save config to a file only saves the Device
Manager settings.
Settings such as Net provider / Access codes / ISDN
protocol / Rx-L band output are not saved.
Phone book data and traffic log must be saved in the
Book and Log menus.
USER MANUAL
68
Nera F77
Continuing the Saturn tradition
Page 69
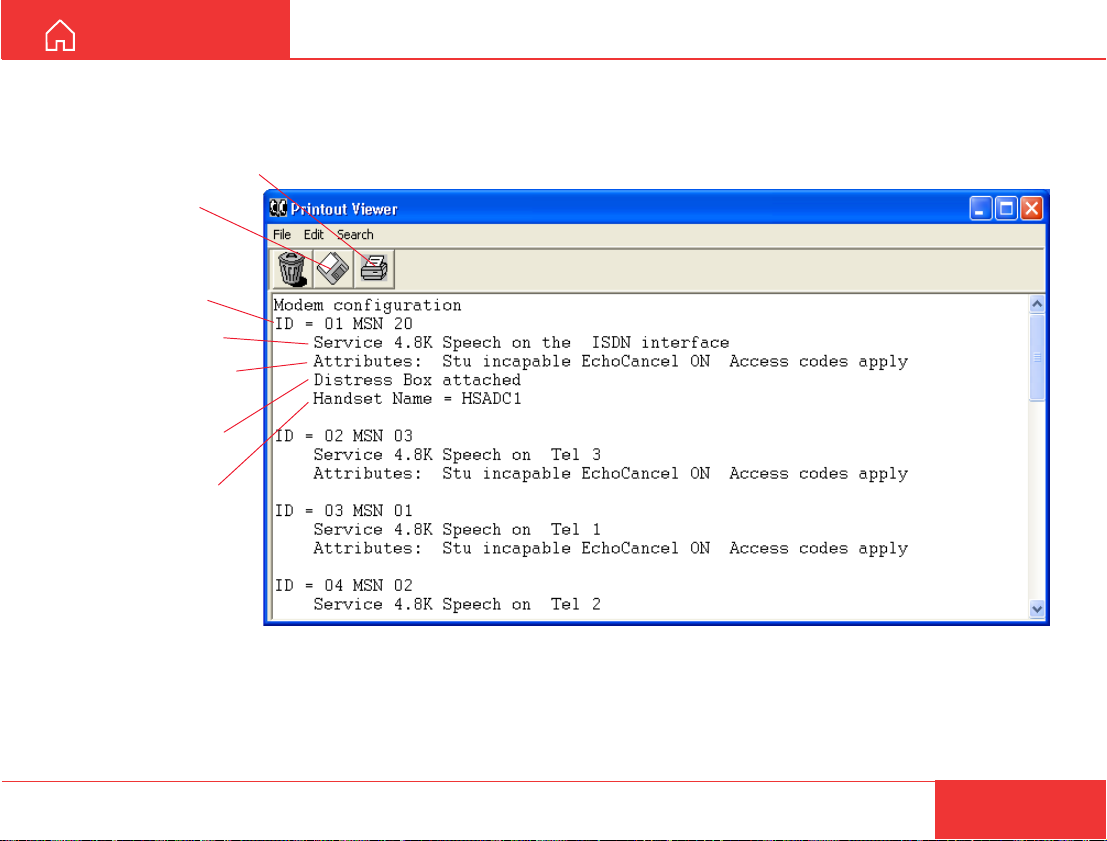
USER MANUAL
Configuration printout viewer
The list is sorted by Terminal Id
Print to local printer
Save to disk
Terminal Id and
MSN number
Type of service
Individual device
settings
Distress Alarm,
if attached
Name/location,
if entered
CONFIGURATION FROM PC CONT’D
Nera F77
Continuing the Saturn tradition
69
Page 70
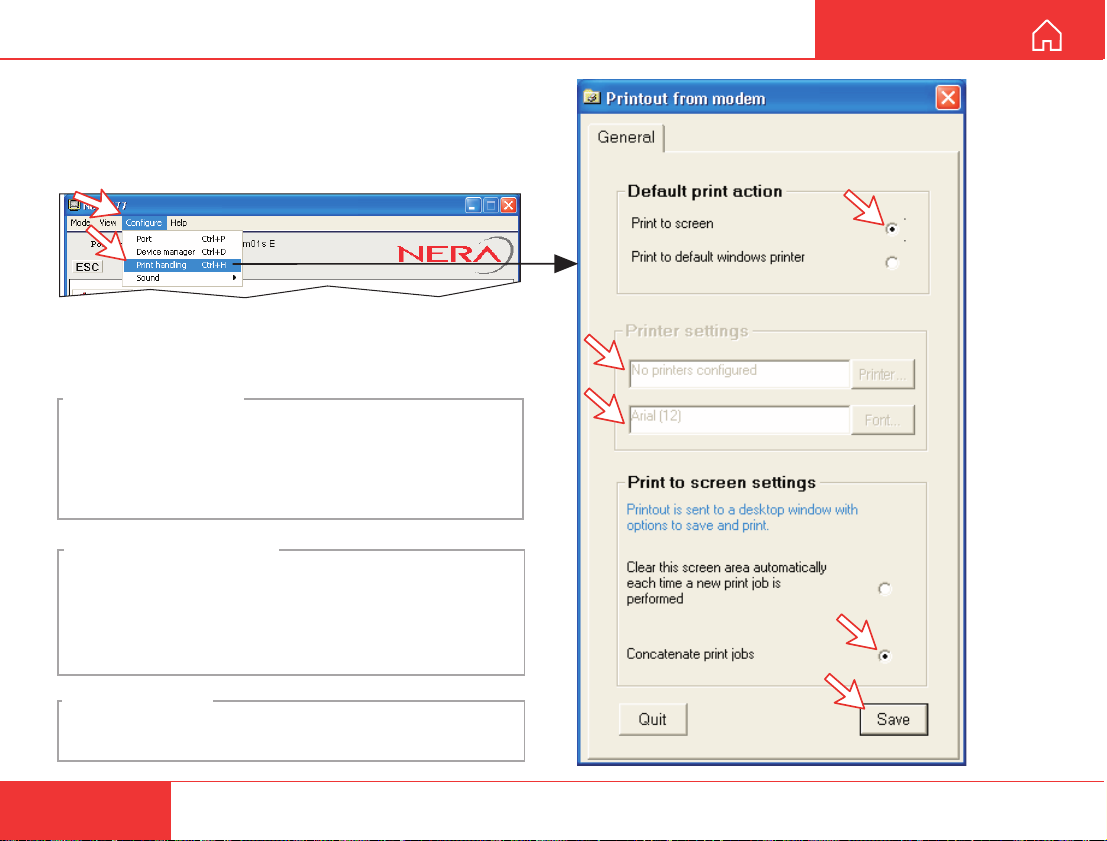
CONFIGURATION FROM PC CONT’D
Print handling setup
The Printout from modem window is used for
setting of default output of Traffic log, Modem configuration etc.
Clicking Configure > Print handling opens the
Printout from modem window. The following settings are selectable:
Default print action:
Normally, choose Print to screen which causes the file
to be output via the Printout viewer. For an example,
see "TRAFFIC LOG > Printout viewer".
For direct printout, choose Print to default windows
printer.
Print to screen settings:
Determines the output of records via the Printout viewer.
Normally, use Concatenate print jobs which “chains”
the jobs to be printed or saved to file.
The alternative choice clears the screen after each
printout.
USER MANUAL
Printer settings:
For hardcopy printout, make sure that the appropriate
printer and font are selected.
70
Nera F77
Continuing the Saturn tradition
Page 71

USER MANUAL
Mobile Packet Data Service
The MPDS service can be efficient for applications
such as:
• E-mail
• Internet/intranet
• Navigational updates
• Vessel telemetry transmission
• Database queries
• E-commerce
CONFIGURATION FROM PC CONT’D
The user only pays for the amount of data sent over
the network, and not for the time connected.
The MPDS service is set up and run from a PC
connected to the RS232/RS422 or USB port of the
Main Communication Unit.
No configuration is needed!
Reverting to Mobile ISDN service is done from the
PC.
See the MPDS application on the Nera F77 CD.
Nera F77
Continuing the Saturn tradition
71
Page 72

MAINTENANCE
General
No regular maintenance is required of the Nera F77
satellite terminal.
USER MANUAL
72
Nera F77
Continuing the Saturn tradition
Page 73
USER MANUAL
Problem Probable cause Action
TROUBLESHOOTING
1. The Nera F77 MCU power
indicator does not light
up:
2. The Nera ISDN Handset
display freezes or stays
completely black:
3. Nera F77 cannot find the
satellite:
4. Nera F77 functions
abnormally:
The Main Communication
Unit is not switched ON
Power is not connected
The handset cord is not
connected, damaged, or
enumerating failed
No or weak signals
Faulty or no power
Toggle the ON/OFF switch to ON.
Switch off, wait 10 secs and switch back on
Check that the power cord is properly connected.
Check that the handset cord is properly connected
and inspect the cord.
Power MCU off/on
Disconnect cord from MCU and connect it again.
Check for correct position of the antenna. Check
that no obstacles block the free sight to the satellite.
The signal strength indicator should preferably
exceed 570.
Check that the coax cable is connected properly.
Restart the search for any satellite, or try a satellite in
a specific Ocean Region.
Turn off power and disconnect power cable.
Connect power cable, and switch on again.
Replace fuses, if needed. Located near the power
switch.
Verify correct voltages to the MCU: 100-240V AC.
Download new software from the Nera website.
Nera F77
Continuing the Saturn tradition
73
Page 74
TROUBLESHOOTING CONT’D
Problem Probable cause Action
USER MANUAL
5. Unsuccessful call
attempt:
6. Problems with telefax
or Videophone:
Nera F77 is not properly
commissioned.
The called party is busy.
Subscriber busy
appears in the display.
The following messages
appear in the vtLite
display:
No response from netor
Not authorized for this
service. (HS: Disconnected)
This message appears:
"Traffic log is full"
Incomplete dialing Remember to press "#" as last digit before starting
Service not commissioned
System transmission
delays
Call the Net Service Provider.
If unsuccessful, wait for some time and try again.
Call another destination (another country).
Select another Ocean Region.
Check that the correct Net service provider is
shown in the display.
The Nera F77 terminal is not properly
commissioned. Check with the Net service provider,
or verify that "Network status information" function
displays Region Registration: Successful.
Connect a PC to Nera F77 and read/print out the traffic
log to allow further logging.
transmission.
Instead of
+ subscriber number.
See problem 5.
The OFF-HOOK time should be as long as possible
(e.g. 2 minutes). When the fax machine is called,
ringing time should be set to minimum (e.g.
immediate answer).
Try a different fax machine. Check that a Group
4 fax is used on the ISDN interface, and Group 3
fax via analogue interface (e.g. TEL4).
"#", try to enter: 902 + 00 + country code
74
Nera F77
Continuing the Saturn tradition
Page 75
USER MANUAL
Problem Probable cause Action
TROUBLESHOOTING CONT’D
7. No GPS
8. Problems with data
communication:
9. Routing of calls:
GPS alarm, or no GPS
readout
Wrong PC settings
MSN number not entered
properly
Wait for 15 minutes. The GPS may use up 15
minutes if Nera F77 has switched off for more than
6 hours. If not the case, GPS will report position
to the vtLite Marine and handset display when the
system logs on to the satellite.
Check the PC program settings: speed
115200bps, 8 data bits, 1 stop bit, no parity if
RS232 is used (default settings in F77 MCU).
If shore/land side has an analogue modem, use
3.1 kHz service in Nera F77.
If shore/land side has ISDN connection, use
64kbps UDI service.
If shore/land has 56 kbps UDI (some states in
America), use 56 kbps UDI data service.
Read Nera Application guide on F77 CD.
Contact the PC applications vendor for help.
Make sure that the MSN number entered into Nera
F77 with the Device Manager, is also entered into
connected equipment. Some ISDN devices can
be programmed with multiple MSNs and will answer
different services and MSNs.
Nera F77
Continuing the Saturn tradition
75
Page 76
TROUBLESHOOTING CONT’D
Problem Probable cause Action
USER MANUAL
10.Problem with local calls:
11.Problem with call
transfer
12.Problem with Distress
Wrong dialing
Distress Alarm
Check that you call the correct MSN number. If
Access Code is used, you need to enter this code
first.
ISDN-to-ISDN: MSN
Phone does not support R-button.
Not possible to transfer call from analogue to
ISDN.
Make sure that the ISDN Handset related to the
Distress Alarm is properly connected.
Test distress buzzer using the ISDN Handset
function Priority Call or vtLite Marine.
76
Nera F77
Continuing the Saturn tradition
Page 77

USER MANUAL
LIST OF TERMS
AC Alternating Current
AOR-E Atlantic Ocean Region East.
AOR-W Atlantic Ocean Region West.
Azimuth horizontal direction angle between north and, e.g. the
direction to the satellite.
Bit rate the number of bits transmitted per second (bps).
Bps bits per second (8 bits = 1 Byte)
CHV2 higher access level on the SIM card, corresponding to
Nera F77 "owner" level.
DC Direct Current.
DID Destination terminal IDentification.
DSP Digital Signal Processor .
DTE Data Terminal Equipment.
Elevation vertical angle to the satellite, i.e. the height of the
satellite above the horizon.
Fleet 77 Inmarsat's single integrated voice, fax, Mobile Data
Service and Mobile Packet Data Service.
FWD ID forward Id, telephone network identity.
GAN Inmarsat Global Area Network.
Home LES Home Land Earth Station gives access to MPDS
service like Internet / e-mail and handles MPDS billing system.
IMN Inmarsat Mobile Number, a unique 9-digit number which
identifies each device connected to Nera F77.
Inmarsat International Maritime Satellite Organisation.
IOR Indian Ocean Region.
ISDN Integrated Services Digital Network.
ISN Inmarsat Serial Number, individual number assigned to
each Nera F77 terminal.
ITU International Telecommunications Union
Kbps Kilobits per second.
LAN Local Area Network.
LES Land Earth Station, a station that interconnects fixed telecom-
munications networks with the Inmarsat system; may also be called
a CES (Coast Earth Station) or a GES (Ground Earth Station).
M4 Inmarsat Multi-Media Mini-M.
MES Mobile Earth Station, a user terminal for an Inmarsat
system; the Nera F77 terminal is an MES for the Inmarsat GAN
system; MES may also be called SES (Ship Earth Station) or, if
on aircraft, AES (Aeronautical Earth Station).
MPDS Inmarsat Mobile Packet Data Service.
MSN Multiple Subscriber Number, the extension number that
connected equipment responds to. Also used for internal calls.
NCS Network Coordination Station, station that supervises all
messages and signals sent in the Inmarsat system; one in each
Ocean Region.
OID Originating terminal IDentification.
Ocean Region the coverage area of an Inmarsat satellite within
which Nera F77 may communicate.
PABX Private Automatic Branch Exchange.
PIN Personal Identification Number.
POR Pacific Ocean Region.
PPP Point-to-Point Protocol, protocol used for serial data
communication via the Nera F77 RS-232 or USB port.
PUK Personal Unblocking Key, code that allows unblocking a
SIM card.
RF Radio Frequency.
R LES Regional Land Earth Station sets terminal in MPDS list.
S/A operator StandAlone operator who maintains connectivity
in the event of Network Coordinating Station failure.
SBS Shared Base Station assigns channels to the MPDS user
and handles the MPDS communication.
SIM Subscriber Identity Module.
SMS Short Message System.
Spot Beam an Ocean Region is divided into sub-regions, each
“spotlighted” by a beam from the region satellite.
Terminal ID (OID/DID) different IDs for different Inmarsat
services (e.g. 01 = 4.8 speech)
Terrestrial Network a fixed telecommunications network, such
as a telephone network or a data network, which connects to
the Inmarsat system at an LES/NCS.
UDI Unrestricted Digital Information.
USB Universal Serial Bus.
UTC Coordinated Universal Time, referenced to Greenwich
Mean Time (GMT).
Nera F77
Continuing the Saturn tradition
77
Page 78
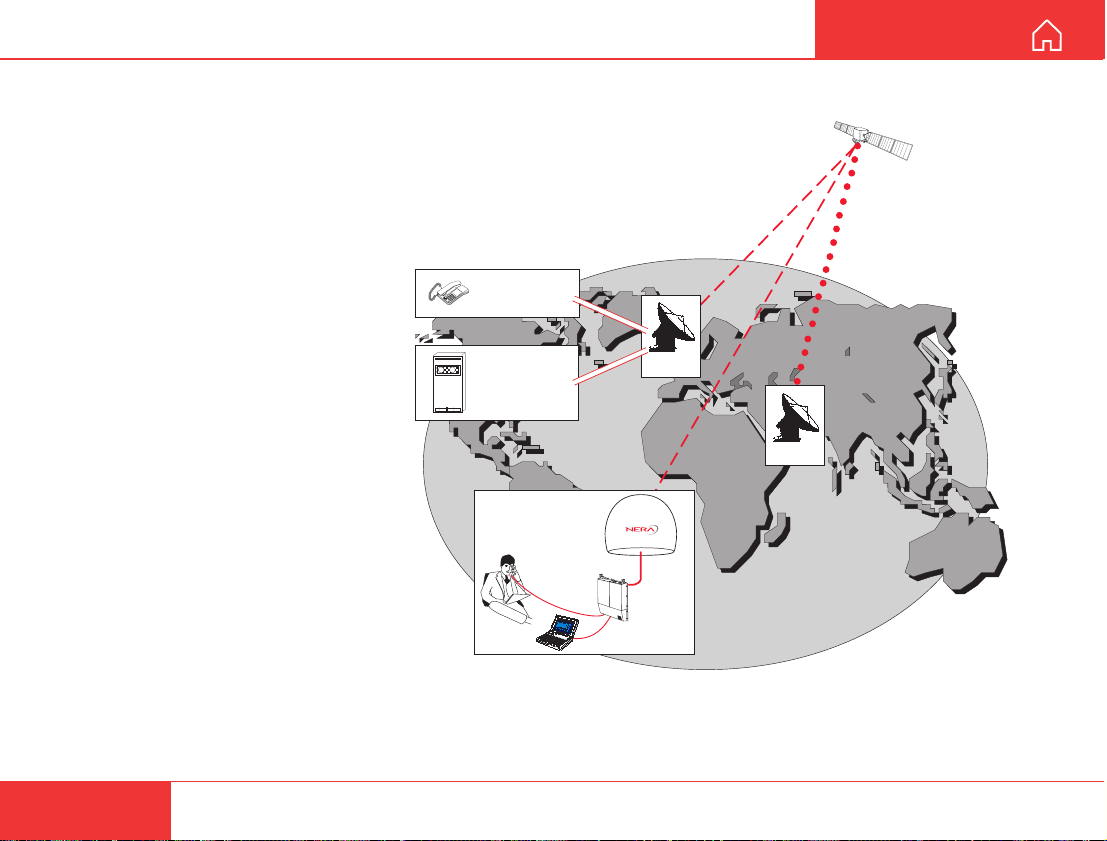
SYSTEM DESCRIPTION
Inmarsat GAN system/Fleet77
The Inmarsat Global Area Network service (GAN)
provides a truly portable 64 kbps ISDN communications service for data and voice transmissions to and
from mobile/fixed subscribers anywhere within the
worldwide coverage of the Inmarsat 3 spot Beam
system, see map later in the Service Guide.
The benefit of the INMARSAT system
is its high capacity, and the rapid and
reliable connection between the land
based (fixed) users and the Mobile
Earth Stations (MESs).
Each satellite region is under the
control of a Network Coordinating
Station (NCS), which controls and
monitors the traffic between the
MESs and the LESs.
R
P
7
4
8
1
5
9
S
2
6
0
3
#
R
TELEPHONE
NETWORKS
DATA
NETWORKS
USER MANUAL
LES
NCS
NCS: Network Coordinating Station,
one in each Ocean Region (supervises all messages and signals sent in
the Inmarsat system).
LES: Land Earth Station w/Net
service providers (interconnects fixed
telecommunication networks with the
Inmarsat system.
MES: Mobile Earth Station
(Nera F77, a user terminal for the
Inmarsat system).
78
MES
Overview of the Inmarsat GAN system.
Nera F77
Continuing the Saturn tradition
Page 79
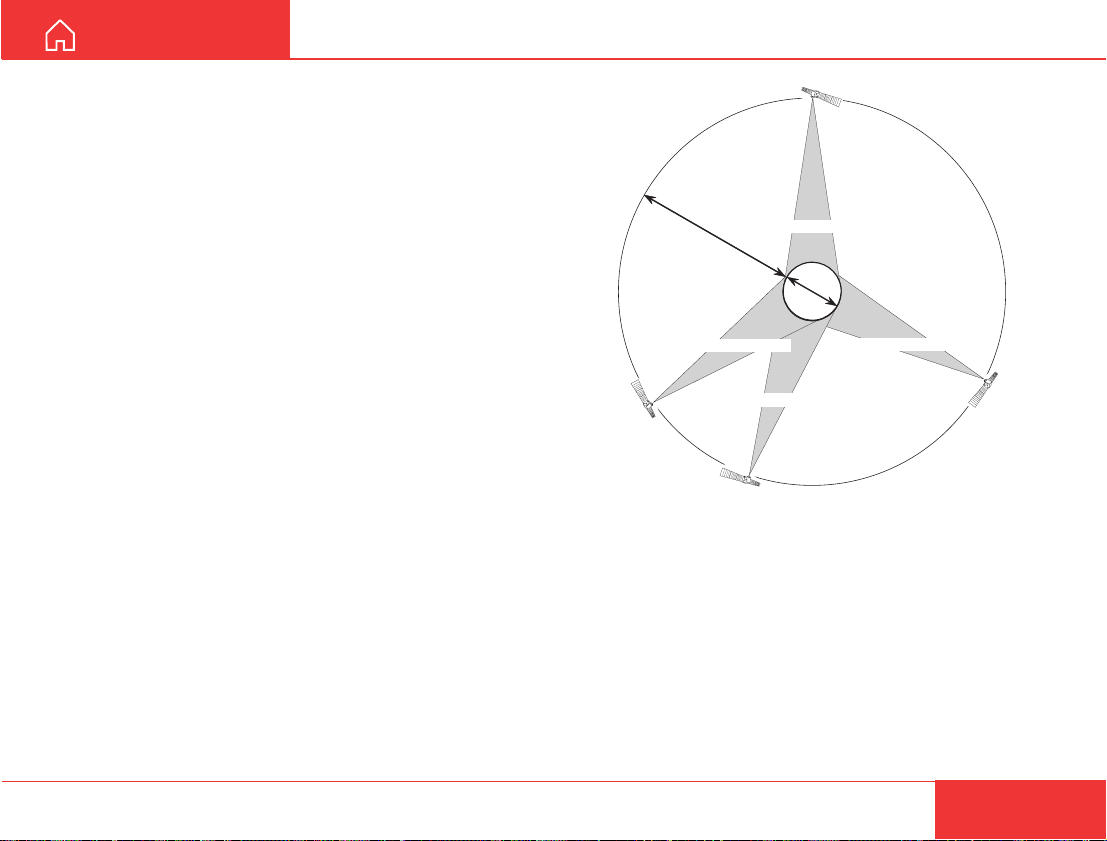
USER MANUAL
SYSTEM DESCRIPTION CONT’D
System satellites
The satellites are positioned in a geostationary orbit
above the equator at approximately 35700 km
altitude.
See figure.
In geostationary orbit, each satellite moves at the
same rate as the earth, and so remains in the same
relative position to the earth.
The satellites provide 99% landmass coverage.
Nera F77 can communicate via the four satellite
Ocean Regions:
AOR-W Atlantic Ocean West Region
AOR-E Atlantic Ocean East Region
IOR Indian Ocean Region
POR Pacific Ocean Region
For coverage area of the satellites for Nera F77, see
HANDSET FUNCTIONS >Satellite Coverage Map.
See also Inmarsat Coverage Maps on the CD.
Transmission frequencies
The Inmarsat terminals operate in the following
frequency bands:
MES transmission frequencies:
1626.5 MHz - 1646.5 MHz
MES receiving frequencies:
1530.0 MHz - 1559.0 MHz
178°E
35700 km
Pacific Ocean Region
Q
U
E
A
T
12000 km
O
R
EARTH
Atlantic Ocean Region (West)
54°W
Atlantic Ocean Region (East)
15.5°W
Indian Ocean Region
64.5°E
Satellite positions.
A large number of channels are available (20 kHz
channel separation), offering either 4.8 or 64 kbps
voice communication, as well as 3.1 kHz audio or
64 kbps (56 kbps) data communication.
Duplex communication uses two channel frequencies, one in each direction.
The LESs provide interface to the international
networks for telephony and data: PSTN (Public
Switched Telephone Networks) and PSDN (Packet
Switched Data Networks).
Nera F77
Continuing the Saturn tradition
79
Page 80
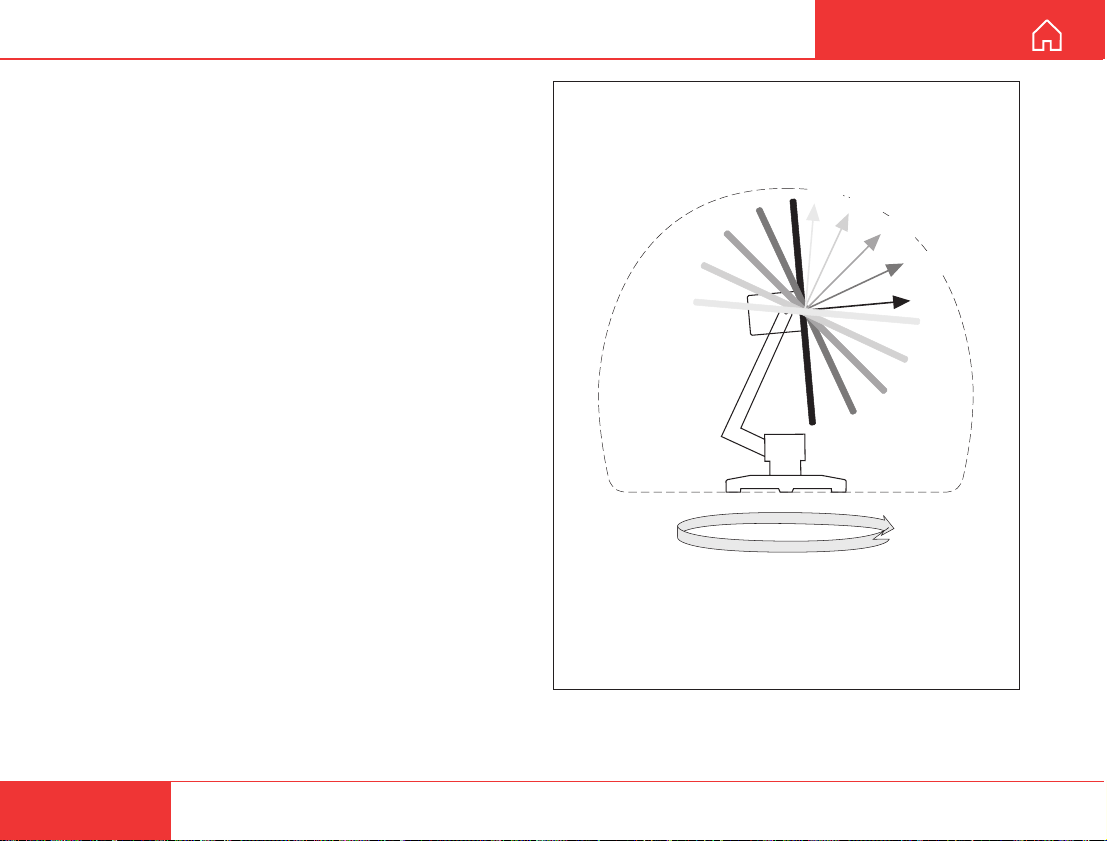
SYSTEM DESCRIPTION CONT’D
Antenna search pattern
USER MANUAL
Azimuth sweep
A 360° rot ation of the antenna in azimuth at a fixed
elevation angle.
Hemispheric search
A hemispheric search is constituted by azimuth
sweeps at elevation angles 5°, 25°, 45°, 65° and 85°.
The antenna searches on the NCS Common TDM
channel frequency (NCSC), initiated by the Nera F77
Main Communication Unit (MCU).
When finding the satellite signal, it completes the
hemispheric search and moves to the position where
the strongest signal was detected.
The Antenna report s back to the MCU for verification
of valid NCSC.
If no valid signal is detected, no further automatic
action occurs until the MCU initiates a new search.
A search request from the MCU may cont ain channel
frequency and an order to make a full 360° search at
a specific elevation, calculated from map and GPS
information. If no satellite is found, a hemispheric
search will be performed.
Tracking
At the end of a search, Nera F77 performs a finetuning of the antenna position around the strongest
detected signal. The fine-tuning is obtained by a
squinting function based on satlite signal quality .
H
E
M
I
S
P
E
85°
L
65°
H
E
E
V
A
R
T
I
I
C
O
N
S
A
E
N
25°
G
L
E
45°
5°
3
6
0
°
A
Z
I
M
Note! Nera F77 remembers the last used Ocean
Region when when switching the terminal off/on.
S
U
T
H
W
P
E
E
A
R
C
H
S
80
Nera F77
Continuing the Saturn tradition
Page 81
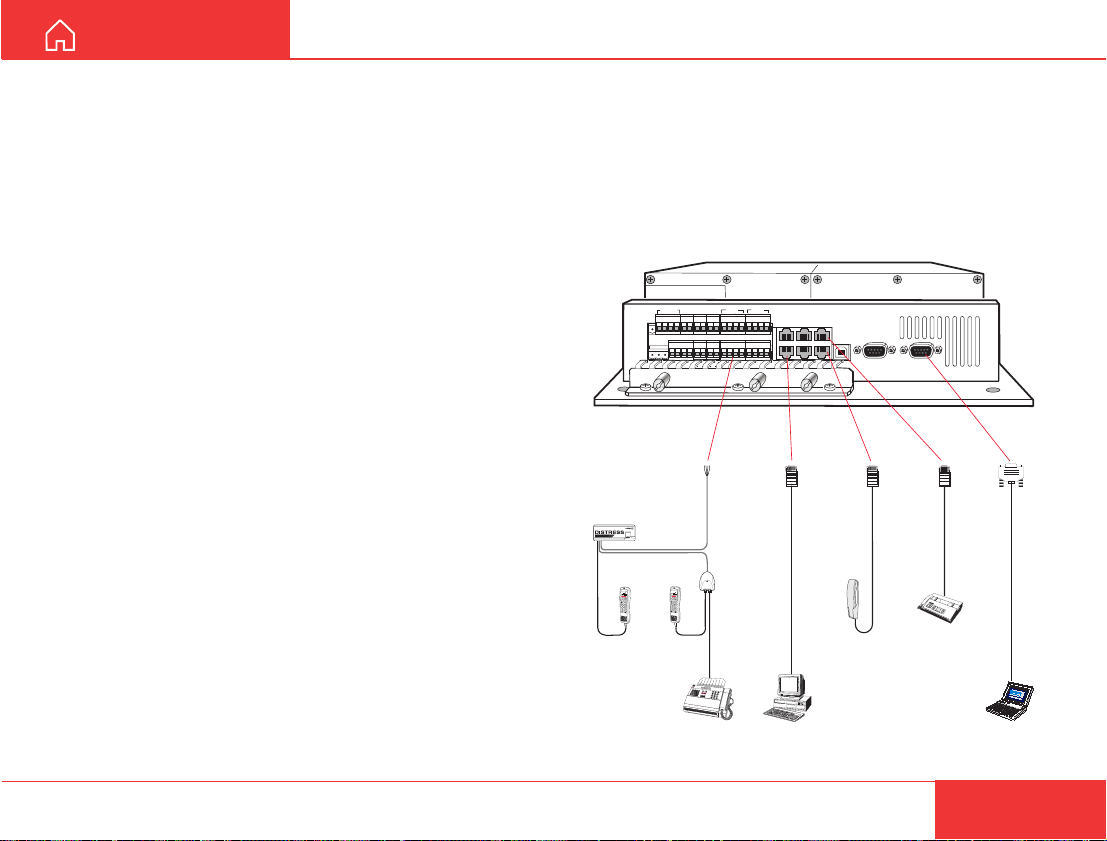
USER MANUAL
-
-
-
-
-
-
-
-
-
SYSTEM DESCRIPTION CONT’D
Communication services
Nera F77 provides the following interfaces & services:
• ISDN:
- 4.8 kbps speech
- 64 kbps speech
- 64 kbps data service (UDI)
- 56 kbps data service
- 3.1 kHz audio (64 kbps)
• RS-232/RS422:
- 64 kbps data service (UDI)
- MPDS
• USB
- 64 kbps data service (UDI)
- MPDS
Requires PC with MS Windows 98 Second
Edition, or Apple OS 9.03 (or later).
• ANALOGUE
The Nera F77 MCU has following ports (see figure):
• ISDN ports for connection of ISDN telephones,
• RS-232/RS422 and USB ports for connection of
- 3.1 kHz audio
- 4.8 kbps speech
- 64 kbps speech
telefax (Gr.4) or data equipment; a tot al of 7
devices.
data equipment.
Control interface
The RS-232 or USB port allows connection of a PC
for configuration of Nera F77.
A PC program (vtLite Marine) that provides the
software to operate and configure Nera F77 terminal
is supplied on the enclosed CD (requires at least
Windows 95).
SILENCE
SW
NMEA -
IND
-
-
TX
TX+
RX
RS-422
Distress
Alarm Unit
Nera F77
D
IA
L
0
0
+
IN
T
D
L
IA
L
0
0
+
IN
T
L
T
E
L
.N
O
.+
T
E
L
.N
O
.+
S
H
I
F
T
B
A
T
A
L
P
H
A
S
H
I
F
T
B
A
T
O
A
N
L
P
H
A
O
N
F
U
N
C
A
L
P
H
A
E
N
T
E
R
F
U
N
C
A
L
P
H
A
E
N
T
E
R
M
S
O
H
R
I
F
E
T
/
L
E
S
H
E
M
L
S
O
P
H
R
I
F
E
T
/
P
T
L
T
E
S
H
E
L
P
P
T
T
ON/OFF
ON/OFF
L
IS
T
L
I
S
T
L
IS
T
D
E
S
E
C
L
L
IS
T
D
E
S
E
C
L
PL
AY
1
A
B
C
P
LAY
2
D
E
F
1
A
B
3
C
G
HI
2
D
E
F
3
G
H
I
4
J
K
L
5
MNO
4
J
6
K
L
P
Q
R
5
MNO
6
P
Q
R
T
AX
7
L
STU
I
G
H
T
T
AX
8
V
W
X
7
L
STU
I
G
H
9
T
Y
Z
Æ
8
V
W
X
9
Y
Z
Æ
D
A
T
A
D
A
T
A
Ø
Å
.
0
Ä
Ö
Ü
Ø
Å
.
S
P
0
C
Ä
Ö
Ü
S
P
C
Nera ISDN
Handset
Nera ISDN
Handset
NMEA +
RX+
MCU - Main Communication Unit
ISDN
ISDN
-
-
-
-
TX
TX
TX+
TX+
TEL 1
TEL 3
RX
RX
RX+
RX+
-
-
-
-
TX
TX
TX+
TX+
RX
RX
RX+
RX+
TEL 2
TEL 4
ISDN
ISDN
ISDN wall
Nera ISDN
socket
TEL 3
ISDN
ISDN
ISDN
USB
ISDN
TEL 4
RS-232
RS-232
B
A
Analogue
telephone
Analogue
telefax (G3)
Internal communication
Equipment connected to the various interfaces may
communicate with each other via an internal MSN
(Mobile Subscriber Number) assigned to each unit.
Nera F77
Continuing the Saturn tradition
Digital
telefax (G4)
PC w/ISDN
interface
Nera F77 ports.
PC
81
Page 82
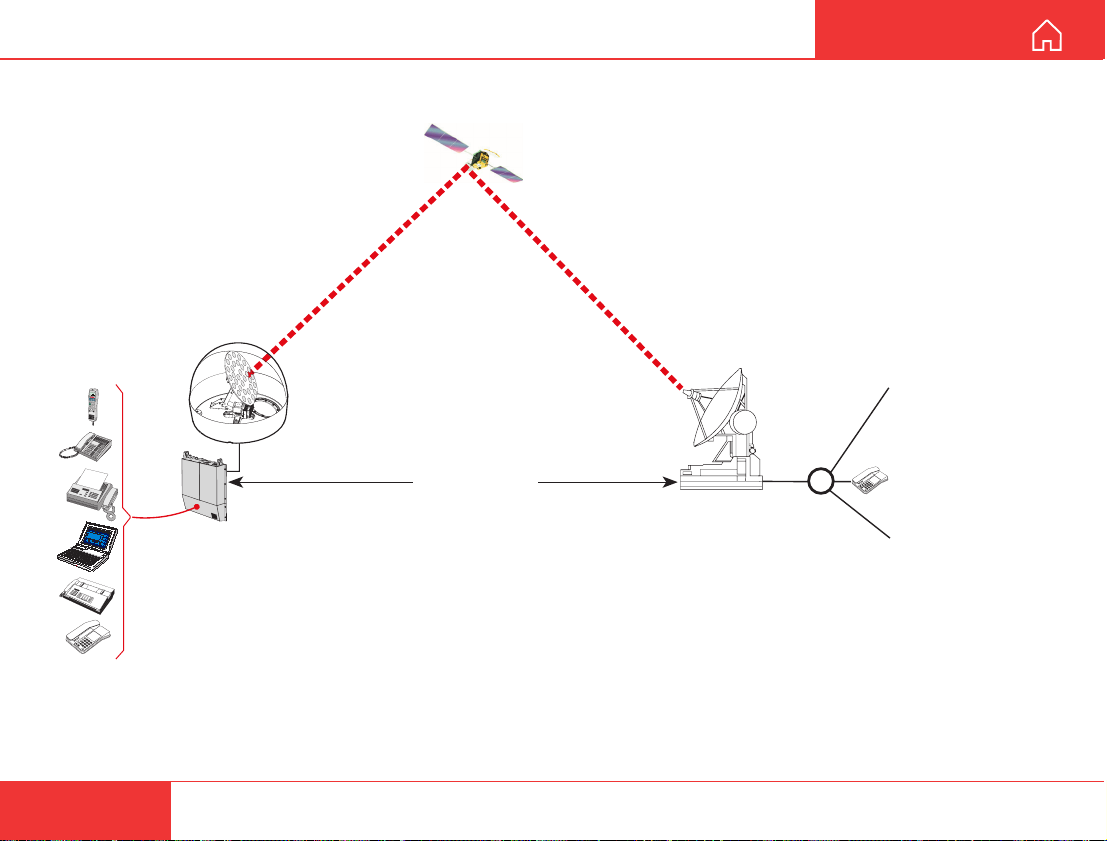
SYSTEM DESCRIPTION CONT’D
USER MANUAL
82
Nera F77
Land
Earth
Station,
D
IA
L
0
0
+
I
N
T
L
T
E
L
.N
O
.+
S
H
IF
T
O
N
D
E
L
1
2
3
4
5
6
7
8
9
0
Path established by
the Nera F77
terminal via satellite
Examples of connections:
Nera ISDN Telephone (s)
ISDN telephone(s)
ISDN video telephone(s)
R
e
P
7
4
8
1
5
9
S
2
6
0
3
#
R
Telefax Gr.4
Data communication/internet
Telefax Gr.3
Analogue telephone (s)
LES
Public
Switched
Telephone
Network,
PSTN
Telefax Gr.3 -
3.1 kHz audio
Telefax Gr.4 64 kbps UDI
ISDN and
analogue telephone:
- 4.8 kbps speech
- 64 kbps speech
- 3.1 kHz audio
PC/modem/video:
- analogue, 3.1 kHz
audio
- ISDN, 64 kbps UDI
- ISDN, 56 kbps UDI
Communication path.
Nera F77
Continuing the Saturn tradition
Page 83
USER MANUAL
SYSTEM DESCRIPTION CONT’D
Net service provider
The Net service provider issues your user licence
and IMN (Inmarsat Mobile Number) phone numbers.
It is also responsible for the billing of calls (charges).
The Nera F77 may respond to individual IMN numbers, giving the possibility to transfer a call directly to
each device attached to it.
Note! T ermlD is a term that includes both Originating
Identity (OlD) and Destination Identity (DID).
The DID is used from LES to MES to identify the
service, whereas OlD is used from MES to LES to
identify the service.T ermlD is used in this manual
because the DID and OlD have the same value.
Calls from Mobiles
See figure.
To make an outgoing call, you use a standard international telephone number with the 00 prefix. The
MES automatically includes information to identify
itself and the particular device that originates.
System signalling
The LES uses the identifying information of the
attached device for billing purposes.
The MES transmits the dialing information on a
channel specially assigned by the NCS to the LES.
LES routes the call over the public telecommunications networks to the intended destination. When the
called party responds, the call proceeds.
Call announcement from mobile to fixed:
The MES uses the Return Identity (RTNID) to communicate with the LES. It uses the TermlD to identify
its IMN number and the service in use.
The attached equipment dials the number and
transmits its MSN number to the MES. The MES
routes the MSN to a TermlD.
LES checks that the RTNID is commissioned before
connecting the call to the fixed net.
Nera F77
Continuing the Saturn tradition
83
Page 84
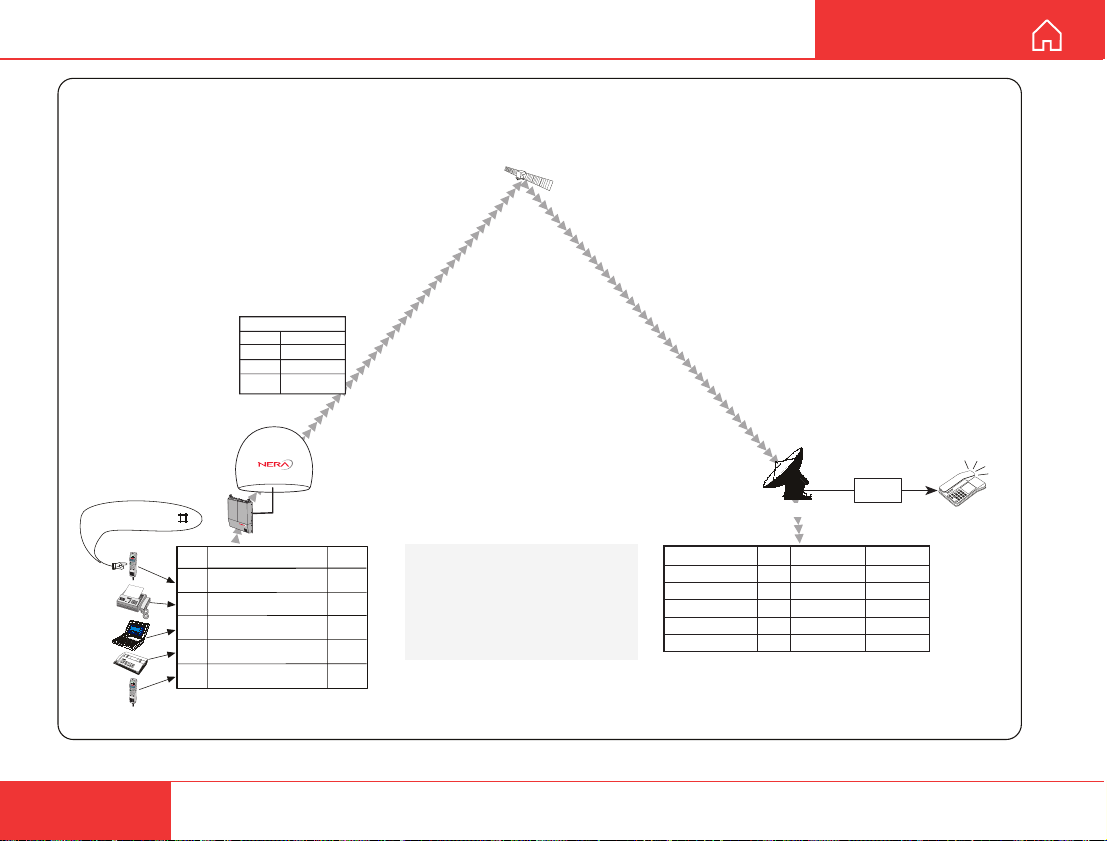
SYSTEM DESCRIPTION CONT’D
Call announcement
LES
2
Return ID
ABCDEF
Term Id
01
Fixed net
004767244700
number
00 47 67 24 47 00
DIAL 00+INTL
T
EL.NO
.+
S
H
IFT
ON
MSN
D
E
L
1
2
3
4
5
6
7
8
9
0
Service
20 4.8 kbps speech 01
60 64 kbps data (Gr.4 fax) 51
61 64 kbps data 52
04 3.1 kHz audio (Gr.3 fax) 61
30 64 kbps speech 91
DIA
L 00+INTL
TE
L.NO.+
S
HIFT
ON
D
E
L
1
2
3
4
5
6
7
8
9
0
Example of MES Translation Table
Term.Id
Calls from Mobiles
When the MES originates a call it starts
by sending a request to the LES.
This initial request for service contains
the MES Return ID and type of service.
Nera F77 incorporates a configuration
table that contains Terminal Id for every
device connected and type of service.
Forward/return ID
123456/ABCDEF
123456/ABCDEF
123456/ABCDEF
123456/ABCDEF
123456/ABCDEF
USER MANUAL
LES
Term Id
Service
01
4.8kbps speech
51
64kbps data
64kbps data
52
3.1kHz audio
61
64kbps speech
91
LES Translation Table
PSTN
IMN
761234567
601234789
601234890
601234481
601234
67244700
R
e
P
7
4
8
1
5
9
S
2
6
0
3
#
R
84
Nera F77
Continuing the Saturn tradition
Page 85

USER MANUAL
SYSTEM DESCRIPTION CONT’D
Calls to Mobiles
See figure.
The Nera F77 terminal receives incoming calls via
the IMN phone numbers. IMN numbers are assigned
to the following ports by the user:
• ISDN ports
• RS-232 serial data ports
• RS-422 serial data port
• USB serial data port
• Analogue ports
Calls are made as ordinary international (Satellite)
calls by dialing the international prefix (normally 00)
followed by 870 and the IMN number, e.g.:
00 870 762420510.
The common Ocean Region access no. 870 connects the call to the dialed Nera F77 regardless of
the Ocean Region the user currently communicates
through.
If the Net service provider does not support access
no. 870, call the Ocean Region directly:
871 – AOR-E (Atlantic Ocean Region East)
872 – POR (Pacific Ocean Region)
873 – IOR (Indian Ocean Region)
874 – AOR-W (Atlantic Ocean Region West)
Call announcement from fixed to mobile:
The LES uses the MES’s Forward Identity (FWID) to
communicate with the MES, and the Terminal Identity
(TermlD) to identify the IMN number and the service
in use.
The FWID together with the TermlD replaces the
need of the IMN number to be transmitted through
the Inmarsat system in order to identify the MES and
the specific equipment attached to it. This means
that LES routes an IMN number received from the
fixed net to the specific FWID and TermlD identifying
the MES.
The MES identifies the FWID and the TermID and
routes it to a Mobile Subscriber Number (MSN)
which is programmed in the attached equipment.
Nera provides a table to identify which TermlD is
routed to an MSN.
Nera F77
Continuing the Saturn tradition
85
Page 86
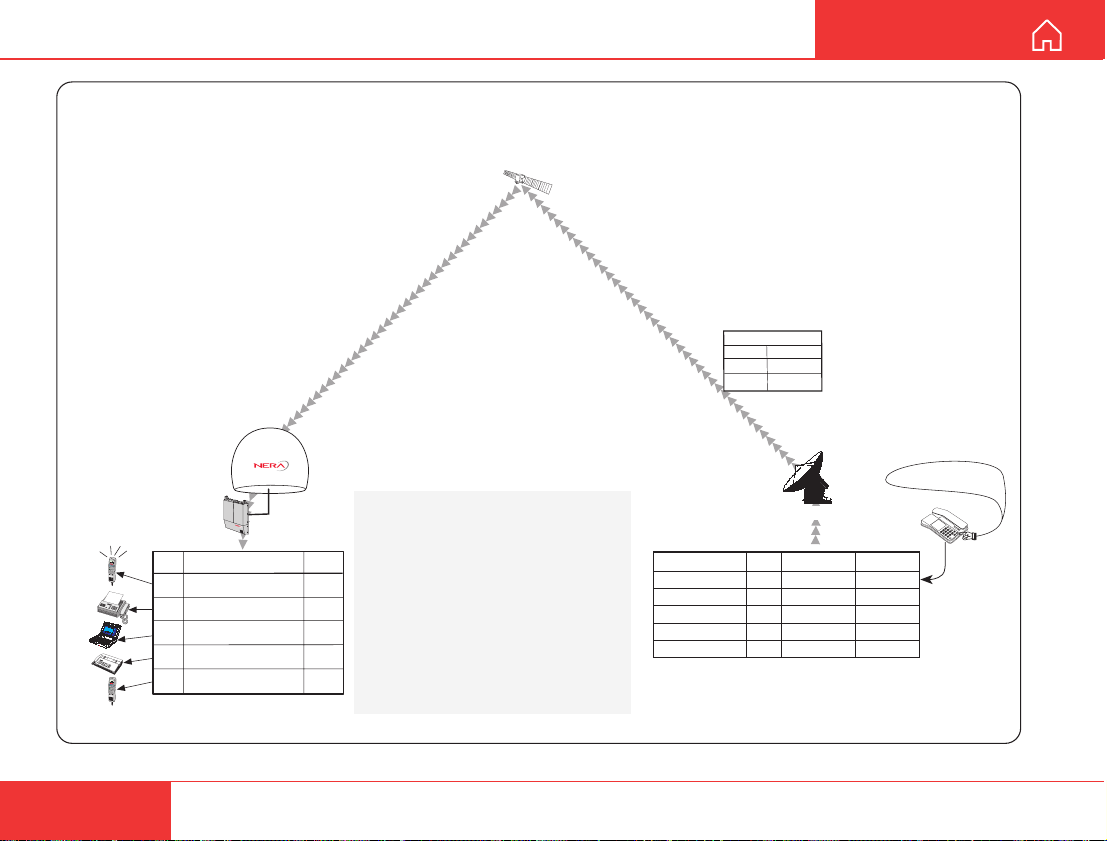
SYSTEM DESCRIPTION CONT’D
When requested to call a specific IMN, LES
translates the IMN to a Terminal Id.
The request is then sent to the MES which
DIAL 00+INTL
TEL.NO.+
SHI
FT
O
N
MSN
D
E
L
1
2
3
4
5
6
7
8
9
0
Incoming call route
20 4.8 kbps speech 1
60 64 kbps data (Gr.4 fax) 51
61 64 kbps data 52
40 3.1 kHz audio (Gr.3 fax) 61
DIAL 00+INTL
TEL.NO.+
SHIFT
O
N
30 64 kbps speech 91
D
E
L
1
2
3
4
5
6
7
8
9
0
Example of MES Translation Table
translates the Terminal Id to an MSN number.
Term.Id
To "connect" a Terminal Id to a physical line, Nera
F77 incorporates a translation table. This table
can contain up to 100 Id translations, and each
Terminal Id in use is programmed with type of call
and destination.
A call is not allowed to be routed to a device that
is configured to another type than the Terminal Id
specifies. A telephone Terminal Id can only be
routed to a phone type device. A telefax Terminal
Id can only be routed to a fax device.
Calls to Mobiles
LES
Fwd ID
Term ID
Forward/return ID
123456/ABCDEF
123456/ABCDEF
123456/ABCDEF
123456/ABCDEF
123456/ABCDEF
Call announcement
2
123456
01
LES=2
Service
Term Id
4.8kbps speech
01
64kbps data
51
64kbps data
52
3.1kHz audio
61
64kbps speech
91
LES Translation Table
USER MANUAL
00 870 761234567
R
e
P
7
4
8
1
5
9
S
2
6
0
3
#
R
IMN
761234567
601234789
601234890
601234481
601234
86
Nera F77
Continuing the Saturn tradition
Page 87
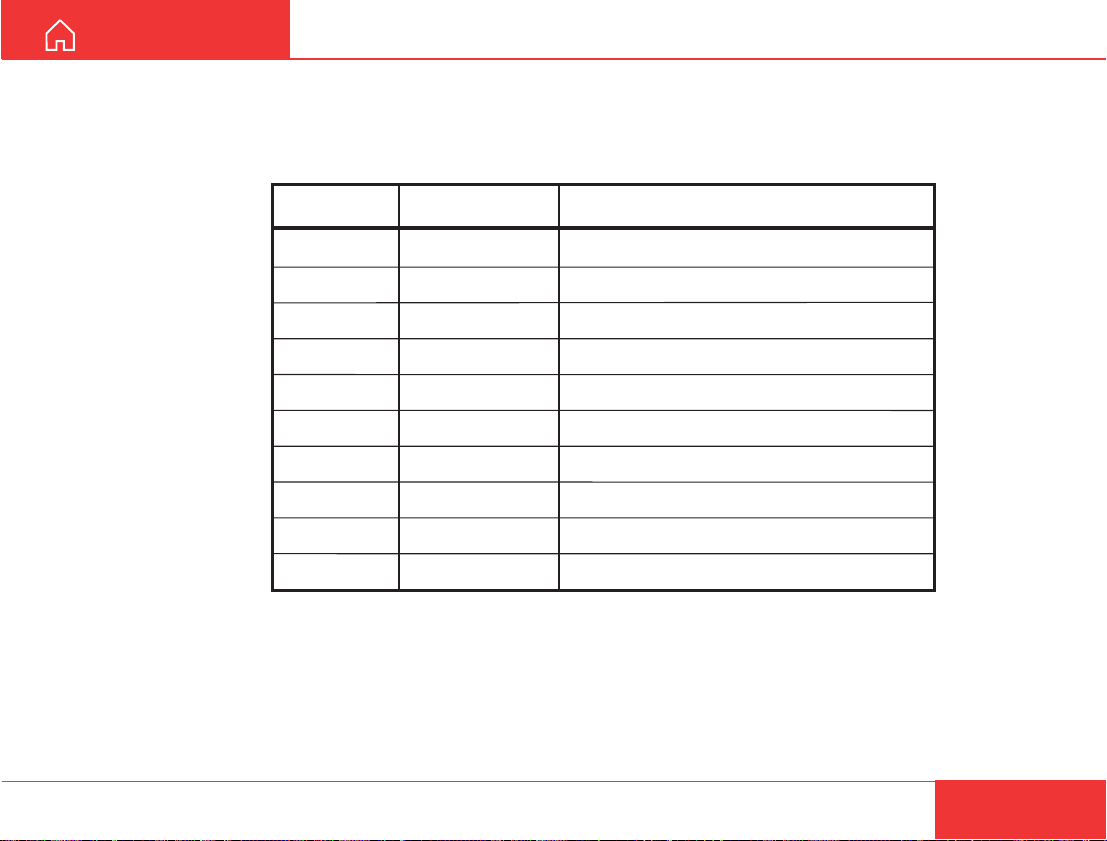
USER MANUAL
APPENDIX
Term. Id Service
01 - 0F Voice B: 16.8, M: 4.8, Mini-M: 4.8, F: 4.8
11 - 1F Fax B: 9.6, M: 2.4, Mini-M: 2.4
21 - 2F ASD B: 9.6, M: 2.4, Mini-M: 2.4
31 - 3F Telex B
41 - 4F HSD B
51 - 5F 64k Data GAN/F
61 - 6F 3.1kHz Audio GAN/F
71 - 7F 56K Data GAN/F
N.C.
91 - 9F 64K Speech GAN/F
Inmarsat services
Terminal Identities and the corresponding Inmarsat Services.
Note! MPDS is given the Terminal Id: AI
Nera F77
Continuing the Saturn tradition
87
Page 88

Page 89

Page 90

Back to Start Page
Nera ASA
Nera SatCom AS
Bergerveien 12, PO Box 91
N-1375 Billingstad, Norway
Tel: +47 67 24 47 00
Fax: +47 67 24 46 21
www.nera.no
 Loading...