


USER MANUAL
SCA1
Digital Terrestrial Receiver
and Recorder
- 1 -
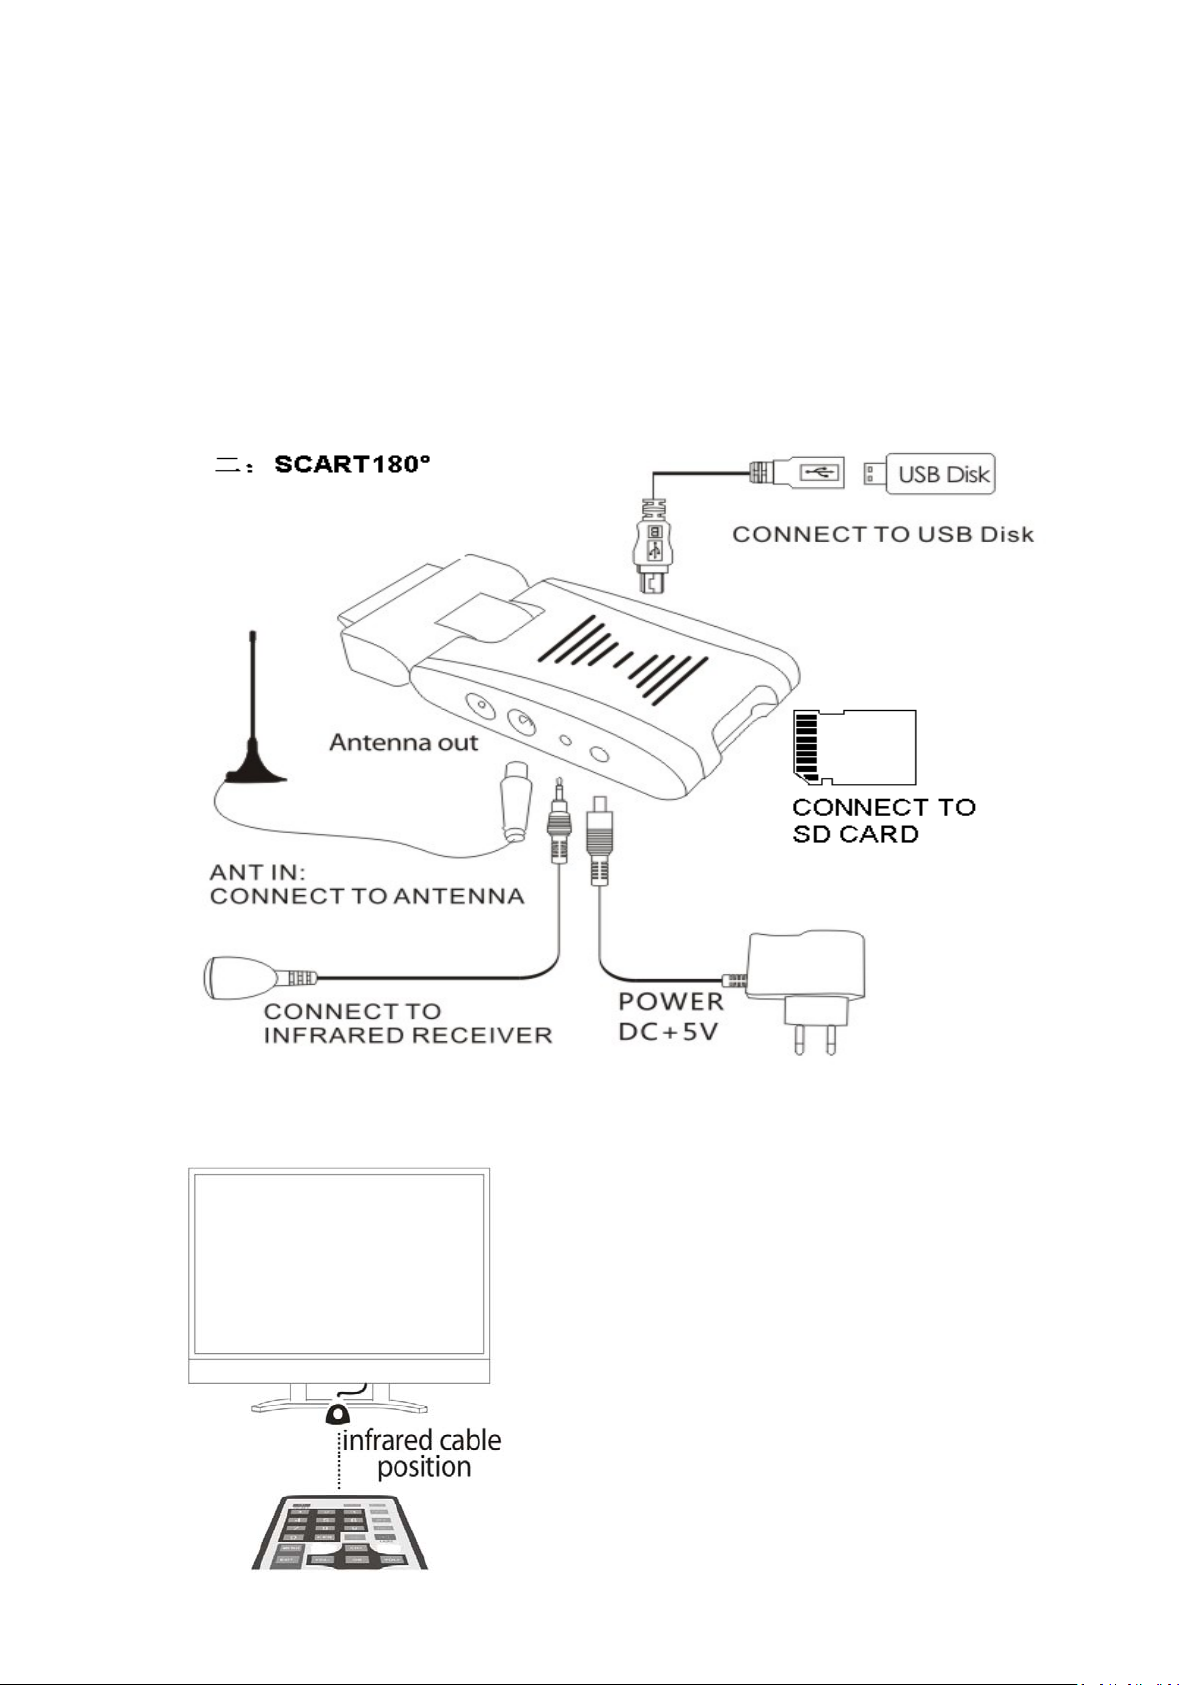
1. Connections
After connecting the SCART to your TV please be
sure to select from your TV remote control the
key that allows you to select SCART source (could
be "AV" or "source" or "INPUT" or "SCART")
- 2 -
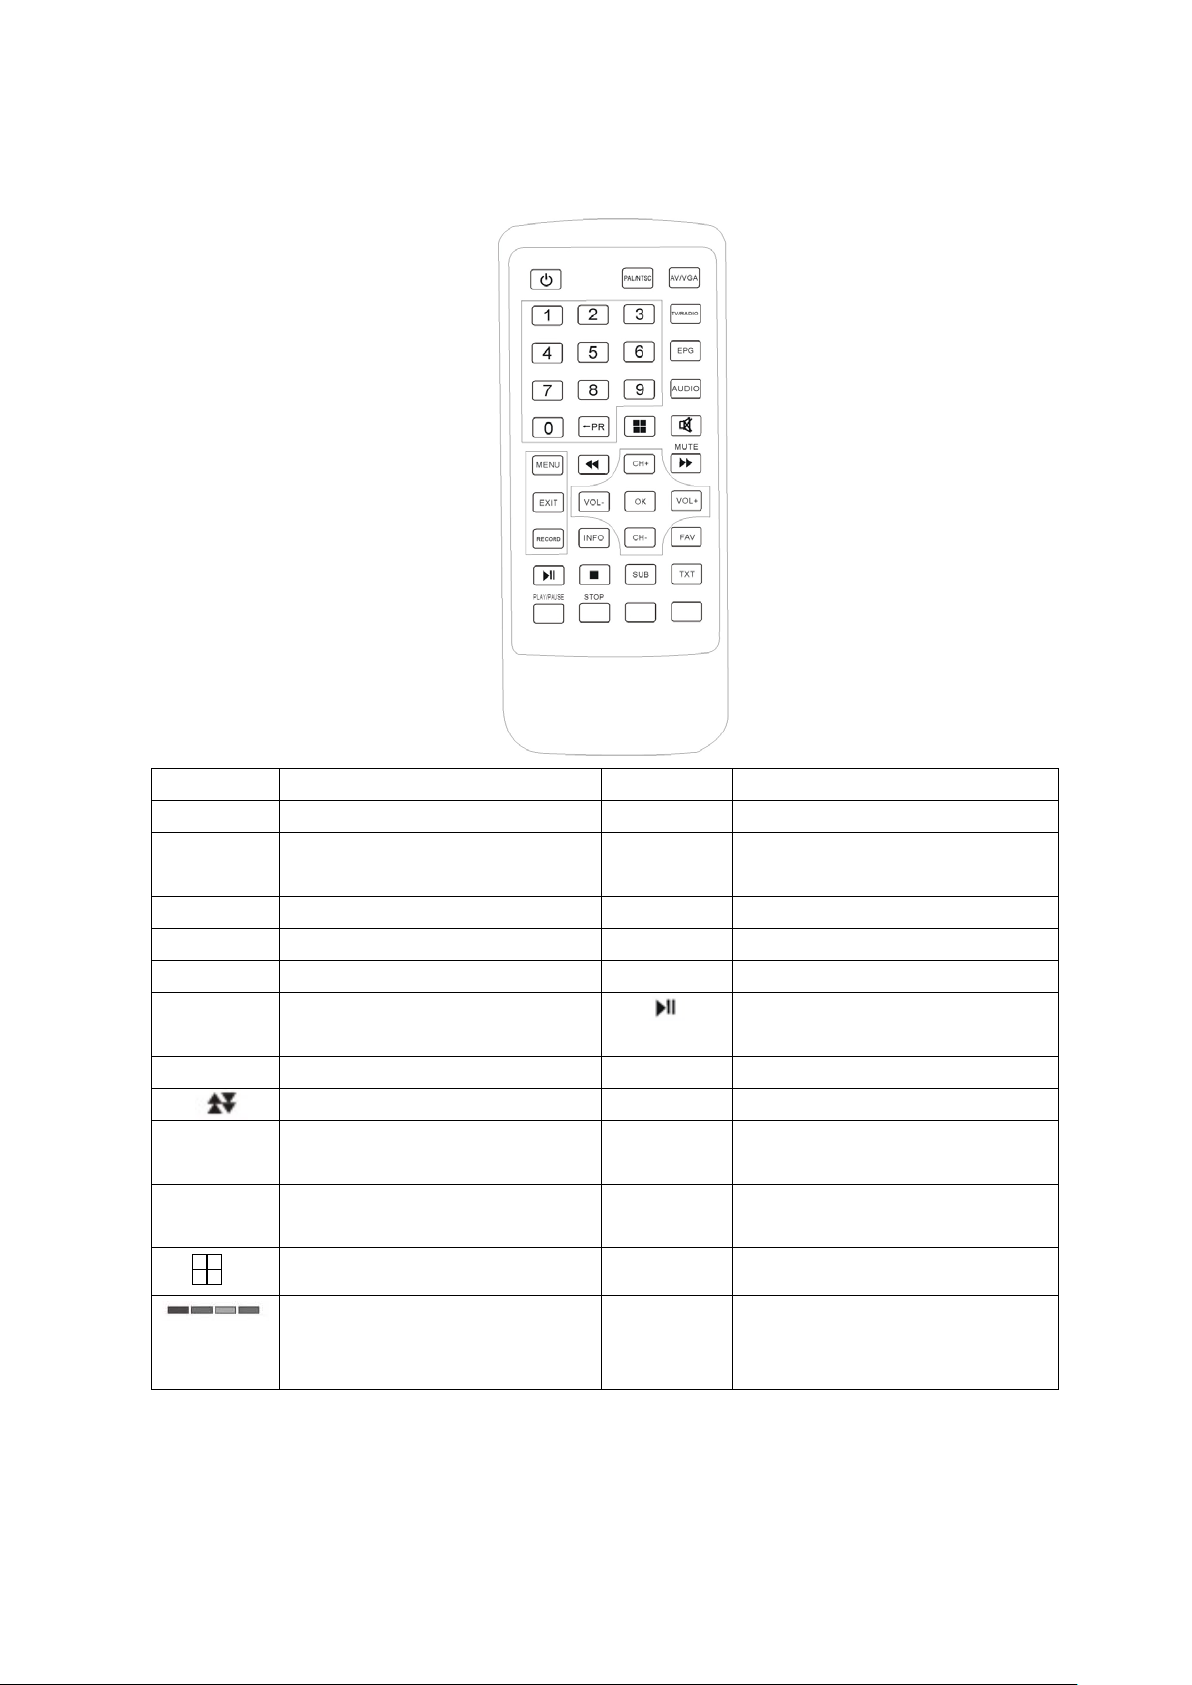
Remote Control
←
Key Function Key Function
POWER TV ON/OFF MUTE Audio Mute
0-9 Enter channel number or TV
setting into menu
EPG Electronic program guide AUDIO Select audio mode
PR
Switch to previous program PAL/NTSC Switch between TV standard
INFO Info about current program MENU Show main menu
EXIT Exit from menu
RECORD Start Recording STOP Stop Recording
UP/Down in item lists FAV Display favourite program list
CH+/CH- Change program or move
Up/Down in the Main menu
OK/LIST Confirm the selection inside
menu
Channel preview (9 windows) TXT Function not available
Switching functions in Main Menu
– red button services not
supported
TV/RADIO Switch between TV and Radio
Freeze Picture / Pause when
used with Recording function
VOL+/VOL- Adjust the volume or move
LEFT/RIGHT in the Main menu
SUB Subtitle
AV/VGA AV output and VGA output
mode conversion
- 3 -
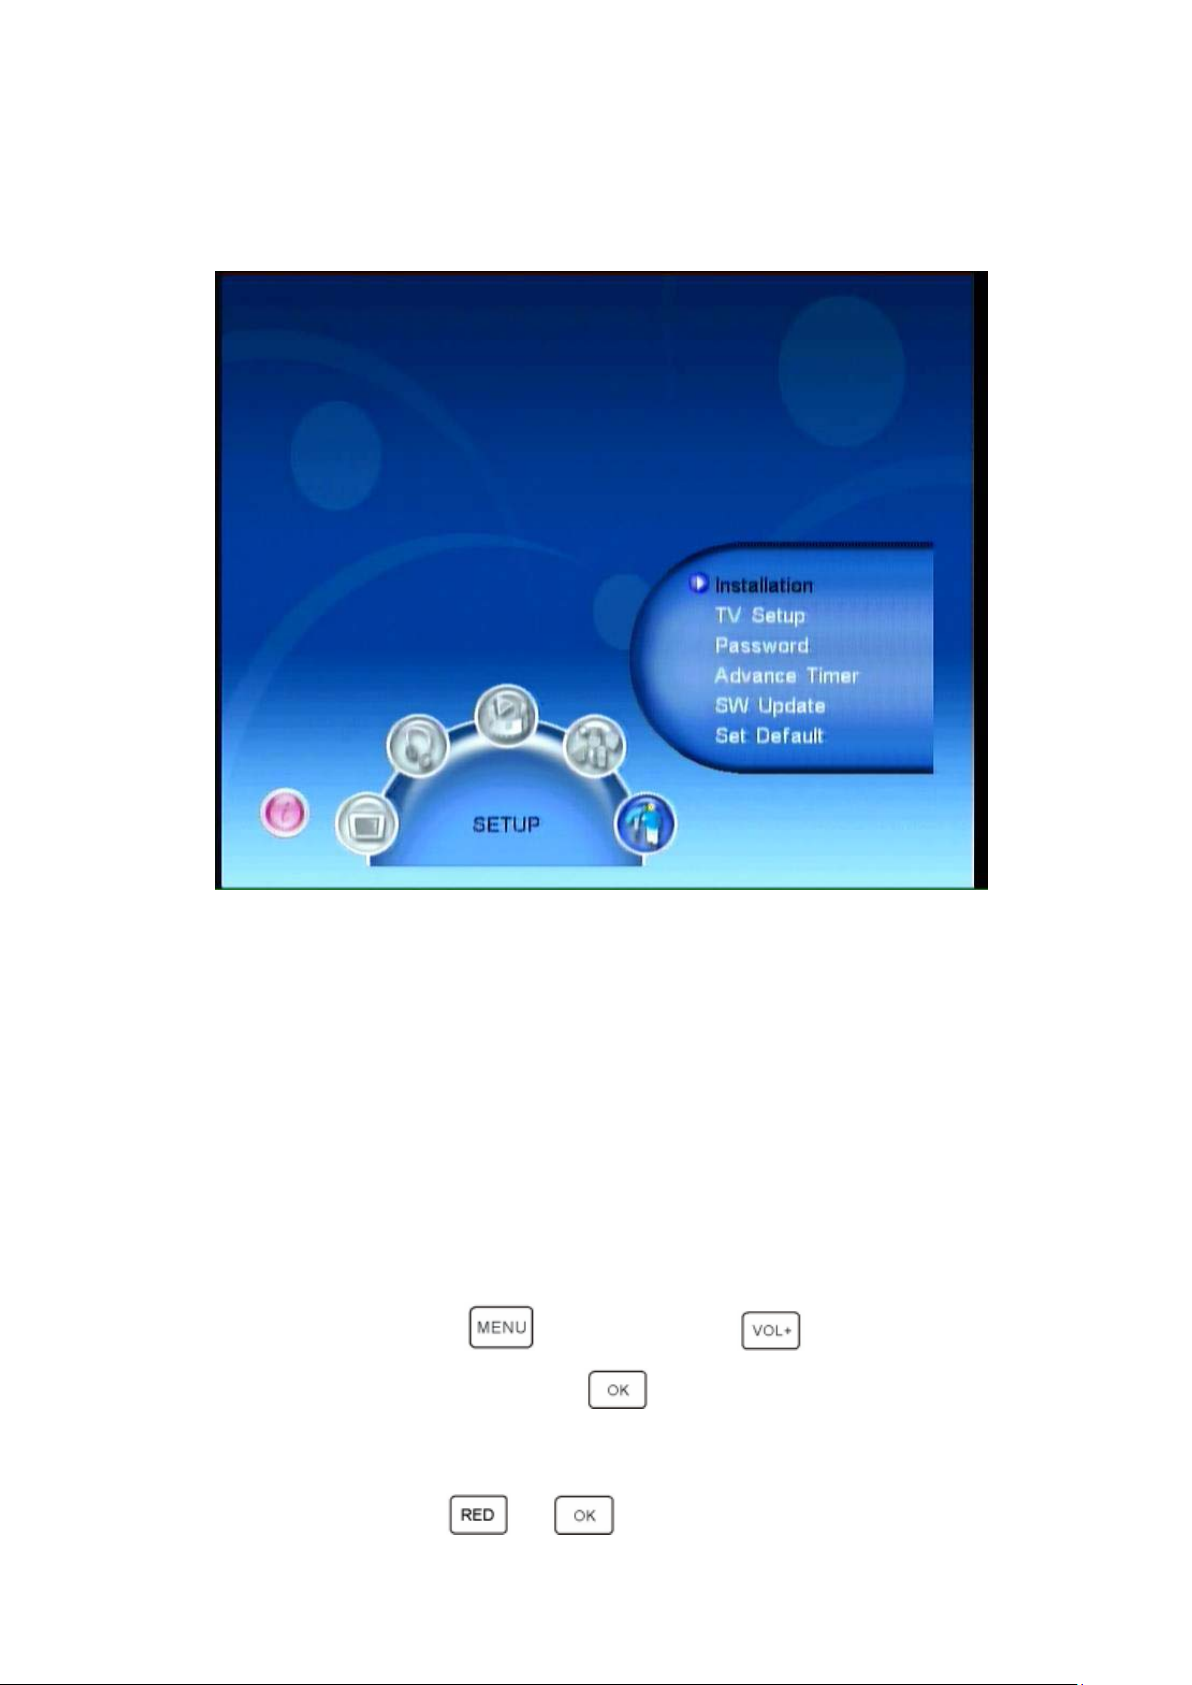
MAIN MENU
1. TV : View television and create a channel viewing list
2. RADIO : Listen to radio and create a listening list
3. MULTIM EDIA : Listen and w at ch video/audio/photos from your
external HD or USB memory using SD card slot or mini USB por t ,
or record to external memor y devices (SD card, memory stick or hard drive)
4. GAME : Play games
5. SETUP : Scan available programmes, access recording options, user interface
and update the firmware
3. SETTING DVB-T FREEVIEW RECEPTION
3.1 Quick scan channels
Step1: Please pres s button, then press button,
Select “SETUP: Installation” press button.
Step2: OSD La nguage Setting
Step3: Country Setting
Step4: Then press and button to search for channels.
- 4 -

4.2. Full Installation
****** SEE PAGE 2 FOR HOW TO INSERT MEMO RY C ARD/US B STICK, ANTENNA AND REMOTE CONTROL SE NS O R ******
4.21.Setting Language
Users can select a preferred language among vario us languages in the Installat ion page.
(1) Press <menu> button to enter Main Menu.
(2) Press <VOL-/VOL+> button to select SETUP option.
(3) Press <CH+/CH-> button to select Installation option.
(4) Press <OK> button to enter Installation page.
(5) Press < CH+/CH- > button to select OSD Language opt i on.
(6) Press < VOL-/VOL+ > button to select a language.
See Figure 1: If there is no channel database (from scan result) you may start at step 5
above.
Figure1. Main Menu, SETUP
- 5 -
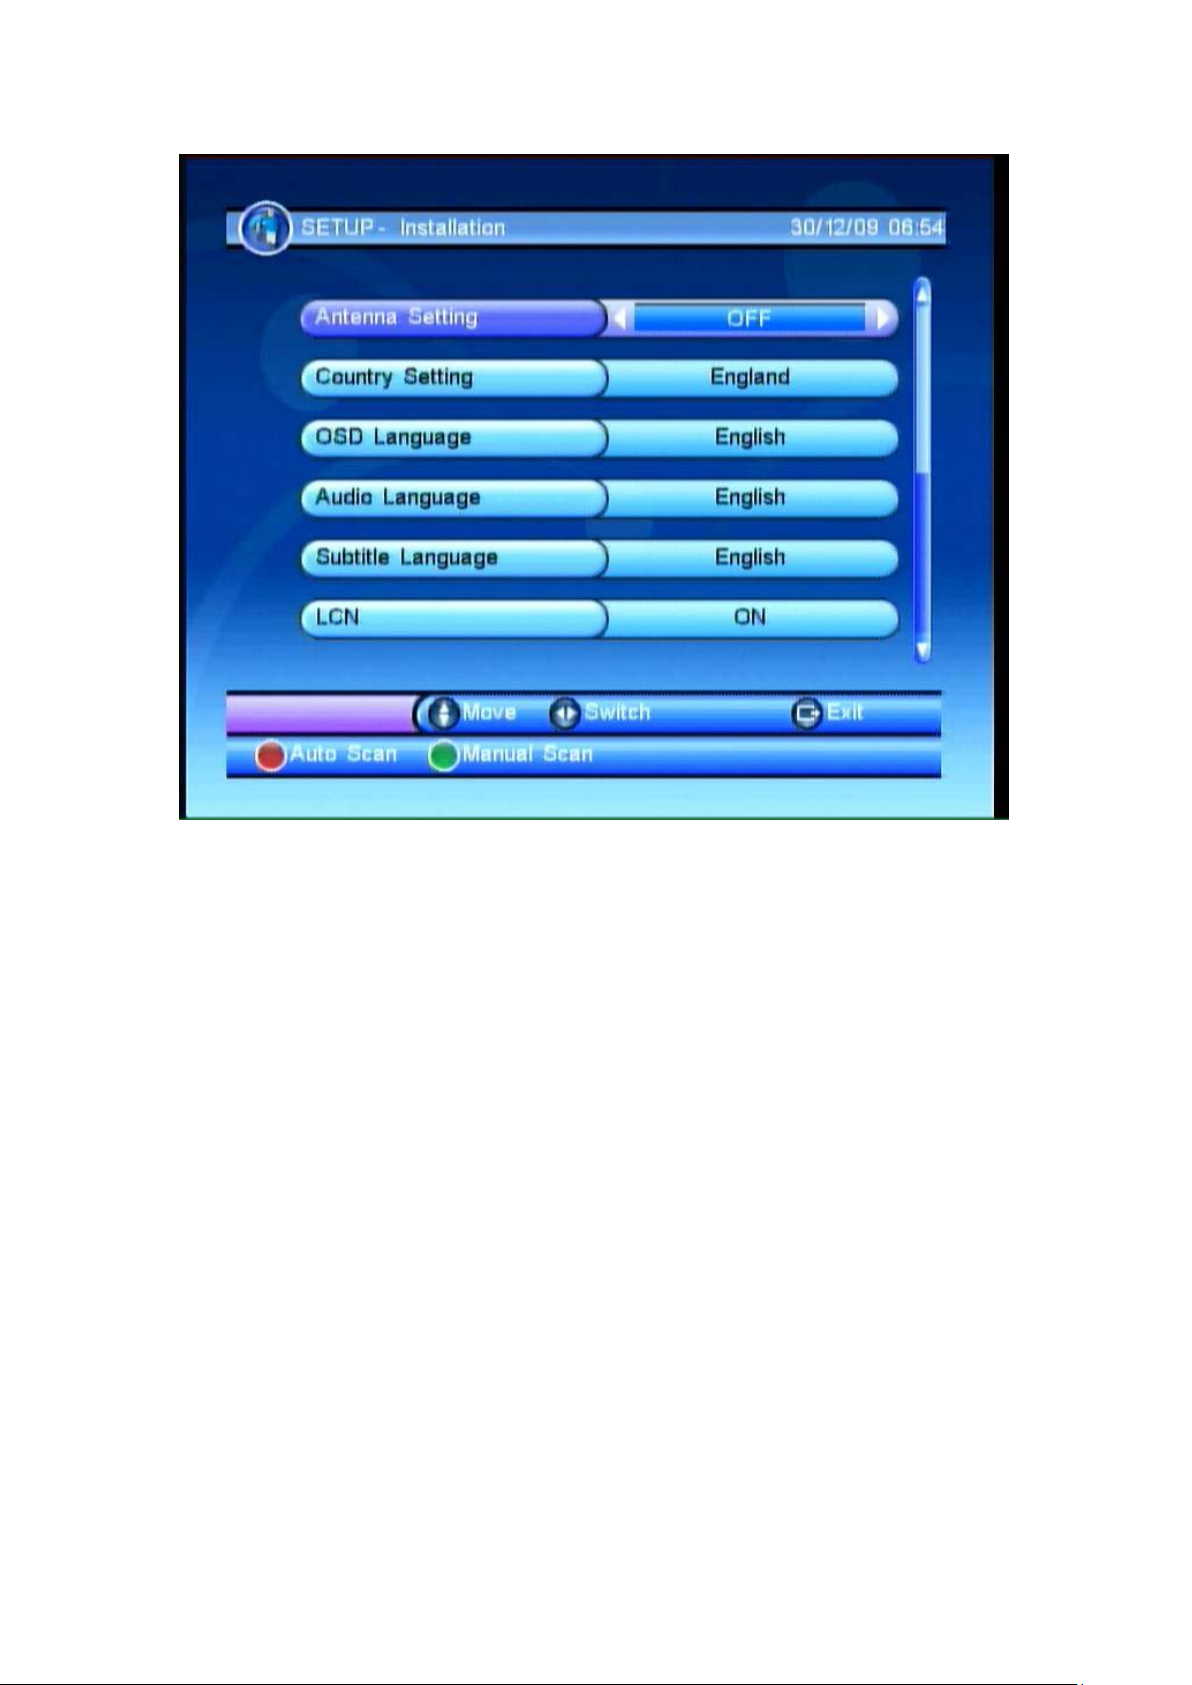
Figure 2. Installation Page
4.22. How to receive TV programs?
Scan the broadcast frequencies and bandwidth to receive all programs.
(1) Press <menu> button to enter Main Menu.
(2) Press <VOL-/VOL+> button to select SETUP option.
(3) Press <CH+/CH-> button to select Installation option.
(4) Press <OK> button to enter Installation page.
(5) Press <CH+/CH-> button to select Count r y Setting option.
(6) Press <VOL-/VOL+> button to set Country Setting.
(7) Press <RED/GREEN> button to Auto Scan or Manua l S c an.
See Figure 1 above: If there is no channel database (from scan result) you ma y start at
step 5 above.
4.23. Auto Scan
Auto Scan will first erase the entire exist ing channel list, and then scan default frequency
and bandwidth by Country Setting. After following steps at section 4.21:
- 6 -

(1) Press <RED> button to confirm to clear the database.
(2) Press <OK> button to confirm the database wil l be cl ear ed and start Auto Scan.
It takes some time to do Auto S can, user can press <exit> to exit at anytime. See below.
Figure 3. Clear database me ss age
Figure 4. Auto Scan Page
- 7 -

4.24. Manual Scan
Manual Scan adds the new scann ing results into the exi sting c hanne l list - it doesn’t erase
the channel list. Howev er, the user must know the Frequency and Ba ndw idth f or scann in g.
If the user scans the same Frequency and Bandwidth more than onc e, the programs will
be duplicated. After following steps at section 4.21:
(1) Press <GREEN> button to enter Manual Scan Page.
(2) Press <CH+/CH-> button to select Frequency opt io n.
(3) Press <0~9> button to input the Frequency value.
(4) Press <CH+/CH-> button to select Bandwidth option.
(5) Press <VOL-/VOL+> button to set Bandwidth value.
(6) Press <OK/exit> button to start scan or exit. See Figures 5 and 6 below.
Figure 5. Manual Scan Page
- 8 -

Figure 6. Manual Scan Result
4. MULTIMEDIA
The Multimedia setting requires an SD card or USB port memory device (see page 2).
Enter ‘My Album’ and ‘My Music’, the screen will display “Initializi ng” when you insert a
memory device or “Device is not ready!” if the memory device is not yet
inserted/attached. See Figures 7&8
- 9 -

Figure 7. Multimedia
Figure 8. Device is not ready – replace external medi a device
- 10 -

From main menu please choose“Multimedia”where you w ill be able to manage:
1. My Album: Supports JPEG files.
2. My Music: Supports MP3 files.
3. My Movie: Supports DIVX and MPEG files.
4. My Recorder: Supports MPEG2 Recorde d TV.
Use the colour keys to make y our selection:
5. Recording function
Please note you will need an SD card or external hard drive / memory stick
with USB connection to record TV. See page 2 for details on how to connect
these devices, and section 5 of these instructions regarding how to select the
memory device (in the Multimedia menu) you have attached for recording TV.
6.1 How do I record video?
In “Normal play” or time-shift status, press“
"One Button Recording” indicates “ON”, press“
“OFF” is shown, the following screen will be seen (see Figure 3-1). Press “VOL-” and
“VOL+” button to set the recordi ng time, then press“OK” button to start. W hen you start
recording, the top left corner of the screen will show the recorded ti me (see Figure 3-2).
Note: When subtitles are ‘ON’, the recorded timer bar will di sappea r, and you can check
the status by pressi ng any button.
” button to prepare to record TV. When
”button to start recording – when
Figure 3-1 Set video recordin g t ime
- 11 -

Figure 3-2 Video recor ding
While you are recording video, if you want to set the video recording time, press
“
”button to enter settings pag e and press “VOL-” and “VOL+” button to set time.
When the recording device is not available, the system will indicate a failure message, as
Figure 3-3 indicates below. When video recording conflicts with a (preset) reserve video
recording so that it cannot start to record video, the system will indicate a mess age and
stop recording, as Figure 3-4 indicates below.
- 12 -

Figure 3-3 Failure of video recording
Figure 3-4 Conflict in video recording
- 13 -

When a requested recording ti me con flict s with a preset reserv e r ecord ing, the system will
set the recording time automatically and indicates the relevant message, as Figure 3-5
indicates. W hen recording ends, the system will quit recording autom atically and revert
back to “Normal Play” condi tion - if you want to stop recording video midway, just press
“
” button. If there is not enough memory capacity for recording video, the system
will stop recording video a nd in dicate the relevant message, as figure 3-6 indic at es.
Figure 3-5 Automatically setting recording video time
Figure 3-6 Storage device is full
- 14 -

5.1 Preset video recording
The user can set the date, time and frequency to make a preset video recording. W hen
the preset time arrives it will automatically start video recording. See section 6.21 for
instructions:
6.21 Advance timer reserve video recordi ng
To use the “Advance timer” reserve video recording, the process is “Menu ->Setup ->
Advance Timer” then the following screen will be displayed as in the figure 4.1:
Figure 4-1 Advance timer page
There are ten positions for advance recordings: press “CH+” and “CH-” button to choose
one of the locations then press the “RED” button, the following page will be displayed (4-2)
- 15 -

Figure 4-2 Setting Advance Timer
Press “CH+” and “CH-” to change the setting item, press “VOL-” and “VOL+” button to
change the item descripti on.
Note: Once you’ve set the planned Advance Recordings, the following page of planned
recordings will appear (Figure 4-3), the red dot in front of the “EVENT” is the indication of
a preset advance video recording.
Figure 4-3 Save Event
- 16 -

6.3 Pause Live TV & Playback*
Whilst recording as per secti on 6, you can pause and rewind live TV by pressing“
”
You can rewind at x2, x4, x8, x16 and x32 speeds. As Figure 3-7 indicates when you
rewind to the beginning of the video recording position it will automatically return to normal
speed play. Press“ ”button to fast forwar d at x2, x4, x8, x16 and x32 speeds.
As Figure 3-8 indicates, when you forward to the present time (and thus y ou ar e watching
live TV) the progress bar w ill disappe ar as you have returned to normal TV viewing. Press
“
”button to pause TV, as figure 3-9 indicates.
(* PLEASE NOTE: you can only pause live TV and play it back when you are alr eady
recording)
Figure 3-7 Fast rewind
- 17 -

Figure 3-8 Fast forward
Figure 3-9 Pause
- 18 -

The timer at the lower left of the screen is the difference between live TV (current time)
and the recorded TV you are watching. The lower right time indicates the recorded tim e.
Press“
speed play.
6.4 Find and vie w your recordings
Select ‘menu’, ‘my recorder’, ‘recorded list’ and select your recording and press ‘OK’ to
view your recording.
”button in “Pause”, “Fast Forward” and “Fast Rewind” to return to normal
SHOULD YOU REQUIRE ANY ASSISTANCE
WITH YOUR SCART DVB-T FREEVIEW PLAYER
AND RECORDER PLEASE CONTACT THE
TECHNICAL HELPLINE ON 0845 555 4440.
FAQs
Q: How many gigabytes of memory will be taken up recording one hour of TV?
A: One hour of TV will require approx 1 GB of memory.
Q: What is the maximum size SD card I can use?
A: There is no maximum, so currently available 32GB cards will be fine to use.
Q: Can I receive Digital TV Freeview in my area?
A: Check the Freeview coverage in your area by calling 08708 80 99 80 or go to
www.freeview.co.uk
Q: How is this product powered?
A: It is powered by the supplied UK spec mains lead.
Q: I have set the parental lock and forgotten my PIN number – what can I do?
A: 1.Press <menu> button to enter Main Menu.
2. Select SETUP option--then select <SET DEFAULT > and press <OK> button.
3. Press PLAY/PAUSE (red) button to confirm reset.
Q: Does this unit support red button interactive services?
A: No, unfortunately not on this model.
Q: When I play back a recording I want to make the percentage bar at the top of
the screen disappear – how do I do that?
A: Press INFO on the remote control to make the percentage bar disappear.
- 19 -
 Loading...