

PROFESSIONAL BELT DRIVE TURNTABLE
WITH CASSETTE RADIO CD RECORDER AND
USB ENCODING TO COMPUTER
5 IN 1 SYSTEM
GSCD1
INSTRUCTION MANUAL
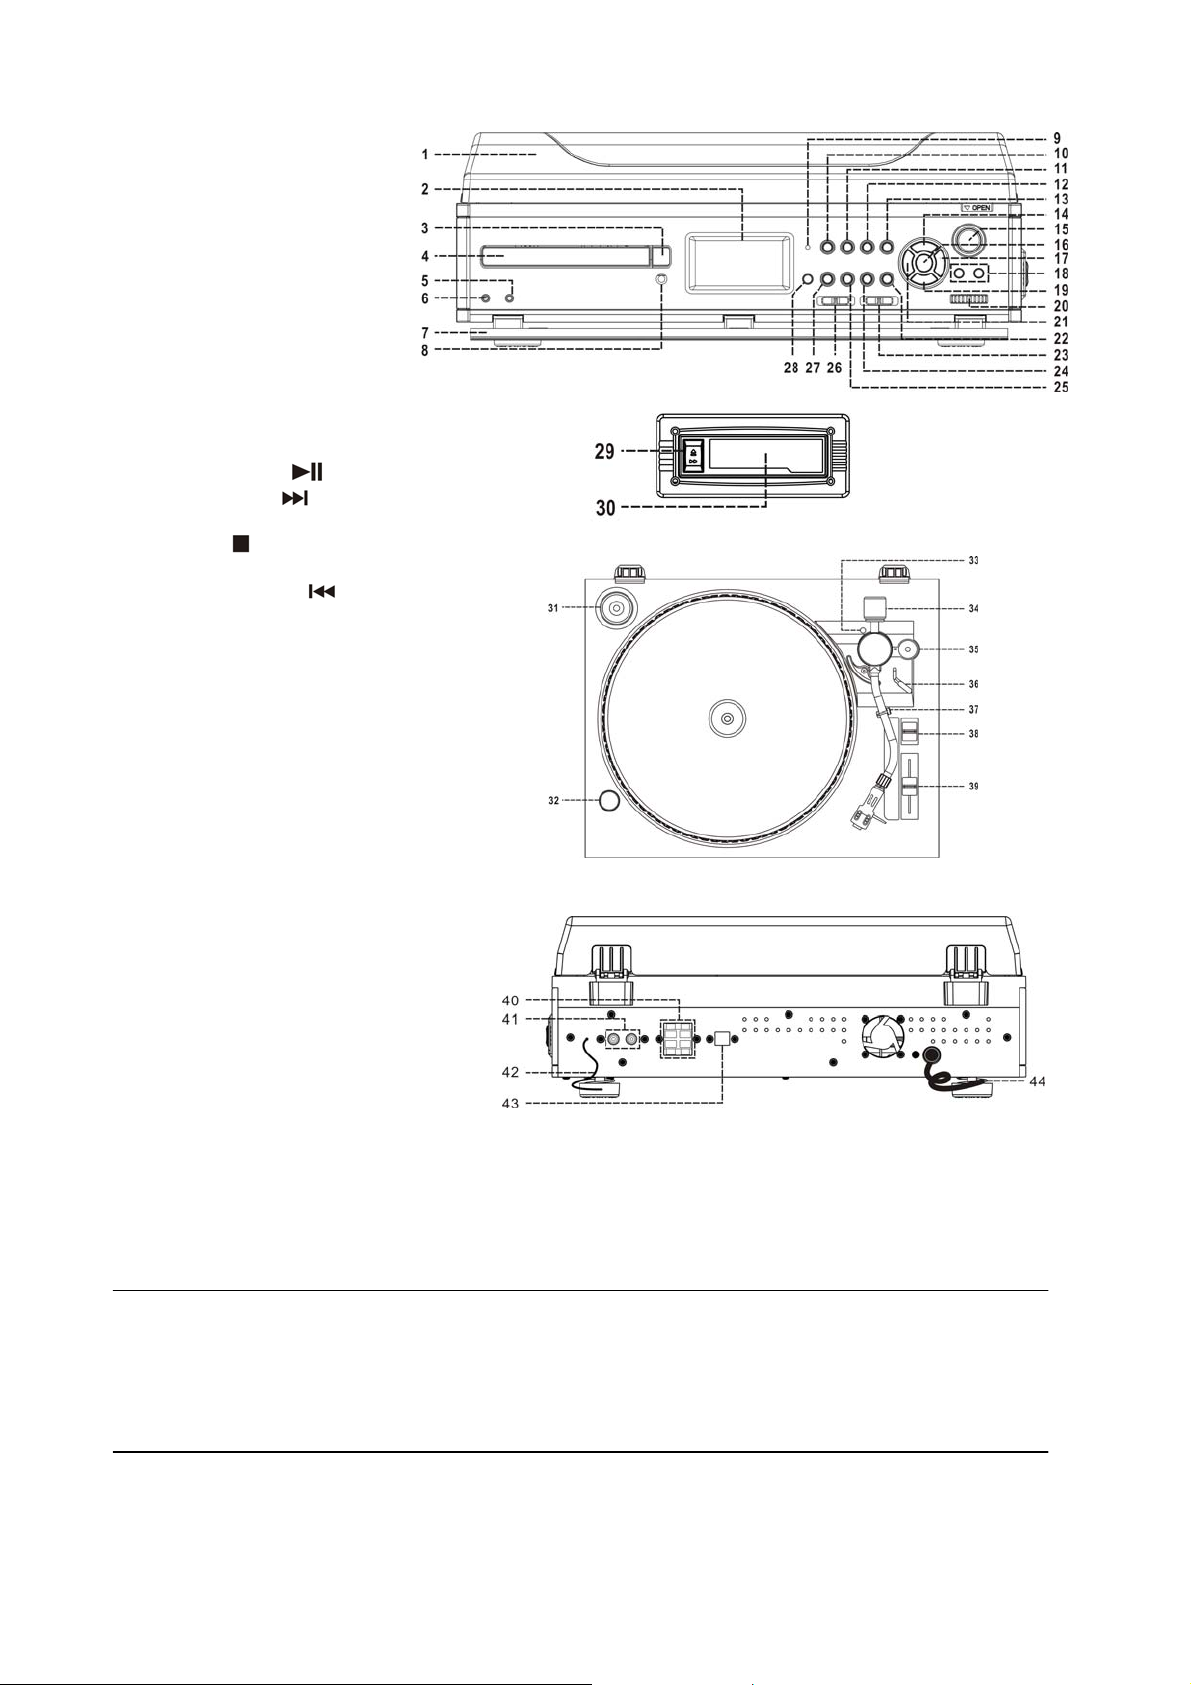
Location of controls
1) Turntable cover
2) LCD display
3) CD tray open button
4) CD tray
5) Aux in jack
6) Earphone jack
7) Panel cover
8) Remote sensor
9) Power LED indicator
10)
Power button
11) Finalize button
12) Erase button
13) Track sepa ration button
14) Record button
15) Eject button
16) CD play/pause
17) Skip/search up
button
button
18) Vol +/- button
19) CD stop
button
20) Tuning knob
21) Skip/search down
button
22) Tape button
23) Band switch
24) Aux button
25) Phono button
26) Function switch
27) CD button
28) Extra bass button
29) Cassette forward/eject knob
30) Cassette slot
31) Spindle adaptor
32) Strobe illuminator
33) Alignment screw with rubber cover
34) Counter weight
35) Anti skating
36) Cueing lever
37) Tone-arm lock
38) Turntable speed selector
39) Pitch adjustment
40) Speaker terminal
41) Line out jack
42) FM antenna
43) USB port for computer connection
44) AC line cord
Caution:
Usage of controls or adjustments or performance of procedures other than those specified herein may result in hazardous
radiation exposure.
This unit should not be adjusted or repaired by anyone except qualified service personnel.
Precautions for use
Installation
Unpack all parts and remove protective material.
Do not connect the unit to the mains before checking the mains voltage and before all other connections have been
made.
Do not cover any vents and make sure that there is a space of several centimeters around the unit for ventilation.
Installation of counter weight
1. Slide in the counter weight completely into the rear of the tone arm until it reaches the end Then turn it clock wise until it
clicks with pin inside.
2. Twist the counter weight clockwise & backward until it reaches the white line as in figure 2.
3. Twist the counter marking until it reaches position “ 1 “.
4. Twist the counter weight anti-clockwise & inwards until it reaches the appropriate working pressure.
E-1
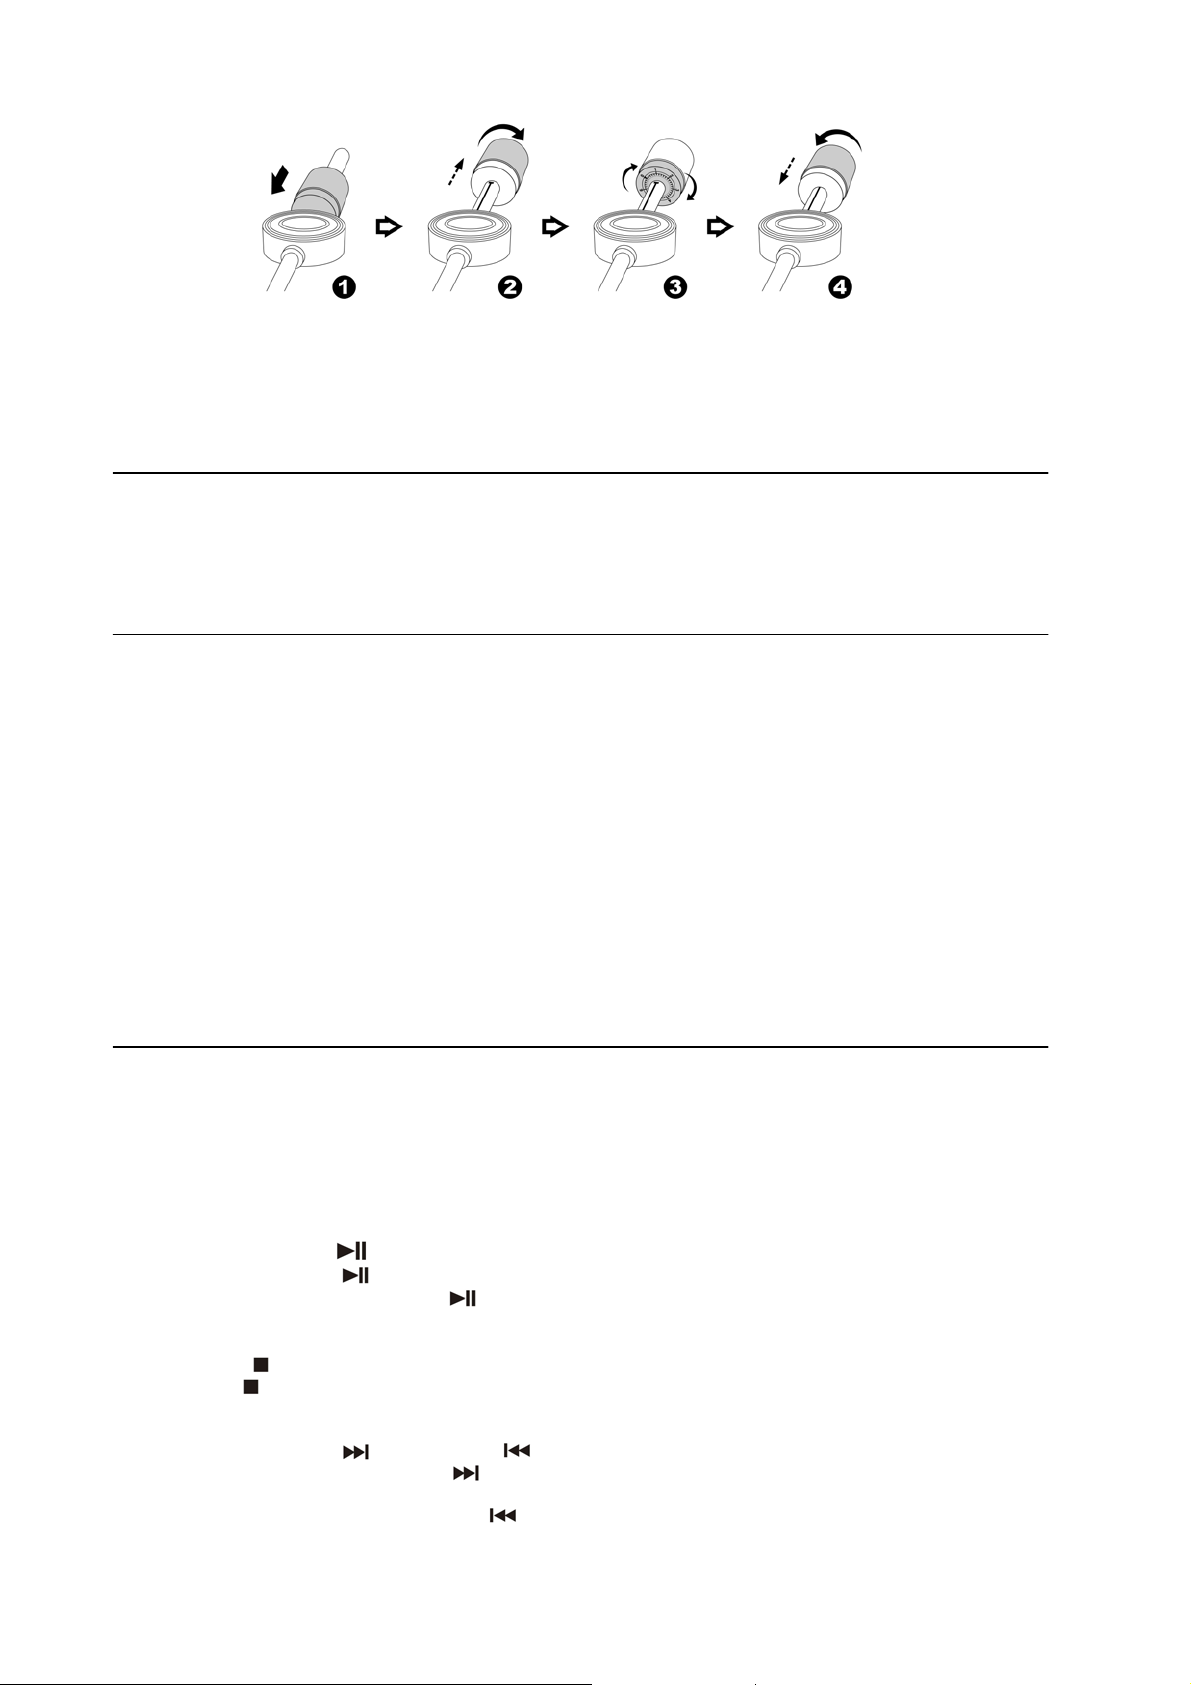
Remark : According to the cartridge manufacturer, the working pressure of the stylus provided is within a range of 4 – 6
grams.. All styli have their own working pressure. Please refer to the specifications.
Connection
1. Connect the speaker wire to the speaker terminal (40) located on the rear side of unit and connect the AC line cord (44)
to AC outlet.
2. To initially test the equipment, press the Power button (10) to s witch on the unit and select the function switch (26) to
“ Tuner “.Then press the Volume +/- button (18) to adjust the volume to half level.
3. If sound is coming out from the speakers, it’s means the power supply is normal. Your system is now ready.
Listening to radio
Manual tuning
1. Press the Power button (10) to switch on the unit and select the function switch (26) to “ Tuner “ position.
2. Select the desired band by band switch (23) (AM or FM or FM-stereo).
3. Tune to the required station by turning the tuning knob (20).
4. Adjust Volume +/- button (18) to the desire volume level.
FM & FM-stereo reception
Set the Band switch (23) at “ FM ” position. Programs are received in mo no mode. In particular when stereo signal are
weak. It is preferable to receive the program in mono.
Set the Band switch (23) at “FM-St” position for receiving stereo programs. The FM-stereo icon “ST” will light up on LCD
display (2) show FM stereo program is receiving.
Hints for best reception:-
- AM : The receiver has a built-in AM bar antenna. If AM reception is weak, re-position ing of the unit will usuall y improve
the reception.
- FM : The receiver has a built-in FM wire antenna (42) hanging at the rear cabinet. T his wire should be totally unravele d,
extended and position checked for best reception.
Playing compact disc
Getting start
1. Select the function switch (26) to “ Source ” position. The LCD display (2) will show “ pls select function “. Then press the
CD button (27).
2. The LCD display will show “ busy “ and then “ no disc “ if the CD compartment is empty.
3. Then press the CD tray open button (3) to open the CD tray (4).
4. Place a CD with the printed side facing up inside the tray & then close the cd door.
5. Focus search is performing and the LCD display (2) will show “ busy “ and then display the total number of tracks & total
playing time.
Play / Pause mode
1. Press the “ Play/Pause ” button (16) to start playback, the first track will start playback.
2. To interrupt, press the “ Play/Pause ” button (16) once, the playing time will freeze on the LCD display (2). Press
again to resume normal playback.
Stop mode
1. If “ CD Stop “ button (19) is pressed during play or pause mode it will go to stop mode and display the total number of
tracks on the LCD display (2).
Skip mode (skip up / skip down )
1. During play or pause mode, if “Skip up ” button (17) is pressed it will go to next track and display the track no. and then
remain in the play or pause mode.
2. During play or pause mode, if “Skip down ” button (21) is pressed it will go back to the previous track and play the
track.
E-2

Remark:-
Before pressing the “ CD tray open ” button (3) for changing disc
- The reaction time of the CD burner is longer than normal CD player due to the complicity of the system.
- WARNING : DO NOT press difference function buttons within a very short time of one another as this may cause a
mal-function of the system. Please re-start the unit if this is happens.
- The reading and playback time of CD-R(W) disc varies from brand to brand. It depends on the compatibility of the used
disc.
- This device onl y des igned for normal compact disc format. It will not support MP3/WMA formats.
. press the “ CD stop ” button (19).
Repeat mode (by remote control)
Press the Repeat button before or during playback. A single track or all the tracks can be played in difference mode as
follows:-
(1) repeat all track
Play mode on LCD display
Repeat all
Repeat 1
Off mode --------------
(2) repeat 1 (3) off mode
Indicator
Random play mode (by remote control)
- Pressing the Random button on the remote control will active the shuffle play function and the Random indicator “ RAN
“ will show on the LCD display (2). Press the stop button to stop the unit and cancel the random play function.
CD disc programming (by remote control)
Up to 32 tracks can be programmed for CD playing. Before use, be sure the system is at stop mode before
programming:-
1. Set in CD mode & stop the disc playback.
2. Press the “Program” button, “ Prog “ indicator will appear on the LCD display (2). It will also indicate the program n o.
(P-xx) and digits for track no. to be programmed.
3. Select a desired track by pressing skip up
4. Press the “ Program ” button to store the trace into memory.
5. Repeat steps 3 and 4 to enter additional tracks into the memory if required.
6. When all the desired tracks have been programmed, press CD “ Play/Pause
order.
7. To cancel the programmed file, press “Stop” button on the remote handset until “ Prog “ indicator disappears on the LCD
display (2).
or down buttons.
” button to play the disc in assigned
Remark:-
- If required, you can delete previously programmed tracks after they have been played and whilst the unit is still in
program mode. Press stop button to set the unit in stop mode first, press “ Clear “ button on your remote control one track
at a time once. The programmed track will delete one by one from the memory in the order they were originally
programmed.
-
Recording function
Apart from the CD playback function, this unit can perform the CD recording function either from Phono, Tape or Aux mode
respectively. All the recorded tracks will be stored in “ audio-CD “ format:Before starting, place a blank CD-R or CD-RW disc in the CD tray (4). The disc is able to record only if the LCD display shows
“ NO TOC “.
Remark : CD-R discs can only be recorded once and will not support erase or re-record functions.
Important notices:-
- The revolving speed of CD burner is higher than normal CD mechanism and therefore you may detect some slight
mechanical noise and vibration of unit during this function. This is normal and not a malfunction of the system.
- Due to the variety of quality and compatibility of CD-R(W) discs in the market, you may need to experiment with a number
of different brands before you find the most suitable.
A) Recording mode
I) Phono recording
1) Select the function switch (26) to “ Source ” position, then press the “ Phono “ button (25). Place the recorded vinyl on
the turntable & get ready for playback.
2) Press “ Rec
LCD display (2).
“ button (14) and then the CD “ Play/Pause ” button (16) until the play indicator “ “ shows on the
E-3

3) After few seconds, the LCD (2) will show the time counter . The sy stem is ready to start the recording process. Now begin
the playback of your vinyl.
4) After completing of recording, press the “ Stop
” button (19) .
II) cassette recording
1) Select the function switch (26) to “ Source ” position, then press the “ Tape “ button (22). Place the recorded cassette
tape to the cassette slot (30) to get ready for playback. Do not press the tape fully in.
2) Press “ Rec “ button (14) and then the CD “ Play/Pause ” button (16) until the play indicator “ “ shows on LCD
display (2).
3) After a few seconds, the LCD (2) will show the time counter. The system is now ready to start recording. Now push the
cassette tape fully into the cassette compartment to start playback.
4) After completion of recording, press the “ Stop
” button (19).
III) Aux-in recording
1) Select the function switch (26) to “ Source ” position, then press the “ Aux “ function button(24). Connect the headphone
output at the audio device (such as mp3 player, CD player etc) to the 3.5mm aux-in jack (5) via a 3.5 mm connecting
cable (not provided).
2) Repeat the same proce dures from step 2 to 4 as described on other recording modes from before.
3) Adjust the volume output level at your audio player device if the recording level is too high.
Remark:-
- The recording speed is 1:1 and according to the actual plying time of the playing source.
- To suspend the recording process, press the “ Play/Pause ” button (16), “ busy “ briefly appears on the LCD and the
recording is in pause mode. To re-start, press the “ Play/Pause ” button (16) again until the pla y indicator “
“ shows on the LCD display (2).
B) Recording setting
I) Recording level
The preset recording level of the system is lower than the original music source in order to avoid distortion durin g recording,
except when in aux-in recording mode.
) Track s eparation
II
You can divide the recording music track by track during recording -
1. anytime when pressing the “ track separate “ “ button (13) once during recording at any mode, the system will
generate a new track and continue the recording. The word “ busy “ will briefly show on the LCD display (2) and means the
unit is creating a new track correctly.
) Finalizing a CD-R(W) disc
III
You must convert the CD-R(W) disc into standard CD before playing in other audio CD players. This process is
known as finalizing and a table of contents (TOC) will be written to the CD at the same time:-
1. Select CD function mode and place the CD-R(W) disc you are going to finalize.
2. Press the finalize button (11) during CD stop mode. “ Fin-d “ appears on the LCD display (2). (press the “ CD stop
button to quit finalize mode if necessary)
3. Press the “ Play/Pause
4. After completion, the CD door will open automatically and the “ NO TOC “ indicator will disappear from LCD (2).
” button (16) to start finalizing and the LCD (2) will show “ busy “ during the process.
Remark:-
- The time for finalizing is subject to the contents of recorded and it may take up to 15 minutes in some cases.
- No button is working during finalizin g process so do not attempt any other function whilst finalizing is in process.
- Never turn off the power or un-plug the power cord during the finalizing pro cess.
- The CD-R disc cannot be recorded again after finalizing.
- Although finalized CD-R disc may be played on ordinary CD players, remember that finalized CD-RW disc may not play
on ordinary CD players.
- Owing to the variance of the compatibility of CD-R or CD-RW discs available in the market, please try another
one if the recording does not perform correctly or satisfactorily. This is not a malfunction of the system.
IV) Erase or un finalize a cd-RW disc
It is possible to erase the last recorded track or erase a whole recorded disc.
If you wish to erase the last track of a finalized CD-RW, the disc must un- finalized.
A) To Un- finalize a CD-RW disc
1. Set at CD function mode and place the CD-RW disc you would like to un-finalize.
2. Press the “ Erase “ button(12) at CD stop mode & display will show “un Fin-d” then press the “ Play/Pause
start erasing. “ busy “ will disappear from the LCD (2)
3. After you have finished, the un-finalized display will show total track number and total playing time of the disc. “ NO TOC”
indicator will appear.
E-4
”
” button to

B) Erase one track
4. Set at CD function mode and place the un-finalized CD-RW disc you would like to delete the track.
5. Press the “ Erase “ button(12) at CD stop mode & “Er“ and the last track number will appear on the LCD (2)
6. Press the “ Play/Pause
7. After finishing, the track erasing display will show total track nr. and total playing time of the disc and the“ NO TOC ”
indicator will appear.
8. Repeat step 5 and 7 to continue erasing if you wish.
C) Erasing all tracks
1. Set at CD function mode and place the CD-RW disc you would like to delete the tracks.
2. Press the “ Erase “ button(12) at CD stop mode repeatedly until “ Er all “ appears on the LCD (2)
3. Press the “ Play/Pause
4. The LCD (2) will show “ 0000000 “ to confirm the complete erasing process has been completed.
” button to start erasing the last track and “ busy “ will disappear on the LCD (2) .
” button to start erasing. The LCD display will indicate “busy” during erasing
Remark :
- Once tracks are erased they are erased forever and the process cann ot be reversed.
- Already copied CD-RW discs from other systems cannot be erased track by track. Only Erase All is possible.
Listing to Cassette Tapes:
General operation
Select the function switch(26) to “ source ” position. The LCD display (2) will show “ pls select function “. Then press the Tape
button (22)
Cassette playback : The system will start the playback automatically after inserting
cassette tape
Stop and ejection : Press the “ Tape forward / Eject “ button completely inwards
and the cassette tape will be ejected though the cassette door cover. The “ Tape forward /
eject “ button will stay at its depressed height position.
Fast forward : Press the “ Tape forward / Eject “ button half inwards during
Playback mode, the tape winding forward direction. The “ Tape forward / Eject “ button will
keeping at its middle height position.
Slightly press the “ Tape forward / Eject “ button again to resume normal playback. The “ Tape
forward / Eject “ button will resume to its highest position.
Remark
- Make sure the direction is correct when inserting the tape into the system.
- You should remove the cassette tape from the system once you have finished listening to the tracks.every times after
listening and don’t leave the cassette tape inside the system when not under playback mode.
Phono
operation
- Remove the stylus protector.
- Be sure that the tone arm is detached from the tone arm rest before operating and
re-secured again afterwards.
1. Select the function switch(26) to “ Source ” position. The LCD display (2) will show “ pls select function “. Then press the
phono button (25)
2. Set the speed selector (38) to the proper position depending on the record to be played.
3. Place the record on the platter (use the spindle adaptor if require d).
4. Set the cueing lever (36) to the up position.
E-5

5. Lift the tone arm from the rest and slowly move it to the record side. The platter will start to rotate and position the tone
arm over the desired position of the record.
6. Pull down the cueing lever (36). The tone arm will slowly descend onto the record.
7. At the end of record, the tone arm will return to the rest position automatically.
8. To stop manually, lift the tone arm from the record and return it to the rest.
Play suspension
Setting the cueing lever (36) to the up position will lift up the tone arm and then stop playback temporarily.
Play ejection
Pressing the Eject button (15) anytime during playback will return the tone arm to the rest position immediately.
Remark :
- When using for the very first time, the tone arm will return to the rest automatically when first placing
the tone arm to the platter. This is not a malfunction.
- If you find the tone arm cannot return automatically after playback the record, please press the eject
button and return the tone arm back to the rest position.
- Should you attempt change to a magnetic cartridge system, you will prevent playback via the aux-in.
Adjustments
Anti-skating control
- The anti-skating control (35) is to control the stability of the stylus relative to different type of vinyl.
Platter speed alignment
- During playback of records, check the strobe calibration dots from the strobe lens. The upper calibration is for 33 rpm and
the middle one is for 45 rpm.
- If the strobe dots appear to flowing to the right, it means the platter is revolving slower than rated speed. Turn the pitch
control (39) to the “ + “ direction. If the strobe dots appear to flowing to the left, it means the platter is revolving faster than
rated speed, in which case, turn the pitch control (39) to the “ – “ direction.
- Adjust the pitch control (39) until the strobe dots appear stationary (ie, no left or right movement.)
Tone arm stopping position alignment
- The position of the tone arm complete playback and return to the rest station can be adjusted at the alignment screw (33)
as follows:-
Before starting the alignment, please remove rubber hole cover:-
A) If the system cannot complete the playback of the record and returns too early
1) Using a cross head screw driver, turn the alignment screw (33) inside the hole clockwise. The stopping and eject position of
the tone arm will move more inward to the centre of the record before playback completion.
B) If the system cannot return to rest position automatically after playback of record
2) Using a cross head screw driver, turn the alignment screw (34) inside the hole anti-clockwise, the stopping and eject
position of the tone arm will move further away from the centre of the record before playback completion.
Remark:-
- The stopping position is very subjective amongst difference users. Please select the most suitable position based on your
own record collection. The ex-factory setting is based on the most common template.
- Please check the stopping position from time to time. Avoid any over-adjustment as thi s could damage the mechanism
and is not covered under your warranty.
E-6

Connecting to a computer for recording
Before getting started, please install the “ AUDACITY ” recording software to your computer. Below is an example using a
computer with Microsoft XP and the Audacity software installed. For more options, please refer to the Audacity sof tware guide
separately.
1) Turn on your computer and allow it to boot up fully. Turn the unit power ON, connect the USB port from the unit to your
computer via the USB cable provided. The unit connected to your PC will be recognised as a USB device.
2) Open the “ AUDACITY ” program. Under the “ EDIT ” tab, select “ PREFERENCES ”.
3) Click the “DEVICE” tab and then choose the “USB Audio Controller” at Recording and Playback device section
4) Select Channels “2 (STEREO)” and then click “OK” to close preference setting window.
5) Play the music, eg. Radio/Aux/Phono to be recorded into the computer.
6) Click the red Record button on the software control panel. You will see a waveform moving and can listen to the record
playing through your computer’s speakers or headphone.
7) When you have finished the recording, click the yellow Stop button on the software control panel.
8) Now click “FILE ” and choose to save your recording file.
9) Click the green Play button to playback your finished recording.
NOTE:
Free software (AUDACITY) licensed under the GNU general public license (GPL).
More information as well as open source code can be found on the provided CD or on the website at:
http://audacity.sourceforge.net/
IMPORTANT NOTES
LISTENING AND EXPORTING TO MP3
To listen to your digitized audio, you will need a third party application that can play WAV files. You can also use any standard
audio CD burning software to burn your WAV files to an audio CD.
If you would like to save your vinyl recordings as MP3 files after recording them using AUDACITY, you will need to install the
optional "LAME MP3 ENCODER" plug-in to the software provided on the CD. Once a file is in MP3 format it can be played on
any MP3 compatible mobile digital device.
The provided CD also included the LAME MP3 Encoder plug-in.
In AUDACITY, when you attempt to EXPORT AS MP3… for the first time after installing the lame MP3 encoder plug-in,
you will be asked for the location of the plug-in file. Browse to the LAME MP3 PLUGIN FOLDER you copied the plug-in
file to and select the file. Subsequently, audacity will remember the location of this file.
Software Name Operation System
Lame_Library_v3.98.2_for_Audacity_on_OSX Audacity 1.2.5 on Mac OS X (Intel)
LameLib-Carbon-3.91 Audacity 1.2.6 on Mac OS X (PPC)
Lame_v3.98.2_for_Audacity_on_Windows
Line out connection
You can connect the system to your whole hi-fi system by connecting the line out socket (41) to the auxiliary input socket with
an RCA cable (not included).
X-bass sound effect
Press the x-bass button (19) to active x-bass function and enhance the bass effect at “ on “ position.
Remote control transmitter
Battery installation (batteries not included)
The infra-red transmitter requires 2 pc AAA size batteries for operation
E-7
Audacity 1.2.6 on Windows
(Me/2000/XP/Visa)

Button descrition
1) Play/Pause In CD mode, press once to start
playback. Press again to enter
pause mode
2) Skip up
3) Stop In CD mode, press to stop
4) CD Press to select CD function
5) Phono Press to select Phono function
6) Rec
7) Repeat In CD mode, press to activate repeat
/down Press to select previous / next tracks
in CD mode
playback
Press to active CD Recording
function
play function
8) Display Press to change the CD playback
information
9) Erase Press to erase or un-finalize a
CD-RW disc
10) Open/Close Press to open and close the CD tray
11) Program In CD mode, press to activate
programming function
12) Tape Press to select tape function
13) Aux Press to select aux function
14) Random In CD mode, press to activate random play function
15) Clear Press to clear the progr ammed tracks
16) Track separation Press to generate a new track during recording
17) Finalize Press to finalize the CD-R(W) disc after recording
18)Volume +/- Press to adjust the volume level
E-8

Specifications
CD Player Section
Frequency Response 60 to 5KHz +/-3dB
S/N Ratio 45dB
CD Burner Section
Frequency Response 80 to 5KHz
S/N Ratio 40dB
Cassette (Magnet Erase)
Tape Speed 3000Hz +3/-2%
Playback 8000Hz +/-4dB
Wow & Flutter 0.1% (WRMS)
Frequency Response 125 to 1000Hz +/-4dB
S/N Ratio 35dB
Record Player Section
Speed 33/45/78 RPM
Wow & Flutter Less than 0.35%
S/N Ratio 28dB
Cartridge Type Ceramic cartridge
Stylus Sapphire stylus (Japanese made)
Radio Section
Frequency Range AM 522-1620 kHz FM 87.5-108 MHz
Amplifier Section
Frequency Response 60 to 16KHz
S/N Ratio 40dB
Output power 10% THD 2 x 4W RMS
General
Power Requirement AC 230V ~ 50Hz
Power Consumption 48W
Dimension (Main Unit) 428 (W) x 370 (D) x 168 (H) mm - Approx.
Dimension (Speaker) 146 (W) x 142 (D) x 240 (H) mm - Approx.
Weight 7.3kgs - Approx
Accessories Instruction manual
45 rpm adaptor
CD Disc (Audacity Software)
USB cable
3.5mm AUX IN cable
RCA cable
Remote control
GUARANTEE:
This product is guarantee against faulty workmanship for a period of 12 months from date of purchase.
Any modification, tampering of internal workings or wiring, willful damage or misuse will render this guarantee
invalid. Your statutory rights remain unaffected.
Should you have any query or complaint, please contact our Neostar Electroni cs customer helpline on 0845 555
4440 or visit www.neostarelectronics.com
Neostar Electronics is a registered trademark of T2 Direct Ltd – London.
E-9
 Loading...