


Neostar NTCD1V Silver
Neostar NTCD1B Black
Turntable, Cassette, CD Player Recorder,AUX F unction
with USB to PC R cording
IMPORTANT SAFETY INSTRUCTIONS
When using electrical products, basic precautions should alwa ys be fol lowed i nclud ing:
1. Read Instructions - All the safety and operating instructions should be read befo re the
product is operated.
2. Retain Instructions - The s afety a nd oper ating i nstru ction s shoul d be reta ined fo r futur e
reference.
3. Foll ow Inst ructi ons - All warnings on the product and in the operating instructions
should be adhered to.
4. Foll ow Inst ructi ons - All operating and user instructions should be followed.
5. Cleaning - Un plug this product from the wall outlet before cleaning. Do not use liqu id
cleaners or aerosol cleaners. Use a damp cloth for cleaning.
6. At tachm ents - Do n ot use at tachm ents no t recom mende d by the pr oduct m anufa cture r
as they may cause hazards.
7. Wa ter and M oistu re - Do not u se this p roduc t near wa ter-f or exam ple, ne ar a bath t ub,
wash bowl, kitchen sink, or laundry tub, in a wet basement, or near a swimming poo l,
Etc.
8. Ac cesso ries - Do n ot plac e this pr oduct o n an un-e ven sur face. The product may fall,
causing serious injury to a child or adult, and serious damage to the pro duct. U se only
with a stand, bracket, or table recommended by the manufacturer, or sold with the
product. Any mounting of the product should follow the manufacturer's ins truct ions,
and should use a mounting accessory recommended by the manufactur er.
9. Transporting - This p roduc t shoul d be move d with ca re to avo id dama ge or inj ury.
10. Ventilation - Slots and openings in the cabinet are provided for ventilation, to e nsure
reliable operation of the product and to protect it from overheating. Th ese ope nings
must not be blocked or covered. The ope nings s hould n ever be b locke d by plac ing the
product on a bed, sofa, rug, or similar surface. This p roduc t shoul d not be pl aced in a
built-in installation such as a bookcase or rack unless proper vent ilati on is pro vided
or the manufacturer's instructions have been adhered to.
11. Power Sources - This p roduc t shoul d be oper ated on ly from t he type o f power s ource
indicated on the marking label. If you are not sure of the type of power supply to your
home, consult your product dealer or local power company. For prod ucts in tende d to
operate from battery power, or other sources, refer to the operation instructions.
12. Pow er - Cord Protection - Power-supply cords should be routed so that they are not
likely to be trapped in any way.
13. Mains plug - T he main s plug is u sed to di sconn ect the d evice , the dis conne ct devi ce
shall r emain r eadily operable.
14. Lig htnin g - For add ed protection for this product during a lightning storm, or when it is
left unattended and unused for long periods of time, unplug it from the wall out let and
disconnect the antenna or cable system. Th is will p reven t damag e to the pr oduct d ue
to lightning and power-line surges.
15. Pow er Line s - An outside antenna system should not be located in the vicinity of
overhead power lines or other electric light or power circuits, or wh ere it ca n fall in to
such power lines or circuits. When installing an outside antenna sy stem, e xtrem e
care should be taken to keep from touching such power lines or circuits as conta ct
with them might be fatal.
Custome r Helplin e Tel: 087 1 590 5917
Please ke ep these op erating i nstruct ions in a safe place f or future r eferenc e.
1

16. Overloading - Only connect this appliance to a main s sup ply t hat c orres ponds to t he
same voltage as the appliance. Failure to observe this warning coul d cause a f ire.
17. Ob ject and Liquid Entry - Never pu sh obj ects of an y kind into this produ ct thr ough
openings as they may touch danger ous volta ge poi nts or sho rt-ou t part s that cou ld
result in a fire or ele ctric shock . Never spi ll liq uid of any kind on the product. The
apparatus shall no t exposed to dri pping or spla shing and no obj ect filled wi th liqui ds,
such as vases, shall be placed on the apparatus.
18. Serv icing - Do not at tempt to service this pro duct you rself as op ening or re movin g
covers may expose you to dangerous voltage or other hazards. Refer all servi cing to
Qualified service personnel.
19. Dama ge Requiring Servi ce - U nplug th is product fr om the wall ou tlet and re fer
servicing to qualified service personnel under the following co nditi ons:
a. If the p ower-supply cord or plug is damaged.
b. If liq uid has spilled, or objects have fallen into the product.
c. If the p roduct has been exposed to rain or water.
d. If the pro duct do es n ot oper ate nor mally b y fo llowi ng the op erati ng instructions. Adjus t
only tho se controls th at are co vered by the oper ating in struc tions , as an improper
adjustment of other contro ls may res ult in damage an d will oft en req uire extensive
work by a qualified technician to restore the product to its normal operatio n.
e. If t he prod uct h as been dropped or damaged in any way, and t he prod uct e xhibi ts a
distinct change in performance-this indicates a need for service.
20. Repl aceme nt Parts - When r eplac ement parts are req uired , b e sure the s ervic e
technician has used rep lacement parts speci fied by the manufacture r or hav e the
same characteristics as the or igina l part. U nauth orize d subst ituti ons may result in fi re,
electric shock, or other hazards.
21. Safety Chec k - Upon comple tion of an y ser vice or re pairs to this produc t, as k the
service techn ician to pe rform sa fety che cks to dete rmine th at the prod uct is in proper
operating condition.
22. Heat - T he p roduc t sh ould be situa ted away from hea t so urces suc h as rad iator s, s toves
or other products(including amplifiers)that produce heat.
Precautions
Safety Information
Caution:
1. Use of controls and adjustments or performance of procedures other than those sp ecifi ed
herein may result in hazardous radiation exposure.
2. If thi s product develops trouble, contact qualified service centers, and do not use the
product in defective states.
Safety Precautions
WARNING:
To reduce the risk of fire or electric shock, do not expose this appliance to rain or moistur e.
CAUTION
RISKS OF ELECTRIC SHOCK- DO NOT OPEN!
To reduce the risk of electric shock, do not remove cover or back.
No user serviceable parts inside. Refer servicing to qualified se rvice p erson nel.
The light flash with arrowhead symbol, within an equilateral tria ngle, i s
intended to alert user to the presence of uninsulated dangerous voltage
within the product's enclosure that may be of suffi cient m agnit ude to
constitute risk of electric shock to persons.
The exclamation point within an equilateral triangle is in tende d to aler t
user to the presence of important operating and maintenance (servicing )
instructions in the literature accompanying the appliance.
Caution:
For compact disc units only: invisible laser radiation when open an d
interlock failed or defeated. avoid direct exposure to laser beam.
PRODUCT COMP LIES WI TH DHHS R ULE 21 CF R SUBCH APTER J I N
EFFEC T AT DATE O F MANUFA CTURE .
(See markings on the back of the unit)
Caution:
To prevent electric shock, match wide blade of plug to wide slot, fully insert.
2 3

Before Use
1. Choose unit installation location carefully. Avoi d placi ng it in di rect su nligh t or close to a
source of heat. Also avoid locations subject to vibrations and excessive du st, col d or
moisture. Keep away from sources that hum, such as transformers or motors.
2. Do not open the cabinet as this might result in damage to the circuitry or electrical sh ock,
if a foreign object should get into the set, contact your dealer.
3. Be sure not to handle discs with dirty fingers. Never insert a disc that has a crack on the
surface.
4. When removing the power plug from the wall outlet, always pull direc tly on th e plug, n ever
pull the cord.
5. To keep th e laser p ickup c lean, d o not tou ch it, an d do not fo rget to c lose th e disc tr ay.
6. Do not attempt to clean the unit with chemical solvents as this might damage the finish.
Use a clean, dry cloth.
7. In ord er to shut off the p ower to t his pro duct co mplet ely, unplug t he powe r cord fr om the
wall outlet. Be sure to unplug the unit if you do not intend to use it for an extended period
of time, such as a vacation.
8. Keep this manual in a safe place for future reference.
Beware of Condensation
When the player (or a compact disc) is moved from a cold to a warm place or is used after a
sudden temperature change, there is a danger of condensation. Wate r vapou r in the ai r
could condense on the mechanism or the laser pickup. If droplets of water form on these
parts, correct playback will be impossible because the laser cann ot read t he info rmati on
from th e disc correctly. To pre vent th is, if yo u are goi ng to use t he play er in a con ditio n where
condensation could occur, you should leave the playe r for 1 or 2 ho urs aft er plug ging it i nto
an AC outlet depending on the amount of condensation. If this is done, the player w ill
stabilize at the temperature of its surroundings.
Handling Records
Do not touch the record’s groo ves. Wi th clea n hands , only ha ndle re cords b y their e dges
or label. Dirty hands can leave residue on the record surface and make th e surfa ce
deteriorate.
Use a sof t anti- static cloth to gently wipe the record surface when the record has become
dirty.
Keep re cords in their sleeve when not in use.
Store r ecords vertically on a shelf or record storage cabinet. Never lay records flat as thi s
may cause them curved.
Avoid pl acing i t in dire ct sunl ight or c lose to a s ource o f heat su ch as rad iator s, stov es.
Also avoid locations subject to vibration and excessive dust, heat, cold o r moist ure.
to become
Label groov es
edge
CD Discs
Always place the disc on the disc tray with the label side uppermost(compact di scs can
be played or recorded only on one side)
To move a dis c from it s stora ge case , press d own on th e cente r of the ca se and li ft the
disc out, holding it carefully by the edges.
Should t re
he disc become dirty, wipe the s urfac e from th e cent
hole outward towards the outer edge with a soft, dry cloth.
Never u se such chemicals as record spray, ant istat ic spra ys or flu id, ben zine or t hinne r
to clean the discs. Such chemicals will do irreparable damage to the di sc's pl astic
surface.
Discs s hould be returned to their cases after use to avoid dust and scratches that could
cause the laser pick up skip.
Do not ex pose discs to direct sunlight or high humidity and temperature for extende d
periods. Long exposure to high temperatures will warp the disc.
Use a sof t oil-based felt-tipped pen to write the information on the label side. Neve r use a
ball-point or hard-tipped pen, as this may cause damage to the record ed side .
Do not us e CDs with an irregular shape(octagonal, heart shaped, business c ard siz e,
etc).CDs of this sort can damage the unit:
4 5

Remote Control Unit
When operating the remote control unit, point it towards the front panel of the unit.
Even if the remote con trol unit is opera ted within the effective range, remo te control
operation may be impossibl e i f t here are an y o bstac les betw een the uni t a nd the remo te
control.
If the remote cont rol un it is o perat ed near ot her ap plian ces wh ich ge nerat e infr ared rays,
or if other remot e control de vices usin g inf rared rays are us ed ne ar the unit, it may
operate incorrectly. Conv ersel y, the o ther ap plian ces may o perat e incor rectl y.
Battery Installation
1. Remove the batteries compartment cover.
2. Insert two AAA dry batte ries( not inclu ded). Mak e su re t hat the batte ries are inse rted with
their positive + and - poles positioned correctly.
3. Close the cover.
Battery Replacement
If the di stance required between the remote control unit and main unit decre ases, t he
batteries are exhausted. In this case, please replace the battery with new ones.
Precautions concerning batteries
Be sure t o insert the batteries with correct positive + and negative - polarities.
Use bat teries of the same type, never use diff erent t ypes of b atter ies tog ether.
Rech argea ble and n on-re -char geabl e batteries ca n be used. Refe r to the p recau tions on
their labels.
Wh en t he remo te cont rol unit is n ot to be used f or a l ong time (m ore tha n a mo nth), r emove
the batteries from t he rem ote co ntrol unit to p reven t them from l eakin g. If they leak , wipe
away the liquid inside the battery compartment and replace the batteries w ith new o nes.
Do not he at o r di sasse mble batt eries and n ever disp ose of o ld b atter ies by thro wing them
in a fire.
Remote Control
A
OPEN/CLOSE
In CD,PHONO or AUX mode, use this button to
open and close the disc tray.Th is butt on does n ot
work In FM/AM mode.
CD
B
Press the CD button to play a CD.
REPEAT
C
In CD mode, use this button to select a repeat
Mode of CD.
D
PROGR AM
In CD mode, use this button to program tracks.
E
SHUFFLE
In CD mode, use this button for shuffle p layba ck.
F
DISPLAY
E
C
M
D
L
K
I
J
Q
R
In CD mode, use this button to change the display.
G
TRACK INCREMENT
During recording, use this button to divide tracks.
H
MANUAL/AUTOINCR EMENT
Use this button to select the mode of track number assignment.
I
Record
Use this button to record CD.
REC VOL+/REC VOL -
J
Use this button to adjust the record volume.
FINALIZE
K
Use this button to finalize a CD-R/CD-RW dis c.
L
ERASE
Use this button to erase a CD-RW d isc.
Clear
M
In CD mode, use this button to clear programmed tracks.
N
PHONO
Press the PHONO button and select PHONO to play a record.
AUX
O
Press the AUX button and select AUX to listen to the external source connect ed to the
AUX IN jacks.
P
TAPE
Press the TAP E butto n to play c asset te.
MUSIC SKIP
Q
In CD mode, use these buttons to skip tracks. Hold down these buttons to search for a
Part of a track.
R
PLAY/PAUSE
Use this button to play/pause recording, finalizing and erasing .
STOP
S
Use this button to stop playback or recording.
VOL+/ VOL-
T
Use this button to adjust the volume level when listen through earpho ne.
N
F
A
OPEN/
CLOSE
PHONO
DISPLAY
AUX
SHUFFLE
CD
REPEAT
TAPE
PROGRAM
CLEAR
MANUAL/
TRACK
ERASE
FINALIZE
AUTOINCREMENT INCREMENT
RECORD
REC VOL- REC VOL+
VOL+
VOL-
O
B
P
G
H
Q
T
S
6
7

Programmed Playback
Up to 32 tracks can be programmed in the desired order.
Inser t a disc an d select CD before beginning programming.
Shuff le play back do es not wo rk duri ng prog ramme d playb ack.
Progr ammed playback works with finalized disc only.
1
Press the PROGRAM button while the player is inactive.
OPEN/
CLOSE
PHONO
DISPLAY
AUX
SHUFFLE
CD
REPEAT
TAPE
PROGRAM
Pro gra m
CLEAR
MANUAL/
TRACK
ERASE
FINALIZE
AUTOINCREMENT INCREMENT
RECORD
REC VOL- REC VOL+
VOL+
VOL-
3 Press the PROGRAM button.
Progra m
OPEN/
CLOSE
PHONO
DISPLAY
AUX
SHUFFLE
CD
REPEAT
TAPE
PROGRAM
CLEAR
MANUAL/
TRACK
ERASE
FINALIZE
AUTOINCREMENT INCREMENT
RECORD
REC VOL- REC VOL+
VOL+
VOL-
NO TOC CD-RW
TR
CD
PROGRAM
PROGRAM indicator blinks, and P-01 appears on the display.
2 Press the MUSIC SKIP bu tton ( or ) t o selec t a track .
OPEN/
CLOSE
PHONO
DISPLAY
AUX
SHUFFLE
CD
REPEAT
TAPE
PROGRAM
CLEAR
MANUAL/
TRACK
ERASE
FINALIZE
AUTOINCREMENT INCREMENT
RECORD
REC VOL- REC VOL+
VOL+
VOL-
NO TOC CD-RW
TR
PROGRAM
CD
NO TOC CD-RW
TR
CD
PROGRAM
The tra ck is programmed, and P-02 is displayed.
Repeat step 2 and 3 to program more tracks.
You can program up to 32 tracks.
To cancel t he prog ram mod e, pres s the STOP button ( ) .
4. When the selection of track numbers has been finished, press the PLAY bu tton ( ) to
Start p rogram playback.
OPEN/
CLOSE
PHONO
DISPLAY
AUX
SHUFFLE
CD
REPEAT
TAPE
PROGRAM
CLEAR
MANUAL/
TRACK
ERASE
FINALIZE
AUTOINCREMENT INCREMENT
RECORD
REC VOL- REC VOL+
VOL+
VOL-
8 9

To check t he prog ramme d order
In the st op mode, press the MUSIC SKIP bu tton re peate dly to sh ow the tr ack num bers
that have been stored in memory.
OPEN/
CLOSE
PHONO
DISPLAY
AUX
SHUFFLE
CD
REPEAT
TAPE
PROGRAM
CLEAR
MANUAL/
TRACK
ERASE
FINALIZE
AUTOINCREMENT INCREMENT
RECORD
REC VOL- REC VOL+
VOL+
VOL-
NO TOC CD-RW
TR
PROGRAM
CD
To add a tra ck to the e nd of the p rogra m
In the st op mode, press the PROGRAM button.
Select a track number by pressing the MUSIC SKIP butt on, and t hen pre ss the
PROGR AM button.
The tra ck is added to the end of the program.
To delet e the las t track f rom the p rogra m.
While the pl ayer is inac tive
, press the CLEAR button to del ete the last trac k from the
program.
OPEN/
CLOSE
PHONO
Clear
DISPLAY
AUX
SHUFFLE
CD
REPEAT
TAPE
PROGRAM
CLEAR
MANUAL/
TRACK
ERASE
FINALIZE
AUTOINCREMENT INCREMENT
RECORD
REC VOL- REC VOL+
VOL+
VOL-
Each time the DISPLAY button is pressed, the display changes as follows:
CD REPEAT 1
TR
CD-R REPEAT 1
TR
CD
CD
1st pre ss-3: 25
( )
total time of the track
2nd pre ss-00 :01
( )
this will then progress
CD-R=Finalized
CD-R REPEAT 1
TR
CD
3rd pre ss-28 :35
)
(Total time from all tracks
Unfinalized CD-R/CD-RW, stop mode
CD-R REPEAT 1
the bal ance of t ime on th e disc( ie. 80 mi n on
blank C D)
TR
CD
Press d ispla y button on remote, it will show
To clear t he prog ram
If one of the following buttons is pressed, the programmed contents will be cleared :
OPEN/CLOSE, FM/AM, PHONO, AUX, STO P in th e stop mo de
10
CD-RW REPEAT 1
TR
CD
Displ ay will show the balance of time on a
parti ally re corded disc.
During recording onto blank disc
NO TOC CD-RW
time le ft trac king ti me down .(The s ame
REC
appli es to rec ordin g onto pa rtial ly used d isc.)
TR
AUTO TRACK
PHONO
-dB 30 12 6 3 0 OVER
L+R
Press d ispla y button on remote, it will show
11

Repeat Playback
Repeat
Shuffle Playback
OPEN/
CLOSE
PHONO
DISPLAY
AUX
SHUFFLE
CD
REPEAT
TAPE
PROGRAM
CLEAR
MANUAL/
TRACK
ERASE
FINALIZE
AUTOINCREMENT INCREMENT
RECORD
REC VOL- REC VOL+
VOL+
VOL-
Shuffl e
OPEN/
CLOSE
PHONO
DISPLAY
AUX
SHUFFLE
CD
REPEAT
TAPE
PROGRAM
CLEAR
MANUAL/
TRACK
ERASE
FINALIZE
AUTOINCREMENT INCREMENT
RECORD
REC VOL- REC VOL+
VOL+
VOL-
Each ti me the RE PEAT button i s press ed, the r epeat m ode is ch anged a s follo ws:
REPEAT ALL (Repea t ALL the Tra cks)
Press the REPEAT but ton onc e durin g playb ack.
All the tracks of the disc will be played repeatedly.
REPEAT 1(Repe at one tr ack)
Press the REPEAT but ton twi ce duri ng play back.
The tra ck being played will be played repeatedly. If y ou pres s the MUS IC SKIP butt on
and select another track, the track you select will be played repeatedly.
It is als o possible to select a track to be repeated in the stop mode. Press the
REPEAT butto n twice a nd then s elect t he trac k numbe r by pres sing th e MUSIC S KIP
button. Press the PLAY butto n to star t playb ack.
If one of t he foll owing buttons is pressed, repeat mode will be cancelled:
OPEN/ CLOSE ,FM/A M, PHON O, AUX.
NO TOC CD-RW
TR
CD
SHUFFLE
Press the SHUFFLE button during playback, or in the stop mode, press the SHUFFLE
butto n and the PLAY bu tton, t he trac ks can be p layed r andom ly.
When the SHUFFLE playback of all the tracks has been finished, the unit stops and the
shuff le play back mo de is can celle d.
If yo u press the ( ) button duri ng shuffle playba ck, nex t tra ck will be ran domly
selected and played. If you pr ess the ( ) b utton , t he previ ous play ed track wi ll be
played from the beginning. A track cannot be replayed duri ng shuffle p layba ck.
Shuff le play back do esn't w ork dur ing pro gramm ed play back.
If one of t he foll owing buttons is pressed, shuffle m ode wil l be canc elled :
SHUFF LE in the s top mode, OPEN/CLOSE, FM/AM, PHONO, AUX.
1312

Parts Instruction
1. Power Button
2. Power Indicator
3. Spindle
4. Turntable
5. 33RPM Button
6. 45RPM Button
7. 78RPM Button
8. Play/Pause Button
9. EARPHONE Jack
10. Eject Button
11. Styl us
12. Tone Arm Res t
13. Lift Handle
14. Balance We ight
Remote Control Sensor
15.
16.Open/Close Button
17. Skip- Button
18. Skip+ Button
19. Play/Pause Button
20. Sto p Button
21. REC Button
22. REC Level-
23. REC Level+
24. Display
CD Recorder Disc Tray
25.
26. CD Button
27. PHONO Button
28. AUX Button
29. Tape But ton
30. Finalize Button
31. Erase Button
32. Auto/Manual Button
33. Track Increment Button
34. Cassette
35. Line Out
36. USB Jack
37. AUX IN Jack
38. AC Cord
Basic Operation
onnect the AC power cord to the wall outlet.
1. C
2.Remove w hite prote ctive needle cover by gently pu lling down wards fron t o f uni t. Please
retain
the protective needle cover when you don’t use.
3. Screw the bal ance wei ght whic h c omes alo ng with the prod uct on the ton e a rm onto the
scale mark, please refer to picture A&B as below.
A
B
The bal ance we ight is t o adjus t the pre ssure o f the nee dle. If t he pres sure is t oo much , the
sound will become distorted; if the pressure is too little, track skipping will eas ily hap pen.
Please adjust the balance weight by turning the balance weig ht cloc kwise o r
clockwise
Put the b alanc e weight into scale mark of the tone arm, then rotate it to the
positio n of the sc ale mar k .
Rotat e the bal ance weight anticlockwise so that it moves outward towards position
if trac k skipp ing occurs.
Rotat e the bal ance weight clockwise so that it moves inward towards position if the
sound i s disto rted or the bass poor.
Fine tu ne the ba lance weight position between and to achieve optimum sound
Perfo rmanc e.
Note:
Do not try to adjust the balance weight while playing a record, it will bre ak the ne edle
and scratch the record this way.
Please r emove the bala nce we ight b efore tr anspo rtati on to pre vent dam age or
breakage to the unit.
per instructions below.
designated
C
A
B
C
D
D
anti-
C
D
14
4. Press the POWER button to turn the unit on.
15

How to Replace the Turntable Stylus (Needle)
Caution:
Do not re move or bend the stylus.
Do not to uch the needle, which your hand.
Turn off t he unit 's powe r befor e you rep lace th e stylu s.
Avoid di rect su nligh t or clos e to a sour ce of hea t.
Removing old stylus
1. Hold the tip of the stylus in the direction A.
2. Remove the stylus by pulling it forward.
Installing a n ew styl us
1. Hold the tip of the stylus in the direction A.
2. Push the stylus inside.
could injure
Listening to a Record
1. Connect the AC power cord to AC outlet.
2. Plug the 2 ends of the LINE OUT Cab le into t he auxi liary i nput (A ux or Audio -In) on y our
TV, ho me ente rtain ment re ceive r or othe r music s ystem . Be sure t hat the r ed RCA Cab le is
inserted into the red jack and the white RCA Cable is inserted into the whit e jack.
3. Press the POWER button on the unit.
4. Press the PHONO button to select the PHONO function.
A
A
5. Put a re cord onto the turntable. When playing a 45rpm record, remember to use the
adapter packed in the polybag along with the manual.
6. Select player speed (33, 45 OR 78 rpm) according to the record you are playing.
7. Remove the tone arm-rest holder, lift the lift handle and move the tone arm gently to the
desired position over the record. Lower the lift handle slowly and re cord wi ll star t to play.
8. Adjust the volume on your auxiliary source to control the volume of the music.
LINE OUT
1. Plug the Power Cord into a standard 230V~50Hz outlet.
2. Plug the Line Out cable located at the rear of the unit into the auxiliary input (AUX) on
your TV, home entertainment receiver or other music system, again bei ng sure t hat the
correct color coded jacks are used.
3. Press the POWER button to turn on the unit. Adjust the volume on your TV or h ome
entertainment receiver.
EARPHONE JACK
For private listening, connect your earphone cable into the EARPHONE jac k in fron t of the
unit. The earp hone is o ption al, not i nclud ed in the p ackag e.
If no sou nd is heard when inserted the earphone plug, please che ck whet her vol ume lev el is
turned down by remote control.
Listening to TAPE
1.Press the TAP E b utton to se lect the TAPE func tion.
2.Load Cassette Tape into the un it (loca ted on side of th e u nit) pla yback wi ll autom atica lly
begin.
3.Press TAPE bu tton hal fway to Fas t F orwar d t he Tape. Press TAP E b utton li ghtly an d
playback will resume.
4.Press TAPE bu tton all th e w ay into end pl aybac k a nd eject Tape .
9. Press PLAY/PAUSE b utton t o pause t he reco rd.
10. Press the PLAY/PAUSE but ton to co ntinu e playi ng.
11. When t he musi c playi ng is fin ished a nd tone -arm re aches t he end of t he reco rd, the t onearm will return back to the arm-rest automatically.
PLEASE NOTE: It could take approximately 20 seconds for the tone-arm to return to the
arm-rest when playing records at 78 rpm.
Or you ca n press the Eject button when playing the record and the tone-arm will li ft up fro m
the record and automatically return to the arm-rest.
12. Remember to when not playing the unit for
extended periods of time.
remove the mains plug from the power socket
16 17

Listening to a CD
1. Press the CD button.
CD
2. Press the OPEN/CLOSE button to open the tray.
OP EN/C LOSE
3. Place a disc on the tray with the printed label face up.
OP EN/C LOSE
Fast Re verse (FR) and Fast Forward (FF) You can reverse or forward to any point in a
selected track by pushing and holding the F.R or F.F buttons.
NOTE: D o not push both buttons together as this may damage the unit.
As the unit is tracking quickly, forwa rd or bac kward y ou will h ear you r selec tion pl aying a t a
distorted speed. Simply release the depressed button to continue playi ng at nor mal spe ed
at the desired position in the selected track.
8. P ause th e CD ,press P LAY/ PAUS E button an d by pressing the PL AY/PAUSE but ton aga in
will restart the CD where it was paused.
Do not switch the unit off while p layin g a CD as thi s will da mage th e unit.
9.Press STOP butt on to sto p the CD.
Play an External Audio Source
Never p lace more than one disc on the tray.
The di sc mus t be placed in th e cent er of t he disc tray. If the d isc is not co rrect ly loaded, it
may not be possi ble to open th e t ray agai n o nce it has closed, so you shou ld ensur e t he
disc is always centered on the tray.
Do not fo rce the t ray by hand during opening and closing operations.
4. Press the OPEN/CLOSE button to close the tray.
OP EN/C LOSE
5. Press the PLAY/PAU SE ( ) butt on to pla y the CD.
The CD disc will start playing from the first track.
6. Press the FF ( )b utton o nce to sk ip to the n ext track.
7. Press the FR( ) button o nce to go back to the beginning of the current track. Press the
FR button twice to go back to the beginning of the previous track.
18
An exter nal (auxiliary) audio source (ie. Personal CD player or MP3 pl ayer) c an be
conne cted to this unit and record to the CD.
1. Press the AUX button to select the AUX function.
2. Plug one end of cable(included) into the AUX IN jack at rear of the unit.
3. Plug the other end of the cable into the headphone or LINE OUT so cket of t he exte rnal
sourc e.
4. Turn the audio source on and adjust volume level.
19

Recording Operation Steps
Load an empty or nonfinalized CD-R or CD-RW disc
Select Auto/Manu al Tr ack
Increment Mode;
Set Auto Track Increment
Sensitivity
Recording To CD
About C D-R and CD-RW di scs
CD-R discs can be recorded once only. On ce they h ave bee n used fo r recod ing, th ey cann ot
be erased or re-recorded. However, if space is available on the d isc (an d the dis c has not
been finalized), additional material can be recorded.
By contrast, a CD-RW di sc can be u sed in mu ch the sa me way as a C D-R dis c, but th e last
track or tracks recorded can be erased, and the space on the disc can be re-used for other
recordings.
However, you should note that an audio CD created using a CD-RW d isc may n ot play b ack
satisfactorily on every audio CD-player.
CD-R, by contrast, may be played satisfactorily on the majority of audio CD players .
Audio f rom the P HONO, TAPE, AUX sources can be recorded on the CD recorder.
Select Recording Source
Activate Recording
Test and Adjust Recording
Level
Start Recording
Tra ck Divi sion
Finalizing Recorded Disc
Please refer to the detailed operation instructions which follo w.
For CD-R or CD-RW,If it is r ecord ed and fi naliz ed, the d isc is po ssibl e to be pla yed by
ordinary CD players; If it is recorded but not finalized, the disc will not be possible t o be
played by any other CD players.
20 21
1.Press the OPEN/CLOSE button to open the disc tray, place a re corda ble dis c on the di sc
tray with the printed label side up, and then press the OPEN/CLOSE button to close the tray.
OP EN/C LOSE
Selec t the mod e of trac k numbe r assignment.
A. Au to/Ma nual mo de
If you pr efer, the sequence of tracks can be followed with the AUTO/MAN UAL button.
AUTO:
If ther e’s no so und for m ore tha n 2 secon ds the cu rrent t rack wi ll stop a nd then a n ew trac k
will begin when the sound recommences.
NOTE: If the sec tion of no sound always exists, without sound source input, it will stay at the
pause state all the time.
B. TRACK INCREMENT
The unit doesn’t divide tracks under Manual Mode.
The unit will record the next track when you press the TR ACK INC REMEN T but ton eve ry
time. If the cur rent track isn’t finished recording, if you press the TRAC K INCRE MENT
Butto n, the unit will record the next track.
NO TOC CD-RW
REC
TR
Please n ote , without AU TO TRA CK si gn in the dis pla y when
change i nto t he manual m ode , you can com par e with abov e.
PHONO
NO TOC CD-RW
REC
TR
AUTO TRACK
PHONO
-dB 30 12 6 3 0 OVER
L+R
*For best results, use MANUAL TRACK INCREMENT for ca ssett e tapes , class ical mu sic, or
any other style of music where the division of songs may not be definite.

Selec ting recording source.
To record from a record press PHONO button.
To record from external source, Please see page 24.
To record f rom the c asset te tape .
Press the TAP E butto n, load a C asset te Tape partially into the unit (located on side o f the
unit), the tape will begin playing when fully inserted.
The TRA CK INCR EMENT butt on work s regar dless o f the MAN UAL/A UTO REC setting.
This se ction d eals wi th the ac tions t aken af ter rec ordin g.
To Tur n Recor d Or Tape O ver
(A) Pre ss PLAY/ PAUS E butto n to susp end rec ordin g tempo raril y (paus e mode) .
(B) Pre ss the PLAY/PAUSE but ton aga in to con tinue r ecord ing.
To record from a record to CD
1. Press the RECORD button. REC will appear on the display.
No butt on will work while busy is displayed. Wait a f ew seco nds
RE C
until b usy disappears from the display.
2. Adjust the recording level using the REC LEVEL bu ttons , the dis play wi ll show
From -7 0 to 00 to +7.
RE C LEV ELRE C LEV EL
NO TOC CD-RW
REC
TR
AUTO TRACK
3.Move the tone arm over to the record to start playing.
To stop rec ordin g
4. When you finish recording, press the STOP butt on to sto p recor ding.
5. Press the PLAY/ PAUS E ( )butt on to sta rt reco rding .
PHONO
-dB 30 12 6 3 0 OVER
L+R
Remem ber that every time recording is paused or stopped, a new track number will
alway s be assigned. It is not possible to record in two stages within one track.
ERASE
1. To erase r ecord ing, pr ess CD bu tton to s elect C D funct ion.
2. Press the ERASE button and ERASE ONE will show on the display.
Note: You can only erase from the last song on.
If you wa nt to era se all songs, the ERASE button and display will
press and hold down
show ERASE ALL, pre ss PLAY butto n to star t erasi ng all.
3. Press PLAY button t o start e rasin g.
Please note: Erase function works only with CD-RW d isc.
Final izing
In order for a disc to become a standard CD, it must have a Table of C onten ts(TOC) wr itten
to it. Th is proc ess is kn own as fi naliz ing.
THE CD MUST BE FIN ALISE D.
1. Press CD button to select CD function.
2. Press the FIN ALIZE button in the stop mode. FINALIZE appears on the display.
To cancel t he fina lizin g proce ss, pre ss the STOP button( ).
3. Press the PLAY ( )butt on to sta rt fina lizin g.
The dis play wi ll show - --Bus y durin g final izati on, wai t until t he busy
disap pears to complete the finalizing. The fina lizin g time is s ubjec t
to the co ntent s of the re cords, it may take few minutes in some cases.
When th e operation has been finished, the CD door will open.
To check a fi naliz ed disc , put the d isc in. C lose th e CD door. I t means t he disc i s final ized
when the display shows CD-R or CD-RW on t he left t op corn er.
Manua l track division
It is pos sible to divide the recording into tracks while recording.
While recording is taking place, press the TRACK IN CREME NT bu tton. T he curr ent tra ck
number will be incremented by one.
TR ACK IN CRE MEN T
22 23
Durin g finalizing, no buttons work.
Never t urn off t he powe r or unpl ug the po wer cor d.
For CD-R or CD-RW, if it is re corde d and fin alize d, the di sc may be p layed o n other C D
players.Iif it is recorded but not finalized, the disc will not be able to be played on oth er CD
players.
Once fi nalized, CD-R discs are truly final. No more tracks can be recorded on them. By
contrast, CD-RW dis c can be un final ized. An d if ther e is spac e in disc , furth er mate rials
can be recorded on them.

Record from Cassette to a CD
1. Load a recordable disc in the disc tray.
2. Press TAPE b utton t o selec t tape fu nctio n.
3. Press AUTO MAN UAL button to activate the function.
4. Press RECORD button to activate recording. REC will appear on display.
5. Load a cassette tape partially into the cassette deck, the tape will begin playing w hen
fully inserted.
6. Press PLAY button t o start r ecord ing.
7. Adjust the REC-LEVEL and t he VOLU ME.
8. Finalize the CD when you finish recording.
Press C ASSET TE butt on half way to fast forward.
Press C ASSET TE butt on all the way in to stop and eject the tape.
Record from External Audio Source
1. Load a recordable disc in the disc tray.
An exter nal (auxiliary) audio source (ie. Personal CD player or MP3 pl ayer) c an be
conne cted to this unit and record to the CD.
2. Press the AUX button to select the AUX function.
3. Plug one end of cable(included) into the AUX IN jack at rear of the unit.
4. Plug the other end of the cable into the headphone or LINE OUT so cket of t he exte rnal
sourc e.
5. Turn the audio source on and adjust volume level.
Record to PC
You ca n get hel p on-li ne and ch eck out f reque ntly as ked que stion s by goin g to
www.audacity.sour cefor ge.ne t/hel p/faq
Audio from the PHONO, CD, TAP E, AUX can b e recor ded on th e compu ter.
1.To record from a record, press PHONO button.
2. To recor d from a CD d isc, pr ess CD bu tton. L oad a dis c on the tr ay with l abel fa cing up .
Close the tray and press play/pause button to start playing.
3.To record from cassette tape. Press the TAP E butto n, load a C asset te Tape partially into
the unit (located on side of the unit), the tape will begin playing when fu lly ins erted .
4.To record from external source, press the AUX button and connect the cable to the AUX IN
jack at back of the unit. And connect the other end into LINE OUT or hea dphon e jack or
external source.
Audacity Software
The pro vided C D disc contains the fol lowin g softw are:
(1)audacity-src-1.2.6--------- For source codes
(2)Audacity_for_MAC---------For Macintosh
(3)Audacity_for_WIN---------For Windows
(4)AUTORUN .INF
(5)The GNU General Public License.html
The software is compatible with Window 98, 2000, ME, XP, VISTA, 7 and Ma cinto sh.
Audacity Installation and USB Connection
Connect the USB cable to the unit and your computer. Connect the AC cord of the unit.
Press POWER button to turn the unit on.
1. Please insert the Audacity software disk that comes with your unit. Go to My Computer
and double click the CD ROM Drive.
6. Press REC button to activate recording.
7. Press PLAY button o n the aud io sour ce.
8. Press PLAY button o n the rec ord pla yer to st art rec ordin g.
No butt on will work while busy is displayed. Wait a f ew seco nds unt il busy
Disap pears from the display.
9. It’s n ecess ary to ad just th e recor ding le vel whe n you sel ect Auto Ma nual Fu nctio n
using t he REC LEVEL knobs, t he disp lay wil l show fr om -70 to 0 0 to +7 whi ch
indicates lowest to highest volume levels. Adjust the volume level .
RE C LEV ELRE C LEV EL
NO TOC CD-RW
REC
TR
AUTO TRACK
PHONO
-dB 30 12 6 3 0 OVER
L+R
10. Finalize the CD when you finish recording.
24
2. Ther e are fiv e folde r in the Aud acity d isk. Se lect Aud acity _for_ WIN for W indow s syste m,
and select Audacity_for_MAC for Macintosh system.
25

3. Double click the Audacity_for_WIN for Windows system, and double click the
audacity-win-1.2.6 to install the audacity software.
4. Double click the Audacity_for_MAC for Macintosh system. The re are th ree fol ders wi ll
appear as below. If your computer is Mac OS X system (Intel CPU), please enter the Intel
folder to install the audacity software; If your computer is Mac OS 9 system, please enter
the Mac OS 9 folder to install the audacity software; If your computer is Mac OS X system
(Power PC CPU), please enter the PPC folder to install the audacity software.
2. Click on I accept the agreement and click on Next.
3. Continue to click on the Next buttons.
Installing the Audacity Software
1.The Audacity Setup Wizard will appear. Click on Next to install the soft ware.
26
27

4. Click on the Install button to start installation.
2928

5. Click on Finish to complete installation.
6. You can now open the Audacity software and start recording your fi les.
(For additional information, visit the Audacity website at http://auda city.sour cefor ge.ne t)
Configuring Audacity for Microsoft Wi nd ow s
Audacity Interface
Audacity Interface---Settings and controls.
Audacity Control Buttons
Using the attribute controls button at the top of the screen to go to beginning, Play, Record ,
Pause, Stop and End. Use the File, Edit, View, Pr oject , Gener ate, Effec t and Analy ze menu s
to Save, Export, and edit the music.
1. Click the ( ) but ton to sk ip to sta rt;
2. Adjust the output volume.
3. Click the ( ) but ton to pl ay;
4. Click the ( ) but ton to re cord;
5. Click the ( ) but ton to pa use the recording;
6. Click the ( ) but ton to st op the re cording;
7. Adjust the input volume.
8. Click the ( ) but ton to sk ip to end;
3130

Audacity Preferences
Click the Edit on the Audacity interface, select Preferences.
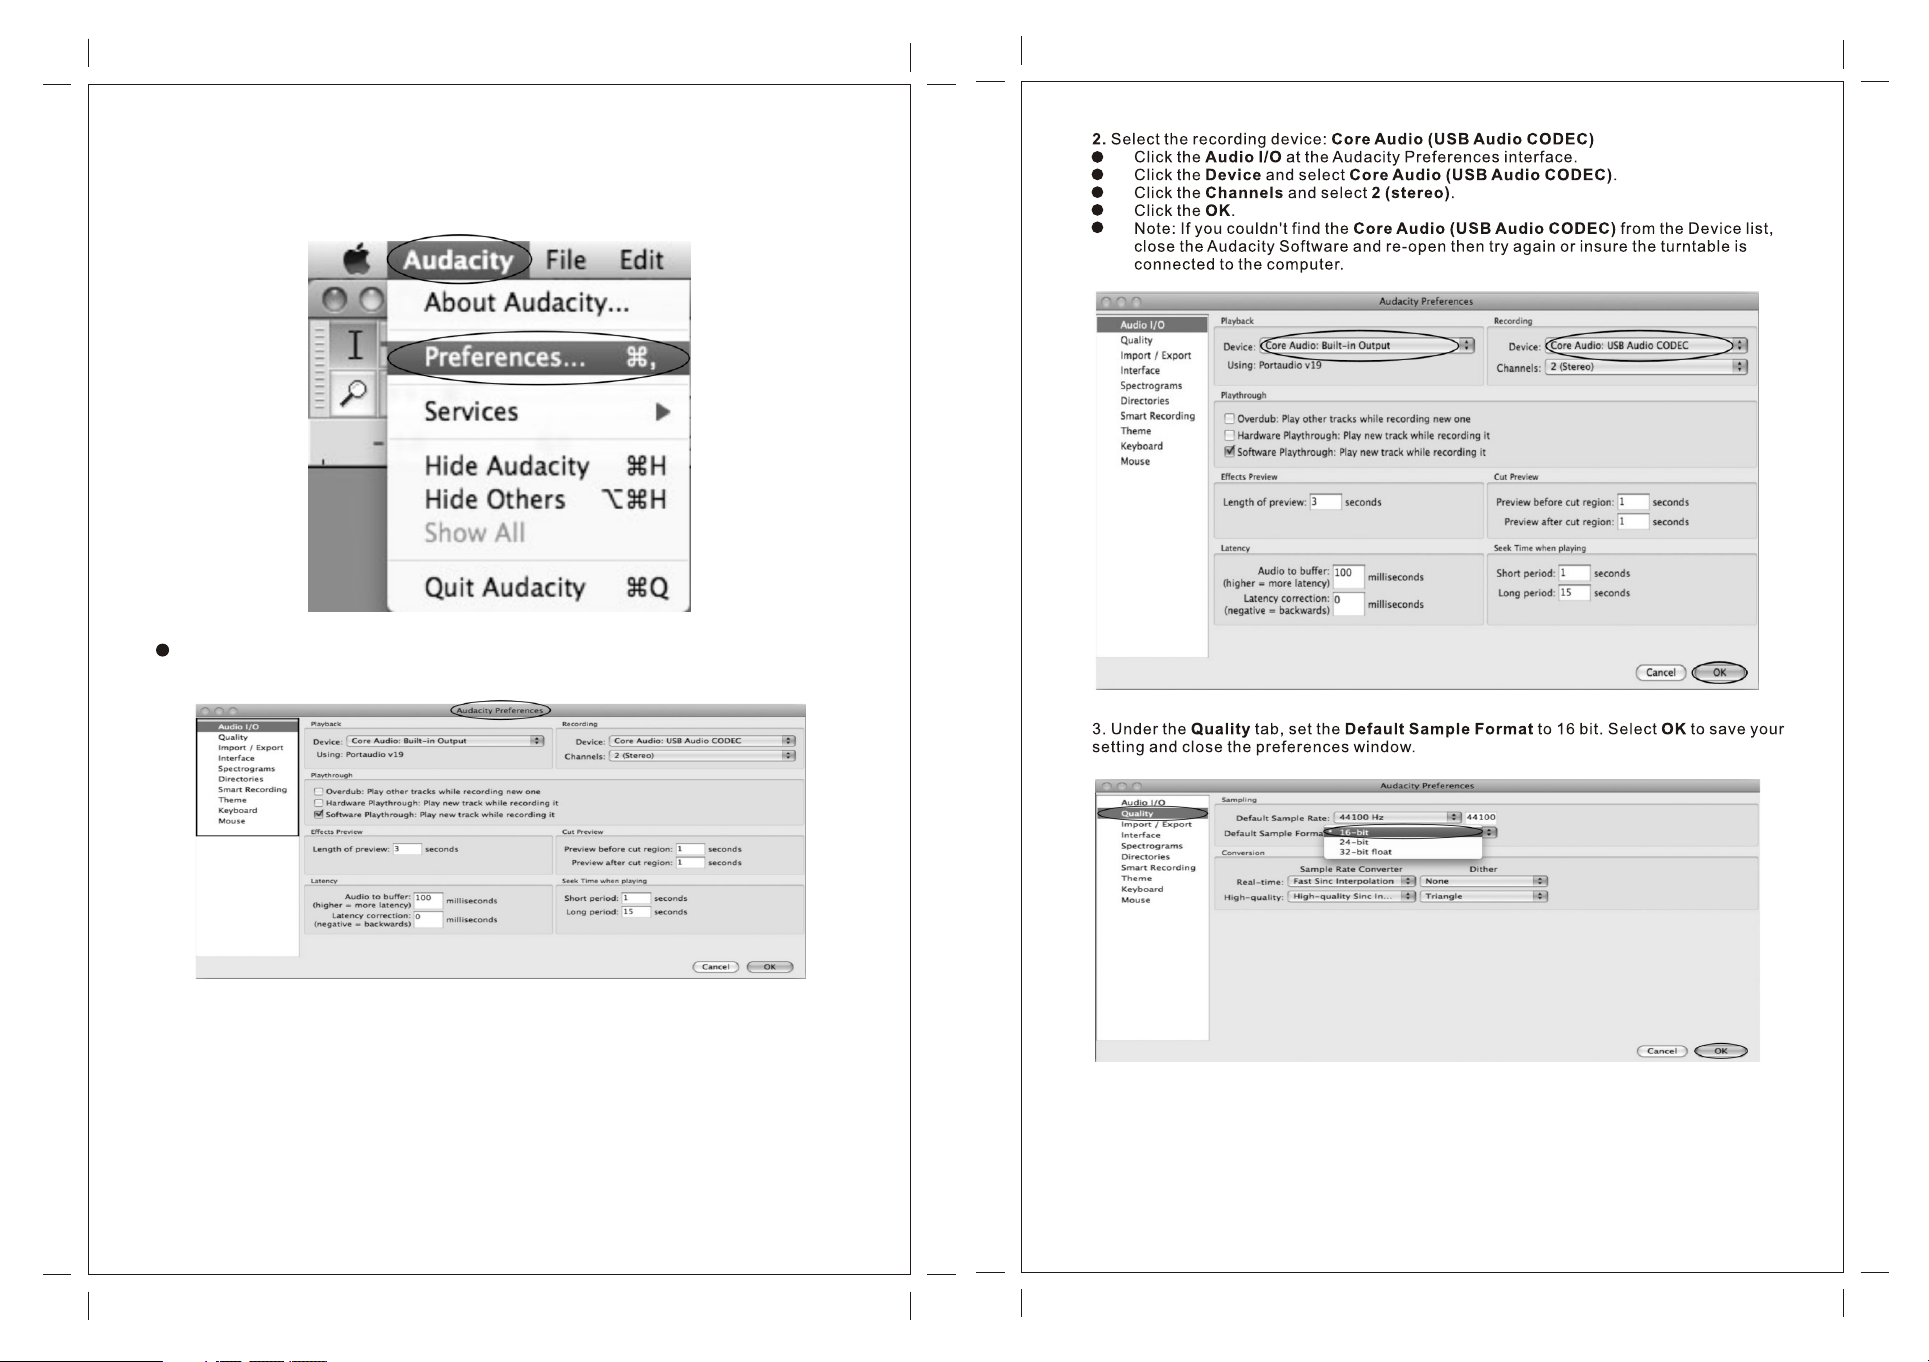
Select the recording device: microphone (USB Audio CODEC)
Click the Audio I/O at th e Audacity Preferences interface.
Click the Device and select microphone (USB Aud io CODE C).
Click the Channels and select 2 (stereo).
Click the OK.
Note: If you couldn't find the microphone (USB Au dio COD EC) fro m the Dev ice lis t,
close the Audacity Software and re-open then try again.
The scr een wil l open up Au dacit y Prefe rence s. You can se e the Audio I/O, Qu ality, File
Formats, Spectrograms, Directories, Interface, Keyboard and Mouse in the Audacity
preference interface.
32 33
Adjust the output and input volume.
NOTE: Because of the variation of differen t opera tion sy stem, t he inpu t volum e contr ol
may not work on some individual Windows versions. Windows Vista e nsure t he inpu t
volume control working properly.

Preparing to Export and Save For MP3 Format
Prepare for MP3 Export--- (Additional software lame_enc.dll needs to be installed. )
1. Please make sure that the Audacity disc is still inserted in your computer.
2. Click the Edit Tab on the Aud acity i nterf ace, se lect Pr efere nces.
3. Select the File Formats Tab and cl ick on th e Find Li brary B utton .
4. A dialog box will appear. Click Yes.
34 35

5. Another box appears to locate the CD ROM or Audacity D. Click on look in: Arrow and
select CD Rom or Audacity D, double click on Audacity-For-Wi n., you w ill fin d the lam -
enc.all software. Click the software then click open.
For Win dows Vi sta dou ble cli ck comp uter an d find CD R OM. Dou ble cli ck CD ROM a nd
find lame_enc.dll .
Recording Operation
To downl oad mus ic from P HONO to P C
1. Place the record on the turntable.
2. Move the tone-arm over to the record to start playing.
3. Click the Record( )button to start recording.
The waves (top and bottom) will show on the interface.
4. At end of the song, click Pause ( ) button on computer and press PLAY/PAU SE butt on
on turntable.
For the next song, replace the album or move tone-arm to another desired song. Press
PLAY/PAUSE b utton o n turnt able to s tart pl aying t he next s ong. Im media tely pr ess Pau se
( ) butto n on comp uter and downloading will continue.
5. Repeat steps 3 and 4 until you have finished downloading.
NOTE: D o not click Stop button on computer while continuously downloadin g songs .
Remember to click Pause in between your desired songs. Press Stop on computer only
when all your desired songs have been downloaded.
After y ou have finished downloading, you may play back the songs thro ugh you r compu ter.
In Stop M ode, simply click ( )SKIP to START button then the ( ) PLAY bu tton.
6. Click on the OK Button.
Now the MP3 software set up is complete and now you can record and export the record file
to MP3 fo rmat.
36
NOTE: You can not hea r music d uring t he reco rding p roces s.
37

NOTE: I f do not ha ve fluctuant wave on the interface when recording, adjust the recording
volume as follows:
Click the Start in the left corner of the computer, select Programes, Acc essor ies,
Entertainment, Sound Recorder to enter Sound Recorder interface.
Sound Recorder Interface
Select Edit and click Audio Properties in the bottom of the menu to enter Audio
Properties interface:
Audio Properties Interface
Select sound recording default device and click Microphone USB Aud io Code c,
then click the Volume to enter Wave In i nterf ace.
Wave In Interface
38
Adjust the recording volume from the middle or higher. The fl uctua nt wave w ill
show on the interface when recording.
39

General problem for all Windows version
Adjustment for Windows 7 and some Vista system only
1. When the turntable is connected, you cannot hear any sound if you need to listen to vide o or
music. It is because the default playback device has been changed to USB Audio CO DEC
once the turntable connects to the PC.
Solution1: Remove the USB cable from the PC.
Solution2: Click "Start" and go to the Control Panel. Find and click “Sound” i con. Cl ick the
"Playback" tab and change the playback device. Click ok. Then sou nd come s out. Pl ease no te
that yo u need to change the setting manually when you connect the USB cable with t he PC.
2. If you w ant to hear the music while downloading to the computer, go to the Audacity
interface. Click Edit and select “Preference”. Then cl ick “Au dio I/O ” tab. And f ollow t he
following setting. Click “OK” to confirm.
If do not have the fluctuant wave on the Audacity interface or the sound is distorted when
recording, adjust the recording level as follows:
Click “Start” at the lower left corner, go to the Control Panel.
In Classic Vie w, doubl e click t he Soun d icon.
Deselect the check box to disable its function.
40
41

Or in Control Panel Home view, click “Hardware and Sound”. Th en clic k “soun d”.
In the So und interface, select “Recording” tab.
Then, choose a recording device. Herein we recommend you to select Microph one of
USB Audio CODEC which is highlighted in the picture and click “Propert ies”.
42
43

Select “Levels” and adjust the Volume Reading. The r eadin g is from 0 t o 100. No rmall y it
should be 3-8. However, you may refer to the Input Level Indicator from the Audaci ty pane l
that doesn't excess 0. Then cl ick “OK ” on the Mi croph one pro perti es inte rface a nd soun d
interface. Close the Control Panel. (Please note that there is no “Levels” tab in “So und”
panel in some operating system, such as Windows 98, Windows 2000. For Window s 7
users and Vist a users , the “Le vels” t ab in “So und” pa nel is av ailab le.)
Dividing Tracks
Note: Follow the previous instructions to download the songs but DO NOT cl ick the S top
button when the first song is finished. Click the Pause button on computer. For the next
song, replace the album or move tone-arm to another desired song. Click the Pa use but ton
to continue the downloading. Only click the Stop button when you have finish ed
downloading into computer.
When your downloading is completed:
1. Press ( ) skip to s tart bu tton to r eturn t o the beginning of the first song.
For exa mple: You have 2 songs downloaded (before ex porti ng). The dur ation o f the
first song is from 0:00-1:4 5 / the dur ation o f the sec ond son g is from 1 :45- 4:00. ( See tim e
bar directly above waves in interface below.)
Input Level Indicator
44
(Suggestion: You can also write down the duration of time each son g takes t o downl oad
while it is playing by watching the wavelengths.)
45

2. Move cursor to the wave graphic area, left click mouse and hold then drag from left to
right. You ca n see the t ime bar c olor ch angin g to gray ( highl ighte d). Rel ease th e mouse
when the highlighted time bar has reached 1:45 (end of first song).
Export and Save For MP3 Format
When th e recor ding is finished, click the ( ) on the screen. The n press t he
PLAY/PAUSE b utton o n the tur ntabl e.
You have a music downloaded on your computer now. But the music needs t o be
converted to MP3 formats before exporting.
You may play the song through your computer. Simply click skip( ) to start button then
( ) play bu tton.
NOTE: You m ay visit the Audacity website at http://audacity.sourc e forge .net.
For mor e detai led information and operation, etc.
See interface example below, saved as MP3 format:
3. Click File ta b then select EXPORT SELECTION AS O gg, OR MP 3.
4. The wind ow will pop up a d ialog bo x f or you to put the so ng title (F ile name ), where yo u
want to save it (Save in), and file format (Save as type).
5. C lick Save and the first s ong from 0:00 -1:45 is saved on the compu ter. See Save
interface on the next page.
46
Complete box below:
47

Second song to b e divid ed and sa ved:
1. Move cursor to the wave graphic area at 1:45 (beginning of 2 song). Left click mous e and
hold then drag from left to right until you reach 4:00 (end of 2 song). You can see the area
nd
nd
from 1:45 to 4:00 highlighted.
Export and Save For WAV, OGG Format
When th e recor ding is finished, click the ( ) on the screen. The n press t he
PLAY/PAUSE b utton o n the tur ntabl e.
You have a music downloaded on your computer now. But the music needs to be
conve rted to WAV, or Ogg fo rmats b efore e xport ing.
You may play the song through your computer. Simply click skip( ) to start button
then ( ) pl ay butt on.
NOTE: You m ay visit the Audacity website at http://audacity.sourc e forge .net.
For mor e detai led information and operation, etc.
1. Click the file tab on the audacity interface. Select Export as WAV or Ex port as O gg.
Expor t As WAV
2. Click File tab then select EXPORT SELECTION AS M P3.
3. Follow Steps 2, 3 and 4 and 5 on page 41 export, save and divide the songs; one by one.
To Change The Titles (For MP3 Format Only)
DURING EX PORT SELE CTION AS MP3: the soft ware only pro vides one tim e to tit le the
song being saved. All subsequent songs being divide d from the same track are wit h the
same title.
To change the titles, follow the steps below:
1. Right click on the Music file which will show all its contents.
2 .Select Properties, then click on Summary.
3. Click on Titl e, and th en chan ge it to yo ur desi red tit le.
4. Select OK.
5. Do all these steps until you title each song.
48
Expor t As Og g
49

2. Once you have chosen to which file format recording should be exported, the i nterf ace
below appears. Here you may provide the file name and the location wher e it will b e
saved, i.e. desktop. Then cl ick Sav e.
Save as WAV
Save as Ogg
Recording Operation From CD
To downl oad mus ic into c omput er
1. Press POWER button to turn the unit on.
2. Press CD button and press open/close button .
3. Place a disc on the CD tray with printer label facing up.
4. Press open/close button to close CD door and press PLAY bu tton to s tart pl aying t he CD.
5. Click the Record( )button to start recording.
The waves (top and bottom) will show on the interface.
6. At end of CD/song, click Pause ( ) button on computer and press STOP bu tton on C D.
Replace the CD or press SKIP but ton to se lect an other d esire d song. P ress PL AY but ton on
CD to sta rt playing the next song. Immediately press Pause( ) button on computer and
downloading will continue.
7. Repeat steps 5 and 6 until you have finished downloading.
NOTE: D o not click Stop button on computer while continuously downloadin g songs .
Remember to click Pause in between your desired songs. Press Stop on computer only
when all your desired songs have been downloaded. If you do not ha ve fluc tuant w ave, se e
pages 38 and 39.
50
Fluct uating Wav e
To divide, export and save the recorded music
To MP3, WAV or Og g refer f rom pages 40 to 45.
51

Recording Operation From CASSETTE
To downl oad mus ic into c omput er:
1.Press POWER button to turn the unit on.
2.Load the cassette tape into the unit, playback automatically begins.
Recording Operation From AUX IN
To downl oad mus ic into c omput er
1. Press POWER button to turn the unit on and press AUX button.
2. Plug one end of the cable (included) into the AUX IN socket on the unit.
3. Click the Record( )button to start recording.
The waves (top and bottom) will show on the interface.
4. At end of cassette, click Pause ( ) button on computer and press EJECT bu tton on t he
cassette, turn over or replace the cassette and load it to play. Immed iatel y press P ause
( ) butto n on comp uter and downloading will continue.
5. Repeat steps 3 and 4 until you have finished downloading.
NOTE: Do not click Stop button on computer while continuously downloadin g songs .
Remember to click Pause in between your desired songs. Press Stop on computer only
when all your desired songs have been downloaded. If you do not ha ve f wave,
see pages 38 and 39.
luctuating
Fluct uating Wav e
3. Plug the other end of the cable into the headphone or line out socket of external s ource .
4. Turn on the external source, adjust the volume level and press PLAY butto n to star t
playing.
5. Click the Record( )button to start recording.
The waves (top and bottom) will show on the interface.
6. To skip to a nothe r song, c lick Pa use ( ) but ton on co mpute r and pre ss STOP button on
external source. Press skip button on the external source to select another desir ed song .
Press PLAY bu tton on t he exte rnal so urce to s tart pl aying t he next s ong. Im media tely pr ess
Pause( ) butto n on computer and downloading will continue.
7. Repeat steps 5 and 6 until you have finished downloading.
NOTE: D o not click Stop button on computer while continuously downloadin g songs .
Remember to click Pause between your desired songs. Press Stop on computer only whe n
all your desired songs have been downloaded.
If you do n ot have waves, see pages 38 and 39.
fluctuating
To divide, export and save the recorded music
To MP3, WAV or Og g refer f rom pages 40 to 45.
52
Fluct uatin g Wav e
To divide, export and save the recorded music
To MP3, WAV or Og g refer f rom pages 40 to 45.
53

Configuring Audacity for Mac
Audacity Interface for Mac
Audacity Interface---Settings and controls.
At the to p of the ma in Audacity window, to the right of the play control buttons, you will see
the input and output level meters (labeled L and R). U nder th e outpu t level m eter, is a n icon
that looks like a microphone. Next to the microphone is a black arrow that point s down. C lick
this arrow and select Start Monitor. (If you don't see the input and output level meters, open
your Preferences again as described above.)
Audacity Control Buttons
Using the at tribu te con trols but ton at the top of the sc reen to go to beg innin g, Play, Record,
Pause, St op and End. U se t he File , Edit, View, Proje ct, Gen erate , Effec t and Analyz e menus
to Save, Export, and edit the music.
1. Click the ( ) but ton to sk ip to sta rt;
2. Click the ( ) but ton to pl ay;
3. Click the ( ) but ton to re cord;
4. Click the ( ) but ton to pa use the recording;
5. Click the ( ) but ton to st op the recording;
6. Click the ( ) but ton to sk ip to end;
7. Adjust the output volume.
8. Adjust the input volume.
54
55
Audacity Preferences
1. Click the Audacity on the Audacity interface, select Preferences.
The scr een wil l open up Au dacit y Prefe rence s. You can se e the Audio I /O, Qua lity,
Import/Export, Interface , Spectrograms , Directories, Smart Recording, Them e,
Keyboard and Mouse.
56
57

To set the Smart Recording
To select the Smart Recording in the Audacity Preferences interface, and set the Sound
Activation Level(dB) to -36, and then click OK.
At the to p of the ma in Audacity window, to the right of the input and output level meters
(labeled L and R), yo u will se e the inp ut and ou tput vo lume. The left of the inp ut and
output volume, there is an volume icon. To adjus t the out put and i nput vo lume to
maximum.
Export and Save Files (After Recording is Completed)
When the song is finished, click the ( ) on the screen. The n press t he PLAY/PAUSE
button on the turntable.
You ha ve a musi c downl oad on yo ur comp uter no w.
You ma y play ba ck the so ng thro ugh you r compu ter.
Simply click the ( ) to play.
NOTE: You may visit the Audacity website at http://audacity.s ource f orge. net.
For more detailed information and operation, etc.
1. Click the file tab on the audacity interface. Select Export to save the file.
NOTE: Because of the variation of differen t opera tion sy stem, t he inpu t volum e contr ol
may not work on some individual Windows versions. Windows Vista i s recom mende d to
ensure the input volume control working properly.
58
2. It wil l pop-up window below after click Export. It will default MP3 format, but you also can
select other format, only need to click the arrow located at the right of the MP3 Files.
59

Copying The Music File To An MP3 Player
1. Connect MP3 player to your computer via USB cable.
2. Turn on your computer.
3. Double click on MY COM PUTER .
4. Locate the drive named REMOVABLE DI SK or MP3 P LAYE R - This is your MP3 player.
5. Double click the REMOVABLE D ISK/M P3 PLAYER to op en the fo lder. It w ill sho w all
files currently on your player.
6. Next locate your music files on your computer. Most people store them in their MY
MUSIC folder.
7. Once y our music folder/MP3 file folder is open, click once to highlight the song you
want to send to your MP3 player. One of the following steps will copy the MP3 file:
A. Right click on the highlighted song and a box will come up. Move cursor to SEND TO
and another box will come up. If you have the option REMOVABLE DI SK, cli ck on it.
This will send copy of MP3 file to MP3 player.
B. If you d o not have REMOVABLE DIS K liste d, then c lick on C OPY. Go b ack and r epeat
steps 3, 4 & 5 (above). Right click in the middle of the window and a box will open . Selec t
PASTE an d MP3 fil e will be s ent to MP 3 playe r.
Listening to the music on iPod
After e xporting music for WAV, Ogg, MP 3 forma ts, if yo u want to l isten t o music o n your
iPod, you must first install iTun es soft ware in to your c omput er. (iTunes i s the mus ic
application you use with an iPod.) See instructions below on how to use i Tunes to
transform your music onto iPod.
1. Inst all iTunes
You ca n downl oad the i Tun es late st vers ion in th e inter net. Fo r iTunes 7.6.2.9 ve rsion ,
doubleclick iTune s Set Up to i nstal l the sof tware , then fo llow in struc tions b elow:
Now I will give an example for iTunes 7 .6.2. 9 versi on. Dou ble cli ck iTunes Se t Up to
install the iTune s softw are fol low the s creen i nstru ction s to comp lete th e set up.
2. View t he iTunes version.
Click the Help on the iTunes w indow, t hen sel ect Abo ut iTunes.
60
61

iTu nes 7.6 .2.9 ve rsion
Check your iTunes v ersio n to be sur e it is the s ame as ab ove (7. 6.2.9 ).
3. To Conne ct iPod t o your co mpute r.
Plug one end of iPod Cable Dock Connector into the USB port on your compute r, and
then connect the other end to iPod.
Click on Devices, then select Summary to enter into interface below.
4. Summary Interface
In the Su mmary interface, you can see the iPod information, including name , capac ity,
softw are version, sync function, etc. Th e Sync bu tton is u sed to sy nchro nize th e iPod
with the iTu nes.
Click on Music to enter into interface below.
5. Music Interface
In the Mu sic interface, you can sync music in the iTu nes.
Even though there are many functions in this interface, only transforming music from
iTu nes int o iPod wi ll be exp laine d in this m anual .
6. To add mus ic that 's alre ady on yo ur comp uter to t he iTunes:
If you ha ve music on your computer encoded in file formats that iTu nes sup ports , you can
easily add the music to iTun es.
Click the File tab, and select Add folder to Library.
62
63

A dialog box will appear and you may select the Music file. Then cl ick the O K butto n.
If iTunes su pport s the son g file fo rmat, t he song s are aut omati cally a dded to t he iTunes
library. You can al so drag i ndivi dual so ng file s to iTunes.
8. Click Music for music interface (below). Select Sync music. A box will come up
advising that all existing songs and play lists on the iPod Admin istra tor wil l be remo ved.
Click the Sync button to synchronize the music files in the iTune s to iPod .
9. After clicking Sync, you can find the music in your iPod that has been transformed from
the iTunes .
You ca n see tha t all son gs will l ist on th e right o f the iTunes ( as abov e).
7. After inputting music, click iPod under the Devices.
64
65

Troubleshooting Guide
Specifications
In case of trouble with the unit, please look through below and see if you can solve t he
problem by yourself before calling your dealer.
NO SOUND:
If you ar e not getting any sound into the software application, go back to the preferences
as shown above and make sure you have selected the USB input for the record ing dev ice.
Power Cycle: Close Audacity, turn off the tu rntab le, unp lug the U SB Cabl e. Then p lug in
the USB Cable, turn on the turntable, and reopen Audacity.
If you ar e not able to hear any audio as you play the record, please click on the
microphone drop-down arrow and select Monitor Input. This wil l enabl e you to he ar the
audio from the turntable, even if you have not record-enabled the Audac ity app licat ion.
If you ar e not seeing the microphone slider, please go to the Preferences menu in
Audacity. Cli ck on the I nterf ace tab a nd make s ure tha t the Ena ble Mix er Tool bar and
Enable Meter Tool bar opt ions ar e check ed. If th ey are no t, plea se chec k them an d then
press OK.
Check the microphone slider to make sure that it is at full volume, all the way to the right
as shown below. If you are not seeing the microphone slider, pleas e go to the P refer ences
menu in Audacity. Click on t he Inte rface t ab and ma ke sure t hat the E nable M ixer Toolbar
and Enable Meter Toolba r optio ns are ch ecked . If they a re not, p lease c heck th em and
then press OK.
CD PLAYER sec tion
Frequency Response………………….….60 to 20, 000 Hz +/-4 dB
Signal-to-Noise Ratio……………….….…55 dB (IEC-A)
CASSETTE DECK section
Tra ck Syst em……… …………… ……... ….4 Trac k, 2 chan nel ste reo
Tape Speed………………………………...4.8 cm/sec
Wow and F lutte r………… …………… ..….0 .4% (WR MS)
Frequency Response……………..……...125 to 6300 Hz +/-6 dB
RECORD PLAYER sect ion
Motor…………………………………..…....DC servo motor
Drive System………………………..….….Belt Drive
Speeds……………………………….…..…33-1/3 rpm, 45 rpm and 78 rpm
Wow &Fl utter …………… …………. ..….… Less th an 0.35 % (WTD)
S/N Ratio…………………………….……...More than 50 dB
Cartridge Typ e………… …………… ……..C erami c Stere o Cartr idge
Stylus………………………………………..402-M208-165
GENERAL
Power Requirements……………….…..…AC 230 V~ 50 Hz
Power Consumption……………………....19 W
Dimensions(W x Hx D)………………...….20.1''x12.2''x13.6''(approx.)
Weigh t………… …………… ……….… ..... 2 9.1 Ibs . (appr ox.)
Standard Accessories……………...……..Operating Instruction Booklet
45 rpm Adapter
CD Disc(Audacity Software DRIVER)
USB Cable
RCA AUX IN Cable
Balance Weig ht
Remote control
POOR SO UND Quality:
Check your stylus to make sure it is secured to the tone arm. The st ylus mu st be
connected to the tone arm whenever using the turntable.
Make sure that your RCA plugs are plugged into a source or not touchin g bare me tal.
If you ar e experiencing noise through the USB, you may have interference fro m the RCA
plugs. Ensure the USB cable is not touching or near any other cables.
If you ex perience any odd sounds coming from the recording, try closing all ap plica tions ,
restarting the computer, and only run Audacity while recording.
Make sure that you have properly installed and calibrated the tone ar m of the tu rntab le.
66
67

Troubleshooting Guide
In case of trouble with the unit, please look through this chart and see if you can solve the
problem by yourself before calling your dealer.
Problem
Power does not come on when
the power switch is pressed.
Unit crashes or fails to
respond.
Cause
Unit is unplugged.
It might be affected by external
factors such as ESD
(Electro-static discharge).
Solution
Connect the unit to the AC
power supply.
Unplug the power cord,
remove the USB cable and
AUX IN cable if connected,
then re-plug the power cord
after one minute.
GUARANTEE :
This product is guaranteed against manufacturing defects for a period of 1 2 month s from
date of purchases on the basis the equipment is operated in accordanc e with th ese
operating instructions. Any modification to, misuse or abuse of the produ ct will
invalidate your guarantee. Your statutory rights remain un aff ected .
Neostar Electronics is a registered brand of T2 Dir ect Ltd – L ondon
A range of accessories for this equipment is available at www.technol ogyin theho me.co m
The tape does not move.
No sound when downloading into
computer.
The sound is distorted or faint
when downloading into computer.
CD stops immediately after
starting, or unit pauses or
stops during play.
No sound when downloading into
computer.
Specific CD is noisy, or
playback stops or skips.
Unit won’t record or shows
NO DISC on the display.
The cassette tape is not
inserted properly.
The tape heads are dirty.
The CD is inserted upside
down.
The CD is dusty or dirty or
there is condensation on the
CD.
The CD player is paused.
The CD is scratched,
damaged or warped.
The disc is very dirty.
The disc has recorded as a
CD-RW.
Insert the cassette tape
correctly.
Clean the tape heads.
Insert the CD with the
printed side right-side up.
Carefully clean and dry
the CD.
Press the PLAY/PAUSE
button.
The CD should be
changed.
Carefully clean the CD.
Erase t he co nte nts o f
the CD- RW.
68
 Loading...