

Page 1
[en] Instruction manual
Double oven U12S53.3GB
Page 2

Page 3

3
Ú Table of contents
[en]Instruction manual
Important safety information..................................................... 4
Causes of damage .............................................................................5
Energy and environment tips....................................................5
Saving energy......................................................................................5
Environmentally-friendly disposal.....................................................5
Your new appliance .................................................................... 6
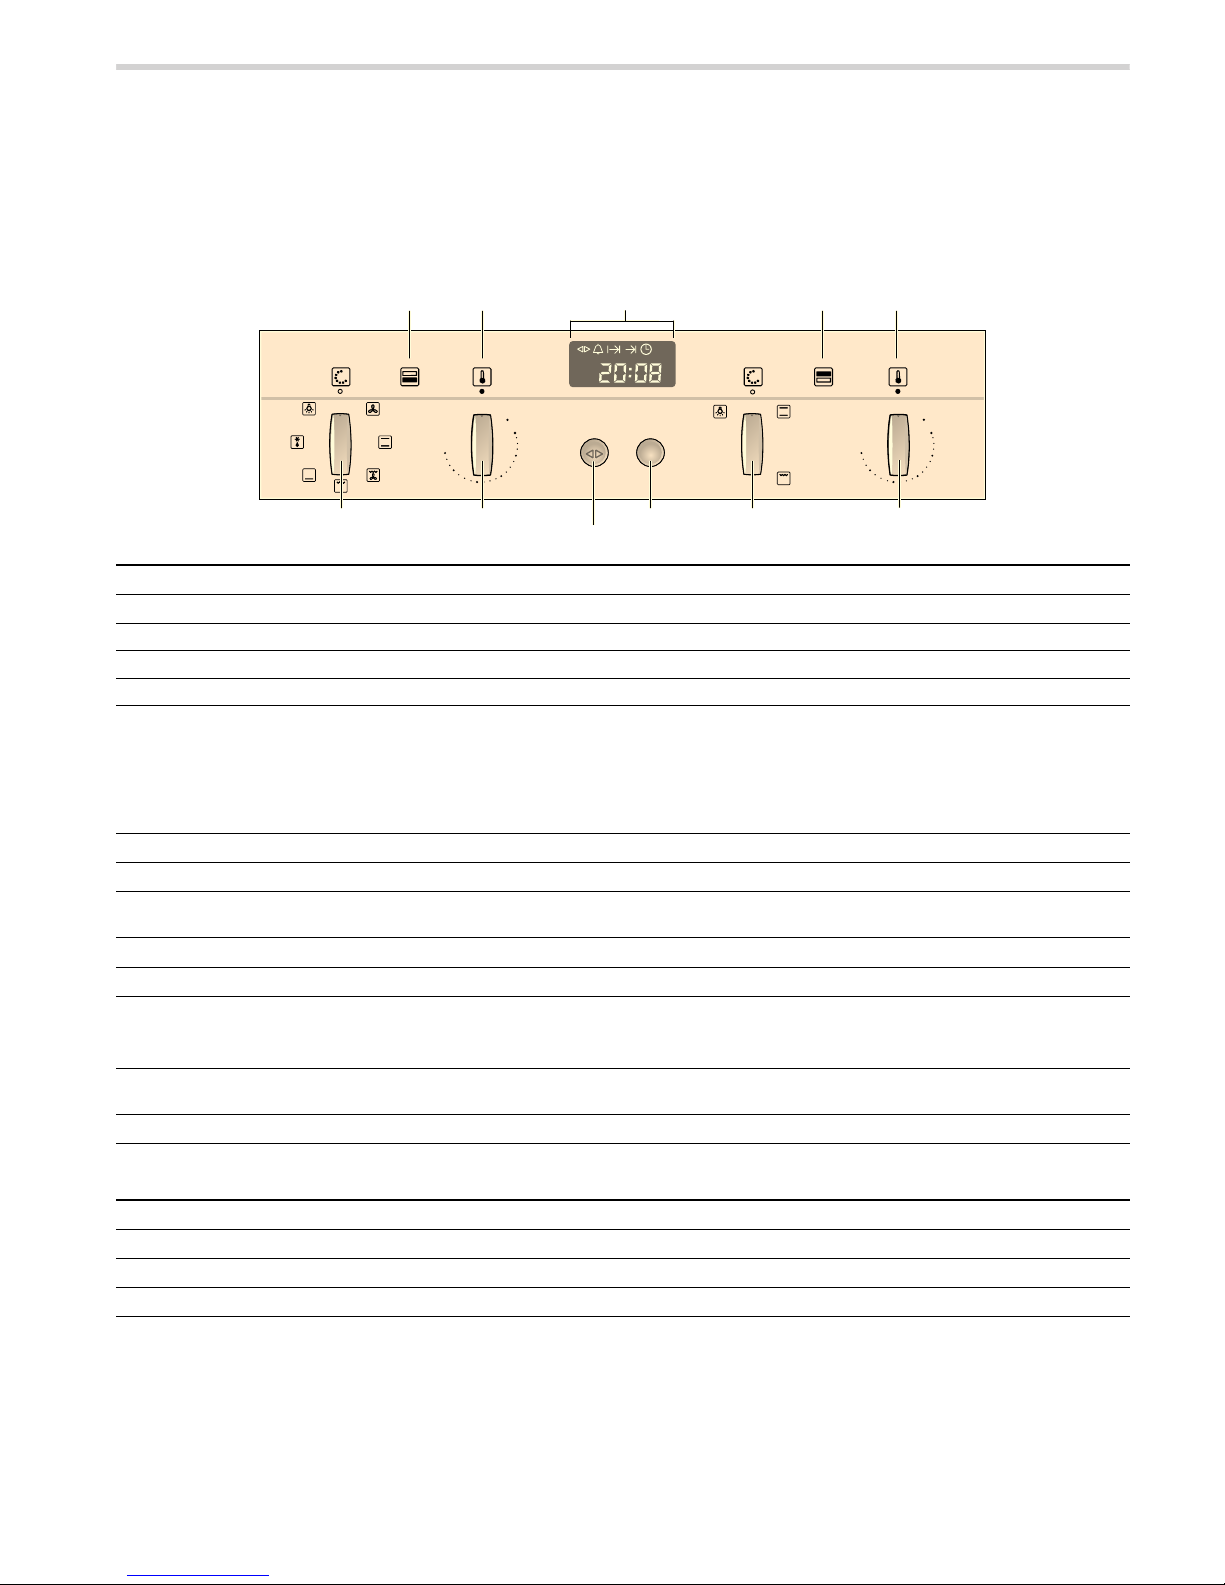
Control panel .......................................................................................6
Operating modes ................................................................................6
Your accessories........................................................................ 7
Accessories .........................................................................................7
Inserting accessories .........................................................................7
Shelf positions .....................................................................................7
Optional accessories .........................................................................7
Before using the appliance for the first time ...........................8
Setting the clock .................................................................................8
Cleaning the appliance......................................................................8
Operating the appliance ............................................................8
Switching on the appliance...............................................................8
Switching off the appliance...............................................................8
Electronic clock..........................................................................9
Clock display .......................................................................................9
Timer .....................................................................................................9
Cooking time .......................................................................................9
End of operation .............................................................................. 10
Preset operation............................................................................... 10
Setting the clock .............................................................................. 10
Checking, correcting or deleting settings ................................... 10
Baking .......................................................................................10
Baking on one level......................................................................... 11
Baking on two or more levels ....................................................... 11
Baking table......................................................................................11
Baking table for ready-made products ........................................ 13
Tips and tricks .................................................................................. 13
Roasting and braising.............................................................. 14
Roasting............................................................................................. 14
Braising..............................................................................................14
Tables for roasting and braising...................................................14
Tips and tricks .................................................................................. 16
Grilling.......................................................................................16
Circo-roasting ...................................................................................16
Radiant grilling.................................................................................. 16
Grilling table...................................................................................... 17
Defrosting .................................................................................18
Defrosting with CircoTherm® ........................................................ 18
Defrost................................................................................................ 18
Yoghurt...................................................................................... 19
Cleaning and care ....................................................................19
Cleaning the appliance exterior .................................................... 19
Cleaning the cooking compartment.............................................19
Cleaning self-cleaning surfaces in the cooking compartment 20
Removing and fitting the appliance door....................................20
Cleaning the door panels............................................................... 21
Cleaning the hook-in racks ............................................................ 21
Faults and repairs ....................................................................22
Replacing the oven light bulb........................................................ 22
Changing the door seal..................................................................23
After-sales service ...................................................................23
E number and FD number ............................................................. 23
Test dishes................................................................................ 24
Produktinfo
Additional information on products, accessories, replacement
parts and services can be found at www.neff-
international.com and in the online shop www.neff-
eshop.com
Page 4

4
: Important safety information
Read these instructions carefully. Only then
will you be able to operate your appliance
safely and correctly. Retain the instruction
manual and installation instructions for
future use or for subsequent owners.
This appliance is only intended to be fully
fitted in a kitchen. Observe the special
installation instructions.
Check the appliance for damage after
unpacking it. Do not connect the appliance
if it has been damaged in transport.
Only a licensed professional may connect
appliances without plugs. Damage caused
by incorrect connection is not covered
under warranty.
This appliance is intended for domestic use
only. The appliance must only be used for
the preparation of food and drink. The
appliance must be supervised during
operation. Only use this appliance indoors.
This appliance may be used by children
over the age of 8 years old and by persons
with reduced physical, sensory or mental
capabilities or by persons with a lack of
experience or knowledge if they are
supervised or are instructed by a person
responsible for their safety how to use the
appliance safely and have understood the
associated hazards.
Children must not play with, on, or around
the appliance. Children must not clean the
appliance or carry out general maintenance
unless they are at least 8 years old and are
being supervised.
Keep children below the age of 8 years old
at a safe distance from the appliance and
power cable.
Always slide accessories into the cooking
compartment correctly. See "Description of
accessories in the instruction manual.
Risk of fire!
■
Combustible items stored in the cooking
compartment may catch fire. Never store
combustible items in the cooking
compartment. Never open the appliance
door if there is smoke inside. Switch off
the appliance and unplug it from the
mains or switch off the circuit breaker in
the fuse box.
Risk of fire!
■
A draught is created when the appliance
door is opened. Greaseproof paper may
come into contact with the heating
element and catch fire. Do not place
greaseproof paper loosely over
accessories during preheating. Always
weight down the greaseproof paper with a
dish or a baking tin. Only cover the
surface required with greaseproof paper.
Greaseproof paper must not protrude over
the accessories.
Risk of burns!
■
The appliance becomes very hot. Never
touch the interior surfaces of the cooking
compartment or the heating elements.
Always allow the appliance to cool down.
Keep children at a safe distance.
Risk of serious burns!
■
Accessories and ovenware become very
hot. Always use oven gloves to remove
accessories or ovenware from the cooking
compartment.
Risk of burns!
■
Alcoholic vapours may catch fire in the hot
cooking compartment. Never prepare food
containing large quantities of drinks with a
high alcohol content. Only use small
quantities of drinks with a high alcohol
content. Open the appliance door with
care.
Risk of scalding!
■
The accessible parts become hot during
operation. Never touch the hot parts. Keep
children at a safe distance.
Risk of scalding!
■
When you open the appliance door, hot
steam may escape. Open the appliance
door with care. Keep children at a safe
distance.
Risk of scalding!
■
Water in a hot cooking compartment may
create hot steam. Never pour water into
the hot cooking compartment.
Risk of injury!
Scratched glass in the appliance door may
develop into a crack. Do not use a glass
scraper, sharp or abrasive cleaning aids or
detergents.
Page 5
5
Risk of electric shock!
■
Incorrect repairs are dangerous. Repairs
may only be carried out by one of our
trained after-sales engineers. If the
appliance is faulty, unplug the mains plug
or switch off the fuse in the fuse box.
Contact the after-sales service.
Risk of electric shock and serious injury!
■
The cable insulation on electrical
appliances may melt when touching hot
parts of the appliance. Never bring
electrical appliance cables into contact
with hot parts of the appliance.
Risk of electric shock!
■
Do not use any high-pressure cleaners or
steam cleaners, which can result in an
electric shock.
Risk of electric shock!
■
When replacing the cooking compartment
bulb, the bulb socket contacts are live.
Before replacing the bulb, unplug the
appliance from the mains or switch off the
circuit breaker in the fuse box.
Risk of electric shock!
■
A defective appliance may cause electric
shock. Never switch on a defective
appliance. Unplug the appliance from the
mains or switch off the circuit breaker in
the fuse box. Contact the after-sales
service.
Causes of damage
Caution!
■ Accessories, foil, greaseproof paper or ovenware on the
cooking compartment floor: do not place accessories on the
cooking compartment floor. Do not cover the cooking
compartment floor with any sort of foil or greaseproof paper.
Do not place ovenware on the cooking compartment floor if a
temperature of over 50 ºC has been set. This will cause heat
to accumulate. The baking and roasting times will no longer
be correct and the enamel will be damaged.
■ Water in a hot cooking compartment: do not pour water into
the cooking compartment when it is hot. This will cause
steam. The temperature change can cause damage to the
enamel.
■ Moist food: do not store moist food in the cooking
compartment when it is closed for prolonged periods This will
damage the enamel.
■ Fruit juice: when baking particularly juicy fruit pies, do not
pack the baking tray too generously. Fruit juice dripping from
the baking tray leaves stains that cannot be removed. If
possible, use the deeper universal pan.
■ Cooling with the appliance door open: only allow the cooking
compartment to cool when it is closed. Even if the appliance
door is only open a little, front panels of adjacent units could
be damaged over time.
■ Very dirty door seal: If the door seal is very dirty, the
appliance door will no longer close properly when the
appliance is in use. The fronts of adjacent units could be
damaged.Always keep the door seal clean.
■ Appliance door as a seat, shelf or worktop: Do not sit on the
appliance door, or place or hang anything on it. Do not place
any cookware or accessories on the appliance door.
■ Inserting accessories: depending on the appliance model,
accessories can scratch the door panel when closing the
appliance door. Always insert the accessories into the
cooking compartment as far as they will go.
■ Carrying the appliance: do not carry or hold the appliance by
the door handle. The door handle cannot support the weight
of the appliance and could break.
Energy and environment tips
Here you can find tips on how to save energy when baking and
roasting and how to dispose of your appliance properly.
Saving energy
Only preheat the oven if this is specified in the recipe or in the
operating instruction tables.
Use dark, black lacquered or enamelled baking tins. They
absorb the heat particularly well.
Open the appliance door as little as possible during cooking,
baking or roasting.
It is best to bake several cakes one after the other. The cooking
compartment is still warm. This may reduce the baking time for
the second cake.
For longer cooking times, you can switch the oven off
10 minutes before the end of the cooking time and use the
residual heat to finish cooking.
Environmentally-friendly disposal
Dispose of packaging in an environmentally-friendly manner.
This appliance is labelled in accordance with
European Directive 2012/19/EU concerning used
electrical and electronic appliances (waste electrical
and electronic equipment - WEEE). The guideline
determines the framework for the return and recycling
of used appliances as applicable throughout the EU.
Page 6
6
Your new appliance
In this section, you will find information on
■ the control panel
■ the operating modes
Control panel
Operating modes
Here is an overview of the operating modes of your appliance.
Bottom oven
õ
Top ovenô
Control element Use
KJ
Clock function button Selects the desired clock function (see section: Electronic clock)
Rotary selector Makes settings within a clock function (see section: Electronic clock)
Operating mode selector Selects the desired operating mode
Temperature selector Sets the desired temperature
5RWDU\VHOHFWRU
&
ORFNIXQFWLRQEXWWRQ
(OHFWURQLFFORFN
7
HPSHUDWXUH
LQGLFDWRUODPS
7HPSHUDWXUH
LQGLFDWRUODPS
%
RWWRP
RYHQ
7RS
RYHQ
2SHUDWLQJPRGH
VHOHFWRU
7HPSHUDWXUH
VHOHFWRU
7HPSHUDWXUH
VHOHFWRU
2SHUDWLQJPRGH
VHOHFWRU
Operating mode Used for
3
CircoTherm® For baking and roasting on one or more levels
%
Top/bottom heat For baking and roasting on one level. Especially suitable for cakes with moist toppings
(e.g. cheesecake)
4
Circo-roasting For poultry and larger pieces of meat
(
Full-surface grill For large amounts of flat, small items for grilling (e.g.steaks, sausages)
$
Bottom heat For food and baked goods which should form a crust or need more browning on the
underside.
Only activate bottom heat for a short while at the end of the baking time.
A
Defrost setting For gentle defrosting of pieces of meat, bread and delicate pastries (e.g. cream
gateau)
\
Interior lighting Provides assistance when maintaining and cleaning the cooking compartment
Operating mode Used for
%
Top/bottom heat Especially suitable for cakes with moist toppings (e.g. cheesecake)
(
Full-surface grill For large amounts of flat, small items for grilling (e.g. steaks, sausages)
\
Interior lighting Provides assistance when maintaining and cleaning the cooking compartment
Page 7

7
Your accessories
In this section, you will find information on
■ Your accessories
■ the correct way to insert the accessories into the cooking
compartment
■ the shelf positions
■ the optional accessories
Accessories
The following accessories are included with your appliance:
Note: The baking tray and universal pan may become distorted
when the appliance is in operation. This is caused by the
considerable temperature differences acting on the
accessories. These differences may occur if only a part of the
accessory is covered with food, or if frozen items such as pizza
are placed on the accessory.
Inserting accessories
The accessories are equipped with a locking function. The
locking function prevents the accessories from tilting when they
are pulled out. The accessories must be inserted into the
cooking compartment correctly for the tilt protection to work
properly.
When inserting the wire rack, check
■ that the lug (a) is pointing downwards
■ that the lug (a) is in the rear part of the wire rack
When inserting the baking tray or the universal pan, check
■ that the lug (a) is in the rear part of the of the accessory
■ that the sloping edge of the accessory faces towards the
appliance door when it is inserted
Shelf positions
The shelf positions in the cooking compartment are counted
from the bottom up.
Note: When baking and roasting with CircoTherm®
3, do not
use shelf position 2. This will adversely affect air circulation and
your baking and roasting results will not be as good.
Main oven
õ
The cooking compartment in the main oven has four shelf
positions.
: Risk of burns!
The telescopic shelves become hot when the appliance is in
use. Take special care not to get burnt when they are pulled
out.
Top oven
ô
The cooking compartment of the top oven has two shelf
positions.
Optional accessories
You can purchase optional accessories from the after-sales
service or specialist retailers. A comprehensive range of
accessories for your appliance can be found in our brochures
or on our website.
Wire rack
for baking in baking tins, roasting in
roasting dishes and grilling
Universal pan, enamelled
for baking moist cakes, roasting,
grilling and collecting drops of
liquid during cooking
Insert grid
for roasting and grilling
Note: The wire insert is always used
together with the universal pan. In
this combination, the wire insert is
placed in the universal pan.
D
D
Optional accessories Order no.
System steamer N8642X3
Grill set Z1240X2
Glass pan Z1262X0
Extra-deep pan, enamelled Z1272X0
Baking tray, non-stick Z1343X0
D
D
Page 8
8
Before using the appliance for the first time
In this section, you can read about
■ How to set the clock after connecting up your appliance
■ How to clean your appliance before using it for the first time
Setting the clock
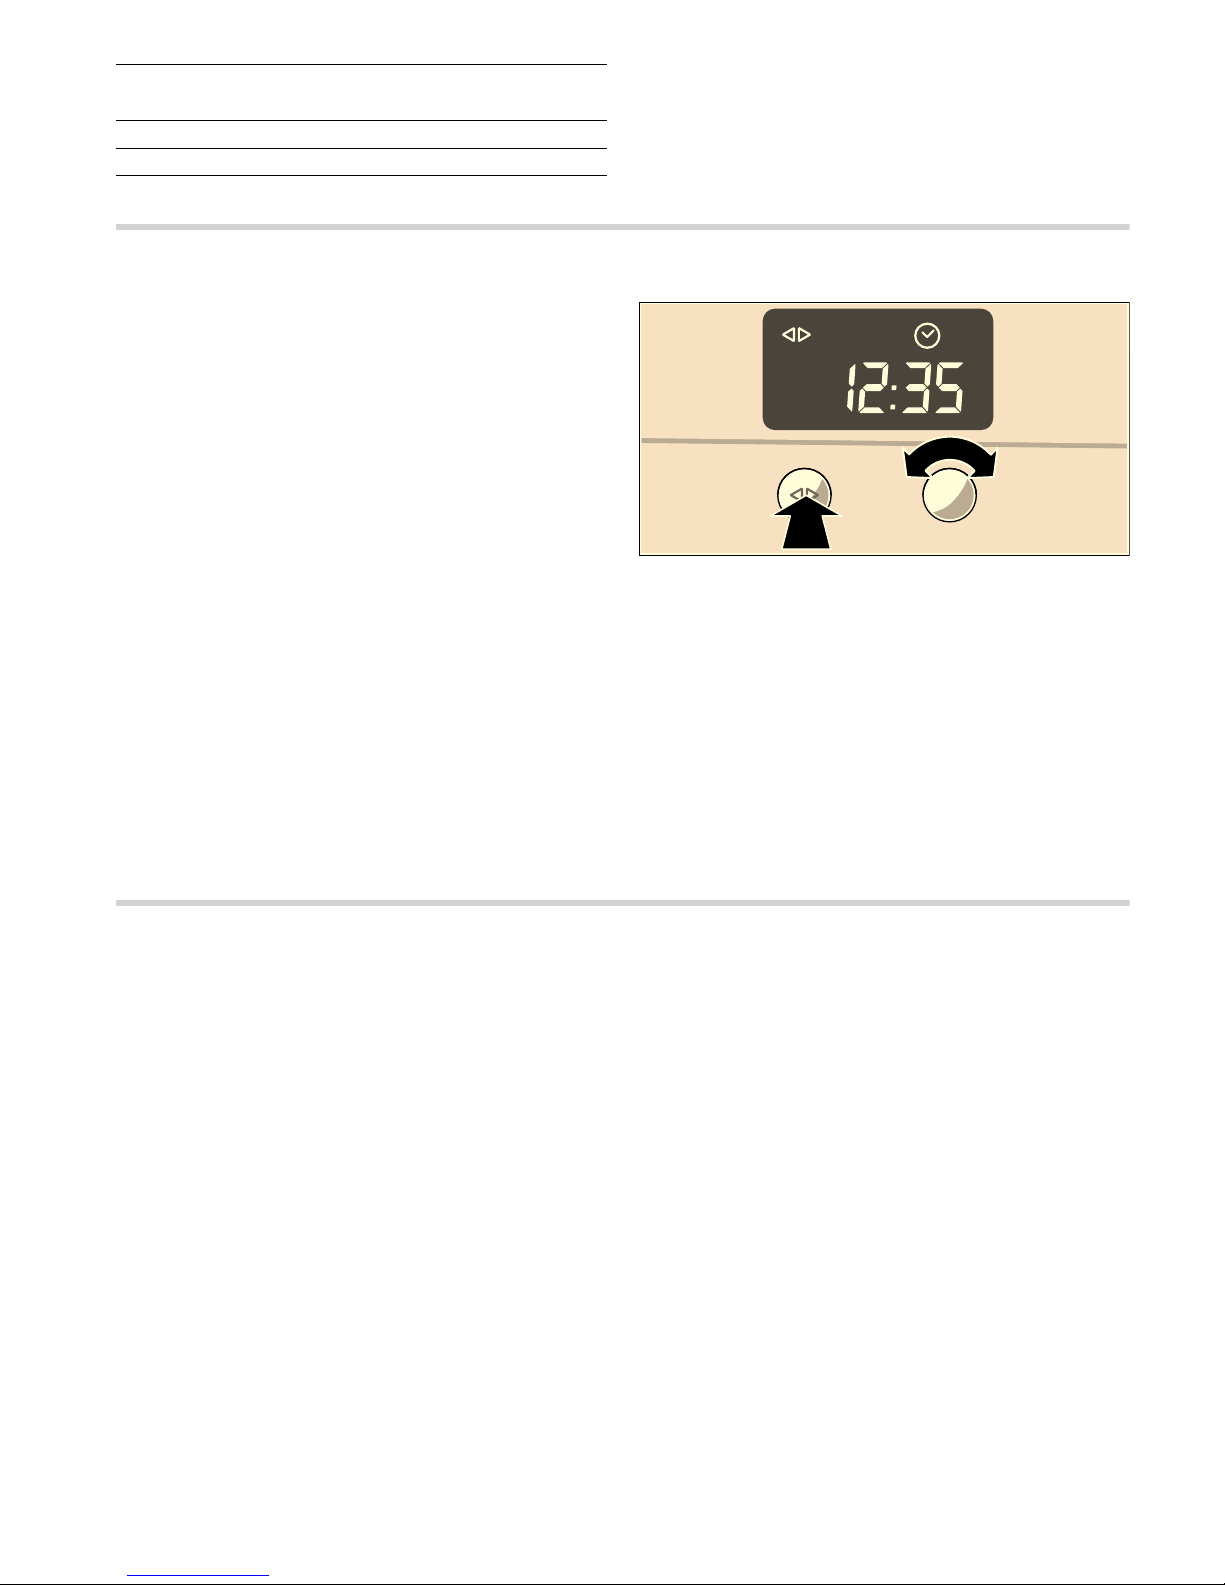
Note: When you press the KJ clock function button, you have
3 seconds to set the clock using the rotary selector. Should this
have been insufficient for you, you can amend the clock time
later.
‹:‹‹ flashes in the clock display.
1. Briefly press the KJ clock function button to go to the
setting mode.
The
KJ and 3 symbols light up. ‚ƒ:‹‹ appears in the
clock display.
2. Set the current time using the rotary selector.
Your setting is accepted after 3 seconds.
Changing the clock
To subsequently change the time, press the
KJclock function
button repeatedly until the
KJ and 3 symbols light up again.
Change the time with the rotary selector.
Cleaning the appliance
Clean your appliance before using it for the first time.
1. Remove any accessories and residual packaging from both
cooking compartments.
2. Clean the accessories and cooking compartments with hot
soapy water (see section: Cleaning and care).
3. Heat the at 270 °C using Full-surface grill and the bottom
oven at 240 °C using CircoTherm for 30 minutes.
4. Once the cooking compartments have cooled, wipe them out
with hot soapy water.
5. Clean the outside of the appliance with a soft, damp cloth
and soapy water.
Operating the appliance
In this section, you can read about
■ how to switch your appliance on and off
■ how to select an operating mode and temperature
Switching on the appliance
1. Turn the operating mode selector for the õ bottom oven or
for the
ô top oven clockwise until the desired operating
mode is selected.
2. Turn the corresponding temperature selector clockwise, until
the desired temperature is selected.
The corresponding
rindicator lamp lights up while the oven
is heating up and during any subsequent heating.
Switching off the appliance
1. Turn the operating mode selector back to the Û position.
2. Turn the temperature selector back to the Ú position.
After the appliance is switched off, the cooling fan may
continue to run.
Roasting tray, enamelled, two-piece Z1512X0
CLOU® 3x telescopic shelf Z1742X2
CLOU® 4x telescopic shelf with stop function Z1755X2
Optional accessories Order no.
Page 9

9
Electronic clock
In this section, you can read about
■ how to set the timer
■ how to switch your appliance off automatically (cooking time
and end of operation)
■ how to switch your appliance on and off automatically (preset
operation)
■ how to set the time
Clock display
Notes
■ Between the times ƒƒ:‹‹ and †:†Š the clock display is
dimmed if you do not make any settings in that period or no
clock function is activated.
■ When you set a clock function, the time interval increases
when you set higher values (e.g. cooking time up to
‚:‹‹œ to
the minute, using
‚:‹‹œ
to the nearest 5 minutes).
■ For the Q minute minder, x cooking time, y end of
operation and preselection mode clock functions, a signal
sounds when the settings have elapsed and the
Q or y
symbol flashes. To cancel the audible signal before it ends,
press the
KJ clock function button.
■ Briefly press the KJ clock function button to select a clock
function. You then have 3 seconds to set the selected clock
function. After this time, the setting mode is exited
automatically.
Switching the clock display on and off
1. Press and hold the KJclock function button for 6 seconds.
The clock display switches off. If a clock function is active,
the associated symbol remains lit.
2. Press the KJclock function button briefly.
The clock display switches on.
Timer
1. Press the KJclock function button repeatedly until the KJ
and
Q symbols light up.
2. Set the duration using the rotary selector (e.g. †:‹‹ minutes).
The setting is applied automatically. Then the clock is
displayed again and the minute minder starts counting down.
Cooking time
Automatic switch-off after a cooking time setting has elapsed.
1. Set the operating mode and temperature for the bottom oven.
The bottom oven starts heating.
2. Press the KJ clock function button repeatedly until the KJ
and
x symbols light up.
3. Set the cooking time with the rotary selector
(e.g.
‚:„‹ hours).
The setting is applied automatically. The time is then
displayed again and the set cooking time counts down.
&ORFNIXQFWLRQEXWWRQ 5RWDU\VHOHFWRU
Clock function Use
Q
Timer You can use the minute minder as an egg timer or a kitchen timer. The appliance does
not switch on or off automatically.
x
Cooking time
Bottom oven
õ: The oven switches off automatically after a set cooking time
(e.g.
‚:„‹ hours).
y
End of operation
Bottom oven
õ: The oven switches off automatically at a set time (e.g.: ‚ƒ:„‹ ).
Preset operation
Bottom oven
õ: The oven switches on and off automatically. Cooking time and end of
operation are combined.
3
Clock Sets the clock
Page 10
10
Once the cooking time has elapsed, the bottom oven switches
off automatically.
1. Turn the operating mode and temperature selector back to
the
Û zero position.
2. Press the KJ clock function button to exit the clock function.
End of operation
Automatic switch-off at a set time.
1. Set the operating mode and temperature for the bottom oven.
The bottom oven starts heating.
2. Press the KJ clock function button repeatedly until theKJ
and
y symbols light up.
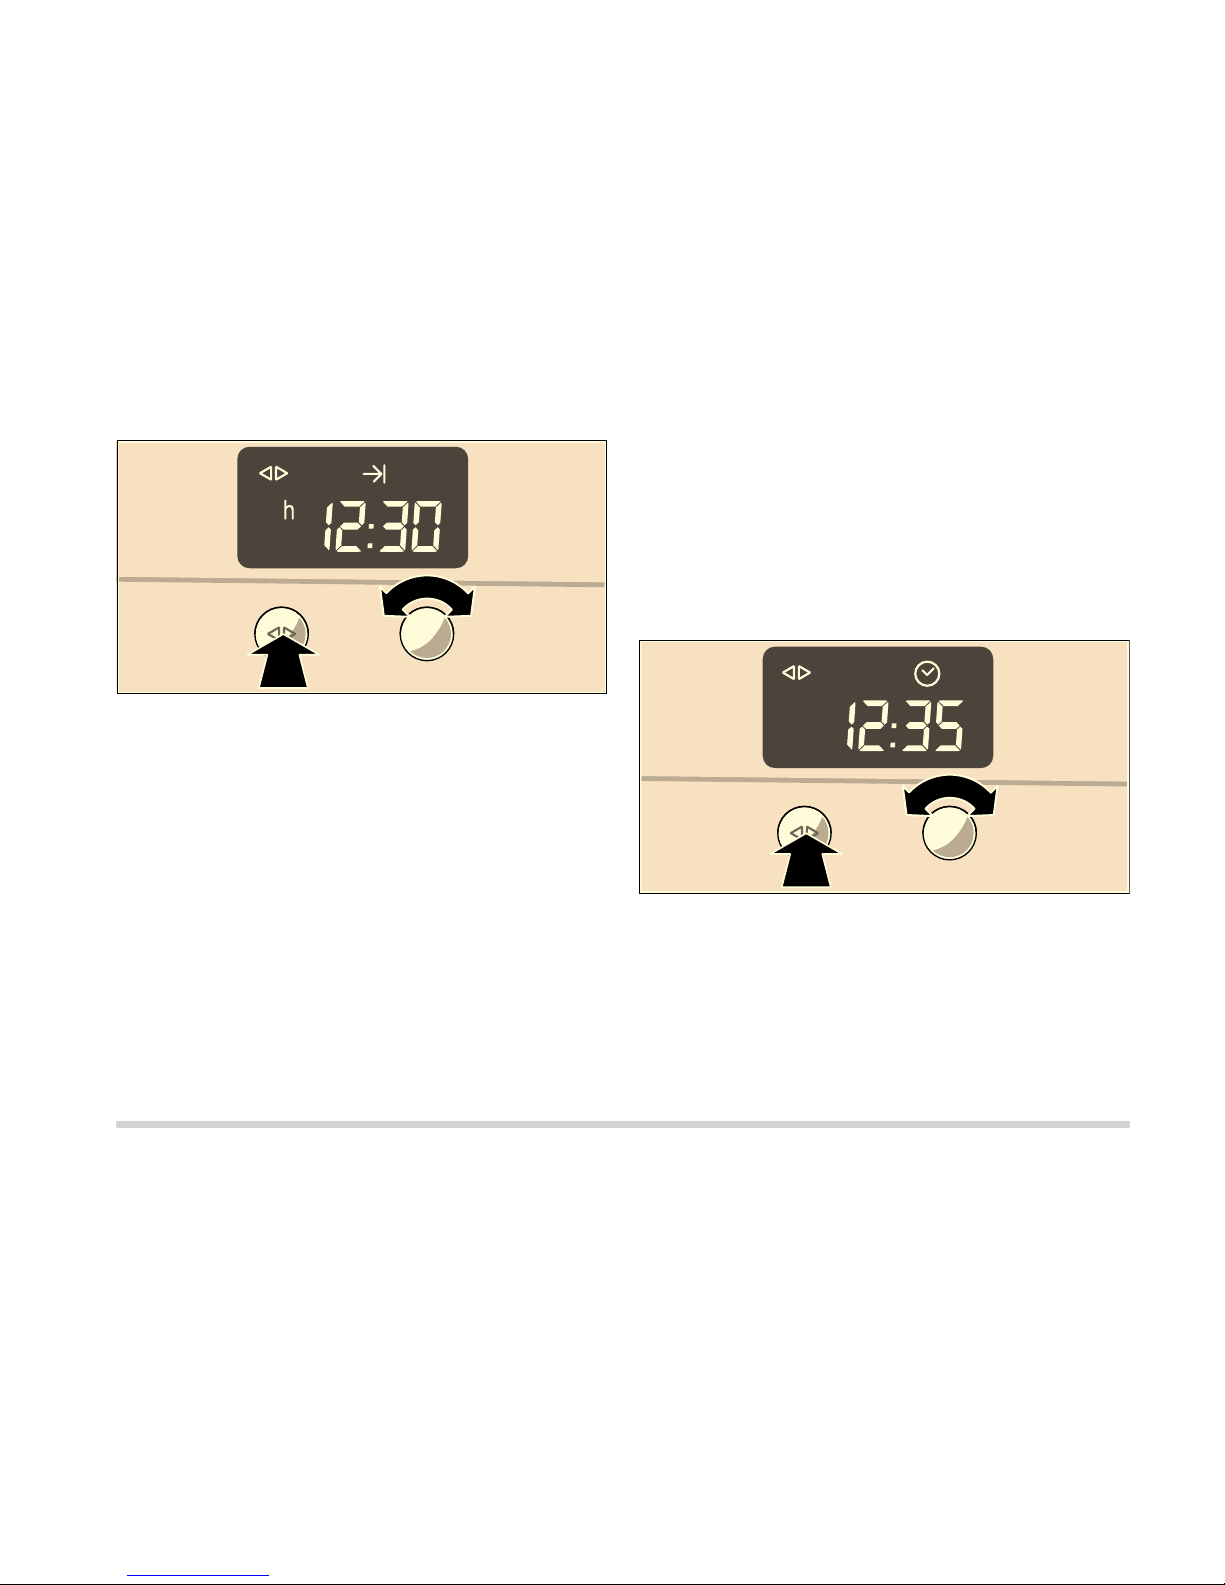
3. Set the end of operation using the rotary selector
(e.g.
‚ƒ:„‹ o'clock).
The setting is applied automatically. The clock is then
displayed again.
The bottom oven switches off automatically at the time set for
the end of operation.
1. Turn the operating mode and temperature selector back to
the
Û zero position.
2. Press the KJ clock function button to exit the clock function.
Preset operation
The bottom oven switches on automatically and switches off at
the time preselected for the end of operation. To set this
function, combine the cooking time and end of operation clock
functions.
Bear in mind that food which spoils easily should not be left in
the cooking compartment for too long.
1. Set the operating mode and temperature for the bottom oven.
The bottom oven starts heating.
2. Press the KJ clock function button repeatedly until the KJ
and
x symbols light up.
3. Set the cooking time with the rotary selector
(e.g.
‚:„‹ hours).
The setting is applied automatically.
4. Press the KJ clock function button repeatedly until the KJ
and
y symbols light up.
5. Set the end of operation using the rotary selector
(e.g.
‚ƒ:„‹ ).
The bottom oven switches off and waits until the correct time
to switch on (in the example at
‚:‹‹ ).
The bottom oven switches off automatically at the time set for
the end of operation
‚ƒ:„‹
1. Turn the operating mode and temperature selector back to
the
Û zero position.
2. Press the KJ clock function button to end the preselection
mode.
Setting the clock
You can only change the clock when no other clock function is
active.
1. Press the KJ clock function button repeatedly until
the
KJand 3 symbols light up.
2. Set the clock using the rotary selector.
The setting is applied automatically.
Checking, correcting or deleting settings
1. To check your settings, press the KJ clock function button
repeatedly until the corresponding symbol lights up.
2. If necessary, you can correct your setting using the rotary
selector.
3. If you wish to cancel your setting, turn the rotary selector anti-
clockwise to the original value.
Baking
In this section, you will find information on
■ Baking on one level
■ Baking on two or more levels
■ The baking table
■ The baking table for ready-made products
■ Tips and tricks for baking
Note: Do not use shelf height 2 when baking with
3
CircoTherm®. The air circulation is impaired and this will have
a negative effect on your baking.
We recommend that you use dark-coloured metal baking tins.
Tinplate and glass dishes increase the baking time required
and the cake will not brown evenly.
If you wish to bake using tinplate tins and
% Top/bottom heat,
you should use shelf position 1.
Always slide the universal pan in carefully as far as it will go
and make sure that the sloping edge is facing the appliance
door.
Page 11
11
Baking on one level
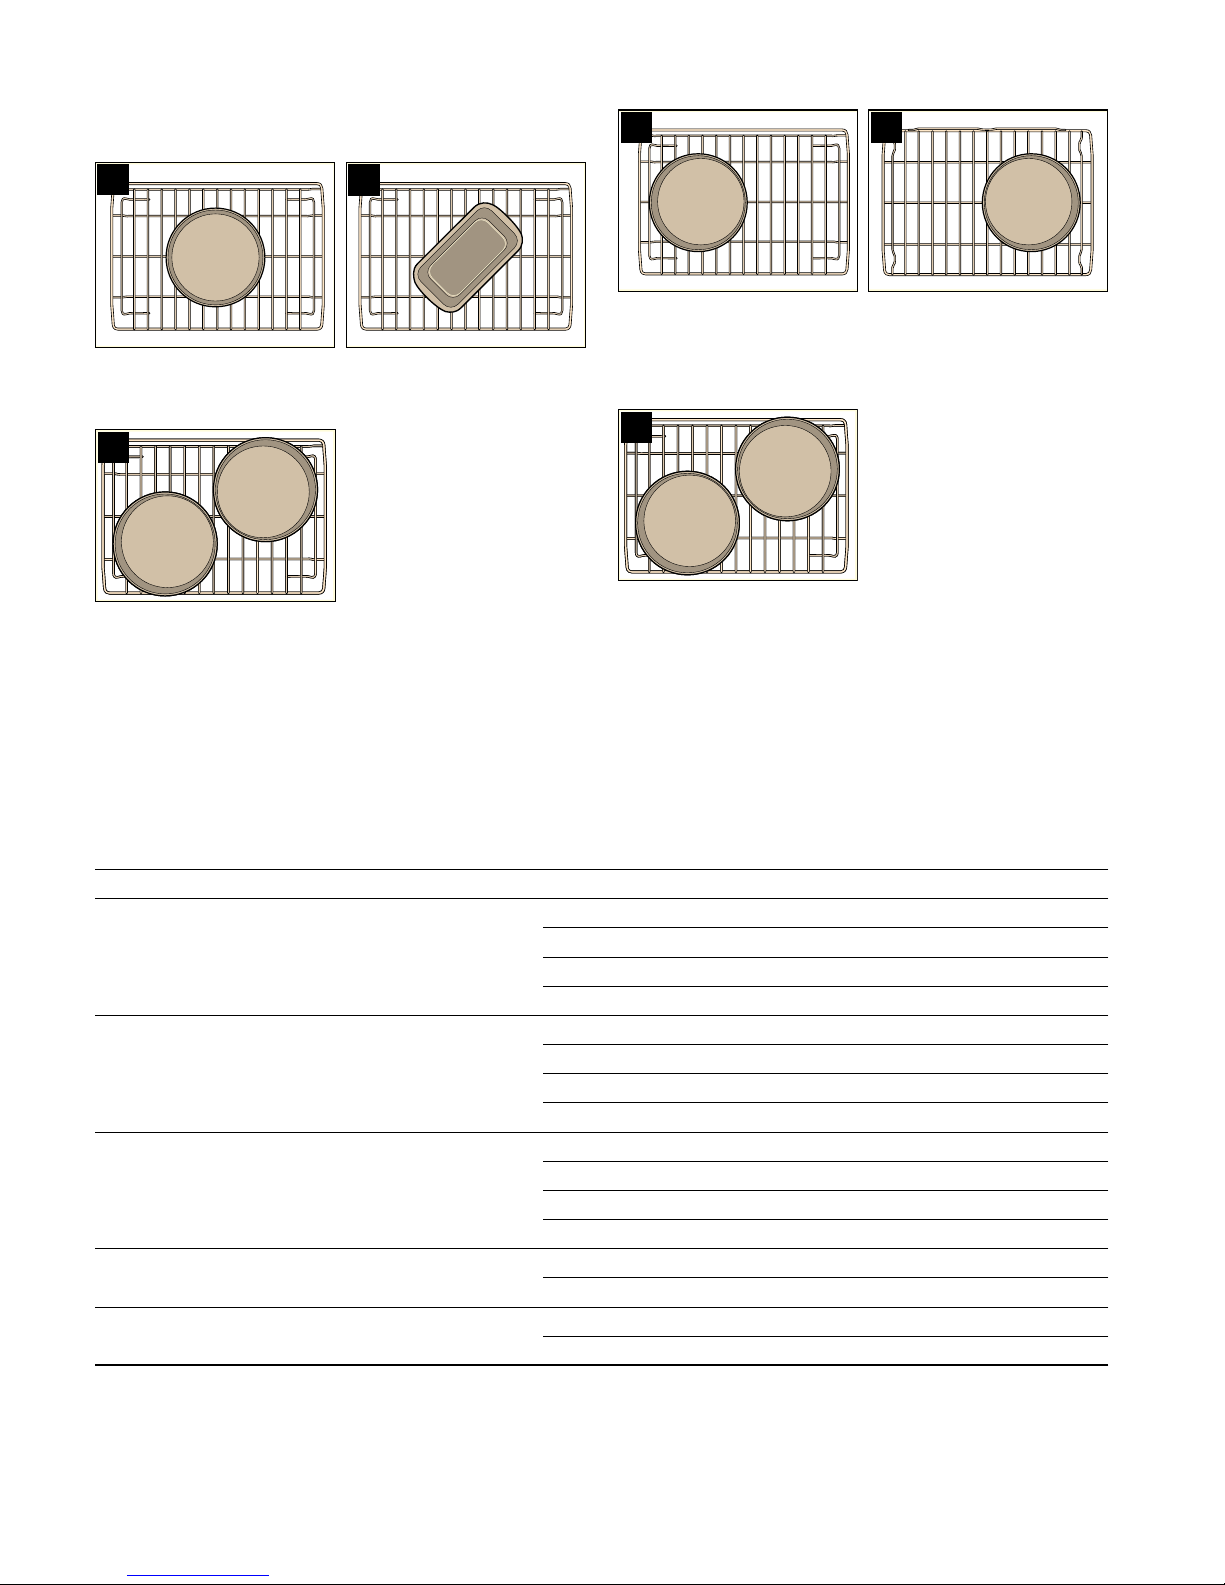
If you are baking on one level with 3 CircoTherm®, always
place a round tin in the centre of the wire rack (figure A) and
always place a loaf tin diagonally (figure B).
If you are baking on one level with
3CircoTherm®, always
place two round baking tins diagonally to each other on the
wire rack (figure C).
Baking on two or more levels
If you are baking on more than one level, only use the
3 CircoTherm® operating mode.
Bear in mind that your items may brown at different rates on
each level. The items on the top level will brown more quickly
and can be taken out earlier.
Two baking tins on two levels
When baking with two round baking tins or two baking trays,
slide a wire rack in at shelf position 1 and a wire rack in at shelf
position 3.
Place the lower baking tin to the left (figure A) and the upper
baking tin to the right (figure B) on the wire rack.
Four baking tins on two levels
When baking with four round baking tins, slide a wire rack in at
shelf position 1 and a wire rack in at shelf position 3.
Always place baking tins on the wire rack (figure C).
Baking table
The details given in the table are guidelines and apply to dark
baking tins. The values may vary depending on the type and
amount of the dough/mixture and on the baking tin.
We recommend that you set the lower of the specified
temperatures the first time. Lower temperatures will generally
allow more even browning.
If you are baking according to your own recipe, use similar
recipes in the table as a guide.
Observe the notes in the table about preheating.
$
%
&&
$
%
&&
Meal Oven Setting Level Temperature in °C Time in minutes
Victoria sponge cake
õ3
1 160 170* 25 - 30
õ%
2 160 170* 20 30
ô%
1 160 170* 25 - 30
õ3
1 + 3 150 160* 25 35
Scones
õ3
1 180 200* 10 - 15
õ%
3 210 220* 8 - 10
ô%
1 200 210* 10 - 12
õ3
1 + 3 180 200* 10 - 15
Small cakes
õ3
1 160 170* 20 30
õ%
3 150 160* 25 35
ô%
1 150 160* 25 - 30
õ3
1 + 3 150 160* 25 35
Light fruit cake
õ3
1 140 150* 80 100
õ%
2 160 170* 70 90
Rich fruit cake
õ3
1 140 150* 210 - 240
õ%
2 140 150* 210 - 240
* Preheat oven
** Preheat the oven to 130 °C
Page 12

12
Jam tarts
õ3
1 190 200* 15 - 20
õ%
3 200 210* 15 - 20
ô%
1 190 210* 15 25
õ3
1 + 3 190 200* 20 25
Swiss roll
õ3
1 180 190* 10 - 15
õ%
2 190 200* 10 - 15
ô%
1 180 190* 10 - 15
Tart
õ3
1 160 170* 50 - 60
õ%
1 180 190* 50 - 60
õ3
1 + 3 160 170* 50 - 60
Pies
õ3
1 170 180* 65 - 75
õ3
1 + 3 170 180* 65 - 75
Biscuits
õ3
1 160 170* 15 - 20
õ%
2 170 180* 15 - 20
ô%
1 170 180* 10 - 15
õ3
1 + 3 160 170* 20 25
õ3
1 + 3 + 4 160 170* 20 25
Meringue
õ3
1 80* 100 130
õ%
3 80* 100 130
ô%
1 80* 110 - 140
Pavlova
õ3
1 90 100** 90 120
õ%
3 80 90** 90 120
Fruit crumble
õ3
1 170 180* 45 - 55
õ%
2 190 200* 45 - 55
Yorkshire pudding
õ3
1 200 220* 15 - 20
õ%
2 200 230* 15 - 20
õ3
1 + 3 200 220* 15 - 20
Vol au vents
õ3
1 190 200* 20 30
Quiche
õ3
1 180 200* 45 - 55
õ%
1 190 210* 45 - 55
(White) bread
õ3
1 210 220* 20 25
õ%
1 220 230* 20 25
Homemade pizza
õ3
1 190 200* 20 30
õ%
2 210 220* 20 30
õ3
1 + 3 180 190* 35 45
Jacket potatoes
õ3
1 160 170 60 70
õ%
2 170 180 60 70
õ3
1 + 3 160 170 65 - 75
Meal Oven Setting Level Temperature in °C Time in minutes
* Preheat oven
** Preheat the oven to 130 °C
Page 13

13
Baking table for ready-made products
Notes
■ Use the universal pan
■ Only use greaseproof paper that is suitable for the selected
temperature
■ Spread chips out in a single layer
■ Turn frozen potato products half way through the baking time
■ Only season frozen potato products after they have finished
baking
■ Leave a little space between the dough when baking bread
rolls. Do not place too many in the universal pan
■ Cover the lasagne with plenty of cheese so that the top
browns evenly
■ Do not use frozen products with freezer burn
■ Do not use frozen products that are heavily frosted
■ Follow the manufacturer's instructions.
The details given in the table are guidelines and apply to the
universal pan.
We recommend that you set the lower of the specified
temperatures the first time. Lower temperatures will generally
allow more even browning.
If you are baking on more than one level, only use the
3
CircoTherm® operating mode.
Observe the notes in the table about preheating.
Tips and tricks
Meal Oven Setting Level Temperature in °C Time in minutes
Frozen pizza
õ3
1 180 - 200* 15 - 25
õ%
2 190 - 210* 15 - 25
ô%
1 180 - 200* 10 - 20
õ3
1 + 3 170 - 190* 20 - 30
Chilled pizza
õ3
1 200 - 210* 10 - 15
õ%
2 190 - 210* 10 - 15
Part-baked white bread
õ3
1 180 - 190* 10 - 20
õ%
2 190 - 200* 10 - 20
õ3
1 + 3 170 - 180* 15 - 20
French fries
õ3
1 180 - 200* 25 - 30
õ%
2 190 - 210* 25 - 30
Potato wedges
õ3
1 180 - 190* 20 - 25
õ%
2 190 - 200* 20 - 25
Croquettes
õ3
1 180 - 190* 25 - 30
õ%
2 190 - 200* 25 - 30
Fisch fingers
õ3
1 180 - 190* 15 - 20
õ%
2 190 - 200* 15 - 20
Lasagne, frozen (400 g)
õ3
1 180 - 190* 40 - 45
Lasagne, frozen (1200 g)
õ3
1 180 - 190* 45 - 50
Lasagne, chilled (400 g)
õ3
1 170 - 180* 35 - 40
õ%
2 190 - 200* 35 - 40
Lasagne, chilled (1200 g)
õ3
1 170 - 180* 40 - 45
õ%
2 190 - 200* 40 - 45
* Preheat oven
The cake is too light in colour Check the shelf height.
Check whether you have used the bakeware that we have recommended.
Place your tin on the wire rack and not on the baking tray.
If the shelf height and the bakeware are correct, then you should either extend the baking time or increase the temperature.
The cake is too dark Check the shelf height.
If the shelf height is correct, you should either shorten the baking time or reduce the
temperature.
The cake is unevenly browned in the baking tin
Check the shelf height.
Check the temperature.
Make sure that your baking tin is not placed directly in front of the air outlets in the rear
panel of the cooking compartment.
Check that the baking tin is in the correct position on the wire rack.
The cake is too dry Set a slightly higher temperature and a slightly shorter baking time.
Page 14
14
Roasting and braising
In this section, you will find information on
■ Roasting
■ Braising
■ Tables for roasting and braising
■ Tips and tricks
: There is a risk of injury if you use roasting dishes that
are not heat-resistant!
Only use roasting dishes that are marked as being suitable for
use in the oven.
Do not use shelf height 2 when roasting with
3 CircoTherm®.
The air circulation would be impaired and this will have a
negative effect on your roast.
Roasting
Roasting dish without a lid is used for roasting.
While the meat is roasting, the liquid in the roasting dish will
evaporate. If necessary, carefully add more hot liquid.
When you are roasting using
% Top/bottom heat, turn the roast
approximately half to two thirds of the way through the roasting
time.
Roasting in the universal pan
Juices escape from the roasting meat and are collected in the
universal pan. You can use these juices as the basis for a tasty
gravy.
Deglaze the pan of the juices with hot water, stock, wine or
similar. Bring to the boil, thicken with cornflour, season and
pass through a sieve if necessary.
You can also cook side dishes (e.g. vegetables) at the same
time as roasting meat in the universal pan.
For smaller joints, you can use a smaller roasting dish instead
of the universal pan. Place this directly on the wire rack.
Roasting in the universal pan with insert grid
Place the wire insert in the universal pan with the lower area
facing downwards and slide them in together at the same shelf
position.
For fatty meat and poultry, add
X to ¼ litre water to the
universal pan, depending on the size and type of the joint.
Roasting in the universal pan with roasting sheet
The roasting sheet reduces dirt in the cooking compartment.
Place the roasting sheet in the universal pan and slide them in
together at the same shelf position.
Dripping fat and meat juices are caught in the universal pan.
Braising
For braising, a roasting dish with a lid is used. Ensure that the
roasting dish and lid fit together well and close properly.
First, sear the meat if required.
Add the meat, vegetables and liquid to the roasting dish in
equal proportions and place the dish with the lid closed on the
wire rack at shelf position 1.
While the meat is braising, the liquid in the roasting dish will
evaporate. Pour in more liquid if required.
Tables for roasting and braising
The details given in the table are guidelines and apply to food
placed in a cold oven and for meat taken directly from the
refrigerator.
Poultry
The information in the tables applies to unstuffed poultry. Turn
the poultry after half of the cooking time.
Lean meat
Coat lean meat with fat or oil as required and cover it with strips
of bacon.
Cooking time and temperature
The cooking time and temperature depend on the size, height,
type and quality of the food and the roasting dish.
As a general rule: the larger the item, the lower the temperature
and the longer the roasting time.
You should set the lower of the specified temperatures the first
time. Lower temperatures will generally allow more even
browning.
The cake is too moist in the centre Set a slightly lower temperature.
Note: Higher temperatures may not mean shorter baking times (cooked on the outside,
but not on the inside).
Select a longer baking time and allow the cake mixture to prove for longer.
Add less liquid to the mixture.
The cake collapses when you take it out of
the oven
Use less liquid for the mixture.
Set a longer baking time or a slightly lower temperature.
The specified baking time is not correct For small items, check the quantity on the baking tray. Small items must not be touch-
ing each other.
Frozen products are not browned evenly
after baking
Check whether the frozen product is unevenly pre-browned before baking. This uneven
browning will remain after the baking time.
Several cakes on one level are unevenly
browned
Check the position of the baking tins on the wire rack.
Frozen products are not browned, not
crispy or the specified times are not correct
Remove ice from frozen products before baking. Do not use frozen products that are
heavily frosted
Saving energy Only preheat the appliance when it is specified in the baking table that you should do
so.
Use dark baking tins as these absorb the heat better.
Make use of the residual heat with longer baking times and switch the oven off
5 10 minutes before the end of the baking time.
Page 15

15
The values for cooking time apply to 0.5 - 2 kg of food. For
greater weights, reduce the temperature and increase the
cooking time. For multiple pieces, apply the cooking time for
the weight of the heaviest piece.
Standing time
At the end of the cooking time, switch the oven off and leave
the roast to stand for approximately 10 minutes in the cooking
compartment with the door closed. The recommended standing
time is not included in the cooking times specified.
Meal Oven Setting Level Temperature in °C Time, min. per 500 g
+ add. time
Beef
Slow roast joint
õ3
1 140 40 + 40
õ%
2 150 40 + 40
Top side / top rump
õ3
1 160 30 + 25
õ%
2 190 30 + 25
Lamb
Leg
õ3
1 170 30 + 25
õ%
2 200 30 + 25
Shoulder (bone-in)
õ3
1 170 25 + 20
õ%
2 200 25 + 20
Shoulder (boned and rolled)
õ3
1 170 30 + 25
õ%
2 200 30 + 25
Rack of lamb
õ3
1 180 25 + 25
õ%
2 200 25 + 25
Pork
Roast joint
õ3
1 180 35 + 35
õ%
2 180 35 + 35
Loin joint
õ3
1 180 30 + 30
õ%
2 180 30 + 30
Belly
õ3
1 160 30 + 25
õ%
2 190 30 + 25
Gammon
Joint
õ3
1 160 30 + 30
õ%
2 190 30 + 30
Chicken
Whole chicken
õ3
1 170 - 180 20 + 25
õ%
2 190 - 200 20 + 25
Portion (boned)
õ3
1 190 20 + 25
õ%
2 200 - 210 20 + 25
Quarter
õ3
1 190 20 + 25
õ%
2 200 - 210 20 + 25
Duck
õ3
1 180 20 + 20
õ%
2 190 - 200 20 + 20
Turkey
Drumstick
õ3
1 180 20 + 20
Crown
õ3
1 160 25 + 20
Whole, 3 - 4 kg
õ3
1 160 - 170 15 + 10
Whole, 4.5 - 8 kg
õ3
1 150 - 160 13 + 10
Whole, 8.5 - 12 kg
õ3
1 140 - 150 12 + 10
Complete Meal
with beef
õ3
1 + 3 160 30 + 25*
with chicken
õ3
1 + 3 180 20 + 25
* + time for Yorkshire pudding
Page 16
16
Tips and tricks
Grilling
In this section, you will find information on
■ Grilling in general
■ Circo-roasting 4
■ Radiant grilling (
Caution!
Material damage due to effect of heat: The temperature
generated in the cooking compartment is very high. Keep the
appliance door closed when using the grill. Never grill with the
appliance door open.
Notes
■ It is preferable to use the universal pan with wire insert for
grilling
■ Place the insert grid into the universal pan and slide the two
in together at the shelf position specified in the grilling table
■ Always place the food to be grilled in the centre of the wire
rack
■ If you are grilling more than one piece of meat, make sure
that they are the same sort of meat and that they are of
similar thickness and weight.
■ Use the wire rack for particularly large quantities. Insert the
wire rack at the shelf position indicated in the grilling table. To
prevent the oven from becoming dirty, insert the universal
pan one level lower.
Circo-roasting
The 4 Circo-roasting operating mode is particularly suitable for
poultry or meat (e.g. roast pork with crackling) that is to be
crispy.
Turn large items of food after approximately half to two-thirds of
the grilling time. For items of food with rind, place them on the
wire rack rind-side down for the first half of the grilling time.
Pierce duck and goose skin under the wings and legs to allow
the fat to escape.
Depending on the type of food you are cooking, the cooking
compartment may become very dirty when you cook food using
Circo-roasting. You should therefore clean the cooking
compartment after every use so that the dirt does not become
burnt on.
At the end of the cooking time, switch the grill off and leave the
food to stand for approximately 10 minutes in the cooking
compartment with the door closed. The recommended standing
time is not included in the grilling times specified.
Radiant grilling
For flat items to be grilled, use the ( full-surface grill.
Brush the items to be grilled with a little oil according to taste.
Turn the items after half to two-thirds of the grilling time.
You can influence the grilling result by changing the position of
the wire rack.
Note: Always use the universal pan in the standard position
(not the other way up).
Casseroles Oven Setting Level Temperature in °C Time, min. per 500 g
+ add. time
Diced meat (beef, pork, lamb, chicken)
õ3
1 140 40 + 80
õ$
1 140* 40 + 80
Braising steak
õ3
1 140 45 + 80
õ$
1 140* 45 + 80
Chicken pieces (boned)
õ3
1 140 50 + 70
õ%
2 140 50 + 70
* Preheat oven
Crust too thick and/or roast too dry Reduce the temperature or shorten the roasting time.
Check the shelf height.
Crust too thin Increase the temperature or switch on the grill briefly at the end of the roasting time.
The meat is not cooked right through Remove any accessories that are not required from the cooking compartment.
Increase the roasting time.
Check the core temperature of the joint using a meat thermometer.
Steam in the cooking compartment is condensing on the appliance door
The steam dries during the course of the cooking. If there is an excessive volume of
steam, you can carefully open the door briefly to dissipate the steam more quickly.
The meat is burned slightly during braising Add the meat, vegetables and liquid to the roasting dish in equal proportions.
The roasting dish and lid must fit together well and close properly.
Reduce the temperature.
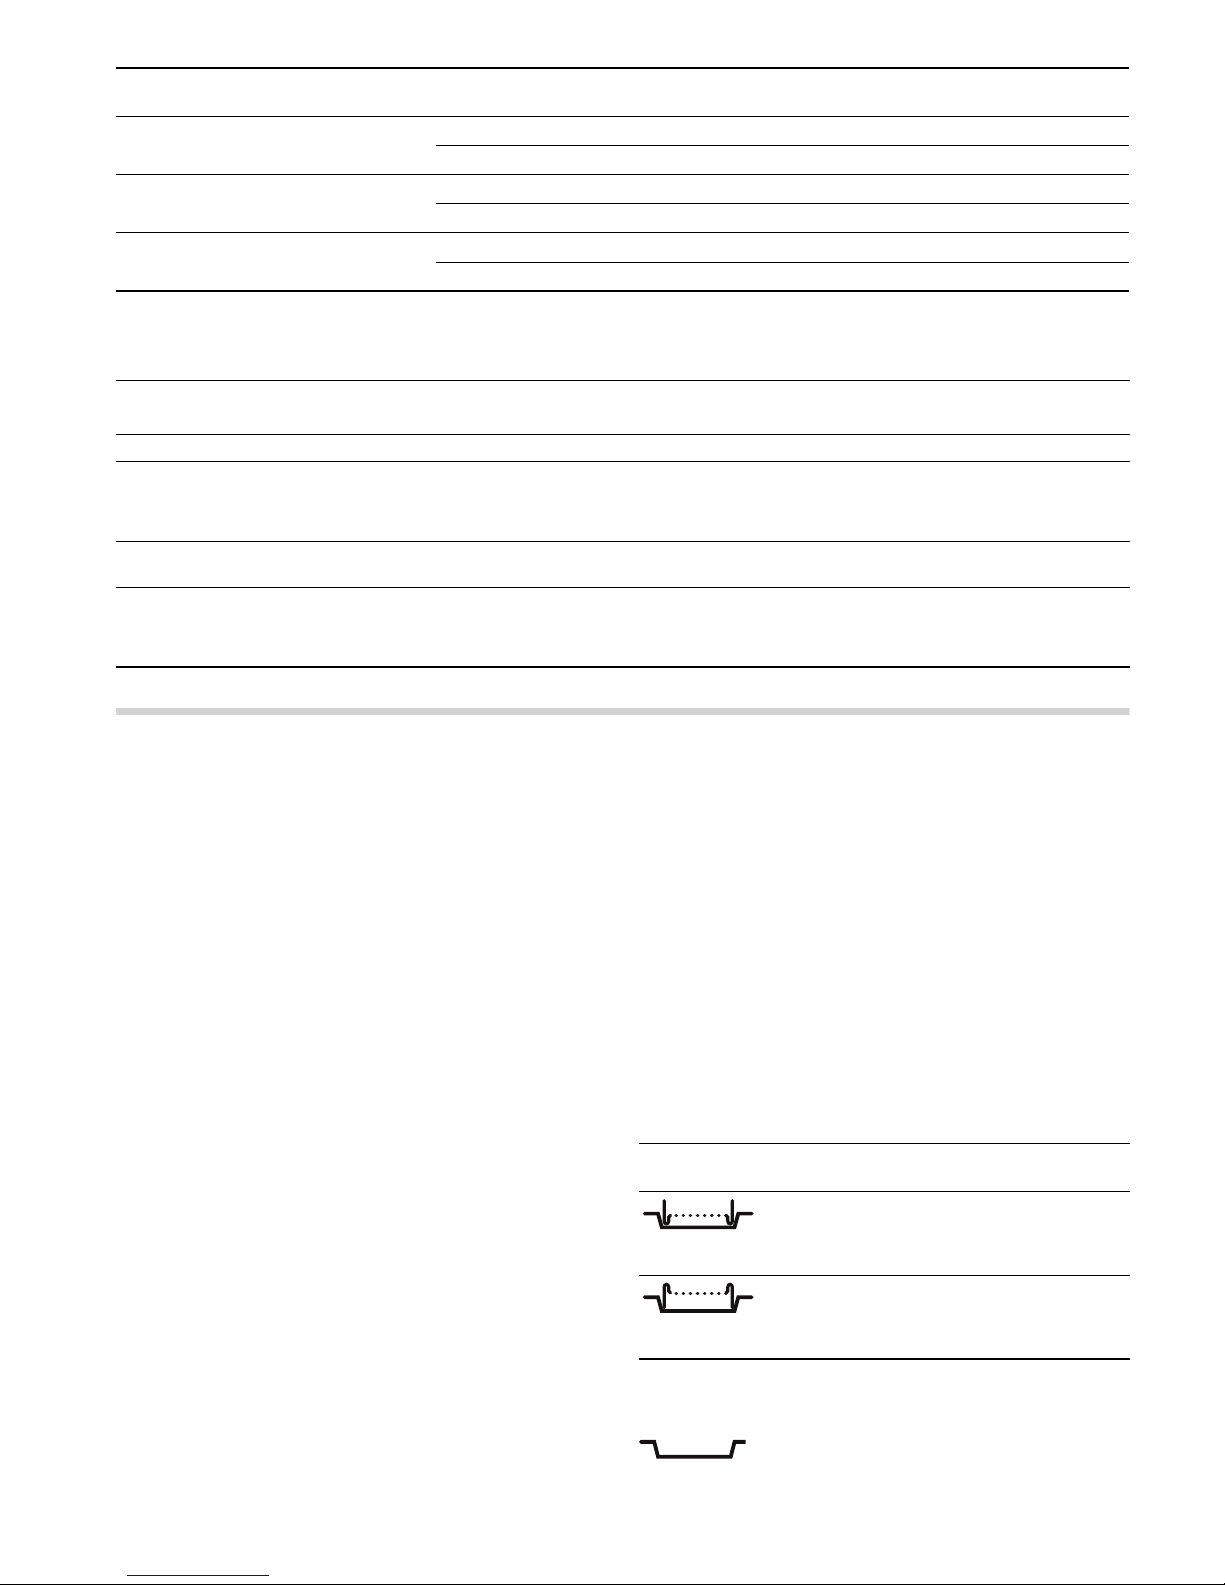
Wire rack position
Application
Place the wire insert in the universal pan with
the lower area facing downwards: Suitable
for grill items that should be predominantly
well-done
Place the wire insert in the universal pan with
the lower area facing downwards: Suitable
for grill items that should be cooked predominantly rare to medium-rare
Page 17

17
Grilling table
The details given in the table are guidelines and apply to the
enamelled universal pan with wire insert. The values may vary
depending on the type and amount of items to be grilled.
You should set the lower of the specified temperatures the first
time. A lower temperature will generally provide more even
browning.
The values refer to food placed in the oven when it is cold and
for meat taken directly from the refrigerator.
Meal Oven Setting Level Temperature in °C Time in minutes
Beef
Steaks, 2 - 3 cm thick
õ(
4 270*
1
st
side: 9 - 12
2
nd
side: 5 - 7
ô(
2 270*
1
st
side: 10 - 13
2
nd
side: 6 - 8
Burgers, 1 - 2 cm thick
õ(
4 270
1
st
side: 8 - 10
2
nd
side: 6 - 8
ô(
2 270
1
st
side: 10 - 12
2
nd
side: 6 - 8
Lamb
Leg
õ4
2 170 190 120 - 150***
Shoulder (on the bone)
õ4
2 170 190 100 - 130***
Shoulder (boned and rolled)
õ4
2 170 190 120 - 150***
Steaks, 2 - 3 cm thick
õ(
4 270
1
st
side: 5 - 7
2
nd
side: 3 - 5
ô(
2 270
1
st
side: 6 - 8
2
nd
side: 4 - 6
Chops, 2 - 3 cm thick
õ(
4 270
1
st
side: 6 - 8
2
nd
side: 4 - 7
ô(
2 270
1
st
side: 7 - 9
2
nd
side: 5 - 8
Pork
Roast joint
õ4
2 180 200 120 - 150***
Steaks, 1 - 2 cm thick
õ(
4 270*
1
st
side: 8 - 10
2
nd
side: 5 - 8
ô(
2 270*
1
st
side: 9 - 12
2
nd
side: 6 - 8
Chops, 2 - 3 cm thick
õ(
4 270
1
st
side: 10 - 12
2
nd
side: 8 - 10
ô(
2 270
1
st
side: 10 - 13
2
nd
side: 8 - 12
Burgers, 1 - 2 cm thick
õ(
4 270
1
st
side: 8 - 10
2
nd
side: 6 - 8
ô(
2 270
1
st
side: 10 - 12
2
nd
side: 6 - 8
Sausages, 2 - 4 cm thick
õ(
4 270 12 16**
ô(
2 270 14 18**
Gammon
Steaks, 1 - 2 cm thick
õ(
4 270
1
st
side: 9 - 12
2
nd
side: 5 - 7
ô(
2 270
1
st
side: 10 - 12
2
nd
side: 5 - 7
* Preheat for 3 minutes
** Turn frequently
*** Turn after half of the time
Page 18
18
Defrosting
In this section, you can read about
■ how to defrost using 3 CircoTherm®
■ how to use the A Defrost operating mode
Defrosting with CircoTherm®
Use 3 CircoTherm® to defrost and cook frozen products.
Notes
■ Frozen products that have been defrosted (meat in particular)
require shorter cooking times than fresh products
■ The cooking time for frozen meat increases by the defrosting
time
■ Always defrost frozen poultry before cooking so that you can
remove the giblets
■ Cook frozen fish at the same temperatures as fresh fish
■ You can place large quantities of ready made frozen
vegetables in aluminium dishes in the cooking compartment
at the same time
■ Use shelf height 1 when defrosting on one level, and shelf
heights 1 + 3 when using two levels
■ Observe the instructions on the packaging when using frozen
foods.
Defrost
Using defrost setting A you can defrost delicate pastries
particularly well (e.g. cream cakes).
1. Switch on the A Defrost operating mode.
2. Defrost the frozen food for 25-45 minutes, depending on type
and size.
3. Remove the frozen food from the cooking compartment and
let it thaw for 30 - 45 minutes.
With small quantities (pieces), the defrosting time is shortened
to 1520 minutes and the extended defrosting time is shortened
to 1015 minutes.
Chicken
Drumsticks
õ(
3 250
1
st
side: 15 - 17
2
nd
side: 10 - 13
ô(
2 250
1
st
side: 16 - 20
2
nd
side: 12 - 15
Breast (boneless)
õ(
4 250
1
st
side: 12 - 15
2
nd
side: 7 - 10
ô(
2 250
1
st
side: 13 - 15
2
nd
side: 8 - 10
Whole chicken
õ4
2 200 230 70 - 90***
Quarter
õ4
2 210 230 40 - 50***
Fish
Whole fish, e.g. trout
õ(
3 220
1
st
side: 10 - 15
2
nd
side: 10 - 15
õ4
2 220 15 25
Fillets
õ(
4 220
1
st
side: 8 - 12
2
nd
side: 7 - 10
ô(
1 220
1
st
side: 9 - 13
2
nd
side: 8 - 12
Meal Oven Setting Level Temperature in °C Time in minutes
* Preheat for 3 minutes
** Turn frequently
*** Turn after half of the time
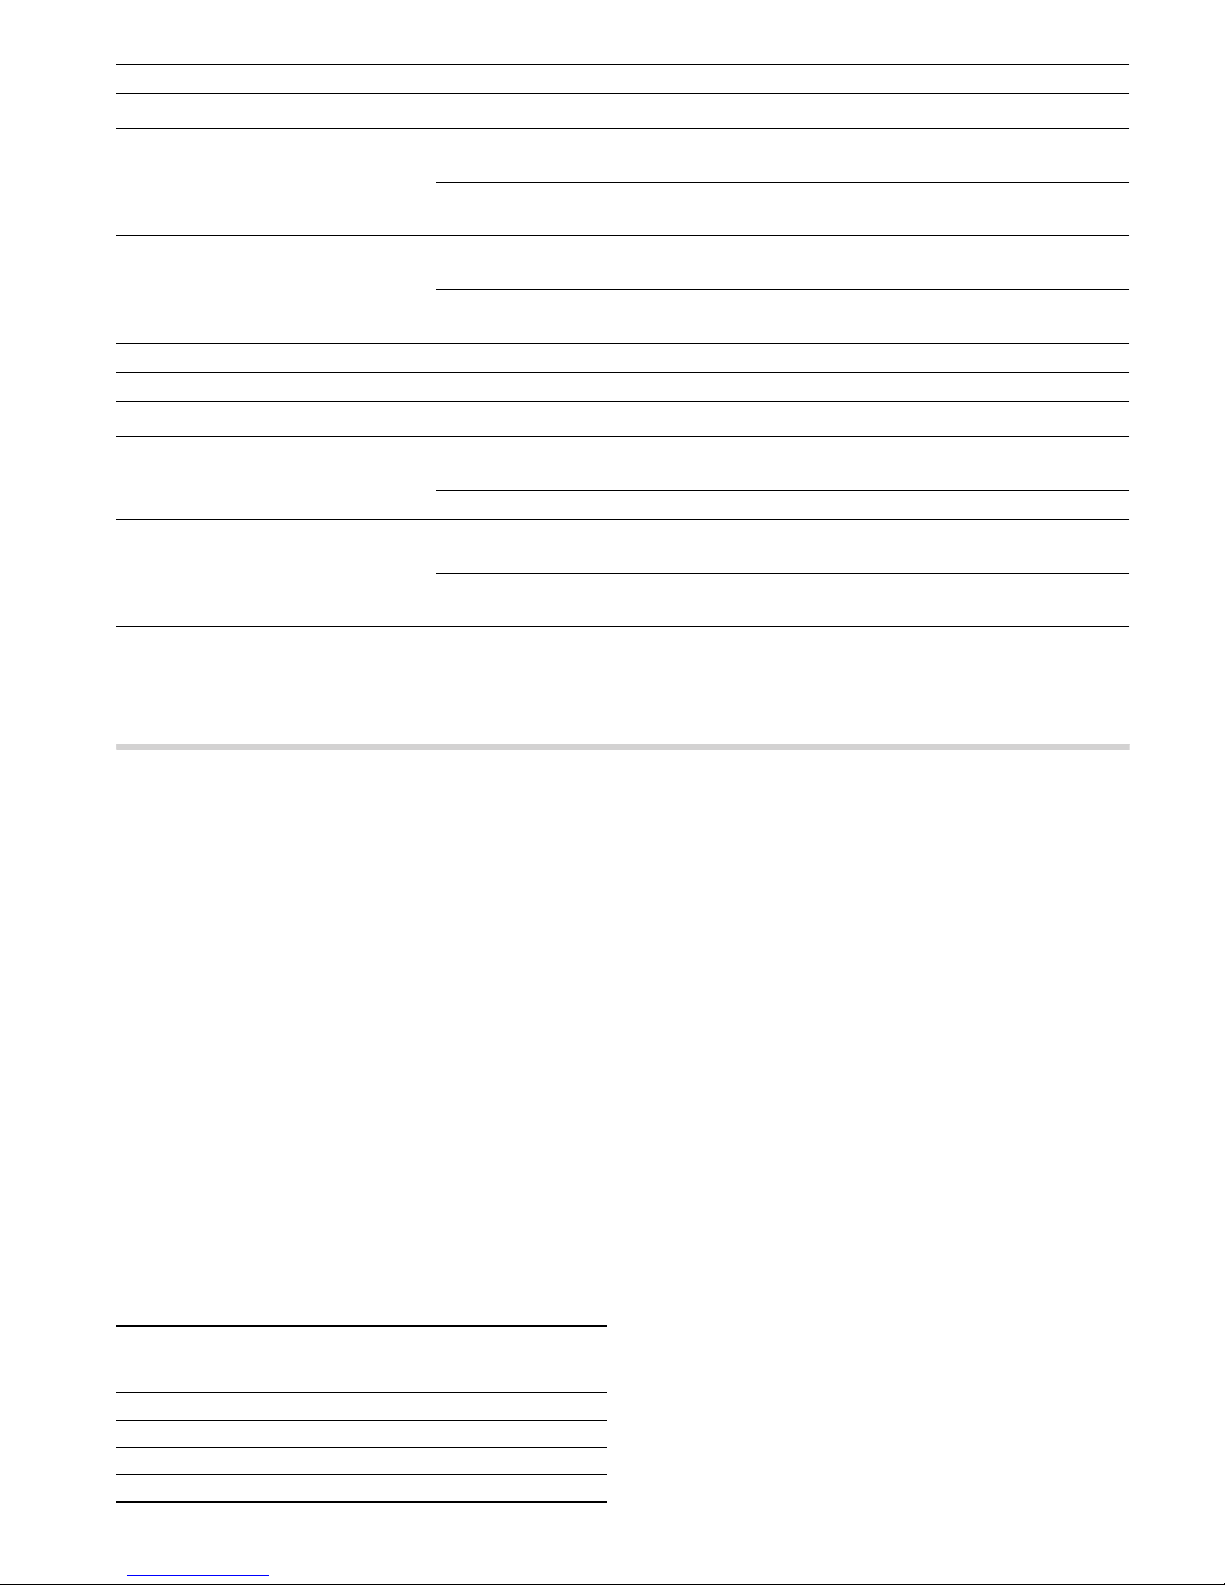
Frozen meals Tempera-
ture in °C
Defrosting
time in min-
utes
Raw frozen products/ foods 50 30 - 90
Bread/Bread rolls (750 - 1,500 g) 50 30 - 60
Dry, frozen tray bakes 60 45 - 60
Moist, frozen tray bakes 50 50 - 70
Page 19

19
Yoghurt
You can also use the appliance to make home-made yoghurt:
The heat of the
\ cooking compartment light is used for this.
1. Remove accessories and hook-in racks, telescopic shelves
or separate fitting systems.
2. Heat 1 litre of long-life milk (3.5 % fat) or fresh pasteurised
milk to 40 °C
or
Bring 1 litre of fresh milk to the boil once and allow to cool
down to 40 °C.
3. Add 150 g of set yoghurt to the warm milk, stir in and fill the
jars or bowls evenly. Do not pour more than 200 ml into any
single container.
4. Cover the filled containers with a suitable lid or cling film.
5. Switch on the appliance.
õ Main oven: Set the operating mode selector to
CircoTherm® and preheat for 5 minutes at 50 °C.
or
ô Top oven: Set the operating mode selector to Full-
surface grill and preheat for 15 minutes at 100 °C.
6. Then set the operating mode selector to the \ cooking
compartment light.
7. Evenly space the containers over the cooking compartment
floor, then close the appliance door.
8. After 8 hours, switch off the \ cooking compartment light
and place the containers in the refrigerator for at least
12 hours.
Cleaning and care
In this section, you will find information on
■ cleaning and care of your appliance
■ Cleaning agents and aids
■ Self-cleaning surfaces in the cooking compartment
: Risk of short circuit!
Do not use high-pressure cleaners or steam jet cleaners to
clean your appliance.
Caution!
Surface damage due to incorrect cleaning: Do not use any
■ harsh or abrasive cleaning agents
■ cleaning agents that contain alcohol
■ abrasive cleaning aids such as steel wool or scourers.
Observe the specifications in the tables.
Note: Highly recommended cleaning and care products can be
purchased through our after-sales service. Observe the
manufacturer's instructions.
Cleaning the appliance exterior
Cleaning the cooking compartment
Caution!
Risk of damaging the surface. Do not clean the appliance while
still warm, even if using oven cleaners specially intended for
this purpose.
Notes
■ Enamel is baked on at very high temperatures during
manufacture. This can cause some slight colour variation.
This is normal and does not affect its function.
■ The edges of thin trays cannot be completely enamelled. As
a result, these edges may be rough. Anti-corrosion protection
is still guaranteed, however.
Appliance part/surface Cleaning agent/aid
Stainless steel surfaces Apply commercially available washing-up liquid with a soft, damp cloth or chamois; dry
with a soft cloth.
Use cleaners for matted stainless steel if very dirty.
Painted surfaces Apply commercially available washing-up liquid with a soft, damp cloth or chamois; dry
with a soft cloth.
Control panel Apply commercially available washing-up liquid with a soft, damp cloth or chamois; dry
with a soft cloth.
Do not use glass cleaners or glass scrapers.
Door panels Use a commercially available glass cleaner or washing-up liquid with a soft, damp
cloth or chamois; dry with a soft cloth.
The inner door panel on the appliance door has a coating which reduces the temperature and reflects the heat. The view through the appliance door is not impaired by this.
When the appliance door is open, this coating can have the effect of a light-coloured
film. This is part of the design and is not due to any quality defect.
Page 20
20
Keeping the appliance clean
To avoid getting the cooking compartment dirty,
■ clean the cooking compartment after each use, as dirt will
bake on the next time it is heated up, and this can only be
removed with difficulty
■ always remove flecks of limescale, grease, starch and
albumin (e.g. egg white) immediately
■ use 3 CircoTherm® whenever possible. This operating
mode creates less dirt
■ Use the universal pan to bake very moist cakes
■ use suitable ovenware when roasting (e.g. roasting dish) or a
roasting sheet (see section: Accessories)
Cleaning self-cleaning surfaces in the
cooking compartment
The ceiling in the top oven, and the back wall in the main oven,
are coated with self-cleaning enamel. This coating absorbs and
dispels splashes from baking and roasting while the oven is in
operation. The higher the temperature and the longer the oven
is in operation, the better the result will be.
If dirt is still visible after operating the oven several times, clean
the self-cleaning surfaces with hot soapy water and a soft cloth.
Over time, discolourations may occur, which can no longer be
removed. These will not damage the enamel.
Caution!
Damage to surfaces on self-cleaning areas due to applying
oven cleaner.Never clean the self-cleaning surfaces with oven
cleaner.
If oven cleaner accidentally gets onto self-cleaning surfaces,
remove it immediately with a sponge and plenty of water.
Caution!
Damage to surfaces on self-cleaning areas due to the use of
abrasive and acidic cleaning agents and aids.
Do not use cleaning agents containing abrasive substances or
acids.
Do not use abrasive cleaning aids such as steel wool or
scourers.
Removing and fitting the appliance door
You can remove the appliance door to clean it more
thoroughly.
: Risk of injury!
The hinges of the appliance door may snap shut with great
force. Always open the hinge locking lever fully when removing
the appliance door and close it fully after refitting. Do not reach
into the hinge.
: Risk of injury!
If the appliance door has only been unhinged on one side, do
not reach into the hinge. The hinge can snap back with great
force. Call the aftersales service.
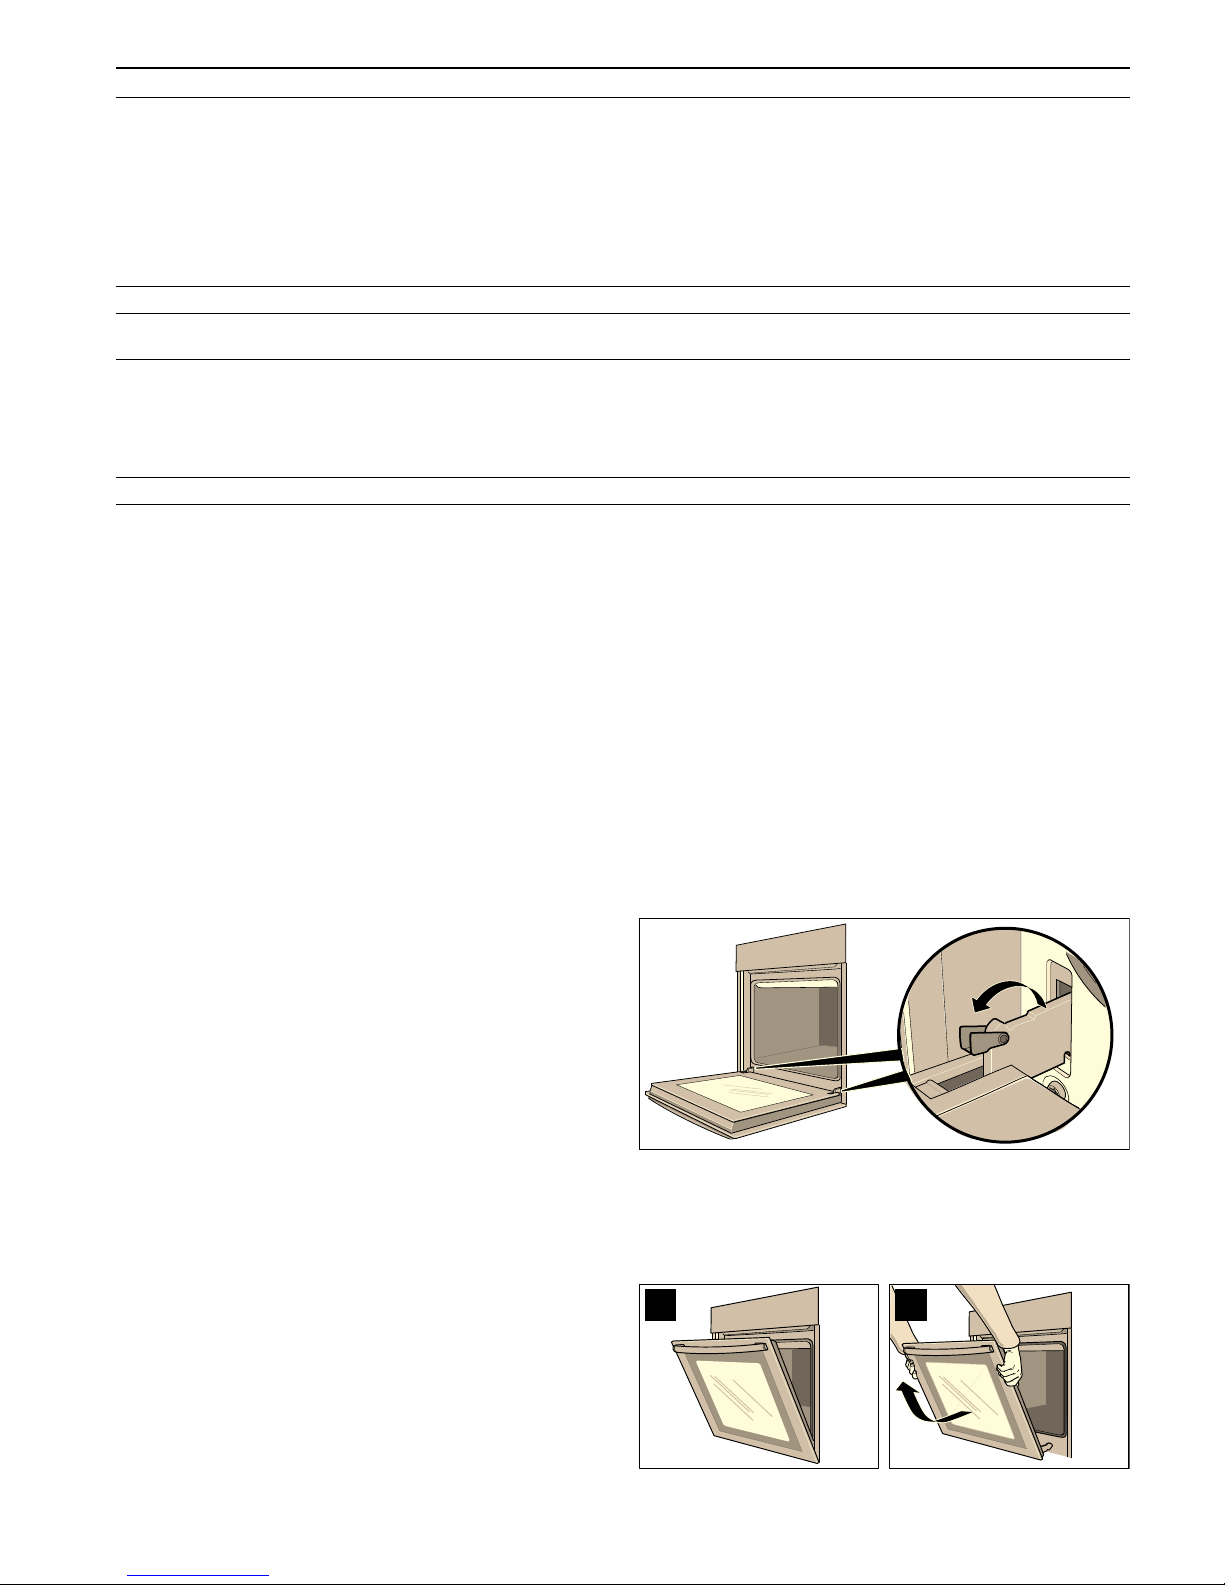
Removing the appliance door
1. Open the appliance door fully.
2. Open the locking levers on the left and right-hand side fully.
The hinges are secured and cannot snap closed.
3. Close the appliance door until resistance becomes
noticeable (figure A)
4. With both hands, grip the door on the left and right-hand side,
close the door a little more and pull it out (figure B).
Appliance part Cleaning agent/aid
Enamel surfaces To facilitate cleaning, you can switch on the interior lighting and detach the appliance
door if necessary.
Apply commercially available washing-up liquid or a vinegar solution with a soft, damp
cloth or chamois; dry with a soft cloth.
Soften baked-on food residues with a damp cloth and detergent.
We recommend using oven cleaner if the oven is very dirty. Observe the manufacturer's instructions when cleaning with an oven cleaner.
Leave the cooking compartment open to dry after cleaning.
Door seal Hot soapy water
Hook-in racks Hot soapy water:
Soak and clean with a dish cloth or brush.
Telescopic shelves Hot soapy water:
Clean with a dish cloth or a brush.
Do not remove the lubricant while the pull-out rails are pulled out – it is best to clean
them when they are pushed in.
Do not soak or clean in the dishwasher.
Accessories Soak in hot soapy water, clean with a brush and sponge or wash in the dishwasher.
$ %
Page 21
21
Fitting the appliance door
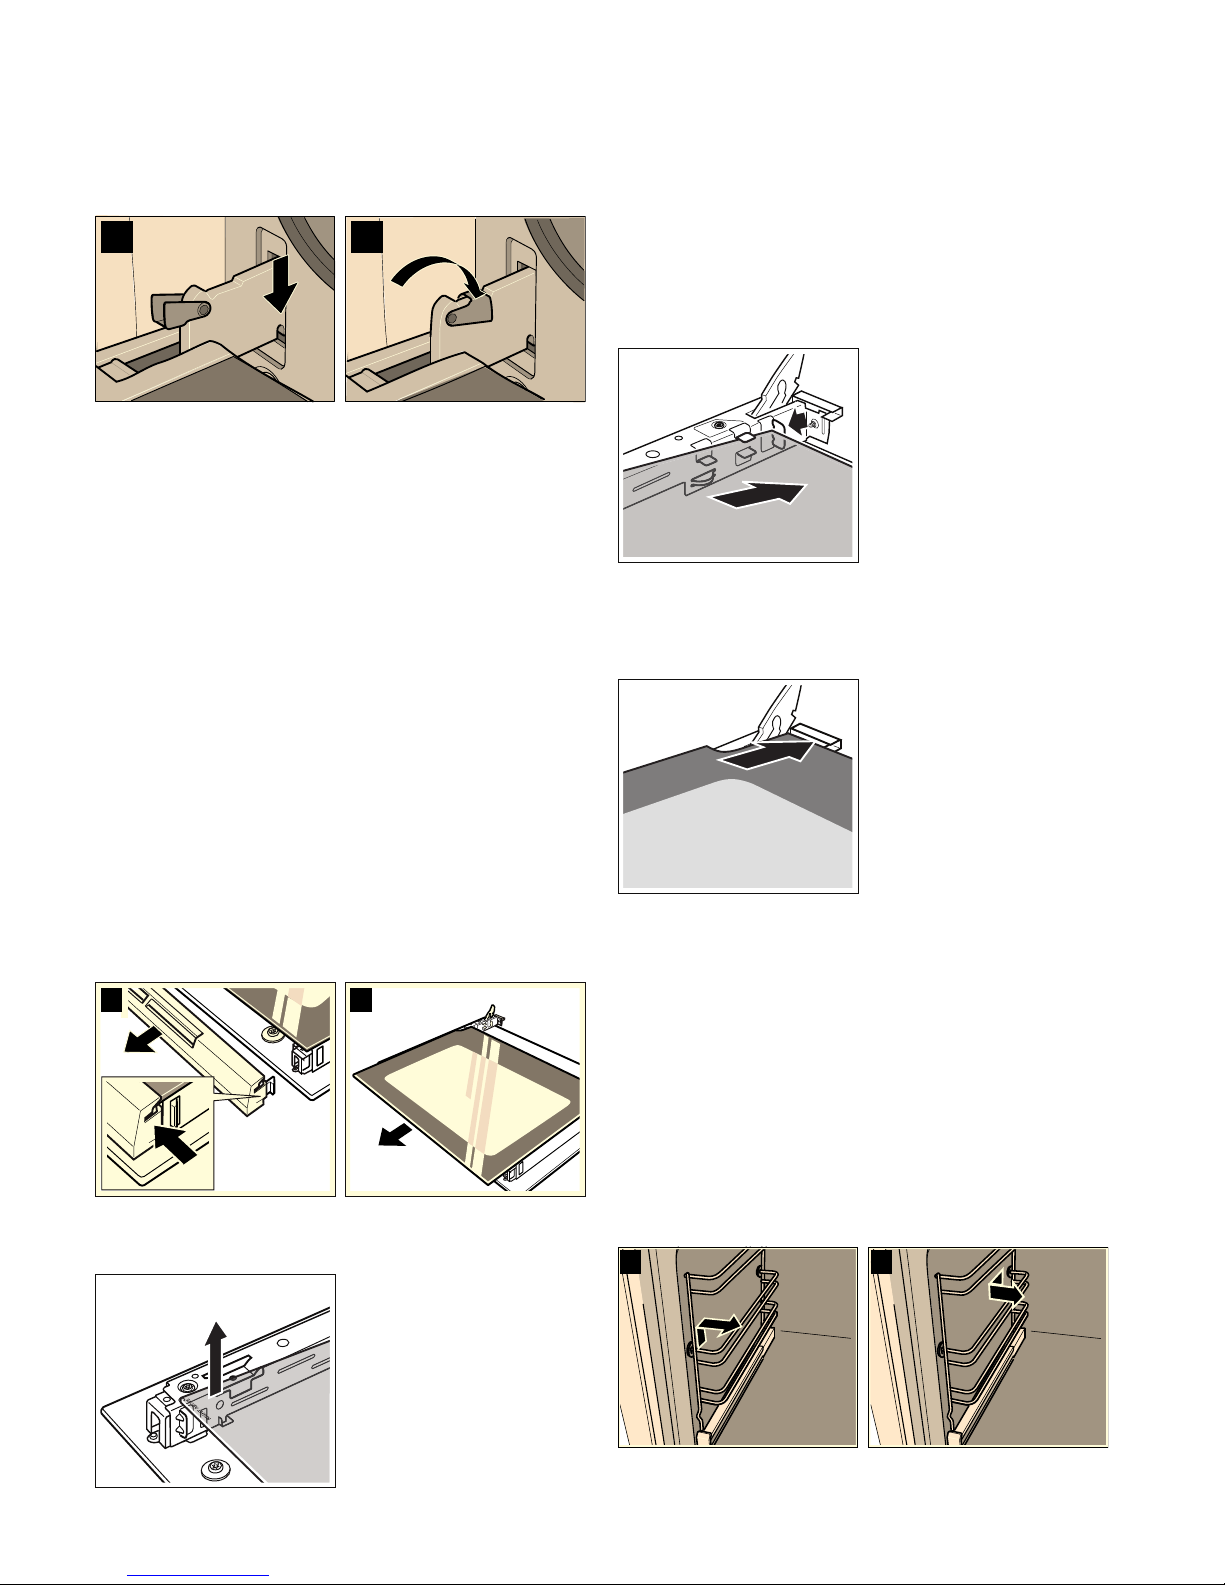
1. Insert the hinges in the left and right-hand holders (figure C).
The notch on both hinges must engage.
2. Open the appliance door fully.
3. Close the locking levers on the left and right-hand side fully
(figure D).
The appliance door is secured and can no longer be
removed.
4. Close the appliance door.
Cleaning the door panels
To facilitate cleaning, you can remove the inner door panels
from the appliance door.
: Risk of injury!
The components inside the appliance door may have sharp
edges. Take care not to cut yourself. Wear protective gloves.
: Risk of injury!
The appliance must not be used again until the door panels
and appliance door have been correctly fitted.
Removing the door panel
Note: Before removing, make a note of which way round the
door panel is fitted, so that it is not refitted the wrong way
round.
1. Unhook the appliance door and lay it on a soft, clean surface
with the front side facing downwards (see section: Removing
and installing the appliance door).
2. Pull off the cover at the top of the appliance door. Press in
the tabs on the left and right using your fingers (fig.A).
3. Lift the door panel slightly and pull it out (Fig. B).
Removing the intermediate panel
Lift the intermediate panel slightly and pull it out towards you.
Cleaning
Clean the door panel with glass cleaner and a soft cloth.
: Risk of injury!
Scratched glass in the appliance door may develop into a
crack. Do not use a glass scraper, sharp or abrasive cleaning
aids or detergents.
Fitting the intermediate panel
Note: During installation, make sure that the lettering "top right"
is upside down at the bottom left.
Insert the intermediate panel towards the back as far as it will
go.
Fitting the door panel
1. Insert the door panel at an angle towards the back into both
brackets as far as it will go. The smooth surface must face
outwards.
2. Put the cover back in place and press on it until it clicks in
place.
3. Refit the appliance door.
Cleaning the hook-in racks
You can remove the hook-in racks with telescopic shelves for
easier cleaning.
: Risk of burning due to hot components in the cooking
compartment!
Wait until the cooking compartment has cooled down.
1. Push the hook-in rack upwards at the front and unhook to the
side (figure A).
2. Push the hook-in rack forwards at the rear and unhook to the
side (figure B).
3. Clean the hook-in rack with washing-up liquid and a sponge
or brush.
&
'
%$
$
%
Page 22
22
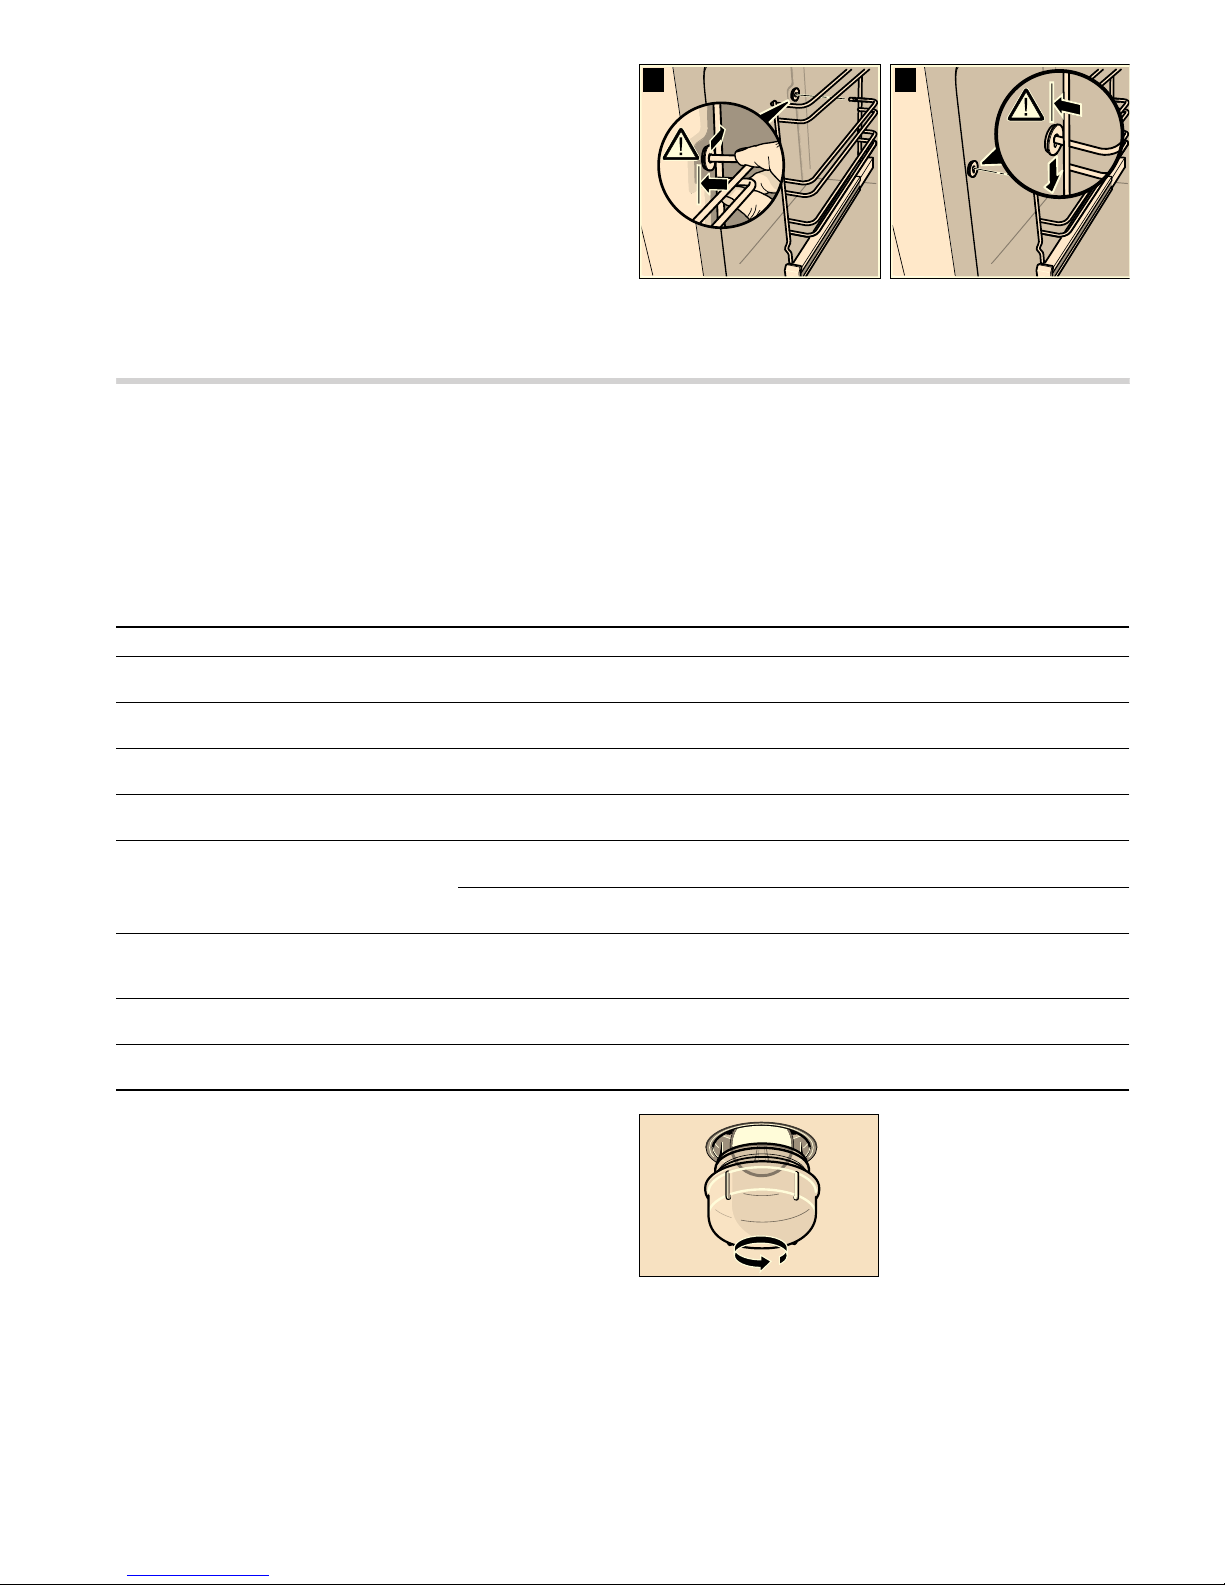
4. Align the hook-in rack with the indentation (a) facing
downwards, so that the shelf heights match
5. Insert the hook-in rack at the rear to the limit stop and push to
the rear (figure C).
6. Insert the hook-in rack at the front to the limit stop and push
downwards (figure D).
7. Push telescopic shelves in as far as the limit stop and close
appliance door.
Faults and repairs
It is not always necessary to call the after-sales service.
Sometimes, you can find a remedy yourself. You will find some
tips for troubleshooting in the following table.
: Risk of electric shock!
■ Work on the appliance electronics may only be performed by
a specialist.
■ Always disconnect the appliance from the power supply
when work is carried out on the electronics. Switch off the
circuit breaker or remove the fuse from your household fuse
box.
Replacing the oven light bulb
Replace faulty oven light bulbs.
Spare bulbs can be obtained from the after-sales service or
specialist retailers. Only use these oven light bulbs.
■ For the main oven: E14, 220 - 240 V, 40 W, heat-resistant to
300 °C.
■ For the top oven: E14, 220 - 240 V, 25 W, heat-resistant to
300 °C.
: Risk of electric shock !
Disconnect the appliance from the power supply. Switch off the
circuit breaker or remove the fuse from the household fuse box.
1. Place a tea towel in the cold cooking compartment to prevent
damage.
2. Turn the glass cover anticlockwise and remove it.
3. Replace the oven light bulb with a bulb of the same type.
4. Screw on the glass cover again.
5. Remove the tea towel and switch on the circuit breaker.
Note: Use rubber gloves if the glass cover cannot be
unscrewed: Or order a special removal tool from the after-sales
service:
■ For the main oven: Order no. 613634
■ For the top oven: Order no. 621743
D D
&
'
Problem Possible cause Remedial action
Electrical operation is malfunctioning (e.g.
indicator lamps do not light up)
Faulty circuit breaker Check fuses in the fuse box and replace if
necessary
Liquid or runny dough runs to one side Appliance not installed level Check the appliance installation (see the
Installation instructions)
‹:‹‹ flashes in the clock display
There was a power cut Reset the clock (see section: Electronic
clock)
Electronically controlled functions are malfunctioning
Energy surges (e.g. lightning strike) Reset the function concerned
Smoke is generated during roasting or grilling
Fat is burning on the grill element Continue grilling or roasting until the fat on
the grill element is burnt away
Wire rack or universal pan inserted incorrectly
Check the shelf height (see section:
Roasting or grilling)
High levels of condensation are generated
in the cooking compartment
Normal occurrence (e.g. when baking
cakes with very moist toppings or roasting
a large joint)
Open the appliance door briefly from time
to time during operation
Enamelled accessories have light, matt
spots on them
Normal occurrence caused by dripping
meat or fruit juices
Not possible
Door panels are misted up Normal occurrence caused by tempera-
ture differences
Heat the appliance up to 100 °C and then
switch off again after 5 minutes
Page 23
23
Changing the door seal
If the door seal is defective, it must be replaced. Replacement
seals for your appliance can be obtained from the after-sales
service.
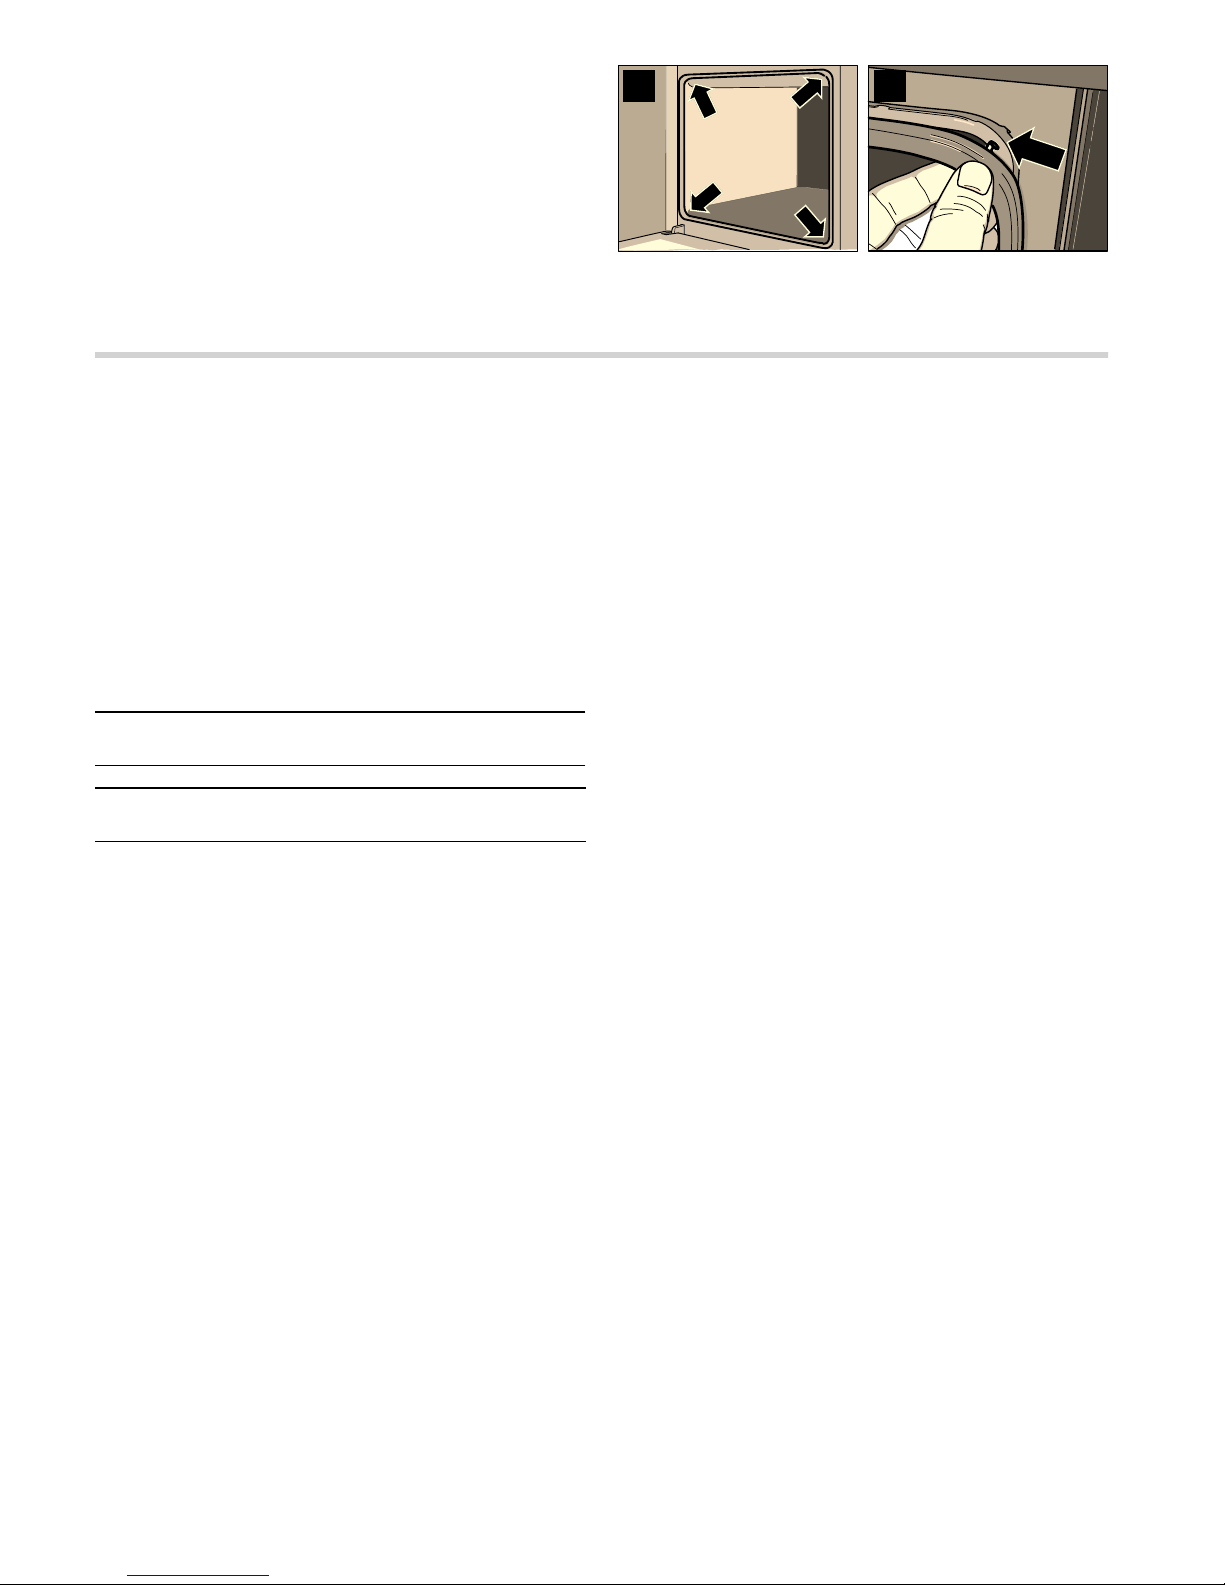
The door seal is attached in four places (figure A). When
replacing it, disconnect and attach the hooks at all four points
(figure B).
Check again to ensure that the seal is seated correctly in the
corners in particular.
After-sales service
Our after-sales service is there for you if your appliance needs
to be repaired. We will always find the right solution in order to
avoid unnecessary visits from a service technician.
E number and FD number
When calling us, please give the product number (E no.) and
the production number (FD no.) so that we can provide you with
the correct advice. The rating plate bearing these numbers can
be found on the lower left-hand side when you open the
appliance door.
You can make a note of the numbers of your appliance and the
telephone number of the after-sales service in the space below
to save time should it be required.
Please note that there will be a fee for a visit by a service
technician in the event of a malfunction, even during the
warranty period.
Please find the contact data of all countries in the enclosed
customer service list.
To book an engineer visit and product advice
Rely on the professionalism of the manufacturer. You can
therefore be sure that the repair is carried out by trained service
technicians who carry original spare parts for your appliances.
$ %
E no.
FD no.
After-sales service
O
GB 0844 8928989
Calls from a BT landline will be charged at up to
3 pence per minute. A call set-up fee of up to 6 pence
may apply.
IE 01450 2655
0.03 € per minute at peak. Off peak 0.0088 € per
minute.
Page 24
24
Test dishes
Dishes tested to EN 60350. Please note the information in the
tables about preheating.
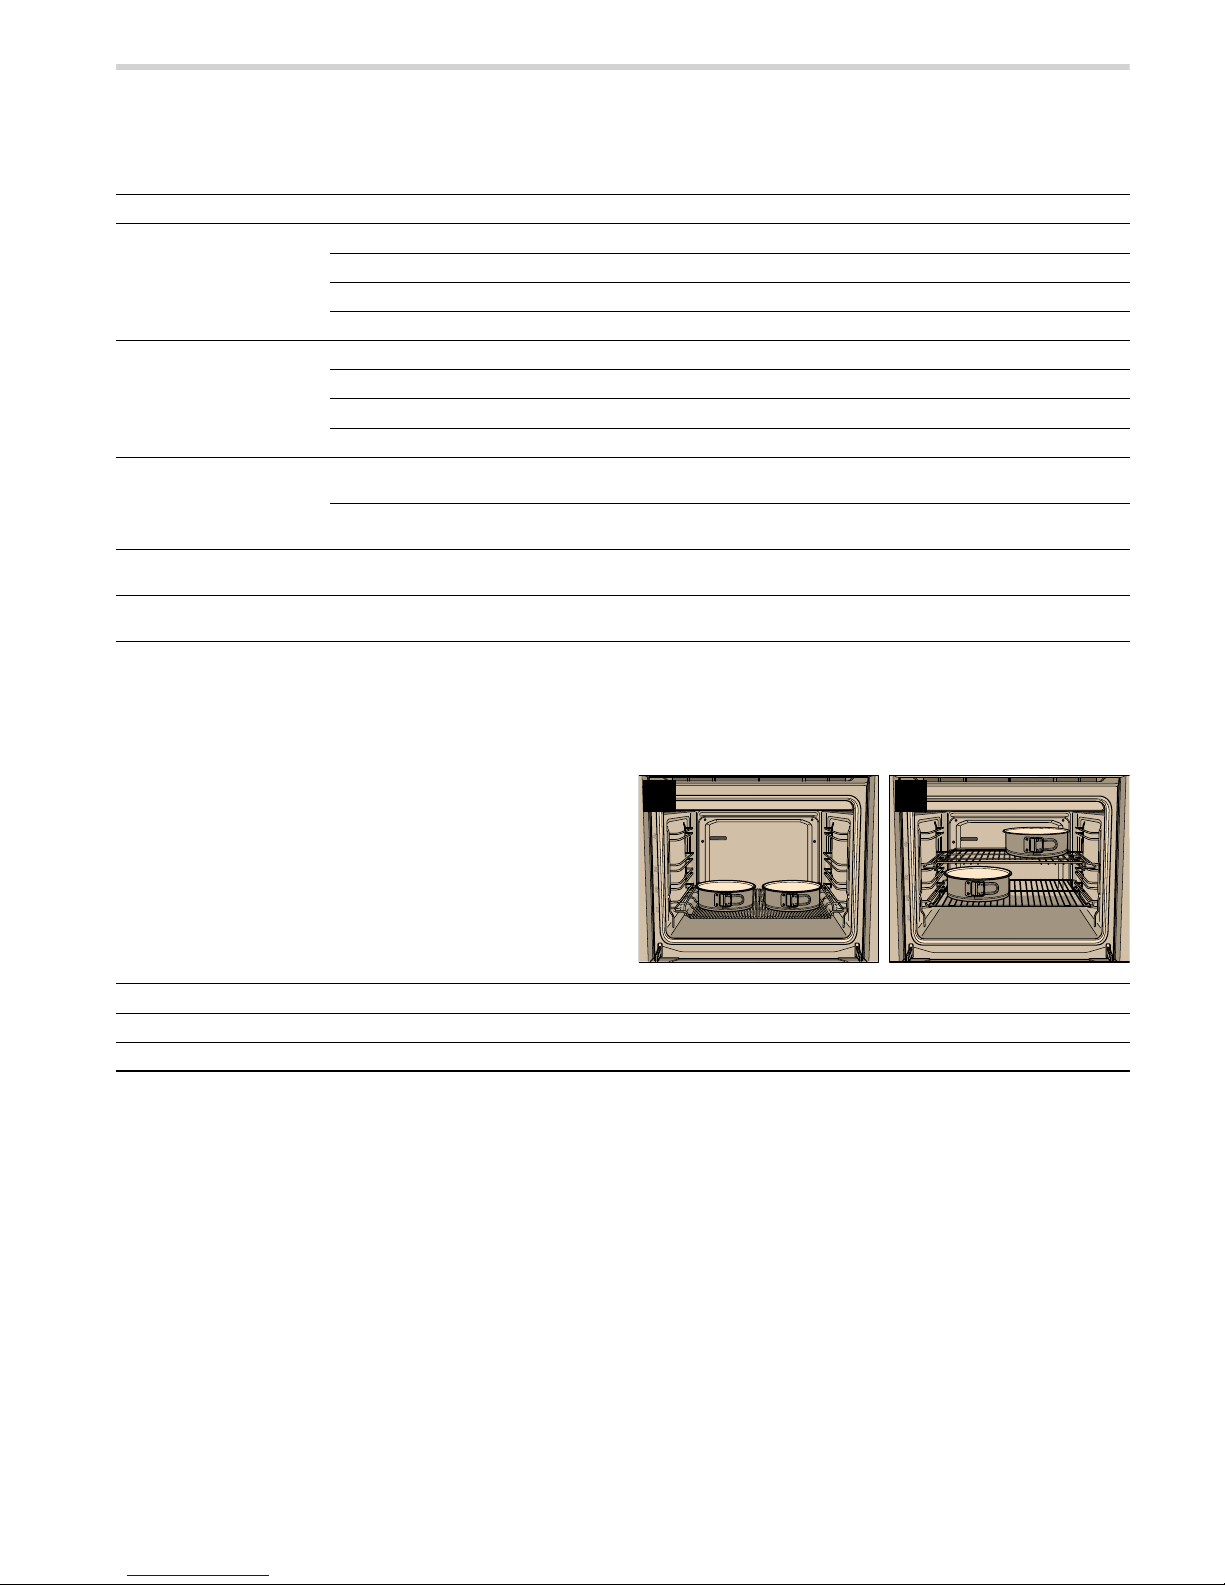
When baking apple pie using
3 CircoTherm®, place both
springform cake tins next to each other on the wire rack
(figure A).
If you are baking German apple pie on two levels, place the
lower baking tin to the left on the wire rack and the upper
baking tin to the right on the wire rack (figure B).
Baking Cookware Oven Setting Level Temperature Time in minutes
Shortbread Baking tray***
õ%
3 140 - 150** 20 - 25
Baking tray***
õ3
1 140 - 150** 20 - 30
2 baking trays***
õ3
1 + 3 140 - 150** 20 - 30
3 baking trays***
õ3
1 + 3 + 4 130 - 150** 35 - 45
Small cakes (20 pieces) Baking tray***
õ%
3 160 170* 25 - 35
Baking tray***
õ3
1 150 - 160* 25 - 35
2 baking trays***
õ3
1 + 3 150 - 160* 25 - 35
3 baking trays***
õ3
1 + 3 + 4 150 - 160* 25 - 35
Fat-free sponge cake Springform cake tin****
dia. 26 cm
õ%
2 160 - 170** 20 - 30
Springform cake tin****
dia. 26 cm
õ3
1 150 - 160** 20 - 30
Apple pie 2 x springform cake tin****
dia. 20 cm (see figure A)
õ3
1 170 180** 70 - 80
2 x springform cake tin****
dia 20 cm (see figure B and C)
õ3
1 + 3 170 180** 70 - 80
* Preheat for 10 minutes
** Preheat oven
*** Only use original baking trays, order no. Z1342X0
**** Use a black springform cake tin
$ %
Grilling Cookware Oven Setting Level Temperature Time in minutes
White bread Universal pan + wire rack
ô(
1 + 2 275* 0,5 - 2
Beef steaks Universal pan + wire rack
ô(
2 270 25 - 30**
* Preheat for 10 minutes
** Turn after
Z of the time
Page 25

25
Page 26

26
Page 27

27
Page 28
940325
*9000986099*
9000986099
Constructa Neff
Vertriebs-GmbH
Carl-Wery-Straße 34
D-81739 München
 Loading...