

Page 1
[de] Gebrauchsanleitung ...........2
[en] Instruction manual ............15
[fr] Notice d’utilisation ............28
[it] Istruzioni per l’uso ............41
[ru] Правила пользования ....54
H12WE60N0 H12WE60S0
Mikrowelle
Microwave
Micro-ondes
Forno a microonde
Микроволновая печь
Page 2

Ø Inhaltsverzeichnis
[de]Gebrauchsanleitung
Wichtige Sicherheitshinweise .................................................. 2
Ursachen für Schäden .......................................................................4
Aufstellen und Anschließen...................................................... 4
Energie- und Umwelttipps......................................................... 4
Energiesparen .....................................................................................4
Umweltgerecht entsorgen .................................................................5
Das Bedienfeld........................................................................... 5
Drehwähler ...........................................................................................5
Das Zubehör........................................................................................5
Vor dem ersten Benutzen.......................................................... 6
Uhrzeit einstellen.................................................................................6
Die Mikrowelle............................................................................ 6
Hinweise zum Geschirr......................................................................6
Mikrowellen-Leistungen......................................................................6
Mikrowelle einstellen ..........................................................................6
Kühlgebläse .........................................................................................7
Memory ....................................................................................... 7
Memory speichern..............................................................................7
Memory Starten...................................................................................7
Signaldauer ändern ................................................................... 7
Pflege und Reinigung................................................................ 7
Reinigungsmittel..................................................................................8
Störungstabelle.......................................................................... 8
Kundendienst............................................................................. 9
E-Nummer und FD-Nummer .............................................................9
Technische Daten ...............................................................................9
Programm-Automatik .............................................................. 10
Programm einstellen ....................................................................... 10
Auftauen mit der Programmautomatik......................................... 10
Garen mit der Programmautomatik.............................................. 10
Für Sie in unserem Kochstudio getestet............................... 11
Hinweise zu den Tabellen .............................................................. 11
Auftauen............................................................................................. 11
Auftauen, Erhitzen oder Garen tiefgefrorener Speisen............. 12
Speisen erhitzen............................................................................... 12
Speisen garen .................................................................................. 13
Tipps zur Mikrowelle........................................................................ 13
Prüfgerichte nach EN 60705 ................................................... 14
Garen und Auftauen mit Mikrowelle............................................. 14
Produktinfo
Weitere Informationen zu Produkten, Zubehör, Ersatzteilen und
Services finden Sie im Internet: www.neff-international.com
und Online-Shop: www.neff-eshop.com
Für Produktinformationen sowie
Anwendungs- und Bedienfragen
wählen Sie unsere Info-Nummer: (Mo-Fr: 8.00-18.00 Uhr
erreichbar) Nur für Deutschland
gültig.
: Wichtige Sicherheitshinweise
Diese Anleitung sorgfältig lesen. Nur dann
können Sie Ihr Gerät sicher und richtig
bedienen. Die Gebrauchs- und Montageanleitung für einen späteren Gebrauch oder
für Nachbesitzer aufbewahren.
Dieses Gerät ist nur für den Einbau bestimmt. Spezielle Montageanleitung beachten.
Das Gerät nach dem Auspacken prüfen.
Bei einem Transportschaden nicht anschließen.
Nur ein konzessionierter Fachmann darf
Geräte ohne Stecker anschließen. Bei Schäden durch falschen Anschluss besteht kein
Anspruch auf Garantie.
Dieses Gerät ist nur für den privaten Haushalt und das häusliche Umfeld bestimmt.
Das Gerät nur zum Zubereiten von Speisen
und Getränken benutzen. Das Gerät während des Betriebes beaufsichtigen. Das
Gerät nur in geschlossenen Räumen verwenden.
Dieses Gerät kann von Kindern ab 8 Jahren
und Personen mit reduzierten physischen,
sensorischen oder mentalen Fähigkeiten
oder Mangel an Erfahrung oder Wissen
benutzt werden, wenn sie von einer Person,
die für ihre Sicherheit verantwortlich ist,
beaufsichtigt oder von ihr bezüglich des
sicheren Gebrauchs des Gerätes unterwiesen wurden und sie die daraus resultierenden Gefahren verstanden haben.
Kinder dürfen nicht mit dem Gerät spielen. Reinigung und Benutzer-Wartung dürfen nicht durch Kinder durchgeführt werden, es sei denn, sie sind 8 Jahre und älter und werden beaufsichtigt.
Kinder jünger als 8 Jahre vom Gerät und der Anschlussleitung fernhalten.
Zubehör immer richtig in den Garraum einsetzten. Siehe Beschreibung Zubehör in
der Gebrauchsanleitung.
2
Page 3

Brandgefahr!
■
Im Garraum gelagerte, brennbare Gegenstände können sich entzünden. Nie brennbare Gegenstände im Garraum
aufbewahren. Nie die Gerätetür öffnen,
wenn Rauch im Gerät auftritt. Das Gerät
ausschalten und Netzstecker ziehen oder
Sicherung im Sicherungskasten ausschalten.
Brandgefahr!
■
Die nicht bestimmungsgemäße Verwendung des Gerätes ist gefährlich und kann
Schäden verursachen.
Nicht zulässig sind, das Trocknen von
Speisen oder Kleidung, das Erwärmen von
Pantoffeln, Körner- oder Getreidekissen,
Schwämmen, feuchten Putzlappen und
Ähnlichem.
Zum Beispiel können sich erwärmte Pantoffeln, Körner- oder Getreidekissen auch
noch nach Stunden entzünden. Das Gerät
nur zum Zubereiten von Speisen und
Getränken benutzen.
Brandgefahr!
■
Lebensmittel können sich entzünden. Nie
Lebensmittel in Warmhalteverpackungen
erwärmen.
Nie Lebensmittel in Behältern aus Kunststoff, Papier oder anderen brennbaren
Materialien unbeaufsichtigt erwärmen.
Nie eine viel zu hohe Mikrowellen-Leistung
oder -Zeit einstellen. Nach den Angaben in
dieser Gebrauchsanleitung richten.
Nie Lebensmittel mit Mikrowelle trocknen.
Nie Lebensmittel mit geringem Wassergehalt, wie z. B. Brot, mit zu hoher Mikrowellen-Leistung oder -Zeit auftauen oder
erwärmen.
Brandgefahr!
■
Speiseöl kann sich entzünden. Nie ausschließlich Speiseöl mit Mikrowelle erhitzen.
Explosionsgefahr!
Flüssigkeiten oder andere Nahrungsmittel
in fest verschlossenen Gefäßen können
explodieren. Nie Flüssigkeiten oder andere
Nahrungsmittel in fest verschlossenen Gefäßen erhitzen.
Gefahr schwerer Gesundheitsschäden!
■
Bei mangelhafter Reinigung kann die
Oberfläche des Gerätes beschädigt werden. Es kann Mikrowellen-Energie austreten. Gerät regelmäßig reinigen und
Nahrungsmittelreste sofort entfernen. Garraum, Türdichtung, Tür und Türanschlag
immer sauber halten; siehe auch Kapitel
Pflege und Reinigung.
Gefahr schwerer Gesundheitsschäden!
■
Durch eine beschädigte Garraumtür oder
Türdichtung kann Mikrowellen-Energie
austreten. Nie das Gerät benutzen, wenn
die Garraumtür oder die Türdichtung
beschädigt ist. Kundendienst rufen.
Gefahr schwerer Gesundheitsschäden!
■
Bei Geräten ohne Gehäuseabdeckung tritt
Mikrowellen-Energie aus. Nie die Gehäuseabdeckung entfernen. Bei Wartungsoder Reparaturarbeit Kundendienst rufen.
Stromschlaggefahr!
■
Unsachgemäße Reparaturen sind gefährlich. Nur ein von uns geschulter Kundendienst-Techniker darf Reparaturen
durchführen und beschädigte Anschlussleitungen austauschen. Ist das Gerät
defekt, Netzstecker ziehen oder Sicherung
im Sicherungskasten ausschalten. Kundendienst rufen.
Stromschlaggefahr!
■
An heißen Geräteteilen kann die Kabelisolierung von Elektrogeräten schmelzen. Nie
Anschlusskabel von Elektrogeräten mit
heißen Geräteteilen in Kontakt bringen.
Stromschlaggefahr!
■
Eindringende Feuchtigkeit kann einen
Stromschlag verursachen. Keinen Hochdruckreiniger oder Dampfreiniger verwenden.
Stromschlaggefahr!
■
Ein defektes Gerät kann einen Stromschlag verursachen. Nie ein defektes
Gerät einschalten. Netzstecker ziehen
oder Sicherung im Sicherungskasten ausschalten. Kundendienst rufen.
Stromschlaggefahr!
■
Das Gerät arbeitet mit Hochspannung. Nie
das Gehäuse entfernen.
Verbrennungsgefahr!
■
Zubehör oder Geschirr wird sehr heiß. Heißes Zubehör oder Geschirr immer mit
Topflappen aus dem Garraum nehmen.
Verbrennungsgefahr!
■
Alkoholdämpfe können sich im heißen
Garraum entzünden. Nie Speisen mit großen Mengen an hochprozentigen alkoholischen Getränken zubereiten. Nur kleine
Mengen hochprozentiger Getränke verwenden. Gerätetür vorsichtig öffnen.
Verbrennungsgefahr!
■
Lebensmittel mit fester Schale oder Haut
können während, aber auch noch nach
dem Erwärmen explosionsartig zerplatzen.
Nie Eier in der Schale garen oder hartgekochte Eier erwärmen. Nie Schalen- und
Krustentiere garen. Bei Spiegeleiern oder
Eiern im Glas vorher den Dotter anstechen. Bei Lebensmitteln mit fester Schale
oder Haut, wie z. B. Apfel, Tomaten, Kartoffeln oder Würstchen, kann die Schale
3
Page 4

platzen. Vor dem Erwärmen die Schale
oder Haut anstechen.
Verbrennungsgefahr!
■
Die Hitze in der Babynahrung verteilt sich
nicht gleichmäßig. Nie Babynahrung in
geschlossenen Gefäßen erwärmen. Immer
den Deckel oder den Sauger entfernen.
Nach dem Erwärmen gut umrühren oder
schütteln. Temperatur überprüfen, bevor
Sie dem Kind die Nahrung geben.
Verbrennungsgefahr!
■
Erhitzte Speisen geben Wärme ab. Das
Geschirr kann heiß werden. Geschirr oder
Zubehör immer mit einem Topflappen aus
dem Garraum nehmen.
Verbrennungsgefahr!
■
Bei luftdicht verschlossenen Lebensmitteln
kann die Verpackung platzen. Immer die
Angaben auf der Verpackung beachten.
Gerichte immer mit einem Topflappen aus
dem Garraum nehmen.
Verbrühungsgefahr!
■
Beim Öffnen der Gerätetür kann heißer
Dampf entweichen. Gerätetür vorsichtig
öffnen. Kinder fernhalten.
Verbrühungsgefahr!
■
Beim Erhitzen von Flüssigkeiten kann es
zu Siedeverzug kommen. Das heißt, die
Siedetemperatur wird erreicht, ohne dass
die typischen Dampfblasen aufsteigen.
Schon bei geringer Erschütterung des
Gefäßes kann die heiße Flüssigkeit plötzlich heftig überkochen und verspritzen.
Beim Erhitzen immer einen Löffel mit in
das Gefäß geben. So wird der Siedeverzug vermieden.
Verletzungsgefahr!
■
Zerkratztes Glas der Gerätetür kann springen. Keinen Glasschaber, scharfe oder
scheuernde Reinigungsmittel benutzen.
Verletzungsgefahr!
■
Ungeeignetes Geschirr kann bersten.
Geschirr aus Porzellan und Keramik kann
feine Löcher in Griffen und Deckel haben.
Hinter diesen Löchern verbirgt sich ein
Hohlraum. In den Hohlraum eingedrungene Feuchtigkeit kann das Geschirr zum
Bersten bringen. Nur mikrowellengeeignetes Geschirr verwenden.
Ursachen für Schäden
Achtung!
■ Stark verschmutzte Dichtung: Wenn die Dichtung stark ver-
schmutzt ist, schließt die Gerätetür bei Betrieb nicht mehr
richtig. Die angrenzenden Möbelfronten können beschädigt
werden. Dichtung immer sauber halten.
■ Mikrowellenbetrieb ohne Speisen: Der Betrieb des Gerätes
ohne Speisen im Garraum führt zur Überlastung. Nie das
Gerät ohne Speisen im Garraum einschalten. Ausgenommen
ist ein kurzzeitiger Geschirrtest siehe Kapitel Mikrowelle,
Geschirr.
■ Mikrowellen-Popcorn: Nie eine zu hohe Mikrowellen-Leistung
einstellen. Maximal 600 Watt verwenden. Die Popcorntüte
immer auf einen Glasteller legen. Die Scheibe kann durch
Überbelastung springen.
■ Übergekochte Flüssigkeit darf nicht durch den Drehtelleran-
trieb in das Innere des Gerätes gelangen. Garvorgang beobachten. Zunächst eine kürzere Gardauer verwenden und
wenn nötig Gardauer verlängern.
■ Nie das Mikrowellengerät ohne Drehteller benutzen.
Aufstellen und Anschließen
Dieses Gerät ist nur für den privaten Haushalt bestimmt.
Dieses Gerät ist nur für den Einbau bestimmt.
Beachten Sie bitte die spezielle Montageanleitung.
Das Gerät ist steckerfertig und darf nur an eine vorschriftsmä-
ßig installierte Schutzkontaktsteckdose angeschlossen werden. Die Absicherung muss 10 Ampere (L- oder B-Automat)
betragen. Die Netzspannung muss der auf dem Typenschild
angegebenen Spannung entsprechen.
Energie- und Umwelttipps
Hier erhalten Sie Tipps, wie Sie beim Backen und Braten Energie sparen können und wie Sie Ihr Gerät richtig entsorgen.
Energiesparen
Heizen Sie den Backofen nur dann vor, wenn es im Rezept
oder in den Tabellen der Gebrauchsanleitung angegeben ist.
Verwenden Sie dunkle, schwarz lackierte oder emaillierte Backformen. Sie nehmen die Hitze besonders gut auf.
Öffnen Sie die Gerätetür während Sie garen, backen oder braten möglichst selten.
Das Verlegen der Steckdose oder der Austausch der
Anschlussleitung darf nur vom Elektrofachmann ausgeführt
werden. Wenn der Stecker nach dem Einbau nicht mehr
erreichbar ist, muss installationsseitig eine allpolige Trennvorrichtung mit einem Kontaktabstand von mindestens 3 mm vorhanden sein.
Mehrfachstecker, Steckerleisten und Verlängerungen dürfen
Sie nicht benutzen. Bei Überlastung besteht Brandgefahr.
Mehrere Kuchen backen Sie am besten nacheinander. Der Garraum ist noch warm. Dadurch kann sich die Backzeit für den
zweiten Kuchen verkürzen.
Bei längeren Garzeiten können Sie den Backofen 10 Minuten
vor Ende der Garzeit ausschalten und die Restwärme zum Fertiggaren nutzen.
4
Page 5
Umweltgerecht entsorgen
Entsorgen Sie die Verpackung umweltgerecht.
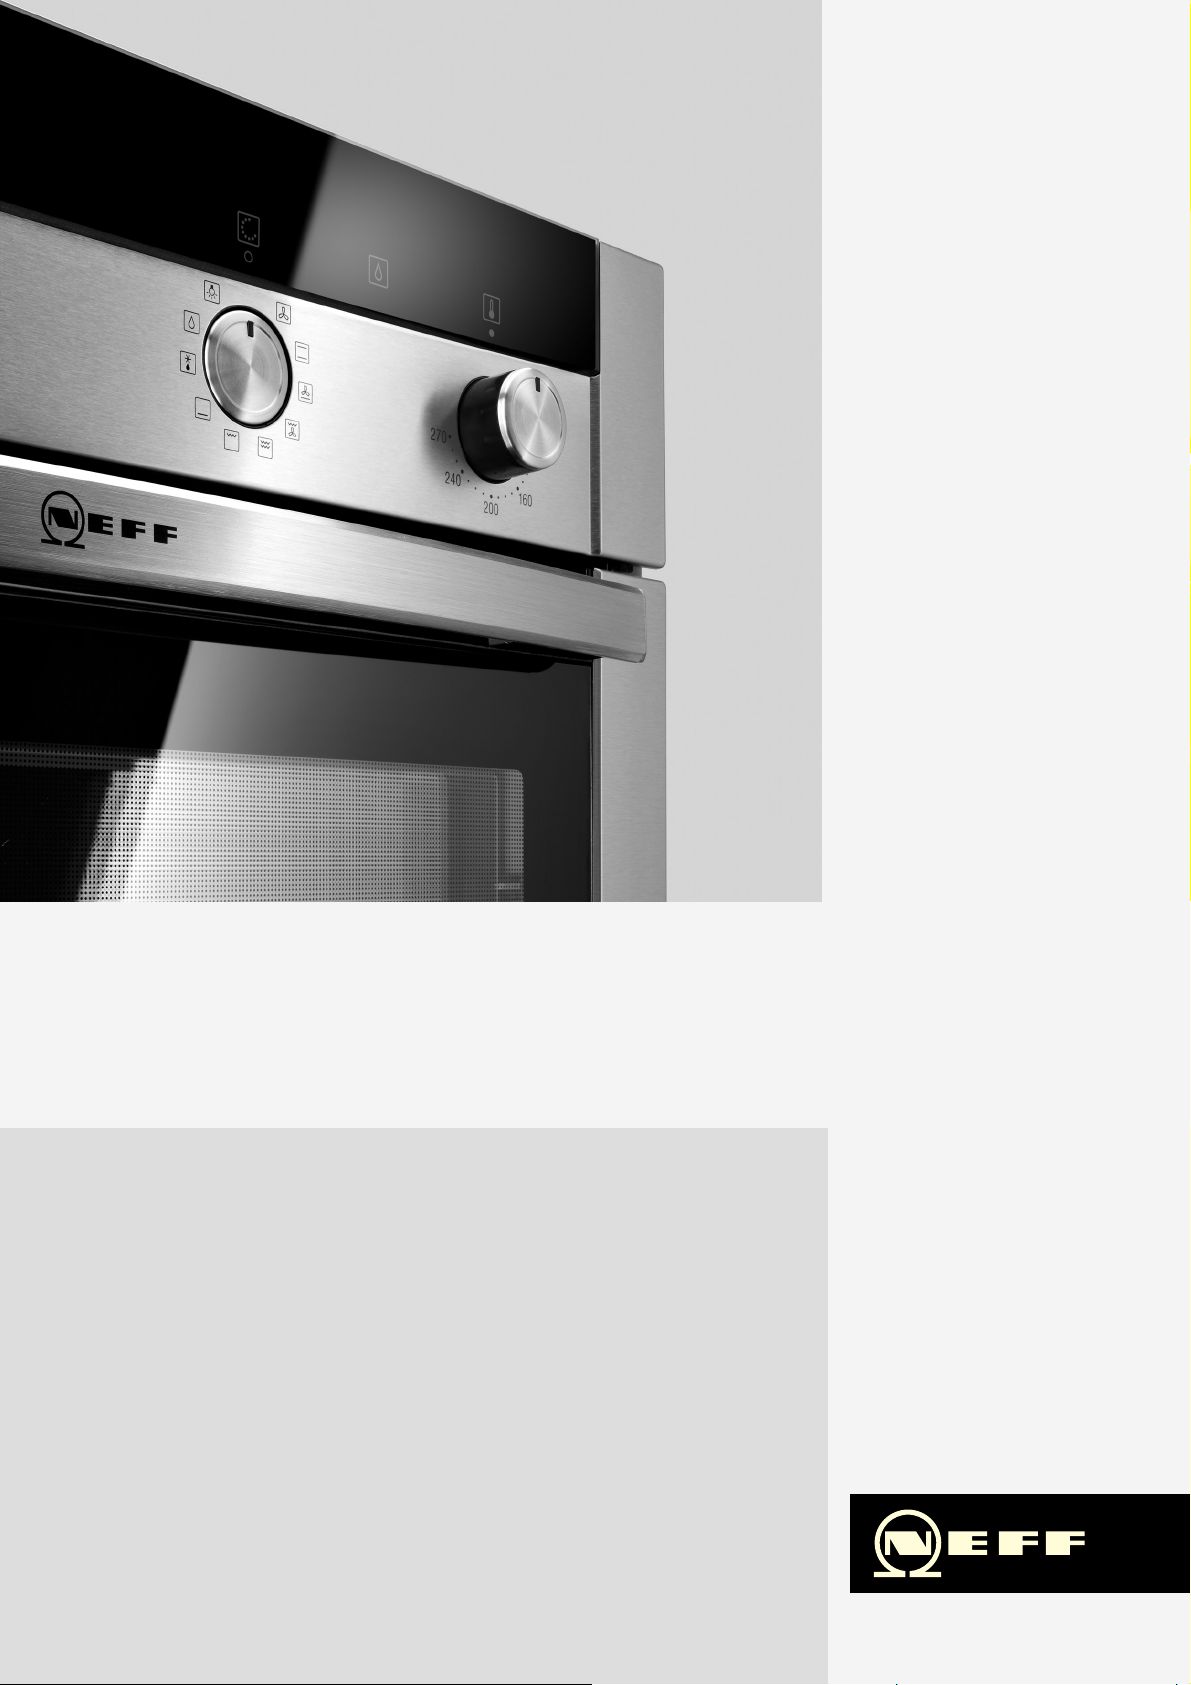
Das Bedienfeld
Dieses Gerät ist entsprechend der europäischen Richtlinie 2012/19/EU über Elektro- und Elektronikaltgeräte
(waste electrical and electronic equipment - WEEE)
gekennzeichnet.
Die Richtlinie gibt den Rahmen für eine EU-weit gültige
Rücknahme und Verwertung der Altgeräte vor.
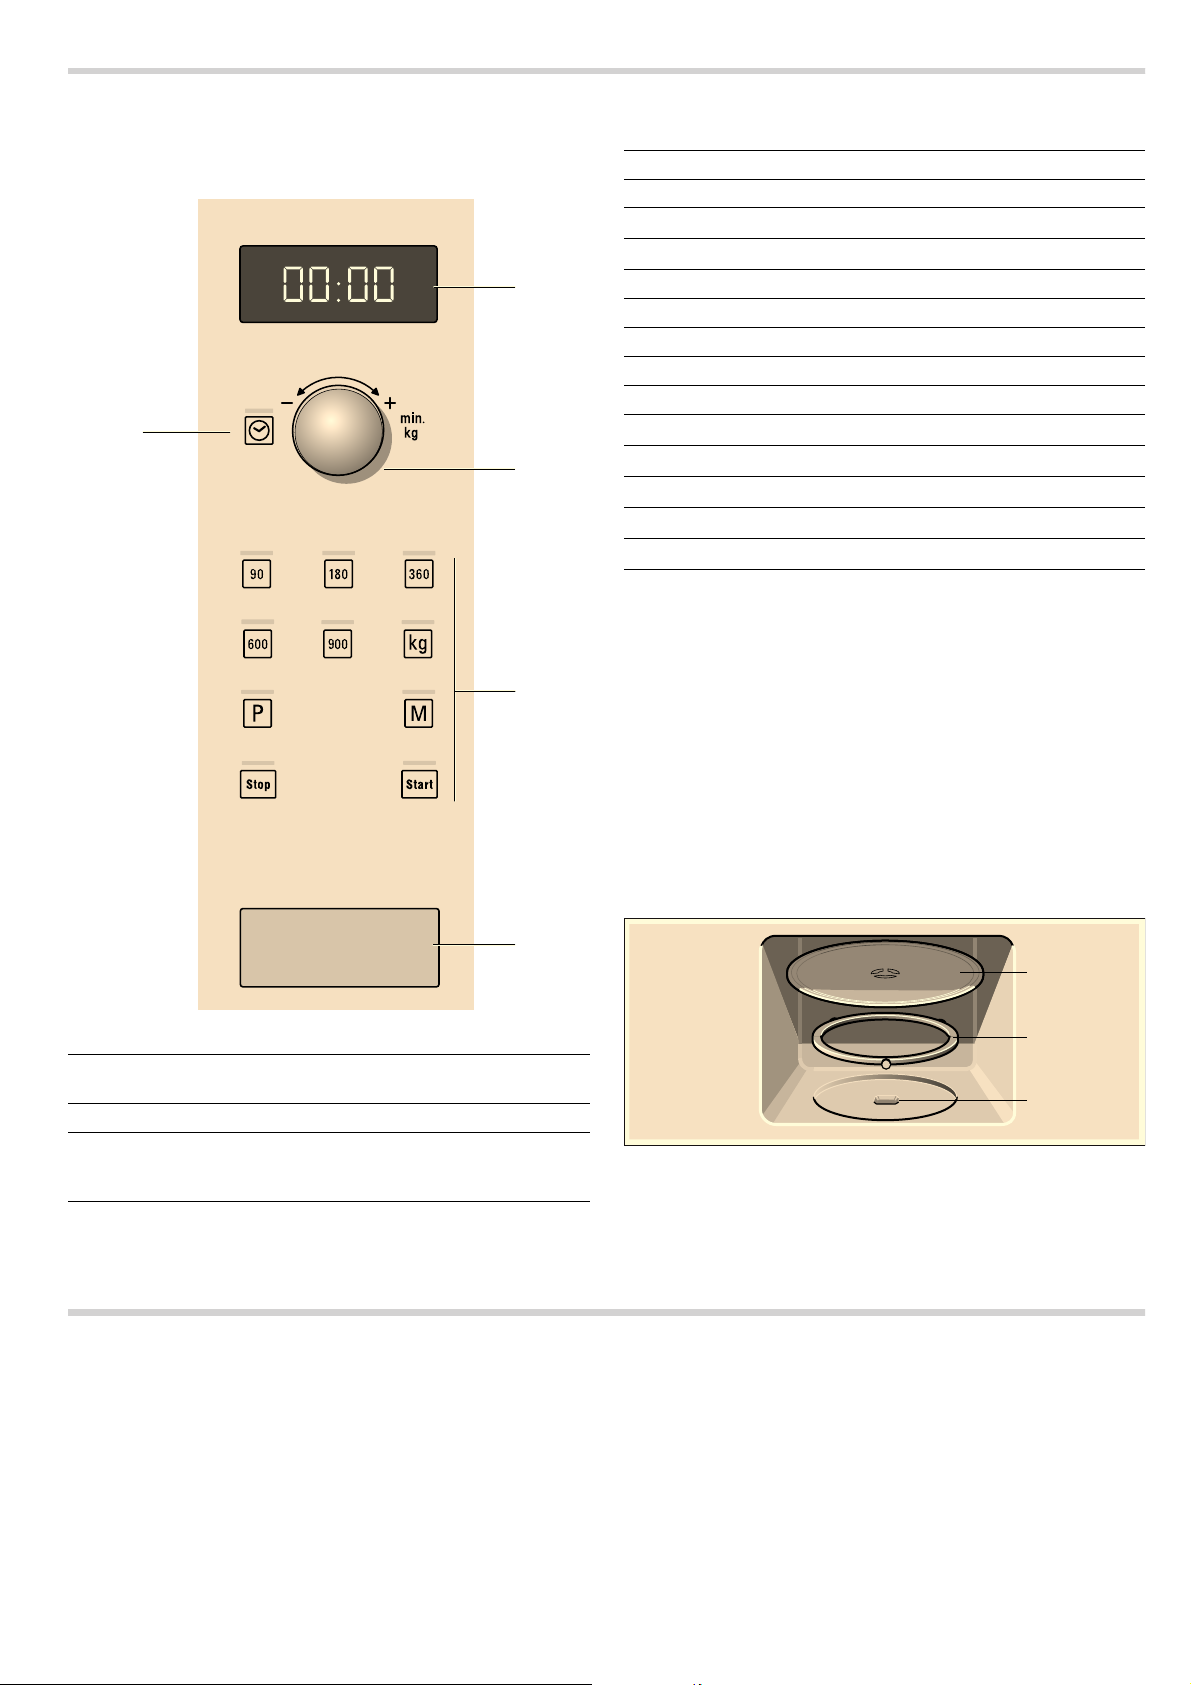
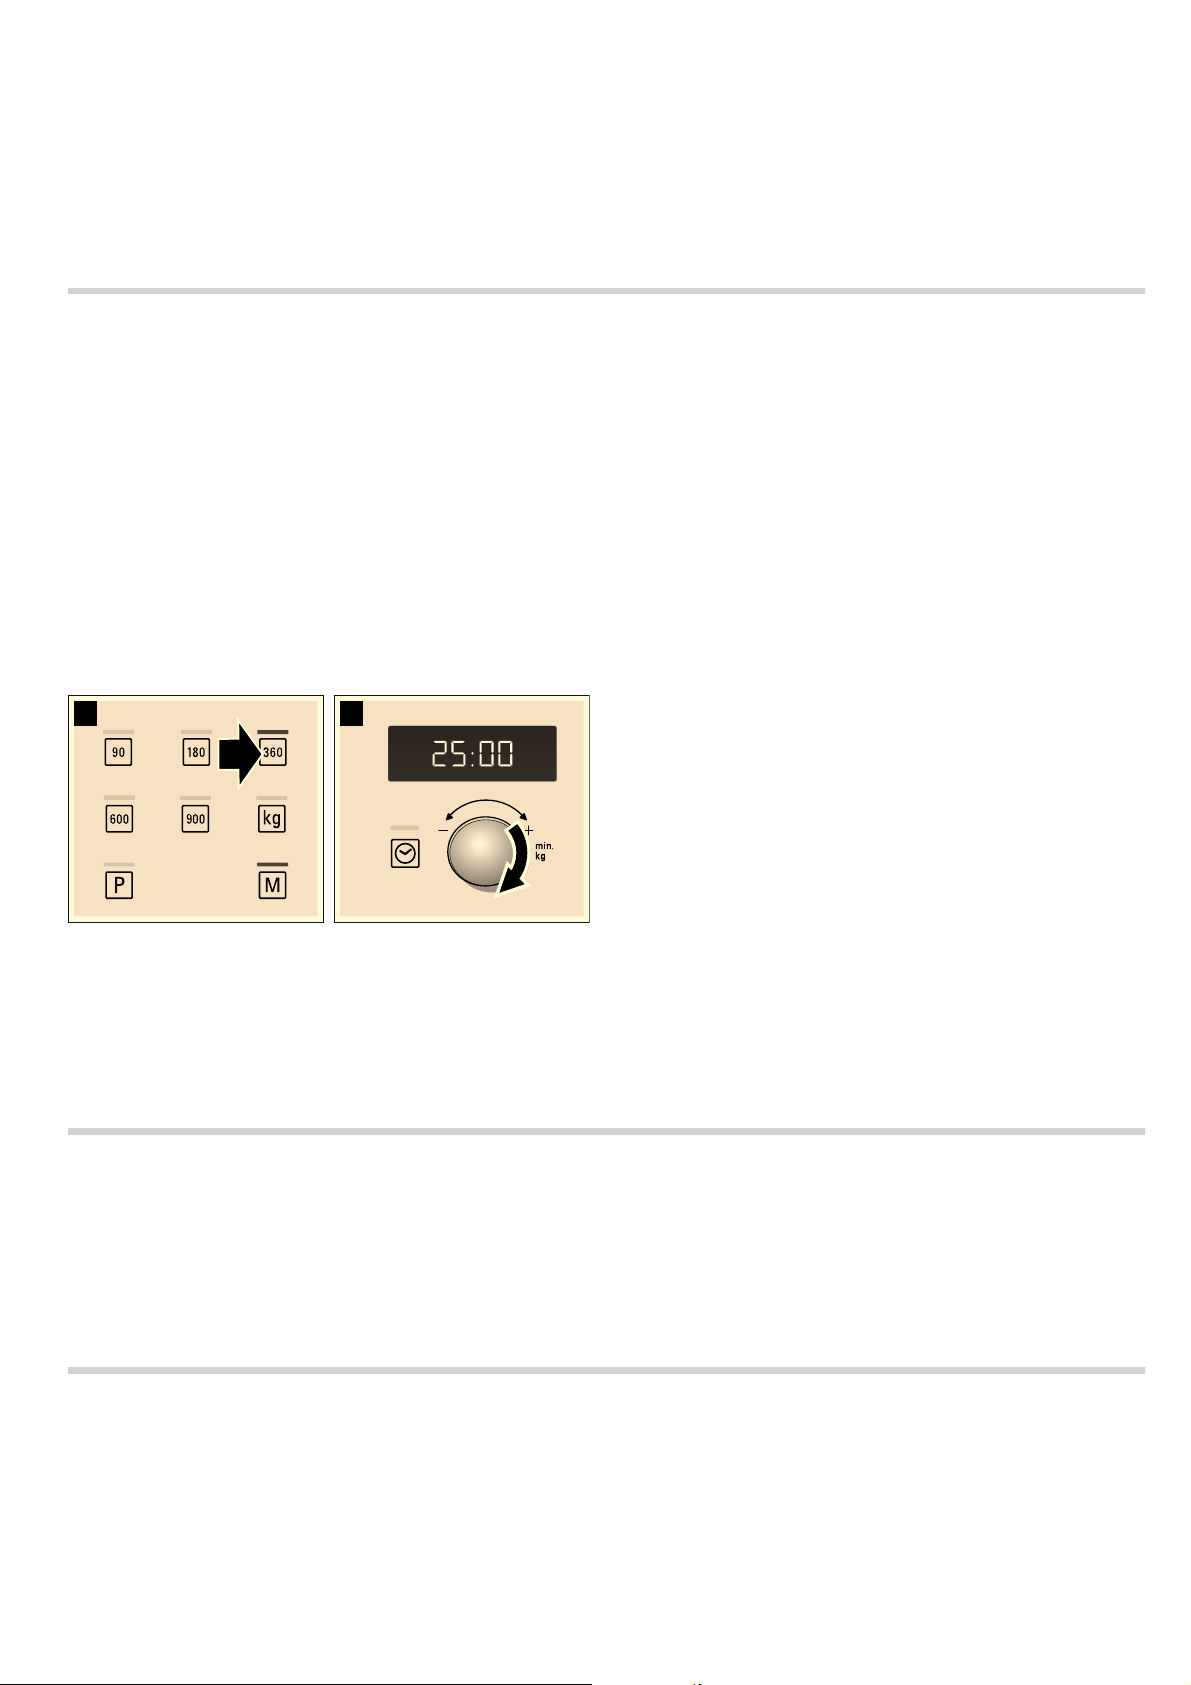
Hier sehen Sie eine Übersicht über das Bedienfeld. Je nach
Gertetyp sind Abweichungen in den Einzelheiten möglich.
Tasten Verwendung
360 Mikrowellen-Leistung 360 Watt wählen
600 Mikrowellen-Leistung 600 Watt wählen
900 Mikrowellen-Leistung 900 Watt wählen
¼
X
l
ƒ
„
Kilogramm bei den Programmen wählen
Programmautomatik anwählen
Memory anwählen
Damit starten Sie den Betrieb
Damit stoppen Sie den Betrieb
Drehwähler
Mit dem Drehwähler können Sie alle Vorschlags- und Einstellwerte verändern.
Der Drehwähler ist versenkbar. Zum Ein- und Ausrasten drücken Sie auf den Drehwähler.
Das Zubehör
Der Drehteller
So setzen Sie den Drehteller ein:
1. Den Rollenring a in die Vertiefung im Garraum legen.
2. Den Drehteller b in den Antrieb c in der Mitte des Garraum-
Bodens einrasten lassen.
1 Anzeige
2 Taste Uhr
3 Drehwäler
4 Tast en
5 Türöffner
Tasten Verwendung
»
90 Mikrowellen-Leistung 90 Watt wählen
180 Mikrowellen-Leistung 180 Watt wählen
für Uhrzeit und Dauer
zum Einstellen von Uhrzeit und Dauer oder zum Einstellen der Programmautomatik
Damit stellen Sie die Uhrzeit ein
E
D
Hinweis: Benutzen Sie das Gerät nur mit eingesetztem Drehteller. Achten Sie darauf, dass er richtig eingerastet ist. Der Drehteller kann sich links oder rechts herum drehen.
F
5
Page 6
Vor dem ersten Benutzen
Hier erfahren Sie was Sie tun müssen, bevor Sie mit Ihrem Mikrowellengerät zum ersten Mal Speisen zubereiten. Lesen Sie
vorher das Kapitel Sicherheitshinweise.
Uhrzeit einstellen
Wenn das Gerät angeschlossen wurde oder nach einem Stromausfall leuchten im Anzeigefeld drei Nullen.
1. Taste » drücken.
In der Anzeige erscheint
über der Taste
2. Mit dem Drehwähler die Uhrzeit einstellen.
3. Taste » erneut drücken.
» leuchtet.
‚ƒ:‹‹ œ und die Anzeigelampe
Die Mikrowelle
Mikrowellen werden in Lebensmitteln in Wärme umgewandelt.
Sie erhalten Informationen zum Geschirr und können nachlesen
wie Sie die Mikrowelle einstellen.
Hinweis: Im Kapitel Für Sie in unserem Kochstudio getestet fin-
den Sie Beispiele zum Auftauen, Erhitzen und Garen mit Mikrowelle.
Probieren Sie die Mikrowelle doch gleich einmal aus. Erhitzen
Sie zum Beispiel eine Tasse Wasser für Ihren Tee.
Nehmen Sie eine große Tasse ohne Gold- oder Silberdekor und
geben Sie einen Teelöffel mit hinein. Stellen Sie die Tasse mit
dem Wasser auf den Drehteller.
1. Taste 900 W drücken.
2. Mit dem Drehwähler‚:„‹ min einstellen.
3. Taste ƒ drücken.
Nach 1 Minute 30 Sekunden ertönt ein Signal. Das Wasser für
den Tee ist heiß.
Während Sie den Tee trinken, lesen Sie bitte nochmals die
Sicherheitshinweise am Anfang der Gebrauchsanleitung. Sie
sind sehr wichtig.
Hinweise zum Geschirr
Geeignetes Geschirr
Geeignet ist hitzebeständiges Geschirr aus Glas, Glaskeramik,
Porzellan, Keramik oder temperaturfestem Kunststoff. Diese
Materialien lassen Mikrowellen durch.
Sie können auch Serviergeschirr verwenden. So sparen Sie
sich das Umfüllen. Benutzen Sie Geschirr mit Gold- oder Silberdekor nur, wenn der Hersteller garantiert, dass es für Mikrowellen geeignet ist.
Ungeeignetes Geschirr
Ungeeignet ist Metallgeschirr. Metall lässt Mikrowellen nicht
durch. Die Speisen bleiben in geschlossenen Metallgefäßen
kalt.
Achtung!
Funkenbildung: Metall - z. B. der Löffel im Glas - muss mindestens 2 cm von den Backofenwänden und der Türinnenseite entfernt sein. Funken könnten das innere Türglas zerstören.
Geschirrtest
Nie die Mikrowelle ohne Speisen einschalten. Einzige Ausnahme ist der nachfolgende Geschirrtest.
Wenn Sie unsicher sind, ob Ihr Geschirr mikrowellengeeignet
ist, machen Sie diesen Test:
Die aktuelle Uhrzeit ist eingestellt.
Ausblenden der Uhrzeit
» drücken und danach Taste „ drücken.
Taste
Die Anzeige ist dunkel.
Wiedereinstellen der Uhrzeit
» drücken.
Taste
In der Anzeige erscheint die Uhrzeit
in Punkt 2 und 3 beschrieben.
Ändern der Uhrzeit z. B. von Sommer- auf Winterzeit
Einstellen wie in Punkt 1 bis 3 beschrieben.
1. Leeres Geschirr für ½ bis 1 Minute bei maximaler Leistung in
das Gerät stellen.
2. Zwischendurch die Temperatur prüfen.
Das Geschirr soll kalt oder handwarm sein.
Wird es heiß oder entstehen Funken, ist es ungeeignet.
‚ƒ:‹‹. Dann einstellen wie
Mikrowellen-Leistungen
Mikrowellen-Leistung
90 W Auftauen empfindlicher Speisen
180 W Auftauen und Weitergaren
360 W Garen von Fleisch und zum Erwärmen
600 W Erhitzen und Garen von Speisen
900 W Erhitzen von Flüssigkeiten
Hinweis: Die Mikrowellen-Leistung 900 W können Sie für 30
Minuten einstellen, 600 W für 1 Stunde, die übrigen Leistungen
für jeweils 1 Stunde und 39 Minuten.
geeignet zum
empfindlicher Speisen
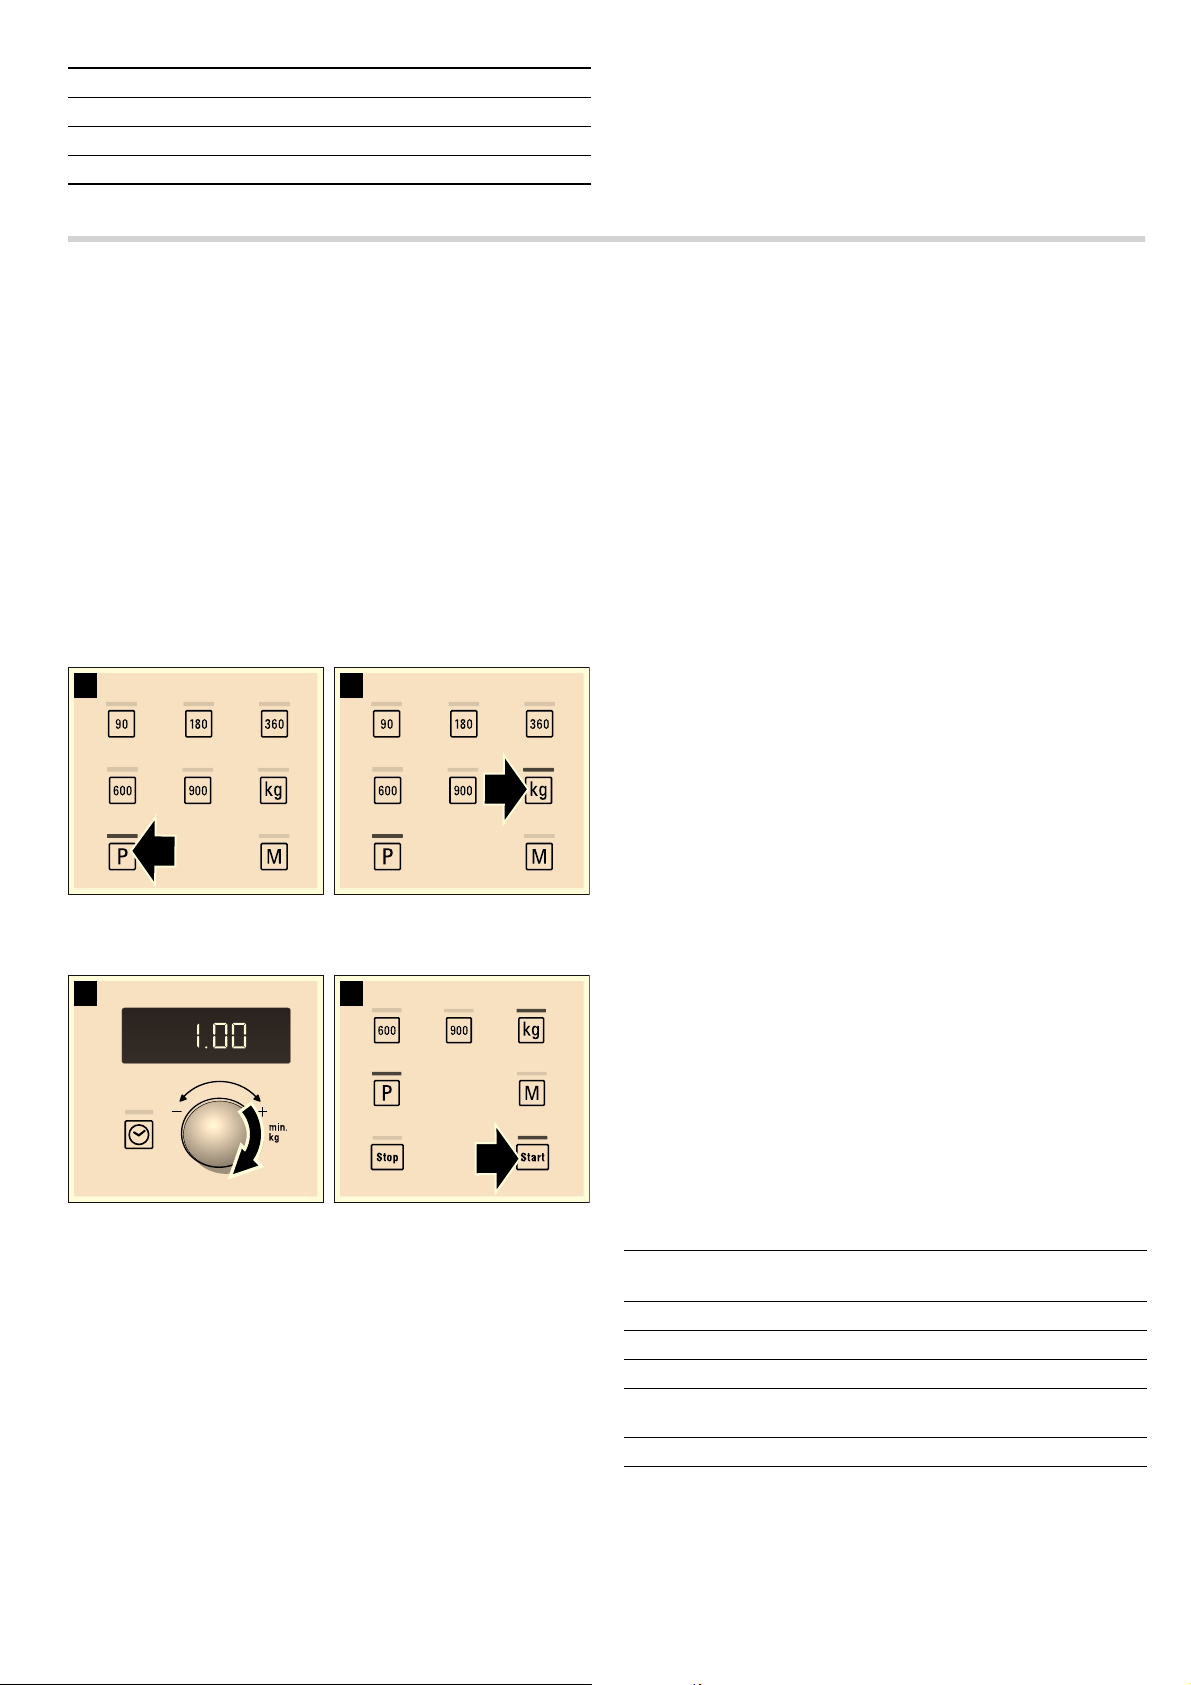
Mikrowelle einstellen
Beispiel Mikrowellen-Leistung 600 Watt, 5 Minuten
1. Gewünschte Mikrowellen-Leistung drücken.
Die Anzeigelampe über der Taste leuchtet.
2. Mit dem Drehwähler eine Dauer einstellen.
PLQ
PLQ
NJ
3. Taste ƒ drücken.
Die Dauer läuft sichtbar in der Anzeige ab.
Die Dauer ist abgelaufen
Ein Signal ertönt. Gerätetür öffnen oder
erscheint wieder.
„ drücken. Die Uhrzeit
6
Page 7
Dauer ändern
Das ist jederzeit möglich. Mit dem Drehwähler die Dauer verändern.
Anhalten
Taste
„ einmal drücken oder die Gerätetür öffnen. Der Betrieb
wird angehalten. Die Anzeige über Taste
Schließen wieder Taste
Betrieb abbrechen
„ 2 mal drücken oder Tür öffnen und Taste „ einmal
Taste
drücken.
Hinweis: Sie können auch zuerst die Dauer und dann die Mikrowellen-Leistung einstellen.
ƒ drücken.
ƒ blinkt. Nach dem
Memory
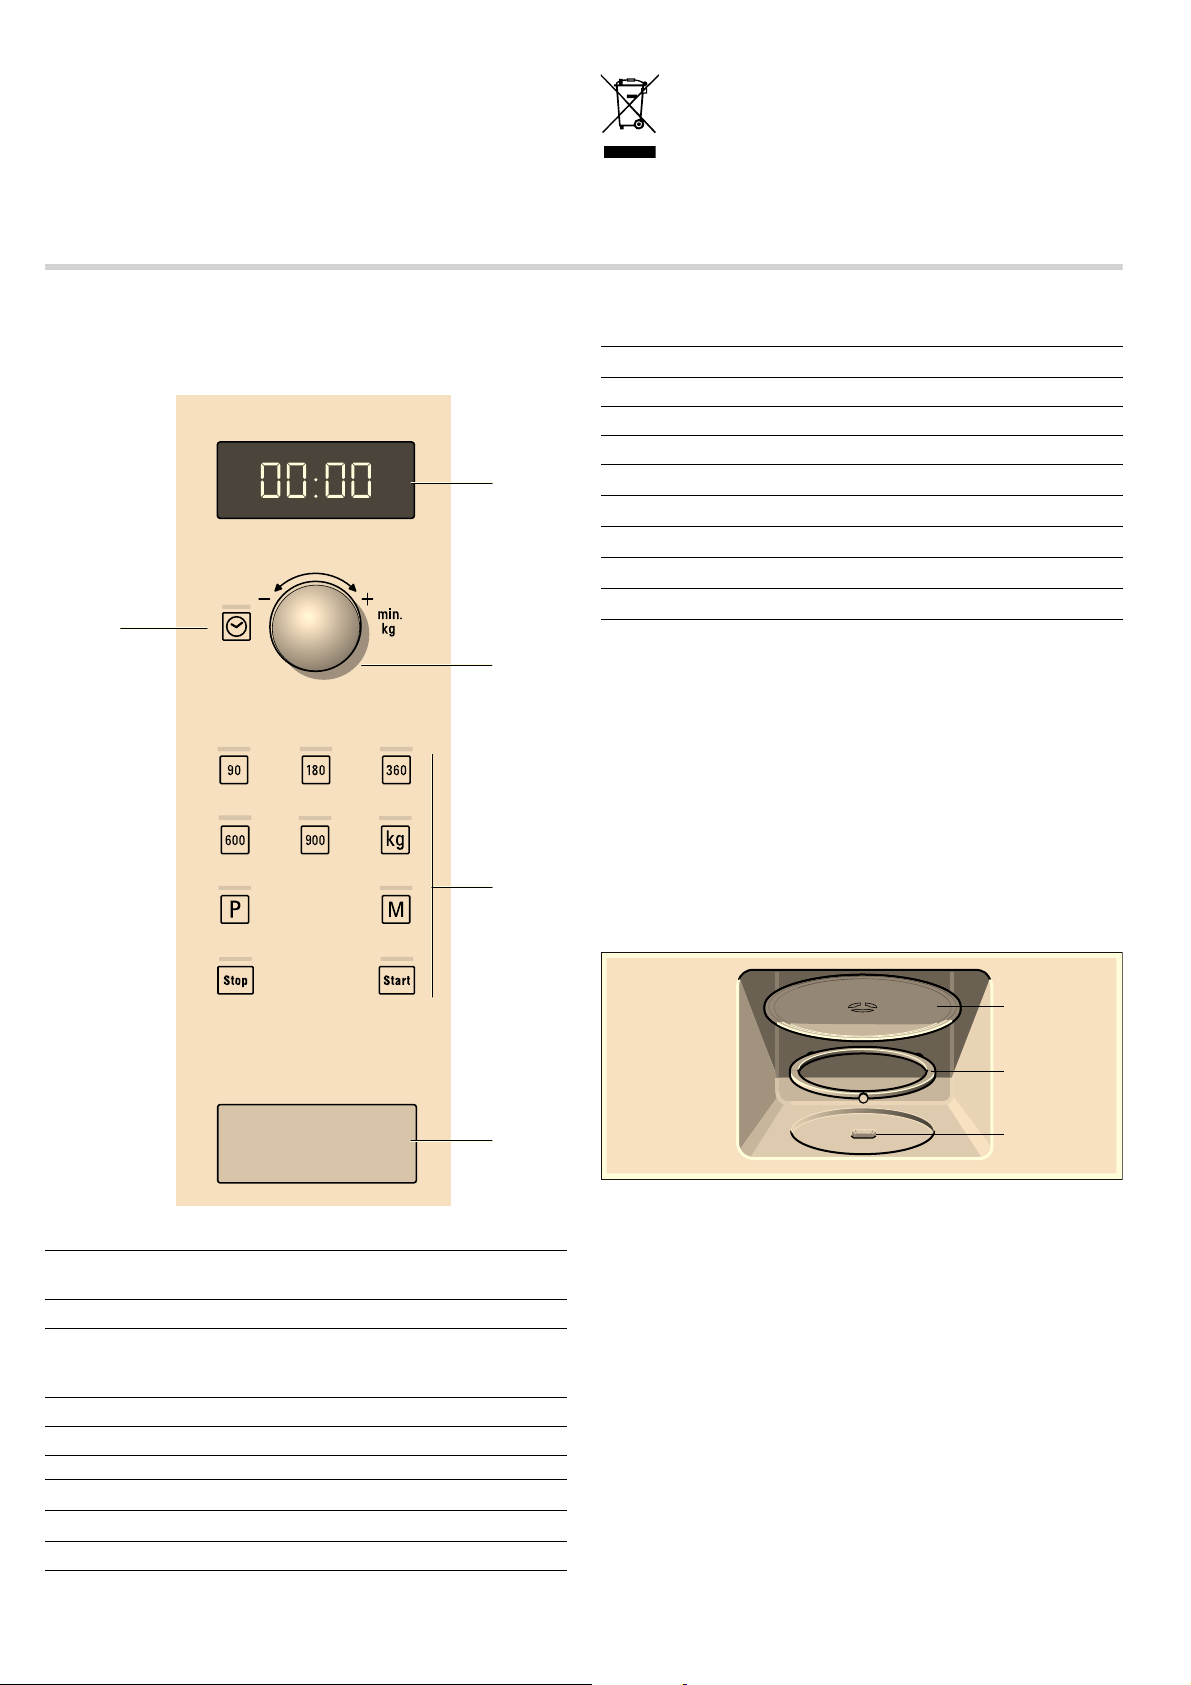
Kühlgebläse
Das Gerät ist mit einem Kühlgebläse ausgestattet. Das Gebläse
kann weiterlaufen, auch wenn das Gerät bereits ausgeschaltet
ist.
Hinweise
■ Beim Mikrowellen-Betrieb bleibt der Garraum kalt. Trotzdem
schaltet sich das Kühlgebläse ein. Es kann weiterlaufen auch
wenn der Mikrowellen-Betrieb bereits beendet ist.
■ An Türfenster, Innenwänden und Boden kann Kondenswas-
ser auftreten. Das ist normal, die Funktion der Mikrowellen
wird dadurch nicht beeinträchtigt. Wischen Sie das Kondenswasser nach dem Garen ab.
Mit Memory können Sie die Einstellung für ein Gericht speichern und jederzeit wieder abrufen.
Sinnvoll ist Memory, wenn Sie ein Gericht besonders häufig
zubereiten.
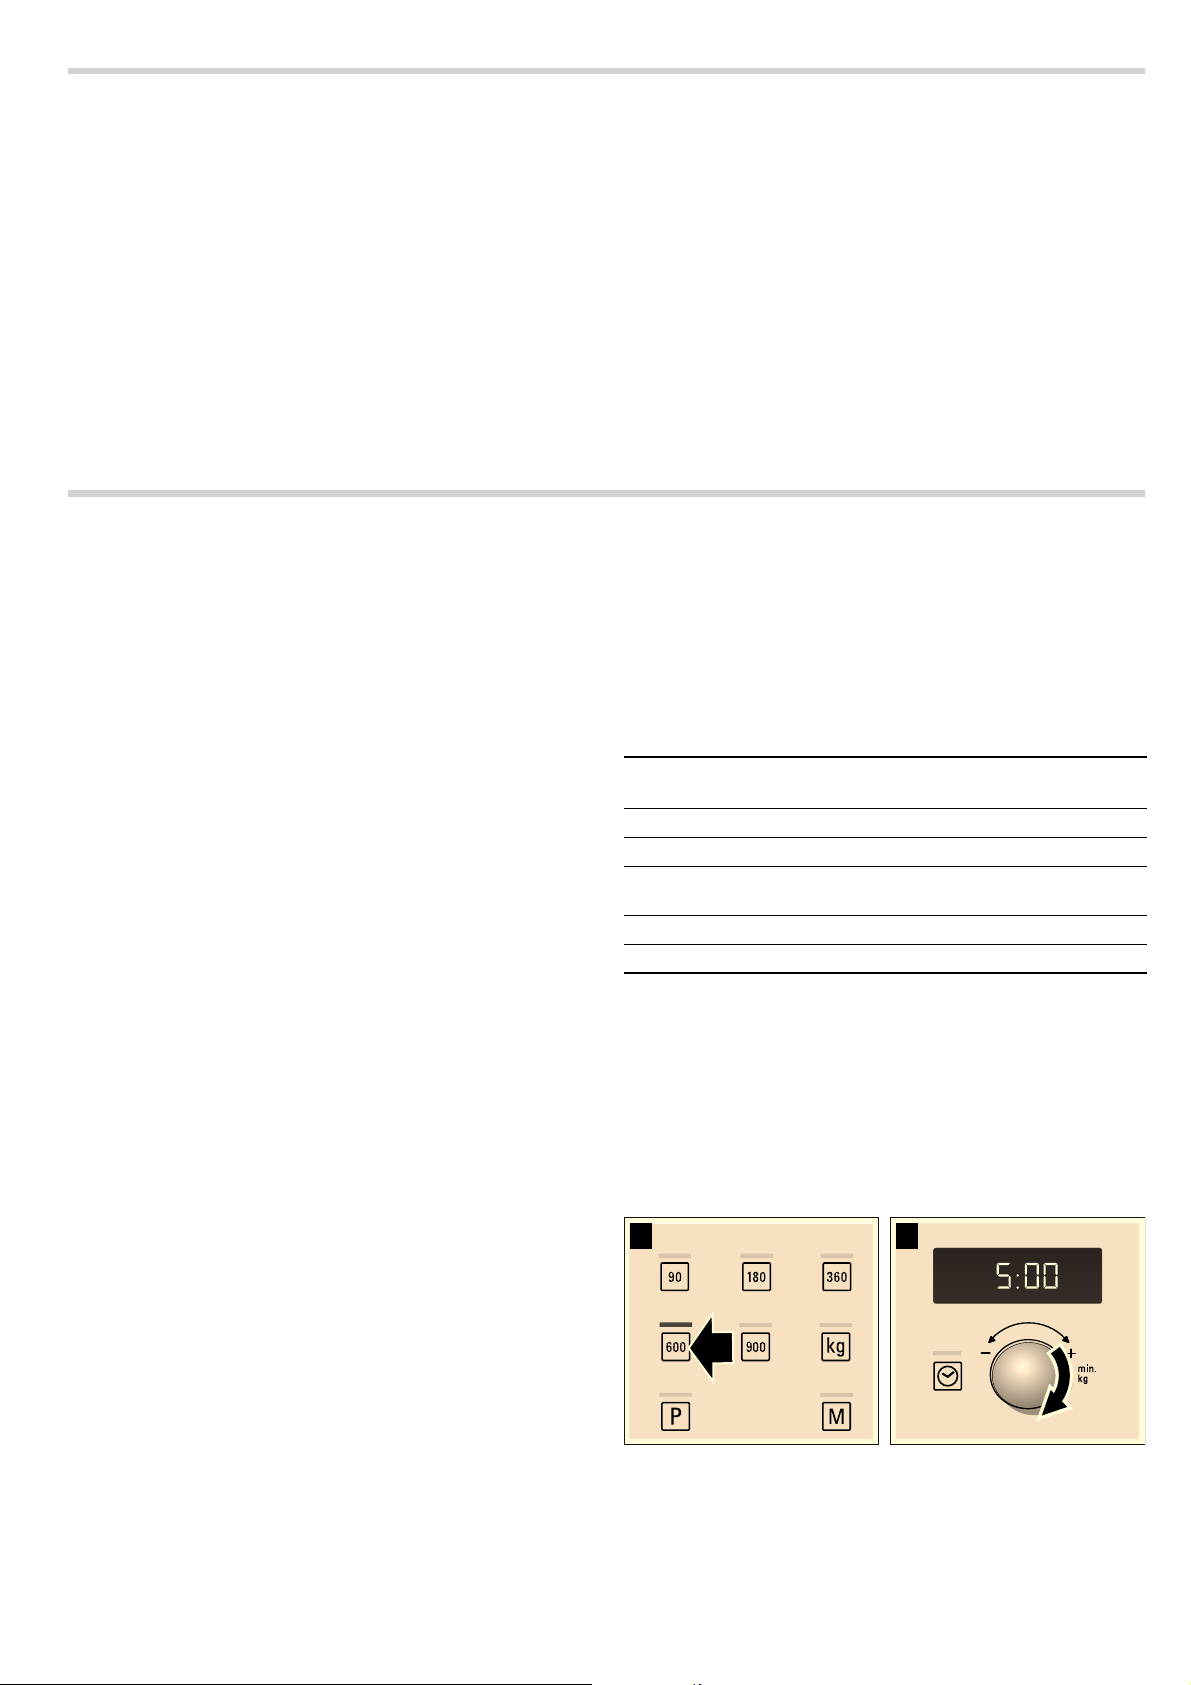
Memory speichern
Beispiel: 360 W, 25 Minuten
1. Taste l drücken.
Die Anzeigelampe über der Taste leuchtet.
2. Gewünschte Mikrowellen-Leistung drücken.
Die Anzeigelampe über der Taste leuchtet und in der Anzeige
erscheint 1:00 min.
3. Mit dem Drehwähler die Dauer einstellen.
PLQ
PLQ
PLQ
NJ
4. Mit Taste l bestätigen.
Die Uhrzeit erscheint wieder. Die Einstellung ist gespeichert.
Hinweise
■ Memory können Sie auch speichern und sofort starten. Drü-
cken Sie zum Schluss nicht
■ Mehrere Mikrowellen-Leistungen nacheinander können Sie
nicht speichern.
■ Automatik-Programme können Sie nicht speichern.
■ Memory neu belegen: Taste l drücken. Die alten Einstellun-
gen erscheinen. Speichern Sie das neue Programm wie in 1
bis 4 beschrieben.
l, sondern ƒ.
Memory Starten
Das gespeicherte Programm können Sie ganz einfach starten.
Stellen Sie Ihr Gericht ins Gerät. Schließen Sie die Gerätetür.
1. Taste l drücken.
Die gespeicherten Einstellungen erscheinen.
2. Taste ƒ drücken.
Die Dauer läuft sichtbar in der Anzeige ab.
Die Dauer ist abgelaufen
Ein Signal ertönt. Gerätetür öffnen oder
erscheint wieder.
Anhalten
„ einmal drücken oder die Gerätetür öffnen. Der Betrieb
Taste
wird angehalten. Die Anzeige über Taste
Schließen wieder Taste
Betrieb abbrechen
„ 2 mal drücken oder Tür öffnen und Taste „ einmal
Taste
drücken.
ƒ drücken.
„ drücken. Die Uhrzeit
ƒ blinkt. Nach dem
Signaldauer ändern
Wenn das Gerät ausschaltet, hören Sie ein Signal. Die Dauer
des Signaltons können Sie ändern.
Dazu drücken Sie ca. 6 Sekunden lang die Taste
ƒ.
Pflege und Reinigung
Bei sorgfältiger Pflege und Reinigung bleibt Ihr Mikrowellengerät lange schön und intakt. Wie Sie Ihr Gerät richtig pflegen und
Die neue Signaldauer wird übernommen.
Die Uhrzeit erscheint wieder.
Möglich sind:
Signaldauer kurz - 3 Töne
Signaldauer lang - 30 Töne.
reinigen, erklären wir Ihnen hier.
7
Page 8

: Kurzschlussgefahr!
Nie Hochdruck- oder Dampfreiniger für die Reinigung verwenden.
: Verbrennungsgefahr!
Nie das Gerät direkt nach dem Ausschalten reinigen. Gerät
auskühlen lassen.
: Stromschlaggefahr!
Nie das Gerät in Wasser tauchen oder unter einem Wasserstrahl reinigen.
Damit die unterscchiedlichen Oberflächen nicht durch falsche
Reinigungsmittel beschädigt werden, beachten Sie die Angaben in der Tabelle.
Verwenden Sie
■ keine scharfen oder scheuernden Reinigungsmittel.
Die Oberfläche kann beschädigt werden. Wenn so ein Mittel
auf die Vorderfront gelangt, wischen Sie er sofort mit Wasser
ab.
■ keine Metall- oder Glasschaber zur Reinigung des Glases an
der Gerätetür.
■ keine Metall- oder Glasschaber zur Reinigung der Dichtung.
■ keine harten Scheuerkissen und Putzschwämme.
Waschen Sie neue Schwammtücher vor Gebrauch gründlich
aus.
■ keine stark alkoholhaltigen Reinigungsmittel.
Reinigungsmittel
Achtung!
Vor dem Reinigen Netzstecker ziehen oder Sicherung im Sicherungskasten ausschalten. Gerät außen und den Garraum mit
einem feuchten Tuch und milderm Reinigungsmittel säubern.
Mit einem sauberen Tuch nachtrocknen.
Bereich Reinigungsmittel
Gerätefront Heiße Spüllauge:
Mit einem Spüllappen reinigen und
einem weichen Tuch nachtrocknen. Keinen Glasreiniger, Metall- oder Glasschaber zur Reinigung verwenden.
Bereich Reinigungsmittel
Gerätefront mit Edelstahl
Garraum aus Edelstahl
Vertiefung im Garraum
Drehteller und Rollenring
Türscheiben Glasreiniger:
Dichtung Heiße Spüllauge:
Heiße Spüllauge:
Mit einem Spüllappen reinigen und
einem weichen Tuch nachtrocknen.
Kalk-, Fett-, Stärke- und Eiweißflecken
sofort entfernen. Unter solchen Flecken
kann sich Korrosion bilden. Beim Kundendienst oder im Fachhandel sind spezielle Edelstahlreiniger erhältlich. Keinen
Glasreiniger, Metall- oder Glasschaber
zur Reinigung verwenden.
Heiße Spüllauge oder Essigwasser:
Mit einem Spüllappen reinigen und
einem weichen Tuch nachtrocknen.
Bei starker Verschmutzung: Backofenreiniger, nur im kalten Garraum benutzen. Am besten verwenden Sie einen
Edelstahl-Schwamm. Benutzen Sie kein
Backofenspray und keine anderen
aggressiven Backofenreiniger oder
Scheuermittel. Auch Scheuerkissen,
raue Schwämme und Topfreiniger sind
ungeeignet. Diese Mittel verkratzen die
Oberfläche. Innenflächen gründlich
trocknen lassen.
Feuchtes Tuch:
Es darf kein Wasser durch den Drehtellerantrieb in das Geräte-Innere laufen.
Heiße Spüllauge:
Wenn Sie den Drehteller wieder einsetzen, muss er richtig einrasten.
Mit einem Spüllappen reinigen. Keinen
Glasschaber benutzen.
Mit einem Spüllappen reinigen, nicht
scheuern. Keinen Metall- oder Glasschaber zur Reinigung verwenden.
Störungstabelle
Wenn eine Störung auftritt, liegt es oft nur an einer Kleinigkeit.
Bevor Sie den Kundendienst rufen, versuchen Sie bitte, mit
Hilfe der Tabelle, die Störung selbst zu beheben.
Wenn einmal ein Gericht nicht optimal gelingt, sehen Sie im
Kapitel Für Sie in unserem Kochstudio getestet nach. Dort finden Sie viele Tipps und Hinweise zum Kochen.
: Stromschlaggefahr!
Unsachgemäße Reparaturen sind gefährlich. Nur ein von uns
geschulter Kundendienst-Techniker darf Reparaturen durchführen.
8
Bei einigen Fehlermeldungen können Sie selbst Abhilfe schaffen.
Page 9

Eine Störung, was tun?
Fehlermeldung Mögliche Ursache Abhilfe / Hinweis
Das Gerät funktioniert nicht Stecker wurde nicht eingesteckt. Stecker einstecken
Stromausfall Prüfen Sie, ob die Küchenlampe funktio-
Sicherung defekt Sehen Sie im Sicherungskasten nach, ob
Fehlbedienung Sicherung im Sicherungskasten ausschal-
In der Anzeige leuchten drei Nullen. Stromausfall Stellen Sie Uhrzeit neu ein.
Das Gerät ist nicht in Betrieb. In der
Anzeige steht eine Dauer.
Die Mikrowelle funktioniert nicht. Die Tür wurde nicht ganz geschlossen. Prüfen Sie, ob Speisereste oder ein Fremd-
Die Speisen werden langsamer heiß
als bisher
Der Drehteller gibt ein kratzendes
oder schleifendes Geräusch von
sich.
Der Mikrowellen-Betrieb wird ohne
erkennbaren Grund abgebrochen.
In der Anzeige steht ein “M”. Das Gerät befindet sich im Demomodus.
Der Drehwähler wurde versehentlich betätigt.
Nach dem Einstellen wurde Taste
gedrückt.
Taste
ƒ wurde nicht gedrückt. Drücken Sie die Taste ƒ.
Es wurde eine zu kleine Mikrowellen-Leistung
eingestellt.
Es wurde eine größere Menge als sonst in das
Gerät gegeben.
Die Speisen waren kälter als sonst. Speisen zwischendurch umrühren oder
Schmutz oder Fremdköper im Bereich des
Drehtellerantriebes.
Die Mikrowelle hat eine Störung. Tritt dieser Fehler wiederholt auf, rufen Sie
ƒ nicht
niert.
die Sicherung für das Gerät in Ordnung ist.
ten. Nach ca. 10 Sekunden wieder einschalten.
Drücken Sie die Taste
Drücken Sie die Taste ƒ oder löschen Sie
die Einstellung mit Taste
körper in der Tür klemmen.
Wählen Sie eine höhere Mikrowellen-Leistung.
Doppelte Menge - doppelte Zeit.
wenden.
Rollenring und Vertiefung im Garraum rei-
nigen.
den Kundendienst.
Taste
ƒ und Taste „ ca. 7 Sekunden
gedrückt hatlen.
Der Demomodus ist deaktiviert.
„.
„.
Kundendienst
Wenn Ihr Gerät repariert werden muss, ist unser Kundendienst
für Sie da. Wir finden immer eine passende Lösung, auch um
unnötige Technikerbesuche zu vermeiden.
E-Nummer und FD-Nummer
Geben Sie beim Anruf bitte die Erzeugnisnummer (E-Nr.) und
die Fertigungsnummer (FD-Nr.) an, damit wir Sie qualifiziert
betreuen können. Das Typenschild mit den Nummern finden
Sie, wenn Sie die Gerätetür öffnen, rechts. Damit Sie bei Bedarf
nicht lange suchen müssen, können Sie hier die Daten Ihres
Gerätes und die Telefonnummer des Kundendienstes eintragen.
E-Nr.
Kundendienst
Beachten Sie, dass der Besuch des Servicetechnikers im Falle
einer Fehlbedienung auch während der Garantiezeit nicht kostenlos ist.
Die Kontaktdaten aller Länder für den nächstgelegenen Kundendienst finden Sie hier bzw. im beiliegenden KundendienstVerzeichnis.
O
FD-Nr.
Reparaturauftrag und Beratung bei Störungen
A 0810 550 544
D 089 12 474 474
CH 0848 840 040
Vertrauen Sie auf die Kompetenz des Herstellers. Sie stellen
somit sicher, dass die Reparatur von geschulten Servicetechnikern durchgeführt wird, die mit den Original-Ersatzteilen für Ihr
Hausgerät ausgerüstet sind.
Dieses Gerät entspricht der Norm EN 55011 bzw. CISPR 11.
Es ist ein Produkt der Gruppe 2, Klasse B.
Gruppe 2 bedeutet, dass Mikrowellen zum Zweck der Erwärmung von Lebensmitteln erzeugt werden. Klasse B besagt,
dass das Gerät für die private Haushaltsumgebung geeignet
ist.
Technische Daten
Eingangsspannung AC 220 - 230 V, 50 Hz
Leistungsverbrauch 1270 W
Maximale Ausgangsleistung 900 W
Mikrowellen Frequenz 2450 MHz
Absicherung 10 A
Abmessungen (HxBxT)
- Gerät 382 mm x 594 mm x 388 mm
9
Page 10
- Garraum 208 mm x 328 mm x 369 mm
VDE-geprüft ja
CE-Zeichen ja
Programm-Automatik
Mit der Programmautomatik können Sie ganz einfach Lebensmittel auftauen und Speisen schnell und problemlos zubereiten.
Sie wählen das Programm und geben das Gewicht Ihrer Speise
ein. Die optimale Einstellung übernimmt die Programmautomatik. Sie können unter 7 Programmen auswählen.
Programm einstellen
Wenn Sie ein Programm gewählt haben, stellen Sie wie folgt
ein:
1. Taste X so oft drücken, bis die gewünschte Programm-Num-
mer erscheint.
Die Anzeige über der Taste leuchtet.
2. Taste ¼ drücken.
Die Anzeigelampe über der Taste leuchtet und ein Vorschlagsgewicht erscheint.
3. Mit dem Drehwähler das Gewicht der Speise einstellen.
4. Taste ƒ drücken.
PLQ
PLQ
NJ
Die Dauer für das Programm läuft sichtbar ab.
Die Dauer ist abgelaufen
Ein Signal ertönt. Gerätetür öffnen oder „ drücken. Die Uhrzeit
erscheint wieder.
Korrektur
Zweimal Taste
Anhalten
„ einmal drücken oder die Gerätetür öffnen. Der Betrieb
Taste
wird angehalten. Die Anzeige über Taste
Schließen wieder Taste
Betrieb abbrechen
„ 2 mal drücken oder Tür öffnen und Taste „ einmal
Taste
drücken.
„ drücken und neu einstellen.
ƒ blinkt. Nach dem
ƒ drücken.
Hinweise
■ Bei einigen Programmen ertönt nach einer bestimmten Zeit
ein Signal. Öffnen Sie die Gerätetür und rühren Sie die Speisen um, bzw. wenden Sie das Fleisch oder Geflügel. Nach
dem Schließen wieder Taste
■ Programm-Nummer und Gewicht können Sie mit X bzw. ¼
ƒ drücken.
abfragen. Der abgefragte Wert erscheint für 3 Sekunden in
der Anzeige.
Auftauen mit der Programmautomatik
Mit den 4 Auftauprogrammen können Sie Fleisch, Geflügel und
Brot auftauen.
Hinweise
■ Lebensmittel vorbereiten
Verwenden Sie Lebensmittel, die möglichst flach und portionsgerecht bei -18 ºC eingefroren und gelagert wurden.
Nehmen Sie das Lebensmittel zum Auftauen grundsätzlich
aus der Verpackung und wiegen Sie es ab. Das Gewicht
benötigen Sie zum Einstellen des Programmes.
■ Beim Auftauen von Fleisch und Geflügel entsteht Flüssigkeit.
Diese beim Wenden entfernen und in keinem Fall weiterverwenden oder mit anderen Lebensmitteln in Berührung bringen.
■ Geschirr
Geben Sie das Lebensmittel auf ein mikrowellengeeignetes,
flaches Geschirr, z. B. einen Glas- oder Porzellanteller und
legen Sie keinen Deckel auf.
■ Ruhezeit
Das aufgetaute Lebensmittel sollte zum Temperaturausgleich
noch 10 bis 30 Minuten ruhen. Große Fleischstücke benötigen eine längere Ruhezeit als kleine. Flache Stücke und
Hackfleisch sollten Sie vor der Ruhezeit voneinander trennen.
Danach können Sie die Lebensmittel weiter verarbeiten, auch
wenn dicke Fleischstücke evtl. noch einen gefrorenen Kern
haben. Bei Geflügel können Sie jetzt die Innereien herausnehmen.
■ Signal
Bei einigen Programmen ertönt nach einer bestimmten Zeit
ein Signal. Öffnen Sie die Gerätetür und zerteilen Sie die
Speisen, bzw. wenden Sie das Fleisch oder Geflügel. Nach
dem Schließen Taste Start drücken.
Programm-Nr. Gewichtsbereich in
kg
Auftauen
P 01 Hackfleisch 0,20 - 1,00
P 02 Fleischstücke 0,20 - 1,00
P 03
Hähnchen, Hänchenteile
0,40 - 1,80
P 04 Brot 0,20 - 1,00
Garen mit der Programmautomatik
Mit den 3 Garprogrammen können Sie Reis, Kartoffeln oder
Gemüse garen.
10
Page 11

Hinweise
■ Geschirr
Garen Sie das Lebensmittel grundsätzlich in einem mikrowellengeeigneten Geschirr mit Deckel. Für Reis sollten Sie eine
große, hohe Form benutzen.
■ Lebensmittel vorbereiten
Wiegen Sie das Lebensmittel ab. Sie benötigen die Angabe
zum Einstellen des Programmes.
Reis:
Verwenden Sie keinen Kochbeutel-Reis. Geben Sie die erforderliche Wassermenge laut Herstellerangabe auf der Verpackung zu. Normalerweise ist das die zwei- bis dreifache
Menge des Reisgewichts.
Kartoffeln:
das Gemüse in kleine, gleichmäßige Stücke. Geben Sie pro
100 g Gemüse einen EL Wasser zu.
■ Signal
Während das Programm abläuft, ertönt nach einiger Zeit ein
Signal. Rühren Sie das Lebensmittel um.
■ Ruhezeit
Wenn das Programm abgelaufen ist, rühren Sie das Lebensmittel noch einmal um. Zum Temperaturausgleich sollte es
noch 5 bis 10 Minuten ruhen.
Die Garergebnisse sind abhängig von Lebensmittelqualität
und -beschaffenheit.
Programm-Nr. Gewichtsbereich in kg
Für Salzkartoffeln schneiden Sie die frischen Kartoffeln in
kleine, gleichmäßige Stücke. Geben Sie pro 100 g Salzkartoffeln einen EL Wasser und etwas Salz zu.
Frisches Gemüse:
Wiegen Sie das frische, geputzte Gemüse ab. Schneiden Sie
P 05 Reis 0,05 - 0,2
P 06 Kartoffeln 0,15 - 1,0
P 07 Gemüse 0,15 - 1,0
Für Sie in unserem Kochstudio getestet
Garen
Hier finden Sie eine Auswahl an Gerichten und die optimalen
Einstellungen dazu. Wir zeigen Ihnen, welche Mikrowellen-Leistung für Ihr Gericht am besten geeignet ist. Sie bekommen
Tipps zum Geschirr und zur Zubereitung.
Auftauen
Hinweise
■ Geben Sie die gefrorenen Lebensmittel in einem offenen
Gefäß auf den Drehteller.
Hinweise zu den Tabellen
In den folgenden Tabellen finden Sie viele Möglichkeiten und
Einstellwerte zur Mikrowelle.
Die Zeitangaben in den Tabellen sind Richtwerte. Sie sind
abhängig vom Geschirr, von der Qualität, Temperatur und
Beschaffenheit der Lebensmittel.
In den Tabellen sind häufig Zeitbereiche angegeben. Stellen
Sie zuerst die kürzere Zeit ein und verlängern Sie, wenn es
erforderlich ist.
Es kann sein, dass Sie andere Mengen haben, als in den Tabellen angegeben. Dafür gibt es eine Faustregel:
Doppelte Menge - fast doppelte Dauer
halbe Menge - halbe Dauer.
Stellen Sie das Geschirr immer auf den Drehteller.
■ Empfindliche Teile wie z. B. Beine und Flügel von Hähnchen
oder fette Randpartien von Braten können Sie mit kleinen Stücken Alufolie abdecken. Die Folie darf die Backofenwände
nicht berühren. Nach der Hälfte der Auftauzeit können Sie die
Alufolie abnehmen.
■ Beim Auftauen von Fleisch und Geflügel entsteht Flüssigkeit.
Diese beim Wenden entfernen und in keinem Fall weiterverwenden oder mit anderen Lebensmitteln in Berührung bringen.
■ Die Speisen zwischendurch 1 bis 2 mal wenden oder umrüh-
ren. Große Stücke sollten Sie mehrmals wenden.
■ Lassen Sie das Aufgetaute noch 10 bis 20 Minuten bei
Raumtemperatur ruhen, damit sich die Temperatur ausgleicht. Beim Geflügel können Sie dann die Innereien herausnehmen. Das Fleisch kann auch mit einem kleinen
gefrorenen Kern weiterverarbeitet werden.
Auftauen Gewicht Mikrowellen-Leistung in Watt, Dauer in
Hinweie
Minuten
Fleisch im Ganzen vom Rind, Kalb
oder Schwein (mit und ohne Knochen)
800 g 180 W, 15 Min. + 90 W, 10-20 Min. 1 kg 180 W, 20 Min. + 90 W, 15-25 Min.
1,5 kg 180 W, 30 Min.+ 90 W, 20-30 Min.
Fleisch in Stücken oder Scheiben
vom Rind, Kalb oder Schwein
200 g 180 W, 2 Min. + 90 W, 4-6 Min. beim Wenden die aufgetauten Teile
500 g 180 W, 5 Min. + 90 W, 5-10 Min.
voneinander trennen
800 g 180 W, 8 Min. + 90 W, 10-15 Min.
Hackfleisch, gemischt 200 g 90 W, 10 Min. möglichst flach einfrieren
500 g 180 W, 5 Min. + 90 W, 10-15 Min.
mehrmals wenden, bereits aufgetautes
Fleisch entfernen
800 g 180 W, 8 Min. + 90 W, 10-20 Min.
Geflügel oder Geflügelteile 600 g 180 W, 8 Min. + 90 W, 10-15 Min. -
1,2 kg 180 W, 15 Min. + 90 W, 20-25 Min.
Fischfilet, Fischkotelett oder Schei-
400 g 180 W, 5 Min. + 90 W, 10-15 Min. aufgetaute Teile voneinander trennen
ben
Gemüse, z. B. Erbsen 300 g 180 W, 10-15 Min. Obst, z. B. Himbeeren 300 g 180 W, 7-10 Min. zwischendurch vorsichtig umrühren,
500 g 180 W, 8 Min. + 90 W, 5-10 Min.
aufgetaute Teile voneinander trennen
11
Page 12
Auftauen Gewicht Mikrowellen-Leistung in Watt, Dauer in
Hinweie
Minuten
Butter, antauen 125 g 180 W, 1 Min. + 90 W, 2-3 Min. Verpackung vollständig entfernen
250 g 180 W, 1Min. + 90 W, 3-4 Min.
Brot im Ganzen 500 g 180 W, 6 Min. + 90 W, 5-10 Min. -
1 kg 180 W, 12 Min. + 90 W, 10-20 Min.
Kuchen, trocken, z. B. Rührkuchen 500 g 90 W, 10-15 Min. nur für Kuchen ohne Glasur, Sahne
oder Creme, Kuchenstücke voneinander trennen
oder Gelatine
Kuchen, saftig, z. B. Obstkuchen,
Quarkkuchen
750 g 180 W, 5 Min. + 90 W, 10-15 Min.
500 g 180 W, 5 Min. + 90 W, 15-20 Min. nur für Kuchen ohne Glasur, Sahne
750 g 180 W, 7 Min. + 90 W, 15-20 Min.
Auftauen, Erhitzen oder Garen tiefgefrorener Speisen
Hinweise
■ Nehmen Sie Fertiggerichte aus der Verpackung. Im mikrowel-
lengeeigneten Geschirr erwärmen sie sich schneller und
gleichmäßiger. Verschiedene Speisenkomponenten können
sich unterschiedlich schnell erwärmen.
■ Flache Speisen garen schneller als hohe. Verteilen Sie die
Speisen daher möglichst flach im Geschirr. Lebensmittel sollten Sie nicht übereinander schichten.
■ Decken Sie die Speisen immer zu. Wenn Sie keinen passen-
den Deckel für ihr Geschirr haben, nehmen Sie einen Teller
oder Mikrowellen-Spezialfolie.
■ Die Speisen sollten Sie zwischendurch 2 bis 3 mal umrühren
bzw. wenden.
■ Lassen Sie die Gerichte nach dem Erhitzen noch 2 bis
5 Minuten zum Temperaturausgleich ruhen.
■ Benutzen Sie immer Topfhandschuhe oder Topflappen, wenn
Sie das Geschirr herausnehmen.
■ Der Eigengeschmack der Speisen bleibt weitgehend erhal-
ten. Deshalb können Sie mit Salz und Gewürzen sparsam
umgehen.
Auftauen, Erhitzen oder Garen tiefgefrorener Speisen
Menü, Tellergericht, Fertiggericht
Gewicht Mikrowellen-Leistung in Watt,
Dauer in Minuten
300-400 g 600 W, 8-11 Min. -
Hinweise
(2-3 Komponenten)
Suppe 400 g 600 W, 8-10 Min. Eintöpfe 500 g 600 W, 10-13 Min. Fleischscheiben oder -stücke in Soße,
z. B. Gulasch
500 g 600 W, 12-17 Min. beim Umrühren die Fleischstücke von-
einander trennen
Fisch, z. B. Filetstücke 400 g 600 W, 10-15 Min. evtl. Wasser, Zitronensaft oder Wein
zugeben
Aufläufe, z. B. Lasagne, Cannelloni 450 g 600 W, 10 - 15 Min. Beilagen, z. B. Reis, Nudeln 250 g 600 W, 2-5 Min. etwas Flüssigkeit zugeben
500 g 600 W, 8-10 Min.
Gemüse, z. B. Erbsen, Brokkoli, Möhren
300 g 600 W, 8-10 Min. im Geschirr bodenbedeckt Wasser
600 g 600 W, 14-17 Min.
zugeben
Rahmspinat 450 g 600 W, 11-16 Min. ohne Zugabe von Wasser garen
Speisen erhitzen
: Verbrühungsgefahr!
Beim Erhitzen von Flüssigkeiten kann es zu Siedeverzug kommen. Das heißt, die Siedetemperatur wird erreicht, ohne dass
die typischen Dampfblasen aufsteigen. Schon bei geringer
Erschütterung des Gefäßes kann die heiße Flüssigkeit plötzlich
heftig überkochen und verspritzen. Geben Sie beim Erhitzen
von Flüssigkeit immer einen Löffel mit in das Gefäß. So vermeiden Sie Siedeverzug.
12
Achtung!
Metall - z. B. der Löffel im Glas - muss mindestens 2 cm von
den Backofenwänden und der Türinnenseite entfernt sein. Funken könnten das innere Türglas zerstören.
Hinweise
■ Nehmen Sie Fertiggerichte aus der Verpackung. Im mikrowel-
lengeeigneten Geschirr erwärmen sie sich schneller und
gleichmäßiger. Verschiedene Speisenkomponenten können
sich unterschiedlich schnell erwärmen.
■ Decken Sie die Speisen immer zu. Wenn Sie keinen passen-
den Deckel für ihr Gefäß haben, nehmen Sie einen Teller
oder Mikrowellen-Spezialfolie.
■ Die Speisen sollten Sie zwischendurch mehrmals umrühren
bzw. wenden. Kontrollieren Sie die Temperatur.
■ Lassen Sie die Gerichte nach dem Erhitzen noch 2 bis
5 Minuten zum Temperaturausgleich ruhen.
■ Benutzen Sie immer Topfhandschuhe bzw. Topflappen, wenn
Sie das Geschirr herausnehmen.
Page 13

Speisen erhitzen Gewicht Mikrowellen-Leistung in Watt,
Hinweise
Dauer in Minuten
Menü, Tellergericht, Fertiggericht
350-500 g 600 W, 4-8 Min. -
2-3 Komponenten)
Getränke 150 ml 800 W, 1-2 Min. Löffel ins Glas geben, alkoholische Getränke
300 ml 800 W, 2-3 Min.
nicht überhitzen; zwischendurch kontrollieren
500 ml 800 W, 3-4 Min.
Babykost, z. B. Milchfläschchen 50 ml 360 W, ca. ½ Min. Ohne Sauger oder Deckel. Nach dem Erhit-
100 ml 360 W, ca. 1 Min.
200 ml
360 W, 1
^ Min.
zen immer gut schütteln. Unbedingt die Temperatur kontrollieren!
Suppe 1 Tasse 200 g 600 W, 2-3 Min. Suppe 2 Tassen 400 g 600 W, 4-5 Min. Fleisch in Soße 500 g 600 W, 8-11 Min. Fleischscheiben voneinander trennen
Eintopf 400 g 600 W, 6-8 Min. -
800 g 600 W, 8-11 Min. Gemüse, 1 Portion 150 g 600 W, 2-3 Min. etwas Flüssiegkeit zugeben
Gemüse, 2 Portionen 300 g 600 W, 3-5 Min.
Speisen garen
Hinweise
■ Flache Speisen garen schneller als hohe. Verteilen Sie die
Speisen daher möglichst flach im Geschirr. Lebensmittel sollten Sie nicht übereinander schichten.
■ Garen Sie die Speisen im geschlossenen Geschirr. Wenn Sie
keinen passenden Deckel für Ihr Geschirr haben, nehmen Sie
■ Der Eigengeschmack der Speisen bleibt weitgehend erhal-
ten. Deshalb können Sie mit Salz und Gewürzen sparsam
umgehen.
■ Lassen Sie die Gerichte nach dem Garen noch 2 bis
5 Minuten zum Temperaturausgleich ruhen.
■ Benutzen Sie immer Topfhandschuhe bzw. Topflappen, wenn
Sie das Geschirr herausnehmen.
einen Teller oder Mikrowellen-Spezialfolie.
Speisen garen Gewicht Mikrowellen-Leistung in Watt,
Hinweise
Dauer in Minuten
Hackbraten 750 g 600 W, 20-25 Min. offen garen
Ganzes Hähnchen, frisch, ohne
1,2 kg 600 W, 25-30 Min. nach der Hälfte der Zeit wenden
Innereien
Gemüse, frisch 250 g 600 W, 5-10 Min. Gemüse in gleich große Stücke schneiden;
500 g 600 W, 10-15 Min.
je 100 g Gemüse 1 bis 2 EL Wasser zugeben;
zwischendurch umrühren
Kartoffeln 250 g 600 W, 8-10 Min. Kartoffeln in gleich große Stücke schneiden;
500 g 600 W, 11-14 Min.
je 100 g 1 bis 2 EL Wasser zugeben;
zwischendurch umrühren
750 g 600 W, 15-22 Min.
Reis 125 g 600 W, 5-7 Min. +
doppelte Menge Flüssigkeit zugeben
180 W, 12-15 Min.
250 g 600 W, 6-8 Min. +
180 W, 15-18 Min.
Süßspeisen, z. B. Pudding (Instant) 500 ml 600 W, 6-8 Min. Pudding zwischendurch mit dem Schneebesen
2 bis 3 mal gut umrühren
Obst, Kompott 500 g 600 W, 9-12 Min. -
Tipps zur Mikrowelle
Sie finden für die vorbereitete Speisenmenge keine Einstellangabe.
Die Speise ist zu trocken geworden. Stellen Sie beim nächsten Mal eine kürzere Garzeit ein oder wählen
Die Speise ist nach Ablauf der Zeit noch nicht aufgetaut, heißoder gar.
Nach Ablauf der Garzeit ist die Speise am Rand überhitzt, in
der Mitte aber noch nicht fertig.
Verlängern oder verkürzen Sie die Garzeiten nach folgender Faustregel:
Doppelte Menge = fast doppelte Zeit
halbe Menge = halbe Zeit
Sie eine niedrigere Mikrowellen-Leistung. Decken Sie die Speise ab
und geben Sie mehr Flüssigkeit dazu.
Stellen Sie eine längere Zeit ein. Größere Mengen und höhere Speisen brauchen länger.
Rühren Sie zwischendurch um und wählen Sie beim nächsten Mal
eine niedrigere Leistung und eine längere Dauer.
13
Page 14

Nach dem Auftauen ist das Geflügel oder Fleisch außen angegart, in der Mitte aber noch nicht aufgetaut.
Wählen Sie beim nächsten Mal eine kleinere Mikrowellen-Leistung.
Wenden Sie das Auftaugut bei großen Mengen auch mehrmals.
Kondenswasser
An Türfenster, Innenwänden und Boden kann sich Kondenswasser bilden. Das ist normal. Die Funktion der Mikrowelle wird
dadurch nicht beeinträchtigt. Wischen Sie das Kondenswasser
nach dem Garen heraus.
Prüfgerichte nach EN 60705
Qualität und Funktion von Mikrowellengeräten werden von Prüfinstituten anhand dieser Gerichte geprüft.
Nach Norm EN 60705, IEC 60705 bzw. DIN 44547 und
EN 60350 (2009)
Garen und Auftauen mit Mikrowelle
Garen mit Mikrowelle
Gericht Mikrowellen-Leistung Watt, Dauer in Minuten Hinweis
Eiermilch, 565 g 180 W, 25-30 Min. + 90 W, 20-25 Min. Pyrexform 20 x 17 cm auf den Drehteller stellen.
Biskuit 600 W, 8-10 Min. Pyrexform Ø 22 cm auf den Drehteller stellen.
Hackbraten 600 W, 20-25 Min. Pyrexform auf den Drehteller stellen.
Auftauen mit Mikrowelle
Gericht Mikrowellen-Leistung Watt, Dauer in Minuten Hinweis
Fleisch 180 W, 5-7 Min. + 90 W, 10-15 Min. Pyrexform Ø 22 cm auf den Drehteller stellen.
14
Page 15

Ú Table of contents
[en]Instruction manual
Important safety information................................................... 15
Causes of damage .......................................................................... 17
Installation and connection.....................................................17
Energy and environment tips..................................................17
Saving energy................................................................................... 17
Environmentally-friendly disposal.................................................. 17
The control panel .....................................................................18
Rotary selector ................................................................................. 18
Accessories ......................................................................................18
Before using the appliance for the first time .........................18
Setting the clock .............................................................................. 18
The microwave..........................................................................19
Notes regarding ovenware............................................................. 19
Microwave power settings.............................................................. 19
Setting the microwave..................................................................... 19
Cooling fan........................................................................................ 20
Memory......................................................................................20
Saving memory settings ................................................................. 20
Starting the memory........................................................................ 20
Changing the signal duration..................................................20
Care and cleaning ....................................................................20
Cleaning agents ...............................................................................21
Malfunction table......................................................................21
After-sales service ...................................................................22
E number and FD number ............................................................. 22
Technical data .................................................................................. 22
Automatic programmes ...........................................................22
Setting a programme ...................................................................... 22
Defrosting using the automatic programmes............................. 23
Cooking with the automatic programmes................................... 23
Tested for you in our cooking studio .....................................24
Information regarding the tables................................................... 24
Defrost................................................................................................ 24
Defrosting, heating up or cooking frozen food .......................... 24
Heating food ..................................................................................... 25
Cooking food.................................................................................... 26
Microwave tips.................................................................................. 26
Test dishes in accordance with EN 60705 .............................27
Cooking and defrosting with microwave..................................... 27
Produktinfo
Additional information on products, accessories, replacement
parts and services can be found at www.neff-
international.com and in the online shop www.neff-
eshop.com
: Important safety information
Read these instructions carefully. Only then will you be able to operate your appliance safely and correctly. Retain the instruction manual and installation instructions for future use or for subsequent owners.
This appliance is only intended to be fully fitted in a kitchen. Observe the special installation instructions.
Check the appliance for damage after unpacking it. Do not connect the appliance if it has been damaged in transport.
Only a licensed professional may connect appliances without plugs. Damage caused by incorrect connection is not covered under warranty.
This appliance is intended for domestic use only. The appliance must only be used for the preparation of food and drink. The appliance must be supervised during operation. Only use this appliance indoors.
This appliance may be used by children
over the age of 8 years old and by persons
with reduced physical, sensory or mental
capabilities or by persons with a lack of
experience or knowledge if they are
supervised or are instructed by a person
responsible for their safety how to use the
appliance safely and have understood the
associated hazards.
Children must not play with, on, or around the appliance. Children must not clean the appliance or carry out general maintenance unless they are at least 8 years old and are being supervised.
Keep children below the age of 8 years old at a safe distance from the appliance and power cable.
Always insert the accessories into the cooking compartment correctly. See "Description of accessories in the instruction manual.
Risk of fire!
■
Combustible items stored in the cooking
compartment may catch fire. Never store
combustible items in the cooking
compartment. Never open the appliance
door if there is smoke inside. Switch off
the appliance and unplug it from the
mains or switch off the circuit breaker in
the fuse box.
Risk of fire!
■
Using the appliance for anything other
than its intended purpose is dangerous
and may cause damage.
15
Page 16

The following is not permitted: drying out
food or clothing, heating slippers, grain or
cereal pillows, sponges, damp cleaning
cloths or similar.
For example, heated slippers and grain or
cereal pillows may catch fire, even several
hours after they have been heated.The
appliance must only be used for the
preparation of food and drinks.
Risk of fire!
■
Food may catch fire. Never heat food in
heat-retaining packages.
Do not leave food heating unattended in
containers made of plastic, paper or other
combustible materials.
Do not select a microwave power or time
setting that is higher than necessary.
Follow the information provided in this
instruction manual.
Never use the microwave to dry food.
Never defrost or heat food with a low
water content, e.g. bread, at too high a
microwave power or for too long.
Risk of fire!
■
Cooking oil may catch fire. Never use the
microwave to heat cooking oil on its own.
Risk of explosion!
Liquids and other food may explode when in containers that have been tightly sealed. Never heat liquids or other food in containers that have been tightly sealed.
Risk of serious damage to health!
■
The surface of the appliance may become
damaged if it is not cleaned properly.
Microwave energy may escape. Clean the
appliance on a regular basis, and remove
any food residue immediately. Always
keep the cooking compartment, door seal,
door and door stop clean; see also
section Care and cleaning.
Risk of serious damage to health!
■
Microwave energy may escape if the
cooking compartment door or the door
seal is damaged. Never use the appliance
if the cooking compartment door or the
door seal is damaged. Contact the aftersales service.
Risk of serious damage to health!
■
Microwave energy will escape from
appliances that do not have any casing.
Never remove the casing. For any
maintenance or repair work, contact the
after-sales service.
Risk of electric shock!
■
Incorrect repairs are dangerous. Repairs
may only be carried out and damaged
power cables replaced by one of our
trained after-sales technicians. If the
appliance is defective, unplug the
appliance from the mains or switch off the
circuit breaker in the fuse box. Contact the
after-sales service.
Risk of electric shock and serious injury!
■
The cable insulation on electrical
appliances may melt when touching hot
parts of the appliance. Never bring
electrical appliance cables into contact
with hot parts of the appliance.
Risk of electric shock!
■
Do not use any high-pressure cleaners or
steam cleaners, which can result in an
electric shock.
Risk of electric shock!
■
A defective appliance may cause electric
shock. Never switch on a defective
appliance. Unplug the appliance from the
mains or switch off the circuit breaker in
the fuse box. Contact the after-sales
service.
Risk of electric shock!
■
The appliance is a high-voltage appliance.
Never remove the casing.
Risk of serious burns!
■
Accessories and ovenware become very
hot. Always use oven gloves to remove
accessories or ovenware from the cooking
compartment.
Risk of burns!
■
Alcoholic vapours may catch fire in the hot
cooking compartment. Never prepare food
containing large quantities of drinks with a
high alcohol content. Only use small
quantities of drinks with a high alcohol
content. Open the appliance door with
care.
Risk of burns!
■
Foods with peel or skin may burst or
explode during, or even after, heating.
Never cook eggs in their shells or reheat
hard-boiled eggs. Never cook shellfish or
crustaceans. Always prick the yolk when
baking or poaching eggs. The skin of
foods that have a peel or skin, such as
apples, tomatoes, potatoes and sausages,
may burst. Before heating, prick the peel
or skin.
Risk of burns!
■
Heat is not distributed evenly through
baby food. Never heat baby food in closed
containers. Always remove the lid or teat.
Stir or shake well after the food has been
heated. Check the temperature of the food
before it is given to the child.
Risk of burns!
■
Heated food gives off heat. The ovenware
may become hot. Always use oven gloves
to remove ovenware or accessories from
the cooking compartment.
Risk of burns!
■
Airtight packaging may burst when food is
heated. Always observe the instructions
on the packaging. Always use oven gloves
16
Page 17

to remove dishes from the cooking
compartment.
Risk of scalding!
■
When you open the appliance door, hot
steam may escape. Open the appliance
door with care. Keep children at a safe
distance.
Risk of scalding!
■
There is a possibility of delayed boiling
when a liquid is heated. This means that
the liquid reaches boiling temperature
without the usual steam bubbles rising to
the surface. Even if the container only
vibrates a little, the hot liquid may
suddenly boil over and spatter. When
heating, always place a spoon in the
container. This will prevent delayed
boiling.
Risk of injury!
■
Scratched glass in the appliance door
may develop into a crack. Do not use a
glass scraper, sharp or abrasive cleaning
aids or detergents.
Risk of injury!
■
Unsuitable ovenware may crack. Porcelain
or ceramic ovenware can have small
perforations in the handles or lids. These
perforations conceal a cavity below. Any
moisture that penetrates this cavity could
cause the ovenware to crack. Only use
microwave-safe ovenware.
Causes of damage
Caution!
■ Heavily soiled seal: If the seal is very dirty, the appliance door
will no longer close properly during operation. The fronts of
adjacent units could be damaged. Always keep the seal
clean.
■ Operating the microwave without food: Operating the
appliance without food in the cooking compartment may lead
to overloading. Never switch on the appliance unless there is
food in the cooking compartment. An exception to this rule is
a short crockery test (see the section "Microwave, suitable
crockery").
■ Microwave popcorn: Never set the microwave power too
high. Use a power setting no higher than 600 watts. Always
place the popcorn bag on a glass plate. The disc may jump if
overloaded.
■ Liquid that has boiled over must not be allowed to run
through the turntable drive into the interior of the appliance.
Monitor the cooking process. Choose a shorter cooking time
initially, and increase the cooking time as required.
■ Never use the microwave oven without the turntable.
Installation and connection
This appliance is intended for domestic use only.
This appliance is only intended to be fully fitted in a kitchen.
Please observe the special installation instructions.
The appliance is fitted with a plug and must only be connected
to a properly-installed earthed socket. The fuse protection must
be rated at 10 amperes (L or B circuit breakers). The mains
voltage must correspond to the voltage specified on the rating
plate.
Energy and environment tips
Here you can find tips on how to save energy when baking and
roasting and how to dispose of your appliance properly.
Saving energy
Only preheat the oven if this is specified in the recipe or in the
operating instruction tables.
Use dark, black lacquered or enamelled baking tins. They
absorb the heat particularly well.
Open the appliance door as little as possible during cooking,
baking or roasting.
It is best to bake several cakes one after the other. The cooking
compartment is still warm. This may reduce the baking time for
the second cake.
For longer cooking times, you can switch the oven off
10 minutes before the end of the cooking time and use the
residual heat to finish cooking.
The socket must be installed and the power cable replaced by
a qualified electrician only. If the plug is no longer accessible
following installation, an all-pin disconnecting device must be
present on the installation side, with a contact gap of at least
3 mm.
Multiple plugs, plug bars and extension leads must not be
used. Overloading can result in a risk of fire.
Environmentally-friendly disposal
Dispose of packaging in an environmentally-friendly manner.
This appliance is labelled in accordance with European
Directive 2012/19/EU concerning used electrical and
electronic appliances (waste electrical and electronic
equipment - WEEE). The guideline determines the
framework for the return and recycling of used
appliances as applicable throughout the EU.
17
Page 18
The control panel
Here, you will see an overview of the control panel. Depending
on the appliance model, individual details may differ.
5 Door opener
Buttons Use
»
90 Selects 90 watt microwave power
180 Selects 180 watt microwave power
360 Selects 360 watt microwave power
600 Selects 600 watt microwave power
900 Selects 900 watt microwave power
¼
X
l
ƒ
„
Sets the clock
Selects the kilogrammes for the programmes
Selects automatic programmes
Selects the memory
Starts operation
Stops operation
Rotary selector
The rotary selector is used to alter the default values and set
values.
The rotary selector is retractable. Press on the rotary selector to
lock it in or out.
1 Display
for clock and cooking time
2 Clock button
3 Rotary selector
for setting the time and cooking time or for setting
automatic programmes
4 Buttons
Accessories
The turntable
How to fit the turntable:
1. Place the turntable ring a in the recess in the cooking
compartment.
2. Let the turntable b slot in place in the drive c in the centre of
the cooking compartment floor.
E
D
F
Note: Do not use the appliance if the turntable is not in place.
Ensure that it is properly slotted into place. The turntable can
turn clockwise or anti-clockwise.
Before using the appliance for the first time
Here you will find everything you need to do before using the
microwave to prepare food for the first time. First read the
section on Safety information.
Setting the clock
When the appliance is first connected or after a power cut,
three zeros will appear in the display panel.
18
1. Press the » button.
‚ƒ:‹‹œ appears in the display and the indicator lamp above
the
» button lights up.
2. Set the clock using the rotary selector.
3. Press the » button again.
The current time is set.
Page 19
Hiding the clock
Press the
The display is blank.
» button and then press the „ button.
The microwave
Resetting the clock
Press the
The time
as described in steps 2 and 3.
Change the clock, e.g. from summer to winter time
Set as described in point 1 to 3.
» button.
‚ƒ:‹‹. appears in the display. Then make the settings
Microwaves are converted to heat in foodstuffs. You will find
information about ovenware and how to set the microwave.
Note: In the Tested for you in our cooking studio section, you
will find examples for defrosting, heating and cooking with the
microwave oven.
Try out the microwave straight away. You could heat up a cup
of water for your tea, for example.
Use a large cup without any decorative gold or silver trim and
place a teaspoon in it. Place the cup containing the water on
the turntable.
1. Press the 900 W button.
2. Set‚:„‹ minutes using the rotary selector.
3. Press the ƒ button.
After 1 minute 30 seconds, an audible signal sounds. The
water for the tea is hot.
As you are drinking your tea, please take time to read again the
safety precautions that can be found at the front of the
instruction manual. This is very important.
Notes regarding ovenware
Suitable ovenware
Suitable dishes are heat-resistant ovenware made of glass,
glass ceramic, porcelain, ceramic or heat-resistant plastic.
These materials allow microwaves to pass through.
You can also use serving dishes. This saves you having to
transfer food from one dish to another. You should only use
ovenware with decorative gold or silver trim if the manufacturer
guarantees that they are suitable for use in microwaves.
Microwave power settings
Microwave power
setting
90 W Defrosting delicate foods
180 W Defrosting and continued cooking
360 W Cooking meat and heating delicate foods
600 W Heating and cooking food
900 W Heating liquids
Note: You can set the 900 W microwave power setting for 30
minutes, 600 W for 1 hour, the other power settings for 1 hour
and 39 minutes respectively.
Suitable for
Setting the microwave
Example: microwave power 600 watts, 5 minutes
1. Press the required microwave power setting.
The indicator light above the button lights up.
2. Set a cooking time using the rotary selector.
PLQ
PLQ
NJ
Unsuitable ovenware
Metal ovenware is unsuitable. Metal does not allow microwaves
to pass through. Food in covered metal containers will remain
cold.
Caution!
Creation of sparks: metal - e.g. a spoon in a glass - must be
kept at least 2 cm from the oven walls and the inside of the
door. Sparks could destroy the glass on the inside of the door.
Ovenware test
Do not switch on the microwave unless there is food inside. The
following ovenware test is the only exception to this rule.
Perform the following test if you are unsure whether your
ovenware is suitable for use in the microwave:
1. Heat the empty ovenware at maximum power for ½ to
1 minute.
2. Check the temperature occasionally during that time.
The ovenware should still be cold or warm to the touch.
The ovenware is unsuitable if it becomes hot or sparks are
generated.
3. Press the ƒ button.
The cooking time counts down in the display.
The cooking time has elapsed
An audible signal sounds. Open the appliance door or press
„. The clock reappears.
Changing the cooking time
This can be done at any time. Change the cooking time using
the rotary selector.
Pausing
Press the
Operation is suspended. The display above the
flashes. After closing the door, press the
Cancelling operation
Press the
button once.
Note: You can also adjust the cooking time first and then the
microwave power setting.
„ button once or open the appliance door.
ƒ button
ƒ button again.
„ button twice or open the door and press the „
19
Page 20
Cooling fan
The appliance is equipped with a cooling fan. The fan may run
on even if the oven has been switched off.
Memory
Notes
■ The cooking compartment remains cold during microwave
operation. The cooling fan will still switch on. The fan may run
on even when microwave operation has ended.
■ Condensation may appear on the door window, interior walls
and floor. This is normal and does not adversely affect
microwave operation. Wipe away the condensation after
cooking.
You can save the settings for a dish in the memory and call it
up again at any time.
The memory is useful for if you frequently prepare a specific
dish.
Saving memory settings
Example: 360 W, 25 minutes
1. Press the l button.
The indicator light above the button lights up.
2. Press the required microwave power setting.
The indicator light above the button lights up and 1:00 min
appears in the display.
3. Set the cooking time using the rotary selector.
PLQ
PLQ
PLQ
NJ
4. Confirm by pressing the l button.
The clock reappears. The setting is saved.
Notes
■ You can save the memory settings and start the appliance
immediately. When finishing, instead of pressing
l, press
ƒ.
■ You cannot save several microwave power settings one after
the other.
■ You cannot save automatic programmes.
■ Saving a new setting in the memory: press the l button.
The old settings appear. Save the new programme as
described in steps 1 to 4.
Starting the memory
It is very easy to start the saved programme. Place your meal
into the appliance. Close the appliance door.
1. Press the l button.
The saved settings are displayed.
2. Press the ƒ button.
The cooking time counts down in the display.
The cooking time has elapsed
An audible signal sounds. Open the appliance door or press
„. The clock reappears.
Pausing
Press the
Operation is suspended. The display above the
flashes. After closing the door, press the
„ button once or open the appliance door.
ƒ button
ƒ button again.
Changing the signal duration
You will hear an audible signal when the appliance is switched
off. You can change the duration of the signal.
To do so, press the
ƒ button for approx. 6 seconds.
Care and cleaning
With careful care and cleaning your microwave oven will retain
its looks and remain good order. We will explain here how you
should care for and clean your appliance correctly.
: Risk of short circuit!
Never use high-pressure cleaners or steam cleaners to clean
the oven.
Cancelling operation
Press the
button once.
The new signal duration is adopted.
The clock reappears.
The following are possible:
Short signal duration - 3 tones
Long signal duration - 30 tones.
„ button twice or open the door and press the „
: Risk of burns!
Never clean the appliance immediately after switching off. Let
the appliance cool down.
: Risk of electric shock!
Do not immerse the appliance in water or clean under a jet of
water.
20
Page 21

Surfaces are different, and damage caused by using the wrong
cleaning agent can be avoided by observing the information in
the table below.
Do not use
■ sharp or abrasive cleaning agents.
The surface could be damaged. If such a substance comes
into contact with the front of the appliance, wash it off
immediately with water.
■ metal or glass scrapers to clean the glass in the appliance
door.
■ metal or glass scrapers for cleaning the seal.
■ hard scouring pads or cleaning sponges.
Wash new sponge cloths thoroughly before use.
■ cleaning agents with high concentrations of alcohol.
Cleaning agents
Caution!
Before cleaning, unplug the appliance from the mains or switch
off the circuit breaker in the fuse box. Clean the outside of the
appliance and the cooking compartment with a damp cloth and
mild detergent. Dry with a clean cloth.
Area Cleaning agents
Appliance front Hot soapy water:
Clean with a dish cloth and dry with a
soft cloth. Do not use glass cleaners or
metal or glass scrapers for cleaning.
Area Cleaning agents
Appliance front with
stainless steel
Cooking compartment made of stainless steel
Recess in cooking
compartment
Turntable and turntable ring
Door panels Glass cleaner:
Seal Hot soapy water:
Hot soapy water:
Clean with a dish cloth and dry with a
soft cloth. Remove flecks of limescale,
grease, starch and albumin (e.g. egg
white) immediately. Corrosion can form
under such residues. Special stainless
steel cleaning agents can be obtained
from the after-sales service or from specialist shops. Do not use glass cleaners
or metal or glass scrapers for cleaning.
Hot soapy water or a vinegar solution:
Clean with a dish cloth and dry with a
soft cloth.
If the oven is very dirty: use oven
cleaner, but only when cooking compartment is cold. It is best to use a stainless-steel sponge. Do not use oven
spray or other aggressive oven cleaners
or abrasive materials. Scouring pads,
rough sponges and pan cleaners are
also unsuitable. These items scratch the
surface. Allow the interior surfaces to
dry thoroughly.
Damp cloth:
Ensure that no water seeps through the
turntable drive into the appliance interior.
Hot soapy water:
When putting the turntable back in
place, make sure it slots in correctly.
Clean with a dish cloth. Do not use a
glass scraper.
Clean with a dish cloth, do not scour. Do
not use a metal or glass scraper for
cleaning.
Malfunction table
Malfunctions often have simple explanations. Please refer to the
malfunction table before calling the after-sales service.
If a meal does not turn out exactly as you wanted, refer to the
Tested for you in our cooking studio section, where you will
find plenty of cooking tips and tricks.
Troubleshooting
Error message Possible cause Remedy/note
The appliance does not work The plug is not plugged in. Plug the plug in
Power failure Check whether the kitchen light works.
Faulty circuit breaker Look in the fuse box to make sure that the
Faulty operation Switch off the circuit breaker in the fuse
Three zeros light up in the display. Power failure Reset the time.
The appliance is not in operation. A
cooking time appears in the display.
The rotary selector was actuated accidentally.
The
ƒ button was not pressed after setting. Press the ƒ button or cancel the setting
: Risk of electric shock!
Incorrect repairs are dangerous. Repairs may only be carried
out by one of our trained after-sales engineers.
You can take remedial action yourself for some error
messages.
circuit breaker for the appliance is in working order.
box. Switch it back on after approx. 10
seconds.
Press the
with the
„ button.
„ button.
21
Page 22

Error message Possible cause Remedy/note
The microwave does not work. The door was not fully closed. Check whether food residue or debris is
The
ƒ button was not pressed. Press the ƒ button.
It takes longer than before for the
food to heat up
The turntable makes a scratching or
grinding noise.
Microwave operation has been cancelled for no apparent reason.
"M" appears in the display. The appliance is in demo mode.
The microwave power level setting was too low. Select a higher microwave power setting.
A larger amount of food than usual has been
placed in the appliance.
The food was colder than usual. Stir or turn the food during cooking.
Dirt or debris in the area around the turntable
drive.
The microwave has a fault. If this fault occurs repeatedly, please call
trapped in the door.
Double the amount - double the time.
Clean the roller ring and the recess in the
cooking compartment.
the after-sales service.
Press and hold the
button for approx. 7 seconds.
Demo mode is deactivated.
ƒ button and the „
After-sales service
Our after-sales service is there for you if your appliance needs
to be repaired. We will always find the right solution in order to
avoid unnecessary visits from a service technician.
E number and FD number
When calling us, please give the product number (E no.) and
the production number (FD no.) so that we can provide you with
the correct advice. The rating plate bearing these numbers can
be found on the right-hand side when you open the appliance
door. To save time, you can make a note of the number of your
appliance and the telephone number of the after-sales service
in the space below, should it be required.
E no.
After-sales service
Please note that there will be a fee for a visit by a service
technician in the event of a malfunction, even during the
warranty period.
Please find the contact data of all countries in the enclosed
customer service list.
O
FD no.
To book an engineer visit and product advice
GB 0844 8928989
Calls from a BT landline will be charged at up to
3 pence per minute. A call set-up fee of up to 6 pence
may apply.
IE 01450 2655
0.03 € per minute at peak. Off peak 0.0088 € per
minute.
Trust the expertise of the manufacturer, and rest assured that
the repair will be carried out by trained service technicians
using original spare parts for your domestic appliance.
This appliance corresponds to the standards EN 55011 and
CISPR 11. It is a Group 2, Class B product.
Group 2 means that microwaves are produced for the purpose
of heating food. Class B states that the appliance is suitable for
private households.
Technical data
Input voltage AC 220 - 230 V, 50 Hz
Power consumption 1270 W
Maximum output power 900 W
Microwave frequency 2450 MHz
Fuse 10 A
Automatic programmes
You can use the automatic programmes to defrost food with
the greatest of ease and prepare dishes quickly and easily. You
select the programme and enter the weight of your food. The
automatic programme makes the optimum setting. You can
select from 7 programmes.
22
Dimensions (HxWxD)
appliance 382 mm x 594 mm x 388 mm
cooking compartment 208 mm x 328 mm x 369 mm
VDE approved yes
CE mark yes
Setting a programme
Once you have selected a programme, make settings as
follows:
Page 23

1. Press the X button repeatedly until the required programme
number appears.
The indicator light above the button lights up.
2. Press the ¼ button.
The indicator light above the button lights up and a suggested weight appears.
3. Turn the rotary selector to specify the weight of the dish.
4. Press the ƒ button.
PLQ
PLQ
NJ
You will see the cooking time for the programme counting
down.
The cooking time has elapsed
An audible signal sounds. Open the appliance door or press
„. The clock reappears.
Correction
Press the
Pausing
Press the
Operation is suspended. The display above the
flashes. After closing the door, press the
Cancelling operation
Press the
button once.
Notes
■ For some programmes, an audible signal sounds after a
certain time. Open the appliance door and stir the food or
turn the meat or poultry. After closing the door, press the
button again.
■ You can query the programme number and weight using "X"
or "
display.
„ button twice and reset.
„ button once or open the appliance door.
ƒ button
ƒ button again.
„ button twice or open the door and press the „
ƒ
¼". The queried value is shown for 3 seconds in the
Defrosting using the automatic programmes
You can use the 4 defrosting programmes to defrost meat,
poultry and bread.
Notes
■ Preparing food
Use food that has been frozen at -18 °C and stored in
portion-sized quantities that are as thin as possible.
Take the food to be defrosted out of all packaging and weigh
it. You need to know the weight to set the programme.
■ Liquid will be produced when defrosting meat or poultry.
Drain off this liquid when turning meat and poultry and under
no circumstances use it for other purposes or allow it to
come into contact with other foods.
■ Ovenware
Place the food in a microwaveable shallow dish, e.g. a china
or glass plate, but do not cover.
■ Resting time
The defrosted food should be left to stand for an additional
10 to 30 minutes until it reaches an even temperature. Large
pieces of meat require a longer standing time than smaller
pieces. Flat pieces of meat and items made from minced
meat should be separated from each other before leaving to
stand.
After this time, you can continue to prepare the food, even
though thick pieces of meat may still be frozen in the middle.
The giblets can be removed from poultry at this point.
■ Signal
For some programmes, a signal sounds after a certain time.
Open the appliance door and separate the food out or turn
the meat or poultry. Close the door and press the Start
button.
Programme no. Weight range in kg
Defrost
P 01 Minced meat 0.20 - 1.00
P 02 Pieces of meat 0.20 - 1.00
P 03
Chicken, chicken
pieces
0.40 - 1.80
P 04 Bread 0.20 - 1.00
Cooking with the automatic programmes
With the 3 cooking programmes, you can cook rice, potatoes
or vegetables.
Notes
■ Ovenware
The food must be cooked in microwaveable cookware with a
lid. For rice, you should use a large, deep dish.
■ Preparing food
Weigh out the food. You need to know the weight to set the
programme.
Rice:
Do not use boil-in-the-bag rice. Add the required amount of
water, as specified on the packaging. This is usually two or
three times the quantity of rice.
Potatoes:
For boiled potatoes, cut the fresh potatoes into small, evensized pieces. Add one tablespoon of water for each 100 g
boiled potatoes, and a little salt.
Fresh vegetables:
Weigh out the fresh, trimmed vegetables. Cut the vegetables
into small, even-sized pieces. Add a tbsp water for each
100 g vegetables.
■ Signal
While the programme is running, a signal sounds after some
time. Stir the food.
■ Resting time
Once the programme has finished, stir the food again. You
should leave it to stand for another 5 to 10 minutes until it
reaches an even temperature.
The cooking result will depend on the quality and consistency
of the food.
Programme no. Weight range in kg
Cooking
P 05 Rice 0.05 - 0.2
23
Page 24

Programme no. Weight range in kg
P 06 Potatoes 0.15 - 1.0
P 07 Vegetables 0.15 - 1.0
Tested for you in our cooking studio
Here you will find a selection of recipes and the ideal settings
for them. We show you which microwave power setting is best
suited to your dish. There are also tips about ovenware and
preparation methods.
Information regarding the tables
The following tables provide you with numerous options and
settings for the microwave.
The times specified in the tables are only guidelines. They may
vary according to the ovenware used, the quality, temperature
and consistency of the food.
Time ranges are often specified in the tables. Set the shortest
time first and then extend the time if necessary.
It may be that you have different quantities from those specified
in the tables. A rule of thumb can be applied:
Double the amount - almost twice the cooking time
Half the amount - half the cooking time.
Always place the ovenware on the turntable.
Defrost Weight Microwave power setting in watts,
Defrost
Notes
■ Place the frozen food in an open container on the turntable.
■ Delicate parts such as the legs and wings of chicken or fatty
outer layers of roasts can be covered with small pieces of
aluminium foil. The foil must not touch the oven walls. You
can remove the foil half way through the defrosting time.
■ Liquid will be produced when defrosting meat or poultry.
Drain off this liquid when turning meat and poultry and under
no circumstances use it for other purposes or allow it to
come into contact with other foods.
■ Turn or stir the food once or twice during the defrosting time.
Large pieces of food should be turned several times.
■ Leave defrosted items to stand at room temperature for a
further 10 to 20 minutes so that the temperature is even
throughout. The giblets can be removed from poultry at this
point. The meat can still be further prepared, even if it has a
small frozen core.
Notes
cooking time in minutes
Whole pieces of meat (beef, veal or
pork - on the bone or boned)
800 g 180 W, 15 mins + 90 W, 10-20 mins 1 kg 180 W, 20 mins + 90 W, 15-25 mins
1.5 kg 180 W, 30 mins + 90 W, 20-30 mins
Meat in pieces or slices of beef,
veal or pork
200 g 180 W, 2 mins + 90 W, 4-6 mins Separate any defrosted parts when
500 g 180 W, 5 mins + 90 W, 5-10 mins
turning
800 g 180 W, 8 mins + 90 W, 10-15 mins
Minced meat, mixed 200 g 90 W, 10 mins Freeze food flat if possible
500 g 180 W, 5 mins + 90 W, 10-15 mins
Turn several times, remove any
defrosted meat
800 g 180 W, 8 mins + 90 W, 10-20 mins
Poultry or poultry portions 600 g 180 W, 8 mins + 90 W, 10-15 mins -
1.2 kg 180 W, 15 mins + 90 W, 20-25 mins
Fish fillet, fish steak or slices 400 g 180 W, 5 mins + 90 W, 10-15 mins Separate any defrosted parts
Vegetables, e.g. peas 300 g 180 W, 10-15 mins Fruit, e.g. raspberries 300 g 180 W, 710 mins Stir carefully during defrosting and
500 g 180 W, 8 mins + 90 W, 5-10 mins
separate any defrosted parts
Butter, defrosting 125 g 180 W, 1 min. + 90 W, 2-3 mins Remove all packaging
250 g 180 W, 1 min + 90 W, 3-4 mins
Loaf of bread 500 g 180 W, 6 mins + 90 W, 5-10 mins -
1 kg 180 W, 12 mins + 90 W, 10-20 mins
Cakes, dry, e.g. sponge cake 500 g 90 W, 10-15 mins Only for cakes without icing, cream or
crème pâtissière, separate the pieces
of cake
gelatine
Cakes, moist, e.g. fruit flan, cheesecake
750 g 180 W, 5 mins + 90 W, 10-15 mins
500 g 180 W, 5 mins + 90 W, 15-20 mins Only for cakes without icing, cream or
750 g 180 W, 7 mins + 90 W, 15-20 mins
Defrosting, heating up or cooking frozen food
Notes
■ Take ready meals out of the packaging. They will heat up
more quickly and evenly in microwaveable ovenware. The
different components of the meal may not require the same
amount of time to heat up .
24
■ Food which lies flat will cook more quickly than food which is
piled high. You should therefore distribute the food so that it
is as flat as possible in the ovenware. Different foodstuffs
should not be placed in layers on top of one another.
■ Always cover the food. If you do not have a suitable cover for
your ovenware, use a plate or special microwave foil.
Page 25

■ Stir or turn the food 2 or 3 times during cooking.
■ After heating, allow the food to stand for a further 2 to
5 minutes so that it can achieve an even temperature.
■ Always use an oven cloth or oven gloves when removing
plates from the oven.
■ This will help the food retain its own distinct taste, so it will
require less seasoning.
Defrosting, heating up or cooking frozen food
Menu, plated meal, ready meal
Weight Microwave power setting in
watts, cooking time in minutes
300-400 g 600 W, 8-11 mins -
Notes
(2-3 components)
Soup 400 g 600 W, 8-10 mins Stews 500 g 600 W, 10-13 mins Slices or pieces of meat in sauce, e.g.
goulash
500 g 600 W, 12-17 mins Separate the pieces of meat when stir-
ring
Fish, e.g. fillet steaks 400 g 600 W, 10-15 mins Add water, lemon juice or wine as
desired
Bakes, e.g. lasagne, cannelloni 450 g 600 W, 1015 mins Side dishes, e.g. rice, pasta 250 g 600 W, 2-5 mins Add a little liquid
500 g 600 W, 8-10 mins
Vegetables, e.g. peas, broccoli, carrots 300 g 600 W, 8-10 mins Pour water into the dish so that it cov-
600 g 600 W, 14-17 mins
ers the base
Creamed spinach 450 g 600 W, 11-16 mins Cook without additional water
Heating food
: Risk of scalding!
There is a possibility of delayed boiling when a liquid is heated.
This means that the liquid reaches boiling temperature without
the usual steam bubbles rising to the surface. Even if the
container only moves a little, the hot liquid can suddenly boil
over and spatter. When heating liquids, always place a spoon in
the container. This will prevent delayed boiling.
Caution!
Metal e.g. a spoon in a glass must be kept at least 2 cm
from the oven walls and the inside of the door. Sparks could
irreparably damage the glass on the inside of the door.
Notes
■ Take ready meals out of the packaging. They will heat up
more quickly and evenly in microwaveable ovenware. The
different components of the meal may not require the same
amount of time to heat up .
■ Always cover the food. If you do not have a suitable cover for
your container, use a plate or special microwave foil.
■ Stir or turn the food several times during the heating time.
Check the temperature.
■ After heating, allow the food to stand for a further 2 to
5 minutes so that it can achieve an even temperature.
■ Always use an oven cloth or oven gloves when removing
plates from the oven.
Heating food Weight Microwave power setting in watts,
Notes
cooking time in minutes
Menu, plated meal, ready meal
350-500 g 600 W, 4-8 mins -
(2-3 components)
Drinks 150 ml 800 W, 1-2 mins Place a spoon in the glass; do not overheat
300 ml 800 W, 2-3 mins
alcoholic drinks; check during heating
500 ml 800 W, 3-4 mins
Baby food, e.g. baby bottle 50 ml 360 W, approx. ½ min No teats or lids. Always shake well after heat-
100 ml 360 W, approx. 1 min.
200 ml
360 W, 1
^ min
ing. You must check the temperature.
Soup 1 cup 200 g 600 W, 2-3 mins Soup, 2 cups 400 g 600 W, 4-5 mins Meat in sauce 500 g 600 W, 8-11 mins Separate the slices of meat
Stew 400 g 600 W, 6-8 mins -
800 g 600 W, 8-11 mins Vegetables, 1 portion 150 g 600 W, 2-3 mins Add a little liquid
Vegetables, 2 portions 300 g 600 W, 3-5 mins
25
Page 26

Cooking food
Notes
■ Food which lies flat will cook more quickly than food which is
piled high. You should therefore distribute the food so that it
is as flat as possible in the ovenware. Different foodstuffs
should not be placed in layers on top of one another.
■ Cook the food in ovenware with a lid. If you do not have a
suitable lid for your ovenware, use a plate or special
microwave foil.
■ This will help the food retain its own distinct taste, so it will
require less seasoning.
■ After cooking, allow the food to stand for a further 2 to
5 minutes so that it can achieve an even temperature.
■ Always use an oven cloth or oven gloves when removing
plates from the oven.
Cooking food Weight Microwave power setting in
Notes
watts, cooking time in minutes
Meat loaf 750 g 600 W, 20-25 mins Cook uncovered
Whole chicken, fresh, no giblets 1.2 kg 600 W, 25-30 mins Turn halfway through the cooking time
Fresh vegetables 250 g 600 W, 5-10 mins Cut vegetables into pieces of equal size.
500 g 600 W, 10-15 mins
Add 1 to 2 tbsp water per 100 g of vegetables.
Stir during cooking
Potatoes 250 g 600 W, 8-10 mins Cut potatoes into pieces of equal size;
500 g 600 W, 11-14 mins
Add 1 to 2 tbsp water for every 100 g.
Stir during cooking
750 g 600 W, 15-22 mins
Rice 125 g 600 W, 5-7 mins +
Add double the quantity of liquid.
180 W, 12-15 mins
250 g 600 W, 6-8 mins +
180 W, 15-18 mins
Sweet foods, e.g. blancmange
(instant)
500 ml 600 W, 6-8 mins Stir the custard pudding thoroughly 2 to
3 times during cooking using an egg whisk.
Fruit, compote 500 g 600 W, 9-12 mins -
Microwave tips
You cannot find any information about the settings for the
quantity of food you have prepared.
The food has become too dry. Next time, set a shorter cooking time or select a lower microwave
When the time has elapsed, the food is not defrosted, hot or
cooked.
When the time has elapsed, the food is overheated at the
edge but not done in the middle.
After defrosting, the poultry or meat is defrosted on the outside but not defrosted in the middle.
Increase or reduce the cooking times using the following rule of
thumb:
Double the amount = almost double the cooking time
Half the amount = half the cooking time
power setting. Cover the food and add more liquid.
Set a longer time. Large quantities and food which is piled high
require longer times.
Stir it during the cooking time and next time, select a lower micro-
wave power setting and a longer cooking time.
Next time, select a lower microwave power setting. If you are
defrosting a large quantity, turn it several times.
Condensation
Condensation may appear on the door window, interior walls
and floor. This is normal. This does not affect how the
microwave operates. Wipe away the condensation after
cooking.
26
Page 27

Test dishes in accordance with EN 60705
The quality and correct operation of microwave appliances are
tested by testing institutes using these dishes.
In accordance with EN 60705, IEC 60705, DIN 44547 and
EN 60350 (2009)
Cooking and defrosting with microwave
Microwave cooking
Dish Microwave setting (watts) nd cooking time in minutes Notes
Custard, 565 g 180 watts, 25-30 mins + 90 watts, 20-25 mins Place the 20 x 17 cm Pyrex dish on the turntable.
Sponge 600 watts, 8-10 mins Place the Ø 22 cm Pyrex dish on the turntable.
Meatloaf 600 watts, 20-25 mins Place the Pyrex dish on the turntable.
Microwave defrosting
Dish Microwave setting (watts) nd cooking time in minutes Note
Meat 180 watts, 5-7 mins + 90 watts, 10-15 mins Place the Ø 22 cm Pyrex dish on the turntable.
27
Page 28

Þ Table des matières
[fr]Notice d’utilisation
Précautions de sécurité importantes..................................... 28
Causes de dommages ................................................................... 30
Installation et branchement .................................................... 30
Conseils concernant l'énergie et l'environnement ............... 31
Economie d'énergie......................................................................... 31
Elimination écologique.................................................................... 31
Le bandeau de commande...................................................... 31
Sélecteur rotatif ................................................................................ 31
Les accessoires ............................................................................... 31
Avant la première utilisation................................................... 32
Régler l'heure ...................................................................................32
Les microondes ...................................................................... 32
Conseils pour les récipients .......................................................... 32
Puissances microondes ................................................................ 32
Réglage des microondes.............................................................. 33
Ventilateur de refroidissement....................................................... 33
Memory ..................................................................................... 33
Enregistrer Memory ......................................................................... 33
Démarrer Memory............................................................................ 33
Modifier la durée du signal ..................................................... 34
Entretien et nettoyage ............................................................. 34
Nettoyants .........................................................................................34
Tableau des pannes................................................................. 35
Service après-vente................................................................. 35
Numéro E et numéro FD ................................................................ 35
Caractéristiques techniques .......................................................... 36
Programmes automatiques..................................................... 36
Réglage du programme ................................................................. 36
Décongélation avec les programmes automatiques ................ 36
Cuisson avec les programmes automatiques............................ 37
Testés pour vous dans notre laboratoire .............................. 37
Remarques relatives aux tableaux ............................................... 37
Décongélation...................................................................................37
Décongeler, réchauffer ou cuire des préparations surgelés... 38
Réchauffer des préparations ......................................................... 39
Cuire des préparations ...................................................................39
Astuces concernant les microondes........................................... 40
Plats tests selon EN 60705...................................................... 40
Cuisson et décongeler avec micro-ondes .................................. 40
Produktinfo
Vous trouverez des informations supplementaires concernant
les produits, accessoires, pièces de rechange et services sur
Internet sous : www.neff-international.com et la boutique en
ligne : www.neff-eshop.com
: Précautions de sécurité importantes
Lire attentivement ce manuel. Ce n'est qu'alors que vous pourrez utiliser votre appareil correctement et en toute sécurité. Conserver la notice d'utilisation et de montage pour un usage ultérieur ou pour le propriétaire suivant.
Cet appareil est conçu pour être encastré uniquement. Respecter la notice spéciale de montage.
Contrôler l'état de l'appareil après l'avoir déballé. Ne pas le raccorder s'il présente des avaries de transport.
Seul un expert agréé peut raccorder l'appareil sans fiche. La garantie ne couvre pas les dommages résultant d'un mauvais raccordement.
Cet appareil est conçu uniquement pour un
usage ménager privé et un environnement
domestique. Utiliser l'appareil uniquement
pour préparer des aliments et des
boissons. Surveiller l'appareil lorsqu'il
fonctionne. Utiliser l'appareil uniquement
dans des pièces fermées.
Cet appareil peut être utilisé par des
enfants de 8 ans ou plus et par des
personnes dotées de capacités physiques,
sensorielles ou mentales réduites ou
disposant de connaissances ou
d’expérience insuffisantes, sous la
surveillance d'un tiers responsable de leur
sécurité ou bien lorsqu'ils ont reçu des
instructions liées à l'utilisation de l'appareil
en toute sécurité et qu'ils ont intégré les
risques qui en résultent.
Les enfants ne doivent pas jouer avec l'appareil. Le nettoyage et l'entretien effectué par l'utilisateur ne doivent pas être accomplis par des enfants, sauf s'ils sont âgés de 8 ans et plus et qu'un adulte les surveille.
Les enfants de moins de 8 ans doivent être tenus à distance de l'appareil et du cordon d'alimentation.
Toujours insérer les accessoires correctement dans le compartiment de cuisson. Voir la description des accessoires dans la notice d'utilisation.
Risque d'incendie !
■
Tout objet inflammable entreposé dans le
compartiment de cuisson peut
s'enflammer. Ne jamais entreposer
d'objets inflammables dans le
compartiment de cuisson. Ne jamais
28
Page 29

ouvrir la porte de l'appareil lorsqu'il s'en
dégage de la fumée. Éteindre l'appareil et
débrancher la fiche secteur ou enlever le
fusible dans le boîtier à fusibles.
Risque d'incendie !
■
Toute utilisation non conventionnelle de
l'appareil est dangereuse et peut
provoquer des dommages.
Il est interdit de sécher des aliments ou
vêtements, de chauffer des chaussons,
coussins de graines ou de céréales,
éponges, chiffons humides et similaire.
Par exemple des chaussons, coussins de
graines ou de céréales chauffés peuvent
s'enflammer même après plusieurs
heures.Utiliser l'appareil uniquement pour
préparer des aliments et des boissons.
Risque d'incendie !
■
Les aliments peuvent s'enflammer. Ne
jamais réchauffer les aliments dans des
emballages qui conservent la chaleur.
Ne jamais réchauffer des aliments dans
des récipients en plastique, en papier ou
autres matériaux inflammables, sans les
surveiller.
Ne jamais régler une puissance ou une
durée de micro-ondes trop élevée. Suivre
les indications de cette notice d'utilisation.
Ne jamais déshydrater des aliments aux
micro-ondes.
Ne jamais décongeler ni réchauffer au
micro-ondes à une puissance trop élevée
ou trop longtemps des aliments dont la
teneur en eau est faible, comme du pain.
Risque d'incendie !
■
L'huile alimentaire peut s'enflammer. Ne
jamais chauffer de l'huile alimentaire seule
aux micro-ondes.
Risque d'explosion !
Les liquides ou autres aliments dans des récipients hermétiquement fermés peuvent exploser. Ne jamais chauffer de liquides ou d'autres aliments dans des récipients hermétiquement fermés.
Risque de préjudice sérieux pour la santé !
■
En cas de nettoyage insuffisant, la surface
de l'appareil peut être endommagée. De
l'énergie de micro-ondes risque de
s'échapper. Nettoyer l'appareil
régulièrement et enlever immédiatement
tous les restes d'aliments. Veiller à ce que
le compartiment de cuisson, le joint de
porte, la porte et la butée de porte soient
toujours propres ; voir également le
chapitre Entretien et Nettoyage.
Risque de préjudice sérieux pour la santé !
■
L'énergie du micro-ondes peut s'échapper
par une porte de compartiment de
cuisson ou un joint de porte endommagé.
Ne jamais utiliser l'appareil si la porte ou
le joint de porte du compartiment de
cuisson est endommagé. Appeler le
service après-vente.
Risque de préjudice sérieux pour la santé !
■
L'énergie du micro-ondes s'échappe dans
le cas d'appareils sans habillage. Ne
jamais enlever l'habillage du corps de
l'appareil. Appeler le service après-vente
en cas d'intervention de maintenance ou
de réparation.
Risque de choc électrique !
■
Tenter de réparer vous-même l'appareil
est dangereux. Seul un technicien du
service après-vente formé par nos soins
est habilité à effectuer des réparations et à
remplacer des câbles d'alimentation
défectueux. Si l'appareil est défectueux,
débrancher la fiche secteur ou enlever le
fusible dans le boîtier à fusibles. Appeler
le service après-vente.
Risque de choc électrique !
■
L'isolation des câbles des appareils
électroménagers peut fondre au contact
des pièces chaudes de l'appareil. Ne
jamais mettre le câble de raccordement
des appareils électroménagers en contact
avec des pièces chaudes de l'appareil.
Risque de choc électrique !
■
De l'humidité qui pénètre peut
occasionner un choc électrique. Ne pas
utiliser de nettoyeur haute pression ou de
nettoyer à vapeur.
Risque de choc électrique !
■
Un appareil défectueux peut provoquer un
choc électrique. Ne jamais mettre en
service un appareil défectueux.
Débrancher la fiche secteur ou enlever le
fusible dans le boîtier à fusibles.Appeler le
service après-vente.
Risque de choc électrique !
■
L'appareil fonctionne avec une tension
élevée. Ne jamais retirer le boîtier.
Risque de brûlure !
■
Les récipients ou les accessoires
deviennent très chaud. Toujours utiliser
des maniques pour retirer le récipient ou
les accessoires du compartiment de
cuisson.
Risque de brûlure !
■
Les vapeurs d'alcool peuvent s'enflammer
dans un compartiment de cuisson chaud.
Ne jamais préparer de plats contenant de
grandes quantités de boissons fortement
alcoolisées. Utiliser uniquement de petites
quantités de boissons fortement
alcoolisées. Ouvrir la porte de l'appareil
avec précaution.
Risque de brûlure !
■
Les aliments comportant une enveloppe
ou une peau dure peuvent éclater, à la
manière d'une explosion, au moment de
29
Page 30

les réchauffer, mais également après. Ne
jamais faire cuire d'oeufs dans leur
coquille ni réchauffer des oeufs durs. Ne
jamais faire cuire d'animaux à coquilles ni
de crustacés. Avant de faire des œufs sur
le plat ou des œufs pochés, percer leur
jaune.En cas d'utilisation d'aliments
comportant une enveloppe ou une peau
dure, comme des pommes, tomates,
pommes de terre ou saucisses,
l'enveloppe peut éclater. Percer
l'enveloppe ou la peau avant de les
réchauffer.
Risque de brûlure !
■
La chaleur ne se répartit pas
uniformément dans l'alimentation pour
bébé. Ne jamais réchauffer des aliments
pour bébé dans des récipients fermés.
Toujours retirer le couvercle et la tétine.
Après réchauffage, remuer ou secouer
énergiquement. Vérifier la température
des aliments avant de donner les aliments
à l'enfant.
Risque de brûlure !
■
Les aliments chauffés dégagent de la
chaleur. Le plat peut devenir chaud.
Toujours utiliser des maniques pour retirer
le récipient ou les accessoires du
compartiment de cuisson.
Risque de brûlure !
■
Si les aliments sont hermétiquement
emballés, leur emballage peut éclater.
Toujours respecter les consignes figurant
sur l'emballage. Toujours utiliser des
maniques pour retirer des plats du
compartiment de cuisson.
Risque de brûlure !
■
De la vapeur chaude peut s'échapper lors
de l'ouverture de la porte de l'appareil.
Ouvrir la porte de l'appareil avec
précaution. Tenir les enfants éloignés
Risque de brûlure !
■
Un retard d'ébullition peut se produire
lorsque vous chauffez des liquides. Cela
signifie que la température d'ébullition est
atteinte sans que les bulles de vapeur
typiques remontent. À la moindre
secousse ou vibration, le liquide chaud
peut alors subitement déborder et jaillir.
Toujours placer une cuillère dans le
récipient que vous faites chauffer. Cela
permet d'éviter ce retard d'ébullition.
Risque de blessure !
■
Un verre de porte d'appareil rayé peut se
fendre. Ne pas utiliser de racloir à verre, ni
de produit de nettoyage agressif ou
abrasif.
Risque de blessure !
■
Toute vaisselle inappropriée peut éclater.
La vaisselle en porcelaine ou en
céramique peut présenter des
microporosités dans les poignées et les
couvercles. Derrière ces microporosités
se dissimulent des cavités. De l'humidité
peut s'y introduire et faire éclater le
récipient. Utiliser uniquement de la
vaisselle conçue pour aller au microondes.
Causes de dommages
Attention !
■ Joint fortement encrassé : Si le joint est fortement encrassé,
la porte de l'appareil ne ferme plus correctement lors du
fonctionnement. La façade des meubles voisins peut être
endommagée. Veillez à ce que le joint soit toujours propre.
■ Fonctionnement du micro-ondes sans aliments : Faire
fonctionner l'appareil sans aliments dans le compartiment de
cuisson entraîne une surchauffe. Ne jamais mettre l'appareil
en marche sans aliments dans le compartiment de cuisson.
Un test rapide de la vaisselle fait exception à cette règle (voir
le chapitre Microondes, récipients.
■ Pop corn au micro-ondes : N'utilisez jamais une puissance
micro-ondes trop élevée. Réglez au maximum sur 600 Watt.
Veillez à toujours placer le cornet de pop corn sur une
assiette en verre. La vitre peut éclater en cas de surcharge.
■ Du liquide débordé ne doit pas parvenir dans l'intérieur de
l'appareil en passant par l'entraînement du plateau tournant.
Surveiller le déroulement de la cuisson. Commencer par une
durée de cuisson plus courte, puis allonger la durée de
cuisson si nécessaire.
■ Ne jamais utiliser l'appareil micro-ondes sans plateau
tournant.
Installation et branchement
Cet appareil est destiné à un usage domestique uniquement.
Cet appareil est destiné à l'encastrement uniquement.
Veuillez respecter la notice de montage spécifique.
L'appareil est livré prêt à brancher et doit être raccordé
impérativement à une prise de courant de sécurité installée de
manière réglementaire. Le fusible le protégeant doit être de
10 ampères (interrupteur automatique L ou B). La tension du
secteur doit correspondre à celle spécifiée sur la plaque
signalétique.
Seul un électricien agréé est habilité à installer ou à déplacer la
prise ou à changer le cordon de raccordement. Si, après
l'encastrement de l'appareil, la prise n'est plus accessible, il
30
faudra installer, côté secteur, un sectionneur omnipolaire avec
un interstice d'ouverture de contact d'au moins 3 mm.
N'utilisez pas de multiprise, ni de barrettes de connexion ou de
rallonges électriques. En cas de surcharge il y a risque
d'incendie.
Page 31

Conseils concernant l'énergie et l'environnement
Vous trouverez ici des conseils comment vous pouvez
économiser de l'énergie lors de la cuisson et comment
correctement éliminer votre appareil.
Economie d'énergie
Préchauffez le four seulement si cela est indiqué dans la
recette ou dans les tableaux de la notice d'utilisation.
Utilisez des moules de couleur foncée, laqués noirs ou
émaillés. Ces types de moules absorbent bien la chaleur.
Pendant la cuisson ou le rôtissage, ouvrez le plus rarement
possible la porte de l'appareil.
Si vous voulez faire cuire plusieurs gâteaux, faitesles cuire les
uns après les autres. Le compartiment de cuisson étant encore
chaud. Le temps de cuisson pour le deuxième gâteau peut
alors être réduit.
Le bandeau de commande
Ci-après l'aperçu du bandeau de commande. Des variations de
détails sont possibles selon le modèle d'appareil.
Si les temps de cuisson sont assez longs, vous pouvez
éteindre le four 10 minutes avant la fin de la durée impartie
puis terminez la cuisson avec la chaleur résiduelle.
Elimination écologique
Eliminez l'emballage en respectant l'environnement.
Cet appareil est marqué selon la directive européenne
2012/19/UE relative aux appareils électriques et
électroniques usagés (waste electrical and electronic
equipment - WEEE).
La directive définit le cadre pour une reprise et une
récupération des appareils usagés applicables dans
les pays de la CE.
3 Sélecteur rotatif
4 Touches
5 Touche d'ouverture de porte
Touches Usage
»
90 Sélection de la puissance microondes 90 W
180 Sélection de puissance microondes 180 W
360 Sélection de la puissance microondes 360 W
600 Sélection de la puissance microondes 600 W
900 Sélection de la puissance microondes 900 W
¼
X
l
ƒ
„
pour régler l'heure et la durée ou pour le réglage des
programmes automatiques
Pour régler l'heure
Sélection de kilogramme pour les programmes
Sélection des programmes automatiques
Sélection de Memory
Pour démarrer le fonctionnement
Pour arrêter le fonctionnement
1 Affichage
de l'heure et de la durée
2 Touche Heure
Sélecteur rotatif
Avec le sélecteur rotatif, vous pouvez modifier toutes les
valeurs de référence et de réglage.
Le sélecteur rotatif est escamotable. Appuyez sur le sélecteur
rotatif pour l'enclencher et le désenclencher.
Les accessoires
Le plateau tournant
Mise en place du plateau tournant :
1. Placer l'anneau à roulettes a dans le creux situé dans le
compartiment de cuisson.
2. Laisser le plateau tournant b s'enclencher dans
l'entraînement c au centre du fond du compartiment de
cuisson.
31
Page 32

E
D
F
Avant la première utilisation
Remarque : Utilisez l'appareil uniquement avec le plateau
tournant en place. Veillez à ce qu'il soit correctement
enclenché. Le plateau tournant peut tourner à gauche ou à
droite.
Vous apprendrez ici ce que vous devez faire avant d'utiliser
votre appareil micro-ondes pour la première fois pour préparer
des mets. Avant de commencer, lisez le chapitre Consignes de
sécurité.
Régler l'heure
Après le raccordement de l'appareil ou après une panne de
courant, trois zéros s'allument dans la zone d'affichage.
1. Appuyez sur la touche ».
‚ƒ:‹‹œ s'affiche et le voyant lumineux au-dessus de la
touche
2. Réglez l'heure à l'aide du sélecteur rotatif.
3. Appuyez à nouveau sur la touche ».
» s'allume.
Les microondes
En pénétrant dans les aliments, les micro-ondes se
transforment en chaleur. Cette notice vous informe sur la
vaisselle à utiliser et le réglage approprié des microondes.
Remarque : Dans le chapitre Testés pour vous dans notre
laboratoire, vous trouverez de nombreux exemples de
décongélation, de réchauffage et de cuisson utilisant les microondes.
Faites un essai avec les microondes. Faites chauffer par
exemple une tasse d'eau pour votre thé.
Prenez une grande tasse sans décor doré ou argenté, puis
placez une cuillère à café dans la tasse. Placez la tasse
contenant l'eau sur le plateau tournant.
1. Appuyer sur la touche 900 W.
2. Régler‚:„‹ min au moyen du sélecteur rotatif.
3. Appuyer sur la touche ƒ.
Un signal sonore retentit au bout de 1 minute 30 secondes.
L'eau pour le thé est chaude.
Pendant que vous buvez le thé, veuillez relire les consignes de
sécurité figurant au début de la notice d'utilisation. Ces
consignes sont très importantes.
Conseils pour les récipients
Récipients appropriés
Sont appropriés des récipients en verre, vitrocéramique,
porcelaine, céramique ou plastique résistant à la chaleur. Ces
matières laissent passer les microondes.
Vous pouvez également utiliser de la vaisselle de service. Vous
n'aurez pas besoin de transvaser. Utilisez de la vaisselle avec
des motifs dorés ou argentés uniquement si le fabricant
garantit qu'elle est appropriée aux micro-ondes.
L'heure actuelle est réglée.
Masquer l'heure
Appuyer sur la touche
L'affichage est obscurci.
Réafficher l'heure
Appuyer sur la touche
L'heure
décrit sous les points 2 et 3.
Modifier l'heure p.ex. passage de l'heure d'été à l'heure d'hiver
Régler comme décrit sous le point 1 à 3.
Récipients inappropriés
Les récipients métalliques sont inappropriés. Le métal ne laisse
pas passer les microondes. Dans les récipients en métal, les
préparations restent froides.
Attention !
Formation d'étincelles : le métal p. ex. une cuillère dans un
verre doit se trouver à une distance d'au moins 2 des parois
du four et de l'intérieur de la porte. Des étincelles pourraient
détériorer la vitre de la porte.
Test de la vaisselle
Ne faites jamais fonctionner le microondes sans aliments. La
seule exception à cette règle est le test de vaisselle suivant.
Si vous n'êtes pas sûr que votre récipient est micro-ondable,
effectuez le test suivant :
1. Placez le plat vide dans l'appareil pendant ½ à 1 minute à la
2. Vérifiez régulièrement la température.
Le récipient doit être froid ou tiède.
S'il est chaud ou si des étincelles se produisent, votre récipient
n'est pas approprié.
‚ƒ:‹‹ apparaît dans l'affichage. Régler ensuite comme
puissance maximale.
» et ensuite sur la touche „.
».
Puissances microondes
Puissance
microondes
90 W Décongeler des mets délicats
180 W Décongeler et poursuivre la cuisson
360 W Cuire de la viande et faire chauffer des
convient pour
mets délicats
32
Page 33

Puissance
convient pour
microondes
600 W Faire chauffer et cuire des mets
900 W Faire chauffer des liquides
Remarque : Vous pouvez régler la puissance microondes
900 W pour 30 minutes, 600 W pour 1 heure, les autres
puissances pour respectivement 1 heure et 39 minutes.
Réglage des microondes
Exemple Puissance microondes 600 Watts, 5 minutes
1. Appuyer sur la puissance microondes désirée.
Le voyant lumineux au dessus de la touche s'allume.
2. Régler une durée au moyen du sélecteur rotatif.
PLQ
PLQ
NJ
3. Appuyer sur la touche ƒ.
La durée s'écoule visiblement dans l'affichage.
La durée est écoulée
Un signal retentit. Ouvrir la porte de l'appareil ou appuyer sur
„. L'heure se réaffiche.
Modifier la durée
Vous pouvez à tout moment modifier la durée. Pour ce faire,
utilisez le sélecteur rotatif.
Arrêter
Appuyez une fois sur
fonctionnement s'arrête.L'affichage au-dessus de la touche
„ ou ouvrez la porte de l'appareil. Le
ƒ
clignote.Après la fermeture, appuyez à nouveau sur la
touche
ƒ.
Annuler le fonctionnement
Appuyer 2 fois sur la touche
une fois sur la touche
„ ou ouvrir la porte et appuyer
„.
Remarque : Vous pouvez également régler d'abord la durée et
ensuite la puissance microondes.
Ventilateur de refroidissement
L'appareil est équipé d'un ventilateur de refroidissement. Le
ventilateur peut continuer de fonctionner même si vous avez
déjà éteint l'appareil.
Remarques
■ Le compartiment de cuisson reste froid lors du
fonctionnement des micro-ondes. Toutefois le ventilateur de
refroidissement se met en marche. Il peut continuer de
fonctionner même si le mode micro-ondes est déjà terminé.
■ De l'eau de condensation peut se former à la vitre de la
porte, aux parois intérieures et à la sole. Ceci est normal et
ne compromet pas le fonctionnement des microondes.
Essuyez l'eau de condensation après la cuisson.
Memory
Avec la fonction Memory vous pouvez mémoriser le réglage
pour un plat et l'appeler à tout moment.
Memory est utile si vous préparez un plat assez souvent.
Enregistrer Memory
Exemple : 360 W, 25 minutes
1. Appuyer sur la touche l.
Le voyant lumineux au dessus de la touche s'allume.
2. Appuyer sur la puissance microondes désirée.
Le voyant lumineux au dessus de la touche s'allume et 1:00
min. apparaît dans l'affichage
3. Régler la durée au moyen du sélecteur rotatif.
PLQ
PLQ
PLQ
NJ
4. Confirmer au moyen de la touche l.
L'heure se réaffiche. Le réglage est mémorisé.
Remarques
■ Vous pouvez aussi enregistrer Memory et le démarrer de
suite. A la fin, n'appuyez pas sur
l, mais sur ƒ.
■ Vous ne pouvez pas mémoriser plusieurs puissances
microondes successives.
■ Vous ne pouvez pas mémoriser les programmes
automatiques.
■ Nouvel enregistrement de Memory : Appuyer sur la
touche
l. Les anciens réglages apparaissent. Mémorisez le
nouveau programme comme décrit sous les points 1 à 4.
Démarrer Memory
Il est très simple de démarrer le programme mémorisé. Placez
votre plat dans l'appareil. Fermez la porte de l'appareil.
1. Appuyer sur la touche l.
Les réglages mémorisés apparaissent.
2. Appuyer sur la touche ƒ.
La durée s'écoule visiblement dans l'affichage.
La durée est écoulée
Un signal retentit. Ouvrir la porte de l'appareil ou appuyer sur
„. L'heure se réaffiche.
Arrêter
Appuyez une fois sur
fonctionnement s'arrête.L'affichage au-dessus de la touche
clignote.Après la fermeture, appuyez à nouveau sur la
touche
ƒ.
Annuler le fonctionnement
Appuyer 2 fois sur la touche
une fois sur la touche
„ ou ouvrez la porte de l'appareil. Le
ƒ
„ ou ouvrir la porte et appuyer
„.
33
Page 34

Modifier la durée du signal
Lorsque l'appareil se désactive, vous entendez un signal. Vous
pouvez modifier la durée du signal sonore.
Pour cela, appuyez env. 6 secondes sur la touche
ƒ.
Entretien et nettoyage
Si vous entretenez et nettoyez soigneusement votre appareil
micro-ondes, il gardera longtemps un aspect neuf et restera
intact. Vous trouverez ici des conseils pour entretenir et
nettoyer correctement votre appareil.
: Risque de court-circuit !
N'utilisez jamais de nettoyant à pression ou à vapeur.
: Risque de brûlure !
Ne nettoyez jamais l'appareil juste après l'avoir éteint. Laissez
refroidir l'appareil.
: Risque de choc électrique !
Ne jamais plonger l'appareil dans l'eau ni le nettoyer sous un
jet d'eau.
Afin de ne pas endommager les différentes surfaces en utilisant
des nettoyants inappropriés, veuillez respecter les indications
dans le tableau.
N'utilisez pas
■ de produits agressifs ou récurants.
La surface peut être endommagée. Si un tel produit arrive sur
la façade, essuyez-le immédiatement avec de l'eau.
■ de racloirs à verre ou métalliques pour nettoyer la porte
vitrée.
■ de racloirs à verre ou métalliques pour nettoyer le joint.
■ de tampons en paille métallique ni d'éponges à dos récurant.
Avant d'utiliser des lavettes éponges neuves, rincez-les
soigneusement.
■ de nettoyants fortement alcoolisés.
Nettoyants
Attention !
Avant le nettoyage, retirer la fiche secteur ou couper le fusible
dans le boîtier à fusibles. Nettoyer l'extérieur de l'appareil et le
compartiment de cuisson avec un chiffon humide et un
nettoyant doux. Sécher avec un chiffon propre.
Niveau Nettoyants
Façade de l'appareil Eau chaude additionnée de produit à
vaisselle :
Nettoyer avec une lavette et sécher
avec un chiffon doux. N'utilisez pas de
nettoyant pour vitres, ni de racloirs à
verre ou métalliques pour le nettoyage.
La nouvelle durée du signal est validée.
L'heure se réaffiche.
Réglages possibles :
Durée du signal courte - 3 sons
Durée du signal longue - 30 sons
Niveau Nettoyants
Façade de l'appareil
avec de l'inox
Compartiment de
cuisson en inox
Creux dans le compartiment de cuisson
Plateau tournant et
anneau à roulettes
Vitres du four Nettoyant pour vitres :
Joint Eau chaude additionnée de produit à
Eau chaude additionnée de produit à
vaisselle :
Nettoyer avec une lavette et sécher
avec un chiffon doux. Éliminez immédiatement les dépôts calcaires, de graisse,
de fécule et de blanc d'œuf. De la corrosion peut se former sous ces salissures.
Des nettoyants spéciaux pour inox sont
en vente au service après-vente ou dans
le commerce spécialisé. N'utilisez pas
de nettoyant pour vitres, ni de racloirs à
verre ou métalliques pour le nettoyage.
Eau chaude additionnée de produit à
vaisselle ou de l'eau vinaigrée :
Nettoyer avec une lavette et sécher
avec un chiffon doux.
En cas d'encrassement important : utiliser un produit de nettoyage pour four
uniquement dans le compartiment de
cuisson froid. Utilisez de préférence une
éponge pour inox. N'utilisez pas de
spray pour four ni d'autres produits
agressifs de nettoyage pour four ni de
produits récurants. Des tampons en
paille métallique, éponges à dos récurant et des produits abrasifs sont également inappropriés. Ils rayent la surface.
Laisser bien sécher les surfaces intérieures.
Chiffon humide :
De l'eau ne doit pas parvenir dans l'intérieur de l'appareil en passant par
l'entraînement du plateau tournant.
Eau chaude additionnée de produit à
vaisselle :
Lorsque vous remettez le plateau tournant en place, veillez à ce qu'il
s'enclenche correctement.
Nettoyer avec une lavette. Ne pas utiliser de racloir à verre.
vaisselle :
Nettoyer avec une lavette, sans frotter.
N'utilisez pas de racloirs à verre ou
métalliques pour le nettoyage.
34
Page 35

Tableau des pannes
Une anomalie de fonctionnement n'est souvent due qu'à un
problème simple. Avant d'appeler le service après-vente,
veuillez essayer de remédier vous-même à la panne à l'aide du
tableau.
Si un jour, le résultat de cuisson d'un plat n'est pas optimal,
consultez le chapitre Testés pour vous dans notre laboratoire.
Vous y trouverez de nombreux conseils et astuces pour la
cuisson.
Que faire en cas de dysfonctionnement ?
Message d'erreur Cause possible Remède/remarque
L'appareil ne fonctionne pas La prise n'a pas été branchée. Connectez la fiche
Coupure de courant Vérifiez si l'éclairage de la cuisine s'allume.
Fusible défectueux Vérifiez dans le boîtier à fusibles si le
Manipulation incorrecte Coupez le fusible dans le boîtier à
Trois zéros apparaissent dans l'affichage.
L'appareil ne fonctionne pas. L'affichage indique une durée.
Le micro-ondes ne fonctionne pas. La porte n'a pas été correctement fermée. Vérifiez si des résidus de nourriture ou des
Les aliments sont plus lents à
réchauffer qu'avant.
Le plateau tournant émet un son grinçant ou de frottement.
Le micro-ondes a cessé de fonctionner sans raison apparente.
Un « M » s'affiche. L'appareil est en mode Démo.
Coupure de courant Réglez à nouveau l'heure.
Le sélecteur rotatif a été actionné par mégarde.
La touche
réglage.
La touche
La puissance du micro-ondes sélectionnée est
trop faible.
Vous avez placé une quantité plus importante
dans l'appareil.
Les aliments refroidissent plus vite qu'avant. Remuez ou retournez les aliments de
De la poussière ou un corps étranger se trouve
à proximité du plateau tournant.
Le micro-ondes présente un dysfonctionnement.
ƒ n'a pas été actionnée après le
ƒ n'a pas été actionnée. Appuyez sur la touche ƒ.
: Risque de choc électrique !
Tenter de réparer vous-même l'appareil est dangereux. Seul un
technicien du service après-vente formé par nos soins est
habilité à effectuer des réparations.
En cas de messages d'erreur, vous pouvez y remédier vousmême.
fusible utilisé pour l'appareil est en bon
état.
fusibles.Patientez 10 secondes avant de
l'enclencher à nouveau.
Appuyez sur la touche
Appuyez sur la touche ƒ ou supprimez le
réglage à l'aide de la touche
corps étrangers n'empêchent pas sa fermeture.
Choisissez une puissance du micro-ondes
plus élevée.
Plus la quantité est importante, plus le
temps de chauffe est important.
temps en temps.
Nettoyez l'anneau de roulement et la cavité
du compartiment de cuisson.
Si cette erreur se reproduit, contactez le
service après-vente.
Maintenez enfoncées les touches
pendant env. 7 secondes.
Le mode Démo sera désactivé.
„.
„.
ƒ et „
Service après-vente
Si votre appareil a besoin d'être réparé, notre service aprèsvente se tient à votre disposition. Nous trouvons toujours une
solution appropriée pour éviter des visites inutiles d'un
technicien.
Numéro E et numéro FD
Lors de votre appel, veuillez indiquer le numéro de produit (n°
E) et le numéro de fabrication (n° FD), pour nous permettre de
mieux vous aider. La plaque signalétique avec les numéros se
trouve à droite, en ouvrant la porte de l'appareil. Pour éviter
d'avoir à les rechercher en cas de besoin, vous pouvez inscrire
ici les données de votre appareil et le numéro de téléphone du
service après-vente.
N° E
N° FD
Service après-vente O
Veuillez noter que la visite d'un technicien du SAV n'est pas
gratuite en cas de manipulation incorrecte, même pendant la
période de garantie.
Vous trouverez les données de contact pour tous les pays dans
l'annuaire ci-joint du service après-vente.
35
Page 36

Commande de réparation et conseils en cas de dérangements
B 070 222 143
FR 01 40 10 42 10
CH 0848 840 040
Faites confiance à la compétence du fabricant. Vous
garantissez ainsi que la réparation sera effectuée par des
techniciens formés qui possèdent les pièces de rechange
d’origine pour votre appareil.
Cet appareil est conforme à la norme EN 55011 ou bien CISPR
11. C'est un produit du groupe 2, classe B.
« Groupe 2 » signifie que des micro-ondes sont générées pour
chauffer des aliments. « Classe B » signifie que l'appareil est
approprié à l'environnement domestique.
Programmes automatiques
Caractéristiques techniques
Tension d'entrée AC 220 - 230 V, 50 Hz
Consommation d'énergie 1270 W
Puissance de sortie maxi-
male
Fréquence microondes 2450 MHz
Fusible 10 A
Dimensions (HxLxP)
appareil 382 mm x 594 mm x 388 mm
compartiment de cuisson 208 mm x 328 mm x 369 mm
Conforme aux normes VDE oui
Marque CE oui
900 W
Avec les programmes automatiques vous pouvez facilement
décongeler des aliments et préparer des plats rapidement et
sans problème. Vous sélectionnez le programme et entrez le
poids de votre mets. La commande des programmes
automatiques se charge du réglage optimal. Vous avez le choix
entre 7 programmes.
Réglage du programme
Après avoir choisi un programme, réglez de façon suivante :
1. Appuyer répétitivement sur la touche X, jusqu'à ce que le
numéro du programme désiré apparaisse.
Le voyant lumineux au dessus de la touche s'allume.
2. Appuyer sur la touche ¼.
Le voyant lumineux au dessus de la touche s'allume et un poids de référence apparaît.
3. Avec le sélecteur rotatif, régler le poids du mets.
4. Appuyer sur la touche ƒ.
PLQ
PLQ
NJ
La durée du programme s'écoule visiblement.
La durée est écoulée
Un signal retentit. Ouvrir la porte de l'appareil ou appuyer sur
„. L'heure se réaffiche.
Correction
Appuyer deux fois sur la touche
Arrêter
Appuyez une fois sur
fonctionnement s'arrête.L'affichage au-dessus de la touche
clignote.Après la fermeture, appuyez à nouveau sur la
touche
Annuler le fonctionnement
Appuyer 2 fois sur la touche
une fois sur la touche
Remarques
■ Lors de certains programmes, un signal retentit après un
■ Vous pouvez interroger le numéro de programme et le poids
ƒ.
certain temps. Ouvrez la porte de l'appareil et remuez les
aliments ou bien retournez la viande ou la volaille. Réappuyer
sur la touche
en appuyant sur
pendant 3 secondes dans l'affichage.
„ ou ouvrez la porte de l'appareil. Le
„.
ƒ après avoir fermé la porte.
X ou ¼. La valeur interrogée apparaît
„ et régler de nouveau.
ƒ
„ ou ouvrir la porte et appuyer
Décongélation avec les programmes automatiques
Avec les 4 programmes de décongélation vous pouvez
décongeler de la viande, de la volaille et du pain.
Remarques
■ Préparation des aliments
Utilisez des aliments qui ont été congelés et stockés si
possible à plat et par portion, à -18 °C.
Pour la décongélation, retirez l'aliment de son emballage et
pesezle. Vous avez besoin de connaître le poids pour le
réglage du programme.
■ Un liquide se forme lors de la décongélation de viande et de
volaille. En retournant les aliments, enlever ce liquide. Il ne
doit en aucun cas être utilisé par la suite ou entrer en contact
avec d'autres aliments.
■ Récipient
Placez l'aliment sur un récipient plat micro-ondable, p.ex. une
assiette en verre ou en porcelaine, et ne mettez pas de
couvercle.
36
Page 37

■ Temps de repos
L'aliment dégelé doit encore reposer 10 à 30 minutes afin
que la température s'égalise. Les gros morceaux de viande
nécessitent un temps de repos plus long que les petits
morceaux. Séparez les morceaux plats et la viande hachée
avant le temps de repos.
Ensuite vous pouvez continuer à transformer les aliments,
même si les gros morceaux de viande sont éventuellement
encore gelés au cœur. En cas de volaille, vous pouvez
maintenant retirer les abats.
■ Signal
Lors de certains programmes, un signal retentit après un
certain temps. Ouvrez la porte de l'appareil et séparez les
aliments ou bien retournez la viande ou la volaille. Appuyer
sur la touche Start après avoir fermé la porte.
Numéro de programme.
Fourchette de poids
en kg
Décongeler
P 01 Viande hachée 0,20 - 1,00
P 02
P 03
Morceaux de
viande
Poulet, morceaux
de poulet
0,20 - 1,00
0,40 - 1,80
P 04 Pain 0,20 - 1,00
■ Préparation des aliments
Pesez l'aliment. Vous avez besoin de connaître le poids pour
le réglage du programme.
Riz :
N'utilisez pas de riz en sachet. Ajoutez la quantité d'eau
nécessaire selon les indications du fabricant sur l'emballage.
C'est généralement deux à trois volumes d'eau pour un
volume de riz.
Pommes de terre :
Pour des pommes de terre à l'anglaise, coupez les pommes
de terre fraîches en petits morceaux de grosseur égale.
Ajoutez une c.à s. d'eau et un peu de sel pour 100 g de
pommes de terre.
Légumes frais :
Pesez les légumes frais, nettoyés. Coupez les légumes en
petits morceaux de grosseur égale. Ajoutez une c.à s. d'eau
pour 100 g de légumes.
■ Signal
Pendant le déroulement du programme, un signal retentit
après un certain temps. Remuez l'aliment.
■ Temps de repos
Remuez l'aliment encore une fois à la fin du programme.
Laissez reposer l'aliment encore 5 à 10 minutes afin que la
température s'égalise.
Les résultats de cuisson dépendent de la qualité et de la
nature de l'aliment.
Cuisson avec les programmes automatiques
Numéro de programme.
Avec les 3 programmes de cuisson vous pouvez faire cuire du
riz, des pommes de terre ou des légumes.
Remarques
■ Récipient
Faites toujours cuire l'aliment dans un récipient micro-
P 05 Riz 0,05 - 0,2
P 06 Pommes de terre 0,15 - 1,0
P 07 Légumes 0,15 - 1,0
ondable avec un couvercle. Pour du riz, utilisez un grand
moule à bord haut.
Testés pour vous dans notre laboratoire
Vous trouverez ici un choix de plats et les réglages optimaux
correspondants. Nous vous montrons quelle puissance
microondes est la plus appropriée pour votre plat et vous
donnons des conseils concernant les récipients et la
préparation.
Remarques relatives aux tableaux
Les tableaux suivants vous indiquent de nombreuses
possibilités et valeurs de réglage pour les microondes.
Les durées indiquées dans les tableaux sont indicatives. Elles
dépendent des récipients, de la qualité, de la température et de
la nature de l'aliment.
Les tableaux indiquent souvent des plages de durée. Réglez
d'abord sur la plus courte durée, puis rallongez-la si
nécessaire.
Il se peut que les quantités dont vous disposez diffèrent de
celles indiquées dans les tableaux. En règle générale :
Double quantité quasiment double durée
Si vous réduisez de moitié la quantité, réduisez d'autant la
durée.
Placez le récipient toujours sur le plateau tournant.
■ Vous pouvez recouvrir les morceaux délicats, p.ex. les
cuisses et les ailes de poulet ou bien les bords gras des
rôtis, avec de petits morceaux de feuille d'aluminium. La
feuille ne doit pas entrer en contact avec les parois du four. À
la moitié de la durée de décongélation, vous pouvez retirer la
feuille d'aluminium.
■ Un liquide se forme lors de la décongélation de viande et de
volaille. En retournant les aliments, enlever ce liquide. Il ne
doit en aucun cas être utilisé par la suite ou entrer en contact
avec d'autres aliments.
■ Pendant le processus de décongélation, remuer ou retourner
les aliments 1 à 2 fois. Retournez les gros morceaux
plusieurs fois.
■ Laissez reposer les aliments décongelés pendant 10 à
20 minutes à température ambiante, afin que la température
s'égalise. En cas de volaille, vous pouvez alors retirer les
abats. Vous pouvez continuer à transformer la viande même
si elle est encore légèrement congelée au cœur.
Fourchette de poids en
kg
Cuire
Décongélation
Remarques
■ Disposez les aliments surgelés dans un récipient non fermé
que vous placez sur le plateau tournant.
37
Page 38

Décongélation Poids Puissance microondes en Watt, durée
Conseils
en minutes
Viande de bœuf, de veau ou de
porc en un seul morceau (avec ou
sans os)
800 g 180 W, 15 min. + 90 W, 10-20 min. 1 kg 180 W, 20 min. + 90 W, 15-25 min.
1,5 kg 180 W, 30 min. + 90 W, 20-30 min.
Viande de bœuf, de veau ou de
porc en morceaux ou en tranches
200 g 180 W, 2 min. + 90 W, 4-6 min. En les retournant, séparer les pièces
500 g 180 W, 5 min. + 90 W, 5-10 min.
déjà décongelées
800 g 180 W, 8 min. + 90 W, 10-15 min.
Viande hachée, mixte 200 g 90 W, 10 min. La congeler à plat, si possible
500 g 180 W, 5 min. + 90 W, 10-15 min.
Retourner plusieurs fois, enlever la
viande déjà décongelée
800 g 180 W, 8 min. + 90 W, 10-20 min.
Volaille ou morceaux de volaille 600 g 180 W, 8 min. + 90 W, 10-15 min. -
1,2 kg 180 W, 15 min. + 90 W, 20-25 min.
Filet, darnes ou tranches de pois-
400 g 180 W, 5 min. + 90 W, 10-15 min. Séparer les pièces déjà décongelées
son
Légumes, p.ex. petits pois 300 g 180 W, 10-15 min. Fruits, p.ex. framboises 300 g 180 W, 7-10 min. Remuer délicatement régulièrement,
500 g 180 W, 8 min. + 90 W, 5-10 min.
séparer les pièces déjà décongelées.
Dégeler du beurre 125 g 180 W, 1 min. + 90 W, 2-3 min. Retirer l'emballage complètement
250 g 180 W, 1 min. + 90 W, 3-4 min.
Pain entier 500 g 180 W, 6 min. + 90 W, 5-10 min. -
1 kg 180 W, 12 min. + 90 W, 10-20 min.
Gâteau sec, p.ex. cake 500 g 90 W, 10-15 min. Uniquement pour des gâteaux sans
glaçage, chantilly ou crème fraîche,
séparer les morceaux de gâteau
glaçage, chantilly ou gélatine
Gâteau fondant, p.ex. gâteau aux
fruits, gâteau au fromage blanc
750 g 180 W, 5 min. + 90 W, 10-15 min.
500 g 180 W, 5 min. + 90 W, 15-20 min. Uniquement pour des gâteaux sans
750 g 180 W, 7 min. + 90 W, 15-20 min.
Décongeler, réchauffer ou cuire des préparations surgelés
Remarques
■ Sortez les plats cuisinés de leur emballage. Dans un récipient
micro-ondable ils réchauffent plus rapidement et plus
uniformément. Les différents ingrédients du plat peuvent se
réchauffer plus ou moins vite.
■ Les aliments peu épais se réchauffent plus vite que des
aliments épais. C'est pourquoi il est recommandé de bien
répartir uniformément les aliments dans le récipient afin qu'ils
forment le moins d'épaisseur possible. N'empilez pas les
■ Recouvrez toujours les préparations. Si vous ne disposez pas
d'un couvercle adapté à votre récipient, prenez une assiette
ou du film micro-ondable.
■ Remuez ou retournez les aliments 2 à 3 fois pendant le
processus de décongélation, de réchauffage ou de cuisson.
■ Une fois réchauffés, laissez reposer les aliments 2 à
5 minutes pour que la température s'égalise à l'intérieur.
■ Utilisez toujours des gants anti-chaleur ou des maniques
lorsque vous retirez le récipient.
■ Les aliments gardent leur saveur. Vous pouvez donc faire
usage de sel et d'épices avec modération.
aliments.
Décongeler, faire chauffer ou cuire
des aliments surgelés
Menu, plat, plat cuisiné
Poids Puissance microondes en
Watt, durée en minutes
300400 g 600 W, 8-11 min. -
Remarques
(2-3 composants)
Potage 400 g 600 W, 8-10 min. Potées/Ragoûts 500 g 600 W, 10-13 min. Tranches ou morceaux de viande en
sauce, p.ex. goulasch
500 g 600 W, 12-17 min. En remuant, séparer les morceaux de
viande
Poisson, p.ex. morceaux de filet 400 g 600 W, 10-15 min. Ajouter éventuellement de l'eau, du jus
de citron ou du vin
Soufflés, p.ex. lasagne, cannelloni 450 g 600 W, 10-15 min. Garnitures, p.ex. riz, pâtes 250 g 600 W, 2-5 min. Ajouter un peu de liquide
500 g 600 W, 8-10 min.
Légumes, p.ex. petits pois, brocolis,
carottes
300 g 600 W, 8-10 min. Ajouter de l'eau dans le récipient de
600 g 600 W, 14-17 min.
façon à ce que le fond soit recouvert
Épinards à la crème 450 g 600 W, 11-16 min. Faire cuire sans ajouter de l'eau
38
Page 39

Réchauffer des préparations
: Risque de brûlure !
Un retard d'ébullition peut se produire lorsque vous chauffez
des liquides. Cela signifie que la température d'ébullition est
atteinte sans que les bulles de vapeur typiques remontent. À la
moindre secousse ou vibration, le liquide chaud peut alors
subitement déborder et jaillir. Mettez toujours une cuillère dans
le récipient lorsque vous réchauffez un liquide. Vous éviterez
ainsi un retard d'ébullition.
Attention !
Du métal p.ex. une cuillère dans un verre doit se trouver à
une distance d'au moins 2 cm des parois du four et de
l'intérieur de la porte. Des étincelles pourraient détériorer la
vitre de la porte.
Remarques
■ Sortez les plats cuisinés de leur emballage. Dans un récipient
micro-ondable ils réchauffent plus rapidement et plus
uniformément. Les différents ingrédients du plat peuvent se
réchauffer plus ou moins vite.
■ Recouvrez toujours les mets. Si vous ne disposez pas d'un
couvercle adapté à votre récipient, utilisez une assiette ou du
film micro-ondable.
■ Entre-temps, remuez ou retournez les mets plusieurs fois.
Vérifiez la température.
■ Une fois réchauffées, laissez reposer les préparations 2 à
5 minutes pour que la température s'égalise à l'intérieur.
■ Utilisez toujours des gants anti-chaleur ou des maniques
lorsque vous retirez le récipient.
Faire chauffer des mets Poids Puissance microondes en Watt,
Remarques
durée en minutes
Menu, plat, plat cuisiné
350-500 g 600 W, 4-8 min. -
2-3 composants)
Boissons 150 ml 800 W, 1-2 min. Placez une cuillère dans le verre, ne chauffez pas trop
300 ml 800 W, 2-3 min.
les boissons alcoolisées, contrôlez régulièrement
500 ml 800 W, 3-4 min.
Aliments pour bébé, p.ex.
biberon de lait
50 ml 360 W, env. ½ min. Sans tétine ou couvercle. Toujours bien agiter après le
100 ml 360 W, env. 1 min.
200 ml
360 W, 1
^ min.
chauffage. Contrôler impérativement la température !
Potage 1 tasse 200 g 600 W, 2-3 min. Potage, 2 tasses 400 g 600 W, 4-5 min. Viande en sauce 500 g 600 W, 811 min. Séparer les tranches de viande
Ragoût/potée 400 g 600 W, 6-8 min. -
800 g 600 W, 811 min. Légumes, 1 portion 150 g 600 W, 2-3 min. Ajouter un peu de liquide
Légumes, 2 portions 300 g 600 W, 3-5 min.
Cuire des préparations
Remarques
■ Les aliments peu épais se réchauffent plus vite que des
aliments épais. C'est pourquoi il est recommandé de bien
répartir uniformément les aliments dans le récipient afin qu'ils
forment le moins d'épaisseur possible. N'empilez pas les
aliments.
■ Faites cuire les aliments dans un récipient fermé. Si vous ne
disposez pas d'un couvercle adapté à votre récipient, utilisez
une assiette ou du film micro-ondable.
■ Les aliments gardent leur saveur. Vous pouvez donc faire
usage de sel et d'épices avec modération.
■ Une fois cuits, laissez reposer les aliments 2 à 5 minutes
pour que la température s'égalise à l'intérieur.
■ Utilisez toujours des gants anti-chaleur ou des maniques
lorsque vous retirez le récipient.
Cuire des mets Poids Puissance microondes en
Remarques
Watt, durée en minutes
Rôti de viande hachée 750 g 600 W, 20-25 min. Cuire à découvert
Poulet entier, frais, sans abats 1,2 kg 600 W, 25-30 min. Retourner à mi-cuisson
Légumes, frais 250 g 600 W, 5-10 min. Couper les légumes en morceaux de même
500 g 600 W, 10-15 min.
grosseur ;
ajouter 1 à 2 c.à s. d'eau pour 100 g de
légumes ;
remuer entre-temps
Pommes de terre 250 g 600 W, 8-10 min. Couper les pommes de terre en morceaux de
500 g 600 W, 11-14 min.
750 g 600 W, 15-22 min.
même grosseur ;
ajouter 1 à 2 c.à s. d'eau pour 100 g ;
remuer entre-temps
39
Page 40

Cuire des mets Poids Puissance microondes en
Watt, durée en minutes
Riz 125 g 600 W, 5-7 min. +
180 W, 12-15 min.
250 g 600 W, 6-8 min. +
180 W, 15-18 min.
Entremets, p.ex. flan (instant.) 500 ml 600 W, 6-8 min. Entre-temps, bien remuer le flan 2 à 3 fois avec
Fruits, compote 500 g 600 W, 912 min. -
Remarques
Ajouter deux fois son volume de liquide
un fouet
Astuces concernant les microondes
Vous ne trouvez pas d'indication de réglage pour la quantité
d'aliments préparée.
Les aliments sont devenus trop secs. La prochaine fois, réglez un temps de cuisson plus court ou choi-
Après écoulement du temps, les aliments ne sont pas encore
décongelés, chauds ou cuits.
Après écoulement du temps de cuisson, les aliments sont
trop chauds au bord mais pas encore cuits au milieu.
Après la décongélation, la volaille ou la viande a commencé à
cuire à l'extérieur, mais n'est pas encore décongelée au
milieu.
Eau de condensation
De l'eau de condensation peut se former à la vitre de la porte,
aux parois intérieures et à la sole. C'est normal. Cela ne
Allongez ou réduisez les temps de cuisson selon la règle générale
suivante :
Si vous doublez la quantité, doublez la durée
Si vous réduisez de moitié la quantité, réduisez d'autant le temps
sissez une plus faible puissance micro-ondes. Couvrez les aliments
et ajoutez plus de liquide.
Réglez un temps plus long. Les aliments placés en grandes quantités et plus épais nécessitent plus de temps.
Remuez régulièrement et la prochaine fois, choisissez une plus
faible puissance et une durée plus longue.
La prochaine fois, choisissez une plus faible puissance
microondes. Lorsqu'il s'agit de grandes quantités, retournez plusieurs fois les aliments à décongeler.
compromet pas le fonctionnement du microondes. Essuyez
l'eau de condensation après la cuisson.
Plats tests selon EN 60705
Les laboratoires d'essai se servent de ces plats tests pour
vérifier la qualité et le fonctionnement des appareils microondes.
Selon la norme EN 60705, IEC 60705 ou DIN 44547 et
EN 60350 (2009)
Cuisson et décongeler avec micro-ondes
Cuisson avec les micro-ondes
Plat Puissance micro-ondes W, durée en minutes Remarques
Lait aux œufs,
565 g
Biscuit 600 W, 8-10 min. Placer un moule en Pyrex Ø 22 cm sur le plateau tournant.
Rôti de viande
hachée
Décongeler avec les micro-ondes
Plat Puissance micro-ondes W, durée en minutes Remarques
Viande 180 W, 5-7 min. + 90 W, 10-15 min. Placer un moule en Pyrex Ø 22 cm sur le plateau tournant.
40
180 W, 25-30 min. + 90 W, 20-25 min. Placer un moule en Pyrex 20 x 17 cm sur le plateau tour-
nant.
600 W, 20-25 min. Placer un moule en Pyrex sur le plateau tournant.
Page 41

â Indice
[it]Istruzioni per l’uso
Importanti avvertenze di sicurezza.........................................41
Cause dei danni............................................................................... 43
Installazione e allacciamento ..................................................43
Consigli per l'ambiente e il risparmio energetico .................44
Risparmio energetico...................................................................... 44
Smaltimento ecocompatibile ......................................................... 44
Il pannello comandi..................................................................44
Selettore girevole ............................................................................. 44
Accessori........................................................................................... 44
Prima del primo utilizzo ...........................................................45
Impostazione dell'ora ...................................................................... 45
Il forno a microonde.................................................................45
Avvertenze per stoviglie/pentole................................................... 45
Potenze microonde ......................................................................... 46
Impostazione del microonde ......................................................... 46
Ventola di raffreddamento.............................................................. 46
Memory......................................................................................46
Memorizzazione della memory...................................................... 46
Avvio della funzione memory......................................................... 46
Modifica della durata del segnale ...........................................47
Cura e manutenzione ...............................................................47
Detergente......................................................................................... 47
Tabella guasti............................................................................48
Servizio di assistenza tecnica.................................................48
Codice del prodotto (E) e codice di produzione (FD).............. 48
Dati tecnici......................................................................................... 49
Programmazione automatica ..................................................49
Impostazione del programma .......................................................49
Scongelamento con la programmazione automatica............... 49
Cottura con la programmazione automatica.............................. 50
Testati nel nostro laboratorio.................................................. 50
Indicazioni sulle tabelle................................................................... 50
Scongelamento ................................................................................ 50
Scongelare, riscaldare o cuocere prodotti surgelati................. 51
Riscaldare le pietanze..................................................................... 51
Cuocere gli alimenti.........................................................................52
Consigli per la cottura al microonde............................................ 53
Pietanze sperimentate secondo EN 60705.............................53
Cottura e scongelamento con microonde .................................. 53
Produktinfo
Per ulteriori informazioni su prodotti, accessori, pezzi di
ricambio e servizi è possibile consultare il sito Internet
www.neff-international.com e l'eShop www.neff-eshop.com
: Importanti avvertenze di sicurezza
Leggere attentamente le presenti istruzioni
per l'uso. Solo così è possibile utilizzare
l'apparecchio in modo sicuro e corretto.
Custodire con la massima cura le presenti
istruzioni per l'uso e il montaggio in caso di
un utilizzo futuro o cessione a terzi.
Questo apparecchio è concepito esclusivamente per l'incasso. Osservare le speciali istruzioni di montaggio.
Controllare l'apparecchio dopo averlo disimballato. Qualora si fossero verificati danni da trasporto, non collegare l'apparecchio.
L'allacciamento senza spina dell'apparecchio può essere effettuato solo da un tecnico autorizzato. In caso di danni causati da un allacciamento non corretto, decade il diritto di garanzia.
Questo apparecchio è pensato
esclusivamente per l'utilizzo in abitazioni
private e in ambito domestico. Utilizzare
l'apparecchio per la preparazione di cibi e
bevande. Prestare attenzione
all'apparecchio durante il suo
funzionamento. Utilizzare l'apparecchio
esclusivamente in luoghi chiusi.
Questo apparecchio può essere utilizzato
da bambini di età pari o superiore a 8 anni
e da persone con ridotte facoltà fisiche,
sensoriali o mentali nonché da persone
prive di sufficiente esperienza o
conoscenza dello stesso se sorvegliate da
una persona responsabile della loro
sicurezza o se istruite in merito all'utilizzo
sicuro dell'apparecchio e consapevoli degli
eventuali rischi derivanti da un utilizzo
improprio.
I bambini non devono utilizzare l'apparecchio come un giocattolo. I bambini non devono né pulire né utilizzare l'apparecchio da soli a meno che non abbiano un'età superiore agli 8 anni e che siano assistiti da parte di un adulto.
Tenere lontano dall'apparecchio e dal cavo di alimentazione i bambini di età inferiore agli 8 anni.
Inserire sempre correttamente gli accessori nel vano di cottura. Vedi la descrizione degli accessori nelle istruzioni per l'uso.
Pericolo di incendio!
■
Gli oggetti infiammabili depositati nel vano
di cottura possono incendiarsi. Non
41
Page 42

riporre mai oggetti infiammabili all'interno
del vano di cottura. Non aprire mai la
porta dell'apparecchio quando fuoriesce
del fumo. Disattivare l'apparecchio e
staccare la spina o il fusibile nella scatola
dei fusibili.
Pericolo di incendio!
■
L'utilizzo non conforme dell'apparecchio è
pericoloso e può causare danni.
Non è consentito asciugare alimenti e
vestiti, riscaldare le pantofole, i cuscini di
grano o di cereali, le spugnette, i panni
per la pulizia umidi e simili.
Ad esempio, le pantofole e i cuscini di
grano o di cereali riscaldati possono
incendiarsi anche dopo alcune
ore.Utilizzare l'apparecchio
esclusivamente per la preparazione di cibi
e bevande.
Pericolo di incendio!
■
Gli alimenti possono prendere fuoco. Non
far mai riscaldare gli alimenti all'interno di
confezioni termiche.
Gli alimenti all'interno di contenitori in
plastica, carta o altri materiali infiammabili
devono essere tenuti sempre sotto
sorveglianza.
Non impostare mai valori troppo elevati
per la potenza microonde o per la durata
di cottura. Attenersi alle indicazioni
riportate in queste istruzioni per l'uso.
Non essiccare mai gli alimenti con la
funzione microonde.
Non scongelare o riscaldare troppo a
lungo o a una potenza microonde
eccessiva gli alimenti a basso contenuto
d'acqua, come ad es. il pane.
Pericolo di incendio!
■
L'olio può prendere fuoco. Non utilizzare
mai la funzione microonde per far
scaldare soltanto dell'olio.
Pericolo di esplosione!
Liquidi o altri tipi di alimenti in contenitori chiusi possono esplodere. Non riscaldare mai liquidi o altri tipi di alimenti in contenitori chiusi.
Rischio di gravi danni alla salute!
■
In caso di scarsa pulizia, la superficie
dell'apparecchio può danneggiarsi. Si
potrebbe originare dell'energia a
microonde. Pulire regolarmente
l'apparecchio e rimuovere sempre i residui
delle pietanze. Tenere sempre puliti vano
di cottura, guarnizione della porta, porta e
fermaporta, vedere anche il capitoloCura
e pulizia.
Rischio di gravi danni alla salute!
■
Se la porta del vano di cottura o la
guarnizione della porta sono danneggiate
si potrebbe originare dell'energia a
microonde. Se la porta del vano di cottura
o la guarnizione della porta sono
danneggiate, l'apparecchio non deve
essere messo in funzione. Rivolgersi al
servizio di assistenza clienti.
Rischio di gravi danni alla salute!
■
Negli apparecchi senza rivestimento
esterno fuoriesce l'energia microonde.
Non rimuovere mai il rivestimento esterno.
In caso di lavori di manutenzione o
riparazione contattare il servizio assistenza
clienti.
Pericolo di scariche elettriche!
■
Gli interventi di riparazione effettuati in
modo non conforme rappresentano una
fonte di pericolo. Le riparazioni e le
sostituzioni di cavi danneggiati devono
essere effettuate esclusivamente da
personale tecnico adeguatamente istruito
dal servizio di assistenza tecnica. Se
l'apparecchio è difettoso, staccare la
spina o il fusibile nella scatola dei fusibili.
Rivolgersi al servizio di assistenza clienti.
Pericolo di scariche elettriche!
■
Se posto vicino ai componenti caldi
dell'apparecchio, l'isolamento del cavo
degli apparecchi elettronici può fondere.
Evitare il contatto tra il cavo di
allacciamento e i componenti caldi
dell'apparecchio.
Pericolo di scariche elettriche!
■
L'infiltrazione di liquido può provocare una
scarica elettrica. Non utilizzare detergenti
ad alta pressione o dispositivi a getto di
vapore.
Pericolo di scariche elettriche!
■
Un apparecchio difettoso può causare
delle scosse elettriche. Non mettere mai in
funzione un apparecchio difettoso.
Togliere la spina o disattivare il fusibile
nella scatola dei fusibili. Rivolgersi al
servizio di assistenza clienti.
Pericolo di scariche elettriche!
■
L'apparecchio è soggetto ad alta tensione.
Non rimuovere mai il rivestimento esterno
Pericolo di scottature!
■
L'accessorio o la stoviglia si surriscalda.
Servirsi sempre delle presine per estrarre
le stoviglie e gli accessori caldi dal vano
di cottura.
Pericolo di scottature!
■
I vapori dell'alcol nel vano di cottura caldo
potrebbero prendere fuoco. Non cucinare
pietanze con quantità elevate di bevande
ad alta gradazione alcolica. Utilizzare
esclusivamente piccole quantità di
bevande ad alta gradazione alcolica.
Aprire con cautela la porta
dell'apparecchio.
Pericolo di scottature!
■
Gli alimenti con pelle o buccia dura
possono scoppiare durante e dopo il
42
Page 43

riscaldamento. Non cuocere mai le uova
nel guscio o riscaldare le uova sode. Non
cuocere mai molluschi e crostacei. In
caso di uova al tegamino forare prima il
tuorlo. In caso di alimenti con pelle o
buccia dura, quali ad es. mele, pomodori,
patate o salsicce, la buccia può
scoppiare. Prima di procedere alla cottura,
forare la buccia o la pelle.
Pericolo di scottature!
■
Il calore degli alimenti per neonati non si
distribuisce in modo uniforme. Non far mai
riscaldare gli alimenti per neonati
all'interno di contenitori con coperchio.
Rimuovere sempre il coperchio o la
tettarella. Una volta terminata la fase di
riscaldamento, scuotere o mescolare
sempre con cura. Controllare la
temperatura prima di dare gli alimenti al
bambino.
Pericolo di scottature!
■
Le pietanze riscaldate emettono calore. Le
stoviglie possono surriscaldarsi. Servirsi
sempre delle presine per estrarre le
stoviglie e gli accessori dal vano di
cottura.
Pericolo di scottature!
■
Le confezioni ermetiche a tenuta d'aria
possono esplodere. Osservare sempre le
istruzioni riportate sulla confezione.
Servirsi sempre delle presine per estrarre
le pietanze dal vano di cottura.
Pericolo di bruciature!
■
Aprendo la porta dell'apparecchio
potrebbe fuoriuscire del vapore caldo.
Aprire con cautela la porta
dell'apparecchio. Tenere lontano i
bambini.
Pericolo di bruciature!
■
Durante il riscaldamento di liquidi si può
verificare un ritardo nel processo di
ebollizione. In altri termini, la temperatura
di ebollizione viene raggiunta senza che si
formino le tipiche bollicine di vapore.
Anche un urto leggero del recipiente può
causare l'improvviso traboccare del
liquido o la formazione di spruzzi. Quando
si riscalda, aggiungere sempre un
cucchiaio nel contenitore, così si evita un
ritardo nel processo di ebollizione.
Pericolo di lesioni!
■
Il vetro graffiato della porta
dell'apparecchio potrebbe saltare. Non
utilizzare raschietti per vetro, né detergenti
abrasivi o corrosivi.
Pericolo di lesioni!
■
Le stoviglie non adatte si possono
spaccare. Le stoviglie in porcellana e
ceramica possono presentare piccoli fori
sui manici e sul coperchio. Dietro questi
fori possono nascondersi cavità. Se si
verifica un'infiltrazione di liquido in queste
cavità, la stoviglia si può spaccare.
Utilizzare esclusivamente stoviglie adatte
al microonde.
Cause dei danni
Attenzione!
■ Guarnizione molto sporca: Se la guarnizione è molto sporca,
durante il funzionamento dell'apparecchio la porta non si
chiude più correttamente. Le superfici dei mobili adiacenti
possono danneggiarsi. Mantenere sempre pulita la
guarnizione.
■ Funzionamento a microonde senza pietanze: Il
funzionamento dell'apparecchio senza pietanze all'interno del
vano di cottura comporta un sovraccarico. Non attivare mai
l'apparecchio senza inserire le pietanze nel vano di cottura.
L'unica eccezione consentita è quella di un breve test per le
stoviglie, vedere il capitolo Microonde, stoviglie.
■ Popcorn al microonde: Non impostare mai una potenza
microonde troppo elevata. Utilizzare al massimo 600 watt.
Appoggiare sempre la busta dei popcorn su un piatto in
vetro. Il pannello potrebbe saltare a causa del sovraccarico.
■ Il liquido di cottura non deve penetrare all'interno
dell'apparecchio attraverso il sistema di azionamento del
piatto girevole. Controllare il processo di cottura. Inizialmente
utilizzare un tempo di cottura ridotto che, se necessario, può
essere prolungato.
■ Non utilizzare mai l'apparecchio microonde senza il piatto
girevole.
Installazione e allacciamento
Questo apparecchio è stato concepito esclusivamente ai fini di
un uso privato.
Questo apparecchio è stato concepito per l'incasso.
Osservare le speciali istruzioni di montaggio.
L'apparecchio è già fornito di apposita spina e deve essere
collegato soltanto a una presa con messa a terra
conformemente a quanto previsto dalle prescrizioni in materia.
La protezione deve equivalere a 10 Ampere (interruttore
automatico di sicurezza L oppure B). La tensione di rete deve
corrispondere al valore di tensione indicato sulla targhetta.
L'installazione della presa oppure la sostituzione del cavo di
allacciamento devono essere eseguite esclusivamente da un
elettricista qualificato. Se in seguito al montaggio la spina non
risulta più accessibile, relativamente all''installazione deve
essere presente un disgiuntore su tutti i poli con una distanza
di contatto di almeno 3 mm.
Non è consentito l'utilizzo di prese multiple, prese a ciabatta o
prolunghe. In condizioni di sovraccarico sussiste il pericolo di
incendio.
43
Page 44

Consigli per l'ambiente e il risparmio energetico
Questa parte contiene consigli per risparmiare energia durante
la cottura e su come smaltire l'apparecchio in modo corretto.
Risparmio energetico
Preriscaldare il forno soltanto se indicato nella ricetta o nelle
tabelle delle istruzioni per l'uso.
Utilizzare teglie scure, con smalto o vernice nera. Questo tipo di
stoviglie assorbe bene il calore.
Durante la cottura, aprire il meno possibile la porta
dell'apparecchio.
In caso di preparazione di più dolci, si consiglia di cuocerli in
forno uno dopo l'altro. Il vano di cottura rimane caldo e si
riduce così il tempo di cottura per il secondo dolce.
Il pannello comandi
È qui fornito uno schema generale del pannello di comando.
Sono possibili lievi variazioni in funzione del modello.
In caso di tempi di cottura prolungati, disattivare il forno
10 minuti prima della fine del tempo di cottura e utilizzare il
calore residuo per ultimare la cottura.
Smaltimento ecocompatibile
Si prega di smaltire le confezioni nel rispetto dell'ambiente.
Questo apparecchio dispone di contrassegno ai sensi
della direttiva europea 2012/19/UE in materia di
apparecchi elettrici ed elettronici (waste electrical and
electronic equipment - WEEE).
Questa direttiva definisce le norme per la raccolta e il
riciclaggio degli apparecchi dismessi valide su tutto il
territorio dell’Unione Europea.
3 Selettore
4 Tast i
5 Apertura porta
Tasti Tipo di utilizzo
»
90 Impostare la potenza microonde a 90 watt
180 Impostare la potenza microonde a 180 watt
360 Impostare la potenza microonde a 360 watt
600 Impostare la potenza microonde a 600 watt
900 Impostare la potenza microonde a 900 Watt
¼
X
l
ƒ
„
Per impostare l'ora e la durata oppure la programmazione automatica
Consente di impostare l'ora
Per regolare il peso in chilogrammi nei programmi
Selezionare la programmazione automatica
Selezionare Memory
Consente di avviare il funzionamento
Consente di arrestare il funzionamento
1 Indicatore
per ora e durata
2 Tasto Orologio
44
Selettore girevole
Il selettore permette di modificare tutti i valori predefiniti e i
valori di impostazione.
Il selettore è una manopola a scomparsa. Premere per estrarlo
e reinserirlo.
Accessori
Piatto girevole
Inserimento del piatto girevole:
1. Disporre l'anello a nell'incavo del vano di cottura.
Page 45

2. Incastrare il piatto girevole b nell'elemento di trasmissione c
che si trova al centro del fondo del vano di cottura.
E
D
F
Prima del primo utilizzo
Avvertenza: Utilizzare l'apparecchio solo con il piatto girevole
inserito. Verificare sempre che sia posizionato in modo corretto.
Il piatto girevole può ruotare verso destra o verso sinistra.
In questo capitolo viene illustrato tutto ciò che bisogna fare
prima utilizzare il forno a microonde per la prima volta. Leggere
prima il capitolo Norme di sicurezza.
Impostazione dell'ora
In seguito al primo allacciamento dell'apparecchio o ad un
black-out elettrico, sull'indicatore lampeggiano tre zeri.
1. Premere il tasto ».
Sull'indicatore compare
tasto
».
2. Impostare l'ora servendosi del selettore.
3. Premere nuovamente il tasto ».
‚ƒ:‹‹œ e si illumina la spia sopra il
Il forno a microonde
Le microonde vengono trasformate in calore negli alimenti.
Questa sezione contiene informazioni relative alle stoviglie e
istruzioni su come impostare il forno a microonde.
Avvertenza: Il capitolo Testati nel nostro laboratorio presenta
esempi relativi allo scongelamento, al riscaldamento e alla
cottura con il microonde.
Sperimentate la funzione microonde, ad es. per scaldarvi una
tazza d'acqua per il tè.
Prendere una grossa tazza senza decorazioni in oro o argento
e metterci dentro un cucchiaino. Riempire la tazza d'acqua e
poggiarla sul piatto girevole.
1. Premere il tasto 900 W.
2. Con il selettore impostare ‚:„‹ min.
3. Premere il tasto ƒ.
Dopo 1 minuto e 30 secondi viene emesso un segnale
acustico. L'acqua per il tè è calda.
Mentre vi bevete il tè, leggete ancora una volta le indicazioni di
sicurezza all'inizio di queste istruzioni per l'uso. Sono molto
importanti.
Avvertenze per stoviglie/pentole
Stoviglie adatte
Sono appropriate le stoviglie termoresistenti in vetro,
vetroceramica, porcellana, ceramica o in materiale plastico
refrattario. Questi materiali sono permeabili alle microonde.
È anche possibile utilizzare piatti di servizio. In questo modo
non sarà più necessario travasare gli alimenti. Le stoviglie con
decorazioni dorate o argentate possono essere utilizzate
L'ora attuale è impostata.
Come nascondere l'ora
Premere il tasto
L'indicatore diventa scuro e l'ora scompare.
Reimpostazione dell'ora
Premere il tasto
Sull'indicatore viene visualizzata l'ora
l'impostazione come descritto ai punti 2 e 3.
Modifica dell'ora ad es. per passare dall'ora legale all'ora solare
Effettuare l'impostazione come descritto ai punti da 1 a 3.
soltanto nel caso in cui il costruttore garantisca che esse siano
adatte all'uso con il forno a microonde.
Stoviglie non adatte
Le stoviglie in metallo non sono appropriate. Il metallo non è
permeabile alle microonde. Gli alimenti posti entro contenitori
in metallo restano freddi.
Attenzione!
Formazione di scintille: i componenti in metallo, ad es. i
cucchiai contenuti nei bicchieri, devono restare a una distanza
non inferiore a 2 cm dalle pareti del forno e dal lato interno
della porta. Le scintille potrebbero infatti danneggiare
gravemente il vetro interno della porta.
Test delle stoviglie
Non attivare mai il forno a microonde senza aver prima inserito
gli alimenti. L'unica eccezione consentita è rappresentata dal
seguente test per le stoviglie.
In caso di dubbio circa l'adeguatezza delle stoviglie all'uso nel
forno a microonde, si consiglia di effettuare il seguente test:
1. Introdurre la stoviglia vuota nell'apparecchio per ½ - 1 minuto
alla massima potenza.
2. Controllare regolarmente la temperatura.
La pentola deve essere fredda o tiepida.
Nel caso in cui sia calda o qualora si formino scintille, la
pentola non è adatta.
» e in seguito il tasto „.
».
‚ƒ:‹‹. Effettuare
45
Page 46

Potenze microonde
Potenza microonde
90 W scongelare cibi delicati
180 W scongelare e continuare la cottura
360 W cuocere la carne e riscaldare cibi delicati
600 W riscaldare e cuocere cibi
900 W riscaldare liquidi
Avvertenza: È possibile impostare la potenza 900 W per 30
minuti, 600 W per 1 ora e le altre potenze rispettivamente per
1 ora e 39 minuti.
indicata per
Impostazione del microonde
Esempio: potenza microonde 600 watt, 5 minuti
1. Premere la potenza microonde desiderata.
La spia sopra il tasto si illumina.
2. Impostare la durata servendosi del selettore.
PLQ
PLQ
NJ
3. Premere il tasto ƒ.
Sull'indicatore viene visualizzato lo scorrere della durata.
La durata è trascorsa
Viene emesso un segnale acustico. Aprire la porta
dell'apparecchio o premere
„. L'ora ricompare.
Modifica della durata
È sempre possibile. Modificare la durata servendosi del
selettore.
Arresto
Premere una volta il tasto
„ o aprire la porta dell'apparecchio.
Il funzionamento si arresta. Lampeggia l'indicatore sopra il
tasto
ƒ. Dopo avere chiuso la porta, premere di nuovo il
tasto
ƒ.
Interruzione del funzionamento
Premere il tasto
una volta il tasto
„ 2 volte, oppure aprire la porta e premere
„.
Avvertenza: È anche possibile impostare dapprima la durata e,
successivamente, la potenza microonde.
Ventola di raffreddamento
L'apparecchio è dotato di una ventola di raffreddamento, che
può continuare a funzionare anche in seguito allo spegnimento
dell'apparecchio stesso.
Avvertenze
■ Durante il funzionamento a microonde, il vano di cottura
rimane freddo. Tuttavia, la ventola di raffreddamento entra in
funzione e può continuare a funzionare anche quando il
funzionamento a microonde è terminato.
■ Sul vetro della porta, sulle pareti interne e sulla base può
formarsi della condensa. Questo è un fenomeno normale che
non compromette il corretto funzionamento del forno a
microonde. Una volta terminata la fase di cottura, eliminare
l'acqua di condensa.
Memory
Con la funzione Memory è possibile memorizzare
l'impostazione per una pietanza e richiamarla ogni volta che lo
si desidera.
La funzione Memory è utile quando si prepara spesso una
pietanza.
Memorizzazione della memory
Esempio: 360 W, 25 minuti
1. Premere il tasto l.
La spia sopra il tasto si illumina.
2. Premere la potenza microonde desiderata.
La spia sopra il tasto si illumina e compare sull'indicatore
1:00 min.
3. Impostare la durata servendosi del selettore.
PLQ
PLQ
PLQ
NJ
4. Confermare con il tasto l.
L'ora ricompare. L'impostazione è memorizzata.
Avvertenze
■ La memory può essere memorizzata e immediatamente
avviata. Alla fine non premere
■ Non è possibile memorizzare più potenze microonde una di
l, ma ƒ.
seguito all'altra.
■ I programmi automatici non possono essere memorizzati.
■ Impostare nuovamente la memory: premere il tasto l . Le
vecchie impostazioni vengono in questo modo visualizzate.
Memorizzare il nuovo programma come descritto ai punti da
1 a 4.
Avvio della funzione memory
Il programma memorizzato può essere avviato molto
semplicemente. Inserire la pietanza nell'apparecchio e chiudere
la porta.
1. Premere il tasto l.
Le impostazioni memorizzate vengono in questo modo
visualizzate.
2. Premere il tasto ƒ.
Sull'indicatore viene visualizzato lo scorrere della durata.
La durata è trascorsa
Viene emesso un segnale acustico. Aprire la porta
dell'apparecchio o premere
„. L'ora ricompare.
46
Page 47

Arresto
Premere una volta il tasto
Il funzionamento si arresta. Lampeggia l'indicatore sopra il
tasto
ƒ. Dopo avere chiuso la porta, premere di nuovo il
tasto
ƒ.
„ o aprire la porta dell'apparecchio.
Modifica della durata del segnale
Interruzione del funzionamento
Premere il tasto
una volta il tasto
„ 2 volte, oppure aprire la porta e premere
„.
Quando l'apparecchio si spegne viene emesso un segnale
acustico. È possibile modificare la durata del segnale acustico
in qualsiasi momento.
A tale scopo premere per ca. 6 secondi il tasto
ƒ.
Cura e manutenzione
Una cura e manutenzione scrupolosa contribuiscono a
mantenere a lungo il forno a microonde in buone condizioni.
Sono qui illustrate le modalità di cura e pulizia dell'apparecchio
corrette.
: Pericolo di corto circuito!
Per la pulizia non utilizzare mai detergenti ad alta pressione o
dispositivi a getto di vapore.
: Pericolo di scottature!
Non pulire mai l'apparecchio appena spento. Lasciarlo
raffreddare.
: Pericolo di scariche elettriche!
Non immergere mai l'apparecchio in acqua e non pulirlo sotto
un getto d'acqua.
Per non danneggiare le diverse superfici con l'utilizzo di
detergenti non appropriati, prestare attenzione alle indicazioni
della tabella.
Non utilizzare
■ detergenti aggressivi o abrasivi.
Ne potrebbe infatti conseguire il danneggiamento della
superficie. Se uno di questi prodotti dovesse venire a
contatto con la parte frontale, pulire immediatamente con
acqua.
■ raschietti per metallo o per vetro per la pulizia del vetro della
porta,
■ raschietti per metallo o per vetro per la pulizia della
guarnizione,
■ spugnette dure o abrasive.
Lavare bene le spugne nuove prima di utilizzarle.
■ detergenti a elevato contenuto di alcol.
Detergente
Attenzione!
Prima della pulizia staccare la spina o disattivare il fusibile nella
scatola dei fusibili. Pulire le superfici esterne dell'apparecchio e
il vano di cottura con un panno morbido e un detergente
delicato. Asciugare con un panno pulito.
Settore Detergente
Lato frontale
dell'apparecchio
Soluzione di lavaggio calda:
pulire con un panno spugna e asciugare
con un panno morbido. Non utilizzare
per la pulizia né detergenti per vetro né
raschietti per metallo o per vetro.
Viene acquisita la nuova durata del segnale acustico.
L'ora ricompare.
Alternative:
Durata segnale breve - 3 toni
Durata segnale lunga - 30 toni.
Settore Detergente
Parte frontale
dell'apparecchio con
acciaio inox
Vano di cottura in
acciaio inox
Incavo del vano di
cottura
Piatto girevole e
anello
Vetri delle porte Detergente per vetro:
Guarnizione Soluzione di lavaggio calda:
Soluzione di lavaggio calda:
pulire con un panno spugna e asciugare
con un panno morbido. Rimuovere
immediatamente le macchie di calcare,
grasso, amido o albume in quanto
potrebbero corrodere la superficie. Speciali detergenti per superfici in acciaio
inox possono essere richiesti presso il
servizio di assistenza tecnica o presso il
proprio rivenditore specializzato. Non
utilizzare per la pulizia né detergenti per
vetro né raschietti per metallo o per
vetro.
Soluzione di lavaggio calda o acqua e
aceto:
pulire con un panno spugna e asciugare
con un panno morbido.
In caso di sporco ostinato: utilizzare il
detergente per forno soltanto quando il
vano cottura si è completamente raffreddato. Utilizzare preferibilmente una spugnetta in acciaio. Non utilizzare spray
per forno, altri detergenti aggressivi o
abrasivi. Non sono adatte neanche le
spugnette abrasive, ruvide o in metallo
poiché graffiano la superficie. Fare
asciugare completamente le superfici
interne.
Panno umido:
Non fare colare acqua nel comando del
piatto girevole all'interno dell'apparecchio.
Soluzione di lavaggio calda:
Quando viene nuovamente montato, il
piatto girevole deve innestarsi correttamente in posizione.
pulire con un panno spugna. Non utilizzare raschietti per vetro.
pulire con un panno spugna senza sfregare. Non utilizzare per la pulizia
raschietti per metallo o per vetro.
47
Page 48

Tabella guasti
Quando si verificano anomalie, spesso si tratta di guasti
facilmente risolvibili. Prima di rivolgersi al servizio di assistenza,
si prega di tentare di eliminare autonomamente il guasto,
basandosi sulle indicazioni fornite nella tabella.
Se un piatto non riesce in modo ottimale, consultare il capitolo
Testati nel nostro laboratorioche contiene molti suggerimenti e
avvertenze per la preparazione delle pietanze.
Un guasto, che fare?
Messaggio di errore Possibile causa Rimedio/avvertenza
L'apparecchio non funziona La spina non è inserita. Inserire la spina
Interruzione dell’energia elettrica. Verificare che la lampada della cucina fun-
Il fusibile è difettoso Controllare nella scatola dei fusibili che il
Utilizzo improprio Disattivare il fusibile nella scatola dei fusi-
Sull'indicatore si illuminano tre zeri. Interruzione dell’energia elettrica. Impostare nuovamente l'ora.
L'apparecchio non è in funzione.
Sull'indicatore viene visualizzata una
durata.
Il forno microonde non funziona. La porta non è stata chiusa correttamente. Accertarsi che la porta non sia bloccata da
Le pietanze si riscaldano più lentamente del solito.
Il piatto girevole mentre ruota emette
rumori inconsueti (tipo scricchiolii o
sibili).
Il funzionamento in modalità microonde viene interrotto senza alcun
motivo evidente.
Sull'indicatore viene visualizzata una
“M”.
Il selettore è stato azionato inavvertitamente.
Non è stato premuto il tasto
tuato la regolazione.
Non è stato premuto il tasto
È stato impostato un livello di potenza micro-
onde troppo basso.
È stata introdotta nell'apparecchio una quantità
maggiore del solito.
Le pietanze erano più fredde del solito. Mescolare o girare di tanto in tanto le pie-
Sporcizia o corpi estranei nella zona della trasmissione del piatto girevole.
Il forno microonde presenta un'anomalia. Se questa anomalia continua a manife-
L'apparecchio si trova in modalità demo.
: Pericolo di scariche elettriche!
Gli interventi di riparazione effettuati in modo non conforme
rappresentano una fonte di pericolo. Le riparazioni devono
essere effettuate esclusivamente da personale tecnico
adeguatamente istruito dal servizio di assistenza tecnica.
Alcuni messaggi di errore si possono risolvere
autonomamente.
zioni.
fusibile dell'apparecchio sia in perfette
condizioni.
bili. Riattivarlo dopo circa 10 secondi.
Premere il tasto
ƒ dopo aver effet-
Premere il tasto ƒ oppure cancellare
l'impostazione con il tasto
residui di cibo o da un corpo estraneo.
ƒ. Premere il tasto ƒ.
Selezionare una potenza microonde superiore.
Quantità raddoppiata: tempo raddoppiato.
tanze.
Pulire l'anello e l'incavo del vano di cottura.
starsi, contattare il servizio di assistenza
tecnica.
Tenere premuti il tasto
ca. 7 secondi.
La modalità demo è disattivata.
„.
„.
ƒ e il tasto „ per
Servizio di assistenza tecnica
Il servizio di assistenza tecnica è a disposizione per eventuali
riparazioni. Troveremo la soluzione giusta, evitando di
coinvolgere un tecnico quando non è necessario.
Codice del prodotto (E) e codice di produzione (FD)
Quando si contatta il servizio clienti indicare sempre il codice
del prodotto (E) e il codice di produzione (FD), in modo da
poter ricevere subito un'assistenza mirata. Aprendo la porta
dell'apparecchio, la targhetta con i numeri in questione si trova
in alto a destra. Per avere subito a disposizione le informazioni
utili in caso di necessità, si consiglia di riportare subito qui i dati
relativi all'apparecchio e il numero di telefono del servizio di
assistenza tecnica.
48
Codice del
prodotto (E)
Servizio di assistenza
tecnica
Prestare attenzione al fatto che, in caso di utilizzo improprio,
l'intervento del tecnico del servizio di assistenza non è gratuito
anche se effettuato durante il periodo di garanzia.
Trovate i dati di contatto di tutti i paesi nell'accluso elenco dei
centri di assistenza clienti.
O
Codice di produzione (FD)
Page 49

Ordine di riparazione e consulenza in caso di guasti
I 800-522822
Linea verde
CH 0848 840 040
Fidatevi della competenza del Costruttore. In questo modo
avrete la garanzia di una riparazione effettuata da tecnici
qualificati e con pezzi di ricambio originali per il vostro
elettrodomestico.
Questo apparecchio è conforme alle norme EN 55011 o CISPR
11. Si tratta di un prodotto del gruppo 2, classe B.
'Gruppo 2' significa che le microonde vengono generate ai fini
del riscaldamento e della cottura di alimenti. Classe B indica
che l'apparecchio è adatto all'uso in ambito domestico.
Dati tecnici
Tensione di ingresso AC 220 - 230 V, 50 Hz
Programmazione automatica
Consumo di potenza 1270 W
Massima tensione di uscita 900 W
Frequenza microonde 2450 MHz
Protezione 10 A
Dimensioni (AxLxP)
Apparecchio 382 mm x 594 mm x 388 mm
Vano di cottura 208 mm x 328 mm x 369 mm
Testato VDE (ente di certificazione tedesco)
Contrassegno CE sì
sì
Con la programmazione automatica è possibile scongelare gli
alimenti in modo semplice e preparare le pietanze velocemente
e senza problemi. Basta selezionare il programma e inserire il
peso relativo alla pietanza. La funzione di programmazione
automatica provvede ad adottare l'impostazione ottimale. È
possibile scegliere fra 7 programmi diversi.
Impostazione del programma
Selezionare un programma e regolare nel modo seguente.
1. Premere ripetutamente il tasto X finché non viene
visualizzato il numero di programma desiderato.
La spia sopra il tasto si illumina.
2. Premere il tasto ¼.
La spia sopra il tasto si illumina e compare un peso predefinito.
3. Impostare il peso della pietanza servendosi del selettore.
4. Premere il tasto ƒ.
PLQ
PLQ
NJ
Sull'indicatore viene visualizzato lo scorrere della durata del
programma impostato.
La durata è trascorsa
Viene emesso un segnale acustico. Aprire la porta
dell'apparecchio o premere
Correzione
Premere due volte il tasto
Arresto
Premere una volta il tasto
Il funzionamento si arresta. Lampeggia l'indicatore sopra il
tasto
ƒ. Dopo avere chiuso la porta, premere di nuovo il
tasto
ƒ.
Interruzione del funzionamento
Premere il tasto
una volta il tasto
Avvertenze
■ In alcuni programmi, al termine del tempo impostato viene
emesso un segnale acustico. Aprire la porta dell'apparecchio
e mescolare la pietanza, oppure girare la carne o il pollame.
Dopo avere chiuso la porta, premere di nuovo il tasto
■ È possibile richiamare il numero del programma e il peso
con
X o ¼. Per 3 secondi sull'indicatore compare il valore
richiamato.
„ 2 volte, oppure aprire la porta e premere
„.
„. L'ora ricompare.
„ e reimpostare.
„ o aprire la porta dell'apparecchio.
ƒ.
Scongelamento con la programmazione automatica
Con i 4 programmi di scongelamento è possibile scongelare
carne, pollame e pane.
Avvertenze
■ Preparazione degli alimenti
Utilizzare alimenti che siano stati congelati e conservati a
-18 °C possibilmente non troppo spessi e suddivisi in
porzioni.
Prima di scongelarli, togliere gli alimenti dalla confezione e
pesarli. Il peso è necessario per impostare il programma.
■ Durante lo scongelamento di carne e pollame fuoriesce del
liquido. Fare scolare tale liquido, che in alcun caso deve
essere riutilizzato, né messo in contatto con altri alimenti.
■ Stoviglie
Disporre l'alimento in una stoviglia bassa, adatta al forno a
microonde, come ad es. esempio un piatto in vetro o
porcellana. Non chiudere con un coperchio.
49
Page 50

■ Tempo di riposo
Dopo lo scongelamento, lasciar riposare il cibo per altri 10 30 minuti. I pezzi di carne grossi necessitano di un tempo di
riposo più lungo rispetto a quelli di piccole dimensioni. La
carne tritata o le fettine sottili devono essere separate l'una
dall'altra prima del tempo di riposo.
In seguito è possibile procedere alla preparazione degli
alimenti, anche qualora i pezzi di carne più spessi siano
rimasti congelati nella parte centrale. Nel caso di pollame è
ora possibile estrarre le interiora.
■ Segnale
In alcuni programmi, al termine del tempo impostato viene
emesso un segnale acustico. Aprire la porta dell'apparecchio
e tagliare a pezzi la pietanza, oppure girare la carne o il
pollame. Dopo avere chiuso la porta, premere il tasto start.
N° programma Ambito di peso in kg
Scongelamento
P 01 Carne tritata 0,20 - 1,00
P 02 Pezzi di carne 0,20 - 1,00
P 03 Pollo, pezzi di pollo 0,40 - 1,80
P 04 Pane 0,20 - 1,00
Cottura con la programmazione automatica
Con i 3 programmi di cottura è possibile cuocere riso, patate o
verdure.
Avvertenze
■ Stoviglie
Cuocere l'alimento in una stoviglia adatta al forno microonde
con il coperchio. Per il riso utilizzare una stoviglia alta di
grandi dimensioni.
■ Preparazione degli alimenti
Pesare l'alimento. Il peso è necessario per impostare il
programma.
Riso:
non utilizzare riso da cuocere negli appositi sacchetti.
Aggiungere la quantità d'acqua necessaria indicata sulla
confezione. Di norma essa corrisponde a due-tre volte la
quantità del riso.
Patate:
per lessare le patate, tagliarle a piccoli pezzi di dimensioni
uguali. Per ogni 100 g di patate, aggiungere un cucchiaio di
acqua e un po' di sale.
Verdure fresche:
pesare le verdure fresche dopo averle pulite e tagliarle a
piccoli pezzi di dimensioni uguali. Per ogni 100 g di verdure,
aggiungere un cucchiaio d'acqua.
■ Segnale
Nel corso dell'avanzamento del programma, dopo un certo
tempo viene emesso un segnale acustico. Mescolare il cibo.
■ Tempo di riposo
Al termine del programma, lasciar riposare il cibo ancora un
po', di norma per 5 - 10 minuti affinché la temperatura si
stabilizzi.
I risultati della cottura dipendono dalla qualità e dalle
caratteristiche degli alimenti.
N° programma Ambito di peso in kg
Cottura
P 05 Riso 0,05 - 0,2
P 06 Patate 0,15 - 1,0
P 07 Verdure 0,15 - 1,0
Testati nel nostro laboratorio
Qui di seguito, viene proposta una selezione di pietanze con le
relative impostazioni ottimali. Viene indicata la potenza
microonde migliore per ogni piatto. Le istruzioni sono corredate
da consigli sulle stoviglie da utilizzare e sulla preparazione dei
piatti.
Indicazioni sulle tabelle
Le tabelle seguenti riportano le possibilità di cottura e i
parametri di impostazione per il microonde.
I tempi di cottura riportati nelle tabelle costituiscono valori
indicativi che dipendono dal tipo di pentola, dalla qualità, dalla
temperatura e dalle caratteristiche degli alimenti.
Nelle tabelle sono spesso riportati gli intervalli di tempo.
Impostare dapprima il tempo minimo e, se necessario,
prolungarlo.
I valori di quantità indicati nelle tabelle potrebbero essere
differenti da quelli di cui si dispone. Esiste a questo proposito
una regola approssimativa:
Quantità raddoppiata - durata pressoché raddoppiata,
quantità dimezzata - durata dimezzata.
Posizionare sempre la stoviglia sul piatto girevole.
Scongelamento Peso Potenza microonde in watt, durata in
Carne intera di manzo, vitello o
maiale (con o senza osso)
800 g 180 W, 15 min. + 90 W, 10-20 min. 1 kg 180 W, 20 min. + 90 W, 15-25 min.
1,5 kg 180 W, 30 min. + 90 W, 20-30 min.
minuti
Scongelamento
Avvertenze
■ Posizionare gli alimenti surgelati in un contenitore aperto sul
piatto girevole.
■ Le parti delicate, quali cosce e ali del pollo o le parti grasse
dell'arrosto, possono essere coperte con pezzettini di
pellicola di alluminio. Evitare che la pellicola entri in contatto
con le pareti interne del vano di cottura. Trascorsa la metà
del tempo di scongelamento, è possibile rimuovere la
pellicola di alluminio.
■ Durante lo scongelamento di carne e pollame fuoriesce del
liquido. Fare scolare tale liquido, che in alcun caso deve
essere riutilizzato, né messo in contatto con altri alimenti.
■ Nel frattempo girare o mescolare 1 - 2 volte gli alimenti. Le
porzioni di maggiori dimensioni devono essere girate
ripetutamente.
■ Lasciare riposare il cibo scongelato per altri 10 - 20 minuti a
temperatura ambiente in modo da uniformare la temperatura.
Nel caso del pollame è possibile estrarre le interiora. La
carne può essere preparata anche se il nucleo centrale non è
ancora del tutto scongelato.
Avvertenze
50
Page 51

Scongelamento Peso Potenza microonde in watt, durata in
Avvertenze
minuti
Pezzi o fettine di carne di manzo,
vitello o maiale
200 g 180 W, 2 min. + 90 W, 4-6 min. Separare le parti scongelate girando
500 g 180 W, 5 min. + 90 W, 5-10 min.
gli alimenti
800 g 180 W, 8 min. + 90 W, 10-15 min.
Carne tritata, mista 200 g 90 W, 10 min. Se possibile surgelare in posizione
500 g 180 W, 5 min. + 90 W, 10-15 min.
800 g 180 W, 8 min. + 90 W, 10-20 min.
piana.
Girare ripetutamente, togliere le porzioni di carne già scongelate
Pollame o pezzi di pollo 600 g 180 W, 8 min. + 90 W, 10-15 min. -
1,2 kg 180 W, 15 min. + 90 W, 20-25 min.
Filetto, cotoletta o fette di pesce 400 g 180 W, 5 min. + 90 W, 10-15 min. Separare le parti scongelate
Verdure, ad es. piselli 300 g 180 W, 10-15 min. Frutta, ad es. lamponi 300 g 180 W, 7-10 min. Mescolare di tanto in tanto con cau-
500 g 180 W, 8 min. + 90 W, 5-10 min.
tela, separare le parti scongelate
Sciogliere il burro 125 g 180 W, 1 min. + 90 W, 2-3 min. Rimuovere completamente la confe-
250 g 180 W, 1 min. + 90 W, 3-4 min.
zione.
Pane intero 500 g 180 W, 6 min. + 90 W, 5-10 min. -
1 kg 180 W, 12 min. + 90 W, 10-20 min.
Dolci, asciutti, ad es. torte morbide 500 g 90 W, 10-15 min. Solo per dolci senza glassa, panna o
crema; separare le porzioni di dolce
l'una dall'altra
crema.
Dolci, con ripieno succoso, ad es.
torta di frutta, torta di ricotta
750 g 180 W, 5 min. + 90 W, 10-15 min.
500 g 180 W, 5 min. + 90 W, 15-20 min. Solo per dolci senza glassa, panna o
750 g 180 W, 7 min. + 90 W, 15-20 min.
Scongelare, riscaldare o cuocere prodotti surgelati
Avvertenze
■ Togliere i piatti precotti dalla confezione. In una pentola
adatta al forno microonde riscaldano più rapidamente e in
modo più uniforme. I diversi componenti delle pietanze si
scaldano in tempi diversi.
■ Le pietanze basse si scaldano più rapidamente. Di
conseguenza, è preferibile distribuire le pietanze nella
stoviglia in uno strato più sottile possibile. Si consiglia di non
■ Coprire sempre gli alimenti. Se non si dispone di un
coperchio adatto, utilizzare un piatto o una pellicola speciale
adatta ai forni a microonde.
■ Girare o mescolare le pietanze 2 -3 volte durante la cottura.
■ Dopo aver scaldato il cibo, lasciarlo riposare per altri 2 -
minuti di modo che la temperatura si uniformi.
■ Prelevare sempre le stoviglie utilizzando il guanto da forno o
le presine.
■ Il gusto tipico degli alimenti viene conservato. Per questo
motivo non eccedere nell'uso di sale e spezie.
sovrapporre gli alimenti.
Scongelare, riscaldare o cuocere prodotti surgelati
Menu, piatti pronti o precotti
Peso Potenza microonde in watt,
durata in minuti
300-400 g 600 W, 8-11 min. -
Avvertenze
(2-3 portate)
Minestra 400 g 600 W, 8-10 min. Pasticci 500 g 600 W, 10-13 min. Fette o pezzetti di carne con sugo,
500 g 600 W, 1217 min. Separare i pezzi di carne girandoli
ad. es. gulasch
Pesce, ad es. filetto 400 g 600 W, 10-15 min. Eventualmente aggiungere acqua,
succo di limone o vino.
Sformati, ad es. lasagne, cannelloni 450 g 600 W, 10-15 min. Contorni, ad es. riso, pasta 250 g 600 W, 2-5 min. Aggiungere un po' di liquido
500 g 600 W, 8-10 min.
Verdure, ad es. piselli, broccoli, carote 300 g 600 W, 8-10 min. Versare dell'acqua nella stoviglia fino a
600 g 600 W, 14-17 min.
coprirne il fondo.
Spinaci con panna 450 g 600 W, 11-16 min. Cuocere senza aggiungere acqua
Riscaldare le pietanze
: Pericolo di bruciature!
Durante il riscaldamento di liquidi si può verificare un ritardo nel
processo di ebollizione. In altri termini, la temperatura di
ebollizione viene raggiunta senza che si formino le tipiche
bollicine di vapore. Anche un urto leggero del recipiente può
causare l'improvviso traboccare del liquido o la formazione di
spruzzi. Quando si riscaldano liquidi, aggiungere sempre un
cucchiaio nel contenitore in modo da evitare un ritardo del
processo di ebollizione.
51
Page 52

Attenzione!
I componenti in metallo, per esempio i cucchiai contenuti nei
bicchieri, devono restare a una distanza non inferiore a 2 cm
dalle pareti del forno e dal lato interno della porta. Le scintille
potrebbero infatti danneggiare gravemente il vetro interno della
porta.
Avvertenze
■ Togliere i piatti precotti dalla confezione. In una pentola
adatta al forno microonde riscaldano più rapidamente e in
modo più uniforme. I diversi componenti delle pietanze si
scaldano in tempi diversi.
■ Coprire sempre gli alimenti. Se non si dispone di un
coperchio adatto, utilizzare un piatto o una speciale pellicola
adatta ai forni a microonde.
■ Girare o mescolare più volte durante la cottura. Controllare la
temperatura.
■ Dopo aver scaldato il cibo, lasciarlo riposare per altri 2-
5 minuti in modo che la temperatura si uniformi.
■ Prelevare sempre le stoviglie utilizzando il guanto da forno o
le presine.
Riscaldare le pietanze Peso Potenza microonde in watt,
Avvertenze
durata in minuti
Menu, piatti pronti o precotti
350500 g 600 W, 4-8 min. -
2-3 portate)
Bevande 150 ml 800 W, 1-2 min. Mettere un cucchiaio nel contenitore in vetro, non riscal-
300 ml 800 W, 2-3 min.
dare troppo le bevande alcoliche; controllare di tanto in
tanto
500 ml 800 W, 3-4 min.
Alimenti per bambini ad es.
biberon
50 ml 360 W, ca. ½ min. Senza tettarella o coperchio. Una volta terminato il riscal100 ml 360 W, ca. 1 min.
200 ml
360 W, 1
^min.
damento, scuotere sempre con cura. Controllare assolutamente la temperatura.
Minestra 1 tazza 200 g 600 W, 23 min. Minestra 2 tazze 400 g 600 W, 4-5 min. Carne in salsa 500 g 600 W, 8 11 min. Separare le fettine di carne l'una dall'altra.
Pasticcio 400 g 600 W, 6-8 min. -
800 g 600 W, 8 11 min. Verdure, 1 porzione 150 g 600 W, 23 min. Aggiungere un po' di liquido.
Verdure, 2 porzioni 300 g 600 W, 3-5 min.
Cuocere gli alimenti
Avvertenze
■ Le pietanze basse si scaldano più rapidamente. Di
conseguenza, è preferibile distribuire le pietanze nella
stoviglia in uno strato più sottile possibile. Si consiglia di non
sovrapporre gli alimenti.
■ Coprire con un coperchio e far cuocere come indicato. Se
non si dispone di un coperchio adatto, utilizzare un piatto o
una pellicola speciale adatta ai forni a microonde.
■ Il gusto tipico degli alimenti viene conservato. Per questo
motivo non eccedere nell'uso di sale e spezie.
■ Dopo aver cotto il cibo, lasciarlo riposare per altri 2 -5 minuti
di modo che la temperatura si uniformi.
■ Prelevare sempre le stoviglie utilizzando il guanto da forno o
le presine.
Cuocere gli alimenti Peso Potenza microonde in watt,
Avvertenze
durata in minuti
Polpettone 750 g 600 W, 20-25 min. Cuocere senza coperchio
Pollo intero, fresco senza interiora 1,2 kg 600 W, 25-30 min. Girare trascorsa metà del tempo impostato
Verdura, fresca 250 g 600 W, 5-10 min. Tagliare le verdure in pezzi di dimensioni
500 g 600 W, 10-15 min.
uguali;
ogni 100 g di verdure aggiungere 1 -2 cucchiai
di acqua;
mescolare di tanto in tanto
Patate 250 g 600 W, 8-10 min. Tagliare le patate in pezzi di dimensioni uguali;
500 g 600 W, 11-14 min.
ogni 100 g aggiungere 1 -2 cucchiai di acqua;
mescolare di tanto in tanto
750 g 600 W, 15-22 min.
Riso 125 g 600 W, 5-7 min. +
Aggiungere l'acqua in quantità doppia
180 W, 12-15 min.
250 g 600 W, 6-8 min. +
180 W, 15-18 min.
52
Page 53

Cuocere gli alimenti Peso Potenza microonde in watt,
durata in minuti
Dolci, ad es. budino (istantaneo) 500 ml 600 W, 6-8 min. Di tanto in tanto mescolare bene il budino 2-
Frutta, composta di frutta 500 g 600 W, 9-12 min. -
Avvertenze
3 volte con la frusta
Consigli per la cottura al microonde
Non sono indicate le impostazioni da effettuare relativamente
alla quantità di cibo che si intende preparare.
Il cibo si è asciugato troppo. La prossima volta impostare un tempo di cottura più breve o sele-
Al termine del tempo impostato il cibo non è ancora scongelato, caldo o cotto.
Al termine del tempo impostato il cibo si è surriscaldato ai
bordi, ma la parte centrale non è ancora cotta.
Dopo lo scongelamento il nucleo centrale del pollame o della
carne è ancora surgelato.
Acqua di condensa
Sul vetro della porta, sulle pareti interne e sulla base può
formarsi della condensa. Si tratta di un fenomeno normale. che
Prolungare o ridurre i tempi di cottura basandosi sulla seguente
regola approssimativa:
Quantità raddoppiata = tempo quasi raddoppiato
Quantità dimezzata = tempo dimezzato
zionare una potenza microonde inferiore. Coprire la pietanza e
aggiungere più liquido.
Impostare un tempo più lungo. Grandi quantità e alimenti più
spessi necessitano di tempi più lunghi.
Durante la cottura mescolare di tanto in tanto e la prossima volta
selezionare una potenza inferiore e un tempo di cottura più lungo.
La prossima volta selezionare una potenza microonde inferiore.
Girare anche più volte l'alimento da scongelare se la quantità è elevata.
non compromette la funzione del forno a microonde. Una volta
terminata la fase di cottura, eliminare l'acqua di condensa.
Pietanze sperimentate secondo EN 60705
La qualità e il funzionamento degli apparecchi a microonde
sono testati da istituti di controllo sulla base di queste ricette.
Conformemente alla norma EN 60705, IEC 60705 o DIN
44547 e EN 60350 (2009)
Cottura e scongelamento con microonde
Cottura con il forno a microonde
Pietanza Potenza microonde in watt, durata in minuti Avvertenza
Latte all'uovo, 565 g 180 W, 25-30 min. + 90 W, 20-25 min. Disporre lo stampo in pyrex 20 x 17 cm sul piatto girevole.
Pan di Spagna 600 W, 8-10 min. Disporre lo stampo pyrex Ø 22 cm sul fondo del forno.
Polpettone 600 W, 20-25 min. Collocare lo stampo pyrex sul piatto girevole.
Scongelamento con il forno a microonde
Pietanza Potenza microonde in watt, durata in minuti Avvertenza
Carne 180 W, 5-7 min. + 90 W, 10-15 min. Disporre lo stampo pyrex Ø 22 cm sul fondo del forno.
53
Page 54

î Оглавление
[ru]Правила пользования
Важные правила техники безопасности.................................. 54
Причины повреждений.........................................................................56
Установка и подключение.......................................................... 56
Рекомендации по экономии электроэнергии и охране
окружающей среды .................................................................... 57
Экономия электроэнергии .................................................................57
Правильная утилизация упаковки.....................................................57
Панель управления ...................................................................... 57
Поворотный переключатель...............................................................57
Принадлежности....................................................................................57
Перед первым использованием ................................................ 58
Установка времени суток....................................................................58
Микроволны .................................................................................. 58
Указания по выбору посуды...............................................................58
Мощность микроволн...........................................................................58
Установка мощности микроволн.......................................................59
Охлаждающий вентилятор ..................................................................59
Память ............................................................................................ 59
Ввод в память.........................................................................................59
Запуск программ
Изменение продолжительности звукового сигнала.............. 60
Уход и очистка.............................................................................. 60
Чистящие средства ...............................................................................60
Таблица неисправностей ............................................................ 61
из памяти...............................................................59
Сервисная служба........................................................................61
Номер E и номер FD ............................................................................61
Технические характеристики.............................................................62
Программы автоматического приготовления.......................... 62
Установка программы.......................................................................... 62
Размораживание с помощью программ автоматического
приготовления........................................................................................62
Доведение до готовности с помощью программ
автоматического приготовления.......................................................63
Протестировано для вас в нашей кухне-студии.....................63
Указания к таблицам............................................................................63
Размораживание ...................................................................................63
Размораживание, разогревание или доведение
замороженных полуфабрикатов до готовности............................64
Разогревание блюд ..............................................................................64
Приготовление блюд............................................................................65
Рекомендации по использованию микроволновой печи ........... 66
Контрольные блюда в соответствии с EN 60705 .................... 66
Доведение до готовности и размораживание с помощью
микроволн ...............................................................................................66
Produktinfo
Более подробную информацию о продукции, принадлежностях,
запасных частях и службе сервиса можно найти на
официальном сайте www.neff-international.com и на сайте
интернет-магазина www.neff-eshop.com
: Важные правила техники безопасности
Внимательно прочитайте данное
руководство. Оно поможет вам научиться
правильно и безопасно пользоваться
прибором. Сохраняйте руководство по
эксплуатации и инструкцию по монтажу
для дальнейшего использования или для
передачи новому владельцу.
Данный прибор предназначен исключительно для встраивания. Соблюдайте специальные инструкции по монтажу.
Распакуйте и осмотрите прибор. Не подключайте прибор, если он был поврежден во время транспортировки.
Подключение прибора без штепсельной
вилки должен производить только
квалифицированный специалист.
Повреждения из-за неправильного
подключения приводят к снятию
гарантийных обязательств.
Этот прибор предназначен только для
домашнего использования. Используйте
прибор только для приготовления блюд и
напитков. Следите за прибором во время
его работы. Используйте прибор только в
закрытом помещении.
Дети до 8 лет, лица с ограниченными
физическими, умственными и
психическими возможностями, а также
лица, не обладающие достаточными
знаниями о приборе, могут использовать
прибор только под присмотром лиц,
отвественных за их безопасность, или
после подробного инструктажа и
осознания всех опасностей, связанных с
эксплуатацией прибора.
Детям не разрешается играть с прибором.
Очистка и обслуживание прибора не
должны производиться детьми, это
допустимо, только если они старше 8 лет и
их контролируют взрослые.
Не допускайте детей младше 8 лет к прибору и его сетевому проводу.
Всегда правильно вставляйте принадлежности в рабочую камеру. См. описание принадлежностей в руководстве по эксплуатации.
Опасность возгорания!
■
Сложенные в рабочей камере
легковоспламеняющиеся предметы могут
загореться. Не храните в рабочей камере
54
Page 55

легковоспламеняющиеся предметы. Не
открывайте дверцу прибора, если внутри
прибора образовался дым. Выключите
прибор, выньте вилку сетевого провода
из розетки или отключите
предохранитель в блоке
предохранителей.
Опасность возгорания!
■
Использование прибора не по
назначению опасно и может привести к
поломке.
Не допускается сушка продуктов или
одежды, нагревание домашней обуви,
крупяных или зерновых подушечек, губок,
влажных тряпок и тому подобного.
Например, домашняя обувь, крупяные или
зерновые подушечки при нагревании
могут вспыхнуть.Используйте прибор
только для приготовления блюд и
напитков.
Опасность возгорания!
■
Продукты могут воспламениться. Никогда
не разогревайте продукты питания в
термостатической упаковке.
Разогревать продукты в контейнерах из
пластмассы, бумаги или других
воспламеняющихся предметов можно
только под наблюдением.
Нельзя устанавливать слишком большую
мощность микроволн или очень
длительное время. Всегда следуйте
указаниям, приведённым в данном
руководстве по эксплуатации.
Не сушите продукты в микроволновом
режиме.
Не размораживайте и не готовьте
продукты с низким содержанием воды,
например, хлеб, при высокой мощности
микроволн или слишком долгое время.
Опасность возгорания!
■
Масло для приготовления пищи может
загореться. Никогда не разогревайте
растительное масло в микроволновом
режиме.
Опасность взрыва!
Жидкости или другие продукты питания в
плотно закрытой посуде могут взорваться.
Никогда не разогревайте жидкости или
другие продукты питания в плотно
закрытой посуде.
Высокая опасность для здоровья!
■
Недостаточная очистка может привести к
повреждению поверхности. Возможен
выход энергии микроволн наружу.
Очищайте прибор своевременно и сразу
же удаляйте из него остатки продуктов.
Всегда содержите в чистоте рабочую
камеру, уплотнение дверцы, дверцу и
ограничитель открывания дверцы;
см. главу «Уход и очистка».
Высокая опасность для здоровья!
■
Через повреждённую дверцу рабочей
камеры или её уплотнитель может
выходить энергия микроволн. Не
используйте прибор, если повреждены
дверца или её уплотнитель. Вызовите
специалиста сервисной службы.
Высокая опасность для здоровья!
■
У приборов без защитного корпуса
энергия микроволн может выходить
наружу. Никогда не снимайте защитный
корпус. Для осуществления
профилактики и ремонта вызывайте
сервисную службу.
Опасность удара током!
■
При неквалифицированном ремонте
прибор может стать источником
опасности. Любые ремонтные работы и
замена проводов и труб должны
выполняться только специалистами
сервисной службы, прошедшими
специальное обучение. Если прибор
неисправен, выньте вилку сетевого
провода из розетки или отключите
предохранитель в блоке
предохранителей. Вызовите специалиста
сервисной службы.
Опасность удара током!
■
При сильном нагреве прибора изоляция
кабеля может расплавиться. Следите за
тем, чтобы кабель не соприкасался с
горячими частями электроприборов.
Опасность удара током!
■
Проникающая влага может привести к
удару электрическим током. Не
используйте очиститель высокого
давления или пароструйные очистители.
Опасность удара током!
■
Неисправный прибор может быть
причиной поражения током. Никогда не
включайте неисправный прибор. Выньте
из розетки вилку сетевого провода или
выключите предохранитель в блоке
предохранителей. Вызовите специалиста
сервисной службы.
Опасность удара током!
■
Прибор работает под высоким
напряжением. Никогда не вскрывайте
корпус прибора.
Опасность ожога!
■
Принадлежности или посуда очень
горячие. Чтобы извлечь горячую посуду
или принадлежности из рабочей камеры,
всегда используйте прихватки.
Опасность ожога!
■
Пары спирта в горячей рабочей камере
могут вспыхнуть. Запрещается готовить
блюда, в которых используются напитки с
высоким содержанием спирта.
Добавляйте в блюда только небольшое
количество напитков с высоким
55
Page 56

содержанием спирта. Осторожно
откройте дверцу прибора.
Опасность ожога!
■
Продукты с твёрдой кожурой или шкуркой
могут «взорваться» во время и после
нагревания. Нельзя варить яйца в
скорлупе и разогревать варёные яйца.
Никогда не варите моллюсков и
ракообразных. При приготовлении
яичницы-глазуньи нужно наколоть желток.
У продуктов питания с жёсткой кожурой
или шкуркой, например, яблок, томатов,
картофеля, сосисок, кожура может
лопнуть. Наколите кожуру или шкурку
перед приготовлением.
Опасность ожога!
■
Детское питание прогревается не
равномерно. Не разогревайте детское
питание в закрытой посуде. Всегда
снимайте крышку или соску. После
нагрева тщательно перемешайте или
взболтайте содержимое; перед тем как
кормить ребенка, обязательно проверьте
температуру.
Опасность ожога!
■
Разогретые блюда отдают тепло. Посуда
может сильно нагреваться. Чтобы извлечь
посуду и принадлежности из рабочей
камеры, всегда используйте прихватки.
Опасность ожога!
■
Герметично запаянная упаковка при
нагревании может лопнуть. Всегда
соблюдайте указания на упаковке. Чтобы
извлечь блюда из рабочей камеры,
всегда используйте прихватки.
Опасность ошпаривания!
■
Из открытой дверцы прибора может
вырваться горячий пар. Осторожно
откройте дверцу прибора. Не позволяйте
детям подходить близко к горячему
прибору.
Опасность ошпаривания!
■
При нагревании жидкости возможна
задержка закипания. В этом случае
температура закипания достигается без
образования в жидкости характерных
пузырьков. Даже при незначительном
сотрясении ёмкости горячая жидкость
может внезапно начать сильно кипеть и
брызгать. При нагревании всегда кладите
в ёмкость ложку. Это поможет избежать
задержки закипания.
Опасность травмирования!
■
Поцарапанное стекло дверцы прибора
может треснуть. Не используйте скребки
для стекла, а также едкие и абразивные
чистящие средства.
Опасность травмирования!
■
Неподходящая посуда может лопнуть. В
ручках и крышках фарфоровой и
керамической посуды могут быть мелкие
дырочки, за которыми находятся пустоты.
При проникании в эти пустоты влаги
посуда может треснуть. Используйте
специальную посуду для микроволновых
печей.
Причины повреждений
Внимание!
■ Сильное загрязнение уплотнителей: Если уплотнитель
дверцы сильно загрязнён, дверца не будет плотно
закрываться. Это может привести к повреждению соседних
мебельных фасадов. Следите за чистотой уплотнителя
дверцы.
■ Режим микроволн при пустом приборе: Работа прибора без
установленных в него блюд ведёт к перегрузке. Включать
режим микроволн с пустой посудой запрещается.
Исключением является кратковременная проверка посуды
на пригодность: см. гл. «Микроволны, посуда».
■ Попкорн в микроволновой печи: Никогда не устанавливайте
слишком большую мощность. Максимум 600 Вт. Пакетики с
попкорном всегда кладите на стеклянное блюдо. Из-за
перегрузки стекло может треснуть.
■ Жидкость, переливающаяся через край при кипении, не
должна проникать через привод вращающейся подставки во
внутренний отсек прибора. Следите за процессом
приготовления. Установите сначала короткое время
приготовления и при необходимости продлите его.
■ Никогда не используйте прибор с микроволнами без
установленной вращающейся подставки.
Установка и подключение
Данный прибор предназначен только для бытового
использования.
Данный прибор предназначен исключительно для встраивания.
Соблюдайте специальные инструкции по монтажу.
Прибор можно подключать к сети только через правильно
установленную розетку с заземляющим контактом. Ёмкость
предохранителя должна составлять 10 ампер (автомат типа L
или B). Напряжение в сети должно соответствовать значению,
указанному на типовой табличке.
Перенос розетки
выполняться только квалифицированным электриком. Если
после установки прибора до штепсельной вилки невозможно
будет добраться, то при установке следует сделать
специальный выключатель для размыкания всех полюсов с
расстоянием между разомкнутыми контактами не менее 3 мм.
56
или замена сетевого провода должны
Не используйте тройники, разветвители и удлинители. При
перегрузке существует опасность возгорания.
Page 57

Рекомендации по экономии электроэнергии и охране окружающей среды
В этом разделе вы найдёте ряд рекомендаций, как сэкономить
электроэнергию в процессе выпекания и жарения и как
правильно утилизировать духовой шкаф.
Экономия электроэнергии
Предварительно нагревайте духовой шкаф только в том случае,
если это указано в рецепте или в таблицах руководства по
эксплуатации.
Используйте тёмные, покрытые чёрным лаком или
эмалированные формы для выпекания. Они поглощают тепло
особенно хорошо.
Как можно реже открывайте дверцу прибора во время тушения,
выпекания или жарения продуктов.
Несколько пирогов лучше всего
камера остаётся тёплой, за счёт чего время выпекания второго
пирога может уменьшиться.
печь один за другим. Рабочая
Панель управления
В этом разделе приводится описание панели управления
вашего духового шкафа. В зависимости от типа прибора
возможны некоторые незначительные отклонения от данного
описания.
При длительном времени приготовления духовой шкаф можно
выключить за 10 минут до окончания приготовления и
использовать остаточное тепло для доведения блюда до
готовности.
Правильная утилизация упаковки
Утилизируйте упаковку с соблюдением правил экологической
безопасности.
Данный прибор имеет отметку о соответствии
европейским нормам 2012/19/EU утилизации
электрических и электронных приборов (waste
electrical and electronic equipment - WEEE).
Данные нормы определяют действующие на
территории Евросоюза правила возврата и утилизации
старых приборов.
1 Дисплей
2 Кнопка «Часы»
3 Поворотный переключатель
4 Кнопки
5 Кнопка открывания дверцы
для отображения времени суток и времени приготов
ления
для установки времени суток или времени приготовле
ния, или для выбора программы автоматического приготовления
Кнопки Использование
»
90 Выбор мощности микроволн 90 Вт
180 Выбор мощности микроволн 180 Вт
360 Выбор мощности микроволн 360 Вт
600 Выбор мощности микроволн 600 Вт
900 Выбор мощности микроволн 900 Вт
¼
X
l
ƒ
„
Установка времени суток
Выбор килограммов в программах
Выбор программы автоматического приготовления
Вызов программы из памяти
Включение микроволновой печи
Остановка микроволновой печи
Поворотный переключатель
Поворотный переключатель предназначен для изменения
предлагаемых и установочных значений.
Поворотный переключатель является утапливаемым. Чтобы
зафиксировать или расфиксировать переключатель, нажмите
на него.
Принадлежности
Вращающаяся подставка
Как следует вставлять вращающуюся подставку:
1. Положите роликовое кольцо a в углубление на дне рабочей
камеры.
57
Page 58

2. Вращающуюся подставку b зафиксируйте в приводном механизме c, расположенном в центре на дне рабочей камеры.
E
D
F
Перед первым использованием
Указание: Используйте прибор со вставленной вращающейся
подставкой. Проверьте, чтобы она была правильно
зафиксирована. Вращающаяся подставка может вращаться как
в левую, так и в правую сторону.
Из этого раздела вы узнаете, что необходимо сделать перед
первым приготовлением блюд в микроволновой печи. Сначала
прочитайте главу «Правила техники безопасности».
Установка времени суток
После подключения прибора или после отключения
электроэнергии на дисплее высвечиваются три нуля.
1. Нажмите кнопку ». На дисплее появляется
индикатор.
2. Установите время суток с помощью поворотного переключателя.
3. Снова нажмите кнопку
‚ƒ:‹‹œ а над кнопкой » загорается
».
Микроволны
Микроволны проникают внутрь продуктов и преобразуются в
тепло. Здесь приведена информация о посуде и об установках
режима микроволн.
Указание: В главе «Протестировано для Вас в нашей кухне-
студии» приведено множество примеров размораживания,
разогревания и приготовления блюд в микроволновом режиме.
Обязательно опробуйте микроволновую печь хотя бы один раз.
Разогрейте, например, чашку
Возьмите большую чашку без декорирования золотом или
серебром и опустите туда чайную ложку. Поставьте чашку с
водой на вращающуюся подставку.
1. Нажмите кнопку 900 Вт.
2. Установите поворотным переключателем
3. Нажмите кнопку
Через 1 минуту 30 секунд раздаётся сигнал. Вода для чая
готова.
Пока вы будете пить чай, прочтите ещё раз внимательно
правила техники безопасности в начале руководства по
эксплуатации. Это очень важно.
ƒ.
Указания по выбору посуды
Рекомендуемая посуда
Используйте жаропрочную посуду из стекла, стеклокерамики,
фарфора, керамики или термостойкой пластмассы. Эти
материалы пропускают микроволны.
Сервировочная посуда также подходит для этого режима.
Таким образом, не нужно перекладывать блюда из одной
посуды в другую. Использовать посуду с золотым или
серебряным орнаментом можно только в том случае, если
воды для чая.
‚:„‹ мин.
Текущее время суток установлено.
Отключение индикации времени суток
Нажмите кнопку
Дисплей темнеет.
Повторная установка времени суток
Нажмите кнопку
На дисплее появляется время суток ‚ƒ:‹‹. Выполните
установки, как описано в пунктах 2 и 3.
Изменение времени суток, например, при переходе с летнего на зимнее время
Выполните настройку, как описано в пунктах 1-3.
изготовитель посуды гарантирует
микроволнового режима.
Неподходящая посуда
Металлическая посуда не подходит для микроволнового
режима, так как металл не пропускает микроволны. В закрытой
металлической посуде блюда не разогреваются.
Внимание!
Искрение: следите за тем, чтобы металл, например ложка, был
на расстоянии не менее 2 см от стенок духового шкафа и
внутренней стороны дверцы. Искровые
повредить стекло дверцы.
Проверка посуды
Включать режим микроволн с пустой посудой запрещается.
Единственным исключением является описанный ниже тест.
Если вы не уверены, что посуда подходит для микроволн,
произведите следующую проверку:
1. поставьте пустую посуду на ½-1 минуту в прибор при
максимальной мощности.
2. Во время приготовления проверяйте температуру. Посуда должна быть
допускающей прикосновение рукой.
Если посуда сильно нагревается или происходит искрение, то
она непригодна.
», а затем кнопку „.
».
её пригодность для
разряды могут
холодной или нагреться до температуры,
Мощность микроволн
Мощность микро
волн
90 Вт Для размораживания нежных блюд
Подходит для
58
Page 59

Мощность микро
волн
180 Вт Для размораживания и доведения до
360 Вт Для тушения мяса и разогревания нежных
600 Вт Для разогревания блюд и доведения их
900 Вт Для разогревания жидкостей
Указание: Вы можете установить мощность микроволн 900 Вт на 30 минут, 600 Вт на 1 час, для остальных мощностей для каждого 1 часа и 39 минут.
Подходит для
готовности
блюд
до готовности
Установка мощности микроволн
Пример: мощность микроволн 600 Вт, 5 минут
1. Нажмите кнопку требуемой мощности микроволн.
Над кнопкой загорается индикатор.
2. Установите время приготовления с помощью поворотного
переключателя.
PLQ
PLQ
NJ
3. Нажмите кнопку
ƒ.
Время приготовления начинает отсчитываться на дисплее.
По истечении времени приготовления
Раздаётся звуковой сигнал. Откройте дверцу прибора или
нажмите
Изменение времени выполнения
Это возможно в любой момент. Измените время приготовления
поворотным переключателем.
Остановка
Один раз нажмите кнопку
Работа приостанавливается. Индикатор над кнопкой
После закрывания дверцы повторно нажмите кнопку
Отмена режима
Дважды нажмите кнопку
нажмите кнопку
Указание: Можно сначала установить время приготовления, а затем - мощность микроволн.
„. На дисплее снова появляется время суток.
„ или откройте дверцу прибора.
ƒ мигает.
ƒ.
„ или откройте дверцу и один раз
„.
Охлаждающий вентилятор
Прибор оснащён охлаждающим вентилятором. Вентилятор
может продолжать работать даже после выключения прибора.
Указания
■ Во время работы в микроволновом режиме прибор не
нагревается. Тем не менее, включается охлаждающий
вентилятор. Вентилятор может продолжать работать даже
после выключения микроволнового режима.
■ На стекле дверцы, внутренних стенках и дне рабочей камеры
может образовываться конденсат. Это нормальное явление,
не оказывающее отрицательного воздействия на
функционирование прибора. По окончании приготовления
просто удалите конденсат.
Память
С помощью функции памяти вы можете сохранить и в любой
момент снова вызвать свое любимое блюдо.
Это целесообразно, если вы готовите какое-нибудь блюдо
очень часто.
Ввод в память
Пример: 360 Вт, 25 минут.
1. Нажмите кнопку
Над кнопкой загорается индикатор.
2. Нажмите кнопку требуемой мощности микроволн.
Над кнопкой загорается индикатор, а на дисплее появляется
1:00 мин.
3. Установите время приготовления с помощью поворотного
переключателя.
l.
PLQ
PLQ
PLQ
NJ
Указания
■ Можно сохранить установку в памяти и сразу же
активизировать её. Для завершения нажмите не на кнопку
ƒ.
а на
■ Сохранение в памяти нескольких значений мощности
микроволн не предусмотрено.
■ Сохранение в памяти автоматических программ также не
предусмотрено.
■ Ввод новых значений в память: нажмите кнопку l . На
дисплее отображаются прежние установки. Сохраните новую
программу, как описано в пунктах 1-4.
l,
Запуск программ из памяти
Вы можете в любой момент вызвать программу, сохранённую в
памяти. Поставьте посуду в прибор. Закройте дверцу прибора.
1. Нажмите кнопку
Отображаются сохранённые в памяти установки.
2. Нажмите кнопку
Время приготовления начинает отсчитываться на дисплее.
По истечении времени приготовления
Раздаётся звуковой сигнал. Откройте дверцу прибора или
нажмите
„. На дисплее снова появляется время суток.
l.
ƒ.
4. Подтвердите нажатием кнопки
На дисплее снова появляется время суток. Установка
сохранена в памяти.
l.
Остановка
Один раз нажмите кнопку
Работа приостанавливается. Индикатор над кнопкой
После закрывания дверцы повторно нажмите кнопку
„ или откройте дверцу прибора.
ƒ мигает.
ƒ.
59
Page 60

Отмена режима
Дважды нажмите кнопку
нажмите кнопку
„.
„ или откройте дверцу и один раз
Изменение продолжительности звукового сигнала
При выключении прибора раздаётся звуковой сигнал.
Продолжительность звукового сигнала можно изменить.
Для этого нажмите и удерживайте кнопку
6 секунд.
ƒ в течение прим.
Уход и очистка
При тщательном уходе и очистке ваша микроволновая печь
надолго сохранит свою привлекательность и
функциональность. В данном руководстве по эксплуатации
приводится описание правильного ухода и правильной очистки
прибора.
: Опасность короткого замыкания!
Никогда не используйте очистители высокого давления и
пароструйные очистители.
: Опасность ожога!
Не чистите прибор сразу после выключения. Обязательно
дайте прибору остыть.
: Опасность удара током!
Никогда не погружайте прибор в воду и не очищайте его под
струёй воды.
Чтобы не допустить повреждения различных поверхностей в
результате применения неподходящих чистящих средств,
следуйте указаниям, приведённым в таблице.
Не используйте
■ едкие или абразивные чистящие средства.
Они могут повредить поверхность. Если такое средство
попадёт на переднюю панель, сразу смойте его водой.
■ металлические скребки или скребки для стекла для очистки
стекла дверцы.
■ металлические скребки или скребки для стекла для очистки
уплотнителя.
■ жёсткие мочалки и губки.
Новые губки для мытья посуды тщательно вымойте перед
использованием.
■ чистящие средства, содержащие большой процент спирта.
Чистящие средства
Внимание!
Перед выполнением очистки выньте вилку сетевого кабеля из
розетки или отключите предохранитель в блоке
предохранителей. Очистите прибор снаружи и внутри с
помощью влажной тряпочки и мягкого средства для очистки.
Затем протрите насухо чистой тряпкой.
Зона очистки Чистящие средства
Передняя панель
прибора
Горячий мыльный раствор.
Очистите с помощью мягкой тряпочки, а
затем вытрите досуха. Не используйте
для чистки металлические скребки или
скребки для стеклянных поверхностей.
Новая продолжительность сигнала принимается.
На дисплее снова появляется время суток.
Возможны:
Короткий сигнал - 3 раза
Длинный сигнал - 30 раз.
Зона очистки Чистящие средства
Передняя панель из
нержавеющей стали
Внутренние поверх
ности из нержавею
щей стали
Углубление на дне
рабочей камеры
Вращающаяся под
ставка и роликовое
кольцо
Стёкла дверцы Средство для очистки стёкол:
Уплотнитель Горячий мыльный раствор.
Горячий мыльный раствор.
Очистите с помощью мягкой тряпочки, а
затем вытрите досуха. Немедленно удаляйте пятна извести, жира, крахмала и
яичного белка. Под такими пятнами
может возникать коррозия. Специальные средства для чистки металлических
изделий можно приобрести в сервисной
службе или в специализированном мага
зине. Не используйте для чистки металлические скребки или скребки
лянных поверхностей.
Горячий мыльный раствор или раствор
уксуса.
Очистите с помощью мягкой тряпочки, а
затем вытрите досуха.
При сильном загрязнении: используйте
средство для чистки духовок только
после охлаждения рабочей камеры.
Лучше всего воспользоваться мочалкой
из нержавеющей проволоки. Не используйте ни спреи для духовых шкафов, ни
любые другие агрессивные очистители
для духовых шкафов, а также абразивные чистящие средства. Кроме того, не
подходят жёсткие мочалки, грубые губки
и
средства для чистки посуды. Все эти
средства царапают поверхности.
Хорошо просушите внутренние поверх
ности.
Влажная тряпка:
Вода не должна попадать через привод
вращающейся подставки во внутрь при
бора.
Горячий мыльный раствор.
Следите за тем, чтобы вращающаяся
подставка была правильно зафиксиро
вана.
Очистите с помощью мягкой тряпочки.
Не используйте скребок для стёкол.
Очистите с помощью мягкой тряпочки.
Не трите! Не используйте для чистки
металлические скребки или скребки для
стеклянных поверхностей.
для стек-
60
Page 61

Таблица неисправностей
Часто случается, что причиной неисправности стала какая-то
мелочь. Перед обращением в сервисную службу попробуйте
устранить возникшую неисправность самостоятельно, следуя
указаниям из таблицы.
Если какое-либо блюдо у вас не получится, обратитесь к главе
«Протестировано для вас в нашей кухне-студии». В ней вы
найдёте множество рекомендаций по приготовлению блюд
Что делать при неисправности?
Сообщение об ошибке Возможная причина Устранение/Указание
Прибор не работает. Вилка не вставлена
Отключение электроэнергии. Проверьте, горит ли лампа на кухне.
Неисправен предохранитель Проверьте, в порядке ли предохранитель
Неправильная эксплуатация. Отключите предохранитель в блоке предо
На дисплее мигают три нуля. Отключение электроэнергии. Повторно установите время суток.
Прибор не
появляется время приготовления.
Микроволновая печь не работает. Дверца закрыта неплотно. Проверьте, не зажаты ли дверцей остатки
Блюда разогреваются медленнее,
чем обычно.
Вращающаяся подставка издает лёг
кий шум.
Микроволновый режим отключается
без видимых причин.
На дисплее высвечивается «M». Прибор работает в режиме демонстрации.
работает. На дисплее
Был случайно повёрнут поворотный переключа
тель.
После установки не была нажата кнопка
Не была нажата кнопка
Установлена слишком низкая мощность микро
волн.
В приборе находится больший объём продук
тов, чем обычно.
Блюда холоднее, чем обычно. В процессе приготовления перемешивайте
Наличие загрязнения или инородного тела в
области привода вращающейся подставки.
Проблема генерации микроволн. Если эта ошибка повторяется неодно
.
в розетку. Вставьте вилку в розетку.
: Опасность удара током!
При неквалифицированном ремонте прибор может стать
источником опасности. Любые ремонтные работы должны
выполняться только специалистами сервисной службы,
прошедшими специальное обучение.
Следующие неисправности вы можете устранить
самостоятельно.
прибора в блоке предохранителей.
хранителей. Примерно через 10 секунд
включите его снова.
Нажмите кнопку
ƒ. Нажмите кнопку ƒ или удалите настройку
с помощью кнопки
пищи или посторонние предметы.
ƒ. Нажмите кнопку ƒ.
Установите более высокую мощность микроволн.
Двойной объём почти вдвое увеличивает
время приготовления.
или переворачивайте блюда.
Очистите роликовое кольцо и углубление в
рабочей камере.
кратно, обратитесь в сервисную службу.
Держите кнопку
мерно в течение 7 секунд.
Режим демонстрации завершён.
„.
„.
ƒ и „ нажатыми при
Сервисная служба
Если ваш прибор нуждается в ремонте, наша сервисная служба
всегда к вашим услугам. Мы всегда стараемся найти
подходящее решение, чтобы избежать в том числе ненужных
вызовов специалистов.
Номер E и номер FD
Для получения квалифицированного обслуживания при вызове
специалиста сервисной службы обязательно указывайте номер
изделия (номер E) и заводской номер (номер FD) вашего
прибора. Фирменная табличка с номерами находится на
внутренней стороне дверцы справа. Чтобы не тратить время на
поиск этих номеров, впишите их и телефонный номер
сервисной службы здесь.
Номер E
Сервисная служба
O
Номер FD
Обратите внимание, что визит специалиста
для устранения повреждений, связанных с неправильным
уходом за прибором, даже во время действия гарантии не
является бесплатным.
Заявка на ремонт и консультация при неполадках
Контактные данные всех стран Вы найдёте в приложенном
списке сервисных центров.
Положитесь на компетентность изготовителя. Тогда вы можете
быть уверены, что ремонт будет произведë
специалистами и с использованием фирменныx запасныx
частей.
Данный прибор соответствует нормам EN 55011 и CISPR 11.
Это прибор группы2, классаB.
Принадлежность к группе2 означает, что прибор предназначен
только для нагрева пищевых продуктов. Принадлежность к
классу B свидетельствует, что прибор предназначен для
бытового использования.
сервисной службы
н грамотными
61
Page 62

Технические характеристики
Входное напряжение 220-230 V, 50 Гц
Потребляемая мощность 1270 Вт
Максимальная выходная мощ
ность
Частота микроволн 2450 МГц
Предохранитель 10 A
900 Вт
Размеры (ВxШxГ)
- прибора 382 мм x 594 мм x 388 мм
- рабочей камеры 208 мм x 328 мм x 369 мм
Проверен VDE (Союз немецких
электротехников):
Знак CE Да
Программы автоматического приготовления
Да
С помощью программы автоматического приготовления вы
можете быстро размораживать продукты и легко готовить
блюда. Нужно выбрать программу и указать вес продуктов.
Оптимальную установку предложит программа
автоматического приготовления. Вы можете выбрать одну из
7 программ.
Установка программы
Если программа выбрана, выполните установки, как описано
далее:
1. Нажимайте кнопку
программы.
Над кнопкой загорается индикатор.
2. Нажмите кнопку
Над кнопкой загорается индикатор, а на дисплее появляется предлагаемый вес.
X, пока не появится нужный номер
¼.
3. Установите требуемый вес блюда с помощью поворотного
переключателя.
4. Нажмите кнопку
ƒ.
PLQ
PLQ
NJ
На дисплее начинается отсчёт времени приготовления в
выбранной программе.
По истечении времени приготовления
Раздаётся звуковой сигнал. Откройте дверцу прибора или
нажмите
Корректировка
Дважды нажмите кнопку
„. На дисплее снова появляется время суток.
„ и выполните установку заново.
Остановка
Один раз нажмите кнопку
Работа приостанавливается. Индикатор над кнопкой
После закрывания дверцы повторно нажмите кнопку
Отмена режима
Дважды нажмите кнопку
нажмите кнопку
Указания
■ При работе некоторых программ вы через некоторое время
услышите сигнал. Откройте дверцу прибора и перемешайте
блюдо или переверните мясо или птицу. После закрывания
дверцы повторно нажмите кнопку
■ Номер программы и вес можно запросить путем нажатия
X или ¼. Запрошенное значение на 3 секунды
на
появляется на дисплее.
„.
„ или откройте дверцу прибора.
ƒ мигает.
ƒ.
„ или откройте дверцу и один раз
ƒ.
Размораживание с помощью программ автоматического приготовления
С помощью 4 программ размораживания можно
размораживать мясо, птицу и хлеб.
Указания
■ Подготовка продуктов
Используйте по возможности продукты, которые
замораживались тонкими кусками или порционно и
хранились при -18 °C.
Полностью выньте продукты для размораживания из
упаковки и взвесьте их. Знание веса необходимо для
установки программы.
■ При размораживании мяса и птицы образуется жидкость. Ни
в коем случае нельзя использовать её для дальнейшей
готовки, она также не должна соприкасаться с другими
продуктами.
■ Посуда
Положите продукты на пригодную для микроволновой печи
плоскую посуду, например, на стеклянную или фарфоровую
тарелку, и не закрывайте их крышкой.
■ Время выдержки
Размороженные продукты оставьте ещё на 10-30 минут для
выравнивания температуры. Для больших кусков мяса это
время может быть более продолжительным, чем для
маленьких. Тонкие куски и мясной фарш следует перед
выстаиванием отделить друг от друга.
После этого продукты можно обрабатывать дальше, даже
если толстые куски в середине не до конца
Птицу можно начать потрошить.
■ Звуковой сигнал
В некоторых программах после определённого времени
раздаётся сигнал. Откройте дверцу прибора и разделите
блюдо или переверните мясо или птицу. После закрывания
дверцы повторно нажмите кнопку Start.
разморозились.
62
Page 63

Номер программы Диапазон веса, кг
Размораживание
P 01 Мясной фарш 0,20-1,00
P 02 Куски мяса 0,20-1,00
P 03
Цыпленок, цыпленок кусочками
0,40-1,80
P 04 Хлеб 0,20-1,00
Доведение до готовности с помощью программ автоматического приготовления
С помощью 3 программ приготовления вы можете варить рис,
картофель или тушить овощи
Указания
■ Посуда
Готовить продукты нужно в пригодной для микроволновой
печи посуде с крышкой. Для приготовления риса нужно
использовать большую, высокую форму.
■ Подготовка продуктов
Взвесьте продукты. Знание веса необходимо для установки
программы.
Рис:
не используйте рис быстрого приготовления в пакетиках.
Добавьте необходимое количество воды согласно указаниям
производителя на упаковке. Воды должно быть, как правило,
в 2-3 раза больше, чем риса.
Картофель:
для приготовления отварного картофеля нарежьте свежий
картофель на маленькие, одинаковые кусочки. На каждые
100 г картофеля добавьте одну ст.л. воды и немного соли.
Свежие овощи:
взвесьте свежие очищенные овощи. Нарежьте овощи на
маленькие, одинаковые кусочки. Добавьте на каждые 100 г
овощей одну ст. л. воды.
■ Звуковой сигнал
После окончания программы раздастся звуковой сигнал.
Перемешайте продукты.
■ Время выдержки
После завершения программы перемешайте продукты ещё
раз. Для выравнивания температуры нужно оставить их ещё
на 5-10 минут.
Результат приготовления зависит от качества продуктов и их
состояния.
Номер про
Диапазон веса, кг
граммы
Доведение до готовности
P 05 Рис 0,05-0,2
P 06 Картофель 0,15-1,0
P 07 Овощи 0,15-1,0
Протестировано для вас в нашей кухне-студии
В приложенных таблицах вы найдёте большой выбор блюд и
оптимальные установки для их приготовления. Мы расскажем
вам, какой микроволновый режим лучше всего подходят для
выбранного блюда. Кроме того, вы получите советы по выбору
посуды и приготовлению пищи.
Указания к таблицам
В следующих таблицах приведены примеры различного
использования печи и установочные значения микроволн.
Значения времени, указанные в таблицах, являются
ориентировочными. Они зависят от посуды, температуры, а
также от качества и свойств продуктов.
В таблице часто указывается диапазон значений времени.
Сначала установите самое короткое время, а затем при
необходимости увеличьте его.
Может случиться
отличается от указанного в таблице. В этом случае действует
общее правило:
двойной объём почти вдвое увеличивает время приготовления,
половина объёма сокращает время приготовления вдвое.
Всегда ставьте посуду на вращающуюся подставку.
Размораживание Вес Мощность микроволн (Вт), время при-
Говядина, телятина или свинина куском (на кости и без кости)
Говядина, телятина или свинина
кусочками или ломтиками
Мясной фарш, смешанный 200 г 90 Вт, 10 мин Замораживать, разложив по возмож-
так, что объём приготавливаемых продуктов
готовления (мин)
800 г 180 Вт, 15 мин + 90 Вт, 10-20 мин 1 кг 180 Вт, 20 мин + 90 Вт, 15-25 мин
1,5 кг 180 Вт, 30 мин + 90 Вт, 20-30 мин
200 г 180 Вт, 2 мин + 90 Вт, 4-6 мин При переворачивании отделить размо
500 г 180 Вт, 5 мин + 90 Вт, 5-10 мин
800 г 180 Вт, 8 мин + 90 Вт, 10-15 мин
500 г 180 Вт, 5 мин + 90 Вт, 10-15 мин
800 г 180 Вт, 8 мин + 90 Вт, 10-20 мин
Размораживание
Указания
■ Поставьте замороженные продукты в открытой ёмкости на
вращающуюся подставку.
■ Нежные части, например, ножки и крылышки цыплёнка или
жирные крайние части жаркого, можно накрыть небольшими
кусочками алюминиевой фольги. При этом фольга не должна
касаться внутренних стенок прибора. По истечении половины
времени размораживания фольгу можно снять.
■ При размораживании мяса и птицы образуется жидкость. Ни
в коем случае нельзя использовать её для дальнейшей
готовки, она также не должна соприкасаться с другими
продуктами.
■ В процессе размораживания 1-2 раза перевернуть или
перемешать. Большие куски нужно переворачивать
несколько раз.
■ Оставьте размороженные продукты ещё на 10-20 минут при
комнатной температуре для выравнивания температуры.
После этого птицу можно потрошить. Мясо можно
разделывать, даже если в самой середине оно не до конца
разморозилось.
Указания
роженные части
ности плоско.
Во время размораживания несколько
раз перевернуть, вынимая уже размороженный фарш
друг от друга
63
Page 64

Размораживание Вес Мощность микроволн (Вт), время при-
Птица целиком или
Рыбное филе, рыбные котлеты или
ломтики
Овощи, например горошек 300 г 180 Вт, 10-15 мин Фрукты, ягоды, например, малина 300 г 180 Вт, 7-10 мин Время от времени осторожно перево
Растопить масло 125 г 180 Вт, 1 мин + 90 Вт, 2-3 мин Полностью снять упаковку
Хлеб целиком 500 г 180 Вт, 6 мин + 90 Вт, 5-10 мин -
Пирог, сухой, например, сдобный
пирог
Пирог, сочный, например, фруктовый пирог, творожный пирог
кусками 600 г 180 Вт, 8 мин + 90 Вт, 10-15 мин -
1,2 кг 180 Вт, 15 мин + 90 Вт, 20-25 мин
400 г 180 Вт, 5 мин + 90 Вт, 10-15 мин Отделять размороженные части друг
500 г 180 Вт, 8 мин + 90 Вт, 5-10 мин
250 г 180 Вт, 1 мин + 90 Вт, 3-4 мин
1 кг 180 Вт, 12 мин + 90 Вт, 10-20 мин
500 г 90 Вт, 10-15 мин Только для выпечки без глазури, сли750 г 180 Вт, 5 мин + 90 Вт, 10-15 мин
500 г 180 Вт, 5 мин + 90 Вт, 15-20 мин Только для выпечки без глазури, сли750 г 180 Вт, 7 мин + 90 Вт, 15-20 мин
готовления (мин)
Указания
от друга
рачивать и отделять размороженные
части друг от
вок и крема, отделить куски пирога
от друга
друг
вок или желатина.
друга
Размораживание, разогревание или доведение замороженных полуфабрикатов до готовности
Указания
■ Выньте полуфабрикаты из упаковки. В специальной посуде
для микроволновой печи они нагреваются быстрее и
равномернее. Различные компоненты полуфабриката могут
нагреваться с различной быстротой.
■ Плоские полуфабрикаты доходят до готовности быстрее, чем
высокие. Поэтому следует разложить полуфабрикаты по
блюду как можно более тонким слоем. При этом отдельные
части не должны перекрывать друг друга.
Размораживание, разогревание или
доведение замороженных полуфа
брикатов до готовности
Меню, порционное блюдо, готовое
блюдо (2-3 компонента)
Суп 400 г 600 Вт, 8-10 мин Рагу 500 г 600 Вт, 10-13 мин Ломтики или кусочки мяса в соусе,
например, гуляш
Рыба,
например, кусочки филе 400 г 600 Вт, 10-15 мин Можно добавить воду, лимонный сок
Запеканка, например, лазанья, каннеллони
Гарниры, например, рис, макароны 250 г 600 Вт, 2-5 мин Добавить немного жидкости
Овощи, например, горошек, брокколи,
морковь
Шпинат 450 г 600
Вес Мощность микроволн (Вт),
время приготовления (мин)
300-400 г 600 Вт, 8-11 мин -
500 г 600 Вт, 12-17 мин При переворачивании отделить куски
450 г 600 Вт, 10-15 мин -
500 г 600 Вт, 8-10 мин
300 г 600 Вт, 8-10 мин Добавить в посуду воду, чтобы покры600 г 600 Вт, 14-17 мин
■ Полуфабрикаты всегда нужно накрывать. Если у вас нет
подходящей крышки для посуды, используйте тарелку или
специальную пленку для микроволновой печи.
■ В процессе размораживания полуфабрикат нужно 2-3 раза
перемешать или перевернуть.
■ После разогревания оставьте блюдо ещё на 2-5 минут для
выравнивания температуры.
■ Для извлечения посуды всегда используйте плотные
рукавицы или прихватки.
■ Оригинальный вкус блюда в значительной степени
сохраняется. Поэтому соли и специй можно много не
добавлять.
Указания
мяса друг от друга
или вино
лось дно
Вт, 11-16 мин Готовить без добавления воды
Разогревание блюд
: Опасность ошпаривания!
При разогревании жидкости возможно запаздывание
закипания. В этом случае температура закипания достигается
без образования в жидкости характерных пузырьков. Даже при
незначительном сотрясении ёмкости горячая жидкость может
внезапно начать сильно кипеть и брызгать. При нагревании
жидкости всегда кладите в ёмкость ложку. Благодаря этому
удается избежать задержки закипания.
64
Page 65

Внимание!
Следите за тем, чтобы металл, например ложка, был на
расстоянии не менее 2 см от стенок духового шкафа и
внутренней стороны дверцы. Искровые разряды могут
повредить стекло дверцы.
Указания
■ Выньте полуфабрикаты из упаковки. В специальной посуде
для микроволновой печи они нагреваются быстрее и
равномернее. Различные компоненты полуфабриката могут
нагреваться с различной быстротой.
■ Полуфабрикаты всегда нужно накрывать. Если у вас нет
подходящей крышки для посуды, используйте тарелку или
специальную пленку для микроволновой печи.
■ В процессе размораживания полуфабрикат нужно несколько
раз перемешать или перевернуть. Следите за температурой.
■ После разогревания оставьте блюдо ещё на 2-5 минут для
выравнивания температуры.
■ Для извлечения посуды всегда используйте плотные
рукавицы или прихватки.
Разогревание блюд Вес Мощность микроволн (Вт), время
Указания
приготовления (мин)
Меню, порционное блюдо, готовое
блюдо
350-500 г 600 Вт, 4-8 мин -
2-3 компонента)
Напитки 150 мл 800 Вт, 1-2 мин Положить ложку в стакан, не перегревать
300 мл 800 Вт, 2-3 мин
алкогольные напитки, время от времени проверять
500 мл 800 Вт, 3-4 мин
Детское питание, например, бутылочки с молочной смесью
50 мл 360 Вт, ½ мин Без соски или крышки. После разогревания
100 мл 360 Вт
200 мл
360 Вт, 1
, 1 мин
^ мин
хорошо встряхнуть. Обязательно контролировать температуру!
Суп, 1 тарелка 200 г 600 Вт, 2-3 мин Суп, 2 тарелки 400 г 600 Вт, 4-5 мин Мясо в соусе 500 г 600 Вт, 8-11 мин Отделить ломтики мяса друг от друга.
Рагу 400 г 600 Вт, 6-8 мин -
800 г 600 Вт, 8-11 мин Овощи, 1 порция 150 г 600 Вт, 2-3 мин Добавить немного жидкости
Овощи, 2 порции 300 г 600 Вт, 3-5 мин
Приготовление блюд
Указания
■ Плоские полуфабрикаты доходят до готовности быстрее, чем
высокие. Поэтому следует разложить полуфабрикаты по
блюду как можно более тонким слоем. При этом отдельные
части не должны перекрывать друг друга.
■ Доводите полуфабрикаты до готовности в закрытой посуде.
■ Оригинальный вкус блюда в значительной степени
сохраняется. Поэтому соли и специй можно много не
добавлять.
■ После разогревания оставьте блюдо ещё на 2-5 минут для
выравнивания температуры.
■ Для извлечения посуды всегда используйте плотные
рукавицы или прихватки.
Если у вас нет подходящей крышки для посуды, используйте
тарелку или специальную пленку для микроволновой печи.
Приготовление блюд Вес Мощность микроволн (Вт),
Указания
время приготовления (мин)
Мясной рулет 750 г 600 Вт, 20-25 мин Довести до готовности в открытой посуде
Цыплёнок целиком, свежие про-
1,2 кг 600 Вт, 25-30 мин По истечении 1/2 времени перевернуть
дукты, потрошёный
Овощи, свежие продукты 250 г 600 Вт, 5-10 мин Порезать овощи на кусочки одинаковой вели-
500 г 600 Вт, 10-15 мин
чины.
На каждые 100 г добавить 1-2 ст. л. воды;
время от времени перемешивать
Картофель 250 г 600 Вт, 8-10 мин Порезать картофель на кусочки одинаковой
500 г 600 Вт, 11-14 мин
750 г 600 Вт, 15-22 мин
Рис 125 г 600 Вт, 5-7 мин
величины.
На каждые 100 г добавить 1-2 ст. л. воды;
время от времени перемешивать
Добавить вдвое больше жидкости;
180 Вт, 12-15 мин
250 г 600 Вт, 6-8 мин
180 Вт, 15-18 мин
Сладкие блюда, например,
пудинг (быстрого приготовления)
500 мл 600 Вт, 6-8 мин В процессе приготовления 2-3 раза хорошо
перемешать пудинг венчиком.
Фрукты, компот 500 г 600 Вт, 9-12 мин -
65
Page 66

Рекомендации по использованию микроволновой печи
Вы не можете найти для приготавливаемого количества про
дуктов установочных значений.
Блюдо получилось слишком сухим. В следующий раз установите менее продолжительное время приго
Блюдо по истечении времени не разморозилось, не разогрелось или не дошло до готовности.
По истечении времени приготовления блюдо по краям пере
грето, а середина
После размораживания птица или мясо снаружи мягкие, а
внутри ещё не оттаяли.
Конденсат
На стекле дверцы, внутренних стенках и дне рабочей камеры
может образовываться конденсат. Это нормально. На работу
ещё не совсем готова.
Увеличьте или сократите время приготовления, руководствуясь следующим правилом:
Двойной объём почти вдвое увеличивает время приготовления.
Половина объёма сокращает время приготовления вдвое
товления или
крышкой и добавьте больше жидкости.
Установите более длительное время. Продукты большего объёма и
большей высоты требуют для обработки больше времени.
В процессе приготовления перемешивайте блюдо и в следующий
раз установите более низкую мощность или более длительное
время.
В следующий раз выберите более низкое значение мощности микроволн. При большом объёме размораживаемых продуктов
несколько раз поворачивайте их во время размораживания.
микроволновой печи это не влияет. По окончании
приготовления просто удалите конденсат.
более низкую мощность микроволн. Накройте блюдо
Контрольные блюда в соответствии с EN 60705
На примере этих блюд производится проверка качества и
правильности функционирования микроволновой печи
контролирующими органами.
В соответствии со стандартом EN 60705, IEC 60705 или
DIN 44547 и EN 60350 (2009)
Доведение до готовности и размораживание с помощью микроволн
Приготовление с микроволнами
Блюдо Мощность микроволн (Вт), время приготовле-
ния (мин)
Омлет, 565 г 180 Вт, 25-30 мин + 90 Вт, 20-25 мин Поставить форму Pyrex 20 х 17 см на вращающуюся под-
Бисквит 600 Вт, 8-10 мин Поставить форму Pyrex Ø 22 см на вращающуюся под-
Мясной рулет 600 Вт, 20-25 мин Поставить форму Pyrex на вращающуюся подставку.
Размораживание с микроволнами
Блюдо Мощность микроволн (Вт), время приготовле-
ния (мин)
Мясо 180 Вт, 5-7 мин + 90 Вт, 10-15 мин Поставить форму
Указание
ставку.
ставку.
Указание
Pyrex Ø 22 см на вращающуюся под-
ставку.
66
Page 67

Page 68

Constructa Neff
Vertriebs-GmbH
Carl-Wery-Straße 34
D-81739 München
*9000915347*
9000915347
(01)
930906
 Loading...