

Page 1
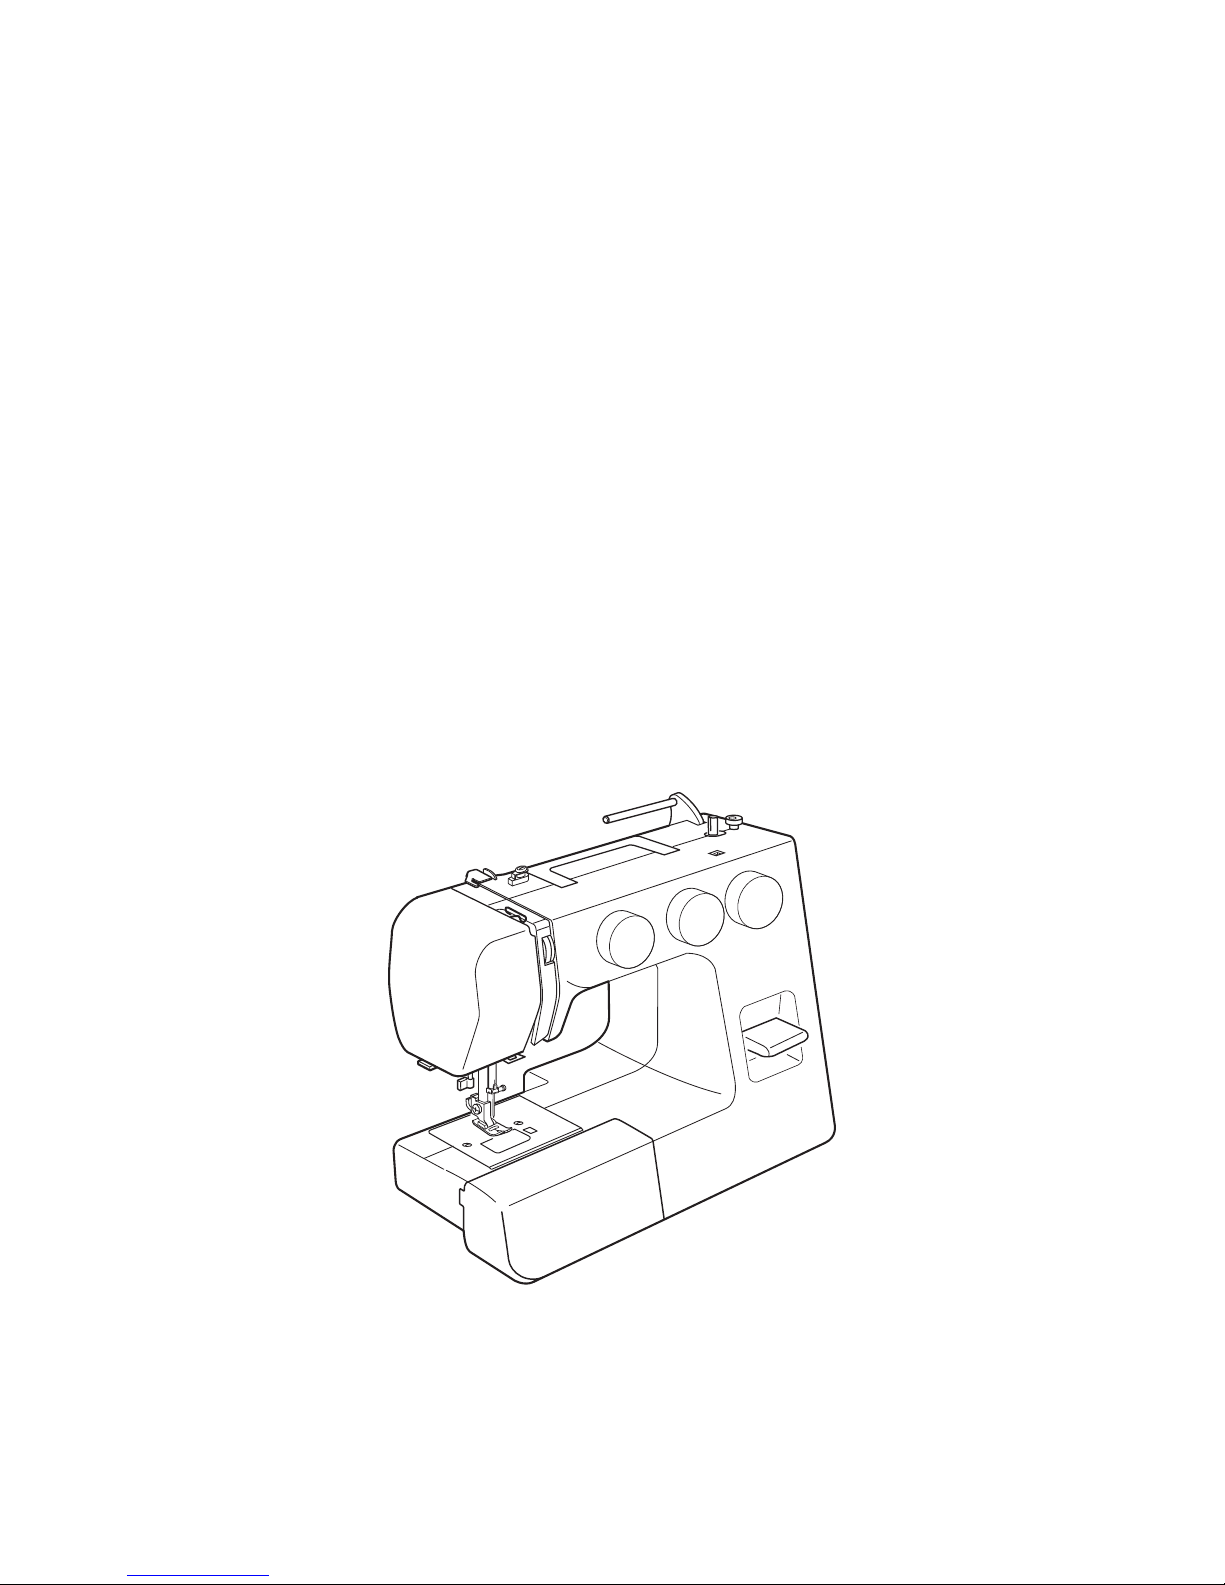
Instruction Manual
Page 2

IMPORTANT SAFETY INSTRUCTIONS
When using an electrical appliance, basic safety precautions should always be followed, including the
following:
This sewing machine is designed and manufactured for household use only.
Read all instructions before using this sewing machine.
DANGER
—
To reduce the risk of electric shock:
1.
An appliance should never be left unattended when plugged in. Always unplug this
sewing machine from the electric outlet immediately after using and before cleaning.
WARNING
—
To reduce the risk of burns, fire, electric shock, or injury to persons:
1. Do not allow to be used as a toy. Close attention is necessary when this sewing machine is used
by or near children.
2. Use this appliance only for its intended use as described in this owner’s manual.
Use only attachments recommended by the manufacturer as contained in this owner’s manual.
3. Never operate this sewing machine if it has a damaged cord or plug, if it is not working properly, if
it has been dropped or damaged, or dropped into water.
Return this sewing machine to the nearest authorized dealer or service center for examination,
repair, electrical or mechanical adjustment.
4. Never operate the appliance with any air opening blocked. Keep ventilation openings of this
sewing machine and foot controller free from accumulation of lint, dust and loose cloth.
5. Never drop or insert any object into any opening.
6. Do not use outdoors.
7. Do not operate where aerosol (spray) products are being used or where oxygen is being
administered.
8. To disconnect, turn all controls to the off (“O”) position, then remove plug from outlet.
9. Do not unplug by pulling on cord. To unplug, grasp the plug, not the cord.
10. Keep fingers away from all moving parts. Special care is required around the sewing machine
needle and/or cutting blade.
11. Always use the proper needle plate. The wrong plate can cause the needle to break.
12. Do not use bent needles.
13. Do not pull or push fabric while stitching. It may deflect the needle causing it to break.
14. Switch this sewing machine off (“O”) when making any adjustment in the needle area, such as
threading the needle, changing the needle, threading the bobbin or changing the presser foot, and
the like.
15. Always unplug this sewing machine from the electrical outlet when removing covers, lubricating, or
when making any other adjustments mentioned in this owner’s manual.
SAVE THESE INSTRUCTIONS
Please note that on disposal, this product must be safely recycled in accordance with relevant National
legislation relating to electrical/electronic products. If in doubt please contact your retailer for guidance.
(European Union only)
For Europe only:
This appliance can be used by children aged from 8 years and above and persons with reduced
physical, sensory or mental capabilities or lack of experience and knowledge if they have been given
supervision or instruction concerning use of the appliance in a safe way and understand the hazards
involved. Children shall not play with the appliance. Cleaning and user maintenance shall not be made
by children without supervision.
For outside Europe (except U.S.A and Canada):
This appliance is not intended for use by persons (including children) with reduced physical, sensory or
mental capabilities, or lack of experience and knowledge, unless they have been given supervision or
instruction concerning use of the appliance by a person responsible for their safety.
Children should be supervised to ensure that they do not play with this appliance.
Page 3

SECTION 1. KNOW YOUR MACIHNE
Names of Parts ............................................................... 2
Setting the Spool Pin ...................................................... 2
Standard Accessories.....................................................3
Extension Table .............................................................. 3
SECTION 2. GETTING READY TO SEW
Connecting the Power Supply ........................................4
Controlling the Sewing Speed ........................................5
Reverse Stitch Lever .......................................................5
Dropping the Feed Dog ..................................................5
Raising and Lowering the Presser Foot..........................6
Changing the Presser Foot .............................................6
Removing and Attaching the Foot Holder ......................6
Changing Needles .......................................................... 7
Fabric and Needle Chart ................................................7
Winding the Bobbin ........................................................8
Removing the Bobbin .....................................................8
Winding the Bobbin ........................................................9
Inserting the Bobbin ..................................................... 10
Threading the Machine ................................................. 11
Needle Threader .......................................................... 12
Drawing up the Bobbin Thread ..................................... 12
Selecting the Stitch Pattern ..........................................13
Stitch Length Dial .........................................................13
Stitch Width Dial ........................................................... 13
Balancing Needle Thread Tension ................................14
SECTION 3. BASIC SEWING
Straight Stitch Sewing ..................................................15
Changing the Sewing Direction ....................................15
Use the Seam Guide ....................................................16
Turning a Square Corner .............................................. 16
Variable Needle Position ............................................... 16
SECTION 4. UTILITY STITCHES
Basic Zigzag ................................................................. 17
Overcasting ..................................................................17
Tricot Stitch (Multiple Zigzag Stitch) .............................18
Knit Stitch .....................................................................18
Straight Stretch Stitch ................................................... 19
Zigzag Stretch Stitch ....................................................19
Button Sewing ..............................................................20
4-Step Buttonhole ......................................................... 21
Corded Buttonhole ........................................................22
Zipper Application ....................................................23-25
Blind Hemming ............................................................26
SECTION 5. DECORATIVE STITCHES
Shell Tuck ..................................................................... 27
Smocking ......................................................................27
Applique ........................................................................28
Pin Tucking ................................................................... 28
Satin Stitches ................................................................29
Decorative Stretch Stitches ..........................................29
SECTION 6. CARE AND MAINTENANCE
Cleaning the Hook Race and Feed Dog .......................30
Replacing the Bobbin Holder ........................................ 31
Troubleshooting ............................................................ 32
TABLE OF COTENTS
Page 4
2
SECTION 1. KNOW YOUR MACIHNE
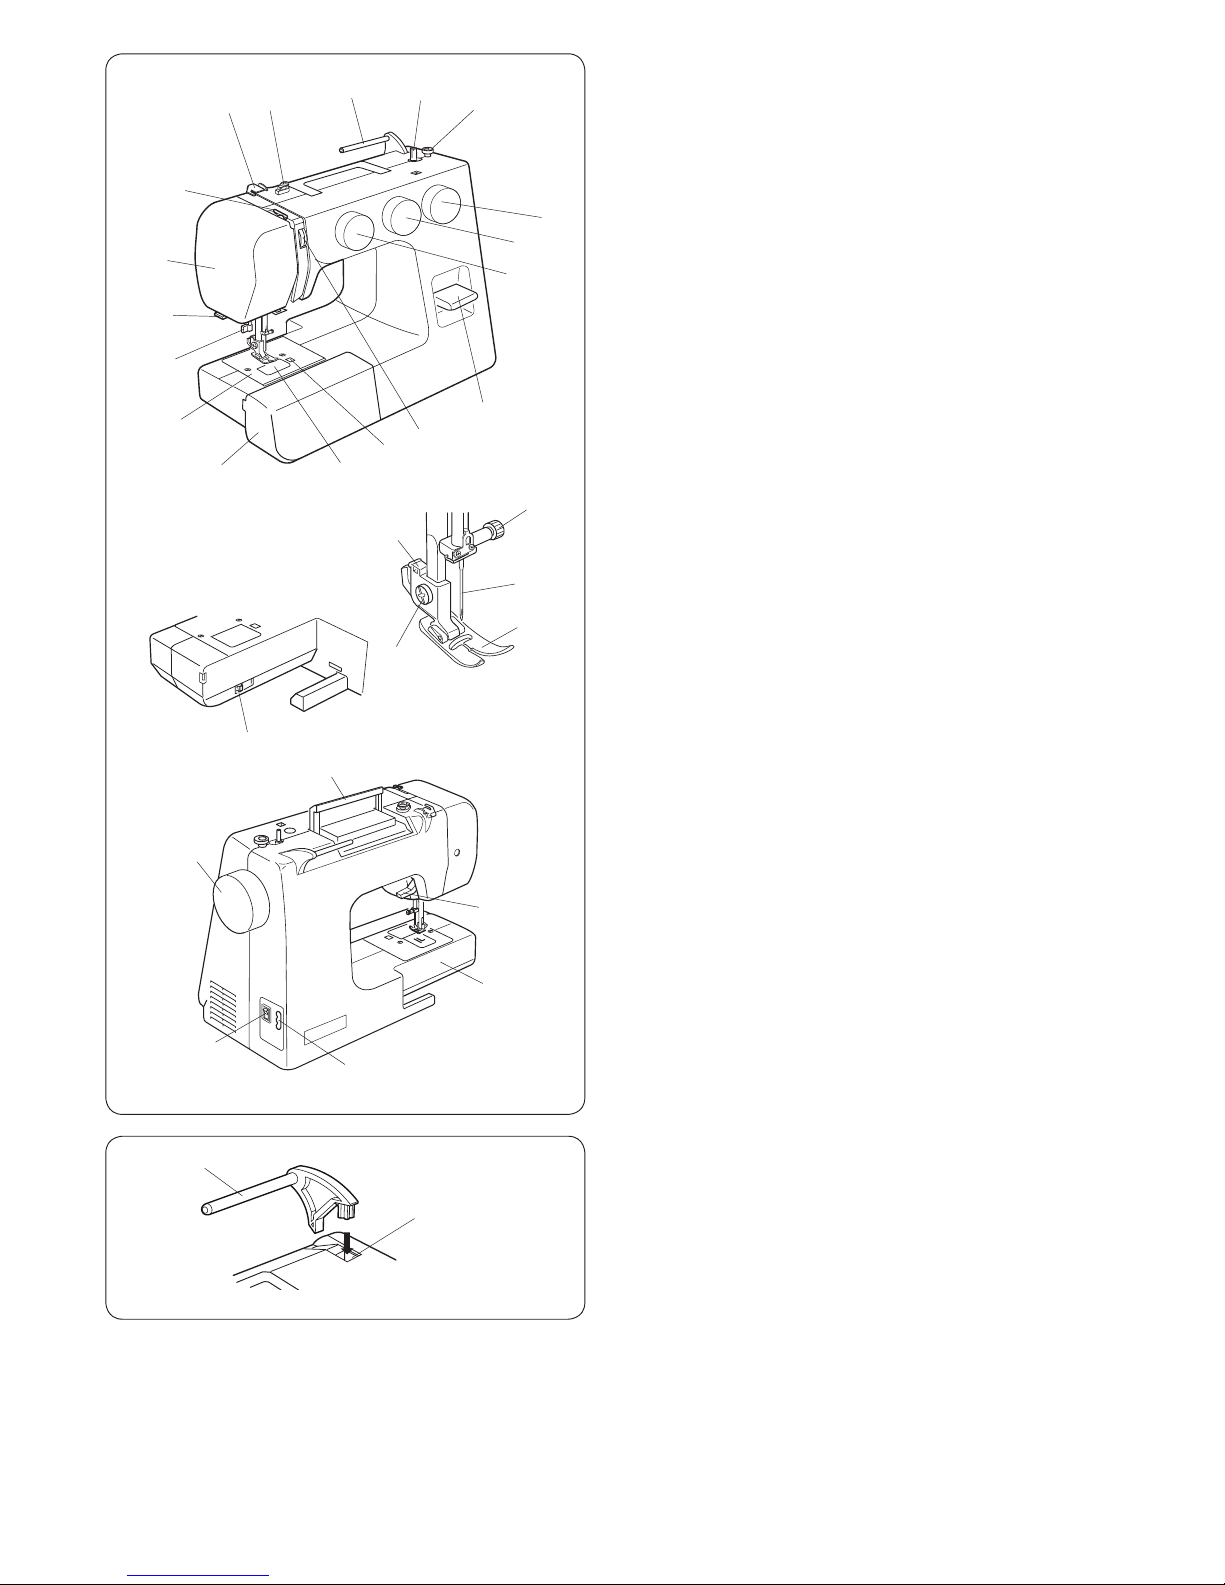
Names of Parts
Bobbin winder stopper
Bobbin winder spindle
Spool pin
Bobbin winder thread guide
Thread guide
Thread take-up lever
Face plate
Thread cutter
Needle threader
Needle plate
Extension table (Accessory storage)
Hook cover plate
Hook cover plate release button
Thread tension dial
Reverse stitch lever
Stitch width dial
Stitch length dial
Pattern selector dial
Presser foot
Needle
Needle clamp screw
Foot holder
Setscrew
Carrying handle
Handwheel
Power switch
Machine socket
Drop feed lever
Free-arm
Presser foot lifter
q
w
e
r
t
y
u
i
o
!0
!1
!2
!3
!4
!5
!6
!7
!8
!9
@0
@1
@2
@3
@4
@5
@6
@7
@8
@9
#0
q
w
e
r
t
y
u
i
o
!0
#0
@9
@8
@7
@6
@5
@4
@3
@2
@1
@0
!9
!8
!7
!6
!5
!4
!3
!2
!1
Setting the Spool Pin
Insert the spool pin into the hole as shown.
q Spool pin
w Hole
q
w
Page 5
3
3
56
Стандарòíûå àêñåññóàðû
1 Øïóëüêè
2 Набор игë
3 Ëàïêà äëÿ ïîòайногî øâà G
4 Ëàïêà äëÿ ìîëíèè E
5 Ëàïêà äëÿ ïåòëè J
6 Держаòåëü êàòóøêè áîльшой
7 Держаòåëü êàòушки малый
8 Вспарывàòåëü
9 Îòâåðòêà
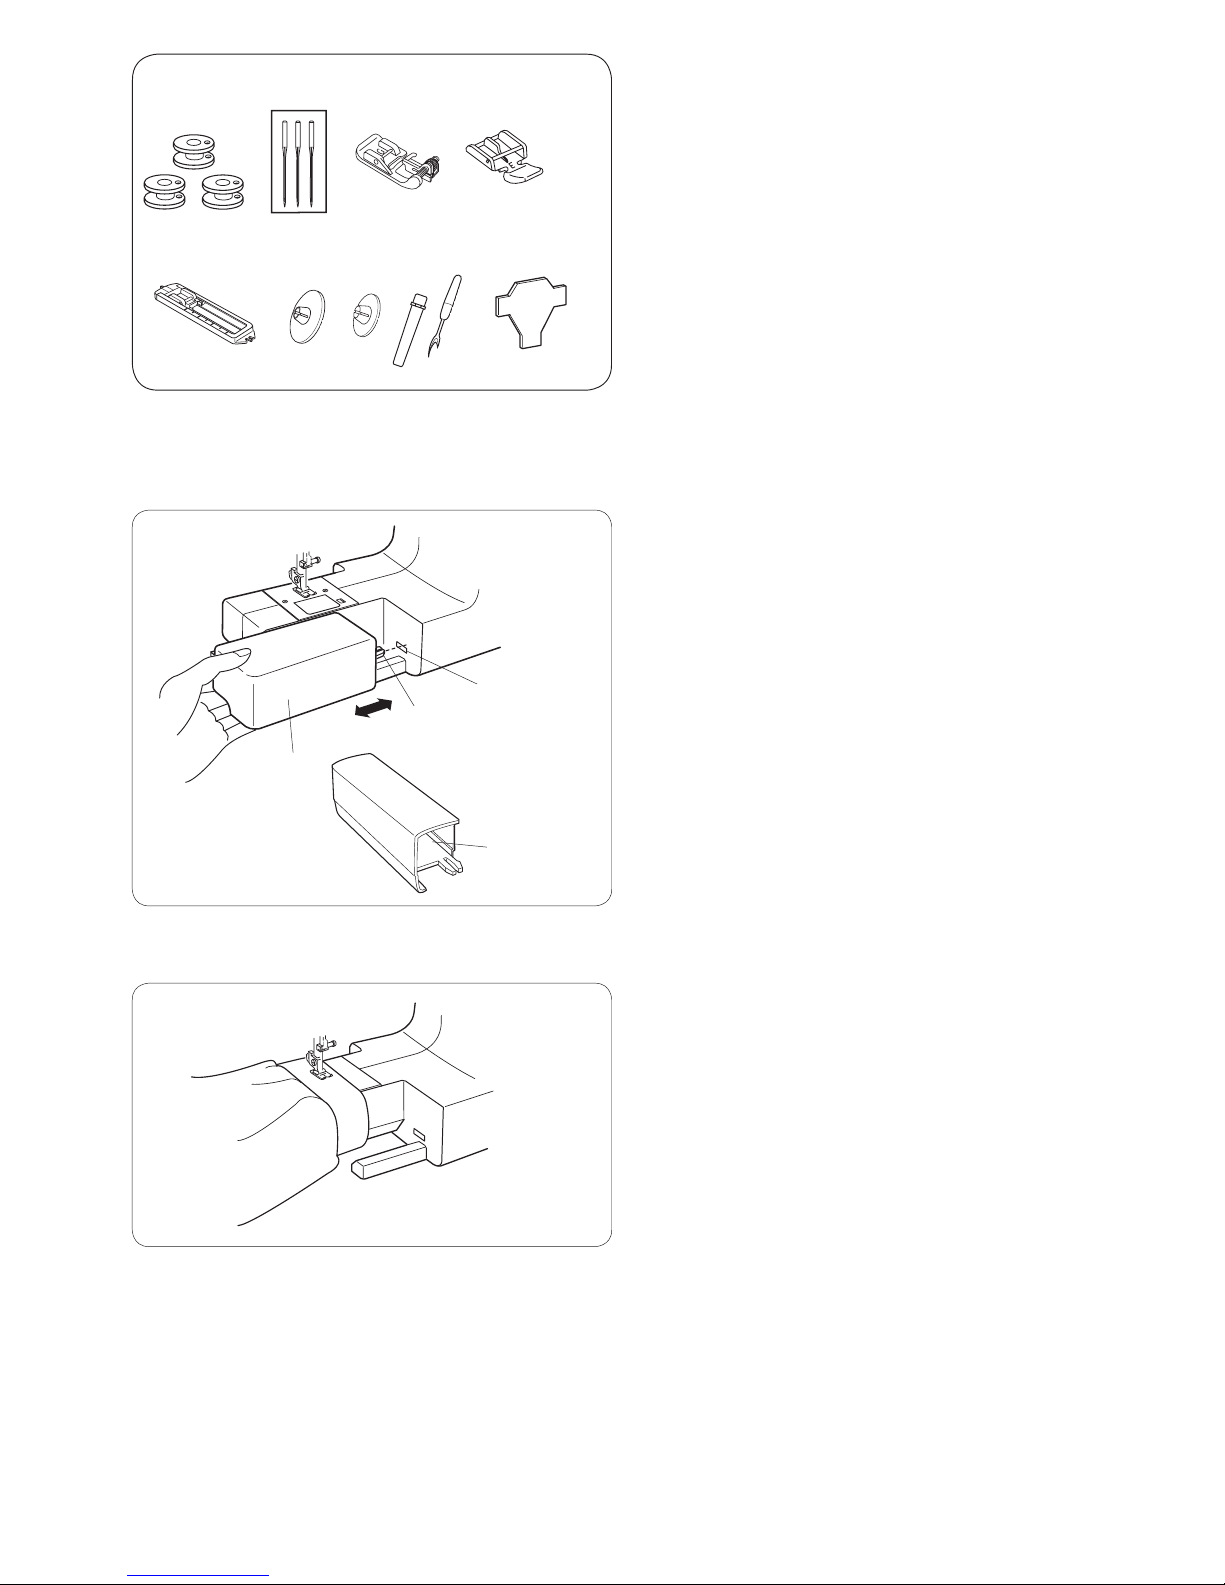
Standard Accessories
q Bobbins
w Needle set
e Blind hemming foot G
r Zipper foot E
t Sliding buttonhole foot J
y Spool holder (large)
u Spool holder (small)
i Seam ripper (buttonhole opener)
o Screwdriver
Extension Table
The extension table provides an extended sewing
area and can be easily removed for free arm sewing.
The accessories can be stored in the table.
Detaching the table:
Pull the table away from the machine, as illustrated.
Attaching the table:
Push the extension table, inserting the tab into the slot
until the table snaps into the machine.
q Extension table
w Tab
e Slot
r Accessory storage
Free-arm sewing
Free-arm sewing is used for stitching sleeves,
waistbands, pant legs or any other tubular garments.
It is also useful for darning socks or mending knees or
elbows.
q
w
e r
t y u i o
q
w
e
r
Page 6
4
SECTION 2. GETTING READY TO SEW
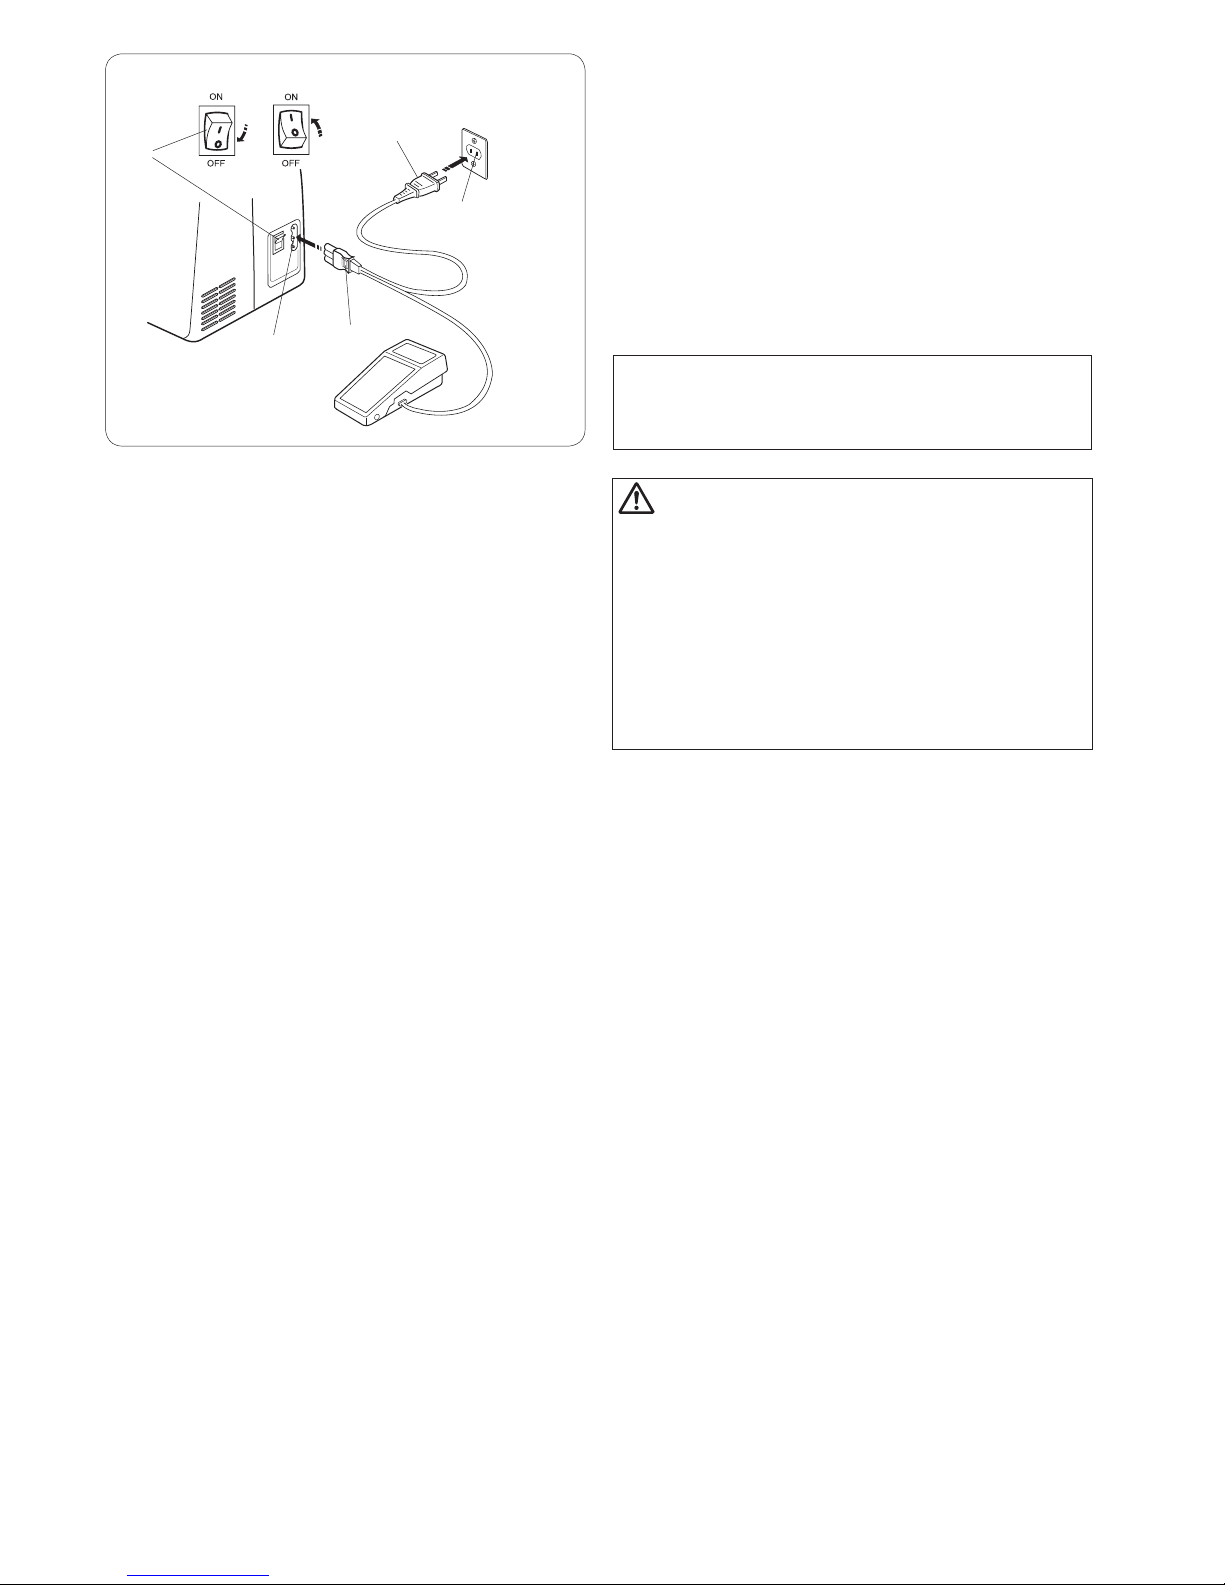
Connecting the Power Supply
z Turn the power switch off.
x Insert the machine plug into the machine socket.
c Insert the power supply plug into the wall outlet.
v Turn the power switch on.
q Power switch
w Machine plug
e Machine socket
r Power supply plug
t Wall outlet
NOTE:
Before connecting to the power supply, make sure the
voltage shown on the machine conforms to your
electrical power.
WARNING :
While in operation, always keep your eyes on the
sewing area, and do not touch any moving parts such
as the thread take-up lever, handwheel or needle.
Always turn off the power switch and unplug from the
power supply:
- when leaving the machine unattended.
- when attaching or removing parts.
- when cleaning the machine.
Do not place anything on the foot control, otherwise the
machine will run intermittently.
Operating Instructions:
The symbol “O” of a switch indicates the “off” position of
a switch.
For an appliance with a polarized plug (one blade wider
than the other):
To reduce the risk of electrical shock, this plug is
intended to fit in a polarized outlet only one way.
If it does not fit fully in the outlet, reverse the plug. If it still
does not fit, contact a qualified electrician to install the
proper outlet. Do not modify the plug in any way.
The foot controller Model YC-482J-EC or TJC-150 is used
with this sewing machine (USA market only).
q
w
e
r
t
Page 7
5
Контроëü ñêîðîсти шитья
Íîжная педаль
Ñêорость шитья можно изменять при помощи
ïåдали. Чем сильнее давить на пеäàëü, òåì
âûøå ñêорость шитья.
Кнопка ревåðñà
Ïîêа вы нажимаеòå на кнопку реверса,
áóäåò øèòü â îáðàтном направлении.
машина
Контроëü ñêîðîсти шитья
Íîжная педаль
Ñêорость шитья можно изменять при помощи
ïåдали. Чем сильнее давить на пеäàëü, òåì
âûøå ñêорость шитья.
1
3
2
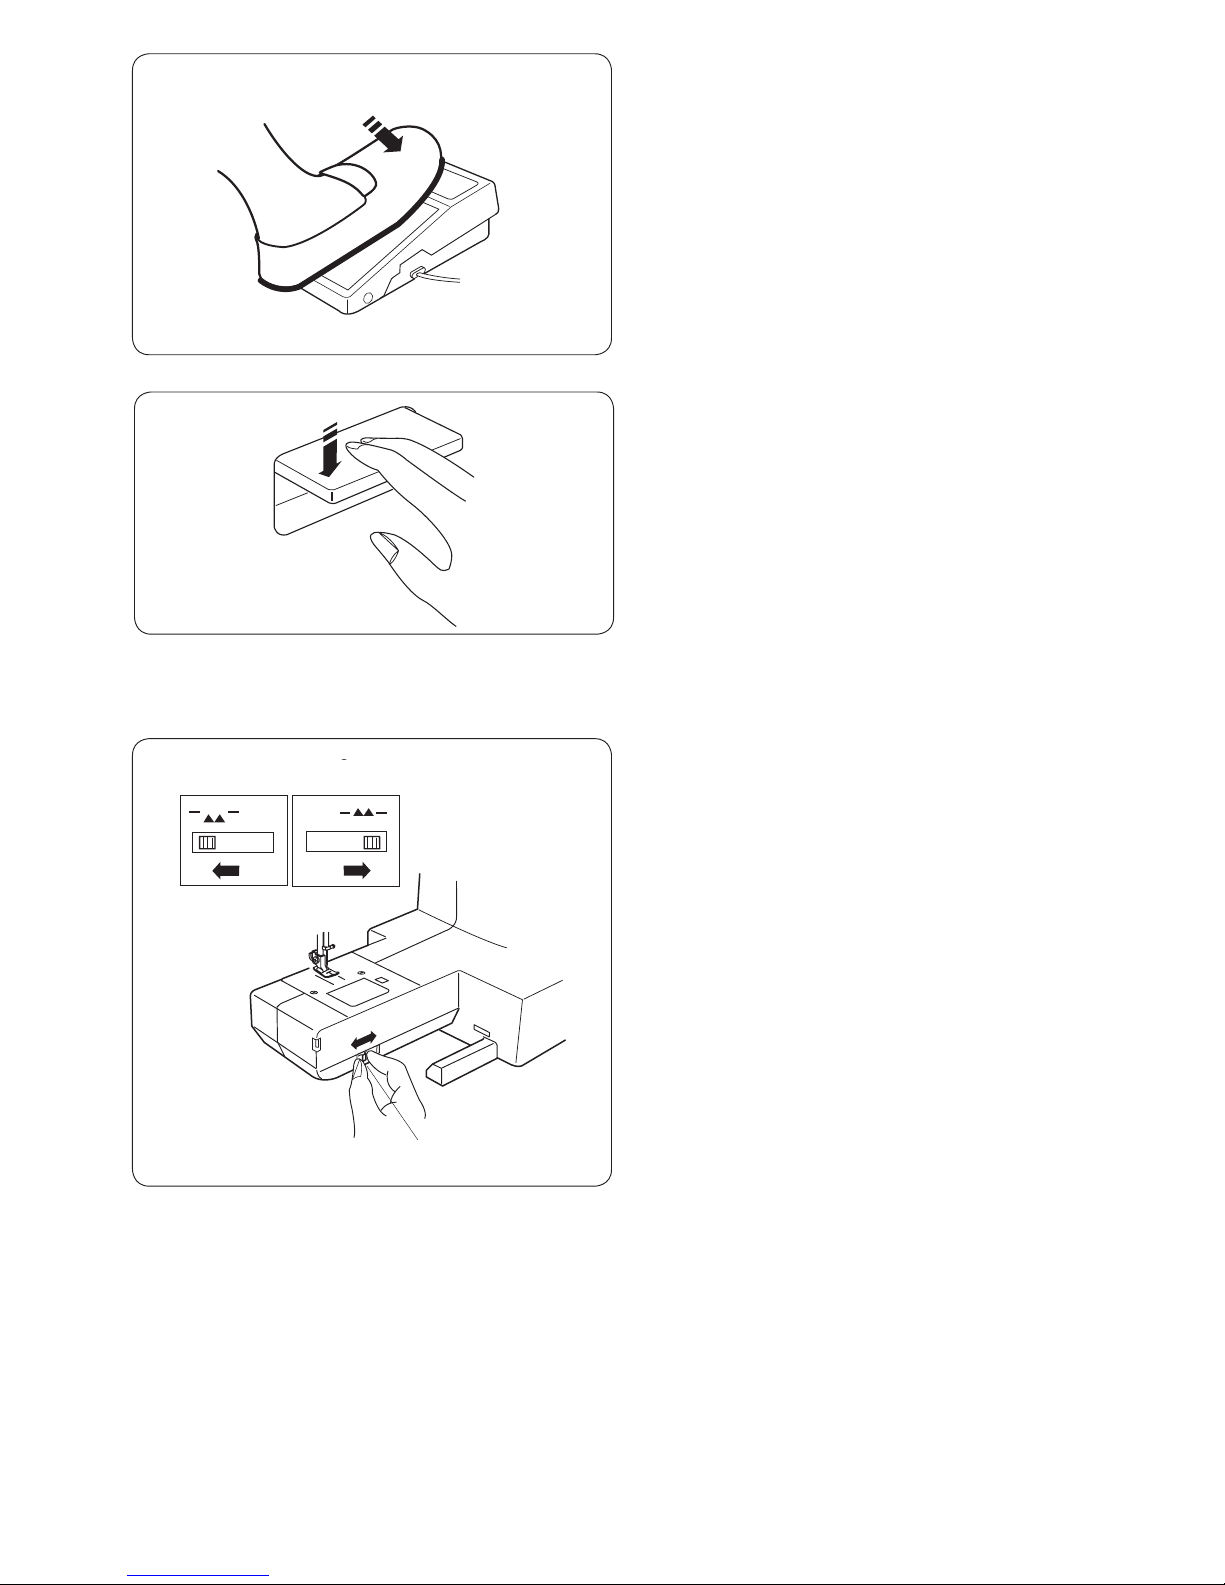
Controlling the Sewing Speed
Foot control
Sewing speed can be varied by the foot control.
The harder you depress the foot control, the faster the
machine runs.
Reverse Stitch Lever
Push the reverse stitch lever down to sew in reverse.
The machine will sew in reverse while the lever is pushed.
Dropping the Feed Dog
The drop feed lever is located underneath the free-arm
bed on the front side of the machine.
To drop the feed dog, push the lever in the direction of the
arrow, as illustrated.
To raise the feed dog, push the lever in the direction of
the arrow, as illustrated, and turn the handwheel toward
you.
The feed dog must be up for regular sewing.
q Drop feed lever
w Raised position
e Lowered position
w
e
q
Page 8

6
1
2
3
3
2
1
2
3
3
2
1
2
3
Ïîäúåì è îïóскание прижимной лапки
Рычаг поäъема прижимной лапки поднимаеò è
îïóñêàåт прижимную лапку.
Âû ìîæåòå ïîднять лапку на 0,6 см выше
обычногî ïîëîжения для быстрой смены
прижимной лапки или для беспрепятñòâенногî
ðàçìåùåíèè îáъемных маòериалîâ ïîд лапкой.
1 Îïóùенное поëîжение
2 Обычное поäíÿòîå ïîëîжение
3 Наивысшее поëîжение
Смена прижимной лапки
ВНИМАНИЕ!
Ïåðåд сменой прижимной лапки îòêëþ÷èòå
ïèòàíèå.
Âñåãäà èñïîëüçóéòå òîëüêî ïîäõîдящую лапкó
для выбранногî îáðàзца. Из-за неправильной
лапки моæåт сломаòüñÿ èãëà.
Êак снять прижимную лапку
Ïîâернитå ìàõîâîå êîëåñî ïðîòèâ ÷àñîâîé
ñòðåëêè è ïîднимитå èãëó â âåðõíåå ïîëîжение.
Ïîднимите прижимную лапку и нажмите на
рычаг позади держаòåля лапки.
1 Рычаг
Êак пристегнуть прижимную лапку
Ðàñïîëîæèòе выбранную прижимную лапку так,
÷òîáû ñòержень нахîдился прÿìî ïîд выемкой
держаòåëÿ.
Îïóñòèòе держаòåль лапки и пристегните лапку.
Raising and Lowering the Presser Foot
The presser foot lifter raises and lowers the presser foot.
You can raise the foot about 1/4˝ (0.6 cm) higher than the
normal up position for easy removal of the presser foot,
or to help you place heavy fabric under the foot.
q Lowered position
w Normal up position
e Extra up position
Changing the Presser Foot
To r em o ve :
Raise the needle to its highest position by turning the
handwheel counterclockwise. Raise the presser foot, and
press the lever on the back of the foot holder.
q Lever
CAUTION:
Turn OFF the power switch before changing the foot.
Always use the proper foot for the selected pattern. The
wrong foot can cause the needle to break. Do not push
the lever down to prevent it from being broken.
To attach:
Place the desired presser foot, so that the pin on the foot
lies just under the groove on the foot holder. Lower the
presser foot lifter to lock the foot in place.
w Groove
e Pin
Removing and Attaching the Foot Holder
WARNING :
Turn OFF the power switch before detaching or
attaching the foot holder.
To r em o ve :
Remove the setscrew by turning it counterclockwise with
a screwdriver and remove the foot holder.
To attach:
Match the hole in the foot holder with the threaded hole
in the presser bar. Fit the setscrew into the hole. Tighten
the screw by turning it clockwise with a screwdriver.
q Setscrew
w Foot holder
e Hole
r Threaded hole
q
w
w
e
e
w
e
q
w
e
r
q
Page 9
7
1
2
3
4
1
Смена игë
ВНИМАНИЕ!
Ïåðåд заменой игë îòêëþ÷àéòå ïèòàíèå
машины.
1. Ïîâернитå ìàõîâîå êîëåñî ïðîòèâ ÷àñîâîé
ñòðåëêè è ïîднимитå èãëó â âåðõíåå ïîëîжение.
Îïóñòèòе прижимную лапку.
Ослабьòå âèíò èãîльногî ñòержня, повернув егî
ïðîòèâ ÷àñîâîé ñòðåëêè.
Âûòàùèòå èãлу из зажима
1 Винт зажима игëû
2. Âñòàâüòå íîâóþ èãлу в зажим плоскîé
ñòороной îò ñåáÿ.
Âñòàâëÿÿ èãлу в зажим, поäòîлкнитå åå êàê
ìîæíî âûøå è çàтянитå âèíò, ïîâернув егî ïî
÷àñîâîé ñòðåëêå.
2 Ñòîïîð
3 Плоскàÿ ñòорона
1
2
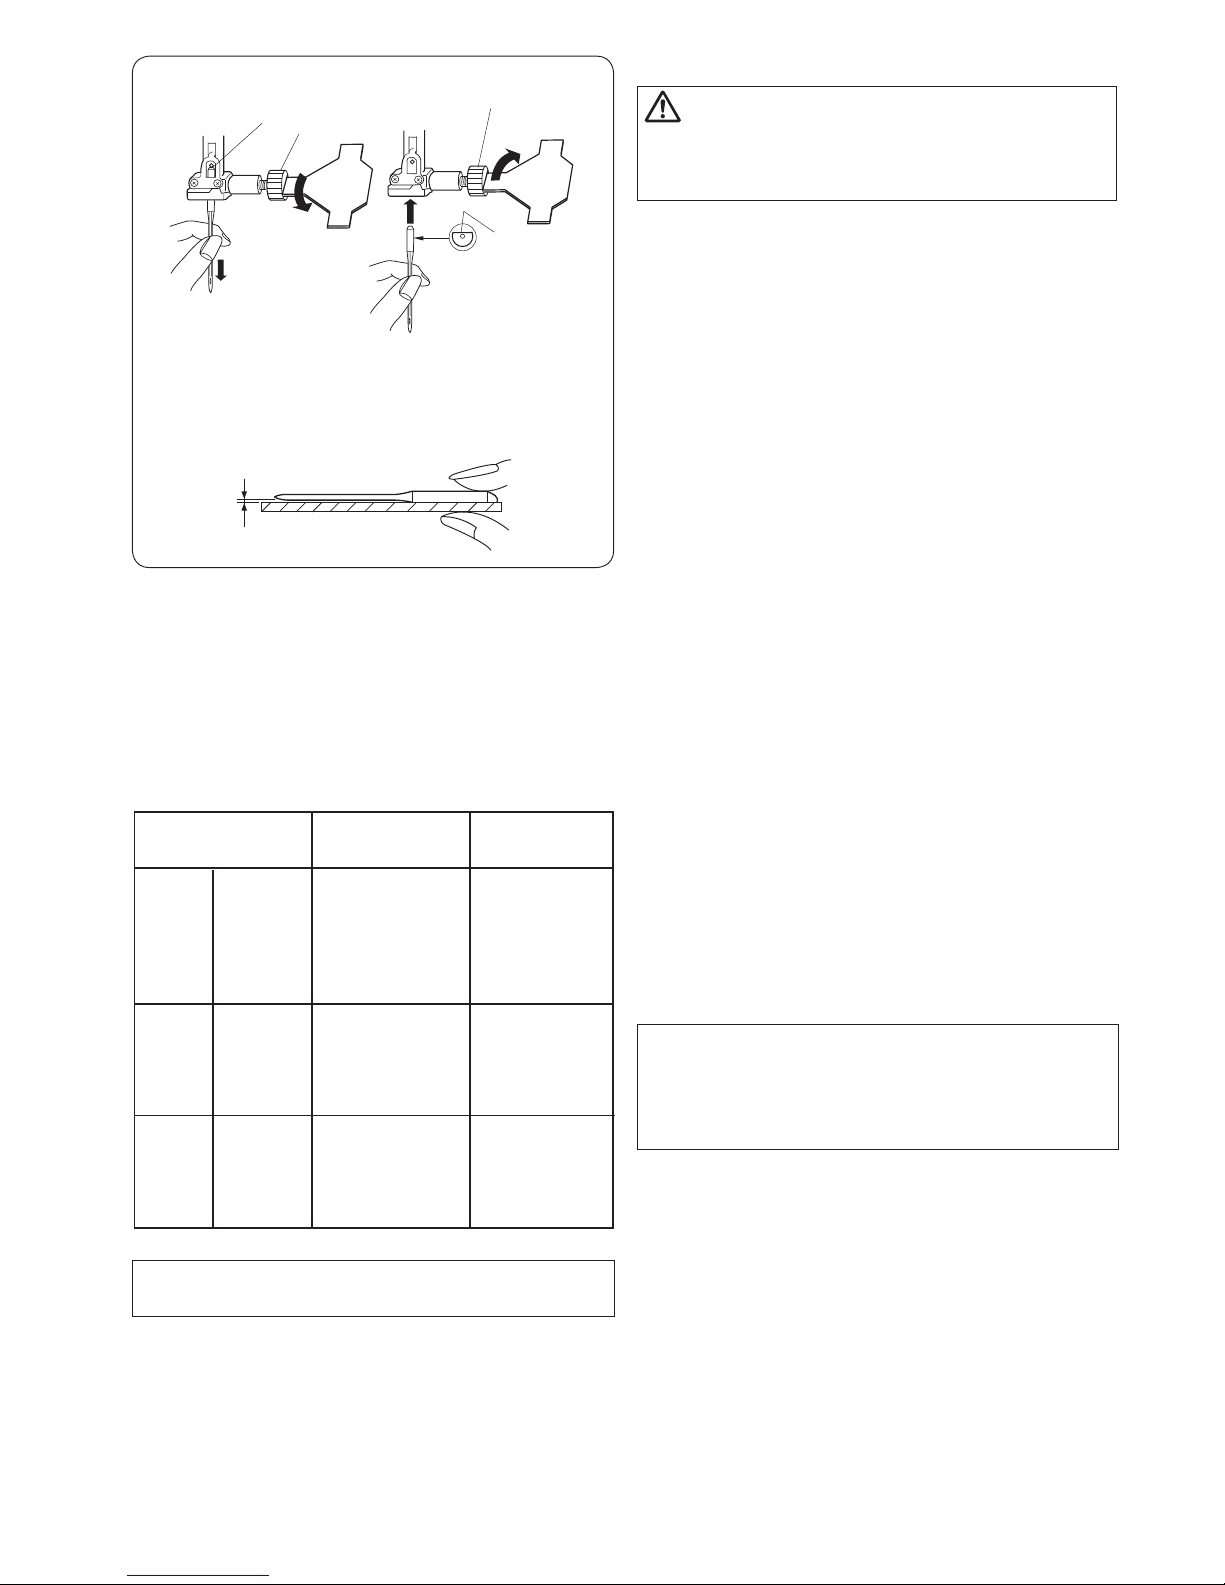
Changing Needles
CAUTION:
Always make sure to turn the power switch off and
disconnect the machine from power supply before
changing the needle.
Raise the needle by turning the handwheel and lower the
presser foot.
Turn off the power switch.
z Loosen the needle clamp screw by turning it
counterclockwise.
Remove the needle from the clamp.
q Needle clamp screw
x Insert a new needle into the needle clamp with
the flat side of the needle to the rear.
When inserting the needle into the needle clamp,
push it up against the stopper pin and tighten the
needle clamp screw firmly.
w Stopper pin
e Flat side
To check needle straightness, place the flat side of the
needle onto something flat (glass, etc.)
The gap between the needle and the flat surface should
be consistent.
Never use a blunt needle.
r Gap
Fabric and Needle Chart
•Forgeneralsewing,useneedlesize11/75or14/90.
•Anethreadandneedleshouldbeusedforsewing
lightweight fabrics, so the fabric will not be marred.
•Heavyfabricsrequireaneedlelargeenoughtopierce
the fabric without fraying the needle thread.
•Alwaystestthethreadandneedlesizeonasmallscrap
of the fabric that will be used for actual sewing.
•Ingeneral,usethesamethreadfortheneedleand
bobbin.
NOTE:
When sewing stretch fabrics, very fine fabrics and
synthetics,useabluetipneedle(PartNo.990311000,
sold separately). The blue tip needle effectively
prevents skipped stitches.
Fine
Medium
Silk #80-100
Cotton #80-100
Synthetic #80-100
Heavy
weight
Denim
Tweed
Coating
Quilting
Lawn
Georgette
Tricot
Organza
Crepe
Sheeting
Jersey
Broadcloth
Fleece
#9/65-11/75
Thread Needle
Silk #50
Cotton #50-80
Synthetic #50-80
#11/75-14/90
Silk #30-50
Cotton #40-50
Synthetic #40-50
#14/90-16/100
Fabric
NOTE:
3x#14/90needlesareincludedintheenvelop.
q
z
q
x
w
e
r
Page 10

8
1
2
(A)
(B)
Óстановка катóøêè íà êàòóøêîäåðæатель
À Óñòановитå íà ñòержень êàòóøêó, ðàçìàòûâàÿ
íèòêу по направлению, покàзанном на рисунке.
Ñâåðху наденьòå áîльшой держаòåëü è ïëîòíî
зафиксируйтå íà êàòóøêå.
1 Держаòåëü êàòóøêè áîльшой
 Ìалый держаòåëü èñïîëüçóåòñÿ äëÿ
маленьких или узких êàòóøåê.
2 Держаòåëü êàòушки малый
14
5
1
2
3
1
2
Winding the Bobbin
Setting the spool
Place a spool of thread on the spool pin with the thread
coming off the spool as illustrated.
A: Press the large spool holder firmly against the spool of
thread.
q Large spool holder
B: For a small spool, use the small spool holder.
w Small spool holder
Removing the Bobbin
z Push the hook cover plate release button to the right
and remove the cover plate.
q Hook cover plate release button
w Hook cover plate
x Lift out the bobbin.
e Bobbin
q
w
q
w
z
x
e
Page 11
9
1
1
2
4
2
3
3
5
Íàìîòêà øïóëüêè
1. Вытянитå íèòü ñ êàòушки. Направьòå íèòü çà
íèòенаправитåëü âåðõíåé íèòè. Ïðîтянитå íèòü
÷åðåз направитåëü øïóльной нити.
1 Íèòенаправитåëü âåðõíåé íèòè
2 Направитåëü øïóльной нити
2. Пропуñòèòå íèòü ñêâîçü îòâерстие в шпуëüêå
изнутри íàðóæó. Óñòановитå øïóëüêó íà
шпиндеëü ìîòàëêè.
3 Шпиндеëü ìîòàëêè
3. Ïîäòîлкнитå øïóльку вправî.
4. Óдерживàÿ ñâîáîдный конец нити в ðóêå,
надавитå íà ïåäàëü. Îñòановите машину после
íåñêîльких обороòîâ è îáðåæüòå ñâîáîäíûé
êîíåö íèòè áлизко к шпуëüêå.
5. Ñíîâа нажмитå íà ïåäàëü. Êîãäà øïóëüêà
áóäåò ïîлностью намоòана, машина
îñòановитñÿ àâòîìàтически. Вернитå øïóëüêó â
ïåðâîíàчальное поëîжение, îòîдвинув
шпиндеëü âëåâî, è îáðåæüòå íèòü êàê ïîêàçàíî
на рисункå.
ПРИМЕЧАНИЕ:
Ïîëîжение стопора намоòêè øïóëüêè ìîæíî
ðåãóлировàть в зависимости îò òðåáóåìîãî
êîличестве нитки на шпульке (например,
íàïîëовину намоòàíà èëè ïîлностью
íàìîòана). При помощи îòâåðтки ослабьòå âèíò
íà îдин оборот или меньше тàê, ÷òîáû
îтрегулировàòü ïîëîжение стопора намоòêè. Íå
îòâîðà÷èâàéòå âèíò ïîлностью. Снова затянитå
винт и зафиксируйтå ïîëîжение стопора
íàìîòêè.
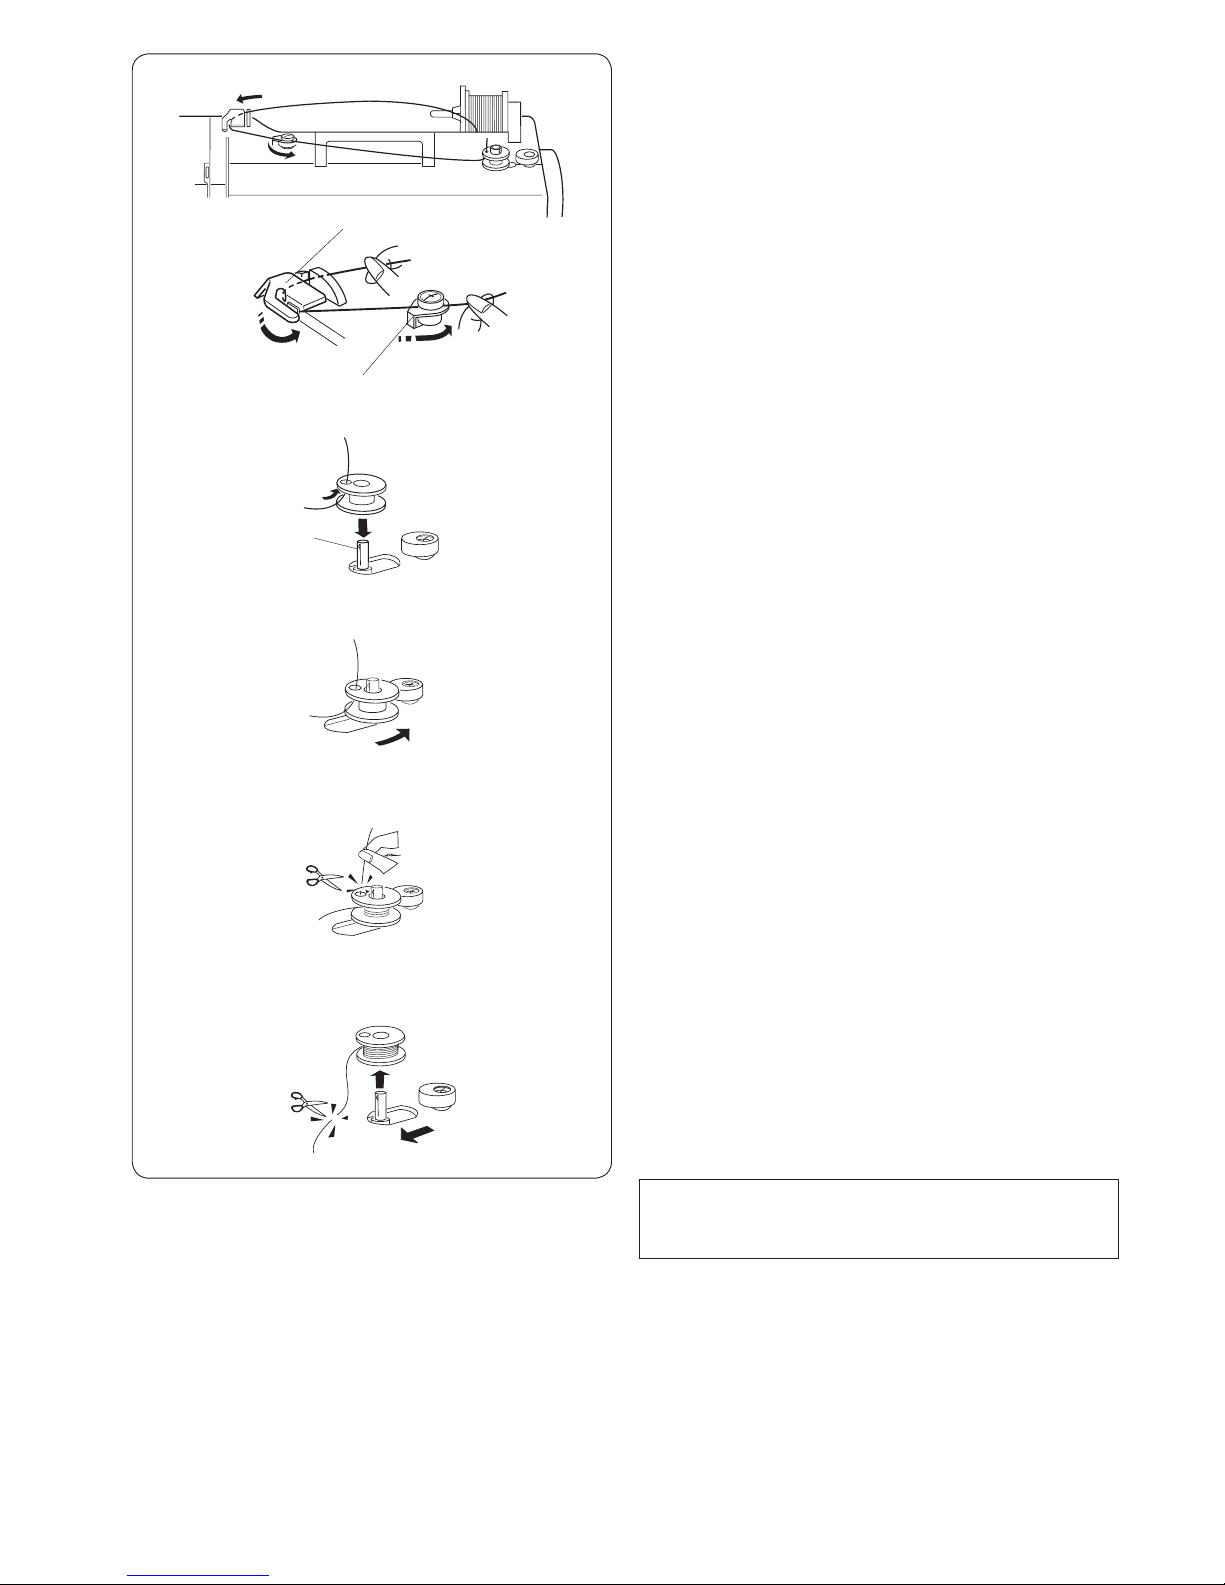
Winding the Bobbin
z Hold the thread with both hands and pass the thread
under the thread guide.
Guide the thread around the bobbin winding thread
guide.
q Thread guide
w Bobbin winding thread guide
x Pass the thread through the hole in the bobbin from
the inside to the outside.
Put the bobbin on the bobbin winder spindle.
e Bobbin winder spindle
c Push the bobbin winder spindle to the right.
v Hold the free end of the thread in your hand and start
the machine.
Stop the machine when the bobbin has been wound a
few layers, and cut the thread close to the bobbin.
b Start the machine again. When the bobbin is fully
wound, it will stop automatically.
Stop the machine and return the bobbin winder spindle
to its original position by moving it to the left, and cut
the thread with a pair of scissors. Remove the bobbin
from the bobbin winder spindle.
NOTE:
The machine will not sew until the spindle has been
returned to the left.
z
x
c
v
b
q
w
e
Page 12
10
1
2
3
4
1
2
3
4
1. Поместитå øïóльку в держаòåëü, îòìàòûâàÿ
íèòü ïðîòèâ ÷àñîâîé ñòðåëêè.
1 Конец нити
2. Пропуñòèòе нить в первый паç â ïåðåäíåé
части шпуëåдержаòåëÿ. Îòâåäèòå íèòü âëåâî è
пропуñòèòå åå ìåæäó ïðóжинами натяжения.
2 Ïàç
3 Ïðóæèíû íàтяжения
3. Ïðîäîлжайтå îñòîðîжно вытягивàòü íèòü,
ïîêà îíà íå ñîñêîльзнеò â ïàç.
4 Ïàç
4. Вытянитå íàçàä îêîëî 15 ñì íèòè.
Óñòановите пластину чеëíî÷íîãî îòñåêà.
Óстановка шпуëüêè
8
(A)
1
1
5
6
4
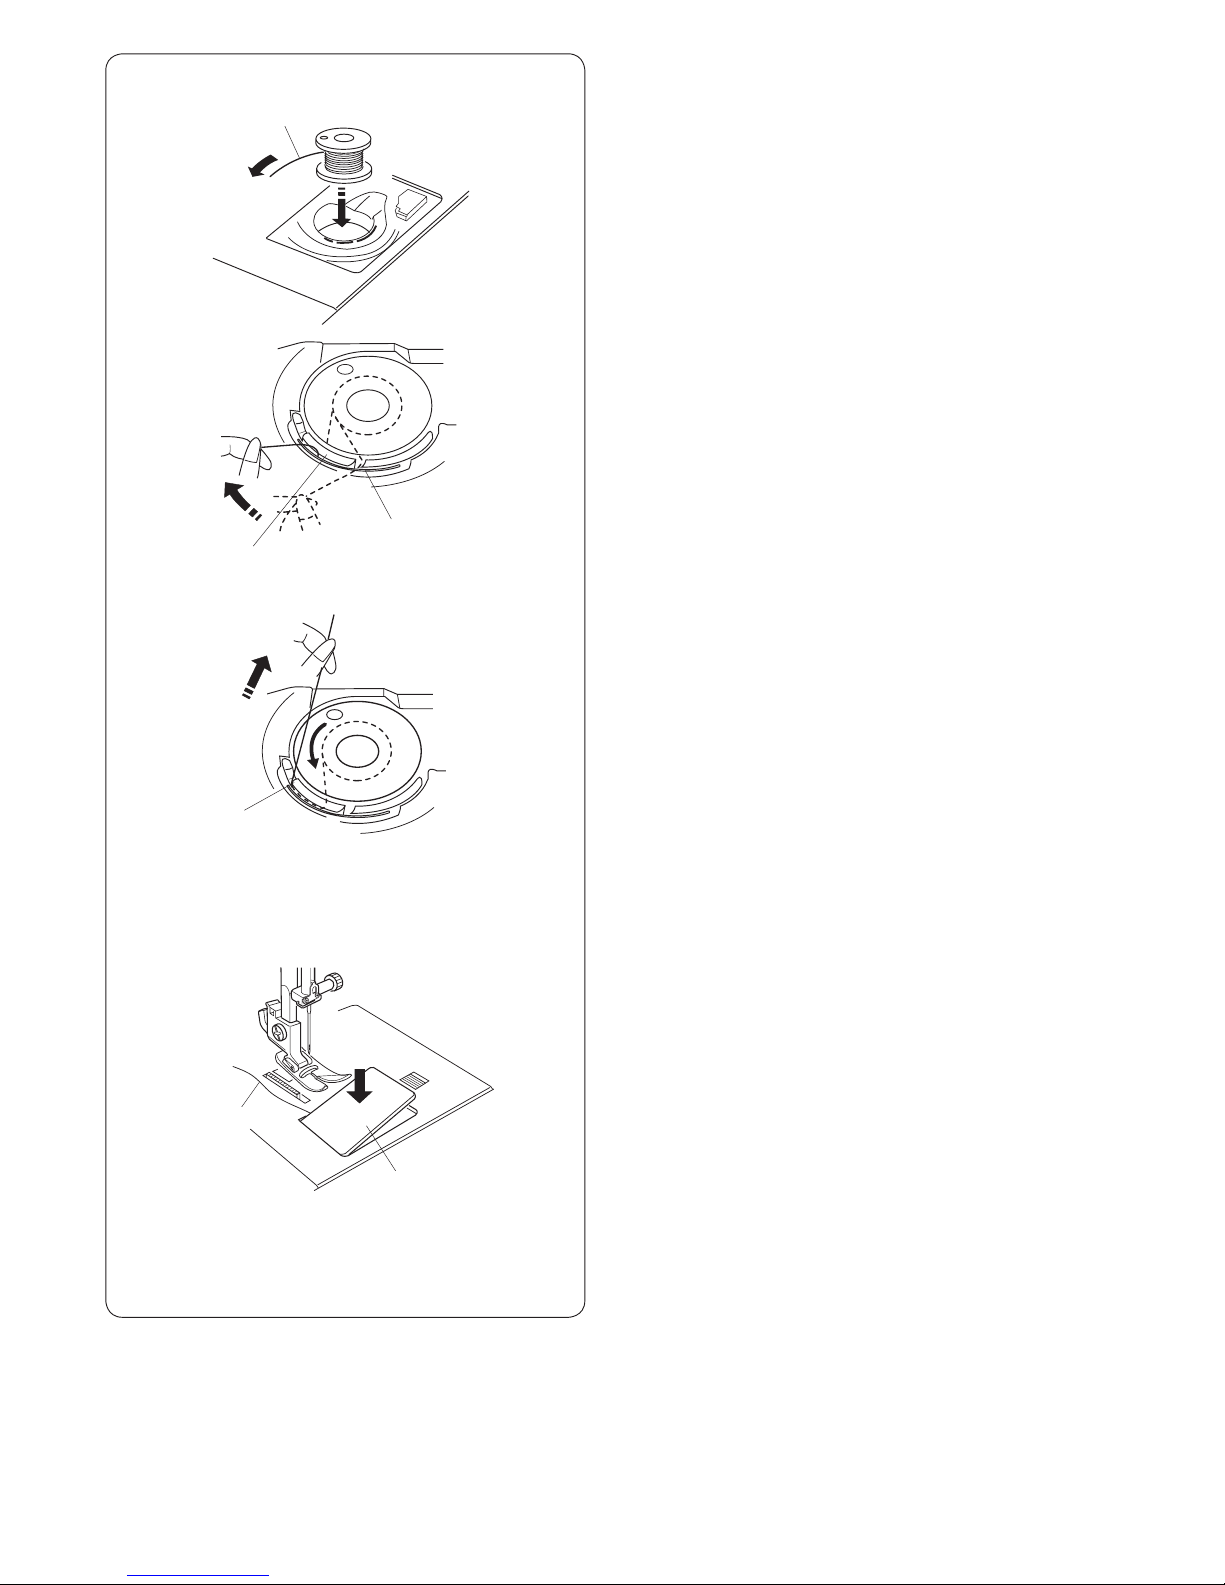
Inserting the Bobbin
z Place the bobbin in the bobbin holder with the thread
running off as illustrated.
q Thread
x Guide the thread into the front notch on the front side
of the bobbin holder. Draw the thread to the left,
sliding it between the tension spring blades.
w Front notch
e Tension spring blade
c Continue to draw the thread lightly until the thread
slips into the side notch.
r Side notch
v Pull out about 4˝ (10 cm) of thread. Attach the hook
cover plate. Check the threading by referring to the
chart shown on the hook cover plate.
t Thread
y Hook cover plate
w
q
z
x
c
v
e
r
t
y
Page 13
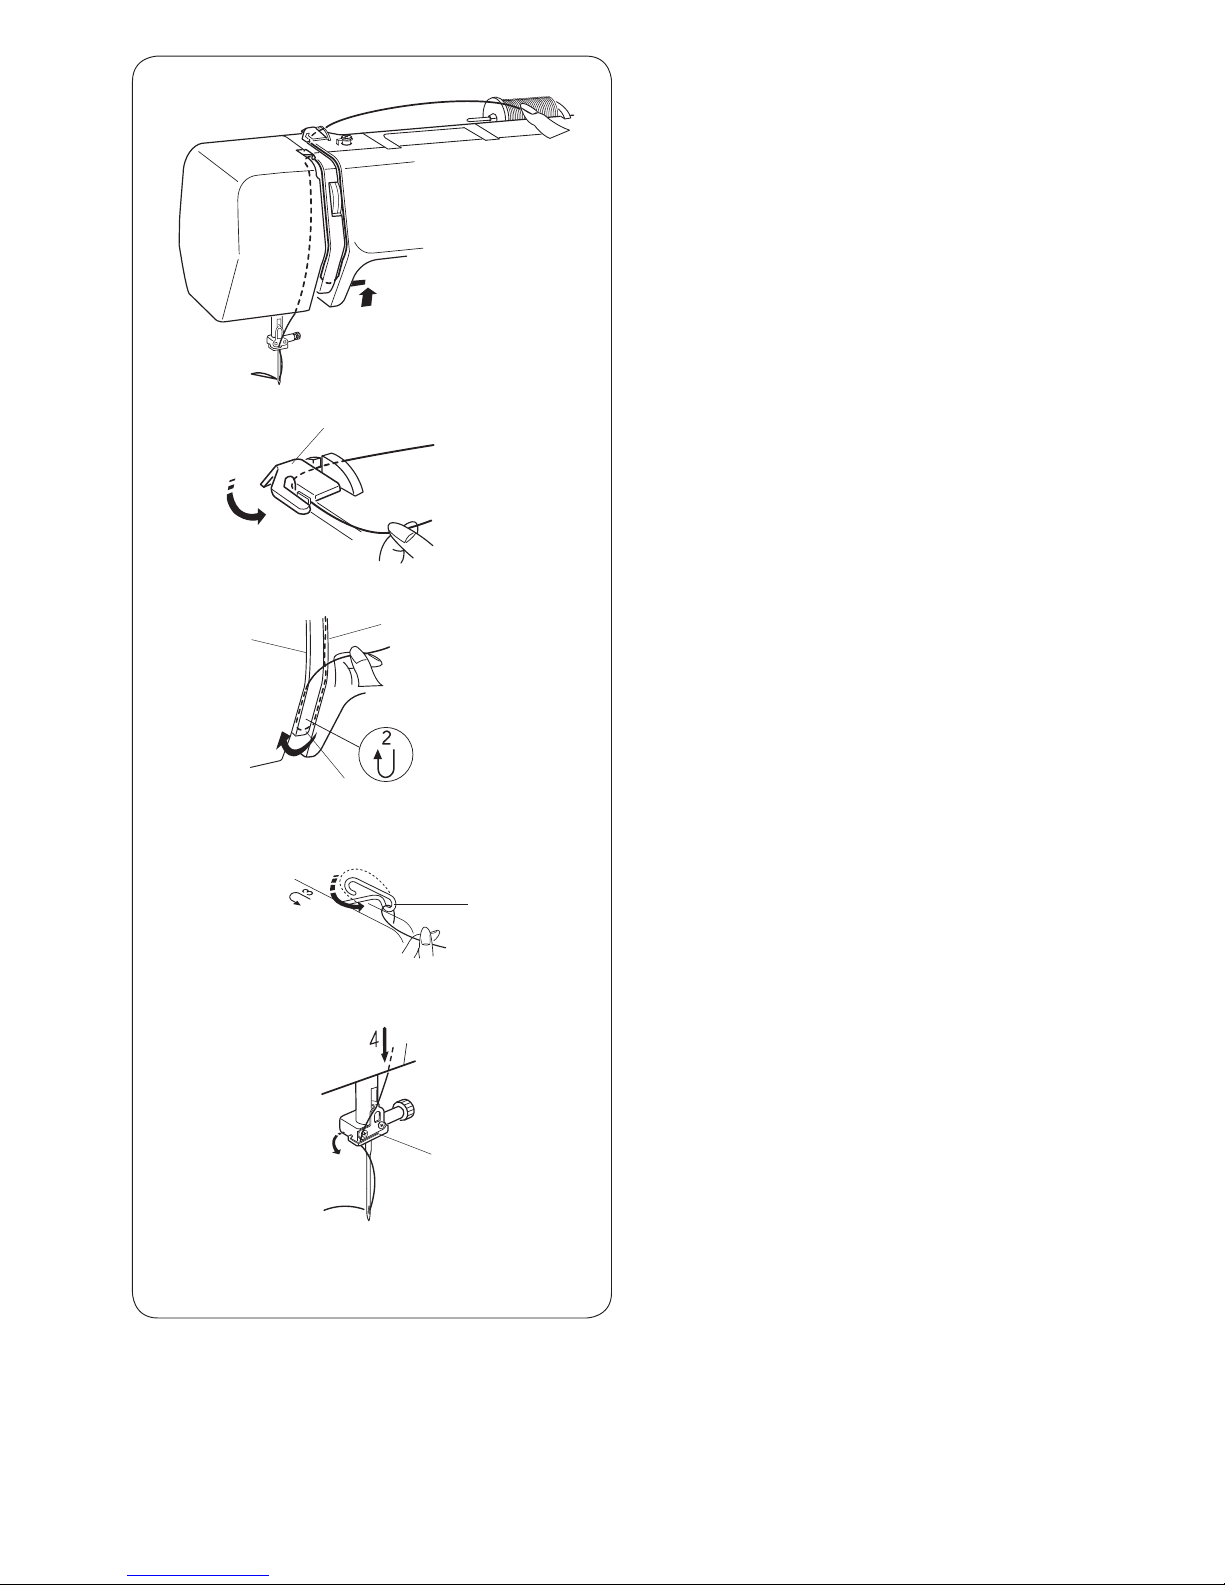
11
Threading the Machine
To set the needle thread:
Raise the presser foot.
Turn the hand wheel to raise the thread take-up lever to
its highest position.
z Draw the thread from the spool and pass it under the
thread guide.
q Thread guide
x Draw the thread down along the right channel and pull
it up around the bottom of the thread guide plate.
Pull the thread up along the left channel.
w Right channel
e Thread guide plate
r Left channel
c Firmly draw the thread from right to left over the
thread take-up lever and down into the take-up lever
eye.
t Thread take-up lever
v Draw the thread down along the left channel and slip
the thread behind the needle bar thread guide from
the left.
y Needle bar thread guide
b Pass the thread through the needle eye from the front.
w
q
z
x
c
v
b
e
r
t
y
Page 14
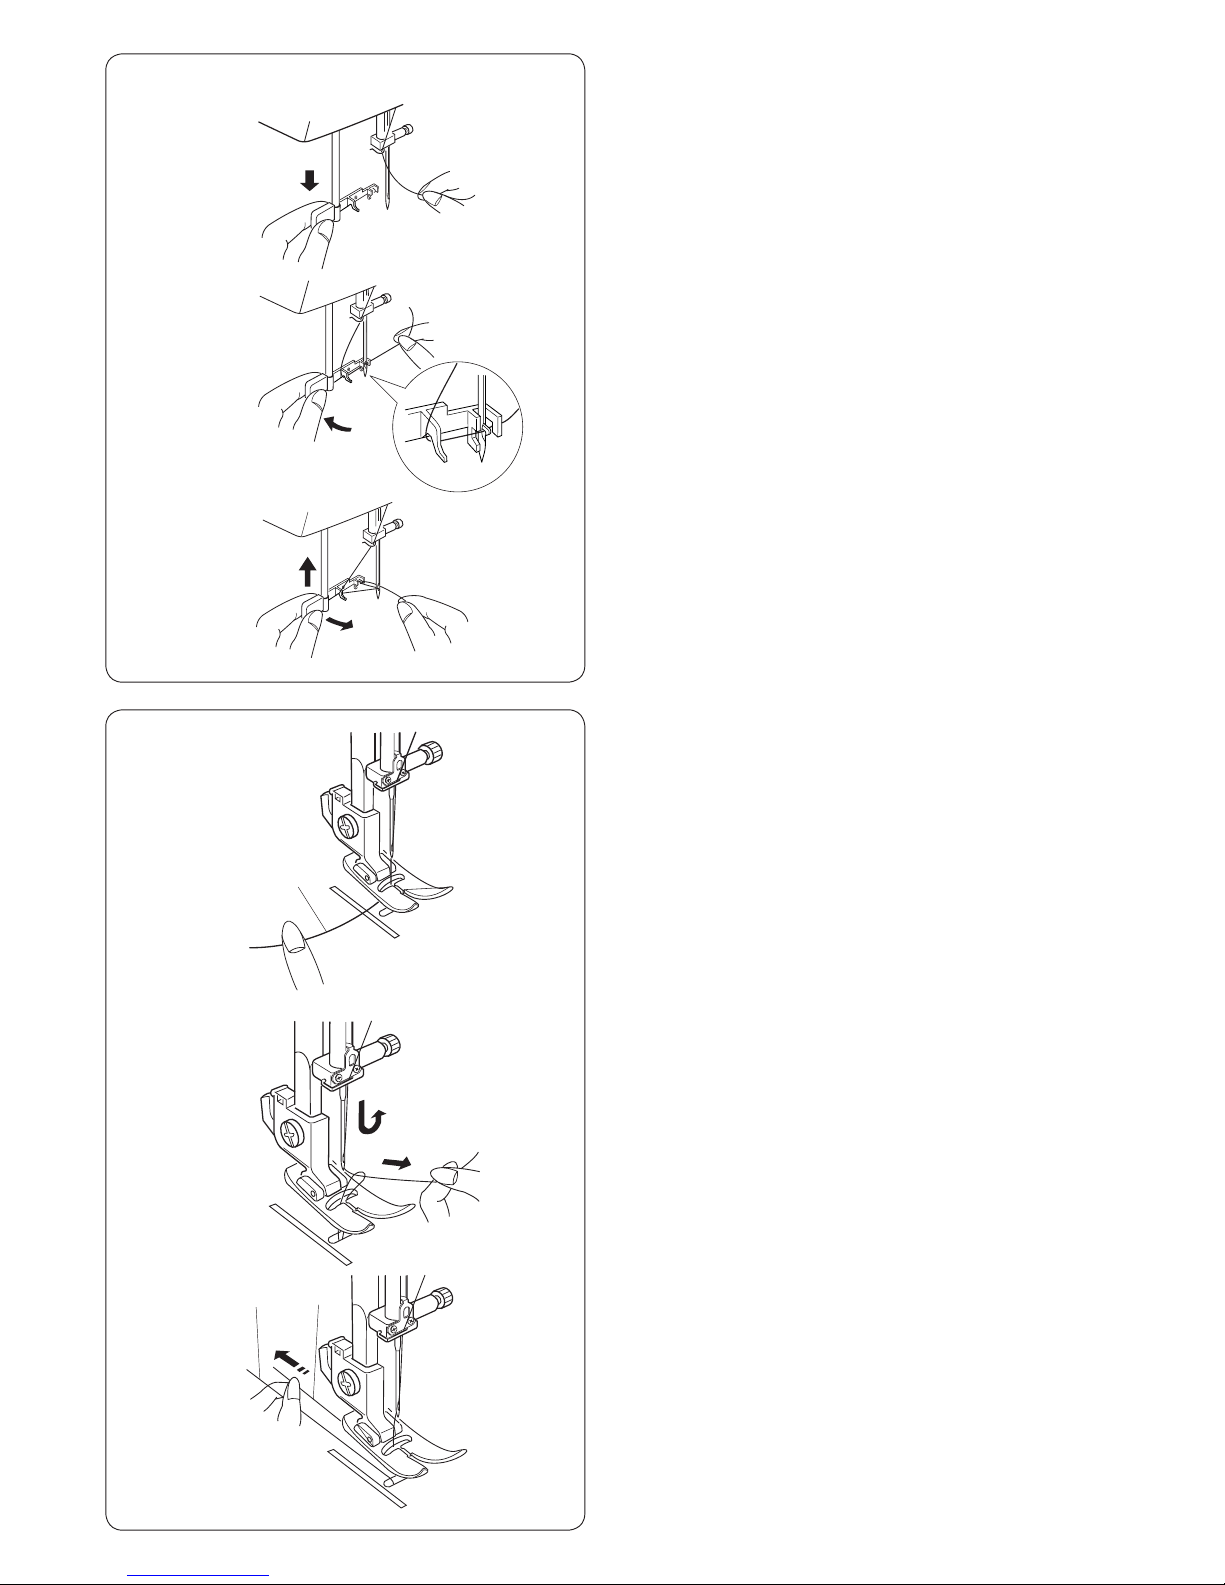
12
1
2
1
Drawing up the Bobbin Thread
z Raise the presser foot and hold the needle thread
lightly with your left hand.
q Needle thread
x Turn the handwheel slowly toward you one complete
turn. Bring the bobbin thread up by pulling the needle
thread as illustrated.
c Pull 4˝ (10 cm) of both threads back and under
the presser foot.
q Needle thread
w Bobbin thread
Needle Threader
z Raise the needle to its highest position.
Pull down the needle threader knob as far as it will go.
x Turn the knob in the direction of the arrow in the
illustration, then insert hook into the needle eye.
Lead the thread around guide and under hook.
c Turn the knob in the direction of the arrow in the
illustration, drawing the thread loop through the
needle.
Pull the thread through the needle eye.
* The needle threader can be used with a #11 to #16
needle or a Janome Blue tipped needle. Thread size 50
to90shouldalsoworkwell.
x
z
c
x
z
c
w
q
q
Page 15
13
1
Перекëþчение выбора стро÷åê
ВНИМАНИЕ!
Ïîднимитå èãëó íàä òêàíüþ êîãда выбираеòå
ñòðî÷êó.
Перекëþчатель выбора стро÷åê
Для выбора нужной Вам операции повернитå
перекëþ÷àòåль выбора стро÷åê òàê, ÷òîáû áóêâà
ñ èçображением нужной операции совпалî ñ
индикационной меòêîé.
1 Перекëþ÷àòåль выбора стро÷åê
2 Индикационная меòêà
ВНИМАНИЕ!
Íå ïîâîðà÷èâàéòе перекëþ÷àòåль выбора
ñòðî÷åê, åñëè èãëà íàõîäèòñÿ â òêàíè. Èãëà
ìîæåò ñëîìàться или погнуться.
Для выбора стåæêîâ ñòðå÷, óñòановитå ðó÷êó
длины стåæêà íà «S.S»
3 Виды стрейч стåæêà
Èçменение длины стеæêà
Ïîâернитå ðó÷êу изменения длины стåæêà è
óñòановитå íóæíóþ öèôðу длины стåæêà ó
êонтрольной оòìåòêè. ×åì áîльше цифра, тåì
длиннее стåæîê. Ñèìâîë « » îçíà÷àåò ðÿä
изменений при выполнении пеòëè.
4 Индикационная меòêà
5 Ðó÷êа изменения длины стåæêà
“+”
“–”
1
2
3
Перекëþчение выбора стро÷åê
ВНИМАНИЕ!
Ïîднимитå èãëó íàä òêàíüþ êîãда выбираеòå
ñòðî÷êó.
Перекëþчатель выбора стро÷åê
Для выбора нужной Вам операции повернитå
перекëþ÷àòåль выбора стро÷åê òàê, ÷òîáû áóêâà
ñ èçображением нужной операции совпалî ñ
индикационной меòêîé.
1 Перекëþ÷àòåль выбора стро÷åê
2 Индикационная меòêà
ВНИМАНИЕ!
Íå ïîâîðà÷èâàéòе перекëþ÷àòåль выбора
ñòðî÷åê, åñëè èãëà íàõîäèòñÿ â òêàíè. Èãëà
ìîæåò ñëîìàться или погнуться.
Для выбора стåæêîâ ñòðå÷, óñòановитå ðó÷êó
длины стåæêà íà «S.S»
3 Виды стрейч стåæêà
Èçменение длины стеæêà
Ïîâернитå ðó÷êу изменения длины стåæêà è
óñòановитå íóæíóþ öèôðу длины стåæêà ó
êонтрольной оòìåòêè. ×åì áîльше цифра, тåì
длиннее стåæîê. Ñèìâîë « » îçíà÷àåò ðÿä
изменений при выполнении пеòëè.
4 Индикационная меòêà
5 Ðó÷êа изменения длины стåæêà
Ðåãóлировка баланса стрейч стеæêîâ
Для выбора стåæêов стрейч, óñòановите рó÷êó
длины стåæêà íà S.S.
Åсли стрейч стро÷êа не ровная, òî ïîâернитå
ðó÷êу изменения длины стåæêà:
« - », ÷òîáû ñæàòü
« + » ÷òобы расширить
ABCDEFGH J
4
2
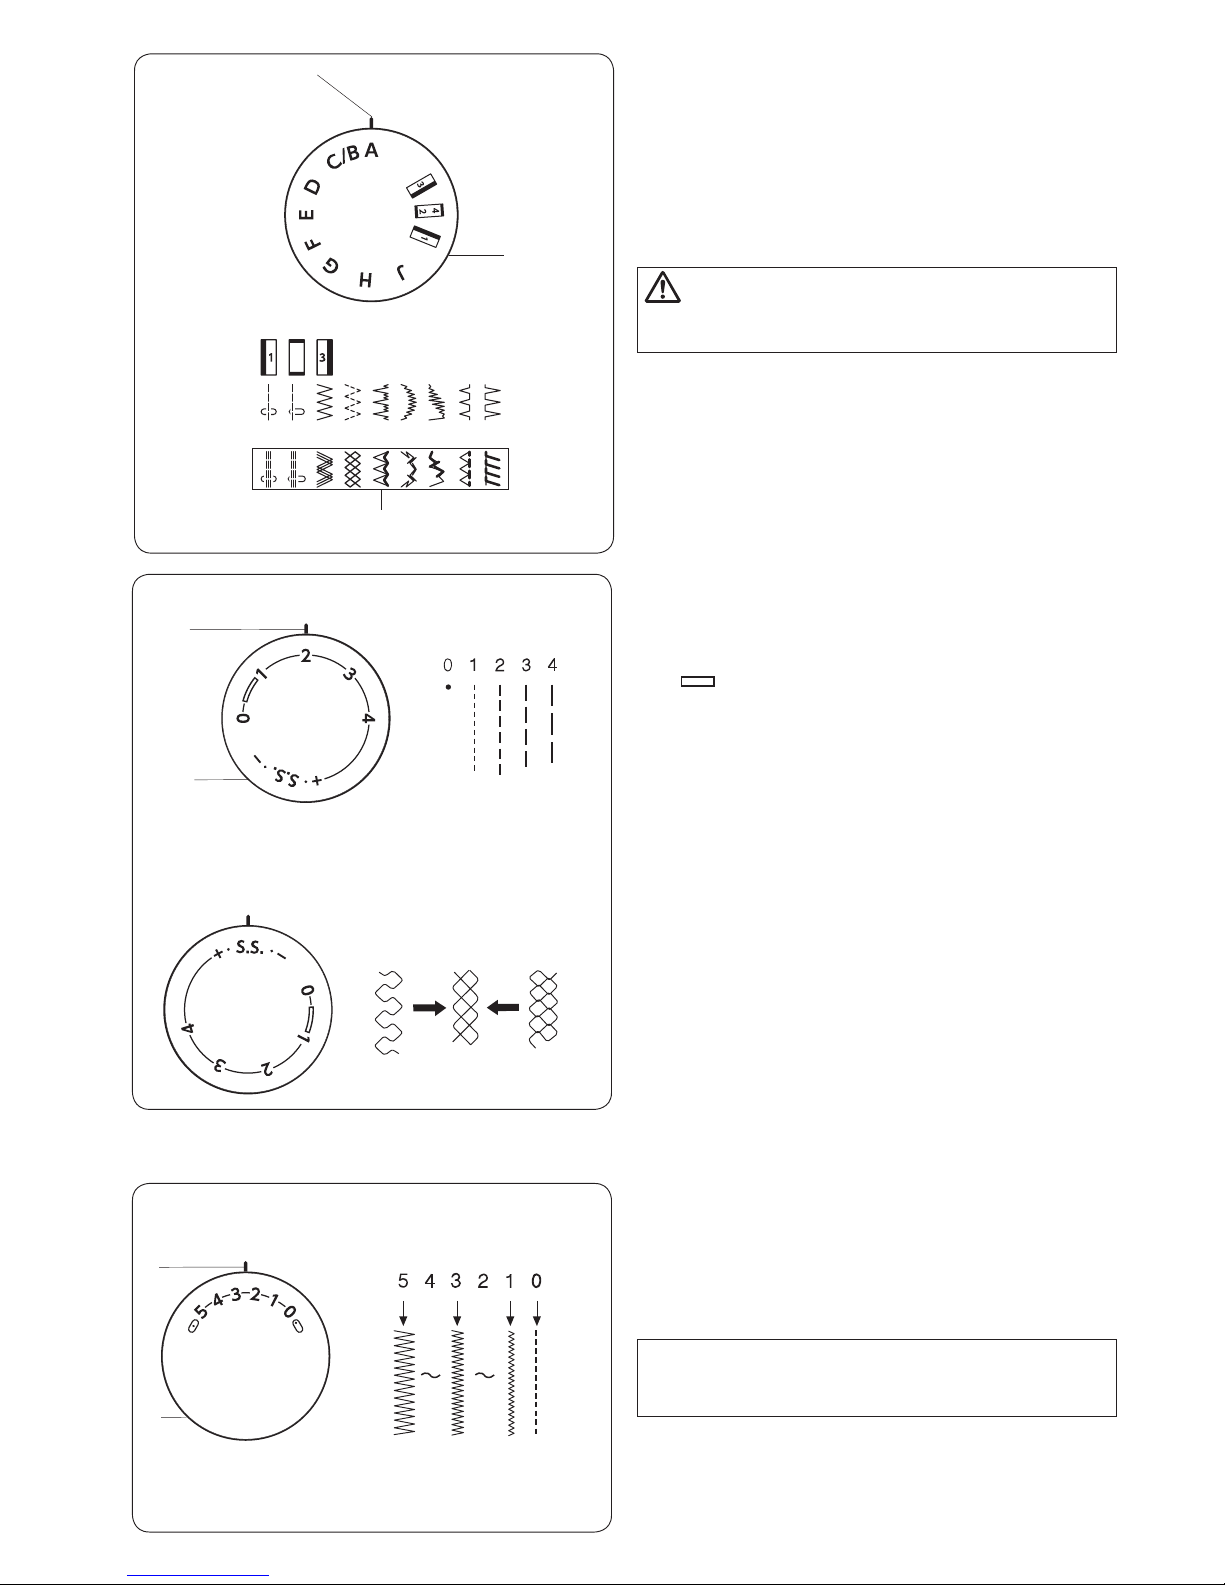
Selecting the Stitch Pattern
Raise the needle to its highest position.
Pattern selector dial
Turn the pattern selector dial to set the symbol of the
desired stitch pattern at the setting mark.
q Pattern selector dial
w Setting mark
CAUTION:
Do not turn the pattern selector dial while the needle is
in the fabric, otherwise the needle may bend or break.
To select the stretch stitch patterns, set the stitch length
dial at S.S.
e Stretch stitch patterns
Stitch Length Dial
Turn the stitch length dial to set the desired stitch length
number at the setting mark.
The higher the number, the longer the stitch.
The “ ” mark shows the adjustment range when
sewing the buttonhole.
r Stitch length dial
t Setting mark
Adjusting stretch stitch balance
If the stretch stitch patterns are uneven when you sew
on a particular fabric, correct them by turning the stitch
length dial.
If the patterns are drawn out, correct them by setting the
dial to the “–” side.
If the patterns are compressed, correct them by setting
the dial to the “+” side.
Stitch Width Dial
Turn the stitch width dial to set the desired stitch width at
the setting mark .
The higher the number, the wider the stitch width.
y Pattern selector dial
u Setting mark
NOTE:
Raise the needle above the fabric, when you turn the
stitch width dial.
w
q
e
r
y
t
u
Page 16
14
1
2
3
4
5
2
Настройка натяжåíèÿ âåðõíåé íèòè
Äëÿ ïðÿìîé ñòðî÷êè:
Íàтяжение нити при шитье óñòàíàâëèâàåòñÿ â
зависимости îò обрабàòûâаемой ткàíè,
êîличествà ñëîåâ è äðóãèõ ðàçличных óñëîâèé.
Для изменения натяжения нити повернитå äèñê
íàтяжения нити.
1 Äèñê íàтяжения нити
Ñбалансированное натяжåíèå
Идеальная прÿìàÿ ñòðî÷êà áóäåò â òом случае,
åñëè èãîльная и нижняя нитки сцепляюòñÿ â
öентре двóõ ñëîåâ òêàíè.
Äëÿ çèãçàãообраçíîé ñòðî÷êè:
При правильной стро÷êå çèãçàãà øïóëå÷íàÿ
íèòü íå äîëæíà ïîêàçûâàòüñÿ íà âåðõíåé
ñòороне ткàíè. Íàтяжение âåðõíåé íèòè
ñëåäóåò принять слабее по сравнению с прÿìîé
2
1
B
1
2
3
4
5
2
Настройка натяжåíèÿ âåðõíåé íèòè
Äëÿ ïðÿìîé ñòðî÷êè:
Íàтяжение нити при шитье óñòàíàâëèâàåòñÿ â
зависимости îò обрабàòûâаемой ткàíè,
êîличествà ñëîåâ è äðóãèõ ðàçличных óñëîâèé.
Для изменения натяжения нити повернитå äèñê
íàтяжения нити.
1 Äèñê íàтяжения нити
Ñбалансированное натяжåíèå
Идеальная прÿìàÿ ñòðî÷êà áóäåò â òом случае,
åñëè èãîльная и нижняя нитки сцепляюòñÿ â
öентре двóõ ñëîåâ òêàíè.
Äëÿ çèãçàãообраçíîé ñòðî÷êè:
При правильной стро÷êå çèãçàãà øïóëå÷íàÿ
íèòü íå äîëæíà ïîêàçûâàòüñÿ íà âåðõíåé
ñòороне ткàíè. Íàтяжение âåðõíåé íèòè
ñëåäóåò принять слабее по сравнению с прÿìîé
ñòðî÷êîé. Âåðõíÿÿ íèòêà äîлжна слегкà
ïîÿâляться на обраòíîé ñòороне ткàíè.
2 Èãîльная нить
3 Øïóльная нить
4 Ëèöåâàÿ ( âåðõíÿÿ ) ñòорона изäåëèÿ
5 Изнаночная ( нижняя ) сторона изäåëèÿ
*Натяжение нити слишкîì áîльшое
Нижняя нить видна на âåðõíåé ñòороне ткàíè.
Для ослабления натяжения âåðõíåé íèòè
ïîâернуть диск в сторону меньших номеров.
1
B
1
1
2
3
4
5
2
Настройка натяжåíèÿ âåðõíåé íèòè
Äëÿ ïðÿìîé ñòðî÷êè:
Íàтяжение нити при шитье óñòàíàâëèâàåòñÿ â
зависимости îò обрабàòûâаемой ткàíè,
êîличествà ñëîåâ è äðóãèõ ðàçличных óñëîâèé.
Для изменения натяжения нити повернитå äèñê
íàтяжения нити.
1 Äèñê íàтяжения нити
Ñбалансированное натяжåíèå
Идеальная прÿìàÿ ñòðî÷êà áóäåò â òом случае,
åñëè èãîльная и нижняя нитки сцепляюòñÿ â
öентре двóõ ñëîåâ òêàíè.
Äëÿ çèãçàãообраçíîé ñòðî÷êè:
При правильной стро÷êå çèãçàãà øïóëå÷íàÿ
íèòü íå äîëæíà ïîêàçûâàòüñÿ íà âåðõíåé
ñòороне ткàíè. Íàтяжение âåðõíåé íèòè
ñëåäóåò принять слабее по сравнению с прÿìîé
ñòðî÷êîé. Âåðõíÿÿ íèòêà äîлжна слегкà
ïîÿâляться на обраòíîé ñòороне ткàíè.
2 Èãîльная нить
3 Øïóльная нить
4 Ëèöåâàÿ ( âåðõíÿÿ ) ñòорона изäåëèÿ
5 Изнаночная ( нижняя ) сторона изäåëèÿ
*Натяжение нити слишкîì áîльшое
Нижняя нить видна на âåðõíåé ñòороне ткàíè.
Для ослабления натяжения âåðõíåé íèòè
ïîâернуть диск в сторону меньших номеров.
*Натяжение нити слишкîì ìàëåíüêîå
Èãîльная нить видна на нижней стороне ткàíè.
Äëÿ óâåличения натяжения âåðхней нитки
ïîâернуть диск в сторону больших номеров.
1
B
1
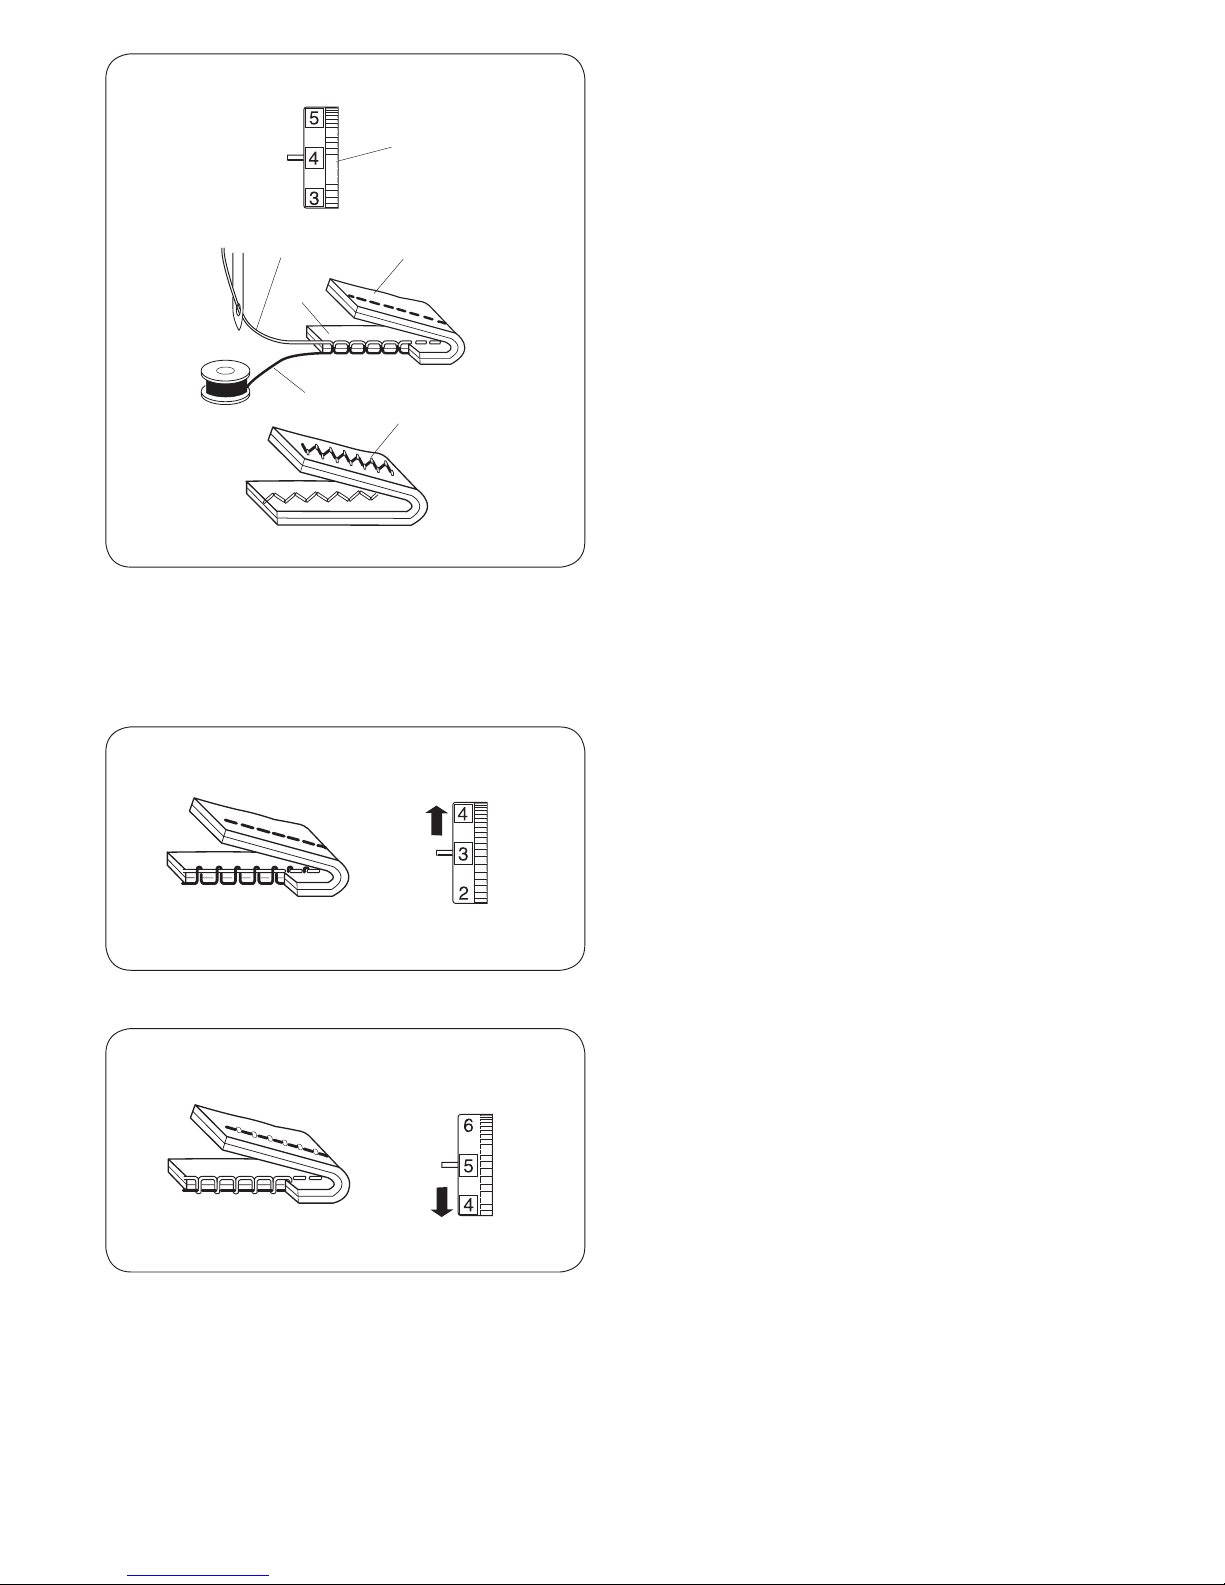
Balancing Needle Thread Tension
The thread tension should be adjusted depending on the
sewing materials, layers of fabric and sewing method.
To adjust the thread tension, turn the tension dial.
q Thread tension dial
Balanced tension:
The ideal straight stitch has threads locked between two
layers of fabric, as illustrated.
For an ideal zigzag stitch, the bobbin thread does not
show on the right side (top side) of the fabric, and the
needle thread shows slightly on the wrong side (bottom
side) of the fabric.
w Needle thread (Top thread)
e Bobbin thread (Bottom thread)
r Right side (Top side) of fabric
t Wrong side (Bottom side) of fabric
Needle thread tension is too tight:
The bobbin thread (bottom thread) will appear on the
right side (top side) of the fabric.
Loosen the needle thread tension by moving the dial to a
lower number.
Needle thread tension is too loose:
The needle thread (top thread) will form loops on the
wrong side (bottom side) of the fabric.
Tighten the needle thread tension by moving the dial to a
higher number.
w
e
r
w
q
t
Page 17
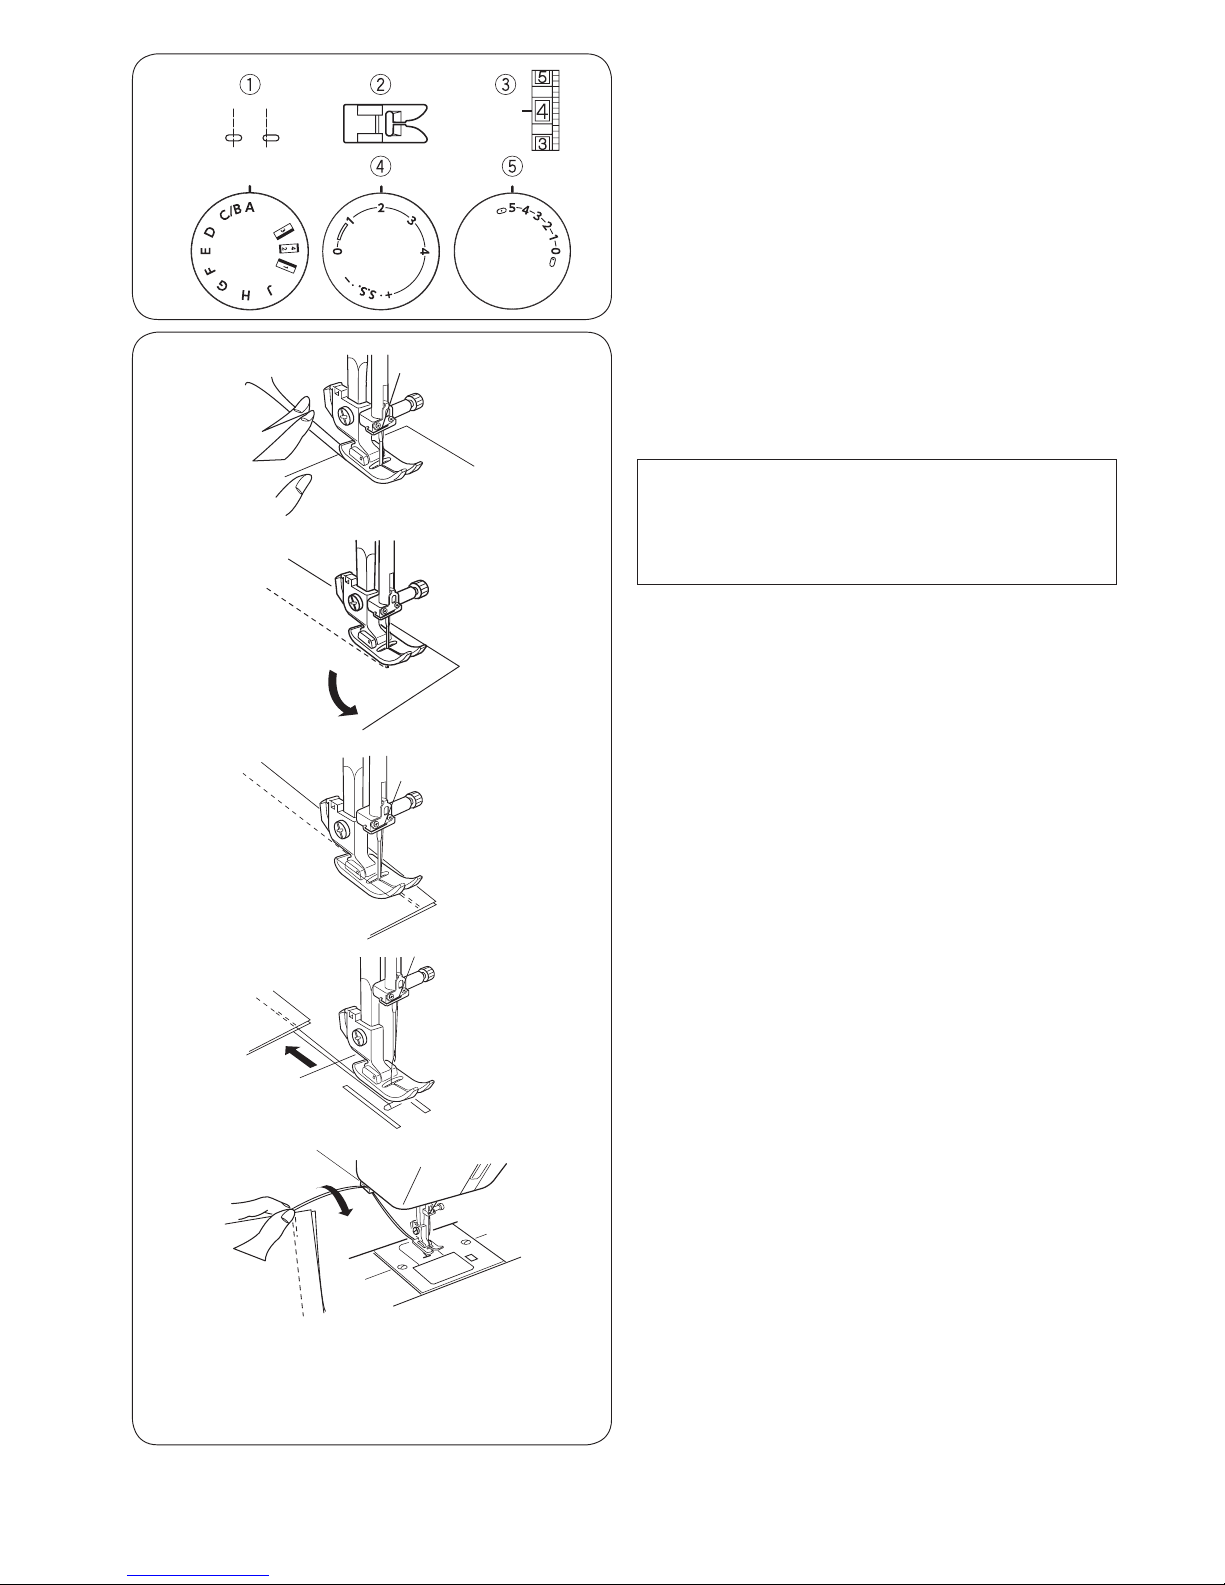
15
1
SECTION 3. BASIC SEWING
Straight Stitch Sewing
Machine setting
q Stitch pattern: A or B
w Presser foot: Zigzag foot A
e Thread tension: 2 - 6
r Stitch length: 1.5 - 4
t Stitch width: 0 or 5
Starting to sew
Raise the presser foot and place the fabric under the foot.
Lower the needle into the fabric.
Lower the presser foot and smooth the threads toward
the back. Depress the foot control.
NOTE:
Draw the threads to the left when sewing with the
buttonhole foot.
To fasten the beginning of the seam, first sew several
stitches in reverse then sew forward.
Changing the Sewing Direction
Stop the machine and turn the handwheel toward you to
bring the needle down into the fabric.
Raise the presser foot.
Pivot the fabric around the needle to change sewing
direction as desired. Lower the presser foot and continue
sewing in the new direction.
Finishing sewing
Press the reverse stitch lever and sew several stitches in
reverse at the end of the seam.
Raise the presser foot and remove the fabric, drawing the
threads to the back.
Draw the threads up and into the thread cutter.
The threads are cut the proper length for starting the next
seam.
q Thread cutter
q
Page 18
16
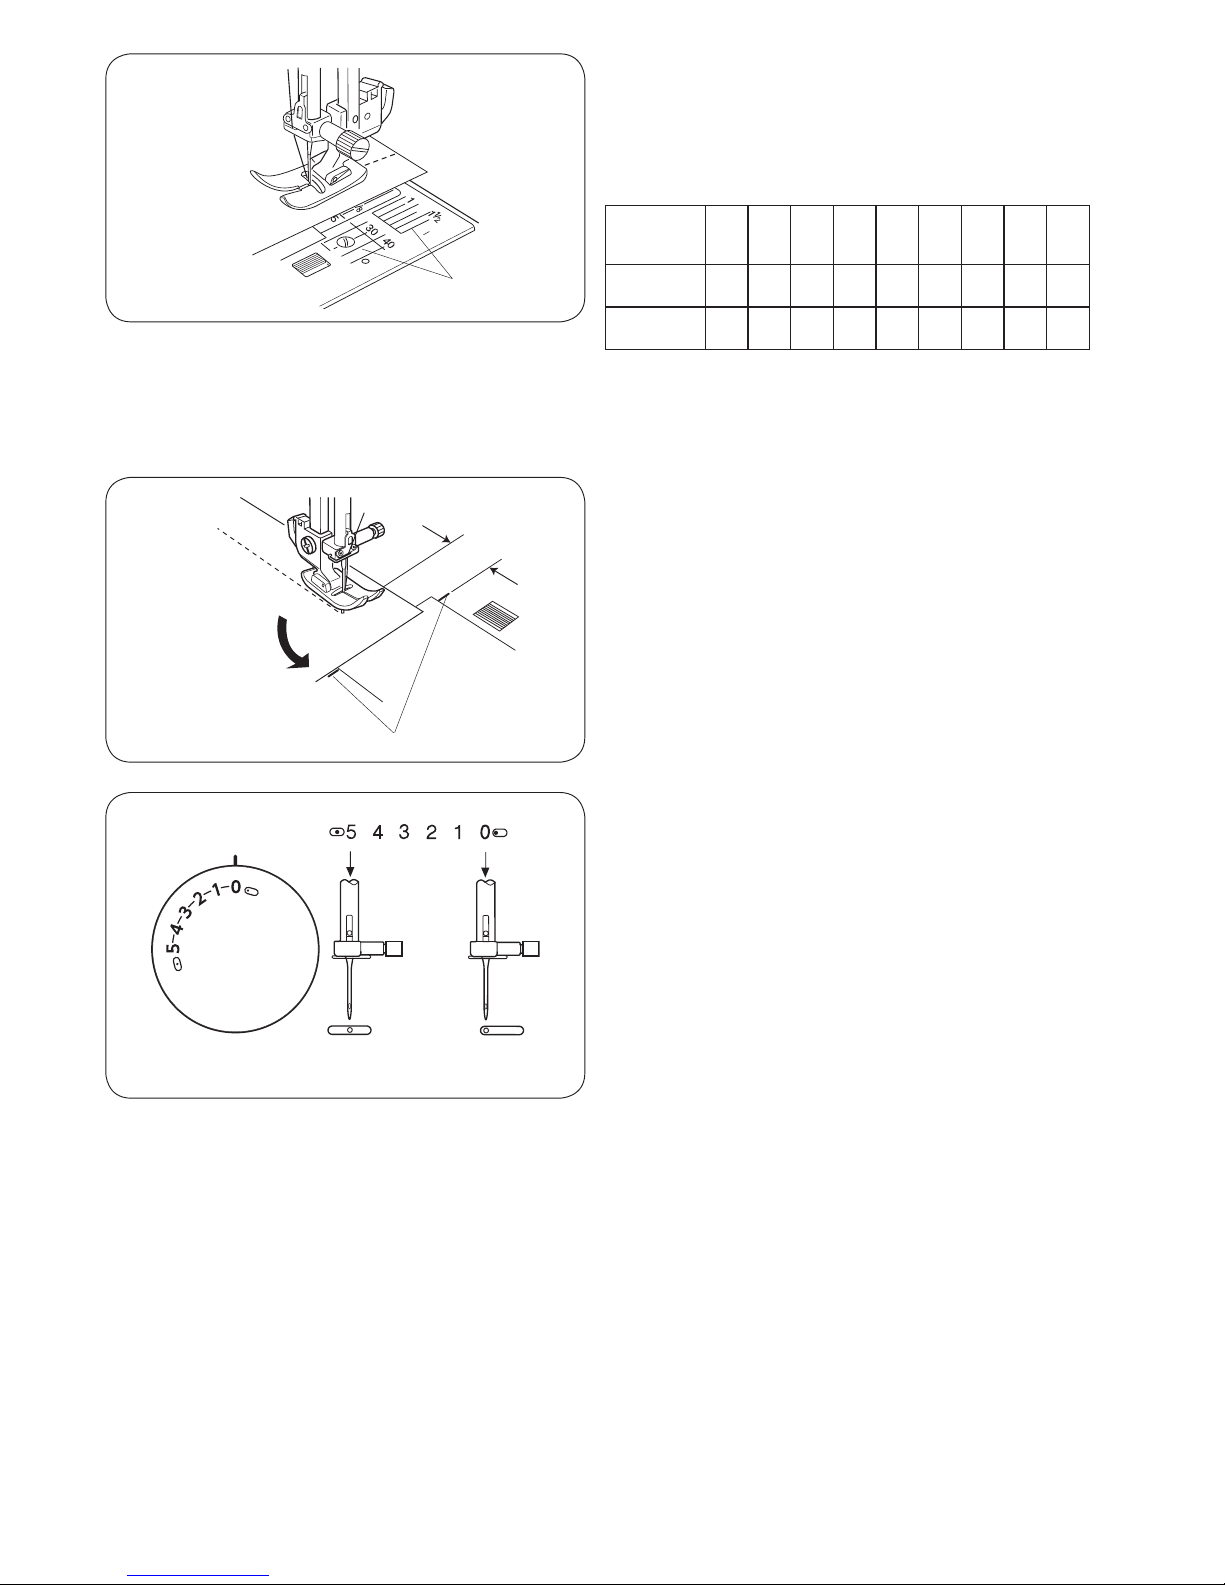
Numbers on
the needle
plate
10 15 30 40 3/8 1/2 5/8 1 1 1/2
Distance in
centimeters
1.0 1.5 3.0 4.0 — — — — —
Distance in
inches
— — — — 3/8 1/2 5/8 1 1 1/2
Use the Seam Guide
The seam guides on the needle plate help you to
measure seam width.
The numbers indicate the distance between the center
needle position and the guide line.
q Seam guides
Turning a Square Corner
The cornering guide helps you maintain a 5/8˝ (1.6 cm)
seam allowance when sewing a corner.
When the fabric edge facing you lines up with the
cornering guide as illustrated, stop stitching and lower the
needle into the fabric by turning the handwheel toward
you.
Raise the presser foot and pivot the fabric so the edge of
the fabric will align with the 5/8˝ (1.6 cm) seam guide.
Lower the presser foot and start stitching in the new
direction.
w Cornering guide
Variable Needle Position
When the straight stitch (pattern A) is selected, you can
move the needle between center and left needle position
by turning the stitch width dial.
q
w
Page 19
17
SECTION 4. UTILITY STITCHES
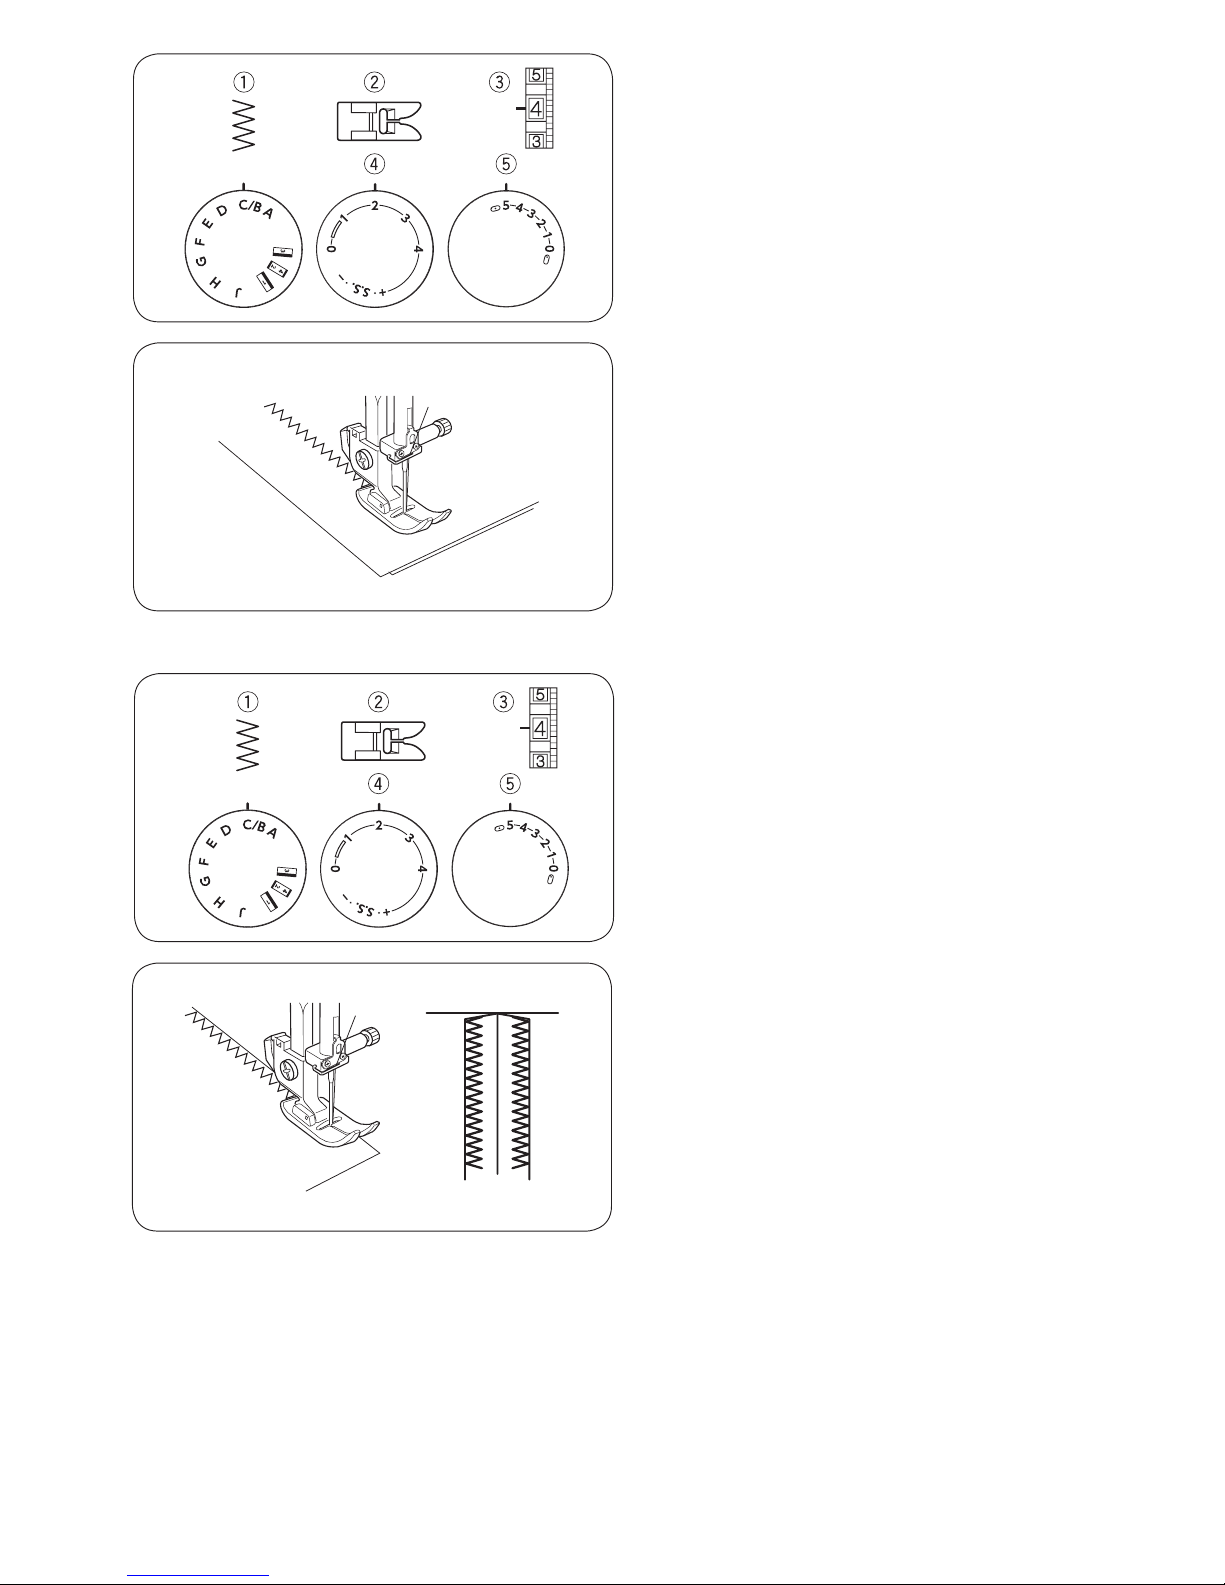
Basic Zigzag
Machine setting
q Stitch pattern: C
w Presser foot: Zigzag foot A
e Thread tension: 2 - 5
r Stitch length: 0.5 - 3
t Stitch width: 1 - 5
Simple zigzag stitching is widely used for overcasting,
sewing on buttons etc.
Adjust the stitch length to suit your sewing needs.
Overcasting
Machine setting
q Stitch pattern: C
w Presser foot: Zigzag foot A
e Thread tension: 1 - 4
r Stitch length: 1 - 2
t Stitch width: 5
The zigzag stitch is used on the seam allowance to
prevent fabric from fraying at raw edges.
Page 20
18
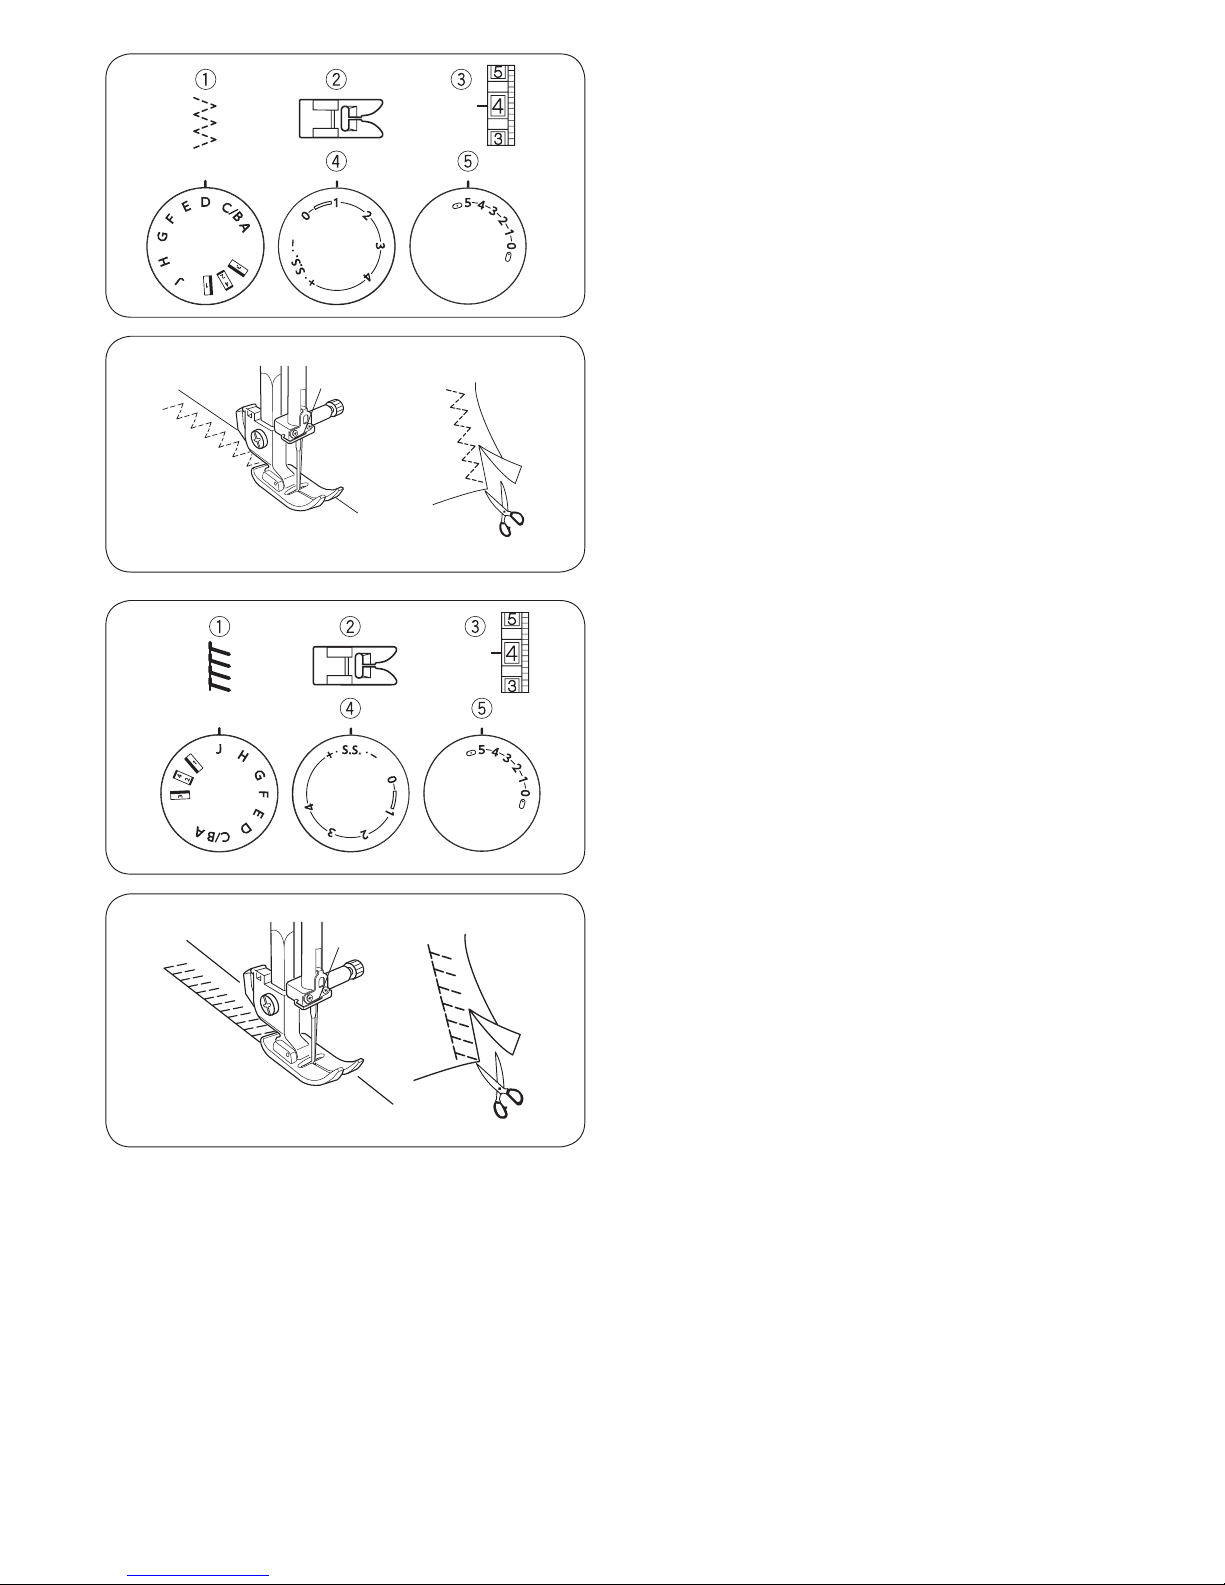
Tricot Stitch (Multiple Zigzag Stitch)
Machine setting
q Stitch pattern: D
w Presser foot: Zigzag foot A
e Thread tension: 1 - 4
r Stitch length: 0.5 - 1.5
t Stitch width: 5
This stitch is used to finish the seam allowance on
synthetics and other fabrics that tend to pucker.
Place your fabric to allow a 1.6 cm (5/8˝) seam.
Trim the seam allowance after sewing.
It is also handy for darning and mending tears.
Knit Stitch
Machine setting
q Stitch pattern: J
w Presser foot: Zigzag foot A
e Thread tension: 1 - 4
r Stitch length: S.S.
t Stitch width: 5
This stitch is ideal for 1/4˝ (0.6 cm) seams on knits or on
medium to heavy weight woven fabrics where you want
a narrow seam. It is also great for sewing spandex swim
wear. Place the fabric to leave a 5/8˝ (1.6 cm) allowance.
Trim the extra allowance after sewing.
Page 21
19
УСИЛЕННАЯ ПРßÌÀß ÑÒÐÎ×ÊÀ
Óстановки на машине:
1. Ñòðî÷êà ïðÿìàÿ À
2. Ëàïêà óíèâерсальная «À»
3. Íàтяжение âåðõíåé íèòè 2 - 6
4. Длина стåæêà S.S.
5. Ширина стро÷êè 5 èëè 0
Óсиленный или крепкий тройной шов – ýòî
ïðî÷íûé øîâ, êîòîðûé ðåêомендуåòся для шитья
ýластичных тканей или трикоòàæà, à òàê æå òàì,
ãäå íóжна крепость и надежность швà.
Èñïîëüçóéòå ýòîò шов в проймах и шагîâûõ øâàõ,
применяйте для придания свåðõ ïðîчности
ñóìêам и рюкзакàì.
Ñòðî÷êà øüåòñÿ äâóìÿ ñòåæêами впереä è îäíèì
ñòåæêîì íàçàä, îáðàçóÿ øîâ, ïîõîæèé íà öåïî÷êó,
êîòîðóþ íåлегко порвàòü. Ýòîò øîâ î÷åíü òðóäíî
распустить, поэòîìó äåòàëè îäåæäû ïåðåä
шитьем доëæíû áûòü ïðåäâàðèòåëüíî íàìåòàíû è
ïîдогнаны.
УСИЛЕННАЯ ПРßÌÀß ÑÒÐÎ×ÊÀ
Óстановки на машине:
1. Ñòðî÷êà ïðÿìàÿ À
2. Ëàïêà óíèâерсальная «À»
3. Íàтяжение âåðõíåé íèòè 2 - 6
4. Длина стåæêà S.S.
5. Ширина стро÷êè 5 èëè 0
Óсиленный или крепкий тройной шов – ýòî
ïðî÷íûé øîâ, êîòîðûé ðåêомендуåòся для шитья
ýластичных тканей или трикоòàæà, à òàê æå òàì,
ãäå íóжна крепость и надежность швà.
Èñïîëüçóéòå ýòîò шов в проймах и шагîâûõ øâàõ,
применяйте для придания свåðõ ïðîчности
ñóìêам и рюкзакàì.
Ñòðî÷êà øüåòñÿ äâóìÿ ñòåæêами впереä è îäíèì
ñòåæêîì íàçàä, îáðàçóÿ øîâ, ïîõîæèé íà öåïî÷êó,
êîòîðóþ íåлегко порвàòü. Ýòîò øîâ î÷åíü òðóäíî
распустить, поэòîìó äåòàëè îäåæäû ïåðåä
шитьем доëæíû áûòü ïðåäâàðèòåëüíî íàìåòàíû è
ïîдогнаны.
УСИЛЕННЫЙ ЗИГ-ЗАГ
Óстановки на машине:
1. Ñòðî÷êà ïðÿìàÿ Ñ
2. Ëàïêà óíèâерсальная «À»
3. Íàтяжение âåðõíåé íèòè 2 - 6
4. Длина стåæêà S.S.
5. Ширина стро÷êè 5 èëè 0
Ïðè âûïîлнении зиг-загà óñòановите длину стåæêà
íà «S.S.», òàêèì îáðàçîì Âû ïîлучитå óсиленную
ñòðî÷êó çèã-çàã. Ìашина шьеò äâà ñòåæêà впереä è
îäèí íàçàä, êаждое звåíî çèã-çàãà îáðàçóåòñÿ
îдновременно тремя стåæêàìè.
Òàêóþ ñòðî÷êó ìîæíî èñïîëüçîâàòü íà ïëîòíûõ
òêанях типа джинс в êàчестве декоративной, а на
ýластичных или трикоòажных тканях с помощью
ýòîé ñòðî÷êè ìîæíî ñäåëàòü ïîдгибку или
пришить реçèíêó.
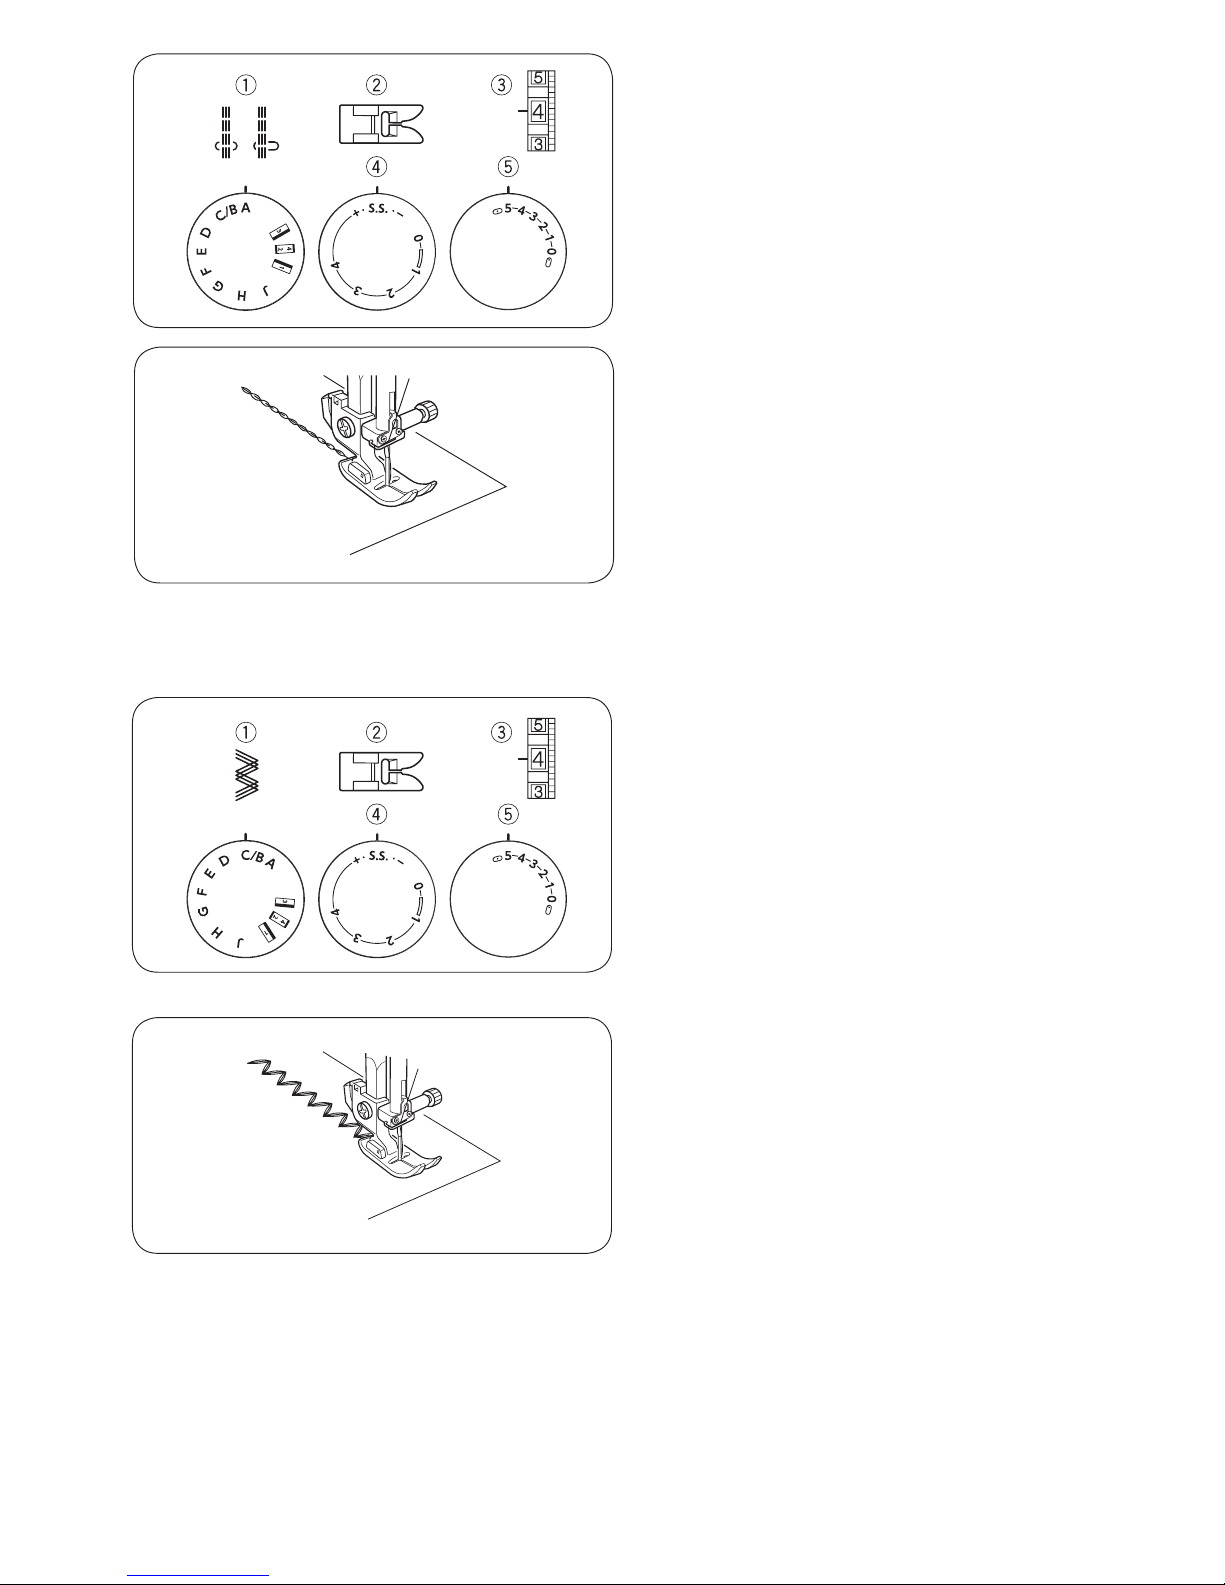
Straight Stretch Stitch
Machine setting
q Stitch pattern: A or B
w Presser foot: Zigzag foot A
e Thread tension: 2 - 6
r Stitch length: S.S.
t Stitch width: 5 or 0
The pattern is sewn with two stitches forward and one
stitch backward, forming a seam that does not rip easily.
Use it to reinforce areas such as crotch and armhole
seams.
Also use it when constructing items such as backpacks
for extra strength.
Carefully guide the fabric while sewing as the fabric
moves back and forth.
Zigzag Stretch Stitch
Machine setting
q Stitch pattern: C
w Presser foot: Zigzag foot A
e Thread tension: 2 - 6
r Stitch length: S.S.
t Stitch width: 5 or 0
Sew on stretch fabrics in any area that you might use a
zigzag stitch.
This stitch is used as a decorative topstitch as well.
Page 22
20
1
2
3
2
3
4
Пришивàíèå ïóãîâèö
Óстановка машины
1 Выбор стро÷êè: Ñ
2 Длина стåæêà: ëþáàÿ
3 Íàтяжение нити: 3- 7
4 Прижимная лапкà: ëàïêà äëÿ çèã-çàãà À
5 Òранспорòåð òêàíè îòêëþ÷åí
Óдалитå íèòü èç èãлы. Измените ширину зигçàãà
òàê, ÷òîáû èãëà ïðîõîäèëà ñêâîзь прореçü íà
лапке попадала в îòâерстие пуговицы.
Ïîâернитå ìàõîâîå êîëåñî è ïðîâåðüòå , âõîäèò
ëè èãëà â îòâерстие пуговицы.
2
y
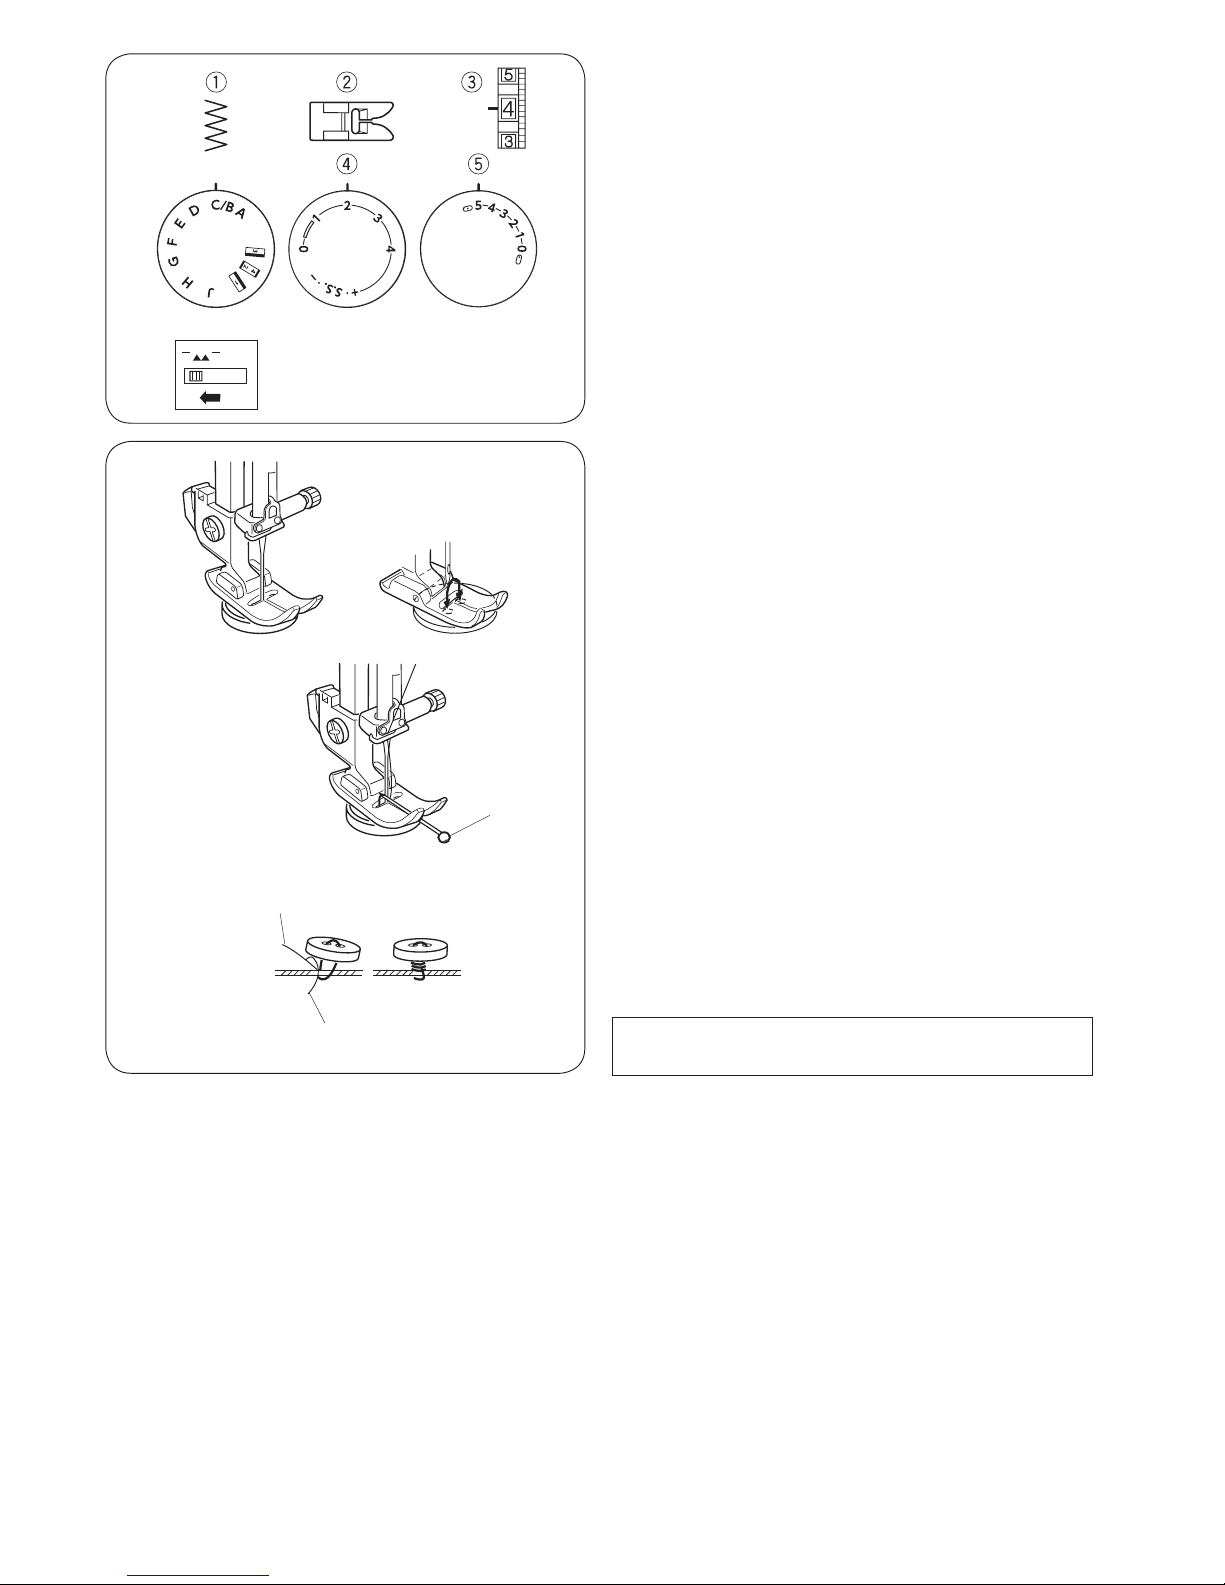
Button Sewing
Machine setting
q Stitch pattern: C
w Presser foot: Zigzag foot A
e Thread tension: 3 - 7
r Stitch length: Any
t Stitch width: Adjust as necessary
y Feed dog: Dropped
Unthread the needle. Adjust the stitch width to match it
with the span of the holes in the button.
Turn the handwheel to check if the needle enters into
each hole in the button.
Lower the foot to hold the button in place.
The holes in the button should align with the slot of the
foot.
A pin can be placed on the foot to form a shank.
Make sure to check if the needle enters into both holes in
the button.
q Pin
Re-thread the needle and sew about 10 stitches and cut
the needle and bobbin threads at the beginning.
Raise the presser foot and remove the fabric.
Cut the needle and bobbin threads leaving 8˝ (20 cm)
tails.
Bring the needle thread between the button and fabric
through the holes in the button.
Pull the needle thread to pick bobbin thread up to the
right side of the fabric.
Wind the threads to from a shank and tie them together.
w Needle thread
e Bobbin thread
NOTE:
Raise the feed dog after sewing.
w
q
e
Page 23
21
Ïåòëÿ çà 4 øàãà
Óстановки машины
1 Выбор стро÷êè:
2 Длина стåæêàâ: 0,5- 1
3 Íàтяжение нити: 1- 5
4 Прижимная лапкà: ëàïêà äëÿ ïåòëè J
1. Óñòàновитå ðó÷êу выбора стро÷êè íà “ “.
Àêêóðàòíî îòìåòüòå длину пеòëè íà òêàíè.
Ðàñïîëîæèòå òêань так, чтобы дальняя попере÷èíà
áûëà ïðÿìî ïîä ëàïêîé (ïåòëÿ äîëæíà äâèãàòüñÿ
íà âàñ ). Îòâåäèòå îáå íèòè âëåâî. Ïåðåäâèíüòå
ïîëçóíîê íà ñåáÿ òàê, ÷òîáû îòìåòêа на верху (2)
ñîвпадала с òî÷êîé íà÷àëà (1).
1 Òî÷êà íà÷àëà
2 Îòìåòêà íà âåðõó
3 Èãîльная нить
4 Øïóльная нить
ПРИМЕЧАНИЕ:
Øêàëà íà ïîëçóíêå ïðèâåäåíà â ñì.
2. Прошейте впереä ïîêа не достигнеòå îòìåòêè
Вашей пеòëè.
Îñòановите машину на левîì ñòåæêå.
3. Ïîднимитå èãëó â âåðõíåå ïîëîжение и
óñòановитå ðó÷êу выбора стро÷åê íà “ “
Прошейтå 5 ñòåæêîâ. Îñòановите машину на
ïðàâîì ñòåæêå.
4. Ïîднимитå èãëó â âåðõíåå ïîëîжение и
óñòановитå ðó÷êу выбора стро÷åê íà “ “.
Øåéòе впереä, ïîêа не достигнеòå дальней
îòìåòêå ïåòëè
1
2
3
4
1
23
45
1
2
3
4
1
1
2
3
4
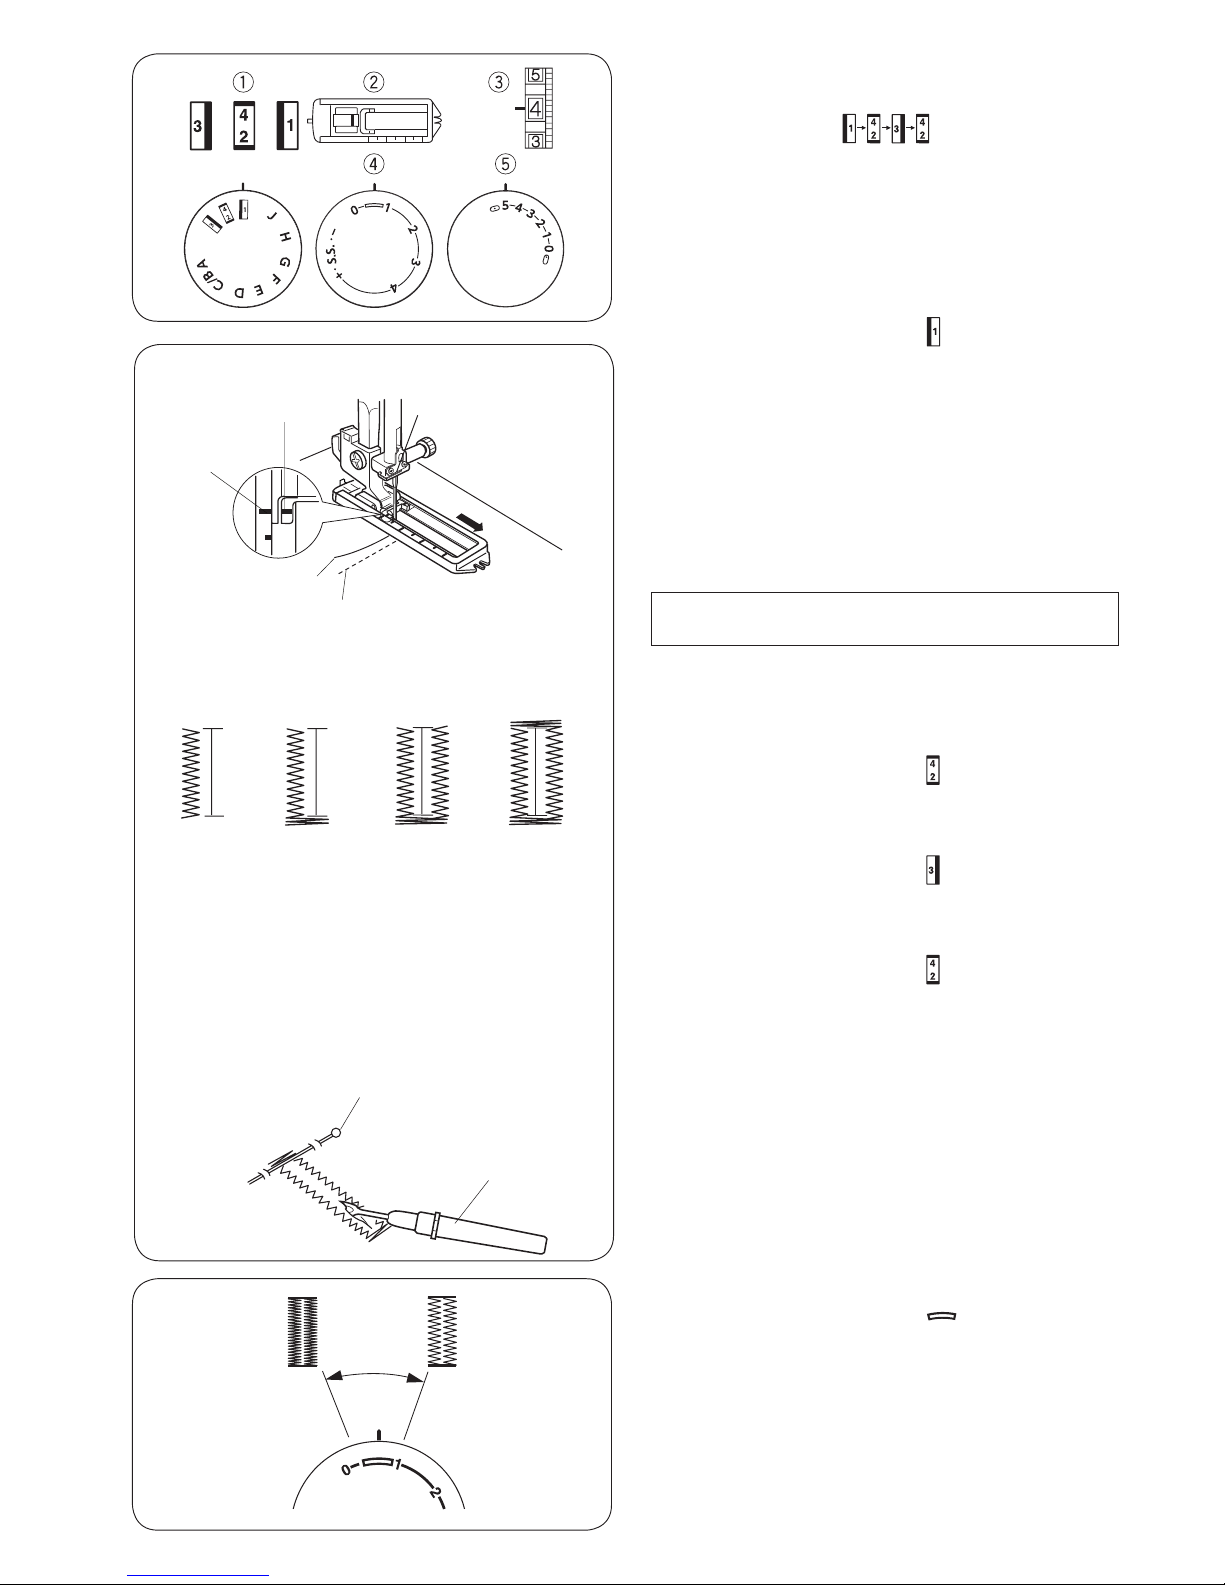
4-Step Buttonhole
Machine setting
q Stitch pattern:
w Presser foot: Sliding buttonhole foot J
e Thread tension: 1 - 5
r Stitch length: 0.5 - 1
t Stitch width: 3 - 5
z Set the pattern selector dial at “ ”.
Carefully mark buttonhole length on fabric.
Place the fabric under the foot with the buttonhole
marking running toward you.
Draw both of needle and bobbin thread to the left.
Move the slider toward you so that the top mark w on
the slider meets the start mark q.
q Start mark
w Top ma r k
e Needle thread
r Bobbin thread
NOTE:
The scale on the slider is engraved in centimeters.
x Sew forward until you reach the front marking of your
buttonhole. Stop sewing at a left stitch.
c Raise the needle to its highest position.
Set the pattern selector dial at “
”. Sew 5 stitches,
then stop sewing at a right stitch.
v Raise the needle to its highest position.
Set the pattern selector dial at “ ”. Sew until the
needle reach the back marking of the buttonhole.
b Raise the needle to its highest position.
Set the pattern selector dial at “ ”. Sew 5 stitches,
then stop sewing. Set the stitch length dial to “0” and
the pattern selector dial at straight sewing.
Sew a few locking stitches.
n Raise the needle and presser foot. Remove the fabric
from the machine and cut the sewing thread. Insert a
pin inside the bartack.
Then cut the opening with a seam ripper.
Take care not to cut the stitches.
t Pin
y Seam ripper
To adjust buttonhole stitch density
Set the stitch length dial between “
Ïåòëÿ çà 4 øàãà
Óстановки машины
1 Выбор стро÷êè:
2 Длина стåæêàâ: 0,5- 1
3 Íàтяжение нити: 1- 5
4 Прижимная лапкà: ëàïêà äëÿ ïåòëè J
1. Óñòàновитå ðó÷êу выбора стро÷êè íà “ “.
Àêêóðàòíî îòìåòüòå длину пеòëè íà òêàíè.
Ðàñïîëîæèòå òêань так, чтобы дальняя попере÷èíà
áûëà ïðÿìî ïîä ëàïêîé (ïåòëÿ äîëæíà äâèãàòüñÿ
íà âàñ ). Îòâåäèòå îáå íèòè âëåâî. Ïåðåäâèíüòå
ïîëçóíîê íà ñåáÿ òàê, ÷òîáû îòìåòêа на верху (2)
ñîвпадала с òî÷êîé íà÷àëà (1).
1 Òî÷êà íà÷àëà
2 Îòìåòêà íà âåðõó
3 Èãîльная нить
4 Øïóльная нить
ПРИМЕЧАНИЕ:
Øêàëà íà ïîëçóíêå ïðèâåäåíà â ñì.
2. Прошейте впереä ïîêа не достигнеòå îòìåòêè
Вашей пеòëè.
Îñòановите машину на левîì ñòåæêå.
3. Ïîднимитå èãëó â âåðõíåå ïîëîжение и
óñòановитå ðó÷êу выбора стро÷åê íà “ “
Прошейтå 5 ñòåæêîâ. Îñòановите машину на
ïðàâîì ñòåæêå.
4. Ïîднимитå èãëó â âåðõíåå ïîëîжение и
óñòановитå ðó÷êу выбора стро÷åê íà “ “.
Øåéòе впереä, ïîêа не достигнеòå дальней
îòìåòêå ïåòëè
5. Ïîднимитå èãëó â âåðõíåå ïîëîжение и
óñòановитå ðó÷êу выбора стро÷åê íà “ “
Прошейтå 5 ñòåæêîâ è îñòановитåñü. Çàòåì
óñòановите длину стåæêà «0», à ðó÷êу выбора
ñòðî÷åê íà ïðÿìîé ñòåжок. Прошейтå íåñêîëüêî
закрепляющих стåæêîâ.
6. Ïîднимитå èãлу и прижимную лапку. Снимитå
òêань с машины и обреæüòå нитки. Внутрь пеòëè
âñòàâüòå áóëàâêó. Прореæüòå ïåòëþ
âспарывàòåëåì.
Áóäüòå внимаòåëüíû, íå ðàçðåæüòå ñòåæêè.
5 Áóëàâêà
6 Вспарывàòåëü
Èçменение плîòíîñòè ïåòëè
Ïîâернитå ðó÷êу изменения длины стåæêà â
ïðåäåлах “ “ для изменения плотности
ñòåæêîâ ïåòëè.
7 Ïëîòíàÿ ïåòëÿ
6
3
4
8
” to adjust
the buttonhole stitch density.
u Denser buttonhole
i Coarser buttonhole
w
x
q
z
e
c
r
v
t
y
b
n
u i
Page 24
22
3
1
2
1
2
5
6
3
z
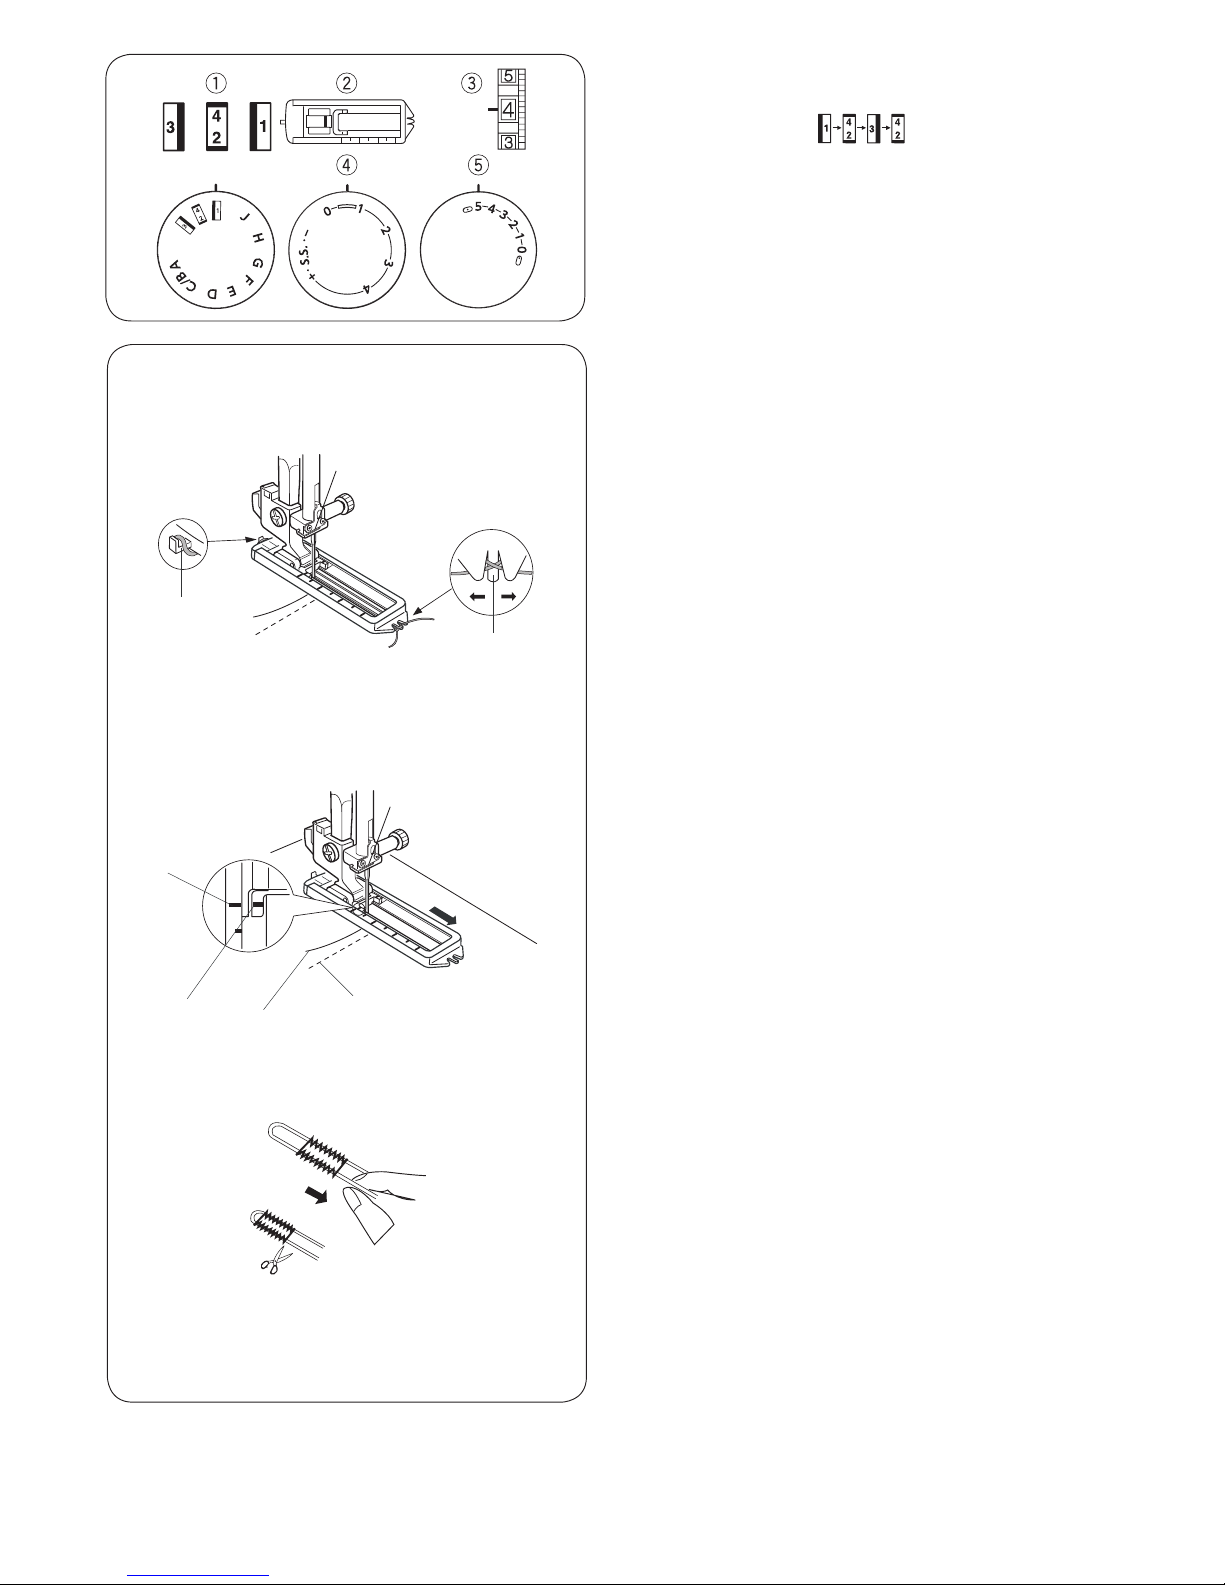
Corded Buttonhole
Machine setting
q Stitch pattern:
w Presser foot: Sliding buttonhole foot J
e Thread tension: 1 - 5
r Stitch length: 0.5 - 1
t Stitch width: 3 - 5
z With the buttonhole foot raised, hook the filler cord on
the spur at the back of the foot.
Bring the ends toward you under the foot, clearing the
front end.
Hook the filler cord into the forks on the front of the
foot to hold them tight.
q Spur
w Forks
x Draw both of needle and bobbin thread to the left.
Move the slider toward you so that the top mark r on
the slider meets the start mark e.
e Spur
r Forks
t Spur
y Forks
Lower the needle into the fabric at the starting point
and lower the foot.
Depress the foot control gently and sew the buttonhole
over the cord.
The sewing sequence is the same as the 4-step
buttonhole.
c Pull the left end of the filler cord to tighten it and cut
the excess tails.
To cut the buttonhole opening, refer to the instructions
on page 21.
w
x
q
e
c
r
y
t
Page 25
23
3
4
5
6
7
8
9
1
2
(A)
(B)
11
12
13
14
10
2
3
4
Пришивàíèå ìîëíèè
Óстановка машины
1 Выбор стро÷êè: À
2 Длина стåæêà: 1,5 - 4
3 Íàтяжение âåðõíåé íèòè: 3 - 6
4 Прижимная лапкà: ëàïêа для пришивàíèÿ
ìîëíèè Å
Óстановка лапки для ìîëíèè
Сопостàâüòå перекладину на лапке с выемкîé
на держаòåле лапки.
×òобы пришить левóþ ñòорону моëíèè,
пристегните лапку для молнии на правый край
перекладины.
×òобы пришить правóþ ñòорону моëíèè,
пристегните лапку для молнии на левый край
перекладины.
1 Выемкà
2 Перекладина
À. Êîãда прошивàåòñÿ ëåâàÿ ñòорона
Â. Êîãда прошивàåòñÿ ïðàâàÿ ñòорона
Ïîäãîòовка ткани
1. Äîáàâüòå 1 ñì ê ðàçìåðó ìîëíèè. Ýòо общий
ðàзмер раскрытия.
1 Ëèöåâàÿ ñòорона ткàíè
2 1 ñì
3 Ðàзмер раскрытия
4 Длина моëíèè
5 Замок
6 Çóáöû ìîëíèè
7 Ëåíòà ìîëíèè
8 Изнано÷íàÿ ñòорона ткàíè
9 Конец раскрытия
2. Ñëîæèòå ëèöåâûå ñòороны ткàíè âìåñòå è
прошейте до конца раскрытия моëíèè, îñòàâèâ
2 см на припуñê.
Закрепитå ñòåæêè ðåâåðñîì. Íàìåòàéòå
раскрытие молнии с длиной стåæêà â 4.5.
10 2 ñì
11 Ðаскрытие моëíèè
12 Ñòåæîê ðåâåðñ
13 Конец раскрытия
14 Øîâ
1
2
Пришивàíèå ìîëíèè
Óстановка машины
1 Выбор стро÷êè: À
2 Длина стåæêà: 1,5 - 4
3 Íàтяжение âåðõíåé íèòè: 3 - 6
4 Прижимная лапкà: ëàïêа для пришивàíèÿ
ìîëíèè Å
Óстановка лапки для ìîëíèè
Сопостàâüòå перекладину на лапке с выемкîé
на держаòåле лапки.
×òобы пришить левóþ ñòорону моëíèè,
пристегните лапку для молнии на правый край
перекладины.
×òобы пришить правóþ ñòорону моëíèè,
пристегните лапку для молнии на левый край
перекладины.
1 Выемкà
2 Перекладина
À. Êîãда прошивàåòñÿ ëåâàÿ ñòорона
Â. Êîãда прошивàåòñÿ ïðàâàÿ ñòорона
Пришивàíèå ìîëíèè
Óстановка машины
1 Выбор стро÷êè: À
2 Длина стåæêà: 1,5 - 4
3 Íàтяжение âåðõíåé íèòè: 3 - 6
4 Прижимная лапкà: ëàïêа для пришивàíèÿ
ìîëíèè Å
Óстановка лапки для ìîëíèè
Сопостàâüòå перекладину на лапке с выемкîé
на держаòåле лапки.
×òобы пришить левóþ ñòорону моëíèè,
пристегните лапку для молнии на правый край
перекладины.
×òобы пришить правóþ ñòорону моëíèè,
пристегните лапку для молнии на левый край
перекладины.
1 Выемкà
2 Перекладина
À. Êîãда прошивàåòñÿ ëåâàÿ ñòорона
Â. Êîãда прошивàåòñÿ ïðàâàÿ ñòорона
Ïîäãîòовка ткани
1. Äîáàâüòå 1 ñì ê ðàçìåðó ìîëíèè. Ýòо общий
ðàзмер раскрытия.
1 Ëèöåâàÿ ñòорона ткàíè
2 1 ñì
3 Ðàзмер раскрытия
4 Длина моëíèè
5 Замок
6 Çóáöû ìîëíèè
7 Ëåíòà ìîëíèè
8 Изнано÷íàÿ ñòорона ткàíè
9 Конец раскрытия
2. Ñëîæèòå ëèöåâûå ñòороны ткàíè âìåñòå è
прошейте до конца раскрытия моëíèè, îñòàâèâ
2 см на припуñê.
Закрепитå ñòåæêè ðåâåðñîì. Íàìåòàéòå
раскрытие молнии с длиной стåæêà â 4.5.
10 2 ñì
11 Ðаскрытие моëíèè
12 Ñòåæîê ðåâåðñ
13 Конец раскрытия
14 Øîâ
1
2
(A)
(B)
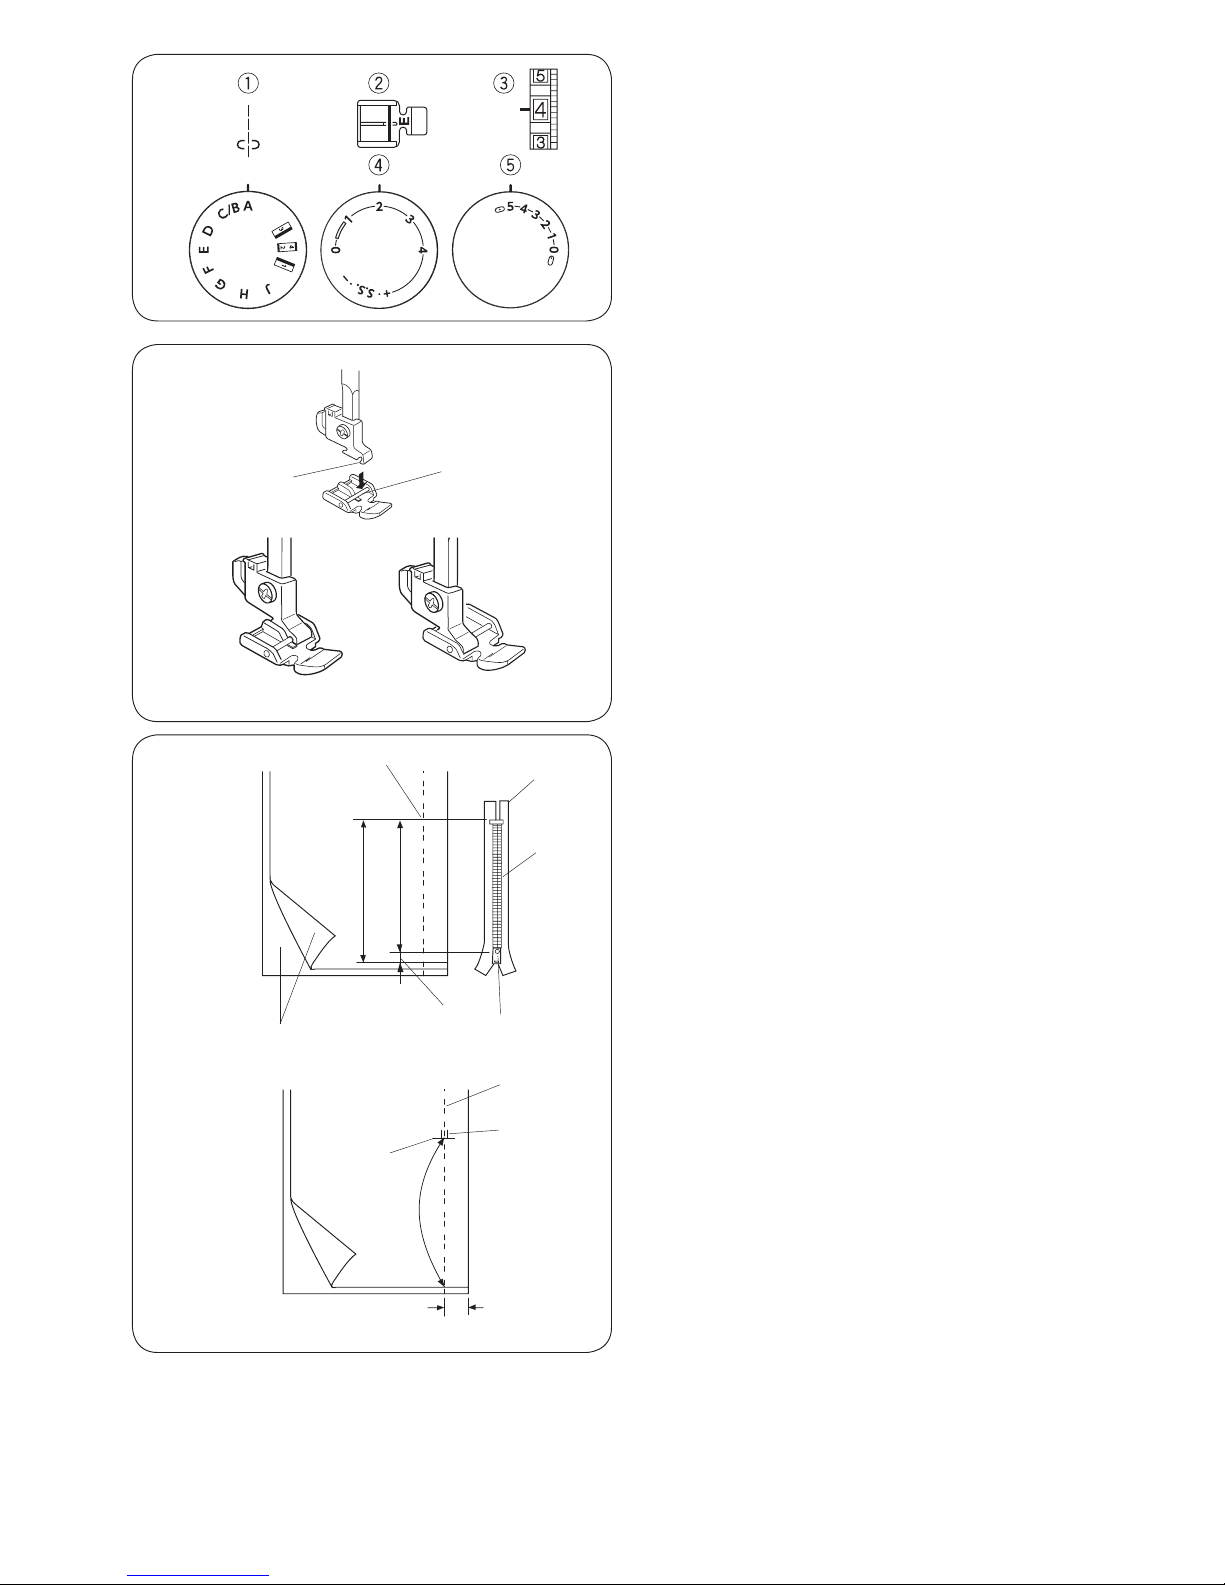
Zipper Application
Machine setting
q Stitch pattern: A
w Presser foot: Zipper foot E
e Thread tension: 3 - 6
r Stitch length: 1.5 - 4
t Stitch width: 5
To snap on the zipper foot
A: To sew the left side of the zipper, attach zipper foot
with the right side pin.
B: To sew the right side of zipper, attach the zipper foot
with the left side pin.
q Groove
w Pin
Fabric preparation
z Add 3/8˝ (1 cm) to the zipper size. This is the overall
opening size.
q Right side of the fabric
w 3/8˝ (1 cm)
e Opening size
r Zipper size
t Slider
y Zipper teeth
u Zipper tape
i Wrong side of the fabric
o End of the opening
x Place the right (top) sides of the fabric together. Sew a
bottom seam 5/8˝ (2 cm) from the right edge to the
zipper bottom stop position. Sew a few stitches in
reverse to lock.
Increase the stitch length to “4”, set needle thread
tension to “1”, and baste the entire length of the fabric.
!0 5/8˝ (2 cm)
!1 Basting
!2 Reverse stitch
!3 End of the opening
!4 Bottom seam
w
u
w
x
q
y
q
z
eir
o
t
!0
!1
!2
!3
!4
Page 26
24
1
2
3
4
5
6
7
8
9
10
11
12
3
5
9
x
z
c
v
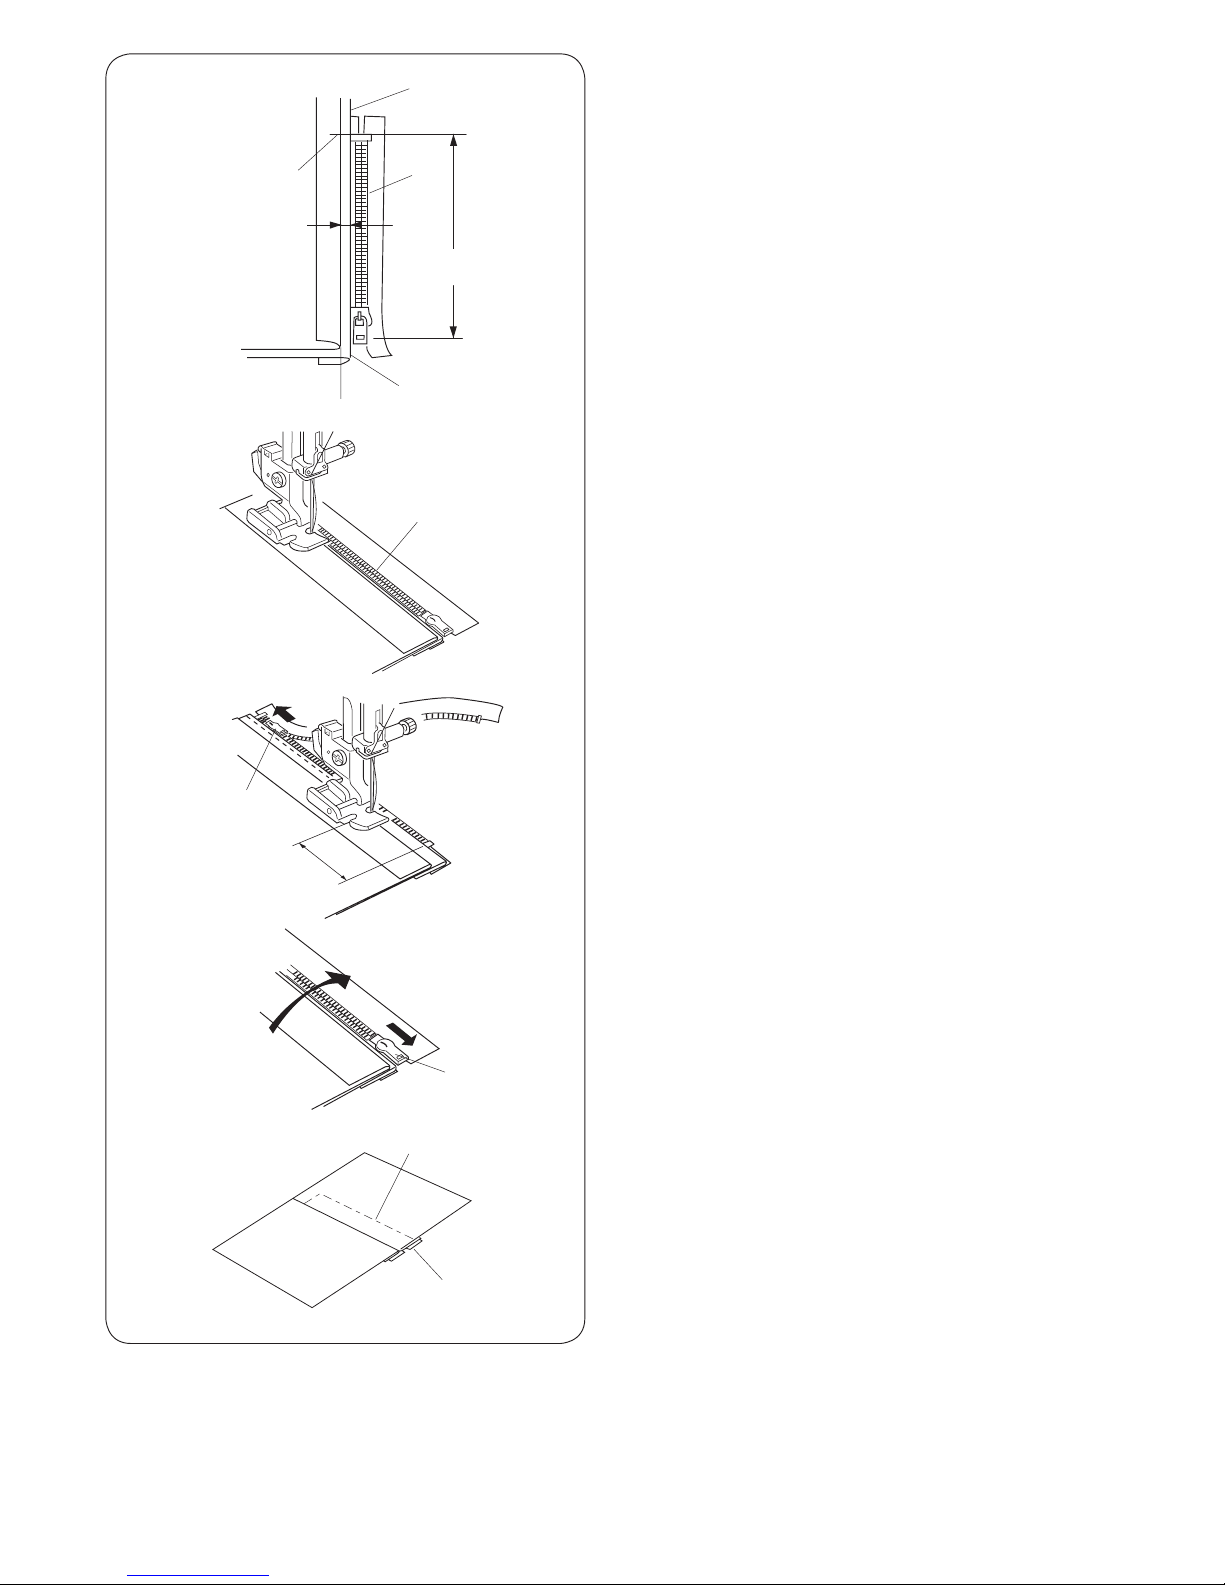
To sew
z Attach zipper foot with the right side pin.
Fold back the upper layer seam allowance.
Fold back the lower layer seam allowance to leave a
1/8˝ (0.4 cm) margin of fabric.
q Lower layer
w End of the opening
e Zipper teeth
r 1/8˝ (0.4 cm) margin
t Upper layer
y Opening size
u Folded edge
i Basting
x Place zipper teeth next to margin edge and baste the
zipper tape to the lower fabric layer.
Align zipper foot with margin edge. Return thread
tension and stitch length to original settings.
Sew a seam the entire length of zipper tape.
c Stop the machine 2˝ (5 cm) before reaching the slider,
with needle in the fabric and raise the foot, then unzip
a few inches to clear a path for stitching.
o Slider
!0 2˝ (5 cm)
v Remove fabric and close zipper. Take the upper fabric
layer and lay it flat over the zipper.
Baste the zipper tape to the upper fabric layer.
!1 Basting
!2 Zipper tape
w
q
e
e
r
t
t
y
u
i
o
o
!0
!1
!2
Page 27
25
13
14
b
n
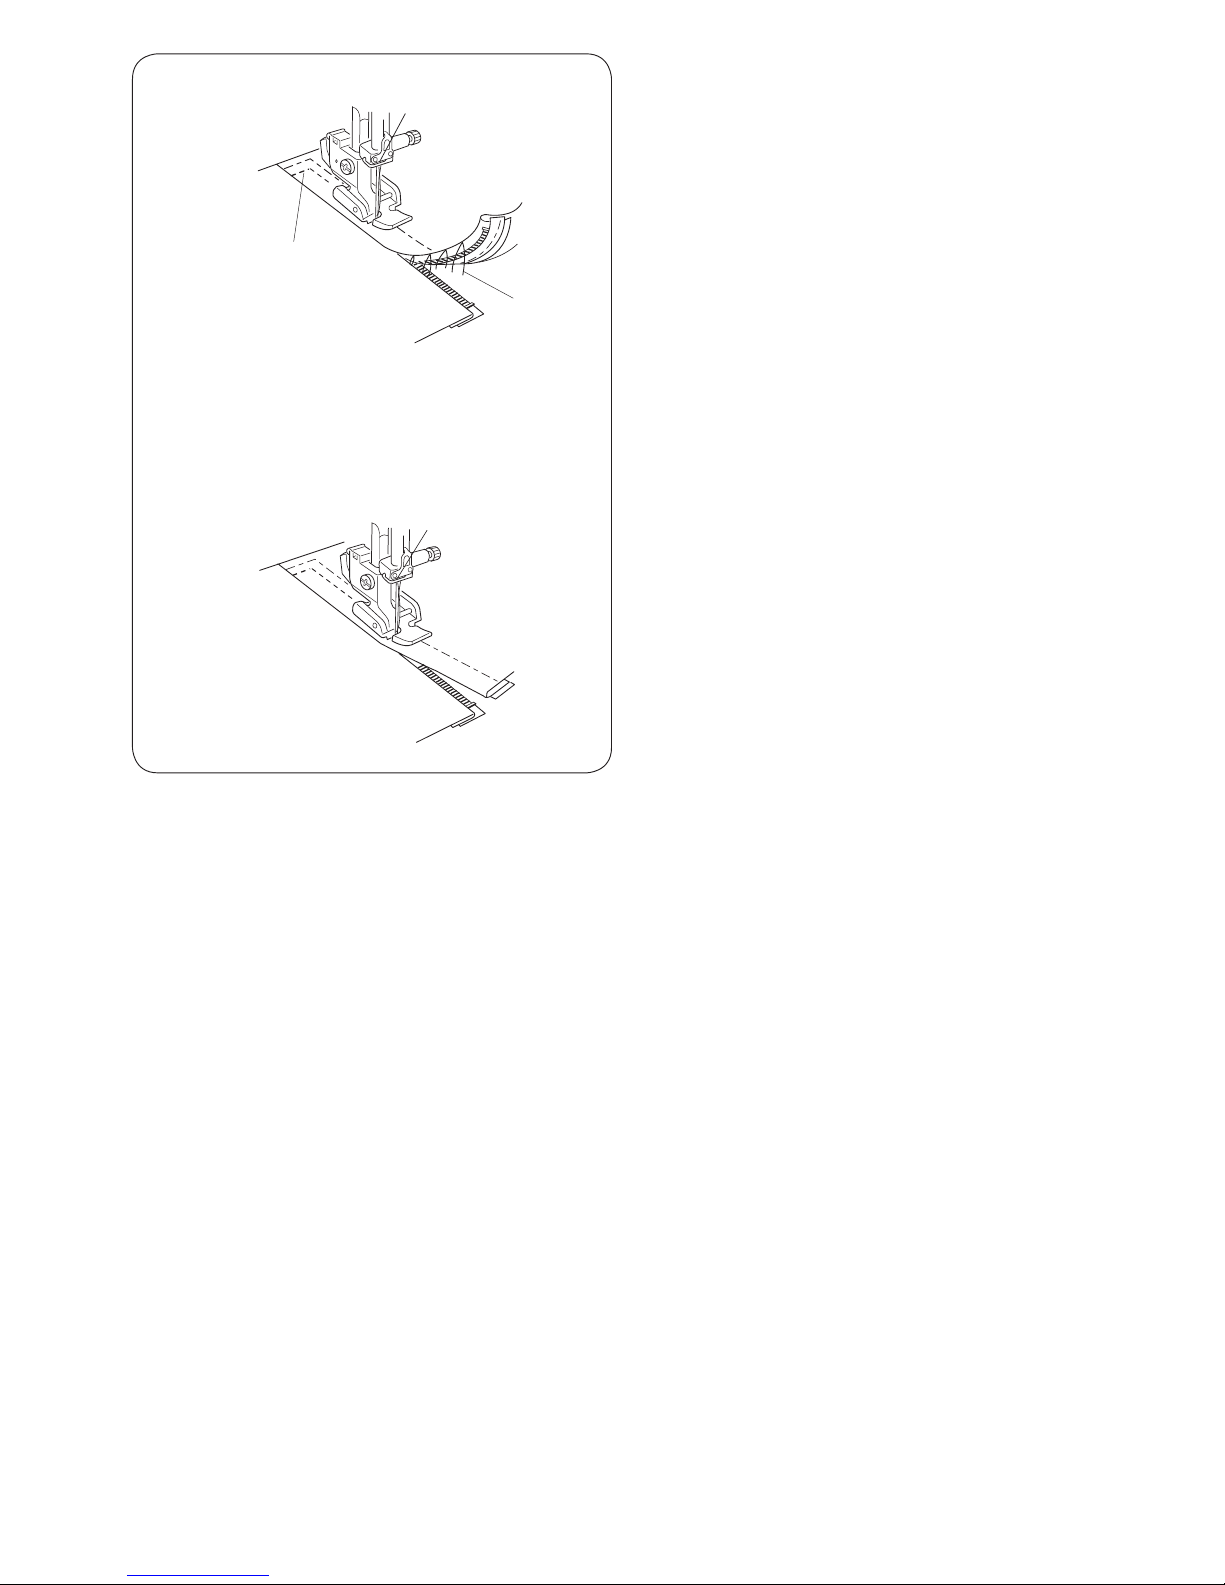
b Raise and release the foot, and re-attach it with the
left side pin.
Starting just below zipper bottom stop, sew across
fabric to about 3/8˝ (1 cm) distance from the basting
line.
Turnfabric90degreesandsewaseamtheentire
length of the zipper tape. Before reaching the slider,
stop the machine with needle in fabric and raise the
foot. Use seam ripper to open a few inches of basting
stitch.
!3 Unstitch basting
!4 3/8˝ (1 cm)
n Unzip a few inches to clear a path for stitching.
At end of seam, sew a few stitches in reverse to lock.
Once both sides of zipper are sewn, use the seam
ripper to open the basting stitch.
!3
!4
Page 28
26
1
2
3
4
8
1
2
5
6
7
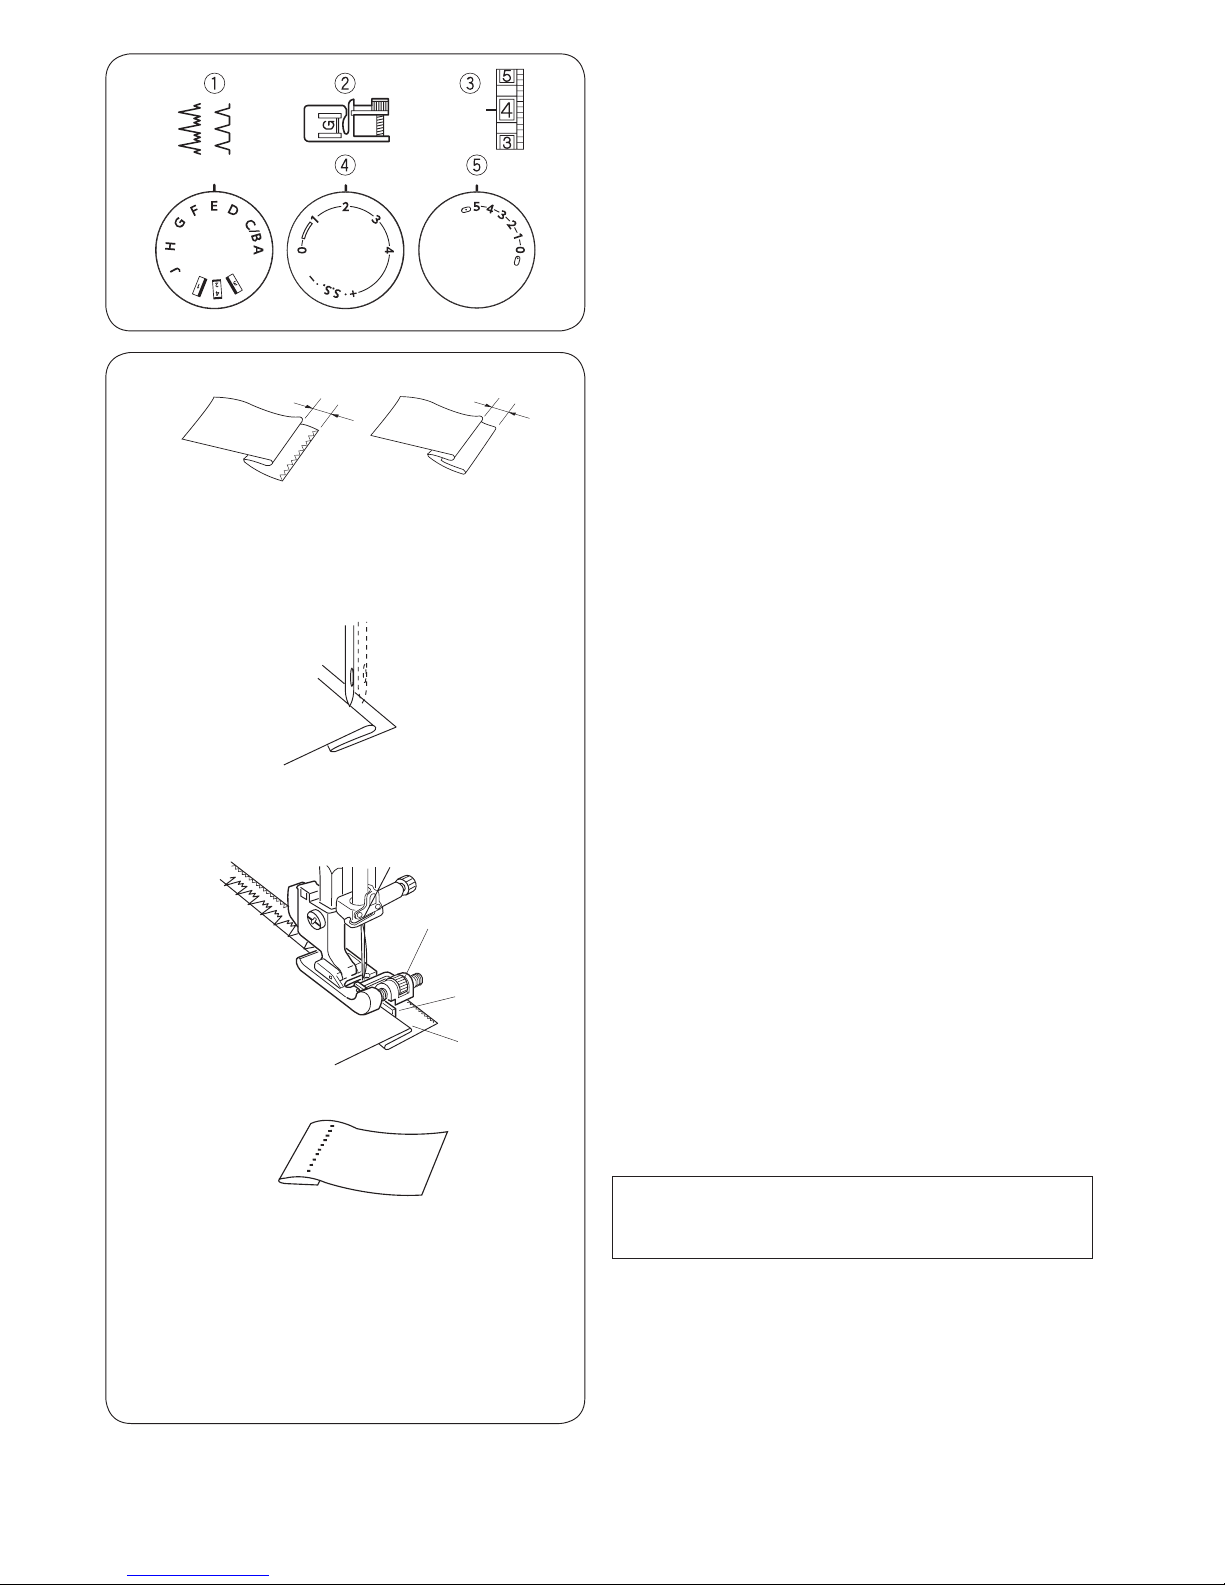
Blind Hemming
Machine setting
q Stitch pattern: E or H
w Presser foot: Blind hemming foot G
e Thread tension: 2 - 4
r Stitch length: 1 - 3
t Stitch width: 5
z On heavy weight fabrics that ravel, the raw edge
should be overcast first.
Fold the hem under the fabric as illustrated for fine or
medium fabrics.
Fold a hem with the wrong side up forming a 1/8˝ (0.5
cm) allowance.
q Wrong side of the fabric
w 1/8˝ (0.5 cm)
e Heavy weight fabric
r Fine and medium weight fabric
x Place the fabric so that the needle just pierces the
folded edge when the needle comes over the extreme
left side.
Lower the presser foot.
c Turn the screw to align the guide on the foot with the
folded edge so that the needle just pierces the fold.
If the needle pierces too far left, move the guide
slightly to the left.
If the needle misses the fold, move the guide slightly
to the right.
Sew slowly while guiding the folded edge along the
guide.
t Screw
y Guide
u Folded edge
v Open and press the fabric after sewing is finished.
i Right side of the fabric
NOTE:
If the needle drops too far left, the stitches will be
apparent on the right side of the fabric.
w
w
x
q
q
z
e
c
r
v
t
y
i
u
Page 29
27
1
2
3
4
Ñборки
Óстановка машины
1 Выбор стро÷êè: D
2 Длина стåæêà: S.S
3 Íàтяжение âåðõíåé íèòè: 1 - 4
4 Прижимная лапкà: ëàïêà äëÿ çèã-çàãà À
ПРИМЕЧАНИЕ:
Ослабьòå íàтяжение âåðõíåé íèòè äëÿ
îáлегчения создания сборок.
1. Сборки – утонченная декîðàтивная îòäåëêà
íà äåòñêîé îäåжде или женских бëóçêàõ.
Âûáåðèòе мягкую и легкóþ òêàíü òàêóþ êàê
áàòèñò èëè øàëè. Îòðåæüòå òêàíü â òðè ðàçà
длиннее длины преäïîëàãаемого проекòà.
Óñòановите длину стåæêà на «4» и прошейтå
ðÿäû ïðÿìûõ ñòåæêîâ, ïðèáлизитåëüíî íà 1 ñì
äðóã îò äðóãà äëÿ ñîçдания сборок.
1
2
3
4
Ñборки
Óстановка машины
1 Выбор стро÷êè: D
2 Длина стåæêà: S.S
3 Íàтяжение âåðõíåé íèòè: 1 - 4
4 Прижимная лапкà: ëàïêà äëÿ çèã-çàãà À
ПРИМЕЧАНИЕ:
Ослабьòå íàтяжение âåðõíåé íèòè äëÿ
îáлегчения создания сборок.
1. Сборки – утонченная декîðàтивная îòäåëêà
íà äåòñêîé îäåжде или женских бëóçêàõ.
Âûáåðèòе мягкую и легкóþ òêàíü òàêóþ êàê
áàòèñò èëè øàëè. Îòðåæüòå òêàíü â òðè ðàçà
длиннее длины преäïîëàãаемого проекòà.
Óñòановите длину стåæêà на «4» и прошейтå
ðÿäû ïðÿìûõ ñòåæêîâ, ïðèáлизитåëüíî íà 1 ñì
äðóã îò äðóãà äëÿ ñîçдания сборок.
1 Ðàññòояние меæäó ðядами
2. Çàâÿæèòå íèòè ñ îäíîé ñòороны . С дрóãîé
ñòороны потянитå çà øïóльную (нижнюю) нить и
ровно распреäåëèòå ñêладки .
Прошейте декоративные стро÷êè ìåæäó ðядами
ïðÿìûõ ñòåæêов. Вытянитå íèòè ïðÿìûõ
ñòåæêîâ.
3
Кнопка ревåðñà
Ïîêа вы нажимаеòå на кнопку реверса,
áóäåò øèòü â îáðàтном направлении.
Контроëü ñêîðîсти шитья
Íîжная педаль
Ñêорость шитья можно изменять при помощи
ïåдали. Чем сильнее давить на пеäàëü, òåì
âûøå ñêорость шитья.
Òранспорòåð ïîäàчи ткани
При пришивàíèè ïóãîâèö è ò.ä. îòêëþ÷èòå
транспорòåð.
Îòêëþчение транспорòåðà ïîäàчи ткани
Äëÿ îòêëþчения транспорòåðà òêàíè
ïåðåдвиньòå рычаг îòêëþчения транспорòåðà
âëåâî.
Ïîäêëþчение транспорòåðà ïîäàчи ткани
×òîáû ïîднять транспорòåð òêàíè, ïåðåдвиньòå
рычаг вправî.
2
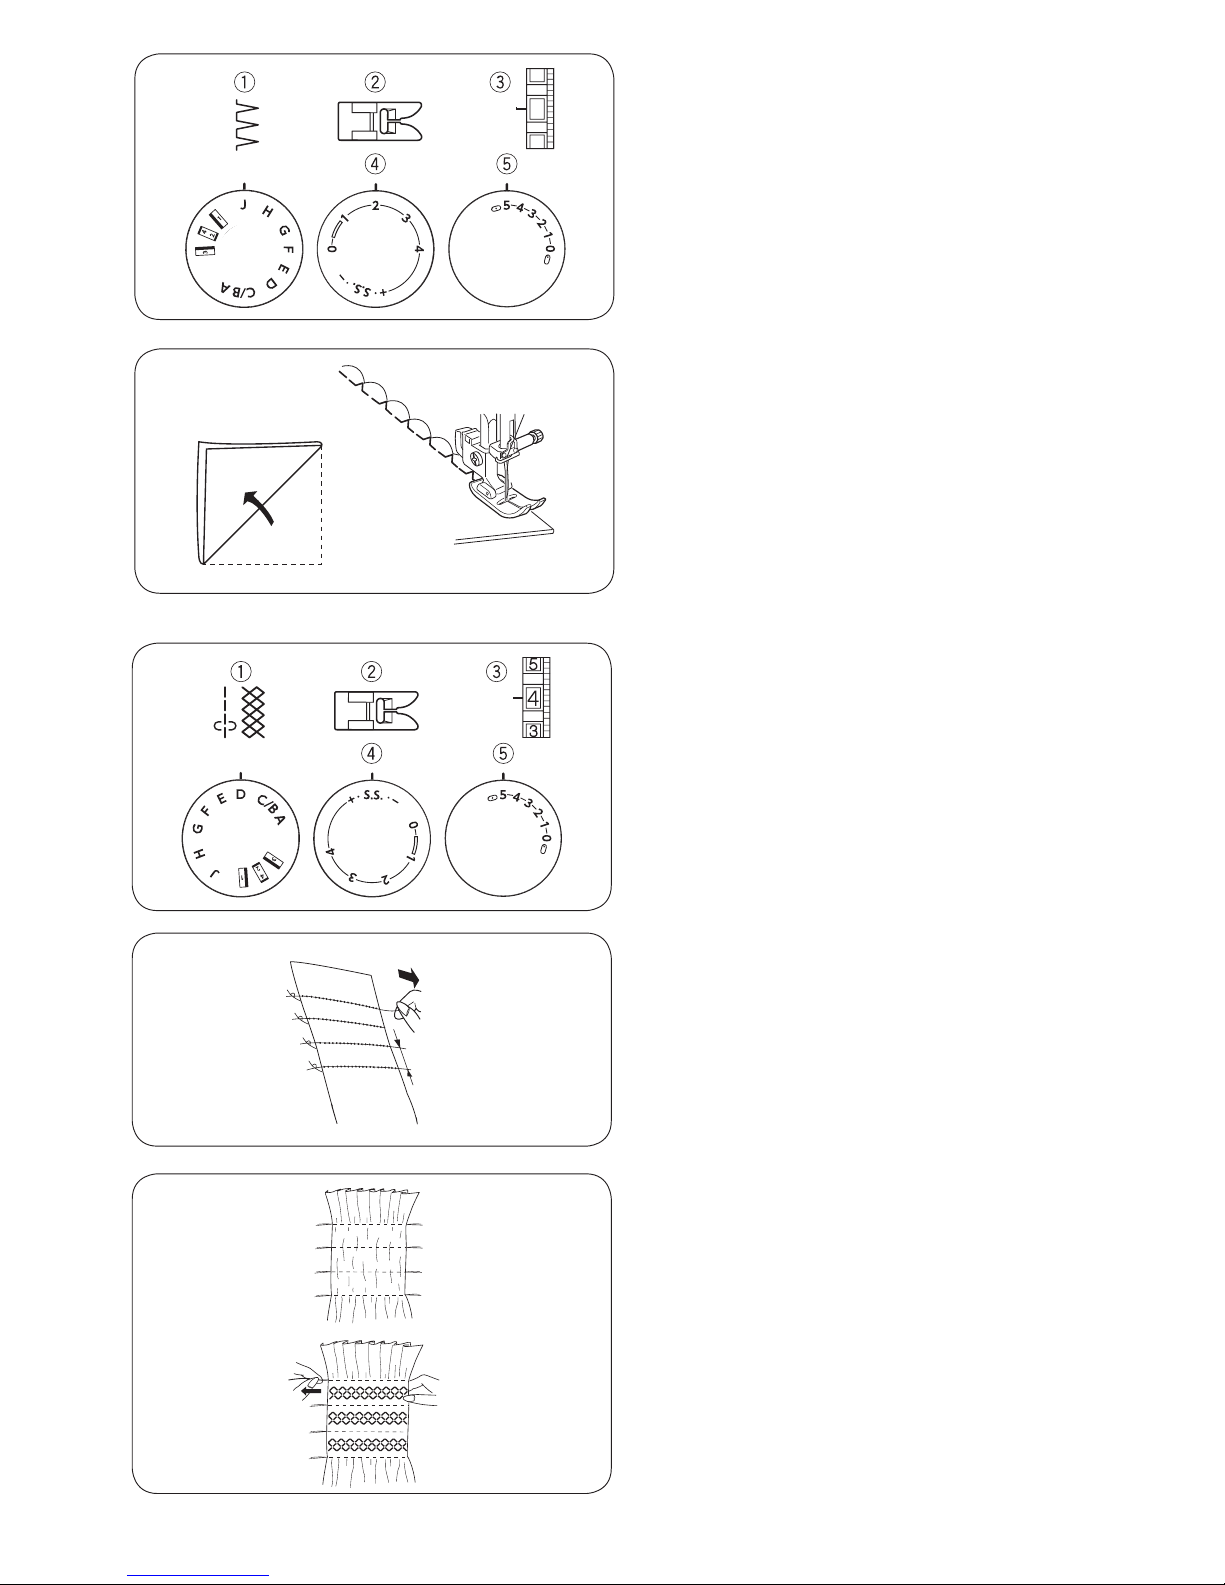
SECTION 5. DECORATIVE STITCHES
Shell Tuck
Machine setting
q Stitch pattern: J
w Presser foot: Zigzag foot A
e Thread tension: 6 - 8
r Stitch length: 2 - 3
t Stitch width: 5
Place the folded edge along the slot of foot.
The needle should fall off the edge of the fabric on the
right forming a tuck.
Smocking
Machine setting
q Stitch pattern: A, D
w Presser foot: Zigzag foot A
e Thread tension: 1 - 4
r Stitch length: S.S.
t Stitch width: 5
Choose a soft and lightweight fabric such as batiste,
gingham or challis. Cut the fabric three times wider than
the project width.
Increase the stitch length to “4” and loosen thread
tension to “1”. Sew rows of straight stitches 3/8˝ (1 cm)
apart across the area to be smocked.
q 1 cm (3/8˝)
Knot the threads along one end. From the other end, pull
the bobbin threads to distribute gathers evenly and
secure the threads.
Return the thread tension to the original setting.
Sew rows of the smocking stitch between the gathering
stitches.
Remove the gathering stitches after finished.
6
7
8
q
Page 30
28
1
2
3
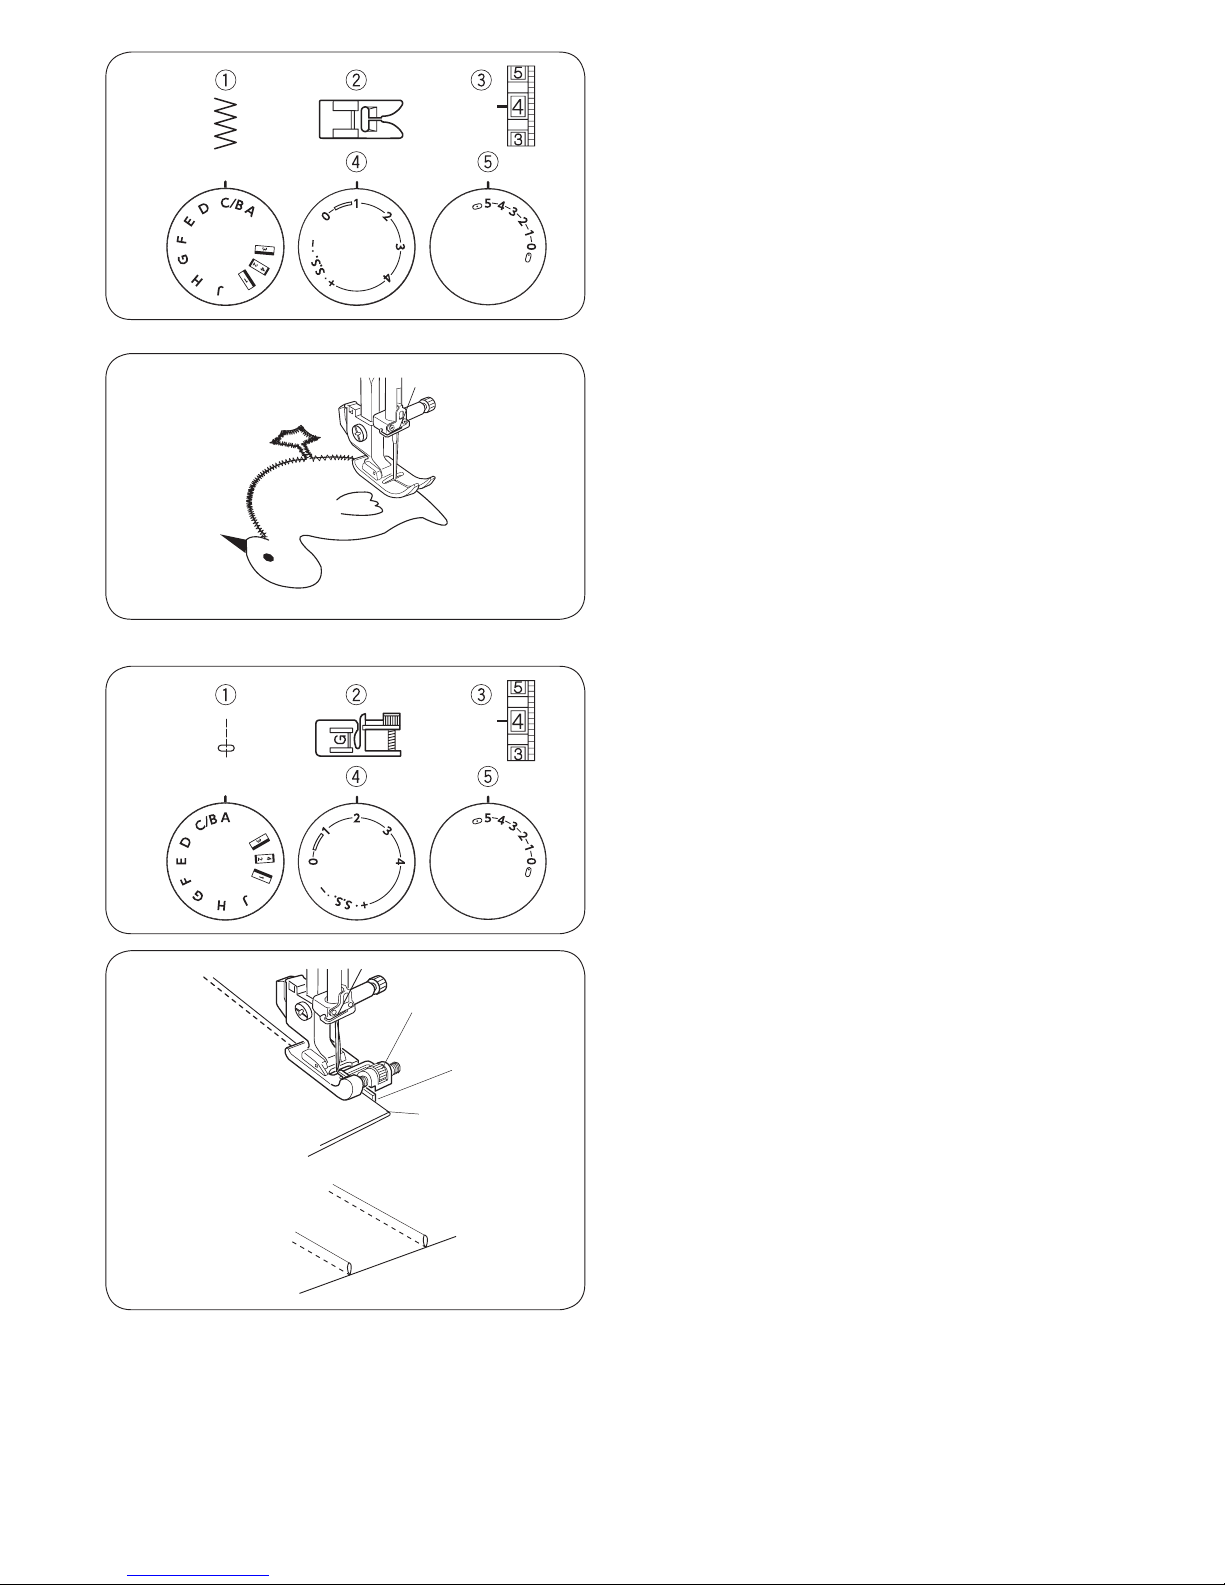
Applique
Machine setting
q Stitch pattern: C
w Presser foot: Zigzag foot A
e Thread tension: 1 - 4
r Stitch length: 0.5 - 1
t Stitch width: 5
Baste (or fuse with iron-on fabric joiner) applique pieces
on the fabric. Stitch around the applique making sure the
needle falls along the outer edge of the applique.
When sewing corners, lower the needle down into the
fabric. Raise the presser foot and pivot fabric to the right
or left.
Pin Tucking
Machine setting
q Stitch pattern: A
w Presser foot: Blind hemming foot G
e Thread tension: 3 - 6
r Stitch length: 1.5 - 4
t Stitch width: 5
Fold a fabric wrong side together and Lower the needle
into the fabric 0.1 – 0.2 cm inside the folded edge.
Lower the foot and turn the screw to align the guide on
the foot with the folded edge.
Sew slowly while guiding the folded edge along the
guide.
Open the fabric and iron press the tucks.
q Screw
w Guide
e Folded edge
w
q
e
Page 31
29
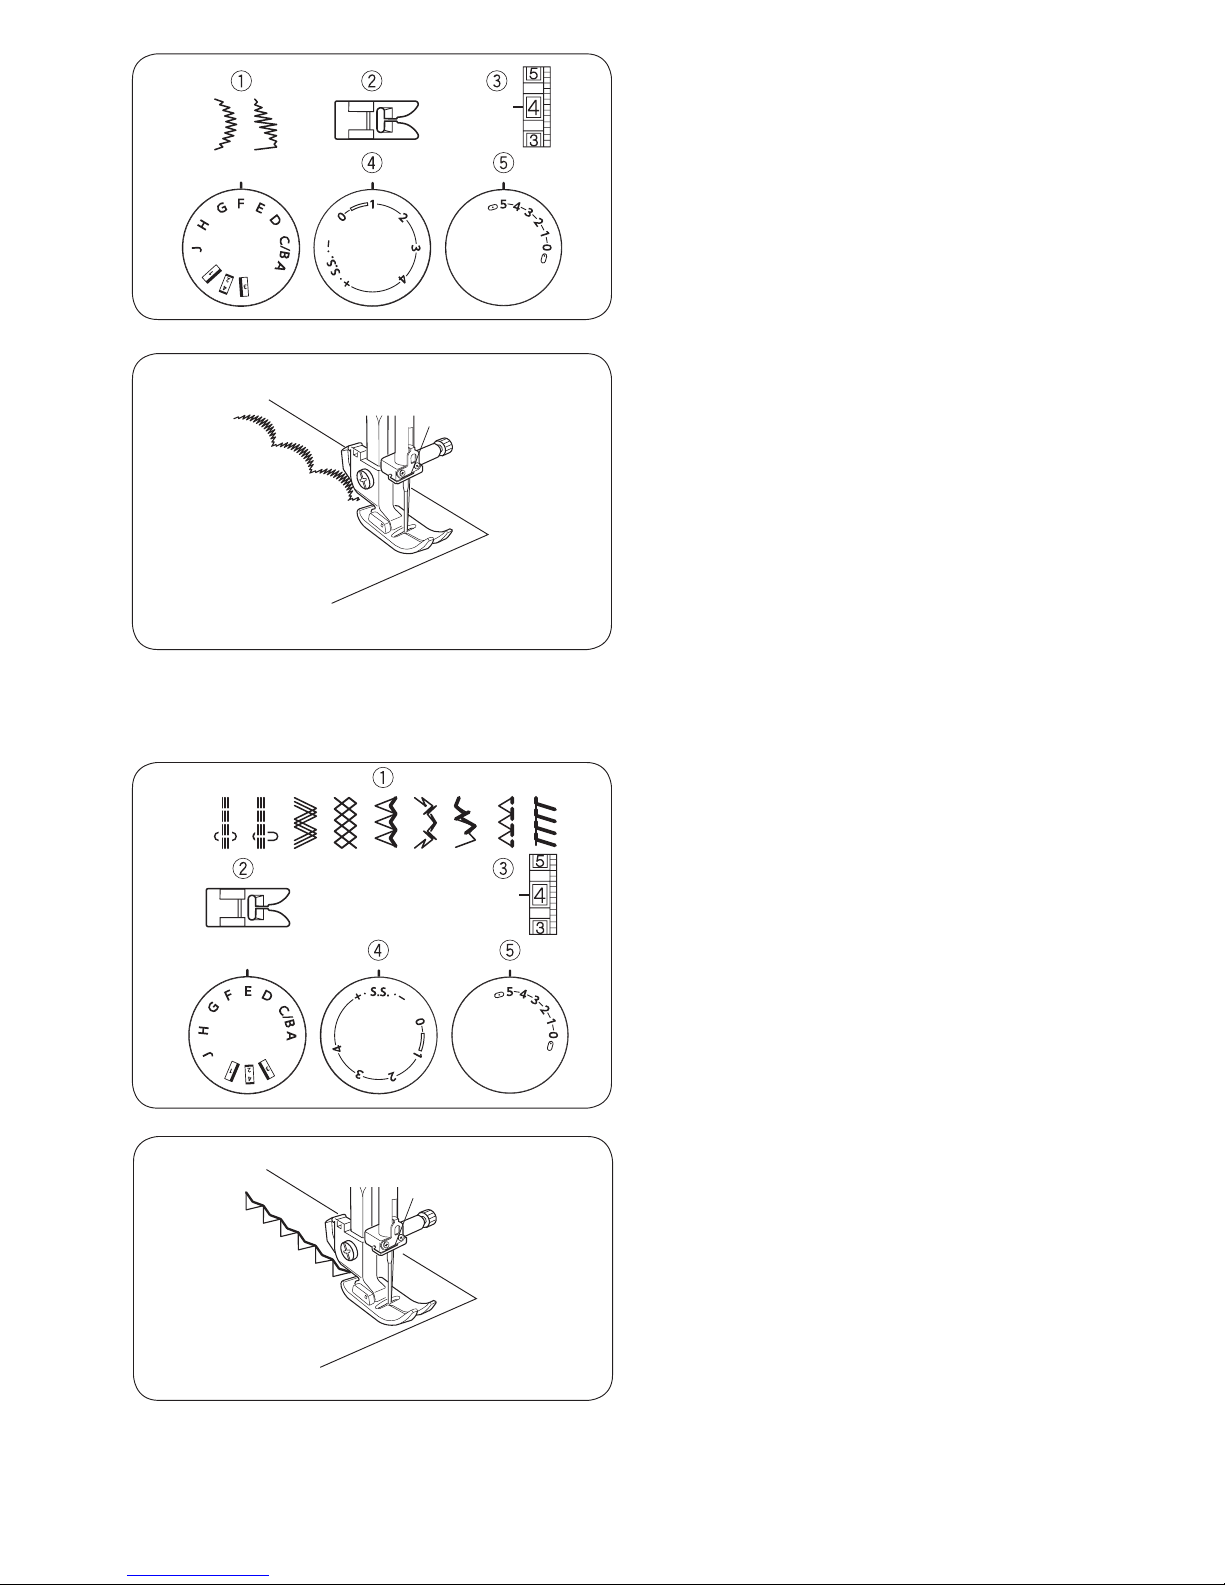
Satin Stitches
Machine setting
q Stitch pattern: F or G
w Presser foot: Zigzag foot A
e Thread tension: 1 - 4
r Stitch length: 0.5 - 1
t Stitch width: 3 - 5
For a delicate appearance on fabric such as chiffon, use
a single layer with a tear-away backing, if necessary.
Decorative Stretch Stitches
Machine setting
q Stitch pattern: A - J
w Presser foot: Zigzag foot A
e Thread tension: 3 - 6
r Stitch length: S.S.
t Stitch width: 3 - 5
Decorative stretch patterns are used for adding a creative
and personalized touch to items.
Carefully guide the fabric while sewing as the fabric
moves back and forth.
Page 32
30
x
z
c
v
b
SECTION 6. CARE AND MAINTENANCE
WARNING:
Turn the power switch off and unplug the machine
before cleaning.
NOTE:
Do not dismantle the machine in any way other than
what is explained in this section.
Remove the setscrew by turning it counterclockwise with
a screwdriver and remove the foot holder.
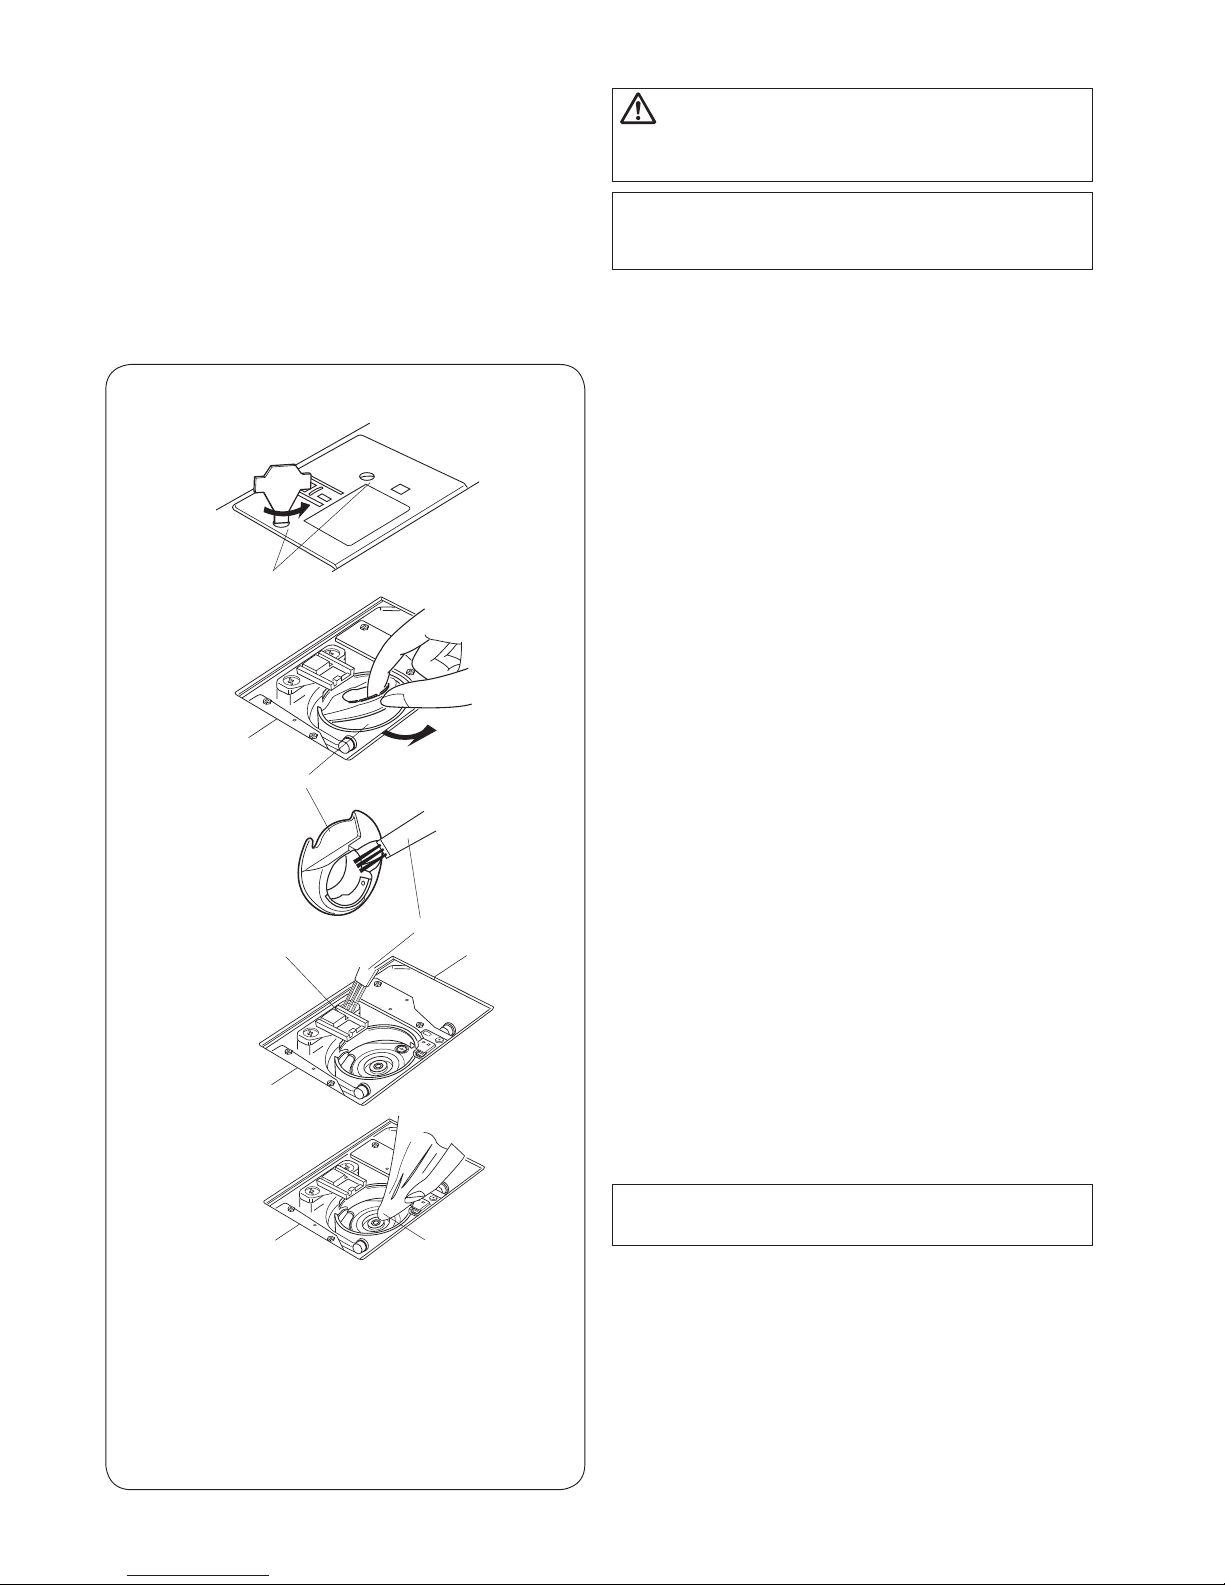
Cleaning the Hook Race and Feed Dog
z Remove the presser foot and needle. Remove screw
on the needle plate with the screwdriver.
Remove the needle plate and take out the
bobbin.
q Screw
x Lift up the bobbin holder and remove it.
w Bobbin holder
c Brush out dust and lint. Wipe the bobbin holder with a
soft, dry cloth.
v Clean the feed dogs and hook area with the lint brush.
e Lint brush
r Feed dogs
b Wipe the hook race with a soft, dry cloth.
r Hook race
NOTE:
You may also use a vacuum cleaner.
w
q
e
r
t
Page 33
31
1
2
4
Ñборка шпуëåäåðæателя
1. Âñòàâüòå øïóëåдержаòåëü â ãíåçäî
2. Óñòановитå øïóëåдержаòåëü òàê, ÷òîáû
ãîëîâêà ïîдошла к стîïîðó øïóëåдержаòåëÿ.
1 Ãîëîâêà
2 Ñòîïîð
3. Âñòàâüòå øïóëüêó.
Óñòановитå èãîльную пластину с óñòановочными
âèíòàìè.
3 Óñòаново÷íûé âèíò
После чистки âñòàâüòå èãлу и прижимную лапку.
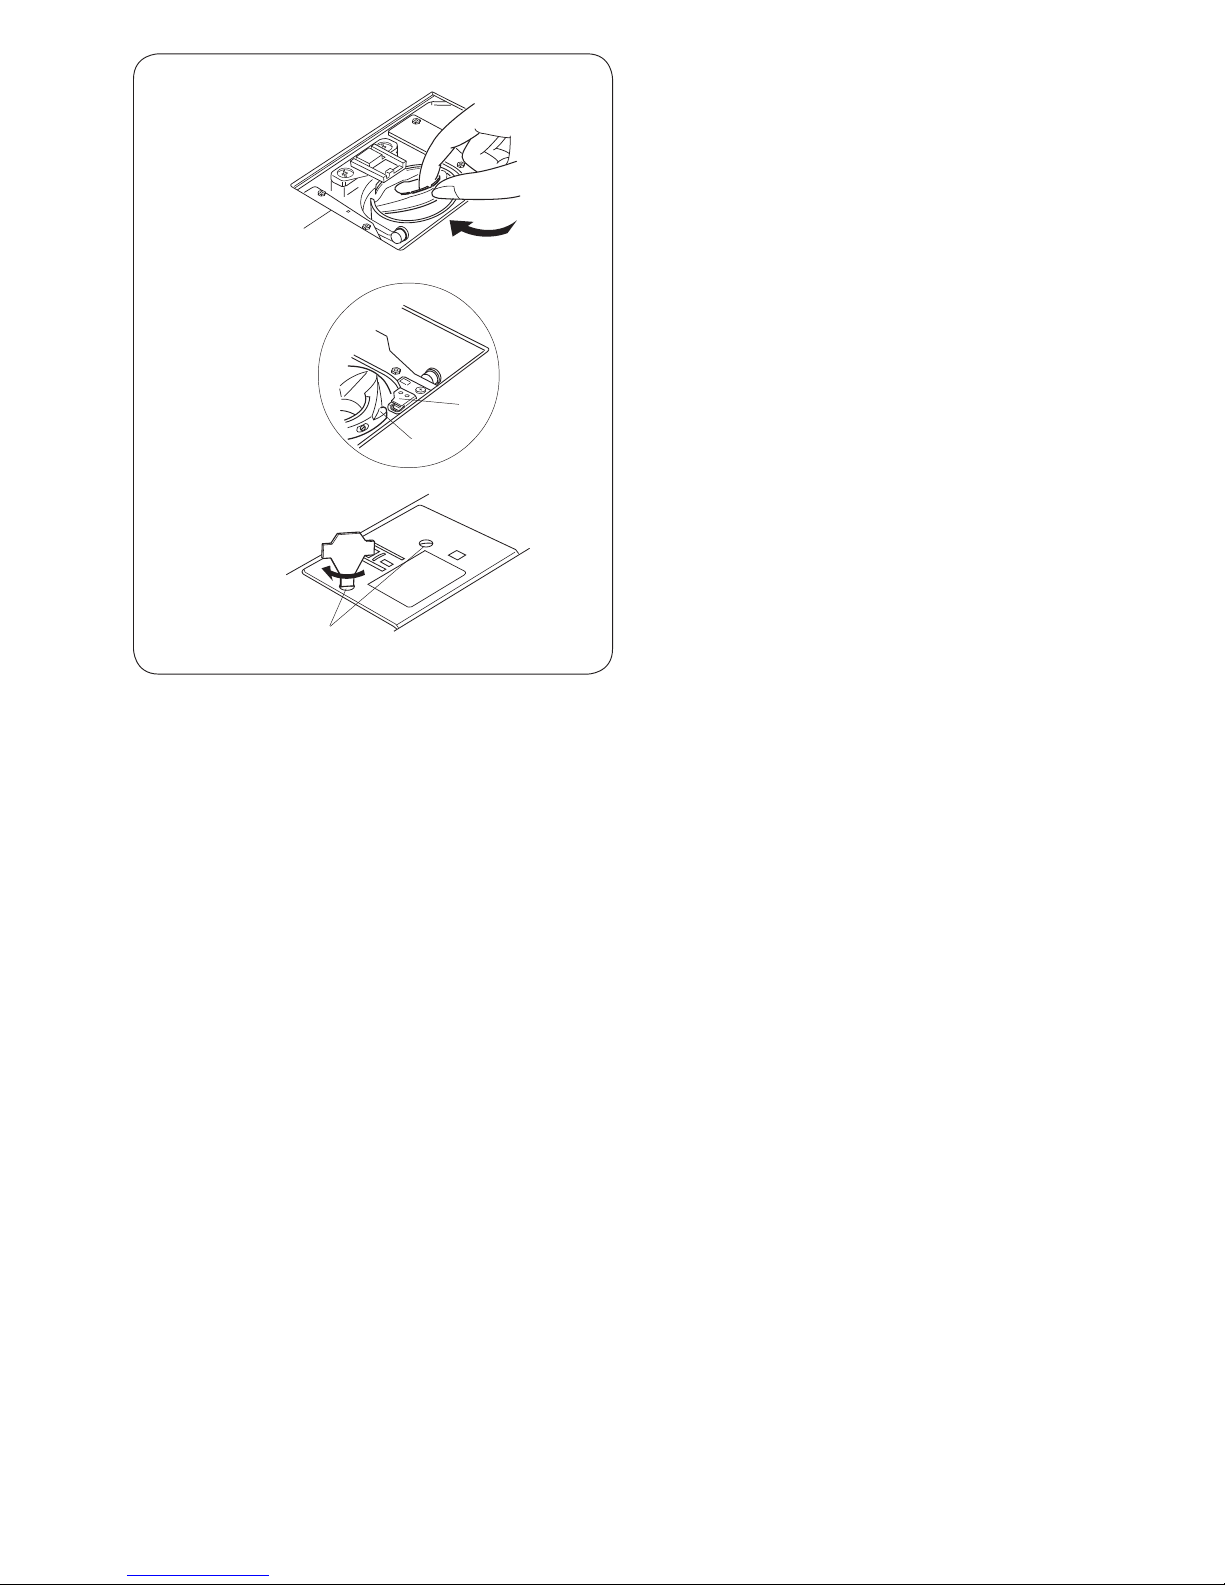
Replacing the Bobbin Holder
z Insert the bobbin holder into the hook race.
x Lift up the bobbin holder and remove it.
q Knob
w Stopper
c Replace the bobbin.
Attach the needle plate.
Tighten the screw firmly with the screwdriver.
e Screw
w
x
q
z
e
c
Page 34

32
Troubleshooting
Problem
The needle thread breaks.
The bobbin thread breaks.
The needle breaks.
The needle thread
loops.
Skipped stitches
Seam puckering
The cloth is not fed
smoothly.
The machine does not
work.
Patterns are distorted.
The buttonhole is not
sewn well.
Noisy operation.
Cause
1. The needle thread is not threaded properly.
2. The needle thread tension is too tight.
3. The needle is bent or blunt.
4. The needle is incorrectly inserted.
5. The needle thread and the bobbin thread are not drawn to the rear
and set properly under the presser foot when starting sewing.
6. The fabric is not drawn to the rear when sewing is finished.
7. The thread is too heavy or too fine for the needle.
1. The bobbin thread is not threaded properly in the bobbin holder.
2. Lint has collected in the bobbin holder.
3. The bobbin is damaged and does not turn smoothly.
4. The thread is wound loosely on the bobbin.
1. Needle is incorrectly inserted.
2. The needle is bent or blunt.
3. The needle clamp screw is loose.
4. A proper foot is not used.
5. The fabric is not drawn to the rear when sewing is finished.
6. The needle is too fine for the fabric being sewn.
1. The needle thread tension is too loose.
2. The needle size is not suitable for the thread.
1. The needle is incorrectly inserted.
2. The needle is bent or blunt.
3. The needle
and/or thread are not suitable for the fabric being sewn.
4. The needle thread is not threaded properly.
5. A poor quality needle is used.
1. The needle thread tension is too tight.
2. The needle thread is not threaded properly.
3. The needle is too heavy for the fabric being sewn.
4. The stitch length is too long for the fabric.
* Use a stabilizer for very fine fabrics.
1. The feed dog is packed with lint.
2. The stitches are too fine.
3. The feed dog was not raised after being lowered.
1. The machine is not plugged in.
2. Thread is caught in the hook race.
3. The bobbin winder spindle is in the bobbin winding position.
1. The stitch is not balanced.
1. The stitch density is not suitable for the fabric being sewn.
2. Interfacing is not being used with stretch fabrics.
1. The feed dog is packed with lint.
2. Lint has collected in the bobbin holder.
Reference
See page 11.
See page 14.
See page 7.
See page 7.
See page 15.
See page 15.
See page 7.
See page 10
See page 30
Replace the bobbin.
Re-wind the bobbin.
See page 7.
See page 7.
See page 7.
Use proper foot.
See page 15.
See page 7.
See page 14.
See page 7.
See page 7.
See page 7.
See page 7.
See page 11.
Replace the needle.
See page 14.
See page 11.
See page 7.
Make stitch shorter.
See page 30.
Make stitch longer.
See page 5.
See page
4.
See page
30.
See page
9.
See page 13.
See page 21.
Use an interfacing.
See page 30.
See page 30.
Page 35

Page 36

508-800-409 (EN)
 Loading...