

Page 1

Proprietary Notice and Liability Disclaimer
The information disclosed in this document, including all designs and related
materials, is the valuable property of NEC Computer Systems Division, Packard Bell NEC,
Inc. (hereinafter “NEC CSD”) and/or its licensors. NEC CSD and/or its licensors, as
appropriate, reserve all patent, copyright and other proprietary rights to this document,
including all design, manufactur ing, reproduction, use, and sales rig hts thereto, except to
the ex tent said right s are expr es sly granted to other s.
The NEC CSD product(s) discussed in this document are warranted in accordance with the
terms of the Warranty Statement accompanying each product. However, actual performance
of each such product is dependent upon factors such as system configuration, customer
dat a, and op erat or contr ol. S ince i mplemen tat ion by cu stomer s of each p roduc t may vary,
the suitability of specific product configurations and applications must be determined by the
customer and is not warranted by NEC CSD.
To allow for design and specification improvements, the information in this document is
subject to change at any time, without notice. Reproduction of this document or portions
thereof w ithout prior written approval of NEC CS D is prohibite d.
As an ENERGY star partner, NEC Computer Systems Division (NEC CSD) has determined that this product
meets the ENERGY star guidelines for energy efficiency.
FaxFlash is a service mark of NEC CSD, Packard Bell NEC, Inc.
NEC and Versa are registered trademarks of NEC Corporation, used under license.
ENERGY STAR is a U.S. registered trademark.
All other product, b r and, or t rade names used in this publication are the tr ademar k s or regi stered t rademarks of
their respective trademark owners.
First Printing — December 1998
Copyright 1998
NEC Computer Systems Division
Packar d Bell NEC, Inc.
1 Packar d Bell Way
Sacramento, CA 95828-0903
All Rights Reserved
Page 2

Contents
Using This Guide
Text Setup.......................................................................................................x
Related Documents.........................................................................................xi
1 Getting Started
Your NEC Versa Note ................................................................................. 1-2
Around the Front of the System.................................................................... 1-4
LCD Panel............................................................................................. 1-4
Control Panel......................................................................................... 1-6
Status Icons..................................................................................... 1-7
Keyboard Panel and Base Unit............................................................... 1-8
Around the Back of the System .................................................................... 1-9
Around the Left Side of the System.............................................................1-11
Around the Right Side of the System...........................................................1-12
Around the Bottom of the System................................................................1-14
NEC Versa Note Power Sources .................................................................1-15
Using the AC Adapter...........................................................................1-15
Powering On / Off ..........................................................................1-16
Using the Battery Pack..........................................................................1-17
Replacing the Battery Pack.............................................................1-17
When Battery Power is Low...........................................................1-18
Battery Handling..................................................................................1-19
Battery Life ..........................................................................................1-19
Extending Battery Life..........................................................................1-20
Battery Charging..................................................................................1-20
Battery Precautions...............................................................................1-21
Battery Disposal...................................................................................1-21
Internal Batteries.........................................................................................1-22
CMOS Battery......................................................................................1-22
System Care................................................................................................1-23
Storage Requirements...........................................................................1-23
Routine Cleaning..................................................................................1-24
Important Safety Instructions ......................................................................1-25
Precautions...........................................................................................1-25
German Language Version of Important Safety Instructions........................1-28
Wichtige Hinweise Zur Sicherheit.........................................................1-28
Vorsichtsmaßnahmen............................................................................1-29
Contents iii
Page 3

2 Understanding the Software
Windows Introduction.................................................................................. 2-3
Windows 98.......................................................................................... 2-3
Desktop Icons.................................................................................. 2-3
Taskbar Icons.................................................................................. 2-4
Windows 95.......................................................................................... 2-6
Active Desktop................................................................................ 2-7
Internet Explorer Channel Bar......................................................... 2-7
Taskbar Icons.................................................................................. 2-8
Windows NT......................................................................................... 2-8
Service Pack 4 ................................................................................. 2-9
Guide to Online Help..................................................................................2-10
Guide to NEC Utilities................................................................................2-10
Setup....................................................................................................2-11
NEC Customize Utility.........................................................................2-11
PHDisk.................................................................................................2-11
Other Software............................................................................................2-11
Adobe Acrobat Reader..........................................................................2-12
QuickLink MessageCenter III...............................................................2-12
eSafe Protect.........................................................................................2-12
Microsoft Office 97 Professional Edition (only on selected models)......2-12
World Wide Web Browsers.........................................................................2-12
Netscape Navigator...............................................................................2-13
Microsoft Internet Explorer...................................................................2-13
Applications and Drivers CD ......................................................................2-13
Launching the Applications and Drivers CD.........................................2-13
Installing the Software ..........................................................................2-14
3 Using Setup and Power Management
Setup Utility................................................................................................ 3-2
How to Enter Setup................................................................................ 3-2
How to Use Setup.................................................................................. 3-3
Looking at Screens.......................................................................... 3-3
Using Keys...................................................................................... 3-4
Checking/Setting System Parameters............................................... 3-5
Setup Menus.......................................................................................... 3-7
Main Menu...................................................................................... 3-7
Advanced Menu.............................................................................. 3-8
Security Menu................................................................................. 3-8
Power Menu.................................................................................... 3-9
iv Contents
Page 4

Boot Menu.....................................................................................3-11
Exit Menu......................................................................................3-11
4 Using Your NEC Versa Note
LCD Panel................................................................................................... 4-2
Keyboard..................................................................................................... 4-2
NEC VersaGlide.......................................................................................... 4-5
Making VersaGlide Adjustments ........................................................... 4-6
VersaGlide Tips..................................................................................... 4-7
Integrated Drives.......................................................................................... 4-7
20X or 24X CD-ROM Reader................................................................ 4-8
CD Loading........................................................................................... 4-8
CD Care ................................................................................................ 4-9
Changing the Auto Play Setting............................................................. 4-9
56K Internal Modem ...................................................................................4-10
Connecting the Internal Modem............................................................4-11
PC Cards....................................................................................................4-12
Type II Cards........................................................................................4-12
Type II Extended Cards........................................................................4-12
Type III Cards ......................................................................................4-12
Communication Cards....................................................................4-12
PC Card Modems ...........................................................................4-13
Storage Cards.................................................................................4-13
Interface Cards...............................................................................4-13
Other Cards....................................................................................4-13
PC Card Sl ots.......................................................................................4-14
Inserting a PC Card........................................................................4-14
Removing a Card............................................................................4-15
IR Port..................................................................................................4-16
USB Port..............................................................................................4-17
Enabling and Disabling Devices ..................................................................4-18
Increasing System Storage and Memory......................................................4-19
Hard Disk Drive...................................................................................4-19
Memory Module Installation.................................................................4-19
Connecting Options ....................................................................................4-22
External Monitor..................................................................................4-23
Printer ..................................................................................................4-23
Parallel Devices..............................................................................4-24
Serial Devices ................................................................................4-24
External Keyboard/Mouse/Keypad........................................................4-25
External Audio Options ........................................................................4-26
Contents v
Page 5

NEC PortBar........................................................................................4-26
Using the PortBar...........................................................................4-26
Updating the System BIOS...................................................................4-29
5 Using Multimedia
Audio........................................................................................................... 5-2
Recording.............................................................................................. 5-2
Line-In .................................................................................................. 5-3
CD-ROM Input..................................................................................... 5-4
Microphone........................................................................................... 5-4
Playing Back......................................................................................... 5-4
Using Headphones........................................................................... 5-5
Using the Built-In Speakers............................................................. 5-5
Using External Stereo Speakers....................................................... 5-5
Video........................................................................................................... 5-5
Using Digital Video Files....................................................................... 5-6
Using Animation Files........................................................................... 5-6
Multimedia Applications.............................................................................. 5-7
6 Traveling with Your NEC Versa Note
Power Connections...................................................................................... 6-2
Checklist Information...................................................................................6-2
What to Take......................................................................................... 6-3
Preparing Your NEC Versa Note for Travel........................................... 6-3
7 Solving Problems
Problem Checklist........................................................................................ 7-2
Start-up Problems ........................................................................................ 7-3
POST Error Messages............................................................................ 7-4
If You Need Assistance................................................................................ 7-6
Product Recovery CD.................................................................................. 7-7
Full/Express Restore.............................................................................. 7-8
Partition Restore...................................................................................7-10
If You Need Assistance...............................................................................7-13
A Setting Up a Healthy Work Environment
Making Your Computer Work for You.........................................................A-2
Arrange Your Equipment............................................................................. A-3
Adjust Your Chair........................................................................................A-3
Adjust Your Input Devices ...........................................................................A-4
vi Contents
Page 6

Adjust Your Screen or Monitor.................................................................... A-5
Vary Your Workday.....................................................................................A-6
Pre-existing Conditions and Psychosocial Factors ........................................ A-7
B Specifications
System Components.....................................................................................B-2
Interrupt Controllers.....................................................................................B-7
DMA Settings..............................................................................................B-8
C Getting Services and Support
Quick Reference Chart.................................................................................C-2
NEC NOW ..................................................................................................C-3
NEC CSD Web Site .....................................................................................C-4
NEC CSD FTP Site......................................................................................C-5
NEC CSD FaxFlash Service.........................................................................C-6
Email/Fax to Support Services.....................................................................C-8
NEC CSD Bulletin Board.............................................................................C-9
NEC CSD Support Services.......................................................................C-11
NEC CSD Customer Assistance Center......................................................C-11
Versa Laptop Fulfillment Hotline ...............................................................C-12
Glossary
Index
Content s vii
Page 7

Using This Guide
The NEC Versa Note User’s Guide gives you the information you need
to use your NEC Versa Note notebook computer. T he information in this
guide refers to the Windows 98, Windows 95, and Windows NT
operating syste ms. Read this guide to familiarize yourself wit h t he
system and its features. For specific information, see
Chapter 1, “Getting Started,” acquaints you with the system
hardware.
Chapter 2, “Understanding t he Software,” summarizes the
applications loaded on your system. Software included lets you
experience the full spectr um of the system, from creating vivid
multimedia presentations to access ing t he Int er net .
Chapte r 3, “U sing S e tup and P owe r Manageme nt,” expl ains how t o
customize your notebook’s parameter and power management
settings.
Chapter 4, “Using Your NEC Versa Note,” describes the NEC Ver sa
Note features and functions. Yo u’ ll also master pr ocedur es for
connecting external options like a headphone, micro phone o r
speakers.
Chapter 5, “Using Multimedia,” det ails how to integrate video and
sou nd clip s into impr e ssiv e pre s entatio ns.
Chapter 6, “Traveling with Your NEC Versa Note,” lists valuable tips
for getting the most out of your system while on the road.
Chap ter 7, “Solving Proble ms ,” prov ides si mple solutions to common
problems that may arise while operat ing your notebook .
Appendix A, “Setting Up a Healthy Work Environment,” provides
guidelines to help promote a healthy work setting.
Appendix B, “Specifications,” reviews NEC Versa Note system
specifications.
Using This Guide ix
Page 8
Appendix C, “Getting Services and Support,” describes the variety of
services available for you when you need help with your system.
Text Setup
To make this guide easy to use, text is set up in the following ways.
Warnings, caut ions, and notes have the following format:
Warnings alert you to situations that could result i n
serious personal injury or loss of life.
Cautions indi c ate situations that can damage the
system hardware or software.
informati on on whatever is being described.
Note:
WA RNING
CAUTION
Notes give particularl y important
Names of keys are printed as they appear on the keyboard, for
example,
Text that you must type or keys that you must pr ess are pr esented in
bold type. For example, type
x Using This Guide
Ctrl, Alt
, or
Enter
.
dir
and press
Enter
.
Page 9

Related Documents
See the following documents for additional information on your NEC
Versa Note notebook computer:
The NEC Versa Note Quick Setup sheet helps you get your system up
and running.
The NEC Versa Note Quick Referen ce car d pro v ides an easy-to-carry
reference to LED meanings, cont ro ls, funct ion key combinations, and
NEC help numbers.
The NEC Versa Note User’s Guide is a fully navigat ional, HTML-
based document containing a full search capability and all of the
information about your NEC Versa Note that you find in this printed
user’s guide, and more. This is insta llable fro m the Applications and
Drivers CD t hat ships with the syst em.
Using This Guide xi
Page 10

Getting Started
Your NEC Versa Note
Around the Front of the System
Around the Back of the System
Around the Left Side of the System
Around the Right Side of the System
Around the Bottom of the System
NEC Versa Note Power Sources
Internal Batteries
1
System Care
Important Safety Instructions
German Language Version of Import ant S afety
Instructions
`
Page 11

Your NEC Versa Note
WA RNING
Prolonged or improper use of a c om puter
workstation may pose a risk of serious injury. To
reduce your risk of i njur y, set up and use your
computer in the manner described in Appendix A,
Setting Up a Healthy Work Envir onm ent.
After completing the st eps in the qu ick setup sheet that comes with your
computer, your NEC Versa Note system is ready to go! To get started:
Read Appendix A, Setting Up a Healthy Work Environment, for
guidelines that help you use your computer productively and safely.
Information includes how to set up and use your co mputer to reduce
your risk of develop ing nerve, muscle, or tendon disorders.
Read through this guide to familiarize yourself with t he NEC Ver sa
Note.
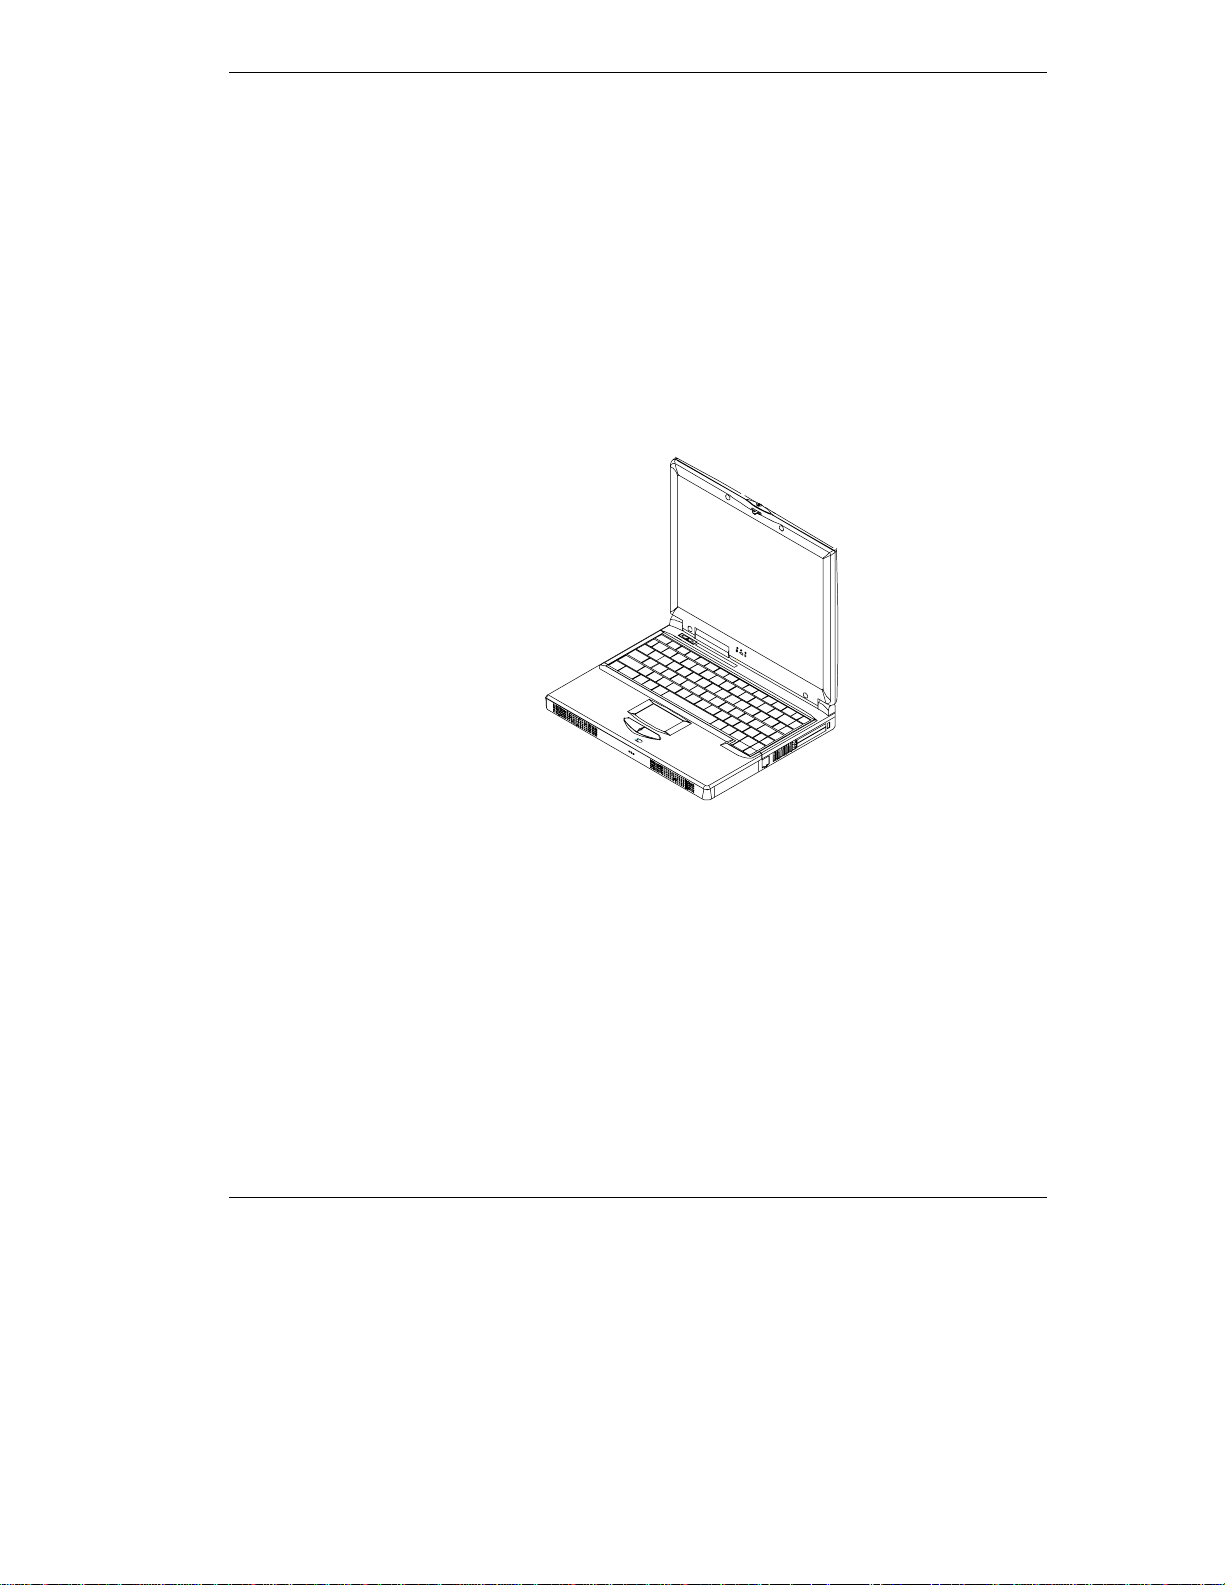
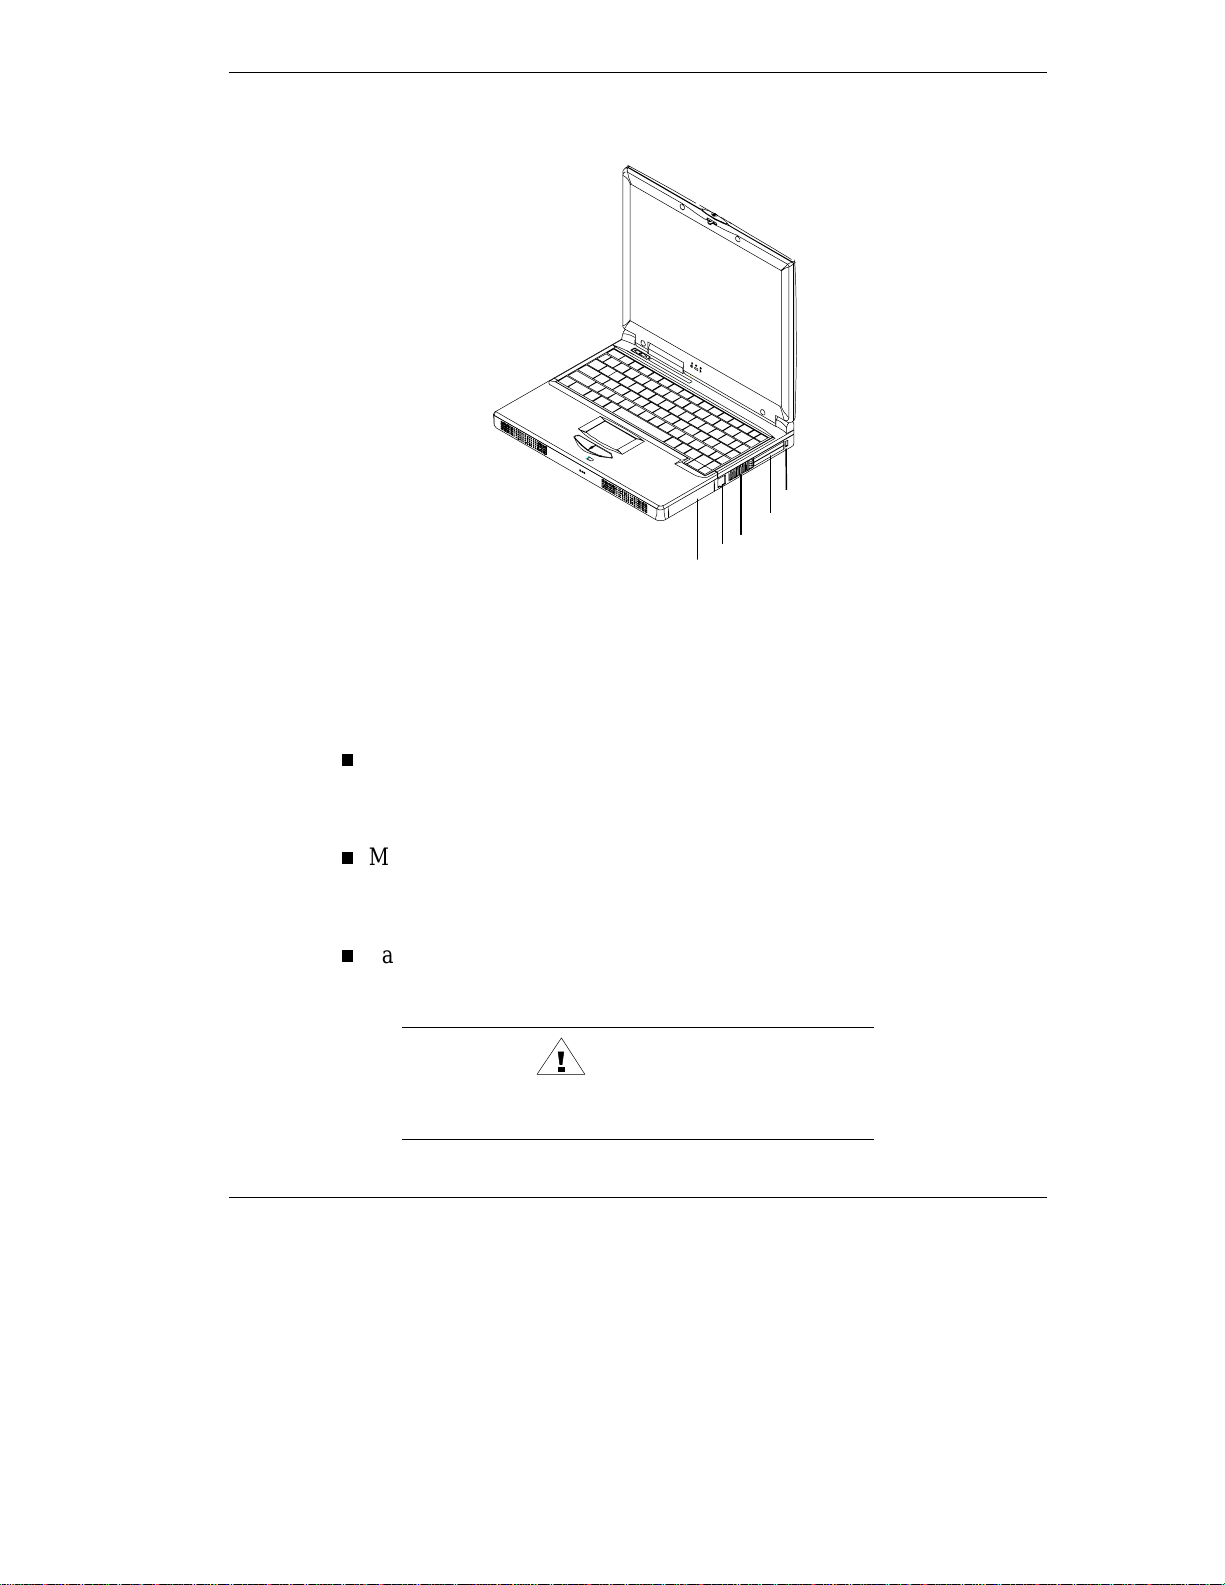
The NEC Versa Note notebook computer offers you a portable system
filled with exciting resources for home, business or travel. Standard
features include a powerful Intel® Pentium microproces s or that works
together with the latest Peripheral Component Interconnect (PCI)
architecture. Depending on the model, your NEC Versa Note is equipped
with one of the following processors: Pentium Tillamook or Pentium II.
1-2 Getting Started
Page 12
In addition, your all-in-one system provides a hig h-performance hard
disk drive, diskette drive, 20X or 24X CD-ROM, PC card slots, and a
V.90-compliant 56 kilobits per second (Kbps) modem (modem only
available on some models). As a multimed ia syst em, your NEC Versa
Note provides the tools needed to create and present impress ive images
using video clips and sound.
To get comfortable with your notebook, read the following sections and
take a tour around your system!
NEC Versa Note notebook computer
Getting Started 1-3
Page 13
Around the Front of the System
The NEC Versa Note is compact with features on every side. First , loo k
at the front of the system. The following sections describe front featur es,
beginning with the liquid crystal display (LCD) panel.
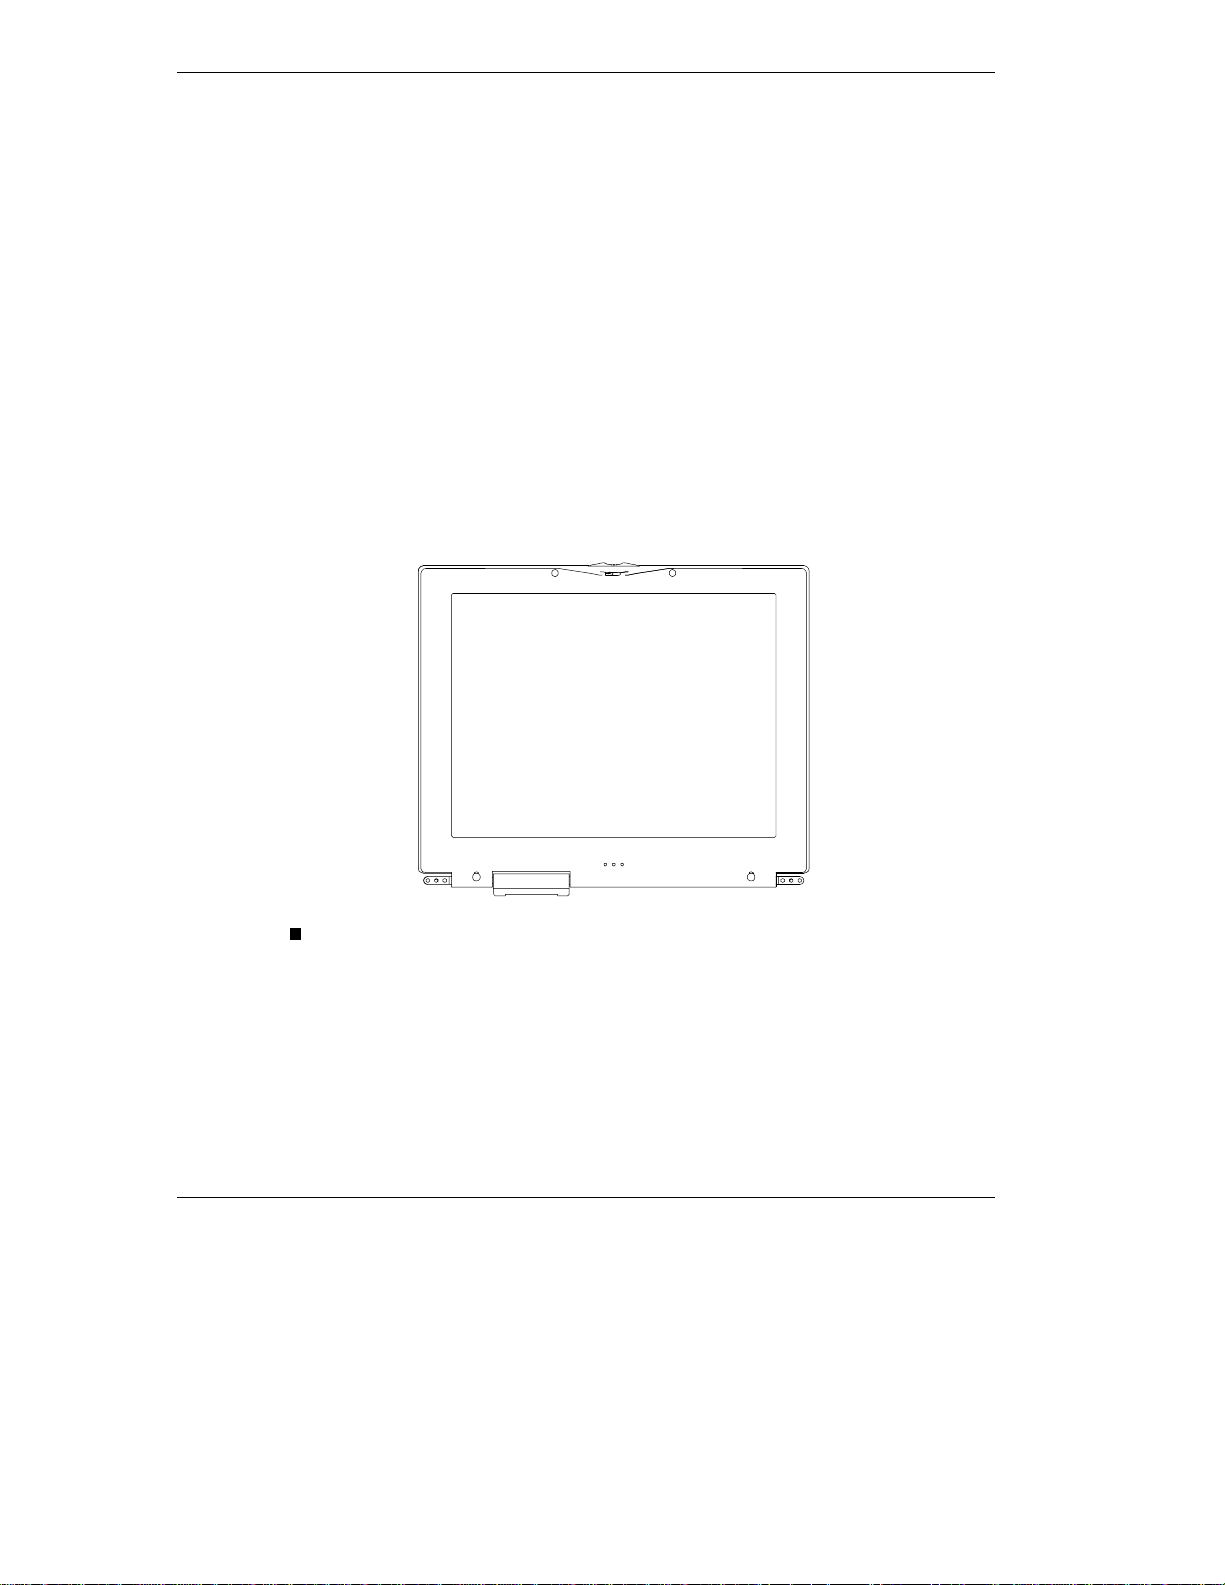
LCD Panel
The NEC Versa Note comes with a color LCD panel that you can adjust
for a comfortable viewing position. The LCD panel can be a
12.1-inch Dual Scan Super-Twisted Nematic (DSTN) or Thin Film
Transistor (TFT), Super Video Graphics Array (SVGA) color display, or
a 13.3-inch TFT, Extended Graphics Arra y (XGA). The features of the
LCD panel are described after the figure.
LCD panel
Power and Suspend Status LE Ds — (identified by icons) are locat ed
just under the front of the LCD panel. The stat us LE Ds ar e duplicated
on the back of the LCD panel to allow viewing when the panel is
closed.
1-4 Getting Started
Page 14

Power and Sus pend LEDs
❶
1. Power LED 2. Battery Charging LED 3. Suspend Mode LED
Power LED — lets you know that power to the system is turned
❷
❸
on. This LED is positioned so that you see the power state
whether the LCD panel is opened or closed.
– Lights green when the system is powered on using the AC
adapter, battery, or Power Xtender™ Auto adapt er.
– Lights green when on a nd has normal ba ttery power. Lights
yellow when on and low (8% to 4%) battery power. Lights
amber when in Suspend mode and very low (3% or less)
battery power.
Battery Charging LED — lights to indicate batt er y charging
status.
– Lights amber to indicate the battery is charging.
– Lights off to indicate the battery is fully charged.
Suspend Mode LED — is on when the system is in Standby
mode, blinks in Suspend mode and off in full on or Power off
mode.
Getting Started 1-5
Page 15
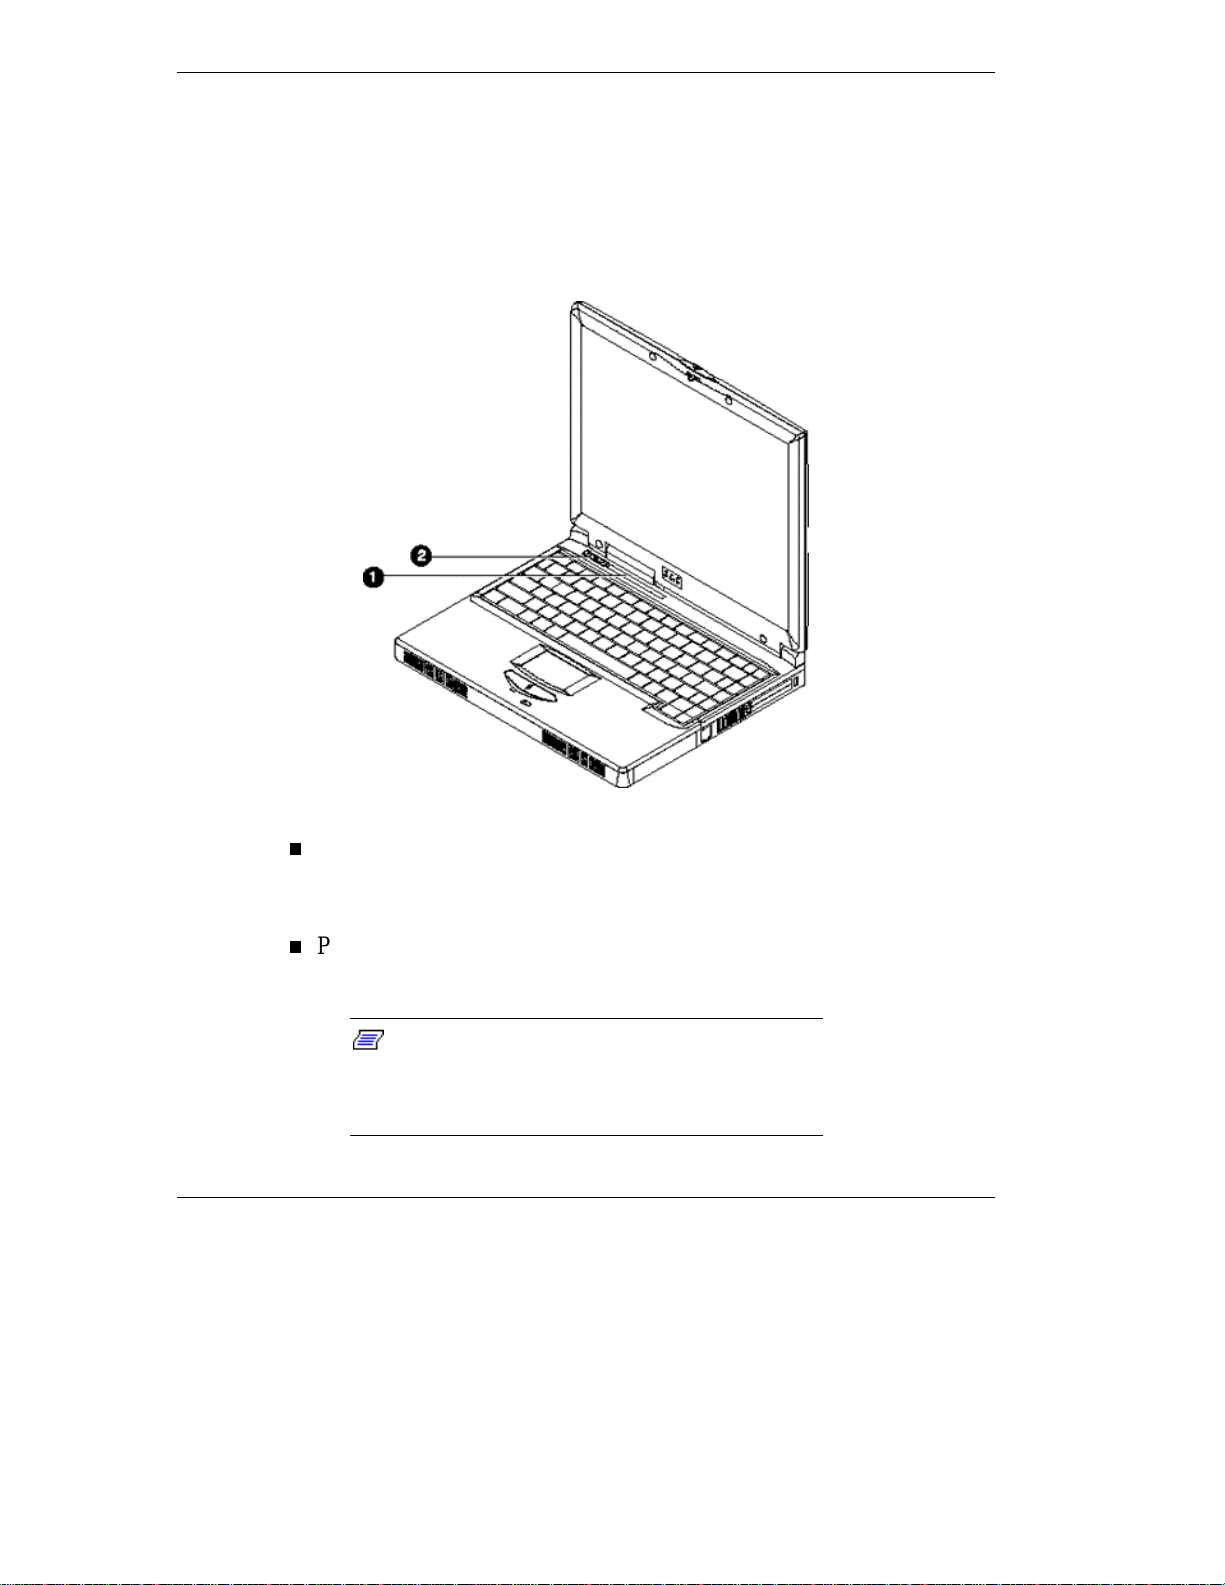
Control Panel
The NEC Versa Note control panel provides the features s ho wn in the
following figure. The control panel features ar e described after the
figure.
Control Panel
1. Status LEDs 2. Power Button
Status LEDs — keep you informed of your NEC Versa Note’s current
operating status. Descriptions of the status icons appear in the
following sect ion.
Power Button — press the Power button either to power on or power
off the system.
system, use the power overr ide. Press the Power
button and hold it in pl ac e until t he system power s
off.
1-6 Getting Started
Note:
If you are unable to power off the
Page 16

Status Icons
The NEC Versa Note syste m uses st atus lights marked with icons to
communicate syst em status. See the following figure and list for each
icon ’s me a nin g.
Status LED ic ons
❶
1. Hard Drive Access 2. Diskette Drive Access
3. Caps Lock 4. Scroll Lock
5. Num Lock
Hard Drive Access — light s when t he NEC Ver sa Note accesses the
❷
❸
❹
❺
hard disk drive .
Diskette Drive Access — lights when the NEC Versa Note writes
data to or retrieves data from the diskette drive.
Caps Lock — lights when caps lock is in effect .
Scr oll Lock — lig hts when scr oll lo c k is in effect.
Num Lock — li gh ts wh en Num Lock mode is a ctive.
Getting Started 1-7
Page 17
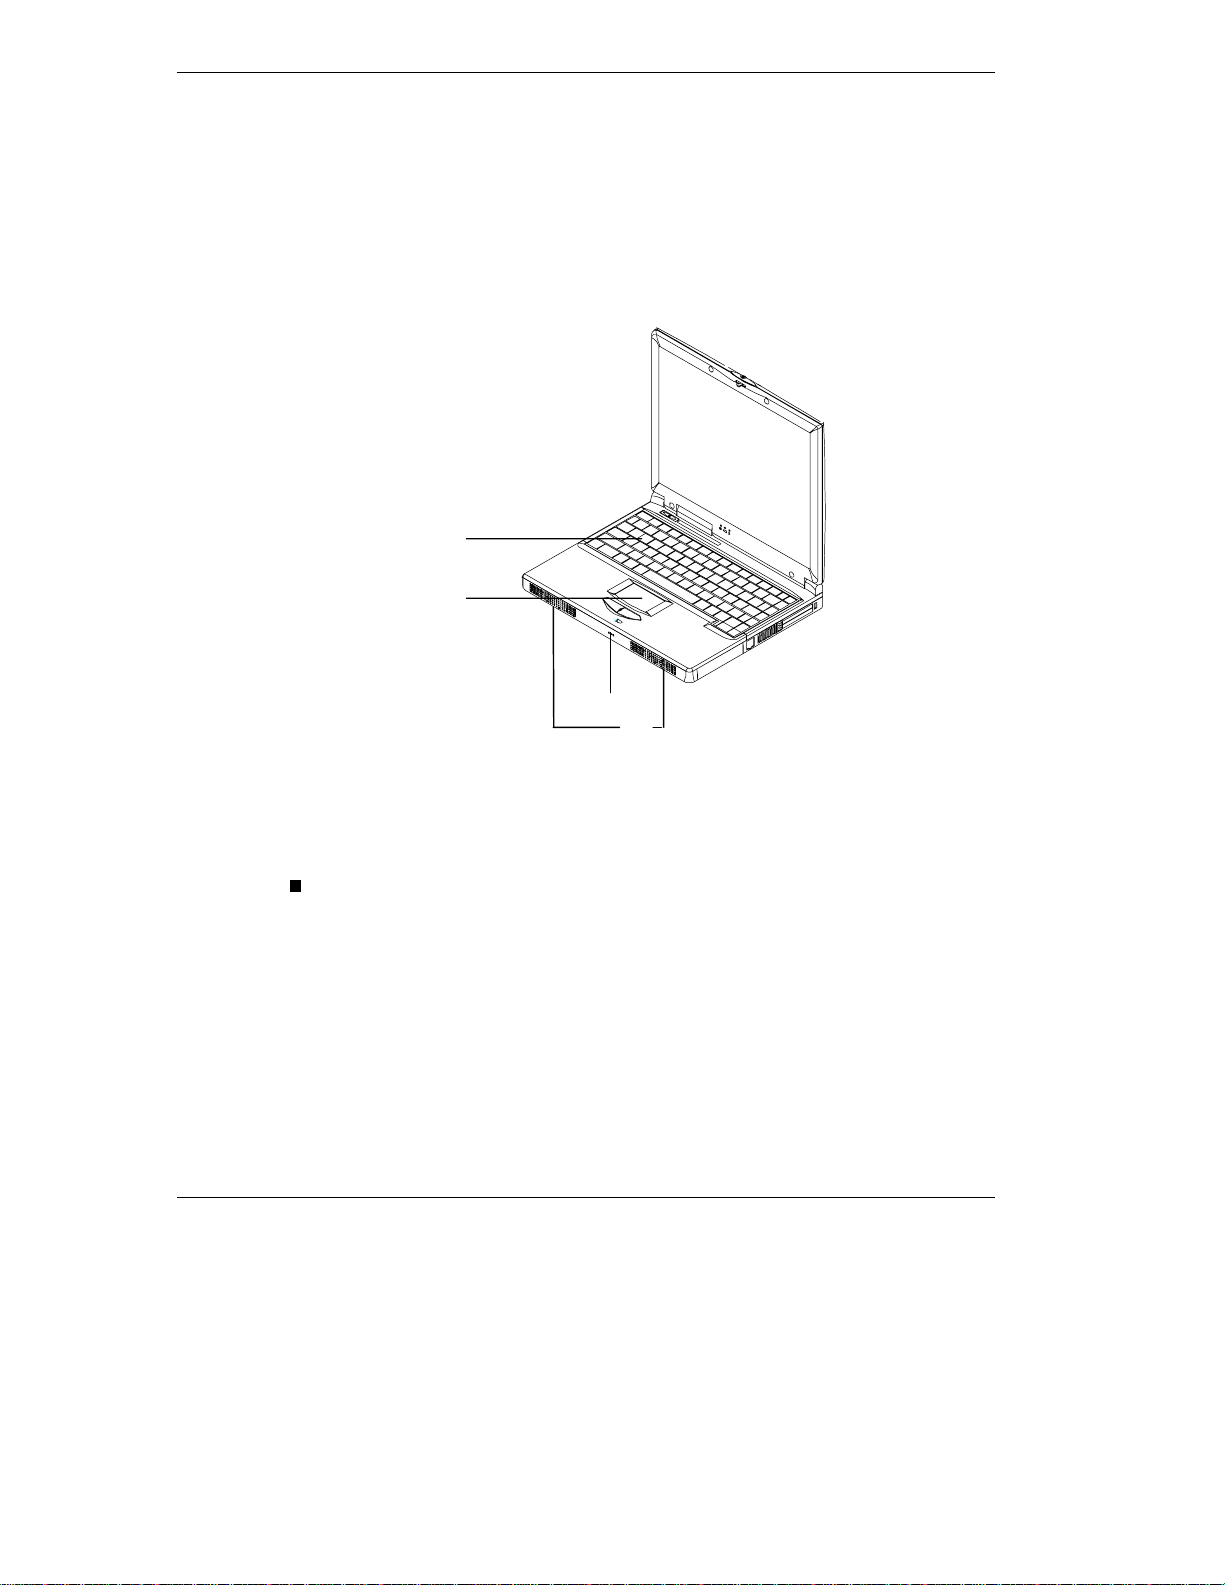
Keyboard Panel and Base Unit
The NEC Versa Note keyboard panel and base unit contain the following
features. The keyboard panel and base unit features are described after
the figure.
Keyboar d Pa nel an d Base Unit
❶
❷
1. Keyboard 2. NEC VersaGlide
3. Microphone 4. Built-in Speakers
Keyboard — standard QWERTY-key layout. See “Using the
Keyboard” in Chapter 4 for details abo ut control ke ys , fu nct ion ke ys ,
and keyboard features. (Models shipped outside of the U.S. are
equipped with country-specific keyboard layouts.)
1-8 Getting Started
❸
❹
Page 18
NEC VersaGlide — work s like a standard computer mouse. Simply
move your fingertip over the VersaGlide to co ntrol the pos it ion of the
cursor. Use the selection buttons below t he VersaG lide t o select menu
items. See “NEC VersaGlide” in C hapt er 4 for informat ion abo ut
customizing Ve rsaGlid e settings .
Microphone — allows you to record monophonic sound directly into
your notebook computer. See Chapter 5, “Using Multimedia,” for
details a bout reco rding.
Built-in Stereo S peaker s — provides st ereo sound for your
multimedia prese ntations or listenin g ple a s ure.
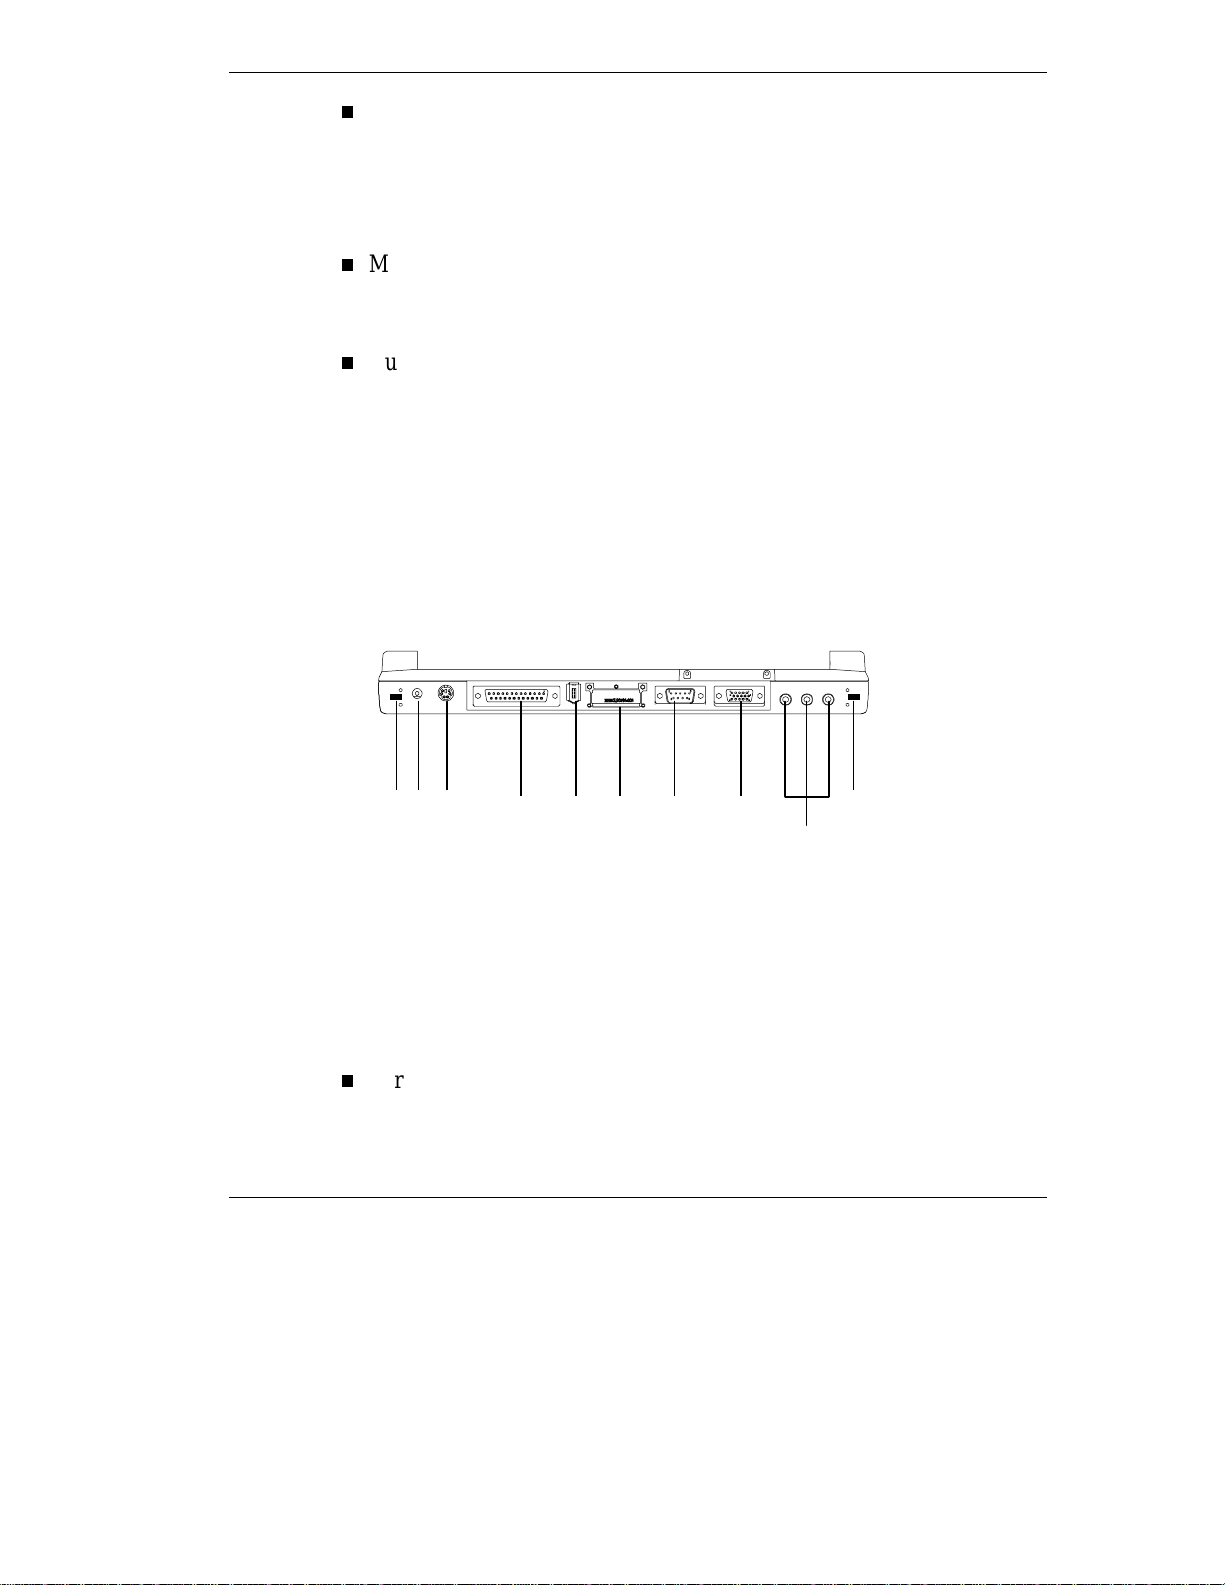
Around the Back of the System
You’ll find system ports for connecting your NE C Versa Note to
optional devices (like a printer or exter nal monito r ) on the back of your
NEC Versa Note. The ports are described after the figure.
Back system features
❶ ❷ ❸ ❶
1. PortBar Notches 2. AC Power Port
3. PS/2 Port 4. Parallel Port
5. USB Port 6. Expansion Port
7. Serial Port 8. Monitor (Video) Port
9. Audio Ports (From left to right): Microphone, Line In & Headphones
PortBar Not ches — Use t hese notches to secure the PortBar to the
❹ ❺ ❻ ❼ ❽
❾
back of the system. (There ar e t wo Port Bar notches located at the
both ends of the rear side of the syste m.)
Getting Started 1-9
Page 19
AC Power Port — Lets you attach the NEC Versa Note to the AC
power source using the AC adapter that comes with your system.
Keep the system connected to AC power whenever poss ible to keep
the battery pack and internal CMOS battery charged.
PS/2 Port — Use the standard PS/2 port to connect an external PS/2-
style mouse, PS/2-style keyboard, or PS/2 style Numeric Keypad to
the system. With an optional Y adapter, you can connect up to two of
these devices at the sa me time.
Parallel Port — Use this port to connect a parallel printer or other
parallel device. The parallel port default supports the Enhanced
Capabilities Port (ECP) standard. The port also supports bi-directional
and output only protocols.
Note:
on your NEC Versa Note is set to Enhanced
Capabilities Port (ECP). Some older parallel devic es
may not function with the ECP default setting. You
may need to adjust the setting to accommodate your
parallel devic e. F ollow the instructions in Chapter 3,
“Using Setup and Power Managem ent,” to adjust the
setting.
The default setting for the parallel port
USB Port — The Universal Serial Bus (USB) port allows you to
connect up to 127 USB-equipped peripheral devices (for example,
printers, monitors, scanners) to your NEC Versa Note.
Expa ns ion Po rt — Use this port to connect the NEC PortBa r.
Serial Port — Use this port to connect a serial printer or other serial
device.
Monitor (Video) Port — Use this 15-pin port to attach an external
monitor to your NEC Versa Note. You can run the LCD display and
the external monitor simultaneous l y or ru n either alone.
1-10 Getting Started
Page 20
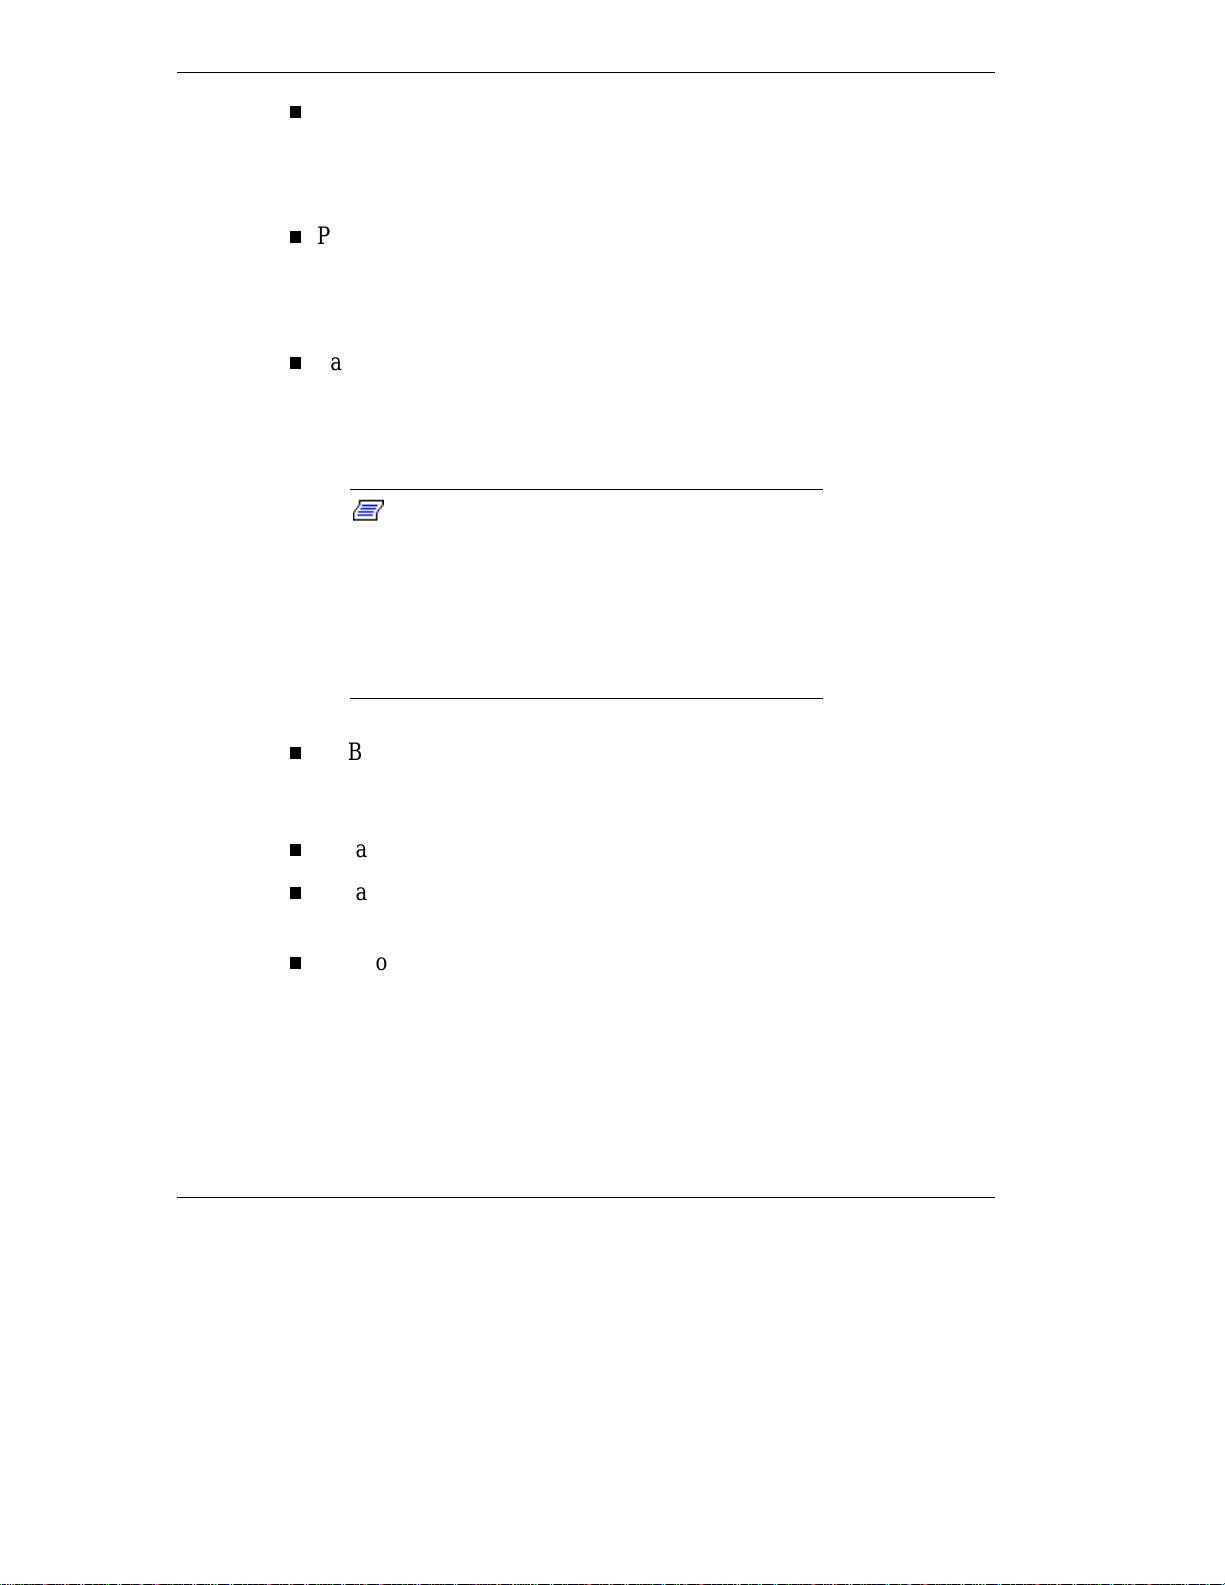
Audio Ports
Microphone — Allo ws you to conn ect an external mic rophone for
monophonic recording or amplification through the unit. Plugging
in an exte rnal micro phone disa bles the built -in microphone.
Line In — Lets you use another audio system, like a home stereo,
as an input source. Use a cable to connect to the Line-Out port on
the other audio system to record or play.
Headphones — Lets you plug in stereo headphones or powered
speakers.
Around the Left Side of the System
The left side of your NEC Versa Note pro vides the featur es sho wn in the
following figure. The left side features are described after the figure.
Left side features
❶
❷
1. IR Port 2. Volume Control
3. CD-ROM Reader 4. Diskette Drive
❹
❸
Getting Started 1-11
Page 21

IR Port — Use this port to transfer files between your NEC Versa
Note and an IR-equipped desktop or notebook computer. You can
also print to an IR-equipped printer without using cables. Use the
IRMON utility in Windows 98 with your IR-equipped printer. With
Windows 95/NT, make sure the IR port is set properly in BIOS to use
your system with an IR-equipped printer.
Volume Contr ol — Allows you to contr ol th e speaker volume
thro ugh the thumb wheel.
CD-ROM Reader — Allows you to load and start progr ams from a
compact disc (CD) and play audio CDs. See Chapter 4, “Using Your
NEC Versa Note Computer,” for details about using the CD-ROM
reader.
Diskette Drive — A 3.5-inch, 1.44-MB diskett e drive comes installed
in the NEC Versa Note system. The drive accepts 1.44-MB highdensity diskettes as well as 720-KB double-sided double-density
diskettes.
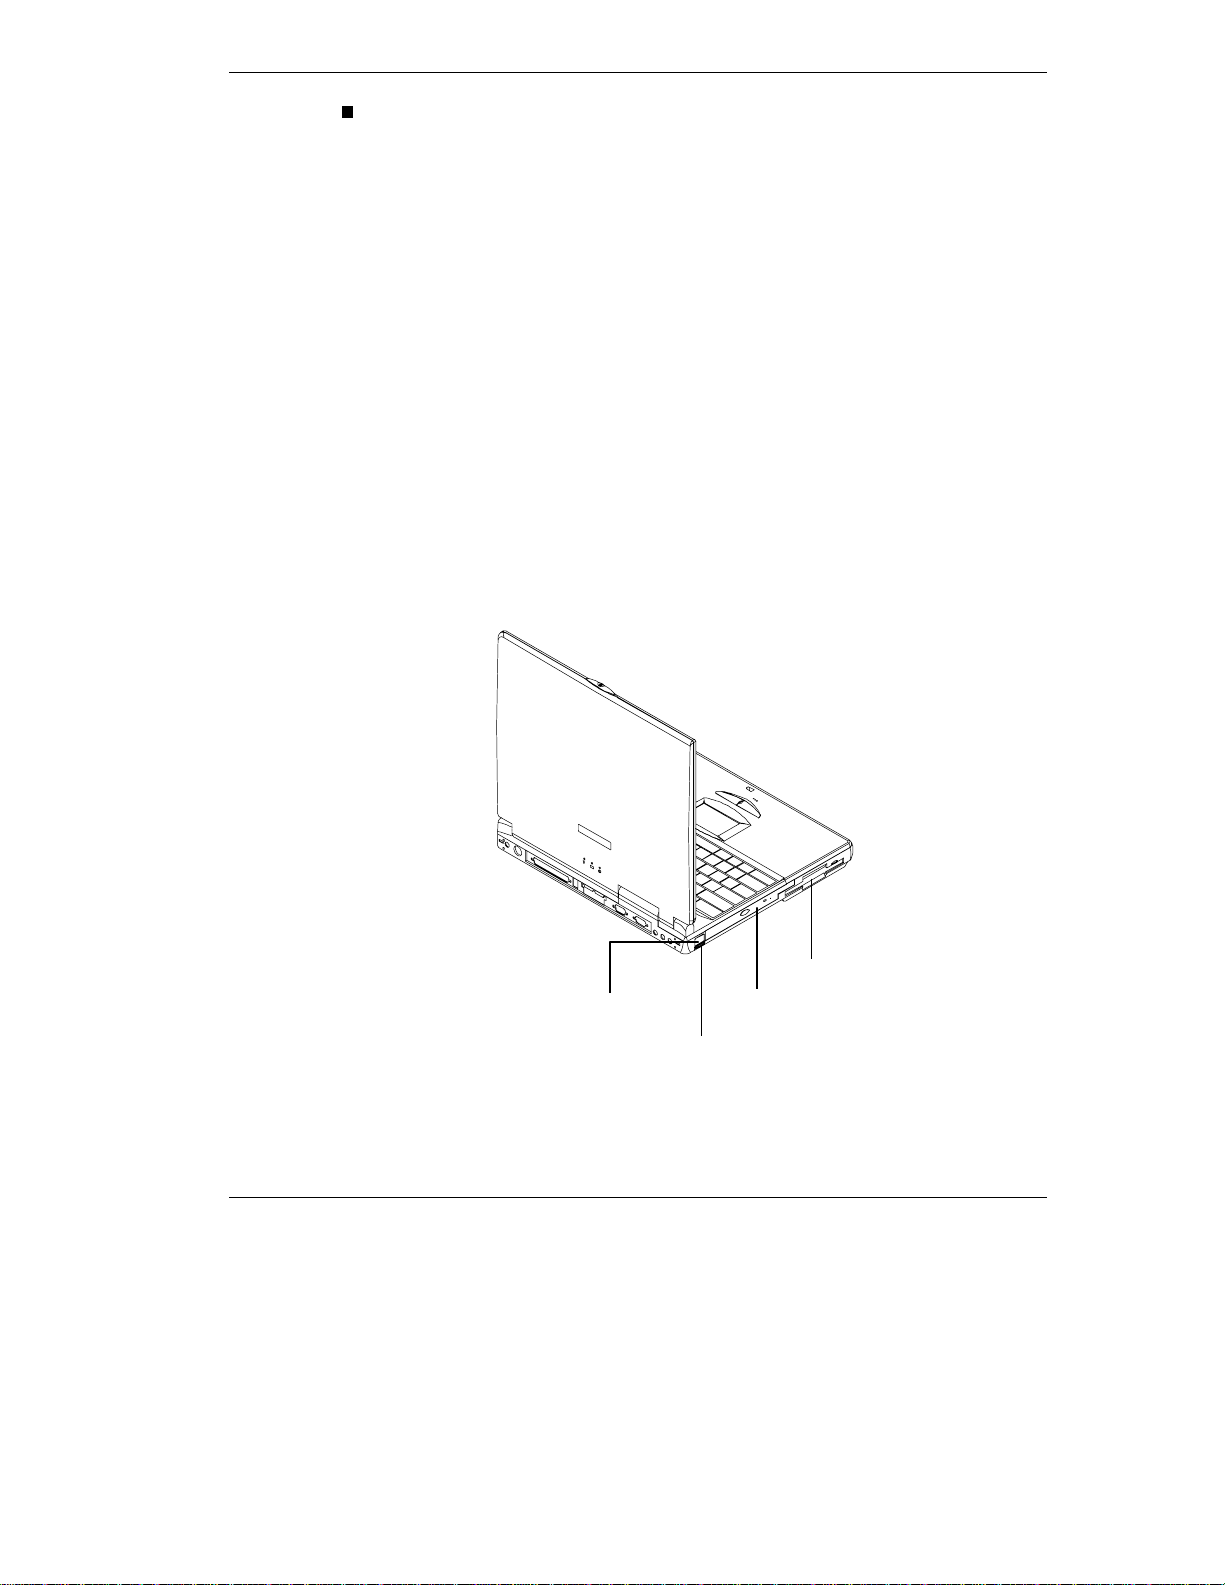
Around the Right Side of the System
The right side of the NEC Versa Note offers the features shown in the
following figure. The right side features are described after the figure.
1-12 Getting Started
Page 22
Right side features
1. Battery Bay 2. Modem Port
3. Fan 4. PC Card Slots
5. Kensington Lock
❺
❹
❸
❷
❶
Battery Bay — Depending upon the model, the battery bay contains a
rechargeable Nickel-Metal-Hydride (NiMH) or Lithium-Ion (Li-Ion)
battery pack.
Modem Port (modem only available on some models) — NEC
includes a 56K internal voice/fax/data modem. It keeps you
connected to the outside world!
Fan — Allows your system to cool properly and maintain a safe
operating environment.
CAUTION
Do not block the fan while the NEC Versa Note is in
use.
Getting Started 1-13
Page 23

PC Card Slots — Two PC card slots allow you to insert two Type II
PC cards or one Type III PC card in the bottom slot. Card BUS cards
are supported and Zoom Video is supported in the top slot.
Kensington Lock — Lets you provide added secur ity by installing an
optional Kensington Lock.
Around the Bottom of the System
The bottom of the NEC Versa Note offers the following features. The
features are descr ibed after the figure.
Bottom of the system
1. Battery Bay 2. Battery Release Latch
3. Memory Module Bay Cover 4. Tilt Foot
Battery Bay — Equipped with a rechargeable Nickel-Metal-Hydride
(NiMH) or (depending on the model) Lithium-Ion (Li-Ion) battery.
Battery Release Latch — Slide the latch to the ot her end and hold it.
While holding the latch, slide the battery bay outwards to remove the
battery.
1-14 Getting Started
Page 24
Memory Module Bay Cover — Remove the screw to find two
SO-DIMM slots. One is inserted with SDRAM memory board
configured by the factory. The other is empty for upgrade use.
Tilt Foot — Adjust to provide flexible keyboard angle.
NEC Versa Note Power Sources
The NEC Versa Note can be powered using different sources, making it
a truly portable system. Operat e your NE C Ver sa Not e syst em just about
anywhere using one of the following power sources:
the AC adapter connected to an electrical wall outlet (using AC
power).
the battery pack.
the PowerXtender Auto Adapter.
Read the following sections for specific steps on powering on the
system.
Using the AC Adapter
Use the AC adapter and power cable that came with your NEC Versa
Note to run your computer on alternating current (AC) power, or to
recharge the battery pack. Use the AC adapter whenever a wa ll outlet is
nearby.
WA RNING
Do not attempt to disassembl e the AC adapter. The
AC adapter has no user-replaceable or serviceable
parts inside. Dangerous voltage in the AC adapter
can cause serious personal injury or death. The AC
adapter is int ended for use with a computer. Both
must meet EN60950 standards.
When connected, the AC adapter charges the battery whether or not the
NEC Versa Note is powered on.
Getting Started 1-15
Page 25
Note:
range of 100–240 Volt s AC. Verify that the cord and
plug are appropri ate for your AC source.
The AC outlet voltage should be in the
Connect the AC adapter as follows:
CAUTION
Use only the AC adapter that comes with your NE C
Versa Note system. Although other AC adapters
may look similar, usi ng them can damage the
system.
1.
Connect the AC adapter cable to t he power port o n the rear side of
your NEC Versa Note system.
2.
Plug one end of the AC power cable into the AC adapter and the
other end into a 120- or 240-volt wall outlet.
WA RNING
Do not cover or place objects on the AC adapter.
Doing so can cause the adapter to ov er heat.
Powering On / Off
To power on, locate the Po wer butto n on the left hand side of the co nt ro l
panel above the keyboard and press it. To power off the syste m, press
the Power button. In Windows, the computer auto mat ically shuts down,
when “Shut Down” is selected from the Start menu. That is, you do not
need to press the Power butto n to switch off the computer.
1-16 Getting Started
Page 26
Using the Battery Pack
The NEC Versa Note system co mes with a rechargea ble N ickel MetalHydride (NiMH) or Lithium-Ion (Li-Ion) battery pack. You can run your
system on battery power for approximately 2.5 hours with power
management features ena bled. Bat tery packs are easy to insta ll and
remove.
Note:
the factory, transi t and shelf time may reduce the
initial batt er y charge. We recommend that the first
time you use your system, connect it to AC power
using the AC adapter. This also rechar ges your
battery.
When battery power drop s to the level where t he Batt er y Warning is
activated, the power LED lights yellow.
When battery power reaches 8%, the power LED lights amber and the
system beeps a warning and the system goes into Suspend/Save to File
mode.
Although the battery is fully charged at
Replacing the Battery Pack
Install the battery pack in your system as follows:
Be sure to save your data before r eplac ing the
battery pack or connecting the AC adapter. Failure
to do so can result in data loss.
1.
If your system is on, save your data, power down the system.
2.
Close the LCD and turn the system over.
3.
Release the batt er y bay latc h, slide the battery away from the system,
and l i ft it o ff.
CAUTION
Getting Started 1-17
Page 27
Align the terminals on t he new batter y with the ter minal co nnect or in
4.
the bay. Insert the battery into the bay, until the battery bay latch
locks the battery in place.
Press down on the batt er y to secure the ter minal connection.
5.
6.
Turn the system over and press the Power button to power on the
system.
When Battery Power is Low
When battery power gets low, connect your syst em to the AC adapter. I f
an AC adapter is not available, change the battery pack using the
Replace Batt er y Pack procedure. See the section, “Replacing the Battery
Pack.”
To prevent accidental battery ignition or explosion,
adhere to the following:
Keep the battery away f r om extreme heat.
Keep metal objects away fr om the bat tery terminals
to prevent a short cir c uit.
WA RNING
Make sure the battery i s properly installed in the
battery bay.
Read the precauti ons printed on the battery.
1-18 Getting Started
Page 28
Battery Handling
Review the following before handling the system batt er y.
Use the NiMH or Li-Ion batteries only in the NEC
Versa Note comput er for which they are designed.
Mixing other NEC Versa Note batt er ies, other
manufacturer’s batteries, or using a combination of
very old and new batteries can det er iorate battery
and equipment perf ormance.
Turn off power to the system after use.
Clean the battery terminals with a dry cloth if they get dirty.
When not in use, store the batter y in a cool dry area.
The following symptoms indicate that battery life is nearing an end.
Discard batter ies that disp la y these sy mpt oms:
shorter work times
CAUTION
discoloration, warping
hot to the touch
strange odor.
Battery Lif e
The NEC Versa Note NiMH or Li-Ion battery has an approximate life of
2.5 hours under the following co ndit ions:
When it is new and fully charged.
When no peripherals are connect ed to your NE C Versa Note.
When you have no options installed.
Enabling power management features increases battery life.
Getting Started 1-19
Page 29

Extending Battery Life
While on the road, it is important to be aware of the simple things you
can do to extend the life of the system’s main batter y. Turning down the
screen brig htness (
Press
Fn + F7
to toggle through different power management modes and
ext e nd batt ery life. Cha pte r 3 “Using Setup and Pow er Management”
gives details about po wer management featur es and t he modes available.
Battery Charging
Charge time depends on whether or not you are using the system. There
are two ways to charge your battery while it is installed in the NEC
Versa Note:
When the system is off or in Suspend mode and the AC adapter is
connected, charge time is approximate ly 3 hours.
When the system is powered on and the AC adapter is connected,
charge time is approximately 4 hours.
For maximum battery performance, fully discharge the battery before
recharging it. To do so, unplug the AC adapter, turn off power
management features (throug h B IOS S e tup (
power management), and turn on the system. Once the battery is fully
discharged, plug in the AC adapter and recharge the battery.
Fn + F9)
and contrast (
Fn + F11)
Fn + F7
extends battery life.
) and Windows
If you do not discharge the battery completely, it not only fails to accept
a full recharge, but also sends inco r r ect information to the Battery Gauge
utility. The utility may indicate that you have plenty of battery power
when you actu ally have ve ry litt le. Th is c an re s ult in d ata loss w hen the
battery suddenly dies.
The warning beep that sounds when battery power becomes critically
low is always a true indicator that battery power is low. Be sure to save
your data when you hear the beep and take proper steps to provide power
to your system.
1-20 Getting Started
Page 30

Battery Precautions
To prevent accidental battery ignition, rupture, or explosion, adhere to
the following precautions.
There is a danger of explosi on if t he batt er y is
incorrectl y replaced. Replace only with the same or
equivalent type r ec ommended by the manufacturer.
Discard used batteri es accor ding to the
manufacturer’s i nstr uc tions.
Keep the battery away f r om heat sources i nc luding
direct sunlight, open fires, microwave ovens, and
high-voltage containers. Temperatures over 60ºC
(140ºF) may cause dam age.
Do not drop or impact the batter y .
Do not disassembl e the batter y .
Do not solder the battery .
Do not puncture the batt er y.
Do not use a battery that appears damaged or
deformed, has any rust on its casing, is discolored,
overheats, or emits a foul odor .
WA RNING
Keep the battery dry and away fr om water.
Keep metal objects away fr om batt er y termi nals.
Metal object s in cont act with the terminals can
cause a short circuit and dam age.
If the battery leaks onto ski n or cl othing, wash the
area immediately . Batt er y fluid can cause a skin
rash and damage fabri c.
If battery fl uid gets in eyes, DO NOT rub; rinse with
clear water immediately and see a doctor.
Battery Disposal
Before disposing of the battery, put adhesive tape on the terminals.
Depending upon the NEC Versa Note model, the main battery is made of
Nickel Metal-Hydride (NiMH) or Lithium-Ion (Li-Ion).
Getting Started 1-21
Page 31

Contact your loca l wast e management officials for in formation regarding
environmentally sound collection, recycling, and disposal of batteries.
Internal Batteries
The Nickel Metal-Hydride or Lithium-Ion battery is the main power
source in your NEC Versa Note computer. Appendix B lists battery
specifications. I n add it ion to the main battery, the CMOS battery
provides power to maintain system configuration settings.
CMOS Battery
This battery provides battery backup and prevents data loss in the
system’s complementary metal-o xide semiconductor ( CMOS ) RAM.
This memory area contains information on the system’s configuration,
for example, date, time, dr ives, a nd memor y. The CMOS battery lasts
approximately two years. An author ized NEC service t echnic ian can
replace the CMOS battery for you.
1-22 Getting Started
Page 32

CAUTION
This equipment uses an ungrounded power
cable. Replace the cord if it becomes dam aged.
U.S. and Canadian repl acement cords must be
UL-approved (CSA certified in Canada) type
SPT-2, 18 AWG, 2-conductor cord with a
permanently attached NEMA type 5-15P pl ug at
one end, and a permanentl y attached connector
body on the other. Cord l ength may not ex ceed
15 feet.
Outside the U.S. and Canada the cor d must be
rated for at least 250VAC at 10 amps, and must
indicate international safety agency approval.
The plug must be a type appropriate for the
country where it is used. Check wit h your local
dealer for HAR type 18 AWG, 2 conductor cord,
or better. (Reference the booklet, “Getting
Service and Support for Asia, Australia, and
Europe” to find out how to contact the local
office in your country.)
Obtain replacement cords at an authorized
service center. T he replacement m ust be of the
same type and voltage rating as the original
cord.
Disconnect all supply lines before the hinged
front cover is removed. Replace the hinged
cover before the unit is restarted.
System Care
Storage Requirements
Store the computer and AC adapter in an environment that meets the
following co ndit ions:
Maintain storage temperatures between –4ºF to 104ºF (–20ºC to
40ºC).
Getting Started 1-23
Page 33

If the temperat ur e of the NEC Ver sa Note suddenl y
rises or falls (for ex am ple, when you m ov e the
system from a warm place to a cold place) v apor
condenses inside t he system. Turning on the system
under this condition can damage the internal system
components.
Before turning on t he system, wait until the system’s
internal tem per ature equalizes with the new
environment and any internal moisture can
evaporate.
Keep the storage area free from vibration and magnetic fields.
Keep the system and its compone nt s away from organic solvents or
corro sive gases.
Avoid leaving the system and its components in direct sunlight or
near heat sources.
Routine Cleaning
Clean or dust your system as follows.
CAUTION
Never use harsh solutions, househ old cleaners, or
spray cleaners that contain caustic material s on the
NEC Versa Note. These cl eaner s are usually high in
alkalinit y which is measured in pH. Using these
cleaners can cause the plastic surface to crack or
discolor.
LCD screen — Carefully wipe the LCD screen with a soft cloth or a
screen wipe desig n ed for that purpo se. Special screen wipes are
available through your local computer dealer.
System case — NEC recommends that you carefully wipe the case
wit h a slightly damp, almost d ry cloth.
1-24 Getting Started
CAUTION
Page 34

Important Safety Instructions
The NEC Versa Note is a durable, dependable system built for extensive
use and travel. Follow these gu idelines to maintain the condition,
performance and safety of your computer. Please read these safety
instruct ions carefu lly and keep t his User’s Guide for reference.
CAUTION
Immediatel y turn off and unplug the NEC Versa
Note under the following conditions:
The power cord is damaged or fray ed.
Liquid spills on or into the NEC Versa Note.
System is dropped or casing is damaged.
Precautions
Follow these precautions whe n using your NEC Versa Note and AC
adapter. Always follow all cautions and warnings.
Avoid dropping or bumping the computer or the AC adapter.
Do not stack heavy objects on the computer, the AC adapter, or the
battery packs.
Do not place items near the NEC Versa Note that could block air
vents and cause overheating.
Use the NEC Versa Note on a level surface and avoid moving the
NEC Versa Note during system operat ion, espec ially while t he hard
disk, diskett e drive, or CD-ROM reader is being accessed.
When using the AC adapter, make sure the power source falls within
the system’s compatible range of 100–240 volts AC. Never use the
AC adapter if the voltage falls outside of this range. (Watch for this
when traveling to other countries.)
Getting Started 1-25
Page 35

Turn computer power off before attaching or removing non-plug and
play devices.
Disconnect the not ebook from the electrical outlet if it is not going to
be used for a long time. This will avoid damage by transient overvoltage.
Do not attempt to disassemble t he computer. For safety the computer
should be disassembled only by a qualified service person.
Do not pu s h any fore ign objects int o the NEC V ersa Note bays,
connectors, and slots.
Avoid using the computer or AC adapter for extended periods in
direct sunlight.
Do not use the system in humid or dusty environments.
Keep liquids and food away fro m the syst em.
Turn computer power off before cleaning it.
Avoid exposing the NEC Versa Note or AC adapter to extreme
changes in temperature or humidity. I f it is unavo idable, allow your
NEC Versa Note to adjust to roo m temperatur e befor e use.
When cleaning the system, use a soft, clean, dry cloth. Avoid wiping
the display surface with abrasive material, including rough fabric. Do
not use a cleaning solution, t h is may damage the notebook’s plastic.
If the AC adapter becomes extremely hot, unplug the adapter and let
it cool.
The electrical outlet and any extension cords should be rated to
support the total current load of all connected devices.
Be sure to follow these power cord safety tips:
Unplug by the plug only; do not pull on the cable.
Place the power cord so that it can not be tripped on, stepped on,
nor have items placed directly on the power cord.
Use an electrical outlet t hat is as close as possible to the computer.
1-26 Getting Started
Page 36

Do not use the IR port directly under fluorescent lighting, or near
flashing incandescent light.
If one of the following situations arises, have the noteboo k checked
by service personnel:
The power cord or plug is damaged.
Liquid has penetrated into the notebook.
The not eboo k has been exposed to moistur e.
The not eboo k has not wo rked well o r you c an no t get it to work
according to the user’s guide.
The notebook has been dropped and damaged.
If the notebook has an obvious sign of damage.
An ap proved p owe r cor d has t o be used for t he notebook’s powe r
supply. For a rated current up to 6A and an equipment weight more
than 3 kg, a power cord not lighter than H05VV-F, 2G, 0.75mm2, has
to be used.
The sound pressure level at the oper ato r ’s position according to IEC
704-1: 1982 is equal or less than 70dB(A).
Getting Started 1-27
Page 37

German Language Version of Important
Safety Instructions
The NEC Versa Note is an international noteboo k co mputer. This
section contains the German version of the Important Safety Instructions
from the prior sect ion.
Wichtige Hinweise Zur Sicherheit
Das NEC Versa Note ist ein langlebiges und zuverlässiges System, das
für häufige Verwendung und den Einsatz au f Reisen konzipiert wurde.
Befolgen Sie die nachstehenden Anweisungen, um die
Funktionsfähigkeit, die Leistungsfähigkeit und die Sicherheit Ihres
Computers zu gewährleisten. Les en Sie diese Hinweise zur Sicherheit
bitte aufmerksam durch und bewahren Sie diese Bedienungsanleitung
sorgfältig a uf, um jede rzeit darin nachle s en zu könn en.
ACHTUNG
Schalten Sie das NEC Versa Note in den
folgenden Fäll en sofort aus und ziehen S ie den
Stecker:
Wenn das Stromkabel beschädigt oder
durchgescheuert ist.
Wenn Flüssigkeit auf oder in das NEC Versa
Note geraten ist.
Wenn das Gerät fallen gelassen bzw. das
Gehäuse beschädigt wurde.
1-28 Getting Started
Page 38

Vorsichtsmaßnahmen
Halten Sie sich bei der Verwendung Ihres NEC Versa Note und des
Wechselstro madapters an die fo lgenden Vor s ichtsmaßnahmen.
Berücksichtigen Sie stets alle Hinweise und Warnungen.
Lassen Sie den Computer und den Wechselstromadapter nicht fallen
und setzten Sie die Geräte auch keinen Stößen aus.
Stellen Sie keine schweren Gegenst ände au f den Co mputer, auf den
Wechselstromadapter oder auf das Batterieladegerät .
Legen Sie in der Nähe des NEC Versa Note keine Gegenstände ab,
die die Lüftungsschlitze block iere n und ein Überhitzen des Ger äts
veru rsachen k önnten.
Verwenden Sie das NEC Versa Note auf einer ebenen Arbeitsfläche
und vermeiden Sie es, das NEC Versa Note während des Betriebs zu
bewegen, vor allem während auf die Fest platte, auf das
Diskettenlaufwerk oder auf das CD-ROM-Laufwerk zugegriffen
wird.
Wen n Sie den Wechs elstromadapte r verwenden, verg ewissern S ie
sich, daß die Stromversorgung dem Kompatibilitätsbereich des
Systems entspricht (100 – 240 Volt Wechselstrom). Verwenden Sie
den Wechselstromadapter niemals, wenn die Spannung nicht
innerhalb dieses Bereichs liegt. (Beachten Sie diesen Pu nkt
insbesondere bei Reisen ins Ausland.)
Schalten Sie Ihren Computer ab, bevor S ie „non-plug and play“-
Geräte anschließe n od er ent fernen.
Trennen Sie das Notebook von der Stromversorgung, wenn es über
einen lä ngeren Zeitraum nicht ve rwe ndet werd en wird . So könne n
Schä den aufgrund eine r kurzzeitigen Ü bersp annung ve rmiede n
werden.
Versuchen Sie nicht, den Computer zu demontieren. Aus Gründen
der Sicherheit sollte der Computer nur von qualifizierten
Servicetechnikern demontiert werden.
Stecken Sie keine Gegenstände in die Öffnungen, Anschlüsse und
Schlitze des NEC Versa Note.
Getting Started 1-29
Page 39

Vermeiden Sie es, den Computer oder den Wechselstromadapter
über längere Zeit hinweg bei direkter Sonneneinstrahlung zu
verwenden.
Verwenden Sie das System nicht in feuchten oder staubigen
Umgebungen.
Halten Sie Flüssigkeiten und Nahrungsmittel von Ihrem System fern.
Schalte n Sie d en Comput er ab, bevor Sie ihn reinigen.
Vermeiden Sie es, das NEC Versa Note oder den
Wechselstro madapter extr eme n Änderungen der T e mperat ur oder der
Luftfeuchtigkeit auszu setzen. Falls dies unverme idlich ist , lasse n S ie
Ihr NEC Versa Note sich vor der Verwendung an die
Raumtemperatur anpassen.
Verwenden Sie zum Reinigen des Systems e in weic he s, sauberes,
trockenes Tuch. Vermeiden Sie es, den Bildschirm mit scheuernden
Materialien - dazu gehört auch rauher Sto ff - abzuwischen.
Ver wenden Sie ke ine Re inigungslösung, diese kö nnte d en Ku ns tst off
Ihres Notebooks beschädigen.
Wenn der Wechselstromadapter extrem heiß wird, ziehen Sie den
Netzstecker und lassen Sie den Adapter abkühlen.
Der Stromanschluß und allfällige Verlängerungsstecker sollten so
ausgelegt sein, daß sie der gesamten Strombelastung aller
angeschlossenen Geräte entsprechen.
Stellen Sie sicher, daß die nachfolgenden Sicherheitst ips in bezug
auf das Stromkabel befolgt werden:
Entfernen Sie das Stromkabel nur am Stecker, ziehen Sie niemals
am Kabel.
Plazieren Sie das Stromkabel so, daß niemand darauf steigen,
darüber stolpern oder Gegenstände direkt auf das Kabel stellen
kann.
Verwenden Sie eine Steckdose, die dem Computer so nahe wie
mög lic h lie g t .
1-30 Getting Started
Page 40

Verwenden Sie den IR-Port nicht direkt unter Leuchtstoffröhren oder
in der Nähe flackernder Glühlampen.
Falls einer der nachfolgenden Fälle eintritt, lassen Sie Ihr Notebook
von einem Servicetechniker überprüfen:
Das Stromkabel oder der St ecker ist beschäd igt .
Flüssigkeit ist in das Notebook eingedrungen.
Das Notebook ist Feuchtigkeit ausgesetzt worden.
Das N ote book hat n icht richtig funktionie rt bzw. Sie können das
Notebook nicht dazu bringen, entsprechend der
Bedienungsanleitung zu funktionieren.
Das N ote book wur de fallengelas s en u nd ist beschäd igt.
Das N ote book w eist eindeutige Z eichen einer B esch ädig ung a uf.
Für die Stromversorgung des Notebooks ist ein zugelassenes
Stromka bel zu verw enden. Fü r einen Nennstrom von bis zu 6 A und
ein System mit einem Gewicht von mehr als 3 kg ist ein Stromkabel
mit den folgenden Mindestanforderungen zu verwenden: H05VV-F,
2G, 0,75 mm2.
In Übereinstimmung mit IEC 704-1: 1982 ist der Geräuschpegel am
Arbeitsplatz des Benutzers kleiner oder gleich 70 dB(A).
Getting Started 1-31
Page 41

2
Understanding the Software
Windows Introduction
Guide to Online Help
Guide to NEC Utilities
Other Software
World Wide Web Browsers
Applications and Dri vers CD
Page 42

This chapter introduces you to the software that comes with the NEC
Versa Note system, including:
Windows 98 operating system, Windows 95 operating syste m, or
Windows NT operating system
Online Help
NEC Utilities
Setup
NEC C ustomize Utility
PHDisk
Other Software*
Adobe Acrobat Reader
QuickLink MessageCenter III
eSafe Protect
Microsoft Office Professional 97
World Wide Web Browsers*
Microsoft Internet Explorer
Netscape
* Software not available on all models.
®
2-2 Understanding the Softwa re
Page 43

Windows Introduction
Your NEC Versa Note comes pre-installed with the Windows 98,
Windows 95, or Windows NT operating system. These Microsoft
operating systems provide a means of running applicat ions, navigat ing
through your file structure, and using your notebook computer. Each
operating system offers its own look and tools through an easy-to-use
graphical inter face.
Windows 98
Windows 98 gives you the newest features offered by Microsoft,
including a Desktop with room to maneuver, a taskbar for quick access
to a variety of system functions, st ate-o f-the-art plug and play support,
powerful system utilities, enha nced ent ert ainment feat ur es, and a fully
integrated Internet experience.
Desktop Icons
With Windows 98, the following icons are installed on your desktop:
My Computer — Provides access to drives, printers, the co ntrol
panel, network features, and scheduled tasks.
Recycle Bin — Gives you a trash co nt ainer in which to put and
discard unwanted files o r a llows you to resto r e tho se same files back
to their original location.
®
Set Up the Microsoft Network — Provides a setup program that
allows you to sign-up for the Microsoft Network. If you already have
an account, use this interface to sign-on to the Microso ft Netwo r k.
Network Neighborhood — Appears when your computer is connected
to a ne twork. U se the netw ork neigh borhoo d t o browse through t he
computers in your workgrou p and the computers in the entire
network.
My Briefcase — Provides a mechanism for file synchronization
between the NEC Ver sa Not e and another system.
Understanding the Software 2-3
Page 44

My Documents — Provides you with a convenient place to stor e
documents, graphics, and other files for quick access.
Connect to the Inter net — Runs the Int er net Connection wizard t hat
helps you to set up your computer to access t he Int er net .
Note:
must either connect an optional modem and a
working phone line to your system or install a LAN
card for network access.
Online Services — Includes setup icons for a variety of online
Before connecting to the Internet, you
services.
Your NEC Versa Note comes with all the so ftwar e you need to get
started on the most popular services available today. For a fee, online
services give you access to the Internet, email, the world wide web,
travel information, news reports, and more.
Note:
online servi c e, you must either c onnec t an optional
modem and a working phone line t o your system or
install a LAN card for network ac c ess.
If you are using this product outside of the United
States or Canada, some online services may require
a long-distance or international call.
NEC Customize — Gives you t he option to launch t he App lications
Before choosing and registering for an
and Drivers CD.
Taskbar Icons
With Windows 98, a number of icons appear on t he taskbar. Use the
cursor to hover over the icon and display its function, right click the icon
to display its menu op tions, or double c lick th e ico n to lau nc h it.
The following icons normally appear on the left s ide o f the Windows 98
taskbar.
2-4 Understanding the Softwa re
Page 45

Internet Explorer — Allows you to browse the internet or view loca l
HTML files. Also acces s I nt er net Explorer under Start, P ro grams,
Internet Explorer.
Outlook Express — Provides your default email program with secure
and personalized features for email and newsgro up communication.
Also access Outlook Express under Start, Programs, Internet
Explorer.
Show Desktop — Minimizes a ll active screens to display your
desktop.
Channels — Delivers content from your favorite web sites directly to
your computer.
The following icons normally appear o n the right side of the Windows
98 taskbar.
Task Scheduler — Enables you to schedule tasks, such as D isk
Defragmenter, to run regularly. Also access Task Scheduler u nder
Start, P rograms, Accessories, System Tools, Sch ed uled Tasks.
Po wer Mana gement Propert ies — Displa ys your current power s ource
and total remaining battery power. Access Power Management
Properties under Start, Settings, Control Panel, Power Management.
NEC VersaGlide — Allows you to adjust your VersaGlide (mouse)
properties. Also access NEC VersaGlide under St art, Sett ings,
Control Pane l, Mo use.
Volume Control — Adjust s the vo lume and speaker balance when
you play audio files. Also access Volume Contro l under Start,
Programs, Accessories, Enter tainment, Volume Control.
Time Clock — Allow s you to adjust the time and date, rearrange
active windows on your desktop, create a new toolbar or customize
your existing toolbar.
For more information about the desktop and taskbar icons, refer to the
Windows 98 online help.
Understanding the Software 2-5
Page 46

Windows 95
Windows 95 provides many Windows features, including a Desktop with
room to maneuver, a taskbar for quick navigation between open
windows, plug and play features, online networking functions, and more.
When you install Windows 95, the following icons are loaded o n your
desktop:
My Computer — Provides access to drives, printers, the co ntrol
panel, and network features.
Inbox — Lets you access the Microsoft fax and mail software as well
as Microsoft network services.
Rec ycle Bin — Gives you a trash conta ine r in whic h to put unw a nted
file s .
The Microsoft Network — Provides a setup program that allows you
to sign-up for the Microsoft Network. If you already have an account,
use this interface to sign-on to the Microsoft Network.
Network Neighborhood — Shows you the network, integrated LANs,
and WANs (only after your system has been configured for a
network).
My Briefcase — Allows easy transfer of files between the NEC Versa
Note and another system.
Online Services — Includes setup icons for a variety of online
services.
Your NEC Versa Note comes with all the so ftwar e you need to get
started on the most popular services available today. For a fee, online
services give you access to the Internet, email, the world wide web,
travel information, news reports, and more.
Internet Explorer — Makes finding information on the Internet easy.
Outlook Express — Provides email capability.
2-6 Understanding the Softwa re
Page 47

NEC Customize — Gives you t he option to launch t he App lications
and Drivers CD.
Active Desktop
The Active Desktop in Internet Explorer 4.0 integrates the browser
software with Windows 95 to bring true web integrat ion to all your
computing activities. The Active Desktop lets you place both Windows
icons and HTML elements on your computer desktop making it easier to
nav igat e anyw here on yo ur s ystem. The Ac tive Desk top consist s of the
following two layers.
Note
: Before choosing and registering for an
online servi c e, you must connect the internal
modem to your system and to a working phone line.
The phone line must be anal og. If y ou ar e unsure
what type of line you hav e, call y our loc al phone
company.
If you are using this product outside of the United
States or Canada, some online services may require
a long-distance or international call.
A transparent icon layer that displays all your existing desktop
shortcuts.
A background HTML layer that hosts any HTML-based items,
including ActiveX controls and scripts.
Internet Explorer Channel Bar
The Channel Bar appears o n t he right side o f the Windows 95 desktop.
The Chan nel Bar is anot her imp leme ntation of HTML on t he Active
Desktop giving you direct access to web sites and content des igned for
Internet Explorer 4.0 .
Understanding the Software 2-7
Page 48

Taskbar Icons
A number of icons appear on the taskbar. Move the cursor over the icon
to display its function, right click the icon to see its menu options, or left
click the icon to launch it. The following icons appear on the left side of
the Windows 95 taskbar.
The following icons appear on the right side of the Windows 95 taskbar.
Internet Explorer
Outlook Express
Show Desktop
Channels
Po wer Mana gement Propert ies
Volume Contro l
NEC VersaGlide
Time Clock
See the W indows 95 o nline help for de taile d instructio ns on using
Windows 95.
Window s NT
Windows NT allows you to run applications created specially for
Windows NT and Windows 95. You can also run applications created
for other versions of Windows or MS-DOS® operating systems.
Windows NT gives you a variety of features offered by Microsoft,
including a desktop to maneuver, a taskbar for quick navigation between
open windows, and more. The follow ing ico ns/ but tons appear on the
desktop.
My Computer — Provides access to drives, printers, the Co ntrol
Panel, and network features.
Network Neighborhood — Shows you the network, integrated LANs,
and WANs.
2-8 Understanding the Softwa re
.
Page 49

Inbox — Lets you access the Microsoft mail software as well as
Microsoft services.
Rec ycle Bin — Gives you a trash conta ine r in whic h to put unw a nted
file s .
My Briefcase — Allows easy transfer of files between the NEC Versa
and another system.
NEC Custo mize — G ives you the option t o inst all NEC custom
wallpaper, launch the Applicat ions and Driver s C D, or inst all t he
NEC-supplied mouse driver.
Service Pack 4
Service Pack 4 is a large update to the Windows NT 4.0 operating
system. The components included within Service Pack 4 are the latest
available from Microsoft. Many software packages include calls t o
Windows NT to install drivers t hat ar e Windows NT specific. As a
result, when installing new hardware or software, like a network PC card
or a remote access serv ice, par ts of Service Pack 4 may be overwritten
by the original Windows NT files. Therefore, it is very important to
reinstall Service Pack 4 after introducing new hardware or software.
To reinstall Service Pack 4, double click the sp4i386.exe file located in
the C:\SP4 directory on your hard disk drive.
CAUTION
When running update.exe , DO NOT replace the file,
PCMCIA.SYS and DO NOT overwrite newer files
install ed by some applic ations.
When running update.exe, be sure to select the
Details button f or additional installation instr uc tions.
Service Pack 4 for Windows NT 4.0 is available from the Microsoft web
site at http://www.microsoft.com.
Understanding the Software 2-9
Page 50

Note:
message pertaini ng to Windows NT 4.0 year 2000
issues appears.
When reinstalling Serv ic e Pack 4, a
Guide to Online Help
The NEC Versa Note User’s Guide, NE C UltraCare Guide, and Modem
User’s Guide are included on the Application and Drivers CD that ships
with the system. Yo u can install the online documentation onto t he
system using the Applications and Drivers CD.
The NEC Versa Note User’s Guide
The NEC Versa Note User’s Guide is an online versio n o f this user ’s
guide, which provides general informat ion on system usage as well as
more extensive topics including using power management, PC card
technology, and system memory map.
NEC UltraCare Guide
The NEC UltraCare Guide describes NEC’s extended warranty
program to help you protect your invest ment in an NEC Versa Note
system. (If you purchased your syste m outs ide of the United States or
Canada, please cont act yout local dealer for extended warranty
information.)
Modem User’s Guide
Th e Mode m User’s Guide provides information on the mo dem a nd on
using it with your system.
Guide to NEC Utilities
NEC provides several programs and routines designed to make your
NEC Versa Note run more efficiently. These pro gr ams are known as
utilities.
2-10 Understanding the Software
Page 51

Setup
The Setup utility automatically configures your NE C Ver sa Note each
time you start it up. This utility is not access ib le from Windows. Access
Setup at po w er-on. Press F2 at the screen prompt, “Press <F2> to Enter
Setup.” (You may need to press
See Chapter 3, “Using Setup and Power Management,” for a discussion
of the Setup utility. In a dditio n, onlin e he lp assist s you in changing
settings.
NEC Customize Utility
The NEC Customize ut ility provides eas y access to your Applicat ions
and Drivers CD.
PHDisk
This utility creates a file o n t he hard disk that is large enough to contain
the entire program and data residing in the NEC Versa Note dynamic
memory. You only need to update this file size if you upgrade the
amount of memo ry in your syst em. Ru n this util ity in D OS mode or
DOS environment. It will not r un on a compressed drive. Access PHDisk
from
several times.)
F2
C:\necutils\PHDisk\phdisk /create /file
or
C:\necutils\PHDisk\phdisk /? (F or ext ended Help)
Other Software
Your Applications and Drivers CD that ships with your NEC Versa Note
contains other applications that let you take full advantage of your
system resources. The rest of this chapter discusses each applicat ion,
including what it can do for you, how to get started, and how to use the
program help.
Understanding the Software 2-11
Page 52

Adobe Acrobat Reader
Adobe Acrobat Reader allows you to view, navigate, and print PDF files
from your local hard drive, your local network, or the Internet.
QuickLink MessageCenter III
QuickLink MessageCent er III is a multi-functional communications
application. It provides integrated voice mail, fax, and data
communic at ions, c u s tomizable voice mailboxes, incomin g call routing
and transfer, call monitoring, and much more.
eSafe Protect
eSafe Protect is a personal Inter net safety solution for your NEC Versa
Note at home or work. In addition to sealing off unwanted visitors in the
"Sand Box" quarant ine, this Complete Inter net Pro tect ion solution
includes complete Anti-Virus protection, a state-of-the-art Personal
Firewall and the Anti-Vandal Defense System.
Microsoft Office 97 Professional Edition (only on selected
models)
Microsoft Office 97 includes everything you need to create dynamic
reports, including Word 97, Excel 97, PowerPoint, Access 97, Outlook
97, and Binder.
World Wide Web Browsers
Your NEC Versa Note comes with the two of the most popular World
Wide Web browsers available: Micro soft Internet Explorer and
Netscape.
2-12 Understanding the Software
Page 53

Netscape Navigator
Netscape Navigator is one of the most popular software applications for
browsing information on intranets or the Internet . Netscape Navigator is
not pre-installed on t he syst em. It is located on the Applications and
Drivers CD that ships with the system. You can instal l Netscape
Navigator onto the system using the Applications and Drivers CD.
Informat ion too ls s impli f y access t o favorite sites and prov ide one-c l ick
access to Inter net searches. Navigat or’s features include technology that
allows you directly manipulate and move images and Java applets to
create visually exciting, fully interactive pages. In addition, Navigator
lets you customize for individual preferences and bookmark favorite web
sites to facilitate repeated access.
Microsoft Internet Explorer
Microsoft’s Internet Explorer 4.0 makes finding information on the
Internet eas y. Built- in webcasting features give you the cont ent you
want, when you want it. An integrated set of too ls provides services
ranging from basic email to exciting conferencing, broadcasting, and
web- a uthor ing capabil itie s .
Microsoft’s Internet Explorer 4.0 is built into the operating system.
Applications and Drivers CD
Use the Applicat ions and Drivers CD t o install applications, drivers,
utilities, and Internet browsers.
Launching the Applications and Drivers CD
Follow these steps to launc h t he Applications and Drivers CD using
NEC Customize.
Insert the Applications and Drivers CD into the CD-ROM reader.
1.
Double click the NEC Customize icon.
2.
Select “Launch Applications and Drivers CD.”
3.
Understanding the Software 2-13
Page 54

Clic k I nstall to lau nc h th e CD.
4.
The Applications and Drivers CD dialog box appears.
Installing the Software
The Applications and Drivers CD dialog box consists of the following
components.
Selection Tabs — Located just below the tit le bar, each tab represent s
a software cat egory. The selection tabs include applicat ions, dr ivers,
utilities, and Internet browsers.
Description — Located in the bottom portion of the dialog box, the
text describes the select ed or highlighted software catego r y or
application, driver, etc.
Install — Clicking the I ns ta ll butt on insta lls the selecte d software.
Exit — Clicking the Exit button closes the Applications and Drivers
CD dialog box.
Once the Applicat ions and Dr ivers CD dia log box appears, follow these
steps to inst all the desired so ft wa r e.
Click the selection tab o f your choice.
1.
Click the plus (+) box beside the desired application, driver, etc. to
2.
expand the selection.
Click the Installation selection to activate the Install butto n.
3.
Click the Inst all bu tton to ins ta ll your s electio n.
4.
Follow the on-scr een instructions to install your selection.
Click Exit to close the Applications and Drivers CD dialog box.
5.
Remove the CD from the CD-ROM reader whe n t he installation is
6.
complete.
2-14 Understanding the Software
Page 55

Using Setup and Power Management
Setup Utility
3
Page 56

Setup Utility
Your NEC Versa Note system co mes w ith a hardware co nfiguration
program called Setup that allows you to view and set system parameters.
Setup also allows you to set password features that protect your s yste m
from unauthorized use.
Use Setup to:
set the current time and date (you can also set the date and time
through Windows)
customize your operating syste m to reflect your computer hardware
secure your system with a passwo r d
balance your performance needs with po wer co nservat ion.
How to Enter Setup
Access Setup at power-on. Just press F2 at the screen prompt “Press
<F2> to Enter Setup.”
When you press F2 to enter Setup, the system interrupts the Power-OnSelf-Test (POS T) and displays the curr ent CMOS RAM set tings.
If the system detects an error during POST, it prompts you with a double
beep and a message: "P ress <F1> to resume." If you press F1, the system
may enter setup to allow you to correct the error. If you want to fix the
error, carefully read the err or message t hat appear s abo ve t he prompt
(taking notes if you want). If the system does not enter setup, the
standard bootup procedure resumes.
3-2 Using Setup and Power Management
Page 57

When you ent er setup, the syste m disp lays the Setup Main scree n,
similar to the following.
Main Advanced Security Power Saving Boot Exit
System Time: [15:00:00] Item Specific Help
System Date: [01/14/1999] <Tab>, <Shift-Tab>, or
Language: [English (US)] <Enter> selects field
Diskette A: [1.44/1.25 MB, 3 1/2"]
Internal HDD: [3253MG]
Internal CD-ROM: Installed
Boot Display Device [Both]
System Memory 640KB
Extended Memory 63MB
CPU Type Pentium II
CPU Speed 266 MHz
BIOS Version 0.4B-0166-6205/083A0200
F1 Help Select Item –/+ Change Values F9 Setup Defaults
Esc Exit < > Select Menu Enter Select Sub-Menu F10 Save and Exit
How to Use Setup
The following sections describe how to use Setup, including these
topics:
PHOENIXBIOS SETUP UTILITY
Looking at screens
Using keys
Checking and setting system parameters.
Looking at Screens
Setup screens have three ar eas as s ho wn in the previous page.
Menus
The top part of the screen. This area lists six menus in which related
parameters are shown.
Parameters
The left part of the screen. This area lists parameters and their current
settings.
Using Setup and Power Management 3-3
Page 58

Using Keys
Key What It Does
F1 Shows on-line help on key functions.
↑
F9 Load default configuration.
Tab, Shift-
Tab
or Enter
Esc Exits the current screen and returns to the main menu or exit
←→
F10 Save changes and exit.
It em Specific H elp
The right part of the screen. Th is area lists t ips and explanations to
help yo u .
Key Legend
The bottom corner of the screen. These lines display th e keys that
move the cursor and select paramet er s.
The following table lists Setup keys and their functions.
Setup Key Functions
↓
−/+
Moves the cursor between the displayed parameters.
M odi f ies t he current parameter setting s.
For some parameter settings, moves the cursor between the
subfields. Also moves the cursor to the next line or selection.
For example, f or System Ti me, Tab moves th e curs or from
hour to minute to second.
menu.
Changes between displayed menus.
3-4 Using Setup and Power Management
Page 59

Checking/Setting System Parameters
See the following table for a list of parameters, their facto r y default
settings, and a lter nate settings. A description o f each setting follows the
table.
To reset all parameters to the default settings, select F9 or Load Setup
Defaults fro m the Exit Me nu and select
Set up Parameters
Yes
.
Default
Parameter
Main Men u
Language
System Time
System Date
Diskette Drive A
Internal HDD
Internal CD-ROM
Boot Display Device Both Both, CRT, LCD
System Memory
Extended Memory
CPU Type
CPU Sp eed
BIOS Version
Advanced Menu
PS/2 Mouse
Insta lled O/S
Silent Boot
I/O Devic e Configuration
Serial Port
Infrared Port
Mode
Parallel Port
Mode
Floppy Disk Controller
Setting
English (US)
hh:mm:ss
mm/dd/yyyy
1.44/1.25 MB,
3 1/2"
Auto
Auto
640 KB (Auto Detect)
Auto
Win98
Enabled
Auto
Disabled
FIR
Auto
ECP
Enabled
Alternat e
Setting(s)
Japanese
Disabled
Us er Def ined
Auto, Disabled, Both
Win95, Win98, Other
Enabled, Disabled, Black
Enabled, Disabled, Auto
IrDA, FIR
Enabled, Disabled, Auto
Output only, Bidirectional, ECP
Enabled, Disabled
Using Setup and Power Management 3-5
Page 60

Set up Parameters
Parameter
Security Menu
Set Supervisor
Password
Set User Password
Password on Boot
Password on Resume
Fixed Disk Boot Sector
Diskette Access
Power Saving Menu
Power Switch
Power Management
Function
Power Savings
Standby Timeout
Suspend Timeout
Suspend Mode
Audio Save To Disk
Hard Disk Timeout
Video Timeout
LID Switch
Default
Setting
None
None
Disabled
Disabled
Normal
Supervisor
On/Off
Battery only
Maximum Po wer
Saving
1 min
5 min
Suspend
Off
1 min
2 min
Suspend
Alternat e
Setting(s)
User Defined
User Defined
Enabled, Disabled
Enabled, Disabled
Normal, Write Protect
User, Supervisor
On/Off, Su s p end/Resume
Always on, Battery only
Customized, Maximum
Performance, Disabled
Maximum Power Saving
Off, 1/2/4/6/8/12 min
Off, 5/10/15/20/30/40/60
min
Suspend, Save To Disk
Off, After 1 Hour
Disabl ed, 1/2/4/ 6/8/10/15
min
Disabl ed, 1/2/4/ 6/8/10/15
min
Suspend, Backlight Off
Resume On Modem
Ring
Resume On Time
Resume Time
Boot Menu
Bootup Sequence is
described in
numerical order.
Off
Off
[00:00:00]
ATAPI CD-ROM
Drive
3-6 Using Setup and Power Management
On, Off
On, Off
User Defined
Diskette Drive, Hard
Drive, ATAPI CD-ROM
Drive, Network Boot
Page 61

Set up Parameters
Parameter
Exit Menu
Exit Saving Changes
Exit Discarding Changes
Load Setup Defaults
Discard Changes
Save Changes
Battery Refresh
Setup Menus
Read the following descriptions for explanations of items that appear in
the Setup menus, as listed in the preceding table. See t he item-specific
help that appears on the Setup scr een for more details.
Main Menu
Language — This field lets you set the type of language for the BIOS
display.
System Time — To set the time, enter t he curr ent hour, minute, and
second on hr/min/sec, 24 hour for mat.
Default
Setting
Alternat e
Setting(s)
User Selecta ble when
exiting
same as above
same as above
same as above
same as above
System Date — This field lets you set your NEC Versa Note calendar
month, day, and year. The calendar clock is year 2000-compliant.
These settings remain in me mory e ven after you t urn off the s ys te m.
To set the date, use the
field. Use the +
Diskette Drive A —This field allows you to enable or disable the
− keys to change numbers within each field.
/
Tab/Shift-Tab/Enter
key to mo ve fro m field to
built-in 1.44/1.25MB 3 1/2” diskette.
Internal HDD — This field displays various parameters for the hard
disk drive. If type [Auto] is selected, the syste m auto maticall y sets
these parameters. If type [User] is selected, Cylinders, Heads and
Sectors can be edited.
Using Setup and Power Management 3-7
Page 62

Internal CD-ROM — This field is for information only as the BIOS
automatically detects the CD-ROM.
Boot Display Device — Allows you to select the display device.
System Memory, Extended Memory, CPU Type, CPU Speed and
BIOS Version — These fields are for information only as the BIOS
automatically detects related values.
Advanced Menu
PS/2 Mouse — [Auto] allows the OS to determine whether to enable
or disable the PS/2 mouse. [Disabled] prevents any insta lled PS/2
mouse from functioning. [Both] is also an available option.
I/O Device Configurat ion — lets you configure input/output device
such as Serial Port, Parallel Port, IrDA and Floppy disk controller.
Note:
cannot enable or assign i t using the Windows device
manager. The device is not listed in the Windows
device list. T o contr ol the device using the Windows
device manager, sel ect any setting other than
“Disable” i n Setup.
If you disable a device in Setup, you
Installe d O/S — Spe c i fies the ins ta lle d op erating syste m whic h you
use most commonly.
Security Menu
Set User Passwo r d — Specifies if the syst em prompts you to enter a
password when accessing t he syst em. The Set User Password
function will be enabled once a Supervisor password is set.
Set Supervisor Password — Specifies if the system prompts you to
enter a password when entering Set up.
Password on Boot — Enables password check when booting.
Passwor d o n Resu me — Enables password check when resu m ing
from suspend.
3-8 Using Setup and Power Management
Page 63

Power Menu
The Po w e r Sav ing ma nag e me nt set u p menu let s yo u ba la nc e h ig h
performance and energy conservation using parameters including the
following.
Fixed Disk Boot Sector — [Write Protect] enables write protect boot
sector on hard disk to prevent against viruses. [Normal] disables this
write protect function.
Diskette Access — Controls access to diskette drive.
Note:
95. 98, or NT, have their own power management
software which over rides CMOS settings.
Power Button — The power butto n oper ates as both a On/Off and
Some operating systems, lik e Windows
Suspend/Resume switch.
On/Off function s a s a normal Power but ton t o pow er the syst em
on or off .
Suspend/Resume fu nctions as a Suspe nd button to p ut the s ystem
into Suspend mode and return to normal operat ion from Suspend.
Power Management Function — Battery only enables the power
saving management function when the system operat es in batter y
po w er only. Alw ays enables the pow er saving management funct ion
when the system operat ions either in AC power or battery.
Power Savings — Lets you choose one of four levels of power
management.
Maximum Power Savings — conser ves t he greatest amount of
system power.
Maximum Performance — conserves power but allows the
greatest system performance.
Disabled — turns off the power management function.
Using Setup and Power Management 3-9
Page 64

Customized — allows you to change related settings so that you
can define your own power management configuration. You can
set the following parameters:
Standby Timeout — Allows you to select the system standby timeout
period. The Standby Timeout sets the time the system needs to be idle
before entering the Standby mode. Standby mode po wer s down
various devices in the system until you start using the system again.
Suspend Timeout is amount of time the system needs to be in
Standby mode before entering the Suspend mode.
Suspend Mode — If you choose Suspend t he syst em saves its state,
but remains in a low power mode. If you choose Save To Disk, the
syste m save s its state to disk and powers o ff.
When Auto S a ve To Disk is turned on, the s yst em sa ves its state
to disk and then powers off after being in Suspend mode for a
period of time.
Hard Disk Timeout — Allows you to select the amount of time the
hard disk needs to be inactive before it shuts down.
Video Timeout — Allows you to select t he amount o f time the user
input devices needs to be inactive before it shuts down.
LID Switch — Determines system state when panel is closed.
Battery Low Suspend — On allows the system to enter Suspend
Mod e upo n battery low condition.
Resume On Modem Ring — On wakes the system up when an
incoming call is detected on your modem. If Suspend Mode is set to
“Save To Disk” the Resume On Modem Ring does not work.
Resume On Time — On will wakes the syste m up at a specific time.
If Suspend Mode is set to “Save To Disk” the Resu me On Time does
not wor k.
Resume Time — Specifies the t ime when syst em is t o wake up.
3-10 Using Setup and Power Management
Page 65

Boot Menu
Exit Menu
The Boot menu lets you dec ide the boot order of booting devices
including:
ATAPI CD-RO M Drive
Diskette Drive
Hard Drive
Network Boot
The booting o rder is lis ted in numerical seque nc e in the menu.
Exit Saving Changes — Exits System Setup and saves your changes
to CMOS.
Exit Discard Changes — Exits Setup utility without saving Setup data
to CMOS.
Load Setup Defaults — Loads default settings for all items in Setup.
Discard Changes — Reverts to previously selected sett ings and exits
Setup.
Save Changes — Saves Setup data to CMOS.
Battery Refresh — Conditions the battery so that the battery can be fully
charged. The function applies to NiMH batt er y only.
Using Setup and Power Management 3-11
Page 66

4
Using Your NEC Versa Note
LCD Panel
Keyboard
NEC VersaGlide
Integrated Drives
56K Internal Modem
PC Cards
Enabling and Disabli ng Devic es
Increasing Syst em Storage and Mem ory
Connecting Options
Page 67

The more you use your NEC Versa Note system, the more proficient you
become at everything — from using funct ion keys to setting up
presentations.
This chapter gives concise informat ion on these a nd other important
tasks, including how to use the:
LCD panel
keyboard
NEC VersaGlide
integrated drives
20X or 24X CD-ROM reader
internal modem (included on so me models)
PC card slots
USB port
IR port.
In addition, this chapter focuses on expanding memory capacit y and
installing options.
LCD Panel
The LCD panel on your NEC Versa Note system is fully adjust able to
provide comfortable viewing. To adjust the viewing angle, gently tilt the
LCD panel into position.
Keyboard
The NEC Versa Note keyboard is equipped with many features. These
include:
Function keys
Windows keys
Cur s or control keys
4-2 Using Your NEC Versa Note
Page 68

Typewriter keys
Numeric keypad
Control keys .
Key features and operations are descr ibed after t he figure.
Keyboard
❶
❷
❸
❷
1. Function Keys 2. Control Keys
3. Windows Start Menu Key 4. Windows Shortcut Key
5. Cursor Control Keys
❹
❺
Function Keys — Twelve function k eys,
through
F1
, are available
F12
on the NEC Versa Note keyboard. These keys work toget her with the
key to activate special functions. Eight keys (printed in blue) are
Fn
preprogrammed with dual functions.
Function keys are application-dr iven. See the specific application’s
user guide for information about how each function key work s within
the application you are using.
The following function key combinations are pre-programmed for the
NEC Versa Note.
— Display toggles between three video modes, LCD, CRT, or
Fn-F3
simulta ne ous display o n both.
Using Your NEC Versa Note 4-3
Page 69

Fn-F4 —
Standby sets standby power management mode to On. Press
any key to turn off Standby mode.
Fn-F5
— LCD Expa nsion expands a ppl ications to fill the LCD panel -
800 x 600 on XGA (any mode) and 640 x 480 on SVGA.
Fn-F6 —
System Speaker Volume to ggles the built-in speaker s to on
or off. A single beep indicates that the speaker mode has changed.
The speaker icon in the lower right-cor ner of the Windows 98 or
Windows 95 desktop may give a false status.
— Pow e r Management Level se ts the po wer saving mode.
Fn-F7
— Increase s the LCD’s brightness seven settings from the
Fn-F8
lowest set ting.
— Reduces the LC D’s brig htness se ven sett ings from the
Fn-F9
highest setting.
Fn-F10
Fn-F11
The following key combinations are available with some applications.
Fn-SysReq
—Increases the LCD’s contrast (DSTN only).
— Reduces the LCD’s contrast (D STN on ly).
— System request is used in terminal emulation
applications.
Fn-Break
Windows keys — Use the following t wo keys to facilitate your work.
— Break sends a break command.
Shortcut/Applicat ion key – provides quick access to shortcut
menus. (This key acts like a right mouse button.)
Floating Window key – displays the Start menu.
Cur s or Control ke ys — Cursor co ntrol keys let you posit ion the
cursor on the screen where you want. On the screen, t he cursor is a
blinking underline, block, or vertical bar depending on the
application. The cursor indicates where the next text typed is inserted.
4-4 Using Your NEC Versa Note
Page 70

Typewriter keys — Typewriter keys (also called alphanumeric keys)
are used to enter text and characters. Keys with blue pr int on them
behave differ ently when combine d with co ntrol keys or the
Fn
key.
Numeric Keypad — Pressing
numeric keypad numbers and functions printed in blue on top of the
keys.
The keypad lets you type numbers and mathematical operand s (+, –)
as you would on a calculator. The keypad is ideal for entering long
lists o f numbers.
When you press
functions as typewriter keys.
Control keys —
conjunction with other keys to change their functions. To use control
keys, press and hold the control key while pressing another key. For
example, “Press
letter c. Key combinations work specific to the application you are
running.
NEC VersaGlide
The NEC VersaGlide is an easy way to contro l the cursor with your
finger. Lightly glide your finger across the NEC VersaGlide and the
cursor follows. To use the VersaG l ide, you can
Num Lock
Num Lock
Ctrl, Alt, Fn
Ctrl c
again, the ke ys revert to their no rmal
, and
Shift
” means to hold down t he
on the keyb oard activates the
are contro ls used in
key and type t he
Ctrl
Double tap your finger on the VersaGlide (emulates the left mouse
button).
Double click the left button (this is the primary button).
Using Your NEC Versa Note 4-5
Page 71

VersaGlide features
❶
1. Left Button 2. Right Button
3. VersaGlide Touchpad
❷
❸
Try both ways and decide which you prefer. If you find the double tap
difficu lt to use, go to the next se c tion for gener al directions abo ut
adjusting the touchpad properties.
Note:
the shipping default, the double-tap capability may
be lost.
If you install another mouse driv er ov er
Making VersaGlide Adjustments
The NEC VersaGlide offers a number of options that let you custo mize
how it functions. To access these opt ions, locate the Contro l Panel and
double click on the Mouse icon.
4-6 Using Your NEC Versa Note
Page 72

The options let you contro l the size and color of the cursor, cursor speed,
the accepted double-click speed, and select ion but ton orientation.
VersaGlide Tips
Fo llow these basic ergo nomic tips while working:
Use a light touch on the VersaGlide surface.
Set up the NEC Versa Note with your keyboard and VersaGlide at a
comfortable height. Keep your forear ms para llel to the floor. Your
wrists should be relaxed and straight.
While using the keyboard and VersaGlide, keep your shoulders and
arms as relaxed as possible.
Take regular breaks from the computer to rest your eyes. Perform
stretching exercises to relax your fingers, hands, wrists, forearms, and
shoulders.
See Appe ndix A, “Setting Up a Healthy Wo rk E nviro nment,” for
mo r e i n formation.
Integrated Drives
The NEC Versa Note comes with three integrat ed drives — t wo on the
left side of the syste m, and one inside of the syst em. The dr ives are as
follows:
CD-ROM — Your system ships with either a 20X or 24X CD-ROM
reader already insta lled in the front of the syst em.
Diskette Drive — Your system ships with a standard 3.5- inch 1.44-
MB d is k ette drive alread y in s ta lle d in t he left side of the syst em.
Hard Disk Drive — Depending upon the model, your s ystem ships
with a 2.1, 3.2, or greater GB hard disk drive alread y instal led under
the base unit cover.
Using Your NEC Versa Note 4-7
Page 73

20X or 24X CD-R OM Rea der
Use the CD-ROM reader to load and start programs from a compact disc
(CD). You can also use the CD-ROM reader to play your aud io CDs.
The 20X and 24X CD-ROM readers are compatible with industry data
and audio CDs.
The CD-ROM reader oper ates at different speeds depending o n whet her
the CD you are using contains data or music. This allow s you to get your
data faster and to see smoother animat ion and video.
Note:
Product.
CD-ROM reader features inc lude t he following:
Release Butto n — ejects the CD tray. Press this button when power is
on to insert a CD into or remove a CD from the reader.
Emergency Eject Hole — allows you to manually remove a CD from
the reader if the eject function is disabled by software or a power
failure occurs.
The CD-ROM reader is a Class 1 Laser
To remove a CD, insert the end of a paper clip into the eject ho le, and
push in until the CD tray releases. Now you can manually open the
drawer.
Status LED — lights during data read operations. Do not eject t he CD
or turn off the NEC Versa Note when the indicator is lit.
CD Loading
To insert a CD into the CD-ROM reader , follow these steps.
Press the Release button and pull the CD tray out from the reader
1.
door.
Put your CD, printed side up, into the circular impression in the tray.
2.
Push the CD tra y in until it c licks shut.
3.
4-8 Using Your NEC Versa Note
Page 74

Note:
does not affect CD-ROM r eader functioning.
Some CDs vibrate when playing. Thi s
CD Care
When handling CDs, consider the follow ing guidelines.
Always pick up the CD by its edges.
Avoid scratching or soiling the side of the CD that has no printing or
writin g o n it.
Do not write on or apply labe ls to either side of the CD.
Keep the CD away from direct sunlight or high temperatur es.
Clean fingerprints or dust from the CD by wiping it with a soft cloth.
Chan ging the Auto Play Setting
Your system ships so that a CD inserted into the reader automatically
starts playing. The system periodically checks the reader to see if a CD
was inserted. Although this feature makes using your CDs very
convenient, it inter feres with the system’s automatic Save to F ile feature.
To disable the Auto Play feature or re-enable it, follow these
instructions.
From the Windows Start menu, select Settings and Control Panel.
1.
In the Control Panel, highlight and double click on the System icon
2.
to show s ystem properties.
Go to the Device Manager tab.
3.
Locate and open the CD-ROM folder.
4.
Highlight the line marked “xxxx” for the CD-ROM model name
5.
(Where xxxx refers to the specific model name) .
Press the Prop ert ies butt on at the bottom of the window and select
6.
the Settings tab.
Using Your NEC Versa Note 4-9
Page 75

Proceed as follows:
7.
To disable Auto Play, click to remove the check mark next to the
line “Auto insert notification.”
To enable Auto Play, click to add a check mark next to the line
“Auto insert notification.”
Select OK twice to accept the sett ings in the Settings t ab and exit the
8.
Properties window.
9.
To activate the new setting, reboot the system when prompted.
56K Internal Modem
The NEC Versa Note comes equipped with a 56K capable internal
voice/fax/data modem that allows you to co mmunicat e with others via
fax, ema il, o r connect to an onlin e s ervice or bullet i n boa rd. (The modem
is on ly availab le on some models.)
Note:
time that this docum ent was printed, the 56K internal
modem transmit s at a maximum speed of 52K.
Due to FCC regulations in effect at the
The speed of data transmi ssion is dependent on the
quality of telephone lines. Digitally terminated lines
improve the speed of data transmission. Contact
your service provider for more information.
Be sure to check the NEC Bulletin B oar d ( 916- 379-
4499) for the latest firmware enhancements to the
56K internal modem.
To find out more about your modem capabilities and uses, refer to the
online modem user’s guide that is available on your NEC Ver sa Note
system.
4-10 Using Your NEC Versa Note
Page 76

Connecting the Internal Modem
The built-in voice/fax/data mode m provides o ne st andard phone
connector. NEC provides one analog cable for your convenience.
Use the following steps to co nnect the analog pho ne ca ble to your
modem.
Locate the analog phone cable in the accessories box in the NEC
1.
Versa Note computer shipping carto n. Each end of the cable has a
RJ-11 connector that plugs into a standard wall outlet.
Note:
standard cable. Longer c ables are available at your
local electronics store.
Connect one end of the cable into a standard telephone wall out let.
2.
Connect the other end of the cable into the computer’s modem port.
3.
Note:
requirements, y ou m ay need to disabl e the modem
in order to enable the IR port for wireless data
transfer.
The analog phone cable is an industry
Depending on your operational
For informati on about enabling and disabling
devices on your NEC Versa Note, see “Enabling and
Disabling Devices,” later in this chapter.
Using Your NEC Versa Note 4-11
Page 77

PC Cards
PC cards are all approximately the same size and var y only in th ick ness.
All have a standard 68-pin connector. Your NEC Versa supports the
installation of the PC cards described next.
Type II Cards
Type II cards have a thickness of 5.0 millimeters (mm). Type II cards are
often storage or communications devices such as batt er y backed Stat ic
Random Access M emory (SRAM), Read Only Memory (ROM), Flash
Memory, LAN, and Small Co mputer S yste m Int er face (SCSI ) . Typica l
Type II cards include input/output (I/O) features such as modems and
LANs.
Type II Extended Cards
Many PC cards are Type II extended cards. The extended card has a n
additional physical co mponent t hat protrudes be yond the tr adit ional card
size. The extension can be as large as 40 mm deep by 9.65 mm high.
This extension provides room for additional electronics as well as a
location for exter nal connectors.
Type III Cards
Type III cards are thicker (10.5 mm) than Type II cards and allow no
extensions. Type III card uses include advanced function I/O cards with
additional features suc h as w ireless modems, multimode cards (car ds
with more than one function such as a combined modem and LAN card),
and small hard drive storage.
Communication Cards
You can use both fax/modem and networ k PC cards with your NEC
Versa Note. Here are some suggestions to help you get the best system
performance.
Network Cards
Fax/Modem Cards
4-12 Using Your NEC Versa Note
Page 78

You can insert a fax/modem in either slot.
Always insert the fax/modem card before using your fax/modem
software app licat ion. If you st art t he application befor e inserting the
fax/modem card, the applicat ion typically does not find the card.
PC Card Modems
You can use a PC card modem wit h your NE C Ver sa Not e to
communicate with others via fax, e-mail, or connect to an o nline serv ice
or bulletin board .
Follow these steps to co nnect your system to a phone line.
Connect the telephone cable to t he modem port.
1.
Connect the other end of the telephone cable to the wall outlet ( you
2.
might have to unplug the telephone if it is plugged into the outlet)
Storage Cards
When you insert a memory or storage car d in an NEC noteboo k
computer, it appears as a unique drive as long as the syst em has an
available interrupt for the card.
Interface Cards
You can connect most standard Small Computer S yst em Interface
(SCSI) devices using the optional NEC PC cardSCS I car d. This PC card
is also known as the Adaptec SlimSCSI .
Other Cards
Many other kinds of PC cards are available to not ebook computer users.
They include the following cards:
Global Positioning System (GPS) − to enable the tr acking of remote
units (for example, delivery trucks)
Paging − for receiving remote paging messages
Serial − for adding an extra serial communicat ions po rt
Using Your NEC Versa Note 4-13
Page 79

Multimedia − for combining animation and sound
Audio − to enable the use of sound.
PC Card Slots
Your NEC Versa Note has two Cardbus slots for inserting two PC or
Cardbus cards. The slots support two Type II cards or one Type III PC
card.
Using the system’s PC card slots, you can add optional PC cards and
connect external devices to your NE C Ver sa Note. These devices include
peripheral devices, such as modems, LAN cards, and storage cards.
Inserting a PC Card
Follow these steps t o insert a PC card in your system.
Some PC cards require additional system
resources. Before inserting a PC card you may have
to disable either the I R port, USB port, or the 56K
internal modem. Check the Windows device
manager to ensure that one of these dev ic es i s
disabled bef or e insert ing a PC card.
CAUTION
For informati on about enabling and disabling
devices on your NEC Versa Note, see “Enabling and
Disabling Devices,” later in this chapter.
1.
Align the card so that the 68-pin connector points to war ds t he slot
and the arrow on the PC card faces up.
2.
Slide the card into either slot. A low tone followed by a high tone
lets you know that the card is fully inserted and recognized. (If you
turn off the sound, no sound is emitted.)
4-14 Using Your NEC Versa Note
Page 80

3.
You can use the PC card software preinstalled on your syste m to
check PC card slot availability. For example, loo k for the PC Card
icon in the Wind ows Cont rol panel. I t show s which slot contains a
PC card and which is empt y.
Removing a Card
Remove a PC card as follows.
1.
From the screen, se lect My Computer, then Contro l Panel. (You can
also double click on the PC Card icon in the lower right side of the
toolbar on your desktop.)
2.
Select the PC Card icon.
3.
Select the PC card to remove and select Sto p. Windows alerts you if
any applications are still using the card. I f all applicat ions using that
card are closed, services for that car d are shut down, and you get a
message telling you it is safe to remove the card.
CAUTION
Other two-tone sequence s such as hi gh, then low
tones indicat e that the car d is i nsert ed, but the card
type is unknown.
4.
Press the butto n bes ide the PC card slot.
5.
When the card pops out slightly, pull it out of the slot.
Note:
use. To save energy, pr ess the button to disconnect
the card when it is not in use. You can leav e the
card in the slot while it i s di sconnected for easy
storage.
PC cards draw power even when not in
Using Your NEC Versa Note 4-15
Page 81

IR Port
The IR port on the left side of your syste m lets your NEC Versa Note
communicate with ot her devices that also use infrar ed technology. The
IR port is Infrared Data Association (IrDA) compatible. You can easily
transfer files between your NEC Ver sa Note and an IR-equipped
desktop, or print to an IR-equipped printer without using cables.
There are three tr ansfer rat es for t he IR port on your NEC Versa Not e.
The transfer rat es are FIR (Fast Infrared - 4.0 Mbit/sec), MI R ( Medium
Infrared - 1.152 Mbit/sec), and SIR (Serial Infrared St andard - 2.4
Kbit/sec). Windows 98 and Windows 95 transfers at up to 4 Mbits/sec.
Windows NT does not support IR.
Your NEC Versa Note transfers data at the speed compatible with the
receiving device. If the receiving device is also FIR equipped, your NEC
Versa Note recognizes this capabil it y a nd t r ansfers data at t he FIR rate.
CAUTION
Your NEC Versa Note ships with the IR port
disabled. The first time that you use the IR port you
must enable the device through the setup utility.
Once the IR port is enabled in setup, use the
Windows 95/98/NT device manager to enable and
disable devic es.
For informati on about enabling and disabling
devices on your NEC Versa Note, see “Enabling and
Disabling Devices,” later in this chapter.
Follow these steps to enable the IR port using the Setup utility.
1.
Enter the setup utility as indicated in Chapter 3, “Using Setup and
Po wer Mana gement.”
2.
Select Advanced Menu.
3.
Select I/O Device Configuration.
4.
Set the Infrared Port to AUTO.
4-16 Using Your NEC Versa Note
Page 82

Exit I/O Configuration and Advanced menu.
5.
Save s e ttings and e xit.
6.
Note:
an external devic e when a PC card is i nstalled, use
the Windows 95/98/NT devi c e m anager to disable
either the USB port or the 56K internal modem
(modem only available on some models). Ensure
that the IR port has been enabled thr ough the setup
utility.
To take advantage of t he FI R transfer r ate, disable
the 56K internal modem.
For informati on about enabling and disabling
devices on your NEC Versa Note, see “Enabling and
Disabling Devices,” later in this chapter.
To use the IR port to communicate with
For the infrared technology to work, follow these guidelines:
position the NEC Versa Not e no more than three feet way from the IR
peripheral device you are using, and
keep the IR ports between the computer and the device parallel.
USB Port
The USB port on the rear side of your system allows you to connect up
to 127 USB-equipped peripheral devices to your NEC Versa Note
notebook computer . These peripherals may include digital cameras,
scanners, printers, CD-ROM/DVD-ROM dr ives, modems, keyboards,
telephones, and games devices.
USB devices called USB hubs can ser ve as connection ports for other
USB peripherals. Only one device needs to be plugged into your NEC
Versa Note. Additional peripherals can be connected in a daisy chain
configuration where one device is connected to another in a series. Up to
127 USB devices can be connected together in this way.
Using Your NEC Versa Note 4-17
Page 83

Note:
your NEC Versa Note that di spl ay s the USB icon.
Depending on your operational requirement s, you
may need to disable the USB port in or der release
system resources to use other dev ices.
For informati on about enabling and disabling
devices on your NEC Versa Note, see “Enabling and
Disabling Devices,” later in this chapter.
Connect the USB device to the port on
Enabling and Disabling Devices
Depending on your operational requirements you may need to enable
and disable devices on your NEC Ver sa Not e to optimize system
resources.
Follow these steps to enable o r disable a device on your NEC Versa
Note:
Press Start, s lide the curso r to Settings, and locate the Control Panel.
1.
Double click the System icon and select Device Manager.
2.
Double click the appropriate device (for example, the Infrared Port),
3.
then double click the device name (e.g., NEC Versa Note Fast
Infrared Port).
Enable or disable a device as follows.
4.
To enable a device, click to remove the check mark beside
“Dis able in th is hard w are p rofile ” in t he device usa ge port ion of
the screen.
To disable a device, click to add the check mark beside “Disable
in this hardware profile” in the device usage portion of the
screen.
Click OK and follow the on-screen instructions, as appropriate.
5.
Note:
appears beside the devi c e nam e in the devic e
manager device list.
4-18 Using Your NEC Versa Note
When a device is disabled, a red X
Page 84

CAUTION
Reboot your system after enabling or disabling a
device to implem ent t he modification to the system
configurati on.
Increasing System Storage and Memory
As your needs grow and change, you may need to add an optional hard
disk drive with a greater capacity or additional memor y. Read the
following sect ions to lear n how t o install a n opt ional ha rd disk drive or a
me mory mod ule .
Hard Disk Drive
You can increase the syste m’s storage capacity by replacing the standard
hard disk drive with a drive with greater storage capacity.
Note:
contact your local dealer for more information about
this dealer-installable device.
If you purchased this system outside of the United
States or Canada, see the booklet, “Getting Servic e
and Support in Asia, A ustr alia, and Europe,” to find
out how to contact the local office in your country.
If you want to replace your hard disk,
Memory Module Installation
Depending on configurations, your NEC Versa Note comes standard
with 32 or 64 megabytes (MB) of synchronous DRAM (SDRAM)
memory. This new technology gives your system higher performance.
You can increase system memory to a maximum of 128 MB by
installing one small outline double inline memory module (SO-DIMM)
in the system.
Using Your NEC Versa Note 4-19
Page 85

The following module capacities are availa ble:
32 -MB memory mo du l e .
64 -MB memory mo du l e
128-MB memory module (depending on availability).
Insta ll SO-DI MMs as follow s.
Make sure the system is powered off and that no peripheral devices
1.
are attached.
Turn the syste m over and locat e t he screw on the Memory Module
2.
Bay cover as indicated in the figure sho wn next.
Memory Module Bay Cover on the bottom of the system
❸
❷
❶
1. Memory Module Bay Co ver 2. Screw
3. Upper side of Memory Module Bay Cover
Remove the screw.
3.
Gently lift the Me mory Module Bay c over .
4.
Locate the alignment notch on the module.
5.
4-20 Using Your NEC Versa Note
Page 86

Locate the memory module sockets. Your system comes with one
6.
module alr eady installed in the s ocket. When in s ta lling additiona l
memory, use the other empty socket.
CAUTION
Avoid touching the exposed components inside the
system. Doing so can damage the system.
Align the notch with the notch in the so cket co nnect or and insert t he
7.
module as follows.
Hold the SO-DIMM at a 30-degree ang le and align t he SO-
DIMM connector with the socket in the syste m. Push the
connector into t he so cket .
Press down o n the edge of the SO-DI MM unt il the locking t abs
on the sides snap into place, securing the modu le.
To remove a SO-DIMM, pr ess t he lock ing tabs away from the sides
of the module until the module pops up. Then, remove the SODIMM.
Reassemble t he NEC Ver sa Note components as follows.
8.
Replace the Memory Module Bay cover.
Replace the screw.
Turn t he system over.
Rebuild your PHDisk Save-to-Disk file as described in
Chapter 2.
Using Your NEC Versa Note 4-21
Page 87

Connecting Options
Your NEC Versa Note notebook provides industry-standard connector s
so that you can integrate the following.
External monitor
Printer s (par allel and serial)
External keyboard
External mouse
External audio options.
In addition, NEC offers the NEC PortBar that was developed to work
specifically with your NEC Versa Not e.
See the following sect ions for steps on using the options.
Back system features
❶ ❷
1. PS/2 port 2. Parallel port
3. USB port 4. Expansion port
5. Serial port 6. VGA port (monitor port)
7. Microphone in jack 8. Line-in jack
9. Headphone jack
❸
4-22 Using Your NEC Versa Note
❹ ❺
❻ ❼❽ ❾
Page 88

External Monitor
You can add a standard external monitor to your NEC Versa Note. You
need a display signal cable (usually provided w ith the monito r ). One end
of the cable must have a 15-pin connector for the syste m.
Follow these steps to connect an exter nal monito r to your NEC Versa
Note.
Check that the NEC Versa Note is powered off and the monitor
1.
Power switch is t ur ned off.
off or suspended while t he m onitor is being
connected.
Attach the 15-pin cable connector to the monitor port on the system.
2.
Secure the cable connection with the screws provided.
Connect the monitor power cable and plug it into a properly
3.
grounded wall outlet.
Note:
The NEC Versa Note must be powered
Printe r
Follow any setup instruct ions in the monitor user’s gu ide.
4.
5.
Turn on power to the monitor.
6.
Power on the NEC Versa Note.
Press the
function key combination to toggle between the LCD,
Fn-F3
CRT, or simultaneous display on both.
You can attach a printer with either a parallel or a serial connector . A
parallel printer connector has 25 pins; a serial connector has 9 pins.
Some printers come with both types of connectors.
Using Your NEC Versa Note 4-23
Page 89

Parallel Devices
To install a parallel device, such as a printer, you need a cable with a
male 25-pin connector for the system and, for some parallel printers, a
Centro nics®-compat ible 36-pin connector.
Connect a parallel device to your NEC Versa Note as follows.
Check that both the NEC Versa Note and parallel device power are
1.
off.
Align and connect the 25-pin parallel cable connector to the parallel
2.
port on the system. Secure the cable with t he screws pr ovided.
Align and connect the other end of the cable to the parallel port on
3.
the device. Lock the connecto r clips.
Connect the power cable to the device and a properly grounded wall
4.
outlet.
Note:
install the appr opri ate printer driver through the
Windows Control Panel.
When you connect a printer, be sure to
Turn on power to the system and the device.
5.
Note:
you try to use it. See the instructions that came with
the device for more information.
Check that the device is online before
Serial Devices
To install a serial device such as a printer or an external mouse, you need
a cable with a female 9-pin connector.
Note:
install the appr opri ate printer driver through the
Windows Control Panel.
4-24 Using Your NEC Versa Note
When you connect a printer, be sure to
Page 90

Follow these steps to connect a ser ial device to your NE C Versa Note.
Check that both the NEC Versa Note and the device power are off.
1.
Align and connect the 9-pin connector with the serial port on the
2.
system. Secure the co nnect ion wit h t he screws pr ovided.
Align and connect the other end of the cable to the appropriate port
3.
on the device. Secure the connections with the screws provided.
Connect the power cable to the device and a properly grounded wall
4.
outlet.
Turn on power to the system and the device.
5.
External Keyboard/Mouse/Keypad
You can add a full-size PS/2-style keyboard or PS/2-style mouse to your
NEC Versa Note.
When you connect an external keyboard, you can use bot h the built-in
keyboard and external keyboard simultaneously. (The embedded
numeric keypad on the NEC Ver sa Not e does not wo r k in this case. Use
the keypad on the external keyboard.)
To attach two external PS/2-style devices at the same time, use the
optional NEC Y-adapter. Cont act an authorized NEC dealer in your area
for in forma tion.
Follow these steps to connect an exter nal ke yboar d, mouse, or keypad to
your system.
Connect the keyboard, mouse, or keypad cable connector to the PS/2
1.
port on the system.
If power is turned off, power on the NEC Versa Note to resume
2.
operation.
The system immediate ly reco gnizes the device.
Using Your NEC Versa Note 4-25
Page 91

External Audio Options
The NEC Versa Note comes equipped with built-in audio po rt s t hat let
you record and play sound.
Connect audio jacks, like a micropho ne o r ext er nal speakers, to t he aud io
ports as follows.
Note:
designed with an icon repr esentative of the device.
When connecti ng the audio device to your NEC
Versa Note, be sure to matc h the icon on the cable
connector to the icon on t he system por t.
Locate the audio port (Microphone, Line-in or Headphones) that you
1.
want to use.
2.
Plug the jack into the port on the rear side of the syste m.
Note:
experience sound distortion or feedback, lower the
volume.
Some audio device cable connect or s are
If you use external speakers and
Some feedback is caused by having the microphone
and speakers too close to each other, so moving the
external audio option away from the unit may also
help.
NEC PortBar
The NEC PortBar™ is an accessory that duplicates the ports found on
the back of your NEC Versa Note system. Keep the NEC PortBar in
your office connected to peripherals while you take your NEC Versa
Note on the road. (PortBar ports are described in the next section.)
Using the PortBar
Follow these st eps t o install the optional Po rtBar.
Rotate the re lease bars to the ou tside.
1.
4-26 Using Your NEC Versa Note
Page 92

Plug the PortBar into the expansion connecto r on the back of the
2.
NEC Versa Note computer. Be sur e that the Port Bar snaps into the
PortBar latches o n each side o f the NEC Ver sa Note.
Rotate to release bar to the center to lock.
3.
Using PortBar
❷
❶
❸
1. Release bars 2. PortBar
3. PortBar latches
Using Your NEC Versa Note 4-27
Page 93

PortBar
❶
1. AC Power Port 2. Mini-DIN PS/2 Mouse Port
3. Mini-D IN PS /2 Keyboar d P ort 4. Seri al Port
5. Parallel Port 6. Monitor Port
7. USB Port
❷
❸
❹
❺ ❻
❼
The ports on the PortBar are described next.
AC Power Port — Connects an AC adapter to your notebook
computer.
Mini-DIN PS/2 Mo use Port — Connects to a PS/2 mouse.
Mini-DI N PS/2 Ke yboar d Por t — Co nnects to a 6-pin s tandard PS /2-
style ke yboar d.
Serial Port — Connects a serial device to your notebook computer,
such as an external modem or mouse.
Parallel Port — Connects a printer to your notebook computer. You
can change the LPT Mode in the Setu p progr am.
Monitor Port — Connects an external VGA/SVGA monitor to your
notebook computer.
USB Port — Connects up to 127 peripheral devices to your notebook
computer.
4-28 Using Your NEC Versa Note
Page 94

Updating the System BIOS
Use the following steps to update your NEC Versa Note system BIOS
with the BIOS Update Diskette (BUD). Specifically, the BIOS is the
code transmitted onto your system’s read-only memory (ROM).
Note:
NEC makes significant improvements or fixes to the
current system BIOS. Your authorized dealer or
Customer Servic es representative can help you
determine this.
If you are informed that the BIOS needs an upgrade, contact NEC CSD
Customer Services (800) 632-4525, Fax (801) 578-5101 to receive a
copy of the BUD.
You can also download the BIOS from the NEC CSD BBS or web site.
Refer to appendix C for deta iled ins truct ions on how t o dow nload the
BIOS.
Only use the BIOS upgrade diskett e for your specific model.
You only need to update the BIOS if
Note:
system outside of the U. S. or Canada, please
contact a local offic e or dealer in y our countr y .
If you purchased this system outside of the United
States or Canada, see the booklet, “Getting Servic e
and Support in Asia, A ustr alia, and Europe” to find
out how to contact the local office in your country.
If you purchased or are using this
Using Your NEC Versa Note 4-29
Page 95

Using Multimedia
Audio
Video
Multimedia Applications
5
Page 96

With its fast Pent ium II/MMX processor and enhanced audio and video
capabilities, you can perform fantastic multimedia feats with your NEC
Versa Note! This section describes the NEC Versa Note’s mult imed ia
features and how you can use them to create high-quality, power ful
presentations.
Multimedia combines audio, text, animation, photo images, and video
sources into o ne presentation.
Audio
The NEC Versa Note provides entertainment-level sound quality
through the ster eo speakers and. I t handle s musical instru ment digital
interface (MIDI) files, digital audio files, and analog audio sources. This
means the NEC Versa Note recognizes .WAV, .MID, and .AVI files.
The system is also Sound Blaster™ compatible.
Recording
All information on a computer must be stored in digital form. Analog
audio signals from sources such as ta pe cassettes or music CDs must be
digitized before being recorded and stored on disk.
Note:
default. Enable the microphone before attempti ng to
use it.
You can make recordings fro m two classes of audio input: line level and
microphone level. Line level accepts analog aud io signa ls from
electronic sour ces such as tape cassettes, VCRs, and CD/VCD/DVD
players through the Line-In port.
Note:
make sure the speaker volume is turned down or
feedback may occur.
5-2 Using Multimedia
The built-in microphone is muted by
When using the built-in microphone,
Page 97

Line- I n
The following procedure describes how to use the Sound Recorder in the
Microsoft Windows Accessories gro up to record sound into a file on the
NEC Versa Note. (For details, see the online help that is available when
you open the Sound Recorder.)
Locate the Sound Record er by sliding the cursor over Progr ams,
1.
Accessories, Ent ert ainment, Mult imedia, and the So und Reco r der
line. Release your finger from the VersaGlide to open the recorder.
(You may have to press the left select or button on the VersaGlide.)
Use the VersaGlide to press the Record butto n on the screen. T he
2.
Record butto n has a red circle in the middle.
Speak into the microphone to create a sound file.
3.
When you finish recording, press the Stop button. Be careful when
4.
recording; audio files can become quite large.
Analog signals come in through the NEC Versa Not e’s Line-In port . The
analog signals are converted into digital bits and bytes (digitized)
through a converter known as an ADC (analog-to- digital converter). The
resulting digital sound bytes can be stored, edited, pro cessed, and
transferred. You can record ambient sound effects, specific so und
effects, or music to enhance a present ation.
Ambient sound effects creat e a sense of place o r environment and include
sounds such as rain, h eavy traffic , chirping birds. Specific sound effects
accent or illustrate an action. Examples of specific sound effect s include
footsteps, a crash, and a clock chime. There are many sources of
prerecorded sound effects available on the market, or, you can record
your own sounds.
Line-In accepts analog signals from external devices such as a tape deck,
a stereo CD-p layer, or a st er eo tuner. The Line-In po rt has a mini-type
connector. You may need an adapter to connect your input device to the
NEC Versa Note through Line-In.
Using Multimedia 5-3
Page 98

internal speakers.
CD-ROM Input
You can record music and sound effects from a CD (compact disc) and
store them on your hard disk. The audio sig nal from t he CD-ROM reader
connects direct ly to your NE C Ver sa Not e. Simply follow t he
instructions in “Recor ding” to record sound from your CD player.
Microphone
You can capture and record sounds through the internal microphone on the
NEC Versa Note or through an external microphone that connect s t o the
system thro ugh the microphone po rt. Yo u can recor d voice-overs for
narration, reminders, or special instructions.
See “Recording” earlier in this chapter, for det ails about recor ding sound
with the microphone.
Playing Back
Note:
Using Line-In does not disable the
You can play back your recorded soundtrack thro ugh st ereo headphones,
the internal NEC Versa Note ster eo speaker s, o r exter nal ster eo speaker s.
You can play .WAV and MIDI files as well as CD audio. Adjust the
volume through the software (a volume control feature can be found in
Accessories or on the system tray in the Toolbar) or with the volume
control knob on the left side of the system.
Play audio from files or audio devices as follows. (This example shows
how to use the Media player opt ion in Accessories. You can also play
audio by opening a file through the Sound Recorder and pressing the
Play button.)
1. Go to Progr ams, Acce ssories, Mult imedia, and open the Media
Player.
2. Select your audio so urce as fo llows:
5-4 Using Multimedia
Page 99

If playing a file, use the F ile menu to s p ecif y the file name.
If playing from a device, use the Device menu to select your
audio source. Once your file is open or your source spec ified,
press the Play button.
3. Press t he square Stop button to stop playing the audio.
Using Headphones
The NEC Versa Note headphone port delivers sound at half a watt.
Stereo headphones plug in thro ugh the headphone jack located on the
rear side of the NEC Versa Note. Use the aud io software that comes on
your system to adjust the volume.
Note:
speakers.
Using headphones disables the i nternal
Using the Built-In Speakers
The NEC Versa Note has built- in stereo speakers. Adjust the volume
through the software or with the volume control knob locat ed o n t he left
side of the system.
Using External Stereo Speakers
For full stereo sound impact, you can plug a pair of stereo speakers into
the headphones jack located on the rear of the system. Adjust the volume
through software, with the contro ls on the external speakers (if equipped
with controls), o r with the volume cont rol knob on the NEC Versa Note.
When using external speakers t he inter nal speak er s ar e disabled.
Video
Depending on the model, the NEC Versa Note features a DSTN or TFT
panel with SVGA or a TFT panel with XGA resolution. This enables
color display for sharp e ffect ive visuals right on the system or pro jected
onto an external CRT monitor .
Using Multimedia 5-5
Page 100

Use your NEC Versa Note to run full mot ion, full-scree n MPE G video .
In Windows 98, Windows 95 and Windows NT, the Active Movie
Control gives you MPE G capab ilities. In Windows NT, you must install
Internet Explor er to use t he Act ive Movie Co ntrol function.
Access the Active Movie Control as fo llow s:
Go to Start, Programs, Accessories, Entertainment (Windows 98), or
1.
Multimedia (Windows 95 and NT), and select Active Movie Control.
An Open dialog box displays.
Locate your CD-ROM drive and double click on the appropriate
2.
drive to display its cont ent s.
Open your file and press the Play butto n. (To play full screen MPEG
3.
video, you may need to press the Window maximize button to bring
your video to full size.)
Using Digital Video Files
With commercial video capt ure hardware and applicat ion software, you
can plug any video device, including VCRs, televisions, camcorders, and
laser disc players into your NE C Ver sa Note and record motion graphics
to your hard drive.
Use a video frame grabber and store a stream of grabbed stills on your
hard disk .
Using Animation Files
You can create a dynamic presentat ion using an animation application.
Animation can illustrate a concept, drive home an important point, or
command attention. Graphics animation can add punch to a presentation
with an ani ma ted illustration, a flash in g arr ow, o r a flying lo go.
5-6 Using Multimedia
 Loading...