

Page 1

PROPRIETARY NOTICE AND L IABILITY DISCLAIME R
The information disclosed in this document, including all designs and related
materials, is the valuable property of NEC Corporation (NEC) and/or its licensors.
NEC and/or its licensors, as appropriate, reserve all patent, copyright and other
proprietary rights to this document, including all design, manufacturing,
reproduction, use, and sales rights thereto, except to the extent said rights are
expressly granted to others.
The NEC product(s) discussed in this document are warranted in accordance with
the terms of the Warranty Statement accompanying each product. However, actual
performance of each such product is dependent upon factors such as system
configuration, customer data, and operator control. Since implementation by
customers of each product may vary, the suitability of specific product
configurations and applications must be determined by the customer and is not
warranted by NEC.
To allow for design and specification improvements, the information in this
document is subject to change at any time, without notice. Reproduction of this
document or portions thereof without prior written approval of NEC is prohibited.
Versa is a U.S. registered trademark of NEC Technologies, Inc.
MediaDock is a U.S. trademark of NEC Technologies, Inc.
All other product, brand, or trade names used in this publication are the trademarks or
registered trademarks of their respective trademark owners.
First Prin t ing — September 1995
Copyright 1995 Copyright 1995
NEC Technologies, Inc. NEC Corporation
1414 Massachusetts Avenue 7-1 Shiba 5-Chome, Minato-Ku
Boxborough, MA 01719 Tokyo 108-01, Japan
All Rights Reserved All Rights Reserved
Page 2

Using this Guide
The NEC Versa® MediaDock™2000 User’s Guide gives
you the information you need t o ma ximize the use of you r
MediaDock 2000. Read this guide to familiarize yourself
with the MediaDock 2000 and its features. For specific
information see
Chapter 1 to acquaint yourself with MediaDock 2000
capabilities and features.
Chapter 2 to set up your MediaDock 2000 hardware and
connect you r NEC Vers a 2000 series system. Chapter 2
als o gives you recommendati ons for taking care of your
MediaDock 2000.
Chapter 3 to set up and use the software needed for you r
NEC Versa 2000 computer to recognize and let you us e
the MediaDock 2000 and its CD ROM reader.
Chapter 4 to learn more about us ing the MediaDoc k
2000 and the built-in CD ROM reader. Chapter 4 also
descr ibes how to t ake care of your CDs .
Cha pter 5 to master procedur es for connecting external
options like headphones, microp hones or speakers.
Appendix A to find out MediaDock 2000 specifications.
Appendix B for troubles hooting informa tion.
This doc ument, along with your NEC Versa 2000 Series
User’s Guide, provides the information that you need to ef-
fectively use your MediaDock 2000.
Using this Guide vii
Page 3

TEXT SETUP
To make this guide as easy to use as possible, text is set up
in the following ways.
Warnings, c autions, a nd notes have the f ollowing
format.
CAUTION:
damage system hardware or software.
NOTE:
about whatever is being described.
Notes give partic ularly important infor mation
Names of keys are p rinted as they appear on the keyboard, for example,
Text tha t you must type or keys tha t you must press are
presented in bold type. For example, type
.
Enter
RELATED DOCUMENTS
See the following docu ments for inf ormation related t o MediaDock 2000 and NEC Versa 2000 system operation:
Your NEC Versa 2000 User’s Guide.
Cautions indicate situations that can
Ctrl, Alt
, or
Enter
.
and press
dir
viii Using this Guide
The Mi c rosoft® Windows f or Wor kgroups, Windows
95, and
MS- DOS op erat ing system documentation t hat
came with your NEC Versa 2000 computer.
Page 4

Contents
Using this G uide
Text Setup................................................................ viii
Related Documents................................................... viii
1 Introducing the MediaDock 2000
What’s in the Box..................................................... 1-2
MediaDock 2000 Features ........................................ 1-3
Front and Right Side Features.............................. 1-4
Rear Features ...................................................... 1-6
Rear Panel Icons............................................. 1-8
2 Getting Started
Setup Location.......................................................... 2-2
Environmental Conditi ons ......................................... 2-2
Hardware Setup........................................................ 2-3
Connecting the Power Cab le ................................. 2-4
Docking Your Versa 2000 Computer.................... 2-5
Powering On........................................................ 2-9
Detaching Your NEC Versa 2000 and
MediaDock 2000...................................................... 2-10
Powering Off....................................................... 2-10
Disc onnecting Your NEC Versa 2000 .................. 2-12
MediaDock 2000 Care .............................................. 2-13
Precautions.......................................................... 2-13
Routine Care........................................................ 2-14
3 Setting Up and Using the Software
Setting Up MediaDock 2000 Software ...................... 3-1
Running the Setup Ut ility — Windows
for Workgroups................................................... 3-2
Choosing a Configu rat ion ................................ 3-5
Running the Setup Ut ility — Windows 95............ 3-6
Contents iii
Page 5

Using DOS-Based Functions................................ 3-8
Changing the Volume...................................... 3-8
Changing IRQ and DMA Settings................... 3-9
4 Using the MediaDock 2000
Changing the Volume................................................ 4-1
Using the Hardware to Adjust the Volume............ 4-1
Using the Software to Adjust the Volume............. 4-2
Using Windows 95.......................................... 4-2
Using Windows for Workgrou ps ..................... 4-2
CD-ROM Use........................................................... 4-3
CD Loading......................................................... 4-5
Audio CDs................................................................ 4-7
Using Audio CDs u nder Windows f or
Workgroups......................................................... 4-7
Adding the CD Audio Option.......................... 4-7
Pla ying an Audio C D from Windows f or
Workgroups.................................................... 4-8
Using Audio CDs u nder Windows 9 5 ................... 4-8
Using Entertainment CDs.......................................... 4-9
Pla ying Entertainment C Ds us ing W i ndows
for W orkgrou ps or W indows 95...................... 4-9
Playing Entertainment CDs in MS-DOS Mode..... 4-10
CD Care................................................................... 4-12
Emergency Eject.................................................. 4-13
5 Connecting Options
Headp hones or Externa l Speakers.............................. 5-2
Line-In Device.......................................................... 5-3
Ext ernal M i c rophone................................................. 5-4
Line-Out Device....................................................... 5-5
External PS/2 Keyboard............................................ 5-6
External PS/2 Mouse................................................ 5-7
Joystick/MIDI Device............................................... 5-8
Serial Device............................................................ 5-9
Parallel Device.......................................................... 5-10
External Monitor ...................................................... 5-11
iv Contents
Page 6

A Specifications
B Solving Problems
Problem Checklist..................................................... B-1
Troubleshooting........................................................ B-2
If You Need Help...................................................... B-3
Index
Contents v
Page 7
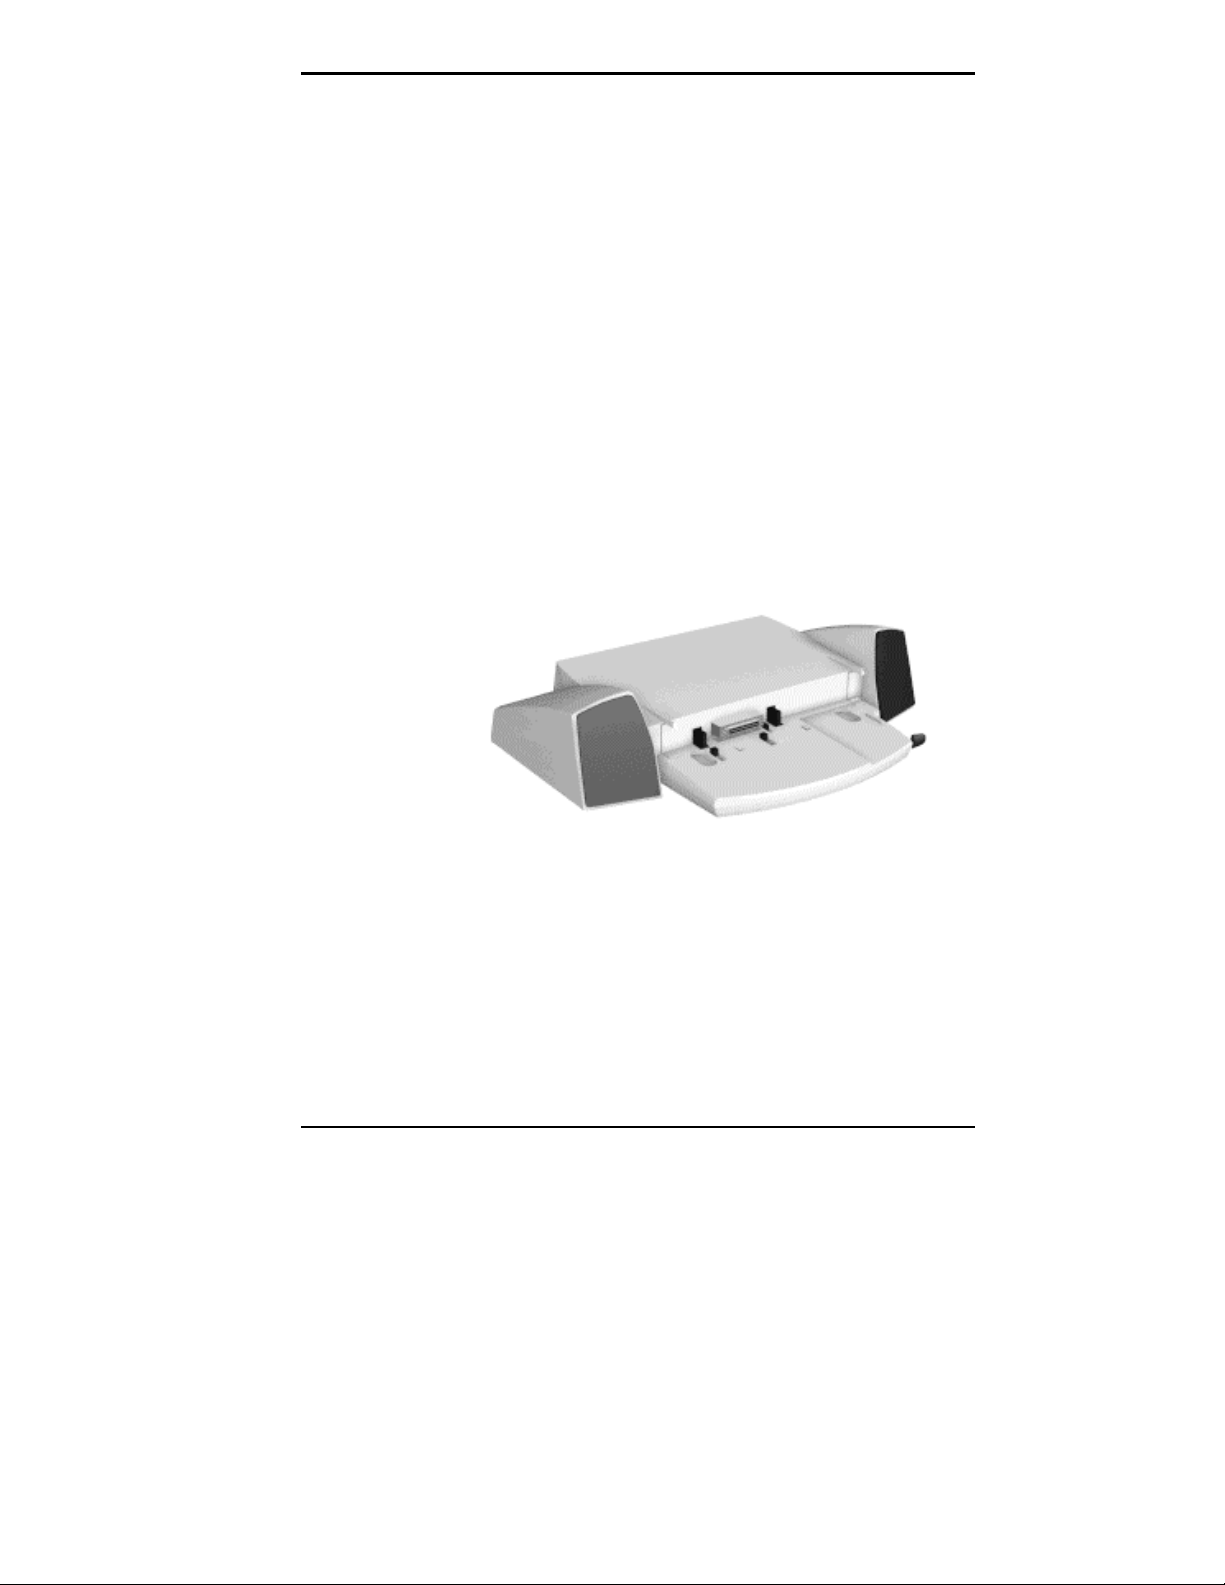
Introducing the
1
MediaDock 2000
The NEC Versa® MediaDock™ 2000 transforms your
NEC Versa 2000 notebook computer into a multif aceted
multimedia desktop system. In addition to it s multimedia
capabilities , the MediaD oc k 2000 pr ovides I/O ports
including a parallel port, serial device port, PS/2-style
keyboard/mouse port, and externa l CRT port.
This c hapter des c ribes t he fea tures and cap abilities that
make the MediaDock 2000 an exceptional multimedia system.
NEC Versa MediaDoc k 2000
Introducing the MediaDock 2000 1-1
Page 8
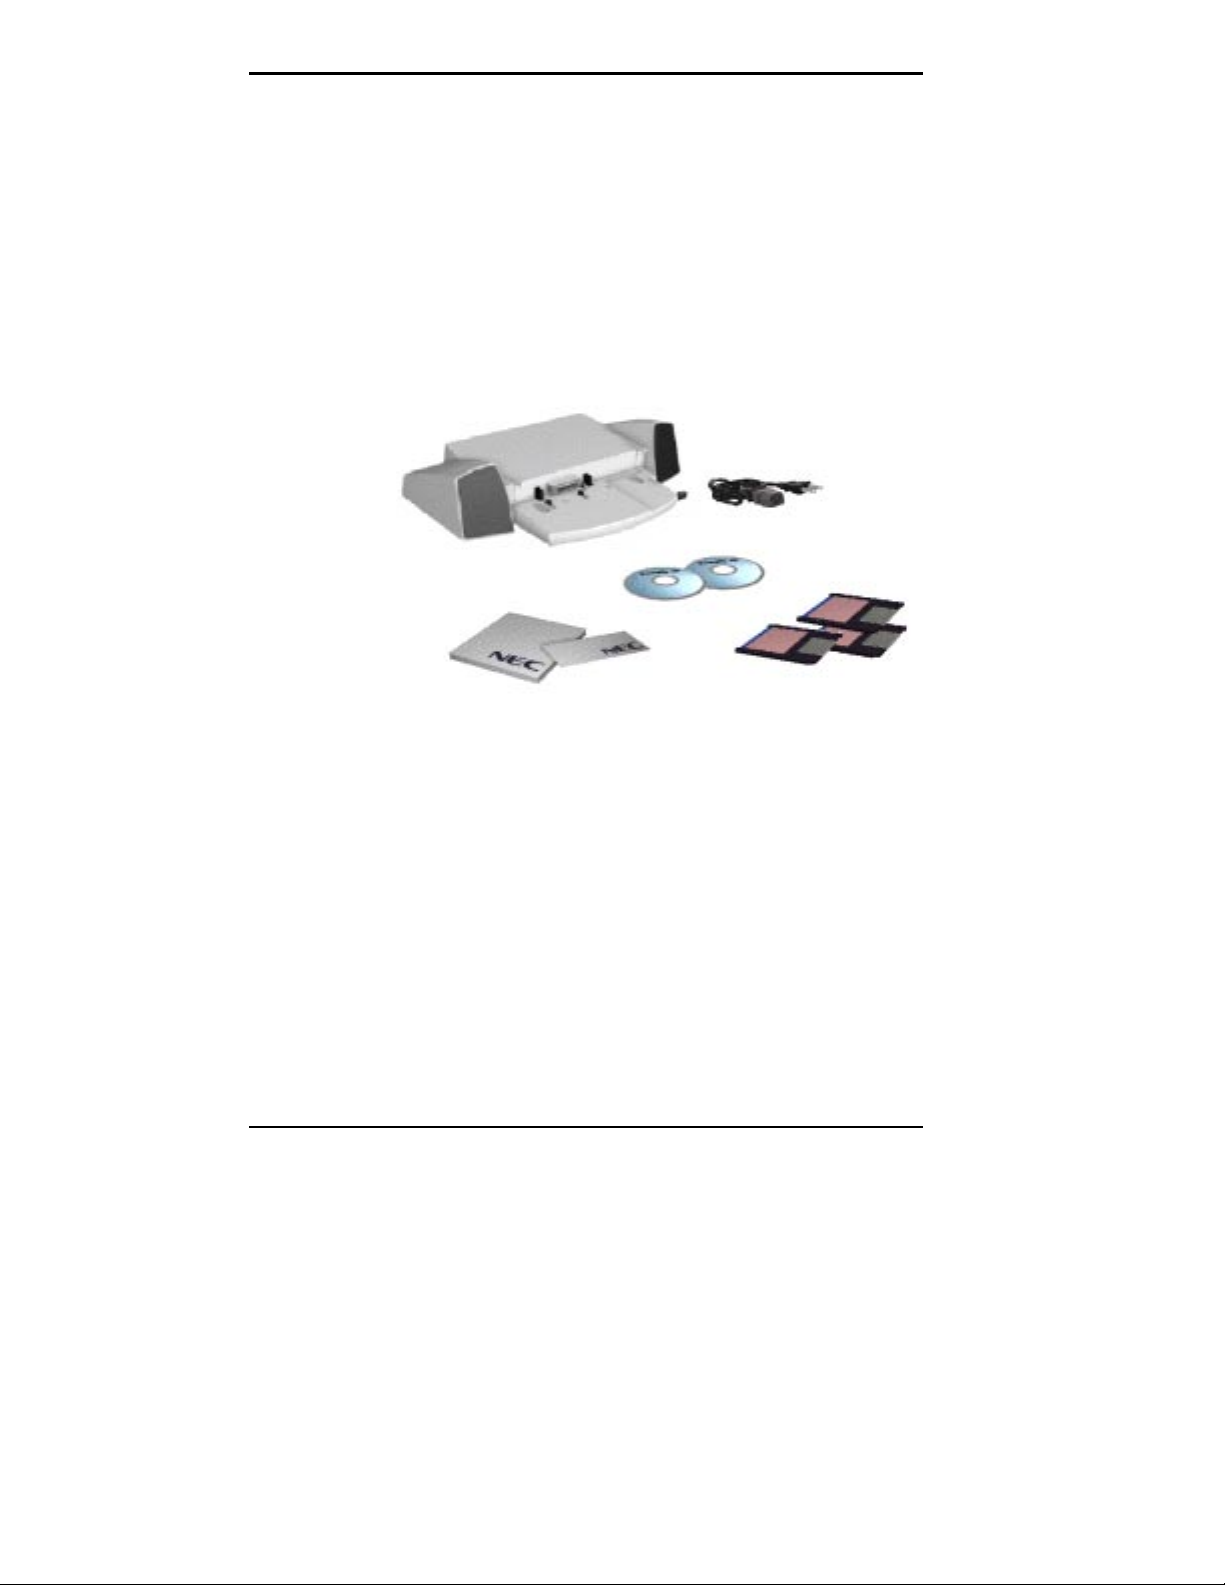
WHAT’S IN THE BOX
Ca refully unpack a nd c heck the contents of the MediaD oc k
2000 shipping carton. MediaDock 2000 accessories are
pac ked in t he b ottom of the s hip ping carton.
Make sure you have the hardware components shown in the
following figure and that they are in good condit ion. If
anything is damaged or missing, c ontact your deal er.
1-2 Introducing the MediaDock 2000
Carton cont ents
Page 9

MEDIADOCK 2000 FEATURES
The MediaDock 2000 provides the following features.
A quad-s peed CD-ROM R eader /Pl ayer .
Two s peakers to output mid-range a nd base s ounds.
A docking lever to gently guide your Versa 2000 com-
put er towa rds the docking mecha nism, secu ring it in
place.
Mult imedia ports for p lugging in external spea kers, a
microphone, headphones, or a musica l instr ument device
interface (MIDI) device/joystick.
Peri pheral ports for attaching a PS/ 2 type keyboard,
mouse, a printer port with Enhanced Parallel Port (EPP)
support, a serial port for serial (RS232-C) devices, and
a CRT port for an external monitor.
Locking latches that secure your NEC Versa 2000
computer to the MediaDock 2000.
The sections that follow give the location and a description
of each feature.
Introducing the MediaDock 2000 1-3
Page 10
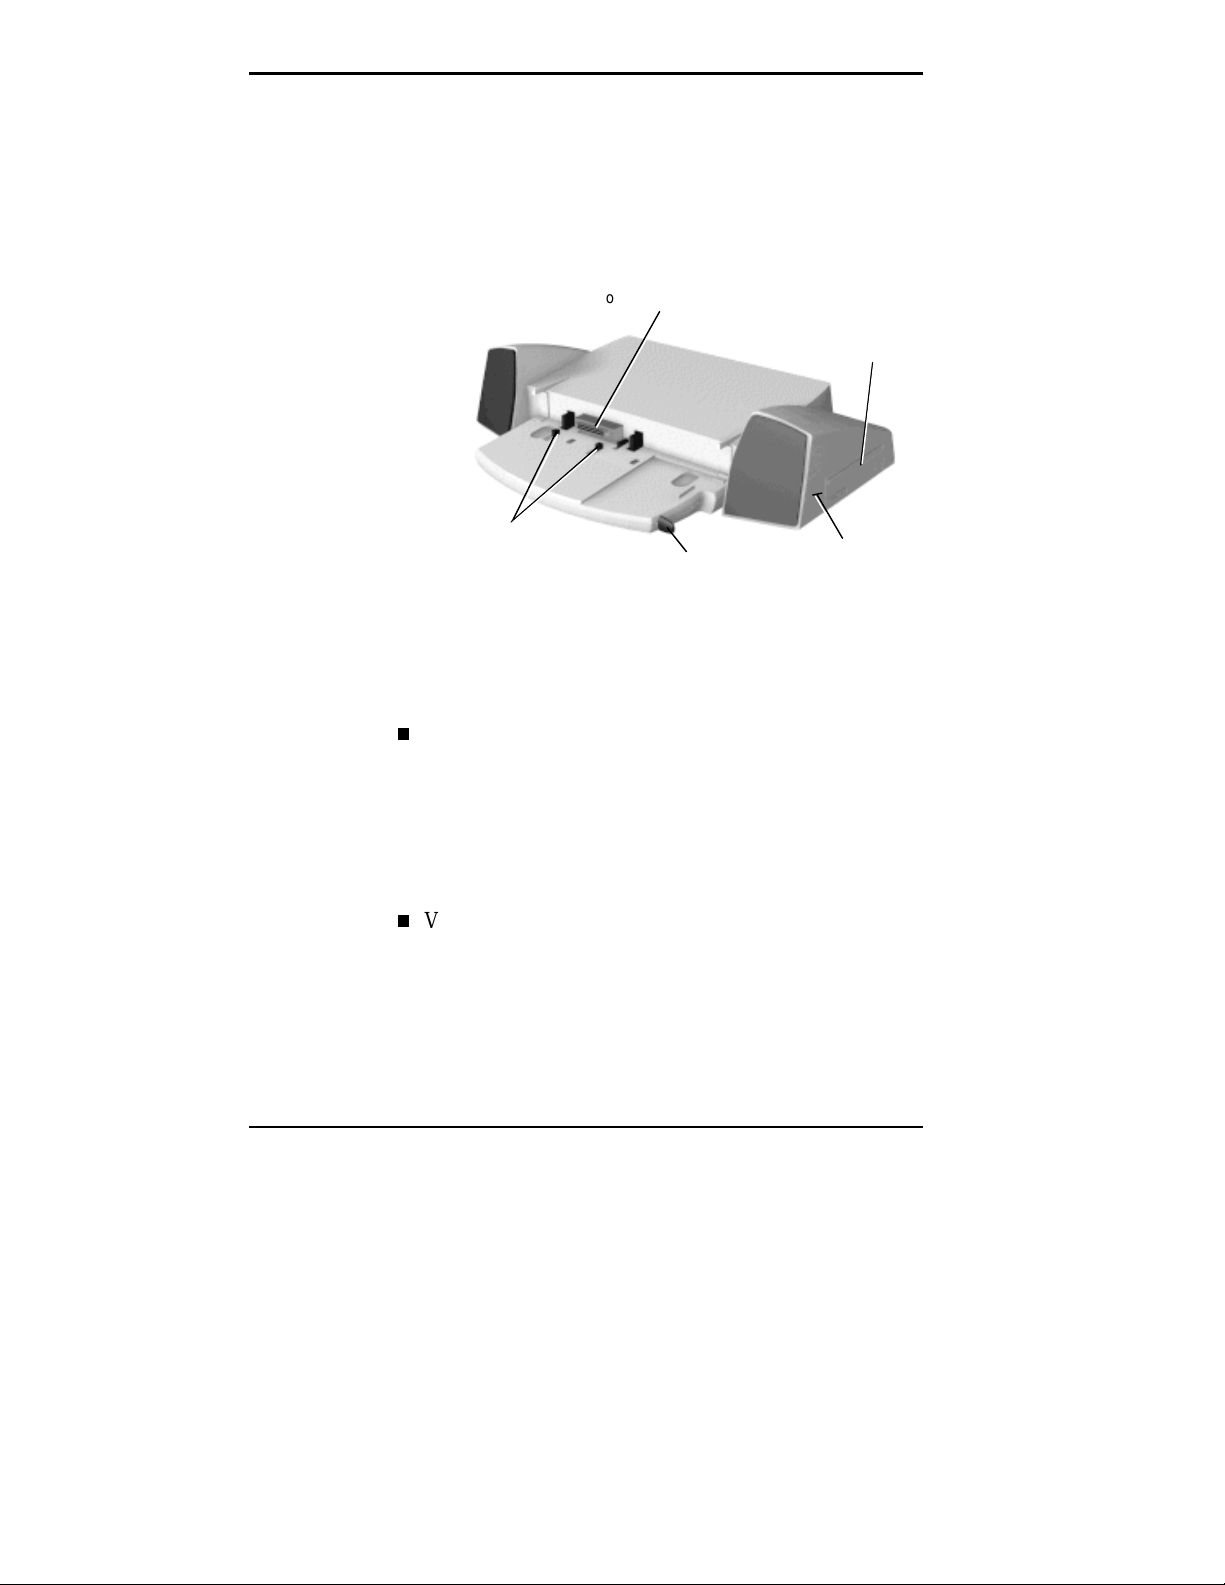
Front and Right Side Features
The following figure shows features located on the front a nd
right side of the MediaDock 2000. Descriptions follow the
figure.
Docking Connector
Locking Latches
Docking Leve r
Quad-Speed
CD-ROM
Reader
Volume Con t rol
MediaDock 2000 fr ont and right side features
Features on the front and side of the MediaDock 2000 are
descr ibed next.
CD ROM Reader — A built-in, quad-speed CD-ROM
reader lets you access data and recorded audio. You ca n
output sound to the MediaDock 2000 speakers, external
spea kers, or external hea dphones.
CD-ROM u se and controls a re descr ibed in Chap ter 4
under “CD - ROM Use.”
Volume Control — This contr ol let s you control the
sound volume produced by the MediaDock 2000. Move
the control towards the front of the MediaDock 2000 to
decrease sound; back to increase sound.
1-4 Introducing the MediaDock 2000
Page 11

Docking Lever — Push the docking lever for ward t o
lock your NEC Versa 2000 computer into place. Lift
and pull the lever back to rel ease the comp uter.
Docking Connector — The docking connector lets you
dock your NEC Versa 2000 computer and access the
MediaDock 2000’s CD-ROM and sound capabilities.
Locking la tches — These lat c hes secure you r Vers a
2000 to the MediaDock 2000.
Introducing the MediaDock 2000 1-5
Page 12
Rear Features
The following figure shows features located on the rear of
the MediaDock 2000.
Features on the rear of the MediaDock 2000 are described
in the following sect ion.
Microphone
Line-In
Headphones/
External Speakers
Line-Out
Seria l Port
Joystick
PS/2-style
Keyboard/Mouse
MediaDock 2000 rear features
Headphone/ Exter nal Speaker Port — This port lets you
plug in headphones or ex terna l speaker s.
Line-In — This port lets you use another audio sys tem,
like a home st ereo, as an input source. Use a cable to
connect t o the Line-Ou t por t on the other audio system
to record or play.
Microphone Por t — T his port lets you plug in a micro-
phone.
Printer Port
CRT Port
Power
Port
Line-Out — T his port let s the MediaDock act as a n input sourc e f or anot her audio system. Connect this port to
a Line- I n port on another audio system to play or record.
1-6 Introducing the MediaDock 2000
Page 13

PS /2-t ype Keyboard Port — L et s you add an external
keyboard.
PS/2-type Mouse Port — Lets you add an external
mouse.
Joystick/MI DI por t — If you are using a joystick or
MIDI device, insta ll the device in this por t.
Serial Port — Use this port to install any serial
(RS232-C) devices.
Parallel Port — Use t his port to insta ll a parallel pr inter
or other parallel devices, such as tape bac kup systems.
External CRT Port — Use this port to install an external
monitor.
Air Vents — MediaDock 2000 air vents allow air to cir-
cula te inside the unit. This keeps the internal c omponents cool and pr otects from overhea ting.
Power Cable Port — The power cable port lets you connect t he p ower cord to the MediaDock and AC power .
Introducing the MediaDock 2000 1-7
Page 14
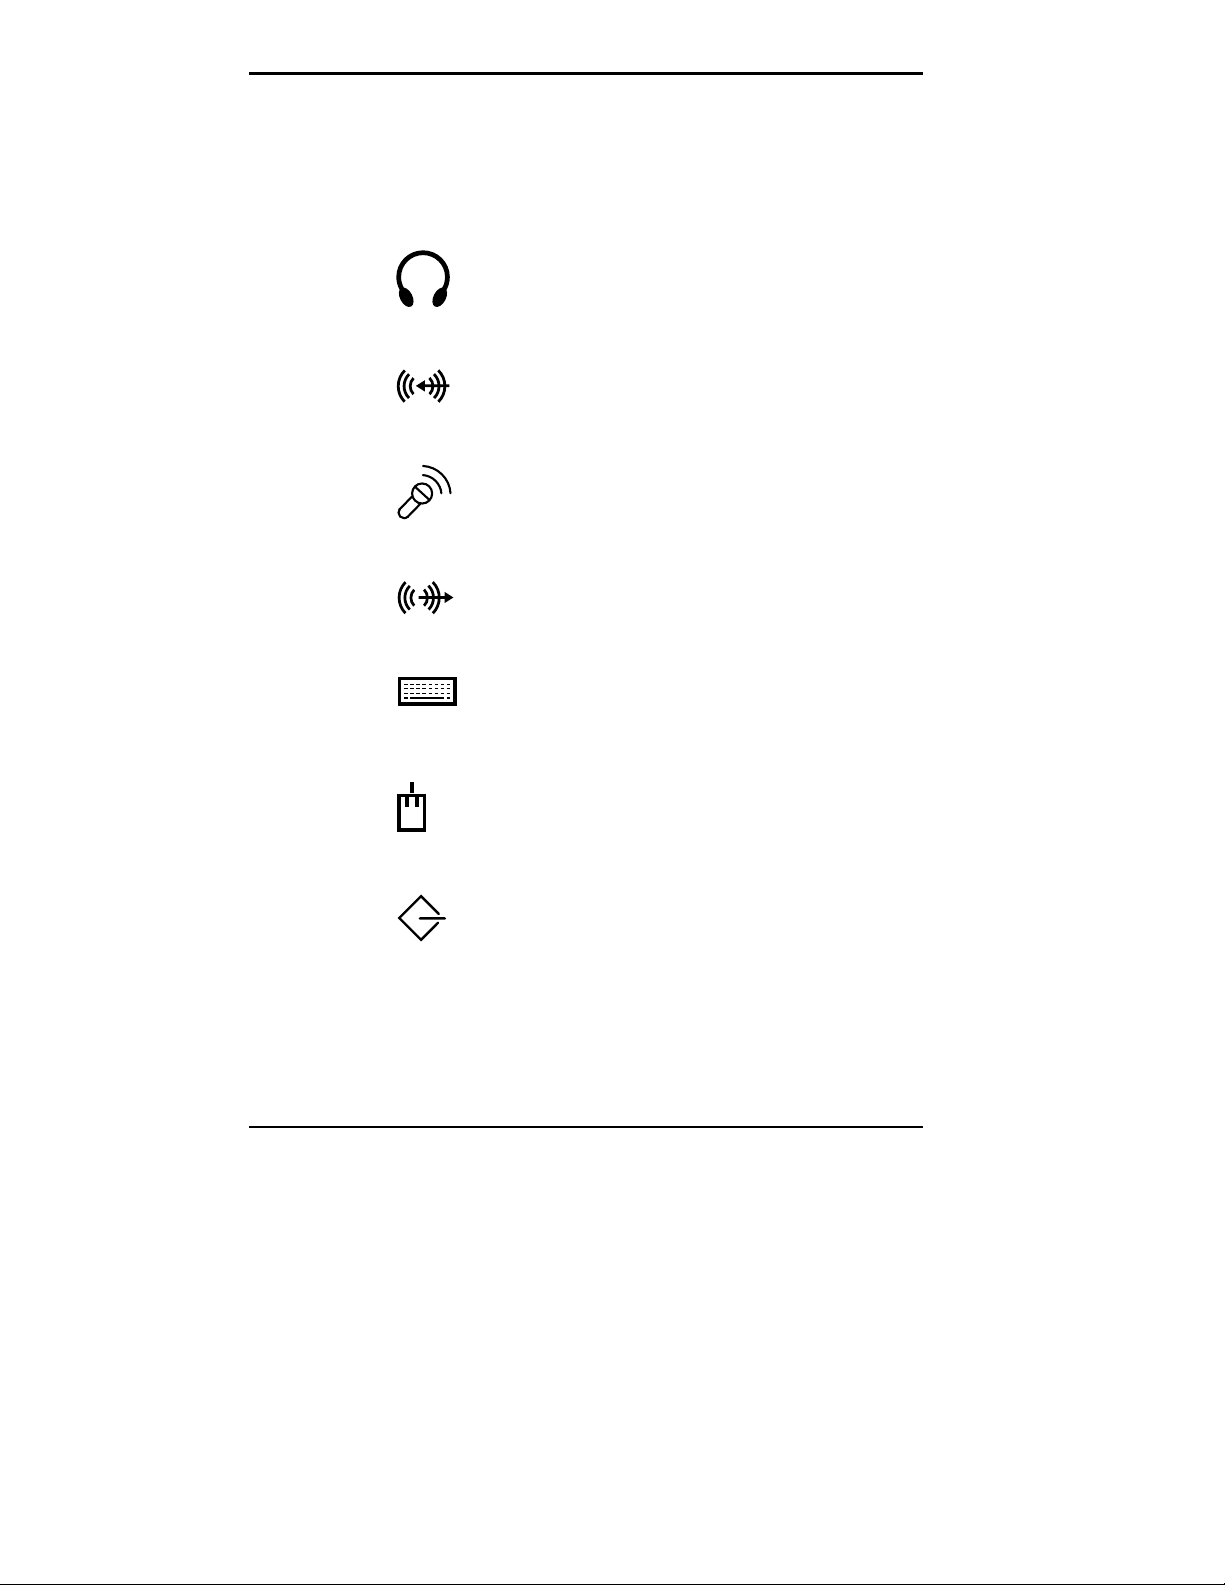
Rear Panel Icons
The following lis ts provides a desc ript ion of rear panel
icons.
— Hea dphones/External Sp eakers
— Line-In
— Mic rophone
— Line-Out
— Keyboard
— Mouse
— Joystick/MIDI
1-8 Introducing the MediaDock 2000
Page 15

— Serial
— Parallel
— CRT
Now tha t you have f amiliariz ed you rself wit h MediaDock
2000 features, go to Section 2, “Getting Started” for setup
and docking ins tructions.
Introducing the MediaDock 2000 1-9
Page 16

2
Getting Started
Getting your MediaDock 2000 up and running is easy. This
chap ter provides the p rocedures you need to get sta rted.
They i n clude:
Finding a good loc ation for the Media Dock 2000
Connecting your NEC Versa 2000 computer and Medi-
aDock 2000
Power ing on and off.
Thi s chapt er a l so provides the p rocedures to use when yo u
are finished using the MediaDock 2000 and NEC Versa
2000 together.
Getting Started 2-1
Page 17

SETUP LOCATION
Before setting up your MediaDock 2000, find a good location for using it . Here a re some guidelines.
Select a flat, sturdy surface, like a desktop or table, so
you have access to both the front and ba c k of the unit.
Choose an ar ea awa y from extremely warm or cold sur-
roundings, dir ect sunlight , excess i ve du st, vib ration,
shock or mois ture.
ENVIRONMENTAL CONDITIONS
Use your MediaDock 2000 in a location that meets the following environmental c onditions:
Temperature: 41°F to 95°F (5°C to 35°C)
Humidity: 20% to 80% ( noncondensing)
Store your MediaDock 2000 in a location that meets the
following conditions:
Temperature: –4°F to 122°F (–20°C to 50°C)
2-2 Getting Started
Humidity: 10% to 85% ( noncondensing)
Page 18

HARDWARE SETUP
Setting up your NEC Versa 2000 computer and MediaDock
2000 involves the following:
Connecting the power c able to you r Media D ock 2000
and an electrical out let
Docking your NEC Versa 2000 computer on your Me-
diaDock 2000
Powering on using your NEC Versa 2000 computer
power switch.
Follow the ins truc tions given next in the order presented to
get your NEC Versa 2000 computer and MediaDock 2000
up and running.
Getting Started 2-3
Page 19
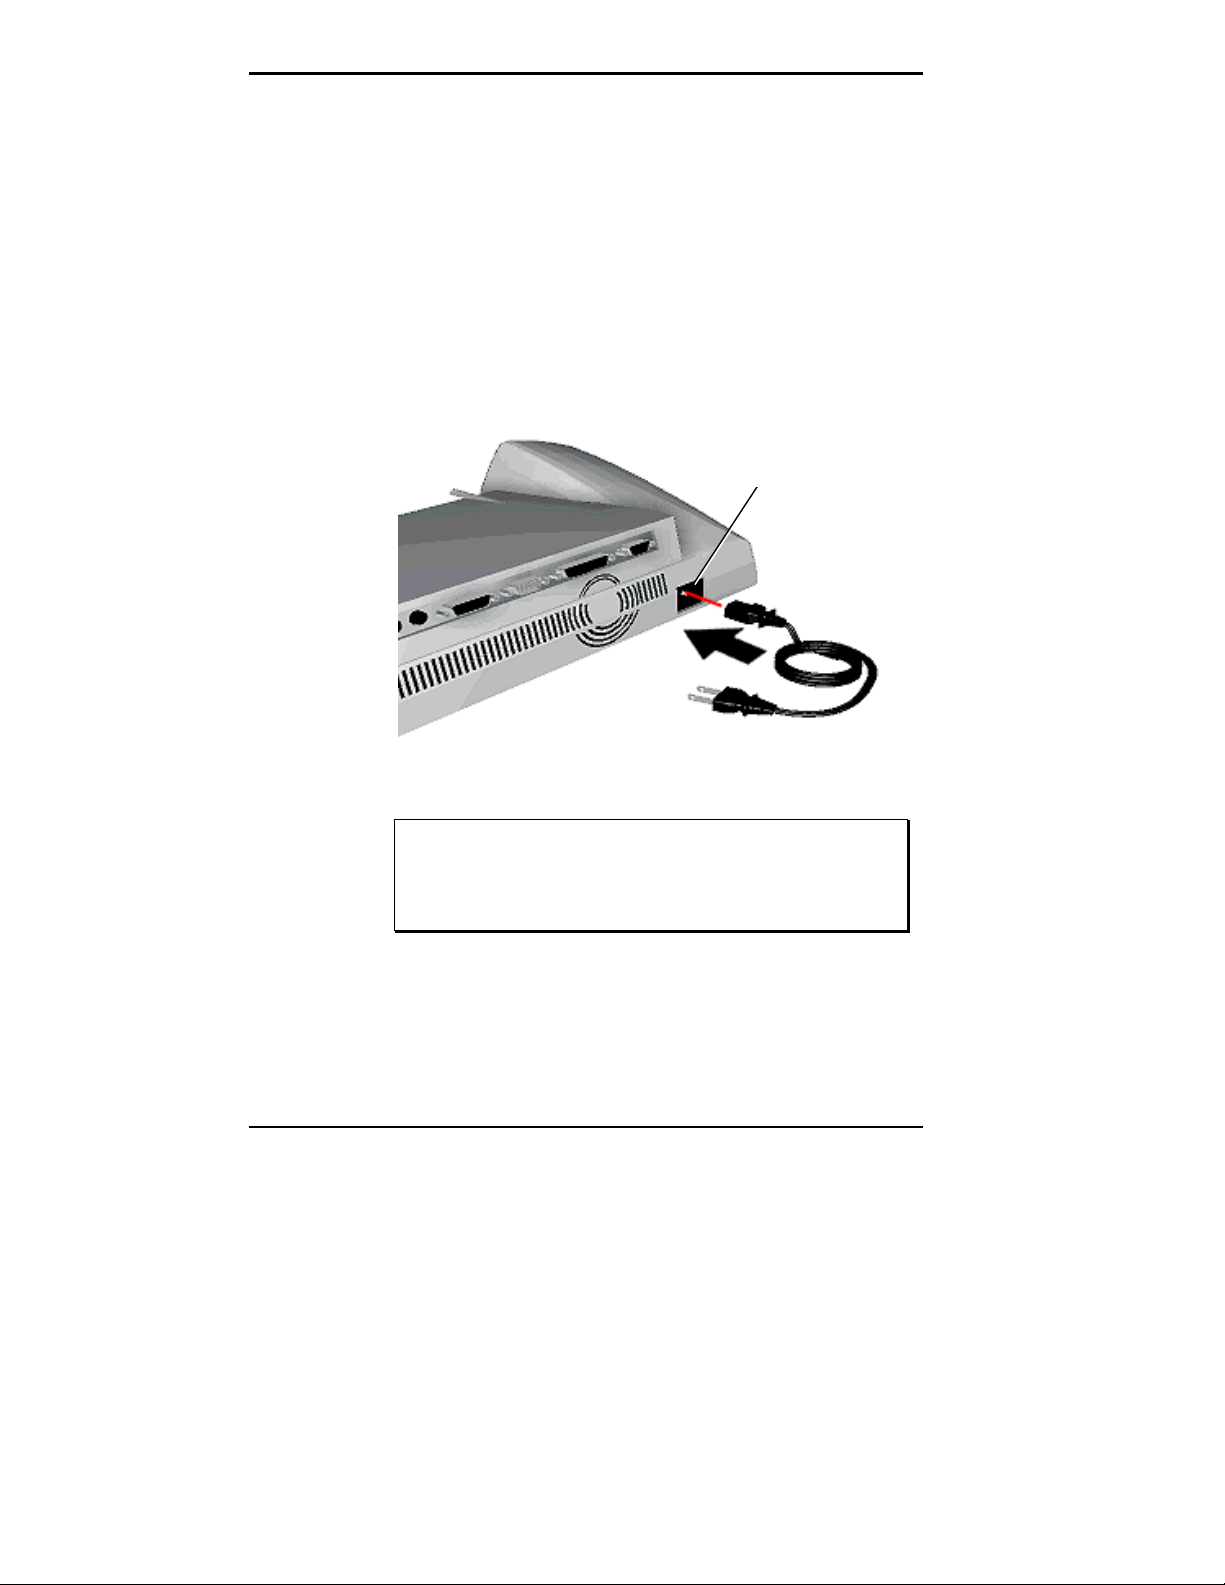
Connecting the Power Cable
The power cable that came with your MediaDock 2000
provides power to your MediaDock 2000 and your NEC
Versa 2000 computer. Connect the power c able a s follows:
Position your MediaDock 2000 on a flat surface.
1.
Attach one end of the power cable to the MediaDock
2.
2000 power port.
Attach the ot her end to a wall outl et .
3.
Power Port
2-4 Getting Started
Connecting the power cable
CAUTION:
the MediaDock 2000 and NE C Versa 2000 are runnin g, results in a sy stem crash.
Disconnecting the power cable while
Follow the p rocedure given next to c onnect your NEC
Versa 2000 computer to your MediaDock 2000.
Page 20
Docking Your NEC Versa 2000 Computer
Attach your NEC Versa 2000 to your MediaDock 2000 as
follows.
CAUTION:
Adhere to the f ol l owing c auti ons. Fai l ure
to do so can damage your NEC Versa 2000 computer, your MediaDock 2000, or both.
Your NEC Versa 2000 computer
ered off
when connecting and di sconnecting it to
must be pow-
your MediaDock 2000.
Make sure all NEC Versa 2000 computer port
cover s (except for the expansi on port cov er) are
securely closed before connecting y our c omputer
to your MediaDock 2000. Open and stow the expansion port cov er as instructed in t he following
procedure.
Your NEC Versa 2000 computer is the
model that can be used with your MediaDock
2000 option. Do not attempt to attach any other
model notebook computer to your MediaDock
2000.
Turn off power to your NEC Versa 2000 computer.
1.
Verify that the power cord is connected to your Medi-
2.
aDock 2000 and a wall outlet.
only
Open the ex pansion port c over on the back of your NEC
3.
Versa 2000 computer and slide it underneath the expansion port.
Getting Started 2-5
Page 21

Opening the NEC V er s a 2000 ex pans ion por t cover
2-6 Getting Started
Stow ing the expansion port cover
Turn your NEC Versa 2000 computer around, and align
4.
its expansion c onnector wit h the docking connector on
your MediaDock 2000.
Page 22
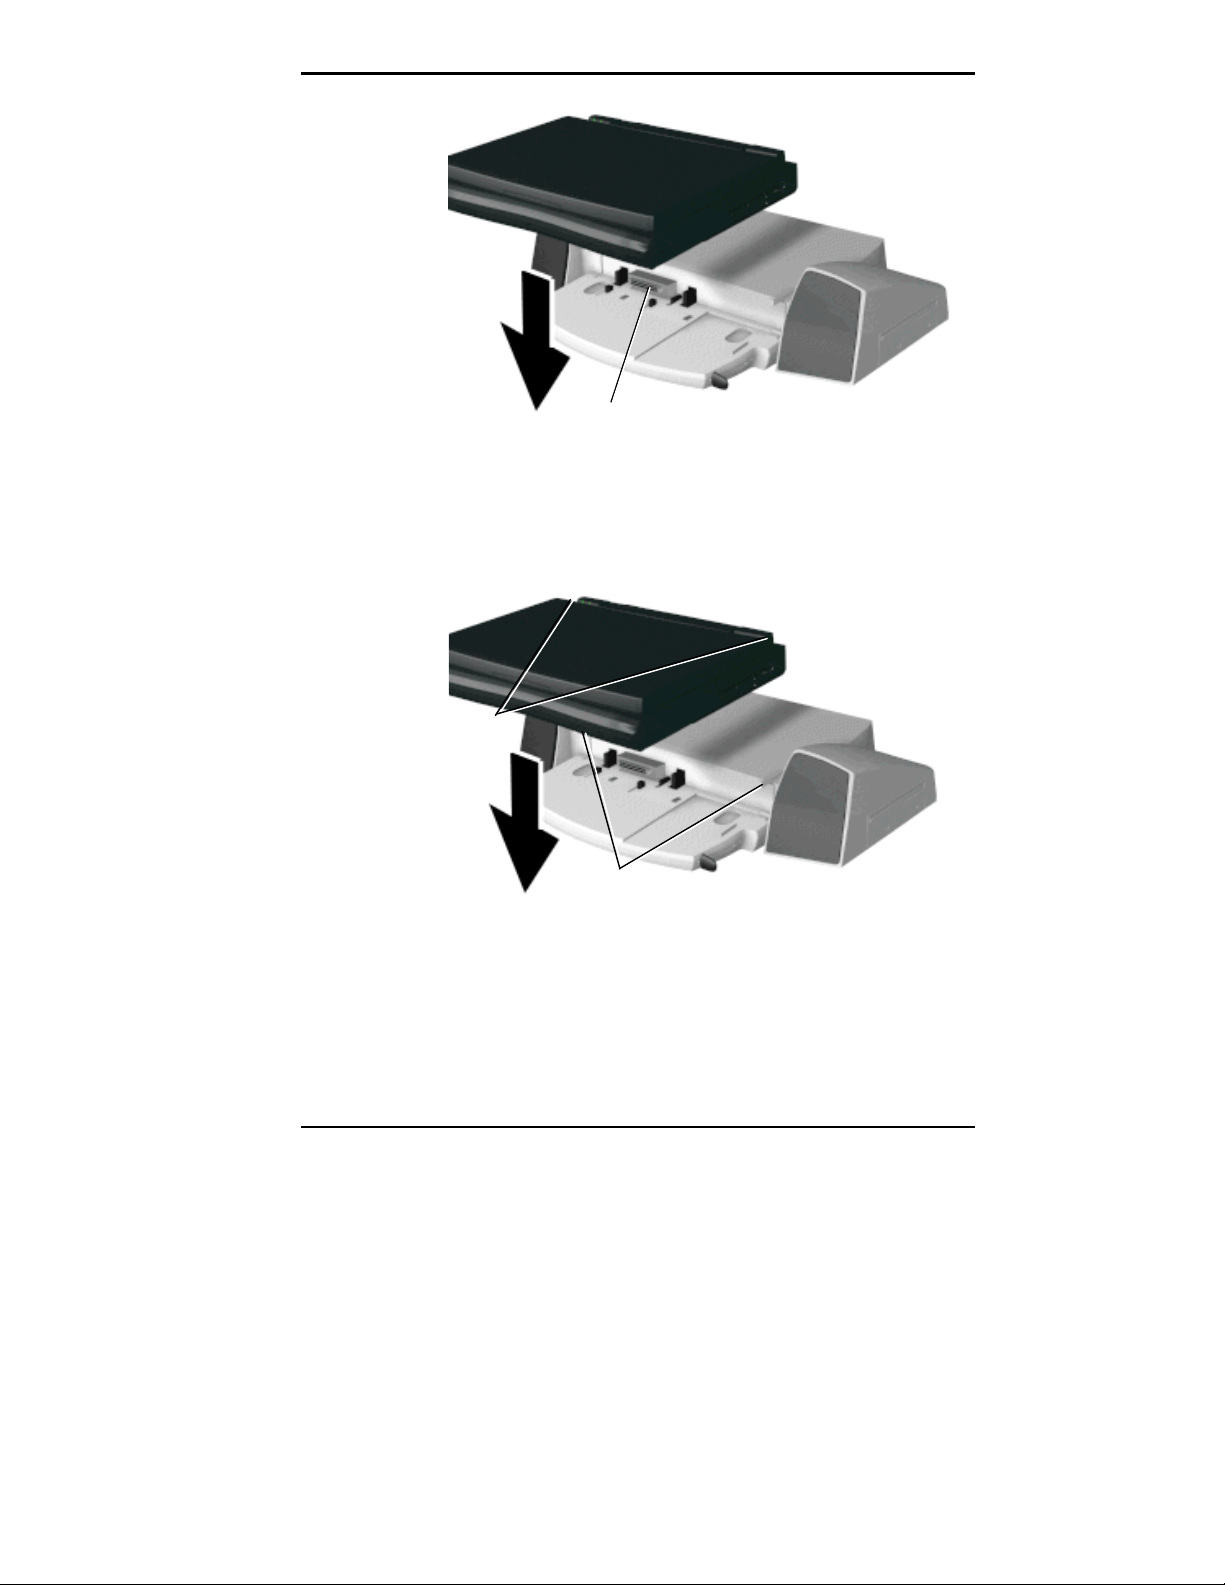
Docking Connector
Aligning your NEC Ver s a 2000 with your MediaDock 2000
Locate the indents on the rear of your NEC Versa 2000
5.
comput er. Pl ace the indents underneath MediaDoc k
2000 tabs.
Indents
MediaDock 2000 Tabs
Locating NEC Ver s a 2000 indents
While holding your c omputer in p lace, push the Medi-
6.
aDock 2000 docking lever all the way to the back of the
unit, secur i ng it into place in the locking notch.
Getting Started 2-7
Page 23
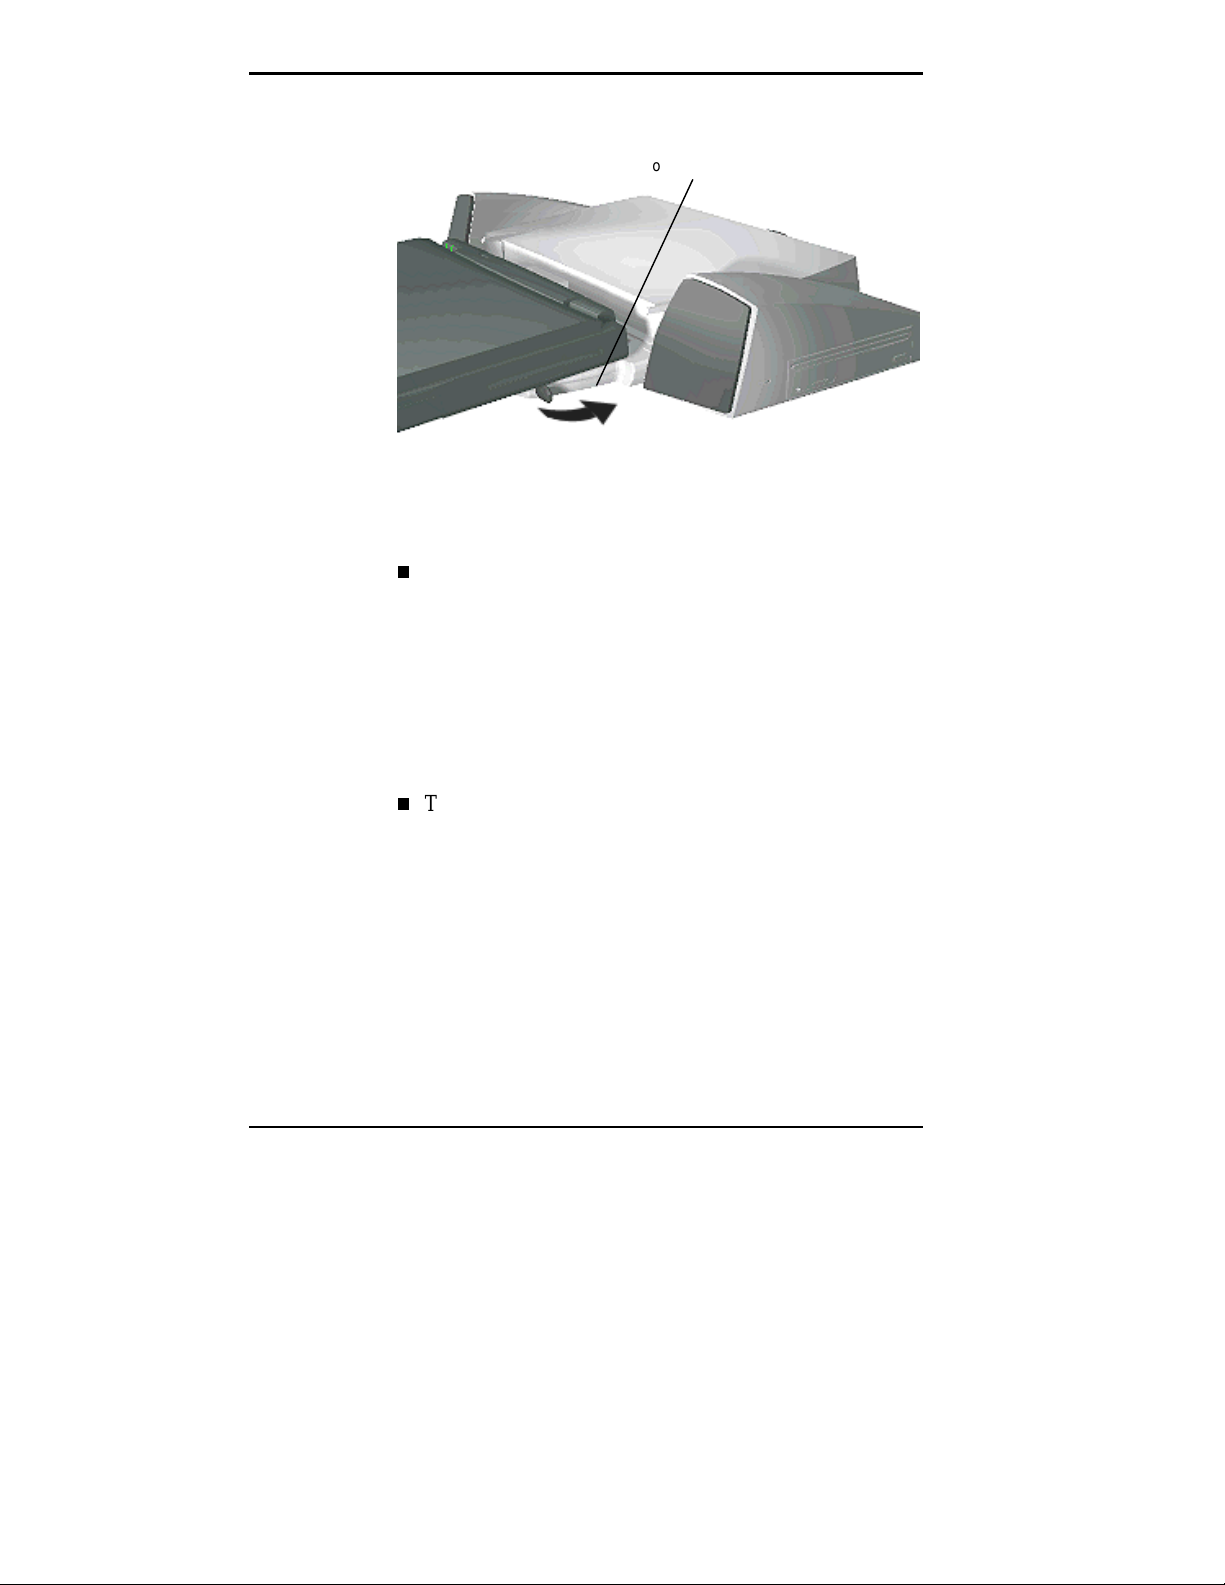
Locking Notch
Securing the doc k ing lev er
Your NEC Versa 2000 computer is now docked. Keep the
following in mind.
To use the MediaDock 2000, the power cable must be
connected. The MediaDock 2000 power cable powers
both the MediaDock 2000 and the NEC Versa 2000
connected to it. Your MediaD oc k 2000 cannot ru n on
the NEC Versa 2000 batteries.
And since the MediaDock 2000 runs on AC power only,
your NEC Versa 2000 power management features are
unavailable while it’s doc ked.
2-8 Getting Started
The first time you connect your NEC Versa 2000 com-
puter and MediaDock 2000, you need to set up your
Versa 2000 software to recognize the MediaDock 2000
and a udio software. This information is in Chapter 3,
“S etting Up and Using th e Software.”
Page 24

Powering On
NOTE:
dows 95 installed, when you power up the computer
it automatical ly detects your new hardware.
However, you still need to see Chapter 3, “Setting
Up and Using the Sof tware”, to i nstall audio dri vers
and the online version of this user’s guide.
If your NEC Versa 2000 computer has Win-
Your NEC Versa 2000 power button controls the power to
your MediaDock 2000.
Turn your MediaDock 2000 power on as follows:
Connect the power c able to the MediaDoc k 2000, a nd
1.
dock your NEC Versa 2000 computer as described in
the prec ed i n g sections.
Open your NEC Versa 2000 computer to the working
2.
position, a nd locate t he power bu tton.
Power Button
Turning pow er on
Getting Started 2-9
Page 25

Slide the power button right to turn it on, slide the
3.
switch again to turn it off, (for more details, see your
NEC Versa 2000 User’s Guide).
Detaching Your NEC Versa 2000 and MediaDock 2000
When you finish using your MediaDock 2000 and NEC
Versa 2000 computer together, power down and disconne ct
the two as described next .
Powering Off
The NEC Versa 2000 computer power button turns power
off to both the computer and MediaDock 2000.
CAUTION:
save any data on which you are working before
powering off your NEC Versa 2000 com puter. Failure to do so can result i n data loss.
Be sure to close acti ve appl icati ons and
2-10 Getting Started
Page 26

Turn power off as follows:
Locate the power button on your NEC Versa 2000 com-
1.
puter.
Power Button
Turning pow er off
Slide the power but ton towa rds the right, hold it briefly,
1.
and release it. Close your NEC Versa 2000 computer
LCD panel.
Getting Started 2-11
Page 27

Disconnecting Your NEC Versa 2000
Remove the NEC Versa 2000 from the MediaDock 2000 as
follows.
CAUTION:
power before disconnecting i t from your MediaDock
2000. Keeping power on can damage your computer, Medi aDoc k 2000, or both.
Lift and pull the docking lever all t he way to the front of
1.
Turn off your NEC Ver sa 2000 comput er
your MediaDock 2000 to release the NEC Versa 2000
computer.
Lift the computer off of the MediaDock 2000.
2.
Docking Leve r
2-12 Getting Started
Releasing the docking lev er
Page 28

MEDIADOCK 2000 CARE
Your MediaDock 2000 is designed to provide many hours
of dynamic sound. W ith pr otective measures and pr oper
care, you can pr event problems and pr omote the succes sful
operation and long life span of your MediaDock 2000.
Precautions
Follow these precautions when using a nd stor ing your
MediaDock 2000.
Do not use or store your MediaDock 2000 in direct sun-
light or near r adiant heat sou rces for an excessive length
of t ime. Heat from these sources can rai se the i n tern al
temperature of the unit and damage its parts.
Avoid dusty environments.
Do not cover the ai r vents or put anything near enough
to them to b loc k air c irculation.
Do not use or store your MediaDock 2000 near chemicals.
Avoid excess ive vibra tion and shoc k. Dr opping your
MediaDock 2000 or knocking it over c an cau se seriou s
damage.
Keep your MediaDock 2000 away from machinery that
generates strong electr ic or magneti c f ields.
Do not p lace any hea vy objects on you r MediaDock
2000.
Getting Started 2-13
Page 29

Routine Care
Maintain t he condition of your MediaDock 2000 by
periodically following the general proc edures listed below.
WARNING:
MediaDock 2000 and NEC Versa 2000 before
cleaning.
Clean the outside of your MediaDock 2000 with a soft
For safety, power off and unpl ug your
clean cl oth.
Remove stubborn stains with a cloth slightly dampened
with a mild detergent. N ever use a s trong cleaner or solvent on any p art of the unit .
Check your MediaDock 2000 regularly for any loose
material (such a s paper, books, ma gazines) that blocks
air circulation.
Keep food a nd liquids away from your MediaDock 2000
and your NEC Versa 2000 computer.
Now that you have setup your MediaDock 2000 with your
NEC Versa 2000 computer, go to Chapter 3, “Setting Up
and Using Software” for complete p rocedures on ru nning
the MediaDock 2000 Setup Utility.
Soft
2-14 Getting Started
Page 30

Setting Up and
3
SETTING UP MEDIADOCK 2000 SOFTWARE
Using the Software
Your MediaDock 2000 comes with all the software you
need to get it u p and r unning.
There a re two d i ffer ent software s etup pro cedures dep en ding on whether you are running Windows for Workgroups
(WF W G), or Windows 9 5 on your NEC Versa 2000 computer.
Refer to the appropria te steps i n the following s ec tions to
install MediaDock 2000 software
Setting Up and Using the Softw a re 3-1
Page 31

Running t he Setup Utility — Windows for Workgroups
This section describes how to use the MediaDock 2000
Setu p utilit y u nder Windows for Workgroups. While ru nning the ut ility, you c an use t he following options:
To stop the installation, press
To accept default settings, press
Esc
Enter,
.
click “O K,” or
click “Continue” at the prompts.
To change setti ngs, follow t he on-screen instruc tions.
To begin, locate one NEC MediaDock 2000 Setup Utility
diskette, and two NEC MediaDock 2000 Audio Applications diskettes in the shipping c art on. Run the MediaDoc k
2000 Setup utility as f ollows .
NOTE: When running Windows for Workgroups,
your NEC Versa 2000 comput er lets you c hoose a
mobile or docked configuration. See “Choosing a
Configur ation” later in this section.
Follow the ins truc tions in Chapter 2 and doc k your NE C
1.
Versa 2000 computer on your MediaDock 2000. Power
on your computer.
Boot into W i ndows , if Windows is not already opened.
2.
(Type
win
and press
to open Wi ndows.)
Enter
Close any Windows a pplica tions that may b e running
3.
(for example, CardVi ew, NEC Battery Gau g e or th e
Distribution Diskette Creator).
Insert the MediaDock 2000 Setup Utility diskette into
4.
the diskette drive.
Fr om t he Windows Pr ogram Manager , access the File
5.
pull-down menu and select “Run.”
3-2 Setting Up and Using the Software
Page 32

Type
6.
7.
a:winstall
Respond to the utility prompts as follows:
After reading the message that introduces the Medi-
and press
Enter
or click “OK. ”
aDock 2000 Setup Utility, click “ OK” or p ress
to continue with the setup.
Specif y the disk drive on which t o install the
software. Press
or click “OK” to accept the
Enter
defaul t drive c:.
Specify the subdirectory in which t o install the
software. Press
or click “OK” to accept the
Enter
default subdirectory “MD2000.”
Wait while the utility copies t he required soft ware
into the sp ecif ied s ubdirect ory.
Read the scr een t hat lets you know about changes
made to the AUTOEXEC.BAT and CONFIG.SYS
files. Click “OK.”
Pr oc eed a s follows t o load the au dio drivers :
8.
At the prompt , remove the setup utility diskett e.
Insert the MediaDock 2000 Audio Applications
diskette 1 into the diskette drive, and press
.
ter
Enter
En-
The firs t audio screen tells you to close any ap-
plica tions that a re running. If you f ollowed the
instruct ions given here, you alrea dy c l osed open
applicat ions. Ju st click “Continu e” to proc eed.
If you did not follow these instru c tions, c lic k
“Ex i t.” Go back to the beginning of this section,
“MediaDock 2000 Setup Utility,” and start over.
Setting Up and Using the Softw a re 3-3
Page 33

When prompted, select installation operations in the
9.
following order.
Driver installation
C lic k the “Dr i ver Installat ion” butt on.
S elect “Defa u lt Board Configurat ion” at the
prompt.
NOTE:
tion, do
terminate the instal lation procedure.
Upon completing the audio driver installa-
not
select “Restart W indows.” Doing so will
C lic k the “Inst all Soft ware” button t o install t he
audio software at the next prompt .
Soft ware inst allation
Press
or click “OK” to accept the defau lt
Enter
direct ory PCAUDIO for loading the audio s of tware.
Press
aga in to create the dir ectory.
Enter
C hoose “Complete Installati on” f or the typ e of
installation to follow.
At the prompt, insert the MediaDock 2000 Audio
Applications diskette 2 into the diskette drive and
press
. T he audio software ins talls in your
Enter
computer.
After the Audio Applic ations diskette 2 installs the
10.
audio drivers, select “Rest art Windows. ”
Exit Windows. Press the Power but ton to r eboot the
11.
comput er and a c tivat e t he CD-RO M drivers.
3-4 Setting Up and Using the Software
Page 34

Go to t he following section “ Choosing a Configura-
12.
tion”, for s teps on using the Mobile/Docked configuration menu that appears after the computer reboots.
Choosing a Configuration
After setting up the MediaDock 2000 software, your NEC
Versa boot- up differ s from its origina l procedure. T he new
boot u p sequence lets you choose either a docked or mobile
configurat ion.
Use the new boot up procedure as follows:
Power on your NEC Versa 2000 computer as you would
1.
normally. A menu similar to the following is displayed.
1. MediaDock 2000 Configuration
2. Mobile Configuration
Enter the app ropr i ate number for t he conf igura tion you
2.
want to us e as fo l lo ws:
MediaDock 2000 Configuration — Use this configuration when you dock your NEC Versa 2000 computer on your MediaDock 2000.
Mobile Conf igura tion — Select this configurat ion to
use your NEC Versa 2000 computer by itself.
Your MediaDock 2000 software installation is complete. Go
to Chapter 4, “Using the MediaDock 2000” for instructions
on operating your MediaDock 2000.
Setting Up and Using the Softw a re 3-5
Page 35

Running t he Setup Utility — Windows 95
This section describes how to run the MediaDock 2000
Setu p utilit y u nder Windows 95.
NOTE:
2000 automatically recognizes whether your computer is currently in a docked or mobile conf iguration.
When running Windows 95, your Versa
To begin, locate the NEC MediaDock 2000 Setup Utility
diskett e in t he s hipping ca rton.
Make sure power to your NEC Versa 2000 computer is
1.
turned off. Dock your MediaDock 2000 to your NEC
Versa 2000 computer.
See “Hardware Setup” in Chapter 2 for instructions on
docking your MediaDock 2000.
When you first power on your NEC Versa 2000 com-
2.
put er, Windows 95 a utomat ic ally recogniz es the new
har dware and automa tically conf igures it self for u se
with the MediaDock 2000.
For ex ample, Windows 95 displays messages indicating
tha t your new hardware and audio dr ivers a re installed.
However, you will need to use the NEC MediaDoc k
2000 Setup Utility (diskette 1 only) to install the online
version of this user’s guide and some support files.
Insert the NEC MediaDock 2000 Setup Utility diskett e
3.
into the diskette drive.
Click on “Start ” f rom the Taskbar.
4.
Select “Run.”
5.
a:winstall
Type
6.
while the system accesses the drive.
3-6 Setting Up and Using the Software
and click “OK.” Wait a few moments
Page 36

A message dis plays indic ating that Windows 95 is de-
7.
tected, and the online documenta tion will be installed.
Respond to the utility prompts as follows:
After reading the message that introduces the MediaDock 2000 Setup Utility, click “ OK” or p ress
Enter
to continue with the setup.
Specif y the disk drive on which t o install the
software. Press
or click “OK” to accept the
Enter
defaul t drive c:.
Specify the subdirectory in which t o install the
software. Press
or click “OK” to accept the
Enter
default subdirectory “MD2000.”
Wait while the utility copies t he required soft ware
into the sp ecif ied s ubdirect ory.
When setup is complete, remove the NEC M ediaDock
8.
2000 Setup Utility from the diskette drive. Ins talla tion is
complete.
To access the online version of t he NEC Versa Series
9.
MediaDock 2000 User’s Guide that you ju st inst alled,
complete the following.
Select “Start” from the Taskbar. Select “Programs.”
Select “MediaDock 2000 User’s Guide” from the
pop-up menu.
Go to Section 4, “Using the MediaDock 2000” for instructions on operating your MediaDock 2000.
Setting Up and Using the Softw a re 3-7
Page 37

Using DOS-Based Functions
Two sound contr ol u tilities are st ored on your hard disk
drive when you run the MediaDock 2000 Setup utility.
When using applications that run from MS-D OS, you may
need to change these sound s ettings.
The following two u tilities let you adjust the speaker volume and change the DMA and IR Q addres ses.
ESSVOL.EXE — allows you to increase or decrease
the volume of the s ound coming from your Media D ock
2000.
ESSCF G .EXE — allows you to cha nge D MA and IRQ
sett ings if your application r equ ires that you do s o.
Only change these sett ings if you try to run a D O S-based
applicat ion and you get no s ound or poor sound f rom the
MediaDock 2000.
Changing the Volume
Cha nge s peaker volume settings as follows .
Fr om t he DO S pr ompt, type the following and press
1.
to change to the MD2000 directory.
Enter
cd MD2000
Disp lay the current sound settings by t yping the follow-
2.
ing and pressing
essvol
The sc reen displa ys the current volume settings.
3-8 Setting Up and Using the Software
Enter
.
Page 38

To change a volume setting, t ype the following:
3.
The command
The code for the set ting to change followed by a
essvol
follo wed by the space.
colon
A number between 0 a nd 15 as the new setting.
changes the master volume
/v:
changes the line volume
/l:
changes the wave volume
/w:
changes the mic volume
/m:
changed the CD volume
/c:
changes the synthesizer volume.
/s:
The followin g example decreases th e master vol ume to 3
and increases the wave volume to 1 4:
ESSVOL /V:3 /W:14
When you finis h u sing your DOS-based application, you do
not need to reset the volu me settings f or Windows. At boot
up, Windows specifies its own setti ngs.
Changing IRQ and DMA Settings
Before changing these s ettings, check the docu mentation
that came with you r MS - D OS based ap plicat ion. If the applica tion has its own setup, t ry adju sting the a pplication
settings before changing MediaDock 2000 settings.
Setting Up and Using the Softw a re 3-9
Page 39

!
Onl y change MediaDoc k 2000 sound IRQ and DM A
settings as a last resort. If you change the settings
to run a DOS application, y ou may need to change
the settings back to the defaults before running
Windows.
In some cases changing these settings can create
system conf licts. If you run into diff iculti es, change
your settings back t o the def aults and cal l the appl ication manufacturer .
MediaDock 2000 default settings are as follows:
Boar d type: SoundBlaster Pro Compatible
IRQ: 5
DMA: 1
If your app lic ation indica tes tha t it requ ires special setti ngs ,
CA UT ION
proceed a s follo ws.
1.
Fr om t he DOS prompt, type the following and pres s
Enter
to change to the MD2000 directory.
cd MD2000
2.
Disp lay the cu rrent I RQ and DMA set tings by typing the
following and p ressing
esscfg
The sc reen displa ys the current settings and the following four options f rom which to choos e.
1) Set new IRQ channel
2) Set new DMA channel
3) Display current settings
4) Quit
3-10 Setting Up and Using the Software
Enter
.
Page 40

To change a setting, type the number that appears in
3.
front of the option and p ress
Enter
.
Specif y a new sett ing f rom the opti ons displayed.
When done, select 4 to quit and us e you r DOS-ba sed
4.
app lic ation.
Go to Section 4, “Using the MediaDock 2000” for information on cont rolling MediaDock sound, and C D - ROM reader
functionality.
Setting Up and Using the Softw a re 3-11
Page 41

Using the MediaDock
4
CHANGING THE VOLUME
Using the Hardware to Adjust the Volume
2000
This chapter describes how to use the MediaDock 2000
audio c apabilities inclu ding adjust ing the volume, and u sing
the CD-ROM rea d er.
You can adjust the MediaDock 2000 volume via hardware
or software. See t he following sections f or complete instruct ions.
The MediaDock 2000 comes with a standard volume control. The volume cont rol lets you adjust the sound ou tput by
the MediaDock 2000. Move the control towards the front of
the unit to decrease volume; move the contr ol towar ds the
back to increase volume.
Volume Con t rol
MediaDock 2000 volume c ontrol
Using the MediaDock 2000 4-1
Page 42

Using the Software to Adjust the Volume
See the following sections for c omplet e ins truc tions on us ing soft ware to c ontrol t he volu me.
See “Us i ng D OS-Based Fu nc tions” in Chapter 3 f or instructions on setti ng the volume via two sou nd c ontrol utilities s tored on your har d disk via the MS-DO S pr ompt.
Using Windows 95
Set the volume under Windows 95 as follows.
Open Windows 95. L oc ate the speaker ic on in the bot-
1.
tom right corner of the Windows 95 deskt op. T he
speaker is situated next to the time display.
A volume control app ears . Use the Ver saGlide on you r
2.
Versa 2000 computer to move the volume control up to
increa se the volume, down to decreas e t he volu me. Or,
select “Mute” to turn off sound completely.
Cli ck in t h e area ou tsid e the volume cont rol to exit the
3.
volume contr ol.
Using Windows for Workgroups
Set the volume while running Windows for Workgroups as
follows.
Click on t he Au dio Applica tions icon in the Progr am
1.
Manager.
Click on t he Volume Control icon. Use the Versa G lide
2.
on your NEC Versa 2000 computer to move the volume
control up t o inc rease t he volu me, down to decrea se the
volume. Or, select “Mute” to turn off sound completely.
Cli ck in t h e area ou tsid e the volume cont rol to exit the
3.
volume contr ol.
4-2 Using the MediaDock 2000
Page 43

CD-ROM USE
Your MediaDock 2000 comes with a 4x-Speed CD-ROM
rea der that features quad-speed technology. The CD-ROM
reader is assigned the next availa ble drive letter.
NOTE:
MediaDock 2000 is connected to AC power, your
NEC Versa 2000 is docked, and your computer is
powered on.
The CD-ROM reader onl y works when your
Use the C D -ROM reader to load and start progr ams fr om a
compact d i sc (CD). You can also use t h e CD-ROM rea d er
to play your audio CD s (see “Audio CDs” in this chapter).
The qua d- speed CD-RO M reader is f ully compatible with
Kodak Multis es sion Photo CDs™ and standard audio CDs.
The CD-ROM reader operates a t different speeds depending
on whether the CD you are using contains data or music.
This allows you to get your data fa ster and to see s moot her
animation and video.
Using the MediaDock 2000 4-3
Page 44

The q uad-sp eed CD- ROM rea d er features ar e shown in the
following figure. Desc ript ions of these features follow.
Stop/Eject Button
Headphone
Jack
CD-ROM Reader
Volume Con t rol
Busy Lamp
CD-ROM reader c ontrols and indicators
Headphone jack — T his port lets you plug in head-
phones for au dio CDs only, (use the headphone port on
the rear of the MediaDock 2000 for entertainment and
educational CD s).
CD-ROM r eader volume contr ol — This control a dju sts
the sou nd f or headp hones plugged into t he CD-ROM
reader headphone ja c k only. Pull the contr ol towar ds the
front of the MediaDock 2000 to decrease sound; back to
increase sound.
CD b usy lamp — lights du ring data r ead operations. Do
not eject the CD or turn off the MediaDock 2000 when
the indicat or is lit.
Stop/eject button — ejects or retracts the CD tray. Press
this b utton when power is on to inser t a C D into or r emove a CD f rom the reader.
4-4 Using the MediaDock 2000
Page 45

CD Loading
NEC gives you two exciting CD titles to get you s tar ted.
These incl ude:
American H erita ge Talking Dic tionary from Sof key™
Smiths onian’s America fr om C reative Media™
To insert a CD into the CD-ROM reader, follow these
steps.
Press the stop/eject button. A CD tray emerges from the
1.
rea der door.
Stop/Eject Button
Pressing t he s top/eject button
Using the MediaDock 2000 4-5
Page 46

Put your CD, printed side up, into the circular impres-
2.
sion in the tray.
Loading a CD into the reader
Press the stop/eject button again. The reader automati-
3.
cally pulls in the tray.
To remove a CD, simply pr es s the stop/eject b utton and remove the CD when the tray slides out. Press the stop/eject
but ton again to clos e the reader door.
4-6 Using the MediaDock 2000
Page 47

AUDIO CDs
This section describes how t o play a n audio CD from Windows for Workgroups and Windows 95.
Using Audio CDs under Windows for Workgroups
To u se audio CDs under Windows for Wor kgroups, you
must f irst load audio drivers as described in the following
st eps. Then see the secti o n that foll o ws on pl aying the CD.
Adding the CD Audio Option
Add the “CD Audio” option to the Media Player’s Device
list as follows.
Pr es s the St op/Eject but ton and insert an audio CD into
1.
the tray. Press the button again so the tray retracts into
the read er.
Fr om t he P rogram Manager, select the Main pr ogram
2.
group. Double click the Control Panel icon.
Double clic k the Driver s icon and select “Add.”
3.
Scroll throu gh the list of drivers and highlight
4.
Audio
. Clic k “OK. ”
[MCI] CD
If you see the prompt that the mcicda.drv is already on
the system, select “New.”
Click “OK” in t he C DROM drive detection window.
5.
Click on t he “Close” b utton to close the Drivers window.
Close t he C ontrol P anel.
6.
You only need to a dd the CD Audio option once. After
doing so, go to the next section to p lay au dio CDs.
Using the MediaDock 2000 4-7
Page 48

Playing an Audi o CD from Windows for Workgroups
Follow thes e ins tru c tions to p lay au dio CDs.
Insert a CD into the tray. Press the Stop/Eject button to
1.
open and cl ose the tr ay.
Fr om Windows, double click on the Acc es sories pro-
2.
gra m group.
In Accessories, highlight and double click on t he M edia
3.
Pla yer icon.
Fr om t he D evice drop down menu, select “CD Audio.”
4.
Fr om the media p layer cont rol pa nel t hat a ppear s, click
5.
on the play but ton.
Use the slide ba r displayed to specif y a particu lar t rack
on the CD .
Using Audio CDs under Windows 95
Follow thes e ins tru c tions to p lay au dio CDs while r unning
Windows 95. F or more deta ils, see your Microsoft Win-
dows 95 User’s Guide.
Insert the audio CD into the CD-ROM reader tray.
1.
Press the eject button to close the CD-R OM reader tray .
2.
Windows 95 automatically detects the au dio CD, and it
begins playing.
4-8 Using the MediaDock 2000
Page 49

Using Entertainment CDs
Read the following sections for information on playing a
game or educ ationa l CD fr om Windows for Workgrou ps,
Windows 9 5 or in MS-DOS mode.
Playing Entertainment CDs using Windows for Workgroups or
Windows 95
When ru nning W indows for W orkgroups, or Windows 95
use the f ollowing steps to run a game or educ ationa l CD.
Press the Stop/Eject button to open the CD tray. Insert a
1.
CD into the tray. Press the Stop/Eject button to close the
CD tray.
Follow the installa tion instructions that come with your
2.
CD-ROM t itle. For example, you will have to enter the
drive lett er assigned to the C D -ROM reader .
NOTE:
driv e is usually d: if running Wi ndows 95, f: if running Windows for Workgroups.
3.
4.
The drive letter assigned to the CD-ROM
Exit the setup u tility. Select
Yes
to save your settings.
Click on t he game icon created when you ra n the CD ti tle’s setup u tility. You are now r eady to play!
Using the MediaDock 2000 4-9
Page 50

Playing Entertainment CDs in MS-DOS Mode
To run an MS-DOS ga me in Windows 95, use the following proc edures to create a game specific icon t hat will appear in your Sta rt menu list each ti me you p ower on.
Eac h time you want to run the game, just click on t he M SDOS mode icon. Your computer automatically enters MSDOS mode and installs the necessary drivers f or the game.
Follow the instructions that came with the game to in-
1.
stall it in your NEC Versa 2000 computer.
Click on t he Windows 95 Taskbar and select “Pr oper-
2.
ties.”
When the Taskbar Prop erti es menu opens, left click on
3.
the “Start Menu Programs” tab.
Click “ Add.”
4.
Click on “Browse” and select the command you used to
5.
install the game. C lic k “Open. ” O r, you c an refer to the
instructions that came with the game and type it in.
Select “Next.”
6.
Scroll to the folder that you want the icon to appear in
7.
on your Sta rt M enu .
Create a separate folder to place for the game icon as
8.
follows:
Select “New Folder.”
A new folder with a default name appears. Type
DOS Games
Select “Next.” Type in the name of the game. This
9.
name will app ear underneath t he icon.
Select “ Next”. Select a s ymbol for the icon.
10.
Select “ Finish.”
11.
4-10 Using the MediaDock 2000
MS-
to rename the folder.
Page 51

Click on t he new item and select “Proper ties” from the
12.
pop-up menu.
Left c lic k on the “Program” tab . Select “Advanced. ”
13.
Select “MS- DOS mode.” The defau lt sett ing inc l udes a
14.
warning every time you enter MS-DOS mode.
Select “Specify a new MS - DOS conf igura tion.” Con-
15.
fig.sys and autoex ec .ba t windows appear.
Add the following to the bottom line of you r config. sys
16.
file.
device=c:\md2000\mtmcda1.sys /d:\mtmid e01
Add the following to the bottom line of you r au to-
17.
exec.bat f i le.
c:\md2000\mscd ex.exe/dmtmide01 /A:1
Select “OK.” Select “OK” again.
18.
Close the “Ex plore” window.
19.
Select “OK” on t he Tas kb ar p roperties window.
20.
From the Start Menu select the f older where you placed
21.
the game. You will see the MS-D O S mode game icon
you jus t crea ted.
Eac h time you wish to run t he game, simply double
22.
click on the ga me icon.
Using the MediaDock 2000 4-11
Page 52

CD CARE
When handling C D s, keep the following guidelines in mind.
Always pick up the disc by its edges.
Handle a disc by its edges
Avoid scr atching or soiling the s ide of the disc that ha s
no printing or writing on it. This is the dat a side of t he
disc.
Do not write on or apply labels to either side of the disc.
Keep the disc away from direct sunlight or high
temperatures.
4-12 Using the MediaDock 2000
Page 53

Clean f i ngerprints or dust from the disc b y wiping it
with a soft cloth. Gent ly brush the clot h from the center
of the disc toward the edge.
CAUTION:
cord cleaner, static repel lent, or any ot her chemi cal
on the disc. Chemicals and cleaners can damage
the disc.
Emergency Eject
Use the following p rocedur e t o manually remove a disc
fr o m the CD-ROM reader if the ejec t fu nction i s dis abl ed
by software or a power failure occurs.
Turn off computer power and unplug the MediaDock
1.
2000.
Locate the emer gen cy eject hole.
2.
Avoi d using benzene, pai nt thi nner, re-
Emergency
Eject Hol e
Opening the dust door
Using the MediaDock 2000 4-13
Page 54

Insert a tiny screwdriver (jeweler-type screwdriver) into
3.
the eject hol e. Turn the sc rewdriver clockwi se until th e
disc tray emerges.
4-14 Using the MediaDock 2000
Page 55

5
Connecting Options
The MediaDock 2000 provides ports for the connection of a
number of ex ternal options, including t he following:
Headp hones /external speakers
Line-In
Microphone
Line -Out
Ext ernal keyboard/mouse
Joystick
Serial device
Parallel printer
External monitor.
This c hapter descr i bes how to connect these options to your
MediaDock 2000.
Connecting Options 5-1
Page 56

HEADPHONES OR EXTERNAL SPEAKERS
Follow these steps to connect headphones or external speakers to your MediaDock 2000.
NOTE:
headphones. Use the same procedure for i nstalling
external speakers. External speakers connect to the
same port.
The fol lowing procedure descri bes installing
Connect headphones as follows.
Loca te the headphone port on the MediaD oc k 2000
1.
base.
Inser t the headphone jack into the p ort.
2.
5-2 Connecting Options
Headphone port on the M ediaDoc k 2000 bas e
Page 57

LINE-IN DEVICE
Follow thes e s teps t o c onnect a line-in device to the MediaDock 2000.
1.
2.
Loca te the line-in por t on the rear of t he M ediaDock
2000.
Ins ert the line-in cable i n to th e por t.
Line-In port on the M ediaDoc k 2000
Connecting Options 5-3
Page 58

EXTERNAL MICROPHONE
Follow these steps to connect an external micr ophone to the
MediaDock 2000.
NOTE:
ing a microphone for recording with the Medi aDock
2000.
If you experience audi o feedback dur ing use, mov e
the mi c r ophone away from the MediaDock 2000.
1.
You can record only mono sound when us-
Loca te the microphone port on the MediaD oc k 2000
base.
Inser t the microp hone jack into the p ort.
2.
5-4 Connecting Options
Microphone Port
Microphone port on the MediaDock 2000
Page 59

LINE-OUT DEVICE
Follow thes e s teps t o c onnect a line-out device to the MediaDock 2000.
Loca te the line-out port on the rear of the MediaDock
1.
2000.
Insert the line-out cable into the port.
2.
Line-Out Port
Line-Out por t on the MediaDock 2000
Connecting Options 5-5
Page 60

EXTERNAL PS/2 KEYBOARD
Follow these steps to connect an external P S/2 keyb oard t o
the MediaDock 2000.
Loca te the PS/2 keyboard p ort on t he rear of the Medi-
1.
aDock 2000.
Inser t the keyboa rd cable into the connector.
2.
Key board Port
Keyboard port on the MediaDock 2000
5-6 Connecting Options
Page 61

EXTERNAL PS/2 MOUSE
Follow these steps to connect an external P S/2 mouse to the
MediaDock 2000.
Locate the PS/2 mouse port on the rear of the Medi-
1.
aDock 2000.
Inser t the keyboa rd cable into the connector.
2.
PS/2 Mouse Port
PS/2 mous e por t on the MediaDock 2000
Connecting Options 5-7
Page 62

JOYSTICK/MIDI DEVICE
Follow thes e s teps t o c onnect a joystick/M I DI device to the
MediaDock 2000.
Loca te the joystic k port on the rear of the MediaDock
1.
2000.
Insert the joystick cable into the joystick port.
2.
Joystick Port
Joystic k por t on the MediaDock 2000
5-8 Connecting Options
Page 63

SERIAL DEVICE
Follow thes e s teps t o c onnect a serial device t o the MediaDock 2000.
1.
2.
Loca te the serial device port on the rear of the MediaDock 2000.
Insert the serial device cable into the serial port.
Seria l Port
Serial port on the MediaDock 2000
Connecting Options 5-9
Page 64

PARALLEL DEVICE
Follow thes e s teps to connect a parallel device (like a pa rallel printer) to the MediaDock 2000.
Locate the parallel port on the rear of the MediaDock
1.
2000.
Insert the par allel device cable into t he para llel port.
2.
Parallel Port
5-10 Connecting Options
Parallel port on the MediaDock 2000
Page 65

EXTERNAL MONITOR
Follow thes e s teps t o c onnect an ext ernal monitor to the
MediaDock 2000.
Locate the external monitor port on the rear of the Me-
1.
diaDock 2000.
Insert the external monitor cable into the external moni-
2.
tor port.
External Monitor Port
External m onitor port on the MediaDock 2000
Connecting Options 5-11
Page 66

A
Features
Quad-Speed CD-ROM Reader
Specifications
The followin g spec i fications are stand ard except wher e
noted.
CDR-4x — Quad-speed CD-ROM reader
Soundb laster Pr o Compatible Sound Subsys tem
ESS™ 688 Sound Chip
Yamaha™ OPL3 MIDI sequencer
Two mid-range sp eakers
Two channels, softwa re volume control
Wave Audio compatible A/D D/A convert er
Up to 44.1 KHz sampling frequency, 16 bit (CD-
quality)
Data capacity — 540 megabytes (MB)/disc (maximum)
Data transfer rate — 600 kilobytes (KB)/second
(mode 1), or 700 kilobytes (KB)/second (mode 2)
Burst transfer rate — PIO mode 3
Access time — 250 msec
Memory buffer — 128 KB
Interface — IDE
Photo CD Compatibilit y — Multisession P hoto CD,
Single Session Photo CD
Specifications A-1
Page 67

Input/Output Facilities
Headphone/ Exter nal Speaker Port — This port lets you
plug in headphones or ex terna l speaker s.
Line-In — This port lets you use another audio sys tem,
like a home st ereo, as an input source. Use a cable to
connect t o the Line-Ou t por t on the other audio system
to record or play.
Micr ophone Port — This port lets you p lug in an
exter nal microphone.
Line-Out — T his port let s the MediaDock act as a n
input sourc e f or anot her audio system. Connect this port
to a Line-In port on another a udio system to play or
record.
PS /2-t ype Keyboard Port — L et s you add an external
keyboard.
PS/2-type Mouse Port — Lets you add an external
mouse.
A-2 Specifications
Joystick/(M IDI) port — If you a re using a joystick, or
MIDI device, install the device in this port.
Serial Port — Use this port to install any serial
(RS232-C) devices.
Parallel Port — Use t his port to insta ll a parallel device,
like a pa rallel printer.
External CRT Port — Use this port to install an external
monitor.
Power Cable Port — The power cable port lets you
connect t he power cor d to the MediaDock 2000 and AC
power.
Page 68

Indicator LEDs
Power Supply
Dimensions
4X speed lamp on fr ont panel of the CD reader
Busy lamp on front panel of the CD reader
Input voltage: 115 to 230 V; autosensing, autoswitching
Total Power Consumption
70W maximum
Frequency: 50/60 Hz
Output Voltage
12.0 V (3.5 A)
19.0 V (2.2 A)
Height: 4.8 in, 122. mm.
Width: 18.2 in., 458 mm
Depth: 14.1 in., 359 mm
Weight: 9.14 lb, 4.15 kg
Envi ronmental Requirements
Opera ting Requirements
Temperature: 41°F to 95°F (5°C to 35°C)
Humidity: 2 0% to 80% (noncondensing)
Storage Req uir ements
Temperature: –4°F to 122°F (–20°C to 50°C)
Humidity: 1 0% to 85% (noncondensing)
Specifications A-3
Page 69

Provided Software
MediaDock 2000 Setup Utility
Audio drivers
American H erita ge Talking Dic tionary from Sof key™
Smiths onian’s America fr om Creat ive M edia™
A-4 Specifications
Page 70

Solving Problems
B
This appendix describes what to do if you encounter problems using your NEC Versa series MediaDock 2000 option.
Use the information in t his app endix to determine and f ix
the problems. Of ten, you can solve problems that occu r by
yourself.
If you s till need help, see the section “If You N eed Help” at
the end of this appendix .
PROBLEM CHECKLIST
Check the it ems in t he following list if you c annot get you r
MediaDock 2000 to work properly. If these do not help,
continue to the “Troubleshooting” section of t his app endix .
Check that your NEC Versa 2000 computer is connected
properly to your MediaDock 2000.
Check that your NEC Versa 2000 computer power is
turned on.
Verify that the electrical outlet to which the MediaDock
2000 is connected is working. Test the out let by plugging in a la mp or other electrical device.
Make s ure all c ables are connect ed tightly.
Solving Problems B-1
Page 71

TROUBLESHOOTING
The docking lever does not pull f orwar d when trying to
dock your NEC Versa 2000 computer.
Remove the NEC Versa 2000 computer from the MediaDock 2000 and check that the computer’s expansion
port cover is opened and stowed p roperly. See “D oc king
Your Versa 2000 Computer” in Chapter 2.
Pr essing the p ower but ton does not turn on your Medi-
aDock 2000.
C hec k that the power cable is c onnected properly to
the MediaDock 2000 and a wall outlet.
C heck the wall outlet by plugging in another electr i-
cal device such as a la mp.
C heck that the docking lever is pu lled all the way
back.
Try removing the AC power cab l e f rom the AC
outlet, r eattaching it, and powering on again.
B-2 Solving Problems
No sound can be heard from the MediaDock 2000
speakers.
C heck the volume control. Push the volume control
lever towards the back of the MediaDock 2000 to
increase the vo lume.
The MediaDock 2000 volume control does not seem to
work properly; sound is either too lou d or too s of t.
MediaDock 2000 volume is directly related to the volume control sett ings in your software. If softwar e and
har dware volu me a re both s et to high or low, the resulting sound can be extremely loud or sof t. Adjust the
soft ware s etting a ppropriately.
Page 72

The CD you are using stops, sound from the MediaDock
2000 ceases abruptly, and your Versa locks up.
Close any applications running, exit Windows and
power off your NEC Versa 2000 system. Detach the
MediaDock 2000, and reboot your NEC Versa 2000
system. Check for any discrepancies in your system.
Consult your NEC Versa 2000 User’s Guide for
troubleshooting tips.
The CD-ROM reader is not being recognized.
Close any applications running, exit Windows and
reboot your system. Select the MEDIADOCK 2000
configuration at boot up (using Windows for Workgroups only).
If you do not see a menu that lets you choose the
MediaDock 2000 configuration, see Chapter 3 for
information about setting up your software.
You cannot play the Audio CDs.
Follow the instructions for playing audio CDs given in
Chapter 4 under “Audio CDs.”
IF YOU NEED HELP
If you have a problem with your MediaDock 2000, first review the checklist and problems listed previously.
If you still have a problem, call the NEC Technical Support
Center (TSC), toll free, at 1-800-632-4525. Direct technical
help is a vailab le M onday thr ough Fr iday, between 8:30 AM
and 8: 00 PM , Ea stern Sta ndard Time (EST).
Solving Problems B-3
Page 73

Index
A
Accessories, 1-2
Air vents, 1- 7
B
Bat tery operation, 2-8
C
Care
CD, 4-12, 4-13
MediaDock 2000, 2-13
Ca rton contents, 1-2
CD titles
American Heritage Talking
Dictionary, 4-5
Smithsonian's America, 4 - 5
CD-ROM reader
CD busy lamp, 4-4
emergency eject, 4-13, 4-14
features
headphone ja c k, 4-4
specifications, A-1
stop /eject bu tton, 4-4
use, 4-3, 4-6
volume contr ol, 4-4
CD-ROM reader/player, 1-3
CDs
care, 4-12, 4-13
ejecting, 4-4
emergency eject, 4-13, 4-14
inserting, 4-4, 4-5
removing, 4 - 6
Cha nging I RQ and DMA settings,
3-9
Changing the volume
using hardware, 4-1
using software, 4-2
Choosing a configurat ion
Windows f or Wor kgroups, 3-5
Cleaning the MediaDoc k
2000, 2-14
Connecting
NEC Versa 2000, 2-5
options, 5- 1
Connecting options
external monitor, 5-11
exter nal PS/2 keyboard, 5-6
external PS/2 mouse, 5-7
headphones , 5-2
joystic k, 5-8
line-in device, 5-3
line-out device, 5-5
parallel device, 5-10
serial device, 5- 9
speakers, 5-2
D
Dimensions, A-3
Disconnec ting the NEC Versa
2000, 2-12
Docking connector, 1-5
Docking lever, 1-3, 1-5
DOS - B ased functions, 3-8
changing t he volu me, 3 - 8
Index-1
Page 74

DOS - B ased functions
DMA settings, 3-10
IRQ settings, 3-10
Drive assig n ment, 4-3
E
Emergency eject , 4-1 3
ESSCFG.EXE, 3-8
ESSVOL.EXE, 3-8
External CRT port, 1-7, A-2
External speaker ports, 1-6, A-2
F
Features, 1-3
H
Hardware setup, 2-1, 2-3
Headp hone connec tion, 5- 2
Headp hone ports, 1 - 6, A-2
I
Icons, 1-8
If you need help, B - 3
Indica tor L EDs, A-3
Introduction, 1-1
J
Joystick, 1-7, A-2
K
Keyboard port, 1-7, A-2
L
Line-in port, 1-6, A-2
Line-out port, 1-6, A-2
Loading audio drivers for Windows
for Workgroups, 4-7
Locking latches, 1-3, 1-5
M
MediaDock 2000
care, 2-13
front features, 1-4
rear features, 1-6
side features, 1-4
software setup, 3-1
specifications, A-1
MediaDock 2000 connection
locking notch, 2-7
Microphone connection, 5-4
Microphone port, 1-6, A- 2
MIDI, A-2
Mid-range speakers , 1-3
Mouse port, 1-7, A-2
MS-DOS mode, 4-10
Multimedia p orts, 1-3
Musical instrument device interface
(MIDI), 1-7
Mute, 4-2
N
NEC Versa 2000 computer
connection, 2-5
Power ma nagement featur es , 2-8
O
Onli n e user's g uide, 3-7
Oper ating envir onment, 2-2 , A-3
P
Parallel port, 1-7, A-2
Peripheral ports, 1-3
Pla ying audio CDs
using Wi ndows 95, 4-8
using Wi ndows for W orkgrou ps,
4-8
Index-2
Page 75

Pla ying ent erta inment CDs
using Wi ndows 95, 4-9
using Wi ndows for
Workgroups, 4-9
Power cable, 2-3
Power cable port, 1-7, A-2
Power supply specifications, A-3
Power ing off, 2 -10
Power ing on, 2-9
Precautions, 2-13
Problem checklist, B-1
Pr ovided software, A-4
Q
Quad-Speed rea der
emergency eject, 4 -13
R
Rear panel
icons, 1-8
Running the setup utility
Windows f or Wor kgroups, 3-2
Windows 9 5, 3-6
S
Selecting an operating environment,
2-2
Serial port, 1-7, A-2
Setting the volume
Windows 9 5, 4-2
Windows f or Wor kgroups, 4-2
Setting up, 2-1
Setup utility
Windows f or Wor kgroups, 3-2
Windows 9 5, 3-6
Software setup
MediaDock 2000, 3-1
Solving problems, B- 1
Sound system specifications, A-1
Speaker sound
mute, 4-2
Speakers, 1-3
Specific ations, A-1
Storage envir onment, 2-2 , A-3
Storage precautions, 2-13
T
Taking care of the MediaDock
2000, 2-13
Troubleshooting, B-2
Turning off power, 2-10
Tu rning on power, 2-9
U
Undocking the NEC Versa
2000, 2-12
Usage precautions, 2-13
Using the CD-ROM, 4-3
Using the MediaDock 2000, 4-1
audio features, 4-1
V
Versa expansion port cover , 2-5
Volume control, 1-4
W
Windows 9 5
Setup utilit y, 3-6
Windows f or Wor kgroups
docked or mobile configura tion,
3-5
setup utility, 3-2
MediaDock 2000 configuration, 3-5
Mobile configuration, 3- 5
Index-3
 Loading...