

Page 1

Page 2

Proprietary Notice and Liability Disclaimer
The information disclosed in this document, including all designs and related
materials, is the valuable property of NEC Computers Inc. (hereinafter “NECC”) and/or its
licensors. NECC and/or its licensors, as appropriate, reserve all patent, copyright and other
proprietary rights to this document, including all design, manufacturing, reproduction, use,
and sales rights thereto, except to the extent said rights are expressly granted to others.
The NECC product(s) discussed in this document are warranted in accordance with the
terms of the Warranty Statement accompanying each product. However, actual performance
of each such product is dependent upon factors such as system configuration, customer
data, and operator control. Since implementation by customers of each product may vary,
the suitability of specific product configurations and applications must be determined by the
customer and is not warranted by NECC.
To allow for design and specification improvements, the information in this document is
subject to change at any time, without notice. Reproduction of this document or portions
thereof without prior written approval of NECC is prohibited.
As an ENERGY star partner, NEC Computers Inc. (NECC) has determined that this product meets the
ENERGY star guidelines for energy efficiency.
NEC and Versa are registered trademarks of NEC Corporation and/or one or more of its sub sidiaries. UltraCare
is a service mark of NEC Corporation and/or one or more of its subsidiaries.
ENERGY STAR is a U.S. registered trademark.
All other product, brand, or trade names used in this publication are the trademarks or registered trademarks of
their respective trademark owners.
First Printing — March 1999
Copyright 1999
NEC Computers Inc.
15 Business Park Way
Sacramento, CA 95828
All Rights Reserved
Page 3

Contents
Using This Guide
Text Setup...............................................................................................x
Related Documents................................................................................xi
........................................................................
1 Introducing the NEC Versa
Getting to Know Your NEC Versa......................................................1-2
NEC Versa LX Notebook....................................................................1-3
Around the Front of the System..........................................................1-4
LCD Panel......................................................................................1-4
Status Panel....................................................................................1-5
Keyboard Panel and Base Unit.......................................................1-7
Around the Back of the System.........................................................1-10
Around the Left Side of the System ..................................................1-11
Around the Right Side of the System................................................1-13
Around the Bottom of the System.....................................................1-15
2 Getting Started
Power Sources for Your NEC Versa...................................................2-2
Using the AC Adapter....................................................................2-2
Powering On .............................................................................2-4
Using the Main Battery Pack..........................................................2-5
Determining Battery Status.......................................................2-6
When to Change the Battery.....................................................2-8
Battery Handling.......................................................................2-8
Replacing the Battery................................................................2-9
Battery Precautions.................................................................2-11
Recharging Battery Precautions..............................................2-12
Extending Battery Life............................................................2-12
NEC VersaBay III........................................................................2-12
Internal Batteries..........................................................................2-12
CMOS Battery.........................................................................2-13
Bridge Battery.........................................................................2-13
System Care.......................................................................................2-14
Precautions...................................................................................2-14
Storage Requirements ..................................................................2-15
Routine Cleaning..........................................................................2-16
ix
Contents iii
Page 4

Introducing the Software...................................................................2-17
Traveling with your NEC Versa........................................................2-17
Power Connections.......................................................................2-18
Checklists.....................................................................................2-18
What to Take...........................................................................2-18
Preparing your NEC Versa for Travel ....................................2-19
3 Using the Software
BIOS Setup..........................................................................................3-2
How to Enter the BIOS Setup........................................................3-2
BIOS Setup Utility Main Menu................................................3-3
How to Use BIOS Setup.................................................................3-3
Looking at Screens....................................................................3-4
Using Keys................................................................................3-5
Checking/Setting System Parameters .......................................3-5
BIOS Setup Menus....................................................................3-9
Other BIOS Setup Options......................................................3-14
Password Protection................................................................3-14
Using BIOS Setup to Set Power Management.............................3-15
Using the Save to File (STF) Feature......................................3-15
Updating the BIOS.......................................................................3-17
Preparing the BIOS Update Diskette ......................................3-17
Changing the Switch Settings.................................................3-18
Performing the BIOS Update..................................................3-18
Windows Introduction.......................................................................3-19
Windows 98..................................................................................3-20
Desktop Icons..........................................................................3-20
Taskbar Icons..........................................................................3-21
Windows 95..................................................................................3-22
Windows NT................................................................................3-24
Service Pack 4.........................................................................3-25
Adding Hardware....................................................................3-26
NEC Utilities.....................................................................................3-26
NEC Customize Utility................................................................3-26
Using the NEC Customize Utility...........................................3-27
HDPREPEZ Utility......................................................................3-28
Using HDPREPEZ in Windows 98 or 95...............................3-28
NEC Help Center...............................................................................3-29
Software Applications and Drivers....................................................3-29
Using the Application and Driver CD..........................................3-30
Launching the Application and Driver CD.............................3-30
iv Contents
Page 5

Installing the Software............................................................3-31
Uninstalling the NEC Help Center..........................................3-32
Partition Magic.............................................................................3-32
Using Partition Magic.............................................................3-32
Intel LANDesk Client Manager...................................................3-33
SystemSoft PowerProfiler............................................................3-34
SystemSoft CardWizard...............................................................3-35
Intellisync for Notebooks.............................................................3-35
McAfee VirusScan.......................................................................3-36
Microsoft Internet Explorer..........................................................3-36
Netscape Navigator......................................................................3-36
Adobe Acrobat Reader.................................................................3-36
4 Using the Hardware
LCD Panel...........................................................................................4-2
Keyboard .............................................................................................4-2
NEC VersaGlide..................................................................................4-5
Making VersaGlide Adjustments...................................................4-6
VersaGlide Tips..............................................................................4-7
NEC Versa File Bay............................................................................4-7
SuperDisk Drive..................................................................................4-8
Formatting Diskettes in the SuperDisk Drive ................................4-8
NEC VersaBay III ...............................................................................4-9
NEC VersaBay Swapping Utility.................................................4-10
Installing the NEC VersaBay Swapping Utility......................4-10
Using the NEC VersaBay Swapping Utility...........................4-10
Removing a Device from the VersaBay III..................................4-11
Installing a Device in the VersaBay III........................................4-13
Customizing Your System with the VersaBay III........................4-15
24X CD-ROM Drive.........................................................................4-15
CD Loading..................................................................................4-16
CD Care........................................................................................4-17
Changing the Auto Play Setting...................................................4-17
DVD-ROM Drive..............................................................................4-18
PC Cards............................................................................................4-19
Type II Cards................................................................................4-19
Type II Extended Cards................................................................4-19
Type III Cards ..............................................................................4-19
Communication Cards.............................................................4-19
PC Card Modems....................................................................4-20
Storage Cards..........................................................................4-21
Contents v
Page 6

Interface Cards........................................................................4-21
Other Cards.............................................................................4-21
PC Card Slots...............................................................................4-21
Inserting a PC Card......................................................................4-22
Removing a Card..........................................................................4-23
IR Port ...............................................................................................4-23
Using the IR Port..........................................................................4-24
Enabling the IR Port.....................................................................4-25
Windows 98 or 95 Systems.....................................................4-25
Windows NT Systems.............................................................4-25
Increasing System Storage and Memory...........................................4-26
Hard Disk .....................................................................................4-26
Memory Module Installation........................................................4-32
Switch Settings..................................................................................4-37
Changing Switch Settings............................................................4-38
5 Using External Devices
External Monitor .................................................................................5-2
Printer..................................................................................................5-3
Parallel Devices..............................................................................5-3
Serial Devices.................................................................................5-4
External Keyboard/Mouse...................................................................5-5
External Bar Code Scanner..................................................................5-7
External Television Connections.........................................................5-7
External Audio Options.......................................................................5-9
USB Devices .....................................................................................5-10
NEC Versa Dock...............................................................................5-11
NEC Versa PortBar ...........................................................................5-11
PortBar Ports................................................................................5-11
6 Using Multimedia
vi Contents
Audio...................................................................................................6-2
Recording.......................................................................................6-2
Optimizing the Sound Quality..................................................6-3
Line-In............................................................................................6-4
CD-ROM Input ..............................................................................6-4
Microphone....................................................................................6-5
Mixing............................................................................................6-5
Playing Back ..................................................................................6-5
Using Headphones ....................................................................6-6
Using the Built-In Speakers......................................................6-6
Page 7

Using External Stereo Speakers................................................6-7
MIDI Files......................................................................................6-7
Video ...................................................................................................6-7
Using Digital Video Files...............................................................6-8
Using Animation Files ...................................................................6-8
Multimedia Applications.....................................................................6-8
7 Solving System Problems
Problem Checklist ...............................................................................7-2
Start-Up Problems...............................................................................7-4
Post Error Messages.......................................................................7-4
Using the Product Recovery CD.........................................................7-8
Guidelines for Using the Product Recovery CD............................7-8
Recovery Choices...........................................................................7-9
Full/Express Restore ....................................................................7-10
Partition Restore...........................................................................7-12
Windows NT Recovery CDs........................................................7-14
If You Need Assistance.....................................................................7-15
8 Getting Services and Support
Services and Support Contact Information..........................................8-2
NECC Web Site...................................................................................8-2
NECC FTP Site ...................................................................................8-3
NECC Support Services......................................................................8-4
Email/Fax to Support Services............................................................8-4
A Setting Up a Healthy Work Environment
Making Your Computer Work for You..............................................A-2
Arrange Your Equipment...................................................................A-3
Adjust Your Chair ..............................................................................A-4
Adjust Your Input Devices.................................................................A-4
Adjust Your Screen or Monitor..........................................................A-5
Vary Your Workday...........................................................................A-6
Pre-Existing Conditions and Psychosocial Factors............................A-7
B Specifications
System Components...........................................................................B-2
Memory Map......................................................................................B-9
Interrupt Controllers.........................................................................B-10
Contents vii
Page 8

C Frequently Asked Questions
External Mouse...................................................................................C-2
Display................................................................................................C-2
PC Cards.............................................................................................C-3
Diskette Drive.....................................................................................C-5
Booting...............................................................................................C-7
Power Management............................................................................C-7
Miscellaneous...................................................................................C-10
Glossary
Index
viii Contents
Page 9

Using This Guide
The NEC Versa® LX User's Guide gives you the information you need to
maximize the use of your NEC Versa notebook computer. Read this
guide to familiarize yourself with the NEC Versa and its features. For
specific information see
Chapter 1, “Introducing the NEC Versa,” to acquaint yourself with
!
system hardware.
Chapter 2, “Getting Started,” for instructions on how to connect,
!
power on, and care for your system, as well as what to bring when
you travel with your NEC Versa notebook computer.
Chapter 3, “Using the Software,” for a concise summary of the
!
applications and utilities loaded on your system. We included
software to let you experience the full spectrum of the system.
Chapter 4, “Using the Hardware,” for an understanding of NEC Versa
!
features and functionality. You’ll learn how to swap VersaBay
devices, install PC cards, and upgrade your system memory.
Chapter 5, “Using External Devices,” to master procedures for
!
connecting external devices like an external monitor, headphones, a
printer, or speakers.
Chapter 6, “Using Multimedia,” for steps on integrating video and
!
sound clips into impressive presentations.
Chapter 7, “Solving System Problems,” for simple solutions to
!
common problems that may arise while operating your notebook.
Chapter 8, “Getting Services and Support,” for information about
!
getting help when you need it from NEC Computers Inc. (NECC).
Appendix A, “Setting Up a Healthy Work Environment,” for
!
guidelines that help promote a healthy work setting.
Appendix B, “Specifications,” to review NEC Versa system
!
specifications.
Using This Guide ix
Page 10

!
Text Setup
To make this guide as easy to use as possible, text is set up as follows.
!
Appendix C, “Frequently Asked Questions,” (FAQs) for a look at
questions that users commonly ask and the answers to those
questions.
Warnings, cautions, and notes have the following format:
Warnings alert you to situations that could result in
serious personal injury or loss of life.
Cautions indicate situations that can damage the
system hardware or software.
information about whatever is being described.
Names of keys are printed as they appear on the keyboard, for
!
example,
Text that you must type or keys that you must press are presented in
!
bold type. For example, type
x Using This Guide
Note:
Ctrl, Alt
Notes give particularl y im portant
Enter
, or
.
dir
and press
Enter
.
Page 11

Related Documents
See the following documents for additional information on your NEC
Versa notebook computer:
The NEC Versa LX Quick Setup sheet helps get your system up and
!
running.
The NEC Versa LX Quick Reference card provides an easy-to-carry
!
reference to LED meanings, controls, function key combinations, and
NECC help numbers. (The quick reference card does not ship with
some systems purchased outside of the United States and Canada.)
The NEC Help Center is a fully navigational, HTML-based document
!
containing multimedia elements, a full search capability, and all of
the information about your NEC Versa that you find in this printed
user's guide, and more.
Using This Guide xi
Page 12

1
Introducing the NEC Versa
Getting to Know Your NEC Versa
!
NEC Versa LX Notebook
!
Around the Front of the System
!
Around the Back of the System
!
Around the Left Side of the System
!
Around the Right Side of the System
!
Around the Bottom of the System
!
Page 13

Getting to Know Your NEC Versa
Prolonged or improper use of a computer
workstation may pose a risk of serious injury. To
reduce your risk of injury, set up and use your
computer in the manner described in Appendix A,
“Setting Up a Healthy Work Environment.”
After completing the steps in the quick setup sheet that comes with your
computer, your NEC Versa LX notebook computer is ready to go! To
get started, do the following:
Read Appendix A, “Setting Up a Healthy Work Environment,” for
!
guidelines that help you use your computer productively and safely.
Information includes how to set up and use your computer to reduce
your risk of developing nerve, muscle, or tendon disorders.
Take the online System Tour to get acquainted with the NEC Versa.
!
The System Tour is part of the NEC Help Center. Use the Application
and Driver CD for the NEC Versa LX that ships with your system to
install the NEC Help Center.
Read through this guide to familiarize yourself with the NEC Versa.
!
1-2 Introducing the NEC Versa
Page 14
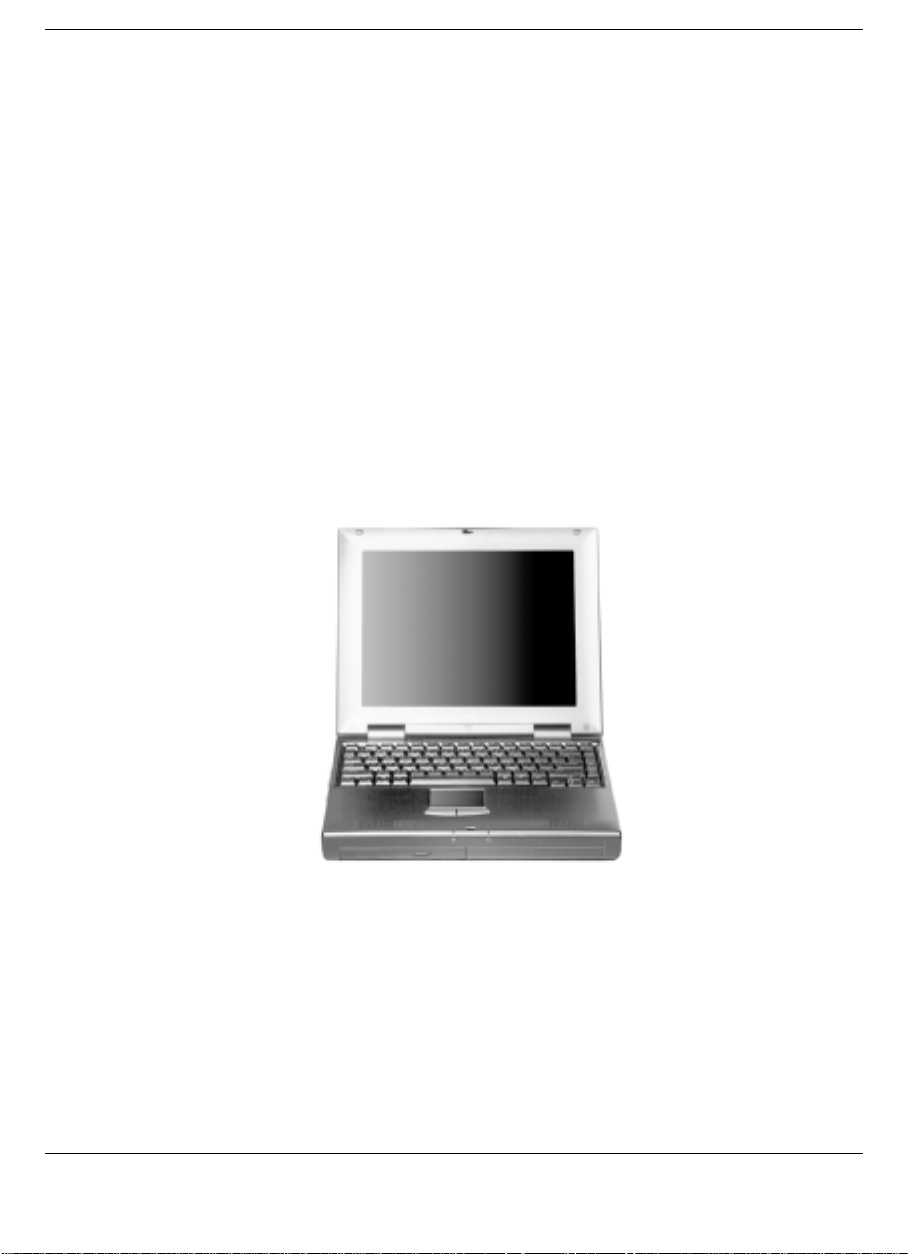
NEC Versa LX Notebook
The NEC Versa LX notebook computer offers you a portable system
filled with exciting resources for home, business or travel. Standard
features include a powerful Intel Pentium II 300-PE, 333-MHz or
366-MHz microprocessor with AGP (advanced graphics port) that works
together with the latest Peripheral Component Interconnect (PCI)
architecture.
In addition, your system provides a high-performance hard disk drive, a
diskette drive or SuperDisk™ drive, and PC card support. Most models
are equipped with a 24X CD-ROM drive, or a DVD-ROM drive. As a
multimedia system, your NEC Versa also provides the tools needed to
create and present impressive images using video clips and sound.
NEC Versa LX notebook computer
To get comfortable with your notebook, read the following sections and
take a tour around your system!
Introducing the NEC Versa 1-3
Page 15

Around the Front of the System
The NEC Versa is compact with features on every side. First, look at the
front of the NEC Versa. The following sections describe front features,
beginning with the liquid crystal display (LCD) panel.
LCD Panel
Your NEC Versa LX comes with a 1024x768, 64K color LCD panel that
you can adjust for a comfortable viewing position. Depending on the
model, your system is equipped with a:
13.3-inch color Thin Film Transistor (TFT) Extended Graphics Array
!
(XGA) panel.
14.1-inch Thin Film Transistor (TFT) Extended Graphics Array
!
(XGA) panel.
To adjust the LCD panel brightness press the
keys. For more details about using the system’s function keys, see
Chapter 4, “Using the Hardware.”
Fn-F8
and
Fn-F9
functions
1-4 Introducing the NEC Versa
Page 16

Status Panel
The NEC Versa status panel provides the features shown in the figure.
These features are described after the figure.
Status panel
A
– Microphone B – Operating Status LEDs
Microphone — A strategically positioned built-in microphone allows
!
you to record monophonic sound directly into your notebook
computer. See Chapter 6, “Using Multimedia,” for details about
recording.
Operating Status LEDs — keeps you informed of your NEC Versa's
!
current operating status. See the following figure and list for each
icon's meaning.
Introducing the NEC Versa 1-5
Page 17
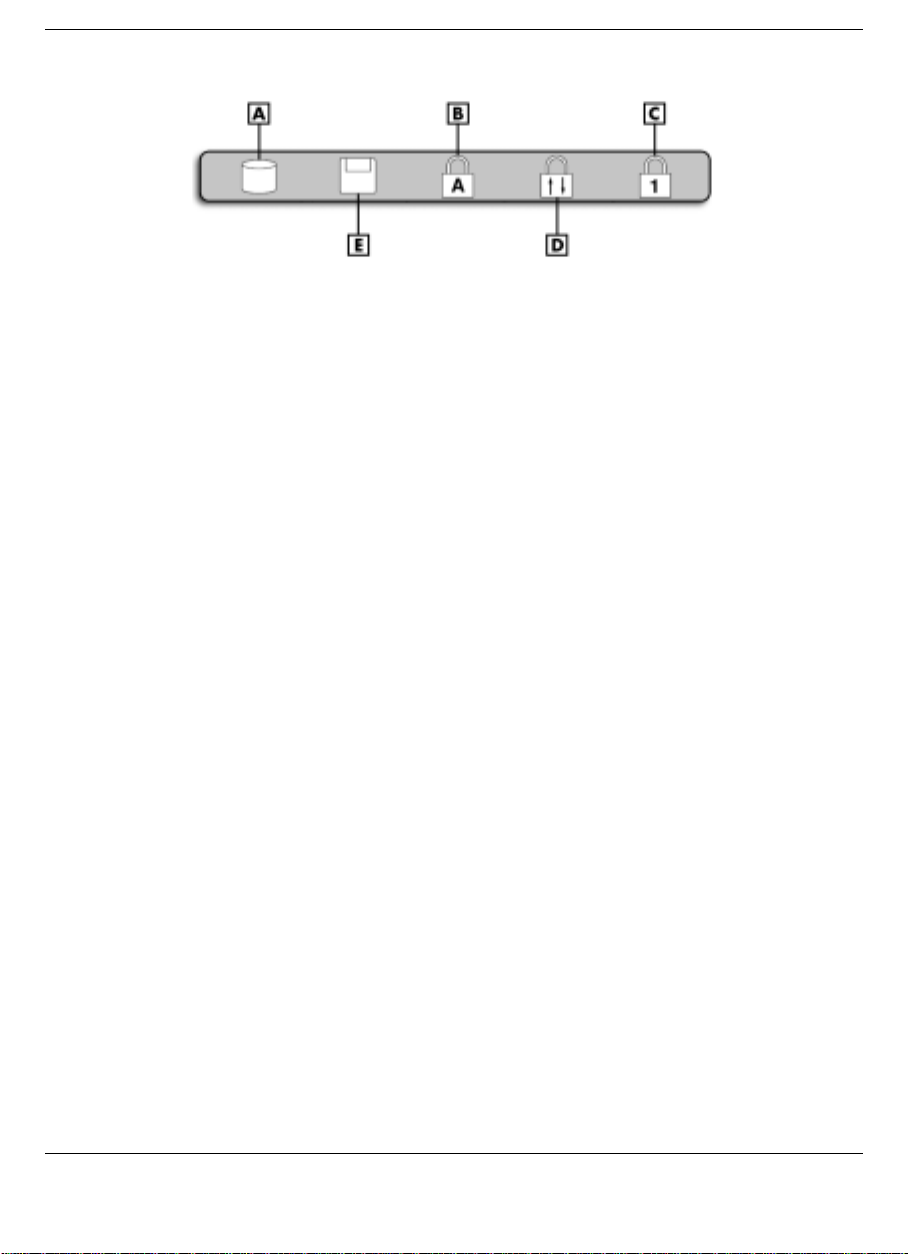
Operating status LEDs
A
– IDE/VBIII Devices B – Caps Lock C – Num Lock D – Scroll Lock E – Diskette Drive
IDE/VBIII devices — lights when the NEC Versa writes data to
or retrieves data from the internal hard disk drive, a SuperDisk
drive in the file bay, or a device in the VersaBay III.
Caps Lock — lights when Caps Lock is in effect.
Num Lock — lights when Num Lock mode is active.
Scroll Lock — lights when Scroll Lock is in effect.
Diskette Drive — lights when the NEC Versa accesses the floppy
diskette drive.
1-6 Introducing the NEC Versa
Page 18

Keyboard Panel and Base Unit
The NEC Versa keyboard panel and base unit contain the following
features which are described after the figure.
Keyboard panel and base unit
A
– Stereo Speaker B – VersaGlide C – Keyboard
D
– System Power Status LEDs E – VersaBay III
Stereo Speakers — provide stereo sound for your multimedia
!
presentations or listening pleasure. The built-in sound system also
supports 3D sound, which simulates the latest surround-sound
technology.
NEC VersaGlide — The NEC VersaGlide works like a standard
!
computer mouse. Simply move your fingertip over the VersaGlide to
control the position of the cursor. Use the selection buttons below the
VersaGlide to select menu items. VersaGlide settings and features are
described in detail in Chapter 4.
Keyboard — 85 keys with the standard QWERTY-key layout. See
!
Chapter 4 for complete details. (Models purchased outside of the U.S.
and Canada ship with country-specific keyboard layouts.)
Introducing the NEC Versa 1-7
Page 19
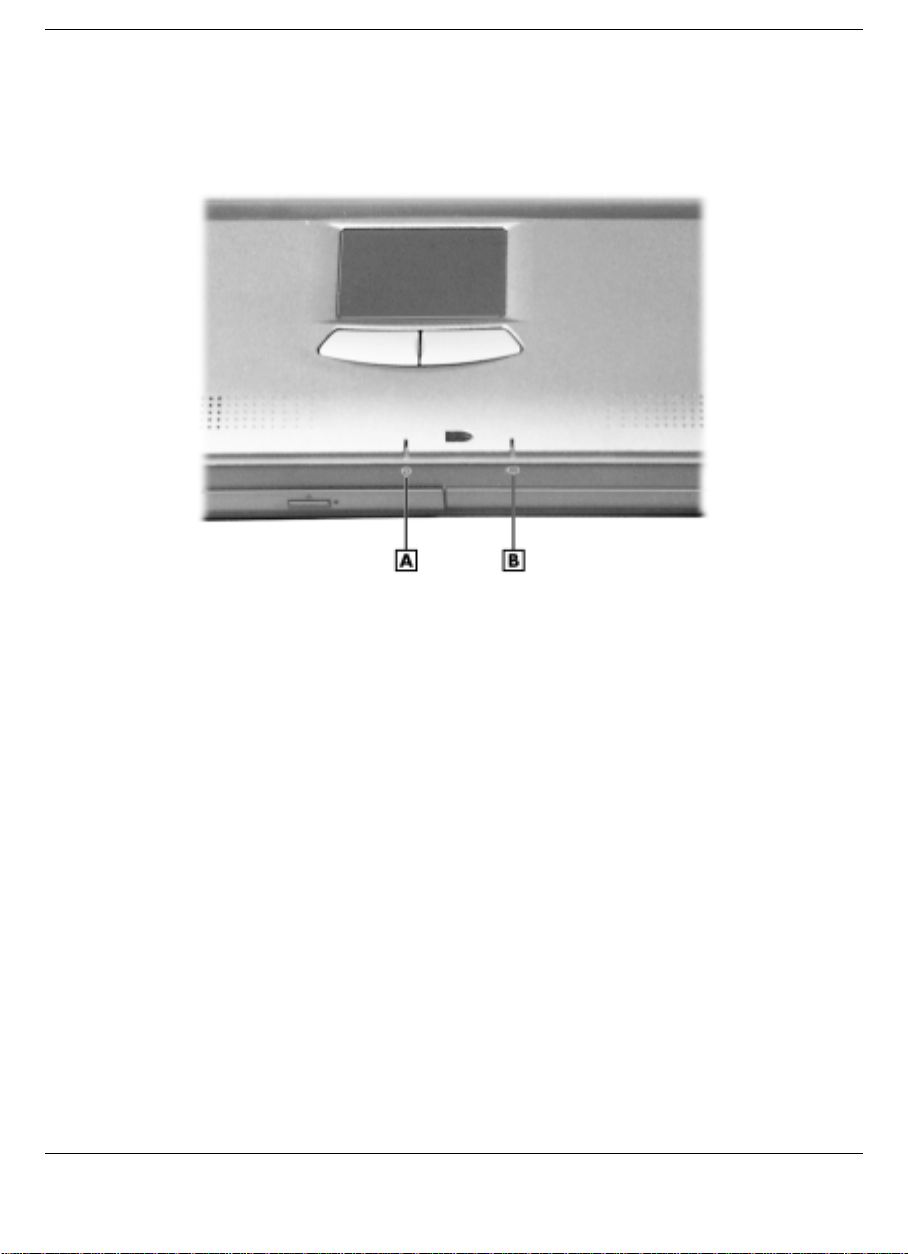
System Power Status LEDs — keeps you informed of the system’s
!
current power status.
System power status LEDs
A
– Power Status LED B – Battery Charging LED
Power Status LED — lights green when the system is under AC
power. When the system is under battery power, this LED lights
to indicate the following:
– Lights green when the system power is on.
– Blinks green when the system is in Suspend mode.
– Lights yellow (blinks when in Suspend mode) to indicate that
battery power is at 8% capacity or less.
– Lights amber (blinks when in Suspend mode) to indicate that
battery power is at 3% capacity.
1-8 Introducing the NEC Versa
Page 20

Note
:
When both the primary and a
secondary battery are installed, the po wer
status LED indicates the total (primary plus
secondary) battery status.
Battery Charging LED — lights to indicate battery charging
activity.
– Lights amber when the primary battery is charging. Blinks
amber to indicate an error. The primary battery is installed in
the battery bay.
– Lights green when the secondary battery is charging. Blinks
green to indicate an error. The secondary (optional) battery is
installed in the VersaBay III.
NEC VersaBay III™ — A 24X CD-ROM drive, a SuperDisk drive,
!
or a DVD-ROM drive comes installed in the NEC VersaBay III on
the front of your system.
The VersaBay III lets you add options, including an optional second
Li-Ion battery, or an additional hard disk drive. See “Customizing
Your System with the VersaBay III” in Chapter 4.
Introducing the NEC Versa 1-9
Page 21

Around the Back of the System
You'll find system ports for connecting optional devices (like a printer, a
docking station, or an external monitor) on the back of your NEC Versa.
These ports are described after the figure.
Ports on the back of the system
A
– Port Bar Notch B – Serial Port C – Expansion Port D – AC Power Port
E
– External Monitor Port F – Parallel Port G – PS/2 Port
PortBar Notch — Use these notches to secure the PortBar to the back
!
of the system.
Serial Port — Use this port to connect an external modem or other
!
serial device.
Expansion Port — This port (also called the Docking port) provides a
!
connection for NEC Versa LX options including the NEC Versa
Dock and the NEC Versa PortBar.
Only dock the NEC Versa LX system on the NEC
Versa Dock. The cover of the NEC Versa Dock is
specially designed to allow for proper system
cooling.
1-10 Introducing the NEC Versa
Page 22
AC Power Port — Use the power jack to attach the NEC Versa to a
!
DC power source, such as the AC adapter or the optional DC auto
adapter.
External Monitor (Video) Port — Use this 15-pin port to attach an
!
external monitor to your NEC Versa. You can run the LCD display
and the external monitor simultaneously or run either alone.
Parallel Port — Use this port to connect a parallel printer or other
!
parallel device. The port is an Enhanced Capabilities Port (ECP). The
ECP standard provides you with a greater processing speed than the
conventional parallel port. It also supports Enhanced Parallel Port
(EPP), bi-directional and uni-directional protocols.
PS/2 Port –— Use the standard PS/2 port to connect an external PS/2-
!
style mouse or a PS/2-style keyboard to the system. With an optional
Y-cable adapter, you can connect both a mouse and a keyboard at the
same time.
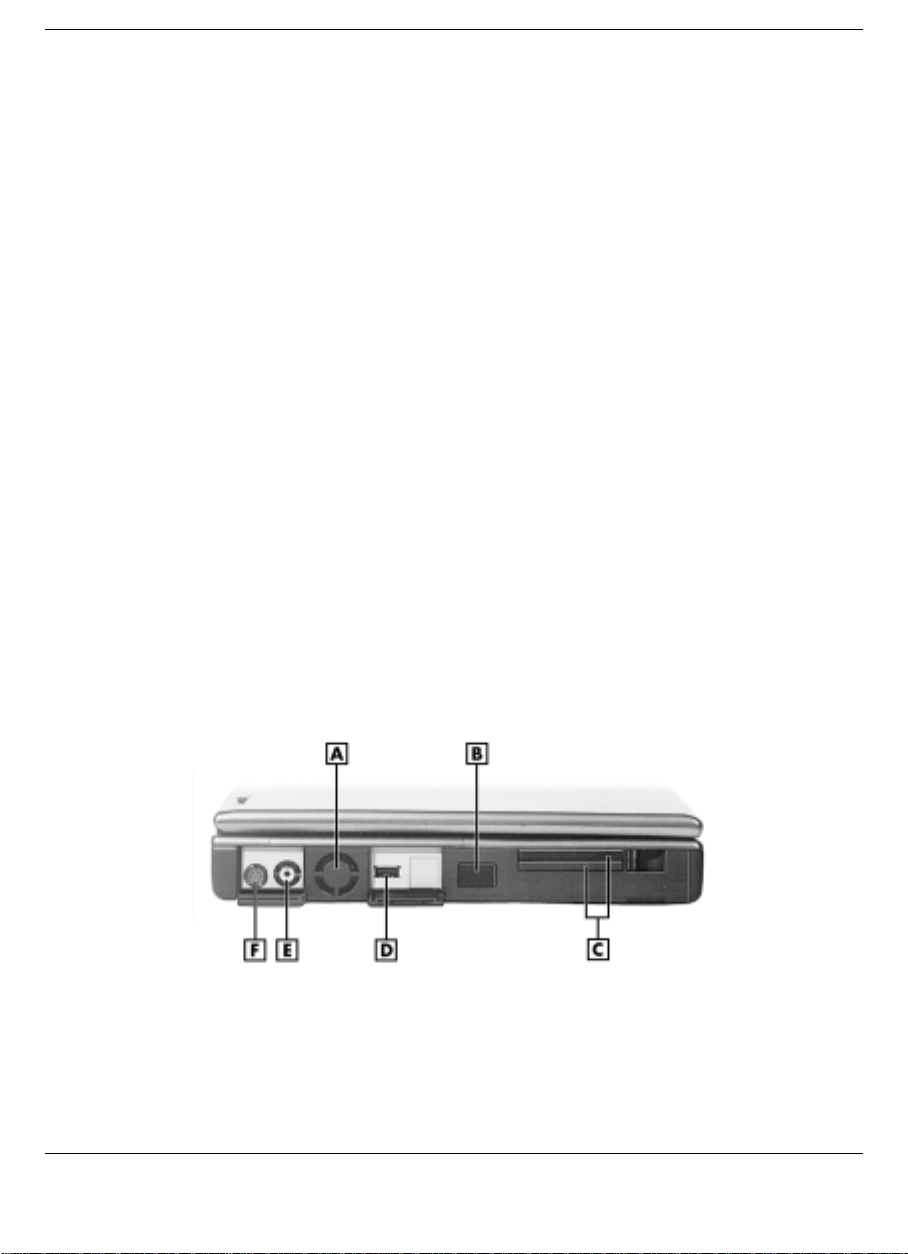
Around the Left Side of the System
The left side of your NEC Versa offers the following features, which are
described after the figure.
Left side features
A
– Fan B – IR Port C – PC card slots D – USB Port E – TV Out (RCA) Port
F
– TV Out (S-video) Port
Introducing the NEC Versa 1-11
Page 23

Fan — Allows your system to cool properly and maintain a safe
!
operating temperature.
Always keep the fan vents unobstructed to allow
proper system cooling.
IR Port — Use this infrared (IR) port to transfer files between your
!
NEC Versa and an IR-equipped desktop or notebook computer or to
print to an IR-capable printer.
Note
: Your NEC Versa LX ships with the IR port
disabled. For detailed instructions on how to enable
the IR port, see Chapter 4, “Using the Hardware.”
PC card slots — Provide two slots for inserting two Type II PC cards
!
or one Type III PC card.
USB Port — The Universal Serial Bus (USB) port allows you to
!
connect up to 127 USB-equipped peripheral devices (printers,
monitors, scanners, etc.) to your NEC Versa.
TV Out (RCA) Port — Lets you use a television set equipped with a
!
standard RCA jack as an external monitor. This port supports both
NTSC and PAL signals.
TV Out (S-video)Port — Lets you use a television set equipped with
!
an S-video input jack as an external monitor. This port supports both
NTSC and PAL signals.
Note:
SECAM signal used in some countries.
1-12 Introducing the NEC Versa
The TV Out ports do not support the
Page 24
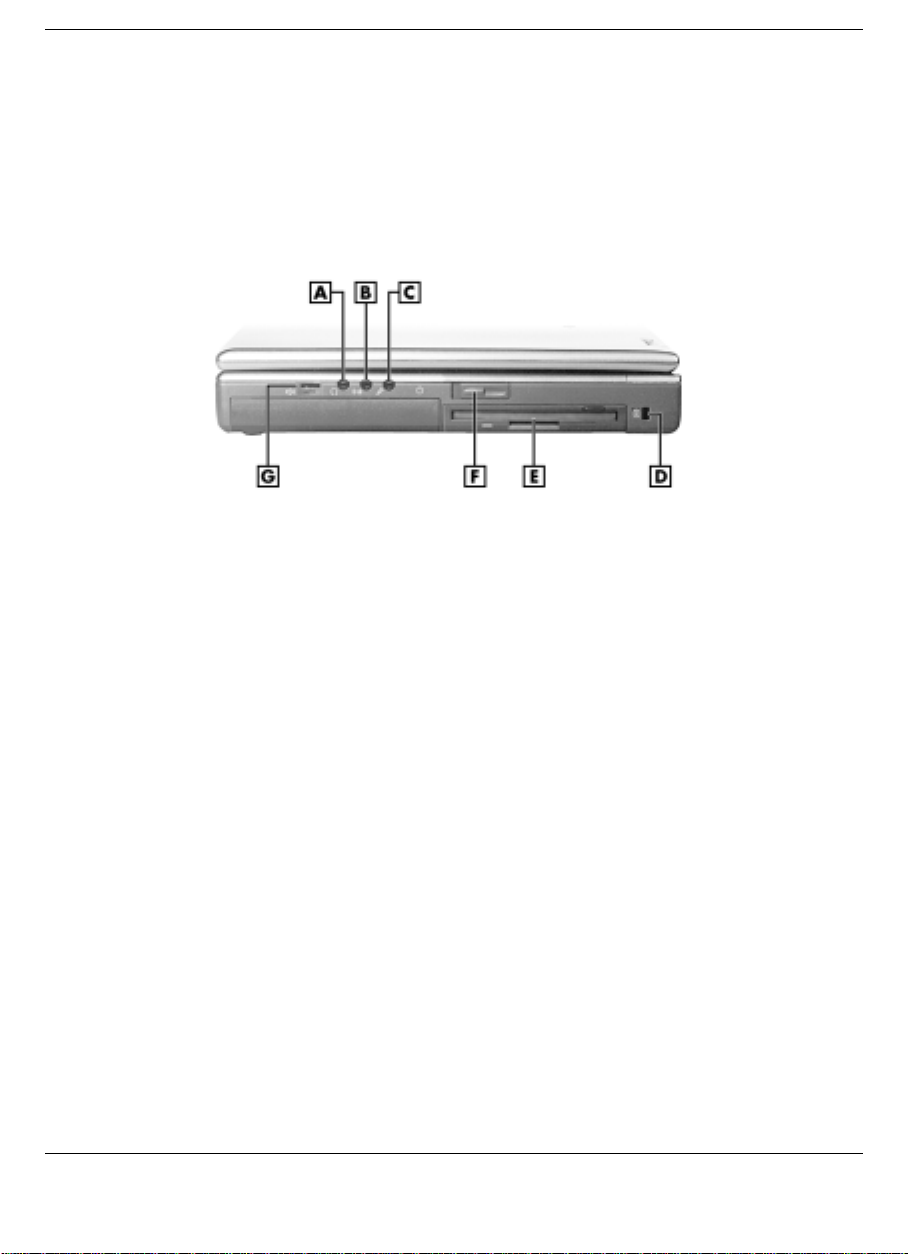
Around the Right Side of the System
The right side of the NEC Versa offers the features shown in the
following figure. Features are described after the figure.
Right side features
A
– Headphones B – Line In C – External Microphone D – Kensington Lock
E
– File Bay F – Power/Sleep Button G – Audio Volume
Audio ports
!
Headphones — Lets you connect external headphones or
speakers to your NEC Versa. Plugging in headphones disables
the built-in system speakers.
Line-In — Lets you use another audio system, like a home
stereo, as an input source. Use a cable to connect to the Line-Out
port on the other audio system to record or play in stereo.
External Microphone (MIC) — Allows you to connect an
external microphone for monophonic recording or amplification
through the unit. Plugging in an external microphone disables the
built-in microphone.
Kensington Lock — Lets you provide added security by installing an
!
optional Kensington Lock.
Introducing the NEC Versa 1-13
Page 25

File Bay — Your NEC Versa ships with a 3.5-inch, 1.44-MB diskette
!
drive or the SuperDisk drive installed in the file bay.
Power/Sleep Button — Slide the Power/Sleep button toward the front
!
of the system to power on, power off, and to put the computer into
Suspend mode.
Slide the Power/Sleep button toward the front of the system to
power on.
Hold the Power/Sleep button in place for 4 or fewer seconds to
put the system into Suspend mode. (Before using the
Power/Sleep button to put the system into Suspend mode, set the
System Switch BIOS parameter to Sleep button.)
Hold the Power/Sleep button in place for 4 or more seconds to
initiate power override (powers off the system).
The Power/Sleep button is a “smart” switch, meaning that it
recognizes when the system is in Suspend mode. If in Suspend mode,
you cannot power off until you slide forward the Power/Sleep button
again to bring it out of Suspend mode.
In addition, the Smart Power switch invokes an orderly shutdown in
the Windows 98 and Windows 95 environments. If you use the
Power/Sleep button to turn off your system while applications are
running, the Smart Power switch alerts the operating system. The
operating system prompts you to save all data and invokes an orderly
shutdown procedure.
Put the unit in Suspend mode when you need to be away from your
system for a short period of time and want to return to where you left
off. Suspend mode shuts down all devices in the system while
retaining data and system status. Use the
combination to initiate a manual save-to-file. Slide the Smart Power
switch (Power/Sleep button) toward the front of the system to resume
from a save-to-file. You can find more detailed information on using
Suspend mode in Chapter 3, “Using the Software.”
Volume Control — Allows you to control the speaker and headphone
!
volume.
1-14 Introducing the NEC Versa
Fn-Power/Sleep
key
Page 26

Around the Bottom of the System
The bottom of the NEC Versa offers the features shown next. Features
are described after the figure.
Bottom featur es
A
– Height Adjustment Feet B – Battery Bay Release Latch
C
– VersaBay Release Latch D – VersaBay Release Lock
E
– Battery Bay
Height Adjustment Feet — Allow you to modify the angle of the
!
NEC Versa for easier viewing and typing.
Battery Bay Release Latch — Allows you to release and remove the
!
system’s main battery.
NEC VersaBay III Release Lock and Latch — Lets you unlock and
!
remove the device currently installed in the bay.
Battery Bay — Contains the system's main battery. It is a twelve-cell
!
Lithium-Ion (Li-Ion) battery.
Introducing the NEC Versa 1-15
Page 27

Getting Started
Power Sources for Your NEC Versa
!
System Care
!
Introducing the Software
!
Traveling with your NEC Versa
!
2
Page 28

Power Sources for Your NEC Versa
The NEC Versa can be powered using three different sources, making it
a truly portable system. Operate your NEC Versa just about anywhere
using one of the following power sources:
the AC adapter connected to an electrical wall outlet (using AC
!
power).
the battery pack or an optional second battery pack.
!
the optional DC Auto adapter.
!
Read the following sections for specific steps on powering on the
system.
Using the AC Adapter
Use the AC adapter and power cable that came with your NEC Versa to
run your computer on alternating current (AC) power, or to recharge the
battery pack. Use the AC adapter whenever a wall outlet is nearby.
Keep the adapter connected whenever possible. The AC adapter charges
the battery when it is connected, whether the NEC Versa is powered on
or off.
Do not attempt to disassemble the AC adapter. The
AC adapter has no user-replaceable or serviceable
parts inside. Dangerous volta ge in the AC ada pter
can cause serious personal injury or death. The AC
adapter is intended for use with a computer and
must meet EN609050 standards.
2-2 Getting Started
Page 29
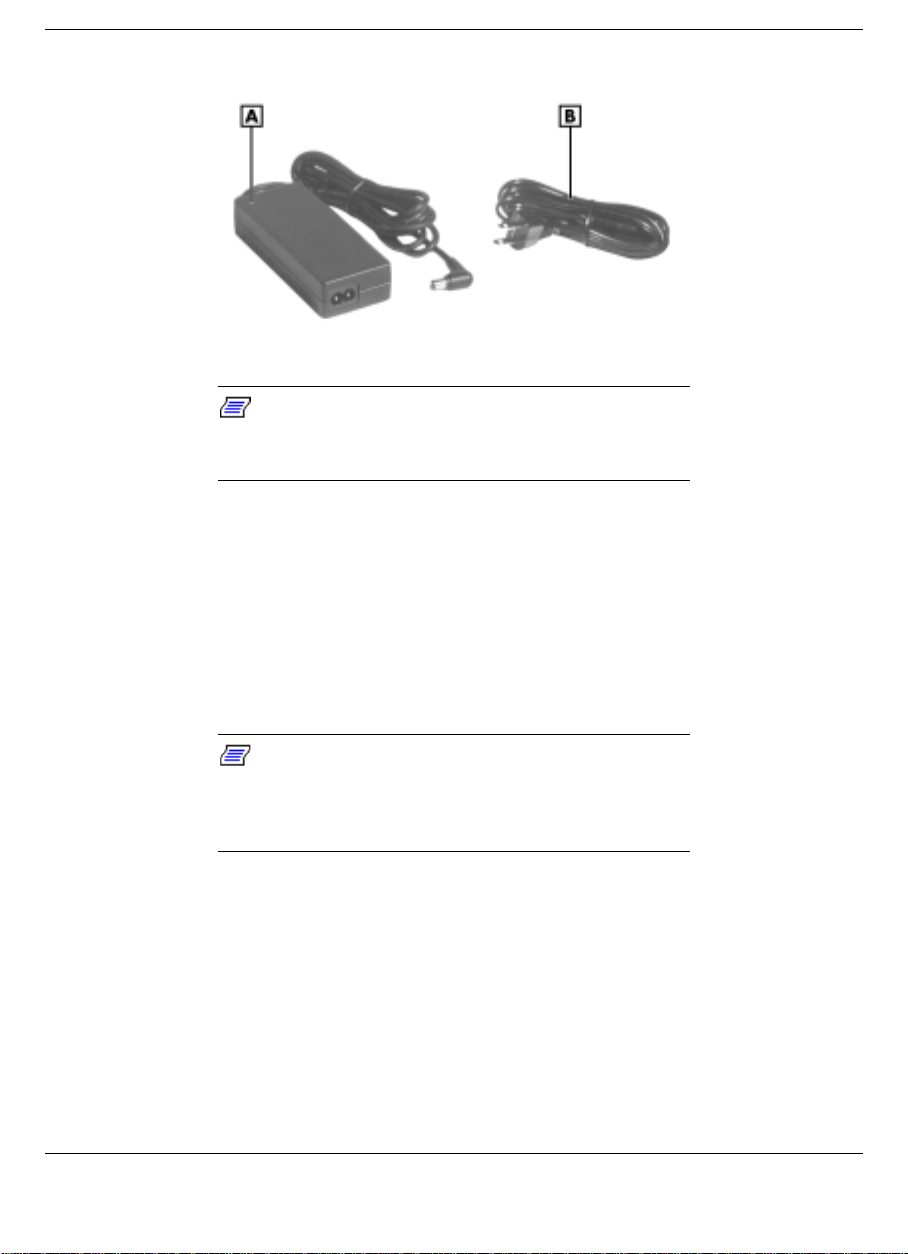
AC Adapter
A
– AC Adapter B – AC Power Cable
Note:
the range of 100-240 volts AC. Verify that the cord
and plug are appropriate for your AC source.
Check that the AC outlet voltage falls in
Connect the AC adapter as follows:
1.
Connect the AC adapter cable to the power port on the back of your
NEC Versa.
2.
Plug one end of the AC power cable into the AC adapter and the
other end into a properly grounded 120- or 240-volt wall outlet.
Note:
system uses depends on the country where you are
using it. Contact the local dealer to purchase the
correct power cable.
The AC power cable type that your
Getting Started 2-3
Page 30

Connecting the AC Adapter
A
– AC Adapter B – Power Port
Do not cover or place objects on the AC adapter.
Keeping the adapter clear of objects lets the adapter
cool properly during use.
Only use the AC adapter that comes with your Versa
LX. Although other adapters look similar, using them
can damage your system.
Powering On
Power on the system as follows:
1.
Locate the latch on the front of the LCD panel, slide it to the right,
and raise the panel.
2.
Locate the Power/Sleep button and slide it toward the front of the
system to turn on system power. For additional information about
Power control buttons and power LEDs, refer to Chapter 1,
“Introducing the NEC Versa.”
2-4 Getting Started
Page 31

Using the Main Battery Pack
The NEC Versa comes with a rechargeable Lithium-Ion (Li-Ion) battery
pack. It’s easy to install and remove.
Your NEC Versa system provides tools to help you keep track of the
main (or an optional) battery’s power level. These include the power
status LED described in Chapter 1, and SystemSoft’s PowerProfiler (for
Window NT systems, only) described later in this chapter. Both provide
important battery status information.
When battery power is very low, the power LED flashes amber.
When battery power gets low, do one of the following:
Slide the Power/Sleep button toward the front of the system and hold
!
it in place for 4 or fewer seconds to put your system in Suspend
mode. (Before using the Power/Sleep button to put the system into
Suspend mode, set the System Switch BIOS parameter to Sleep
button.) Remove the battery pack and replace it with a fully charged
battery.
Leave the battery pack in the system and connect your NEC Versa to
!
the AC adapter and a wall outlet. If you connect the system to AC
power and keep the system within standard operating temperatures,
the battery recharges in approximately 2–3 hours whether or not you
use your system.
To prevent accidental battery ignition or explosion,
adhere to the following:
! Keep the battery away from extreme heat.
! Keep metal objects away from the battery
connectors to prevent a short circuit.
! Make sure the battery is properly installed in the
battery bay.
! Read the precautions printed on the batter y.
Getting Started 2-5
Page 32
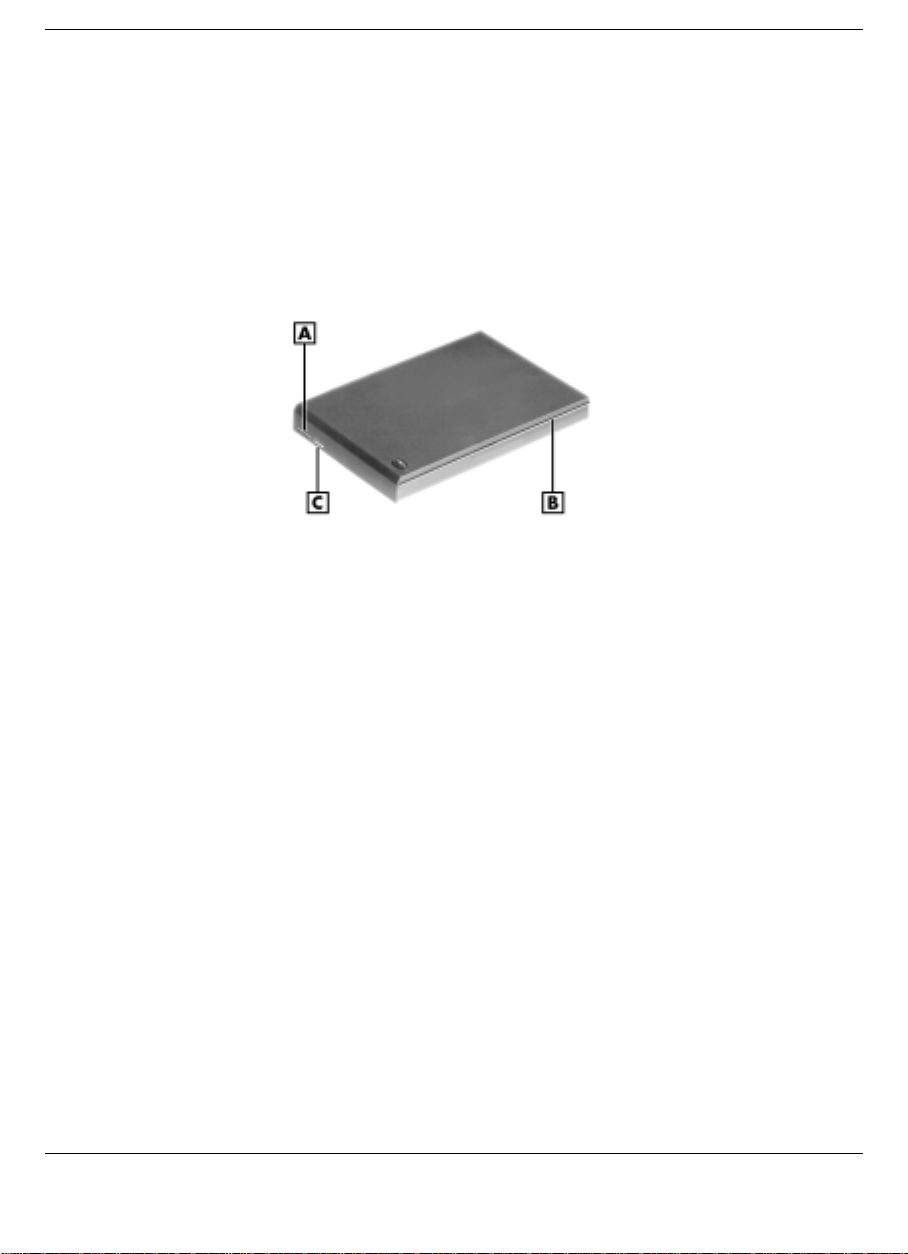
Determining Battery Status
You can determine battery status via the battery gauge LEDs on the front
of the Lithium-Ion battery that ships with your NEC Versa LX computer.
A
– Battery Gauge LED B – Alignment Groove C – LED Status Button
Lithium-Ion battery
2-6 Getting Started
Page 33
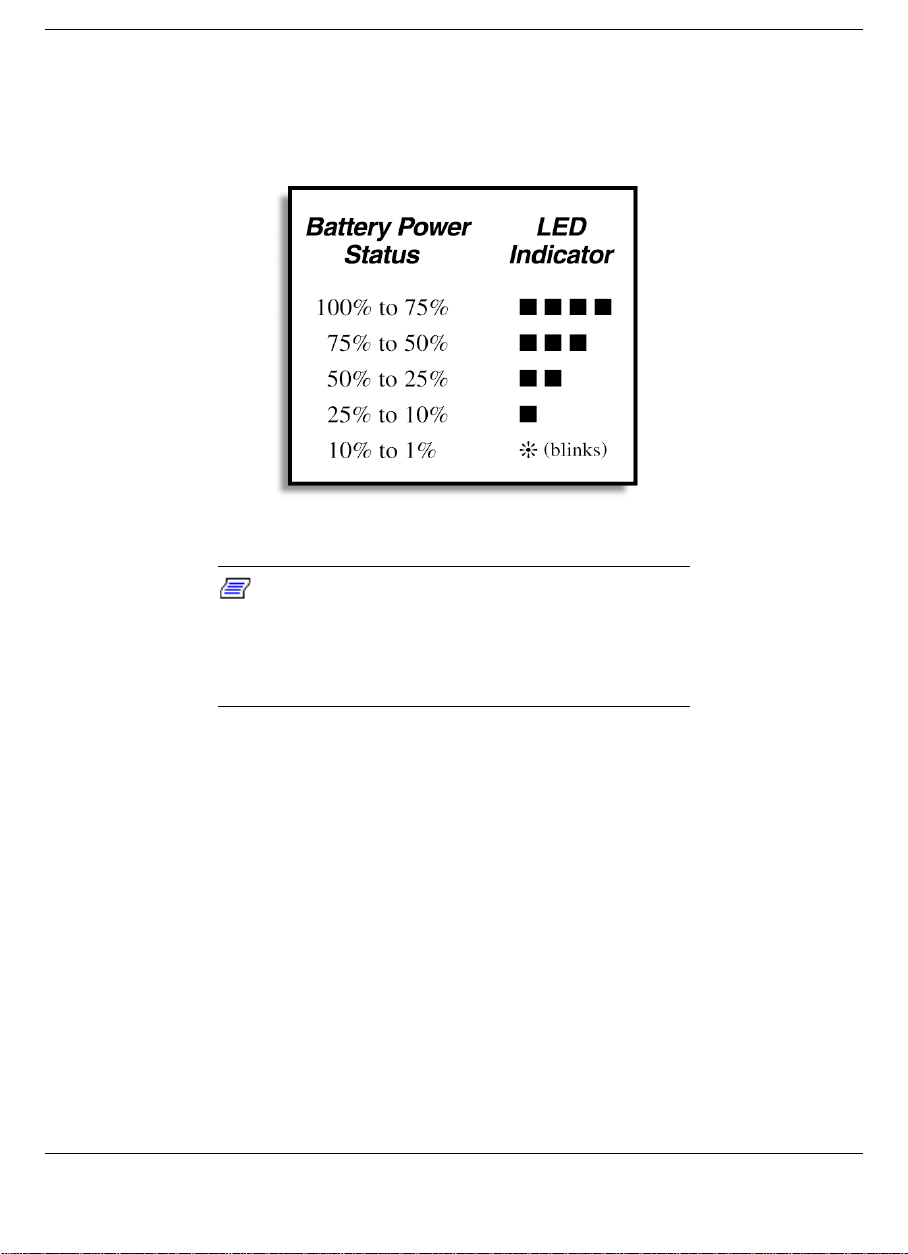
To check battery status, press the LED status button to illuminate the
LEDs. The battery gauge LEDs indicate the following:
Battery gauge LEDs
Note:
combination other than those depicted in the
illustration, recharge the battery overnight. If the
problem still persists, contact NECC Technical
Support.
If the battery gauge LEDs display a
In Windows 98 and 95 environments, you can also use the power meter
to determine battery status. Just move the cursor over the power icon on
the taskbar to display the remaining battery power.
In Windows NT environments, in addition to the battery gauge LEDs,
use SystemSoft’s PowerProfiler™ to determine battery status. Click on
the battery icon located on the taskbar. The PowerProfiler battery page
displays the remaining battery power.
Getting Started 2-7
Page 34

To return the battery to its normal state, try the following:
remove and then reinstall the battery
!
reinstall the battery in your NEC Versa and fully recharge the battery
!
(to 100%).
When to Change the Battery
The following symptoms indicate that battery life is nearing an end.
Replace batteries that display these symptoms.
Shorter work times.
!
Discoloration, warping.
!
Hot to the touch.
!
Strange odor.
!
Battery Handling
Keep the following in mind when removing or replacing a battery.
Use only the battery designed for your system in the NEC Versa.
!
Mixing other manufacturers’ batteries, or using a combination of very
old and new batteries can deteriorate battery and equipment
performance.
Turn off power to the system after use. Keeping system power on can
!
degrade battery performance and shorten battery life.
Clean the battery connectors with a dry cloth when they get dirty.
!
Keep the battery out of the reach of children.
!
2-8 Getting Started
Page 35
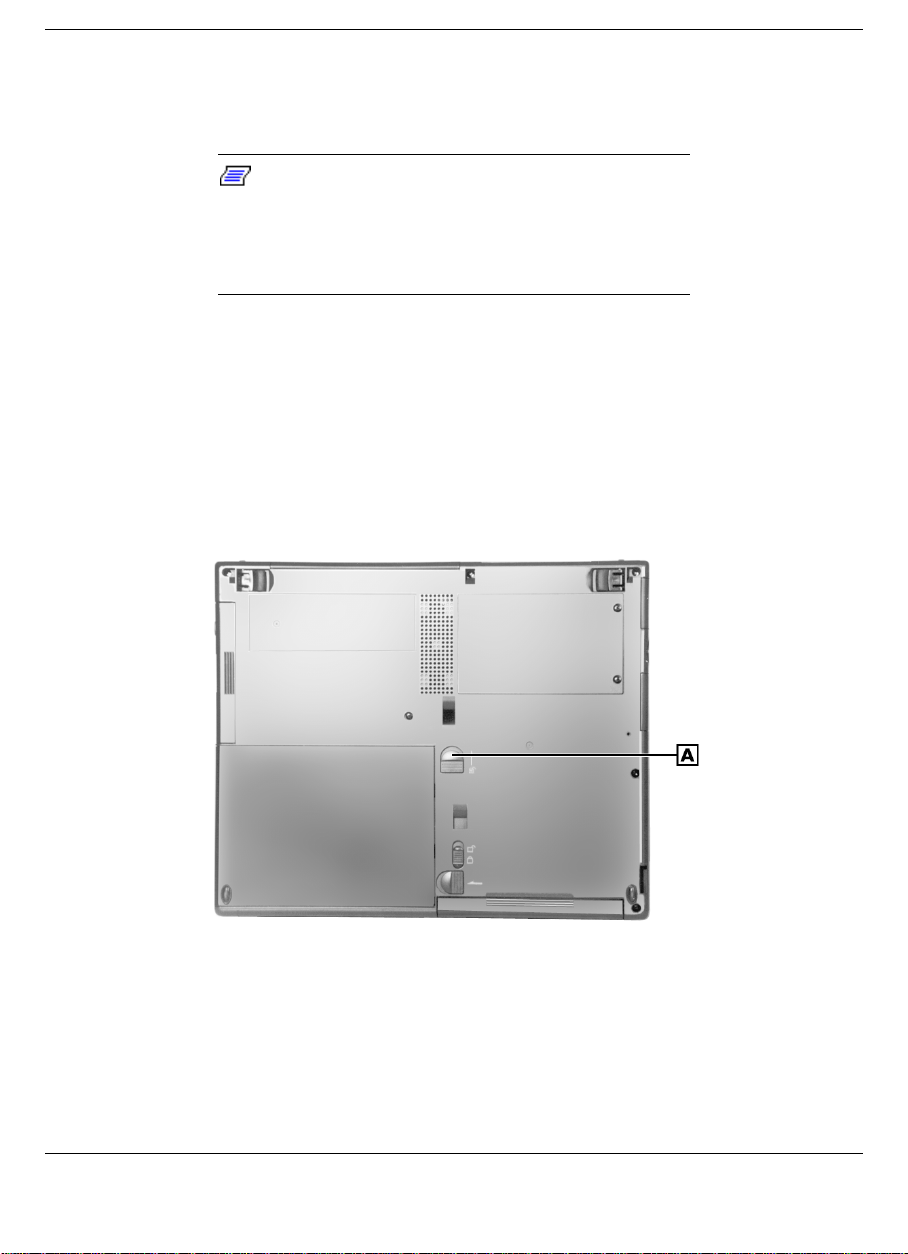
Replacing the Battery
Replace the battery pack installed in your NEC Versa system as follows.
Note:
computer for which they are designed. Also,
installing another manufacturer’s battery, or using a
combination of very old and new batteries can
deteriorate battery and equipment performance.
1.
Save your files, exit Windows, and put your system into Suspend
Use the batteries in the NEC Versa
mode or turn off system power.
2.
Close the LCD and turn the system over.
3.
Slide the battery release latch toward the back of the system and hold
firmly.
A
– Battery Bay Release Latch
Getting Started 2-9
Page 36
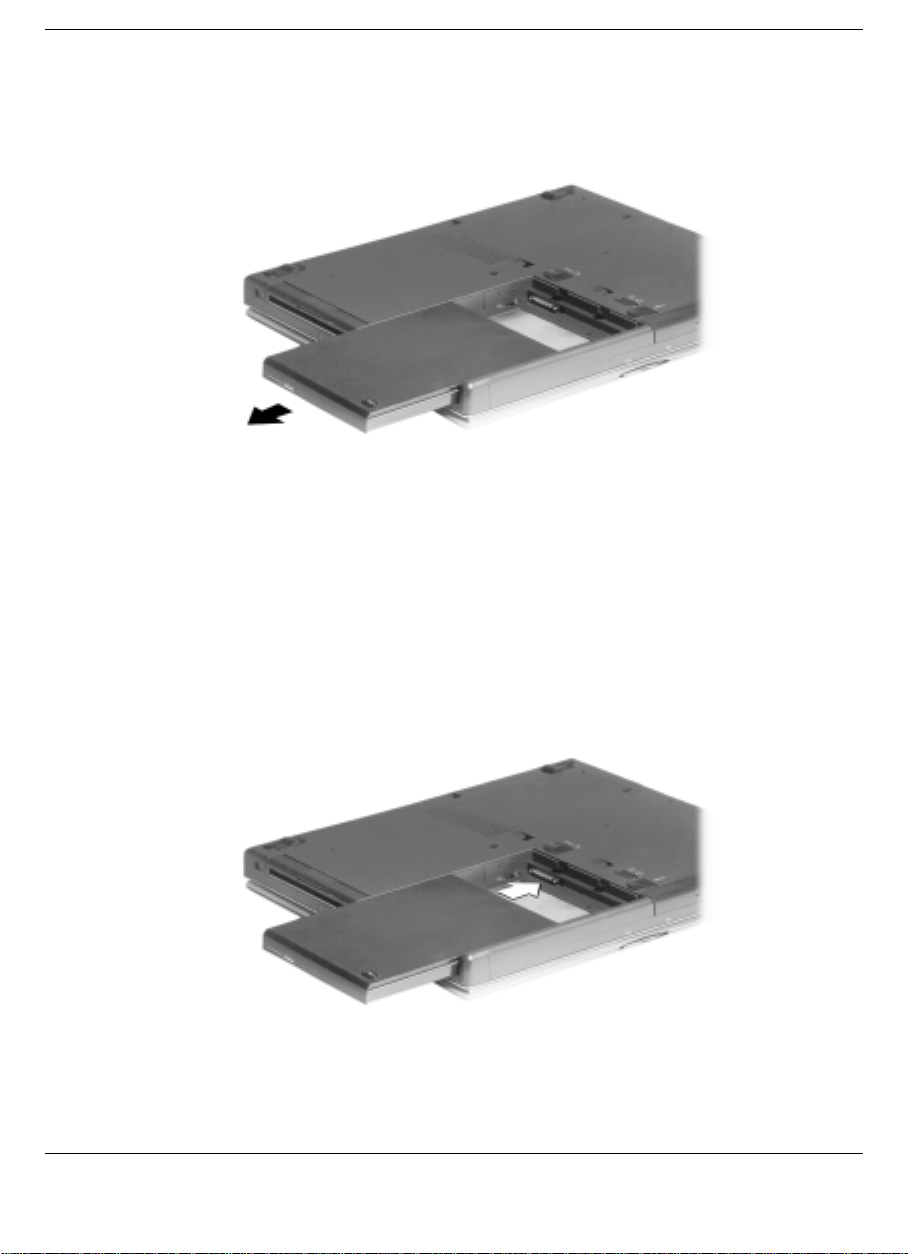
4.
Continue to hold the battery release latch as you slide the battery out
of the system.
Removing the battery
5.
Insert the new battery as follows:
Locate the alignment groove on the edge of the battery.
!
Locate the alignment groove inside the battery bay.
!
Align the grooves on the battery with the grooves in the bay.
!
Slide the battery into the bay until securely locked into place.
!
6.
Turn the system over.
2-10 Getting Started
Inserting the battery pack
Page 37

Battery Precautions
To prevent accidental battery ignition, rupture, or explosion, adhere to
the following precautions.
There is a danger of explosion if the battery is incorrectly replaced.
Replace only with the same or equivalent type recommended by the
manufacturer. Discard used batteries according to the manufacturer’s
instructions.
To avoid personal injury and property damage, read these battery
precautions on handling, charging, and disposing Li-Ion batteries.
! Keep the battery away from heat sources including direct sunlight,
open fires, microwave ovens, and high-voltage containers.
Temperatures over 140º F (60ºC) may cause damage.
! Do not drop or impact the battery.
! Do not disassemble the battery.
! Do not solder the battery.
! Do not puncture the battery.
! Do not use a battery that appears damaged or deformed, has any rust
on its casing, is discolored, overheats, or emits a foul odor.
! Keep the battery dry and away from water.
! Keep metal objects away from battery connectors. Metal objects in
contact with the connectors can cause a short circuit and damage.
If the battery leaks:
! If the battery leaks onto skin or clothing, wash the area immediately
with clean water. Battery fluid can cause a skin rash and damage
fabric.
! If battery fluid gets into eyes, DO NOT rub; rinse with clear water
immediately and consult a doctor.
! Take extra precautions to keep a leaking battery away from fire.
There is a danger of ignition or explosion.
Getting Started 2-11
Page 38

Recharging Battery Precautions
Adhere to the following precautions when recharging the primary or
secondary battery.
Use only the NEC battery charger designed for your NEC Versa
!
battery type. Different NEC Versa models require different batteries
and battery chargers.
Charge the battery for the specified charge time only.
!
During charging, keep the environmental temperature between 32°F
!
and 104°F (0°C to 40°C).
Read the instructions that came with the battery charger before
!
charging the battery.
Extending Battery Life
While on the road, it is important to be aware of the simple things you
can do to extend the life of the system’s main battery. One way is to
keep the brightness setting low. Use the
to control the brightness.
Fn+F8
and
Fn+F9
function keys
NEC VersaBay III
The NEC VersaBay III Battery Pack provides a optional, second
Lithium-Ion (Li-Ion) battery to use in your NEC Versa LX computer.
Inserting a second fully charged battery increases battery life to
approximately 4 to 5 hours.
Internal Batteries
The twelve-cell Lithium-Ion (Li-Ion) battery provides the main power
source in your NEC Versa LX computer. See Appendix B for a list of
battery specifications. In addition to this battery, the CMOS battery and
bridge battery also provide system power.
2-12 Getting Started
Page 39

CMOS Battery
This lithium battery provides battery backup and prevents data loss in
the system’s complementary metal oxide semiconductor (CMOS) RAM.
This memory area contains information on the system’s configuration,
for example date, time, drives, and memory. The CMOS battery charges
when your NEC Versa is connected to AC power. The CMOS battery
may discharge completely if the NEC Versa notebook remains unused
for approximately two months.
Bridge Battery
The bridge battery saves your system status in Suspend mode for up to
five minutes. This gives you time to install a fully charged battery or
plug in AC power when your battery charge becomes low.
The bridge battery should be replaced only by an authorized NECC
technician.
Connect your NEC Versa system to AC power for a
full 24 hours before using it on battery power for the
first time. Doing so insures that the bridge battery is
fully charged and that no data is lost during a battery
change.
Getting Started 2-13
Page 40

System Care
The NEC Versa is a durable, dependable system built for extensive use
and travel. Follow these guidelines to maintain the condition and
performance of your computer.
Immediately turn off and unplug the NEC Versa
under the following conditions:
! The power cord is damaged or frayed.
! Liquid spills on or into the NEC Versa.
! Someone drops the system or damages the
casing.
Precautions
Follow these precautions when using your NEC Versa LX computer, AC
adapter, and VersaBay III.
Avoid dropping or bumping the computer or the AC adapter.
!
Do not stack heavy objects on the computer, the AC adapter, or the
!
battery packs.
Avoid moving the NEC Versa during system operation, especially
!
while the hard disk, diskette drive, or VersaBay III device is being
accessed.
When using the AC adapter, make sure the power source falls within
!
the system’s compatible range of 100-240 volts AC. Never use the
AC adapter if the voltage falls outside of this range. (Watch for this
when traveling to other countries.)
Turn computer power off before attaching or removing non-plug and
!
play devices.
Do not push any foreign objects into the NEC Versa bays, connectors,
!
and slots.
2-14 Getting Started
Page 41

Do not set the computer on top of a magnetized area. Doing so can
!
destroy the data on your hard disk drive. (Some airline tray tables are
magnetic.)
Avoid using the computer or AC adapter for extended periods in
!
direct sunlight.
Do not use the system in humid or dusty environments.
!
Turn computer power off before cleaning it.
!
Avoid exposing the NEC Versa or AC adapter to extreme changes in
!
temperature or humidity. If it is unavoidable, allow your NEC Versa
to adjust to room temperature before use.
When cleaning the system, use a soft, clean, dry cloth. Avoid wiping
!
the display surface with abrasive material, including rough fabric. Do
not use a cleaning solution; this may damage the notebook’s plastic.
If the AC adapter becomes extremely hot, unplug the adapter and let
!
it cool.
Keep the AC adapter away from the IR ports.
!
Storage Requirements
Store the computer and AC adapter in an environment that meets the
following conditions:
If the temperature of the NEC Versa suddenly rises
or falls (for example, when you move the system
from a warm place to a cold place), vapor
condenses inside the system. Turning on the system
under this condition can damage the internal system
components.
Before turning on the system, wait until the system’s
internal temperature equalizes with the new
environment and any internal moisture can
evaporate.
Getting Started 2-15
Page 42

Maintain storage temperatures between -4°F and 104°F (-20°C and
!
40°C).
Keep the storage area free from vibration and magnetic fields.
!
Keep the system and its components away from organic solvents or
!
corrosive gases.
Avoid leaving the system and its components in direct sunlight or
!
near heat sources.
Routine Cleaning
Clean or dust your system as follows:
Never use harsh solutions, household cleaners, or
spray cleaners that contain caustic materials on the
NEC Versa computer.
These cleaners are usually high in alkalinity which is
measured in pH. Using these cleaners can cause
the plastic surface to crack or discolor.
LCD screen — Carefully wipe the LCD screen with a soft cloth or a
!
screen wipe designed for that purpose. Special screen wipes are
available through your local computer dealer.
System case — NECC recommends that you carefully wipe the case
!
with a slightly damp, almost dry cloth.
2-16 Getting Started
Page 43

Introducing the Software
Your NEC Versa LX system ships with either the Windows 98,
Windows 95, or Windows NT operating system.
Follow the quick setup instructions to initialize your operating system
and related drivers. Use the Application and Driver CD for the NEC
Versa LX that ships with your system to install additional software and
online documentation.
Refer to Chapter 3, “Using the Software,” for details about using the
operating system, software applications and online documentation.
Traveling with your NEC Versa
The NEC Versa LX computer makes a natural traveling companion.
Using a battery, you can use the computer anywhere you go. Here is
some information you might find helpful when taking the NEC Versa on
the road.
Carry an extra charged battery pack for additional battery power.
!
Check that you have everything you need before you leave on a trip.
!
Be sure you have all the necessary cables and accessories. (See the
checklist later in this chapter.)
If you run your system with battery power, maximize battery life by
!
using power-saving features whenever possible.
Take the AC adapter in case you have an electrical outlet handy. This
!
saves battery power for when you really need it.
Take along any application or data files on diskette that you might
!
need.
Getting Started 2-17
Page 44

Power Connections
With the right accessories, you can run your NEC Versa almost
anywhere! Your system self-adjusts to various power sources. The
United States, Canada, and most of Central and South America use
120-volt alternating current (AC). Most other countries of the world use
240-volt AC. The NEC Versa adapts to voltages ranging from
100 to 240 volts.
There are a few countries with areas that use direct current (DC) as their
main power source. You need a DC-to-AC converter in particular areas
of Argentina, Brazil, India, Madeira, and South Africa.
To use your system overseas, you need an adapter plug. There are five
different plugs available worldwide. You can buy these at an electronics
supply store.
Checklists
The following checklists can help you prepare for your trip with your
NEC Versa. Look them over and use what fits your situation.
What to Take
The following are what you should take with you when you travel with
your NEC Versa.
Extra fully charged batteries
!
Single-outlet surge protector
!
Appropriate AC plug adapter
!
Copy of proof of purchase for your computer and other equipment for
!
customs check
Customer support phone numbers for your software
!
NEC Versa LX Quick Reference card
!
AC extension cord.
!
2-18 Getting Started
Page 45

Note:
of the U.S. and Canada, you might need a modem
adapter approved for the local telephone system.
Contact the local NECC dealer or representative for
information.
When using an optional modem outside
Preparing your NEC Versa for Travel
Here is what you should do before you leave home:
Note:
carrying a charged system. Inspectors want to see
the screen display a message. The boot message is
usually sufficient.
If your system is fully charged, the inspection only
takes a minute or so. Otherwise, be prepared to
attach the AC adapter and power cable. And if you
don’t have these, the inspection might include a
disassembly of the system.
Back up your NEC Versa’s hard disk.
!
Insert a fully charged battery to make sure your system is ready to
!
Speed the trip through airport secur ity by
quickly boot up at the airport security check.
Fully charge all your batteries.
!
Tape your business card to your NEC Versa, AC adapter, and
!
batteries.
Getting Started 2-19
Page 46

Using the Software
BIOS Setup
!
Windows Introduction
!
NEC Utilities
!
NEC Help Center
!
Software Applications and Drivers
!
3
Page 47

BIOS Setup
Your NEC Versa LX computer comes with a hardware program called
BIOS Setup that allows you to view and set system parameters. BIOS
Setup also allows you to set password features that protect your system
from unauthorized use.
Use BIOS Setup to:
set the current time and date
!
customize your operating system to reflect your computer hardware
!
secure your system with a password
!
balance your performance needs with power conservation.
!
How to Enter the BIOS Setup
Access the BIOS utility at power-on. Just press F2 when the following
prompt appears.
Press <F2> to enter Setup.
When you press F2 to enter BIOS Setup, the system interrupts the
Power-On Self-Test (POST) and displays the current CMOS RAM
settings.
If the system detects an error during POST, it prompts you with a double
beep and a message: “Press <F1> to resume.” If you press F1, the system
enters BIOS Setup automatically. If you want to fix the error, carefully
read the error message that appears above the prompt (taking notes if
you want), and press F2. You will see this message if your CMOS
battery becomes fully discharged.
To pause the screen during POST to view the BIOS revision number and
other POST messages, press and hold the Insert key while using the
power button to power on the system.
3-2 Using the Software
Page 48
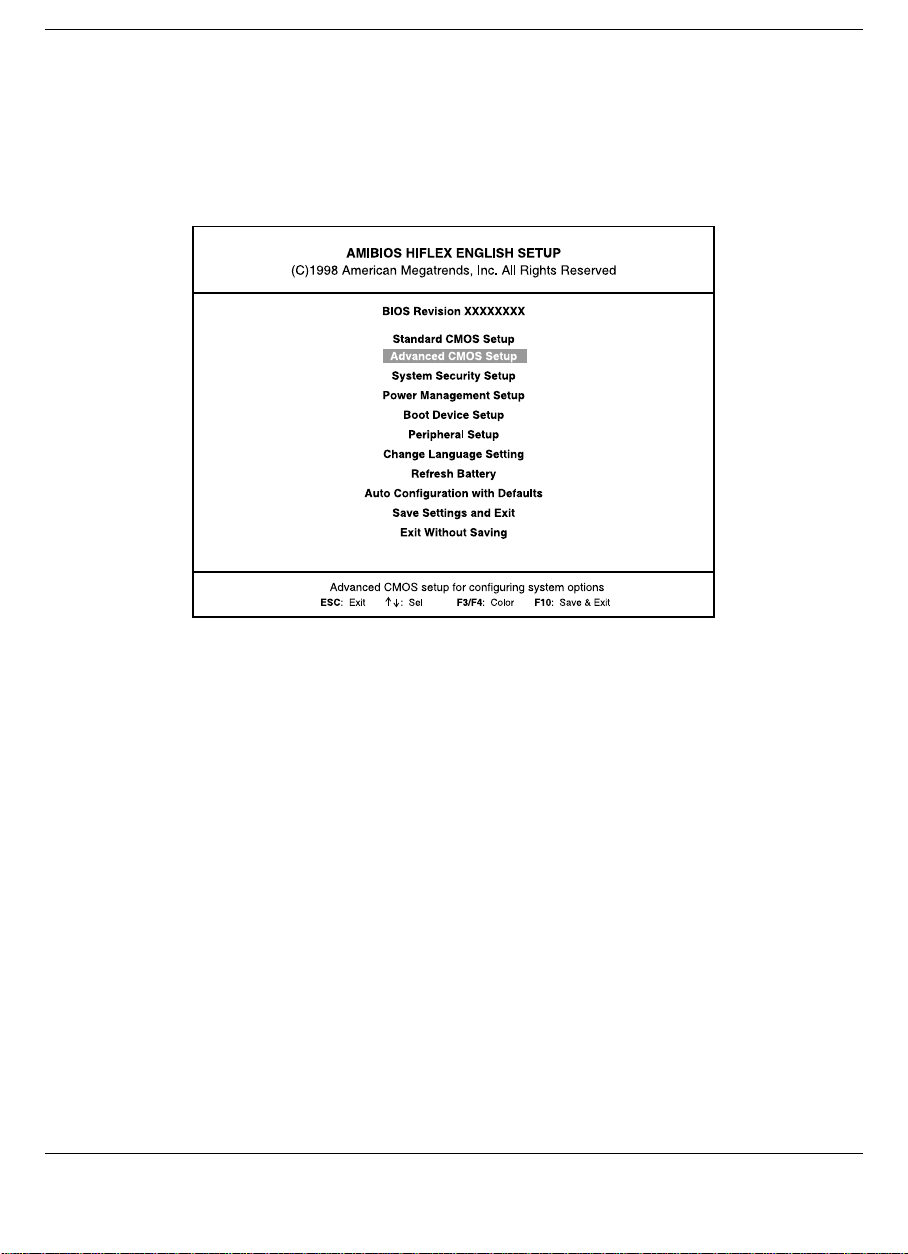
BIOS Setup Utility Main Menu
After you press F2, the system displays the BIOS Setup Main Menu
screen, similar to the following.
BIOS Setup Main Menu
Use the up and down arrow keys (located on the lower right corner of the
keyboard) to toggle through the BIOS Setup menu items.
How to Use BIOS Setup
The following sections describe how to use BIOS Setup, including these
topics:
Looking at screens
!
Using keys
!
Checking and setting system parameters
!
Using the Software 3-3
Page 49
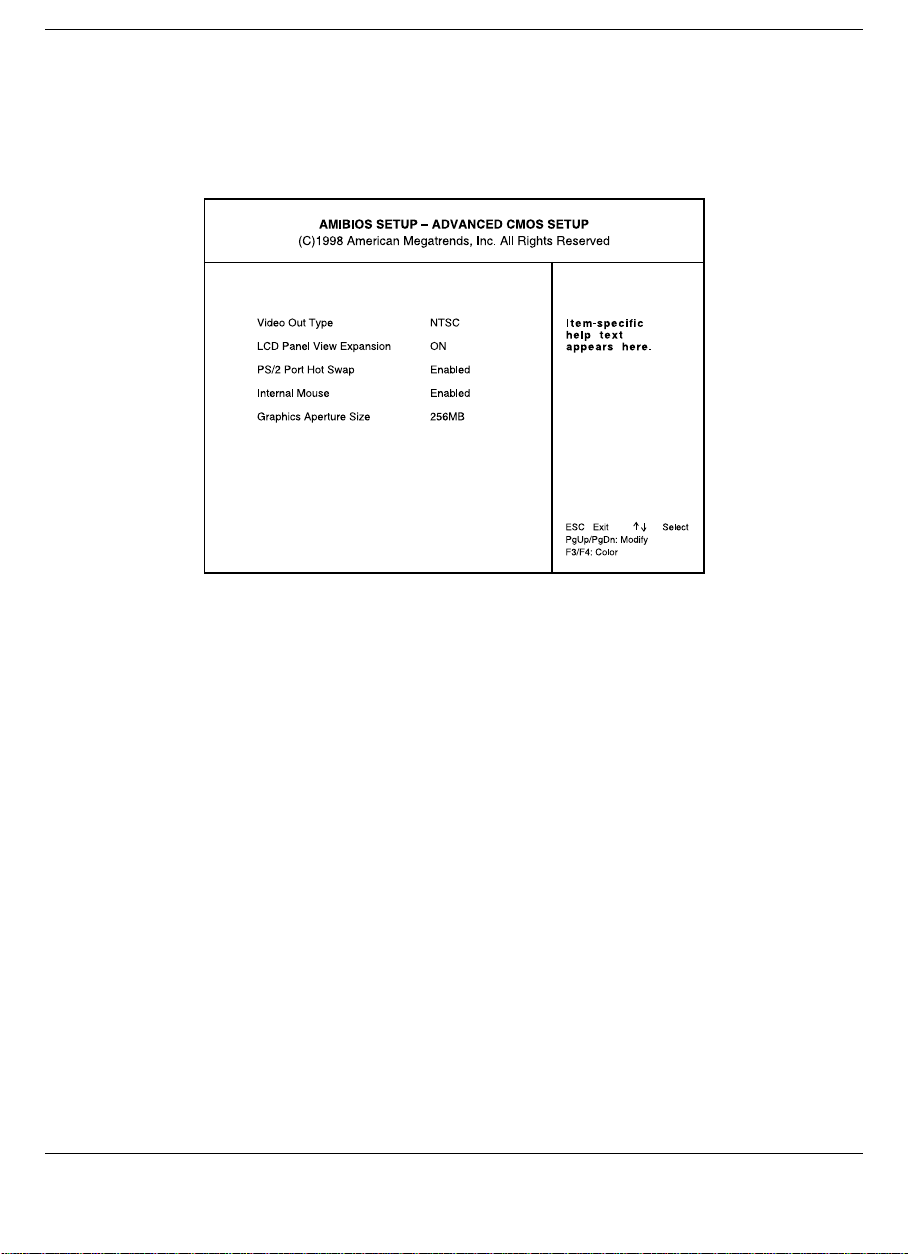
Looking at Screens
BIOS setup screens have three areas as shown next.
Advanced CMOS Setup Menu
Parameters — The left side of the screen. This area lists parameters
!
and their current settings.
Available Options and Help — The right side of the screen. This area
!
lists alternate settings and Help text for each parameter.
Key Legend — The bottom right corner of the screen. These lines
!
display the keys that move the cursor and select parameters.
Options that are grayed out are not available for the current selection.
3-4 Using the Software
Page 50

Using Keys
The following table lists the BIOS Setup keys and their functions.
BIOS Setup Key Functions
Key Function
↑ ↓
PgUp/PgDnToggles through the current parameter settings.
Tab For some parameter settings, moves the cursor between the
ESC Exits the current screen and returns to the Main Menu
F3/F4 Changes the screen color.
F10 Saves and exits the BIOS setup utility.
Moves the cursor between the displayed parameters.
subfields. Also moves the cursor to the next line or
selection. For example, for System Time, Tab moves the
cursor from hour to minute to second.
screen. From the Main Menu screen, displays the prompt,
“Quit without saving.”
Checking/Setting System Parameters
See the following table for a list of parameters, their factory default
settings, and alternate settings. A description of each setting follows the
table.
To reset all parameters to the default settings, select Auto Configuration
with Defaults from the BIOS Setup Main Menu, either press Y and press
Enter
or use the arrow keys to select
Yes
and press
Enter
.
Using the Software 3-5
Page 51

BIOS Setup Parameters
Parameter Default Setting Alternate Setting(s)
Standard CMOS Setup
Date mm/dd/yyyy
System Memory (automatically detected)
Time hh/mm/ss
Diskette Drive A 1.44 MB, 3.5 Not installed, 1.44 MB
Diskette Drive B
1
Internal Auto User Defined, CDROM
32-Bit Mode On Off
VersaBay Auto CDROM User Defined, CDROM
32-Bit Mode On Off
Boot Sector Virus Protection Disabled Enabled
DS VersaBay
Docking Station IDE
1
1
Not installed 1.2 MB, 5.25; 1.44 MB, 3.5
SuperDsk, Not installed
SuperDsk, Not installed
Auto User defined, CDROM
SuperDsk, Not installed
Auto User defined, CDROM
SuperDsk, Not installed
Advanced CMOS Setup
Video Out Type NTSC PAL
LCD Panel View Expansion On Off
PS/2 Port Warm Swap Enabled Disabled
Internal Mouse Enabled Disabled
Graphics Aperture Size 256 MB 4, 8, 16, 32, 64, 128 MB
System Security Setup
Change Supervisor
Press Enter
Password
Change User Password
Boot Password Required
2
3
Resume Password Required
Press Enter
No Yes
3
No Yes
3-6 Using the Software
Page 52

BIOS Setup Parameters
Parameter Default Setting Alternate Setting(s)
Power Management Setup
System Switch Power Button Sleep Button
Power Management under AC Off On
Power Savings Level Longest Life High Perform/Custom/Off
CPU Speed Control 100% 12.5, 25, 50%
Hard Disk Timeout
Video Timeout
Peripheral Timeout
Audio Device Timeout
Standby Timeout
Auto Suspend Timeout
LCD Suspend Disabled Enabled
Suspend Option Suspend STF
Auto Save to File Enabled Disabled
Panel Brightness Auto User Defined
Suspend Warning Tone Enabled Disabled
4
4
4
4
4
4
2 minutes 5/30/45 sec; 1/4/6/8/10/15 min.
Off
2 minutes 30/45 sec.; 1/4/6/8/10/15 min.
Off
On Off
On Off
4 min. Off/1/2/6/8/10/15 min.
10 minutes Off/5/15/20/25/30 min.
Remote Power On Enabled Disabled
Resume Signal PME# RI
Wake Up Alarm Disabled Enabled
Resume Alarm Time
5
Off Set time in 5 min. increments
when Wake Up Alarm is set.
Boot Device Setup
Quick Boot Enabled Disabled
Silent Boot Enabled Disabled, Black
Boot Display Device Simul. Mode CRT only, LCD only
Docking Station Video
1
Dock Stn. Portable
BootUp NumLock Auto On, Off
1st Boot Device
6
SuperDsk Disabled/1st Fnd IDE/Floppy
CDROM/SCSI/Network
Using the Software 3-7
Page 53

BIOS Setup Parameters
Parameter Default Setting Alternate Setting(s)
2nd Boot Device
3rd Boot Device
4th Boot Device
Try Other Boot Devices Yes No
1st IDE Hard Drive Internal VersaBay/DS Internal
nd
2
IDE Hard Drive VersaBay Internal/DS Internal
rd
3
IDE Hard Drive DS Internal Internal/VersaBay
th
4
IDE Hard Drive DS VersaBay Internal/VersaBay/DS Internal
Peripheral Setup
Internal Hard Drive Enabled Disabled
6
CDROM Disabled/1st Fnd IDE/Floppy
SuperDsk
6
Floppy Disabled/1st Fnd IDE/SuperDsk
CDROM
6
1st Fnd IDE Disabled/Floppy/SuperDsk
CD-ROM
DS VersaBay
DS VersaBay
DS VersaBay
USB Controller Disabled Enabled
Serial Port Auto Disabled/(PnP OS Setup
7
)
COM1,IRQ4/COM2,IRQ3
COM3,IRQ4/COM4,IRQ3
Parallel Port Auto Disabled/LPT1/LPT2
(PnP OS Setup
7
)
Parallel Mode ECP Uni-Directional/Bi-Directional
EPP
IR Serial Port Disabled Auto/(PnP OS Setup7)
COM2,IRQ3/COM3,IRQ4
COM4,IRQ3
1
These setup items are only visible when system is docked
2
Greyed out until supervisor password is set up
3
Only active after a password is set up.
4
Available when power savings is set to Custom
5
Resume alarm time is selectable when wake up from suspend alarm is set
6
Bootable device when set to IDE hard drive. Only one IDE device is bootable
7
Appears only when configured by the Windows 98 or Windows 95 device manager.
.
.
.
.
.
3-8 Using the Software
Page 54

BIOS Setup Menus
Read the following descriptions for explanations of items that appear in
the BIOS Setup menus, as listed in the preceding table. See the itemspecific help that appears on each Setup screen for more details.
Standard CMOS Setup
When you select the Standard CMOS Setup screen you see System Time
and System Date parameters as well as drive parameters.
Date — Sets your NEC Versa’s calendar month, day and year. The
!
calendar clock is year 2000-compliant. These settings remain in
memory even after you turn off system power.
To set the date use the
PgUp
Use the
System Memory — Displays the amount of system memory currently
!
or
Tab
or arrow keys to move from field to field.
PgDn
key to change the numbers within each field.
installed in your system.
Time — Sets the time, enter the current hour, minute, and second in
!
hr/min/sec
To set the time use the
Use the
Diskette Drives — Designates the drive type for your diskette drives.
!
Internal Drives — Assigns devices to the internal drives, file bay and
!
, 24-hour format.
PgUp
or
PgDn
Tab
or arrow keys to move from field to field.
key to change the numbers within each field.
VersaBay, in your system.
Boot Sector Virus Protection — Write protects the boot sector of the
!
hard disk drive to avoid infection by some virus types.
Docking Station Drives — Enables or disables the drives installed in
!
a docking station. (These options are only available when the NEC
Versa is docked.)
Using the Software 3-9
Page 55

Advanced CMOS Setup
Advanced CMOS settings let you define the following functions.
Video Out Type — Specifies the signal type used by the video device
!
connected to the TV Out Port.
LCD Panel View Expansion — Specifies whether the panel view is
!
reduced/off or expanded/on.
PS/2 Port Warm Swap — Specifies whether or not you can swap a
!
PS/2 device during system operation.
Internal Mouse — Specifies whether or not you can use both the
!
internal and the external mouse.
Graphics Aperture Size — Selects the graphics aperture size used by
!
the AGP video device.
System Security Setup
Change Supervisor Password — Establishes password protection for
!
entering the BIOS setup utility, booting the system, and resuming
from suspend.
Change User Password — Establishes a user password once a
!
Supervisor password is set.
Boot Password Required — Indicates whether or not a password is
!
required during system boot.
Resume Password required — Indicates whether or not a password is
!
required during system resume. Boot Password must be defined to
activate this parameter.
Power Management Setup
In the Windows 98 environment, your NEC Versa uses the Advanced
Power Management (APM) which enables the operating system to
manage the power given to each attached device and to turn off a device
when not in use.
The Power Management Setup menu lets you balance high performance
and energy conservation using parameters including the following.
3-10 Using the Software
Page 56

System Switch — Sets the Power/Sleep button as a power switch or a
!
sleep button.
Power Management Under AC — Specifies whether to enable power
!
management features when AC power is in use. When AC power is
connected to your NEC Versa system, power management is usually
disabled. If you enable this parameter, the system automatically
activates the power management profile you set, even when AC
power is used.
Power Savings Level — Specifies one of four levels of power
!
management.
High Performance provides the greatest system performance with
only minimal power conservation.
Longest Life provides the maximum amount of power savings.
Off disables power management and all device timeouts.
Custom lets you define your own power management
configuration by selecting values for specific device timeouts.
Custom lets you set the following timeouts.
– CPU Speed Control — Sets CPU performance at one of four
levels.
– Hard Disk Timeout — Sets the time delay before your hard
disk powers down.
– Video Timeout — Sets the time delay before your video
powers off.
– Peripheral Timeout — Sets the time delay before your
peripherals are controlled by power management.
– Audio Device Timeout — Sets the time delay before your
audio device powers off.
– Standby Timeout — Selects the system standby timeout
period.
Using the Software 3-11
Page 57

– Auto Suspend Timeout — Defines how much time elapses
from the time the system enters Standby mode to the time the
system automatically enters Suspend Mode.
LCD Suspend — Allows you to suspend/resume when the LCD panel
!
is closed.
Suspend Option — Specifies either Suspend or Save to File (STF) as
!
the default power management mode. In Suspend, after a specified
amount of inactivity, your NEC Versa shuts down all devices as you
specified in Power Management Setup or applies default timeouts. All
your data is automatically recovered from where you left off when
you Resume.
Automatic STF — After 30 minutes in Suspend mode the current file
!
is automatically saved to a special file on the hard disk and the system
shuts down. To resume, you must press the power button. The system
reads the saved file and sets up your system accordingly.
If Auto Save to File is set to Off and the save-to-file area is present on
your hard drive, pressing the
the system into Save to File mode.
Fn-Power/Sleep
key combination puts
(Before using the Power/Sleep
button to put the system into Suspend mode, set the System Switch
BIOS parameter to Sleep button.)
For details about creating the
save-to-file area, see the section, “HDPREPEZ Utility,” later in this
chapter.
Panel Brightness — Selects the LCD screen brightness.
!
Suspend Warning Tone — Specifies whether the system warning tone
!
sounds when Suspend mode starts. It is best to keep this option
enabled.
Remote Power On — Allows the serial port modem or LAN board to
!
wake the system on a ring signal.
Resume Signal — Selects the signal which triggers a modem ring
!
resume.
Wake Up from Suspend Alarm/Resume Alarm Time — Allows the
!
alarm to resume the system from suspend. Designates the time
parameter in five minutes increments.
3-12 Using the Software
Page 58

Boot Device Setup
Boot Device Setup allows you to define the following functions.
Quick Boot — Specifies whether or not the system performs all tests
!
during system boot.
Silent Boot — Specifies whether or not to display the NEC logo
!
during the system boot.
Boot Display Device — Specifies the display device(s) for system
!
boot messages.
Docking Station Video — Selects whether or not a video card
!
installed in the Docking Station is enabled at system boot.
BootUp NumLock — Specifies whether NumLock is On or Off at
!
system startup.
Boot Devices — Specifies the sequence of boot devices and whether
!
or not the system attempts to boot from a device other than those
specified.
Other Boot Devices — Allows you to specify IDE devices as
!
bootable devices.
Peripheral Setup
The Peripheral Setup menu displays the connection locations between
the system and the Input/Output (I/O) ports. This menu also lets you
specify different port assignments as needed.
!
!
Note:
Setup, you cannot enable or assign it using the
Windows 98 or Windows 95 device manager. The
device will not be listed in the Windows device list.
To control the device using the Windows device
manager, select any setting other than Disabled in
Peripheral Setup.
If you disable a device in Peripher al
Internal Hard Drive — Enables or disables the internal hard drive.
USB Controller — Enables or disables the USB controller.
Using the Software 3-13
Page 59

Serial Port — Disables the port or changes its address assignment.
!
Parallel Port/Parallel Mode — Disables or reassigns the parallel port
!
and select a parallel port mode.
IR Serial Port — Enables, disables or reassigns the IR serial port.
!
Other BIOS Setup Options
BIOS Setup offers other options, including the following:
Change Language Setting — Controls the BIOS setup language
!
display. English and Japanese are the available options.
Refresh Battery — Launches the Refresh Battery utility. Once
!
launched, the utility fully discharges your battery to eliminate any
residual memory effect. Once refreshed, your battery is conditioned to
recharge to its full capacity. To recharge the battery, connect your
NEC Versa to AC power. This process may take up to four hours to
complete.
Auto Configuration with Defaults — Loads default settings.
!
Save Settings and Exit — Accepts changes made to current settings,
!
saves to CMOS, and exits BIOS Setup.
Exit Without Saving — Reverts to previously selected settings and
!
exits Setup.
Password Protection
Your NEC Versa supports a password for system security on several
levels. Once you set a supervisor password, you must enter it before you
can enter BIOS Setup, access the system at startup, or resume from
Suspend, depending on your configuration selection.
Your system is not protected until you set a user password and you are
not prompted to enter a user password until you set a supervisor
password.
3-14 Using the Software
Page 60

Note:
before the BIOS Setup utility allows you to set a
user password.
You must set the supervisor password
Using BIOS Setup to Set Power Management
Power Management Setup allows you to use the factory-defined power
savings level (Longest Life), or choose between High Performance,
Custom, or Off. Each provides a special value to your current work
effort. These power management levels were designed with you in mind.
For example, you can use them under the following circumstances:
Longest Life — Provides best battery life and good performance. Use
!
while traveling long distances.
High Performance — Provides best performance and good battery
!
life. Use while on the road or traveling short distances.
Custom — Lets you decide! Set power management levels according
!
to your own needs and present environment.
Off — Works well in an office environment while powering your
!
NEC Versa with AC power.
Using the Save to File (STF) Feature
STF protects the integrity of your working files. For example, if you are
called away from your NEC Versa and Suspend mode is selected with
auto Save to File active, your system automatically goes into Suspend
mode. After 30 minutes, if you don’t return, your working environment
is saved to a special file on your hard disk.
Using STF can benefit you in the following ways.
When in STF, there is minimum battery drain.
!
Increases the life of your NEC Versa.
!
Saves you time. When you return from that urgent call or meeting,
!
you don’t have to reboot, just press the Power/Sleep button to resume
system operation.
Using the Software 3-15
Page 61

To configure your NEC Versa’s STF feature:
1.
Access the BIOS setup utility.
2.
Select Power Management from the Setup Main Menu.
3.
Move the cursor down and highlight Suspend Option.
4.
Press the
5.
Save the settings and exit BIOS Setup.
PgUp
key and select STF.
There are three ways to invoke the NEC Versa’s STF feature, one
automatic and two manual.
After 30 minutes of inactivity, your NEC Versa automatically invokes
!
STF, provided you have configured STF in the BIOS Setup utility.
You can manually invoke STF by:
!
Pressing
NEC Versa.
Fn Power/Sleep
simultaneously, before you leave your
(Before using the Power/Sleep button to put the
system into Suspend mode, set the System Switch BIOS parameter
to Sleep button.)
Selecting Start, Suspend.
Note:
is only 3% power remaining in the system, the NEC
Versa automatically performs a Save to File.
When the status bar indicates that there
3-16 Using the Software
Page 62

Updating the BIOS
Use the BIOS Update Diskette to update your NEC Versa system BIOS.
Specifically, the BIOS is the code transmitted onto your system’s
microprocessor, or central processing unit (CPU). Use the BIOS Setup
utility to configure your system’s hardware features. For details about
the BIOS Setup utility, see the section earlier in this chapter, “BIOS
Setup.”
Note:
NECC makes significant improvements or fixes to
the current system BIOS. Your authorized
NECC dealer or NECC Support Services
representative can help you determine this.
You only need to update the BIOS if
If you are informed that the default BIOS needs an update contact the
NECC Support Services at (800) 632-4525, Fax (801) 981-3133, or
access the web site, www.nec-computers.com to obtain a copy of the
BIOS update.
Note:
computer outside the U.S. or Canada, please
contact a local NECC or dealer in your country.
If you purchased and are using this
Only use the BIOS upgrade diskette for your specific model and be sure
to prepare the diskette before updating the BIOS.
Preparing the BIOS Update Diskette
Before using the BIOS update diskette you must make the diskette BIOS
flash ready. Refer to the readme.txt file on the diskette before using the
diskette.
Follow these instructions to prepare the BIOS Update Diskette.
1.
Scan your hard drive for any computer viruses.
2.
Enable the diskette for write access.
Using the Software 3-17
Page 63

3.
Insert the diskette into the file bay drive.
4.
Type a:install or b: install (depending upon your hardware
configuration) at the DOS prompt and follow the on-screen
instructions.
Install.bat copies the DOS system files from your hard drive onto the
BIOS Update Diskette to make it BIOS flash ready.
The system prompts you when the process is complete.
5.
Scan the BIOS Update Diskette for computer viruses.
The diskette is ready for use.
6.
Follow the instructions in “Performing the BIOS Update.”
Changing the Switch Settings
Before performing the BIOS update, be sure to change the switch
settings to enable BIOS flash. Set switch 5 to “ON” before performing
the BIOS update. For details about setting the switches, see the section,
“Switch Settings,” in Chapter 4.
Performing the BIOS Update
Use the following procedure to perform the actual BIOS update.
1.
Make sure that the computer is operating under AC power, is
undocked, and that the power is off. Insert the BIOS Update diskette
into the file bay drive.
2.
Power on the computer with the diskette in the file bay drive. The
computer boots and automatically loads the utility. A message
similar to the following appears:
The NEC BIOS Update Utility should not be used to modify the BIOS in a
Versa system which is docked. If your Versa is docked, please exit the BIOS
Update Utility, power down, and undock your Versa before running the utility.
Plug in your AC cable before restarting the flash utility.
Press
Enter
3.
3-18 Using the Software
to continue.
Page 64

The utility checks the currently installed BIOS version and the
diskette’s BIOS version. The Main menu appears.
4.
Use the arrow keys to highlight the “Display BIOS Version” option
on the Main Menu. Use this option to check the currently installed
BIOS version and the version of the new replacement BIOS.
Press any key to return to the Main menu.
5.
Highlight the “Install New BIOS” option and press
6.
Press Y and then press
telling you to remove the diskette from the file bay drive.
7.
Remove the diskette and press any key to continue. The utility
updates the BIOS.
Power off your computer. The next time you power on your
computer, you will have the latest NEC Versa LX computer BIOS
revision level.
8.
Enter Setup to restore the default parameter settings.
9.
Be sure to modify any custom settings that you may have configured.
10.
Be sure to change switch 5 back to “OFF” after completing the BIOS
update. For details about setting the switches, see the section,
“Switch Settings,” in Chapter 4.
Enter
Windows Introduction
Your NEC Versa comes pre-installed with either the Windows 98,
Windows 95 or Windows NT operating system. These Microsoft
operating systems provide a means of running applications, navigating
through your file structure, and using your notebook computer. Each
operating system offers its own look and tools through an easy-to-use
graphical interface.
Enter
.
. After a brief pause, a message appears
®
Using the Software 3-19
Page 65

Windows 98
Windows 98 gives you the newest features offered by Microsoft,
including a Desktop with room to maneuver, a taskbar for quick access
to a variety of system functions, state-of-the-art plug and play support,
powerful system utilities, enhanced entertainment features, and a fully
integrated Internet experience.
Desktop Icons
With Windows 98, the following icons are installed on your desktop:
My Computer — Provides access to drives, printers, the control
!
panel, network features, and scheduled tasks.
Recycle Bin — Gives you a trash container in which to put and
!
discard unwanted files or allows you to restore those same files back
to their original location.
Set Up the Microsoft Network — Provides a setup program that
!
allows you to sign-up for the Microsoft Network. If you already have
an account, use this interface to sign-on to the Microsoft Network.
Network Neighborhood — Appears when your computer is connected
!
to a network. Use the network neighborhood to browse through the
computers in your workgroup and the computers in the entire
network.
My Briefcase — Provides a mechanism for file synchronization
!
between the NEC Versa and another system.
My Documents — Provides you with a convenient place to store
!
documents, graphics, and other files for quick access.
Connect to the Internet — Runs the Internet Connection wizard that
!
helps you to set up your computer to access the Internet.
Note:
must either connect an optional modem and a
working phone line to your system or install a LAN
card for network access.
3-20 Using the Software
Before connecting to the Internet, you
Page 66

Online Services — Includes setup icons for a variety of online
!
services.
Your NEC Versa comes with all the software you need to get started
on the most popular services available today. For a fee, online
services give you access to the Internet, email, the world wide web,
travel information, news reports, and more.
!
Taskbar Icons
With Windows 98, a number of icons appear on the taskbar. Use the
cursor to hover over the icon and display its function, right click the icon
to display its menu options, or double click the icon to launch it.
The following icons normally appear on the left side of the Windows 98
taskbar.
!
Note:
online service, you must either connect an optional
modem and a working phone line to your system or
install a LAN card for network access.
If you are using this product outside of the United
States or Canada, some online services may require
a long-distance or international call.
Before choosing and registering for an
NEC Customize — Gives you the option to launch the Application
and Driver CD, access the IR setup utility, or install the NEC
VersaBay Swapping utility.
Internet Explorer — Allows you to browse the internet or view local
HTML files. Also access Internet Explorer under Start, Programs,
Internet Explorer.
Outlook Express — Provides your default email program with secure
!
and personalized features for email and newsgroup communication.
Also access Outlook Express under Start, Programs, Internet
Explorer.
Show Desktop — Minimizes all active screens to display your
!
desktop.
Using the Software 3-21
Page 67

Channels — Delivers content from your favorite web sites directly to
!
your computer.
The following icons normally appear on the right side of the Windows
98 taskbar.
Task Scheduler — Enables you to schedule tasks, such as Disk
!
Defragmenter, to run regularly. Also access Task Scheduler under
Start, Programs, Accessories, System Tools, Scheduled Tasks.
Power Management Properties — Displays your current power source
!
and total remaining battery power. Access Power Management
Properties under Start, Settings, Control Panel, Power Management.
NEC VersaGlide — Allows you to adjust your VersaGlide (mouse)
!
properties. Also access NEC VersaGlide under Start, Settings,
Control Panel, Mouse.
Volume Control — Adjusts the volume and speaker balance when
!
you play audio files. Also access Volume Control under Start,
Programs, Accessories, Entertainment, Volume Control.
ATI — Allows you to modify display and icon settings, as well as,
!
desktop schemes. Lets you launch any installed ATI programs.
Time Clock — Allows you to adjust the time and date, rearrange
!
active windows on your desktop, create a new toolbar or customize
your existing toolbar.
For more information about the desktop and taskbar icons, refer to the
Windows 98 online help.
Windows 95
Windows 95 gives you the newest features offered by Microsoft,
including a Desktop with room to maneuver, a taskbar for quick
navigation between open windows, plug and play features, online
networking functions, and more.
When you install Windows 95, the following icons are loaded on your
desktop:
3-22 Using the Software
Page 68

My Computer — Provides access to drives, printers, the control
!
panel, and network features.
Inbox — Lets you access the Microsoft fax and mail software as well
!
as Microsoft network services.
Recycle Bin — Gives you a trash container in which to put unwanted
!
files.
Network Neighborhood — Shows you the network, integrated LANs,
!
and WANs (if your system is connected to a network).
My Briefcase — Allows easy transfer of files between the NEC Versa
!
and another system.
Online Services — Includes setup icons for a variety of online
!
services.
Your NEC Versa comes with all the software you need to get started
on the most popular services available today. For a fee, online
services give you access to the Internet, email, the world wide web,
travel information, news reports, and more.
Note
: Before choosing and registering for an
online service, you must connect an optional modem
to your system and to a working phone line. The
phone line must be analog. If you are unsure what
type of line you have, call your local phone
company.
If you are using this product outside of the United
States, some online services may require a
long-distance or international call.
NEC Customize — Gives you the option to launch the Application
!
and Driver CD, install NEC custom wallpaper, access the IR setup
utility, or install the NEC VersaBay Swapping Utility.
Internet Explorer — Allows you to browse the internet or view local
!
HTML files. Also access Internet Explorer under Start, Programs,
Internet Explorer.
Using the Software 3-23
Page 69

Outlook Express — Provides your default email program with secure
!
and personalized features for email and newsgroup communication.
Also access Outlook Express under Start, Programs, Internet
Explorer.
See the Windows 95 online help for detailed instructions on using
Windows 95.
Windows NT
Windows NT allows you to run applications created specially for
Windows NT and Windows 95. You can also run applications created
for other versions of Windows, MS-DOS®.
Windows NT gives you a variety of features offered by Microsoft,
including a desktop to maneuver, a taskbar for quick navigation between
open windows, and more. The following icons appear on the desktop.
My Computer — Provides access to drives, printers, the Control
!
Panel, and network features.
Network Neighborhood — Shows you the network, integrated LANs,
!
and WANs.
Inbox — Lets you access the Microsoft mail software and services.
!
Internet Explorer — Allows you to browse the internet or view local
!
HTML files. Also access Internet Explorer under Start, Programs,
Internet Explorer.
NEC Customize — Gives you the option to launch the Application
!
and Driver CD, or install the NEC-supplied mouse driver.
My Briefcase — Allows easy transfer of files between the NEC Versa
!
and another system.
Recycle Bin — Gives you a container in which to put unwanted files.
!
3-24 Using the Software
Page 70

Service Pack 4
Service Pack 4 is a large update to the Windows NT 4.0 operating
system. The components included within Service Pack 4 are the latest
available from Microsoft. Many software packages include calls to
Windows NT to install drivers that are Windows NT specific. As a
result, when installing new hardware or software, like a network PC card
or a remote access service, parts of Service Pack 4 may be overwritten
by the original Windows NT files. Therefore, it is very important to
reinstall Service Pack 4 after introducing new hardware or software.
To reinstall Service Pack 4, double click the
sp4i386.exe
file located in
the C:\SP4 directory on your hard disk drive and follow the on-screen
instructions.
When running
pcmcia.sys
file,
installed by some applications.
When running
Details button for additional installation instructions.
sp4i386.exe
and DO NOT overwrite newer files
sp4i386
, DO NOT replace the
.exe
, be sure to select the
During the Service Pack 4 installation, you may be prompted to reinstall
additional service pack files. Service Pack 4 and other service pack files
for Windows NT 4.0 are available from the Microsoft web site at
http://www.microsoft.com.
Using the Software 3-25
Page 71

Adding Hardware
When you add hardware to your NEC Versa LX with Windows NT, a
Windows NT Setup screen may appear to inform you that Setup needs to
copy some Windows NT files. Setup looks for the files in the location
specified in the dialog box. By default, this location is the c:\I386\
directory. If you want Setup to look in another location, for example, on
the Product Recovery CD (2 of 2) in the CD-ROM drive, type in F:\I386
(where F refers to the letter assigned to your CD-ROM drive), then click
on Continue and follow the on-screen instructions. (For details on using
the Product Recovery CD, see the “Using the Product Recovery CD,” in
Chapter 7.
NEC Utilities
NECC provides several programs and routines designed to make your
NEC Versa run more efficiently.
The NEC utilities include:
NEC Customize Utility
!
HDPREPEZ Utility
!
NEC Customize Utility
In Windows 98 systems, Windows 95 systems, and Windows NT
systems, the NEC Customize utility gives you the option to install or
launch:
NEC custom wallpaper (Windows 95, only)— Use this option to
!
install wallpaper displaying the NEC logo.
Application and Driver CD — You must use this option to install
!
software applications, drivers, etc.
NEC VersaBay Swapping Utility (Windows 98 and 95, only) — You
!
must use this option to take advantage of warm swapping your
VersaBay devices.
IR setup utility to enable the IR port (Windows 98 and 95 only) —
!
You must use this option to enable the IR port.
3-26 Using the Software
Page 72

Note
: For details about how to access and use
the IR setup utility, see Chapter 4, “Using the
Hardware.”
NEC-supplied mouse driver (Windows NT only) — Use this option
!
to take advantage of the VersaGlide features described in Chapter 4,
“Using the Hardware.”
The NEC Customize utility screen consists of the following.
A window at the top half of the screen lists the available options.
!
The window below the options list displays a description of each
!
option when the option is highlighted.
The Launch button initiates a selected option when clicked.
!
The More Info button provides an overview of the NEC Customize
!
utility.
The Exit button closes the NEC Customize utility.
!
Using the NEC Customize Utility
Follow these steps to use the NEC Customize utility.
1.
Double click the NEC Customize icon.
2.
From the display window, select the desired option.
3.
Click Launch to initiate the selected option.
4.
Follow the on-screen instructions to process the selected option.
For some of the selected options you are prompted to reboot your
system.
5.
If necessary, click Exit to close the NEC Customize dialog box.
Using the Software 3-27
Page 73

HDPREPEZ Utility
Using the HDPREPEZ utility automatically configures your NEC
Versa’s system’s save-to-file (STF) area on the hard disk drive.
Note:
utility, see the HDPREPEZ.TXT file in the
NECUTILS/HDPREP directory.
For more details about the HDPREPEZ
Using HDPREPEZ in Windows 98 or 95
In Windows 98 or 95, run the HDPREPEZ utility if you increase the
memory capacity in your NEC Versa beyond the factory installed base
memory.
Follow these steps to run the HDPREPEZ utility.
1.
Power off and restart your NEC Versa.
2.
At the statement “Starting Windows 98 (or 95),” press F8.
3.
From the Startup menu, select the “Safe Mode Command Prompt
Only” option.
4.
Enter MS-DOS. At the c: prompt, type
Enter
5.
press
Type
to change to the \necutils\hdprep directory.
HDPREPEZ
and press
prepares your NEC Versa for the newly installed memory.
cd \necutils\hdprep
Enter
. The utility automatically
and
6.
Power off your system and then power on. A file, large enough to
accommodate your system’s memory is created on the hard disk
drive.
3-28 Using the Software
Page 74

NEC Help Center
The NEC Help Center is a fully navigational, HTML-based online
document. The Help Center includes multimedia elements, a full search
capability, index, and a glossary function.
The NEC Help Center includes the following sections.
System Tour
The
!
and functions as described in Chapter 1 of the printed user’s guide.
provides a multimedia version of system features
System Information
!
Appendices A and B of the printed user’s guide and describes:
Getting Started
Using the Software
Using the Hardware
Using External Devices
Using Multimedia
Solving System Problems
Setting Up a Healthy Work Environment
System Specifications
Service and Support
!
Support,” from the printed user’s guide.
FAQs
!
(Frequently Asked Questions) provides answers to the
questions that NEC Versa users most frequently ask.
provides an online version of Chapters 2-7 and
includes Chapter 8, “Getting Services and
Software Applications and Drivers
A variety of software* applications and drivers are provided on the
Application and Driver CD for the NEC Versa LX that ships with your
system. Some of the drivers are already installed as part of your
operating system environment. These applications and drivers let you
take full advantage of your system resources. Once you have installed an
application from the Application and Driver CD access the program
through its desktop icon or through the Start, Programs menu.
Using the Software 3-29
Page 75

The software* applications available on the Application and Driver CD
vary according to your operating system environment and may include:
PowerQuest® PartitionMagic
!
Intel LANDesk® Client Manager
!
SystemSoft® PowerProfiler (Windows NT only)
!
SystemSoft® CardWizard (Windows NT only)
!
Intellisync™ for Notebooks
!
McAfee VirusScan™
!
Microsoft ®Internet Explorer
!
Netscape Navigator™
!
Adobe® Acrobat® Reader
!
* The software listed here is current at the time of printing and subject to change without notice.
®
Using the Application and Driver CD
Use the Application and Driver CD to install applications, drivers,
utilities, Internet browsers, and the online NEC Help Center.
Launching the Application and Driver CD
Follow these procedures to launch the Application and Driver CD using
NEC Customize.
Windows 98 and Windows 95 Environments
1.
Insert the Application and Driver CD into the CD-ROM drive.
2.
Double click the NEC Customize icon, if necessary.
3.
Highlight Launch Application and Driver CD.
4.
Click launch.
The Application and Driver CD dialog box appears.
3-30 Using the Software
Page 76

Windows NT Environment
1.
Insert the Application and Driver CD into the CD-ROM drive.
2.
Double click the NEC Customize icon.
3.
Select Launch Application and Driver CD.
4.
Click Install to launch the CD.
The Application and Driver CD dialog box appears.
Installing the Software
The Application and Driver CD dialog box consists of the following
components.
Selection Tabs — Located just below the title bar, each tab represents
!
a software category. The selection tabs include applications, drivers,
utilities, Internet browsers, and the NEC Online Documentation.
Description — Located in the bottom portion of the dialog box, the
!
text describes the selected or highlighted software category or
application, driver, etc.
Install — Clicking the Install button installs the selected software.
!
Exit — Clicking the Exit button closes the Application and Driver CD
!
dialog box.
Once the Application and Driver CD dialog box appears, follow these
steps to install the desired software.
1.
Click the selection tab of your choice.
2.
Click the desired application, driver, or utility.
3.
Click the Install button to install your selection.
Follow the on-screen instructions to install your selection.
4.
Click Exit to close the Application and Driver CD dialog box.
5.
Remove the CD from the CD-ROM drive when the installation is
complete.
Using the Software 3-31
Page 77

Uninstalling the NEC Help Center
Follow this procedure to uninstall the NEC Help Center.
1.
Go to Start, Settings, Control Panel, and double click Add/Remove
Programs.
2.
Use the scroll bar, if necessary, to display the NEC Help Center item.
3.
Highlight NEC Help Center and click the Add/Remove button.
4.
Select Automatic as the uninstall method and click Next.
5.
Click Finish to perform the uninstall.
6.
When the uninstall is complete, click OK and close the Control Panel
window.
Partition Magic
Dividing a hard disk drive into several partitions lets you efficiently
organize operating systems, programs, and data. PowerQuest’s Partition
Magic allows you to optimize hard disk drive space with an easy click of
the mouse. Visually create, format, shrink, expand, and move hard disk
partitions in minutes.
Using Partition Magic
Your NEC Versa Windows 98 or 95 notebook computer ships with an
internal hard disk drive consisting of a single FAT 32 partition, drive C:.
Use Partition Magic if you want to create multiple partitions and convert
any of all of these to FAT 16 on the hard disk drive.
3-32 Using the Software
Page 78

Before using Partition Magic refer to the associated
cautionary notes on the Application and Driver CD.
The cautionary notes contain important information
about designating the partitions on the hard disk
drive as primary and/or extended.
The partitions must be properly designated before
using the Product Recover y CD to reinstall your
operating system.
drive are not properly designated, it appears as
though data loss has occurred after using the
Partition Restore Choice on the Product Recovery
CD.
If the partitions on the hard disk
After using Partition Magic to create multiple partitions on your hard
disk drive, you must perform a partition restore using the Product
Recovery CD for Windows 98 or 95. The partition restore process
reinstalls the operating system and related drivers to drive C:. For details
on using the Product Recovery CD, see Chapter 7, “Solving System
Problems.”
Intel LANDesk Client Manager
Intel LANDesk Client Manager provides the capability for managing a
variety of components within a PC system. These components include
network interface cards, memory modules, printers, and software
applications. LANDesk Client Manager uses the Desktop Management
Interface (DMI) standard established by the Desktop Management Task
Force (DMTF).
Note:
continuously monitors your system for optimal
system performance. This monitoring function
interrupts the auto suspend feature that invokes
after 30 minutes of inactivity.
If you install Intel’s LANDesk Client Manager the
NEC Versa auto suspend feature may become
disabled.
Intel LANDesk Client Manager
Using the Software 3-33
Page 79

Set up the LANDesk Client Manager software on your NEC Versa using
the easy-to-follow setup program. Follow these installation suggestions
when installing LANDesk Client Manager.
To install on a user’s system, run Client setup, only.
!
To install on a system administrator’s system, run Client setup first,
!
then run Administration setup. Installing both components enables the
administrator to monitor his/her own system, as well as, all network
systems. To monitor network systems only, run Administration setup,
only.
If you use the NEC Versa system with the NEC Versa Dock and want to
install LANDesk Client/Admin Manager, you must load the applicable
software
before
docking the system.
To find out more about Intel LANDesk Client Manager capabilities and
uses, refer to the online help that is available when you open Client
Manager.
Note:
LANDesk Client Manager, you may be prompted to
install Microsoft’s Internet Ex pl or er. Be sur e to ins ta ll
Internet Explorer before installing LANDesk Client
Manager.
After Internet Explorer is installed you must run the
LANDesk Client Manager setup program again.
During the setup and installation of
SystemSoft PowerProfiler
SystemSoft PowerProfiler for Windows NT lets you manage power
resources, balancing performance with battery conservation. You can
group power management settings into “profiles” for best performance
and best conservation. You can also create custom profiles.
PowerProfiler provides status information, alarms, and timers that let
you easily monitor and control power consumption.
Access PowerProfiler through the Start, Programs menu or from the
taskbar.
3-34 Using the Software
Page 80

SystemSoft CardWizard
SystemSoft CardWizard for Windows NT provides limited plug and play
capability by automatically diagnosing and resolving many PC card
problems.
When you insert a new PC card into a PC card slot, the Wizard displays
a representation of the slot with information about the new card. If there
are problems, in most cases, the Wizard automatically fixes them.
Typical problems that are resolved include incorrect or missing drivers,
system resource conflicts, unconfigured network and ATA cards, and
memory conflicts.
Access CardWizard through the Start, Programs menu or from the
taskbar.
Intellisync for Notebooks
Intellisync for Notebooks is a powerful PC-to-PC synchronization
solution that enhances your productivity by letting you synchronize all
your key data. With Intellisync for Windows you can:
Synchronize files, drives, and directories on two computers, or in
!
different partitions on a single computer.
Synchronize data between two Personal Information Managers
!
(PIMs).
Copy and move files on a remote system using an infrared device or a
!
parallel or serial cable.
Control access each remote system has to your data.
!
Before using Intellisync for infrared transfer, enable the IR port on your
NEC Versa. For details about how to enable the IR port, see Chapter 4,
“Using the Hardware.”
Before using Intellisync for parallel or serial communication, connect the
appropriate cable to the appropriate port on the back of your NEC Versa.
For details about how to connect parallel and serial cables, see Chapter
5, “Using External Devices.”
For more information about Intellisync refer to the online manual.
Using the Software 3-35
Page 81

McAfee VirusScan
The McAfee VirusScan software detects, identifies, and disinfects
known computer viruses. It checks memory as well as both system and
data areas of your disks for virus infections. In most cases, it will
eliminate and fully repair infected programs or system areas to their
original condition.
Access McAfee VirusScan through the Start, Programs menu.
Microsoft Internet Explor er
Microsoft’s Internet Explorer makes finding information on the Internet
easy. Built-in webcasting features give you the content you want, when
you want it. An integrated set of tools provides services ranging from
basic email to exciting conferencing, broadcasting, and web-authoring
capabilities.
Netscape Navigator
Netscape Navigator is one of the most popular software packages for
browsing information on intranets or the Internet. Information tools
simplify access to favorite sites and provide one-click access to Internet
searches.
Navigator’s features include technology that allows you to manipulate
and move images and Java applets to create visually exciting, fully
interactive pages. In addition, Navigator lets you customize for
individual preferences and bookmark favorite web sites to facilitate
repeated access.
Adobe Acrobat Reader
Adobe Acrobat Reader allows you to view, navigate, and print PDF files
from your local hard drive, your local network, or the Internet. For
Windows NT only, Adobe Acrobat Reader is installed with the
installation of Intel LANDesk Client Manager.
3-36 Using the Software
Page 82

Using the Hardware
LCD Panel
!
Keyboard
!
NEC VersaGlide
!
NEC Versa File Bay
!
SuperDisk Drive
!
NEC VersaBay III
!
24X CD-ROM Drive
!
DVD-ROM Drive
!
4
PC Cards
!
IR Port
!
Increasing System Storage and Memory
!
Switch Settings
!
Page 83

LCD Panel
The LCD panel on your NEC Versa LX notebook is fully adjustable to
provide comfortable viewing. To adjust the viewing angle, gently tilt the
LCD panel into position.
To adjust the panel’s brightness, use the
If the LCD panel backlight turns off when you attempt to close the panel,
toggle the
backlight.
Keyboard
The NEC Versa keyboard is equipped with many features. These
include:
Function keys
!
Numeric keypad
!
Cursor control keys
!
Windows keys
!
Control keys
!
Typewriter keys
!
Fn-F8
Fn-F3
function key or close and open the panel to turn on the
and
Fn-F9
function keys.
4-2 Using the Hardware
Page 84
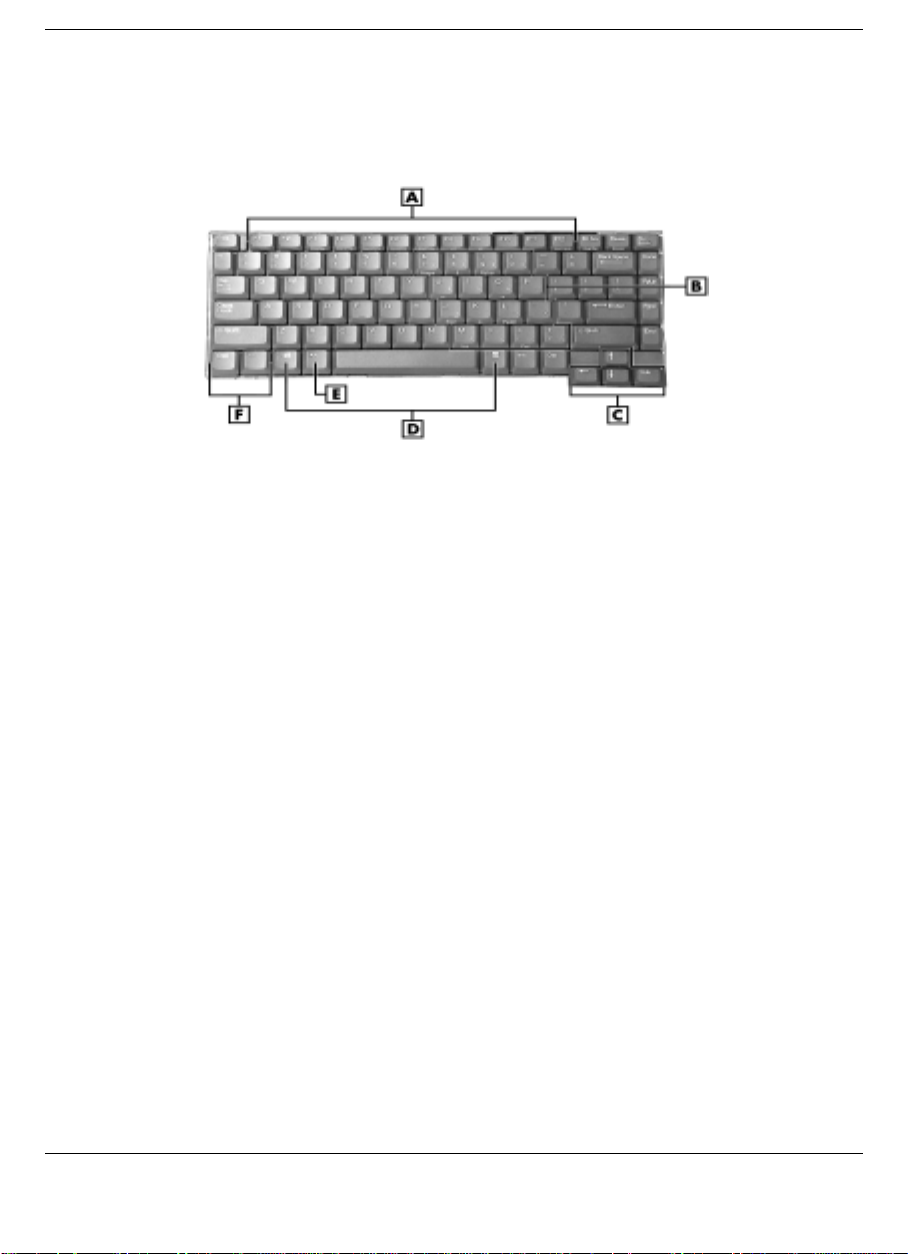
Feature keys are located as shown in the following figure. Key
operations are described after the figure.
Keyboard
A
– Function Keys B – Numeric Keys C – Cursor Control Keys
D
– Windows Keys E – Control Key F – Control Keys
Function keys — Twelve function keys, F1 through
!
F12
, are available
on the NEC Versa keyboard. These keys work together with the
key to activate special functions. Nine keys are preprogrammed with
dual functions, seven of which are printed in blue on the key.
Function keys are application-driven. See the specific application’s
user guide for information about how each function key works within
the application you are using.
The following function key combinations are preprogrammed for the
NEC Versa LX computer.
Fn-F3
— toggles between four video modes; LCD, CRT, both (LCD
and CRT) or TV out.
Fn-F4
— sets standby power management mode on. Press any key to
resume from standby mode. In Windows 98, slide the Power button
toward the front of the system to resume from standby mode.
Fn-F6
— sets the beeper speaker volume to low, medium, high, or
mute.
Fn
Using the Hardware 4-3
Page 85

Fn-F7
— toggles between various power management levels. Beeps
indicate the level chosen as follows:
1 beep Off
2 beeps Custom
3 beeps Highest Performance
4 beeps Longest Life
Fn-F8
— increases the LCD panel brightness.
Fn-F9
— decreases the LCD panel brightness.
Fn-F10
Fn-F12
Fn-Power/Sleep button
— toggles zoom in and zoom out.
— toggles the scroll lock off and on.
— initiates a save-to-file on demand. Saves
your working environment to a reserved area on the hard drive, if
configured in the BIOS setup.
An additional preprogrammed function key,
Fn-Left Cntl
, simulates
pressing the right control key for support of IBM 327x connections.
Numeric keypad — Pressing NumLock on the keyboard activates the
!
numeric keypad numbers and functions printed in blue on the keys.
The keypad lets you type numbers and mathematical operands (+, -)
as you would on a calculator. The keypad is ideal for entering long
lists of numbers.
When you press NumLock again, the keys revert to their normal
functions as typewriter keys.
Cursor Control keys — Cursor control keys let you position the
!
cursor on the screen where you want. On the screen, the cursor is a
blinking underline, block, or vertical line depending on the
application. The cursor indicates where the next text typed is inserted.
Windows keys — If you have Windows 98 or 95, you can use the
!
following two keys to facilitate your work.
4-4 Using the Hardware
Page 86

Quick access to shortcut menus
Display the Start menu
Control keys —
!
conjunction with other keys to change their functions. To use control
keys, press and hold the control key while pressing another key. For
example, “press
letter c. How the key combination works depends on the application
you are running.
Typewriter keys — The typewriter keys (also called alphanumeric
!
keys) are used to enter text and characters. Keys with blue printing on
them behave differently when combined with control keys or the
Fn
key.
NEC VersaGlide
The NEC VersaGlide is an easy way to control the cursor with your
finger. Lightly glide your finger across the NEC VersaGlide and the
cursor follows. The NEC VersaGlide provides standard mouse
functionality, plus more. VersaGlide features include the:
Single tap to the touchpad, equivalent to a single click of the
!
primary mouse button.
Double tap to the touchpad, equivalent to a double click of the
!
primary mouse button.
Ctrl, Alt, Fn
Ctrl c”
means to hold down the
, and
Shift
are controls used in
Ctrl
key and type the
Click and hold, then drag your finger across the VersaGlide
!
touchpad, equivalent to a click and drag of the primary mouse button.
Using the Hardware 4-5
Page 87
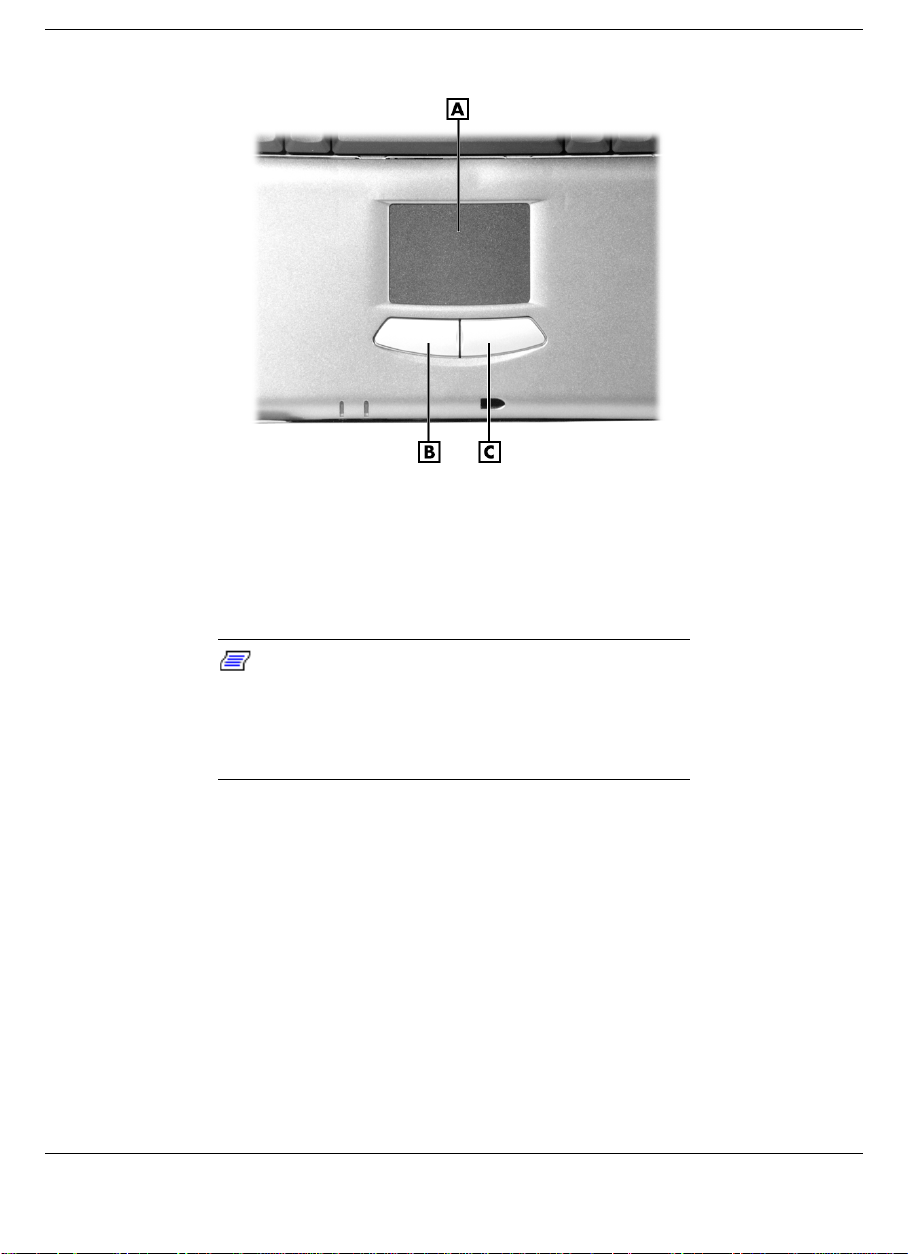
VersaGlide features
A
– Touchpad B – Left (Primary) Button C – Right Button
Try all of the features and decide which you prefer. If you find the
double tap or any of the other features difficult to use, go to the next
section for general directions about adjusting the touchpad properties.
Note:
must use the NEC Customize Utility to install the
NEC-supplied mouse driver. The NEC-supplied
mouse driver provides the VersaGlide functionality
described in thi s section.
In Windows NT environments only, you
Making VersaGlide Adjustments
The NEC VersaGlide offers a number of options that let you customize
how it functions. The options let you control the cursor speed, select
button orientation, enable or disable tapping, define auto jumps, enable
easy-scrolling, and configure gestures to initiate selected functions by
tapping in a designated area of the touchpad.
To access these options, locate the Control Panel and double click on the
mouse icon. Use the context-sensitive help to learn more about each
option.
4-6 Using the Hardware
Page 88
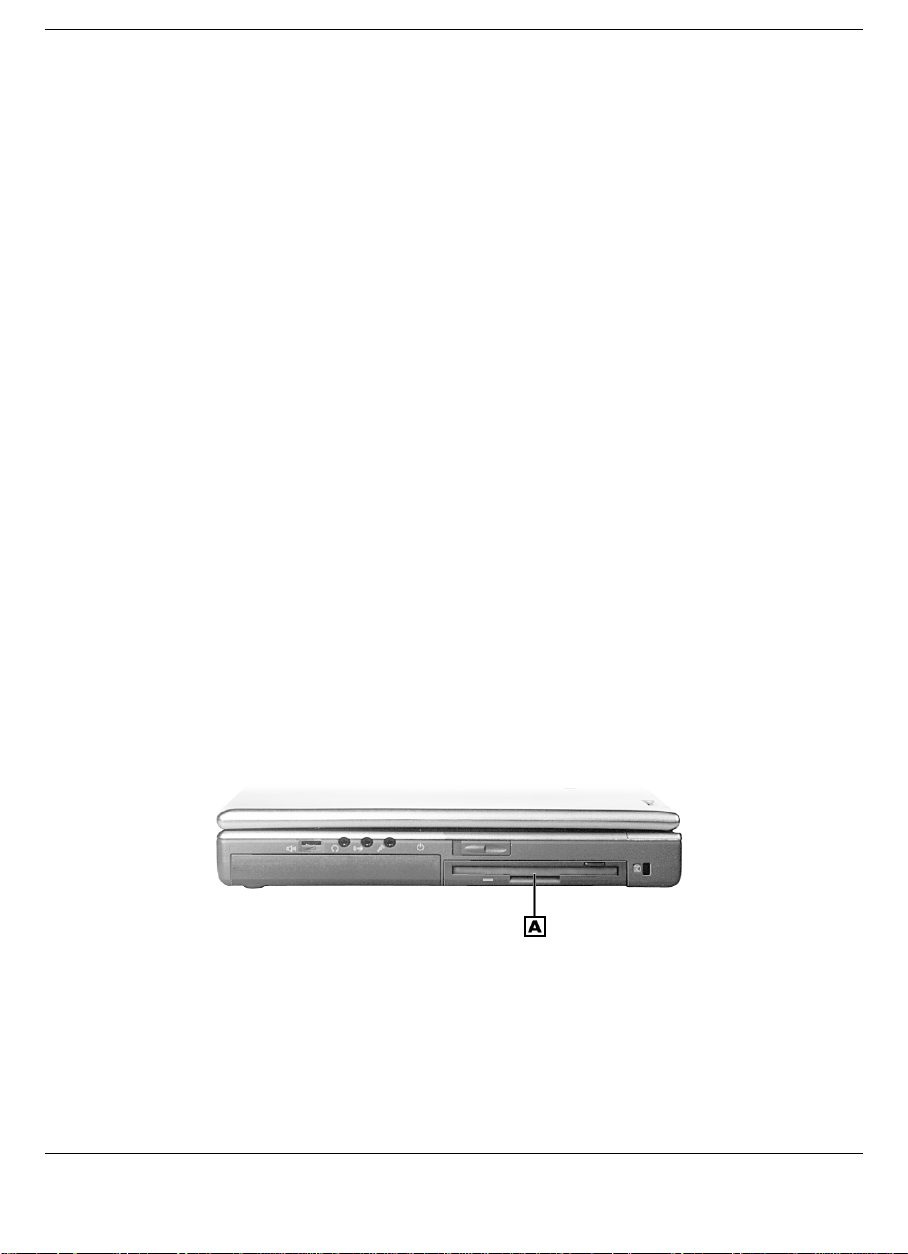
VersaGlide Tips
Follow these basic ergonomic tips while working:
Use a light touch on the VersaGlide surface.
!
Set up the NEC Versa with your keyboard and VersaGlide at a
!
comfortable height. Keep your forearms parallel to the floor. Your
wrists should be relaxed and straight.
While using the keyboard and VersaGlide, keep your shoulders and
!
arms as relaxed as possible.
Take regular breaks from the computer to rest your eyes. Perform
!
stretching exercises to relax your fingers, hands, wrists, forearms, and
shoulders.
See Appendix A, “Setting Up a Healthy Work Environment,” for more
information.
NEC Versa File Bay
The NEC Versa File Bay is the bay located at the rear of the system’s
right side. Your NEC Versa ships with a standard 3.5-inch, 1.44-MB
diskette drive or a SuperDisk™ drive installed in the bay.
Locating the file bay
A
- NEC Versa File Bay
Using the Hardware 4-7
Page 89
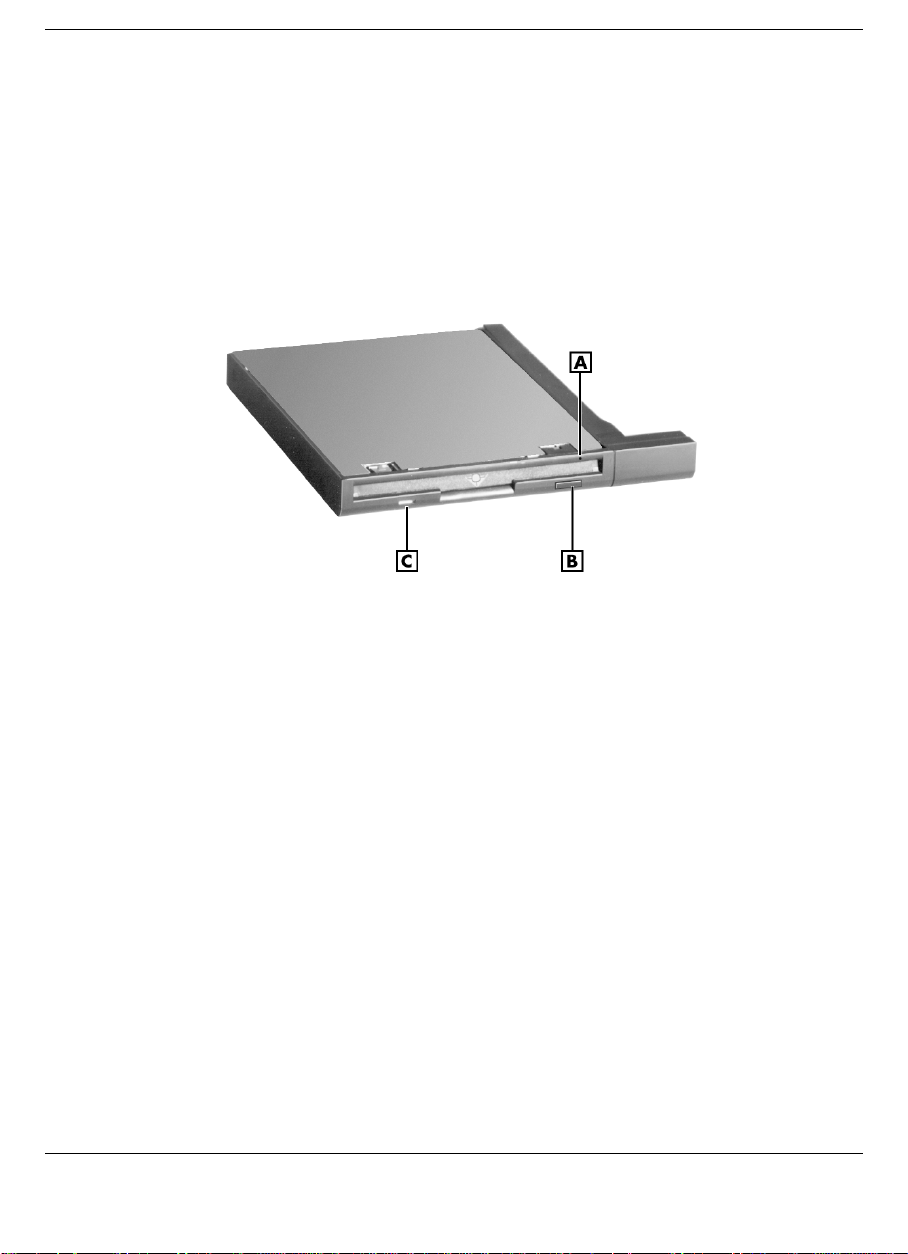
SuperDisk Drive
The SuperDisk drive offers many improvements on the standard diskette
drive technology, including faster data access, greater reliability, and
higher recording capacities. The drive uses the latest laser-servo (LS)
technology, which writes to and reads from specially designed
120-MB diskettes as well as standard 720-KB and 1.44-MB diskettes.
SuperDisk drive
A
– Emergency Eject Hole B – Release Button C – Status LED
Formatting Diskettes in the SuperDisk Drive
When formatting a diskette in the SuperDisk drive while in DOS mode,
you may encounter the following error messages:
For 720-KB and 1.44-MB diskettes the error message states
!
“Invalid media or Track 0 bad – disk unusable,”
“Extended Error 1g - format terminated.”
For a 120-MB SuperDisk the error message states
!
“Parameters not supported by drive.”
These error messages indicate that the diskette you are attempting to
format is write-protected. Simply write-enable the diskette before
formatting.
4-8 Using the Hardware
Page 90
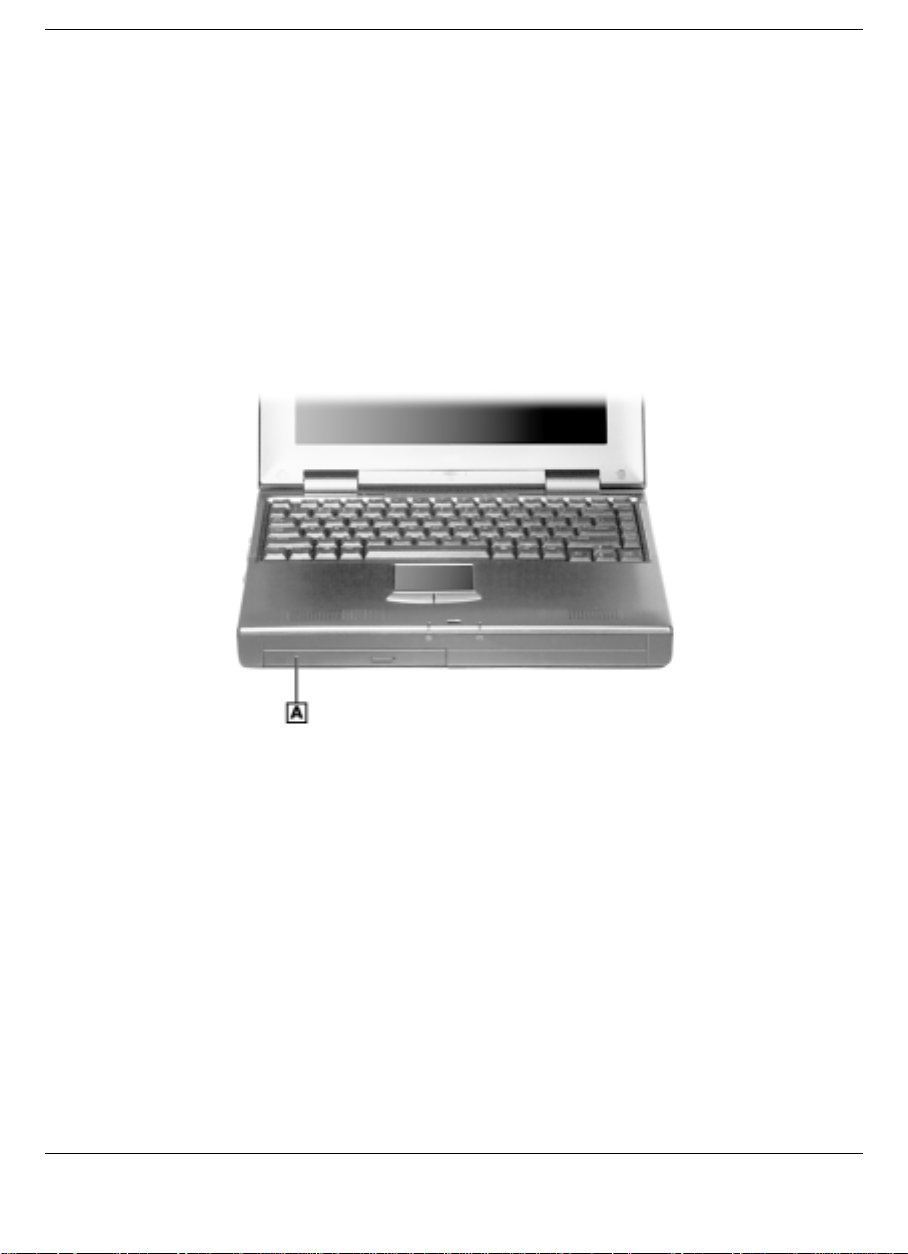
NEC VersaBay III
The NEC VersaBay III is the drive bay located below the VersaGlide at
the front left side of the system. Your NEC Versa ships with a 24X
CD-ROM drive, SuperDisk drive, or DVD-ROM drive installed in the
bay. The NEC VersaBay III supports warm swapping which allows you
to remove and replace a device while your NEC Versa is in a suspend
state. For details about using the warm-swap utility, refer to the section,
“NEC VersaBay Swapping Utility,” later in this chapter.
Locating the VersaBay III
A
– VersaBay III
In addition to the CD-ROM drive, SuperDisk drive, or DVD-ROM
drive, the VersaBay III accepts the following options:
a second battery pack
!
a second hard disk drive.
!
Contact your NECC dealer to purchase options and accessories for your
NEC Versa notebook computer.
Using the Hardware 4-9
Page 91

NEC VersaBay Swapping Utility
The VersaBay III supports warm swapping of some bay devices. Warm
swapping extends the power of Plug-and-Play technology to your NEC
VersaBay III devices by allowing you to swap a CD-ROM drive,
SuperDisk drive, or DVD-ROM drive in the VersaBay III while your
system is in a suspended state. Use the NEC VersaBay Swapping utility
to put your system into a suspended state before swapping a device in
the Windows 98 or Windows 95 environments. This dynamic solution
further increases the flexibility of your already versatile notebook
computer. Warm swapping devices is not supported on Windows NT
systems.
Installing the NEC VersaBay Swapping Utility
Use the NEC Customize utility to install the NEC VersaBay Swapping
utility. For details about using the NEC Customize utility, refer to the
section, “NEC Customize Utility,” earlier in this chapter.
Once the swapping utility is installed on your system, a small icon
appears in the lower right hand corner of the Windows taskbar. Moving
your cursor over the icon displays information about the VersaBay III.
The balloon message that appears indicates if the bay is empty or if a
device is installed. Because warm swapping is only supported for the
CD-ROM drive, SuperDisk drive, DVD-ROM drive, and the VersaBay
III Battery Pack the balloon message may not be accurate if you install a
hard disk drive. Your system must be powered off before installing a
hard disk drive in the VersaBay III.
Using the NEC VersaBay Swapping Utility
With the NEC VersaBay Swapping utility running on your notebook
computer, you can warm swap a CD-ROM drive, SuperDisk drive,
DVD-ROM drive, or VersaBay III Battery Pack in the VersaBay III.
Please note the following when using the swapping utility:
Windows 98 or 95 Power Management must be enabled to use the
!
swapping utility. By default, Windows 98 or 95 Power Management
is enabled when your system ships. For details, see your Windows
documentation.
4-10 Using the Hardware
Page 92

The swapping utility only supports the swapping of a CD-ROM drive,
!
SuperDisk drive, DVD-ROM drive, or VersaBay III Battery Pack.
Other devices installed in the VersaBay will work properly. However,
warm swapping other devices is not supported.
Warm swapping other devices can damage the
device, the system, or both.
Swap devices in the VersaBay III as follows:
1.
If you have files open on the device you are planning to remove,
close them.
2.
Right click on the swapping utility taskbar icon to display the menu.
3.
Highlight and click on the Swap Device option.
4.
A dialog box appears and lets you know that your system must be in
a suspended state to swap the device and asks you if you want to
continue. Press
Yes
to put your system into a suspended state.
5.
Once your system is in a suspended state, remove the device from
your computer. Insert the new device while your system is still in a
suspended state.
6.
To resume your system after removing and/or installing a device,
slide the Power/Sleep button toward the front of the system.
References to the drive letter listed under My Computer and the
Windows Explorer change automatically when the device is swapped or
removed. The balloon message that appears when you move your cursor
over the taskbar icon also changes to reflect the new VersaBay status.
Removing a Device from the VersaBay III
Use the following steps to remove a device from the VersaBay III.
Your system must be in a suspended state to use the utility, or powered
off, before removing or inserting devices in the VersaBay III.
Using the Hardware 4-11
Page 93
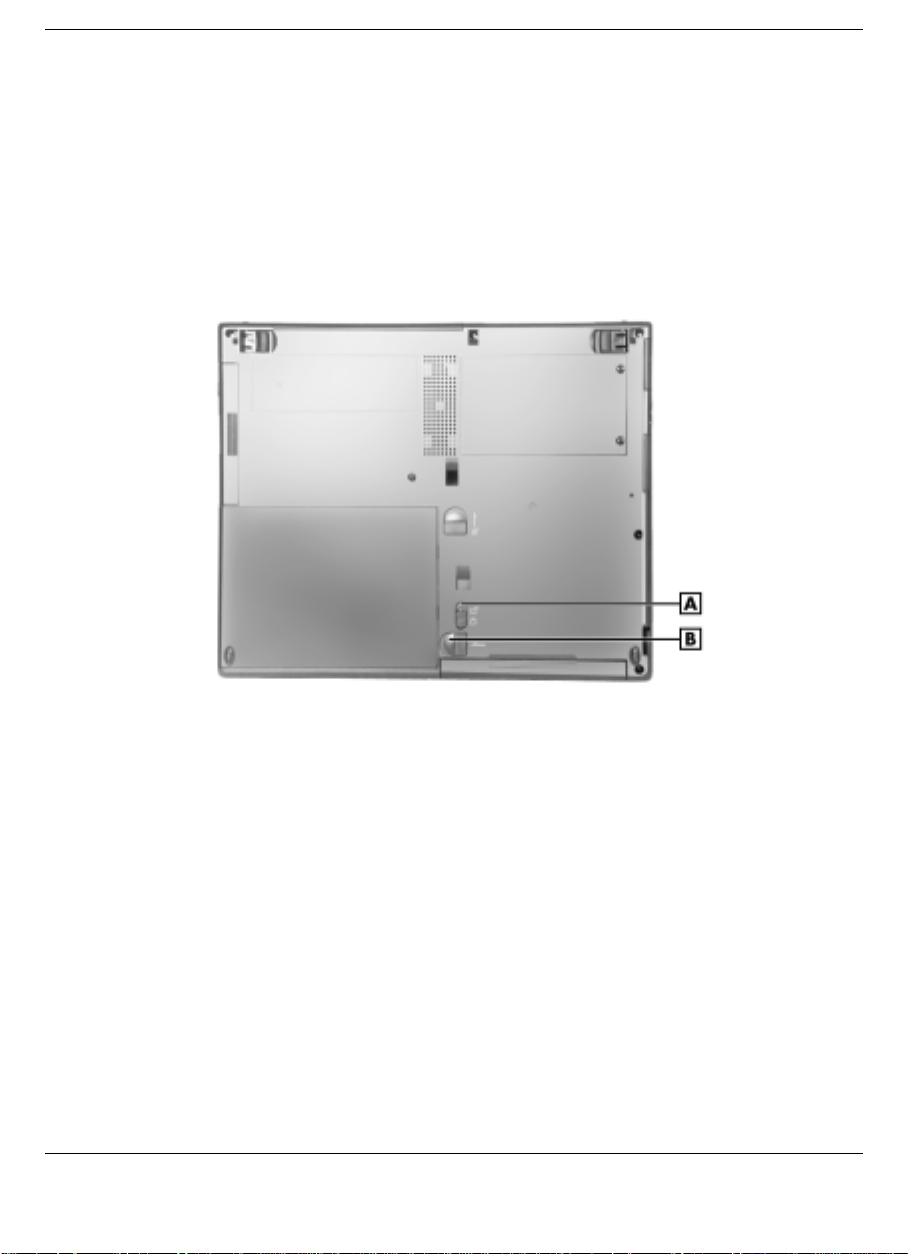
1.
Use the NEC VersaBay Swapping Utility to put your system into a
suspended state or power off the system.
2.
Close the LCD panel and turn the system upside down.
3.
Locate the VersaBay III release lock and release latch on the bottom
of the unit.
VersaBay III release latches
A
– VersaBay Release Lock B – VersaBay Release Latch
4.
Slide the lock to the unlocked position before releasing the latch.
5.
Slide the latch toward the battery bay and hold it.
4-12 Using the Hardware
Page 94
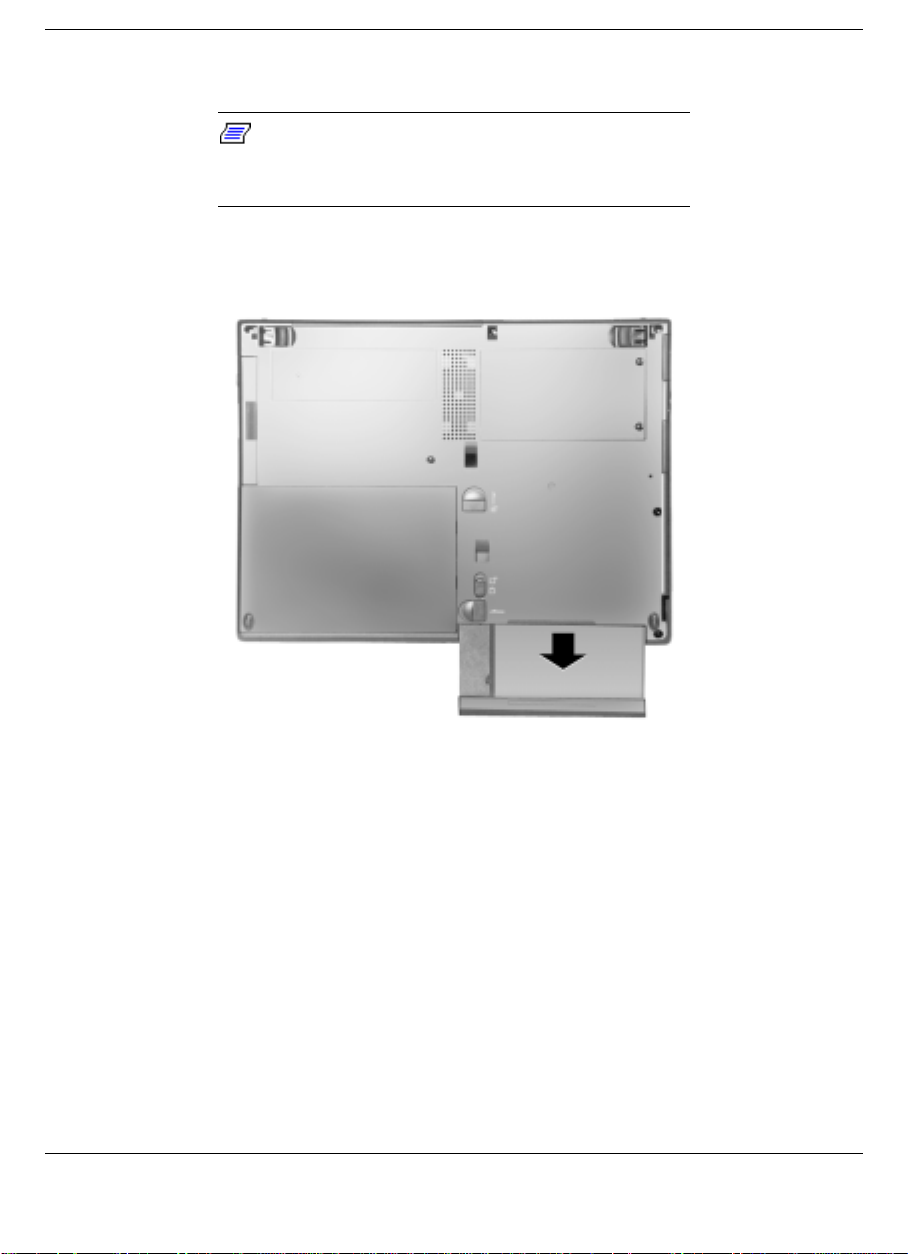
6.
Pull the device out of the system.
Note:
removing the de vice, the device casing catches on
the inside of the latch.
If you release the latch before completely
Releasing the device
Installing a Device in the VersaBay III
Use the following steps to install a device in the VersaBay III.
Your system must be in a suspended state to use the utility, or powered
off, before removing or inserting devices in the VersaBay III.
1.
Use the NEC VersaBay Swapping Utility to put your system into a
suspended state, or power off the system.
2.
Close the LCD panel and turn the system upside down.
Using the Hardware 4-13
Page 95
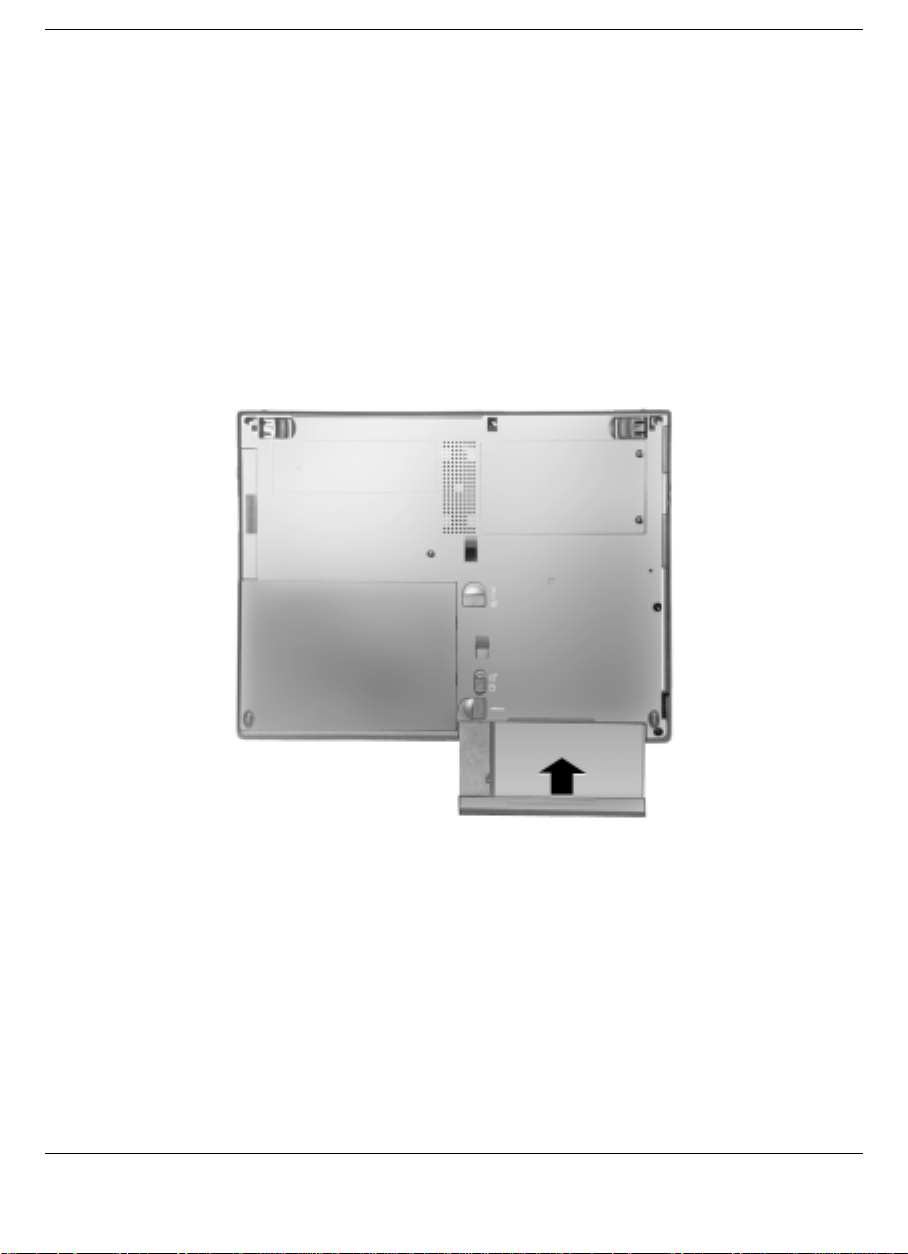
3.
Locate the VersaBay III release lock and release latch on the bottom
of the unit.
4.
Slide the lock to the unlocked position, if necessary.
5.
Slide the latch toward the battery bay and hold it.
6.
Align the device in the VersaBay III and push it in until it locks into
place.
7.
Slide the lock back to the locked position.
Inserting the CD-ROM drive
8.
Turn the system over and open the LCD panel.
9.
Press the Power/Sleep button to resume operation.
4-14 Using the Hardware
Page 96

Customizing Your System with the VersaBay III
Customizing your NEC Versa is easy using the VersaBay III. If you find
you require additional hard disk space simply remove the standard
device and plug in an optional hard disk drive.
Your system must be powered off before removing or inserting a hard
disk drive in the VersaBay III.
Add another hard disk drive as follows.
1.
Power off your system.
2.
Remove the installed device from the VersaBay III as described in
steps 2-6 in “Removing a Device from the VersaBay III.”
3.
Install the new hard drive in the VersaBay III as described in steps 28 in “Installing a Device in the VersaBay III.”
4.
Once you power on, the system automatically recognizes the newly
installed hard drive.
24X CD-ROM Drive
Your NEC Versa may ship with a 24X CD-ROM drive that features the
latest in CD-ROM technology. The CD-ROM drive is assigned an
available drive letter.
Use the CD-ROM drive to load and start programs from a compact disc
(CD). You can also use the CD-ROM drive to play your audio CDs. The
24X CD-ROM drive is fully compatible with Kodak Multisession Photo
CDs™ and standard audio CDs.
The CD-ROM drive operates at different speeds depending on whether
the CD you are using contains data or music. This allows you to get your
data faster and to see smoother animation and video.
CD-ROM drive features are shown in the following figure. Descriptions
of these features follow.
Using the Hardware 4-15
Page 97
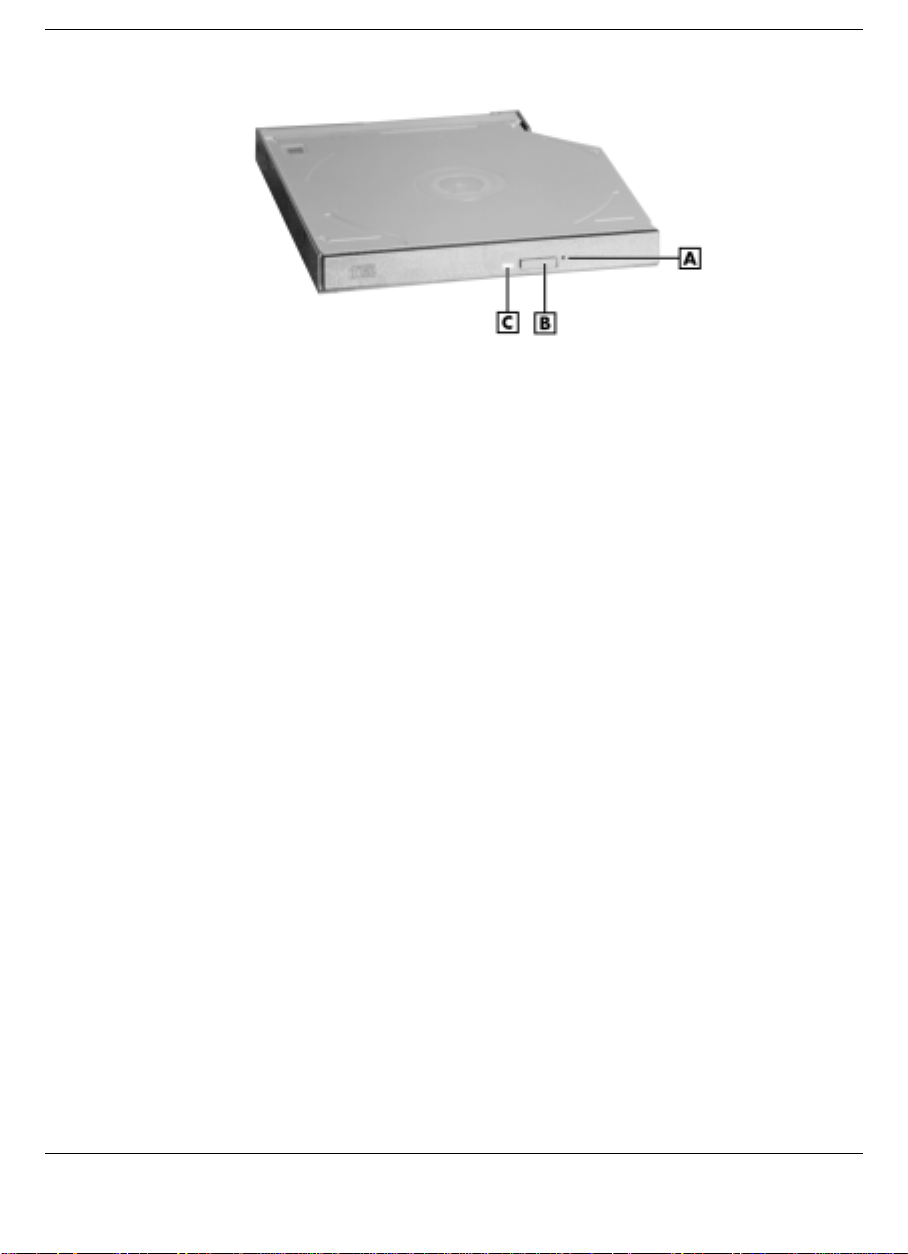
24X CD-ROM drive
A
– Emergency Eject Hole B – Release Button C – Status LED
Emergency Eject Hole — allows you to manually remove a disc from
!
the CD-ROM drive if the eject function is disabled by software or a
power failure occurs.
To remove a disc, insert the end of a paper clip into the eject hole, and
push in until you hear a click. Manually open the drawer.
Release Button — ejects the CD tray. Press this button when power is
!
on to insert a CD into or remove a CD from the drive.
Status LED — lights during data read operations. Do not eject the CD
!
or turn off the NEC Versa when the indicator is lit.
CD Loading
To insert a CD into the CD-ROM drive, follow these steps.
1.
Press the Release button. The CD tray emerges a short way out of the
drive door.
2.
Gently pull the tray out until you can easily position a disc in the
tray.
3.
Put your CD, printed side up, into the circular impression in the tray.
4.
Push the CD tray in until it clicks shut.
4-16 Using the Hardware
Page 98

CD Care
Note:
does not affect the CD-ROM drive.
Some CDs vibrate when playing. This
When handling CDs, keep the following guidelines in mind.
Always pick up the disc by its edges.
!
Avoid scratching or soiling the side of the disc that has no printing or
!
writing on it. This is the data side of the disc.
Do not write on or apply labels to either side of the disc.
!
Keep the disc away from direct sunlight or high temperatures.
!
Clean fingerprints or dust from the disc by wiping it with a soft cloth.
!
Gently brush the cloth from the center of the disc toward the edge.
Avoid using benzene, paint thinner, record cleaner,
static repellent, or any other chemical on the disc.
Chemicals and cleaners can damage the disc.
Changing the Auto Play Setting
Your system may not be configured to allow a CD to automatically play
upon insertion. Although this feature makes using your CDs very
convenient, it may interfere with the system’s power management
function.
Follow these instructions to enable or disable the Auto play feature.
1.
From the Windows 98 or 95 Start menu, select Settings and Control
Panel.
2.
In the Control Panel, highlight and double-click on the System icon.
3.
Select the Device Manager tab.
4.
Locate and open the CD-ROM folder.
Using the Hardware 4-17
Page 99
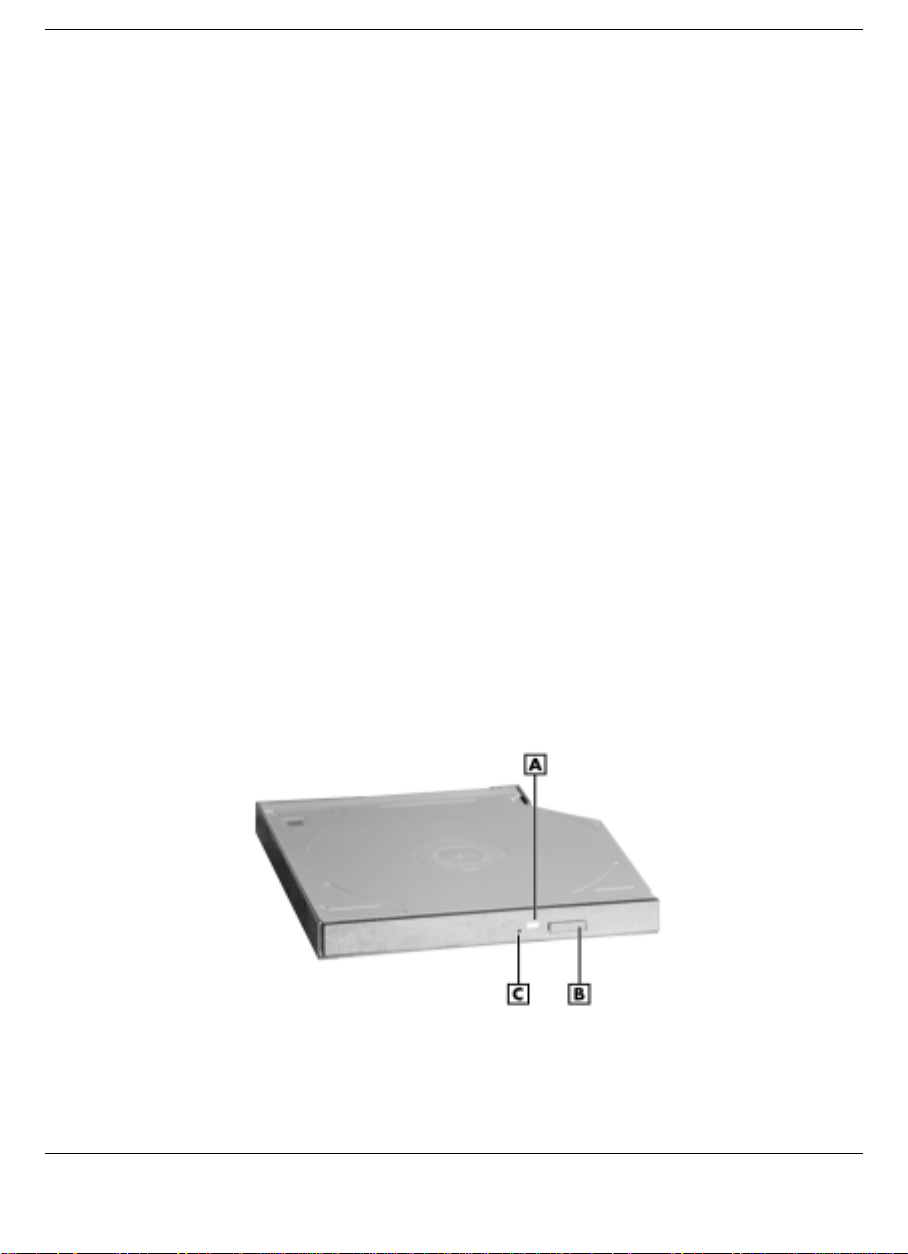
5.
Highlight the appropriate CD-ROM line.
6.
Press the properties button at the bottom of the window and select
the Settings tab.
7.
Proceed as follows:
To enable Auto Play, click to add a check mark next to the line
!
“Auto insert notification.”
To disable Auto Play, click to remove the check mark next to the
!
line “Auto insert notification.”
8.
Select OK twice to accept the settings in the Settings tab and exit the
Properties window.
9.
To activate the new setting, reboot the system when prompted.
DVD-ROM Drive
The DVD-ROM drive offers many improvements over the standard
CD-ROM technology including superior video and audio playback,
faster data access, and greater storage capacities. The drive uses the
latest DVD technology which reads from specially designed DVD discs
as well as standard audio and video CDs.
A
– Status LED B – Release Button C – Emergency Eject Hole
4-18 Using the Hardware
DVD-ROM drive
Page 100

PC Cards
PC cards are all approximately the same size and vary only in thickness.
All have a standard 68-pin connector. Your NEC Versa supports the
installation of the PC cards described next.
Type II Cards
Type II cards have a thickness of 5.0 millimeters (mm). Type II cards are
often storage or communication devices such as Static Random Access
Memory (SRAM), Read Only Memory (ROM), Flash Memory, NIC,
and Small Computer System Interface (SCSI). Typically Type II cards
include input/output (I/O) features such as modems and NIC.
Type II Extended Cards
Many PC cards are Type II extended cards. The extended card has an
additional physical component that protrudes beyond the traditional card
size. The extension can be as large as 40 mm deep by 9.65 mm high.
This extension provides room for additional electronics as well as a
location for external connectors.
Type III Cards
Type III cards are thicker (10.5 mm) than Type II cards and allow no
connections. Type III card uses include advanced function I/O cards with
additional features such as wireless modems, multimode cards (cards
with more than one function such as a combined modem and NIC card),
and small hard drive storage.
Communication Cards
You can use both fax/modem and network PC cards with your NEC
Versa. Here are some suggestions to help you get the best system
performance.
Note:
United States or Canada, contact a local NECC
dealer for availability information.
If you are using this unit outside of the
Using the Hardware 4-19
 Loading...