

Page 1

Portable Projector
UM351W/UM301W/
UM361X/UM301X
User’s Manual
The UM301W and UM301X are not distributed in North America.
Model No.
NP-UM351W, NP-UM301W, NP-UM361X, NP-UM301X
Page 2

Ver. 1 10/14
• Apple,Mac,MacOS,MacBook,andiMacaretrademarksofAppleInc.registeredintheU.S.andothercountries.
• Microsoft,Windows,WindowsVista, Internet Explorer,.NETFrameworkandPowerPointareeitheraregistered
trademarkortrademarkofMicrosoftCorporationintheUnitedStatesand/orothercountries.
• IntelandIntelCorearetrademarksofIntelCorporationintheU.S.and/orothercountries.
• PowerPCisaregisteredtrademarkoftheInternationalBusinessMachinesCorporation.
• MicroSaverisaregisteredtrademarkofKensingtonComputerProductsGroup,adivisionofACCOBrands.
• VirtualRemoteToolusesWinI2C/DDClibrary,©NicomsoftLtd.
• HDMI,theHDMILogoandHigh-DenitionMultimediaInterfacearetrademarksorregisteredtrademarksofHDMI
LicensingLLC.
• MHLandtheMHLlogoareatrademark,registeredtrademarkorservicemarkofMHL,LLCintheUnitedStates
and/or other countries.
• TrademarkPJLinkisatrademarkapplied fortrademarkrightsinJapan,theUnitedStatesof Americaandother
countries and areas.
• Wi-Fi®,Wi-Fi Alliance®,andWi-Fi Protected Access(WPA,WPA2)®areregisteredtrademarksoftheWi-FiAlliance.
• Blu-rayisatrademarkofBlu-rayDiscAssociation
• CRESTRONandROOMVIEWareregisteredtrademarksofCrestronElectronics,Inc.intheUnitedStatesandother
countries.
• EthernetiseitheraregisteredtrademarkortrademarkofFujiXeroxCo.,Ltd.
• Otherproductandcompanynamesmentionedinthisuser’smanualmaybethetrademarksorregisteredtrademarks
oftheirrespectiveholders.
• GPL/LGPLSoftwareLicenses
Theproductincludessoftwarelicensed underGNUGeneral PublicLicense(GPL),GNULesserGeneralPublic
License(LGPL),andothers.
Formoreinformationoneachsoftware,see“readme.pdf”insidethe“aboutGPL&LGPL”folderonthesuppliedCD-
ROM.
NOTES
(1)Thecontentsofthisuser’smanualmaynotbereprintedinpartorwholewithoutpermission.
(2)Thecontentsofthisuser’smanualaresubjecttochangewithoutnotice.
(3)Greatcarehasbeentakeninthepreparationofthisuser’smanual;however,shouldyounoticeanyquestionable
points,errorsoromissions,pleasecontactus.
(4)Notwithstandingarticle(3),NECwillnotberesponsibleforanyclaimsonlossofprotorothermattersdeemed
toresultfromusingtheProjector.
Page 3
Important Information
Safety Cautions
Precautions
PleasereadthismanualcarefullybeforeusingyourNECprojectorandkeepthemanualhandyforfuturereference.
CAUTION
Toturnoffmainpower,besuretoremovetheplugfrompoweroutlet.
Thepoweroutletsocketshouldbeinstalledasneartotheequipmentaspossible,andshouldbeeasily
accessible.
CAUTION
TOPREVENTSHOCK,DONOTOPENTHECABINET.
THEREAREHIGH-VOLTAGECOMPONENTSINSIDE.
REFERSERVICINGTOQUALIFIEDSERVICEPERSONNEL.
Thissymbolwarnstheuserthatuninsulatedvoltagewithintheunitmaybesufcienttocauseelectrical
shock.Therefore,itisdangeroustomakeanykindofcontactwithanypartinsideoftheunit.
Thissymbolalertstheuserthatimportantinformationconcerningtheoperationandmaintenanceofthis
unithasbeenprovided.
Theinformationshouldbereadcarefullytoavoidproblems.
WARNING:TOPREVENTFIREORSHOCK,DONOTEXPOSETHISUNITTORAINORMOISTURE.
DONOTUSETHISUNIT’SPLUGWITHANEXTENSIONCORDORINANOUTLETUNLESSALLTHEPRONGS
CANBEFULLYINSERTED.
DOC Compliance Notice (for Canada only)
ThisClassB digital apparatus meets all requirements of the Canadian Interference-Causing Equipment Regulations.
Machine Noise Information Regulation - 3. GPSGV,
Thehighestsoundpressurelevelislessthan70dB(A)inaccordancewithENISO7779.
CAUTION
Avoiddisplayingstationaryimagesforaprolongedperiodoftime.
DoingsocanresultintheseimagesbeingtemporarilysustainedonthesurfaceoftheLCDpanel.
Ifthis shouldhappen,continuetouseyourprojector.Thestaticbackgroundfrompreviousimageswill
disappear.
Disposing of your used product
EU-widelegislationasimplementedineachMemberStaterequiresthatusedelectricalandelectronicproductscarryingthemark(left)mustbedisposedofseparatelyfromnormalhouseholdwaste.Thisincludes
projectorsandtheirelectricalaccessoriesorlamps.Whenyoudisposeofsuchproducts,pleasefollowthe
guidanceofyourlocalauthorityand/orasktheshopwhereyoupurchasedtheproduct.
Aftercollectingtheusedproducts,theyarereusedandrecycledinaproperway.Thiseffortwillhelpus
reducethewastesaswellasthenegativeimpactsuchasmercurycontainedinalamptothehumanhealth
andtheenvironmentattheminimumlevel.
ThemarkontheelectricalandelectronicproductsonlyappliestothecurrentEuropeanUnionMember
States.
i
Page 4

Important Information
WARNING TO CALIFORNIA RESIDENTS:
Handlingthecablessuppliedwiththisproductwillexposeyoutolead,achemicalknowntotheStateofCalifornia
tocausebirthdefectsorotherreproductiveharm.WASHHANDSAFTERHANDLING.
RF Interference (for USA only)
WARNING
TheFederalCommunicationsCommissiondoesnotallowanymodicationsorchangestotheunitEXCEPTthose
speciedbyNECDisplaySolutionsofAmerica,Inc.inthismanual.Failuretocomplywiththisgovernmentregulationcouldvoidyourrighttooperatethisequipment.Thisequipmenthasbeentestedandfoundtocomplywith
thelimitsforaClassBdigitaldevice,pursuanttoPart15oftheFCCRules.Theselimitsaredesignedtoprovide
reasonableprotectionagainstharmfulinterferenceinaresidentialinstallation.Thisequipmentgenerates,uses,and
canradiateradiofrequencyenergyand,ifnotinstalledandusedinaccordancewiththeinstructions,maycause
harmfulinterferencetoradiocommunications.However,thereisnoguaranteethatinterferencewillnotoccurina
particularinstallation.
Ifthisequipmentdoescauseharmful interferencetoradioortelevisionreception,whichcanbedeterminedby
turningtheequipmentoffandon,theuserisencouragedtotrytocorrecttheinterferencebyoneormoreofthe
followingmeasures:
• Reorientorrelocatethereceivingantenna.
• Increasetheseparationbetweentheequipmentandreceiver.
• Connecttheequipmentintoanoutletonacircuitdifferentfromthattowhichthereceiverisconnected.
• Consultthedealeroranexperiencedradio/TVtechnicianforhelp.
ForUKonly:InUK,aBSapprovedpowercordwithmouldedplughasaBlack(veAmps)fuseinstalledforusewith
thisequipment.Ifapowercordisnotsuppliedwiththisequipmentpleasecontactyoursupplier.
Important Safeguards
Thesesafetyinstructionsaretoensurethelonglifeofyourprojectorandtopreventreandshock.Pleasereadthem
carefullyandheedallwarnings.
Installation
• Donotplacetheprojectorinthefollowingconditions:
- on an unstable cart, stand, or table.
- nearwater,baths,ordamprooms.
- indirectsunlight,nearheaters,orheatradiatingappliances.
- inadusty,smokyorsteamyenvironment.
- onasheetofpaperorcloth,rugsorcarpets.
• Ifyouwishtohavetheprojectorinstalledontheceiling:
- Donotattempttoinstalltheprojectoryourself.
- Theprojectormustbeinstalledbyqualiedtechniciansinordertoensureproperoperationandreducetherisk
ofbodilyinjury.
- Inaddition,theceilingmustbestrongenoughtosupporttheprojectorandtheinstallationmustbeinaccordance
withanylocalbuildingcodes.
- Pleaseconsultyourdealerformoreinformation.
ii
Page 5
Important Information
+10˚
10˚
WARNING
• Donotplaceanyobjects,whichareeasilyaffectedbyheat,infrontoftheprojectionwindow.Doingsocould
leadtotheobjectmeltingfromtheheatthatisemittedfromthelightoutput.
• Donotuseaspraycontainingammablegastogetridofaccumulateddustanddirtontheltersandtheprojection
window.Itmaycauseofre.
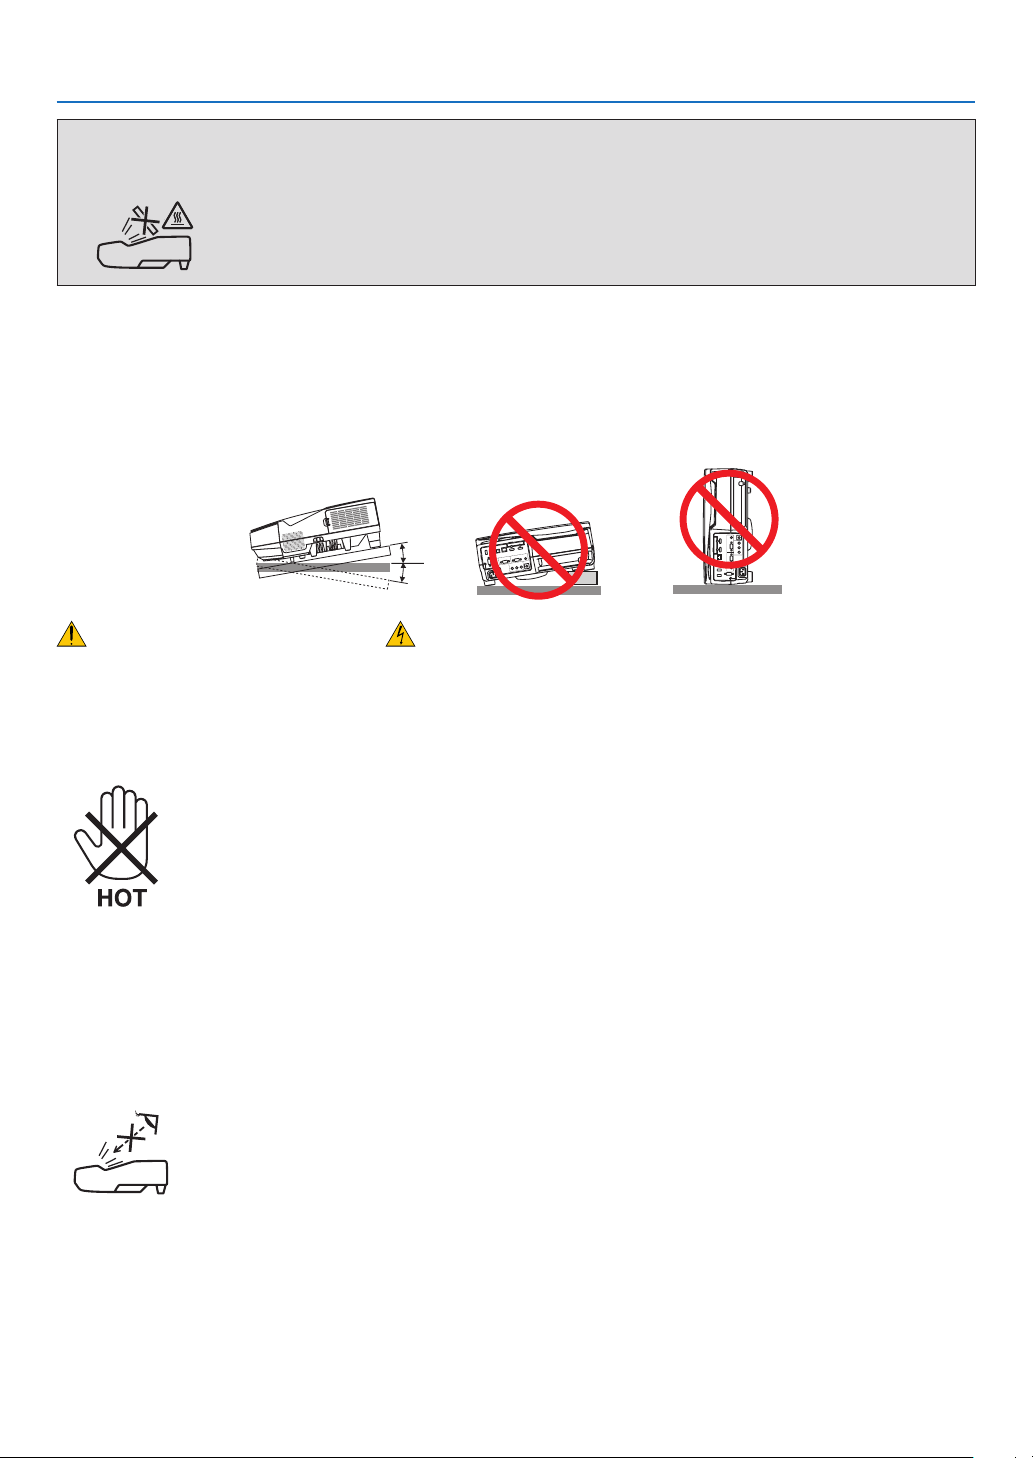
Place the projector in a horizontal position
Thetiltangleoftheprojectorshouldnotexceed10degrees,norshouldtheprojectorbeinstalledinanywayother
thanthedesktopandceilingmount,otherwiselamplifecoulddecreasedramatically.
Fire and Shock Precautions
• Ensurethatthereissufcientventilationandthatventsareunobstructedtopreventthebuild-upofheatinsideyour
projector.Allowatleast4inches(10cm)ofspacebetweenyourprojectorandawall.
• Donottrytotouchtheexhaustventasitcanbecomeheatedwhiletheprojectoristurnedonandimmediatelyafter
theprojectoristurnedoff.Partsoftheprojectormaybecometemporarilyheatediftheprojectoristurnedoffwith
thePOWERbuttonoriftheACpowersupplyisdisconnectedduringnormalprojectoroperation.
Usecautionwhenpickinguptheprojector.
• Preventforeignobjectssuchaspaperclipsandbitsofpaperfromfallingintoyourprojector.Donotattempttoretrieve
anyobjectsthatmightfallintoyourprojector.Donotinsertanymetalobjectssuchasawireorscrewdriverintoyour
projector.Ifsomethingshouldfallintoyourprojector,disconnectitimmediatelyandhavetheobjectremovedbya
qualiedservicepersonnel.
• Donotplaceanyobjectsontopoftheprojector.
• Donottouchthepowerplugduringathunderstorm.Doingsocancauseelectricalshockorre.
• Theprojectorisdesignedtooperateonapowersupplyof100-240VAC50/60Hz.Ensurethatyourpowersupply
tsthisrequirementbeforeattemptingtouseyourprojector.
• Donotlookintotheprojectionwindowwhiletheprojectorison.Seriousdamagetoyoureyescouldresult.
• Keepanyitemssuchasmagnifyingglassoutofthelightpathoftheprojector.Thelightbeingprojectedfromthe
projectionwindowis extensive,thereforeanykindofabnormalobjects thatcanredirectlightcoming out ofthe
projectionwindow,cancauseunpredictableoutcomesuchasreorinjurytotheeyes.
• Donotplaceanyobjects,whichareeasilyaffectedbyheat,infrontofaprojectorexhaustvent.
Doingsocouldleadtotheobjectmeltingorgettingyourhandsburnedfromtheheatthatisemittedfromtheex-
haust.
• Donotsplashwaterovertheprojector.Doingsocancauseelectricalshockorre.Iftheprojectorgetswet,turnoff
iii
Page 6

Important Information
theprojector,unplugthepowercordandhavetheprojectorservicedbyaqualiedservicepersonnel.
• Handlethepowercordcarefully.Adamagedorfrayedpowercordcancauseelectricshockorre.
- Donotuseanypowercordotherthantheonesuppliedwiththeprojector.
- Donotbendortugthepowercordexcessively.
- Donotplacethepowercordundertheprojector,oranyheavyobject.
- Donotcoverthepowercordwithothersoftmaterialssuchasrugs.
- Donotheatthepowercord.
- Donothandlethepowerplugwithwethands.
• Turnofftheprojector,unplugthepowercordandhavetheprojectorservicedbyaqualiedservicepersonnelunder
thefollowingconditions:
- Whenthepowercordorplugisdamagedorfrayed.
- Ifliquidhasbeenspilledintotheprojector,orifithasbeenexposedtorainorwater.
- Iftheprojectordoesnotoperatenormallywhenyoufollowtheinstructionsdescribedinthisuser’smanual.
- Iftheprojectorhasbeendroppedorthecabinethasbeendamaged.
- Iftheprojectorexhibitsadistinctchangeinperformance,indicatinganeedforservice.
• Disconnectthepowercordandanyothercablesbeforecarryingtheprojector.
• Turnofftheprojectorandunplugthepowercordbeforecleaningthecabinetorreplacingthelamp.
• Turnofftheprojectorandunplugthepowercordiftheprojectorisnottobeusedforanextendedperiodoftime.
• WhenusingaLANcable(onlymodelswiththeRJ-45LANport):
Forsafety,donotconnecttotheterminalforperipheraldevicewiringthatmighthaveexcessivevoltage.
CAUTION
• Besuretotightenthescrewsafterattachingthecablecover.Failuretodosomaycausethecablecovertocome
offandfall,resultingininjuryordamagetothecablecover.
• Donotputbundledcablesinthecablecover.Doingsomaydamagethepowercord,resultinginare.
• Donotholdthecablecoverwhilemovingtheprojectorordonotapplyexcessiveforcetothecablecover.Doing
somaydamagethecablecover,resultingininjury.
• Donotusethefeetforpurposesotherthanoriginallyintended.Misusessuchasgrippingthetilt-footorhanging
onthewallcancausedamagetotheprojector.
• Donotsendtheprojectorinthesoftcasebyparceldeliveryserviceorcargoshipment.Theprojectorinsidethe
softcasecouldbedamaged.
• Select [HIGH]inFanmodeifyoucontinuetousetheprojectorforconsecutivedays.(Fromthemenu,select
[SETUP]→[OPTIONS(1)]→[FANMODE]→[HIGH].)
• DonotturnofftheACpowerfor60secondsafterthelampisturnedonandwhilethePOWERindicatorisblinkingblue.Doingsocouldcauseprematurelampfailure.
Remote Control Precautions
• Handletheremotecontrolcarefully.
• Iftheremotecontrolgetswet,wipeitdryimmediately.
• Avoidexcessiveheatandhumidity.
• Donotshort,heat,ortakeapartbatteries.
• Donotthrowbatteriesintore.
• Ifyouwillnotbeusingtheremotecontrolforalongtime,removethebatteries.
• Ensurethatyouhavethebatteries’polarity(+/−)alignedcorrectly.
• Donotusenewandoldbatteriestogether,orusedifferenttypesofbatteriestogether.
• Disposeofusedbatteriesaccordingtoyourlocalregulations.
iv
Page 7
Important Information
Note for US Residents
Thelampinthisproductcontainsmercury.PleasedisposeaccordingtoLocal,StateorFederalLaws.
Lamp Replacement
• Usethespeciedlampforsafetyandperformance.
• Toreplacethelamp,followallinstructionsprovidedonpage122.
• Besuretoreplacethelampandlterwhenthemessage[THE LAMP HAS REACHED THE END OF ITS USABLE
LIFE. PLEASE REPLACE THE LAMP AND FILTER.]appears.Ifyoucontinuetousethelampafterthelamphas
reachedtheendofitsusablelife,thelampbulbmayshatter,andpiecesofglassmaybescatteredinthelampcase.
Donottouchthemasthepiecesofglassmaycauseinjury.
Ifthishappens,contactyourdealerforlampreplacement.
A Lamp Characteristic
Theprojectorhasadischargelampasspecialpurposesasalightsource.
Alamphasacharacteristicthatitsbrightnessgraduallydecreaseswithage.Alsorepeatedlyturningthelampon
andoffwillincreasethepossibilityofitslowerbrightness.
Theactuallamplifemayvarydependingupontheindividuallamp,theenvironmentalconditionsandusage.
CAUTION:
• DONOTTOUCHTHELAMPimmediatelyafterithasbeenused.Itwillbeextremelyhot.Turntheprojectoroff
andthendisconnectthepowercord.Allowatleastonehourforthelamptocoolbeforehandling.
• Whenremovingthelampfromaceiling-mountedprojector,makesurethatnooneisundertheprojector.Glass
fragmentscouldfallifthelamphasbeenburnedout.
About High Altitude mode
• Set[FANMODE]to[HIGHALTITUDE]whenusingtheprojectorataltitudesapproximately5500feet/1700meters
orhigher.
Usingtheprojectorataltitudesapproximately5500feet/1700metersorhigherwithoutsettingto[HIGHALTITUDE]
cancausetheprojectortooverheatandtheprotectorcouldshutdown.Ifthishappens,waitacoupleminutesand
turnontheprojector.
• Usingtheprojectorataltitudeslessthanapproximately5500feet/1700metersandsettingto[HIGHALTITUDE]
cancausethelamptoovercool,causingtheimagetoicker.Switch[FANMODE]to[AUTO].
• Usingtheprojectorataltitudesapproximately5500feet/1700metersorhighercanshortenthelifeofopticalcomponentssuchasthelamp.
About Copyright of original projected pictures:
Pleasenotethatusingthisprojectorforthepurposeofcommercialgainortheattractionofpublicattentioninavenue
suchasacoffeeshoporhotelandemployingcompressionorexpansionofthescreenimagewiththefollowingfunctionsmayraiseconcernabouttheinfringementofcopyrightswhichareprotectedbycopyrightlaw.
[ASPECTRATIO],[KEYSTONE],Magnifyingfeatureandothersimilarfeatures.
Turkish RoHS information relevant for Turkish market
EEE Yonetmeliğine Uygundur.
Thisdeviceisnotintendedforuseinthedirecteldofviewatvisualdisplayworkplaces.Toavoidincommodingreectionsatvisualdisplayworkplacesthisdevicemustnotbeplacedinthedirecteldofview.
v
Page 8

Important Information
Power management function
Theprojectorhaspowermanagementfunctions.Toreducepowerconsumption,thepowermanagementfunctions(1
and2)arefactorypresetasshownbelow.TocontroltheprojectorfromanexternaldeviceviaaLANorserialcable
connection,usetheon-screenmenutochangethesettingsfor1and2.
1. STANDBY MODE (Factory preset: NORMAL)
To control the projector from an external device, select [NETWORK STANDBY] for [STANDBY MODE].
NOTE:
• When[NORMAL]isselectedfor[STANDBYMODE],thefollowingconnectorsandfunctionswillnotwork:
MONITOROUTconnector,AUDIOOUT connector,USB(PC)port,LAN functions,MailAlert function,DDC/CI(Virtual Remote
Tool).Pleaserefertopage94aboutdetails.
2. AUTO POWER OFF (Factory preset: 1 hour)
To control the projector from an external device, select [OFF] for [AUTO POWER OFF].
NOTE:
• When[1:00]isselectedfor[AUTOPOWEROFF],youcanenabletheprojectortoautomaticallyturnoffin60minutesifthereis
nosignalreceivedbyanyinputorifnooperationisperformed.
vi
Page 9

Table of Contents
Important Information ............................................................................................i
1. Introduction .......................................................................................................... 1
1What’sintheBox? ......................................................................................................... 1
IntroductiontotheProjector .......................................................................................... 2
Featuresyou’llenjoy: ............................................................................................... 2
Aboutthisuser’smanual .......................................................................................... 3
PartNamesoftheProjector .......................................................................................... 4
TopandScreenSideofProjector ............................................................................ 4
TerminalPanelSideofProjector .............................................................................. 4
RemovingandAttachingtheCableCover ............................................................... 5
TopFeatures ............................................................................................................ 7
TerminalPanelFeatures .......................................................................................... 8
PartNamesoftheRemoteControl ............................................................................... 9
BatteryInstallation ................................................................................................. 10
RemoteControlPrecautions .................................................................................. 10
OperatingRangeforWirelessRemoteControl ...................................................... 10
SoftwareIncludedonCD-ROM ................................................................................... 11
2. Projecting an Image (Basic Operation) .............................................. 12
1FlowofProjectinganImage ........................................................................................ 12
ConnectingYourComputer/ConnectingthePowerCord ............................................. 13
TurningontheProjector .............................................................................................. 14
NoteonStartupscreen(MenuLanguageSelectscreen) ...................................... 15
SelectingaSource ...................................................................................................... 16
Selectingthecomputerorvideosource................................................................. 16
AdjustingthePictureSizeandPosition ....................................................................... 17
Adjustinghorizontal/verticalposition ...................................................................... 18
Adjustingthefocus(Focusring) ............................................................................ 18
Adjustingthetilt(Tiltfoot) ...................................................................................... 19
Adjustingthesize[DigitalZoom] ............................................................................ 20
❻CorrectingKeystoneDistortion[KEYSTONE] ............................................................. 21
OptimizingComputerSignalAutomatically ................................................................. 23
AdjustingtheImageUsingAutoAdjust .................................................................. 23
TurningUporDownVolume ........................................................................................ 23
TurningofftheProjector .............................................................................................. 24
WhenMovingtheProjector ......................................................................................... 25
3. Convenient Features ..................................................................................... 26
1TurningofftheImageandSound ................................................................................ 26
FreezingaPicture ....................................................................................................... 26
MagnifyingaPicture .................................................................................................... 26
ChangingEcoMode/CheckingEnergy-SavingEffect ................................................ 27
UsingEcoMode[ECOMODE] .............................................................................. 27
CheckingEnergy-SavingEffect[CARBONMETER] ............................................. 28
❺Using4-PointCornertoCorrectKeystoneDistortion[CORNERSTONE] ................... 29
Cornerstone ........................................................................................................... 29
vii
Page 10

Table of Contents
Pincushion ............................................................................................................. 31
PreventingtheUnauthorizedUseoftheProjector[SECURITY] ...................................... 33
UsingtheComputerCable(VGA)toOperatetheProjector(VirtualRemoteTool) ..... 36
OperatingYourComputer’sMouseFunctionsfromtheProjector’sRemoteControl
viatheUSBCable(RemoteMouseFunction) ..........................................................42
ProjectingYourComputer’sScreenImagefromtheProjectorviatheUSBCable
(USBDisplay) ........................................................................................................ 43
ControllingtheProjectorbyUsinganHTTPBrowser ................................................. 45
ControllingtheProjectoroveraLAN(PCControlUtilityPro4/Pro5) .............................52
ProjectingYourComputer’sScreenImagefromtheProjectoroveraLAN(Image
ExpressUtilityLite) ................................................................................................ 56
StartingImageExpressUtilityLitefromaUSBMemoryorSDCard .................... 59
ProjectinganImagefromanAngle(GeometricCorrectionToolinImageExpress
UtilityLite) .............................................................................................................. 61
WhatyoucandowithGCT .................................................................................... 61
ProjectinganImagefromanAngle(GCT) ............................................................. 61
ConnectingYourMicrophone ....................................................................................... 63
4. Using the Viewer ............................................................................................. 64
❶WhatyoucandowiththeViewer ................................................................................. 64
❷ProjectingimagesstoredinaUSBmemorydevice .................................................... 66
5. Using On-Screen Menu ................................................................................ 72
1UsingtheMenus .......................................................................................................... 72
MenuElements ............................................................................................................ 73
ListofMenuItems ....................................................................................................... 74
MenuDescriptions&Functions[SOURCE] ................................................................ 77
COMPUTER .......................................................................................................... 77
HDMI1/MHLandHDMI2 ........................................................................................ 77
VIDEO .................................................................................................................... 77
USB-A .................................................................................................................... 77
LAN ........................................................................................................................ 77
USB-B .................................................................................................................... 77
MenuDescriptions&Functions[ADJUST] .................................................................. 78
[PICTURE] ............................................................................................................. 78
[IMAGEOPTIONS] ................................................................................................ 81
[AUDIO] .................................................................................................................. 85
MenuDescriptions&Functions[SETUP] .................................................................... 86
[GENERAL] ............................................................................................................ 86
[MENU] .................................................................................................................. 88
[INSTALLATION] .................................................................................................... 90
[OPTIONS(1)] ........................................................................................................ 92
[OPTIONS(2)] ........................................................................................................ 94
SettinguptheProjectorforaWiredLANConnection[WIREDLAN] ..................... 96
SettinguptheProjectorforaWirelessLANConnection(withtheoptionalUSB
WirelessLANUnitequipped)[WIRLESSLAN] ...................................................... 97
MenuDescriptions&Functions[INFO.] ...................................................................... 99
[USAGETIME] ....................................................................................................... 99
viii
Page 11

Table of Contents
[SOURCE(1)] ....................................................................................................... 100
[SOURCE(2)] ....................................................................................................... 100
[WIREDLAN] ....................................................................................................... 100
[WIRELESSLAN] ................................................................................................ 101
[VERSION] ........................................................................................................... 101
[OTHERS] ............................................................................................................ 101
MenuDescriptions&Functions[RESET] .................................................................. 102
ReturningtoFactoryDefault[RESET] ................................................................. 102
6. Installation and Connections ................................................................. 103
1SettingUptheScreenandtheProjector ................................................................... 103
MakingConnections .................................................................................................. 106
ConnectingYourComputer .................................................................................. 106
ConnectinganExternalMonitor .......................................................................... 108
ConnectingYourDVDPlayerorOtherAVEquipment .......................................... 109
ConnectingComponentInput .............................................................................. 110
ConnectingHDMIInput........................................................................................ 111
Connectingasmartphoneandatabletterminal ................................................. 112
Connectingyourdocumentcamera ..................................................................... 113
Tableprojection .................................................................................................... 113
ConnectingtoaWiredLAN ................................................................................. 114
ConnectingtoaWirelessLAN(Optional:NP05LMseries) .................................. 115
7. Maintenance .................................................................................................... 118
1CleaningtheFilters.................................................................................................... 118
CleaningtheProjectionWindow ................................................................................ 121
CleaningtheCabinet ................................................................................................. 121
ReplacingtheLampandtheFilters ........................................................................... 122
8. Appendix ............................................................................................................. 128
1Troubleshooting ......................................................................................................... 128
IndicatorMessages .............................................................................................. 128
CommonProblems&Solutions ........................................................................... 129
Ifthereisnopicture,orthepictureisnotdisplayedcorrectly. .............................. 130
Specications ............................................................................................................ 131
CabinetDimensions .................................................................................................. 133
PinAssignmentsofD-SubCOMPUTERInputTerminal ........................................... 134
CompatibleInputSignalList ...................................................................................... 135
PCControlCodesandCableConnection ................................................................. 136
TroubleshootingCheckList ........................................................................................ 137
TCOCertication ....................................................................................................... 139
REGISTERYOURPROJECTOR!(forresidentsintheUnitedStates,Canada,and
Mexico) ................................................................................................................ 140
ix
Page 12
1. Introduction
1 What’s in the Box?
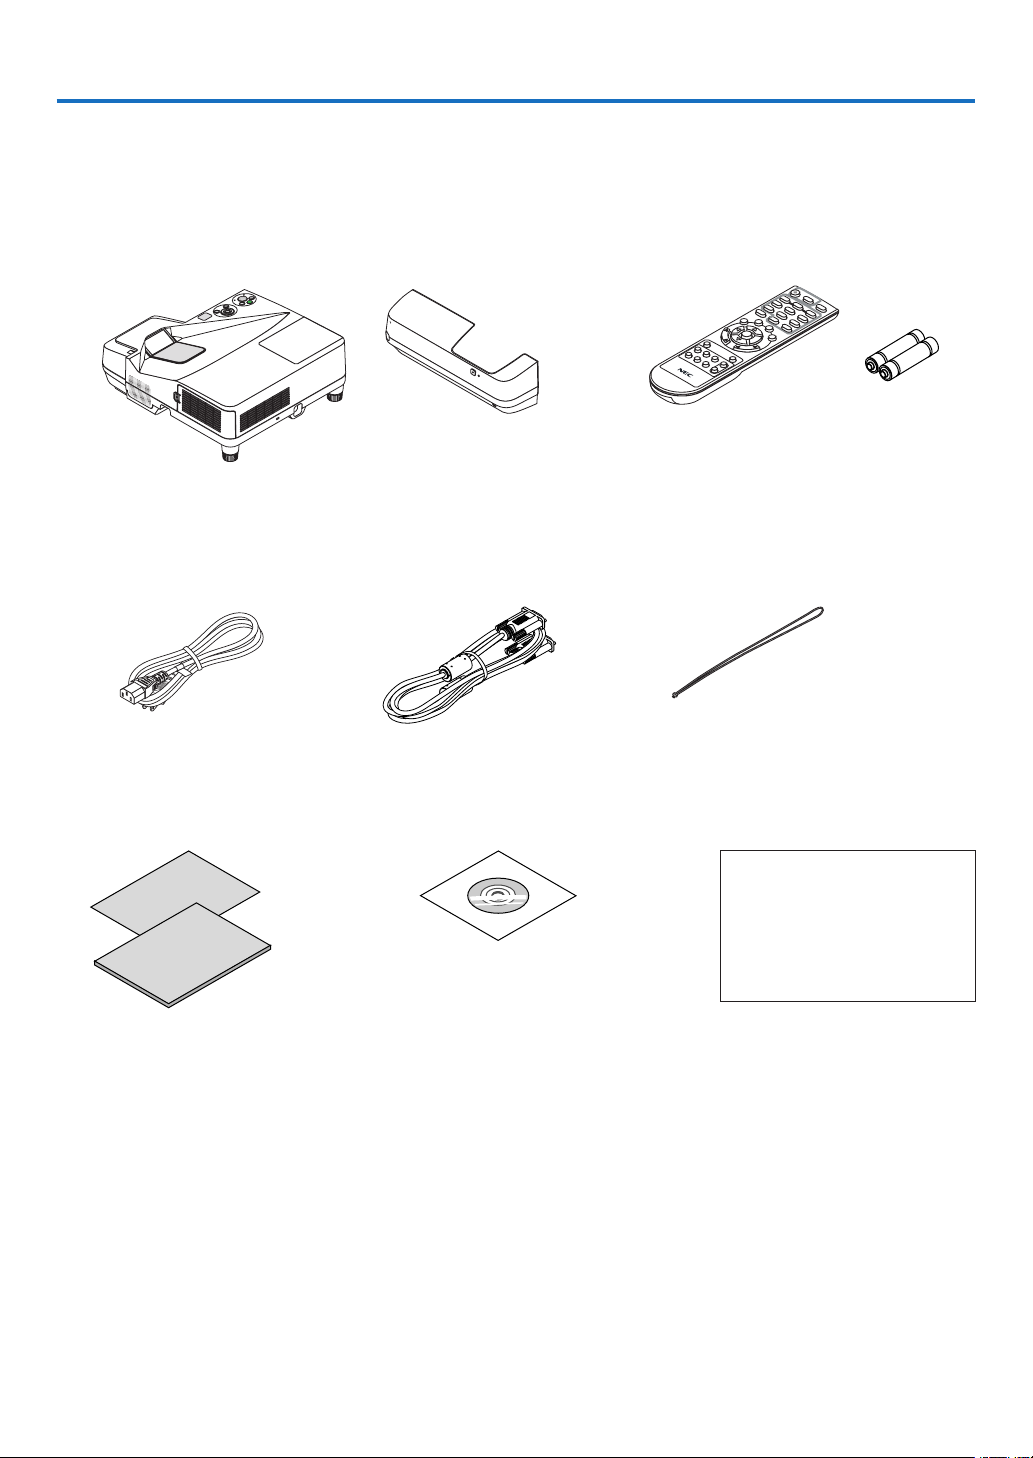
Makesureyourboxcontainseverythinglisted.Ifanypiecesaremissing,contactyourdealer.
Pleasesavetheoriginalboxandpackingmaterialsifyoueverneedtoshipyourprojector.
Projector
Power cord
(US: 7N080240/7N080243)
(EU: 7N080027/7N080029)
• ImportantInfomation(ForNorth
America: 7N8N5231) (For Other
countries than North America:
7N8N5231 and 7N8N5241)
• QuickSetupGuide(7N8N5251)/
(7N8N5261)
Cable cover (24FU2001)
(attached to the projector
at the time of shipment →
page 5)
Computer cable (VGA)
(7N520089)
NEC Projector CD-ROM
User’s manual (PDF) and the utility
software
(7N952071)
Remote control
(7N901051)
Wireless receiver strap
For North America only
Limited warranty
For customers in Europe:
You will find our current valid
Guarantee Policy on our Web
Site:
www.nec-display-solutions.com
Batteries (AAA × 2)
Unlessotherwise described in theuser’smanual, the drawingsfor the projectorcabinetshowexamplesofthe
UM351W.
1
Page 13

1. Introduction
Introduction to the Projector
Thissectionintroducesyoutoyournewprojectoranddescribesthefeaturesandcontrols.
Features you’ll enjoy:
• Ultrashortthrowdistances
Ultrashortfocallensesprovideforalargerimageusingashorterthrowdistancewhencomparedtoatypical
projectorlens.
UM361X/UM301X:Max116.6"(UM351W/UM301W:Max110"),throwdistance:51cm/20inches
(Thethrowdistancereferstothedistancebetweenthescreenandthescreensideoftheprojector)
• Quickstart(6seconds*1),QuickPowerOff,DirectPowerOff
6 seconds*1afterturningonthepower,theprojectorisreadytodisplayPCorvideoimages.
Theprojectorcanbeputawayimmediatelyaftertheprojectorispowereddown.Nocooldownperiodisrequired
aftertheprojectoristurnedofffromtheremotecontrolorcabinetcontrolpanel.
Theprojectorhasafeaturecalled“DirectPowerOff”.Thisfeatureallowstheprojectortobeturnedoff(evenwhen
projectinganimage)byusingtheMainPowerSwitchordisconnectingtheACpowersupply.
ToturnofftheACpowersupplywhentheprojectorispoweredon,useapowerstripequippedwithaswitchand
abreaker.
*1 Thequickstarttimeisonlywhen[STANDBYMODE]issetto[NETWORKSTANDBY]intheon-screenmes-
sage.
• 0.22W(100-130VAC)/0.39W(200-240VAC)instandbyconditionwithenergysavingtechnology
Selecting[NORMAL]for[STANDBYMODE]fromthemenucanputtheprojectorinpower-savingmodethatcon-
sumesonly0.22W(100-130VAC)/0.39W(200-240VAC).
• CarbonMeter
Thisfeaturewillshowenergy-savingeffectintermsofCO2emissionreduction(kg)whentheprojector’s[ECO
MODE]issetto[AUTOECO],[NORMAL],or[ECO].
TheamountofCO2emissionreductionwillbedisplayedintheconrmationmessageatthetimeofpower-offand
intheINFOoftheon-screenmenu.
• Lamplifeupto8000hours*
UsinginEcoMode(ECO)allowsyoutoprolongtheprojector’slamplifeupto8000hours(upto4000hoursin
ECOMODEOFF).
*2 UM351W/UM361X:6000hours(upto3800hoursinECOMODEOFF)
• TwoHDMIinputssupportsdigitalsignals
ThetwoHDMIinputsprovideHDCPcompatibledigitalsignals.TheHDMIinputalsosupportsaudiosignal.
• Projecttheimageonasmartphoneandatablet
SincetheprojectorsupportsMHL(MobileHigh-denitionLink),itcanprojectvideosandphotosonasmartphone
andatabletterminalbyconnection,andoutputtheirsoundfromthebuilt-inspeaker.
• 20Wbuilt-inspeakerforanintegratedaudiosolution
Powerful20wattmonauralspeakerprovidesvolumeneedforlargerooms.
• MICInputprovided
AMICinputjackforacommerciallyavailabledynamicmicrophoneisusefulforyourpresentationinaconference
room or lecture in a classroom.
• Theoptionalinteractivewhiteboardkit(NP03Wi,soldseparately)andtheprojectorcanbeusedtoconvert
yourwhiteboardintoavirtualtouchscreen.
Bytheoptionalstyluspen,it'sabletodirectlywrite-intotheprojectedimagethatrealizesmoreeffectivepresenta-
tion and lecture.
2
2
Page 14

1. Introduction
• Correspondtovariousinstallation
Besidesinstallationonthewall,itcancorrespondvariousinstallationasprojectingimageupontotheceiling,onto
thetable,andontotheoor,etc.
• ThesuppliedremotecontrolallowsyoutoassignaCONTROLIDtotheprojector
Multipleprojectorscanbeoperatedseparatelyandindependentlywiththesamesingleremotecontrolbyassigning
anIDnumbertoeachprojector.
• USBDisplay
UsingacommerciallyavailableUSBcable(compatiblewithUSB2.0specications)toconnectthecomputerwith
theprojectorallowsyoutosendyourcomputerscreenimagetothe projectorwithouttheneedofatraditional
computercable(VGA).
• IntegratedRJ-45terminalforwirednetworkingcapabilityalongwithwirelessnetworkingcapabilities
AnRJ-45terminalisstandard.AnoptionalUSBWirelessLANUnitisrequiredforwirelessLANconnection.
• Softwareprograms(UserSupportware)containedinthesuppliedCD-ROM
ThesuppliedNECProjectorincludesthreeprograms:VirtualRemoteTool,ImageExpressUtilityLite(forWindows/
MacOS),andPCControlUtilityPro4(forWindows)/5(forMacOS).
ImageExpressUtilityLite(forWindows)canbestartedfromacommerciallyavailableUSBmemoryorSDcard
withouttheneedofinstallingonyourcomputer.
• AUTOPOWERONandAUTOPOWEROFFfeatures
TheDIRECTPOWERON,AUTOPOWERON,AUTOPOWEROFF,andOFFTIMERfeatureseliminatetheneed
toalwaysusethePOWERbuttonontheremotecontrolorprojectorcabinet.
• Preventingunauthorizeduseoftheprojector
Enhancedsmartsecuritysettingsforkeywordprotection,cabinetcontrolpanellock,securityslot,andsecurity
chainopeningtohelppreventunauthorizedaccess,adjustmentsandtheftdeterrence.
• HighresolutionuptoWUXGA*
Highresolutiondisplay-uptoWUXGAcompatible,XGA(UM361X/UM301X)/WXGA(UM351W/UM301W)native
resolution.
3
*
WhenWXGAMODEissettoON.
• CRESTRONROOMVIEWcompatibility
TheprojectorsupportsCRESTRONROOMVIEW,allowingmultipledevicesconnectedinthenetworktobeman-
agedandcontrolledfromacomputerorcontroller.
3
About this user’s manual
Thefastestwaytogetstartedistotakeyourtimeanddoeverythingrightthersttime.Takeafewminutesnowto
reviewtheuser’smanual.Thismaysaveyoutimelateron.Atthebeginningofeachsectionofthemanualyou’llnd
anoverview.Ifthesectiondoesn’tapply,youcanskipit.
3
Page 15
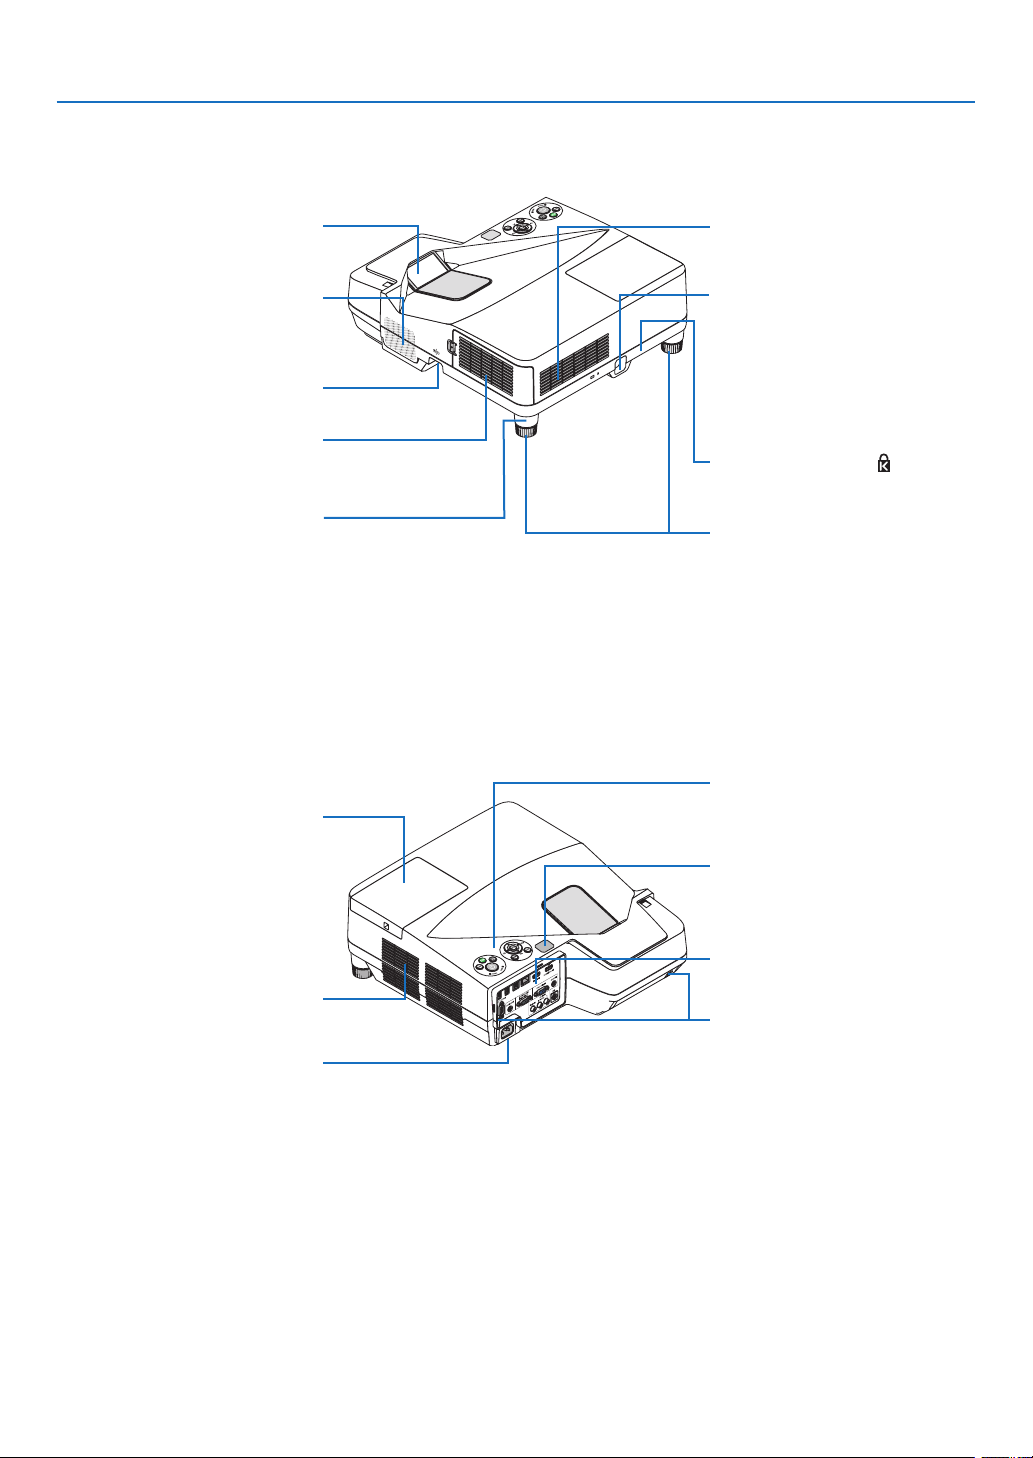
Part Names of the Projector
Top and Screen Side of Projector
1. Introduction
Projection Window
MonauralSpeaker(20W)
Focus Ring
(→ page 18)
FilterCover/IntakeVent/Filter
(→ page 118, 125)
Spacer (Left/Right)
To fine-adjust the height of the rear
foot, remove the spacer and rotate
the rear foot to the desired height.
(→ page 19)
* ThissecurityslotsupportstheMicroSaver®SecuritySystem.
Terminal Panel Side of Projector
Lamp Cover
(→ page 123)
IntakeVent/Filter
(→ page 118, 125)
Security chain opening
Attach an anti-theft device.
The security chain opening accepts
security wires or chains up to 0.18
inch/4.6 mm in diameter.
Built-in Security Slot (
Tilt Foot
(→ page 19)
Controls
(→ page 7)
Remote Sensor
(→ page 10)
)*
Exhaust Vent
ACInput
Connect the supplied power cord’s
three-pin plug here, and plug the
other end into an active wall outlet.
(→ page 13)
Terminal Panel (→ page 8)
Screw Hole for Cable Cover (Left/
Right)
(→ page 6)
4
Page 16
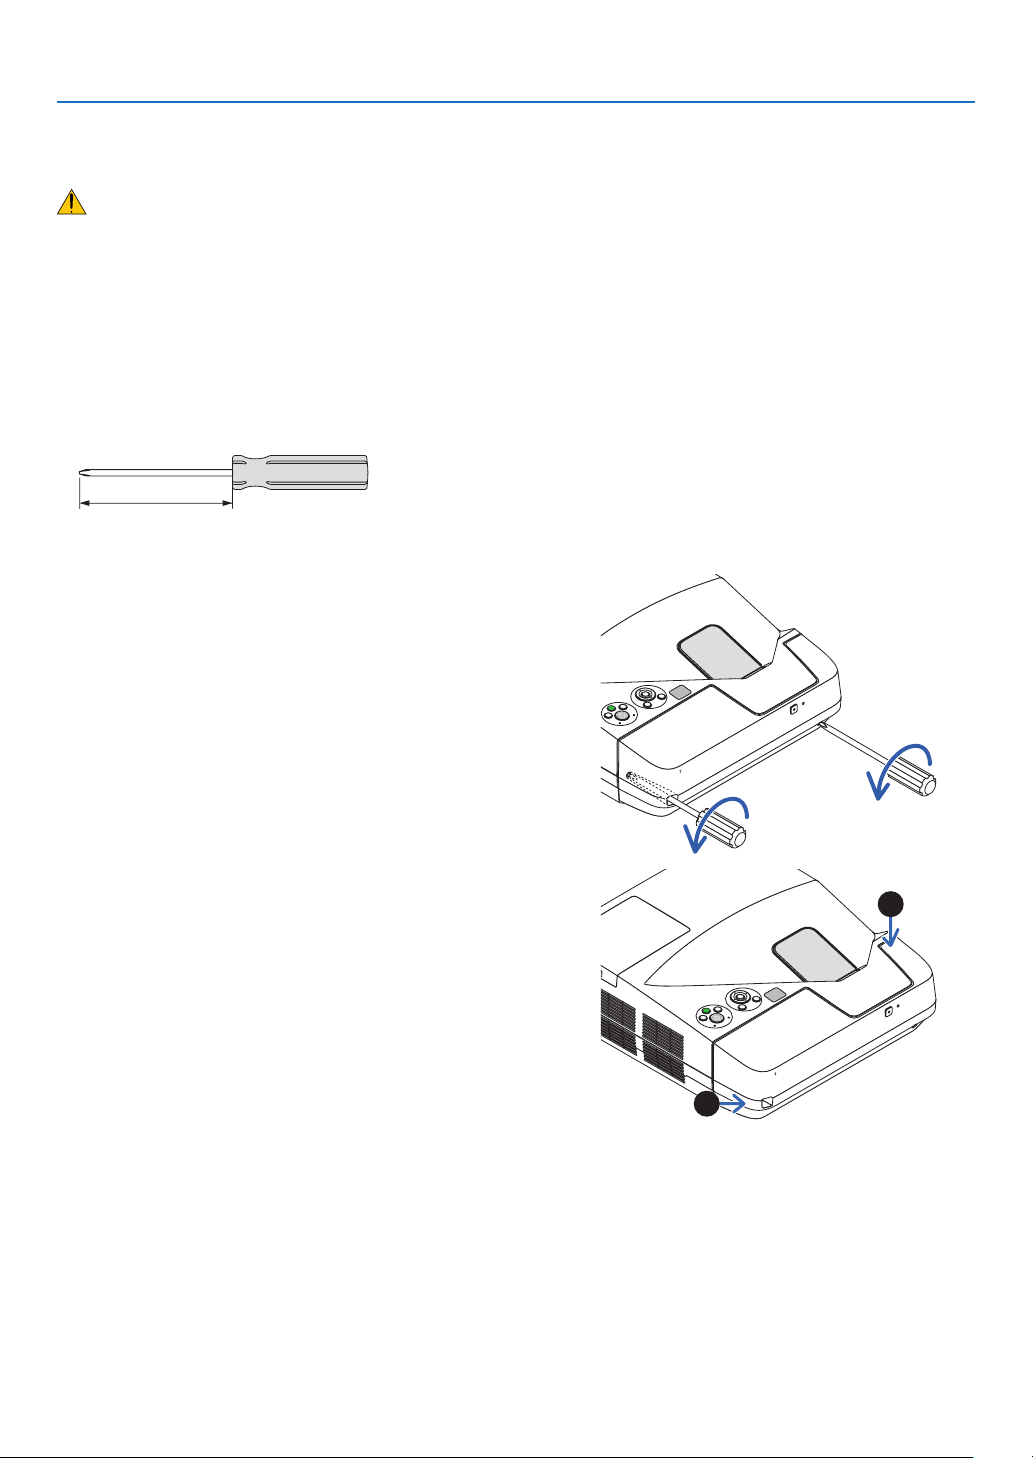
1. Introduction
1
2
Removing and Attaching the Cable Cover
Afternishingconnections,attachthesuppliedcablecovertoproperlyhidethecables.
CAUTION:
• Besuretotightenthescrewsafterattachingthecablecover.Failuretodosomaycausethecablecovertocome
offandfall,resultingininjuryordamagetothecablecover.
• Donotputbundledcablesinthecablecover.Doingsomaydamagethepowercord,resultinginare.
• Donotholdthecablecoverwhilemovingtheprojectorordonotapplyexcessiveforcetothecablecover.Doingso
maydamagethecablecover,resultingininjury.
Removingthecablecover
Toolneeded:
• Phillipsscrewdriver(plus-head)about9cm/4inchesinlength
9 cm/4 inches
1. Loosen the cable cover screws until the Phillips screw-
driver goes into a freewheeling condition.
•Thesescrewsremaintostay.
2. Remove the cable cover.
1Push up the cable cover slightly and rotate it to release.
Pull the cable cover while pushing and holding the arrow
part
Ifyoundittohardtoreleasethecablecover,tryholdingit
slightly up.
5
Page 17
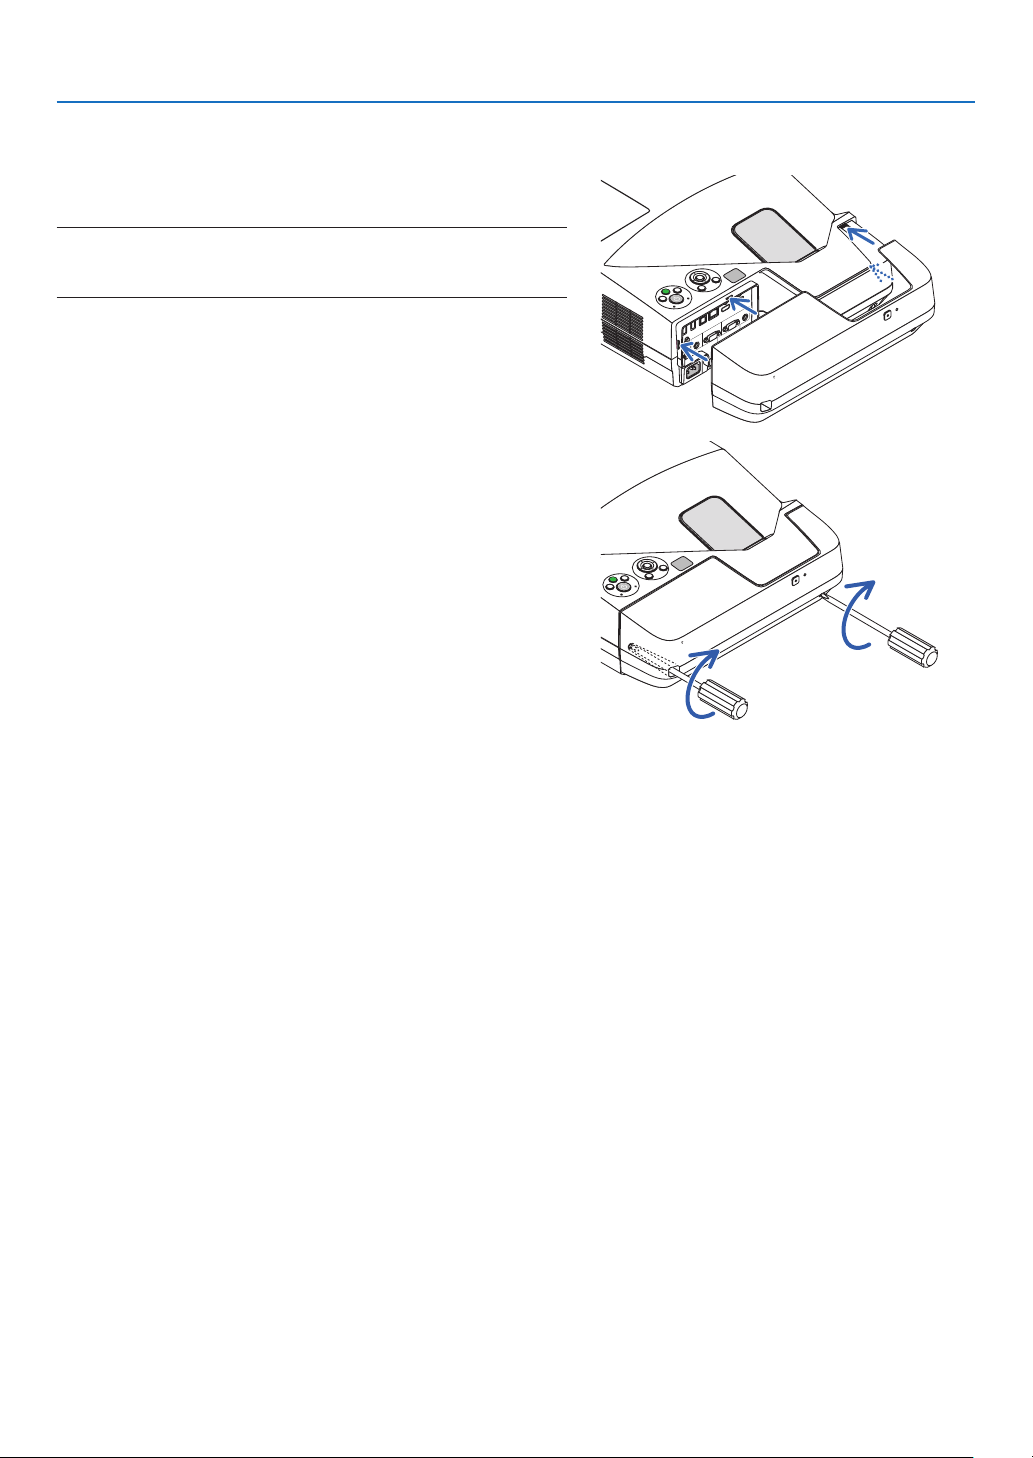
Attachingthecablecover
1. Align four tabs of the cable cover with grooves of the pro-
jector and push the cable cover until you click it.
NOTE:
• Becarefulnottogetcablescaughtinbetweenthecablecoverandthe
projector.
2. Tighten the cable cover screws.
• Besuretotightenthescrews.
1. Introduction
6
Page 18
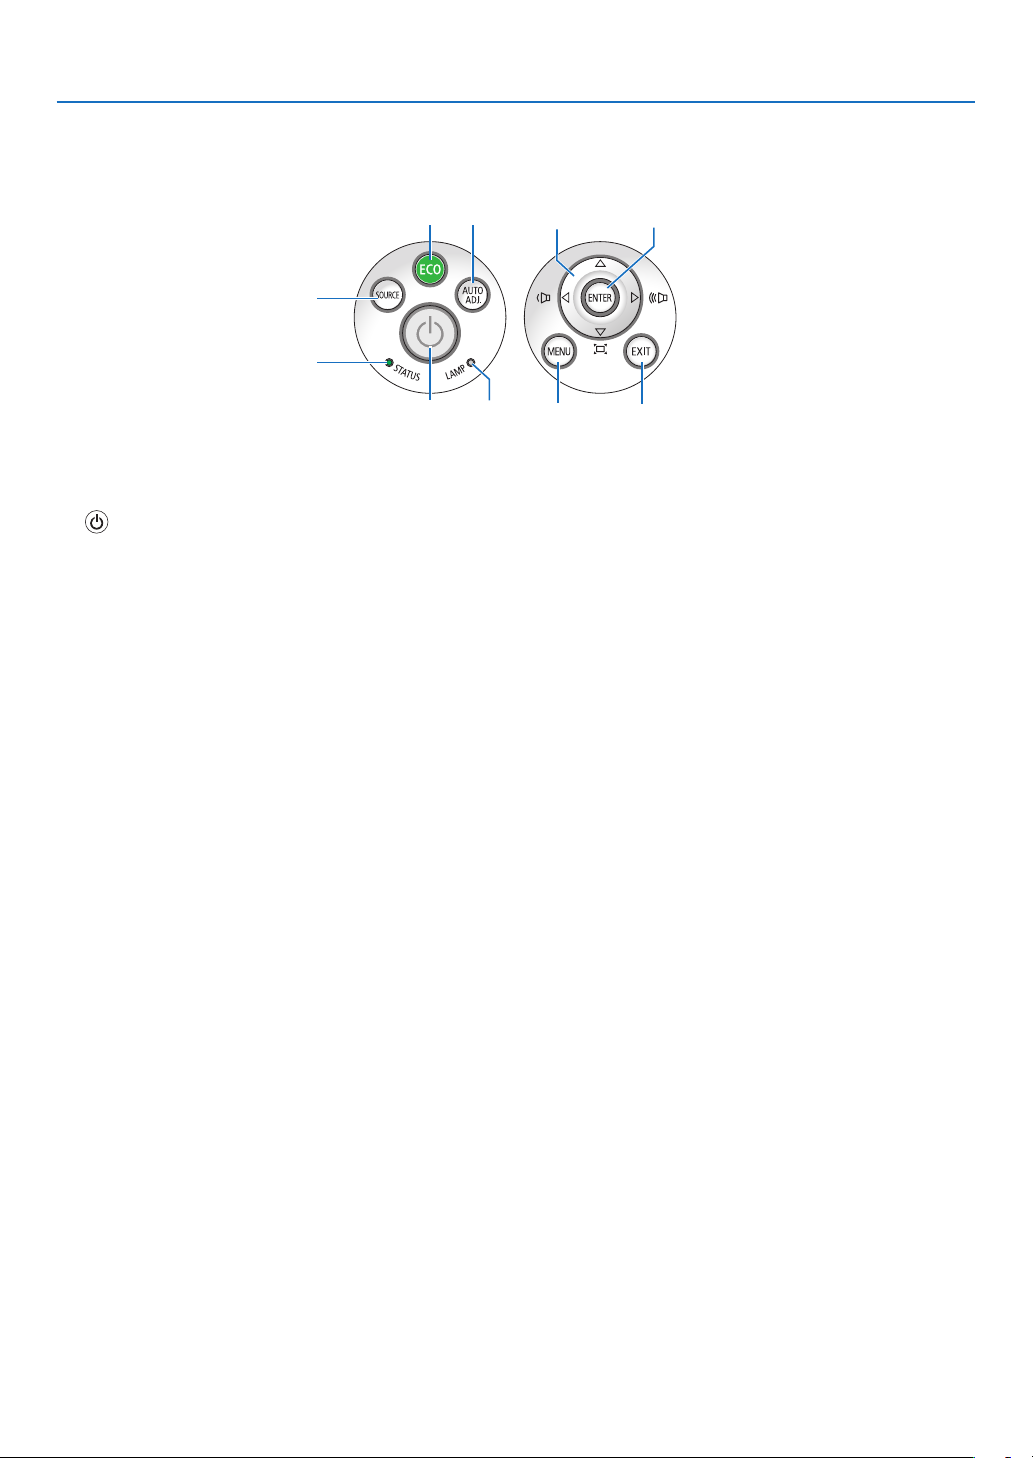
Top Features
1, 2
7
4
8
9
11
5
6
10
3
1. (POWER)Button(→page14, 24)
2. POWER Indicator (→page13, 14, 24, 128)
3. STATUSIndicator(→page128)
4. LAMPIndicator(→page122, 128)
5. ECOButton(→page27)
6. SOURCEButton(→page16)
7. AUTOADJ.Button(→page23)
8. MENUButton(→page72)
9.
(→page15, 21, 23, 72)
10.ENTERButton(→page72)
11.EXITButton(→page72)
/VolumeButtons / KeystoneButtons
1. Introduction
7
Page 19
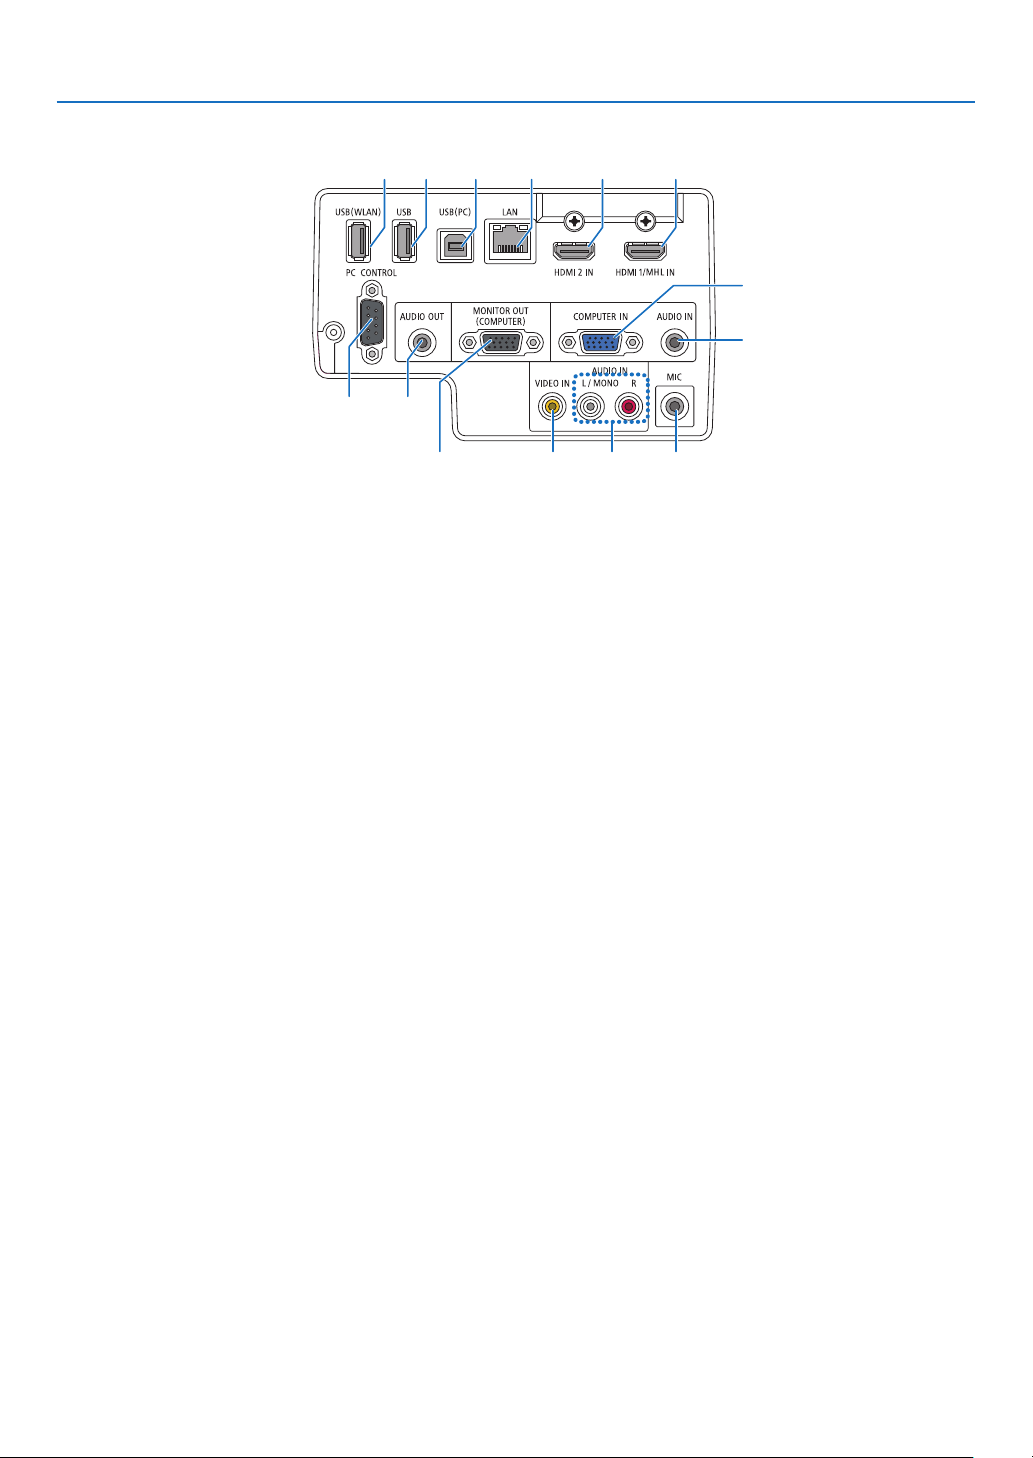
Terminal Panel Features
1
2
45
7
6
9
14
8 10
111312 3
1. COMPUTERIN/ComponentInputTerminal(Mini
D-Sub15Pin)(→page106, 110, 113)
2. COMPUTERAUDIOINMiniJack(StereoMini)
(→
page106, 107, 110)
3. HDMI1/MHLINTerminal(TypeA)
(→
page106, 107, 111, 112)
4. HDMI2INTerminal(TypeA)
(→
page106, 107, 111)
5. USB(PC)Port(TypeB)
(→
page42, 43, 106)
6. MONITOROUT(COMPUTER)Terminal(MiniD-Sub
15Pin)(→page108)
7. AUDIO OUT Mini Jack (Stereo Mini)(→ page
108)
8. VIDEOINTerminal(RCA)(→page109, 113)
9. VIDEO/S-VIDEOAUDIOINL/MONO,R(RCA)
(→
page109)
10.MICInputJack(MonauralMini)
(→page63)
11.LANPort(RJ-45)(→page114)
12.USB(WirelessLAN)Port
(→page115)
13.USBPort(TypeA)(→page66)
14.PCCONTROL[PCCONTROL]Port(D-Sub9Pin)
(→
page136)
Usethisport to connectaPCor control system.
Thisenablesyoutocontroltheprojectorusingserial
communicationprotocol.Ifyouarewritingyourown
program,typicalPCcontrolcodesareonpage136.
1. Introduction
8
Page 20
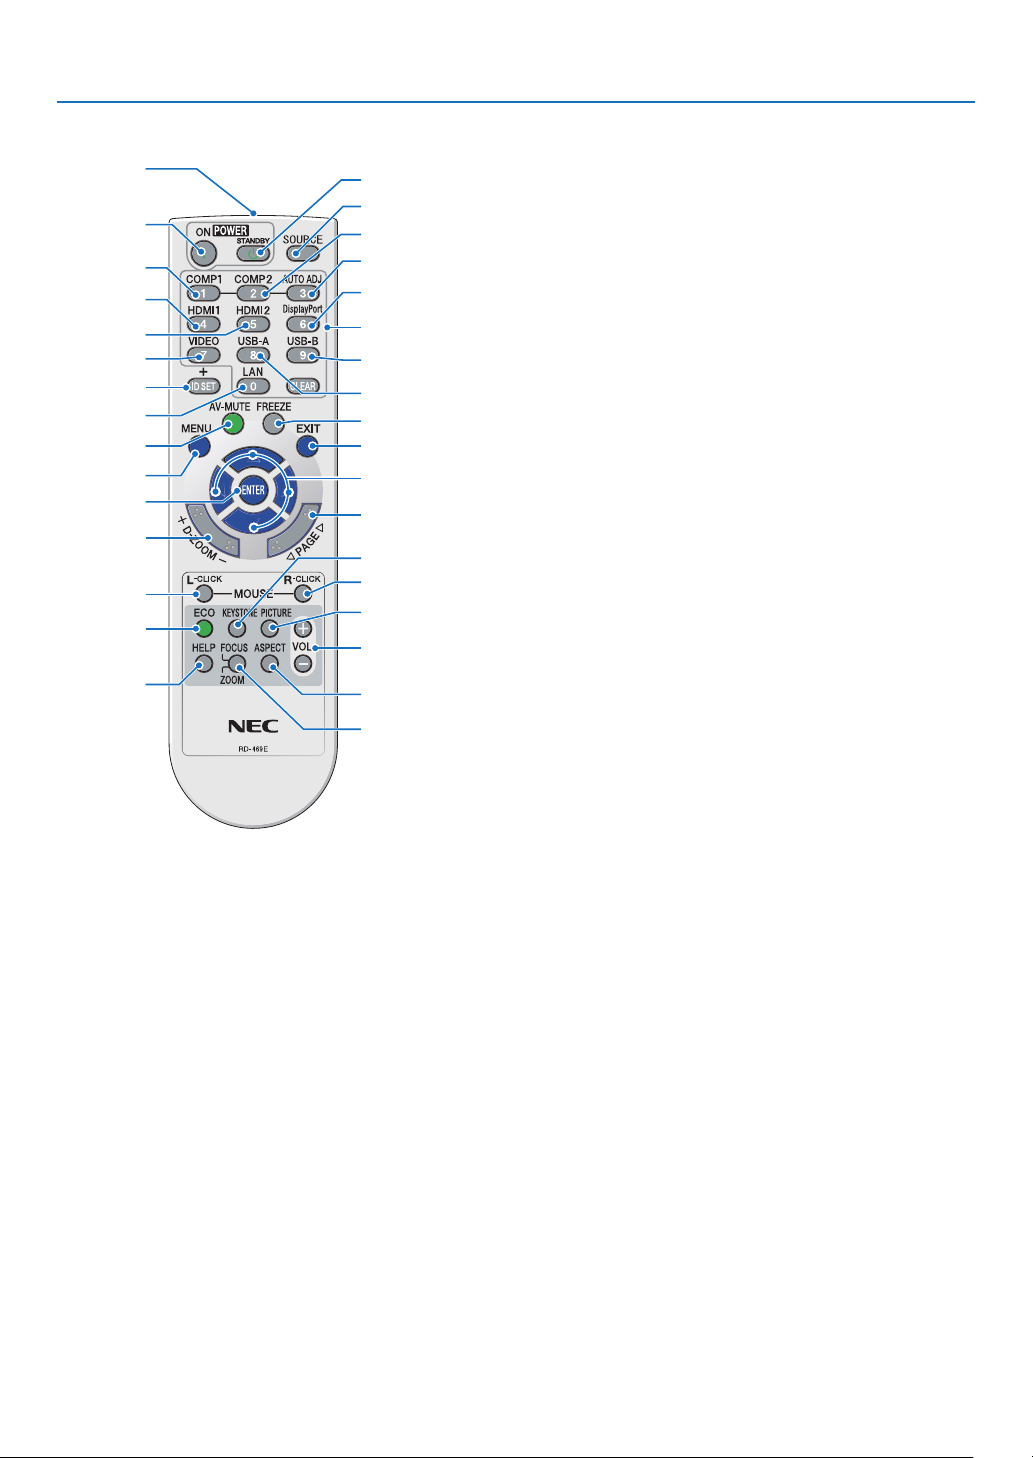
1. Introduction
3
4
6
7
1
2
10
16
17
15
14
9
5
8
13
30
31
32
20
21
26
28
29
25
24
23
22
27
33
19
18
12
11
Part Names of the Remote Control
10.DisplayPortButton
(→page16)
11.VIDEOButton(→page16)
12.USB-AButton(→page16, 66, 68)
13.USB-BButton(→page16, 106)
14.LANButton(→page16)
15.IDSETButton
(→page91)
16.NumericKeypadButton/CLEARButton
(→page91)
17.FREEZEButton
(→page26)
18.AV-MUTEButton
(→page26)
19.MENUButton
(→page72)
20.EXITButton(→page72)
21. Button(→page72)
22.ENTERButton(→page72)
23.D-ZOOM(+)(–)Button
(→page26, 27)
1. Infrared Transmitter
(→page10)
2. POWERONButton
(→page14)
3. POWERSTANDBYButton
(→page24)
4. SOURCEButton
(→page16)
5. COMPUTER1Button
(→page16)
6. COMPUTER2Button
(Thisbuttondoesnotworkinthisseriesofprojectors)
7. AUTOADJ.Button
(→page23)
8. HDMI1/MHLButton
(→page16)
9. HDMI2Button
(→page16)
* TheMOUSEL-CLICKandMOUSER-CLICKbuttonsworkonlywhenaUSBcableisconnectedwithyourcom-
puter.
24.MOUSEL-CLICKButton*
(→page42)
25.MOUSER-CLICKButton*
(→page42)
26.PAGE/Button
(→page42)
27.ECOButton(→page27)
28.KEYSTONEButton
(→page29)
29.PICTUREButton
(→page78, 80)
30.VOL.(+)(–)Button
(→page23)
31.ASPECTButton
(→page83)
32.FOCUS/ZOOMButton
TheZOOMbuttonwilldisplaytheDIGITALZOOMbar.
(→page20, 86)TheFOCUSbuttondoesnotwork
onthisseriesofprojectors.
33.HELPButton
(→page99)
9
Page 21
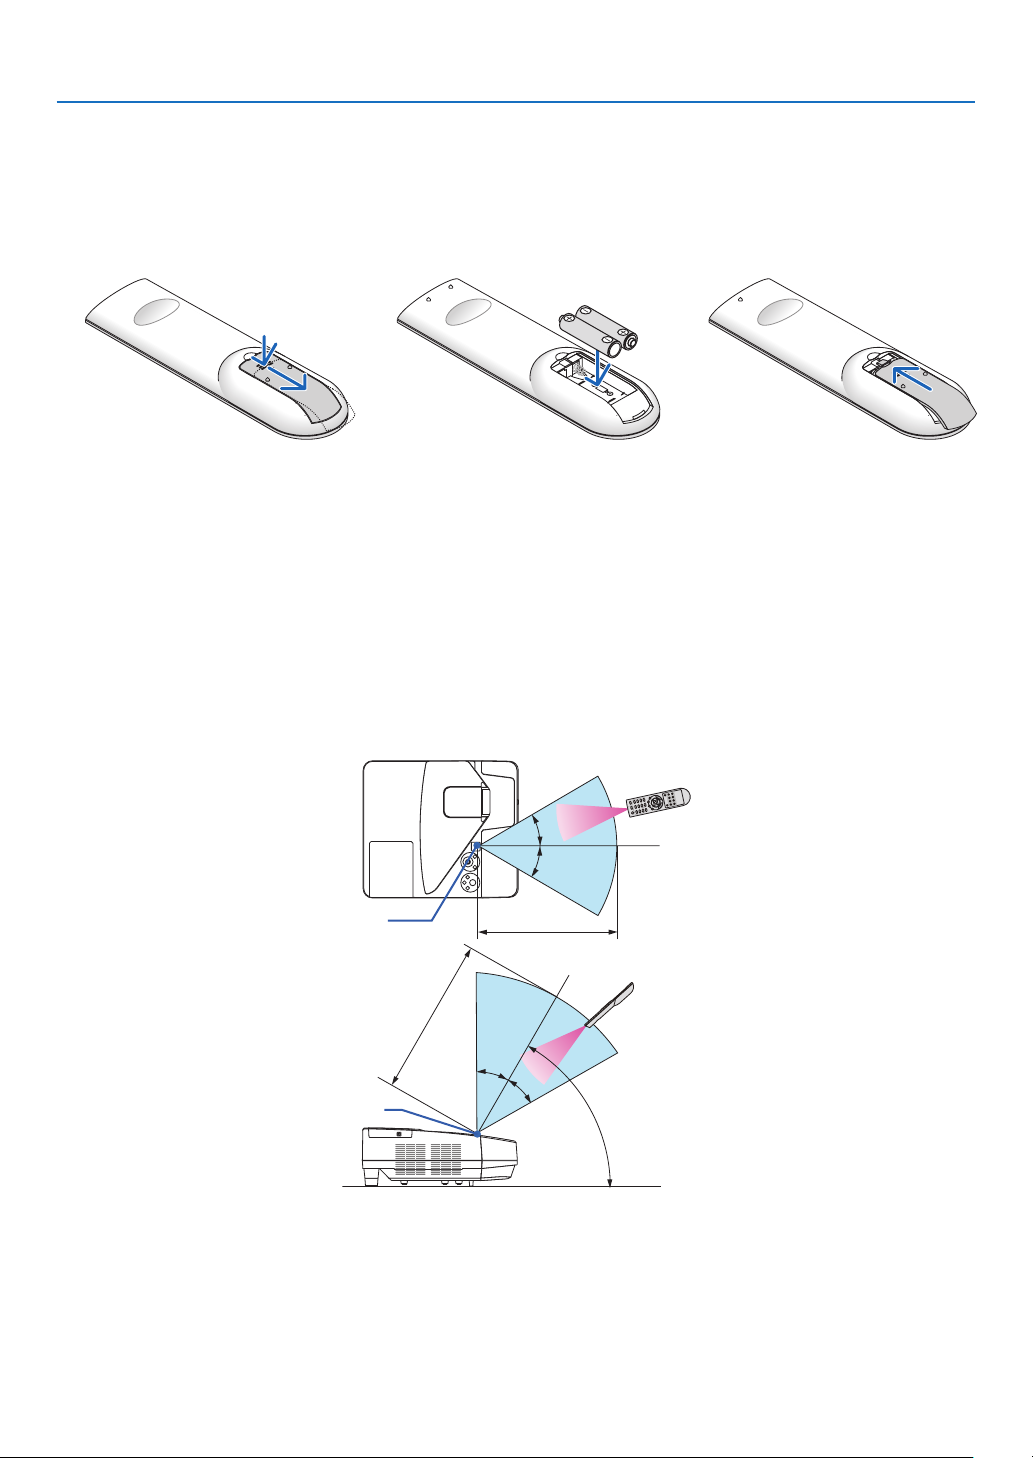
30°
30°
30°
30°
60°
Battery Installation
OPEN
OPEN
1. Introduction
1
Pressrmlyandslidethebattery
coveroff.
2
Installnewbatteries(AAA).Ensure
thatyouhavethebatteries’polarity
(+/−)alignedcorrectly.
3
Slipthecoverbackoverthebatteriesuntilitsnapsintoplace.Do
notmixdifferenttypesofbatteries
ornewandoldbatteries.
Remote Control Precautions
• Handletheremotecontrolcarefully.
• Iftheremotecontrolgetswet,wipeitdryimmediately.
• Avoidexcessiveheatandhumidity.
• Donotshort,heat,ortakeapartbatteries.
• Donotthrowbatteriesintore.
• Ifyouwillnotbeusingtheremotecontrolforalongtime,removethebatteries.
• Ensurethatyouhavethebatteries’polarity(+/−)alignedcorrectly.
• Donotusenewandoldbatteriestogether,orusedifferenttypesofbatteriestogether.
• Disposeofusedbatteriesaccordingtoyourlocalregulations.
Operating Range for Wireless Remote Control
Remote control
Remote sensor on projector cabinet
19.7 feet/6 m
Remote control
22 feet/7 m
Remote sensor on projector cabinet
• Theinfraredsignaloperatesbyline-of-sightuptoadistanceofabout22feet/7mandwithina60-degreeangleof
theremotesensorontheprojectorcabinet.
• Theprojectorwillnotrespondifthereareobjectsbetweentheremotecontrolandthesensor,orifstronglightfalls
onthesensor.Weakbatterieswillalsopreventtheremotecontrolfromproperlyoperatingtheprojector.
10
Page 22

Software Included on CD-ROM
NamesandFeaturesofBundledSoftwarePrograms
Nameofsoftwareprogram Features
VirtualRemoteTool
(Windowsonly)
Nameofsoftwareprogram Features
ImageExpressUtilityLite
ImageExpressUtilityLitefor
MacOS
Nameofsoftwareprogram Features
PCControlUtilityPro4
PCControlUtilityPro5(forMac
OS)
ThisisasoftwareprogramusedtocontrolthepowerON/OFFandsourceselectionoftheprojectorfromyourcomputerbyusingthesuppliedcomputercable
(VGA)andothers.(→page36)
• Thisisasoftwareprogramusedtoprojectyourcomputer’sscreenoverthe
USBcableorthewired/wirelessnetwork.Thecomputercable(VGA)isnot
required.(→page56, 60)
• ThissoftwareprogramcanbeusedtocontrolthepowerON/OFFandsource
selectionoftheprojectorfromyourcomputer.
• TheGeometricCorrectionTool(GCT)functionallowsyoutocorrectdistortion
ofimagesprojectedonacurvedwall.(→page61)
* “USBDisplay”and“GCT”functionsarenotsupportedbyMac.
Thisisasoftwareprogramusedtooperatetheprojectorfromthecomputerwhen
thecomputerandtheprojectorareconnectedwithLAN(wiredorwireless)or
aserialcable.(→page52)
1. Introduction
NOTE:
• ImageExpressUtilityLitedoesnotsupport“MeetingMode”inImageExpressUtility2.0suppliedwithourothermodels.
DownloadServiceandOperatingEnvironment
Pleasevisitourwebsiteaboutoperatingenvironmentanddownloadserviceforeachsoftware:
VisitURL:http://www.nec-display.com/dl/en/index.html
Download-Projector→Software&Driver
11
Page 23

2. Projecting an Image (Basic Operation)
Thissectiondescribeshowtoturnontheprojectorandtoprojectapictureontothescreen.
1 Flow of Projecting an Image
Step 1
• Connectingyourcomputer/Connectingthepowercord(→ page 13)
Step 2
• Turningontheprojector(→ page 14)
Step 3
• Selectingasource(→ page 16)
Step 4
• Adjustingthepicturesizeandposition(→ page 17)
• Correctingkeystonedistortion[KEYSTONE](→ page 21)
Step 5
• Adjustingapictureandsound
- Optimizing a computer signal automatically (→ page 23)
- Turning up or down volume (→ page 23)
Step 6
• Makingapresentation
Step 7
• Turningofftheprojector(→ page 24)
Step 8
• WhenMovingtheProjector(→ page 25)
12
Page 24
2. Projecting an Image (Basic Operation)
Connecting Your Computer/Connecting the Power Cord
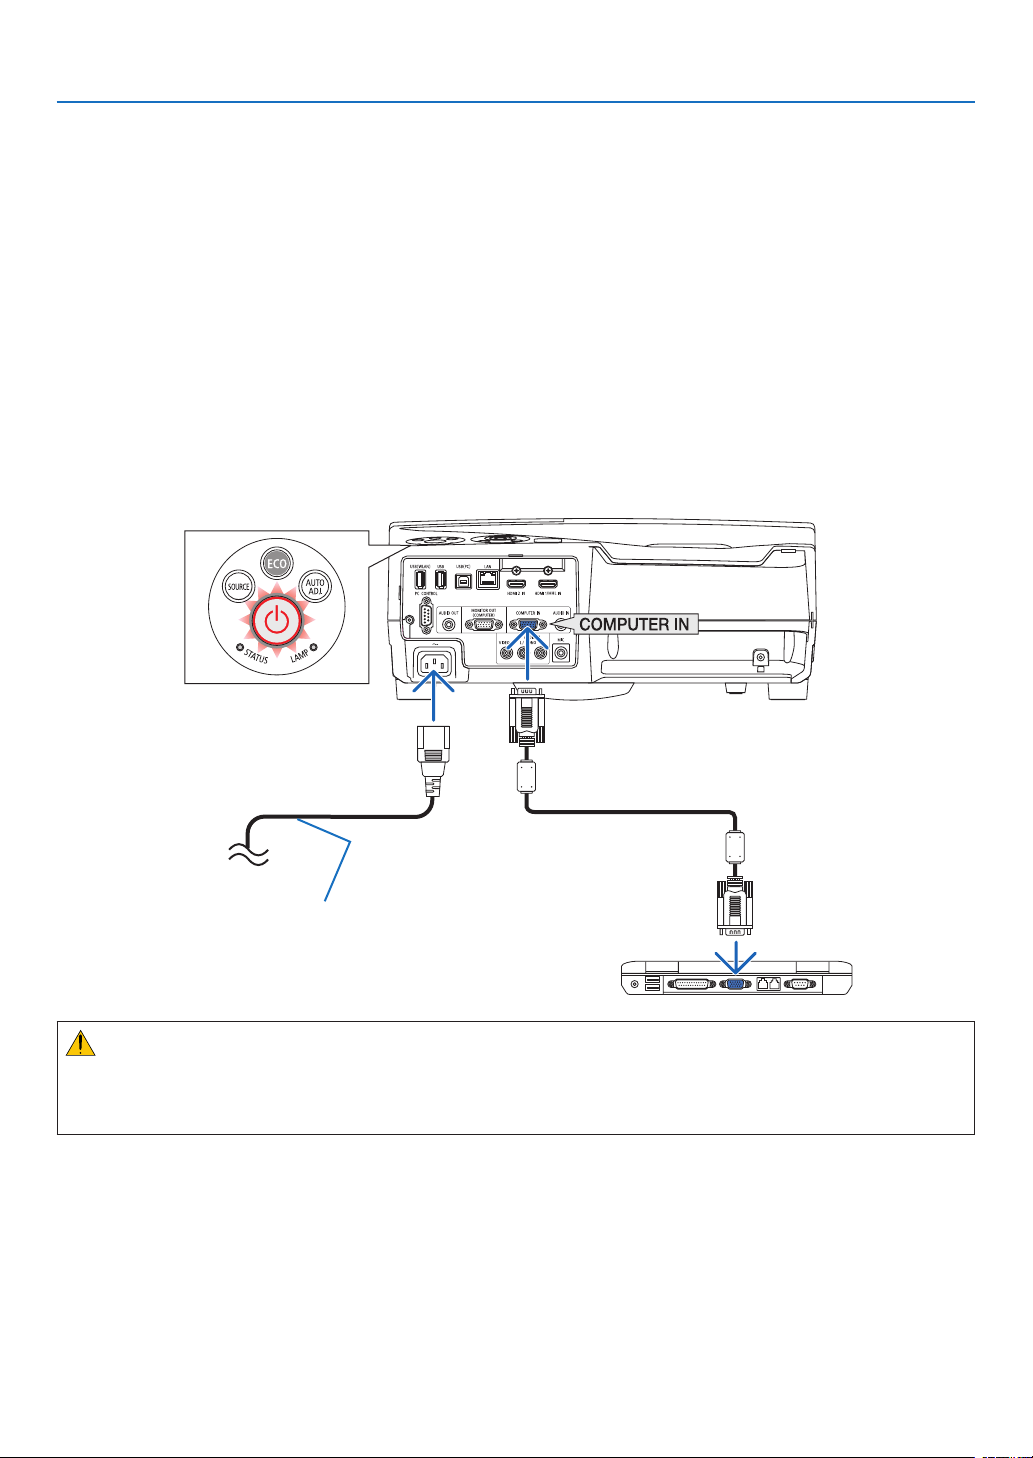
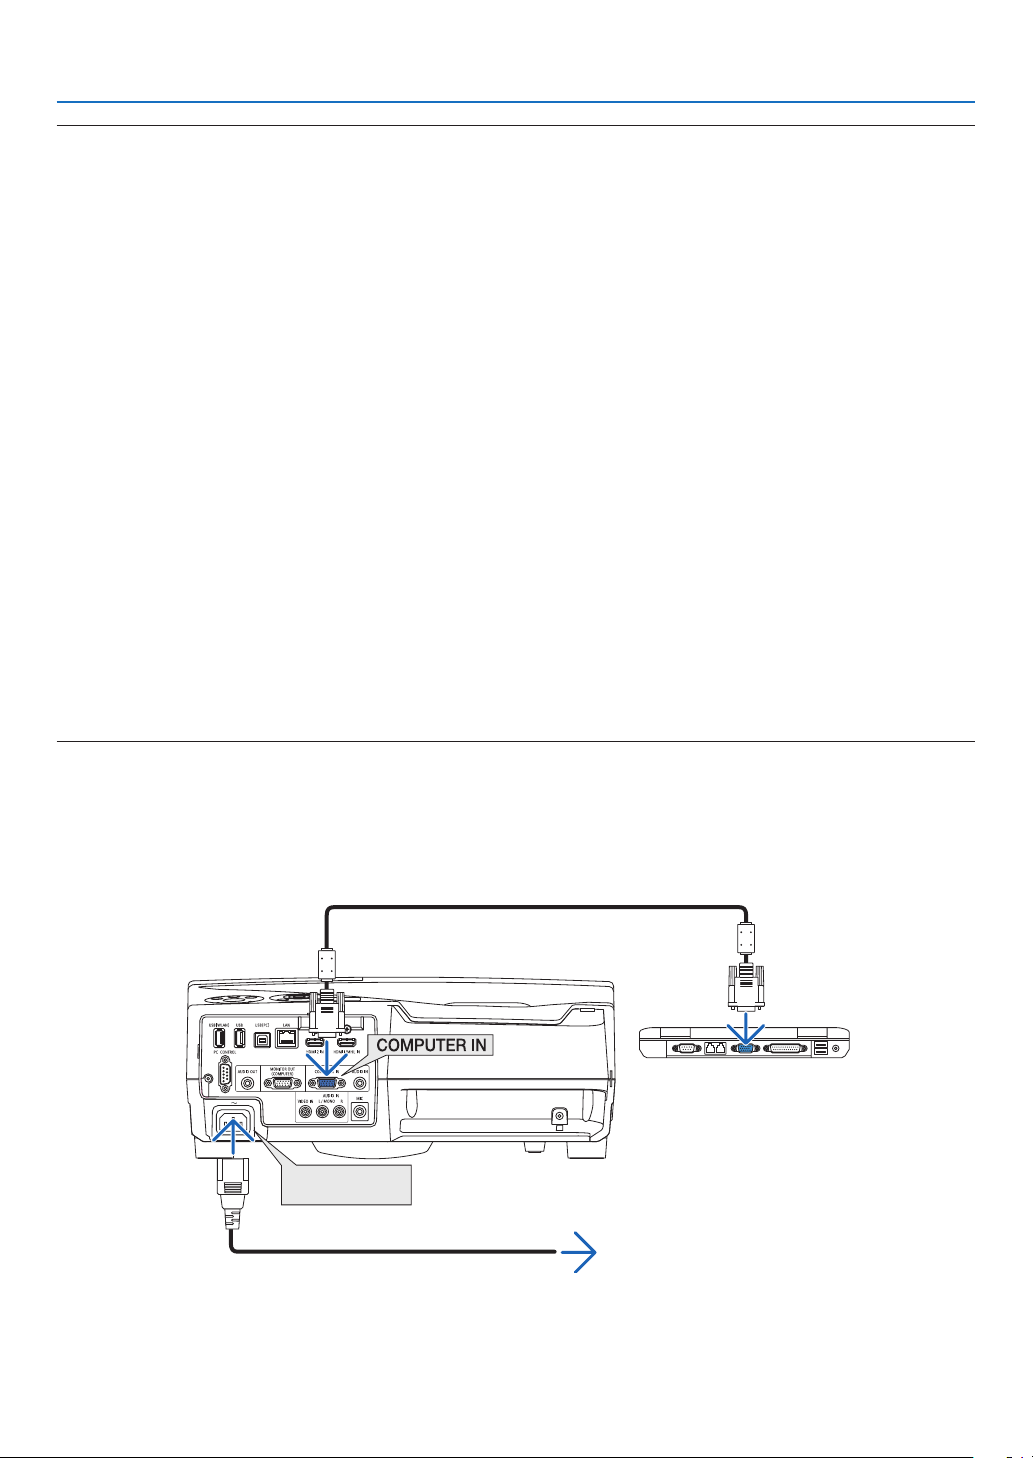
1. Connectyourcomputertotheprojector.
This section will show you a basic connection to a computer. For information about other connections, see “6.
InstallationandConnections”onpage106.
Connectthecomputercable(VGA)betweentheprojector’sCOMPUTERINterminalandthecomputer’sport(mini
D-Sub 15 Pin). Turn two thumb screws of both terminals to fix the computer cable (VGA).
2. Connectthesuppliedpowercordtotheprojector.
Firstconnectthesuppliedpowercord’sthree-pinplugtotheACINof theprojector,and thenconnecttheother
plug of the supplied power cord in the wall outlet.
The projector’s power indicator will flash for a few seconds and then will light red* (standby mode).
*Thiswillapplyforbothindicatorswhen[NORMAL]isselectedfor[STANDBYMODE].SeethePowerIndicator
section.(→ page 128)
Makesurethattheprongsarefullyinsertedinto
boththeACINandthewalloutlet.
To wall outlet ←
CAUTION:
PartsoftheprojectormaybecometemporarilyheatediftheprojectoristurnedoffwiththePOWERbuttonorifthe
ACpowersupplyisdisconnectedduringnormalprojectoroperation.
Becarefultohandletheprojector.
13
Page 25
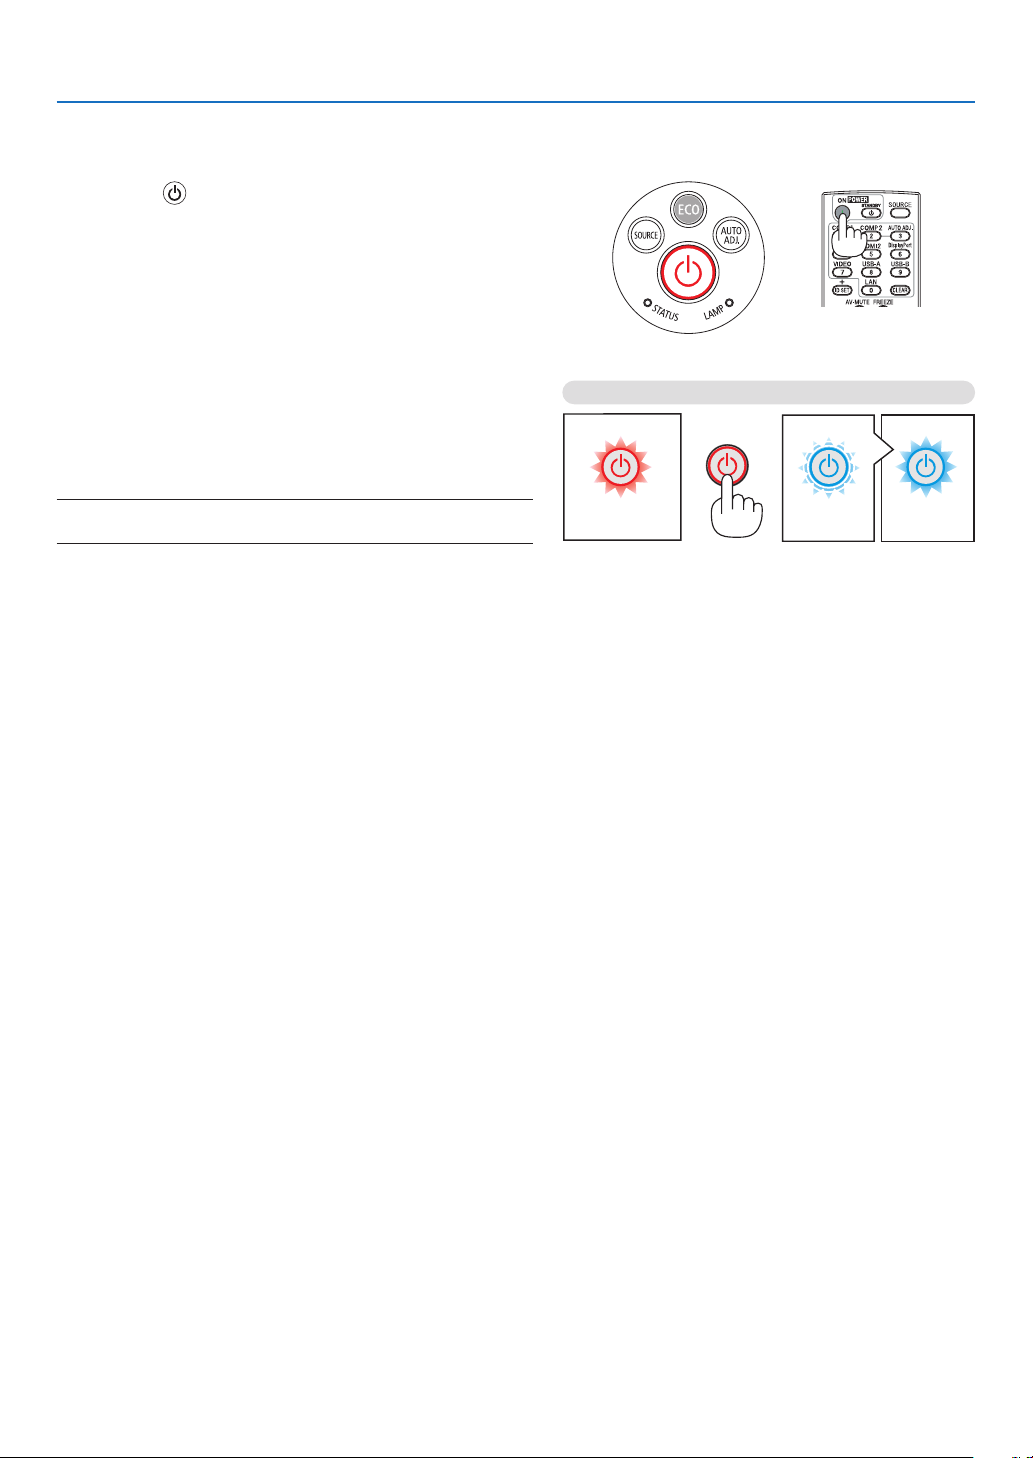
Turning on the Projector
• Pressthe (POWER) button on the projector cabinet
or the POWER ON button on the remote control.
ThePOWERindicatorwillblinkandtheprojectorwillbe-
come ready to use.
TIP:
• Whenthemessage“Projectorislocked!Enteryourpassword.”
isdisplayed,itmeansthatthe[SECURITY]featureisturnedon.
(→page33)
After you turn on your projector, ensure that the computer
or video source is turned on.
2. Projecting an Image (Basic Operation)
Standby Blinking PowerOn
NOTE:Whenno input signalispresent, the no-signalguidanceis
displayed(factorymenusetting).
Steady red light
(→page128)
Blinking blue light Steady blue light
14
Page 26
2. Projecting an Image (Basic Operation)
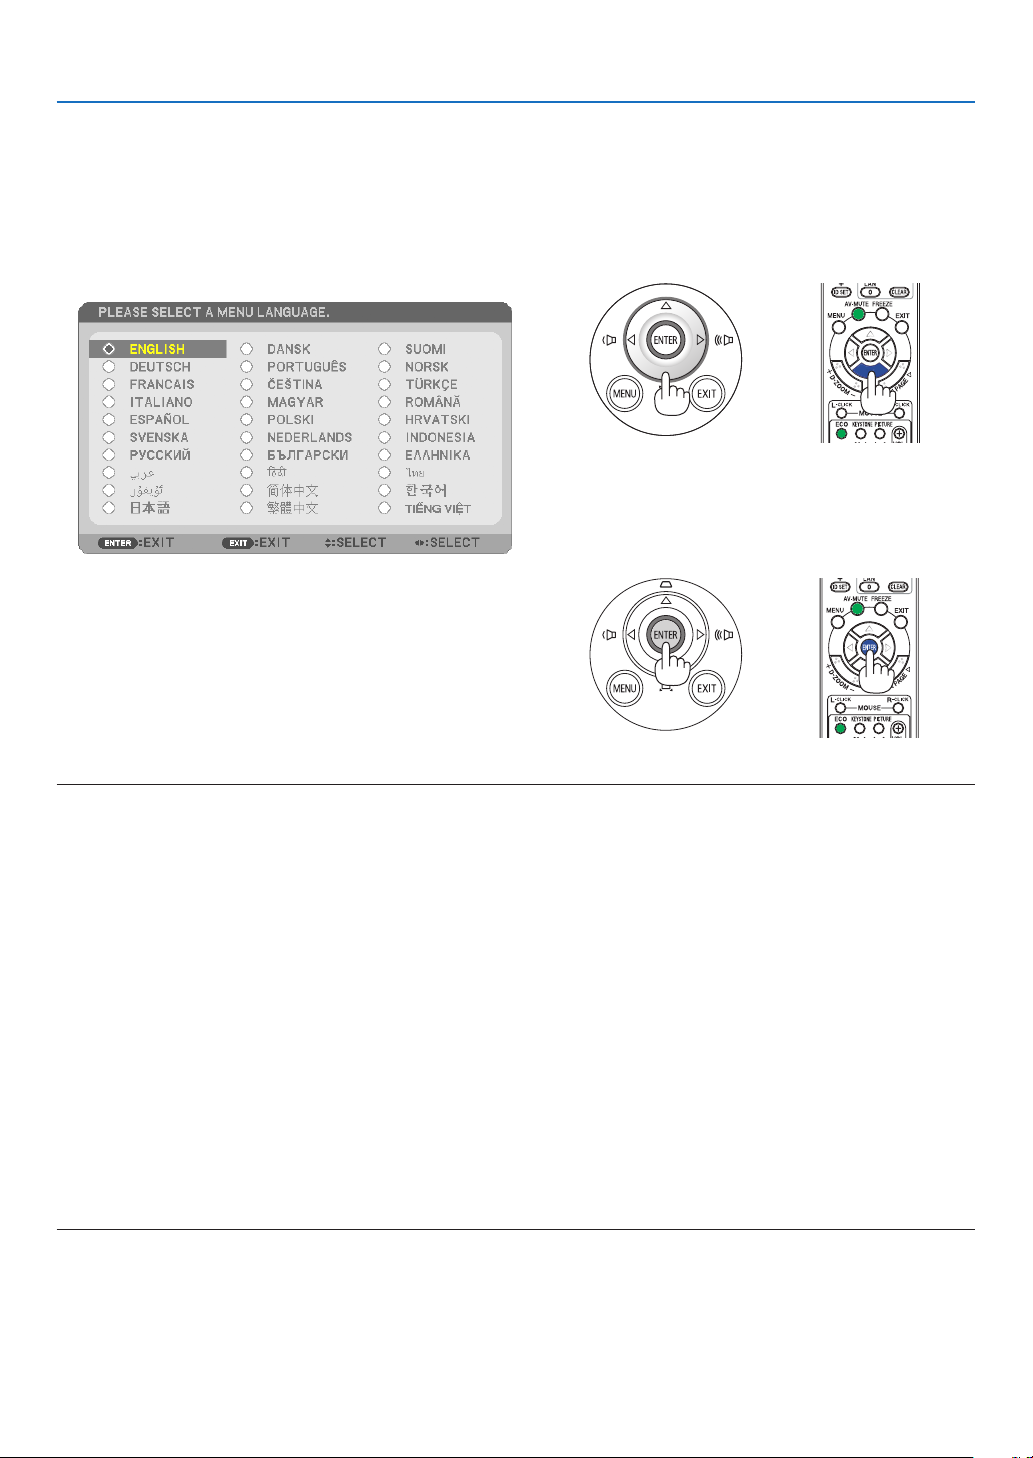
Note on Startup screen (Menu Language Select screen)
Whenyourstturnontheprojector,youwillgettheStartupmenu.Thismenugivesyoutheopportunitytoselectone
ofthe30menulanguages.
Toselectamenulanguage,followthesesteps:
1. Use the , , or button to select one of the 30
languages from the menu.
2. Press the ENTER button to execute the selection.
After this has beendone, you can proceedto themenu
operation.
Ifyouwant,youcanselectthemenulanguagelater.
(→[LANGUAGE]onpage74 and 88)
NOTE:
• IftheprojectorisshutoffbyDIRECTPOWEROFF(pullingoutthepowercord)duringprojection,waitfor1secondatleastfor
reconnectthepowercordforturningontheprojector.
Failingtodosocouldresultinnopowertotheprojector.(Therewillbenostand-byLED)
Shouldthishappen,unplugthepowercordandplugitinagain.Turnonthemainpower.
• Ifoneofthefollowingthingshappens,theprojectorwillnotturnon.
- Iftheinternaltemperatureoftheprojectoristoohigh,theprojectordetectsabnormalhightemperature.Inthisconditionthe
projectorwillnotturnontoprotecttheinternalsystem.Ifthishappens,waitfortheprojector’sinternalcomponentstocool
down.
- Whenthelampreachesitsendofusablelife,theprojectorwillnotturnon.Ifthishappens,replacethelamp.
- IftheSTATUSindicatorlightsorangewiththepowerbuttonpressed,itmeansthatthe[CONTROLPANELLOCK]isturnedon.
Cancelthelockbyturningitoff.(→page90)
- Ifthelampfailstolight,andiftheSTATUSindicatorashesonandoffinacycleofsixtimes,waitafullminuteandthenturn
onthepower.
• WhilethePOWERindicatorisblinkingblueinshortcycles,thepowercannotbeturnedoffbyusingthepowerbutton.
• Immediatelyafterturningontheprojector,screenickermayoccur.Thisisnormal.Wait3to5minutesuntilthelamplightingis
stabilized.
• Whentheprojectoristurnedon,itmaytakesometimebeforethelamplightbecomesbright.
• Ifyouturnontheprojectorimmediatelyafterthelampisturnedofforwhenthelamptemperatureishigh,thefansrunwithout
displayinganimageforsometimeandthentheprojectorwilldisplaytheimage.
15
Page 27
2. Projecting an Image (Basic Operation)
Selecting a Source
Selecting the computer or video source
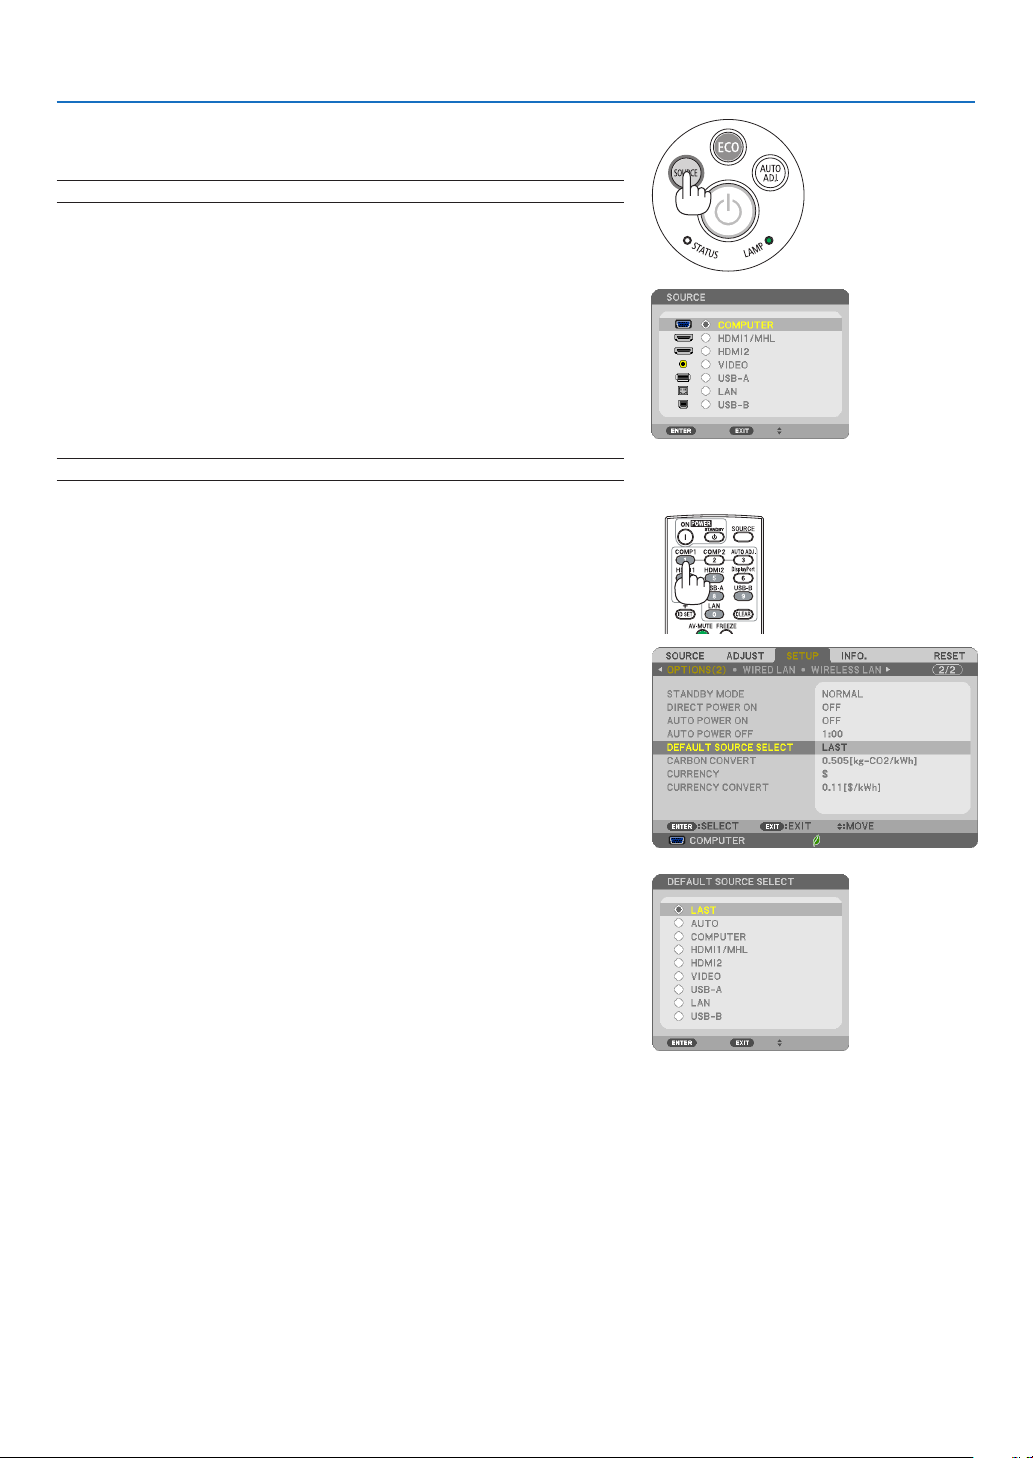
NOTE:Turnonthecomputerorvideosourceequipmentconnectedtotheprojector.
DetectingtheSignalAutomatically
PresstheSOURCEbuttononce.Theprojectorwillsearchfortheavailable
inputsourceanddisplayit.Theinputsourcewillchangeasfollows:
COMPUTER→HDMI1/MHL→HDMI2→VIDEO→USB-A→LAN→
USB-B
• Withthe SOURCE screen displayed,youcan press theSOURCE
buttonafewtimestoselecttheinputsource.
TIP:Ifnoinputsignalispresent,theinputwillbeskipped.
UsingtheRemoteControl
PressanyoneoftheCOMPUTER1,HDMI1/MHL,HDMI2,VIDEO,USBA,USB-B,orLANbuttons.
SelectingDefaultSource
Youcansothatitwillbedisplayedeachtimetheprojectoristurnedon.
1. Press the MENU button.
The menu will be displayed.
2. Press the buttontwicetoselect[SETUP]andthe button or
theENTERbuttontoselect[GENERAL].
3.
Press the buttonfourtimestoselect[OPTIONS(2)].
4. Press the buttonvetimestoselect[DEFAULTSOURCESE-
LECT]andpresstheENTERbutton.
The [DEFAULT SOURCE SELECT] screen will be displayed.
(→ page 95)
5.
Select a source as the default source, and press the ENTER button.
6. PresstheEXITbuttonafewtimestoclosethemenu.
7. Restart the projector.
The source you selected in step 5 will be projected.
TIP:
• When theprojectorisinStandby mode, applyingacomputersignalfrom a
computerconnected totheCOMPUTER INinputwillpoweron theprojector
andsimultaneouslyprojectthecomputer’simage.
([AUTOPOWERON]→page95)
• OnWindows7,acombinationoftheWindowsandPkeysallowsyoutosetup
externaldisplayeasilyandquickly.
16
Page 28
2. Projecting an Image (Basic Operation)
Adjusting the Picture Size and Position
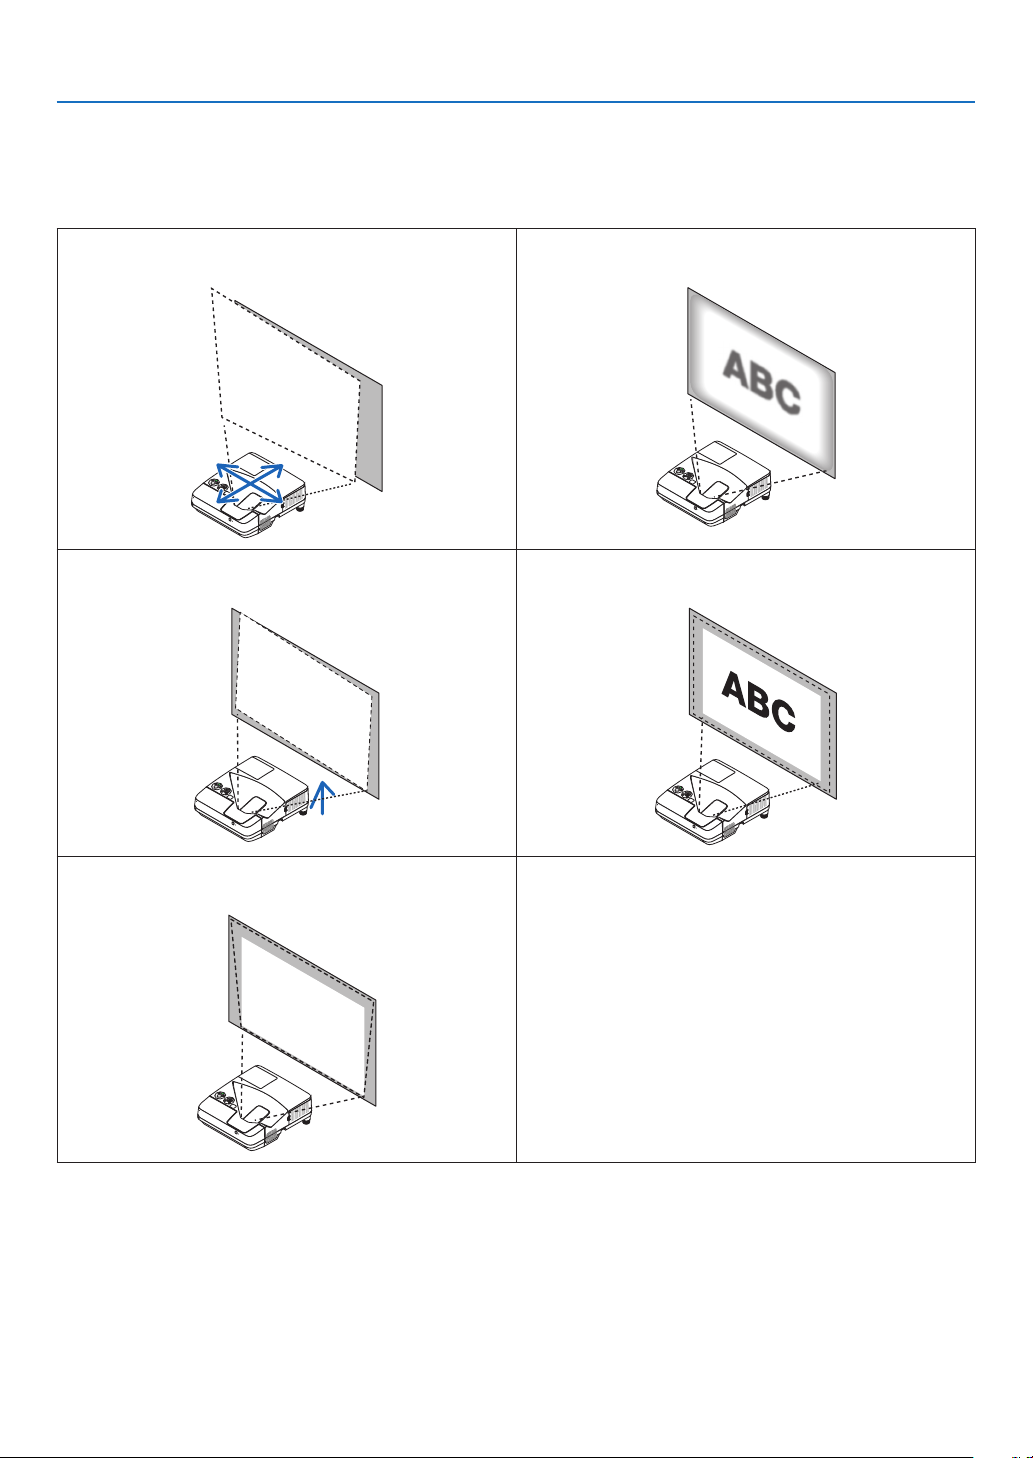
Usetheadjustabletiltfoot,thezoomfunctionorthefocusringtoadjustthepicturesizeandposition.
Inthischapterdrawingsandcablesareomittedforclarity.
Adjustinghorizontal/verticalposition
(→page18)
Finelyadjustingtheleftandrighttilt[TiltFoot]
(→page19)
Adjustingthefocus[Focusring]
(→page18)
Adjustingthesize[DigitalZoom]
(→page20)
Correctingthekeystonedistortion[Keystone]*
(→page21)
* Toperformkeystonecorrectionmanually,see“6.CorrectingKeystoneDistortion[KEYSTONE]”onpage21.
17
Page 29
2. Projecting an Image (Basic Operation)
Adjusting horizontal/vertical position
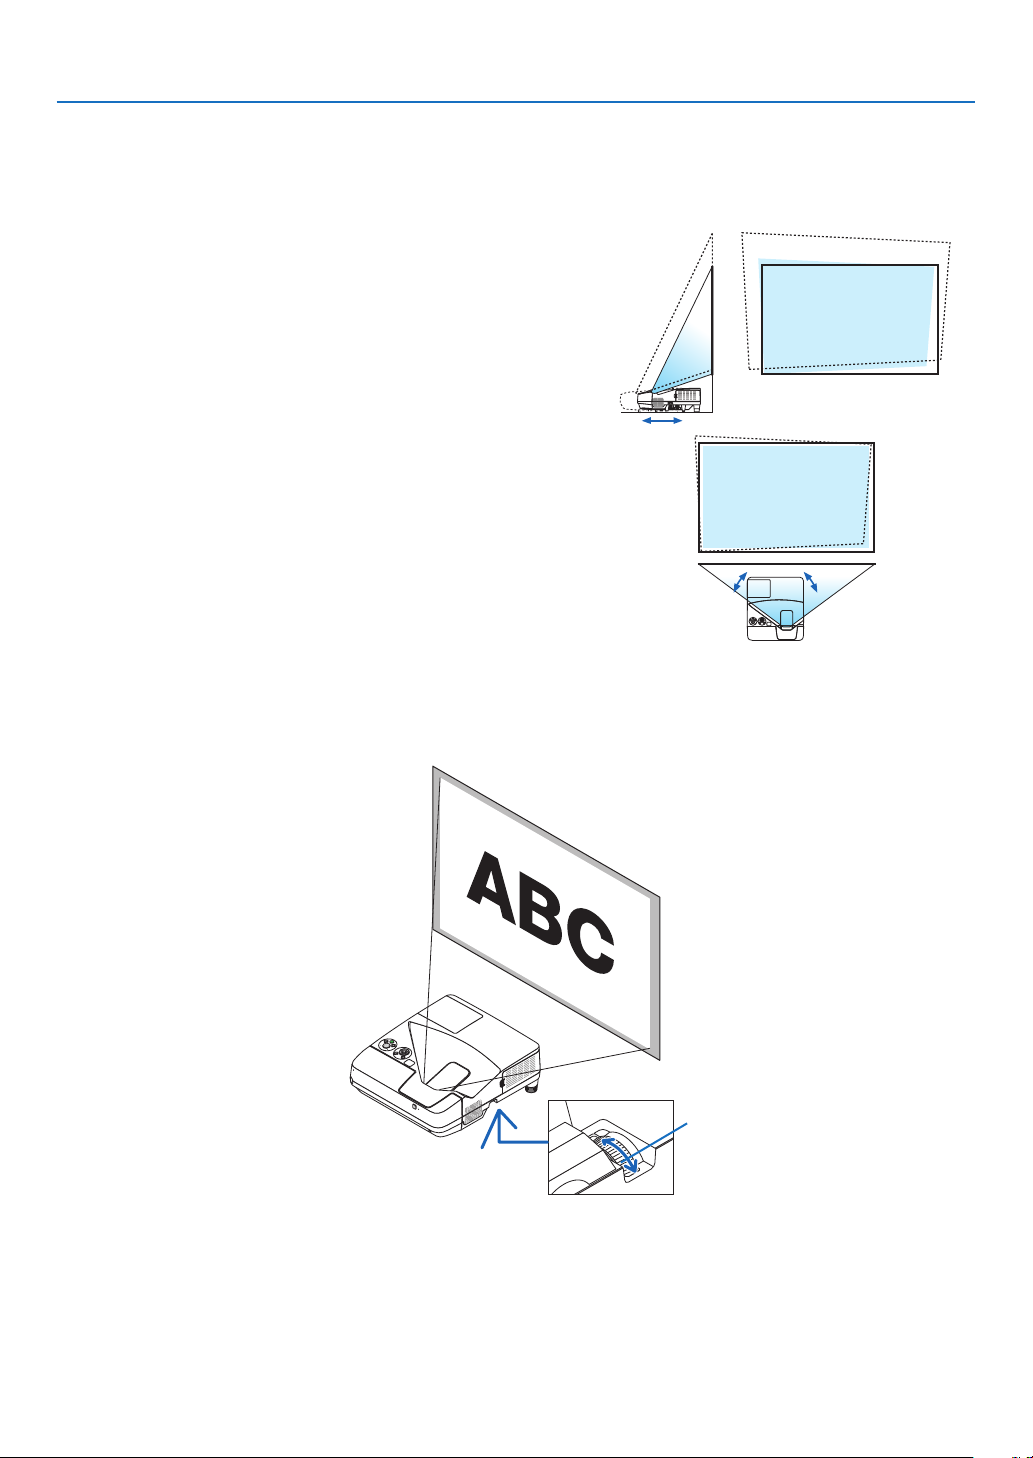
Thethrowdistancecanaffectthesizeandtheheightoftheprojectedimage.Beforeinstallingtheprojector,decide
thethrowdistanceaccordingto“SettingUptheScreenandtheProjector”(→page103, 104)
Itisrecommendedtodisplaythetestpatternwhileadjustingtheimage.(→page92)
1. Move the projector back and forth and left and right so that
the image fits the screen width.
Youcanreducetheimagesizeto70%byusing[DIGITALZOOM]
from the menu.
2. Place the projector so that it is parallel with the screen.
Ifthetopsideoftheimageisnotparallelwithitsbottomside,rotate
theprojectorslightlyto adjust it.If the side of theimageshows
outside the screen, move it to the center line of the screen.
Adjusting the focus (Focus ring)
• Rotatethefocusringuntilyouobtainthebestfocus.
Focus ring
(view from the bottom)
18
Page 30
2. Projecting an Image (Basic Operation)
Adjusting the tilt (Tilt foot)
Adjustingtheleftandrighttilt.
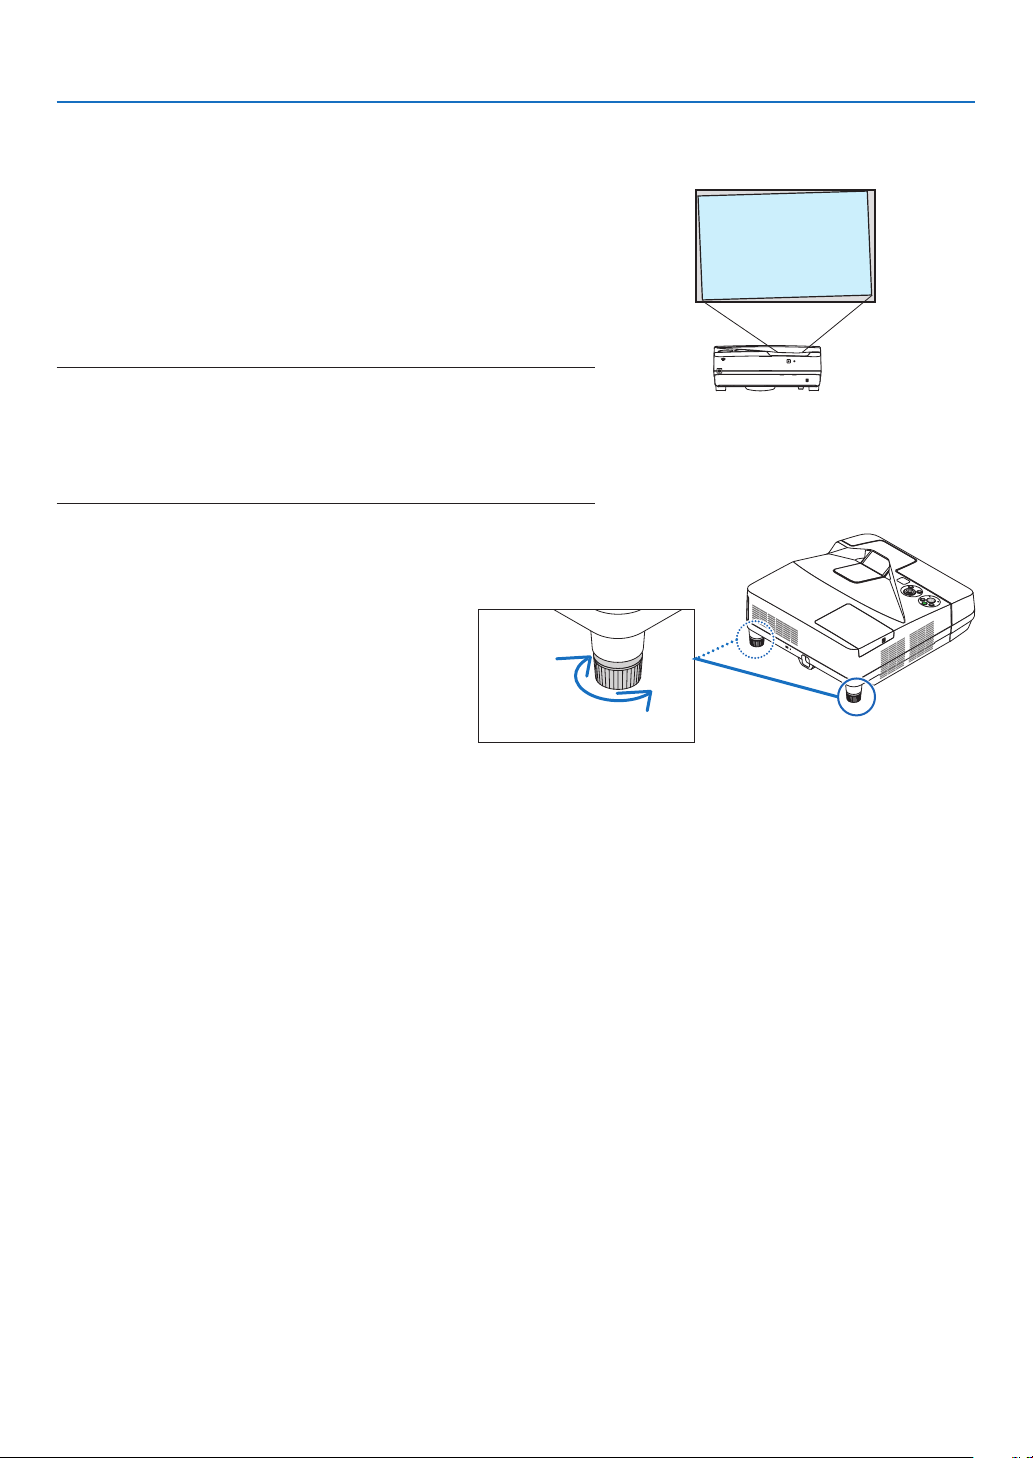
1. Rotate the tilt foot to adjust the left and right tilt.
The tilt foot is equipped at the left and the right front bottom of the
projector.
Iftheprojectedimageistilted,rotateoneofthetiltfoottoadjust
the angle to project.
Ifkeystonedistortionisappeared,adjustiteitherbythe button
onthecabinetorkeystonebuttonontheremotecontrol
NOTE:
• Donotextendthetiltfootbeyonditsheightlimit(18mm/0.7inches).Doing
somaycausethetiltfoottocomeoutoftheprojector.
• Donotusethetilt-footforpurposesotherthanoriginallyintended.
Misusessuchasusingthetiltfoottocarryorhang(fromthewallorceiling)
theprojectorcancausedamagetotheprojector.
Up
Down
19
Page 31
2. Projecting an Image (Basic Operation)
Adjusting the size [Digital Zoom]
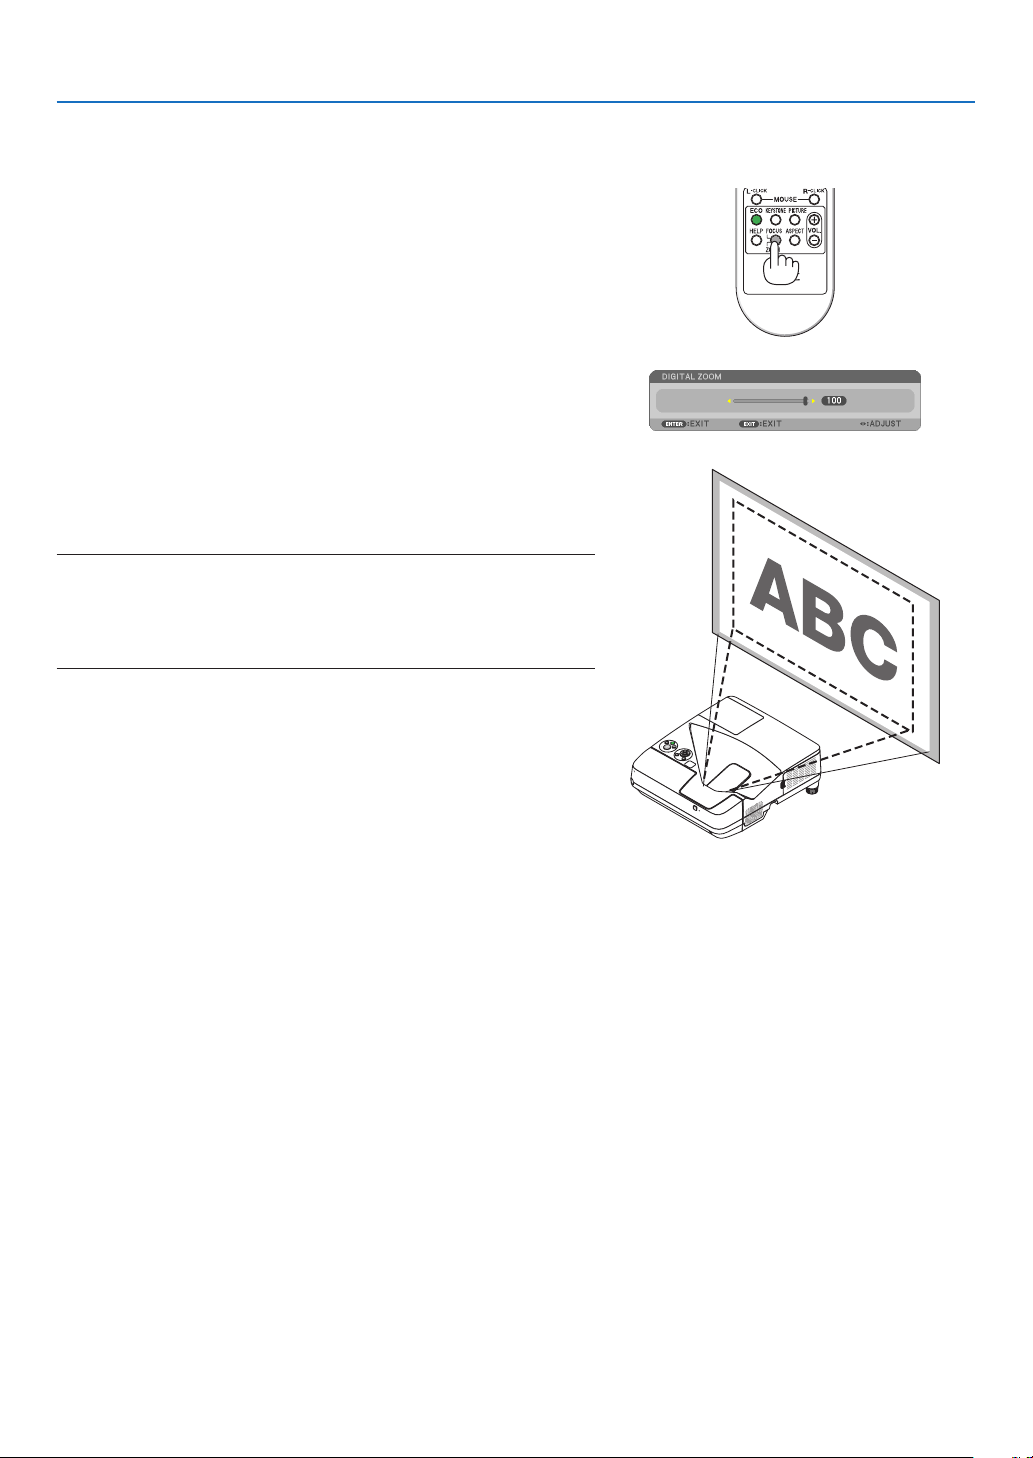
Usetheremotecontroltonelyadjustthesizeoftheimage.
1. PresstheFOCUS/ZOOMbuttonontheremotecontrol.
TheDIGITALZOOMbarwillbedisplayed.
2. Press the or buttontonelyzoominorout.
3. After completing the adjustment, press the ENTER button.
TheDIGITALZOOMbarwillbeclosed.
NOTE:
• Thisfeatureallowsyoutoelectronicallyneadjusttheimagesizeonthe
screen
• ThisfeaturecannotbeusedwhenUSB-A,LAN,orUSB-Bisselectedasa
inputterminal.
20
Page 32
2. Projecting an Image (Basic Operation)
❻ Correcting Keystone Distortion [KEYSTONE]
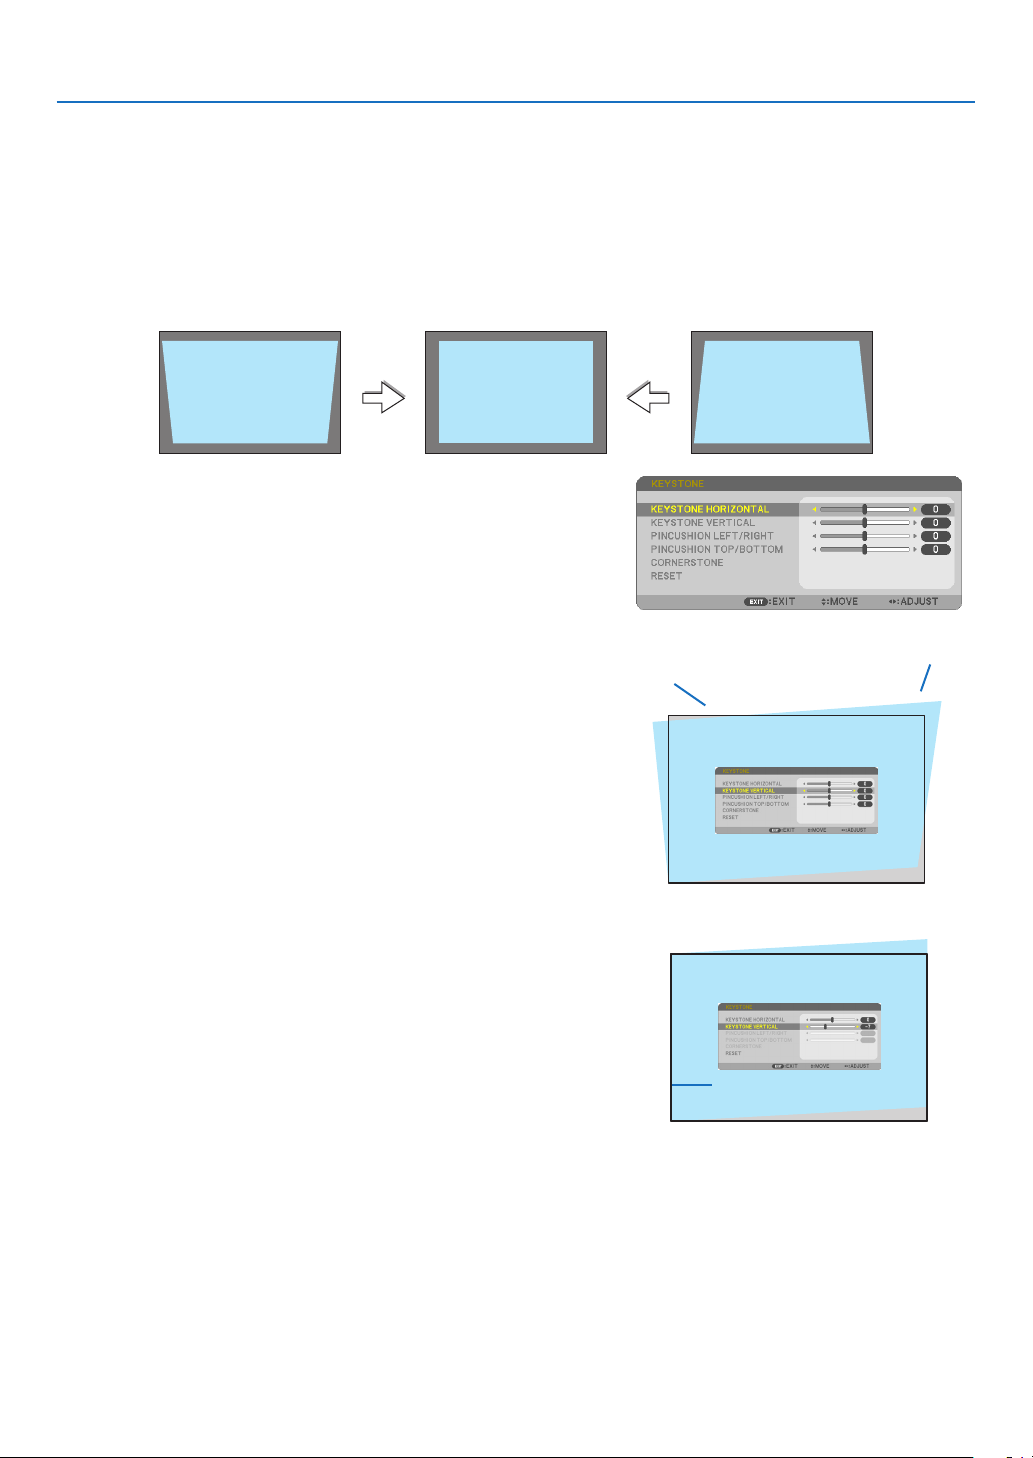
Whentheprojectorisnotexactlyperpendiculartothescreen,keystonedistortionoccurs.Toovercomeit,youcanuse
the“Keystone”function,adigitaltechnologythatcanadjustforkeystone-typedistortion,resultinginacrisp,square
image.
Thefollowingprocedureexplainshowtousethe[KEYSTONE]screenfromthemenutocorrecttrapezoidaldistor-
tions.
Whentheprojectorisplaceddiagonallytothescreen,
Whentheprojectorissetupatanangleinrelationtothescreen,adjusttheHorizontaloptionoftheKeystonemenu
sothatthetopandbottomofsidesoftheprojectedimageareparallel.
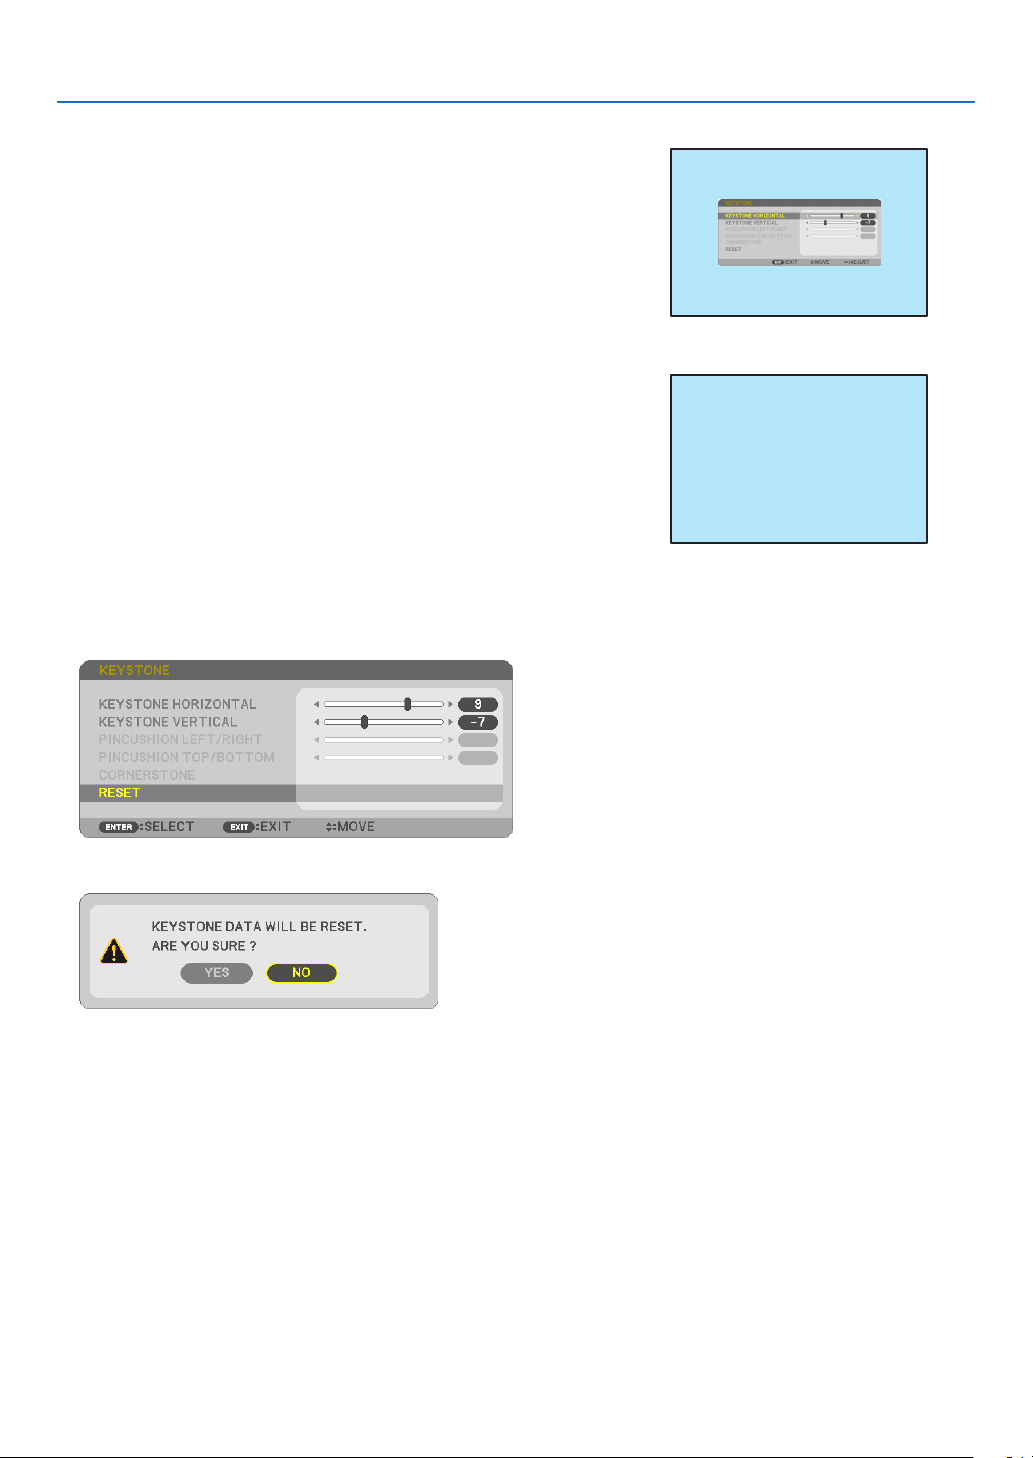
1. Press the ▼ button on the projector cabinet.
The Keystone screen will be displayed on the screen.
• PresstheKEYSTONEbuttonwhenusingtheremotecontrol.
• SeepageforPINCUSHION.
• SeepageforCORNERSTONE.
• SeepageforRESET.
2. Press the ▼buttontoselect[VERTICAL]andthenusethe◀ or ▶
so that the left and right sides of the projected image are parallel.
* Adjusttheverticalkeystonedistortion.
Screen frame
Projected area
3. Align the left (or right) side of the screen with the left (or right)
side of the projected image.
• Usetheshortersideoftheprojectedimageasthebase.
• Intherightexample,usetheleftsideasthebase.
21
Align left side
Page 33
2. Projecting an Image (Basic Operation)
4. Press the ▲buttontoselect[HORIZONTAL]andthenusethe◀
or ▶ so that the top and bottom sides of the projected image are
parallel.
• Adjustthehorizontalkeystonedistortion.
5. Repeat steps 2 and 4 to correct keystone distortion.
6. AftercompletingKeystonecorrection,presstheEXITbutton.
The Keystone screen will disappear.
• ToperformKeystonecorrectionagain,pressthe▼ button to display
the Keystone screen and repeat above steps 1 to 6.
Toreturnthekeystoneadjustmentstodefault:
1. Press the ▼buttontoselect[RESET]andpresstheENTERbutton.
2. Press the ◀ or ▶buttontoselect[YES]andpresstheENTERbutton.
The adjustments will be reset.
All the adjustments for all the five items will be reset at the same time.
• TheKEYSTONEfeaturecancauseanimagetobeslightlyblurredbecausethecorrectionismadeelectronically.
22
Page 34
2. Projecting an Image (Basic Operation)
Optimizing Computer Signal Automatically
Adjusting the Image Using Auto Adjust
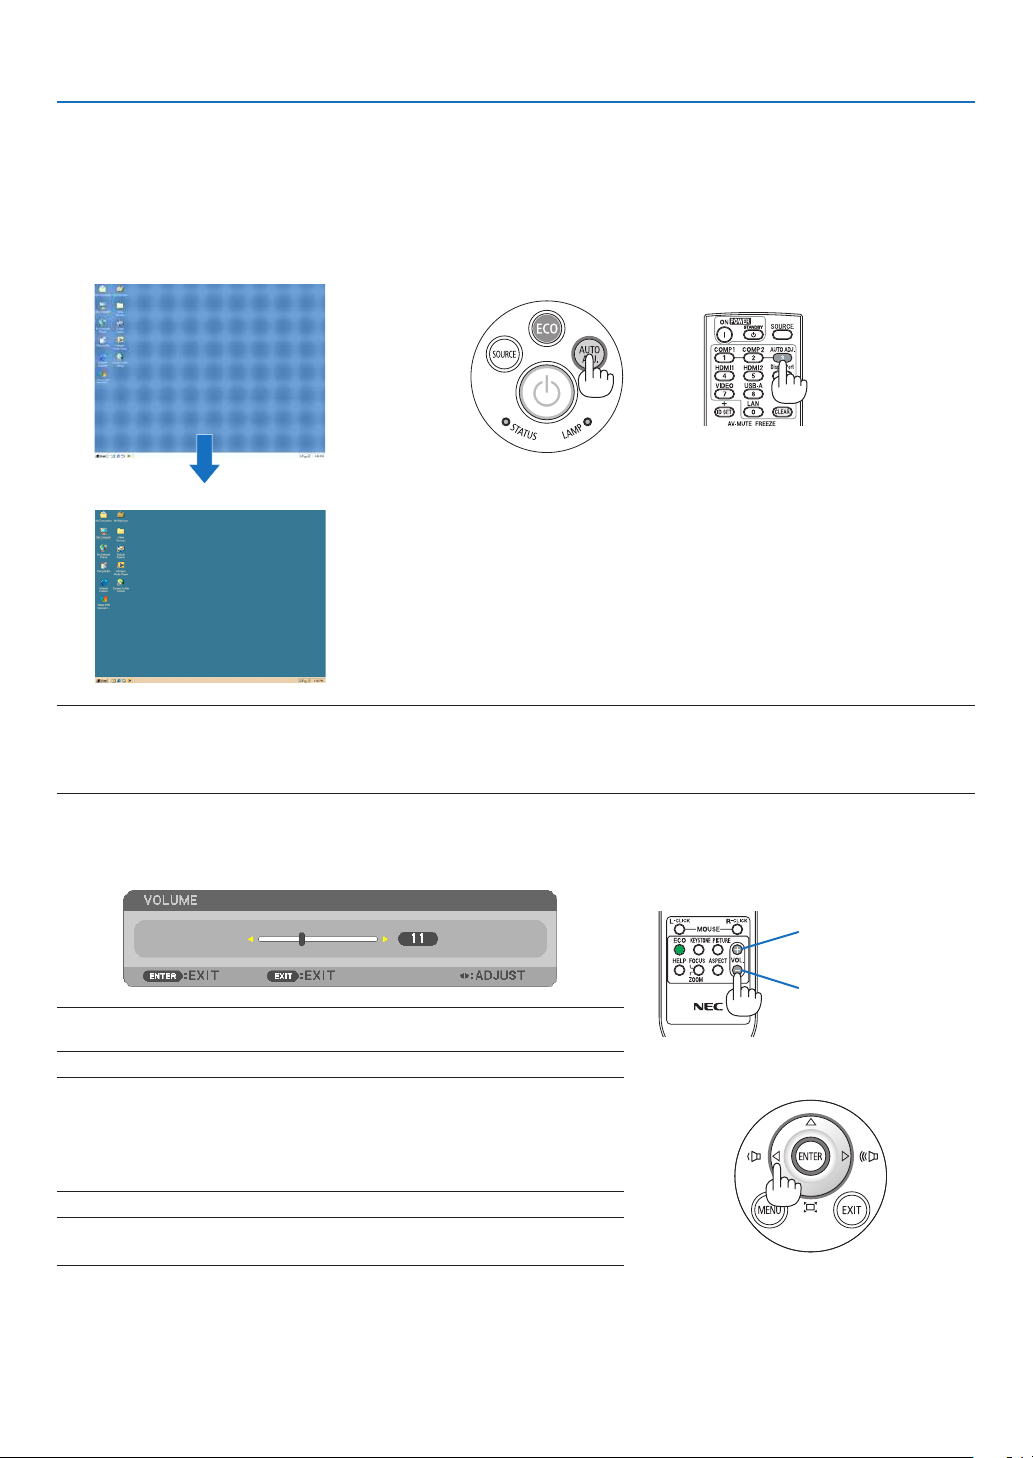
Optimizingacomputerimageautomatically.(COMPUTER)
PresstheAUTOADJ.buttontooptimizeacomputerimageautomatically.
Thisadjustmentmaybenecessarywhenyouconnectyourcomputerforthersttime.
[Poor picture]
[Normal picture]
NOTE:
Somesignalsmaytaketimetodisplayormaynotbedisplayedcorrectly.
• IftheAutoAdjustoperationcannotoptimizethecomputersignal,trytoadjust[HORIZONTAL],[VERTICAL],[CLOCK],and[PHASE]
manually.(→page81,82)
Turning Up or Down Volume
Soundlevelfromthespeakeroraudiooutputcanbeadjusted.
Increasevolume
Decrease volume
TIP:Whennomenusappear,theandbuttonsontheprojectorcabinetwork
asavolumecontrol.
NOTE:
• VolumecontrolisnotavailablewiththeorbuttonwhenanimageismagniedbyusingtheD-ZOOM(+)buttonorwhenthemenuisdisplayed.
• Volumecontrol is notavailable with the or button whenVIEWER is
used.
TIP:The[BEEP]soundvolumecannotbeadjusted.Toturnoffthe[BEEP]sound,
fromthemenu,select[SETUP]→[OPTIONS(1)]→[BEEP]→[OFF].
23
Page 35
Turning off the Projector
Toturnofftheprojector:
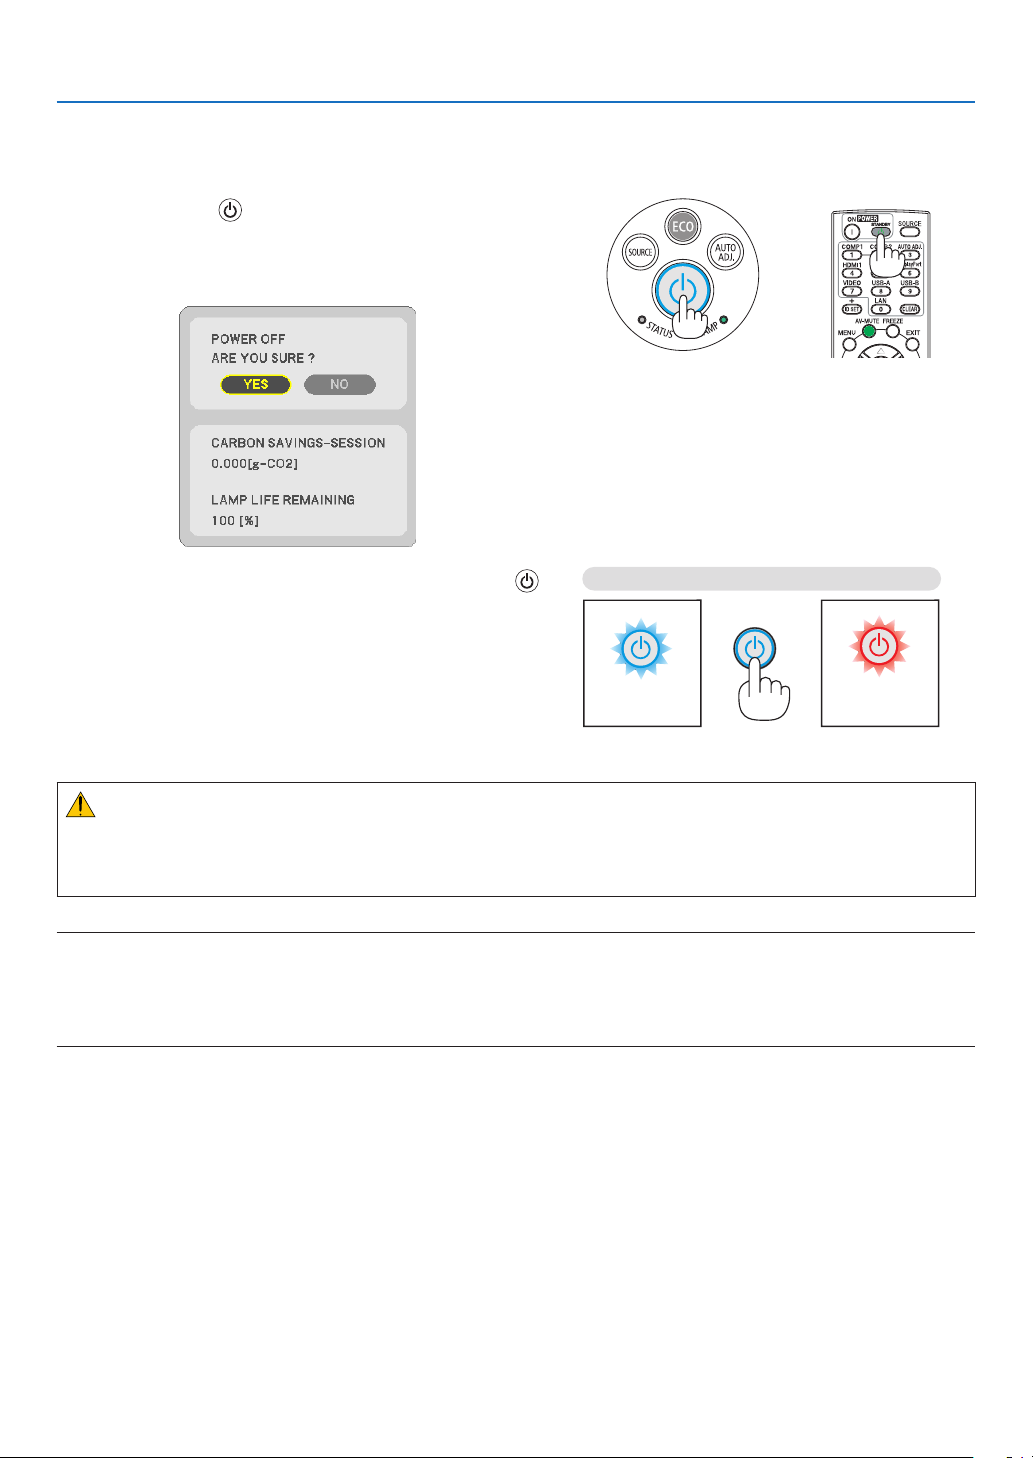
1. First, press the (POWER) button on the projector
cabinet or the STANDBY button on the remote control.
The confirmation message will be displayed.
2. Projecting an Image (Basic Operation)
2. Secondly, press the ENTER button or press the
PowerOn
Standby
(POWER) or the STANDBY button again.
The lamp will turn off and the projector will go into standby
mode. When in standby mode, the POWER indicator will
light red and the STATUS indicator will turn off when [NORMAL] is selected for [STANDBY MODE].
Steady blue light
Steady
red light
CAUTION:
PartsoftheprojectormaybecometemporarilyheatediftheprojectoristurnedoffwiththePOWERbuttonorifthe
ACpowersupplyisdisconnectedduringnormalprojectoroperation.
Usecautionwhenpickinguptheprojector.
NOTE:
• Whilethepowerindicatorisblinkingblueinshortcycles,thepowercannotbeturnedoff.
• Youcannotturnoffthepowerfor60secondsimmediatelyafterturningitonanddisplayinganimage.
• DonotdisconnecttheACpowersupplytotheprojectorwithin10secondsofmakingadjustmentorsettingchangesandclosing
themenu.Doingsocancauselossofadjustmentsandsettings.
24
Page 36

2. Projecting an Image (Basic Operation)
When Moving the Projector
Preparation:Makesurethattheprojectoristurnedoff.
1. Remove the cable cover.
(→ page 5)
2. Unplug the power cord.
3. Disconnect any other cables.
• RemovetheUSBmemoryorthewirelessLANUnitifitisinsertedintotheprojector.
(→ page 66, 116)
25
Page 37
3. Convenient Features
1 Turning off the Image and Sound
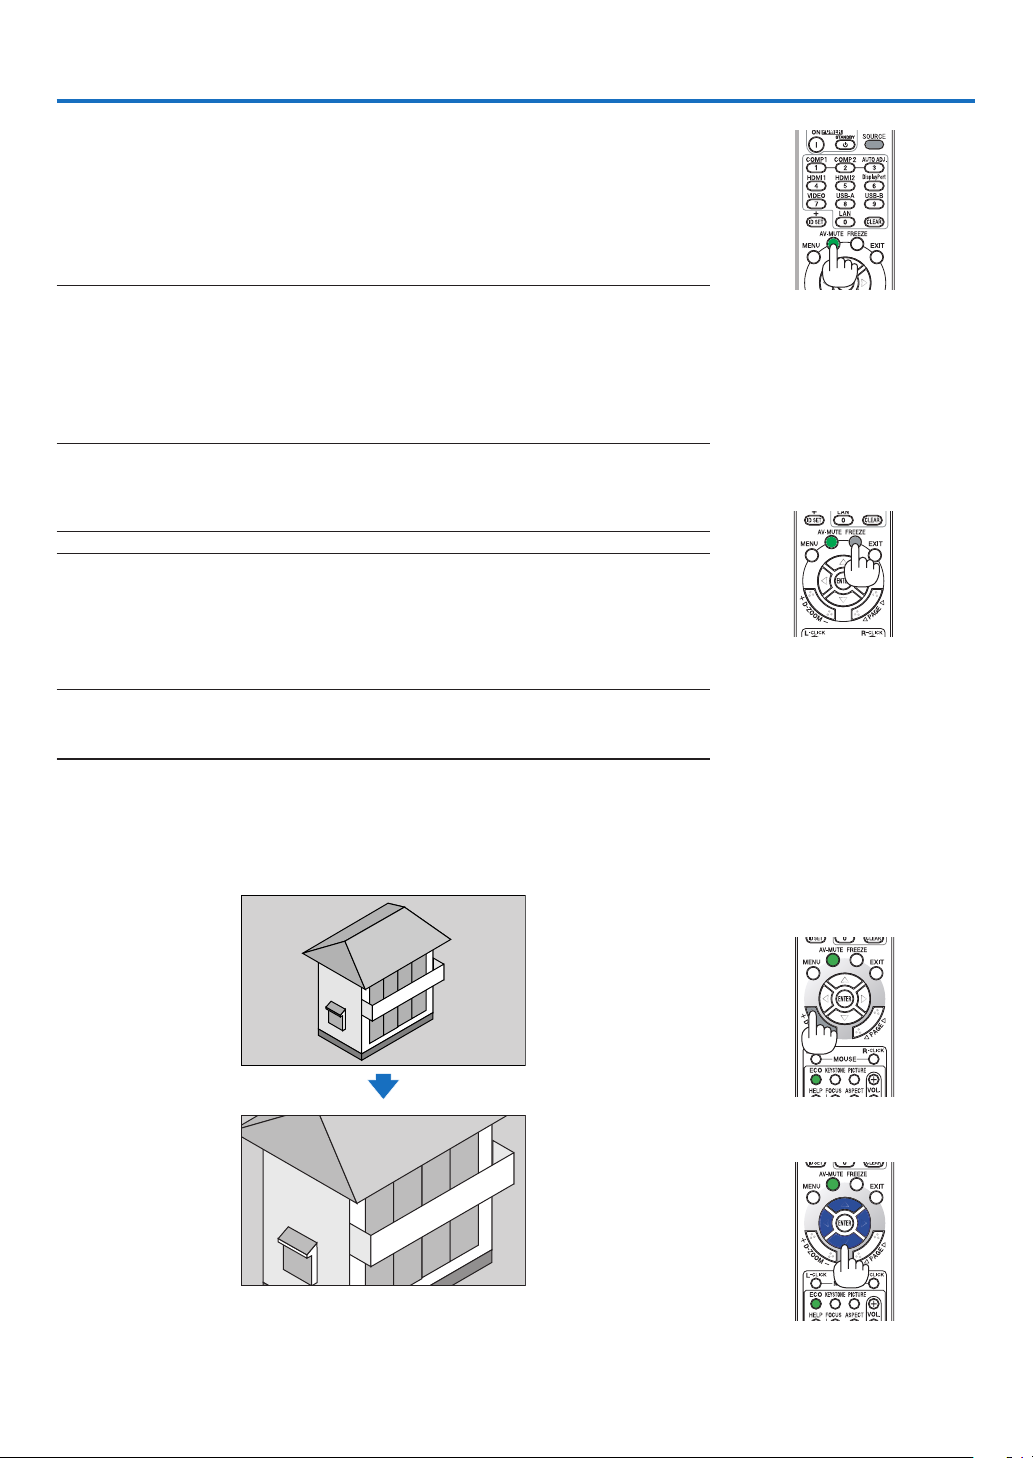
PresstheAV-MUTEbuttontoturnofftheimageandsoundforashortperiodoftime.
Pressagaintorestoretheimageandsound.
Theprojector’spower-savingfunctionwillwork10secondsaftertheimageisturned
off.
Asaresult,thelamppowerwillbereduced.
NOTE:
• Eventhoughtheimageisturnedoff,themenustillremainsonthescreen.
• SoundfromtheAUDIOOUTjack(Stereomini)canbeturnedoff.
• Evenwhenthepower-savingfunctionworks,thelamppowermayberestoredtoitsoriginal
leveltemporarily.
• Torestoretheimage,evenifyoupresstheAV-MUTEbuttonimmediatelyafterthestartof
thepower-savingfunction,thelampbrightnessmaynotberestoredtoitsoriginallevel.
Freezing a Picture
PresstheFREEZEbuttontofreezeapicture.Pressagaintoresumemotion.
NOTE:Theimageisfrozenbuttheoriginalvideoisstillplayingback.
• ThisfeaturecannotbeusedwhenUSB-Aisselectedastheinputterminal.
Magnifying a Picture
Youcanenlargethepictureuptofourtimes.
NOTE:
• Themaximummagnicationmaybelessthanfourtimesdependingonthesignal.
• ThisfeaturecannotbeusedwhenLAN,andUSB-Bisselectedastheinputterminal.
Todoso:
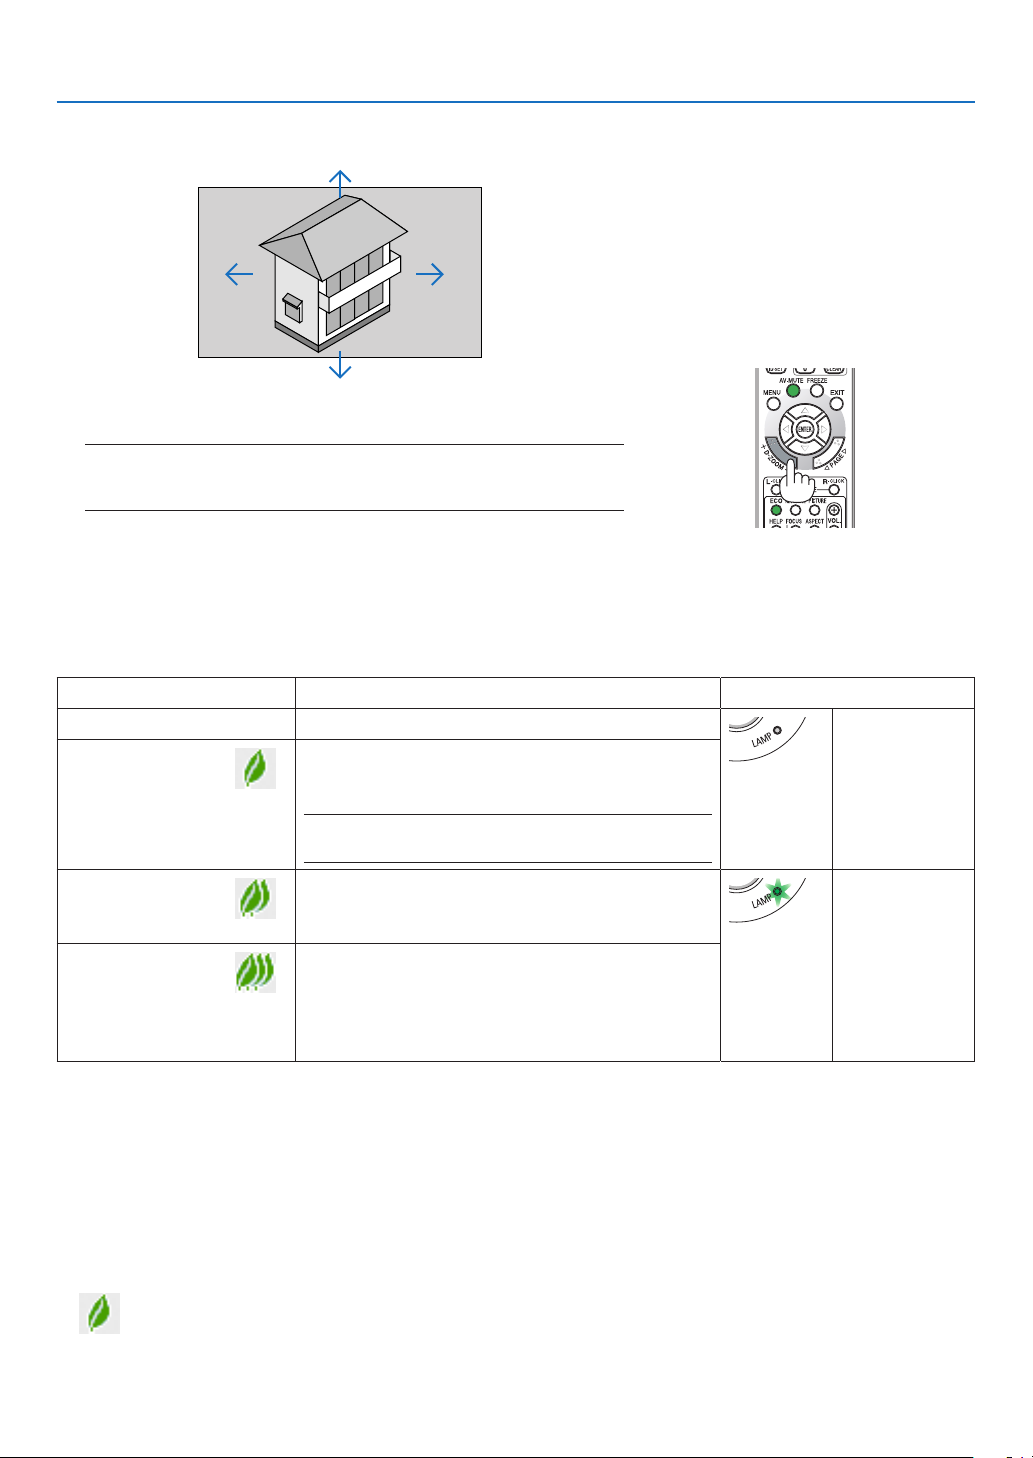
1. PresstheD-ZOOM(+)buttontomagnifythepicture.
To move the magnified image, use the ,, or button.
26
Page 38
3. Convenient Features
2. Press the button.
The area of the magnified image will be moved
3. PresstheD-ZOOM(−)button.
EachtimetheD-ZOOM(−)buttonispressed,theimageisreduced.
NOTE:
• Theimagewillbemagniedordemagniedatthecenterofthescreen.
• Displayingthemenuwillcancelthecurrentmagnication.
Changing Eco Mode/Checking Energy-Saving Effect
Using Eco Mode [ECO MODE]
TheECOMODE(NORMALandECO)increaseslamplife,whileloweringpowerconsumptionandcuttingdownon
CO2 emissions.
Fourbrightnessmodesofthelampcanbeselected:[OFF],[AUTOECO],[NORMAL]and[ECO]modes.
[ECOMODE] Description StatusofLAMPindicator
[OFF] Thelampbrightnessis100%. Off
[AUTOECO] Lamppowerconsumptionwillbechangedbetween
[OFF] and [NORMAL] automaticallyaccordingto
picturelevel
NOTE:Abrightgradation may be lessvisibledepending
ontheimage.
[NORMAL] Lamppowerconsumption:approx.80%brightness.
The lamp lifewill extend by loweringthe lamp
power.
[ECO]
Toturnonthe[ECOMODE],dothefollowing:
1. PresstheECOButtonontheremotecontroltodisplay[ECOMODE]screen.
2. PresstheECObuttonagaintoselectamodeyouwish.
• EachtimetheECObuttonispressed,thechoiceswillbechanged:
OFF → AUTO ECO → NORMAL → ECO → OFF
TIP:
• TheleafsymbolatthebottomofthemenushowsthecurrentselectionofECOmode.
Lamppowerconsumption(approx.60%brightness).
The lamplife willextend longer thanthe oneon
NORMALmodebycontrollingpowerappropriatefor
thelamp.Themaximumpowerbecomesequivalent
tothepowerinNORMAL.
SteadyGreen
light
27
Page 39
3. Convenient Features
NOTE:
• The[ECOMODE]canbechangedbyusingthemenu.
Select[SETUP]→[GENERAL]→[ECOMODE].
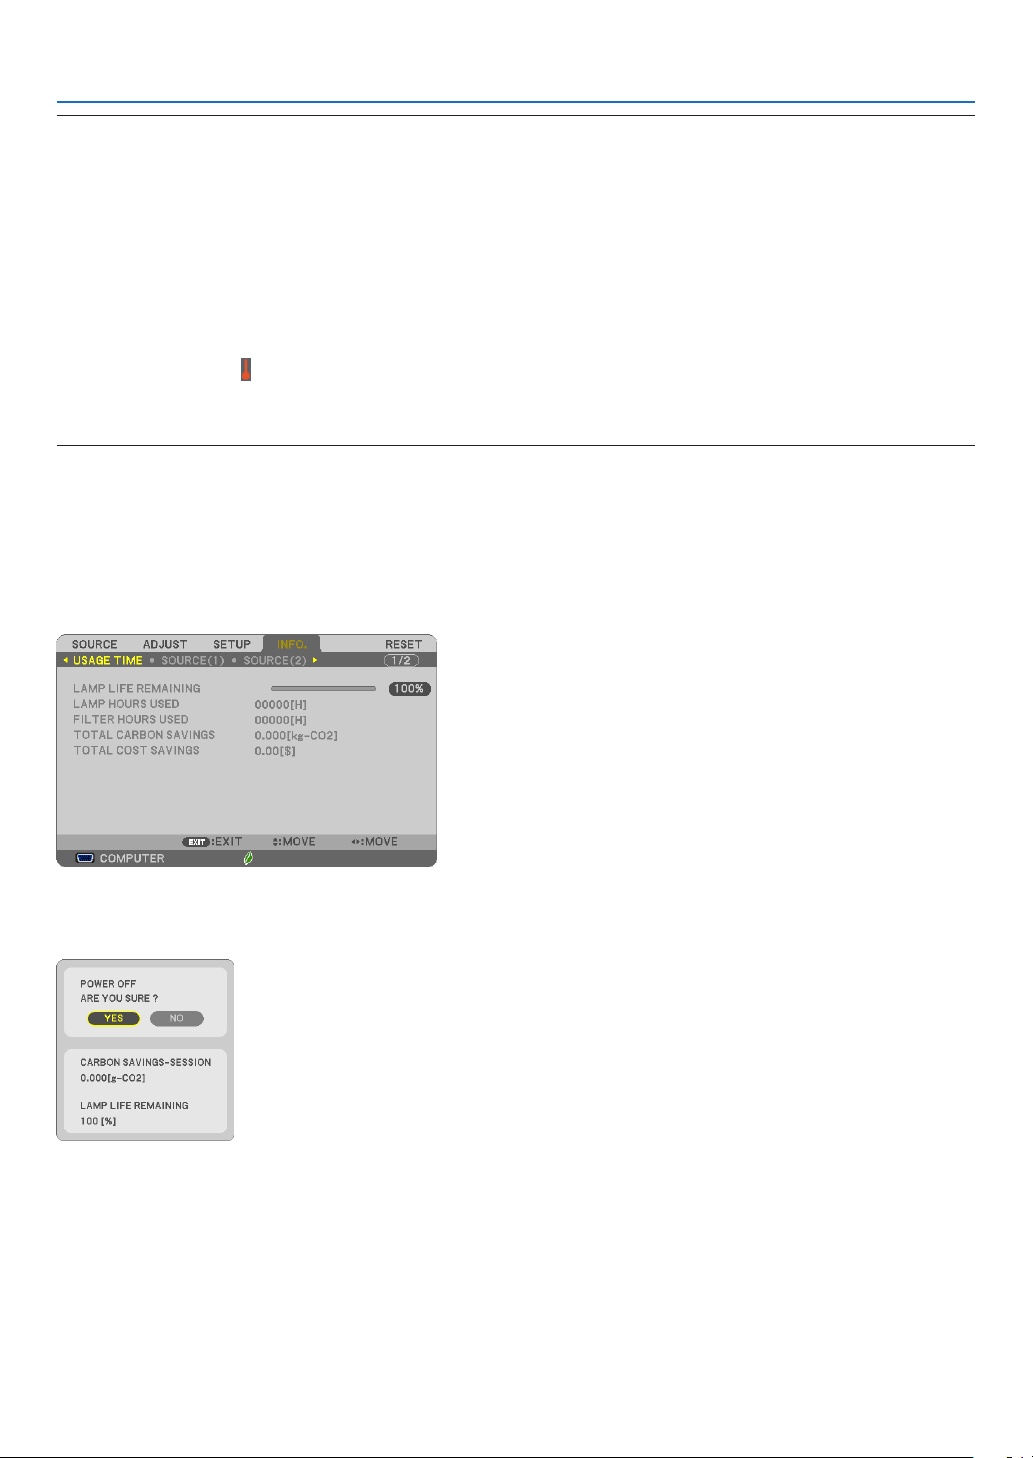
• Thelampliferemainingandlamphoursusedcanbecheckedin[USAGETIME].Select[INFO.]→[USAGETIME].
• Theprojectorisalwaysin[NORMAL]for90secondsafterthelampisturnedonandwhilethePOWERindicatorisblinkinggreen.
Thelampconditionwillnotbeaffectedevenwhen[ECOMODE]ischanged.
• Afteralapseof1minutefromwhentheprojectordisplaysno-signalguidance,ablue,blackorlogoscreen,[ECOMODE]will
automaticallyswitchto[ECO].Theprojectorwillreturntoitsoriginalsettingonceasignalisaccepted.
• Iftheprojectorisoverheatedin[OFF]mode,theremaybeacasewherethe[ECOMODE]automaticallychangesto[NORMAL]
modetoprotecttheprojector.Whentheprojectorisin[NORMAL]mode,thepicturebrightnessdecreases.Whentheprojector
comesbacktonormaltemperature,the[ECOMODE]returnstoitsoriginalsetting.
Thermometersymbol[ ]indicatesthe[ECOMODE]isautomaticallysetto[NORMAL]modebecausetheinternaltemperature
istoohigh.
• Immediatelyafter[ECOMODE]ischangedfrom[ECO]tooneof [OFF],[AUTOECO],or[NORMAL],thelampbrightnessmay
decreasetemporarily.Thisisnotamalfunction.
Checking Energy-Saving Effect [CARBON METER]
Thisfeaturewillshowenergy-savingeffectintermsofCO2emissionreduction(kg)whentheprojector’s[ECOMODE]
issetto[AUTOECO],[NORMAL],or[ECO].Thisfeatureiscalledas[CARBONMETER].
Therearetwomessages:[TOTALCARBONSAVINGS]and[CARBONSAVINGS-SESSION].The[TOTALCARBON
SAVINGS]messageshowsthetotalamountofCO2emissionreductionfromthetimeofshipmentuptonow.Youcan
checktheinformationon[USAGETIME]from[INFO.]ofthemenu.(→page99)
The[CARBONSAVINGS-SESSION]message showstheamount ofCO2emissionreductionbetweenthetime of
changingtoECOMODEimmediatelyafterthetimeofpower-onandthetimeofpower-off.The[CARBONSAVINGSSESSION]messagewillbedisplayedinthe[POWEROFF/AREYOUSURE?]messageatthetimeofpower-off.
TIP:
• TheformulaasshownbelowisusedtocalculatetheamountofCO2emissionreduction.
AmountofCO2emissionreduction=(PowerconsumptioninOFFforECOMODE−PowerconsumptioninAUTOECO/NORMAL/
ECOforECOMODE)×CO2conversionfactor.*WhentheimageisturnedoffwiththeAV-MUTEbutton,theamountofCO2emmissionreductionwillalsoincrease.
*CalculationforamountofCO2emissionreductionisbasedonanOECDpublication“CO2EmissionsfromFuelCombustion,2008
Edition”.
• The[TOTALCARBONSAVINGS]iscalculatedbasedonsavingsrecordedin15minutesintervals.
• Thisformulawillnotapplytothepowerconsumptionwhichisnotaffectedbywhether[ECOMODE]isturnedonoroff.
28
Page 40
3. Convenient Features
❺ Using 4-Point Corner to Correct Keystone Distortion
[CORNERSTONE]
Usethe[CORNERSTONE]and[PINCUSHION]featurestocorrectkeystone(trapezoidal)distortiontomakethetop
orbottomandtheleftorrightsideofthescreenlongerorshortersothattheprojectedimageisrectangular.
Cornerstone
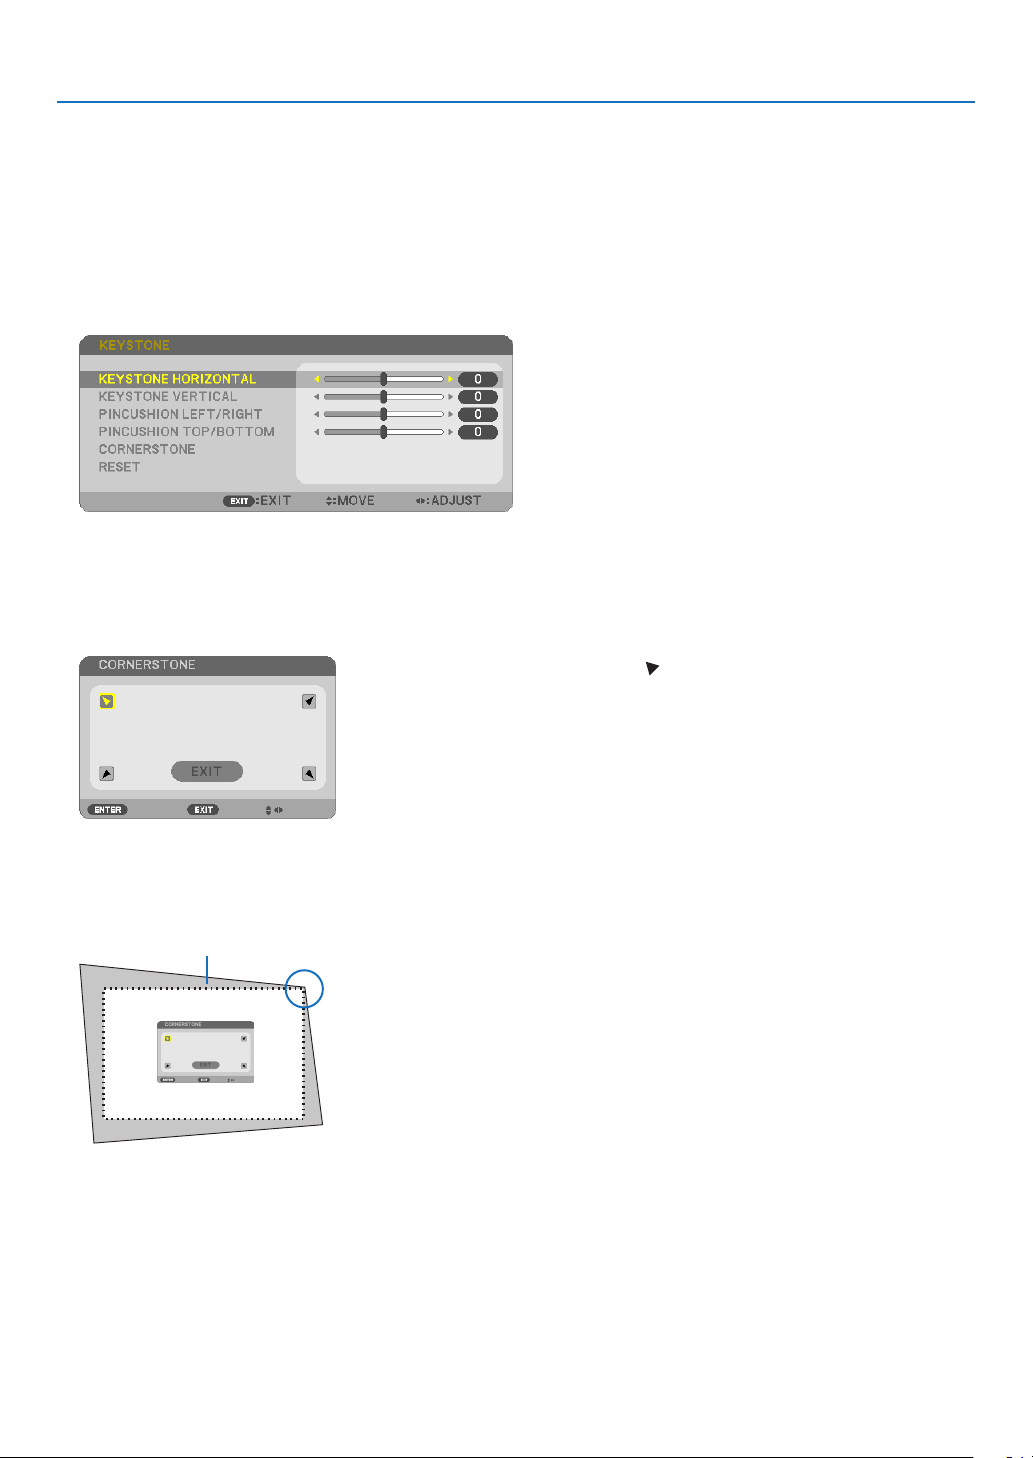
1. PresstheKEYSTONEbuttonwithnomenudisplayed.
The KEYSTONE screen will be displayed.
• PresstheKEYSTONEbuttonwhenusingtheremotecontrol.
• SeepageforPINCUSHION.
2. Press the ▼buttontoselect[CORNERSTONE]andpresstheENTERbutton.
The drawing shows the upper left icon ( ) is selected.
The CORNERSTONE screen will be displayed.
3. Project an image so that the screen is smaller than the area of the raster.
4. Pick up any one of the corners and align the corner of the image with a corner of the screen.
Projected image
The drawing shows the upper right corner.
TIP:If youareadjusting [KEYSTONEHORIZONTAL],[KEYSTONE VERTICAL],[PINCUSHIONLEFT/RIGHT],or[PINCUSHION
TOP/BOTTOM],the[CORNERSTONE]itemwillnotbeavailable.Ifthishappens,resetthe[KEYSTONE]adjustments.
5. Use the ▲▼◀▶ button to select one icon (▲) which points in the direction you wish to move the projected
image frame.
6. Press the ENTER button.
29
Page 41
3. Convenient Features
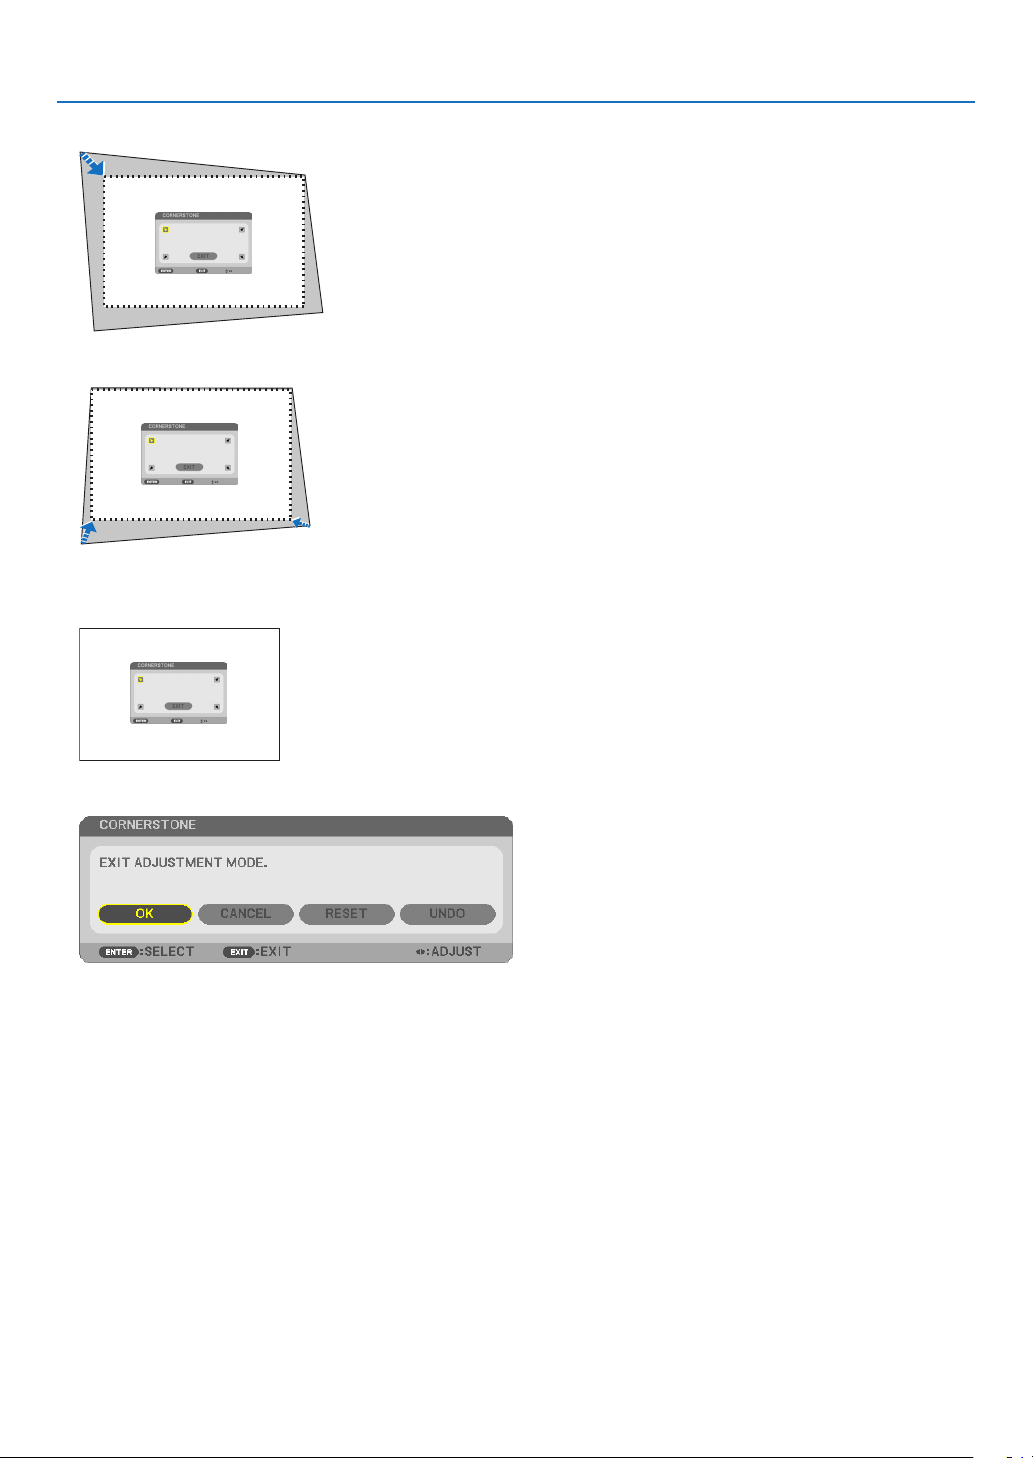
7. Use the ▲▼◀▶ button to move the projected image frame as shown on the example.
8. Press the ENTER button.
9. Use the ▲▼◀▶ button to select another icon which points in the direction.
OntheCornerstoneadjustmentscreen,select[EXIT]orpresstheEXITbuttonontheremotecontrol.
The confirmation screen is displayed.
10
. Press the ◀ or ▶buttontohighlightthe[OK]andpresstheENTERbutton.
ThiscompletestheCornerstonecorrection.
Selecting[CANCEL]willreturntotheadjustmentscreenwithoutsavingchanges(Step3).
Selecting[RESET]willreturntothefactorydefault.
Selecting[UNDO]willexitwithoutsavingchanges.
30
Page 42
3. Convenient Features
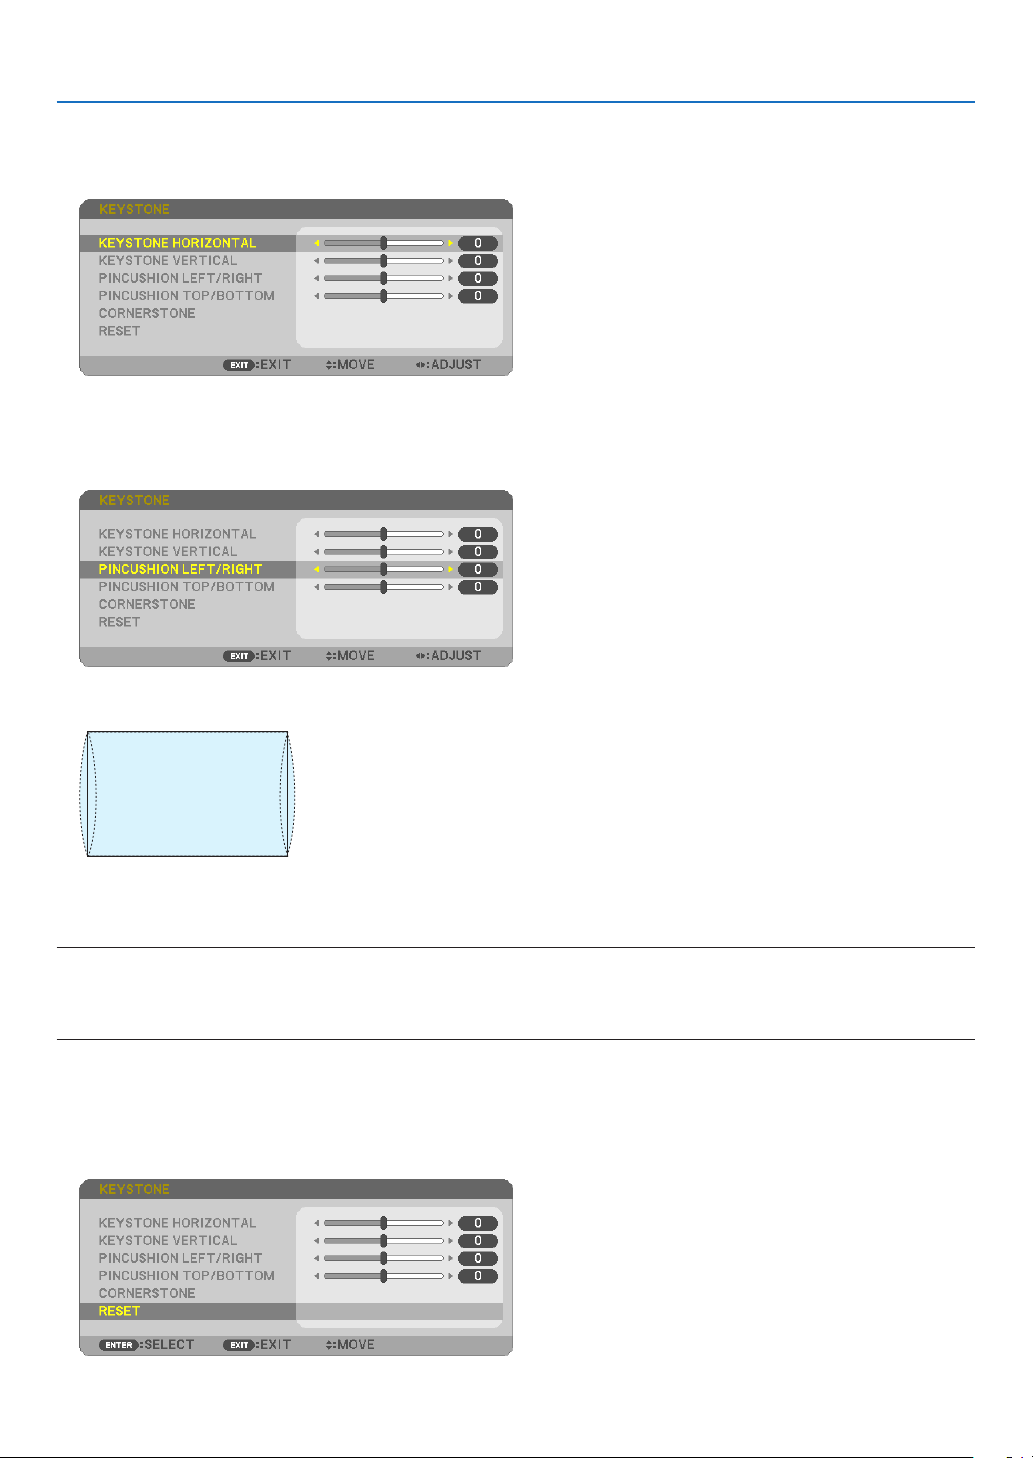
Pincushion
1. PresstheKEYSTONEbuttonwithnomenudisplayed.
The KEYSTONE screen will be displayed.
• PresstheKEYSTONEbuttonwhenusingtheremotecontrol.
2. Press the buttontoselecteitherPINCUSHIONADJUSTMENTLEFT/RIGHTorPINCUSHIONADJUSTMENT
TOP/BOTTOM.
3. Press either or button to reform pincushion distortion.
4. PresstheEXITwhenPINCUSHIONadjustmentiscompleted.
NOTE:
• Evenwhentheprojectoristurnedon,thelastusedcorrectionvaluesareapplied.
• [PINCUSION]and[CORNERSTONE]correctionscancausetheimagetobeslightlyblurredbecausethecorrectionismadeelectronically.
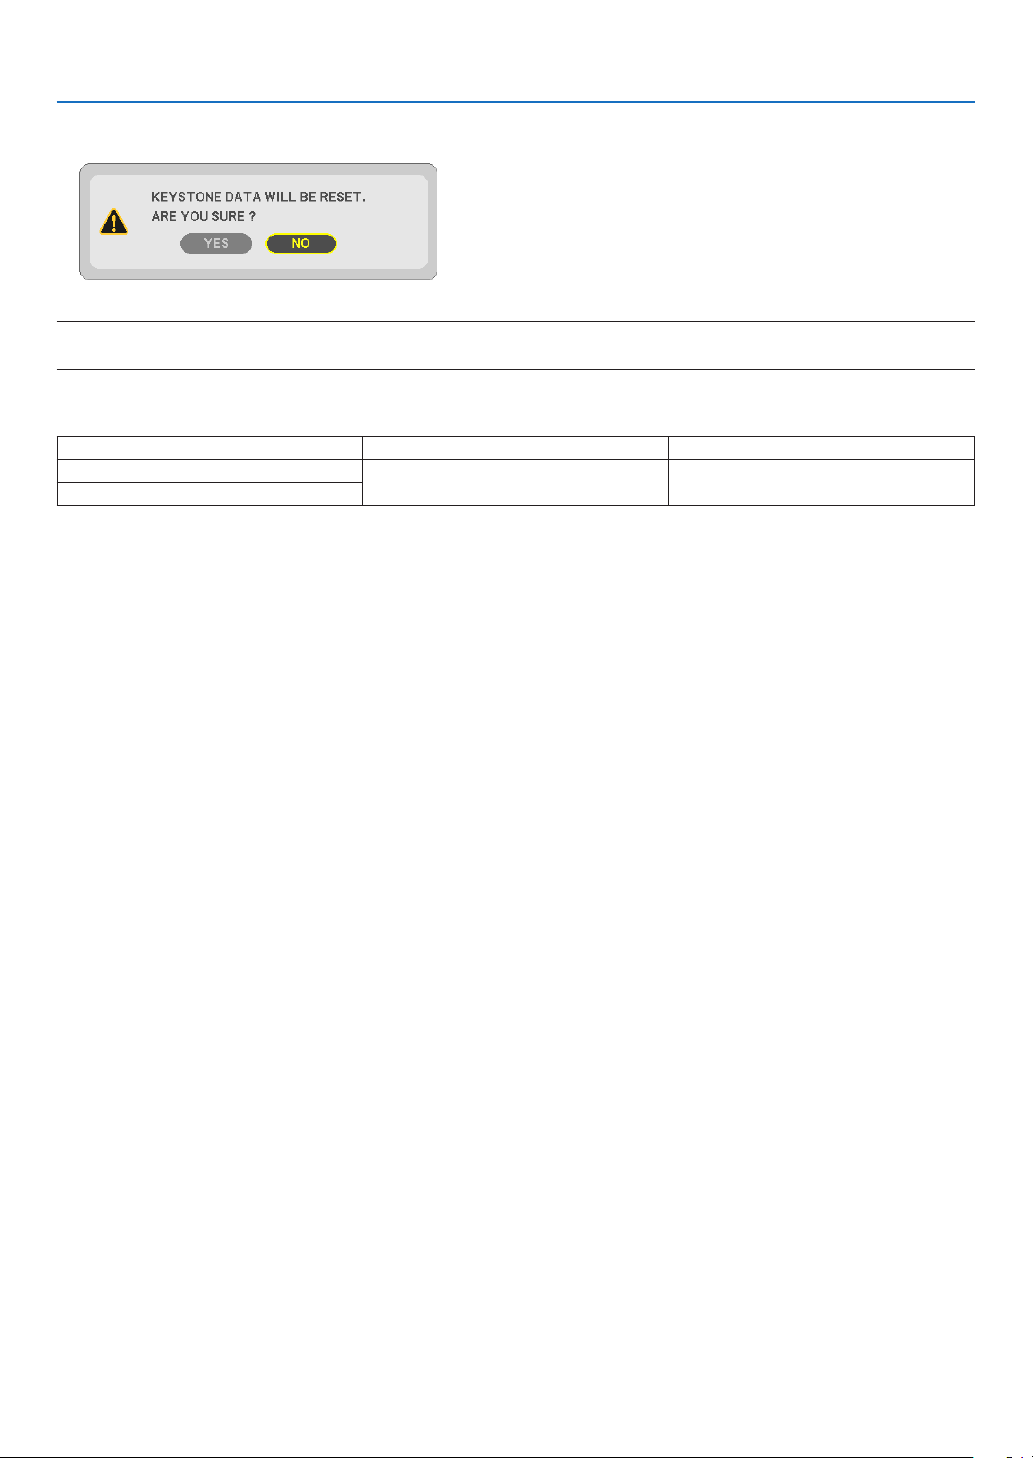
Resetthekeystoneadjustmenttotheinitialvalue
1. PresstheKEYSTONEbuttonwithnomenudisplayed.
ON the displayed KEYSTONE menu, set the cursor at RESET using the button and press ENTER button.
• Conrmationmessageisdisplayedon.
31
Page 43
3. Convenient Features
2. Move the cursor onto YES using either or button and then press the ENTER.
NOTE:
• AlladjustedvaluessetintheKEYSTONEadjustmentareresettoinitialvalues
TIP:
AdjustablerangeoftheKEYSTONEandtheCORNERSTONE:
HorizontalDirection VerticalDirection
CORNERSTONE
KEYSTONE
Adjustablerangemaybenarrowerdependingoninputsignal.
Approx.±10°(Max) Approx.±10°(Max)
32
Page 44
3. Convenient Features
Preventing the Unauthorized Use of the Projector [SECURITY]
AkeywordcanbesetforyourprojectorusingtheMenutoavoidoperationbyanunauthorizeduser.Whenakeyword
isset,turningontheprojectorwilldisplaytheKeywordinputscreen.Unlessthecorrectkeywordisentered,theprojectorcannotprojectanimage.
• The[SECURITY]settingcannotbecancelledbyusingthe[RESET]ofthemenu.
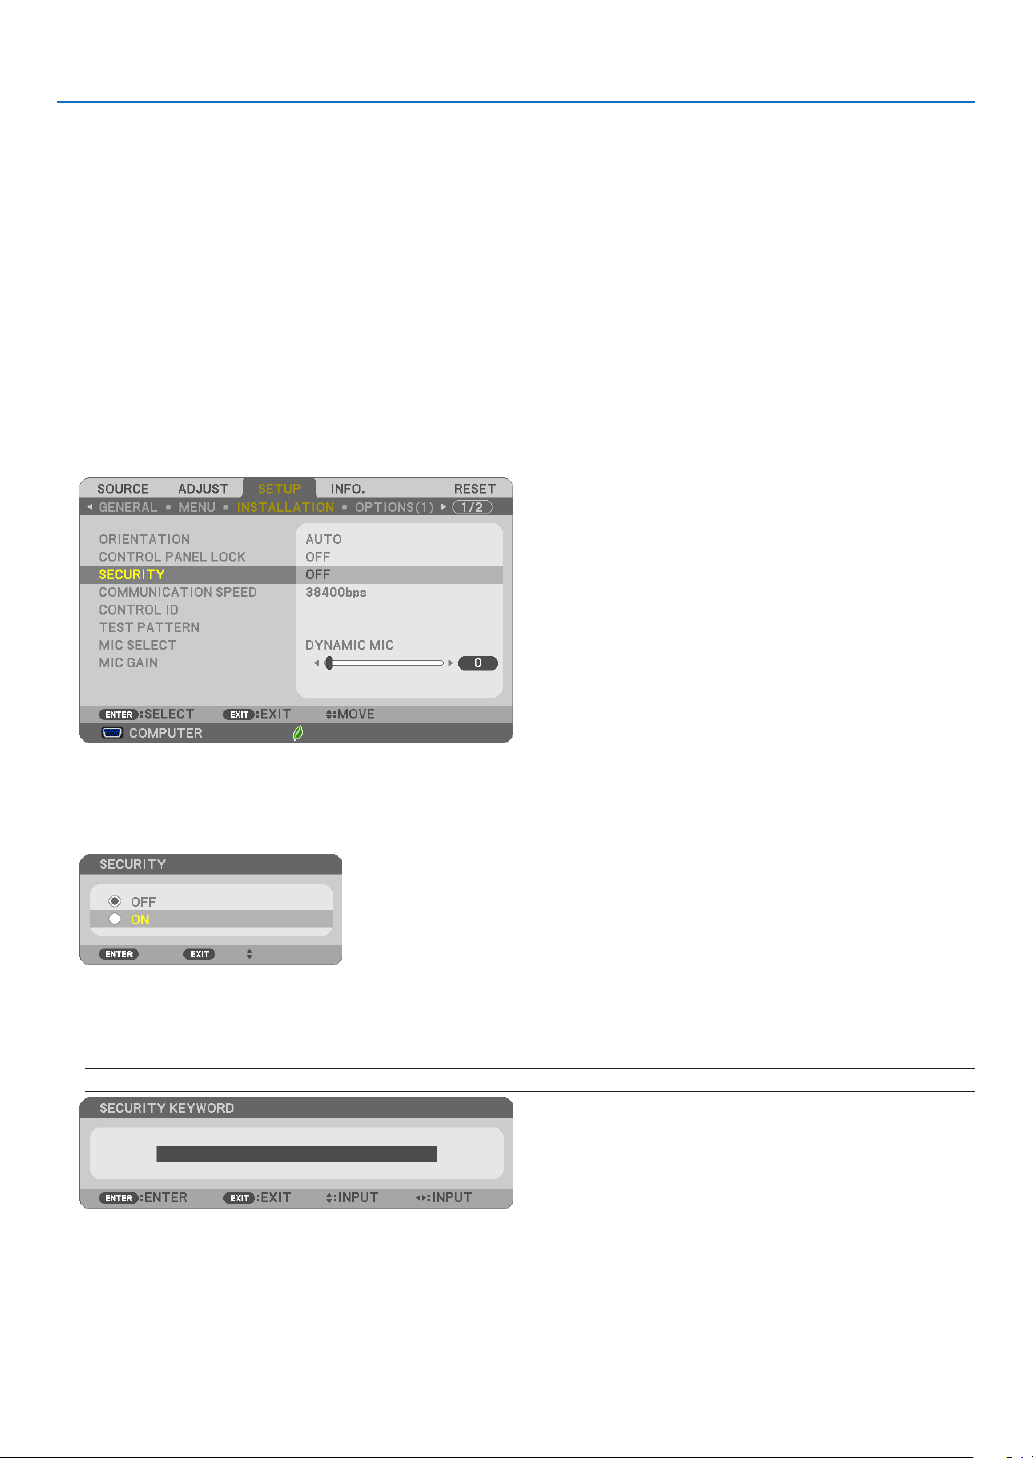
ToenabletheSecurityfunction:
1. Press the MENU button.
The menu will be displayed.
2. Press the buttontwicetoselect[SETUP]andpressthebuttonortheENTERbuttontoselect[GENERAL].
3. Press the buttontoselect[INSTALLATION].
4. Press the buttonthreetimestoselect[SECURITY]andpresstheENTERbutton.
The OFF/ON menu will be displayed.
5. Press the buttontoselect[ON]andpresstheENTERbutton.
The[SECURITYKEYWORD]screenwillbedisplayed.
6. Type in a combination of the four buttons and press the ENTER button.
NOTE:Akeywordmustbe4to10digitsinlength.
The[CONFIRMKEYWORD]screenwillbedisplayed.
33
Page 45
3. Convenient Features
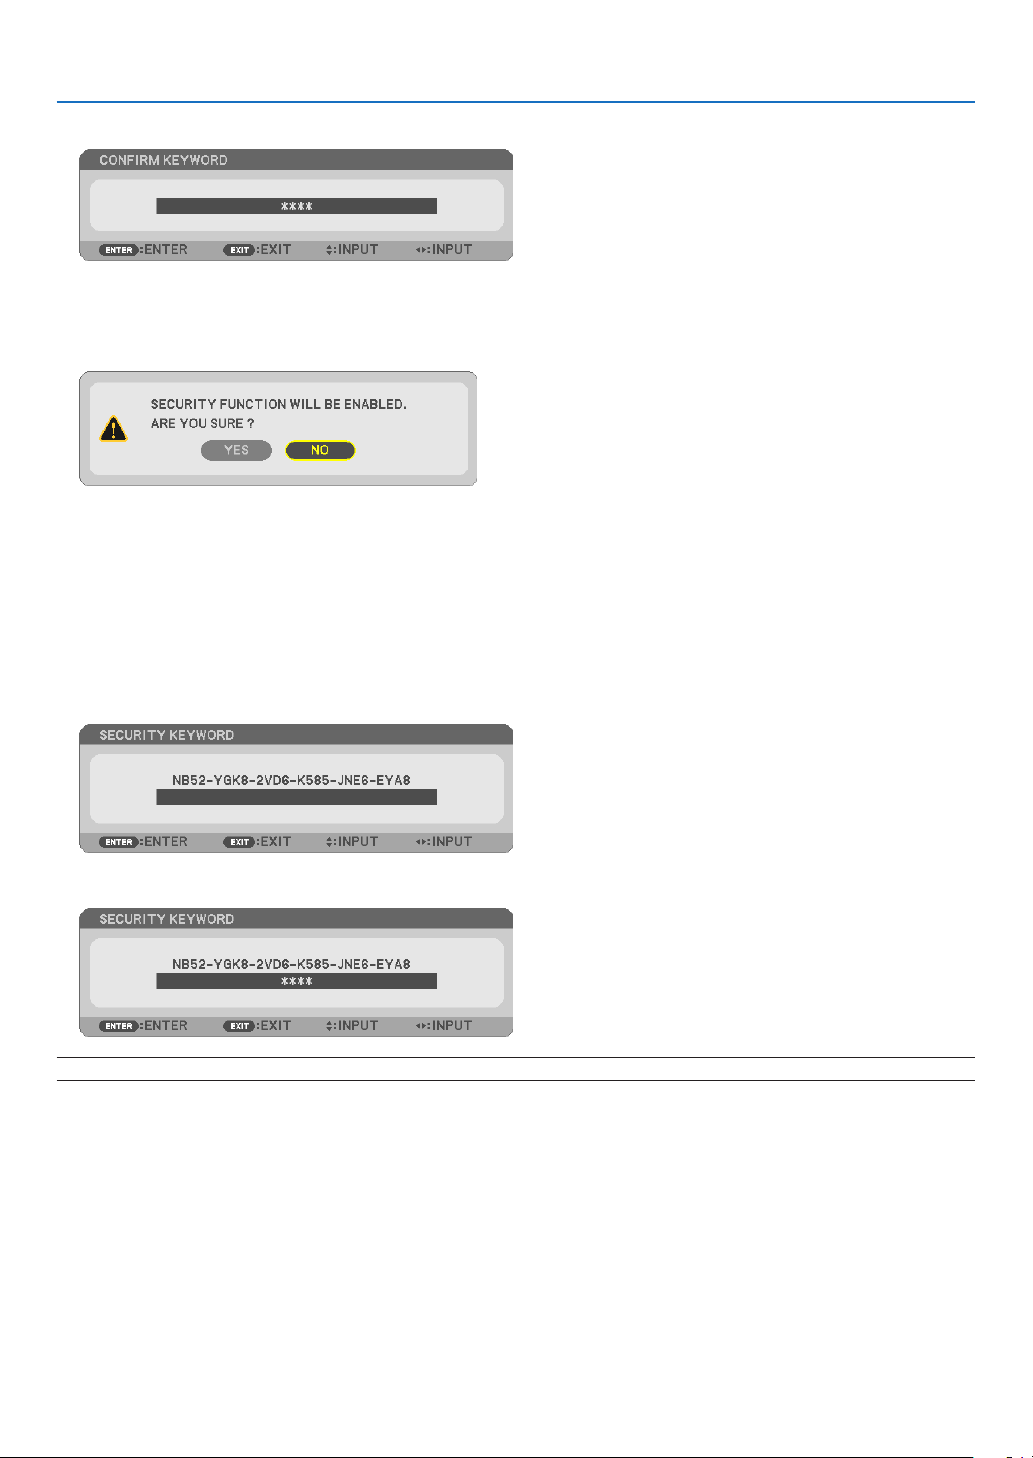
7. Type in the same combination of buttons and press the ENTER button.
The confirmation screen will be displayed.
8. Select[YES]andpresstheENTERbutton.
TheSECURITYfunctionhasbeenenabled.
Toturnontheprojectorwhen[SECURITY]isenabled:
1. Press the POWER button.
Theprojectorwillbeturnedonanddisplayamessagetotheeffectthattheprojectorislocked.
2. Press the MENU button.
3. Type in the correct keyword and press the ENTER button. The projector will display an image.
NOTE:Thesecuritydisablemodeismaintaineduntilthemainpoweristurnedofforunpluggingthepowercord.
34
Page 46
3. Convenient Features
TodisabletheSECURITYfunction:
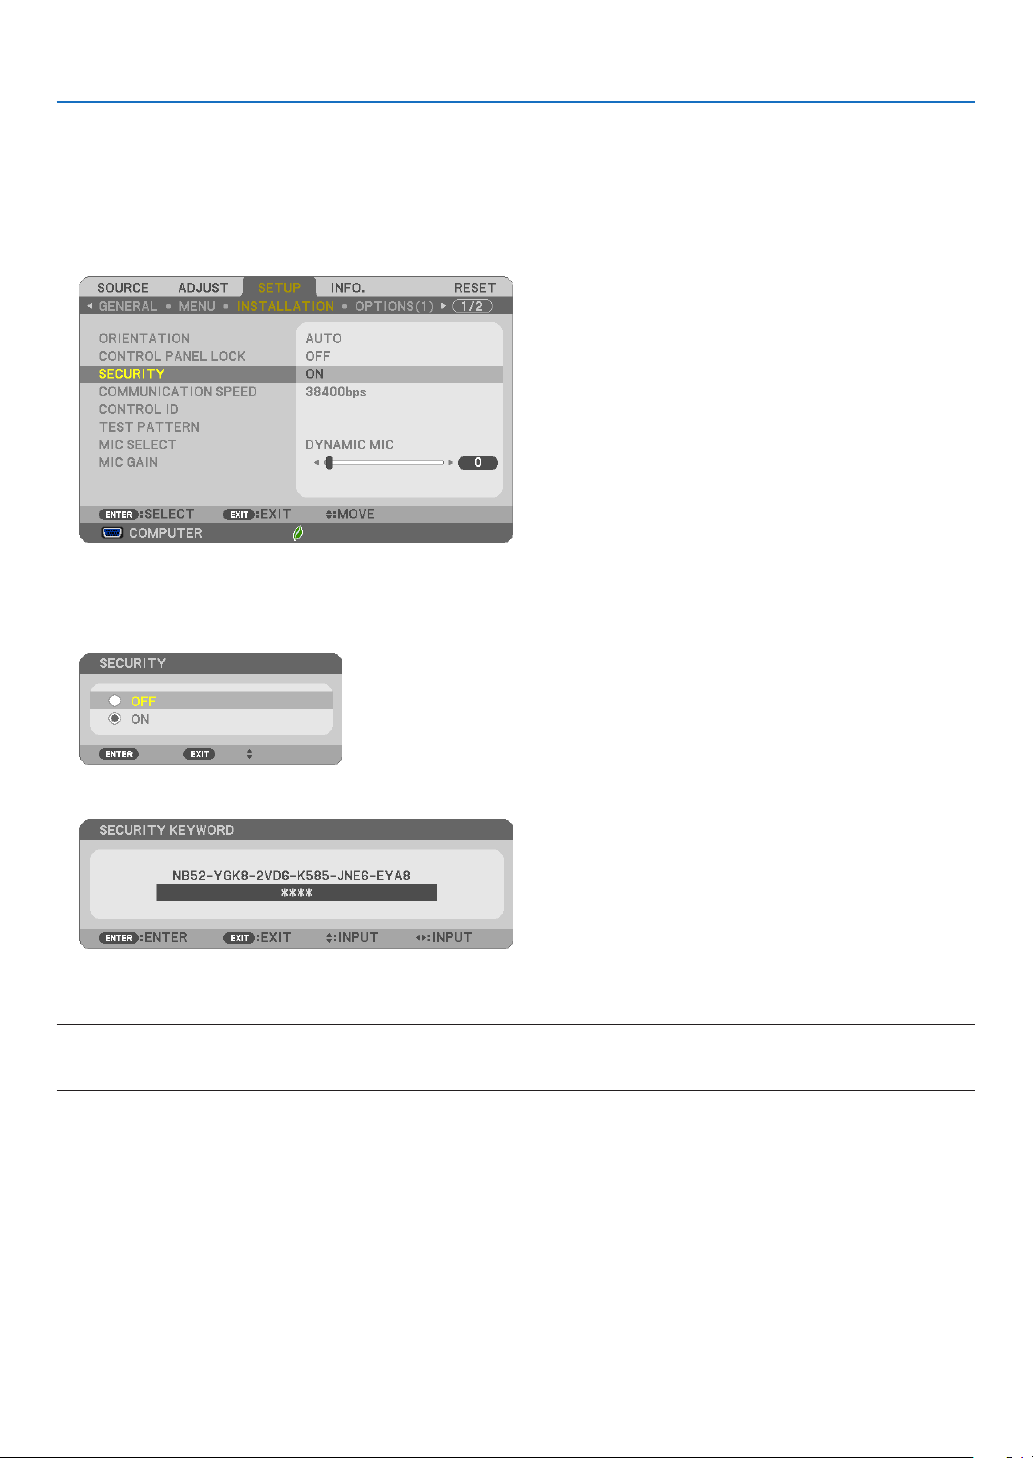
1. Press the MENU button.
The menu will be displayed.
2.Select[SETUP]→[INSTALLATION]→[SECURITY]andpresstheENTERbutton.
The OFF/ON menu will be displayed.
3. Select[OFF]andpresstheENTERbutton.
TheSECURITYKEYWORDscreenwillbedisplayed.
4. Type in your keyword and press the ENTER button.
Whenthecorrectkeywordisentered,theSECURITYfunctionwillbedisabled.
NOTE:Ifyouforgetyourkeyword,contactyourdealer.Yourdealerwillprovideyouwithyourkeywordinexchangeforyourrequest
code.YourrequestcodeisdisplayedintheKeywordConrmationscreen.Inthisexample[NB52-YGK8-2VD6-K585-JNE6-EYA8]
isarequestcode.
35
Page 47
3. Convenient Features
Using the Computer Cable (VGA) to Operate the
Projector (Virtual Remote Tool)
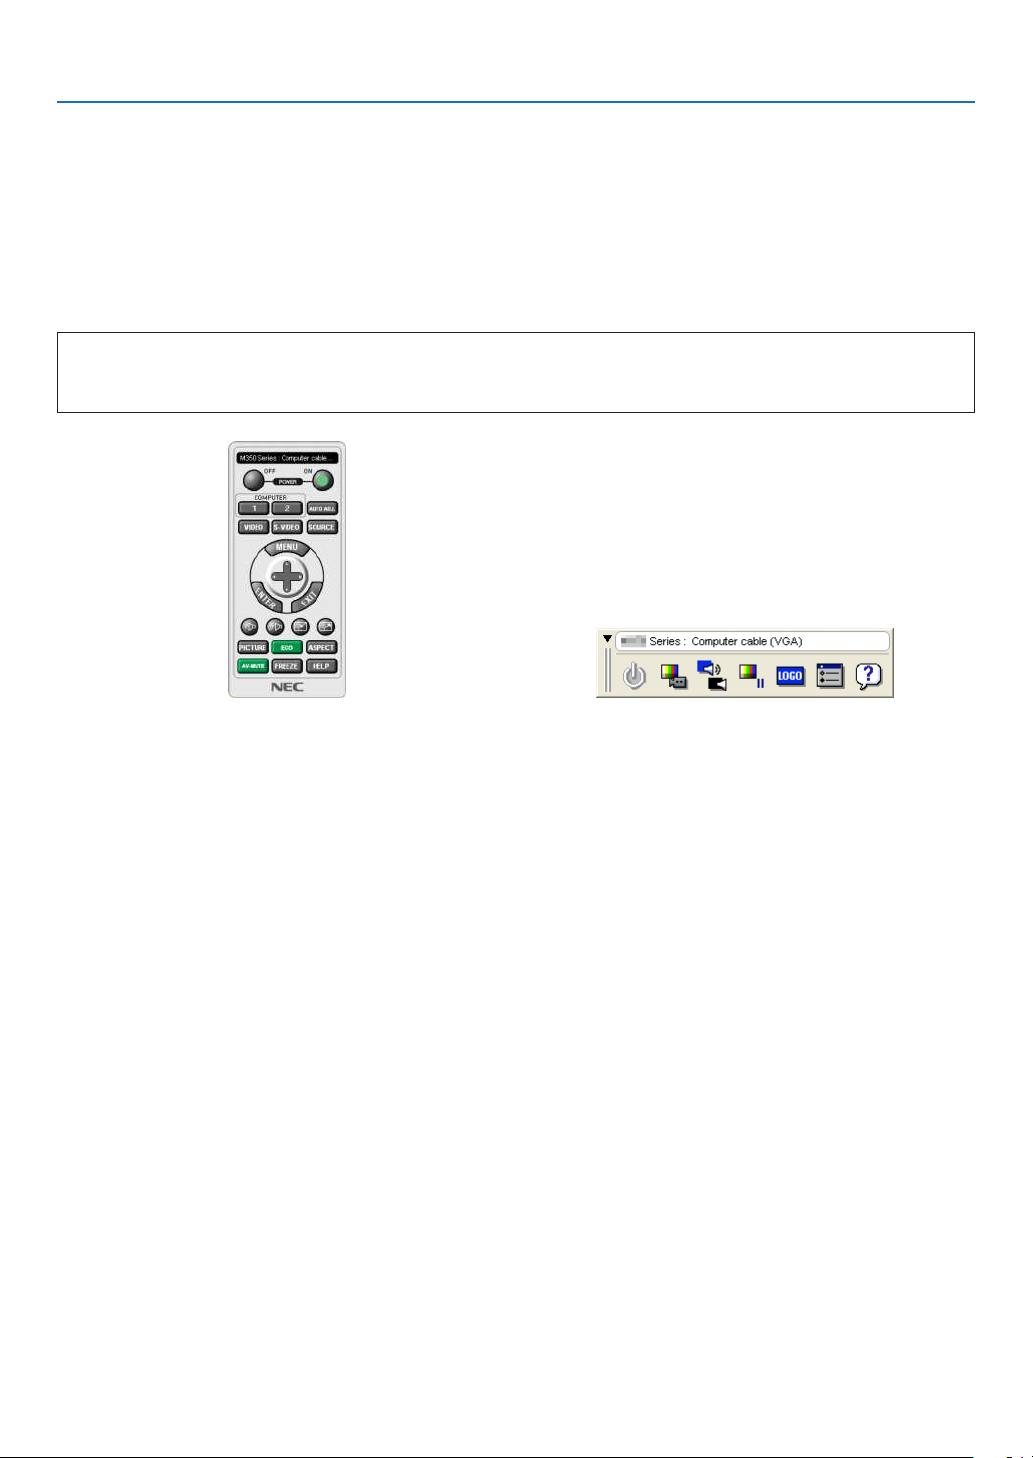
Usingtheutilitysoftware“VirtualRemoteTool”includedonthecompanionNECProjectorCD-ROM,VirtualRemote
screen(ortoolbar)canbedisplayedonyourcomputerscreen.
Thiswillhelpyouperformoperationssuchasprojector’spoweronoroffandsignalselectionviathecomputercable
(VGA),serialcable,orLANconnection.OnlyviaserialorLANconnectionitisalsousedtosend animagetothe
projectorandregisteritasthelogodataoftheprojector.Afterregisteringit,youcanlockthelogotopreventitfrom
changing.
ControlFunctions
PowerOn/Off,signalselection,picturefreeze,picturemute,audiomute,Logotransfertotheprojector,andremote
controloperationonyourPC.
VirtualRemotescreen Toolbar
ThissectionprovidesanoutlineofpreparationforuseofVirtualRemoteTool.
ForinformationonhowtouseVirtualRemoteTool,seeHelpofVirtualRemoteTool.(→page41)
Step1:InstallVirtualRemoteToolonthecomputer.(→page37)
Step2:Connecttheprojectortothecomputer.(→page39)
Step3:StartVirtualRemoteTool.(→page40)
TIP:
• VirtualRemoteToolcanbeusedwithaLANandaserialconnection.USBconnectionisnotsupportedbyVirtualRemoteTool.
• ForupdateinformationonVirtualRemoteTool,visitourwebsite:
http://www.nec-display.com/dl/en/index.html
36
Page 48
3. Convenient Features
NOTE:
• When[COMPUTER]isselectedfromyoursourceselection,theVirtualRemotescreenorthetoolbarwillbedisplayedaswellas
yourcomputerscreen.
• Usethesuppliedcomputercable(VGA)toconnecttheCOMPUTERINterminaldirectlywiththemonitoroutputterminalofthe
computertouseVirtualRemoteTool.
Usingaswitcherorothercablesthanthesuppliedcomputercable(VGA)maycausefailureinsignalcommunication.
VGAcableterminal:
PinNos.12and15arerequiredforDDC/CI.
• VirtualRemoteToolmaynotworkdependingonyourcomputer’sspecicationsandversionofgraphicadaptersordrivers.
• TorunVirtualRemoteToolonWindows8.1,Windows8andWindowsXP,“Microsoft.NETFrameworkVersion2.0”isrequired.
TheMicrosoft.NETFrameworkVersion2.0,3.0or3.5isavailablefromMicrosoft’swebpage.Downloadandinstallitonyour
computer.
• Logodata(graphics)thatcanbesenttotheprojectorwithVirtualRemoteToolhasthefollowingrestrictions:
(OnlyviaserialorLANconnection)
- Filesize:Lessthan1MB
- Imagesize(resolution):
UM361X/UM301X:Horizontal1024×vertical768dotsorless
UM351W/UM301W:Horizontal1280×vertical800dotsorless
- Numberofcolors:256colorsorless
• Toputthedefault"NEClogo"backinthebackgroundlogo,youneedtoregisteritasthebackgroundlogobyusingtheimagele
(UM351W/UM301W:/Logo/necpj_bbwx.bmp,UM361X/UM301X:/Logo/necpj_bb_x.bmp)incluldedonthesuppliedNECProjector
CD-ROM.
TIP:
• The projector’sCOMPUTERINterminalsupportsDDC/CI(DisplayDataChannelCommandInterface).DDC/CIisastandard
interfaceforbidirectionalcommunicationbetweendisplay/projectorandcomputer.
Step 1: Install Virtual Remote Tool on the computer
NOTE:
• ToinstallVirtualRemoteTool,theWindowsuseraccountmusthave“Administrator”privilege(Windows8.1,Windows8,Windows
7,andWindowsVista)or"ComputerAdministrator"privilege(WindowsXP).
• ExitallrunningprogramsbeforeinstallingVirtualRemoteTool.Ifanotherprogramisrunning,theinstallationmaynotbecom-
pleted.
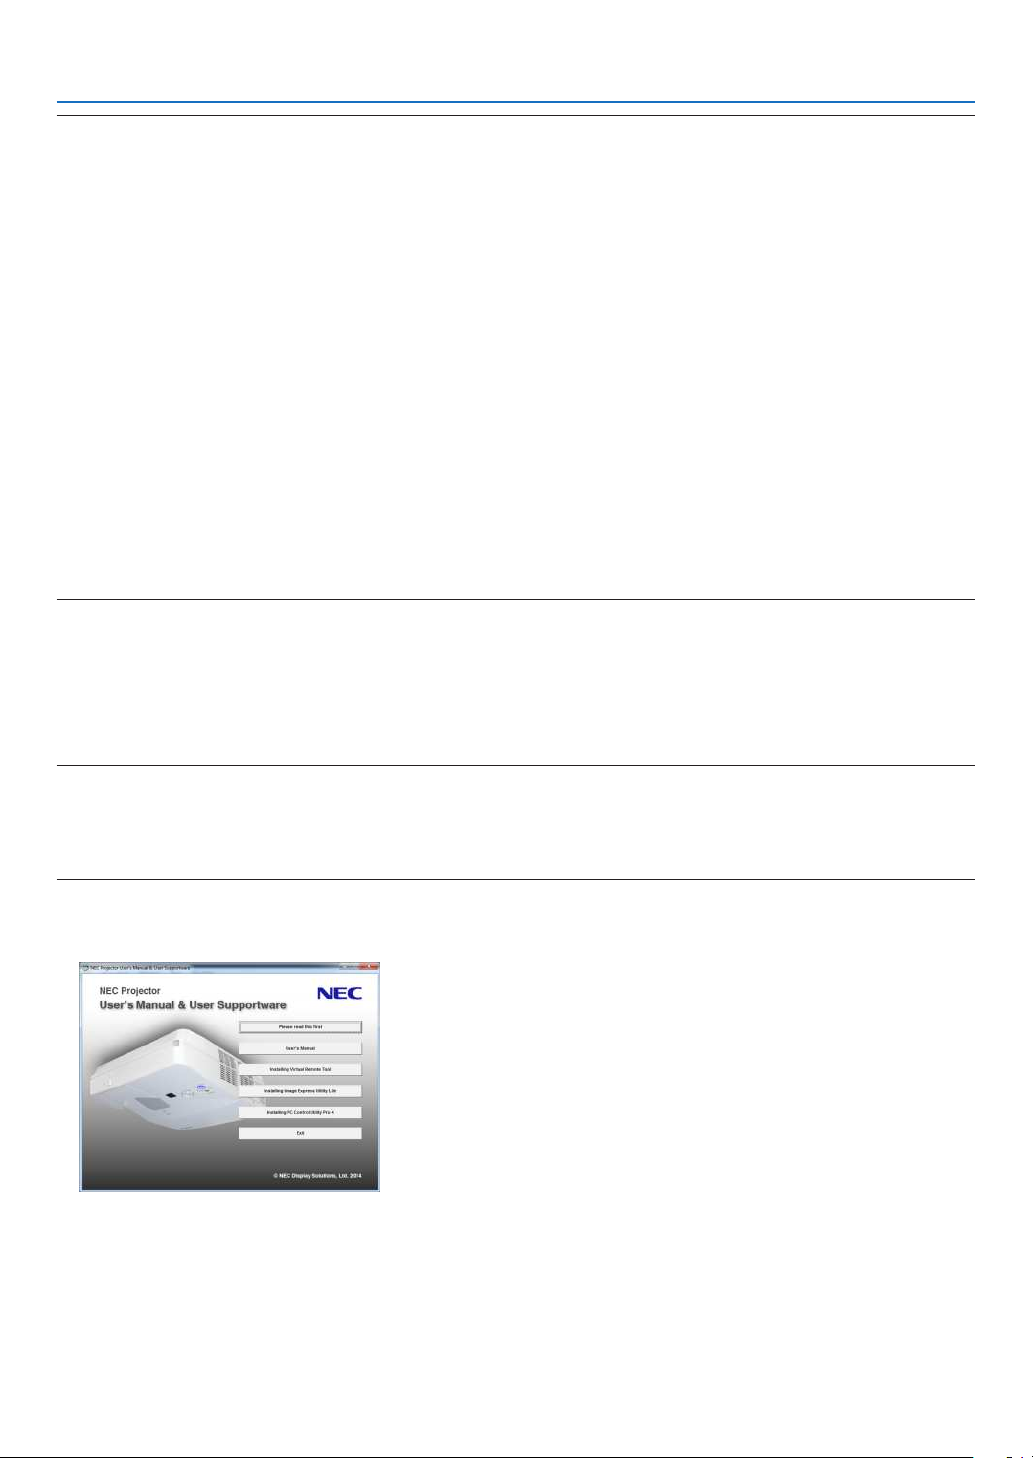
1 InserttheaccompanyingNECProjectorCD-ROMintoyourCD-ROMdrive.
The menu window will be displayed.
37
Page 49
3. Convenient Features
TIP:
Ifthemenuwindowwillnotbedisplayed,trythefollowingprocedure.
ForWindows7
1. Click“start”onWindows.
2. Click“AllPrograms”→“Accessories”→“Run”.
3. Type your CD-ROM drive name (example:“Q:\”) and“LAUNCHER.EXE” in “Name”.(example: Q:\
LAUNCHER.EXE)
4. Click“OK”.
The menu window will be displayed.
2 Click“InstallVirtualRemoteTool”onthemenuwindow.
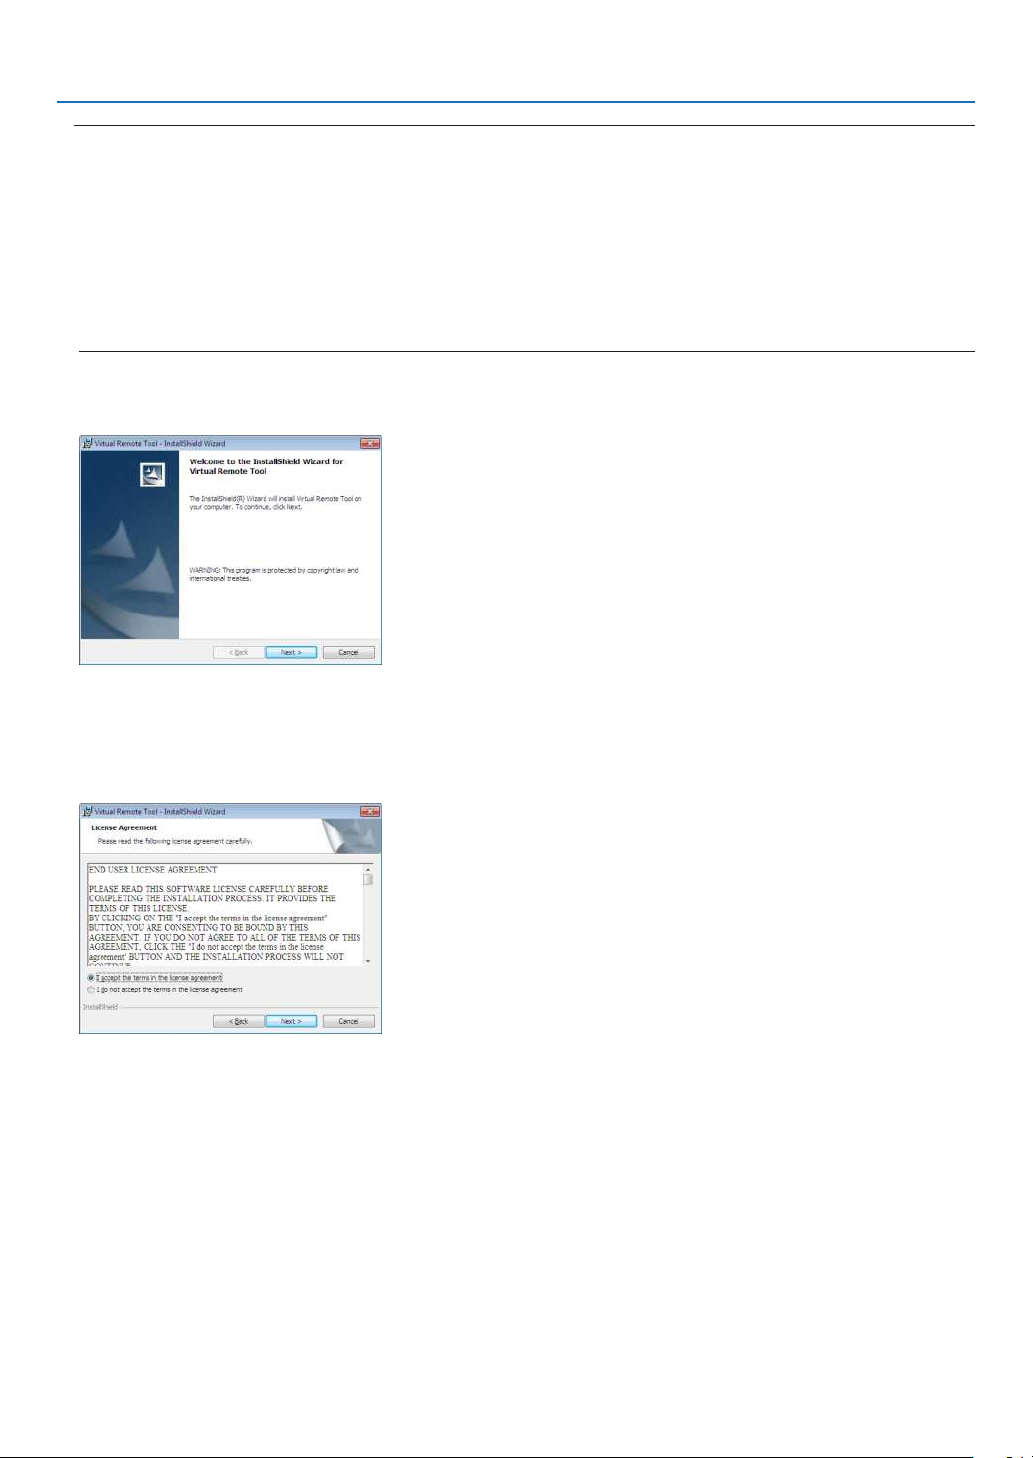
The installation will start.
When the installation is complete, the Welcome window will be displayed.
3 Click“Next”.
“ENDUSERLICENSEAGREEMENT”screenwillbedisplayed.
Read“ENDUSERLICENSEAGREEMENT”carefully.
4 Ifyouagree,click“Iacceptthetermsinthelicenseagreement”andthenclick“Next”.
• Followtheinstructionsontheinstallerscreenstocompletetheinstallation.
• Whentheinstallationiscomplete,youwillreturntothemenuwindow.
38
Page 50
3. Convenient Features
TIP:
UninstallingVirtualRemoteTool
Preparation:
ExitVirtualRemoteToolbeforeuninstalling.TouninstallVirtualRemoteTool,theWindowsuseraccountmusthave
“Administrator”privilege(Windows8.1,Windows8,Windows7andWindowsVista) or “Computer Administrator”
privilege(WindowsXP).
•ForWindows8.1,Windows8,Windows7andWindowsVista
1 Click“Start”andthen“ControlPanel”.
The Control Panel window will be displayed.
2 Click“Uninstallaprogram”under“Programs”
The“ProgramsandFeatures”windowwillbedisplayed.
3 SelectVirtualRemoteToolandclickit.
4 Click“Uninstall/Change”or“Uninstall”.
•Whenthe“UserAccountControl”windowsisdisplayed,click“Continue”.
Follow the instructions on the screens to complete the uninstallation.
•ForWindowsXP
1 Click“Start”andthen“ControlPanel”.
The Control Panel window will be displayed.
2 Double-click“Add/RemovePrograms”.
The Add / Remove Programs window will be displayed.
3 ClickVirtualRemoteToolfromthelistandthenclick“Remove”.
Follow the instructions on the screens to complete the uninstallation.
Step 2: Connect the projector to the computer
1 Usethesuppliedcomputercable (VGA)toconnectthe COMPUTERINterminalofthe projectordirectly
with the monitor output terminal of the computer.
2 ConnectthesuppliedpowercordtotheACINoftheprojectorandthewalloutlet.
The projector is in the standby condition.
Supplied computer cable (VGA)
ACInput
Power cord (supplied)
TIP:
• WhenVirtualRemoteToolstartsforthersttime,“EasySetup”windowwillbedisplayedtonavigateyourconnections.
→ To wall outlet
39
Page 51
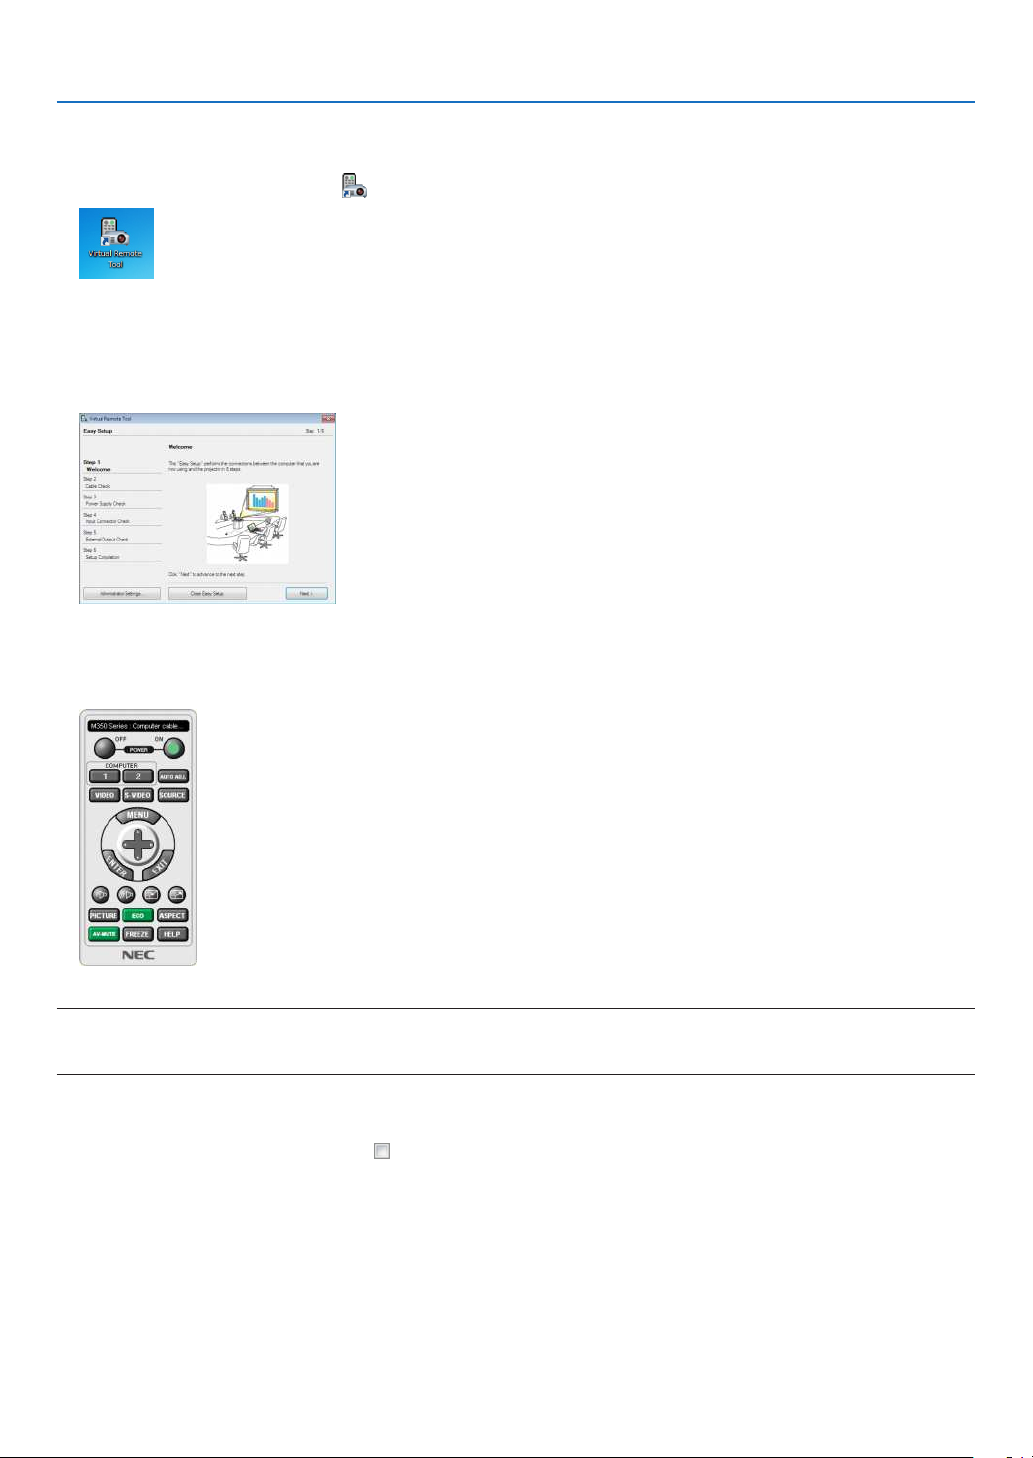
3. Convenient Features
Step 3: Start Virtual Remote Tool
Startusingtheshortcuticon
• Double-clicktheshortcuticon on the Windows Desktop.
StartfromtheStartmenu
• Click[Start]→[AllPrograms]or[Programs]→[NECProjectorUserSupportware]→[VirtualRemoteTool]
→[VirtualRemoteTool].
WhenVirtualRemoteToolstartsforthersttime,“EasySetup”windowwillbedisplayed.
Follow the instructions on the screens
When“EasySetup”iscompleted,theVirtualRemoteToolscreenwillbedisplayed.
NOTE:
• When[NORMAL]isselectedfor[STANDBYMODE]fromthemenu,theprojectorcannotbeturnedonviathecomputercable
(VGA)ornetwork(wiredLAN/wirelessLAN)connection.
TIP:
• TheVirtualRemoteToolscreen(orToolbar)canbedisplayedwithoutdisplaying“EasySetup”window.
Todoso,clicktoplaceacheckmarkfor“ DonotuseEasySetupnexttime”onthescreenatStep6in“EasySetup”.
40
Page 52
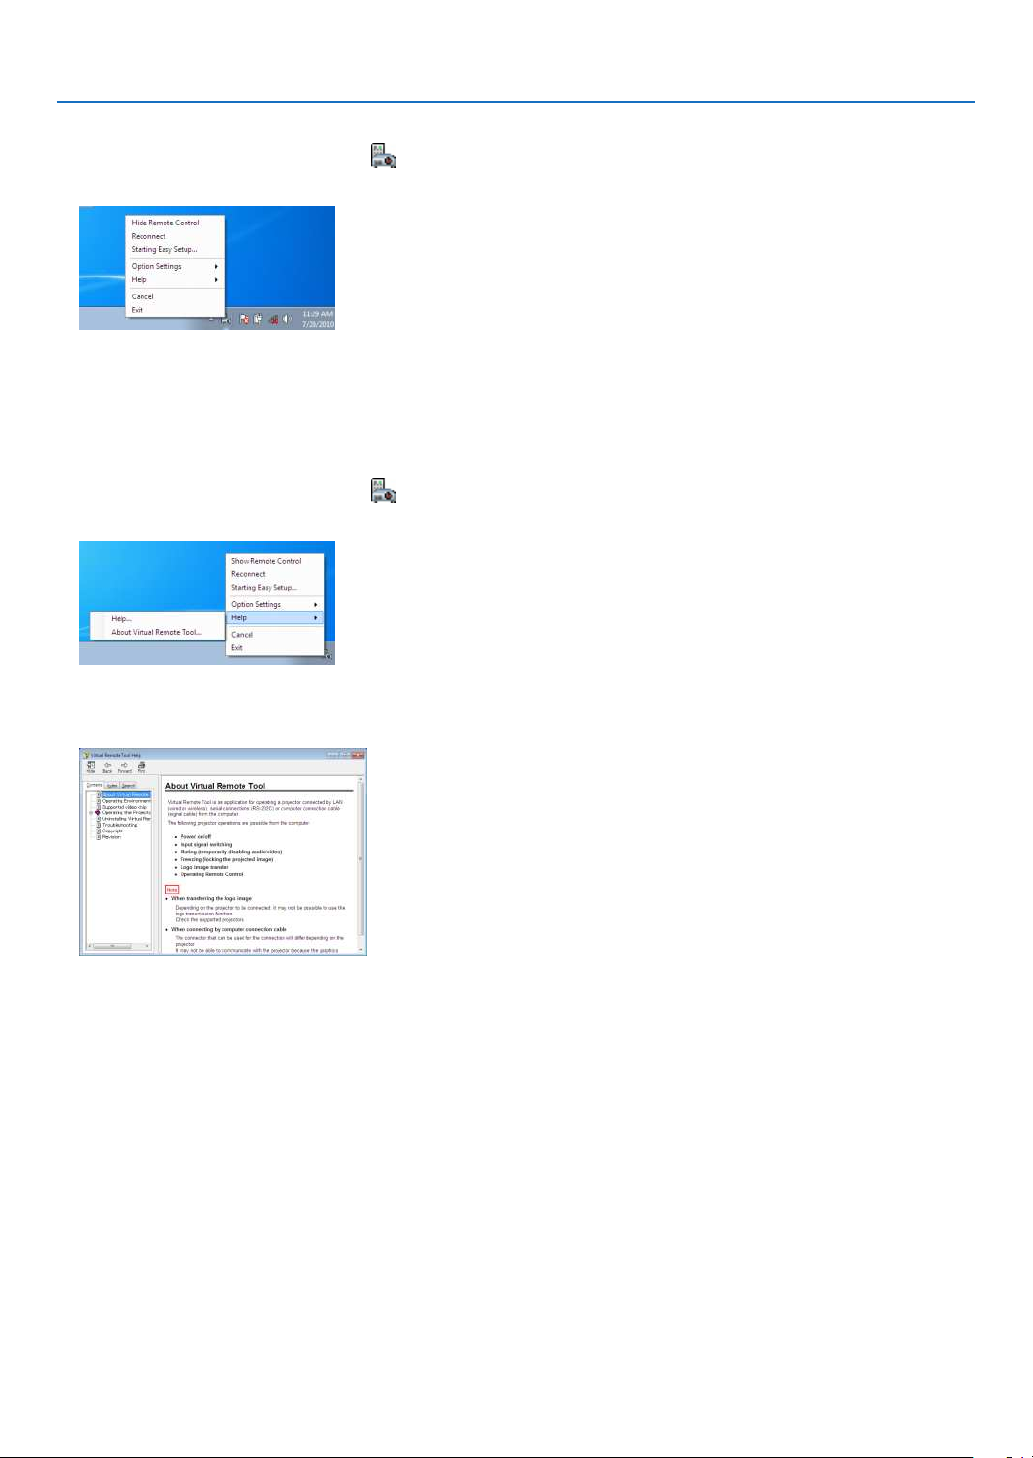
3. Convenient Features
ExitingVirtualRemoteTool
1 ClicktheVirtualRemoteToolicon on the Taskbar.
The pop-up menu will be displayed.
2 Click“Exit”.
The Virtual Remote Tool will be closed.
ViewingthehelpleofVirtualRemoteTool
•Displayingthehelpleusingthetaskbar
1 ClicktheVirtualRemoteToolicon onthetaskbarwhenVirtualRemoteToolisrunning.
The pop-up menu will be displayed.
2. Click“Help”.
The Help screen will be displayed.
•DisplayingthehelpleusingtheStartMenu.
1. Click“Start”→“All programs”or“Programs”→“NEC ProjectorUserSupportware”→“VirtualRemote
Tool”→andthen“VirtualRemoteToolHelp”inthisorder.
The Help screen will be displayed.
41
Page 53
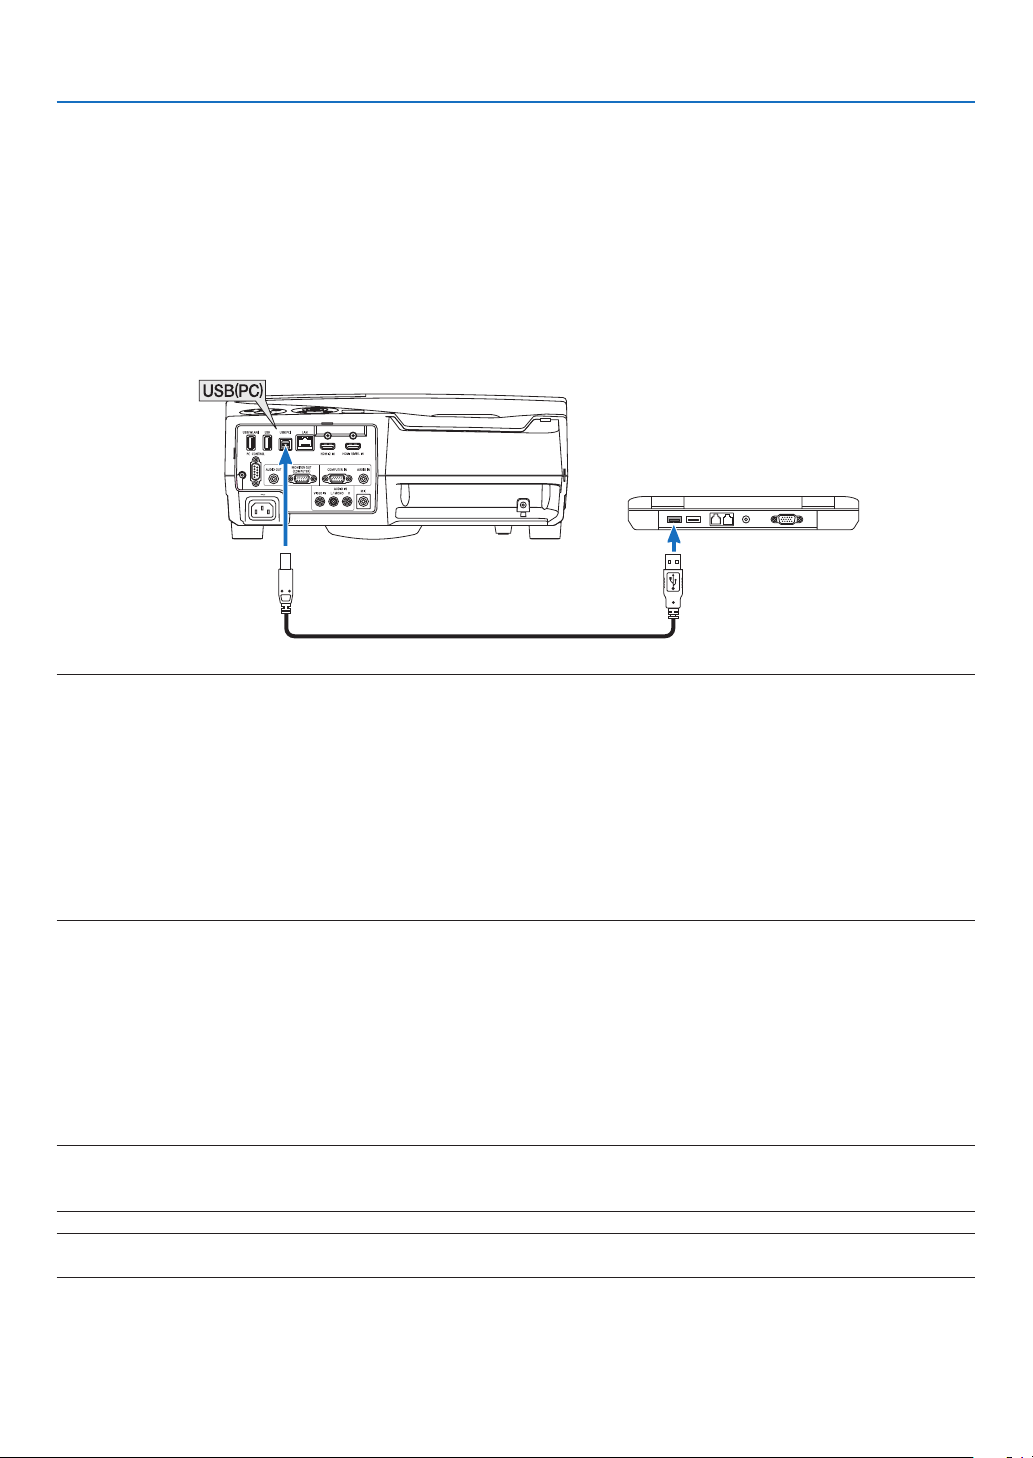
3. Convenient Features
Operating Your Computer’s Mouse Functions from the
Projector’s Remote Control via the USB Cable (Remote Mouse
Function)
Thebuilt-inremotemousefunctionenablesyoutooperateyourcomputer’smousefunctionsfromthesuppliedremote
controlwhentheprojectorisconnectedtoacomputerviaacommerciallyavailableUSBcable(compatiblewithUSB
2.0specications).
TheRemoteMousefunctionworksfortheCOMPUTERinputwhilethecomputerscreenisdisplayed.
TheRemoteMousefunctionwillnotworkwhileyoufreezeormagnifyanimage.
• UsingtheUSBcabletoconnecttheprojectorandthecomputerwillalsostartUSBDisplayfunction.
USB cable (not supplied)
NOTE:
• AUSBcablemustsupporttheUSB2.0Specications.
• Themousefunctioncanbeusedwiththefollowingoperatingsystems:
Windows7,WindowsXP,orWindowsVista
• InSP2orolderversionofWindowsXP,ifthemousecursorwillnotmovecorrectly,dothefollowing:
CleartheEnhancepointerprecisioncheckboxunderneaththemousespeedsliderintheMousePropertiesdialogbox[Pointer
Optionstab].
• Waitatleast5secondsafterdisconnectingtheUSBcablebeforereconnectingitandviceversa.Thecomputermaynotidentify
theUSBcableifitisrepeatedlyconnectedanddisconnectedinrapidintervals.
• ConnecttheprojectortothecomputerwithaUSBcableafterstartingthecomputer.Failuretodosomayfailtostartthecom-
puter.
Operatingyourcomputer’smousefromtheremotecontrol
Youcanoperateyourcomputer’smousefromtheremotecontrol.
PAGE / Button ���������������������������scrolls the viewing area of the window or to move to the previous or next slide in PowerPoint
on your computer�
Buttons ������������������������������moves the mouse cursor on your computer�
MOUSE L-CLICK/ENTER Button ������works as the mouse left button�
MOUSE R-CLICK Button ������������������works as the mouse right button�
NOTE:
• Whenyouoperatethecomputerusingthe orbuttonwiththemenudisplayed,boththemenuandthemousepointer
willbeaffected.Closethemenuandperformthemouseoperation.
TIP:YoucanchangethePointerspeedontheMousePropertiesdialogboxontheWindows.Formoreinformation,seetheuser
documentationoronlinehelpsuppliedwithyourcomputer.
42
Page 54
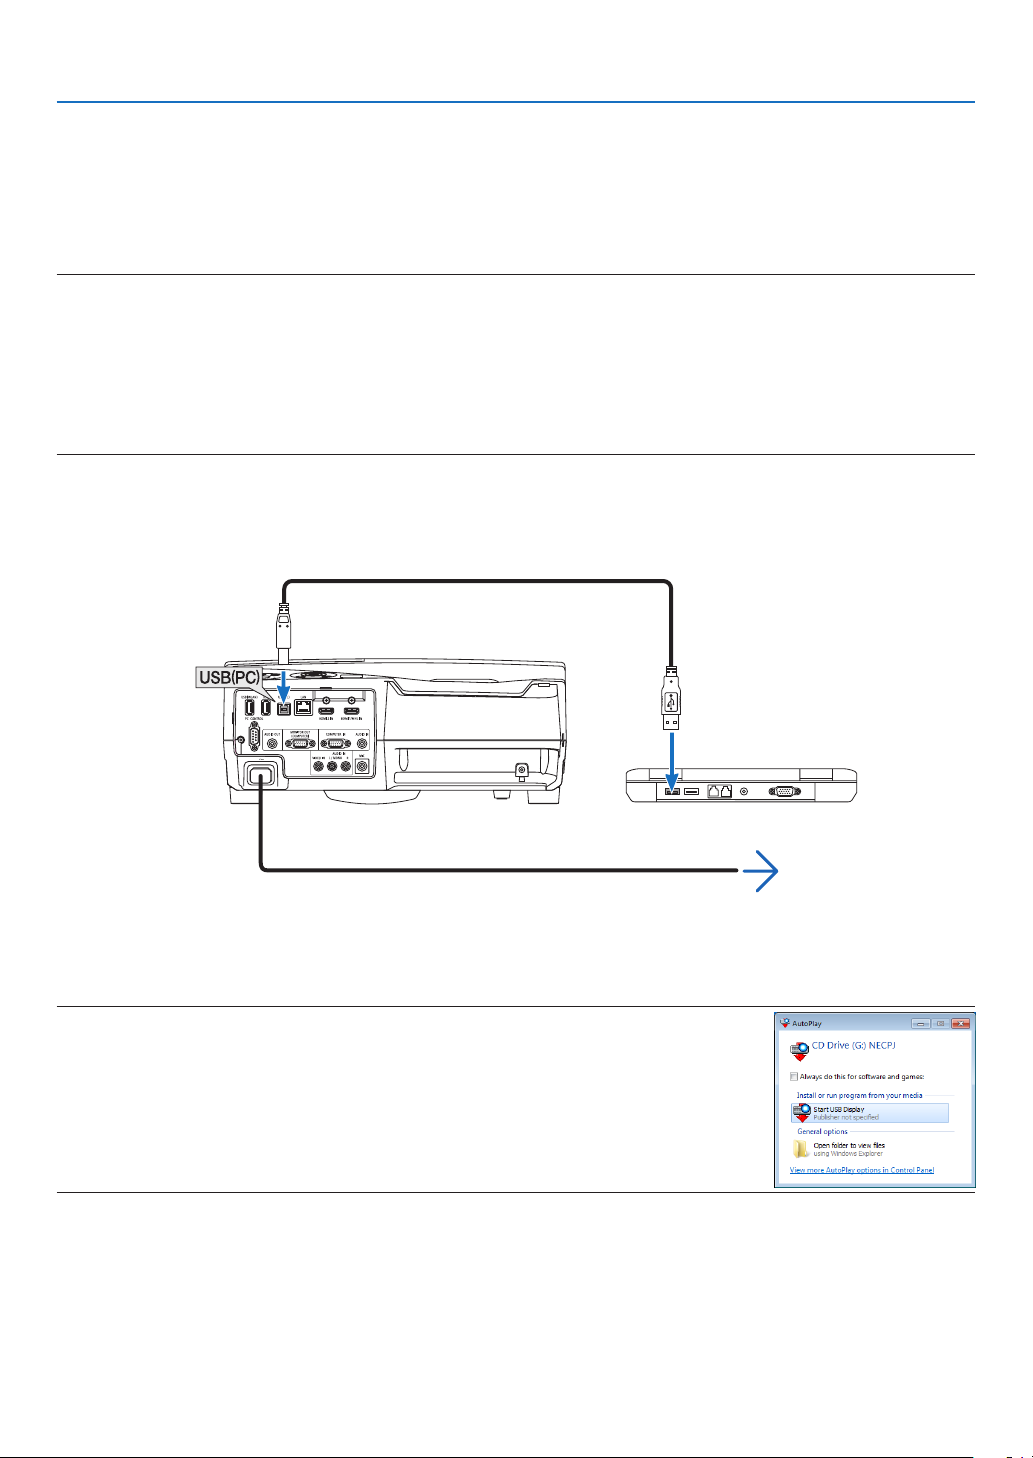
3. Convenient Features
Projecting Your Computer’s Screen Image from the
Projector via the USB Cable (USB Display)
UsingacommerciallyavailableUSBcable(compatiblewithUSB2.0specications)toconnectthecomputerwiththe
projectorallowsyoutosendyourcomputerscreenimagetotheprojectorfordisplaying.PowerOn/Offandsource
selectionoftheprojectorcanbedonefromyourcomputerwithoutconnectingacomputercable(VGA).
NOTE:
• TomakeUSB-BavailableonWindowsXP,theWindowsuseraccountmusthave“Administrator”privilege.
• USBDisplayusesfunctionsofImageExpressUtilityLitecontainedonNECProjectorCD-ROM(→page56).
StartingUSBDisplay,however,willnotinstallImageExpressUtilityLiteonyourcomputer.ThisisbecauseUSBDisplayexecutes
theprojector’sprogramonly.
• USBDisplaywillnotworkin[NORMAL]of[STANDBYMODE].(→page94)
• WhenUSBDisplayisused,thesoundisoutputfromtheCOMPUTERAUDIOINMiniJack(StereoMini).Imageandsoundmay
notbesynchronized.
1. Start the computer.
2. Connecttheprojector’spowercordtothewalloutletandputtheprojectorintostandbycondition.
3. Use the USB cable to connect the computer with the projector.
USB cable (not supplied)
Power cord (supplied)
Themessage“Theprojectorisinstandbymode.Connectit?”willbedisplayedonthecomputerscreen.
• ThecontrolwindowofImageExpressUtilityLitewillbedisplayedonthetopofthescreen.
NOTE:Dependingon the computer setting, the “AutoPlay” window may be displayed when the
computerdetectstheconnectionto the projector.If this happens, click the“StartUSBDisplay”
window.
4. Click“Yes”.
Theprojectorwillturnonandthemessage“Theprojectorisgettingready.Pleasewait.”willbedisplayedonthe
computer screen. This message will disappear in a few seconds.
→ To wall outlet
43
Page 55
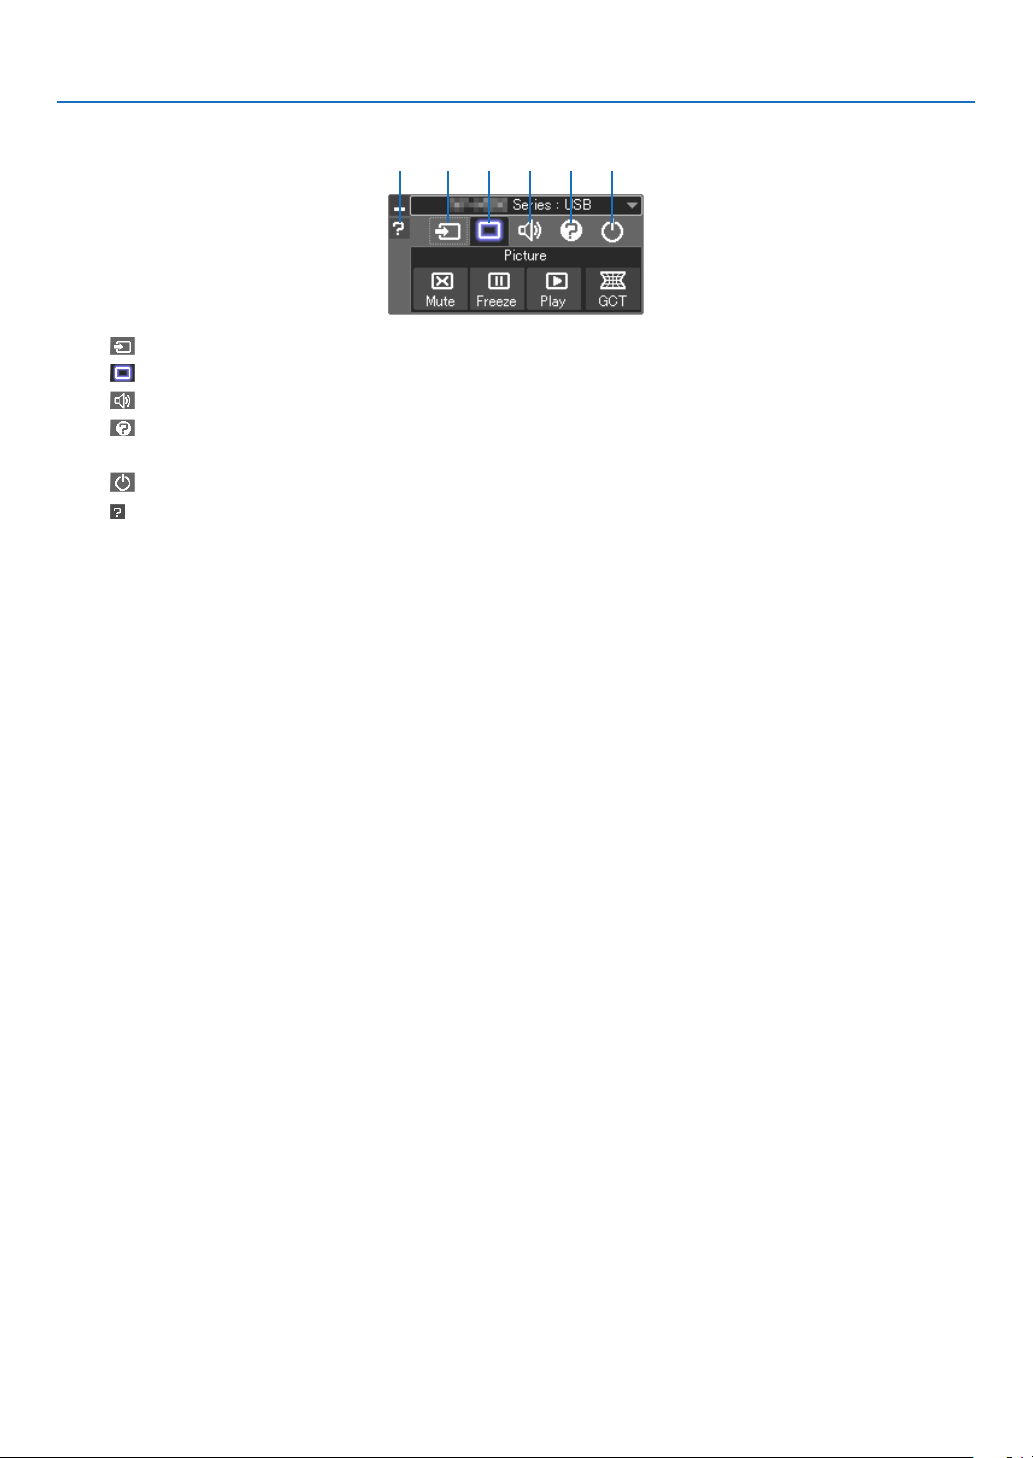
3. Convenient Features
5. Operate the control window.
(1) (2) (3) (4) (5)(6)
(1) (Source) ����� Selects an input source of the projector�
(2) (Picture) ���� Turns on or off AV-MUTE (Picture mute), and turns on or off FREEZE (Freeze a picture)�
(3) (Sound) ����� Turns on or off AV-MUTE (Sound mute), play the sound and turns up or down the volume�
(4) (Others) ����� Uses “Update”, “HTTP Server”*, “Settings” and “Information”�
* The HTTP Server cannot be selected when a USB cable is connected�
(5) (Exit) ���������� Exit Image Express Utility Lite� You can also turn off the projector at the same time�
(6) (Help) ����������� Displays the help of Image Express Utility Lite�
44
Page 56

3. Convenient Features
Controlling the Projector by Using an HTTP Browser
Overview
TheHTTPServerfunctionprovidessettingsandoperationsfor:
1. Settingforwired/wirelessnetwork(NETWORKSETTINGS)
To use wireless LAN connection, the optional USB Wireless LAN Unit is required. (→ page 115)
To use wired/wireless LAN connection, connect the projector to the computer with a commercially available LAN
cable. (→ page 114)
2. SettingAlertMail(ALERTMAIL)
Whentheprojectorisconnectedtoawired/wirelessnetwork,lampreplacetimeorerrormessageswillbesentvia
e-mail.
3. Operating the projector
Power on/off, selecting input, volume control and picture adjustments are possible.
4. SettingPJLinkPASSWORDandAMXBEACON
Thisdeviceuses“JavaScript”and“Cookies”andthebrowsershouldbesettoacceptthesefunctions.Thesetting
methodwillvarydependingontheversionofbrowser.Pleaserefertothehelplesandtheotherinformationprovided
inyoursoftware.
TwowaysofaccesstotheHTTPserverfunctionareavailable:
• StarttheWebbrowseronthecomputerviathenetworkconnectedtotheprojectorandenterthefollowing
URL :
http://<theprojector’sIPaddress>/index.html
• UseImageExpressUtilityLitecontainedonthesuppliedNECProjectorCD-ROM.
TIP:ThefactorysettingIPaddressis[DHCPON].
NOTE:
• Tousetheprojectorinanetwork,consultwithyournetworkadministratoraboutnetworksettings.
• Thedisplay’sorbutton’sresponsecanbesloweddownoroperationmaynotbeaccepteddependingthesettingsofyournetwork.
Shouldthishappen,consultyournetworkadministrator.Theprojectormaynotrespondifitsbuttonsarerepeatedlypressedin
rapidintervals.Shouldthishappen,waitamomentandrepeat.Ifyoustillcan’tgetanyresponse,turnoffandbackontheprojector.
• IfthePROJECTORNETWORKSETTINGSscreendoesnotappearinthewebbrowser,presstheCtrl+F5keystorefreshyourweb
browser(orclearthecache).
Preparation before Use
ConnecttheprojectortoacommerciallyavailableLANcablebeforeengaginginbrowseroperations.(→page114)
Operationwithabrowserthatusesaproxyservermaynotbepossibledependingonthetypeofproxyserverandthe
settingmethod.Althoughthetypeofproxyserverwillbeafactor,itispossiblethatitemsthathaveactuallybeenset
willnotbedisplayeddependingontheeffectivenessofthecache,andthecontentssetfromthebrowsermaynotbe
reectedinoperation.Itisrecommendedthataproxyservernotbeusedunlessitisunavoidable.
45
Page 57
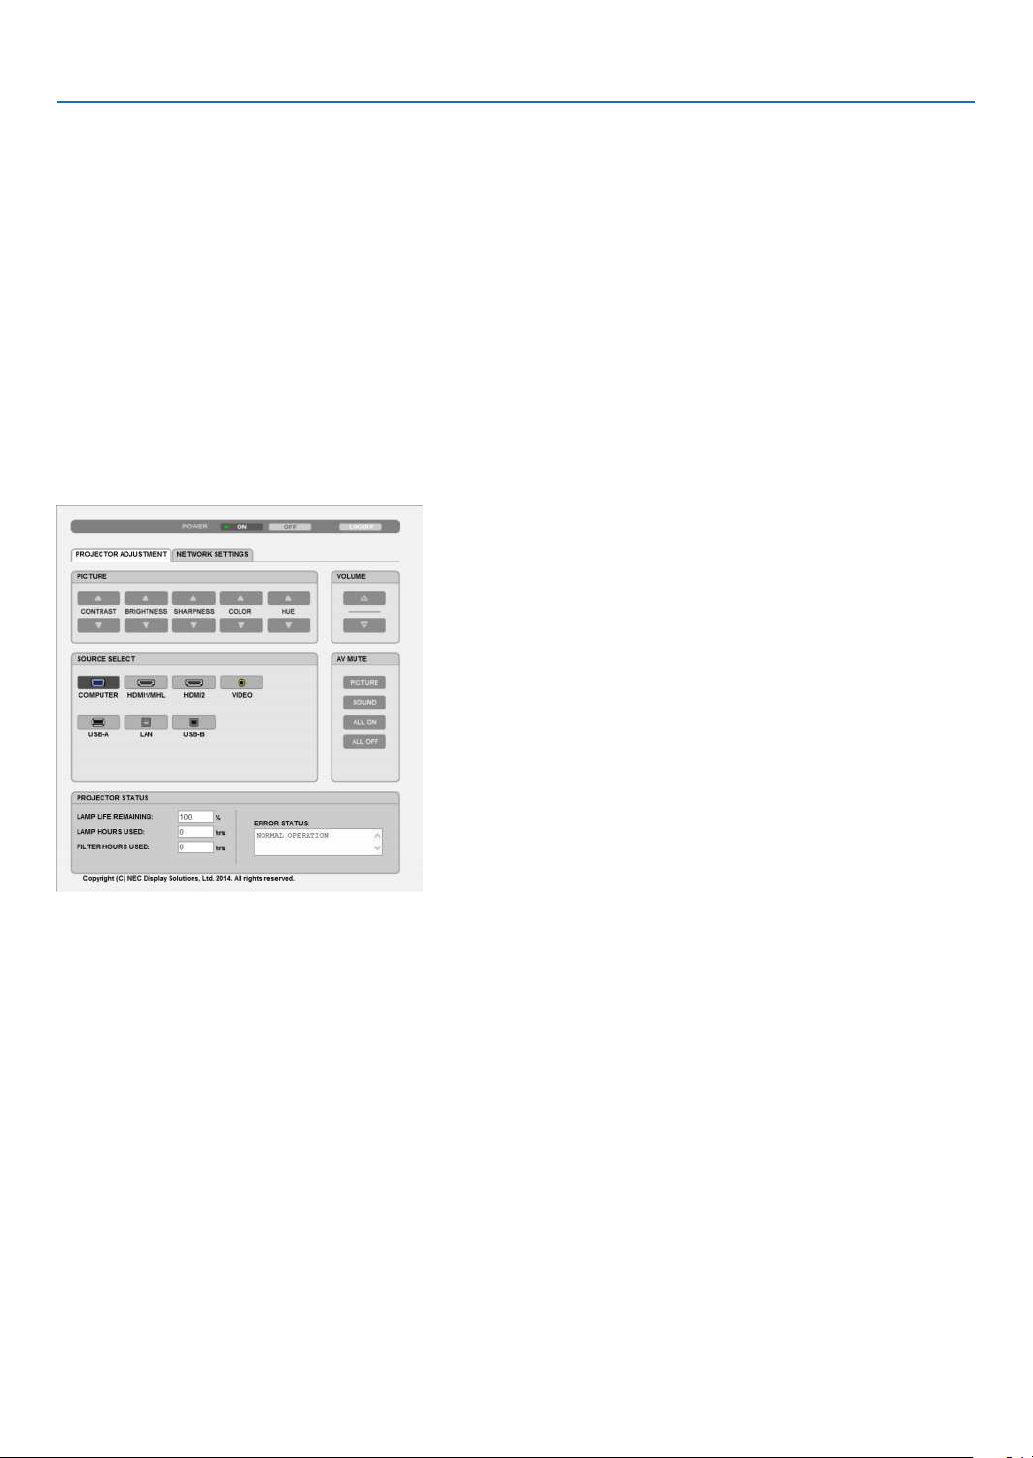
3. Convenient Features
Handling of the Address for Operation via a Browser
RegardingtheactualaddressthatisenteredfortheaddressorenteredtotheURLcolumnwhenoperationoftheprojectorisviaabrowser,thehostnamecanbeusedasitiswhenthehostnamecorrespondingtotheIPaddressofthe
projectorhasbeenregisteredtothedomainnameserverbyanetworkadministrator,orthehostnamecorresponding
totheIPaddressoftheprojectorhasbeensetinthe“HOSTS”leofthecomputerbeingused.
Example1:Whenthehostnameoftheprojectorhasbeensetto“pj.nec.co.jp”,accessisgainedtothenetwork
settingbyspecifying
http://pj.nec.co.jp/index.html
fortheaddressortheentrycolumnoftheURL.
Example2:WhentheIPaddressoftheprojectoris“192.168.73.1”,accessisgainedtothenetworksettingby
specifying
http://192.168.73.1/index.html
fortheaddressortheentrycolumnoftheURL.
PROJECTOR ADJUSTMENT
POWER:Thiscontrolsthepoweroftheprojector.
ON ������������������������� Power is switched on�
OFF ������������������������ Power is switched off�
VOLUME:Thiscontrolsthevolumeoftheprojector.
��������������������������� Increases the volume adjustment value�
��������������������������� Decreases the volume adjustment value�
AV-MUTE:Thiscontrolsthemutefunctionoftheprojector.
PICTURE ON ���������� Mutes the video�
PICTURE OFF ��������� Cancels the video muting�
SOUND ON ������������ Mutes the audio�
SOUND OFF ����������� Cancels the audio muting�
ALL ON ������������������ Mutes each of the video, and audio functions�
ALL OFF ����������������� Cancels the muting of each of the video, and audio functions�
46
Page 58

3. Convenient Features
PICTURE:Controlsthevideoadjustmentoftheprojector.
CONTRAST �������� Increases the contrast adjustment value�
CONTRAST �������� Decreases the contrast adjustment value�
BRIGHTNESS ���� Increases the brightness adjustment value�
BRIGHTNESS ���� Decreases the brightness adjustment value�
SHARPNESS ����� Increases the sharpness adjustment value�
SHARPNESS ����� Decreases the sharpness adjustment value�
COLOR �������������� Increases the color adjustment value�
COLOR �������������� Decreases the color adjustment value�
HUE ������������������� Increases the hue adjustment value�
HUE ������������������� Decreases the hue adjustment value�
• The functionsthatcanbecontrolledwillvary dependingonthesignalbeinginputto theprojector. (→page
80)
SOURCESELECT:Thisswitchestheinputterminaloftheprojector.
COMPUTER ����������� Switches to the COMPUTER IN terminal�
HDMI1/MHL ���������� Switches to the HDMI 1/MHL IN terminal
������������������� Switches to the HDMI 2 IN terminal�
HDMI2
VIDEO �������������������� Switches to the VIDEO IN terminal�
USB-A �������������������� Switches to the data on the USB memory device�
LAN ������������������������ Switches to a LAN signal�
USB-B �������������������� Switches to the USB Port (PC)�
PROJECTORSTATUS:Thisdisplaystheconditionoftheprojector.
LAMP LIFE REMAINING �����Displays the remaining life of the lamp as a percentage�
LAMP HOURS USED �����������Displays how many hours the lamp has been used�
FILTER HOURS USED ��������� Displays how many hours the filter has been used�
ERROR STATUS ������������������ Displays the status of errors occurring within the projector�
LOGOFF:Loggingoffyourprojectorandreturningtotheauthenticationscreen(LOGONscreen).
47
Page 59
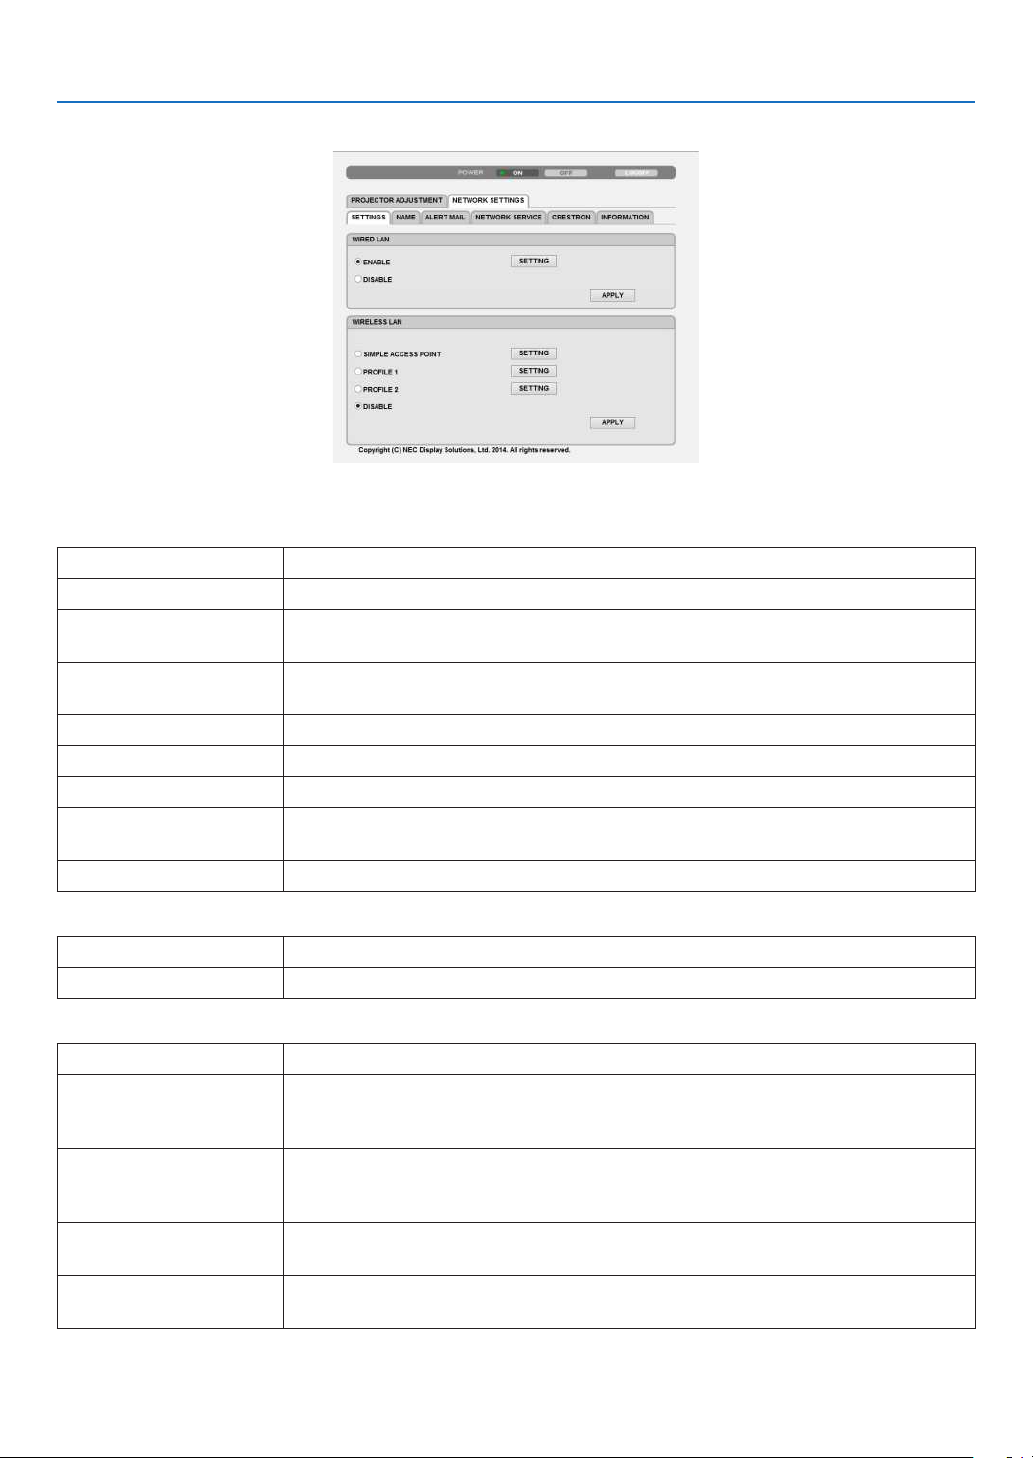
3. Convenient Features
NETWORK SETTINGS
•SETTINGS
WIRED or WIRELESS
SETTING SetforwiredLANorforwirelessLAN.
APPLY ApplyyoursettingstowiredLANorwirelessLAN.
DHCPON AutomaticallyassignIPaddress,subnetmask,andgatewaytotheprojectorfromyour
DHCPserver.
DHCPOFF SetIPaddress,subnetmask,andgatewaytotheprojectorassignedbyyournetwork
administrator.
IPADDRESS SetyourIPaddressofthenetworkconnectedtotheprojector.
SUBNETMASK Setyoursubnetmasknumberofthenetworkconnectedtotheprojector.
GATEWAY Setthedefaultgatewayofthenetworkconnectedtotheprojector.
AUTODNSON DHCPserverwillautomaticallyassignIPaddressof DNS serverconnected to the
projector.
AUTODNSOFF SetyourIPaddressofDNSserverconnectedtotheprojector.
SettingforWIREDLAN
ENABLE TurnonwiredLANconnection
DISABLE TurnoffwiredLANconnection
SettingforWIRELESSLAN(withtheoptionalUSBWirelessLANUnitequipped)
SIMPLEACCESSPOINT Settingasansimpleaccesspoint.
MODE Availablechannelsvarydependingonthecountryandregion.Whenyouselect[IN-
FRASTRUCTURE],make sure that theprojectorandyouraccesspoint are on the
same channel.
CHANNEL Availablechannelsvarydependingonthecountryandregion.Whenyouselect[IN-
FRASTRUCTURE],theaccesspointsamewiththewirelessLANisselectedautomatically.
PROFILE1/PROFILE2 TwosettingscanbesetforwirelessLANconnection.SelectPROFILE1orPROFILE
2.
SSID
Enteranidentier(SSID)forwirelessLAN.Communicationcanbedoneonlywith
equipmentwhoseSSIDmatchesSSIDforyourwirelessLAN.
48
Page 60
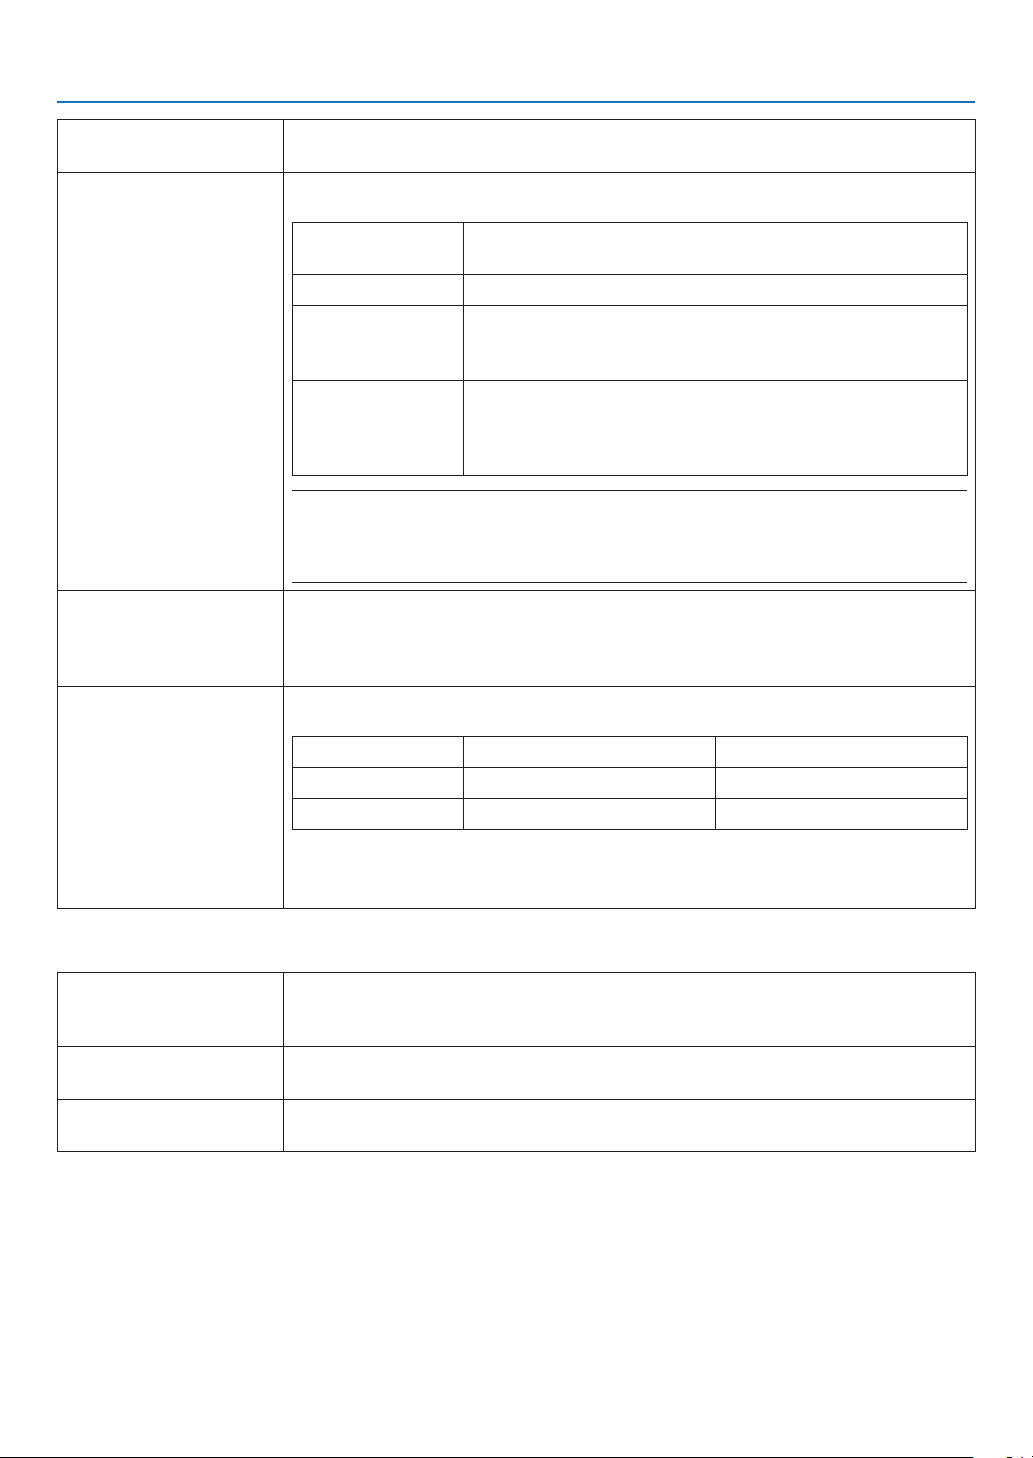
3. Convenient Features
SITESURVEY DisplaysalistofavailableSSIDsforwirelessLANonsite.SelectanSSIDwhichyou
can access.
SECURITYTYPE Turnonorofftheencryptionmodeforsecuretransmission.Whenturnontheencryp-
tionmode,setWEPkeyorencryptedkey.
DISABLE Willnotturnontheencryptionfeature.Yourcommunications
maybemonitoredbysomeone.
WEP64bit Uses64-bitdatalengthforsecuretransmission.
WEP128bit Uses128-bitdatalengthforsecuretransmission.Thisoptionwill
increaseprivacyandsecuritywhencomparedtouseof64-bit
datalengthencryption.
WPAPSK-TKIP/
WPAPSK-AES/
WPA2PSK-TKIP/
WPA2PSK-AES
NOTE:
• TheWEPsettingsmustbethesameascommunicationdevicessuchasPCoraccesspointin
yourwirelessnetwork.
• WhenyouuseWEP,yourimagetransmissionspeedwillslowdown.
INDEX Selectencryptionkeywhenselecting[WEP64bit]or[WEP128bit]in[SECURITY
TYPE].
WEP keyis xedat "1" either WEP64bit or WEP128bit isselectedasSECURITY
TYPE.
KEY
Whenselecting[WEP64bit]or[WEP128bit]in[SECURITYTYPE]:
EnterWEPkey.
Select Characters(ASCII) Hexadecimaldigit(HEX)
WEP64bit Upto5characters Upto10characters
WEP128bit Upto13characters Upto26characters
TheseoptionsprovidestrongersecuritythanWEP.
When selecting [WPAPSK-TKIP], [WPA PSK-AES], [WPA2 PSK-TKIP] or [WPA2
PSK-AES]:
Enterencryptionkey.Keylengthmustbe8orgreaterand63orless.
•NAME
PROJECTORNAME Enteranameforyourprojectorso that yourcomputercanidentifytheprojector.A
projectornamemustbe16charactersorless.
TIP:Projectornamewillnotbeaffectedevenwhen[RESET]isdonefromthemenu.
HOSTNAME Enterthehostnameofthenetworkconnectedtotheprojector.Ahostnamemustbe
15 or less.
DOMAINNAME Enterthedomain name ofthenetworkconnected to theprojector. Adomainname
must be 60 characters or less.
49
Page 61

•ALERTMAIL
3. Convenient Features
ALERTMAIL(English
only)
SENDER’SADDRESS Entersender’saddress.
SMTPSERVERNAME EntertheSMTPservernametobeconnectedtotheprojector.
RECIPIENT’SADDRESS
1,2,3
TESTMAIL Sendatestmailtocheckwhetheryoursettingsarecorrectornot
SAVE Clickthisbuttontoreecttheabovesettings.
Thisoptionwillnotifyyourcomputeroflampreplacetimeorerrormessagesviae-mail
whenusingwirelessorwiredLAN.
PlacingacheckmarkwillturnontheAlertMailfeature.
ClearingacheckmarkwillturnofftheAlertMailfeature.
Sampleofamessagetobesentfromtheprojector:
Thelampandltersareattheendofitsusablelife.Pleasereplacethelampand
lters.
ProjectorName:NECProjector
LampHoursUsed:100[H]
Enteryourrecipient’saddress.Uptothreeaddressescanbeentered.
NOTE:
• Ifyouexecuteatest,youmaynotreceiveanAlertmail.Shouldthishappen,checkifnetwork
settingsarecorrect.
• Ifyouenteredanincorrectaddressinatest,youmaynotreceiveanAlertmail.Shouldthis
happen,checkiftheRecipient’sAddressiscorrect.
•NETWORKSERVICE
PJLinkPASSWORD SetapasswordforPJLink*.Apasswordmustbe32charactersorless.Donotforget
yourpassword.However,ifyouforgetyourpassword,consultwithyourdealer.
HTTPPASSWORD SetapasswordforHTTPserver.Apasswordmustbe10charactersorless.
AMXBEACON TurnonorofffordetectionfromAMXDeviceDiscoverywhenconnectingtothenetwork
supportedbyAMX’sNetLinxcontrolsystem.
TIP:
WhenusingadevicethatsupportsAMXDeviceDiscovery,allAMXNetLinxcontrolsystemwillrec-
ognizethedeviceanddownloadtheappropriateDeviceDiscoveryModulefromanAMXserver.
PlacingacheckmarkwillenabledetectingtheprojectorfromAMXDeviceDiscovery.
ClearingacheckmarkwilldisabledetectingtheprojectorfromAMXDeviceDiscovery.
*WhatisPJLink?
PJLinkisastandardizationofprotocolusedforcontrollingprojectorsofdifferentmanufacturers.ThisstandardprotocolisestablishedbyJapanBusinessMachineandInformationSystemIndustriesAssociation(JBMIA)in2005.
TheprojectorsupportsallthecommandsofPJLinkClass1.
SettingofPJLinkwillnotbeaffectedevenwhen[RESET]isdonefromthemenu.
CRESTRONROOMVIEWcompatibility
TheprojectorsupportsCRESTRONROOMVIEW,allowingmultipledevicesconnectedinthenetworktobemanaged
andcontrolledfromacomputeroracontroller.
Formoreinformation,visithttp://www.crestron.com
<SettingProcedure>
AccesstotheHTTPserverfunction,andmakenecessarysettingsfor[CRESTRON]in[NETWORKSETTINGS].
50
Page 62

•ROOMVIEWformanagingfromthecomputer.
DISABLE DisablesROOMVIEW.
ENABLE EnablesROOMVIEW.
•CRESTRONCONTROLformanagingfromthecontroller.
DISABLE DisablesCRESTRONCONTROL.
ENABLE EnablesCRESTRONCONTROL.
IPADDRESS SetyourIPaddressofCRESTRONSERVER.
IPID SetyourIPIDofCRESTRONSERVER.
TIP:TheCRESTRONsettingsarerequiredonlyforusewithCRESTRONROOMVIEW.
Formoreinformation,visithttp://www.crestron.com
•INFORMATION
WIREDLAN DisplayalistofsettingsofwiredLANconnection.
WIRELESSLAN DisplayalistofsettingsofwirelessLANconnection.
UPDATE Reectsettingswhentheyarechanged.
3. Convenient Features
51
Page 63
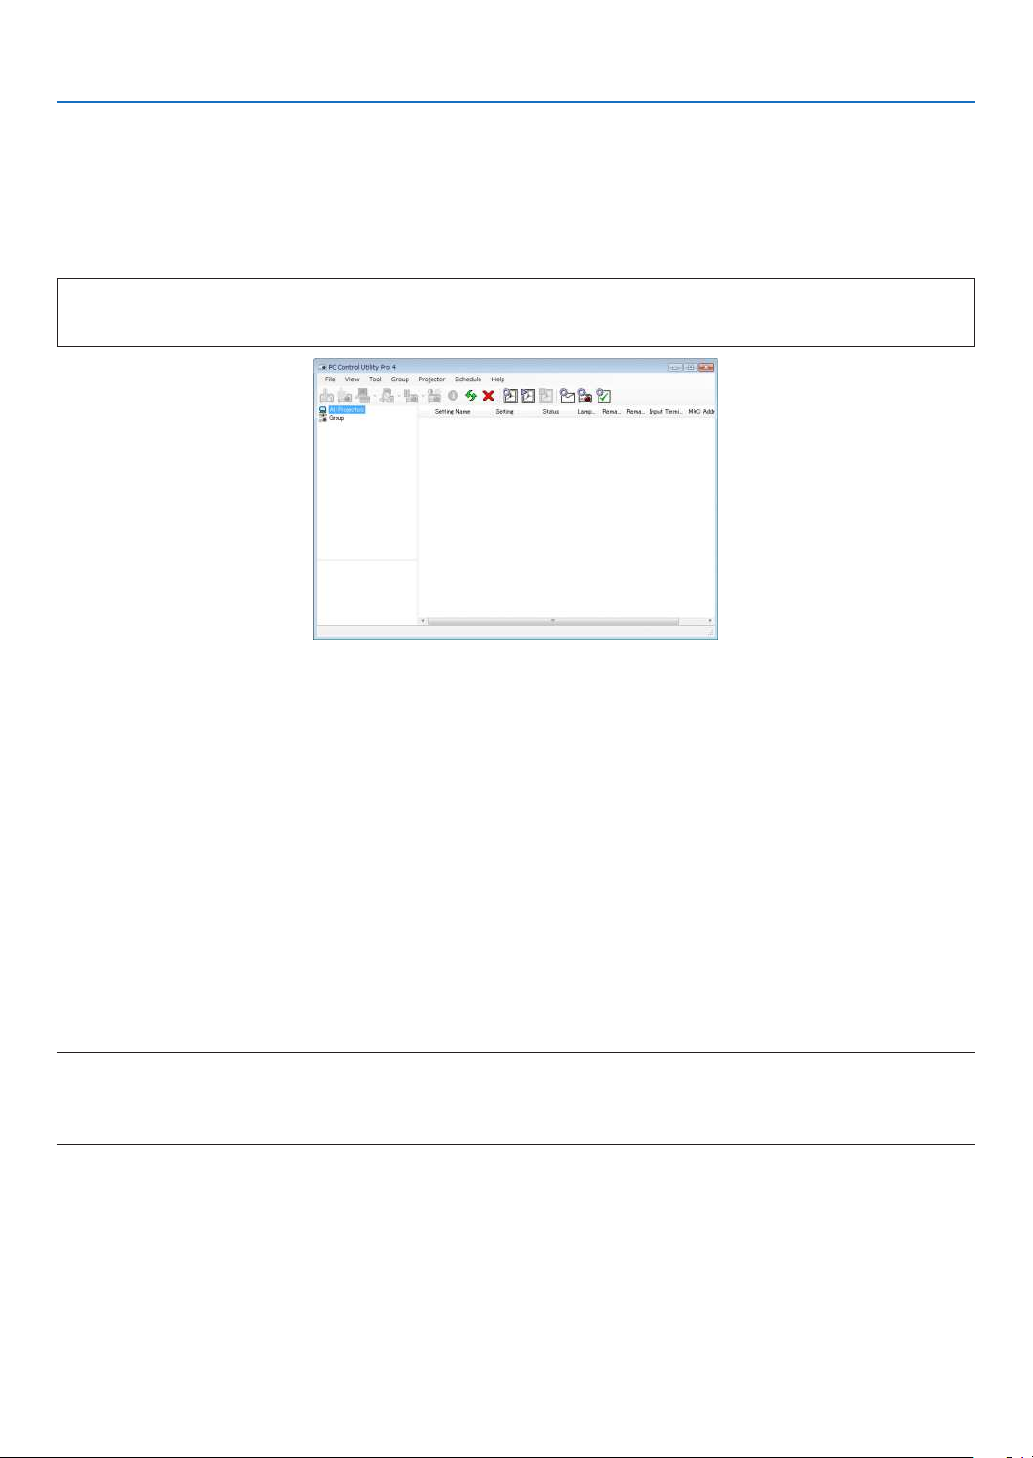
3. Convenient Features
Controlling the Projector over a LAN (PC Control Utility Pro 4/
Pro 5)
Usingtheutilitysoftware“PCControlUtilityPro4”and“PCControlUtilityPro5”includedonthecompanionNEC
ProjectorCD-ROM,theprojectorcanbecontrolledfromacomputeroveraLAN.
PCControlUtilityPro4isaprogramcompatiblewithWindows.(→thispage)
PCControlUtilityPro5isaprogramcompatiblewithMacOS.(→page55)
ControlFunctions
PowerOn/Off,signalselection,picturefreeze,picturemute,audiomute,adjusting,errormessagenotication,event
schedule.
ScreenofPCControlUtilityPro4
ThissectionprovidesanoutlineofpreparationforuseofPCControlUtilityPro4/Pro5.Forinformationonhowtouse
PCControlUtilityPro4/Pro5,seeHelpofPCControlUtilityPro4/Pro5.(→page54, 55)
Step1:InstallPCControlUtilityPro4/Pro5onthecomputer.
Step2:ConnecttheprojectortoaLAN.
Step3:StartPCControlUtilityPro4/Pro5.
• TorunPCControlUtilityPro4onWindows8.1,Windows8andWindowsXP,“Microsoft.NETFrameworkVersion
2.0”is required.The Microsoft .NET FrameworkVersion2.0,3.0or 3.5 is availablefromMicrosoft’sweb page.
Downloadandinstallitonyourcomputer.
TIP:
• PCControlUtilityPro4canbeusedwithaserialconnection.
Using on Windows
Step 1: Install PC Control Utility Pro 4 on the computer
NOTE:
• Toinstalloruninstalltheprogram,theWindowsuseraccountmusthave[Administrator]privilege(Windows8.1,Windows8,
Windows7andWindowsVista)or[ComputerAdministrator]privilege(WindowsXP).
• Exitallrunningprogramsbeforeinstallation.Ifanotherprogramisrunning,theinstallationmaynotbecompleted.
1 InserttheaccompanyingNECProjectorCD-ROMintoyourCD-ROMdrive.
The menu window will be displayed.
52
Page 64
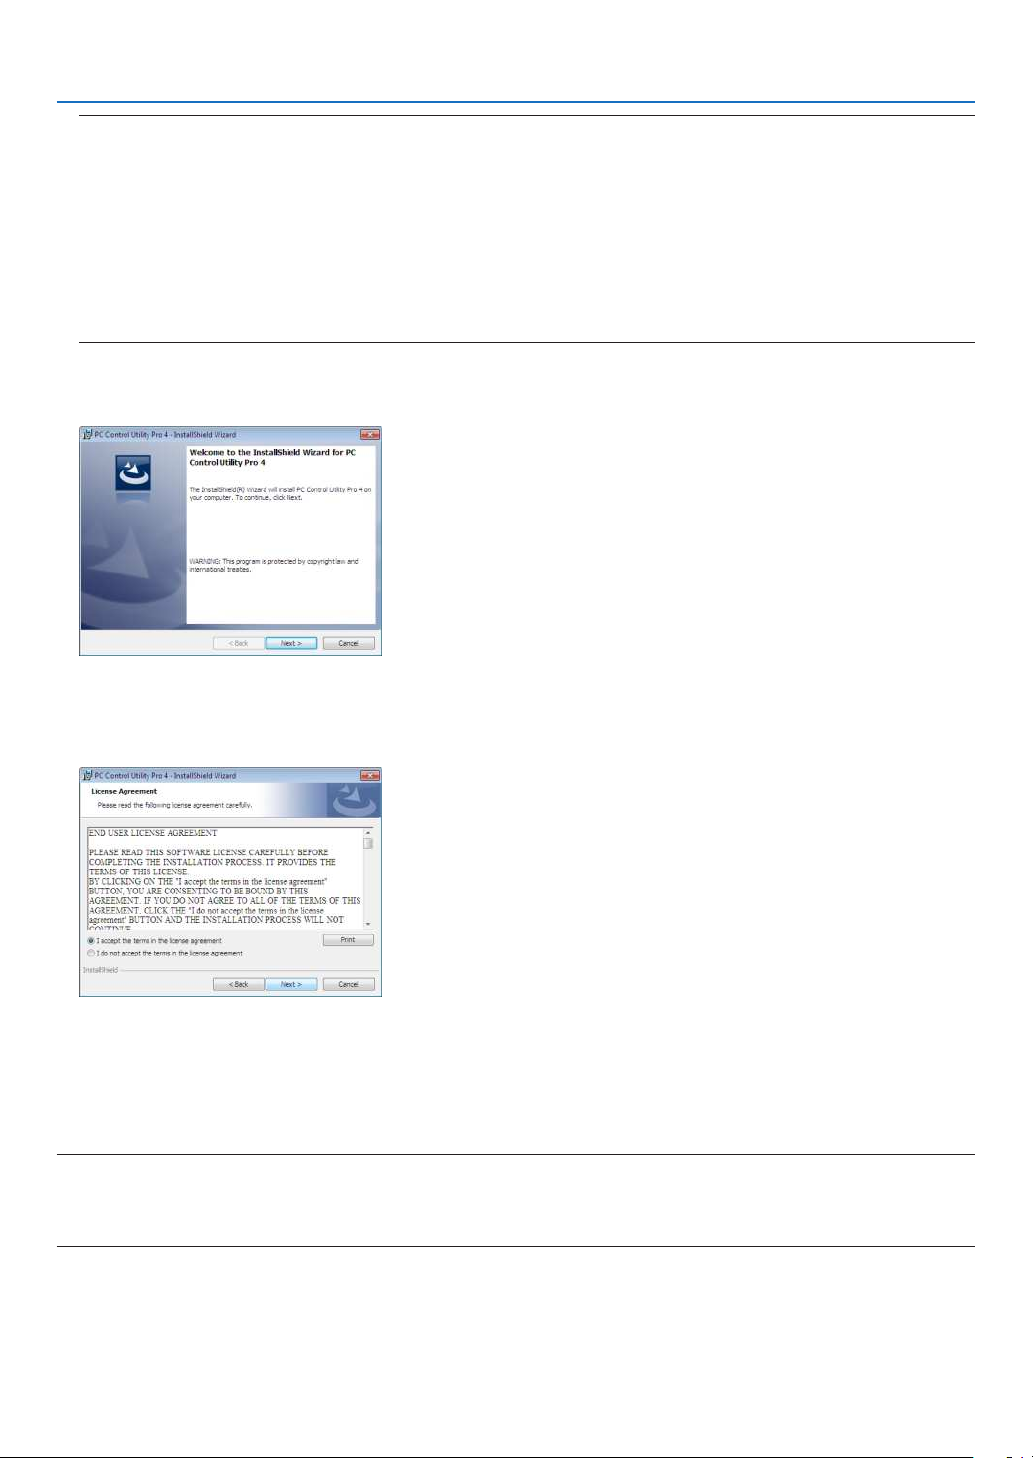
3. Convenient Features
TIP:
Ifthemenuwindowwillnotbedisplayed,trythefollowingprocedure.
ForWindows7:
1. Click“start”onWindows.
2. Click“AllPrograms”→“Accessories”→“Run”.
3. Type your CD-ROM drive name (example:“Q:\”) and“LAUNCHER.EXE” in “Name”.(example: Q:\
LAUNCHER.EXE)
4. Click“OK”.
The menu window will be displayed.
2 Click“PCControlUtilityPro4”onthemenuwindow.
The installation will start.
When the installation is complete, the Welcome window will be displayed.
3 Click“Next”.
“ENDUSERLICENSEAGREEMENT”screenwillbedisplayed.
Read“ENDUSERLICENSEAGREEMENT”carefully.
4 Ifyouagree,click“Iacceptthetermsinthelicenseagreement”andthenclick“Next”.
• Followtheinstructionsontheinstallerscreenstocompletetheinstallation.
• Whentheinstallationiscomplete,youwillreturntothemenuwindow.
TIP:
•UninstallingPCControlUtilityPro4
TouninstallPCControlUtilityPro4,dothesameproceduresstatedasin“UninstallingVirtualRemoteTool”.Read“VirtualRemote
Tool”as“PCControlUtilityPro4”(→page39)
53
Page 65

3. Convenient Features
Step 2: Connect the projector to a LAN.
ConnecttheprojectortotheLANbyfollowingtheinstructionsin“ConnectingtoaWiredLAN”(→page114),“ConnectingtoaWirelessLAN(Optional:NP05LMseries)”(→page115)and“ControllingtheProjectorbyUsingan
HTTPBrowser”(→page45)
Step 3: Start PC Control Utility Pro 4
Click“Start”→“Allprograms”or“Programs”→“NECProjectorUserSupportware”→“PCControlUtilityPro4”→
“PCControlUtilityPro4”.
NOTE:
• FortheSchedule functionof thePCControlutilityPro4to work,youmusthaveyourcomputerrunning andnotinstandby/
sleepmode.Select“PowerOptions”fromthe“ControlPanel”inWindowsanddisableitsstandby/sleepmodebeforerunningthe
scheduler.
[Example]ForWindows7:
Select“ControlPanel”→“SystemandSecurity”→“PowerOptions”→“Changewhenthecomputersleeps”→“Putthecomputer
tosleep”→“Never”.
NOTE:
• When[NORMAL]isselectedfor[STANDBYMODE]fromthemenu,theprojectorcannotbeturnedonviathenetwork(wiredLAN/
wirelessLAN)connection.
TIP:
ViewingtheHelpofPCControlUtilityPro4
• DisplayingtheHelpleofPCControlUtilityPro4whileitisrunning.
Click“Help(H)”→“Help(H)…”ofwindowofPCControlUtilityPro4inthisorder.
The pop-up menu will be displayed.
• DisplayingthehelpleusingtheStartMenu.
Click“Start”→“Allprograms”or“Programs”→“NECProjectorUserSupportware”→“PCControlUtilityPro4”→
“PCControlUtilityPro4Help”.
The Help screen will be displayed.
54
Page 66

3. Convenient Features
Using on Mac OS
Step 1: Install PC Control Utility Pro 5 on the computer
1. InserttheaccompanyingNECProjectorCD-ROMinyourMacCD-ROMdrive.
TheCD-ROMiconwillbedisplayedonthedesktop.
2. Double-clicktheCD-ROMicon.
The CD-ROM window will be displayed.
3. Double-clickthe“MacOSX”folder.
4. Double-click“PCControlUtilityPro5.pkg”.
The installer will start.
5. Click“Next”.
“ENDUSERLICENSEAGREEMENT”screenwillbedisplayed.
6. Read“ENDUSERLICENSEAGREEMENT”andclick“Next”.
The confirmation window will be displayed
7. Click“Iacceptthetermsinthelicenseagreement”.
Follow the instructions on the installer screens to complete the installation.
Step 2: Connect the projector to a LAN
ConnecttheprojectortotheLANbyfollowingtheinstructionsin“ConnectingtoaWiredLAN”(→page114),“ConnectingtoaWirelessLAN(Optional:NP05LMseries)”(→page115)and“❿ControllingtheProjectorbyUsingan
HTTPBrowser”(→page45)
Step 3: Start PC Control Utility Pro 5
1. Open your Applications folder in Mac OS.
2. Clickthe“PCControlUtilityPro5”folder.
3. Clickthe“PCControlUtilityPro5”icon.
PC Control Utility Pro 5 will start.
NOTE:
• FortheSchedulefunctionofthePCControlutilityPro5towork,youmusthaveyourcomputerrunningandnotinsleepmode.
Select“EnergySaver”fromthe“SystemPreferences”inMacanddisableitssleepmodebeforerunningthescheduler.
• When[NORMAL]isselectedfor[STANDBYMODE]fromthemenu,theprojectorcannotbeturnedonviathenetwork(wiredLAN/
wirelessLAN)connection.
TIP:
ViewingtheHelpofPCControlUtilityPro5
•DisplayingtheHelpleofPCControlUtilityPro5whileitisrunning.
• Fromthemenubar,click“Help”→“Help”inthisorder.
The Help screen will be displayed.
•DisplayingtheHelpusingtheDock
1. Open“ApplicationFolder”inMacOS.
2. Clickthe“PCControlUtilityPro5”folder.
3. Clickthe“PCControlUtilityPro5Help”icon.
The Help screen will be displayed.
55
Page 67

3. Convenient Features
Projecting Your Computer’s Screen Image from the
Projector over a LAN (Image Express Utility Lite)
UsingImageExpressUtilityLitecontainedonthesuppliedNECProjectorCD-ROMallowsyoutosendthecomputer’s
screenimagetotheprojectoroveraUSBcableorawiredorwirelessLAN.
ImageExpressUtilityLiteisaprogramcompatiblewithWindows.
ImageExpressUtilityLiteforMacOSisaprogramcompatiblewithMacOS.(→page60)
ThissectionwillshowyouanoutlineabouthowtoconnecttheprojectortoaLANandtouseImageExpressUtility
Lite.FortheoperationofImageExpressUtilityLite,seethehelpofImageExpressUtilityLite.
Step1:installImageExpressUtilityLiteonthecomputer.
Step2:ConnecttheprojectortoaLAN.
Step3:StartImageExpressUtilityLite.
TIP:
• ImageExpressUtilityLite(forWindows)canbestartedfrommostcommerciallyavailableremovablemediasuchasUSBmemory
devicesorSDcardswithouttheneedtoinstallonyourcomputer.(→page59)
What You can Do with Image Express Utility Lite
•Imagetransmission(forWindowsandMacOS)
• Thescreenofyourcomputercanbesenttotheprojectorviaawiredorwirelessnetworkwithoutacomputercable
(VGA).
• Thescreenofyourcomputercanbesenttouptofourprojectorsatthesametime.
•USBDisplay(forWindowsonly)
• Computer’sscreenimagecanbeprojectedviaaUSBcable,withoutconnectingacomputercable(VGA).
• JustconnectingthecomputerandtheprojectoroveraUSBcablewillmaketheUSBDisplayfunctionavailable
(Plug&Play)evenwithoutinstallingImageExpressUtilityLiteonthecomputer.(→page43)
•GeometricCorrectionTool[GCT](forWindowsonly)
See“⓭ProjectinganImagefromanAngle(GeometricCorrectionToolinImageExpressUtilityLite)”.(→page61)
NOTE:
• WhenImageExpressUtilityLiteisused,theaudiofromtheCOMPUTERAUDIOINMiniJack(StereoMini)maynotbesynchronizedwiththevideo.
Using on Windows
Step 1: install Image Express Utility Lite on the computer.
NOTE:
• Toinstalloruninstalltheprogram,theWindowsuseraccountmusthave“Administrator”privilege(Windows8.1,Windows8,
Windows7,WindowsVistaandWindowsXP).
• Exitallrunningprogramsbeforeinstallation.Ifanotherprogramisrunning,theinstallationmaynotbecompleted.
• ImageExpressUtilityLitewillbeinstalledtothesystemdriveofyourcomputer.
Ifthemessage“Thereisnotenoughfreespaceondestination”isdisplayed,freeupenoughspace(about100MB)toinstallthe
program.
1. InserttheaccompanyingNECProjectorCD-ROMintoyourCD-ROMdrive.
The menu window will be displayed.
56
Page 68

3. Convenient Features
TIP:
Ifthemenuwindowwillnotbedisplayed,trythefollowingprocedure.
ForWindows7:
1.Click“start”onWindows.
2.Click“AllPrograms”→“Accessories”→“Run”.
3. TypeyourCD-ROMdrivename(example:“Q:\”)and“LAUNCHER.EXE”in“Name”.(example:Q:\LAUNCH-
ER.EXE)
4. Click“OK”.
The menu window will be displayed.
2. Click“InstallingImageExpressUtilityLite”onthemenuwindow.
The installation will start.
“ENDUSERLICENSEAGREEMENT”screenwillbedisplayed.
Read“ENDUSERLICENSEAGREEMENT”carefully
3. Ifyouagree,click“Iagree.”andthenclick“Next”.
• Followtheinstructionsontheinstallerscreenstocompletetheinstallation.
• Whentheinstallationiscomplete,youwillreturntothemenuwindow.
When the installation is complete, a completion message will be displayed.
4. Click“OK”.
This completes the installation.
TIP:
•UninstallingImageExpressUtilityLite
TouninstallImageExpressUtilityLite,dothesameproceduresstatedasin“UninstallingVirtualRemoteTool”.Read“VirtualRemote
Tool”as“ImageExpressUtilityLite”(→page39)
Step 2: Connect the projector to a LAN.
ConnecttheprojectortotheLANbyfollowingtheinstructionsin“ConnectingtoaWiredLAN”(→page114),“ConnectingtoaWirelessLAN(Optional:NP05LMseries)”(→page115)and“ControllingtheProjectorbyUsingan
HTTPBrowser”(→page45)
Step 3: Start Image Express Utility Lite.
1. OnWindows,click“Start”→“Allprograms”→“NECProjectorUserSupportware”→“ImageExpressUtility
Lite”→“ImageExpressUtilityLite”.
ImageExpressUtilityLitewillstart.
Theselectwindowfornetworkconnectionwillbedisplayed
2. SelectNetworkandclick“OK”.
The select window for destination will show a list of connectable projectors.
• Whenconnectingthecomputerdirectlytotheprojectorbyone-to-one,“SimpleAccessPoint”isrecommended.
• Tocheckforthenetworkavailableforconnectedprojectors,fromthemenu,select[INFO.]→[WIRELESS
LAN]→[SSID].
57
Page 69

3. Convenient Features
3. Placeacheckmarkforprojectorstobeconnected,andthenclick“Connect”.
• Whenoneormoreprojectorsaredisplayed,fromthemenuontheprojector,select[INFO.]→[WIRELESSLAN]
→[IPADDRESS].
When connecting with the projector is established, you can operate the control window to control the projector. (→
page 44)
NOTE:
• When[NORMAL]isselectedfor[STANDBYMODE]fromthemenu,theprojectorthatisturnedoffwillnotbedisplayedinthe
selectwindowfordestination
TIP:
Viewingthe“Help”leofImageExpressUtilityLite
• DisplayingtheHelpleofImageExpressUtilityLitewhileitisrunning.
Clickthe[?](help)icononthecontrolwindow.
The Help screen will be displayed.
• DisplayingtheHelpleofGCTwhileitisrunning.
Click“Help”→“Help”ontheeditwindow.
The Help screen will be displayed.
• DisplayingthehelpleusingtheStartMenu.
Click“Start”→“Allprograms”or“Programs”→“NECProjectorUserSupportware”→“ImageExpressUtilityLite”
→“ImageExpressUtilityLiteHelp”.
The Help screen will be displayed.
58
Page 70

3. Convenient Features
Starting Image Express Utility Lite from a USB Memory or SD Card
ImageExpressUtilityLitecanbestartedfromcommerciallyavailableremovablemediasuchUSBmemoryorSDcards
ifitiscopiedbeforehand.ThiswilleliminatethetroubleofinstallingImageExpressUtilityLitetoyourcomputer.
1. CopyImageExpressUtilityLitetoremovablemedia.
Copyallthefoldersandles(totalsizeapprox.6MB)fromthe“IEU_Lite(removable-media)”folderinthesupplied
NEC Projector CD-ROM to the root directory of your removable media.
2. Insertyourremovablemediaintoyourcomputer.
The“AutoPlay”screenwillbedisplayedonyourcomputer.
TIP:
• Ifthe“AutoPlay”screenisnotdisplayed,openthefolderfrom“Computer”(“MyComputer”forWindowsXP).
3. Click“Openfoldertoviewles”
TheIEU_Lite.exe,otherfolder,andleswillbedisplayed.
4. Double-clickthe“IEU_Lite.exe”( ) icon.
ImageExpressUtilityLitewillstart.
59
Page 71
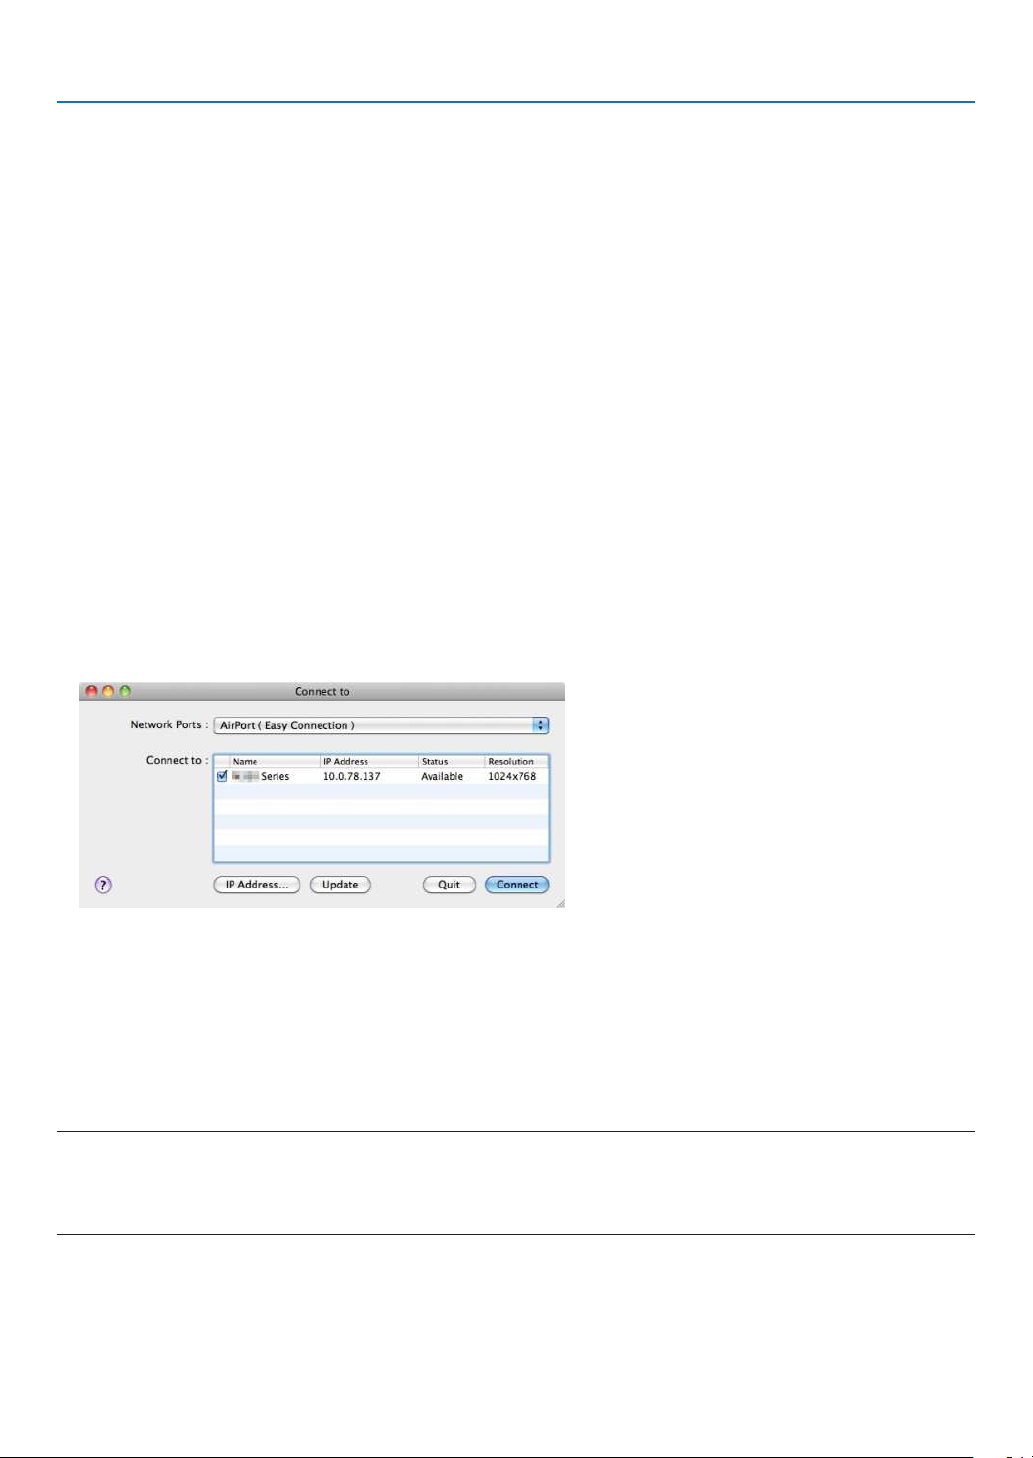
3. Convenient Features
Using on Mac OS
Step 1: Install Image Express Utility Lite for Mac OS on the computer
1. InserttheaccompanyingNECProjectorCD-ROMinyourMacCD-ROMdrive.
TheCD-ROMiconwillbedisplayedonthedesktop.
2. Double-clicktheCD-ROMicon.
The CD-ROM window will be displayed.
3. Double-clickthe“MacOSX”folder.
4. Double-click“ImageExpressUtilityLite.dmg”.
The“ImageExpressUtilityLite”windowwillbedisplayed.
5. Draganddropthe“ImageExpressUtilityLite”foldertoyourApplicationsfolderinMacOS.
Step 2: Connect the projector to a LAN
ConnecttheprojectortotheLANbyfollowingtheinstructionsin“ConnectingtoaWiredLAN”(→page114),“ConnectingtoaWirelessLAN(Optional:NP05LMseries)”(→page115)and“❿ControllingtheProjectorbyUsingan
HTTPBrowser”(→page45)
Step 3: Start Image Express Utility Lite for Mac OS
1. Open your Applications folder in Mac OS.
2. Double-clickthe“ImageExpressUtilityLite”folder.
3. Double-clickthe“ImageExpressUtilityLite”icon.
WhenImageExpressUtilityLiteforMacOSstarts,theselectwindowfordestinationwillbedisplayed.
• At the rsttimeof startup,“ENDUSERLICENSE AGREEMENT”screen will bedisplayedbeforetheselect
window for destination is displayed.
Read“ENDUSERLICENSEAGREEMENT”andselect“Iacceptthetermsinthelicenseagreement”,andclick
“OK”.
4. Selectaprojectortobeconnected,andthenclick“Connect”.
Yourdesktopscreenwillbedisplayedontheprojector.
TIP:
ViewingtheHelpofImageExpressUtilityLiteforMacOS
• Fromthemenu bar,click“Help”→“ImageExpressUtilityLiteHelp”while ImageExpressUtility isrunning.
The Help screen will be displayed
60
Page 72
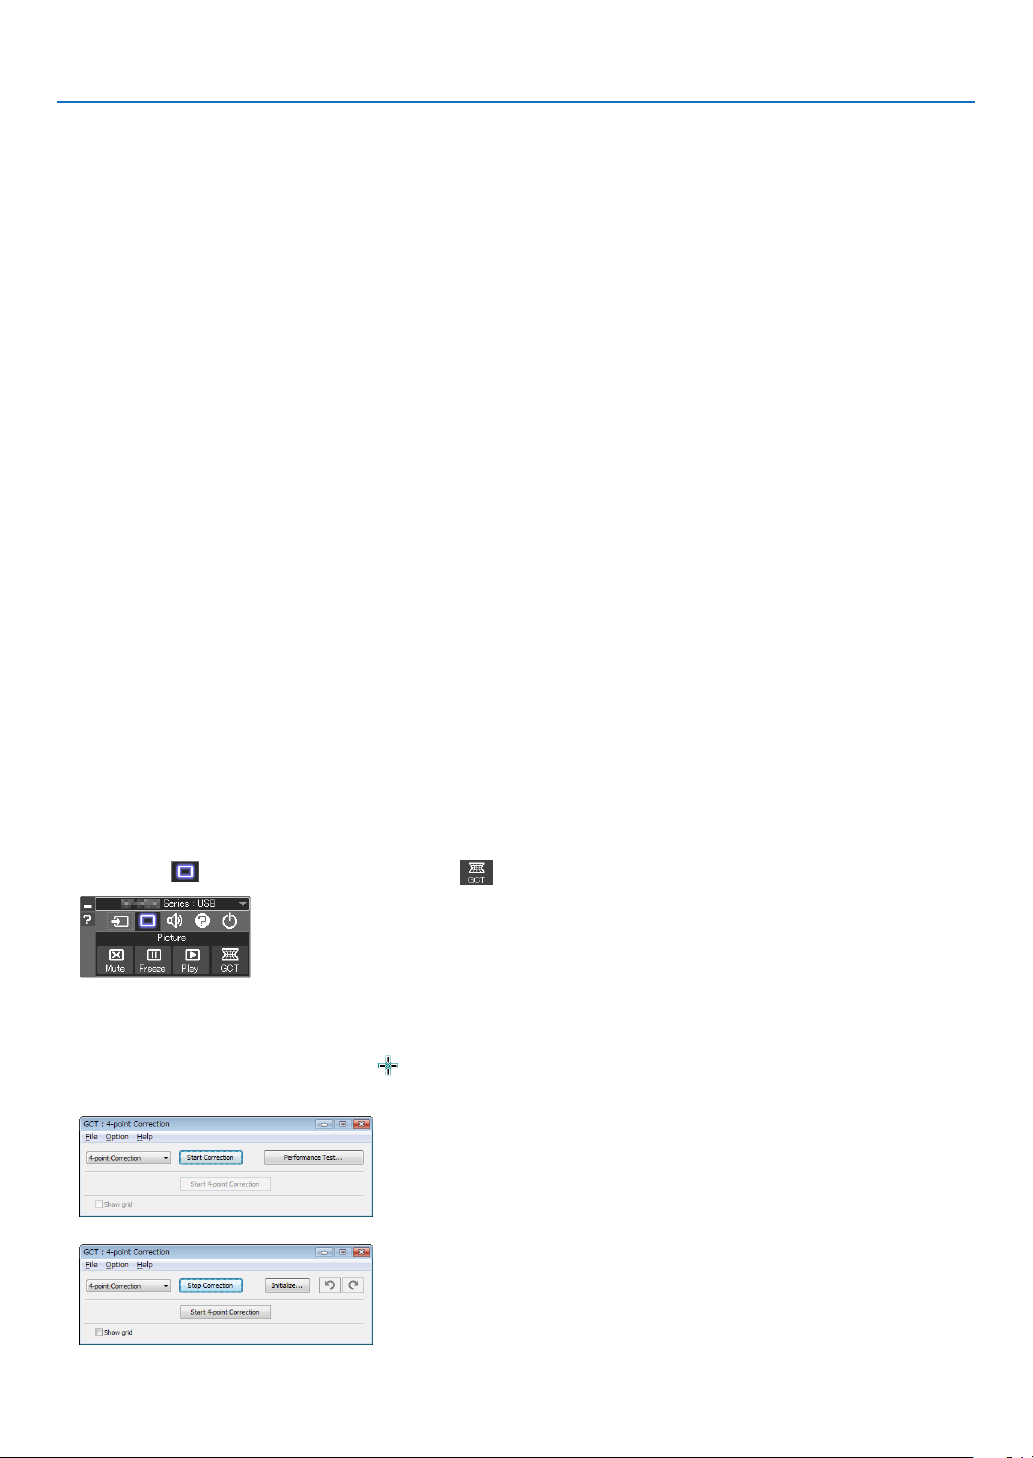
3. Convenient Features
Projecting an Image from an Angle (Geometric Correction
Tool in Image Express Utility Lite)
TheGeometricCorrectionTool(GCT) function allows youtocorrectdistortion ofimagesprojectedevenfrom an
angle.
What you can do with GCT
• TheGCTfeatureincludesthefollowingthreefunctions
• 4-pointCorrection:Youcantaprojectedimagewithintheborderofthescreeneasilybyalignthefourcorners
ofanimagetotheonesofthescreen.
• Multi-pointCorrection:Youcancorrectadistortedimageonthecornerofawallorirregularshapedscreen
byusingmanyseparatedscreenstocorrecttheimageaswellas4-pointCorrection.
• Parameters Correction:Youcancorrectadistortedimagebyusingacombinationoftransformationalrules
preparedinadvance.
Thissectionwillshowanexampleforusewith4-pointCorrection.
Forinformationabout“Multi-pointCorrection”and“ParametersCorrection”,seethehelpleofImageExpress
UtilityLite.(→page58, 60)
• Yourcorrectiondatacanbestoredintheprojectororyourcomputerwhichcanberestoredwhennecessary.
• TheGCTfunctionisavailablewithaUSBcable,wiredorwirelessLANconnection,andvideocable.
Projecting an Image from an Angle (GCT)
ThissectionwillshowanexampleforusewithUSBDisplay(usingaUSBcabletoconnectacomputerandtheprojector).
• TheUSBDisplayfunctionwillautomaticallydisplaythecontrolwindow
• ForavideocableorLANconnection,installandstartImageExpressUtilityLiteinyourcomputerbeforehand.(→
page56)
Preparation:Adjusttheprojectorpositionorthezoomsothattheprojectedimagecancoverthewholescreenarea.
1. Clickthe“ ”(Picture)iconandthenthe“ ”button.
The“4-pointCorrection”windowwillbedisplayed.
2. Clickthe“StartCorrection”buttonandthen“Start4-pointCorrection”button.
A green frame and a mouse pointer ( ) will be displayed.
• Four[•]markswillbeappearedatfourcornersofthegreenframe
61
Page 73
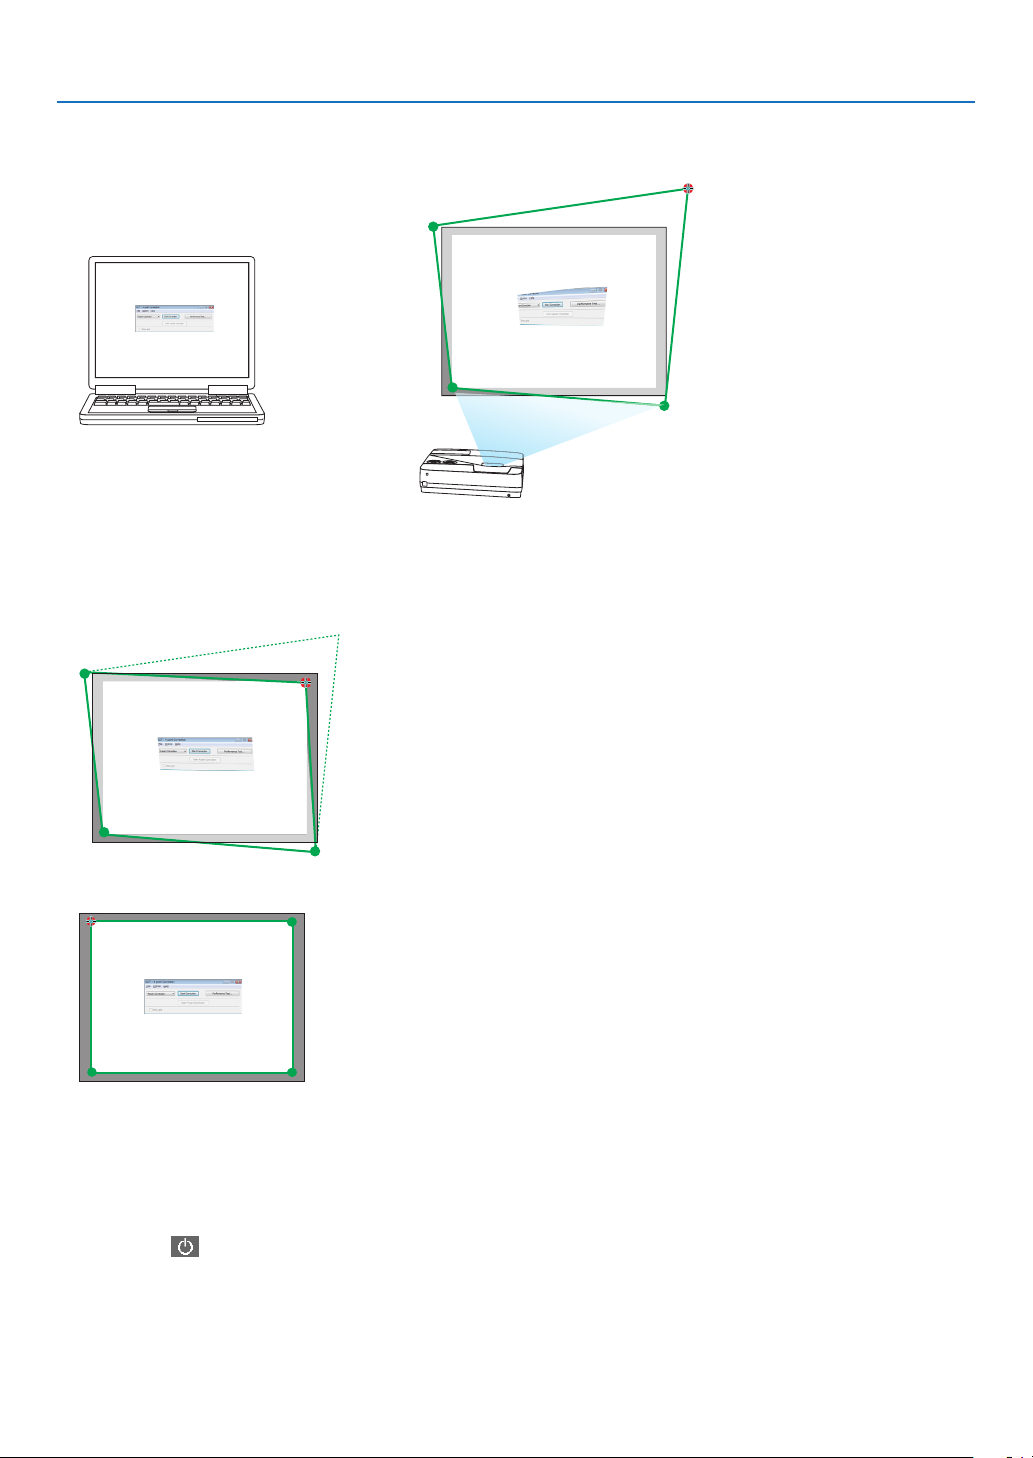
3. Convenient Features
3. Usethemousetoclickthe[•]markofwhichcorneryouwishtomove.
The currently selected [ •]markwillturnred.
(Intheaboveexample,Windowsscreensareomittedforclarication.)
4. Dragtheselected[•]marktothepointyouwishtocorrectanddropit.
• Whenyouclicksomewherewithintheprojectimagearea,thenearest[•]markwillgotothepositionwhere
the mouse cursor is.
5. Repeat Step 3 and 4 to correct the distortion of the projected image.
6. After completing, right-click the mouse.
The green frame and the mouse pointer will disappear from the projected image area. This will complete the cor-
rection.
7. Clickthe“X”(close)buttononthe“4-pointCorrection”window.
The“4-pointCorrection”windowwilldisappearandthe4-pointcorrectionwilltakeeffect.
8. Clickthe“ ”buttononthecontrolwindowtoexittheGCT.
TIP:
• Afterperformingthe4-pointcorrection,youcansavethe4-pointcorrectiondatatotheprojectorbyclicking“File”→“Exportto
theprojector…”onthe“4-pointCorrection”window.
• SeetheHelpofImageExpressUtilityLiteforoperating“4-pointCorrection”windowandotherfunctionsthanGCT.(→page58,
60)
62
Page 74
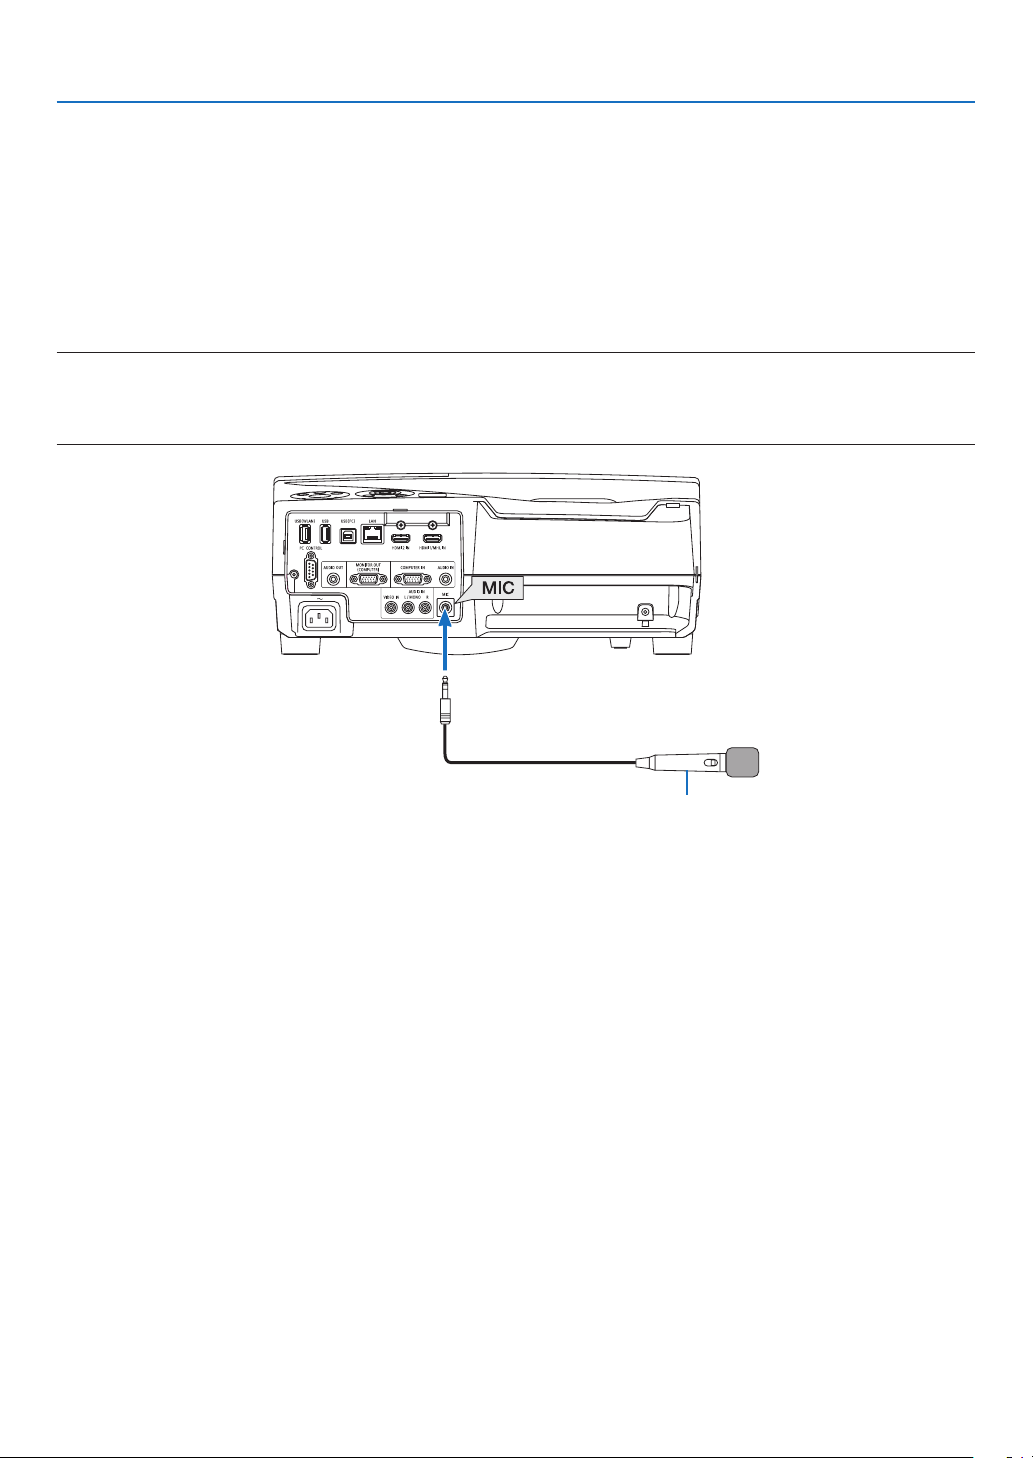
3. Convenient Features
Connecting Your Microphone
ConnectingacommerciallyavailabledynamicmicrophoneorcondensermictotheMICinputjackallowsyoutooutput
yourmicsoundfromthebuilt-inspeaker.
Soundinputfromall inputterminals includingLAN,USB-A,andUSB-B will beheardfromthespeaker withyour
microphonevoice.
Microphonesensitivitycanbeadjusted.Fromthemenu,select[SETUP]→[INSTALLATION]→[MICGAIN].(→page
92)
NOTE:
• DependingoninputconditionofHDMI1/MHLorHDMI2signal,theseisacasesoundmaynotoutput.
• DonotconnectanaudiosignaltotheMICinputjack.Doingsomaycauseexcessivelyloudsound,resultinginadamagetothe
speaker.
Dynamic microphone or condenser microphone
63
Page 75

4. Using the Viewer
❶ What you can do with the Viewer
TheViewerhasthefollowingfeatures.
• WhenacommerciallyavailableUSBmemorythatstoresimagelesisinsertedintotheUSBport(TypeA)ofthe
projector,theViewerallowsyoutoviewtheimagelesontheUSBmemory.
Evenifnocomputerisavailable,presentationscanbeconductedsimplywiththeprojector.
• SupportedgraphicformatisJPEG.
• TheViewerdisplaysthethumbnailscreen(JPEGExifonly)onwhichyoucanjumptoanyspecicimageyouwish
toproject.
• Thereare two waysofplaybackfor slideshow:manualplaybackandautoplayback.Theintervaltimecanbe
changedinautoplayback.
• Theorder ofdisplayingimages can besetbyname, dateorsize. Ascending ordescendingordercanbe se-
lected.
• Imagescanberotatedby90degreesduringplayback.
64
Page 76

4. Using the Viewer
NOTE
• TheUSBportoftheprojectordoesnotsupportUSBhub.
• ThefollowingoperationsbyusingthebuttonsontheprojectorarenotpossiblewhentheVIEWERscreensuchastheslidescreen
andthethumbnailscreenisdisplayed.
Buttons on the cabinet
- Keystonecorrectionbyusingthe▲/▼button
- AutoAdjustmentbyusingtheAUTOADJ.button
- Volumecontrolwiththe◀or▶button
ToperformKeystonecorrectionorSourceselectionduringdisplayoftheViewer,presstheMENUbuttontwicetodisplaythe
menuandoperateViewerfromthemenu.
Remote control
- AutoAdjustmentbutton
- Freezebutton
• Executing[RESET]→[ALLDATA]fromthemenuwillreturnthesettingsfortheViewertoolbartothefactorydefault.
• USBmemory
- BesuretouseaUSBmemorydeviceformattedwiththeFAT32orFAT16lesystem.
TheprojectordoesnotsupportNTFSformattedUSBmemory.
IftheprojectordoesnotrecognizeyourUSBmemory,checkiftheformatissupported.
ToformatyourUSBmemoryinyourcomputer,refertothedocumentorhelplethatcomeswithyourWindows.
- WedonotwarrantthattheUSBportoftheprojectorwillsupportallUSBmemoriesinthemarket.
• Supportedimages
- SupportedleformatforViewerareasfollows.
WedonotwarrantalltheimagesaresupportedforViewer.
Imagesotherthanmentionedinthetablemaynotbesupported.
Imagetype Extension Description
JPEG JPG/JPEG
Baseline/Exifaresupported
- Slideshow,effect,andsoundeffectsetwithPowerPointcannotbeplayedback.
- Imagecanbedisplayedataresolutionupto10000×10000pixels.
- Evenifimagesaremetbytheaboveconditions,theremaybesomeimageswhichcannotbeplayedback.
- Morethan200icons(totalnumberofimageleiconsandfoldericons)cannotbedisplayedinathumbnailscreen.
- Longle/foldernamewillbelimitedtothespeciedlength.Thiscanbeshownbybracketadded.
- Ifonefolderhasmanyles,ittakessometimetoplayback.
• Ifasinglefoldercontainstoomanyles,switchingimageswilltaketime.Toshortenswitchingtime,reducethenumberofimages
containedinasinglefolder.
TIP:
• Exchangeableimageleformat(Exif)isastandardimageleformatusedbydigitalcameraswiththeadditionofspecicshooting
data.
• ViewerPPTconverter3.0issoftwaretoconvertthePowerPointleintotheJPEGle.
Youcandownloaditfromourwebsite:
URL:http://www.nec-display.com/dl/en/index.html
65
Page 77
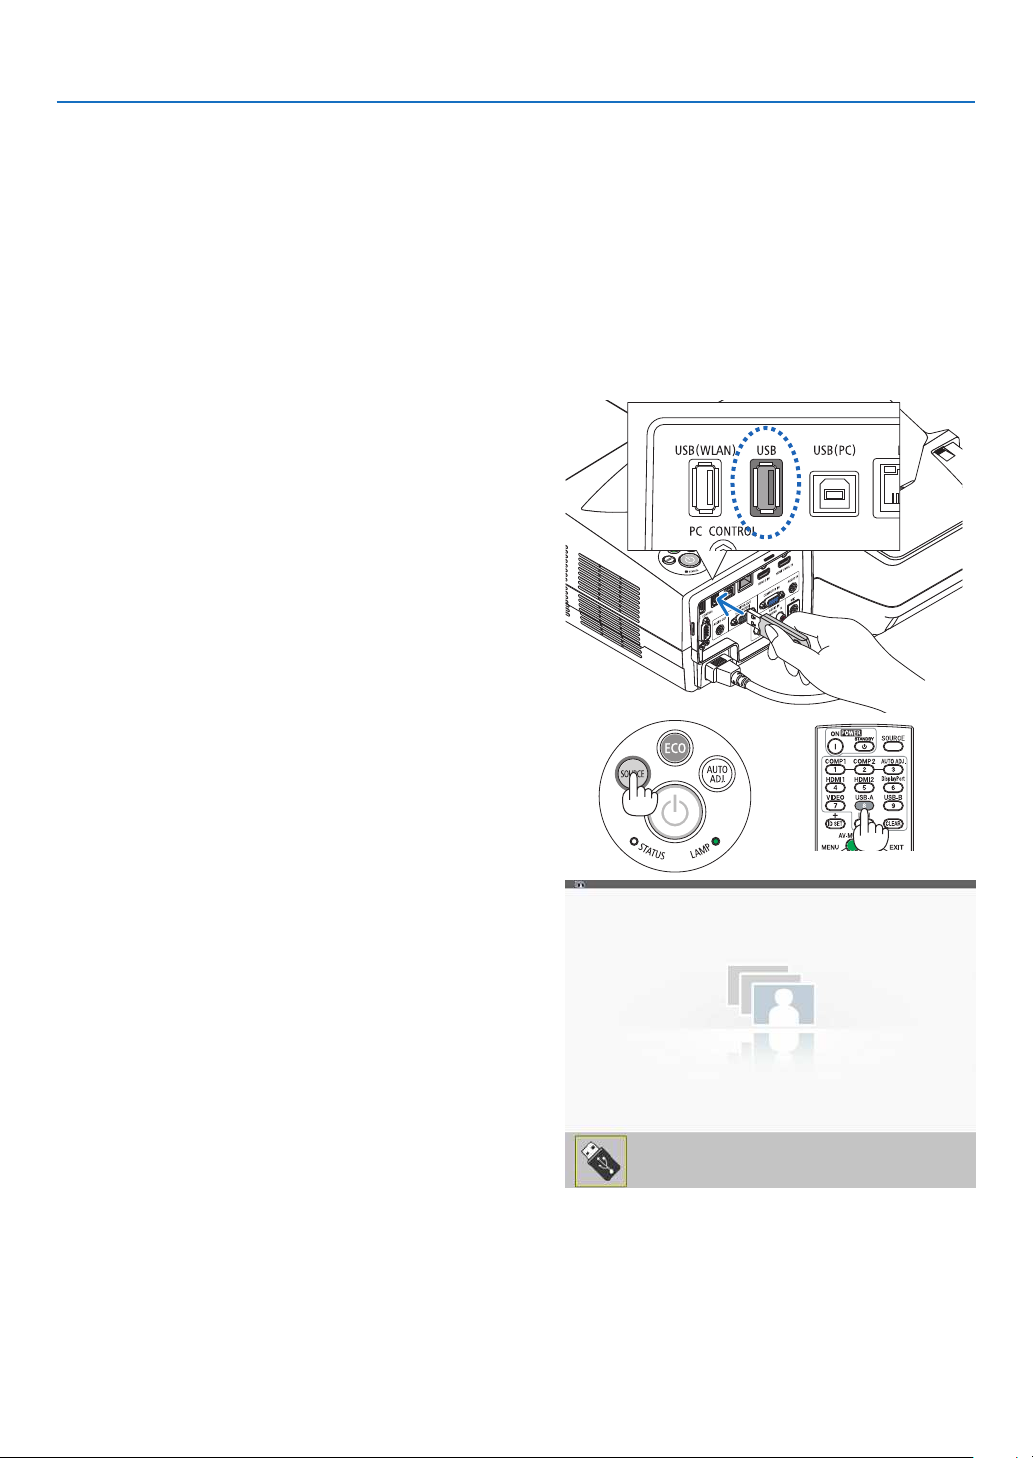
4. Using the Viewer
❷ Projecting images stored in a USB memory device
ThissectionexplainsthebasicoperationoftheViewer.
TheexplanationprovidestheoperationalprocedurewhentheViewertoolbar(→page69)issettothefactorydefault.
-StartingtheViewer .......................................................................below
-RemovingtheUSBmemoryfromtheprojector ....................... page68
-ExitingtheViewer..................................................................... page68
Preparation:BeforestartingtheViewer,storeimagestotheUSBmemoryusingyourcomputer.
Starting the Viewer
1. Turn on the projector. (→ page 14)
2. InserttheUSBmemoryintotheUSBportoftheprojec-
tor.
• DonotremovetheUSBmemoryfromtheprojectorwhile
it’s LED flashes. Doing so may corrupt the data.
3. PresstheSOURCEbuttonontheprojectorcabinet.
The Viewer start screen will be displayed.
• PresstheUSB-Abuttonontheremotecontrol.
66
Page 78
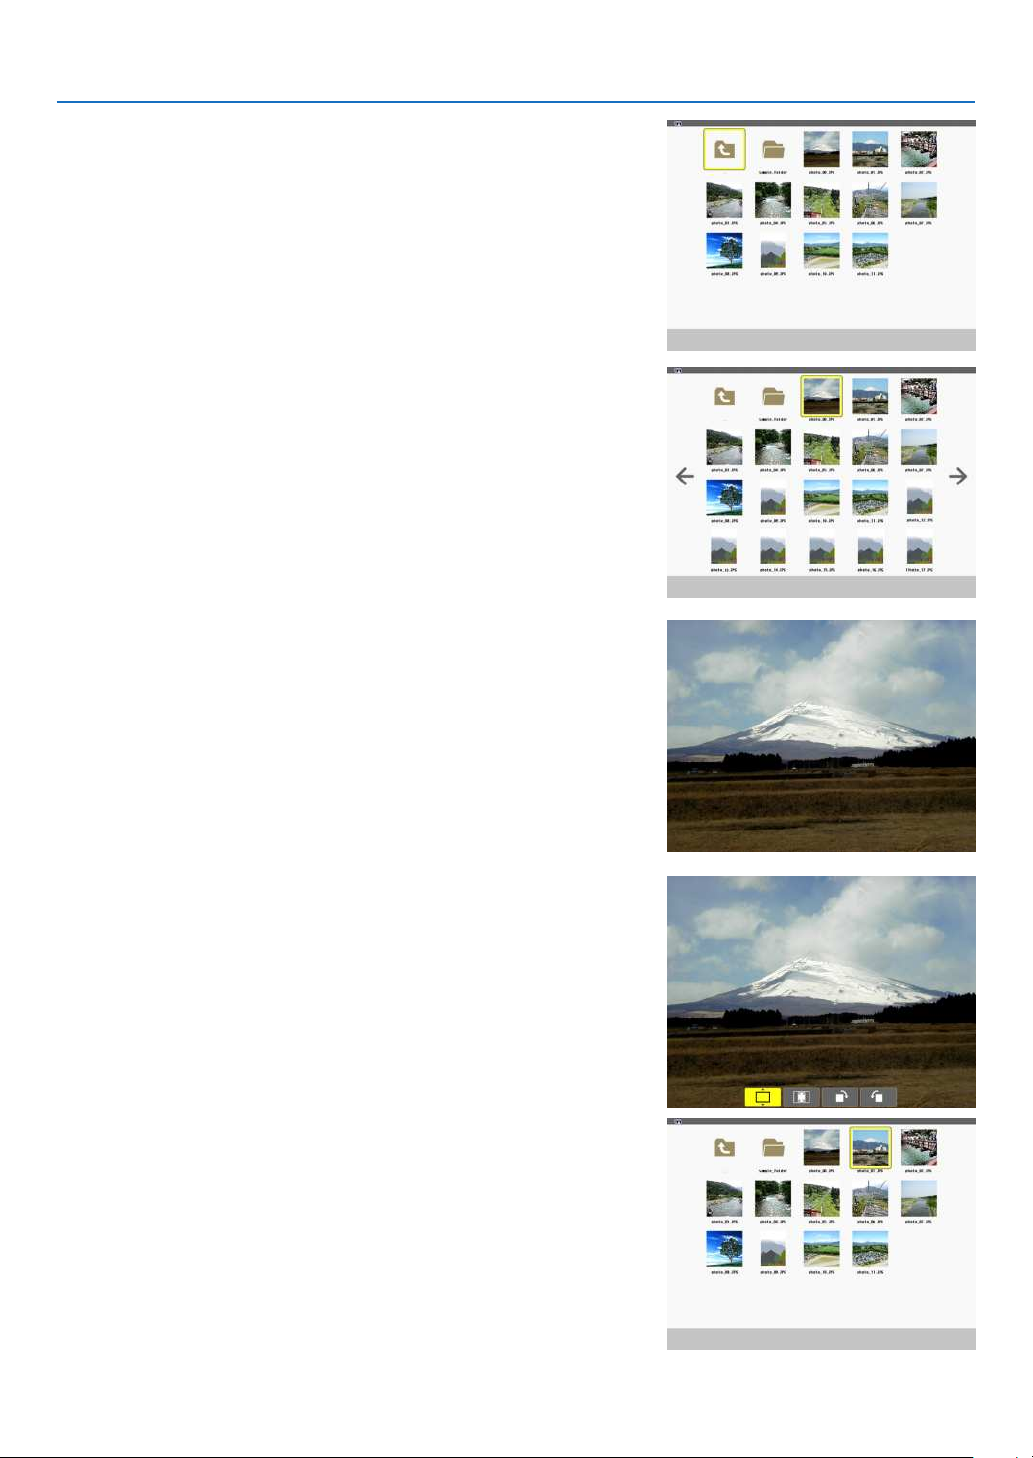
4. Press the ENTER button.
The thumbnail screen will be displayed. (→ page 70)
5. Use the ▲▼◀ or ▶ button to select an icon.
• The→ (arrow) symbol on the right indicates there are more
pages. pressing the PAGE ▽ (page down) button will show
the next page: pressing the PAGE △ (page up) will show
the previous page.
6. Press the ENTER button.
The selected slide will be displayed.
• Whenafoldericonisselected,iconscontainedinthefolder
will be displayed.
4. Using the Viewer
7. Press the ▶ button to select the next slide.
The slide on the right will be displayed.
• The ◀ or ▶ button can be used to select the next (right)
slide or the previous (left) slide in the thumbnail screen.
• PressingtheMENUbuttonduringdisplayofthethumbnail
screen, the slide screen, or the slideshow screen will display
the toolbar. The toolbar is used to select or rotate an slide.
(→ page 71)
8. Press the EXIT buttonwhen the toolbar is not dis-
played.
The thumbnail screen will be displayed.
• Anotherwaytodisplaythethumbnailscreenistopressthe
ENTER button.
• Toclosethetoolbar,presstheMENUbuttontoreturntothe
SOURCE list, and press the MENU button again to close
the SOURCE list.
67
Page 79
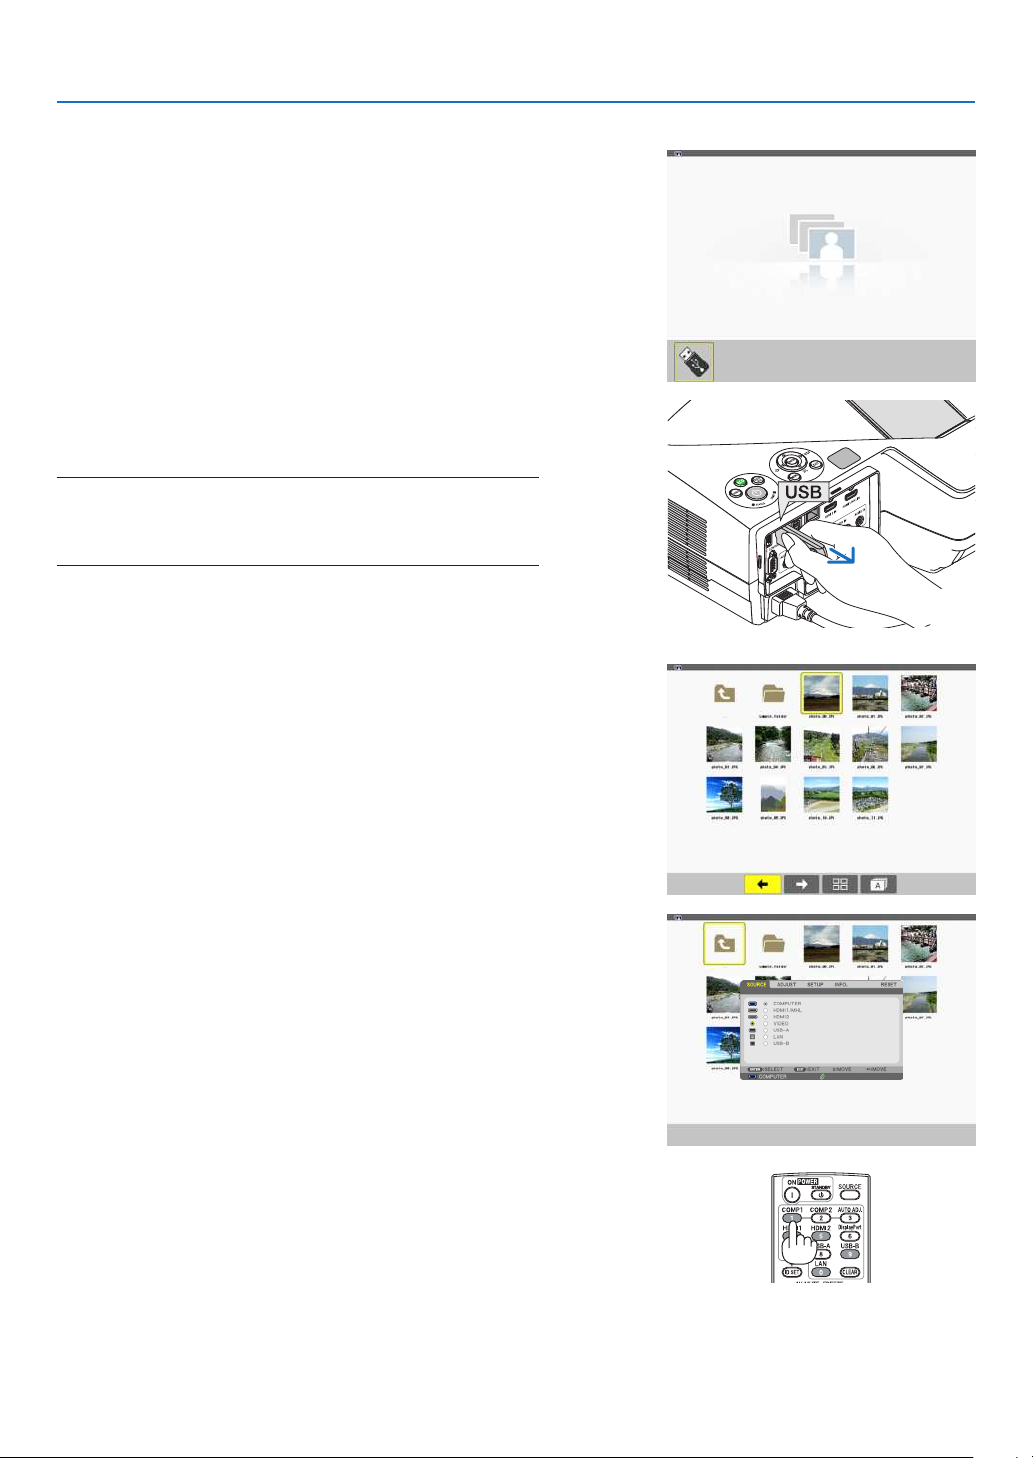
Removing the USB memory from the projector
1. SelecttheVIEWERstartscreen.
PresstheEXITbuttonwithnomenudisplayed.
2. Remove the USB memory from the projector.
MakesurethattheLEDontheUSBmemoryisnotashing
before removing the USB memory.
NOTE:IfyouremovetheUSBmemoryfromtheprojectorwithaslide
displayed,the projectormaynot operatecorrectly.If thishappens,
turnofftheprojectorandunplugthepowercord.Wait3minutes,then
connectthepowercord,andturnontheprojector.
Exiting the Viewer
1. Press the MENU button with the slide screen or the
thumbnail screen displayed.
The control bar or the pop-up menu will be displayed.
4. Using the Viewer
2. Press the MENU button again.
The on-screen menu will be displayed.
3. Selectasourceotherthan[USB-A]andpresstheEN-
TER button.
The Viewer will be exited.
TIP:ToexittheViewerusingtheremotecontrol,selectasourceother
than[USB-A].
68
Page 80
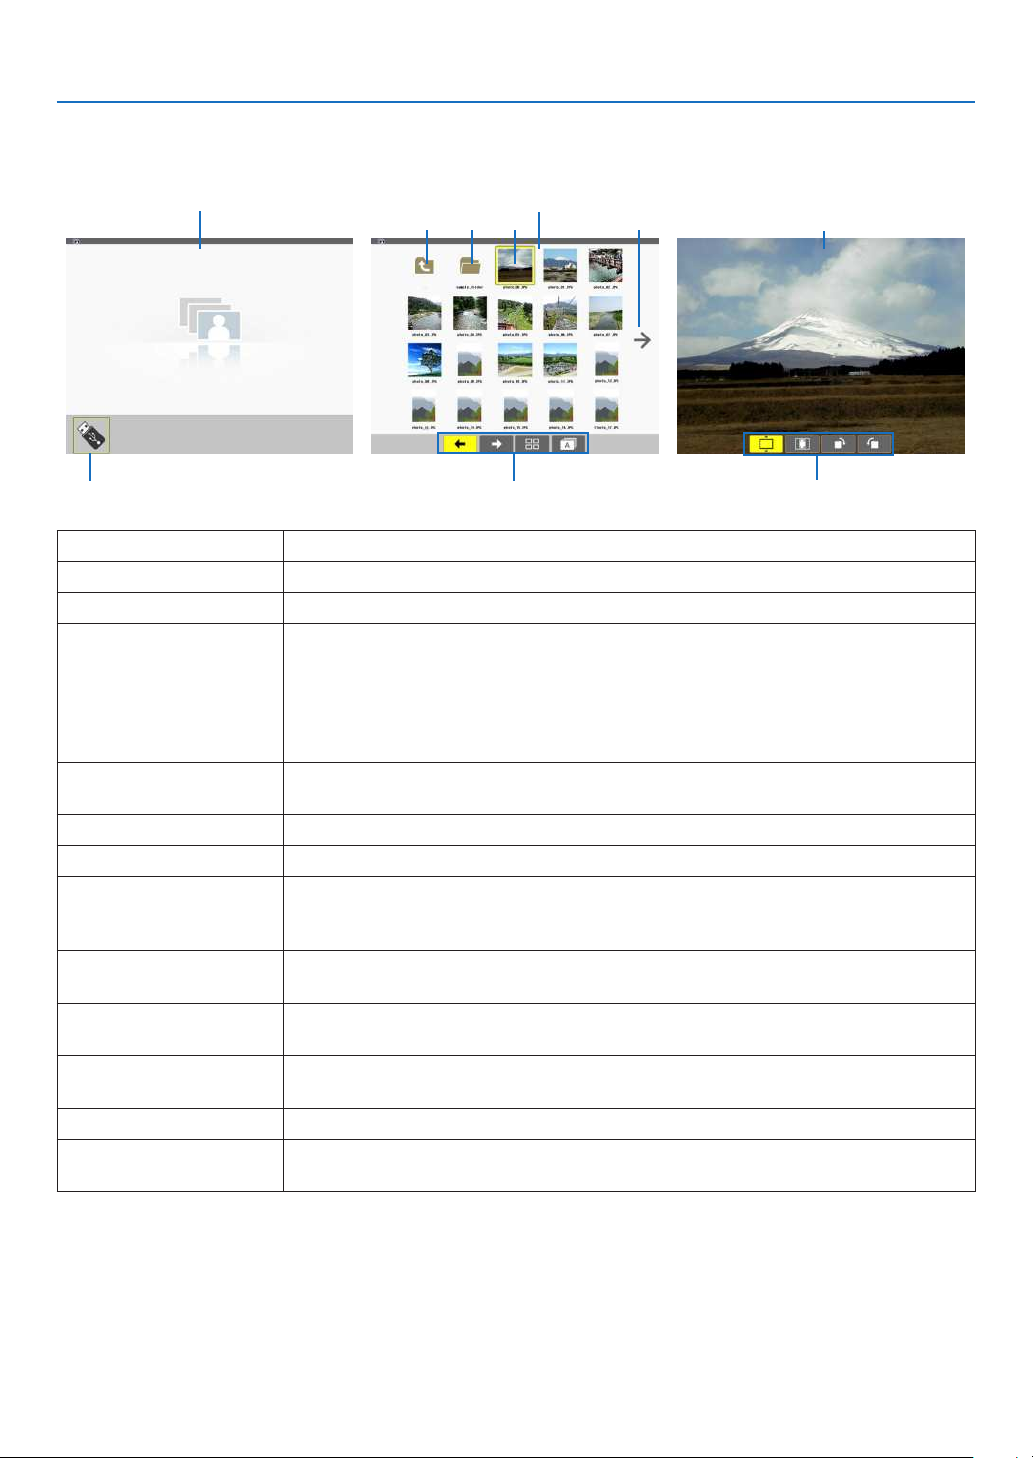
Parts of each screen
TheViewerhasfourscreens.
4. Using the Viewer
(1) Viewer start screen (3) Thumbnail screen (9) Slide screen/
(5) (6) (4) (7)
(8)(2) (10) (12)
Name Description
(1)Viewerstartscreen ThisscreenwillbedisplayedrstwhenyouselecttheViewer.
(2)USBicon ThisiconindicatesthattheUSBmemoryisinsertedintotheprojector.
(3)Thumbnailscreen ThisscreenwillshowalistoffoldersandimagelesstoredintheUSBmemory.The
JPEGExifleswillbedisplayedinthumbnailscreenonly.
• Themaximumnumberofimagelesorfolderswithinonepageisdifferentdepending
on the model.
UM361XandUM301Xare5by4
UM351WandUM301Ware6by4
(4)Cursor Thecursorisusedtoselect(highlight)thefolderorimagelebyusing▲▼◀▶ but-
ton.
(5)Backicon Thisiconisusedtoreturntotheupper(parent)folder.
(6)Foldericon ThisiconshowsthattheUSBmemoryhasfolders.
(7)Pageup(Pagedown)
icon
(8)Thumbnailtoolbar Thistoolbarisusedinthethumbnailscreen.PressingtheMENUbuttonwilldisplay
(9)Slidescreen Thisscreenisusedformanualplayback.Theselectedimagewillbedisplayedinfull
(10)Slidetoolbar Thistoolbaris usedintheslidescreen.Pressingthe MENUbuttonwilldisplaythis
(11)Slideshowscreen Thisscreenisusedforautoplayback.Theslideswillbechangedautomatically.
(12)Slideshowtoolbar Thistoolbarisusedintheslideshowscreen.PressingtheMENUbuttonwilldisplay
Thisiconshowsfurtherfoldersorimagelesareavailableinthenext(previous)page.
Use the ▶buttontogotothenext(previous)row.ThePAGE▽orPAGE△ on the
remotecontrolisusedtogotothenextorpreviouspagedirectly.
thistoolbar.(→page70)
screen.
toolbar.(→page71)
thistoolbar.(→page71)
(11) Slideshow screen
69
Page 81
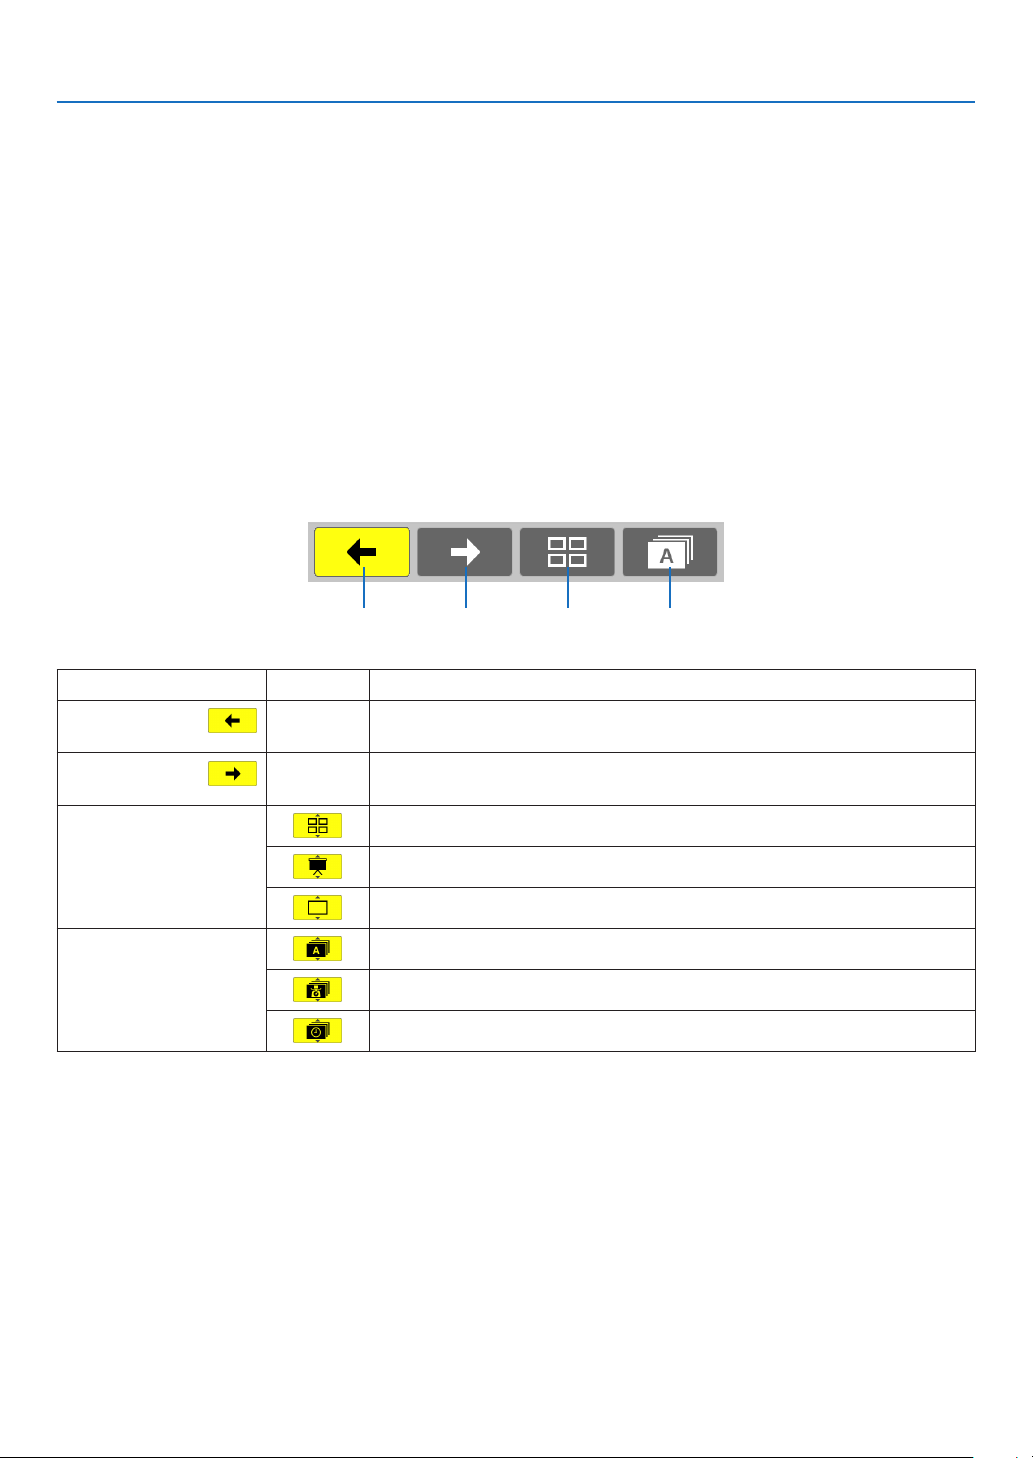
4. Using the Viewer
Using the toolbar
1. Press the MENU button.
The toolbar will be displayed.
The SOURCE screen will be displayed as Viewer connection screen.
2. Use the ◀ or ▶ button to select an item and use the ▲ or ▼ button to select its available option.
When the cursor is placed, the selected item will be changed to yellow.
The ▲ or ▼ shows more available choices.
3. Press the ENTER button.
The selected item will be displayed.
4. Press the MENU button two times.
The toolbar will be closed and the SOURCE list will be displayed. Press the MENU button again to close the
SOURCE list.
Thumbnailtoolbar
(1) (2) (3) (4)
Menu Options Description
(1)Back — Goesbacktothepreviousimage.Whenthecursorreachesthetopleftof
thescreen,itwillgotothepreviouspage.
(2)Forward — Goestothenextimage.Whenthecursorreachesthebottomrightofthe
screen,itwillgotothenextpage.
(3)Display Closesthemenuandreturnstothethumbnailscreen.
Closesthemenuandstartstheslideshowfromthehighlighteditem.
Closesthemenuanddisplaystheslidescreen.
(4)Order Displaystheiconsalphabeticallybyname.(numberbeforealphabet)
Displaystheiconsindescendingorderoflesize.
Displaystheiconsintheorderofcreationdate
70
Page 82
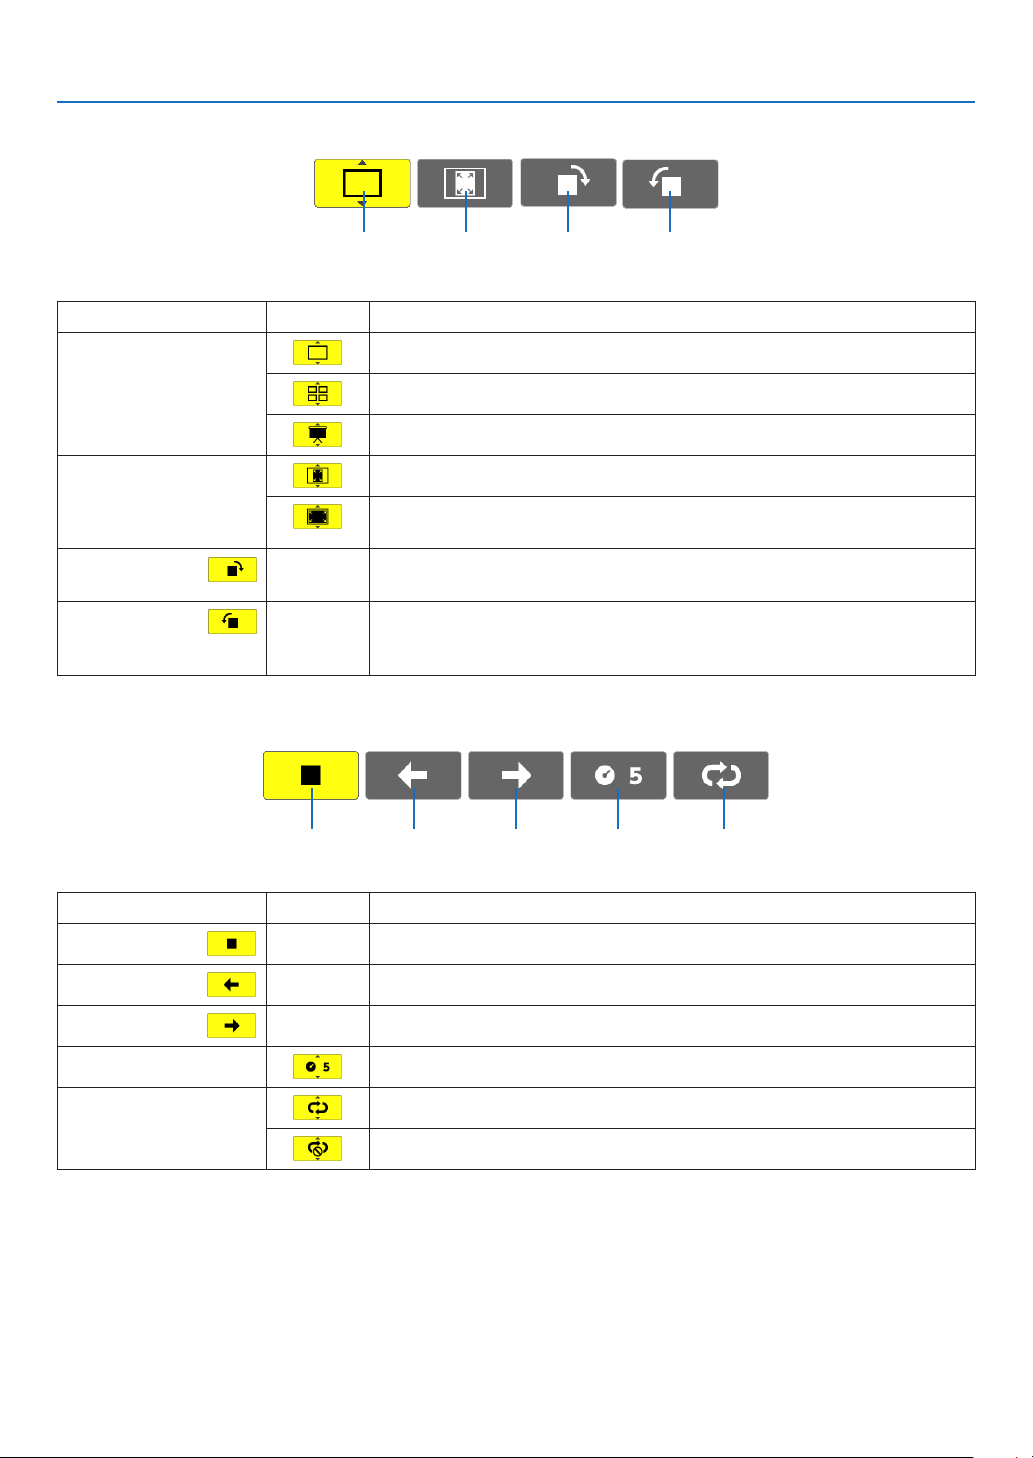
Slidetoolbar
(1) (2) (3) (4)
Menu Options Description
(1)Display Closesthemenuandswitchestotheslidescreen.
Closesthemenuanddisplaysthethumbnailscreen.
Closesthemenuandstartstheslideshowfromthehighlighteditem.
4. Using the Viewer
(2)Image
display
(3)Clockwise
rotation
(4)Counter-
clockwise
rotation
— Closethemenuandrotatetheimage90°clockwise
— Closethemenuandrotatetheimage90°counterclockwise
Closesthemenuanddisplaystheimageinitsactualsize.
Closesthemenuanddisplaystheimageintheprojector’smaximumreso-
lution.
Slideshowtoolbar
(1) (2) (3) (4) (5)
Menu Options Description
(1)Stop — Closesthemenuandchangestotheslidescreen.
(2)Back — Goesbacktothepreviousimage.
(3)Forward — Goestothenextimage.
(4)Interval Speciesintervaltimewhenplayingbacktheslides.
(5)Repeat Repeatstoplaybacktheimagesinthefolder.
Returnstothethumbnailscreen.
TIP:
• Apictureiconatthecenterofthescreenshowsthatthelecannotbedisplayedintheslidescreenorthumbnailscreen.
• Slidetoolbarsettingforrotationwillbecancelledifthefolderismovedfromoneplacetoanother.
71
Page 83
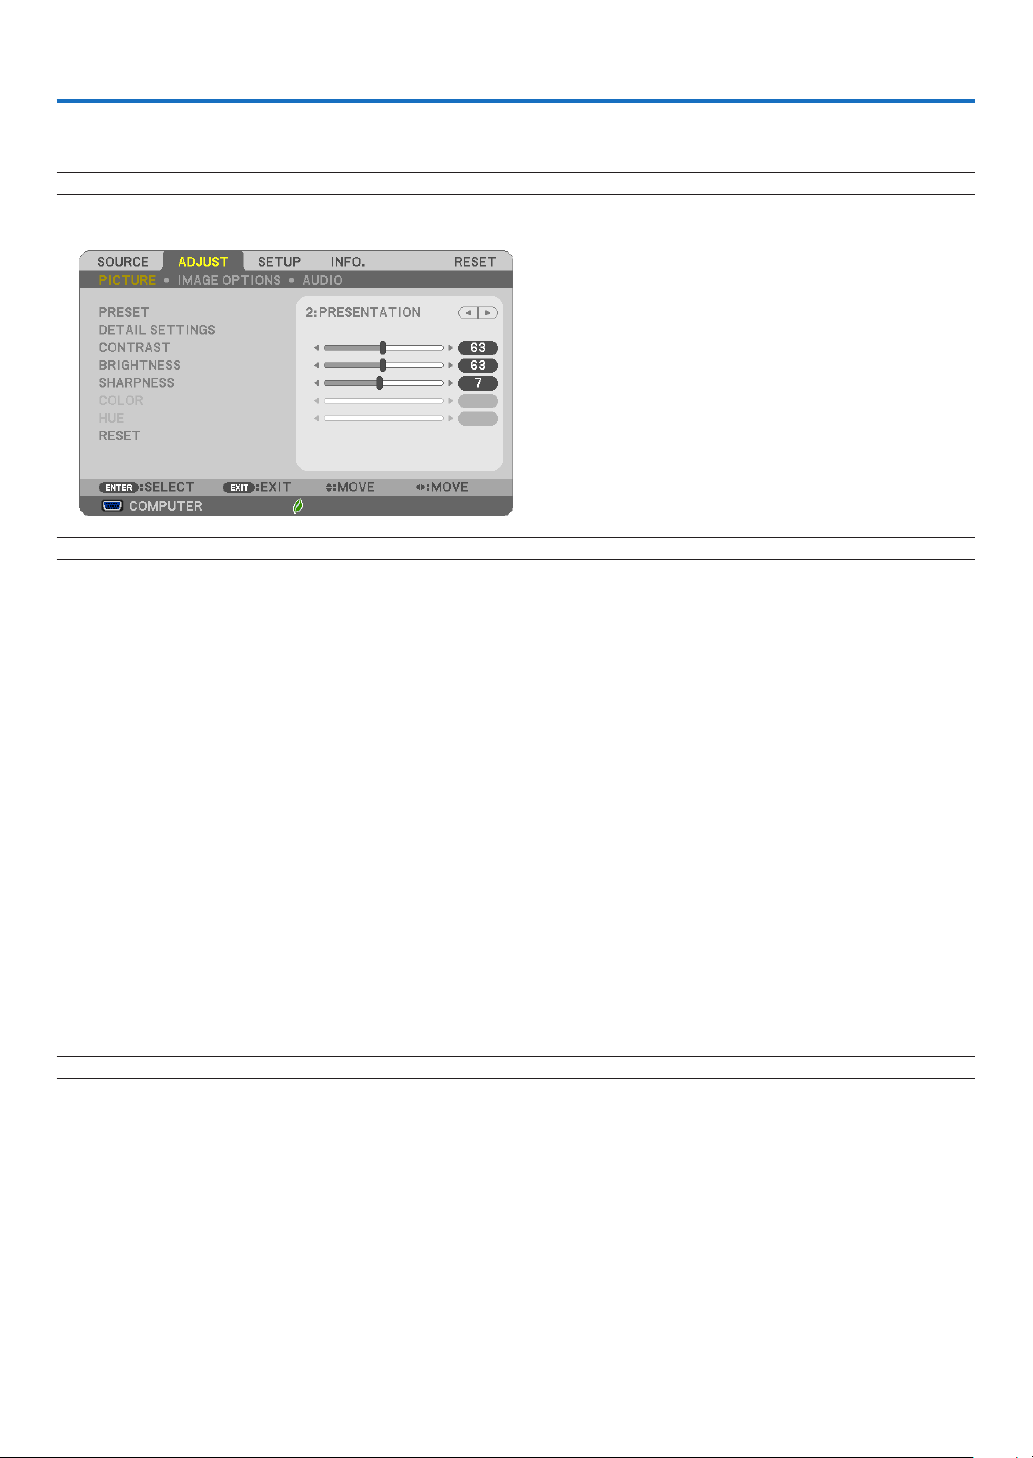
5. Using On-Screen Menu
1 Using the Menus
NOTE:Theon-screenmenumaynotbedisplayedcorrectlywhileinterlacedmotionvideoimageisprojected.
1. Press the MENU button on the remote control or the projector cabinet to display the menu.
NOTE:ThecommandssuchasENTER,EXIT,,inthebottomshowavailablebuttonsforyouroperation.
2. Press the buttons on the remote control or the projector cabinet to display the submenu.
3. Press the ENTER button on the remote control or the projector cabinet to highlight the top item or the first
tab.
4. Use the buttons on the remote control or the projector cabinet to select the item you want to adjust or
set.
You can use the buttons on the remote control or the projector cabinet to select the tab you want.
5. Press the ENTER button on the remote control or the projector cabinet to display the submenu window.
6. Adjust the level or turn the selected item on or off by using the buttons on the remote control or
the projector cabinet.
Changesarestoreduntiladjustedagain.
7. Repeatsteps2-6toadjustanadditionalitem,orpresstheEXITbuttonontheremotecontrolortheprojec-
tor cabinet to quit the menu display.
NOTE:Whenamenuormessageisdisplayed,severallinesofinformationmaybelost,dependingonthesignalorsettings.
8. Press the MENU button to close the menu.
Toreturntothepreviousmenu,presstheEXITbutton.
72
Page 84
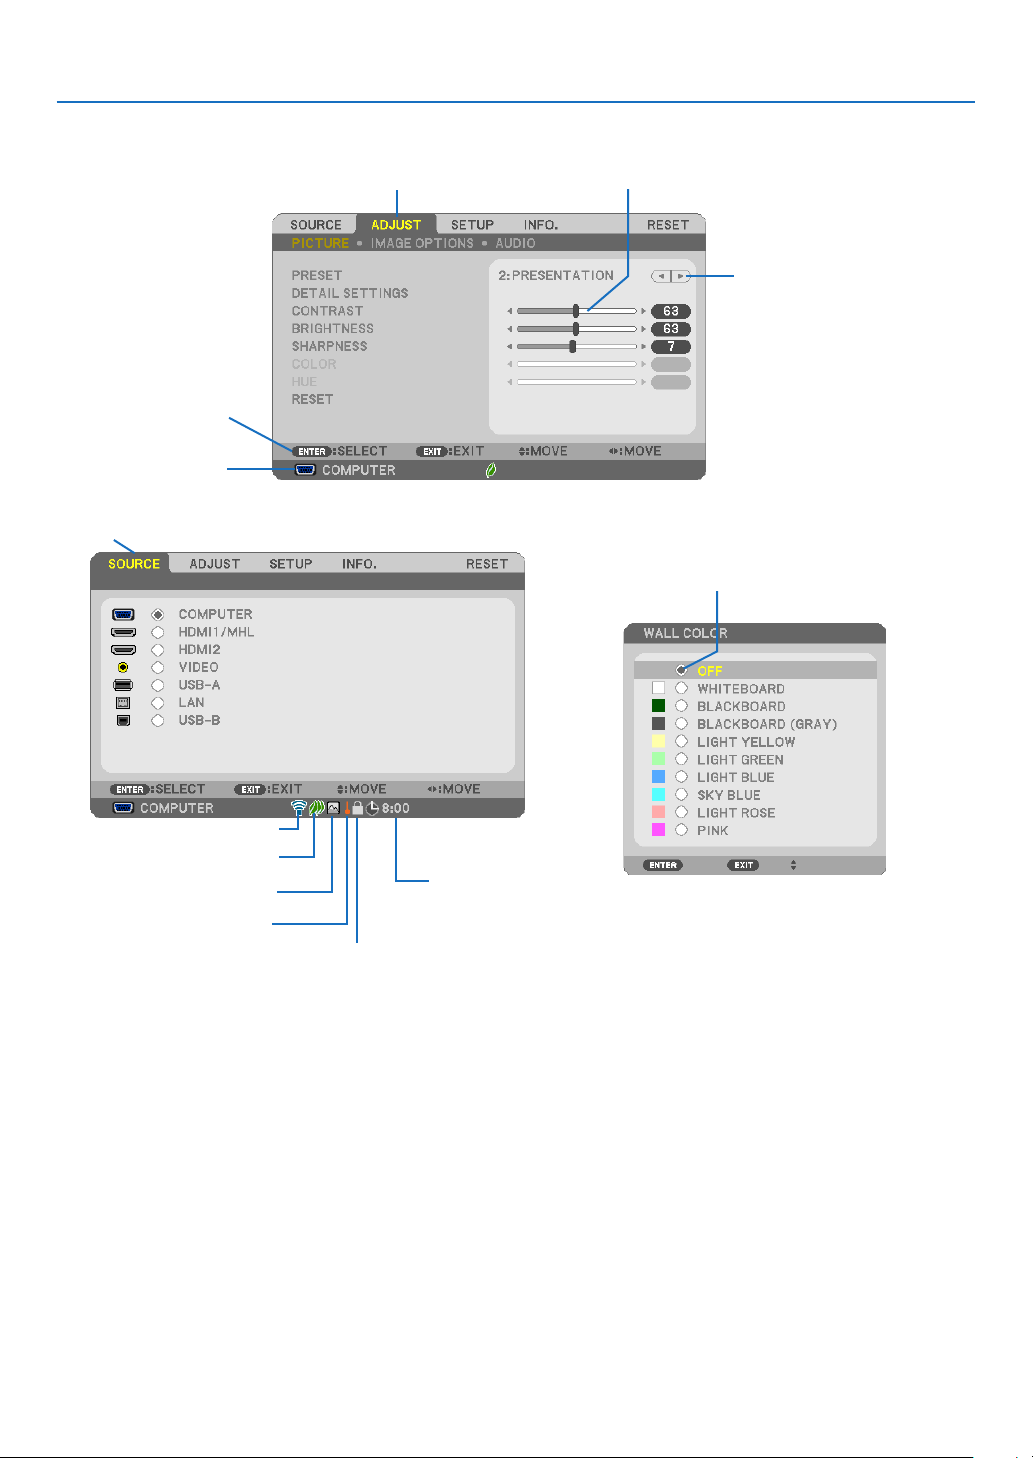
Menu Elements
5. Using On-Screen Menu
Available buttons
Highlight
Source
Tab
Slide bar
Solid triangle
Radio button
Wireless symbol
ECO mode symbol
High Altitude symbol
Thermometer symbol
KeyLocksymbol
Menuwindowsordialogboxestypicallyhavethefollowingelements:
Highlight ����������������������������� Indicates the selected menu or item�
Solid triangle ����������������������Indicates further choices are available� A highlighted triangle indicates the item is active�
Tab ��������������������������������������Indicates a group of features in a dialog box� Selecting on any tab brings its page to the front�
Radio button �����������������������Use this round button to select an option in a dialog box�
Source ��������������������������������Indicates the currently selected source�
Off Timer remaining time ���� Indicates the remaining countdown time when the [OFF TIMER] is preset�
Slide bar �����������������������������Indicates settings or the direction of adjustment�
ECO mode symbol ��������������Indicates ECO MODE is set�
Key Lock symbol ����������������Indicates the [CONTROL PANEL LOCK] is enabled�
Thermometer symbol ���������Indicates the [ECO MODE] is forcibly set to [NORMAL] mode because the internal temperature is
too high�
High Altitude symbol ����������Indicates the [FAN MODE] is set to [HIGH ALTITUDE] mode�
Wireless symbol �����������������Indicate the wireless LAN connection is enabled�
Off Timer remaining
time
73
Page 85
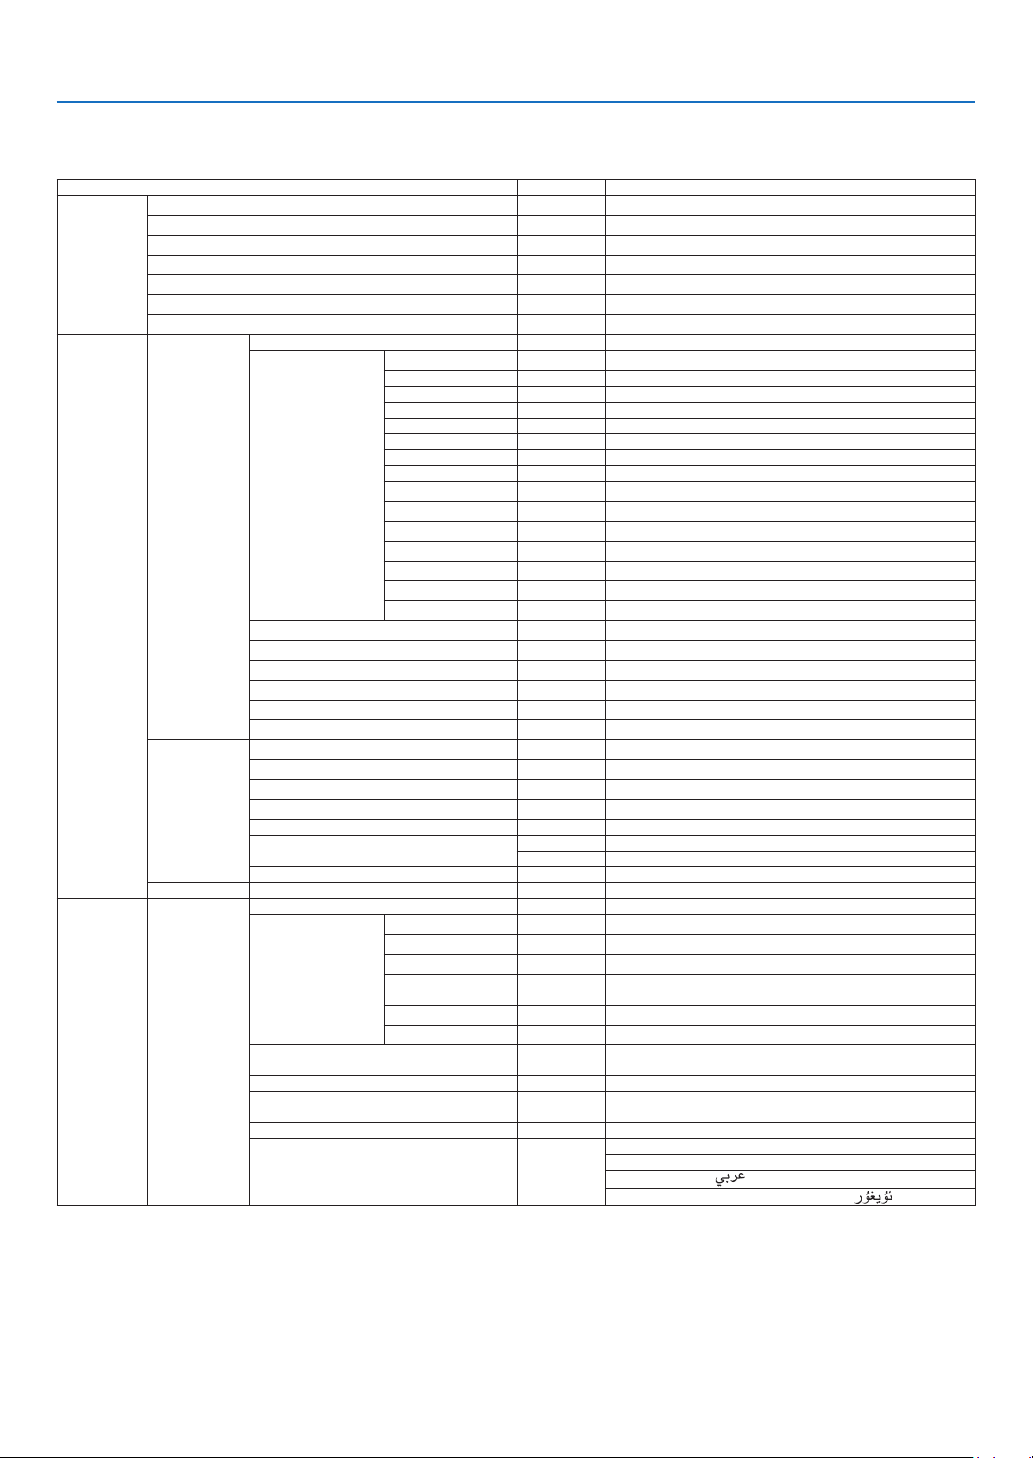
5. Using On-Screen Menu
List of Menu Items
Somemenuitemsarenotavailabledependingontheinputsource.
Menu Item Default Options
SOURCE
ADJUST
SETUP GENERAL
COMPUTER *
HDMI1/MHL *
HDMI2 *
VIDEO *
USB-A *
LAN *
USB-B *
PICTURE
IMAGE OPTIONS
AUDIO VOLUME
PRESET * 1–7
DETAIL SETTINGS
CONTRAST 63
BRIGHTNESS 63
SHARPNESS 7
COLOR 31
HUE 31
RESET
CLOCK *
PHASE *
HORIZONTAL *
VERTICAL *
OVERSCAN * AUTO, 0[%], 5[%], 10[%]
ASPECT RATIO
POSITION (Not available on UM351W/UM301W) 0
DIGITAL ZOOM 100 70 to 100
KEYSTONE
WALL COLOR OFF
ECO MODE AUTO ECO OFF, AUTO ECO, NORMAL, ECO
CLOSED CAPTION OFF
OFF TIMER OFF OFF, 0:30, 1:00, 2:00, 4:00, 8:00, 12:00, 16:00
LANGUAGE ENGLISH
GENERAL
REFERENCE * HIGH-BRIGHT, PRESENTATION, VIDEO, MOVIE, GRAPHIC, sRGB, DICOM SIM.
GAMMA CORRECTION DYNAMIC, NATURAL, BLACK DETAIL
SCREEN SIZE * LARGE, MEDIUM, SMALL
COLOR TEMPERATURE * 5000, 6500, 7800, 8500, 9300, 10500
DYNAMIC CONTRAST * OFF, ON
IMAGE MODE * STILL, MOVIE
COLOR ENHANCEMENT * OFF, LOW, MIDDLE, HIGH
WHITE BALANCE
CONTRAST R 0
CONTRAST G 0
CONTRAST B 0
BRIGHTNESS R *
BRIGHTNESS G *
BRIGHTNESS B *
KEYSTONE HORIZONTAL 0
KEYSTONE VERTICAL 0
PINCUSHION LEFT/RIGHT 0
PINCUSHION TOP/
BOTTOM
CORNERSTONE 0
RESET
3
3
3
* UM361X/UM301X: AUTO, 4:3, 16:9, 15:9, 16:10, WIDE ZOOM, NATIVE
* UM351W/UM301W: AUTO, 4:3, 16:9, 15:9, 16:10, LETTERBOX, NATIVE
0
OFF, WHITEBOARD, BLACKBOARD, BLACKBOARD (GRAY), LIGHT YELLOW,
LIGHT GREEN, LIGHT BLUE, SKY BLUE, LIGHT ROSE, PINK
OFF, CAPTION1, CAPTION2, CAPTION3, CAPTION4, TEXT1, TEXT2, TEXT3,
TEXT4
ENGLISH, DEUTSCH, FRANÇAIS, ITALIANO, ESPAÑOL, SVENSKA, 日本語
DANSK, PORTUGUÊS,
NORSK, TÜRKÇE, РУССКИЙ,
ROMÂNĂ, HRVATSKI, БЪЛГАРСКИ, INDONESIA, , ไทย,
EŠTINA, MAGYAR, POLSKI, NEDERLANDS, SUOMI
, Ελληνικά, 中文, 한국어, TIẾNG ViỆT
, 繁體中文
* Theasterisk(*)indicatesthatthedefaultsettingvariesdependingonthesignal.
74
Page 86

5. Using On-Screen Menu
Menu Item Default Options
MENU
INSTALLATION
SETUP
OPTIONS(1)
OPTIONS(2)
WIRED LAN
WIRELESS LAN
COLOR SELECT COLOR COLOR, MONOCHROME
SOURCE DISPLAY ON OFF, ON
ID DISPLAY ON OFF, ON
ECO MESSAGE OFF OFF, ON
DISPLAY TIME AUTO 45 SEC MANUAL, AUTO 5 SEC, AUTO 15 SEC, AUTO 45 SEC
BACKGROUND BLUE BLUE, BLACK, LOGO
FILTER MESSAGE 5000(H) OFF, 100[H], 500[H], 1000[H], 2000[H], 5000[H]
ORIENTATION DESKTOP FRONT AUTO, DESKTOP FRONT, CEILING REAR, DESKTOP REAR, CEILING FRONT
CONTROL PANEL LOCK OFF OFF, ON
SECURITY OFF OFF, ON
COMMUNICATION SPEED 38400bps 4800bps, 9600bps, 19200bps, 38400bps
CONTROL ID
TEST PATTERN
MIC SELECT DYNAMIC DYNAMIC, CONDENSOR
MIC GAIN
AUTO ADJUST NORMAL OFF, NORMAL, FINE
SEAMLESS SWITCHING OFF, ON
FAN MODE AUTO AUTO, HIGH, HIGH ALTITUDE
SIGNAL SELECT
WXGA MODE
DEINTERLACE ON OFF, ON
HDMI
SETTINGS
AUDIO SELECT
BEEP ON OFF, ON
STANDBY MODE NORMAL NORMAL, NETWORK STANDBY
DIRECT POWER ON OFF OFF, ON
AUTO POWER ON OFF OFF, ON
AUTO POWER OFF 1:00 OFF, 0:05, 0:10, 0:20, 0:30, 1:00
DEFAULT SOURCE SELECT LAST LAST, AUTO, COMPUTER, HDMI1/MHL, HDMI2, VIDEO, USB-A, LAN, USB-B
CARBON CONVERT
CURRENCY $, €, JP¥, RMB¥
CURRENCY CONVERT
WIRED LAN ENABLE DISABLE, ENABLE
SETTINGS
RECONNECT
PROFILE DISABLE DISABLE, SIMPLE ACCESS POINT, PROFILE1, PROFILE2
RECONNECT
CONTROL ID NUMBER 1 1–254
CONTROL ID OFF OFF, ON
COMPUTER
VIDEO AUTO AUTO, NTSC3.58, NTSC4.43, PAL, PAL-M, PAL-N, PAL60, SECAM
HDMI1/
VIDEO LEVEL AUTO AUTO, NORMAL, ENHANCED
MHL
HDMI2 VIDEO LEVEL AUTO AUTO, NORMAL, ENHANCED
HDMI1/MHL HDMI1/MHL HDMI1/MHL, COMPUTER
HDMI2 HDMI2 HDMI2, COMPUTER
LAN LAN LAN, COMPUTER
USB-B USB-B USB-B, COMPUTER
RGB/
COMPONENT
UM361X/UM301X:
OFF
UM351W/UM301W:
ON
DHCP: ON
AUTO DNS: ON
RGB/COMPONENT, RGB, COMPONENT
OFF, ON
DHCP, IPADDRESS, SUBNET MASK, GATEWAY, AUTO DNS, DNS
* Theasterisk(*)indicatesthatthedefaultsettingvariesdependingonthesignal.
75
Page 87

5. Using On-Screen Menu
Menu Item Default Options
USAGE TIME
SOURCE(1)
SOURCE(2)
INFO.
RESET
WIRED LAN
WIRELESS LAN
VERSION
OTHERS
CURRENT SIGNAL
ALL DATA
CLEAR LAMP HOURS
CLEAR FILTER HOURS
LAMP LIFE REMAINING
LAMP HOURS USED
FILTER HOURS USED
TOTAL CARBON SAVINGS
TOTAL COST SAVINGS
SOURCE NAME
SOURCE INDEX
HORIZONTAL FREQUENCY
VERTICAL FREQUENCY
SYNC TYPE SEPARATE SYNC, COMPOSITE SYNC, SYNC ON GREEN, SYNC ON VIDEO
SYNC POLARITY
SCAN TYPE INTERLACE, NON-INTERLACE
SIGNAL TYPE RGB, COMPONENT, VIDEO, HDTV
VIDEO TYPE NTSC, NTSC3.58, NTSC4.43, PAL, PAL-M, PAL-N, PAL60, SECAM
BIT DEPTH 8[bits], 10[bits], 12[bits]
VIDEO LEVEL ENHANCED, FULL
MHL SIGNAL SUPPORTED, NOT SUPPORTED
IP ADDRESS
SUBNET MASK
GATEWAY
MAC ADDRESS
IP ADDRESS
SUBNET MASK
GATEWAY
MAC ADDRESS
SSID
NETWORK TYPE
WEP/WPA
CHANNEL
SIGNAL LEVEL
FIRMWARE
DATA
PROJECTOR NAME
MODEL NO.
SERIAL NUMBER
LAN UNIT TYPE
CONTROL ID (when [CONTROL ID] is set)
* Theasterisk(*)indicatesthatthedefaultsettingvariesdependingonthesignal.
76
Page 88
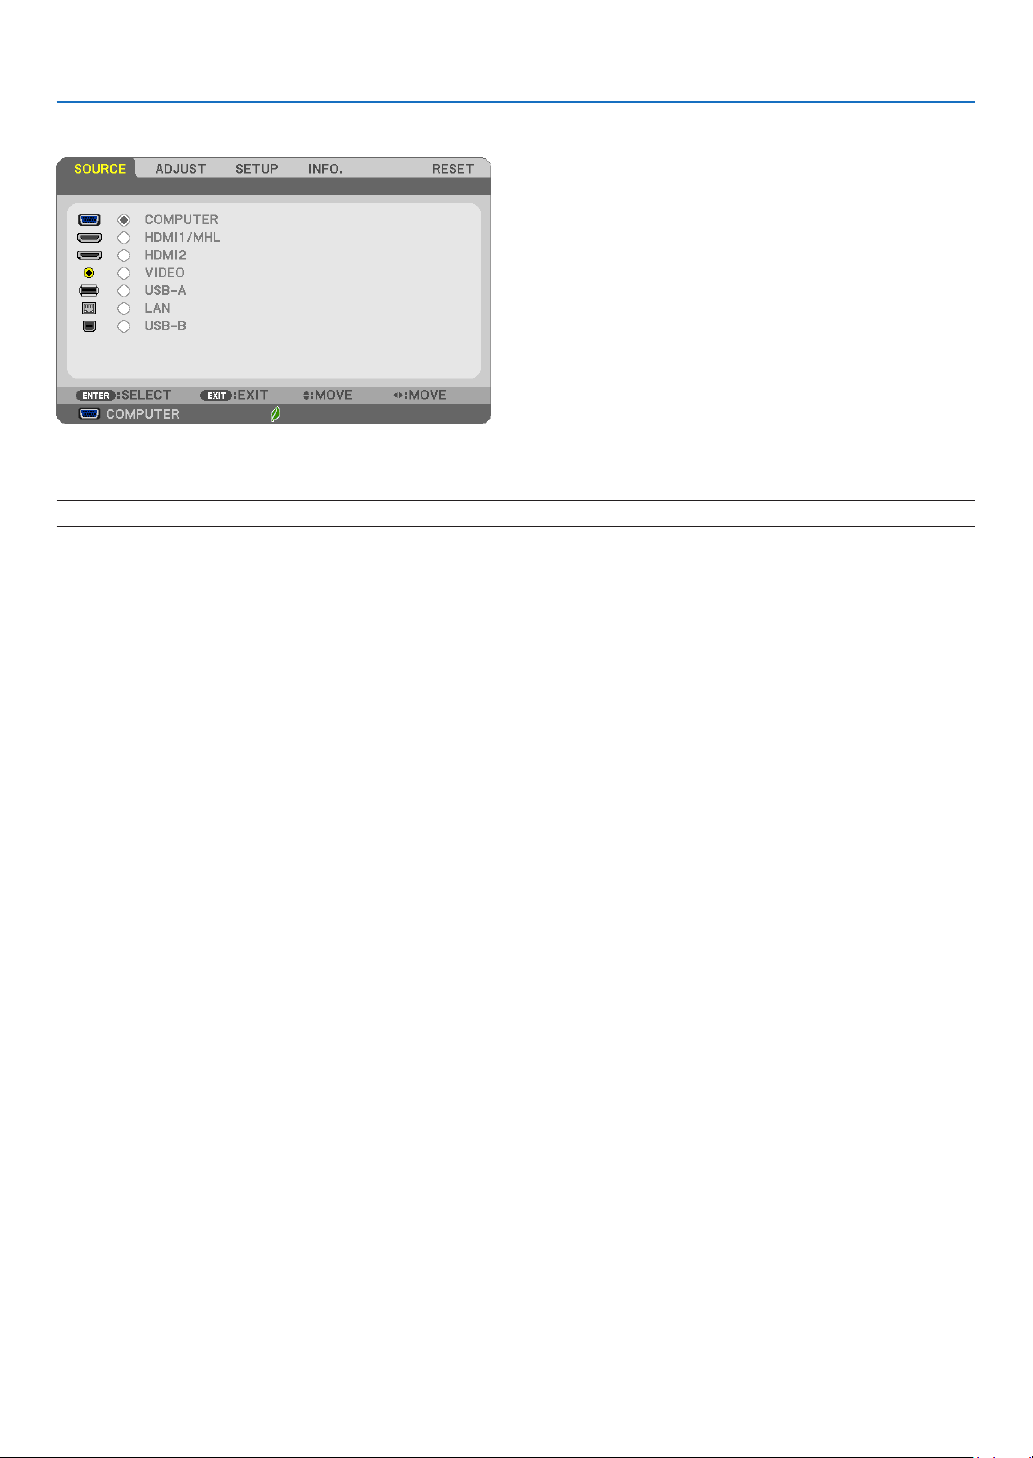
5. Using On-Screen Menu
Menu Descriptions & Functions [SOURCE]
COMPUTER
SelectsthecomputerconnectedtoyourCOMPUTERinputterminalsignal.
NOTE:WhenthecomponentinputsignalisconnectedtotheCOMPUTERINterminal,select[COMPUTER].
HDMI1/MHL and HDMI2
SelectstheHDMIcompatibleequipmentconnectedtoyourHDMI1/MHLor2INterminal.
VIDEO
SelectswhatisconnectedtoyourVIDEOinput-VCR,DVDplayerordocumentcamera.
USB-A
ThisfeatureenablesyoutomakepresentationsusingaUSBmemorythatcontainsslides.
(→page64“4.UsingtheViewer”)
LAN
SelectsasignalfromtheLANport(RJ-45)ortheinstalledUSBwirelessLANunit(optional).
USB-B
SelectsthecomputerconnectedtotheUSB(PC)port(typeB)byusingacommerciallyavailableUSBcable.
(→page42)
77
Page 89
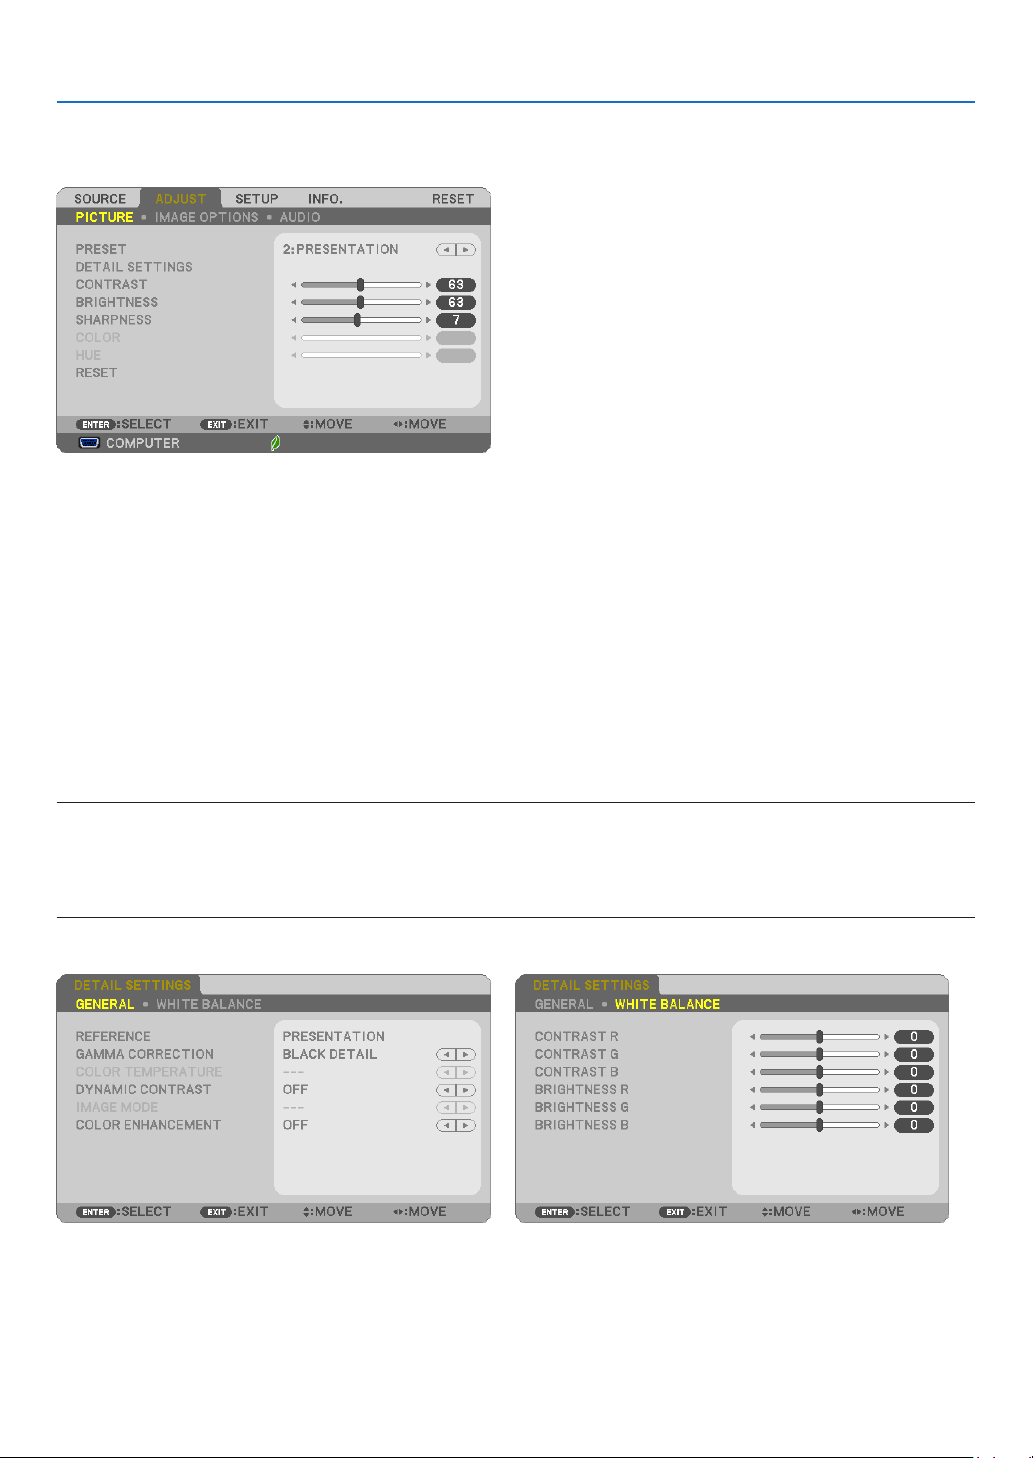
5. Using On-Screen Menu
Menu Descriptions & Functions [ADJUST]
[PICTURE]
[PRESET]
Thisfunctionallowsyoutoselectoptimizedsettingsforyourprojectedimage.
Youcanadjustneutraltintforyellow,cyanormagenta.
Therearesevenfactorypresetsoptimizedforvarioustypesofimages.Youcanalsouse[DETAILSETTINGS]toset
useradjustablesettingstocustomizeeachgammaorcolor.
Yoursettingscanbestoredin[PRESET1]to[PRESET7].
HIGH-BRIGHT �������� Recommended for use in a brightly lit room�
PRESENTATION ����� Recommended for making a presentation using a PowerPoint file�
VIDEO �������������������� Recommended for typical TV program viewing�
MOVIE ������������������� Recommended for movies�
GRAPHIC ��������������� Recommended for graphics�
sRGB ��������������������� Standard color values
DICOM SIM� ���������� Recommended for DICOM simulation format�
NOTE:
• The[DICOMSIM.]optionisfortraining/referenceonlyandshouldnotbeusedforactualdiagnosis.
• DICOMstandsforDigitalImagingandCommunicationsinMedicine.ItisastandarddevelopedbytheAmericanCollegeofRadiology(ACR)andtheNationalElectricalManufacturersAssociation(NEMA).
Thestandardspecieshowdigitalimagedatacanbemovedfromsystemtosystem.
[DETAIL SETTINGS]
78
Page 90

5. Using On-Screen Menu
[GENERAL]
StoringYourCustomizedSettings[REFERENCE]
Thisfunctionallowsyoutostoreyourcustomizedsettingsin[PRESET1]to[PRESET7].
First,selectabasepresetmodefrom[REFERENCE],thenset[GAMMACORRECTION]and[COLORTEMPERATURE].
HIGH-BRIGHT �������� Recommended for use in a brightly lit room�
PRESENTATION ����� Recommended for making a presentation using a PowerPoint file�
VIDEO �������������������� Recommended for typical TV program viewing�
MOVIE ������������������� Recommended for movies�
GRAPHIC ��������������� Recommended for graphics�
sRGB ��������������������� Standard color values�
DICOM SIM� ���������� Recommended for DICOM simulation format�
SelectingGammaCorrectionMode[GAMMACORRECTION]
Eachmodeisrecommendedfor:
DYNAMIC �������������� Creates a high-contrast picture�
NATURAL ��������������� Natural reproduction of the picture�
BLACK DETAIL ������� Emphasizes detail in dark areas of the picture�
NOTE:Thisfunctionisnotavailablewhen[DICOMSIM.]isselectedfor[DETAILSETTINGS].
SelectingScreenSizeforDICOMSIM[SCREENSIZE]
Thisfunctionwillperformgammacorrectionappropriateforthescreensize.
LARGE ������������������� For screen size of 110"
MEDIUM
SMALL
���������������� For screen size of 90"
������������������� For screen size of 70"
NOTE:Thisfunctionisavailableonlywhen[DICOMSIM.]isselectedfor[DETAILSETTINGS].
AdjustingColorTemperature[COLORTEMPERATURE]
Thisoptionallowsyoutoselectthecolortemperatureofyourchoice.
NOTE:When[PRESENTATION]or[HIGH-BRIGHT]isselectedin[REFERENCE],thisfunctionisnotavailable.
AdjustingBrightnessandContrast[DYNAMICCONTRAST]
Thisfunctionallowsyoutoadjustthecontrastratioopticallyusingthebuilt-iniris.
Toincreasethecontrastratio,select[ON].
SelectingStillImageModeorMovieMode[IMAGEMODE]
Thisfunctionallowsyoutoselectthestillimagemodeorthemoviemode.
STILL ��������������������� This mode is for a still image�
MOVIE ������������������� This mode is for a movie�
NOTE:Thisfunctionisavailableonlywhen[HIGH-BRIGHT]isselectedfor[REFERENCE].
79
Page 91

5. Using On-Screen Menu
EnhancingtheColor[COLORENHANCEMENT]
Thisallowsyoutoadjustthecolordensityoftheimage.
Thecoloroftheimagewillbecomedeeperintheorderof"LOW","MEDIUM",AND"HIGH"asthedisplayedimage
willbecomedarker.
With"OFF"selected,theCOLORENHANCEMENTfunctionwillnotwork.
NOTE:Thisfunctionisavailableonlywhen[PRESENTATION]isselected[REFERENCE].
AdjustingWhiteBalance[WHITEBALANCE]
Thisallowsyoutoadjustthewhite balance.Contrastforeachcolor(RGB)toadjustthewhitelevelof thescreen;
Brightnessforeachcolor(RGB)isusedtoadjusttheblacklevelofthescreen.
[CONTRAST]
Adjuststheintensityoftheimageaccordingtotheincomingsignal.
[BRIGHTNESS]
Adjuststhebrightnesslevelorthebackrasterintensity.
[SHARPNESS]
Controlsthedetailoftheimage.
[COLOR]
Increasesordecreasesthecolorsaturationlevel.
[HUE]
Variesthecolorlevelfrom+/−greento+/−blue.Theredlevelisusedasreference.
Input signal CONTRAST BRIGHTNESS SHARPNESS COLOR HUE
COMPUTER/HDMI (RGB) Yes Yes Yes No No
COMPUTER/HDMI (COMPONENT) Yes Yes Yes Yes Yes
USB-B Yes Yes Yes No No
VIDEO Yes Yes Yes Yes Yes
USB-A/LAN Yes Yes Yes No No
Yes=Adjustable,No=Notadjustable
[RESET]
Thesettingsandadjustmentsfor[PICTURE]willbereturnedtothefactorysettingswiththeexceptionofthefollowing;
Presetnumbersand[REFERENCE]withinthe[PRESET]screen.
Thesettingsandadjustmentsunder[DETAILSETTINGS]withinthe[PRESET]screenthatarenotcurrentlyselected
willnotbereset.
80
Page 92
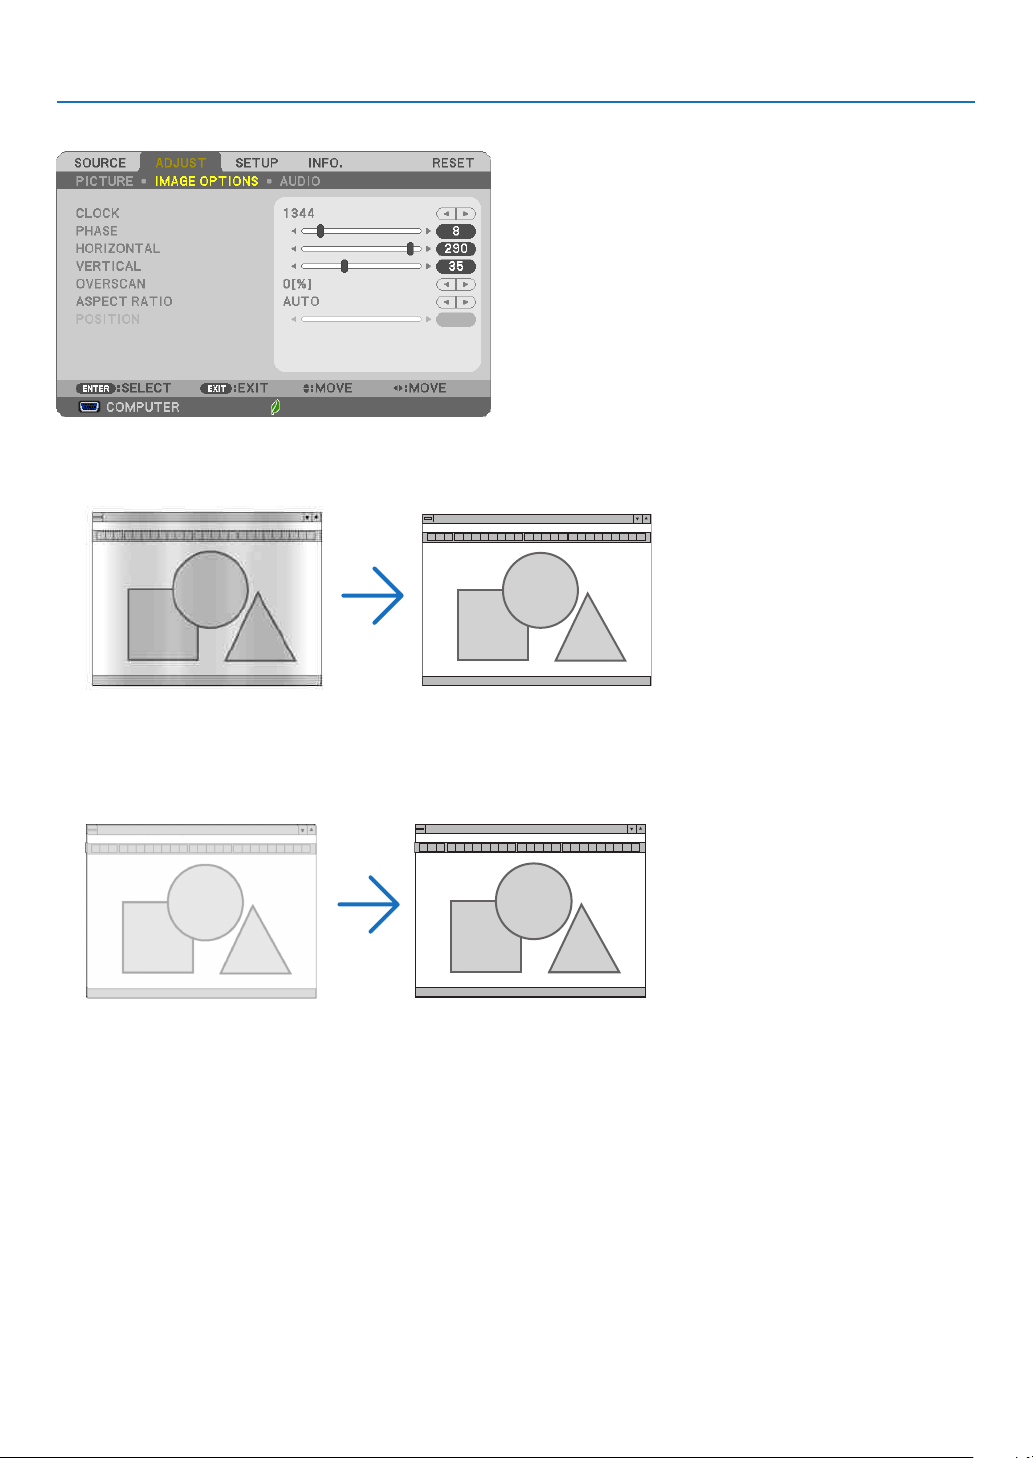
[IMAGE OPTIONS]
AdjustingClockandPhase[CLOCK/PHASE]
ThisallowsyoutomanuallyadjustCLOCKandPHASE.
5. Using On-Screen Menu
CLOCK ������������������� Use this item to fine tune the computer image or to remove any vertical banding that might appear� This
function adjusts the clock frequencies that eliminate the horizontal banding in the image�
This adjustment may be necessary when you connect your computer for the first time�
PHASE ������������������� Use this item to adjust the clock phase or to reduce video noise, dot interference or cross talk� (This is
evident when part of your image appears to be shimmering�)
Use [PHASE] only after the [CLOCK] is complete�
81
Page 93
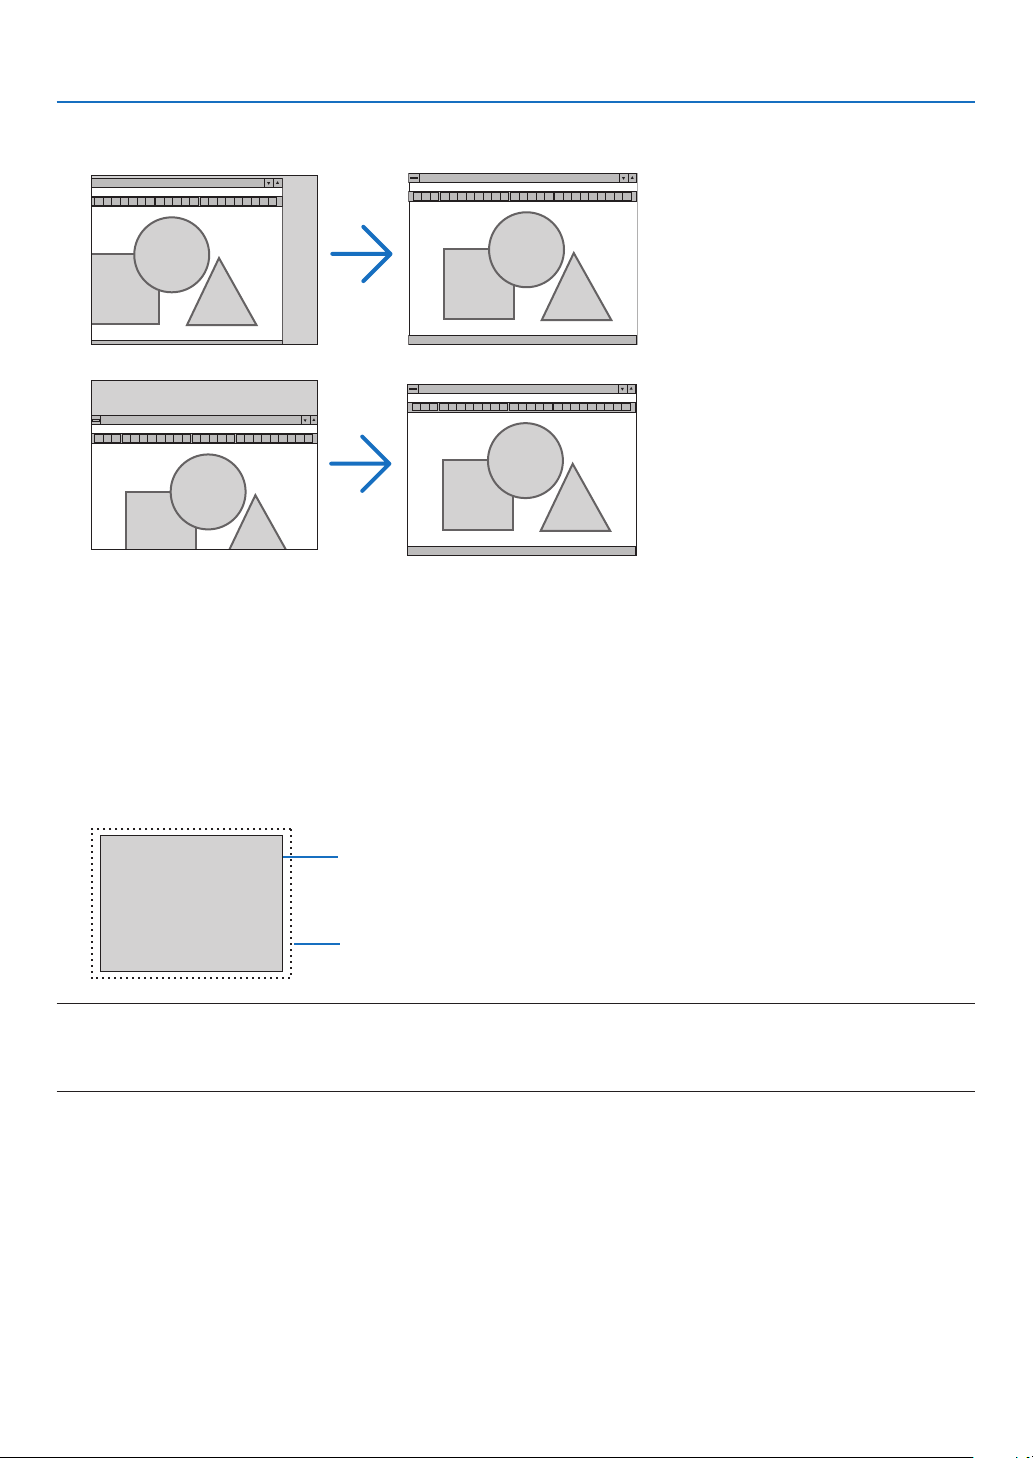
5. Using On-Screen Menu
AdjustingHorizontal/VerticalPosition[HORIZONTAL/VERTICAL]
Adjuststheimagelocationhorizontallyandvertically.
- Animagecanbedistortedduringtheadjustmentof[CLOCK]and[PHASE].Thisisnotmalfunction.
- Theadjustmentsfor[CLOCK],[PHASE],[HORIZONTAL],and[VERTICAL]will bestoredinmemoryforthe
currentsignal.Thenexttimeyouprojectthesignalwiththesameresolution,horizontalandverticalfrequency,
itsadjustmentswillbecalledupandapplied.
Todeleteadjustmentsstoredinmemory,fromthemenu,youselect[RESET]→[CURRENTSIGNAL]or[ALL
DATA]andresettheadjustments.
SelectingOverscanPercentage[OVERSCAN]
Selectoverscanpercentage(AUTO,0%,5%and10%)forsignal.
Projected image
Overscaned by 10%
NOTE:
• The[0[%]]cannotbeselectedwhenVIDEOsignalisused.
• The[OVERSCAN]itemisnotavailable:
- when[NATIVE]isselectedfor[ASPECTRATIO].
82
Page 94
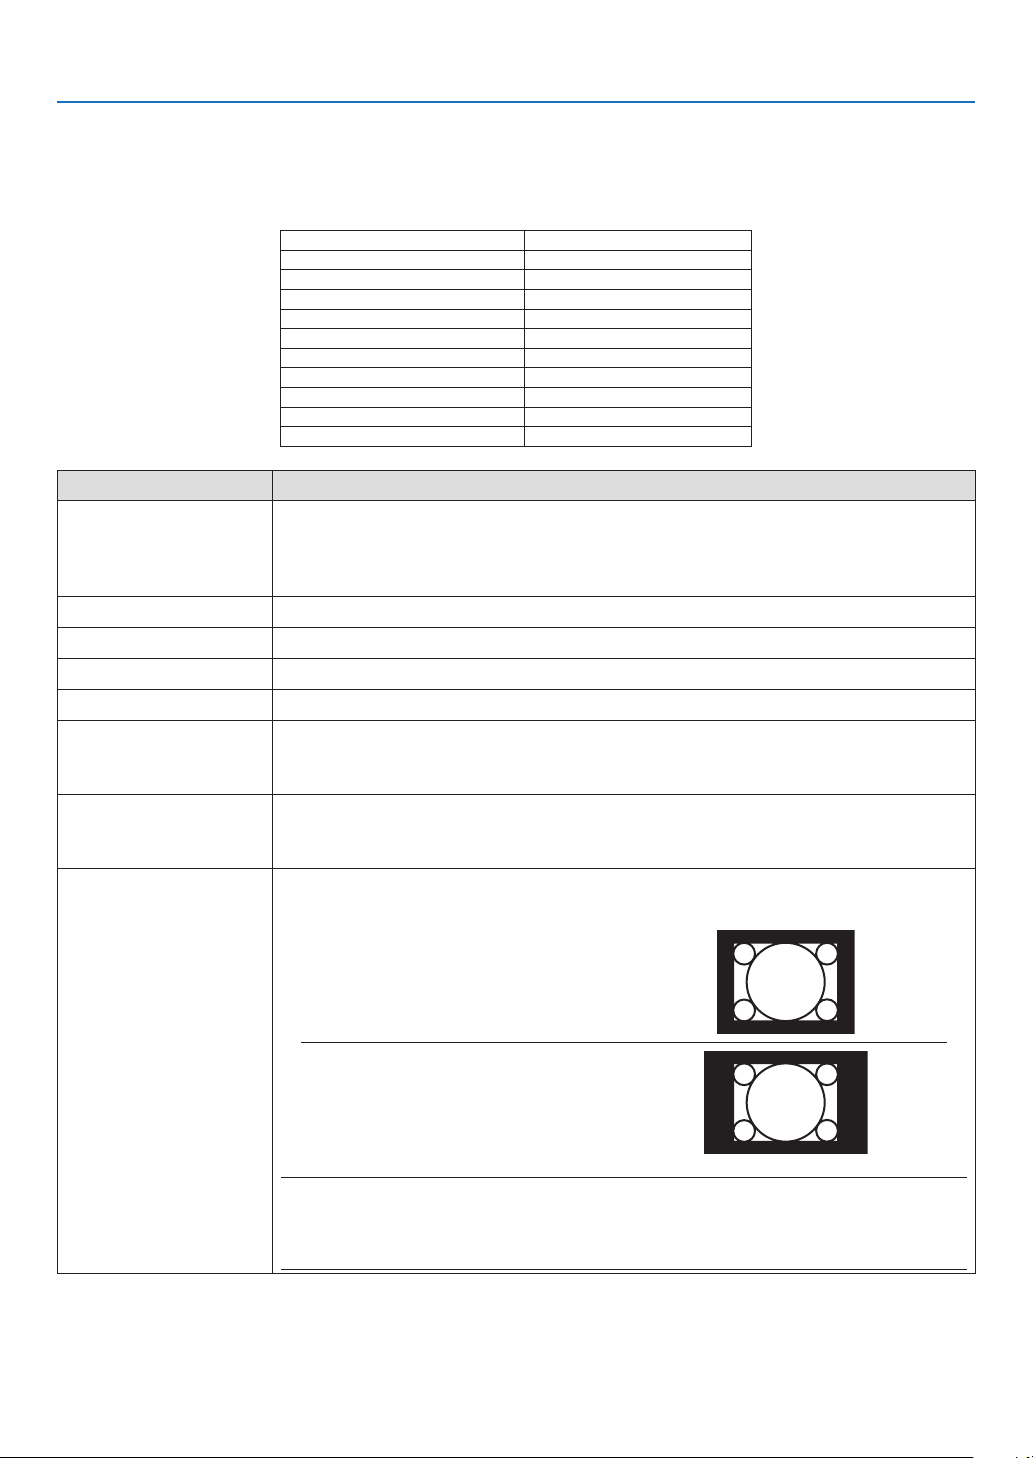
5. Using On-Screen Menu
SelectingAspectRatio[ASPECTRATIO]
Theterm“aspectratio”referstotheratioofwidthtoheightofaprojectedimage.
Theprojectorautomaticallydeterminestheincomingsignalanddisplaysitinitsappropriateaspectratio.
• Thistableshowstypicalresolutionsandaspectratiosthatmostcomputerssupport.
VGA 640 × 480 4:3
Resolution AspectRatio
SVGA 800 × 600 4:3
XGA
WXGA
WXGA
WXGA+
SXGA
1024×768 4:3
1280×768 15:9
1280×800 16:10
1440×900 16:10
1280×1024 5:4
SXGA+ 1400 × 1050 4:3
UXGA
WUXGA
1600×1200 4:3
1920×1200 16:10
Options Function
AUTO
Theprojectorwillautomaticallydeterminetheincomingsignalanddisplayitinitsaspect
ratio.(→ nextpage)
Theprojectormayerroneouslydeterminetheaspectratiodependingonitssignal.Ifthis
occurs,selecttheappropriateaspectratiofromthefollowing.
4:3 Theimageisdisplayedin4:3aspectratio.
16:9 Theimageisdisplayedin16:9aspectratio.
15:9 Theimageisdisplayedin15:9aspectratio.
16:10 Theimageisdisplayedin16:10aspectratio.
WIDEZOOM
(UM361X/UM301X)
Theimageisstretchedleftandright.
Partsofthedisplayedimagearecroppedattheleftandrightedgesandthereforenot
visible.
LETTERBOX
(UM351W/UM301W)
Theimageofaletterboxsignalisstretchedequallyinthehorizontalandverticaldirec-
tionstotthescreen.Partsofthedisplayedimagearecroppedatthetopandbottom
edgesandthereforenotvisible.
NATIVE Theprojectordisplaysthecurrentimageinitstrueresolutionwhentheincomingcomputer
signalhasalowerresolutionthantheprojector’snativeresolution.
[Example 1]Whenthe incoming
signalwiththe resolutionof800×
600is displayedon the UM361X/
UM301X:
[Example 2]Whenthe incoming
signalwiththe resolutionof800×
600isdisplayedontheUM351W/
UM301W:
NOTE:
• Whenanon-computersignalisdisplayed,the[NATIVE]isnotavailable.
• Whenasignalwithahigherresolutionthantheprojector’snativeresolutionisdisplayed,[NATIVE]isnotavailable.
83
Page 95
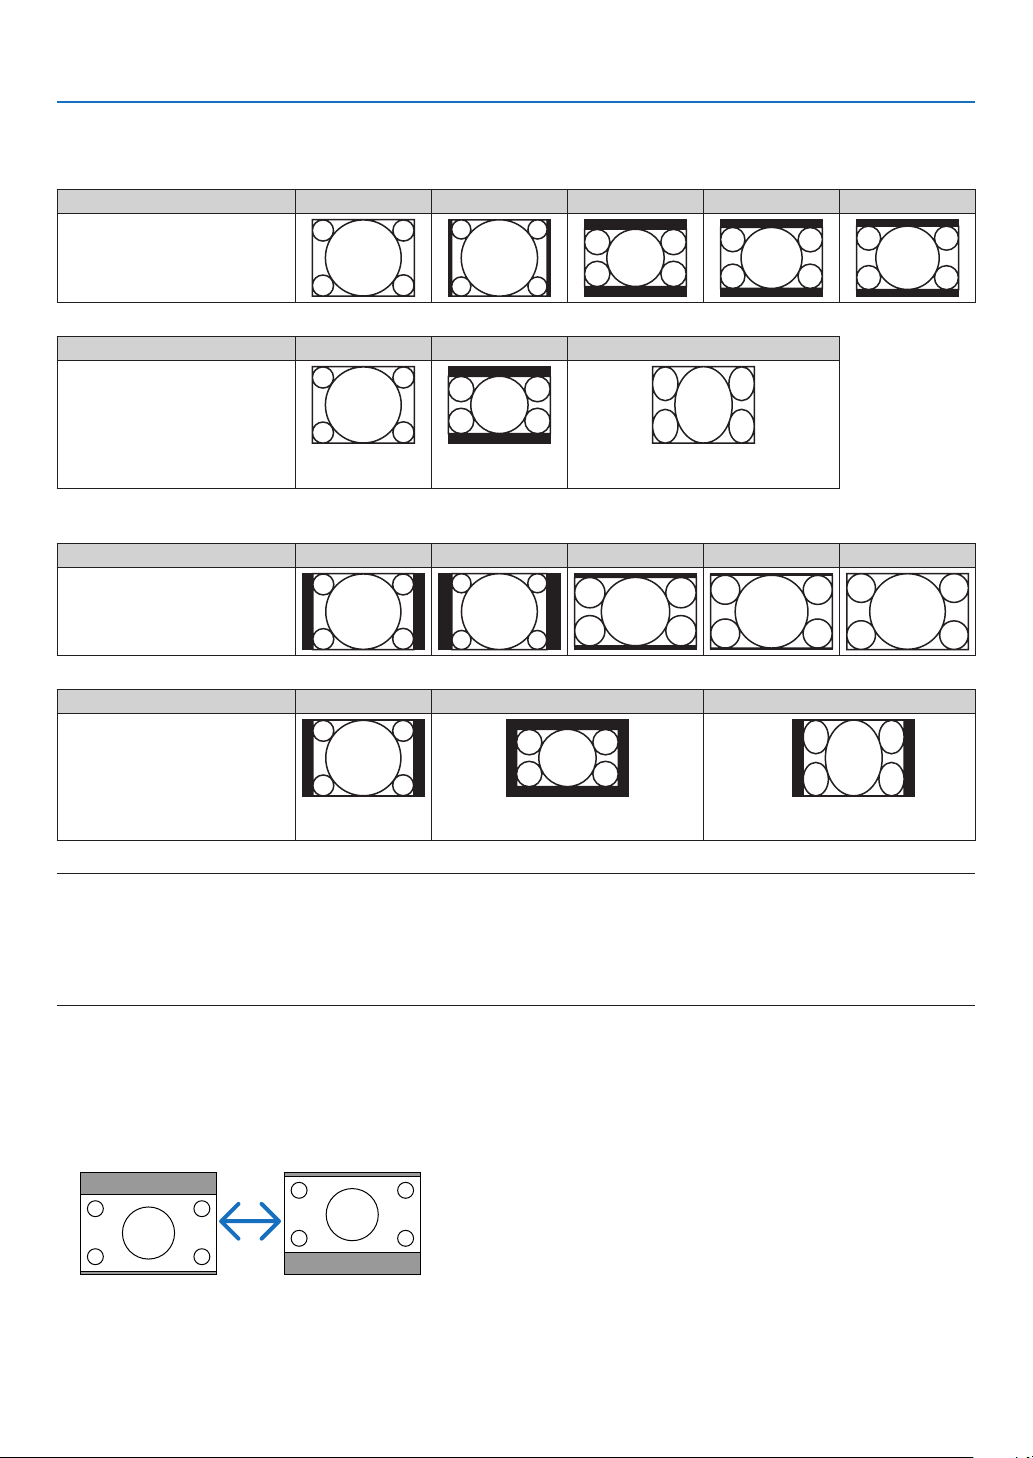
5. Using On-Screen Menu
Sampleimagewhentheappropriateaspectratioisautomaticallydetermined
UM361X/UM301X
[Computersignal]
Aspectratioofincomingsignal 4:3 5:4 16:9 15:9 16:10
Sampleimagewhenthe appropriate aspect ratio is automaticallydetermined
[Videosignal]
Aspectratioofincomingsignal 4:3 Letterbox Squeeze
Sampleimage when the aspectratioisautomaticallyde-
termined
UM351W/UM301W
[Computersignal]
Aspectratioofincomingsignal 4:3 5:4 16:9 15:9 16:10
Sampleimagewhenthe appropriate aspect ratio is automaticallydetermined
NOTE:Todisplayasqueezedsignalproperly,select[16:9]or[WIDEZOOM].
[Videosignal]
Aspectratioofincomingsignal 4:3 Letterbox Squeeze
Sampleimage when the aspectratioisautomaticallyde-
termined
NOTE:Todisplayaletterboxsignalproperly,select[LETTERBOX].
NOTE:Todisplayasqueezedsignalproperly,select[16:9].
TIP:
• Imagepositioncanbeadjustedverticallyusing[POSITION]whenthe[16:9],[15:9],or[16:10]aspectratiosareselected.
• Theterm“letterbox”referstoamorelandscape-orientedimagewhencomparedtoa4:3image,whichisthestandardaspect
ratioforavideosource.
Theletterboxsignalhasaspectratioswiththevistasize“1.85:1”orcinemascopesize“2.35:1”formovielm.
• Theterm“squeeze”referstothecompressedimageofwhichaspectratioisconvertedfrom16:9to4:3.
AdjustingtheVerticalPositionofImage[POSITION](notavailableonUM351W/UM301W)
(onlywhen[16:9],[15:9],or[16:10]isselectedfor[ASPECTRATIO])
When[16:9],[15:9],or[16:10]isselectedin[ASPECTRATIO],theimageisdisplayedwithblackbordersonthetop
and bottom.
Youcanadjusttheverticalpositionfromthetoptothebottomoftheblackarea.
84
Page 96

5. Using On-Screen Menu
[AUDIO]
TurningUporDownSound
AdjuststhevolumeoftheprojectorspeakerandAUDIOOUT(StereoMiniJack).
TIP:
• Whennomenusappear,the◀and▶buttonsontheprojectorcabinetandtheVOL.+/−buttonsontheremotecontrolworkas
avolumecontrol.(→page23)
85
Page 97
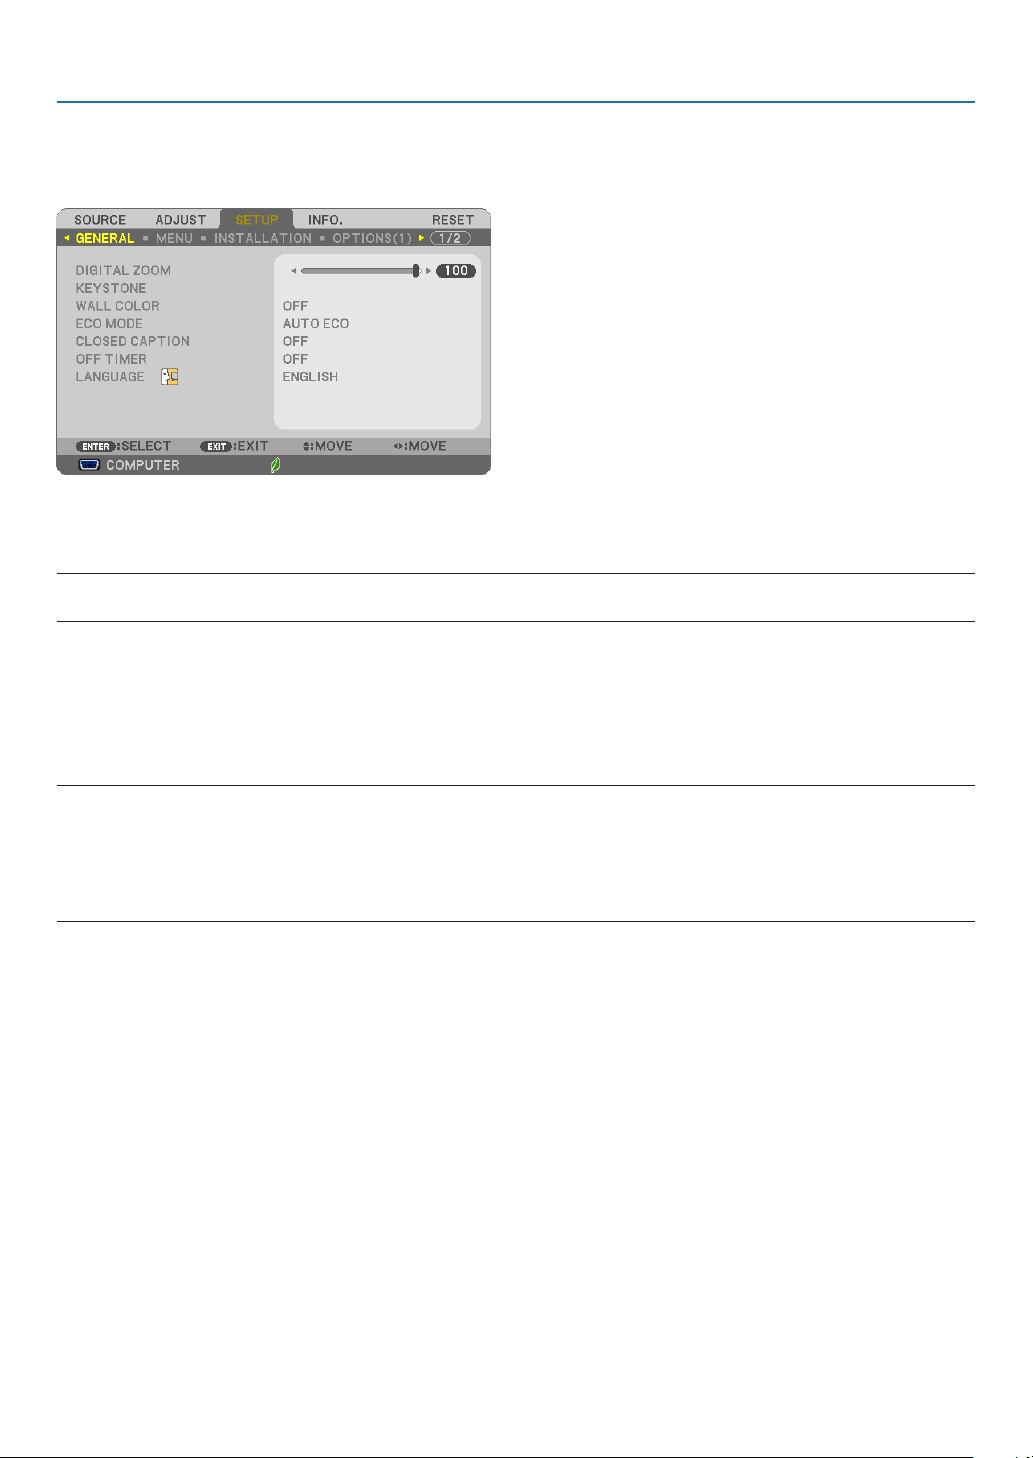
5. Using On-Screen Menu
Menu Descriptions & Functions [SETUP]
[GENERAL]
UsingDigitalZoom[DIGITALZOOM]
Thisfeatureallowsyoutoelectronicallyneadjusttheimagesizeonthescreen.
NOTE:
• ThisfeaturecannotbeusedwhenUSB-A,LAN,orUSB-Bisselectedasainputterminal.
TIP:Toadjusttheprojectedimagesizeroughly,movetheprojectorawayorclosertothescreen.Toneadjustthezoom,usethe
→
[DIGITALZOOM]function.(
page20)
CorrectingKeystoneDistortionManually[KEYSTONE]
Youcancorrecthorizontalorverticalkeystone,pincushion,orcornerstonedistortionmanually.
NOTE:
• Someitemsarenotavailablewhenoneitemisactivated.Unavailableitemsareshowningrey.
• Tochangefromoneitemtoanotheritem,resettherstitem.
• Adjustmentvalueswillbeoverwritten.Theywillnotbedeletedevenwhentheprojectoristurnedoff.
• Using [KEYSTONE],[PINCUSHION]and [CORNERSTONE]correctioncancause theimagetobe slightlyblurredbecause the
correctionismadeelectronically.
KEYSTONE HORIZONTAL ��������� Corrects horizontal keystone distortion� (→ page 21)
KEYSTONE VERTICAL
PINCUSHION LEFT/RIGHT
PINCUSHION TOP/BOTTOM ����� Corrects pincushion distortion at the top or bottom side�
CORNERSTONE ������������������������ Fits a projected image within the border of the screen easily by align the four corner of an image
��������������������������������������� Returns all the above items to the factory preset values�
RESET
TIP:
• Adjustableanglerangeinhorizontalandverticaldirectioninthecornerstoneandthekeystonecorrections:Approx.10degrees
(Max)
- Dependingoninputsignal,theadjustablerangemaybenarrower.
��������������� Corrects vertical keystone distortion� (→ page 21)
�������� Corrects pincushion distortion at the left or right side�
to the ones of the screen� (→ page 29)
86
Page 98

5. Using On-Screen Menu
UsingtheWallColorCorrection[WALLCOLOR]
Thisfunctionallowsforquickadaptivecolorcorrectioninapplicationswherethescreenmaterialisnotwhite.
NOTE:Selecting[WHITEBOARD]reduceslampbrightness.
SettingEcoMode[ECOMODE]
TheECOMODEincreaseslamplife,whileloweringpowerconsumptionandcuttingdownonCO2 emissions.
Fourbrightnessmodesofthelampcanbeselected:[OFF],[AUTOECO],[NORMAL]and[ECO]modes.
(→page27)
87
Page 99
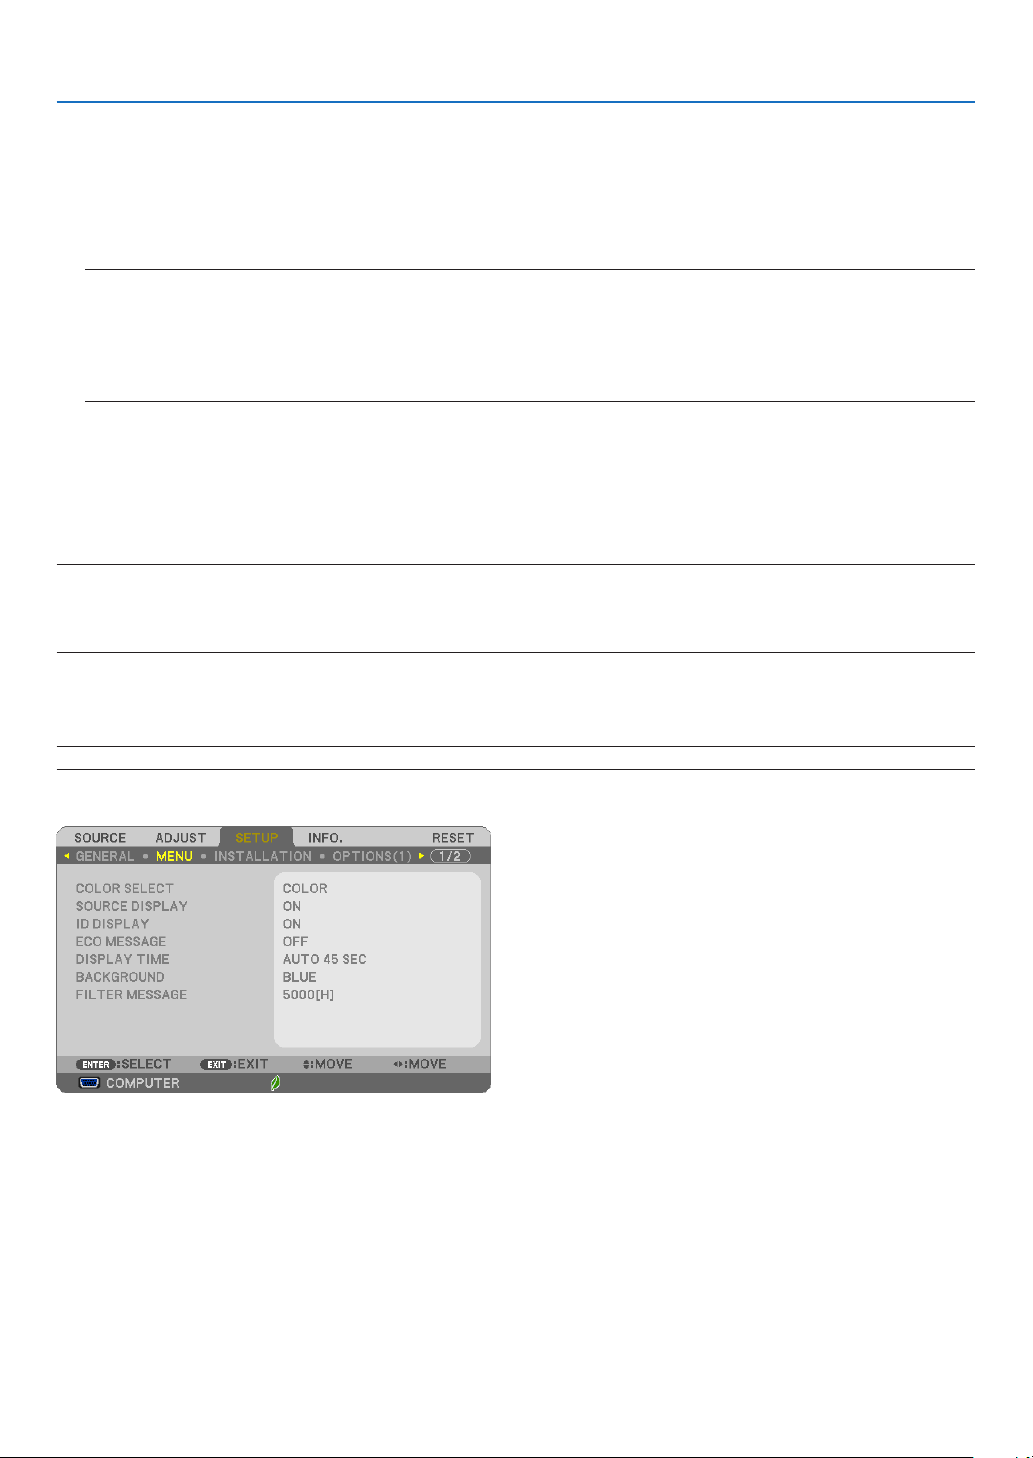
5. Using On-Screen Menu
SettingClosedCaption[CLOSEDCAPTION]
ThisoptionsetsseveralclosedcaptionmodesthatallowtexttobesuperimposedontheprojectedimageofVideo
orS-Video.
OFF ������������������������ This exits the closed caption mode�
CAPTION 1-4 ��������� Text is superimposed�
TEXT 1-4 ���������������� Text is displayed�
NOTE:
• Theclosedcaptionisnotavailableunderthefollowingconditions:
- whenmessagesormenusaredisplayed.
- whenanimageismagnied,frozen,ormuted.
• Portionsofsuperimposedtextorclosedcaptionmaybetruncated.Ifthat happens,trytoplacethesuperimposed textor
closedcaptionwithinthescreen.
UsingOffTimer[OFFTIMER]
1. Select your desired time between 30 minutes and 16 hours: OFF, 0:30, 1:00, 2:00, 4:00, 8:00, 12:00, 16:00.
2. Press the ENTER button on the remote control.
3. The remaining time starts counting down.
4. The projector will turn off after the countdown is complete.
NOTE:
• Tocancelthepresettime,set[OFF]forthepresettimeorturnoffthepower.
• Whentheremainingtimereaches3minutesbeforetheprojectoristurnedoff,the[THEPROJECTORWILLTURNOFFWITHIN3
MINUTES]messagewillbedisplayedonthebottomofthescreen.
SelectingMenuLanguage[LANGUAGE]
Youcanchooseoneof30languagesforon-screeninstructions.
NOTE:Yoursettingwillnotbeaffectedevenwhen[RESET]isdonefromthemenu.
[MENU]
SelectingMenuColor[COLORSELECT]
Youcanchoosebetweentwooptionsformenucolor:COLORandMONOCHROME.
TurningOn/OffSourceDisplay[SOURCEDISPLAY]
Thisoptionturnsonoroff input namedisplaysuchasCOMPUTER, HDMI1/MHL, HDMI2,VIDEO,USB-A,LAN,
USB-B,tobedisplayedonthetoprightofthescreen.
Whennoinputsignalispresent,theno-signalguidancepromptingyoutocheckforanavailableinputwillbedisplayed
atthecenterofthescreen.Whenthe[USB-A]or[LAN]itemisselectedfor[SOURCE],theno-signalguidancewill
notbedisplayed.
88
Page 100
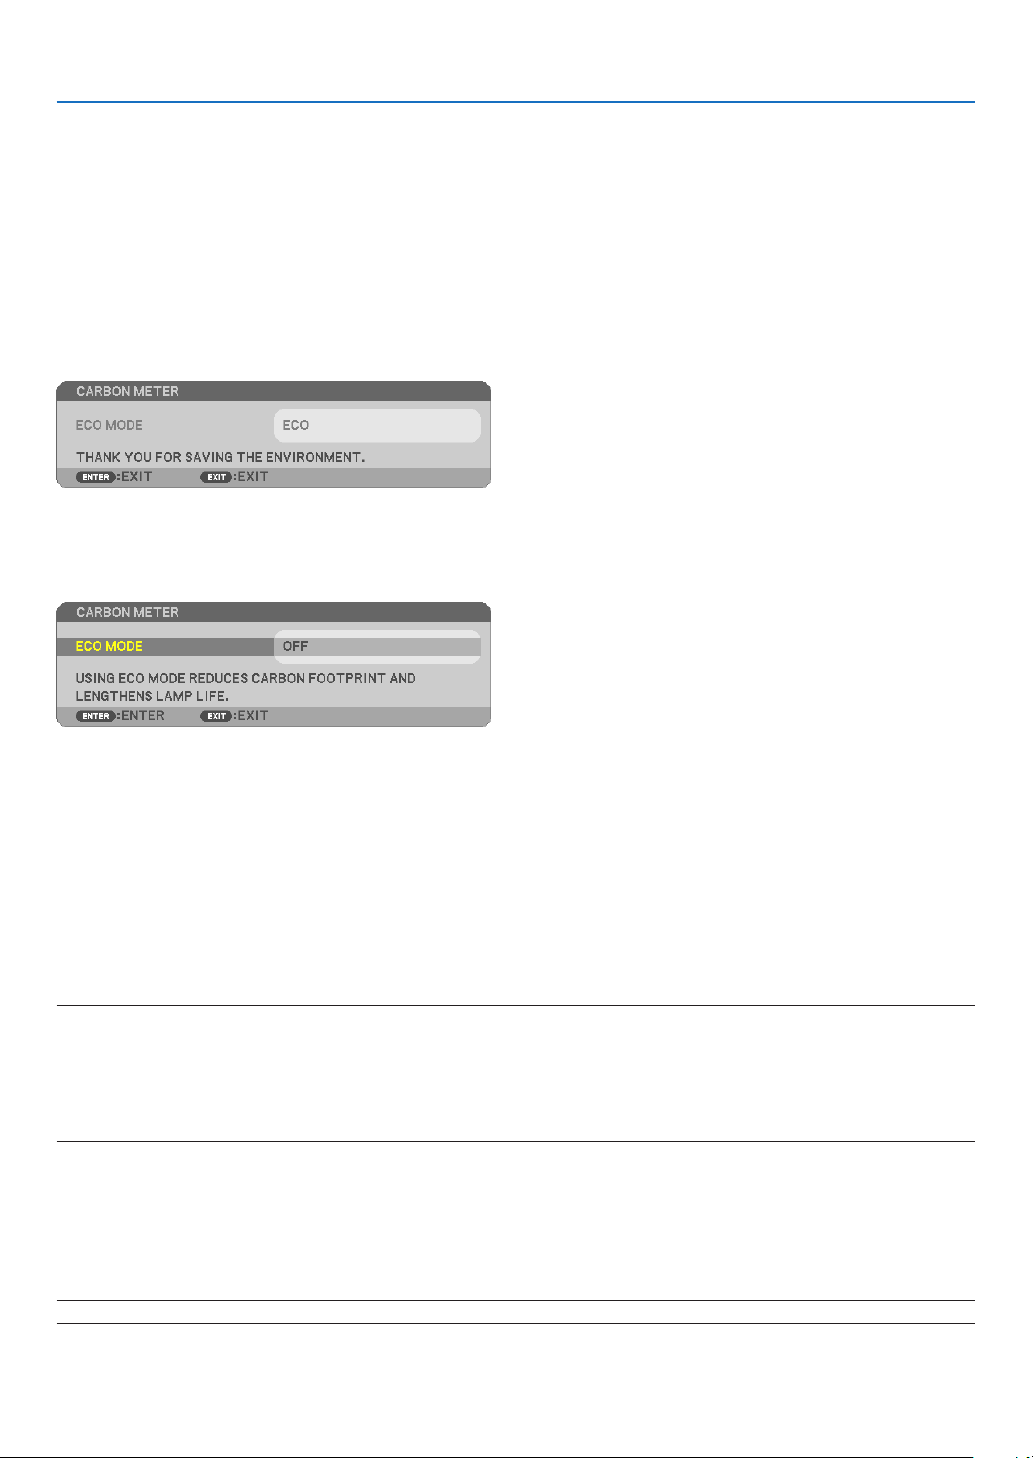
5. Using On-Screen Menu
TurningON/OFFControlID[IDDISPLAY]
ID DISPLAY ����������� This option turns on or off the ID number which is displayed when the ID SET button on the remote control
is pressed�
TurningOn/OffEcoMessage[ECOMESSAGE]
Thisoptionturnsonoroffthefollowingmessageswhentheprojectoristurnedon.
TheEcoMessagepromptstheusertosaveenergy.When[OFF]isselectedfor[ECOMODE],youwillgetamessage
topromptyoutoselect[AUTOECO],[NORMAL],or[ECO]for[ECOMODE].
When[AUTOECO],[NORMAL],or[ECO]isselectedfor[ECOMODE]
Toclosethemessage,pressanyoneofthebuttons.Themessagewilldisappearifnobuttonoperationisdonefor
30 seconds.
When[OFF]isselectedfor[ECOMODE]
PressingtheENTERbuttonwilldisplaythe[ECOMODE]screen.(→page27)
Toclosethemessage,presstheEXITbutton.
SelectingMenuDisplayTime[DISPLAYTIME]
Thisoptionallowsyoutoselecthowlongtheprojectorwaitsafterthelasttouchofabuttontoturnoffthemenu.The
presetchoicesare[MANUAL],[AUTO5SEC],[AUTO15SEC],and[AUTO45SEC].The[AUTO45SEC]isthefactorypreset.
SelectingaColororLogoforBackground[BACKGROUND]
Use thisfeature to display a blue/blackscreen orlogo whenno signalis available.Thedefault background is
[BLUE].
NOTE:
• Ifthe[LOGO]itemisselectedfor[BACKGROUND]withthe[LAN]or[USB-B]sourceselected,the[BLUE]itemwillbeselected
regardlessofitsselection.
• When[SOURCEDISPLAY]isturnedon,theno-signalguidancepromptingyoutocheckforanavailableinputwillbedisplayed
atthecenterofthescreenregardlessofitsselection.
• Yoursettingwillnotbeaffectedevenwhen[RESET]isdonefromthemenu.
SelectingIntervalTimeforFilterMessage[FILTERMESSAGE]
Thisoptionallowsyoutoselectthetimepreferencebetweendisplayingthemessageforcleaningthelters.Clean
thelterwhenyougetthemessage“PLEASECLEANTHEFILTER.”(→page118)
Sixoptionsareavailable:
OFF,100[H],500[H],1000[H],2000[H],5000[H]
NOTE:Yoursettingwillnotbeaffectedevenwhen[RESET]isdonefromthemenu.
89
 Loading...