

NEC POWERMATE VE - 03-1996 User Manual

PROPRIETARY NOTICE AND LIABILITY DISCLAIMER
The information disclosed in this document, including all designs and related
materials, is the valuable property of NEC Corporation (NEC) and/or its licensors.
NEC and/or its licensors, as appropriate, reserve all patent, copyright and other
proprietary rights to this document, including all design, manufacturing,
reproduction, use, and sales rights thereto, except to the extent said rights are
expressly granted to others.
The NEC product(s) discussed in this document are warranted in accordance with
the terms of the Warranty Statement accompanying each product. However, actual
performance of each such product is dependent upon factors such as system
configuration, customer data, and operator control. Since implementation by
customers of each product may vary, the suitability of specific product
configurations and applications must be determined by the customer and is not
warranted by NEC.
To allow for design and specification improvements, the information in this
document is subject to change at any time, without notice. Reproduction of this
document or portions thereof without prior written approval of NEC is prohibited.
MultiSync and PowerMate are registered trademarks of NEC Technologies, Inc.
FastFacts is a trademark of NEC Technologies, Inc.
All other product, brand, or trade names used in this publication are the trademarks or
registered trademarks of their respective trademark owners.
Copyright 1996 Copyright 1996
NEC Technologies, Inc. NEC Corporation
1414 Massachusetts Avenue 7-1 Shiba 5-Chome, Minato-Ku
Boxborough, MA 01719 Tokyo 108-01, Japan
All Rights Reserved All Rights Reserved
First Printing — March 1996

Contents
Using This Guide
Text Conventions ..................................................... x
Related Documents................................................... xi
1 Introducing Your Computer
Front Features.......................................................... 1-1
System Controls and Lamps ................................ 1-3
Diskette Drive A ................................................. 1-4
CD-ROM Reader ................................................ 1-5
Back Features .......................................................... 1-8
External Connectors ............................................ 1-10
Power Supply Features........................................ 1-11
Network Interface Board ..................................... 1-12
Speakers .................................................................. 1-13
Microphone.............................................................. 1-14
2 Getting Started
Using a Mouse ......................................................... 2-1
About Your Online Documentation........................... 2-2
Where to Go from Here ............................................ 2-4
3 Installing Options
Option Installation Procedures.................................. 3-2
Safety Precautions............................................... 3-4
Removing the System Unit Cover ........................ 3-5
Replacing the System Unit Cover......................... 3-7
Expansion Boards .................................................... 3-8
Locating Expansion Slots .................................... 3-8
Installing an Expansion Board ............................. 3-10
Installing an Expansion Board in the
Inside Slot......................................................... 3-12
Removing an Expansion Board............................ 3-14
Contents iii

Removing an Expansion Board
from the Inside Slot ........................................... 3-15
SIMM Upgrade........................................................ 3-17
Checking System Memory ................................... 3-18
Removing a SIMM.............................................. 3-20
Installing a SIMM............................................... 3-21
Video Upgrade ......................................................... 3-22
Processor Upgrade ................................................... 3-24
Removing the Processor ...................................... 3-24
Installing the Processor........................................ 3-25
Secondary Cache Upgrade........................................ 3-26
Data Storage Devices ............................................... 3-28
Locating Device Slots.......................................... 3-28
Preparing the Device ........................................... 3-29
Device Cables ..................................................... 3-30
Diskette Drive Signal Cable............................ 3-32
IDE Signal Cables.......................................... 3-33
System Power Cables ..................................... 3-34
Cabling Storage Devices...................................... 3-34
Cabling an IDE Device................................... 3-35
Cabling a Diskette Drive ................................ 3-36
Installing Storage Devices ................................... 3-37
Removing the 3 1/2-Inch Drive
Bracket ........................................................ 3-37
Installing the 3 1/2-Inch Drive ........................ 3-39
Removing the Front Panel............................... 3-40
Installing the 5 1/4-Inch Device ...................... 3-41
Replacing the Front Panel............................... 3-44
Replacing the 3 1/2-Inch Drive
Bracket ........................................................ 3-45
Adding External Options .......................................... 3-46
Connecting a Parallel Printer ............................... 3-46
Connecting an RS232C Device............................ 3-47
iv Contents

4 Setting System Parameters
The Setup Utility...................................................... 4-2
How to Start Setup................................................... 4-3
How to Use Setup .................................................... 4-4
The Menu Bar..................................................... 4-5
The Legend Bar................................................... 4-6
Selecting a Menu Item .................................... 4-7
Displaying a Submenu.................................... 4-7
Getting Help................................................... 4-7
Main Menu Options ................................................. 4-7
IDE Adapters...................................................... 4-9
Memory Cache.................................................... 4-11
Memory Shadow ................................................. 4-12
Boot Options....................................................... 4-12
NumLock............................................................ 4-13
The Advanced Menu ................................................ 4-14
Integrated Peripherals Menu ................................ 4-15
The Security Menu................................................... 4-17
The Power Menu...................................................... 4-20
The Exit Menu ......................................................... 4-22
Save Changes & Exit .......................................... 4-22
Discard Changes & Exit...................................... 4-23
Get Default Values.............................................. 4-23
Load Previous Values.......................................... 4-23
Save Changes...................................................... 4-24
5 Setting System Board Jumpers
Changing Processor Jumper Settings......................... 5-2
Setting the Cache Jumper ......................................... 5-5
Clearing Your Password........................................... 5-6
6 Using Voyetra Sound Software
AudioStation............................................................ 6-2
Power Bar........................................................... 6-2
Mixer Module ..................................................... 6-4
CD Module ......................................................... 6-4
Contents v

Digital Audio Transport (DAT) Module .............. 6-5
MIDI Module...................................................... 6-5
MIDI Orchestrator ................................................... 6-6
Playing a MIDI Song File.................................... 6-7
Editing a MIDI Song File .................................... 6-7
WinDAT.................................................................. 6-9
Recording .WAV Files ........................................ 6-9
Loading and Playing .WAV Files......................... 6-10
Editing .WAV Files............................................. 6-11
7 24-Hour Information Services
NEC's Fastfacts Service ........................................... 7-2
NEC Bulletin Board Service..................................... 7-4
America Online Service ............................................ 7-6
CompuServe Online Service ..................................... 7-7
AT & T Interchange................................................. 7-8
E-Mail/Fax Technical Support Service ..................... 7-9
Internet .................................................................... 7-10
NEC Technical Support Services.............................. 7-11
8 If You Have a Problem
Problem Checklist .................................................... 8-2
Solutions to Common Problems ................................ 8-3
System Problems................................................. 8-3
Diskette Drive Problems...................................... 8-5
Monitor Problems................................................ 8-6
Keyboard/Mouse Problems.................................. 8-7
CD-ROM Problems............................................. 8-7
Speaker Problems................................................ 8-8
Microphone Problems.......................................... 8-8
Replacing the CMOS Battery ................................... 8-9
Diagnostic Diskette .................................................. 8-12
Getting Help............................................................. 8-13
Getting Help from Your Company....................... 8-13
Getting Help from Your NEC Dealer................... 8-13
vi Contents

Getting Help from NEC's Technical Support
Center............................................................... 8-14
NEC Warranty/Non-Warranty Repair Service ..... 8-14
A Setting Up a Healthy Work Environment
Making Your Computer Work for You ..................... A-1
Arrange Your Equipment.......................................... A-3
Adjust Your Chair.................................................... A-4
Adjust Your Input Devices ....................................... A-6
Adjust Your Monitor................................................ A-8
Vary Your Workday................................................. A-10
Pre-Existing Conditions and Psychosocial Factors..... A-11
Checking Your Comfort: How Do You Measure Up? A-12
Checking Your Chair........................................... A-12
Checking Your Keyboard .................................... A-12
Checking Your Mouse......................................... A-12
Checking Your Monitor....................................... A-12
Checking You ..................................................... A-13
B Reviewing System Interrupts
Interrupt Controller .................................................. B-1
Index
List of Tables
Quick Reference to Information About Your
Computer............................................................... 2-5
Setup Key Functions ................................................ 4-6
Main Menu Parameters ............................................ 4-8
IDE Hard Disk Parameters....................................... 4-11
Memory Cache Parameters....................................... 4-12
Boot Parameters....................................................... 4-13
Keyboard Parameters ............................................... 4-14
Advanced Menu Parameters ..................................... 4-15
Contents vii

Integrated Peripherals Parameters............................. 4-16
System Security Options........................................... 4-19
Power Management Parameters ................................ 4-21
Interrupt Level Assignments ..................................... B-1
viii Contents

Using This Guide
The PowerMate Ve Series User's Guide provides a quick
reference to information about your computer.
The guide contains the following information:
■ Chapter 1, Taking a Look at Your System, provides a
look at system components. See this chapter to
familiarize yourself with your system.
■ Chapter 2, Getting Started, gives you information about
using a mouse, using online documentation, and what
you should do after your system is up and running.
The chapter includes a quick-reference chart for finding
information about a variety topics.
■ Chapter 3, Installing Options, provides installation
procedures for internal and external options.
■ Chapter 4, Setting System Parameters, describes the
Setup utility and explains how to use it to configure your
system.
■ Chapter 5, Setting System Board Jumpers, provides
information on changing jumper settings when
reconfiguring your system.
■ Chapter 6, Using Voyetra Sound Software, explains how
to use Voyetra’s Multimedia Sound Software to play
music CDs, record, play and edit audio files, and play
and edit MIDI files.
■ Chapter 7, 24-Hour Information Services, lists the
services available to you for information and help and
describes how to access the services.
Using This Guide ix
■ Chapter 8, If You Have a Problem, contains
troubleshooting tips for solving simple problems and
provides information on where you can find help when
you cannot solve a problem yourself.
■ Appendix A, Setting Up a Healthy Work Environment,
contains guidelines to help you use your computer
productively and safely. This appendix also instructs
you on how to set up and use your computer to reduce
your risk of developing nerve, muscle, or tendon
disorders.
■ Appendix B, Reviewing System Interrupts, provides a
list of interrupt settings.
!
Prolonged or improper use of a computer
workstation may pose a risk of serious injury. To
reduce your risk of injury, set up and use your
computer in the manner described in Appendix A,
Setting Up a Healthy Work Environment.
WARNING
TEXT CONVENTIONS
This guide uses the following text conventions.
■ Warnings, cautions, and notes have the following
meanings:
Warnings alert you to situations that could result in
serious personal injury or loss of life.
x Using This Guide
!
WARNING

Cautions indicate situations that can damage the
hardware or software.
NOTE
Notes give important information about the
material being described.
■ Names of keyboard keys are printed as they appear on
the keyboard, for example,
■ Text or keystrokes that you enter appear in boldface
type. For example, type
■ File names are printed in uppercase letters.
RELATED DOCUMENTS
In addition to this guide, the following printed
documentation ships with your PowerMate
system.
!
CAUTION
Ctrl, Alt, or Enter.
return and press Enter.
®
Ve Series
■ NEC PowerMate Ve Series Quick Setup/
Quick-Reference Roadmap
Quick Setup contains information for quickly getting
your system up and running. Read this information to set
up the system for the first time.
The Quick-Reference Roadmap gives you a look at the
documentation, NEC tools, software applications, and
services available to you.
Using This Guide xi

■ How Does Your Workplace Measure Up?
This brochure provides information for setting up and
using your computer productively and safely.
Information includes guidelines to reduce the risk of
injury associated with using a computer.
■ Windows 95 User’s Guide
This guide is a quick reference to information about
using Windows 95.
The following printed documents are available by filling out
a fulfillment coupon (included in the system carton) and
mailing it to the address provided.
■ MS-DOS Quick-Start Guide
Use with MS-DOS/Windows for WorkGroups
systems. Provides information for using MS-DOS.
■ Windows Quick-Start Guide
Use with MS-DOS/Windows for WorkGroups systems.
Provides information for using Windows for
WorkGroups™.
xii Using This Guide

Your system comes with the following online documentation
on the hard disk:
■ PowerMate Ve Series System Documentation
This online documentation is your comprehensive source
of information about your system. It contains a System
Tour, User’s Guide, Product Information Center, Option
Installation Center, and Support Center.
■ Ergonomics
This is an online version of the “How Does Your
Workplace Measure Up?” brochure.
■ Using Windows 95
Comes with Windows 95 systems. Contains information
for using Windows 95.
Most of your application programs provide extensive online
help. Some programs provide separate online user’s guides
for specific applications.
Windows 95 provides extensive online help and “wizards”
to guide you through procedures.
Using This Guide xiii

In addition to the documentation that ships with the system,
the following documentation is available from NEC:
■ PowerMate Ve Series Service and Reference
Manual (part number 819-181406-000) which
provides information for maintaining, troubleshooting,
and repairing the PowerMate Ve Series system. This
guide also includes hardware and interface information
for programmers, engineers, and others who need to
know how the system is designed.
To purchase the service and reference manual, call NEC
at 1-800-233-6321.
■ NEC FastFacts
NEC FastFacts is an automated service that sends the
latest information about NEC and its products directly
to a fax machine. The service is available 24 hours a
day, 7 days a week.
With FastFacts, you can obtain product literature and
technical information bulletins. By using FastFacts, you
can be kept up-to-date on the latest technical information
for your system.
xiv Using This Guide
See “NEC’s FastFacts Service” in Chapter 7 for
information about using FastFacts.

Introducing Your
1
FRONT FEATURES
Computer
Prolonged or improper use of a computer
workstation may pose a risk or serious injury. To
reduce your risk of injury, set up and use your
computer in the manner described in Appendix A,
Setting Up a Healthy Work Environment.
After setting up your computer, familiarize yourself with
your system. The following sections provide a brief look at
the front and back features of your system.
For a comprehensive source of information about your
computer, see the online NEC PowerMate Ve Series System
Documentation in the Windows
The following figure shows the features on the front of the
system. A brief description of the features follows the
figure.
!
WARNING
®
NEC Information group.
Introducing Your Computer 1-1
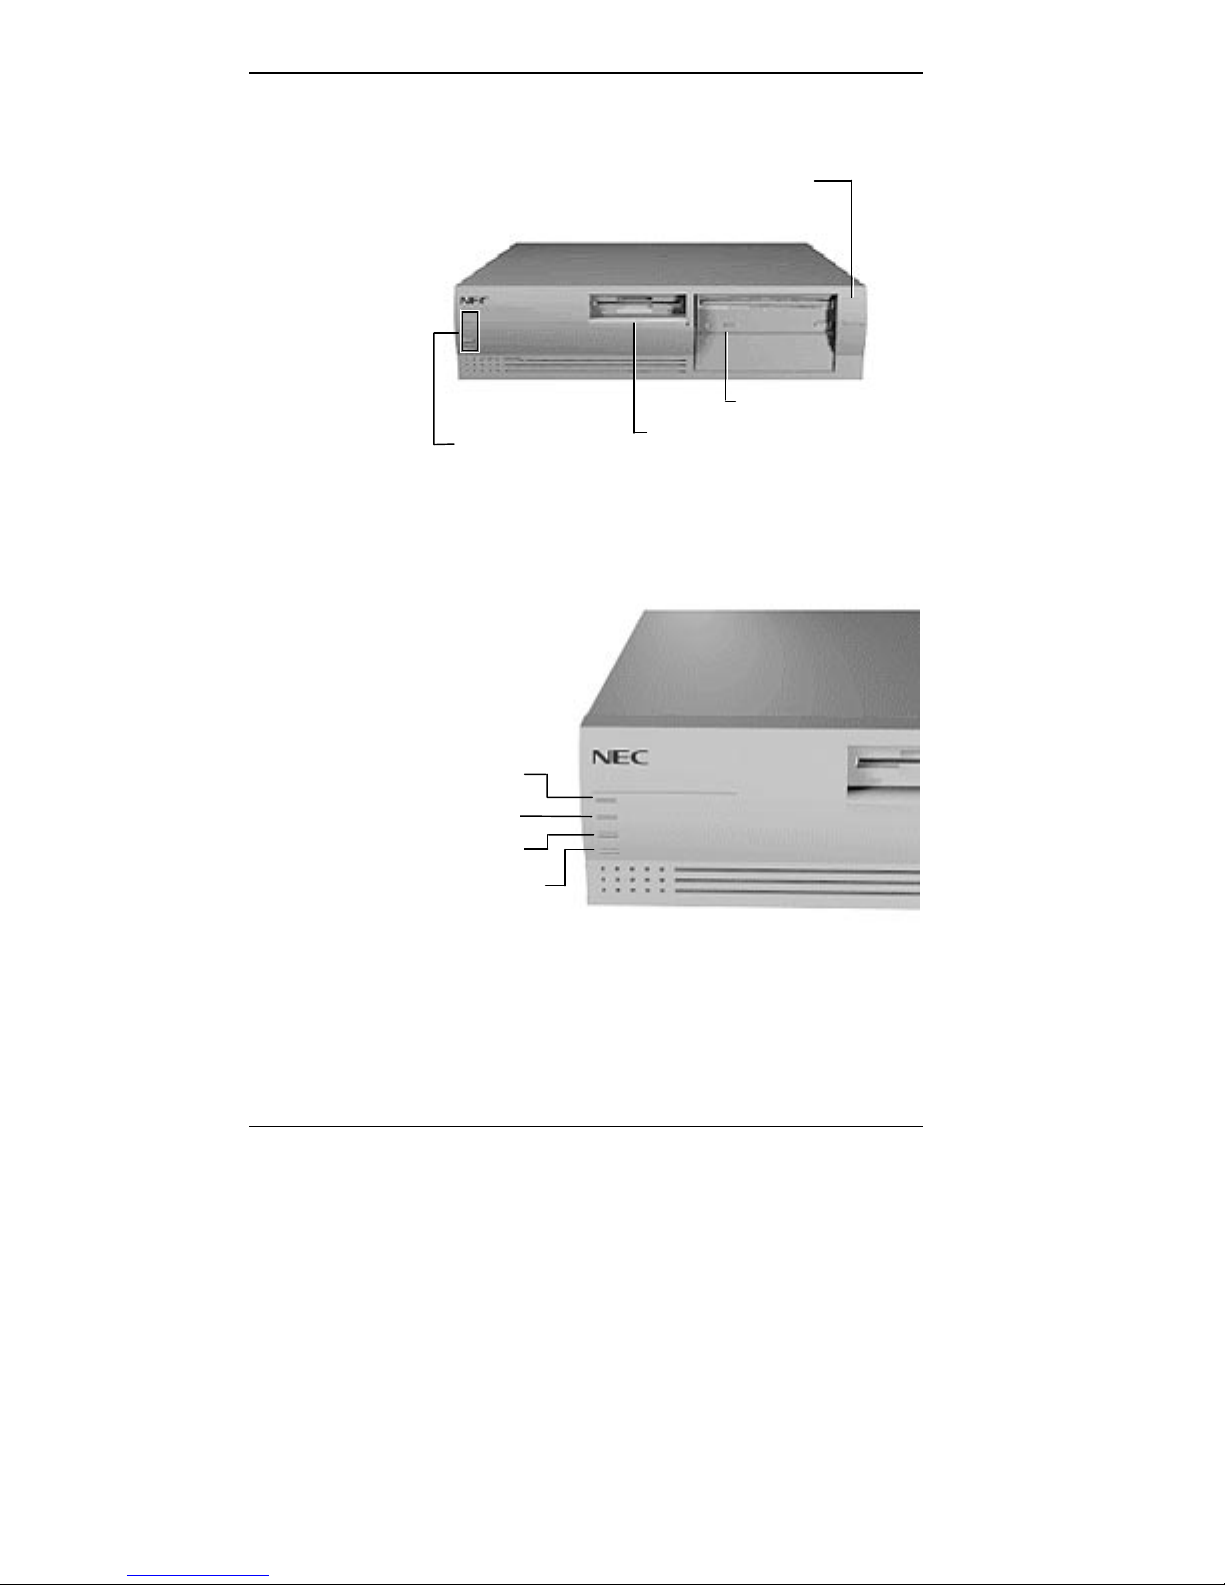
Power Button
CD-ROM Reader
System Controls
and Lamps
Diskette Drive A
Front features
Power Lamp
Disk Lamp
Reset Button
Suspend Button
1-2 Introducing Your Computer
System controls and lamps

System Controls and Lamps
System controls let you select specific system operations.
Lamps let you know the status of system operation. Your
computer has the following controls and lamps:
■ Power button
Press this button to turn on system power. Press it again
to turn off the power.
■ Suspend button
Lets you initiate a power-saving mode of operating your
computer. Press this button to suspend system operation
when you plan to be away from your computer for a
short time. Press any key or move your mouse to resume
system operation to where you stopped it.
A blinking system unit power lamp lets you know that
the system is in a power-saving mode.
■ Reset button
The reset button lets you manually restart your system
when it does not respond to keyboard commands.
!
Resetting your system can result in the loss o f data.
Press the reset button only when all other methods
of restarting your computer fails.
■ Power lamp
The power lamp indicates whether system power is on or
off. It also lets you know if the system is operating in a
power-saving mode.
CAUTION
Introducing Your Computer 1-3
■ Disk lamp
Do not turn off the system, unless absolutely
necessary, while the disk lamp is lit. To do so can
damage your hard disk or data.
Diskette Drive A
Diskette drive A loads and starts programs from a diskette.
Diskette drive A is your primary “bootable” drive.
A steady green lamp indicates that the power is on to all
system components. A blinking green lamp indicates that
the system is in Suspend mode with full power
reduction.
Indicates if your hard disk is doing anything. A green
lamp tells you that the hard disk is reading or writing
data.
!
CAUTION
1-4 Introducing Your Computer
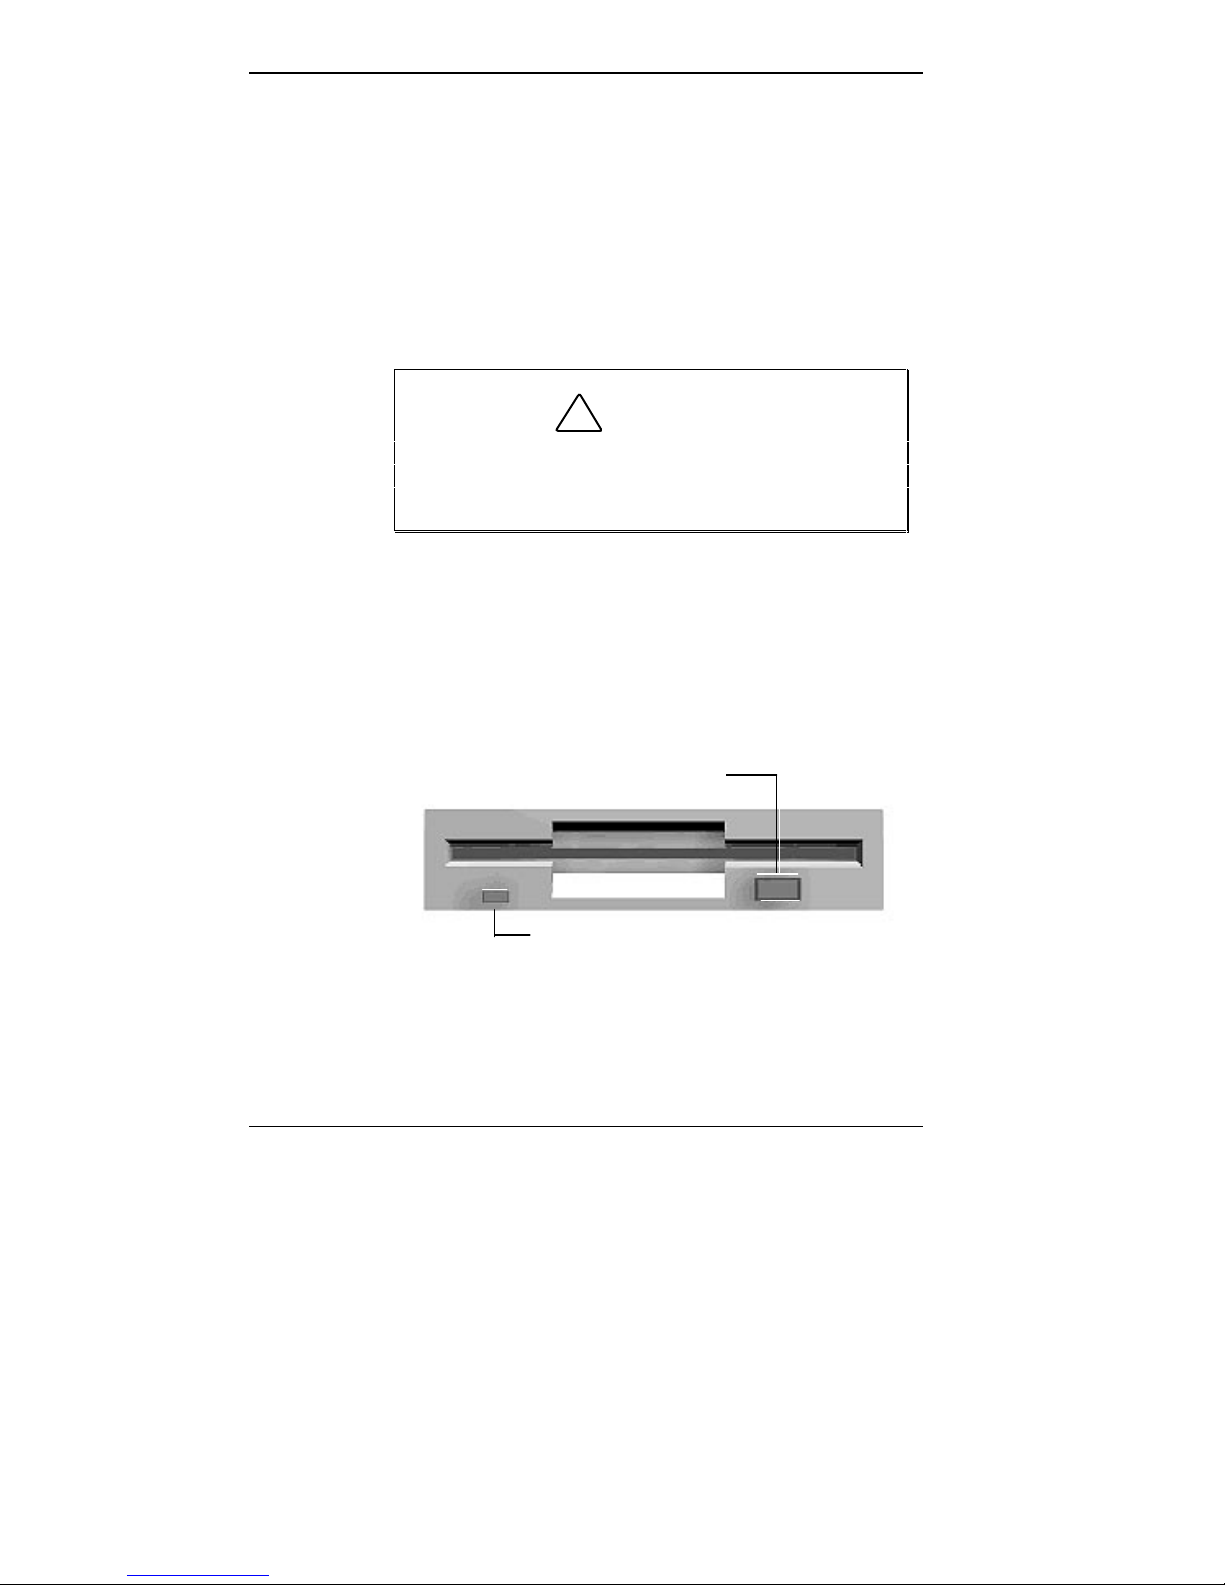
Diskette Release Button
Diskette Drive
Busy Lamp
Diskette drive A features

Your diskette drive has the following features:
■ Diskette drive busy lamp
To prevent damage to your diskette drive and data,
do not turn off the system or remove a diskette
while the diskette drive busy lamp is lit.
■ Diskette release button
CD-ROM Reader
A quad-speed CD-ROM reader is a standard feature in
multimedia models. The CD-ROM reader is assigned as
drive E.
Lights when your diskette drive is reading to or writing
from a diskette.
!
Press this button to release a diskette from the diskette
drive.
CAUTION
Use the CD-ROM reader to load and start programs from a
compact disc (CD). You can also use the CD-ROM reader
to play your audio CDs. The CD-ROM reader is fully
compatible with Kodak Multisession Photo CDs and
standard audio CDs.
The CD-ROM reader operates at different speeds depending
on whether the CD you are using contains data or music.
This allows you to get your data faster and to see smoother
animation and video.
Introducing Your Computer 1-5
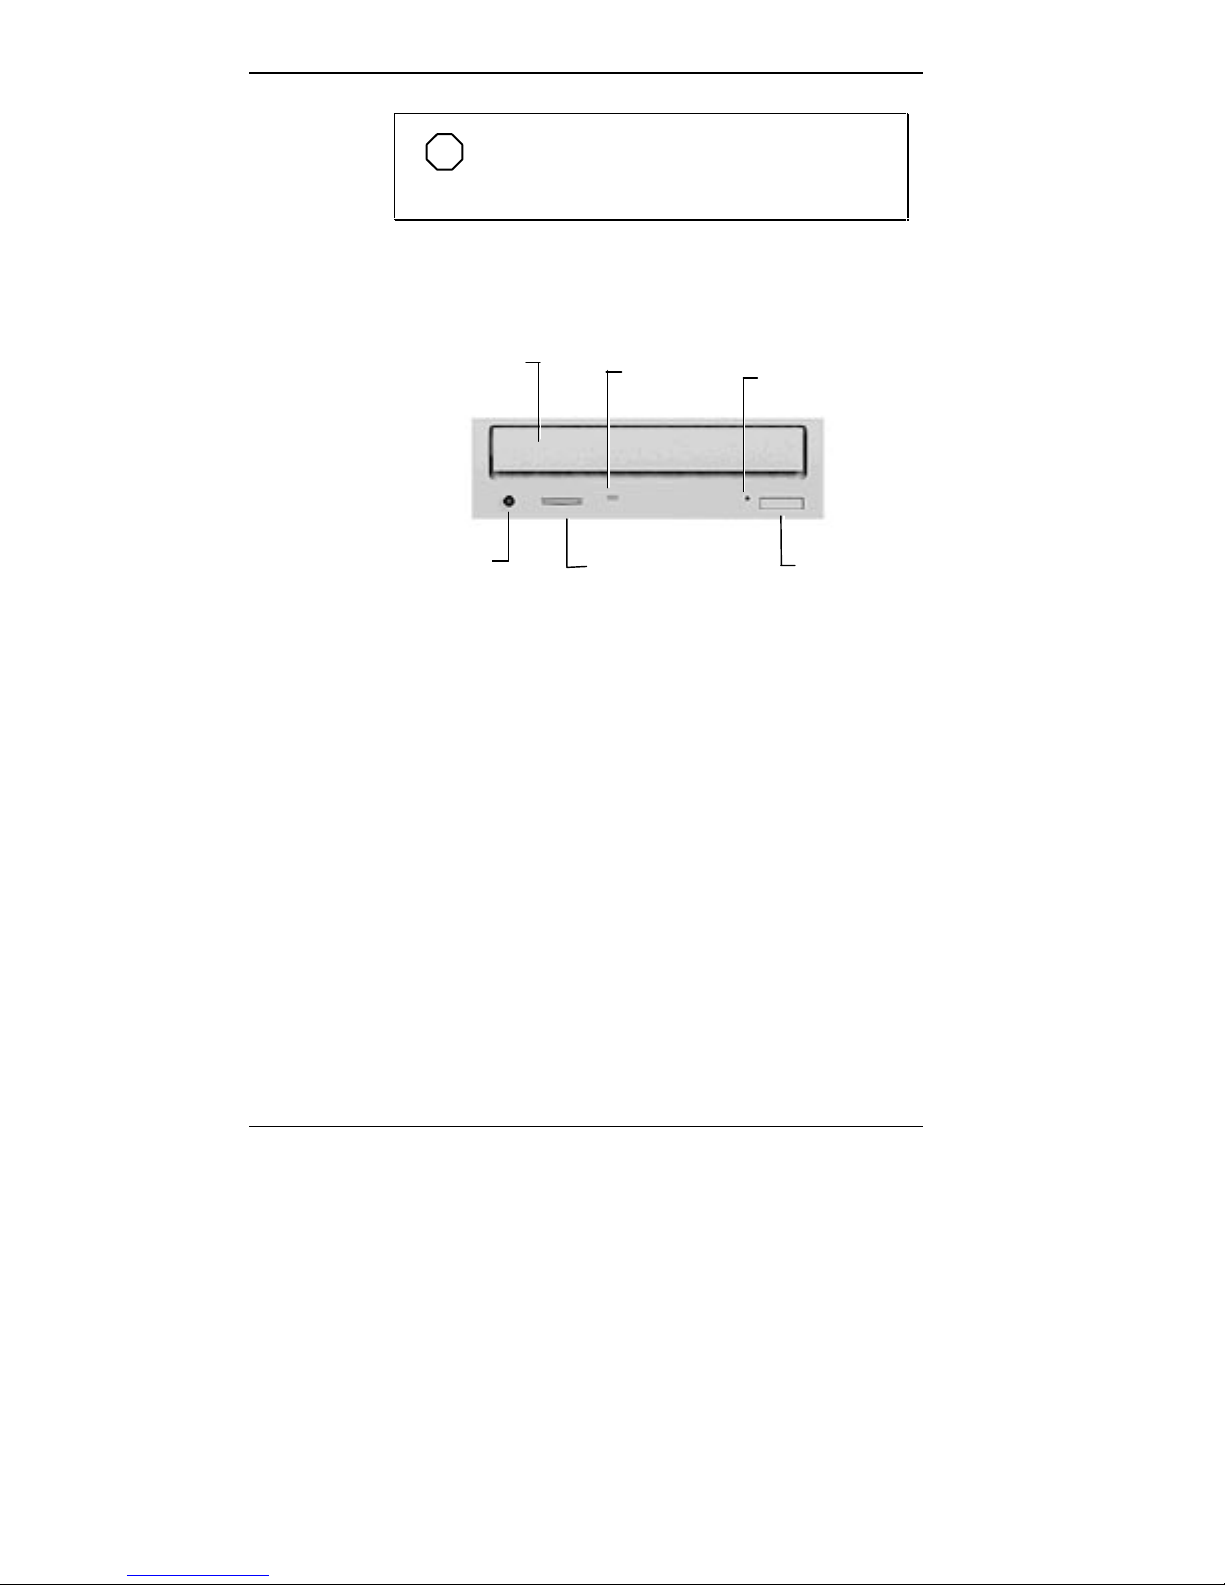
NOTE
The CD-ROM reader in your system might
look different from the one shown here.
CD Tray
Headphone
Jack
CD Busy
Lamp
Volume
Control Knob
Emergency
Eject Hole
Open/Close
Button
CD-ROM reader features
The CD-ROM reader has the following features:
■ Headphone jack
Allows the connection of an optional set of headphones
with a stereo mini-jack plug.
■ Volume control knob
Lets you adjust the volume of an optional set of
headphones.
1-6 Introducing Your Computer

■ Open/close button
Opens or closes the reader’s loading tray. Press this
button when the computer power is on to insert or
remove a CD into or out of the reader.
■ Emergency eject hole
Allows the manual ejection of a CD if the eject function
is disabled by software or if a power failure occurs.
■ CD busy lamp
Lights when the reader is retrieving data, music, or
graphics/audio from a CD. Do not eject the CD or turn
off the system unit when the lamp is on.
■ CD tray
Provides a surface for loading a CD into the reader.
Press the open/close button to open or close the CD tray.
Introducing Your Computer 1-7
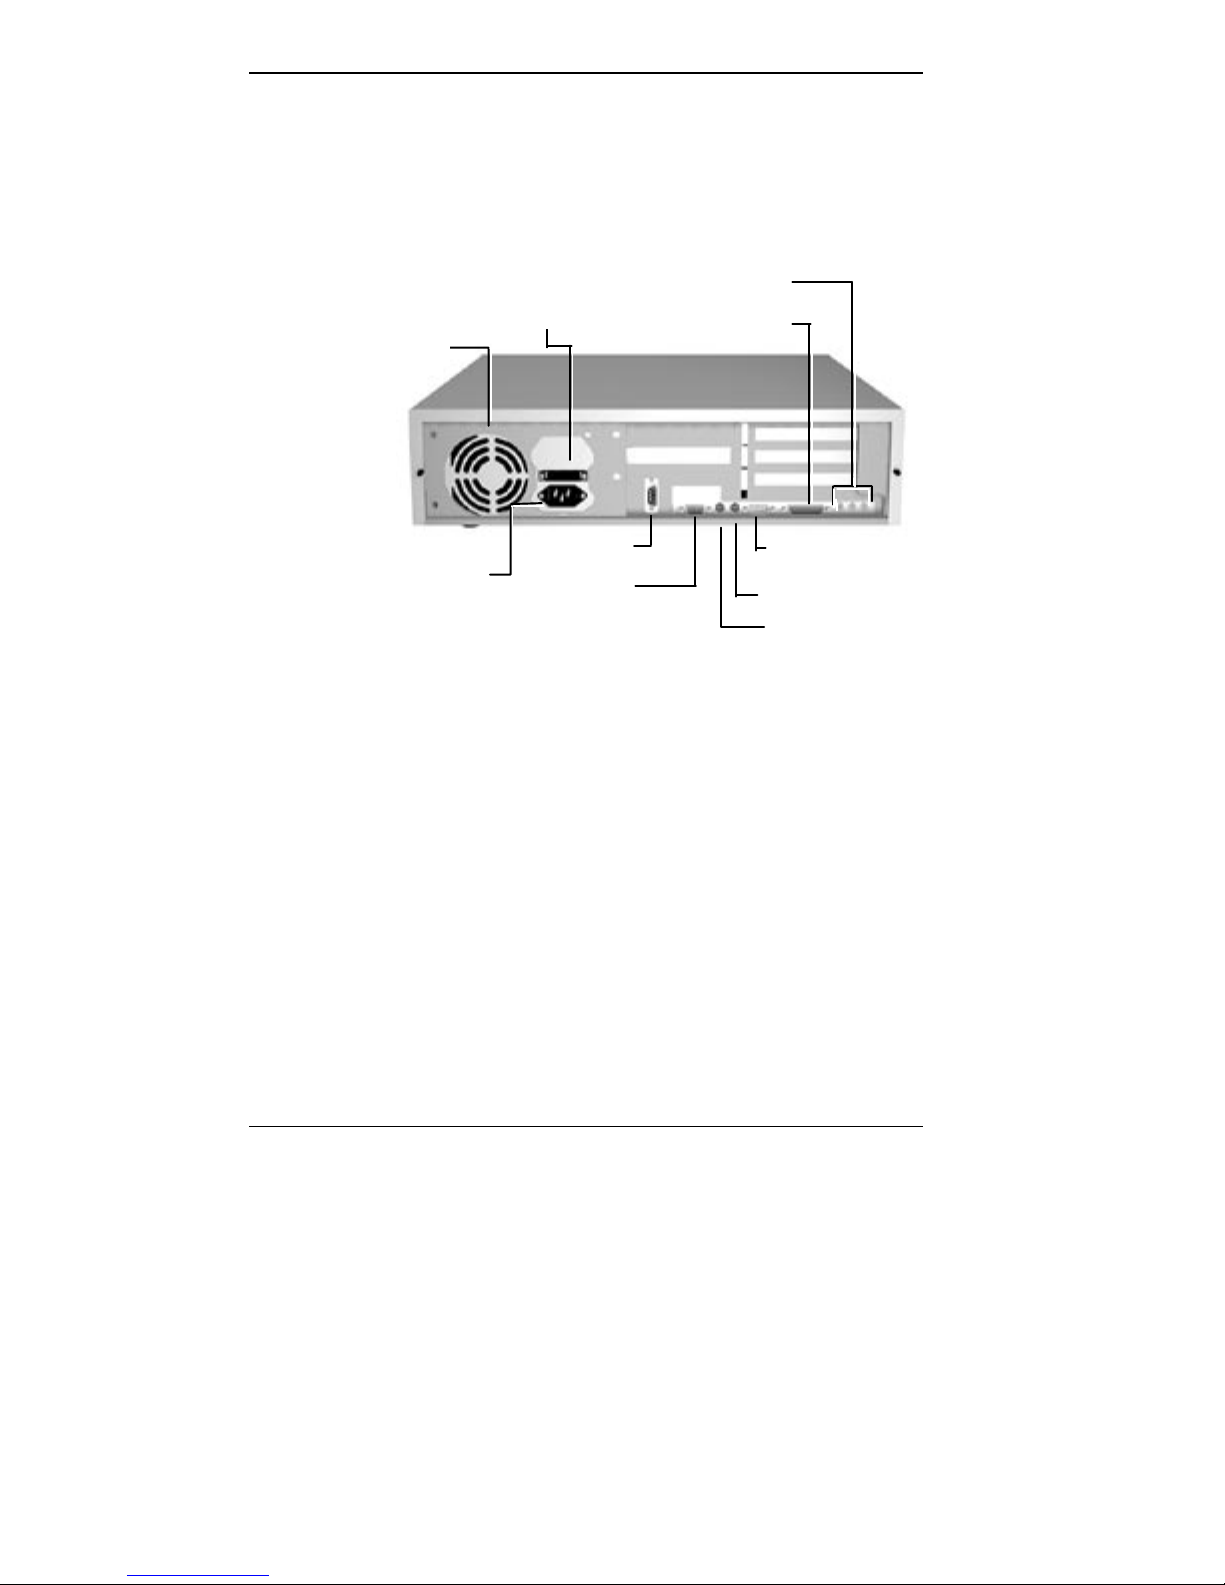
BACK FEATURES
On the back of your computer, you’ll find external
connectors, power supply features, and expansion board
slots. The following figures show these features.
Fan
Voltage Selector
Switch
*Audio
Connectors
Printer Port
Power
Socket
*Multimedia systems only
Serial Port 2
VGA Monitor
Connector
Serial Port 1
Mouse Port
Keyboard Port
Rear features
1-8 Introducing Your Computer
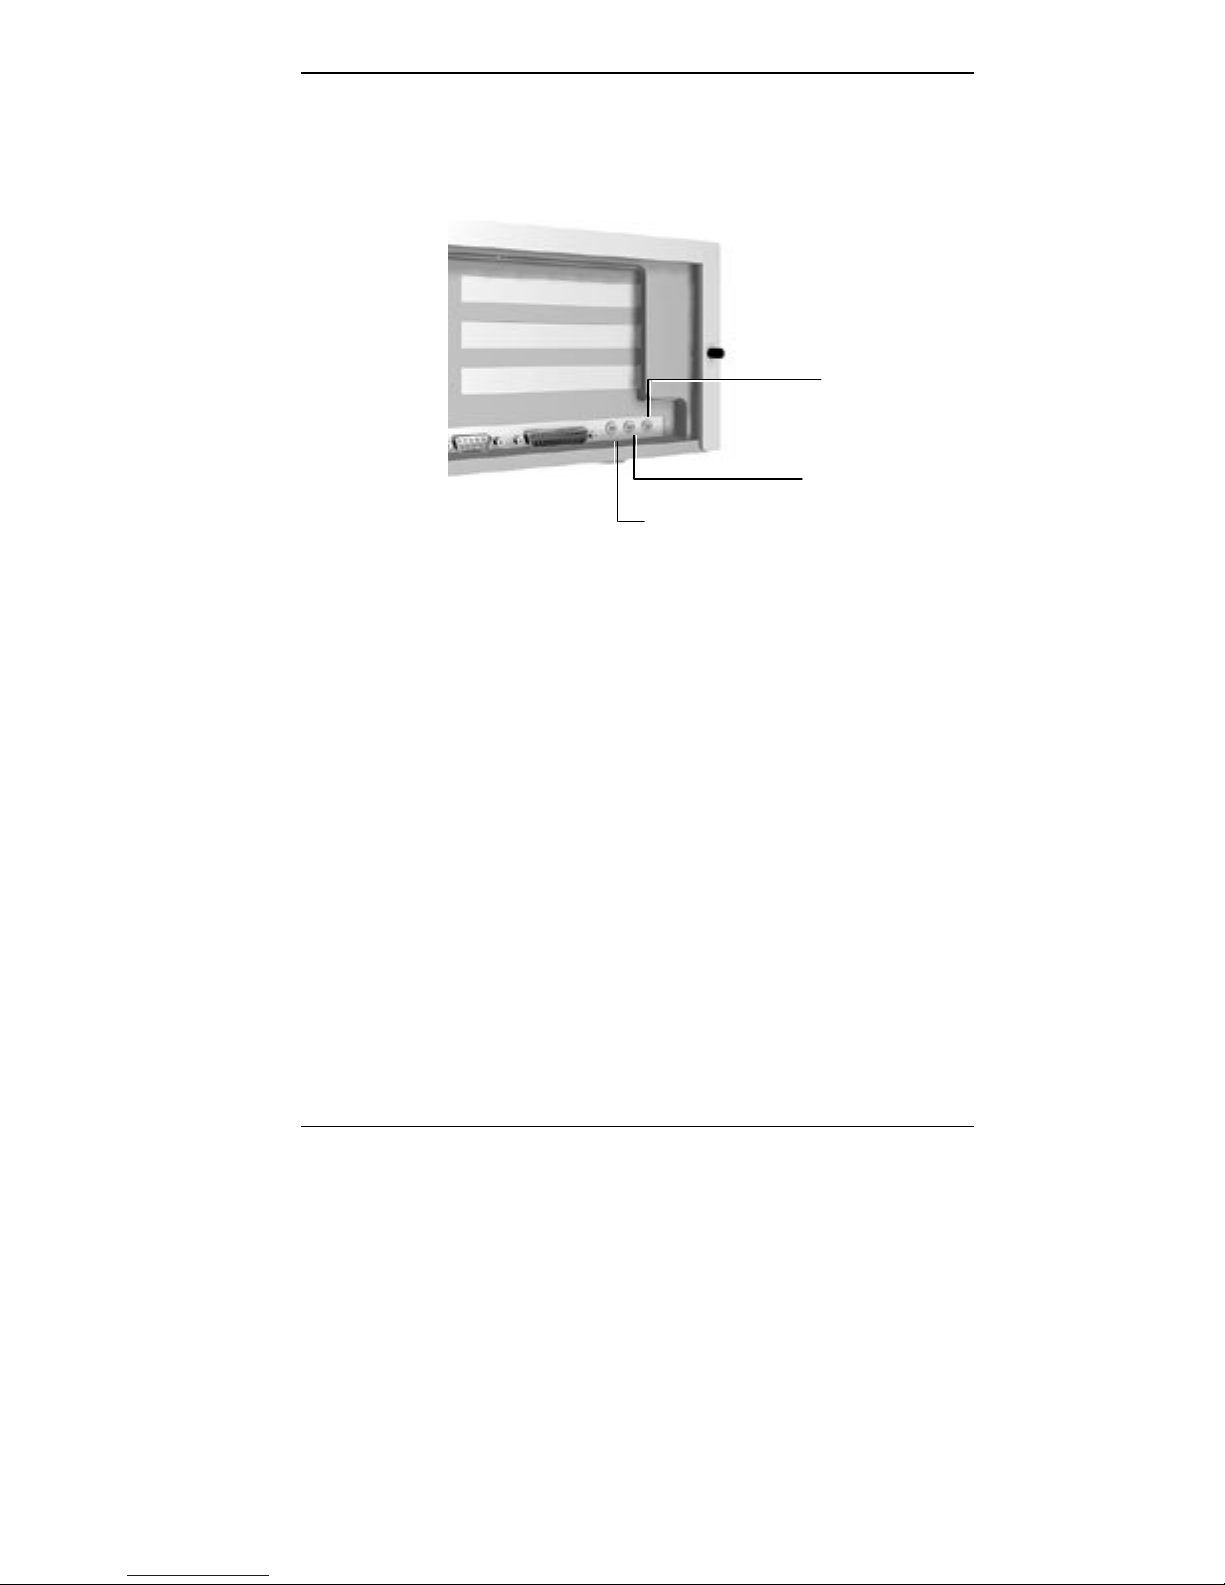
The following figure identifies the audio connectors called
out in the previous figure.
Line Out
Jack
Microphone In
Jack
Line In Jack
Audio connectors
Introducing Your Computer 1-9

External Connectors
External connectors let you attach peripheral devices, such
as a monitor, keyboard, mouse, and printer to your system.
Your system has the following external connectors:
■ VGA monitor connector
Attach the signal cable from your monitor to this
connector. Supports an NEC MultiSync
other video graphics array (VGA)-compatible monitor
with a 15-pin connector.
■ Audio connectors
These connectors come integrated on multimedia models.
The connectors include microphone in, line in, and line
out jacks.
The microphone in jack lets you connect a
microphone for recording audio information in your
data system files.
The line in jack lets you connect a stereo audio
device such as a stereo amplifier or a cassette or
minidisc player for playback or recording.
®
monitor or
The line out jack allows you to connect an amplified
output device such as powered speakers, stereo tape
recorder, or an external amplifier for audio output.
Use this jack to connect the stereo speakers that
come with your system.
■ Printer Port
Use this port to connect a parallel printer with a 25-pin
connector to the system.
■ Serial Ports
Attach a serial device with a 9-pin connector to each
serial port. Serial devices include a pointing device,
serial printer, or modem.
1-10 Introducing Your Computer

■ Keyboard port
Attach the keyboard that comes with your computer to
this connector.
The keyboard port supports a personal system (PS)/2®compatible, 104-key keyboard (in the U.S. and Canada)
or a 102-key keyboard (in the United Kingdom and
Germany) with a 6-pin mini DIN connector.
■ Mouse port
Attach the mouse that comes with your computer to this
port. The mouse port supports a PS/2-compatible
mouse.
Power Supply Features
Your system has the following power supply features:
■ Power supply fan
Keep this area clear for proper ventilation. The power
supply fan cools system components and prevents them
from overheating.
■ Voltage selector switch
Sets the voltage for your system to 115 volts or
230 volts.
!
Set the switch correctly for the voltage in your area.
Most wall outlets in the United States and Canada
are 115 volts. Outlets in Europe, Australia, and Asia
(except Taiwan) are 230 volts. Taiwan uses 115-volt
outlets.
■ Power socket
CAUTION
Connect your power cable to this socket.
Introducing Your Computer 1-11
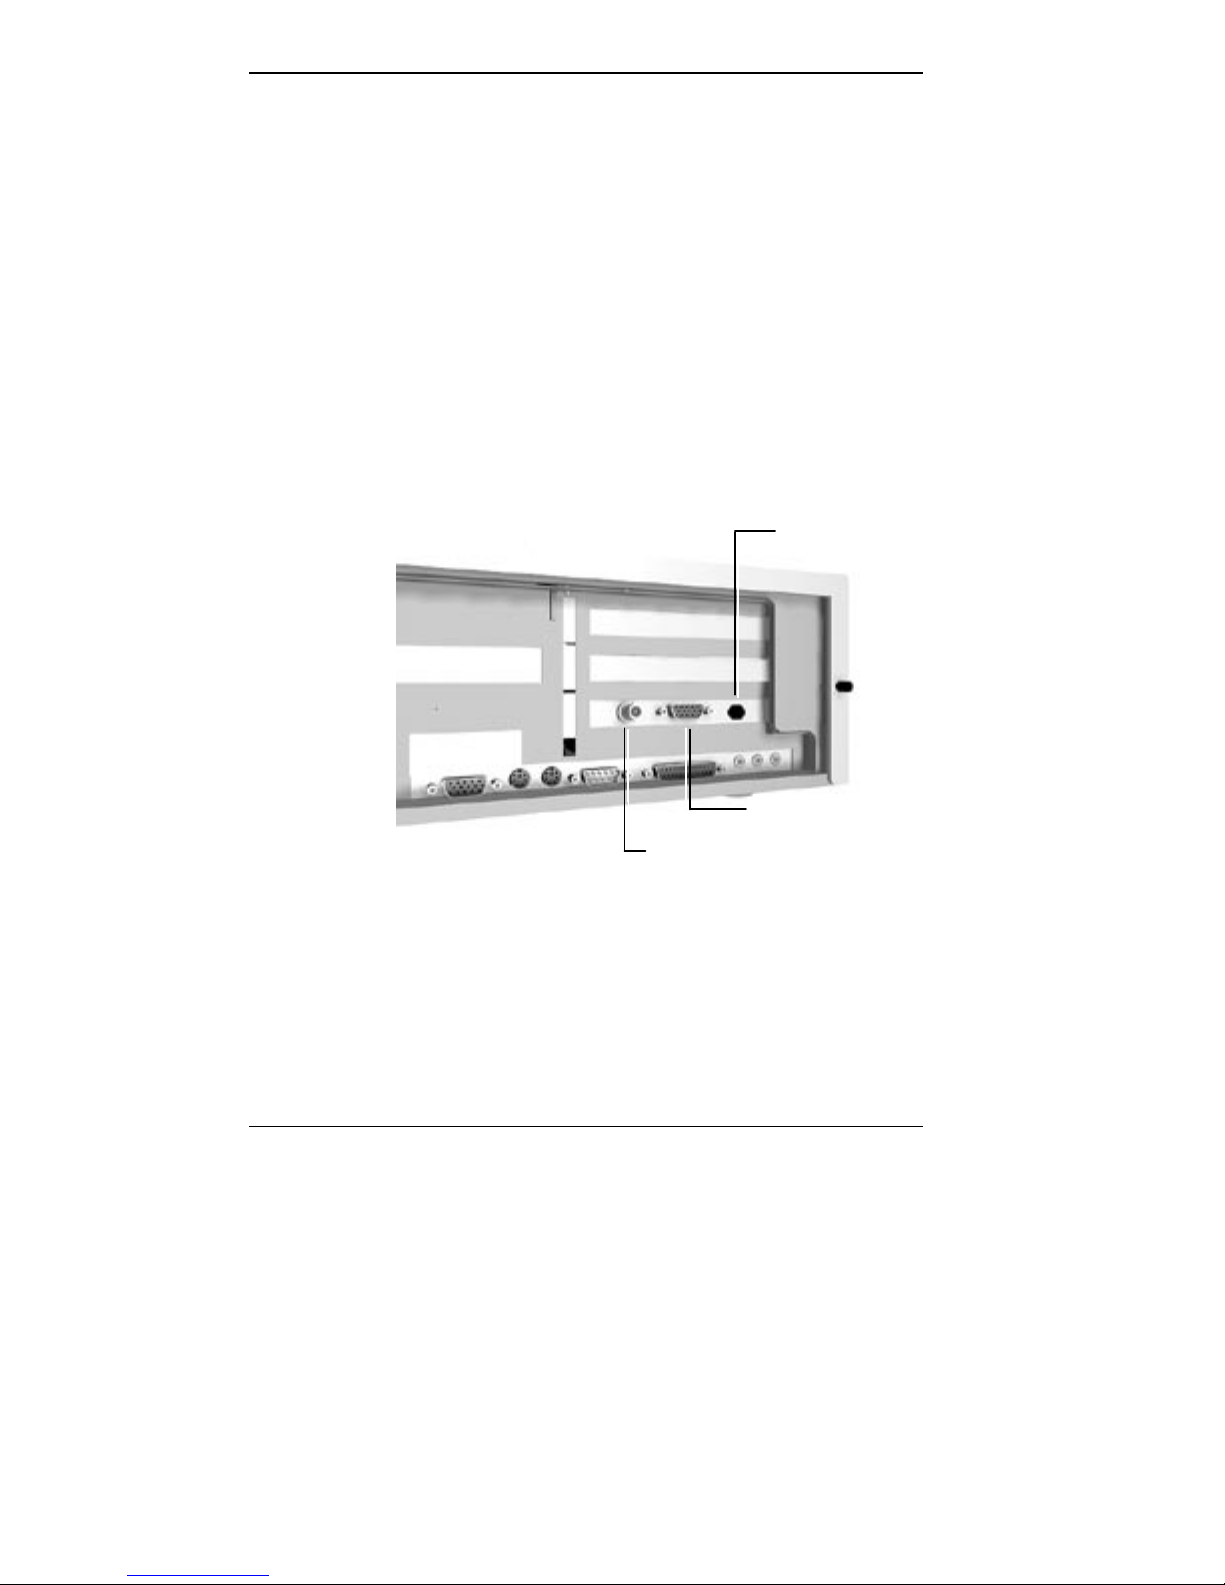
Network Interface Board
Network-ready models come with an Ethernet network
interface board. The board allows you to connect the system
to an Ethernet network and communicate with other
computers. The network interface board, also referred to as
a network interface card (NIC), provides three connectors
for coaxial and twisted-pair network cabling:
■ BNC — supports thin coaxial cables.
■ AUI connector — supports thick coaxial cables.
■ RJ-45 connector — supports twisted-pair 10BASE-T
cables.
RJ-45
Connector
If you have a network-ready model, see “Network Setup
Utility” in your online Product Information Center to set up
a network-ready system.
1-12 Introducing Your Computer
AUI Connector
BNC Connector
Network interface board connectors

SPEAKERS
Multimedia models come with a pair of high-quality, 5-watt
stereo speakers that you can arrange to suit your work
environment.
An AC adapter comes with the system. Set up the speakers
with the AC adapter. The speakers connect to the line out
jack on the back of the system unit.
Volume ControlPower Button
Power Lamp
5-watt speaker
The speaker set features a power button, power lamp, and
volume knob.
Adjust the speaker volume by using the volume control on
the top of the right speaker or by using the preinstalled
sound system software. Use the sound software to balance
the speakers.
Introducing Your Computer 1-13

The sound software is Voyetra Multimedia Sound Software.
See Chapter 6 for information on using the Multimedia
Sound Software.
MICROPHONE
The microphone allows you to record voice and sound into
your computer data files. See Chapter 6 for information on
recording sound using the Multimedia Sound Software.
1-14 Introducing Your Computer
Microphone

2
USING A MOUSE
Getting Started
This chapter provides the information you need to start
using your system. Information includes:
■ Using a Mouse
If you are already familiar with using a mouse, skip this
section.
■ About Your Online Documentation
Read this section for an explanation of the online
document format and where to access it on your
computer.
■ Where to Go from Here
Look at this section for a quick reference to what you
can do and where you can get information.
Use the mouse to quickly move around on the screen, to
select menu items, and to choose functions specific to your
software.
Use the mouse to
■ Click
Clicking selects an object on your screen. To “click,”
point to the object and press and release the left mouse
button.
■ Double click
Some actions require a double click to execute them. To
“double click” an object, point to the object and press
and release the left mouse button twice.
Getting Started 2-1

■ Press
Pressing the mouse button holds an action until you
release the mouse button.
■ Drag
Dragging the mouse attaches the pointer to an object on
the screen and allows you to highlight text or move an
object. To drag an object, point to the object, press the
left mouse button, and move the mouse to the new
location.
Typical screen objects that you click or double click are
icons, buttons, and menu options.
NOTE
If your mouse pointer disappears, move your
mouse in wide circles to bring it back into the
screen.
For more information about your mouse, see your online
User’s Guide and your application documentation. Also
included in the online documentation is information on
cleaning your mouse.
ABOUT YOUR ONLINE DOCUMENTATION
Besides this printed user’s guide, your system comes with
online documentation conveniently available right from
Windows.
To access the online system documentation, locate the NEC
Information group in Windows. Click the NEC PowerMate
Online Documentation icon. A welcome screen appears with
the information you need to use the online documentation.
2-2 Getting Started

The NEC PowerMate Ve Series System Documentation is a
comprehensive source of information about your system. To
help you find the information you need, the documentation
is organized by topic and the following modules:
■ System Tour
■ User’s Guide
■ Product Information Center
■ Option Installation Center
■ Support Center.
NOTE
Run the online NEC PowerMate Ve Series
System Documentation at the shipping default video
resolution — 800 by 600 with 256 colors with small
fonts.
Other online documents include:
■ Ergonomics
■ Using Windows 95.
Most of your application programs provide extensive online
help at the touch of a button (usually the Help button).
Some programs provide separate online user’s guides for
specific applications.
Windows 95 provides extensive online help and “wizards”
to guide you through procedures.
Getting Started 2-3
 Loading...