

Page 1

Empowered by Innovation
http://ws1.necii.com (registration is required)
Conference Bridge
User Guide
P/N 0893416
Rev 1, September 2006
Printed in U.S.A.
5.99
Technical Support Web Site:
Page 2

This manual has been developed by NEC Unified Solutions, Inc. It is intended for the use of its customers and
service personnel, and should be read in its entirety before attempting to install or program the system. Any
comments or suggestions for improving this manual would be appreciated. Forward your remarks to:
NEC Unified Solutions, Inc.
4 Forest Parkway
Shelton, CT 06484
necunifiedsolutions.com
Nothing contained in this manual shall be deemed to be, and this manual does not constitute, a warranty of, or
representation with respect to, any of the equipment covered. This manual is subject to change without notice and
NEC Unified Solutions, Inc. has no obligation to provide any updates or corrections to this manual. Further, NEC
Unified Solutions, Inc. also reserves the right, without prior notice, to make changes in equipment design or
components as it deems appropriate. No representation is made that this manual is complete or accurate in all
respects and NEC Unified Solutions, Inc. shall not be liable for any errors or omissions. In no event shall NEC Unified
Solutions, Inc. be liable for any incidental or consequential damages in connection with the use of this manual. This
document contains proprietary information that is protected by copyright. All rights are reserved. No part of this
document may be photocopied or reproduced without prior written consent of NEC Unified Solutions, Inc.
©2006 by NEC Unified Solutions, Inc. All Rights Reserved.
Printed in U.S.A.
Microsoft and Windows are registered trademarks of Microsoft Corporation.
Page 3

◆
Table of Contents
Introduction . . . . . . . . . . . . . . . . . . . . . . . . . . . . . . . . . . . . . . . . . . . . . . . . . . . . . . . . . . . . .1
Chapter 1 . . . . . . . . . . . . . . . . . . . . . . . . . . . . . . . . . . . . . . . . . . . . . . . . . . . . . . . 3
Accessing the Aspire Conference Bridge . . . . . . . . . . . . . . . . . . . . . . . . . . . . . . . . . . . . . 3
LOGGING INTO ASPIRE CONFERENCE BRIDGE PCB . . . . . . . . . . . . . . . . . . . . . . . . . . . . . . . . . . . 3
Access Levels 4
MAIN PAGE . . . . . . . . . . . . . . . . . . . . . . . . . . . . . . . . . . . . . . . . . . . . . . . . . . . . . . . . . . . . . . . . . . . . . 5
Navigation Side Bar . . . . . . . . . . . . . . . . . . . . . . . . . . . . . . . . . . . . . . . . . . . . . . . . . . . 5
Status Window . . . . . . . . . . . . . . . . . . . . . . . . . . . . . . . . . . . . . . . . . . . . . . . . . . . . . . . 5
Operations Window . . . . . . . . . . . . . . . . . . . . . . . . . . . . . . . . . . . . . . . . . . . . . . . . . . . 5
Chapter 2 . . . . . . . . . . . . . . . . . . . . . . . . . . . . . . . . . . . . . . . . . . . . . . . . . . . . . . . 7
Administration Setup. . . . . . . . . . . . . . . . . . . . . . . . . . . . . . . . . . . . . . . . . . . . . . . . . . . . . .7
ADMINISTRATION . . . . . . . . . . . . . . . . . . . . . . . . . . . . . . . . . . . . . . . . . . . . . . . . . . . . . . . . . . . . . . . . 7
Edit Bridge Configuration . . . . . . . . . . . . . . . . . . . . . . . . . . . . . . . . . . . . . . . . . . . . . . 9
User Accounts . . . . . . . . . . . . . . . . . . . . . . . . . . . . . . . . . . . . . . . . . . . . . . . . . . . . . . 11
Add Account . . . . . . . . . . . . . . . . . . . . . . . . . . . . . . . . . . . . . . . . . . . . . . . . . . . . 12
Edit Account . . . . . . . . . . . . . . . . . . . . . . . . . . . . . . . . . . . . . . . . . . . . . . . . . . . . . 13
Delete Account . . . . . . . . . . . . . . . . . . . . . . . . . . . . . . . . . . . . . . . . . . . . . . . . . . . 14
Gain Configuration . . . . . . . . . . . . . . . . . . . . . . . . . . . . . . . . . . . . . . . . . . . . . . . . . . . 15
CONFIGURATION . . . . . . . . . . . . . . . . . . . . . . . . . . . . . . . . . . . . . . . . . . . . . . . . . . . . . . . . . . . . . . . . 16
Email Configuration . . . . . . . . . . . . . . . . . . . . . . . . . . . . . . . . . . . . . . . . . . . . . . . . . . 17
Chapter 3 . . . . . . . . . . . . . . . . . . . . . . . . . . . . . . . . . . . . . . . . . . . . . . . . . . . . . . 19
Scheduling a Conference Call . . . . . . . . . . . . . . . . . . . . . . . . . . . . . . . . . . . . . . . . . . . . . 19
SET UP A NEW CONFERENCE . . . . . . . . . . . . . . . . . . . . . . . . . . . . . . . . . . . . . . . . . . . . . . . . . . . . 19
Simple Conference . . . . . . . . . . . . . . . . . . . . . . . . . . . . . . . . . . . . . . . . . . . . . . . . . . . . . . . . . . . . . . . 24
Edit Simple Conference . . . . . . . . . . . . . . . . . . . . . . . . . . . . . . . . . . . . . . . . . . . . . . . 26
Chapter 4 . . . . . . . . . . . . . . . . . . . . . . . . . . . . . . . . . . . . . . . . . . . . . . . . . . . . . . 27
Managing Scheduled Conferences . . . . . . . . . . . . . . . . . . . . . . . . . . . . . . . . . . . . . . . . . 27
CONFERENCE MANAGER . . . . . . . . . . . . . . . . . . . . . . . . . . . . . . . . . . . . . . . . . . . . . . . . . . . . . . . . . 27
Conference Details . . . . . . . . . . . . . . . . . . . . . . . . . . . . . . . . . . . . . . . . . . . . . . . . . . . 28
Edit Conference . . . . . . . . . . . . . . . . . . . . . . . . . . . . . . . . . . . . . . . . . . . . . . . . . . . . . 29
Delete Conference . . . . . . . . . . . . . . . . . . . . . . . . . . . . . . . . . . . . . . . . . . . . . . . . . . . 30
Aspire Conference Bridge User Guide
Table of Contents- 1
Page 4

◆
Table of Contents
Chapter 5 . . . . . . . . . . . . . . . . . . . . . . . . . . . . . . . . . . . . . . . . . . . . . . . . . . . . . . 31
Calling Into A Conference Bridge Call. . . . . . . . . . . . . . . . . . . . . . . . . . . . . . . . . . . . . . . 31
Calling Into A Conference Bridge Call . . . . . . . . . . . . . . . . . . . . . . . . . . . . . . . . . . . . . . . . . . . . . . . 31
Conference Access Codes . . . . . . . . . . . . . . . . . . . . . . . . . . . . . . . . . . . . . . . . . . . . . . . . . . . . . . . . 32
Table of Contents - 2
Aspire Conference Bridge User Guide
Page 5

◆
Introduction
Introduction
Introduction
The Aspire Conference Bridge feature is designed for the Aspire M/L/XL system. The PCB is installed in the telephone system and allows up to 16 parties to take part in a conference call. The participants dial a pre-assigned phone
number at the determined time, optionally enter a password, and are prompted to speak their name which will be
announced to the other conference participants. The functionalities include:
Password protection is provided for each conference.
●
Applicable voice messages and announcements (e.g., entry, password request, exit) are available.
●
●
EMail notiÞcation, when enabled, requires the organizer to enter the EMail address of each
participant to be sent notiÞcation of a pending conference. This option is selectable when setting up new
conferences.
The Aspire Conference Bridge EMail conÞguration supports SMTP mail server ONLY.
●
Host Required, when enabled, requires the host/organizer to be logged into the conference before any
other participant can enter. This option is selectable when setting up new conferences.
●
Admission Control, when enabled, requires the organizer to dial a digit allowing each participant to
enter the conference. This option is a predeÞned access code.
One customer greeting can be recorded for each Aspire Conference Bridge PCB. A predeÞned password
●
is necessary to record personal greetings.
●
Password protection option for each conference.
Remote conference programming with conference scheduler (via a Web User Interface).
●
●
Programmable gain adjustments.
●
Support for DTMF detection for manual setup options (Telephone User Interface).
HTTP Interface for conference schedule management and conference PCB administration.
●
Aspire Conference Bridge User Guide
1
Page 6

2 ◆
Introduction
- For Your Notes -
Aspire Conference Bridge User Guide
Page 7
◆
Chapter 1
Chapter 1
Accessing the Aspire Conference Bridge
Accessing the Aspire Conference Bridge
Chapter 1
LOGGING INTO ASPIRE CONFERENCE BRIDGE PCB
Communication to the Aspire Conference Bridge is made using a straight ethernet cable, crossover cable, and/or
a small hub and Microsoft’s Internet Explorer web browser. To ensure proper communication between the PC
and the Aspire Conference Bridge , they must be attached to the same network.
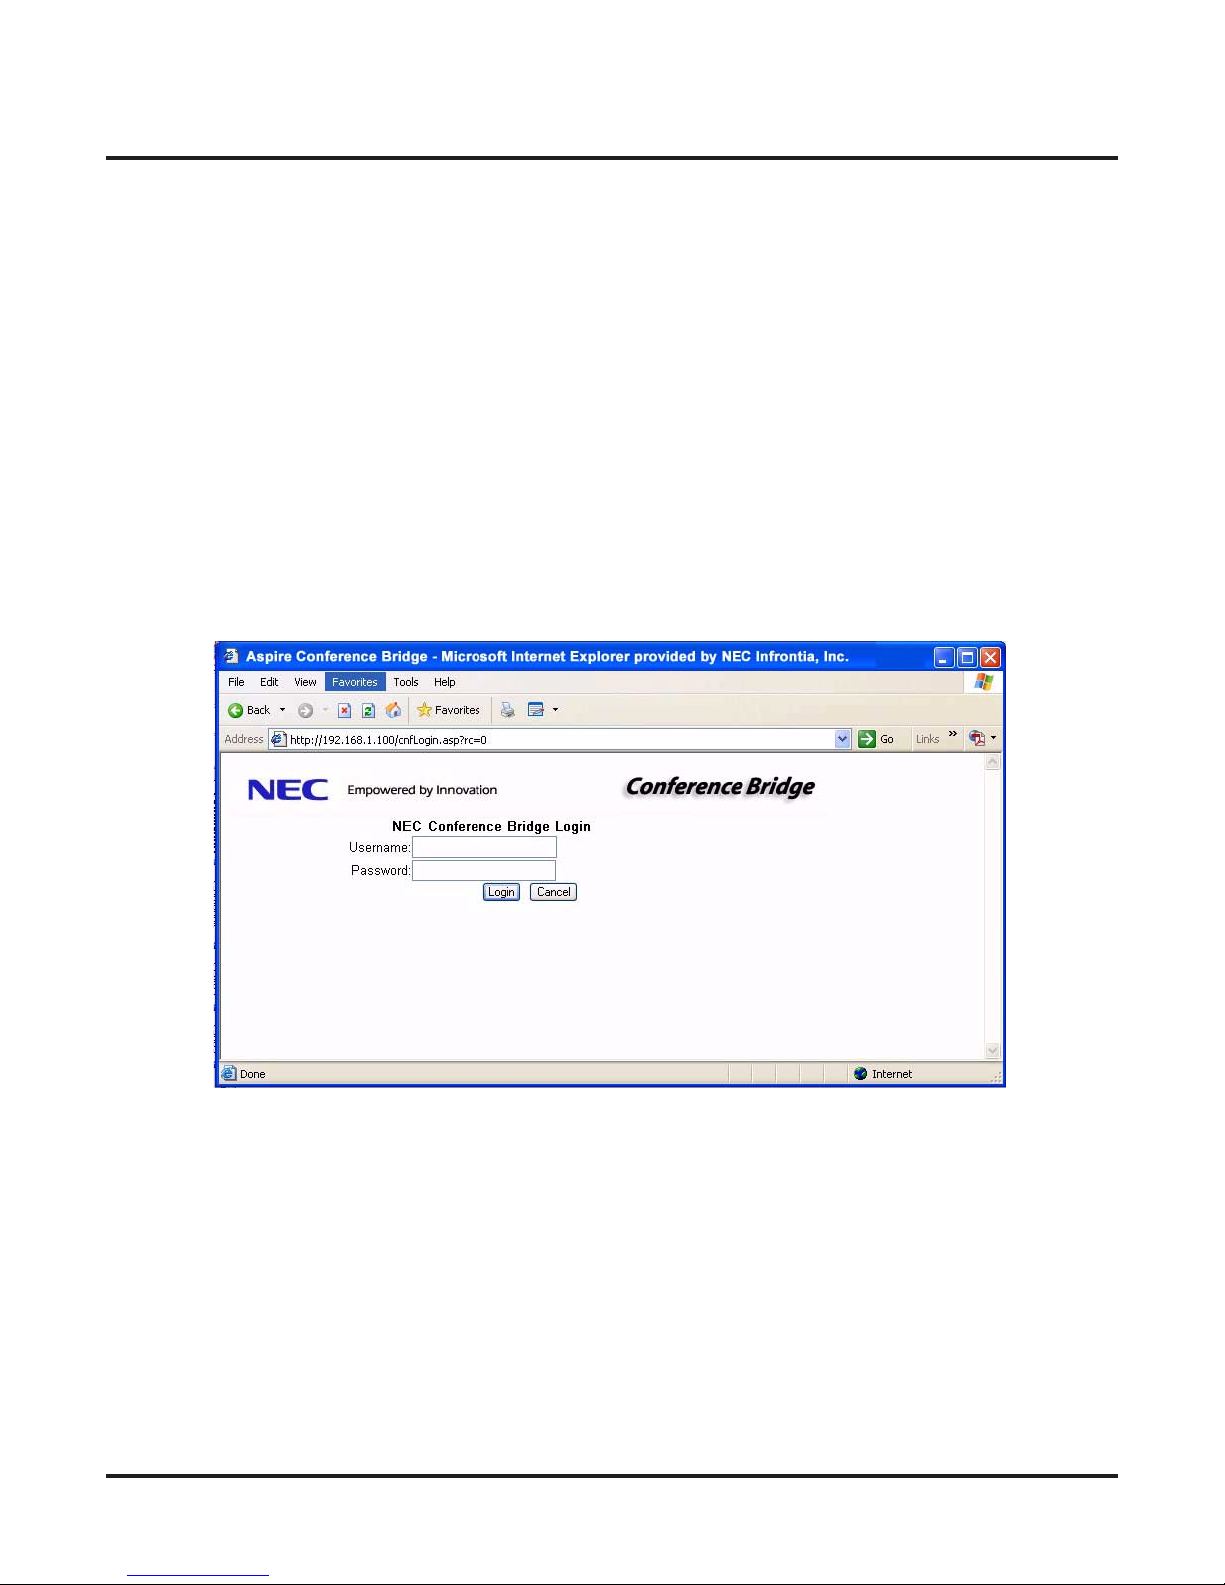
The Aspire Conference Bridge is conÞgured using an Internet Browser. Microsoft Internet Explorer 6.0 or higher
is recommended. The Login page allows a user to enter their user name and password for network access.
Log in as follows:
1. Start your Internet Explorer from a PC connected to the same network as the Aspire Conference Bridge
PCB.
2. Enter the IP Address for the Aspire Conference Bridge in the address link of your browser.
the IP address is: 192.168.1.100.
3. When the Login screen is displayed, enter your Login ID and the password.
4. After entering the user name and password, click on
Aspire Conference Bridge User Guide
Your System Administrator can provide the Conference Bridge IP address. By default,
Your System Administrator can provide your login and password information.
Login
.
3
Page 8

4 ◆
Chapter 1
Accessing the Aspire Conference Bridge
Access Levels
User Group (Black color - user code)
●
The user group is the most restricted group of the three levels. A member of the user group may create
conferences only under their user name and view conferences that are created by them.
Admin Group (Green color - user code)
●
A member of the admin group may create, view, edit and delete conferences for any user. The member
may also edit the conference application settings and create new admin and user members.
Installer Group (Red color - user code)
●
A member of the installer group has the same privileges as an admin user, plus the ability to view and
modify the PCB conÞguration options. The installer may also upload new Þrmware to the PCB and reset
the PCB from the web interface.
Aspire Conference Bridge User Guide
Page 9
MAIN PAGE
After logging into the Conference Bridge web manager, the main page is displayed. The main page is split into
three regions: the navigation side bar, the status window near the bottom of the screen and the operations window in the center of the screen.
◆
Chapter 1
Accessing the Aspire Conference Bridge
Navigation Side Bar
The side bar allows you to navigate to the different areas of the web interface. When logged in as a member of
the user group, only the
logged in as a member of the admin group, the
though the information in the
When logged in as a member of the installer group, the previously mentioned links plus all the
options can be edited. The side bar is always visible from the main page.
Setup New Conference
Status Window
The status window is always located at the bottom of the browser window. The status window displays the user
name and administration level of the current user. A
the web interface and return you to the login screen.
Operations Window
The operations window provides access to the operation that is currently selected. When a user clicks on a side
bar link, the target page is displayed in this window. When you Þrst log in, the
is displayed by default.
Aspire Conference Bridge User Guide
Configuration
and
Scheduled Conferences
Administration
link is displayed, only the
Logout
and
Configuration
button is provided that is clicked to log you out of
links are available. When
links are also available -
EMail Configuration
Setup New Conference
can be edited.
Configuration
window
5
Page 10

6 ◆
Chapter 1
Accessing the Aspire Conference Bridge
- For Your Notes -
Aspire Conference Bridge User Guide
Page 11
Chapter 2
Administration Setup
ADMINISTRATION
◆
Chapter 2
Administration Setup
Chapter 2
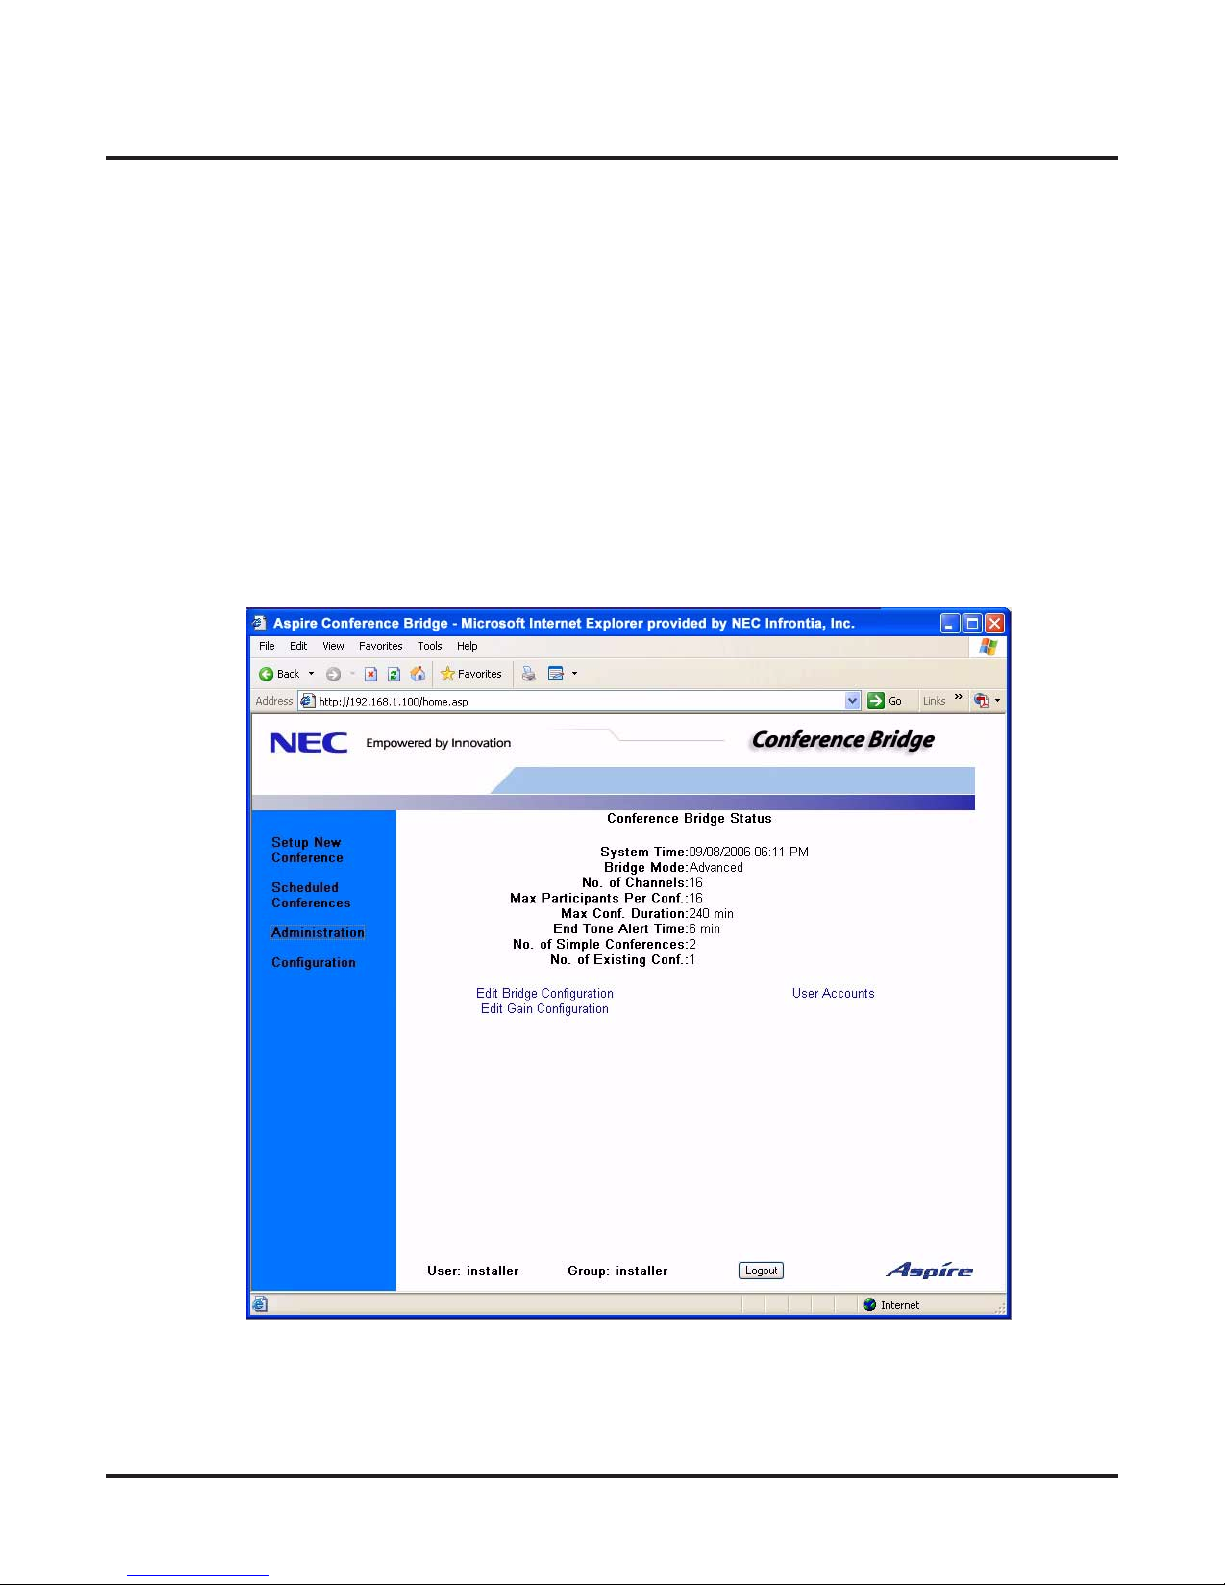
To access the Conference Bridge status and conÞguration pages, click on the
bar. This link is available only to members for the Admin and Installer level groups. The Þrst page displayed is
the
Conference Bridge Status
This option is displayed only for Admin and Installer password levels.
information.
Administration
link on the side
Aspire Conference Bridge User Guide
7
Page 12

Chapter 2
Administration Setup
The screen displays the following conÞgured information for the Aspire Conference Bridge:
System Time
●
The current date and time being used by the Aspire Conference Bridge (16CNFU) PCB.
Bridge Mode
●
The mode of operation for the Aspire Conference Bridge (Simple and Advanced Mode).
Only the Advanced mode is available with the Aspire.
No. of Channels
●
The number of channels available on the Aspire Conference Bridge PCB.
●
Max. Conf. Duration
The maximum conference duration.
●
End Tone Alert Time
The alert message is played to all participants at the speciÞed time before the end of the conference. A
time of two minutes speciÞes that the end message be played two minutes before the conference ends.
●
No. of Simple Conferences
The number of conferences conÞgured in simple mode conÞguration.
Not available with the Aspire system.
8 ◆
●
No. of Existing Conf.
The number of currently scheduled conferences.
This screen also allow access to deÞne some of the Conference Bridge settings:
●
Edit Bridge Configuration
(page 9)
:
Maximum Participants Per Conference
Maximum Conference Duration
End Tone Alert Time
Use Custom Greeting
●
User Accounts
●
Edit Gain Configuration
(page 11)
(page 15)
Aspire Conference Bridge User Guide
Page 13

Edit Bridge Configuration
◆
Chapter 2
Administration Setup
Clicking on the
Edit Bridge Configuration
link takes you to the
Conference Bridge Configuration
page.
Aspire Conference Bridge User Guide
9
Page 14

Chapter 2
Administration Setup
Max Participants Per Conf.
●
ConÞgures the maximum participants including the organizer in a conference. (Default = 16)
Max Conf. Duration
●
ConÞgures the maximum duration of a conference. (Default = 240 minutes)
End Tone Alert Time
●
ConÞgures the time that the end alert message is played. (Default = 6 minutes)
Use Custom Greeting
●
When enabled (by selecting the check box) the Conference Bridge will play the recorded personalized
greeting. When disabled (unchecking the box), Conference Bridge PCB restores the factory default
greeting.
●
Recording Personalized Greeting:
1. Dial into the Conference Bridge PCB and enter the set code for recording a Personalized
greeting.
PASSWORD: 243939#
2. Listen to the series of prompts played to guide you through recording your personalized
greeting.
The customized greeting is automatically enabled after you accept the newly
recorded greeting.
10 ◆
Clicking on Submit sends the changes to the conference application. The conÞguration is saved to non-volatile
memory so it is retained after a reset. Clicking on the Cancel button returns you to the Administration page.
Aspire Conference Bridge User Guide
Page 15

Chapter 2
Administration Setup
User Accounts
Clicking on the User Accounts link brings up the User Accounts Management page. Using this page, User
Accounts may be added, edited, or deleted.
Aspire Conference Bridge User Guide ◆ 11
Page 16

Chapter 2
Administration Setup
Add Account
The Add Account page allows an administrator or installer to create new accounts to access the Aspire
Conference Bridge PCB.
● Username
Enter a user name for a new account. The name must contain only alphanumeric characters and/or a -.
● Group
DeÞne the group with which the new account should be associated. When the current user is a member
of the admin group, they may only add members of the admin group or user group. When the current
user is a member of the installer group, they may add accounts to any of the three groups. User groups
status can be identiÞed by the following color designations:
● Installer - Red
● Admin - Green
● User - Black
● Password, ConÞrm Password
DeÞne the password for the new user. The password must contain only alphanumeric characters and/or a -.
12 ◆ Aspire Conference Bridge User Guide
Page 17

Edit Account
The Edit Account page allows you to modify any user password.
Chapter 2
Administration Setup
Aspire Conference Bridge User Guide ◆ 13
Page 18

Chapter 2
Administration Setup
Delete Account
The Delete Account page allows you to delete previously added user account(s).
The “installer” account cannot be deleted.
14 ◆ Aspire Conference Bridge User Guide
Page 19

Chapter 2
Administration Setup
Gain Configuration
These Þelds are useful for attenuation applied to obtain adequate voice levels for the end users. It is recommended not to alter this value unless solving an issue related to voice levels. (Default = 0)
● Transmit/Receive Gain
This is the base gain value that is applied to all calls (internal or external).
● Transmit/Receive Internal or External Bias
This option sets the Transmit/Receive levels for external and internal calls.
negative (-) number decreases the volume level.
Example: When the following settings are applied:
Transmit Gain = 2, Transmit Internal Bias = 2
Transmit Gain set for the channel of a call on an internal line would equal a total of 4.
● AGC ConÞguration
These Þelds are useful when controlling the gain of the system in order to maintain consistent audio levels during a conference.
PCB. The values may need to be adjusted for optimal performance on your system.
Aspire Conference Bridge User Guide ◆ 15
Setting this option to a positive (+) setting increases the volume level. Entering a
The default values are suggested baseline settings for the Aspire Conference Bridge
Page 20

Chapter 2
Administration Setup
CONFIGURATION
To access the system conÞguration page, click on the Configuration link. This page is only accessible to members of the admin and installer groups. However, the admin group will only be able to access the “Email ConÞg-
uration” window. The Þrst page that is displayed contains the current system status information. Below the
system information are the links to the pages that allow you to modify the system conÞguration.
This page is displayed for Admin and Installer password levels, however, with the Admin pass-
word, only the EMail ConÞguration can be edited (the other entries can only be edited with the
Installer password). For details on the ConÞguration items programmable by the Installer password
level, refer to the Aspire Conference Bridge Manual, P/N 0893215.
This screen displays the following settings pertaining to the Aspire Conference Bridge:
● System Time (Time used by the Aspire Conference Bridge)
● Kernel Version
● RFS Version (Firmware)
● MAC Address
● IP Address (To access the Aspire Conference Bridge)
● Netmask Address (Subnet mask address)
● Gateway Address
● Host Name
● Domain Name
● Nameserver Address
● DHCP
16 ◆ Aspire Conference Bridge User Guide
Page 21

Chapter 2
Administration Setup
Email Configuration
The Email Configuration page allows the installer to conÞgure the Email server settings that are used for
Emailing conference notiÞcations.
The Aspire Conference Bridge Email conÞguration supports SMTP mail server ONLY.
Consult with your System Administrator for SMTP Server information.
This option is displayed for Admin and Installer password levels, however, with the Admin pass-
word, only the EMail ConÞguration can be edited (the other entries are displayed but can only be
edited with the Installer password). For details on the ConÞguration items programmable by the
Installer password level, refer to the Aspire Conference Bridge Manual, P/N 0893215.
Aspire Conference Bridge User Guide ◆ 17
Page 22

Chapter 2
Administration Setup
● Outgoing Mail Server (SMTP)
DeÞne the network address of the SMTP server to be used.
● Outgoing Mail Server Port
DeÞne the SMTP server port. This normally is set to 25.
● Server Requires Authentication
When this is checked, the SMTP server requires messages sent to it to be authenticated to an account.
● Authentication User Name
DeÞne the user name to use for the authentication.
● Authentication Password
DeÞne the password to use for the authentication.
This must be entered every time the Email conÞguration is modiÞed when authentication is used.
● From Email Address
DeÞne the Email address displayed in the From Þeld on notiÞcations sent from the Aspire Conference
Bridge PCB.
● Subject
Enter the subject line of the notiÞcations sent from the Aspire Conference Bridge PCB.
● Message Introduction
Enter the introduction that is printed before the conference details.
● Message Conclusion
Enter the conclusion that is printed at the end of the Email address.
Upon clicking Submit, a page is provided where the installer may send a test Email to the speciÞed To address to
verify that the Email settings are correct.
18 ◆ Aspire Conference Bridge User Guide
Page 23

Chapter 3
Scheduling a Conference Call
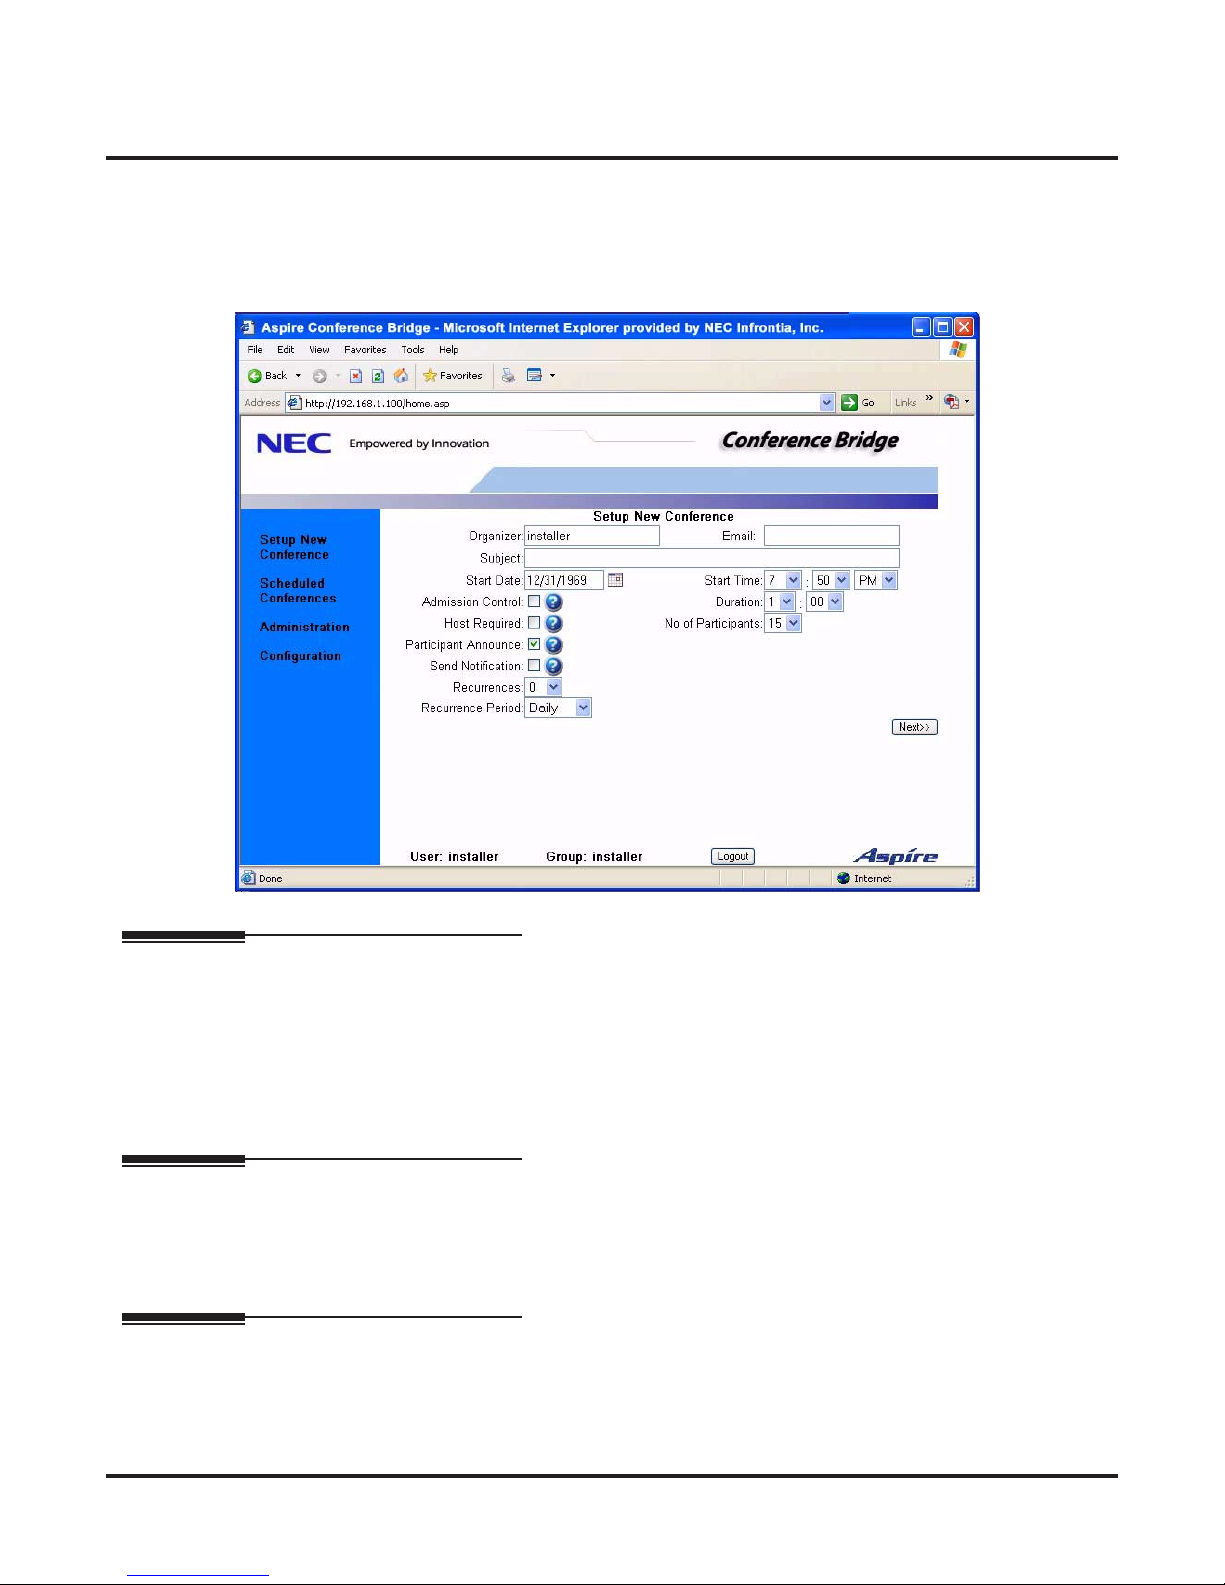
SET UP A NEW CONFERENCE
From the Setup New Conference window in the operations window, you may make the initial selections for
the conference.
This option is displayed for User, Admin, and Installer password levels.
Chapter 3
Scheduling a Conference Call
Chapter 3
Aspire Conference Bridge User Guide ◆ 19
Page 24

Chapter 3
Scheduling a Conference Call
1. Log in to the Aspire Conference Bridge PCB (page 3).
2. Click on the Setup New Conference link. Enter the following information:
● Organizer
The user name of the organizer. When a user is logged in as a member of a group, the group
name is supplied in this Þeld.
This Þeld is informational only and is based on the user’s password. It cannot
be modiÞed.
● Email
The Email address of the organizer.
● Subject Line
The subject line allows organizers to personalize the conference subject on a per conference
basis.
● Start Date
Enter the start date for the conference call. The calendar icon can be clicked to allow for easier
selection.
● Start Time
The start time of the conference call.
● Duration
The duration of the conference call.
● No. of Participants
The number of participants to invite to the conference besides the organizer. The maximum
number of conÞgurable participants is Þfteen (15) plus the one (1) organizer for a total of sixteen (16) participants.
● Admission Control
Administration Control, when checked, this option requires the organizer to allow (by
pressing a key sequence) each new participant to enter the conference. When this function is
enabled, the Host Required option must also be enabled. Clicking on Admission Control
automatically enables Host Required.
The organizer enters the following codes at the organizer keyset to allow each new participant
to enter the conference.
Admission Control: Access Codes
*5
*6
● Host Required
Host Required, when checked, requires the organizer to be present for the conference to con-
Organizer Accept Participant
Organizer Reject Participant
vene. No participants may enter the conference prior to the organizer entering the conference.
● Participant Announce
Allows you to enable or disable the announcement prompt when conference participants enter
scheduled conferences.
20 ◆ Aspire Conference Bridge User Guide
Scheduled conferences with nine (9) participants or more will automatically
disable this function.
Page 25

Chapter 3
Scheduling a Conference Call
● Send NotiÞcation
Enabling this object results in an Email notiÞcation being sent to all participants (for which
Email addresses have been entered).
The Email information is entered in the following screen - after clicking on Next>>.
● Recurrences
Organizers may schedule a conference to recur in a cycle of 1-31. The number of recurrences
is dependant on the number of days in the month. (Default: 0)
● Recurrence Period
Organizer may schedule conference to recur daily or weekly. (Default: Daily)
3. Click NEXT.
4. From the new window, you can enter the Participant name information and Email information. The
name and Email information is not required to create the conference. When complete, click Submit.
Aspire Conference Bridge User Guide ◆ 21
Page 26

Chapter 3
Scheduling a Conference Call
5. When the conference creation is successful, a new conference report is generated with the conference
information and passwords for the organizer and all the participants.
If the browser has pop-ups disabled, you may not see the New Conference Report page
displayed. You can allow pop-ups for the TCP/IP address used for the Conference Bridge PCB
under the TOOLS-POP-UP BLOCKER-POP-UP BLOCKER SETTINGS menu.
When Send Notification is enabled, an Email is sent to all participants with an Email address entered. The
Email contains the conference start date, start time, duration, and their individual password. The reply address
of the notiÞcation Emails is the organizer Email. An option to print the new conference report is provided at
the bottom of the page. Clicking Close closes the report window.
Note that each password allows one person to enter the conference call. Once a password is used to sign into
a conference, anyone else trying to use that same password to access the conference call will hear an “invalid
password” error message.
22 ◆ Aspire Conference Bridge User Guide
Page 27

Chapter 3
Scheduling a Conference Call
6. When an error occurs during the conference creation process, the cause of the error is displayed and you
have the opportunity to modify the conference to resolve any scheduling conflicts.
When the Email ConÞguration options are not set properly, a message is displayed in the new conference
report indicating that the notiÞcation Emails were not sent out. You have the opportunity to resend the notiÞ-
cations from the Conference Manager (page 25).
Aspire Conference Bridge User Guide ◆ 23
Page 28

Chapter 3
Scheduling a Conference Call
- For Your Notes -
24 ◆ Aspire Conference Bridge User Guide
Page 29

Chapter 4
Managing Scheduled Conferences
CONFERENCE MANAGER
To access the Conference Manager, click on the Scheduled Conferences link on the side bar. When you are a
member of the “user” group, only the conferences scheduled with that user name are displayed. When you are a
member of the “admin” or “installer” groups, all currently scheduled conferences, along with the organizer of
each conference are displayed. The start date, start time, and duration are always displayed along with the
Details button and Delete button. Before the conference starts and moves to the active state, the Edit button is
also available.
This option is displayed for User, Admin, and Installer password levels.
Once a conference begins, the Edit option is available while a conference is active to add or
delete participants.
Chapter 4
Managing Scheduled Conferences
Chapter 4
Aspire Conference Bridge User Guide ◆ 25
Page 30

Chapter 4
Managing Scheduled Conferences
Conference Details
By clicking on the Details button, you may view all the conference information. This information is the same
information displayed in the New Conference Report.
The Conference Details also provides an additional option to resend Email notiÞcations.
26 ◆ Aspire Conference Bridge User Guide
Page 31

Chapter 4
Managing Scheduled Conferences
Edit Conference
The Edit Conference window brings up a form with all the current conference information Þlled in. You may
modify any parameter of the conference, such as add or delete participants, etc.
Deleting a participant will only delete that participant’s information, and will not delete any
other participant’s information.
When deleting a participant, if the Send Notification box is checked - an Email notiÞcation will
be sent again to all participants. Uncheck this box if you do not wish to resend Email notiÞcation.
Aspire Conference Bridge User Guide ◆ 27
Page 32

Chapter 4
Managing Scheduled Conferences
Delete Conference
When the Delete button is clicked from the Conference Manager, you are prompted with a new browser win-
dow conÞrming that the delete operation should occur. When you click No, the delete operation is canceled.
When you clicks Yes, the conference is removed from the schedule.
28 ◆ Aspire Conference Bridge User Guide
Page 33

Calling Into A Conference Bridge Call
Chapter 5
Calling Into A Conference Bridge Call
Calling Into A Conference Bridge Call
The installer programs the telephone ports used by the Conference Bridge into a Department Group. The pilot
number for this Department Group is entered into the EMail ConÞguration (page 17) so that when the EMail
notiÞcation is used, the recipients know what telephone number to call.
Consult the System Administrator for the Department Group number used for the
Conference Bridge ports.
1. At the scheduled time for the Conference call, dial the Department Group number.
Example: Internal call: 650 (as deÞned in Program 11-07-01),
External call: 203-926-54xx (this telephone number is the DID/DIL trunk number that would
be directed to the Department Group pilot number).
2. After the announcement message plays, if required by the Conference Bridge setup, you hear a prompt
to enter your password. Enter the password provided when the conference was scheduled (refer to the
EMail notification or the Conference Manager) followed by the #.
Each password allows only one person to enter the conference call. Once a password is
used to sign into a conference, anyone else trying to use that same password to access the conference call will hear an “invalid password” error message.
Chapter 5
3. If required by the Conference Bridge setup, speak your name, then press the # key.
This voice clip will be used to announce your entry into the conference call.
4. You will now hear a message advising you that you are entering the conference call.
While in the conference call, there are several options available to the organizer as well
as each participant. Refer to the following table for details.
5. When the conference call is complete, each user simply hangs up.
Aspire Conference Bridge User Guide ◆ 29
Page 34

Chapter 5
Calling Into A Conference Bridge Call
Conference Access Codes
While in the conference call, there are several options available to the organizer as well as each participant.
Feature Access Code Description
Delete
End Conference Declare
Extend Duration of
Conference
Declared Conference
Secured
Accept Participant Entry Dial *5
Reject Participant Entry Dial *6
Transmit Volume Increase
Transmit Volume Decrease
Receive Volume –
Increase
conference via
Web Manager
Dial ##
Dial *4
Dial 1
Dial 3
Dial 7
The organizer can declare the conference ended by
accessing the Conference Web Manager and deleting the
conference.
The organizer can extend the conference in increments of
10 minutes.
The organizer may use this access code to declare the
conference secured and not allow any additional participant
entry. Note: If this option is set, the conference is secured
for the duration of the conference.
The organizer may use this access code to permit
participants access to the a scheduled conference.
The organizer may use this access code to reject
participants from accessing the scheduled conference.
Users may uses this access code to increasing the transmit
volume level.
Users may use this access code to decrease transmit
volume level.
Users may use this access code to increase his/her receive
volume level.
Receive Volume –
Decrease
Mute Conference Dial 5
Dial 9
Users may use this access code to decrease his/her
receive volume level.
Users may use this access code to mute the Conference
[Toggle ON/OFF].
30 ◆ Aspire Conference Bridge User Guide
Page 35

NEC Unified Solutions, Inc.
4 Forest Parkway, Shelton, CT 06484
Tel: 800-365-1928 Fax: 203-926-5458
www.necunifiedsolutions.com
Other Important Telephone Numbers
Sales: . . . . . . . . . . . . . . . . . . . . . . . . . . . . . . . . . . . .203-926-5450
Customer Service: . . . . . . . . . . . . . . . . . . . . . . . . . . .203-926-5444
Customer Service FAX: . . . . . . . . . . . . . . . . . . . . . . .203-926-5454
Technical Service: . . . . . . . . . . . . . . . . . . . . . . . . . . .203-925-8801
Discontinued Product Service: . . . . . . . . . . . . . . . . . .900-990-2541
Technical Training: . . . . . . . . . . . . . . . . . . . . . . . . . . .203-926-5430
Emergency Technical Service (After Hours) . . . . . . . .203-929-7920
(Excludes discontinued products)
Page 36

(0893416)
September 25, 2006, Rev 1
NEC Unified Solutions, Inc.
4 Forest Parkway, Shelton, CT 06484
TEL: 203-926-5400 FAX: 203-929-0535
www.necunifiedsolutions.com
Printed in U.S.A.
 Loading...