

Speakers ...............................................................................
PX-SP4U/B
PX-SP4U/S
Instruction Manual
Thank you for choosing to purchase NEC PX-SP4U/B•PX-SP4U/S speakers.
In order to ensure that you are able to make the fullest possible use of this product, please be sure to read this Instruction
Manual before use.
After reading, place this manual in a easily accessed location for future reference.
This product is designed for use exclusively with the following plasma monitors.
¶¶
¶ 42-inch Plasma Monitors: PX-42XR5•PX-42XM5
¶¶
¶¶
¶ 50-inch Plasma Monitors: PX-50XR6•PX-50XM6
¶¶
¶¶
¶ 60-inch Plasma Monitors: PX-60XR5•PX-60XM5
¶¶
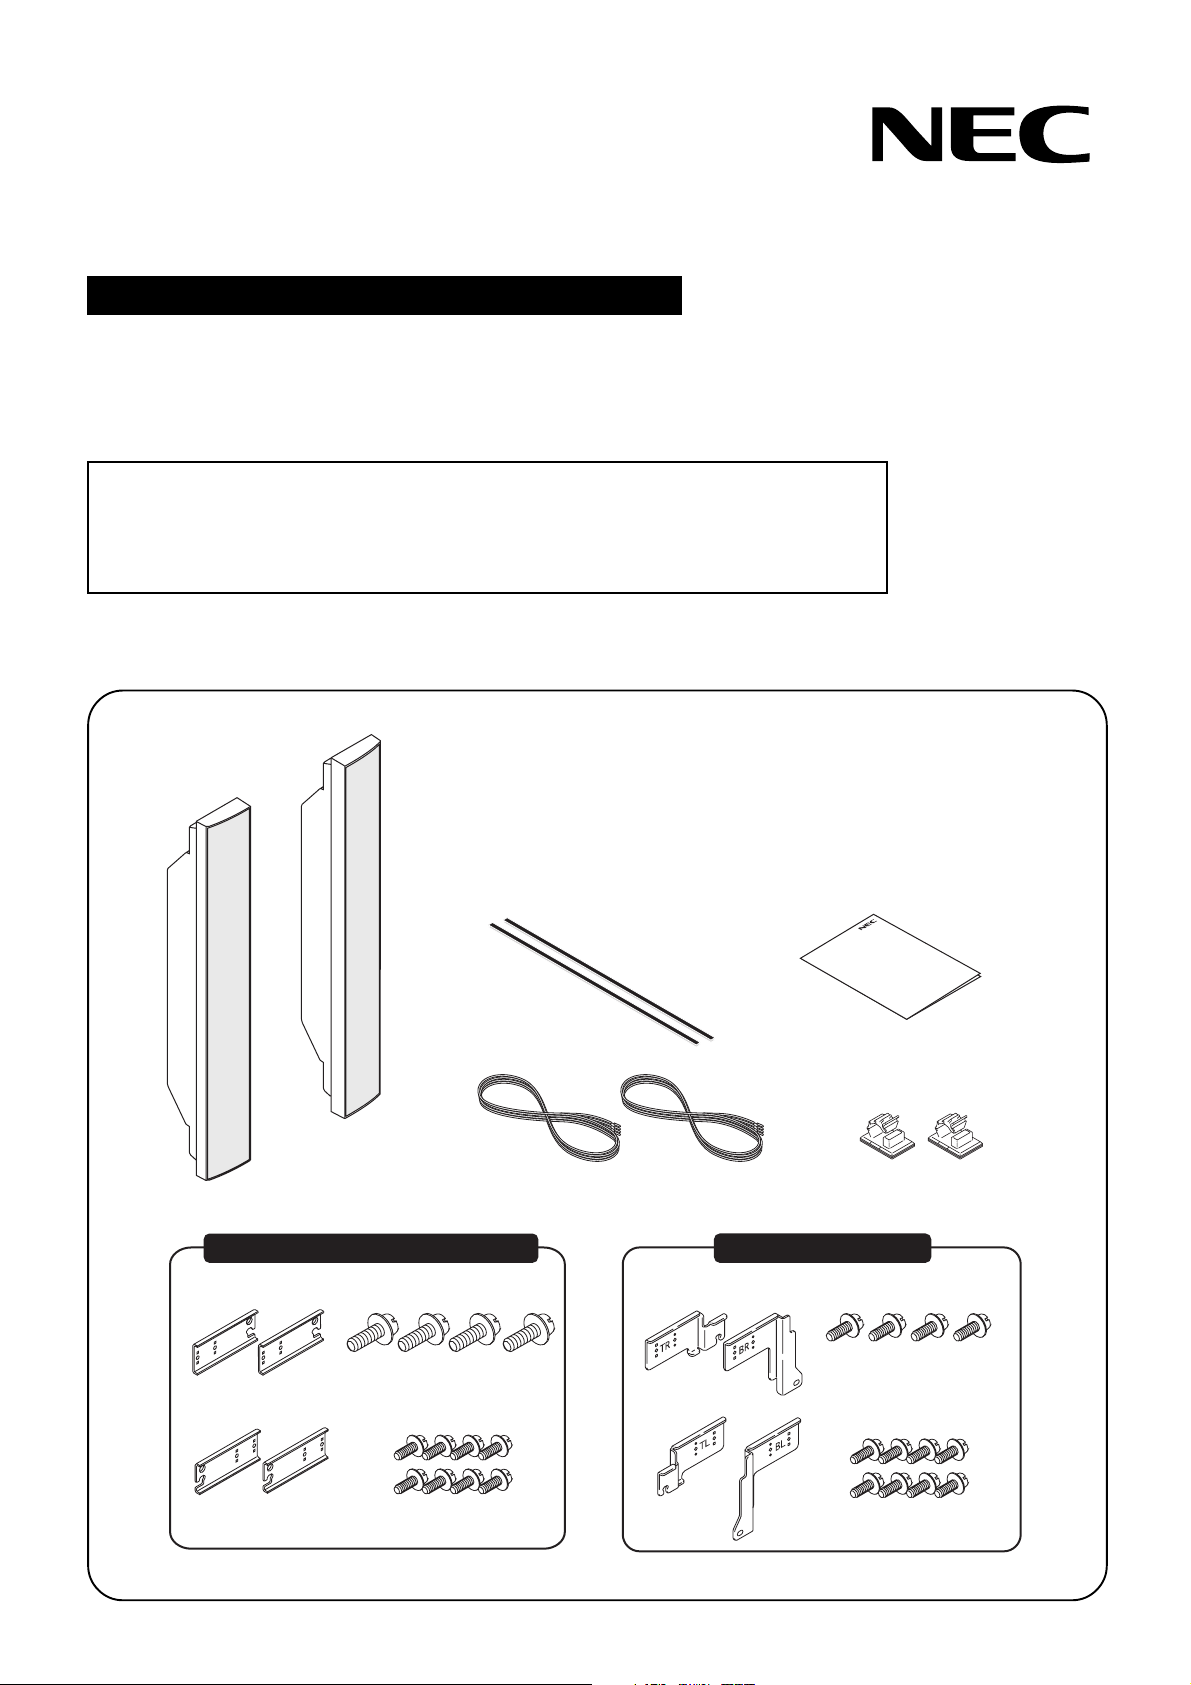
— Checking materials included in package —
Please be sure to check that all of the following items are included in the
package with your product. If for any reason there are any items missing or
items which fail to work properly, please contact NEC or the retailer at which
you purchased the product immediately for assistance.
Right speaker
Speaker units (2)
Left speaker
For 42-inch and 50-inch monitors
Attachment plates
Monitor attachment screws
Cushions (2)
Speaker cords (2)
For 60-inch monitors
Attachment plates
PX-SP4U/B
PX-SP4U/S
Instruction manual (1)
Cord clampers (2)
Monitor attachment screws
R
Right plates (2)
R
L
Left plates (2)
M8 × 18 mm (4)
Attachment plate screws
L
M4 × 10 mm (8)
Right plates (2)
Left plates (2)
M5 × 12 mm (4)
Attachment plate screws
M4 × 10 mm (8)
Safety Precautions
(A note on symbols used herein)
Warning
In order to ensure that the product is used properly and safely, a
number of different symbols are used to mark items designed to
prevent bodily injury to yourself or any third parties or to prevent any
damage to property from occurring. The meaning of these symbols
is as explained below. Be sure to read the following descriptions
carefully before reading the main text.
Warning
Items marked with this symbol indicate items containing instructions
which, if ignored or improperly followed, might result in death or bodily
injury.
Caution
Items marked with this symbol indicate items containing instructions
which, if ignored or improperly followed, might result in bodily injury
or damage to property.
Examples of symbols used herein
This symbol is used to mark cautions (and warnings)
containing instructions which must be followed.
This symbol is used to mark items containing instructions
about actions which are prohibited (i.e., which must never
be performed).
This symbol is used to mark items containing instructions
or other content requiring the user to take certain actions.
Before use
Be sure to follow the instructions below to protect your speakers
from damage from excessive input levels.
÷ Never play signals at a level exceeding maximum input.
÷ When connecting this product or any other audio or visual
equipment to an amplifier, be sure the power to the amplifier is
turned off.
÷ Avoid raising the volume too high when using an graphic equalizer
to greatly amplify high-frequency sounds.
÷ Never raise the volume too high when using a low-output amplifier.
(Doing so would result in increased distortion in the amplifier's
high-frequency range, and thus result in damage to the speakers.
Note
Depending on the manner of installation, there may be times when
colors blur or other effects appear on screen if the speaker is
placed in close proximity to any other type of plasma monitor.
If this happens, place the speakers at a distance from the monitor
during use.
÷ Never use the speakers to hold the plasma monitor
when moving the plasma monitor, as doing so might
cause the plasma monitor to fall and result in personal
injury. When moving the plasma monitor, always be
sure to hold the bottom of the main body of the
plasma monitor.
÷ Make sure that all nuts, bolts, and screws are properly
tightened to ensure safety. Failing to do so may result
in the speakers falling, thus resulting in bodily injury.
Caution
Installation
÷ Never place the speakers or plasma monitor on an
unsteady platform or uneven surface, as doing so
might result in their falling and this in turn might result
in bodily injury.
÷ Never place the speakers or plasma monitor in a
location subjected to direct sunlight or excessively
high temperatures, as doing so might result in fires
occurring.
÷ Never place the speakers or plasma monitor in a
location where they would be subjected to excessive
levels of dust or humidity or in a location subject to
steam or smoke from oil (e.g., next to a stove or
heating plate), as doing so might result in fires
occurring.
Instructions for use
÷ Avoid using over long periods of time when significant
levels of sound distortion occur, as doing so might
cause the speakers to heat up excessively and this
could in turn result in fire.
÷ Never sit on or hang from the product. Particular care
should be taken around children, as doing so might
result in the product toppling over and this could in
turn result in damage to the product or bodily injury.
÷ Never insert water into the speakers or otherwise
allow them to become wet, as doing so might result in
fire or exposure to electrical shock. Also never use
this product outdoors, as doing so might similarly
result in fire or exposure to electrical shock.
÷ Never place any heavy objects on the speaker cords
or allow the speaker cords to be caught under the
plasma monitor. Doing so could result in damage to
the cords and this in turn might result in fire or
exposure to electrical shock.
÷ Never drop or insert any metallic objects, easily
flammable materials, or other foreign objects in the
mouths or other openings of the speakers, as doing
so might result in fire or exposure to electrical shock.
Special care should also be taken when using the
product in a home or other location where there are
small children.
÷ Never attach the speakers to any devices other than
the specified plasma monitors, as doing so might
result in fire or damage to the product.
2
Selecting the plates and screws to be used in installation
This product comes with plates and screws designed for use in connecting the speakers to a 42-inch, 50-inch, or
60-inch monitor.
Always be sure to use only the plates and screws designed for use with the plasma monitor which you have
purchased.
None of the other plates or screws are to be used.
English
Attachment plates
Attachment
screws
Attachment
screws
42/50
60
Attachment plates
¶ Always be sure to use only the plates and screws designed for use with your own
plasma monitor.
Warning
Using any other plates and/or screws could result in the speakers falling, and this
in turn might result in bodily injury.
If attaching speakers to a 42-inch or 50-inch plasma monitor .......... See page
If attaching speakers to a 60-inch plasma monitor............................... See page
3
4
6
Attaching speakers to a 42-inch or 50-inch plasma monitor
R
R
R
The speakers are divided into a right (R) and left (L) speaker.
When attaching the speakers, be sure to check the labels located on the rear of the speakers as well as the markings (R/
L) written on the attachment plates.
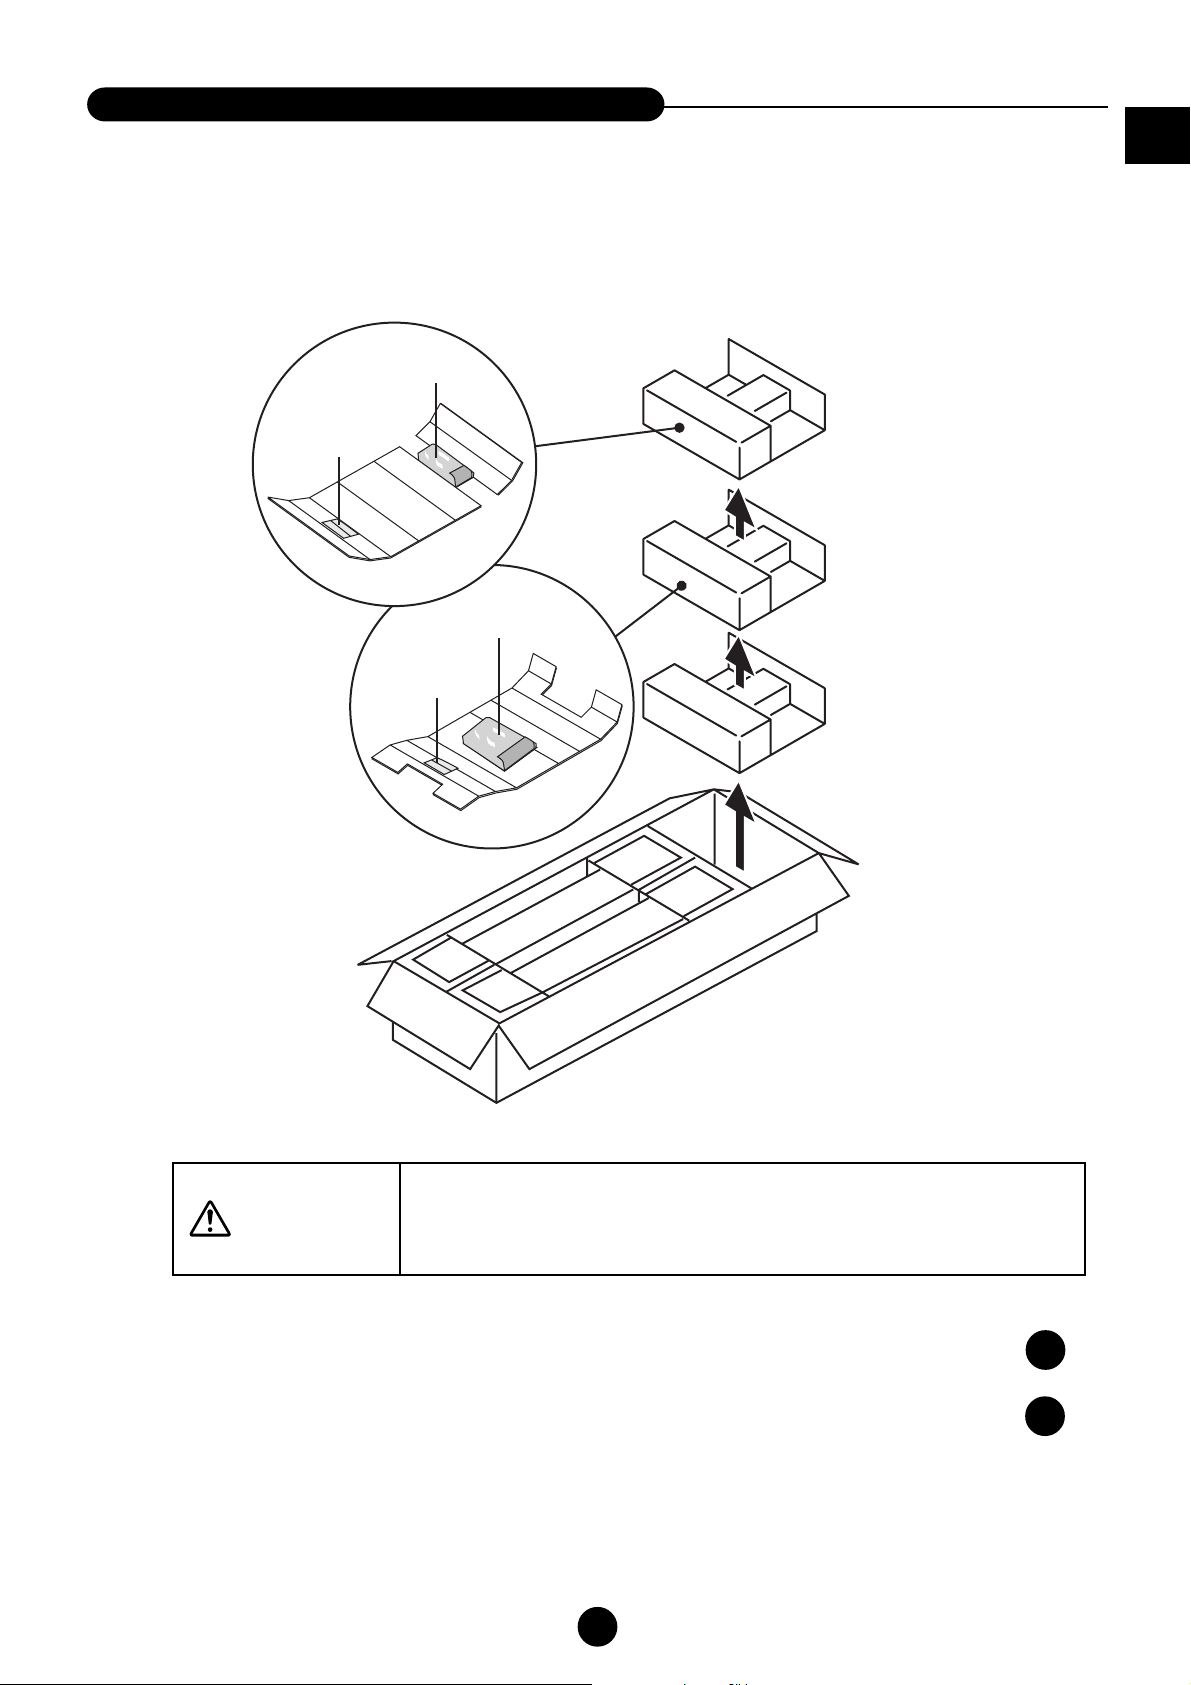
1 Remove the protective tape from the cushions and then
attach the cushions to the sides of the speakers in the
locations indicated in the diagram below.
Cushions
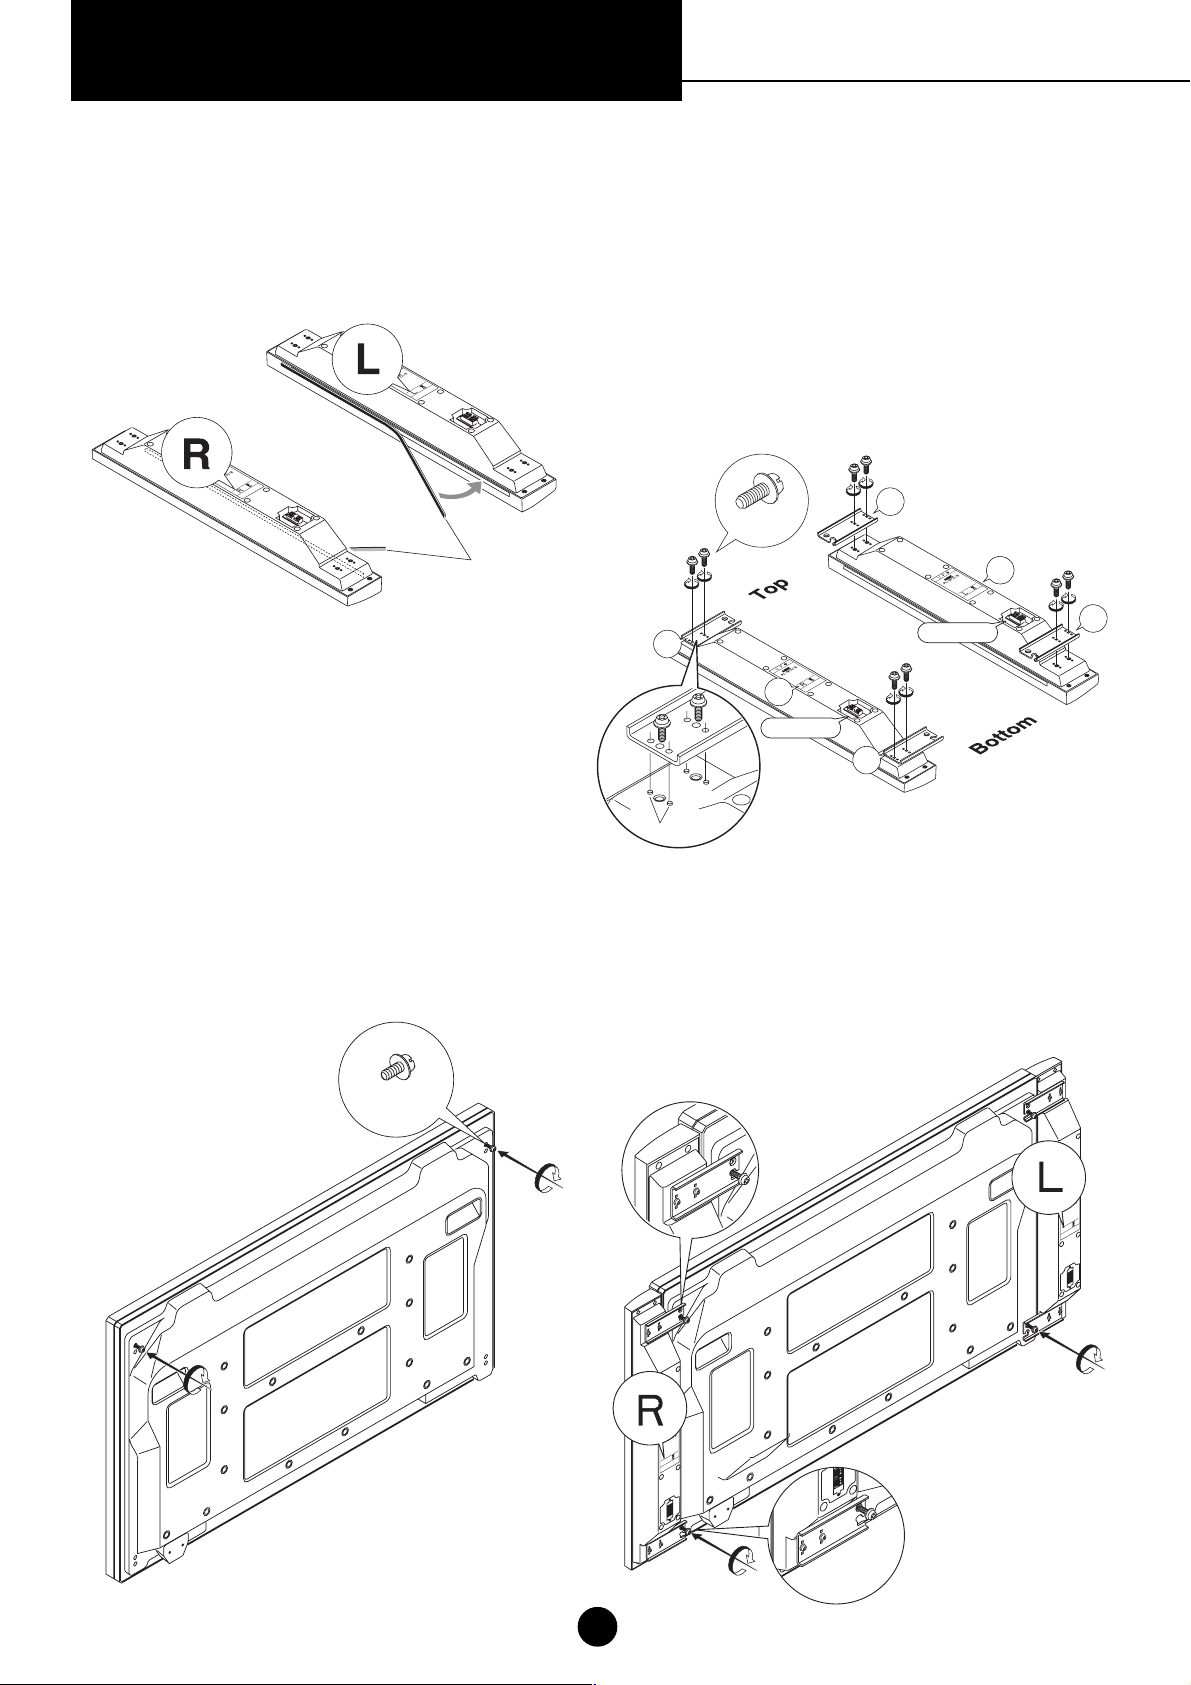
2 Place the speakers as indicated in the diagram below.
(Orient speakers so that the speaker jacks come towards
the bottom of the diagram.)
Attach the attachment plates marked 'R' to the speaker
with the label marked 'R'. Place the attachment plates onto
the speakers so that the guide pins are inserted into the
holes in the attachment plates as indicated below, and fix
the plates tightly into position using the M4 x 10 mm screws
(8 screws).
L
M4 × 10 mm
R
R
R
Speaker jacks
L
L
L
Speaker jacks
R
R
L
3 Screw the M8 x 18 mm screws loosely into the screw holes
at the upper end of the plasma monitor (2 locations).
∗ Illustration shows an example using a 42-inch
monitor.
M8 × 18 mm
Guide pins
4 1 Place the attachment plates at the upper part of the
speakers over the screws at the top of the plasma
monitor.
2 Align the holes of the attachment plates of the speakers
over the screw holes located at the bottom of the plasma
monitor and use the M8 x 18 mm screws to loosely
tighten into place (2 locations).
L
L
L
R
R
R
4
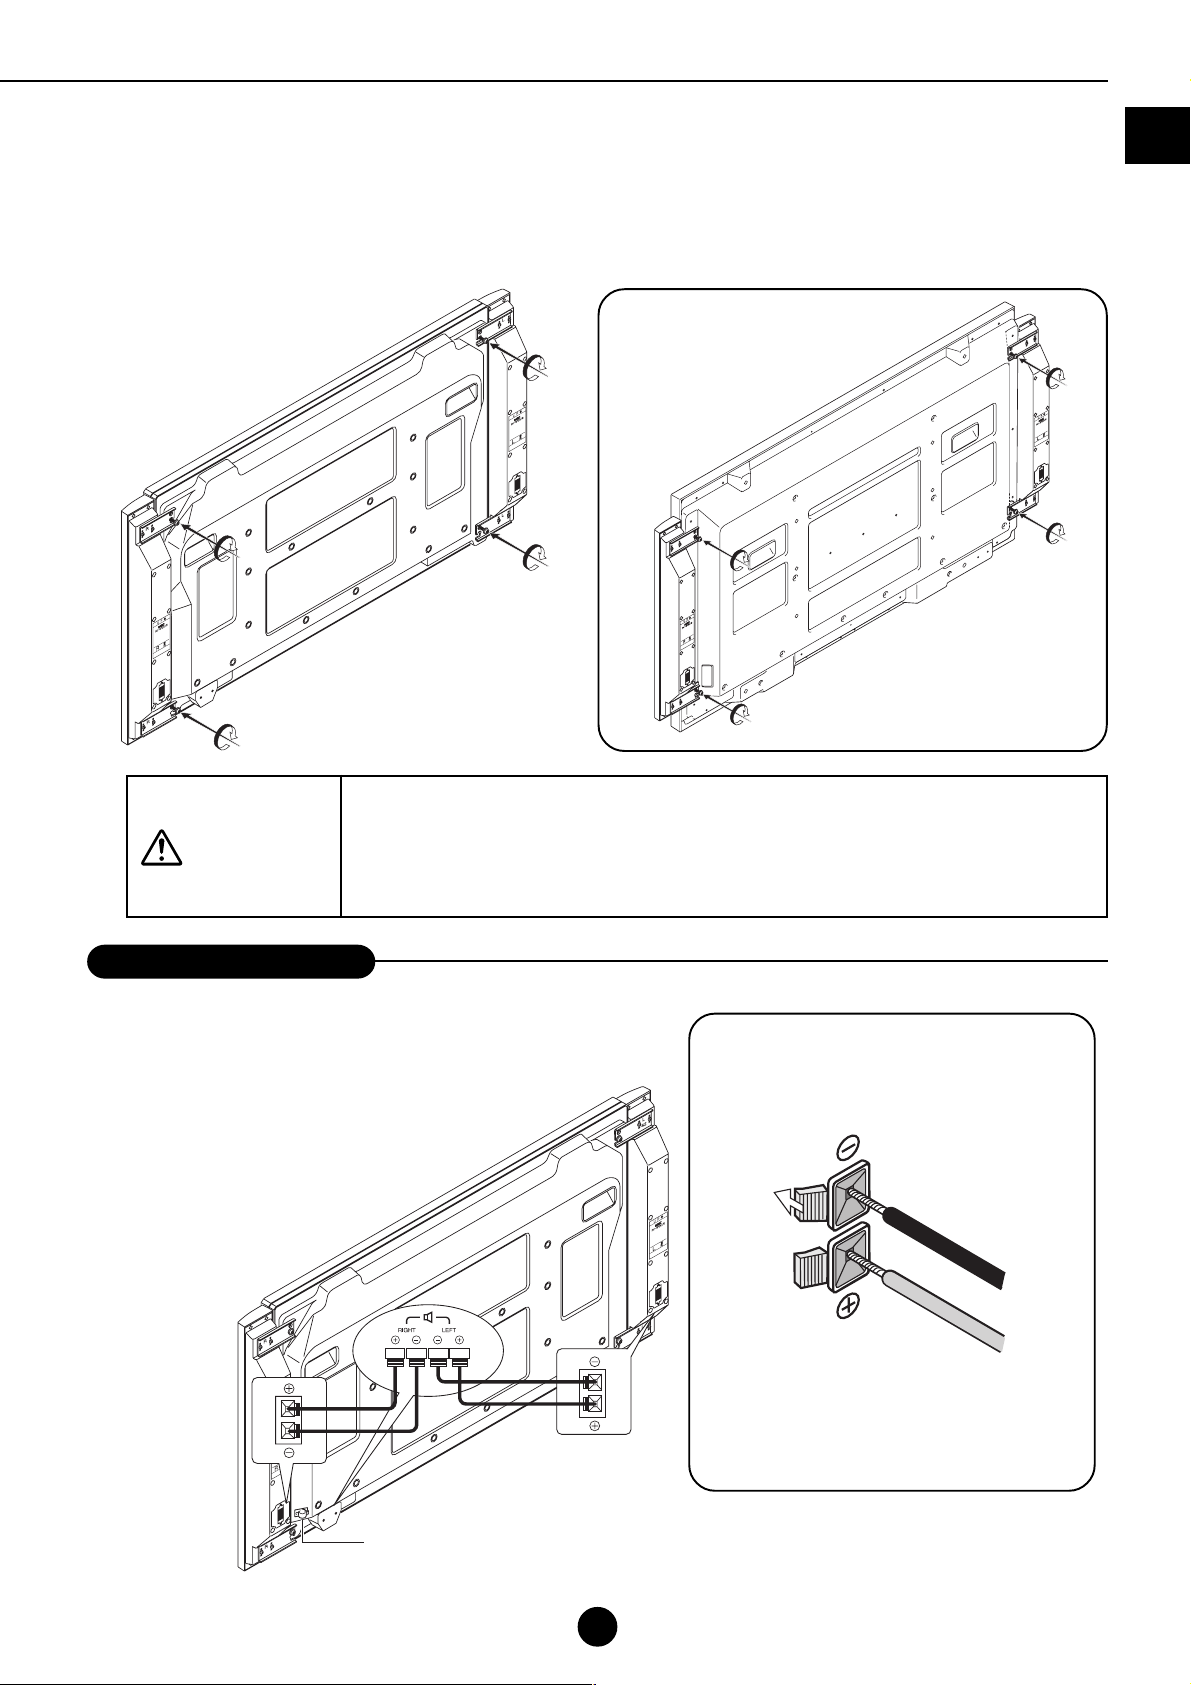
5 Tighten the loosely inserted screws in 4 locations fully into place.
∗ Push the speakers lightly onto the plasma monitor when tightening the screws.
Check to make sure that the screws at all 4 locations have been firmly screwed into place.
English
Warning
When attached to a 50-inch
L
plasma monitor
R
R
L
¶ Never hold the speakers when speakers are attached to the plasma monitor to move the
plasma monitor. Doing so might result in the plasma monitor falling, and this in turn might
result in bodily injury.
¶ Be sure to screw the screws firmly into place. Failing to do so might result in the speakers
falling, and this in turn might result in bodily injury.
Connecting speaker cords
Be sure to turn off the power to the plasma monitor before
connecting the speakers.
Use the provided speaker cords to connect the R/L speaker jacks of
the plasma monitor to the speaker jacks of the speakers.
Once the cords have been connected, pull on the cords
lightly to make sure that they have been connected
firmly to the speaker jacks. An improper
connection might result in the sound
being interrupted or the appearance
of noise in the output sound.
Cord clampers
Remove the protective tape from the rear of the cord clampers, attach
the clampers in the desired position, and clamp the cords into place.
Note that the speaker cords have positive
and negative ends, and that you should be
sure to insert them correctly.
Black
Red
Press the button of the speaker jack and
keep it pressed down as you insert the wire
of the speaker cord and then release the
button.
5

Attaching speakers to a 60-inch plasma monitor
The speakers are divided into a right (R) and left (L) speaker.
When attaching the speakers, be sure to check the labels located on the rear of the speakers as well as the markings (R/
L) written on the attachment plates.
1 Remove the protective tape from the cushions and then
attach the cushions to the sides of the speakers in the
locations indicated in the diagram below.
Cushions
2 Place the speakers as indicated in the diagram below.
(Orient speakers so that the speaker jacks come towards
the bottom of the diagram.)
Attach the attachment plates marked 'TR' to the speaker
with the label marked 'R'. Place the attachment plates onto
the speakers so that the guide pins are inserted into the
holes in the attachment plates as indicated below, and fix
the plates tightly into position using the M4 x 10 mm screws
(8 screws).
TL
M4 × 10 mm
TR
R
R
Speaker jacks
L
L
Speaker jacks
BR
BL
3 Screw the M5 x 12 mm screws loosely into the screw holes
at the upper end of the plasma monitor (2 locations).
M5 × 12 mm
Guide pins
4 1 Place the attachment plates at the upper part of the
speakers over the screws at the top of the plasma
monitor.
2 Align the holes of the attachment plates of the
speakers over the screw holes located at the bottom
of the plasma monitor and use the M5 x 12 mm
screws to loosely tighten into place (2 locations).
6

5 Tighten the loosely inserted screws in 4 locations fully into place.
∗ Push the speakers lightly onto the plasma monitor when tightening the screws.
Check to make sure that the screws at all 4 locations have been firmly screwed into place.
¶ Never hold the speakers when speakers are
attached to the plasma monitor to move the
plasma monitor. Doing so might result in the
plasma monitor falling, and this in turn might
result in bodily injury.
¶ Be sure to screw the screws firmly into place.
Failing to do so might result in the speakers
falling, and this in turn might result in bodily injury.
English
Warning
Connecting speaker cords
Be sure to turn off the power to the plasma monitor before connecting the speakers.
Use the provided speaker cords to connect the R/L speaker jacks of the plasma monitor to the speaker jacks of the speakers.
Once the cords have been connected, pull on the cords lightly to make sure that they have been connected firmly to the speaker
jacks. An improper connection might result in the sound being interrupted or the appearance of noise in the output sound.
Note that the speaker cords have positive
and negative ends, and that you should be
sure to insert them correctly.
Black
Red
Press the button of the speaker jack and
keep it pressed down as you insert the wire
of the speaker cord and then release the
button.
Cord clampers
Remove the protective tape from the rear of the cord clampers, attach
the clampers in the desired position, and clamp the cords into place.
7

Cleaning cabinets
Before cleaning, always be sure to remove the power plug from its socket.
¶ Wipe with a soft, dry cloth with a relatively flat pile.
If soiling is particularly bad, wet the cloth in a mixture of neutral detergent thinned with water, wring the cloth dry, wipe, and
then finish with a dry cloth.
If using a chemically treated cleaning cloth, be sure to follow any and all instructions on its use.
¶ Wiping with a mixture containing benzene, paint thinner, or other volatile materials may result in warping or the peeling of the
cabinet coating.
¶ To remove dust from the speaker mesh protectors, use a vacuum cleaner with a brush adapter.
Note that you should never attempt to clean the speakers by applying a vacuum directly to the speaker mesh protectors or by
using nozzle adaptor.
¶ Scratching the cabinet or the speaker mesh protectors with a fingernail or the application of force using any other hard object
may result in scratching.
Also note that inserting any sharp object into the speaker mesh protectors may result in the opening of holes.
Never apply insecticide or any other volatile materials on the cabinet. Also avoid leaving any rubber or plastic materials
on the cabinet for any extended period of time, as doing so may result in warping or the peeling of the cabinet coating.
Disposing of your used product
EU-wide legislation as implemented in each Member State requires that used electrical and electronic products carrying the mark (left) must be disposed of separately from normal household waste.
This includes plasma monitors and their electrical accessories. When you dispose of such products, please follow the
guidance of your local authority and/or ask the shop where you purchased the product.
After collecting the used products, they are reused and recycled in a proper way. This effort will help us reduce the wastes as well
as the negative impact to the human health and the environment at the minimum level.
The mark on the electrical and electronic products only applies to the current European Union Member States.
Specifications
Description : 2-way, 3-speaker system (Bass reflex speaker system; Qty: 1)
Impedance : 6 Ω
Rated input : 15 W
Maximum input : 40 W
External dimensions : 80 mm (W) x 592 mm (H) x 92 mm (D)
3.1 in. (W) x 23 in. (H) x 3.6 in. (D)
(Not including attachment plates; Qty: 1)
Weight : 3.8 kg (8.4 lbs)
(2 speakers / When attachment plates for 42-inch and 50-inch monitors are installed)
4.0 kg (8.8 lbs)
(2 speakers / When attachment plates for 60-inch monitors are installed)
Usage environment
Temperature : 0 °C to 40 °C/32 °F to 104 °F
Humidity : 20 % to 80 %
Storage environment
Temperature : –10 °C to 50 °C/14 °F to 122 °F
Humidity : 10 % to 90 %
¶ The specifications and/or design of this product may be subject to change at any time without prior notice.
NEC and the NEC logo are registered trademarks of NEC Corporation.
8

Enceintes ..............................................................................
PX-SP4U/B
PX-SP4U/S
Mode d’emploi
Merci d’avoir acheté les enceintes NEC PX-SP4U/B•PX-SP4U/S.
Pour être sûr(e) de faire une utilisation optimale de ce produit, lisez ce manuel dans son intégralité.
Après avoir lu le manuel, rangez-le de façon à pouvoir le consulter à nouveau si le besoin s’en fait sentir.
Ce produit est conçu exclusivement pour les écrans à plasma suivants :
¶¶
¶ écrans à plasma 42 pouces : PX-42XR5•PX-42XM5
¶¶
¶¶
¶ écrans à plasma 50 pouces : PX-50XR6•PX-50XM6
¶¶
¶¶
¶ écrans à plasma 60 pouces : PX-60XR5•PX-60XM5
¶¶
— Contrôle des pièces incluses dans le paquet —
Vérifiez bien que tous les éléments ci-dessous sont inclus dans la boîte du
produit que vous avez acheté. Si, pour quelque raison que ce soit, il manque
des pièces ou certaines pièces ne fonctionnent pas correctement, contactez
NEC ou votre revendeur pour obtenir immédiatement de l’aide.
Coussinets (x 2)
Enceinte droite
Enceintes (x 2)
Enceinte gauche
Pour écrans 42 pouces et 50 pouces
Pièces de fixation
Vis de fixation de l’écran
Cordons (x 2)
B
PX-SP4U/
PX-SP4U/
Mode d’emploi (1)
Colliers de cordon (x 2)
Pour écrans 60 pouces
Pièces de fixation
S
Vis de fixation de l’écran
R
Pièces de fixation
droites (x 2)
Pièces de fixation
gauches (x 2)
R
L
L
M8 × 18 mm (x 4)
Vis des pièces de fixation
M4 × 10 mm (x 8)
Pièces de fixation
droites (x 2)
Pièces de fixation
gauches (x 2)
M5 × 12 mm (x 4)
Vis des pièces de fixation
M4 × 10 mm (x 8)

Consignes de sécurité
(explication des symboles utilisés
dans le manuel)
Pour vous permettre d’utiliser le produit correctement et en toute
sécurité, différents symboles sont utilisés pour signaler des points
importants pour éviter tout dommage corporel ou matériel. La
signification de ces symboles est expliquée ci-dessous. Lisez
attentivement ces explications avant de passer au texte principal.
Avertissement
Les paragraphes accompagnés de ce symbole contiennent des
instructions qui, si elles sont ignorées ou mal suivies, présentent un
risque de dommages corporels voire de décès.
Avertissement
¶ Lorsque vous déplacez l’écran à plasma, ne le prenez
jamais par les enceintes. L’écran pourrait tomber et
blesser quelqu’un. Lorsque vous déplacez l’écran à
plasma, tenez-le toujours par le dessous.
¶ Veillez à ce que tous les écrous, boulons et vis soient
bien serrés pour un maximum de sécurité. Si tel
n’était pas le cas, les enceintes risqueraient de
tomber et de blesser quelqu’un.
Attention
Attention
Les paragraphes accompagnés de ce symbole contiennent des
instructions qui, si elles sont ignorées ou mal suivies, présentent un
risque de dommages corporels voire de décès.
Exemples de symboles utilisés dans le manuel
Ce symbole signale les paragraphes de mise en garde
(et d’avertissement) qui contiennent des instructions qui
doivent être observées.
Ce symbole signale les paragraphes qui contiennent des
instructions sur ce qu’il est interdit de faire (c’est-à-dire ce
qu’il ne faut jamais faire).
Ce symbole signale les paragraphes qui contiennent des
instructions ou autres remarques qui obligent l’utilisateur à
faire quelque chose.
Avant d’utiliser vos enceintes
Suivez attentivement les instructions ci-dessous pour protéger
vos enceintes de toute détérioration due à des niveaux de
puissance absorbée excessifs.
¶ Ne lisez jamais des signaux à un niveau supérieur à la puissance
absorbée maximale.
¶ Lorsque vous raccordez les enceintes ou un autre appareil audio
ou visuel à un amplificateur, veillez à ce que l’amplificateur ne
soit pas sous tension.
¶ Evitez de trop monter le volume lorsque vous utilisez un égaliseur
graphique pour beaucoup amplifier des sons haute fréquence.
¶ Ne montez jamais trop le volume lorsque vous utilisez un
amplificateur de performance modeste (cela augmenterait la
distorsion dans la gamme haute fréquence de l’amplificateur, ce
qui endommagerait les enceintes).
Remarque
Selon le mode d’installation choisi, les couleurs peuvent devenir
floues ou d’autres effets peuvent apparaître sur l’écran si l’enceinte
est placée trop près d’un autre écran. Si cela se produit, éloignez
les enceintes de l’écran pendant l’utilisation.
Installation
¶ N’installez jamais les enceintes ou l’écran sur une
plate-forme instable ou une surface irrégulière, ils
risqueraient de tomber et de blesser quelqu’un.
¶ N’installez jamais les enceintes ou l’écran à un endroit
exposé à la lumière directe du soleil ou à des
températures excessives, un incendie pourrait
survenir.
¶ N’installez jamais les enceintes ou l’écran à un endroit
où ils seraient exposés à une poussière ou à une
humidité excessives ou encore à un endroit soumis à
la vapeur ou à des dégagements de fumée générés
par du pétrole (par exemple à proximité d’un poêle ou
d’une table chauffante), un incendie pourrait survenir.
Consignes d’utilisation
¶ Evitez toute utilisation prolongée en cas de distorsion
importante du son, les enceintes risqueraient de
chauffer de façon excessive et de prendre feu.
¶ Ne vous asseyez jamais sur le produit et ne vous y
suspendez pas. Veillez en particulier à ce que des
enfants ne le fassent pas. Ceci risquerait
d’endommager le produit ou quelqu’un pourrait se
blesser.
¶ N’introduisez jamais de l’eau dans les enceintes et ne
les mettez jamais en contact avec un liquide, ceci
pourrait provoquer un incendie ou un choc électrique.
N’utilisez jamais le produit en extérieur, ceci pourrait
également provoquer un incendie ou un choc
électrique.
¶ Ne placez jamais d’objets lourds sur les fils des
enceintes et veillez à ne jamais coincez ces derniers
sous l’écran à plasma. Cela pourrait endommager les
fils et provoquer un incendie ou un choc électrique.
¶ Ne glissez et n’introduisez jamais d’objets
métalliques, de matières facilement inflammables ou
autres corps étrangers dans la bouche ou toute autre
ouverture des enceintes, ceci pourrait provoquer un
incendie ou un choc électrique. L’utilisation du produit
en présence de jeunes enfants doit en outre faire
l’objet d’une attention particulière.
¶ Ne fixez jamais les enceintes sur des appareils autres
que les écrans plasma spécifiés, ceci pourrait
provoquer un incendie ou endommager le produit.
2

Sélectionner les pièces et les vis à utiliser pour installer les enceintes
Ce produit est livré avec des pièces et des vis conçues pour raccorder les enceintes à un écran 42, 50 ou
60 pouces.
Veillez à n’utiliser que les pièces et les vis qui sont prévues pour l’écran plasma que vous avez acheté.
Il est impératif de ne pas utiliser d’autres pièces et vis.
Pièces de fixation
Vis de fixation
Vis de fixation
42/50
Français
60
Pièces de fixation
¶ Veillez à n’utiliser que les pièces et les vis qui sont prévues pour votre écran plasma.
Avertissement
L’utilisation d’autres pièces/vis pourrait entraîner une chute des enceintes, qui
risqueraient de blesser quelqu’un.
Pour fixer les enceintes sur un écran à plasma 42 ou 50 pouces ..... Voir par
Pour fixer les enceintes sur un écran à plasma 60 pouces ................. Voir par
3
4
6

Pour fixer les enceintes sur un écran à plasma 42 ou 50 pouces
R
R
R
Le système se compose d’une enceinte droite (R) et d’une enceinte gauche (L).
Pour les monter, reportez-vous aux étiquettes (R/L) situées à l’arrière des enceintes et sur les pièces de fixation.
1 Retirez les bandes de protection des coussinets puis fixez
les coussinets sur le côté des enceintes comme indiqué
sur le schéma ci-dessous.
Coussinets
2 Placez les enceintes comme indiqué dans le schéma ci-
dessous. (Orientez-les de façon à ce que les prises
d’enceintes se trouvent au bas du schéma)
Fixez les pièces de fixation marquées « R » sur l’enceinte
marquée « R ». Placez les pièces de fixation sur les
enceintes de sorte que les tiges de guidage s’insèrent
dans les trous des pièces de fixation comme indiqué cidessus, puis maintenez les pièces de fixation en place en
les vissant fermement à l’aide de vis M4 x 10 mm (8 vis).
L
M4 × 10 mm
Haut
R
R
R
Prises d’enceintes
L
R
Prises d’enceintes
R
L
Bas
L
L
3 Vissez légèrement les vis M8 x 18 mm dans les trous des
vis situés en haut de l’écran à plasma (2 endroits).
∗ Le schéma ci-dessous donne en exemple un écran
42 pouces.
M8 × 18 mm
Tiges de guidage
4 1 Placez les pièces de fixation situées en haut des
enceintes sur les vis situées en haut de l’écran à
plasma.
2 Alignez les trous des pièces de fixation des enceintes
sur les trous des vis situées au bas de l’écran plasma.
Ensuite, serrez légèrement les vis M8 x 18 mm pour
maintenir le tout en place (2 endroits).
L
L
R
L
R
R
4

5 Serrer complètement les 4 vis.
∗ Serrez les vis tout en poussant légèrement les enceintes contre l’écran à plasma.
Vérifiez que les quatre vis ont été complètement vissées.
Avertissement
Fixation des enceintes sur un
L
écran 50 pouces
R
R
L
¶ Une fois que les enceintes ont été fixées sur l’écran, ne déplacez jamais l’écran en le
prenant par les enceintes. L’écran risquerait de tomber et de blesser quelqu’un.
¶ Veillez à bien serrer les vis. Si tel n’était pas le cas, les enceintes risqueraient de
tomber et de blesser quelqu’un.
Français
Raccorder les cordons des enceintes
Veillez à mettre l’écran hors tension avant de raccorder les
enceintes.
A l’aide des cordons inclus, branchez les prises enceintes des
enceintes sur les prises d’enceintes R/L de l’écran.
Une fois que les enceintes sont branchées, tirez légèrement
sur les cordons pour vérifier qu’ils sont bien insérés
fermement dans les prises d’enceintes.
Si le raccordement était mal fait, cela pourrait
entraîner des interruptions du son ou
l’apparition de bruit dans le son
de sortie.
Colliers de cordon
Retirez la bande protectrice située au dos des colliers de cordon, fixez
les colliers à l’endroit souhaité puis mettez les cordons en place.
Il est à noter que les cordons des enceintes
ont des polarités négative et positive.
Vous devez donc les mettre en place
correctement.
Noir
Rouge
Appuyez sur le bouton de la prise
d’enceinte et tenez-le enfoncé pendant que
vous insérez le fil du cordon d’enceinte.
Quand vous avez fini, relâchez le bouton.
5

Pour fixer les enceintes sur un écran à plasma 60 pouces
Le système se compose d’une enceinte droite (R) et d’une enceinte gauche (L).
Pour les monter, reportez-vous aux étiquettes (R/L) situées à l’arrière des enceintes et sur les pièces de fixation.
1 Retirez les bandes de protection des coussinets puis fixez
les coussinets sur le côté des enceintes comme indiqué
sur le schéma ci-dessous.
Coussinets
2 Placez les enceintes comme indiqué dans le schéma ci-
dessous. (Orientez-les de façon à ce que les prises
d’enceintes se trouvent au bas du schéma)
Fixez les pièces de fixation marquées « TR » sur l’enceinte
marquée « R ». Placez les pièces de fixation sur les
enceintes de sorte que les tiges de guidage s’insèrent
dans les trous des pièces de fixation comme indiqué cidessus, puis maintenez les pièces de fixation en place en
les vissant fermement à l’aide de vis M4 x 10 mm (8 vis).
TL
M4 × 10 mm
TR
L
Haut
Prises d’enceintes
R
BR
Prises d’enceintes
Bas
BL
3 Vissez légèrement les vis M5 x 12 mm dans les trous des
vis situés en haut de l’écran à plasma (2 endroits).
M5 × 12 mm
Tiges de guidage
4 1 Placez les pièces de fixation situées en haut des
enceintes sur les vis situées en haut de l’écran à
plasma.
2 Alignez les trous des pièces de fixation des enceintes
sur les trous des vis situées au bas de l’écran plasma.
Ensuite, serrez légèrement les vis M5 x 12 mm pour
maintenir le tout en place (2 endroits).
6

5 Serrer complètement les 4 vis.
∗ Serrez les vis tout en poussant légèrement les enceintes contre l’écran à plasma.
Vérifiez que les quatre vis ont été complètement vissées.
Avertissement
¶ Une fois que les enceintes ont été fixées sur
l’écran, ne déplacez jamais l’écran en le prenant
par les enceintes. L’écran risquerait de tomber et
de blesser quelqu’un.
¶ Veillez à bien serrer les vis. Si tel n’était pas le
cas, les enceintes risqueraient de tomber et de
blesser quelqu’un.
Raccorder les cordons des enceintes
Veillez à mettre l’écran hors tension avant de raccorder les enceintes.
A l’aide des cordons inclus, branchez les prises enceintes des enceintes sur les prises d’enceintes R/L de l’écran.
Une fois que les enceintes sont branchées, tirez légèrement sur les cordons pour vérifier qu’ils sont bien insérés
fermement dans les prises d’enceintes.
Si le raccordement était mal fait, cela pourrait entraîner
des interruptions du son ou l’apparition de
bruit dans le son de sortie.
Il est à noter que les cordons des enceintes
ont des polarités négative et positive.
Vous devez donc les mettre en place
correctement.
Français
Appuyez sur le bouton de la prise
d’enceinte et tenez-le enfoncé pendant que
vous insérez le fil du cordon d’enceinte.
Quand vous avez fini, relâchez le bouton.
Colliers de cordon
Retirez la bande protectrice située au dos des colliers de cordon, fixez
les colliers à l’endroit souhaité puis mettez les cordons en place.
7
Noir
Rouge

Nettoyer les boîtiers
Veillez à débrancher la prise d’alimentation avant de nettoyer les boîtiers.
¶ Essuyez le boîtier avec un chiffon doux et sec à la texture relativement régulière.
Si le boîtier est particulièrement sale, imprégnez le chiffon de détergent neutre allongé à l’eau, essorez-le bien, passez-le sur
le boîtier et essuyez avec un chiffon sec.
Si vous utilisez une lingette nettoyante traitée chimiquement, suivez toutes les instructions du fabricant sur son utilisation.
¶ L’utilisation d’un mélange contenant du benzène, un diluant ou autre liquide volatil peut provoquer un gondolement ou un
décollement du revêtement.
¶ Pour débarrasser les protections en filet des enceintes de leur poussière, utilisez un aspirateur avec un embout en forme de
brosse.
Il est à noter que toute tentative de nettoyage en appliquant l’embout de l’aspirateur ou un suceur directement sur les
protections en filet des enceintes est à proscrire.
¶ Tout frottement vigoureux de l’ongle ou d’un objet dur sur le boîtier peut en érafler la surface ou, dans le cas des protections
en filet des enceintes, les déchirer.
Il est également à noter que l’introduction d’objets tranchants à l’intérieur des enceintes peut entraîner une ouverture des
trous.
Ne vaporisez jamais d’insecticide ou d’autres produits volatiles sur le boîtier. Evitez également de laisser des objets en
plastique ou en caoutchouc sur le boîtier pendant des périodes prolongées, son revêtement pourrait gondoler ou se
décoller.
Mise au rebut de votre produit usagé
La législation européenne, appliquée dans tous les Etats membres, exige que les produits électriques et électroniques
portant la marque (à gauche) doivent être mis au rebut séparément des autres ordures ménagères. Ceci inclus les
moniteurs plasma et leurs accessoires électriques.
Lorsque vous mettez au rebut ces produits, veuillez suivre les recommandations des autorités locales et/ou demandez conseil
au magasin qui vous a vendu le produit. Une fois ces produits mis au rebut, ils sont recyclés et de manière appropriée.
Cet effort nous aidera à réduire les déchets et à maintenir au niveau minimum leurs conséquences négatives sur la santé
humaine et sur l’environnement. La marque figurant sur les produits électriques et électroniques ne s’applique qu’aux Etats
membres actuels de l’Union Européenne.
Spécifications
Description : Système 2 voies 3 hauts-parleurs (système d’enceintes basse reflex ; Qté : 1)
Impédance : 6 Ω
Puissance
absorbée normale : 15 W
Puissance
absorbée maximale : 40 W
Dimensions
extérieures : 80 mm (L) x 592 mm (H) x 92 mm (P)
3,1 pouces (L) x 23 pouces (H) x 3,6 pouces (P)
(hors plaques de fixation ; Qté : 1)
Poids : 3,8 kg (8,4 lbs) (2 enceintes / lorsque les pièces de fixation pour écran 42 ou 50 pouces sont installées)
4,0 kg (8,8 lbs) (2 enceintes / lorsque les pièces de fixation pour écran 60 pouces sont installées)
Conditions d’utilisation
Température : 0 °C à 40 °C / 32 °F à 104 °F
Humidité : 20 % à 80 %
Conditions d’entreposage
Température : –10 °C à 50 °C / 14 °F à 122 °F
Humidité : 10 % à 90 %
¶ Les spécifications et la conception de ce produit peuvent être modifiées en vue de leur amélioration sans avis préalable.
NEC et le logo NEC sont des marques déposées de NEC Corporation.
Printed in China / Imprimé en Chine <AZR1192-A>
8
 Loading...