

Page 1

NVM-2e
with i-Series
Quick Setup Guide
2.01
Read Chapter 1: Introduction, to:
• Learn about the NVM-2e Voice Mail System (page 1).
Read Chapter 2: Installing the Voice Mail, to:
• Install the Voice Mail Hardware (page 8).
• Connect a laptop to the Voice Mail (page 9).
• Connect the Voice Mail to the phone system (page 10).
Read Chapter 3: Phone System Programming, to:
• Learn how to program your telephone system for Voice Mail (page 11).
Read Chapter 4: Programming the Voice Mail, to:
• Follow basic programming steps to get Voice Mail up and running (page 15).
Read Chapter 5: End-User Operation, to:
• Operate the Voice Mail (page 35).
Read Chapter 6: NVM-2e Menu Trees, to:
• Learn about the NVM-2e Menu Trees and the functions that you can perform
from each menu (page 41).
Read Appendix A: Application Notes, to:
• Learn about sev eral unique applications that s how the Voice Mail’s power and
flexibility (page 47).
Page 2

This manual has been developed by NEC America, Inc. It is intended for the use of its customers and service personnel, and
should be read in its entirety before attempting to install or program the system. Any comments or suggestions for imp r oving
this manual would be appreciated. Forward your remarks to:
NEC America, Inc., Corp orate Networks Group
4 Forest Parkway Shelton, CT 06484
Attention: Manager, Technical Publications
http://www.cng.nec.com
Nothing contained in this manual shall be dee m ed to be, and this manual does not constitute, a warranty of, or representation
with respect to, any of the Equipment covered. This manua l is subject to change withou t notice and NEC America, Inc. has
no obligation to provide any updates or corrections to this manual. Further, NEC America, Inc. also reserve s the right,
without prior notice, to make changes in equ ipment design or components as it deems appropriate. No repre sentation is made
that this manual is complete or accurate in all respects and NEC America, Inc. shall not be liable for any errors or omissions.
In no event shall NEC America, Inc. be liable for any incidental or consequential damages in connection with the use of this
manual. This document contains proprietary informat ion that is protecte d by copyright. All rights are reserved. No part of this
document may be photocopied or reproduced without prior written consent of NEC America, Inc.
© 2002 by NEC America, Inc. All Rights Reserved
Printed in U.S.A.
Page 3

Table of Cont ents NVM- 2e/i- Series Quick Setup G uide ◆ TOC-i
Table of Contents
Chapter 1:
Introduction . . . . . . . . . . . . . . . . . . . . . . . . . . . . . . . . . . . . . . . . . . . . . . . . . . . . 1
About the Voice Mail System . . . . . . . . . . . . . . . . . . . . . . . . . . . . . . . . . . . . . . . . . . . .1
NVM-2e Voice Mail System . . . . . . . . . . . . . . . . . . . . . . . . . . . . . . . . . . . . . . . . . . . . . . . . . . . . . . 1
The Automated Attendant and the Instruction Menu . . . . . . . . . . . . . . . . . . . . . . . . .1
Subscriber Mailboxes. . . . . . . . . . . . . . . . . . . . . . . . . . . . . . . . . . . . . . . . . . . . . . . . . 1
Default Numbering and Mailbox Assignments . . . . . . . . . . . . . . . . . . . . . . . . . . . . . .1
The NVM-2e Cabinet. . . . . . . . . . . . . . . . . . . . . . . . . . . . . . . . . . . . . . . . . . . . . . . . . . . . . . . . . . . . 2
The Communication Port (COM 2) . . . . . . . . . . . . . . . . . . . . . . . . . . . . . . . . . . . . . . . . . . . . . . . . .2
Specifications. . . . . . . . . . . . . . . . . . . . . . . . . . . . . . . . . . . . . . . . . . . . . . . . . . . . . . . . . . . . . . . . . . 3
Chapter 2:
Installing the Voice Mail . . . . . . . . . . . . . . . . . . . . . . . . . . . . . . . . . . . . . . . . . . 5
Overview . . . . . . . . . . . . . . . . . . . . . . . . . . . . . . . . . . . . . . . . . . . . . . . . . . . . . . . . . . . . .5
Installation Requirements . . . . . . . . . . . . . . . . . . . . . . . . . . . . . . . . . . . . . . . . . . . . . . 6
Unpacking the Equipment . . . . . . . . . . . . . . . . . . . . . . . . . . . . . . . . . . . . . . . . . . . . . . . . . . . . . . . . 6
General Equipment Requirements . . . . . . . . . . . . . . . . . . . . . . . . . . . . . . . . . . . . . . . . . . . . . . . . . .6
Phone System Requirements . . . . . . . . . . . . . . . . . . . . . . . . . . . . . . . . . . . . . . . . . . . . . . . . . . . . . . 6
Site Requirements . . . . . . . . . . . . . . . . . . . . . . . . . . . . . . . . . . . . . . . . . . . . . . . . . . . . . . . . . . . . . . 7
Installing the Voice Mail Hardware . . . . . . . . . . . . . . . . . . . . . . . . . . . . . . . . . . . . . . . 8
Connecting a Laptop to the Voice Mail . . . . . . . . . . . . . . . . . . . . . . . . . . . . . . . . . . . . . . . . . . . . . . . . . . . . . 9
Connecting the Voice Mail to a Phone System . . . . . . . . . . . . . . . . . . . . . . . . . . . . 10
Connecting to the i-Series Phone System. . . . . . . . . . . . . . . . . . . . . . . . . . . . . . . . . . . . . . . . . . . . . . . . . . . 10
Page 4

TOC-ii ◆ NVM-2e/i-Series Quick Setup Guide Table of Contents
Chapter 3:
Phone System Programming . . . . . . . . . . . . . . . . . . . . . . . . . . . . . . . . . . . . . 11
Overview . . . . . . . . . . . . . . . . . . . . . . . . . . . . . . . . . . . . . . . . . . . . . . . . . . . . . . . . . . . 11
Phone System Programming . . . . . . . . . . . . . . . . . . . . . . . . . . . . . . . . . . . . . . . . . . .1 2
Voice Mail Required Hardware and Software. . . . . . . . . . . . . . . . . . . . . . . . . . . . . . . . . . . . . . . . 12
Phone System Hardware and Software Requirements. . . . . . . . . . . . . . . . . . . . . . . . . . . . . . . . . . 12
Hardware . . . . . . . . . . . . . . . . . . . . . . . . . . . . . . . . . . . . . . . . . . . . . . . . . . . . . . . . . 12
Software . . . . . . . . . . . . . . . . . . . . . . . . . . . . . . . . . . . . . . . . . . . . . . . . . . . . . . . . . . .12
Required Phone System Programming . . . . . . . . . . . . . . . . . . . . . . . . . . . . . . . . . . . . . . . . . . . . . 12
Optional Phone System Programming. . . . . . . . . . . . . . . . . . . . . . . . . . . . . . . . . . . . . . . . . . . . . . 14
Chapter 4:
Programming the Voice Mail . . . . . . . . . . . . . . . . . . . . . . . . . . . . . . . . . . . . . 15
Overview . . . . . . . . . . . . . . . . . . . . . . . . . . . . . . . . . . . . . . . . . . . . . . . . . . . . . . . . . . . .15
Initializing the Voice Mail for Your Phone System . . . . . . . . . . . . . . . . . . . . . . . . . 16
Installing the Phone System. . . . . . . . . . . . . . . . . . . . . . . . . . . . . . . . . . . . . . . . . . . . . . . . . . . . . . 16
Default Setup for the Voice Mail . . . . . . . . . . . . . . . . . . . . . . . . . . . . . . . . . . . . . . . . 17
Testing the Voice Mail . . . . . . . . . . . . . . . . . . . . . . . . . . . . . . . . . . . . . . . . . . . . . . . . 18
Modifying the Time and Date. . . . . . . . . . . . . . . . . . . . . . . . . . . . . . . . . . . . . . . . . . . 19
Default . . . . . . . . . . . . . . . . . . . . . . . . . . . . . . . . . . . . . . . . . . . . . . . . . . . . . . . . . . . . . . . . . . . . . . 19
Modifications to Default . . . . . . . . . . . . . . . . . . . . . . . . . . . . . . . . . . . . . . . . . . . . . . . . . . . . . . . . 19
Setting the Time and Date . . . . . . . . . . . . . . . . . . . . . . . . . . . . . . . . . . . . . . . . . . . . . . . . . . . . . . . 19
For more information. . . . . . . . . . . . . . . . . . . . . . . . . . . . . . . . . . . . . . . . . . . . . . . . . . . . . . . . . . . 19
Basic Voice Mail Programming. . . . . . . . . . . . . . . . . . . . . . . . . . . . . . . . . . . . . . . . . 19
Checking the Default Automated Attendant . . . . . . . . . . . . . . . . . . . . . . . . . . . . . . . . . . . . . . . . . . . . . . . . 20
About Call Routing Mailboxes . . . . . . . . . . . . . . . . . . . . . . . . . . . . . . . . . . . . . . . . . . . . . . . . . . . 20
About Answering Schedule Tables . . . . . . . . . . . . . . . . . . . . . . . . . . . . . . . . . . . . . . . . . . . . . . . . 20
Default . . . . . . . . . . . . . . . . . . . . . . . . . . . . . . . . . . . . . . . . . . . . . . . . . . . . . . . . . . . . . . . . . . . . . . 21
Modifications to Default . . . . . . . . . . . . . . . . . . . . . . . . . . . . . . . . . . . . . . . . . . . . . . . . . . . . . . . . 22
Programming . . . . . . . . . . . . . . . . . . . . . . . . . . . . . . . . . . . . . . . . . . . . . . . . . . . . . . . . . . . . . . . . . 22
For more information. . . . . . . . . . . . . . . . . . . . . . . . . . . . . . . . . . . . . . . . . . . . . . . . . . . . . . . . . . . 22
Page 5

Table of Cont ents NVM-2e/i-Series Quick Setup Guide ◆ TOC-iii
Assigning Answering Schedule Tables to Ports or Trunks . . . . . . . . . . . . . . . . . . . . . . . . . . . . . . . . . . . . . 23
Default . . . . . . . . . . . . . . . . . . . . . . . . . . . . . . . . . . . . . . . . . . . . . . . . . . . . . . . . . . . . . . . . . . . . . . 23
Modifications to Default . . . . . . . . . . . . . . . . . . . . . . . . . . . . . . . . . . . . . . . . . . . . . . . . . . . . . . . . 23
Programming . . . . . . . . . . . . . . . . . . . . . . . . . . . . . . . . . . . . . . . . . . . . . . . . . . . . . . . . . . . . . . . . . 23
For more information. . . . . . . . . . . . . . . . . . . . . . . . . . . . . . . . . . . . . . . . . . . . . . . . . . . . . . . . . . . 23
Completing the AST Worksheet . . . . . . . . . . . . . . . . . . . . . . . . . . . . . . . . . . . . . . . . . . . . . . . . . . . . . . . . . 24
Default . . . . . . . . . . . . . . . . . . . . . . . . . . . . . . . . . . . . . . . . . . . . . . . . . . . . . . . . . . . . . . . . . . . . . . 24
Modifications to Default . . . . . . . . . . . . . . . . . . . . . . . . . . . . . . . . . . . . . . . . . . . . . . . . . . . . . . . . 25
Programming . . . . . . . . . . . . . . . . . . . . . . . . . . . . . . . . . . . . . . . . . . . . . . . . . . . . . . . . . . . . . . . . . 25
For more information. . . . . . . . . . . . . . . . . . . . . . . . . . . . . . . . . . . . . . . . . . . . . . . . . . . . . . . . . . . 25
Creating and/or Customizing the Call Routing Mailboxe s . . . . . . . . . . . . . . . . . . . . . . . . . . . . . . . . . . . . . 26
Default . . . . . . . . . . . . . . . . . . . . . . . . . . . . . . . . . . . . . . . . . . . . . . . . . . . . . . . . . . . . . . . . . . . . . . 26
Modifications to Default . . . . . . . . . . . . . . . . . . . . . . . . . . . . . . . . . . . . . . . . . . . . . . . . . . . . . . . . .26
Programming . . . . . . . . . . . . . . . . . . . . . . . . . . . . . . . . . . . . . . . . . . . . . . . . . . . . . . . . . . . . . . . . . .26
For more information . . . . . . . . . . . . . . . . . . . . . . . . . . . . . . . . . . . . . . . . . . . . . . . . . . . . . . . . . . .26
Programming the ASTs . . . . . . . . . . . . . . . . . . . . . . . . . . . . . . . . . . . . . . . . . . . . . . . .27
Default . . . . . . . . . . . . . . . . . . . . . . . . . . . . . . . . . . . . . . . . . . . . . . . . . . . . . . . . . . . . . . . . . . . . . . 27
Modifications to Default . . . . . . . . . . . . . . . . . . . . . . . . . . . . . . . . . . . . . . . . . . . . . . . . . . . . . . . . 27
Programming . . . . . . . . . . . . . . . . . . . . . . . . . . . . . . . . . . . . . . . . . . . . . . . . . . . . . . . . . . . . . . . . . .27
For more information. . . . . . . . . . . . . . . . . . . . . . . . . . . . . . . . . . . . . . . . . . . . . . . . . . . . . . . . . . . 27
Modifying the Dial Action Tables . . . . . . . . . . . . . . . . . . . . . . . . . . . . . . . . . . . . . . . 28
Default . . . . . . . . . . . . . . . . . . . . . . . . . . . . . . . . . . . . . . . . . . . . . . . . . . . . . . . . . . . . . . . . . . . . . . .28
Default Dial Action Tables for i-Series . . . . . . . . . . . . . . . . . . . . . . . . . . . . . . . . . . . . . . . . . . . . .29
Modifications to Default . . . . . . . . . . . . . . . . . . . . . . . . . . . . . . . . . . . . . . . . . . . . . . . . . . . . . . . . 30
Programming . . . . . . . . . . . . . . . . . . . . . . . . . . . . . . . . . . . . . . . . . . . . . . . . . . . . . . . . . . . . . . . . . 31
For more information. . . . . . . . . . . . . . . . . . . . . . . . . . . . . . . . . . . . . . . . . . . . . . . . . . . . . . . . . . . 31
Modifying Instruction Menus. . . . . . . . . . . . . . . . . . . . . . . . . . . . . . . . . . . . . . . . . . . .32
Modifying Instruction Menus (Main Greeting Portion) . . . . . . . . . . . . . . . . . . . . . . . . . . . . . . . . . . . . . . . . 3 2
Default . . . . . . . . . . . . . . . . . . . . . . . . . . . . . . . . . . . . . . . . . . . . . . . . . . . . . . . . . . . . . . . . . . . . . . 32
Modifications to Default . . . . . . . . . . . . . . . . . . . . . . . . . . . . . . . . . . . . . . . . . . . . . . . . . . . . . . . . .32
Modifying Instruction Menus (Dialing Options Portion) . . . . . . . . . . . . . . . . . . . . . . . . . . . . . . . . . . . . . . .33
Default . . . . . . . . . . . . . . . . . . . . . . . . . . . . . . . . . . . . . . . . . . . . . . . . . . . . . . . . . . . . . . . . . . . . . . .33
Modifications to Default . . . . . . . . . . . . . . . . . . . . . . . . . . . . . . . . . . . . . . . . . . . . . . . . . . . . . . . . 33
Programming . . . . . . . . . . . . . . . . . . . . . . . . . . . . . . . . . . . . . . . . . . . . . . . . . . . . . . . . . . . . . . . . . .33
For more information. . . . . . . . . . . . . . . . . . . . . . . . . . . . . . . . . . . . . . . . . . . . . . . . . . . . . . . . . . . 33
Recording Names for the Subscriber Mailboxes . . . . . . . . . . . . . . . . . . . . . . . . . . .34
Default . . . . . . . . . . . . . . . . . . . . . . . . . . . . . . . . . . . . . . . . . . . . . . . . . . . . . . . . . . . . . . . . . . . . . . 34
Modifications to Default . . . . . . . . . . . . . . . . . . . . . . . . . . . . . . . . . . . . . . . . . . . . . . . . . . . . . . . . .34
Programming . . . . . . . . . . . . . . . . . . . . . . . . . . . . . . . . . . . . . . . . . . . . . . . . . . . . . . . . . . . . . . . . . 34
For more information . . . . . . . . . . . . . . . . . . . . . . . . . . . . . . . . . . . . . . . . . . . . . . . . . . . . . . . . . . .34
Page 6

TOC-iv ◆ NVM-2e/i-Series Quick Setup Guide Table of Contents
Chapter 5:
End-User Operation. . . . . . . . . . . . . . . . . . . . . . . . . . . . . . . . . . . . . . . . . . . . . 35
Overview . . . . . . . . . . . . . . . . . . . . . . . . . . . . . . . . . . . . . . . . . . . . . . . . . . . . . . . . . . . .35
Telling Subscribers About the Master Extension . . . . . . . . . . . . . . . . . . . . . . . . . . 36
Using the Voice Mail. . . . . . . . . . . . . . . . . . . . . . . . . . . . . . . . . . . . . . . . . . . . . . . . . . 36
Calling Your Mailbox . . . . . . . . . . . . . . . . . . . . . . . . . . . . . . . . . . . . . . . . . . . . . . . . . . . . . . . . . . 36
Leaving a Message (Keyset only) . . . . . . . . . . . . . . . . . . . . . . . . . . . . . . . . . . . . . . . . . . . . . . . . . .36
Forwarding Calls to your Mailbox . . . . . . . . . . . . . . . . . . . . . . . . . . . . . . . . . . . . . . . . . . . . . . . . .37
Transferring Calls to a Mailbox . . . . . . . . . . . . . . . . . . . . . . . . . . . . . . . . . . . . . . . . . . . . . . . . . . .37
Recording your call . . . . . . . . . . . . . . . . . . . . . . . . . . . . . . . . . . . . . . . . . . . . . . . . . . . . . . . . . . . . .38
Person a l A n sw er i n g M ac hine Emu la ti o n ( K ey set Only). . . . . . . . . . . . . . . . . . . . . . . . . . . . . . . . 38
Checking Your Messages (Keyset Only) . . . . . . . . . . . . . . . . . . . . . . . . . . . . . . . . . . . . . . . . . . . .39
Chapter 6:
NVM-2e Menu Trees . . . . . . . . . . . . . . . . . . . . . . . . . . . . . . . . . . . . . . . . . . . . 41
Overview . . . . . . . . . . . . . . . . . . . . . . . . . . . . . . . . . . . . . . . . . . . . . . . . . . . . . . . . . . . .41
NVM-2e Menu Trees. . . . . . . . . . . . . . . . . . . . . . . . . . . . . . . . . . . . . . . . . . . . . . . . . . 42
User’s Menu . . . . . . . . . . . . . . . . . . . . . . . . . . . . . . . . . . . . . . . . . . . . . . . . . . . . . . . . . . . . . . . . . . . . . . . . . .42
System Administrator Menu. . . . . . . . . . . . . . . . . . . . . . . . . . . . . . . . . . . . . . . . . . . . . . . . . . . . . . . . . . . . . 43
Database Management Menu (Sheet 1) . . . . . . . . . . . . . . . . . . . . . . . . . . . . . . . . . . . . . . . . . . . . . . . . . . . . .44
Database Management Menu (Sheet 2) . . . . . . . . . . . . . . . . . . . . . . . . . . . . . . . . . . . . . . . . . . . . . . . . . . . . 45
Database Management Menu (Sheet 3) . . . . . . . . . . . . . . . . . . . . . . . . . . . . . . . . . . . . . . . . . . . . . . . . . . . . .46
Appendix A:
Application Notes . . . . . . . . . . . . . . . . . . . . . . . . . . . . . . . . . . . . . . . . . . . . . . 47
Overview . . . . . . . . . . . . . . . . . . . . . . . . . . . . . . . . . . . . . . . . . . . . . . . . . . . . . . . . . . . .47
Application Note ANV0004A . . . . . . . . . . . . . . . . . . . . . . . . . . . . . . . . . . . . . . . . . . . .48
One Company , wit h A u to A tt en d an t on ly An s w er i n g C al ls A t N i ght . . . . . . . . . . . . . . . . . . . . . . . . . . . . . 48
Application Note ANV00005A . . . . . . . . . . . . . . . . . . . . . . . . . . . . . . . . . . . . . . . . . . .50
One Company, with Auto Attendant Answering Calls Day & Night . . . . . . . . . . . . . . . . . . . . . . . . . . . . . 50
Application Note ANV00006A . . . . . . . . . . . . . . . . . . . . . . . . . . . . . . . . . . . . . . . . . . 52
One Company, with Auto Attendant Answering Calls Day & Night . . . . . . . . . . . . . . . . . . . . . . . . . . . . . 52
Page 7

Chapter 1: In troduc tio n NVM-2e/i-Series Quick Setup Guide ◆ 1
Chapter 1:
Introduction
About the Voice Mail System
About the Voice Mail System
NVM-2e Voice Mail System
Welcome to the NVM-2e Voice Mail syste m!
The Automated Attendant and the Instruction Menu
After you install your NVM-2e Voice Mail system and perform some simple programming, you
will ha ve an Automated Attendant who answers calls, using the rec or d ed default main greeting
from the Instructi on Menu. This menu typically begins with the Thank you for calli n g greeting,
and a list of dialing options follows this greeting. The Automated Attendant lets outside callers
press digits on their Touch Tone phones to process their ow n ca lls. A caller can also lea ve a
recor d ed message for an extension, when the extension is busy, does not answer, or is in the Do N ot
Disturb mode. Or t he calle r can re turn to th e Aut omated Att endant for more d ialing options . If you
wish, you can customize the greeting and the dialing options in the Instruction Menu.
Subscriber Mailboxes
In addition, t he NVM-2e Voice Mail s ystem pro vides a Subs cribe r Ma ilbox f or up to 50 ex ten sions.
This Subscriber Mailbox holds the recorded me s sa ges, lets the extension users record and send
messages to each other, and offers many other features. The Voice Mail lets exte ns ion users know
when they have ne w messages in their Subscriber Mailboxes by lighting the Message Lamp on key
phones.
Default Numbering and Mailbox Assignments
The default numbering of the Subscriber Mailboxes in the NVM-2e depends on the phone system
that you install, but the default Voice Mail for every phone system provides a total of 49 Subscriber
Mailboxes. (One extension number is reserv ed for c onnecting a FAX machine.) If you wish, you
can change thes e mailbox assignments.
Page 8
About the Voice Mail System
2 ◆ NVM-2e/i-Series Quick Setup Guide Chapter 1: Introduction
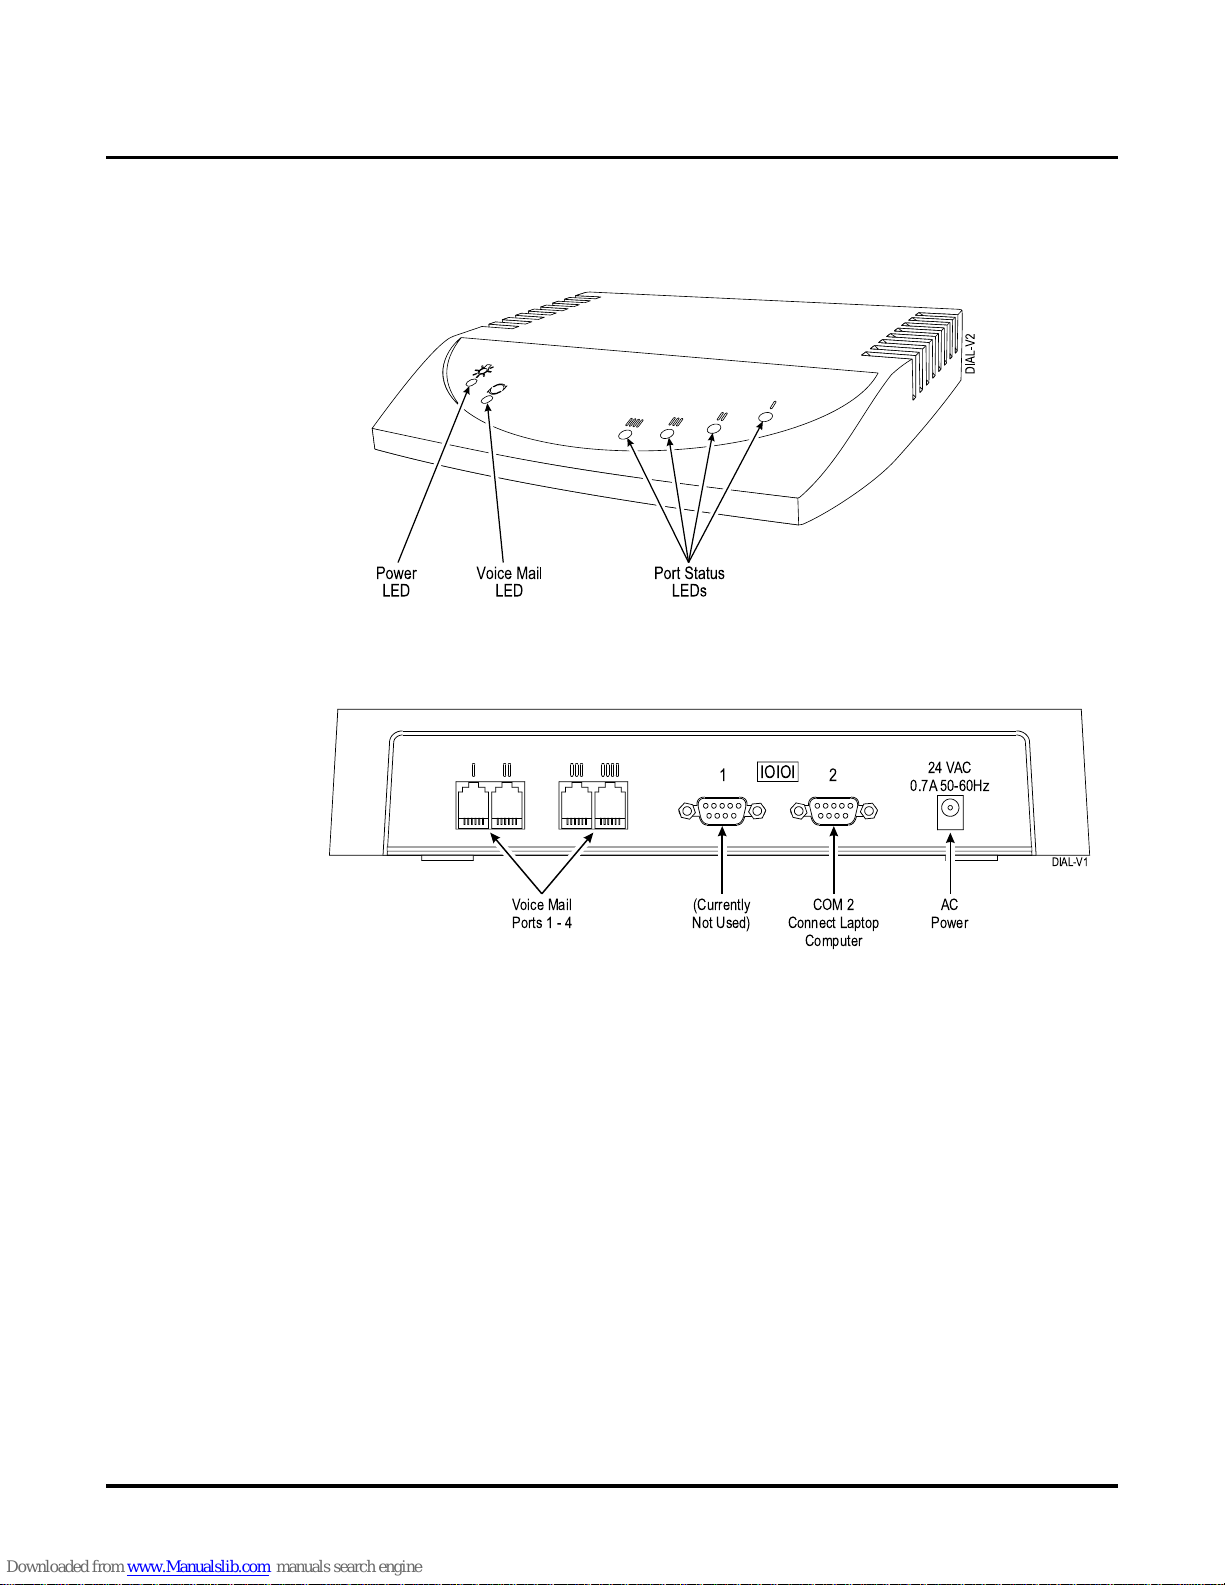
The NVM-2e Cabinet
Figure 1 and Figure 2 show the front and the back of the NVM-2e cabinet.
Figure 1: Front - NVM - 2e Voice Mail Ca bi net
Figure 2: Back - NVM-2e Voice Mail Cabinet
The Communication Port (COM 2)
To program the NVM-2e Voice Mail system, you can use COM 2 (shown in Figure 2) with a
terminal emulat ion software, such as ProCom Plus or Hyper Terminal , which is installed on a
laptop computer.
12
24 VAC
0.7A 50-60Hz
IOIOI
DIAL-V1
Voice Mail
Ports1-4
AC
Power
(Currently
Not Used)
COM 2
Connect Laptop
Computer
Page 9

About the Voice Mail System
Chapter 1: Introduction NVM-2e/i-Series Quick Setup Guide ◆ 3
Specifications
Cabinet Dimensions Length: 12 13/16 inches
Width: 9 15/16 inches
Height: 2 inches
Weight: 5 lb.
Ports 2 or 4
Voice Storage 3 hours
Mailboxes 66 (See page 17)
Maximum Tenants 1
Answering Schedule Tables 2 (with software version 2.0)
1 (with software version prior to 2.0)
Dial Action Tables 4
Telephone System Interface One Analog Station Port for Each Voice
Mail Port
Programming Phone system single line extension or
direct connection to RS-232C port
Electrical Requirements 105 - 120 VAC, 60 Hz
Environmental Requirements
Room Temperature
Humidity
Dust
50-104oF (10-40oC)
20-85% non-condensing
No visible accumulation within 24 hours
Reliability Designed to meet 50,000 hours MTBF
Safety Approv a ls UL, CSA
EMI Emiss i o n s Complies with FCC part 15, class A
Page 10

About the Voice Mail System
4 ◆ NVM-2e/i-Series Quick Setup Guide Chapter 1: Introduction
Page 11

Overview
Chapt er 2: Installing the Voice Mail NVM-2e/i-Series Quick Setup Guide ◆ 5
Chapter 2:
Installing the
Voice Mail
Overvi ew
Overview
This chapter te lls you how to install your NVM-2e Voice Mail. Specifically, you find instructions
for:
1. Installation Requirements (page 6)
2. Installing the Voice Mail Hardware (page 8)
3. Connecting a Laptop to the Voice Mail (page 9)
4. Connecting the Voice Mail to the i-Series Phone System (page 10)
Page 12

Installation Requirements
Unpacking the Equipment
6 ◆ NVM-2e/i-Series Quick Setup Guide Chapter 2: Installing the Voice Mail
Unpacking the EquipmentInstallation Requirements
Unpacking the Equipment
Unpacking the Equipment
Unpack the Voice Mail equipment and make sur e you ha ve the following items:
● NVM-2e Voice Mail cabinet (P/N 17780)
● External power supply
General Equipment Requirements
You will als o need the following items:
● Standard Telecom tool s, including a Phillips -head screwdriver
● ESD wrist strap (to be worn at all times)
● Laptop or other IBM-comp atible computer containing a standard communications software
program, such as Procomm Plus
● Surge Protector
● Standard sheet rock (dry-wall) screws, a center-hole punch (or other pointed tool), tape, and
hammer
● RJ-45 null modem cable
● The manuals for your telephone system
Phone System Requirements
Each Voice Mail port must be connected to an analog extension circui t in the phone system. You
may connect the Voice Mail port directly to the analog sta tio n port or to a port on a 2-OPX Module .
For each Voice Mail port, you may use:
- at least one modular li ne cord
- a port on a 2-OPX Module (if desired)
- cross-connec t wire and modular jack assemblies (see the phone system manual for details).
Page 13

Installation Requirements
Site Requirements
Chapt er 2: Installing the Voice Mail NVM-2e/i-Series Quick Setup Guide ◆ 7
Installation Requirements
Site Requirements
Site Requirements
Be sure to provi de the following conditions:
● A dust-free site, far away from large motors
● Adequate ventilation for the cabinet
● Adequate space above and below if you plan to wall-mount the cabinet
● Temperature of 50–104°F (10–40°C)
● Non-condensing humi dity of 28– 85%
● 10-90% relative humidity (non-condensing).
● Do not place anything on top of this unit or obscure the vents.
● Do not expose this pr oduct to rain or any type of moisture.
● Do not locate the unit near heating applianc es .
● Do not expose the operating unit to direct sunlight.
● Locat e the unit away fro m dev ic e s th at gener ate ele ct r ical noi se li ke fl uo r escen t la m p s an d
motors.
● Protect the unit from dust, high temperat ures , and vibration.
● Do not place any covering over the unit while it is in operation/
● Do not obstruct the ventilation holes on the sides of the unit.
● Allow at least two inch es o f clearanc e fro m an y adj a c en t sur fa ce .
● Request outside lines with open loop flash disconnect supervis ion from the phone company.
Outside lines with open loop disconnect supervi s ion prevent the recording of unwanted
silence. This can happen when an Automated Attendant caller records a message and then
hangs up, but the Voice Mail is unabl e to detect the hangup. To test your system, call in and
wait for the Autom ated Attendan t to to ans wer , and then ha ng up. See if the port drops (hangs
up).
Request that your telephone compan y apply an open loop of at l ea st 300 milliseconds. If this
feature is not available in the area, request that continuous dial tone be sent upon disconnect
from the far end (that is when an Automated Attendant calle r hangs up).
IMPORTANT
Take care of this Voice M ail Syste m by ob serving al l s i te re qu i r ements list ed be l ow.
Failure to do so may harm th e rel iability and continued operation of the equipmen t.
Page 14
Installing the Voice Mail Hardware
8 ◆ NVM-2e/i-Series Quick Setup Guide Chapter 2: Installing the Voice Mail
Installin g the Voi ce Mail H ardware
To install the Voice Mail:
1. Place the Voice Mail on any sturdy flat surface.
OR
Mount the Voice Mail on a wall, using the screw slots located on the bottom of the cabinet.
Make sure that the ventila tion slots are not blocked. Position the cabinet so that LEDs can be
seen. The LEDs are li t w h en :
- the unit has power (Powe r LED)
- the Voice Mail is initializing (Voice Mail LED)
- a particular Voice Mail port is busy (Power Status LEDs).
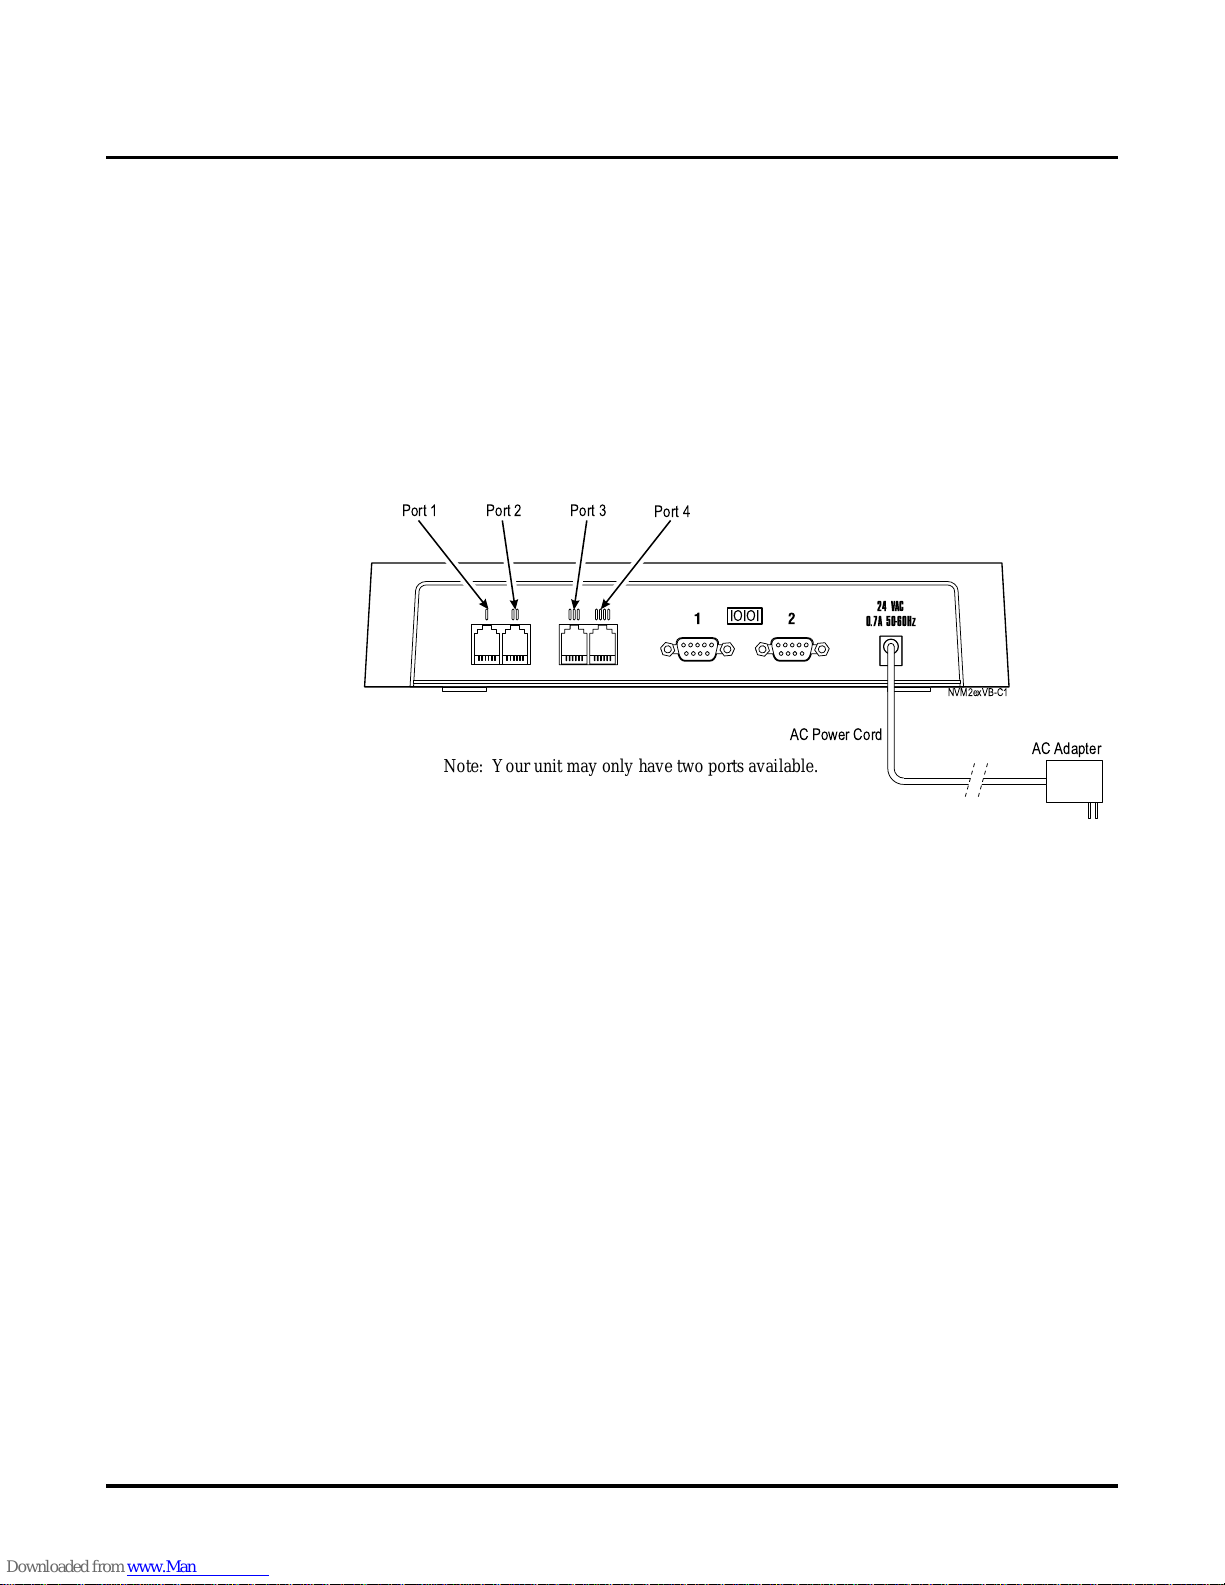
2. Plug the Voice Mail power supply cord into the connector labele d 24 VAC. Plug the AC
Adapter into a 120 V, 60 Hz grounded outlet. See Figure 3.
Figure 3: Installing the NVM-2e Voice Mail System
12
24 VAC
0.7A 50-60Hz
IOIOI
NVM2exVB-C1
Port 2
Port 4
Port 1
Port 3
AC Adapter
AC Power Cord
Note: Your un it m a y only have two po rts av ai la b le.
Page 15
Installing the Voice Mail Hardware
Connecting a Laptop to the Voice Mail
Chapt er 2: Installing the Voice Mail NVM-2e/i-Series Quick Setup Guide ◆ 9
Connecting a Laptop to the Voice Mail
Connecting a Laptop to the Voice Mail
You need a laptop computer to modify certain Voice Mail parameters that you ca nnot program
through a System Administrator Mailbox, such as mailbox numbers, port options, and various system options. You also need a laptop computer to view reports or perform diagnostics.
To connect a laptop computer to the NVM-2e:
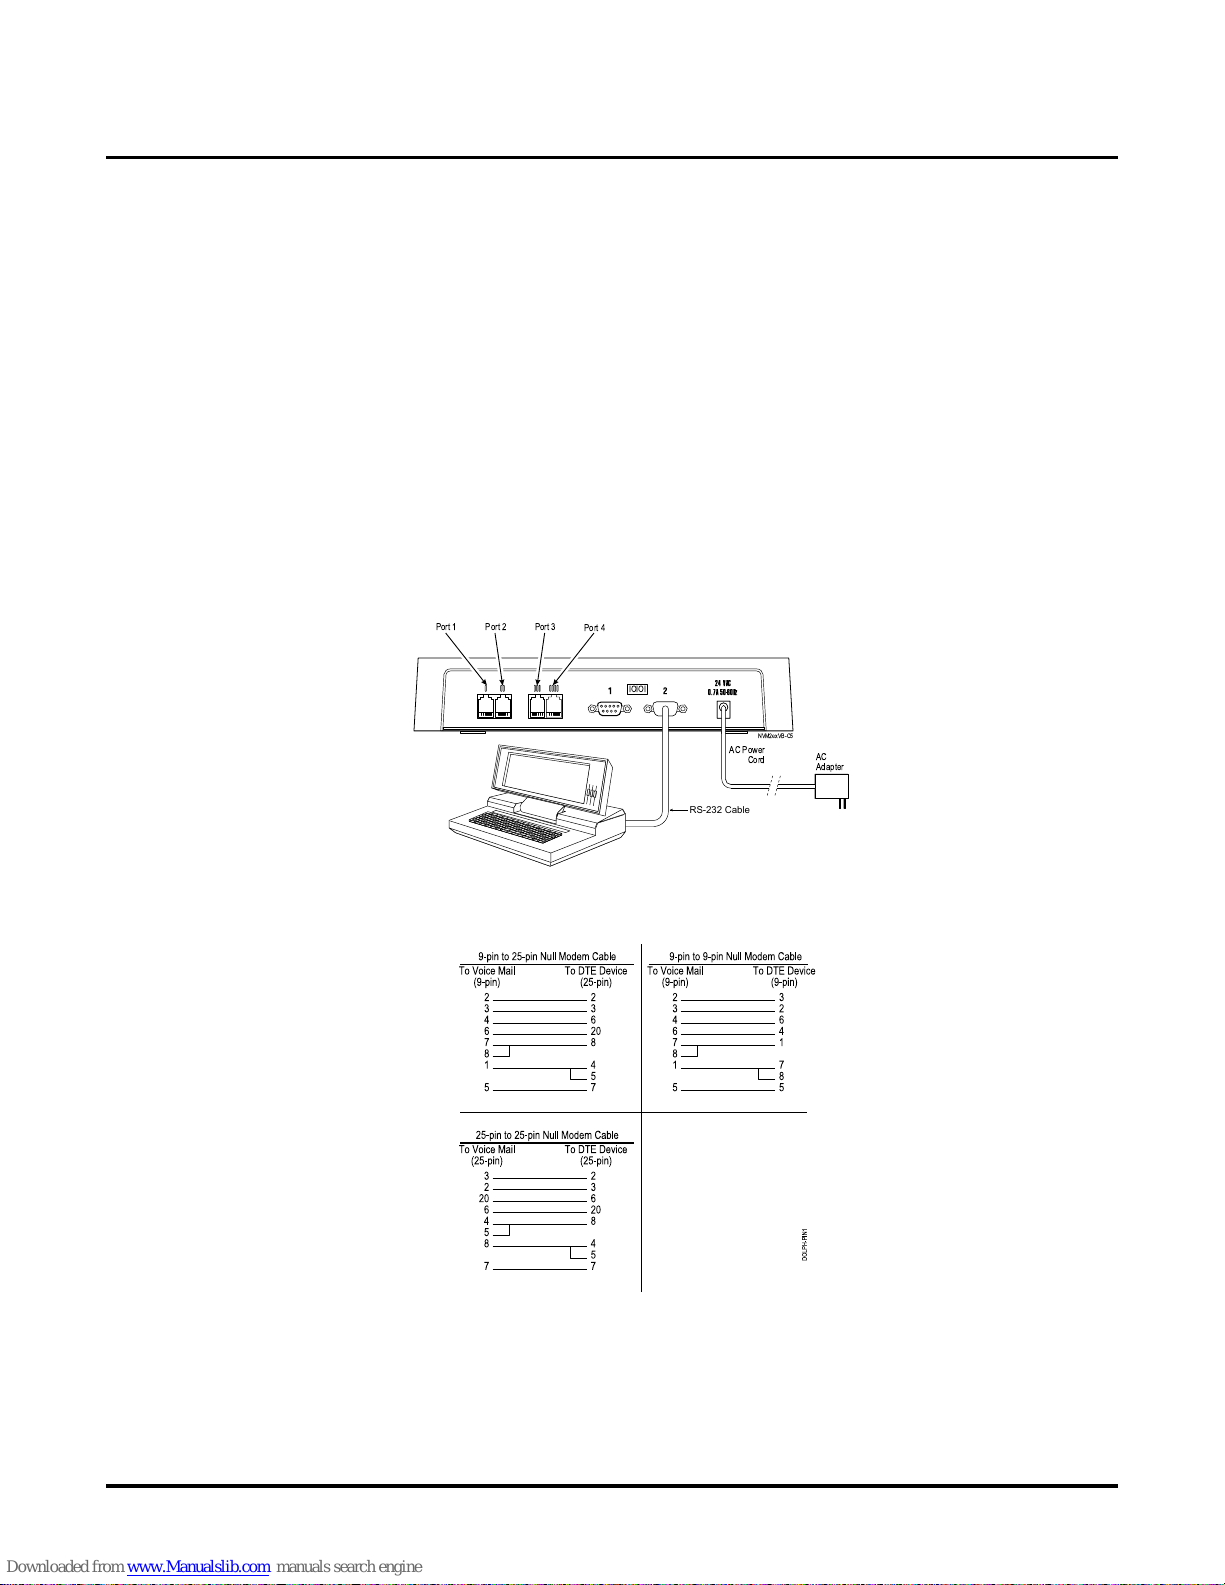
1. Use an RS-232 c able (null modem) to connect the laptop computer to the connector labeled 2
on the Voice Mail. See Figure 4. Make sure that the RS-232 cable has one of the pin-outs
shown in Figure 5.
2. Turn on the laptop computer.
3. Use standard communications software (such as ProComm Plus) to set the laptop to 115200
baud, 8 data bits, no parity, and 1 stop bit. The terminal emulation should be VT100.
■ If you are using W indows HyperTerminal after you selec t the proper COM port for your
laptop: In Port sett ing s, set the Baud Rate to 115200 , Dat a Bits to 8, Parit y to N, Stop Bit s
to 1, and Flow Control to None. Do not leav e Flow Control at t he def au lt se tt ing wh ich is
Hardware. If the laptop does not c o mmunicate with the Voice Mail, try setting Flow Control to x/on, x/off.
Figure 4: Connecting a Laptop Computer to the NVM-2e Voice Mail
.
Figure 5: Required Pin-puts for the RS-232 Cable
4. When the laptop is communicating with the Voice Mail, you will see the Main Menu for the
NVM-2e.
5. Proceed to Connecting the Voice Mail to the i-Series Phone System on the next page.
12
24 VAC
0.7A 50-60Hz
IOIOI
NVM2exVB-C5
AC
Adapter
AC Power
Cord
Port 2
Port 4
Port 1
Port 3
RS-232 Cable
Page 16
Connecting the Voice Mail to a Ph one System
Connecting to the i-Series Phone System
10 ◆ NVM-2e/i-Series Quick Setup Guide Chapter 2: Installing the Voice Mail
Connecting the Voice Mail to a P hone System
Connecting to the i-Series Phone System
Connecting the Voice Mail to the i-Series Phone System
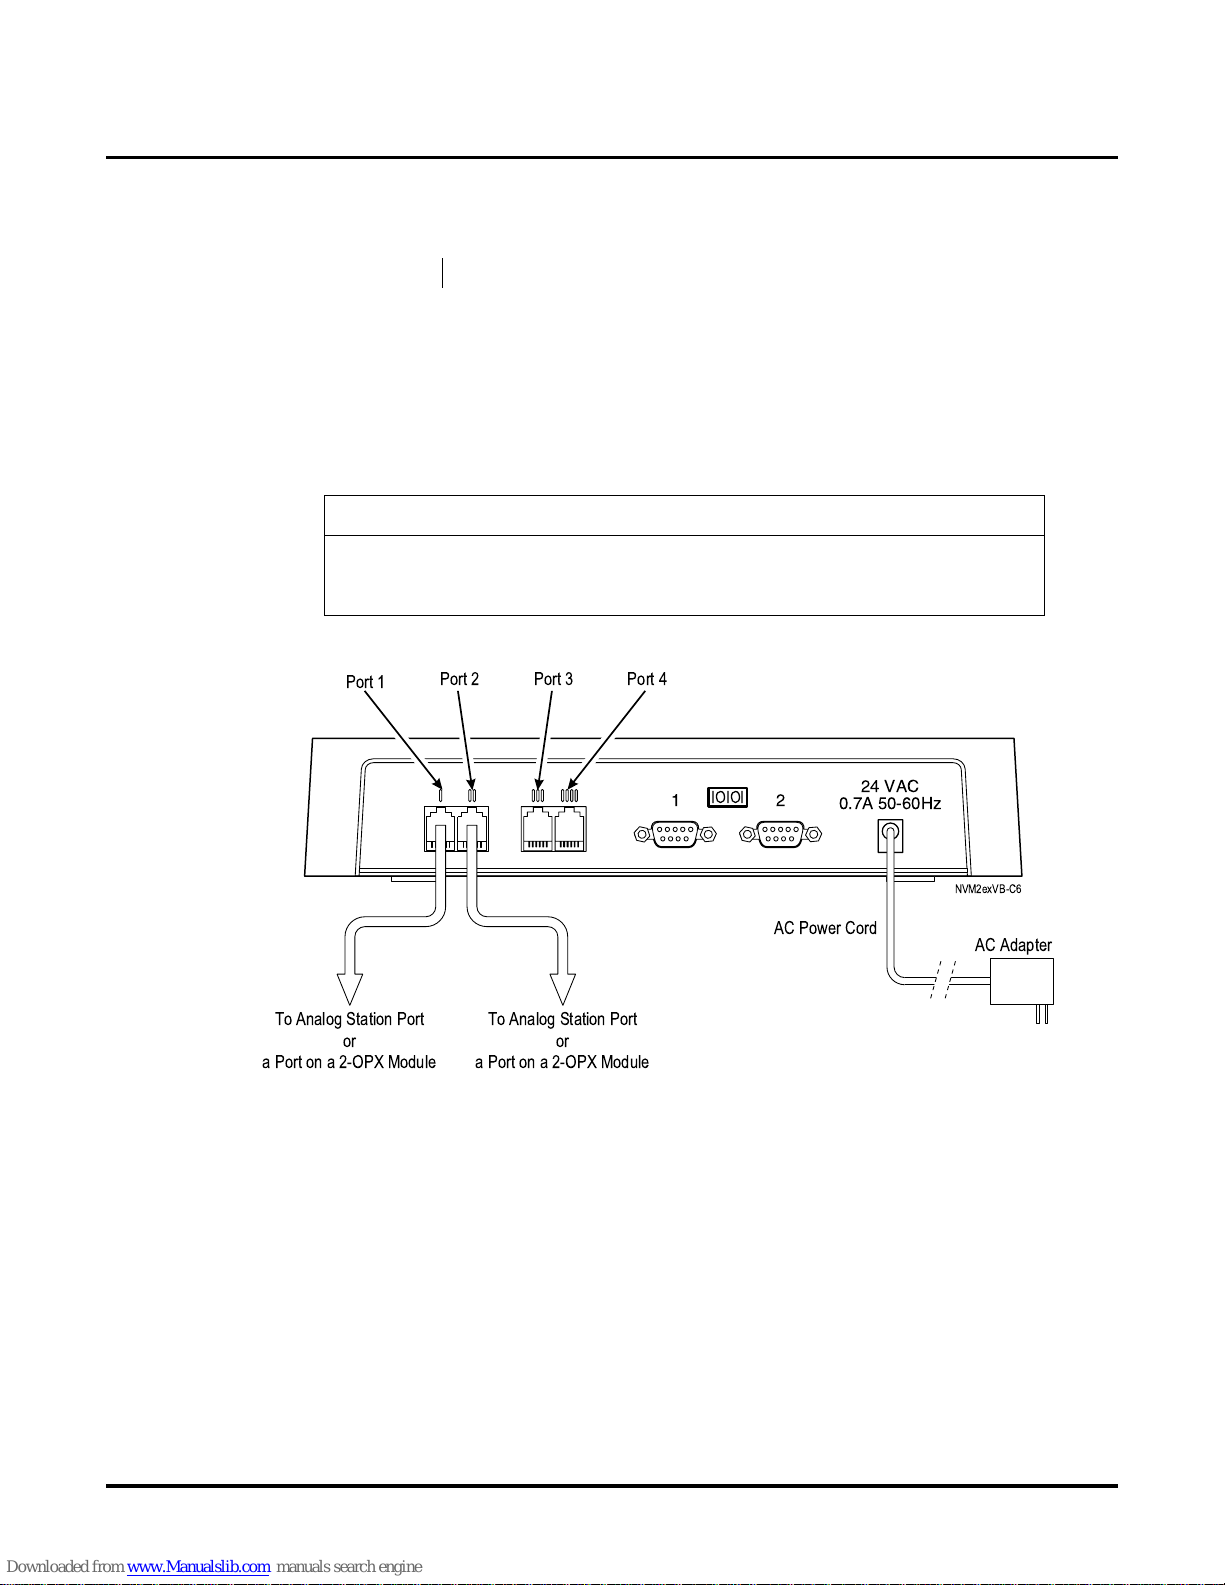
To connect the NVM-2e to the i-Series Phone System:
1. Plug one end of a modular line cord into Port 1 on the NVM-2e.
Plug the other end into an analog station port or a port on a 2-OPX Module, as
shown in Figure 6.
2. Repeat step 1 for Port 2.
3. Repeat step 1 for Ports 3 and 4 if your Voice Mail contains 4 ports.
.
Figure 6: Connecting an i-Series Phone System to the NVM-2e
Availability: All versions of the NVM-2e integrate with the i-Series.
IMPORTANT NOTE
Extension s will rece iv e notif ic ation of new messages (bl ink ing Message Waiting Lights
and interrupted dial tone for single lin e phone s) only if Voice Mail Port 2 is connected
to the phone system.
12
24 VAC
0.7A 50-60Hz
IOIOI
NVM2exVB-C6
AC Adapter
AC Power Cord
Port 2 Port 4
Port 1
Port 3
To Analog Station Port
or
a Port on a 2-OPX Module
To Analog Station Port
or
a Port on a 2-OPX Module
Page 17

Overview
Chapter 3: Phone System Programming NVM-2e/i-Series Quick Setup Guide ◆ 11
Chapter 3:
Phone System
Programming
Overvi ew
Overview
Your phone sys tem requires specific e ntries in several programs, so that it integrates correctly with
the NVM-2e Voice Mail. In addition, the phone system may need to have a piece of spe cific equipment or a certain software level in order for it to operate correctly with the Voice Mail.
This chapter tells you if need any special equipment and the specific programs you will need to
config ure your phone system, so that it integrates with NVM-2e.
Page 18

Phone System Programming
For the i-Series
12 ◆ NVM-2e/i-Series Quick Setup Guide Chapter 3: Phone System Programming
Phone System Programming
For the i-Series
Voice Mail Required Hardware and Software
Phone System Hardware and Software Requirements
Hardware
Each analog Voice Mail port requires one analog port o n the ASTU card . The NVM-2e
integr ates with the 28i, 124i (as long as it is not fully expanded), 28i/124i commonized, and
the 124ie (as long as it is not fully expanded).
Software
Analog Voice Mail is supported in all i-Serie s software vers ions.
Required Phone System Programming
➻ 0004 - Automatic Extension Circuit Type
(Use Phone Programming. Applies to 28i/124i commonized, 124ie)
Make sure that you ha ve already connected the NVM-2e to the phone system before you use
this program.
Run program 0004 to automatically set up extension circuit types.
Note: Running 0004 after the system is set up may require that you re-program certain
devices (such as DSS Consoles and DCI’s).
➻ 0005 - Extension Circuit Type (Whenever possibl e, use 0004)
(Use Phone Programming. Applies to 28i/124i commonized, 124ie)
Assign circuit type 3 to analog Voice Mail ports.
Assign circuit 9, order 2 to digital Voice Mail ports. (Remember to program both the oddnumbered port and the next consecutive even port reserved by the system.)
Note: Entering circuit type using 0005 may require a manua l entry in 1001. [In 1001 - Basic
Extension Port Setup (Part A), Item 1: Telephone Sig naling Type, enter 1 for DTMF.]
Availability: All versions of the NVM-2e integrate with the i-Series.
IMPORTANT
Before you program the phon e system, make sure that you have performed all steps in
Chapter 2: Installing the Voice Mail (beginning on page 5 ). This simplifies programming the phone system. Specifically, make sure that you have connected the NVM-2e
to the phone system.
Page 19

Phone System Programming
For the i-Series
Chapter 3: Phone System Programming NVM-2e/i-Series Quick Setup Guide ◆ 13
➻ 1001 - Basic Extension P ort Setup (part A), Item 5: Terminal Type
(Use Phone Programming. Applies to Commonized Software)
Set all station ports used for Voice Mail as type 1. (Enables DTMF dialing into Voice Mail
from Keysets .)
➻ 1003 - Extension (Department) Groups
Put all the Voice Mail ports in a Department Group (typically the last available group. For 28i/
124i, use group 8), and assign an order number (1, 2, 3, etc.)
This group is used to distribute calls directed to the Voice Mail. It also allows DILs to the
Voice Mail to ring other Voice Mail ports when the DIL’s assigned port is busy.
➻ 1005 - Class of Service
Assign all of the Voice Mail ports with an unus ed Cla ss of Se rvice (t ypi cally, the last a v ail able
COS. For 28i/124i, use COS 8.).
➻ 0410 - Extension (Department) Group Options, Item 3: Voice Mail Group
Enter 1 for the Voice Mail group (the Group you assigned in Program 1003)
Designate which Department Group is to be assigned as a Voice Mail Group.
➻ Program 0419 - Class of Service Options (Part B), Item 26: Message Wait Dialtone
Enter 0 (zero) for the Class of Service assigned to the Voice Mail ports.
(Stutter dial tone on a Voice Mail port causes Message Wait Lamping and tr ansf er problems.)
➻ 0516 - Voice Mail Master Number
Assign an e xtens ion number and n ame fo r the Voice Mail Maste r Number. Be sure th e number
you select doe s not c orres pond to a n inst alle d e xtens ion or fe ature. Con sider pickin g a n umber
that is outside the normal extension numbering range (e.g., 600). Do not sele ct a numbe r that
begins with 1, 8 or 9.
➻ 1017 - Voice Mail Por t Assignment
(Applies to 28i/124i with software versions 5.07 and lower)
(F or ALL other i-series soft ware versions, use Program 1003)
Assign single line (ASTU PCB) ports as Voice Mail po r ts. The sy stem allows u p to 16 Voice
Mail ports.
Page 20

Phone System Programming
For the i-Series
14 ◆ NVM -2e/i-Seri es Quick Setup Guide Chapter 3: Phone System Programming
Optional Phone System Programming
➻ 0401 - Tenant Group Options, Part A, Item 18: SLT Answering Mode
Enter 1 for this option to enable Conver sation Record.
➻ 0401 - Tenant Group Options , Part A, Item 23: DIL Call Waiting
If setting up Immediate Voice Mail Overflow, enter 0. If setting up Delayed Voice Mail Overflow, enter 1.
➻ 0405 - System Timers (Part A), Item 62: DIL No Answer Recall Time
If setting up Delaye d Voice Mail Overflo w, enter a timer va lue greater than 0. Overflow will
occur after this interval (provided the other related progra m mi ng is correct). If setting up
Immediate Voice Mail Overflow, enter 0.
➻ 0405 - System Timers (Part A), Item 65: Record Alert Tone Interval Time
Set the interval bet w een Voice Mail Conv ersation Reco r d alerts. The alert is two s hor t beeps
followed by a pro g rammabl e in t er val of sil en ce.
➻ 0406 - COS Options, Item 57: Continued Dialing
Enable Continued Dialing (1) for all extensions that will dial Voice Mail features.
➻ 0901 - Basic Trunk Port Setup (Part A), Items 14-17; Trunk Service Type
Assign Service Type 4 to each trunk you want to ring into Voice Mail as a Dire ct Inward Line
(DIL).
➻ 0909 - Extension Ring Group Assignment
To enabl e Voice Mail Overflow, assign selected extensions t o a Ring Group tha t w ill ring for
unanswered DILs to Voice Mail ports. Enter 1 to enabl e overflow ringing.
➻ 0910 - Trunk Ring Group Assignment
To enable Voice Mail Over f low, assign the Voice Mail DILs to the Ring Group specif ied in
program 0909 abov e. This allows calls on the DILs to ring other extensions when all VM
ports are busy.
➻ 0917 DIL Assignment
Assign a Voice Mail port as the DIL destination for each tru nk that should directly ring into
Voice Mail. (Requires Trunk Service Type 4 in 0901.) If all Voice Mail ports are in the same
unique Extension (Department) Group (see Program 1003 on page 13), the DIL will ring
another Voice Mail port if its assigne d port is busy.
➻ 1005 - Class of Service
Assign a Class of Service (1-15) to an extension.
➻ 1006 - Programming Function Keys
Assign a Voice Mail key to an extension (code 1059 plus extension number).
(Optional) Assign a Voice Mail Record key to an extensi on code (1060).
(Optional) Assign a Personal Answering Machine Emulation key (code 1072).
➻ 1027 - Fixed Call Forward in g Setup
Transf erred, DIL and DID calls can forward to Voice Mail using this program.
For an extension port, assign the Fixed Call Forwardi ng Type (0-4) and the destination extension port (first Voice Mail extension port.) Available types are:
0 = Fixed Call Forw arding off
1 = Fixed Call Forwarding with Both Ringing (do not use for Voice Mail ports)
2 = Fixed Call Forwarding when Unanswered
3 = Fixed Call Forw arding Immediate
4 = Fixed Call Forwarding when Busy or Not Answered
Page 21

Overview
Chapter 4: Voice Mail Programming NVM-2e/i-Series Quick Setup Guide ◆ 15
Chapter 4:
Programming
the Voice Mail
Overvi ew
Overview
This chapter provides instructions for programming the basic Automated Attendant and a few
other important fe atures. After you perform a few easy steps, you will have the basic NVM-2e
Voice Mail System customized for your communication needs. Specifically, this chapte r contains
information about the following topics:
1. Initializing the Voice Mail for Your Phone System (page 16)
2. Default Setup for the i-Series (page 17)
3. Testing the Voice Mail Operation (page 18)
4. Basic Voice Mail Programming (page 19)
● Modifying the Ti me and Dat e (page 19)
● Checking the Default Automated Attendant (page 20)
● Assigning Answering Schedule Tables to Ports or Trunks (page 23)
● Completing the AST Worksheet (page 24)
● Creating and/or Custom izing Call Routing Mai lboxes (page 26)
● Programming the ASTs (page 26)
● Modifying the Dial Action Tables (page 28)
● Modifying the Instruction Menus for the Main Greeting and Dialing Options (page 32)
● Recording Names for Subscriber Mailboxes (page 34)
When you are finished with this chapter, use Chapter 3, Programming, in the NVM-2e System
Guide (P/N 17780INS08 or high er) to perform any other programming that you may nee d.
Page 22

Initializing the Voice Mail for Your Phone System
Installing the Phone System
16 ◆ NVM -2e/i-Seri es Quick Setup Guide Chapter 4: Voice Mail Programm ing
Installing the Phone SystemInitializing the Voice Mail for Your Phone System
Initializing the Voice Mail for Your Phone System
Installing the Phone System
At default, the Voice Mail database should already have the i-Series as the installed phone
system. Howe v er , it is recommended t hat you v erify tha t th e i-Serie s is the i nstalle d phone s ystem.
To program the Voice Mail as explained below, your NVM-2e requires software version 2.00 or
higher.
To verify that an i-Series phone system is installed in the Voice Mail:
1. Turn on the laptop or other computer, and access the communic ations software.
When the computer is communicating with the Voice Mail, you will see the MAIN MENU ->
prompt.
2. At the MAIN MENU -> prompt, press IN and t h en Enter to select Insta ll System .
The Install Syst em Menu will be displayed. Each phone syste m on this menu corresponds to
a number in the column at the left.
3. The default ent r y sho uld already be 2 (the number that correspo nds to the 28i/124i phone
system). If it isn’t, enter 2 and press Enter.
4. Follow the instructions on your Voice Mail screen.
For information about integrating the i-Series with the Voice Mail, see Chapter 3: Phone
System Programming starting on page 11.
This option is also availabl e on the Database Management Menu. For
more information, see Database Management Menu Tree in Chapter
6.
******* INSTALL SYSTEM Menu *******
Press command below,
then press Enter:
To Install the Voice Mail
System for:
1
2
3
4
90
91
92
E
PORTRAIT 308/824
28i/124i
ONYX VS/VSI/DS100/DS01
DS2000
To Install Voice Mail Ports only
To Install Voice Compression Rate only
To View Current Settings
To Exit to MAIN Menu
Page 23

Default Setup for the Voice Mail
Mailbox Configuration with the i-Series
Chapter 4: Voice Mail Programming NVM-2e/i-Series Quick Setup Guide ◆ 17
Mailbox Configuration with the i-SeriesDefault Setup for the Vo ice Mail
Mailbo x Configura tion
At default, the NVM-2e is already ini tialized for the i-Series. As a result, the Voice Mail database
is set up with the 66 def ault mailboxes shown below. You cannot cha nge this number of default
mailboxes in the NVM-2e. However, you can change mailbox es that are defaulted as one type to
another type. But if you cha nge trunk mailboxes to some other type, it is recommended that you
keep one mailbox defined as a trunk mailbox.
Mailbox Type Default # of
Mailbox Type
Default Numbering of Mai lboxes
Announcement Mailbox 2 800-801
Call Routing Mailbox 4 802-804,
807
Distribution Mailbox 1 805
Future Delivery Mailbox 1 806
Subscriber Mailbox 49 301-307,
309-350
Subscriber Mailbox Reserved f o r
Fax
1 308
Trunk Mailbox 8 001-008
Page 24

Testing the Voice Mail
18 ◆ NVM -2e/i-Seri es Quick Setup Guide Chapter 4: Voice Mail Programm ing
Testin g the Voice Mail
Testing the Voice Mail
Once the NVM-2e has b een installed and i nitialized, y ou s hould perform the foll owing two te sts to
check Voice Mail operation.
Test 1 (for the Automated Attendant):
1. Call into a trunk that you have ass igned to the NVM-2e.
2. Listen for: Thank you for calling. If you are calling from a Touch Tone phone, please dial
the extension number you wish to reach or dial 0 for assistance. If you are calling from a
rotary dial phone, please stay on the line for assistance.
Test 2 (for Voice Mail):
1. From the MAIN MENU - > pr ompt , se l ect DI - Diagnostics and then press Enter.
2. Enter the password (the default password is CTL), if requested and press Enter.
3. Select PA - Port Activity and then press Enter.
4. At a Multibutton extension, press the Message Ke y.
5. Listen for: You have —messages (if you did not install a default Security Code) or Please
enter your security code.
6. Repeat steps 4 and 5 until you see each Voice Mail port operating.
If you do not hear the stated voice prompts, check the equipment connections and the telephone
system programming for Voice Mail.
Page 25

Basic Voice Mail Programming
Modifying the Time and Date
Chapter 4: Voice Mail Programming NVM-2e/i-Series Quick Setup Guide ◆ 19
Modifying the Time and Dat eBasic V oice Mail Programming
Modifying the Time and Date
The NVM-2e has an intern al clo ck and cale ndar tha t mus t be set i n order for th e Voice Mail to work
correctly. You can set the time and date through t he System Administrator Mailbox or by using the
laptop computer. At default, the lowest extens ion num ber in the phone system is assign ed to the
System Administrator Mailbox.
Default
USA Eastern Standard T im e and Date
Modifications to Default
Date ______________________
Time ______________________
Setting the Time and Date
To set the time and date from the System Administrator Mailbox:
1. Log onto a System Administrator Mailbox (the lowest extension in the phone system):
■ From any extension: Get intercom dial tone and dia l Voice Mail m as ter extensi on number.
OR
■ Dial outside phone number to reach the Automated Attendant.
2. If you hear the company greeting, dial #. Otherwise go to step 3.
3. If requested, dial System Administrator mailbox number.
4. If requested, dial s ec urity code.
5. Press SA (36) for the System Administrator Menu.
6. Press TI (84) to set the system time.
7. Follow the voice pr o mpts.
8. When you are finished setting the time, return to the System Administrator Menu.
9. Press DT (38) to set the system date.
10. Follow th e vo ice prompts.
From MAIN Menu (on the lapt op c om puter):
1. Select Maintenance.
2. For further instructions, see Set System Time and Set System Date in the NVM-2e System
Guide (P/N 17780INS08 or high er).
For more information
See System Time and Date in the NVM-2e System Guide (P/N 17780INS08 or higher).
Page 26

Basic Voice Mail Programming
Checking the Default Automated Attendant
20 ◆ NVM -2e/i-Seri es Quick Setup Guide Chapter 4: Voice Mail Programm ing
Checking the Default Automated Atte ndant
Checking the Def a ult Automated Att e ndant
The Automated Attendant answers incoming call s using a Cal l Routi ng mailbox. That is, t he Voice Mail
sends an incoming caller to a Call Routing mailbox and plays , to the calle r, the message that is recorded
for that mailbox (e.g., Thank you for calling ABC company.) The default Automated Attendant uses
two different Call Routing Mailboxes to answer incoming calls according to programmed schedules.
Call Routing Mailboxes and the Answering Sche dule Tables are explained below.
For a quick loo k at the default Automated Attendant setup, see also Figure 7: How the Default
Automated Attendant Handles Call s on the next page.
About Call Routing Mailboxes
A Call Routing Mailbox (used in conjunction with a Dia l Action Table) lets callers press a dialpad
key (0-9, *, #) on a Touch Tone phone to route their own call to an extens ion, mailbox, or Voice
Mail. A Call Routing Mailbox uses the following two items:
● The Dial Action Table assigns a routing option (or “action”) to each dialpad key (0-9, *, #).
For e xam ple, you coul d assign the action, Scree ned tran sf er to 306" to key 7. This lets a caller
press key 7 t o tra nsfe r to ext ensi on 306. The Voice Mail can accommoda te up to 4 Dial Action
Tables.
● The Instruct io n Menu contains a Main Greeti ng to g r eet the callers and lis t s the av ailable
dialing options. A typical main greeting or Welcome Messa ge is: Thank you for calling
XYZ Compa ny. The recording dialing options of the Main Greeting lets a caller know the
routing options that have been prog ramme d in the Dial Action Table.
About Answering Schedule Tables
The V oice Mail can use different Call Routing Mailboxes to answer calls, because of the Answering
Schedule Tables (ASTs). An AST lets the Automated Attendant answer calls and greet callers differently depending on the day/date and time. For example, an AST lets the Automated Attendant
answer calls using Ca ll Routing Ma ilb ox A during the morning, Call Rou tin g Mail box B during t he
afternoon, Call Routing Mailbox C at night, etc.
An AST can contain up to 20 day/date/time schedules, and the NVM-2e can accommodate up to 2
ASTs. You assign the AST to a port or trunk. If you assign an AST to a port, Voice Mail uses that
AST to ans wer any trunk that uses the port. If you assign an AS T to a trunk, Voice Mail ignores the
port's AST and us es the trunk's AST.
Availability: NVM- 2e with software version 2.00 has 2 Answering S chedule Tables and
4 Dial Action Tables.
Page 27

Basic Voice Mail Programming
Checking the Default Automated Attendant
Chapter 4: Voice Mail Programming NVM-2e/i-Series Quick Setup Guide ◆ 21
Default
Figure 7: How the Default Automated Attendant Handles Calls
Call rings into Voice Mail port 1 on Wednesday (a workweek da y), 5:30 PM.
To work with
AST’s, see Com-
pleting the AST
Worksheet on
page 24.
Voice Mail looks at AST 1, which is ass ign ed to each port, to see which
Call Routing (CR) Mailbox & Dial Action Table (DAT) should answer.
<====
Sched 1. Workweek Mon-Fri, starting at 8AM
Sc h ed 2 . Workweek M o n-Fri, starting at 5PM
CR 802 DAT 1
CR 803 DAT 2
To modify the
Instruction Men u
(Main Greeting
portion), see Mod-
ifying Instruction Menus
(Main Greeting
Portion) on
page 32.
<====
Since the call falls into the Workweek Evening time period, the Voice Mail
plays the Main Greeting for Call Routing Mailbox 803. The default Welcome
Message is: Thank you for calling.
To modify the
Instruction Menus
(Dialing Opti ons
portion), see Mod-
ifying Instruction Menus
(Dialing Option
Portion) on
page 33.
<====
The Voice Mail plays the default dialing options for Call Routing Mailbox
803: If you ar e cal ling from a touch tone phone, please dial the extension
number you wish to reach or dial 0 for as sistance. If you are calling from a
rotary dial phone, please stay on the line for assistance.
Caller presses a dialpad key.
The Voice Mail uses the default routing options in the Dial Action Table
shown on the next page.
Page 28

Basic Voice Mail Programming
Checking the Default Automated Attendant
22 ◆ NVM -2e/i-Seri es Quick Setup Guide Chapter 4: Voice Mail Programm ing
Modifications to Default
See the references to the left of the flowchart on the previous page .
Programming
See the references to the left of the flowchart on the previous page .
For more information
T o custo mize th e Aut omat ed Atte ndant, see “Customiz in g Call out (Messag e Not if ica tion) Opt ion s”
in Chapter 3: Programming of the NVM-2e System Guide (P/N 17780INS08 or higher).
To modify the
Dial Action T able,
see Modify ing the
Dial Action
Tables on
page 28.
<==== Key 0:
Key 1-8
Key 9:
Key *:
Key #:
TIMEOUT:
Rec1 (Record a Message ) for 1s t exte nsion in numberi ng plan.
The caller hears the Subscriber’s greeting followed by a beep
tone.
Unde fin ed Rou ti n g or Transfer to any extension the caller
dials. Transfers are scr e en ed in th e Voice Mail. Incomplete
Scre ened T ransf ers are handle d b y the Voice Mail ; Unscreened
Transfers are handled by the phone system. When a ca ller
presses an Undefined key , Voice Mail plays, That is an invali d
entry, then the Instruction Menu .
Transfer is assi gned only to th e key s th at match the 1st digi t of
the exte nsions (if extensions are 21-36, Transfer is assigned to
keys 2 & 3, Undefined Routing to ke ys 4-8).
Hangs up th e call.
Quick Message (After dialing *, the caller can dia l a mailbox
number to lea ve a message in that mailbox.)
Log On (After diali ng #, the callers dial their mailbox number
to log on to their mailbox and use Voice Mail ).
If caller waits more than 5 seconds to dial something after the
Instruction Menu plays, the caller hears a pro mpt (Recording,
followed by a beep tone) for recording a message for the lowest numbered extension.
IMPORTANT
This guide shows you how to have Call Routing Mailboxes answer ca lls.
T o ha v e other types of mailbox es answer calls , see “A Flowchar t Summar y ” in Chap ter
3: Programming of the NVM-2e System Guide (P/N 17780INS08 or higher).
Page 29

Basic Voice Mail Programming
Assigning Answering Sc hedule Tables to Ports or Trunks
Chapter 4: Voice Mail Programming NVM-2e/i-Series Quick Setup Guide ◆ 23
Assigning Answering Schedule Tables to Ports or Trunks
Assigning Answering Schedule Tables to Ports or Trunks
Here are some guidelines in figuring out how ma ny ASTs you will need, when you assign an AST
to a port or trunk:
● If you want the Autom ated Attendant to ans wer all incoming lines in the same way, you need
only 1 Answering Schedule Table. And, you simply ass ign it to each port. As a matter of fact,
AST 1 is assigned to ea ch port by default, so you rea lly do not have to do an ything.
● If you want the Automated Attendant to answer some trunks differently than others, you
assign the desire d Answering Schedule Table (1-2) to the Trunk Mailbox for the trunk. A
trunk’s AST al w ays overrides th e port’s AST.
For an explanation of ASTs, see About Answering Tables on page 20.
Default
AST 1 is assigned to ea ch port. No trunks hav e an AST assignment.
Modifications to Default
NVM-2 e ca n ac co m modate up to 2 AS Ts (1-2).
Programming
From Main Menu:
To assign an AST to a port: Select Customize Menu, Port Options. Enter AST (1-2) in Answering
Schedule Table field.
To assign an AST to a Trunk Mailbox: Select Customize Menu, Mailbox Options. Enter AST (1-
2) in Answering Schedule Table fie ld.
For more information
See “Customizing Answering Options Using an Answering Schedule T able” in Chap te r 3 :
Programming of the NVM-2e System Guide (P/N 17780INS08 or higher).
Availability: NVM-2e with software version 2.0 0 has two Ans w ering Schedule Tables
and four Dial Action Tables
AST ____ for Port 1
AST ____ for Port 2
AST ____ for Port 3
AST ____ for Port 4
AST ____ for Trunk ____ AST ____ for Trunk ____
AST ____ for Trunk ____ AST ____ for Trunk ____
AST ____ for Trunk ____ AST ____ for Trunk ____
AST ____ for Trunk ____ AST ____ for Trunk ____
AST ____ for Trunk ____ AST ____ for Trunk ____
Page 30

Basic Voice Mail Programming
Completing the AST Worksheet
24 ◆ NVM -2e/i-Seri es Quick Setup Guide Chapter 4: Voice Mail Programm ing
Completing the AST Worksheet
Completing the AST Worksheet
Before programming an AST, you should f ind out ho w man y sched ules t he customer wa nts in that AST.
That is, you should fi nd out ho w man y dif fer ent company greetings the customer want s and at what time
each one should take ef fect. The customer may, for example, want a distinct gre eting for mornings, afternoons, evenings, and weekends. An AST may contain up to 20 day/date/time schedules.
More specif ically: For each schedule (1-20) you enter in an AST, you must include the following:
● The mailbox number tha t sh ould answer a call. BUT KEEP THIS IN MI N D : This chapter
describes how to plac e only Call Routi ng Mailboxes i n ASTs. Placing a distinct Call Routing
Mailbox in a schedul e lets you record a distinct greeting (Welcome Message) for that schedule. For inst ructions on placing other types of mailboxes in an AST, see “Customizing
Answering Options Usi ng an Answering Schedule Table” Chapter 3: Programming in the
NVM-2e System Guide (P/N 17780INS08 or higher).
● The date or day (s) that the mai lbox should start answering a call
● The time of day the mailbox should start answering the call
For exampl e: Suppose you are programming AST #1. If Call Routing Mailbox 802 should answer
calls starting at 10AM on Monday through Friday, the AST would look like this:
Answering Schedule Table #1:
■ Schedule 1 Day (s) or Date: Mo-Fr
■ Schedule 1 Time: 10:00
■ Schedule 1 Mailbox: 802
Default
Answering Schedule Table #1:
■ Schedule 1 Day (s) or Date: Mo-Fr
■ Schedule 1 Time: 9:00
■ Schedule 1 Mailbox: 802
■ Schedule 2 Day (s) or Date: Mo-Fr
■ Schedule 2 Time: 17:00
■ Schedule 2 Mailbox: 803
Answering Schedule Table #2:
■ Schedule 1 Day (s) or Date: Mo-Fr
■ Schedule 1 Time: 9:00
■ Schedule 1 Mailbox: 802
■ Schedule 2 Day (s) or Date: Mo-Fr
■ Schedule 2 Time: 17:00
■ Schedule 2 Mailbox: 803
Page 31

Basic Voice Mail Programming
Completing the AST Worksheet
Chapter 4: Voice Mail Programming NVM-2e/i-Series Quick Setup Guide ◆ 25
Modifications to Default
On the AST Worksheet:
● For Day (s) or Date:
Enter a single day (e.g., Mo) or a range of days (e.g, Mo-We) or a date (e.g., 06/31). Do not
enter a range that bri dges S unday (e.g., Fr-Mo). Convert it into 2 s chedules: Fr-Su, Mo-Fr.
● For Time:
Enter hours and minutes (HH:MM), where HH is the hour (00-23) and MM is the minutes (00-59).
● For Mailbox:
Enter a Call Routing Mailbox Number.
Programming
N/A
For more information
See “Customizing Answering Options Using an Answering Schedule T able” in Chap te r 3 :
Programming of the NVM-2e System Guide (P/N 17780INS08 or higher) to set up an AST.
Answering Schedule Table # _____
Schedule 1 Day (s) or Date __________
Schedule 1 T ime __________________
Schedule 1 Mailbox _______________
Schedule 11 Day (s) or Date __________
Schedule 11 Time __________________
Schedule 11 Mailbox _______________
Schedule 2 Day (s) or Date__________
Schedule 2 T ime __________________
Schedule 2 Mailbox _______________
Schedule 12 Day (s) or Date __________
Schedule 12 Time __________________
Schedule 12 Mailbox _______________
Schedule 3 Day (s) or Date __________
Schedule 3 T ime __________________
Schedule 3 Mailbox _______________
Schedule 13 Day (s) or Date __________
Schedule 13 Time __________________
Schedule 13 Mailbox _______________
Schedule 4 Day (s) or Date __________
Schedule 4 T ime __________________
Schedule 4 Mailbox _______________
Schedule 14 Day (s) or Date __________
Schedule 14 Time __________________
Schedule 14 Mailbox _______________
Schedule 5 Day (s) or Date __________
Schedule 5 T ime __________________
Schedule 5 Mailbox _______________
Schedule 15 Day (s) or Date __________
Schedule 15 Time __________________
Schedule 15 Mailbox _______________
Schedule 6 Day (s) or Date __________
Schedule 6 T ime __________________
Schedule 6 Mailbox _______________
Schedule 16 Day (s) or Date __________
Schedule 16 Time __________________
Schedule 16 Mailbox _______________
Schedule 7 Day (s) or Date __________
Schedule 7 T ime __________________
Schedule 7 Mailbox _______________
Schedule 17 Day (s) or Date __________
Schedule 17 Time __________________
Schedule 17 Mailbox _______________
Schedule 8 Day (s) or Date __________
Schedule 8 T ime __________________
Schedule 8 Mailbox _______________
Schedule 18 Day (s) or Date __________
Schedule 18 Time __________________
Schedule 18 Mailbox _______________
Schedule 9 Day (s) or Date __________
Schedule 9 T ime __________________
Schedule 9 Mailbox _______________
Schedule 19 Day (s) or Date __________
Schedule 19 Time __________________
Schedule 19 Mailbox _______________
Schedule 10 Day (s) or Date __________
Schedule 10 Time __________________
Schedule 10 Mailbox _______________
Schedule 20 Day (s) or Date __________
Schedule 20 Time __________________
Schedule 20 Mailbox _______________
Page 32

Basic Voice Mail Programming
Creating and/or Customizing the Call Routing Mailboxes
26 ◆ NVM -2e/i-Seri es Quick Setup Guide Chapter 4: Voice Mail Programm ing
Creating and/or Customizing the Call Routing Mailboxes
Creating and/or Customizing the Call Routing Mailboxes
Before you can program a mailbox num ber into an AST, you must mak e s ure the mailbox exists .
This step sho ws you how to create and/or customize the Call Routing Mailboxes you selected for
the ASTs in Step 5.
Default
There are 4 Call Routing Mailboxes by default: 802, 803, 804 and 807.
● Dial Action Table 1 is assigned to Call Routing Mailbox 802
● Dial Action Table 2 is assigned to Call Routing Mailbox 803
● Dial Action Table 3 is assigned to Call Routing Mailbox 804
● Dial Action Table 4 is assigned to Call Routing Mailbox 807
● Each Call Routing Mailbox has seven other programmable options. The default values for
these optio ns should be fine to get your basic system up and running. To see the defaul t values, see “Call Routing Mailboxes” in Chapter 3: Programming in the NVM-2e System Guide
(P/N 17780INS08 or higher).
T o s ee ho w the C all Rou tin g Mai lboxe s are assign ed t o AST 1, see Completing the AST Worksheet
on page 24 of this chapter.
To review the routing options assigned to the keys in Dial Action Table, see Figure 7 starting on
page 21 in Checking the Default Automated Attendant of this chap ter.
Modifications to Default
The only thing you should change about a Call Routing Mailbox, at this point is its Dial Action
Table number. You can enter a number from 1 to 4.
Keep this in mind: If Call Routing Mailbox 802 should hav e a different set of dialing options than
Call Routing Mailbox 803, then you should keep the default Dial Action Table assignments.
Programming
From Main Menu:
Customize Menu, Mailbox Options. To find out which mail box num bers are unused, use the View-
ing/Printing Reports Menu, “Mailbox List (Numerical) - ML” of th e N V M - 2 e S ys te m G uid e ( P /N
17780INS08 or higher). The NVM-2e allows mailbox numbers 000-999.
For more information
See “Call Routing Mailboxes” in Chapter 3: Programming of the NVM-2e Syste m Gui de
(P/N 17780INS08 or higher) to understand the Call Routing Mailbox options.
Call Routing Mailbox _______ DAT _____
Call Routing Mailbox _______ DAT _____
Call Routing Mailbox _______ DAT _____
Call Routing Mailbox _______ DAT _____
Page 33

Basic Voice Mail Programming
Pro gra m ming the ASTs
Chapter 4: Voice Mail Programming NVM-2e/i-Series Quick Setup Guide ◆ 27
Programming the ASTs
Programm ing the ASTs
Once you a re f ini sh ed cr eat ing/ c ust omi z ing t he Cal l R outi ng Ma ilbo x e s, y ou ar e r eady to en ter th e AST
worksheet data into the V oice Mail system.
Default
N/A
Modifications to Default
Use the worksheet on page 25.
Programming
From Main Menu:
Select Customize Menu, Answering Schedule Table.
For more information
See “Customizing Answering Options Using an Answering Schedule T able” in Chap te r 3 :
Programming of the NVM-2e System Guide (P/N 17780INS08 or higher) to enter data into an
AST.
Page 34

Basic Voice Mail Programming
Modifying the Dial Action Tables
28 ◆ NVM -2e/i-Seri es Quick Setup Guide Chapter 4: Voice Mail Programm ing
Modifying the Dial Action Tables
Modifying the Dial Action Tables
You must customize the routing option s for each Dial Action Table number you used on page 26.
Remember: a Dial Action Table lets you a ssign a partic ular routing option to each dialpad key (0-9,
*, and #). For example: You can assign the routing option, Screened T ransfer (TRF) to 306" to dial-
pad key 7. This le ts a caller press ke y 7 to transfer to extensi on 306.
Default
The NVM-2e assigns Dial Act ion Table 1 to Call Rout ing Mailb ox 802, Dial Acti on Table 2 to Call
Routing Mailbox 803, Dial Action Table 3 to Call Routing Ma ilbox 804 and Di al Action Table 4 to
Call Routin g Mai lbo x 807.T he def ault r outi ng op ti ons for Di al Action Table 1 are listed bel ow (see
also in Checking th e Default Automated Attendan t on page 20.).
Availability: NVM- 2e has 4 Dial Action Tables.
Key: Routing Option:
Key 0 Unscreened Transfer to first extension in numbering plan (see Keys 1-8 for
details on Unscreene d Transfers) .
DIAL ACTION TABLE; UTRF XXX (XXX
= ext number)
Keys 1-8 Either Undefine d Routing or Transfer to any extension the caller dials. Transfer
is assigned only to the keys that m atch the first digit of the extension numbers .
For exam ple, if the e xt ensions are 21-36, Tra nsfer will be a ssigne d to K eys 2 and
3, and Undef ined Routing will be assigned to Keys 4-8. If a caller presses an
Undefined Routing key, the Voice Mail says, That is an invalid entry, then
repeats the dialing options.
IMPORTANT:
In th e NVM-2e, the Transfers are Screened Transf ers. If a Screened Transfer
is incomplete, the call retu r ns to Voice Mail and the caller hea r s their dia ling
options.
DIAL ACTION TABLE:
UND N for Undefined Routing
TRF XX for 2-digit extensions
TRF XXX for 3-digit exte ns ions
Key 9 Hang up
DIAL ACTION TABLE: HUP N
Key * Quick Message
DIAL ACTION TABLE:
REC IXX for 2-digit ext ens ions
REC IXXX for 3-digit extensions
Key # Log on to Voice Mail
DIAL ACTION TABLE: LOGON N
TIMEOUT If caller doe s not dial an yt hing with in a pre- programm ed amount of ti me, the
NVM-2e makes an Unscreened Transfer to the first extension in the numbering plan. (See K eys 1-8 for an explanation of Unscreened Transfers). DIAL
ACTI ON TABLE: UTRF XXX (XXX = ext number).
Page 35

Basic Voice Mail Programming
Modifying the Dial Action Tables
Chapter 4: Voice Mail Programming NVM-2e/i-Series Quick Setup Guide ◆ 29
Default Dial Action Tables for i-Series
The extensi on num bering is 301-350. Mailbox 308 is assigned for FAX transfers. The following
lists the default values for DATs 1-4.
Key Routing Option
Key 0 Action : UTRF for DATs 1 & 4
REC1 for DATs 2 & 3
Number: 301
Key 1 Action: UND
Number: None
Key 2 Action: UND
Number: None
Key 3 Action: TRF
Number: XXX
Key 4 Action: UND
Number: None
Key 5 Action: UND
Number: None
Key 6 Action: UND
Number: None
Key 7 Action: UND
Number: None
Key 8 Action: UND
Number: None
Key 9 Action: HUP
Number: None
Key * Action: REC1
Number: IXXX
Key # Action: LOGON
Number: None
TIMEOUT Action: UTRF for DATs 1 & 4
REC2 for DATs 2 & 3
Number: 301
Page 36

Basic Voice Mail Programming
Modifying the Dial Action Tables
30 ◆ NVM -2e/i-Seri es Quick Setup Guide Chapter 4: Voice Mail Programm ing
Modifications to Default
To assign this call routing option to Key Z:
Enter this in Dial Action
Action Table for Key Z:
Transfer to a sp ecific exten si o n Action:
Number:
TRF (screened)
UTRF (unscreened)
Extension number
Transfer to any extension that the caller dials, where
the dialed ex tension numbers start with the digit Z
Action:
Number:
TRF (screened)
UTRF (unscreened)
XXX (3-digit ext)
XX (2-digit ext)
Transfer to an extension that does not have a corresponding voice mailbox. (If you use this call rout ing option, you do not have to set up transfer-only
mailboxes.)
Availability: To use this call routing option, your
NVM-2e requires software version
2.01 or higher. You must also be usi ng
a laptop computer for programming.
You cannot set up this call routing
option when using a phone to program.
Action:
Number:
TRF (screened)
UTRF (unscreened)
{XXX}(3-digit ext )
{XX} (2-digit ext)
Go to a spec ifi c m a il b o x Action:
Number:
GOTO
Mailbox number
Go to any mailbox that the caller dials, where the
dialed mailbox number starts with the digit Z
Action:
Number:
GOTO
XXX
Log on to a mailbox and Voice Mail Action:
Number:
LOGON
N
• (Note: After callers press key Z, they must dial their mailbox number to logon to their mailbox.)
Leave a (quick) message in a mailbox Action:
Number:
REC
IXXX (3-digit ext)
IXX (2-digit ext)
• (Note: After callers press key Z, they must dial the extension associated with the mailbox # to leave a
messa ge in th a t mail bo x. )
Access to a Name Directory of first or last names Action:
Number:
DIRF or DIRL
N
• (Note: After the caller presses Key Z, they can dial an extension user's first or last name to transfer to
that extension).
Hang up the Voice Mail call Action:
Number:
HUP
N
Undefined routing Action:
Number:
UND
N
• (Note: When the caller presses Key Z, the Voice Mail plays, That is an invalid entry.)
Page 37

Basic Voice Mail Programming
Modifying the Dial Action Tables
Chapter 4: Voice Mail Programming NVM-2e/i-Series Quick Setup Guide ◆ 31
Modifications to Default (cont’d)
If you are using more than 2 Dial Action Tables, you may want to make copies of this page so you
have the number of form s you need.
Programming
From Main Menu, to program DATs:
Select Customize Menu, Dial Action Table.
For the GOTO:
See “Go to a Mailbox” in Chapter 3: Programming of the NVM-2e System Guide
(P/N 17780INS08 or higher) for details.
For DIRF or DIRL only, also do this:
Select Customize M enu, Ma ilbox Opti ons. E nter a name to each Subscri ber Mai lbox . For f i rst-na me
dialing, enter the Subscri ber's first name first; for las t-name dialing, enter last name first.
For more information
See “Customizing Rout ing Options Using a Dial Action Table” in Chapter 3: Programming of the
NVM-2e System Guide (P/N 17780INS08 or higher).
Dial Action Table # _____ Dial Action Table # _____
Key 0 Action______
Key 0 Number_____
Key 0 Action______
Key 0 Number_ ____
Key 1 Action______
Key 1 Number_____
Key 1 Action______
Key 1 Number_ ____
Key 2 Action______
Key 2 Number_____
Key 2 Action______
Key 2 Number_ ____
Key 3 Action______
Key 3 Number_____
Key 3 Action______
Key 3 Number_ ____
Key 4 Action______
Key 4 Number_____
Key 4 Action______
Key 4 Number_ ____
Key 5 Action______
Key 5 Number_____
Key 5 Action______
Key 5 Number_ ____
Key 6 Action______
Key 6 Number_____
Key 6 Action______
Key 6 Number_ ____
Key 7 Action______
Key 7 Number_____
Key 7 Action______
Key 7 Number_ ____
Key 8 Action______
Key 8 Number_____
Key 8 Action______
Key 8 Number_ ____
Key 9 Action______
Key 9 Number_____
Key 9 Action ______
Key 9 Number_ ____
TIMEOUT Action______
TIMEOUT Number_____
TIMEOUT Action______
TIMEOUT Number_____
Page 38

Basic Voice Mail Programming
Modifying Instruction Menus (Main Greeting Portion)
32 ◆ NVM -2e/i-Seri es Quick Setup Guide Chapter 4: Voice Mail Programm ing
Modifying Instruction Menus (Main G reeting Portion)
Modifying Instruction Menus
An Instruction Menu may consist of a Main Greeting portion (a Welcome Message) and a Dialing
Options portion .
Main Greeting Portion
You must record a W e lcom e Message for each Call Rout ing Mailbox you placed in an AST. A Wel-
come Message typically than k s the caller and identifies the company. A common Welcome Message for workweek mornings is: Good Morn ing. Thank you for calling XYZ compan y.
Default
Thank you for calling.
Modifications to Default
Main Greeting Portion of Instruction Menus
CR ____ ________________________________________________
_________________________________________________________
_________________________________________________________
_________________________________________________________
CR ____ ________________________________________________
_________________________________________________________
_________________________________________________________
_________________________________________________________
CR ____ ________________________________________________
_________________________________________________________
_________________________________________________________
_________________________________________________________
CR ____ ________________________________________________
_________________________________________________________
_________________________________________________________
_________________________________________________________
CR ____ ________________________________________________
_________________________________________________________
_________________________________________________________
_________________________________________________________
Page 39

Basic Voice Mail Programming
Modify ing Ins t r u c t i on Menus ( D ialing Op t ions Por tion)
Chapter 4: Voice Mail Programming NVM-2e/i-Series Quick Setup Guide ◆ 33
Modifying Instruction Menus (Dialing O ptions Portion)
Dialing Options Portion
In the Instruction Menu, you must record the dialing options that are available for each distinct Dial
Action T able that you used. For example, if you programmed two different Dial Action Tables, you will
need to record tw o different Instruction Menus. The dialing options in the Instruction Menu simply te ll
the Automated Attendant calle rs about the routing options that are programmed in the Dial Action Table
(Press 1 for customer service, 2 for Sales, etc.).
When you record the dialing options for the Instruction Menu, you will need to enter the Call Routing Mailbox number associated with the desired Dial Action Table. So if Call Routing Mailboxes
802 and 804 both will use Dial Action Table 1, you can record one menu for 802, then copy it to
Call Routing Mailbox 804. There is no need to record the same Instruction Menu twice.
Default
If you are calling from a touch tone phone, please dial the extension number you wish to reach or dial
0 for assistance. If you are calling from a rotary dial phone, please stay on the line for assistance.
Modifications to Default
Dialing Options for I nstruction Menus
If there are more than 3, you may want to make copies of this page so you have the number of forms you need.
Programming
To listen to, record, erase, or copy an Instruction Menu:
1. Call a System Administrator Mailbox from the first extension in the numbering plan as follows:
■ Get intercom dial tone.
■ Dial Voice Mail extension number.
■ If you hear the default greeting, dial #. Otherwise, go to the next bulle t.
■ Dial the mailbox number for the first extension in the numbering plan.
■ If requested, dial S ec urity Code.
2. Press S A (7 2) for System Administrator Menu.
3. Press I (4) for Instruction Menu.
4. Dial the Call Routing # that corresponds with the DAT #.
5. Follow the voice pr o mpts.
For more information
See “Recording an Instruction Menu” in Chapter 3: Prog ra mmin g of the NVM-2e System Guide
(P/N 17780INS08 or higher).
DAT ____ for CR _________________
_________________________________________________________
_________________________________________________________
_________________________________________________________
_________________________________________________________
DAT ____ for CR _________________
_________________________________________________________
_________________________________________________________
_________________________________________________________
_________________________________________________________
DAT ____ for CR _________________
_________________________________________________________
_________________________________________________________
_________________________________________________________
_________________________________________________________
Page 40

Basic Voice Mail Programming
Recording Names for the Subscriber Mailboxes
34 ◆ NVM -2e/i-Seri es Quick Setup Guide Chapter 4: Voice Mail Programm ing
Recording Names for the Subscriber Mailboxes
Recording Names for Subscriber Mailboxes
You should record a name for each Subscriber Mailbox. The Voice Mail plays the name in voice
prompts that would otherwise play the Subscriber mailbox or extension number. F or example:
Suppose you record the name “Joe Smith” for Subscriber Mail box 303. If an Automated At tendant
transfer to extension 303 is incomplete because the extension is busy, the Voice Mail says , Joe
Smith is b usy, instead of, Extension 303 is busy.
Subscribers can also record their name for their mail box. All they have to do is call their mailbox
and dial RN. The de ta il s ar e in th e U ser's Gui d e.
The Voice Mail plays the most recently recorded name, regardl ess of how it was recorded.
Default
No mailbox names recorded.
Modifications to Default
Recorded names can be up to 10 seconds long.
Programming
To listen to, record, or erase a Mailbox Name:
1. Call a System Administrator Mailbox from the first extension in the numbering plan as
follows:
■ Press Message key .
■ If requested, dial S ec urity Code.
2. Press S A (7 6) for System Administrator Menu.
3. Press N (6) for Mailbox Name.
4. Dial mailbox number.
5. Follow the voice pr o mpts.
For more information
See “Using the Options on the System Administrator Menu” in Chapter 3: Programming of the
NVM-2e System Guide (P/N 17780INS08 or higher) to record Mailbox Names.
Page 41

Overview
Chapt er 5: End-User Operation NVM-2e/i-Series Quick Setup Guide ◆ 35
Chapter 5:
End-User
Operation
Overvi ew
Overview
This chapter tells you how end-users operate the NVM-2e. Specifically, you find instructions for:
1. Telling Subscribers About the Master Extension (page 36)
2. Using the Voice Mail (page 36)
● Lea ving a Message (page 36)
● Forwarding a Call to Your Mailbox (page 37)
● Transferring a Call to Your Mailbox (page 37)
● Recording a Call (page 38)
● Personal Answering Machine Emulation (page 38)
● Checking Your Messages (page 39)
For com pl et e inst ru ct ion s on usin g NVM -2e, see the N VM-S er ie s User’s Guide (P/N 17600S UG05
or higher).
Page 42

Using the Voice Mail
With the i-Series
36 ◆ NVM -2e/i-Seri es Quick Setup Guide Chapter 5: End-User Operation
With the i-SeriesUsing the Voice Mail
Telling Subscribers About the Master Extension
Subscribers gain access to their mailbo x by pressing the Message ke y at their extension . Or, the
Subscribers can dial the Voice Mail master extension number and their mailbox number from any
extensi on. You should let the Subscribers know what the master number is. You sho uld also let th e
Subscribers know what the Mailbox Default Security Code is, if any.
Using the Voice Mail
The followi ng provides Subscribers with instructions for using their mailboxes.
Calling Your Mailbox
To call your mailbox:
Your Voice Mail key flashe s when you have ne w messag es in y our mailbo x. I f you don’ t
have a Voice Mail key, your MW LED flashes instead.
Keyset
1. Press your Voice Mail key (PGM 1006 or SC 851: 1059).
OR
Press idle CALL k ey and dial the Voice Mail Master Number. After Voice Mail Answ ers, dial
your mailbox number.
Your mailbox number is normally the same as your extens ion number. You may
optionall y dial a co-wor ker’s mailbox - or us e thi s procedur e to call your mai lbox from
a co-worker’s phone.
OR
Press idle CALL key and dial *8.
2. If requested by Voice Mail, enter your security code.
Ask your Voice Mail system administrato r for your security code.
Normally, your MW LED goes out (if appl icable). If it continues to flash, you have
unanswered “Message Waiting” requests or a ne w “General Messag e.” Go to “To
check your messages” page 39.
Single Line 2500 Type
1. Lift handset and dial *8.
If you ar e at a co- work er’ s phone, you can dial th e Voice Mail master number and your
mailbox number instead. You can also use this procedure from your own phone to call
a co-worker’s mailbox.
2. If requested by Voice Mail, enter your security code.
Leaving a Message (Keyset only)
To leave a message in the mailbox of an unanswered extension:
The extension you call can be busy, in DND or unanswered.
1. Press Voice Mail key (PGM 1006 or SC 851: code 1059)
OR
Dial 8.
The Voice Mail system will prompt you to leave a messag e.
Page 43

Using the Voice Mail
With the i-Series
Chapt er 5: End-User Operation NVM-2e/i-Series Quick Setup Guide ◆ 37
Forwarding Calls to your Mailbox
To activate or cancel Call Forwarding:
1. Press idle CALL key (or lift handset at DSL/SLT) and dial *2.
OR
Press your Call Forward (Station) ke y (PGM 1006 or SC 851: code 1080).
2. Dial Call Forwarding condition:
2 = Busy or not answered
4 = Immediate
6 = Not Answered
0 = Cancel
3. Dial Voice Mail master number or pres s Voice M ail key.
4. Dial Call Forwarding type:
2 = All calls
3 = Outside calls only
4 = Intercom calls only
5. Press SPK to hang up (or hang up at DSL/SLT) if you dialed *2 in step 1.
Your DND or Call F orwar ding (Station) key flashes when Call Forwarding is activated.
Transferring Calls to a Mailbox
To Transfer your active call to a mailbox:
Keyset
1. Press HOLD.
2. Press Voice Mail key (PGM 1006 or SC 851: code 1059).
3. Dial number of mailbox to receive Transfer.
This number can be your mailbox number or a co-worker’s mailbox number.
OR
Press DSS Console or One Touch key for extension who’s mailbox will receive the Transfer.
If the Transfer destination is an extension forwarded to Voice Mail, the call waits
befor e routing the calle d use r’s mailbox. Thi s giv es you t he op tion of retrie v ing the call
instead of ha vi n g it pi cked up by Voice Mail.
4. Hang up.
Voice Mail will prompt your caller to leave a message in the mailbox you selected.
OR
1. Dial extensi on number or press a DSS Console key for extension who’s mailbox will receive
the Transfer.
2. Press Voice Mail key (PGM 1006 or SC 851: code 1059).
3. Hang up.
Voice Mail will prompt your caller to leave a message in the mailbox you selected.
Single Line 2500 Type
1. Hookflash
2. Dial Voice Mail master number followed by destination mailbox.
If the Transfer destination is an extension forwarded to Voice Mail, the call waits
befor e routing the calle d use r’s mailbox. Thi s giv es you t he op tion of retrie v ing the call
instead of ha vi n g it pi cked up by Voice Mail.
3. Hang up.
Page 44

Using the Voice Mail
With the i-Series
38 ◆ NVM -2e/i-Seri es Quick Setup Guide Chapter 5: End-User Operation
Recording your call
Keyset
1. Press Voice Mail Record key (PGM 1006 or SC 851: code 1060)
You hear two beeps and your Record key flashes. The beeps periodically repeat to
remind you that you are recor ding.
To stop recording, press the Voice Mail Record key again. You can restart and stop
rec ording as required.
Single Line 2500 Type
1. Hookflash
2. Dial 154.
The system automatically reconnects you to your call .
To stop recording , hookflash twice. You can restart and stop recording as required.
Personal Answering Machine Emulation (Keyset Only)
To enable or cancel Personal Answering Machine Emulation:
1. Press idle CALL key (or lift handset at DSL/SLT) and dial *2.
OR
Press your Call Forward (Station) ke y (PGM 1006 or SC 851: code 1080).
2. Dial 1 and the Call Forwarding type:
2 = All calls
3 = Outside calls only
4 = Intercom calls only
3. Press SPK to hang up (or hang up at DSL/SLT) if you dialed *2 in step 1.
Your DND or Call Forwarding (Station) key flashes when Call Forwarding is activated.
When Answering Machine Emulation broadcasts your caller’s mes-
sage, you can:
Your telephone must be idle (not on a call).
1. Do nothing.
The message is automatically being recor ded in your mailbox. The broadcast stops
when your call er hangs up.
OR
1. Lift the handset to listen in priv acy.
You do not connect to the call. Use this mode for private listening.
OR
1. (Optional) Lift the handset.
2. Press the flashing CALL key to intercept the call.
You connect to the caller. The system r ecords the first part of the message in your mailbox. The line key changes from red to green.
OR
1. (Optional) Lift the handset.
2. Press a line ke y or idle CALL key for a new call.
The message is recorded in your mailbox.
OR
Page 45

Using the Voice Mail
With the i-Series
Chapt er 5: End-User Operation NVM-2e/i-Series Quick Setup Guide ◆ 39
1. (If you have Autom atic Handsfree) Press a line key or idle CALL key for a ne w cal l.
The message is recorded in your mailbox.
OR
1. Press SPK to cut off the message broadcast and send the call to your mailbox.
Voic e Mail records the entire message in your mailbox.
Checking Your Messages (Keyset Only)
To check your messages:
1. Press CHECK
2. Dial *0.
You can have any combination of the message types in the table below on your phone.
3. Press VOL ▲ or VOL ▼ to scroll through your display.
4. When you find the message you want to answer, press CALL1. You’ll either:
- Go to your Voice Mail mailbox.
- Listen to the new General Message.
- Automatically call the extension that left you a Message Waiting.
If you see. You have...
VOICE MESSAGE
n MESSAGES
New messages in your Voice Mail mailb ox
CHECK MESSAGE VAU
GENERAL MESSAGE
Not listened to the current Ge neral Me ss a ge
CHECK MESSAGE
(name)
Message Waiting re quests left at your phone by
your co-workers
Page 46

Using the Voice Mail
With the i-Series
40 ◆ NVM -2e/i-Seri es Quick Setup Guide Chapter 5: End-User Operation
Page 47

Overview
Chapter 6: NVM-2e Menu Trees NVM-2e/i-Series Quick Setup Guide ◆ 41
Chapter 6:
NVM-2e
Menu Trees
Overvi ew
Overview
This chapter shows the following NVM-2e Menu Trees:
● the User’s Menu Tree (page 42)
● the System Administrator Menu Tree (page 43)
● the Database Manageme nt Menu Tree (page 44).
Page 48

NVM-2e Men u Trees
User’s Menu
42 ◆ NVM -2e/i-Seri es Quick Setup Guide Chapter 6: NVM-2e Menu Trees
User’s MenuNVM-2e Menu Trees
RS
ecord and end
a Message
77
RS
User's Menu
NVM-2e
B2
BB
22
E
3
#
#
BB
ackup to eginning
E
rase Recording
End Recording
B
ackup a Few Seconds
While recording, you can:
L
isten to Messages
5
L
MAIN Menu
RE 7 3
MF
63
TI
84
SA
72
Have a sg orwarded
MF
Hear Msg me & Date (Sender)
TI
SA
ve Message
Record a ply
RE
While listening, you can:
E
RL
L
B
E
rase Message
RL
everse istening Order
L
isten to Next Message
B
ackup 5 Seconds
See also Select Listen Mode in the Main Menu.
3
75
5
2
BB 2 2
G
4
*
MC
62
G
o Ahead 5 Seconds
Pause/Resume Listening
MC
ake all to Sender
BB
ackup to the eginning
VU
VD
VN
#
Turn olume p
VU
Turn olume own
VD
Restore olume to ormal
VN
Exit Listen Mode
88
83
#
*
86
Record and Send a
uture elivery
Message
FD
33FD
Erase message and return to
Main Menu.
Enter mailbox numbers to
receive message, up to 10.
When done recording, you can:
Specify mailbox recipients by
name. After you press ,
follow the voice prompts.
N
N
*
6
**
** **
After entering a mailbox number or name,
you can:
Cancel previous mailbox. If no
mailbox recipients remain, go
to previous menu. Otherwise,
go to top of this menu.
Send message and return to
Main Menu.
**
Enter another mailbox number.
Or, press N to enter another
mailbox name.
##
Erase message and go to Main
Menu.
Specify next recipient by the
opposite method, then go to top
of this menu.
N
*
6
*
** **
Mailbox tions
OP
67
OP
S
7
N6
Exit Menu
Security Code
Changes or erases your
mailbox security code.
The mailbox options are as follows:
Message Notification
Calls co-worker or outside
number when you get a msg.
##
Record a reeting
For YourMailbox
G
4G
Record a ame
For YourMailbox
N
76
RN
SA
ystem dmin
Options
(For Sys Admin
Mailboxes Only)
72
SA
DM
atabase gt
Menu
(For Sys Admin
Mailboxes Only
)
36DM
Hear me & Date
TI
84
TI
E it Mailbox
X
9
X
Select Listen Mode
N
ew Messages
S
aved Messages
H
eld Messages
A
ll Messages
These options also available
while listening to a message.
1N
1S
1H
1A
16
17
14
12
To call your mailbox and access the Main Menu of features:
1.
2.
3.
4.
5.
Dial Voice Mail extension number_______________
or Voice Mail outside number_______________.
If you hear the company greeting, dial #
(or other log-on code_______________).
Otherwise, go to step 3.
If requested, dial your mailbox number_______________.
If requested, dial your security code_______________.
Select the desired feature from the Main Menu. To access a feature,
dial the letters shown to the left of the feature name. For your convenience,
their corresponding numbers are shown to the right of the feature name.
Youllnotice the letters you dial to access a feature match some of the
letters in the feature name. To get a recorded help message at anytime,
press 0 (zero).
P/N NVM2EUM2, APRIL 2001
Page 49

NVM-2e Menu Trees
System Administrator Menu
Chapter 6: NVM-2e Menu Trees NV M-2e/i-Ser ies Quick Setup Guide ◆ 43
System Administrator Menu
System Administrator Menu
NVM-2e
System Administrator Menu
26AN
An Announcement Message is recorded for an Announcement Mailbox. An
Announcement Message typically plays some type of information (movie schedule,
sales promos, insurance rates) for Auto Attendant callers. When the Announcement
finishes playing, the caller goes back to the Automated Attendant Instruction Menu. To
record an Announcement Message, you will have to enter anAnnouncement Mailbox
number (800 or 801 at default). (To let a caller hear the Announcement, you will have
to assign theAnnouncement mailbox to a key in a Dial action Table. See the Database
Management Menu.)
ANnouncement Messages
4I
An Instruction Menu is recorded for a Call Routing Mailbox, which answers your
incoming calls. The Instruction Menu should do the following:
Greet the caller.To figure out what an appropriate greeting should be, look at the
Answering Schedule for that particular Call Routing Mailbox. For example, if the
Call Routing Mailbox is placed in a schedule for weekday mornings, perhaps the
Instruction Menu can start out with
For more information on Answering Schedules, see the
Database Management Menu.
List the available dialing options (
). The dialing options come from the Dial Action Table that is assigned
to the Call Routing Mailbox. For more information on the Dial Action Table, see
the Database Management Menu.
Torecord an Instruction Mailbox Menu, you have to enter a Call Routing Mailbox
number. For your convenience, the default Call Routing Mailbox numbers (and their Dial
Action Table assignments) are shown below.
Call Routing Mailbox 802 has Dial Action Table 1
Good morning, thank you for calling
XYZ company.
e.g., Press 1 for Sales, 2 for Technical
Support.
Call Routing Mailbox 803 has Dial Action Table 2
Call Routing Mailbox 804 has Dial Action Table 3
Call Routing Mailbox 807 has Dial Action Table 4
Instruction Menus
6N
A Subscriber Mailbox name replaces the mailbox number (or corresponding extension
number) in voice prompts.
Mailbox Names
36EM
This feature erases all the messages in a specific Subscriber Mailbox.
Erase All Messages
76
SO
This feature lets you change the Call Routing Mailbox (and therefore Instruction Menu)
that is answering incoming calls. The selected Call Routing Mailbox (802, 803, or 804)
will answer calls until you turn Answering Schedule Override off. See also Answering
Schedule on the Database Management Menu.
Answering Schedule Override
84TI
This feature sets the time in the Voice Mail system.
System TIme
78SV
This feature erases all the messages in a specific Subscriber Mailbox.
System Version
##
Exit Menu
38DT
System DaTe
This feature sets the date in the Voice Mail system.
To access the System Administrator Menu:
1.
2.
3.
4.
5.
6.
7.
Make sure you call into a System Administrator Mailbox. To convert
a Subscriber Mailbox into a System Administrator Mailbox, see the
Database Management Menu. By default, the lowest numbered
extension is a System Administrator Mailbox.
Dial Voice Mail extension number_______________
or Voice Mail outside number_______________).
or press VoiceMail Key_______________.
If you hear the Instruction Menu, dial #. Otherwise, go to step 4.
If a mailbox is requested, dial System Administrator mailbox
number_______________.
If requested, dial Security Code_______________.
Press SA for System Administrator Menu.
Select the desired feature.
Toselect a feature, dial the letters shown to the left of the feature name.
For your convenience, their corresponding numbers are shown to the
right of the feature name.
P/N NVM2ESAM2,APRIL 2001
Page 50

NVM-2e Men u Trees
Database Management Menu (Sheet 1)
44 ◆ NVM -2e/i-Seri es Quick Setup Guide Chapter 6: NVM-2e Menu Trees
Database Management Menu (S heet 1)
69MW
This lights the Subscribers Msg Lamp when there is a new message in the Subscribers
Message Wait Lamp
72SA
This gives the Subscriber Mailbox access to the System Administrator and/or Database
Management Menus.
System Administrator
67NP
This assigns a name to the mailbox for the Directory Dialing (name-dialing) feature.
Mailbox Name Programming
To access the Database Management Menu:
1.
2.
3.
4.
5.
6.
Dial VoiceMail extension number_______________ or Voice Mail outside number_______________.
If you hear the company greeting, dial #. Otherwise, go to step 3.
If a mailbox is requested, dial SystemAdministrator mailbox number_______________.
If requested, dial Security Code_______________.
Press DM for Database Management Menu.
Select the desired feature.
Toselect a feature, dial the letters shown to the left of the feature name. For your convenience,
their corresponding numbers are shown to the right of the feature name.
Database Management Menu
NVM-2e
Database Management Menu
P/N NVM2EDBM2,APRIL 2001
The Mailbox Programming Options are as follows:
26
AN
Automated Attendant ANswering Schedules
This sets up answering schedules so theAutomated Attendant
can greet/instruct callers differently depending on the day/date
and time.A schedule consists of 4 things:
1) A schedule number (1-20).
2) Day,date, or range of days that the greeting/instructions
should play.
3) Time of day that the greeting/instructions should start playing.
4) The mailbox number that should answer the call.
The greeting/instructions (called the Instruction Menu) is actually
recorded for the mailbox.
For example, suppose the data for Schedule 1 is:
All people who call into the Auto Attendant on Monday - Friday at
12:00 PM or later will hear the Instruction Menu recorded for Call
Routing Mailbox 802. To record the Instruction Menu, see the
System Administrator Menu. Toset up dialing options for the
Automated Attendant callers, see the Automated Attendant Dial
Action Tables below.
Monday - Friday, 12:00 PM, 802
Subscriber Mailbox Programming
67
MP
32
DA
Automated Attendant Dial Action Tables
A Dial Action Table (DAT)sets up a menu of dialing options (e.g.,
,
etc.) forAuto Attendant callers. You can set up a menu using
Keys 0-8 on the dialpad. To set up the menu, you assign an
action and number to each key. When the caller presses the key,
the Auto Attendant performs the action and dials the number. An
example for entering an action/number/key is as follows:
1. Select the action: . The code, ET is for action Pre-Defined
Extension Transfer (Screened) listed on the next page.
2. Select the number: .
3. Press the key for the action: .
The result is as follows: When the caller presses key 2, theAuto
Attendant transfers the call to extension 25.
Voice Mail provides 4 Dial Action Tables.At default, Dial Action
Tables(1-4) are associated with Call Routing Mailboxes 802, 803,
804 and 807 respectively. So if Call Routing Mailbox 802 is
answering calls (see Answering Schedules above), the Voice
Mail will let callers use the menu of options in Dial Action Table 1.
The available actions are listed on sheet 2.
For Susan, press 1. For John, press 2. For Sales, press 3.
ET
25
2
38
FT
Fax Transfers
This allows assigning an extension number to a fax machine
(using an extension number for a fax reduces the number of
Subscriber Mailboxes to 49).
74
SI
System Initialization
This initializes the message database, the entire database and
the phone system integration. The available options are on sheet
3.
Sheet 1 of 3
37DS
This deletes the Security Code of the Subscriber mailbox.
Delete Security Code
65ML
This determines the number of messages that a Subscriber Mailbox may hold. Setting
the number to 0 (zero) prevents the mailbox from receiving messages.
Specify Message Storage Limit
69MW
This lights the Subscribers Msg Lamp when there is a new message in the Subscribers
Message Wait Lamp
89UX
This determines the number of messages that a Subscriber Mailbox may hold. Setting
the number to 0 (zero) prevents the mailbox from receiving messages.
Forced Unscreened Xfer (Transfer)
69MW
This lights the Subscribers Message Lamp when there is a new message in the
Subscribers Mailbox.
Message Wait Lamp
22BA
This prevents an Auto Attendant caller from reaching the Subscriber extension. Voice
Mail lets the caller leave a message. Or you can have VoiceMail reroute the blocked
caller to another extension. See Next Call Routing Mailbox below.
Block Auto Attendant Calls
62
NC
This assigns a Call Routing Mailbox (along with its Dial Action Table) to a Subscriber
Mailbox. This Call Routing Mailbox does the following:
Lets an outside caller dial 0 before or after leaving a message in a Subscriber
Mailbox. Dialing 0 reroutes the caller to another extension, typically the operator.
Automatically reroutes the callers who have been blocked from reaching the
Subscriber extension (see Block Auto Attendant Calls above.).
In both cases, the Voice Mail reroutes the call using the Key 0 assignment in the Dial
Action Tables (see Dial Action Table Programming Menu). For example, if you assign
Call Routing Mailbox 803 as the Next Call Routing Mailbox, you will have to program
Key 0 in Dial Action Table 2. If you want the caller to go to the operator,you could select
Unscreened Transfer to a Pre-Defined Extension (UX) for the Key 0 action and the
operators extension for the Key 0 number.
Next Call Routing Mailbox
Page 51

NVM-2e Menu Trees
Database Management Menu (Sheet 2)
Chapter 6: NVM-2e Menu Trees NV M-2e/i-Ser ies Quick Setup Guide ◆ 45
Database Management Menu (S heet 2)
Dial Action Table Programming
NVM-2e
Sheet 2 of 3
Database Management Menu
32
DA
Automated Attendant
Dial Action Tables
A Dial Action Table (DAT)sets up a menu of
dialing options (e.g.,
etc.) forAuto Attendant callers. You can set
up a menu using Keys 0-8 on the dialpad.
Toset up the menu, you assign an action
and number to each key. When the caller
presses the key, the Auto Attendant performs
the action and dials the number.
An example for entering an action/number/
key is as follows:
1. Select the action: . The code, ET is for
the action, Pre-Defined Extension
Transfer (Screened) listed to the right.
2. Select the extension number (for example,
25), press #.
3. Press the key for action: .
The result is as follows: When the caller
presses key 2, the AutoAttendant transfers
the call to extension 25.
Voice Mail provides 4 DialAction Tables.At
default, DialAction Tables(1-4) are
associated with Call Routing Mailboxes 802,
803, 804 and 807 respectively. So if Call
Routing Mailbox 802 is answering calls
(see Answering Schedules), the VoiceMail
will let callers use the menu of options in
Dial Action Table1.
For Susan, press 1.
For John, press 2. For Sales, press 3.
ET
2
P/N NVM2EDBM2,APRIL 2001
To Customize Dial Action Tables:
1.
2.
3.
4.
.
.
Dial VoiceMail extension number_______________
or VoiceMail outside number_______________.
If you hear the company greeting, dial #. Otherwise,
go to step 3.
If a mailbox is requested, dial System Administrator
mailbox number_______________.
If requested, dial Security Code_______________.
5 Press DM for Database Management Menu, then DA
for DialAction Table.Select a Dial Action Table number.
6 Select the desired feature.
Toselect a feature, dial the letters shown to the left of
the feature name. For your convenience, their
corresponding numbers are shown to the right of the
feature name.
Note 1:
Note 2:
The actions for Keys 9, and # cannot be changed. Key 9 is reserved for hanging up a call. Key is for Quick Message.After pressing , the caller dials a Subscriber Mailbox number
to leave a message in that mailbox. Key # is reserved for mailbox log on. A caller presses # followed by their Subscriber Mailbox number to log on to their Subscriber Mailbox (and listen to their
messages, for example).
Youcan also assign an action and number to the function.The function determines what the AutoAttendant does with a call if the caller does not dial anything after the
Instruction Menu finishes playing. By default in DATs1&4,theAutoAttendant sends the caller to the operators extension. By default in DATs2&3,when occurs, the caller hears a
prompt for recording a message for the lowest numbered extension. To assign a function, you must press the key when Voice Mail asks you to .
Timeout Timeout
Timeout
Timeout
Please press the key for this action
***
*
The available actions are as follows:
47
HP
Hear Current Parameters For Keys
This plays the current dial action assignments for the dialpad keys.
Go to a Pre-Defined Mailbox
This lets the caller press one dialpad key to go to a specific mailbox. You can enter the following mailbox numbers:
Announcement Mailbox (800, 801). Voice Mail plays the Announcement that is recorded for the Announcement
Mailbox. To record the Announcement Message, see the System Administrator Menu.
Call Routing Mailbox (802, 803, 804 and 807). Voice Mail plays the Instruction Menu for the Call Routing
Mailbox then lets the caller press a dialpad key to route their call. The dialing options are programmed in Dial
Action Tables; 1, 2, 3, or 4 respectively. Torecord the Instruction Menu, see the SystemAdministrator Menu.
Distribution Mailbox (805). Voice Mail lets the caller record a message that will automatically be distributed to
all Subscriber Mailboxes.
Subscriber Mailboxes (50 total). Voice Mail logs the caller onto that mailbox so the caller can listen to the
messages in the mailbox and use other Voice Mail features.
Caller-Dialed Go to a Mailbox
This lets the caller dial mailbox numbers to go to those mailboxes. Assign CG to the 1st digit of the mailbox
numbers. There is no need to assign a number to this action. See MG for the types of mailboxes that the caller
can go to.
64
MG
24
CG
Pre-Defined Extension Transfer (Screened)
This lets the caller press one dialpad key to make a screened transfer to a specific Subscriber extension. If the
transfer is incomplete, Voice Mail retrieves the call and lets the caller leave a message or return to the Auto
Attendant Instruction Menu.
38
ET
Caller-Dialed Extension Transfer (Screened)
This lets the caller dial extension numbers to transfer to those extensions. Assign CT to the 1st digit of the
extension numbers. There is no need to assign a number to this action. If the transfer is incomplete, Voice Mail
retrieves the call and lets the caller leave a message or return to the Auto Attendant Instruction Menu.
28
CT
Unscreened Xfer (Transfer) to a Pre-Defined Extension
This lets the caller press one dialpad key to make an unscreened transfer to a specific Subscriber extension. If the
transfer is incomplete, the phone system handles the call.
89
UX
Unscreened Transfers to a Caller-Dialed Extensions
This lets the caller dial extension numbers to make unscreened transfers to those extensions. Assign UC to the
1st digit of the extension numbers. There is no need to assign a number to this action. If the transfer is incomplete,
the phone system handles the call.
82
UC
Message Recording For a Pre-Defined Subscriber Mailbox
This lets the caller press one key to leave a message in a specific Subscriber Mailbox. The caller only hears the
subscribers greeting, followed by a beep tone.
67
MR
Message Recording 2 For a Pre-Defined Subscriber Mailbox
This lets the caller press one key to leave a message in a specific Subscriber Mailbox. The caller only hears the
subscribers prompt, , followed by a beep tone. You will not hear a voice prompt for this key action.
Recording
27
CR
Directory Dialing Using First Names
This lets the caller press one key to access Directory Dialing by First Names. There is no need to assign a number
to this action. After pressing the key, the caller can dial the first few letters of a Subscribers first name to make a
screened transfer to the Subscribers extension. Make sure you have entered the Subscribers name in the Name
Programming feature on the Database Management Menu. Enter their first name first.
33
DF
Directory Dialing Using Last Names
This lets the caller press one key to access Directory Dialing by Last Names. There is no need to assign a number
to this action. After pressing the key, the caller can dial the first few letters of a Subscribers last name to make a
screened transfer to the Subscribers extension. Make sure you have entered the Subscribers name in the Name
Programming feature on the Database Management Menu. Enter their last name first.
35
DL
Hang Up
This lets the caller press the selected key to terminate the call. You will not hear a voice prompt for this key action.
48
HU
Undefined Key
This removes the action assigned to a key.
85
UK
Restore Default Parameters
73
RD
This restores the default actions to the keys. For DATs1&4,Key0isunscreened transfer to the lowest extension
number. For DATs2&3,Key0isrecord a message for the lowest extension number.Keys 1-8 are either
undefined or screened transfer to any extension the caller dials. Screened transfer is assigned only to the
keys that match the first digit of the extension number. For example, if the extensions are 200-219, screened
transfer is assigned to Key 2. Key 9 is hang up. Key is record a message in a caller-dialed Subscriber Mailbox.
Key # is log onto a Subscriber Mailbox. Timeout is unscreened transfer to the lowest extension number. For DATs
2 & 3, when Timeout occurs, the caller hears a prompt for recording a message for the lowest numbered extension.
*
Page 52

NVM-2e Men u Trees
Database Management Menu (Sheet 3)
46 ◆ NVM -2e/i-Seri es Quick Setup Guide Chapter 6: NVM-2e Menu Trees
Database Management Menu (S heet 3)
Database Management Menu
NVM-2e
Sheet 3 of 3
To access the Database Management Menu:
1.
2.
3.
4.
.
.
Dial Voice Mail extension number_______________ or Voice Mail outside number_______________.
If you hear the Instruction Menu, dial #. Otherwise, go to step 3.
If a mailbox is requested, dial System Administrator mailbox number_______________.
If requested, dial Security Code_______________.
5 Press DM for Database Management Menu.
6 Select the desired feature.
To select a feature, dial the letters shown to the left of the feature name. For your convenience, their
corresponding numbers are shown to the right of the feature name.
Database Management Menu
P/N NVM2EDBM2, APRIL 2001
74
SI
System Initialization
##
Exit Menu
The System Initialization options are as follows:
1
Initialize Voice Mail Database
This initializes the entire database (the message database will be initialized and all
programming options will be set to default values).
2
Initialize Message Database
This initializes the message database so that all personal messages and recordings
(e.g., Instruction Menu) will be erased and the default prompt, if any, will be replaced.
3
Initialize the VoiceMail with a Particular Phone System
This allows you to select the phone system that will be integrated with the Voice Mail.
When you change the phone system integration, you also initialize the message
database and all programming options return to default values. Available phone
systems with their corresponding entry codes are as follows:
Phone
System
Portrait
28i / 124i (default)
Onyx VS
DS-2000
Entry
Code
1
2
3
4
Lowest (First)
Numbered Extension
10
301
300
300
First Trunk
Number
01
001
348
401
Follow the voice prompts to modify the numbering plan.
Page 53

Overview
Appendix A: Application Notes NVM-2e/i-Series Quick Setup Guide ◆ 47
Appendix A:
Application Notes
Overvi ew
Overview
This chapter describes several unique applications that show the flexibility and power of your
Voice Mail System .
1. Application Note ANV00004A: One company, with the Automated Attendant only answering calls at night (page 48)
2. Application Note ANV00005A: One company, with the Automated Attendant answering
calls during the day and at night (page 50)
3. Application Note ANV00006A: One company, with the Automated Attendant answering
calls during the day and at night (page 52)
Page 54

Application Note ANV0004A
One Company, with Auto Attendant only Answering Calls At Night
48 ◆ NVM -2e/i-Seri es Quick Setup Guide Appendix A: Applic ation Notes
Application Note ANV0004A
One Company, with Auto Attendant only Answering Calls At Night
Problem:
A company wa nts t o ha v e the ir “live” operator answer calls during the day and have the Voice Mail
Automated Attendant automatical ly answer calls at night.
Solution:
NVM-2e Voice Mail with Automated Attendant
Explanation:
In this applic ation, extension users answer all calls during the day and the Voice Mail Automated
Attendant answ ers all calls at night. You can set up this application follo w ing these 4 steps:
1. Revi ew the default Autom ated Attendant setup. See Step 1 below.
2. For Answer Schedule Table 1, have Answer Sche dules 1-2 use Call Routing Mailbox 802.
This will provide the same Inst r uction Menu to callers, regardle ss of when the Automated
Attend ant answers calls. See Step 2
below.
3. Record an Instruction Menu for Call Routing Mailbox 802. See Step 3 below.
4. In your telephone system programming, direc t ca lls to the Automated Attendant at night. See
Step 4
below.
Note:This Application Note illustrates one of several procedures you can use to program this
applicat ion. If you a re familiar with NVM-2e programming, you may be able to set up
an alternate procedure.
Step 1.Review the default Automated Attendant setup.
● All Voice Mail ports use Answering Schedule Table 1. (You will not change this setup.)
● Answering Schedule T able 1 has 2 schedules. (You will change the Call Routing Mailbox
assignment for Answering Schedules 2 in Step 2
below.)
■ Schedule 1 is for weekdays (morning and afternoons)
- Monday through Friday, 9:00 AM to 5:00 PM
- Assigned to Call Routing Mailbox 802 (which uses Dial Action Table 1)
■ Schedule 2 is for weekday even in g s a n d we ek e n ds
- Monday through Thursday, 5:00 PM to 9:00 AM
- Friday from 5:00 PM until Monday at 9:00 AM
- Assigned to Call Routing Mailbox 803 (which uses Dial Action Table 2)
● The default Instruction Message is: “Thank you for calling. If you are calling from a touch
tone phone, plea s e dial the extension number you wish to reach or dial 0 for assistance. If
you are calling from a rotary dial phone, please stay on the line for assistance.”
(You will change these record in gs in Step 3
below.)
● Your tele phone system is not set up to direct calls to the Automated Atte ndant. (You will
change this in S te p 4
below.)
Page 55

Application Note ANV0004A
One Company, with Auto Attendant only Answering Calls At Night
Appendix A: Application Notes NVM-2e/i-Series Quick Setup Guide ◆ 49
One Company, with Auto Attendant only Answering Calls At Night
Step 2. Assign Call Routing Mailbox 802 to Answering Schedules 1-2 in
Answering Schedule Table 1.
This will cause the Automated Attendant to use the same Instruction Menu for each answer ed call.
To do this:
● From the Main Menu, go to CU - Customize Database, the n AST - Answering
Schedule Table. You’ll see the prompt for Schedule Table 1.
● Press Enter repeatedly until you see Schedule 2 Day Mailbox number (N-None) - 803.
● Type 802 and press Enter.
Step 3. Record an Instruction Menu for Call Routing Mailbox 802.
Record a Instruction Menu similar to: “Thank you for call in g ABC company. Our normal hours
are Monday through Friday, 9 AM to 5 PM. If you know the extension of the person you would
like to reach, dial it now.” To do this:
● Call the System Administrator mailbox.
- Get Intercom dial to ne
- Dial Voice Mail master extension
- Dial System Administrator mailbox number
- Enter security code (if required)
● Dial S A (72) for the System Administrator Menu.
● Dial I (4) for the Instruction Menu.
● Follow the voice prompts and make your recordings for Call Routing Mailbox 802.
Step 4. Program the telephone system to direct calls to the Automated
Attendant at night.
In i-Series, for example, you would set up a DIL that routes to the Voice Mail master number (e.g.,
700) when the system goes into the Night Mode. Refer to your sys tems’s Software Manual for addi-
tional details.
Page 56

Application Note ANV00005A
One Company, with Auto Attendant Answering Calls Day & Night
50 ◆ NVM -2e/i-Seri es Quick Setup Guide Appendix A: Applic ation Notes
Applicat ion Note ANV00005A
Applicat ion Note ANV00005A
One Company, with Auto Attendant Answering Calls Day & NightOne Company, with Auto Attendant Answering Calls Day & Night
Problem:
A company wants to have the Automated Attendant answer calls during the day and at night. The
greeting and dialing options (Instruction Menu) available to callers will be different in the day and
at night.
Solution:
NVM-2e Voice Mail with Automated Attendant
Explanation:
In this application, a company want s to have the Automated Attendant answer calls during the day
and at night. The day mode greeting and dialing options (Instruction Menu) will be different tha n
the night mode greeting and dialing opti ons. You can set up this ap plication following these steps:
1. Revi ew the default Autom ated Attendant setup. See Step 1 below.
2. Record an Inst ruct ion Menu for C all Ro uti ng Mailb ox 80 2. Weekday daytime callers wi ll hear
these recordings See Step 2
below.
3. Record an Instruction Menu for Call Routing Mailbox 803. Even ing and weekend callers will
hear these recordings See Step 3
below.
4. In your telephone system programming, direct calls to the Automated Attendant during the
day and at night. See Step 4
below.
Note: This Applic ation No te illus trate s one of se ve ral pr oce dures you can use t o program t his
applicat ion. If you a re familiar with NVM-2e programming, you may be able to set u p
an alternate procedure.
Step 1.Review the default Automated Attendant setup.
● All Voice Mail ports use Answering Schedule Table 1. (You will not change this setup.)
● Answering Schedule T able 1 has 2 schedules. (You will not change this setup.)
■ Schedule 1 is for weekdays (mornings and afternoons)
- Monday through Friday, 9:00 AM to 5:00 PM
- Assigned to Call Routing Mailbox 802 (which uses Dial Action Table 1)
■ Schedule 2 is for weekday even in g s a n d we ek e n ds
- Monday through Thursday, 5:00 PM to 9:00 AM
- Friday from 5:00 PM until Monday at 9:00 AM
- Assigned to Call Routing Mailbox 803 (which uses Dial Action Table 2)
● The default Instruction Menu is: “Thank you for calling. If you are calling from a touch
tone phone, plea s e dial the extension number you wish to reach or dial 0 for assistance. If
you are calling from a rotary dial phone, please stay on the line for assistance.”
(You will change these recordings in Steps 2 and 3
below.)
● Your tele phone system is not set up to direct calls to the Automated Atte ndant. (You will
change this in S te p 4
below.)
Page 57

Application Note ANV00005A
One Company, with Auto Attendant Answering Calls Day & Night
Appendix A: Application Notes NVM-2e/i-Series Quick Setup Guide ◆ 51
Step 2. Record an Instruction Menu for Call Routing Mailbox 802.
This is the Instruction Menu that will play every weekday from 8:00 AM to 5:00 PM. Rec ord an
Instruction Menu similar to: “Thank you for ca lling ABC company. If you kno w the extension of
the person you would like to re ach, dial it now.”
Remember, your weekday routing is Call Routing Mailbox 802 with Dial Action Table 1. Your
evening and weekend routing is Call Routing Mailbox 803 and Dial Action T able 2.
To record your Instruction Message for CRB 802:
● Call the System Administrator mailbox.
- Get Intercom dial to ne.
- Dial Voice Mail master extension
- Dial System Administrator mailbox number
- Enter security code (if required)
● Dial S A (72) for the System Administrator Menu.
● Dial I (4) for the Instruction Menu.
● Follow the voice prompts and make your recordings for Call Routing Mailbox 802.
Step 3. Record an Instruction Menu for Call Routing Mailbox 803.
This is the Instruction Menu that will play e very evening and over the weekend. Record an Instruction Me nu similar to: “Thank you for calling ABC co mpa ny. Our normal business hours are
Monday-Friday, 8 AM to 5 PM. If you know the extension of the person you would like to reach,
dial it now.”
Remember, your weekday routing is Call Routing Mailbox 802 with Dial Action Table 1. Your
evening and weekend routing is Call Routing Mailbox 803 and Dial Action T able 2.
To record your Instruction Menu for CRB 803:
● Call the System Administrator mailbox.
- Get Intercom dial to ne.
- Dial Voice Mail master extension
- Dial System Administrator mailbox number
- Enter security code (if required)
● Dial S A (72) for the System Administrator Menu.
● Dial I (4) for the Instruction Menu.
● Follow the voice prompts and make your recordings for Call Routing Mailbox 803.
Step 4. Program the telephone system to direct calls to the Automated
Attendant during the day and at night.
In i-Series, for example, you would set up a DIL that routes to the Voice Mail master number (e.g.,
700) during the day and at night. Refer to your systems’s Software Manual for additiona l details.
Page 58

Application Note ANV00006A
One Company, with Auto Attendant Answering Calls Day & Night
52 ◆ NVM -2e/i-Seri es Quick Setup Guide Appendix A: Applic ation Notes
Applicat ion Note ANV00006A
Problem:
A company wants to have the Automated Attendant answer calls during the day and at night. The
greeting and dialing options (Instruction Menu) available to callers will be different in the day and
at night.
As an option, you can set up daytime weekday callers with the ability to dial 1 for Sales and 2 for
Service. Thi s single-digit diali ng capability will not be availabl e to evening and weekend callers.
Solution:
NVM-2e Voice Mail with Automated Attendant
Explanation:
In this application, a company want s to have the Automated Attendant answer calls during the day
and at night. The day mode greeting and dialing options (Instruction Menu) will be different tha n
the night mode greeting and dialing opti ons. You can set up this ap plication following these steps:
1. Revi ew the default Autom ated Attendant setup. See Step 1 below.
2. Record an Inst ruct ion Menu for C all Ro uti ng Mailb ox 80 2. Weekday daytime callers wi ll hear
these recordings See Step 2
below.
3. Record an Instruction Menu for Call Routing Mailbox 803. Even ing and weekend callers will
hear these recordings See Step 3
below.
4. To set up the optional s ingle-digit dialing, change the dialing o ptions for daytime weekday
callers ( Dial Acti on Table 1). See S te p 4
below.
5. In your telephone system programming, direct calls to the Automated Attendant during the
day and at night. See Step5
below.
Note: This Applic ation No te illus trate s one of se ve ral pr oce dures you can use t o program t his
applicat ion. If you a re familiar with NVM-2e programming, you may be able to set u p
an alternate procedure.
Step 1.Review the default Automated Attendant setup.
● All Voice Mail ports use Answering Schedule Table 1. (You will not change this setup.)
● Answering Schedule T able 1 has 2 schedules. (You will not change this setup.)
■ Schedule 1 is for weekdays (mornings and afternoons)
- Monday through Friday, 9:00 AM to 5:00 PM
- Assigned to Call Routing Mailbox 802 (which uses Dial Action Table 1)
■ Schedule 2 is for weekday even in g s a n d we ek e n ds
- Monday through Thursday, 5:00 PM to 9:00 AM
- Friday from 5:00 PM until Monday at 9:00 AM
- Assigned to Call Routing Mailbox 803 (which uses Dial Action Table 2)
● The default Instruction Menu is: “Thank you for calling. If you are calling from a touch
tone phone, plea s e dial the extension number you wish to reach or dial 0 for assistance. If
you are calling from a rotary dial phone, please stay on the line for assistance.”
(You will change these recordings in Steps 2 and 3
below.)
● The Dial Action Tables do not provide single-digit dialing to extensions or groups (You will
change this setting for Dial Action Table 1 in Step 4
below.)
● Your tele phone system is not set up to direct calls to the Automated Atte ndant. (You will
change this in S te p 5
below.)
Page 59

Application Note ANV00006A
One Company, with Auto Attendant Answering Calls Day & Night
Appendix A: Application Notes NVM-2e/i-Series Quick Setup Guide ◆ 53
Step 2. Record an Instruction Menu for Call Routing Mailbox 802.
This is the Instruction Menu that will play every weekday from 8:00 AM to 5:00 PM. Rec ord an
Instruction Menu similar to: “Thank you for ca lling ABC company. If you kno w the extension of
the person you would like to re ach, dial it now, press 1 for Sales or 2 for Service.”
Remember, your weekday routing is Call Routing Mailbox 802 with Dial Action Table 1. Your
evening and weekend routing is Call Routing Mailbox 803 and Dial Action T able 2.
To record your Instruction Message for CRB 802:
● Call the System Administrator mailbox.
- Get Intercom dial to ne
- Dial Voice Mail master extension
- Dial System Administrator mailbox number
- Enter security code (if required)
● Dial S A (72) for the System Administrator Menu.
● Dial I (4) for the Instruction Menu.
● Follow the voice prompts and make your recordings for Call Routing Mailbox 802.
Step 3. Record an Instruction Menu for Call Routing Mailbox 803.
This is the Instruction Menu that will play e very evening and over the weekend. Record an Instruction Me nu similar to: “Thank you for calling ABC co mpa ny. Our normal business hours are
Monday-Friday, 8 AM to 5 PM. If you know the extension of the person you would like to reach,
dial it now.”
Remember, your weekday routing is Call Routing Mailbox 802 with Dial Action Table 1.Your
evening and weekend routing is Call Routing Mailbox 803 and Dial Action T able 2.
To record your Instruction Menu for CRB 803:
● Call the System Administrator mailbox.
- Get Intercom dial to ne.
- Dial Voice Mail master extension.
- Dial System Administrator mailbox number.
- Enter security code (if required).
● Dial S A (72) for the System Administrator Menu.
● Dial I (4) for the Instruction Menu.
● Follow the voice prompts and make your recordings for Call Routing Mailbox 803.
Page 60

Application Note ANV00006A
One Company, with Auto Attendant Answering Calls Day & Night
54 ◆ NVM -2e/i-Seri es Quick Setup Guide Appendix A: Applic ation Notes
Step 4. Change the Dial Action Table for Call Routing Mailbox 802 to provide the daytime dialing options.
By default, Dial Act ion Ta ble 1 does not provide routing options for the digit 1 (Sales) or 2 (Ser vice). Consider directing these calls to the dispatchers or master num bers for Sales and Service,
respectively. To do this:
● From the Main Menu, go to CU - Customize Database, then DAT - Dial Action Table.
You’ll see the prompts for Dial Action Table 1.
● Press Enter until you see the prompt Action - UND for Key 1 Action.
● Enter the option for key 1 that will direct callers to the Sales group.
For example, type UTRF and press Enter if you are setting up an Unscreened Transfer.
● Enter the destination for key 1.
For example, enter the master number for the Sales Extension Hunting group.
● Using these same st eps, set up key 2 to route to the Servi ce group.
Step 5. Program the telephone system to direct calls to the Automated
Attendant during the day and at night.
In i-Series, for example, you would set up a DIL that routes to the Voice Mail master number (e.g.,
700) during the day and at night. Refer to your systems’s Software Manual for additiona l details.
Page 61

NEC America, Inc., Corporate Networks Group
4 Forest Parkway, Shelton, CT06484
T el: 800-365-1928 Fax: 203-926-5458
cng.nec.com
Other Important Telephone Numbers
Sales: . . . . . . . . . . . . . . . . . . . . . . . . . . . . . . . . . . . .203-926-5450
Customer Service: . . . . . . . . . . . . . . . . . . . . . . . . . . .203-926-5444
Customer Service FAX: . . . . . . . . . . . . . . . . . . . . . . .203-926-5454
Technical Service: . . . . . . . . . . . . . . . . . . . . . . . . . . .203-925-8801
Discontinued Product Service: . . . . . . . . . . . . . . . . . .900-990-2541
Technical Training: . . . . . . . . . . . . . . . . . . . . . . . . . . .203-926-5430
Emergency Technical Service (After Hours) . . . . . . . .203-929-7920
(Excludes discontinued products)
Page 62

NEC Ame r ica, Inc., Co rpo ra t e Networks Gr o up
4 Forest Parkway, Shelton, CT 06484
! TEL: 203-926-5400 FAX: 203-929-0535 April 2002
17780QSETI02 cng.nec.com Printed in U.S.A.
 Loading...