

Page 1

NVM-2000/3000
Installing the Fax Server
Page 2

This manual has been devel oped by NEC America, Inc. It is intended for the use of its cus tom ers and service personnel, and should be read in its entirety before at tempting to install or prog ram the system. Any comments or suggestions for improving this manual would be appre ciated. Forward your remar ks to:
NEC America, Inc., Corporate Networks Group
4 Forest Parkway
Shelton, CT 06484
Attention: Manager, Techni cal Publications
Nothing contained in this manual shall be deemed to be, and this manual does not constitute, a warranty of, or representati on with respect to, any of the e quipment covered. This manual is subject to change without notice, and NEC
AmericaAmerica has no obligat ion to provide any updates or corrections to this manual. Further, NEC America a lso
reserves th e right, wit hout prior not ice, to make change s in equipment design or compon ents as it deems appropria te.
No represe ntation is made tha t this manual is complete or accurate in all respects, and NEC America shall not be liable for any errors or omissio ns. In no e vent shall NEC America be liabl e for any incide ntal or con sequenti al damages
in connectio n with the use of this manual. This doc ume nt contains proprie tary information that is protected by copyright. All rights are reserved. No part of this document may be p hotocopied or reproduced without prior written consent of NEC America.
2002 by NEC America. All Rights Res erved
Printed in U.S.A.
Page 3

Table of Contents
i
Table of Contents
About Fax Server . . . . . . . . . . . . . . . . . . . . . . . . . . . . . . . . . . . . . . . . . . . . . . . . . . . . . . . . . . .1
Introduction . . . . . . . . . . . . . . . . . . . . . . . . . . . . . . . . . . . . . . . . . . . . . . . . . . . . . . . . . . . . . . . . . . . . . . 1
Syste m Re q u i rements. . . . . . . . . . . . . . . . . . . . . . . . . . . . . . . . . . . . . . . . . . . . . . . . . . . . . . . . . . . . . . . 1
Back Up the Voice Mail Database . . . . . . . . . . . . . . . . . . . . . . . . . . . . . . . . . . . . . . . . . . . . . 2
Locally Ba cking Up the Voice Mail D at a b a se. . . . . . . . . . . . . . . . . . . . . . . . . . . . . . . . . . . . . . . . . . . . 2
Activating the Fax Server Feature. . . . . . . . . . . . . . . . . . . . . . . . . . . . . . . . . . . . . . . . . . . . . 4
Installing Fax Server. . . . . . . . . . . . . . . . . . . . . . . . . . . . . . . . . . . . . . . . . . . . . . . . . . . . . . . . 5
Setting Up th e Voice Mail fo r Fax Server . . . . . . . . . . . . . . . . . . . . . . . . . . . . . . . . . . . . . . . . . . . . . . . 5
Setting Up th e Client Work Station . . . . . . . . . . . . . . . . . . . . . . . . . . . . . . . . . . . . . . . . . . . . . . . . . . . . 6
Instal l th e Fax Printe r D ri v er in Client W o rkstatio n s . . . . . . . . . . . . . . . . . . . . . . . . . . . . . . . . 6
Instal l the Cl i e n t So f tware in a Cl i e n t Wor k st a t i o n . . . . . . . . . . . . . . . . . . . . . . . . . . . . . . . . . 9
Remove t h e Fax Server fro m a Client Workstatio n . . . . . . . . . . . . . . . . . . . . . . . . . . . . . . . . 16
Using the F a x S er v er . . . . . . . . . . . . . . . . . . . . . . . . . . . . . . . . . . . . . . . . . . . . . . . . . . . . . . . . . . . . . . 1 7
Sendin g a Fa x Message. . . . . . . . . . . . . . . . . . . . . . . . . . . . . . . . . . . . . . . . . . . . . . . . . . . . . . 17
Using th e Fax Setup Optio n s . . . . . . . . . . . . . . . . . . . . . . . . . . . . . . . . . . . . . . . . . . . . . . . . . 22
Recipien t En try Optio n s . . . . . . . . . . . . . . . . . . . . . . . . . . . . . . . . . . . . . . . . . . . . . . . . . . 22
Using the Exchange/Outlook Address Book. . . . . . . . . . . . . . . . . . . . . . . . . . . . . . . 22
Using th e Voi ce Mail Dir e ct o ry . . . . . . . . . . . . . . . . . . . . . . . . . . . . . . . . . . . . . . . . 2 5
Fax Mail Opt i o n s . . . . . . . . . . . . . . . . . . . . . . . . . . . . . . . . . . . . . . . . . . . . . . . . . . . . . . . 28
Fax Dist ribution Opt i o n s . . . . . . . . . . . . . . . . . . . . . . . . . . . . . . . . . . . . . . . . . . . . . . . . . 29
Cover Page Options . . . . . . . . . . . . . . . . . . . . . . . . . . . . . . . . . . . . . . . . . . . . . . . . . . . . . 30
Page 4

Table of Conte nts
ii
Page 5

About Fax Server
Issue 1-0 ◆ 1
About Fax Server
Introduction
The Fax Server allows you to fax a document directly from an applicati on you are using at your
computer’s desktop. You can send the fax to a fax machine or internally to another S u bscriber Mailbox (through Fax Mail).
To use Fax Server, a c lient workstation m us t have the Fax Server Print er Driver and Fax Server Client software installed. To fax a document, you then select the appl ication’s print menu and choose
Voice Mail Fax Server as the printer. From the Fax Server Setup window, you then select the recipients of your fax.
This docume nt tells you how t o activate the FAX Server feature on your Voice Mail and then install
the Fax Server Printer Driver and Fax Server Client software on a client workstation.
System Requirements
You need the following to use the Fax Server on an NVM Voice Mail System:
■ An NVM Voice Mail System with software versi on 10.00 or higher .
■ The Fax Mail featur e al rea dy installed and programmed.
■ A LAN Card must be installed (if it is not already) in the NVM Voice Mail which must be con-
nected to the LAN.
■ Your LAN must be TCP/IP Compatible (e.g., Microsof t, Nov ell, Lantast ic) and have an ethernet
connection.
■ The Fax Serv er Fea ture Act iv a tion a nd Soft ware Kit (P/N 17 584) which consi sts of one 3/ 1 inch
floppy diskette and CD-ROM (labeled Fax Server Distribution 1.02)
■ Each Client Workstation that will have access to the Fax Server must be connected to the net-
work and have:
● Windows 95/98 or NT 4.0
● A CD-ROM Drive (or access to the network for copyin g files from the Fax Server Distri-
butio n C D - ROM)
● Fax Server Printer Driver software installed (from files on the Fax Server Distribution
CD-ROM)
● Fax Server Client Software (from files on the Fax Server Distribution CD-ROM)
Note: The Fax Server software is available as install ation files for W indows 95/98 and for NT
4.0. Be sure you install the correct set of files on a particular client workstation.
Overview of Feature Activation and Installation
This supplement will explain how to perform the following:
1. Backing up the current Voice Mail database
2. Activating the Fax Server Fea ture
3. Setting Up the Voice Mail for Fax Server
4. Setting Up the Client Workstation
Page 6

Back Up the Voice Mail Database
2 ◆ Issue 1-0
Back Up the Voice Mail Database
Locally Backing Up the Voice Mail Database
You should back up the current Voice Mail database as a precaution before you activate the Fax
Server feature. Backing up the database s hould be performed locally and not through a modem.
During the procedure, you will ha ve the option to back up messages for individual m ailboxes. This
is a len gthy and ex tensive process. For this reason, it is rec ommended that you s uggest to users that
they del ete as many (if not all) of their messages. This will save you time and reduce the number of
messages that you will have to back up.
The backup instru ctions listed below assume you are in the Full Scre en Editor mode of programming.
To locally back up the Voice Mail database:
1. Insert a floppy disk into the Voice Mail’s floppy disk driv e.
2. From the Main Menu, select I nstall.
3. If requested, type the system pas sword.
4. Select View Current Settings. Write down on paper the phone system that is installed with
the Voice Mail as well as the followi n g settin gs:
Number of Voice Mail Ports
Voice Compression Rate
Mailbox Default Security Code
Default Bilingual Mode
Mailbox Range
Extension Range
5. Return to the Main Menu, and select Maintenance.
6. If the system requests it, type the system password.
7. Select Local Backup.
The system prompts you through the backup procedure:
Select the fil es to be processed:
-System Database D
-Mailbox Messages M
File Type (enter Q to Quit)? [D]
8. Default is D (which is the selection you need). Press Enter.
The system provides you with informatio n about the Backup Utility.
9. When you see the prompt, Do you wish to continue,? [Y/N], enter Y. The Voice Mail Sys tem
will shut down and exit to the SYST EM SAVE FILE CREATION utility in DOS.
10. When you see the prompt, Do you w ish to s a ve the history data at th is ti m e ? [Y/N], ent er N.
11. The system displays prompts as the Backup Utili ty progresses. When you see the prompt,
Press any key to continue..., press a n y ke y.
12. The system displays status prompts as the data files are copied onto the floppy dis k. When
complete, you will see a list of files on your disk as well as a list of fil es to compare them
against. These are the files that should be copied on to your disk.
Note: If all files were not copied, complete thi s pr ocedure through step 13 to reboot the Voice Mail.
Repeat steps 5 through 13 to try to back up the files again.
13. Remove the disk from the disk drive.
14. When you see the prompt, Press a ny key to continue...(and after you remov ed the disk from
the disk drive), press any key. The Voice Mail will reboot.
Page 7

Back Up the Voice Mail Database
Issue 1-0 ◆ 3
Locally Backing Up the Voice Mail Database (cont’d)
Note: If you do not remove the disk in step 13, when the Voice Mail trie s to reboot, the system
prompts with a Non-system disk or disk error.
15. Repeat steps 5 through 7 to begin backing up messa ges in a mailbox.
16. At the prompt:
Select the fil es to be processed:
-System Database D
-Mailbox Messages M
File Type (enter Q to Quit?) [D]
Enter M and Enter. Follow th e screen prompts.
17. When finished, return to the Voice Mail’s Main Menu.
18. Go to Activat ing the Fax Server Feature on page 4.
Page 8
Activat ing the Fax Server Feature
4 ◆ Issue 1-0
Activating the Fax Server Feature
Activat ing the Fax Server Feature
To activate the Fax Server Feature:
1. From the Voice Mail Main Menu, select Exit, and type the system password.
2. Select Shutdown Voice Mail System to shut down the Voice Mail.
3. After the Voice Mail shuts down, turn off the system power.
4. Install the Fax Server Feature Activation Dis k (labeled P/N 17584) into the floppy drive of the
Voi ce Ma il .
5. Turn on system power to boot the disk.
You see:
Starting Upgrade...
Voice Mail System Upgrade
This Upgrade Process is automatic and is performed in two (2) steps, requiring
the system to reboot once...
Are you sure you want to apply this upgrade [N,(Y)]?
6. Do not press any key unless you want to abort the feature activ ation/upgrade.
You see:
Beginning Upgrade Step 1. Please Wait...
Yo u see a status as the activation/upgrade progresses:
Moving authorization from A: to C:
Current Available Install Count = 0
Emove completed Successfully
Step 1 Complete...
7. The Voice Mail will reboot. Do not remove the disk.
You see:
Starting Upgrade...
Voice Mail System Upgrade
Beginning Upgrade Step 2. Please Wait...
The Voice Mail Software Upgrade is now complete./
The Voice Mail System must be restarted for the changes to take effect
8. Remove the disk from the Voice Mail’s floppy drive.
9. Press the Reset b utton to reboot the Voice Mail when you are prompted to do so during the
boot.
10. Go to Settin g Up th e Vo ice Mail fo r Fax Serv er on page 5.
WARNING
Before you install the Fax installation software onto your machine,
make sure that this is the intended machine for its use.
Do not turn off the V oice Mail without first shutting it down. If you do
not shut down first, you may corrupt the Voice Mail database when
you turn it off.
WARNING
This disk will cause the Voice Mail to boot twice. Follow these
instructions carefully. If you remove the disk too soon, your Voice
Mail will be inoperable.
Page 9

Installing Fax Server
Setting Up the Voice Mail for Fax Server
Issue 1-0 ◆ 5
Setti ng Up the Voice Mail for Fa x Serv erInstalling Fax Server
Setting Up the Voice Mail for Fax Server
This section provides instructions for programming the Voice Mail for the Fax Server. Before you
begin this procedure, you should already have installed and/ or programmed:
■ The Fax Mai l Option in the Voice Mail
■ The LAN Card in your Voice Mail and connecte d your Voice Mail to the Network
■ The Fax Server Option must be activa ted in your current Voice Mail System software. (See
Activat in g th e Fax Server Feature on page 4.)
To program the Voice Mail for Fax Server:
1. From the Main Menu, select Customize ➱ Mailbox Options
2. Type the system password, if requested, and press <Enter>.
3. Create/acces s a Fax Mailbox. If you need help in creating mailboxes, see the System Guide,
P/N 17500INS05 or higher.
4. Set the Number of msgs field to a value tha t is large enough to handle outgoing Fax traffic.
The default value is 32. The range is 1 to 1000.
5. Set the Fax MB type field to Delivery (Fax Mail D-Delivery).
6. Set the Fax Delivery number field to None.
7. Return to the Voice Mail Main Menu.
8. You should now install the Fax Server software on the client computers that will be using the
featu re. See Setting Up the Client WorkStation on page 6.
Page 10
Installing Fax Server
Setting Up th e Clie nt WorkStat ion
6 ◆ Issue 1-0
Setting Up the C lient Work Station
Setting Up the Client WorkStation
You must install a Fax Printer Driver and Fax Serve r Client software on each personal computer
that should hav e access to t he Fax Server. The Fax Server software is on the Fax Serve r Distrib ution
1.02 CD-ROM. This CD contains installation fil es f or client computers with Windows 95/98 and
files for client compute r s with Win dows NT 4.0. Be sure you install the correct set of files on a particul ar cl ient work s ta tion.
Note: The ins tr uctions in the follo w ing pages show screen s a s they appear in client wor k station with
Windows 98. If you have Windows NT, your screens may be slightly dif f erent but will function identically.
Install the Fax Printer Driver in Client Workstations
The Fax Printer Dri ver is located on the Fax Server Distribution 1.02 CD. Y ou must install the
Fax Printer Driver before you install the Fax Server client software.
IMPORTANT
You must close all programs before you begin the installation. This includes any email and any virus protection programs.
To install the Fax Printer Driver in a client workstation:
1. Close all programs.
2. Insert the Fax Server Distribution 1.02 CD into the CD-ROM drive of the client computer.
3. Click Start ➱ Run.
4. Click Browse.
5. In the Browse window, click in the Lo ok in box for the CD-ROM drive of the computer.
6. Double-click to open the file labeled Fax Server Distribution 1.02. Then double-click to
open the following subsequent file folders:
■ Cd
■ NTK
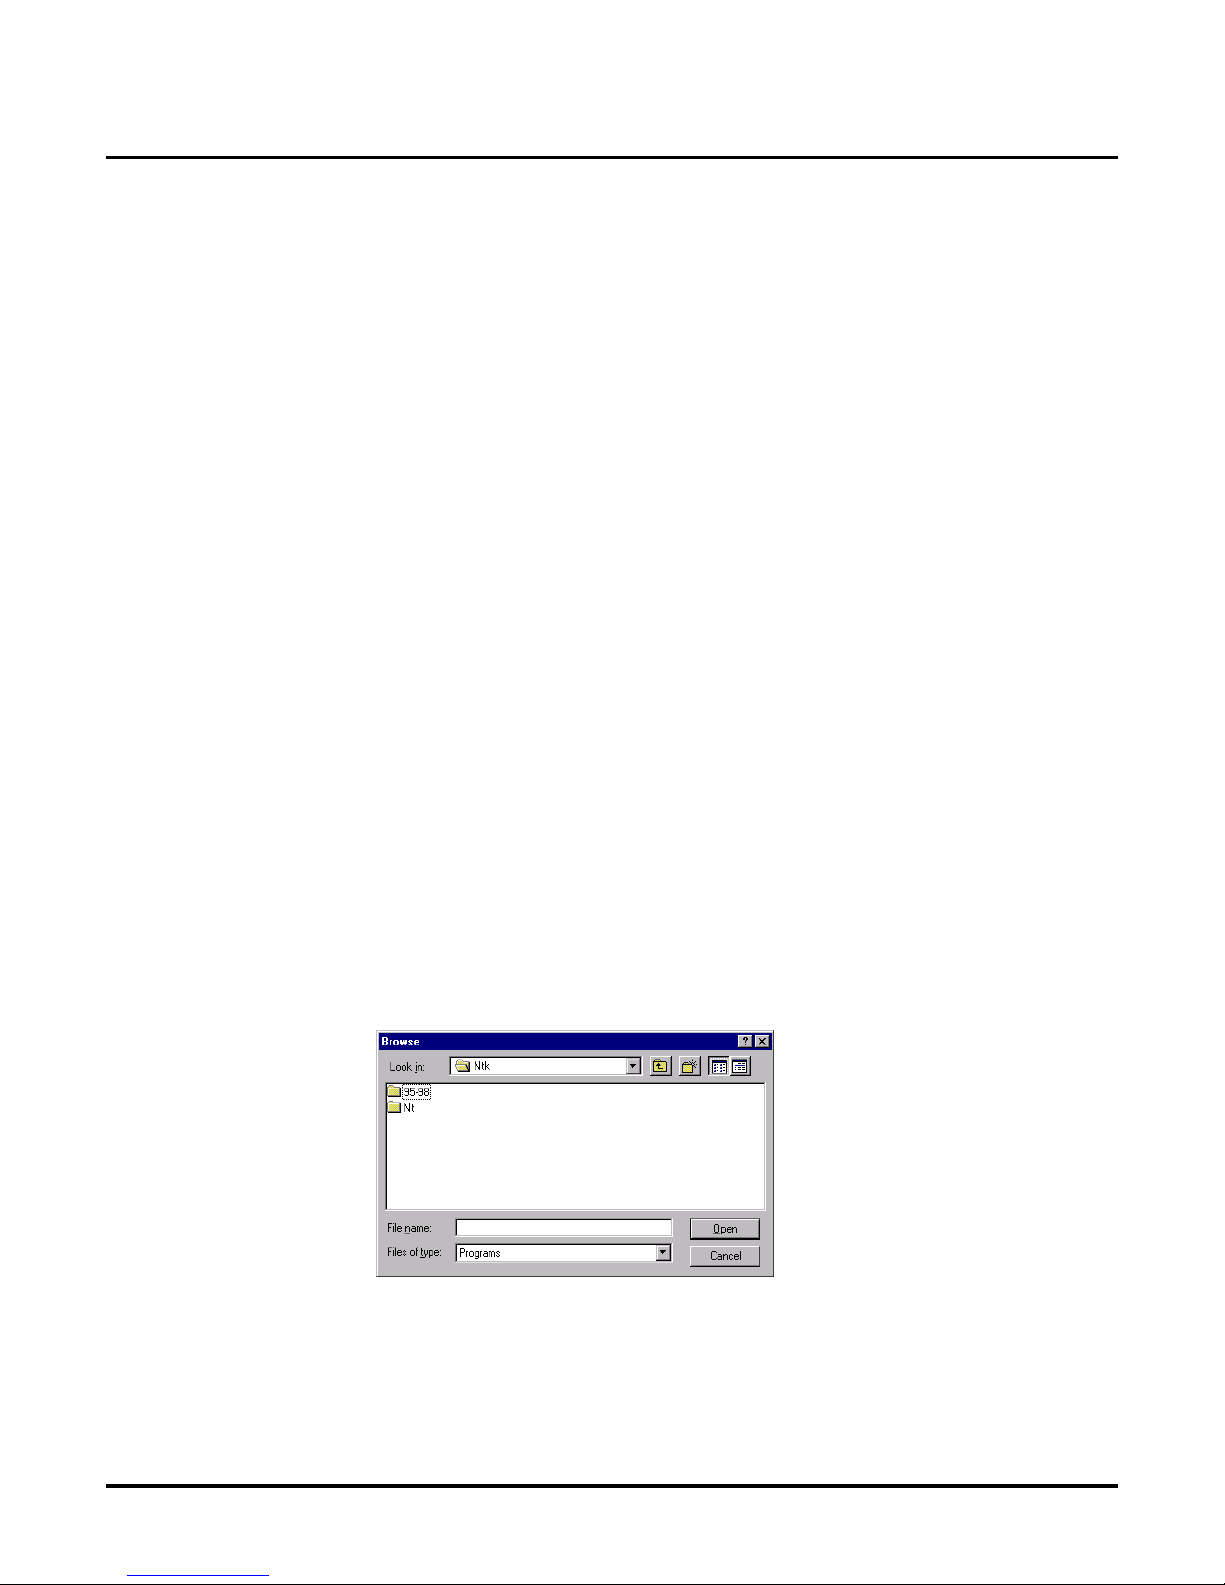
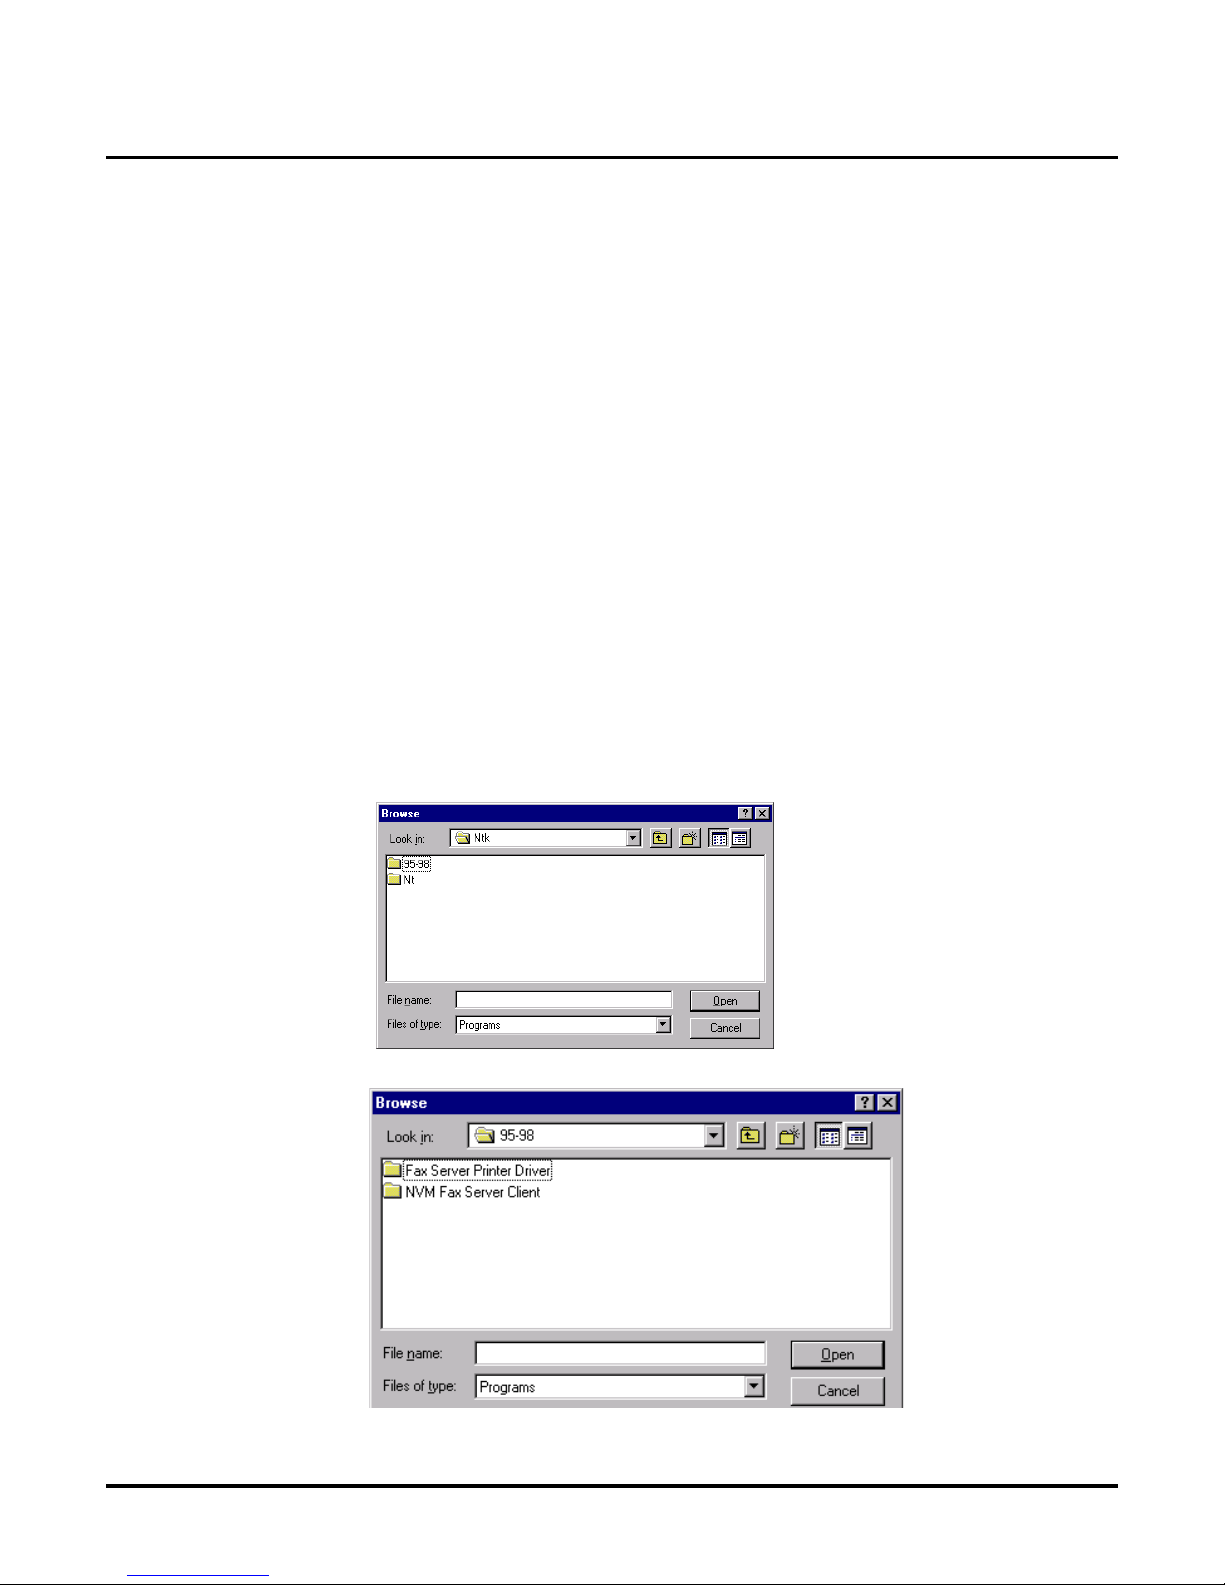
7. You will see two file folders that contain installati on files for clien t computers with Windows
95/98 and files for client computers with Windows NT 4.0, as shown below.
Double-clic k to open the appropriate file folder for the computer on which you are installing
the software.
Page 11
Installing Fax Server
Settin g U p t he C li e nt WorkSt at io n
Issue 1-0 ◆ 7
Install the Fax Printer Driver in Client Workstations
(cont’d)
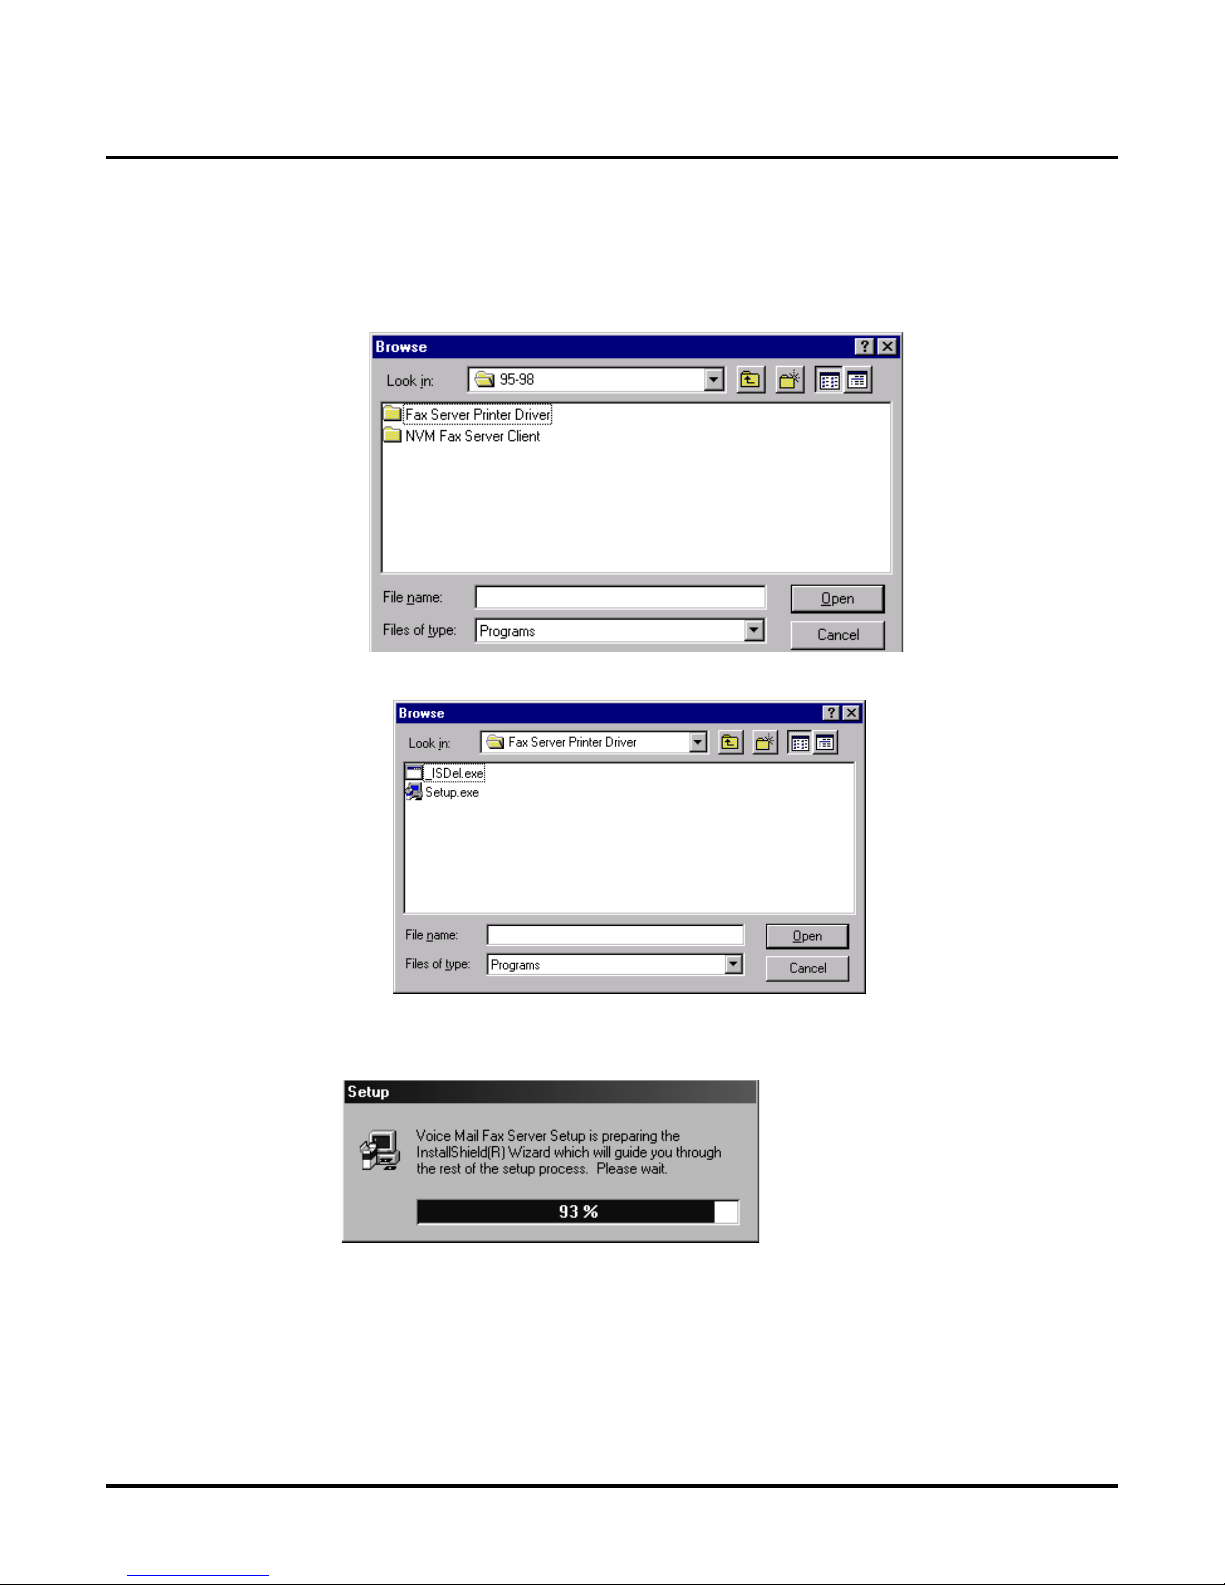
You then see a screen similar to the following:
8. D ouble- c lick to op e n th e Fax Server Printer Driver folder. You see:
9. Double-click on the Setup.exe file. Click OK. After a few moments , you see a screen s imilar
to:
Page 12
Installing Fax Server
Setting Up th e Clie nt WorkStat ion
8 ◆ Issue 1-0
Install the Fax Printer Driver in Client Workstations
(cont’d)
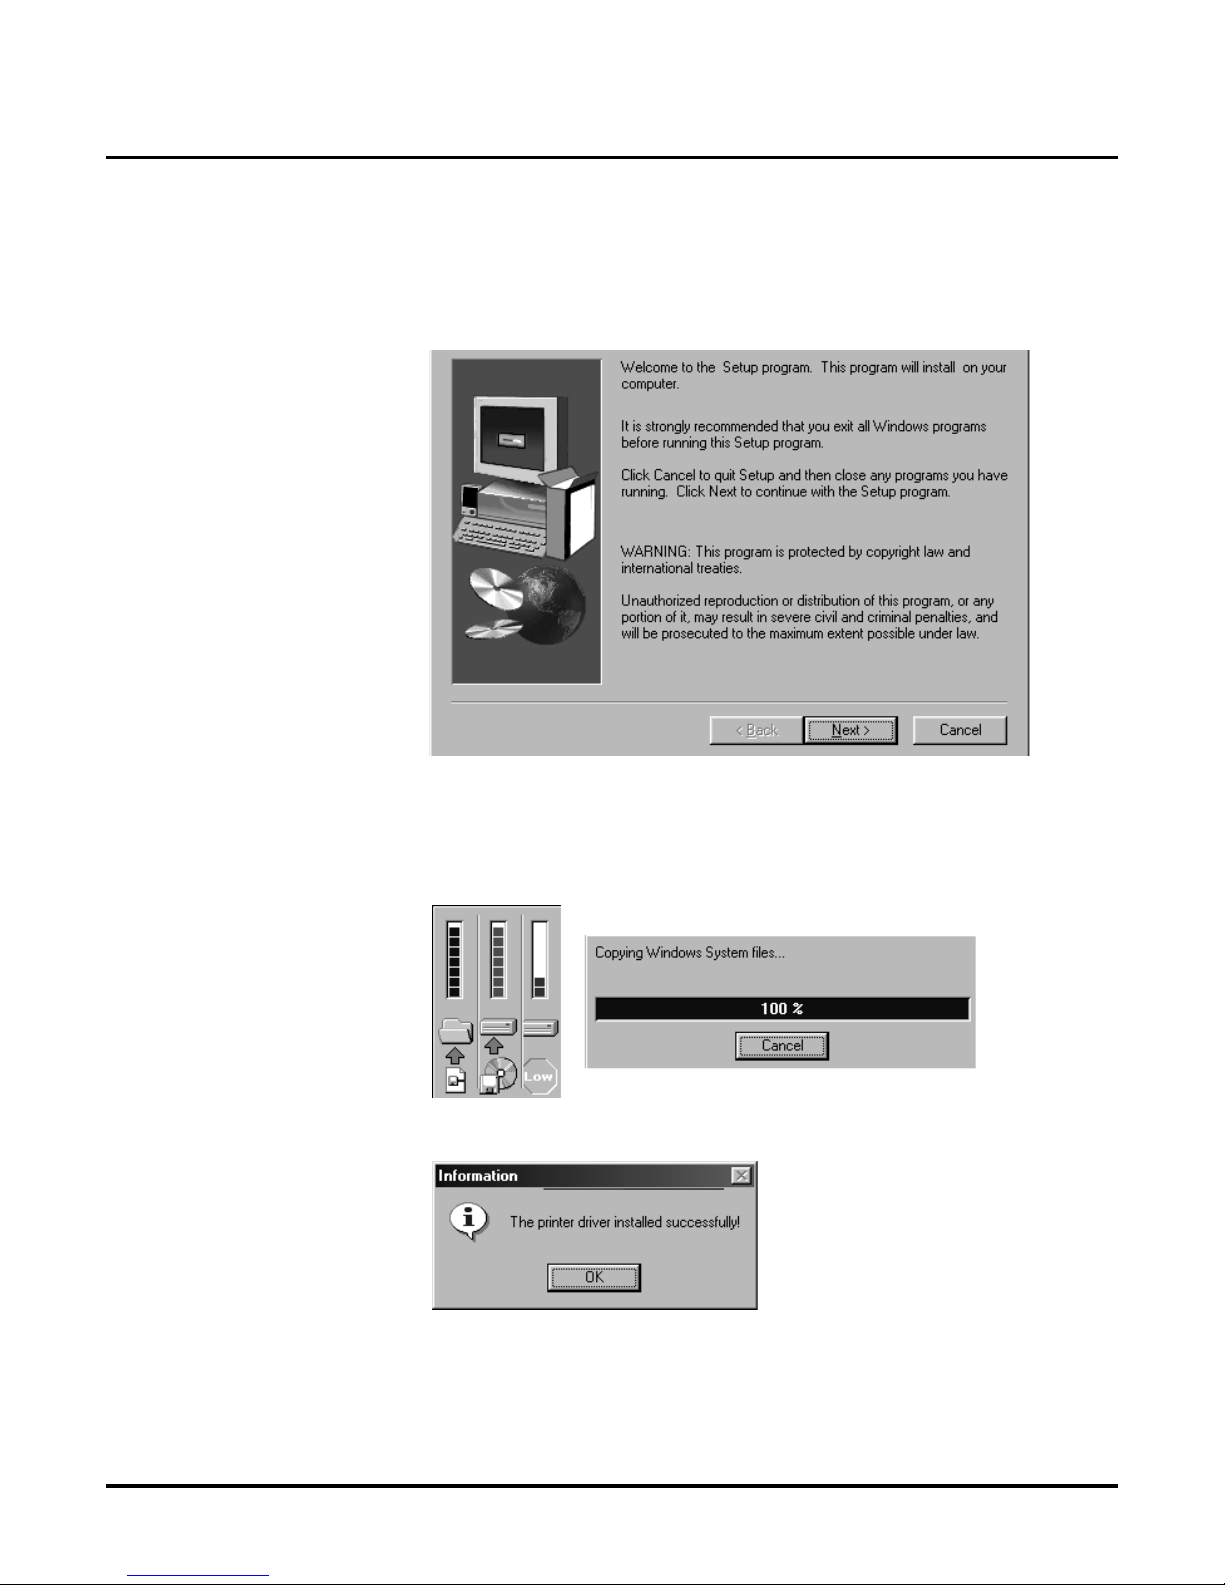
10. You then see the following scree n which sugg ests tha t you close an y prog rams that are running .
If you have an y other programs running, cl ick Cancel, and return to step 1.
OR
If don’t see any other programs running, click Next to conti nue. You see a scre en th at shows
the status of the f ile copy process:
If the program insta lled correctly, you see:
11. Click OK. You return to your comput er’s desktop. You are now ready to inst all the Client Soft-
ware. These instructions begin on the next page.
Page 13
Installing Fax Server
Settin g U p t he C li e nt WorkSt at io n
Issue 1-0 ◆ 9
Install the Client Software in a Client Workstation
The files for the Client Software for th e Fax Server is also on the Fax Server Distribution 1.02
CD.
To install the Fax Server Client Software on a workstation:
IMPORTANT
You must close all programs before you begin the installation. This includes any email and any virus protection programs.
To install the Fax Server Client Software:
1. Close all programs (if you have not already done so).
2. The Fax Server Distribution 1.02 CD should still be in the CD-ROM drive of the client
computer. (If it is not, insert it into the CD-ROM drive now.)
3. Click Start ➱ Run.
4. Click Browse.
5. In the Browse window, click in the Lo ok in box for the CD-ROM drive of the computer.
6. Double-click to open the file labeled Fax Server Distribution 1.02.Then double-click to
open the following subsequent file folders:
■ Cd
■ NTK
7. You will see two file folders that contain installati on files for clien t computers with Windows
95/98 and files for client computers with Windows NT 4.0, as shown below.
Double-clic k to open the appropriate file folder for the computer on which you are installing
the software.
You then see a screen similar to the following:
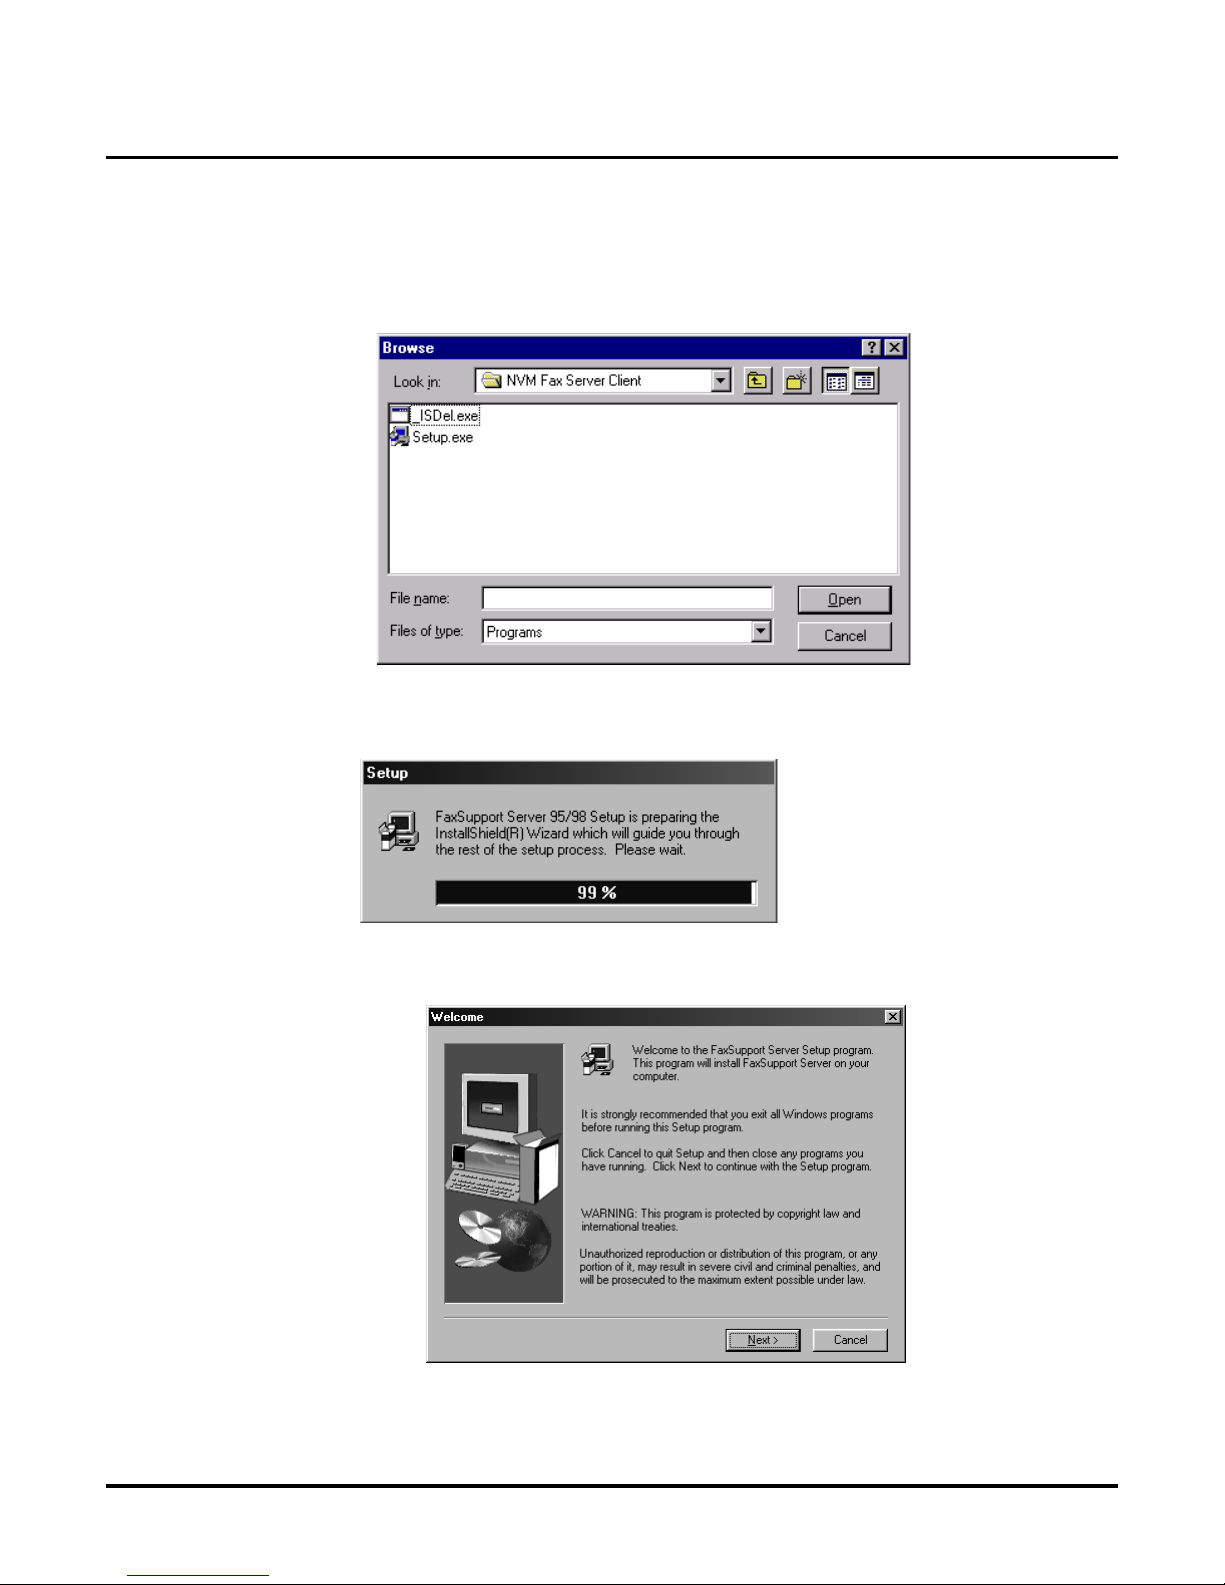
8. Doub l e- click on NVM Fax Server Client.
Page 14
Installing Fax Server
Setting Up th e Clie nt WorkStat ion
10 ◆ Issue 1-0
Install the Client Software in a Client Workstation
(cont’d)
Yo u s ee a sc re en similar to:
9. Double-click on the Setup.exe file. Click OK. After a few moments , you see a screen s imilar
to:
10. You then see the following scree n which sugg ests tha t you close an y prog rams that are running .
If you have an y other programs running, cl ick Cancel, and return to step 1.
OR
Page 15
Installing Fax Server
Settin g U p t he C li e nt WorkSt at io n
Issue 1-0 ◆ 11
Install the Client Software in a Client Workstation
(cont’d)
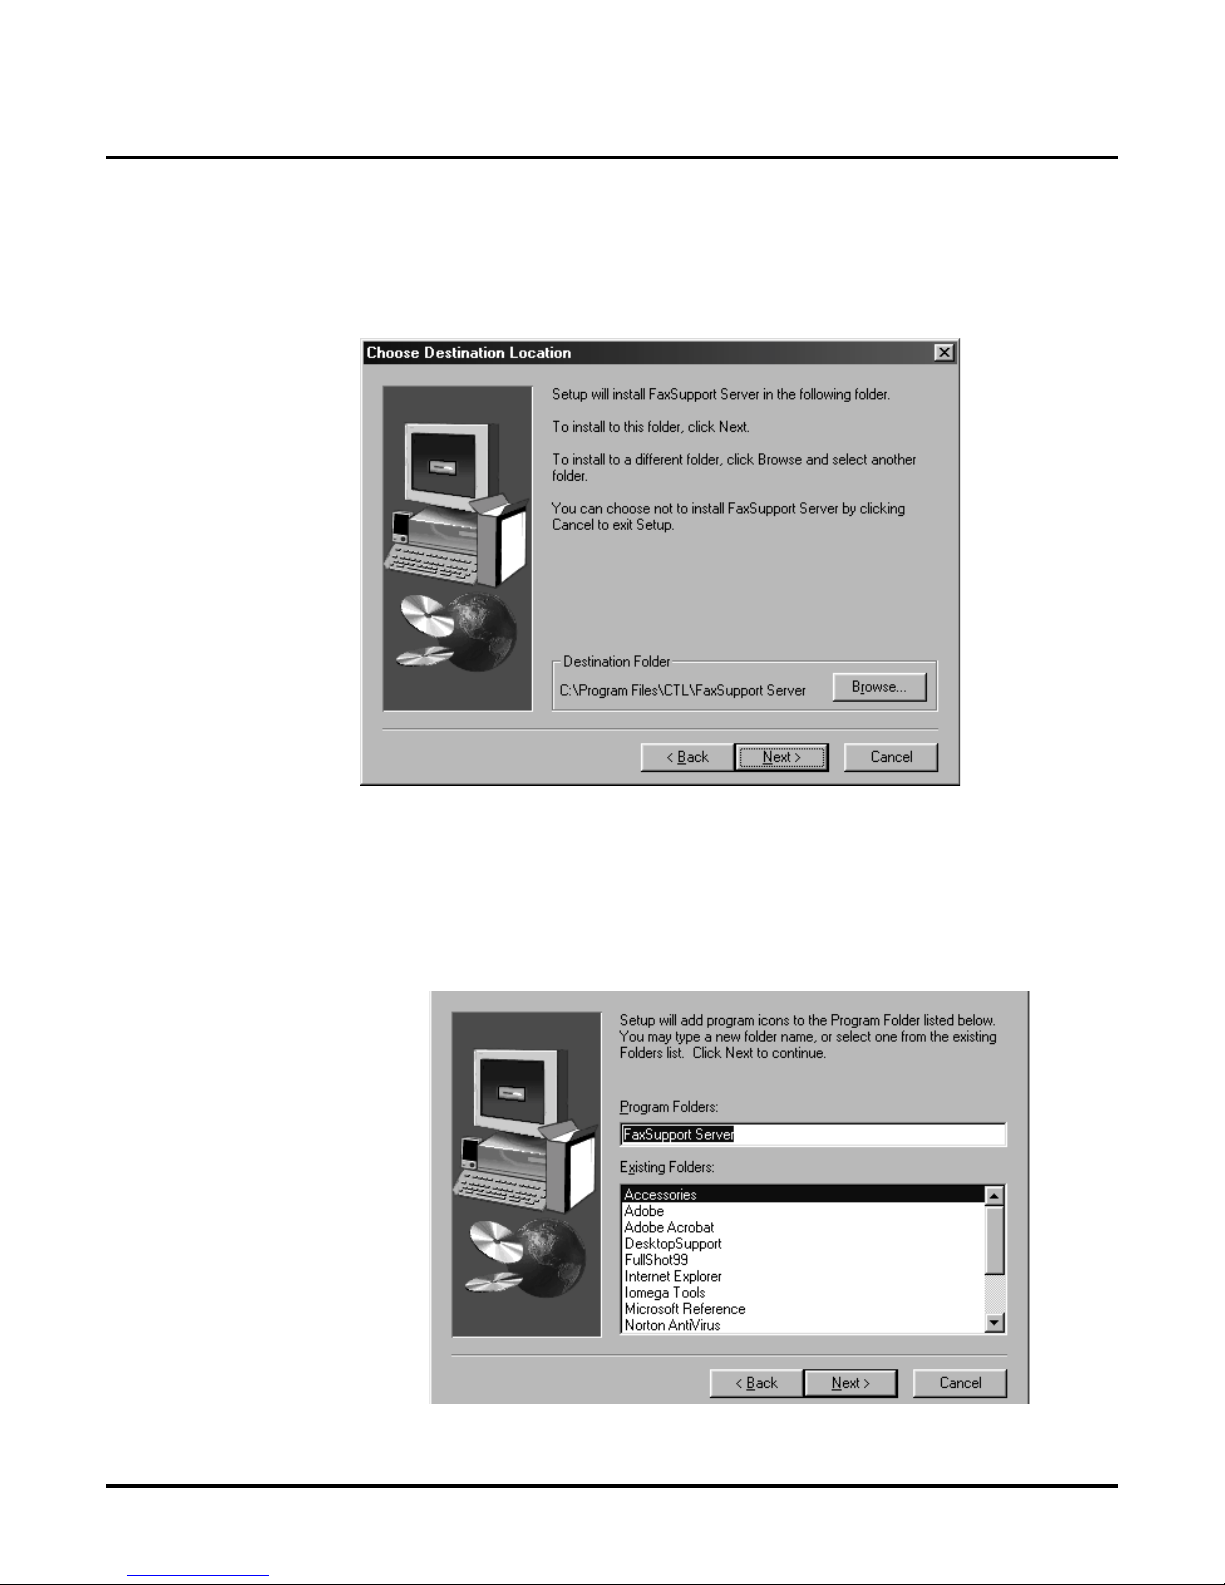
If don’t see any other programs running, click Next to continue.You see:
11. To instal l the Fax Server in the default location:
(C:\Program Files\CTL\FaxSupport Server), click Next and go to step 12.
OR
Click Browse to select another location, and go to step 12.
OR
Click Cancel to quit the Inst aller, and continue later on.
12. After selecting the location for the files (default is: C:\Program Files\CTL\FaxSupport
Server) in step 11, you see:
Page 16
Installing Fax Server
Setting Up th e Clie nt WorkStat ion
12 ◆ Issue 1-0
Install the Client Software in a Client Workstation
(cont’d)
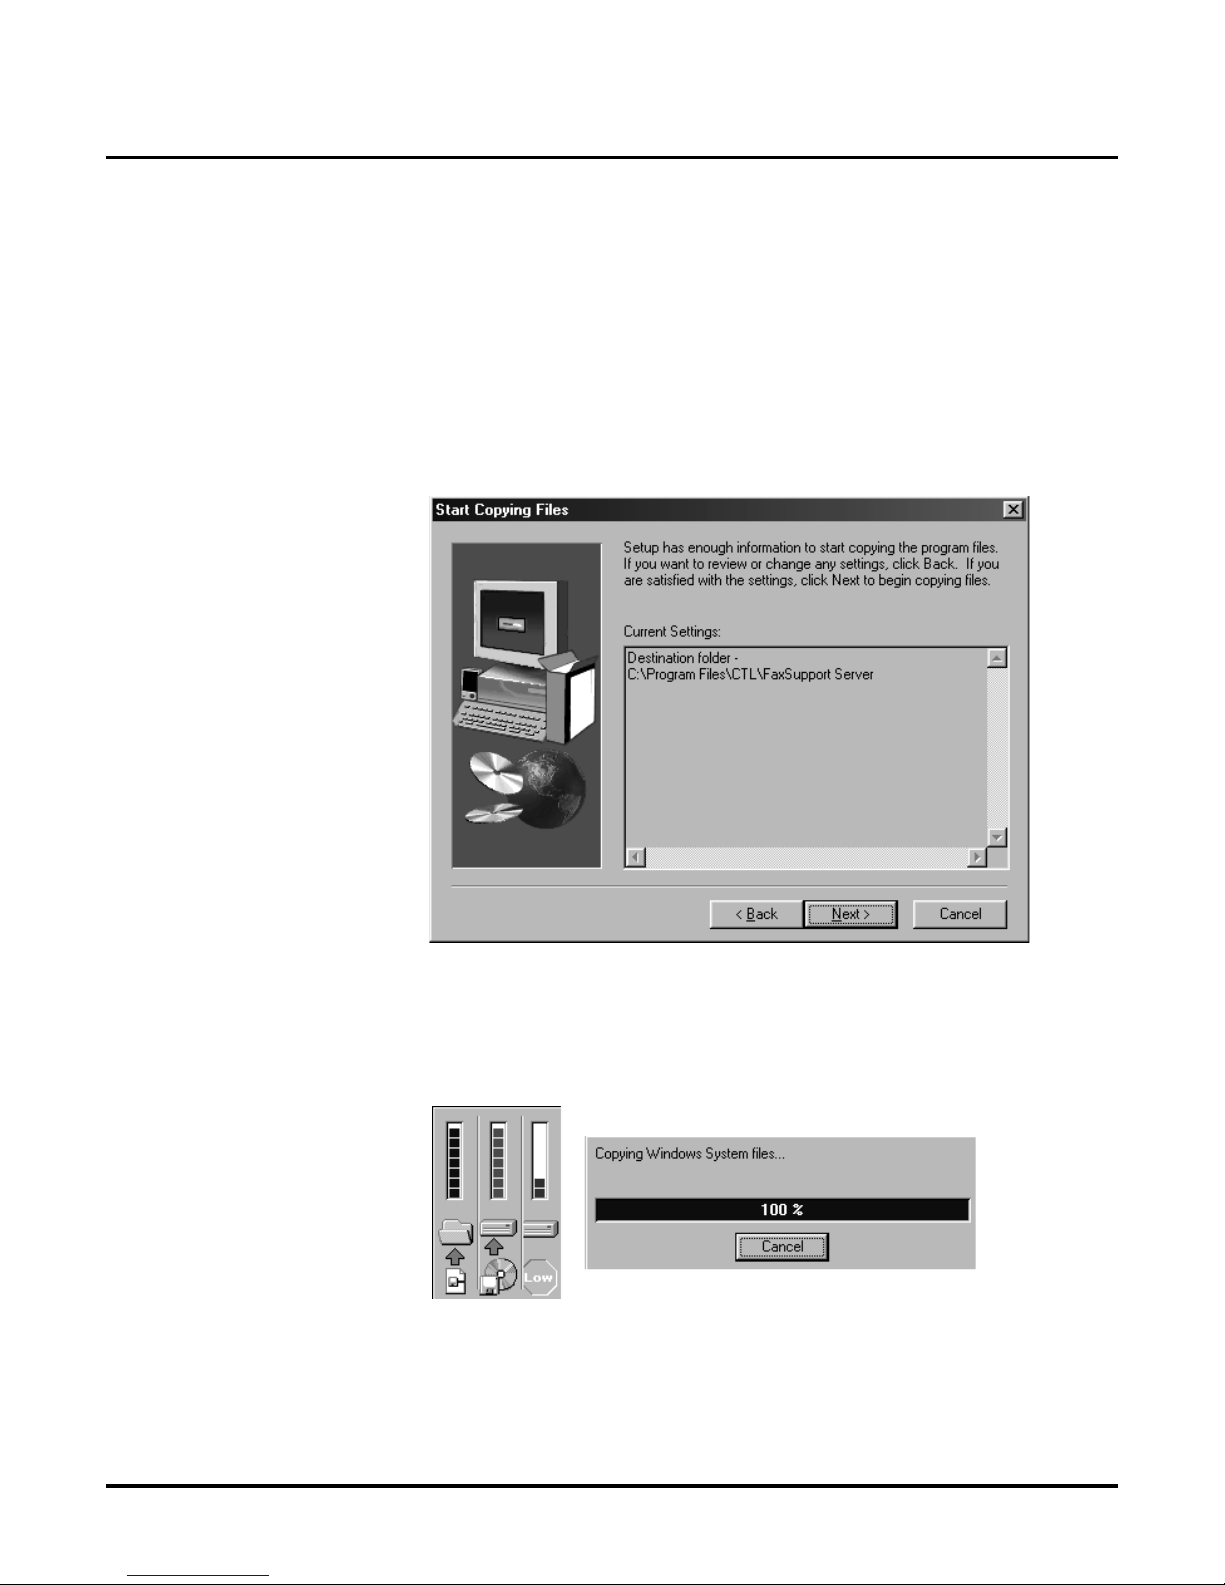
To select the default Program Group (FaxSupport S erv er), click Next.
OR
Click on the box under Program Folders. Type in desired name, and click Next.
OR
Click on the box under Existing Folders. Use the scroll bar to find desired name. Select
name so it is highlighted, and click Next.
13. The installa tion program is ready copy th e program files onto your computer . You see:
If the screen shows the correct settings, click Next.
OR
Click Back to change your entries in previous screens.
If you clicked Next, you see a screen that shows the status of the file copy process:
Page 17
Installing Fax Server
Settin g U p t he C li e nt WorkSt at io n
Issue 1-0 ◆ 13
Install the Client Software in a Client Workstation
(cont’d)
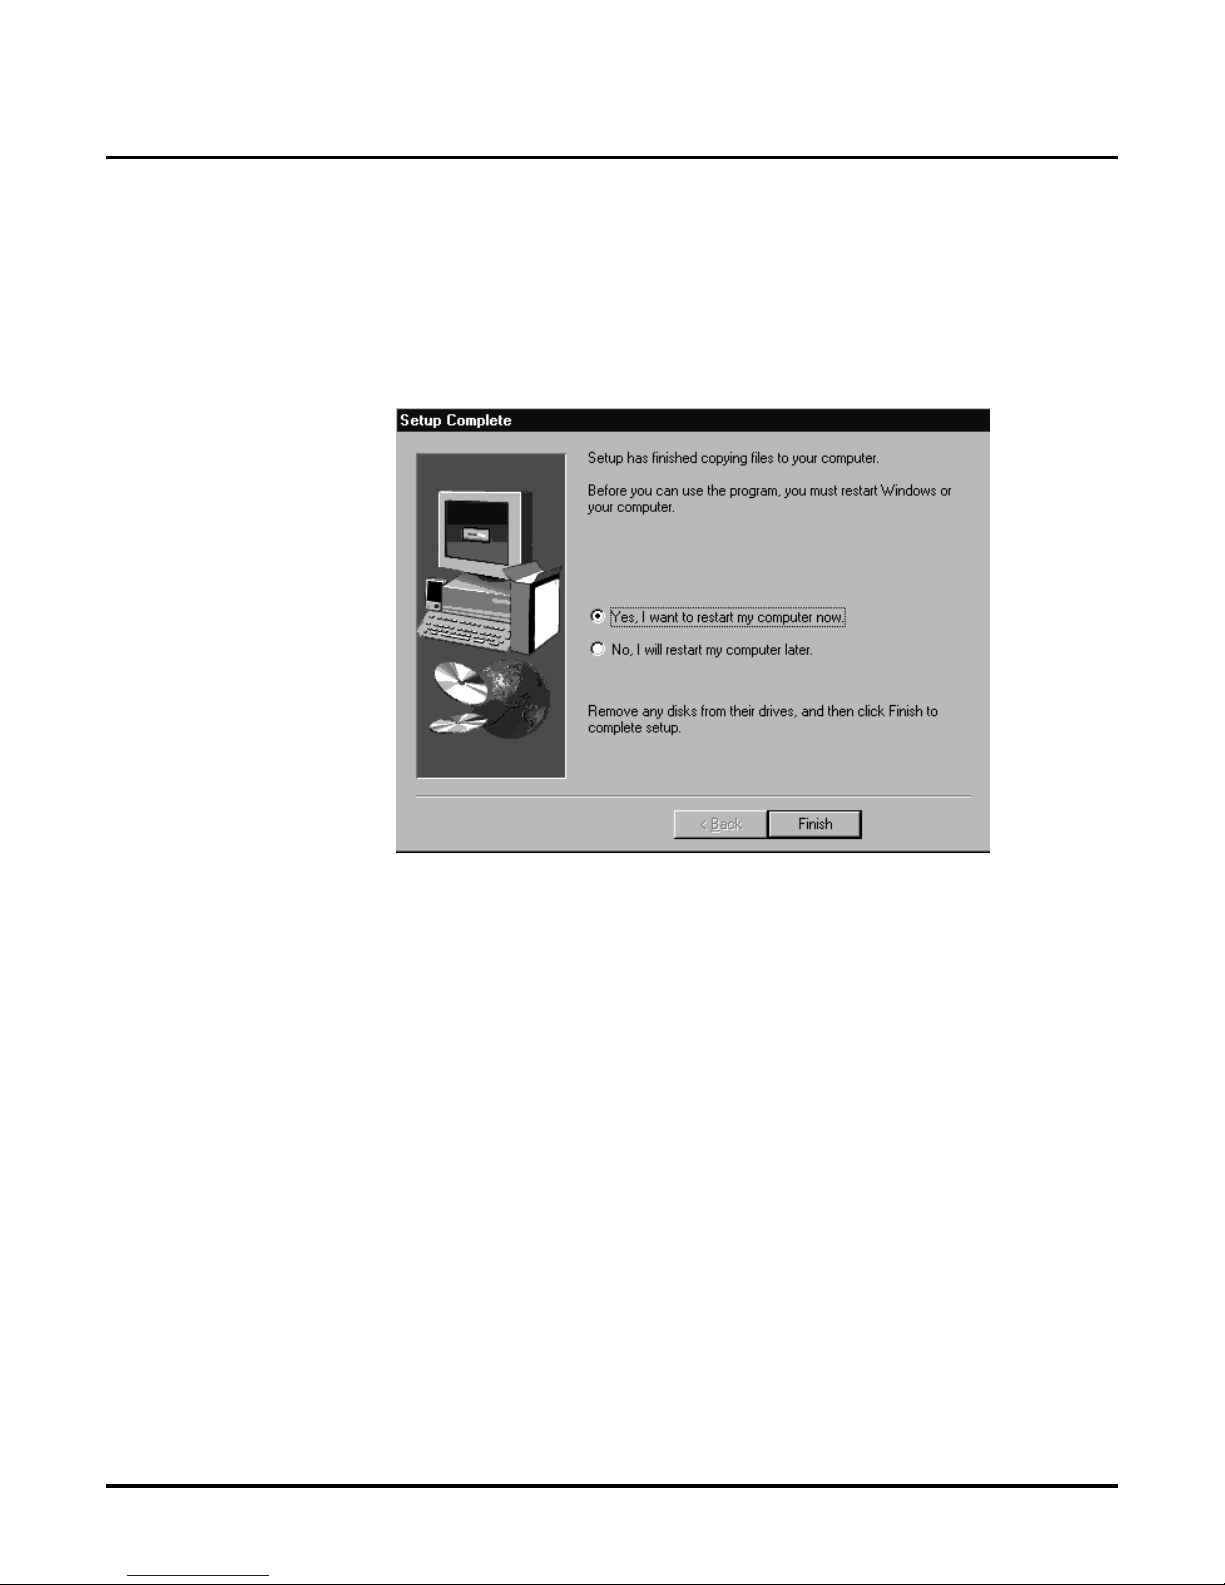
You will see one of two screens depending upon whether any system files needed to be
upgraded:
● If system f iles needed to be upgraded, you will see :
If you see the above screen, you mus t restart your computer before you can use the Fax Server.
Be sure that the radio button for restarting the computer is selected.
Page 18
Installing Fax Server
Setting Up th e Clie nt WorkStat ion
14 ◆ Issue 1-0
Install the Client Software in a Client Workstation
(cont’d)
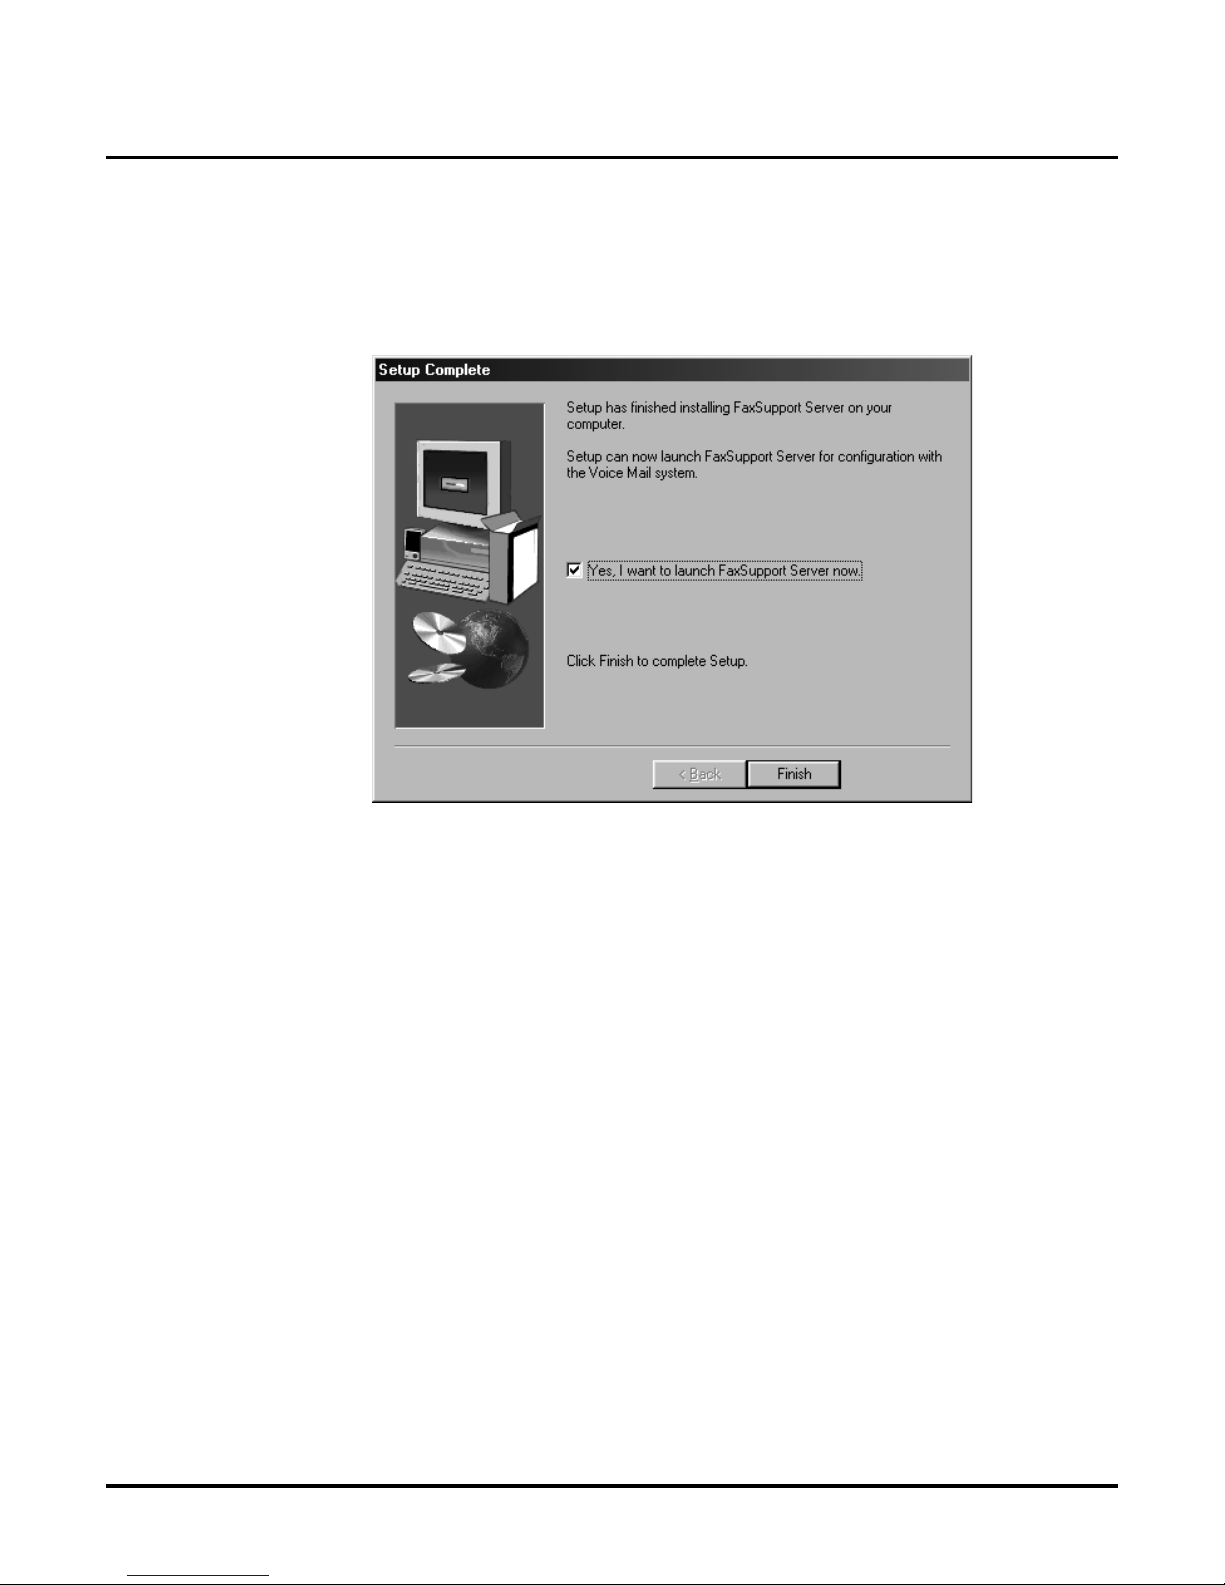
● If system f iles do not need to be upgraded, you see the following screen:
If you see this screen, you will not have to restart your computer before using the Fax Server.
If you want to launch Fax S erver now, be sure that the radio button is sele cted.
14. Remove the CD from the computer’s CD-ROM drive.
15. To launch Fax Server now:
● Be sure that the radio button, Yes, I want to launch FaxSupport Server now, is
enabled. You must launch Fax Server to get a Setup screen before you use it.
● Click Finish.
OR
● Click Finish without en abling the radio button, or click Finish and your computer
restarts. You return to your compute r’s desktop.
● To get the Setup screen at a later date, navigate to and open the folder where the Fax
Server files are stored. If you used the default, it is C:\Pr ogram Files\CTL\FaxSupport Se rver.
● Doubl e- click on FaxServer.exe.
Page 19
Installing Fax Server
Settin g U p t he C li e nt WorkSt at io n
Issue 1-0 ◆ 15
Install the Client Software in a Client Workstation
(cont’d)
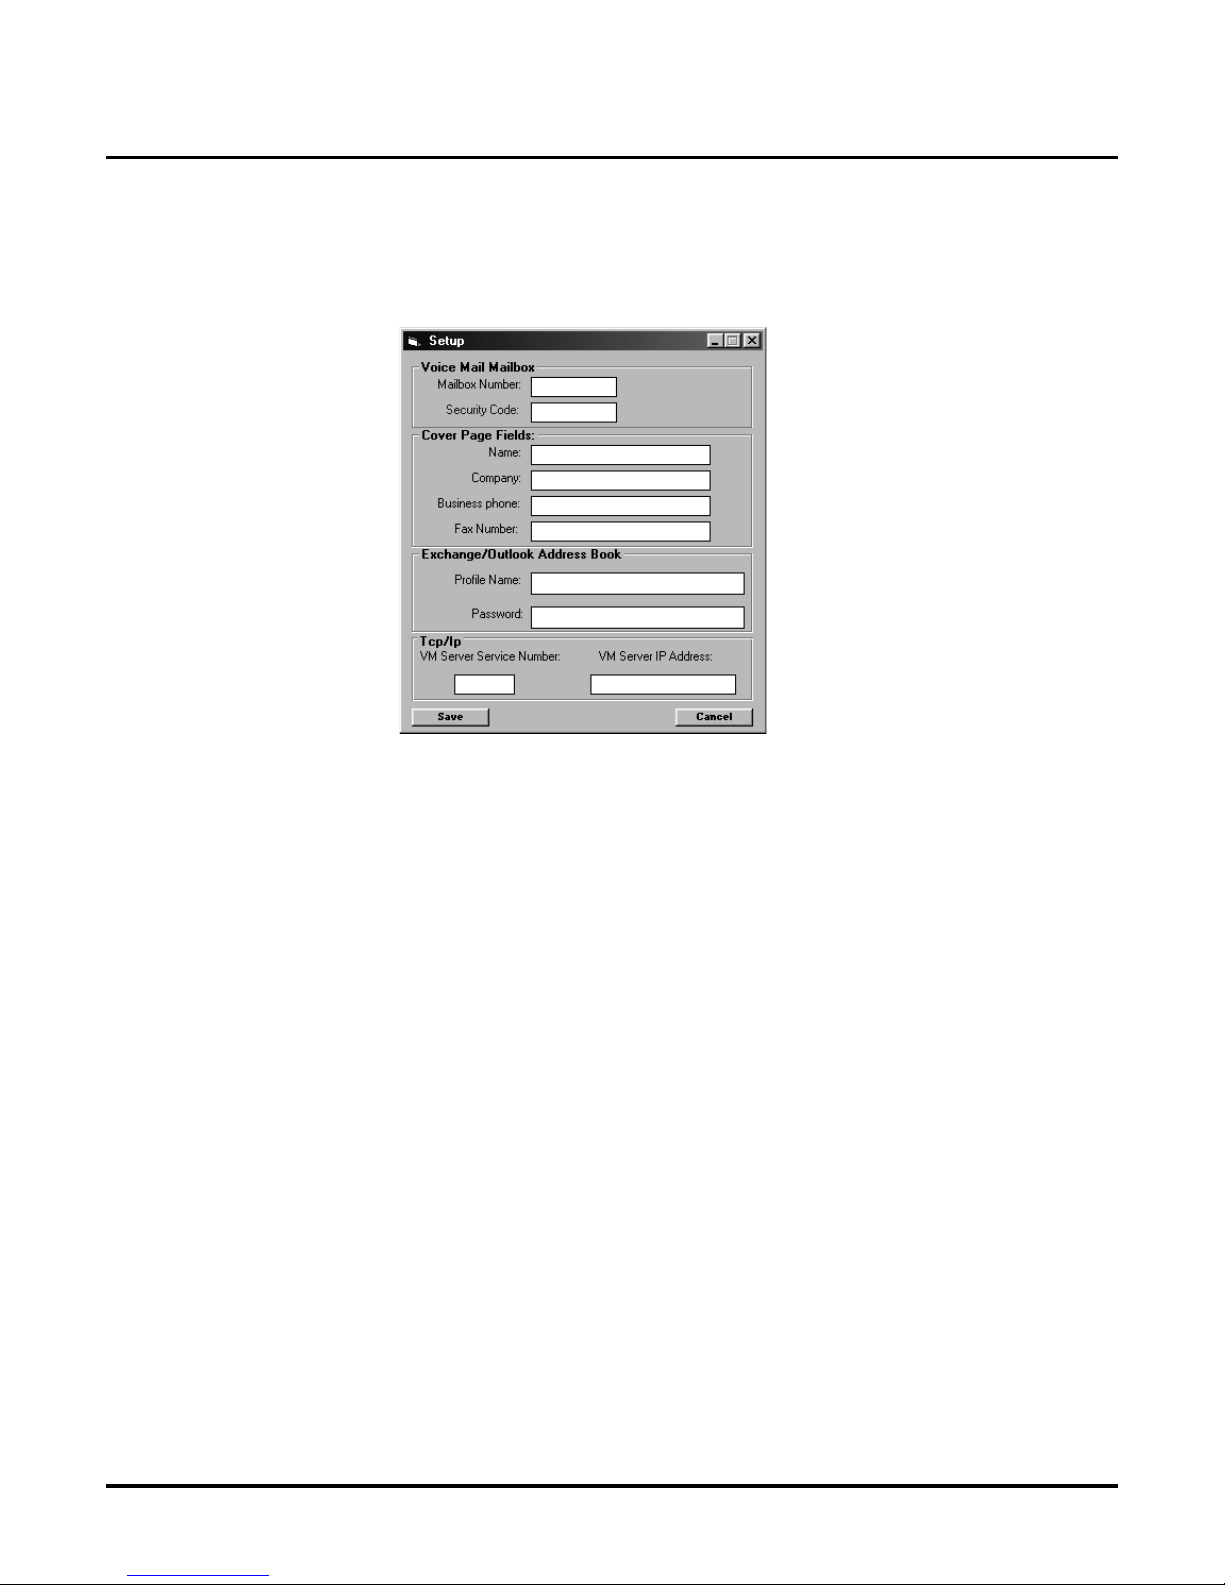
You see:
16. Complete the Fa x Server Setup screen as follows:
In the Voice Mail Mailbox portion of the screen:
● Enter the Mailbox Number of the Subscriber Mailbox.
● Enter the Sec ur i ty Cod e of the Subscriber Mailbox
In the Cover Page Fields portion of the screen:
● In the Name field, en ter the us e’s name as it should appear on the Fax cover page.
● In the Company field, enter the name of the user’s company as it should appear on the
Fax Cov er page.
● In the Business phone field, enter the user’s phone number.
● In the Fax number field, enter the number of the user’s Fax number (where the user
receives Fax messages).
The Exchange/Outlook portion of the screen allows access to the address book of Microsoft
Exchang e/Outlook. This allows users to se nd f ax messages to recipients lis ted in the address
book.
In the Exchange/Outlook Address Book portion of the screen:
● In the Profile Name field, enter the users’s profile name (se e the Microsoft Mail Admin-
istrator if required).
● Enter the user’s Exc hange/Outlook pas sword (if there is one) in the Password field.
The Tcp/IP portion of the screen must be com plete d to all o w Fa x f iles to be do wnlo aded to t he
Voice Mail (which sends the fi le out as a Fax). See the System Administ rator for help.
● Enter the VM Server Service Numb er.
● Enter the VM Server IP Address.
17. Click Save when you are finished.
18. Reboot your computer.
19. Repeat the instructions in Setting Up a Client Computer for each client that will have access to
Fax Server.
Fax Server is se t up and re ady to use. See Using the Fax Server on page 17.
Page 20

Installing Fax Server
Setting Up th e Clie nt WorkStat ion
16 ◆ Issue 1-0
Remove the Fax Server from a Client Workstation
If you want to remove the Fax Server at some point in the future, you can do so from the Control
Panel’s Add/Remove Program’s Properties box.
To delete the Fax Server:
1. Double-click on th e My comp uter icon on your computer desktop.
2. Doub l e- click on Control Panel.
3. Doub l e- click on Add/Remove Programs
4. On the Add/Remove Programs Properties box, use the scroll bar to locate FaxSupport
Server.
5. Click on FaxSupport Server .
6. Click Add/Remove.
7. Click Yes to confirm removal of the applic ation.
Page 21
Installing Fax Server
Using the Fax Server
Issue 1-0 ◆ 17
Using the Fax Server
Using the Fax Server
The Fax Server allows you to fax a document directly from an applicati on you are using at your
computer’s deskt op. Do not fax more than 94 pages at one time.
You can use any application to send the fax as long as you are able to se lect a type of printer.
Sending a Fax Message
The follo wing screens ar e from Microsoft Word. Your screens will v ary depending on the softw are
applicati on that you use to send the fax.
To send a Fax Message:
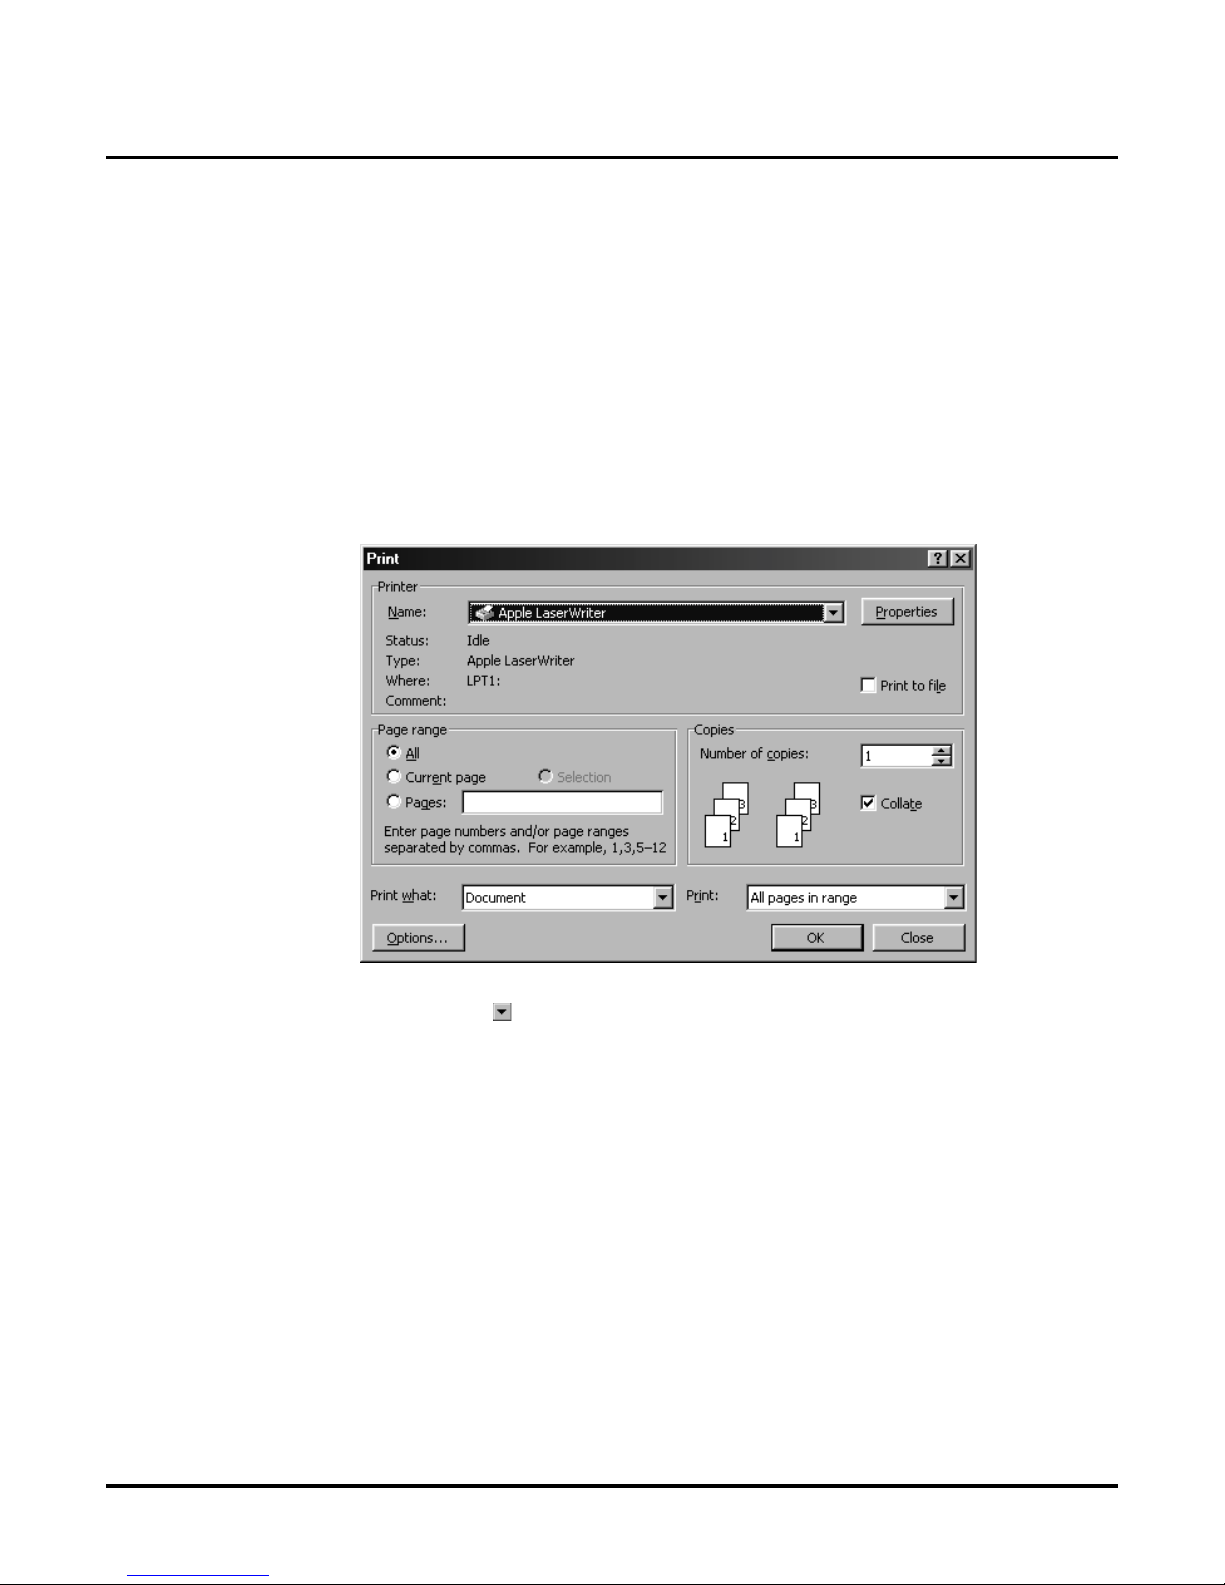
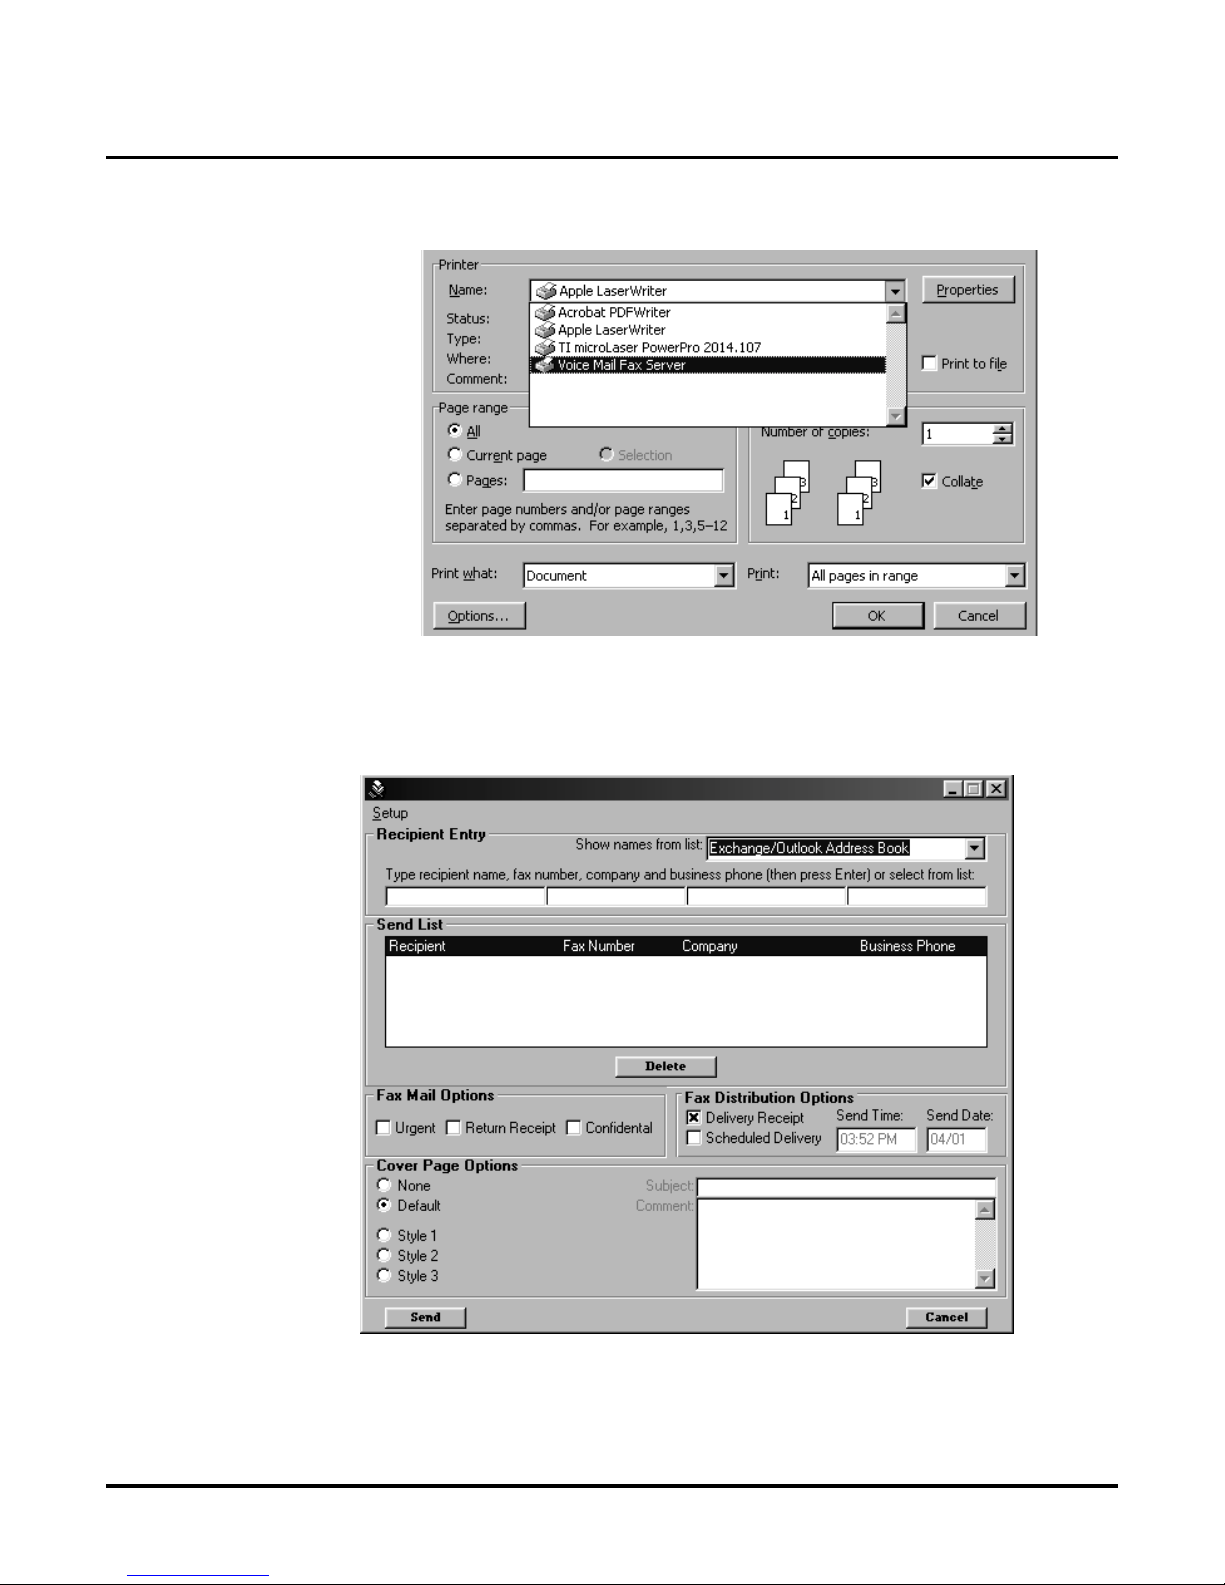
1. From the application you are using select File ➱ Print. You see a print setup screen from
your application. For example:
2. Find the types of printer for your appl ication. (In this example, using Microsoft Word, you
would click the in the Printer Name box.) You see a selection of printers. For example:
Page 22
Installing Fax Server
Using the Fax Server
18 ◆ Issue 1-0
Sending a Fax Message (cont’d)
3. Select to highlight the Voice Mail Fax Server.
4. Click on whatever button the application has to actually print the document. In this example,
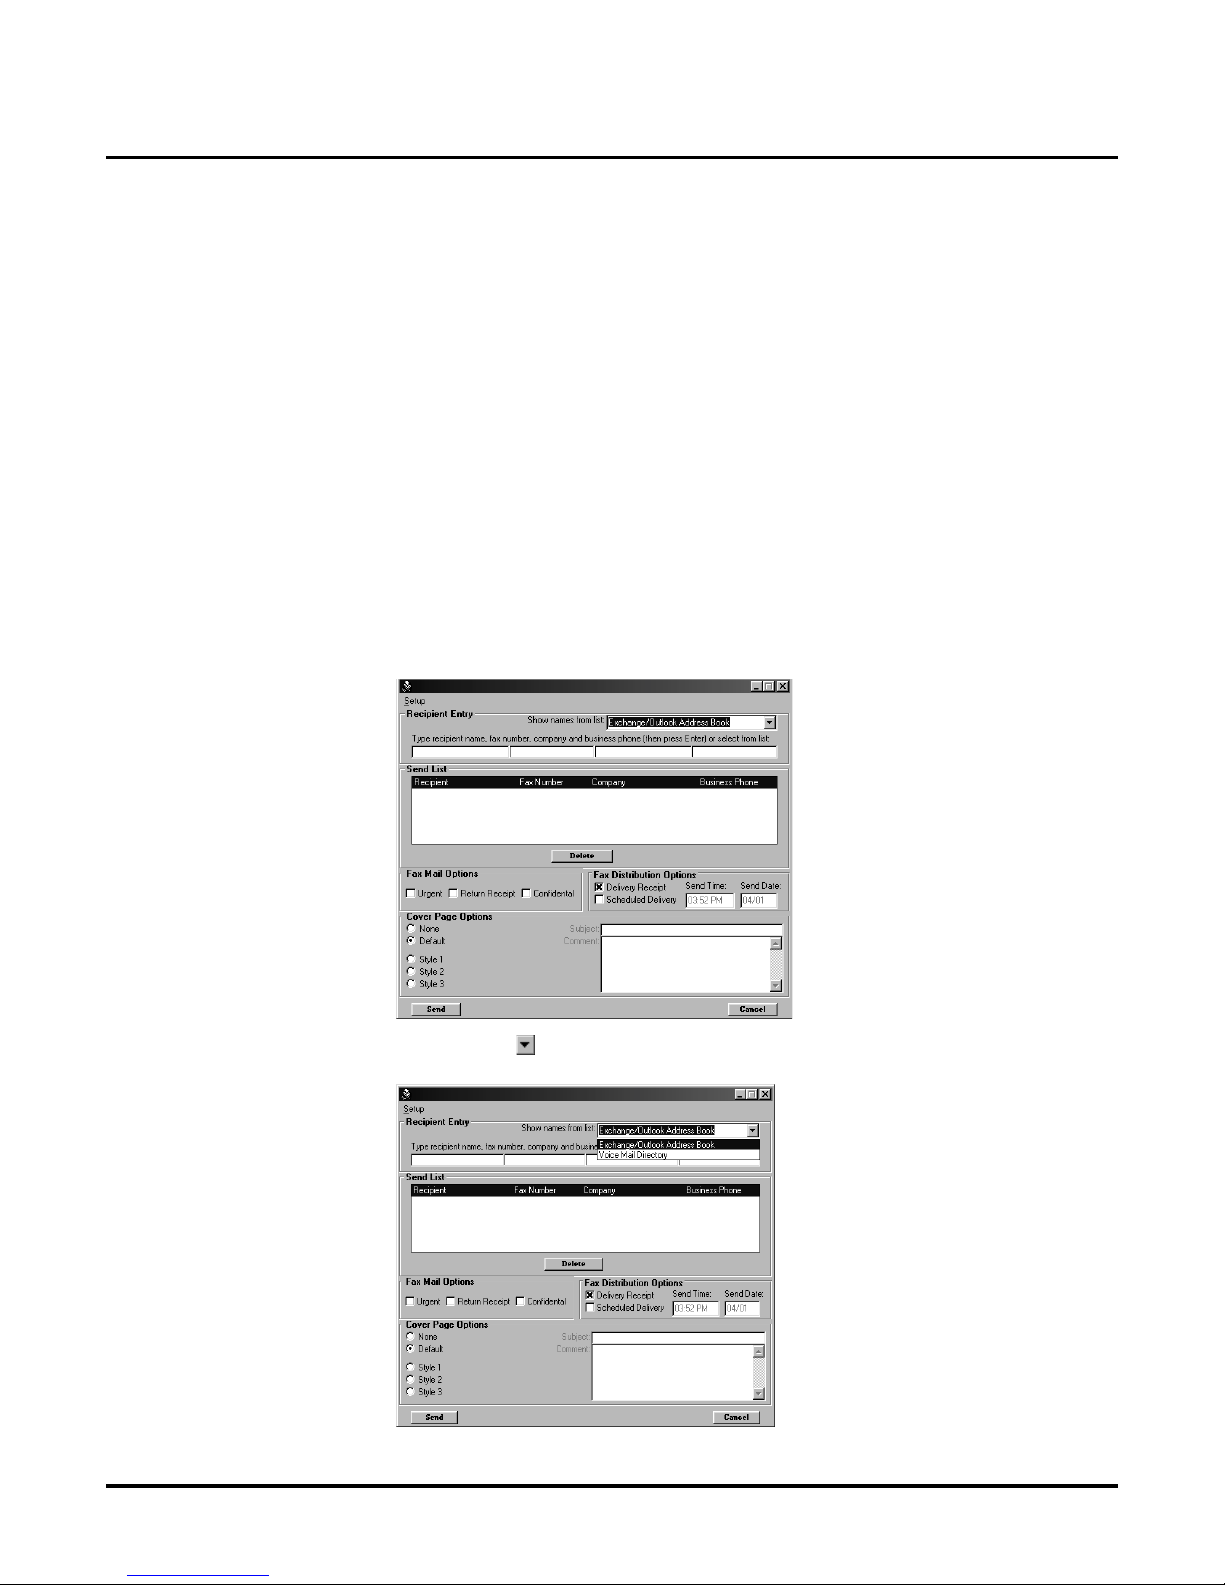
you click the OK button. After a short time, you see the Fax Server Setup screen:
The followi ng steps explain how to finish sending a basic f ax. Information for using the various
options when sending a fax begin on page 22.
Page 23
Installing Fax Server
Using the Fax Server
Issue 1-0 ◆ 19
Sending a Fax Message (cont’d)
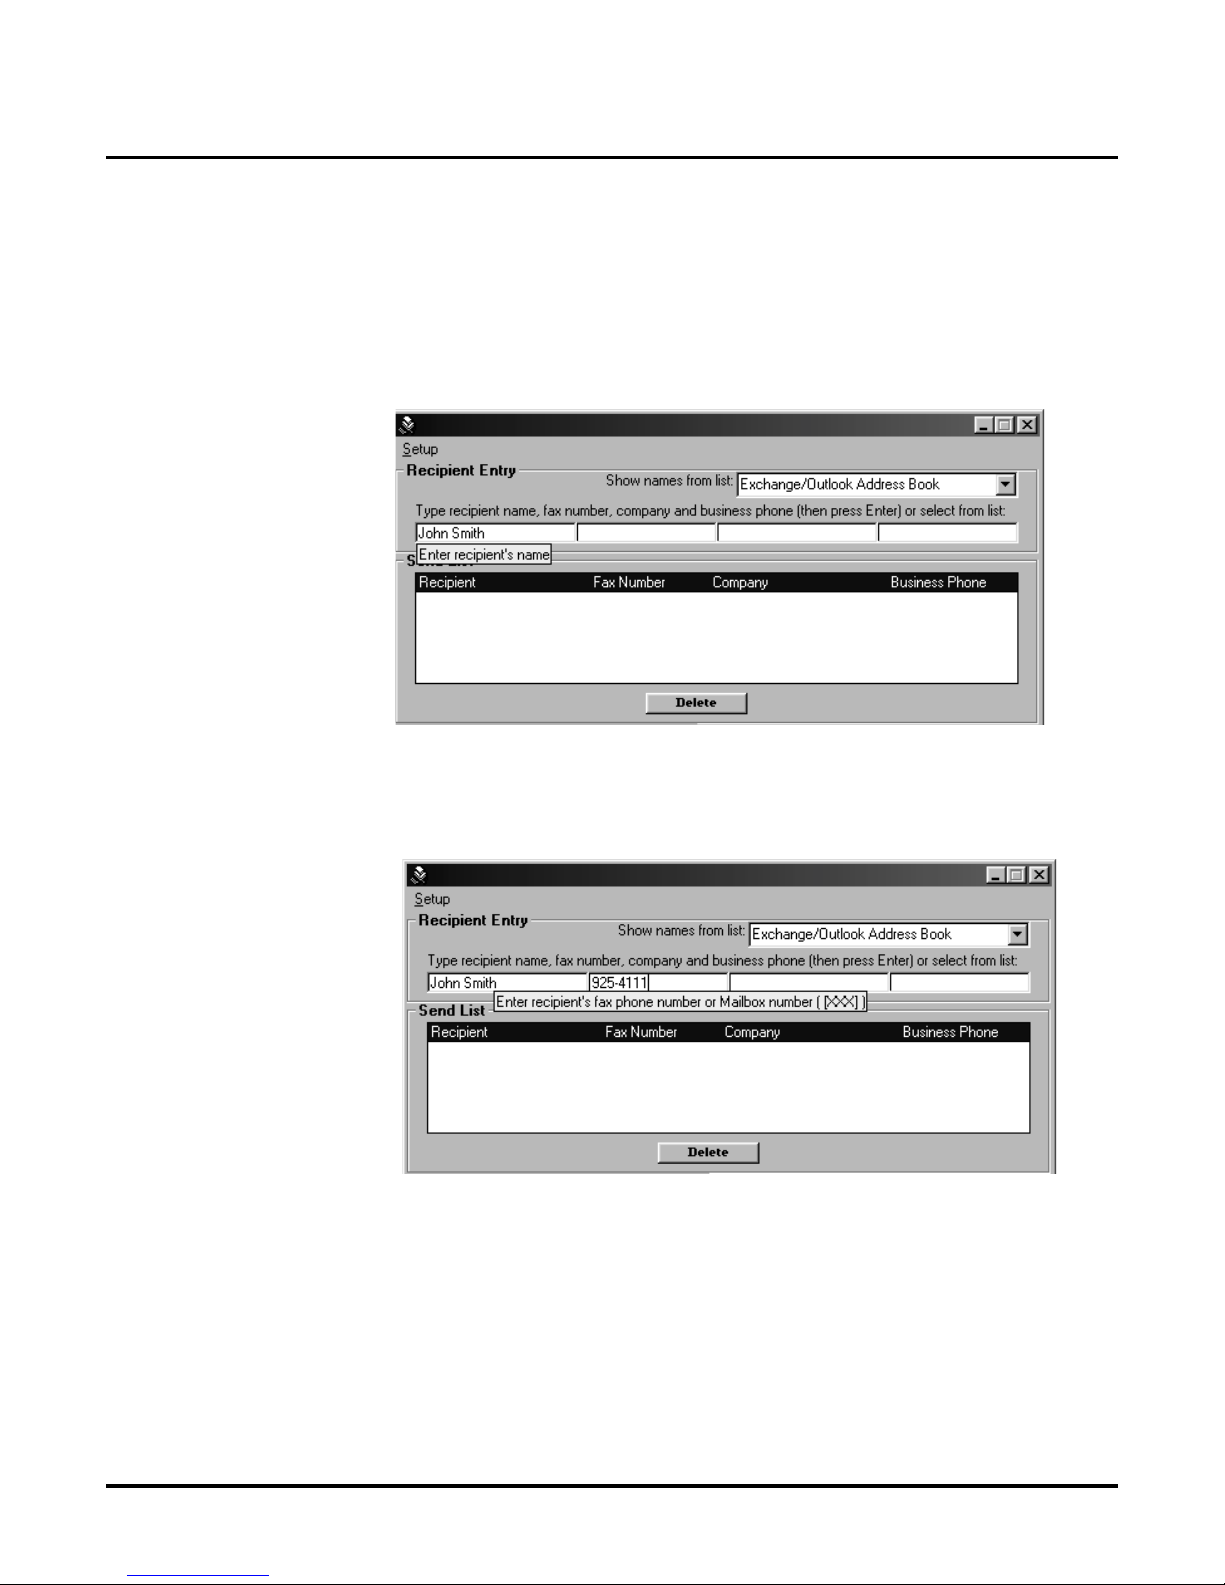
5. This step shows you how to manually enter the rec ipient information. You can also use various
lists for entering recipient information. See information beginning on page 22.
Make th e following e n tr i es in th e R ecipien t’s Entry fields. When you click in each of the
boxes, you see a hel p d ialog box that tells you what you need to enter.
● Click in the first box, and enter the name of your recipient. For e xample:
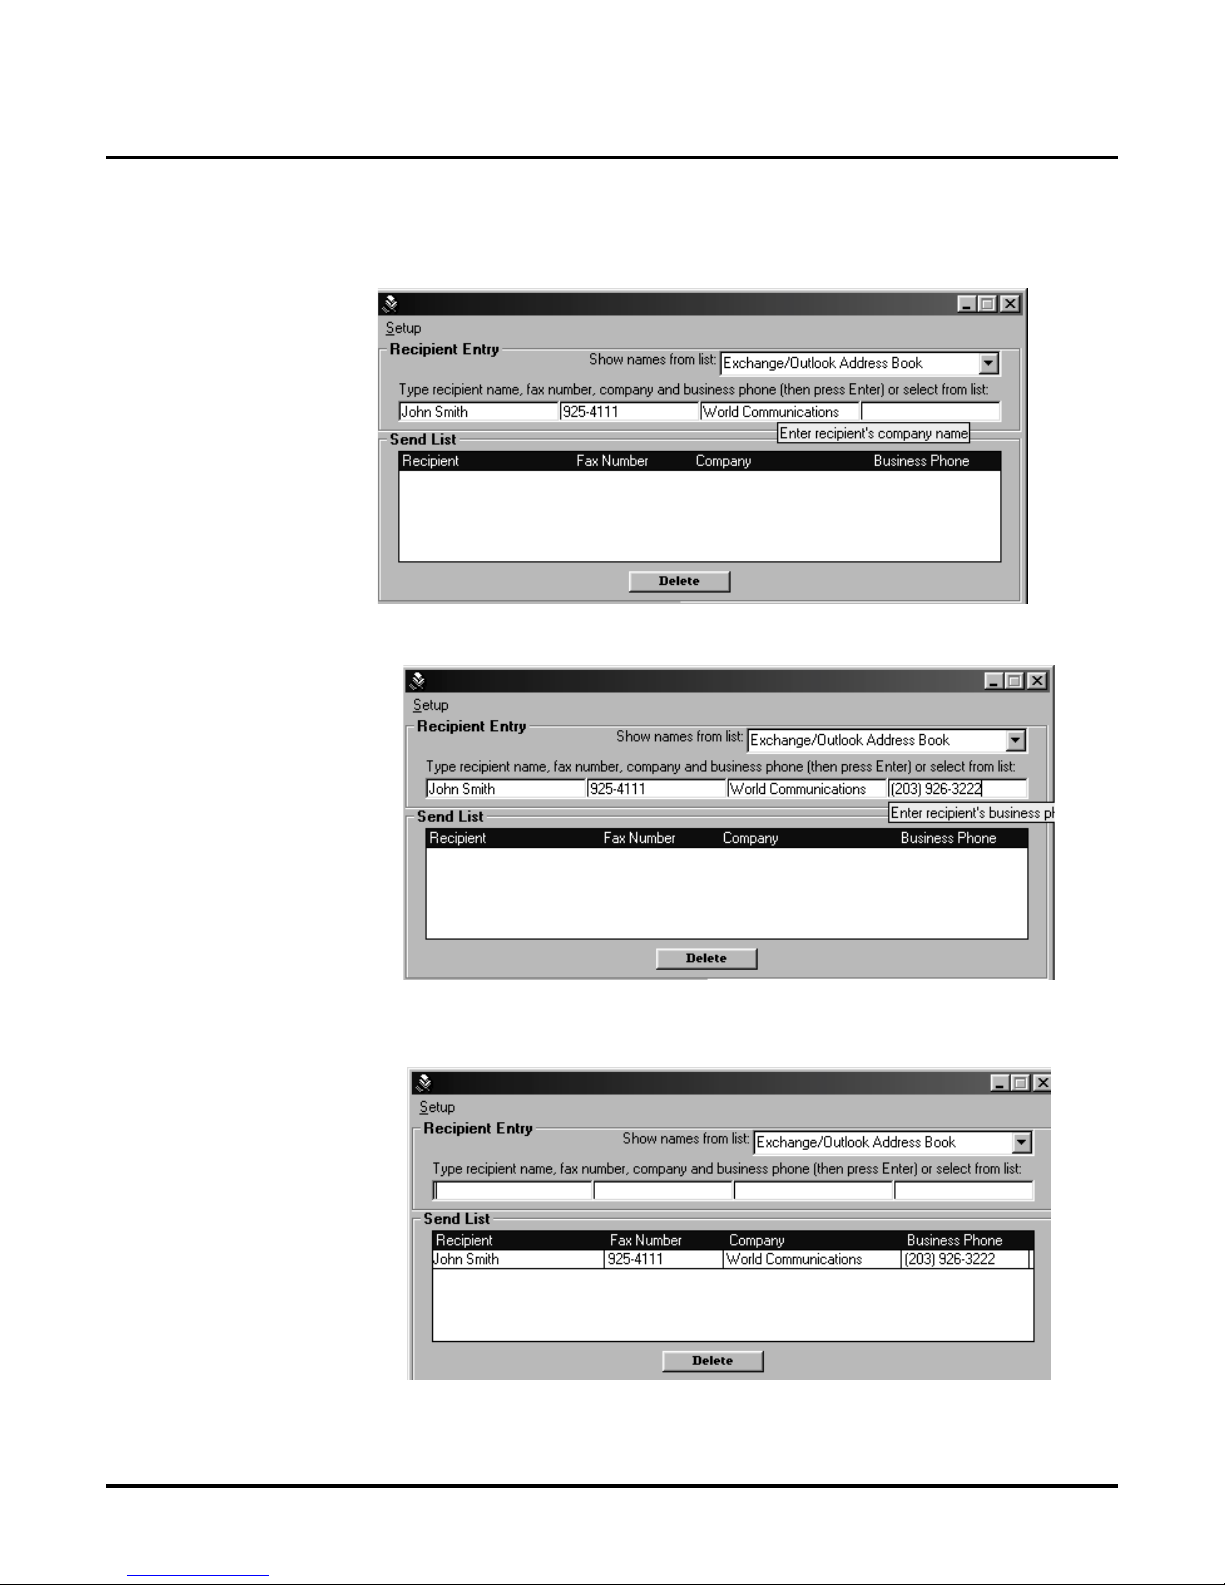
● Click (or use the Tab key) in the se cond box, and ent er the recipient’s fax num ber. Be sure
to enter the fax number exactly as the V oice Mail needs to dial it. For example, a local call
is XXX-XXXX. A long distance call within the same area code is 1-XXX-XXXX. A
long distance call outside of the same area code is 1-XXX-XXX-XXXX.
Page 24
Installing Fax Server
Using the Fax Server
20 ◆ Issue 1-0
Sending a Fax Message (cont’d)
● Click (or use the Tab key) in next box, and enter the recipient’s business.
● Click (or use the Tab key) in the last box, and enter the recipient’s phone number.
6. When finished entering all the information, click Enter. The information drops to the Send
List.
Page 25
Installing Fax Server
Using the Fax Server
Issue 1-0 ◆ 21
Sending a Fax Message (cont’d)
7. Repeat steps 5 and 6 for each recipient. You can have up to 25 recipients.
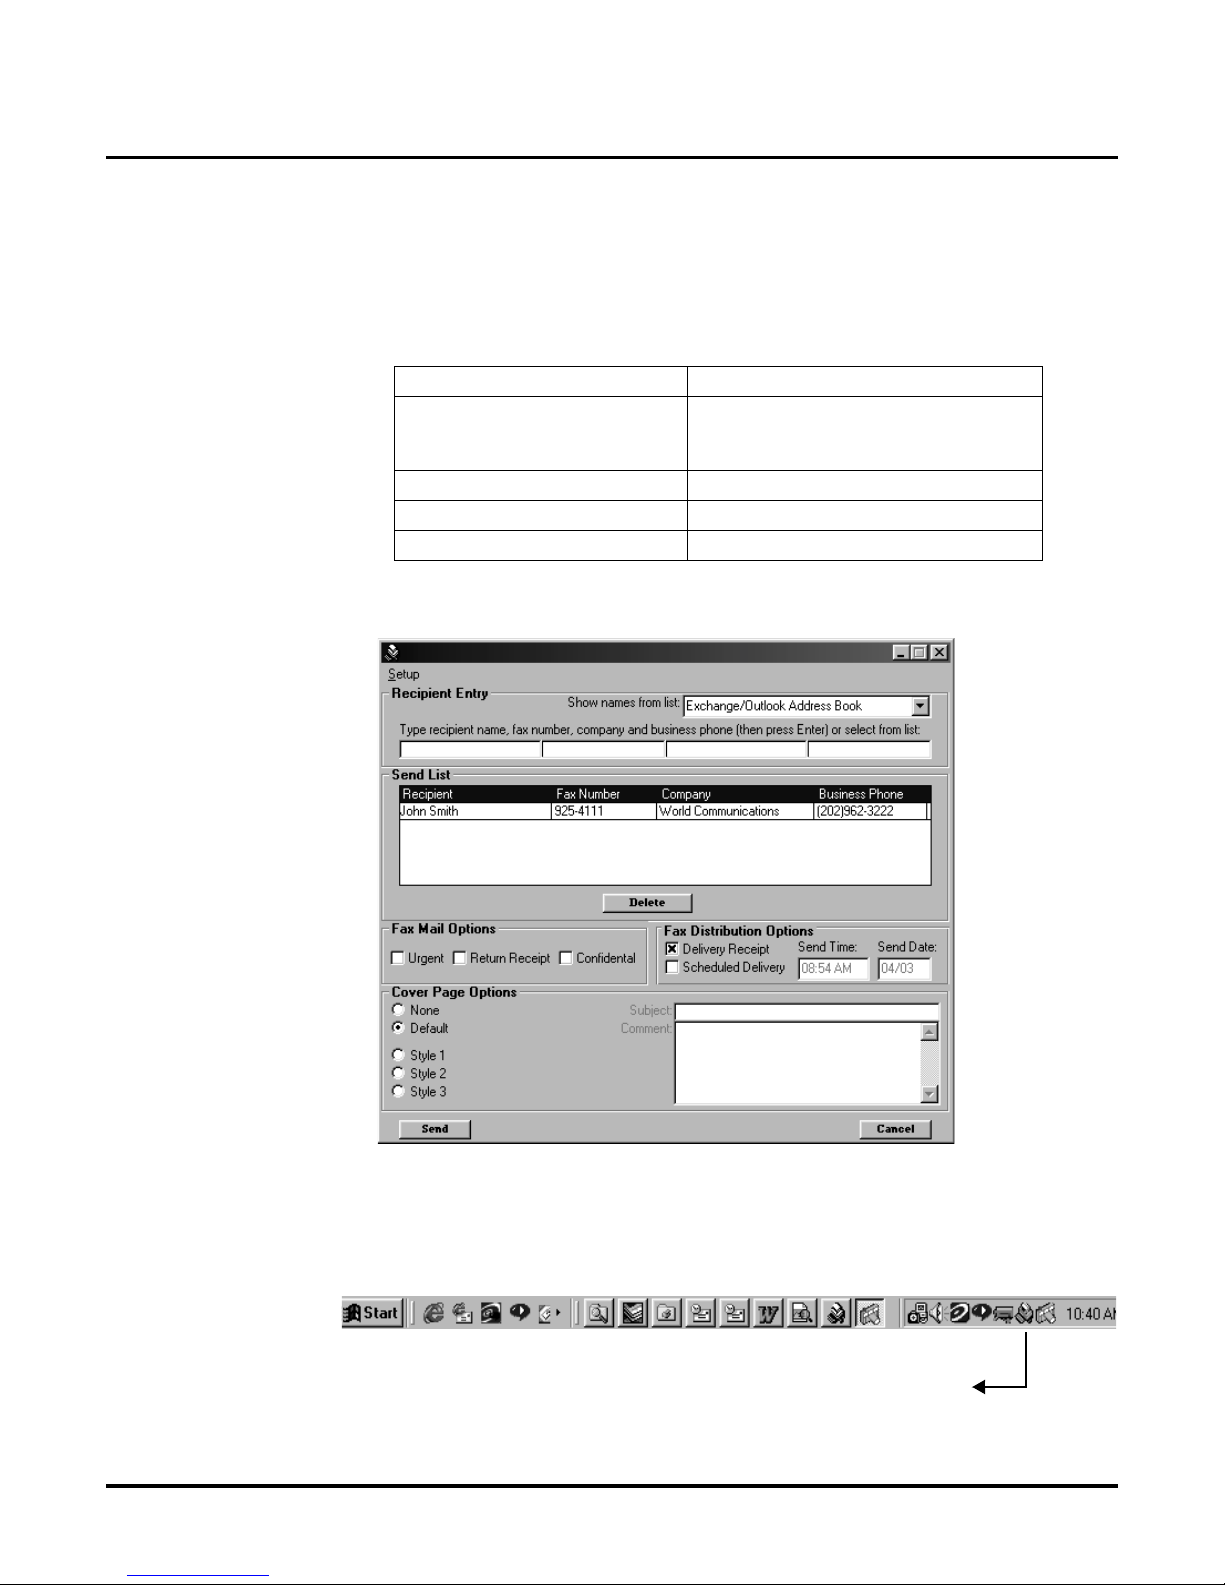
8. When you are finished (see the following screen for reference):
● If the r ecipient information is no t correct, click Delete to start over .
● To use various options that a re available:
● If you do not want to send the fax, click the Cancel button to cancel it.
● If the inf ormation is cor r ect, clic k the Send button at the bottom of the screen.
Clicking Send will minimize FaxSupport Serv er icon to the System T ray (s ee below). The
Faxes be gin to download to the Voice Mail for delivery. This download may take several sec onds or severa l minutes , depending on the number of pages in and number of recipients for the
fax. No additional faxes should be sent until the FaxSupport S erver icon clears from the system tray.
To learn about: See Page:
Recipient Entry
Exchange/Outlook
Voic e M a i l Dir e ctory)
page 22
page 22
page 25
Fax Mail Options page 28
Fax Distribution Options page 29
Cover Page Options page 30
FaxSupport Server Icon
Page 26
Installing Fax Server
Using the Fax Server
22 ◆ Issue 1-0
Using the Fax Setup Options
Now that you know how to send a basic Fax message using the Fax Serve r, you are ready to learn
how to use the various Fax Setup options. These options make se nding a Fax message easy, and
allow you to customize your message.
Recipient Entry Options
Show nam es fr om lis t allo ws you to se le ct name s from dif f ere nt lis ts so tha t you do no t have
to type in a name manually. You can select from the Voice Mail Directory or from the
Exchange/Outlook Address Book. To use the Exchange/Outlook Address book, the workstation must have Exchange/Outlook installed. When you use the Voice Mail Directory, your fax
is sent through F ax Mail. You can then use the Fax Mail Options por tion of the screen to tag
your message as Urgent, Confidential or to request a Return Receipt. For information see
page 28.
Using the Exchange/Outlook Address Book
To use the Exchange/Outlook Address Book:
1. Initiate Sending a fa x message so that you see the Fax Server Setup screen. (For he lp,
see page 17.
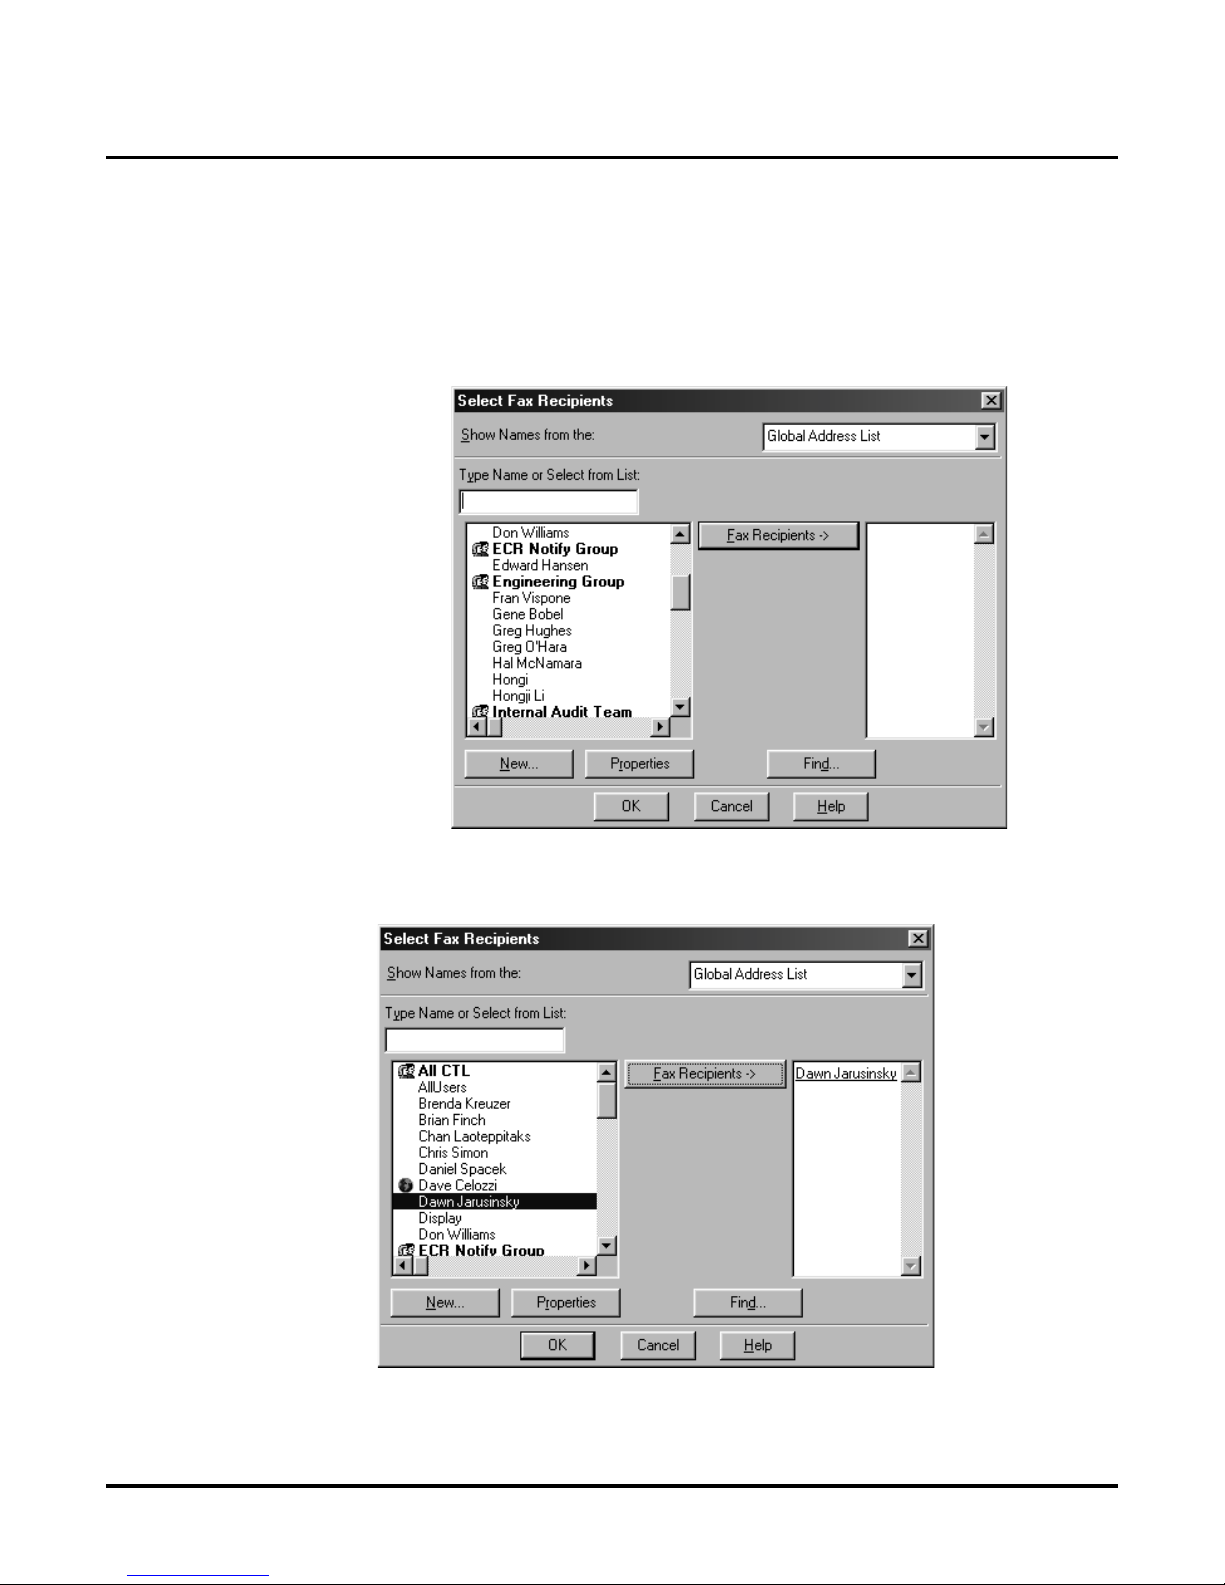
2. Click on the button. You see:
Page 27
Installing Fax Server
Using the Fax Server
Issue 1-0 ◆ 23
Using the Fax Setup Options (cont’d)
Using the Exchange/Outlook Address Book (cont’d)
3. Click on Microsoft/Outlook Address Book. You see a screen showing the Address
Book or lists that are load ed for your system. (These Address Books and lists are from
Microsoft Exchange/Outlook which is already installe d on your desktop.) For example:
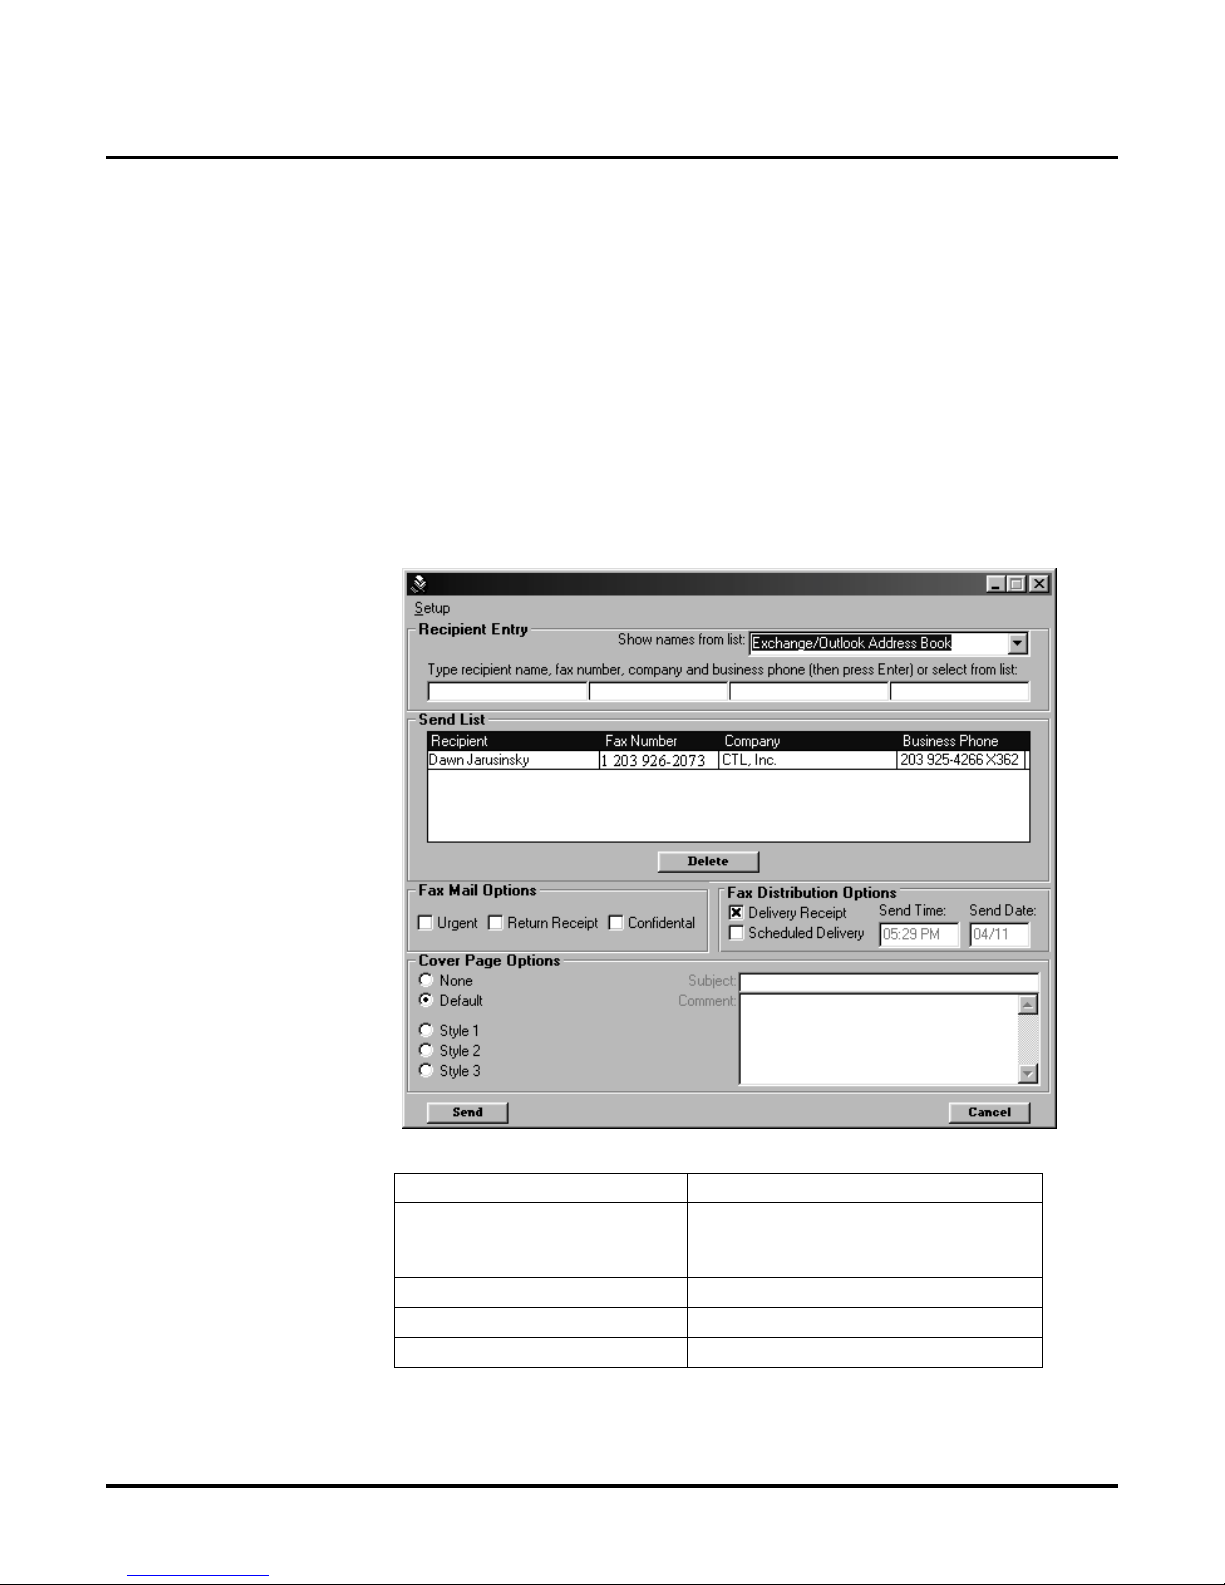
4. Click to highlight the name of the person you wish to receive your fax. Then, click the
Fax Recipients button. The name is copied to the right-hand column:
Page 28
Installing Fax Server
Using the Fax Server
24 ◆ Issue 1-0
Using the Fax Setup Options (cont’d)
Using the Exchange/Outlook Address Book (cont’d)
5. Click Properties so that you can veri fy the fax number in the Address Book is entered
exactly as the Voice Mail dials it . If it is not and you are in your P ersonal Addre ss Book,
change the fax number so that it mat che s what the Voice Mail dials. (Note: You are actually editing your Address Book Microsoft Exchange/Outlook. If you need help, refer to
the Exchange/Outlook documentation.) If your are in a Global Address Book and you
do not have permission to change the number, you will have to type in the recipient
manually. See page page 19. When you are finished wit h Properties, return to th e
Select Fax Recipients screen.
6. Repeat steps 4 and 5 for each recipient. You can have up to 25 recipients.
7. Click OK. The name drops to the Send List box. For example:
8. Finish setting up your fax (see page page 21). For more options :
When you are finished, pres s Send to send the fax.
To learn about: See Page:
Recipient Entry
Exchange/Outlook
Voic e M a i l Dir e ctory)
page 22
page 22
page 25
Fax Mail Options page 28
Fax Distribution Options page 29
Cover Page Options page 30
Page 29
Installing Fax Server
Using the Fax Server
Issue 1-0 ◆ 25
Using the Fax Setup Options (cont’d)
Using the Voice Mail Directory
You can also select a name from the Voice Mail Directory when you send a fax. If you use the
Voice Mail Directory, your fax is sent through Fax Mail. You can then use the Fax Mail
Options portion of the screen to tag your message as Urgent, Confidential or to request a
Return Receipt. For information see page 28.
To use the Voice Mail Directory:
1. Initiate Sending a fa x message so that you see the Fax Server Setup screen. (For he lp,
see page 17.
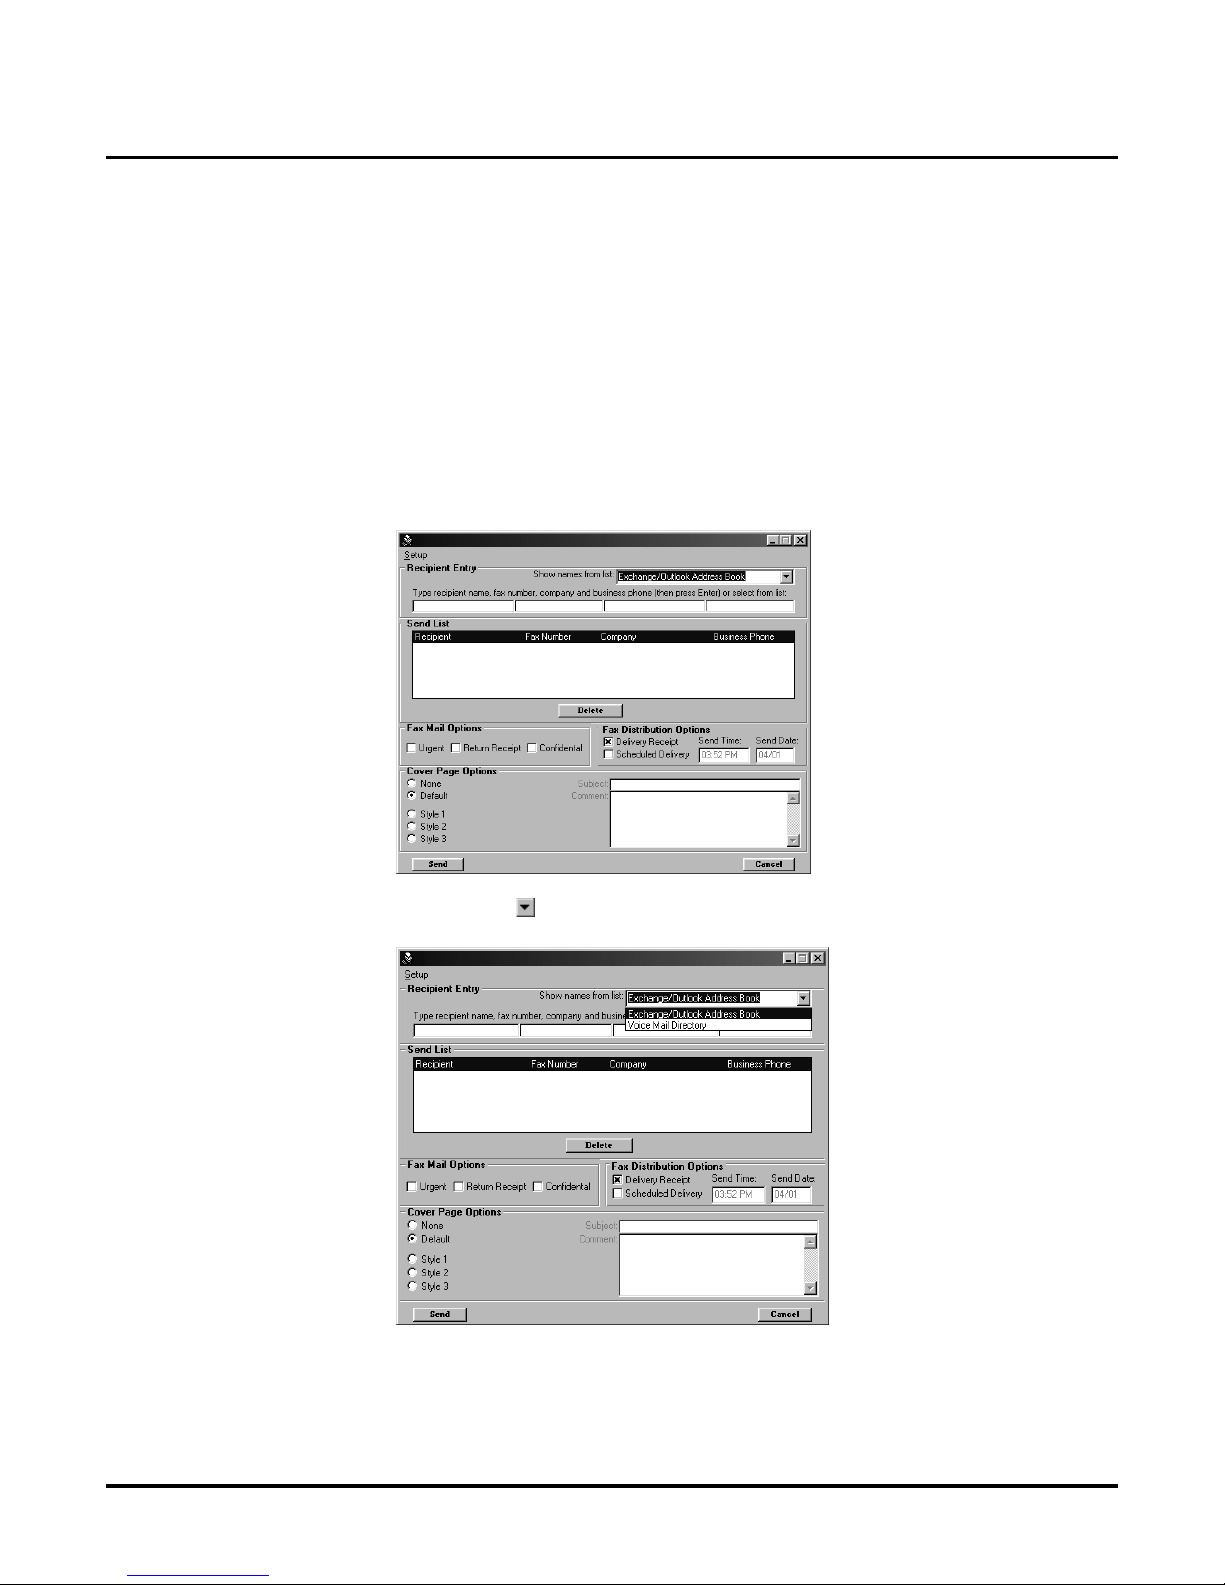
2. Click on the button. You see:
Page 30
Installing Fax Server
Using the Fax Server
26 ◆ Issue 1-0
Using the Fax Setup Options (cont’d)
Using the Voice Mail Directory (cont’d)
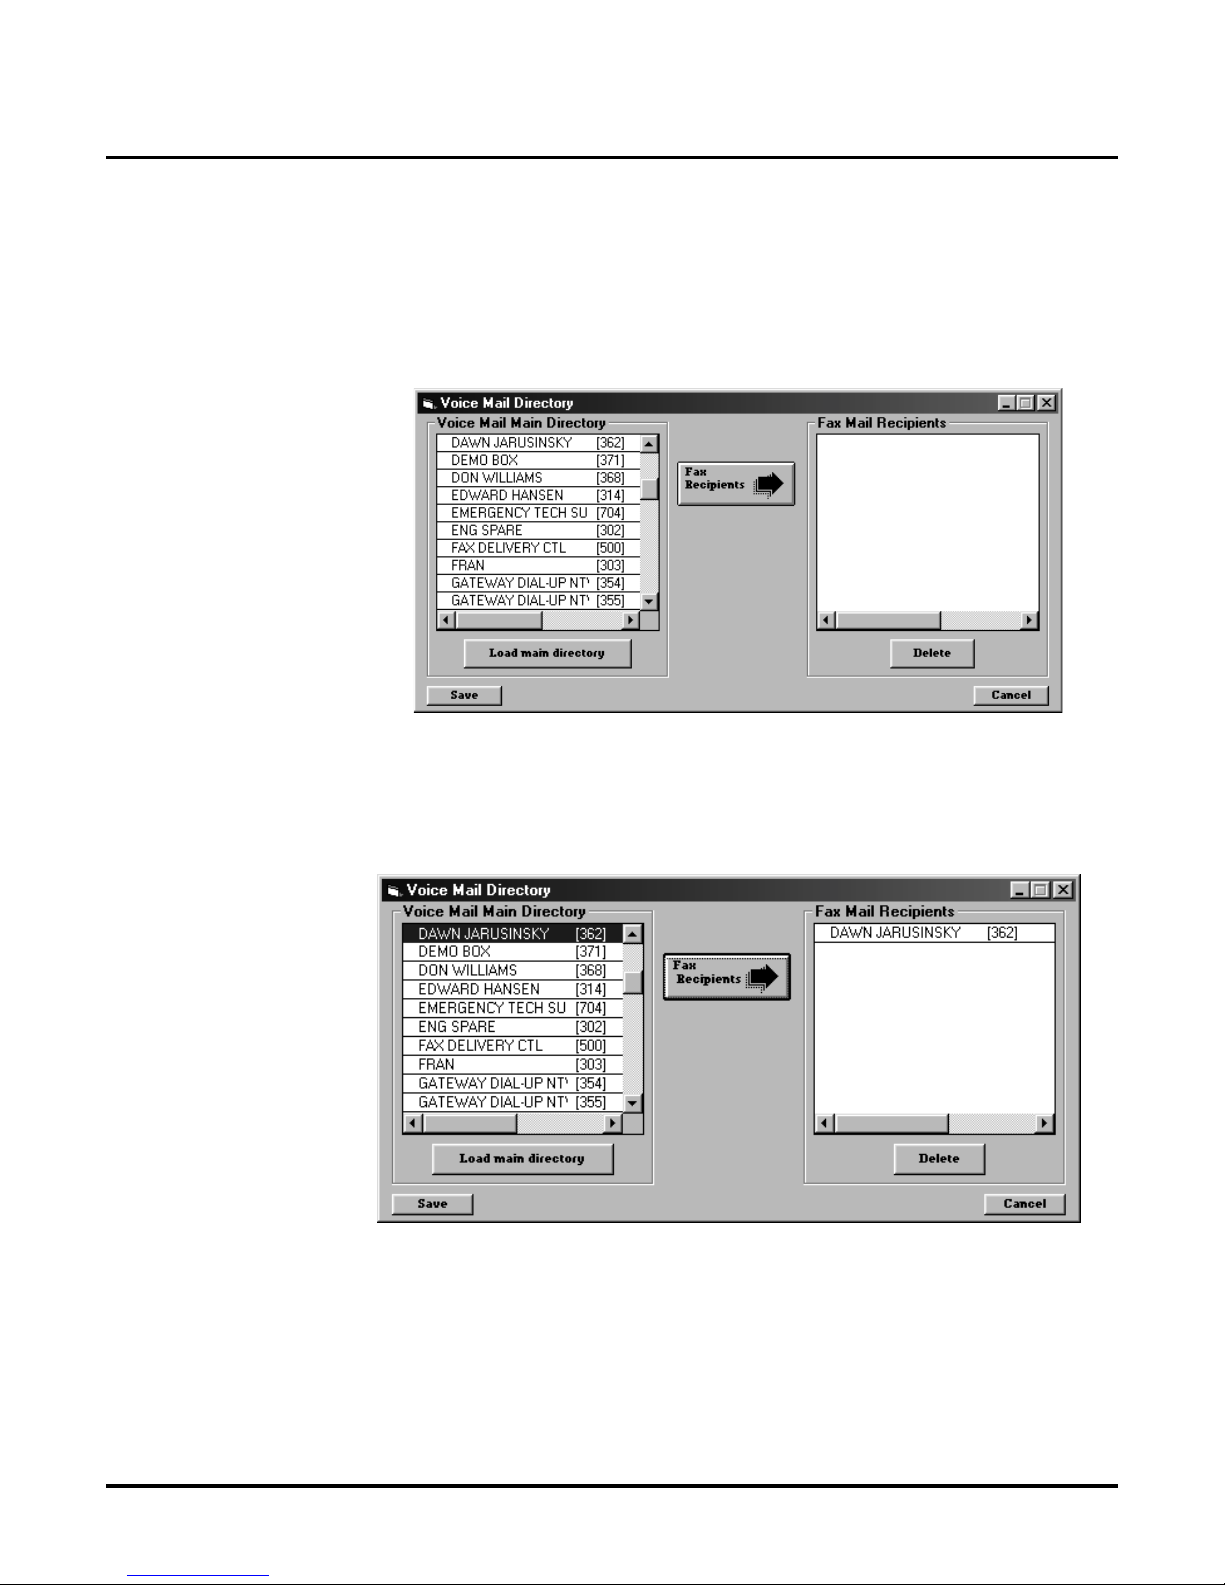
3. Click on the Voice Mail Directory. You see a Voice Mail Directory screen.
4. Click Load main directory. This loads the directory of Voice Mailboxes for your sys tem. For example:
5. Click on the name of the person who should receive your fax. (Move the scroll bar up
and d ow n to vi ew th e na mes in th e Main Dir ectory ) .
6. Click on Fax Recipients. The name moves to the Fax Mail Recipients column.
For example:
7. Repeat steps 5 and 6 for each Fax Re cipient.
● If you do not want this list, click the Cancel button to canc el it.
● If one (or more) of the recipients is not correct, click to highli ght the name(s) and
press Delete.
● If the information is correct, click the Save b utton at the bottom of the scree n.
Page 31
Installing Fax Server
Using the Fax Server
Issue 1-0 ◆ 27
Using the Fax Setup Options (cont’d)
Using the Voice Mail Directory (cont’d)
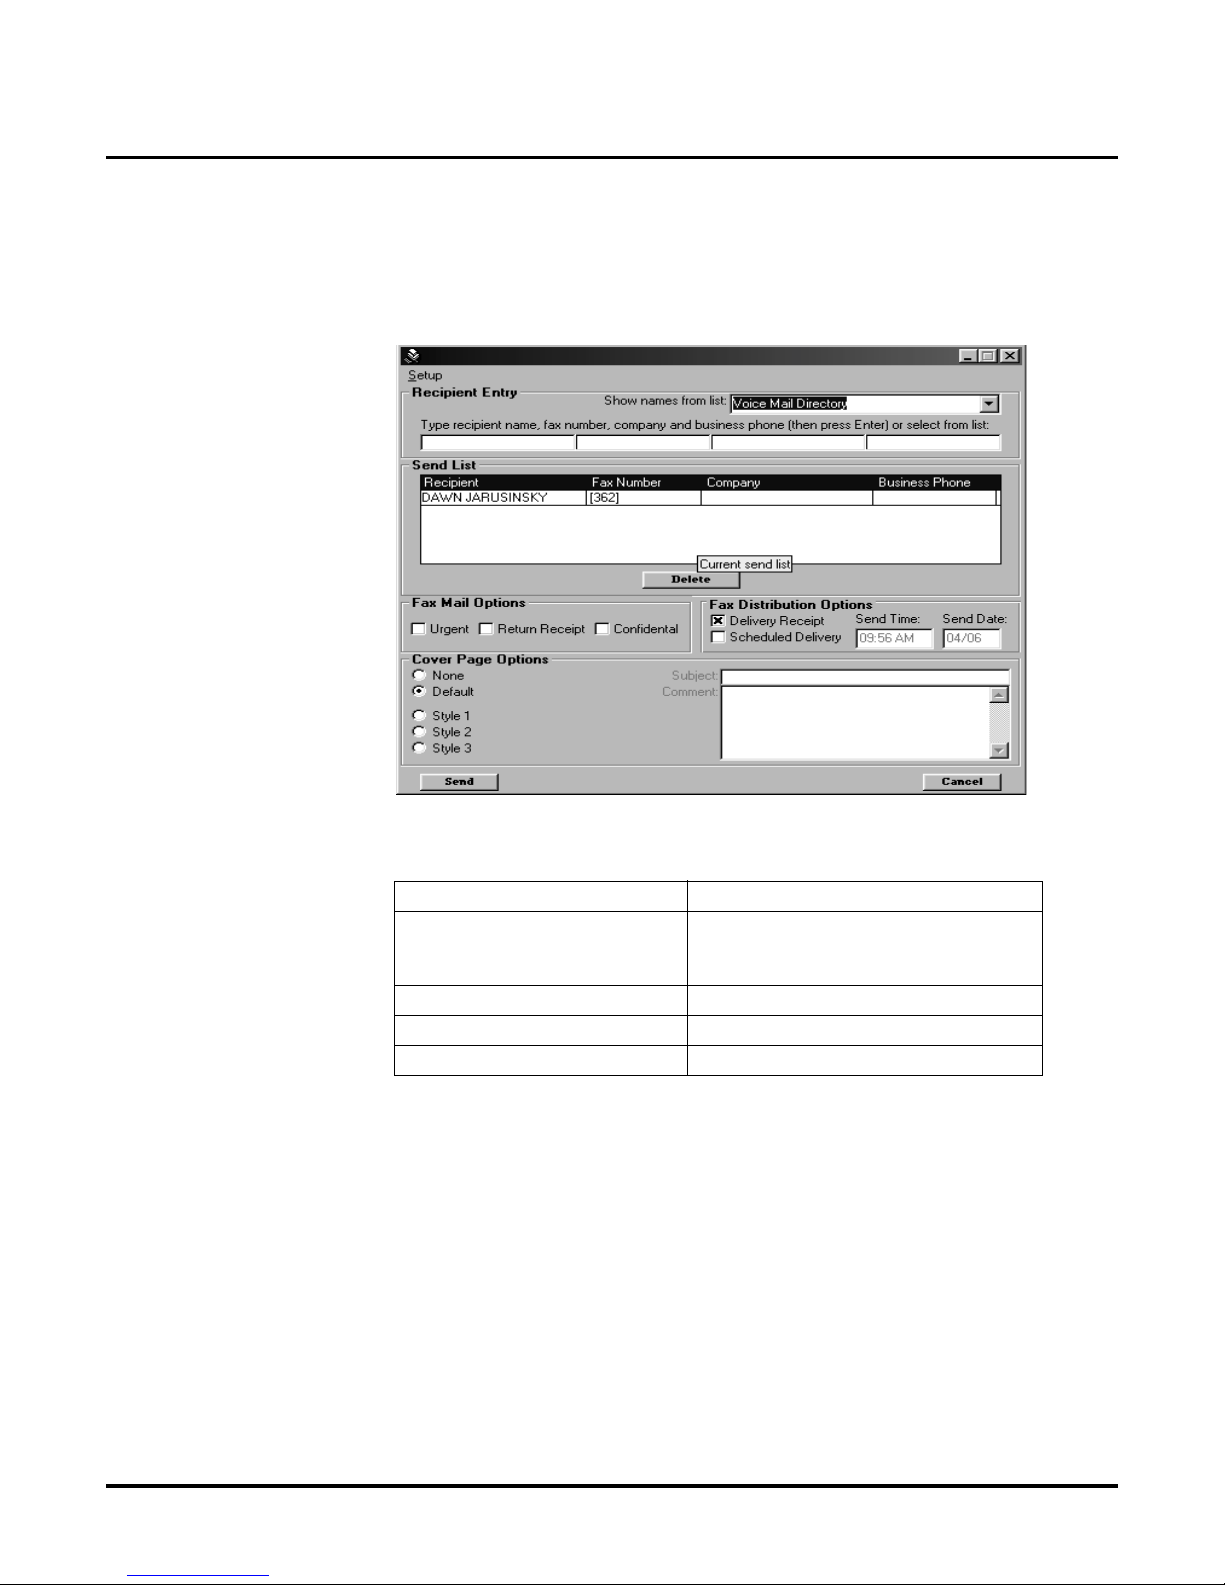
8. Finish setting up your fax (see page 21). For more options:
When you are finished, pres s Send to send the fax.
To learn about: See Page:
Recipient Entry
Exchange/Outlook
Voic e M a i l Dir e ctory)
page 22
page 22
page 25
Fax Mail Options page 28
Fax Distribution Options page 29
Cover Page Options page 30
Page 32
Installing Fax Server
Using the Fax Server
28 ◆ Issue 1-0
Using the Fax Setup Options (cont’d)
Fax Mail Options
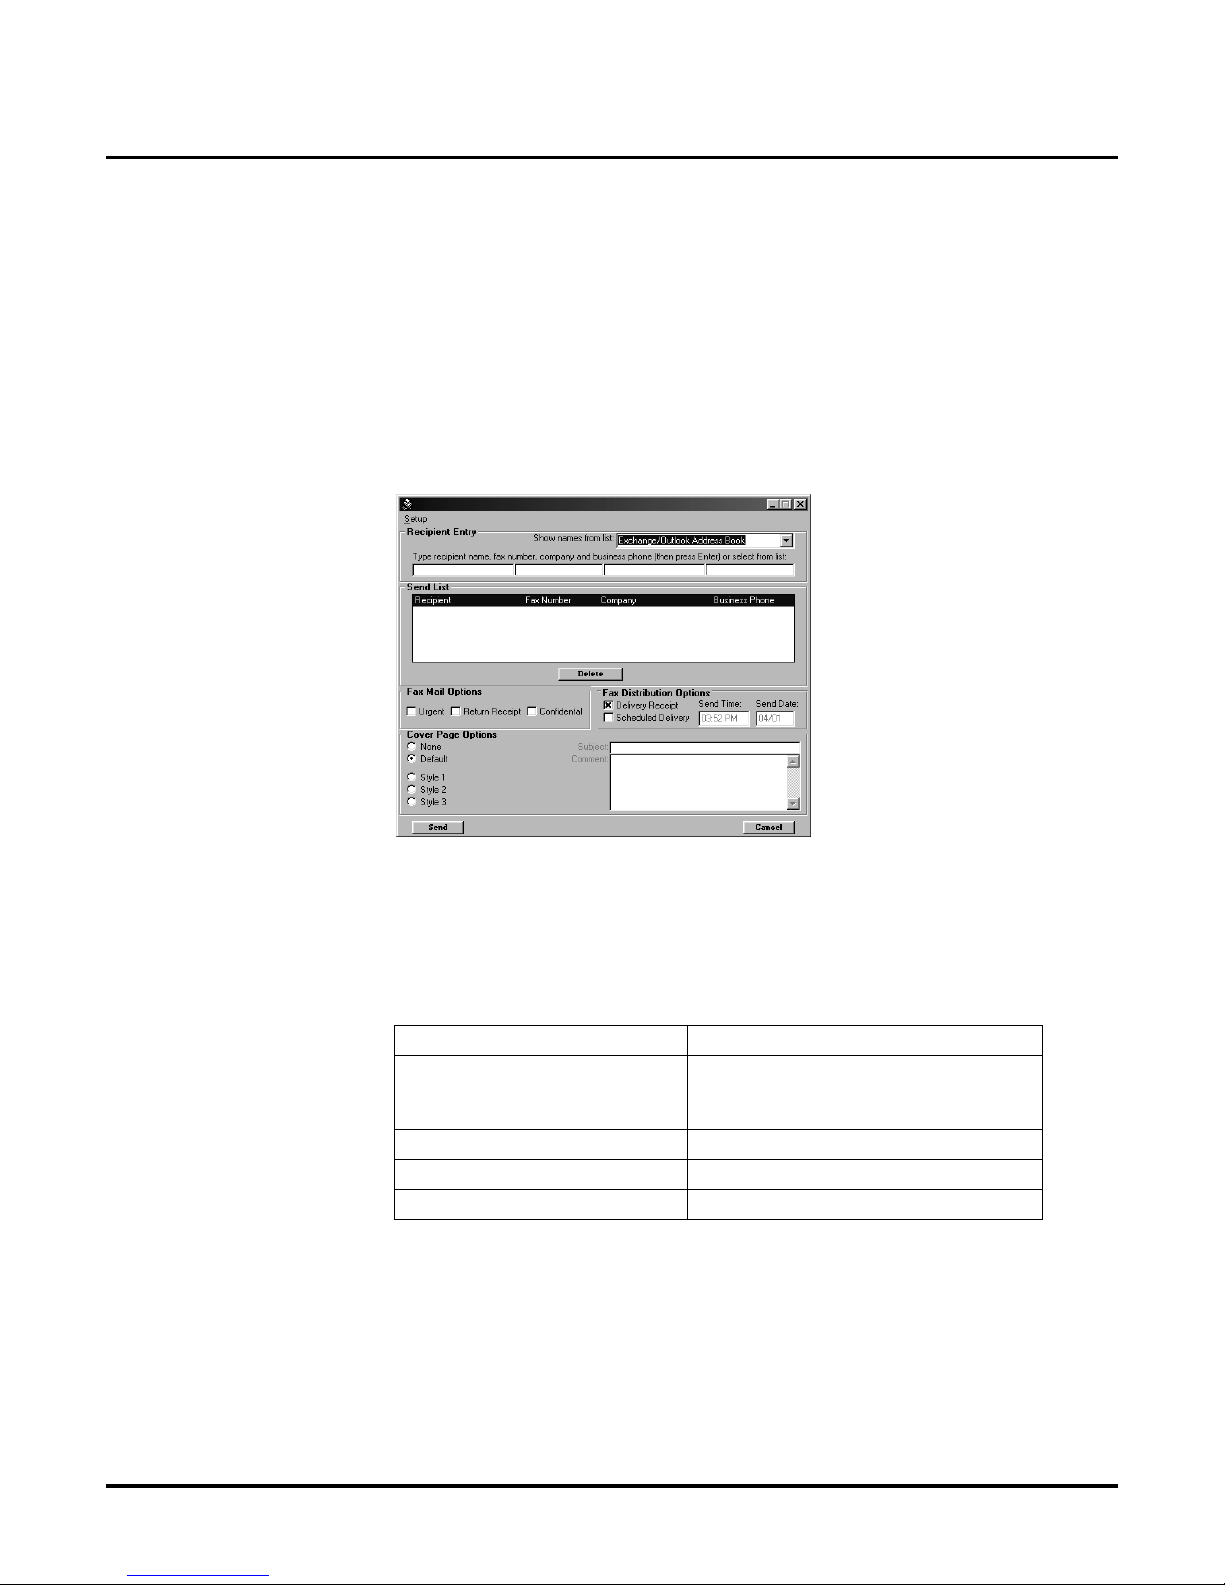
Fax Mail Opti on s all ows you to tag your fax messages as Ur gent, Confidential or to request
a Return Receipt. To use these options, you mu st use the Voice Mail Directory to send the fax
through the Voice Mail. For more in formation on Urgent and Confidential messages as well as
Return Re ceipt, see th e NVM-S er i es User ’s Guide.
To use the Fax Mail Options:
1. Initiate Sending a fa x message so that you see the Fax Server Setup screen. (For he lp,
see page 17.
2. Complete the Recipient Entry portion of the scre en using the Voice Mail Directory. For
help, see page 25.
3. Click on the boxes for the Fax Mail Options that you want (Urgent, Confidential and or
Return Receipt.)
4. Finish setting up your fax (see page 21). For more options:
When you are finished, pres s Send to send the fax.
To learn about: See Page:
Recipient Entry
Exchange/Outlook
Voic e M a i l Dir e ctory)
page 22
page 22
page 25
Fax Mail Options page 28
Fax Distribution Options page 29
Cover Page Options page 30
Page 33
Installing Fax Server
Using the Fax Server
Issue 1-0 ◆ 29
Using the Fax Setup Options (cont’d)
Fax Distribution Options
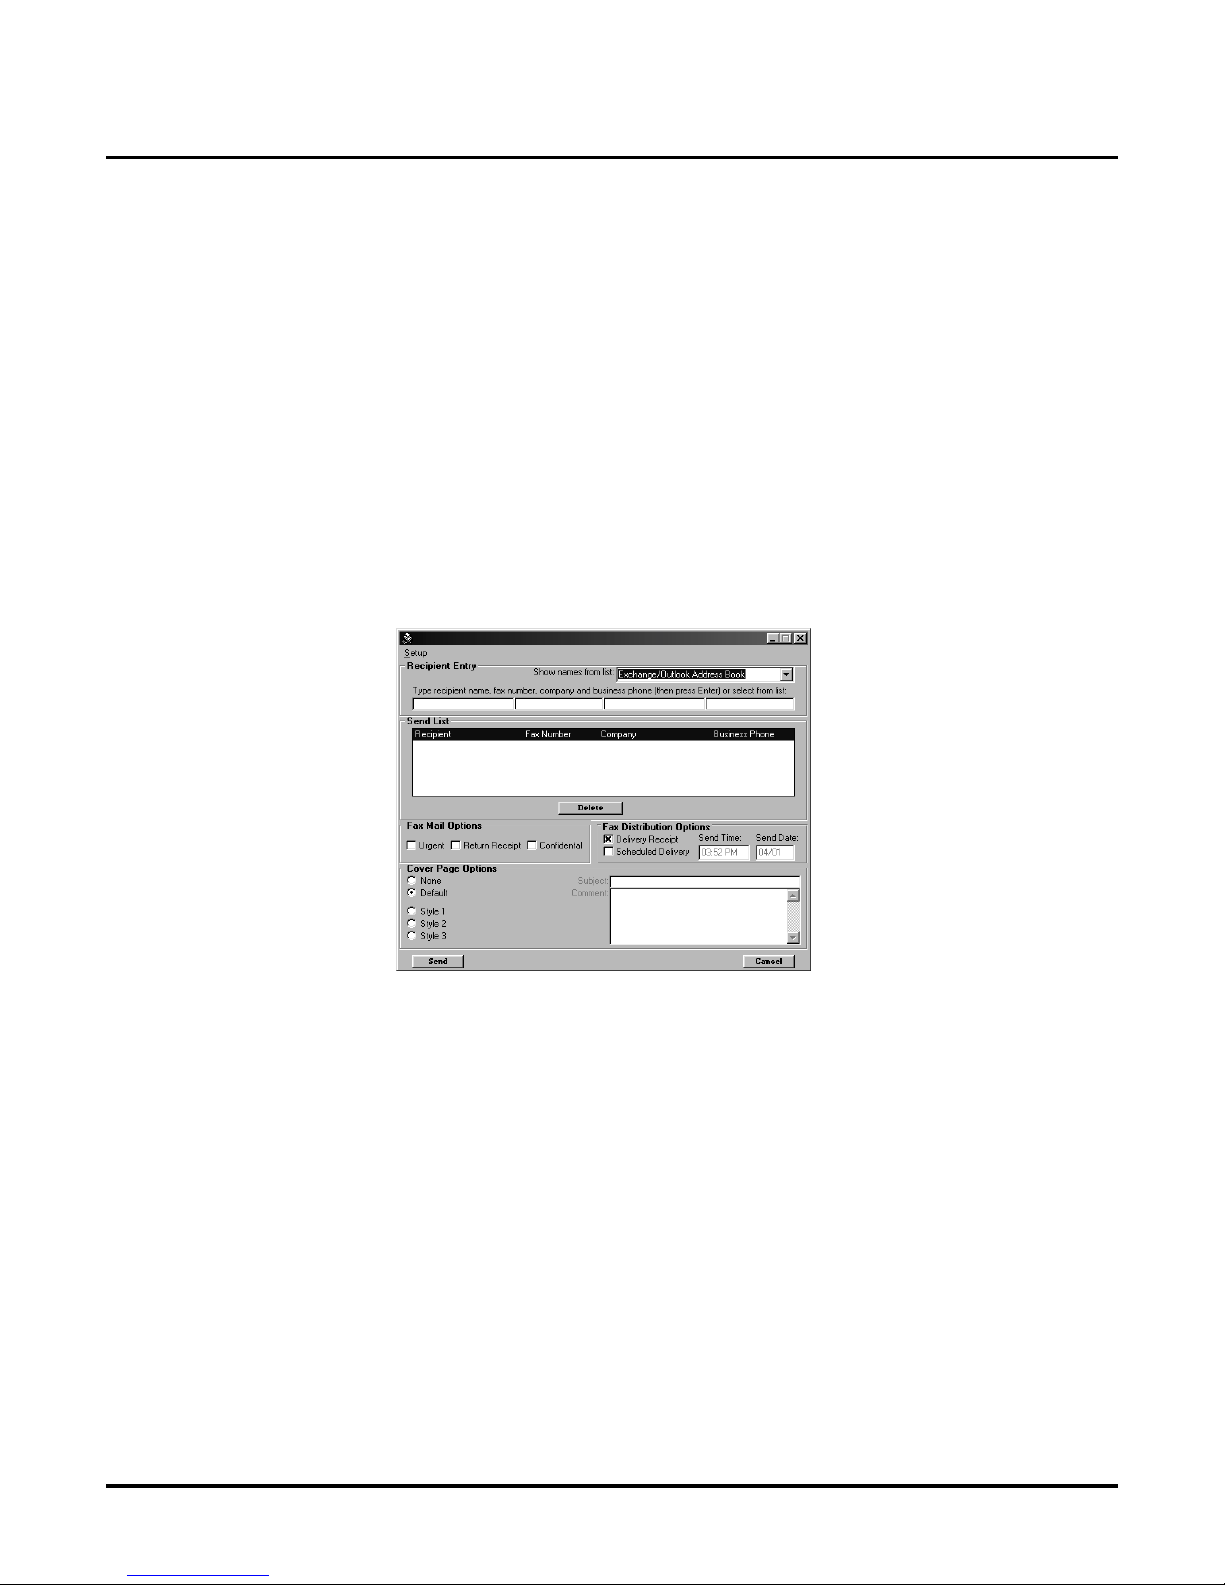
Fax Distribution Options are those features that you can use when your fax is recei ved at a
fax machine (i. e., you do not use the Voice Mail directory to assi gn a recipient. As a result,
you do not use Fax Mail to send the fax).
Delivery Receipt sends you notification that your fax was delivered to your recipient. You
receive a verbal notification in your Subscriber Mailbox, as well as an e-mail in your
Microsoft Exchange/Outlook Mailbox (if integrated with the Voice Mail). This feature is
enabled at default. You must disabl e it if you do not want a notification that your fax was
delivered.
Scheduled Delivery allows you to set the time you want your fax delivered.
T o use the Fax Distribution Options:
1. Initiate Sending a fa x message so that you see the Fax Server Setup screen. (For he lp,
see page 17.
2. Complete the Recipient Entry portion of the screen by manually typing in the recipient
or by using Microsoft Exchange. For help, se e page 22.
3. Click on the boxes for the Fax Options as follows:
● For Delivery Recei pt:
➱ If you want to recei ve not ifi ca tion th at your f ax was de li v ere d, le av e t his en try as
it is.
➱ If you do not want to rec ei ve notif ic at ion, c lick th is box so th at the x is removed.
● For Scheduled Delivery:
➱ Click on the Scheduled Delive ry box so that it is marked with an x.
➱ Click on the box under Send Time. Ente r the time that you want your fax deliv-
ered.
➱ Click on the box under Send Dat e . Enter the date that you want your fax deliv-
ered.
● If the information is correct, click the Save b utton at the bottom of the scree n.
Page 34
Installing Fax Server
Using the Fax Server
30 ◆ Issue 1-0
Using the Fax Setup Options (cont’d)
Fax Distribution Options (cont’d)
4. Finish setting up your fax (see page 21). For more options:
When you are finished, pres s Send to send the fax.
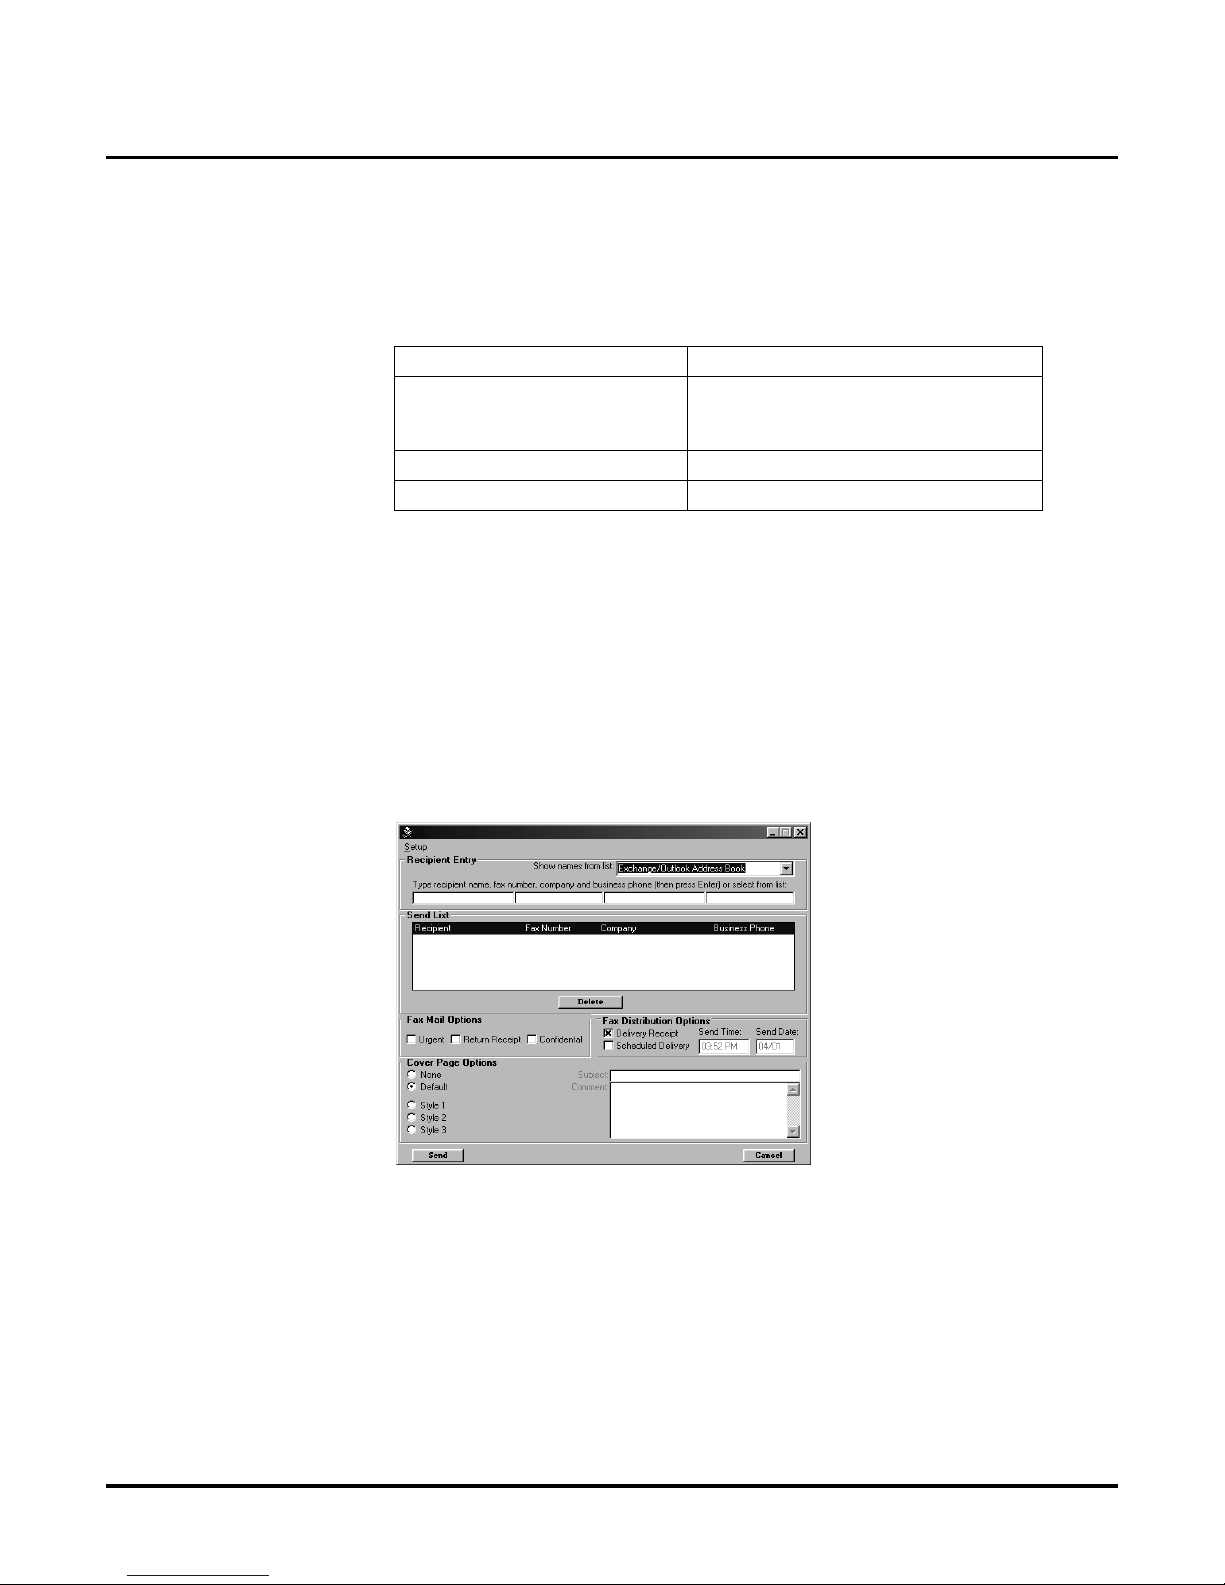
Cover Page Options
When you send a fax, you have the choice of using no cover page, using the Voice Mail’s
default cover page, or using one of three styles of cover pages. If you use one of the three
styles, you will also be able to add a subject and /or any comments to the cover page.
To use the Fax Cover Page Options:
1. Initiate Sending a fa x message so that you see the Fax Server Setup screen. (For he lp,
see page 17.
2. Complete the Recipient Entry portion of the screen by manually typing in the recipient
or by using the Voice Mail Directory or Microsoft Exchange. For help, see page 22.
3. If you assigned a recipient by usi ng the Voice Mail Directory (so that your fax is sent
through Fax Mail), select the desired Fa x Mail Options. For help , see page 28.
4. If you assigned a reci pient by using an Exchange/Outl ook Address book or by typing in
the name manually (so that your fax is sent to a fax machine ), s elect the desired Fax
Delivery Options. For help, see page page 29.
To learn about: See Page:
Recipient Entry
Exchange/Outlook
Voic e M a i l Dir e ctory)
page 22
page 22
page 25
Fax Mail Options page 28
Cover Page Options page 30
Page 35
Installing Fax Server
Using the Fax Server
Issue 1-0 ◆ 31
Using the Fax Setup Options (cont’d)
Cover Page Options (cont’d)
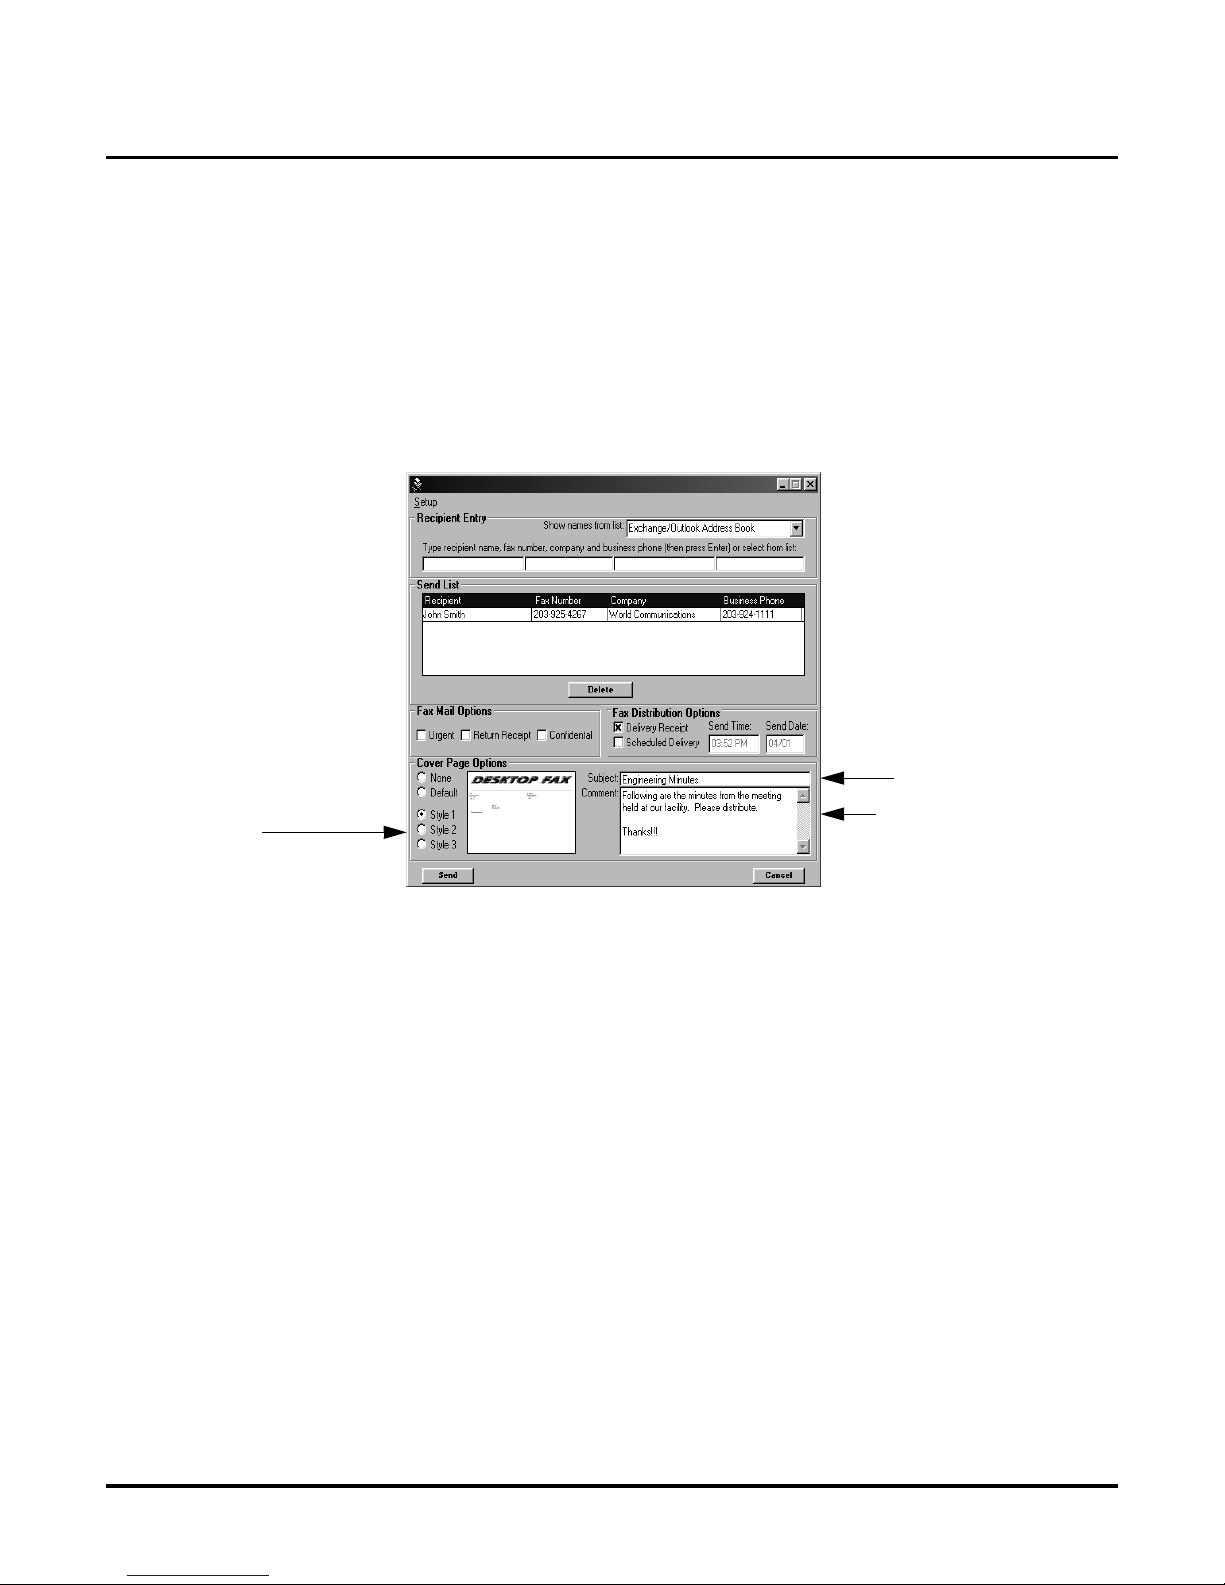
5. Click on the type of Cover P age that you want as follo w s:
● For no cover page , cl ick None.
● For the Voice Mail’s default cover page, click Default.
● For the cover page style shown be low, click Style 1.
Click in Subject, and type in a subject if desi red.
Click in Comment, and type in comments if desire d. For example:
Subject of Fax
Comments to Fax
Styles of Fax
Cover Pages
Page 36
Installing Fax Server
Using the Fax Server
32 ◆ Issue 1-0
Using the Fax Setup Options (cont’d)
Cover Page Options (cont’d)
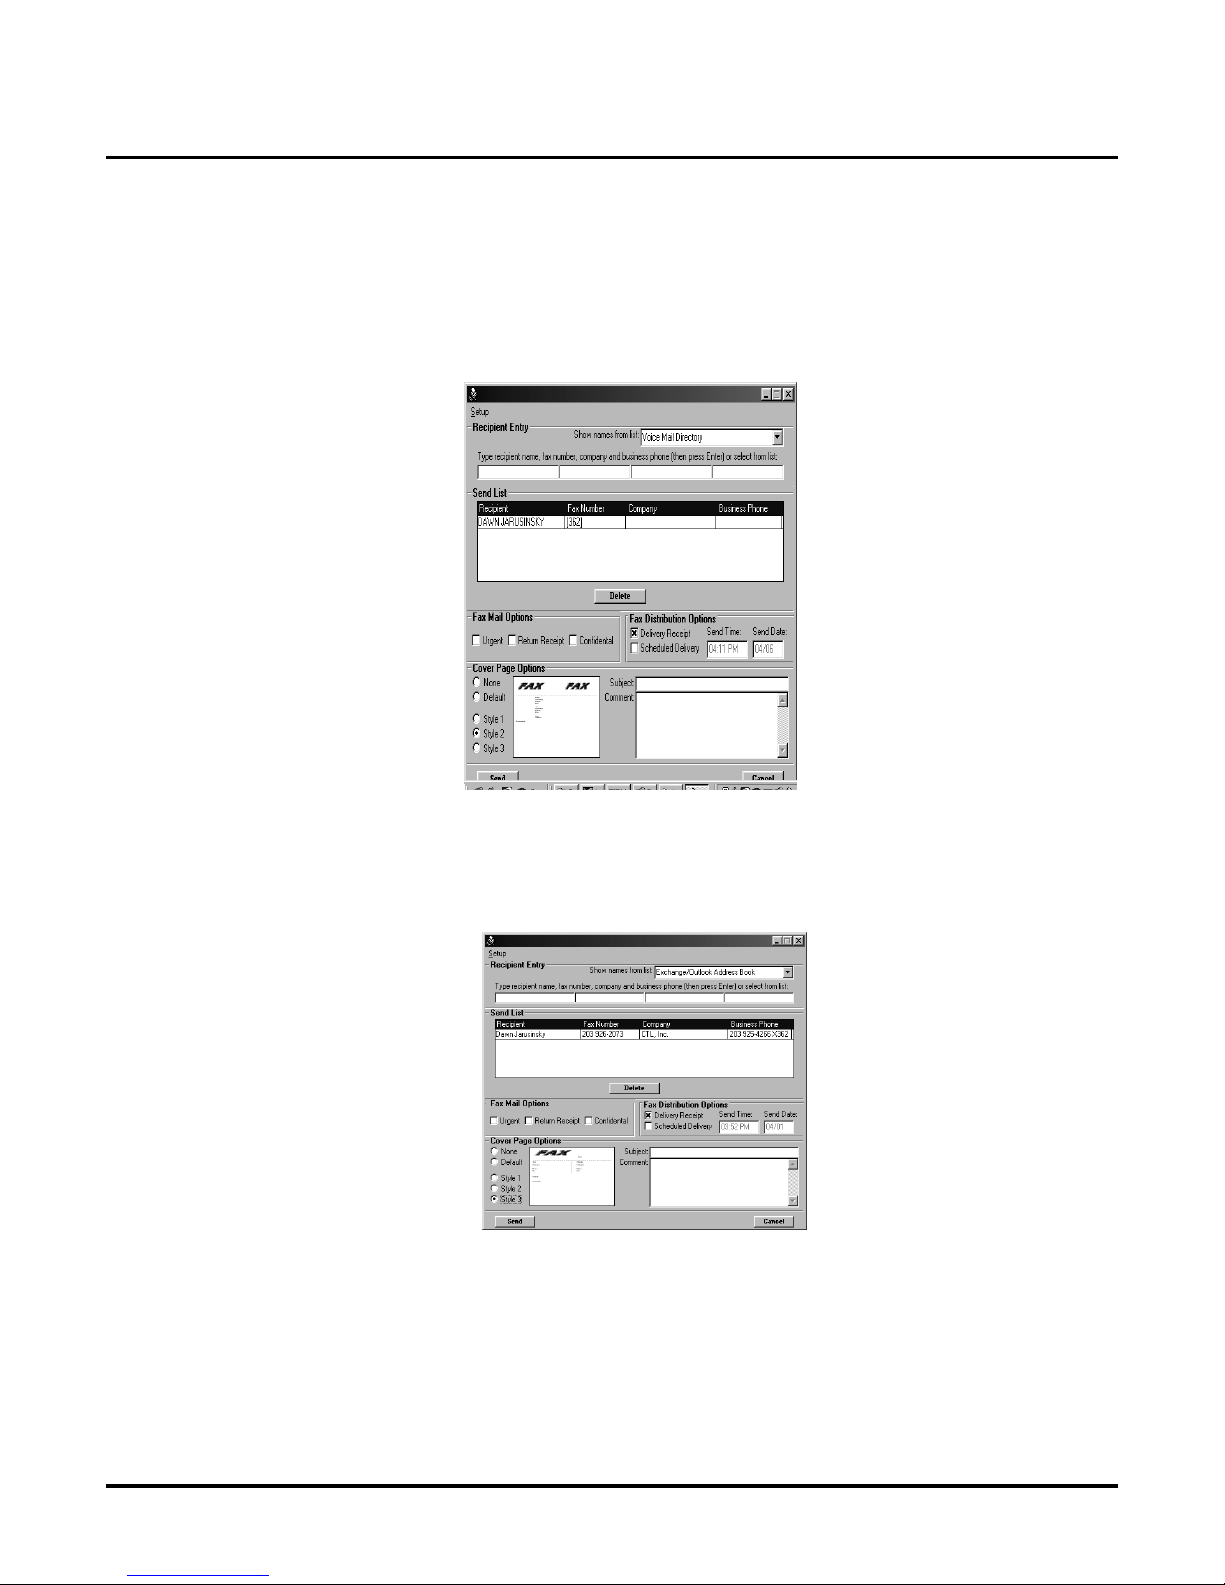
● For the cover page style shown be low, click Style 2.
Click in Subject, and type in a subject if desi red.
Click in Comment, and type in comments if desire d. For example:
● For the cover page style shown be low, click Style 3.
● Click in Subject, and type in a subject if desi red.
Click in Comment, and type in comments if desire d. For example:
Page 37
Installing Fax Server
Using the Fax Server
Issue 1-0 ◆ 33
Using the Fax Setup Options (cont’d)
Cover Page Options (cont’d)
6. Finish setting up your fax (see page 21). For more options:
When you are finished, pres s Send to send the fax.
To learn about: See Page:
Recipient Entry
Exchange/Outlook
Voic e M a i l Dir e ctory)
page 22
page 22
page 25
Fax Mail Options page 28
Fax Distribution Options page 29
Page 38

Installing Fax Server
Using the Fax Server
34 ◆ Issue 1-0
Page 39

NEC America, Inc., Corporate Networks Group
4 Forest Parkway, Shelton, CT06484
T el: 800-365-1928 Fax: 203-926-5458
cng.nec.com
Other Important Telephone Numbers
Sales: . . . . . . . . . . . . . . . . . . . . . . . . . . . . . . . . . . . .203-926-5450
Customer Service: . . . . . . . . . . . . . . . . . . . . . . . . . . .203-926-5444
Customer Service FAX: . . . . . . . . . . . . . . . . . . . . . . .203-926-5454
Technical Service: . . . . . . . . . . . . . . . . . . . . . . . . . . .203-925-8801
Discontinued Product Service: . . . . . . . . . . . . . . . . . .900-990-2541
Technical Training: . . . . . . . . . . . . . . . . . . . . . . . . . . .203-926-5430
Emergency Technical Service (After Hours) . . . . . . . .203-929-7920
(Excludes discontinued products)
Page 40

NEC America, Inc., Corporate Networks Group
4 Forest Parkway, Shelton, CT 06484
TEL: 203-926-5400 FAX: 203 -929-0535 March 2002
17584INS02 cng.nec.com Printed in U.S.A.
 Loading...