

NEC NLT-19HDB3, NLT-22HDB3, NLT-26HDB3, NLT-19HDDV3, NLT-22HDDV3 Owner's Manual

LCD TV
Owner’s Manual
NLT-19HDB3
NLT-22HDB3
NLT-26HDB3
Please read this manual carefully before operating your set.
Retain it for future reference.
See the label attached on the back cover and quote this information to your dealer when
you require service.
ENGLISH

Contents
2
Contents 2-3
Safety Instructions 4
Installation 5
Remote control handset 6-8
Controls 6-7
Battery installation 8
Controls of 9-10
Front panel 9
Back panel 10
Connection to External equipment 11-14
Connect to Aerial socket 11
Watching VCR 11
Watching Cable TV 12
Watching external AV source 12
Watching DVD 13
Connecting HDMI (DTV) 13
Connecting Headphone 14
Connecting PC (DTV) 14
Connecting Digital Audio (26inch model only) 14
Basic operation 15
On screen menus Menu selection 16
Setting up TV stations 17-24
Auto programme tuning 17
Manual programme tuning 18-19
Programme edit 20-21
Calling the programme table 21
Manual programme tuning (in digital mode only) 22
Channel list (in digital mode only) 22
Rating (in digital mode only) 23
Favourite CH (in digital mode only) 24
Picture Menu 25-27
CSM (Colour Status Memory) 25
PSM (Picture Status Memory) 26
Manual Picture Control 26
Picture format 27
Sound Menu 28-31
SSM (Sound Status Memory) 28
Balance 29
Surround 29
AVL (Auto Volume Leveler) 30
Audio mode (in digital mode only) 30
Stereo/Dual/NICAM reception 31

Contents
3
Warning
- Image Persistence
Avoid displaying fixed pattern in the monitor for long period of time to avoid image persistence.
“The marking or retained image on the LCD panel resulting from fixed image use is not an
operating defect and as such is not covered by warranty. This product is not designed to
fixed image patterns for extended periods of time”.
- The appliance is not intended for use by young children or infirm persons without supervision
-Young children should be supervised to ensure that they do not play with the appliance.
FOR LCD TV
If the TV is cold, there may be a small “flicker” when it is turned on. This is normal, there is nothing
wrong with TV.
Some minute dot defects may be visible on the screen, appearing as tiny red, green, or blue spots.
However, they have no adverse effect on the monitor's performance.
Avoid touching the LCD screen or holding your finger(s) against it for long periods of time. Doing so
may produce some temporary distortion effects on the screen.
On Disposal
a. The fluorescent lamp used in this product contains a small amount of mercury.
b. Do not dispose of this product with general household waste.
c. Disposal of this product must be carried out in accordance to the regulations of your local
authority.
Time Menu 32-35
Clock 32
On/Off time 33
Auto sleep 34
Time Zone (in digital mode only) 34
D.Saving (in digital mode only) 35
Sleep timer 35
Setup Menu 36-37
Child lock 36
New password 37
Other Menu 38
Information (in digital mode only) 38
TV Guide (in digital mode only) 38
Connection of PC
PC Setup 39
WXGA or VGA (Only PC-RGB mode) 39
Teletext (option) 40-42
Displayable Monitor Specification 43
Troubleshooting 44
Product Spec. 45-47
NEC Service Centres 48

Safety Instructions
4
1. Read these instructions.
2. Keep these instructions.
3. Heed all warnings.
4. Follow all instructions.
5. Do not use this apparatus near water.
6. Clean only with dry cloth.
7. Do not block any ventilation openings. Install in accordance with the manufacturer's instructions.
8. Do not install near any heat sources such as radiators, heat registers, stoves, or other apparatus
(including amplifiers) that produce heat.
9. Do not defeat the safety purpose of the polarized or grounding-type plug.
If the provided plug does not fit into your outlet, consult an electrician for replacement of the obsolete outlet.
10. Protect the power cord from being walked on or pinched particularly at plugs, convenience receptacles, and the point where they exit from the apparatus.
11. Only use attachments/accessories specified by the manufacturer.
12. Use only with the cart, stand, tripod, bracket, or table specified by the manufacturer, or sold with the
apparatus. When a cart is used, use caution when moving the cart/apparatus combination to avoid
injury from tip-over.
13. Unplug this apparatus during lightning storms or when unused for long periods of time.
14. Refer all servicing to qualified service personnel. Servicing is required when the apparatus has been
damaged in any way, such as power-supply cord or plug is damaged, liquid has been spilled or
objects have fallen into the apparatus, the apparatus has been exposed to rain or moisture, does
not operate normally, or has been dropped.
- The apparatus shall not be exposed to dripping or splashing and that no objects filled with liquids,
such as vases, shall be placed on the apparatus.
- Minimum distances(e.g. 10cm) around the apparatus for sufficient ventilation
“WARNING - To reduce the risk of fire or electric shock, do not expose the apparatus to rain or moisture.”
Installation
5
Power
* 22/26inch model
This set operates on an AC mains supply, the voltage is as indicated on the label on the back cover.
Never apply DC power to the set. In the event of thunderstorms or powercuts, please pull out the
aerial and mains plugs.
* 19inch model
This set operates on a DC supply provided by the AC-DC adapter, the voltage is as indicated on the
label on the back cover. Use only the AC-DC adapter supplied with the set and never apply an AC
mains to the set directly. The AC-DC adapter operates on an AC mains supply, the voltage is as
indicated on the label of the AC-DC adapter.
a. Connect the DC plug of the AC-DC adapter to the 12V socket of the set.
b. Connect the AC-DC adapter and it’s power cord.
c. Connect the power cord to an AC mains.
In the event of thunderstorms or powercuts, please pull out the mains plug of the AC-DC adapter and
the aerial plug. Do not allow anything to rest upon or roll over the power cord, and do not place the
monitor where the power cord is subject to damage.
Warning
To prevent fire or shock hazard, do not expose the set to rain or moisture. Do not rub or strike the
Active Matrix LCD with anything hard as this may scratch, mar, or damage the Active Matrix LCD
permanently.
Service
Never remove the back cover of the set as this can expose you to very high voltage and other hazards. If the set does not operate properly, unplug it and call your dealer.
Aerial
Connect the aerial cable to the socket marked +75 Ω on the back cover. For the best reception an
outdoor aerial should be used.
Location
Position your set so that no bright light or sunlight falls directly onto the screen. Care should be taken
not to expose the set to any unnecessary vibration, moisture, dust or heat. Also ensure that the set is
placed in a position to allow a free flow of air. Do not cover the ventilation openings on the back cover.
Cleaning
Unplug the set before cleaning the face of the LCD Screen. Dust the set by wiping the screen and the
cabinet with a soft, clean cloth. If the screen requires additional cleaning, use a clean, damp cloth. Do
not use liquid cleaners or aerosol cleaners.
To preserve the Environment,
do not rubbish.

Remote control handset
6
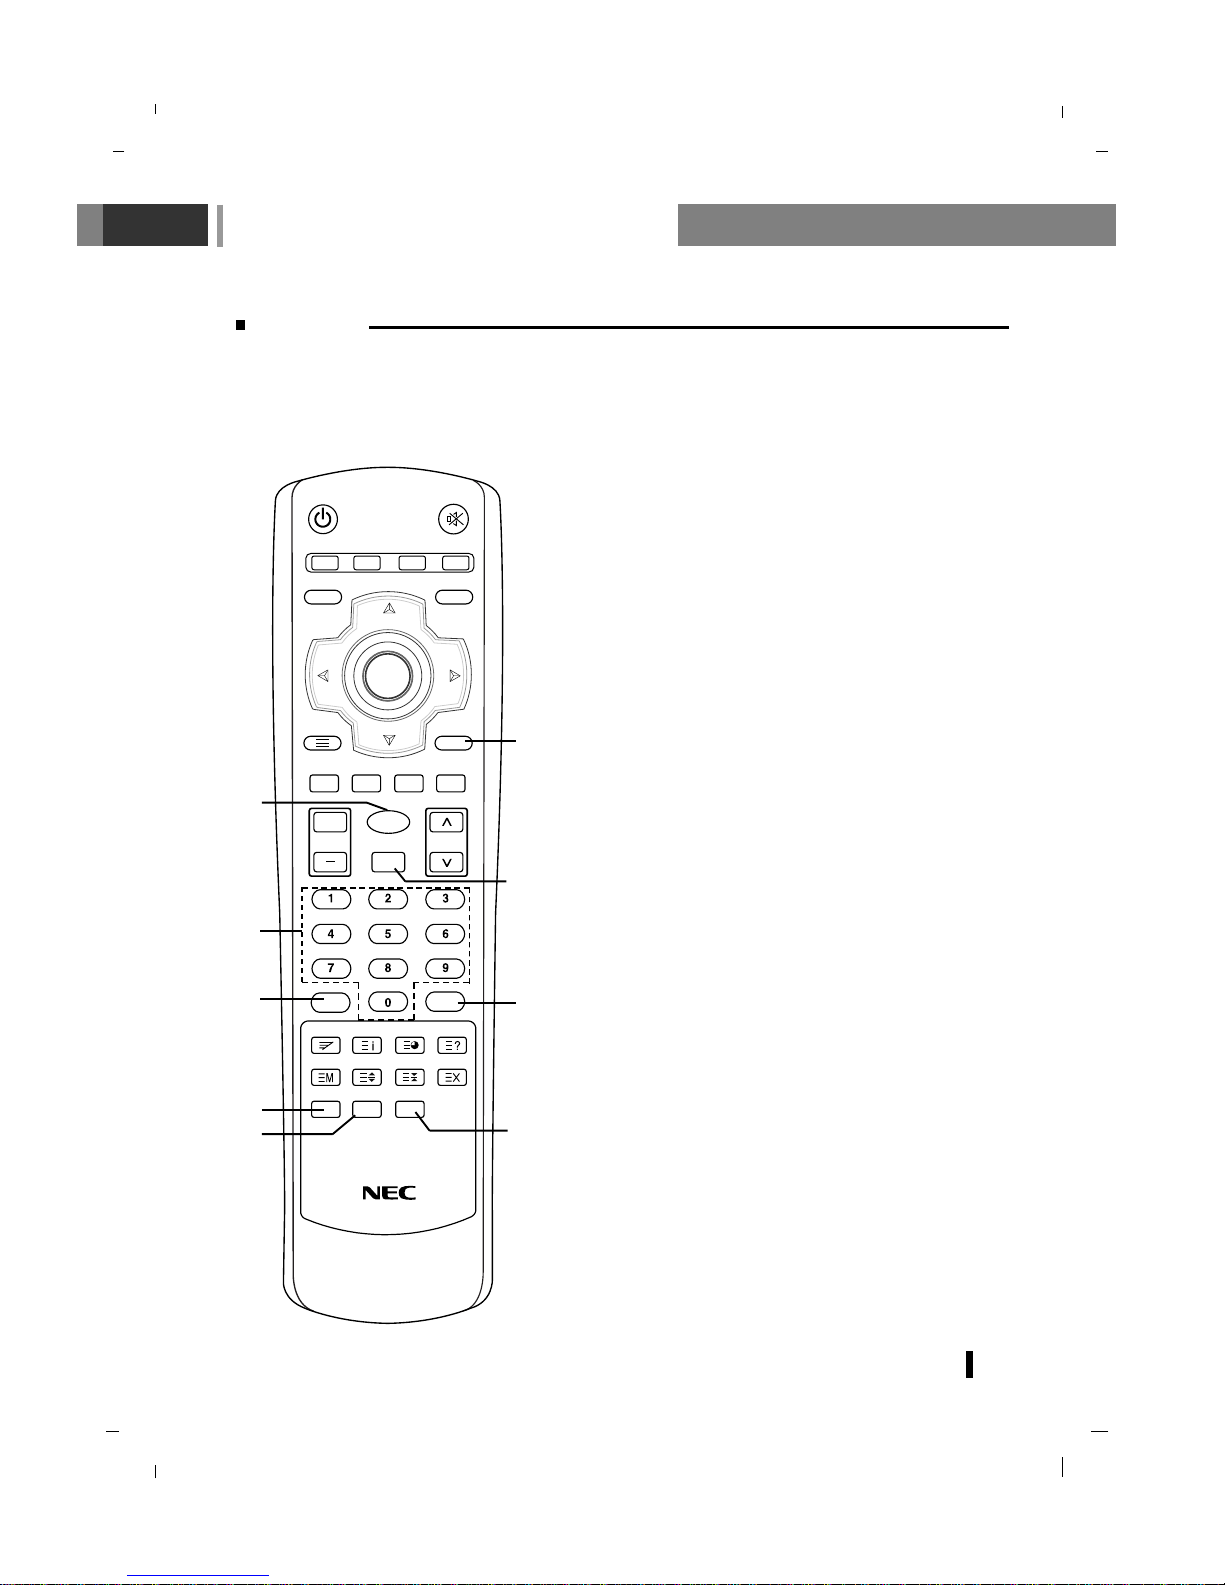
Controls
- All the functions can be controlled with the remote control handset.
- Some functions can also be adjusted with the buttons on the front panel of the set.
- Before you use the remote control handset, please install the batteries.
MUTE
TV/DTV LIST Q.VIEW
I/II
MENU
TEXT EXIT
INPUT
OK
POWER
ARC
VOL PR
PSM
MIX
INDEX TIME
REVEAL
MODE
SIZE HOLD
UPDATE
C.C
SLEEP
STILL
SSM
+
INFO
1. POWER
Select the set On or Off.
2. MUTE
Switches the sound On or Off.
3. LIST
Displays the programme table.
4. Q.VIEW
Returns to the previously viewed programme.
5. TV/DTV (In digital mode only)
Select
TV, DTV mode.
6. I/II
Selects the language during dual language broadcast.
Selects the sound output.
7. MENU
Selects a menu.
8. INPUT
Select
DTV, TV, AV 1 , AV2 (26inch model only),
S-VIDEO, COMPONENT, PC-RGB, HDMI1, HDMI2
(26inch model only) mode.
Switches the set on from standby.
9. Navigation button
DD EE
FF GG
OK
Accepts your selection or displays the current mode.
10.TELETEXT BUTTONS (option)
These buttons are used for teletext.
For further details, see the ‘Teletext’ section.
11. (Programme Up/Down)
Selects a programme or a menu item.
Switches the set on from standby.
(Volume Up/Down)
Adjusts the volume.
Adjusts menu settings.
2
4
6
1
3
5
8
9
11
7
10
Remote control handset
7
Controls
MUTE
TV/DTV LIST Q.VIEW
I/II
MENU
TEXT EXIT
INPUT
OK
POWER
ARC
VOL PR
PSM
MIX
INDEX TIME
REVEAL
MODE
SIZE HOLD
UPDATE
C.C
SLEEP
STILL
SSM
+
INFO
12.EXIT
Exits from each mode.
13.INFO (In digital mode only)
Displays information on top of the screen during watching TV.
14.ARC
Select your desired picture format.
15.NUMBER BUTTONS
16.PSM (Picture Status Memory)
Recalls your preferred picture setting.
17.SSM (Sound Status Memory)
Recalls your preferred sound setting.
18.C.C (In digital mode only)
Select a closed caption.
19.SLEEP
Sets the sleep timer.
20.STILL
Freezes motion of the picture.
14
13
20
18
19
15
16
12
17
Remote control handset
8
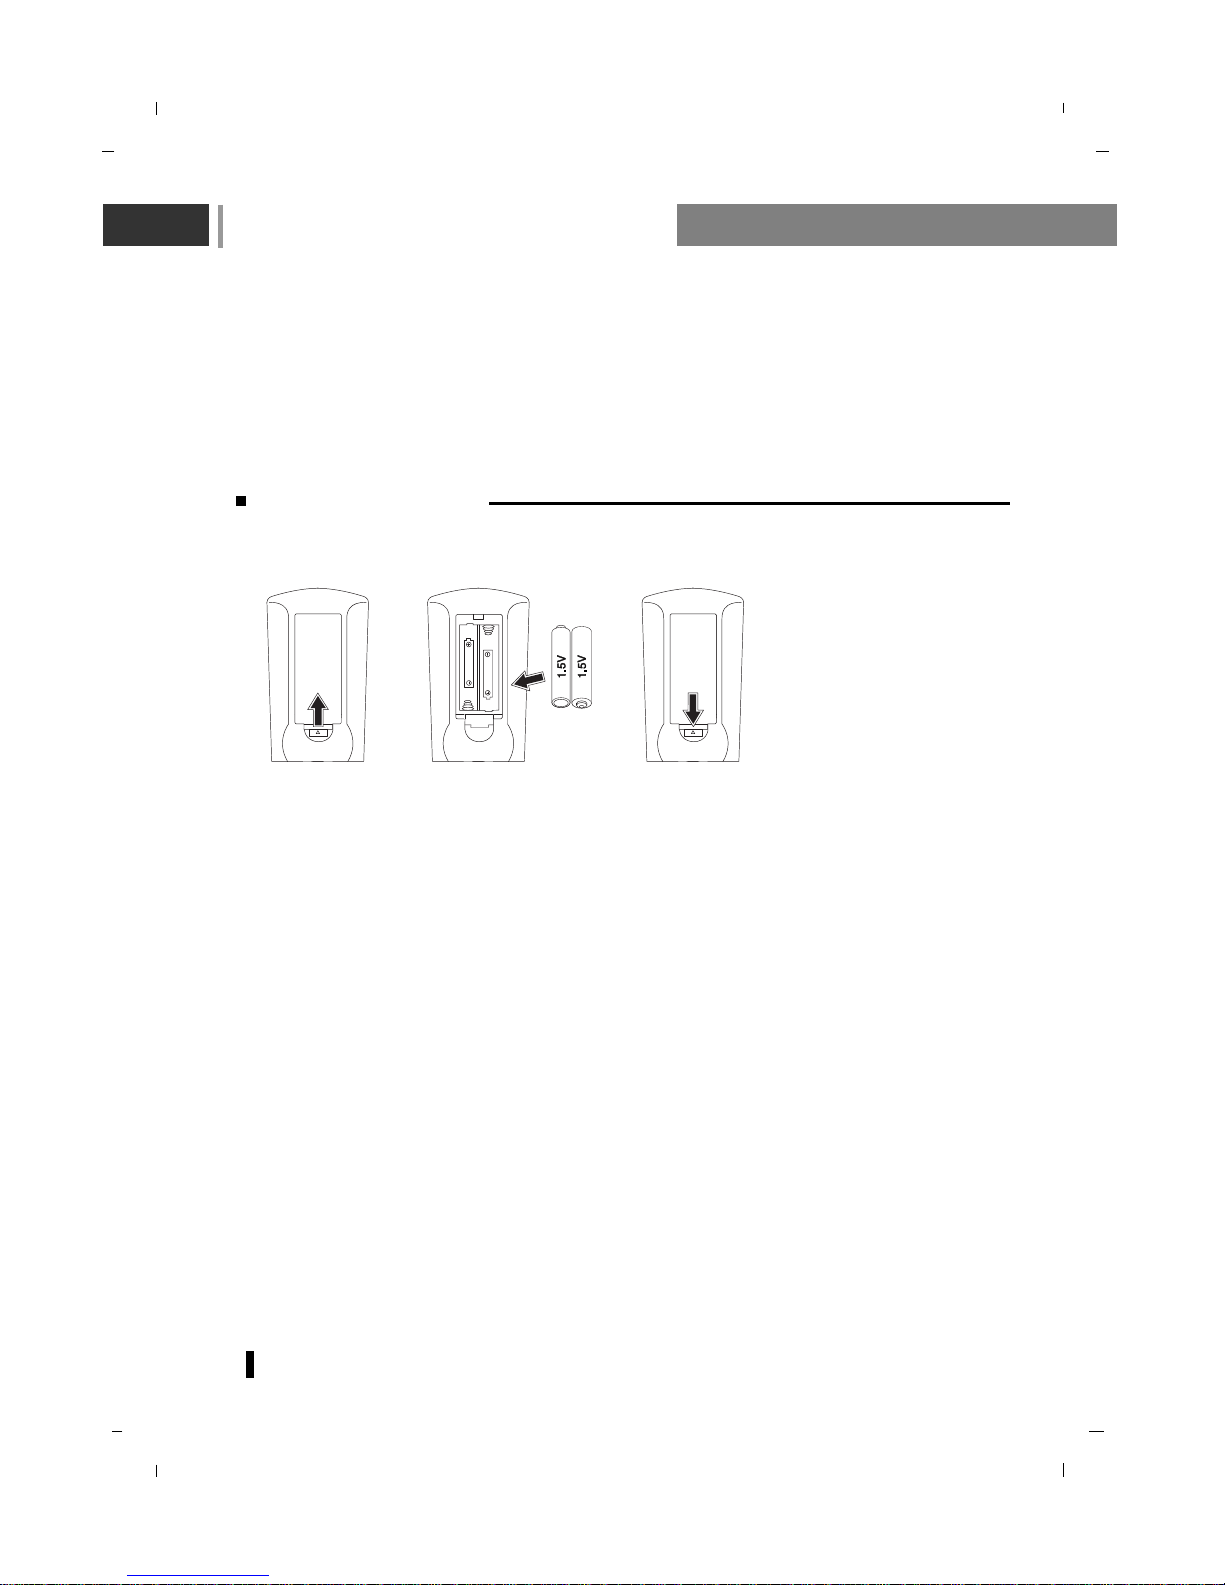
Battery installation
-Your remote control handset is powered by two AAA type batteries.
1. To insert batteries, turn the remote control handset over and remove the battery cover.
2. Put the two batteries into the compartment observing battery polarity.
3. Replace the cover.
To avoid damage from possible battery leakage, remove the batteries if you do not plan to use the
remote control handset for an extended period time. Do not use batteries of differing age or type.
Always discard of batteries safely.
1) 2) 3)
Controls of
9
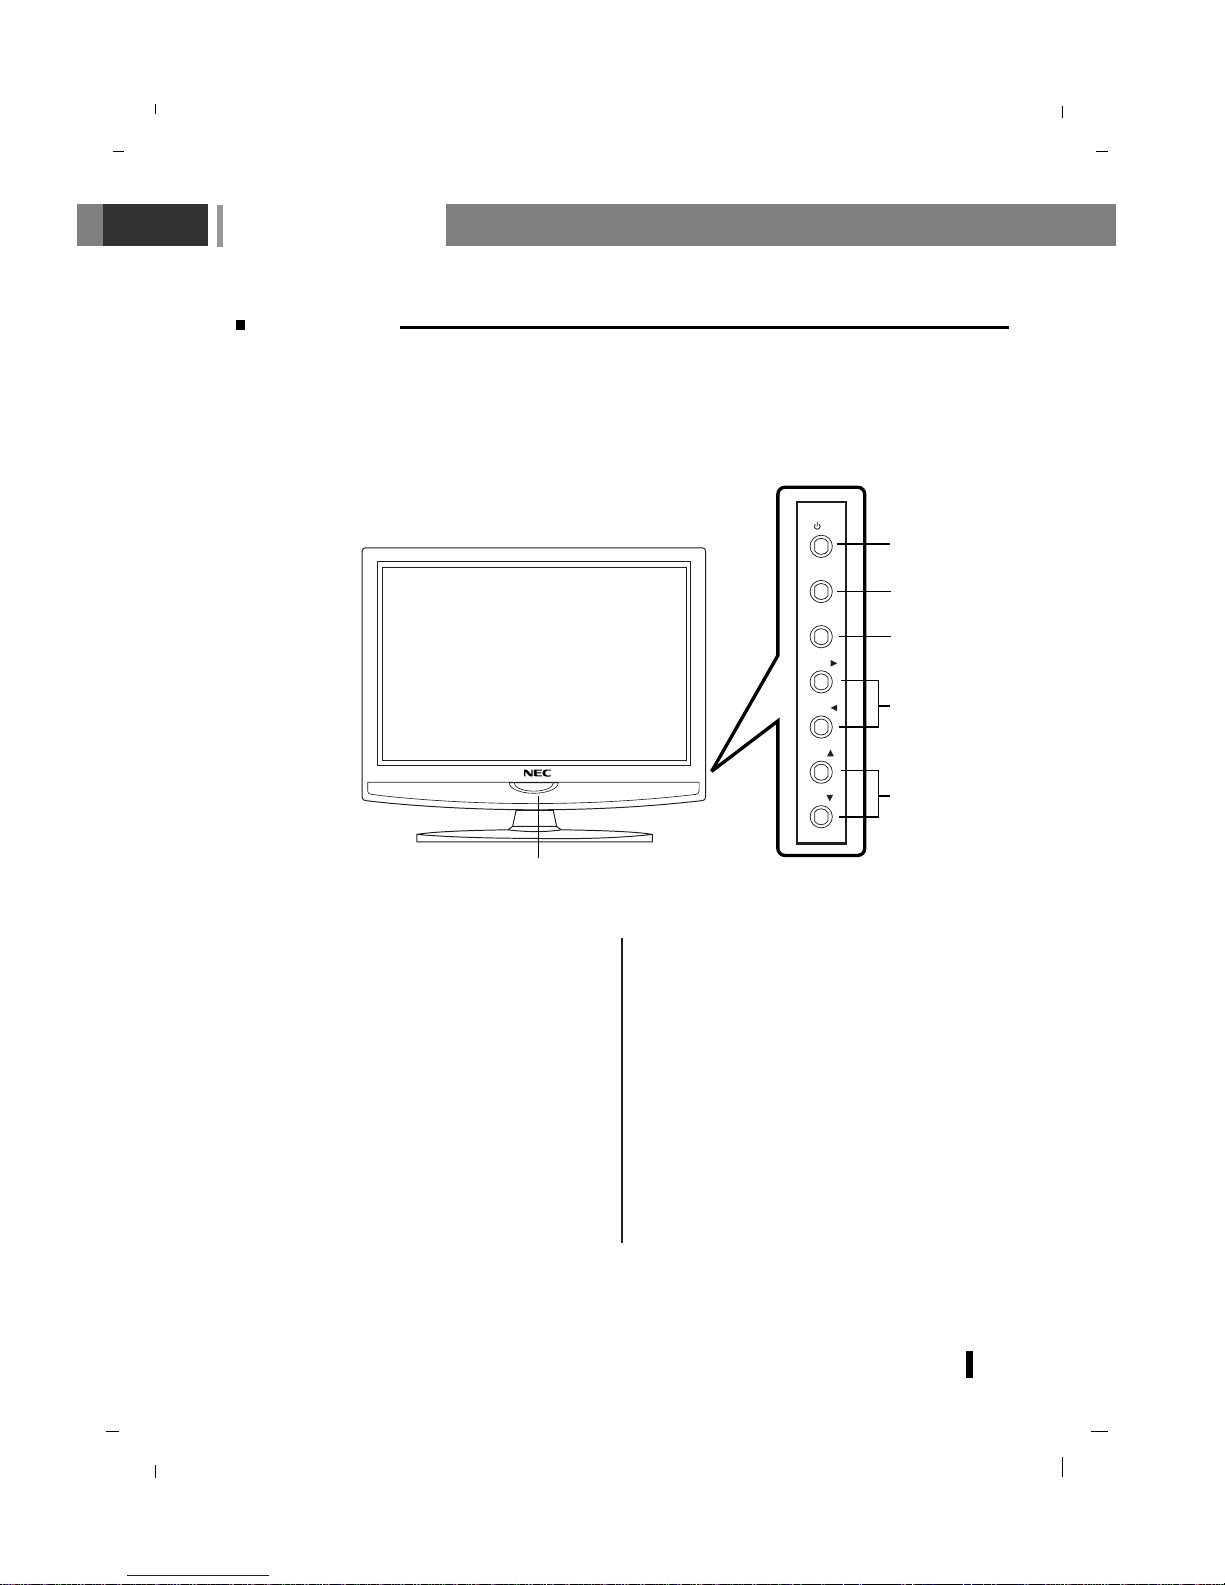
Front panel
- Shown is a simplified representation of the set.
- Here shown may be somewhat different from your set.
INPUT
MENU
/I
VOL
PR
PR
VOL
1
2
3
4
5
6
1. POWER (rr)
Select the set On or Off.
2. INPUT
Select
DTV, TV, AV 1 , AV2 (26inch model
only),
S-VIDEO, COMPONENT, PC-RGB,
HDMI1, HDMI2 (26inch model only) mode.
3. MENU
Selects a menu.
4.
FF / GG (Volume Up/Down)
Adjusts the volume.
Adjusts menu settings.
5.
DD / EE
(Programme Up/Down)
Selects a programme or a menu item.
Switches the set On from standby.
6. REMOTE CONTROL SENSOR
POWER/STANDBY INDICATOR(rr)
Illuminates red in standby mode.
Illuminates green when the set is switched
On.
Controls of
10
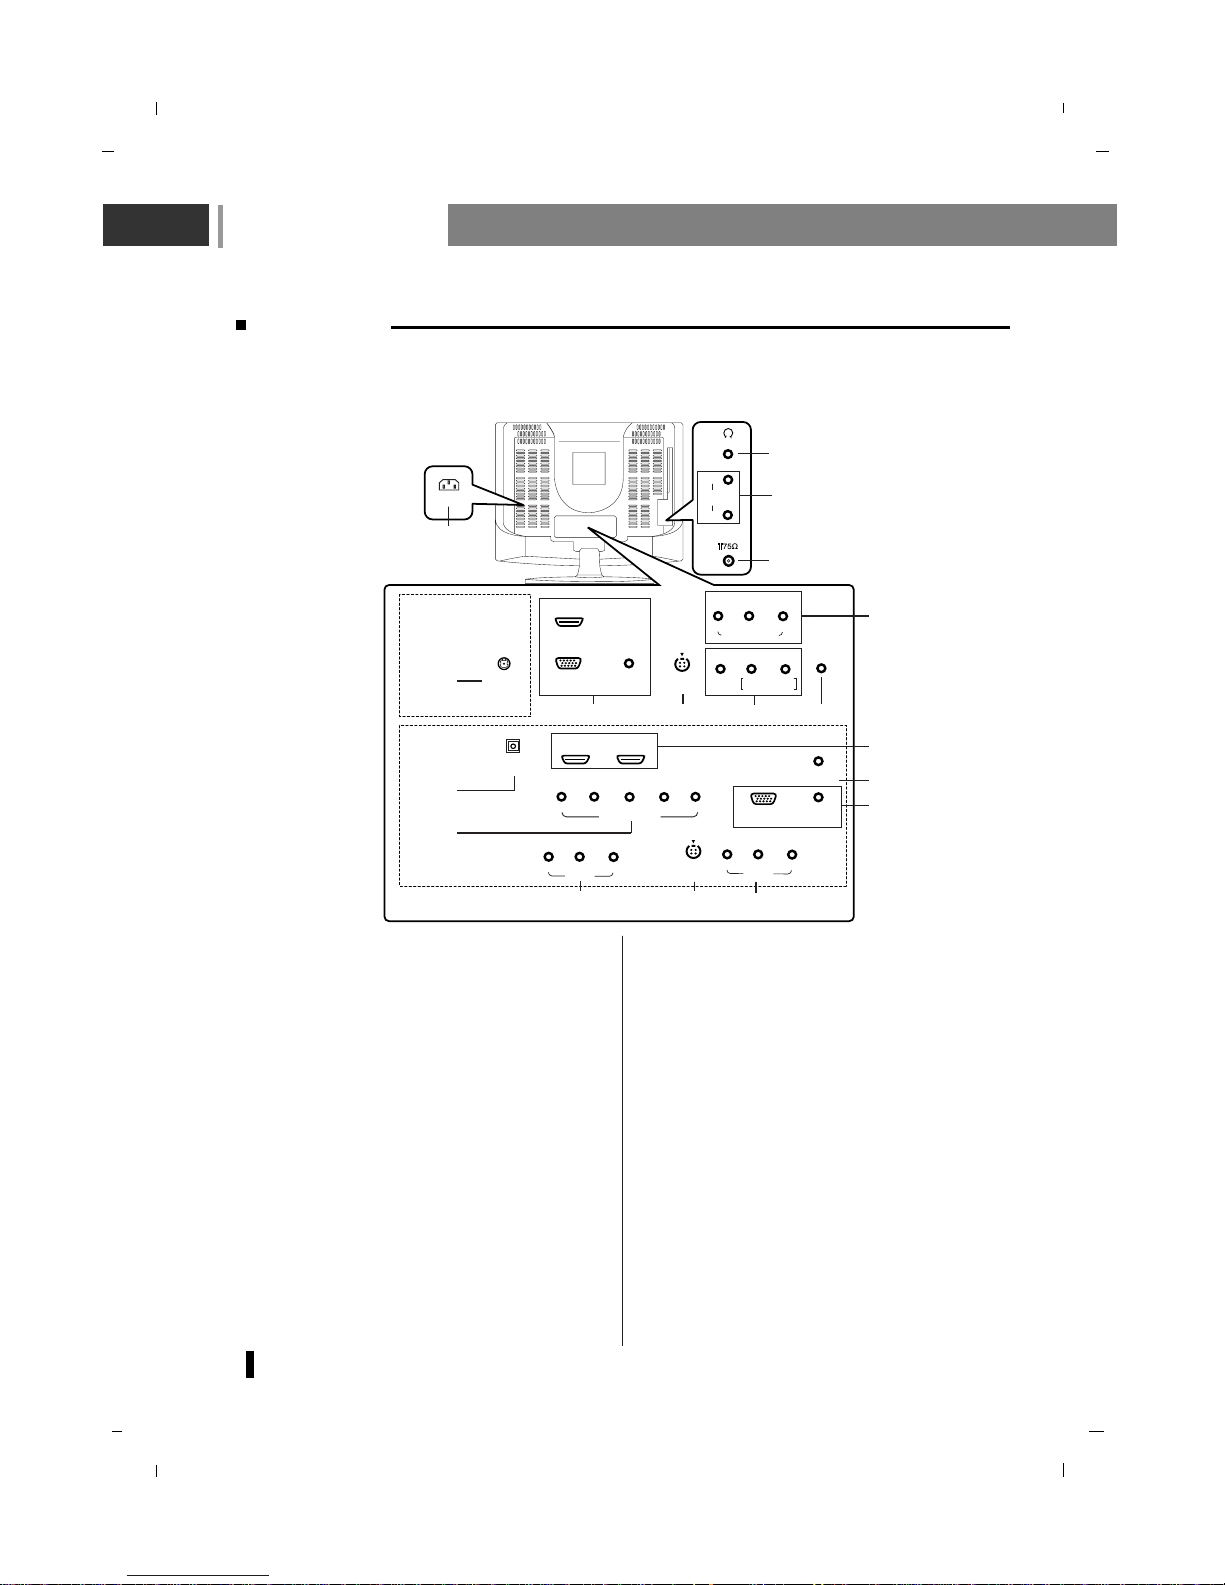
Back panel
- Shown is a simplified representation of the set.
- Here shown may be somewhat different from your set.
1. POWER CORD SOCKET
* 19inch model only
This set operates on an DC power. Connect
the DC plug of the AC-DC adapter to the 12V
socket of the set.
* 22/26inch model only
This set operates on an AC power.
The voltage is indicated on the Specifications
page.
2. HDMI(DVI) / RGB IN (PC/DTV) / AUDIO IN
(RGB/DVI) SOCKETS
Connect the set output socket of the PERSONAL COMPUTER to this socket.
3. S-VIDEO IN
Connect video out from an S-Video VCR to
the S-VIDEO input.
4. AUDIO/VIDEO IN SOCKET
Connect the audio/video out sockets of the
VCR to AV sockets of the set.
5. SERVICE ONLY SOCKET
6. AERIAL SOCKET
7. HEADPHONE SOCKET
Connect the headphone plug to this socket.
8. DIGITAL AUDIO (OPTICAL) OUT
Connect digital audio from various types of
equipment.
Note : In standby mode, these ports will not
work.
9. COMPONENT IN (480i / 576i / 480p / 576p /
720p / 1080i) SOCKETS
10. AUDIO OUT SOCKET
Connect an external amplifier or add a subwoofer to your surround sound system.
AC IN
SERVICE
AUDIO IN
(RGB/DVI)
RGB IN (PC/DTV)
HDMI(DVI)-1 HDMI(DVI)-2
S-VIDEO
IN
(L
) A
U
D
IO
(R
)
V
ID
E
O
M
O
N
O
A
V
2
IN
(L
) A
U
D
IO
(R
)
V
ID
E
O
M
O
N
O
A
V
1
IN
DIGITAL AUDIO
(OPTICAL) OUT
(L) (R)
COMPONENT IN
YPBP
R
AUDIO IN
(RGB/DVI)
SERVICE
RGB IN (PC/DTV)
HDMI(DVI)
S-VIDEO
IN
DC IN (12V)
COMPONENT IN
YPbP
r
L/M
O
N
O
R
VIDEO
AV
IN
AV
, S-VIDEO
COMP. AUDIO IN
ANT. IN
(R
)
(L
)
A
U
D
IO
O
U
T
4 3
1
4
2 3
4
5
5
2
7
6
1
9
8
* 19 inch
model only
* 22/26 inch
model only
* 26 inch
model
* 26 inch model
2
9
10
Connection to External equipment
11
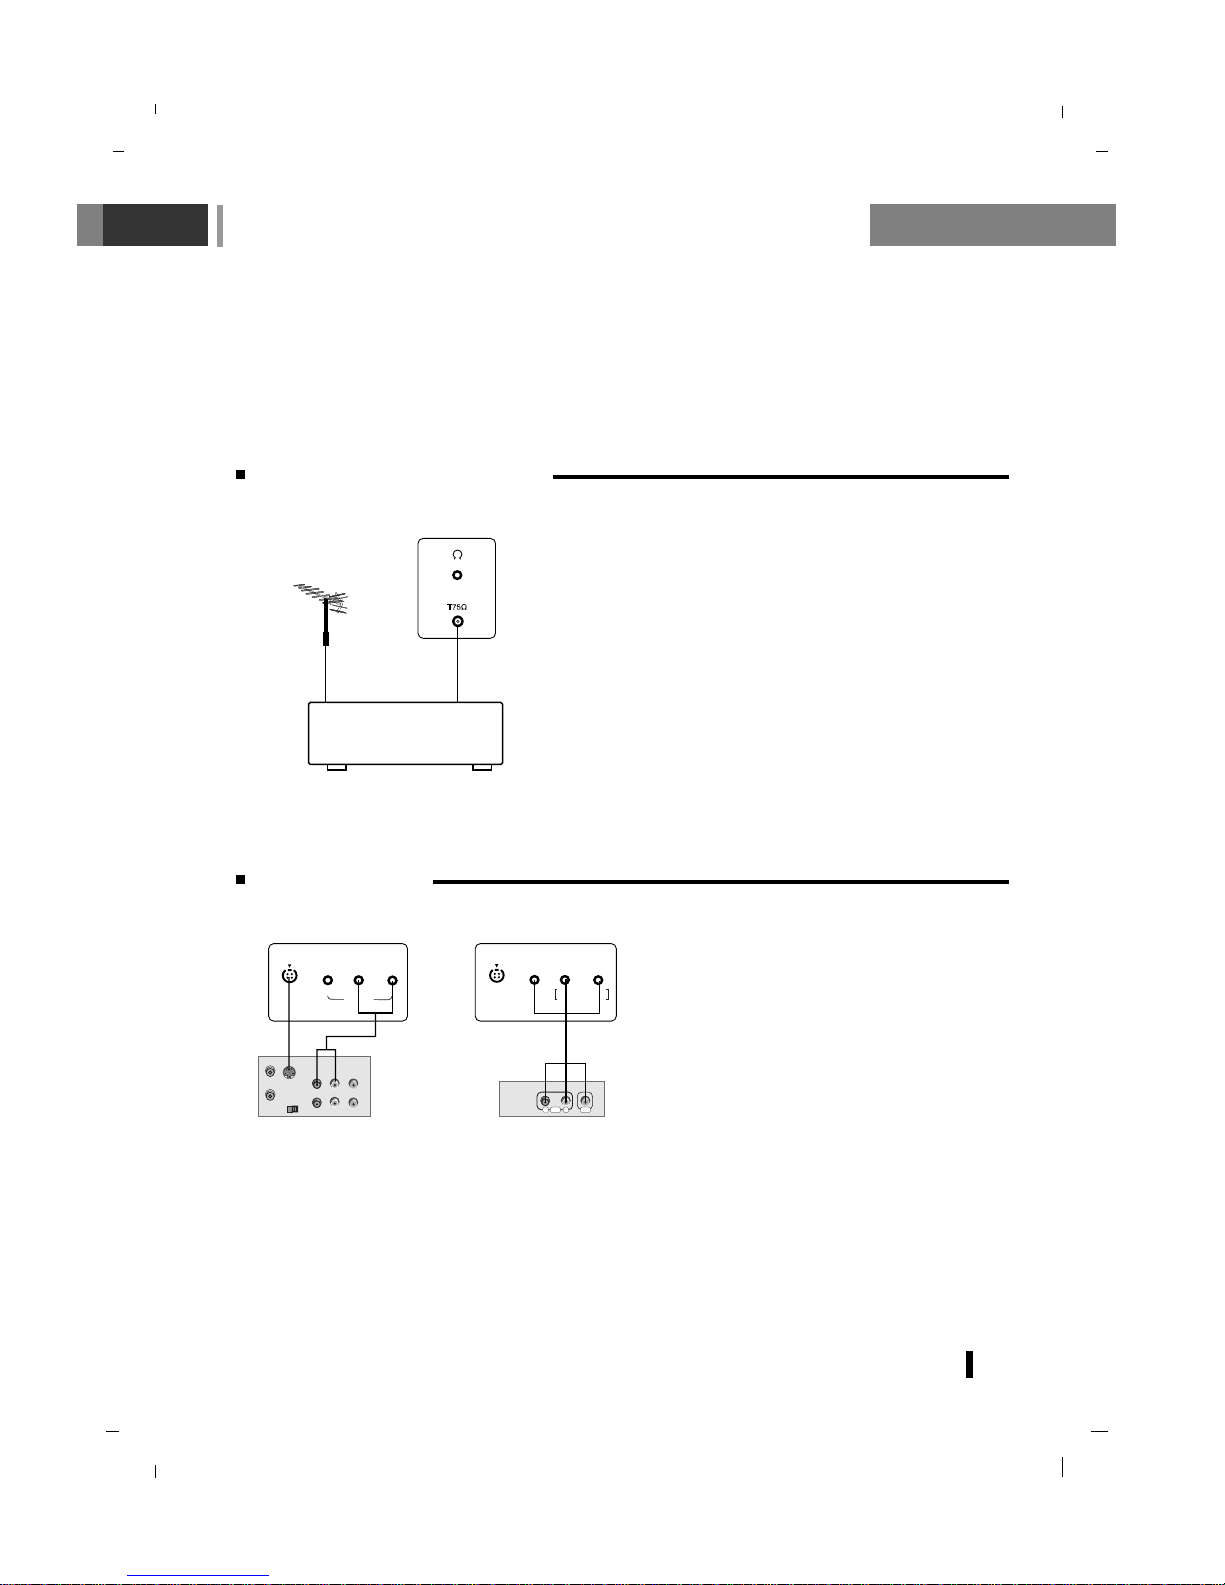
Connect to Aerial socket
-You can connect additional equipment, such as VCRs, camcorders etc. to your set. However please
check with your manufacturers instruction books for specific information. Make sure all connections
are made with both your set and additional appliance unplugged from the mains to avoid damaging
your equipment.
- Here shown may be somewhat different from your set.
Connect the RF out socket of the VCR to the aerial socket on the back of the set.
Connect the aerial cable to the RF aerial in socket of the
VCR.
Store the VCR channel on a desired programme number
using the ‘Manual programme tuning’ section.
Select the programme number where the VCR channel is
stored.
Press the PLAY button on the VCR.
VCR
ANT. IN
< Back panel of the set >
Watching VCR
Use the INPUT button on the remote control to select AV or S-Video.
Insert a video tape into the VCR and press the PLAY button on the VCR.
(See VCR owner’s manual).
- If you connect an S-VIDEO VCR to the SVIDEO input, the picture quality is improved;
compared to connecting a regular VCR to the
Video input.
-To avoid picture noise (interference), leave
an adequate distance between the VCR and
set.
S-VIDEO
OUT
IN
(R) AUDIO (L) VIDEO
S-VIDEO
IN
(L
) A
U
D
IO
(R
)
V
ID
E
O
M
O
N
O
A
V
2
IN
RL
AUDIO VIDEO
S-VIDEO
IN
L/MONO R
VIDEO
AV
IN
AV
, S-VID
EO
CO
M
P.
AUDIO
IN
< Back panel of the set >
< Back panel of VCR >
Connection to External equipment
12
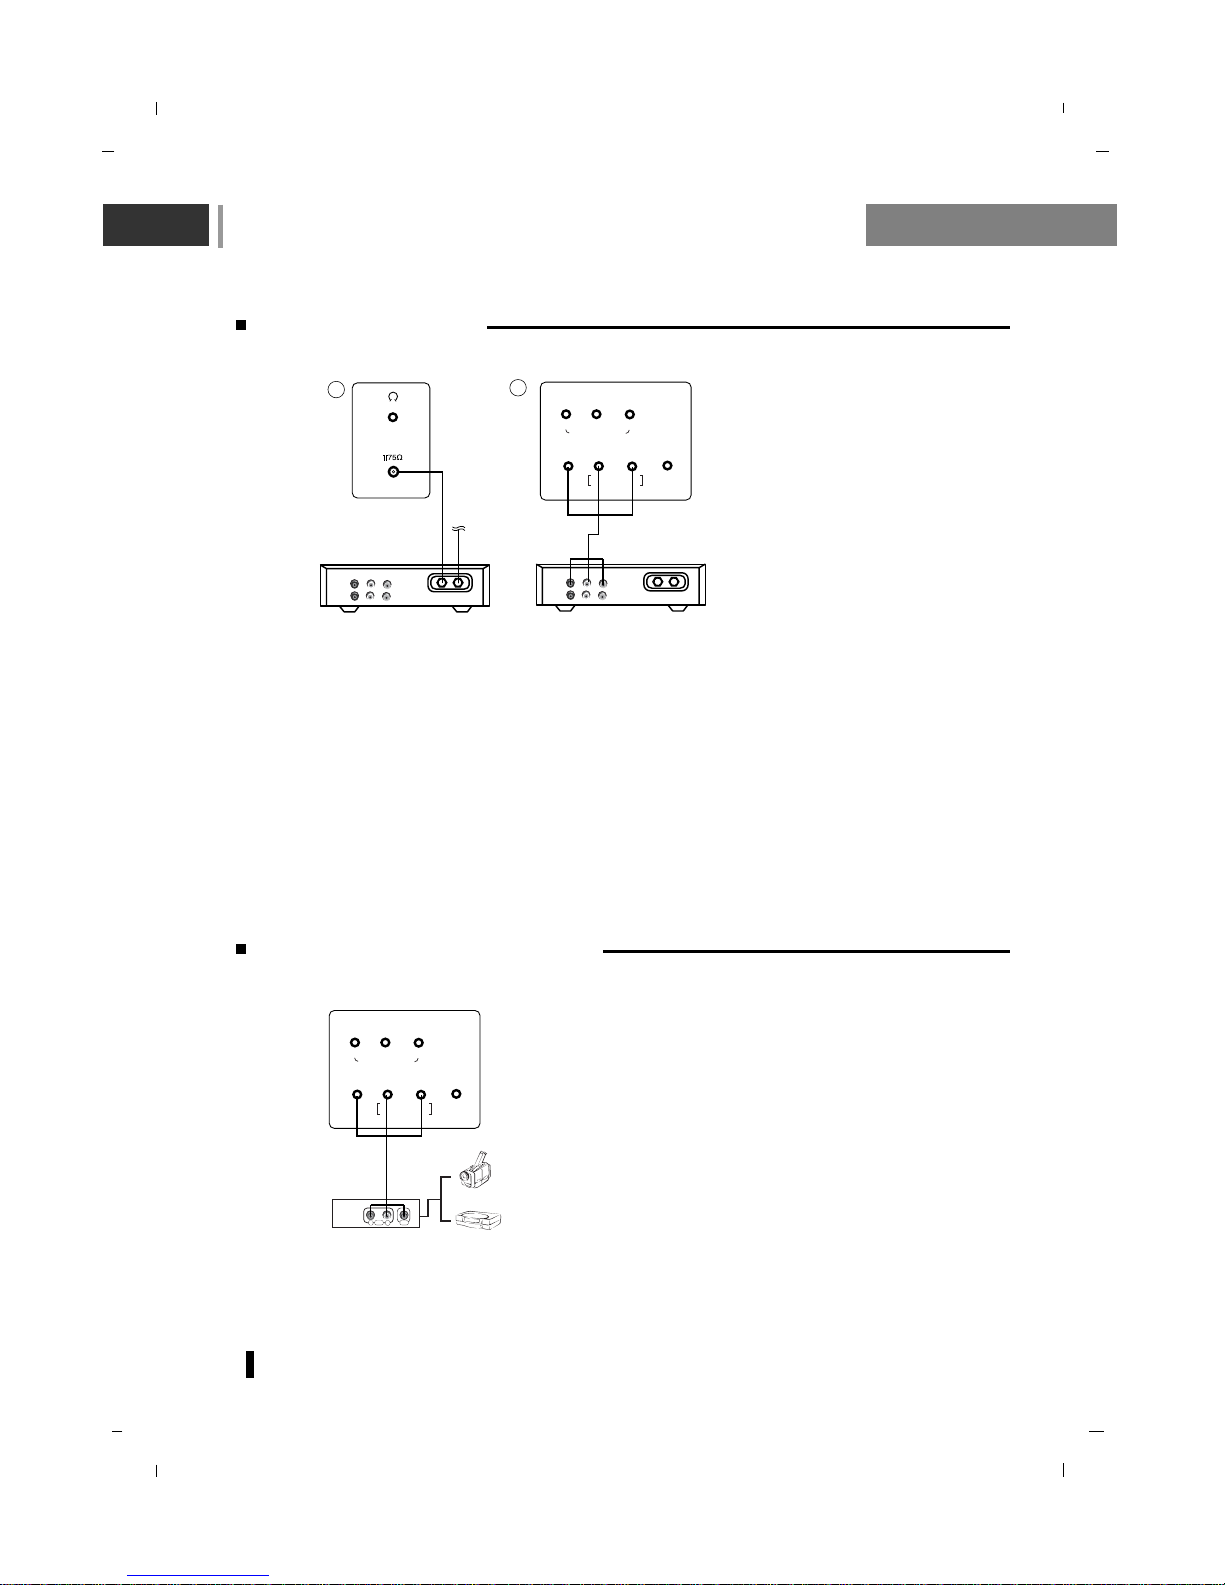
Watching Cable TV
- After subscribing for a local cable TV station and installing a converter you can watch cable TV.
- For further information of cable TV, contact the local cable TV station.
In using connection 1
Select programme number in programme switch of cable box.
Match the set programme with selected programme of cable box.
Select your desired programme with the remote control for cable box.
In using connection 2
Use the INPUT button on the remote control and select
AV or S-Video.
Tune to cable service provided channels using the cable box.
Watching external AV source
When connecting the set to an external source, match
the colours of AUDIO/VIDEO input jacks on the set
with the output jacks on the audio/video equipment.
Use the INPUT button on the remote control to select
AV or S-Video.
Operate the corresponding external equipment. See
external equipment operating guide.
Cable
TV
(R) AUDIO (L) VIDEO
VCR
RF
Cable
TV
(R) AUDIO (L) VIDEO
VCR
RF
SERVICE
COMPONENT IN
YPbP
r
L/MONO R
VIDEO
AV
IN
AV
, S-VIDEO
COMP. AUDIO IN
ANT. IN
For cable TV
< Cable Box >
< Back panel of the set >
2
1
RL
AUDIO VIDEO
SERVICE
COMPONENT IN
YPbP
r
L/MONO R
VIDEO
AV
IN
AV, S-VIDEO
COMP. AUDIO IN
< Back panel of the set >
Camcorder
Video game set
< Back panel of the external
equipment >
Connection to External equipment
13
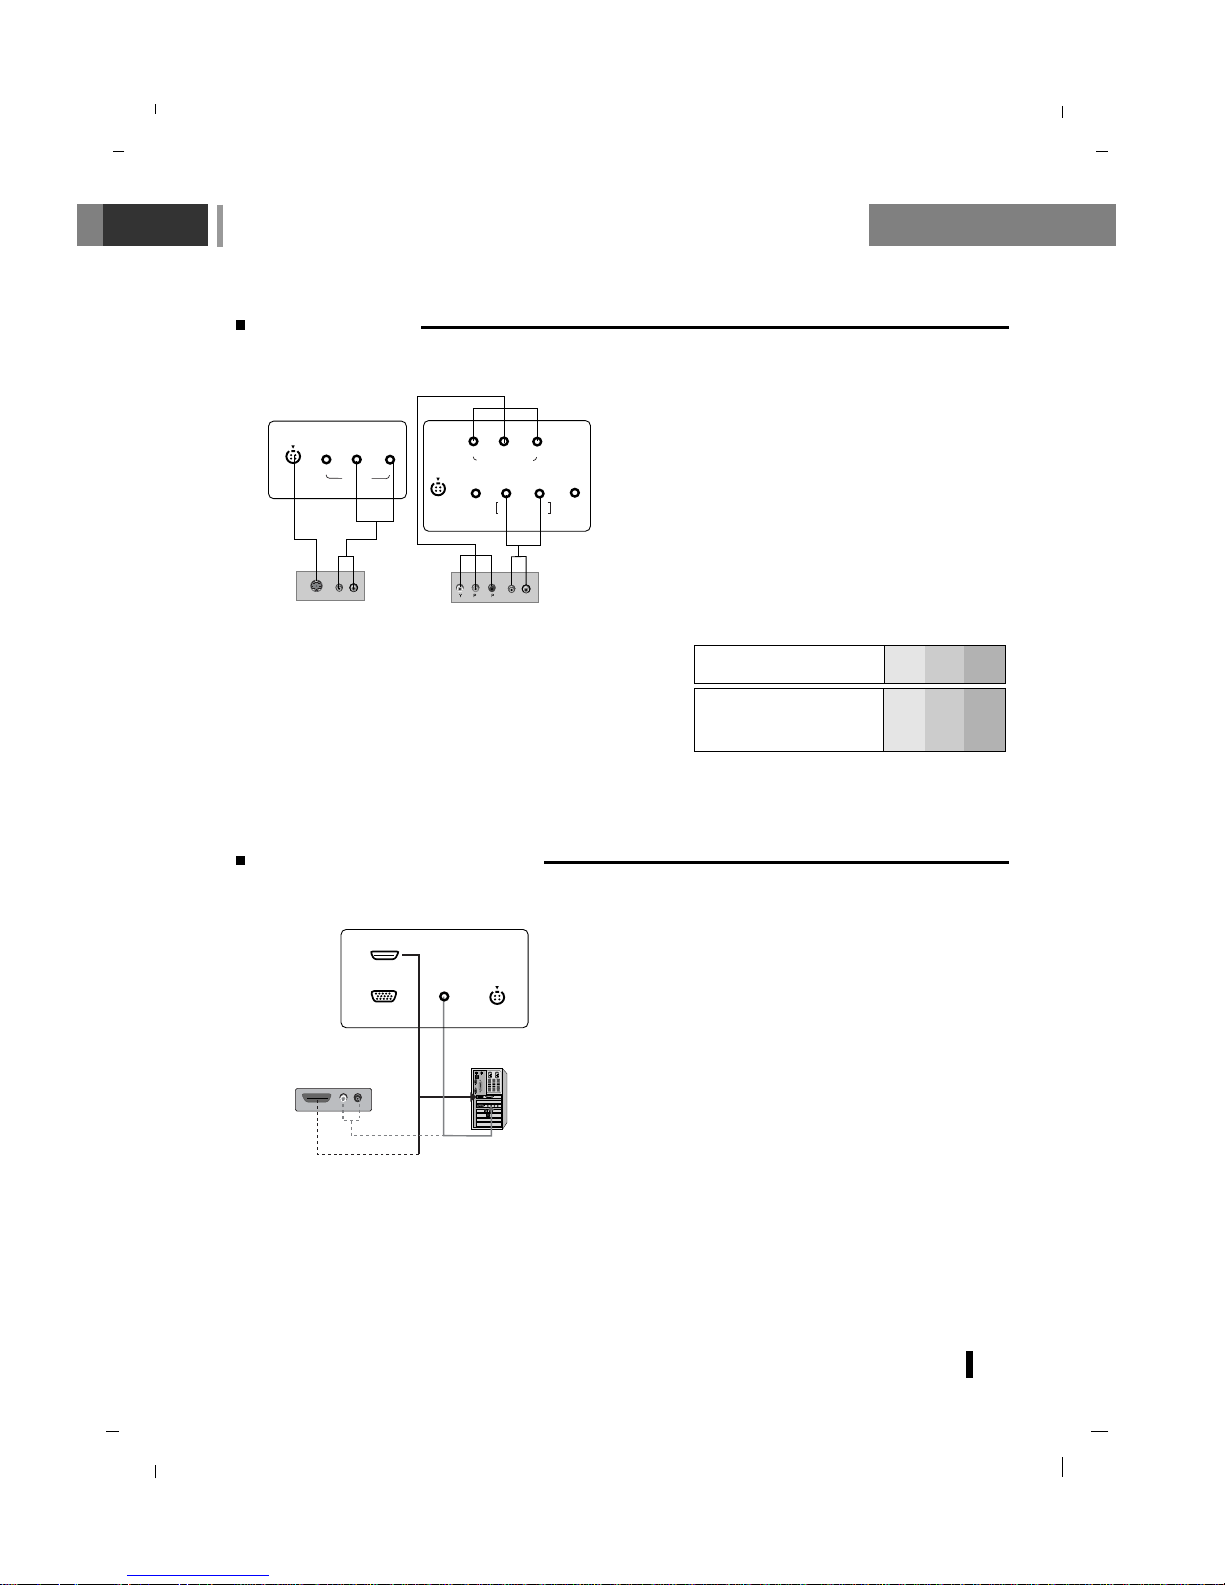
HDMI-DTV input signal : 480p-60Hz, 576p-50Hz, 720p-50Hz, 720p-60Hz, 1080i-50Hz, 1080i-60Hz
This TV SET can receive the High-Definition Multimedia Interface(HDMI) or Input of Digital Visual
Interface(DVI).
Connect the signal cable from the monitor output
socket of the PERSONAL COMPUTER to the
HDMI socket of the set.
Connect the audio cable from the PC to the
AUDIO IN sockets of the set.
Press the INPUT button to select
HDMI.
Switch on the HDMI, and the HDMI screen
appears on the set.
HDMI OUTPUTHDMI OUTPUT
(R) (R) AUDIO (L)AUDIO (L)
AUDIO IN
(RGB/DVI)
RGB IN (PC/DTV)
HDMI(DVI)
S-VIDEO
IN
< Back panel of the set >
or
Watching DVD
How to connect
Connect DVD video inputs to Y, Pb, Pr of COMPONENT (DVD INPUT) and audio inputs to Audio
sockets of AUDIO INPUT.
How to use
Turn on the DVD player, and insert a DVD.
Use INPUT button on the remote control to select
Component. Refer to the DVD player's manual
for operating instructions.
(R) AUDIO (L)
S-VIDEO
S-VIDEO
IN
(L
) A
U
D
IO
(R
)
V
ID
E
O
M
O
N
O
A
V
2
IN
B
R
(R) AUDIO (L)
SERVICE
S-VIDEO
IN
COMPONENT IN
YPbP
r
L
/M
O
N
O
R
VIDEO
AV
IN
AV,
S-V
ID
EO
CO
M
P. A U
DIO
IN
< Back panel of the set >
or
Connecting HDMI (DTV)
< Back panel of a DVD player >
• COMPONENT Input ports
You can get better picture quality if you connect DVD
player with COMPONENT input ports as below.
Component input signal : 480i / 576i / 480p / 576p / 720p
/ 1080i
COMPONENT
ports of the set
Y
Pb
Pr
Video output ports
of DVD player
Y
Y
Y
Y
Pb
B-Y
Cb
PB
Pr
R-Y
Cr
P
R
Connection to External equipment
14
Connecting PC (DTV)
Connect the signal cable from the monitor output socket of the
PERSONAL COMPUTER to the RGB IN socket of the set.
Connect the audio cable from the PC to the AUDIO IN sock-
ets of the set.
Press the INPUT button to select
PC-RGB.
Switch on the PC, and the PC screen appears on the set.
Do PC Auto on Menu to adjust the screen automatically.
The set can be operated as the PC monitor.
RGB-DTV input signal : 480p-60Hz, 576p-50Hz, 720p-50Hz,
720p-60Hz, 1080i-50Hz, 1080i-60Hz, 1080p-50Hz, 1080p-60Hz.
RGB OUTPUTRGB OUTPUT
(R) (R) AUDIO (L)AUDIO (L)
AUDIO IN
(RGB/DVI)
RGB IN (PC/DTV)
HDMI(DVI)
S-VIDEO
IN
< Back panel of the set >
or
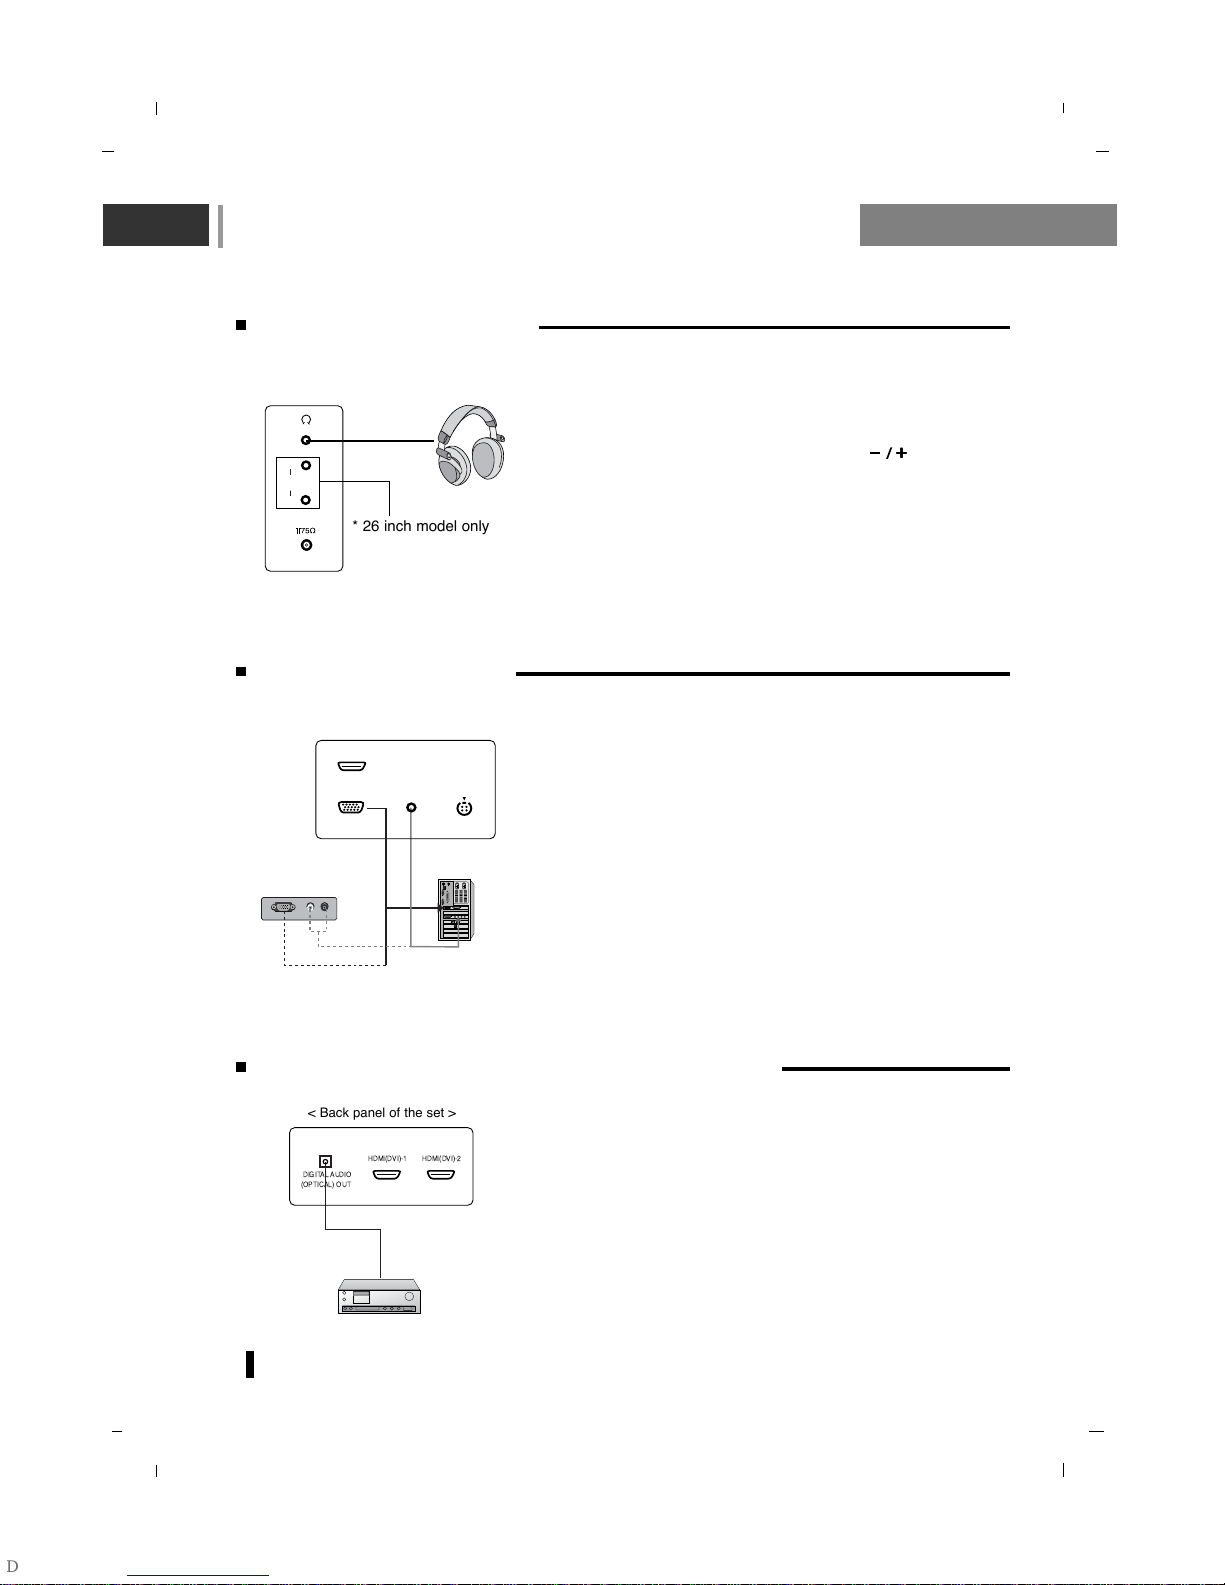
Connecting Headphone
Insert the headphone plug to the headphone socket of the
set.
You can listen to the sound through the headphone. To
adjust the headphone volume, press the button.
Control the volume of the headphone to the appropriate
level.
Hearing for a long time with the high volume may damage
the eardrum.
Audio Out (26inch model only) : Connect a second TV or
Monitor.
ANT. IN
(R)
(L)
AUDIO
OUT
< Side panel of the set >
Connecting Digital Audio (26inch model only)
- Send the set’s audio to external audio equipment (stereo
system) via the Digital Audio Output (Optical).
Caution : Do not look into the optical output port. Looking at
the laser beam may damage your vision.
How to connect
Connect one end of an optical cable to the TV Digital Audio
(Optical) Output port.
Connect the other end of the optical cable to the digital audio
(optical) input on the audio equipment.
HDMI(DVI)-1 HDMI(DVI)-2
DIGITALAUDIO
(OPTICAL) OUT
< Back panel of the set >
* 26 inch model only

Basic operation
15
On and Off
First, connect power cord correctly.
At this moment the TV switches to standby mode.
If the set is in standby mode, press the POWER, buttons on the remote control handset to switch
it on fully.
Press the POWER button on the remote control handset.
The set reverts to standby mode.
Press the power button again to switch the set standby mode.
Programme selection
You can select a programme number with the or NUMBER buttons.
Volume adjustment
Press the button to adjust the volume.
If you want to switch the sound off, press the MUTE button.
You can cancel it by pressing the MUTE, , SSM or I/II button.
On screen language selection
Press the MENU button and then use
DD / EE
button to select the SETUP menu.
Press the
GG button and then use
DD / EE
button to select Language.
Press the
GG button and then use
DD / EE
button to select your desired language.
All the on screen displays will appear in the selected language.
Repeatedly press the MENU button to return to normal TV viewing.
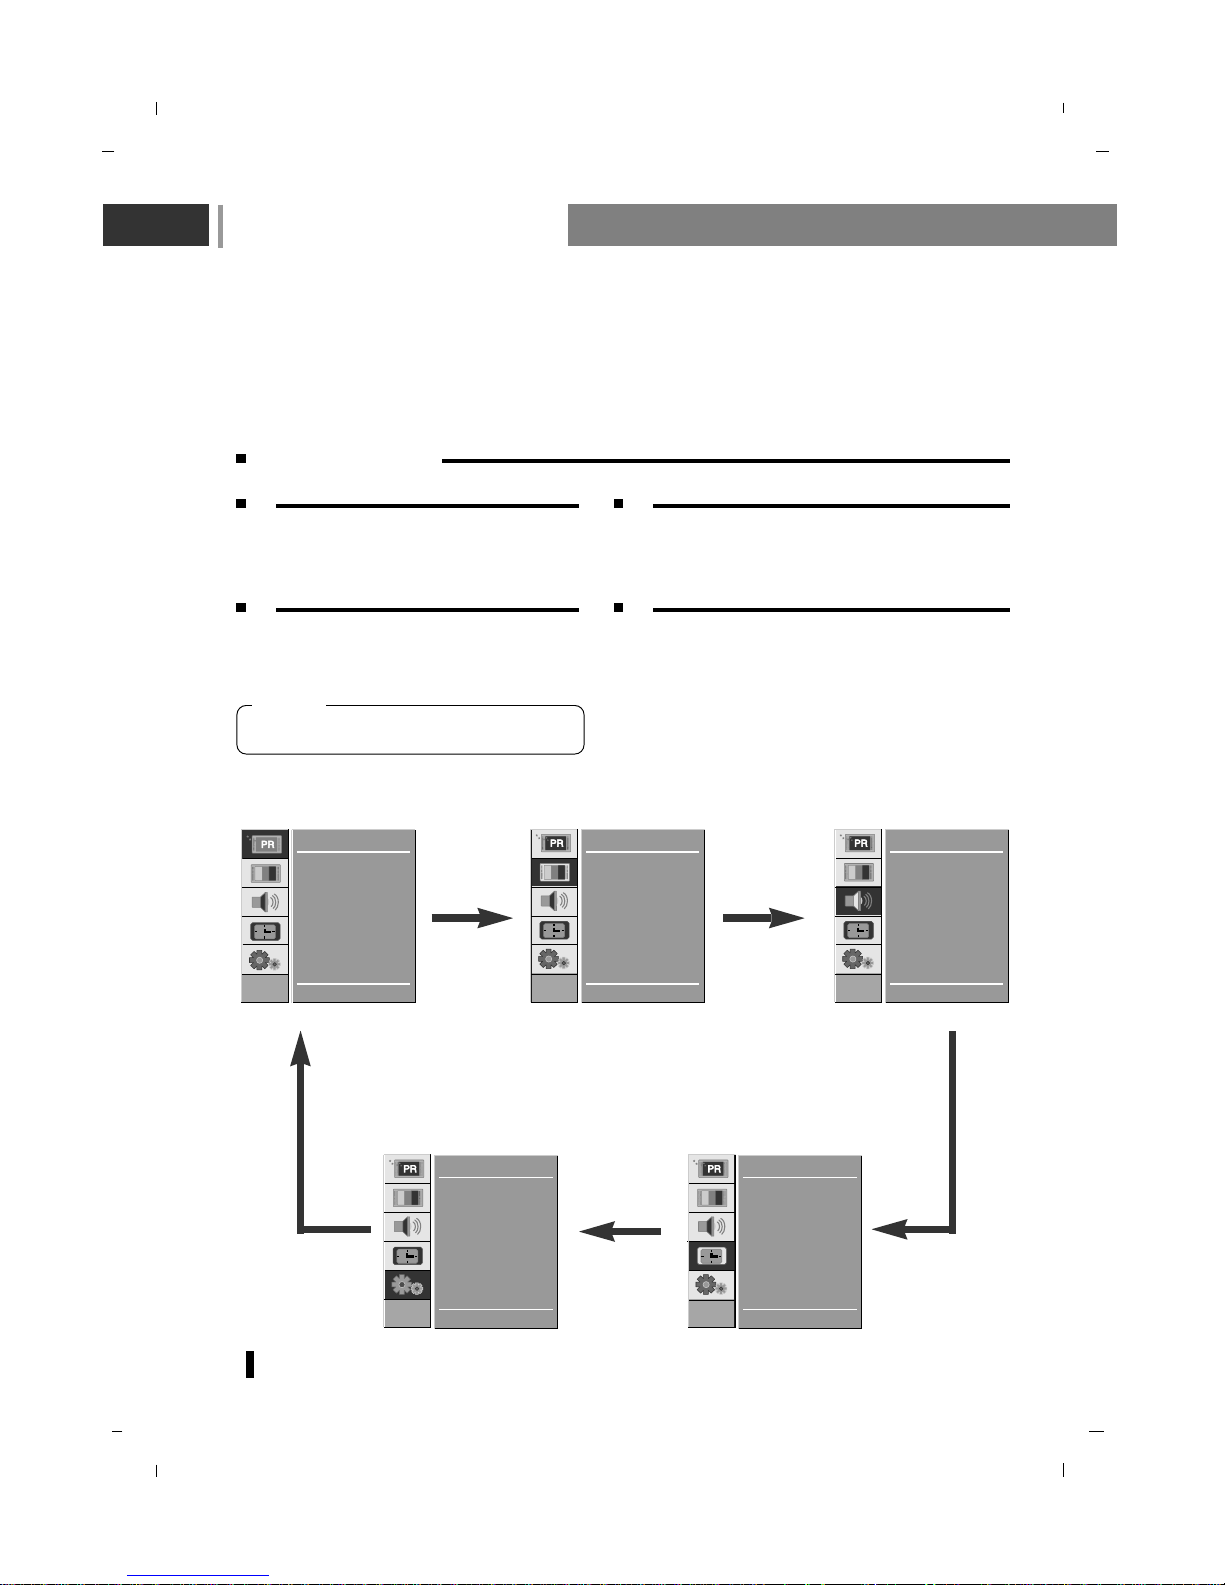
On Screen Menus
16
- The dialogue between you and your set takes place on screen with an operator menu.
The buttons required for the operating steps are also displayed.
- In this manual, the OSD (On Screen Display) may be different from your TV’s because it is just
example to help the TV operation.
- The OSD (On Screen Display) displays differently depending on the input signal.
Auto
Manual
Edit
E DD
G OK MENU
STATION
CSM
PSM
Contrast
Brightness
Colour
Sharpness
E DD
G OK MENU
PICTURE
SSM
Balance
Surround
AVL
Audio mode
E DD
G OK MENU
SOUND
Language
Input
ARC
PC-Control
WXGA
VGA
Child lock
New password
E DD
G OK MENU
SETUP
Clock
Off time
On time
Auto sleep
Time zone
D.saving
E DD
G OK MENU
TIME
Press the MENU button and then use
DD / EE
button to display each menu.
Press the
GG button and then use
DD / EE
button to
select a menu item.
Press the
GG button to display the sub menu
or the pull-down menu.
Change the setting of an item in the sub or pull-down
menu with
DD / EE
or FF
/
GG.
You can move to the higher level menu with
FF
button and to move to the lower level menu press the
GG button.
1 2
3 4
- Menus may vary according to input mode.
[ Note ]
Menu selection
 Loading...