

Page 1

OpenWorX BUSINESS ATTENDANT SYSTEM
USER GUIDE
NEC America, Inc.
NDA-30103-004
Revision 4.0
November, 2001
Stock # 0221191
Page 2

LIABILITY DISCLAIMER
NEC America, Inc. reserves the right to change the specifications,
functions, or features, at any time, without notice.
NEC America, Inc. has prepared this document for the exclusive use
of its employees and customers. The information contained herein is
the property of NEC America, Inc. and shall not be reproduced
without prior written approval from NEC America, Inc.
NEAX, D
term
, and OpenWorX are registered trademarks of NEC
Corporation.
© 2001 NEC America, Inc.
Printed in the USA
All other brand or product names are or may be trademarks or
registered trademarks of, and are used to identify products or
services of, their respective owners.
MS-DOS, Microsoft, Windows, Windows NT, and Windows 2000
are registered trademarks of Microsoft Corporation. Microsoft
Windows 95 and Microsoft Windows 98 are trademarks of
Microsoft Corporation.
Page 3

OpenWorX Business Attendant System User Guide CONTENTS
TABLE OF CONTENTS
Page
Chapter 1 - Introduction . . . . . . . . . . . . . . . . . . . . . . . . . . . . . . . . . . . . . . . . . . . . . . . . . . 1
What is the Business Attendant System?. . . . . . . . . . . . . . . . . . . . . . . . . . . . . . . . . . . . . . . . . . . . 1
How This Guide is Organized . . . . . . . . . . . . . . . . . . . . . . . . . . . . . . . . . . . . . . . . . . . . . . . . . . . . . 2
Using This Guide . . . . . . . . . . . . . . . . . . . . . . . . . . . . . . . . . . . . . . . . . . . . . . . . . . . . . . . . . . . . . . 3
Document Conventions . . . . . . . . . . . . . . . . . . . . . . . . . . . . . . . . . . . . . . . . . . . . . . . . . . . . . . . . 3
Procedures . . . . . . . . . . . . . . . . . . . . . . . . . . . . . . . . . . . . . . . . . . . . . . . . . . . . . . . . . . . . . . . . 4
Keyboard Conventions . . . . . . . . . . . . . . . . . . . . . . . . . . . . . . . . . . . . . . . . . . . . . . . . . . . . . . . 4
Summary of Shortcut and Function Keys . . . . . . . . . . . . . . . . . . . . . . . . . . . . . . . . . . . . . . . . . 5
Business Attendant System Terminology . . . . . . . . . . . . . . . . . . . . . . . . . . . . . . . . . . . . . . . . . . . . 6
Chapter 2 - Getting Started . . . . . . . . . . . . . . . . . . . . . . . . . . . . . . . . . . . . . . . . . . . . . . . . 9
Overview . . . . . . . . . . . . . . . . . . . . . . . . . . . . . . . . . . . . . . . . . . . . . . . . . . . . . . . . . . . . . . . . . . . . . 9
About the Business Attendant Client Windows. . . . . . . . . . . . . . . . . . . . . . . . . . . . . . . . . . . . . . . . 9
Line Status Window . . . . . . . . . . . . . . . . . . . . . . . . . . . . . . . . . . . . . . . . . . . . . . . . . . . . . . . . . . . 10
Menus . . . . . . . . . . . . . . . . . . . . . . . . . . . . . . . . . . . . . . . . . . . . . . . . . . . . . . . . . . . . . . . . . . . . 10
Line Menu . . . . . . . . . . . . . . . . . . . . . . . . . . . . . . . . . . . . . . . . . . . . . . . . . . . . . . . . . . . . . . . . 10
Call Menu . . . . . . . . . . . . . . . . . . . . . . . . . . . . . . . . . . . . . . . . . . . . . . . . . . . . . . . . . . . . . . . . 11
Options Menu . . . . . . . . . . . . . . . . . . . . . . . . . . . . . . . . . . . . . . . . . . . . . . . . . . . . . . . . . . . . . 13
Window Menu . . . . . . . . . . . . . . . . . . . . . . . . . . . . . . . . . . . . . . . . . . . . . . . . . . . . . . . . . . . . . 13
Help Menu. . . . . . . . . . . . . . . . . . . . . . . . . . . . . . . . . . . . . . . . . . . . . . . . . . . . . . . . . . . . . . . . 13
Commands Tab . . . . . . . . . . . . . . . . . . . . . . . . . . . . . . . . . . . . . . . . . . . . . . . . . . . . . . . . . . . . . 14
Command Buttons . . . . . . . . . . . . . . . . . . . . . . . . . . . . . . . . . . . . . . . . . . . . . . . . . . . . . . . . . 14
Loops . . . . . . . . . . . . . . . . . . . . . . . . . . . . . . . . . . . . . . . . . . . . . . . . . . . . . . . . . . . . . . . . . . . 14
Queues Tab . . . . . . . . . . . . . . . . . . . . . . . . . . . . . . . . . . . . . . . . . . . . . . . . . . . . . . . . . . . . . . . . 16
Queues . . . . . . . . . . . . . . . . . . . . . . . . . . . . . . . . . . . . . . . . . . . . . . . . . . . . . . . . . . . . . . . . . . 16
Source and Destination Areas . . . . . . . . . . . . . . . . . . . . . . . . . . . . . . . . . . . . . . . . . . . . . . . . 17
Number Entered Field . . . . . . . . . . . . . . . . . . . . . . . . . . . . . . . . . . . . . . . . . . . . . . . . . . . . . . . 18
Status Line . . . . . . . . . . . . . . . . . . . . . . . . . . . . . . . . . . . . . . . . . . . . . . . . . . . . . . . . . . . . . . . 18
Directory Window . . . . . . . . . . . . . . . . . . . . . . . . . . . . . . . . . . . . . . . . . . . . . . . . . . . . . . . . . . . . . 19
Speed Dials Window. . . . . . . . . . . . . . . . . . . . . . . . . . . . . . . . . . . . . . . . . . . . . . . . . . . . . . . . . . . 21
About Monitoring Speed Dials . . . . . . . . . . . . . . . . . . . . . . . . . . . . . . . . . . . . . . . . . . . . . . . . . . 21
Running the Business Attendant Client Application . . . . . . . . . . . . . . . . . . . . . . . . . . . . . . . . . . . 22
Logging In To the Application: . . . . . . . . . . . . . . . . . . . . . . . . . . . . . . . . . . . . . . . . . . . . . . . . . . 22
Exiting the Application:. . . . . . . . . . . . . . . . . . . . . . . . . . . . . . . . . . . . . . . . . . . . . . . . . . . . . . . . 22
Connecting to the Business Attendant Server . . . . . . . . . . . . . . . . . . . . . . . . . . . . . . . . . . . . . . 23
If the Server Goes Down While You Are Logging In. . . . . . . . . . . . . . . . . . . . . . . . . . . . . . . . 23
If the Server Goes Down While You Are Working. . . . . . . . . . . . . . . . . . . . . . . . . . . . . . . . . . 24
Chapter 3 - Processing Calls . . . . . . . . . . . . . . . . . . . . . . . . . . . . . . . . . . . . . . . . . . . . . 25
Overview . . . . . . . . . . . . . . . . . . . . . . . . . . . . . . . . . . . . . . . . . . . . . . . . . . . . . . . . . . . . . . . . . . . . 25
About Call Processing. . . . . . . . . . . . . . . . . . . . . . . . . . . . . . . . . . . . . . . . . . . . . . . . . . . . . . . . . . 26
Processing Calls Using the Directory . . . . . . . . . . . . . . . . . . . . . . . . . . . . . . . . . . . . . . . . . . . 26
Processing Calls Using the Speed Dials. . . . . . . . . . . . . . . . . . . . . . . . . . . . . . . . . . . . . . . . . 27
Making Calls . . . . . . . . . . . . . . . . . . . . . . . . . . . . . . . . . . . . . . . . . . . . . . . . . . . . . . . . . . . . . . . . . 27
To Make a Call from the Line Status Window . . . . . . . . . . . . . . . . . . . . . . . . . . . . . . . . . . . . . . 27
To Make a Call Using the Speed Dials . . . . . . . . . . . . . . . . . . . . . . . . . . . . . . . . . . . . . . . . . . . 27
To Make a Call Using the Directory . . . . . . . . . . . . . . . . . . . . . . . . . . . . . . . . . . . . . . . . . . . . . . 28
Answering Calls . . . . . . . . . . . . . . . . . . . . . . . . . . . . . . . . . . . . . . . . . . . . . . . . . . . . . . . . . . . . . . 29
NDA-30103 Revision 4 DRAFT Page i
Page 4

CONTENTS OpenWorX Business Attendant System User Guide
Page
Holding Calls . . . . . . . . . . . . . . . . . . . . . . . . . . . . . . . . . . . . . . . . . . . . . . . . . . . . . . . . . . . . . . . . . 30
Placing a Call On Hold . . . . . . . . . . . . . . . . . . . . . . . . . . . . . . . . . . . . . . . . . . . . . . . . . . . . . . . . 30
Retrieving a Held Call . . . . . . . . . . . . . . . . . . . . . . . . . . . . . . . . . . . . . . . . . . . . . . . . . . . . . . . . 30
Canceling Transactions . . . . . . . . . . . . . . . . . . . . . . . . . . . . . . . . . . . . . . . . . . . . . . . . . . . . . . . . 30
To Cancel a Call . . . . . . . . . . . . . . . . . . . . . . . . . . . . . . . . . . . . . . . . . . . . . . . . . . . . . . . . . . . . 30
Transferring Calls . . . . . . . . . . . . . . . . . . . . . . . . . . . . . . . . . . . . . . . . . . . . . . . . . . . . . . . . . . . . . 31
Making a Blind Transfer . . . . . . . . . . . . . . . . . . . . . . . . . . . . . . . . . . . . . . . . . . . . . . . . . . . . . . . 31
To Make a Blind Transfer from the Line Status Window. . . . . . . . . . . . . . . . . . . . . . . . . . . . . 31
To Make a Blind Transfer Using the Speed Dials. . . . . . . . . . . . . . . . . . . . . . . . . . . . . . . . . . 32
To Make a Blind Transfer Using the Directory . . . . . . . . . . . . . . . . . . . . . . . . . . . . . . . . . . . . 32
Making a Screened Transfer . . . . . . . . . . . . . . . . . . . . . . . . . . . . . . . . . . . . . . . . . . . . . . . . . . . 33
To Make a Screened Transfer from the Line Status Window . . . . . . . . . . . . . . . . . . . . . . . . . 33
Transferring a Call to Voice Mail . . . . . . . . . . . . . . . . . . . . . . . . . . . . . . . . . . . . . . . . . . . . . . . . 34
To Transfer a Call to Voice Mail . . . . . . . . . . . . . . . . . . . . . . . . . . . . . . . . . . . . . . . . . . . . . . . 34
Making Conference Calls . . . . . . . . . . . . . . . . . . . . . . . . . . . . . . . . . . . . . . . . . . . . . . . . . . . . . . . 34
To Place a Conference Call . . . . . . . . . . . . . . . . . . . . . . . . . . . . . . . . . . . . . . . . . . . . . . . . . . . . 35
Releasing Calls . . . . . . . . . . . . . . . . . . . . . . . . . . . . . . . . . . . . . . . . . . . . . . . . . . . . . . . . . . . . . . . 36
To Release a Call . . . . . . . . . . . . . . . . . . . . . . . . . . . . . . . . . . . . . . . . . . . . . . . . . . . . . . . . . . . 36
Camping On To a Busy Line. . . . . . . . . . . . . . . . . . . . . . . . . . . . . . . . . . . . . . . . . . . . . . . . . . . . . 36
To Camp On a Busy Line. . . . . . . . . . . . . . . . . . . . . . . . . . . . . . . . . . . . . . . . . . . . . . . . . . . . . . 36
Switching Between Source and Destination Callers . . . . . . . . . . . . . . . . . . . . . . . . . . . . . . . . . . . 37
To Switch Between Source and Destination Callers . . . . . . . . . . . . . . . . . . . . . . . . . . . . . . . . . 37
Overriding Calls . . . . . . . . . . . . . . . . . . . . . . . . . . . . . . . . . . . . . . . . . . . . . . . . . . . . . . . . . . . . . . 37
To Override a Call . . . . . . . . . . . . . . . . . . . . . . . . . . . . . . . . . . . . . . . . . . . . . . . . . . . . . . . . . . . 37
Parking Calls. . . . . . . . . . . . . . . . . . . . . . . . . . . . . . . . . . . . . . . . . . . . . . . . . . . . . . . . . . . . . . . . . 38
Parking a Call. . . . . . . . . . . . . . . . . . . . . . . . . . . . . . . . . . . . . . . . . . . . . . . . . . . . . . . . . . . . . . . 38
About Orbit Numbers . . . . . . . . . . . . . . . . . . . . . . . . . . . . . . . . . . . . . . . . . . . . . . . . . . . . . . . 38
To Park a Call . . . . . . . . . . . . . . . . . . . . . . . . . . . . . . . . . . . . . . . . . . . . . . . . . . . . . . . . . . . . . 39
Joining a Caller with a Parked Call . . . . . . . . . . . . . . . . . . . . . . . . . . . . . . . . . . . . . . . . . . . . . . 40
To Join a Parked Call . . . . . . . . . . . . . . . . . . . . . . . . . . . . . . . . . . . . . . . . . . . . . . . . . . . . . . . 40
Retrieving a Parked Call . . . . . . . . . . . . . . . . . . . . . . . . . . . . . . . . . . . . . . . . . . . . . . . . . . . . . . 41
To Retrieve a Parked Call. . . . . . . . . . . . . . . . . . . . . . . . . . . . . . . . . . . . . . . . . . . . . . . . . . . . 41
Parked Call Timeout . . . . . . . . . . . . . . . . . . . . . . . . . . . . . . . . . . . . . . . . . . . . . . . . . . . . . . . . . 42
Forwarding Calls . . . . . . . . . . . . . . . . . . . . . . . . . . . . . . . . . . . . . . . . . . . . . . . . . . . . . . . . . . . . . . 42
To Forward a Call . . . . . . . . . . . . . . . . . . . . . . . . . . . . . . . . . . . . . . . . . . . . . . . . . . . . . . . . . . . 42
To Cancel Call Forwarding . . . . . . . . . . . . . . . . . . . . . . . . . . . . . . . . . . . . . . . . . . . . . . . . . . . . 43
Setting Do-not-disturb . . . . . . . . . . . . . . . . . . . . . . . . . . . . . . . . . . . . . . . . . . . . . . . . . . . . . . . . . . 44
To Set Do-not-disturb. . . . . . . . . . . . . . . . . . . . . . . . . . . . . . . . . . . . . . . . . . . . . . . . . . . . . . . . . 44
Canceling Do-not-disturb . . . . . . . . . . . . . . . . . . . . . . . . . . . . . . . . . . . . . . . . . . . . . . . . . . . . . . 45
Working With Messages . . . . . . . . . . . . . . . . . . . . . . . . . . . . . . . . . . . . . . . . . . . . . . . . . . . . . . . . 46
Creating a Message. . . . . . . . . . . . . . . . . . . . . . . . . . . . . . . . . . . . . . . . . . . . . . . . . . . . . . . . . . 46
Viewing Messages. . . . . . . . . . . . . . . . . . . . . . . . . . . . . . . . . . . . . . . . . . . . . . . . . . . . . . . . . . . 48
Chapter 4 - Configuring the User Options . . . . . . . . . . . . . . . . . . . . . . . . . . . . . . . . . . 51
Overview . . . . . . . . . . . . . . . . . . . . . . . . . . . . . . . . . . . . . . . . . . . . . . . . . . . . . . . . . . . . . . . . . . . . 51
About the Business Attendant Client Options Dialog Box . . . . . . . . . . . . . . . . . . . . . . . . . . . . . . 52
Configuring the Speed Dial Keys . . . . . . . . . . . . . . . . . . . . . . . . . . . . . . . . . . . . . . . . . . . . . . . . . 53
Adding or Modifying a Speed Dial Number . . . . . . . . . . . . . . . . . . . . . . . . . . . . . . . . . . . . . . . . 53
To Add or Modify a Speed Dial from the Line Status Window . . . . . . . . . . . . . . . . . . . . . . . . 53
To Add or Modify a Speed Dial Using the Directory . . . . . . . . . . . . . . . . . . . . . . . . . . . . . . . . 54
Page ii DRAFT NDA-30103 Revision 4
Page 5

OpenWorX Business Attendant System User Guide CONTENTS
Page
To Add or Modify a Speed Dial from the Speed Dials Window. . . . . . . . . . . . . . . . . . . . . . . . 55
Deleting a Speed Dial Button. . . . . . . . . . . . . . . . . . . . . . . . . . . . . . . . . . . . . . . . . . . . . . . . . . . 56
To Delete a Speed Dial from the Line Status Window . . . . . . . . . . . . . . . . . . . . . . . . . . . . . . 56
To Delete a Speed Dial from the Speed Dials Window. . . . . . . . . . . . . . . . . . . . . . . . . . . . . . 56
Configuring the Window Display Options . . . . . . . . . . . . . . . . . . . . . . . . . . . . . . . . . . . . . . . . . . . 57
Setting the Window Display Options . . . . . . . . . . . . . . . . . . . . . . . . . . . . . . . . . . . . . . . . . . . . . 57
Setting the Health Check Server Interval . . . . . . . . . . . . . . . . . . . . . . . . . . . . . . . . . . . . . . . . . . . 58
Configuring Incoming Call Notification . . . . . . . . . . . . . . . . . . . . . . . . . . . . . . . . . . . . . . . . . . . . . 59
Selecting the Displayed Command Buttons . . . . . . . . . . . . . . . . . . . . . . . . . . . . . . . . . . . . . . . . . 60
Displaying the Call Source/Destination Information . . . . . . . . . . . . . . . . . . . . . . . . . . . . . . . . . . . 61
Configuring the Fields Displayed in the Directory Window . . . . . . . . . . . . . . . . . . . . . . . . . . . . . . 64
Changing Passwords . . . . . . . . . . . . . . . . . . . . . . . . . . . . . . . . . . . . . . . . . . . . . . . . . . . . . . . . . . 65
Saving the Screen Layout. . . . . . . . . . . . . . . . . . . . . . . . . . . . . . . . . . . . . . . . . . . . . . . . . . . . . . . 65
Chapter 5 - Working With the Directory. . . . . . . . . . . . . . . . . . . . . . . . . . . . . . . . . . . . . 67
Overview . . . . . . . . . . . . . . . . . . . . . . . . . . . . . . . . . . . . . . . . . . . . . . . . . . . . . . . . . . . . . . . . . . . . 67
About the Directory Window . . . . . . . . . . . . . . . . . . . . . . . . . . . . . . . . . . . . . . . . . . . . . . . . . . . . . 67
Displaying the Directory . . . . . . . . . . . . . . . . . . . . . . . . . . . . . . . . . . . . . . . . . . . . . . . . . . . . . . . . 68
Sorting the Directory . . . . . . . . . . . . . . . . . . . . . . . . . . . . . . . . . . . . . . . . . . . . . . . . . . . . . . . . . . . 68
Changing the Default Sort Order . . . . . . . . . . . . . . . . . . . . . . . . . . . . . . . . . . . . . . . . . . . . . . . . 69
Adding a Directory Entry . . . . . . . . . . . . . . . . . . . . . . . . . . . . . . . . . . . . . . . . . . . . . . . . . . . . . . . . 70
Adding an Internal Directory Entry . . . . . . . . . . . . . . . . . . . . . . . . . . . . . . . . . . . . . . . . . . . . . . . 70
Adding an External Directory Entry . . . . . . . . . . . . . . . . . . . . . . . . . . . . . . . . . . . . . . . . . . . . . . 71
Modifying a Directory Entry. . . . . . . . . . . . . . . . . . . . . . . . . . . . . . . . . . . . . . . . . . . . . . . . . . . . . . 73
Modifying an Internal Directory Entry . . . . . . . . . . . . . . . . . . . . . . . . . . . . . . . . . . . . . . . . . . . . . 73
Modifying an External Directory Entry . . . . . . . . . . . . . . . . . . . . . . . . . . . . . . . . . . . . . . . . . . . . 74
Deleting a Directory Entry . . . . . . . . . . . . . . . . . . . . . . . . . . . . . . . . . . . . . . . . . . . . . . . . . . . . . . . 75
Deleting an Internal Directory Entry . . . . . . . . . . . . . . . . . . . . . . . . . . . . . . . . . . . . . . . . . . . . . . 75
Deleting an External Directory Entry . . . . . . . . . . . . . . . . . . . . . . . . . . . . . . . . . . . . . . . . . . . . . 76
Chapter 6 - Using the Wave File Recording Features . . . . . . . . . . . . . . . . . . . . . . . . . 77
Overview . . . . . . . . . . . . . . . . . . . . . . . . . . . . . . . . . . . . . . . . . . . . . . . . . . . . . . . . . . . . . . . . . . . . 77
About Wave File Recording . . . . . . . . . . . . . . . . . . . . . . . . . . . . . . . . . . . . . . . . . . . . . . . . . . . . . 77
Wave File Naming Conventions. . . . . . . . . . . . . . . . . . . . . . . . . . . . . . . . . . . . . . . . . . . . . . . . . 77
Configuring Wave Files Settings . . . . . . . . . . . . . . . . . . . . . . . . . . . . . . . . . . . . . . . . . . . . . . . . . . 78
Configuring Greetings . . . . . . . . . . . . . . . . . . . . . . . . . . . . . . . . . . . . . . . . . . . . . . . . . . . . . . . . 79
Setting Up Greeting Recording Wave File Input/Output Devices . . . . . . . . . . . . . . . . . . . . . . 79
Configuring Automatic Greetings . . . . . . . . . . . . . . . . . . . . . . . . . . . . . . . . . . . . . . . . . . . . . . 81
Configuring Time-Dependent Greetings . . . . . . . . . . . . . . . . . . . . . . . . . . . . . . . . . . . . . . . . . 81
Configuring Group Greetings . . . . . . . . . . . . . . . . . . . . . . . . . . . . . . . . . . . . . . . . . . . . . . . . . 81
Configuring Automatic Call Recording . . . . . . . . . . . . . . . . . . . . . . . . . . . . . . . . . . . . . . . . . . . . 82
Enabling Call Recording . . . . . . . . . . . . . . . . . . . . . . . . . . . . . . . . . . . . . . . . . . . . . . . . . . . . . 82
Setting Up Call Recording Wave File Input/Output Devices. . . . . . . . . . . . . . . . . . . . . . . . . . 83
Configuring the Number of Calls Recorded . . . . . . . . . . . . . . . . . . . . . . . . . . . . . . . . . . . . . . 84
Configuring the Notification Warning. . . . . . . . . . . . . . . . . . . . . . . . . . . . . . . . . . . . . . . . . . . . 84
Setting the Wave File Path . . . . . . . . . . . . . . . . . . . . . . . . . . . . . . . . . . . . . . . . . . . . . . . . . . . . 85
Working with Greetings . . . . . . . . . . . . . . . . . . . . . . . . . . . . . . . . . . . . . . . . . . . . . . . . . . . . . . . . . 86
Recording a Greeting . . . . . . . . . . . . . . . . . . . . . . . . . . . . . . . . . . . . . . . . . . . . . . . . . . . . . . . . . 86
Working with Recorded Calls . . . . . . . . . . . . . . . . . . . . . . . . . . . . . . . . . . . . . . . . . . . . . . . . . . . . 89
Recording a Call . . . . . . . . . . . . . . . . . . . . . . . . . . . . . . . . . . . . . . . . . . . . . . . . . . . . . . . . . . . . 89
NDA-30103 Revision 4 DRAFT Page iii
Page 6

CONTENTS OpenWorX Business Attendant System User Guide
Page
Playing a Recorded Call . . . . . . . . . . . . . . . . . . . . . . . . . . . . . . . . . . . . . . . . . . . . . . . . . . . . . . 90
Deleting Wave Files . . . . . . . . . . . . . . . . . . . . . . . . . . . . . . . . . . . . . . . . . . . . . . . . . . . . . . . . . . . 91
Troubleshooting Wave Files . . . . . . . . . . . . . . . . . . . . . . . . . . . . . . . . . . . . . . . . . . . . . . . . . . . . . 92
Appendix A - Error Messages . . . . . . . . . . . . . . . . . . . . . . . . . . . . . . . . . . . . . . . . . . . A-93
Page iv DRAFT NDA-30103 Revision 4
Page 7

OpenWorX Business Attendant System User Guide FIGURES
LIST OF FIGURES
Figure Title Page
2-1 Line Status Window. . . . . . . . . . . . . . . . . . . . . . . . . . . . . . . . . . . . . . . . . . . . . . . . . . . 10
2-2 Command Buttons. . . . . . . . . . . . . . . . . . . . . . . . . . . . . . . . . . . . . . . . . . . . . . . . . . . . 14
2-3 Loop Buttons . . . . . . . . . . . . . . . . . . . . . . . . . . . . . . . . . . . . . . . . . . . . . . . . . . . . . . . . 14
2-4 Queue Buttons . . . . . . . . . . . . . . . . . . . . . . . . . . . . . . . . . . . . . . . . . . . . . . . . . . . . . . 16
2-5 Source and Destination Area . . . . . . . . . . . . . . . . . . . . . . . . . . . . . . . . . . . . . . . . . . . 17
2-6 Number Entered Field . . . . . . . . . . . . . . . . . . . . . . . . . . . . . . . . . . . . . . . . . . . . . . . . . 18
2-7 Status Line . . . . . . . . . . . . . . . . . . . . . . . . . . . . . . . . . . . . . . . . . . . . . . . . . . . . . . . . . 18
2-8 Directory window. . . . . . . . . . . . . . . . . . . . . . . . . . . . . . . . . . . . . . . . . . . . . . . . . . . . . 19
2-9 Speed Dials window . . . . . . . . . . . . . . . . . . . . . . . . . . . . . . . . . . . . . . . . . . . . . . . . . . 21
2-10 Login dialog box . . . . . . . . . . . . . . . . . . . . . . . . . . . . . . . . . . . . . . . . . . . . . . . . . . . . . 22
2-11 Server Information message (Unsuccessful Connection) . . . . . . . . . . . . . . . . . . . . . . 23
2-12 Server Down Error message . . . . . . . . . . . . . . . . . . . . . . . . . . . . . . . . . . . . . . . . . . . . 24
2-13 Server Connected message . . . . . . . . . . . . . . . . . . . . . . . . . . . . . . . . . . . . . . . . . . . . 24
3-1 Line Status window . . . . . . . . . . . . . . . . . . . . . . . . . . . . . . . . . . . . . . . . . . . . . . . . . . . 26
3-2 Queue Button . . . . . . . . . . . . . . . . . . . . . . . . . . . . . . . . . . . . . . . . . . . . . . . . . . . . . . . 29
3-3 Park dialog box . . . . . . . . . . . . . . . . . . . . . . . . . . . . . . . . . . . . . . . . . . . . . . . . . . . . . . 39
3-4 Join Parked Call window . . . . . . . . . . . . . . . . . . . . . . . . . . . . . . . . . . . . . . . . . . . . . . . 40
3-5 Retrieve Parked Call window . . . . . . . . . . . . . . . . . . . . . . . . . . . . . . . . . . . . . . . . . . . 41
3-6 Change Forwarding dialog box—Setting Forwarded Extension . . . . . . . . . . . . . . . . . 42
3-7 Change Forwarding dialog box—Setting Forwarding Extension. . . . . . . . . . . . . . . . . 43
3-8 Change Do-not-disturb dialog box—Setting Do-not-Disturb Extension. . . . . . . . . . . . 44
3-9 Change Do-not-disturb dialog box—Select Phone Operation. . . . . . . . . . . . . . . . . . . 45
3-10 New Message dialog box . . . . . . . . . . . . . . . . . . . . . . . . . . . . . . . . . . . . . . . . . . . . . . 47
3-11 View Messages window . . . . . . . . . . . . . . . . . . . . . . . . . . . . . . . . . . . . . . . . . . . . . . . 48
4-1 Business Attendant Client Options dialog box . . . . . . . . . . . . . . . . . . . . . . . . . . . . . . 52
4-2 Speed Dial Buttons group box. . . . . . . . . . . . . . . . . . . . . . . . . . . . . . . . . . . . . . . . . . . 53
4-3 Speed Dial Properties dialog box . . . . . . . . . . . . . . . . . . . . . . . . . . . . . . . . . . . . . . . . 55
4-4 Windows group box. . . . . . . . . . . . . . . . . . . . . . . . . . . . . . . . . . . . . . . . . . . . . . . . . . . 57
4-5 Health Check Server Interval field. . . . . . . . . . . . . . . . . . . . . . . . . . . . . . . . . . . . . . . . 58
4-6 Line Window tab . . . . . . . . . . . . . . . . . . . . . . . . . . . . . . . . . . . . . . . . . . . . . . . . . . . . . 59
4-7 Command Buttons group box . . . . . . . . . . . . . . . . . . . . . . . . . . . . . . . . . . . . . . . . . . . 60
4-8 Employee DB tab . . . . . . . . . . . . . . . . . . . . . . . . . . . . . . . . . . . . . . . . . . . . . . . . . . . . 61
4-9 External Number DB tab . . . . . . . . . . . . . . . . . . . . . . . . . . . . . . . . . . . . . . . . . . . . . . . 62
4-10 DID DB tab . . . . . . . . . . . . . . . . . . . . . . . . . . . . . . . . . . . . . . . . . . . . . . . . . . . . . . . . . 62
4-11 Route/Trunk tab. . . . . . . . . . . . . . . . . . . . . . . . . . . . . . . . . . . . . . . . . . . . . . . . . . . . . . 63
4-12 Employee Directory Display group box . . . . . . . . . . . . . . . . . . . . . . . . . . . . . . . . . . . . 64
4-13 Change Password dialog box . . . . . . . . . . . . . . . . . . . . . . . . . . . . . . . . . . . . . . . . . . . 65
5-1 Directory window. . . . . . . . . . . . . . . . . . . . . . . . . . . . . . . . . . . . . . . . . . . . . . . . . . . . . 67
5-2 Default Sort field . . . . . . . . . . . . . . . . . . . . . . . . . . . . . . . . . . . . . . . . . . . . . . . . . . . . . 69
5-3 Add Employee dialog box . . . . . . . . . . . . . . . . . . . . . . . . . . . . . . . . . . . . . . . . . . . . . . 70
5-4 Add External Number dialog box. . . . . . . . . . . . . . . . . . . . . . . . . . . . . . . . . . . . . . . . . 71
5-5 Edit Employee dialog box . . . . . . . . . . . . . . . . . . . . . . . . . . . . . . . . . . . . . . . . . . . . . . 73
5-6 Modify External Number dialog box . . . . . . . . . . . . . . . . . . . . . . . . . . . . . . . . . . . . . . 74
5-7 Edit Employee dialog box . . . . . . . . . . . . . . . . . . . . . . . . . . . . . . . . . . . . . . . . . . . . . . 75
5-8 Delete External Number dialog box. . . . . . . . . . . . . . . . . . . . . . . . . . . . . . . . . . . . . . . 76
6-1 Wave Files tab. . . . . . . . . . . . . . . . . . . . . . . . . . . . . . . . . . . . . . . . . . . . . . . . . . . . . . . 78
NDA-30103 Revision 4 Page v
Page 8

FIGURES OpenWorX Business Attendant System User Guide
Figure Title Page
6-2 Greeting group box . . . . . . . . . . . . . . . . . . . . . . . . . . . . . . . . . . . . . . . . . . . . . . . . . . . 79
6-3 Wave Input Device dialog box. . . . . . . . . . . . . . . . . . . . . . . . . . . . . . . . . . . . . . . . . . . 79
6-4 Wave Output Device dialog box . . . . . . . . . . . . . . . . . . . . . . . . . . . . . . . . . . . . . . . . . 79
6-5 Call Conversation group box. . . . . . . . . . . . . . . . . . . . . . . . . . . . . . . . . . . . . . . . . . . . 82
6-6 Wave Input Device dialog box. . . . . . . . . . . . . . . . . . . . . . . . . . . . . . . . . . . . . . . . . . . 83
6-7 Wave Output Device dialog box . . . . . . . . . . . . . . . . . . . . . . . . . . . . . . . . . . . . . . . . . 83
6-8 Record Greeting dialog box . . . . . . . . . . . . . . . . . . . . . . . . . . . . . . . . . . . . . . . . . . . . 86
6-9 Save Greeting for Groups dialog box . . . . . . . . . . . . . . . . . . . . . . . . . . . . . . . . . . . . . 88
6-10 Play Back dialog box. . . . . . . . . . . . . . . . . . . . . . . . . . . . . . . . . . . . . . . . . . . . . . . . . . 90
6-11 Play Back Controls - Play Back dialog box . . . . . . . . . . . . . . . . . . . . . . . . . . . . . . . . . 90
Page vi NDA-30103 Revision 4
Page 9

OpenWorX Business Attendant System User Guide TABLES
LIST OF TABLES
Table Ti tle Page
1-1 Document Conventions . . . . . . . . . . . . . . . . . . . . . . . . . . . . . . . . . . . . . . . . . . . . . . . . . 3
1-2 General Key Conventions . . . . . . . . . . . . . . . . . . . . . . . . . . . . . . . . . . . . . . . . . . . . . . . 4
1-3 Business Attendant System Shortcut and Function Keys . . . . . . . . . . . . . . . . . . . . . . . 5
2-1 Loop Button Shortcut Keys . . . . . . . . . . . . . . . . . . . . . . . . . . . . . . . . . . . . . . . . . . . . . 15
2-2 Queue Types and Shortcut Keys . . . . . . . . . . . . . . . . . . . . . . . . . . . . . . . . . . . . . . . . 16
5-1 Valid Sort and Search Fields in the Directory Window . . . . . . . . . . . . . . . . . . . . . . . . 68
6-1 Wave File Naming Conventions . . . . . . . . . . . . . . . . . . . . . . . . . . . . . . . . . . . . . . . . . 77
6-2 Wave File Device Options . . . . . . . . . . . . . . . . . . . . . . . . . . . . . . . . . . . . . . . . . . . . . . 80
6-3 Wave File Device Options . . . . . . . . . . . . . . . . . . . . . . . . . . . . . . . . . . . . . . . . . . . . . . 83
6-4 Greeting Types . . . . . . . . . . . . . . . . . . . . . . . . . . . . . . . . . . . . . . . . . . . . . . . . . . . . . . 87
6-5 Possible Wave File Problems and Solutions. . . . . . . . . . . . . . . . . . . . . . . . . . . . . . . . 92
6-6 Business Attendant Client Error Messages. . . . . . . . . . . . . . . . . . . . . . . . . . . . . . . . . 93
NDA-30103 Revision 4 DRAFT Page vii
Page 10

TABLES OpenWorX Business Attendant System User Guide
This Page Left Blank.
Page viii DRAFT NDA-30103 Revision 4
Page 11

OpenWorX Business Attendant System User Guide Introduction
Chapter 1 Introduction
The Business Attendant System User Guide provides the information you need to
work with the Business Attendant System Client application.
Chapter Topics
• What is the Business Attendant System?
• How This Guide is Organized
• Using This Guide
• Business Attendant System Terminology
What is the Business Attendant System?
The Business Attendant System is an OpenWorX application that brings the basic
functionality of the business attendant console to the desktop of a Windows-based
workstation. The Business Attendant System uses the NEC Open Applications
Interface (OAI) to communicate with the NEAX 2400 or NEAX 2000. When
connected to the NEC PBX, OAI shows call processing information on the
attendant screen and allows the attendants to issue call processing requests with
their keyboard or mouse. The Business Attendant System extends the attendant’s
capabilities with database-driven console features and loops that provide powerful
call handling and directory assistance services.
The Business Attendant System consists of the following components:
•The Business Attendant System—Client application allows the attendants to
process calls with a graphical user interface. The Business Attendant System—
Client is referred to in this document as the Business Attendant Client.
•The Business Attendant System—Administrator application is used by
administrators to configure the Business Attendant System components. The
Business Attendant System—Administrator application is referred to in this
document as the Business Attendant Administrator.
•The Business Attendant System—Server provides connectivity between the
Business Attendant System and the PBX. The Business Attendant System—
Server is referred to in this document as the Business Attendant Server.
Refer to the Business Attendant System Administration Guide for information
about the Business Attendant Administrator application and refer to the Business
Attendant System Installation Guide for information about the installing the
Business Attendant System software.
NDA-30103 Revision 4 Page 1
Page 12

Introduction OpenWorX Business Attendant System User Guide
How This Guide is Organized
Chapter 1 - Introduction
This chapter outlines how to use the manual, including the actual manual
organization, chapter layout, keyboard conventions, function keys, and basic
terminology for the Business Attendant System.
Chapter 2 - Getting Started
This chapter gives a detailed overview of the Business Attendant System and its
functions and features, including the hardware and software requirements, screen
format, and menu descriptions.
Chapter 3 - Processing Calls
This chapter describes how to perform call processing procedures in the Business
Attendant Client application.
Chapter 4 - Configuring the User Options
This chapter shows you how to customize the Business Attendant Client to meet
your preferences and change your password.
Chapter 5 - Working With the Directory
This chapter describes how to use the Business Attendant Client directories,
including how to add, modify, and delete individual directory entries.
Chapter 6 - Using the Wave File Recording Features
This chapter shows you how to work with recorded greetings and recorded calls in
the Business Attendant Client.
Appendix A - Error Messages
This appendix describes the error messages that can be encountered when using the
Business Attendant System Client application, including the potential causes of the
error, and suggested solutions to resolve the error.
Page 2 NDA-30103 Revision 4
Page 13

OpenWorX Business Attendant System User Guide Introduction
Using This Guide
This guide is designed to make the attendant station easy to understand and simple
to use. There are examples of the screens you will see in the Business Attendant
Client, with step-by-step instructions for the procedures you need to perform.
Note: The screens and procedures shown in this guide represent the typical installation
of the Business Attendant System. Remember that the Business Attendant System
can be customized for each site, so the screens shown in this guide may not
always reflect what displays on your attendant station.
Document
Conventions
This guide uses the following conventions:
Table 1-1 Document Conventions
When you see It means Example
Boldfaced Field names
Enter the ID in the Name field.
Click Save.
Button names
Drop-down list names
Select the names from the
Employees drop-down list.
Enter login admin at the
Commands, keywords, or
command prompt.
other user input
Capitalized Menu names
From the File menu, choose
Save.
Window names
From the Directory window,
select Edit > Modify.
Dialog box names
Click OK to save and close the
Account Properties dialog box.
Menu > Submenu
Menu paths Select Edit > Modify.
(boldfaced font)
CTRL+S
CTRL+Shift+S
Shortcut keys Press CTRL+S to save your
changes.
F2 Function keys Press F1 to access the online
help.
Click
Right-click
Click the left mouse
button
Click the right mouse
button
Click OK to save your
changes.
Right-click and select Delete
from the shortcut menu.
NDA-30103 Revision 4 Page 3
Page 14

Introduction OpenWorX Business Attendant System User Guide
Procedures
Step-by-step instructions are numbered. Simply follow the numbered steps to
perform the desired function.
Sometimes in step-by-step instructions, you will have more than one option to
complete the task. These options are presented in bulleted lists, as shown in the
following example:
1. Do one of the following to add a field to the Employee directory.
• Select the desired field from the Employee field and click Add.
• Double-click the desired field from the Employee field.
• To select all of the available fields, click Add all.
Keyboard Conventions
The general keys used throughout Business Attendant System are:
Table 1-2 General Key Conventions
Key Action
Arrow keys Scrolls among options within a menu or field.
Backspace Erases the character to the left of the cursor.
Enter Accepts a selection or field entry. Also will transfer to
an entered number or selected entry in the directory.
ESC Exits the current screen or action and moves to the
previous screen or action.
Function keys Provide direct access to the different tasks that an
attendant can perform. Refer to “Summary of Shortcut
and Function Keys” on page 5 for a brief description of
the function keys and their assigned functions.
Tab Moves forward through fields and options.
Shift+Tab Moves backward through fields and options.
CTRL+Tab Moves forward through tabs.
CTRL+Shift+Tab Moves backward through tabs.
Space Bar Answers an incoming call or answers a held call when
there are no more queued calls.
Page 4 NDA-30103 Revision 4
Page 15

OpenWorX Business Attendant System User Guide Introduction
Summary of Shortcut and Function Keys
Use the following keys in the Line Status window:
Table 1-3 Business Attendant System Shortcut and Function Keys
To Choose Shortcut Key Function Key
Answer ALT+A None
Announce Call ALT+L CTRL+F7
Dial ALT+D None
Hold ALT+H F5
Unhold ALT+U F3
Blind Transfer ALT+B F6
Screened Transfer ALT+S F7
Transfer to Voice Mail ALT+X CTRL+F6
Conference ALT+F F9
Toggle Source/Destination ALT+S F10
Cancel ALT+N F2
Release ALT+R F12
Busy Camp ALT+P F11
Override ALT+V CTRL+F4
Park ALT+K F8
Join with Parked Call ALT+J CTRL+ALT+F8
Retrieve Parked Call ALT+E CTRL+F8
Save Recording None CTRL+F9
Open the Directory window CTRL+R None
Open the Speed Dials window CTRL+P None
NDA-30103 Revision 4 Page 5
Page 16

Introduction OpenWorX Business Attendant System User Guide
Business Attendant System Terminology
Abandoned Parked Caller
A parked caller who chooses not to wait for the paged caller to respond and hangs
up.
ANI Number
Automatic Number Identification. Generally, the ANI Number lists the telephone
number from which the call is placed and the name associated with that number, if
available.
Announce Call
Allows the attendant to place the caller on hold while the attendant announces the
transfer to the destination party without the destination party answering the phone.
Blind Transfer
Allows the attendant to transfer a connected caller directly to the destination party,
and releases the attendant from the call. Also known as a Direct Transfer.
Busy Camp
Allows the caller to wait for connection to a called party whose line is busy.
Depending on the version of the PBX, the waiting caller is automatically connected
when the busy party releases from their call or presses the Answer button on the
term
after hearing the call waiting tone.
D
Conference
Connects two callers and an attendant into one phone conversation.
Destination
The extension where a call terminates or the party being called.
DID Number
Direct Inward Dialing number. Allows inward-directed calls to a PBX to reach a
specific PBX extension without human intervention. When an incoming call
arrives on a Direct Inward Dial Number that is assigned in the PBX as a virtual
number, this virtual number is forwarded to the main monitored number used for
the operator, usually “0”. This feature is often used in a multi-tenant environment
where the operator answers calls for multiple businesses.
Do-not-disturb
Blocks an extension’s incoming calls so that callers will either hear a reorder tone
or will be routed according to the extension’s call forwarding pattern when they
dial that extension.
Forward
Allows the attendant to direct incoming calls from an extension to a different
location. Available Forwarding settings are forward all incoming calls, forward
incoming calls only when the extension is busy, or forward incoming calls only
when there is no answer at that extension.
Health Check
Allows the Business Attendant Server to make sure that the connection between the
Business Attendant Server and a Business Attendant Client workstation is still
active by monitoring the amount of time between heartbeats from the Server to the
clients.
Page 6 NDA-30103 Revision 4
Page 17

OpenWorX Business Attendant System User Guide Introduction
Hold Time
A timer setting that specifies the amount of time the Business Attendant System
allows a caller to remain on hold before reminding the attendant that the caller is
still on hold.
Link Destination Address
The IP address of the PBX running OAI.
Link Port
The port the Business Attendant Server uses to communicate with the PBX.
Link Source Address
Specifies the Ethernet card to use if more than one is installed.
Monitored Numbers
Used by the Business Attendant System to queue and route calls. The different
types of monitored numbers and their purposes are:
• Hold Monitored Number
Number used within the system only for holding calls.
• Incoming Monitored Number
Number used to dial the Business Attendant System attendant internally.
• Priority Monitored Number
Number given to VIPs and emergency listings that routes these calls to the
Priority queue.
• Vacant Monitored Number
Number used to route external calls that were placed to nonexistent
stations to the specified queue.
Orbit Numbers
Comprise the pool of meet-me paging numbers used for joining paged people with
their parked parties.
Override
Allows the attendant to interrupt an ongoing call to conference with both parties in
that call, or talk with one party while the other party is on hold.
Park Recall
A timer setting that specifies the amount of time the Business Attendant System
allows a caller to remain parked waiting to be joined to another party before
sending the call to the Park T.O. queue.
Parked Caller
A caller who has been put on hold in a global area while waiting for a paged party
to respond by either dialing the announced meet-me paging orbit number or by
calling any attendant, who will manually join the call.
Prime Line
Corresponds with the physical phone used by an attendant to process calls.
Retrieved Parked Caller
A Retrieved Parked Caller is a parked caller who is connected to an attendant.
NDA-30103 Revision 4 Page 7
Page 18

Introduction OpenWorX Business Attendant System User Guide
Screened Transfer
Allows the attendant to place the caller on consultation hold, then call the
destination party, announce the transfer, and release from the call. Also known as
an Announced Transfer.
Server Port
The port used by all Business Attendant Client workstations to communicate with
the Business Attendant Server.
Source
The extension where a call originates or the party placing the call.
Transfer to Voice Mail
Automatically routes the source caller to the destination party’s voice mail box.
Page 8 NDA-30103 Revision 4
Page 19

OpenWorX Business Attendant System User Guide Getting Started
Chapter 2 Getting Started
Overview
The Business Attendant System brings the functionality of an attendant console to
the PC. The Business Attendant Client gives you the ability to handle calls quickly
and efficiently with features that include call parking, page retrieval, and internal
and external directory assistance.
Chapter Topics
• About the Business Attendant Client Windows
• Line Status Window
• Directory Window
• Speed Dials Window
• Running the Business Attendant Client Application
About the Business Attendant Client Windows
The Business Attendant Client application is composed of the following three
windows:
Line Status
Contains all of the call processing functions. This is the main window of the
Business Attendant System.
Speed Dials
Contains speed dial buttons which you can set up to dial frequently called numbers.
Directory
Contains the internal and external phone directories.
The Line Status window is described in the following section. For more
information about the Directory window, see “Directory Window” on page 19. For
more information about the Speed Dials window, see “Speed Dials Window” on
page 21.
NDA-30103 Revision 4 Page 9
Page 20
Getting Started OpenWorX Business Attendant System User Guide
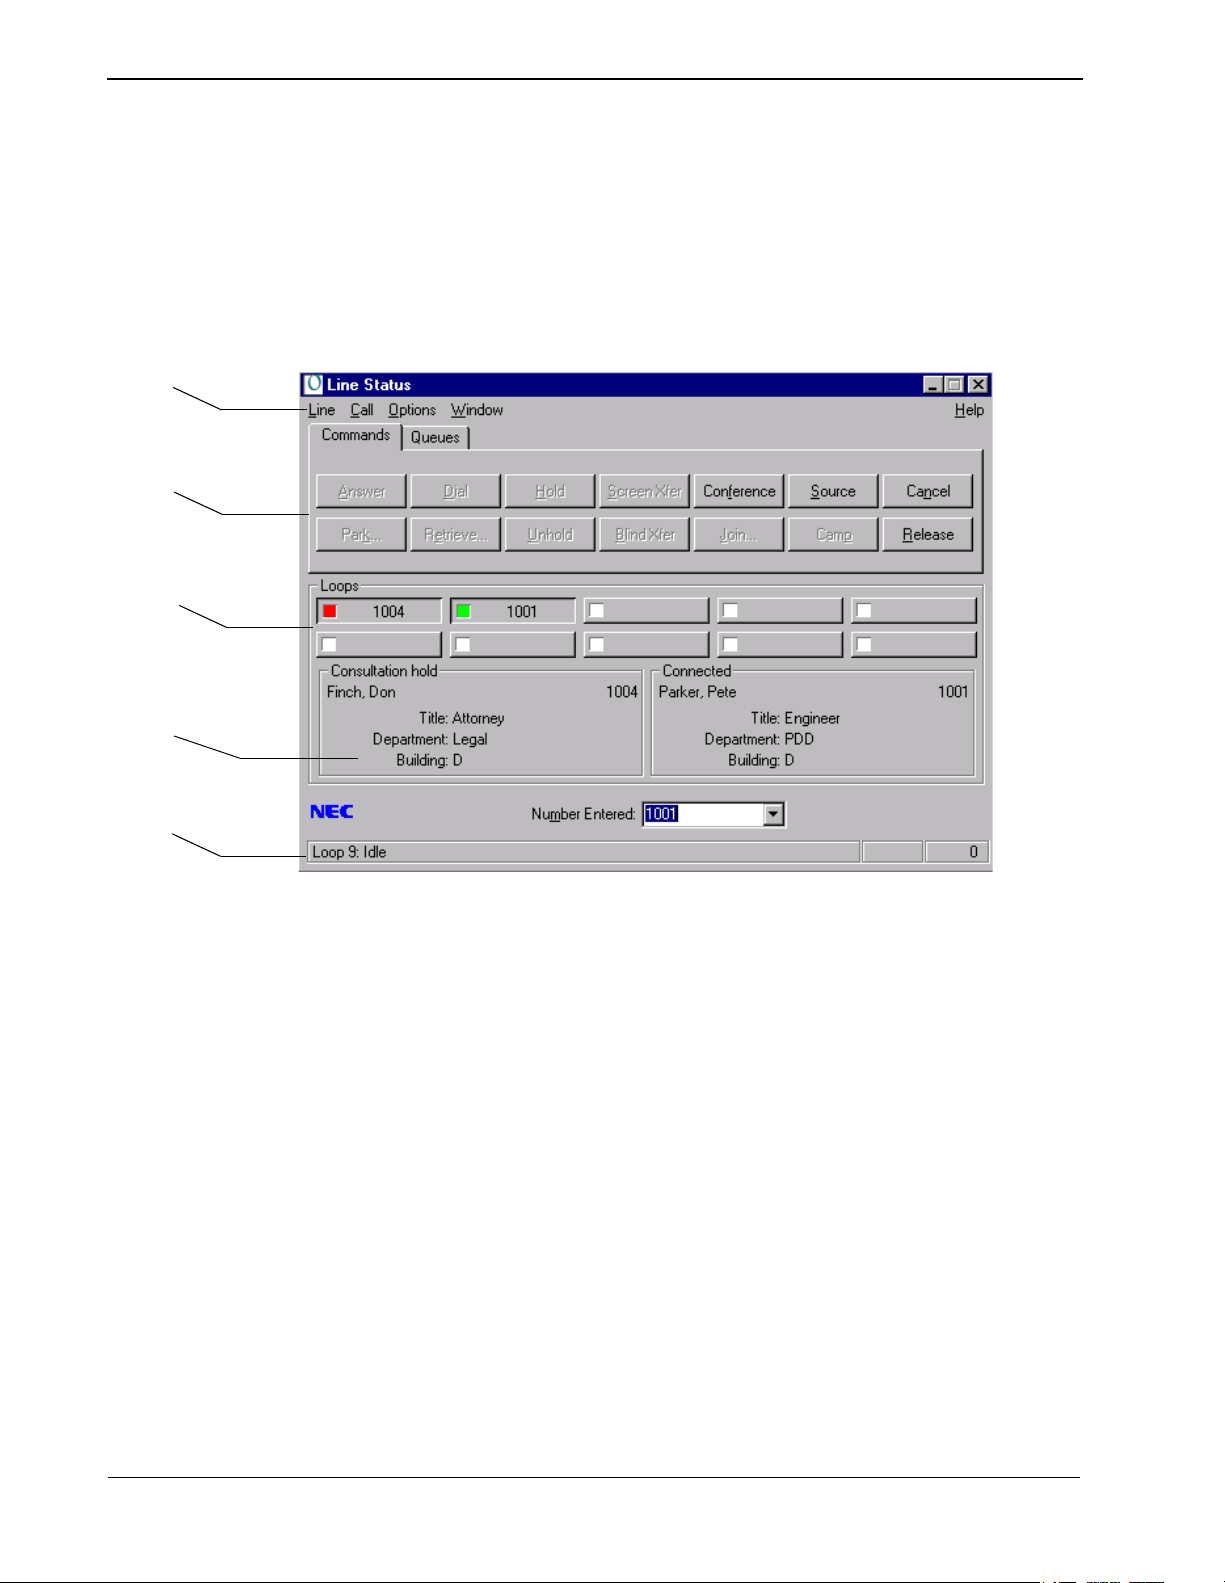
Line Status Window
The Line Status window (Figure 2-1) is the main window of the Business
Attendant Client and is used for all of the call processing functions. This window
displays the status of each loop as well as the activity that is taking place on those
loops. The tabs, buttons, and menus on the Line Status window are described in the
following sections.
Menu Bar
Command
and
Queues Tabs
Loop Buttons
Source and
Destination
Areas
Status Line
Figure 2-1 Line Status Window
Menus The Line Status window (Figure 2-1) has five pull-down menus which allow you
to configure and use the Business Attendant Client: Line, Call, Options, Window,
and Help.
Line Menu
Forward
Directs incoming calls for an extension to a different location. You can forward all
calls, forward calls when busy, or forward when no answer.
Set Do-not-disturb
Blocks an extension’s incoming calls so that callers will either hear a reorder tone
or will be routed according to the extension’s call forwarding pattern when they
dial that extension.
Exit
Closes the Business Attendant Client application.
Page 10 NDA-30103 Revision 4
Page 21

OpenWorX Business Attendant System User Guide Getting Started
Call Menu
Answer
Selects the next call waiting in sequence from the waiting pool (i.e., the first
attendant-specific call, a priority call, or the next call in line in the global pool).
You can also perform this operation with the Answer command button, by
pressing ALT+A, or by pressing the space bar.
Dial
Initiates an outgoing call to the number in the Number Entered field. You can also
perform this operation with the Dial command button, by pressing ALT+D, or by
pressing Enter.
Hold
Places the current call on hold. This option is only enabled when the loop is in a
state in which it can be placed on hold. You can also perform this operation with
the Hold command button, by pressing ALT+H, or by pressing F5.
Unhold
Retrieves a call previously placed on hold. You can also perform this operation
with the Unhold command button, by pressing ALT+U, or by pressing F3.
Blind Transfer
Initiates a direct transfer to the number in the Number Entered field. The Blind
Transfer command connects the caller to the destination party without the attendant
announcing the transfer. You can also perform this operation with the Blind Xfer
command button, by pressing ALT+B, or by pressing F6.
Screened Transfer
Initiates a screened transfer to the number in the Number Entered field. The
Screened Transfer command places the caller on consultation hold in the Source
Caller window while the attendant connects to the destination party, announces the
call, then releases the call to complete the transfer. You can also perform this
operation with the Screen Xfer command button, by pressing ALT+S, or by
pressing F7.
Conference
Conferences a screened transfer call. This option is only enabled when the loop is
in a state in which it can be conferenced or when a conference can be completed.
You can also complete this operation with the Conference command button, by
pressing ALT+F, or by pressing F9.
Toggle source and destination
Switches between source and destination callers prior to completing a conference
call or transfer. This option is only enabled when the current call is in the process
of transferring or conferencing. You can also perform this operation with the
Source/Dest command button, by pressing ALT+S, or by pressing F10.
Save Recording
Writes the selected conversation recording to a specified folder for permanent
retrieval and allows the operator to add a note associated with the recorded wave
file.
NDA-30103 Revision 4 Page 11
Page 22

Getting Started OpenWorX Business Attendant System User Guide
Cancel
Stops a transaction. Use this command to disconnect from a two-party call, such as
when you place an outbound call and want to disconnect, or answer a call and want
to disconnect without transferring. If the destination party does not answer during
a screened transfer or you hear a busy tone after a screened transfer to an outside
line, use this command during a screened transfer to rejoin with the source caller.
You can also perform this operation with the Cancel command button, by pressing
ALT+N, or by pressing F2.
Release
Releases the attendant workstation from the current Source and Destination
connection to receive new calls. You can also perform this operation with the
Release command button, by pressing ALT+R, or by pressing F12.
Busy Camp
Allows the caller to wait for connection to a called party whose line is busy.
Depending on the version of the PBX, the waiting caller is automatically connected
when the busy party releases from their call or presses the Answer button on the
term
after hearing the call waiting tone. You can also perform this operation with
D
the Camp command button, by pressing ALT+P, or by pressing F11.
Override
Allows the attendant to interrupt an ongoing call to speak with one party, placing
the other party on consultation hold, or join in conference with both parties in that
call. You can also perform this operation with the Override command button, by
pressing CTRL+F4 or by pressing ALT+V.
Park
Places a caller on an announcement trunk or a monitored number hearing music
until they can be joined with a paged party. You can also perform this operation
with the Park command button, by pressing ALT+K, or by pressing F8.
Join With Parked Call
Joins a parked caller to the current source caller and releases the attendant. You can
also perform this operation with the Join command button, by pressing ALT+J, or
by pressing CTRL+ALT+F8.
Retrieve Parked Call
Connects the attendant to the parked caller if the destination caller or paged party
doesn’t respond. You can also perform this operation with the Retrieve command
button, by pressing ALT+E, by pressing CTRL+F8.
Announce Call
Allows the attendant to place the caller on hold while the attendant announces the
transfer to the destination party without the destination party answering the phone.
You can also perform this operation by pressing ALT+L or by pressing
CTRL+F7.
Transfer to Voice Mail
Automatically routes the source caller to the destination party’s voice mail box.
You can also perform this operation by pressing ALT+X or by pressing
CTRL+F6.
Page 12 NDA-30103 Revision 4
Page 23

OpenWorX Business Attendant System User Guide Getting Started
Options Menu
Preferences
Displays the Business Attendant Client Options dialog box where you can change
the user preferences. The options configured in this dialog box are saved for each
user, so each user can personalize their speed dials and screen layouts without
affecting other users.
Save screen layout
Saves the current layout of the Business Attendant Client windows. The next time
the application is started for this user, the layout will be restored to the last saved
layout. You can also configure the Business Attendant Client to automatically save
the screen layout every time you exit.
Change Password
Displays a dialog box that enables you to change the password for the current user.
Recording greeting
Displays the Record Greeting dialog box where you can record greeting messages
for incoming internal and external calls and save them as a wave files.
Play back
Displays the Play Back dialog box where you can play back recorded phone
conversations and greeting messages.
Window Menu
Directory
Displays the Directory window.
Speed Dials
Displays the Speed Dials window.
Help Menu
Contents
Displays the help file contents page.
About
Displays version information for the Business Attendant Client.
NDA-30103 Revision 4 Page 13
Page 24
Getting Started OpenWorX Business Attendant System User Guide
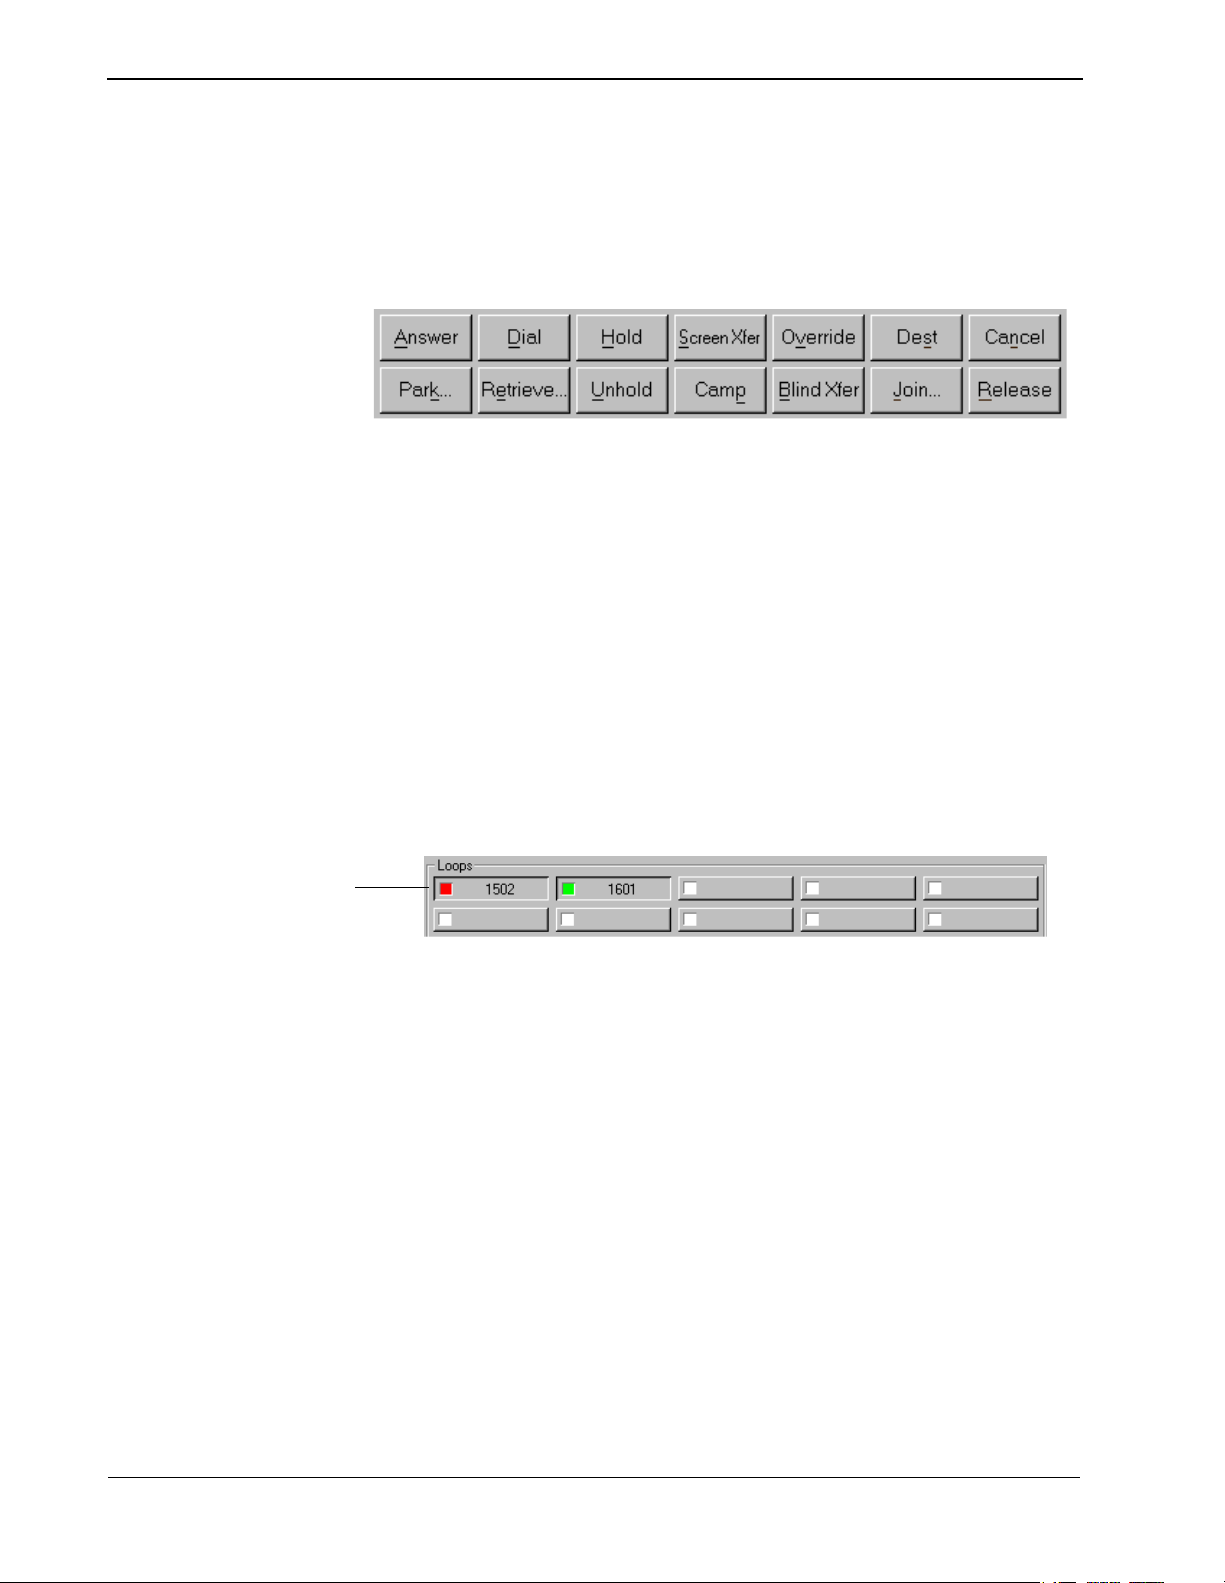
Commands Tab The Commands tab contains the Command buttons, the Loop buttons, the Source
and Destination areas, and the Number Entered field. (See “Command Buttons” on
page 14 and “Loops” on page 14 for more information.)
Command Buttons
Figure 2-2 Command Buttons
Command buttons (Figure 2-2) are shortcuts to menu functions that help you
process phone calls. You can access these buttons by clicking the button, or by
holding down the Alt key while pressing the character underlined on the button.
(For example, to access the Answer button, press the Alt key while pressing the
letter A on the keyboard.) If a command is not valid for that particular call state,
the command button will be unavailable. (See “Menus” on page 10 for more
information.)
Call Status
Indicator
Attendants can select which command buttons are displayed on the Line Status
window for that specified attendant login name. (See “Selecting the Displayed
Command Buttons” on page 60 for more information.)
Loops
Figure 2-3 Loop Buttons
Loops represent calls being handled by an attendant. A loop shows the presence of
an incoming call that has been answered or an outgoing call that has been placed
by an attendant. When an incoming call is answered, the Business Attendant
System automatically places it on the next available loop in sequential order with
a green light.
The Loop buttons (Figure 2-3) allow you to work with and display information
about the ten loops available for call processing. When selected, the Loop Number,
Caller Number, and Call Status for that loop appear in the Status Line. Moving the
mouse pointer over a loop shows the party connected or held along with the amount
of time that the caller has been on that loop in the Status Line. (See “Status Line”
on page 18 for more information.)
The Loop Number identifies the selected loop, ranging from 1 to 10. The Caller
Number is the extension number or Route/Trunk number from which the currently
connected caller originates. For incoming calls from external sources and for
outgoing calls to external sources, the route and trunk number displays.
Page 14 NDA-30103 Revision 4
Page 25

OpenWorX Business Attendant System User Guide Getting Started
The Call Status Indicator shows the status of the caller. Green indicates an active
call, while red indicates a call that is on hold. Blinking red signifies a party that has
been held beyond the configured amount of time. (Refer to the Business Attendant
Administration Guide for more information.)
To select a loop, click the desired loop button or use the following keyboard
sequence.
Table 2-1 Loop Button Shortcut Keys
To Select Press
Loop 1 SHIFT+F1
Loop 2 SHIFT+F2
Loop 3 SHIFT+F3
Loop 4 SHIFT+F4
Loop 5 SHIFT+F5
Loop 6 SHIFT+F6
Loop 7 SHIFT+F7
Loop 8 SHIFT+F8
Loop 9 SHIFT+F9
Loop 10 SHIFT+F10
NDA-30103 Revision 4 Page 15
Page 26
Getting Started OpenWorX Business Attendant System User Guide
Queues Tab The Queues tab contains the Queue buttons, the Loop buttons, the Source and
Destination areas, and the Number Entered field. (See “Queues” on page 16 for
more information.)
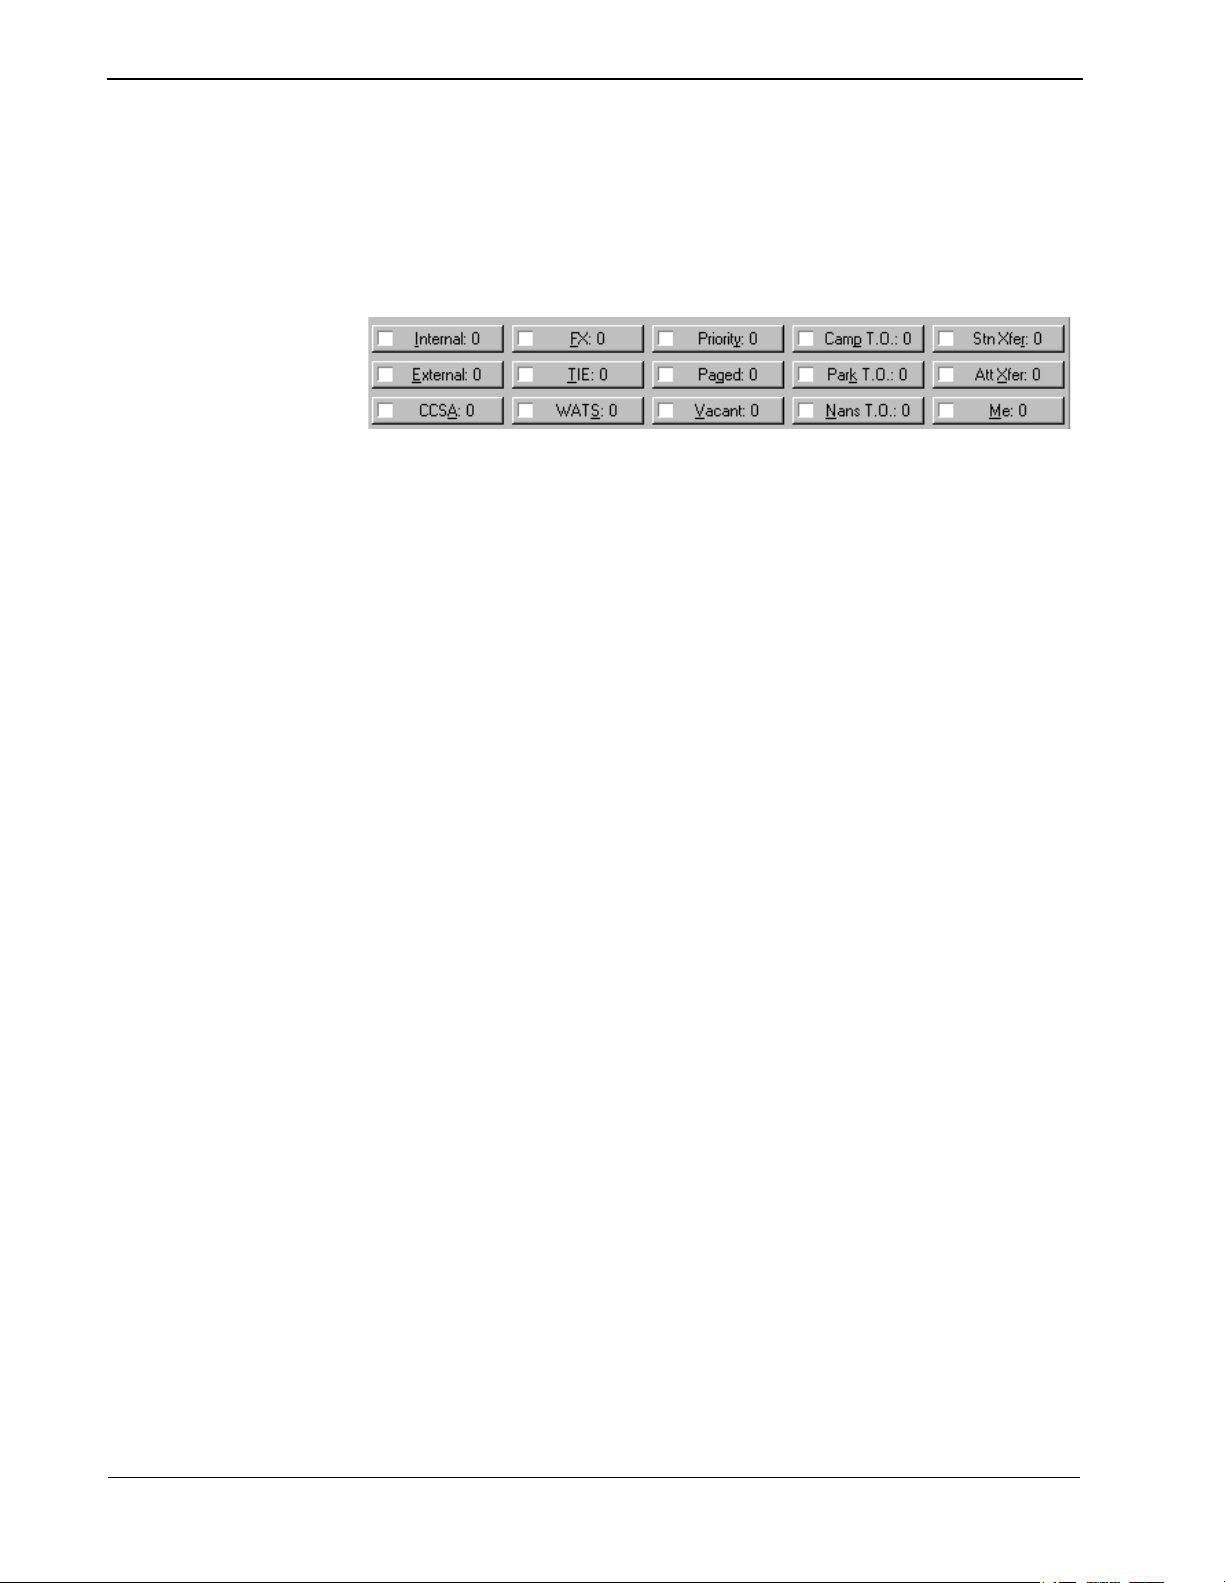
Queues
Figure 2-4 Queue Buttons
The Queue buttons (Figure 2-4) show the current incoming calls according to their
origination, such as Internal and CCSA. Each incoming call label is followed by
the number of calls of this type waiting for the attendants. This number increases
by one with every incoming call of its type and decreases by one every time an
attendant answers one of this type or a caller abandons before the call is answered.
You can configure the Business Attendant Client workstation to sound a beep when
an incoming call is placed in the queue. (See “Configuring the User Options” on
page 51 for more information.)
Calls are placed in the queue in first-come, first-served order, but different queues
are assigned different priorities, such as Priority or Me. To answer the next call,
press the space bar. To answer a particular type of call, select the Queue Button or
press the shortcut key for the desired queue. Table 2-2, “Queue Types and Shortcut
Keys,” on page 16 describes each incoming call type and the shortcut key for each
queue. Each call type is routed to the global attendant pool unless otherwise noted.
Table 2-2 Queue Types and Shortcut Keys
Type Description
Shortcut
Key
Internal Incoming from an internal source ALT+I
External Incoming from a central office switch ALT+E
CCSA
Incoming call from the Common Control Switching
Arrangement network
ALT+A
FX Incoming call via a foreign exchange trunk ALT+F
TIE Incoming call from a remote station ALT+T
WAT S
Priority
Incoming call from across a Wide Area
Telecommunications Service
Incoming call to a monitored number designated with a
higher priority, given to select individuals
ALT+S
ALT+Y
Incoming call to the Parked Orbit number in response to a
Paged
page; a call is routed to this queue when the parked call has
ALT+G
abandoned and is no longer waiting
Page 16 NDA-30103 Revision 4
Page 27

OpenWorX Business Attendant System User Guide Getting Started
Table 2-2 Queue Types and Shortcut Keys
Type Description
Va ca n t
A call has terminated at an unassigned station number or
vacant level
Caller has been parked beyond the configured amount of
Park T.O.
time. (Refer to the Business Attendant System
Administration Guide for more information about this
timer setting.)
Direct transferred call to an internal extension was not
Nans T.O.
answered within the configured amount of time. (Refer to
the Business Attendant System Administration Guide for
more information about this timer setting.)
Station-to-Attendant transfer; the station issuing the
Stn Xfer
transfer can be voice mail or an integrated voice response
unit (IVR) as well as an employee station, etc.
Att Xfer
Attendant-to-Attendant transfer, routed only to the specific
target attendant
Internal or external call routed to the attendant’s personal
Me
number that moves with them if they log on to a different
Business Attendant Client workstation
Shortcut
Key
ALT+V
ALT+K
ALT+N
ALT+R
ALT+X
ALT+M
Source and Destination Areas
Figure 2-5 Source and Destination Area
The Source and Destination areas (Figure 2-5) on the Line Status window are used
to show who is connected to the active loop. The left window shows the status of
the source caller, the person who called in or was called first. The right window
shows the status of the destination caller (i.e., the extension or phone number being
called during transfers or conferences). You can display up to three lines of
information about the source and destination in these areas of the Line Status
window. For information on how to change the source information that is
displayed, see “Displaying the Call Source/Destination Information” on page 61.
NDA-30103 Revision 4 Page 17
Page 28
Getting Started OpenWorX Business Attendant System User Guide
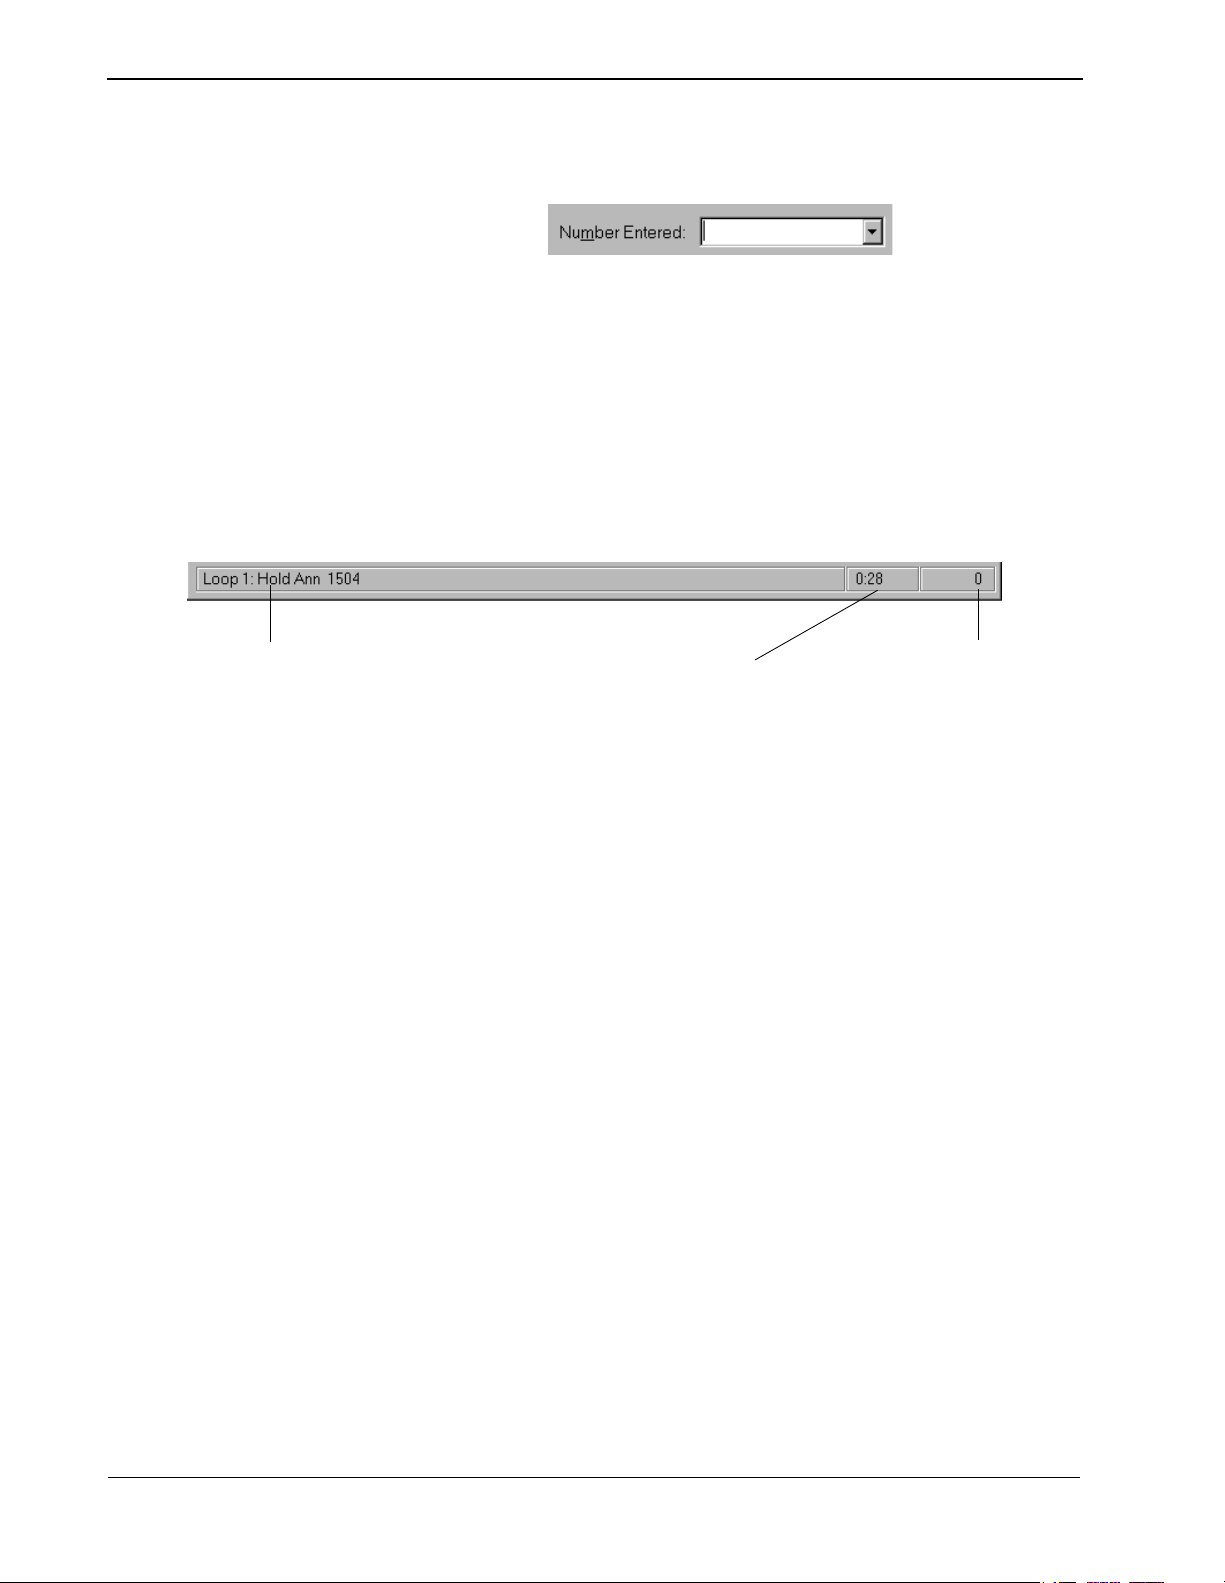
Number Entered Field
Figure 2-6 Number Entered Field
The Number Entered field (Figure 2-6) is where you enter extension numbers or
phone numbers for processing calls. If you enter a non-numeric character (except
# or *) in this field, the Directory window displays, and the directory is searched
for matching characters. The directory can be configured to search based on
various sort criteria. (See “Changing the Default Sort Order” on page 69 for more
information.)
Status Line
Current Call
Status
Timer
Figure 2-7 Status Line
Number of
Queued Calls or
Off-line Status
The Status Line (Figure 2-7) displays information about a loop. Moving the mouse
pointer over a Loop button displays the status of that loop in the Status Line,
including the caller information and a timer showing how long (in minutes and
seconds) the loop has been in its current state. For example, if you move the mouse
pointer over the Loop button of a loop that is on hold, the Status Line indicates who
is on hold and the timer indicates how long this person has been on hold.
Additionally, the number of calls waiting in the queue appears on the right side of
the Status Line when the Business Attendant Server is on-line. When the Business
Attendant Server is down, the number of queued calls changes to Off-line.
Page 18 NDA-30103 Revision 4
Page 29
OpenWorX Business Attendant System User Guide Getting Started
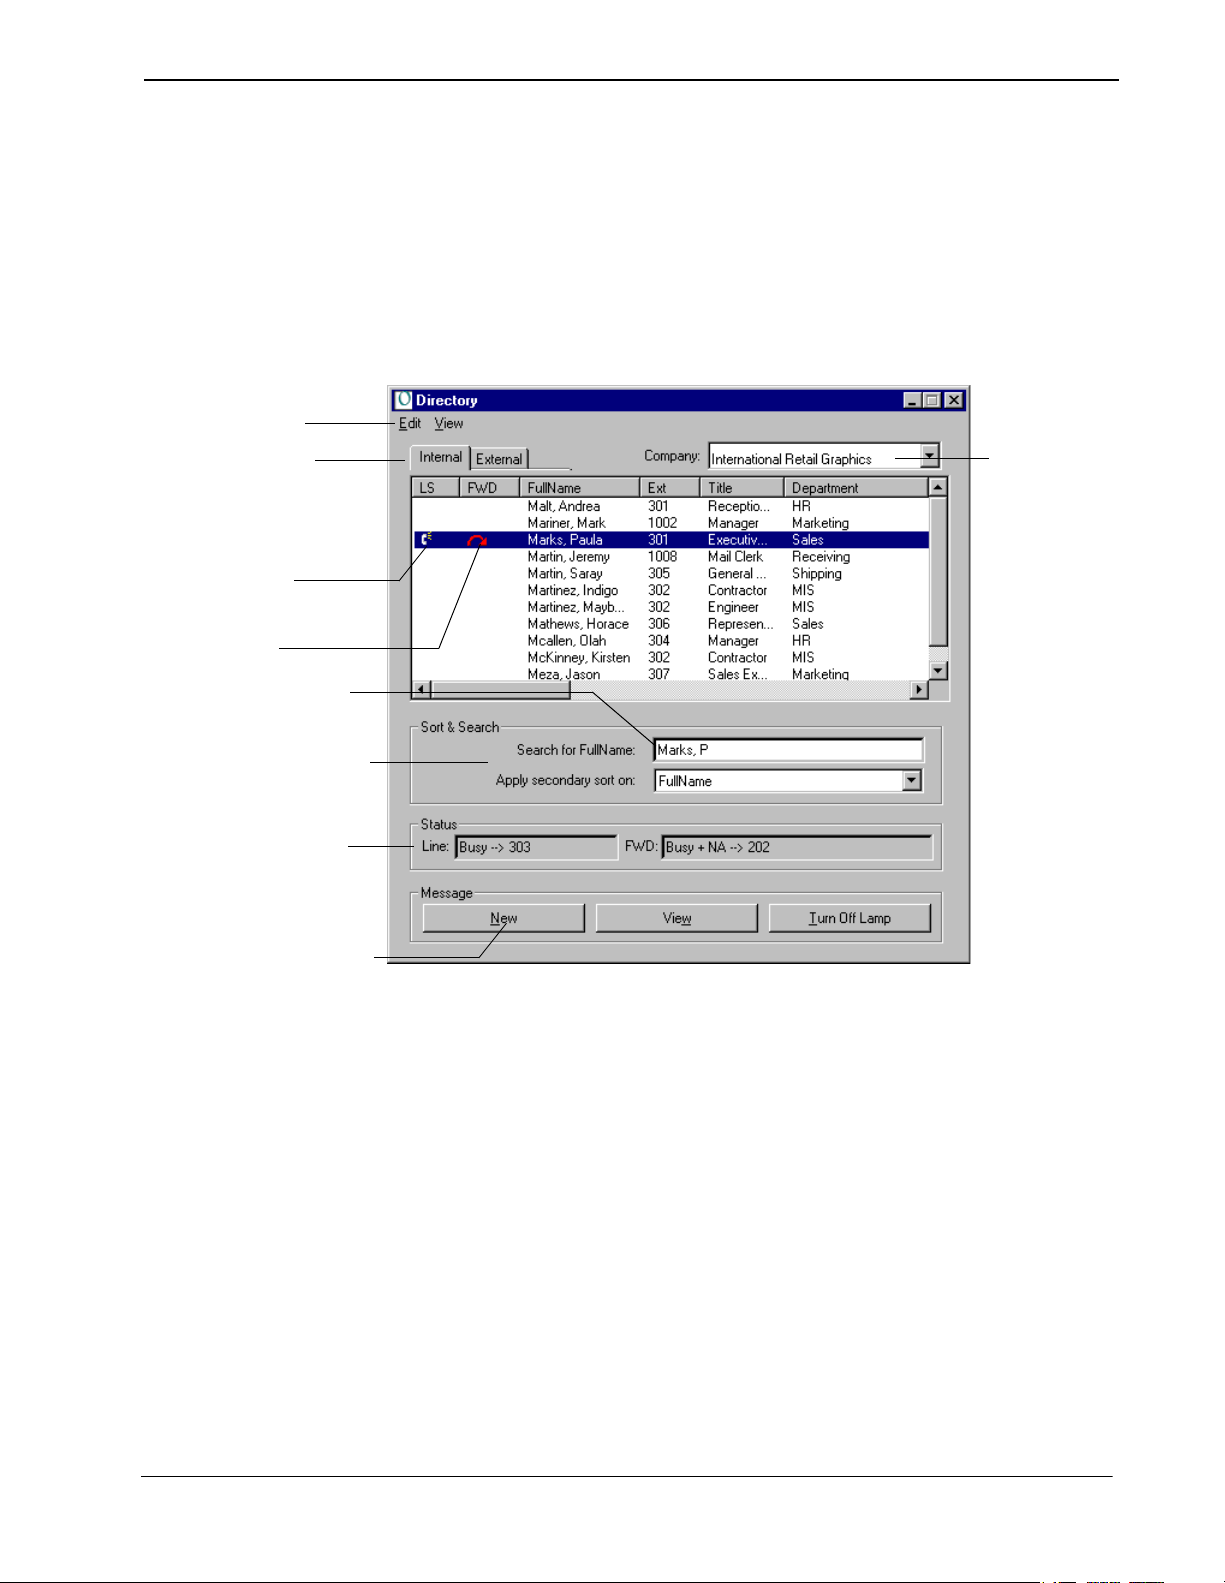
Directory Window
The Directory window (Figure 2-8) contains the internal and external phone
directories. Double-click an entry in the directory, press Enter, or drag it to the
Line Status window to place a call or dial a transfer destination. You can also use
the Directory window to define the speed dial buttons on the Speed Dials window.
(See “Adding or Modifying a Speed Dial Number” on page 53 for more
information.)
Menus
Tabs
Line Status
Indicator
Call Forward
Indicator
Primary
Search field
Company
drop-down list
Secondary
Sort field
Line Status
Group Box
Messaging
Buttons
Figure 2-8 Directory window
Menus
The Directory window contains two menus, Edit and View. These drop-down
menus give you access to directory configuration options that allow you to
administer or view the directory entries.
Internal/External Tabs
Clicking on these tabs will allow you to view the external directory or the internal
directory, depending on which directory is displayed.
NDA-30103 Revision 4 Page 19
Page 30

Getting Started OpenWorX Business Attendant System User Guide
Line Status Indicator
If the Line Status Indicator field is configured to display in the directory, a
telephone or a question mark can be displayed to indicate the status of that station
when a directory entry is highlighted. The telephone icon indicates that the caller
is on the line. The question mark icon indicates that the station is off-hook and not
connected to another party. No icon present indicates that the extension is idle. The
Line field in the Line Status group box also shows the line status. (See
“Configuring the Fields Displayed in the Directory Window” on page 64 for more
information.)
Call Forward Indicator
If the Call Forward Indicator field is configured to display in the directory, this icon
indicates that this line is forwarded when a directory entry is highlighted. A red
arrow indicates that calls to that line will be forwarded. A white arrow indicates
that calls to that line may or may not be forwarded, depending on the call
forwarding patterns in effect. No icon present indicates that calls directed to that
extension will not be forwarded. The FWD field in the Line Status group box also
shows the line’s forward status. (See “Configuring the Fields Displayed in the
Directory Window” on page 64 for more information.)
Search Fields
Use these fields to find an individual's number in the phone directory according to
the search criteria you enter. Enter letters or digits in the Primary search field
(depending on the selected sort option) and the first matching entry in the directory
will be selected. If needed, enter letters or digits in the Secondary sort field to sort
on an alternate field when the primary search field has identical entries.
Line Status Group Box
These fields show detailed information about the line settings for the selected line,
such as the call forwarding patterns and the current status of that line.
Note: If the Line Status Group box shows, Busy → Private, the VIP check box on the
Contact tab of the Add or Modify Employee dialog box has been selected for
that person. (See “Working With the Directory” on page 67 for more
information.)
New Message Button
This button displays the New Message dialog box, where you can edit and send a
new message to the employee currently selected in the employee directory.
View Message Button
This button displays the View Messages dialog box, where you can view all of the
messages for the employee currently selected in the employee directory.
Turn Off Lamp Button
This button displays the Turn Off Message Lamp dialog box, where you can turn
off the message indicator lamp of the specified telephone.
Page 20 NDA-30103 Revision 4
Page 31

OpenWorX Business Attendant System User Guide Getting Started
Speed Dials Window
The Speed Dials window (Figure 2-9) contains the speed dial buttons you can use
to quickly dial another party. To associate a number with a speed dial button, drag
an entry from the Directory window onto a speed dial button on the Speed Dials
window. You can also define a speed dial button from General tab on the Business
Attendant Client Options dialog box (Figure 4-1) or by right-clicking on a speed
dial button and choosing Properties from the shortcut menu. (See “Configuring
the Speed Dial Keys” on page 53 for more information.)
Menu
Speed Dial
buttons
About Monitoring Speed Dials
Figure 2-9 Speed Dials window
Options Menu
The Speed Dials window contains the Options menu. From the Options menu, you
can change the number of speed dial buttons displayed and clear all the speed dial
buttons.
Speed Dial Buttons
Clicking on these buttons dials the configured number. Right-clicking on a speed
dial button opens a shortcut menu, where you can configure the properties of that
speed dial, as well as dial, forward, or set do-not-disturb for the extension
associated with that speed dial.
The Speed Dials window can be configured to monitor the status of the internal
speed dial numbers, if the OpenWorX administrator enabled this option in the
Business Attendant Administrator. Speed dial number monitoring allows
attendants to check the status of an internal extension at a glance. If a number is
monitored, the speed dial button associated with that number will flash when that
number is dialed and turn red when connected. Speed dial monitoring is configured
in the Client Setup options in the Business Attendant Administrator application.
(Refer to the Business Attendant Administration Guide for more information.)
NDA-30103 Revision 4 Page 21
Page 32

Getting Started OpenWorX Business Attendant System User Guide
Running the Business Attendant Client Application
Each time you work with the Business Attendant Client, log in with your user ID
and password. When you have finished using the Business Attendant Client, you
must exit (or quit) the application completely.
Logging In To the Application:
1. From the workstation desktop, click the Start button, then select Programs >
NEC OpenWorX > Business Attendant Client or select the Program Folder
specified during the BAS Client installation. The Business Attendant Client
Login dialog box displays (Figure 2-10).
Figure 2-10 Login dialog box
2. Enter your User ID in the User ID field.
Note: An account for this User ID must have been set up by your BAS Administr ator.
(Refer to the Business Attendant System Administration Guide for more
information about maintaining user accounts.)
3. Enter your password in the Password field.
4. Click OK or press Enter. The Line Status window displays (Figure 2-1). If the
Business Attendant Server is up, the number of calls waiting in the queues
displays in the Status Line. If the Business Attendant Server is down, Off-line
displays in the Status Line.
Exiting the Application:
Page 22 NDA-30103 Revision 4
• Select Line > Exit from the Line Status window. The Business Attendant
Client application closes and the Windows desktop displays.
Page 33

OpenWorX Business Attendant System User Guide Getting Started
Connecting to the Business Attendant Server
The Business Attendant Client must be connected to the Business Attendant Server
to process calls. To make sure that it is communicating properly with the Business
Attendant Server, the Business Attendant Client periodically performs a “health
check” to make sure that the Business Attendant Server is operational. You can
configure how often the Business Attendant Client checks the Business Attendant
Server in the Health Check Server Interval. (See “Setting the Health Check Server
Interval” on page 58 for more information.)
If the Server Goes Down While You Are Logging In
If the Business Attendant Client cannot connect to the Business Attendant Server
when you are first logging in, the Server Information message displays (Figure 2-
11).
Figure 2-11 Server Information message (Unsuccessful Connection)
If you receive this message, do the following:
1. Click OK to attempt to connect to the Business Attendant Server.
2. If you are not able to reconnect to the server after repeated tries, contact the
Administrator for the Business Attendant System at your site. Click Cancel to
bypass the Server Information message. The Line Status window displays for
processing employee information and directory services, but call processing
cannot occur until connection to the Business Attendant Server can be
established.
NDA-30103 Revision 4 Page 23
Page 34

Getting Started OpenWorX Business Attendant System User Guide
If the Server Goes Down While You Are Working
If the Business Attendant Client loses communication with the Business Attendant
Server, the Server Down Error message displays (Figure 2-12).
Figure 2-12 Server Down Error message
If you receive this message, do the following:
1. Click OK to close the error message window.
2. Contact the Administrator for the Business Attendant System at your site.
3. Continue to answer calls ringing on your phone manually, using the Business
Attendant Directory to look up numbers and then use the transfer key on the
telephone to transfer callers to their destination.
4. When the Business Attendant Server comes back up and successfully connects
with the Business Attendant Client, the following message appears.
Figure 2-13 Server Connected message
5. Click OK. The Line Status window displays. Continue processing calls as
usual.
Page 24 NDA-30103 Revision 4
Page 35

OpenWorX Business Attendant System User Guide Processing Calls
Chapter 3 Processing Calls
Overview
This chapter outlines the procedures the attendant uses to process calls, including
answering a call, placing a call on hold, and transferring a call.
You can use your mouse or your keyboard in the Business Attendant Client, so in
most cases there will be more than one way to perform a function. For more
information about navigating through the windows, see “Keyboard Conventions”
on page 4 or “About the Business Attendant Client Windows” on page 9.
Chapter Topics
• About Call Processing
• Making Calls
• Answering Calls
• Holding Calls
• Transferring Calls
• Working With Messages
• Canceling Transactions
• Releasing Calls
• Making Conference Calls
• Switching Between Source and Destination Callers
• Camping On To a Busy Line
• Overriding Calls
• Parking Calls
• Forwarding Calls
• Setting Do-not-disturb
NDA-30103 Revision 4 Page 25
Page 36

Processing Calls OpenWorX Business Attendant System User Guide
About Call Processing
To begin processing calls, log in to the Business Attendant Client. (See “Running
the Business Attendant Client Application” on page 22 for more information.)
After logging in, the Line Status window displays (Figure 3-1).
Figure 3-1 Line Status window
From the Line Status window, you can perform all call processing functions.
Additionally, you can perform selected functions from the Directory and Speed
Dials windows.
Processing Calls Using the Directory
You can use the Directory window (Figure 5-1 on page 67) to perform several call
processing functions, such as dialing or transferring calls. You can open the
directory when the station is in “Idle” status or while the attendant is connected to
a caller. (See “Working With the Directory” on page 67 for more information.)
Use one of the following methods to open the Directory window.
• Start typing the name in the Number Entered field on the Line Status window
to find the matching entries in the Directory.
Note: If no records are found, check the Search for field listed on the Directory
Window to verify that the BAS is searching for either the FullName,
LastName, or FirstName field. If it is not, select a different Default sort field
in the Options>Preferences>Employee DB tab from the Line Status Window.
• Select Window > Directory from the Line Status window.
•Press CTRL+R.
Page 26 NDA-30103 Revision 4
Page 37

OpenWorX Business Attendant System User Guide Processing Calls
Processing Calls Using the Speed Dials
You can use the Speed Dials window (Figure 2-9 on page 21) to perform several
call processing functions, such as dialing or forwarding calls. (See “Speed Dials
Window” on page 21 for more information.)
Use one of the following methods to open the Speed Dials window.
• Select Window > Speed Dials from the Line Status window.
•Press CTRL+P.
Making Calls
The Dial command allows you to place a call through the Business Attendant
System, if there is an available loop. The loop button displays the extension used
for internal calls, or the route and trunk used for external calls.
Note: If you attempt to place a call when no loop is available, a message box appears
notifying you that the call will not be placed. Before the call can be placed,
unhold and process an existing call to clear a loop.
To Make a Call from the Line Status Window
To Make a Call Using the Speed Dials
Use the following steps to make a call from the Line Status window.
1. Enter the phone number of the person that you are trying to call in the Number
Entered field on the Line Status window.
2. Do one of the following:
• Select the Dial command button.
• Select Call > Dial from the Line Status window.
•Press ALT+D.
•Press Enter.
The Business Attendant System selects the first available loop and dials the
number.
Use the following steps to make a call using speed dialing.
1. If the Speed Dials window (Figure 2-9 on page 21) is not displayed, do one of
the following:
• Select Window > Speed Dials from the Line Status window.
•Press CTRL+P.
2. Do one of the following:
•Click the desired speed dial button
• Right-click the desired speed dial button and select Dial from the shortcut
menu.
The Business Attendant System selects the first available loop and dials the
number.
NDA-30103 Revision 4 Page 27
Page 38

Processing Calls OpenWorX Business Attendant System User Guide
To Make a Call Using the Directory
Use the following steps to make a call from the Directory window.
1. If the Directory window (Figure 2-8 on page 19) is not displayed, open the
Directory window by doing one of the following:
• Start typing the name in the Number Entered field on the Line Status
window to find the matching entries in the Directory.
Note: If no records are found, check the Search for field listed on the Directory
Window to verify that the BAS is searching for either the FullName,
LastName, or FirstName field. If it is not, select a different Default sort
field in the Options>Preferences>Employee DB tab from the Line Status
Window.
• Select Window > Directory from the Line Status window.
•Press CTRL+R.
The Directory window displays.
2. Do one of the following:
• Double-click on the directory entry you want to call.
• Click and drag the directory entry you want to call from the Directory
window to the Line Status window.
• Enter the name of the person you are trying to call in the Search for
FullName field. Select the desired party from the matching entries
displayed in the Directory window and press Enter.
Note: If the Search for field does not specify FullName, select FullName for the
Default sort field under the Options>Preferences>Employee DB tab from
the Line Status Window.
• Right-click on the directory entry you want to call and select the number you
want to dial from the shortcut menu. The numbers available to call in this list
include those User-defined fields that have been marked by the
administrator as “Dialable”. (Refer to the OpenWorX Business Attendant
System Administration Guide for more information.)
The Business Attendant System selects the first available loop and dials the
number.
Page 28 NDA-30103 Revision 4
Page 39

OpenWorX Business Attendant System User Guide Processing Calls
Answering Calls
The Answer command connects you to an incoming call and places it on the next
available loop.
Note: If there are no available loops, the Business Attendant System stops answering
calls until a loop becomes available.
When an incoming call arrives in a queue, the queue button for that type of call is
lit and the number on the display increases by one, as shown in Figure 3-2.
Call Indicator
Queue Name
Figure 3-2 Queue Button
Number of Calls
Waiting in Queue
There are other ways the Business Attendant System can notify you of an incoming
call in addition to the indicators on the queue buttons. You can configure the
Business Attendant System to sound a beep, maximize the Line Status window,
bring the application to the front, or flash the Line Status window when a new call
is received. (See “Configuring Incoming Call Notification” on page 59 for more
information.)
Use one of the following actions to answer an incoming call.
•Click the desired Queue button.
•Click the Answer command button.
• Select Call > Answer from the Line Status window.
•Press the SPACE bar.
•Press ALT+A from the Commands tab.
The Business Attendant System connects you to the first caller waiting in that
queue and places the call in the first available loop.
NDA-30103 Revision 4 Page 29
Page 40

Processing Calls OpenWorX Business Attendant System User Guide
Holding Calls
The Hold command allows you to temporarily leave a connected call without
releasing it, freeing you to handle calls on other loops.
Note: If there are no available loops, the Business Attendant System stops answering
calls until a loop becomes available.
Placing a Call On Hold
Retrieving a Held Call
Use one of the following actions to place a caller on hold.
•Click the Hold command button.
• Select Call > Hold from the Line Status window.
•Press ALT+H.
•Press F5.
The Business Attendant System places the caller on hold with music and the
Call Status indicator on that loop button turns red.
The Unhold command reconnects you to a call you previously placed on hold.
Use one of the following actions to retrieve a caller on hold.
•Click the Loop button of the held caller.
• Select the Unhold command button.
• Select Call > Unhold from the Line Status window.
•Press ALT+U.
•Press F3.
• If there are no calls waiting in the queue, press the SPACE bar to connect you
to the held call that has been waiting longest.
The Business Attendant System connects you to the caller and the Call Status
Indicator on that loop button turns green.
Canceling Transactions
The Cancel command stops a call transaction in progress. Use this command to
rejoin the source caller if the destination party does not answer or is busy when you
attempt a screened transfer, or to hang up after placing a call or answering a call.
To Cancel a Call Use one of the following actions to cancel or end the current call.
•Click the Cancel command button.
• Select Call > Cancel from the Line Status window.
•Press ALT+N.
•Press F2.
The current call ends. If canceling a screened transfer, you are connected to the
source caller for further processing.
Page 30 NDA-30103 Revision 4
Page 41

OpenWorX Business Attendant System User Guide Processing Calls
Transferring Calls
The Business Attendant System gives you three ways to transfer calls:
Blind Transfer
Transfers the caller directly to the destination party and releases the attendant from
the call. This is also known as a Direct Transfer.
Screened Transfer
Places the caller on hold while the attendant calls the destination party and
announces the transfer. After announcing the transfer, the attendant releases the
call. This is also known as an Announced Transfer or Assisted Transfer.
Transfer to Voice Mail
Transfers the caller directly to the destination party’s voice mail box and releases
the attendant from the call.
Announce Call
Allows the attendant to place the caller on hold while the attendant announces the
transfer to the destination party without the destination party answering the phone.
Making a Blind Transfer
If you are already connected to a call, use any of the following methods to perform
a blind transfer.
Note: If the destination party is external, the Business Attendant System forces the
attendant to perform a screened transfer and listen for a busy signal or a ringback tone, then manually release from the call.
To Make a Blind Transfer from the Line Status Window
Use the following steps to make a blind transfer from the Line Status window.
1. Enter the phone number of the person to whom you are transferring the call in
the Number Entered field on the Line Status window.
2. Do one of the following:
• Select the Blind Xfer command button.
• Select Call > Blind transfer from the Line Status window.
•Press ALT+B.
•Press F6.
The Business Attendant System places the current call on hold, dials the party
to whom the call is being transferred, and releases you from the call.
NDA-30103 Revision 4 Page 31
Page 42

Processing Calls OpenWorX Business Attendant System User Guide
To Make a Blind Transfer Using the Speed Dials
Use the following steps to make a blind transfer using speed dialing.
1. If the Speed Dials window (Figure 2-9 on page 21) is not displayed, do one of
the following:
• Select Window > Speed Dials from the Line Status window.
•Press CTRL+P.
2. Do one of the following:
• If the administrator has set the default transfer type to Blind Transfer, click
the speed dial button that corresponds to the person to which the call is
being transferred.
• Right-click the speed dial button that corresponds to the person to which the
call is being transferred, and select Blind Transfer from the shortcut menu.
The Business Attendant System places the current call on hold, dials the party
to whom the call is being transferred, and releases you from the call.
To Make a Blind Transfer Using the Directory
Use the following steps to make a blind transfer from the Directory window.
1. If the Directory window (Figure 2-8 on page 19) is not displayed, open the
Directory window by doing one of the following:
• Start typing the name in the Number Entered field on the Line Status
window to find the matching entries in the Directory.
Note: If no records are found, check the Search for field listed on the Directory
Window to verify that the BAS is searching for either the FullName,
LastName, or FirstName field. If it is not, select a different Default sort
field in the Options>Preferences>Employee DB tab from the Line Status
Window.
• Select Window > Directory from the Line Status window.
•Press CTRL+R.
The Directory window displays.
2. Do one of the following:
• If the administrator has set the default transfer type to Blind Transfer,
double-click the entry of the person to whom you are transferring the call.
• If the administrator has set the default transfer type to Blind Transfer, click
on the entry of the person to whom you are transferring the call from the
Directory window and drag it to the Destination section or the Number
Entered field of the Line Status window.
• From the Directory window, right-click on the entry of the person to whom
you are transferring the call, then select Blind Transfer from the shortcut
menu.
The Business Attendant System places the current call on hold, dials the party
to whom the call is being transferred, and releases you from the call.
Page 32 NDA-30103 Revision 4
Page 43

OpenWorX Business Attendant System User Guide Processing Calls
Making a Screened Transfer
If you are already connected to a call, use any of the following methods to perform
a screened transfer.
Note: In any of the methods described below, you can toggle your connection between
the source and destination parties by clicking on the Source/Dest command
button. (See “Switching Between Source and Destination Callers” on page 37 for
more information.)
To Make a Screened Transfer from the Line Status Window
Use the following steps to make a screened transfer from the Line Status window.
1. Enter the phone number of the person to whom you are transferring the call in
the Number Entered field on the Line Status window.
2. Do one of the following:
• Select the Screen Xfer command button on the Line Status window.
• Select Call > Screened transfer from the Line Status window.
•Press ALT+S.
•Press F7.
• If the Directory window is open, right-click on the destination party in the
Directory window and select Screen Transfer from the shortcut menu.
• If the Speed Dials are open, right-click the speed dial button that
corresponds to the person to which the call is being transferred.and select
Screen Transfer from the shortcut menu.
The Business Attendant System places the current call on hold and dials the
party to whom the call is being transferred.
3. When the destination party answers that call, announce the transfer and release
the call. (See “Releasing Calls” on page 36 for more information.) The two calls
are connected, the loop button clears, and you are released from the call.
4. If the destination party doesn’t answer or is busy, cancel the transfer to rejoin
the source party. (See “Canceling Transactions” on page 30 for more
information.)
NDA-30103 Revision 4 Page 33
Page 44

Processing Calls OpenWorX Business Attendant System User Guide
Transferring a Call to Voice Mail
The Business Attendant System allows you to automatically transfer a caller
directly to a destination party’s voice mail box from the Directory window,
releasing you from the call. When the Transfer to Voice Mail action is selected, the
Business Attendant System places the source caller on hold and uses a script to dial
the Voice Mail Pilot number and connect the caller to the destination party’s voice
mail box, releasing the attendant from the call. The Voice Mail Transfer script is
configured in the Business Attendant Administrator application. (Refer to the
Business Attendant Administration Guide for more information.)
To Transfer a Call to Voice Mail
If you are already connected to a call, use one of the following steps to transfer a
call to a specific voice mail box.
• Right-click on the destination party in the Directory window and select
Transfer to Voice Mail from the shortcut menu.
• Right-click the speed dial button that corresponds to the person to which the
call is being transferred.and select Transfer to Voice Mail from the shortcut
menu.
The Business Attendant System places the current call on hold, dials the desired
voice mail box, and releases you from the call.
Making Conference Calls
The Conference command allows you to initiate a conference call with two other
parties.
A conference call connects an attendant with two parties in one phone
conversation. You can initiate a conference from a screened transfer call. This
option is only available when the current loop is in a state where it can be
conferenced or when a conference can be completed.
Note: In any of the methods described below, you can toggle your connection between
the source and destination parties by clicking on the Source/Destination
command button. (See “Switching Between Source and Destination Callers” on
page 37 for more information.)
Page 34 NDA-30103 Revision 4
Page 45

OpenWorX Business Attendant System User Guide Processing Calls
To Place a Conference Call
Use the following steps to place a conference call from the Line Status window.
1. Enter the phone number of the party you want to be conferenced in to the
current call in the Number Entered field on the Line Status window.
2. Do one of the following:
• Perform a screened transfer by doing one of the following:
• Select the Screen Xfer command button.
• Select Call > Screened transfer from the Line Status window.
•Press ALT+S.
•Press F7.
• Announce the call by doing the following:
•Press ALT+L.
•Press F7.
The Business Attendant System places the current call on hold and dials the
first party to be joined into the conference call.
3. Once you are connected to the destination number, do one of the following:
•Click the Conference command button on the Line Status window.
• Select Call > Conference from the Line Status window.
•Press ALT+F.
•Press F9.
You are connected to both the source and destination callers in a conference
call.
4. When you have finished with the conference call, release the call by doing one
of the following:
•Click the Loop button of the destination caller.
•Click the Release command button.
• Select Call > Release from the Line Status window.
•Press ALT+R to release the current call.
•Press F12 to release the current call.
The two callers are connected, the loop buttons clear, and you are released
from the call.
NDA-30103 Revision 4 Page 35
Page 46

Processing Calls OpenWorX Business Attendant System User Guide
Releasing Calls
The Release command connects a transferred caller to his or her destination,
releases the attendant workstation from the call, and clears the loop to receive new
calls. This command is also used to exit a conference call, leaving the other two
parties talking.
To Release a Call Use one of the following actions to release the current call from the Line Status
window.
•Click the Loop button of the destination caller.
•Click the Release command button.
• Select Call > Release from the Line Status window.
•Press ALT+R to release the current call.
•Press F12 to release the current call.
The caller is connected to its destination, the attendant workstation is released
from the call, and the loop button display clears, indicating that the loop is idle.
Camping On To a Busy Line
The Camp command allows the caller to wait for connection to a destination party
whose line is busy, while leaving the attendant free to answer the next call. The
busy party hears a zip tone, alerting them to the presence of the waiting caller. The
busy party can then press the Answer key on their D
on consultation hold and answer the new call.
Note: The destination party must be an internal station on the local PBX. You cannot
camp on to a party across the CCIS network on a remote PBX.
To Camp On a Busy Line
Use one of the following actions to camp the current caller on to a busy line after
attempting to call a busy line from the Line Status window.
•Click the Camp command button.
• Select Call > Busy camp from the Line Status window.
•Press ALT+P.
•Press F11.
You are released from the call and the loop button clears while the current
caller waits for the destination party to become available. The caller will hear
music or a ring-back tone, depending on the PBX firmware level at your site.
• If the caller hears music after being camped, they will be connected to the
destination party when they become available.
term
to place their current call
• If the caller hears a ring-back tone after being camped, the destination party
can press the Answer key on their telephone to toggle between their existing
call and the new caller. In this case, no recall will occur if the busy party does
not answer the new call.
Page 36 NDA-30103 Revision 4
Page 47

OpenWorX Business Attendant System User Guide Processing Calls
Switching Between Source and Destination Callers
The Source/Destination commands allow you to switch between the source and
destination parties prior to completing a conference call or transfer. This option is
only available when you are in the process of transferring, overriding, or
conferencing the current call.
To Switch Between Source and Destination Callers
Overriding Calls
Use one of the following actions to switch between the source and destination
parties from the Line Status window.
Note: The Source/Dest command button changes as you toggle between the source and
destination.
•Click the Source/Dest command button to switch between the source and
destination.
• Select Call > Toggle source & destination from the Line Status window.
•Press ALT+S to switch between the source and destination.
•Press F10 to switch between the source and destination.
The current party is put on hold, and the Business Attendant System connects
you to the desired party. The loops for the source and destination change to
reflect their change in status.
The Override command allows you to break in to an ongoing call to speak with one
party or conference with both parties in that call.
Note 1: One of the parties being overridden must be an internal station on the local PBX,
not an external number or across the CCIS network on a remote PBX.
Note 2: You can determine if a line is busy by dialing it from the Number Entered field
in the Line Status window or using the directory.
To Override a Call Use the following steps to break in to a call from the Line Status window.
1. After attempting to call a busy extension, do one of the following:
•Click the Override command button.
• Select Call > Override from the Line Status window.
•Press ALT+V.
•Press CTRL+F4.
A message appears asking “Are you sure you want to break into this person’s
current call?”
2. Click Yes . You are connected to the destination party. While you are on the line
with the destination party, the other party on the call is placed on hold.
3. Do one of the following:
• Speak with the destination party.
• Toggle to speak with the caller that is on hold.
• Join with both parties in a conference call. (See “Making Conference Calls”
on page 34 for more information.)
NDA-30103 Revision 4 Page 37
Page 48

Processing Calls OpenWorX Business Attendant System User Guide
4. When you are done, click the Release command button. The callers are left in
a two-way call, the attendant workstation is released from the call, and the loop
button display clears.
Parking Calls
One of the more powerful features of the Business Attendant System is the ability
to park calls. Call parking allows the attendant to place the call in a pool to wait for
the destination caller, freeing the attendant to answer more calls. The destination
party is then paged to notify them that they have a call, and they can retrieve the
waiting call from any telephone by dialing the attendant or dialing a meet-mepaging orbit number to join the call automatically.
There are three main commands relating to call parking in the Business Attendant
System:
Park
Places a caller on an announcement trunk or a monitored number hearing music to
wait for a paged party. (See “Parking a Call” on page 38 for more information.)
Join With Parked Call
Joins a parked caller to the current source caller. (See “Joining a Caller with a
Parked Call” on page 40 for more information.)
Retrieve Parked Call
Connects the attendant to the parked caller if the destination caller or paged party
doesn’t respond. (See “Retrieving a Parked Call” on page 41 for more
information.)
Refer to the following sections for more information about these commands.
Parking a Call The Park command places a caller on an announcement trunk or a monitored
number to wait for a party who has been paged to answer their call.
To connect to the parked caller, the destination party can dial a “meet-me page”
number to join the waiting call automatically or use the attendant to join the waiting
call. (See “Joining a Caller with a Parked Call” on page 40 for more information.)
The “meet-me page” numbers are configured in the Business Attendant
Administrator application. Refer to the Business Attendant System Administration
Guide for more information.
About Orbit Numbers
Orbit numbers specify the numbers that are announced in paging as the meet-me
page numbers. When a call is parked to wait for a party, the Business Attendant
System assigns an orbit number to that call.
The orbit number assigned to the parked call displays in the bottom left corner of
the Line Status window. The attendant announces this number to the paged party
as the “meet-me page” number. The paged party then can dial this number to
retrieve their call without attendant help.
If no orbit numbers are available, then the paged party must call the attendant, who
then joins the paged party to the waiting caller.
Page 38 NDA-30103 Revision 4
Page 49

OpenWorX Business Attendant System User Guide Processing Calls
To Park a Call
Use the following steps to park a caller from the Line Status window.
1. Do one of the following:
•Click the Park command button.
• Select Call > Park from the Line Status window.
•Press ALT+K.
•Press F8.
The Park dialog box displays (Figure 3-3).
Figure 3-3 Park dialog box
2. If the caller’s information was not filled in automatically, enter the caller’s name
in the Name field in the Party being parked group box. If available, enter the
caller’s number in the Call Back # field.
Note: The Call Back # field is optional, but the Name field is required.
3. Enter the paged party’s name in the Name field in the Party holding for group
box.
4. Click OK. The caller is parked to wait for the paged destination party with the
assigned “meet-me page” number displayed in the lower left corner of the Line
Status window. If no “meet-me page” number displays in the Line Status
window, no orbit numbers are available and the attendant must instruct the
paged party to call the operator. The attendant workstation is then released from
the call and the loop button display clears.
NDA-30103 Revision 4 Page 39
Page 50

Processing Calls OpenWorX Business Attendant System User Guide
Joining a Caller with a Parked Call
The Join command allows you to retrieve a parked caller and connect them to the
paged party.
Figure 3-4 Join Parked Call window
To Join a Parked Call
Use the following steps to join the paged party to the parked caller from the Line
Status window.
1. After answering the call from the paged destination party, do one of the
following:
•Click the Join command button.
• Select Call > Join with parked call from the Line Status window.
•Press ALT+J.
•Press CTRL+ALT+F8.
The Join Parked Call window displays (Figure 3-4).
2. Do one of the following:
• Select the desired parked caller and click OK.
• Double-click on the desired parked caller.
The Business Attendant System connects the destination party to the parked
caller, releases the attendant workstation, clears the loop button, and removes
the parked record from the database.
Page 40 NDA-30103 Revision 4
Page 51

OpenWorX Business Attendant System User Guide Processing Calls
Retrieving a Parked Call
If the destination party does not respond to their page, you can retrieve the parked
caller to take a message or send them to another party.
Note: You can access any caller parked in the system, not just those you parked.
Figure 3-5 Retrieve Parked Call window
The Retrieve Parked Call window (Figure 3-5) lists all parked callers. Each parked
call record includes information entered by the attendant who parked the call,
including the name of the parked caller, the name of the paged party, the orbit
number that the paged destination party can dial to connect automatically to the
parked caller, and the total time the caller has been parked at the time the window
displays. If the parked caller abandoned by hanging up or disconnecting, the total
time since the caller abandoned displays under the Abandoned column and the
entry displays in red.
To Retrieve a Parked Call
Use the following steps to connect to the parked caller from the Line Status
window.
1. Do one of the following:
•Click the Retrieve command button.
• Select Call > Retrieve parked call from the Line Status window.
•Press ALT+E.
•Press CTRL+F8.
The Retrieve Parked Call window displays (Figure 3-5).
2. Do one of the following:
• Select the desired parked caller and click OK.
• Double-click on the desired parked caller.
The Business Attendant System connects you to the parked caller and places
the call in the first available loop.
NDA-30103 Revision 4 Page 41
Page 52

Processing Calls OpenWorX Business Attendant System User Guide
Parked Call Timeout
Forwarding Calls
If a call is parked beyond the amount of time configured in the Business Attendant
Administrator application, the Business Attendant System sends it back to any
available attendant in the Park T.O. queue, which is presented to all attendants.
However, even though the call has been sent back to the attendant, the parked caller
can still be joined to the paged caller if:
• The paged party calls the “meet-me page” number before an attendant answers
the call in the Park T.O. queue, the paged party and the parked party will
automatically be joined and the call will be removed from the Park T.O. queue
and from the parked database.
• The attendant answers a call from the Park T.O. queue and is still on the line
with the parked caller when the paged party calls the “meet-me page” number,
the attendant will be notified that the paged caller is present and given the
opportunity to join the calls.
• The attendant answers a call from the Park T.O. queue and places the parked
caller on hold, the paged party and the parked party will automatically be joined
if the paged party calls the “meet-me page” number.
The Forward command redirects incoming calls for an extension to another
location, such as an extension or voice mail. You can forward all calls to that
extension, forward calls only when the extension is busy, or forward calls only
when no one answers.
To Forward a Call Use the following steps to forward a call.
Tip: You can use the following shortcuts to go directly to Figure 3-7, “Change
Forwarding dialog box—Setting Forwarding Extension” on page 43.
• From the Speed Dials window, right-click on the desired speed dial
button and select Forward from the shortcut menu.
• From the Directory window, right-click on the desired directory entry
and select Forward from the shortcut menu.
1. From the Line Status window, select Line > Forward. The Change Forwarding
dialog box displays (Figure 3-6).
Figure 3-6 Change Forwarding dialog box—Setting Forwarded Extension
Page 42 NDA-30103 Revision 4
Page 53

OpenWorX Business Attendant System User Guide Processing Calls
2. Do one of the following:
• Enter the phone number you want forwarded in the Extension field.
•Click the Directory button to display the Directory window, then click and
drag the appropriate entry from the Directory window (Figure 2-8 on page
19) to the Change Forwarding dialog box.
Click OK. The Setting Forwarding Extension dialog box displays (Figure 3-7),
with the current forwarding patterns displayed.
To Cancel Call Forwarding
Figure 3-7 Change Forwarding dialog box—Setting Forwarding Extension
3. Enter the phone number that will receive the forwarded calls in one of the
following fields in the Number to forward to group box:
•All Calls
Forwards all calls to the specified extension.
• Busy Calls
Forwards calls to the specified extension only when the designated
extension is busy.
• Unanswered Calls
Forwards calls to the specified extension only when the designated
extension does not answer.
4. Click OK. The designated calls are forwarded to the new extension.
1. Select Line > Forward from the Line Status window. The Change Forwarding
dialog box displays (Figure 3-6).
2. Enter the Extension that needs Call Forwarding canceled.
3. Clear the phone numbers in the desired fields in the Number to forward to group
box.
4. Click OK. Call forwarding is canceled. The calls are canceled for that type of
forwarding.
NDA-30103 Revision 4 Page 43
Page 54

Processing Calls OpenWorX Business Attendant System User Guide
Setting Do-not-disturb
The Do-not-disturb command blocks an extension’s incoming calls. When Do-notdisturb is active, callers will either hear a reorder (fast busy) tone when they dial
that extension or follow the extension’s call forwarding patterns for all calls or
unanswered calls.
To Se t
Do-not-disturb
Use the following steps to set Do-not-disturb for an extension.
Tip: You can use the following shortcuts to go directly to Figure 3-9, “Change
Do-not-disturb dialog box—Select Phone Operation” on page 45.
• From the Speed Dials window, right-click on the desired speed dial
button and select Forward from the shortcut menu.
• From the Directory window, right-click on the desired directory entry
and select Forward from the shortcut menu.
1. From the Line Status window, select Line > Set do-not-disturb.The Change
Do-not-disturb dialog box displays (Figure 3-8), where you will specify the
extension for which to set Do-not.disturb.
Figure 3-8 Change Do-not-disturb dialog box—Setting Do-not-Disturb Ex-
tension
2. Do one of the following:
• Enter the phone number you want to set for Do-not-disturb in the Extension
field.
• Click the Directory button to display the Directory window. Click and drag
the appropriate entry from the Directory window (Figure 2-8 on page 19) to
the Change Do-Not-Disturb dialog box.
Page 44 NDA-30103 Revision 4
Page 55

OpenWorX Business Attendant System User Guide Processing Calls
3. Click OK. The Change Do-not-disturb dialog box displays (Figure 3-9),
showing the current Do-not-disturb setting for that extension.
Figure 3-9 Change Do-not-disturb dialog box—Select Phone Operation
4. Select Don’t allow incoming calls.
5. Click OK. Do-not-disturb is set and all incoming calls are blocked from this
extension.
Canceling
Do-not-disturb
Use the following steps to cancel Do-not-disturb for an extension.
Tip: You can use the following shortcuts to go directly to Figure 3-9, “Change
Do-not-disturb dialog box—Select Phone Operation” on page 45.
• From the Speed Dials window, right-click on the desired speed dial
button and select Forward from the shortcut menu.
• From the Directory window, right-click on the desired directory entry
and select Forward from the shortcut menu.
1. From the Line Status window, select Line > Set do-not-disturb.The Change
Do-not-disturb dialog box displays (Figure 3-8 on page 44).
2. Do one of the following:
• Enter the phone number you want to set for Do-not-disturb in the Extension
field.
•Click the Directory button to display the Directory. Click and drag the
appropriate entry from the Directory window to Change Do-Not-Disturb
dialog box.
3. Click OK. The Change Do-not-disturb dialog box displays (Figure 3-9),
showing the current Do-not-disturb setting for that extension.
4. Select Allow incoming calls.
5. Click OK. Do-not-disturb is canceled and the extension can now receive
incoming calls.
NDA-30103 Revision 4 Page 45
Page 56

Processing Calls OpenWorX Business Attendant System User Guide
Working With Messages
The Business Attendant System allows you to take messages for employees and
send them either by e-mail or by turning on the employee’s message waiting lamp.
When the employee calls back after seeing the message waiting lamp, the attendant
can view and read the messages for the employee. The message waiting lamp is
automatically turned off when there are no unread messages. (See “Directory
Window” on page 19 for more information.)
Creating a Message
Note: The adjunct OpenWorX Message Reader application allows employees to read
their messages directly from their D
Consult your NEC distributor for additional information.
term
telephones without calling the attendant.
Use the following steps to edit and send a new message.
1. If the Directory window (Figure 2-8 on page 19) is not displayed, open the
Directory window by doing one of the following:
• Start typing the name in the Number Entered field on the Line Status
window to find the matching entries in the Directory.
Note: If no records are found, check the Search for field listed on the Directory
Window to verify that the BAS is searching for either the FullName,
LastName, or FirstName field. If it is not, select a different Default sort
field in the Options>Preferences>Employee DB tab from the Line Status
Window.
• Select Window > Directory from the Line Status window.
•Press CTRL+R.
The Directory window displays.
2. Do one of the following from the Internal directory:
• Select the desired directory entry and click the New Message button.
• Right-click on the desired directory entry and select New Message from the
shortcut menu.
The New Message dialog box displays (Figure 3-10), with the employee’s
name and e-mail address (if available) in the To: box.
Page 46 NDA-30103 Revision 4
Page 57

OpenWorX Business Attendant System User Guide Processing Calls
Figure 3-10 New Message dialog box
3. Enter information about the person for whom you are taking the message in the
Name, Company, Phone number, and Extension fields.
4. Enter the message in the Message edit box and, if desired, select any of the six
message description check boxes in the Attributes group box.
5. After you have finished editing the new message, send the message by doing
one of the following:
• Click the Send by e-mail button to send the message to the employee by e-
mail without further editing. If the e-mail address is not displayed when the
New Message dialog box displays, enter the e-mail address. This e-mail
address is then added to the database.
•Click the Edit in e-mail button to edit the message in the default e-mail
application. This action is very useful when sending the message to multiple
people, or attaching wave file recordings. All of the message information
you have entered will be displayed in the e-mail application.
•Click the Tur n on la mp button to turn on the employee’s message waiting
lamp and, on the 2400 series of PBX, display TMM on the phone display.
The message is saved for the attendant to read to the employee when the
employee calls back. If using the adjunct Message Reader application,
term
employees can read their messages from their D
screen.
NDA-30103 Revision 4 Page 47
Page 58

Processing Calls OpenWorX Business Attendant System User Guide
Viewing Messages Use the following steps to review the messages for an employee.
1. If the Directory window (Figure 2-8 on page 19) is not displayed, open the
Directory window by doing one of the following:
• Start typing the name in the Number Entered field on the Line Status
window to find the matching entries in the Directory.
Note: If no records are found, check the Search for field listed on the Directory
Window to verify that the BAS is searching for either the FullName,
LastName, or FirstName field. If it is not, select a different Default sort
field in the Options>Preferences>Employee DB tab from the Line Status
Window.
• Select Window > Directory from the Line Status window.
•Press CTRL+R.
The Directory window displays.
2. Do one of the following from the Internal directory:
• Select the desired directory entry and click the View button.
• Right-click on the desired directory entry and select View Message from the
shortcut menu.
The View Messages window displays (Figure 3-11).
Figure 3-11 View Messages window
All messages for the employee stored in the database are displayed in the
message list. Unread messages are indicated by a closed envelope in the Status
column. Read messages are represented by an opened envelope in the Status
column.
Page 48 NDA-30103 Revision 4
Page 59

OpenWorX Business Attendant System User Guide Processing Calls
3. The message list can be sorted in the ascending or descending order by any of
the fields displayed. To sort the list in the ascending order by a given field, click
the column header of the appropriate field. Click on the column header again
to sort the list by the field in descending order.
4. To read the text of the message, double-click the message entry. The message
text displays in the Message edit box. Some of the check boxes to the right of
the Message edit box may be selected. Once the message is read, the status of
the message changes from unread to read, and the Time field indicates the time
that the message was read. The employee’s message waiting lamp is turned off
when the message is marked read and there are no more unread messages.
5. Do one of the following:
•Click Delete to delete the selected message. The message is deleted from the
message database.
•Click Close to exit the View Messages window without deleting the
message. The View Messages window closes.
Note: A read message will only be retained in the database for the amount of time
configured in the Business Attendant Administrator. It will be deleted after the
configured amount of time elapses. (Refer to the Business Attendant System
Administration Guide for more information.)
NDA-30103 Revision 4 Page 49
Page 60

Processing Calls OpenWorX Business Attendant System User Guide
This Page Left Blank.
Page 50 NDA-30103 Revision 4
Page 61

OpenWorX Business Attendant System User Guide Configuring the User Options
Chapter 4 Configuring the User Options
Overview
This chapter outlines the procedures used to change the Business Attendant Client
options to create a more personalized environment. The options can be set
individually by each user, so each user can customize their speed dials and screen
layouts without affecting other users.
Chapter Topics
• About the Business Attendant Client Options Dialog Box
• Configuring the Speed Dial Keys
• Configuring the Window Display Options
• Setting the Health Check Server Interval
• Configuring Incoming Call Notification
• Selecting the Displayed Command Buttons
• Displaying the Call Source/Destination Information
• Configuring the Fields Displayed in the Directory Window
• Changing Passwords
• Saving the Screen Layout
NDA-30103 Revision 4 Page 51
Page 62

Configuring the User Options OpenWorX Business Attendant System User Guide
About the Business Attendant Client Options Dialog Box
From the Business Attendant Client Options dialog box (Figure 4-1), you can
configure the settings used by the Business Attendant Client application.
Figure 4-1 Business Attendant Client Options dialog box
The tabs in the Business Attendant Client Options dialog box contain the following
information:
General
Contains the parameters for the speed dial buttons, display options, and the Health
Check Server Interval.
Line Window
Configures the appearance and behavior of the Line Status window.
Employee DB
Configures the information displayed for employees in the internal Directory
window and the Source/Destination area of the Line Status window.
External Number DB
Configures the information displayed for external numbers in the external
Directory window and the Source/Destination area of the Line Status window.
DID DB
Configures the information displayed for DID numbers in the Source/Destination
area of the Line Status window.
Page 52 NDA-30103 Revision 4
Page 63

OpenWorX Business Attendant System User Guide Configuring the User Options
Route/Trunk
Configures the information displayed for routes and trunks in the Source/
Destination area of the Line Status window.
Wave Files
Configures wave file parameters used for recording and playing back greetings and
telephone conversations.
Note: The Wave Files tab is displayed and functional only if the NEC D
an alternate device is installed. (Refer to the System Requirements in the Business
Attendant System Administration Guide.)
Configuring the Speed Dial Keys
You can add, modify, and delete your speed dial keys. The default number of speed
dial keys shown is 16, but you can define up to 40 speed dial keys. (See “Speed
Dials Window” on page 21 for more information.)
Adding or Modifying a Speed Dial Number
Use one of the following methods to add or modify a speed dial number.
Note: If a name is too long to display on a speed dial button, you can modify the
displayed name in the Speed Dial Buttons group box in the Business Attendant
Client Options dialog box.
To Add or Modify a Speed Dial from the Line Status Window
Use the following steps to add or modify a speed dial number from the Line Status
window.
1. Select Options > Preferences from the Line Status window. The Business
Attendant Client Options dialog box displays (Figure 4-1 on page 52).
term
PC Card or
2. Select the General tab, which contains the Speed Dial group box (Figure 4-2).
Figure 4-2 Speed Dial Buttons group box
3. Select the button that you want to use from the Button drop-down list in the
Speed Dial Buttons group box.
4. Enter the name that you want to appear on the speed dial button in the Name
field and enter the phone number that you want associated with this button in
Number field.
5. Click OK. The speed dial button is updated.
NDA-30103 Revision 4 Page 53
Page 64

Configuring the User Options OpenWorX Business Attendant System User Guide
To Add or Modify a Speed Dial Using the Directory
Use the following steps to add or modify a speed dial number using the Directory
window.
1. If the Directory window is not displayed, open the Directory window by doing
one of the following:
• Start typing the name in the Number Entered field on the Line Status
window to find the matching entries in the Directory.
Note: If no records are found, check the Search for field listed on the Directory
Window to verify that the BAS is searching for either the FullName,
LastName, or FirstName field. If it is not, select a different Default sort
field in the Options>Preferences>Employee DB tab from the Line Status
Window.
• Select Window > Directory from the Line Status window.
•Press CTRL+R.
The Directory window displays (Figure 5-1 on page 67).
2. If the Speed Dials window is not displayed, open the Speed Dials window by
doing one of the following:
• From the Line Status window, select Window > Speed Dials.
•Press CTRL+P.
The Speed Dials window displays (Figure 2-9 on page 21).
3. Do one of the following to update the speed dial button:
• Click and drag the desired entry from the Directory window to the General
tab of the Business Attendant Client Options dialog box (Figure 4-1 on page
52). Click OK. The speed dial button is updated.
• Click and drag the desired entry from the Directory window to the Speed
Dials window, then drop onto the speed dial button you want to update. The
speed dial button is updated.
Page 54 NDA-30103 Revision 4
Page 65

OpenWorX Business Attendant System User Guide Configuring the User Options
To Add or Modify a Speed Dial from the Speed Dials Window
Use the following steps to add or modify a speed dial number from the Speed Dials
window.
1. If the Speed Dials window (Figure 2-9 on page 21) is not displayed, do one of
the following:
• Select Window > Speed Dials from the Line Status window.
•Press CTRL+P.
2. Right-click the desired speed dial button and select Properties from the
shortcut menu. The Speed Dial Properties dialog box displays (Figure 4-3).
Figure 4-3 Speed Dial Properties dialog box
3. Enter the name that you want to appear on the speed dial button in the Name
field.
4. Enter the phone number that you want associated with this button in Number
field.
5. Do one of the following:
• To turn on monitoring for this speed dial, select the Monitor Speed Dial
Buttons check box. When monitoring is selected, the BAS will flash this
speed dial button red if a call is ringing on this extension, and it will turn the
button solid red if the extension is off hook.
Note: Only extensions on the local PBX or on the Fusion network can be
monitored. Therefore, do not select this option if the speed dial number is
an ACD pilot, an extension across CCIS, or an external phone number. If
OAI traffic is heavy at your site, or if your PBX is running in two port mode
and this extension already is being monitoring by other applications, such
as Incoming Call Assistant or ACD, you may choose not to select this
option.
• To turn off monitoring for this speed dial, clear the Monitor Speed Dial
Buttons check box.
6. Click OK. The speed dial button is updated.
NDA-30103 Revision 4 Page 55
Page 66

Configuring the User Options OpenWorX Business Attendant System User Guide
Deleting a Speed Dial Button
To Delete a Speed Dial from the Line Status Window
Use the following steps to delete a speed dial button from the Line Status window.
1. Select Options > Preferences from the Line Status window (Figure 3-1 on page
26). The Business Attendant Client Options dialog box displays (Figure 4-1 on
page 52).
2. Select the General tab, which contains the Speed Dial group box (Figure 4-2
on page 53).
3. Select the button that you want to delete from the Button drop-down list in the
Speed Dial Buttons group box.
4. Clear the information in the Name field.
5. Clear the information in the Number field.
6. Click OK. The information defined for that speed dial button is deleted.
To Delete a Speed Dial from the Speed Dials Window
Use the following steps to delete a speed dial number from the Speed Dials
window.
1. If the Speed Dials window (Figure 2-9 on page 21) is not displayed, do one of
the following:
• Select Window > Speed Dials from the Line Status window.
•Press CTRL+P.
2. Right-click the desired speed dial button and select Properties from the
shortcut menu. The Speed Dial Properties dialog box displays (Figure 4-3 on
page 55).
3. Clear the information in the Name field.
4. Clear the information in the Number field.
5. Clear the Monitor Speed Dial Buttons check box to turn off monitoring for
this speed dial.
6. Click OK. The information defined for that speed dial button is deleted.
Page 56 NDA-30103 Revision 4
Page 67

OpenWorX Business Attendant System User Guide Configuring the User Options
Configuring the Window Display Options
You can configure how the Business Attendant Client windows displays on your
desktop.
Setting the Window Display Options
Use the following steps to configure the Business Attendant Client window display
options.
1. Select Options > Preferences from the Line Status window (Figure 3-1 on page
26). The Business Attendant Client Options dialog box displays (Figure 4-1 on
page 52).
2. Select the General tab.
Figure 4-4 Windows group box
3. To save the current screen layout when you exit the Business Attendant Client,
select the Save screen layout on exit check box in the Windows group box
(Figure 4-4).
4. To configure the Line Status window to overlap the Directory and Speed Dials
windows and remain active, select the Allow Line window to overlap
sub-windows check box in the Windows group box (Figure 4-4).
5. To minimize the Directory and Speed Dials windows when the Line Status
window is minimized, select the Minimize sub-windows with Line window
check box in the Windows group box (Figure 4-4).
Note: This option is automatically chosen if the Allow Line window to overlap sub-
windows option is not selected.
6. Click OK. The window display options are saved.
NDA-30103 Revision 4 Page 57
Page 68

Configuring the User Options OpenWorX Business Attendant System User Guide
Setting the Health Check Server Interval
The Business Attendant Client periodically checks to see if the Business Attendant
Server is working properly. You can configure how often the Business Attendant
Client checks the Business Attendant Server in the Business Attendant Client
Options dialog box.
Use the following steps to set the Health Check Server Interval.
1. Choose Options > Preferences on the Line Status window (Figure 3-1 on page
26). The Business Attendant Client Options dialog box displays (Figure 4-1 on
page 52).
2. Select the General tab.
3. Enter the desired number of seconds the Business Attendant Client will wait
between server health checks in the Health Check Server Interval field. The
Health Check Server Interval can be configured for a minimum of 10 seconds
and a maximum number of 60 seconds.
Figure 4-5 Health Check Server Interval field
4. Click OK.The Business Attendant Client Health Check Server Interval is
changed.
Page 58 NDA-30103 Revision 4
Page 69

OpenWorX Business Attendant System User Guide Configuring the User Options
Configuring Incoming Call Notification
You can configure the Business Attendant Client to alert you to the presence of an
incoming call whether or not the application is an active window. This feature
allows you to minimize the Business Attendant Client while working in another
application, and the system will notify you when you receive an incoming call. For
example, if you are typing a letter in another application and you do not want the
Business Attendant Client on your screen, you can minimize the Line Status
window so that the Business Attendant Client is still running, but not displayed on
your screen. When a call comes in, the Business Attendant Client either activates
the application, beeps, or flashes on your screen so that you can answer that call,
depending on the notification method you selected.
Use the following steps to configure how the Business Attendant Client will notify
you of an incoming call.
1. Choose Options > Preferences from the Line Status window (Figure 3-1 on
page 26). The Business Attendant Client Options dialog box displays (Figure 4-
1 on page 52).
2. Select the Line Window tab (Figure 4-6).
Figure 4-6 Line Window tab
3. If you want the Business Attendant Client to be activated automatically when a
call comes in, select the Pop when minimized check box.
4. If you want the window and the Business Attendant Client icon to flash when
you receive a call, select the Flash window check box.
5. If you want to hear an audible tone when you receive a call, select the Beep
check box.
6. Click OK. The incoming call notification options are saved.
NDA-30103 Revision 4 Page 59
Page 70

Configuring the User Options OpenWorX Business Attendant System User Guide
Selecting the Displayed Command Buttons
You can specify which command buttons appear in the Line Status window when
you are using the Business Attendant Client. For example, if call parking is not
used by your organization, you can remove the Park, Retrieve, and Join buttons to
simplify the user interface.
Use the following steps to select the commands displayed on the command buttons
in the Line Status window:
1. Select Options > Preferences from the Line Status window (Figure 3-1 on page
26). The Business Attendant Client Options dialog box displays (Figure 4-1 on
page 52).
2. Select the Line Window tab (Figure 4-6 on page 59). The commands displayed
on the command buttons in the Line Status window display in the Command
Buttons group box (Figure 4-7).
Figure 4-7 Command Buttons group box
3. To clear a command from the buttons, click on the button to be cleared to select
it, then click Clear.
4. To add a command to a button, drag and drop the command from the Available
commands list box to a blank command button. If you want to replace a
displayed command, drag and drop an available command to the button you
want to replace.
5. To remove a displayed command, drag and drop the command from the button
to the Available commands list box.
6. Click OK. The command button display options are saved.
Page 60 NDA-30103 Revision 4
Page 71

OpenWorX Business Attendant System User Guide Configuring the User Options
Displaying the Call Source/Destination Information
The Business Attendant Client displays information about the original inbound or
outbound caller in the Source area and information about the party receiving a
transfer or participating in a conference in the Destination area of the Line Status
window. You can select the type of information that displays for internal calls and
external calls. Additionally, you can select the type of information that displays for
incoming DID calls and incoming Route/Trunk calls.
When you receive a call, the Business Attendant Client takes the information that
is available about that call (such as Trunk ID, ANI, DNIS, and Extension number)
and searches your directory to find a match of that information. If a match is found,
the Business Attendant Client shows up to three lines of information about that call,
depending on the options you selected.
If you are handling calls for several departments or companies, this feature enables
you to answer the call with the appropriate greeting.
Use the following steps to select the source and destination display information.
1. Choose Options > Preferences on the Line Status window (Figure 3-1 on page
26). The Business Attendant Client Options dialog box displays (Figure 4-1 on
page 52).
2. To change the information displayed for internal calls, select the Employee DB
tab (Figure 4-8), then select the information that you want displayed on lines 1,
2, and 3 from the Source/Dest Caller Information group box. If you do not want
to display any information on a line, select None.
Figure 4-8 Employee DB tab
NDA-30103 Revision 4 Page 61
Page 72

Configuring the User Options OpenWorX Business Attendant System User Guide
3. To change the information displayed for external calls, select the External
Number DB tab (Figure 4-9), then select the information that you want
displayed on lines 1, 2, and 3 from the Source/Dest Caller Information group
box. If you do not want to display any information on a line, select None.
Figure 4-9 External Number DB tab
4. To change the information displayed for DID calls, select the DID DB tab
(Figure 4-10), then select the information that you want displayed on lines 1, 2,
and 3 from the Source/Dest DID Info group box. If you do not want to display
any information on a line, select None.
Figure 4-10 DID DB tab
Page 62 NDA-30103 Revision 4
Page 73

OpenWorX Business Attendant System User Guide Configuring the User Options
5. To change the information displayed for calls coming in on a specific route and
trunk, select the Route/Trunk tab (Figure 4-11), then select the information that
you want displayed on lines 1, 2, and 3 from the Source/Dest Route/Trunk
Information group box. If you do not want to display any information on a line,
select None.
Figure 4-11 Route/Trunk tab
6. Click OK to save your changes.
NDA-30103 Revision 4 Page 63
Page 74

Configuring the User Options OpenWorX Business Attendant System User Guide
Configuring the Fields Displayed in the Directory Window
The Business Attendant Client directory is divided into internal and external
directory. Each directory contains various fields about employees and external
numbers, respectively. You can choose the fields for each directory that you want
to display in the Directory window. (See “Directory Window” on page 19 for more
information.)
Note: The fields available to display in the directory can only be defined by the
Administrator, using the Business Attendant Administrator application.
Use the following steps to choose the fields displayed in the Directory window.
1. Select Options > Preferences on the Line Status window. The Business
Attendant Client Options dialog box displays with the General tab selected.
2. Do one of the following:
• Select the Employee DB tab to change the information displayed in the
Employee Directory.
• Select the External Number DB tab to change the information displayed in
the external directory.
Figure 4-12 Employee Directory Display group box
The selected tab contains the fields available for display in the Directory
window listed in either the Employee directory display group box or the
External number directory display group box. The Fields to display box
contains the fields that currently appear in the Directory window.
3. Do one of the following from the Employee fields box or the External DB fields
box:
• To add a field, select the desired field from the Employee fields or the
External DB fields and click Add. You can also double-click the field.
• To select all of the available fields, click Add all.
• To remove a field from the Directory window display, select the desired field
from the Fields to display box and click Remove. You can also double-click
the field.
• To change the order in which the fields are displayed, select a field and click
the Move up or Move down button.
4. Click OK. The Directory window shows any changes to the fields that you
made.
Page 64 NDA-30103 Revision 4
Page 75

OpenWorX Business Attendant System User Guide Configuring the User Options
Changing Passwords
You can change your password for the Business Attendant Client application by
using the Change Password dialog box.
Use the following steps to change your password:
1. Select Options > Change password from the Line Status window. The Change
Password dialog box displays (Figure 4-13).
2. Enter your current password in the Old password field.
3. Enter your new password in the New password field. The maximum length of
the password is ten characters, either letters or numbers. This field is not casesensitive.
4. Enter the new password again in the Verify new password field.
5. Click OK. Your password is changed as specified in the New Password field.
Use it the next time you log in to the Business Attendant Client.
Saving the Screen Layout
Once the workstation is configured to your preferences, you can save the current
layout of the Business Attendant Client windows for future use. The next time you
start the application, the layout will be restored to the last saved layout. You can
also configure the Business Attendant Client to automatically save the screen
layout every time you exit.
• To save the current screen layout, select Options > Save screen layout from
the Line Status window. The Business Attendant Client windows configuration
is saved and will be restored the next time you log in.
Figure 4-13 Change Password dialog box
NDA-30103 Revision 4 Page 65
Page 76

Configuring the User Options OpenWorX Business Attendant System User Guide
This Page Left Blank.
Page 66 NDA-30103 Revision 4
Page 77

OpenWorX Business Attendant System User Guide Working With the Directory
Chapter 5 Working With the Directory
Overview
This chapter outlines the procedures used to change the Business Attendant Client
options to create a more personalized environment. The options can be set
individually by each user, so each user can customize their speed dials and screen
layouts without affecting other users.
Chapter Topics
• About the Directory Window
• Displaying the Directory
• Sorting the Directory
• Adding a Directory Entry
• Modifying a Directory Entry
• Deleting a Directory Entry
About the Directory Window
The Directory window (Figure 5-1) contains the internal and external directories.
Double-click on an entry in the directory, press Enter, or drag it to the Line Status
window to place a call. You can also use the Directory window to define the speed
dial buttons on the Speed Dials window. (See “Adding or Modifying a Speed Dial
Number” on page 53 for more information.)
Figure 5-1 Directory window
NDA-30103 Revision 4 Page 67
Page 78

Working With the Directory OpenWorX Business Attendant System User Guide
Displaying the Directory
The Directory window contains the internal and external directories. You can open
the directory when the station is in “Idle” status or while the attendant is connected
to a source caller.
From the Line Status window (Figure 3-1 on page 26), use one of the following
methods to display the Directory window (Figure 5-1).
• Start typing the name in the Number Entered field on the Line Status window
to find the matching entries in the Directory.
Note: If no records are found, check the Search for field listed on the Directory
Window to verify that the BAS is searching for either the FullName,
LastName, or FirstName field. If it is not, select a different Default sort field
in the Options>Preferences>Employee DB tab from the Line Status Window.
• Select Window > Directory from the Line Status window.
•Press CTRL+R.
Sorting the Directory
You can sort the information in the internal and external directories in various
ways. When you change the sort criteria of the directory, the application changes
the directory search criteria to the same value. For example, if you sort the
directory by LastName, the Business Attendant Client searches the directory by
LastName when you enter information in the Search for field on the Directory
window or in the Number Entered field on the Line Status window.
In the internal directories, you can sort and search by the following fields listed in
Table 5-1.
Table 5-1 Valid Sort and Search Fields in the
Directory Window
Field Names
Extension Company
FullName Division
FirstName Department
LastName Building
Title Pager
City Fax
State Loc Status
Zip Return Date
Mail Stop
For external directories, you can sort and search by most of the displayed fields.
(See “Directory Window” on page 19 for more information.)
You can also apply a secondary sort. For instance, you can find all people with the
last name of “Smith” in Accounting by sorting by the FullName or LastName
with a secondary sort on the Department.
Page 68 NDA-30103 Revision 4
Page 79

OpenWorX Business Attendant System User Guide Working With the Directory
Changing the Default Sort Order
Use the following steps to change the default sort order of the displayed directory.
1. Select Options > Preferences on the Line Status window (Figure 3-1 on page
26) to open the Business Attendant Client Options dialog box (Figure 4-1 on
page 52).
2. Select the Employee DB or External Number DB tab.
3. Select the field from the Default sort field drop-down list (Figure 5-2).
Figure 5-2 Default Sort field
4. Click OK. The Business Attendant Client Options dialog box closes, saving the
parameters.
NDA-30103 Revision 4 Page 69
Page 80

Working With the Directory OpenWorX Business Attendant System User Guide
Adding a Directory Entry
Use the following procedures to add new listings in the internal and external
directories.
Adding an Internal Directory Entry
Use the following steps to add an entry to the internal directory.
1. Do one of the following to open the internal directory:
• Select the View > Internal directory from the Directory window (Figure 5-
1 on page 67).
• Select the Internal tab in the Directory window (Figure 5-1 on page 67).
2. Do one of the following:
• Select Edit > Add.
• Right-click on an entry and select Add from the shortcut menu.
The Add Employee dialog box displays (Figure 5-3).
Figure 5-3 Add Employee dialog box
3. Enter data in each of the available fields. Click on the desired tab to navigate
between the tabs.
4. Click OK to save the entry and exit the Add Employee dialog box. The Add
Employee dialog box closes, adding the entry to the directory.
Page 70 NDA-30103 Revision 4
Page 81

OpenWorX Business Attendant System User Guide Working With the Directory
Adding an External Directory Entry
Use the following steps to add an entry to the external directory.
1. Do one of the following to open the external directory:
• Select the View > External directory from the Directory window (Figure 5-
1 on page 67).
• Select the External tab in the Directory window (Figure 5-1 on page 67).
2. Do one of the following:
• Select Edit > Add.
• Right-click on an entry and select Add from the shortcut menu.
The Add External Number dialog box displays (Figure 5-4).
Figure 5-4 Add External Number dialog box
3. Enter the available information in the following fields:
• ANI num
A ten digit number used to find this record or displayed when answering
calls. (For example, enter 9725551212 as a valid ANI number.)
• Call num
The access code and number used when placing and transferring calls to
this destination. (For example, 99725551212 or 95551212.)
• Displayable num
NDA-30103 Revision 4 Page 71
Page 82

Working With the Directory OpenWorX Business Attendant System User Guide
The number to be displayed in the directory, complete with spaces,
hyphens, and parentheses. (For example, (972) 555-1212.)
•Name
• Account
• Department
• Company
•Address
•City
• State
•Zip
• User Defined fields 1 - 4
4. To save the entry and add another entry without exiting the Add External
Number dialog box, click Add Another.
5. Click OK to save the entry and exit the Add External Number dialog box. The
Add External Number dialog box closes, adding the entry to the directory.
Page 72 NDA-30103 Revision 4
Page 83

OpenWorX Business Attendant System User Guide Working With the Directory
Modifying a Directory Entry
Use the following procedures to edit an entry in the internal or external directory.
Modifying an Internal Directory Entry
Use the following steps to modify an entry in the internal directory.
1. Do one of the following to open the internal directory:
• Select the View > Internal directory from the Directory window (Figure 5-
1 on page 67).
• Select the Internal tab in the Directory window (Figure 5-1 on page 67).
2. Select the directory entry that you want to modify.
3. Do one of the following:
• Select Edit > Modify.
• Right-click on an entry and select Modify from the shortcut menu.
The Edit Employee dialog box displays (Figure 5-5).
Figure 5-5 Edit Employee dialog box
4. Enter the new information in the desired field(s). Click on the desired tab to
navigate between the tabs.
5. Click OK to save the entry and exit the Edit Employee dialog box. The Edit
Employee dialog box closes, modifying the directory entry.
NDA-30103 Revision 4 Page 73
Page 84

Working With the Directory OpenWorX Business Attendant System User Guide
Modifying an External Directory Entry
Use the following steps to modify an entry in the external directory.
1. Do one of the following to open the external directory:
• Select the View > External directory from the Directory window (Figure 5-
1 on page 67).
• Select the External tab in the Directory window (Figure 5-1 on page 67).
2. Select the directory entry that you want to modify.
3. Do one of the following:
• Select Edit > Modify.
• Right-click on an entry and select Modify from the shortcut menu.
The Modify External Number dialog box displays (Figure 5-6).
Figure 5-6 Modify External Number dialog box
4. Enter the new information in the desired field(s).
5. Click OK to save the entry and exit the Modify External Number dialog box.
The Modify External Number dialog box closes, modifying the entry in the
directory.
Page 74 NDA-30103 Revision 4
Page 85

OpenWorX Business Attendant System User Guide Working With the Directory
Deleting a Directory Entry
Use the following procedures to delete listings in the internal and external
directories.
Deleting an Internal Directory Entry
Use the following steps to delete an internal directory entry.
1. Do one of the following to open the internal directory:
• Select the View > Internal directory from the Directory window (Figure 5-
1 on page 67).
• Select the Internal tab in the Directory window (Figure 5-1 on page 67).
2. Select the directory entry that you want to delete from the Directory window.
3. Do one of the following:
• Select Edit > Delete.
• Right-click on an entry and select Delete from the shortcut menu.
The Edit Employee dialog box displays (Figure 5-7).
Figure 5-7 Edit Employee dialog box
4. Click OK to delete the entry and exit the Edit Employee dialog box. The Edit
Employee dialog box closes, deleting the entry from the directory.
NDA-30103 Revision 4 Page 75
Page 86

Working With the Directory OpenWorX Business Attendant System User Guide
Deleting an External Directory Entry
Use the following steps to delete an external directory entry.
1. Do one of the following to open the external directory:
• Select the View > External directory from the Directory window (Figure 5-
1 on page 67).
• Select the External tab in the Directory window (Figure 5-1 on page 67).
2. Select the entry that you want to delete from the Directory window.
3. Do one of the following:
• Select Edit > Delete.
• Right-click on an entry and select Delete from the shortcut menu.
The Delete External Number dialog box displays (Figure 5-8).
Figure 5-8 Delete External Number dialog box
4. Click OK to delete the entry and exit the Delete External Number dialog box.
The Delete External Number dialog box closes, deleting the entry from the
directory.
Page 76 NDA-30103 Revision 4
Page 87

OpenWorX Business Attendant System User Guide Using the Wave File Recording Features
Chapter 6 Using the Wave File Recording Features
Overview
This chapter outlines the procedures used to work with recorded wave files with
the Business Attendant System, including playing and recording greetings and
conversations.
Chapter Topics
• About Wave File Recording
• Configuring Wave Files Settings
• Working with Greetings
• Working with Recorded Calls
• Deleting Wave Files
• Troubleshooting Wave Files
About Wave File Recording
If you have installed the NEC D
you can use the wave file recording and playing feature the Business Attendant
System provides. After the wave device has been configured, the attendant can
record and play back wave files, including greetings and conversations. (See
“Working with Greetings” on page 86 for more information.) If automatic call
recording is enabled, the Business Attendant System automatically records calls
and allows attendants to play them back. (See “Working with Recorded Calls” on
page 89 for more information.)
term
PC Board and its driver or an alternate device,
Wave File Naming Conventions
NDA-30103 Revision 4 Page 77
Each wave file has a .wav extension. The Business Attendant Client uses the
following conventions in naming the files.
Table 6-1 Wave File Naming Conventions
When You See It Indicates
g This is a greeting wave file.
i This is an internal greeting wave file.
e This is an external greeting wave file.
gxxxx This is a greeting wave file for called number xxxx.
dy This is a greeting wave file used all day.
am This is a greeting wave file used only for mornings.
pm This is a greeting wave file used only for afternoons.
Page 88

Using the Wave File Recording Features OpenWorX Business Attendant System User Guide
Table 6-1 Wave File Naming Conventions
When You See It Indicates
If the file name contains all digits, the file is a recorded
call conversation. The numbers indicate the time that the
conversation was recorded. The first two digits indicate
File name is all digits
(example: 12121212)
the day, the second two digits indicate the hour, the third
two digits indicate the minutes, and the fourth set of two
digits indicate the seconds. As a result of this format, the
call may be overwritten within a month of the recorded
time.
Configuring Wave Files Settings
Before using the wave file recording and playing functionality of the Business
Attendant System, the wave devices for playing greetings and phone conversation
recordings must be configured. Wave device and file settings can be made through
the Wave Files tab of the Business Attendant Client Options dialog box (Figure 6-
1).
Use the following steps to display the Wave Files tab.
1. Select Options > Preferences on the Line Status window (Figure 3-1 on page
26). The Business Attendant Client Options dialog box displays (Figure 4-1 on
page 52).
2. Select the Wave Files tab (Figure 6-1).
Figure 6-1 Wave Files tab
Page 78 NDA-30103 Revision 4
Page 89

OpenWorX Business Attendant System User Guide Using the Wave File Recording Features
Configuring Greetings
The Greeting group box (Figure 6-2) on the Wave Files tab (Figure 6-1 on page 78)
contains the settings the Business Attendant System uses to record and play
greetings.
Figure 6-2 Greeting group box
The input and output wave devices for recording and playing back greetings must
be configured before the Business Attendant System can use recorded greetings.
Additionally, through the settings in the Greeting group box, you can configure the
Business Attendant System to use different greetings for nights and different
greetings for groups.
Setting Up Greeting Recording Wave File Input/Output Devices
Use the following steps to select the wave file input and output devices for
recording and playing back greetings.
1. To select the device that will be used to record the greeting, click the Change
button beside the Input field in the Greeting group box (Figure 6-2). The Wave
Input Device dialog box displays (Figure 6-3).
Figure 6-3 Wave Input Device dialog box
2. To select the device that will be used to play back the greetings, click the
Change button beside the Output field in the Greeting group box (Figure 6-2).
The Wave Output Device dialog box displays (Figure 6-4).
Figure 6-4 Wave Output Device dialog box
NDA-30103 Revision 4 Page 79
Page 90

Using the Wave File Recording Features OpenWorX Business Attendant System User Guide
3. Select the device that will be used to record and play back the greeting wave file
from the following options in the drop-down list.
Table 6-2 Wave File Device Options
Option Recording and Play Back Method
Recording is done from the Mic input and the
recording is played back through the speakers.
Stereo Mic/Speakers
To use this device for recording and playing
back wave files, plug a microphone into the
term
PC board’s microphone jack and plug in
D
a speaker to the D
term
PC Board’s SPKR jack.
Recording is done with the adjunct telephone,
Phone Voice Channel
recording over the dial tone. The recording is
played back to the phone.
Recording is done from both the adjunct
term
D
PC Line and Phone
telephone and the far party. The recording is
played back to both the adjunct telephone and
the far party.
Note: The Sample Rate, Sample Size, and Stereo fields are related to the wave file
format. These fields can be changed if they are enabled. The higher the
sample rate chosen, the better the recording quality, but the more disk space
is needed for every second of recording. For example, to record a wave file
for one second at 11KHz uses 10.78 KB disk space, at 22KHz uses 21.53KB
disk space, and 44KHz uses 43.06KB disk space.
4. If available, select the desired sample rate from the Sample Rate group box.
5. If available, select the desired sample size from the Sample Size group box.
6. If desired, click the Stereo check box to record in Stereo.
Note: In addition to the sample rate, the Input Gain and Wave Volume affect the
record and playback quality of your wave files. These items can be set through
term
the D
Package. The D
detailed information about wave device settings. The Input Gain and Wave
Volume for selected wave devices can be adjusted before or during recording
or playing back wave file.
PC Board Configure software that comes with your D
term
PC Installation Guide for D
term
PC Series III contains
term
PC Board
7. Click OK. The Wave Input/Output Device dialog box closes and the Business
Attendant Client Options dialog box displays.
8. Click OK to save this parameter and exit the Business Attendant Client Options
dialog box.
Page 80 NDA-30103 Revision 4
Page 91

OpenWorX Business Attendant System User Guide Using the Wave File Recording Features
Configuring Automatic Greetings
Use the following steps to enable the Business Attendant System to play a greeting
automatically.
1. From the Business Attendant Client Options dialog box (Figure 4-1 on page
52), select the Wave Files tab (Figure 6-1 on page 78).
2. Select the Automatically play greeting check box.
3. Click OK to save this parameter and exit the Business Attendant Client Options
dialog box.
Configuring Time-Dependent Greetings
The Business Attendant System allows you to play a different greeting depending
on the time of day.
Use the following steps to enable the Business Attendant System to use a timedependent greeting.
1. From the Business Attendant Client Options dialog box (Figure 4-1 on page
52), select the Wave Files tab (Figure 6-1 on page 78).
2. Select the Play different greeting for AM and PM check box.
3. Click OK to save this parameter and exit the Business Attendant Client Options
dialog box.
Configuring Group Greetings
The Business Attendant System can be configured to play different greetings for
different groups or DIDs. The groups/DIDs are configured in the Business
Attendant Administrator application. Group greetings are configured when
recording greetings. (See “Recording a Greeting” on page 86 for more
information.)
Use the following steps to enable the Business Attendant System to use different
greetings for groups.
1. From the Business Attendant Client Options dialog box (Figure 4-1 on page
52), select the Wave Files tab (Figure 6-1 on page 78).
2. Select the Play different greeting for groups check box.
3. Click OK to save this parameter and exit the Business Attendant Client Options
dialog box.
NDA-30103 Revision 4 Page 81
Page 92

Using the Wave File Recording Features OpenWorX Business Attendant System User Guide
Configuring Automatic Call Recording
The Call Conversation group box (Figure 6-5) on the Wave Files tab (Figure 6-1
on page 78) contains the settings the Business Attendant System uses to enable
attendants to record conversations.
Figure 6-5 Call Conversation group box
If automatic recording is selected, the Business Attendant System warns the
attendant after the configured number of minutes that the conversation is being
recorded. The attendant can then decide to continue or to stop recording. Since the
wave files require a large amount of disk space, the attendant might want to stop
recording after the warning displays.
Note: Please follow the FCC rules regarding the legality of recording telephone
conversations before you start recording a phone conversation.
Before the Business Attendant System can record calls, call recording must be
enabled and the input and output wave devices for recording and playing back call
conversations must be configured. Additionally, the Call Conversation group box
allows you to configure the number of calls that will be recorded automatically, and
the length of time between recording reminders.
Enabling Call Recording
Before the Business Attendant System can record any call conversations,
conversation recording must be enabled. Use the following steps to enable call
recording.
1. From the Business Attendant Client Options dialog box (Figure 4-1 on page
52), select the Wave Files tab (Figure 6-1 on page 78).
2. Select the Record phone conversation check box.
3. Click OK to save this parameter and exit the Business Attendant Client Options
dialog box.
Page 82 NDA-30103 Revision 4
Page 93

OpenWorX Business Attendant System User Guide Using the Wave File Recording Features
Setting Up Call Recording Wave File Input/Output Devices
Use the following steps to select the wave file input and output devices for
recording and playing back calls.
1. To select the device that will be used to record the calls, click the Change button
beside the Input field in the Call Conversation group box (Figure 6-5). The
Wave Input Device dialog box displays (Figure 6-3).
Figure 6-6 Wave Input Device dialog box
2. To select the device that will be used to play back the wave files of the calls,
click the Change button beside the Output field in the Call Conversation group
box (Figure 6-5). The Wave Output Device dialog box displays (Figure 6-3).
Figure 6-7 Wave Output Device dialog box
3. Select the device that will be used to record and play back the recorded call
wave files from the following options in the drop-down list.
Table 6-3 Wave File Device Options
Option Recording and Play Back Method
Recording is done from the Mic input and the
recording is played back through the speakers.
Stereo Mic/Speakers
To use this device for recording and playing
back wave files, plug a microphone into the
term
PC board’s microphone jack and plug in
D
a speaker to the D
term
PC Board’s SPKR jack.
Recording is done with the adjunct telephone,
Phone Voice Channel
recording over the dial tone. The recording is
played back to the phone.
NDA-30103 Revision 4 Page 83
Page 94

Using the Wave File Recording Features OpenWorX Business Attendant System User Guide
Table 6-3 Wave File Device Options
Option Recording and Play Back Method
Recording is done from both the adjunct
term
PC Line and Phone
D
telephone and the far party. The recording is
played back to both the adjunct telephone and
the far party.
Note: The Sample Rate, Sample Size, and Stereo fields are related to the wave file
format. These fields can be changed if they are enabled. The higher the
sample rate chosen, the better the recording quality, but the more disk space
is needed for every second of recording. For example, to record a wave file
for one second at 11KHz uses 10.78 KB disk space, at 22KHz uses 21.53KB
disk space, and 44KHz uses 43.06KB disk space.
4. If available, select the desired sample rate from the Sample Rate group box.
5. If available, select the desired sample size from the Sample Size group box.
6. If desired, click the Stereo check box to record in Stereo.
Note: In addition to the sample rate, the Input Gain and Wave Volume affect the
record and playback quality of your wave files. These items can be set through
term
the D
Package. The D
detailed information about wave device settings. The Input Gain and Wave
Volume for selected wave devices can be adjusted before or during recording
or playing back wave file.
PC Board Configure software that comes with your D
term
PC Installation Guide for D
term
PC Series III contains
term
PC Board
7. Click OK. The Wave Input/Output Device dialog box closes and the Business
Attendant Client Options dialog box displays.
8. Click OK to save this parameter and exit the Business Attendant Client Options
dialog box.
Configuring the Number of Calls Recorded
The Business Attendant System can record up to the last five calls. Use the
following steps to configure the number of calls the Business Attendant System
records automatically.
1. From the Business Attendant Client Options dialog box (Figure 4-1 on page
52), select the Wave Files tab (Figure 6-1 on page 78).
2. Enter the number of calls, ranging from 1 to 5, that the Business Attendant
System will record in the Record last calls field.
3. Click OK to save this parameter and exit the Business Attendant Client Options
dialog box.
Configuring the Notification Warning
Use the following steps to configure how long the conversation is recorded before
the BAS reminds the attendant that the call is being recorded.
1. From the Business Attendant Client Options dialog box (Figure 4-1 on page
52), select the Wave Files tab (Figure 6-1 on page 78).
Page 84 NDA-30103 Revision 4
Page 95

OpenWorX Business Attendant System User Guide Using the Wave File Recording Features
2. Enter the number of minutes that the Business Attendant System should record
the conversation before displaying a reminder in the Remind interval field.
3. Click OK to save this parameter and exit the Business Attendant Client Options
dialog box.
Setting the Wave File Path
Before wave files can be played and recorded using the Business Attendant
System, you must enter a path indicating the location of the wave files. You can
store the wave files for all attendants in a common directory to save disk space on
the local machines, instead of having each attendant store their individual wave
files on their local machine. If the wave files are stored in a common directory, the
administrator can view, playback, or delete the wave files to maintain the files and
disk space. In the common directory, each attendant has their own folder.
Attendants can only view, play, or delete their own wave files.
Use the following steps to configure the wave file common directory.
1. From the Business Attendant Client Options dialog box (Figure 4-1 on page
52), select the Wave Files tab (Figure 6-1 on page 78).
2. Do one of the following:
• Enter the desired path in the Path to wave files field.
•Click the Browse button and select the desired path from the available
directories.
3. Click OK to save this parameter and exit the Business Attendant Client Options
dialog box.
NDA-30103 Revision 4 Page 85
Page 96

Using the Wave File Recording Features OpenWorX Business Attendant System User Guide
Working with Greetings
If you have installed the D
computer, you are able to record and play wave files from or to a telephone line.
The Business Attendant System provides the following options for playing
greeting wave files:
Automatically play greeting
This option enables the Business Attendant System to automatically play back a
prerecorded greeting wave file when an incoming call is connected.
Play different greeting for AM and PM
This option enables the Business Attendant System to play back different greeting
wave files in the morning and in the afternoon.
Play different greeting for groups
This option enables the Business Attendant System to play back different greeting
wave files to different external group callers.
When a call comes in and is connected, a prerecorded greeting wave file is played
for the calling party. If your selected greeting wave file does not exist, no greeting
is played.
term
PC Board and its driver or alternate device in your
Recording a Greeting
Attendants can record greeting wave files after the greetings parameters are
configured on the Wave Files tab in the Business Attendant Client Options dialog
box. Before you start recording, verify that the record and play back devices have
been properly configured. (See “Configuring Greetings” on page 79 for more
information.) Use the following steps to record a greeting.
1. Select Options > Record greeting from the Line Status window (Figure 3-1 on
page 26). The Record Greeting dialog box displays (Figure 6-8). The Record
Greeting dialog box contains controls that are similar to those on a tape
recorder.
Figure 6-8 Record Greeting dialog box
Page 86 NDA-30103 Revision 4
Page 97

OpenWorX Business Attendant System User Guide Using the Wave File Recording Features
2. Click the red Record button to start recording. The slider moves while you
record the message. The length of the file displays in the Position and Length
fields.
Note 1: The Stereo Mic/Speakers option is recommended to ensure the highest quality
of recording.
term
Note 2: If you have selected the D
hook and speak the desired greeting. The dial tone will not be incorporated
in the recording.
Phone Voice Channel, take the receiver off the
3. Use the play back controls to navigate within and play the wave file:
•Click the Play button to play the wave file.
•Click the Fast Forward or Rewind button to move to the beginning or end
of the wave file. After reaching the desired location, click the Play button to
play the wave file.
• Move the Slider Control to move to a specific location in the wave file.
After reaching the desired location, click the Play button to play the wave
file.
•Click the Pause button to stop playing the wave file at the current location.
Click the Pause button again to resume playing the wave file.
•Click the Stop button to stop the wave file from playing.
4. Once you are satisfied with your recording, you can save the file as one of the
following types of greetings.
Table 6-4 Greeting Types
Greeting Type Action
Internal Greeting Plays for internal incoming calls.
External Greeting
Plays for external incoming calls in spite of the
called numbers.
Plays for external incoming calls according to
Group Greeting
their groups. Groups are defined by called
numbers.
5. If you selected the Group greeting radio button, click the Select groups button
to select the group(s) that you want to hear the wave file greeting. The Save
Greeting for Groups dialog box displays (Figure 6-9), displaying the groups
previously configured using the Business Attendant Administrator.
NDA-30103 Revision 4 Page 87
Page 98

Using the Wave File Recording Features OpenWorX Business Attendant System User Guide
Figure 6-9 Save Greeting for Groups dialog box
6. Click the group(s) to select the desired groups. Click OK when all groups are
selected. The Save Greeting for Groups dialog box closes.
7. Select the time of day that you want the message to be played:
•All day
• Morning
• Afternoon
8. Click OK. The Record Greeting dialog box closes, saving the greeting.
Page 88 NDA-30103 Revision 4
Page 99

OpenWorX Business Attendant System User Guide Using the Wave File Recording Features
Working with Recorded Calls
The Business Attendant System gives attendants the capability to record and play
back call conversations. If configured, the Business Attendant System will
automatically record a number of calls and save them as wave files for attendants
to play back. (See “Configuring Automatic Call Recording” on page 82 for more
information.)
Recording a Call If the Business Attendant System is configured to automatically record the phone
conversations, the specified number of calls are recorded. The files are not
permanently saved to the hard drive since the files often require large amounts of
disk space. Instead, the temporary files are saved to the location configured in the
Business Attendant Client Options. (See “Configuring Automatic Call Recording”
on page 82 for more information.)
Note: Please follow the FCC rules regarding the legality of recording telephone
conversations before you start recording a phone conversation.
Use following methods to save call recordings, with a note attached.
Note: The Save Recording option is only available after hanging up with the caller you
were recording.
•Click the SvRec command button in the Line Status window (Figure 3-1 on
page 26).
• CTRL+F9
• Select Call > Save Recording from the Line Status window (Figure 3-1 on
page 26).
The recording is saved to the location configured in the Business Attendant
Client Options dialog box.
NDA-30103 Revision 4 Page 89
Page 100

Using the Wave File Recording Features OpenWorX Business Attendant System User Guide
Playing a Recorded Call
Use the following steps to play a wave file of a recorded call.
1. Select Options > Play back from the Line Status window (Figure 3-1 on page
26). The Play Back dialog box displays (Figure 6-10).
Figure 6-10 Play Back dialog box
2. Select the wave file that you want to play from the Wave Files group box.
• To open wave files that are not saved in the default folder, click the Browse
button, then open the desired wave file.
• Information about the wave file displays in the Record Information group
box, including the name of the caller or called party, the phone number, the
time of the call, and any notes that the operator entered when saving the
recording.
Slider Control
Play
Rewind
Figure 6-11 Play Back Controls - Play Back dialog box
Stop
Pause
Fast Forward
3. The Play Back dialog box controls (Figure 6-11) are similar to those on a tape
recorder. Use the play back controls to navigate within and play the wave file:
•Click the Play button to play the wave file.
Page 90 NDA-30103 Revision 4
 Loading...