


NEC Mobile Suite User Guide for N411i Rev 1.0 6/May/2005
NEC Mobile Suite User Guide
Ver:1.01 6, May, 2005

NEC Mobile Suite User Guide for N411i Rev 1.0 6/May/2005
CONTENTS
1PREFACE................................................................................................................................4
1.1Glossary and Definitions....................................................................................................4
1.2Typographical Conventions...............................................................................................4
2INTRODUCTION...................................................................................................................5
2.1Purpose...............................................................................................................................5
2.2Scope..................................................................................................................................5
2.3System Requirements.........................................................................................................6
2.3.1Minimum PC Requirements.......................................................................................6
3INSTALLATION & CONFIGURATION............................................................................7
3.1Installation..........................................................................................................................7
3.2Configuration...................................................................................................................14
4APPLICATION Functionality.............................................................................................14
4.1Phone Selection................................................................................................................15
4.2The Communication Service - systray icon.....................................................................15
4.3Start using NEC Mobile Suite..........................................................................................17
4.3.1Backup/Restore ........................................................................................................18
4.3.1.1Backup...............................................................................................................18
4.3.1.2Restore...............................................................................................................19
4.3.2Multimedia Resource Manager – MRM...................................................................20
4.3.2.1Controls..............................................................................................................21
4.3.2.1.1Resource selection icons.............................................................................21
4.3.2.1.2PC Area.......................................................................................................21
4.3.2.1.3Phone Area..................................................................................................21
4.3.2.1.4Preview Area...............................................................................................21
4.3.2.1.5Pop-up menu...............................................................................................21
4.3.2.1.7Transfer UP Button.....................................................................................21
4.3.2.1.8Transfer DOWN Button..............................................................................22
4.3.2.1.9Get List Button............................................................................................22
4.3.2.1.10Get list with image preview......................................................................22
4.3.2.1.11Transfer Button.........................................................................................22
4.3.2.1.12Delete Button ...........................................................................................22
4.3.2.1.13New Folder Button....................................................................................23
4.3.2.2Features..............................................................................................................24
4.3.2.2.1Upload to Phone..........................................................................................24
4.3.2.2.2Download to PC..........................................................................................24
4.3.2.2.3Upload and Download................................................................................25
4.3.2.2.4Marking Resources.....................................................................................26
4.3.2.3Menus.................................................................................................................28
4.3.2.3.1File menu.....................................................................................................28
4.3.2.3.2View menu..................................................................................................29
4.3.3Personal Information Manager - PIM.......................................................................30
4.3.3.1PIM selection icons ...........................................................................................30
4.3.3.1.1Action buttons.............................................................................................30
4.3.3.2Contacts..............................................................................................................31
4.3.3.2.1Groups area.................................................................................................31
4.3.3.2.2Contacts area...............................................................................................32
4.3.3.2.3Details area..................................................................................................32
4.3.3.3Schedule ............................................................................................................33

NEC Mobile Suite User Guide for N411i Rev 1.0 6/May/2005
4.3.3.3.1Viewer.........................................................................................................33
4.3.3.3.2Settings........................................................................................................34
4.3.3.4ToDo..................................................................................................................35
4.3.3.4.1Viewer.........................................................................................................35
4.3.3.4.2Settings........................................................................................................35
4.3.3.5Notepad..............................................................................................................37
4.3.3.5.1Settings........................................................................................................37
4.3.3.5.2Viewer.........................................................................................................37
4.3.3.6Bookmark...........................................................................................................38
4.3.3.6.1Settings........................................................................................................38
4.3.3.6.2Viewer.........................................................................................................38
4.3.3.7File Menu...........................................................................................................39
4.3.3.7.1Importing a CSV File..................................................................................41
4.3.3.7.2Exporting a CSV File..................................................................................44
5KEYBOARD SHORTCUTS................................................................................................47

NEC Mobile Suite User Guide for N411i Rev 1.0 6/May/2005
1 PREFACE
1.1 Glossary and Definitions
Term Description
CSV Comma Separated Values
DRM Digital Rights Management
MRM Multimedia Resource Manager
PC Personal Computer
PIM Personal Information Manager
Resources Files of a given type
1.2 Typographical Conventions
In this document the following typographical conventions will be used to aid clarity.
<ESC> Angle brackets mean press the key with the given label. In this case this is the
Esc key.
Ctrl+<X> Plus means hold the first key down whilst depressing the next key, then
release them all.
[Cancel] Square brackets mean the command button with the given label, in this case “Cancel”.
a:\setup Bold fixed point text indicates some information which needs to be entered by the user.
Exception Normal fixed point text Indicates some message/output produced by the application.
var-name Italic fixed point text indicates the position where a user defined name can be entered.
File This means use the mouse to click on the windows menu bar or pop-up menu option
with the given label, in this case “File”.
File | Open This means use the mouse to click on the menu bar option “File”. Then click on the
option “Open” which will be displayed in the pop-up menu displayed as a result of
clicking on “File”.

NEC Mobile Suite User Guide for N411i Rev 1.0 6/May/2005
2 INTRODUCTION
The NEC Mobile Suite is an application that provides the user an interface to interact with the Phone.
The NEC Mobile Suite contains three modules that deal with specific type of data, the
Backup/Restore, the MRM - Multimedia Resource Manager and the PIM - Personal Information
Manager.
The Backup/Restore allows the user to make a backup of all the phone’s data (images, melodies,
contacts, sms, etc) and at any time restore them to the phone again. MRM will enable the user to
download (from Phone to PC) and upload (from PC to Phone) Images, Melodies, Movies and MP3,
whilst PIM will allow the user to manage the Phone Book, Schedule, ToDo, Notepad and depending on
the user’s phone model the Bookmark’s.
Section 4 will describe in a comprehensive way all the features of this application.
2.1 Purpose
This document describes in detail the NEC Mobile Suite environment, all its features and how the user
accesses them. It is intended to describe to the user how to do a specific operation.
2.2 Scope
This document has three main sections that will help the user to understand the purpose of this
application, how to make it run and what features it provides.
The sections are as follows:
Introduction
Gives the user an idea of what is the application and what does it offer.
Installation and Configuration
Helps the user to install and configure the application, guiding the user throughout the process
until its ready.
Application Functionality
Explains in detail all the features and options available, so that the user can understand the
environment, interpret it and take full advantage of what the application has to offer.
NOTE: The sections Troubleshooting and Appendix are currently blank.

NEC Mobile Suite User Guide for N411i Rev 1.0 6/May/2005
2.3 System Requirements
2.3.1 Minimum PC Requirements
Operating Systems
NEC Mobile Suite can run on the following operating systems
• Microsoft Windows 2000 (SP4)
• Microsoft Windows XP Pro (SP1)
• Microsoft Windows XP Home Edition (SP1)
Minimum required by the operating system
• NEC Mobile Suite requires processor with clock speed of > 350 MHz.
• 64 MB RAM is required.
Recommendation
• CPU clock speed of > 1GMHz.
• 256 MB RAM.
Available Disk Space
The amount of disk space required to install the NEC Mobile Suite is 10 MB.
Monitor
A monitor with following features is recommended:
• Screen resolution of 800 x 600
• 256 colours
Logging Lead
USB
Note:
Install the USB/Modem driver before a NMS setup.

NEC Mobile Suite User Guide for N411i Rev 1.0 6/May/2005
3 INSTALLATION & CONFIGURATION
3.1 Installation
To initiate the installation process please double-click on the “setup.exe” file.
The first screen that will appear is the Choose Setup Language.
The user just has to choose the language (be aware that the installation language will also be the one
used in the application itself) and press [Next].
The next one is the Preparing to Install followed by the Welcome screen. Press [Next].

NEC Mobile Suite User Guide for N411i Rev 1.0 6/May/2005
NOTE: The installation process can be cancelled by clicking on the [Cancel] button.
Pressing [Next] will lead you to the Licence Agreement screen. Read it carefully before pressing [I
accept the terms of the license agreement] and [Next] if you agree and want to proceed with the
installation or [No] if you do not agree and want to abort the installation. [Back] returns to the previous
screen.

NEC Mobile Suite User Guide for N411i Rev 1.0 6/May/2005
Now the user will be asked to enter some personal information
NOTE: The first option will install the NEC Mobile Suite for all users, i.e. all users that log in will be able
to use it.
Press [Next].

NEC Mobile Suite User Guide for N411i Rev 1.0 6/May/2005
On this screen the user can either select the installation directory by clicking on the [Browse] button or
use the default directory. Press [Next].

NEC Mobile Suite User Guide for N411i Rev 1.0 6/May/2005
Through this screen the user will be able to create/select the Program Folder in which the shortcut for
the NEC Mobile Suite will be created. Press [Next].

NEC Mobile Suite User Guide for N411i Rev 1.0 6/May/2005
In this screen the user can check the installation settings before the process is initialised.
Press [Next], when ready to start installation.

NEC Mobile Suite User Guide for N411i Rev 1.0 6/May/2005
In this screen, Setup Status, the user can monitor the installation progress. W hen concluded the next
screen (Installation Completed) will appear.

NEC Mobile Suite User Guide for N411i Rev 1.0 6/May/2005
When this screen appears the installation will be concluded.
Before ending the process the user can instruct the installer to create a desktop shortcut and/or run the
NEC Mobile Suite at Windows startup.
After pressing [Finish], one last screen is displayed enabling the user to start the NEC Mobile Suite
application immediately.
3.2 Configuration
No further configuration is needed to start using the NEC Mobile Suite.
Now the user is ready to start using the NEC Mobile Suite.
4 APPLICATION FUNCTIONALITY
This section contains a detailed description of the NEC Mobile Suite application, all its components and
features.

NEC Mobile Suite User Guide for N411i Rev 1.0 6/May/2005
4.1 Phone Selection
In order to start using the NEC Mobile Suite, the user can double click the NEC Mobile Suite icon on
the desktop (if this option was selected during the installation process) or select the item on the Start |
Programs | NEC Mobile Suite | NEC Mobile Suite.
Either way a Phone Selection screen will be presented to the user.
The user can then select one of the phones listed and press [OK] or press [Auto detect] so that the
correct phone can be detected. After that the NEC Mobile Suite application will be loaded.
NOTE: The Phone Selection screen will only be presented automatically the first time the NEC Mobile
Suite application is started after the installation. It can be recalled at any time through the Systray
menu – explained in detail in the next section (4.2).
4.2 The Communication Service - systray icon
The Comms Service icon (located in the tray containing the system clock) will be visible after the NEC
Mobile Suite application is started and it will remain there even if the NEC Mobile Suite application is
closed. It can be closed by right clicking choosing Exit.
The icon will look like this:

NEC Mobile Suite User Guide for N411i Rev 1.0 6/May/2005
Below is a sample of the Comms Service menu that the user can easily access by right clicking on it.
The first line, XXXX connected on COMx, indicates which is the phone model (XXXX) and in
which PORT (COMx) it was detected. If no phone is connected the text “No phone
connected” will be displayed.
The second, third and fourth line, Personal Information Manager, Multimedia Resource
Manager and Backup/Restore, allow the user to start these applications within the NEC
Mobile Suite (they can be loaded at the same time).
Phone selection loads the screen with the same name already discussed above.
Configure COM port enables the user to set manually the COM port used to communicate
with the Phone. By default all existing COM ports are listed. When the user connects a phone
using a USB port, this last is added to the list. The list is only updated when the user accesses
it.
About brings up a screen where the user can verify the software version of each NEC Mobile
Suite module (PIM & MRM), the Comms Service and the NEC Mobile Suite itself.
Exit closes the Comms Service, along with the NEC Mobile Suite if it’s opened.
The systray icon can assume 5 status forms:
No phone connected
Phone connected
Auto detecting phone
Data transfer in progress
Manual port changed. It’s not yet confirmed if the selected port is valid.
Each of these status forms will be discussed later.

NEC Mobile Suite User Guide for N411i Rev 1.0 6/May/2005
4.3 Start using NEC Mobile Suite
If not already opened the user can now start the NEC Mobile Suite by any of the ways described above
(section 4.1).
When the NEC Mobile Suite is started for the first time none of its modules are opened and it will look
like this:
The user can open one or more of its modules (only the last one will be seen) by clicking once in the
corresponding icons, on the left. The module will be opened on the right side of the application window.
In order to switch between modules just click on the same icons used to open them.

NEC Mobile Suite User Guide for N411i Rev 1.0 6/May/2005
4.3.1 Backup/Restore
The Backup/Restore (bellow) provides a way to save all data from a phone into a file on the PC that
can be restored (inserted back into the phone) at any time. As it can be seen Contacts, Schedule,
ToDo, Melodies, Pictures, Movies, SMS/EMS and depending on the user’s phone model MMS and email or i-mode are the available data for these operations.
4.3.1.1 Backup
The user starts by selecting which kind of data is to be backed up by ticking the boxes on the left side.
The Select All option will tick all boxes. After this, clicking on the [Backup] button (or File | Backup) will
show a Save As screen where the user selects the name and location of the backup file. Pressing
[Save] will initiate the backup process, which can be monitored on the right side of the Backup/Restore
window (blank box). When finished, all the ticked boxes on the Backup side will be also ticked in the
Restore side.
The user can now make a full restore (all that was backed up) or only choose some of the data,
unselecting those not required to restore.
As stated above, depending on the user’s phone model, the options presented may be the following:

NEC Mobile Suite User Guide for N411i Rev 1.0 6/May/2005
4.3.1.2 Restore
To restore the data (from a backup file) into the phone the user must click on the [Open] button (or
File | Open) and select a backup file. After confirming the file, all the boxes corresponding to the
backed up data will be ticked. The user may untick items if they are not to be restored. To initiate the
process click on the [Restore] button (or on File | Restore). The process can be monitored on the right
side of the Backup/Restore window (the blank area in the design above).

NEC Mobile Suite User Guide for N411i Rev 1.0 6/May/2005
4.3.2 Multimedia Resource Manager – MRM
The MRM environment can be seen in the image below. The MRM manages the Images, Melodies,
Movies and MP3 resources, and provides the user a way to transfer both from the Phone to the PC
and vice-versa. A detailed explanation of how it works, what features it provides will now be presented.
All this information will be given for the Image resources, because the Melodies, Movies and MP3
resources work exactly the same way.

NEC Mobile Suite User Guide for N411i Rev 1.0 6/May/2005
4.3.2.1 Controls
4.3.2.1.1 Resource selection icons
On the top of the MRM window (on the left of the module name) there are four icons: Images,
Melodies, Movies and MP3 icon. The icon selected will be coloured, and the name will be displayed
on the left of the icons.
NOTE: The same actions can be performed through the View menu, options Images, Melodies,
Movies or MP3.
4.3.2.1.2 PC Area
Below the Resource selection buttons is the PC Area. This area shows the contents (images,
melodies, movies or MP3, depending on which Resource type the user selected, and embedded
directories) of a directory (user selectable) . Through it the user can select the Resources to be
transferred to the Phone. If the selected Resources are of Image type then a preview of it is shown in
the screen of the Phone picture. If it’s a Melody, Movie or MP3 a picture symbolizing it will be shown in
the Phone screen.
4.3.2.1.3 Phone Area
The Phone area is located under the PC area. In it the user can select the resources (images,
melodies, movies or MP3, depending on which Resource type is selected) to be transferred to the PC,
navigating through the folders structure, delete resources files and create new folders.
4.3.2.1.4 Preview Area
The Preview Area is located on the right side of the MRM window. It contains a picture of the phone
that is being used (detected) and the preview of the image file selected will be done on the phone
display.
4.3.2.1.5 Pop-up menu
A pop-up menu is available in both PC and Phone Areas. With a right-click the user has access to two
options whose actions are always carried out in the selected area. The options are the following:
New Folder – Creates a new folder on the selected area. If the selected area is the PC, the folder is
created on the hard disk.
Delete – Same as the [Delete] button.
4.3.2.1.6
4.3.2.1.7 Transfer UP Button
The button can be found between the two areas (PC and Phone). This button transfers the selected
Resources from the Phone to the PC
colour in the destination area). The actual transfer occurs when the [Transfer] button is pressed.
- it will NOT do the actual transfer (it just marks it by changing its

NEC Mobile Suite User Guide for N411i Rev 1.0 6/May/2005
NOTE: The same actions can be performed on File | Move Up.
4.3.2.1.8 Transfer DOWN Button
The button can be found between the two areas (PC and Phone) this button transfers the selected
Resources from the PC to the Phone - it will NOT do the actual transfer (it just marks it by changing its
colour in the destination area). The actual transfer occurs when the [Transfer] button is pressed.
NOTE: The same actions can be performed on File | Move Down.
4.3.2.1.9 Get List Button
It can be found on the bottom left corner of the application and when pressed it retrieves all the
Resources (Images, Melodies, Movies or MP3) names from the Phone.
NOTE: The same actions can be performed on File | Get Resource List.
4.3.2.1.10 Get list with image preview
Bellow the Preview Area there is a button (works like a check box), Get list with image preview, that
when ticked, before pressing [Get List], retrieves the images with display information, which means
that the images preview can be done on the MS Area. This feature is available for image files only.
4.3.2.1.11 Transfer Button
The button can be found next to the [Get List] button, it does the actual transfer (uploads and/or
downloads) of all the marked Resources, whether they are visible or not.
For instance, if the user signalled some images files and presently is signalling some melodies, when
the [Transfer] button is pressed all files will be transferred. The same situation applies to files
signalled onto a given folder that aren’t visible on the moment of the transfer process initiation.
NOTE: The same actions can be performed on File | Transfer.
4.3.2.1.12 Delete Button
The button can be found next to the [Transfer] button and it enables the user to perform the following
actions:
Delete marked files from both PC and Phone areas.
Mark (the icon of these changes) for deletion Phone files and folders (files and folders on the
Phone Area that belong to the Phone – retrieved with the [Get List] Button). The Phone files
and folders marked for deletion will not be actually deleted from the Phone until the [Transfer]
button is pressed.
When one or more items (files and/or folders) marked for deletion are selected the [Delete] button will
change to [Undelete]. Pressing it will undelete all selected items, i.e., it will un-mark them, restoring
the corresponding icons.

NEC Mobile Suite User Guide for N411i Rev 1.0 6/May/2005
If the user selects one or more of these items (marked for deletion) along with normal ones and/or
marked files the [Delete] button becomes disable.
The same result can be accomplished by pressing the [Delete] keyboard key, or by accessing File
| Delete.
4.3.2.1.13 New Folder Button
The button can be found next to the [Delete] button and it enables the user to create a new folder on
the Phone Area. If a folder with the same name already exists the user is warned and the previous
name restored. The user can change its name at any time (before doing the [Transfer]) by clicking on
the folder itself or pressing [F2]. After the folder is transferred to the Phone its name can no longer be
changed (from the NEC Mobile Suite).
NOTE: The same actions can be performed on File | New Folder.

NEC Mobile Suite User Guide for N411i Rev 1.0 6/May/2005
4.3.2.2 Features
4.3.2.2.1 Upload to Phone
To upload one or more Resources the user must first select the Resource type (if the desired one is
not selected already). The last used directory is immediately set on the PC area. If there is no last used
directory, the default directory (My Documents) will be set instead.
The following step is to select the desired Resources and press the Transfer DOWN button. This
action will mark the selected Resources in the Phone area, but it will NOT actually upload it into the
Phone. All marked resources assume a different colour (as showed below – red text) in the destination
area until they are actually transferred.
The process of selecting and transferring the Resources can be repeated for different source
directories (PC area) until the user is satisfied with the current set.
The transfer process (equivalent to the pressing of the Transfer DOWN button) can be done by
dragging the selected files to the Phone area.
After the Upload is complete the Resources (newly Uploaded ones) in the Phone area will change to
the normal colour and will remain there as they now exist in the Phone.
4.3.2.2.2 Download to PC
To download one or more Resources the user must first select the Resource type (if the desired one is
not selected already). The last used directory is immediately set on the PC area. If there is no last used

NEC Mobile Suite User Guide for N411i Rev 1.0 6/May/2005
directory, the default directory (My Documents) will be set instead. This directory will be the one used
for the Download.
If the Phone Area is empty it is possible that the [Get List] button was not pressed yet, and therefore
no information (Resources) was retrieved from the Phone.
If the Phone area has Resources available then the following step is to select the desired Resources
and press the Transfer UP button. This action will mark the selected Resources in the PC area, but it
will NOT actually upload it into the Phone. The user may also drag the selected files to the PC area,
dropping them on the current directory or on any directory listed. All marked resources assume a
different colour (as showed bellow – red text) in the destination area until they are actually transferred.
The process of selecting and transferring the Resources can be repeated for different destination
directories (PC area) until the user is satisfied with the current set.
After the Upload is complete the Resources (newly downloaded ones) in the PC area will change to the
normal colour and will remain there as they are now actually in the PC.
4.3.2.2.3 Upload and Download
The Upload and Download of Resources can be set up at the same time, i.e., if the user set Resources
for Upload and Download before pressing the Transfer button, when this is done MRM will perform the
Upload and then the Download of the Resources in the same manner as if it was done separately.

NEC Mobile Suite User Guide for N411i Rev 1.0 6/May/2005
4.3.2.2.4 Marking Resources
When resources are marked the user can change its name by clicking on the resource or pressing
[F2] and retyping the new name. If the name exceeds the maximum allowed the user will be warned
and the previous name will be restored. The same thing will happen regarding the new folders (folders
created by the user and not yet transferred to the Phone) in the Phone Area.
There are also a number of situations that can occur when marking a file. Those are:
Size of file too big – The file size exceeds the allowed size for a specific Resource type. A
warning message will appear, the file in question will change colour and it will not be marked.
Sample:
File with long name – The file name exceeds a certain number of characters allowed. The file
name will be renamed automatically and it will be marked .

NEC Mobile Suite User Guide for N411i Rev 1.0 6/May/2005
Sample:
Digital Right Management (DRM) files – DRM files are protected by copyright and cannot be
Uploaded or Downloaded. W hen the user tries to mark a DRM file into the Phone Area a
warning message will appear, the file will change colour and it will not be marked.
Sample:
Corrupted files – If a file is corrupted a warning message will be presented and the file will not
be marked (a file can get corrupted in various ways, for instance when downloading it from a
site or when is affected by a virus).
Sample:

NEC Mobile Suite User Guide for N411i Rev 1.0 6/May/2005
File name already exists – When transferring files with names that already exist (both on the
PC and the Phone) these will be changed automatically and marked.
Sample:
4.3.2.3 Menus
4.3.2.3.1 File menu

NEC Mobile Suite User Guide for N411i Rev 1.0 6/May/2005
On File menu the user has several options. A brief description of each one will follow.
New Folder – Creates a new folder in the Phone Area (same as the [New Folder] button).
Delete – Same as [Delete] button or keyboard [Delete] button.
Move Up – Same as [Transfer UP] button.
Move Down – Same as [Transfer DOWN] button.
Get Resource List – Same as [Get List] button.
Transfer – Same as [Transfer] button.
Close – Closes MRM.
4.3.2.3.2 View menu
In the View menu the user has three options. A brief description of each one will follow.
Images – Same as the Image resource selection icon.
Melodies – Same as the Melodies resource selection icon.
Refresh – Reloads the contents of the current PC Area directory.

NEC Mobile Suite User Guide for N411i Rev 1.0 6/May/2005
4.3.3 Personal Information Manager - PIM
The PIM, which can be seen below, manages four or five(depending on the users phone model) types
of data; the phone Contacts, Schedule, ToDo, Notepad and Bookmarks (not available in all phone
models) and provides the user a way to transfer any of these from the Phone to the PC and vice-versa.
A detailed explanation of how it works, features it provides and how to interpret the environment (the
structure of the application, the purpose of each area, button, etc) will be given now, for each of the
mentioned data types.
4.3.3.1 PIM selection icons
On the top of the PIM window (on the left of the module name) there are three icons, Contacts,
Schedule, ToDo, Notepad and Bookmark. The icon selected will be coloured, and the name will be
displayed on the left of the icons.
4.3.3.1.1 Action buttons
The following buttons are available in all PIM modules:
[download] – Transfers all data, of the selected data type, from the Phone into PIM.
[upload] – Transfers all data, of the selected data type, from PIM into the Phone
[new] – allows the user to create a new contact.
[delete] – allows the user to delete the selected contact.

NEC Mobile Suite User Guide for N411i Rev 1.0 6/May/2005
[delete all] – deletes all contacts from the selected group.
[apply] to confirm the changes
[cancel] to resume the previous settings
The button below is only available in Modules Notepad and Bookmark (notice that this module is not
available on all phone models):
[New Folder] adds a new folder in the Notepad or Bookmark
4.3.3.2 Contacts
The Contacts has three main areas:
Groups are on the left
Contacts are in the middle
Details of the selected contact are on the right
The names stated above will be used each time one of these areas is referred.
4.3.3.2.1 Groups area
In this area the user can find an All Groups indicator, a No Group one and all 19 predefined groups.
Each one of these (when pressed) acts as a filter so the user can view the corresponding contacts on
the Contacts area. When selected they will act as follows:
All Groups - Show the user, on the Contacts area, all contacts available, including those that
are in No Groups.
No Groups - all contacts that have no defined group will be shown.
When a particular group is selected the corresponding contacts are shown.
The All Groups and the No Group names can’t be changed, but the groups can at any time be
renamed. For that the user has to select the target group, then click on it again or press <Enter>. The
user can cancel the changes at any time by pressing <Esc>.
On the bottom of the Groups area is the Group Default Settings area. In here the user can change
three fields for each group, which are Melody, Picture and Led colour.
Melody corresponds to the melody that is going to be played each time a call is received by a
particular contact, or contact belonging to a group (that has this melody defined).
Picture is the one being displayed in the same conditions as Melody.
Led colour is the colour displayed by the phone led, again in the previously mentioned
conditions.
Each one can be set for a particular group and in doing so all contacts (of that group) will be affected in
the following way:
- All contacts will assume the default settings for the fields that aren’t set already.

NEC Mobile Suite User Guide for N411i Rev 1.0 6/May/2005
4.3.3.2.2 Contacts area
The Contacts area is where the contacts of the selected group are shown. When a contact is selected
its details are shown in the Details area. There is an up/down ( ) arrow button on the top right of the
Contacts area. Clicking it will order the contacts alphabetically (ascending/descending).
There are some actions that the user can do with the contacts in the Contact area. These are:
Change group
The contact group can be changed by dragging and dropping it on any other group. Several
contacts can be changed at the same time.
Change field values
Multiple fields can be updated on multiple contacts at the same time. To do that after selecting
the contacts whose fields are to be changed, all fields except Group, Melody, Picture and Led
will be disabled. Any changes made on these fields will reflect on every selected contact
correspondent field.
4.3.3.2.3 Details area
The Details area shows all the details of the selected contact (if no contact is selected only the field
names will be shown). Here the user can at any time consult the data and change it very easily. These
are the existing fields:
<name> – The name of the contact.
<pinyin> – A second name or nickname for the contact (ONLY available for the Chinese
version).
<home> – The home phone number.
<mobile> – The mobile phone number.
<work> – The work phone number.
<data> – The data phone number.
<fax> – The fax phone number.
<spare 1> – A spare phone number.
<spare 2> – A spare phone number.
<group> – Already explained above.
<melody> – Already explained above.
<picture> – Already explained above.
<led> – Already explained above.
<info 1> – Additional information container.
<info 2> – Additional information container.
<email 1> – Email address.
<email 2> – Email address.
If any change is made in any field or a new contact is added, the [apply] and [cancel] buttons are
activated. The user can now press [apply] to confirm the changes or [cancel] to resume the previous
settings.
NOTE: All changes made are not committed to the phone until the File | Upload to Phone option
is selected.

NEC Mobile Suite User Guide for N411i Rev 1.0 6/May/2005
4.3.3.3 Schedule
The Schedule environment:
The user can schedule any type of events with a wide variety of options. A Schedule event is an
occurrence that has a description, date and time (when it will be activated or displayed), and a
recurrence (interval).
The Schedule is divided in two main sections:
on the right is the zone where the user can insert and/or modify an event, which will be
known as the Settings.
on the left is the zone where the user can view the scheduled events, which will be known
as the Viewer.
4.3.3.3.1 Viewer
The Viewer is the area where the existing events are displayed. There are three columns of
information, those being the Date
, Time and Schedule and each one has an up/down ( ) arrow

NEC Mobile Suite User Guide for N411i Rev 1.0 6/May/2005
button associated. Clicking it will order (ascending/descending) the events/schedules by the selected
column info.
4.3.3.3.2 Settings
The upper part of the Settings has a calendar, where the user can set the day, month and year of the
event quite easily. The lower part has 6 fields that are available only if a event is selected or if a new
one is being set. The fields are:
Description – In this field the user can write a description that identifies the event. It is
also what appears in the Phone screen when the event occurs
Date – To set the date of the event. It’s the same as using the calendar.
Time – To set the time of the event.
Recurrence – The user can choose the periodicity of the event – Once, Daily, Weekly and
Monthly.
Melody – In here the user sets the melody that is played when the event occurs. The user
has to tick the checkbox (on the left of the field icon) before being allowed to select the
melody.
Private – If the user ticks this checkbox the event is set as private, therefore, when
accessing it on the Phone a security code must be provided.
[Show daily] – Shows all events of the selected date.
[Show all] – Shows all existing events. If this option is ticked the user cannot use the
calendar to change the day.
If the user adds a new event or begins modifying an existing one, in order to conclude this action one
of two actions/buttons must be taken/pressed:
[apply] – Confirms all changes, whether they are being made in a new event or an
existing one. The user is again able to proceed using the application.
[cancel] - Confirms all changes, whether they are being made in a new event or an
existing one. The user is again able to proceed using the application.
NOTE: All changes made are not committed to the phone until the File | Upload to Phone option
is selected.

NEC Mobile Suite User Guide for N411i Rev 1.0 6/May/2005
4.3.3.4 ToDo
The ToDo environment:
The user can add new ToDo items, modify them and mark (existing ones) them as completed.
The ToDo is divided in two main sections:
on the right is the zone where the user can insert, modify or close a ToDo, which will be
known as Settings.
on the left is the zone where the user can view the all ToDo items, which will be known as
Viewer.
4.3.3.4.1 Viewer
The Viewer is the area where the existing ToDo items are displayed. There are three columns of
information, those being the Start date, End date and Task, and each one has an up/down ( ) arrow
button associated. Clicking it will order (ascending/descending) the ToDo items by the selected column
info.
4.3.3.4.2 Settings
Settings have several fields that are available only if a ToDo is selected or if a new one is being set.
The fields are:

NEC Mobile Suite User Guide for N411i Rev 1.0 6/May/2005
Description – In this field the user can write a description that identifies the ToDo. It’s also
what appears in the Phone screen when viewing the ToDo.
Start date – To set the start date of the ToDo.
Due date – To set the end date of the ToDo.
Category – The user assign a classification to a ToDo. The choices are Business,
Personal or Other.
Priority – The user can assign a priority to the ToDo. They can be High, Low or Normal.
Done – If the user ticks this checkbox the ToDo is set as closed/done. In the Phone this
ToDo is marked as such.
Private – If the user ticks this checkbox the event is set as private, therefore, when
accessing it on the Phone a security code must be provided.
If the user adds a new ToDo or begins modifying an existing one, in order to conclude this action one
of two actions/buttons must be taken/pressed:
[apply] – Confirms all changes, whether they are being made in a new ToDo or an
existing one. The user is again able to proceed using the application.
[cancel] - Confirms all changes, whether they are being made in a new ToDo or an
existing one. The user is again able to proceed using the application.
NOTE: All changes made are not committed to the phone until the File | Upload to Phone option
is selected.

NEC Mobile Suite User Guide for N411i Rev 1.0 6/May/2005
4.3.3.5 Notepad
Bellow is the Notepad environment:
Notepad is divided in two main sections:
on the right is the zone where the user can insert or modify Notepad entry, which will be
known as Settings.
on the left is the zone where the user can view all Notepad entries, which will be known as
Viewer.
4.3.3.5.1 Settings
Settings have two fields, which are available only if a Notepad is selected or if a new one is being set.
The fields are:
Title – In this field the user can write a small description that identifies the Notepad. It’s
also what appears in the Phone screen when viewing the Notepad.
Text – Where the user can write a more detailed description of its Note.
4.3.3.5.2 Viewer
The Viewer is the area where the existing Notepad items are displayed.
NEC Mobile Suite User Guide for N411i Rev 1.0 6/May/2005
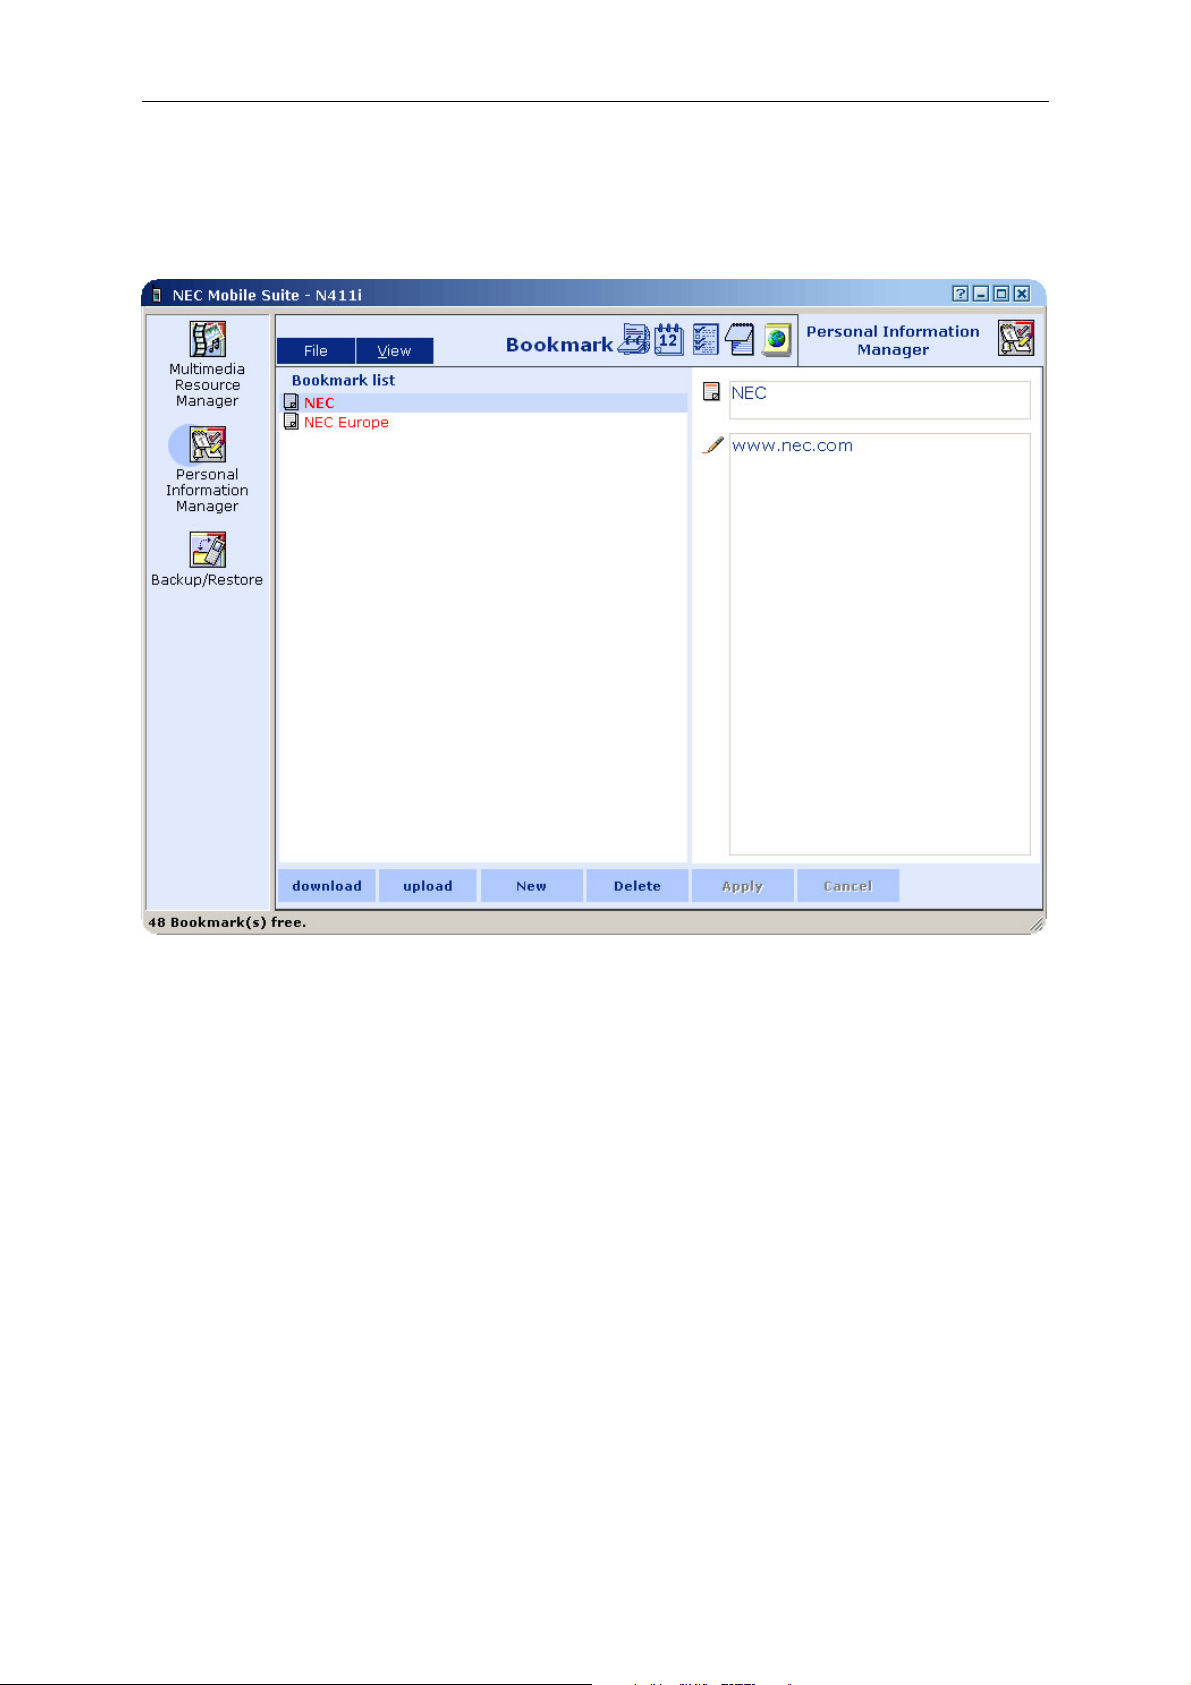
4.3.3.6 Bookmark
Bellow is the Notepad environment:
Bookmark is divided in two main sections:
on the right is the zone where the user can insert or modify Bookmark entry, which will be
known as Settings.
on the left is the zone where the user can view all Bookmark entries, which will be known
as Viewer.
4.3.3.6.1 Settings
Settings have two fields, which are available only if a Notepad is selected or if a new one is being set.
The fields are:
Title – In this field the user can write a small description that identifies Url.
Url – Url text (address).
NOTE: Only 10 folders can be created, and in each one the maximum of 50 Bookmarks can be
created. 50 Bookmarks can also be created in the “root” (where the two bookmarks are in the
above sample picture).
4.3.3.6.2 Viewer
The Viewer is the area where the existing Bookmarks items are displayed.

NEC Mobile Suite User Guide for N411i Rev 1.0 6/May/2005
4.3.3.7 File Menu
On File menu the user has several options, all common to the three data types (Contacts, Schedule,
ToDo, Notepad and Bookmark) managed by PIM. A description of each one in detail will follow.
New – Cleans all data from the application
Open – Opens a “*.pim” file, to load data previously saved.
Save – Saves all data (from the current data type) to a “*.pim” file.
Save as – Same as Save, but the user can choose another name for the file.
Download from Phone – Transfers all data, of the selected data type, from the Phone into
PIM.
Upload to Phone – Transfers all data, of the selected data type, from PIM into the Phone.
Import – This submenu has three options has can be seen in the picture bellow. Those are:
o Import from CSV file – Loads all data (from the current data type) from a CSV file,
which is a standard format file used to enable data import and export between different
applications. Details of the Import procedure will be given later.
o Import vCards – Loads vCards (contacts from the Microsoft Outlook) into Contacts.
o Import vCalendar – Loads Outlook appointments (events scheduled in the Microsoft
Outlook calendar) to the Schedule.
o Import vNote – Loads Notepad entries from vNote files into Notepad.
o Import vBookmark – Loads Bookmark entries from vBookmark files into Bookmark.
Sample:

NEC Mobile Suite User Guide for N411i Rev 1.0 6/May/2005
Export - This submenu has three options has can be seen in the picture bellow. Those are:
o Export to CSV file – Saves all data (from the current data type) to a CSV file, which is
a standard format file used to enable data importation and exportation between
different applications. Details of the Export procedure will be given later.
o Export all vCards – Saves all present contacts (from Contacts) in the format of
vCards (contacts from the Microsoft Outlook).
o Export all vCalendar – Saves all Schedule events in the format of Microsoft Outlook
appointments (events scheduled in the Outlook calendar).
o Export all vCalendar (ToDo) – Saves all ToDo events in the format of Microsoft
Outlook appointments (events scheduled in the Outlook calendar).
o Export all vNotes – Saves all Notepad entries in text files.
o Export all vBookmarks – Saves all Bookmark events in URL shortcuts format.
Sample:
Reset groups – Clears the three fields of the Group Default Settings for all the existing groups
and resets the group names (to the default ones).
Close – Closes PIM.
NOTE: Some menu options and buttons may be displayed in grey (Unavailable) depending on the
selected module. For example the Import from CSV file and Export to CSV file menu options are only
available on the Contacts module. In the remaining modules they are greyed – unavailable.

NEC Mobile Suite User Guide for N411i Rev 1.0 6/May/2005
4.3.3.7.1 Importing a CSV File
There is a Wizard to guide the user through the import of CSV files.
After selecting the Import option, this first screen will be presented:
There are three items presented and they must be filled as follows:
1- The user must type the name of the import file, along with its location (where the file is
stored), or use the [Browse] button in order to select the import file.
2- The user must choose the character that is separating the fields (<name>, <home>,
<mobile>, etc) in the CSV file. If the user doesn’t know what is the separating character, the
CSV file can be opened with Microsoft Excel so that it can be checked.
3- If the check box is ticked, the first line of the CSV file will be the fields name (<name>,
<home>, <mobile>, etc), so that each field has a corresponding identifier.
NOTE: If there is a header line and the box isn’t ticked, the line will be interpreted as a contact.
The [Next] button will take the user to the screen bellow:

NEC Mobile Suite User Guide for N411i Rev 1.0 6/May/2005
The purpose of this step is to define which of the CSV file fields correspond to the PIM fields
(mapping). The user can do this by selecting a field in the From table (on the left) and then click on the
right arrow button ( ) placing it in the To table (on the right). It will be placed in the Mapped From
column. If no position is selected in the To table, the CSV field will be placed in its first available
position in the Mapped From column.
If the [Default Mapping] button is pressed an automatic correspondence will be done, in which the
first CSV field corresponds to the first PIM field, the second CSV field corresponds to the second PIM
field and so on and so forth.
On the right of the To table there are two buttons, an up arrow and a down arrow. These will allow the
user to change the order of the fields by selecting the intended one and pressing the up or the down
arrow as many times necessary until its in the required position.
CSV fields can be removed from the To table by selecting them and clicking on the left arrow button -
. Pressing the [Erase Mapping] will clear all configured fields in the Mapped From column.
After all is set press [Next].
This will be the next screen presented to the user.

NEC Mobile Suite User Guide for N411i Rev 1.0 6/May/2005
In it the user can see the progress and eventually make some decisions regarding the process.
There are two buttons ([Force] and [Skip]) on the bottom right of the screen. These need to be
applied if a given field is empty or its content is incorrect (i.e. a numeric field is filled with text). Here’s
what they will do if a situation like this occurs:
[Force] – The field is not imported.
[Skip] – The complete record is not imported. The process will continue with the next record.
If the check box – “Apply to all the warnings of the type” – is ticked all warnings of the same type
(empty fields or incorrect ones) will be handled in the same way that the user chooses at that moment.
For instance:
If the situation in the above screen occurs and the user ticks the check box and then clicks on the
[Force] button, all <pinyin> fields will be ignored.
At the end of the process the following screen will be shown:

NEC Mobile Suite User Guide for N411i Rev 1.0 6/May/2005
It has a detailed list of the warnings and at the end shows the number of records imported, skipped
and the number of warnings. Click [Finish] to exit.
4.3.3.7.2 Exporting a CSV File
There is a Wizard to guide the user through the export of CSV files.
After selecting the Export option, this first screen will be presented:

NEC Mobile Suite User Guide for N411i Rev 1.0 6/May/2005
There are three items presented and they must be filled as follows:
1- The user must type the name of the Export file, along with destination path (where the file
is going to be stored), or use the [Browse] button in order to select the file path.
2- The user must choose the character that will separate the fields (<name>, <home>,
<mobile>, etc) when stored in the CSV file.
3- If the check box is ticked, the first line of the CSV file will be the field names (<name>,
<home>, <mobile>, etc), so that each field has a corresponding identifier.

NEC Mobile Suite User Guide for N411i Rev 1.0 6/May/2005
Clicking the [Next] button will take the user to the Final Screen:
In this last screen the user can verify the complete file path, the number of records (contacts) exported
and if the process was concluded with success. Click [Finish] to exit.

NEC Mobile Suite User Guide for N411i Rev 1.0 6/May/2005
5 KEYBOARD SHORTCUTS
This is a simple listing of keyboard shortcuts for the application
Key Combination Function
F2 Edit resource name
F5 Refresh PC area
F6 Toggle between PC and Phone areas
F7 Get Resource List
F8 Transfer
F10 Access menus
Ctrl + TAB Toggle between Resource types (Images, Melodies, etc)
Ctrl + F4 Close MRM
ALT + C Close
ALT + D Delete
ALT + G Get Resource List
ALT + N New Folder
ALT + T Transfer
 Loading...