

Page 1

Emergency Services and
Emergency Services and Safety
Safety Precautions
Precautions
Emergency Services
To make an emergency call in any country
☛ Press 1 1 2 .
Ask the operator for the service which you require: Police,
Ambulance, Fire Brigade, Coastguard or Mountain Rescue
Services. Give your position and, if possible, remain
stationary to maintain phone contact.
The 112 emergency number service is available on every
digital network service. The number 999 is an alternative
emergency number for the UK only, and can only be used
with a valid SIM card.
2 Due to the nature of the cellular system, the
success of emergency calls cannot be
guaranteed.
General Care
A cellphone contains delicate electronic circuitry, magnets,
and battery systems. You should treat it with care and give
particular attention to the following points.
• Do not allow the phone or its accessories to come into
contact with liquid or moisture at any time.
• Do not place anything in the folded phone.
• Do not expose your phone to extreme high or low
temperatures.
• Do not expose your phone to naked flame, cigars or
cigarettes.
• Do not paint your phone.
• Do not drop or subject your phone to rough treatment.
• Do not place the phone alongside computer disks, credit
cards, travel cards and other magnetic media. The
information contained on disks or cards may be affected
by the phone.
• Do not leave the phone or the battery in places where the
temperature could exceed 60°C; e.g. on a car dashboard
or on a window sill, behind glass in direct sunlight, etc.
• Do not remove the phone’s battery while the phone is
switched on.
• Take care no t to allow metal objects, such as coins or key
rings, to contact or short-circuit the battery terminals.
• Do not dispose of battery packs in a fire. Your phone's Li-
ion batteries may be safel y disposed of at Li-ion recycling
points. For more specific battery and power supply
information, see page 3.
• Do not put your phone's battery in your mouth as battery
electrolytes may be toxic if swallowed.
• Do not attempt to dismantle the phone or any of its
accessories.
• This equipment is fitted with an internal battery that can
only be replaced by a qualified service engineer. Ther e is
a risk of explosion if the battery is replaced by an
incorrect type. Dispose of the used battery in accordance
with the manufacturer's instructions.
• Using any battery pack, AC adapter or Vehicle power
adapter (option) not specified by the manufacturer for
use with this phone creates a potential safety hazard.
• The earpiece may become warm during normal use and
the unit itself may become warm during charging.
• Use a damp or anti-static cloth to clean the phone. Do
NOT use a dry cloth or electrostatically charged cloth. Do
not use chemical or abrasive cleaners as these could
damage the case.
• Remember to recycle: the cardboard packaging supplied
with this phone is ideal for recycling.
• Do not leave the battery pack empty or disconnected for
a long time, otherwise some data may be initialized.
• Your phone contains metal which may cause you an itch,
a rash or eczema depending on your constitution or
physical condition.
• Take care not to put your phone in the back pocket of
your trousers or skirt and then sit on it. Also, do not put
your phone at the bottom of bag where it may subject to
excessive weight or pressure.
Doing so may damage the LCD and camera lens and
cause them malfunction.
• Take care not to hold the Light too close to your or other
people’s eyes when the Light is lit.
• Do not aim or direct the InfraRed (IR) data port towards
your or other people’s eyes when using the IR data
exchange.
• The foam covers the earpiece of the headset (option). Do
not put any other part of the headset in your ears.
Aircraft Safety
• Switch off your phone and remove its battery when inside
or near aircraft. The use of cellphones in aircraft is illegal.
It may be dangerous to the operation of the aircraft and it
may disrupt the cellular network. Failure to observe this
instruction may lead to suspension or denial of cellphone
service to the offender, or legal action, or both.
• Do not use your phone on the ground without the
permission of the ground crew.
Hospital Safety
• Switch off your phone in areas where the use of
cellphones is prohibited. Follow the instructions given by
the respective medical facility regarding the use of
cellphones on their premises.
General Safety
• Observe ‘Turn off 2-way radio’ signs, such as those near
stores of fuel, chemicals or explosives.
• Do not allow children to play with the phone, charger or
batteries.
• Small parts are included in your phone. Keep them out of
reach of small children, for whom it could be a choking
hazard.
• The operation of some medical electronic devices, such
as hearing aids and pacemakers, may be affected if a
cellphone is used next to them. Observe any warning
signs and manufacturer's recommendations.
• If you have a weak heart, you should take extra
precautions when setting functions such as the Vibrator
and Ringer volume functions for incoming calls.
• If you set the Vibrator setting to anything other than OFF,
be careful that the phone is not near a source of heat
(e.g. a heater) and that it does not fall from a desk due to
the vibration.
Road Safety
• You MUST exercise proper control of your vehicle at all
times. Give full attention to driving.
• Observe all the recommendations contained in your local
traffic safety documentation.
• Pull off the road and park before making or answering a
call if driving conditions so require.
• You MUST NOT stop on the hard shoulder of a motorway
to answer or make a call, except in an emergency.
• Switch off your phone at a refuelling point, such as a
petrol station, even if you are not refuelling your own car.
• Do not stor e or carry flammable or explosive materials in
the same compartment where a radio transmitter, such
as a cellphone, is placed.
• Electronic vehicle systems, such as anti-lock brakes,
speed control and fuel injection systems are not normally
affected by radio transmissions. The manufacturer of
such equipment can advise if it is adequately shielded
from radio transmissions. If you suspect vehicle
problems caused by radio transmissions, consult your
dealer and do not switch on your phone until it has been
checked by qualified approved installers.
Vehicles Equipped with an Air Bag
An air bag inflates with great force. Do not place objects,
including either installed or portable
wireless equipment, in the area over the air bag or in the
air bag deployment area. If in-vehicle wireless equipment
is improperly installed and the air bag inflates, serious
injury could result.
i
Page 2

Third Party Equipment
The use of third party equipment, cables or accessories,
not made or authorized by NEC, may invalidate the
warranty of your cellphone and also adversely affect the
phone’s operation. For example use only the NEC mains
cable supplied with the AC charger.
Service
The cellphone, batteries and charger contain no userserviceable parts. We recommend that your NEC
cellphone is serviced or repaired by an NEC authorized
service centre. Please contact your Service Provider or
NEC for advice.
Non-Ionizing Radiations
The radio equipment shall be connected to the antenna via
a non-radiating cable (e.g. coax).
The antenna shall be mounted in a position such that no
part of the human body will normally rest close to any part
of the antenna unless there is an intervening metallic
screen, for example, the metallic roof.
Use only an antenna that has been specifically designed
for your phone. Use of unauthorized antennas,
modifications or attachments could damage your phone
and may violate the appropriate regulations, causing loss
of performance and radio frequency (RF) energy above the
recommended limits.
Efficient Use
For optimum performance with minimum power
consumption, note the following:
• Your phone has the internal antenna. Do not cover part
of the internal antenna of the phone with your hands. This
affects call quality, may cause the phone to operate at a
higher power level than needed and may shorten talk and
standby times.
Radio Frequency Energy
Your phone is a low-power radio transmitter and receiver.
When it is turned on, it
intermittently receives and transmits radio frequency (RF)
energy (radio waves). The system that handles the call
controls the power level at which the phone transmits.
Exposure to Radio Frequency Energy
Your phone is designed not to exceed the limits for
exposure to RF energy set by national authorities and
international health agencies. * These limits are part of
comprehensive guidelines and establish permitted levels
of radio wave exposure for the general population. The
guidelines were developed by independent scientific
organizations such as ICNIRP (International Commission
on Non-Ionizing Radiation Protection) through periodic and
thorough evaluation of scientific studies. The limits include
a substantial safety margin designed to assure the safety
of all persons, regardless of age and health, and to account
for any variations in measurements.
*Examples of radio frequency exposure guidelines and
standards that your phone is designed to conform to:
•ICNIRP, “Guidelines for limiting exposure to time-varying
electric, magnetic, and electromagnetic fields (up to 300
G Hz)-International Commission on Non-Ionizing
Radiation Protection (ICNIRP)”.
Health Physics, vol. 74. pp, 494-522, April 1998.
•99/519/EC Council Recommendation on the limitation of
exposure to the general public toelectromagnetic fields
0 Hz-300 GHz, Official Journal of the European
Communities, July 12,1999.
•ANSI/IEEE C95.1-1992. “Safety levels with respect to
human exposure to radio frequencyelectromagnetic
fields, 3kHz to 300 GHz”. The Institute of Electrical and
Electronics Engineers Inc., New York, 1991.
•FCC Report and Order, ET Docket 93-62, FCC 96-326,
Federal Communications Commission (FCC), August
1996.
•Radio communications (Electromagnetic Radiation
Human Exposure) Standard 1999, Australian
Communications Authority (ACA), May 1999.
Declaration of Conformity
•This product complies with the requirements of the
R&TTE Directive 1999/5/EC. The ‘Declaration of
Conformity’ leaflet can be found within this box.
License
®
•T9
Text Input and the T9 logo are registered trademarks
of Tegic Communication.
“T9 Text Input is licensed under one or more of the
following:
U.S. Pat. Nos. 5,818,437, 5,953,541, 5,187,480,
5,945,928, 6,011,554, and 6,307,548; Australian Pat.
No. 727539; Canadian Pat. No. 1,331,057; United
Kingdom Pat. No. 2238414B; Hong Kong Standard Pat.
No. HK0940329; Republic of Singapore Pat. No. 51383;
Euro. Pat. No. 0 842 463 (96927260.8) DE/DK, FI, FR,
IT, NL, PT. ES, SE, GB; Republic of Korea Pat. Nos.
KR201211B1 and KR226206B1; and additional patents
are pending worldwide”
•USE OF THIS PRODUCT IN ANY MANNER THAT
COMPLIES WITH THE MPEG-4 VISUAL STANDARD IS
PROHIBITED, EXCEPT FOR USE DIRECTLY
RELATED TO (A) DATA OR INFORMATION ENCODED
BY A CONSUMER FOR PERSONAL AND NONCOMMERCIAL USE WITHOUT REMUNERATION; (B)
DATA OR INFORMATION (i) GENERATED BY AND
OBTAINED WITHOUT CHARGE FROM A CONSUMER
NOT THEREBY ENGAGED IN A BUSINESS
ENTERPRISE, AND (ii) FOR PERSONAL USE ONLY;
AND (C) OTHER USES SPECIFICALLY AND
SEPARATELY LICENSED BY MPEG LA, L.L.C.
•Helvetica is a registered Trademark of Heidelberger
Druckmaschinen AG which may be registered in certain
jurisdictions.
•©2002 Music Airport Inc., http://www.music-airport.com/
•Java and all Java-based trademarks and logos are
trademarks or registered trademarks of Sun
Microsystems, Inc in the U.S. and other countries.
•This product contains ACCESS Co., LTD’s Compact
NetFront™ Plus internet browser software.
Copyright © 1998-2004 ACCESS CO., LTD.
Compact NetFront™ is a registered trademark or
trademark of ACCESS CO., LTD in Japan and selected
countries worldwide.
•This product contains ACCESS CO., LTD’s JV-Lite2™
Java virtual machine software.
Copyright © 2000-2004 ACCESS CO., LTD.
JV-Lite2™ is a registered trade mark or trademark of
ACCESS COl, LTD, in Japan and selected countries
world wide.
•This product contains ACCESS CO., LTD's IrFront®
Infrared communication software.
Copyright ©1996-2004 ACCESS CO.,LTD.
•i-mode and i-mode logos are trademarks or registered
trademarks of NTT DoCoMo.
For the purpose of improvement, the specifications for
this product and its accessories are subject to complete
or partial change without prior notice.
ii
Page 3

Before You Start
▼
User’s manual conventions
The instructions in this user’s manual make use of the shortcuts selection except special cases.
The following markers are used throughout the user’s manual to attract your attention:
/ This type of paragraph will contain details of where to find information related to the topic in question.
2 This type of paragraph will contain information worth noting.
, This type of paragraph will contain important information.
☛ This type of description will contain procedures to operate your phone.
Menu shortcuts selection
The alternative shortcuts method of selection lets you jump straight to a menu or function without highlighting an icon and scrolling through the
intermediate menu options. The selection are made by pressing numbers on the keypad which relate to the displayed menu options.
2 The instructions in this user’s manual make use of the shortcuts selection, except in special cases.
Reading the titles
Some titles in this manual contain information on how to access the functions. In these titles, M stands for , the numbers indicate the menu shortcut
numbers (see “Overview of menu function” on page ix for details) and ... (three periods) indicate that there are more operations described in the
paragraph.
Reading the procedures
“Highlight” means to use the four way navigation keys (▲▼ ) to move the area emphasized with different colouring.
“Select” means to highlight an item and then press
Procedures are written omitting the verb “press”, except in some special cases.
For example, 1 2 means to:
☛ Start from the standby screen ➔ Press to display the Main menu screen
☛ Press 1 to display the Settings screen ➔ Press 2 to display the Phone modes screen
Simple procedures are connected by arrows (➔).
Check box/Radio button
A check box enables/disables an option out of a set of options, and multiple check boxes can be selected at the same time. On the other hand, selecting
a radio button automatically cancels the previous selection, so only one radio button can be selected at one time.
A check box/radio button option can be selected/cancelled by highlighting it and pressing .
▼
.
iii
Page 4
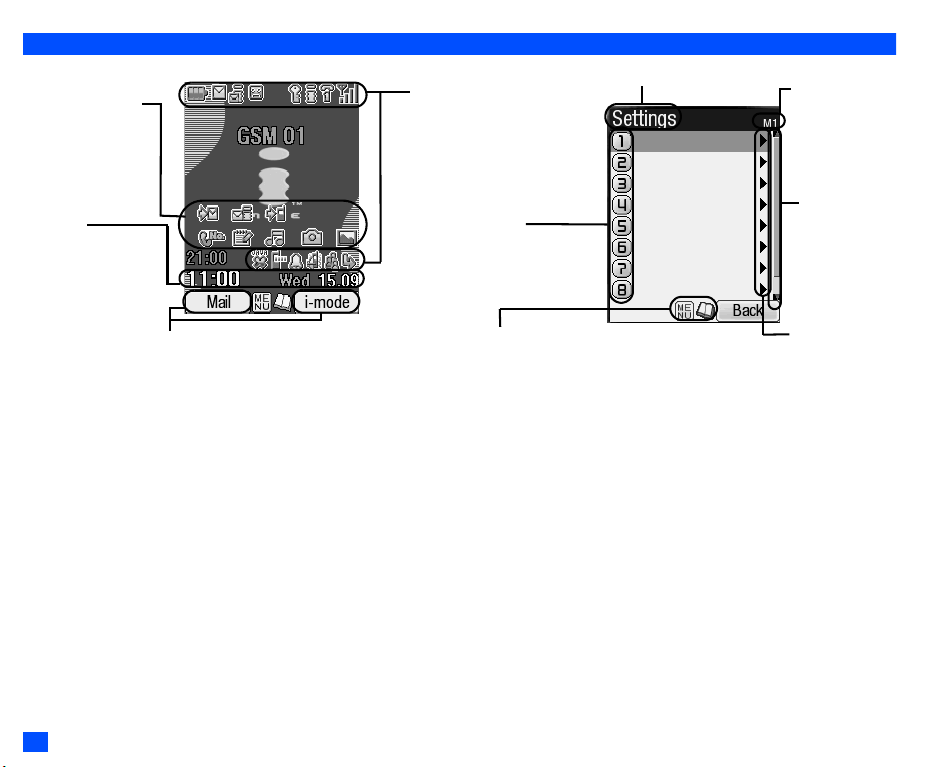
Display information
▼
M
Desktop icon area
This area contains the
automatically displayed
and the manually created
desktop icons. They
provide shortcuts to
certain items/functions.
Help area
This area contains help
information appropriate
for the current screen
(e.g. key presses
remaining when
composing a message).
Softkey area
This area contains context sensitive descriptions of the
Softkeys’ functions appropriate for the current screen.
, The Liquid Crystal Displays (LCD) on your phone are manufactured using high-precision technology. Even so, the LCD may contain pixels
(dots) that fail to light or that remain permanently lit. Note that this is normal and does not indicate a problem with your display.
Status bar area
This area contains icons which
indicate the battery strength, new
SMS/MMS message(s), signal
strength, etc. (see page vii).
On screens other than the
standby screen, the clock display
is placed in this area.
Shortcut number
Press the appropriate number to
jump straight to a next menu. The
row colour is changed when
selected (e.g. to activate/deactivate
a facility).
Help icons
Displayed when you can use the key
represented by these icons (see page vii).
enu title
Displayed when you can press or the
shortcut number to show the next menu.
Shortcut menu
number
The current menu
number is displayed.
Page scroll bar
Displayed when
you can press ▼
to scroll to the next
page.
Next menu icon
iv
Page 5
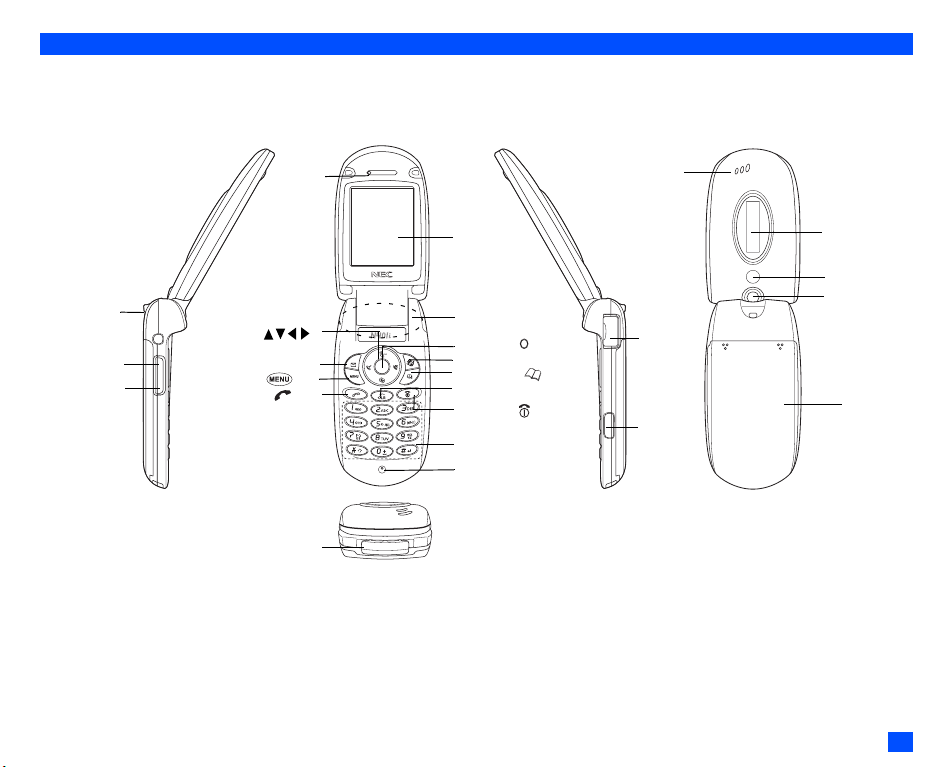
Parts and functions
Through-hole
for straps
Side up key
Side down key
Earpiece
4 way navigation key
(
Softkey1(SK1)
Menu ( ) key
Send ( ) key
Charger connector cover
)
Main-LCD
Internal antenna
Select key
( )
Softkey2(SK2)
Phonebook ( )key
Clear (CLR)/Back key
End/on-off ( ) key
Alphanumeric keys
Mouthpiece
Speaker
Earphone
jack cover
IR port
2nd-LCD
LED & light
Camera
Rear cover
for battery
v
Page 6

Keypad shortcuts
▼
The following operations are available from the standby screen.
Key Operation that involves pressing a key See page Operation that involves pressing and holding a key See page
Accessing the Main menu screen ix Setting/Cancelling the Side key lock 21
SK1 Accessing the Mail screen 42 Accessing the Inbox screen 42
SK2 Accessing the i-mode menu screen 38 Accessing the Java™ applications screen 66
Accessing the Phonebook list screen 47 Accessing the Message screen 27
▲ Accessing the Phone modes screen 22
▼ Accessing the My data screen 61 Accessing the voice recall 7
▼
Accessing the received calls list 10 Accessing the received calls list 10
Accessing the missed calls list 10 Accessing the missed calls list 10
Accessing the dialled calls list 10 Accessing the dialled calls list 10
Highlighting a desktop icon 19 Accessing the homepage (when Set homepage is set) 41
Ending a call or returning to the standby screen – Powering off 4
CLR Deleting character or returning to the previous screen –
1 Entering phone numbers 5 Calling the Voice mail centre 55
2 to 9 Entering phone numbers 5
0 Entering phone numbers 5 Entering + when you make an international call 13
# Entering # 6 Entering a pause –
Entering
Accessing the volume control screen when your phone is open
(Use ▲ ▼, Side keys or 0 to 9 keys to adjust the volume.)
Side up
Activating the ring silencer function when you receive a call 21
Accessing the volume control screen when your phone is open
Side down
(Use ▲ ▼, Side keys or 0 to 9 keys to adjust the volume.)
Activating the ring silencer function when you receive a call 21
Setting the phone to Meeting mode/Returning to the previous
mode
Deletes all the automatically displayed desktop icons 19
Deleting all characters when you enter text –
One-touch dial to the corresponding number in the phonebook
(SIM)
6 Switching the ALS line 1/2 (if the SIM card supports ALS) 21
21
Accessing the camera view finder screen 56
21
Turning on the light
(To turn it off, press any key or open/close your phone.)
22
7
–
vi
Page 7

LCD and displayed icons
Main-LCD
8
1
364
2
15
16
17
1
Indicates the battery level.
Indicates the battery charging status (fast, slow,
pause).
2
Indicates that there is a new SMS in your phone.
Indicates that there is a new SMS on the network.
Indicates that the SIM memory is full.
Indicates that the Inbox in your phone is full.
3
(green)
Indicates that there is a mail on the server.
(blue)
Indicates that there is an MMS on the server.
(pink)
Indicates that there are mail and MMS on the server.
(orange)
7
5
(red, green, blue)
9
Indicates that there is a new mail/MMS in your
phone.
2 This orange icon blinks while a mail/MMS
is being downloaded
10
11
12
13
14
Indicates that the memory for mail/MMS is full.
4
Indicates that new voice mail messages are on the
network (No ALS/ALS Line 1/2).
(red, green/red, green)
6
Indicates secured communication on SSL.
7
Indicates that GPRS is active for purposes other
than i-mode connections.
(gray)
Indicates that the phone is in the GSM (Global
System for Mobile communication) network service
area and GPRS is active.
(yellow)
Indicates that the GPRS is available and i-mode is
active.
Indicates that the i-mode connection is carried out.
Indicates that the i-mode lock is on.
2 No icon appears when the phone is outside
the GSM network service area, or when
the phone is in the GSM network service
area and GPRS is not attached.
8
Indicates the line status (ALS line 1/2 no ALS).The
icon with displayed in red indicates that the
ALS line 1 or 2 is unencrypted/no ALS.
9
Indicates the signal strength level.
Appears when you are outside the service area.
10
Network name (indicated in orange when using
roaming service)
11
Desktop icons
See “Desktop icons” on page 19 for details.
12
Indicates
the call diversion is set.
Indicates the Meeting mode, Pocket mode, Car
mode.
2 No icon appears for the Normal mode.
alarm-on, sound-off, vibrator-on, sound-
Indicates
off/vibrator-on.
Indicates the IR modem is set to on, the auto start of
a Java™ application has failed.
Date
13
Day of week
14
15
Remote time
Local time
16
17
Indicates that you can use the options menu by
pressing
Indicates that you can use the phonebook list by
pressing .
Indicates the usable keys in black, while a Java™
application is in operation.
Indicates that the help display is available when
using SIM toolkit
vii
Page 8

Indicates that a Java™ application is in operation.
<When the camera/video view finder is in
operation>
2
Indicates single/burst mode (camera).
Indicates the video mode is on or the video is
recording.
3
Indicates that the self timer is on.
4
Indicates the quality of the picture (super fine, fine,
normal, economy or super economy).
Indicates the quality of the video.
5
Indicates the photo/video screen size.
6
Indicates the shooting environment.
7
Indicates the brightness setting. The “+2” setting is
the brightest.
8
Indicates the zoom level.
<When the video preview is in operation>
2
Indicates the video mode is on, the video is playing,
on pause, fast forwarding, or rewinding.
4
Indicates the track information of the video (the video
file only, the video and audio file, or the audio file
only).
7
8
2nd-LCD
1
2
3
4
Indicates the video is played in normal/enlarged
screen size.
Displays the current volume level. The 0 is mute and
9 is the maximum.
364
2
1
Indicates the battery level.
Indicates the battery charging status (fast, slow,
pause).
Indicates that there is a new SMS in your phone.
Indicates
Indicates that the SIM memory is full.
Indicates that the Inbox in your phone is full.
Indicates that there is a mail on the server.
Indicates that there is an MMS on the server.
Indicates that there are mail and MMS on the server.
Indicates that there is a new mail/MMS in your
phone.
Indicates that the memory for a mail/MMS is full.
Indicates that a new voice mail message is on the
network (No ALS/ALS Line 1/2).
(red, green, blue)
that there is a new SMS on the network.
(green)
(blue)
(pink)
(orange)
(red, green/red, green)
8
7
5
5
Indicates that the alarm is set.
6
Indicates that the vibrator is set.
7
Indicates that the phone is in the Meeting mode,
Pocket mode, Car mode.
2 No icon appears for the Normal mode.
8
Indicates the signal strength level.
Appears when you are outside the service area.
<When 2nd-LCD is used as the camera view finder
screen>
9
11
2 The left image is when the phone is folded,
10
12
and the right image is when the phone is
open.
9
Indicates single or burst mode of the camera.
(blue)
Indicates that the video mode.
(red)
Indicates the video is recording.
10
Indicates that the self timer is on.
11
Indicates the photo/video screen size.
12
Indicates the battery level.
viii
Page 9
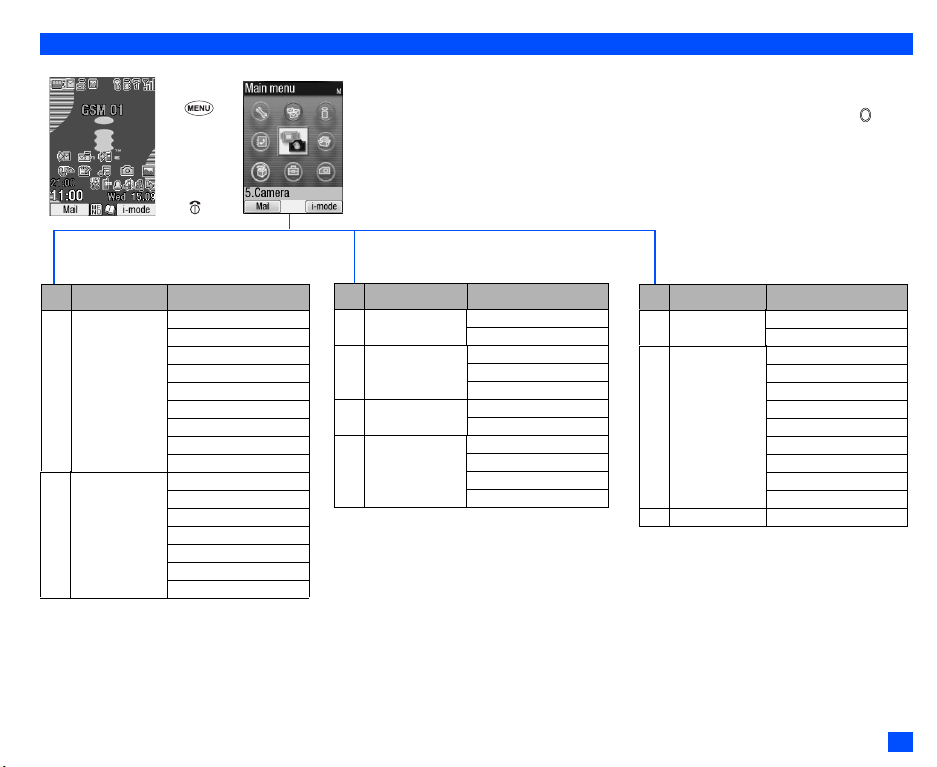
Overview of menu function
▼
Standby screen
➡
➡
CLR
or
Main menu screen
➡
➡
The Main menu has a set of icons for its top levels of options (examples of the top level are shown right)
which can be selected either using a combination of the 4-way navigation key (▲ ▼
selection), or just the keypad (shortcuts selection).
▼
) and (menu
2 The title of the selected option will be displayed in the Help area.
2 SIM toolkit icon is displayed only when your SIM card supports this function.
2 With the Main menu screen displayed, press 0 to display your own number.
Key Main menu Second level menu
1 Settings Phone
Phone modes
Main-LCD
2nd-LCD
Power saving
Calls
Security
Network
Reset settings
2 Message Inbox
Drafts
Outbox
Sent
Folder1
Folder2
CB
Key Main menu Second level menu
3 i-mode i-mode
Settings
4 Phonebook Lists
Information #
Call options
5 Camera Camera
Video recorder
6 My data Videos
Sounds
Pictures
Music
Key Main menu Second level menu
7 Java Programs
Prog backlight
8 Accessory Music player
Calculator
Clock alarm
Scheduler
ToDo list
Notepad
Voice memo
Currency
Infrared
9 SIM toolkit
ix
Page 10

Getting Started 1
Basic Calls & Phone Use 5
Text Entry 14
IR Data Exchange 17
Desktop icons 19
Settings (M1) 21
Message (M2) 27
i-mode (M3) 33
Phonebook (M4) 47
Camera (M5) 56
My data (M6) 61
Java™ (M7) 66
Accessory (M8) 68
Index 77
Page 11

Before You Start iii
User’s manual conventions............................................. iii
Display information ......................................................... iv
Parts and functions ..........................................................v
LCD and displayed icons ............................................... vii
Overview of menu function ............................................. ix
Getting Started 1
Preparing the phone ........................................................1
Standby and talk times..................................................... 3
Checking the battery ........................................................3
Low battery alarm ............................................................3
Other battery alarms ........................................................3
Attaching and Removing the Emblem.............................. 4
Start-up ............................................................................4
Basic Calls & Phone Use 5
Making basic calls............................................................5
Ending a call ....................................................................5
Receiving an incoming call ..............................................5
Unsuccessful calls ...........................................................6
Emergency calls............................................................... 6
Last number redial ...........................................................6
One-touch dial.................................................................. 7
Fast dialling......................................................................7
Displaying your own phone number (M0/M416) ..............7
Voice recall ......................................................................7
Options menu (during a call) ............................................ 7
Putting a call on hold........................................................ 8
Mute .................................................................................8
Transferring a call ............................................................8
Multi-party calls ................................................................ 8
Recording a call ............................................................... 9
Call options (M43)............................................................ 9
Call settings (M16) ......................................................... 11
International dialling codes ............................................13
Roaming......................................................................... 13
Text Entry 14
Mode change .................................................................14
®
English text input ....................................................14
T9
Normal text input............................................................15
Numeric input.................................................................16
Key allocations............................................................... 16
IR Data Exchange 17
Positioning of the phones............................................... 17
IR send........................................................................... 17
IR receive (M891) ..........................................................18
IR modem (M892) .......................................................... 18
Desktop icons 19
Settings (M1) 21
Phone(M11) ................................................................... 21
Phone modes (M12) ......................................................22
Main-LCD (M13) ............................................................23
2nd-LCD (M14) .............................................................. 23
Power saving (M15) ....................................................... 24
Calls (M16)..................................................................... 24
Security (M17)................................................................ 24
Network (M18) ...............................................................26
xi
Page 12

Reset settings (M19)...................................................... 26
Message (M2) 27
Message overview ......................................................... 27
Reading a message (M21) ............................................ 28
Creating a message....................................................... 31
Cell broadcast (M27) ..................................................... 33
i-mode (M3) 33
i-mode operation guide .................................................. 33
i-mode screen ................................................................ 38
i-mode menu screen ...................................................... 38
iMenu screen .................................................................41
Mail screen .................................................................... 42
i-mode glossary ............................................................. 46
Phonebook (M4) 47
Phonebook types ........................................................... 47
Accessing your phonebook (M4) ...................................48
Phonebook list Options menu........................................ 49
Personal data Options menu .........................................54
Scratchpad number ....................................................... 54
Voice mail (M417).......................................................... 55
Camera (M5) 56
Notes on using the camera............................................ 56
Taking a picture (M51)................................................... 57
Recording a video (M52) ............................................... 59
My data (M6) 61
Sounds (M62) ................................................................ 62
Pictures (M63) ............................................................... 62
Music (M64) ................................................................... 63
File selector Options menu ............................................ 64
Java™ (M7) 66
Programs (M71)............................................................. 66
Prog backlight (M72)...................................................... 67
Accessory (M8) 68
Music player (M81) ........................................................ 68
Calculator (M82) ............................................................ 69
Clock alarm (M83) ......................................................... 69
Scheduler (M84) ............................................................ 70
ToDo list (M85) .............................................................. 72
Notepad (M86)............................................................... 73
Voice memo (M87) ........................................................ 75
Currency (M88).............................................................. 75
Infrared (M89) ................................................................ 76
Index 77
Videos (M61) ................................................................. 61
xii
Page 13

Getting Started
Preparing the phone
Before trying to use your phone, make sure that a valid Subscriber Identity Module (SIM) card is inserted and the battery is charged.
SIM card
Before using your phone, you must sign-up with one of the digital network service providers. In addition to your subscription details you will receive a
personal SIM (Subscriber Identity Module) card which is inserted into your phone.
If the SIM card is removed, the phone becomes unusable until a valid SIM card is fitted. It is possible to transfer your SIM card to another compatible
phone and resume your network subscription. The screen on your phone will display appropriate messages if no SIM card is fitted.
, If the phone, or the SIM card, is lost or stolen then you should contact your service provider immediately in order to bar it from use.
2 The phone supports a number of languages and the keyboard symbols have been chosen for world-wide operation.
2 The digital technology of your phone helps to ensure that your conversations are kept secure.
2 The SIM card contains personal data such as your electronic phonebook, messages (see “Message (M2)” on page 27) and also details of the network
services you have subscribed to. The phone will not work (except for emergency calls on some networks) unless a valid SIM card is fitted.
, Be sure to turn the phone off before inserting and removing a SIM card. Otherwise damage to the SIM card can occur.
Inserting a SIM card
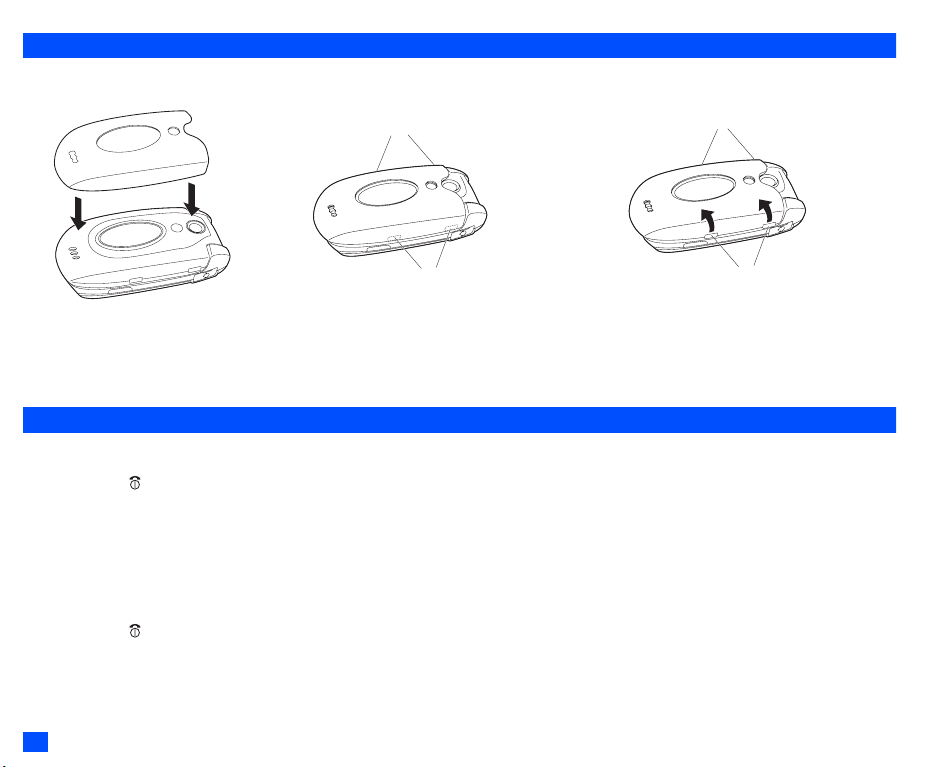
, Be sure to turn the phone off before removing the battery pack.
☛ While pressing down the areas marked with of the rear cover as indicated by arrows ➀, slide the rear cover about 3 mm in the direction of
arrows ➁ with your finger tips. Then, lift the cover up in the direction of arrow ➂ to remove it.
☛ Lift the finger tab of the battery pack up in the direction of arrow ➃. Then lift the battery pack out in the direction of arrow ➄.
☛ With the metal part facing down, insert the straight end of the SIM card under the holder in the direction of arrow ➅. Slide the SIM card all the way
until it reaches the end.
☛ Align the marks on the battery pack with the marks on the phone. Insert it into the cavity in the phone body in the direction of arrow
➇, making sure that the tabs on the battery pack fit properly into the notches in the phone. Then, press the battery pack down in the direction of
arrow ➈ to clip it into the phone.
☛ Make sure that the battery pack is securely attached to the phone and align the rear cover with the grooves on the phone so that there is a gap
of about 3 mm at the end of the cover. After making sure that there is no gap between the rear cover and the phone body, slide the rear cover in
the direction of arrows ➉ until you hear a click.
1
Page 14
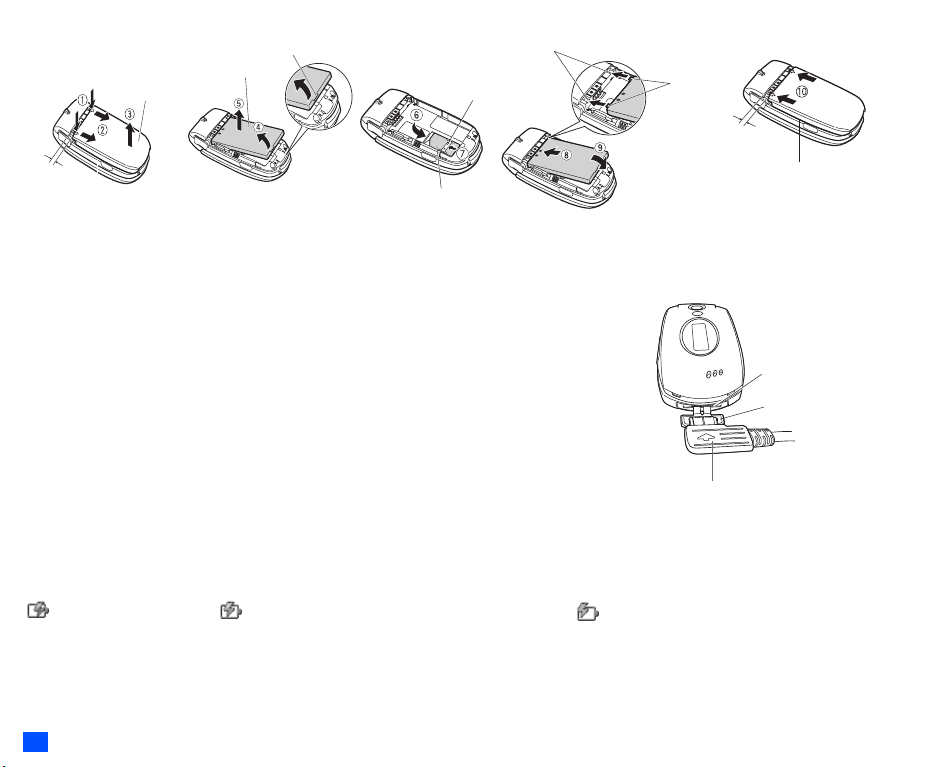
Rear cover
Battery
Finger tab
Holder
Notches
Tabs
About 3 mm
About 3 mm
SIM card
.
Check that there is no gap
between the rear cover
and the phone body.
, If the SIM card is not fully inserted when the battery is replaced, damage to the SIM card can occur.
/ If the SIM card is already fitted, see “Start-up” on page 4.
Removing a SIM card
☛
With the battery removed, push the short and straight end of the SIM card with your thumb to
slide it gently in the direction of arrow ➆ ➔ Lift the SIM card after it is completely removed from
the holder.
Charging the battery
Before trying to use your phone, insert the phone’s battery, connect the NEC battery charger (AC
adapter) supplied with your phone to a suitable mains power socket.
Charger connector
Charger connector
cover
☛ Pull open the charger connector cover gently.
, Be careful when handling the charger connector cover. Do not pull strongly.
☛ Connect the charger plug (AC adapter) into the charger connector at the bottom of the phone. If
your phone is turned on and charging starts, the battery charging icon will be displayed. LED will
turn on in red while charging. When charging is complete, the LED will turn off.
2 You are recommended to switch off the phone while charging. If you need to receive calls, your phone can be switched on and left in standby
while being charged, although the total time taken to charge is then increased.
The colour on the display shows the charging status of battery.
(red) Fast battery charging (green) Slow battery charging while the phone is in use (blue) Battery charging is stopped due to overheat
Charger plug
, Using any battery pack, AC adapter, vehicle power adapter (option) not specified by NEC for use with this phone can be dangerous and
may invalidate any warranty and approval given to the cellphone. Do not leave the charger connected to the mains supply when it is not
in use.
, Do not try to charge the battery if the ambient temperature is below 5°C (41°F) or above 35°C (95°F).
2
Page 15

, DO NOT connect a charger or any other external DC source until the phone’s battery is inserted.
2 If the phone does not respond, please wait for a few minutes. The charging will then start.
2 If you use the phone while charging, handle the phone carefully since the cable or adapter is connected.
2 If you make/receive a call while charging, the charging may temporarily be interrupted.
2 Charging takes approximately 3 hours with your phone turned off.
2 Even if the phone remains connected to the charger, battery residual capacity may decrease when the phone is used for video recording, playing or
other battery consuming operation.
, IMPORTANT BATTERY CHARGING INFORMATION
Charging a very low battery
The battery’s charge continues to drop after the low battery warning is displayed. In extreme cases where the battery is left uncharged for some
considerable time after this warning, a trickle charge is used to slowly top-up the battery to the safe level at which the fast charging can begin. The
phone can be in trickle charge for a few minutes before the fast charging starts.
Standby and talk times
Your phone works closely with the network you are using to provide the services you need, and the standby and talk times achieved will depend on how
you use the phone and choices made by the network operator.
In particular, factors such as your location within the network, the frequency at which this location is updated, the type of SIM card you have, your
reception of area messages or cell broadcast messages and the use of full rate or enhanced full rate speech, will affect both standby and talk times.
Checking the battery
☛ Check icon at the top of the standby screen.
The block on the display shows the charge of your battery pack.
Full battery power Partial battery power Low battery power Battery empty
Low battery alarm
When the battery voltage falls below the working level, a low battery warning is displayed on the screen accompanied by LED illumination and a short
tone along with an empty battery icon. The phone will automatically power down shortly afterwards.
2 Please charge the battery as much as possible when the battery is very low.
Other battery alarms
Your phone may display warnings when the battery temperature is too high, or the voltage of the battery or the charger is over the appropriate level.
Follow the instruction given by these warnings immediately.
3
Page 16
Attaching and Removing the Emblem
A
ttaching the emblem
Attach the emblem, aligning the holes to
fit the 2nd-LCD, LED and camera.
Depressions
Depressions
Make sure the emblem is fitted over
the square depressions on each side
of the phone.
Remove the emblem by hooking your finger tips near the
square depressions and lifting in the direction of the
arrows. You can also remove the emblem from the other
side of the phone.
Removing the emblem
Depressions
Depressions
Start-up
Switching the phone on
☛
Hold down for about a second to switch on. The screen will display the selected greeting (see page 23) and the phone is then in standby.
2 You may need to charge the battery before using your phone.
2 When your phone is turned on, the specified ringer may sound.
2 If your phone is accidentally turned off while downloading or deleting Java™ application, it will take longer than usual to start up the phone the next
time you turn on the power.
Switching the phone off
☛
Hold down until the display shows the switch off message.
PIN code
The SIM card issued by your service provider has a security feature called PIN code protection. The Personal Identification Number (PIN) is a number
put on to the card by your service provider, and is 4 to 8 digits long. Some service providers supply SIM cards which will cause your phone to prompt for
4
Page 17

a PIN code when it is turned on. If this is the case, enter your code with the phone’s keypad. If you insert a SIM card other than your own, information
▼
such as call logs may be lost. (See “Security (M17)” on page 24 for details.)
Basic Calls & Phone Use
Making basic calls
You make a simple call in the same way as you would with a normal phone, except that you need to press after entering the area Subscriber Trunk
Dialling (STD) code and the phone number. To make international calls, you must first enter the international dialling code (see page 13).
2 Use the full STD area code even if you are calling to a person in the same town. If the numbers are too long to be displayed within one line, after
pressing , excess part is deleted and ‘...’ is added at its end.
2 The main-LCD display shows the strength of the radio signal that links your phone to the network. The maximum signal strength is shown by 4 shaded
blocks and the minimum signal strength by 1 block.
Starting a call
☛
Key in the phone number. Check the number on the display ➔ or SK1 to send the input number to start the call
☛ Before the other party answers the call, you can end the call by pressing briefly, pressing SK2 or closing your phone. When you use the
headset, you can also end the call by pressing and holding the button on it.
When the call is sent, the screen displays the number called or the name stored in the phonebook and a connection graphic or a Calling Line Identification
(CLI) picture that has been allocated to the number called (see page 53).
Correcting mistakes
▼
Use the and to move the cursor and then press CLR to clear individual digits, or hold down CLR to completely clear a phone number.
Ending a call
☛ While talking, press briefly or close your phone. The phone returns to the standby screen.
2 If is held down, your phone will turn off.
2 When you use the headset, you can also end a call by pressing and holding the button on it.
2 You cannot end a call by closing your phone when the headset is connected.
Receiving an incoming call
When someone calls your number, the ringer will play (if set - see page 22), the LED glows in the specified colour, and the phone number of the caller
may be displayed if the calling line identification facility is available and the caller has activated the feature. If the caller’s phone number has been related
5
Page 18

and stored in your phonebook with a name and a CLI picture (see page 53), that name and picture will be displayed. If the caller has withheld their identity,
the screen will give a message that the caller’s number is being withheld.
2 You also have options for holding and forwarding calls. These options depend on your network and your subscription arrangements.
Accepting an incoming call
☛
While receiving an incoming call, press or SK1.
2 When you use the headset, you can also accept an incoming call by pressing the button on it.
Rejecting an incoming call
☛
While receiving an incoming call, press or SK2 briefly or close your phone.
2 When you use the headset, you can also reject an incoming call by pressing and holding the button on it.
2 You cannot reject a call by closing your phone when the headset is connected.
If your phone receives a call and you do not answer it, the screen will display the phone number (or the name if stored) of the caller (if available). This
information is stored in the missed calls list. Up to 20 missed calls are stored in this list.
2 You can set your phone to answer a call when any key is pressed (see “Any key answer” on page 21).
2 If you are making a call, the phone gives priority to receiving a call unless you have already pressed .
/ See also: “Call diversion (M161)” on page 11 and “Call waiting and holding (M162)” on page 12.
/ See also: “Call options (M43)” on page 9.
Unsuccessful calls
If dialled call is not successfully connected, the display will give an appropriate message.
If your phone has the auto redial function activated, the number will be automatically called again after a short delay (see page 12).
Emergency calls
The standard emergency number of 112 can be used.
☛ Key in 1 1 2 ➔ or SK1 to connect the call to the local emergency services.
2 On some networks, emergency calls can be made using the 112 number without a SIM card inserted.
Last number redial
You can redial the last number you called.
☛ Ensure that the standby screen is displayed and no phone number is shown ➔ twice to dial the last number you called.
6
Page 19
/ See also: “Call options (M43)” on page 9.
One-touch dial
One-touch dial for the phonebook (SIM) is available by pressing and holding the number keys between 2 and 9.
2 A number for the One-touch dial corresponds to the location number in the phonebook (SIM).
2 One-touch dial is available only for the phone numbers with the location number 2 to 9 stored in the phonebook (SIM).
Fast dialling
Fast dialling is activated in Abbreviated Dialling Numbers (ADN) by entering a number 1 to 255 (depending on the SIM card), and .
Fast dialling is also activated by entering the location number 1 to 500 of your phonebook (Phone) and then and .
Displaying your own phone number (M0/M416)
☛ 0 or 4 1 6
Voice recall
You can store up to 10 voice recall recordings which can be allocated to a personal data stored in the phonebook (Phone). To store the voice recall
sound, see page 53. To use the voice recall function, use the following procedure:
☛ Press and hold
▼
2 When you use the headset, you can also activate the voice recall function by pressing and holding the button on it from the standby screen.
☛ Within 4 seconds, say the word or words you have recorded to identify the record you wish to recall. If the word or words were recognized, the
first phone number of the personal data stored in the phonebook (Phone) will be called automatically.
Options menu (during a call)
☛ During a call, to display the options menu
No. Options menu (during a call)
1 Main menu Displays the Main menu screen. See “Overview of menu function” on page ix for details.
2Hold/Retrieve Puts the call(s) on hold or retrieves the call(s).
3Mute/Unmute Mutes or unmutes all active calls.
7
Page 20
No. Options menu (during a call) (Continued)
4 Transfer call Enables to transfer the call and connect other parties.
2 After transferring the call, your call will be dropped.
5 Add to conference Merges calls and makes a multi-party call.
6 Private call Make a private call to the highlighted party within the multi-party call.
7 Record call Records the call while talking.
8 Disconnect party Disconnects the highlighted party.
2 Depending on the conditions, some options may be displayed in gray and not be available.
Putting a call on hold
☛ To put the received or dialled call on hold, SK1 or 2. To retrieve the call, SK1 or 2 again.
Mute
You can mute the sound from the mouthpiece during a call. When your call is muted, the other party cannot hear any sound from your phone, but you
can still hear the sound from the other party.
☛ To mute the sound during a call, press 3. To retrieve the sound, press 3 again.
2 The mute function is automatically released after the call ends.
Transferring a call
When you have an active call and a held call, you can transfer the call and connect the two parties, then you can drop from the line while leaving those
two calls active.
☛ To transfer the call, press 4.
2 After dropping from the call with the other two parties, if you have a call waiting, you can proceed the call with it.
, Call transfer facility is SIM dependent.
Multi-party calls
If your SIM card is multi-party enabled, you can make a conference call to more than one caller. You can even leave the call while the remaining
participants carry on with the call.
8
Page 21
Receiving the second call
▼
☛
SK1 or to accept the second call ➔ SK2 or 5 to merge both calls.
2 When you accept the second call, the first call will be put on hold.
Making the second call
☛
SK1 to put the first call on hold ➔ Key in the phone number ➔ SK1 or to make the second call ➔ After the second participant answers, SK2
or 5 to merge both calls.
Putting the multi-party calls on hold
☛
SK1 or 2 to put both the first and second calls on hold ➔ To retrieve the call, SK1 or 2 again.
Making a private call
While on the multi-party call, you can make a private call to a specific party.
☛ Highlight the desired party you want to make a private call to ➔ 6 ➔ To end the private call and return to the normal multi-party call, 5.
2 While you are on a private call, other parties can continue with their conversation.
Ending the multi-party calls
☛
To end all calls, or SK2. To disconnect a specific party on a multi-party call, highlight the party you wish to disconnect ➔ 8
, Multi-party call facilities are network dependent.
Recording a call
You can record the conversation during the call.
☛ During a call, press and hold ▼ or 7 to display the Voice memo screen ➔ SK1 to start the recording ➔ SK1 to pause and SK2 to stop the
recording ➔ To play the recording, see “Recording/playing voice memo or setting speaker” on page 75
Call options (M43)
From Call options, you can display the list of missed, received and dialled calls, the duration of the last call made and all calls, charge information and
the redial blacklist
☛ 4 3 to display the Call options screen.
No. Call options
1 Missed calls Displays the list of missed calls. You can also access this function by pressing from the standby screen.
2 Received calls Displays the list of received calls. You can also access this function by pressing from the standby screen.
▼
9
Page 22
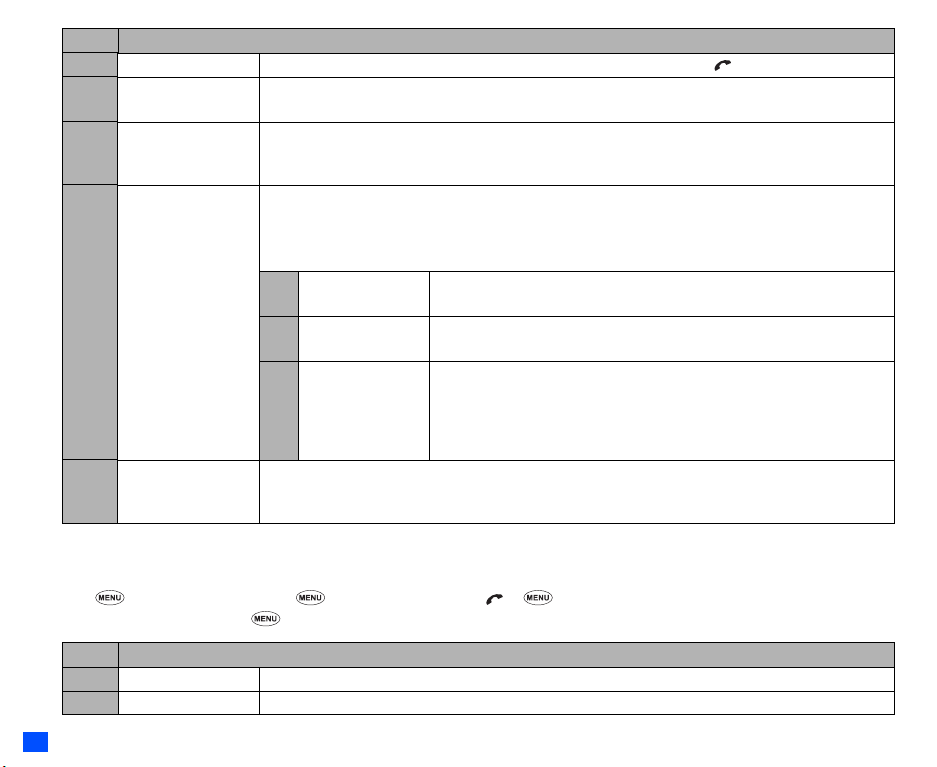
No. Call options (Continued)
▼
3 Dialled calls Displays the list of dialled calls. You can also access this function by pressing from the standby screen.
4 Last call duration Displays the duration of the last call made on your phone.
☛ SK1 to reset the display to zero.
5 Total calls duration Displays the duration of the total calls made on your phone.
☛ SK1 ➔ 1 to reset the duration of the total dialled calls, 2 to reset the duration of the total received calls,
or 3 to reset the duration of all calls.
6Charge info Displays the charge information (Advice of Charge - AOC).
, The AoC facility is SIM card and network dependent.
2 To reset the display to zero, set the maximum charges or edit the unit price, you may be prompted to
enter the PIN2 code.
1 Total charge Displays the total charge.
☛ SK1 to reset the display to zero.
2 Maximum charge Displays the maximum charge.
☛ Key in the maximum number of units allowed ➔ SK1
3Unit price Displays the unit price.
☛ Highlight the whole number (integer), the decimal number or the currency
field ➔ Key in the required value for the whole number and decimal
number fields. For the currency field, key in the currency type using a
maximum of three characters ➔ SK1
7 Redial blacklist Accesses the numbers in the blacklist.
2 If dialled call is not successfully connected (e.g. number busy), the auto redial facility will be offered (see
page 12). If you have set auto redial and the call still fails, the number called will be added to the blacklist.
2 Depending on the conditions, some options may be displayed in gray and not be available.
Display missed/received/dialled calls Options menu (M431M/M432M/M433M)
☛
or 4 3 1 for missed calls, or 4 3 2 for received calls, or or 4 3 3 for dialled calls.
☛ Highlight a number in the list ➔
▼
No. Missed calls/Received calls/Dialled calls Options menu
1 Call Calls the current number.
2 Create message Creates a new message to the highlighted phone number.
10
Page 23
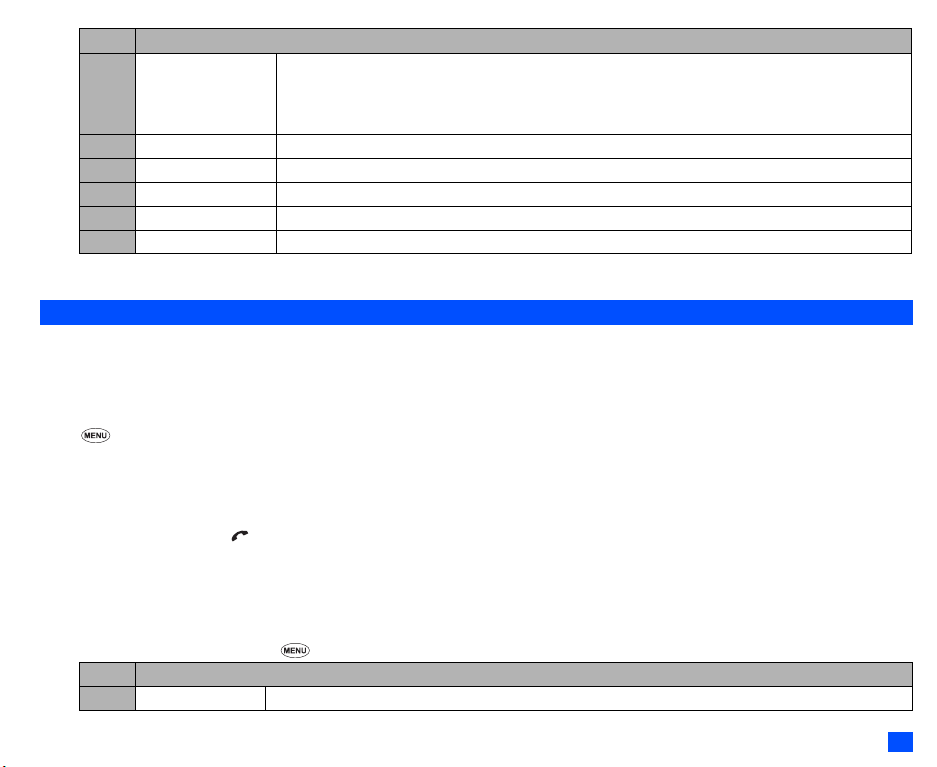
No. Missed calls/Received calls/Dialled calls Options menu (Continued)
3 Add to phonebook Adds the current number to the phonebook.
☛ 1 to add it as a new personal data, 2 to add it to an existing personal data ➔ Press the appropriate
number for the storage destination ➔ Press the appropriate number for the phonebook data field to
copy the current number to.
4 Delete one Deletes the current number.
5 Delete all Deletes all the numbers in the list.
6Info Displays information on the current number.
7 Add desktop icon Creates a desktop icon of the selected number.
8Items/Page Selects either to display 4 or 8 phone numbers in one screen.
2 Depending on the conditions, some options may be displayed in gray and not be available.
Call settings (M16)
From the Calls screen, you can change various call settings: the call diversion, call waiting and holding, auto redial and line identification.
Call diversion (M161)
Setting Call diversion
☛ 1 6 1 ➔ Highlight the type of call you wish to divert
2 There will be a delay while your phone checks its divert status with your network.
☛ Highlight one of the conditions ➔ When the phone number field of a divert condition is highlighted, either enter the phone number to divert to, or
delete any existing phone number.
☛ If you have made any mistake, highlight the appropriate field ➔ SK1 to clear any mistakes
☛ If the settings are correct,
, There will be a short delay while the network sends the divert status of your phone.
, There may be an additional charge for this service depending on your network.
, There may be unavailable settings depending on your network.
Call diversion edit options menu
☛ Highlight the required edit field ➔
No. Call diversion edit options menu
1Copy Copies the number in the edit field.
11
Page 24
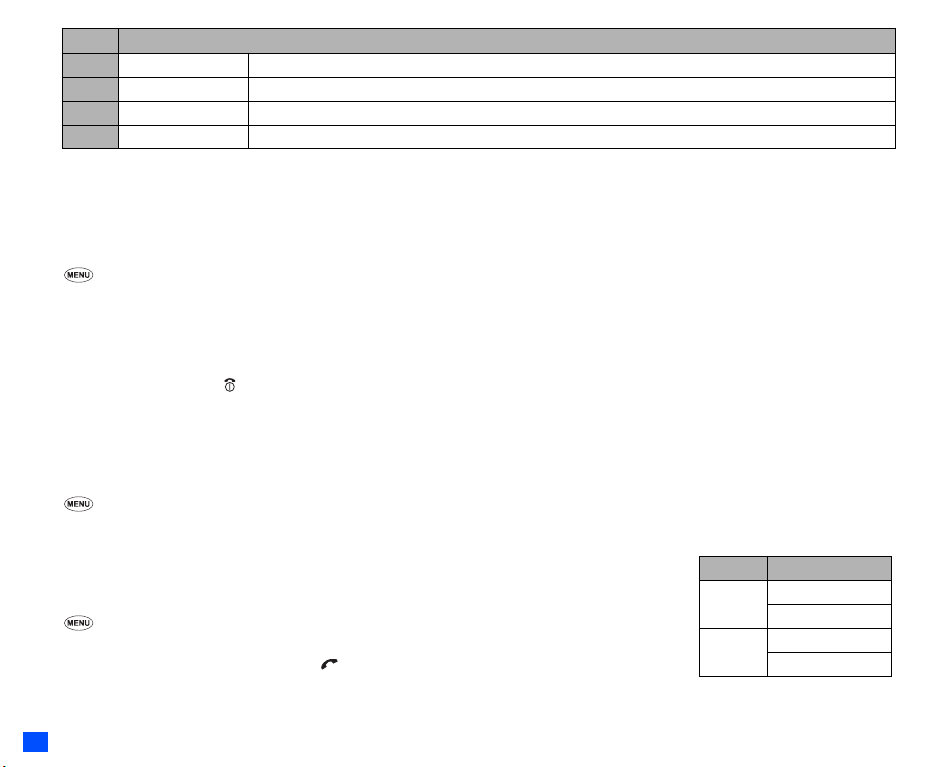
No. Call diversion edit options menu
2Paste Pastes the previously copied number.
3 Disable all Disables the numbers from all the fields.
4 Phonebook Displays the phonebook to insert a number in the edit field.
5 Add to phonebook Adds the number to the phonebook as a new personal data or saves the number in an existing personal data.
2 Depending on the conditions, some options may be displayed in gray and not be available.
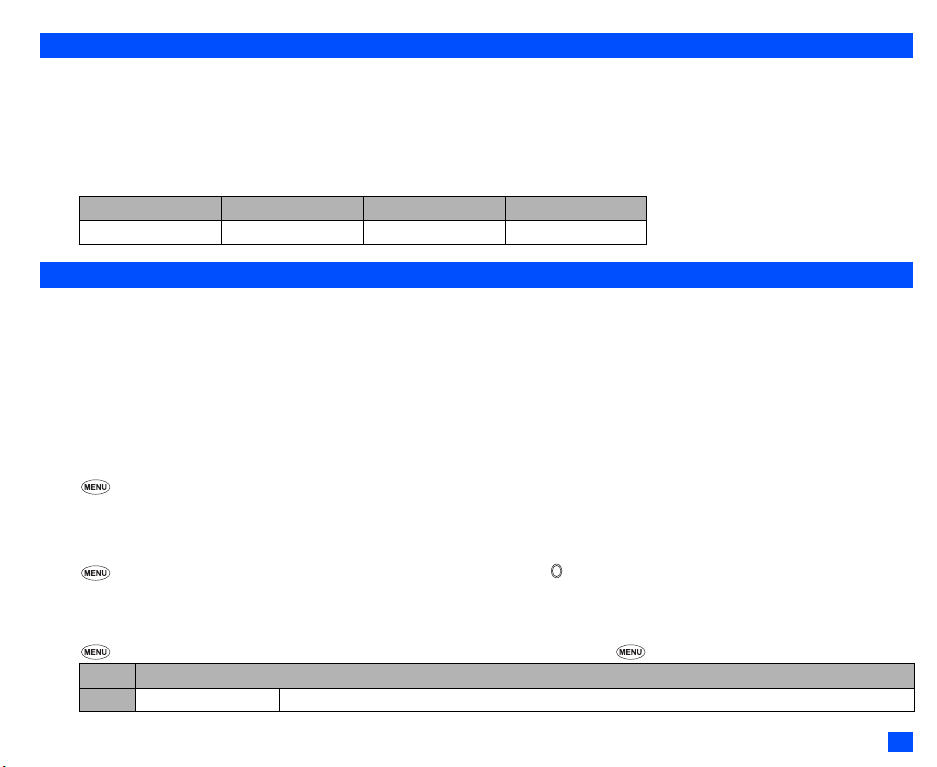
Call waiting and holding (M162)
This facility informs you that another call is being made to your phone while an existing call is in progress.
Setting up call waiting
☛ 1 6 2 ➔ 1 1 to activate, 1 2 to deactivate the call waiting, or 2 to check the status of call waiting.
Using call waiting
☛ If you are on a call and another comes in, you will be alerted by a beep in the earpiece ➔ SK1 to accept the incoming call
☛ To switch the calls, SK1
☛ To merge the calls, SK2 (see “Multi-party calls” on page 8)
☛ To end the current call,
☛ To retrieve the held call SK1
Auto redial (M163)
With the auto redial facility, your phone will redial a number up to 10 times if the first attempt fails. A tone will be heard at each redial attempt. Your phone
cannot connect a call if the other party is busy or if there are network problems. Pressing SK2 during a redial attempt will abort it.
☛ 1 6 3 ➔ 1 to activate or 2 to deactivate the auto redial facility.
Line ID (M164)
, The line ID (identification) facility is network dependent.
The line ID facility enables you to choose whether or not to send your own phone number when you make a call
and also whether or not to display a caller’s phone number when you receive a call.
☛ 1 6 4 to display the Line ID screen with a ✔ over an activated line and a ✘ over a deactivated line.
☛ To set the status of each line (see the table on the right), highlight a line (the line will flash when selected).
☛ SK1 to set the line identification on or off ➔ to save the current settings.
Line type Setting
Outgoing Send own #
Show connected #
Incoming Show Incoming #
Return own #
12
Page 25
International dialling codes
When you make an international call from any country, you must start by dialling a special international access code. Your phone has the facility to prefix
a + symbol to the numbers, so that you need not enter the access code for the country that you are calling from.
Entering international dialling codes
☛ Hold down 0. The 0 character displayed will change to a + character ➔ Key in the country code, area code, and phone number that you wish to call.
The UK country code is always 44, no matter what country you are dialling from. For example, a typical UK number of 0131 1234567 is entered as:
International access country code area code phone number
+ 44 131 1234567
Roaming
, You will be charged for calls forwarded to you while roaming.
The roaming facility enables you to use your phone in many parts of the world and pay all charges through your normal service provider. Your network
operator usually has agreements with named networks in other countries so that automatic roaming can take place with these named networks. The
phone also allows you to set network preferences of your own.
When dialling, you will need to add the international access codes if required. So, storing all numbers with the codes (such as +44 for UK) is helpful (see
page 13).
2 Before leaving your home country, you should select any preferences such as bar calls or call diversion.
Setting Automatic or Manual network selection (M181)
☛
1 8 1 ➔ 1 to select the automatic mode or 2 to select the manual mode.
, Before you manually select a network, ensure it is covered under the agreement you have with your service provider.
New search (M182)
☛
1 8 2 to search the available networks➔ Highlight the desired network ➔ to connect to it
Viewing/editing network list (M183)
, Before editing your network list, please consult with your service provider.
☛ 1 8 3 to read the network list in the SIM memory ➔ Highlight the required network ➔
No. SIM list Options menu
1Add Adds a new network to the list.
13
Page 26
No. SIM list Options menu
2Move Moves the highlighted network within the list.
☛ Use ▲ and ▼ to move the network ➔ SK1
3Remove Deletes the highlighted network.
Selecting the frequency band (M184)
You have to select the frequency band to suit the location.
☛ 1 8 4 ➔ Select the required frequency band.
2 Frequency bands must be adjusted to suit the location when roaming (Europe, US, etc.), for the phone to work properly.
Text Entry
This section describes how you enter text. The same method of text entry can be used in phonebook editing.
Mode change
☛ With a text entry screen displayed, SK1 to change the text entry mode: T9
T9® English text input
Your phone incorporates T9® Text Input, enabling fast, easy and intuitive text input. For each letter to be keyed in, you only need to press the
alphanumeric key once. The screen will display the word you may require based on the internal English dictionary of your phone.
☛ With a text entry screen displayed, SK1 until the entry mode is T9
i) For example, to enter “Good”:
☛ Press 4 6 6 3, and then press 0 to confirm the word.
ii) To enter “Peter is good”:
☛ Press to shift to upper case (for one letter). You will see a green arrow in the Help area.
☛ Press 7 3 8 3 7 to display “Peter”, and then press 0 to confirm.
☛ Press 4 7 to display “is”, and then press 0 to confirm.
☛ Press 4 6 6 3 to display “good”, and then press 0 to confirm and the sentence is completed
Key Function
0 Confirms a word and inserts a space.
SK1(List) Displays the list of other matching words.
®
English text, Normal text (ABC), Numeric input
®
English input.
14
Page 27
Key Function (Continued)
▼
▼
▼
▼
SK1(Spell?) Activates the spell mode which temporarily deactivates T9 for you to spell the word in Normal text input. The
SK2(Dismiss) Cancels the T9 matching word list.
SK2(Next) or # Displays the next candidate.
▼
or Places the cursor.
0 to 9 (press and hold) Inserts the number.
CLR Deletes any character.
(press and hold) Press and hold to activate the highlight mode (see “Highlight mode Options menu” on page 32 for details).
# Activates symbol mode when no word is highlighted.
spell mode ends when you key in 0 to enter a space, or SK1(T9).
Toggles between lower case, shift (upper case for one letter) and caps lock (permanent upper case).
Normal text input
☛ With a text entry screen displayed, press SK1 until the entry mode is Normal text (ABC) input.
☛ Use alphanumeric keys to enter letters. For example, to enter “e”, press 3 twice; to enter “f”, press 3 three times. For other functions, see the table
below.
Key Function
Toggles between lower case, shift (upper case for one letter) and caps lock (permanent upper case).
(press and hold) Press and hold to activate the highlight mode (see “Highlight mode Options menu” on page 32 for details).
0 Inserts a space.
0 to 9 (press and hold) Inserts the number.
CLR Deletes any character.
▼
or Places the cursor.
# Activates symbol mode.
2 If you have made a mistake, use ▲ ▼ to place the cursor to the right of the incorrect character and then press CLR.
2 When entering normal (ABC) text, and the character you require is displayed, use key to move to the next character position (if you wait for more
than 1 second, the cursor will move one character to the right automatically).
▼
15
Page 28

Numeric input
☛ With a text entry screen displayed, press SK1 until the entry mode is Numeric input.
2 You can also press and hold the number key to insert the number in T9/Normal text input mode.
☛ Use alphanumeric keys to enter numbers.
Key allocations
Whenever you need to enter text (for short messages, storing names with numbers, etc.), successive presses of an alphanumeric key will display different
characters. Pressing in T9
(permanent upper case). When a text entry screen is displayed, pressing SK1 enables you to select Normal text input (ABC), T9
Numeric input (123).
2 Depending on the types of text entry screens, not all types of text entry modes are available.
Symbol mode
In the symbol mode, pressing each key will input a symbol according to its position on the Symbols screen. By pressing # in a text entry mode, the Symbol
screen will be displayed. Use ▲ and ▼ to select the row, and then press the appropriate number on the column of the required symbol.
®
English text input or Normal text (ABC) input toggles between lower case, shift (upper case for one letter) and caps lock
®
Text input (T9) or
16
Page 29

IR Data Exchange
Your phone is equipped with an InfraRed (IR) data port which enables you to send and receive phonebook/picture/video/sound excluding MP3/schedule/
ToDo list/note data with cellphones or other devices equipped with IR ports.
, Do not aim or direct the IR data port towards your or other people’s eyes when using IR data exchange.
, Do not aim or direct the IR data port towards another IR device as this may cause the device to malfunction.
2 Depending on the other party’s cellphone or device, the data may not be received correctly.
Positioning of the phones
, Open both sending and receiving phones vertically and place them as
their IR ports face each other with less than 20cm of interval.
2 Do not place anything between IR ports.
2 The angle made of two IR ports must be within 30°.
2 Do not move the phones until the data exchange is complete.
2 The phones may not communicate successfully if they are placed under direct
sunlight or fluorescent light, or close to other infrared devices.
2 While sending or receiving data through IR, your phone is automatically placed out of
service, so phone call, message and i-mode access are disabled.
IR send
You can send phonebook/picture/video/sound excluding MP3/schedule/ToDo list/note data as a file through the IR port.
/ Before starting to send data, the other party must be ready to receive data.
Phonebook entry (M413...)
You can only send Name, Home, Mobile, Work, Fax, 2 Email addresses and 2 pieces of descriptive information.
2
2 Your phone sends data according to the vCard 2.1 specification.
☛ To display the phonebook (Phone), (for required number of times) or 4 1 3 ➔ Highlight a phonebook entry.
☛ 0 or 3 ➔ The phonebook entry will be sent through the IR port.
Video/sound/picture file (M6...)
☛
6 ➔ 1 (Videos), 2 (Sounds) or 3 (Pictures) ➔ Highlight a folder ➔ ➔ Highlight a file ➔ 2 ➔ 3 (for Pictures/Videos) or 4 (for
Sounds) ➔ The file will be sent through the IR port.
15° or less
20cm or less
17
Page 30

Schedule entry (M84...)
☛
8 4 ➔ Highlight a date ➔ ➔ Highlight a schedule entry ➔ 9 ➔ The schedule entry will be sent through the IR port.
ToDo entry (M85...)
☛
8 5 ➔ Highlight Public, Private or All ➔ ➔ Highlight a ToDo entry ➔ 7 ➔ The ToDo entry will be sent through the IR port.
Note (M862...)
☛
8 6 2 ➔ Highlight a note ➔ 2 and 2➔ The note entry will be sent through the IR port.
IR receive (M891)
You can standby your phone to receive data (phonebook/picture/video/sound (excluding MP3)/schedule/ToDo list/note data) from other devices or a
phone of the same model.
Receiving data through IR (M891)
☛
8 9 1 ➔ Start sending data from the other end.
2 Once the transmission completes, your phone automatically judges the type of received data and stores the data accordingly.
2 If your phone does not have enough space to store the received data, a message will be displayed indicating lack of space. In such a case, delete
unnecessary data and try the data exchange again.
2 Received picture/video/sound files are stored in the Download folder of My data (see “My data (M6)” on page 61).
IR modem (M892)
You can use your phone as a modem for a PC via the IR port to establish a dial-up connection to an Internet service provider.
Activating the IR port for modem use
☛ 8 9 2 ➔The phone will be in standby status for IR transmission from the external device.
2 If the IR transmission is not established within a short while, the standby status will end.
2 While on active call or connecting to the external device such as USB, IR modem is not available.
, Your phone consumes a lot of battery power when used as a modem. After using your phone as a modem, be sure to deactivate the
modem function from your PC or press (for the CSD connection only). When the modem function is deactivated, the idle screen will
be displayed without the Infrared icon and GPRS icon.
2 Check with your service provider to use your phone as a modem to connect to the Internet.
18
Page 31

Desktop icons
Desktop icons are shortcuts to functions or items. You can activate a desktop icon on the standby screen (desktop) in stead of following the menu and
pressing the shortcut numbers.
The desktop icons are displayed in two rows on the standby screen. See “LCD and displayed icons” on page vii for the actual location of the desktop
icon area.
There are two types of desktop icons: the automatically displayed and the manually created.
Automatically displayed desktop icons
The following automatically displayed icons are displayed on the upper row of the desktop icon area:
Icon name Image Description
Missed call Displayed when there is a new entry in the Missed calls list.
Missed message Displayed when there is a new message you have not acknowledged.
Missed Mail Displayed when there is a new Mail you have not acknowledged.
2 You can delete all the automatically displayed icons by pressing and holding CLR on the standby screen.
2 If you turn the phone off, all the automatically displayed desktop icons are deleted.
Manually created desktop icons
The following manually created icons are displayed on the lower row of the desktop icon area:
Icon name Image Description
Phone number Displays a dialer screen with the registered phone number displayed.
Message Creates a new message to the registered phone number or Email address.
URL Activates the browser and accesses the registered URL.
Picture Displays the image file.
Notepad Displays the Notepad preview screen with the note file displayed.
Camera Displays the camera view finder screen.
Video Displays the video view finder screen.
Music player Displays the Music player screen.
19
Page 32

Creating a desktop icon manually
☛
Activate the required function (camera/video/music player) or display the item (image file/note file/phone number/Email address/URL).
☛ to display the Options menu and select Add desktop icon (for an image/note file, this menu is under Use item, and for camera/video, under
Other settings).
2 You can create up to 10 desktop icons.
2 If you have more than 5 desktop icons, an arrow will be displayed to indicate that you can scroll for more icons.
2 The phone number, mail address or URL desktop icon data will not be updated when the original data is modified. Delete the old desktop icon
and create a new one in such a case.
2 When you create a desktop icon of an image file or notepad file, the data will be automatically protected. The default title will be the file name,
even if this title is changed the original file name will remain the same.
2 Each manually created desktop icon has a title that you can edit.
Activating a desktop icon
☛
➔ Highlight the required desktop icon ➔
2 If you do not press any key for three minutes after highlighting a desktop icon, the highlight is cancelled and the screen goes back to the normal
standby screen.
2 If you activate an automatically displayed desktop icon, it will be deleted automatically.
Desktop icon Options menu
☛
Highlight a desktop icon ➔
No. Desktop icon Options menu
1 Edit title Edits the title of the highlighted desktop icon.
2 Delete one Deletes the highlighted desktop icon.
3 Delete all Deletes all the manually created desktop icons.
20
Page 33

Settings (M1)
Phone(M11)
☛ 1 1
No. Phone
1 Voice volume Adjusts the sound volume output from the earpiece.
☛ Use ▲ ▼, Side keys or alphanumeric keys (0 to 9) to adjust the volume.
2 You can also press the Side keys to display the volume control screen and to adjust the volume setting.
2 During a call, you can press the Side keys to adjust the setting of the volume as required.
2 Answer options 1 Any key answer On: Any key (except , SK2, the Side keys) is valid to answer a call
2 Ring silencer On: Pressing one of the Side keys stops the ringer sound and the vibrator while
3 Fold answer On: You can answer an incoming call by opening your phone.
3 Side key Disable: Side keys are locked while your phone is folded.
2 You can also lock/unlock the Side keys by pressing and holding on the standby screen.
4 ALS setup , The Alternate Line Service (ALS) facility is SIM card and network dependent.
If your SIM card supports ALS, you can setup which line to use for Outgoing call or Voice mail.
5Clock 1 Show clock Sets to display the local time, both the local and remote times or no time on the
2Set time Sets the time for the local or remote time.
3Set date Sets the date.
4 Set date format Selects the date display format.
5 Set time format Selects the time display format from 12 hour or 24 hour.
Off: Only and SK1 are valid to answer a call
receiving a call with the phone closed.
2 This function cannot be used if the Side keys are locked.
/ See also: “Mute” on page 8.
main-LCD.
21
Page 34

No. Phone (Continued)
5 Clock (Continued) 6 Set timezone Sets the timezone. (A ✔ is placed on the currently selected timezone.)
☛ Highlight the required timezone➔Press SK1 to save the change.
2 If the highlighted timezone has Daylight Saving, a check box will be
displayed at the bottom of the screen. Press to activate (✔)/deactivate
the setting.
6 Language Selects the language the phone displays.
2 When you have switched the language to be displayed, please wait until the new setting becomes active.
7LED Selects the Light Emitting Diode (LED) colour for incoming calls/SMS/Mail or during a call.
2 If the personal setting or the Group setting for the LED colour is also set in the phonebook, it has priority
over this LED setting. (See “Allocating a LED colour” on page 53 for details.)
8 Earphone type Selects the earphone type from Stereo or Monaural, depending on your earphones (headset).
Phone modes (M12)
Your phone can be set to one of the following modes: Normal mode, Meeting mode, Pocket mode or Car mode.
, Any changes made to the settings while in a particular mode will be stored and used when that mode is selected again.
Selecting your phone mode
☛
▲ or 1 2➔ Press the appropriate key for the required mode.
2 You can also set the Meeting mode or return to the previous mode by pressing and holding ▲ on the standby screen.
Editing the mode settings
☛
▲ or 1 2 ➔ Highlight the required mode ➔ SK1 ➔ Press the appropriate number for the required setting in the following table.
☛ For any volume setting, use ▲ ▼, Side keys or alphanumeric keys (0 to 9).
No. Phone mode setting
Ringer Selects the Sound or Video for incoming calls. (See “Sounds (M62)” on page 62 or “Videos (M61)” on page 61 for
1
2 Ringer volume Sets the sound volume for incoming calls.
3SMS tone Selects the ringtone for incoming SMS messages. (See “Sounds (M62)” on page 62 for details.)
details.)
2 While receiving a call with your phone open, the ringer volume can also be adjusted by pressing the Side keys.
22
Page 35

No. Phone mode setting (Continued)
4 SMS tone volume Sets the sound volume for incoming SMS messages.
5 Mail tone Selects the ringtone for incoming Mail or MMS messages. (See “Sounds (M62)” on page 62 for details.)
6 Mail tone volume Sets the sound volume for incoming Mail or MMS messages.
7Key tone Turns on/off the key tone.
8 Service tone Turns on/off the service tone.
9 Alarm volume Sets the sound volume for Clock alarm and Schedule alarm.
0Vibrator Turns on/off the vibrator function.
Earphone setting Selects the sound output from Earphone & Speaker or Earphone.
Auto answer Selects whether to answer an incoming call automatically.
#
2 To use the Auto answer function, connect the headset to your phone and set the earphone volume to 1 or
higher. If the earphone volume is set to 0, you must turn the vibrator ON to use the Auto answer.
2 If the selected mode is Car mode, the backlight will always be turned on. This will reduce battery life.
Main-LCD (M13)
☛ 1 3
No. Main-LCD
1 Greetings Selects the greeting which is displayed on the main-LCD during phone start-up from No greeting, Text or
2 Wallpaper Selects a picture or video file to use as the background for the main-LCD.
3 Main menu style Selects and resets the background and icons for the Main menu screen.
4 Colour style Selects the phone’s colour theme.
Animation.
☛ If you select Text greeting, press SK1 to edit the greeting text. Key in a greeting text and press .
2nd-LCD (M14)
☛ 1 4
23
Page 36

No. 2nd-LCD
1 Clock/Event display Selects which items to display on the 2nd-LCD from Clock & Event, Clock only, Event only or Off.
2 Clock orientation Selects whether to display a horizontal clock or a vertical clock.
2 When you select to display a vertical clock, it is read from the camera and LED end.
2 The event displays and incoming call numbers are shown along the long end according to the Display
direction.
3 Incoming call No. Turns on/off the function to display the incoming call number on 2nd-LCD.
4 Display direction Selects which direction to display the 2nd-LCD.
2 This setting does not effect the vertical clock.
5 Contrast Sets the contrast level of the 2nd-LCD.
Power saving (M15)
☛ 1 5
2 If the selected mode is Car mode, this function is displayed in gray and is not available.
No. Power saving
1 Level setting Selects the power saving level from Level 1 (minimum power save setting), Level 2 (moderate) or Level 3
(maximum).
2 The main-LCD backlight will turn dim and then turn off after a given amount of time with no operation.
2 When the phone is folded, Power saving level also applies to the 2nd-LCD.
2 Function key LED Selects whether to flash the LED of SK1 and SK2 when the main-LCD and its backlight are turned off.
2 If the selected mode is Car mode or the camera view finder screen is displayed, the main-LCD backlight will
always be on.
Calls (M16)
☛ 1 6
/ For settings provided on the Calls screen, see “Call settings (M16)” on page 11.
Security (M17)
☛ 1 7
24
Page 37

The security settings will help to protect your phone from improper and unauthorized use. You may be required to enter one of the five codes (shown
below). When the phone prompts you for one of these codes, key in the appropriate number.
• PIN code (provided by your network service provider to protect your SIM card if it is stolen)
• PIN2 code (provided by your network service provider for charge information and Fixed dialling services protection)
• PUK code (personal unblocking key in case you forget PIN code)
• PUK2 code (personal unblocking key in case you forget PIN2 code)
• Security code
, If you forget any of these codes, ALWAYS contact your service provider as they are the ONLY source for your codes.
PIN code
Your phone can be set up so that your PIN code must be entered at power up before the phone can be used at all. If the PIN code is not entered, not
even incoming calls can be answered. Entering your PIN code incorrectly 3 times (not necessarily in the same session) will invalidate the correct PIN
code. In such a case you will have to contact your service provider for a PUK code to unblock your SIM card.
2 Some SIM cards are set up so that PIN number entry cannot be turned off.
2 When SIM PIN lock is enabled, you can change the PIN code.
PIN2 code
Your phone supports advanced feature that may require a PIN2 code to be entered before they can be accessed or modified. Entering your PIN2 code
incorrectly 3 times (not necessarily in the same session) will invalidate the correct PIN2 code. In this case you will have to contact your service provider
for a PUK2 code.
, The PIN2 code is SIM card related and may only be available from your service provider.
No. Security
1 Change PINs Changes the PIN or PIN2 code. (PIN activate setting must be turned on to change the PIN code.)
2 PIN activate Turns on/off the PIN code entry required at starting up the phone-up.
3 Change security code Change the security code which is used to set some of functions and unlock the Personal Information
4 Phone lock Turns on/off the Phone lock function which will lock the phone: you can only make emergency calls or enter
Manager (PIM) features.
2 The default setting of the security code is “0000”.
the security code. After entering the correct security code, you can use the phone normally.
2 Upon power-up, you are prompted to enter the security code if the Phone lock was active when the phone
was powered down.
25
Page 38

No. Security (Continued)
5 Bar calls You can bar the following calls made/received on your phone: All outgoing (dialled) calls, international
outgoing (dialled) calls, international outgoing (dialled) calls except to home, all incoming (received) calls or
incoming (received) calls when roaming.
1 Change settings ☛ Highlight the type of restriction and the call type, and then ➔ to save
changes.
☛ Key in your bar calls password to verify user identification to the network
➔ SK1 to confirm and save changes to the network.
2 The selected settings have red bars over their icons.
2 Set password , Bar calls facilities are network services and may require a password.
6 Fixed dialling Turns on/off the fixed dialling which restricts the use of dialled number to only the Fixed Dialling Numbers
(FDN).
Changes the bar calls password.
, The FDN facility is network dependent.
/ See also: “Fixed dialling numbers (FDN)” on page 48.
Network (M18)
☛ 1 8
/ For settings provided on the Network screen, see “Roaming” on page 13.
Reset settings (M19)
☛ 1 9
This function will reset your phone to its factory settings.
, By restoring the factory settings, any changes you have made to your phone except the following will return to the factory settings (the
following data/settings will not be reset):
• Settings: Set time other than Remote time, Set date, Language, all settings in Calls other than Auto redial, all Security settings other than Change
security code, SIM list settings in Network.
• All call lists and call information
• Phonebook: All Phonebook entries. The settings for Groups.
• Accessory: All Schedule, ToDo, Notepad and Voice memo entries. All the settings other than Clock alarm, Play list for Music player, View events
for Scheduler and Sort for ToDo.
• i-mode: All Bookmarks, Saved pages, Go to webpage, and Mail settings. All the i-mode related settings.
26
Page 39

• Java: All the Java™ applications.
• Message: All the stored messages. The settings for Msg filter, Msg filter details, and SMS centre number.
• My data: All stored files.
Message (M2)
Message overview
Message services
Your phone supports the following messaging services:
• Short Messaging Service (SMS) allows you to send short messages (160 half-pitch characters max.) to one or more phone numbers. To send an
SMS message, the destination phone number must be a mobile phone with an SMS service subscription. SMS service also supports Enhanced
Messaging Service (EMS) for which the maximum length of the message you can send depends on the number of linked messages (maximum of
10 linked messages are available).
• Mail (i-mode messaging service) allows you to send a message to not only other cellphones but also to PCs and other devices that uses Email
addresses. You can attach files from Pictures, Videos and Sounds in My data (see page 61). Mail facility is available from the Mail screen under
the i-mode facility. For details on the mail service, see “i-mode (M3)” on page 33.
• Multimedia Messaging Service (MMS) is a service that allows you to send messages of a slideshow of text and multimedia files. When you receive
an MMS message, you will be notified by a message from the MMS centre. You can either automatically or manually receive the contents of an
MMS message. MMS facility is available from the Mail screen under the i-mode facility. For details on the mail service, see “i-mode (M3)” on
page 33.
, The Message Services are network dependent.
Sending/Receiving messages
While an SMS message is being sent or received, a name, a number and a CLI picture will be displayed (if a name and CLI picture have been stored
with the number in your phonebook). The received messages are stored on the SIM card or in your phone memory. When you receive a message, your
phone will ring or beep during a call, a new message icon will be shown on your phone’s display and its LED will glow.
2 Please delete the unnecessary messages in the folders from time to time. The phone cannot receive any messages when the Inbox folder is full.
Message screen
☛ To display the Message screen, 2 or press and hold ➔ Press the appropriate key for the required option.
No. Message screen menu
1 Inbox The received messages are stored here.
2Drafts The messages currently being edited are stored here.
27
Page 40

No. Message screen menu (Continued)
3 Outbox The messages that failed to be sent are stored here.
4Sent The sent messages are stored here.
5, 6 Folder1/Folder2 The messages moved by Move msg (see “Message list Options menu” on page 29) are stored here.
7CB The received broadcast messages are saved. See “Cell broadcast (M27)” on page 33 for details.
2 If there is no message in a message list, the list will be displayed in gray and you cannot select it.
Reading a message (M21)
☛ To display the Message view screen of a new message, 2 1 or press and hold and press 1 ➔ Highlight the new message ➔
☛ The new (unread) messages are displayed in bold.If the message cannot be displayed in one page, press ▲ and ▼ keys to scroll through the
message.
The following icons will be displayed.
Icons Descriptions Icons Descriptions
Message type icons Read / Unread status icons
SMS message New / Unread message(s)
Incomplete SMS message Read message(s)
Storing location icons Filtering status icons
Highlighted message stored in SIM SMS messages filtered by status (incomplete)
Highlighted message stored in the phone memory SMS messages filtered by location (SIM)
Sorting status icons SMS messages filtered by location (the phone memory)
Messages sorted by Date Filtered SMS messages
Messages sorted by Name Sent message status icons
Messages sorted by Read/Unread status Sent but failed message
Messages sorted by Size Sent message
Messages sorted by Ascending order
Messages sorted by Descending order
Message Options menu (M2M)
☛
2 or press and hold and press
28
Page 41

No. Message Options menu
1 SMS settings 1 SMS centre Edits the SMS centre number (this number is saved in the SIM card).
2 Auto display
3 Receipt request Selects whether to request a receipt of the sent SMS messages.
Max linked msgs Sets the maximum number of linked SMS messages. This function divides an SMS with
4
Validity period Selects the period of time an SMS message is stored at the SMS centre, while trying to
5
2 CB settings
3 View msg status Displays the information on the number of messages in the phone, the size of free/used memories, SMS units in the
4 Rename folder Renames Folder1 and Folder2 folders.
5View all Displays all the messages in all folders on the same list.
6 Msg filter Sets the type(s) of messages to be displayed by selecting the desired filter option.
Enable 1 to receive none, 2 to receive all, or 3 to specify a list or Cell Broadcast Message
1
2 Languages Selects which language to receive the cell broadcast messages in.
phone/SIM, and complete/incomplete SMS units.
Turns on/off the automatic display function that displays the received SMS messages
automatically.
the message text exceeding the maximum number of characters allowed into multiple
messages.
deliver the message.
Identifier (CBMI) to receive broadcast from.
, The receipt request and linking of SMS messages are network dependant.
2 Depending on the selected folder, some options may be displayed in gray and not be available.
Message list Options menu
☛
Display the message list in the Inbox, Drafts, Outbox, Sent, Folder1, Folder2 or CB ➔
No. Message list Options menu
1Reply Replies to the sender of the highlighted message.
2 Reply all Replies to the sender and all other recipients of the highlighted message.
3Delete Deletes the highlighted message.
4 Delete all Deletes all the messages in the current folder.
5Forward Forwards the message text of the highlighted message.
6 Msgs/page Selects either to display 3 or 7 messages in one screen.
29
Page 42

No. Message list Options menu (Continued)
▼
7Move msg Moves the highlighted message to Inbox or Folder1/2, or copies to SIM or Phone.
8Sort msg By: Sorts the messages by date, name, read/unread status or size.
9Search Searches messages by alphabets.
0View details Displays the detailed information on the highlighted message.
– Add desktop icon Creates a desktop icon of the highlighted message (Inbox, Sent, Folder1/Folder2 only).
–Edit Edits the highlighted message (Drafts and Outbox only).
– Resend Resends the highlighted message in the folder (Outbox only).
Order: Sorts the messages in ascending or descending order.
The entire message or only the packets that failed to reach the recipient(s) can be sent.
2 Depending on the selected folder, the menu number and available options may vary.
2 Depending on the selected folder, some options may be displayed in gray and not be available.
Message view Options menu
☛
Display the message list in the Inbox, Drafts, Outbox, Sent, Folder1, Folder2 or CB➔ Highlight a message ➔ ➔
No. Message view Options menu
1Reply Replies to the sender of the highlighted message.
2 Reply all Replies to the sender and all other recipients of the highlighted message.
3 Delete Deletes the highlighted message.
4View details Displays detailed information on the highlighted message.
5 Forward Forwards the message text of the highlighted message.
6 Save object Saves the highlighted object to a folder in My data.
7Move msg Moves the highlighted message to Inbox or Folder1/2, or copies to SIM or Phone.
8 Highlight mode Activates the Highlight mode.
9 Add desktop icon Creates a desktop icon of the highlighted message.
2 Depending on the conditions, some options may be displayed in gray and not be available.
2 The reply facility uses the phone number of the person who sent the message.
2 The Save object Options menu will be displayed only if an object is highlighted.
☛ and to highlight a phone number, Email address or URL in the message ➔
30
▼
The columns shows the menu numbers for P: Phone number highlighted, E: Email address highlighted and U: URL highlighted.
Page 43

P E U Message view Options menu
▼
1 1 – Add to phonebook Adds the highlighted phone number or Email address to a phonebook.
2 – – Dial phone number Dials the selected phone number.
– – 1 Add to bookmark Adds the highlighted URL to the bookmarks.
– – 2 Go to URL Activates the web browser to access the highlighted URL.
3 2 3 Create message Creates a new message with the highlighted phone number/Email address/URL in the To field,
the message text, or the slide text.
4 3 – Add desktop icon Creates a desktop icon of the highlighted phone number/Email address.
Creating a message
Help area
This area contains the
information on the message.
S indicates the size of the
message equivalent to the
number of SMS messages, and
R indicates the remaining
number of characters
available.
(green)
(red)
(no arrow)
Indicates that an upper case letter will be input next.
Indicates the capital lock.
Indicates that a lower case letter will be input next.
Message composer Options menu
☛
2 SK1 or press and hold and press SK1 ➔ Highlight To or Message field ➔
No. Message composer Options menu
1Add/Edit Adds or edits a recipient phone number or a message.
2 Preview msg Displays a message preview screen.
3 Delete Deletes the highlighted recipient, message, or object.
☛ To display the Message composer screen, press 2 SK1 or press and hold
and press SK1 ( ➔ to display the Message composer Options menu)
☛ To address the message, highlight the To field ➔ ➔ Input the required phone
number ➔
2 To scroll the phone numbers in the To field, or
▼
☛ To key in the message, highlight the Message field ➔ ➔ Key in the message
➔
2 Pressing while keying in the To/Message field displays the Message edit
Options menu screen.
☛ Press SK1 to send the message.
2 When you are in the ABC (normal text) mode, any word entered that is not in the
T9 dictionary will be added automatically.
2 When you are keying in your message, press SK1 to change the text entry mode.
2 If you display another screen or receive a call while you are editing a message
more than 1 character, the message will be saved automatically in Drafts.
31
Page 44

No. Message composer Options menu (Continued)
4 Delete all Deletes all the recipients (To field only).
5 Save Saves the message in Drafts folder.
6 Phonebook Displays the phonebook list to insert a recipient phone number.
Resend list Inserts a phone number from the resend list.
7
8 Insert Inserts a new recipient phone number (To field only).
9 Address list Displays the recipients of the message (To field only).
2 You can delete the highlighted phone number from the resend list or the entire resend list by pressing
1 or 2 respectively.
2 Depending on the selected field, some options may be displayed in gray and not be available.
Message edit Options menu
☛
2 SK1 or press and hold and press SK1 ➔ Highlight To or Message field ➔ ➔
No. Message edit Options menu
1Text colour Selects the colour of text and background.
2 Text format Selects the font size (normal, large or small) and font style (bold, italics, underline or strikethrough).
3 Text alignment Sets the text alignment (left, centred or right).
4Paste Pastes the text which has been copied onto the clipboard in the Highlight mode.
2 This function can be used only when text has been selected in the Highlight mode.
5 Highlight mode Activates the Highlight mode at the cursor position.
2 To toggle the highlight mode on/off, SK1 and to go back to the normal mode, CLR
2 To display the Highlight mode Options menu, (see “Highlight mode Options menu” on page 32).
6Insert object Inserts Text, Sound, Picture, Animation, Emoticon or Pictograph into the message at the cursor position.
7 T9 Language Selects the language for T9 text input.
8 Edit settings Sets the Write mode (Insert or Overwrite) and Clear mode (Backspace or Delete).
2 Depending on the conditions, some options may be displayed in gray and not be available.
Highlight mode Options menu
2 SK1 or press and hold and press SK1 ➔ Highlight To or Message field ➔ ➔ 5, or press and hold ➔
☛
No. Highlight mode Options menu
1 Text colour Selects the colour of text and background.
2 Text format Selects the font size (normal, large or small) and font style (bold, italics, underline or strikethrough).
3 Copy Copies the highlighted part of text onto the clipboard.
32
Page 45

No. Highlight mode Options menu (Continued)
4Cut Cuts the highlighted part of text.
5 Delete Deletes the highlighted part of text.
6 Select word Selects (highlights) the nearest word to the current cursor position.
7 Select paragraph Selects (highlights) the nearest paragraph to the current cursor position.
8 Select all Selects (highlights) the entire text.
9 Save to text file Saves the highlighted part of text as a text file.
2 Depending on the conditions, some options may be displayed in gray and not be available.
Cell broadcast (M27)
Cell Broadcast (CB) messages (e.g. weather reports, news) are sent by the network to all phones in a certain area.
☛ 2 7
, Broadcast messages service is network dependent. Please contact your service provider for details.
i-mode (M3)
Using your phone’s browser facility, you can enjoy i-mode services such as browsing information on i-mode sites (programs) and other Internet web
pages, and sending/receiving i-mode messages which include the mail and MMS (including SMIL).
2 You can download melody files, images, animations, videos and Java™ applications to your phone’s memory. Some files with restrictions cannot be
saved to your phone's memory, even though they can be downloaded and played or displayed.
/ For the definitions of the icons related to i-mode, see “LCD and displayed icons” on page vii.
i-mode operation guide
You can access various i-mode functions by selecting the menus on the main four i-mode related screens: i-mode screen, i-mode menu screen, iMenu
screen and Mail screen. The following table gives an outline of the procedures related to the i-mode services.
Action Procedure
Browsing the i-mode sites/Internet web pages
Display the homepage
Display a web page
☛ Press and hold or SK2 ➔ 6 ➔ 3
2 You need to set the homepage URL in Home page beforehand (see “Set homepage” on page 41).
☛ SK2 ➔ 6 ➔ 1 to key in the address, or 2 to select an address in the history.
33
Page 46

Action Procedure
▼▼▼
▼
▼
Reload the current page
Display the URL of the current page
Bookmark a web page
Display a bookmarked web page
Save a web page
Display a saved page
Save an image
Save a phone number
Display the certificate information
of the current page
Download a file
Returning to the previous screen/
moving forward to the next screen
Mail/MMS
Create a mail
Create an MMS
Read a mail /MMS
Check for new mail/MMS
Settings for i-mode
Change the mail settings
Change the browser settings
Change the phone settings related
to i-mode
☛ While browsing a webpage, 1
☛ While browsing a webpage, 2
☛ With the web page you want to bookmark displayed, 1
☛ SK2 ➔ 5 or 2 while displaying another page ➔ highlight a bookmark ➔
☛ With the page to save displayed, 4
☛ SK2 ➔ 7 ➔ highlight a saved page ➔
☛ With the page including the image to save displayed, 3 ➔
☛ With the highlighted phone number to on the page, 5
☛ With a page displayed, 6
2 You can also refer to a saved page’s certificate information by displaying the page and 3.
☛ Highlight the link to the file to download ➔ ➔ When the download is complete, check that the
downloaded file is stored in My data (see page 61) or the Applications screen of Java™ (see page 66).
☛ While connecting to i-mode, to return to the previous screen (if any), or to move forward to the
next screen (if any).
☛ SK1 ➔ 1 (for details, see “Creating a new mail” on page 35)
☛ SK1 ➔ 2 (for details, see “Creating a new MMS” on page 35)
☛ SK1 ➔ 3 ➔ Highlight a message ➔
☛ SK1 ➔ 6
☛ SK1 ➔ 8 (for details, see “Mail settings” on page 45)
☛ SK2 ➔ 8 (for details, see “Settings” on page 41)
☛ 3 2 (for details, see page 38)
▼
34
Page 47

Mail/MMS operations
Creating a new mail
☛ SK1 ➔ 1
☛ Set the addressee.
Highlight the To field ➔ ➔ key in the destination ➔
To refer to the phonebook, ➔ Open phonebook to retrieve the destination
To send the mail to more than one addressee, ➔ Add To/Cc/Bcc
To change the To/Cc/Bcc status of an already set addressee, highlight the destination ➔ ➔ Change to To/Cc/Bcc
To delete an already set addressee, highlight the To field ➔ ➔ Del. address
☛ Key in the subject.
Highlight the Subject field ➔ ➔ key in the subject ➔
☛ Key in the message.
➔ ➔
Highlight the Message field
To attach a header, ➔ Attach header
To attach a signature, ➔ Attach sign.
key in the message ➔
☛ Attach a file if necessary.
Highlight the Attachment field ➔ ➔ select a file to attach from the My data screen
To delete an already attached file, highlight the attachment field ➔ ➔ Delete attachment
To preview the attached file, highlight the attachment field ➔ ➔ Play/View file
2 You can attach files up to 299 KB in total, or 10 files.
☛ To send the mail, highlight Send ➔
☛ To save the mail, highlight Save ➔
To delete the currently edited mail, ➔ Del. mail
Creating a new MMS
☛ SK1 ➔ 2 ➔ The Compose menu screen is displayed
☛ Using Compose menu options, create an MMS (for details, see the table “Compose menu options” on page 36) ➔ SK2 ➔ The Compose MMS
screen is displayed
☛ Set the addressee and key in the subject (see “Creating a new mail” for details).
☛ To send the MMS, highlight Send ➔
☛ To save the MMS, highlight Save ➔
35
Page 48

Composing an MMS
☛ From the Compose MMS or Edit MMS screen, highlight SMIL ➔ ➔ The slide is displayed ➔
No. Compose menu options
– Add/Delete media 1 Add/Delete text Adds new text data or deletes the text data in the text field on the slide.
2 Add/Delete image Adds an image file or deletes the image file in the image field on the slide.
3 Add/Delete audio Adds a sound file or deletes the sound file in the sound field on the slide.
4 Add/Delete video Adds a video file or deletes the video file on the slide.
–Exit Shifts to the Compose MMS screen.
– Save Saves the currently created MMS.
– Preview Displays the created slides in order from the beginning at the preset playback time for each.
– Add slide 1 Add slide Adds a new slide after the currently displayed slide.
2 Insert slide Inserts a new slide just before the currently displayed slide.
– Delete slide Deletes the currently displayed slide.
– Text colour Selects the Text colour from the 16 different colours.
– Background colour Selects the Background colour from the 16 different colours.
–Set Fit mode Selects the size in which the image/video is displayed.
1Hidden Displays the image/video in the actual size.
2Fill Displays the image/video in the reduced size so that the height and width fit into
3Meet Displays the image/video in the reduced size so that the longer side of the height
4 Slice Displays the image/video in the reduced size so that the shorter side of the height
– Options Sets the length of time a slide is displayed, and sets the beginning and end times for text, image or sound
within that slide display time.
the image/video display area.
or width fits the corresponding side of the image/video display area.
or width fits the corresponding side of the image/video display area.
2 You cannot set the beginning and end time for video files.
– Resize region Changes the region size of the image/video field and the text field, using the ▲ and ▼ keys.
– Switch positions Switches positioning of the image/video field and text field on the slide.
– Previous slide Displays the previous slide.
– Next slide Displays the next slide.
36
Page 49

2 Depending on the conditions, some options may be displayed in gray and not be available.
▼▼▼
▼
☛ When you finish editing SMIL, SK1 to return to the Compose MMS screen.
☛ If necessary, edit the composed mail/MMS using the Edit menu options menu (see “Using the Edit menu options” for details).
Using the Edit menu options
☛ From the Compose mail/Compose MMS/Edit mail/Edit MMS screen, to display the Edit menu options.
No. Edit menu options
–Send Sends the mail.
–Save Saves the mail being edited to the draft folder.
– Attach file Attaches a file to the mail.
– Delete attachment Deletes the attached file(s).
– Play/View file Plays or displays the attached file.
– Open phonebk. Adds the destination directly from the phonebook.
– Add To/Cc/Bcc Adds a To/Cc/Bcc field.
– Change to To/Cc/Bcc Changes the highlighted Cc/Bcc/To field to a To/Cc/Bcc field.
– Del. address Deletes a destination field.
– Attach header/sign. Attaches a stored opening sentence at the start or a stored signature at the end of the text.
– Del. message Deletes the message of the mail being edited.
– Del. mail Deletes the new mail currently edited.
2 Depending on the conditions, some options may be displayed in gray and not be available.
Reading a received mail/MMS
☛ SK1 ➔ 3 ➔ The list of mail/MMS in the Inbox folder will be displayed.
☛ Highlight the message to read ➔ ➔ The message content will be displayed. Scroll the message content.
☛ To view the previous message , to view the next message,
▼
2 While reading a received mail/MMS in the Inbox folder, you can use various functions. See “Inbox” on page 42.
2 If Auto play is on (see “Auto play” on page 45), the MMS/SMIL will be automatically played/displayed. if not, press SK1 to start playing.
2 You can change the font size by pressing and holding the and . enlarges the font size, while reduces it.
▼
37
Page 50

i-mode screen
From the i-mode screen you can change the i-mode related settings of your phone.
☛ 3 ➔ The i-mode screen will be displayed.
No. i-mode screen menus
1i-mode Displays the i-mode menu screen (For details, see “i-mode menu screen menus” on page 39).
2 Settings 1 Ringer time Sets the ringtone duration to 3-10 seconds for incoming mail/MMS.
2 Connection No. Selects the connection number settings to use. The following settings are
3i-mode lock Locks the i-mode function, including mail/MMS.
available:
1/2 Factory setting 1/2 Uses the default connection numbers.
3 User setting Uses and changes the following settings.
1 Access point
2 i-mode server (Gateway address)
3 Portal server (i-mode server)
4 Mail Mail server
2nd Mail server
Confirmation site
5 User data User name
Password
6 Port No. HTTP Port No.
SSL Port No.
i-mode menu screen
From the i-mode menu screen you can access to the iMenu/Mail/Message screen, your bookmarks, the entry screen for a URL to be displayed, the
access history, the saved pages and the list of Java™ applications.
☛ SK2 or 3 1 to display the i-mode menu screen.
38
Page 51

No. i-mode menu screen menus (Sheet 1 of 3)
1iMenu Accesses the iMenu screen. (See “iMenu screen” on page 41.)
2Mail Displays the Mail screen, on which you can display received mail/MMS, saved draft messages and sent messages,
3 Java application Displays the list of Java™ applications (see “Java™ (M7)” on page 66 for details).
4SMS Displays the Message screen, on which you can read received SMS and create new SMS (see “Message (M2)” on
5 Bookmarks Displays the list of bookmarked web pages.
6 Go to webpage Displays the URL you key in, or displays the URL in the address history.
and also create new mail/MMS (see “Mail screen” on page 42).
page 27).
Bookmarks Options menu
1Open Displays the highlighted bookmark.
2 Copy address Copies the highlighted bookmark address.
3 Edit title Edits the title of the highlighted bookmark.
4 Add desktop icon Creates a desktop icon of the URL of the selected bookmark.
5 Create message Creates a new message with the highlighted bookmark address in the message text.
6 Delete one Deletes the highlighted bookmark.
7 Delete all Deletes all the bookmarks.
1 Enter address Prompts you to key in a web page address.
2 Address history Displays the list of addresses in the access history for you to select from.
3 Go to home Displays the homepage set in Home page of Settings (See page 41).
0Back Returns to the i-mode menu screen.
39
Page 52

No. i-mode menu screen menus (Sheet 2 of 3)
7 Saved pages Displays the list of saved pages. Saved pages are stored in your phone memory so you can see them offline.
Saved pages list Options menu
1Open Displays the current saved page.
2 Edit title Edits the title of the current saved page.
3 Protect On/Off Protects or unprotects the current page.
4 Delete one Deletes the current saved page.
5 Delete all Deletes all the saved pages excluding the protected.
6 Delete all + Pr. Deletes all the saved pages including the protected.
Saved pages details Options menu
1 Save image Saves an image as a file on the current saved page.
2 Edit title Edits the title of the current saved page.
3 Certificate info Displays the certificate information on the current saved page.
4 Page info Displays the URL on the current saved page.
5 Protect On/Off Protects or unprotects the current page.
6 Delete Deletes the current saved page.
40
Page 53

No. i-mode menu screen menus (Sheet 3 of 3)
8 Settings Changes the settings of your browser.
1 Set time out Disconnects the connection after the set time. You can set 60 seconds or 90 seconds,
2 Load images Sets whether to display images contained in web pages.
3Wrap text Sets whether to display text as is on web pages and mail/SMIL text, or wrap it to fit
4 Certificates Displays the certificate information and validates/invalidates a certificate.
5 Send terminal info Sets whether to send the terminal information to the Information Providers (IPs).
or disable this function.
your phone’s screen.
, If you agree to send private information (e.g. production serial No. and SIM
No.) to the IPs via the Internet, it may be obtained by others.
6 Set homepage Validates the homepage and sets the URL.
2 You can display the homepage by pressing and holding from the standby
screen.
7 Video auto play Sets whether to play a video file automatically after the download is completed.
8 Check settings Displays all the options set for the settings (browser).
0Back Returns to the i-mode menu screen (see “i-mode menu screen” on page 38).
2 Depending on the conditions, some options may be displayed in gray and not be available.
iMenu screen
From the iMenu screen you can access the various services, and also use the function menus of your browser such as adding a bookmark, saving a web
page and creating a message.
☛ SK2 or 3 1 to display the i-mode menu screen ➔ 1 to display the iMenu screen ➔ to display the browser options menu.
No. Browser options menu
– Add bookmark Bookmarks the current page.
– Bookmarks Displays the Bookmark list.
2 This option is displayed only when one or more bookmarks are registered.
– Save image Saves an image on the current page.
2 This option is displayed only when one or more images are displayed on the current screen.
41
Page 54

No. Browser options menu (Continued)
– Save page Saves the current page.
– Add to phonebook Saves the phone number displayed in the current page in the phonebook.
2 This option is displayed only when one or more phone numbers are displayed on the current screen.
– Certificate info Displays the server certificate of the current page.
2 This option is displayed only when the current page is a SSL page.
– Go to webpage Displays a page by keying in the URL or using the access history (see “Go to webpage” on page 39).
–Reload Updates the data on the current page.
– Page info Displays the URL of the current page.
– Add desktop icon Creates a desktop icon of the URL of the current page.
– Create message Creates a new message with the highlighted phone number or Email address in the message text.
, If you agree to send private information (e.g. production serial No. and SIM No.) to the IPs via the Internet, it may be obtained by others.
2 Pressing CLR or may not bring back the previous screen. Screen operations depend on the current screen content.
Mail screen
From the Mail screen you can use the i-mode message services.
☛ SK1 or 3 1 2 to display the Mail screen.
2 The available options differ depending on the operators.
2 If an error occurs while sending mail, it will be saved in the Draft folder as an unsent mail.
2 The same mail can be sent to up to five addresses.
2 If you save a mail while editing, it will be saved in the Draft folder.
No. Mail screen menus (Sheet 1 of 5)
1 Compose mail Displays the Compose mail screen (see “Creating a new mail” on page 35).
2 Compose MMS Displays the Compose MMS screen (see “Creating a new MMS” on page 35).
3 Inbox Displays the list of received mail/MMS.
Inbox list Options menu
– Show all Displays all the received mail/MMS.
– Show unread Displays only the unread mail/MMS.
42
Page 55

No. Mail screen menus (Sheet 2 of 5)
3 Inbox (Continued) – Show read Displays only the read mail/MMS.
– Show protect. Displays only the protected mails/MMS.
– Delete one Deletes the currently selected mail/MMS.
– Delete read mail Deletes all the read mails except protected mails/MMS.
– Delete all Deletes all the mails/MMS.
– Title sort Sorts the received mails/MMS by title.
– Address sort Sorts the received mails/MMS by address.
– Date sort Sorts the received mails/MMS by date.
Inbox details Options menu
–Reply Replies to the received mail/MMS.
– Reply quoted Replies to the received mail quoted.
– Reply all Replies to all the received mails/MMS.
– Reply quoted all Replies to all the received mails quoted.
– Forward Forwards the received mail/MMS.
– Delete Deletes the received mail/MMS you are viewing.
– Add desktop icon Creates a desktop icon that creates a new message to the sender.
– Save address Saves the address of the sender into the phonebook.
– Add to phonebook Saves the highlighted phone number into the phonebook.
– Create message Creates a new message with the highlighted Email address or phone number.
– Save melody Saves the melody attached to the received mail.
– Save attachment Saves the attached file.
– Copy message Copies the message text.
– Copy subject Copies the desired subject text.
– Copy address Copies the desired address.
– Play SMIL Plays the SMIL content based on the content setting.
Play SMIL Options menu
1 Copy text Copies the text data on the slide.
2 Save image Saves the image file on the slide.
43
Page 56

No. Mail screen menus (Sheet 3 of 5)
3 Inbox (Continued) –Play SMIL
(Continued)
– Browse SMIL Plays the SMIL content manually.
Browse SMIL Options menu
– Protect On/Off Protects or unprotects the received mail/MMS.
4Sent mail Displays the list of sent mail/MMS.
Sent mail list Options menu
– Title sort Sorts the sent mail/MMS by their titles.
– Address sort Sorts the sent mail/MMS by their first destination addresses.
– Date sort Sorts the sent mail/MMS by the date they were sent.
– Delete one Deletes the selected mail/MMS.
– Delete all Deletes all the sent mail/MMS.
– Delete all + Pr. Deletes all the sent mail/MMS including the protected.
Sent mail details Options menu
–Re-edit Displays the composer to edit the sent mail/MMS again.
–Delete Deletes the sent mail.
– Add desktop icon Creates a desktop icon that creates a new message to the addressee.
3 Save audio Saves the audio file on the slide.
4 Save video Saves the video file on the slide.
1 Copy text Copies the text data on the slide.
2 Save image Saves the image file on the slide.
3 Save audio Saves the audio file on the slide.
4 Save video Saves the video file on the slide.
5 Save selection
6 Create message Creates a message to the destination in the slide text.
7Play slide Plays the highlighted slide.
Saves the highlighted phone number, Email address
or URL to the phonebook or bookmarks.
44
Page 57

No. Mail screen menus (Sheet 4 of 5)
4 Sent mail
(Continued)
5Draft Displays the unsent and the saved draft mail/MMS.
6 Selective retrieval Displays the list of stored mail/MMS on the mail server, and lets you select whether to retrieve or delete each one.
7 Check new mail Checks if there is any new i-mode messages (mail/MMS) for you stored at the mail server.
8 Mail settings Changes the mail settings.
– Save address Saves the destination address to the phonebook.
– Add to phonebook Saves the phone number and mail address contained in the message part.
– Create message Creates a new message to the highlighted Email address or phone number.
– Copy message Starts the copy mode in the message part.
– Copy subject Starts the copy mode in the subject part.
– Play SMIL Plays the SMIL content based on the content setting (see “Play SMIL” on page 43).
– Browse SMIL Plays the SMIL content manually (see “Browse SMIL” on page 44).
– Protect On/Off Protects or unprotects the received mail/MMS.
Draft Options menu
1 Delete one Deletes the selected mail/MMS.
2 Delete all Deletes all mail/MMS.
1 Edit header Edits the header to be added at the beginning of a mail, and sets whether to add it
automatically.
☛ Highlight the checkbox ➔ to place a check, to automatically add a header.
☛ Highlight the text box ➔ to edit the header ➔ Edit the text ➔
2 Edit signature Edits the signature to be added at the end of a mail, and sets whether to add it
automatically.
☛ Highlight the checkbox ➔ to place a check, to automatically add the signature.
☛ Highlight the text box ➔ to edit the signature ➔ Edit the text ➔
3 Reply marker Edits the reply markers to be added when replying to a mail with quotations from the
original.
☛ Highlight the text box ➔ to edit the reply marker ➔ Edit the text ➔
4 Auto play Sets whether to automatically play or display the sound, image or video file attached,
when you open the mail.
45
Page 58

No. Mail screen menus (Sheet 5 of 5)
8 Mail settings
(Continued)
5 Auto reception Sets whether to automatically retrieve a mail after receiving the incoming mail
notification.
2 When this setting is turned on your phone will automatically receive mail. If it is
turned off, you will have to manually retrieve from your i-mode service provider
using the Check new mail of iMenu screen (see “Check new mail” on page 45).
6 Receive
attachment
7 Attachment data Selects whether to receive Melody For i-mode (MFi) files attached to a mail.
8 Font size Sets the font size to display the mail/MMS.
9 Check settings Displays the values set to the above mail settings.
0 Back Returns to the Mail screen.
0Back Returns to the i-mode screen.
Sets the attachment file type that can be received.
☛ Highlight the file type ➔ to place a check.
2 Depending on the conditions, some options may be displayed in gray and not be available.
i-mode glossary
The following defines the basic terms used in this section.
Ter m Definition
Site (program) An Internet contents page especially designed for i-mode users, which can be accessed from your i-mode top screen of your
Mail Mail is the messaging service of i-mode. You can not only exchange messages with other cellphones, but also with PCs,
MMS Multimedia Messaging Service lets you send messages with image/video/sound files attached. The MMS type message is
SMIL The SMIL lets you combine text, sound, image and video into a slide, to create original slideshows. The message created by
Access history Your phone stores up to 10 URLs you have accessed. You can refer to this list when you want to go to a web page you have
Web page An Internet contents page compatible to i-mode services, which can be browsed using your phone, including the sites
IP.
PDAs, etc.
also referred to as an MMS.
SMIL is also referred to as a SMIL. A SMIL message is a kind of MMS message.
accessed recently.
(programs).
46
Page 59

Ter m Definition
Bookmark A bookmark contains the URL of a web page. You can save up to 50 bookmarks and use them for easier accesses.
Certificate
information
IP Information Provider. Your IP provides you the i-mode sites (programs).
Home page A web page that is set in your profile as the page to connect to when you press and hold from the standby screen.
Saved pages You can save up to 20 web pages in your phone memory, for quick off-line access.
If you are displaying a Secure Sockets Layer (SSL) page designed to enable safe data transmission, you will be able to see
its certificate information.
Phonebook (M4)
Phonebook types
Your phone can have up to 7 directories stored on your SIM card and in your phone memory:
• Complete (a list of all the numbers stored in the ADN and FDN)
• Personal directories (ADN) in the SIM card
• Personal directories (ADN) in the phone memory
• Service dialling numbers (SDN)
• Fixed dialling numbers (FDN)
• Own number
• Voice mail number
2 When viewing any of the directories described, you can switch to the other directories (if your SIM card supports them) by pressing .
2 The maximum number of phone numbers that can be stored on a SIM card is the total of the ADN, FDN and SDN directories.
2 When you activate the phonebook, the directory which you were referring to the last time will open.
Personal directory (ADN)
These numbers are known as abbreviated dialling numbers (ADN). There are two types of ADN, one is the phonebook stored in the phone memory
(the phonebook (Phone)) and the other is the phonebook stored on the SIM card (the phonebook (SIM)).
Phonebook (SIM)
• Up to 255 personal data can be stored in the SIM card.
• Each personal data contains a phone number, a name and a location number.
2 The number of phone numbers that can be stored on a SIM card depends on the SIM card capability.
47
Page 60

Phonebook (Phone)
Up to 500 personal data can be stored in your phone memory. Each personal data is given a location number (1 to 500), and it can be allocated to a
group.
To each personal data, you can set the following:
• 7 phone numbers (Home, Mobile, Work, Data, Fax, Other phone x 2)
• 2 Email addresses
• 2 descriptive information
• Group, Voice tag, LED colour, a CLI picture and a ringer tone
2 Up to 10 phone numbers can have a voice recognition recording allocated to them.
Fixed dialling numbers (FDN)
Fixed dialling numbers are a means of limiting which numbers can be called from your phone. With the FDN feature switched on (see page 26), you can
call with your phone the numbers you have stored in this phonebook and the emergency number only.
, Although FDN is supported by your phone, it must be present on your SIM card - check with your service provider.
Service dialling numbers (SDN)
The numbers stored in the SDN directory are pre-installed by your service provider. They will call numbers and services as agreed with your supplier
(e.g. customer enquiries, billing information, sportslines, weatherlines, etc.) and cannot be edited by you.
, Although SDN is supported by your phone, it must be present on your SIM card - check with your service provider.
Phonebook list screen Personal data screen
SK2
Accessing your phonebook (M4)
You can store personal information in the phonebook of your phone or your SIM card.
48
Page 61

Displaying a personal data (M41)
☛
4 1 and the appropriate key for the desired directory or until the required directory is displayed ➔ Highlight the required personal data
➔
Displaying information about your phonebook (M42)
☛
4 2 to display the information about your phonebook.
2 This function is SIM dependent.
Call options (M43)
☛
4 3 to display the Call options screen.
/ For details on the Call options screen, see “Call options (M43)” on page 9.
Phonebook list Options menu
2 When editing the data in FDN, you will be prompted to enter PIN2 code.
2 Depending on the condition, some options may be displayed in gray and not be available.
☛ 4 1 and the appropriate key for the desired directory or until the required directory is displayed ➔ Highlight the required personal data
➔
No. Phonebook list Options menu
1Add new Adds a new personal data to Phone/SIM/FDN.
2Edit Displays the data edit screen to edit the currently highlighted personal data.
49
Page 62

No. Phonebook list Options menu (Continued)
3Copy Copies the currently highlighted personal data or the whole list to the following:
2 When copying a personal data from the phonebook (Phone) to other directories, only the items which are
supported by the destination directory can be copied.
1 Current copy ☛ Press the appropriate key for the desired destination (SIM, Phone, FDN, Own
number or Voice mail number) ➔ Key in the desired location number ➔
2 If you copy a personal data with more than one phone number/Email address to
a directory which allows only one phone number/Email address per personal
data to be stored, the Origin number screen will be displayed where you can
choose item to be copied.
2 Package copy ☛ Press the appropriate key for the desired destination (SIM, Phone or FDN) ➔
Key in the desired location number ➔
2 If you select the Phone, you have to select whether to just copy the first phone
number or copy all the registered numbers.
2 If you copy a personal data with more than one phone number/Email address to
a directory which allows only one phone number/Email address per personal
data to be stored, a new personal data for each item will be created in the
destination directory to store the number(s).
4Move Moves the currently highlighted personal data.
☛ Press the appropriate key for the desired destination (SIM, Phone, FDN, Own number or Voice mail number) ➔
Key in the desired location number ➔
5 Delete Deletes personal data.
1 Delete current Deletes the currently highlighted personal data.
2 Delete all Deletes all the data in the list.
50
Page 63

No. Phonebook list Options menu (Continued)
6 Groups Editing the group information
☛ Highlight the group you wish to edit ➔ SK1 and highlight the required field
☛ To rename the group name, select Group name field ➔ Key in the name of the group ➔
☛ To set information on the selected group, select Info field ➔ Key in the info ➔
☛ To select the LED colour, select LED field ➔ 1 ➔ Highlight the desired colour ➔ ➔ SK1 to set the change
☛ To select the CLI picture, select Picture field ➔ 1 ➔ Highlight the desired picture ➔ ➔ SK1 to set the change
☛ To select the ringer, select Sound/Video field ➔ 1 for selecting the Sound or 2 for the Video ➔ Highlight the
desired ringtone or video ➔ ➔ SK1 to set the change
2 If the personal settings for the LED colour, CLI picture, or the ringer are also set, they have priority over those of
the Group settings.
Group member list screen Options menu
☛ Highlight the group you wish to edit ➔ to display the list of group members ➔ Highlight the member ➔
1Call Calls the highlighted member.
2 Create message Creates a message to the highlighted member.
3 Add new Creates a new phonebook entry to join the group.
4 Add to group Adds a phonebook entry to the group.
5 Remove from group Removes the highlighted member from the group.
6 Remove and delete Removes the highlighted member from the group and delete the phonebook entry at
7 Add desktop icon Creates a desktop icon of the phone number of the highlighted member.
7Sort Sorts the personal data in the order of alphabets, or location number.
the same time.
2 Sorting may take time depending on the number of personal data entries, the number of characters contained in
each entry and the type of language.
1 Alphabetic Sorts the personal data alphabetically.
2 You can jump directly to a name beginning with specific characters by pressing the
appropriate key (e.g. press 5 once to jump to names beginning with J, or twice to
jump to names beginning with K).
2 Location Sorts the personal data in memory location number.
51
Page 64

No. Phonebook list Options menu (Continued)
▼
▼
8 Location Searches for the personal data by the location number.
☛ Key in the desired location number ➔ SK1 to display the Phonebook list screen with the selected personal data
highlighted.
9Show Displays phonebook information.
1Summary Displays the summary of phonebook contents.
2 Voice tag list Displays the telephone numbers with the voice recognition tags recorded.
IR send Sends the currently highlighted personal data to another device through the IR port.
0
Add desktop
icon
/ See also: “IR send” on page 17.
Creates a desktop icon of the highlighted personal data.
2 Depending on the conditions, some options may be displayed in gray and not be available.
Making a call or creating a message from the phonebook list
Highlight a desired personal data to display the stored numbers or Email addresses in the help area ➔ Use and to display the other stored
☛
phone numbers or Email addresses, if any, in the help area.
☛ Press to make a phone call to its phone number, or press SK1 to create a new message to send its phone number or Email address
Adding a new personal data
☛
4 1 and the appropriate key for the desired directory or until the required directory is displayed ➔ SK2 ➔ Select the directory to which
you wish to store the personal data ➔ Enter the name and other necessary information ➔ SK1 (see “Editing an existing personal data” below).
2 It is best to store numbers using the international number format.
Editing an existing personal data
☛
4 1 and the appropriate key for the desired directory or until the required directory is displayed ➔ Highlight the required personal data
➔ 2
2 For the phonebook (SIM) and FDN, only the name, phone number and the location number can be added or edited in the following procedures.
2 For the own number and voice mail number settings, only the name and phone number can be added or edited in the following procedures.
Adding/editing phone numbers, mail addresses & personal information
☛ Highlight the field you wish to edit or add information to ➔
☛ Add the required number or information or make necessary changes to the selected field ➔
☛ Highlight another field to make further changes, if required
52
Page 65

2 You can also edit the Name, Phone number, Email address and Info fields by the above method.
Allocating a group
☛ Highlight the Group field ➔ ➔ Highlight the group you wish to add the current personal data to ➔
Voice recall functions
Adding a Voice recall recording
☛ Highlight the Voice tag field ➔ ➔ 1
☛ Say the name you wish to record as a voice tag ➔ Say the name again for confirmation according to the displayed message.
Playing a Voice recall recording
☛ Highlight the Voice tag field ➔ ➔ 2
Deleting a Voice recall recording
☛ Highlight the Voice tag field ➔ ➔ 3
2 Up to 10 voice tags can be stored.
2 You can check the number of stored voice tag and list of those tags (see “Displaying information about your phonebook (M42)” on page 49).
Allocating a LED colour
☛ Highlight the LED colour field ➔ ➔ 1 ➔ Highlight the desired colour ➔
2 This setting has priority over the Group setting and phone setting for the LED colour.
Allocating a CLI picture
☛ Highlight the Picture field ➔ ➔ 1
☛ Highlight the desired CLI picture ➔ SK1 to preview the picture or to select the highlighted picture
2 A ✔ is displayed on the icon for which the item is currently selected.
/ See also: “Pictures (M63)” on page 62.
Allocating a ringtone or video
☛ Highlight the Sound/Video field ➔ ➔ 1 to display the ringtone list screen or 2 to display the video list screen
☛ Highlight the desired ringtone or video ➔ SK1 to preview ➔ SK1 again to stop the preview and select, or SK2 to stop the preview without selecting
2 A ✔ is displayed on the icon for which the item is currently selected.
2 If both the CLI picture and the video are set, the video will be displayed on the screen.
2 See also: “Sounds (M62)” on page 62.
Allocating a location number
☛ Highlight the Location number field ➔ ➔ Key in the desired location number ➔
53
Page 66

Saving the edited personal data
☛ After any edition, SK1 to save the edited data
Personal data Options menu
☛ 4 1 and the appropriate key for the desired directory or until the required directory is displayed
☛ Highlight the required data ➔ ➔ Highlight the required field ➔
No. Personal data Options menu
1Call Calls the highlighted phone number.
2 Create message Creates a message to the highlighted phone number or Email address.
3IR send Sends the selected personal data to another device through the IR port.
4Edit Edits the selected personal data.
5Copy Copies the selected phone number(s)/Email address(es).
☛ Press the appropriate key for the desired destination (SIM, Phone, FDN, Own number or Voice mail
number) ➔ Key in the desired location number ➔
6Move Moves the currently highlighted personal data.
☛ Press the appropriate key for the desired destination (SIM, Phone, FDN, Own number or Voice mail
number) ➔ Key in the desired location number ➔
7 Delete current Deletes the selected personal data.
8 Add desktop icon Creates a desktop icon of the selected personal data.
/ See also: “Phonebook list Options menu” on page 49 for the operation of 4 (Edit), 5 (Copy), 6 (Move) and 7 (Delete current).
Scratchpad number
Your phone has a scratchpad facility that enables you to take down a phone number during a call and then make a call to it when you have finished. This
scratchpad number can be stored in memory for future use.
Noting & calling a scratchpad number
☛
During a call, key in the number to be placed in the scratchpad. It will be shown on your phone’s screen ➔ when the call is finished. The number
will still be displayed. Press to dial the displayed number.
54
Page 67

Voice mail (M417)
Voice mail function enables you to forward received calls to the Voice mail centre, and the caller can leave voice messages in your voice mail mailbox.
You may be notified by an icon on the standby screen if the caller leaves a voice message.
, The voice mail service is network dependent. Contact your service provider for details on your voice mail number.
Setting the Voice mail number
2
This function is available when the Voice mail number has not been set.
☛ 4 1 7 ➔ Highlight the required line ➔ twice ➔ ➔ key in the voice mail number ➔ ➔ SK1 to save the change.
Forwarding a call to the Voice mail centre
☛
Set the voice mail centre number (see “Setting the Voice mail number” for details) ➔ Set up Call diversion (see “Call diversion (M161)” on page 11
for details). When you receive a call set to be diverted, the call will be diverted to the voice mail centre.
Retrieving a Voice mail
2
This function is available when the Voice mail number has been set.
☛ 4 1 7 ➔ Highlight the required line ➔
2 You can also retrieve a voice mail by pressing and holding 1 from the standby screen.
2 To set up the line to call the voice mail centre, see “ALS setup” on page 21 for details.
55
Page 68

Camera (M5)
Camera function enables you to take pictures or record videos and save them as Joint Photographic Expert Group (JPEG) files and 3rd Generation
Partnership Project (3GPP) files respectively. You can enjoy the picture and video files in many ways: send them attached to an MMS or Mail, set a
picture file as the wallpaper for your phone, etc.
Notes on using the camera
Handling the Camera
, The camera of your phone is manufactured using high-precision technology. However, there may be dots or lines on the screen that
appear darker or brighter than the others. Note also that when you are shooting or recording in dimly-lit places, the amount of noise
(such as red and blue dots or horizontal lines) may increase noticeably.
, Be careful not to apply force to the lens when closing your phone. This could damage the lens.
2 Fingerprints or grease on the lens can result in focusing problems or dark images. Wipe the lens clean with a soft cloth before use.
2 The image quality may be degraded after your phone has been left for a long period in a warm place.
2 Exposing the camera to direct sunlight for a long period could discolour the camera’s internal colour filter and cause discoloured images.
2 Camera mode is automatically cancelled if none of the phone’s keys are pressed for 3 minutes or longer.
Precautions when taking pictures/recording videos
You cannot switch the camera’s shutter sound off. The shutter makes a clicking sound when you take a picture or start/end a video recording,
2
even when the phone is in Meeting mode.
2 Avoid camera shake. Moving the phone when you take a picture will result in a blurred image. Hold the camera firmly to keep it still when you take
a picture, or use the auto timer to take the shot.
2 As there is a slight delay from the time you press the shutter ( ) until the picture is actually taken, do not move the camera until you hear the
shutter sound.
2 If taking a picture with not enough light, try to hold the phone still as much as possible, and for a longer period of time after the shutter sound: the
shutter speed may be slower in a darker environment.
2 Note that if you attempt to shoot directly into a strong light source, such as the sun, another bright light or the high reflecting target with strong
light, the image may contain washed-out white highlights or be disrupted.
2 While recording, be careful not to cover the mouthpiece of your phone as it is used as the microphone to record sound along with the video.
56
Page 69

Copyright information
▼
2
Images and videos shot or recorded on your phone cannot be used in ways that infringe copyright laws without the consent of the copyright holder,
unless intended only for personal use. Note that some restrictions apply to the photographing of stage performances, entertainments and exhibits,
even when intended purely for personal use.
2 Users are also asked to note that the transfer of images protected under copyright laws is only permissible within the restrictions imposed by those
copyright laws.
, Be considerate of other people’s privacy when you take a picture or record a video using the camera of your phone and send it to others.
Taking a picture (M51)
☛ To activate the camera function, press and hold Side up or press 5 1
☛ Look into the camera view finder screen and adjust the camera position to place the target on the screen.
2 You can switch the camera view finder screen between the main-LCD and the 2nd-LCD by pressing .
2 You can take a picture while the phone is closed.
☛ Hold the phone still ➔ To use the shutter, or Side up ➔ Check the picture ➔ If successfully taken, ➔ Saved as a JPEG file in Pictures
2 After taking a picture, press SK1 to send the taken picture attached to a message, and press SK2 to discard the picture.
2 The default file name for the picture is the date, month, year and sequence number. When you take pictures in burst mode, the saved files will be
named by the default file names plus a consecutive two-digit number at the end.
2 If a call comes in while you are checking or saving a photographed image, image storage is cancelled. When this occurs, the next time you select
camera function a message appears to say that you have an image that was not stored, allowing you to check and store the image.
2 Before taking a picture, you can switch to the video camera function by pressing SK2. This use of SK2, however, is invalid if the self-timer function
is activated.
Operations when taking a picture
☛
To turn the light on or off, SK1 or Side down
2 Take care not to hold the light too close to your or other people’s eyes when the light is lit.
☛ To zoom in and out, ▲ or ▼
2 You can also select x1,x2,x3 or x4 magnification from the Zoom setting on the Camera Options menu.
☛ To turn on/off the camera view finder on the full screen, press #.
2 Depending on the photo size, there may be parts not seen on the full screen view finder display in the saved picture.
☛ To control the brightness level of the picture, or
▼
57
Page 70

Camera Options menu (before taking a picture)
No. Camera Options menu (before taking a picture)
1 Single mode/Burst mode Switches the shooting mode to Single/Burst mode (serial shooting).
2 Shoot environment Changes the camera settings to suit the environment. Select from Standard, Person, Room or Darkness.
3Effect Applies special effect to the picture. Select from Off, Sepia, Monochrome, Negative film, or Posterization.
4Photo size Sets the picture size to Sub-QCIF (128x96), QCIF (176x144), Wallpaper (176x220), CIF (352x288), or
VGA (640x480).
2 You cannot use the Zoom function for VGA, and you can select only x1 or x2 magnification for
Wallpaper and CIF.
2 You cannot use the Frame and Burst mode functions for CIF and VGA.
2 You cannot use the Full screen function for Sub-QCIF and QCIF.
2 If you select Wallpaper, CIF or VGA, the picture on the camera view finder screen will be displayed as
a smaller picture than the actual size. Also on the camera view finder screen, the picture size before
shooting differs from the size after shooting.
5 Image quality Sets the image quality to Super fine, Fine, Normal, Economy or Super economy.
6
Frame
7 Self timer/Self timer cancel Activates or deactivates the self-timer function.
8 Sound Selects the shutter sound and self timer sound.
9Pictures Displays the Pictures screen.
0 Other settings Add desktop icon: Creates a desktop icon of the camera function on the standby screen.
Switch finder Selects whether to display the camera view finder on the main-LCD or the 2nd-LCD.
Selects whether to use a frame when taking pictures, and sets the desired frame with which a picture will
be taken.
Automatic save: Selects whether to save taken pictures automatically or not.
Light: Turns the light on or off.
Brightness: Changes the brightness level of the picture between -2 and +2.
Zoom: Changes the zoom magnification from x1, x2, x3 or x4.
Thumbnail view: Selects whether to display the pictures taken in the Burst mode as thumbnails or
slides.
Video: Activates the video function.
Flicker control: Selects 50Hz, 60Hz or Auto to prevent flickers when taking a picture under a
fluorescent light.
2 On the 2nd-LCD view finder, the object appears as a mirrored image.
58
Page 71

No. Camera Options menu (before taking a picture) (Continued)
# Full screen Turns the Full screen on or off.
2 Depending on the conditions, some options may be displayed in gray and not be available.
Camera Options menu (after taking a picture)
No. Camera Options menu (after taking a picture)
1 Save current Saves the currently displayed picture.
2 Save all Saves all pictures taken in Burst mode.
3 Create message Creates a new message with the file attached (see page 35).
4 Set as wallpaper Sets the picture as the wallpaper.
5 Display as normal image/
Display as mirror image
6 Save as mirror image Saves the picture as a mirror image when you select the 2nd-LCD as a camera view finder.
7 Thumbnail view Selects whether to display the pictures taken in the Burst mode as thumbnails or slides.
8 Automatic save Selects whether to save taken pictures automatically or not.
9Pictures Opens Pictures in My data.
Depending on the conditions, some options may be displayed in gray and not be available.
2
Selects whether to display the taken picture as a normal or mirror image on the main-LCD
preview screen when you select the 2nd-LCD as a camera view finder.
Recording a video (M52)
Recording a video
, To record a video, keep your phone open at all time. Unlike taking a picture, you cannot record a video while the phone is closed.
☛ Press and hold Side up then SK2, or press 5 2 ➔ Look into the view finder screen and adjust the camera position.
2 You can switch the camera view finder screen between the main-LCD and the 2nd-LCD by pressing .
☛ To start recording, or Side up ➔ The progress bar will show the ratio of how much you have recorded already.
2 While recording, be careful not to cover the mouthpiece of your phone as it is used as the microphone to record sound along with the video.
2 While recording, the key tones are deactivated.
☛ Move the camera to capture the scenes you want ➔ To stop recording, or the Side up
2 After the set video file size is reached, the recording automatically stops.
2 After recording, press SK1 to replay the recorded video, and press SK2 to send the video file attached to a message.
59
Page 72

2 While replaying, you can fast forward by pressing or rewind by pressing . Pressing SK1 or will stop the fast forwarding/rewinding. Then,
▼
▼
pressing SK1 will restart and continue the replay.
▼
2 You can discard the recorded video by pressing or CLR.
☛ To save the recorded video, . The recorded video is saved as a 3GPP file in the Videos - My movies folder in My data (see page 61).
2 Pressing # before/while playing a video file will enlarge the replay screen size, and pressing # will return the screen size to normal.
2 The video file will be saved as a file named from the date, month, year and sequence number.
/ For the operations while replaying the video, see “Videos (M61)” on page 61.
/ For the operations while recording a video, see “Operations when taking a picture” on page 57.
2 If a call comes in while you are checking or saving a video, video storage is cancelled. If this occurs, the next time you select camera function a
message appears to say that you have a video that was not stored, allowing you to check and store the video.
2 Before recording a video, you can switch to the camera function by pressing SK2. This use of SK2, however, is invalid if the self-timer function is
activated.
Operations when recording a video
☛
To turn the light on or off, SK1 or Side down
2 Take care not to hold the light too close to your or other people’s eyes when the light is lit.
☛ To zoom in and out, ▲ or ▼
☛ To control the brightness level of the picture, or
Camera Options menu (before recording a video)
No. Camera Options menu (before recording a video)
1 Shoot environment Changes the camera settings to suit the conditions. Select from Standard, Person, Room or Darkness.
2Effect Applies special effect to the video. Select from Off, Sepia, Monochrome, Negative film, or Posterization.
3 Screen size Sets the video screen size to Sub-QCIF (128x96) or QCIF (176x144).
4 Video file size Sets the video file size to Fast mail or Long mail.
5Quality Sets the video quality to High or Standard.
6 Self timer/Self timer cancel Activates or deactivates the self-timer function.
7 Self timer sound Selects the self timer sound from Sound1, Sound2 or Sound3.
8Videos Opens Videos in My data.
9 Other settings Creates a desktop icon of the camera function on the standby screen, changes the Light, Brightness and
0 Switch finder Selects whether to display the viewfinder on the Main-LCD or the 2nd-LCD.
▼
Zoom settings, activates the camera function, and selects the frequency or auto setting of the Flicker
control.
60
Page 73

2 Depending on the conditions, some options may be displayed in gray and not be available.
▼▼▼
▼
Camera Options menu (after recording a video)
No. Camera Options menu (after recording a video)
1 Save Saves the currently displayed video.
2 Create message Creates a new message with the file attached (see page 35).
3 Set as wallpaper Sets the video as the wallpaper.
4 Full screen
5View detail Displays detailed information on the selected video.
6Videos Opens Videos in My data.
Selects whether to enlarge the replay screen size.
2 You cannot use the Full screen function for QCIF.
My data (M6)
Using My data, you can playback sound and music (MP3) files, or display pictures and videos downloaded from the Internet or captured with the camera
function of your phone.
Videos (M61)
In the following section, how to playback video files (videos) stored in your phone is described. You can either record videos using your phone, download
them from the Internet, receive them attached to MMS messages. There are two pre-set folders: My movies and Download.
Replaying the video files
☛
▼ 1 or 6 1 ➔ Highlight a folder ➔ or ➔ Highlight a video file you wish to replay ➔ ➔ The video file will be replayed
2 When the flat view function is activated, the list of folders is not displayed. The list of all the stored video files is displayed.
2 If you wish to move to another hierarchy folder, use and
2 Pressing # before playing a video file will enlarge the replay screen size, and pressing # again will return the screen size to normal.
2 For the definitions of the icons displayed while replaying, see “LCD and displayed icons” on page vii.
Operations while replaying video
☛ To stop, SK2
☛ To pause, SK1 ➔ While pausing, SK1 again to restart and continue the replay.
☛ To fast forward/rewind, or ➔ SK1 or will stop the fast forwarding/rewinding.]
▼
61
Page 74

☛ To enlarge the replay screen size, #
▼▼▼
▼
▼
☛ To adjust the volume, Side keys
☛ To display the previous/next file, ▲ or ▼
2 You cannot fast forward, rewind or enlarge the screen for video files with only sound but no image.
Sounds (M62)
In the following section, procedures to playback and delete desired sound items are described. There are three pre-set folders: Download, Preset and
Voice memo.
Selecting and playing sound
☛
▼ 2 or 6 2 ➔ Highlight a folder ➔ or ➔ Highlight a sound file you wish to replay ➔
2 When the flat view function is activated, the list of folders is not displayed. The list of all the stored sounds files is displayed.
2 If you wish to move to another hierarchy folder, use and
2 When a folder is highlighted, you cannot use SK1.
Operations while playing sound
☛
To stop, SK2
☛ To adjust the volume, Side keys.
☛ To replay the previous/next file, ▲ or ▼
Pictures (M63)
The Pictures function allows you to display images and animations, which were obtained with the camera function of your phone, received as a file
attached to MMS messages, or downloaded from the Internet. The images can also be edited using this function. From the Pictures function you can
also attach images and animations to MMS messages you compose. There are five pre-set folders: Photo, Preset, Download, Frame and Stamp.
Displaying the Pictures view screen
☛ ▼ 3 or 6 3 ➔ Highlight a folder ➔ or ➔ Highlight an image file you wish to display ➔
☛ To display the previous/next image file, ▲ or ▼
2 When the flat view function is activated, the list of folders is not displayed. The list of all the stored image file is displayed.
2 If you wish to move to another hierarchy folder while the Thumbnail view is turned off, use and
▼
62
Page 75

Cutting the image
☛
Highlight or display the image file you wish to edit ➔ 1 3 ➔ Select the image size ➔ A frame indicating the cut area appears on the preview
screen.
☛ Move the frame position ➔ ➔ SK1 if the image is favorable
2 When you select Free, a cross indicator appears on the preview screen. Move it to the point to start a frame and to confirm the position. Then,
expand the frame into the required size and to confirm.
Reducing the image size
☛
Highlight or display the image file you wish to edit ➔ 1 4 ➔ Select the image size ➔ SK1 if the image is favorable
Rotating the image
☛
Highlight or display the image file you wish to edit ➔ 1 5 ➔ SK1 to rotate the image 90 degrees clockwise
☛ Keep pressing SK1 until the image is at the required angle ➔ to confirm
Decorating the image with stamps
☛
Highlight or display the image file you wish to edit ➔ 1 6
☛ To apply a marker stamp, 1 ➔ Highlight the required stamp ➔ ➔ The marker stamp position is displayed in centre
2 If you wish to preview the highlighted stamp, press SK1
☛ To apply a text stamp, 2 ➔ Key in the text ➔ ➔ The text stamp position is displayed in centre
☛ Move the stamp position ➔ to confirm ➔ The stamp preview is displayed again. Repeat applying if necessary. ➔ SK1 when finished applying
the stamp (the stamp preview will not be applied this time)
Adding a frame to the image
☛
Highlight or display the image file you wish to edit ➔ 1 7 ➔ Highlight a frame ➔ to preview the resulting image ➔ Scroll through the
various frames by ▲ and ▼ ➔ to confirm.
Saving the edited image
☛
After any edition, SK1 or to save the edited image ➔ Select the Save Quality ➔ Edit the name (if required) ➔
Music (M64)
In the following section, the procedures to display and play your music files from Music are described. There is one pre-set folder: Download.
Selecting and playing a music file
☛
▼ 4 or 6 4 ➔ Highlight the music file you want to play ➔
63
Page 76

2 When the flat view function is activated, the list of folders is not displayed. The list of all the stored music files is displayed.
2 To create your own playlist, see “Music player (M81)” on page 68.
Operations while playing a music file
☛
To stop, SK2
☛ To adjust the volume, Side keys.
☛ To replay the previous/next file, ▲ or ▼
File selector Options menu
☛ Display the Videos/Sounds/Pictures/Music list screen ➔
No. File Selector Options menu
1 Edit item Rename item: Edits the user title or file/folder name of the selected file/folder.
2 Use item (Videos) Uses the selected file by setting as ringtone or as wallpaper.
2 Use item (Sounds) Uses the selected file by setting as ring, SMS or Mail tone.
2 Use item (Pictures) Uses the selected file by setting as wallpaper or adding to desktop.
Set protection: Changes the protection settings of the selected folder or file.
Cut: Cuts the selected picture into Sub-QCIF (128x96), QCIF (176x144), Wallpaper
(176x220), or Free.
Reduce: Reduces the selected picture to fit within Sub-QCIF (128x96), QCIF (176x144), or
Wallpaper (176x220)
Rotate: Rotates the selected picture.
Stamp tool: Adds a marker or text stamp on the selected picture.
Frame: Sets a frame to the selected picture.
Set as ring tone: Sets the selected video to be the ringer tone.
Set as wallpaper: Sets the selected video to be the main-LCD wallpaper.
IR send: Sends the selected video through the IR port to other devices or a cellphone.
Set as ring tone: Sets the selected sound to be the ring tone.
Set as SMS tone: Sets the selected sound to be the SMS tone.
Set as Mail tone: Sets the selected sound to be the Mail tone.
IR send: Sends the selected sound through the IR port to other devices or a cellphone.
Set as wallpaper: Sets the selected image to be the main-LCD wallpaper.
Add desktop icon: Creates a desktop icon for the selected image on the standby screen.
IR send: Sends the selected image through the IR port to other devices or a cellphone.
64
Page 77

No. File Selector Options menu (Continued)
3 Create message Sends the file attached to a mail.
2 This function is not available for the Music files.
4 Delete item Deletes the selected file and folder.
5 Delete all Deletes all the files in the current folder.
6 Copy item Copies the selected file to any folder.
7Move item Cuts the selected file and pastes it into any folder.
8 Move all Cuts all the files in the current folder and pastes them into any folder.
9 Create folder Creates a new folder under the current folder.
0 Storage detail Displays the current storage information of your phone memory.
View detail Displays the details of the selected folder or file.
2 You can also display the details on the highlighted folder or file by pressing without displaying the
Options menu.
# Options Sorting order: Sorts the files by date or alphabetically.
Info column: Sets whether to display the column on the list screen, and the information to be
shown there.
None: No column showing
Size: Approximate size of the file
Type: File type
2 You can also change the information on the column by pressing # without displaying the Options menu.
Thumbnail view: Displays the files as thumbnails.
Flat view: Displays the list of all the stored image files regardless of the folder hierarchy.
Save options: Saves the current option settings.
Reset options: Resets the option settings.
2 Depending on the conditions, some options may be displayed in gray and not be available.
2 Neither protected data, preset data nor data in sub-folders can be deleted or moved.
65
Page 78

Java™ (M7)
You can download Java™ applications (games etc.) from i-mode sites and run them on your phone.
Programs (M71)
How to run software
To run a software (Java™ application), perform the following.
☛ 7 1 or press and hold SK2➔ Highlight an application containing the software you want to run ➔
2 When you display the Java™ applications list screen for the first time after downloading a program(s), it may take a while for your phone to verify
the program(s). A message will be displayed during this process, and you may activate the program(s) after it is completed.
, After downloading the software, always make sure that you check the downloaded program is displayed in the Applications screen.
, Do not remove the battery while the software is running as data to that point may not be saved.
2 While the software is active, the Java™ operation icon is displayed (see page vii).
Java™ System menu
☛
7 1 ➔ Highlight an application ➔
No. System menu
1 Description setting Selects whether to display the information of the selected application.
2 Delete all Deletes all the applications.
3Storage status Displays the status of Java™ applications currently stored in your phone.
4 Trace info. Displays the trace information.
5 About Displays the information of the Java™ system.
2 Depending on the conditions, some options may be displayed in gray and not be available.
Application menu
☛
7 1 ➔ Highlight an application you want to run ➔ SK1
No. Application menu
1Properties Displays the information of the selected software.
2 Upgrade Make an enquiry on whether the selected software has an upgrade. If there is, starts downloading
3 Delete Deletes the selected software.
the data.
66
Page 79

No. Application menu
4 Network connection Permits/prohibits the selected software to connect to the network or displays the confirmation
5 Auto start setting Enables or disables the automatic start of a complying Java™ application.
message every time you start the selected software.
2 Depending on the conditions, some options may be displayed in gray and not be available.
Prog backlight (M72)
You can set the backlight mode of your phone.
☛ 7 2 ➔ 1 to set your phone to follow the normal backlight setting, or press 2 to let the backlight be controlled by the Java™ application.
2 If you set your phone to follow the normal backlight setting, the current power save settings will be active (see “Power saving (M15)” on page 24).
2 When the software is not running, the backlight operation depends on your phone’s backlight settings.
67
Page 80

Accessory (M8)
Music player (M81)
This feature allows you to create a Playlist to play MP3 music files in the order you desire. You can add the music files saved in Music of My data to the
Playlist (see “My data (M6)” on page 61) or change the order of the music files within the Playlist.
☛ 8 1 ➔ Highlight a music file and SK1 to play ➔ After playing, SK2 to stop.
2 If there are no music files saved in the Playlist, the Playlist screen will be displayed.
Music player Options menu
☛
8 1
No. Music player Options menu
1 Playlist Displays a list of MP3 music files in the order in which they are played.
☛ to add, move, delete or display the properties of the selected music file, or SK1 to add an MP3 music
file.
2 You can save up to 30 MP3 music files in the Playlist depending on the size of each file.
2 The music files that are moved or deleted from Music of My data or erroneous music files are displayed in
gray and cannot be played.
2 Play mode Normal: Plays all the music files in order from top to bottom of the Playlist once.
3 Equalizer Selects from Rock, Jazz, Pop and Off to obtain the desired tone.
4 Add desktop icon Creates a desktop icon of the Music player function on the standby screen.
2 Depending on the conditions, some options may be displayed in gray and not be available.
Playlist Options menu
☛
8 1 1
No. Playlist Options menu
1 Add item Adds a music file to the Playlist.
2 Move item Moves the highlighted music file in the Playlist.
Repeat all: Plays all the music files in the Playlist repeatedly.
Repeat one: Plays the selected music file repeatedly.
2 The selected Equalizer setting applies to all the music files in the Playlist.
68
Page 81

No. Playlist Options menu (Continued)
▼
3 Delete item Deletes the highlighted music file from the Playlist.
4 Delete all Deletes all the music files from the Playlist.
5View detail Displays the properties (file name, title, artist name and recording time) of the highlighted music file.
Calculator (M82)
You can perform addition, subtraction, multiplication and division with the calculator. It also has a memory function.
☛ 8 2
2 The calculator can display a result of up to 9 digits. If a calculation results in a number exceeding the maximum, the screen displays error in the
calculation field.
Calculator Key Assignment
For calculator function, the keys are assigned different functions. The following shows the key assignment:
Key Operation Key Operation
Addition (+) Subtraction (–)
▲ Multiplication (× ) ▼ Division (÷)
Equals to (=) SK2 Memory Addition (2
SK1 Memory Recall (2
Inversion (±) Exit calculator
Decimal Point (.) CLR Delete digit (if held, all clear)
nd
)/Memory Cancel Percent (%)
▼
nd
)/Memory Store
Clock alarm (M83)
This feature enables you to switch the clock alarm function on/off and to set the time, repetition and alarm tone.
Turning the alarm on/off
☛
8 3
Clock alarm setting
On/Off Turns on or off the alarm.
Set time Sets the time and am/pm (for 12 hour format) at which the alarm will sound.
69
Page 82

Clock alarm setting (Continued)
Set alarm tone Sets the melody to be played when the alarm occurs (optional). See “Sounds (M62)” on page 62
Alarm repeat Selects alarm repeat for once, daily or day of the week.
2 You can select more than one day of the week at the same time.
2 You can remove the check by highlighting and pressing again.
Enter alarm text Sets the message (e.g. Wake up!) which is displayed when the alarm occurs (optional).
☛ When all settings are done, SK1 to save the setting.
2 The selected melody will be played when the alarm occurs if the ringer is turned on based on the current phone mode. If vibration is turned on, you
will be notified of the alarm by vibration.
2 Even if the phone has been switched off, the phone automatically switches itself on and sounds the alarm or vibrates at the specified time.
2 You can stop the alarm tone or vibration by pressing any key.
Scheduler (M84)
Scheduler enables you to enter reminders and appointments for particular time and date.
Adding a new event
☛
8 4 ➔ Highlight the day ➔ to display the day’s schedule list screen (if any) ➔ SK1.
Scheduler setting
Event date/time Sets the day, month, year, time and am/pm (for 12 hour format) of the event.
Description Sets the event description (optional).
Repeat Selects repeat for One time only, Daily, Weekly or Monthly.
Reminder Turns on or off the reminder.
Reminder tone Associates a reminder tone with an event.
2 You can set the reminder tone only when the Reminder is turned on.
Private
☛ When all settings are done, SK1 to save the setting.
2 The selected melody will be played when the scheduled event occurs if the ringer is turned on based on the current phone mode. If vibration is turned
on, you will be notified of the event by vibration.
Sets the event as a private event.
☛ Place a check mark to set the event as a private event. To set the event as a public event, do not place a check
mark.
70
Page 83

2 If the phone has been switched off, the phone does not switch itself on to sound the reminder or vibrate at the specified time.
▼
2 You can stop the reminder tone or vibration by pressing any key.
2 If the event is a private event, the reminder will be sound at the specified time but the entered description will not be displayed on the LCD. You are
prompted to enter the security code to view the details of the private event.
Viewing the scheduled events
☛
8 4 ➔ Highlight a day (SK1 to display the previous monthly/weekly view screen or SK2 to display the next monthly/weekly view screen)
☛ to display the day’s schedule list screen (To display the previous/next day’s schedule list screen, or ).
▼
☛ to display the detail screen of the highlighted schedule.
Scheduler Options menu
☛
8 4 ➔ Highlight the day ➔ to display the day’s schedule list screen (if any) ➔ Highlight the required scheduled event ➔
No. Scheduler Options menu
1 Add new Adds a new entry.
2Edit Edits the highlighted event.
3Copy Copies the highlighted event.
4 Delete Deletes event(s). Press the appropriate keys for the event category (the currently selected event, all the public/
5 Go to date Displays the selected date.
6 Monthly calendar/
Weekly calendar
7 View summary Displays a summary of all the events.
8 View events Displays the events. Press the appropriate keys for the event category (Public only, Private only or All) to display.
private events on the day, all the past public/private events, all the public/private events or all the events) to
delete.
Switches the weekly view screen to the monthly view screen, or the monthly view screen to the weekly view
screen.
2 You are required to key in the security code to display the private events or all events.
9IR send Sends the selected schedule through the IR port to other devices or a cellphone.
2 The IR send function is not available during a call.
2 Depending on the conditions, some options may be displayed in gray and not be available.
71
Page 84

ToDo list (M85)
▼
This feature allows you to set up to 100 ToDo tasks that should be finished by a certain date. You can choose to display either all ToDo tasks, or those
just finished or unfinished. Each task is identified by a description (of up to 256 characters) and its start/due date.
Adding a new ToDo task
☛ 8 5 ➔ Highlight the list ➔ ➔ SK1
ToDo list setting
Start date Sets the day, month and year to start the ToDo task.
Due date Sets the date to end the ToDo task. Key in the date or press the appropriate key for the date.
2 If you select to key in the date yourself, input the day, month and year of the date to end the Todo task, then SK1.
Description Sets the ToDo task description (e.g. Pay the rent).
Category Sets the category (Business, Personal or Other).
Priority Sets the priority (Normal, Low or High).
Private Sets the ToDo task as private.
☛ When all settings are done, SK1 to save the setting.
When a ToDo task is completed
☛
8 5 ➔ Highlight the list ➔ ➔ Highlight the required ToDo task ➔ ➔ 1 and 1, or SK2 to save the task as completed.
Viewing ToDo task details
☛
8 5 ➔ Highlight the list ➔ ➔ Highlight the required ToDo task ➔ ➔ To view the details of the previous or next ToDo task in the list,
▼
or
☛ To edit the currently displayed task, SK1.
ToDo Options menu
☛
To display the ToDo Options menu, 8 5 ➔ Highlight the list ➔ ➔ Highlight the required ToDo task ➔
☛ To display the ToDo detail Options menu, 8 5 ➔ Highlight the list ➔ ➔ Highlight the required ToDo task ➔ ➔
Column L shows the ToDo options menu, and column D shows the ToDo detail Options menu.
L D ToDo Options menu
1 4 Add new Adds a ToDo task based on the highlighted ToDo task (see “Adding a new ToDo task” on page 72, from the
second step).
72
Page 85

L D ToDo Options menu (Continued)
– 1 Status Changes the completion status of the highlighted ToDo task.
2 2Edit Edits the highlighted ToDo task (see “Adding a new ToDo task” on page 72, from the second step).
3 – Delete Deletes ToDo task(s). Press the appropriate keys for the ToDo task category (the currently selected ToDo task,
– 3 Delete current Deletes the highlighted ToDo task.
4 – Display filter Sets the type(s) of ToDo tasks to be displayed by selecting the desired filter option (None, Incomplete or
5 –Sort list Displays a list of ToDo tasks rearranged according to the selected sort key (Due date, Category, Priority, or
6 – View summary Displays the number of unfinished and finished tasks and how many more tasks can be created.
7 5IR send Sends the selected ToDo task through IR port to other devices or a cellphone.
all the public/private ToDo tasks, all the completed public/private ToDo tasks or all the ToDo tasks) to delete.
Complete).
Status).
2 The IR send function is not available during a call.
2 Depending on the conditions, some options may be displayed in gray and not be available.
Notepad (M86)
Notepad function allows you to record and store a note as a text file.
Creating a new memo (M861)
☛
8 6 1 ➔ Key in text ➔ to save the entry as a text file. The first few words are displayed on the text list screen.
Displaying a memo (M862)
☛
8 6 2➔ Highlight the list ➔ SK1 to preview the memo, or to edit the memo.
Notepad Options menu
☛
8 6 2 ➔ Highlight the a text (note) ➔
No. Notepad Options menu
1Edit item Changes the protection settings of the selected file.
Rename item: Edits the user title or file/folder name of the selected file/folder.
Set protection: Changes the protection settings of the selected folder or file.
73
Page 86

No. Notepad Options menu (Continued)
2 Use item Add desktop icon: Creates a desktop icon of the selected file on the standby screen.
IR send: Sends the selected file through IR port to other devices or a cellphone.
2 The IR send function is not available during a call.
3 Create message Creates a new message with the highlighted text (note) in the Message field.
4 Delete item Deletes the selected file or folder if it is unprotected.
5 Delete all Deletes all the notes unprotected from the list.
6 Copy item Copies the selected note.
7 Move item Cuts and pastes the selected note.
8 Move all Cuts and pastes all the notes in the current folder.
9 Create folder Creates a new folder under the current folder.
0Storage detail Displays the current storage information of your phone memory.
View detail Displays the detail of the selected file.
# Options Sorting order: Sorts the files by date or alphabetically.
Info column: Sets whether to display the column on the list screen, and the information to be
shown there.
None: No column showing
Size: Approximate size of the file
Type: File type
2 You can also change the information on the column by pressing # without displaying the Options menu.
Flat view: Displays the list of all the stored files regardless of the folder hierarchy.
Save options: Saves the current option settings.
Reset options: Resets the option settings.
2 Depending on the conditions, some options may be displayed in gray and not be available.
74
Page 87

Voice memo (M87)
Voice memo function allows you to record up to 60 seconds of sound/voice, using your phone’s microphone.
Recording/playing voice memo or setting speaker
☛ 8 7
No. Voice memo setting
1 Record Records a voice memo.
☛ SK1 to start recording.
2 You can finish recording and save the data as a file by pressing SK2 even before the recording is
completed.
/ To record the conversation during a call, see “Recording a call” on page 9
2Play Plays a voice memo or recorded call.
☛ Highlight a voice memo ➔ to start playing and SK2 to stop playing.
3 Speaker setting Selects between speaker and earpiece to play the voice memo.
☛ 1 for the Speaker, or 2 for the Earpiece.
/ See also: “Sounds (M62)” on page 62.
Currency (M88)
Currency function allows you to convert an amount of money in one currency to another.
Converting currency
☛
8 8
Currency setting
From Sets the source currency code.
To Sets the destination currency code.
Exchange rate Sets the exchange rate.
☛ If you wish to change the exchange rate, CLR to delete the displayed exchange rate and key in the required number
(for decimal point, SK1).
Amount Sets the amount of money you wish to convert (for decimal point, SK1).
75
Page 88

2 If you have made a mistake in entering the amount, CLR to delete individual number or SK2 to cancel the entry and return to the previous screen,
and then start again.
Resetting the currencies
☛
8 8 and SK1
Infrared (M89)
Infrared function enables you to receive data (phonebook/picture/video/sound excluding MP3/schedule/ToDo list/note data) from other devices, or a
cellphone of the same model via the infrared port. This function also enables you to use your phone as a modem for your PC via the infrared port to
establish a dial-up connection to an Internet service provider
2 This function is not available during a call.
/ For details, see “IR Data Exchange” on page 17.
☛ 8 9
No. Infrared setting
1IR receive Receives data via infrared.
☛ After the data has been received, SK1 to save the received data.
2 IR modem Uses your phone as a modem for your PC via infrared.
2 After the IR connection is established, the idle screen with an Infrared icon and a General Packet Radio
Service (GPRS) icon will be displayed for GPRS connection, and the Circuit Switched Data (CSD) connection
screen will be displayed for CSD connection.
, Your phone consumes a lot of battery power when used as a modem. After using your phone as a modem, be sure to deactivate the modem
function from your PC or press (for the CSD connection only). When the modem function is deactivated, the idle screen will be displayed
without the Infrared icon and GPRS icon.
76
Page 89

Index
Numerics
2nd-LCD viii
3GPP 56
4 way navigation key v
A
AC adapter 2
Accepting an incoming call 6
Access history 46
Accessory 68
ADN 7, 47
Alarm volume 23
ALS setup 21
Animation 62
Any key answer 21
AOC 10
Auto answer 23
Auto redial 12
B
Band 14
Bar calls 26
Basic calls & phone use 5
Battery charging 3
Battery level icons vii, 3
Battery pack 1
Bookmark 47
Broadcast messages 33
C
Calculator 69
Call diversion 11
Call lists 10
Call waiting and holding 12
Camera 56
Recording a video 59
Taking a picture 57
Car mode 22
CB 33
Certificate information 47
CLI 5
Clock 21
Clock alarm 69
Clock orientation 24
Clock/Event display 24
Colour style 23
Contrast 24
Correcting mistakes 5
CSD 76
Currency 75
D
Date 21
Date format 21
Desktop icons 19
Dialled calls list 10
Direction 24
Download 34
E
Earphone 23
Earphone type 22
Emblem 4
Emergency calls 6
Ending a call 5
F
Fast dialling 7
FDN 48
Flicker control 58
Fold answer 21
Frame 63
Function key LED 24
G
General care i
GPRS 76
Greetings 23
Groups 51
GSM vii
H
Headset 22
Holding a call 8
Homepage 47
I
icons vii
i-mode 33, 42
Certificate information 47
i-mode menu screen 38
i-mode operations 33
i-mode screen 38
IP 47
Mail 46
MMS 46
Site (program) 46
Web page 46
i-mode menu screen 38
i-mode operations 33
i-mode screen 38
Inbox 27
Incoming call No. 24
International calls 13
International dialling codes 13
IP 47
IR 17
IR modem 76
IR receive 76
J
Java™ 66
JPEG 56
K
Key allocations 16
Key tone 23
Keypad shortcuts vi
L
Language 22
Last call duration 10
Last number redial 6
LCD iv
LED 22
Line ID 12
Low battery alarm 3
M
Mail 46
Mail screen 42
Mail server 38
Mail tone 23
77
Page 90

Mail tone volume 23
Main menu ix
Main menu style 23
Main-LCD vii
Making basic calls 5
Meeting mode 22
Menu functions ix
Menu shortcuts selection iii
Message 27
MFi 46
Missed calls list 10
MMS 46
MMS messages 27
Multi-party calls 8
Music 63
Music player 68
Mute 8
My data 61
N
Network selection 13
Normal mode 22
Normal text (ABC) input 15
Notepad 73
Numeric input 16
O
One-touch dial 7
Options menu (during a call) 7
Outgoing call 21
Own phone number display 7
P
Parts and functions v
Phone lock 25
Phone modes 22
Phonebook 47
Pictures 62
PIM 25
PIN activate 25
PIN code 4, 25
PIN2 code 25
Pocket mode 22
Power saving 24
Power saving level 24
Preparing the phone 1
PUK 25
R
Reading a message 28
Received calls list 10
Recording a call 9
Redial blacklist 10
Redial the last number 6
Rejecting an incoming call 6
Reset settings 26
Ring silencer 21
Ringer 22
Ringer volume 22
Roaming 13
S
Safety precautions i
Saved pages 47
Scheduler 70
Scratchpad number 54
SDN 48
Service tone 23
Set time format 21
Set timezone 22
Settings 21
Shortcuts selection ix
Side key lock 21
SIM 1
SIM card 1
SIM card insertion 1
SIM card removal 2
Site (program) 46
SMIL 46
SMS messages 27
SMS tone 22
SMS tone volume 23
Sounds 62
Stamp 63
Standby screen ix
Standby talk times 3
Starting a call 5
Start-up 4
STD 5
Switching the phone off 4
Switching the phone on 4
T
T9 English text input 14
Talk time 3
Text entry 14
Time 21
Time format 21
Timezone 22
ToDo list 72
Transferring a call 8
U
Unsuccessful calls 6
User’s manual conventions iii
V
Vibrator 23
Videos 61
Voice mail 21, 55
Voice memo 75
Voice recall 7
Voice volume 21
W
Wallpaper 23
Web page 46
Z
Zoom 58
1_11004
78
 Loading...