

Page 1

Emergency Services and Safety Precautions
Emergency Services
To make an emergency call in any country.
☛ Press 1 1 2
Ask the operator for the service which you require: Police, Ambulance, Fire Brigade, Coastguard or
Mountain Rescue Services. State your location and, if possible, remain stationary to maintain phone
contact.
The 112 emergency number service is available on every digital network service. The number 999 is an
alternative emergency number for the UK only, and can only be used with a valid SIM card.
2
Due to the nature of the cellular system, the success of emergency calls cannot be
guaranteed.
General Care
A cellphone contains delicate electronic circuitry, magnets, and battery systems. You should treat it with
care and give particular attention to the following points.
• Do not allow the phone or its accessories to come into contact with liquid or moisture at any time.
• Do not place anything in the folded phone.
• Do not expose your phone to extreme high or low temperatures.
• Do not expose your phone to naked flame, cigars or cigarettes.
• Do not paint your phone.
• Do not drop or subject your phone to rough treatment.
• Do not place the phone alongside computer disks, credit cards, travel cards and other magnetic media.
The information contained on disks or cards may be affected by the phone.
• Do not leave the phone or the battery in places where the temperature could exceed 60°C, e.g. on a car
dashboard or on a window sill, behind glass in direct sunlight, etc.
• Do not remove the phone’s battery while the phone is switched on.
• Take care not to allow metal objects, such as coins or key rings, to contact or short-circuit the battery
terminals.
• Do not dispose of battery packs in a fire. Your phone's Li-ION batteries may be safely disposed of at Li-
ion recycling points. For more specific battery and power supply information, see page 8 and 9.
• Do not put your phone’s battery in your mouth as battery electrolytes may be toxic if swallowed.
• Do not attempt to dismantle the phone or any of its accessories.
• This equipment is fitted with an internal battery that can only be replaced by a qualified service engineer.
There is a risk of explosion if the battery is replaced by an incorrect type. Dispose of the used battery in
accordance with the manufacturer's instructions.
• Using any battery pack, AC adapter or Cigar Lighter adapter (option) not specified by the manufacturer
for use with this phone creates a potential safety hazard.
• The earpiece may become warm during normal use and the unit itself may become warm during
charging.
• Use a damp or anti-static cloth to clean the phone. Do NOT use a dry cloth or electrostatically charged
cloth. Do not use chemical or abrasive cleaners as these could damage the case.
• Remember to recycle: the cardboard packaging supplied with this phone is ideal for recycling.
Aircraft Safety
• Switch off your phone and remove its battery when inside or near aircraft. The use of cellphones in
aircraft is illegal, it may be dangerous to the operation of the aircraft and it may disrupt the cellular
network. Failure to observe this instruction may lead to suspension or denial of cellphone service to th e
offender, or legal action, or both.
• Do not use your phone on the ground without the permission of the ground crew.
General Safety
• Observe ‘Turn off 2-way radio’ signs, such as those near stores of fuel, chemicals or explosives.
• Do not allow children to play with the phone, charger or batteries.
• Small parts are included in your phone. Keep them out of reach of small children, for whom it could be a
choking hazard.
• The operation of some medical electronic devices, such as hearing aids and pacemakers, may be
affected if a cellphone is used next to them. Observe any warning signs and manufacturer's
recommendations.
• If you have a weak heart, you should take extra precautions when setting functions such as the Vibrator
and Ring tone volume functions for incoming calls.
• If you set the Vibrator setting to anything other than OFF, be careful that the phone is not near a source
of heat (e.g. a heater) and that it does not fall from a desk due to the vibration.
Road Safety
• You MUST exercise proper control of your vehicle at all times. Give full attention to driving.
• Observe all the recommendations contained in your local traffic safety documentation.
• Pull off the road and park before making or answering a call if driving conditions so require.
• You MUST NOT stop on the hard shoulder of a motorway to answer or make a call, except in an
emergency.
• Switch off your cellphone at a refue lling point, such as a petrol station, even if you are not refuelling your
own car.
• Do not store or carry flammable or explosive mater ials in the same compartment where a radio
transmitter, such as a cellphone, is placed.
• Electronic vehicle systems, such as anti-lock brakes, speed control and fuel injection systems are not
normally affected by radio transmissions. The manufacturer of such equipment can advise if it is
adequately shielded from radi o transmissions. If you suspect vehicle problems caused by radio
transmissions consult your dealer and do not switch on your phone until it has been checked by qualified
approved installers.
Vehicles Equipped with an Air Bag
An air bag inflates with great force. Do not place objects, including either installed or portable
wireless equipment, in the area over the air bag or in the air bag deployment area. If in-vehicle wireless
equipment is improperly installed and the air bag inflates, serious injury could result.
Third Party Equipment
The use of third party equipment, cables or accessories, not made or authorised by NEC, may invalidate
the warranty of your cellphone and also adversely affect the phone's operation. For example use only the
NEC mains cable supplied with the AC charger.
Service
The cellphone, batteries and charger contain no user-serviceable parts. We recommend that your NEC
cellphone is serviced or repaired by an NEC authorised service centre. Please contact your Service
Provider or NEC for advice.
i
Page 2

Non-Ionising Radiations
The radio equipment shall be connected to the antenna via a non-radiating cable (e.g. coax).
The antenna shall be mounted in such a position that no part of the antenna will be in proximity to the
human body unless there is an intervening metallic screen, for example, the metallic roof.
Use only an antenna that has been specifically designed for your mobile phone. Use of unauthorized
antennas, modifications or attachments could damage the mobile phone and may violate the appropriate
regulations, causing loss of performance and radio frequency (RF) energy above the recommended limits.
Efficient Use
For optimum performance with minimum power consumption phases:
• Hold the mobile phone as you would any other telephone. While speaking directly into the mouthpiece,
angle the antenna in a direction up and over your shoulder.
• Do not hold the antenna when the mobile phone is in use. Holding the antenna affects call quality, may
cause the mobile phone to operate at a higher power level than needed and may shorten talk and
standby times.
Radio Frequency Energy
Your mobile phone is a low-power radio transmitter and receiver. When it is turned on, it
intermittently receives and transmits radio frequency (RF) energy (radio waves). The system that handles
the call controls the power level at which the phone transmits.
Exposure to Radio Frequency Energy
Your phone is designed not to exceed the limits for exposure to RF energy set by national authorities and
international health agencies. * These limits are part of comprehensive guidelines and establish permitted
levels of radio wave exposure for the general population. The guidelines were developed by independent
scientific organizations such as ICNIRP (International Commission on Non-ionizing Radiation Protection)
through periodic and thorough evaluation of scientific studies. The limits include a substantial safety margin
designed to assure the safety of all persons, regardless of age and health, and to account for any variations
in measurements.
*Examples of radio frequency exposure guidelines and standards that your phone is designed to conform
to:
• ICNIRP, “Guidelines for limiting exposure to time-varying electric, magnetic, and electromagnetic fields
(up to 300 G Hz)-International Commission on Non-Ionizing Radiation Protection (ICNIRP)”.
Health Physics, vol. 74. pp, 494-522, April 1998.
• 99/519/EC, EU Council Recommendation on the limitation of exposure to the general public to
electromagnetic fields 0 Hz-300 GHz, Official Journal of the European Communities, July 12,1999.
• ANSI/IEEE C95.1-1992. “Safety levels with respect to human exposure to radio frequency
electromagnetic fields, 3kHz to 300 GHz”. The Institute of Electrical and Electronics Engineers Inc., New
York, 1991.
• FCC Report and Order, ET Docket 93-62, FCC 96-326, Federal Communications Commission (FCC),
August 1996.
• Radio communications (Electromagnetic Radiation Human Exposure) Standard 1999, Australian
Communications Authority (ACA), May 1999.
Declaration of Conformity
This product complies with the requirements of the R&TTE Directive 1999/5/EC.
The ‘Declaration of Conformity’ leaflet can be found within this box.
Licenses
®
• T9
Text Input and the T9 logo are registered trademarks of Tegic Communication.
T9 Text Input is licensed under one or more of the following:
U.S. Pat. Nos. 5,818,437, 5,953,541, 5,187,480, 5,945,928, 6,011,554, and 6,307,548; Australian Pat.
No. 727539; Canadian Pat. No. 1,331,057; United Kingdom Pat. No. 2238414B; Hong Kong Standard
Pat. No. HK0940329; Republic of Singapore Pat. No. 51383; Euro. Pat. No. 0 842 463 (96927260.8) DE/
DK, FI, FR, IT, NL, PT. ES, SE, GB; Republic of Korea Pat. Nos. KR201211B1 and KR226206B1; and
additional patents are pending worldwide”
• This product contains ACCESS CO., LTD’s Compact NetFront™ Plus internet browser software.
Copyright © 1998-2003 ACCESS CO., LTD.
Compact NetFront™ is a registered trade mark or trademark of ACCESS CO., LTD. in Japan and
selected countries worldwide.
• © 2002 Music Airport Inc., http://www.music-airport.com/
• Rock It
Written by Herbie Hancock, Michael Beinhorn and Bill Laswell © Hancock Music and More Cut Music
For the purpose of improvement, the specifi cations for this product and its accessories are subject
to complete or partial change without prior notice.
ii
Page 3
Before You Start
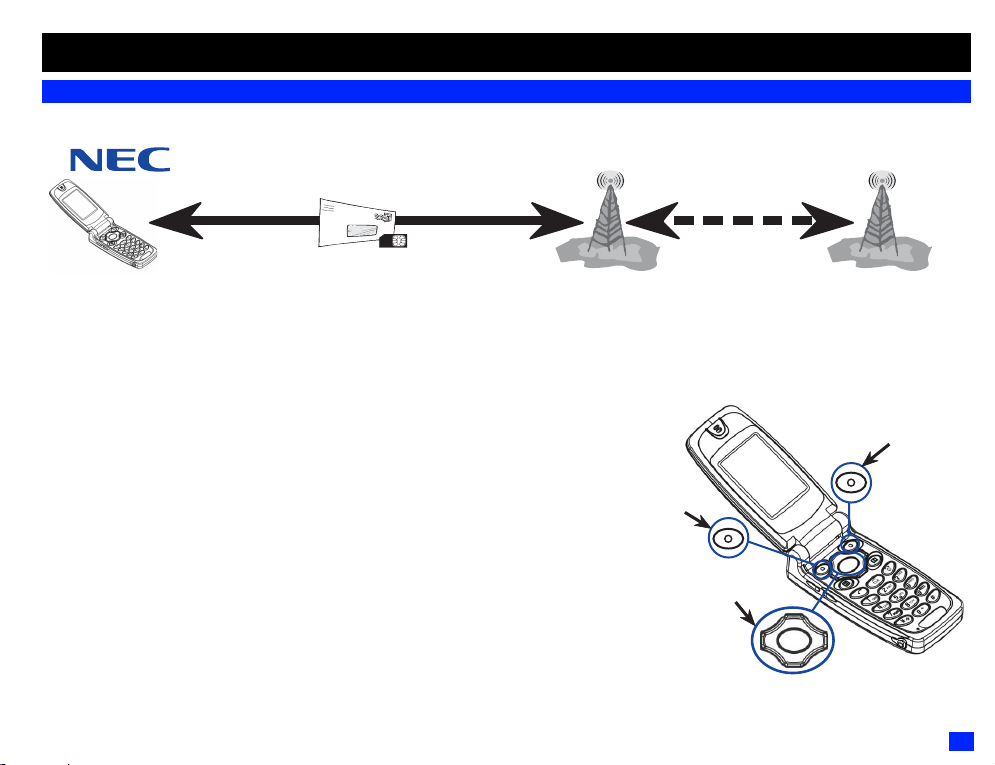
Cellphone system structure
It is worth remembering that every time you use your phone, three or four different organisations are involved:
Service Provider Network e-moción Service Provider
The people that
make your phone
All the features described in this user manual are supported by your phone. However, for all these features to work, you must have a SIM card (supplied by your Service Provider) that
also supports these features. Even if you have a fully featured SIM card, any feature not supported by the Network transmitting your call will not work. This last po int is especially important
when you are roaming networks (see page 11).
User guide conventions
When one or more of the
should be pressed (see right).
There are two keys that change their functions according to the phone’s current use. They are referred to as
Softkey 1 and Softkey 2 (see right).
The following markers are used throughout the user manual to attract your attention:
/
This type of paragraph will contain details of where to find information related to the topic in question.
2
This type of paragraph will contain information worth noting.
,
This type of paragraph will contain important information.
▼
▲ ▼
and keys symbols are shown, the relevant part of the 4 way navigation key
▼
The people that supply
your SIM card and bills
The people that
transmit your calls
Softkey 1
4way
The people that provide
your e-moción services
Softkey 2
Navigation key
iii
Page 4
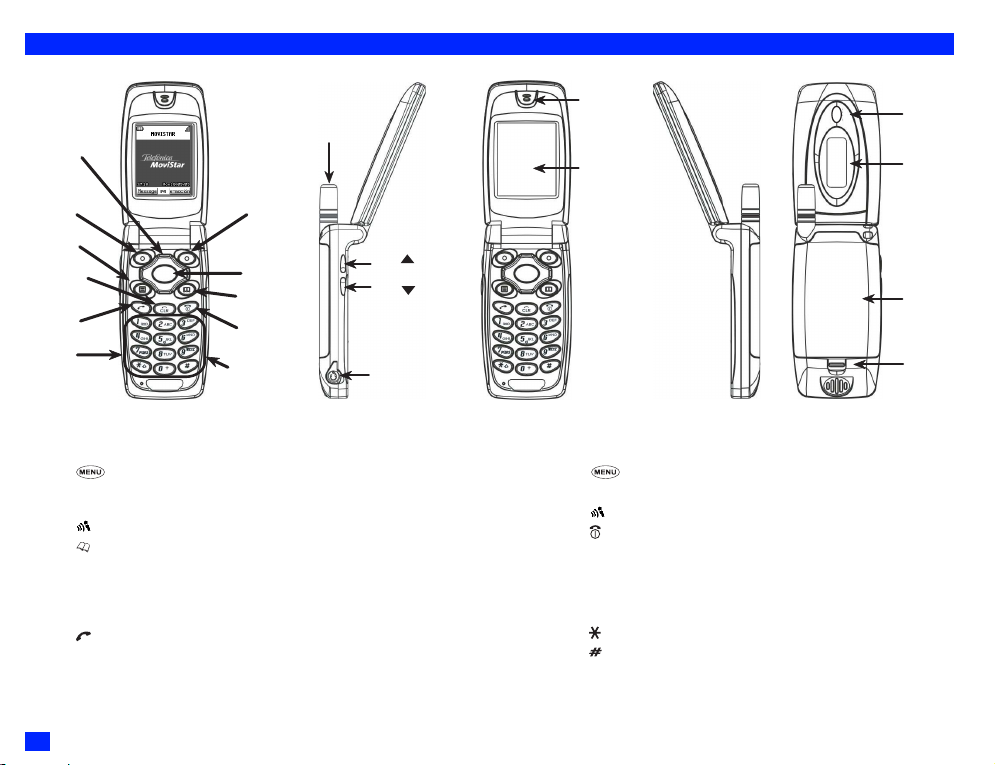
Keypad shortcuts
Menu Key
Antenna
Side key
Side key
Earphone jack
cover
Navigation
Key
Softkey 1 Softkey 2
Voice Key
Clear (CLR)
Key
Send Key
Side Key
Key facilities
The following single button facilities are available from the standby screen:
Phonebook
Key
End/On-Off
Key
Alphanumeric
Keys
☛ Press to access the Main menu icons (see page 10).
☛ Press Softkey 1 to access the Mail menu screen (see page 65).
☛ Press Softkey 2 to access e-moción menu screen (see page 62).
☛ Press to access the Voice recorder menu (see page 55).
☛ Press to access the phonebook (see page 27).
☛ Press the
☛ Press the ▼ key to access the Viewer menu screen (see page 73).
☛ Press the
☛ Press the key to access the missed call list (see page 17).
▲ key to access the phone modes menu screen (see page 12).
▼
key to access the incoming call list (see page 17).
▼
☛ Press to access the Outgoing call list (see page 17).
☛ Press Side Key to adjust the volume when your phone is open (see page 7).
Press Side Key to activate Quick Silent function when your phone is closed (see page 5).
☛ Press 1 ~ 0 keys to enter phone numbers (see page 4).
Earpiece
LCD
Operations that involve pressing and holding keys
The following operations are available from the standby screen:
☛ Press and hold to set the Side Key Lock to ON.
☛ Press and hold Softkey 2 to access the e-moción service.
☛ Press and hold to go to the voice recognition screen.
☛ Press and hold to power off.
☛ Press and hold CLR to delete all characters when you enter text.
☛ Press and hold 1 to call the Voice Mail Centre.
☛ Press and hold 2 ~ 9 to go to the corresponding phonebook (One-touch dial).
☛ Press and hold 0 to enter + when you make an international call.
☛ Press and hold to toggle the selected line.
☛ Press and hold to enter a pause.
LED
2nd LCD
Battery
Battery
lock
iv
Page 5
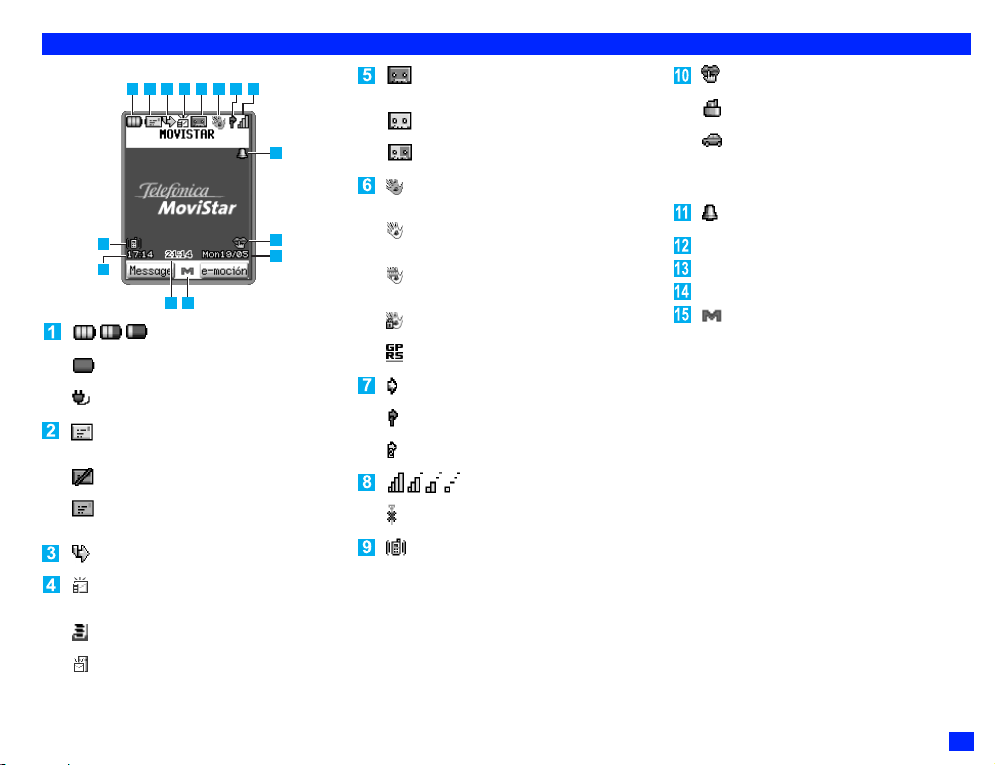
LCD and displayed icons
123 4 5 6 7 8
11
9
12
1513
Indicates the battery level.
Indicates that the battery runs out.
Appears during charging.
Indicates that there is a new message(s) (SMS, EMS) in
your phone.
Indicates that the Inbox in your phone is full.
Indicates that there is a new message(s) (SMS, EMS) on
the network.
Indicates that you divert all or some incoming calls.
Indicates that there is a new MMS in your phone. When a
MMS is being downloaded, the beige icon blinks.
Indicates that the phone memory for MMS is full.
Indicates that there is a new MMS on the server.
10
14
Indicates that there is a new voice mail. (No ALS or ALS
Line 1)
Indicates that there is a new voice mail. (ALS Line 2)
Indicates that there is a new voice mail. (ALS Li ne 1 and 2)
Indicates that the GSM network is active and GPRS is
attached.
Indicates that the GPRS is attached and e-moción is
active.
Indicates that e-moción communication is being carried
out.
Indicates that e-moción lock is on.
Indicates PDP Context is activated.
Indicates the Line status (No ALS).
Indicates the Line status (ALS Line 1).
Indicates the Line status (ALS Line 2).
Indicates the signal reception level.
Appears when you are outside the service area.
Indicates that the Vibrator is set.
Indicates that the Meeting mode is set.
Indicates that the Pocket mode is set.
Indicates that the Car mode is set.
2
When no icon is displayed onthe screen, the phone
mode is the Normal mode.
Indicates that the alarm is set.
Local time
Remote time
Date
Indicates that the menu key is enabled.
v
Page 6
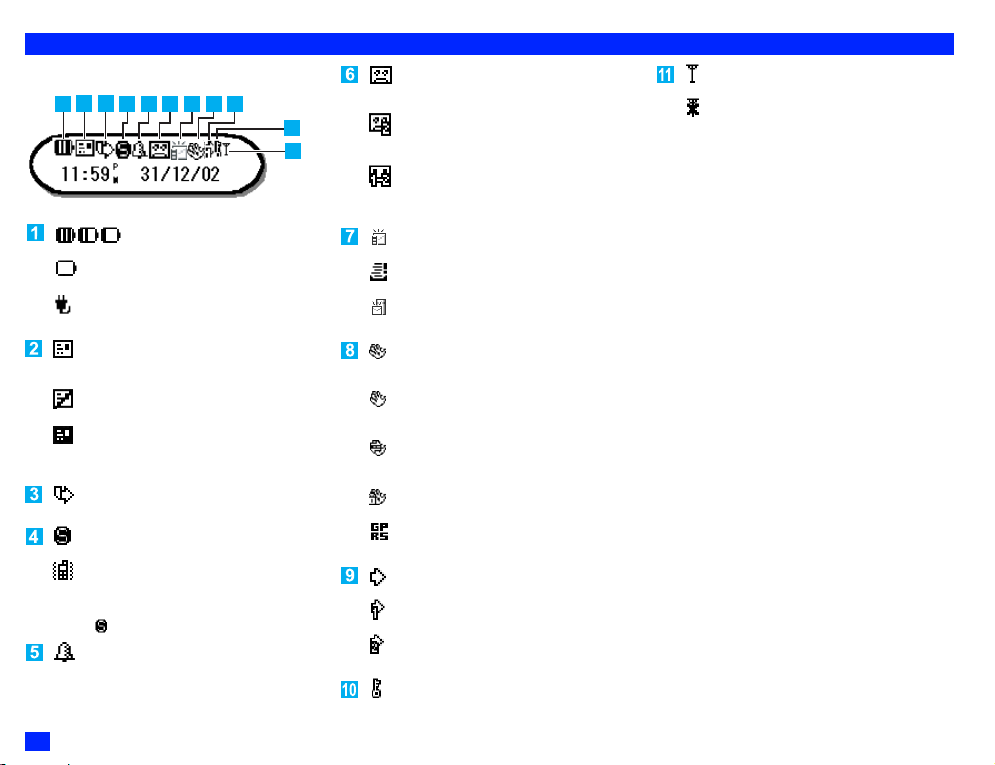
2nd-LCD and displayed icons
3
2
1
Indicates the battery level.
Indicates that the battery runs out.
Appears during charging.
Indicates that there is an unread message(s) (SMS,
EMS) in your phone.
Indicates that the Inbox in your phone is full.
Indicates that there is message(s) (SMS, EMS) on the
network.
Indicates that you divert all or some incoming calls.
Indicates that Quick Silent is set.
Indicates that the Vibrator is set.
2
If Quick Silent is activated while the vibrator has been
set, the has a priority.
Indicates that the alarm is set.
4 5 6 7 9
8
10
11
Indicates that there is an unread voice mail. (No ALS
or ALS Line 1)
Indicates that there is an unread voice mail. (ALS Line
2)
Indicates that there is an unread voice mail. (ALS Line
1 and 2)
Indicates that there is new MMS in your phone.
Indicates that the new MMS in your phone is full.
Indicates that there is a MMS on the server.
Indicates that the GSM network is active and GPRS is
attached.
Indicates that the GPRS is attached and e-moción is
active.
Indicates that e-moción communication is being
carried out.
Indicates that e-moción lock is on.
Indicates PDP Context is activated.
Indicates the Line status (No ALS).
Indicates the Line status (ALS Line 1).
Indicates the Line status (ALS Line 2).
Indicates the signal reception level.
Indicates that you are outside the service area.
Indicates that Side Keys are locked.
vi
Page 7
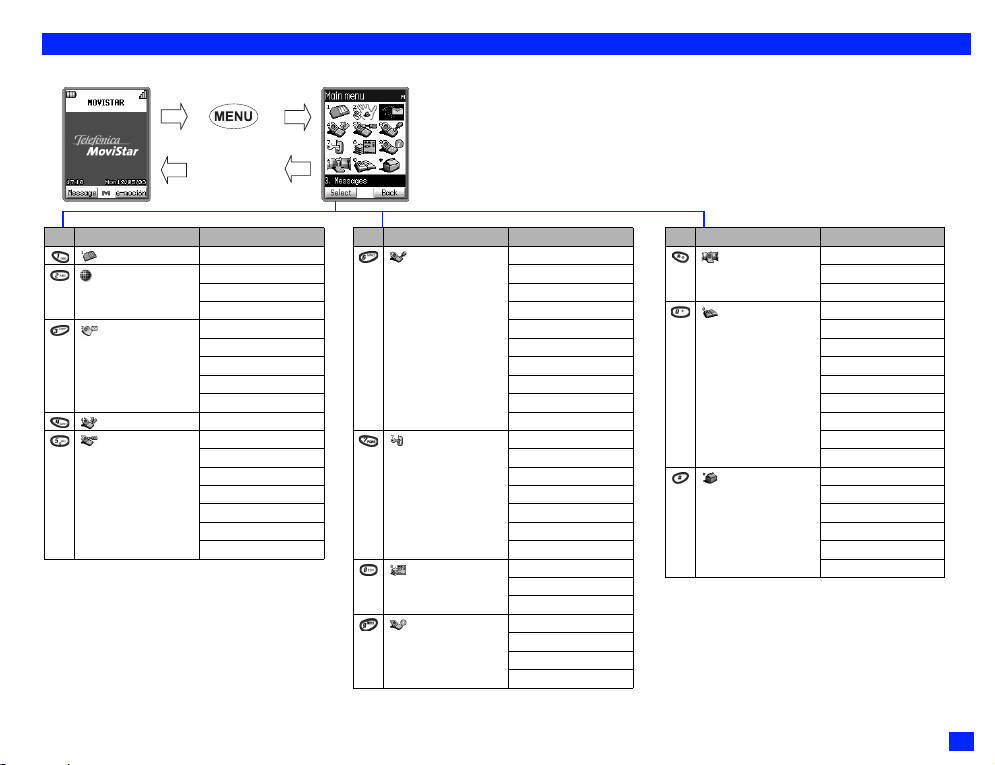
Overview of menu function
Standby screen
Softkey 2
Main menu
Key Main menu Second level menu
Service
e-moción Ringer time
Connection No.
e-moción lock
Messages SMS
Setup
Broadcast
Dial VM line 1
Dial VM line 2
Call diversion Speech Data Fax
Screen settings Greetings
Wallpaper
Clock
Colour style
Contrast
Back side settings
Reset settings
Key Main menu Second level menu
Phone settings Volume
Detailed modes
Language
Own number
Auto redial
Call wait
Line ID
Any key answer
ALS setup
Power saving
Security PIN change
PIN activate
PIN deactivate
PIN2 change
Bar calls
Bar password
Fixed numbers
Call lists Missed calls
Incoming
Outgoing
Call info Last call
Total calls
Charge info
Blacklist
Key Main menu Second level menu
Network Search type
New search
SIM list
Phonebook Create
Scroll alpha
Scroll memory
Group search
Group name
Package copy
Delete all
Setting
Information Numbers
Accessory Calculator
Currency
Schedule
Todo
Voice memo
Game
vii
Page 8

Getting Started 1
Basic calls & phone use 4
Caring for batteries 8
Selecting features 10
Advanced use 11
Setting up your phone 19
Call & charge information 24
Storing & retrieving numbers 25
Text entry 33
Security 35
Messages & voice mail 37
Accessories 46
Voice recording/memo 55
e-moción facilities 58
Viewer 73
Index 75
Page 9

Emergency Services and Safety Precautions i
Emergency Services ............................................................................... i
General Care........................................................................................... i
Aircraft Safety .......................................................................................... i
General Safety ........................................................................................ i
Road Safety............................................................................................. i
Vehicles Equipped with an Air Bag ......................................................... i
Third Party Equipment............................................................................. i
Service .................................................................................................... i
Non-Ionising Radiations ..........................................................................ii
Efficient Use ............................................................................................ii
Radio Frequency Energy.........................................................................ii
Exposure to Radio Frequency Energy ....................................................ii
Declaration of Conformity ........................................................................ ii
Licenses ..................................................................................................ii
Before You Start iii
Cellphone system structure....................................................................iii
User guide conventions ..................................................................... iii
Keypad shortcuts....................................................................................iv
Key facilities .......................................................................................iv
Operations that involve pressing and holding keys............................iv
LCD and displayed icons........................................................................ v
2nd-LCD and displayed icons ................................................................vi
Overview of menu function....................................................................vii
Getting Started 1
Charging the battery ............................................................................... 1
Main Features ........................................................................................ 1
Preparing the phone............................................................................... 2
SIM card............................................................................................. 2
Inserting a SIM card ........................................................................... 2
Removing a SIM card ........................................................................ 2
Start-up................................................................................................... 3
Switching the phone on......................................................................3
Switching the phone off......................................................................3
PIN code ............................................................................................ 3
Display information ................................................................................. 3
Graphic display area .......................................................................... 3
Status Icons ....................................................................................... 3
2nd-LCD............................................................................................. 3
LED .................................................................................................... 3
Help & Softkey area ........................................................................... 3
Basic calls & phone use 4
Making basic calls .................................................................................. 4
Starting a call ..................................................................................... 4
Correcting mistakes ........................................................................... 4
Ending calls ............................................................................................ 4
Receiving calls........................................................................................ 5
Accepting a call .................................................................................. 5
Rejecting a call................................................................................... 5
Putting a call on hold .............................................................................. 5
Quick Silent ............................................................................................ 5
Unsuccessful calls .................................................................................. 5
Stored numbers ...................................................................................... 6
Emergency calls ..................................................................................... 6
Last number redial .................................................................................. 6
Mute........................................................................................................ 6
Displaying your own phone number .......................................................6
Side Key ................................................................................................. 7
Adjustment of volume......................................................................... 7
Quick Silent ........................................................................................ 7
Side Key Lock .................................................................................... 7
Caring for batteries 8
Standby and talk times ........................................................................... 8
Checking the battery............................................................................... 8
Low battery alarm ................................................................................... 8
Changing the battery .............................................................................. 9
ix
Page 10

Charging a battery .................................................................................. 9
Selecting features 10
Menu types ...........................................................................................10
Menu selection......................................................................................10
Fastkey selection .................................................................................. 10
Fastkey selection examples ............................................................. 10
Advanced use 11
International dialling codes ................................................................... 11
Entering international dialling codes.................................................11
Roaming ...............................................................................................11
Set automatic or manual network selection......................................11
View/edit network list ........................................................................ 11
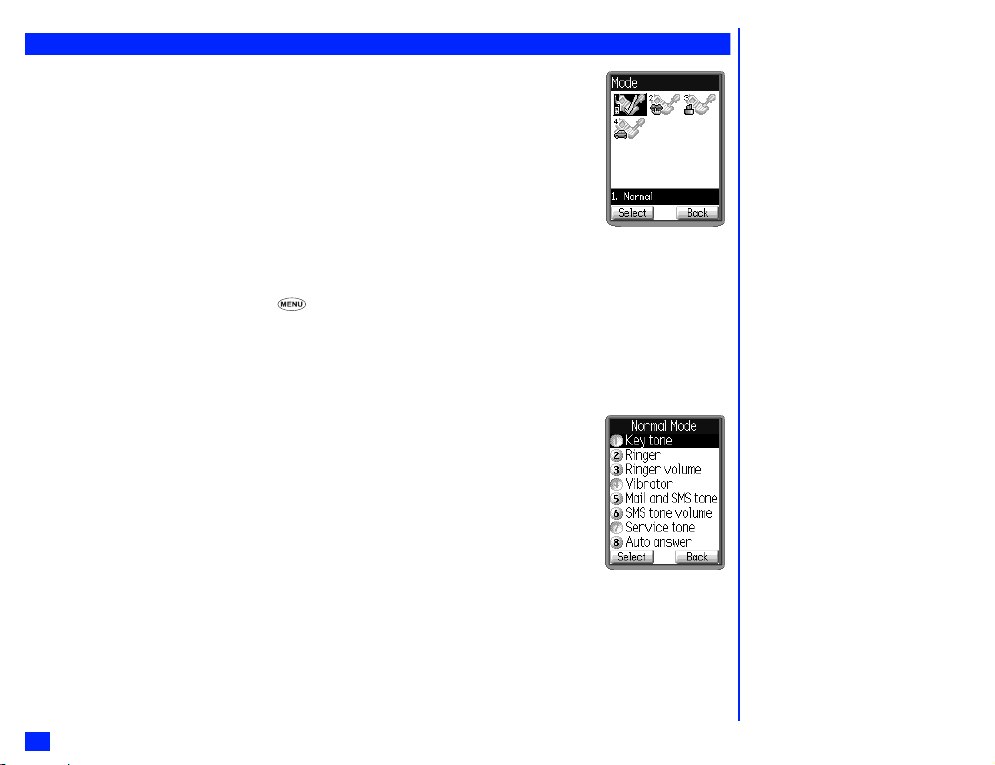
Phone modes........................................................................................12
How to set the mode ........................................................................ 12
How to display the detail of the mode .............................................. 12
The detail of the mode...................................................................... 12
Changing the Mode settings.............................................................13
Language setting ..................................................................................14
Line identification .................................................................................. 14
Multi-party calls..................................................................................... 15
Voice recall ........................................................................................... 15
Diverting calls ....................................................................................... 15
Auto redial............................................................................................. 16
Call waiting and holding ........................................................................ 16
Setting up call waiting.......................................................................16
Using call waiting..............................................................................16
Any key answer ....................................................................................16
ALS setup .............................................................................................17
Service menu........................................................................................17
Call lists ................................................................................................ 17
Scratchpad number ..............................................................................17
Noting & calling a scratchpad number..............................................17
Storing a scratchpad number ...........................................................18
Information numbers .............................................................................18
x
Phone number editing ........................................................................... 18
Editing...............................................................................................18
Entering special characters ..............................................................18
Setting up your phone 19
Time, date & alarm set .......................................................................... 19
Setting the time.................................................................................19
Setting the date ................................................................................19
Format time ...................................................................................... 19
Format date ......................................................................................19
Show clock .......................................................................................19
Setting the alarm ..............................................................................20
Resetting the alarm ..........................................................................20
Earpiece volume setting........................................................................20
Method 1 (from the standby screen):................................................20
Method 2 (from the standby screen):................................................20
Method 3 (during a call): ...................................................................20
Ring melodies .......................................................................................21
Greetings/animations ............................................................................21
Wallpaper..............................................................................................21
Colour style ...........................................................................................21
Contrast ................................................................................................21
Back side settings .................................................................................22
2nd-LCD information ........................................................................22
Back side settings.............................................................................22
Power Saving........................................................................................ 23
Setting the LCD and 2nd-LCD backlight...........................................23
Setting the Key backlight ..................................................................23
Restore factory settings ........................................................................23
Call & charge information 24
Call information .....................................................................................24
View calls..........................................................................................24
Blacklist ............................................................................................ 24
Charge information (Advice of charge - AoC) .......................................24
View total cost of calls (Total charge)...............................................24
Set the call limit (Max charge) ..........................................................24
Set currency (Unit price) ...................................................................24
Page 11

Storing & retrieving numbers 25
Phonebooks ......................................................................................... 25
Personal directory (ADN) ................................................................. 25
Fixed dialling numbers (FDN) .......................................................... 25
Service dialling numbers (SDN) ....................................................... 25
Setting the primary phonebook ............................................................ 26
Storing numbers & names (Phonebook(Phone), Phonebook(SIM) &
FDN)..................................................................................................... 26
Blank entry screen (New storage) .................................................... 26
Storing.............................................................................................. 26
Number pre-loaded entry screen ..................................................... 26
Recalling stored numbers..................................................................... 27
Alphabetical list................................................................................ 27
Memory location list ......................................................................... 27
Search by group............................................................................... 27
Editing or personalising phone memory numbers................................ 27
Editing phonebook(Phone) .............................................................. 28
Editing phonebook entries ...............................................................28
Editing existing phonebook(Phone) information .............................. 28
Editing phonebook(SIM) ..................................................................31
Deleting a single phonebook record ................................................ 31
Move/copy a record between locations and/or phonebooks............ 31
Package copy....................................................................................... 32
Delete all phone records ...................................................................... 32
Text entry 33
Writing messages ................................................................................. 33
®
English text input........................................................................... 33
T9
Normal text input (ABC) ....................................................................... 34
Numeric input ....................................................................................... 34
Keys allocation ..................................................................................... 34
Edit your own phone number ............................................................... 34
Security 35
FDN setting .......................................................................................... 35
Security codes...................................................................................... 35
PIN code............................................................................................... 35
Changing your PIN code .................................................................. 35
PIN 2 code............................................................................................ 36
Changing your PIN 2 code ............................................................... 36
Bar calls................................................................................................ 36
Bar password........................................................................................ 36
Messages & voice mail 37
SMS/EMS overview .............................................................................. 37
Standard messages ......................................................................... 37
Message icons ................................................................................. 37
SMS menu screen............................................................................ 37
Options menu................................................................................... 38
Reading messages............................................................................... 39
Options menu ....................................................................................... 39
Incoming messages ......................................................................... 39
Draft messages ................................................................................ 40
Outgoing messages ......................................................................... 40
Creating a short message .................................................................... 41
Option menu functions .....................................................................41
Deleting a message.............................................................................. 42
Status ................................................................................................... 43
Message setup .....................................................................................43
SMS centre ...................................................................................... 43
Options............................................................................................. 43
Max linked msg ................................................................................ 43
Filter options..................................................................................... 43
Voice mail number ........................................................................... 43
Delete voice mail icon ...................................................................... 44
Cell broadcast messages ..................................................................... 44
Reading cell broadcast messages ................................................... 44
Cell broadcast message filter........................................................... 44
Cell broadcast filter list.....................................................................44
Cell broadcast languages.................................................................45
Voice mail ............................................................................................. 45
Diverting your incoming calls to voice mail ...................................... 45
Storing/changing your voice mail number(s).................................... 45
Retrieving your voice mail ................................................................ 45
Fast dial access to your voice mail .................................................. 45
xi
Page 12

Accessories 46
Currency converter ...............................................................................46
Scheduler.............................................................................................. 47
Making an entry in the scheduler ..................................................... 47
Viewing the scheduled events.......................................................... 47
Scheduler’s option menu .................................................................. 48
ToDo list................................................................................................ 49
Creating a ToDo task ....................................................................... 49
Viewing ToDo task details ................................................................50
ToDo options menu .......................................................................... 50
Calculator.............................................................................................. 51
Games .................................................................................................. 52
Puzzle............................................................................................... 52
UFO..................................................................................................52
Poker ................................................................................................ 53
Thief .................................................................................................53
Belt ................................................................................................... 54
Voice recording/memo 55
Recording a phone call.........................................................................55
Recording a memo ............................................................................... 55
Playback ............................................................................................... 56
Deleting recordings ............................................................................... 56
Voice memo options menu ...................................................................56
Labelling a recording ............................................................................57
e-moción facilities 58
About e-moción..................................................................................... 58
Site (Program) connection service ...................................................58
MMS ................................................................................................. 58
Internet connection...........................................................................58
What can I download ............................................................................ 58
What are Melodies? ......................................................................... 58
What are wallpapers?.......................................................................58
What are animations? ...................................................................... 58
e-moción icons...................................................................................... 59
xii
e-moción quick start..............................................................................59
Access a new e-moción site .............................................................59
Access a stored address .................................................................. 59
Bookmark a page .............................................................................59
Going to a bookmarked page ...........................................................59
Saving a web page ...........................................................................59
Displaying a saved page ..................................................................60
Downloading a melody ..................................................................... 60
Downloading images ........................................................................60
e-moción settings.................................................................................. 60
Ringer time .......................................................................................60
Connection number ..........................................................................61
e-moción lock ...................................................................................61
e-moción menu .....................................................................................62
MoviStar e-moción menu..................................................................62
Mail ...................................................................................................62
SMS..................................................................................................62
Bookmarks........................................................................................63
Go to webpage .................................................................................63
Saved pages.....................................................................................64
Settings.............................................................................................64
Mail menu ............................................................................................. 65
Composing MMS ..............................................................................65
Inbox.................................................................................................67
Sent mail...........................................................................................69
Draft..................................................................................................70
Checking new mail ...........................................................................70
Mail settings......................................................................................70
Back..................................................................................................70
e-moción user settings .......................................................................... 71
Setting time out.................................................................................71
Showing tables .................................................................................71
Loading images ................................................................................71
Wrapping text ...................................................................................71
Sending terminal info ........................................................................71
Checking settings ............................................................................. 72
Back..................................................................................................72
Mail settings ..........................................................................................72
Auto play...........................................................................................72
Auto reception .................................................................................. 72
Checking settings ............................................................................. 72
Back..................................................................................................72
Page 13

Viewer 73
Animation view ..................................................................................... 73
Wallpaper view.....................................................................................73
CLI view................................................................................................ 73
Melody play .......................................................................................... 73
Abbreviations 74
Index 75
xiii
Page 14

Getting Started
Charging the battery
Before trying to use your phone, insert the phone’s battery (see right), connect the NEC battery charger supplied with your phone to a suitable
mains power socket and then connect the charger’s output to the phone’s charger connector (see right). Close the phone and switch on the
mains power to the charger. The LED (see right) will be in Colour 9 (Apple). Leave the phone until the LED goes out. For full information
regarding battery charging, changing and care, see page 9.
2
If the phone does not respond when you first turn the charger on, please wait for 10 to 20 minutes. The charging will then start.
,
DO NOT connect a charger or any other external DC source until the phone’s battery is inserted.
,
Damage may result if you do not press in the charger connector’s side catches when removing it from your phone.
Main Features
Your phone has the following features:
• Dual band (GSM900 and PCN1800)
• 2 Softkeys
• Large display using animated graphics (animated and still graphics can be downloaded)
•
Quick Silent..................................................................................................................................................... See page 5
•
2 Side Keys.....................................................................................................................................................See page 7
•
User mode settings (Normal, Meeting, In Pocket and In Car) ......................................................................See page 12
•
Ring melodies (32 channel harmony ringer) .................................................................................................See page 13
•
Multi-party call capability............................................................................................................................... See page 15
•
Phone record voice recall ............................................................................................................................. See page 15
•
Alternate Line Service (ALS) compatible......................................................................................................See page 17
•
Date, Time & Alarm function.........................................................................................................................See page 19
•
2nd-LCD........................................................................................................................................................ See page 22
•
LED............................................................................................................................................................... See page 22
•
Phonebook(Phone) (can store up to 500 records)........................................................................................ See page 25
•
Phonebook(SIM) (the storable number of record depends on SIM capacity) ...............................................See page 26
•
T9® Text Input............................................................................................................................................... See page 33
•
SMS ..............................................................................................................................................................See page 37
•
Voice mail ..................................................................................................................................................... See page 45
•
Currency converter ....................................................................................................................................... See page 46
•
Scheduler...................................................................................................................................................... See page 47
•
Calculator...................................................................................................................................................... See page 51
• 5 Games ....................................................................................................................................................... See page 52
• Download graphics, CLI picture and ring melodies....................................................................................... See page 58
• e-moción compatible .....................................................................................................................................See page 58
• Viewer ........................................................................................................................................................... See page 73
LED
Charger connector
1
Page 15
Preparing the phone
Before you try to use your phone, check the following has been carried out.
• Valid SIM card inserted (see below)
•
Battery charged (see page 1)
• PIN code entered (if necessary - see page 3)
SIM card
Before using your phone, you must sign-up with one of the digital network Service Providers. In addition to your subscription details you will
receive a personal SIM (Subscriber Identity Module) card which is inserted into your phone.
If the SIM card is removed, the phone becomes unusable until a valid SIM card is fitted. It is possible to transfer your SIM card to another
compatible phone and resume your network subscription. There are two types of SIM cards, plug-in and full-size, and this phone uses the
plug-in type. The screen on your phone will display appropriate messages if no SIM card is fitted.
Inserting a SIM card
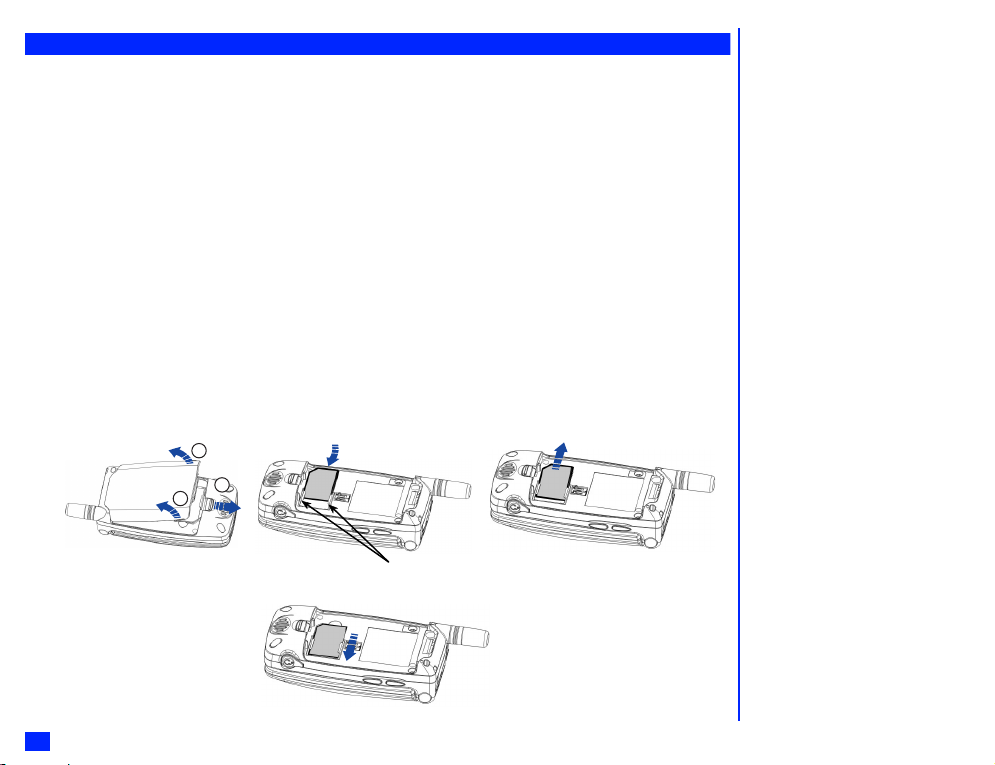
(1) Make sure that the power is off, then remove the battery to reveal the SIM card location.
(2) Slide the SIM card ensuring the gold contacts are face down and the notch on the card lines up as shown. Making absolutely sure
the SIM card is fully inserted, attach the battery.
Removing a SIM card
(3) With the battery removed (see below), remove the SIM card sliding it lightly in the direction of the arrow.
(1) Remove the battery.
2
(2)-1 Insert the SIM card sliding it under
the holders of the both sides.
2
1
(2)-2 Slide the SIM card until it locks.
Holder
(3) Remove the SIM card.
,
If the phone, or the SIM card, is
lost or stolen then you should
contact your Service Provider
immediately in order to bar it from
use.
2
The phone supports a number of
languages and the keyboard
symbols have been chosen for
world-wide operation.
2
The digital technology of your NEC
GSM phone helps to ensure that
your conversations are kept secure.
2
The SIM card contains personal data
such as your electronic phonebook,
messages (see page 37) and also
details of the network services you
have subscribed to. The phone will
not work (except for emergency calls
on some networks) unless a valid
SIM card is fitted.
,
Do not scratch the holders of the
both side when inserting or
removing a SIM card.
,
If the SIM card is not fully inserted
when the battery is replaced,
damage to the SIM card can
occur.
2
If the SIM card is already fitted, see
Start-up on page 3.
2
Page 16
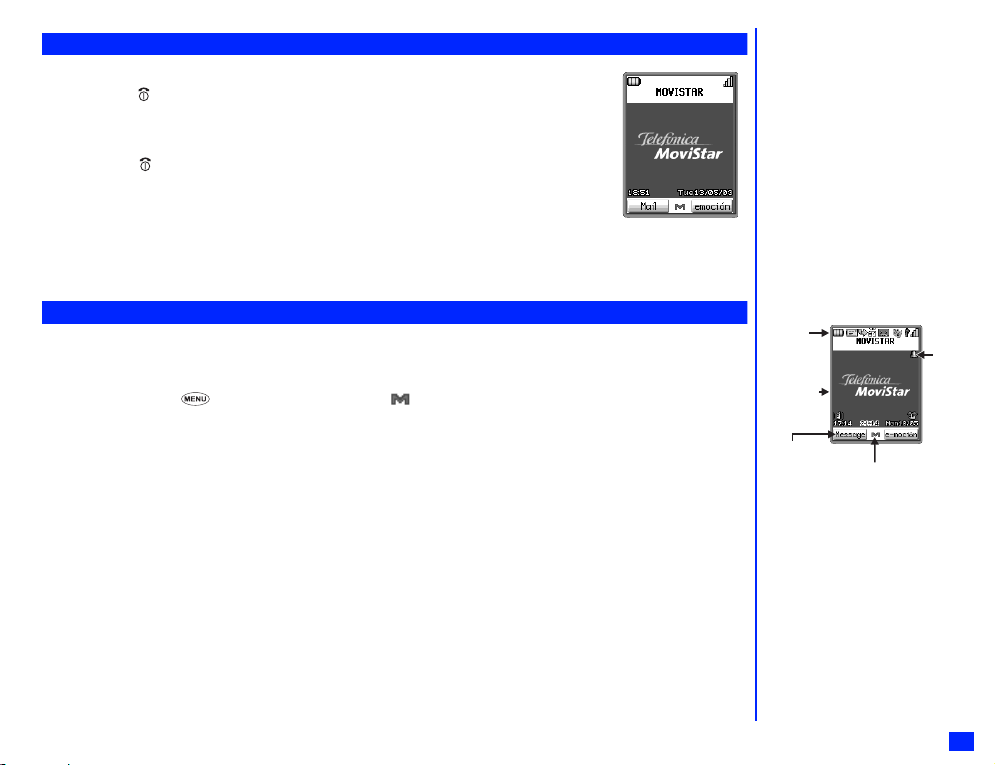
Start-up
A
A
Switching the phone on
☛ Hold down for about a second, to switch the phone on. The screen will either remain blank or display
an animation or greetings text (see page 21 to change the text) and the phone is then in standby.
Switching the phone off
☛
Hold down until the display shows the power down message.
PIN code
The SIM card issued by your service provider has a security feature called PIN code protection. The PIN
(Personal Identification Number) is a number put on to the card by your Service Provider, and is 4 to 8 digits
Standby screen
long. Some service providers supply SIM cards which will cause your phone to prompt for a PIN code when it is
turned on. If this is the case, use the phone’s keypad to enter your code. You can disable this prompt (see
page 35). If you insert a SIM card other than your own, information such as call logs may be lost.
Display information
Graphic display area
This area contains the greeting graphic on power up, status graphics and information when searching for networks and making calls. When
in the standby mode it shows the current network, vibrator status, mode status, current time and date, and whatever you have keyed in with
the phone’s keypad. When
(animated icons and text). Many of the phone’s features are activated using the powerful menu structure (see page 10 on selecting the
phone’s features).
Status Icons
This area contains icons which indicate the battery strength, new short message, call diversion on, new voice mail, GPRS attached, Line
status and Network signal strength.
2nd-LCD
This screen shows the information (clock, status icons or message) when your phone is closed. You can change the display direction of clock
or messages on the 2nd-LCD (for details, see page 22).
LED
There are 12 colours and Gradation for LED. Any of them can be allocated to specific phone numbers so incoming calls from these numbers
can be identified. During charging, it will be in Colour 9 (Apple).
Help & Softkey area
This area can contain help information (e.g. key presses remaining when composing a message) and context sensitive descriptions of the
softkeys’ functions. This area will also display the alarm icon if the alarm is set.
is pressed on the screen on which
icon is displayed, this area displays the phone’s menu options
2
You may need to charge the battery
before using your phone. If the
phone gives no response when
switched on, read the information
about batteries on page 8.
2
The greeting message may not be
as indicated if any locks have been
set or a wrong SIM card has been
inserted. Please follow any
instructions given.
2
Do not remove the battery to switch
your phone off as this may cause
loss of stored information.
Status Icons
Graphic Display
rea
Help & Softkey
rea
MENU icon
Alarm on
icon
3
Page 17
Basic calls & phone use
Making basic calls
You make a simple call in the same way as you would with a normal phone, except that you need to press after entering the phone number
and area STD code. To make international calls you must first enter the international dialling code (see page 11).
Starting a call
☛
Key in the phone number. Check the number on the display.
☛
Press or Softkey 1 to send the call.
☛
To abort the call at any time, press briefly or close your phone. The standby screen will be displayed.
When the call is sent, the screen displays the number called or the name stored in the phonebook (if a name has been stored in memory
along with the number - see page 26) and a connection graphic or a CLI picture that has been allocated to the number called (see page 30).
Correcting mistakes
▼
Use the and
number.
Ending calls
☛
keys to scroll through the number then press CLR to clear individual digits or hold down CLR to completely clear a phone
▼
Press (short press) or Softkey 2 or close your phone. The phone returns to standby.
2
Use the full STD area code even if
you are in the same town. If the
numbers are too long to be displayed
within one line, excess part is
deleted and ‘...’ is added at its end.
2
The phone’s LCD display shows the
strength of the radio signal that links
your phone to the network.
A maximum signal is shown by 4
shaded blocks and a minimum signal
by 1 block.
2
If you do not wish your number to be
displayed on the phone you are
calling, turn the send own number
feature of the line identification
function off (see page 14).
/
See also: “Editing or personalising
phone memory numbers” on
page 27.
2
If is held down, your phone will
turn off.
4
Page 18

Receiving calls
When someone calls your number, the phone’s ringer will sound (if set - see page 21), the LED will flash and the phone number of the person
calling may be displayed in the middle of the screen if the calling line identification (CLI) facility is available and the caller has activated the
feature. If the caller’s phone number has been stored in your phonebook along with a name and a CLI picture (see page 26), that name and
picture will be displayed.
Accepting a call
☛
Press or Softkey 1.
Rejecting a call
☛
Press briefly or Softkey 2 or close your phone.
You also have options for holding calls and diverting calls. These options depend upon your network and your subscription arrangements.
If your phone receives a call and you do not answer it, the screen will display the telephone number (or the name if a stored number) of the
caller (if available). This information is stored in the missed calls list. Up to 10 missed calls are stored in this list. The last 10 incoming calls
are stored in the incoming calls list.
When your phone has received one or more missed calls, the LED will continue to flash until you have opened it (if it was folded) or pressed
any key.
Putting a call on hold
You can put an incoming or outgoing call on hold by pressing Softkey 1. To retrieve the call, press Softkey 1 again.
Quick Silent
When your phone is closed, you can stop the ringing tone or vibration by pressing Side Key during receiving a call or messages, or sounding
alarm (see page 7).
When Quick Silent is active, the Quick Silent icon is displayed on the 2nd-LCD.
Unsuccessful calls
If the call cannot be connected, you will hear a tone. The display will give an appropriate message, and the phone will return to standby.
If your phone is set to Auto redial, the number will be automatically called again after a short delay (see page 16).
If a connection is broken, such as by a poor radio signal, then the phone returns to standby.
2
You can set your phone to answer a
call when any key is pressed - see
“Any key answer” on page 16. If you
are making a call, the phone gives
priority to receiving a call unless you
have already pressed .
/
See Also: “Call waiting and holding”
on page 16 and “Diverting calls” on
page 15.
/
See Also: “Call lists” on page 17.
2
If Side Key Lock is set to ON, you
cannot use Quick Silent function by
pressing the Side Key.
/
See Also: “2nd-LCD and displayed
icons” on page vi.
5
Page 19

Stored numbers
The following numbers are considered to be stored numbers:
• Numbers you have stored yourself
•
The last 10 outgoing call numbers (redial numbers)
• The last 10 incoming call numbers (unless a number was withheld)
•
The last 10 missed call numbers (unless a number was withheld)
Emergency calls
The standard emergency number of 112 can be used.
☛
Key in 1 1 2
☛
Press to connect the call to the local emergency services.
Last number redial
To redial the last number you called:
☛
Ensure the standby screen is displayed and no phone number is shown.
☛
Press twice. The last number you dialled will be called.
Mute
To mute the sound from the mouthpiece:
☛
Press and hold to mute the sound during a call.
☛ Press and hold again to sound.
Displaying your own phone number
☛
Press 6 and 4.
/ See Also: “Storing & retrieving
numbers” on page 25.
/ See Also: “Call lists” on page 17.
2
On some networks, emergency calls
can be made using the 112 number
without a SIM card inserted.
/ See also: “Call lists” on page 17.
2
The mute function is automatically
released after the calling.
2
Also, if you make a call or receive a
call during muting, the mute function
is automatically released.
6
Page 20
Side Key
You can adjust the volume or activate Quick Silent by pressing Side keys.
The following table shows the Side key features.
Fold Open Fold Close
Standby Earpiece volume setting –
Calling Earpiece volume setting Volume setting (with SHF)
Incoming Ringer volume setting Quick Silent
Alarm Alarm volume setting Quick Silent
Adjustment of volume
When your phone is open, you can use Side Key to adjust the volume of your phone.
☛
Press the Side ▲ key to turn the volume up and press the Side
Quick Silent
When your phone is closed, press side keys to stop the ringing tone or vibration during receiving a call or messages. You can also stop alarm.
▼
key to turn the volume down.
☛ Press the Side keys to activate Quick Silent, during receiving a call or SMS messages, or when alarm is sounding.
During Quick Silent is activated, icon is displayed on the 2nd-LCD.
Side Key Lock
When your phone is closed, you can set and cancel the Side Key function. Press and hold down for about a second from the standby
screen.
ON: Enables the Side Key, regardless whether your phone is closed or not.
OFF: Disables the Side Key when your phone is closed.
But, enables them when your phone is open.
When your phone is closed and the Side Key function is set to OFF (Side Key: OFF), icon is displayed on the 2nd-LCD.
The default setting is ON.
To set and cancel the Side Key function again, press and hold down for about a second from the standby screen.
2
If no key is pressed for some time,
the standby screen will be displayed.
2
Hold down the Side ▲ key to keep
turning the volume up to Loud. Hold
down the Side
the volume down to Quiet.
2
When you access an e-moción
session, use the Side
keys to scroll pages.
2
When your phone is closed and the
Side Key function is set to OFF (Side
Key: OFF), you cannot use Quick
Silent function by pressing the Side
Keys.
▼ key to keep turning
▲
and ▼
7
Page 21
Caring for batteries
Standby and talk times
Your phone works closely with the network you are using to provide the services you need, and the standby and talk times achieved will
depend on how you use the phone and choices made by the network operator.
In particular, factors such as your location within the network, the frequency at which this location is updated, the type of SIM card you have,
your reception of area or ‘cell broadcast’ messages and the use of Full Rate or Enhanced Full Rate speech, will affect both standby and talk
times.
,
IMPORTANT BATTERY CHARGING INFORMATION
Charging a very low battery
The battery’s charge continues to drop after the “Charge the battery” warning is displayed. In extreme cases where the battery
is left uncharged for some considerable time after this warning is displayed a trickle charge is used to slowly top-up the battery
to the safe level at which ‘fast charging’ can begin. During this time the charging icon will display but you will not be able to
make or receive a call, or fully power up the phone. Normal operation is resumed once fast charging begins. The phone can be
in trickle charge for a few hours before fast charging starts if the battery is left uncharged for some days after the “Charge the
battery” warning is displayed.
Checking the battery
Check icon at the top of the screen
☛
The block on the display show the charge of your battery pack.
Full battery power Partial battery power Low battery power Battery empty
Low battery alarm
When the battery voltage falls below the working level, “Charge the battery” is displayed on screen along with an empty battery icon.
The phone will automatically power down shortly afterwards.
2
Please charge the battery as much as possible when the battery is very low.
,
DO NOT connect a charger or any
other external DC source if the
phone’s battery is not inserted.
8
Page 22
Changing the battery
Make sure the phone is switched off. Some settings may be lost if the battery is removed while the power is on.
Slide the battery catch towards the base of the phone ➀ and lift the battery out ➁.
☛
Put the new battery pack in the base first then lower it into place ➂.
☛
2
1
2
3
Charging a battery
The charger unit begins to restore the battery power when it is connected to the phone.
Connect the charger plug into the connector at the base of the phone. Check the
☛
charging icon is displayed and the LED is in Colour 9 (Apple).
During charging, screen displays as Fig. 1, the charging icon displays and the LED is in
Colour 9 (Apple) (see Fig. 2). When charging is complete, the charging icon will go out and
the battery icon in full level will be displayed, the LED will go out and trickle charging will
continue. The charging icon will indicate and LED will glow red even when the phone is
switched off during charging.
Switching off the phone is recommended during charging.
If you need to receive calls, your phone can be switched on and left in standby while it is charging, although the total time taken to charge is
then increased.
Your phone is designed to be charged with the NEC equipment listed with the specifications of your phone.
2
If the phone does not respond when you first turn the charger on, please wait for 10 to 20 minutes, the charging will then start.
,
Do not try to charge the battery if the ambient temperature is below 0 °C or above 45 °C
,
Damage may result if you do not press in the charger connector’s side catches when removing it from your phone.
2
If you use the phone during charging, handle the phone carefully since the cable or adapter is connected.
Fig. 2
LED
Charger connector
Charging
icon
Fig. 1
,
Using any battery pack, AC
adapter or Cigar Lighter adapter
(option) not specified by NEC for
use with this phone can be
dangerous and may invalidate any
warranty and approval given to
your phone. Do not connect more
than one charger at any time. Do
not leave the charger connected
to the mains supply when it is not
in use.
9
Page 23
Selecting features
Menu types
With the standby screen displayed, press to display the main menu icons.
The main menu has a set of icons for its top levels of options (examples of the top level are shown right) which
can be selected either using a combination of the 4-way navigation key and Softkey 1 (menu selection), or
just the keypad (fastkey selection).
The main menu icon numbers represent the following options:
1 Service 2 e-moción 3 Messages
4 Call diversion 5 Screen settings 6 Phone settings
7 Security 8 Call lists 9 Call info
Network 0 Phonebook Accessory
Menu selection
When using the icon menu method to select a feature, use the
choice by pressing Softkey 1.
When an option list is displayed, use the
the option, and press Softkey 1.
The currently selected option is normally marked by a ✔ while the highlighted option will be selected if you press Softkey 1.
and ▼ keys to move the option to be under the highlighted bar, or the highlighted bar to be over
▲
Fastkey selection
The alternative ‘fastkey’ method of selection lets you jump straight to a menu or function without highlighting an icon and scrollin g through the
intermediate menu options. The selections are made by pressing numbers on the keypad which relate to the displayed menu’s options.
Fastkey selection examples
Using the fastkey selection method, setting the Any key answer facility on or off would be carried out as follows:
Press 6 and 8.
☛
Using the fastkey selection method, bringing up the Calculator function can be carried out as follows:
Press and 1.
☛
▼
and keys to highlight the required icon and then confirm your
▲ ▼
▼
2
When a main menu icon is
highlighted, the icon graphic will be
animated.
2
Certain menu options are not
accessible during a call. These
options are grayed out.
2
When a ✔ shown over an option
icon, it means this is an On/Off
option which is set to On.
2
The current menu number will be
displayed in the top right-hand
corner of the any menu icon screen.
2
Some menu options will be
inaccessible during a call.
2
Pressing briefly will return you to
the standby screen.
2
The instructions in this user guide
usually make use of the fastkey
method.
2
The final on/off options will also be
selectable using the softkeys. The
options will be displayed in the help
area as appropriate.
10
Page 24
Advanced use
International dialling codes
When you make an international call from any country, you must start by dialling a special international access code. Your phone has the
facility to prefix numbers with a ‘+’ symbol, which saves you entering the access code for the country that you are calling from.
Your phone will automatically dial the correct numbers for each country if you enter the ‘+’ digit as follows:
Entering international dialling codes
With the phone in standby, hold down 0. The ‘0’ character displayed changes to a ‘+’ character.
☛
You can then enter the country code, area code, and phone number that you wish to call. The UK country code is always 44, no matter what
country you are dialling from. For example, a typical UK number of 01189 123456 is entered as:
+ 44 1189 123456
International country area phone
access code code number
Roaming
Roaming allows you to use your phone in many parts of the world and pay all charges through your normal Service Provider. Your network
operator usually has agreements with named networks in other countries. The SIM card fitted in your phone can be supplied so that automatic
roaming can take place with these named networks. The phone also allows you to set network preferences of your own.
When dialling you will need to add the international access codes if required. So storing all numbers with the codes (such as +44 for the UK)
is helpful (see above).
Set automatic or manual network selection
With the standby screen displayed, press and 1. The automatic/manual menu will be displayed with the number for the
☛
currently selected option displayed in green.
Press 1 to select automatic mode or 2 to select manual mode.
☛
View/edit network list
,
Before editing your network list, please consult with your service provider.
With the standby screen displayed, press and 3.
☛
Use the ▲ or
☛
Press the appropriate key to select the required action (see table right).
☛
To move a Network (option 1), use the ▲ and ▼ keys to move its position in the list and press
☛
Softkey 1. To add a new Network (option 2), key in the new Network code and press Softkey 1. To
remove a Network (option 3), press Softkey 1.
key as appropriate until the required network is displayed then press Softkey 1.
▼
Action No.
Move 1
Add 2
Remove 3
2
Before leaving your home country
you should select any preferences
such as call barring or call diverting.
,
You will be charged for calls
forwarded to you while roaming.
2
When your phone is set to manual
mode, you will have to wait while the
phone is searching for networks. If
several network options are found,
▲
or ▼ key to scroll through
use the
the list.
,
Before you manually select a
network, ensure it is covered
under the agreement you have
with your service provider.
11
Page 25
Phone modes
Your phone can be set to operate in one of four modes.
• Normal
•
Meeting
• Pocket
•
Car
How to set the mode
☛ With the standby screen displayed, press the ▲ key. The Mode setting screen is displayed.
☛
How to display the detail of the mode
☛
The detail of the mode
When a mode is selected, some of your phone’s settings will be altered automatically to suit the situation
suggested by the respective mode name. The phone functions altered are as follows:
•
•
▼
▲
Use the
A ✔ will be displayed on the appropriate icon.
With the standby screen displayed, press 6 and 2. The Detailed Mode screen is displayed.
OR
Press Softkey 1 from the Mode setting screen, the Detailed Mode screen is displayed.
The detail of the mode which is currently selected is displayed.
Key tone (on/off)
Ringer (ringer melody)
and ▼ keys to highlight the mode that you want to set, and press Softkey 1.
▼
• Ringer volume
•
Vibrator (on/off)
•
Mail and SMS tone (ringer melody)
• SMS tone volume
•
Service tone (on/off)
•
Auto answer (on/off)
,
Any changes made to these
settings while in a mode will be
stored and used when that mode
is selected again.
12
Page 26
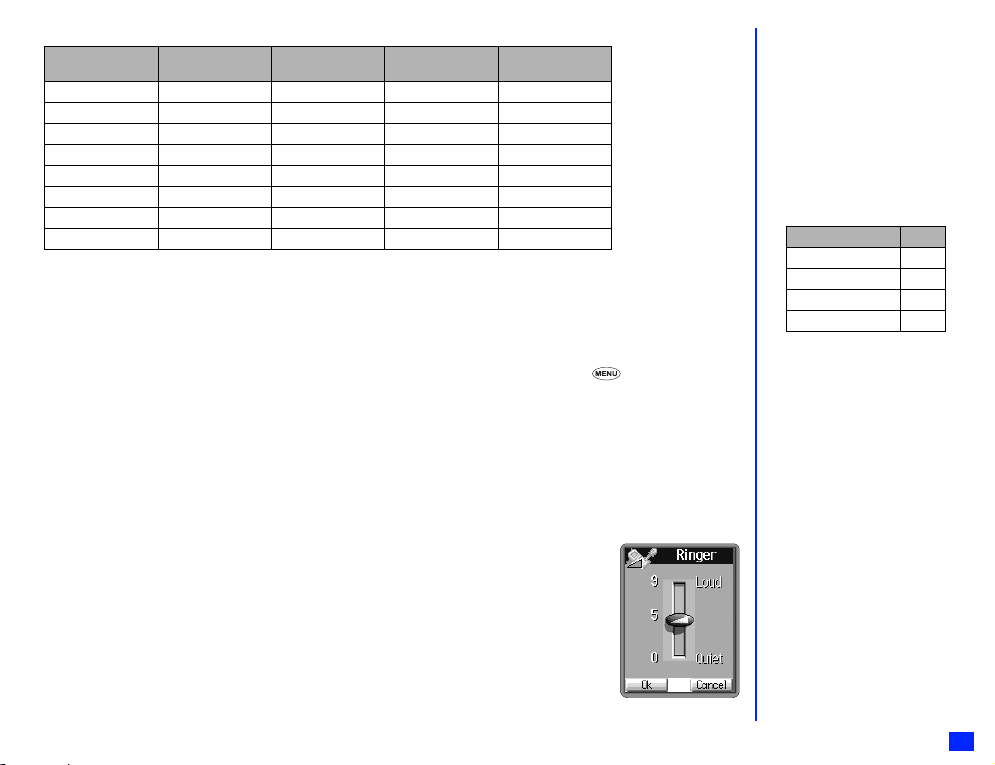
The following table shows the selection keys and default settings for each mode.
Normal
(press ▲ 1)
Key tone On Off On On
Ringer Default melody Default melody Default melody Default melody
Ringer volume Medium Quiet Loud Medium
Vibrator On On On Off
Mail and SMS tone Default melody Default melody Default melody Default melody
SMS tone volume Medium Quiet Loud Medium
Service tone On Off On On
Auto answer Off Off Off On
Changing the Mode settings
To change the settings of a particular mode, use the following procedure.
☛
Press the
▲
key. The phone mode settings menu will be displayed.
Meeting
(press ▲ 2)
Pocket
(press ▲ 3)
Car
(press ▲ 4)
☛ Press the appropriate key for the required mode of which you wish to change the settings (see table right).
☛
When you have selected the required mode, the following setting changes can be made by pressing 6 and 2.
Key tone (1)
☛
Press Softkey 1 to toggle key tones on or off.
Ringer (2)
A selected melody number will turn green.
☛
Use the ▲ and ▼ keys to highlight the required melody and then press Softkey 1.
The volume can be adjusted by pressing side keys.
Ringer volume (3)
The ringer volume slider will be shown on your phone’s display.
☛
Use the Side ▲ and ▼ keys or ▲ and ▼ keys to set the volume to the level required and then
press Softkey 1.
Vibrator (4)
☛ Press Softkey 1 to toggle vibrator on or off.
2
The mode selected when you turn
your phone off will still be selected
when you turn your phone on again.
2
When your SHF is connected, the
volume levels shown on your
phone’s display are for the headset
and will differ from those shown in
the table on the left.
2
When the selected mode is Car, the
only option allowable is ‘Backlight on
always’. This will reduce battery life.
Mode Key
Normal 1
Meeting 2
Pocket 3
Car 4
2
In the on/off functions (e.g. Vibrator),
when you set to ON in the phone
mode setting menu, the option’s
number which is set becomes green.
2
During receiving a call, the ringer
volume can also be adjusted by
pressing side keys.
13
Page 27
Mail and SMS tone (5)
A selected melody number will turn green.
Use the ▲ and ▼ keys to highlight the required melody and then press Softkey 1.
☛
The volume can be adjusted by pressing side keys.
SMS tone volume (6)
The SMS tone volume slider will be shown on your phone’s display.
Use the Side ▲ and ▼ keys or ▲ and ▼ keys to set the volume of SMS tone to the level required and then press Softkey 1.
☛
Service tone (7)
Press Softkey 1 to toggle service tone on or off.
☛
Auto answer (8)
The Auto answer facility will cause an incoming call to be connected automatically only if you are using your phone with the simple hands
free kit.
Press Softkey 1 to toggle auto answer on or off.
☛
Language setting
Your phone can display all its menus and other information in a number of languages. To set the required language, use the following
procedure.
Press 6 and 3. The language menu will be displayed. The icon representing the currently selected language will have a ✔ over
☛
☛
its icon.
Use the
▼
and keys to highlight the required language icon and then press Softkey 1 to select it.
▲ ▼
▼
Line identification
Line identification enables you to choose whether or not to send your own phone number when you make a call and also whether or not to
display a caller’s phone number when you receive a call. To set Line identification, use the following procedure.
Press 6 and 7. The Line identification screen is displayed with a ✔ over an activated line and a ✗ over a deactivated line.
☛
To set the status of each line (see table right), use the ▲ and ▼ keys to select a line (it will turn red when selected).
☛
Press Softkey 1 to toggle between the activated and deactivated state.
☛
Press to save the current settings.
☛
Confirmation window will be displayed if you have made changes and pressed Softkey 2. Press Softkey 1 to enable or Softkey 2 to cancel
to settings.
2
Auto answer will only work if your
phone is working with the simple
hands free kit.
,
The Line identification facility is
network dependent.
Line type Setting
Outgoing
Incoming
Send own
Show connected
Show incoming
Return own
14
Page 28

Multi-party calls
If your SIM card is Multi-party enabled, you can make a conference call to more than one caller. You can even leave the call while the
remaining participants carry on with the call.
When you are on a call while another comes in, press Softkey 1 to put the current call on hold.
☛
Press Softkey 1 to accept the new incoming call.
☛
Press Softkey 2 to merge both calls.
☛
To make a conference call from the call waiting screen press Softkey 2.
☛
To close the conference call press Softkey 2. The standby screen will be displayed.
☛
Voice recall
You can store up to 10 voice recall recordings which can be allocated to a record in your phone memory phonebook. To store a voice recall
sound, see page 29. To use the voice recall function, use the following procedure.
With the standby screen displayed, press and hold .
☛
Within 4 seconds say the word or words you have recorded to identify the record you wish to recall. If the word or words were
☛
recognised, the phonebook contents will be called automatically.
Diverting calls
This facility allows you to divert calls to your phone under the following conditions:
Unconditional • Only if busy • Only if unanswered (No answer time) • Only if unreachable
•
Press and 4. There will be a delay while your phone checks its divert status with your network, then the divert screen will be
☛
displayed.
▼
Use the and keys to move between Speech, Data and Fax if necessary, then use the ▲ and ▼ keys to move between the
☛
above divert conditions.
When the phone number field of a divert condition is highlighted, either enter the phone number to divert to, or delete any existing
☛
phone number.
If you select the No answer time option, use the
☛
time after which the phone will be considered to be unanswered.
Press Softkey 1 to undo any mistakes and then press when the settings are correct.
☛
Confirmation window will be displayed if you have made changes and pressed Softkey 2. Then press Softkey 1 to make settings available
or press Softkey 2 to cancel.
▼
key to enter the No answer time field. Then use the and keys to select a
▼
▼
▼
,
Multi-party call facilities are SIM
card and network dependent.
2
To use Multi-party call facilities,
activate the Call waiting function in
advance.
,
Allow for a short delay while the
network sends the divert status of
your phone. There may be an
additional charge for this service
depending on your network.
15
Page 29

Auto redial
With the Auto redial facility your phone will redial a number 10 times if the first attempt fails. A tone will be heard at each redial attempt. Your
phone cannot connect a call if the other party is busy or if there are network problems. Pressing Softkey 2 during a redial attempt will abort
it. To set redial on or off, use the following procedure.
Press 6 and 5 to activate or deactivate the auto redial facility. A ✔ will be displayed over the icon when the facility is active.
☛
Call waiting and holding
This facility informs you when a call is being made to your phone while an existing call is in progress.
Setting up call waiting
Press 6 and 6. The Call wait menu will be displayed.
☛
Press 1 to activate call waiting, 2 to cancel it, or 3 to check the status of call waiting.
☛
Press Softkey 1 to accept the confirmation. The call waiting screen will be re-displayed. Press Softkey 2 to return to the phone
☛
settings screen.
Using call waiting
If call waiting is activated, you can use the call waiting facility by using the following procedure.
If you are on a call and another comes in, you will be alerted by a beep in the earpiece.
☛
Press Softkey 1 to put the current call on hold and see if you wish to accept the new incoming call.
☛
Press Softkey 1 to accept the incoming call. You will hear beeps in your earpiece and the caller’s phone will now hear the phone
☛
ringing tone.
If you wish to change the call to answer, press Softkey 1.
☛
If you wish to merge calls, press Softkey 2.
If you wish to end the current call, press
When both calls have been ended, the standby screen will be displayed.
☛
Then press Softkey 1 to retrieve the holding call.
.
Any key answer
When this facility is active, you can connect your phone to an incoming call by pressing any key (except , Softkey 2, the ▲ or ▼ key).
When this facility is turned off, you can only connect to an incoming call by pressing or Softkey 1. To set up how you want to answer
incoming calls, use the following procedure.
Press 6 and 8. Press Softkey 1 to activate or deactivate the any key answer facility. A ✔ will be displayed over the icon when
☛
the facility is active.
16
Page 30

ALS setup
If your SIM card supports ALS (Alternate Line Service) you can setup which line to use, or automatic line selection.
Press 6 and 9 then press the appropriate key to select the required setup option (see table right).
☛
When options 1 or 2 are selected the selected option will have a ✔ over its icon while the ✔ on the other option will be removed.
Press Softkey 2 to return to the phone settings menu or to return to the standby screen.
☛
2
When ALS is supported, the connection icon will be replaced with a red icon indicating line 1 is in use or a green icon indicating line 2 is
in use.
Service menu
The service menu allows access to service provider specific services such as horoscopes, etc..
Press and 1. The services available will be listed.
☛
Call lists
There are 3 call lists in your phone’s memory:
•
Missed calls
•
Incoming calls
•
Outgoing calls
These lists contain the last 10 calls of each type. As a new call is added to a list of 10 the oldest is deleted. To display these call lists, use the
following procedure.
☛
Press 8 and 1 to display the missed calls list, 2 for the incoming calls list or 3 for the outgoing calls list.
☛
Use the ▲ and ▼ keys to highlight a number in the list and press . Press 1 to call the number, 2 to store the number in your
phonebook (see page 26 for details on storing a number), 3 to delete one item, 4 to delete all or 5 to display information.
☛
To clear the currently displayed list, press CLR.
Scratchpad number
Your phone has a scratchpad facility that enables you to take down a telephone number during a call, then make a call to it when you have
finished. This scratchpad number can be stored in memory for future use.
Noting & calling a scratchpad number
☛
During a call, key in the number to be placed in the scratchpad. It will be shown on your phone’s screen.
☛ Press when the call is finished. The number will still be displayed. Press . The number displayed will be called.
Setup Option Key
Use Line 1 1
Use Line 2 2
Auto line selection 3
,
ALS facility is network dependent.
,
For details on what is available in
the service menu, contact your
service provider.
2
A quick way to view the incoming
call, missed call and outgoing call
lists from the standby screen is
pressing the key for incoming, the
outgoing. When you use the and
of calls.
2
If you insert a SIM card other than
your own, information such as call
logs may be lost.
2
To redial the last number you called,
press twice.
▼
key for missed, or for
▼
keys, you can display another list
▼
▼
17
Page 31

Storing a scratchpad number
☛
With the scratchpad still displayed, press . The Create Record entry screen will be displayed.
☛ Key in a name associated with the number (see page 33 for the text entry procedure). Use the ▼ key to confirm you have completed
the text entry. The cursor will enter the number entry area.
☛ To store the number in the next available location, press Softkey 1. To store the number in a specific location, key in the location
number required and then press Softkey 1.
☛
If you are entering the number into the phone memory, you will be offered some alternative phone number types to choose from. Press
the appropriate key to select the required phone number type.
Information numbers
Your phone has a menu option which will enable you to access Network and Service provider specific numbers (e.g. Billing enquiries,
Customer care, etc.). This option will only work if you have an appropriate SIM card in your phone.
To access these information numbers, use the following procedure.
☛ Press 0 and 9. A list of available numbers will be displayed.
Phone number editing
Your phone enables you to edit phone numbers in the following circumstances:
• When a number is displayed while in standby . . . . . . . . . . . . . . . . . . . . . . . . . . . . . . . . . . . (standby screen number)
•
When a scratchpad number is displayed while in a call. . . . . . . . . . . . . . . . . . . . . . . . . . . . (standby screen number)
•
During the storage of an own phone number. . . . . . . . . . . . . . . . . . . . . . . . . . . . . . . . . . . . (standby screen number)
• During the entry of a divert-to number . . . . . . . . . . . . . . . . . . . . . . . . . . . . . . . . . . . . . . . . . (divert number)
•
When short message destination number is displayed . . . . . . . . . . . . . . . . . . . . . . . . . . . . (stored number)
•
When your short message service centre number is displayed. . . . . . . . . . . . . . . . . . . . . . (stored number)
•
When a number is displayed while in any of the phonebooks (ADN or FDN) . . . . . . . . . . . (stored number)
•
When a Voice mail number is displayed . . . . . . . . . . . . . . . . . . . . . . . . . . . . . . . . . . . . . . . (stored number)
Editing
A short press of CLR will delete the number to the left of the cursor, a long press will delete the entire number. When a number key is pressed,
it will be inserted at the cursor position.
Entering special characters
Entering a + symbol (for international numbers, see page 11)
Before you can enter a + symbol in a number, the cursor must be at the beginning of a number. To enter a + symbol, press and hold down
0 for about a second.
Entering a pause (for DTMF dialling)
If you want to enter a pause in a number, make sure the conditions in Entering a + symbol above do not apply first and then press and
hold down for about a second.
18
,
Information numbers will only be
available if they are supplied by
your Service provider.
Page 32

Setting up your phone
Time, date & alarm set
Your phone has the ability to store the time and date for two time zones: Home (local time) or World. This information is displayed, in 12 or
24 hour format (see below), on the standby screen and can be used to trigger an alarm. To set the time and date, use the following procedure.
Setting the time
☛
Press 5, 3, 2 and 1 for the Home (local) clock or 5, 3, 2 and 2 for the World clock (remote). The relevant clock set screen
will be displayed.
☛
Key in the time (using the format shown above the time field) and press Softkey 1.
Setting the date
☛
Press 5, 3 and 3. The set date screen will be displayed.
☛
Key in the date (using the format shown above the date field) and press Softkey 1.
Format time
☛
Press 5, 3, 6 and 2. The 12/24 hour menu screen will be displayed. The currently selected option will have a ✔ over its icon.
☛
Press 1 for 24 hour or 2 for 12 hour then press Softkey 2.
Format date
☛
Press 5, 3, 6 and 1. The date format menu screen will be displayed. The currently selected option will have a ✔ over its icon.
☛
Press 1 for European format (dd/mm/yyyy), 2 for American format (mm/dd/yyyy) or 3 for Chinese format (yyyy/mm/dd) then press
Softkey 2.
Show clock
☛
Press 5, 3 and 1. The show clock menu screen will be displayed. The currently selected option will have a ✔ over its icon.
☛
Press 1 for the local clock, 2 for the local and remote clocks or 3 for no clock display.
2
The time is always entered in the 24
hour format even if you wish to
display it in the 12 hour format.
19
Page 33

Setting the alarm
☛ Press 5, 3 and 4. The alarm set screen will be displayed.
☛ Key in the required alarm time using the 24 hour format and press Softkey 1.
☛
Key in the required alarm date (using the format shown on the date field) and press Softkey 1.
☛ Press Softkey 1 to select whether to enable the Alarm Repeat function or not.
☛
Set the volume of alarm.
☛
Using the text entry procedure described on page 33, enter the alarm description and press Softkey 1.
Resetting the alarm
☛
Press 5, 3 and 5. The alarm will be turned off and you will be returned to the clock menu.
Earpiece volume setting
To change the earpiece volume, use the following procedure.
Method 1 (from the standby screen):
☛ With the standby screen displayed, press 6 and 1.
The earpiece volume slider display will be shown on your own display.
☛ Use the Side ▲ and ▼ keys to adjust the settings as required, then press Softkey 1 to select
the current setting.
☛ Press to return to the standby screen.
Method 2 (from the standby screen):
☛
With the standby screen displayed, press the Side ▲ and ▼ keys.
The earpiece volume slider display will be shown on your own display.
☛
Adjust the setting of the volume as required. If no key is pressed for some time, the standby
screen will be displayed.
Method 3 (during a call):
☛
Press the Side ▲ and ▼ keys to adjust the setting of the volume as required.
Fig. 1
Fig. 2
2
When the alarm is set a ✔ will be
displayed over the alarm icon and
the icon will be displayed at the
upper right of the standby screen.
2
When the Repeat function is not set,
the icon will disappear after the
set time comes. When the Repeat
function is set, the icon will
continue to display after the set time
comes and it sounds at every set
time.
2
You can change the alarm volume
by pressing the Side
while the alarm is sounding.
2
If you adjust the volume by pressing
the Side
adjusted volume is applied the next
time.
▲
▲
and ▼ keys, the
and ▼ keys
20
Page 34

Ring melodies
You can set up your ring melody by changing the ringer setting in each mode (see page 13).
Greetings/animations
Four types of greeting screen can be selected as follows.
☛
Press 5 and 1 then press the relevant key to display the required greetings screen (see table right).
☛
If you select option 4 (Edit text), key in the required greetings text (using the text entry method described on page 33) and press
Softkey 1. The greetings menu will be re-displayed.
2
Animation 1 is downloadable (see page 60).
2
You can also select an animation by using Viewer.
Wallpaper
You can choose between 7 pictures to be displayed as a background to the standby screen, as follows.
☛
Press 5 and 2. Use the
1. The wallpaper you selected will be displayed. Press Softkey 1 and then a ✔ will be displayed on the appropriate icon. Press
Softkey 2 to accept the current setting and return to the screen settings menu.
☛
Press to return to the standby screen and the selected screen will be displayed.
▼
▲ ▼
and keys to move the cursor to the wallpaper that you want to select and press Softkey
▼
Colour style
You can select from 8 different colour schemes for your phone’s display, as follows.
☛ Press 5 and 4. The Colour style menu will be displayed with a ✔ on the current selection of the Colour style.
☛
Select the required colour scheme (the screen will change to indicate the highlighted style) and then press Softkey 1. By pressing
CLR or Softkey 2, the Screen settings menu will be re-displayed.
Contrast
To alter the contrast of your phone’s display screen, use the following procedure.
☛
Press 5 and 5. The contrast adjustment screen will be displayed.
☛
Use the ▲ and ▼ keys to adjust the setting as required or press 1 to 9 on the keypad. The contrast will be shown as the setting is
changed.
☛
Press Softkey 1 to select the current setting or CLR to cancel the setting and return to the Screen settings menu.
2
You can also download ring
melodies, see page 60.
Mode Key
Tex t 1
Animation 1, 2 2
No greeting 3
Edit text 4
2
Wallpaper 1-5 are downloadable
(see page 60).
2
You can also select a wallpaper by
using Viewer.
2
You can display other wallpapers by
▲ and ▼ keys when a
using the
wallpaper is displayed.
21
Page 35

Back side settings
2nd-LCD information
This 2nd-LCD screen displays condition of your phone, when the phone is closed. Clock, messages or icons are displayed on 2nd-LCD,
depending on the settings.
Back side settings
☛
Press 5 and 6. The Back side setting screen will be displayed.
(1) 2nd-LCD
2
The default setting is ON.
ON: Enables clock, messages or icons to be displayed on 2nd-LCD.
OFF: Disables clock, messages or icons to be displayed on 2nd-LCD. But, even if you select OFF, 2nd-LCD displays clock or messages
while setting “Set clock type” or “Contrast”.
(2) Fixed clock
ON: Displays only clock on 2nd-LCD.
OFF: Displays clock and messages on 2nd-LCD.
(3) Incoming call no.
ON: Displays the telephone number or the name of the caller (if you have stored it in the phonebook), when you receive a call.
OFF: Displays “Incoming”, irrespective of any information in your phone.
(4) Set clock type
▲
To select the clock type (Digital or Analogue) or display direction (Original or Reverse), use the
press Softkey 1 to select one of them. To end the screen setting, press CLR or Softkey 2.
and ▼ keys to move the highlight, then
• If you select “Digital”, you can set the display direction of clock only.
•
If you select “Analogue”, you can set the display direction of clock and messages.
(5) Contrast
To adjust the contrast of 2nd-LCD, use the
press Softkey 1 to select the current setting or CLR to cancel it.
(6) LED colour
To set the colour of LED, select from the 12 different colours or Gradation (select one of them). You can set the colours for “Incoming
call”, “Message” and “While talking”. You cannot set the colour for “Incoming Call” and “Message” to OFF.
12 different colours 1 Midnight 4 Turquois e 7 Pumpkin 10 Grape
▲
and ▼ keys. You can check that the contrast is changing on 2nd-LCD during setting. Then
2 Skyblue 5 Green apple 8 Orange 11 Peach
3 Blue Hawaii 6 Olive 9 Apple 12 Pearl
2
When you set to ON, the current
setting’s number will become green
(Available for setting of (1) 2nd-LCD,
(2) Fixed clock or (3)Incoming call
no).
2
You can toggle between on and off
by pressing Softkey 1 (Available for
setting of (1) 2nd-LCD, (2) Fixed
clock or (3)Incoming call no).
2
The default setting is OFF.
2
The default setting is ON.
2
The default setting is “Digital”.
22
Page 36

Power Saving
Set the Power Saving function to save consumption of battery power when your phone is open.
Setting the LCD and 2nd-LCD backlight
You can select from 3 levels of power saving; Standard, Saving power1 and Saving power2.
If Saving power2 is set, your phone uses the least consumption of battery power.
☛ Press 6, and 1.
☛
Press 1 to set Standard, 2 to set Saving power1 or 3 to set Saving power2.
Setting the Key backlight
☛
Press 6 and . Use the ▲ and ▼ keys to highlight “Key backlight”, then press Softkey 1 to toggle between on and off.
Restore factory settings
This function will revert your phone to its factory settings.
2
Your phonebooks will be unaffected.
☛
Press 5 and 7.
☛
Press Softkey 1 to confirm or Softkey 2 to cancel the operation.
2
In the Car mode, the level of power
saving is fixed in Standard.
,
By restoring the factory settings,
any changes you have made to
your phone’s set-up will be lost.
Examples of some of these
settings are as follows:
Ringer volume
Ringer type
Mode settings
LED colour
23
Page 37

Call & charge information
Call information
View calls
☛
Press and 9. Then press 1 to display last call information or 2 to display total calls information.
Last call
The last call screen will display the duration of the last call made on your phone. Press Softkey 1 to reset the display to zero or Softkey
2 to return to the call info menu.
Total calls
The total calls screen will display the duration of all calls made from your phone. Press Softkey 1 to reset the display to zero or Softkey
2 to return to the call info menu.
Blacklist
If an outgoing call cannot be connected (e.g. number busy), the Auto redial facility will be offered (if set to On see page 16). If you decide to auto
redial and the call still fails, the number called will be added to the Blacklist. To access the numbers in the Blacklist, use the following procedure.
☛ Press 9 and 4.
Charge information (Advice of charge - AoC)
The AoC feature enables you to view the cost of calls. You can also set a limit in units so your phone cannot be used once the limit is reached.
View total cost of calls (Total charge)
☛
Press 9, 3 and 1. The total cost of calls will be displayed. Press Softkey 2 to return to the charge info menu or Softkey 1 to
reset the display to zero.
Set the call limit (Max charge)
☛
Press 9, 3 and 2. Enter the maximum amount of units allowed and press Softkey 1.
Set currency (Unit price)
☛
Press 9, 3 and 3. The unit price screen will be displayed.
☛ Use the ▲ and ▼ keys to select whether you enter a whole number (integer), a decimal number or a text code.
☛
If you choose to enter a number (either integer or decimal), key in the required value, or if you selected text, use the text entry
procedures (see page 33) to enter the currency type, using a maximum of three characters.
☛
Press Softkey 1.
,
The AoC facility is SIM card and
network dependent.
2
When resetting the total charge
display, you may be requested to
enter your PIN 2 code (see page 36).
2
When setting the call limit, you may
be requested to enter your PIN 2
code (see page 36).
2
When setting the currency, you may
be requested to enter your PIN 2
code (see page 36).
24
Page 38

Storing & retrieving numbers
Phonebooks
Your phone can have up to 3 phonebooks stored on your SIM card and one in your phone memory:
•
Personal directories (ADN) one on SIM card and one in your phone’s memory
•
Fixed dialling numbers (FDN)
•
Service dialling numbers (SDN)
Personal directory (ADN)
These numbers are known as abbreviated dialling numbers (hence ADN). There are two types of ADN, one is the phonebook stored in the
phone memory (the phonebook(Phone)) and the other is the phonebook stored on the SIM card on the SIM card (the phonebook (SIM)).
Phonebook(SIM)
•
Up to 255 personal data can be stored in the SIM card.
• Each personal data contains a phone number and a name only.
Phonebook(Phone)
•
Up to 500 personal data can be stored in your phone memory.
•
Up to 7 phone numbers (Home, Mobile, Work, Data, Fax, Other phone x 2) can be added to each personal data.
• Up to 2 email addresses can be added to each personal data.
•
2 descriptive information fields are allocated to each personal data.
•
Each personal data can be allocated to a group.
•
Up to 10 phone numbers can have a voice recognition recording allocated to them.
•
A Ring tone, LED colour and a phonebook picture can be allocated to each personal data.
Fixed dialling numbers (FDN)
Fixed dialling numbers are a means of limiting which numbers can be called from your phone. With the FDN feature switched on (see
page 35), only numbers you have stored in this phonebook and the emergency number can be called from your phone.
Service dialling numbers (SDN)
The numbers stored in the SDN phonebook are pre-installed by your service provider. They will call numbers and services as agreed with
your supplier (e.g. customer enquiries, billing information, sportslines, weatherlines, etc.) and cannot be edited by you.
You will not be able to see the number which will be dialled, only the associated text title.
2
When viewing any of the directories
described, you can scroll to the other
directories (if your SIM card supports
them) by using .
2
The procedures for storing, calling,
altering and deleting these numbers
are detailed from page 26 onwards.
2
The maximum number of phone
numbers that can be stored on a SIM
card is shared between the ADN,
FDN and SDN directories.
,
Although FDN is supported by
your phone, it must be present on
your SIM card - check with your
service provider.
,
Although SDN is supported by
your phone, it must be present on
your SIM card - check with your
service provider.
25
Page 39

Setting the primary phonebook
Either the phonebook(Phone) or phonebook(SIM) can be set to be the primary phonebook as follows:
☛
Press 0 and 8. The setting menu will be displayed.
☛ Press 1 to set the phonebook(Phone) as the primary phonebook or 2 to set the phonebook(SIM).
Storing numbers & names (Phonebook(Phone), Phonebook(SIM) & FDN)
There are two types of phone number entry screen:
•
Blank
•
Number pre-loaded
Blank entry screen (New storage)
To display a blank entry screen, use the following procedure.
☛ With no number entered into the standby screen, press 0 and 1. The Create Record entry screen will be displayed.
You can store the new entry in the phonebook by entering the name, phonenumber and phone number type.
Storing
☛ With the Create Record entry screen displayed (either blank or pre-loaded) key in the name to be associated with the phone number
you wish to store (see page 33 for text entry details).
If the screen was blank when entered, press the
If the correct number had been pre-loaded, press Softkey 1. The Choose location screen for the primary phonebook, normally the
phonebook(Phone) will be displayed.
☛
If you wish to select between other available phonebooks, press until the required phonebook is displayed at the base of the
screen. If you select the FDN directory you will have to enter your PIN 2 code to continue (for security code details, see page 35).
☛
To store the number in the next available location of the selected phonebook, press Softkey 1. To store the number in a specific
location, key in the location number required. If the location is already in use, you will be prompted to press Softkey 1 to confirm the
replacement.
☛
If you are entering the number into the phonebook(Phone), you will be offered some alternative phone number types to choose from.
Press the appropriate key to select the required phone number type (see table right).
☛
Press Softkey 2 to return to the phonebook menu or to return to the standby screen.
Number pre-loaded entry screen
A number can be pre-loaded into the Create Record entry screen by keying the required number into the standby screen and pressing ,
or by selecting the ‘Phonebook’ option in any call list (see page 17), or by selecting the ‘Phonebook’ option from an incoming message (see
page 39).
▼ key then key in the phone number you wish to store and press Softkey 1.
2
If you have entered the number in
the phone’s memory, you have the
ability to personalise the entry by
allocating a specific ring type, an
LED colour, a phonebook picture,
adding the number to a group, etc.
(see page 27).
2
If the number displayed in the
standby screen is already in your
phonebook when is pressed,
that entry will be displayed.
Phone number type No.
Home 1
Mobile 2
Work 3
Data 4
FAX 5
Spare 1 6
Spare 2 7
2
If you select the FDN directory you
will have to enter your PIN 2 code to
continue (for security code details,
see page 35).
2
It is best to store numbers using the
international number format (see
page 11).
26
Page 40

Recalling stored numbers
The phone numbers in your personal phonebook can be located, then called or edited using one of the following methods. Before that, select
one of the sorting methods to sort your phonebook entries.
Alphabetical list
☛
Press 0, and 1 for alphabetical sorting.
☛ With the standby screen displayed, press or 0 and 2 to display the primary phonebook’s numbers in alphabetical order.
☛
Use the ▲ and ▼ keys as appropriate to scroll through your directory or hold them down to scroll a page at a time. To jump directly
to names starting with a specific character, press the appropriate number key (e.g. press 5 once to jump to names beginning with J
or twice to jump to names beginning with K).
Memory location list
☛
Press 0 and 3. The primary phonebook contents will be displayed in location order (location 1 first).
☛
Use the ▲ and ▼ keys as appropriate to scroll through your directory or hold them down to scroll a page at a time.
Search by group
☛
Press 0 and 4. The list of group names will be displayed.
☛
Use the ▲ and ▼ keys as appropriate to scroll through the list and when the required group name is highlighted, press Softkey 1 to
display the names of the entries in that group.
☛
Use the ▲ and ▼ keys as appropriate to scroll through the names or hold them down to scroll a page at a time.
Editing or personalising phone memory numbers
When the required number or name is highlighted, press Softkey 1 to perform the action described by the function label. Press Softkey 2 to
exit the phonebook and return to the previous screen.
The phone record details enables any phone number stored in the phone’s memory to have additional information and attributes added to it,
and 10 numbers can have a voice recall recording attached to them. This menu allows phonebook entries to be deleted and also copied or
moved between the phonebook(Phone) and phonebook(SIM).
2
To change phonebooks (e.g. from
phonebook(Phone) to
phonebook(SIM)), press .The
entries in the other personal
phonebook will now be displayed.
2
There will be a delay while your
phone scans the phonebook.
2
To set the primary phonebook, see
page 26.
2
To call numbers in the SDN
directory, press until the SDN
directory is displayed and then use
either the scrolling or searching
method to locate and call the
number.
2
When viewing the
phonebook(Phone), use the
keys to display the other number
▼
types within a record (home, mobile,
work, etc.). Each type is identified by
a relevant icon.
▼
and
27
Page 41

Editing phonebook(Phone)
The edit function can be used to alter any of the existing information in a record of phonebook(Phone) and to add the following attributes to
a record:
•
Add further phone numbers (home, work, mobile, etc.)
• Add 2 e-mail addresses
• Add personal information into 2 information fields
•
Allocate the phone number to a group
•
Remove the phone number from a group
•
Add a voice recall recording (10 entries only)
•
Allocate one of the 12 colours LED
•
Allocate a CLI picture
•
Allocate a ring melody
Editing phonebook entries
☛
When any phonebook record is highlighted, the edit menu can be displayed by pressing .
☛ Press the appropriate key to select the required function (see table right).
Add: Create the phonebook. (see page 26)
Edit: Edit the phonebook.
Delete: Delete the phonebook. (see page 31)
Move: Move the phonebook to another location number. (see page 31)
Copy: Copy the phonebook into memory.
Jump to index: Brings up the selected phonebook’s contents.
Empty count: Displays how many empty locations remain in the selected
Editing existing phonebook(Phone) information
☛
With the required phone record’s details displayed in the edit mode, use the ▲ and ▼ keys to highlight the title of the field to be edited
and press Softkey 1. The field’s contents will be displayed.
☛
Make the necessary changes to the selected field (see page 33 for editing procedures) and either press Softkey 1 to save the
changes or the
The phone details will be re-displayed.
phonebook’s memory.
▼
key to enter the field below and make further alterations if required, then press Softkey 1.
Function No.
Add 1
Edit 2
Delete 3
Move 4
Copy 5
Jump to index 6
Empty count 7
2
If you select Home, Mobile or Work
in the edit mode, you can use the
move or copy function by pressing
.
28
Page 42

Adding phone numbers, e-mail addresses & personal information
☛ With the required phone record’s details displayed in the edit mode, use the ▲ and ▼ keys to highlight the title of the field you wish
to add information to and press Softkey 1. The field’s contents will be displayed.
☛ Add the required number or information to the selected field (see page 33 for text entry procedures) and either press Softkey 1 to
save the additions or the
details will be re-displayed.
Creating a group name
There are 20 group headings available to allocate phone numbers to (including ‘No Group’). The groups that can have their names edited
are called group 1 to 19 when your phone first arrives. To change these names to be representative of the phone numbers that are to be
allocated to them, you must change their names as follows:
☛
Press 0 and 5. The list of group names is displayed.
☛
Use the ▲ and ▼ keys to highlight the group name you wish to change and press Softkey 1. The Group name list screen will be
displayed.
☛
Use the text entry procedure (see page 33) to enter the required name and press Softkey 1. The Group name list will be re-displayed.
Either select another group name to alter and repeat the procedure or press Softkey 2 to return to the phonebook menu.
Add a phone record to a group
To make it easier to search for numbers, it is possible to create a group name (see above), e.g. work, golf, family, etc. and then allocate
numbers to the group. To do this, use the following procedure.
☛
With the required phone record’s details displayed in the edit mode, use the ▲ and ▼ keys to highlight the Group field and press
Softkey 1. The Group name list will be displayed.
☛
Use the ▲ and ▼ keys to highlight the group name you wish to select the record to and press Softkey 1. The phone record details
will now be re-displayed.
Remove a phone number from a group
If you wish to remove a number from a group, use the following procedure.
☛
With the required phone record’s details displayed in the edit mode, use the ▲ and ▼ keys to highlight the Group field and press
Softkey 1. The Group name list will be displayed.
☛
Use the ▲ and ▼ keys to highlight ‘No Group’ and press Softkey 1. The phone record details will now be re-displayed.
Add a voice recall recording
Up to 10 records in the phonebook(Phone) can have a 4-second voice recall recording allocated to them so you can display the entry by
saying the recall word(s) into the phone’s mouth piece. To create a voice recall recording, use the following procedure.
☛
Press to enter phonebook(Phone). With the required phone record’s details displayed in the edit mode, use the ▲ and ▼ keys
to highlight the voice field and press Softkey 1. The Voice menu will be displayed.
▼ key to enter the field below and make further additions if required and then press Softkey 1. The phone
2
To use the voice recall facility, see
page 15.
29
Page 43

☛ Press 1. The training screen will be displayed, prompting you to say the word(s) to use as a recall recording.
☛
Speak into the phone’s mouth piece as you would if you were making a call. The recording will be repeated in the earpiece and you
will be prompted to repeat the word(s). If you say the words incorrectly on the second attempt, you will be prompted again.
When you have repeated the words correctly, the phone record details will be re-displayed showing the voice field as ‘Set’.
Playing a voice recall recording
To play a voice recall recording that has been allocated to number, use the following procedure.
☛
With the required phone record’s details displayed in the edit mode, use the ▲ and ▼ keys to highlight the Voice field and press
Softkey 1. The voice menu will be displayed.
☛
Press 2. The voice recall recording for the selected phone record will be played in the phone’s earpiece and the phone record details
will be re-displayed.
Editing/deleting a voice recall record
☛
With the required phone record’s details displayed in the edit mode, use the ▲ and ▼ keys to highlight the Voice field and press
Softkey 1. The voice menu will be displayed.
☛
Press 3. A screen asking you to confirm the deletion will be displayed.
☛
Press Softkey 1 to delete the recording.
Allocate an LED colour
If you wish the LED to flash a certain colour when a particular phone number calls your phone, use the following procedure.
☛
With the required phone record’s details displayed in the edit mode, use the ▲ and ▼ keys to highlight the Arrival LED field and press
Softkey 1. The LED on/off screen will be displayed.
☛
Press Softkey 1. A list of the LED colours will be displayed.
☛
Use the ▲ and ▼ keys to highlight the required LED colour then press Softkey 1 to make your selection. The phone record details
will be re-displayed showing which LED colour has been allocated.
Allocate a CLI picture
To display one of the 20 CLI pictures stored in your phone when a particular phone number calls you, use the following procedure.
☛
With the required phone record’s details displayed in the edit mode, use the ▲ and ▼ keys to highlight the Picture field and press
Softkey 1. The CLI picture on/off screen will be displayed.
☛
Press Softkey 1. The first CLI picture and its title will be displayed.
☛
Use the ▲ and ▼ keys to display the CLI pictures in turn and when the required picture is displayed, press Softkey 1. The phone
record details will be re-displayed showing that a CLI picture has been ‘Set’.
2
Recording the voice in the
phonebook(Phone) enables you to
use the voice recall function (see
page 15).
2
You cannot record the same word.
2
LED flashes in the following case:
• During charging
......Colour 9 (Apple)
2
A CLI picture can be allocated to
more than one phone record.
LED
30
Page 44

Allocate a ring melody
If you wish a specific ring melody to sound when a particular phone number calls your phone, use the following procedure.
☛ With the required phone record’s details displayed in the edit mode, use the ▲ and ▼ keys to highlight the Melody field and press
Softkey 1. The melody on/off screen will be displayed.
☛ Press Softkey 1. The list of melodies will be displayed and the selected melody will sound. The selected melody’s number will become
green.
☛
Use the ▲ and ▼ keys to highlight the required melody (an example of each melody will be played when they are highlighted) and
press Softkey 1. The phone record details will be re-displayed showing the melody title in the melody field.
Editing phonebook(SIM)
The edit function can be used to alter the existing information in the phonebook(SIM) as follows:
☛
When a record in the phonebook(SIM) has been entered for editing purposes, the name field is displayed above the number field.
Press Softkey 1 to enter the edit mode.
☛
Use the text editing facilities (see page 33) to make any changes necessary to the text and then press the
field. Make any changes necessary and press Softkey 1 to save the changes.
Deleting a single phonebook record
☛
When any phonebook record is highlighted, the edit menu can be displayed by pressing .
☛
Press 3. The confirmation screen will be displayed.
☛
Press Softkey 1 to delete the record or Softkey 2 to cancel the action.
Move/copy a record between locations and/or phonebooks
To move or copy a phone record from one location to another within a phonebook or from the phonebook(Phone) to the phonebook(SIM) (or
vice versa), use the following procedure.
☛
When any phonebook record is highlighted, the edit menu can be displayed by pressing .
☛
Press 4 to move a record or 5 to copy it. The enter location screen will be displayed.
☛
To move/copy the record to the new location suggested, press Softkey 1.
To move/copy the record to another location within the same phonebook, key in the location required and press Softkey 1. If the location
is already in use, you will be prompted to press Softkey 1 to confirm the replacement.
To move/copy the record to another phonebook, press until the required phonebook is displayed. The Enter location screen for the
selected phonebook will be displayed. To move/copy the record to the location suggested, press Softkey 1. To move/copy the record to
another location, key in the location required and press Softkey 1. If the location is already in use, you will be prompted to press Softkey
1 to confirm the replacement. The edit menu will be displayed.
☛
Press to return to the standby screen.
▼
key to enter the number
,
If a record is moved/copied from
the phonebook(Phone) to the
phonebook(SIM), the name will be
truncated to the number of
characters allowed by your
phonebook(SIM) and you will be
requested to select which number
in the record you wish to move or
copy.
,
If a record is moved/copied from
the phonebook(SIM) to the
phonebook(Phone), you will be
prompted to enter the phone
number type before the record is
stored (see page 27).
31
Page 45

Package copy
To copy multiple phone records in the phonebook(SIM), to copy a phone number to the phonebook(SIM), or to copy all memory records to
the phonebook(SIM), use the following procedure.
☛ Press 0 and 6. The package copy menu will be displayed.
☛
Press 1 to copy multiple records to the phone memory by location number, 2 to copy first located phone number type to the
phonebook(SIM), or 3 to copy all phone number types to the phonebook(SIM).
☛
If you selected option 1, you will be prompted to enter the location from which the copy will start and the location at which the copy
should end, then to press Softkey 1. If you wish to copy all records, just press Softkey 1. A confirmation screen will be displayed.
Press Softkey 1 to confirm. A status screen will be displayed showing the progress of the copy. When the copy is finished, a
confirmation screen will be displayed. Press Softkey 2 to return to the package copy menu.
If you selected option 2, you will be prompted to enter the location from which the copy will start and the location at which the copy
should end, then to press Softkey 1. A confirmation screen will be displayed. Press Softkey 1 to confirm. A status screen will be
displayed showing the progress of the copy. When the copy is finished, a confirmation screen will be displayed.
Press Softkey 2 to return to the package copy menu.
If you selected option 3, you will be prompted to enter the location from which the record will be copied, then to press Softkey 1. A
confirmation screen will be displayed. Press Softkey 1 to confirm. A status screen will be displayed showing the progress of th e copy.
When the copy is finished, a confirmation screen will be displayed. Press Softkey 2 to return to the package copy menu.
☛ Press to return to the standby screen.
Delete all phone records
To delete all phone records in your phone memory only, use the following procedure.
☛
Press 0 and 7. A deletion confirmation screen will be displayed.
☛
Press Softkey 1 to delete all the phone records, or Softkey 2 to cancel the operation.
,
When records are copied from the
phonebook(Phone) to the
phonebook(SIM), the name will be
truncated to the number of
characters allowed by your SIM
card and, if a single record is
being copied, only the first phone
number in the record will be
stored. If a multiple copy is
carried out to the SIM card, each
number will be allocated a
location.
,
When records are copied from the
phonebook(SIM) to the
phonebook(Phone), it will be
assumed the number is a home
number.
2
The Delete all phone records facility
is not applicable to the SIM card
memory.
32
Page 46

Text entry
This section describes how you enter text (letters, numbers and symbols) in the SMS mode. The same method of text entry can be used in
phonebook editing.
Writing messages
☛
With the standby screen displayed, press 3, 1 and 4. The message entry screen will be displayed.
☛
Press during message creation, the Edit menu will be displayed (see Fig. 1), then you could choose the text entry methods.
®
Press 1 for T9
Press 2 for normal text input (ABC).
Press 3 for numeric input.
Press 4 for Insert object (see table right).
It is available only in the message entry screen.
Press 5 to open the options menu.
Fig. 1
T9® English text input
Your phone incorporates T9® Text Input, enabling fast, easy and intuitive text input. For each letter to be keyed in, you only need to press the
number key once. The screen will display the word you may require based on the internal English dictionary of mobile phone.
English input.
2
Not applicable to text entry in the
e-moción.
Options Key
Quick text 1
Sound 2
Picture 3
Animation 4
Emotion 5
2
The “Insert object” option is
displayed only in the message entry
screen. If you are in other than the
message entry screen, the number
of “Options” is 4.
Typical Text Entry
Screen
Fig. 2
☛
When Fig.1 is displayed, press 1 for T9® English input.
i) For example, to enter “good”, press 4, 6, 6, 3, then press 0
to complete the word. For other functions, see table right.
ii) To enter “Peter is good”:
☛
Press to shift to upper case (for one letter), you will see a
green arrow next to the T9 symbol.
☛
Press 7, 3, 8, 3 and 7 to display “Peter”, then press 0 to
confirm and continue other input.
☛
Press 4 and 7 to display “is”, then press 0 to confirm and
continue other input.
Key Function
0 To complete a word and insert a space.
SK1, SK2 or
▼
or
CLR To delete any particular letter.
To display other matching words (such as home,
gone, hood and etc.).
To place the cursor to the right of the incorrect
▼
character and correct it.
To toggle between lower case, shift (upper case for
one letter) and caps lock (permanent upper case).
To activate symbol mode when no word is
highlighted.
Shift/Caps Lock
Indicator
Fig. 3
Text Entry Mode
Indicator
33
Page 47

☛ Press 4, 6, 6 and 3 to display “good”, then press 0 to confirm and the sentence is completed.
2
☛
For other functions or to display other matching words see the table on page 33.
Normal text input (ABC)
When Fig. 1 on page 33 is displayed, press 2 for normal text
☛
input.
☛
Use number keys to enter letters. For example, to enter “e”,
press 3 twice; to enter “f”, press 3 three times. For other
functions, see table right.
Key Function
To toggle between lower case, shift (upper case for
one letter) and caps lock (permanent upper case).
0 To insert a space.
CLR To delete any particular letter.
▼
To place the cursor to the right of the incorrect
or
▼
character and correct it.
To activate symbol mode.
Numeric input
☛
When Fig. 1 on page 33 is displayed, press 3 for numeric input.
☛
You can press to activate symbol mode.
Keys allocation
Whenever you need to enter text (for short messages, storing names with numbers, etc.), successive presses of a number key will display
different characters. Pressing toggles between lower case, shift (upper case for one letter) and caps lock (permanent upper case).
Whenever a text entry screen is displayed, pressing Softkey 1 enables you to select Normal text input (ABC), T9
input (123).
•
Normal text input (ABC)
•
T9® text input
•
Numeric input
•
Symbol mode
In the symbol mode, each key will display a symbol according to its Candidate page. By pressing the in a text entry mode, the symbol
mode will be turned on. Use the
symbol.
▲
and ▼ keys to select the candidate pages, then press the appropriate number for the required
®
Text input (T9) or Numeric
Edit your own phone number
Press 6 and 4. Your own number will be displayed.
☛
☛
Use CLR to delete individual characters or hold it down to delete all characters and then use the keypad to enter the correct number.
34
Typical Text Entry
Screen
Fig. 1
Fig. 2
2
If you make a mistake, use the
▲
▼
and
keys to place the cursor to
the right of the incorrect character
then press CLR.
2
When entering normal (ABC) text,
and the character you require is
displayed, press the
to the text character position (If you
wait for more than 1 second, the
cursor will move one character to the
right automatically).
If an own number has not been
previously entered a blank screen
will be displayed.
key to move
▼
▼
▼
Page 48

Security
The facilities outlined in this section enable you to protect your phone from improper and unauthorised use.
FDN setting
Press 7 and 7 then press Softkey 1 to turn FDN on or Softkey 2 to turn it off.
☛
2
You may be requested to enter your PIN 2 code to change the FDN setting.
Security codes
You may be required to enter one of the four security codes (shown below). When the phone prompts you for one of these codes, use the
keypad to enter the appropriate number and press Softkey 1.
•
PIN code (provided by your Network to protect your SIM card if it is stolen)
•
PIN 2 code (provided by your Network for AoC and FDN services protection)
•
PUK 1 code (personal unblocking key in case you forget PIN code)
•
PUK 2 code (personal unblocking key in case you forget PIN 2 code)
PIN code
Your phone can be set up so it needs your PIN code entered at power up before the phone can be used at all. If the PIN code is not entered,
not even incoming calls can be answered. If you enter your PIN code incorrectly more than three times (not necessarily in the same session)
not even the correct PIN code will work and you will have to contact your service provider for a PUK 1 code to unblock your SIM card.
☛ Press and 7. The security menu will be displayed.
☛
Press 2 to turn PIN code entry on (activate) and 3 to turn it off (deactivate). You will be prompted to enter your PIN number to confirm
the change.
Changing your PIN code
☛
Press 7 and 1. The PIN change screen will be displayed.
☛ Key in the current code. You will be prompted to enter the new code and then to enter it again as confirmation. A confirmation screen
will be displayed momentarily, then the security screen will be displayed.
/
See also: FDN storage on page 26.
,
The FDN facility is network
dependent.
2
If you forget any of these codes,
ALWAYS contact your service
provider as they are the ONLY
source for your codes.
,
The PIN 2 code is SIM card related
and may only be available from
your service provider.
2
Some SIM cards are set up so that
PIN number entry cannot be turned
off.
35
Page 49

PIN 2 code
Your phone supports advanced feature that may require a PIN 2 code to be entered before they can be accessed or modified. If the PIN 2
code is entered incorrectly 3 times, you will need to contact your service provider for a PUK 2 code.
Changing your PIN 2 code
☛
Press 7 and 4. The PIN 2 change screen will be displayed.
☛ Key in the current code. You will be prompted to enter the new code and then to enter it again as confirmation. A confirmation screen
will be displayed momentarily, then the security screen will be displayed.
Bar calls
This facility allows you to restrict the following types of calls made or received on your phone.
• All outgoing
•
Outgoing international
•
Outgoing international except home
•
All incoming
• All incoming when roaming
☛
Press 7 and 5. There will be a delay while your phone checks its barring status with your network and then the call barring
screen will be displayed.
☛
☛
Confirmation window will appear if you have made changes and pressed Softkey 2. Then press Softkey 1 to m ake settings available or press
Softkey 2 to cancel.
▼
▲
Use the
then press Softkey 1. When a selection has been made, the selected setting will have a red bar over its icon.
When the setting has been made, press , then enter your Network barring password and press Softkey 1.
and ▼ keys to select the type of barring (shown above) and whether it should be for Speech, Data, FAX or SMS,
▼
Bar password
☛
Press 7 and 6 to change your bar password.
☛
Enter current password, then enter new password.
☛
Re-enter new password for confirmation and press Softkey 1.
,
Call barring facilities (barring,
cancelling barring and checking
barring) are network services and
may require a password.
36
Page 50

Messages & voice mail
SMS/EMS overview
Standard messages
Your phone can send and receive SMS or EMS messages. The received messages are stored on the SIM card or in your phone memory.
When you receive a message, your phone will ring, the message icon will be shown on your phone’s display and its LED will flash. When all
messages have been read, the message icon will no longer be displayed and the LED will be switched off.
Your phone will automatically send a message to the service centre when your SIM card memory is full. When the service centre has been
informed that your SIM card is full, the SMS card full icon will be displayed (see below) an error message will be displayed and it will not send
your phone any further messages until your SIM card has some free message space. Your phone will automatically notify the service centre
that there is more space and message reception will resume.
When you send a message, you can attach a receipt request. This will cause the service centre to send you a message indicating whether
your original message was delivered successfully or not.
Message icons
The following icons will be displayed on your phone to inform you of the current message status:
New message on your phone (yellow)
SMS full (red diagonal)
Excess SMS (grey)
SMS menu screen
☛
With the standby screen displayed, press 3 and 1 to display the SMS menu screen.
Press the relevant key(s) according to the screen right.
Inbox: Displays the incoming message list.
Drafts: Displays the draft message list.
Sent: Displays the outgoing message list.
New: Displays the Write screen for creating a message (see page 41).
Status: Displays the Status screen of messages (see page 43).
Settings: Displays the SMS/EMS settings screen (see page 43).
,
The Short Message Service is
network dependent.
2
Please delete the unnecessary
messages in the SMS inbox and
outbox folders from time to time. The
phone cannot receive any SMS
when the SMS folder is full.
2
If there are no messages in the
message list, the item is grayed and
you cannot select it.
2
When you highlight Inbox, Drafts or
Sent on the SMS menu screen, the
and icons are displayed on
the bottom of the screen. The
icon indicates number of opened
messages. The icon indicates
number of unread messages.
37
Page 51

Options menu
☛ Press from the incoming message list, drafts message list or outgoing message list.
The Options menu is displayed. The menu will vary according to whether the message list was
incoming, drafts or outgoing. Press the relevant key(s) according to the table below.
Forward: Forwards the message to a third party.
Delete: Deletes one message (see page 42).
Delete All: Deletes all messages in the list (see page 42).
Sort: Sorts messages in the list by Date, Name or Read/Unread in ascending order or
Reply: Opens the Write screen so you can compose a reply to the sender.
Edit: Edits the message.
Send: Sends the message.
Copy to SIM: Copies the message to SIM card.
descending order.
▲
and ▼ keys to select each button which you desire from By and
Use the
Order and press Softkey 1.
Incoming msg list No.
Forward 1
Delete 2
Delete All 3
Sort 4
Edit 5
Reply 6
Copy to SIM 7
Drafts msg list No.
Forward 1
Delete 2
Delete All 3
Sort 4
Edit 5
Send 6
Copy to SIM 7
Outgoing msg list No.
Forward 1
Delete 2
Delete All 3
Sort 4
Edit 5
Copy to SIM 6
Inbox screen
Sort icon:
Date:
Name:
Read/Unread:
Ascending:
Descending:
Incompleted:
2
Depending on where the message
is stored, the display is changed as
follows:
Storage location
SIM: “Copy to Phone”
Phone: “Copy to SIM”
Storage location
(Phone or SIM)
38
Page 52

Reading messages
To display incoming messages, press 1 from the SMS menu screen.
☛
To display draft messages, press 2 from the SMS menu screen.
To display outgoing messages, press 3 from the SMS menu screen.
Use the ▲ and ▼ keys, if necessary, to scroll through the message list then press Softkey 1 to read the required message.
☛
If the message cannot be displayed in one page, use the ▲ and ▼ keys as necessary to scroll through the message.
☛
Press from the message to go to the options menu (see below).
☛
Press CLR to return to the message list or press Softkey 1 to view the previous message or press Softkey 2 to view the next
☛
message.
Options menu
To access the functions available in this menu, press while viewing a message. The menu will vary according to whether the message
was incoming, draft or outgoing:
Incoming messages
Press the relevant key(s) according to the table right.
☛
Forward: Forwards the message to a third party.
Delete: Deletes the message.
Copy: Allows you to copy the selected text message into your phone memory, and then
Edit: Edits the message.
Phonebook: Prompts you to enter the sender’s phone number into your phonebook.
Reply: Opens the Write screen so you can compose a reply to the sender.
Save object: Saves the object in the message.
you can paste back into a message entry screen, as follows:
See paste function on page 40.
Press Softkey 1 (“Off”). Use the
☛
the beginning of the required text and press Softkey 1 (“On”).
Use the
☛
2. The text will be stored.
When in message entry screen, press 7 to enter the option list, then
☛
press 6 to paste text (see page 40). The selected text will be inserted on the message entry screen.
Objects that you can save are as follows:
Sound, Picture, Animation.
▼
and keys to highlight the required text and press Softkey
▲ ▼
▼
▼
and keys to move the cursor to
▲ ▼
▼
Incoming Function Key
Forward 1
Delete 2
Copy 3
Edit 4
Phonebook 5
Reply 6
Save object 7
2
The unread message is displayed in
bold font.
2
If you wish the network to provide
you with a receipt report regarding
the delivery of the message, ensure
the receipt request option is set to
‘on’ before you send the message
(see page 43).
2
The reply facility uses the phone
number of the person who sent the
message.
2
You can use Save object function
only when there are some objects in
the message.
Save object:
2
▼
and
Use the
the phone number or URL in the
message. Then press and
select the desired function.
Phone number:1. Dial number
URL: 1. Add to Favorite
2. Go to URL
keys to highlight
▼
2. Phonebook
3. Create SMS
39
Page 53

Draft messages
Press the relevant key(s) according to the table right.
☛
Forward: Forwards the message to a third party.
Delete: Deletes the message.
Copy: Allows you to copy the selected text message into your phone memory, and then
Edit: Edits the sent message.
Send: Sends or saves the message.
Save object: Saves the object in the message.
Outgoing messages
Press the relevant key(s) according to the table right.
☛
Forward: Forwards the message to a third party.
Delete: Deletes the message.
Copy: Allows you to copy the selected text message into your phone memory, and then
Edit: Edits the sent message.
Save object: Saves the object in the message.
you can paste back into a message entry screen.
See Incoming messages’ copy function on page 39 for the procedures.
Objects that you can save are as follows:
Sound, Picture, Animation.
you can paste back into a message entry screen.
See Incoming messages’ copy function on page 39 for the procedures.
Objects that you can save are as follows:
Sound, Picture, Animation.
Draft Function Key
Forward 1
Delete 2
Copy 3
Edit 4
Send 5
Save object 6
Outgoing Function Key
Forward 1
Delete 2
Copy 3
Edit 4
Save object 5
2
You can use Save object function
only when there are some objects in
the message.
2
You can use Save object function
only when there are some objects in
the message.
40
Page 54

Creating a short message
To create a short message, use the following procedure.
With the standby screen displayed, press 3, 1 and 4. The message entry screen will be
☛
displayed.
Enter your message using the procedure detailed from page 33 to page 34.
☛
If you press at any time during message creation, the Edit menu will be displayed.
☛
Press the relevant key(s) according to the table right.
T9: T9 text entry
ABC: Normal text entry
123: Numeric entry
Insert object: Inserts object entry
Options: Opens the options menu.
Option menu functions
Text colour: Selects the colour of text and background.
Text format: Selects the font size (Normal, Large or Small) and font style (Bold, Italics,
Text alignment: Sets the text alignment (Left, Centred or Right). Use the
Highlight mode: Sets the highlight mode. Places the cursor at the beginning or the end of the
Edit settings: Sets the write mode (Insert or Overwrite) and Clear mode (Backspace or Delete).
Paste: Pastes the text which is copied into memory. See copy function on page 39.
▼
Use the
will be displayed on the appropriate icon.
Underline or Strikethrough). Use the and
the
▲
highlight the text alignment and press Softkey 1.
text and use the and
highlight mode to toggle between On and Off.
Press CLR to back to the normal mode.
Use the
and
▲
and ▼ keys to highlight the font style and press Softkey 1.
and ▼ keys to highlight the mode and press Softkey 1.
▲
keys to select the colour and press Softkey 1. A ✔
▼
▼
▼
keys to select the font size. Use
▼
▼
keys to highlight the text. Press Softkey 1 in the
▼
and ▼ keys to
▲
Edit Key
T9 1
ABC 2
123 3
Insert object 4
Options 5
Edit Key
Text colour 1
Tex t f orma t 2
Text alignment 3
Highlight mode 4
Edit settings 5
Paste 6
2
When you are in the ABC (normal
text) mode, any word entered that is
not in the T9 dictionary will be added
automatically.
2
If you select Text colour, Text format,
Text alignment or Insert object, SMS
changes to EMS.
2
If you display another screen while
you are editing a message more
than 1 character, the message will
be saved automatically as the draft
message (see page 37).
41
Page 55

When you have created your message, press Softkey 1. The message destination list will be displayed.
☛
Press 1 to open the Auto redial list, 2 to select a number from the phonebook, or 3 to manually input the destination number.
☛
When you have selected or entered the phone number you wish to send the message to, press Softkey 1. The send message menu
☛
will be displayed.
Press 1 to send the message or 2 to save the message.
☛
While a message is being sent , a name, number and a CLI picture will be displayed (if a name and CLI picture have been stored
☛
against the number in your phonebook(Phone)). If there is no name or CLI picture stored against the phone number you are sending
the message to, the number and a graphic will be displayed until the message has been sent and you get a confirmation message
displayed.
Deleting a message
To delete a message or all messages in the list, use the following procedure.
With the standby screen displayed, press 3 and 1.
☛
Press 1 to display the incoming message list, press 2 to display the draft message list or 3 to display the outgoing message list. The
☛
selected message list will be displayed.
Use the ▲ and ▼ keys to highlight the required message and press .
☛
Press 2 to go to Delete confirmation screen and then press Softkey 1. If you cancel the deletion, press Softkey 2.
☛
If you want to delete all messages in the list, press 3 to go to Delete all confirmation screen and then press Softkey 1.
☛
If you cancel the deletion, press Softkey 2.
To delete a message while reading it, use the following procedure.
With the standby screen displayed, press 3 and 1.
☛
Press 1 to display the incoming message list, press 2 to display the draft message list or 3 to display the outgoing message list. The
☛
selected message list will be displayed.
Use the ▲ and ▼ keys to highlight the required message and then press Softkey 1.
☛
Press . Press 2 to go to Delete confirmation screen and then press Softkey 1.
☛
If you cancel the deletion, press Softkey 2.
2
If you receive a call while you are
creating a message, the message
will be saved automatically for you to
complete later.
2
If there is no space left in your SIM
card to store the message, the
message cannot be stored.
42
Page 56

Status
Press 3 and 1 from the standby screen and press 5. The Status screen will be displayed.
☛
You can check the status of messages, as follows:
Total Msgs
•
Completed
•
Incompleted
•
SMS in SIM (SIM dependent)
•
Free in SIM (SIM dependent)
•
SMS in Phone
•
Free in Phone
•
Message setup
With the standby screen displayed, press 3, 1 and 6. The SMS/EMS settings screen will be displayed.
☛
SMS centre
Press 1 and enter the relevant number or edit the existing one. Then press Softkey 1.
☛
Options
Press 2 to display the options menu.
☛
Press 1 from the options menu to set Receipt request. Use the ▲ and ▼ keys to select On or
☛
Off and press Softkey 1. Then press Softkey 2.
Press 2 from the options menu to set Valid time (Validity period). Use the ▲ and ▼ keys to select
☛
the period (12 hours, 1 day, 1 week, 1 month or Max time) and press Softkey 1. Then press
Softkey 2.
Max linked msg
Press 3 and enter the number of max linked messages. Then press Softkey 1.
☛
Filter options
Press 4. Filter options screen is displayed. This option allows the user to filter messages in the Inbox, Draft and Sent folders based
☛
on their storage location. Use the
Softkey 1. Then press Softkey 2.
Voice mail number
To set up your Voice mail centre’s number, use the following procedure.
Press 3, 2 and 1. The Voice Mail number screen will be displayed.
☛
and ▼ keys to select SIM, Phone, Both (SIM & Phone), Complete or Incomplete and press
▲
SMS/EMS settings Key
SMS centre 1
Options 2
Max linked msg 3
Filter options 4
2
When this option is set to “On”, the
network will be requested to send
the phone the status of outgoing
SMS messages.
2
This option set how long messages
are kept on the network.
2
The setting range is from 1 to 10.
2
SIM: Displays only messages stored
in the SIM card.
Phone: Displays only messages
stored in the Phone.
Both: Displays all messages stored
in the SIM card and Phone.
Complete: Displays the messages
that you can read
successfully.
Incomplete: Displays the messages
that you cannot read
successfully.
43
Page 57

Enter the relevant number or edit the existing one and press Softkey 1.
☛
Delete voice mail icon
If your network does not turn off your voice mail icon automatically when you have listened to all your messages, use the following procedure.
Press 3, 2 and 2 to turn your voice mail icon off manually.
☛
Cell broadcast messages
These messages (e.g. weather reports, news) are sent by the network to all phones in a certain area. This service is network dependent.
Please contact your service provider for details.
Reading cell broadcast messages
Press 3, 3 and 1. The message will be displayed.
☛
Use the ▲ and ▼ keys to scroll through the message.
☛
Press Softkey 1 when you have read the message. The cell broadcast menu will be re-displayed.
☛
Cell broadcast message filter
The message filter gives you the following choices:
All (receives all cell broadcast messages)
•
None (receives no cell broadcast messages)
•
List (receives only cell broadcast message types from the filter list)
•
To set the filter, use the following procedure.
Press 3, 3 and 2. The filter menu will be displayed.
☛
Press 1 to receive all cell broadcast messages, 2 to receive none and 3 to manage the filter list or change the broadcast channel (see
☛
below).
When you have made your selection (and altered the filter list if applicable), the chosen option icon will have a ✔ over it.
☛
Press Softkey 2 to return to the cell broadcast main menu.
☛
Cell broadcast filter list
To add to or edit the broadcast channel of the filter list, use the following procedure.
Press 3, 3, 2 and 3. The cell broadcast message filter list will be displayed. If there are no cell broadcast message type codes
☛
in the list, you will be prompted to add one (please contact your service provider). Press Softkey 1 and 1, key in the broadcast channel
code and press Softkey 1 again.
,
The Delete voice mail icon facility
is network dependent.
2
The default setting is All.
,
For information regarding cell
broadcast message codes,
contact your service provider.
2
If there are no more codes in the list
when you delete a code, you will be
prompted to enter another code.
44
Page 58

☛ With the filter list displayed, either press Softkey 2 to accept its contents and return to the main menu or use the ▲ and ▼ keys to
highlight a cell broadcast message code and press Softkey 1 and 2 to delete the highlighted filter code.
Cell broadcast languages
To set the language of your cell broadcast messages, use the following procedure.
☛ Press 3, 3 and 3. The selected cell broadcast message language list number will turn green.
☛
Use the ▲ and ▼ keys to select the required language and press Softkey 1.
☛
Press Softkey 2. The cell broadcast main menu will be displayed.
Voice mail
Your phone supports voice mail, allowing incoming calls to be diverted to the voice mail service provided by your network.
When you are called, your current divert settings will dictate if the call is diverted to your voice mail mailbox. The network will send you a signal
informing you that you have voice mail waiting. You can then call your voice mail centre and listen to your message(s).
Diverting your incoming calls to voice mail
Divert your call in the normal way (see page 15) but enter your voice mail service centre number as the number to divert the call to.
Storing/changing your voice mail number(s)
Before you can use the voice mail retrieval menu option you must store your voice mail retrieval number (see page 43).
,
The above option is SIM card dependent.
Retrieving your voice mail
To retrieve your voice mail, use the following procedure.
☛
Press and 3. Then press 4 to be connected to your voice mail centre on line 1 or 5 to be connected to your voice mail centre
on line 2 (ALS active).
Fast dial access to your voice mail
☛ Press and hold 1 to access your voice mail (in a GSM network, this will only work if you have a number stored in voice mail 1 - see
page 43).
,
The number of broadcast
languages which can be selected
simultaneously varies depending
on your SIM card. A warning
message appears if more
broadcast languages than
allowed are selected and an
attempt is made to apply them.
,
The Voice Mail facility is network
dependent.
,
Contact your Service Provider for
details of your voice mail number
and any other options associated
with this facility.
2
You can also store your voice mail
number in your phonebook with
names. This means that when you
retrieve your voice mail, the stored
name will be displayed on your
phone.
45
Page 59

Accessories
Currency converter
This facility allows you to convert an amount of money from a source currency into the equivalent amount in any one of 42 other country or
Regions’ currencies.
To convert an amount of money from one currency to another, use the following procedure.
☛
Press and 2. The currency converter screen will be displayed.
☛
Use the ▼ key. The source currency code will be highlighted.
To change the source currency, use the and
currency list then use the
currency.
▲
and
☛ Use the ▼ key. The destination currency code will be highlighted.
To change the destination currency, use the and
the currency list then use the
current currency.
☛ Use the ▼ key. The exchange rate will be highlighted.
If you wish to change the exchange rate, delete (using the CLR key) and insert numbers (using the keypad - press for a decimal
point) as required. To clear the rate in order to re-enter it completely, press Softkey 2.
☛
☛
☛
▼
Use the
key. The money field will be highlighted.
Use the keypad to enter the amount of money you wish to convert (press for a d ecimal point) and press Softkey 1. The resulting
conversion will be shown in the result field and the current settings will be stored.
If you make a mistake while entering the amount, use CLR to delete individual num bers or press Softkey 2 to clear the entire amount
and start again.
To convert another amount with the same settings, enter the new amount and press Softkey 1.
To start again with different settings, use the
To reset all the currencies to their initial values, press and 2.
To exit the currency converter, briefly press . The standby screen will be displayed.
▼
keys to scroll through the currency codes or press and 1 to bring up the
▼
keys to highlight the required currency and press Softkey 1. A ✔ will be displayed on the current
▲ and ▼ keys to highlight the required currency and press Softkey 1. A ✔ will be displayed on the
▼
▼
keys to scroll through the currency codes or press and 1 to bring up
▼
▼
key.
46
Page 60

Scheduler
The scheduler allows you to enter reminders and appointments for particular times and dates.
Making an entry in the scheduler
☛ Press and 3. The scheduler will be displayed, showing either a weekly or monthly view (according to how the scheduler
was left when it was last used) with today’s date highlighted.
☛ Press Softkey 1. The day’s schedule list screen (if any) will be displayed.
☛
Press and 2 to display the schedule entry screen.
☛
Press Softkey 2 to set the date of the scheduled event. Use the keypad to enter the year for the scheduled event (if necessary), then
use the
▼
key to enter Month field.
☛
Use the keypad to enter the month for the scheduled event (if necessary), then press the ▼ key to enter Date field.
☛ Use the keypad to enter the date for the scheduled event (if necessary), then press the ▼ key to enter Time field.
☛
Key in the time of the scheduled event and press Softkey 1. You will be returned to the schedule entry screen.
☛
Press the
▼
key to highlight the description field and press Softkey 2. The description entry screen will be displayed.
☛ Use the normal text entry procedures (see page 33) to enter a description of the scheduled event, then press Softkey 1. The schedule
entry screen will be displayed. If the schedule information is now complete, press Softkey 1. If there are no schedule clashes, you
will be returned to the schedule list screen.
☛
Press Softkey 2 to return to the weekly or monthly schedule display or briefly press to return you to the standby screen.
Viewing the scheduled events
☛
Press and 3. The scheduler will be displayed, showing either a weekly or monthly view (according to how the scheduler
was left when it was last used) with today’s date highlighted.
☛
Use the ▲ and ▼ keys to display the last or next week or month respectively if necessary, and use the and keys to display the
previous or next day respectively until the required date is highlighted.
☛
Press Softkey 1. The highlighted day’s schedules (if any) will be displayed. Use the ▲ and ▼ keys to highlight the required
scheduled event and press Softkey 1. The selected scheduled event will be displayed.
To edit the displayed scheduled event, press Softkey 1.
To delete the displayed scheduled event, press CLR. The delete confirmation screen will be displayed. Press Softkey 1 to delete the
event or Softkey 2 to return to the event details screen.
To display the scheduler’s option menu, press (see page 48).
▼
▼
☛ Press Softkey 2 to return to the weekly or monthly schedule display or briefly press to return you to the standby screen.
Fig. 1
2
Only the 24 hour format can be used
for time entry for a scheduled event.
2
If there is already an identical
schedule stored, you will be
informed and returned to the time
and date screen.
47
Page 61

Scheduler’s option menu
The scheduler’s options menu allows you to add, edit, copy, delete and view the status of scheduled events as follows:
☛ Press and 3. The scheduler will be displayed, showing either a weekly or monthly view (according to how the scheduler
was left when it was last used) with today’s date highlighted.
☛ Use the ▲ and ▼ keys to display the last or next week or month respectively if necessary, and use the and keys to display the
previous or next day respectively until the required date is highlighted. Then press Softkey 1. The day’s schedules (if any) will be
displayed.
☛
Use the ▲ and ▼ keys to highlight the required scheduled event and press . The scheduler’s option menu will be displayed.
Key in the appropriate number to select the required option (see table right) or use the
and press Softkey 1.
Home
This option, if selected when viewing the calendar, will return you to today’s date in the weekly or monthly calendar display. If this
option is selected when viewing a day’s schedule list, it will return you to the first schedule in today’s list.
Add
This option allows you to add a scheduled event based on the scheduled event highlighted when the option menu was entered, if
applicable (see the fourth step of Making an entry in the scheduler on page 47).
Edit
This option allows you to edit the scheduled event that was highlighted when the option menu was entered, if applicable (see the
fourth step of Making an entry in the scheduler on page 47).
Delete
Selecting this option will delete the scheduled event that was highlighted when the option menu was entered, if applicable.
Delete all
Selecting this option causes a warning screen to be displayed to confirm the deletion. Press Softkey 1 to delete all scheduled events
and return to the weekly or monthly schedule display screen.
Status
This option shows how many scheduled events there are. It also displays how many more scheduled events can be created.
Delete today
This option allows you to delete all scheduled events for the selected day. The confirmation screen will be displayed. Press Softkey
1 to confirm the deletion. The weekly or monthly schedule display screen will be displayed.
Delete previous days
This option allows you to delete all scheduled events prior to the day that was selected when the options menu was displayed, or the
current date if the options menu was selected from the weekly or monthly display. Press Softkey 1 to confirm the deletion.
The weekly/monthly schedule display screen will be displayed.
▲
or ▼ key to highlight the required option
▼
▼
Option No.
Home 1
Add 2
Edit 3
Delete 4
Delete all 5
Status 6
Delete today 7
Delete previous days 8
Copy 9
48
Page 62

Copy
This option allows you to copy the contents of a scheduled event. The time and date setting screen will be displayed. Carry out the
procedures as from the fifth step of Making an entry in the scheduler on page 47. All the other scheduled event’s details will also be
available for change.
☛
Press CLR or Softkey 2 to return to the weekly or monthly schedule display, or briefly press to return you to the standby screen.
ToDo list
This feature allows you to set up to 100 ToDo tasks that should be finished by a certain date. You can choose to display all ToDo tasks, or
just finished or unfinished ToDo tasks. Each task is identified by a description (of up to 32 characters) and its start due date.
Creating a ToDo task
☛ Press and 4. The list of stored tasks (if any) is displayed.
☛
If there are no ToDo tasks listed, press Softkey 1. The ToDo entry screen will
be displayed showing the Start date (the current date - highlighted), Due da te
(the current date) and status (Unfinished).
☛ If you wish to change the Start date from the current date, press Softkey 2.
The enter start date screen will be displayed. Key in the required year, month
and date. When the contents of a field is correct, use the
next field.
When the Start date has been entered, press Softkey 1. The ToDo entry
screen will again be displayed.
☛
☛
☛
☛
▼
Use the
key to highlight the due date field.
If you wish to accept the current date as the Due date, use the ▼ key. This date will be stored and the Status field will be highlighted.
If you wish to change the Due date from the current date, press Softkey 2. The enter due date screen will be displayed. Key in the
required year, month and date. When the contents of a field is correct, use the
When the Due date has been entered, press Softkey 1. The ToDo entry screen will again be displayed.
▼
Use the
key to highlight the finished/unfinished field then press Softkey 2 only if you wish to change the current state.
▼
Use the
key and then press Softkey 2 to display the ToDo task description entry screen. Use the normal text entry methods (see
page 33 for text entry methods) to enter a description of up to 32 characters for the ToDo task. When you have entered the required
text, press Softkey 1. The ToDo list screen will be displayed. Press Softkey 2 to return to the Accessories menu or briefly press
to return to the standby screen.
▼
key to go to the
Start date
Due date
Status (Unfinished)
ToDo task description
▼
key to go to the next field.
2
If there are no ToDo tasks stored,
you will be prompted to create one.
2
If there are no ToDo tasks listed,
press and 1 to edit.
2
The type of ToDo task displayed in
the list will depend on the setting of
the display filter (see page 51).
2
If an invalid date is entered, an error
screen will be displayed and then
the previous date entry screen will
be redisplayed.
49
Page 63

Viewing ToDo task details
☛ Press and 4. The list of stored tasks is displayed.
☛
Use the ▲ and ▼ keys to highlight the required ToDo task and press Softkey 1. The selected ToDo task’s start date, due date,
Status (finished or unfinished) and description will be displayed.
To view the details of the previous or next ToDo task in the list, use the
To edit the currently displayed task, press Softkey 1.
To delete the currently displayed task, press CLR.
To view the options menu press (see below for details of the options menu).
☛
Press Softkey 2 to return to the ToDo task list or briefly press to return to the standby screen.
ToDo options menu
The ToDo options menu allows you to add, edit, delete individual ToDo tasks, delete all ToDo tasks, view the overall ToDo status, change
the status of ToDo tasks, delete finished ToDo tasks, and view ToDo tasks by some filters. To use the ToDo options menu, use the following
procedure.
☛
Press and 4. Use the ▲ and ▼ keys to highlight the required ToDo task and press . The ToDo options menu will be
displayed.
☛
Key in the appropriate number to select the required option (see table right) or use the ▲ and ▼ keys to highlight an option and press
Softkey 1.
Add
This option allows you to add a ToDo task based on the ToDo task highlighted when the option menu was entered (see the second
step of Creating a ToDo task on page 49).
Edit
This option allows you to edit the ToDo task that was highlighted when the option menu was entered (see the second step of Creating
a ToDo task on page 49).
Delete
Selecting this option will delete the ToDo task that was highlighted when the option menu was entered.
Delete all
Selecting this option causes a warning screen to be displayed to confirm the deletion. Press Softkey 1 to delete all ToDo tasks and
return to the Accessories menu.
Status
This option shows the current number of unfinished and finished tasks there are, and how many more tasks can be created.
Finished
This option changes the status of the selected ToDo task from finished to unfinished or vice versa.
▲
and ▼ keys.
Option No.
Add 1
Edit 2
Delete 3
Delete all 4
Status 5
Finished 6
Delete finished 7
Display filter 8
,
If you select the delete option, the
selected ToDo task will be deleted
immediately. No warning is given.
50
Page 64

Delete finished
When selected this option will display a prompt that requires you to confirm that all finished ToDo tasks will be deleted. Press Softkey
1 to delete all finished ToDo tasks or Softkey 2 to cancel. Whichever option is selected, you will be returned to the ToDo list.
Display filter
This option allows you to select which types of ToDo task are displayed in the ToDo task list. Key in the appropriate number to select
the required display filter (see table right) or use the
If there are no matching ToDo tasks when you have finished making you filter selection, you will be returned to the ToDo list screen.
☛
Press Softkey 2 will display the ToDo list or briefly press to return to the standby screen.
▲ and ▼ keys to highlight an option and press Softkey 1.
Calculator
The calculator can perform addition, subtraction, multiplication, division, inversion, square root, negation and percentage. It also has a
memory function and allows numbers to be added or stored to memory. It obeys mathematical precedence rules, thus it will multiply and divide
before it adds and subtracts.
☛
Press and 1. The calculator screen will be displayed.
☛ The table on the right shows which keys perform which calculator function.
☛
To carry out the calculation 12 + 3 × 5:
Press 1, 2 and the key, then 3 and the
The percentage function may be used to add or subtract an amount from a number.
☛
To find the cost of a $12.50 item that has 6% tax added:
Press 1, 2, , 5 and the key, then 6 and . The answer 13.25 will be displayed.
Numbers may be added or stored into memory and retrieved.
☛
The first press of the Softkey 2 will add the number on the screen into memory. The second press of the Softkey 2 will overwrite the
number in memory with the displayed number.
☛
Pressing the Softkey 1 will retrieve the number in memory. The second press of the Softkey 1 will clear the memory.
Briefly press CLR to erase the rightmost digit. To perform an All Clear, hold down CLR.
All Clear will not erase memory.
▼
▼
▲
key, then 5 and . The answer 27 will be displayed.
Option No.
Unfinished 1
Finished 2
All 3
Key Calculator Function
Addition (+)
▼
▼
▲
▼
Softkey 1
Softkey 2
CLR Delete digit (Held) All
Subtraction (-)
Multiplication (x)
Division (÷)
Memory Recall (2
Memory Cancel
Inversion
Memory Addition (2
Memory Store
Square Root (√)
Percent (%)
Equals (=)
Clear
Exit calculator
Sign inversion (±)
Decimal Point
nd
)
nd
)
2
The calculator can display up to 9
digits.
51
Page 65

Games
Your phone incorporates the following 5 games to play:
• Puzzle
•
UFO
• Poker
•
Thief
•
Belt
Puzzle
Game concept
Normally, 15 puzzle game has 15 pieces of the panel and one space. You can move each piece to the space and complete the panel.
But, in this Puzzle you can move each piece over the screen. If you move a piece outside the screen, this piece appears from opposite
side of the screen. It means that the right and left side, the top and bottom of the screen are connected. It makes this game difficult to win.
How to play
☛
Press and 6. The game’s menu screen is displayed and select the Puzzle icon by using the
to guide” is displayed. The Puzzle game will start by pressing Softkey 1.
☛
If you want to use the wallpaper for the Puzzle game, press from “How to guide” screen and select from 5 wallpapers.
☛
Select the level from Easy, Normal, Hard or Expert and press Softkey 1. Use the
the panel and complete the panel to be the same as the original one.
☛
Press to start the game again once a game is over.
☛
Press Softkey 2 to return to the “How to guide” screen or to return to the standby screen.
UFO
Game concept
You are an alien and are looking for character to use for an experiment. Catch character on earth by shooting beams from UFO. UFO
moves randomly, so press at just the right moment to shoot beams against character. If you shoot a lot of character at one time,
you can get a bonus. As the level goes up, the speed of characters increases.
How to play
☛
Press and 6. The game’s menu screen is displayed and select the UFO icon by using the
guide” is displayed. The UFO game will start by pressing Softkey 1 twice and .
☛
Character are moving at the bottom of the screen to escape from UFO. UFO appears from the top of the screen. Press at just
the right moment to shoot beams against character.
☛
Press , Softkey 1 and to start the game again once a game is over.
▼
▲
and ▼ keys to move (slide) the piece of
▼
▼
▲
▼
▼
▲
and ▼ keys. “How to
▼
and ▼ keys. “How
2
When you receive a call during
playing a game, the ringer tone
sounds and the game is interrupted.
2
The talk times will be shortened
when you play a game.
2
You can adjust the volume by using
the side keys.
The volume is set to quiet when you
start the game.
52
Page 66

☛ Press Softkey 2 to return to the “How to guide” screen or to return to the standby screen.
Poker
Game concept
This is a one-person Poker game. You have one chance to change the cards.
How to play
☛
Press and 6. The game’s menu screen is displayed and select the Poker icon by using the
guide” is displayed. The Poker game will start by pressing Softkey 1.
☛
5 cards are face down on the screen. Then all the cards are turned over to face up. Decide how much you bet by using the ▲ and
▼
keys, and press . Select the cards you wish to keep by pressing the appropriate number keys. Those cards will be held. If
you press the key again, the card will be released.
☛
Press . The cards you did not select will be dealt again. You can get the result.
☛
Press to start the game again once a game is over.
▼
▲
and ▼ keys. “How to
▼
☛ Press Softkey 2 to return to the “How to guide” screen or to return to the standby screen.
Thief
Game concept
You are a thief in an airtight labyrinth, where flying bat-like monsters live. Steal as many jewels as you can, find the key for the door and
escape from the labyrinth before your oxygen runs out. The labyrinth will be constructed at random using 4 screens (2 x 2) for the first
level, and 16 screens (4 x 4) for higher levels. The oxygen decreases 1% every 2.5 seconds. When your Oxygen is gone, the game is over.
You have a gun with which to kill the monsters. When one is hit, it will turn to yellow for a moment and then disappear. Monsters will appear
again at random. Your gun has 5 bullets at the start of the game but more are available for you to pick up on your way around the l abyrinth
(3 in the first level and 6 in higher levels). If you collide with a monster, your oxygen decreases by 5% and your character will blink for 2
seconds. If you touch the monster again while blinking, there is no additional penalty.
When the game ends (whether it is “GAMEOVER” or “CLEAR”), the result screen will appear. The result screen displays the number of
the jewels you stole and the number of monsters you defeated.
How to play
☛
Press and 6. The game’s menu screen is displayed and select the Thief icon by using the
guide” is displayed. The thief game will start by pressing Softkey 1.
☛
In the first level, you start with 49% oxygen left, while in higher levels you start with 99%. Use the
character around the labyrinth. As you cross a jewel, bullet or the key they will be picked up automatically. The number of bullets you
have left (including the ones you pick up) will be displayed at the base of the screen when you pick it up. Only when you have picked
up the key, you will be able to go through the exit door and win the game.
▼
▲
and ▼ keys. “How to
▼
▼
▲
and ▼ keys to move your
▼
☛ Press to fire your gun in the direction you are going.
53
Page 67

☛ Press to start the game again once a game is over. The game will start on a higher level if you won the previous game, or the
same level if you lost. Press Softkey 2 to return to the “How to guide” screen or to return to the standby screen.
Belt
Game concept
You are a luggage loader and are loading parcels into trucks. The parcels are colour coded to be the same colour as the truck they must
be loaded into. In between the parcels and their respective trucks are a series of conveyor belts which can move the parcels to the left or
right. You must switch the conveyor belts’ direction to guide the luggage to the appropriate truck. Each parcel you direct correctly will score
1 point. When 4 parcels miss their respective truck, the game is over. When you load 100 parcels correctly, this game will be finished.
How to play
☛
Press and 6. The game’s menu screen is displayed and select the Belt icon by using the
guide” is displayed. The conveyor belt game will start by pressing Softkey 1.
☛
Each conveyor belt has a key symbol under it. The direction of the conveyor belt (indicated by arrows at each end) will be reversed
by pressing the appropriate key. Belts 1 & 3 and 7 & 9 are linked as pairs, so that pressing either key will change the direction of both
belts (see table right).
☛
Press to start the game again once a game is over.
▼
▲
and ▼ keys. “How to
▼
☛ Press Softkey 2 to return to the “How to guide” screen or to return to the standby screen.
Key Changes Direction of
1 Belt 1 & 3
2 Belt 2
3 Belt 1 & 3
4 Belt 4
6 Belt 6
7 Belt 7 & 9
8 Belt 8
9 Belt 7 & 9
Belt
Belt
54
Page 68

Voice recording/memo
This facility allows you to record in-call conversations and make voice memos. Up to 10 separate call recordings or voice memos can be
stored. The maximum time for all recording or voice memos is approximately 20 seconds.
In addition to making and playing back in-call recordings and voice memos, your phone allows you to view a list of all recordings/voice memo
titles (label name) and date/time order, to allocate or edit voice memo titles and delete individual or all recordings.
Recording a phone call
,
If you intend to record a phone call, you MUST inform the other party first.
☛
During a call press and hold . The Record ready screen will be displayed.
☛
Press Softkey 1 to start recording the received voice. An animated status bar showing the time elapsed and the time left will be
displayed on your phone’s screen.
☛
To pause recording, press Softkey 1. To resume recording, press Softkey 1 again.
☛ To stop recording, press CLR or or Softkey 2. Recording will stop immediately. If you have not stopped the recording manually
after either approximately 20 seconds or by the time the remaining recording time is elapsed (whichever comes first), the recording
will stop automatically. When a recording is stopped (either manually or automatically) the Voice memo menu will be displayed. The
recording itself will be stored along with the time and date. If you wish to add a label to this recording, see page 57.
☛
Press CLR or to return to the standby screen.
Recording a memo
☛
With your phone in standby, press . The voice menu will be displayed.
☛
Press Softkey 1. The Record ready screen will be displayed.
☛
Press Softkey 1 to start recording. An animated status bar showing the time elapsed and the time left will be displayed on your
phone’s screen.
☛
To pause recording, press Softkey 1. To resume recording, press Softkey 1 again.
☛
To stop recording, press CLR or or Softkey 2. Recording will stop immediately. If you have not stopped the recording manually
after either approximately 20 seconds or by the time the remaining recording time is elapsed (whichever comes first), the recording
will stop automatically and the Voice memo menu will be displayed. The recording itself will be stored along with the time and date. If
you wish to add a label to this recording, see page 57.
☛
Press CLR or to return to the standby screen.
2
The label name “Untitled” is stored
automatically when you finish the
recording (As for editing the label
name, see page 57).
55
Page 69

Playback
To playback a particular voice record, use the following procedure.
☛ Press and 2. The list of the recordings available is shown displaying date, time and label (if any) for each.
☛
Use the ▲ and ▼ keys to highlight the required recording and then press Softkey 1. The Playback ready screen will be displayed.
☛ Press Softkey 1. The recording will be played back through your phone’s earpiece.
☛
To pause play, press Softkey 1. To resume play, press Softkey 1 again.
☛
To end the playback before it has finished, press Softkey 2. When the playback has ended (either manually or automatically), the
Voice memo menu will be re-displayed.
☛
Press CLR or to return to the standby screen.
Deleting recordings
You can either delete all recordings at once (see Options menu below) or individual recordings. To delete individual recordings, use the
following procedure.
☛
Press and 4. The list of the existing recordings is shown displaying the date, time and label (if any) for each.
☛ Use the ▲ and ▼ keys to highlight the required recording and then press Softkey 1. The recording will be deleted.
Voice memo options menu
This menu allows you to record, edit a voice memo’s title, delete individual recordings, delete all recordings, view the recording facility status,
play a recording or view the recordings list. To select an option from this menu, use the following procedure.
☛
Press either during a call or from the standby screen and then select the appropriate number from the table right.
Record
This will record a voice memo if there is no call in progress or make an in-call recording if a call is in progress (see page 55).
Playback
This will display the list of recordings available and allow you to play them back (see Playback above).
Label
This selection allows you to change the title of a voice memo (see “Labelling a recording” on page 57).
Delete One
This selection will delete the selected recording (see Deleting recordings above).
Delete All
This selection will prompt you to press Softkey 1 to delete all recordings or Softkey 2 to cancel the operation.
2
This feature is disabled when you
are on a call.
Option No.
Record 1
Playback 2
Label 3
Delete one 4
Delete all 5
56
Page 70

Labelling a recording
To label a voice recording, use the following procedure.
☛
Press and 3. The list of recordings will be displayed.
☛ Use the ▲ and ▼ keys to highlight the recording label you wish to edit.
☛
Press Softkey 1. The cursor will be in the label description area and the recording details will be displayed: date and time for when it
was created, its playing time and whether it has been played or not.
☛
Press to display the text entry mode/options menu.
Press the appropriate key to select T9
☛ Make the necessary changes by moving the cursor with the and keys and using CLR to delete characters or just enter
characters using the keypad.
®
Text Entry, standard text entry, numerals or another option (see table right).
▼
▼
☛ Press Softkey 1 when complete.
Option No.
T9 1
ABC 2
123 3
Options 4
57
Page 71

e-moción facilities
Your phone enables you to access e-moción sites and services and also to send and receive e-moción messages. This section explains how
to set up and use your phone to access these e-moción facilities.
About e-moción
Your phone is compatible with e-moción, which means you can use online services such as site (program) connection service, MMS, and
Internet connection.
Site (Program) connection service
By simple key operations, you can use various sites provided by IPs (Information Providers).
MMS
This service enables you to send/receive MMS not only to/from e-moción mobile phones but also via the Internet.
Internet connection
This service enables you to connect to the Internet using an e-moción mobile phone and access Internet homepages compatible with
e-moción.
What can I download
Your phone supports the downloading of three different types of content:
•
Melodies
•
Wallpapers
•
Animation (greeting)
What are Melodies?
Melodies are played when you receive a call or SMS/MMS.
What are wallpapers?
Wallpaper is an image that is displayed as the background for your standby screen. These pictures are 4096 colour and you can download
them to your phone.
What are animations?
Animations are played when the phone is turned on. These are 4096 colour and you can download them to your phone.
Compact NetFront™ is a registered
trademark or trademark of Access Co., Ltd. in
Japan and selected countries worldwide.
2
If you leave your phone for a long
time with the battery uncharged,
the content of memory cannot be
retained, and stored e-moción
data (*) may be lost. (*) Stored
e-moción data:
e-moción settings
•
MMS data
•
bookmarks, etc.
•
58
Page 72

e-moción icons
The following e-moción icons are displayed in two locations of your phone’s display (see diagram at the front of this document):
•
e-moción status icon - e-moción service area e-moción connected e-moción connecting e-moción locked
•
MMS icon - unread MMS unread MMS full MMS on server
e-moción quick start
The following procedures will help you start using your phone’s e-moción facilities straight away. For more detailed procedures and
information, please read the rest of this section.
Access a new e-moción site
☛
With the standby screen displayed, press Softkey 2, 5 and 1, then Softkey 1.
☛
Key in the site address then press Softkey 1. Use the ▲ and ▼ keys to highlight OK, then press Softkey 1. The phone will connect
to the requested site.
Access a stored address
☛
With the standby screen displayed, press Softkey 2, 5 and 2. Use the ▲ and ▼ keys to highlight the required address then press
Softkey 1.
☛
Use the ▲ and ▼ keys to highlight OK then press Softkey 1. The phone will connect to the requested site.
Bookmark a page
☛ With a web page displayed, press . The browser menu will be displayed.
☛
Press the appropriate key for Add bookmark and press Softkey 1. Use the ▲ and ▼ keys to highlight OK then press Softkey 1. The
page will be added to the bookmark list (see below).
Going to a bookmarked page
☛
With the standby screen, press Softkey 2 and 4.
☛
Use the ▲ and ▼ keys to highlight the required bookmark, then press Softkey 1. The phone will connect to the bookmarked page.
Saving a web page
☛
With a web page displayed, press . The browser menu will be displayed.
☛
Press the appropriate key for Save page and press Softkey 1. Use the ▲ and ▼ keys to highlight OK then press Softkey 1. The
page will be saved in memory.
,
Depending on the type of page
you are viewing, the available
Browser menu options may
change.
59
Page 73

Displaying a saved page
☛ With the standby screen displayed, press Softkey 2 and 6.
☛
Use the ▲ and ▼ keys to highlight the required saved page, then press Softkey 1. The page will be displayed.
Downloading a melody
☛
Navigate to a page containing the melody you require.
Downloading images
☛
Navigate to a page containing the image you wish to download.
e-moción settings
To set up your phone to access e-moción information, use the following procedure.
Ringer time
This option enables you to select the time your phone rings for when mail is received.
☛
Press 2 and 1. The ringer time setting screen will be displayed.
☛ Use CLR to delete the existing time, use the keypad to enter a time between 3 and 10 seconds, then press Softkey 1 to store the
time and return to the e-moción settings menu.
☛ Press briefly to return to the standby screen.
2
Images can be animations or
standby screens (wallpapers).
,
Depending on the type of page
you are viewing, the available
Browser menu options may
change.
60
Page 74

Connection number
This option enables you to select which connection number you use (Factory setting 1 = Contractor, Factory setting 2 = Prepaid, User setting
1) to connect to the e-moción service.
☛
Press 2 and 2. The connection number options will be displayed with the number for the selected option displayed in green.
☛ Use the ▲ and ▼ keys to select the required option and press Softkey 1.
If you select User setting, you will be offered the options shown in the table right. Press the relevant key to select the required option,
enter the required information and the press Softkey 1 to return to the User setting options.
☛
Press Softkey 2 twice to return to the e-moción settings menu.
☛
Press briefly to return to the standby screen.
e-moción lock
If you choose to turn the e-moción lock on, you will not be able to connect to any e-moción services or send or receive mail.
☛
Press 2 and 3 then press Softkey 1 to toggle the e-moción lock on or off. When the e-moción lock is on, a ✔ is displayed over
the menu icon and the e-moción lock icon ( ) is shown at the top of your phone’s standby screen.
☛ Press briefly to return to the standby screen.
2
The factory setting is fixed setting for
connecting to specific operator,
while the user settings can be
changed.
2
The connection with the number
displayed in green will be the
connection number used when you
make an e-moción connection.
User setting option
APN (Access point name) 1
IP Address
(Gateway address)
Portal server
(MoviStar e-moción menu server)
Message server 4
User data
2 Password
Port No.
1 HTTP Port No.
No.
2
3
51User name
6
61
Page 75

e-moción menu
To access the e-moción menu, use the following procedure.
With the standby screen displayed, press Softkey 2. The e-moción menu will be displayed.
☛
Use the ▲ and ▼ keys to highlight a menu option and press Softkey 1 to select it.
☛
MoviStar e-moción menu
With the e-moción menu screen displayed, press 1 to display the browser menu screen.
☛
Press the relevant key to select the required option (see table right).
☛
Add bookmark: Bookmarks the current page.
Bookmarks: Displays Bookmark list. This option is displayed only when one or more
Save image: Saves an image on the current page.
Save page: Saves the current page.
Save phone #: Saves the phone number displayed in the page into the phonebook.
Go to webpage: Enables you to enter URL or select one from a list (see page 63).
Reload: Updates the data on the currently displayed page.
Page info: Displays URL of current page.
Compose MMS: Moves to the Compose MMS screen. To the MMS text, URL of the current
With the e-moción menu screen displayed, press 2 to display the Mail menu screen
☛
(see page 65).
SMS
With the e-moción menu screen displayed, press 3 to display the SMS menu screen (see page 37). If you press CLR to leave this
☛
menu, the e-moción menu screen will be re-displayed.
Bookmark is registered.
page is inserted.
Browser menu option No.
Add bookmark 1
Bookmarks 2
Save image 3
Save page 4
Save phone # 5
Go to webpage 6
Reload 7
Page info 8
Compose MMS 0
▼
2
Whenever the
can be used, the relevant key or
keys will be shown in the softkey
help area of your phone’s display.
2
Whenever an icon is shown in
the centre of the Softkey area of your
phone’s display can be
pressed to access further options.
,
When you agree to send private
information (e.g. production serial
no. and SIM no.) to the IPs via the
Internet, it may be obtained by
others.
2
Pressing CLR or may not bring
back the previous screen. Screen
operations depend on the current
screen content.
▲
▼
and
▼
keys
62
Page 76

Bookmarks
This option will display a list of bookmarked web pages. These bookmarks can then be copied, edited, deleted or used to open the original
web page as follows:
With the e-moción menu screen displayed, press 4 to display the Bookmarks screen.
☛
Use the ▲ and ▼ keys to highlight a bookmark then press . The bookmarks Options menu will be displayed.
☛
Press the appropriate key for the required option (see table right).
☛
Open: Displays selected bookmark page
Copy address: Copies the highlighted bookmarked address so it can be edited
Edit title: Edits the title of the highlighted Bookmark
Compose MMS: Moves to the Compose MMS screen. To the MMS text, URL of the highlighted Bookmark is Inserted.
Delete one: Deletes the selected Bookmark
Delete all: Deletes all Bookmarks
Go to webpage
This option enables you to enter a specific web page address (URL) or select one from the history list, allowing you to visit a particular web
page.
With the e-moción menu screen displayed, press 5 to display the Go the webpage screen.
☛
Entering address
Press 1. The Enter address screen will be displayed.
☛
Use the ▲ and ▼ keys to highlight the address field and press Softkey 1. The Enter address screen will be re-displayed.
☛
Key in the required URL the press Softkey 1.
☛
Use the ▼ key to highlight OK and press Softkey 1. The page at the selected URL address will then be displayed.
☛
Address history
Press 2 to display the Address history screen.
☛
Usethe ▲ and ▼ keys to highlight the required URL address then press Softkey 1. The Address entry screen will be displayed.
☛
Use the ▼ key highlight OK and then press Softkey 1. The page at the selected URL address will be displayed.
☛
Back
Press 0 to display the e-moción menu screen.
☛
,
Depending on the type of page
you received, available options
may change.
Bookmarks option No.
Open 1
Copy address 2
Edit title 3
Compose MMS 4
Delete one 5
Delete all 6
2
Only web pages that are e-moción
compatible will be displayed.
63
Page 77

Saved pages
With the e-moción menu screen displayed, press 6. The Saved pages screen will be displayed.
☛
Use the ▲ and ▼ keys to highlight the required saved page and press . The following options will be available:
☛
Open: Opens the saved page.
Edit title: Enables you to edit the title of the saved page.
Protect On/Off: If the screen memo is unprotected, it will be protected, and if it is protected, it will be unprotected.
Delete one: Deletes the selected saved page.
Delete all: Deletes all saved pages.
With a saved page displayed, press Softkey 1 and . The following options will be available:
☛
Save image: Saves an image on the saved page.
Edit title: Enables you to edit the title of the saved page.
Page info: Displays the saved page’s URL address.
Protect On/Off: If the screen memo is unprotected, it will be protected. If it is protected, it will be unprotected.
Delete: Deletes the displayed saved page.
Settings
With the e-moción menu screen displayed, press 7. The e-moción user settings menu screen will e displayed (see page 60).
☛
2
Saved pages are stored on your
phone which means you can view
them without making a connection to
the e-moción service.
2
Protected pages cannot be deleted.
64
Page 78

Mail menu
This menu enables you to use the mail facility.
With the standby screen displayed, press Softkey 1, or Softkey 2 then 2. The mail menu screen will be
☛
displayed.
Composing MMS
This option enables you to compose, send and save MMS.
Press 1 to display the Compose MMS screen.
☛
Use the ▲ and ▼ keys to highlight the Subject field and press Softkey 1. The Subject screen will be
☛
displayed.
Key in the subject of the message and press Softkey 1. The compose MMS screen will be re-displayed with the Subject title entered.
☛
Use the
☛
☛
Creating new SMIL
☛
☛
☛
key to highlight the address field and press Softkey 1. The address entry screen will be displayed.
▼
Key in the required address or phone number and press Softkey 1. The compose MMS mail screen will be re-displayed with the
address entered.
Use the
key to highlight SMIL and press Softkey 1. SMIL screen will be displayed.
▼
Press to display SMIL Compose menu screen (initial).
Press the appropriate key for the required option (see table right).
Add text: Adds new text data to the SMIL.
Add image: Adds image to the SMIL.
Add audio: Adds sound to the SMIL.
Preview: Shows the created SMIL.
Background colour: Changes the background colour of the SMIL.
Options: Sets the slide playback time.
Compose menu Options (initial) No.
Add text 1
Add image 2
Add audio 3
Preview 4
Background colour 5
Options 6
Mail menu option No.
Compose MMS 1
Inbox 2
Sent mail 3
Draft 4
Check new mail 5
Mail settings 6
Back 0
65
Page 79

SMIL Compose menu options
You can access SMIL Compose menu options by pressing from the SMIL screen. The available options differ depending on the
condition of SMIL creation.
Compose menu
Options (ALL)
Add text The text you enter in the text entry screen will be placed in the text field on the slide.
Remove text The text placed in the slide and the text field on the slide will be deleted.
Add image The image you select will be placed in the image field on the slide.
Remove image The image placed in the slide and the image field on the slide will be deleted.
Add audio The sound you select will be attached to the slide. The audio mark (notes) will be displayed on the left of the slide number.
Remove audio The sound attached to the slide and the audio mark will be deleted.
Preview The slides will be previewed in order from the beginning at the preset playback time for each.
Add slide The new slide will be added after the currently displayed slide.
Insert slide The new slide will be inserted just before the currently displayed slide.
Remove slide The currently displayed slide will be deleted.
Text colour This option enables you to select the Text colour from the 16 different colours.
Background colour This option enables you to select the Background colour from the 16 different colours.
Set Fit mode This option enables you to select the size in which the image is displayed (see table right).
Options The sub menu will be displayed. You can set the lengths of time for playing back slides and showing texts etc. by using
Change region size
Swap image/text This option enables you to swap the place of image field and text field on the slide.
Previous slide The previous slide will be displayed.
Next slide The next slide will be displayed.
Description
this option.
This option enables you to change the region size by using the
▲
and
▼
keys.
Set fit mode
Hidden The image is displayed in
Fill The image is scaled to fit
Meet
(Default)
Slice The image is scaled so that
the actual size.
into the image display
area.
The image is scaled so that
the longer side of the
height or width fits the
corresponding side of
image display area.
the shorter side of the
height or width fits the
corresponding side of
image display area.
66
Page 80

Editing a composed MMS
With the Compose MMS screen displayed, press . The edit menu screen will be displayed.
☛
Press the appropriate key for the required option.
☛
Send: Sends the MMS.
Save: Saves the MMS being edited in Draft (see page 70).
Open phonebk.: Adds the destination address directly from the phonebook.
Add To: Adds the destination address.
Add Cc: Adds the Cc address.
Add Bcc: Adds the Bcc address.
Change to To: Changes Cc or Bcc to To.
Change to Cc: Changes To or Bcc to Cc.
Change to Bcc: Changes To or Cc to Bcc.
Del. address: Deletes an address.
Del. mail: Deletes the MMS being edited.
Use the ▼ key to highlight Send or Save.
☛
If you press Softkey 1 with Send highlighted, your MMS will be sent and the Mail menu screen will be displayed.
If you press Softkey 1 with Save highlighted, your MMS will be saved as a draft (see page 70) and the Mail menu screen will be
displayed.
Inbox
This option enables you to read and process your incoming MMS.
Reading MMS
Press 2 to display the Inbox screen.
☛
With the Inbox mail list displayed, use the ▲ and ▼ keys to highlight the required message, then press Softkey 1 to read it.
☛
Use the ▲ and ▼ keys to scroll the MMS.
☛
☛
☛
Processing MMS
☛
▼
Use the and keys to view the previous or next MMS respectively.
When you have finished reading your MMS, press CLR to return to the Inbox mail list, or press to return to the standby screen.
With the Inbox mail list displayed, use the ▲ and ▼ keys to highlight the required MMS and press . The Inbox filter/deletion
menu will be displayed.
▼
2
The menu contents will vary
depending on what is highlighted.
2
When the Inbox reaches its
maximum limit, a new MMS will
overwrite an old, read MMS.
67
Page 81

Press the appropriate key for the required option (see table right).
☛
Show all: Displays all the received MMS.
Show unread: Displays only the unread MMS.
Show read: Displays only the read MMS.
Show protected: Displays only the protected MMS.
Title sort: Sorts the received MMS by title.
Address sort: Sorts the received MMS by address.
Date sort: Sorts the received MMS by date.
Delete one: Deletes the currently selected MMS.
Delete read mail: Deletes all the read mails except protected MMS.
Delete all: Deletes all the MMS.
With a MMS displayed, you can press the to access the Inbox detail menu:
☛
Press the appropriate key for the required option.
☛
Reply: Replies to the received MMS.
Reply quoted: Replies to the received MMS quoted.
Reply all: Replies to all the received MMS.
Reply quoted all: Replies to all the received MMS quoted.
Forward: Forwards the received MMS.
Protect On/Off: Protects or unprotects the received MMS.
Copy message: Moves to message copy screen to copy the desired text.
Copy subject: Moves to subject copy screen to copy the desired text.
Copy address: Moves to address copy screen to copy the desired text.
Save address: Stores the address of the sender in the phonebook.
Save phone #: Stores the phone number and mail address contained in the text of the received MMS in the phonebook.
Save melody: Stores the melody attached to the received MMS.
Save attachment: Stores the attached melody/image file.
Delete: Deletes the received MMS you are viewing.
Inbox menu Options No.
Show all 1
Show unread 2
Show read 3
Show protect 4
Title sort 5
Address sort 6
Date sort 7
Delete one 8
Delete read mail 9
Delete all 0
68
Page 82

Sent mail
This option enables you to read and process the mails/MMS you have sent and saved.
Reading Sent MMS
Press 3 to display the Sent mail screen.
☛
With the sent mail list displayed, use the ▲ and ▼ keys to highlight the required MMS and then press Softkey 1 to read it.
☛
Use the ▲ and ▼ keys to scroll through the MMS.
☛
☛
Processing Sent MMS
☛
☛
▼
Use the and keys to view the previous or next MMS respectively.
With the sent mail list displayed, use the ▲ and ▼ keys to highlight the required MMS, then press . The Sent mail filter/deletion
menu will be displayed.
Press the appropriate key for the required option (see table top right).
Title sort: Sorts the sent mails/MMS by title.
Address sort: Sorts the sent mails/MMS by address.
Date sort: Sorts the sent mails/MMS by date.
Delete one: Deletes the selected MMS.
Delete all: Deletes all the mails/MMS.
▼
Sent mail list Options No.
Title sort 1
Address sort 2
Date sort 3
Delete one 4
Delete all 5
2
Even if you select Delete all,
protected and unread mail will not
be deleted.
With a MMS displayed, you can press to access the Sent mail detail menu:
☛
Re-edit: Enables you to re-edit a sent MMS.
Protect on/off: Protects or unprotects a sent MMS.
Copy message: Displays the message copy screen so you can copy the message text.
Copy subject: Displays the subject copy screen so you can copy the subject text.
Save address: Stores the address of the sender in the phonebook.
Save phone #: Stores the phone number and mail address contained in the text of the received mail in the phonebook.
Delete: Deletes the sent mail you are viewing.
Sent mail details Options No.
Re-edit 1
Protect on /off 2
Copy message 3
Copy subject 4
Save address 5
Save phone # 6
Delete 7
69
Page 83

Draft
This option enables you to delete or process mails/MMS you have created and saved but not sent.
Editing a Draft MMS
Press 4 to display the Draft screen.
☛
Use the ▲ and ▼ keys to highlight the required MMS, then press Softkey 1 to edit it (see “Composing MMS” on page 65) or press
☛
to display the deletion menu.
Deleting a Draft MMS
With the Draft mail list displayed, use the ▲ and ▼ keys to highlight the required MMS, then press to display the deletion
☛
menu.
Press the appropriate key for the required option (see table right).
☛
Delete one: Deletes the selected MMS.
Delete all: Deletes all the mails/MMS.
Checking new mail
This option gives you access to unread received MMS stocked in the server.
Press 5 to display the Check new mail screen.
☛
Mail settings
This option gives you access to the Mail settings menu (see page 72).
Back
This option returns you to the e-moción menu (see page 62).
Draft list Options No.
Delete one 1
Delete all 2
2
If Auto reception is set to On (see
page 72), the Check new mail
option will display your Inbox (see
page 67), if Auto reception is set to
Off, this option will cause any new
MMS to be downloaded from your
current e-moción service provider.
If your Inbox becomes full, new
MMS will overwrite old MMS that
has already been read.
70
Page 84

e-moción user settings
This menu enables you to set up the way your phone uses and displays web pages.
With the standby screen displayed, press Softkey 2 and 7. The e-moción user settings
☛
menu screen will be displayed.
Setting time out
This option enables you to set the time after which the connection will be broken if there has been no
activity (60 seconds/90 seconds/ disable).
Press 1 to display the Set time out screen.
☛
Use the ▲ and ▼ keys to highlight the circle next to the required time, then press
☛
Softkey 1 to select it.
Use the ▼ key to highlight OK and press Softkey 1.
☛
Showing tables
This option enables you to decide if your phone will display tables contained in a web page.
Press 2 to display the Show tables screen.
☛
Use the ▲ and ▼ keys to highlight the circle next to the required setting, then press Softkey 1 to select it.
☛
Use the ▼ key to highlight OK and press Softkey 1.
☛
Loading images
This option enables you to decide if your phone will load images contained on a web page.
Press 3 to display the Load images screen.
☛
Use the ▲ and ▼ keys to highlight the circle next to the required setting, then press Softkey 1 to select it.
☛
Use the ▼ key to highlight OK and press Softkey 1.
☛
Wrapping text
This option enables you to decide if your phone will display text as it is on the web page or wrap it to fit your phone’s screen.
Press 4 to display the Wrap text screen.
☛
Use the ▲ and ▼ keys to highlight the circle next to the required setting, then press Softkey 1 to select it.
☛
Use the ▼ key to highlight OK and press Softkey 1.
☛
Sending terminal info
Press 6 to display the Send terminal info screen.
☛
Use the ▲ and ▼ keys to highlight the circle next to the required setting, then press Softkey 1 to select it.
☛
Use the ▼ key to highlight OK and press Softkey 1.
☛
User setting Options No.
Set time out 1
Show tables 2
Load images 3
Wrap text 4
Send terminal info 5
Check settings 6
Back 0
71
Page 85

Checking settings
This option displays all the options from this menu with their current settings.
Press 7 to display the Check settings screen.
☛
Back
This option returns you to the e-moción menu (see page 62).
Press 0 to return to the e-moción menu screen.
☛
Mail settings
With the standby screen displayed, press Softkey 1 and 6. The Mail settings menu screen will be
☛
displayed.
Auto play
This option enables you to playback mail attachment and MMS automatically.
Press 1 to display the Auto play screen.
☛
Use the ▲ and
☛
play is turned on).
Use the ▼ key to highlight OK and press Softkey 1. The settings will be stored.
☛
Auto reception
This option enables you to set whether or not to automatically receive mail.
Press 2 to display the Auto reception screen.
☛
Use the ▲ and ▼ keys to select “Yes” or “No” and press Softkey 1 to highlight the circle.
☛
Use the ▼ key to highlight OK and press Softkey 1. The settings will be stored.
☛
Checking settings
This option displays all the options from this menu with their current settings.
Press 3 to display the Check settings screen.
☛
Back
This option returns you to the mail menu (see page 65).
Press 0 to return to the Mail menu screen.
☛
keys to select the required setting and press Softkey 1 (a ✔ in the box means Auto
▼
Mail settings Options No.
Auto play 1
Auto reception 2
Check settings 3
Back 0
2
With Auto-reception set to On, your
phone will automatically receive
MMS. If it is Off, you will have to
manually retrieve your MMS from
your e-moción service provider (see
“Checking new mail” on page 70).
72
Page 86

Viewer
With the standby screen displayed, press the ▼ key to display Viewer screen. There are four view items; Animation view, Wallpaper view,
CLI view, and Melody play.
Animation view
Select the Animation view icon from the Viewer screen and press Softkey 1. The Animation view screen is displayed.
☛
☛
☛
☛
Wallpaper view
☛
☛
☛
☛
CLI view
☛
☛
☛ Use the ▲ and ▼ keys to view other CLI pictures.
☛
Melody play
☛
☛
☛
☛
▼
Use the and keys to select the animation and press Softkey 1 to preview.
Use the ▲ and ▼ keys to toggle between Animation 1 and Animation 2.
To set the animation as the Greeting screen, press Softkey 1. Press Softkey 2 to return to the previous screen, or press to return
to the standby screen.
Select the Wallpaper view icon from the Viewer screen and press Softkey 1. The Wallpaper view screen is displayed.
Use the
Use the ▲ and ▼ keys to preview other wallpapers (Wallpaper 1-7).
To set the wallpaper as the standby screen, press Softkey 1. Press Softkey 2 to return to the previous screen, or press to return
to the standby screen.
Select the CLI view icon from the Viewer screen and press Softkey 1. The CLI view screen is displayed.
Use the ▲ and ▼ keys to select the CLI picture and press Softkey 1 to view.
Press Softkey 2 to return to the previous screen, or press to return to the standby screen.
Select the Melody play view icon from the Viewer screen and press Softkey 1. The Melody play screen is displayed and the
highlighted melody is played.
Use the ▲ and ▼ keys to play the melody. The selected melody is played.
Press Softkey 1 to set the melody as the ringer.
Press Softkey 2 to return to the previous screen, or press to return to the standby screen.
▼
▼
▲ ▼
and keys to select the wallpaper and press Softkey 1 to preview.
▼
2
Animation 1 is downloadable.
2
The animation with a ✔ is displayed
on the Greeting screen.
2
You can select Text or No greeting
as the Greeting screen. See
“Greetings/animations” on page 21.
2
Wallpaper 1-5 are downloadable.
2
A ✔ is displayed on the selected
icon in the Wallpaper view screen.
2
CLI picture 1-20 are downloadable.
2
Melody 1-16 are downloadable.
2
When you select the Melody, the
selected number’s colour becomes
green.
73
Page 87

Abbreviations
ADN Abbreviated Dialling Numbers
ALS Alternate Line Service
AoC Advice of Charge
CLI Calling Line Identification
CSD Circuit Switched Data
DTMF Dual Tone Multi Frequency
EMS Enhanced Message Service
FDN Fixed Dialling Numbers
GPRS General Packet Radio Service
GSM Global System for Mobile communications
LCD Liquid Crystal Display
LED Light Emitting Diode
MMS Multimedia Message Service
PIN Personal Identification Number
PUK Personal Unlocking Key
SDN Service Dialling Numbers
SHF Simple Hands Free kit
SIM Subscriber Identity Module
SMS Short Message Service
74
Page 88

Index
Numerics
12 colour LED 3
2nd-LCD vi
A
Accepting a call 5
Accessories 46
Adding phone numbers 29
ADN 25
Advanced use 11
Advice of charge(AoC) 24
Alarm setting 20
Alphabetical phonebook list 27
ALS setup 17
Animation 21
Any key answer 16
AoC call limit 24
AoC set currency 24
AoC total cost of calls 24
Area messages (cell broadcast
messages) 44
Auto answer 14
Auto redial 16
B
Back side settings 22
Bar calls 36
Bar password 36
Basic calls & phone use 4
Battery care 8
Battery changing 9
Battery charging 9
Battery check 8
Battery level indicator v, vi
Blacklist 24
C
Calculator 51
Call & charge information 24
Call information 24
Call lists 17
Call waiting and holding 16
Cell broadcast messages 44
Charge information 24
Charging the battery 1
CLI picture 30
CLR (Clear) key iv
Colour style 21
Contrast 21
Correcting mistakes 4
Currency converter 46
D
Delete all phone records 32
Deleting recordings 56
Display information 3
Diverting calls 15
E
Earpiece volume 20
Edit your own phone number 34
Editing or personalising phone
memory numbers 27
Emergency calls 6
e-moción facilities 58
Ending calls 4
F
Fastkey selection 10
FDN 25
FDN setting 35
Feature selection 10
Format date 19
Format time 19
G
Games 52
General care i
Getting Started 1
Graphic display area 3
Greetings 21
Groups 29
H
Help & Softkey area 3
I
icons v, vi
Information numbers 18
International dialling codes 11
K
Key facilities iv
Key tone 13
keypad shortcuts iv
Keys allocation 34
L
Labelling a recording 57
Language setting 14
Last number redial 6
LCD v
LCD Icons 3
LED 3
Line identification 14
Low battery alarm 8
M
Main Features 1
Making basic calls 4
Menu functions vii
Menu selection 10
Menu types 10
Message deletion 42
Message options menu 39
Message setup 43
Messages 37
Mode selection & settings 12
Mode settings 13
Multi-party calls 15
Mute 6
N
Network selection 11
Normal text input (ABC) 34
Numeric input 34
O
Options menu 39
75
Page 89

Own phone number display 6
P
Package copy 32
Phone modes 12
Phone number editing 18
Phonebooks 25
PIN 2 code 36
PIN code 3, 35
Playback 56
Power Saving 23
Preparing the phone 2
Primary phonebook setting 26
Putting a call on hold 5
Q
Quick Silent 5
R
Reading messages 39
Recalling stored numbers 27
Receiving calls 5
Recording a memo 55
Recording a phone call 55
Redial last number 6
Rejecting a call 5
Restore factory settings 23
Ring melodies 21
Ringer 13
Ringer volume 13
Roaming 11
S
Safety precautions i
Scheduled events 47
Scheduler 47
Scheduler’s option menu 48
Scratchpad number 17
SDN 25
Security 35
Security codes 35
Service menu 17
Service tone 14
Setting the date 19
Setting the primary phonebook 26
Setting the time 19
Setting up your phone 19
Short message creation 41
Show clock 19
Side Key 7
SIM card 2
SIM card insertion 2
SIM card removal 2
SMS centre number 43
SMS Messages 37
SMS tone 14
SMS tone volume 14
SMS/EMS overview 37
Standard messages 37
Standby screen display vii
Standby screen picture 20
Standby time 8
Starting a call 4
Start-up 3
Status 43
Status Icons 3
Stored numbers 6
Storing & retrieving numbers 25
Storing numbers & names 26
Switching the phone off 3
Switching the phone on 3
T
T9 English text input 33
Talk time 8
Text entry 33
Time, date & alarm set 19
ToDo list 49
U
Unsuccessful calls 5
User guide conventions iii
V
Vibrator 13
View calls 24
Viewer 73
Voice mail 37, 45
Voice mail number 43
Voice memo options menu 56
Voice recall 15, 29
Voice recording/memo 55
W
Wallpaper 21
Writing messages 33
76
 Loading...