

Page 1
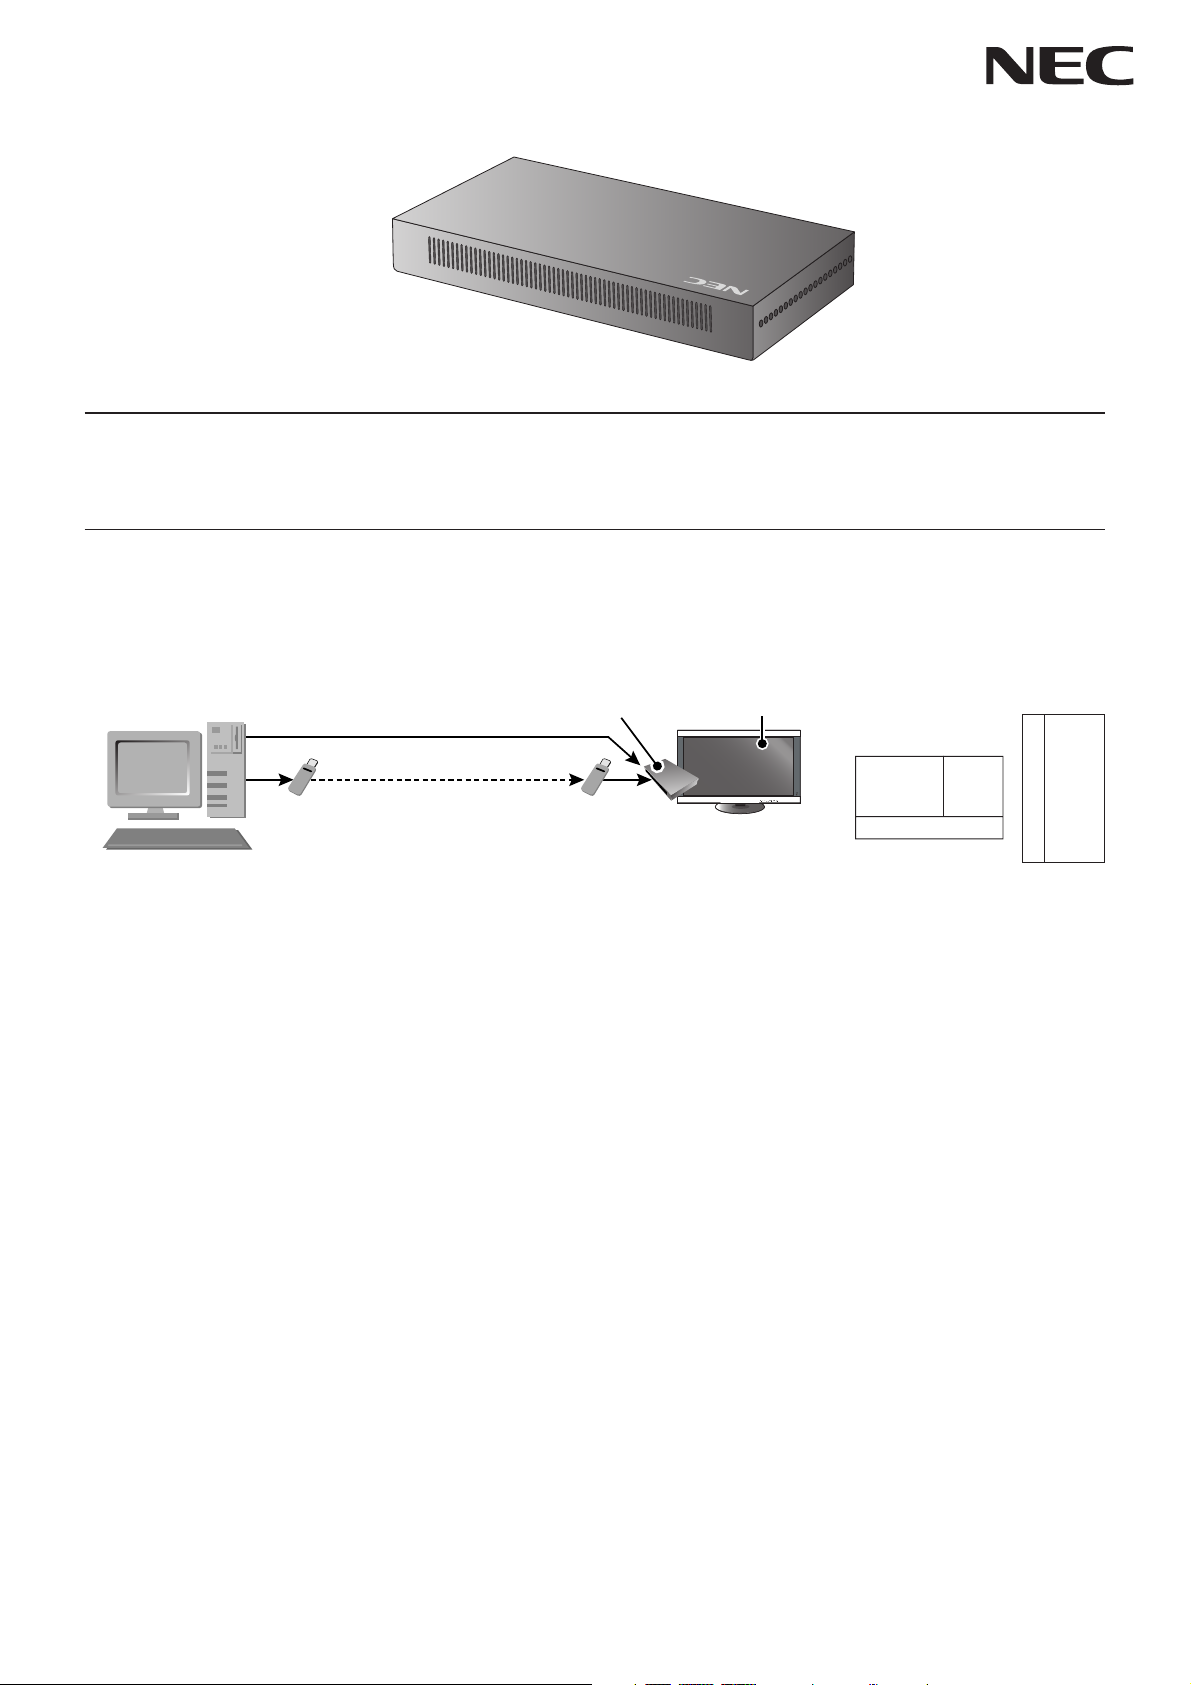
Media Player
(MP-01)
User's Manual Ver.1.10
Introduction
•What is Media Player?
Media Player is a tool for showing programs created from the combination of graphics and sound contents on a display. Programs are created
using the attached authoring software and distributed via LAN or USB memory.
Computer
+
Authoring software
LAN
USB memory USB memory
Media Player Display
Message
Movie Still image
Message
Still image
•What is Authoring Software?
Layout setting
The desired layout can be set by combining movies, still images, and messages.
Scheduling function
This function displays the program at the designated time. You can set the daily program start and end time or the program start and end time for a
particular day.
Distribution function
Program data is distributed via USB memory or to a maximum of 20 Media Players via LAN.
1
Page 2
DECLARATION OF CONFORMITY
This device complies with Part 15 of FCC Rules. Operation is subject to the following two conditions. (1) This device may not cause harmful interference,
and (2) this device must accept any interference received, including interference that may cause undesired operation.
U.S. Responsible Party: NEC Display Solutions of America, Inc.
Address: 500 Park Boulevard, Suite 1100
Itasca, Illinois 60143
Tel. No.: (630) 467-3000
Type of Product: Media Player
Equipment Classification: Class B Peripheral
Model: MP-01(L007KN)
We hereby declare that the equipment specified above
conforms to the technical standards as specified in the FCC Rules.
Canadian Department of Communications Compliance Statement
DOC: This Class B digital apparatus meets all requirements of the Canadian Interference-Causing Equipment Regulations.
C-UL: Bears the C-UL Mark and is in compliance with Canadian Safety Regulations according to CAN/CSA C22.2 No. 60950-1.
FCC Information
1. Use the attached specified cables with MP-01(L007KN) so as not to interfere with radio and television reception.
(1) Please use the supplied power cord or equivalent to ensure FCC compliance.
(2) Please use the supplied shielded video signal cable, DVI-D – DVI-D.
2. This equipment has been tested and found to comply with the limits for a Class B digital device, pursuant to part 15 of the FCC Rules. These
limits are designed to provide reasonable protection against harmful interference in a residential installa-tion. This equipment generates, uses, and
can radiate radio frequency energy, and, if not installed and used in accordance with the instructions, may cause harmful interference to radio
communications. However, there is no guarantee that interfer-ence will not occur in a particular installation. If this equipment does cause harmful
interference to radio or television reception, which can be determined by turning the equipment off and on, the user is encouraged to try to correct
the interference by one or more of the following measures:
• Reorient or relocate the receiving antenna.
• Increase the separation between the equipment and receiver.
• Connect the equipment into an outlet on a circuit different from that to which the receiver is connected.
• Consult your dealer or an experienced radio/TV technician for help.
If necessary, the user should contact the dealer or an experienced radio/television technician for additional suggestions.
The user may find the following booklet, prepared by the Federal Communications Commission, helpful: “How to Identify and Resolve Radio-TV
Interference Problems.” This booklet is available from the U.S. Government Printing Office, Washington, D.C., 20402, Stock No. 004-000-00345-4.
2
Page 3
Important Information
WARNING
TO PREVENT FIRE OR SHOCK HAZARDS, DO NOT EXPOSE THIS UNIT TO RAIN OR MOISTURE. ALSO, DO NOT
USE THIS UNIT’S POLARIZED PLUG WITH AN EXTENSION CORD RECEPTACLE OR OTHER OUTLETS UNLESS
THE PRONGS CAN BE FULLY INSERTED.
REFRAIN FROM OPENING THE CABINET AS THERE ARE HIGH VOLTAGE COMPONENTS INSIDE.
REFER SERVICING TO QUALIFIED SERVICE PERSONNEL.
CAUTION
CAUTION: TO REDUCE THE RISK OF ELECTRIC SHOCK, MAKE SURE POWER CORD IS UNPLUGGED FROM
WALL SOCKET. TO FULLY DISENGAGE THE POWER TO THE UNIT, PLEASE DISCONNECT THE
POWER CORD FROM THE AC OUTLET. DO NOT REMOVE COVER (OR BACK). NO USER
SERVICEABLE PARTS INSIDE. REFER SERVICING TO QUALIFIED SERVICE PERSONNEL.
This symbol warns user that uninsulated voltage within the unit may have sufficient magnitude to cause
electric shock. Therefore, it is dangerous to make any kind of contact with any part inside this unit.
This symbol alerts the user that important literature concerning the operation and maintenance of this unit
has been included. Therefore, it should be read carefully in order to avoid any problems.
CAUTION: Please use the power cord provided with this Media Player in accordance with the table below. If a power cord is not supplied with this
equipment, please contact your supplier. For all other cases, please use a power cord that matches the AC voltage of the power outlet and has been
approved by and complies with the safety standard of your particular country.
Plug Type
North America
European
Continental
U.K.
Chinese
Jpanese
Plug Shape
Country
Voltage
*When operating the MP-01(L007KN) Media Player with its AC 100-240V power supply, use a power supply cord that matches the power supply
voltage of the AC power outlet being used.
NOTE: This product can only be serviced in the country where it was purchased.
U.S.A./Canada
120*
EU (except U.K.)
230
U.K.
230
China
220
Japan
100
Declaration
Declaration of the Manufacturer
We hereby certify that the
MP-01 (L007KN)
Council Directive 2006/95/EC:
– EN 60950-1
Council Directive 2004/108/EC:
– EN 55022
– EN 61000-3-2
– EN 61000-3-3
– EN 55024
is in compliance with
Media Player
and marked with
NEC Display Solutions, Ltd.
4-13-23, Shibaura,
Minato-Ku
Tokyo 108-0023, Japan
3
Page 4

Safety Precautions, Maintenance & Recommended Use
FOR OPTIMUM PERFORMANCE, PLEASE NOTE THE FOLLOWING WHEN
SETTING UP AND USING THE MEDIA PLAYER:
• DO NOT OPEN THE MEDIA PLAYER. There are no user serviceable parts inside and opening or removing covers may expose you to dangerous
shock hazards or other risks.
Refer all servicing to qualified service personnel.
• Do not spill any liquids into the cabinet or use your Media Player near water.
• Do not insert objects of any kind into the cabinet slots, as they may touch dangerous voltage points, which can be harmful or fatal or may cause
electric shock, fire or equipment failure.
• Do not place any heavy objects on the power cord or AC adapter. Damage to the cord or AC adapter may cause shock or fire.
• Do not place this product on a sloping or unstable cart, stand or table, as the Media Player may fall, causing serious damage to the Media Player.
• The power supply cord you use must have been approved by and comply with the safety standards of your country. (Type H03VVH2-F 2x 0.75mm
should be used in Europe)
• In UK, use a BS-approved power cord with molded plug having a black (13A) fuse installed for use with this Media Player.
• Do not place any objects onto the Media Player and do not use the Media Player outdoors.
• Do not bend, crimp or otherwise damage the power cord.
• Do not use wet hands to connect or disconnect the power cord to an electrical socket. This may cause electric shock.
• Clean the plug periodically and check to make sure the plug and power cord are not damaged.
• Do not apply stress to the inlet (AC input side) of the AC adaptor.
• Do not wrap the AC adapter in cloth.
• When moving the Media Player, disconnect all cables. Moving the Media Player with cables connected may cause electric shock.
• Do not pull on the power cord to disconnect from power outlet as this may cause electric shock. Hold onto to the plug at the end of the power cord
to disconnect.
• Do not cover vent on Media Player.
• Do not use Media Player in high temperature, humid, dusty, or oily areas.
• Do not drop or subject to shock.
• Do not place sideways, face down or upside down.
• Do not leave the Media Player in direct sunlight or near heating equipment.
2
Immediately unplug your Media Player from the wall outlet and refer servicing to
qualified service personnel under the following conditions:
• When the power supply cord or plug is damaged.
• If liquid has been spilled, or objects have fallen into the Media Player.
• If the Media Player has been exposed to rain or water.
• If the Media Player has been dropped or the cabinet damaged.
Cleaning the Media Player
• Unplug the power supply.
• Gently wipe the cabinet with a soft cloth.
• To clean the cabinet, dampen the cloth with a neutral detergent and water, wipe the cabinet and follow with a dry cloth.
NOTE:
DO NOT clean with benzene thinner, alkaline detergent, alcoholic system detergent, glass cleaner, wax, polish cleaner, soap powder, or insecticide.
Rubber or vinyl should not be in contact with the cabinet for an extended period of time. These types of fluids and materials can cause the paint to deterio-
rate, crack or peel.
Intel and Intel Pentium are trademarks of Intel Corporation in the United States and other countries. The SD logo is a trademark. Microsoft®, MS, Windows®,
PowerPoint®, Windows Media®, Internet Explorer® and the Internet Explorer® logo are registered trademarks or trademarks of the Microsoft Corporation in the
United States and other countries. All other brands and product names are trademarks or registered trademarks of their respective owners.
4
Page 5
Contents
•Memory card
•Memory card cover
•Wireless remote control
•AA batteries x 2
•Wireless remote control extension
cable
•Double sided tape
control extension cable)
(for Wireless remote
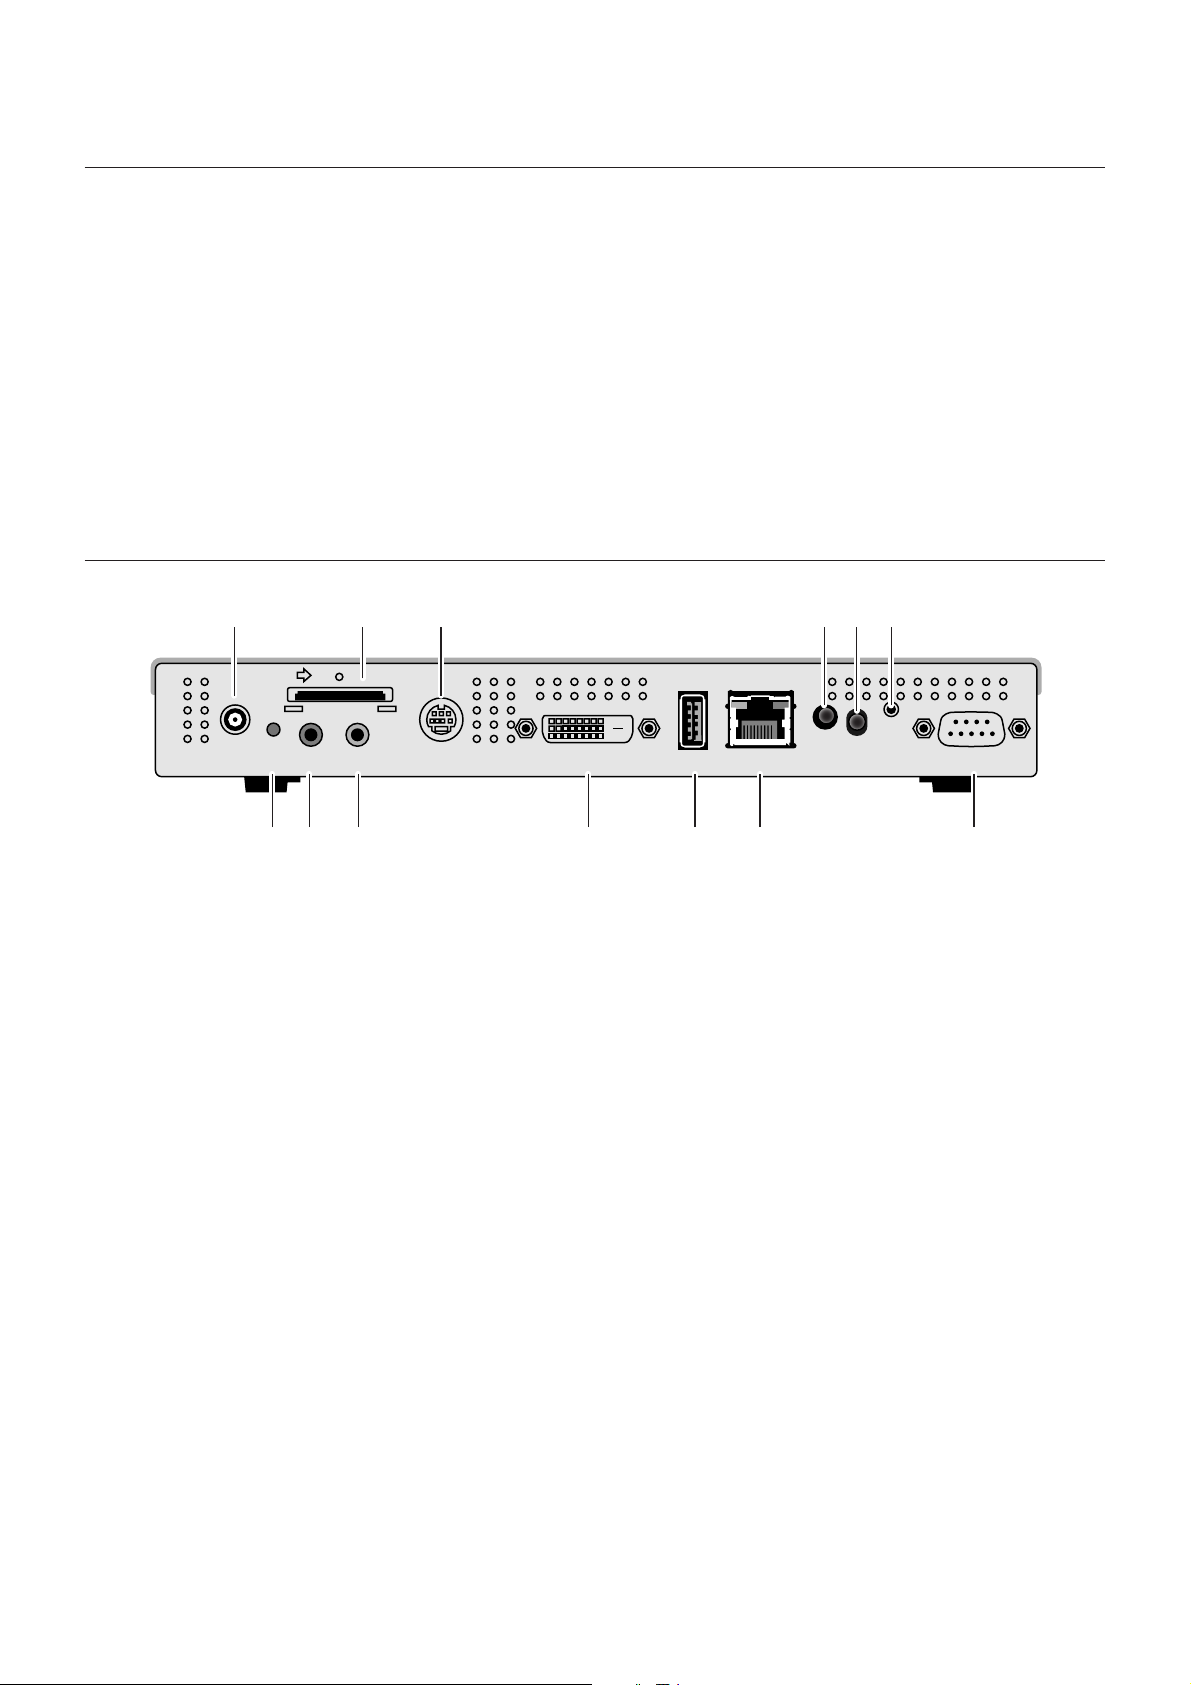
Terminal panel
123 456
SD
POWER RESET VIDEO IN DVI USB LAN RS232
AUDIOINAUDIO
OUT
•Video signal cable (DVI-D-DVI-D)
•Audio cable
•USB cable extension
•Bracket x 2
•Power Cord
•AC adapter
(DXW1225N-S0068Z)
•Set up guide
•CD-ROM
(User’s Manual & software)
1DC IN connector
Connect the enclosed AC adapter.
2Memory card connector
Set the enclosed memory card.
3S-VIDEO IN connector
Connect with video devices, such as DVD players, and movies from
video devices can be placed with messages and still images.
Use an S video cable (available in stores).
4Power Indicator
Power button ON: Green light turns on
Power button OFF: Green light flashes then red light turns on
5Remote control sensor
This is the light receiving part of the signal from the wireless
remote control.
6Wireless remote control extension connector
In cases such as when the remote control sensor is hidden behind
the liquid crystal display, connect the enclosed wireless remote
control extension cable.
Secure the light receiving end of the wireless remote control
extension cable in a position from which remote control operation
is possible using the enclosed double-faced adhesive tape.
#@!0987
7Reset button
The main body is reset. Even if the reset button is pressed, the data in
the memory card will not be erased.
8AUDIO IN
When using the S-VIDEO IN connector, this is connected to
the audio output from a video device.
9AUDIO OUT
This is connected to the AUDIO IN of the liquid crystal display.
0DVI OUT
This is connected to the DVI input connector of the liquid
crystal display.
!USB memory connector
This is used when distributing program data via USB memory
or when updating internal firmware.
If it is difficult to use the connector for USB memory due to
the location installed, use the enclosed USB cable extension.
@LAN connector
This is connected to the LAN cable when distributing program
data via LAN.
#External connector
Terminal used for maintenance.
Cannot be used.
5
Page 6
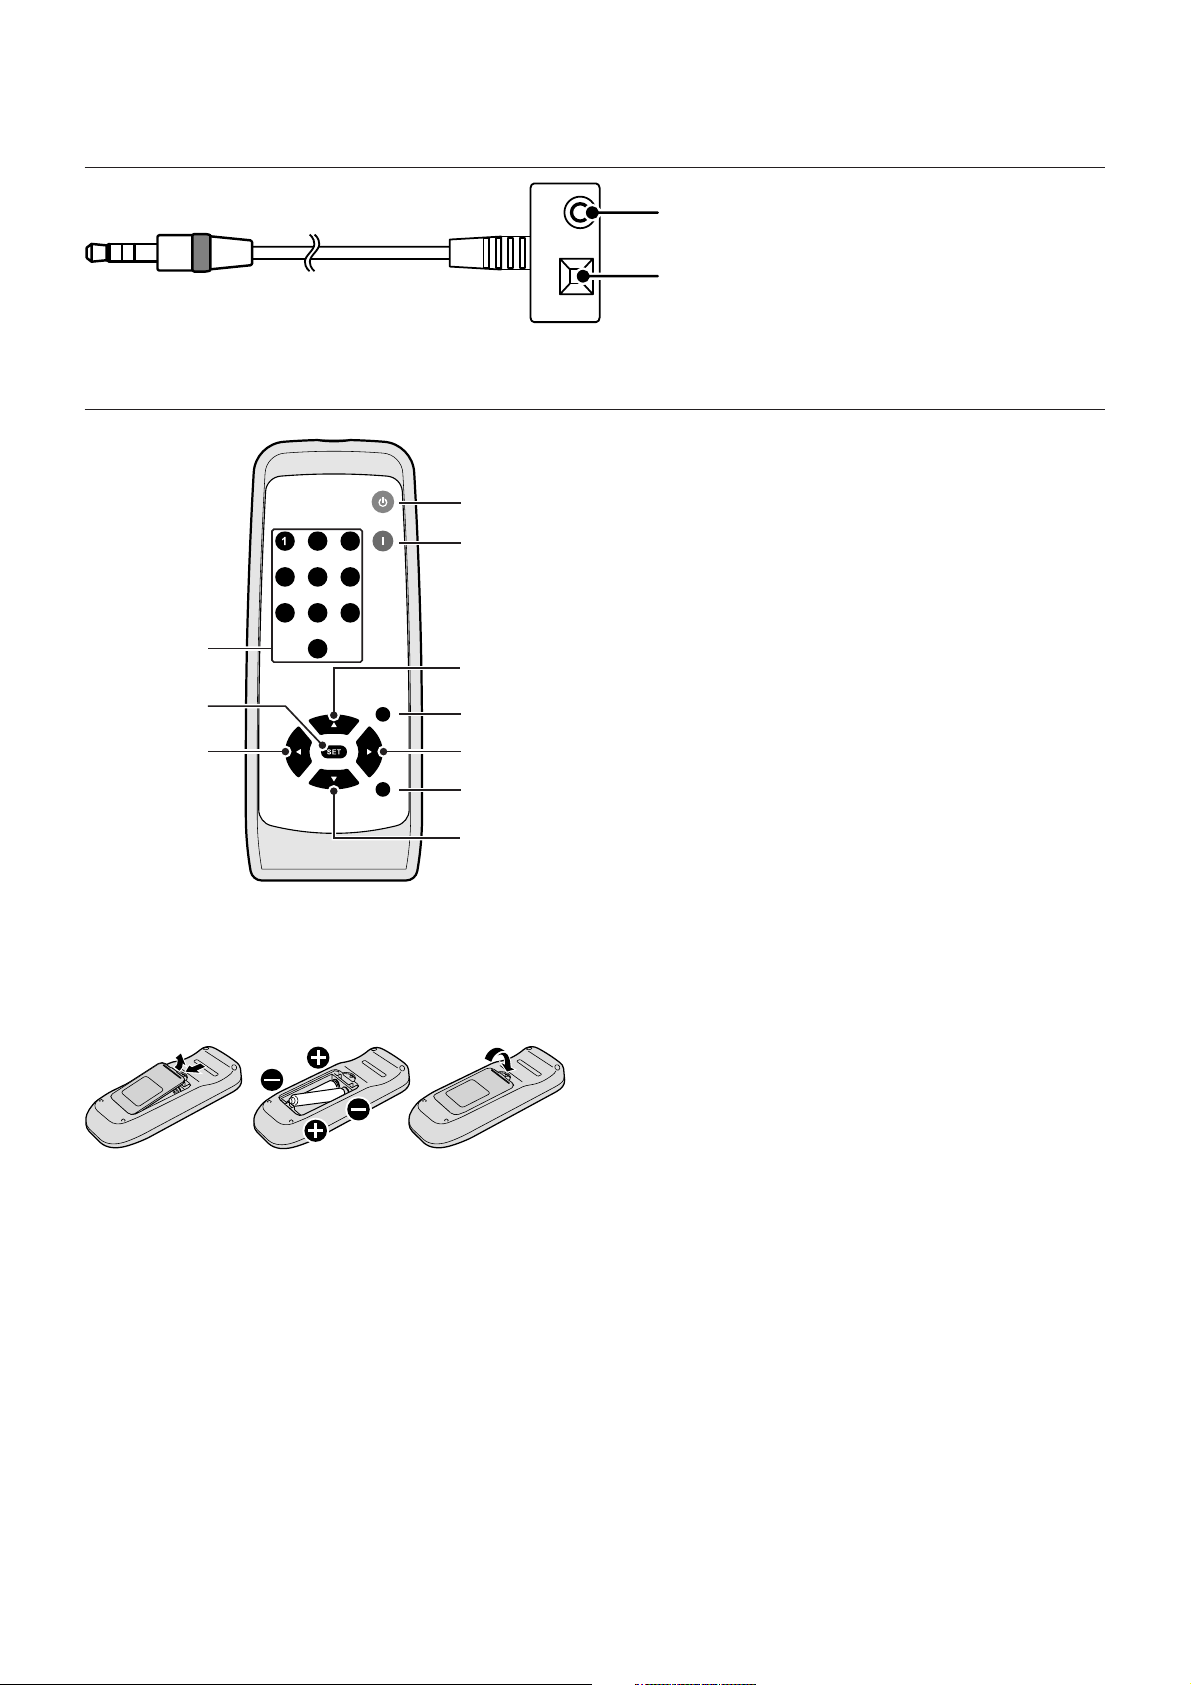
Wireless remote control extension cable
Remote control sensor
Power indicator
Power button ON: Green light turns on
Power button OFF: Green light flashes then turns off
Remote control
1Power button (POWER ON)
Press this button to turn the power on.
2Standby button (STANDBY)
Press this button to turn the power off.
3Number buttons
4MENU button (MENU)
This button turns the OSD screen on and off.
5,6,7and8Direction button
Use this button to select the settings on the OSD screen.
3
0
POWER ON
STANDBY
3
2
5
4
789
6
0
1
2
5
MENU
4
7
EXIT
8
9
6
9EXIT button (EXIT)
This button returns the OSD to the previous screen.
0SET button (SET)
This button saves on the selection on the OSD screen.
Handling the remote control
Install the remote control batteries
This requires two AA batteries. Install the batteries as shown in the diagram below.
A.Press end slide to open the cover
B.
Align the batteries according to the (+) and (-) indications inside the case
C.Replace the cover.
CAUTION:
Incorrect usage of batteries can result in leaks or bursting. NEC recommends the following battery use:
• Place the batteries properly according to the [+] and [-] indicators.
• Batteries have different characteristics depending on type, so do not mix batteries of different types.
• Do not combine new and old batteries. Doing so may shorten the life of new batteries, or cause liquid leakage from old batteries.
• Remove dead batteries immediately to prevent battery acid from leaking and causing a malfunction. Do not touch leaked battery acid as it may irritate the
skin. Carefully wipe the acid with a cloth.
NOTE:
• Other than to install the batteries, do not open the remote control.
• If you do not intend to use the Remote Control for a long period of time, remove the batteries.
Attention
• Do not subject to strong shock.
• Do not expose to water. If the equipment is exposed to water, immediate wipe away the water.
• Avoid exposure to heat and steam.
6
Page 7
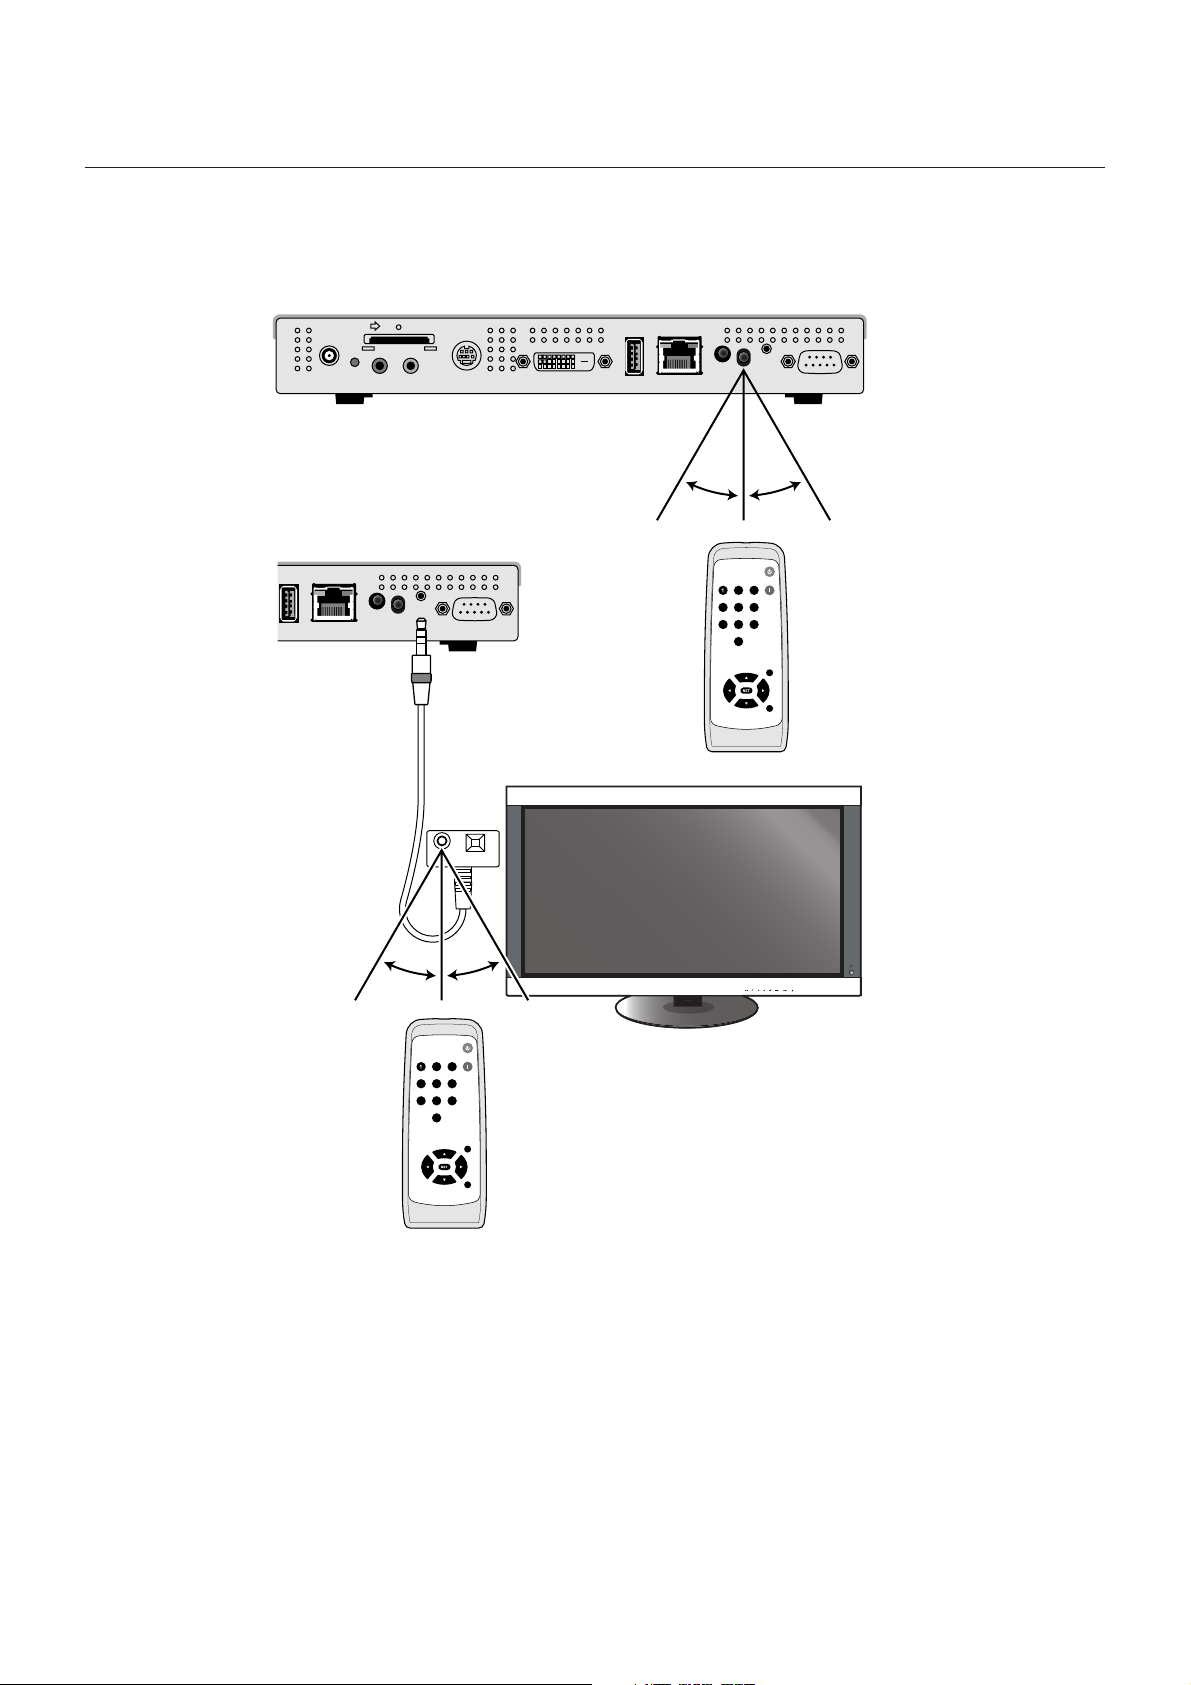
How to Use the Remote control
When operating the remote control, direct the end of the remote control towards the remote control sensor. Use the remote control within 7 m of
the front of the remote control sensor or within 3.5 m when at a 30˚angle above, below, to the left, or to the right of the sensor.
SD
AUDIOINAUDIO
POWER RESET VIDEO IN DVI USB LAN RS232
USB LAN RS232
Wireless remote control
extension cable
OUT
30˚30˚
POWERON
STANDBY
3
2
5
6
4
789
0
MENU
EXIT
30˚30˚
POWERON
STANDBY
3
2
5
6
4
789
0
MENU
EXIT
NOTE:
• When using the remote control sensor on the rear side of the equipment, do not connect the wireless
remote control extension cable. When the wireless remote control extension cable is connected, the
remote control sensor on the rear side of the equipment will not work. If it is difficult to operate the
remote control using the remote control sensor on the rear side, use the wireless remote control
extension cable.
• When using a wireless remote control extension cable, secure the light receiving part at the end of the
cable with the enclosed double-faced adhesive tape in a location where the light of the remote control
can reach it easily.
• The remote control operation may not work in places where there is direct sunlight, strong light, or
near fluorescent lights.
7
Page 8
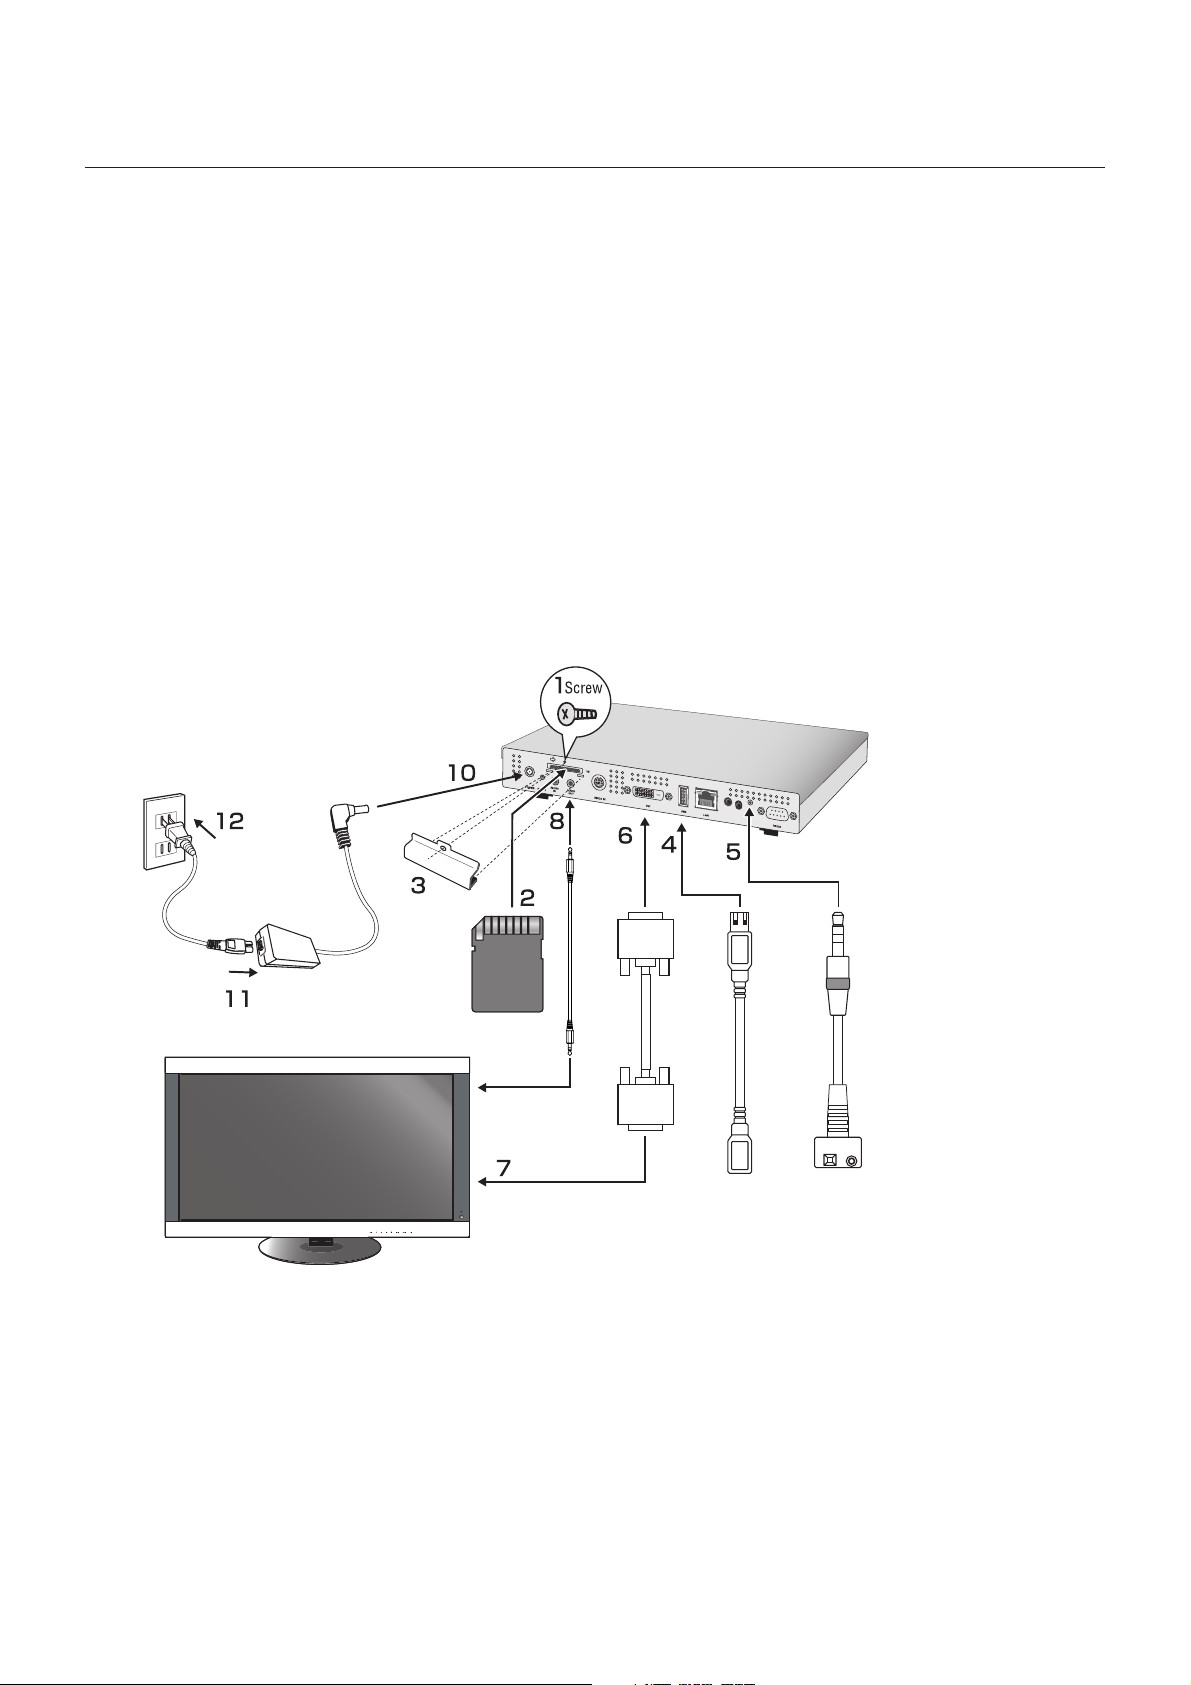
Connection and setting
When using LAN, after finishing the “Connection/Setting” in this chapter, refer to the “LAN Connection/Setting” (page 16).
Preparation
In order to use the Media Player to display the program on the Display, the enclosed authoring software, a computer, and a USB memory
(if the program is distributed using USB memory ) are required.
Authoring software
The authoring software is on the enclosed CD-ROM. Install the authoring software on your computer when using it for the first time. Refer to the
authoring software User’s Manual for the installation procedure.
USB memory
Encoded USB memory cannot be used.
Connection when using USB memory to distribute programs
1. Remove the screw from the mounting hole for the memory card cover.
2. Insert the attached memory card into the memory card connector.
CAUTION:
Insert the memory card with the label side down. Check to make Sure that the write protect switch in riot in the look position.
3. Attach the memory card cover with the screw that was removed from the main body.
4. Insert a USB cable extension into the USB connector.
(When the program is distributed using a USB memory )
8
Page 9
Connection and setting (continued)
5.
Set the wireless remote control extension cable in the wireless remote control extension cable
connector. Secure the light receiving part at the end of the cable with the enclosed doublefaced adhesive tape in a location where the light of the remote control can reach it easily.
NOTE:
When using the remote control sensor on the rear side of the equipment, do not connect the wireless remote control extension cable. When the wireless
remote control extension cable is connected, the remote control sensor on the rear side of the equipment will not work. If it is difficult to operate the remote
control using the remote control sensor on the rear side, use the wireless remote control extension cable.
6. Connect a video signal cable (DVI-D-DVI-D) to the DVI OUT.
7. Connect the signal cable to the DVI input connector of the Display.
8. Connect the audio cable to the AUDIO OUT and connect the other end to the AUDIO IN of
the Display.
9. Switch on the Display. Set the input signal of the Display to “DVI.”
10. Set the plug of the AC adapter cable into the DC In connector.
11. Securely insert one end of the power cord into the power connector of the AC adaptor.
12. Connect the power plug to the AC power source. The power of the Media Player is
automatically switched on.
Warning
• Do not use the equipment with a source voltage other than what is displayed. Doing so may cause fires or electric shock.
If the power code provided with this Media Player doesn’t match the voltage of the power outlet, please use a power cord that matches
•
the AC voltage of the power outlet and has been approved by and complies with the safety standard of your particular country.
• Always use the AC adaptor (DXW1225N-S0068Z) enclosed with the equipment. Using other AC adaptors may cause smoke or
sparks.
• When connecting an AC adaptor, make sure that the cord is not bent or placed under the equipment.
• The power cord and AC adaptor enclosed with this equipment should be used only with this equipment. To ensure safety, do
not use with other equipment.
Attention
•
Make sure the area around the power source is such that the power plug can be easily plugged in and pulled out.
NOTE:
When starting the Media Player for the first time or resetting the equipment, the message “Factory reset is done” may be displayed.
Setting
Language setting
In the default conditions, the language of the OSD menu is set to English. To change the language setting to other language, press the menu
buttons of the remote control and display the OSD screen, and change the “LANGUAGE” on the OSD display to other language.
Date/Time setting
To display a program on the Media Player according to the set schedule, “DATE/TIME” setting is required. Press the MENU buttons of the remote
control and display the OSD screen, and set the Date and Time.
VIDEO OUT
Set the “VIDEO OUT” according to the optimum resolution of the Display.
For other settings, refer to “OSD.”
NOTE:
• About the automatic OFF function of VIDEO OUT
• For periods of time in which programs are not set, the VIDEO OUT is switched OFF to conserve energy.
(When the product is first purchased, programs are not set, so it is always switched OFF.)
• In Video out off, OSD can be displayed by MENU button on remote control.
9
Page 10
How to create program data
Preparing content
First, prepare the content you want to display.
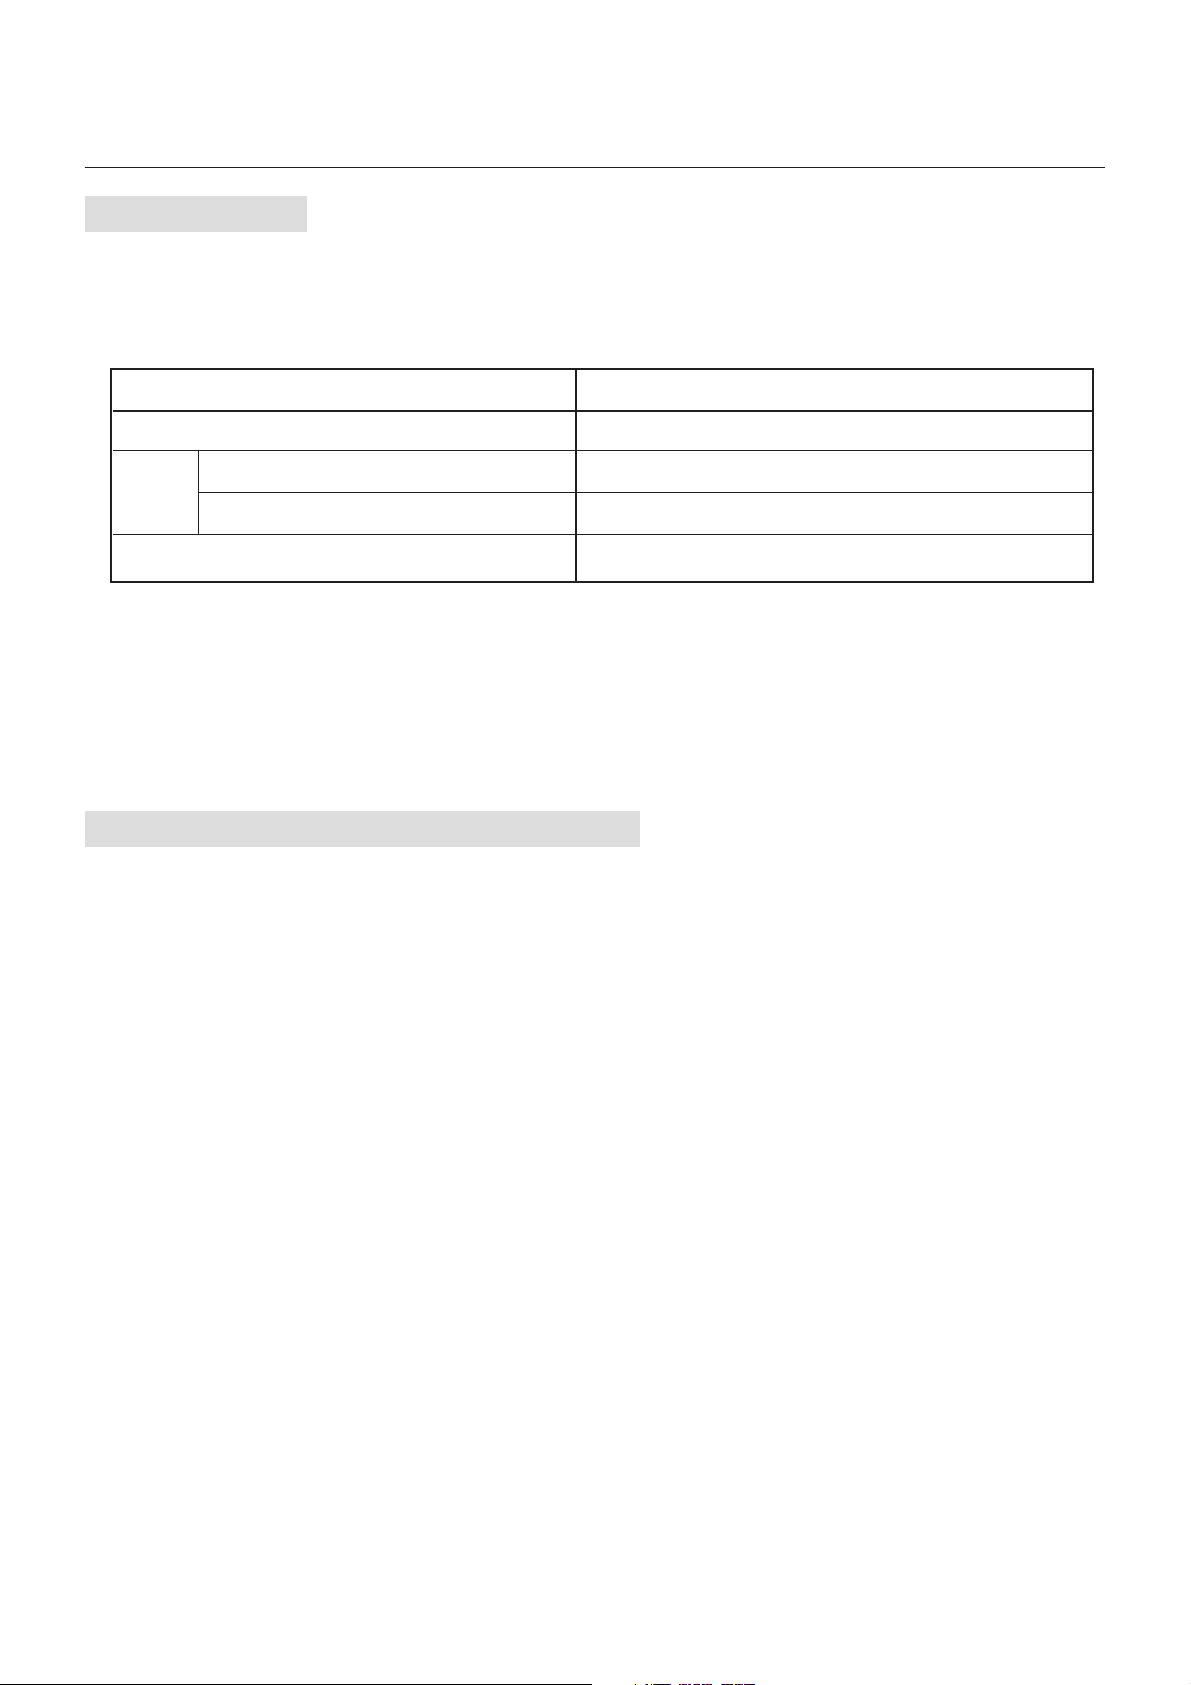
Content files available for use with the authoring software are as follows:
File format Extension
Still image (JPEG, PNG, BMP)
MPEG1, MPEG2
Movie
Windows Media Video 9
Audio
CAUTION:
Depending on the file, it may not be used. For details, refer to the “Content Specifications.”
NOTE:
Data created using PowerPoint® presentation software (*.ppt) can be used on this equipment by converting it to still images (*.jpg, *.png, *.bmp) using the
conversion software Viewer PPT Converter on the enclosed utility disc.
However, animations and movies cannot be converted.
.jpg, *.jpeg, *.png, *.bmp
*
.mpeg, *.mpg, *.m2p, *.m2v, *.vob
*
.wmv
*
.mp3
*
Create program data using authoring software
Click on the authoring software in the computer to start the program. For details on how to use authoring software, refer to authoring software
User’s Manual.
Save the program data created on a USB memory connected to the computer using the distribution function of the authoring software.
10
Page 11

Copy the program data on the memory card of the Media Player
1. Prepare USB memory containing program data.
2.
Press the “STANDBY” button of the remote control to switch off the power of the Media
Player, and then set the USB memory containing the program into the USB cable extension.
NOTE:
If the USB cable extension is not used, set the USB memory directly into the USB memory connector on the main body of the Media Player.
CAUTION:
When the program is updated, the program data in the Media Player will be overwritten. Please be aware that the old program data will be lost.
3. Press the “POWER ON” button of the remote control to switch the Media Player on. The
update confirmation screen will be displayed, so press the “SET” button.
The file on the USB memory will be copied onto the memory card in the equipment.
CAUTION:
While the “Now updating... Important!!!” message is displayed, do not remove the USB memory or switch off the power source. The data on the USB memory
or memory card may be damaged.
4. After the files are copied, the equipment will automatically restart. After the equipment
completes initialization (approx. 1 minute) the update confirmation screen is displayed
again. Press the EXIT button and cancel the screen.
5. Remove the USB memory from the USB cable extension.
CAUTION:
The maximum capacity of the program data is 1.8 Gbytes (in the case of the enclosed SD card (2 Gbytes)).
When copying the program data onto the Media Player, make sure the content data capacity in the USB memory does not exceed this size. The maximum
capacity of the SD card set in the Media Player can be confirmed on the “MEMORY CARD” of the OSD screen.
The update time of the program data is about 15 minutes (maximum) when the data capacity is 1.8 Gbytes.
11
Page 12
OSD
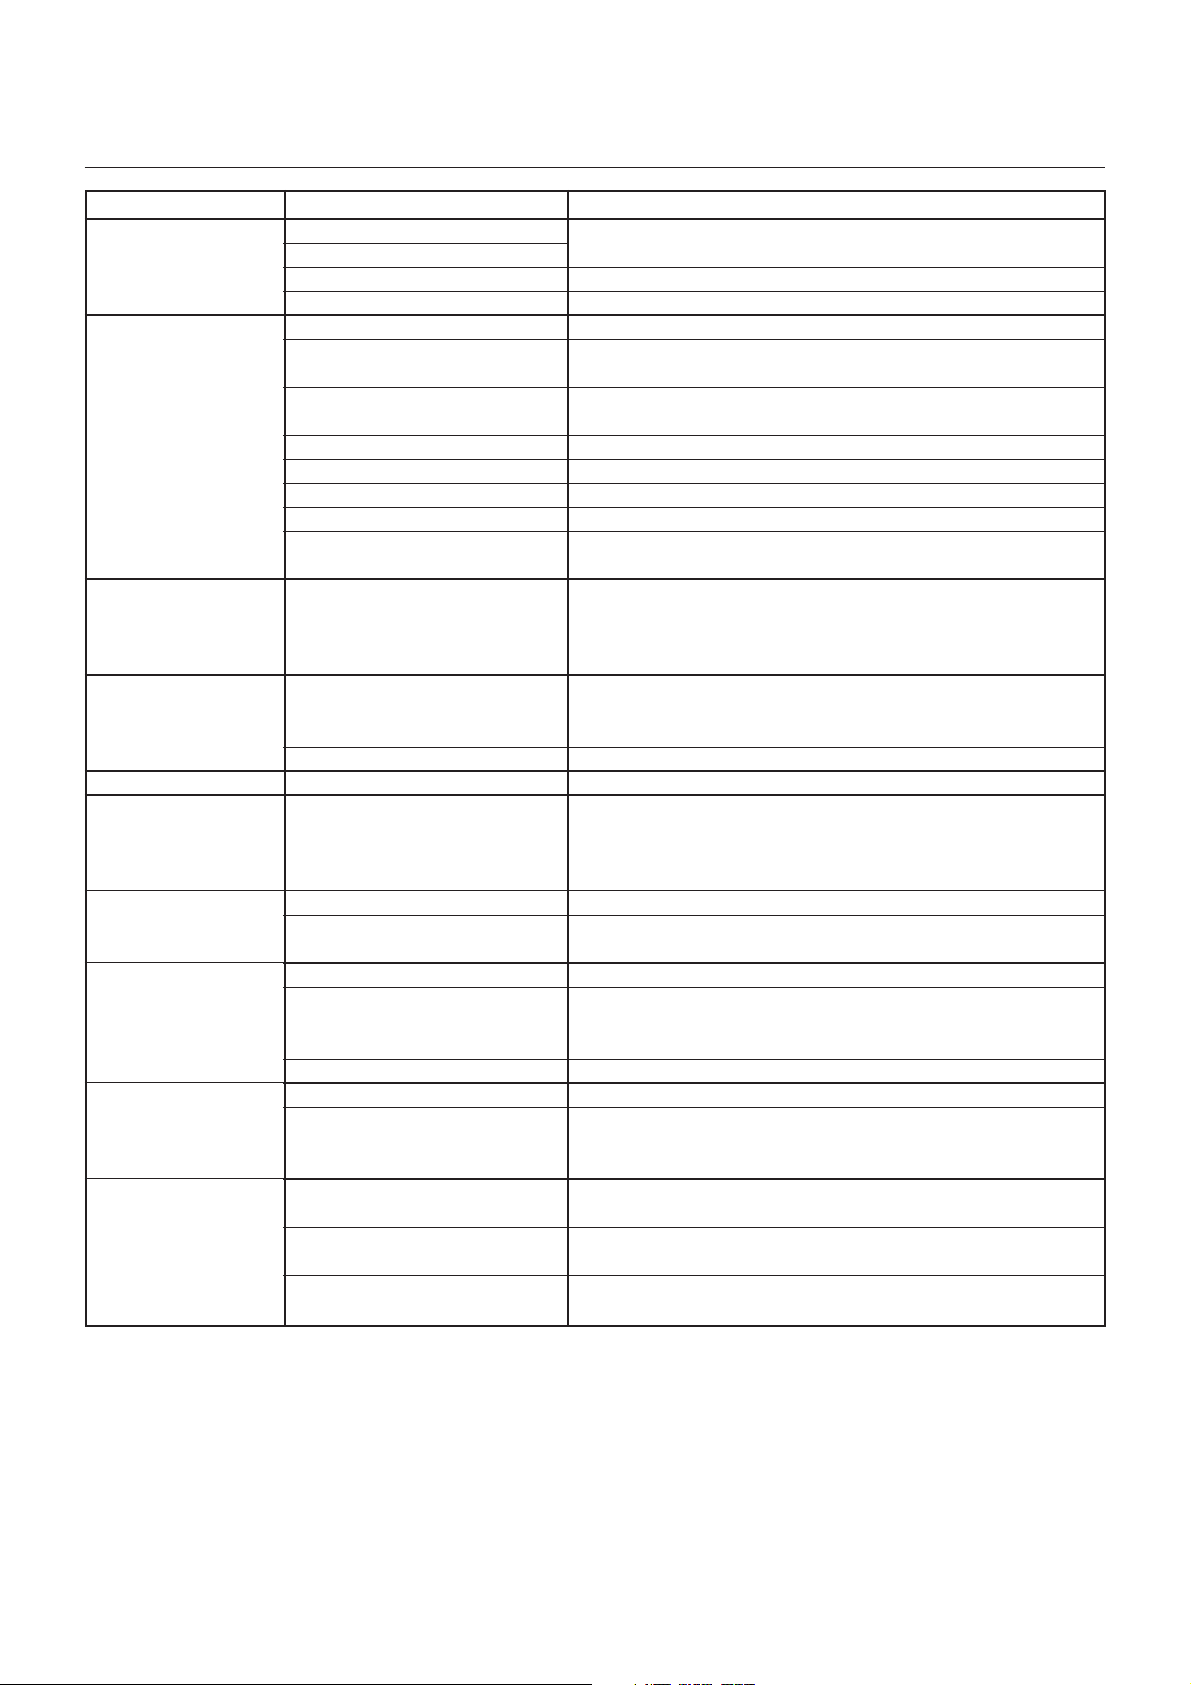
Main Menu
DATE/TIME
NETWORK
PREVIEW
TIMER
LANGUAGE
VIDEO OUT
VIDEO IN
MEMORY CARD
IR CONTROL
SLIDE SHOW
Sub Menu
Date
Time
NTP Server
Time Zone
Static IP/DHCP
IP
Netmask
Gateway
DNS
MAC
Proxy
Update Mode from LAN
Power-ON/Power-OFF
Video-ON/Video-OFF
Normal
S-Video Through Out
Free
Available
Delete All Content Files
Normal
IR Lock
Normal Mode
Slide Show Mode
Video Repeat Mode
Description
Set the current Date and Time.
This is not used in this equipment.
This is not used in this equipment.
Select the IP Address setting method.
Set the IP Address used when selecting a Static IP. The default
setting is (192.168.0.2)
Set the Netmask used when selecting the Static IP. The default
setting is (255.255.255.0)
This is not used in this equipment. Leave the default setting at (192.168.0.1)
This is not used in this equipment. Leave the default setting at (0.0.0.0)
This is the MAC address for this equipment.
This is not used in this equipment. Leave the default setting at (0.0.0.0)
Set it to “Push Mode” (default setting). The “Pull Mode” is not used
with this equipment.
Preview the selected program. Select the program to preview on the “Program List”.
During preview, push any button on the remote control to display the review end
menu. The preview will be displayed repeatedly until it is ended up manually.
* If the OSD menu is selected while displaying the “Slide Show Mode”, the “PREVIEW” is not displayed.
Switches the equipment ON/OFF. If there is program data that set the
time for power on/off, the setting of the program data is valid, and
the timer setting is void. The time set in the program is displayed.
This is a setting for future extensions. Do not select this when using the equipment.
Select the language for the OSD menu.
Select the “VIDEO OUT” according to the Display to be used. Check the
“Read Timing from Display” item and the recommended timing for the
Display will be shown. Depending on the Display, the recommended timing
may not be set normally. In such cases, clear the check from this item.
Normally this is used.
Image from S-VIDEO input will be displayed full screen. Information
other than S-VIDEO (such as Message) will not be displayed.
This is the remaining area available for use.
This is the maximum capacity of content that can be used. As a rough
guide, it should be about 90% of the memory card capacity. (In the case of
the enclosed memory card (2 Gbytes), it is displayed at around 1.8 Gbytes.)
All content will be deleted.
Remote control operation will be locked. To release the lock, press the “MENU,”
“1,” “2,” and “3” buttons on the remote control in order, then wait 3 seconds. If
“OSD Menu Unlock” is displayed, the lock has been released.
The program is displayed according to the schedule set in the
Authoring Software.
This sets the mode in which the images (*.jpg, *.jpeg, *.png, *.bmp) on the
connected USB memory are displayed continuously in the order of the file names.
This sets the mode in which the moving file (*.wmv, *.mpg) on the connected
USB memory are displayed continuously in the order of the file names.
12
Page 13

Slide Show Mode/Video Repeat Mode
These functions continuously display still image data (*.jpg, *.jpeg, *.png, *.bmp) or movie files (WMV9, MPEG1, MPEG2) in the USB
memory in the order of the file names.
The still image data or movie data can be displayed without using authoring software.
How to set the Slide Show Mode
1. Set the USB memory containing the still image data you wish to display in the Media Player.
NOTE:
• Change the name of the folder containing the still images to something other than “media.”
2. Select “Slide Show Mode” in the “SLIDE SHOW” item of the OSD menu.
3. The time can be set from 3 seconds to 60 seconds. If it is set to “Manual,” the display can
be switched using the remote control direction buttons , .
CAUTION:
The setting for the display time will become valid after a restart.
4.
Press the SET button in “Folder,” and select the folder containing the still images you wish to display.
CAUTION:
Folders located lower than 2 levels cannot be selected. The selection of the folder name becomes valid after a restart.
5. Select the “Apply” and select “Yes” on the confirmation screen, and the equipment will
automatically restart.
NOTE:
While displaying still images, press the direction buttons , and the previous or next still image will be displayed.
How to set the Video Repeat Mode
1.
Set the USB memory containing the movie file you wish to display in the Media Player.
Note
• Change the name of the folder containing the movie file to something other than “media.”
2. Select “Video Repeat Mode” in the “SLIDE SHOW” item of the OSD menu.
CAUTION:
• Select full screen and the image will always be shown in full screen.
3. Press the SET button in the “Folder,” and select the name of the folder that contains the
movies you wish to display.
CAUTION:
Folders located lower than 2 levels cannot be selected. The selection of the folder name becomes valid after a restart.
4. Select the “Apply” and select “Yes” on the confirmation screen and the equipment will
automatically restart.
How to release the Slide Show Mode/Video Repeat Mode
1. When displaying the slide show or movie play, press the MENU button on the remote
control and display the OSD menu.
2. After selecting ”Normal Mode” in “SLIDE SHOW” on the OSD menu, select “Yes” on the
confirmation screen and the equipment will automatically restart in Normal Mode.
13
Page 14
How to create program data using external video
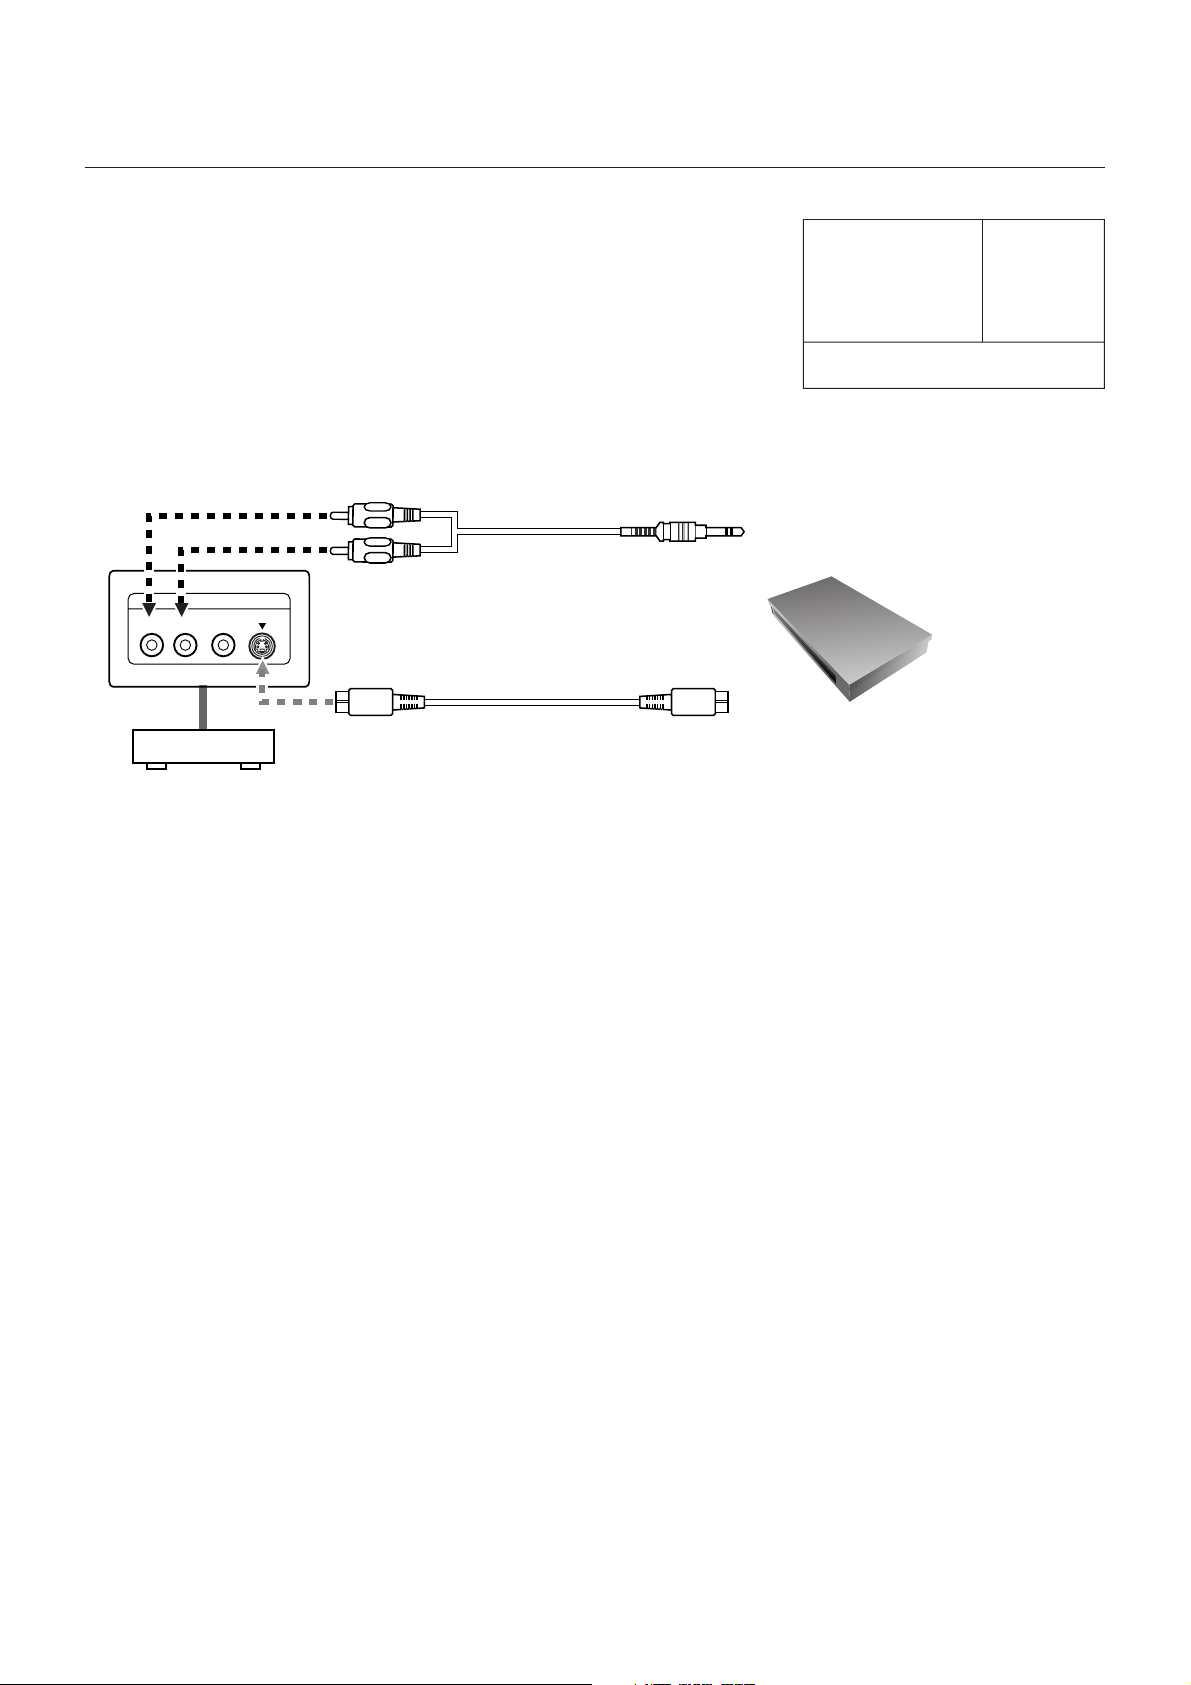
External video image from the S TERMINAL input connector can be displayed with still
images and messages. (For details refer to the authoring software User’s Manual.)
The following shows the connection with commercially available AV equipment.
External AV equipment
Output
VIDEO S-VIDEO
AUDIO
LR
Video, game machines, etc.
Audio output
S Terminal video output
Audio cable (Commercially available)
S Terminal input connector
S Terminal video cable (commercially available)
AUDIO IN
Program layout example
External video image Still image
Message
Media Player
NOTE:
Video signals with copy protection cannot be displayed
due to copyright protection.
14
Page 15
How to use the enclosed brackets
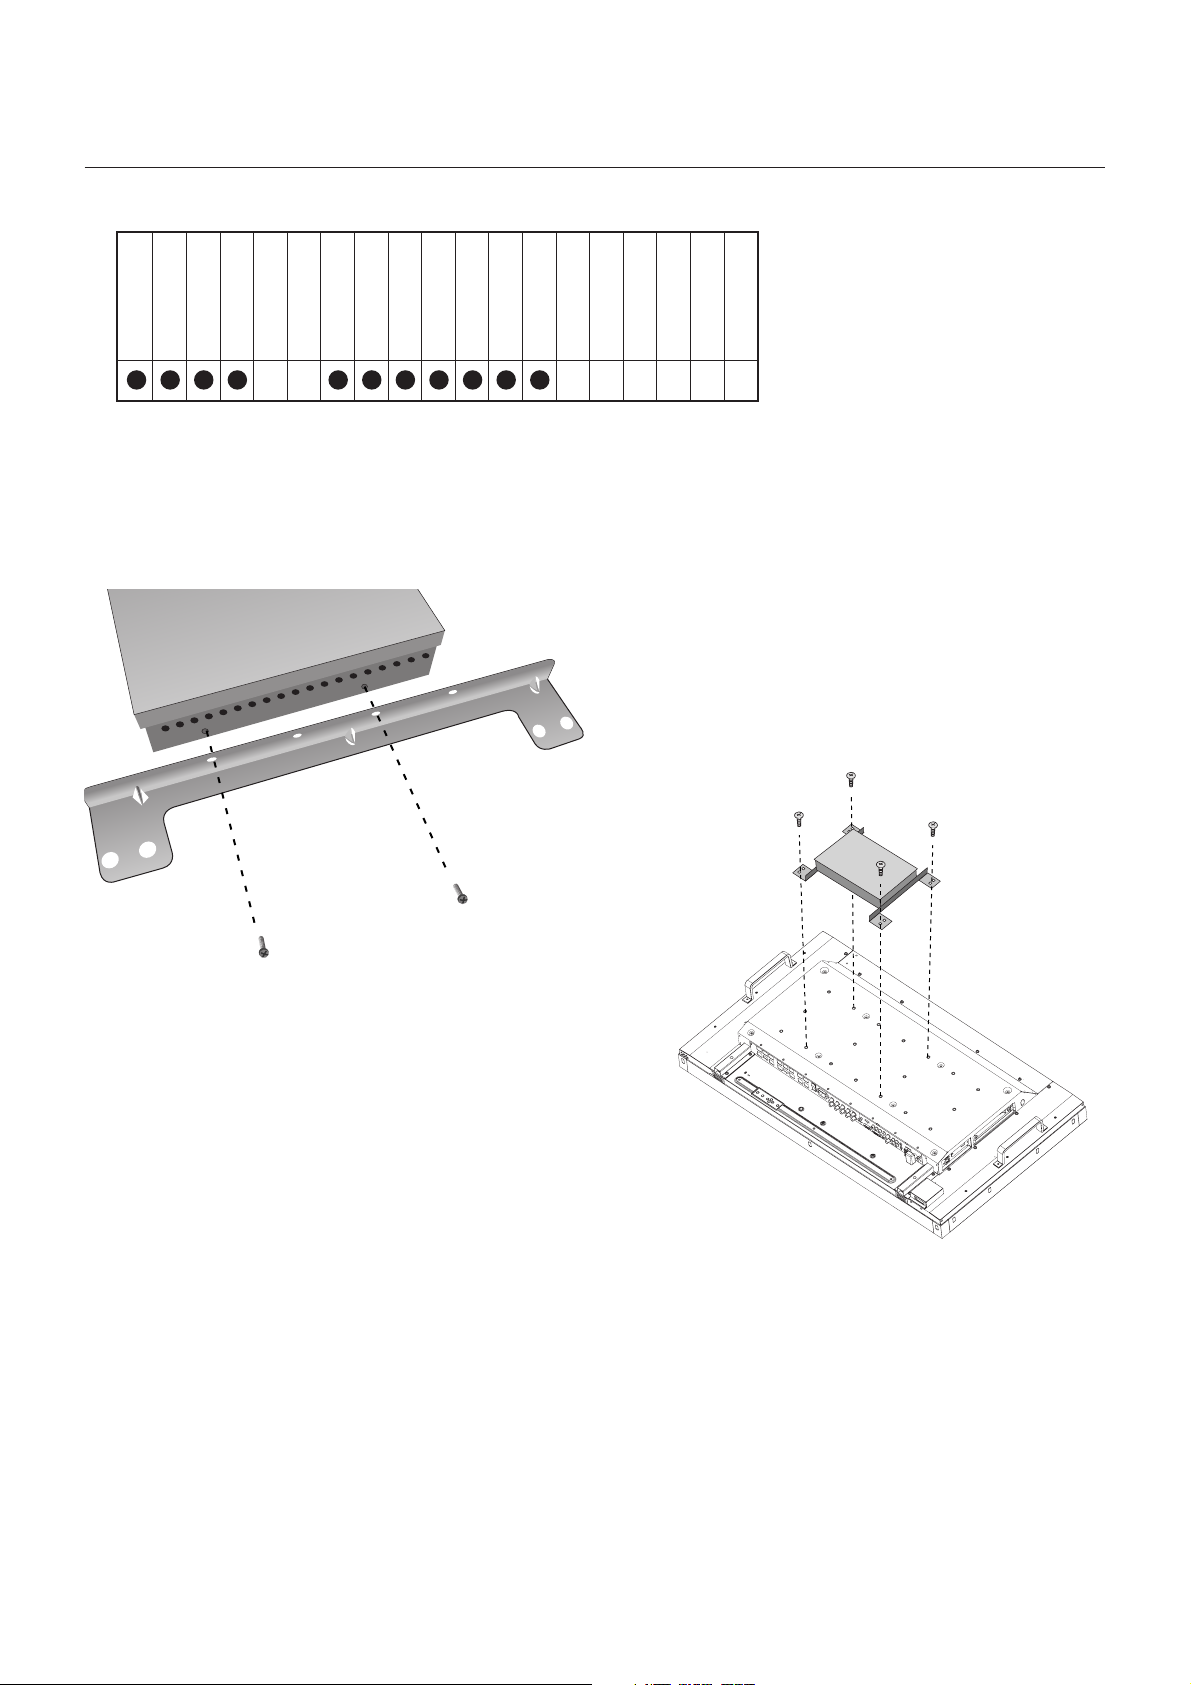
These are used to attach the Media Player to our LCD Display. The equipment can be installed to the rear side of the Display.
LCD6520P/L
LCD5220
X461HB
X461UN
M461
P461
LCD4615
M46
V461
V421
V321
LCD4620
LCD4215
M401
P401
M40
LCD4020
LCD3215
LCD3210
Can be installed on the MP-01
•
When installing the Media Player on the rear side of the Liquid Crystal Display
The equipment can be installed on the following Liquid Crystal Displays.
LCD3210, LCD4020, LCD4620, M40, M46, LCD3215, LCD4215, LCD4615, V321, V421, V461
1.
Remove the two bracket screws from the side of
the main body of the equipment. (There are two on
each side.) Using the screws you removed, screw
the two brackets to each side of the equipment.
2. Install the equipment on the rear side of the
Liquid Crystal Display. Using an M6 screw
(length is the thickness of the mounting fixture
+10 mm), tighten it securely. (tightening torque
470 - 635 N •cm)
CAUTION:
Please purchase the M6 screw as it is not enclosed in the package.
15
Page 16
<Using LAN>
LAN Connection and setting
Introduction
When distributing program data via LAN, LAN connection and setting are required.
There are two methods for setting the IP Address, one for Static IP Address and one using DHCP servers.
In the case of Static IP Address, refer to “LAN connection/setting: When using Static IP Address,” and when using DHCP server refer to “LAN
connection/setting: When using DHCP server.”
NOTE:
The DHCP server provides IP Addresses to equipment on the NETWORK. Normally, they are built-in with routers.
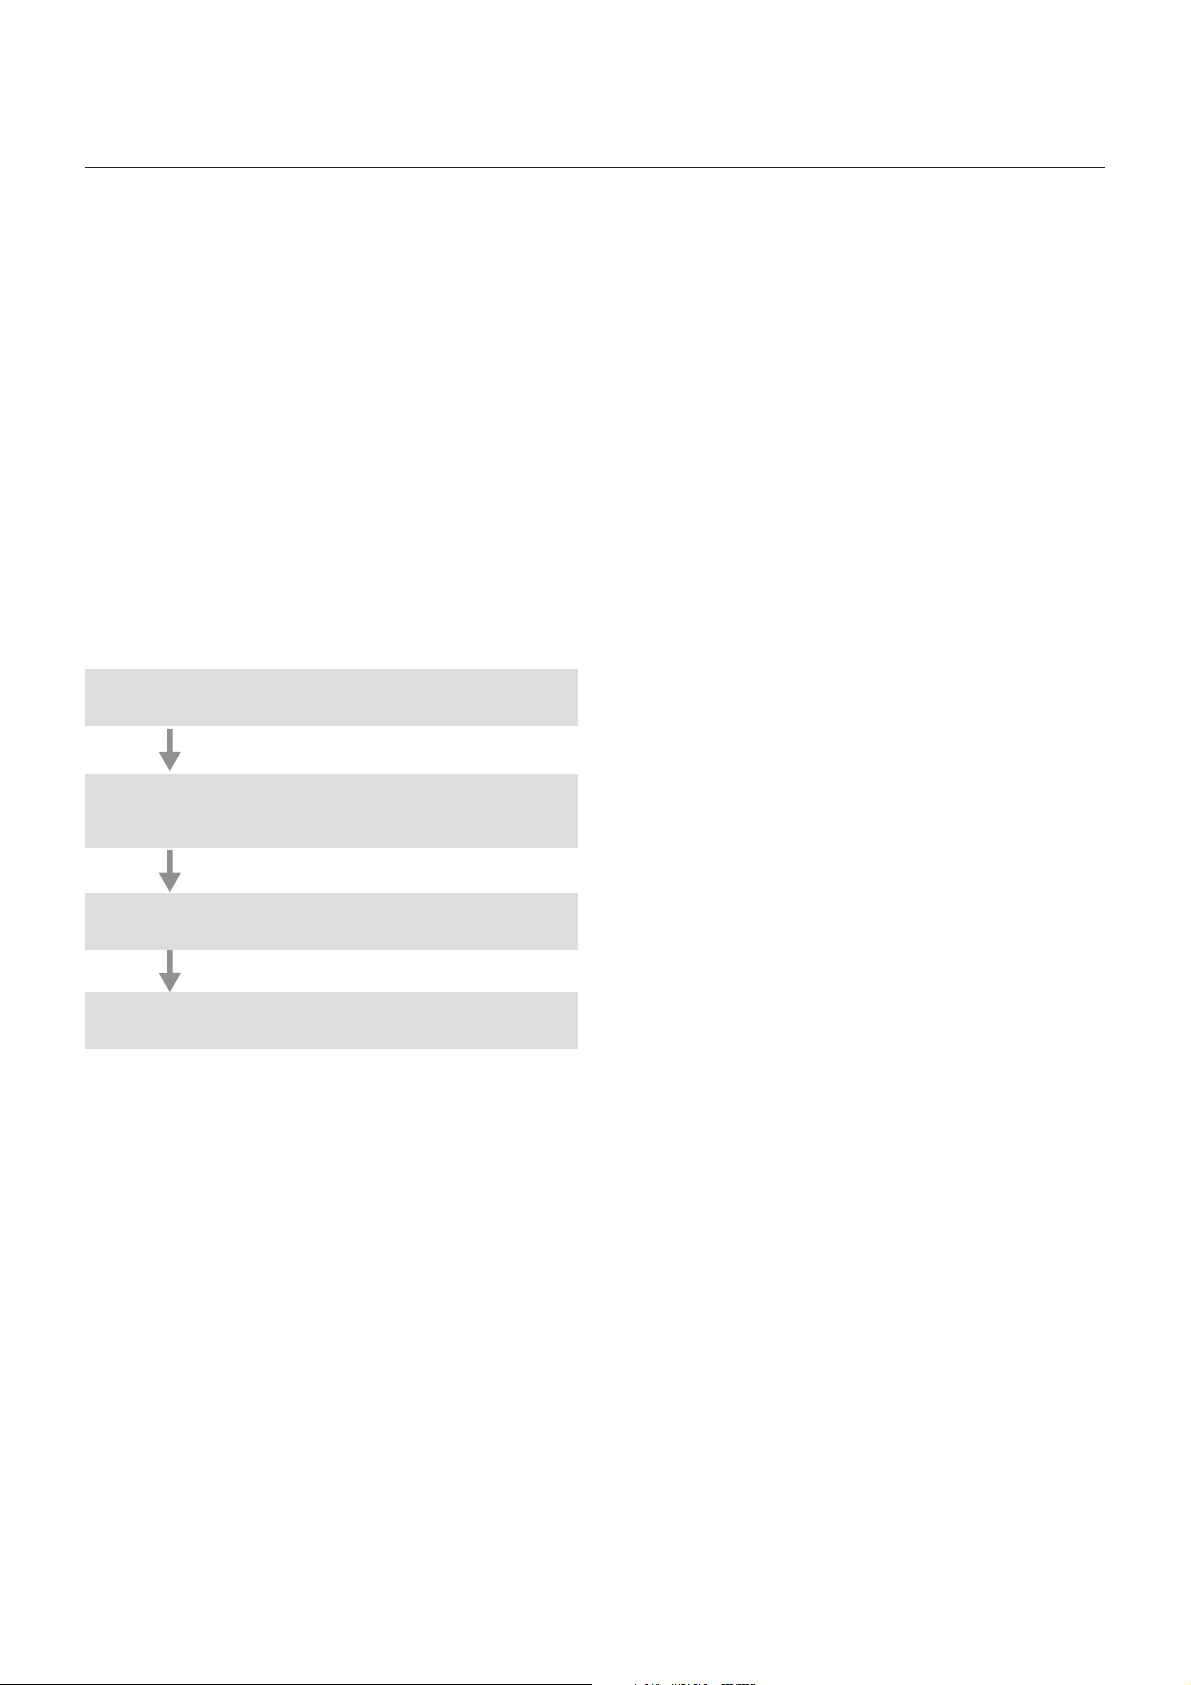
The procedure for LAN setting is as follows.
MP-01 LAN setting
The Media Player name setting of the
MP-01 (required only in the DHCP mode)
* Not required for Static IP.
Authoring software LAN setting
LAN connection test
Open the OSD of the MP-01 using the enclosed remote control and conduct settings.
From Internet Explorer on the computer, call out the MP-01 setting
screen via LAN and conduct settings.
Conduct setting using the panel setting wizard from “panel management” of the authoring software.
To confirm the LAN setting, conduct the connection test.
16
Page 17
LAN Connection and setting (continued)
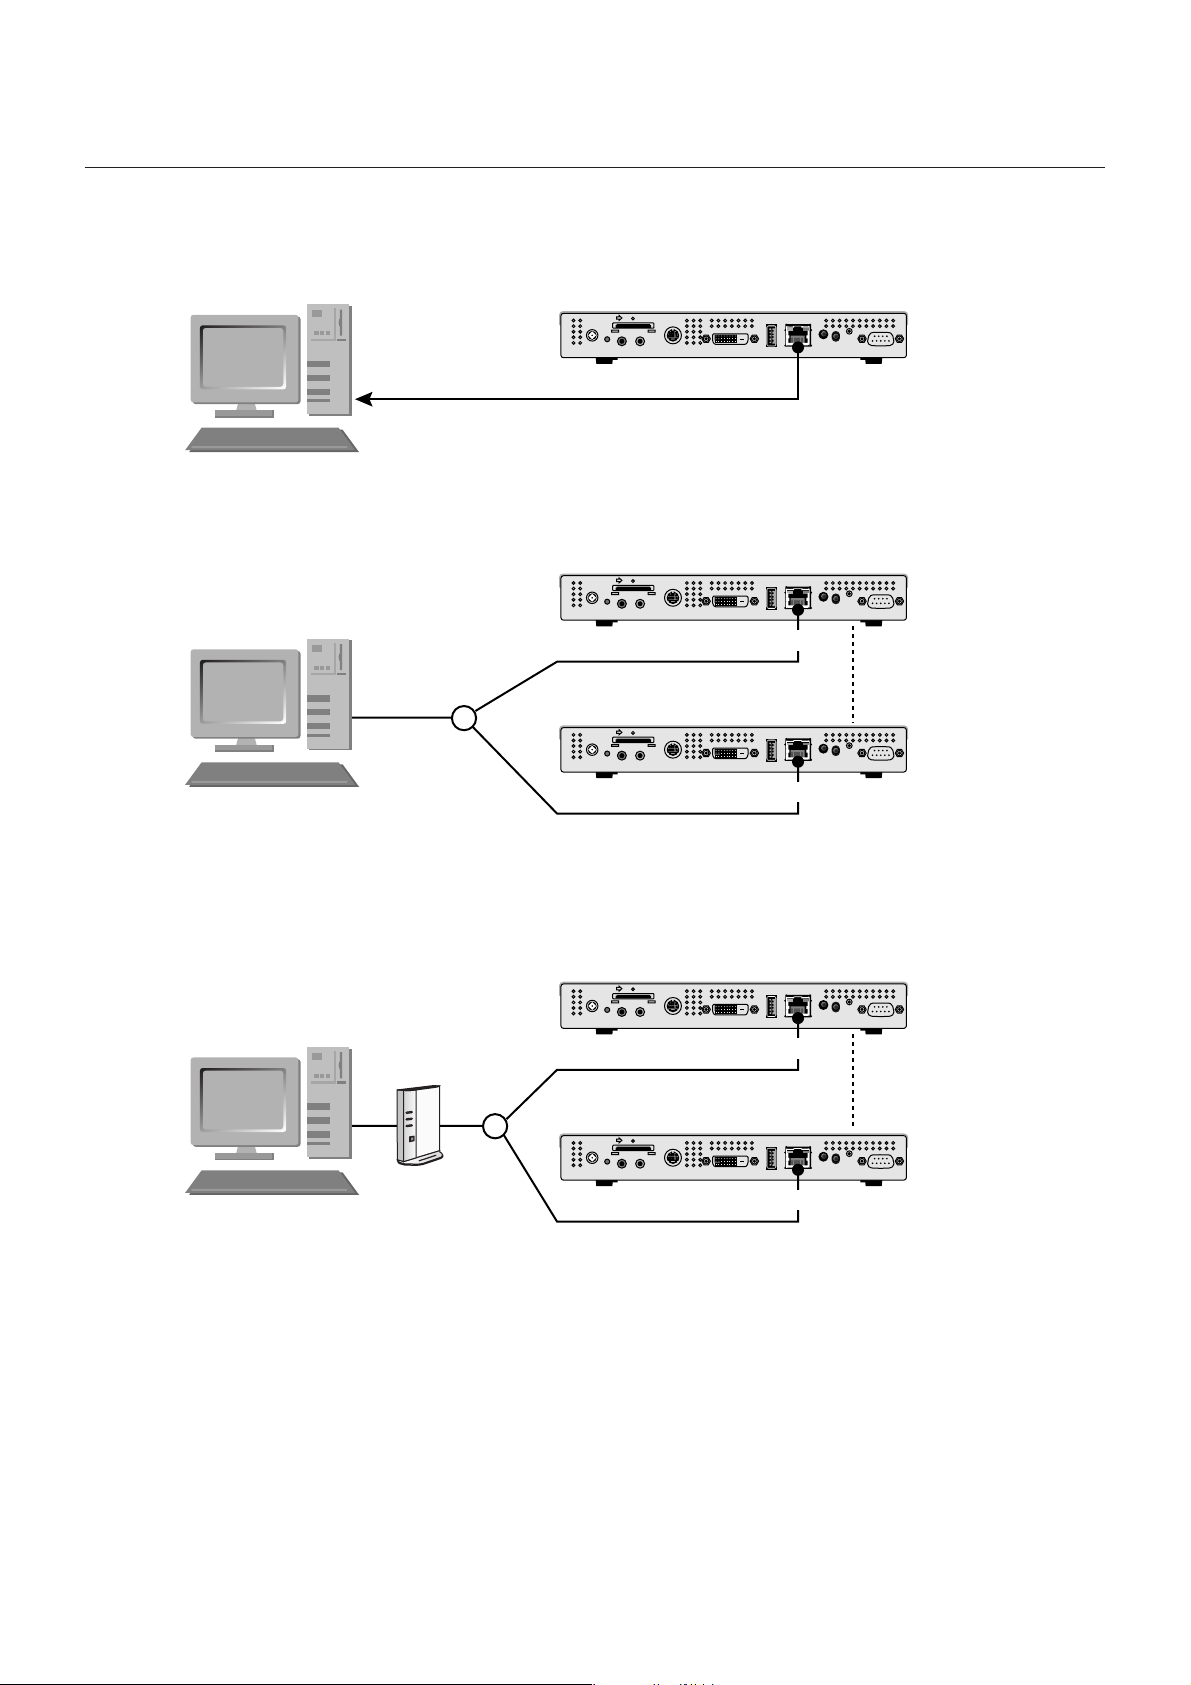
•When connecting directly to a computer
Computer
+
Authoring software
AUDIOINAUDIO
POWE RESET VIDEO IN DVI USB LAN RS232
OUT
LAN straight cable
•When connecting with several computers via a hub
Computer
+
Authoring software
Hub
AUDIOINAUDIO
POWE RESET VIDEO IN DVI USB LAN RS232
OUT
LAN straight cable
AUDIOINAUDIO
POWE RESET VIDEO IN DVI USB LAN RS232
OUT
LAN straight cable
Media Player
SD
Media Player
SD
Media Player
SD
<Using LAN>
LAN connector
LAN connector
LAN connector
•When using a DHCP server (built into routers)
NOTE:
Refer to “LAN connection/setting: Use DHCP servers.”
Computer
+
Authoring software
Hub
Routers
AUDIOINAUDIO
POWE RESET VIDEO IN DVI USB LAN RS232
LAN straight cable
AUDIOINAUDIO
POWE RESET VIDEO IN DVI USB LAN RS232
LAN straight cable
NOTE:
A maximum of 20 Media Players can be connected.
CAUTION:
Connect the computer and Media Player to the LAN terminal, not the WAN terminal of the routers.
Use commercially available routers, LAN cables, and hub.
Use LAN cables that are category 5 or higher.
Media Player
SD
OUT
LAN connector
MediaPlayer
SD
OUT
LAN connector
17
Page 18
<Using LAN>
LAN Connection and setting: When using Static IP Address
1. Static IP Address setting of the Media Player
1) Switch on the power of the Media Player and Display.
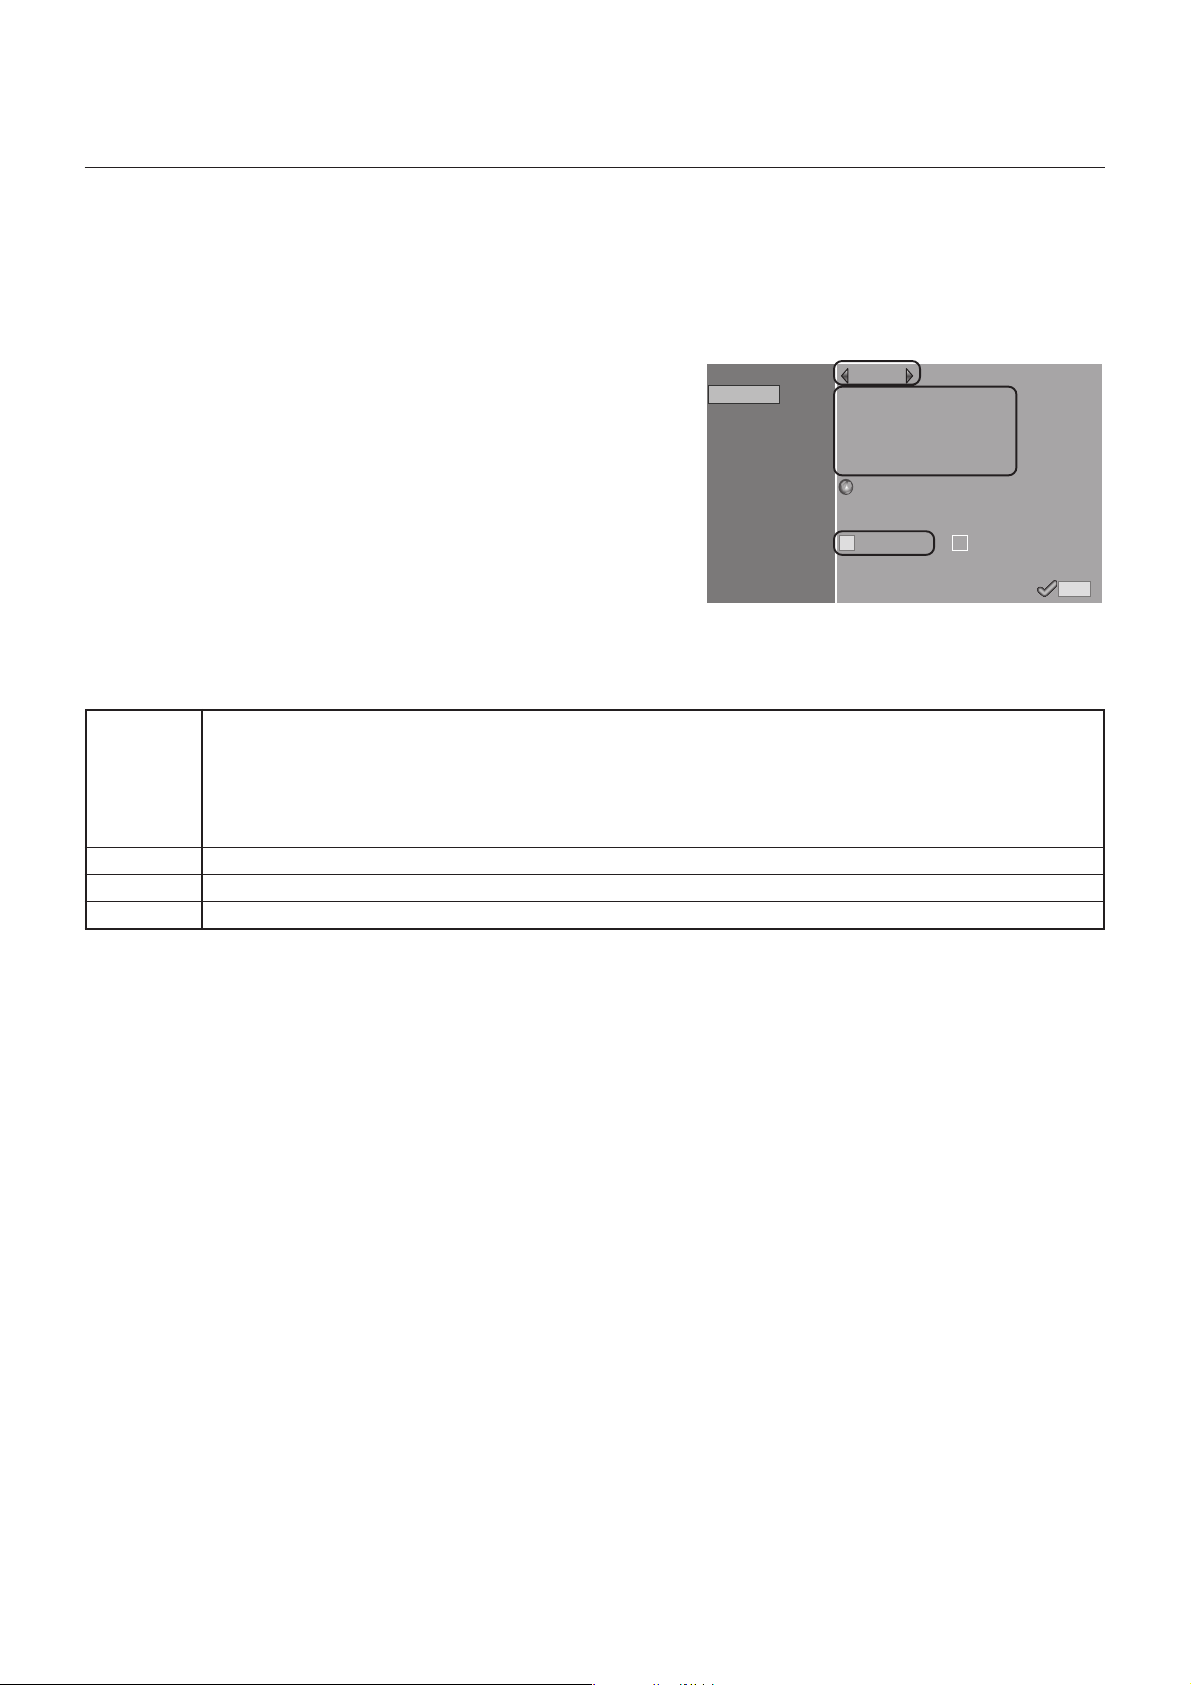
2) Display the OSD screen using the menu buttons on the remote control, and open the
“NETWORK.”
3) Set the IP Address.
1 Use the left and right direction buttons on the remote control to select the
“Static IP”.
2 Select the “Push Mode”.
3 Use the number buttons on the remote control and conduct settings as shown
in the table below. Write down the set IP Address and keep it for reference.
4 Select the “Apply”.
5 Close the OSD menu using the EXIT buttons.
DATE/TIME
NETWORK
PREVIEW
TIMER
LANGUAGE
VIDEO OUT
VIDEO IN
MEMORY CARD
IR CONTROL
SLIDE SHOW
Static IP
IP: 192 .168 .0 .2
Netmask: 255 .255 .255.0
Gateway: 192 .168 .0 .1
DNS: 0 .0 .0 .0
MAC:
Proxy
Update Mode from LAN:
Push mode Pull mode
Static IP Address setting
1
3
00:50:41:80:02:A9
2
4
Apply
IP
Netmask
Gateway
DNS
Find out the IP Address of the computer, change only the last digit of the address, and set the address with the IP Address that is not the
same as other media players.
Ex) IP Address of the computer: In the case of 192.168.0.10,
set the first Media Player as 192.168.0.2.
Set the second Media Player as 192.168.0.3.
Set the same value as the Netmask of the computer. The default setting is (255.255.255.0)
Leave it at the default setting. The default setting is (192.168.0.1)
Leave it at the default setting. The default setting is (0.0.0.0)
CAUTION:
Set the computer’s IP Address according to the network environment.
NOTE:
To confirm the IP Address and Netmask of the computer, startup the “command prompt” (In the Start menu>All programs>Accessories.) in
Windows XP/Vista/7 and run C:\> ipconfig.
18
Page 19
<Using LAN>
LAN Connection and setting: When using Static IP Address
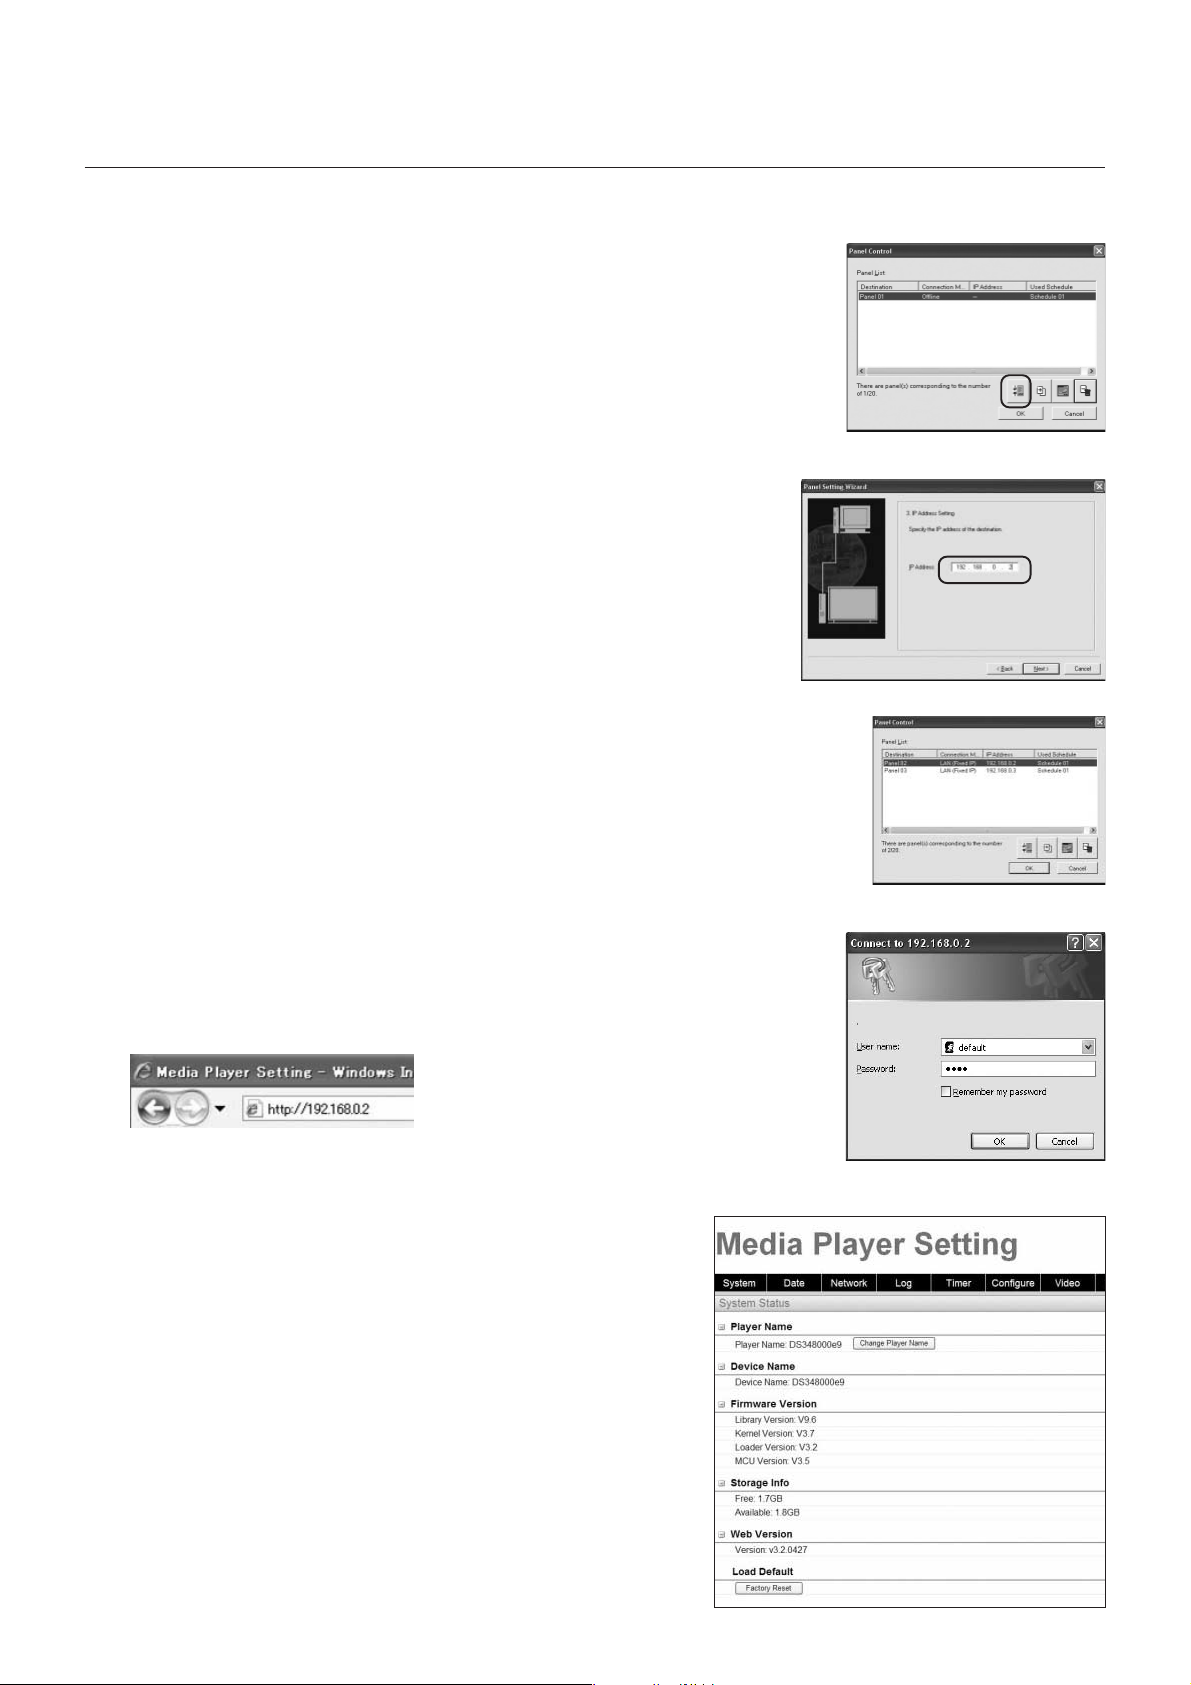
2. Authoring software panel registration
Panel setting wizard startup button of the
(continued)
Click the panel setting button in the “Panel Control” menu of the
authoring software.
1 Distribution list setting
If no changes are required, click “Next.”
2 Set to LAN (Static IP) in the connection type setting.
3 Input the IP Address that was set in 1.
4 - 6 Set if necessary and then click “Next.”
7 Confirm the details of the setting and then click “Complete.”
For all Media Players, implement steps 1 to 7, then reconfirm the setting details in the
“Panel Control” menu. Setting is completed.
IP Address setting of the authoring
NOTE:
The settings above can be changed in the “Panel Property” of the “Panel Control”.
Example: Register 2 Media Players
authoring software
software
3. LAN connection test
1) Startup the Internet Explorer on the computer, and input the
Static IP address set in the authoring software after the “http://”
in the address bar.
2) If the user name and password screen are displayed, input the
user name: default and password: 0000.
3) Confirm that the setting screen is displayed.
NOTE:
The Media Player setting can be confirmed on the WEB setting screen.
CAUTION:
It may not be properly displayed on a browser other than Internet Explorer.
User name, password screen
WEB setting screen
19
Page 20
<Using LAN>
LAN Connection and setting: When using the DHCP server
1.
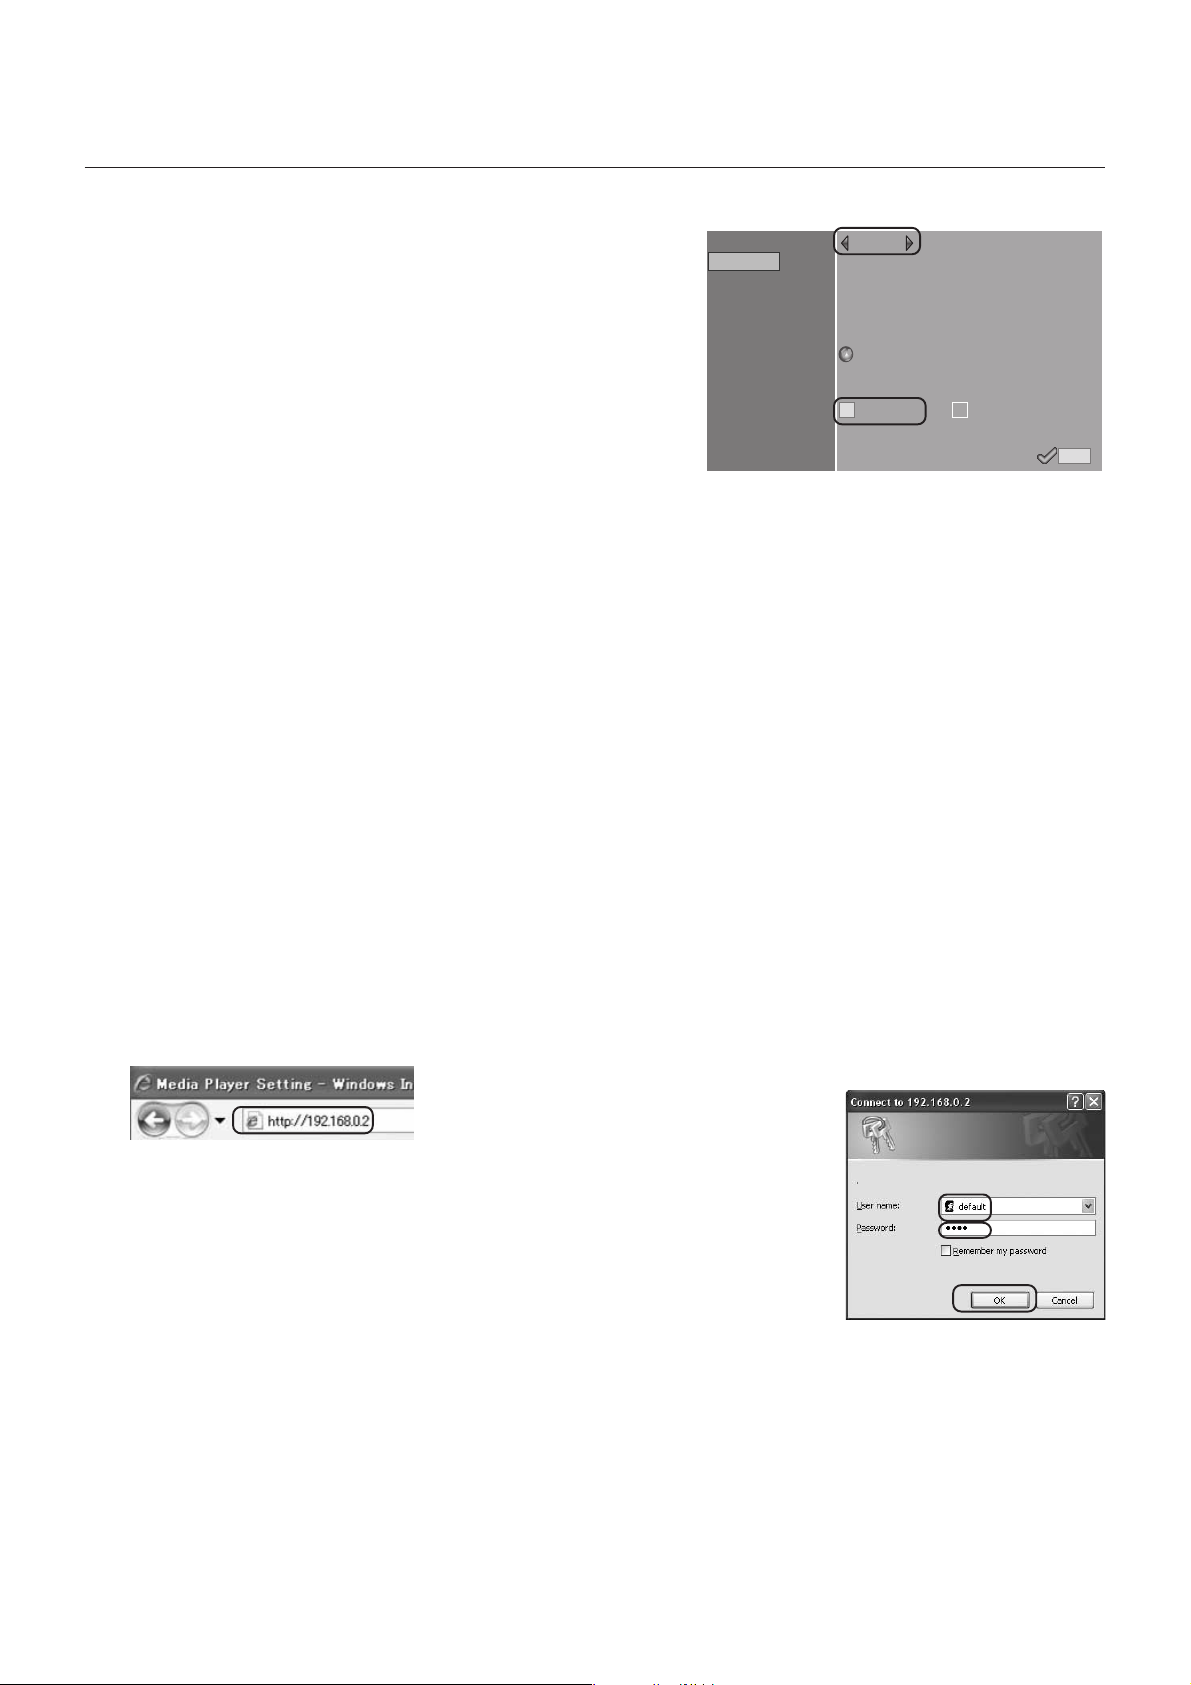
Set the Media Player to DHCP mode.
1) Switch on the power of the Media Player, Display,
hub, and routers.
2) Use the menu button on the remote control to
display the OSD screen, and open “NETWORK”
3) Set the OSD screen as shown below.
1Select “DHCP” using the left and right buttons of the remote control.
2Select “Push Mode”.
3Select “Apply”.
DATE/TIME
NETWORK
PREVIEW
TIMER
LANGUAGE
VIDEO OUT
VIDEO IN
MEMORY CARD
IR CONTROL
SLIDE SHOW
DHCP
IP: 192 .168 .0 .3
Netmask: 255 .255 .255.0
Gateway: 192 .168 .0 .1
DNS: 192 .168 .0 .1
MAC:
Proxy
Update Mode from LAN:
Push mode Pull mode
1
00:50:41:80:01:34
2
DHCP setting
3
Apply
2. Confirm and set the Media Player name
The Media Player name is required in the “Panel Control” of the authoring software.
1) Connect the computer, Media Player, and DHCP server (or routers) on the NETWORK, and
switch on the power.
2) Open “NETWORK” on the OSD screen of the Media Player, confirm that the IP address is
properly set on the DHCP server, and keep a memo of the IP address.
(It can be set to anything other than 0.0.0.0.)
3) Confirm that the computer’s IP Address is set.
NOTE:
IP Address is set when the DHCP is set in OSD or during startup.
4) Startup Internet Explorer on the computer, input the IP Address of the Media Player
confirmed in 2) in the address bar after “http: // ,” and click the “Go” button.
5) The input screen for the user name and password will be displayed. Input the username in
Input the user name and password in the
Ex. http: //192.168.0.2
setting screen
one-byte characters and the default password, 0000, then click
“OK.”
CAUTION:
•Prepare routers that have a DHCP server or DHCP server function.
•In the case of routers, make the DHCP server function valid.
•Set the computer’s IP Address according to the network environment.
NOTE:
To confirm the IP Address and Netmask of the computer, startup the “command prompt” (In the Start menu>All programs>Accessories.) in
Windows XP/Vista/7 and run C:\> ipconfig.
20
Page 21
<Using LAN>
LAN Connection and setting: When using DHCP server
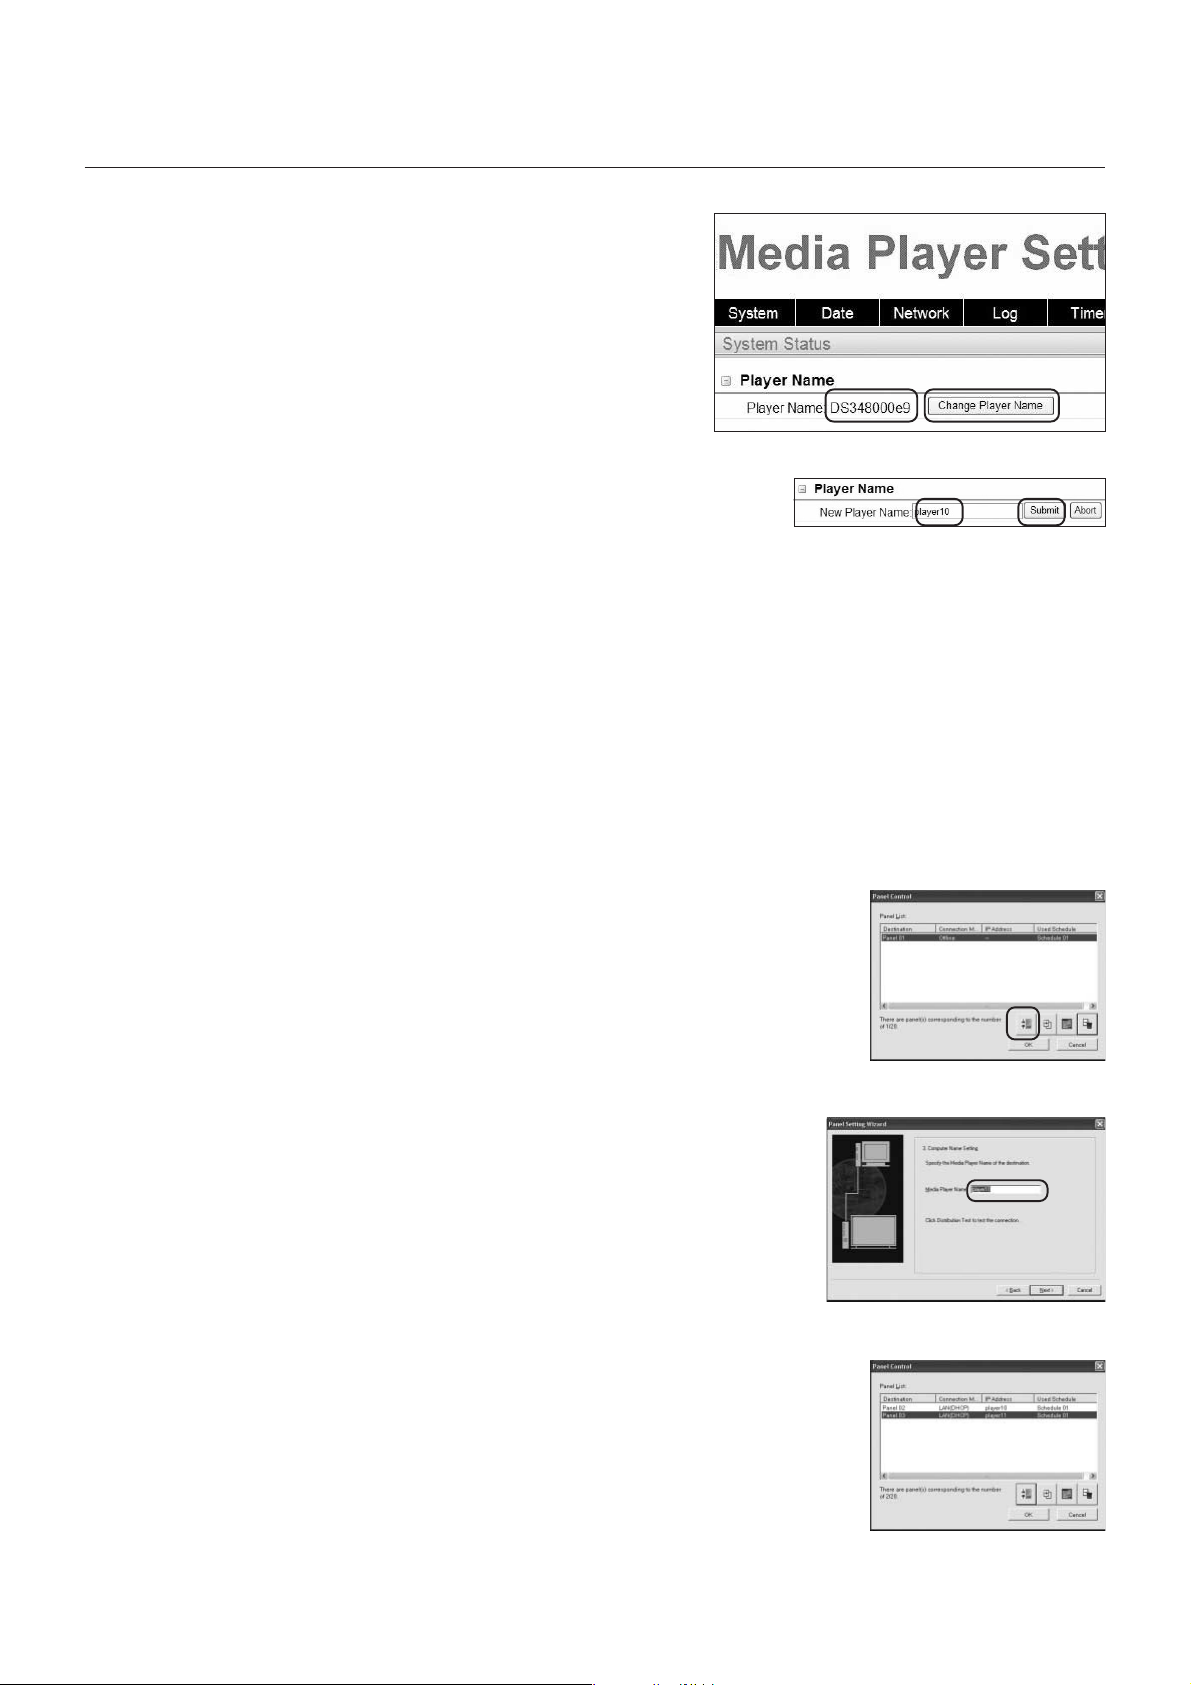
6) After displaying the setting screen, confirm the
Media Player name on the setting screen
(continued1)
media player name (player Name).
To change the name, click the Change Player Name
button, input the name using 15 or less one-byte
characters starting with an alphabet, then click the
“Submit” button. (Do not use symbols or spaces.)
Keep a memo of the Media Player name.
7) Close Internet Explorer.
CAUTION:
Change Media Player Name
Set it so that it is not the same as other media players.
It does not differentiate between uppercase and lowercase alphabets.
NOTE:
The default setting value of the media player name is DS34XXXXXX.
XXXXXX is the last 6 digits of the MAC address of the Media Player.
The MAC address can be confirmed in the “MAC” of the “NETWORK” of the OSD.
Example
In the case of MAC: 0050418000e9, the media player name is DS348000e9.
It can be used without changing the name.
3. Authoring software panel registration
Click the panel setting wizard in the “Panel Control” menu of the
Authoring Software, and startup the wizard.
1 Distribution list name setting
If no changes are necessary, click “Next.”
2 Set to LAN (DHCP) in the connection type setting.
3 Input the set media player name.
4 - 6 Conduct the following settings as required, then click “Next.”
7 Confirm the setting details and click “Complete.”
Conduct 1-7 for all Media Players.
Reconfirm the setting details on the “Panel Control” menu.
The setting is complete.
NOTE:
The above setting can be changed in the “Panel Property” of the “Panel Control”.
Startup button of the panel setting of the
authoring software
Media Player name setting
Example: Register two Media Players
21
Page 22
<Using LAN>
LAN Connection and setting: When using a DHCP server (continued 2)
4. LAN connection test
User name, password screen
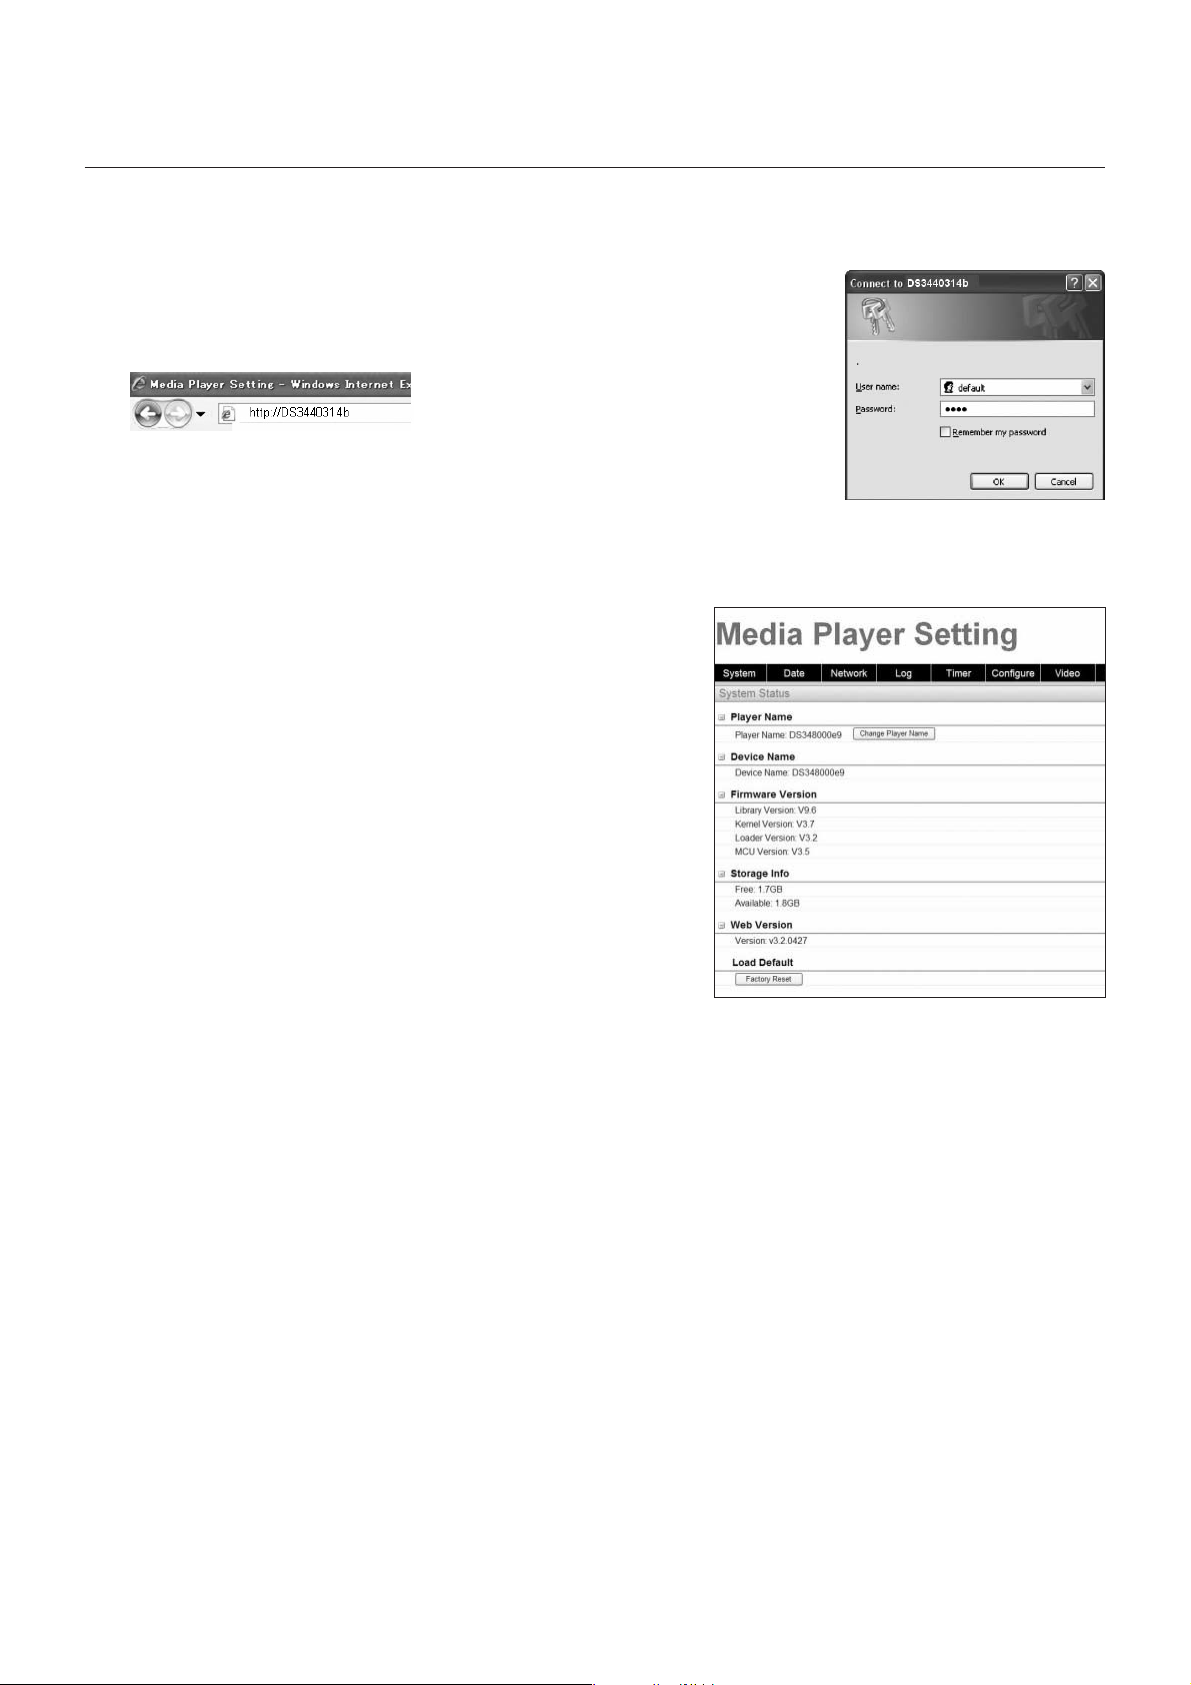
1) Startup Internet Explorer on the computer, input the Media
Player name set in the authoring software in the address column
after the “http://.”
Ex. http: //DS3440314b
NOTE:
The uppercase and lowercase alphabets in the media player name are not differentiated.
2) When the user name and password screen are displayed, input “user name: default and
password: 0000”
WEB setting screen
3) Confirm that the setting screen is displayed.
NOTE:
The Media Player setting can be confirmed in the WEB setting screen.
CAUTION:
I It may not be properly displayed on a browser other than Internet Explorer.
22
Page 23
<Using LAN>
Distribute program data to the Media Player
1. Use authoring software to create a program.
Refer to the “MP-01 Quick Reference Guide” on the enclosed CD-ROM.
2.
Switch on the power to the devices on the network such as Media Players, computers, hubs, and routers.
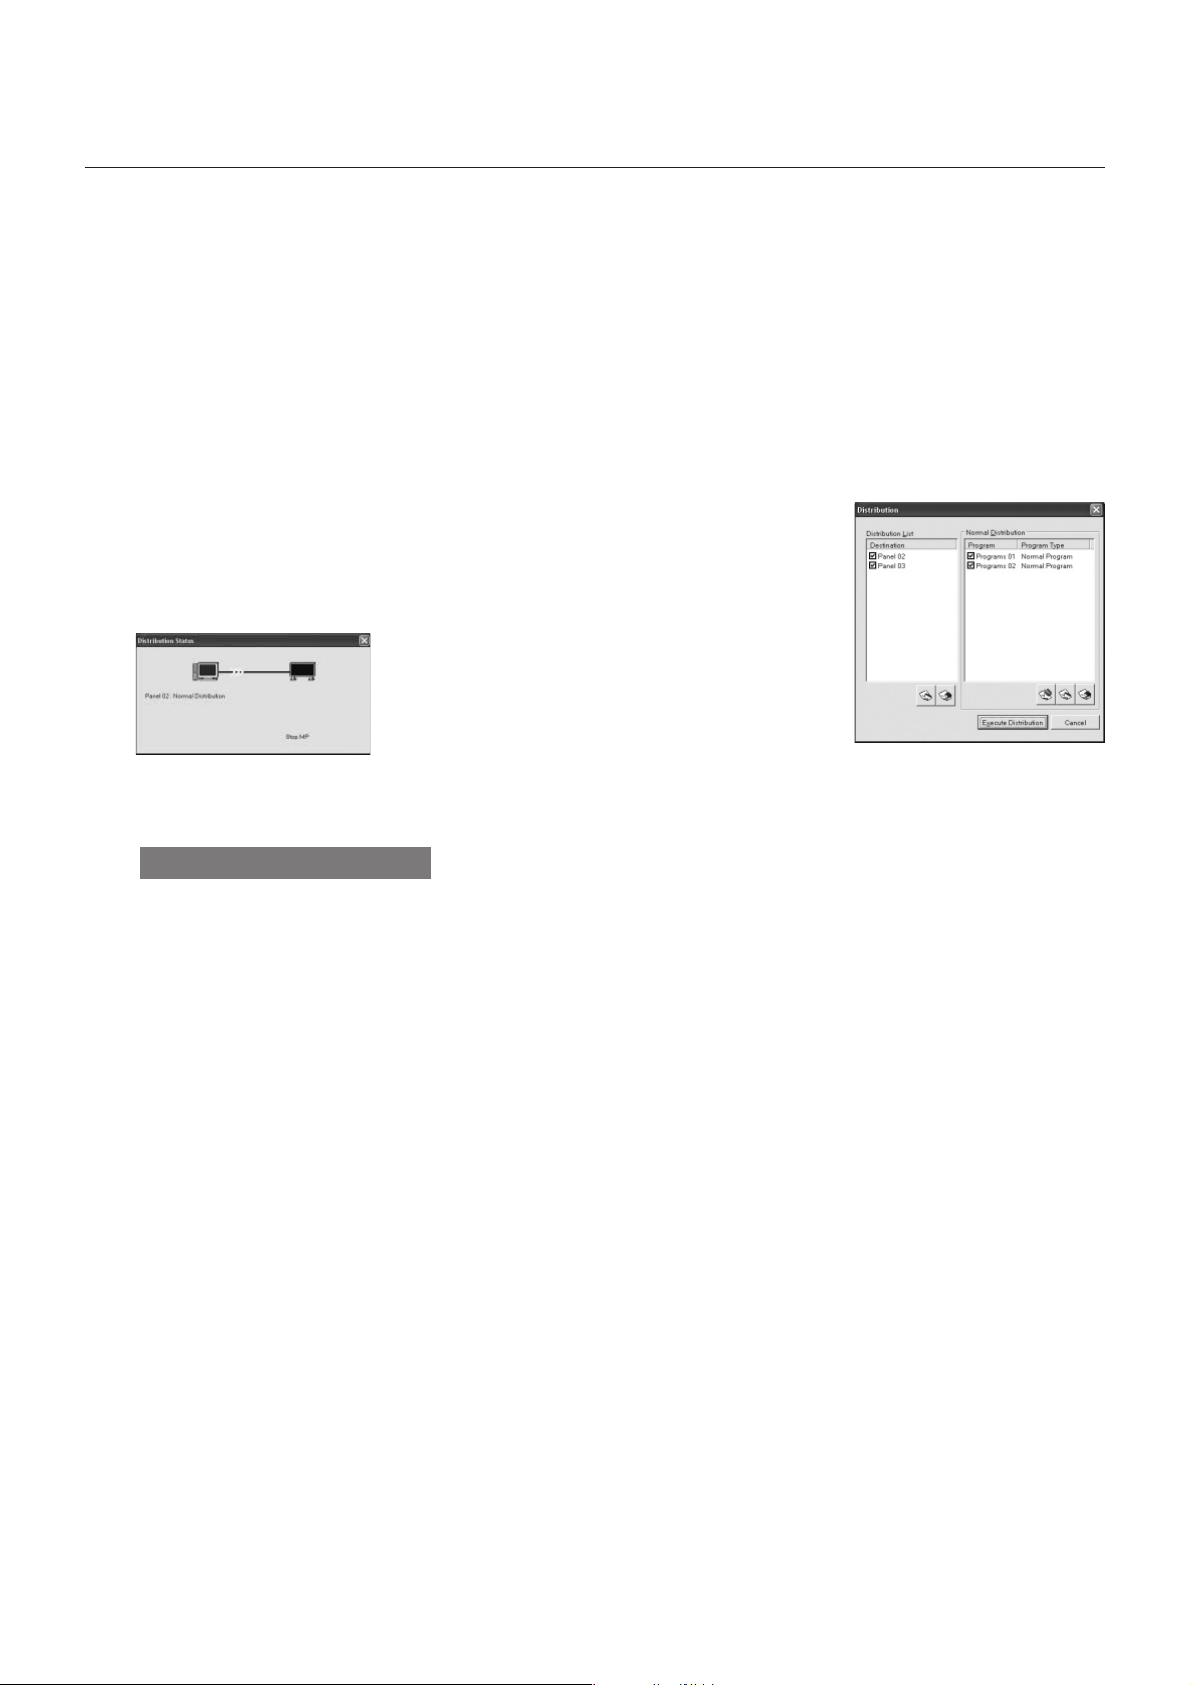
3. Click the “Distribution” button in the authoring software.
4. Select the recipient (Media Player) in “Distribution List”.
5. Select the program that is necessary.(When selecting the recipient, the program registered
in the schedule will be selected.)
6. Click the execute distribution button.
7. The program data will be distributed to the selected recipients on
Select recipients and program
the distribution list. After the program is distributed to all
recipients, it will end.
NOTE:
The error information and distribution program can be confirmed on the distribution log.
8. When distribution starts, the Media Player will stop displaying the program and receive the
program data. While receiving the data, the following message will be displayed.
Content Updating... Please do not power-off.
CAUTION:
•If the data is received while a program is not displayed, the message is not displayed and the screen remains black.
9. After receiving the program data, the Media Player will generate the program data.
10. Media Player will restart (it will take approx. 1 minute), and afterwards, the program will be
displayed according to the schedule.
CAUTION:
• Once distribution is conducted, the old programs in the SD Memory Card are erased.
• To distribute a 100 MB program to one Media Player, 1) it takes approx. 1 minute to distribute the authoring software, and 2) 1 minute to generate the
program data on the Media Player side after distribution.
*The time differs depending on the performance of the PC and the program details.
*After 2), it takes approx. 1 minute for the Media Player to restart.
• Do not switch off the power while the data is being distributed or while the program data is being generated.
• The Media Player must be switched on for the distribution to work.
• While the Media Player is generating the program data, if you distribute the content from Authoring Software to (the procedures of steps 9. and 10. above), a
distribution error will occur. Distribute after the Media Player is restarted.
23
Page 24
<Using LAN>
About distributing the difference of the program data
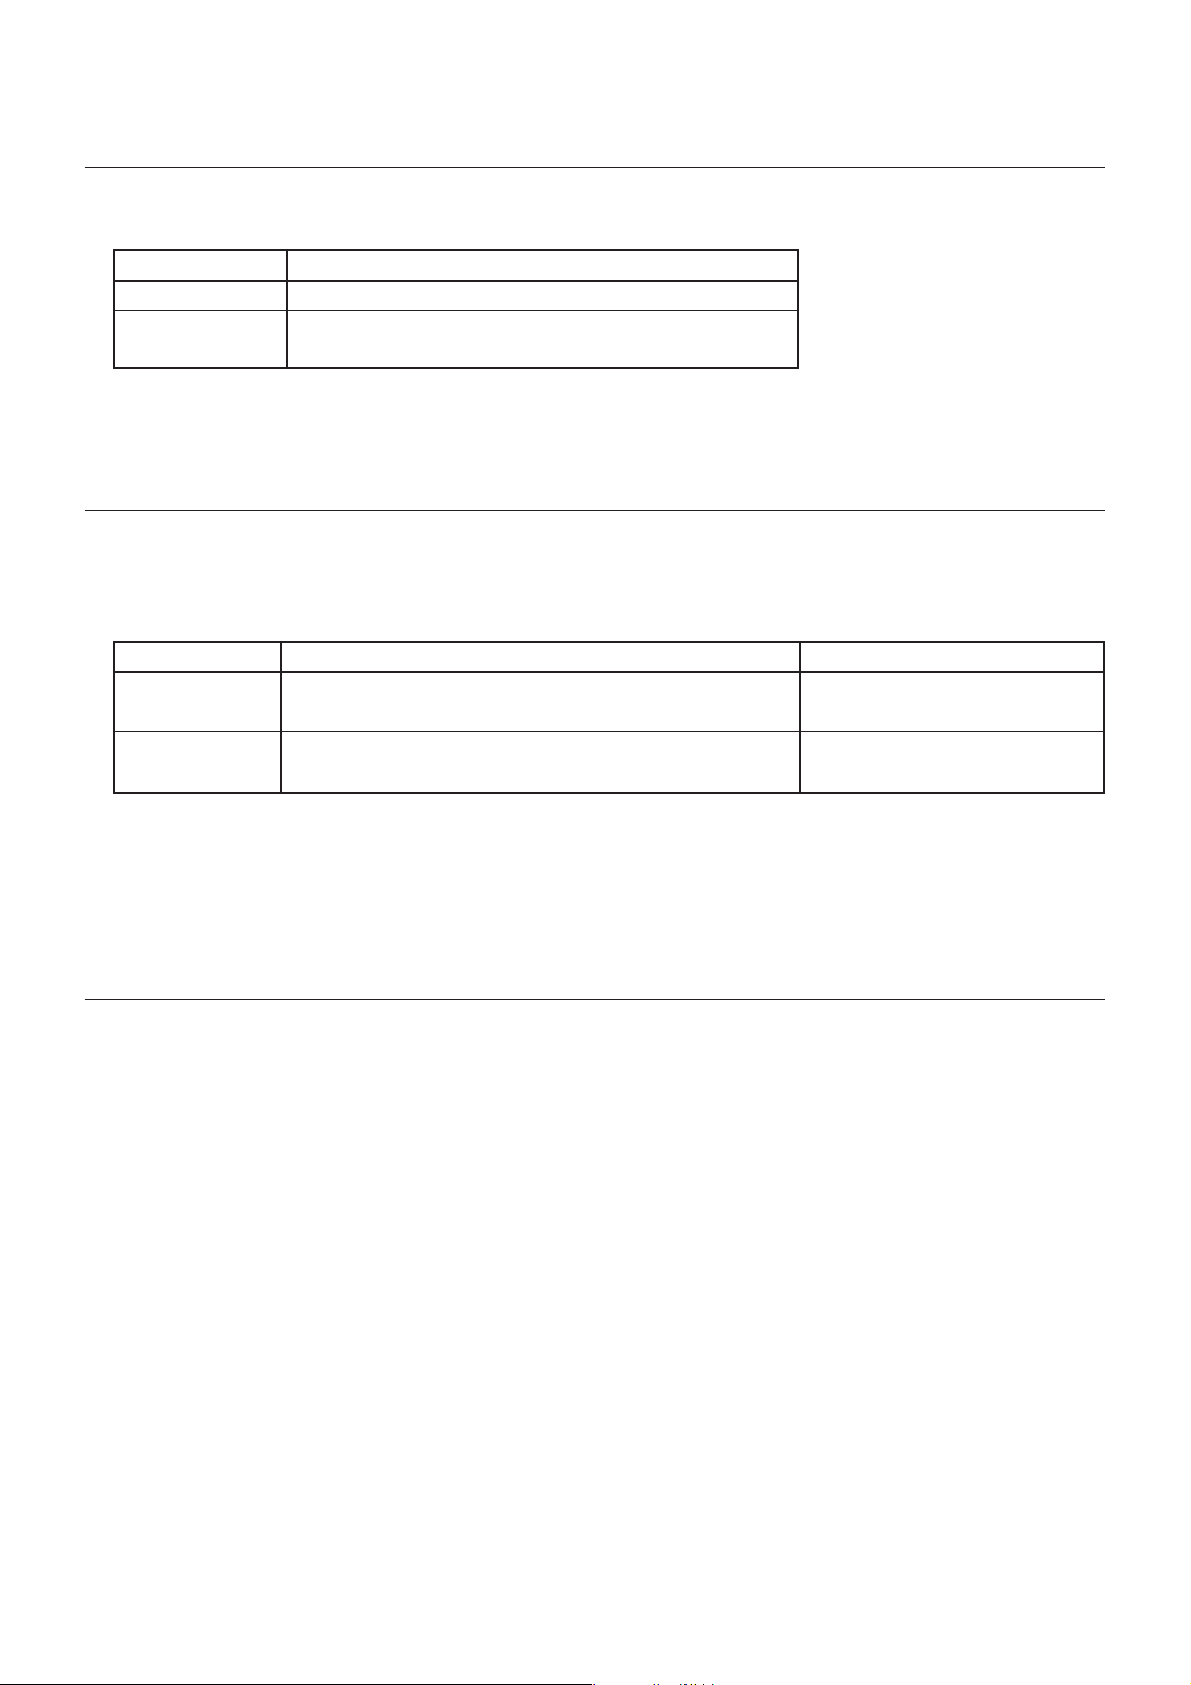
For programs that are redistributed via LAN in order to reduce time, only the newly added movies, still images, and audio files in the program are
distributed.
Program Type
Program to be newly distributed
Program to be re-distributed
Note 1)
Note 1) Redistribution means a program with the same name was previously distributed to the Media Player.
Note 2) The message data and schedule file are always distributed.
Note 3) After distribution, Media Player generates new program from new files and existing files. Unnecessary old files and old programs are deleted.
All files registered in the program
Distribute only the movie, still image, and audio files that were added. Note 2)
Distribution file
Maximum program data capacity
For the maximum program data capacity of one Media Player, refer to the table below.
If an insufficient SD card memory capacity error (Error code 441) is displayed during distribution, reduce the program data or increase the SD
Memory Card capacity.
Distribution method
USB memory
LAN
Note 1) The program data capacity is the total of capacity for each program data.
The capacity of one program data is the total capacity of the movie, still image, and audio data registered.
Ex) When the program distributed to one Media Player registers program 1 (still image 1 and movie 1) and program 2 (still image 2 and movie 1), the program data capacity
will be the total capacity for still image 1 + movie 1 + still image 2 + movie 1.
Note 2) After distribution, the SD card occupied area can be confirmed in the “Memory Card” items of the OSD.
Note 3) Depending on the structure of the program, the maximum capacity may increase.
Within 90% of the SD Memory card capacity Note 1), Note 2)
As a guideline, it should be less than 45% of the SD Memory card capacity.
Note 3), Note 2)
Maximum program data capacity
Ex)
In the case of 2 Gbytes SD card, up to 1.8
Gbytes.
In the case of a 2 Gbytes SD card, up to 0.9
Gbytes as a guideline.
Media Player power management during distribution
When distributing, the Media Player must be switched ON (power indicator is green).
The program cannot be distributed when the power is OFF (power indicator is red).
And when setting the power timer of the Media Player, set it so that the power is ON during the period of time when the data is distributed.
The Power timer can be set in power management of the panel management menu in the authoring software.
24
Page 25
Troubleshooting (startup, video audio output, remote control, OSD)
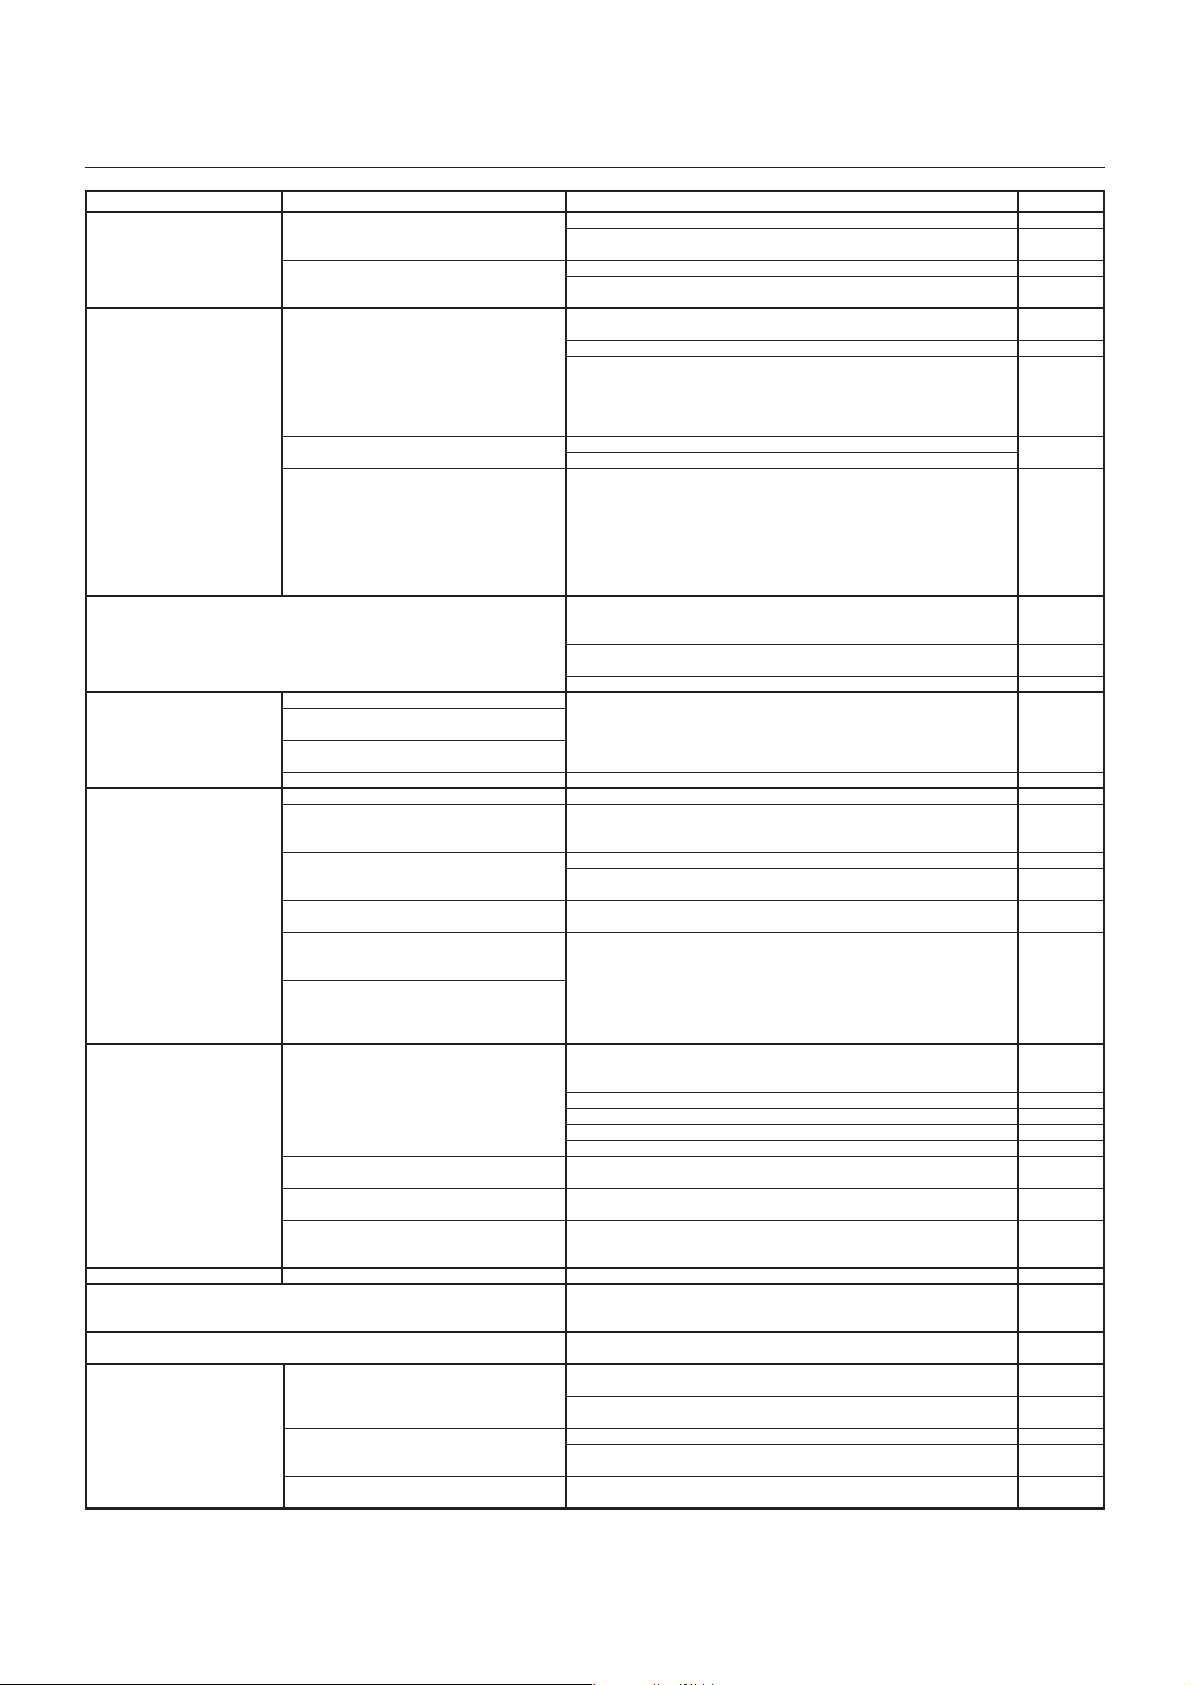
Symptoms
The power cannot be switched on.
There is no image or sound
Remote control is not operating.
The image is not properly displayed.
During startup, the caution screen is
displayed.
Content cannot be updated
OSD timer function will not operate
The power is switched off automatically.
The timing display is displayed in the “VIDEO OUT” setting, but it cannot be selected.
Slide Show Mode or Video Repeat
Mode will not operate.
.
Conditions
The main body power indicator will not light up (ON:
Green, OFF: Red)
The power indicator of the wireless remote control
extension cable is not lit up (ON: Green, OFF: light
turns off)
The image is not displayed on the screen.
There is no sound.
The above was tried, but nothing was displayed.
The screen flickers.
A message from the display side will be shown to
indicate that it is an unsupported signal.
The Media Player display is too small or too large for
the screen.
The color is strange.
The message “It failed to access the memory card” is displayed.
The message “It failed to recover library (.img) file.
There is no library file in the memory card” is
displayed.
The message “There is no scheduled program at
current time.” is displayed.
The message “A content folder is found in USB memory. Press
[Set] to update content from USB memory.” is displayed.
The message “Please plug in USB memory for Slide
Show mode.” or “Please plug in USB memory for
Video Repeat mode.” is displayed.
“There is no file in USB memory for Slide Show
mode.” or “There is no file in USB memory for Video
Repeat mode. Please plug in another USB memory.” is
displayed.
Even when the power is switched on with the USB
memory mounted, the message “A content folder is
found in USB memory. Press [Set] to update content
from USB memory.” is not displayed.
The message “No content file is found. Updating is
aborted.” is displayed.
The message “Content size is too large. Please reduce
it then update again.” is displayed.
During startup, the slide show starts
The timer setting in the OSD menu cannot be set
When starting up the power, the messarge "There is no
file in USB memory for Slide Show mode.” or "There
is no file in USB memory for Video Repeat mode.”
Please plug in another USB memory." is displayed.
The USB memory is mounted, but when starting up the power, the
message “Please plug in USB memory for Slide Show mode.” or
“Please plug in USB memory for Video Repeat mode.” is displayed.
During startup, the confirmation screen for content update
is displayed or the existing program is displayed.
Causes and Measures
Confirm the connection of the AC adaptor and power cord, and the DC power source input connector.
Confirm that power is properly supplied from the power source by connecting a different
device to the power source.
Press the power button of the remote control, and confirm that the power indicator is lit up.
Confirm the connection of the wireless remote control extension cable.
(Insert the cable securely.)
The video signal cable (DVI-D-DVI-D) may not be properly connected to the connector of the
equipment or Display, so confirm that it is connected.
Confirm that the DVI input is selected on the Display side.
Press the Menu button on the remote control, and confirm that the OSD screen is displayed a
few seconds later. If it is displayed, the automatic OFF function of the VIDEO OUT may be
operating. (For the time periods where programs are not set, the VIDEO OUT is switched OFF.
When the equipment is purchased, the programs are not set, so the VIDEO OUT is switched
OFF. When it becomes the time period that a program is set, VIDEO OUT is switched ON .)
Confirm the audio cable connection between the equipment and speaker.
Confirm that the audio input of speaker devices and volume is properly selected.
Conduct the following operations to initialize the system. Doing so will return the settings
to the default conditions.
1) Switch off the power with the remote control.
2) Press the power button on the remote control, and after the power indicator turns
green, immediately press the number buttons in the following order: 7, 8, and 5.
3) The Media Player system is initialized and started up. After the system starting is
displayed on the screen, the message “Factory reset is done” is displayed.
4) Reset “LANGUAGE”, “DATE/TIME”, and “VIDEO OUT”.
If the wireless remote control extension cable is mounted, the light receiving part of the
equipment will not operate. Direct the remote control to the light receiving part of the
remote control light receiving extension cable to operate the remote control.
There are no batteries in the remote control. Or the batteries are weak. Confirm that the
batteries are properly installed.
The “IR Lock” might be operating. Release the IR Lock.
Confirm that the Display is compatible with the resolution of the Media Player. If it is not
compatible, change the display setting of this equipment to one that is compatible with
the Display.
Confirm the signal cable connection between the equipment and the Display.
The Memory card may be dislodged. Confirm that the memory card is securely mounted.
Remove the memory card, and confirm that there is a file with the .img extension on the
computer. If such a file does not exist, obtain a file from the enclosed CD-ROM and copy
the file.
Confirm that the date and time setting is correct.
Confirm the schedule setting of the authoring tool to make sure there are no errors. If
there is an error, correct the schedule and conduct content update.
This is displayed when a USB memory has been mounted. If a content update is not to be
conducted, press the EXIT button and remove the USB memory.
It is the Slide Show Mode or Video Repeat Mode. Connect a USB memory that contains
still images or movies. If you do not wish to use this mode, press the EXIT button and
end it, and set the Slide Show Mode or Video Repeat Mode to “Normal Mode” in the
Slide Show menu of the OSD screen.
Use the computer to confirm that there is a folder named media on the USB memory. If
there is no folder named media, use the authoring software to save the program data on
the USB memory.
Confirm the connection of the USB cable extension.
Make sure that the USB memory format is not NTFS format.
Confirm that the USB memory is not encrypted.
Try a different USB memory.
Use authoring software to save the program data on the USB memory.
Use the authoring software to reduce the program so the size is smaller. The maximum
capacity for content is 1.8 Gbytes (for the enclosed Memory card (2 Gbytes)).
It is set to the “Slide Show Mode”. While displaying the slide show, press the MENU
button to display the OSD menu, change the setting from slide show to “Normal Mode”
and then restart.
When power control is set with content update, the timer function becomes void.
Confirm that the power control is not set in the TIMER or authoring software. If it is set,
release if necessary. For details on releasing power control in the authoring software,
refer to the power management section of the authoring software User’s Manual.
Remove the check from the “Read timing from display” in the “VIDEO OUT” menu of the
OSD screen.
Confirm that there are still images or movies on the USB memory, or confirm the folder
setting from “SLIDE SHOW” on the OSD menu.
Confirm that the still image file or movie file is a file that is supported by Media Player.
Confirm the connection of the USB cable extension.
Try a different USB memory.
Confirm that the “Slide Show Mode” is selected in the “SLIDE SHOW” menu of the OSD
screen.
Reference page
P8
P6
P7
P8
P9
P8
—
P7
P6
P12
P29
P8
P28
P9
—
—
P12, 13
—
P8
—
—
—
—
—
P12, 13
P12
—
P12
—
P30
P5, 8
—
P12, 13
25
Page 26
Troubleshooting (program, content display)
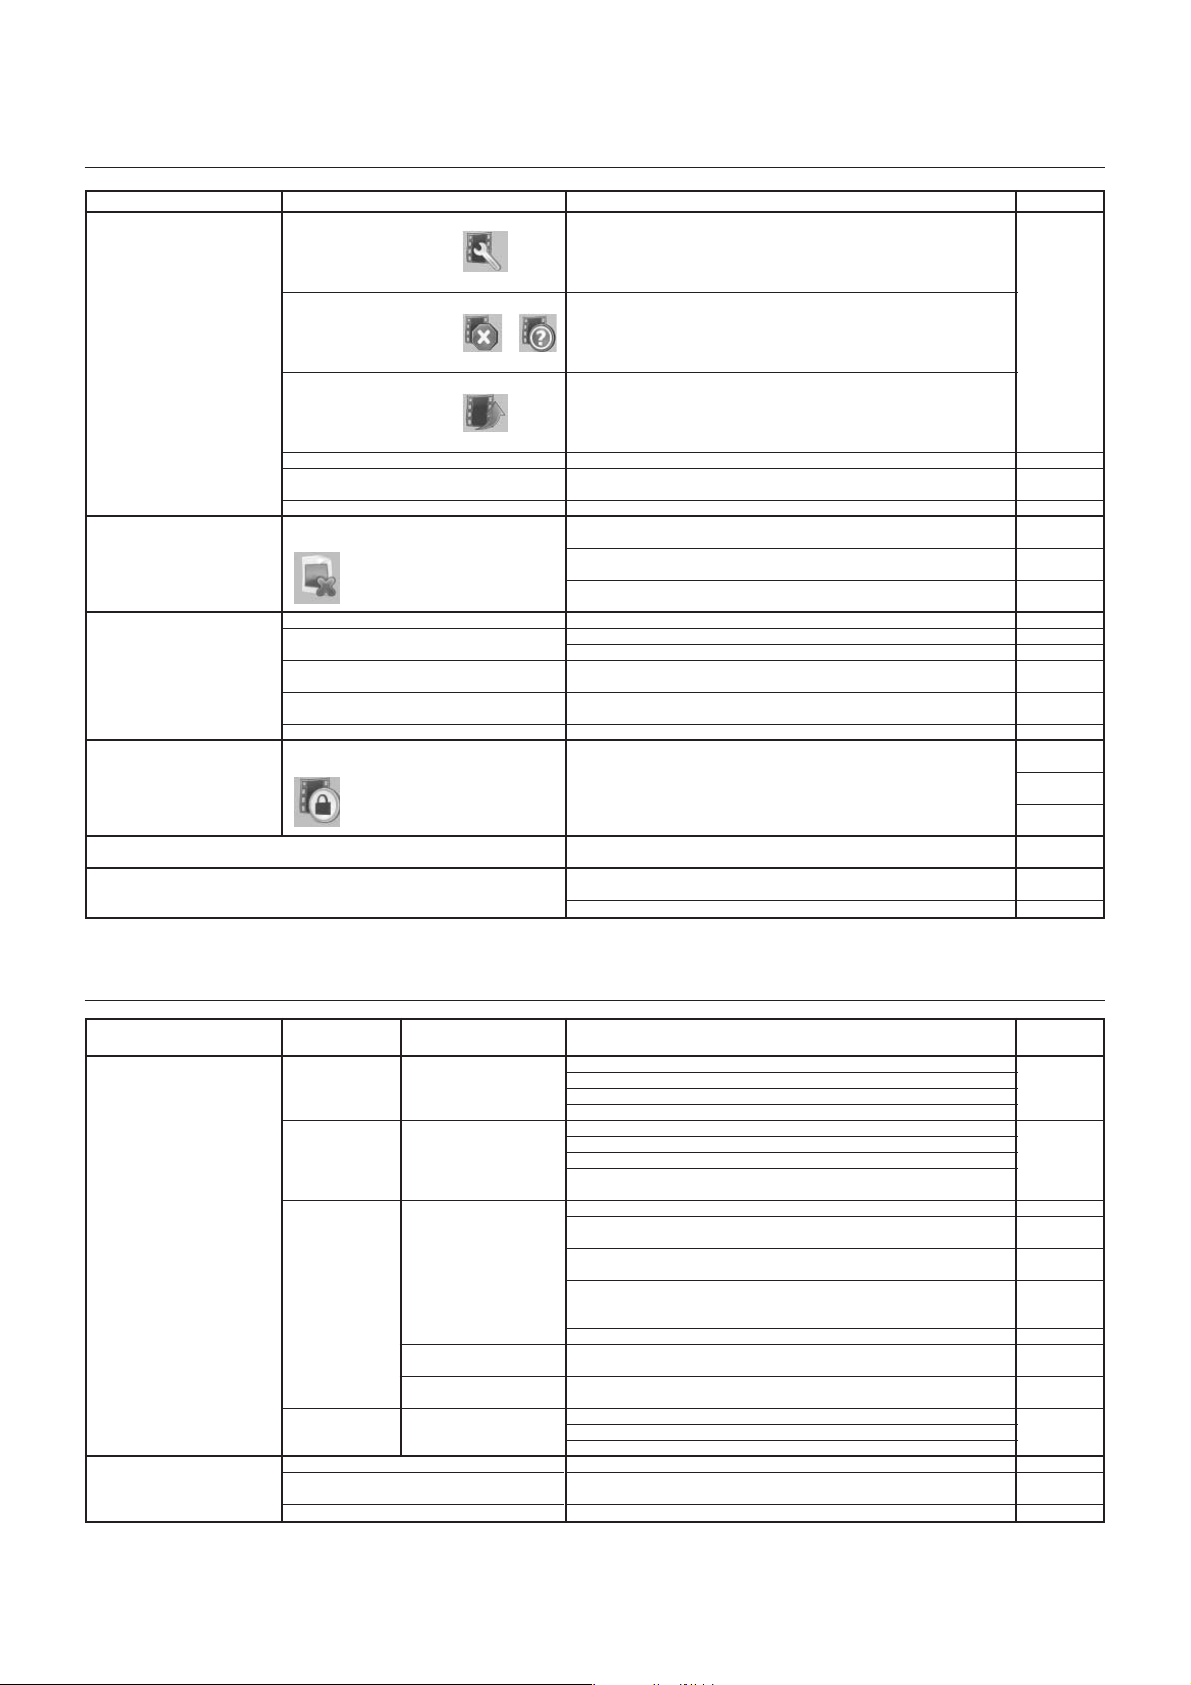
Symptoms
The movie is not properly displayed.
The still images are not properly
displayed.
The Message is not properly displayed.
The movie of the external video is not
displayed.
There is nothing displayed between the programs.
It is not displayed according to the schedule setting.
Conditions
The message “The codec is not supported” is
displayed, nothing is displayed or
displayed.
The message “The codec is not supported” is
displayed, nothing is displayed or
is displayed.
The message “The codec is not supported” is
displayed, nothing is displayed or
displayed.
The movie is displayed but the sound does not come out.
In the vertical layout, the movie will not rotate 90
degrees.
The message “The image items are not supported” is
displayed, there are images that are not displayed or
Nothing is displayed.
Specified characters are not displayed.
When the vertical layout is selected, specified
characters are not rotated.
It takes time for the message to be displayed.
It takes time for the telop to be displayed.
The message “This is not displayed for the signal with
copyright protection” is displayed or
is displayed.
is displayed.
or
Cause and measures
is
is
Confirm that the codec of the movie file you are trying to display is supported by this
equipment.
The file cannot be open or played.
The file format may not be supported. Confirm the format details on the “Content
Specifications”.
Or the file may be broken. Confirm that it can be played on the computer.
If the movie bit rate exceeds the maximum value, it will not be displayed. Use the movie
editing software to reduce the bit rate.
Reference: movies with
(movie file size (Bytes)/Play Time (Sec.)) x 8-bit ) that is larger than the maximum bit rate
will not be displayed.
Confirm that the audio in the movie file is a file supported by this equipment.
The movies are not automatically rotated in the vertical layout. Before using the authoring
tool, use the movie editing software and rotate the image.
The movies that include a copyright protection function cannot be played.
Confirm that the format of image file you are trying to display can be displayed with this
equipment.
Confirm that the codec of the image file you are trying to display can be displayed with
this equipment.
The file may be damaged. Confirm that it can be displayed on the computer.
Confirm the message setting of the authoring software.
One-byte “ <“ and “> “ symbols are not displayed. Make the characters two-bytes.
A small number of special characters may not be displayed.
(=),(,),(“ “) are not rotated.
As the number of characters in a message increases, the time until it is displayed
becomes longer. It takes about 7 seconds to display 100 characters.
Set the height of telop less than 30% whole display.
Video signals with copy protection cannot be displayed due to copyright protection.
When switching the movie, there is about 10 to 20 seconds where there is no image or
audio, however this is not an error or malfunction.
Confirm that there are no errors in the schedule setting of the authoring tool. If there are
any errors, correct the schedule and update the content.
Confirm that the date and time setting are correct.
Reference page
P30
P30
—
—
P30
P30
—
—
—
—
—
—
—
—
—
—
P9
Troubleshooting (when using LAN)
Symptoms
•Cannot be distributed.
•Cannot be connected with the
connection test.
The WEB setting screen cannot be
opened.
Conditions
In the case of
Static IP settings
In the case of
DHCP setting
Common
Static IP/DHCP setting
In case of off-line
(when using USB memory)
Error occurred when inputting user name and password
The Media Player name cannot be set.
The selection button is not displayed.
NOTE:
If there is a problem with the connection test, refer to the next page.
Authoring software
error code
Error code: -1
Error code: 102
Error code: -1
Error code: 100
Error code: 102
Error code: -1
Error code: 100
Error code: 101
Error code: 102
Error code: 434
Error code: 441
Error code: 501
Error code: 507
Cause and measures
Confirm that the IP Address set in the Authoring software is correct.
Confirm that the network setting of the Media Player is correct.
Confirm that the IP Addresses of the Media Players are not overlapped.
Confirm the network setting of the computer.
Confirm that the DHCP servers of the routers are valid.
Confirm that the Media Player name of the Media Player is correct.
Confirm that the Media Player name of the authoring software is correct.
Confirm that the Media Player names are not overlapped.
* The uppercase and lowercase alphabets in the media player name are not differentiated.
Confirm the LAN cable connection.
Confirm that the power of the Router, hub, and Media Player are switched ON (power
indicator is green).
The Media Player may switched off. Manually switch on the Media Player or change the
power timer setting so that the power is ON during distribution.
Confirm that the port number is not closed by firewall or security software.
This device is used port 137, 138 or 1900 when sending from the Media Player.
An optional port is used when sending from Authoring software.
Media Player is starting up. Let some time pass before redistributing.
Media Player is updating. Let some time pass before redistributing.
The SD Memory Card has insufficient capacity. Reduce the program data or change the
SD Memory Card to one with a larger capacity.
It may not able to recognize the USB memory. Load the USB memory again.
The USB memory may be coded. It cannot be used by this device.
Confirm the capacity of 1 file does not exceed 4G byte of the upper limit.
Input user name: default, password : 0000
Set 15 or less one-byte characters (alphabets or numbers) starting with alphabets.
Spaces and symbols cannot be used. After input, click the Submit button.
This may occur when using a browser other than Internet Explorer.
Reference page
P18, 19
P20, 21, 22
P17
—
P24
—
—
—
P24
P20, 22
P20, 21
—
26
Page 27
Troubleshooting
(Using Ping command to conduct a LAN connection test)
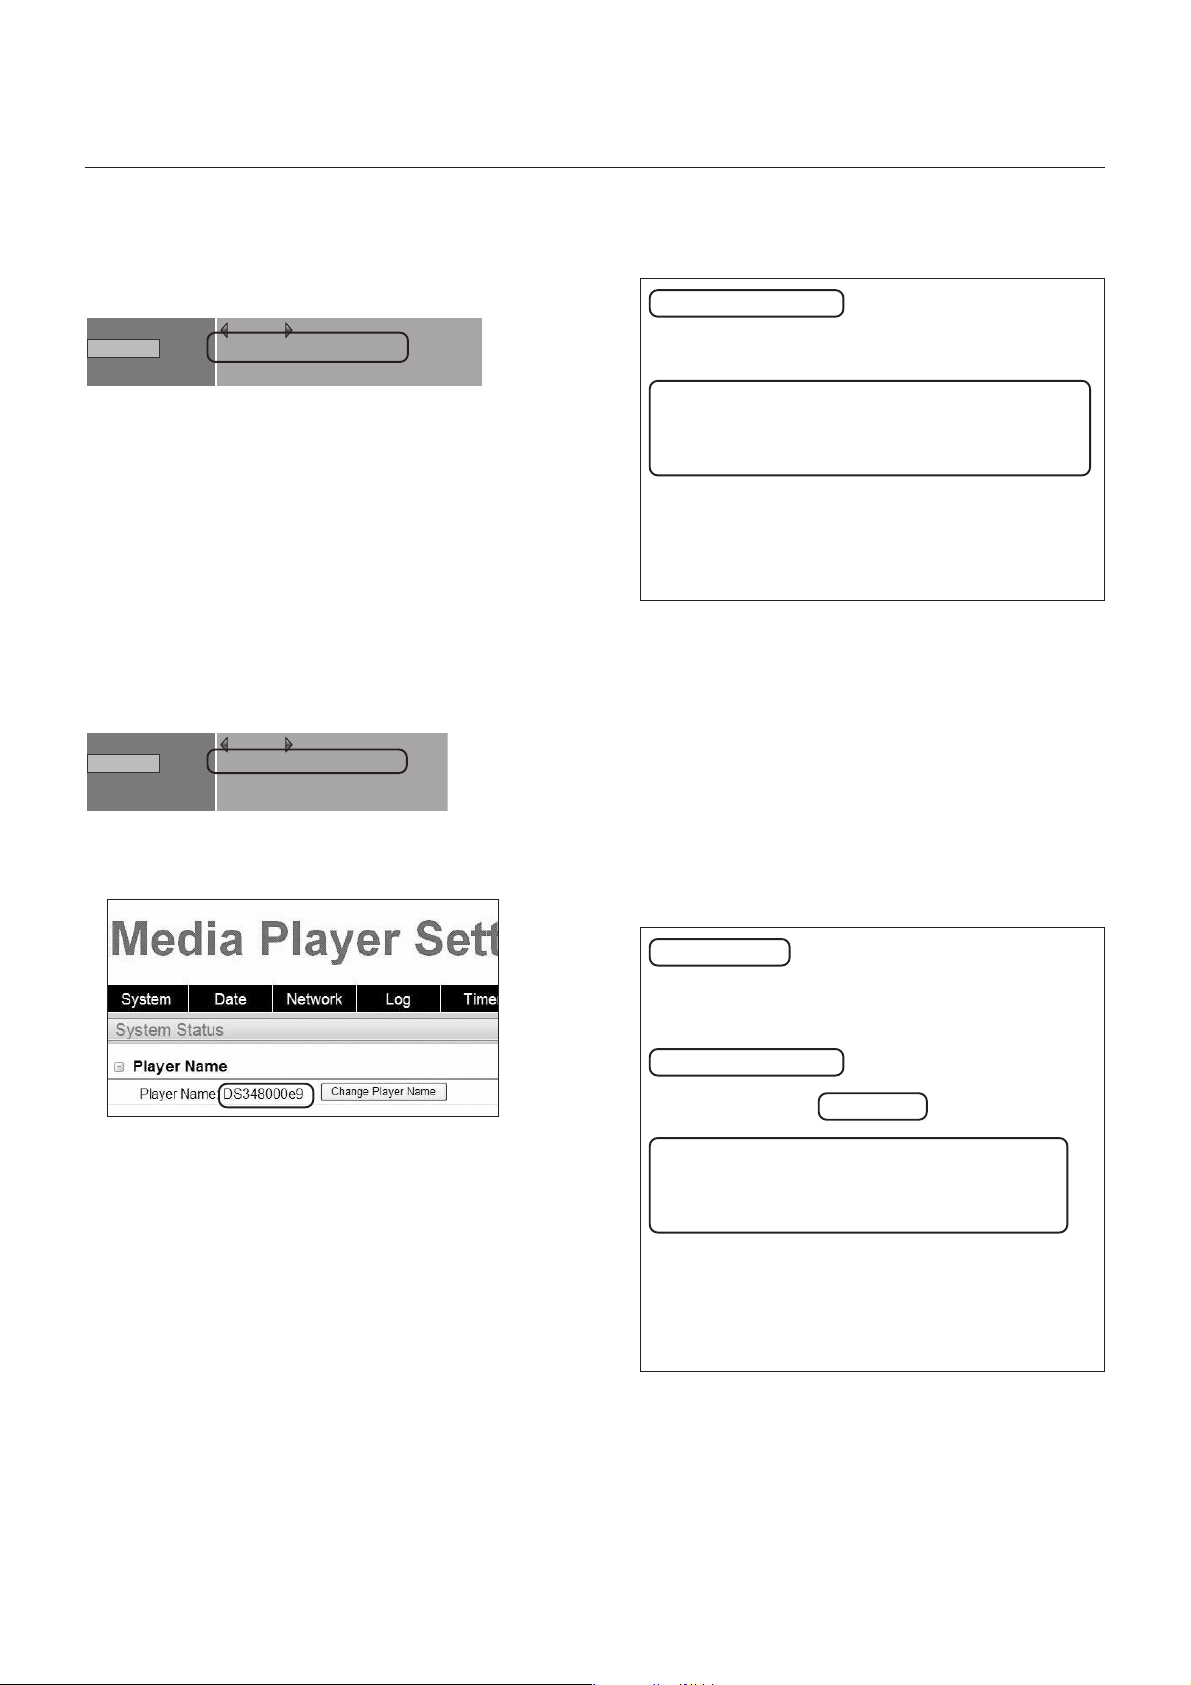
If the data cannot be distributed via LAN, use the Ping command on the computer to conduct a LAN connection test.
In the case of a Static IP Address
1 Look up the IP Address in “NETWORK” on the OSD.
DATE/TIME
NETWORK
PREVIEW
Static IP
IP: 192 .168 .0 .2
Netmask: 255 .255 .255.0
2 Startup the command prompt in Windows on the computer.
3 Enter C: \>ping <IP Address>.
4 If a reply is returned, the connection is made.
When using a DHCP server
1 Look up the IP Address in “NETWORK” on the OSD.
DATE/TIME
NETWORK
PREVIEW
TIMER
DHCP
IP: 192 .168 .0 .3
Netmask: 255 .255 .255.0
Gateway: 192 .168 .0 .1
Command prompt screen
C:\>ping 192.168.0.2
Pinging 192.168.0.2 with 32 bytes of data:
Reply from 192.168.0.2: bytes=32 time<1ms TTL=64
Reply from 192.168.0.2: bytes=32 time<1ms TTL=64
Reply from 192.168.0.2: bytes=32 time<1ms TTL=64
Reply from 192.168.0.2: bytes=32 time<1ms TTL=64
Ping statistics for 192.168.0.2:
Packets: Sent = 4, Received = 4, Lost = 0 (0% loss),
Approximate round trip times in milli-seconds:
Minimum = 0ms, Maximum = 0ms, Average = 0ms
3
4
2 Open Internet Explorer on the computer and enter “http: //<IP Address>” in the address bar.
3 Confirm the Media Player name when the WEB setting screen is displayed.
Command prompt screen
C:\>nbtstat -R
Successful purge and preload of the NBT Remote
Cache Name Table.
C:\>ping ds348000e9
Pinging ds3440314b [192.168.0.3] with 32 bytes of data:
4 Startup the command prompt in Windows.
5 Enter C: \>nbtstat-R.
6 Enter C: \>ping <Media Player name> .
Reply from 192.168.0.3: bytes=32 time<1ms TTL=64
Reply from 192.168.0.3: bytes=32 time<1ms TTL=64
Reply from 192.168.0.3: bytes=32 time<1ms TTL=64
Reply from 192.168.0.3: bytes=32 time<1ms TTL=64
7 Confirm that an IP Address is displayed.
8 Confirm that it matches the IP Address in 1.
9 If a reply is returned, the connection is made.
Ping statistics for 192.168.0.3:
Packets: Sent = 4, Received = 4, Lost = 0 (0% loss),
Approximate round trip times in milli-seconds:
Minimum = 0ms, Maximum = 0ms, Average = 0ms
NOTE:
If it cannot be connected, reconfirm the LAN cable connection, Media
Player and computer settings, and make sure the Media Player is switched
ON (power indicator is green).
If it can be connected with this test but cannot distribute, confirm that the
firewall or security software is not set to block the FTP transmission.
5
6
7
9
27
Page 28
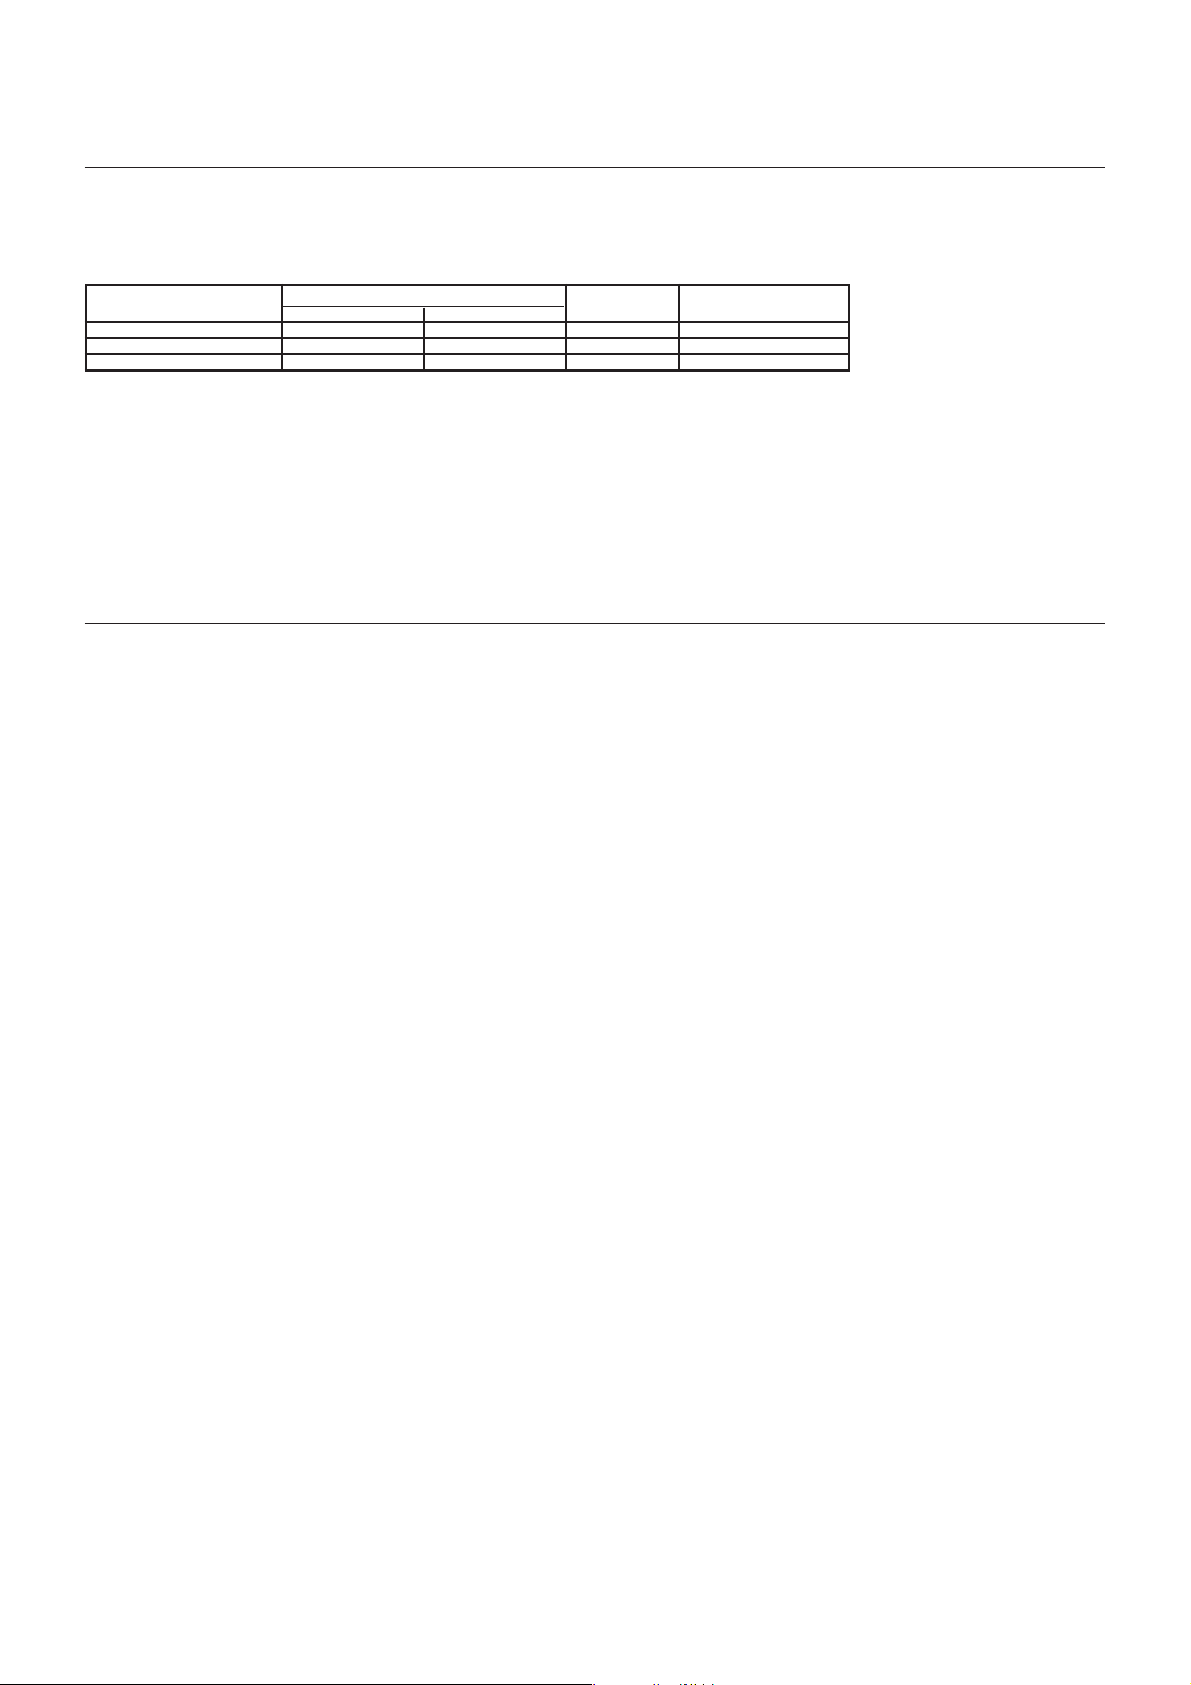
Maximum Play Time for movies
In the case of the enclosed Memory card (2 Gbytes), it would be as follows.
*The Play Time will differ depending on the SD Memory card capacity, and the VIDEO and AUDIO bit rate. Does not include still images and
messages.
SD Memory card capacity
2Gbytes
2Gbytes
2Gbytes
VIDEO
25Mbps
10Mbps
6Mbps
bit rate
AUDIO
128kbps
128kbps
128kbps
Play Time (Min.)
10
25
40
Remarks
1920 x 1080 MPEG2
1920 x 1080 WMV9
720 x 480 MPEG2
The approximate time can be calculated using the following formula.
Play Time (Sec.) = (SD Memory card capacity (Gbyte) x 0.9) x 1024 (Mb) x 1024 (kb) x 8-bit / ((VIDEO bit rate (Mbps) x 1024 (kb)) + AUDIO bit
rate (kbps))
Ex) SD Memory card: 2 Gbytes, VIDEO bit rate: 10 Mbps, AUDIO bit rate: 128 kbps
(2G x 0.9 x 1024 x 1024 x 8) / (10 x 1024 + 128) = 25 min.
Concerning Memory cards
The firmwares (Files with .img extension) are pre-written on the enclosed memory card. If it is mistakenly erased, use the computer to copy the
firmware from the firmware_folder in the enclosed CD-ROM to the memory card.
28
Page 29
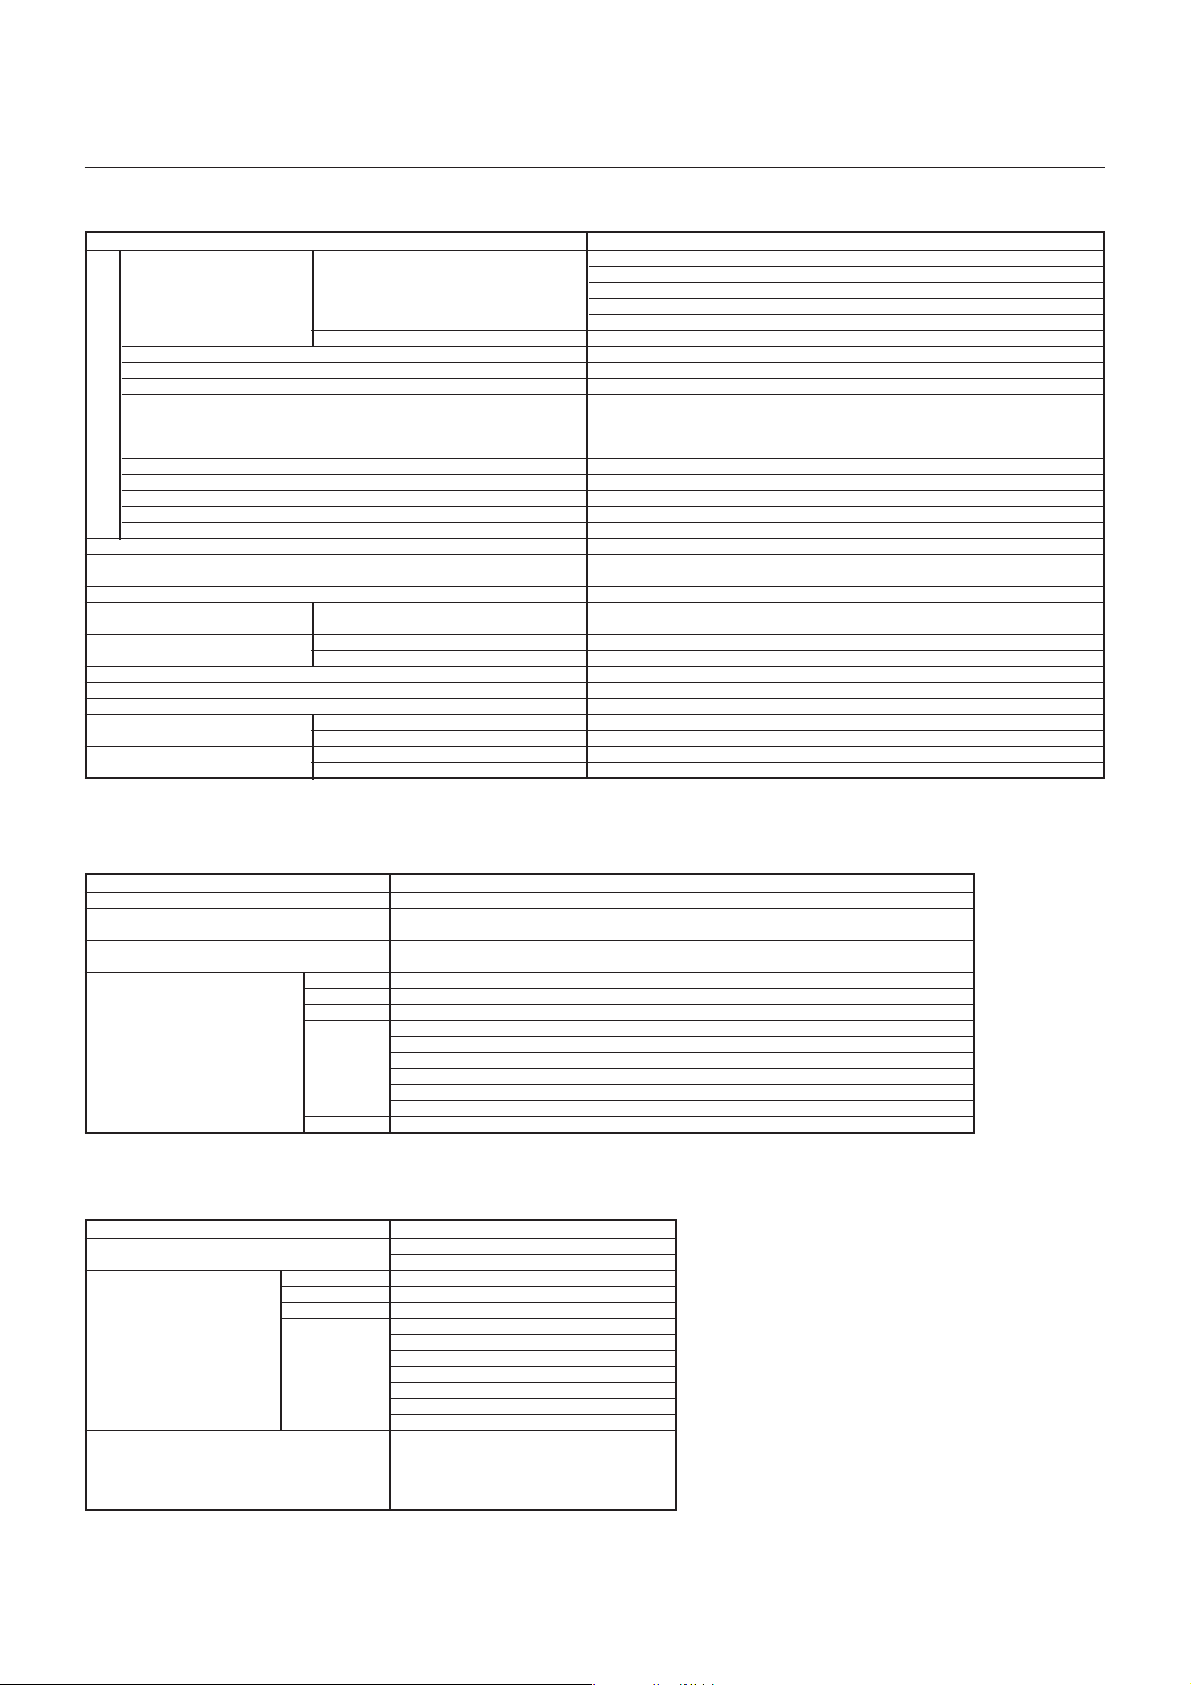
Specifications
Media Player Specifications
Items Specifications
Video output
External interface
Audio output
USB memory interface
Memory card interface
Video input
Audio input
Remote control sensor
Input for wireless remote control extension cable
Controlled output (maintenance terminal)
LAN terminal
Clock function
Memory card (enclosed)
External dimensions
Power source AC adaptor
Power consumption
Applicable standards
Packaging condition (weight/dimensions)
Weight
Use Conditions
Storage Conditions
Resolution
Interface
Normal
During standby
Temperature
Humidity
Temperature
Humidity
1920 x 1080 @ 60Hz
1360 x 768 @ 60Hz(default settings)
1280 x 1024 @ 60Hz
1024 x 768 @ 60Hz
1680 x 1050 @ 60Hz
DVI-D
Line out L/R x 1, 3.5ø stereo mini jack
USB memory connector
Memory card (SD card) connector
Mini DIN 7P Connector
S Video: NTSC/PAL
*Video signals with copy protection, such as commercially available movie DVDs, cannot be displayed
due to copyright protection.
Line in L/R x 1, 3.5ø stereo mini-jack
Infrared
2.5ø mini-jack
D-SUB 9pin
RJ-45 10/100BASE-T
Backup conducted with internal batteries (primary batteries)
Capacity 2 Gbytes (format: FAT16)
Media Player System file (pre-installed)
247.6(W) x 143.6(D) x 33.7(H)
Output +12 V
AC100-240V, 50/60Hz
15W
1W or less
Safety: Electrical Appliance and Material Safety Law (AC adapter, power cord), Electro-Magnetic Interference: VCCI-B
Approx. 2.3 kg/335.0 mm x 131.0 mm x 252.0 mm
0.9kg
0-40˚C
10%-80% (Make sure there is no condensation.)
-10˚C to 60˚C
10%-90% (Make sure there is no condensation.)
Authoring software specifications
Layout function
Create Message
Create schedule
Distributing Programs
Recommended system requirements
CPU
Memory
Resolution
Compatible OS
Others
Layout the movie file (or video input image), still image file, and message on the screen.
Japanese, English
•Set schedule for the created program daily or individually
•Setting to control power ON/OFF on the Media Player weekly
Number distributed via LAN: maximum 20
Output to USB memory
INTEL Pentium 3 1.0 GHz or higher recommended
256 Mbytes or more
1024 x 768, 65,536 colors or more
Microsoft Windows Vista Ultimate 32-bit Ver.
Microsoft Windows Vista Business 32-bit Ver.
Microsoft Windows XP Professional 32-bit Ver.
Microsoft Windows XP Home Edition 32-bit Ver.
Microsoft Windows 7 Professional 32-bit Ver.
Microsoft Windows 7 Home Premium 32-bit Ver.
For Windows XP, Microsoft .NET Framework Version 2.0 or 3.5
Viewer PPT Converter Software Specifications
Source file
Conversion output file
Recommended computer conditions
PowerPoint
CPU
Memory
Maximum Resolution
Compatible OS
Microsoft PowerPoint file (*.PPT)
Conversion format: JPEG/PNG/BMP
Resolution: Up to maximum 1920 x 1080 dots
INTEL Pentium 3 1.0 GHz or higher recommended
256 Mbytes or more
1024 x 768, 65,536 colors or more
Microsoft Windows Vista Ultimate 32-bit Ver.
Microsoft Windows Vista Business 32-bit Ver.
Microsoft Windows XP Professional 32-bit Ver.
Microsoft Windows XP Home Edition 32-bit Ver.
Microsoft Windows 7 Professional 32-bit Ver.
Microsoft Windows 7 Home Premium 32-bit Ver.
Microsoft Windows 7 Ultimate 32-bit Ver.
One of the following software must be installed.
PowerPoint 2000
PowerPoint 2002
PowerPoint 2003
PowerPoint 2007
Restrictions
• PowerPoint Add-in function
This equipment does not support add-in functions, so do not register them.
• Use the equipment without changing the “Slide switch method” option setting. Even if
the “Switching Time” is selected, it will be void.
• Still image format
When selecting a file to output, be sure to select only still image formats supported by
this equipment. The formats supported are jpeg, BMP full color, and PNG full color.
29
Page 30
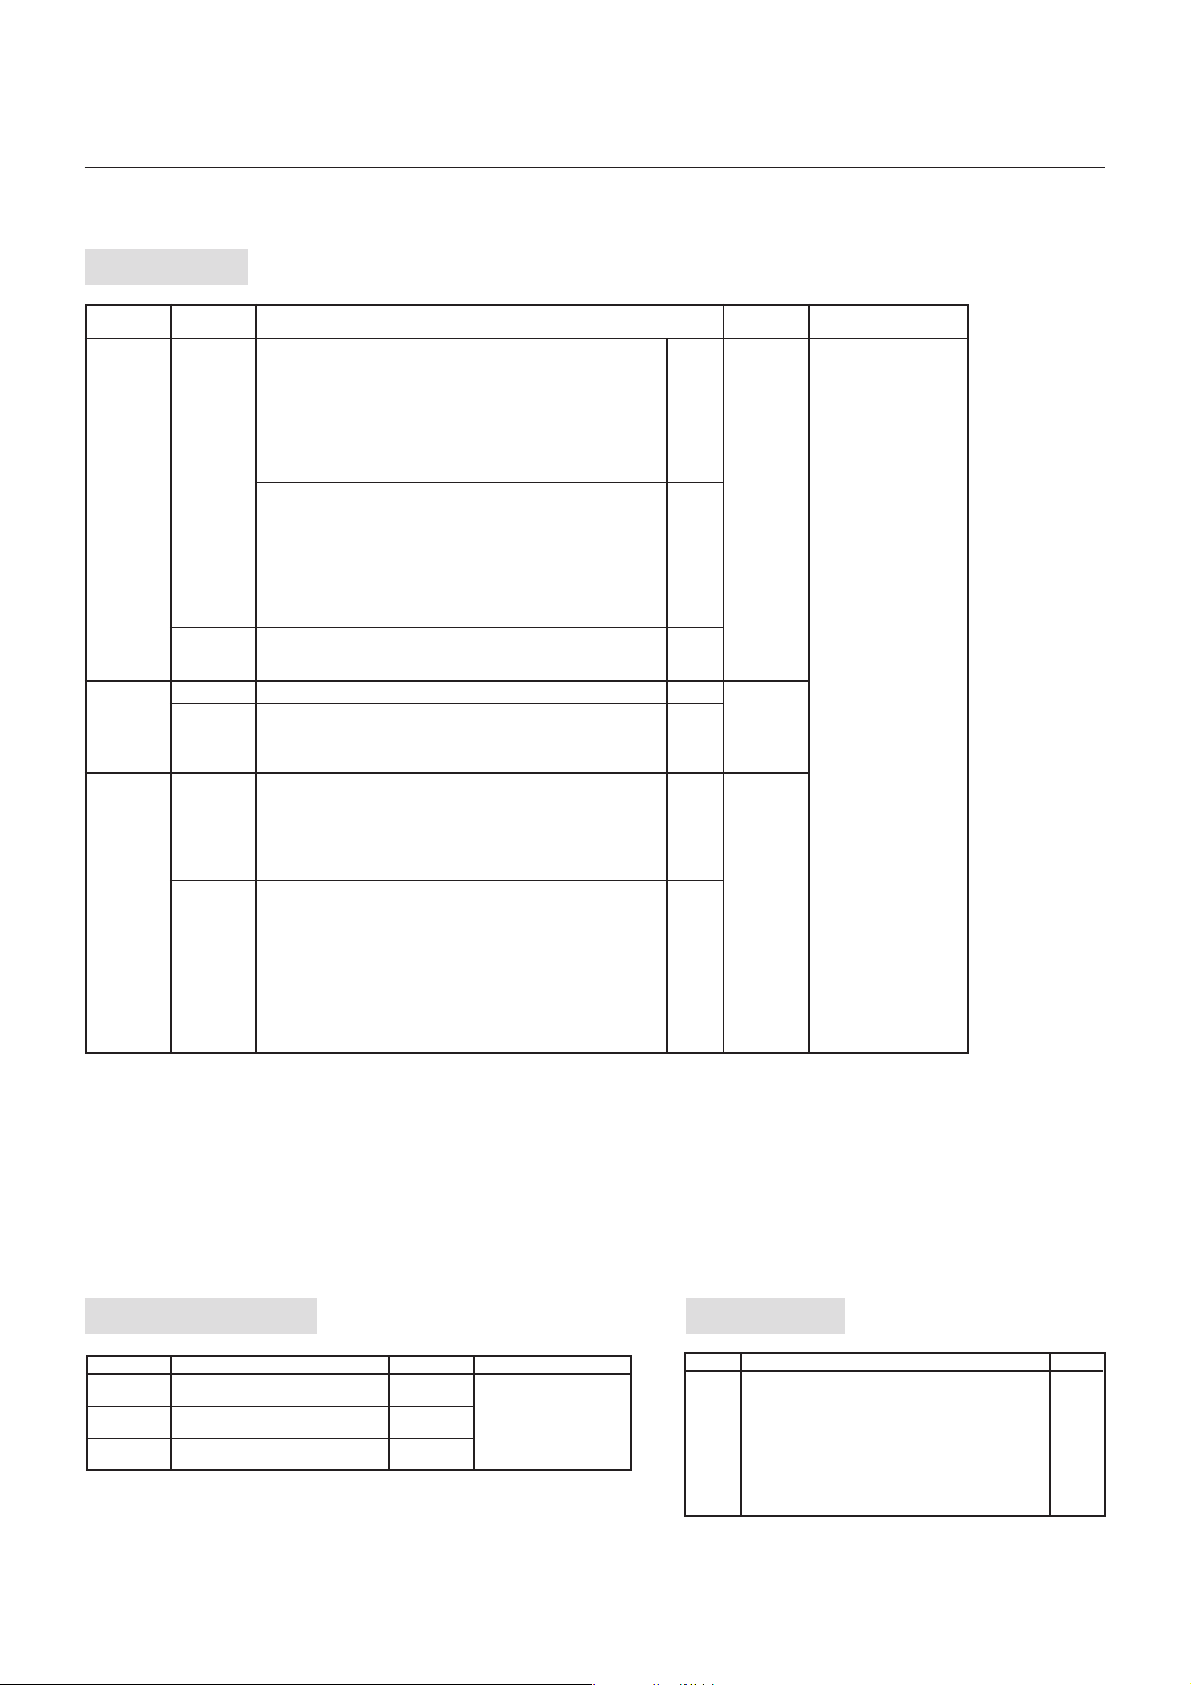
Specifications (continued)
Content Specifications
(1) Movie file
Type
WMV9
Note 6)
MPEG1
Note 6)
MPEG2
Note 6)
Video
/Audio
Video
Audio
Video
Audio
Video
Audio
Detailed Specifications
•Codec
Windows Media Video 9 (WMV3)
•Bit rate
Normal resolution (Up to 720 x 480): maximum 20 Mbps
High-resolution (1920 x 1080 or 1280 x 720): maximum 35 Mbps
•maximum resolution
1920 x 1080 25p (progressive)
1280 x 720 30p (progressive)
•Codec
Windows Media Video 9 Advanced Profile (WMVA)
•Bit rate
Normal resolution (up to 720 x 480): maximum 20 Mbps
High-resolution (1920 x 1080 or 1280 x 720): maximum 35 Mbps
•Maximum resolution
1920 x 1080 25p (progressive), 50i (interlace)
1280 x 720 30p (progressive), 60p (progressive)
•codec
Windows Media Audio 9 (maximum 2ch)
Windows Media Audio 9 Professional (maximum 2ch)
Codec: MPEG-1 Video
•Codec: MPEG-1 Audio layer2
•Bit rate: Maximum 384 kbps
•No. of channels: 2ch
•Sampling grade: 16-bit/24-bit, 32 kHz/44.1 kHz/48 kHz
•Bit rate
Normal resolution (Up to 720 x 480): Maximum 20 Mbps
High-resolution (1920 x 1080 or 1280 x 720): Maximum 35 Mbps
•Maximum resolution
1920 x 1080 25p (progressive), 60i (interlace)
1280 x 720 60p (progressive)
•Codec
MPEG-1 Audio layer 2, MPEG-2 Audio layer 2,
MPEG-1 Audio layer 3, MPEG-2 Audio layer 3
•Bit rate
Layer 2: Maximum 384 kbps
Layer 3: Maximum 320 kbps
•No. of channels: 2ch
•Sampling grade
16bit/24bit, 32kHz/44.1kHz/48kHz
Note 1)
Note 4)
Note 2)
Note 4)
Note 5)
Note 4)
Note 3)
Note 4)
Extension
.wmv
.mpg
.mpeg
.mpg
.mpeg
.m2p
.m2v
.vob
Maximum capacity
/Movie file
FAT16:2Gbytes
FAT32:4Gbytes
Note 7)
Note 1) MP@HL (Main Profile, High Level): Up to 1280 x 720 30p or 1920 x 1080 25p
The following are not supported.
•Complex Profile
•Interlace mode
•File created using the WMV9 BETA encoder
•WMV1 or WMV2
Note 2) MP@HL (Main Profile, High Level): Up to 1280 x 720 30p or 1920 x 1080 25p
AP@L3 (Advanced Profile, L3 Level): Up to 1920 x 1080 50i or 1920 x 1080 25p or 1280 x 720 60p
The following are not supported.
•Complex Profile
•File created using the WMV9 BETA encoder
•WMV1 or WMV2
Note 3) MP@HL (Main Profile, High Level): Up to 1920 x 1080 25p or 1920 x 1080 60i or 1280 x 720 60p
(2) Still image file
Type
JPEG
PNG
BMP
Supports baseline JPEG
Supports RGB 24 bit format
Supports 24 bpp (bit/pixel)
Does not support 8 bpp, 16 bpp, or 32 bpp.
Details
Extension
.jpeg, .jpg
.png
.bmp
• One image/screen
Maximum 2047 x 2047 dots
• Two images/screen
Maximum 1920 x 1080 dots
or 1080 x 1920 dots
Resolution
Note 4) Files that include copyright protection function cannot be played.
Movies with (movie file size (Byte)/Play Time (seconds)) x 8bit > Maximum bit rate cannot be displayed.
Note 5) WMA files recorded in Windows Media Audio Lossless are not compatible.
Note 6) The movie files that are not compatible with the written specifications will be skipped and the next movie file
will be displayed. If there are no other movie files that can be displayed, an error message is displayed. And
if the codec of the video is compatible to the specifications, and the audio codec is not compatible, the video
is displayed but the audio is not output.
Note 7) It differs depending on the format of the SD memory card.
The enclosed memory card is format to FAT16.
(3) Audio file
Details
30
Type
•Codec
MPEG-1 Audio layer 2, MPEG-2 Audio layer 2, MPEG-1
Audio layer 3, MPEG-2 Audio layer 3
•Bit rate
Layer 2: Maximum 384 kbps
MP3
Layer 3: Maximum 320 kbps
•No. of channels: 2ch
•Sampling grade
16bit/24bit, 32kHz/44.1kHz/48kHz
Extension
.mp3
Page 31

WEEE Mark (European Directive 2002/96/EC)
Within the European Union
EU-wide legislation, as implemented in each Member State, requires that waste electrical and electronic
products carrying the mark (left) must be disposed of separately from normal household waste. This includes
monitors and electrical accessories, such as signal cables or power cords. When you need to dispose of your
NEC display products, please follow the guidance of your local authority, or ask the shop where you purchased
the product, or if applicable, follow any agreements made between yourself and NEC.
The mark on electrical and electronic products only applies to the current European Union Member States.
Outside the European Union
If you wish to dispose of used electrical and electronic products outside the European Union, please contact your
local authority so as to comply with the correct disposal method.
31
Page 32

Software license information
This product contains open source software. For the use conditions of the open source software, refer to the following. Also, refer to the official
website of each open source software.
GNU Lesser General Public License (“GNU LGPL”): (“Software license information.pdf”
p.3 - p.16)
•DirectFB
GNU General Public License version 2 (“GNU GPL v.2”): (“Software license
information.pdf” p.17 - p.26)
•The Linux operation system kernel
•BusyBox
•FreeType
•Wget
•Linux fusion
•Dosfstools
Refer to the page below for information on the license for the following software.
•Intel® SDK for UPnPTM Devices (“Software license information.pdf” p.27)
•Net-SNMP (“Software license information.pdf” p.28 - p.34)
•Thttpd (“Software license information.pdf” p.35)
•Pure-FTPd (“Software license information.pdf” p.36)
•Libjpeg (“Software license information.pdf” p.37 - p.39)
•Libpng (“Software license information.pdf” p.40 - p.43)
•TinyXML (“Software license information.pdf” p.44)
Refer to the page below for information on the copyright for the following software.
•Ntpdate (“Software license information.pdf” p.45)
The software above each has a copyright owner..
This product uses GPL/LGPL application software, and our customers reserve the right
to obtain, alter and redistribute the source code of the software in question. Please refer
to the URL below to obtain source codes.
http://www.coretronic.com/digisign/691/index.html
32
 Loading...