

Page 1
M166C / M166CL
Customer Engineer Manual
Issue: November 2015
Page 2

Page 3

Date: November 2015
Great care has been taken to ensure that the information contained in this
handbook is accurate and complete. Should any errors or omissions be
discovered or should any user wish to make a suggestion for improving this
handbook, they are invited to send the relevant details to:
NEC Nederland B.V.
P.O. BOX 32
1200 JD HILVERSUM
THE NETHERLANDS
© NEC Nederland B.V. 2015
All right are reserved. Reproduction in whole or in part is prohibited without the written consent of the
copyright owner. All brand names and product names in this document are trademarks or registered
trademarks of their respective companies.
Page 4

Page 5

Contents
Contents:
Contents: ........................................................................................................................... 5
Preface ............................................................................................................................... 7
1 Introduction ................................................................................................................. 9
1.1 General ............................................................................................................... 9
1.2 Two Types: M166C and M166CL ........................................................................ 9
2 Setting up a Template ............................................................................................... 11
2.1 General ............................................................................................................. 11
2.2 The Settings Menu ............................................................................................ 14
2.3 The Alarms Menu .............................................................................................. 17
2.4 The Notifications Menu ...................................................................................... 19
2.5 Save the Template ............................................................................................ 20
3 How to Subscribe the M166 ..................................................................................... 21
3.1 General ............................................................................................................. 21
3.2 Preparing Head Set connection ......................................................................... 21
3.3 Prepare csv file with name number list .............................................................. 22
3.4 Converting the csv file to an xml file. ................................................................. 22
3.5 Read in the xml file into the DECT Manager PC. ............................................... 25
3.6 Store subscription data from the xml file into the M166 ...................................... 27
4 Changing M166 Settings .......................................................................................... 33
4.1 General ............................................................................................................. 33
4.2 Changing Settings via the Air Interface .............................................................. 33
4.3 Changing Settings using Subscription Procedure. ............................................. 35
5 Buttons and LED Indications ................................................................................... 37
5.1 General ............................................................................................................. 37
5.2 Buttons .............................................................................................................. 38
5.3 LED Indications ................................................................................................. 39
6 Backward Compatibility Mode ................................................................................. 40
6.1 General ............................................................................................................. 40
6.2 Inside Information ................................ .............................................................. 41
© NEC Nederland B.V. 2015 Page 5 M166 CE Manual
Page 6

Contents
7 Tyco/Elpas Integration ............................................................................................. 45
7.1 General ............................................................................................................. 45
7.2 Installing the DLA card in the M166CL............................................................... 46
7.3 Inside Information ................................ .............................................................. 49
8 How to upload Firmware .......................................................................................... 52
8.1 General ............................................................................................................. 52
8.2 Using the Flash Loader. .................................................................................... 52
A State Diagrams .......................................................................................................... 55
A.1 Voice Handling .................................................................................................. 55
A.2 Alarm Handling .................................................................................................. 56
© NEC Nederland B.V. 2015 Page 6 M166 CE Manual
Page 7

Preface
Preface
This manual is valid for the M166 Portable in combination with:
M166 software 10.00.06.
Handset Configurator software Version 4.0.0.38
DMLS Software version DMLS-NEC-4.00.0190
No rights can be derived from this document.
Disclaimer:
Our products are subject to continual development and improvement. Therefore, while the
information in this document was complete when it was written, additions or modifications
to the product after that date may cause changes to the technical and functional
specifications. No rights can be derived from this document.
M166 CE Manual Page 7 © NEC Nederland B.V. 2015
Page 8

M166 CE Manual Page 8 © NEC Nederland B.V. 2015
Page 9

Introduction
1 Introduction
1.1 General
This manual describes:
How to subscribe the M166.
Prior to using the M166, it must be subscribed. As the M166 does not have an
Alphanumeric user interface it must be subscribed using the Handset Configurator
and a dedicated USB_Adaptor-to-headset cable.
Please note that it is a dedicated cable. Don’t try to use any other similar looking
other cable.
This cable is also a converter from USB to mini jack. This means that you must
install the correct drivers. You can download the driver from the NEC BusinessNet
DECT Handset Configurator menu items
New menu items has been added to the DECT Handset Configurator. These need
some explanation. You will find it in Chapter 4 Changing M166 Settings.
Backward Compatibility mode
See Chapter 6 Backward Compatibility Mode
How to setup Tyco and Elpas
For accurate location detection, a locator module can be installed in the M166.
Together with beacons, location can be detected. This is described in Chapter 7
Tyco/Elpas Integration.
1.2 Two Types: M166C and M166CL
Please note that there are two types of M166:
© NEC Nederland B.V. 2015 Page 9 M166 CE Manaul
Page 10
Introduction
M166C
This is the standard M166. It does not offer location detection by means of Tyco
beacons.
The rear side you see the difference between the two. The M166C does not offer a
cover plate that can be removed for mounting the DLA card.
M166CL
The M166CL offers a cover plate that can be removed to install the DLA card for
Location detection. This card picks up signals from Tyco location beacons.
For specific information about the M166CL, consult chapter 7 Tyco/Elpas Integration.
© NEC Nederland B.V. 2015 Page 10 M166 CE Manual
Page 11
Setting up a Template
2 Setting up a Template
2.1 General
Before you start subscribing the M166, please configure the handset configurator with
required settings for the M166. This serves as a template. If you different groups of M166
users, needing different settings, you must repeat this procedure after subscribing a group
of handsets.
Note: This procedure is used for setting up a template. However, it also gives
information about settings, which can be used for making changes.
PROCEDURE: Setting up a template for the M166
Actions
1. Install the DECT Handset Configurator.
2. Start up your DECT Handset Configurator.
3. You will see the following screen:
4. Click “Other”.
5. Now the DECT Handset Configurator window is opened. In the menu bar in the top
of the windows, go to “Tools” “Options” and then select Interface ”
Messaging. From now on, the DECT Handset Configurator communicates with the
M166 via the air interface, using “Headset Connector”
© NEC Nederland B.V. 2015 Page 11 M166 CE Manaul
Page 12

Setting up a Template
6. Click OK.
7. Now you are in the main screen as shown below.
8. Now you must set the settings according to the customers’ requirements. Note that
you must go through the Menu Settings / Alarms / Notifications. (So, the
© NEC Nederland B.V. 2015 Page 12 M166 CE Manual
Page 13

Setting up a Template.
following sections: Section 2.2 The Settings Menu, section 2.3 The Alarms Menu,
section 2.4 The Notifications Menu)
Note: Do not fill in the name and number when you use the setup of the settings as a
template. These will be filled in automatically when doing the Subscription later on
in this manual.
9. You find an explanation of the settings in the following sections in this chapter:
Section 2.2 The Settings Menu,
Section 2.3 The Alarms Menu,
Section 2.4 The Notifications Menu
10. When done, save the configuration to a file: File Save as . This will be your
template file. In case you need more than one template file, go through the settings
again and save the new template file under a recognizable name.
11. continue with chapter 3 How to Subscribe the M166.
G966 Provisioning Guide Page 13 © NEC Nederland B.V. 2015
Page 14
Setting up a Template
2.2 The Settings Menu
The DECT Handset configurator allows you to change settings in the M166. Below, the
Settings Menu.
The following options are available:
Handset name
Here you can enter the handset name. This name will be visible in the DECT
Manager window.
Handset Number
This is the extension number of the M166. Please note that this umber must be the
same as the subscription number. If not the same, writing to the handset will fail.
Ringer Melody
Select the Ring tone for an incoming call.
Ringer Volume
Self-explaining
Speaker Volume.
© NEC Nederland B.V. 2015 Page 14 M166 CE Manual
Page 15

Setting up a Template.
When in a call, the M166 is always in Loud speaking mode. Here you can select the
Loud speaker volume.
Emergency Call Interrupt Mode.
The Emergency Call Interrupt mode, allows room monitoring when an alarm is active
on the M166. So, when an alarm is active and you want to listen in into the room,
you can call the M166. When the ECI mode is activated, the M166 will not ring, but it
will auto answer the call silently. You can select whether you want to have the
Vibrator on or off,
So, basically, it is a Profile setting that overrides the normal M166 settings
(temporarily). So it is used to override the normal settings temporarily, in case of
emergency.
The following settings are available.
1. Disabled.
2. Vibrate On,
3. Vibrate off
If alarm button was not pressed, incoming call is processed with normal ring sound
and vibrator settings.
Silent Charging
There are three options:
- Disabled
The M166 remains fully operational when in charger.
- Silent
The M166 remains fully operational in charger, however, it will not ring.
- Disconnect.
The M166 will detach from the system, and will report itself absent. The M166 is
not reachable anymore.
Power off Button Time out
The time to keep the power button depressed to power off the M166.
Please note that the selection options are 5, 10, 15 seconds. In real life, the time can
be a few seconds longer.
Headset Mode
Two options: “Speaker disabled” or “Speaker enabled”.
This is self-explaining
G966 Provisioning Guide Page 15 © NEC Nederland B.V. 2015
Page 16

Setting up a Template
Auto Answer Settings:
Auto Answer Mode
Determine whether Auto Answer is required or net, and if so, select the number of
rings before the auto answer is activated.
Auto Answer Number
When receiving an incoming call from this particular number, the call will be
answered automatically after approximately one ring no matter how many rings have
been selected in the previous setting. Even when automatic answer is disabled in the
previous setting, still a call from the predefined extension will be automatically
answered.
Auto-Answer Internal
When enabled, internal calls will always be answered automatically, and calls from
external will ring and not be automatically answered.
Auto Answer Message
When enabled, the M166 will automatically answer a message that instructs to set
up a call automatically, using commands <<ANxxxx>> or <<AFxxxx>> in the
message. The M166 is instructed to setup a voice call to the number xxxx. The M166
gives first a short, low volume indication, unless the ringer is muted. Please note
that this functionally depends on conditions. The functionality and conditions are
explained in the IP DECT Advanced DATA Manual, section “Conditional Special
Message Strings” in chapter Special Messages/Features to Handsets.
Silent Answer Message
When enabled, the M166 is instructed to setup a voice call to the number xxxx in a
command <<ASxxxx>> or <<ALxxxx>> in the message. The M166 does not give an
audible indication.
Please note that this functionally depends on conditions. The functionality and
conditions are explained in the IP DECT Advanced DATA Manual, section
“Conditional Special Message Strings” in chapter Special Messages/Features to
Handsets.
© NEC Nederland B.V. 2015 Page 16 M166 CE Manual
Page 17
Setting up a Template.
Other Settings:
Silence
When checked, ringing is disabled.
When you have checked this Check box, the Vibrator checkbox is activated
Night Visibility LED flash
When enabled, the M166 indicates that it is operational by means of two flashing
blue LEDs, left and right, at the front side of the M166.
Vibrator
Enables or disables the Vibrator. Please note that this check box is checked and is
disabled if you have checked the “Silence” check box above
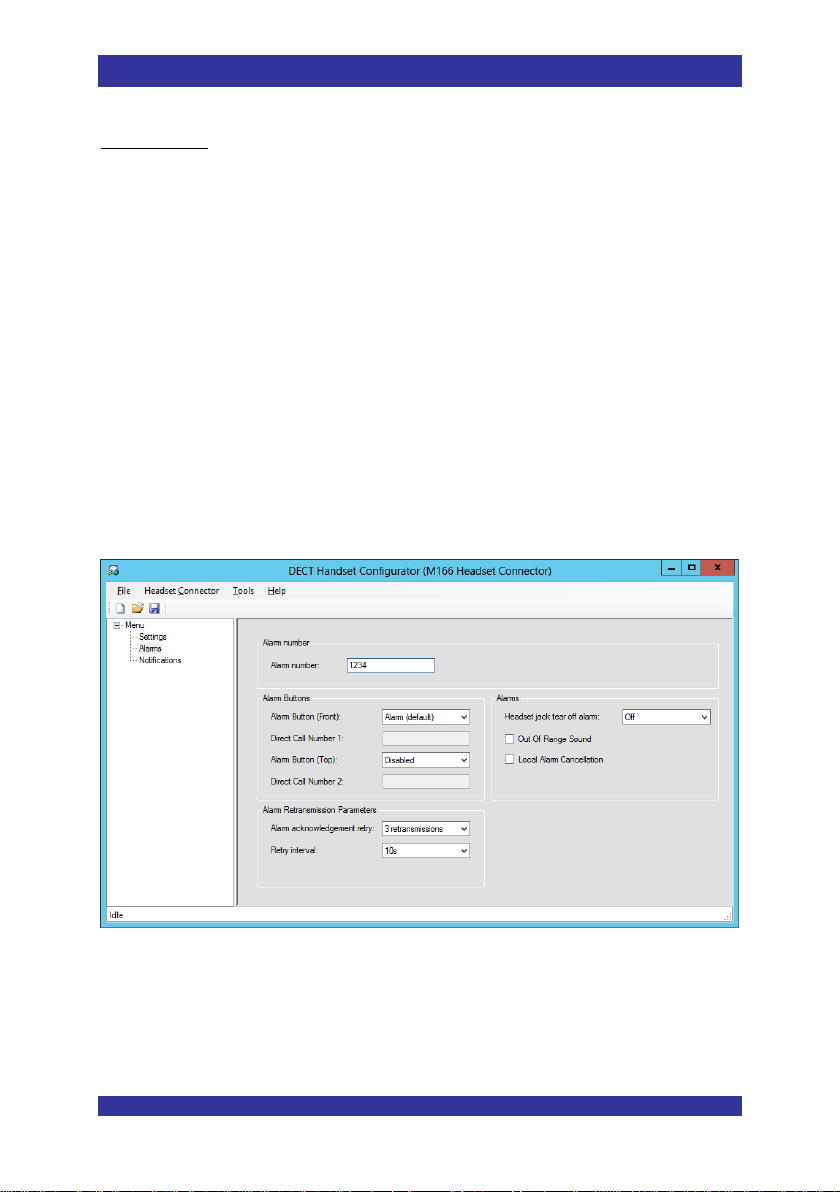
2.3 The Alarms Menu
Below, the Alarms Menu.
The following options are available:
G966 Provisioning Guide Page 17 © NEC Nederland B.V. 2015
Page 18

Setting up a Template
Alarm number
This is the destination number for notifications and events. When the M166 sends a
notification or event, it contains the originator number (M166 extension number) and
the destination number that you have specified here.
Alarm button (Front)
There are two options:
Disabled
Self-explaining
Direct call number 1
When pressed, the alarm number is dialled. This number is specified in the
“Direct Call Number 1” field.
Alarm (default).
An alarm indication is sent to the Messaging Application.
Alarm button (Top)
There are two options:
Disabled
Self-explaining
Direct call number 2
When pressed, the alarm number is dialled. This number is specified in the
“Direct Call Number 2” field.
Single Press Top button
An alarm message is sent to the Messaging Application.
Alarm Retransmission Parameters
When an Alarm is activated, you can select how many times the alarm condition is
sent to the Messaging Application. Also you can specify the interval time between
sending the alarm messages to the Messenger Application. There are two items that
can be adjusted:
- Alarm Acknowledgement retries.
Number of times that the Alarm message is sent to the Messaging Application.
- Retry Interval.
Interval between the retries in seconds.
Headset jack tear off alarm
There are three options which are self-explaining:
- Off
- On, without sound
- On, with sound
Out of range sound
© NEC Nederland B.V. 2015 Page 18 M166 CE Manual
Page 19

Setting up a Template.
Self-explaining.
Local Alarm Cancellation
If enabled, the alarm can be cancelled locally.
(To cancel an alarm locally, press top button for more than 5 seconds.)
2.4 The Notifications Menu
Below, the Notifications menu.
Send full discharge notifications (battery less than 10%)
Self-explaining.
Send low battery notifications (battery less than 25%)
Self-explaining.
G966 Provisioning Guide Page 19 © NEC Nederland B.V. 2015
Page 20

Setting up a Template
Send Power off notifications
Self-explaining.
Send in/out charger notifications
Self explaining.
Low power sound indication.
Self-explaining.
In/out charger sound indication
Self explaining.
Location Notification (RFID) (Only applicable for M166CL with DLA)
Here you can activate notification when the M166 detects an RFID beacon. There
are three options:
Off
In-range Notifications.
When the handset detects a beacon signal, it will give a notification.
In and out-of-range notifications.
When the handset detects a beacon signal or detects that it loses signal from a
beacon, it will give a notification.
Note: When Location Notification is enabled and an Alarm is activated from the M166,
the M166 will send an alarm message AND a beacon notification.
Notification number
The destination number used in the RFID notification. Please note that this number
is only used as notification destination for RFID, and not for other notifications.
2.5 Save the Template
Please note that it is not possible to read out the configuration from the M166. Therefore,
please store the Template that you have created for later use. This may be required in
case you must replace an M166 or if you want to make changes in the configuration.
Save the Template by means of:
File” “Save as”. The File extension will be .166.
© NEC Nederland B.V. 2015 Page 20 M166 CE Manual
Page 21

How to Subscribe the M166
3 How to Subscribe the M166
3.1 General
Subscribing the M166 consists of the following steps:
Setting up a template (already done in chapter 2 Setting up a Template.)
Preparing the headset connection between the USB port on the PC and the M166
Preparing a .csv file with name number list.
Converting the csv file to an xml file with subscription data.
Read in the xml file into the DECT Manager PC.
Store subscription data from the .xml file into the M166. (This includes storing the
settings from the Template.)
3.2 Preparing Head Set connection
PROCEDURE: Preparing the Connection
Actions
1. Charge the M166 sets for 24 hours.
2. Make sure that you have the upload cable for the M166 available. Please note that
this cable consists of the Upload Cable for the G266 and G566, together with a
conversion cable: Mini jack 3,5 mm to mini jack 2,5 mm
3. Install the USB driver for the USB – Mini jack 3,5 mm upload cable. You will find the
driver software on the Software Database on NEC BusinessNet: “DECT” “Tools”
Flash loader 7 V2.0.1.3.
4. Check which COM port number has been assigned to the USB cable. (Use “Run”
“devmgmt.msc” to get access to the device manager under Windows.)
© NEC Nederland B.V. 2015 Page 21 M166 CE Manaul
Page 22

How to Subscribe the M166
3.3 Prepare csv file with name number list
PROCEDURE: How to create a csv file with name number relation
Actions
1. Prepare a file with the extension numbers that you want to subscribe. This must be a
.csv file.
The layout of the file must be as follows:
<Name>,<extension number>
<Name>,<extension number>
Below an example of such a file:
2. Save the file to your Hard Disk.
3.4 Converting the csv file to an xml file.
PROCEDURE: How to Convert the csv file to an xml file
Actions
1. Open the DECT Handset Configurator. You will see the following screen.
© NEC Nederland B.V. 2015 Page 22 M166 CE Manual
Page 23

How to Subscribe the M166
2. Click “Other”. Now the “DECT Handset Configurator” screen is visible.
3. Convert the csv file to an . xml file by means of the menu item. “Tools”
“Create Subscription File”.
G966 Provisioning Guide Page 23 © NEC Nederland B.V. 2015
Page 24

How to Subscribe the M166
4. The following screen is shown:
5. Fill in the fields with the data that is applicable for your configuration. When done,
click “OK”.
6. You will get a confirmation message, that the Subscriptions .xml file is written.
You will use this .xml file to import the subscription data into the DAP Manager
(and later on, into the M166 as well).
Note: Store this file in the directory where you have also stored the template file. (File
extension .166). You should keep these files together because you may need
them both for replacing an M166 or for making configuration changes later on.
© NEC Nederland B.V. 2015 Page 24 M166 CE Manual
Page 25

How to Subscribe the M166
3.5 Read in the xml file into the DECT Manager PC.
PROCEDURE: How to read in the xml file into the DECT Manager
Actions
1. The following steps show how to import the Subscription data ( .xml file) into the
DECT Manager. Open the DAP Manager WEB interface of the DECT System to
which you want to subscribe the M166s.
2. In the left part of the window, click the menu item “Pack Up & Go”.
G966 Provisioning Guide Page 25 © NEC Nederland B.V. 2015
Page 26

How to Subscribe the M166
3. In the window that is opened, click the menu item “Import”.
4. Browse to the .xml file that you have created in Section Converting the csv file to
an xml file.3.4 Converting the csv file to an xml file.. And click “OK”.
5. Now the extension numbers are imported. They are in status “Subscribed”. You will
see them in the subscriptions overview in the DAP Manager. See window below.
© NEC Nederland B.V. 2015 Page 26 M166 CE Manual
Page 27

How to Subscribe the M166
6. Of course, there is no absent/present yet, because the M166 does not have the
subscription data yet.
7. Now the subscription data is in the DECT Manager. Now, the subscription data must
be imported into the M166. See next section.
3.6 Store subscription data from the xml file into the M166
Make sure that you have setup a template for you M166 handsets. See Chapter 2 Setting
up a Template. Also make sure that the name and number fields are empty in the
“Settings” menu. That information will be filled in automatically when doing the
subscription.
If you have groups of M166 handsets, that need to have different templates, repeat the
procedure for subscriptions per group.
PROCEDURE: How to Subscribe the M166
Actions
1. Make sure that the M166 are fully charged (charged for minimum 24 hours).
G966 Provisioning Guide Page 27 © NEC Nederland B.V. 2015
Page 28

How to Subscribe the M166
2. Make sure that you have the upload cable for the M166 available. Please note that
this cable consists of the “Upload Cable for the G266/G566”, together with a
conversion cable: Mini jack 3,5 mm to mini jack 2,5 mm
3. Make sure that you have installed the driver software for the USB – Mini jack 3,5 mm
upload cable. (See the step-by-step procedure in section 2.1 General.) (You will find
the driver software on the Software Database on NEC BusinessNet: “DECT”
“Tools” Flash loader 7 V2.0.1.3.)
4. Make sure that you have installed the DECT Handset Configurator.
5. Make sure that you have the following files available:
Template file, created in section 2 Setting up a Template.
Xml subscriptions file, created in section 3.4 Converting the csv file to an xml
file. (File extension .166)
6. If not yet done, start the Handset Configurator.
7. Read in the Template file into the DECT Handset configurator. (File Open .
”<name>.166 file)
8. Connect the dedicated interface cable “USB to mini jack (3,5 mm) cable” in
combination with Conversion cable from 3,5 mm to 2,5 mm, between the DECT
Handset Configurator PC and the M166.
9. Make sure that the M166(s) that you want to subscribe are switched on.
10. Open the Windows Device manager (Run devmgmt.msc). Check which COM
port has been assigned to the “USB to mini jack) cable” (Under “Ports (COM & LPT).
Write down the COM port number, you will need it later on.
© NEC Nederland B.V. 2015 Page 28 M166 CE Manual
Page 29

How to Subscribe the M166
11. Go to “Tools” “Options”. The following window is displayed
12. Fill in the correct data into the fields in the screen capture above.
- Operation Mode = Configurator
- Type = M166
- Interface = Headset Connector
- Default COM port = Use the Windows Device manager to find the COM port that
is used.
13. Click OK.
14. Click “Headset connector” in the menu bar. Then click “Write”.
G966 Provisioning Guide Page 29 © NEC Nederland B.V. 2015
Page 30

How to Subscribe the M166
© NEC Nederland B.V. 2015 Page 30 M166 CE Manual
Page 31

How to Subscribe the M166
15. The following window is displayed.
Select the COM port. Note that if the USB cable must be connected, otherwise the
com port is not in the list. If you have an M166 already connected, you can click the
“Test Connection” button. Select the subscription file (.xml) that you have created in
section 3.4 Converting the csv file to an xml file.
Click OK.
16. Now the write process is started. The DECT Handset Configurator asks you to
connect the “Next pendant <number>”.
17. Connect an M166 that you want to subscribe to the cable and click OK to write the
subscription data to the M166.
18. Write down the extension number on the M166, because you cannot read it out later
on.
Note: You cannot read out the extension number from the M166!
G966 Provisioning Guide Page 31 © NEC Nederland B.V. 2015
Page 32

How to Subscribe the M166
19. Continue the procedure for the remaining M166s. Do not forget to write down the
extension number on the M166.
20. When done, check the statues of the M166s in the DECT Manager window. When
your DECT System is up and running and the M166s are within reach of the DECT
system, the status should go to “Present” in the DECT Manager.
Now, your M166s are subscribed. In case you want to change settings, you can do
that via the Air interface.
21. Make sure that you store the .xml file and the template file that you have used in this
procedure on a safe location. This allows you to make changes in an individual M166
or in a group of M166 handsets when needed.
© NEC Nederland B.V. 2015 Page 32 M166 CE Manual
Page 33

Changing the M166 Settings
4 Changing M166 Settings
4.1 General
There are two ways to make changes in the M166 configuration:
Making changes via the air interface (preferred!)
Using the subscription procedure as described in chapter 3 How to Subscribe the
M166. (Use the USB – upload cable as mentioned in the procedures in chapter 3 How
to Subscribe the M166
4.2 Changing Settings via the Air Interface
For this procedure, you do not need to have the cable.
PROCEDURE: How to change the settings in an M166
Actions
1. Open the DECT Handset Configurator.
2. In the menu bar, click “Tools” “Options”
3. The following screen is displayed.
© NEC Nederland B.V. 2015 Page 33 M166 CE Manaul
Page 34

Changing the M166 Settings
Set the settings according to the screen capture above.
4. If you want to start from the settings in the Template file ( .166) that you have
created in chapter 2 Setting up a Template, read in this Template file. If you do not
have this file anymore, start with the default settings in the DECT Handset
Configurator. Please note that it is not possible to read out the settings from the
M166.
5. Go through the settings. Use the explanation in chapter 2 Setting up a Template.
Make the changes in the settings according to the customers’ requirements.
6. Enter the name and the number of the handset. The number is the extension number
to which the configuration settings are sent.
7. After you have made the changes, send the configuration to the 166 via the menu
item: Messaging Send, or the small “Send” icon in the tools bar.
© NEC Nederland B.V. 2015 Page 34 M166 CE Manual
Page 35

Changing the M166 Settings
Note: When you send the settings to the M166, the front LEDs indicates that data is
written to the Flash memory. (See section 5.3 LED Indications). During that time
(a few seconds), the M166 is not usable.
8. Because this is a dedicated configuration (not a “template” anymore), save the
configuration in a file with the extension number.
Go to “File” “Save as …”.
Use a recognisable file name, e.g. extension2000.166.
4.3 Changing Settings using Subscription Procedure.
Note: Use this procedure only when the procedure in section 4.2 Changing Settings via
the Air Interface fails or when re-subscription is necessary.
Using the Subscription Procedure in this section means that you go through the
subscription procedure again, but then for a limited number of M166s. During the resubscription, the new configuration is written to the M166.
This requires that you have the following files available:
Template file that you have created in section 2 Setting up a Template
The subscription file that you have created in section 3.4 Converting the csv file to an
xml file.
When you use the subscription file as mentioned above, most likely there are more than
one subscriptions in the file. This means that you must only use the subscription for a
particular M166 that you want to re-configure. The other subscriptions must be skipped
when writing to the M166.
However, it is also possible to create a new subscription file for the M166 that you want to
re-configure. In that case you must remove the existing subscription from the DECT
Manager for that particular M166 and import the newly created subscription.
PROCEDURE: How to change the settings in an M166
Actions
1. Execute the procedure in section 3.2 Preparing Head Set connection.
2. Determine which M166 handset(s) need(s) to be changed. Be aware that you will
override the subscription in a M166 using this procedure. So, be aware that you do
not override an extension number.
G966 Provisioning Guide Page 35 © NEC Nederland B.V. 2015
Page 36

Changing the M166 Settings
3. Execute the procedures in section 3.6 Store subscription data from the xml file into
the M166.
Please note that in this procedure, you read in the .166 file. After you have read
in this file, make changes in the configuration, according to your wishes.
4. Only re-subscribe the M166s that needs to get a changed configuration. For the
other extension numbers, please click “Skip” (only applicable in case of a
subscription file with more than one subscription of an M166 that does not need to
be reconfigured. )
© NEC Nederland B.V. 2015 Page 36 M166 CE Manual
Page 37

Buttons and LED Indications
Operational State LEDs
Alarm Button 2
Alarm Button 1
On/off Switch
with blue LED
Microphone
Headset / Tearoff connector
5 Buttons and LED Indications
5.1 General
© NEC Nederland B.V. 2015 Page 37 M166 CE Manaul
Page 38

Buttons and LED Indications
5.2 Buttons
There are three buttons:
Left side: On /off button
To switch off:
Keep the On/Off button depressed for at least the number of seconds that you have
specified in the DECT Handset Configurator or until you hear the Switch off beep.
To Switch on:
Press the On/Off button
Front Button
Button used for:
- Activating an alarm (depending on settings in the DECT Handset Configurator,
the alarm will be a message or a voice call to a specified destination.
- Terminating a voice call (Hang-up voice call). Keep the button depressed for at
least 2 seconds
- Answering an incoming voice call.
Top Button
Button used for:
- Activating an alarm (depending on settings in the DECT Handset Configurator,
the alarm will be a message or a voice call to a specified destination.
© NEC Nederland B.V. 2015 Page 38 M166 CE Manual
Page 39

Buttons and LED Indications
5.3 LED Indications
There are three LED indications:
Red Led on top side
Handset is charging.
Green LED in top side
Indicates voice call (either ringing or active voice call.).
Blue LEDs at front side
Left + right LED flash: ................ Night Visibility flash. (Can be activated/de-
Top – left+right – bottom flash: ... Writing settings to memory.
Right-going-turn—around: .......... Incoming call
Top + Left + Right + bottom: ....... Alarm Active
Left side On/Off button LED
When Switching off, the LED flashes with a 5 seconds interval, until the M166 is
switched off.
activated by means of the DECT Handset
Configurator.)
G966 Provisioning Guide Page 39 © NEC Nederland B.V. 2015
Page 40

Backward Compatibility Mode
6 Backward Compatibility Mode
6.1 General
The interface between the DMLS and the Messaging Application for the M166 offers a
new set of commands and events. However, there are current Messaging Applications
that cannot handle this new set of commands and events. For those Messaging
Applications you can switch to compatibility mode.
In the DMLS User Interface, you can switch to “Backwards Compatibility Mode” by means
of a check box. Leave the text strings to the defaults. Most likely These text strings are
setup in the receiving Messenger Application. If you change the text strings, most likely
the Messenger Application cannot process the text string.
© NEC Nederland B.V. 2015 Page 40 M166 CE Manaul
Page 41

Backward Compatibility Mode
Note: Whether you should use Backward Compatibility Mode or not depends on your
Messaging Application. So, please check with the supplier of the Messaging
Application whether this Backward Compatibility mode should be set or not.
6.2 Inside Information
In the following screen capture you can see the translation to the Generic PPMSG
commands in detail. Please note that the text strings are the default text strings. You can
adapt these strings, however, it is strongly recommended to keep the defaults! Note that
the text strings are used in the Messenger Application to generate alarms. If you change
the strings, and you do not adapt the Messenger Application, probably the Messenger
Application cannot handle the incoming alarm strings anymore
The following table gives an overview of the translation from traditional events to new
events.
G966 Provisioning Guide Page 41 © NEC Nederland B.V. 2015
Page 42

Backward Compatibility Mode
Backward Compatibility Mode
Event
PPMSG|ID|ORGDNR|TODNR|<text>
New M166 Event
PENDANTEVENT|ID|ORGDNR|TODNR|<XXXX>
Front Button 1 Pressed
0001
Top Button 2 pressed
0002
Tear-off
0005
Alarm Cancelled
0200
Low Battery (less than 25%)
2000
Full Discharge (less than
10%)
2001
In Charger
2002
Off Charger
2003
Power Off
2004
Unhandled Alarm
2005
Location Notification@<new
RFID>(<Old RFID>)|<RPN>
Notification is done with RFIDEVENT
instead of PENDANTEVENT.
For more info, consult the DMLS Client
Interface Description
Please note that you can only get these events when the Messaging Application
Registers to it. You must register the DNR number of the destination (TODNR). The
Registration is done by means of the Register Command.
Backward Compatibility
The Messaging Application can only receive event for the handsets when they are
subscribed/registered to the destination DNR number. For Backward Compatibility,
the following register command should be used:
- REG|ID|PPMSG|<DNRRANGE>
The DNRRANGE can be:
- DNR.
© NEC Nederland B.V. 2015 Page 42 M166 CE Manual
Page 43

Backward Compatibility Mode
- A wildcard range of DNRs (e.g. 12* means all destination numbers starting with
12.
- * , This means all DNRs
When registered to all DNRs for Backward Compatibility, the DMLS Application window
looks like this:
M166 New Events
The Messaging Application can only receive events for the handsets when they are
subscribed/registered to the destination extension number. For New Events for
M166, the following register command should be used:
- REG|ID|PENDANTEVENT|<DNRRANGE>
The DNRRANGE can be:
- DNR.
- A wildcard range of DNRs (e.g. 12* means all destination numbers starting with
12.
- * , This means all DNRs
- When registered to all DNRs for M166 events types, the DMLS Application
window looks like this:
G966 Provisioning Guide Page 43 © NEC Nederland B.V. 2015
Page 44

Backward Compatibility Mode
© NEC Nederland B.V. 2015 Page 44 M166 CE Manual
Page 45

How to Setup Tyco/Elpas
7 Tyco/Elpas Integration
7.1 General
The M166 can be integrated with the Tyco/Elpas location detection system.
The mechanism is as follows:
When the M166 is equipped with a DLA card (inside the M166), it is capable of picking up
radio signals from Tyco/Elpas Beacons. When the M166 detects such a beacon it will
send a notification (RFID Event) to the Messaging application (via the DMLS).
This RFID notification contains the RFID identifier that it newly detected and the RFID
where it came from. The RFID is always one byte.
Please note that this functionality requires a correct setup in the DECT Handset
Configurator for the M166. For more info, consult Section 2.4 The Notifications Menu.
© NEC Nederland B.V. 2015 Page 45 M166 CE Manaul
Page 46

How to Setup Tyco/Elpas
Remove two screws to get access to
the DLA compartment.
7.2 Installing the DLA card in the M166CL
Use the following procedure to install the DLA card.
PROCEDURE: How to install the DLA in the M166
Actions
1. Make sure that your M166 is type M166CL. If not, you cannot install the DLA card.
2. Make sure tha the M166 is switched off.
3. Open the rear side of the M166CL by means of removing the two screws as shown
in the following picture:
4. Mount the DLA card on to the M166, as shown in the picture below.
Note: Please be very careful in installing the DLA in the M166.
Note: The holes in the DLA card should fit over the rings in the M166, as shown in the
picture below.
Note: There are 6 pins on the DLA that should fit into the six pins connector in the
M166.
Note: Do not use force.
© NEC Nederland B.V. 2015 Page 46 M166 CE Manual
Page 47

How to Setup Tyco/Elpas
5. When the DLA is installed, it should look like the picture below:
G966 Provisioning Guide Page 47 © NEC Nederland B.V. 2015
Page 48

How to Setup Tyco/Elpas
6. Now you can check/test whether the DLA works fine. Switch on the M166.
7. Make sure that you have a Elpas/Tyco beacon device as shown below. Also make
sure it is powered up.
8. Make sure you are more than 10 meters away from the Beacon.
9. Walk to the beacon. Keep an eye on the small led on the DLA card. When it detects
the Beacon, it will blink shortly. See the picture below.
© NEC Nederland B.V. 2015 Page 48 M166 CE Manual
Page 49

How to Setup Tyco/Elpas
RED LED. This will
blink shortly, to
indicate the detection
of a beacon signal.
10. When it blinked for a short time, it indicates that your DLA is working fine.
11. Put the cover for the DLA compartment back on the M166 and mount the two screws
that you removed in step 3.
7.3 Inside Information
When the M166 detects an beacon, it will send a notification via the DMLS to the
Messaging Application.
To receive RFID events, the messaging Application must register/subscribe to the
destination extension number using the “REG” command.
- REG|ID|RFIDEVENT|<DNRRANGE>
G966 Provisioning Guide Page 49 © NEC Nederland B.V. 2015
Page 50

How to Setup Tyco/Elpas
The DNRRANGE can be:
- DNR.
- A wildcard range of DNRs (e.g. 12* means all destination numbers starting with
12.
- * , This means all DNRs
- When registered to all DNRs for M166 events types, the DMLS Application
window looks like this:
When there is an RFID notification and Backwards Compatibility is not enabled, the RFID
Event will be as follows:
RFIDEVENT|ID|ORGDNR>|TODNR|EVENT|RPN
Where:
ORGDNR = The device that sends the event
TODNR = DNR to which the event is send.
EVENT = The actual contents of the event
RPN = The RPN via which the device sends the event.
Example of the “EVENT” contents:
C108A900A5
© NEC Nederland B.V. 2015 Page 50 M166 CE Manual
Page 51

How to Setup Tyco/Elpas
Where:
C108 = Indicates that a new RFID has been detected.
A9 = The actual new RFID number that has been detected.
00 = Indicator that the next byte is the previous RFID that was detected.
A5 = The previous RFID that was detected.
For more info, consult the “DMLS Client Interface Description” document.
G966 Provisioning Guide Page 51 © NEC Nederland B.V. 2015
Page 52

How to Upload Firmware
8 How to upload Firmware
8.1 General
There are two ways to upload firmware to the M166:
Via the Air
Use the “Handset Firmware Update mechanism that is available in the DECT
Manager WEB Interface. For more information and procedures, consult the “IP
DECT Administrator Guide”.
Using Flash Loader (cable).
This is described in the following section.
8.2 Using the Flash Loader.
PROCEDURE: How to Subscribe the M166
Actions
1. Make sure that you have the following items available:
Make sure that you have the upload cable for the M166 available. Please note
that this cable consists of the Upload Cable for the G266/G566, together with a
conversion cable: Mini jack 3,5 mm to mini jack 2,5 mm
Windows PC (Windows 7, Windows 2008, Windows 2012) with at least one
USB port available.
Driver software for the Dedicated “USB to mini jack (2,5 mm) cable”.
Flash loader (FL7, - Flash Loader GUI, Version 2.0.1.0)
M166 firmware file. This is a .hex file.
2. Install the Driver Software
3. Install the Flash Loader (FL7) software.
4. Make sure that the battery level of the M166 devices is sufficient (>30 %)
5. Make sure that M166 is properly connected via the USB – Mini Jack cable.
6. Make sure that the COM port that you are going to be used is not already in use.
7. Use the Device Manager in Windows, to find out which com port is assigned to the
“USB to mini jack (2,5 mm) cable”.
8. Start the Flash Loader software.
9. You will see a window like the following:
© NEC Nederland B.V. 2015 Page 52 M166 CE Manaul
Page 53

How to Upload Firmware
10. Via the File menu, select the firmware file for the M166.
11. Select the correct Model in this window. Should be of course M166.
12. Select the correct com port. You have found out which com port is assigned to the
“USB to mini Jack” cable in the Windows device manager.
13. Power off the device by pressing the power key for >15s
14. Press the button on the USB device (on the “USB to mini jack (2,5 mm) cable”) and
keep it pressed.
G966 Provisioning Guide Page 53 © NEC Nederland B.V. 2015
Page 54

How to Upload Firmware
15. Press the power button on the M166 and keep it pressed
16. Release button on USB device (on the “USB to mini jack (2,5 mm) cable”)
17. Click the Start button on the screen.
18. Check that the down load starts. Start download
19. When the download is started, release the power button on the M166.
© NEC Nederland B.V. 2015 Page 54 M166 CE Manual
Page 55

Appendix A State Diagrams
A State Diagrams
A.1 Voice Handling
Figure A.1 Statuses in Voice Handling
© NEC Nederland B.V. 2015 Page 55 M166 CE Manaul
Page 56

Appendix A State Diagrams
A.2 Alarm Handling
Figure A.2 Statuses in Alarm Handling
© NEC Nederland B.V. 2015 Page 56 M166 CE Manual
 Loading...