

Page 1

Portable Projector
LT10 Users Manual
Page 2

FCC Notice
This equipment has been tested and found to comply
with the limits for a Class B digital device, pursuant to
Part 15 of FCC Rules. These limits are designed to provide
reasonable protection against harmful interference
in a residential installation.
Trademarks
Trademarks are the rights of their respective owners.
Page 3

-nglish
Table of Contents
Table of Contents....................................................................................... 1
Important Information ............................................................................... 2
Precautions ......................................................................................................... 2
Introduction ................................................................................................ 4
Introduction ......................................................................................................... 4
What's in the Box? .............................................................................................. 5
Product Overview ................................................................................................ 6
Main Unit ........................................................................................................................ 6
Control Panel ................................................................................................................ 7
Terminal Panel .............................................................................................................. 7
Remote Control ............................................................................................................. 8
Installation ................................................................................................. 9
Connecting the Projector .................................................................................... 9
Powering On/Off the Projector .......................................................................... 10
Powering On the Projector ......................................................................................... 10
Powering Off the projector .......................................................................................... 11
Status Indicator ........................................................................................................... 11
Adjusting the Projected Image ......................................................................... 12
Adjusting the Projector Height ................................................................................... 12
Adjusting the Projector Zoom / Focus ....................................................................... 13
Adjusting Projection Image Size ................................................................................ 13
User Controls ............................................................................................ 14
Control Panel & Remote Control ..................................................................... 14
On Screen Menus ............................................................................................. 16
How to operate ............................................................................................................ 16
Language ..................................................................................................................... 17
All Images.................................................................................................................... 18
Computer Image .......................................................................................................... 20
Video Image ................................................................................................................ 21
Setup ............................................................................................................................ 22
PIP ............................................................................................................................... 24
Appendices .............................................................................................. 25
Troubleshooting ............................................................................................... 25
Changing the lamp ........................................................................................... 28
Specifications ................................................................................................... 29
Compatibility Modes ........................................................................................ 30
TravelCare Guide .................................................................................. A-1
Page 4
-nglish
Important Information
Precautions
Follow all warnings, precautions and maintenance as recommended in this user’s guide to maximize the life of your unit.
Warning- Do not look into the projector’s lens when the lamp is
on. The bright light may hurt your eyes.
Warning- To reduce the risk of fire or electric shock, do not
expose this product to rain or moisture.
Warning- Please do not open or disassemble the product as this
may cause electric shock.
Warning- When changing the lamp, please allow unit to cool
down, and follow all changing instructions.
Warning- This product will detect the life of the lamp itself.
Please be sure to change the lamp when it shows
warning messages.
Warning- Reset the “Clear Lamp Hours Meter” function from the
On Screen Display “Setup” menu after replacing
the lamp module (refer to page 22).
Warning- When switching the projector off, please ensure the
projector completes its cooling cycle before
disconnecting power.
Warning- Turn on the projector first and then the signal sources.
Warning- When the lamp reaches the end of its life, it will burn
out and may make a loud popping sound. If this
happens, the projector will not turn back on until the
lamp module has been replaced. To replace the
lamp, follow the procedures listed under “Changing
the Lamp”.
WARNING TO CALIFORNIA RESIDENTS:
Handling the cables supplied with this product, will expose you to lead, a
chemical known to the State of California to cause birth defects or other
reproductive harm. Wash hands after handling.
Page 5

Important Information
Do:
Turn off the product before cleaning.
Use a soft cloth moistened with mild detergent to clean the
display housing.
Disconnect the power plug from AC outlet if the product is not
being used for a long period of time.
Don’t:
Block the slots and openings on the unit provided for
ventilation.
Use abrasive cleaners, waxes or solvents to clean the unit.
Use under the following conditions:
- Extremely hot, cold or humid environment.
- In areas susceptible to excessive dust and dirt.
- Near any appliance generating a strong magnetic field.
- Place in direct sunlight.
-nglish
!
Page 6

-nglish
Introduction
Introduction
This product is an XGA single chip 0.7” DLPTM projector.
Outstanding features include:
True XGA, 1024 x 768 addressable pixels
2.1 lbs (0.95 kgs) compact design
Single chip DLPTM technology
NTSC/NTSC4.43/PAL/PAL-M/PAL-N/SECAM and
Full function remote control
User friendly multilingual on-screen-menu (OSM)
Advanced electronic keystone correction and high
HDTV compatible
quality full screen image re-scaling
User friendly control panel
SXGA compression and VGA, SVGA re-sizing
120 watt user replaceable P-VIP lamp
Mac compatible
"
Page 7
-nglish
Introduction
What's in the Box?
This projector comes with all the items shown below. Check to
make sure your unit is complete. Contact your dealer immediately if anything is missing.
Projector with lens cap
S-Video Cable
Carrying Case
Quick Start Card Warranty Document
Power Cord
Composite Video Cable
Remote Control
(For Europe or North
America)
VGA Cable
User’s Guide
on CD-ROM
Battery
#
Page 8
-nglish
Introduction
Product Overview
Main Unit
1
2
3
4
5
8
1. Focus Ring
2. Zoom Ring
3. Adjustable Tilt Foot Button
4. Zoom Lens
5. Remote Control Receiver
6. Terminal Panel
7. AC Inlet
8. Control Panel
$
5
6
7
Page 9
Control Panel
-nglish
Introduction
1
3
4
1. Power Indicator
2. Status Indicator
3. On/Standby
4. Source
5. Directional Select and Enter Keys
6. Keystone Correction
7. Menu (On/Off)
Terminal Panel
4
2
3
5
2
5
6
7
6
1
1. AC Inlet
2 PC Analog Signal/HDTV/Component Video Connector
3. Composite Video Input Connector
4. S-Video Input Connector
5. Remote Control Receiver
6. Kensington
TM
Lock Port
%
Page 10
-nglish
Introduction
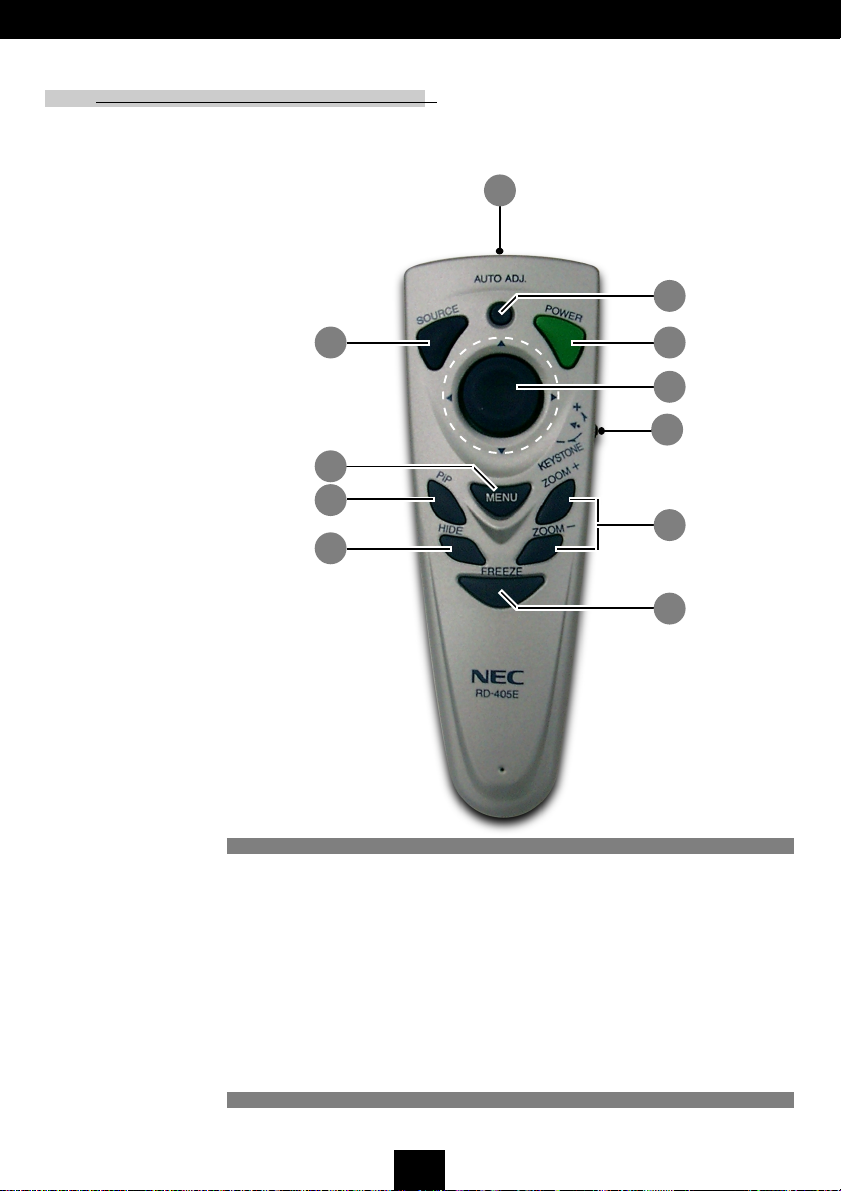
Remote Control
1
11
3
7
8
9
1. Transmit Indicator Light
2. Power
3. Source
4. Keystone Correction
5. Zoom In/Zoom Out
6. Four Directional Select Keys
7. Menu
8. Picture-In-Picture
9. Hide
10. Freeze
11. Auto Adjust
2
6
4
5
10
&
Page 11
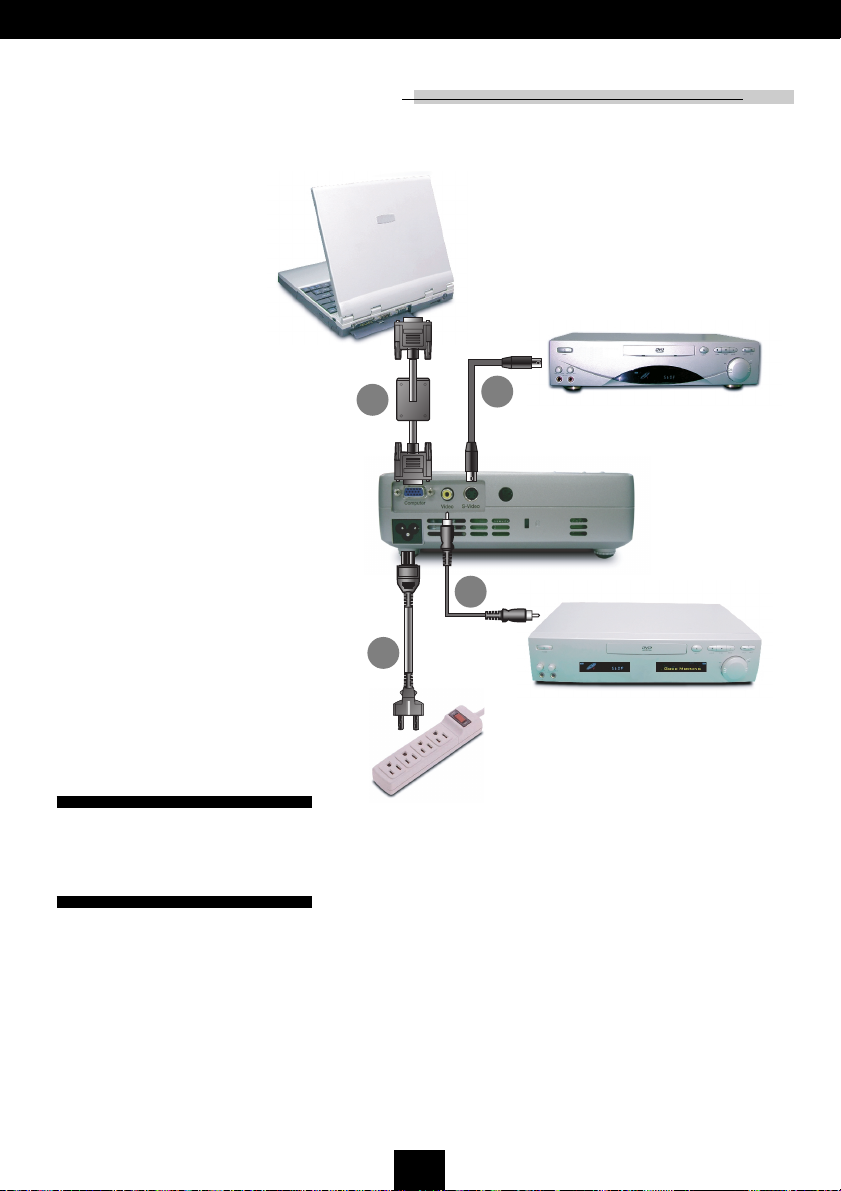
Installation
Connecting the Projector
-nglish
S-Video Output
1. Power Cord
2. VGA Cable
3. S-Video Cable
4. Composite Video Cable
2
3
4
Video Output
1
To ensure the projector works well with your computer, please
set the display mode of your graphics card is less than or equal to
1024 X 768 resolution. Make sure timing of the display mode is
compatible with the projector. Refer to the “Compatibility
Modes” section on page 30.
'
Page 12

-nglish
Installation
Powering On/Off the Projector
1. Remove the lens cap.n
2. Ensure that the power cord and signal cable are securely
3. Turn on the lamp by pressing “On/Standby” button on the
4. Turn on your source (computer, notebook, video player ,
If the screen displays “No Signal”, please make sure the signal
If you connect multiple sources at the same time, use the “Source”
Powering On the Projector
connected.
control panel. o
The startup screen will display for 20 seconds and the Power
indicator will flash green.
When the startup screen disappears, the Power indicator will
turn green.
etc.). The projector will detect your source automatically.
cables are securely connected.
button on the remote control or control panel to switch between them.
Turn on the projector
first and then the
computer.
1
Lens cap
2
On/Standby
Page 13

-nglish
Installation
Powering Off the Projector
1. Press the “Power” button to turn off the projector lamp.
2. After pressing the “Power” button, you will see a message
“Power off the lamp?” on the on-screen display. Press the
“Power” button again to confirm.
Otherwise the message will disappear after 5 seconds.
3. Power indicator flashes orange for about 100 seconds. The
projector will automatically shut itself down.
If you want to turn on the projector again, you must press the
“Power” button after 100 seconds of the flashing indicator.
4. Disconnect the power cord from the electrical outlet and the
projector.
5. Do not turn on the projector immediately following a
power off procedure.
Status Indicator
When the Status indicator turns red, it indicates the projector has
overheated. The projector will automatically shut itself down.
When the Status indicator flashes red (0.5 second intervals), it
indicates a problem with the lamp. Turn off the projector and
disconnect the power cord from the electrical outlet, then contact
your local dealer or our service center.
When the Status indicator flashes red (1 second intervals), it
indicates an internal problem. Stop using the projector and
disconnect the power cord from the electrical outlet, then
contact your local dealer or our service center.
When the Status indicator flashes orange, it indicates high-speed
cooling in progress. This is not an abnormal condition, and you can
continue using the projector.
Page 14

-nglish
Installation
Adjusting the Projected Image
The projector is equipped with an adjustable tilt foot foot for
adjusting the projector height.
To raise the projector:
1. Press the adjustable tilt foot button n.
2. Raise the projector to the desired display angle o, then
release the button to lock the adjustable tilt foot into
position.
3. Use p to fine-tune the display angle.
To lower the projector:
1. Press the adjustable tilt foot button.
2. Lower the projector, then release the button to lock the
adjustable tilt foot into position.
Adjusting the Projector Height
3. Use p to fine-tune the display angle.
3
Tilt Adjusted wheel
Adjustable Tilt
2
Adjustable Tilt
Foot Button
Foot
1
Page 15

-nglish
Installation
Adjusting the Projector Zoom / Focus
You may adjust zoom ring to zoom in or out. To focus the image,
rotate the focus ring until the image is clear. The projector will
focus at distances from 3.94 to 32.81 feet (1.20 to 10.0 meters).
Focus Ring
Zoom Ring
Adjusting Projection Image Size
267.2"(678.7cm)
213.8"(543.0cm)
229.8"
(583.7cm)
183.8"
(466.9cm)
160.3" (407.2cm)
133.6"(339.3cm)
137.9"
(350.2cm)
114.9"
(291.8cm)
80.2"(203.6cm)
68.9"
(175.1cm)
32.1"(81.4cm)
27.6"
(70.0cm)
Screen
(Diagonal)
Screen
Size
Distance
.xaM )mc4.18("1.23 )mc6.302("2.08 )mc3.933("6.331 )mc2.704("3.061 )mc0.345("8.312 )mc7.876("2.762
.niM)mc0.07("6.72)mc1.571("9.86)mc8.192("9.411)mc2.053("9.731)mc9.664("8.381)mc7.385("8.922
)HxW(.xaM
)HxW(.niM
"62.91x"86.52
)mc8.84xmc1.56(
"65.61x"80.22
)mc0.24xmc0.65(
)m2.1('49.3 )m0.3('48.9 )m0.5('04.61 )m0.6('96.91 )m0.8('52.62 )m0.01('18.23
"21.84x"61.46
)mc2.221xmc9.261(
"43.14x"21.55
)mc1.501xmc1.041(
This graph is for user’s reference only.
!
3.94'
(1.2m)
9.84'
(3.0m)
16.40'
(5.0m)
19.69'
(6.0m)
26.25'
(8.0m)
32.81'
(10.0m)
"61.08x"88.601
)mc6.302xmc4.172(
"49.86x"29.19
)mc1.571xmc4.332(
"81.69x"42.821
)mc3.442xmc8.523(
"47.28x"23.011
)mc1.012xmc2.082(
"82.821x"40.171
)mc8.523xmc4.434(
"82.011x"40.741
)mc1.082xmc5.373(
"23.061x"67.312
)mc2.704xmc0.345(
"88.731x"48.381
)mc2.053xmc0.764(
Page 16

-nglish
User Controls
Control Panel & Remote Control
There are two ways for you to control the functions: Remote
Control and Control Panel.
Remote ControlControl Panel
Using the Control Panel
On/Standby
Refer to the “Powering On/Off the Projector” section on pages
10-11.
Source
Press “Source” to choose RGB, Component-p, Component-i,
S-Video, Composite Video and HDTV sources.
Menu
Press “Menu” to launch the on screen menu (OSM). To exit
OSM, press “Menu” again.
Keystone
Adjusts image distortion caused by tilting the projector (±16
degrees).
Directional Select
Use to select items or use to make adjustments for
your selection.
Enter
Confirm your selection of items.
"
Page 17

User Controls
Using the Remote Control
Power
Refer to the “Powering On/Off the Projector” section on pages
10-11.
Source
Press “Source” to choose RGB, Component-p, Component-i,
S-Video, Composite Video and HDTV sources.
AUTO ADJ. (Auto Adjust)
When “AUTO ADJ.” is pressed, the projector will automatically
synchronize with source signal.
PiP
Displays the “PiP” menu of the on screen display.
Keystone + / -
Adjust image distortion caused by tilting the projector (±16
degrees).
Hide
Press “Hide” to hide the image, press again to resume display of
the image.
Zoom In + /Zoom Out -
Press “Zoom +” to magnify an image on the projection screen.
Press “Zoom -” to reduce the image size.
Freeze
Press “Freeze” to pause the screen image.
Four Directional Select Keys
Use to select items or make adjustments to
your selection.
Menu
Press “Menu” to launch the on screen menu (OSM). To exit
OSM, press “Menu” again.
-nglish
#
Page 18

-nglish
User Controls
On Screen Menus
The Projector has multilingual On Screen menus that are
multilingual allowing you to make image adjustments and
change a variety of settings. The projector will automatically
detect the source.
How to operate
1. To open the OSM menu, press “Menu” on the Remote Control or
Control Panel.
2. When OSM is displayed, use keys to select the main menu.
While making a selection on a particular page, press “Enter /
key to enter sub menu.
3. Use keys to select the desired item and adjust the
settings by
”
key.
4. Select the next item to be adjusted in the sub menu and adjust as
described above.
5. Press “Menu” to confirm, and the screen will return to the main
menu.
6. To exit, press “Menu”again. The OSM menu will close and the
projector will automatically save the new settings.
Main Menu Sub Menu Setting
$
Page 19

Computer / Video Mode
Language
You can display the multilingual OSM menu . Use the or
key to select your prefered language.
Press “Menu” to finalize the selection.
-nglish
User Controls
Language
%
Page 20

-nglish
User Controls
Computer / Video Mode
Brightness
Adjusting the brightness of the image.
Press the to darken image.
Press the to lighten the image.
Contrast
The contrast controls the degree of difference between the lightest
and darkest parts of the picture. Adjusting the contrast changes
the amount of black and white in the image.
Press the to decrease the contrast.
Press the to increase the contrast.
White Peaking
White peaking can be incrementally adjusted between 0 and
10. Click on the slider bar to adjust.
Setting 10 will maximize brightness and contrast.
Setting 0 will maximize color reproduction quality.
Color Temperature
Adjust the color temperature. At higher temperature, the screen
looks colder; at lower temperature, the screen looks warmer.
Keystone
Adjusts image distortion caused by tilting projection (±16
degrees).
Zoom
Press the to reduce the size of an image.
Press the to magnify an image on the projection screen.
All Images
&
Page 21

Computer / Video Mode
Aspect Ratio
Selects the desired aspect ratio.
Reset This Menu
Choose “Yes” to return the display parameters on this menu to
their factory default settings.
-nglish
User Controls
All Images
'
Page 22

-nglish
User Controls
Computer Mode
Auto Adjust
The projector automatically adjusts clock, phase, horizontal
and vertical. With most signal sources, Auto Adjust provides the
best results.
Clock
“Clock”changes the display data frequency to match the
frequency of your computer’s graphic card. If you experience a
vertical flickering bar, use this function to make an adjustment.
Phase
“Phase” synchronizes the signal timing of the display with the
graphic card. If you experience an unstable or flickering image, use
this function to correct it.
Horizontal
Press the to move the image left.
Press the to move the image right.
Vertical
Press the to move the image down.
Press the to move the image up.
Reset This Menu
Choose “Yes” to return the display parameters on this menu to
their factory default settings.
Computer Image
Page 23

Video Mode
Color
Adjusts a video image from black and white to fully saturated
color.
Press the to decrease the amount of color in the image.
Press the to increase the amount of color in the image.
Sharpness
Adjusts the sharpness of the image.
Press the to decrease the sharpness.
Press the to increase the sharpness.
Hue
Adjusts the color balance of red and green.
Press the to increase the amount of green in the image.
Press the to increase the amount of red in the image.
Reset This Menu
Choose “Yes” to return the display parameters on this menu to
their factory default settings.
-nglish
User Controls
Video Image
Page 24

-nglish
User Controls
Computer / Video Mode
Menu Location
Choose the Menu location on the display screen.
Orientation
Setup
The factory default setting.
When you select this function, the projector reverses the image
so you can project behind a translucent screen.
When you select this function, the projector turns the image
upside down for ceiling-mounted projection.
When you select this function, the projector reverses and turns
the image upside down at same time. You can project from
behind a translucent screen with ceiling mounted projection.
Front-Desktop
Rear-Desktop
Front-Ceiling
Rear-Ceiling
Lamp Hour Meter
Displays the lamp’s elapsed operating time (in hours).
Clear Lamp Hours Meter
Turns the lamp hour counter to 0 hours.
Reset This Menu
Choose “Yes” to return the display parameters on this menu to
their factory default settings.
Page 25

Computer / Video Mode
Factory Default
Choose “Yes” to return the display parameters (except for Lamp
Hours) on all menus to their factory default settings.
-nglish
User Controls
Setup
!
Page 26

-nglish
User Controls
Computer Mode
PIP
Choose “On” to turn the PIP screen on.
PIP Location
Choose the PIP screen position on the display screen.
PIP Switch Source
Choose the input source of the projector on the PIP screen.
PIP
Picture-In-Picture
The OSM does not
include a PIP menu
under Video mode.
Reset This Menu
Choose “Yes” to return the display parameters on this menu to
their factory default settings.
"
Page 27

-nglish
Appendices
Troubleshooting
If you experience trouble with the projector, refer to
the following information. If the problem persists, please
contact your local reseller or service center.
Problem: No image appears on screen.
Ensure all the cables and power connections are correctly and
securely connected as described in the “Installation” section.
Ensure the pins of connectors are not crooked or broken.
Check if the projection lamp has been securely installed. Please
refer to the “Changing the lamp” section.
Make sure you have removed the lens cap and the projector is
switched on.
Problem: Partial, scrolling or incorrectly displayed image.
Press the “Auto Adjust” function in the “Computer Image” menu
of the OSM.
If you use a PC:
If the resolution of your computer is higher than 1024 x 768.
Follow the steps outlined below to reset the resolution.
For Windows 3.x:
1. In the Windows Program Manager, click the “Windows Setup”
icon in the Main group.
2. Verify that your display resolution setting is less than or equal
to 1024 x 768.
For Windows 95,98,2000,XP:
1. Open “My Computer” icon, the “Control Panel” folder, and
then double click the “Display” icon.
2. Select the “Setting” tab.
3. In the “Desktop Area” you will find the resolution setting.
Verify that the resolution setting is less than or equal to 1024 x
768 resolution.
If the projector is still not projecting the whole image, you will
also need to change the monitor display you are using. Refer to
the following steps.
#
Page 28

-nglish
Appendices
Problem: The screen of the Notebook or PowerBook computer is not displaying your presentation.
4. Follow above steps 1-2. Click on the “Advanced Properties”
button.
5. Select the “Change” button under the “Monitor” tab .
6. Click on “Show all devices”. Then select “Standard monitor
types” under the “Manufactures” box ; choose the resolution
mode you need under the “Models” box.
7. Verify that the resolution setting of the monitor display is less
than or equal to 1024 x 768.
If you are using a Notebook PC:
1. You are required to implement above steps of resolution setting
of computer first.
2. Switch the Notebook PC display to the “external display only”
or “CRT only” mode.
If you experience difficulty in changing resolutions or your monitor
freezes, restart all the equipment and the projector.
If you are using Notebook PC:
Some Notebook PCs may deactivate their screens when a second
display device is in use. Refer to your computer’s documentation
for information on how to reactivate the monitor display.
If you are using an Apple PowerBook:
In Control Panels, open the PowerBook Display to select Video
Mirroring “On”.
Problem: Image is unstable or flickering
Use “Phase” to correct it. Refer to page 20.
Change the monitor color setting from your computer.
Problem: Image has vertical flickering bar
Use “Clock” to make an adjustment. Refer to page 22.
Check and reconfigure the display mode of your graphic card to
make it compatible with the product. Refer to page 25.
$
Page 29

-nglish
Appendices
Problem: Image is out of focus
Adjusts the Focus Ring on the projector lens. Refer to page 13.
Make sure the projection screen is between the required distance
3.94 to 32.81 feet (1.20 to 10.00 meters) from the projector.
Problem: The image is outstretched when displaying 16:9
DVD.
The projector automatically detects 16:9 DVD and adjusts the aspect
ratio by digitizing to full screen with 4:3 default setting.
If the image is still outstretched, you will also need to adjust the aspect
ratio by referring to the following: (See page 18)
Please select 4:3 aspect ratio type on your DVD player if you are
playing a 16:9 DVD.
If you can’t select 4:3 aspect ratio type on your DVD player, please
refer to page 18 to choose 4:3 aspect ratio in the on screen menu.
Problem: Image is reversed.
To select “Setup” from the OSM and adjust the orientation. See
page 23.
Problem: Lamp burns out or makes a popping sound
When the lamp reaches its end of life, it will burn out and may
make a loud popping sound. If this happens, the projector will not
turn on until the lamp module has been replaced. To replace
the lamp, follow the procedures in the “Changing the Lamp”. See
page 28.
%
Page 30

-nglish
Appendices
Changing the lamp
The projector will detect the lamp life itself. It will show you a
warning message “The Lamp has been in use for over 2000
hours. You should purchase a spare bulb.” When you see this
message, please change the lamp as soon as possible. Refer to the
following instructions to replace the lamp.
Warning: Lamp
compartment is hot!
Allow it to cool down
before changing lamp!
Make sure the projector has been cooled down for at least 60
minutes before changing the lamp.
2
1
Warning: To reduce
the risk of personal
injury, do not drop the
lamp module or touch
the lamp bulb. The bulb
may shatter and cause
injury if it is dropped.
3
4
(LT10LP)
Lamp Changing Procedure:
1. Turn off the power to the projector by pressing the Power
button.
2. Allow the projector to cool down at least 60 minutes.
3. Disconnect the power cord.
4. Use a screwdriver to remove 2 screws from the cover.n
5. Remove the cover.o
6. Remove the 2 screws from the lamp module.p
7. Pull out the lamp module.q
To replace the lamp module, reverse the previous steps.
&
Page 31

-nglish
Appendices
Specifications
Light Valve - Single Chip DLPTM Technology by Texas Instruments
Lamp - 120W User Replaceable P-VIP Lamp
Number of Pixels - 1024 pixels(H) X 768 lines(V)
Displayable Color - 16.7M colors
Projection Lens - F/2.8~3.1 f=25.8~30.0mm with 1.16x Manual zoom
lens
Projection Screen Size (Diag.) - 27.6 to 267.2 inches (0.70 to 6.79 meters) Diagonal
Projection Distance - 3.94 to 32.81 feet (1.20 to10.00 meters)
Video Compatibility - NTSC/NTSC 4.43/PAL/PAL-M/PAL-N/SECAM
and HDTV compatible
- Composite video & S-Video capability
H. Frequency - 15kHz~100kHz horizontal scan
V. Frequency - 43Hz~120Hz vertical refresh
Power Supply - Universal AC input 100~240V ;
Input Frequency 50-60Hz
Power Consumption - 170W
Input Current - 2A (100-240V AC)
I/O Connectors - Power: AC power input socket
- Computer Input:
One VGA for analog/component and HDTV signal
- Video Input:
One Composite video RCA input
One S-Video input
Weight - 2.1 lbs (0.95 kgs)
Dimensions (W x H x D) - 7.8 x 2.2 x 5.8 inches (198 x 57 x 148 mm)
Environmental - Operating Temperature: 41~95
Humidity: 80% maximum
- Storage Temperature: -4~140oF (-20~60oC)
Humidity: 80% maximum
Safety Regulation - FCC Class B,CE Class B,UL,cUL,TÜV-GS
o
F (5~ 35oC)
'
Page 32

-nglish
Appendices
Compatibility Modes
Remark : “*”
compression computer
image.
Mode Resolution
AGVASEV 053X046 07 5.13
AGVASEV 053X046 58 9.73
AGVASEV 004X046 58 9.73
AGVASEV 084X046 06 5.13
AGVASEV 084X046 27 9.73
AGVASEV 084X046 57 5.73
AGVASEV 084X046 58 3.34
AGVASEV 004X027 07 5.13
AGVASEV 004X027 58 9.73
AGVS 006X008 65 2.53
AGVS 006X008 06 9.73
AGVS 006X008 27 1.84
AGVS 006X008 57 9.64
AGVS 006X008 58 7.35
AGXASEV 867X4201 4.34 5.53
AGXASEV 867X4201 06 4.84
AGXASEV 867X4201 07 5.65
AGXASEV 867X4201 57 0.06
AGXASEV 867X4201 58 7.86
AGXSASEV* 468X2511 07 8.36
AGXSASEV* 468X2511 57 5.76
AGXSASEV* 468X2511 58 1.77
AGXSASEV* 069X0821 06 06
AGXSASEV* 069X0821 57 57
AGXSASEV* 4201X0821 34 4.64
AGXSASEV* 4201X0821 06 89.36
AGXSASEV* 4201X0821 57 89.97
"61CAM 426X238 55.47 527.94
"91CAM 867X4201 57 42.06
CAM* 078X2511 60.57 86.86
4GCAM 084X046 06 53.13
4GCAM 084X046 021 30.86
4GCAM 867X4201 021 90.79
VDCAMI 084X046 711 06
VDCAMI 006X008 59 06
VDCAMI 867X4201 57 06
VDCAMI* 078X2511 57 94.86
VDCAMI* 069X0821 57 57
V.Frequency
(Hz)
(ANALOG)
H.Frequency
(kHz)
!
Page 33

TravelCare Guide
TravelCare - a service for international travelers
This product is eligible for "TravelCare", NEC's unique international warranty.
Please note that TravelCare coverage differs in par t from coverage under the warranty included with the product.
Services offered with TravelCare
This warranty allows customers to receive service on their product at
the NEC and NEC-designated service stations in the countries listed
herein when temporarily traveling internationally for business or pleasure.
For details on services offered by the different service stations, please
refer to the "List of TravelCare Outlets" below.
1 Repair services
The product will be repaired and delivered within 10 business days,
not including shipping time.
During the term of warranty, the cost of maintenance parts, labor
costs for repairs and shipping costs within the service station's coverage area are covered by the warranty.
2 Replacement product rental service
If the customer desires, he or she can rent a replacement product
while the original product is being repaired.
Fee: US$200 for 12 days
This fee must be paid at the local service station in cash or credit
card.
The $200 rental fee is non-refundable even if the customer rents it
less than 12 days before returning.
The replacement product will be delivered within 3 business days.
If the customer did not return the replacement product within 12 days,
the customer will be charged the price of the unit.
If the customer returned the replacement product in a faulty or damaged condition, the repair cost will be charged to the customer.
Note that this service is not offered in all countries and regions. Please
refer to the "List of TravelCare Outlets".
In addition, this replacement product rental service is not offered after the product's warranty has expired.
Term of warranty
1
a. Upon presentation of the warranty or receipt received upon pur-
chase:
Valid for the term indicated on the warranty or the normal term of
warranty for the country of purchase.
b. When only the product is brought in:
Valid for a period of within 14 months of the date of manufacture
indicated by the serial number attached to the product.
2 When a product whose term of warranty is expired is brought in:
Repairs will be offered for a fee. In this case the customer is not
eligible for the replacement product rental service.
3 In the following cases, repairs may be charged, even if the product's
warranty is still in effect:
1) If the term of warranty, model name, serial number and name of
the store of purchase are not indicated on the warranty or have
been altered.
2) Problems or damage caused by dropping or shocks during shipment or movement by the customer or by improper handling by
the customers.
3) Problems or damage caused by improper usage or unwarrantable alterations or repairs by the customer.
4) Problems or damage caused by fire, salt damage, gas damage,
earthquakes, lightning damage, storm or flood damage or other
natural disasters or such external factors as dust, cigarette
smoke, abnormal voltage, etc.
5) Problems or damage caused by use in hot or humid places, in
vehicles, boats or ships, etc.
6) Problems or damage caused by expendable supplies or devices
connected to the product other than those designated by NEC.
7) Problems caused by natural consumption, wear or deterioration
of parts under normal usage conditions.
8) Problems or damage to lamps and other expendable supplies,
included parts or optional parts.
9) Other conditions stipulated in the warranty included with the product also apply.
NOTE: The product can be used overseas with voltages of 100 to 120V and 200
to 240V by using a power cable suited for the standards and power source voltage of the country in which the product is being used.
List of TravelCare Outlets
This list applies as of June 1, 2002.
For the most up-to-date information, please refer to the websites of the
service stations in the various countries on the List of TravelCare Outlets or to the NEC website at http://www.nec-pj.com.
In Europe
NEC Europe, Ltd. / European Technical Centre
Address: Unit G, Stafford Park 12, Telford TF3 3BJ, U.K.
Telephone: +44 1952 237000
Fax Line: +44 1952 237006
Email Address: AFR@uk.neceur.com
WEB Address: http://www.neceur.com
(Regions Covered)
EU: Austria*, Belgium*, Denmark*, Finland*, France*, Germany*,
Greece*, Ireland*, Italy*, Luxembourg*, The Netherlands*,
Por tugal*, Spain*, Sweden* and the United Kingdom*
EEA: Norway*, Iceland and Liechtenstein
In North America
NEC Solutions (America), Inc.
Address: 1250 Arlington Heights Road, Itasca,
Illinois 60143, U.S.A.
Telephone: +1 800 836 0655
Fax Line: +1 800 356 2415
Email Address: vsd-tech-support@necsam.com
WEB Address: http://www.necvisualsystems.com
(Regions Covered)
U.S.A. *, Canada*
In Oceania
NEC Australia Pty., Ltd.
Address: New South Wales;
184 Milperra Road, Reversby 2212
Victoria;
480 Princess Hwy Noble Park 3174
South Australia;
84A Richmond Road, Keswick 5035
Queensland;
116 Ipswich Road, Woollongabba 4102
Western Australia;
45 Sarich Court Osborne Park 6017
Telephone: 131 632 (from domestic)
+61 8 8375 5706 (from overseas)
Fax Line: +61 8 8375 5757
Email Address: lee.gramola@nec.com.au
WEB Address: http://www.nec.com.au
(Regions Covered)
Australia*, New Zealand
A-1
Page 34

In Asia and Middle East
NEC Viewtechnology, Ltd.
Address: 686-1, Nishioi, Oi-Machi, Ashigarakami-Gun,
Kanagawa 258-0017, Japan
Telephone: +81 465 85 2369
Fax Line: +81 465 85 2393
Email Address: support_pjweb@nevt.nec.co.jp
WEB Address: http://www.nec-pj.com
(Regions Covered)
Japan*
NEC Hong Kong Ltd.
Address: 11th Floor, Tower B, New Mandarin Plaza, 14
Science Museum Road,
Tsim Sha Tsui East, Kowloon, Hong Kong
Telephone: +852 2369 0335
Fax Line: +852 2795 6618
Email Address: esmond_au@nechk.nec.com.hk
WEB Address: http://www.nec.com.hk
(Regions Covered)
Hong Kong
NEC Taiwan Ltd.
Address: 7F, No.167, SEC.2, Nan King East Road, Taipei,
Taiwan, R.O.C.
Telephone: +886 2 8500 1734
Fax Line: +886 2 8500 1420
Email Address: nickliao@nec.com.tw
WEB Address: http://www.nec.com.tw
(Regions Covered)
Taiwan
NEC Solutions Asia Pacific Pte. Ltd
Address: 401 Commonwealth Drive, #07-02, Haw Par
Technocentre, Singapore 149598
Telephone: +65 6 273 8333
Fax Line: +65 6 274 2226
Email Address: tehgh@rsc.ap.nec.com.sg
WEB Address: http://www.nec.com.sg/ap
(Regions Covered)
Singapore
Nautilus Hyosung Inc.
Address: 7th Floor, Cheongdam Building, 52,
Cheongdam-Dong,
Kangnam-Ku, Seoul, Korea 135-100
Telephone: +82 2 510 0234
Fax Line: +82 2 540 3584
Email Address: hds-ykc@hyosung.com
(Regions Covered)
South Korea
Lenso Communication Co., Ltd.
Address: 292 Lenso House 4, 1st Floor, Srinakarin Road,
Huamark, Bangkapi, Bangkok 10240, Thailand
Telephone: +66 2 375 2425
Fax Line: +66 2 375 2434
Email Address: pattara@lenso.com
WEB Address: http://www.lenso.com
(Regions Covered)
Thailand
ABBA Electronics L.L.C.
Address: Tariq Bin Ziyad Road, P.O.Box 327, Dubai,
United Arab Emirates
Telephone: +971 4 371800
Fax Line: +971 4 364283
Email Address: ABBA@emirates.net.ae
(Regions Covered)
United Arab Emirates
Samir Photographic Supplies
Address: P.O.Box 599, Jeddah 21421, Saudi Arabia
Telephone: +966 2 6828219
Fax Line: +966 2 6830820
Email Address: vartkes@samir-photo.com
(Regions Covered)
Saudi Arabia
NOTE: In countries designated with an asterisk(*), replacement product rental
service are offered.
A-2
Page 35

Date: / / ,
TO: NEC or NEC’s Authorized Service Station:
FM:
P-1/ ,
(Company & Name with signature)
Dear Sir (s),
I would like to apply your TravelCare Service Program based on attached registration and qualification sheet and agree with your
following conditions, and also the Service fee will be charged to my credit card account, if I don’t return the Loan units within the
specified period. I also confirm following information is correct. Regards.
Application Sheet for TravelCare Service Program
Country,
product purchased :
User’s Company Name :
User’s Company Address :
Phone No., Fax No. :
User’s Name :
User’s Address :
Phone No., Fax No. :
Local Contact office :
Local Contact office Address :
Phone No., Fax No. :
User’s Model Name :
Date of Purchase :
Serial No. on cabinet :
Problem of units per User :
Required Service : (1) Repair and Return (2) Loan unit
Requested period of Loan unit :
Payment method : (1) Credit Card (2) Travelers Cheque (3) Cash
In Case of Credit Card :
Card No. w/Valid Date :
A-3
Page 36

Condition of your TravelCare Service Program
Enduser is requested to understand following conditions of TravelCare
Service Program and complete the necessary information on the application sheet.
1. Service Options:
There are 3 types of "Service" available. Enduser has to understand
following condition and is required to fill in the Application Sheet.
1) Repair and Return:
The 'Faulty unit' is sent or collected from the customer. It is repaired
and returned within 10 days to the customer, excluding transport time.
There may have a case, repair and return can't be done by NEC
Authorized Service Station, because of shortage of spare parts due
to same model is not sold in the territory.
2) Repair and Return with Loan: (This service is limited to some Service Stations)
This service is offered to the Enduser, who cannot wait until their unit
is repaired.
The customer can borrow a unit for $200 up to 12 days. Customer
then sends in inoperable unit to nearest NEC Authorized Service
Station for service. In order to prevent collection problem, Enduser is
required to fill in Application Sheet.
Enduser needs to confirm the availability of the Service to NEC Authorized Service Stations.
3) Loan Only:
For this service, NEC Authorized Service Station supplies the customer with a loan unit for US$200 up to 12 days. Customer keeps the
inoperable unit and when customer returns home, customer arranges
to have the projector serviced in the home country.
5. Loan Service Charges and Conditions:
Upon acceptance of this NEC Projector, Customer agrees to assume
liability for this loan unit.
The current cost of use of this loan unit is $200.00 USD for 12 calendar
days.
If Customer does not return the unit within the 12 calendar days, Customer will be charged the next highest cost up to and including the full
list price to Credit Cards, which price will be informed by NEC Authorized Service Stations. Please see the attached listing of contacts for
each country to arrange for pickup of the loan unit.
If you return to their country of origin with the loan unit, you will be
charged additional freight to return the unit to the loaning country.
Thank you for your understanding of this program.
2. Warranty Exclusions:
This program does not apply if the Projector's serial number has been
defaced, modified or removed.
If, in the judgement of NEC Authorized Service Station or its agent the
defects or failures result from any cause other than fair wear and tear or
NEC neglect, or fault including the following without limitation:
1) Accidents, transportation, neglect, misuse, abuse, water, dust, smoke
or default of or by the Customer its employees or agents or any third
party;
2) Failure or fluctuation of electrical power, electrical circuitry, air conditioning, humidity control or other environmental conditions such as
use it in smoking area;
3) Any fault in the attachments or associated products or components
(whether or not supplied by NEC or its agents which do not form part
of the Product covered by this warranty);
4) Any act of God, fire, flood, war, act of violence or any similar occurrence;
5) Any attempt by any person other than any person authorized by NEC
to adjust, modify, repair, install or service the product.
6) Any Cross-border charges such as, duty, insurance, tax etc.
3. Charges for Warranty Exclusions and Out of Warranty Case:
In case faulty unit is under warranty exclusions case or under Out of
Warranty period, NEC Authorized Service Station will Inform estimation
of actual service cost to the Enduser with reason.
4. Dead on Arrival (DOA):
Enduser must take this issue up with their original supplier in the country of purchase.
NEC Authorized Service Station will repair the DOA unit as a Warranty
repair, but will not exchange DOA unit with new units.
A-4
 Loading...